

1
0434
innovative business promotion gmbh
Modell/Model/Modèle/Model/Modelo: WL-2405
O² Patch
Elektronisches Anti-Tabak-Pflaster
Electronic Anti-Tobacco Patch
Pansement électronique anti-tabac
Elektronische antitabakpleister
Parche electrónico antitabaco
Gebrauchsanweisung ......... 2
Instructions for Use ........... 24
Mode d‘emploi ................... 46
Gebruiksaanwijzing ........... 68
Manual de instrucciones .. 90

2
3
1. Wie unterstützt Sie diese Gebrauchsanweisung? ..3
2. So wirkt Ihr O² Patch .............................................4
3. Ihre Sicherheit ist uns wichtig .............................. 5
3.1 Für welche Einsatzbereiche ist Ihr O²
Patch geeignet und für welche nicht? ................... 6
3.2 Für welche Anwendungsgebiete ist Ihr
O² Patch geeignet und für welche nicht? .............. 6
3.3 Wann dürfen Sie Ihr O² Patch
nicht anwenden? ...................................................7
3.4 Was Sie sonst noch beachten müssen .................8
4. So schützen Sie Ihr O² Patch ...............................8
5. So bereiten Sie Ihr O² Patch für
die Verwendung vor .............................................. 8
5.1 O² Patch auspacken und prüfen ...........................8
5.2 Batterie einlegen ................................................... 10
6. So führen Sie eine Sitzung durch ......................... 12
6.1 An welchen Stimulationspunkten dürfen
Sie Ihr O² Patch anwenden? .................................12
6.2 Wie lange und wie oft dürfen Sie Ihr
O² Patch anwenden? ............................................13
6.3 So verwenden Sie Ihr O² Patch ............................ 14
7. So reinigen und pflegen Sie Ihr O² Patch ............. 17
7.1 Reinigen ................................................................17
7.2 Pflaster wechseln ..................................................17
7.3 Batterie wechseln .................................................18
8. Wenn es einmal Probleme geben sollte ............... 19
9. Technische Daten .................................................20
10. Service und Garantie ............................................21
10.1 Service Adresse ....................................................21
10.2 Garantie und Schadensersatz ..............................22
11. Entsorgung und Umweltschutz .............................22
12. Was bedeutet die Kennzeichnung an
Ihrem Produkt? .....................................................23
1. Wie unterstützt Sie diese
Gebrauchsanweisung?
Warnung!
Dieses Symbol warnt Sie vor möglichen
gesundheitlichen Beeinträchtigungen.
Achtung!
Dieses Symbol macht Sie auf mögliche Beschädigungen Ihres Geräts
aufmerksam.
Hinweis
Dieses Symbol macht Sie auf besonders
nützliche Informationen zum Gebrauch
Ihres Geräts aufmerksam.
Wichtige Bestandteile Ihres Geräts sind mit
Positionszahlen versehen.
Mit diesen Positionszahlen können Sie
Anzeigen und Bedienelemente, deren
Bedeutung und Gebrauch wir in dieser
Anleitung erklären, sicher identifizieren.
Sie finden die Positionszahlen deshalb in
Klammern gesetzt an allen entsprechenden
Stellen in dieser Gebrauchsanweisung.

4
5
2. So wirkt Ihr O² Patch
Wenn Sie sich entschlossen haben, mit dem
Rauchen aufzuhören, dann unterstützt Sie Ihr
O² Patch wirksam, die unangenehmen Folgen
des Nikotinentzugs so gering wie möglich zu
halten. Typische Folgen sind:
■ Ständiges Verlangen (Qual) nach Nikotin
und Niedergeschlagenheit
■ Reizbarkeit, Heißhunger und
Schlafstörungen.
Diese Symptome führen zu Körperreaktionen
und Nervosität, die gewöhnlich schwer zu
kontrollieren sind.
Ihr O² Patch ist ein elektronisches Anti-TabakPflaster, das ohne Nikotin oder andere chemisch-wirksame Substanzen auskommt und
führt deshalb nicht zu den unerwünschten
Wirkungen dieser Stoffe.
Die Anwendung des O² Patch hilft, Nervosität,
Heißhunger und Schlafbeschwerden zu lindern: Über ein mikroprozessorgesteuertes
Stimulationsprogramm werden Stromreize mit
unterschiedlicher Dauer und Intensität in das
Nervensystem übertragen. Diese Reize sind
nicht schmerzhaft, Sie spüren lediglich ein leichtes Kribbeln auf der Haut.
Versuchen Sie sich von der NikotinAbhängigkeit in zwei Phasen zu befreien:
Abhängige Raucher verfügen gewöhnlich über
ein Gestenritual, wie z. B. das Anzünden einer
Zigarette, bevor das eigentliche Verlangen nach
Nikotin verspürt wird. Dieses Ritual sollte erkannt
werden – am Besten mit Unterstützung einer
Raucherberatung. In der ersten Phase hilft Ihr
O² Patch, das Gestenritual abzubauen, indem es
typische Spannungszustände reduziert. Ziel der
Anwendung ist, den gewohnheitsmäßigen Griff
zur Zigarette zu unterlassen.
Wird der Drang zur Zigarette unwiderstehlich,
dann sollte höchstens eine Zigarette bewusst
geraucht werden. Anschließend darf bis zum
nächsten unwiderstehlichem Drang nicht geraucht werden.
In der ersten Phase, die ein bis zwei Wochen
dauern sollte, genügt eine tägliche Anwendung
Ihres O² Patch von nur ca. 30 bis 60 Minuten im
Bereich des Nackens.
Die zweite Phase soll die Tabaksucht vollständig beenden. Nachdem sich Ihr Tabak-Konsum
bei 4-5 Zigaretten pro Tag stabilisiert hat, stimulieren Sie zwei Bereiche:
■ Nacken
■ Oberbauch (Plexus)
Das Stimulationsprogramm ist dazu aus-
gelegt, die Entzugsreaktionen zu lidern, wie Nervosität, Heißhunger und
Schlafbeschwerden.
In der zweiten Phase, die ebenfalls ein bis
zwei Wochen dauern sollte, genügt eine
tägliche Anwendung Ihres O² Patch von nur
ca. 30 Minuten an jedem Stimulationspunkt.
3. Ihre Sicherheit ist uns wichtig
Bitte lesen Sie diese Gebrauchsanweisung
aufmerksam durch, bevor Sie Ihr O² Patch das
erste Mal benutzen. Sie enthält alles, was Sie
wissen müssen, damit Sie Ihr O² Patch sicher
betreiben und Schäden vermeiden.
Diese Gebrauchsanweisung ist Bestandteil
Ihres Geräts. Bewahren Sie diese
Gebrauchsanweisung sorgfältig auf, bis Sie
Ihr O² Patch entweder zusammen mit dieser
Gebrauchsanweisung an einen neuen Besitzer
weitergeben oder bis Sie Ihr O² Patch entsorgen.
6
7
3.1 Für welche Einsatzbereiche ist Ihr
O² Patch geeignet und für welche nicht?
► Verwenden Sie das O² Patch aus-
schließlich im privaten Bereich.
► Das O² Patch ist nicht für den ge-
werblichen oder medizinischen
Gebrauch bestimmt.
► Das O² Patch ist ausschließlich für
die äußere Anwendung auf den in
dieser Gebrauchsanweisung beschriebenen Stimulationspunkten
am Menschen bestimmt.
► Das O² Patch ist nicht für die
Anwendung an Kindern bestimmt
– auch unter ständiger Aufsicht von
Erwachsenen.
3.2 Für welche Anwendungsgebiete ist
Ihr O² Patch geeignet und für welche nicht?
► Das O² Patch ist ausschließlich zur
Unterstützung des Nikotinentzugs
geeignet.
► Nervosität, Heißhunger,
Schlafstörungen und Schmerzen
können auch Symptome einer
ernsten Erkrankung sein, die eine
Selbstbehandlung mit dem O²
Patch ausschließen.
Wir empfehlen vor Benutzung
Ihren Arzt, Apotheker oder
Physiotherapeuten zu fragen.
3.3 Wann dürfen Sie Ihr O² Patch
nicht anwenden?
Verwenden Sie das O² Patch nicht,
► wenn Sie unter Herzproblemen,
insbesondere unter Herzrythmusstörungen leiden. Der Reizstrom
kann zu Herzkammerflimmern
und schlimmstenfalls zum
Herzstillstand führen.
► wenn Sie einen Herzschrittmacher
oder andere elektronische
Implantate haben. Der Reizstrom
kann die Funktion Ihres Implantats
stören.
► wenn Sie an Anfallsleiden leiden.
Der Reizstrom kann schlimmstenfalls Krampfanfälle auslösen.
► in der Schwangerschaft. Der
Reizstrom kann schlimmstenfalls
Wehen auslösen.
► wenn Sie unter allergischen
Hautreaktionen leiden. Elektroden
und Pflaster können zu
Hautreizungen führen.
► wenn Sie an systemischen, d.h.
den gesamten Körper betreffenden
Krankheiten, leiden.
► wenn das O² Patch beschädigt ist.
Der Reizstrom kann zu Schmerzen
und Hautreizungen führen.
8
9
3.4 Was Sie sonst noch beachten müssen
► Lassen Sie Ihr O² Patch nicht in
Kinderhände gelangen.
Kinder könnten Kleinteile verschlu-
cken und daran ersticken.
4. So schützen Sie Ihr O² Patch
► Die Elektronik Ihres O² Patch
verträgt weder Nässe noch
Feuchtigkeit.
Halten Sie das O² Patch nicht unter
fließendes Wasser, tauchen Sie
ihn nicht in Wasser oder andere
Flüssigkeiten ein, und tragen Sie
ihn nicht beim Schwimmen oder in
der Sauna.
► Ihr O² Patch ist hitzeempfindlich.
Setzen Sie das O² Patch keinem di-
rektem Sonnenlicht aus, und legen
Sie das O² Patch nicht auf heißen
Oberflächen ab.
5. So bereiten Sie Ihr O² Patch
für die Verwendung vor
5.1 O² Patch auspacken und prüfen
1. Packen Sie Ihr O² Patch aus.
Bewahren Sie die Originalverpackung
bitte auf, damit Sie Ihr O² Patch im
Reparaturfall transportsicher an unseren
Service einschicken können.
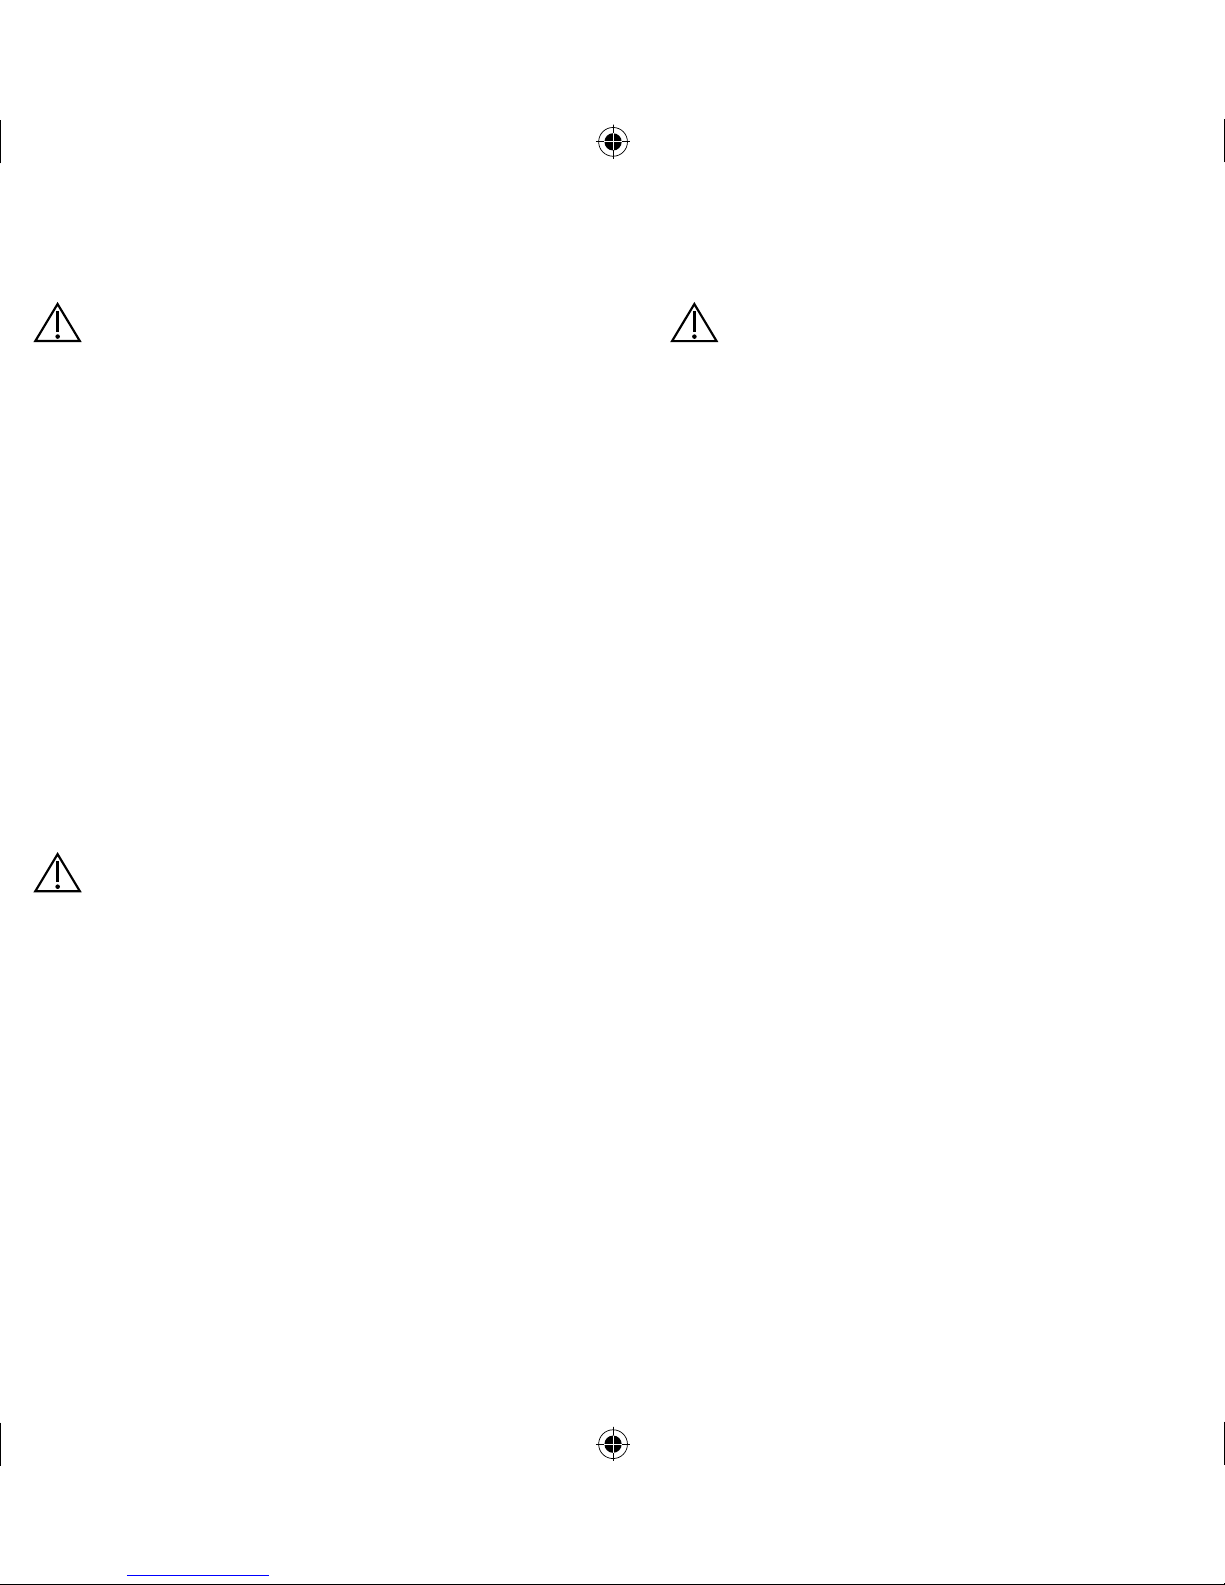
2. Kontrollieren Sie, ob der Lieferumfang
vollständig ist:
0434
innovative business promotion gmbh
Modell/Model/Modèle/Model/Modelo: WL-2405
O²
Patch
Elektronisches Anti-Tabak-Pfl aster
Electronic Anti-Tobacco Patch
Pansement électronique anti-tabac
Elektronische antitabakpleister
Parche electrónico antitabaco
Gebrauchsanweisung ......... 2
Instructions for Use ........... 24
Mode d‘emploi ...................46
Gebruiksaanwijzing ...........68
Manual de instrucciones .. 90
O² Patch mit aufgestecktem
Elektrodenpflaster und Schutzfolie
Batterie
Schutzhülle
Gebrauchsanweisung
3. Kontrollieren Sie Ihr O² Patch auf
mögliche Transportschäden.
Wenn Ihr O² Patch beschädigt sein sollte,
wenden Sie sich bitte an unseren Service
(siehe Service und Garantie).
10
11
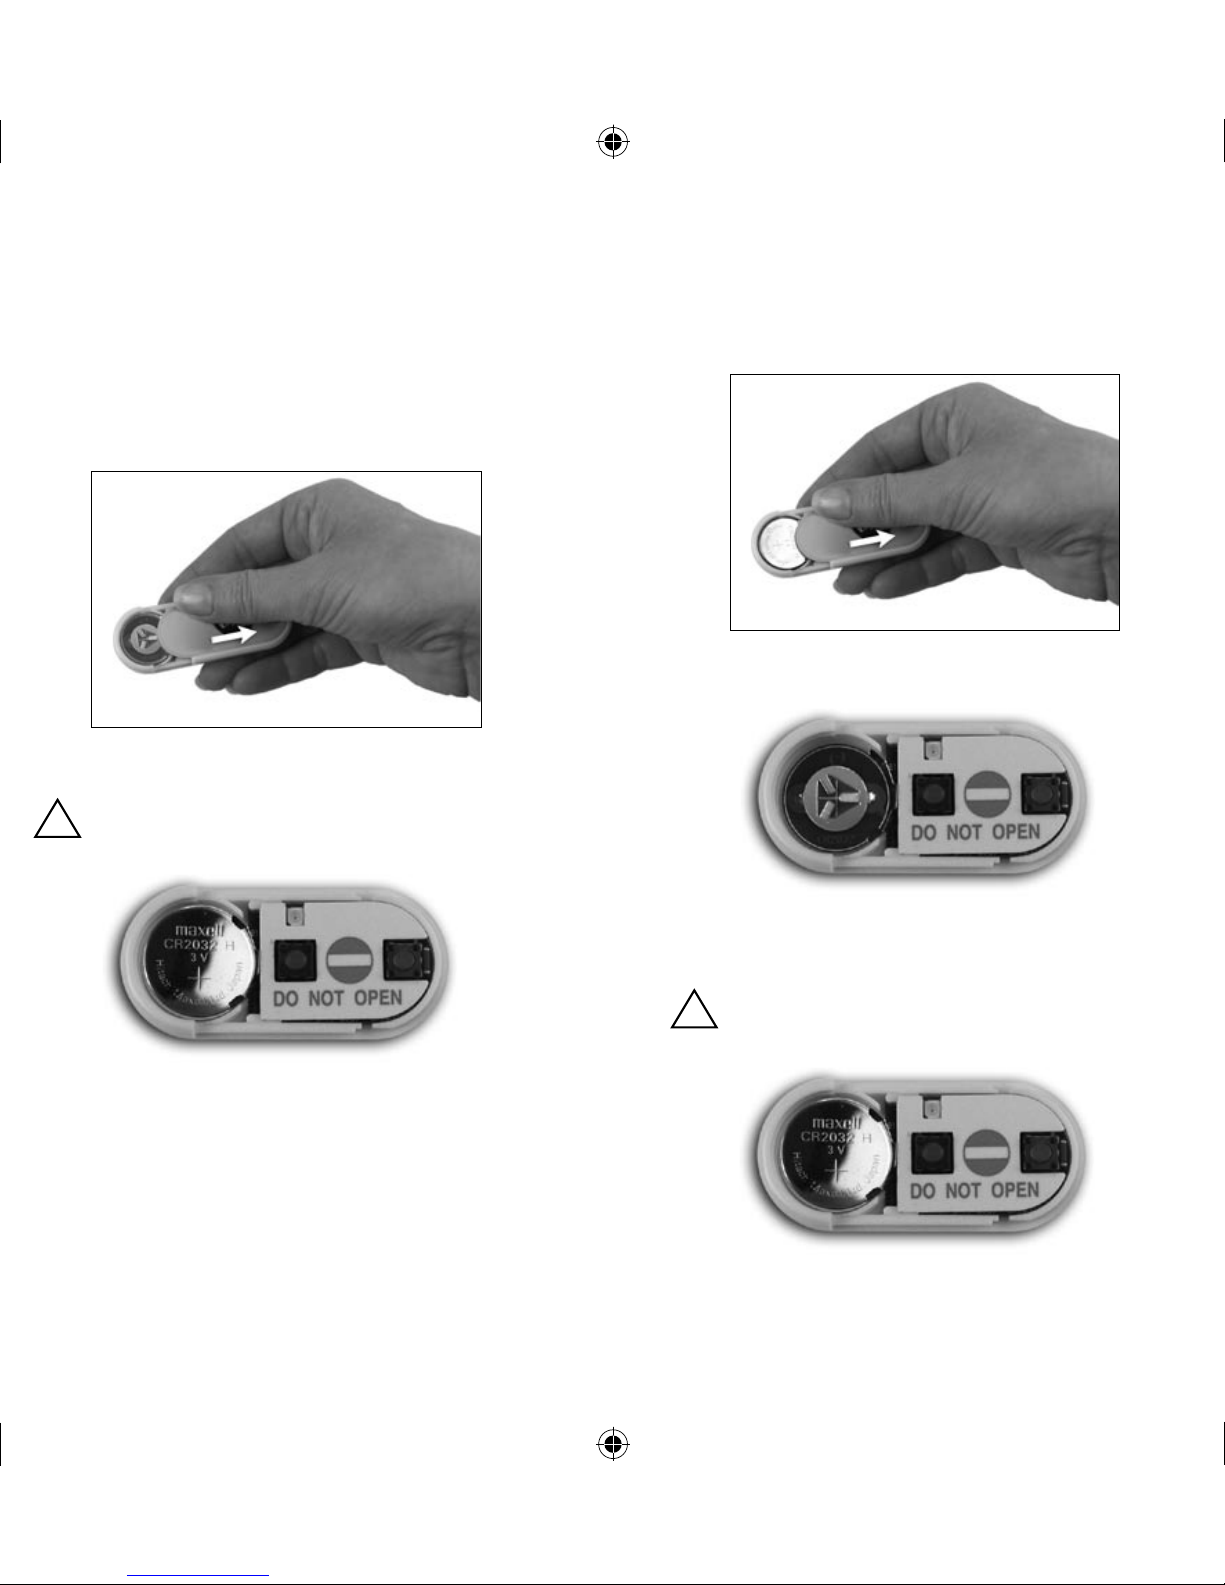
5.2 Batterie einlegen
Wenn die Batterie noch nicht eingelegt ist:
1. Batterie auspacken.
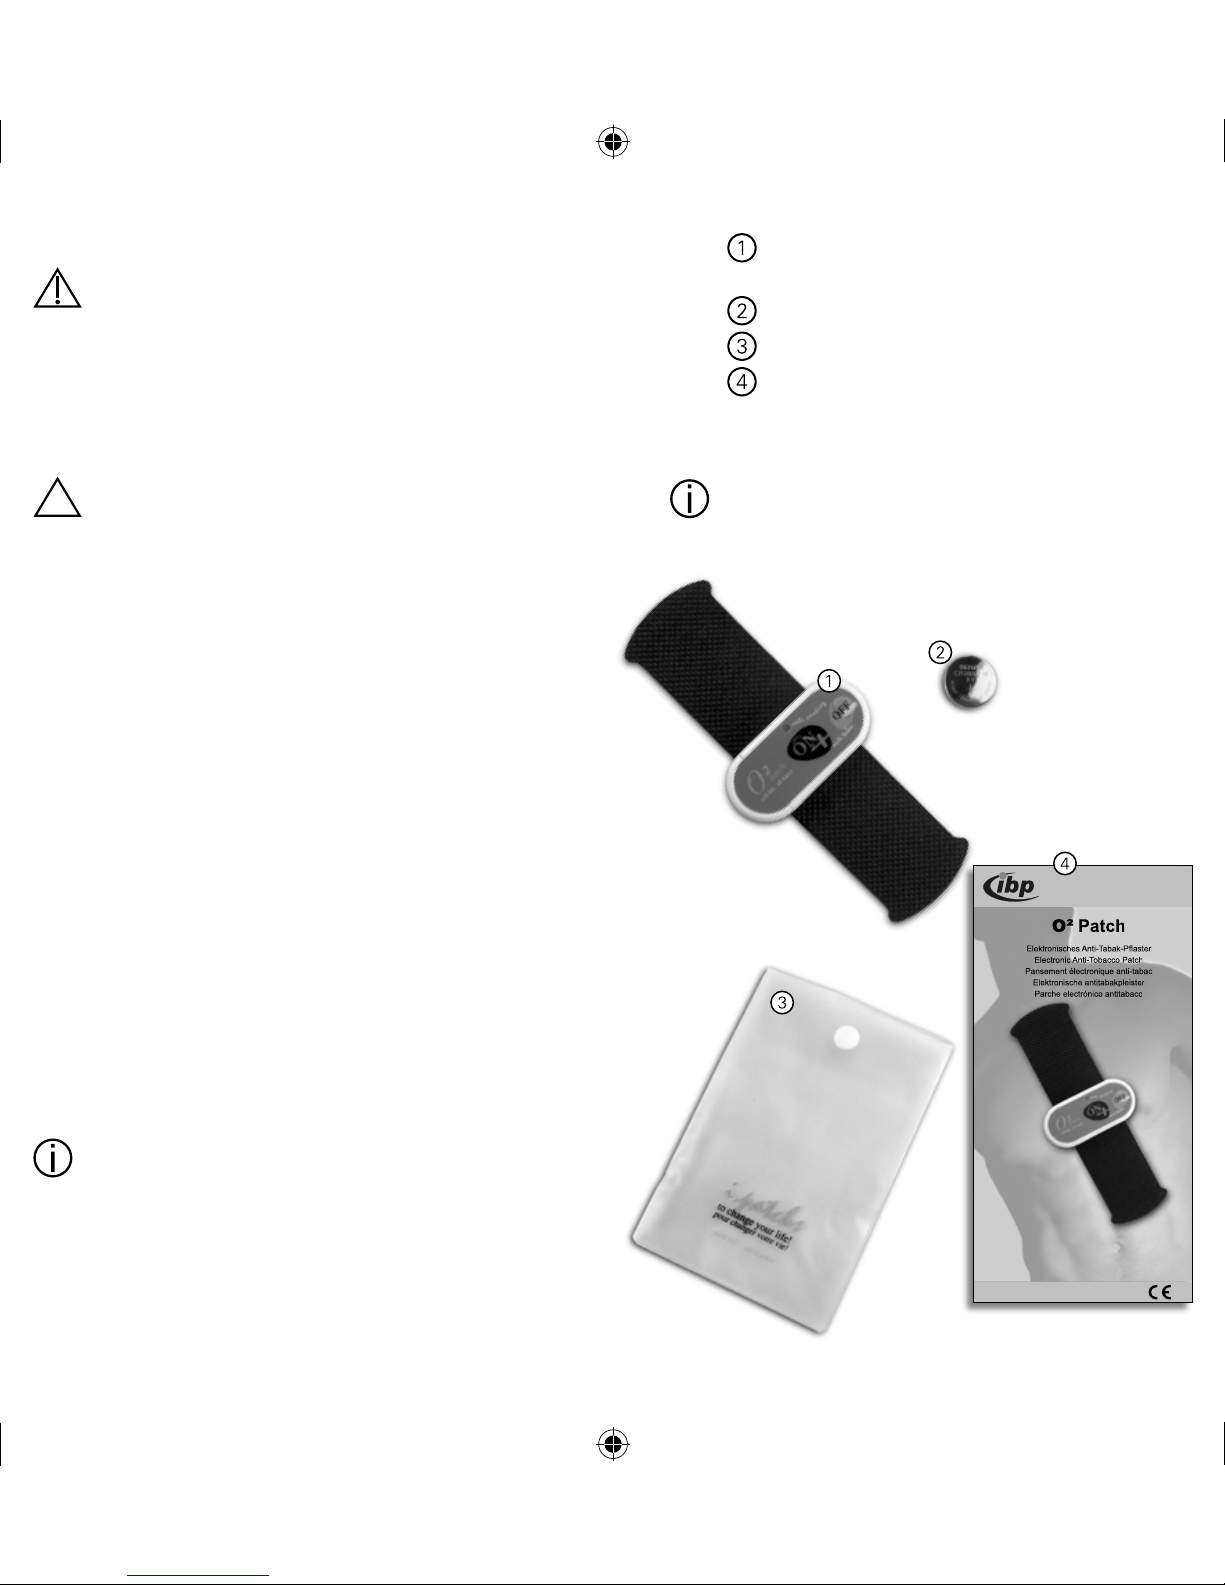
2. Batteriefach öffnen:
Abdeckung mit dem Daumen nach unten
drücken und nach hinten schieben.
3. Batterie einlegen.
Das +-Symbol auf der Batterie muss
nach oben zeigen.
4. Batteriefach schließen.
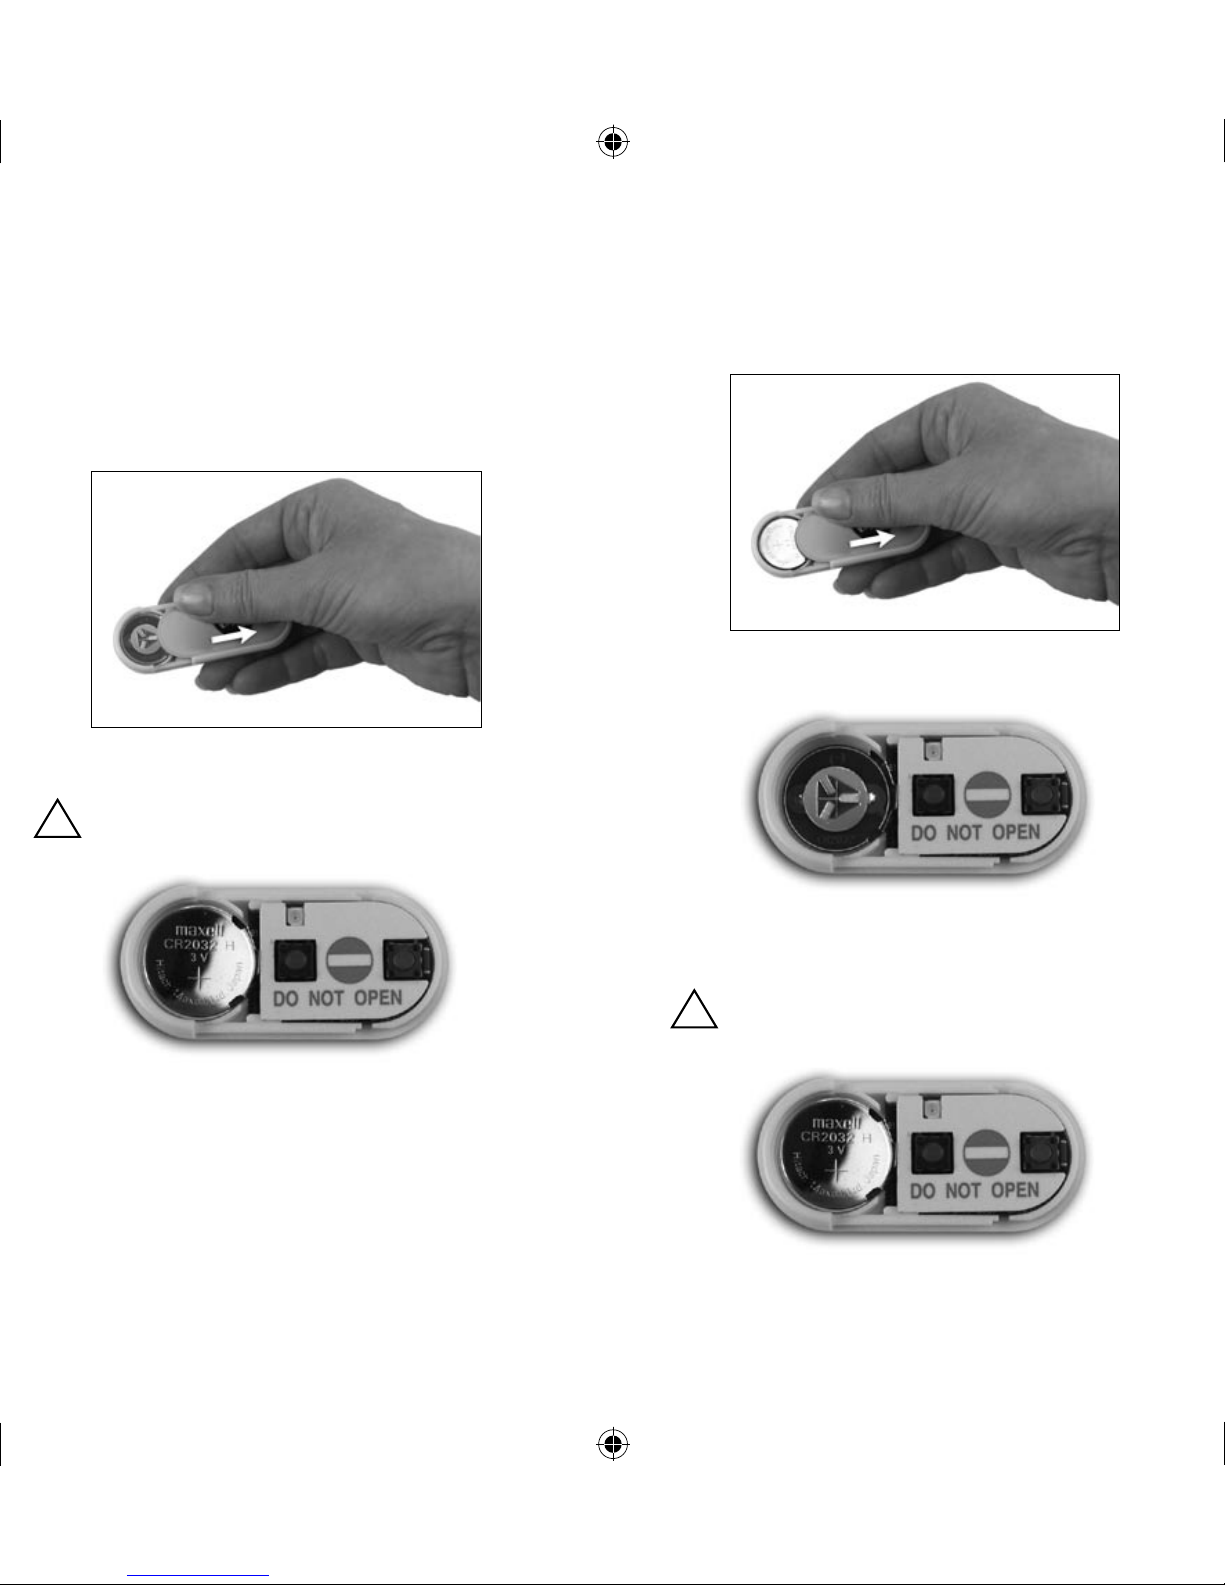
Wenn die Batterie bereits eingelegt ist:
1. Batteriefach öffnen:
Abdeckung mit dem Daumen nach unten
drücken und nach hinten schieben.
2. Batterie entnehmen.
3. Sicherungsstreifen entfernen.
4. Batterie wieder einlegen.
Das +-Symbol auf der Batterie muss
nach oben zeigen!
5. Batteriefach schließen.
12
13
6. So führen Sie die Sitzung durch
Bringen Sie das O² Patch ausschließ-
lich an jenen Stimulationspunkten auf
die Haut auf, die in diesem Abschnitt
beschrieben sind. Verwenden Sie das
Gerät
► nicht auf den Augenlidern. Der
Reizstrom kann das Auge
schädigen.
► nicht im Kehlkopf oder
Rachenbereich. Der Reizstrom
kann zu Muskelverkrampfungen
und damit zum Ersticken führen.
► nicht so, dass Strom direkt
über das Herz fließt (z. B.
in unmittelbarer Nähe des
Herzens). Der Reizstrom kann
zu Herzkammerflimmern
und schlimmstenfalls zum
Herzstillstand führen.
► nicht so, dass Strom direkt über
das Gehirn fließt (z. B. an den
Schläfen). Der Reizstrom kann
Krampfanfälle auslösen.
6.1 An welchen Stimulationspunkten dürfen
Sie O² Patch anwenden?
Halten Sie bei Ihren Anwendungen einen
Mindestabstand von 1 m zu MikrowellenGeräten und Kurzwellengeräten ein.
Elektromagnetische Wechselwirkungen
können die Funktion des O² Patch beeinträchtigen.
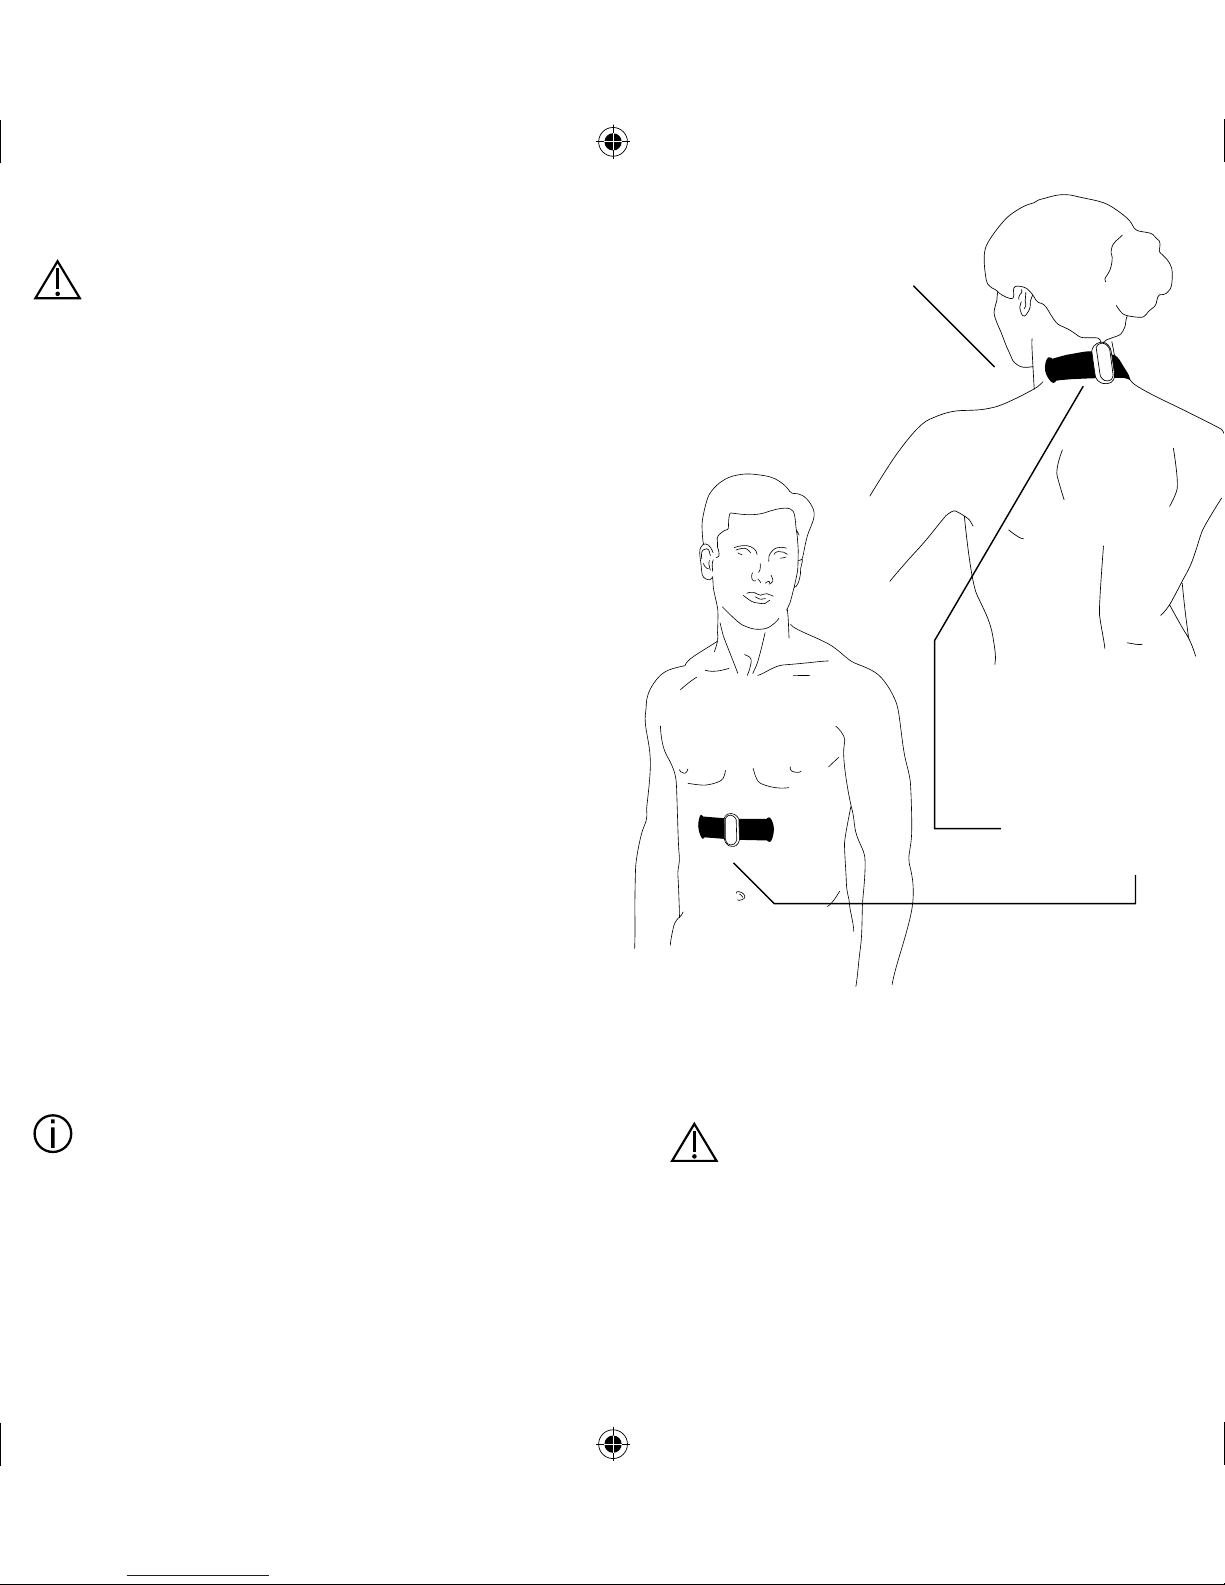
In der ersten Phase
stimulieren Sie den Nacken
(Zone 1). Bringen Sie
das O² Patch so hoch
wie möglich am
Haaransatz an.
In der zweiten Phase
stimulieren Sie
Nacken (Zone 1)
und Oberbauch (Zone 2)
6.2 Wie lange und wie oft dürfen Sie Ihr O²
Patch anwenden?
Überschreiten Sie die angege-
bene Anwendungssdauer und
Anwendungshäufigkeit nicht.
Die Wirkung wird dadurch nicht
gesteigert.
14
15
Versuchen Sie, in der ersten Phase die Anwendung über ein bis zwei Wochen durchzuführen:
Stimulieren Sie die Zone 1 – den Nacken –
täglich 30 bis 60 Minuten lang.
Versuchen Sie, in der zweiten Phase die
Anwendung ebenfalls über ein bis zwei Wochen
durchzuführen: Stimulieren Sie täglich die
Zone 1 – den Nacken – und die Zone 2 – den
Oberbauch – jeweils 30 Minuten lang.
Die gesamte tägliche Anwendungsdauer
beträgt in der zweiten Phase
2 x 30 Minuten = 60 Minuten.
Sie können die Anwendung auch zu einem
späteren Zeitpunkt wiederholen: Setzen
Sie das O² Patch immer dann ein, wenn
Sie Spannungen von Beginn an vermeiden
oder reduzieren möchten um den Wunsch
nach einer Zigarette zu unterdrücken.
6.3 So verwenden Sie Ihr O² Patch
Verwenden Sie das O² Patch nicht im
Bereich von Mikrowellen-Geräten oder
Kurzwellengeräten. Elektromagnetische
Wechselwirkungen können die Funktion
des O² Patch beeinträchtigen.
1. Ziehen Sie die Schutzfolie vom
Elektrodenpflaster ab.
2. Kleben Sie das O² Patch auf eine der
Stimulationszonen.
Kleben Sie das O² Patch nur auf saube-
re, trockene, gesunde Haut, die nicht mit
Kosmetika und Cremes behandelt ist.
Das O² Patch muss fest auf der Haut haf-
ten. Wechseln Sie das Elektrodenpflaster,
wenn die Haftfähigkeit nachgelassen hat.
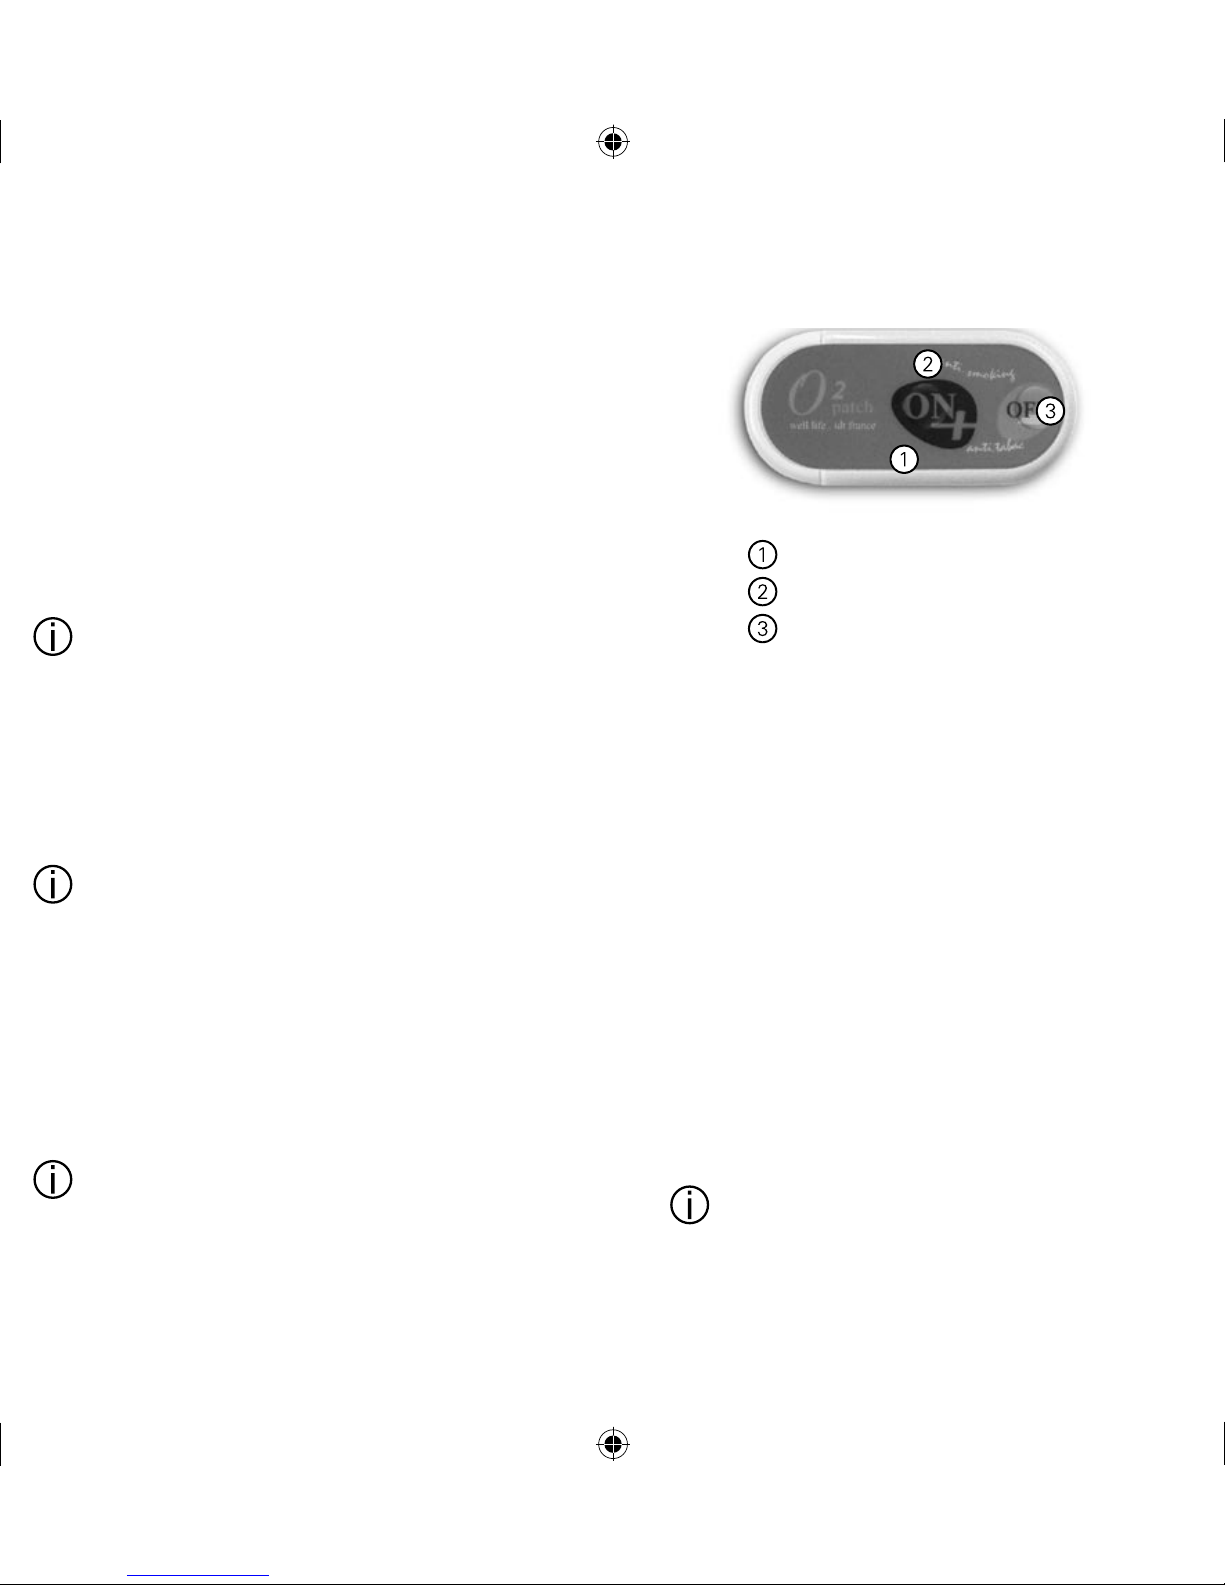
3. Schalten Sie das O² Patch ein: Drücken
Sie einmal auf den ON+ Knopf. Die
Leuchtanzeige blinkt rot.
ON+ Knopf
Leuchtanzeige
OFF– Knopf
4. Stellen Sie die Stimulationsstärke ein. In
Phase 1 und Phase 2 wird eine mittlere
Leistung der Stufe 3 oder 4 empfohlen:
Die Stimulationsstärke wird mit dem
ON+ Knopf erhöht und mit dem
OFF– Knopf gesenkt. Sie können die
Stimulationsstärke in 10 Stufen einstellen.
● Drücken Sie wiederholt den ON+ Knopf,
bis Sie die höchste Ihnen angenehme
Stimulationsstärke erreicht haben. Die
Helligkeit der Leuchtanzeige verstärkt sich
mit Höhe der Stimulationsstärke.
● Drücken Sie wiederholt den OFF– Knopf,
wenn Sie die Stimulationsstärke senken
möchten. Die Helligkeit der Leuchtanzeige
verringert sich mit abnehmender
Stimulationsstärke.
Ihr O² Patch schaltet nach 15 Minuten au-
tomatisch aus. Schalten Sie das O² Patch
wieder ein, wenn Sie die Anwendung fortsetzen möchten.
16
17
Senken Sie die Stimulationsstärke oder
schalten Sie das O² Patch aus, wenn
Ihnen die Wirkung unangenehm werden
sollte.
5. So schalten Sie das O² Patch aus:
Drücken Sie so oft auf den OFF-Knopf,
bis die Leuchtanzeige erlischt.
Entfernen Sie die Elektrodenpflaster
nur im ausgeschalteten Zustand von
der Haut.
6. Entfernen Sie das O² Patch von der Haut:
Schieben Sie einen Finger unter das
Elektrodenpflaster und heben Sie das
Elektrodenpflaster ab.
7. Benetzen Sie die Rückseite des
Elektrodenpflasters links und rechts mit
je einem Tropfen Wasser, damit das
Elektrodenpflaster nicht austrocknet.
8. Setzen Sie O² Patch an einem anderen
Stimulationspunkt ein.
oder
9. Beenden Sie die Anwendung:
● Bringen Sie die Schutzfolie am
Elektrodenpflaster an.
● Stecken Sie das O² Patch in die
Schutzhülle.
● Deponieren Sie das O² Patch kinder-
sicher und vor Sonneneinstrahlung
und Feuchtigkeit geschützt bis zur
nächsten Anwendung.
7. So reinigen und pflegen Sie
Ihr O² Patch
7.1 Reinigen
1. Schalten Sie das O² Patch aus.
2. Reinigen Sie das Gehäuse mit einem mit
Wasser angefeuchtetem Tuch.
► Reinigen Sie das Gehäuse nicht
mit scharfen oder scheuernden
Reinigungsmitteln.
► Sterilisieren Sie weder das
Elektrodenpflaster noch das Gerät
selbst im Dampfsterilisierer oder im
Kaltsterilisierbad.
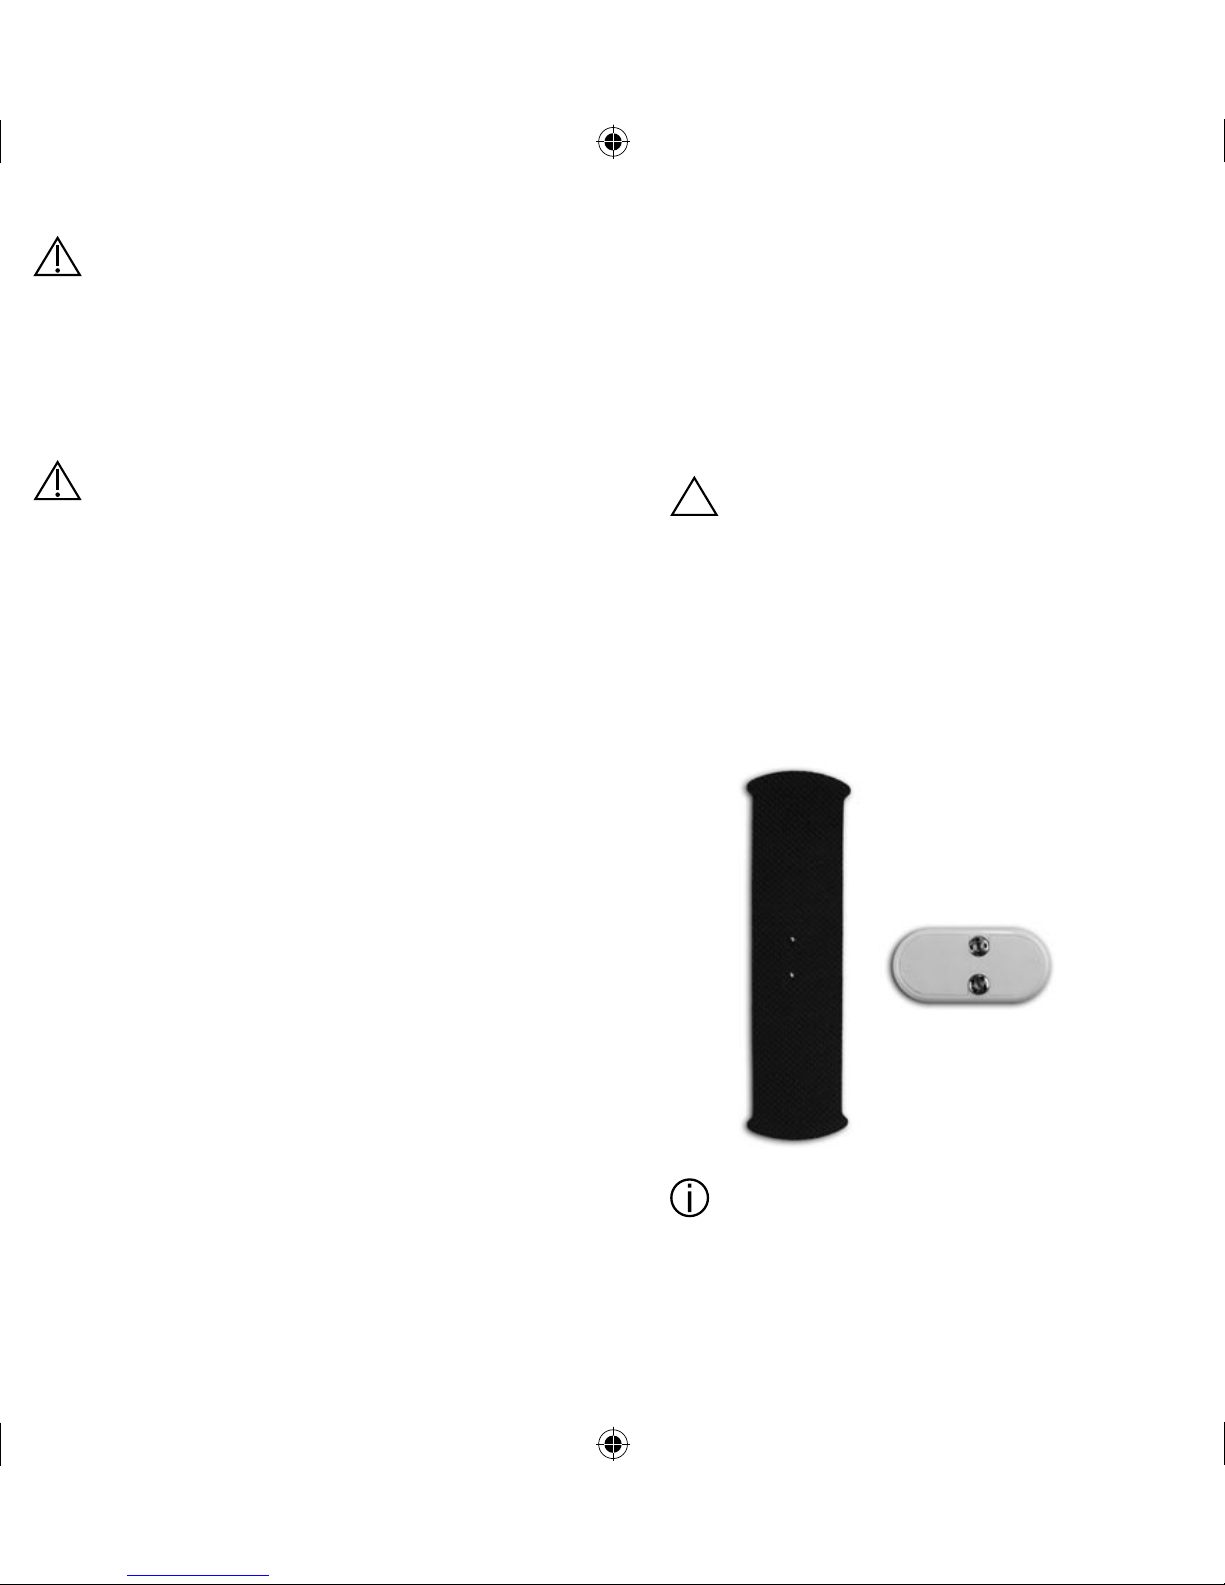
7.2 Pflaster wechseln
Wechseln Sie das Elektrodenpflaster wenn
es verschmutzt oder verbraucht ist.
1. Schalten Sie das O² Patch aus.
2. Stecken Sie das Elektrodenpflaster vom
O² Patch ab.
18
19
3. Stecken Sie das neue Elektrodenpflaster
auf das O² Patch auf.
7.3 Batterie wechseln
► Vergiftungs- und
Erstickungsgefahr!
Kinder können Batterien verschlu-
cken. Halten Sie Batterien von
Kindern fern.
► Werfen Sie Batterien nicht ins Feuer.
► Legen Sie in das O² Patch nur
eine Batterie ein, die mit der
Spezifikation im Abschnitt
Technische Daten übereinstimmt.
► Versuchen Sie nicht, die Batterien
aufzuladen!
Wechseln Sie die Batterie, wie im
Abschnitt Batterie einlegen beschrieben.
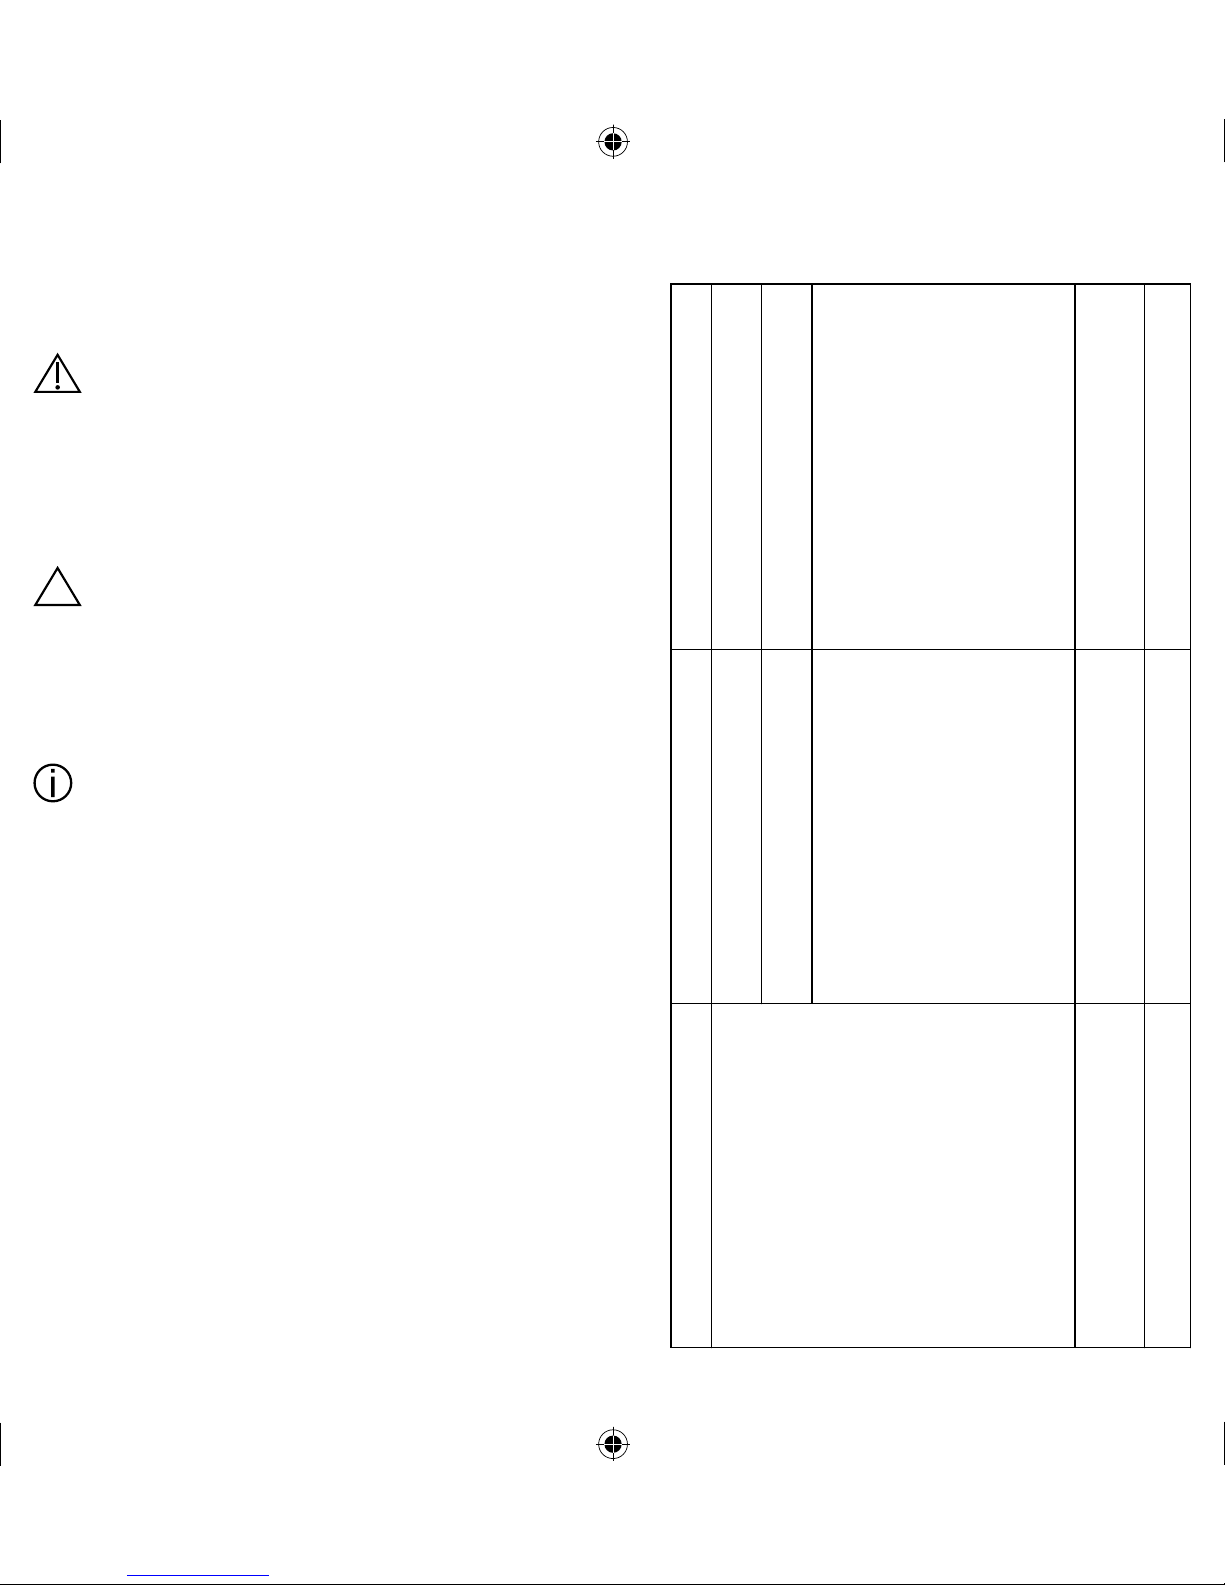
8. Wenn es einmal Probleme geben sollte
Problem Mögliche Ursache Abhilfe
Das O² Patch ist
eingeschaltet, aber ohne
Funktion.
Die Batterie ist nicht eingelegt. Legen Sie die Batterie ein.
Die Batterie ist leer. Wechseln Sie die Batterie.
Das O² Patch ist defekt. Schicken Sie Ihr O² Patch an
unseren Service ein, siehe
Service und Garantie.
oder
Entsorgen Sie das O² Patch,
siehe Entsorgung und
Umweltschutz
Die Stimulation ist zu
schwach.
Die Batterie ist schwach. Wechseln Sie die Batterie.
Das Pflaster klebt nicht mehr. Das Pflaster ist ausgetrocknet. Wechseln Sie das Pflaster aus.

20
21
9. Technische Daten
Hersteller:
Well-Life Healthcare Limited
1Fl., No. 16Lane 454, Jungjeng Rd.
Yunghe City, Taipei City
Taiwan, R.O.C
Gerätetyp:
Gerät zur transkutanen elektrischen
Nervenstimulation (TENS)
Klassifizierung nach 93/42/EWG:
Klasse IIa
Modellbezeichnung:
WL-2405
Maximal zulässige Umgebungstemperatur:
10 °C - 45 °C
Maximal zulässige rel. Luftfeuchtigkeit:
30 % - 75 %
Maximal zulässiger Luftdruck:
700 hPa - 1060 hPa
Batterie:
Knopfzelle Typ CR2032, 3 V,
nicht wiederaufladbar
Max. Ausgangswert der Elektroden:
50 mA
Pulsbreite: 100 - 150 µs
Pulsfrequenz: 10 Hz - 20 Hz
Betriebsspannung: 3 V
Gewicht: 10 g (ohne Batterie)
Maße (mm): B:55 x T:10 x H:140
10. Service und Garantie
10.1 Service Adresse
ibp Service Center
Am Weimarer Berg 6
D-99510 Apolda
Germany
Tel.: +49 (0) 3641 3096299
10.2 Garantie und Schadensersatz
Ab Kaufdatum (Datum des Kaufbeleg oder der
Quittung) führen wir Reparaturen für 24 Monate
kostenlos durch, wenn Ihr Gerät auf Grund von
Fertigungs- oder Materialfehlern defekt ist.
Die Garantie schließt Schäden aus, die daraus
resultieren, dass diese Gebrauchsanweisung
nicht oder nicht vollständig befolgt wurde.
Weitergehende Ansprüche, wie Schadenersatz
sind ebenfalls ausgeschlossen.
Senden Sie Ihr beanstandetes Gerät zusammen mit dem Kaufbeleg oder der Quittung
und der Beschreibung der Beanstandung an
unsere Service Adresse. Fügen Sie bitte auch
die Garantieunterlagen bei, wenn Sie eine
Garantieleistung in Anspruch nehmen möchten.
Batterien und Elektroden sind von der Garantie
ausgenommen.
22
23
11. Entsorgung und Umweltschutz
11.1 Batterieentsorgung / Batteriesicherheitshinweise
Werfen Sie verbrauchte Batterien nicht in den
Hausmüll, sondern in den Sondermüll oder in
eine Batterie-Sammelstation im Fachhandel.
Batteriesicherheitshinweis:
► Batterie nicht kurzschließen
► Batterie nicht ins Feuer werfen
Explosionsgefahr
Weitere Fragen zur Entsorgung beantwortet Ihnen Ihr Händler.
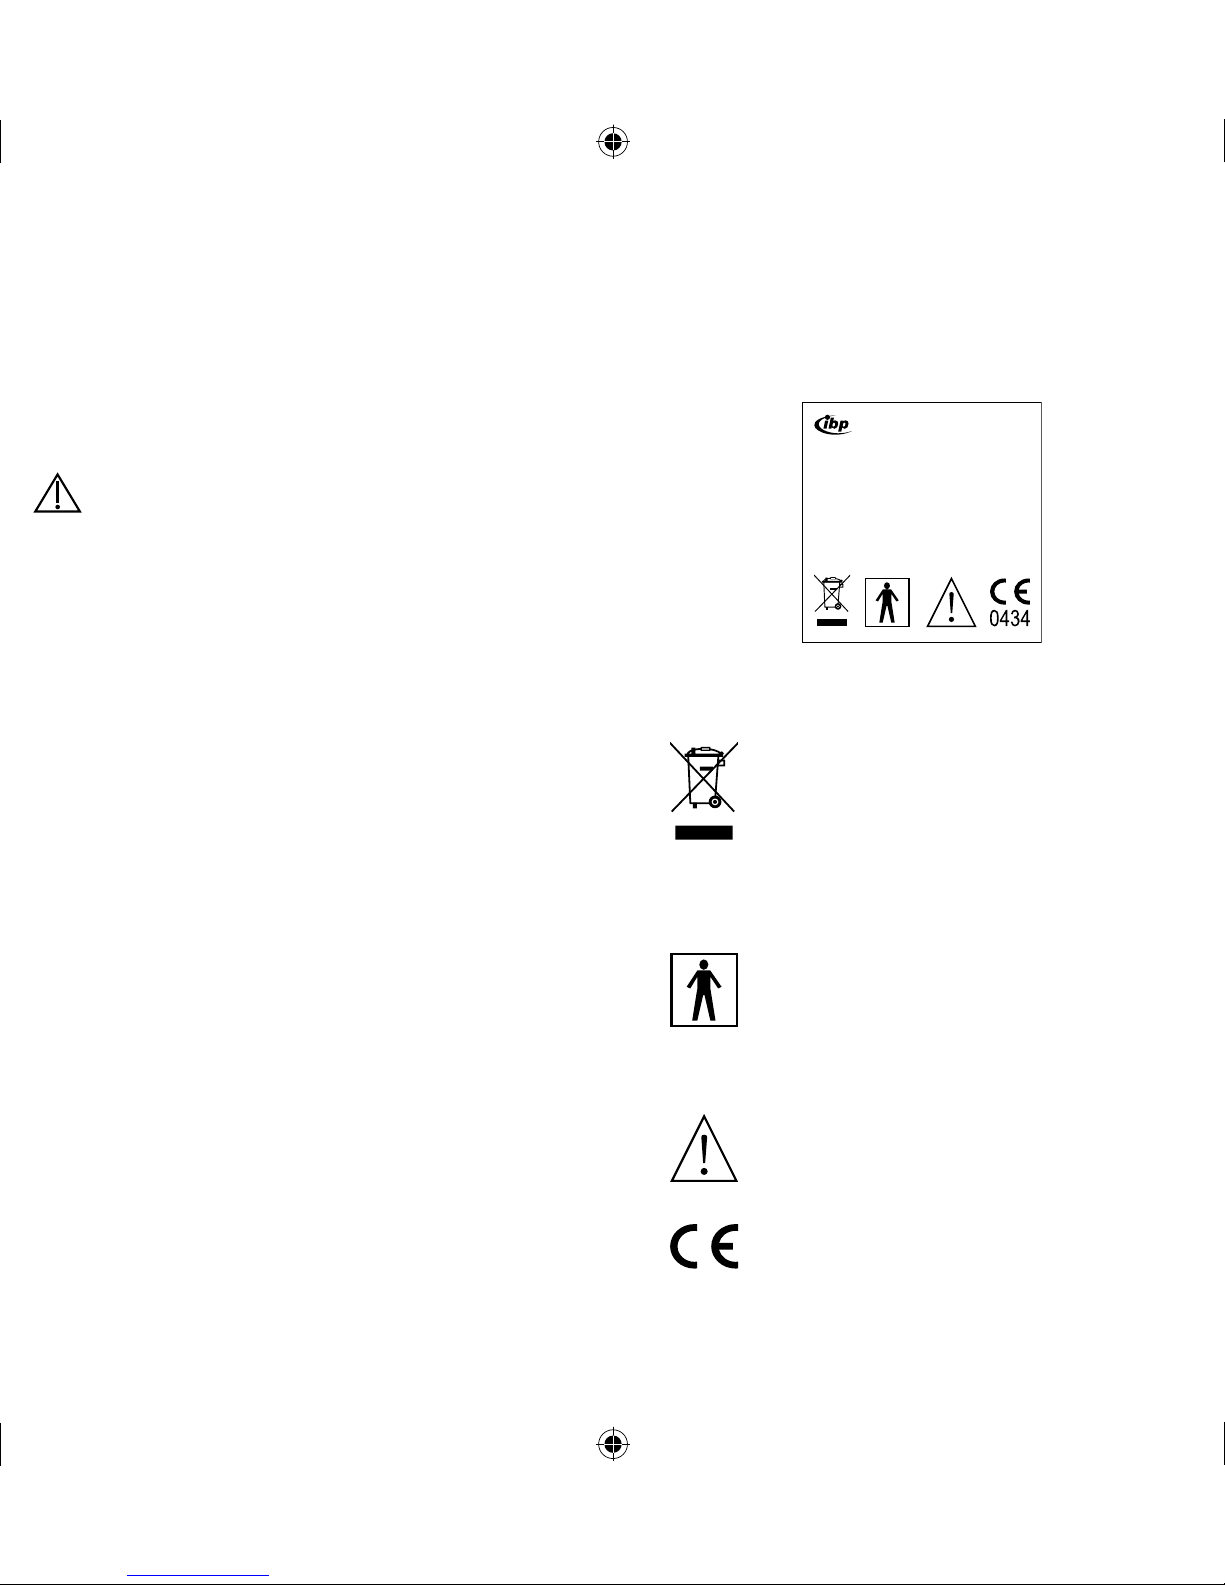
12. Was bedeutet die Kennzeichnung
an Ihrem Produkt?
Das Typenschild befindet sich auf der
Unterseite des O² Patch.
S/N
Seriennummer
Dieses Produkt darf am Ende seiner
Lebensdauer nicht über den normalen
Hausmüll entsorgt werden, sondern
muss an einem Sammelpunkt für
das Recycling von elektrischen und
elektronischen Geräten abgegeben
werden (Altgeräte-Entsorgung).
Anwendungsteil des Typs BF
Anwendungsteil gewährt Schutz gegen elektrischen Schlag durch normgerechtes Einhalten der Ableitströme
(Typ B). Anwendungsteil ist isoliert
(Typ F)
Gebrauchsanweisung beachten
Das Produkt erfüllt die Sicher-
heitsanforderungen der
EU Richtlinie 93/42/EWG
GmbH Jena, Germany
O2 Patch TENS
Model(l):WL-2405•Art.-No.:10154
Batterie/Battery: 3V CR2032
Hersteller/Manufacturer:
Well-Life Healthcare Ltd., Taiwan
S/N:

24
25
1. How do these instructions for use support you? ... 25
2. How your O² Patch works .....................................26
3. Your safety is important to us ...............................27
3.1 For which use is your O² Patch suited,
and for which is it not? ..........................................28
3.2 For which applications is your O² Patch
suited, and for which is it not? ..............................28
3.3 When may you not use your O² Patch? ................ 29
3.4 Other factors you need to consider .......................30
4. How to protect your O² Patch ...............................30
5. How to prepare your O² Patch for use .................30
5.1 Unpacking and checking the O² Patch .................30
5.2 Inserting the battery ..............................................32
6. How to conduct a session ..................................... 34
6.1 On which stimulation points may
you apply your O² Patch? ..................................... 34
6.2 How long and how often may you use your
O² Patch? ..............................................................35
6.3 How to use your O² Patch .....................................36
7. How to clean and care for your O² Patch ..............39
7.1 Cleaning ................................................................39
7.2 Changing the patch ...............................................39
7.3 Changing the battery ............................................40
8. In case problems occur .........................................41
9. Technical Data ......................................................42
10. Service and Warranty ...........................................43
10.1 Service Addresses ................................................ 43
10.2 Warranty and Compensation for Damages ..........43
11. Disposal and Environmental Protection ................ 44
12. What does the designation on
your product mean? .............................................. 45
1. How do these instructions
for use support you?
Warning!
This symbol warns you of possible
health risks.
Caution!
This symbol alerts you of possible
damage to your device.
Note
This symbol indicates particularly useful information regarding the use of your device.
Important components of your device have
been marked with item numbers.
Using these item numbers you can safely identify displays and controls, the importance and
use of which will be explained in these instructions.
Therefore you will find the item numbers placed
in brackets in all corresponding paragraphs of
these instructions for use.

26
27
2. How your O² Patch works
If you have decided to stop smoking, your O²
Patch will effectively support you in keeping the
unpleasant effects of nicotine withdrawal as low
as possible. Typical effects are:
■ constant desire (anguish) for nicotine and
depression
■ irritability, excessive appetite and sleep
disorders.
These symptoms lead to physical reactions and
nervousness, which generally are difficult to
control.
Your O² Patch is an electronic Anti-Tobacco
Patch, which is effective without nicotine or
other active chemically-acting substances, and
will therefore not lead to the undesirable effects
of such substances.
Use of the O² Patch will help ease nervousness,
excessive appetite and sleeping problems:
Using a microprocessor-controlled stimulation
program, current-induced stimuli of varying
duration and intensity are transmitted to the
nervous system. These stimuli are not painful.
You will only feel a slight tingling sensation on
the skin.
Try to get away from the nicotine addiction in
two phases:
Addicted smokers typically have a habit such as
lighting a cigarette before feeling the actual desire for nicotine. This habit should be recognized
– it is best done with the support of a smoker
counseling group. During the first phase your O²
Patch will help you break down the habit in that it
lowers typical states of tension. The objective of
its application is to refrain from the habit of reaching for the cigarette.
When the urge for the cigarette becomes irresistible, you should consciously smoke no
more than one cigarette. After this, you may
not smoke again until the next irresistible urge
develops.
During the first phase, which should last one to
two weeks, daily application of your O² Patch for
only 30 to 60 minutes in your neck area suffices.
The second phase is intended to completely
end the addiction to tobacco. After your tobacco consumption has stabilized around 4-5
cigarettes a day, you will stimulate two areas:
■ neck
■ upper abdomen (Plexus)
The stimulation program is designed to alleviate
the withdrawal symptoms, such as nervousness, excessive appetite and sleeping problems.
During the second phase, which should likewise
last one to two weeks, daily application of your
O² Patch for only about 30 minutes on each
stimulation point suffices.
3. Your safety is important to us
Please read these instructions for use carefully
before using your O² Patch for the first time.
They contain everything you need to know to
operate your O² Patch safely and to avoid damage.
These instructions for use are part of your device. Store these instructions for use carefully
until you either pass your O² Patch on to a new
owner along with these instructions or until you
dispose of your O² Patch.
28
29
3.1 For which use is your O² Patch suited,
and for which is it not?
► Use the O² Patch exclusively in a
private setting.
► The O² Patch is not intended for
commercial or medical use.
► The O² Patch is intended exclu-
sively in humans for external application on the stimulation points
described in these instructions of
use.
► The O² Patch is not intended for
application on children - not even
under the permanent supervision
of adults.
3.2 For which applications is your O² Patch
suited, and for which is it not?
► The O² Patch is suited exclusively
to alleviate the nicotine withdrawal
symptoms.
► Nervousness, excessive appetite,
sleep disorders and pain can also
be symptomatic of a serious illness, thus excluding the self-treatment with the O² Patch.
Prior to its use, we recommend that you
consult your physician, pharmacist or
physiotherapist.
3.3 When may you not use your O² Patch?
Do not use the O² Patch
► if you suffer from cardiac prob-
lems, especially from cardiac dysrhythmias. The stimulation current
can lead to ventricular fibrillation
and in the worst case to cardiac
arrest.
► if you have a pacemaker or other
electronic implants. The stimulation current can interfere with the
function of your implant.
► if you suffer from seizures. In se-
vere cases the stimulation current
can trigger convulsions.
► when pregnant. In severe cases
the stimulation current can trigger
contractions.
► if you suffer from allergic skin reac-
tions. The electrodes and patch
can lead to skin irritations.
► if you suffer from systemic illness-
es, i.e. those affecting the entire
body.
► if the O² Patch is damaged. The
stimulation current can lead to
aches and skin irritations.

30
31
3.4 Other factors you need to consider
► Do not allow children access to
your O² Patch.
Children could swallow small
pieces and as a consequence suffocate.
4. How to protect your O² Patch
► The electronics of your O² Patch
tolerate neither wetness nor moisture.
Do not rinse the O² Patch under
running water, do not immerse it
in water or other fluids, and do not
wear it while swimming or while in
the sauna.
► Your O² Patch is sensitive to heat.
Do not expose the O² Patch to di-
rect sunlight, and do not place it on
hot surfaces.
5. How to prepare your O² for use
5.1 Unpacking and checking the O² Patch
1. Unpack your O² Patch.
Please save the original packaging so that
you may send your O² Patch safely to our
service department in case of repairs.
2. Check whether the scope of delivery is
complete:
O² Patch with inserted
electrode patch and protective foil
Battery
Protective cover
Instructions for use
3. Check your O² Patch for possible damage
from transport.
If your O² Patch should be damaged,
please contact our service department
(see Service and Warranty).
0434
innovative business promotion gmbh
Modell/Model/Modèle/Model/Modelo: WL-2405
O²
Patch
Elektronisches Anti-Tabak-Pfl aster
Electronic Anti-Tobacco Patch
Pansement électronique anti-tabac
Elektronische antitabakpleister
Parche electrónico antitabaco
Gebrauchsanweisung ......... 2
Instructions for Use ........... 24
Mode d‘emploi ...................46
Gebruiksaanwijzing ...........68
Manual de instrucciones .. 90
32
33
5.2 Insert battery
If the battery has not yet been inserted:
1. Unwrap battery.
2. Open battery compartment:
Push down the cover using your thumb
and slide back.
3. Insert battery.
The “+” symbol on the
battery must face up.
4. Close battery compartment.
If the battery has already been inserted:
1. Open battery compartment:
Push down the cover using your thumb
and slide back.
2. Remove battery.
3. Remove safety strip.
4. Reinsert battery.
The “+” symbol on the
battery must face up!
5. Close battery compartment.

34
35
6. How to conduct a session
Apply the O² Patch only on such stimu-
lation points of the skin that are described in this section. Do not use the
device O² Patch
► on the eyelids. The stimulation
current can damage the eye.
► in the laryngeal or pharyngeal ar-
eas. The stimulation current can
lead to muscle cramping and possibly to suffocation.
► such that the current flows directly
across the heart (e.g. in direct
vicinity of the heart). The stimulation current can lead to ventricular
fibrillation and in severe cases to
cardiac arrest.
► such that the current flows directly
across the brain (e.g. on the temples). The stimulation current can
trigger convulsions.
6.1 On which stimulation points may you apply your O² Patch?
During your applications, maintain a
minimum distance of 1 m to microwave devices and short-wave devices.
Electromagnetic interaction may impair the
function of the O² Patch.
During the first phase,
stimulate the neck
(Zone 1). Attach the
O² Patch as high as
possible to the hair
line.
During the second
phase, stimulate the
neck (Zone 1) and
upper abdomen (Zone 2)
6.2 How long and how often may you use
your O² Patch?
Do not exceed the listed application
duration and frequency. It will not increase its effectiveness.

36
37
During the first phase, try to perform the application over a period of one to two weeks:
Stimulate Zone 1 – the neck – daily
for 30 to 60 minutes.
During the second phase, also try to perform
the application over a period of one to two
weeks: Stimulate Zone 1 – the neck – and Zone
2 – the upper abdomen – daily for 30 minutes,
respectively.
The overall daily application duration during the
second phase is 2 x 30 minutes = 60 minutes.
You may also repeat the application at a
later time: Always use the O² Patch when
you want to avoid or reduce tension right
from the start in order to suppress the
desire for a cigarette.
6.3 How to use your O² Patch
Always use the O² Patch away from mi-
crowave devices or short-wave devices.
Electromagnetic interaction may impair
the function of the O² Patch.
1. Remove the protective foil from
the electrode patch.
2. Apply the O² Patch to one of the stimulation zones.
Apply the O² Patch only to clean, dry,
healthy skin that has not been treated with
cosmetics and creams.
The O² Patch must adhere firmly to the
skin. Replace the electrode patch when its
adhesiveness has subsided.
3. Turn on the O² Patch: Push the
ON+ button once. The illuminated
display blinks red.
ON+ button
Illuminated display
OFF– button
4. Adjust the stimulation intensity. In
Phase 1 and Phase 2 an average output
of step 3 or 4 is recommended:
The intensity of the stimulation is in-
creased with the ON+ button and decreased with the OFF– button. You may
set the intensity of the stimulation to 10
different levels.
● Repeatedly press the ON+ button until
you have reached the highest stimulation
intensity that feels comfortable to you.
The brightness of the illuminated display
increases with the amount of stimulation
intensity.
● Repeatedly press the OFF– button if you
would like to lower the stimulation intensity. The brightness of the illuminated
display decreases with the decreasing
stimulation intensity.
Your O² Patch automatically turns off after
15 minutes. Turn the O² Patch back on if
you wish to continue the application.

38
39
Lower the stimulation intensity or turn
off the O² Patch if the effect should
become unpleasant.
5. How to turn off the O² Patch: Press the
OFF– button repeatedly until the illuminated displays turns off.
Remove the electrode patch from the
skin only in off-mode.
6. Remove the O² Patch from the skin: Slide
a finger underneath the electrode patch
and lift up the electrode patch.
7. Moisten the back of the electrode patch
with a drop of water each on the left and
right sides to protect the electrode patch
from drying out.
8. Apply the O² Patch to a different stimulation point
or
9. Terminate the application:
● Apply the protective foil to the elec-
trode patch.
● Place the O² Patch inside the protec-
tive cover.
● Store the O² Patch out of the reach of
children and protected from sunlight
and moisture until the next application.
7. How to clean and
care for your O² Patch
7.1 Cleaning
1. Turn off the O² Patch.
2. Clean the housing with a damp cloth.
► Do not clean the housing with
caustic or abrasive cleansers.
► Do not sterilize the electrode patch
or the device itself in a steam sterilizer or in a cold sterilizing bath.
7.2 Changing the patch
Replace the electrode patch when it is
dirty or worn.
1. Turn off the O² Patch.
2. Remove the electrode patch from the
O² Patch.
3. Place the new electrode patch on the
O² Patch.

40
41
7.3 Changing the battery
► Danger of poisoning and
suffocation!
Children could swallow batteries.
Keep batteries out of reach of
children.
► Do not throw batteries into fire.
► Only insert into the O² Patch bat-
teries in compliance with the specifications listed in the “Technical
Data” section
► Do not attempt to recharge the bat-
teries!
Change the battery as described in the
“Inserting the battery” section.
8. In case problems occur
Problem Possible Cause Solution
The O² Patch is switched
on, but does not function.
The battery is not inserted. Insert the battery.
The battery is empty. Replace the battery.
The O² Patch is defective. Mail your O² Patch to our ser-
vice department, see Service
and Warranty.
or
Dispose of the O² Patch, see
Disposal and Environmental
Protection
The stimulation is too weak. The battery is low. Replace the battery.
The patch does not adhere any
longer.
The patch is dried out. Replace the patch.

42
43
9. Technical Data
Manufacturer:
Well-Life Healthcare Limited
1Fl., No. 16Lane 454, Jungjeng Rd.
Yunghe City, Taipei City
Taiwan, R.O.C
Type of device:
Device for transcutaneous electrical nerve
stimulation (TENS)
Classification according to 93/42/EWG:
Class IIa
Model Description:
WL-2405
Maximum permissible ambient temperature:
10°C - 45°C
Maximum permissible relative humidity:
30% - 75%
Maximum permissible air pressure:
700 hPa - 1060 hPa
Battery:
Coin cell type CR2032, 3 V,
non-rechargeable
Max. output of electrodes: 50 mA
Pulse width: 100 - 150 µs
Pulse rate: 10 Hz - 20 Hz
Operating voltage: 3 V
Weight: 10 g (w/o Battery)
Dimensions (mm): W:55 x D:10 x H:140
10. Service and Warranty
10.1 Service Addresses
England:
International Business Products Limited
6 Newfield Court
West Houghton
Bolton BL5 3 SA England
Phone: +44(0) 19 42 – 8196 95
India:
sano health care products pvt. Ltd.-Group
Corporate Office:
28 Landsdown Terrace
1st Floor
Kolkata – 700 026
Phone: +91 33 2465 0383-85
10.2 Warranty and Compensation for
Damages
Starting with the purchase date (date on proof
of purchase or receipt) we will perform repairs
free of charge for 24 months, should your device be non-operational due to manufacturing or
material defects.
The warranty excludes damage resulting from
non-compliance or only partial compliance with
these instructions for use.
Farther-reaching claims such as compensation
for damages are likewise excluded.
Please send your device in question as well as
the proof of purchase or receipt and the description of the complaint to our service address.
Please also attach the warranty documents if
you would like to file a warranty claim.
Batteries and electrodes are excluded from the
warranty.

44
45
11. Disposal and Environmental Protection
11.1 Battery disposal / battery safety instructions
Do not dispose of used batteries in domestic
waste, but instead in hazardous waste or take
them to a battery collection site available at your
retailer.
Battery safety instructions:
► Do not short-circuit battery
► Do not throw battery into fire
Explosion Hazard
Your retailer will answer additional
questions regarding disposal.
12. What does the designation on
your product mean?
The name plate is located on
the bottom of the O² Patch.
S/N
serial number
At the end of its life cycle, this product
must not be disposed of in regular
domestic waste, but must be taken to
a collection site for recycling electric
and electronic devices (disposal of
used appliances).
Type BF application device
The application device offers protection against electrical shock by standard compliance to leakage currents
(Type B). The application device is
insulated (Type F).
Follow instructions for use
The product meets the safety require-
ments of EU guideline 93/42/EWG
GmbH Jena, Germany
O2 Patch TENS
Model(l):WL-2405•Art.-No.:10154
Batterie/Battery: 3V CR2032
Hersteller/Manufacturer:
Well-Life Healthcare Ltd., Taiwan
S/N:

46
47
1. Symboles dans le mode d’emploi .........................47
2. Fonctionnement de l’O² Patch .............................. 48
3. Votre sécurité nous tient à cœur ...........................49
3.1 Quelles sont les utilisations appropriées de
l’O² Patch, et celles qui sont déconseillées ? .......50
3.2 Quelles sont les applications appropriées de
l’O² Patch et celles qui sont déconseillées ? ........50
3.3 Quand ne devez-vous pas utiliser l’O² Patch ? .....51
3.4 Autres recommandations ...................................... 52
4. Protection de votre O² Patch ................................52
5. Préparatifs avant l’utilisation de votre O² Patch .... 52
5.1 Déballage et contrôle de l’O² Patch ......................52
5.2 Insérer la pile ........................................................54
6. Pour procéder à une application ........................... 56
6.1 Sur quels points de stimulation pouvez-vous
utiliser votre O² Patch ? ........................................ 56
6.2 Points de stimulation, durée et fréquence
de stimulation ........................................................57
6.3 Utilisation de votre O² Patch .................................58
7. Nettoyer et entretenir votre O² Patch .................... 61
7.1 Nettoyage .............................................................61
7.2 Changement du pansement .................................61
7.3 Changement de la pile .......................................... 62
8. En cas de problème .............................................. 63
9. Données techniques .............................................64
10. Service et garantie ................................................ 65
10.1 Adresse du service après-vente ...........................65
10.2 Garantie et indemnisation ..................................... 65
11. Recyclage et protection de l’environnement ......... 66
12. Signification des marquages sur le produit ........... 67
1. Symboles dans ce mode d’emploi
Avertissement !
Ce symbole vous met en garde contre
tout danger potentiel pour la santé.
Attention !
Ce symbole vous indique tout dommage potentiel de votre appareil.
Remarque
Ce symbole vous indique toute information
utile pour l’utilisation de votre appareil.
Les composants essentiels de votre appareil
sont numérotés pour indiquer leur position.
Grâce à ces numéros, vous pouvez identifier
avec précision les affichages et éléments de
commande dont la signification et l’utilisation
sont expliquées dans le présent mode d’emploi.
Vous trouverez donc ces numéros entre parenthèses à tous les emplacements correspondants de ce mode d’emploi.

48
49
2. Fonctionnement de votre O² Patch
Si vous avez décidé d’arrêter de fumer, votre O²
Patch vous aidera efficacement à supporter le
mieux possible les conséquences désagréables
de la désaccoutumance à la nicotine. Les conséquences caractéristiques sont :
■ Envie constante (anxiété) de nicotine et
déprime
■ Irritabilité, fringales et troubles du sommeil.
Ces symptômes entraînent des réactions corporelles et une certaine nervosité qui sont habituellement difficiles à contrôler.
Votre O² Patch est un pansement électronique
anti-tabac dépourvu de nicotine ou de toute
autre substance chimique active et n’entraîne
donc pas les effets indésirables de ces substances.
L’utilisation de l’O² Patch aide à atténuer la nervosité, les fringales et les troubles du sommeil :
un programme de stimulation commandé par
microprocesseur transmet des impulsions électriques avec des intensités différentes au système nerveux. Ces impulsions du programme
de stimulation ne sont pas douloureuses, vous
ressentez uniquement un léger picotement.
Essayez de vous libérer de la dépendance à la
nicotine en deux phases :
Les fumeurs dépendants ont généralement un
rituel gestuel consistant par exemple à allumer
une cigarette avant même de ressentir l’envie
de la nicotine. Il convient de reconnaître ce
rituel – de préférence avec l’aide d’un centre
de conseils sur le sevrage tabagique. Durant
la première phase, votre O² Patch vous aide à
diminuer le rituel gestuel en réduisant les états
de tension caractéristiques. Le but de l’utilisation
consiste à éviter de prendre systématiquement
une cigarette.
Si l’envie d’une cigarette est irrésistible, on
pourra alors fumer consciemment une cigarette
au maximum. Puis on ne fumera pas jusqu’à la
prochaine envie irrésistible.
Durant la première phase qui doit durer de une
à deux semaines, une application quotidienne
de votre O² Patch au niveau du cou d’environ
30 à 60 minutes suffit.
La seconde phase doit stopper complètement la
dépendance au tabac. Après que votre consommation quotidienne de tabac se soit stabilisée à
4-5 cigarettes, stimulez deux endroits :
■ Le cou
■ Le haut du ventre (plexus)
Le programme de stimulation sert à diminuer
les conséquences du manque telles que la nervosité, les fringales et les troubles du sommeil.
Durant la deuxième phase qui doit durer de une
à deux semaines, une application quotidienne
de votre O² Patch à chaque point de stimulation
d’environ 30 minutes suffit.
3. Votre sécurité nous tient à cœur
Veuillez lire attentivement ce mode d’emploi
avant la première utilisation de votre O² Patch.
Ce mode d’emploi contient toutes les informations nécessaires pour vous permettre d’utiliser
votre O² Patch en toute sécurité et d’éviter tout
dommage.
Le présent mode d’emploi fait partie intégrante
votre appareil. Veuillez le conserver soigneuse-

50
51
ment jusqu’à ce que vous donniez l’O² Patch à
un autre utilisateur avec ce mode d’emploi ou
jusqu’à ce que vous vous en débarrassiez.
3.1 Quelles sont les utilisations
appropriées de l’O² Patch et celles
qui sont déconseillées ?
► Utilisez l’O² Patch uniquement à
des fins privées.
► L’O² Patch n’est pas destiné à une
utilisation professionnelle ou médicale.
► L’O² Patch est uniquement destiné
à une utilisation externe sur des
êtres humains et sur des points de
stimulation décrits dans ce mode
d’emploi.
► L’O² Patch ne convient pas à une
utilisation sur les enfants – même
sous la surveillance constante des
adultes.
3.2 Quelles sont les applications
appropriées de l’O² Patch et celles
qui sont déconseillées ?
► L’O² Patch est exclusivement indi-
qué dans l’aide au sevrage tabagique.
► La nervosité, les fringales, les trou-
bles du sommeil et les douleurs
peuvent également traduire des
symptômes d’une maladie sérieuse
qui exclut tout autotraitement par
l’O² Patch.
Nous vous recommandons de consul-
ter votre médecin, pharmacien ou physiothérapeute avant toute utilisation.
3.3 Quand ne devez-vous pas utiliser l’O²
Patch ?
N’utilisez pas l’O² Patch dans
les cas suivants :
► si vous avez des problèmes cardia-
ques, en particulier des troubles du
rythme cardiaque. La stimulation
électrique peut entraîner une fibrillation cardiaque et, dans les cas
extrêmes, un arrêt cardiaque.
► si vous avez un implant cardiaque
ou tout autre implant électronique.
La stimulation électrique peut endommager le fonctionnement de
votre implant.
► si vous souffrez d’épilepsie. La
stimulation électrique peut déclencher des crises d’épilepsie dans les
cas extrêmes.
► en cas de grossesse. La stimula-
tion électrique peut dans les cas
extrêmes déclencher des contractions.
► si vous souffrez de réactions aller-
giques cutanées. Les électrodes
et les pansements peuvent déclencher des irritations cutanées.
► si vous souffrez de maladies systé-
miques, c’est-à-dire des maladies
qui concernent tout le corps.

52
53
► si l’O² Patch est endommagé. La
stimulation électrique peut entraîner des douleurs et des irritations
cutanées.
3.4 Autres recommandations
► Ne pas laisser l’O² Patch à la portée
des enfants.
Les enfants pourraient avaler et
s’étouffer avec les petits éléments.
4. Protection de votre O² Patch
► Les composants électroniques de
votre O² Patch ne supportent ni
l’eau, ni l’humidité.
Ne mettez pas l’O² Patch sous un jet
d’eau, ne pas l’immerger dans l’eau
ou dans tout autre liquide, ne pas le
porter pour nager ou dans le sauna.
► Votre O² Patch est sensible à la
chaleur.
N’exposez pas l’O² Patch à la lu-
mière directe du soleil et ne le posez pas sur des surfaces brûlantes.
5. Préparatifs avant l’utilisation
de votre O² Patch
5.1 Déballage et contrôle de l’O² Patch.
1. Sortez l’O² Patch de son emballage.
Conservez l’emballage original afin de
pouvoir renvoyer votre O² Patch à notre
service après-vente en toute sécurité lors
de toute réparation éventuelle
2. Vérifiez que le contenu est complet :
O² Patch muni d’un pansement à
électrodes et d’un film de protection
Pile
Etui de protection
Mode d’emploi
3. Contrôlez votre O² Patch pour vous assurer qu’aucun dommage n’a été subi pendant le transport.
En cas de dommage de votre O² Patch,
veuillez vous adresser à notre service
après-vente (voir Service et Garantie).
0434
innovative business promotion gmbh
Modell/Model/Modèle/Model/Modelo: WL-2405
O²
Patch
Elektronisches Anti-Tabak-Pfl aster
Electronic Anti-Tobacco Patch
Pansement électronique anti-tabac
Elektronische antitabakpleister
Parche electrónico antitabaco
Gebrauchsanweisung ......... 2
Instructions for Use ........... 24
Mode d‘emploi ...................46
Gebruiksaanwijzing ...........68
Manual de instrucciones .. 90

54
55
5.2 Insérer la pile
Si la pile n’est pas encore insérée :
1. Retirez l’emballage de la pile.
2. Ouvrir le compartiment réservé à la pile :
appuyez avec le pouce vers le bas et
poussez vers l’arrière.
3. Insérez la pile.
Le symbole + de la pile doit être
sur la face supérieure.
4. Fermez le compartiment réservé à la pile.
Si la pile est déjà insérée :
1. Ouvrir le compartiment réservé à la pile :
appuyez avec le pouce vers le bas et
poussez vers l’arrière.
2. Retirez la pile.
3. Retirez la bande de sécurité.
4. Réinsérez la pile.
Le symbole + de la pile doit être
sur la face supérieure.
5. Fermez le compartiment réservé à la pile

56
57
6. Pour procéder à une application
Apposez l’O² Patch uniquement sur les
points de stimulation sur la peau décrits dans ce paragraphe. Ne pas utiliser l’appareil
► sur les paupières. La stimulation
électrique peut endommager les
yeux.
► sur le larynx ou le pharynx. La sti-
mulation électrique peut provoquer
des crampes musculaires et mener
à l’étouffement.
► de sorte à ce que le courant passe
directement par le cœur (par ex. à
proximité directe du cœur). La stimulation électrique peut provoquer
une fibrillation cardiaque et entraîner un arrêt cardiaque.
► de sorte que le courant passe di-
rectement par le cerveau (par ex.
sur les tempes). La stimulation
électrique peut entraîner des crises
d’épilepsie.
6.1 Sur quels points de stimulation pouvezvous utiliser votre O² Patch ?
Lors de l’utilisation, veuillez respecter une
distance minimale de 1 m avec tous les
appareils à micro-ondes et les appareils
à courtes ondes. Les interférences électromagnétiques peuvent endommager le
fonctionnement votre O² Patch.
Durant la première phase,
stimulez le cou (Zone 1).
Placez l’O² Patch aussi
haut que possible au départ
de la chevelure.
Durant la
seconde phase,
stimulez le
cou (zone 1)
et le haut du
ventre (zone 2)
6.2 Points de stimulation, durée et fréquence
d’utilisation
Ne dépassez pas la durée et la fréquen-
ce d’utilisation indiquées. Un dépassement n’augmentera pas les effets.

58
59
Durant la première phase, exécutez l’application
une à deux semaines.
Stimulez la zone 1 – le cou – durant 30 à 60
minutes chaque jour.
Durant la seconde phase, exécutez l’application
également une à deux semaines. Stimulez chaque jour la zone 1 – le cou – et la zone 2 – le
haut du ventre – 30 minutes à chaque fois.
La durée totale quotidienne dans la seconde
phase est de 2 x 30 minutes = 60 minutes.
Vous pouvez également répéter l’applica-
tion plus tard. Utilisez l’O² Patch dès que
vous souhaitez éviter ou réduire les tensions qu’entraîne le refus de l’envie d’une
cigarette.
6.3 Utilisation de votre O² Patch
Lors de l’utilisation, veuillez respecter une
distance minimale de 1 m avec tous les
appareils à micro-ondes et les appareils
à courtes ondes. Les interférences électromagnétiques peuvent endommager le
fonctionnement de votre O² Patch.
1. Retirez le film de protection du pansement
à électrodes.
2. Collez l’O² Patch sur l’un des points de
stimulation.
Collez l’O² Patch uniquement sur une
peau propre, sèche et saine, exempte de
tout produit cosmétique et crème.
L’O² Patch doit fermement adhérer à la
peau. Changez le pansement si son adhésivité se relâche.
3. Mettez l’O² Patch sous tension :
Appuyez une fois sur le bouton ON+.
Le témoin lumineux émet une lumière
rouge.
Bouton ON+
Témoin lumineux
Bouton OFF–
4. Réglez l’intensité de la stimulation comme
décrit dans le paragraphe 6.2 «Points
de stimulation, durée et fréquence
d’utilisation» : la stimulation ne doit générer
aucune sensation désagréable ou douleur !
L’intensité des stimulations est augmentée
avec le Bouton ON+ et diminuée avec le
Bouton OFF– . Vous pouvez régler l’intensité de la simulation sur 10 niveaux.
● Appuyez à nouveau sur le Bouton ON+,
jusqu’à ce que vous atteigniez l’intensité de
la stimulation indiquée.
L’éclairage du témoin lumineux augmente
avec l’intensité de la stimulation.
● Appuyez à nouveau sur le
Bouton OFF– si vous souhaitez réduire
l’intensité de la stimulation.
L’éclairage du témoin lumineux diminue
avec l’intensité de la stimulation.
Votre O² Patch se met automatiquement
hors tension après 15 minutes. Vous pouvez le remettre sous tension si vous souhaitez poursuivre l’application.

60
61
Diminuez l’intensité de la stimulation
ou mettez l’O² Patch hors tension si
l’effet produit devient désagréable.
5. Mettez l’O² Patch hors tension après la
durée d’utilisation recommandée dans le
paragraphe 6.2 «Points de stimulation,
durée et fréquence d’utilisation» :
Appuyez sur le bouton OFF– autant de
fois que nécessaire jusqu’à ce que le témoin lumineux s’éteigne
Retirez le pansement à électrodes de la
peau uniquement lorsque l’appareil est
hors tension
6. Pour retirer l’O² Patch de la peau :
Glissez un doigt sous le pansement et
levez-le.
7. Humectez l’envers du pansement à électrodes à gauche et à droite avec une goutte d’eau afin que le pansement ne sèche
pas.
8. Placez l’O² Patch sur un autre point de
stimulation.
ou
9. Terminez l’application :
● Replacez le film de protection sur le
pansement à électrodes.
● Replacez l’O² Patch dans son étui de
protection.
● Conservez l’O² Patch hors de portée
des enfants et à l’abri du soleil et
de l’humidité jusqu’à la prochaine
utilisation.
7. Nettoyer et entretenir votre O² Patch
7.1 Nettoyage
1. Mettez l’O² Patch hors tension.
2. Nettoyez le boîtier avec un chiffon humidifié avec de l’eau.
► Ne pas nettoyer le boîtier avec des
nettoyants agressifs ou des objets
pointus.
► Ne pas stériliser ni le pansement
ni l’appareil dans un stérilisateur à
vapeur ou dans un bain de stérilisation à froid.
7.2 Changement du pansement
Changez le pansement à électrodes
lorsque celui-ci est sale ou usé.
1. Mettez l’O² Patch hors tension.
2. Retirez le pansement à électrodes de l’O²
Patch.

62
63
3. Placez le nouveau pansement à électrodes sur l’O² Patch.
7.3 Changement de la pile
► Danger d’empoisonnement et
d’asphyxie !
Les enfants risquent d’avaler les
piles. Conservez-les hors de portée
des enfants.
► Ne pas jeter les piles dans le feu.
► Insérez dans l’O² Patch uniquement
une pile dont les spécifications
correspondent à celles indiquées
dans le paragraphe « Données
techniques ».
► N’essayez pas de recharger les
piles !
Veuillez changer la pile comme indiqué
dans le paragraphe « Insérer la pile »
8. En cas de problème
Problème Causes possibles Solutions
L’O² Patch est sous tension,
mais ne fonctionne pas.
La pile n’est pas
insérée.
Insérez une pile.
La pile est vide. Changez la pile.
L’O² Patch est
défectueux.
Renvoyez votre O² Patch à notre service
après-vente, voir Service et Garantie.
Ou
Remettez votre O² Patch à un point de
Recyclage, voir Recyclage et protection
de l’environnement.
La stimulation est trop aible. La pile est faible. Changez la pile.
Le pansement ne colle plus. Le pansement est sec. Changez le pansement.

64
65
9. Données techniques
Fabricant :
Well-Life Healthcare Limited
1Fl., No. 16Lane 454, Jungjeng Rd.
Yunghe City, Taipei City
Taiwan, R.O.C
Type d’appareil :
Appareil pour la neurostimulation transcutanée
et électrique (TENS)
Classification selon 93/42/CEE :
Classe IIa
Désignation du modèle :
WL-2405
Température ambiante max. admissible :
10 °C - 45 °C
Humidité relative de l’air max. admissible :
30 % - 75 %
Pression atmosphérique max. admissible:
700 hPa - 1060 hPa
Pile :
Pile bouton le Type CR2032, 3 V,
non rechargeable
Valeur de sortie max. des électrodes:
50 mA
Largeur d’impulsion: 50 - 100 µs
Fréquence d’impulsion : 10 Hz - 20 Hz
Tension : 3 V
Poids : 10 g (sans pile)
Dimensions (mm): B:55 x T:10 x H:140
10. Service et Garantie
10.1 Adresse du service après-vente
ibp Service Center
Am Weimarer Berg 6
D-99510 Apolda
Allemagne
Tél.: +49 (0) 3641 3096299
10.2 Garantie et indemnisation
Nous effectuons toutes les réparations pendant
24 mois à partir de la date d’achat (date de la
preuve d’achat ou de la facture) à titre gracieux,
si votre appareil présente des défauts de fabrication ou de matériel.
La garantie exclut tout dommage résultant d’un
non-respect ou d’un respect partiel de ce mode
d’emploi.
Toutes autres prétentions, telles que les demandes d’indemnisation, sont exclues.
Veuillez envoyer l’appareil défectueux avec
votre preuve d’achat ou votre facture et la description des défauts à l’adresse de notre service
après-vente. Veuillez y joindre également votre
bon de garantie si vous souhaitez profiter de
votre couverture garantie.
Les piles et les électrodes sont exclues de la
garantie.

66
67
11. Recyclage et protection de
l’environnement
11.1 Recyclage des piles / instructions
de sécurité pour la pile
Ne jetez pas les piles usées avec les déchets
domestiques, mais avec les déchets chimiques
ou déposez-les auprès d’un point de collecte
chez votre commerçant spécialisé.
Conseils de sécurité pour la pile :
► ne pas court-circuiter les piles
► ne pas jeter les piles dans le feu
Risque d’explosion
Votre revendeur se tient à votre disposition pour
toute autre question concernant le recyclage.
12. Signification des marquages
sur le produit
La plaquette signalétique se trouve sur la face
inférieure de l’O² Patch.
S/N
Numéro de série
Ce produit ne doit pas être recyclé
avec les déchets domestiques mais
doit être déposé auprès d’un point de
collecte pour le recyclage d’appareils
électriques et électroniques (recyclage des appareils anciens).
Partie appliquée type BF
La partie appliquée garantit une protection contre les décharges électriques lors d’un respect conforme des
normes de courants de fuite (Type B).
La partie appliquée est isolée (Type F).
Respecter le mode d’emploi
Le produit correspond aux normes de
sécurité de la directive européenne
CE 93/42/CEE.
GmbH Jena, Germany
O2 Patch TENS
Model(l):WL-2405•Art.-No.:10154
Batterie/Battery: 3V CR2032
Hersteller/Manufacturer:
Well-Life Healthcare Ltd., Taiwan
S/N:

68
69
1. Hoe kan deze gebruiksaanwijzing u helpen? ........69
2. Zo werkt uw O² Patch ...........................................70
3. Uw veiligheid is voor ons belangrijk ..................... 71
3.1 Voor welk gebruik is uw O² Patch geschikt
en voor welk niet? ................................................. 72
3.2 Voor welke toepassingen is uw O² Patch
geschikt en voor welke niet? .................................72
3.3 Wanneer mag u uw O² Patch niet gebruiken? ...... 73
3.4 Waarmee u verder nog rekening moet houden .... 74
4. Zo beschermt u uw O² Patch ................................74
5. Zo maakt u uw O² Patch klaar voor gebruik .........74
5.1 O² Patch uitpakken en controleren ....................... 74
5.2 Batterij plaatsen ....................................................76
6. Zo voert u een sessie uit .......................................78
6.1 Op welke stimuleringspunten mag
u uw O² Patch gebruiken? .................................... 78
6.2 Hoe lang en hoe vaak mag u uw
O² Patch gebruiken? ............................................. 79
6.3 Zo gebruikt u uw O² Patch ....................................80
7. Zo reinigt en verzorgt u uw O² Patch ....................83
7.1 Reinigen ................................................................83
7.2 Pleister vervangen ................................................83
7.3 Batterij vervangen ................................................. 18
8. Wanneer er zich een probleem voordoet ..............85
9. Technische gegevens ...........................................86
10. Service en garantie ............................................... 87
10.1 Service-adres ........................................................87
10.2 Garantie en schadevergoeding .............................87
11. Afvalverwerking en bescherming van het milieu ..88
12. Wat betekent de markering op uw product? .........89
1. Hoe kan deze
gebruiksaanwijzing u helpen?
Waarschuwing!
Dit symbool waarschuwt u voor mogelijke schadelijke invloeden op uw
gezondheid.
Opgepast!
Dit symbool wijst u op mogelijke beschadigingen van uw apparaat.
Aanwijzing
Dit symbool wijst u op zeer nuttige informatie voor het gebruik van uw apparaat
Belangrijke onderdelen van uw apparaat worden aangeduid met cijfers.
Met deze cijfers kan u aanduidingen en bedieningselementen waarvan wij de betekenis en
het gebruik in deze handleiding uitleggen, correct identificeren.
U vindt de cijfers daarom tussen haakjes op alle
betreffende plaatsen in deze gebruiksaanwijzing.

70
71
2. Zo werkt uw O² Patch
Als u besloten hebt om te stoppen met roken,
dan steunt de O² Patch u daadwerkelijk om de
onaangename gevolgen van de nicotine-ontwenning zo gering mogelijk te houden. Typische
gevolgen zijn:
■ Constant verlangen (kwelling) naar nicotine
en neerslachtigheid
■ Prikkelbaarheid, vraatzucht en slaapstoor-
nissen.
Deze symptomen leiden tot lichaamsreacties en
zenuwachtigheid die normaal moeilijk te controleren zijn.
Uw O² Patch is een elektronische antitabakpleister zonder nicotine of andere chemisch
werkzame stoffen en leidt daarom niet tot de
ongewenste bijwerkingen van deze stoffen.
Het gebruik van de O² Patch helpt om zenuwachtigheid, vraatzucht en slaapklachten te
verminderen: via een microprocessorgestuurd
stimuleringsprogramma worden stroomprikkels
met verschillende duur en intensiteit in het zenuwstelsel overgebracht. Deze stroomprikkels
zijn niet pijnlijk, zodat u slechts een lichte kriebeling voelt op de huid.
Tracht u zich van de nicotineafhankelijkheid te
bevrijden in twee fasen:
Rookverslaafden vertonen gewoonlijk een gebarenritueel, zoals bijv. het aansteken van een sigaret vóór het eigenlijke verlangen naar nicotine optreedt. Dit ritueel dient te worden herkend – best
met ondersteuning van een rookbegeleiding. In
de eerste fase helpt uw O² Patch u om het gebarenritueel af te bouwen, doordat het typische
spanningstoestanden reduceert. Het doel van de
toepassing bestaat erin, dat u het gewoontematig
grijpen naar een sigaret achterwege laat.
Wanneer de drang naar een sigaret onweerstaanbaar wordt, mag u hoogstens één sigaret
bewust roken. Daarna mag u niet meer roken,
tot de drang opnieuw onweerstaanbaar wordt.
In de eerste fase die één tot twee weken kan
duren, is een dagelijkse sessie met uw O² Patch
gedurende slechts ong. 30 tot 60 minuten in de
nekstreek voldoende.
De tweede fase moet het verlangen naar tabak
dan volledig doen verdwijnen. Nadat uw tabakgebruik zich op 4-5 sigaretten per dag heeft
gestabiliseerd, stimuleert u twee gebieden:
■ Nek
■ Bovenbuik (plexus)
Het stimuleringsprogramma is er op gericht de
verslavingsreacties te verlichten, zoals zenuwachtigheid, vraatzucht en slaapklachten.
In de tweede fase die eveneens één tot twee
weken kan duren, is een dagelijkse toepassing
met uw O² Patch gedurende ong. 30 minuten op
ieder stimuleringspunt voldoende.
3. Uw veiligheid is voor ons belangrijk
Leest u a.u.b. deze gebruiksaanwijzing aandachtig door, vóór u uw O² Patch de eerste keer
gebruikt. Er staat alles in wat u moet weten om
uw O² Patch veilig te gebruiken en letsels te
vermijden.
Deze gebruiksaanwijzing maakt deel uit van
uw apparaat. Bewaar deze gebruiksaanwijzing
zorgvuldig, tot op het ogenblik dat u uw O²
Patch ofwel samen met deze gebruiksaanwij-

72
73
zing aan een nieuwe eigenaar doorgeeft ofwel
tot u uw O² Patch voor recycling afvoert.
3.1 Voor welk gebruik is uw O² Patch
geschikt en voor welk niet?
► Uw O² Patch dient uitsluitend voor
privé-gebruik.
► De O² Patch is niet bestemd voor
commercieel of medisch gebruik.
► De O² Patch is uitsluitend bestemd
voor de externe toepassing bij de
mens op de stimuleringspunten die
in deze gebruiksaanwijzing worden
beschreven.
► De O² Patch is niet bestemd voor
gebruik bij kinderen – ook niet onder permanent toezicht van volwassenen.
Voor welke toepassingen is uw O² Patch
geschikt en voor welke niet?
► De O² Patch is enkel geschikt voor
ondersteuning bij de nicotineontwenning.
► Zenuwachtigheid, vraatzucht,
slaapstoornissen en pijn kunnen
eveneens symptomen zijn van het
begin van een ziekte die zelfbehandeling met de O² Patch uitsluit.
Wij adviseren om vóór gebruik, uw arts,
apotheker of fysiotherapeut advies te
vragen.
3.3 Wanneer mag u uw O² Patch
niet gebruiken?
Gebruik de O² Patch niet,
► als u lijdt aan hartproblemen,
vooral bij hartritmestoornissen. De
stroomprikkels kunnen leiden tot
hartkamerfibrillatie en in het ergste
geval tot hartstilstand.
► als u een pacemaker of een ander
elektronisch implantaat hebt. De
stroomprikkels kunnen de werking
van uw implantaat storen.
► als u lijdt aan epilepsie. De stroom-
prikkels kunnen in het ergste geval
stuipaanvallen veroorzaken.
► tijdens de zwangerschap. De
stroomprikkels kunnen in het ergste geval weeën opwekken.
► als u lijdt aan allergische huidreac-
ties. Elektroden en pleisters kunnen huidirritatie veroorzaken.
► als u lijdt aan systemische aandoe-
ningen, (die het hele lichaam treffen).
► als de O² Patch beschadigd is. De
stroomprikkels kunnen pijn en
huidirritatie veroorzaken.

74
75
3.4 Waarmee u verder nog rekening moet
houden
► Laat uw O² Patch nooit in kinder-
handjes terechtkomen.
Kinderen zouden kleine onderdelen
kunnen inslikken en daardoor stikken.
4. Zo beschermt u uw O² Patch
► De elektronica van uw O² Patch is
niet bestand tegen water of vocht.
Houd de O² Patch niet onder stro-
mend water, dompel het apparaat
niet onder in water of andere vloeistoffen en draag het niet tijdens het
zwemmen of in de sauna.
► Uw O² Patch is gevoelig voor hitte.
Stel uw O² Patch niet bloot aan
direct zonlicht en leg de O² Patch
niet neer op een heet oppervlak.
5. Zo maakt u uw O² Patch klaar
voor gebruik
5.1 O² Patch uitpakken en controleren
1. Neem uw O² Patch uit de verpakking.
Bewaart u a.u.b. de originele verpakking,
zodat u uw O² Patch in geval van reparatie
transportveilig naar onze service-afdeling
kan verzenden.
2. Controleer of de verpakking alles bevat:
O² Patch mit aufgestecktem
Elektrodenpflaster und Schutzfolie
Batterij
Opberghoesje
Gebruiksaanwijzing
3. Controleer uw O² Patch op eventuele
transportschade.
Als uw O² Patch beschadigd is, gelieve
dan contact op te nemen met onze service-afdeling (zie service en garantie).
0434
innovative business promotion gmbh
Modell/Model/Modèle/Model/Modelo: WL-2405
O²
Patch
Elektronisches Anti-Tabak-Pfl aster
Electronic Anti-Tobacco Patch
Pansement électronique anti-tabac
Elektronische antitabakpleister
Parche electrónico antitabaco
Gebrauchsanweisung ......... 2
Instructions for Use ........... 24
Mode d‘emploi ...................46
Gebruiksaanwijzing ...........68
Manual de instrucciones .. 90

76
77
5.2 Batterij installeren
Als de batterij nog niet geïnstalleerd is:
1. Batterij uit verpakking nemen.
2. Batterijvakje openen:
Afdekking met de duim naar beneden
drukken en naar achter schuiven.
3. Batterij plaatsen.
Het +-symbool op de batterij
moet naar boven wijzen.
4. Batterijvakje sluiten.
Als de batterij reeds geïnstalleerd is:
1. Batterijvakje openen:
Afdekking met de duim naar beneden
drukken en naar achter schuiven.
2. Batterij eruit nemen.
3. Beveiligingsstrookje verwijderen.
4. Batterij weer terugplaatsen.
Het +-symbool op de batterij
moet naar boven wijzen!
5. Batterijvakje sluiten.

78
79
6. Zo voert u een sessie uit
Breng de O² Patch enkel aan op sti-
muleringspunten op de huid, die in dit
hoofdstuk worden beschreven. Gebruik
het apparaat
► niet op de oogleden. De stroom-
prikkels kunnen de ogen beschadigen.
► niet op het strottenhoofd of de
keelholte. De stroomprikkels kunnen leiden tot spierverkramping
met verstikking tot gevolg.
► niet zo, dat de stroom zich recht-
streeks door het hart voortplant
(bijv. in de onmiddellijke omgeving
van het hart). De stroomprikkels
kunnen leiden tot hartkamerfibrillatie en in het ergste geval tot hartstilstand.
► niet zo, dat de stroom zich recht-
streeks door de hersenen voortplant (bijv. aan de slapen). De
stroomprikkels kunnen stuipaanvallen veroorzaken.
6.1 Op welke stimuleringspunten mag u uw
O² Patch gebruiken?
Houd bij uw sessies een minimum afstand
aan van 1 m tot microgolf-en korte-golfapparatuur. Elektromagnetische wisselwerkingen kunnen de werking van de O²
Patch nadelig beïnvloeden.
In de eerste fase
stimuleert u de nek
(zone 1). Plaats de
O² Patch zo hoog
mogelijk aan de
haargrens.
In de tweede fase
stimuleert u
nek (zone 1)
en bovenbuik (zone 2)
6.2 Hoe lang en hoe vaak mag u uw O²
Patch gebruiken?
U mag de aangegeven gebruiksduur en
gebruiksfrequentie niet overschrijden.
De werking wordt daardoor niet versterkt.

80
81
Tracht in de eerste fase de toepassing over één
tot twee weken te spreiden:
stimuleer de zone 1 – de nek – dagelijks gedurende 30 tot 60 minuten.
Tracht in de tweede fase de toepassing eveneens over één tot twee weken te spreiden:
stimuleer dagelijks zone 1 – de nek – en zone
2 – de bovenbuik – telkens gedurende 30 minuten.
De totale dagelijkse gebruiksduur bedraagt in
de tweede fase 2 x 30 minuten = 60 minuten.
U kan de toepassing ook op een later
tijdstip herhalen: gebruik de O² Patch altijd
wanneer u spanningen vanaf het begin
wenst te vermijden of te verminderen om
het verlangen naar een sigaret te onderdrukken.
6.3 Zo gebruikt u uw O² Patch
Gebruik de O² Patch niet in de buurt
van microgolf- of korte-golf-apparatuur.
Elektromagnetische wisselwerkingen kunnen de werking van de O² Patch nadelig
beïnvloeden.
1. Verwijder de beschermfolie van de elektrodepleister.
2. Kleef de O² Patch op één van de stimuleringsgebieden.
Kleef de O² Patch enkel op zuivere, droge,
gezonde huid die niet met cosmetica en
crèmes is behandeld.
De O² Patch moet goed op de huid vastzit-
ten. Vervang de elektropleister wanneer
het kleefvermogen afneemt.
3. Schakel de O² Patch in: druk eenmaal op
de knop ON+. Het rode indicatorlampje
knippert.
Knop ON+
Indicatorlampje
Knop OFF-
4. Stel de sterkte van de stimulering in. In
fase 1 en 2 wordt een gemiddeld vermogen op stand 3 of 4 aangeraden:
De stimulatiesterkte wordt met de knop
ON+ versterkt en met de knop OFF- verzwakt. U kan de stimulatiesterkte in 10
trappen instellen.
● Druk meermaals op de knop ON+, tot u
de sterkste stimulatie hebt bereikt die nog
aangenaam aanvoelt. Het indicatorlampje
brandt feller bij een sterkere stimulatie .
● Druk meermaals op de knop OFF-, wanneer u de stimulatie wenst te verzwakken.
Het indicatorlampje brandt zwakker bij een
zwakkere stimulatie .
Uw O² Patch schakelt zich na 15 minuten
automatisch uit. Schakel de O² Patch opnieuw in, wanneer u de sessie wenst voort
te zetten.

82
83
Stel de stimulatie zwakker in of schakel
de O² Patch uit, wanneer de werking
onaangenaam aanvoelt.
5. Zo schakelt u de O² Patch uit: druk zo
vaak op de knop OFF-, tot het indicatorlampje uitgaat.
Verwijder de elektrodepleister enkel in
uitgeschakelde stand van de huid.
6. Verwijder de O² Patch van de huid: schuif
een vinger onder de elektrodepleister en
trek de elektrodepleister los.
7. Bevochtig de rugzijde van de elektrodepleister links en rechts telkens met een
druppel water, zodat de elektrodepleister
niet uitdroogt.
8. Plaats de O² Patch op een ander stimuleringspunt.
of
9. Beëindig de sessie:
● Breng de beschermfolie aan op de
elektrodepleister.
● Steek de O² Patch in het opberghoesje.
● Berg de O² Patch op tot de volgende
sessie, buiten het bereik van kinderen
en beschut tegen zonnestralen.
7. Zo reinigt en verzorgt u uw O² Patch
7.1 Reinigen
1. Schakel de O² Patch uit.
2. Reinig het omhulsel met een doek bevochtigd met water.
► U mag het omhulsel niet reinigen
met bijtende of schurende reinigingsmiddelen.
► De elektrodepleister noch het appa-
raat zelf, mag worden gesteriliseerd
in een stoomsterilisator of in een
koud desinfecterend bad.
7.2 Pleister vervangen
U dient de elektrodepleister te vervangen
wanneer deze vuil is of versleten.
1. Schakel de O² Patch uit.
2. Maak de elektrodepleister los van de O²
Patch.

84
85
3. Bevestig de nieuwe elektrodepleister aan
de O² Patch.
7.3 Batterij vervangen
► Gevaar voor vergiftiging en verstik-
king!
Kinderen kunnen batterijen inslik-
ken. Houd daarom batterijen uit de
buurt van kinderen.
► Werp geen batterijen in het vuur.
► Installeer in de O² Patch enkel een
batterij die met de specificaties in
het hoofdstuk “Technische gegevens” overeenstemt.
► Probeer niet de batterijen op te
laden!
Vervang de batterij, zoals beschreven in
het hoofdstuk “Batterij plaatsen”.
8. Wanneer er zich een probleem voordoet
Probleem Mogelijke oorzaak Oplossing
De O² Patch is ingeschake-
ld, maar functioneert niet.
De batterij is niet geïnstal-
leerd.
Installeer de batterij.
De batterij is leeg. Vervang de batterij.
De O² Patch is defect. Verstuur uw O² Patch naar onze
service-afdeling, zie Service en
Garantie.
of
Voer de O² Patch af voor afvalver-
wer-king, zie Afvalverwer-king en
bescherming van het milieu
De stimulering is te zwak. De batterij is zwak. Vervang de batterij.
De pleister kleeft niet meer. De pleister is uitgedroogd. Vervang de pleister.

86
87
9. Technische gegevens
Fabrikant:
Well-Life Healthcare Limited
1Fl. , No. 16Lane 454 , Jungjeng Rd.
Yunghe City , Taipei City
Taiwan , R.O.C
Apparaattype:
Apparaat voor Transcutane Elektrische
NeuroStimulatie (TENS)
Classificatie volgens 93/42/EEG:
klasse IIa
Modelbenaming:
WL-2405
Maximum toegelaten omgevingstemperatuur:
10 °C - 45 °C
Maximum toegelaten rel. luchtvochtigheid:
30 % - 75 %
Maximum toegelaten luchtdruk:
700 hPa - 1060 hPa
Batterij:
Knoopcel type CR2032, 3V, niet oplaadbaar
Max. uitgangswaarde van de elektroden:
50 mA
Pulsbreedte: 100 -150 µs
Pulsfrequentie: 10 Hz - 20 Hz
Bedrijfsspanning: 3 V
Gewicht: 10 g (zonder batterij)
Afmetingen (mm): B:55 x D:10 x H:140
10. Service en garantie
10.1 Service-adres
ibp Service Center
Am Weimarer Berg 6
D-99510 Apolda
Duitsland
Tel.: +49 (0) 3641 3096299
10.2 Garantie en schadevergoeding
Vanaf aankoopdatum (datum van aankoopbewijs of van ontvangbewijs) voeren wij gedurende 24 maanden gratis reparaties uit, wanneer
uw apparaat defect raakt op grond van productie- of materiaalfouten.
In de garantie is niet begrepen, de schade die
voortspruit uit het feit dat de gebruiksaanwijzing
niet of niet volledig werd nageleefd.
Verdere aanspraken, zoals schadevergoeding,
zijn eveneens uitgesloten.
Zend uw defecte apparaat, samen met het aankoopbewijs of het ontvangbewijs en de beschrijving van het defect, naar ons service-adres.
Voeg a.u.b. tevens de garantiedocumenten toe,
wanneer u aanspraak wenst te maken op de
garantiebepalingen.
Batterijen en elektroden vallen niet onder de
garantie.

88
89
11. Afvalverwerking en bescherming
van het milieu
11.1 Afvoeren van batterijen / veiligheidsaanwijzingen i.v.m. batterijen
Werp lege batterijen niet weg samen het huisvuil, maar voer ze af als gevaarlijk afval of
breng ze naar een erkend inzamelpunt voor
batterijen.
Veiligheidsaanwijzing i.v.m. batterijen:
► Batterij niet kortsluiten
► Batterij niet in het vuur werpen
Explosiegevaar
Voor verdere vragen over afvalverwerking, kan u terecht bij uw verkoper.
12. Wat betekent de markering
op uw product?
Het typeplaatje bevindt zich aan de onderzijde
van de O² Patch.
S/N
Serienummer
Dit product mag op het einde van zijn
levensduur niet samen met het normale huisvuil worden afgevoerd, maar
moet naar een inzamelpunt voor recycling van elektrische en elektronische
apparaten worden gebracht (afvalverwerking van oude apparaten)
Gebruiksgedeelte van het type BF
Gebruiksgedeelte verleent bescherming tegen elektrische schok door
voorschriftmatige naleving van de lekstromen (type B). Gebruiksgedeelte is
geïsoleerd (type F)
Gebruiksaanwijzing in acht nemen
Dit product voldoet aan de veilig-
heidsvereisten van de EU-richtlijn
93/42/EEG
GmbH Jena, Germany
O2 Patch TENS
Model(l):WL-2405•Art.-No.:10154
Batterie/Battery: 3V CR2032
Hersteller/Manufacturer:
Well-Life Healthcare Ltd., Taiwan
S/N:

90
91
1. ¿Cómo ayuda este manual de instrucciones? ...... 91
2. Así actúa el O² Patch ........................................... 92
3. Su seguridad es importante para nosotros ......... 93
3.1 ¿Para qué tipo de aplicación es adecuado/
inadecuado el O² Patch? ..................................... 94
3.2 ¿Para qué tratamientos es adecuado/
inadecuado el O² Patch? ..................................... 94
3.3 ¿Cuándo no debe utilizarse el O² Patch? ............ 95
3.4 Otras cosas que deben tenerse en cuenta .......... 96
4. Cómo proteger el O² Patch .................................. 96
5. Cómo preparar el O² Patch antes de su uso ....... 96
5.1 Desembalar y probar el O² Patch ........................ 96
5.2 Colocar la batería ................................................ 98
6. Cómo realizar una sesión .................................... 100
6.1 ¿En qué puntos de estimulación debe
utilizarse el O² Patch? .......................................... 100
6.2 ¿Durante cuánto tiempo y con qué frecuencia
debe utilizarse el O² Patch? ................................. 101
6.3 Cómo utilizar el O² Patch ..................................... 103
7. Limpieza y mantenimiento del O² Patch .............. 105
7.1 Limpieza .............................................................. 105
7.2 Cambio del parche ............................................... 105
7.3 Cambio de la batería ........................................... 106
8. Ante la aparición de problemas ........................... 107
9. Datos técnicos ..................................................... 108
10. Servicio y garantía ............................................... 109
10.1 Dirección del Servicio Técnico ............................. 109
10.2 Garantía y responsabilidad por daños ................. 109
11. Eliminación del producto y protección
del medio ambiente ............................................. 110
12. ¿Qué significa la identificación existente
en su producto? ................................................... 111
1. ¿Cómo ayuda este manual
de instrucciones?
Advertencia:
Este símbolo advierte sobre posibles
riesgos de salud.
Atención:
Este símbolo indica posibles daños en
su equipo.
Nota
Este símbolo indica la presencia de información útil para el uso de su equipo.
Los componentes importantes de su equipo
cuentan con números de posición.
Estos números de posición permiten identificar con claridad los avisos y los elementos de
mando, cuyo significado y uso se explica en el
presente manual.
En todos los puntos correspondientes, usted
encontrará entonces los números de posición
señalados entre paréntesis.

92
93
2. Así actúa el O² Patch
Si usted ha decidido dejar de fumar, el O² Patch
le proporcionará una efectiva ayuda para reducir al mínimo las desagradables consecuencias
de la abstinencia de nicotina. Típicas consecuencias son:
■ constante necesidad de nicotina (ansiedad)
y depresión
■ irritabilidad, ataques de hambre y trastornos
del sueño.
Estos síntomas generan reacciones corporales
y un estado de nerviosismo que, por lo general,
son difíciles de controlar.
El O² Patch es un parche electrónico antitabaco
que prescinde de la nicotina u otras sustancias
de acción química y, por ende, no produce los
efectos indeseables de estos elementos.
El uso del O² Patch ayuda a calmar el nerviosismo, el hambre y el insomnio: Un programa
controlado por microprocesador permite conducir estímulos eléctricos de diferente duración e
intensidad hacia el sistema nervioso. Estos estímulos no son dolorosos; usted sólo percibirá un
ligero cosquilleo en la piel.
Intente liberarse de la dependencia de la nicotina en dos etapas:
Los fumadores dependientes suelen exhibir
gestualmente algún ritual (por ejemplo, el encendido de un cigarrillo) antes de percibir la real
necesidad de nicotina. Es importante identificar
este ritual (si es posible, con el apoyo de especialistas). En la primera etapa, O² Patch ayuda a
eliminar el ritual, reduciendo los típicos estados
de tensión. El objetivo de la aplicación es abandonar ese hábito de coger un cigarrillo.
Si el impulso se torna irresistible, entonces, a lo
sumo, habrá de fumarse un cigarrillo de forma
consciente. Luego no se deberá fumar hasta el
siguiente impulso irrefrenable.
En la primera etapa, que debería durar entre
una y dos semanas, una aplicación diaria del
O² Patch resulta suficiente (con una duración
aproximada de entre 30 y 60 minutos en la
zona de la nuca).
La segunda etapa debe eliminar completamente la adicción al tabaco. Una vez que el consumo de tabaco se haya estabilizado en
4-5 cigarrillos por día, estimule dos zonas:
■ nuca
■ abdomen superior (plexo)
El programa de estimulación tiende a controlar
las reacciones de abstinencia, tales como el
nerviosismo, el hambre y el insomnio.
En la segunda etapa, también de entre una y
dos semanas, basta con aplicar el O² Patch una
vez por día durante aprox. 30 minutos en cada
punto de estimulación.
3. Su seguridad es importante
para nosotros
Lea atentamente este manual de instrucciones
antes de utilizar por primera vez el O² Patch.
Su contenido incluye todo lo que usted debe
saber para operar de forma segura el O² Patch
y evitar daños.
El presente manual de instrucciones forma parte del equipo. Consérvelo en buen estado hasta
entregarlo junto con el O² Patch a un nuevo
propietario o hasta eliminar el producto.

94
95
3.1 ¿Para qué tipo de aplicación es adecua-
do/inadecuado el O² Patch?
► Utilice el O² Patch exclusivamente
en el ámbito privado.
► El O² Patch no ha sido diseñado
para un uso industrial o medicinal.
► El O² Patch es apto únicamente
para el uso externo en seres humanos en los puntos de estimulación
indicados en este manual.
► El O² Patch no debe utilizarse en
niños, ni siquiera cuando están
bajo la constante vigilancia de un
adulto.
3.2 ¿Para qué tratamientos es adecuado/in-
adecuado el O² Patch?
► El O² Patch ha sido diseñado exclu-
sivamente para apoyar tratamientos de abstinencia de nicotina.
► El nerviosismo, los ataques de
hambre, los trastornos del sueño y
los dolores pueden ser también el
síntoma de una enfermedad grave,
cuyas características excluyen la
posibilidad de un autotratamiento
con O² Patch.
Antes del uso, le recomendamos con-
sultar a su médico, farmacéutico o
fisioterapeuta.
3.3 ¿Cuándo no debe utilizarse el O² Patch?
No utilice el O² Patch
► si sufre problemas cardíacos, espe-
cialmente arritmias. La corriente de
estimulación puede provocar fibrilación ventricular e incluso un paro
cardíaco.
► si usa un marcapasos u otro im-
plante electrónico. La corriente de
estimulación puede afectar el funcionamiento del implante.
► si sufre de epilepsia. La corriente
de estimulación puede llegar a
provocar convulsiones.
► durante el embarazo. La corriente
de estimulación puede llegar a
provocar contracciones.
► si sufre reacciones alérgicas en
la piel. Los electrodos y el parche
pueden provocar irritaciones en la
piel.
► si sufre de enfermedades sistémi-
cas, es decir, que afectan todo el
cuerpo.
► si el O² Patch está dañado. La
corriente de estimulación puede
provocar dolores e irritaciones en
la piel.

96
97
3.4 Otras cosas que deben tenerse en cuenta
► No permita que el O² Patch llegue a
manos de los niños.
Los niños podrían tragar piezas
pequeñas y ahogarse con ellas.
4. Cómo proteger el O² Patch
► El sistema electrónico del O² Patch
no está preparado para resistir la
acción de la humedad.
No coloque el O² Patch debajo del
agua corriente, no sumerja el equipo en agua ni en otros líquidos, no
lo use en una piscina o sauna.
► El O² Patch es sensible al calor.
No exponga el O² Patch a la luz
directa del sol ni lo coloque sobre
superficies calientes.
5. Cómo preparar el O² Patch antes
de su uso
5.1 Desembalar y probar el O² Patch
1. Desembale el O² Patch.
Conserve el envase original para poder
enviar el O² Patch de manera segura a
nuestro Servicio Técnico en caso de que
sea necesaria una reparación.
2. Verifique que el suministro esté completo:
O² Patch con parche de
electrodos y lámina protectora
Batería
Envoltura
Manual de instrucciones
3. Controle que el O² Patch no presente
daños atribuibles al transporte.
Si el O² Patch está dañado, diríjase a
nuestro Servicio Técnico (véase Servicio
y garantía).
0434
innovative business promotion gmbh
Modell/Model/Modèle/Model/Modelo: WL-2405
O²
Patch
Elektronisches Anti-Tabak-Pfl aster
Electronic Anti-Tobacco Patch
Pansement électronique anti-tabac
Elektronische antitabakpleister
Parche electrónico antitabaco
Gebrauchsanweisung ......... 2
Instructions for Use ........... 24
Mode d‘emploi ...................46
Gebruiksaanwijzing ...........68
Manual de instrucciones .. 90

98
99
5.2 Colocar la batería
Cuando la batería aún no está colocada:
1. Desembale la batería.
2. Abra el compartimento de la batería:
Presione la cubierta con el pulgar hacia
abajo y deslícela hacia atrás.
3. Coloque la batería.
El símbolo + de la batería
debe apuntar hacia arriba.
4. Cierre el compartimento de la batería.
Cuando la batería ya está colocada:
1. Abra el compartimento de la batería:
Presione la cubierta con el pulgar hacia
abajo y deslícela hacia atrás.
2. Extraiga la batería.
3. Quite la cinta de seguridad.
4. Coloque nuevamente la batería.
El símbolo + de la batería
debe apuntar hacia arriba.
5. Cierre el compartimento de la batería.

100
101
6. Cómo realizar una sesión
Coloque el O² Patch únicamente en
aquellos puntos de estimulación de la
piel que se describen la presente sección. No utilice el equipo
► sobre los párpados. La corriente de
estimulación puede dañar el ojo.
► en la zona del cuello o de la gar-
ganta. La corriente de estimulación
puede provocar espasmos musculares y conducir a un ahogo.
► con el flujo de corriente orientado
directamente hacia el corazón (por
ejemplo, demasiado cerca de él).
La corriente de estimulación puede
provocar fibrilación ventricular e
incluso un paro cardíaco.
► con el flujo de corriente orientado
directamente hacia el cerebro (por
ejemplo, en la sien). La corriente de
estimulación puede provocar convulsiones.
6.1 ¿En qué puntos de estimulación debe
utilizarse el O² Patch?
Al utilizar el equipo, mantenga una distan-
cia mínima de 1 m respecto a los aparatos de microondas y de onda corta. Las
interacciones electromagnéticas pueden
afectar el funcionamiento del O² Patch.
Durante la primera etapa,
estimule la nuca (zona 1).
Coloque el O² Patch lo más
alto posible en la zona del
nacimiento del cabello.
En la segunda etapa,
estimule la nuca
(zona 1) y la parte
superior del
abdomen (zona 2).
6.2 ¿Durante cuánto tiempo y con qué frecuencia debe utilizarse el O² Patch?
No sobrepase el tiempo ni la frecuencia
de aplicación indicados.
Si lo hace, el efecto no será mayor.

102
103
En la primera etapa, intente realizar la aplicación durante un período de entre una y dos
semanas:
Estimule diariamente la zona 1 (nuca)
entre 30 y 60 minutos.
En la segunda etapa, intente realizar la aplicación también durante un período de entre una
y dos semanas: Estimule diariamente la zona 1
(nuca) y la zona 2 (abdomen superior) durante
30 minutos en cada caso.
La duración total de la aplicación en la segunda
etapa es de 2 x 30 = 60 minutos diarios.
También es posible repetir la aplicación
posteriormente: Utilice el O² Patch cada
vez que quiera evitar o reducir tensiones,
a fin de reprimir el deseo de fumar.
6.3 Cómo utilizar el O² Patch
Evite utilizar el O² Patch cerca de apara-
tos de microondas o de onda corta. Las
interacciones electromagnéticas pueden
afectar el funcionamiento del O² Patch.
1. Retire la lámina protectora del parche de
electrodos.
2. Adhiera el O² Patch sobre una de las zonas de estimulación.
Adhiera el O² Patch a una parte limpia,
seca y sana de la piel, que no esté sometida a la acción de productos cosméticos y
cremas.
El O² Patch debe fijarse con firmeza a la
piel. Si la adherencia se reduce, cambie el
parche de electrodos.
3. Encienda el O² Patch: Oprima una vez el
botón ON+. La luz indicadora parpadea
(color rojo).
Botón ON+
Luz indicadora
Botón OFF–
4. Ajuste la intensidad de estimulación. En
las etapas 1 y 2 se recomienda una potencia media de nivel 3 ó 4:
La intensidad se aumenta con el botón ON+
y se reduce con el botón OFF–. El ajuste
del nivel de estimulación admite 10 pasos
graduales.
● Oprima repetidamente el botón ON+ hasta alcanzar la mayor intensidad de estimulación que resulte agradable. El brillo de
la luz indicadora aumenta cuando crece la
intensidad.
● Oprima repetidamente el botón OFF– si
desea reducir la intensidad de estimulación. El brillo de la luz indicadora disminuye cuando baja la intensidad.
Luego de 15 minutos, el O² Patch se
desconecta automáticamente. Si quiere
continuar con el uso, vuelva a encender
el O² Patch.

104
105
Si el efecto se torna desagradable, re-
duzca la intensidad de estimulación o
desconecte el O² Patch.
5. Desconecte el O² Patch: Oprima el botón
OFF– hasta que la luz indicadora se apa-
gue.
Retire el parche de electrodos de la piel
sólo cuando el equipo se encuentre
desconectado.
6. Para retirar el O² Patch de la piel: Deslice
un dedo por debajo del parche de electrodos y levántelo.
7. En la cara posterior del parche, coloque
una gota de agua a la izquierda y otra a la
derecha para evitar que se seque.
8. Aplique el O² Patch en otro punto de estimulación
o bien
9. Para finalizar la aplicación:
● Coloque la lámina protectora en el
parche de electrodos.
● Coloque el O² Patch en la envoltura.
● Conserve el O² Patch en un lugar
inaccesible para los niños y verifique
que no quede expuesto a los rayos
solares ni a la humedad hasta el
próximo uso.
7. Limpieza y mantenimiento del O² Patch
7.1 Limpieza
1. Desconecte el O² Patch.
2. Limpie la caja con un trapo humedecido
con agua.
► Al limpiar la caja, evite utilizar de-
tergentes agresivos o abrasivos.
► No esterilice el parche de elec-
trodos ni el propio aparato en el
esterilizador de vapor o el baño de
esterilización en frío.
7.2 Cambio del parche
En caso de suciedad o desgaste, cambie
el parche de electrodos.
1. Desconecte el O² Patch.
2. Quite el parche de electrodos del O²
Patch.

106
107
3. Inserte el nuevo parche de electrodos en
el O² Patch.
7.3 Cambio de la batería
► ¡Peligro de intoxicación y asfixia!
Los niños pueden tragar las bate-
rías. Mantenga las baterías lejos
del alcance de los niños.
► No arroje las baterías al fuego.
► Inserte en el O² Patch sólo una
batería que coincida con las especificaciones de la sección “Datos
técnicos”.
► No intente cargar las baterías.
Cambie la batería del modo indicado en la
sección “Colocar la batería”.
8. Ante la aparición de problemas
Solución
Coloque la batería.
Cambie la batería.
Envíe su O² Patch a nuestro Servicio
Técnico, véase Servicio y garantía,
o
deseche el O² Patch, véase
Eliminación del producto y
protección del medio ambiente.
Cambie la batería.
Reemplace el parche.
Posible causa
No está colocada la batería.
La batería está descargada.
El O² Patch está averiado.
La batería tiene poca carga.
El parche está seco.
Problema
El O² Patch está encendido,
pero no funciona.
La estimulación es
demasiado débil.
El parche ya no se adhiere.

108
109
9. Datos técnicos
Fabricante:
Well-Life Healthcare Limited
1Fl., No. 16 Lane 454, Jungjeng Rd.
Yunghe City, Taipei City
Taiwán, República de China
Tipo de equipo:
Equipo de estimulación eléctrica nerviosa
transcutánea (TENS)
Clasificación según Directiva 93/42/CEE:
Clase IIa
Modelo:
WL-2405
Temperatura ambiente máxima admisible:
10°C - 45°C
Humedad relativa máxima admisible:
30% - 75%
Presión de aire máxima admisible:
700 hPa - 1060 hPa
Batería:
Pila botón tipo CR2032, 3 V,
no recargable
Máx. valor de salida de los electrodos:
50 mA
Duración del impulso: 100 -150 µs
Frecuencia del impulso: 10 Hz - 20 Hz
Tensión de servicio: 3 V
Peso: 10 g (sin batería)
Dimensiones (mm): anch:55 x prof:10 x alt:140
10. Servicio y garantía
10.1 Dirección del Servicio Técnico
ibp Service Center
Am Weimarer Berg 6
D-99510 Apolda
Alemania
Tel.: +49 (0) 3641 3096299
10.2 Garantía y responsabilidad por daños
Nuestra empresa realiza reparaciones gratuitas durante 24 meses a partir de la fecha de
compra (fecha del comprobante o recibo de
compra) cuando el equipo presenta defectos de
material o de fabricación.
La garantía no cubre los daños ocasionados
por una inobservancia total o parcial de las
instrucciones de este manual.
Asimismo, se excluyen otras reclamaciones
(por ejemplo, indemnización por daños y perjuicios).
Envíe a la dirección de nuestro Servicio Técnico
el equipo en cuestión junto con el comprobante
o recibo de compra y la descripción de la reclamación. Si solicita el cumplimiento de una
garantía, adjunte también la documentación
correspondiente.
Las baterías y los electrodos no están incluidos
en la garantía.

110
111
11. Eliminación del producto y protección
del medio ambiente
11.1 Eliminación de la batería / Normas de seguridad
Las baterías usadas no deben arrojarse a los
residuos domésticos, sino a los residuos especiales o en un centro establecido para la recolección de baterías.
Normas de seguridad para las baterías:
► No ponga la batería en cortocircui-
to
► No arroje la batería al fuego
Peligro de explosión
Para cualquier otra consulta rela-
cionada con la eliminación del producto, diríjase a su vendedor.
12. ¿Qué significa la identificación
existente en su producto?
La placa identificadora se encuentra en la cara
inferior del O² Patch.
S/N
Número de serie
Al final de su vida útil, este producto
no debe ser arrojado a los residuos
domésticos normales, sino que debe
entregarse en un punto de recolección destinado especialmente al reciclado de equipos eléctricos y electrónicos usados.
Pieza de tipo BF
Ofrece protección contra descargas
eléctricas mediante el cumplimiento
de las normas relacionadas con las
corrientes de fuga (tipo B). Ofrece
aislamiento (tipo F).
Tenga en cuenta la información del
manual de instrucciones.
El producto cumple los requisitos de
seguridad de la Directiva 93/42/CEE.
GmbH Jena, Germany
O2 Patch TENS
Model(l):WL-2405•Art.-No.:10154
Batterie/Battery: 3V CR2032
Hersteller/Manufacturer:
Well-Life Healthcare Ltd., Taiwan
S/N:

112
innovative business promotion gmbh
Botzstraße 6
07743 Jena
Germany
Tel.: +49 (0) 3641 -30 96-0
Fax: +49 (0) 3641- 30 96 20
 Loading...