

Page 1

Installation and
Administration Guide
2.5
R E L E A S E
Page 2

COPYRIGHT
Under the copyright laws, neither the documentation nor the software may be copied, photocopied,
reproduced, translated, or reduced to any electronic medium or machine-readable form, in whole or in
part, without the prior written consent of Lotus Development Corporation, except in the manner
described in the documentation.
© Copyright 1996, 1997, 1998 Lotus Development Corporation
55 Cambridge Parkway
Cambridge, MA 02142
All rights reserved. Printed in the United States of America.
Lotus, Lotus Notes, and SmartIcons are registered trademarks, and Notes, Domino, LearningSpace, and
LotusScript are trademarks of Lotus Development Corporation. OS/2 and AIX are trademarks of IBM
Corporation. Digital images from PhotoDisc, Inc. are used with permission of PhotoDisc, Inc. PhotoDisc
is a trademark of PhotoDisc, Inc.
Other product and company names mentioned herein may be the trademarks or registered trademarks of
their respective owners.
LearningSpace was developed by Lotus Institute.
Page 3

Contents
Getting Started with Lotus
LearningSpace
..................
About this Guide ...............
1 Getting Started ................
What you need to perform installation
and course creation ..............
Supported hardware and
software requirements ...........
2 Installing the LearningSpace
Files onto a Server
If you are upgrading from Release 2.0 to
Release 2.5 ...................
Shut down and restart the Notes
server process .................
Establishing access for the LearningSpace
Admin group ..................
..............
3 Creating a Course with
v
LearningSpace Central
Adding the LearningSpace Central database
vii
1
1About LearningSpace ..............
1Roles of LearningSpace participants .....
2About creating a LearningSpace course ...
2
3
4What’s on the LearningSpace CD? ......
5LearningSpace documentation .........
7
7
7Installing files on the server ............
icon to your Notes workspace .......
...........
4 Upgrading a Course ............
8
Shut down and restart the
8Open Install.nsf from the CD ..........
11Update server document ............
11Assigning access to LearningSpace files ....
12
12Using more than one Central on a server ..
Domino server ................
Installing LearningSpace files
on the server ..................
Replacing the design of the
Multimedia Library ..............
13
13
14About creating a new course using Central ...
15Creating a new course ................
16New Course Options ...............
17CoursePack filename ...............
18Course Information ................
19Course Locations .................
20Schedule options .................
20CourseRoom options ...............
21MediaCenter option ...............
21Assessment Manager options .........
22Course Access ...................
24Additional options ................
25Course creation is complete! ..........
27
27Upgrading a Release 2.0 course ..........
27
28
28Replacing the design of Central ........
29
iii
Page 4

Automatically upgrading the
course databases ................
Creating new local replicas of the
upgraded course databases .........
Instructing students to recover their
private documents ..............
5 Administering a Course with
LearningSpace Central
About using Central to
administer a course ..............
In the NOTES.INI file on the Domino
server .......................
Guidelines for setting instructor
access levels ..................
Assigning instructor and
administrator roles ..............
About open and closed
course environments .............
Creating an open or closed
course environment .............
Adding participants to the
Name & Address book ............
...........
29
30
30
31Upgrading a Release 2.0 Design Library ..
33
33
33Deferred creation of course databases ......
35Adding database icons to your workspace ...
35Enabling Web browser access to courses ....
35In the Server Name & Address book .....
36
36Setting access levels to courses ...........
36
37
38
39
40Managing course enrollment ............
40
41Adding students to a course ..........
iv LearningSpace Installation and Administration Guide
Page 5
Getting Started
with Lotus LearningSpace
This chart presents roles and responsibilities for those creating, developing,
teaching, and participating in LearningSpace™ courses.
Where to find information . . . ResponsibilitiesLearningSpace Role
Lotus Notes®
Administrator
The Notes™ administrator is
responsible for creating new
LearningSpace courses and for
managing the databases on your
server, including student and
instructor access.
The LearningSpace Installation and Configuration Guide
provides information on creating courses and some aspects
of administering courses. LearningSpace on-line Instructor
Help contains more comprehensive information about
administering courses and managing course enrollment.
See below for information on accessing on-line Help.
See Lotus Notes® Release 4.5 or higher Help for additional
information
.
Lotus Notes
Application
Developers
(optional)
Courseware
Development
Team (designers
and instructors)
Students/
Participants
A Notes application developer can
modify aspects of the LearningSpace
database design (for example, you
can add the logo of your organization
to the LearningSpace navigators).
The LearningSpace courseware
development teams consists of:
Instructional designers
Instructors and teaching assistants
This team is responsible for
development and delivery of
LearningSpace courses.
To participate in LearningSpace
courses.
LearningSpace on-line Instructor Help provides all
required information on how to customize LearningSpace
courses.
See Lotus Notes Release 4.5 or higher Help for additional
information
Documentation for developing and designing courses is
contained in LearningSpace on-line Instructor Help. From
anywhere in LearningSpace, click the Help button, then
click the “Goto Instructor Help” button. The documents in
Instructor Help are private to the courseware development
team.
Documentation for students is contained in LearningSpace
on-line Student Help.
From anywhere in LearningSpace, click the Help button to
open a Help view containing detailed user information.
.
For more information about LearningSpace, contact either Lotus Development,
your local Lotus Authorized Reseller, or visit us on the World Wide Web at
http://www.lotus.com/learningspace.
v
Page 6

About this Guide
This guide describes the process for installing LearningSpace Release 2.5 and
creating and administering LearningSpace courses. It has five chapters:
Chapter 1: Getting Started
Chapter 2: Installing the LearningSpace Files onto a Server
Chapter 3: Creating a Course with LearningSpace Central
Chapter 4: Upgrading a Course
Chapter 5: Administering a Course with LearningSpace Central
For information about designing or teaching a LearningSpace
course, see on-line LearningSpace Instructor Help or the
LearningSpace Instructor Guide.
Follow the procedures described in Chapters 1 and 2 to install the
LearningSpace Release 2.5 templates and databases.
Refer to Chapter 3 for information on how to begin to create LearningSpace
courses using LearningSpace Central once you have installed the
LearningSpace files onto a Notes server.
Chapter 4 covers how to upgrade a course created with an earlier release of
LearningSpace.
Chapter 5 covers how to use LearningSpace Central to administer a course,
manage enrollment, and set up remote users.
For a list of features of LearningSpace, use a Web browser to open the HTML
file Features.htm on the LearningSpace CD.
For Release Notes, use a Web browser to open the HTML file Relnotes.htm
on the LearningSpace CD.
vii
Page 7

Chapter 1
Getting Started
This chapter provides general information on LearningSpace and the
installation and course creation processes.
About LearningSpace
LearningSpace is a Notes application that allows you to create, conduct, and
administer courses. A LearningSpace course consists of five Notes databases.
Together, they provide an interactive environment for teaching and taking
courses.
LearningSpace Release 2.5 (R2.5) requires a Notes Domino 4.5x or 4.6x
server. Compatibility with Domino allows courses to be accessible using
Notes 4.5 or 4.6 clients and over the Internet using Web browsers.
LearningSpace comes with a database called LearningSpace Central.
LearningSpace Central streamlines the process of creating and administering
LearningSpace courses. You can use it to create a new course (Chapter 3) as
well as to administer a course (Chapter 5).
Students and instructors can use Central to access courses. Central is the
point through which students using Web browsers access courses.
Instructors supply students with a Uniform Resource Locator (URL)
identifying the location of Central on the Internet. From within Central,
students then open the courses to which they have access and begin work.
Roles of LearningSpace participants
LearningSpace is designed to support a variety of roles for course creation,
design, administration, delivery, and participation. In some environments,
one or more of these roles may be performed by the same person. The roles
are as follows:
Administrator – Creates new courses; administers the Notes server on which
the courses are stored; adds and removes participants from the Access
Control Lists of the course databases; performs various tasks related to
managing or modifying a course.
1
Page 8

Designer – Designs the content, flow, and appearance of the course.
Instructor – Conducts the course; interacts with students.
Student – Participates in the course.
Note The instructor frequently assumes the role of designer. This guide
and LearningSpace Help assume that the role of instructor and designer are
combined and refer to them both as “instructor.”
About creating a LearningSpace course
The core LearningSpace application comes in the form of five Notes template
databases (.nsf). Creating a new LearningSpace course involves creating and
configuring a set of databases from these templates. An instructor designs a
new LearningSpace course using these databases to create the schedule,
course materials, assignments, and so on.
LearningSpace also includes a database called LearningSpace Central which
automates the course creation process and administration tools. The
administration tools related to course creation are described in Chapter 5.
For information about all the administration functions served by Central,
see the LearningSpace Instructor Guide or on-line Instructor Help.
Note You can access Help from a course database by clicking the Help
action button. Once Help opens, you can access Instructor Help by clicking
the Go To Instructor Help button.
The course creation process configures four or five course databases using
LearningSpace templates and the options you specify. Each course has at
least four databases: Schedule, MediaCenter, CourseRoom, and Profiles.
The fifth course database, the Assessment Manager, is only created if the
course is designated as being graded.
Once a course has been created, the course instructor designs the structure
and content of the course (schedule, assignments, reference materials, and
student assessments). For information on designing a LearningSpace course,
instructors should see the LearningSpace Instructor Guide or on-line Instructor
Help.
Note The options you choose during course creation can be modified after
the course databases have been created.
What you need to perform installation and course creation
To install and create courses, you have to meet the following requirements:
Must be a member of the LearningSpace Admin group in the server
Name & Address book. The LearningSpace Admin group is given
Manager access and the required roles in the Access Control Lists for all
the LearningSpace templates and databases.
2 LearningSpace Installation and Administration Guide
Page 9

Set the LearningSpace Admin group to have “Create new databases”
permission on the server on which the LearningSpace files will be
installed.
Set the LearningSpace Admin group to have “Create new replicas”
access to the servers on which replicas of the course databases will be
created.
For more information about becoming a member of the LearningSpace
Admin group in the Name & Address book, see “Assigning access to
LearningSpace files” in Chapter 2.
A server administrator assigns “Create new database” and “Create new
replicas” access in the Restrictions section of the server document in the
Name & Address book. For more information, see the Notes Administrator’s
Guide.
At minimum, the person creating a new LearningSpace course should also
know:
The name of the course to be created
The title to be given to the course databases (usually related to the
course name)
The name of the subdirectory where the course databases will be stored
Whether the course will be graded
The name of the course administrator (if not yourself) and the
designer/instructor so that you can give them appropriate access to
begin designing the course
Supported hardware and software requirements
Either a Notes client or a Web browser can be used to access a
LearningSpace course. The following is a list of the supported server and
client platforms and software. For more information, see the Notes
Administrator’s Guide for Domino 4.5x or 4.6x.
Domino server platforms
Microsoft NT (Intel, DEC Alpha); IBM OS/2™; IBM AIX™; IBM System
390™; Hewlett-Packard HP-UX; Sun Solaris™ (SPARC, Intel Edition)
Notes client platforms
Microsoft Windows 95 and NT; Macintosh OS (PowerPC and 68K); IBM
OS/2 and IBM AIX
Domino server software versions
Domino 4.5 or higher
Chapter 1: Getting Started 3
Page 10

Notes client software
Notes Release 4.51 or higher
Web browsers
Netscape Navigator 3.x, 4.x, Microsoft Internet Explorer 4.x
Note Instructor and administrator tasks require that you access a course
using a Notes client rather than a Web browser.
What’s on the LearningSpace CD?
The LearningSpace CD contains the five LearningSpace template databases,
a template for course packs, and a number of other Notes databases.
The names of the template databases are:
schedule.nsf – Schedule
mcenter.nsf – MediaCenter
croom.nsf – CourseRoom
profiles.nsf – Profiles
assess.nsf – Assessment Manager
pack.nsf – CoursePack (used for packing a course into a single database for
distribution)
The Notes databases included on the CD are:
central.nsf – This is the LearningSpace Central database. For information
on creating a LearningSpace course using Central, see Chapter 3. For
information on administering a course using Central, see Chapter 5 in this
book, the LearningSpace Instructor Guide, or on-line Instructor Help.
weblib.nsf – The Multimedia Library database is a repository for all
graphics and multimedia in the course utilized by Web browsers. For more
information, see the LearningSpace Instructor Guide or on-line Instructor Help.
lscustsc.nsf – Schedule customization library
lscustmc.nsf – MediaCenter customization library
lscustcr.nsf – CourseRoom customization library
lscustpr.nsf – Profiles customization library
lscustas.nsf – Assessment Manager customization library
lscustc.nsf – Central customization library
There is a customization library database for each LearningSpace database
template. Experienced Notes designers can use the customization libraries to
4 LearningSpace Installation and Administration Guide
Page 11

customize design aspects of LearningSpace databases. For information about
using the customization library databases, see the LearningSpace on-line
Instructor Help.
install.nsf and upgrade.nsf – These databases allow easy installation of the
LearningSpace files. The Install database is used for initial installation of the
LearningSpace files. The Upgrade database is used to upgrade existing
LearningSpace 2.0 files to Release 2.5.
relnotes.htm – Lists the known problems and work-arounds in
LearningSpace Release 2.5. This file is formatted in HTML and can be
opened from any Web browser.
scrcam.txt – Instructions for installing the Lotus ScreenCam demo application.
install.txt – A text file describing the process of preparing to install
LearningSpace from a UNIX Notes client.
LearningSpace documentation
In addition to this guide, LearningSpace includes the LearningSpace Student
Guide, the LearningSpace Instructor Guide, on-line Help for both instructors
and students, and a quick-reference card for installing LearningSpace. The
guides and on-line Help contain the same information, including
information about using LearningSpace to design and conduct a course, as
well as guidance for students taking a course.
On-line Help is available by clicking the Help action button in any
LearningSpace course database. It includes a view accessible to both
instructors and students called Student Help. The view called Instructor
Help is accessible to instructors and administrators only. The How Do I?
view option, in both Student and Instructor Help, lists Help documents by
task.
The LearningSpace Student Guide and on-line Student Help include the
following chapters/categories:
Introduction to LearningSpace
Accessing a Course
Getting Around in LearningSpace
Student Basics
Schedule
MediaCenter
CourseRoom
Profiles
Chapter 1: Getting Started 5
Page 12

The LearningSpace Instructor Guide and on-line Instructor Help include the
following chapters/categories:
LearningSpace Instructor Guide
Working with a course
The LearningSpace Welcome page
Designing a Course Schedule
Adding Course Materials to the MediaCenter
Creating and Maintaining Participant Profiles
Using the CourseRoom
Creating and Modifying Assessments
Grading
Changing Course Attributes
Managing Course Enrollment
Administering a Course
Customizing Course Database Design
Web integration
Course Design and Delivery Issues
6 LearningSpace Installation and Administration Guide
Page 13

Chapter 2
Installing the LearningSpace Files onto a Server
This chapter contains information on how to prepare your environment for
LearningSpace and how to install LearningSpace files onto a server.
If you are upgrading from Release 2.0 to Release 2.5
If you are upgrading to LearningSpace Release 2.5, delete the Release 2.0
template files before installing the Release 2.5 templates on the server hard
drive. The files you should delete from the server are:
schedule.ntf
mcenter.ntf
assess.ntf
croom.ntf
profiles.ntf
Also, make backup copies of any customization databases you may have
altered. Later, you can update the new customization databases with the
changes you made.
For more information about upgrading Release 2.0 courses to Release 2.5,
see Chapter 4.
Upgrad i ng fr o m Lear n in g Sp ac e Re le as e 1. 0: To upgrade from LearningSpace
Release 1.0 to Release 2.5, you will have to upgrade to Release 2.0, then run
the procedure for upgrading to Release 2.5. For information about upgrading
from Release 1.0 to Release 2.0, call LearningSpace Support.
Installing files on the server
You install the LearningSpace files from a Notes server. The procedures in
this section work for Notes servers running OS/2 or Windows NT.
Note for users installing from a UNIX Notes client: Before you can install
the LearningSpace files using a UNIX Notes client, you must perform the
procedure described in a text file called install.txt. The text file is included
on your LearningSpace CD. After performing the procedure, continue with
the steps in this chapter.
7
Page 14
Shut down and restart the Notes server process
Before beginning the installation, shut down the Notes server process and
restart it. Perform this step from the server, not from a workstation.
1. At the server console, type exit and press
ENTER
The server shuts down.
2. Double-click the Notes Domino icon to restart the server.
Open Install.nsf from the CD
If you are upgrading from a previous release of LearningSpace, make sure
you are a member of the LearningSpace Admin group in the server Name &
Address book before performing this procedure
1. Place the LearningSpace CD in the drive. You can either:
If you’re using Windows, double-click the install.nsf file in Windows
Explorer. Then go to Step 2.
or
From the Notes client, choose File - Database - Open.
.
In the Filename field, enter d:\install.nsf where d: is the letter that
refers to your CD-ROM drive.
Click Open.
2. In the dialog box that asks where you want to install LearningSpace,
select Local if installing from the server console, or select the name of the
server where you want to install LearningSpace.
8 LearningSpace Installation and Administration Guide
Page 15

3. Enter the name of the LearningSpace Installation directory.
The LearningSpace Installation directory is the subdirectory of the Notes
data directory where LearningSpace Central resides. All courses that are
administered through Central and all related files reside in
subdirectories of the LearningSpace Installation directory that you name.
If you will only be using one LearningSpace Central on this server, it is
recommended that you name the Installation directory “lspace.” For
more information about using multiple Centrals, see “Using more than
one Central on a server” in this chapter.
4. The Install database copies the files from the CD into the Installation
directory.
When you are done, the paths to the saved files should be as follows,
where installation-dir is the name you assigned to the LearningSpace
Installation directory:
notes\data\installation-dir\template\schedule.nsf
notes\data\installation-dir\template\mcenter.nsf
notes\data\installation-dir\template\croom.nsf
notes\data\installation-dir\template\profiles.nsf
notes\data\installation-dir\template\assess.nsf
notes\data\installation-dir\template\pack.ntf
notes\data\installation-dir\central.nsf
notes\data\installation-dir\lib\weblib.nsf
notes\data\installation-dir\design\default\lscustsc.nsf
notes\data\installation-dir\design\default\lscustmc.nsf
notes\data\installation-dir\design\default\lscustcr.nsf
notes\data\installation-dir\design\default\lscustpr.nsf
notes\data\installation-dir\design\default\lscustas.nsf
notes\data\installation-dir\design\default\lscustc.nsf
Chapter 2: Installing the LearningSpace Files onto a Server 9
Page 16

Later, when creating LearningSpace courses, you will use Central to save
each new set of course databases in a separate subdirectory under the
LearningSpace Installation directory. Figure 1 represents the placement
of LearningSpace files and subdirectories:
Figure 1 LearningSpace Directory Structure
10 LearningSpace Installation and Administration Guide
Page 17

Update server document
To enable proper Web client access to the server, you have to update the
server document as follows.
1. Open the Name & Address book on the server where you are installing
LearningSpace.
2. In the Server\Servers v iew, open and edit th e server docu ment for the
server where you are installing LearningSpace
3. Open the Agent Manager section of the server document.
4. In the Run restricted LotusScript™ agents field, enter Lotus Notes
Template Development/Lotus Notes
5. Close and save the document.
Assigning access to LearningSpace files
Before you can begin to create LearningSpace courses, give yourself access to
the LearningSpace files. The LearningSpace files are the templates and
databases you installed from the LearningSpace CD.
To create a course and perform certain administrative tasks, you must have
the proper access to LearningSpace files. Either you or a group of which you
are a member must have Manager access in the Access Control List (ACL)
and have the “[LSAdmin]” and “[InstructorStaff]” roles selected.
The ACLs of all LearningSpace files have an entry called LearningSpace
Admin. LearningSpace Admin is a group name you can use to simplify
assigning the required access to LearningSpace files. By making yourself a
member of the LearningSpace Admin group in the server Name & Address
book, you gain the required access to all LearningSpace files. If the group
does not exist in the Name & Address book, you must first create it.
Note
group called LearningSpace Admin in the server Name & Address book.
If so, make sure your name is listed as a member of that group.
The following describes how to create a LearningSpace Admin group in the
Name & Address book:
If you are upgrading from Release 2.0, you might already have a
1. Open your server Name & Address book.
2. Choose Create - Group.
3. In the Group Name field, enter LearningSpace Admin.
This must be entered exactly.
4. In the Group Type field, select Access Control List only.
Chapter 2: Installing the LearningSpace Files onto a Server 11
Page 18

5. In the Description field, enter Access to LearningSpace Central.
6. In the Members field, enter your name and those of any others who will
be using Central to create and administer LearningSpace courses.
If your site uses hierarchical names, use the person’s full hierarchical
name. For example: Sandy Bingham/Acme/Education.
7. Save and close the document.
Establishing access for the LearningSpace Admin group
Make sure that all members of the LearningSpace Admin Group have access
to create new databases and new replicas on your LearningSpace server.
1. Open the Server\Servers view in the Name & Address book.
2. Open the server document for the LearningSpace server.
3. Click the Edit server button.
4. Expand the restrictions section.
5. Edit the “Create new databases” and “Create replica databases” fields to
include LearningSpace Admin.
6. Save and close.
Using more than one Central on a server
You can have more than one LearningSpace Installation Directory and
Central database on a server. Creating multiple Installation directories
allows you to have distinct LearningSpace “course domains” on the server.
Each Installation Directory is associated with a unique central.nsf. The
Central in a given Installation Directory manages all the courses contained
in that Installation Directory. If, for example, you have a large number of
courses that can be divided into two distinct groupings — say Technical
courses and Management Training courses — you might want to create a
separate Central to manage each set of courses.
To create another Central, follow the procedure in the “Installing files on the
server” section in this chapter. When you enter the name of the Installation
Directory, use a unique name. For example, if you are creating two
Installation directories, you might name them “lspace1” and “lspace2.”
12 LearningSpace Installation and Administration Guide
Page 19

Chapter 3
Creating a Course with LearningSpace Central
This chapter describes the process of using LearningSpace Central to create
LearningSpace courses.
Note It is recommended that you perform the procedures in this chapter
from a workstation connected to the server where LearningSpace is installed
rather than from the server itself.
This chapter includes the following topics:
Adding the LearningSpace Central database icon to your Notes
workspace
About creating a new course using Central
Creating a new course
Adding the LearningSpace Central database icon
to your Notes workspace
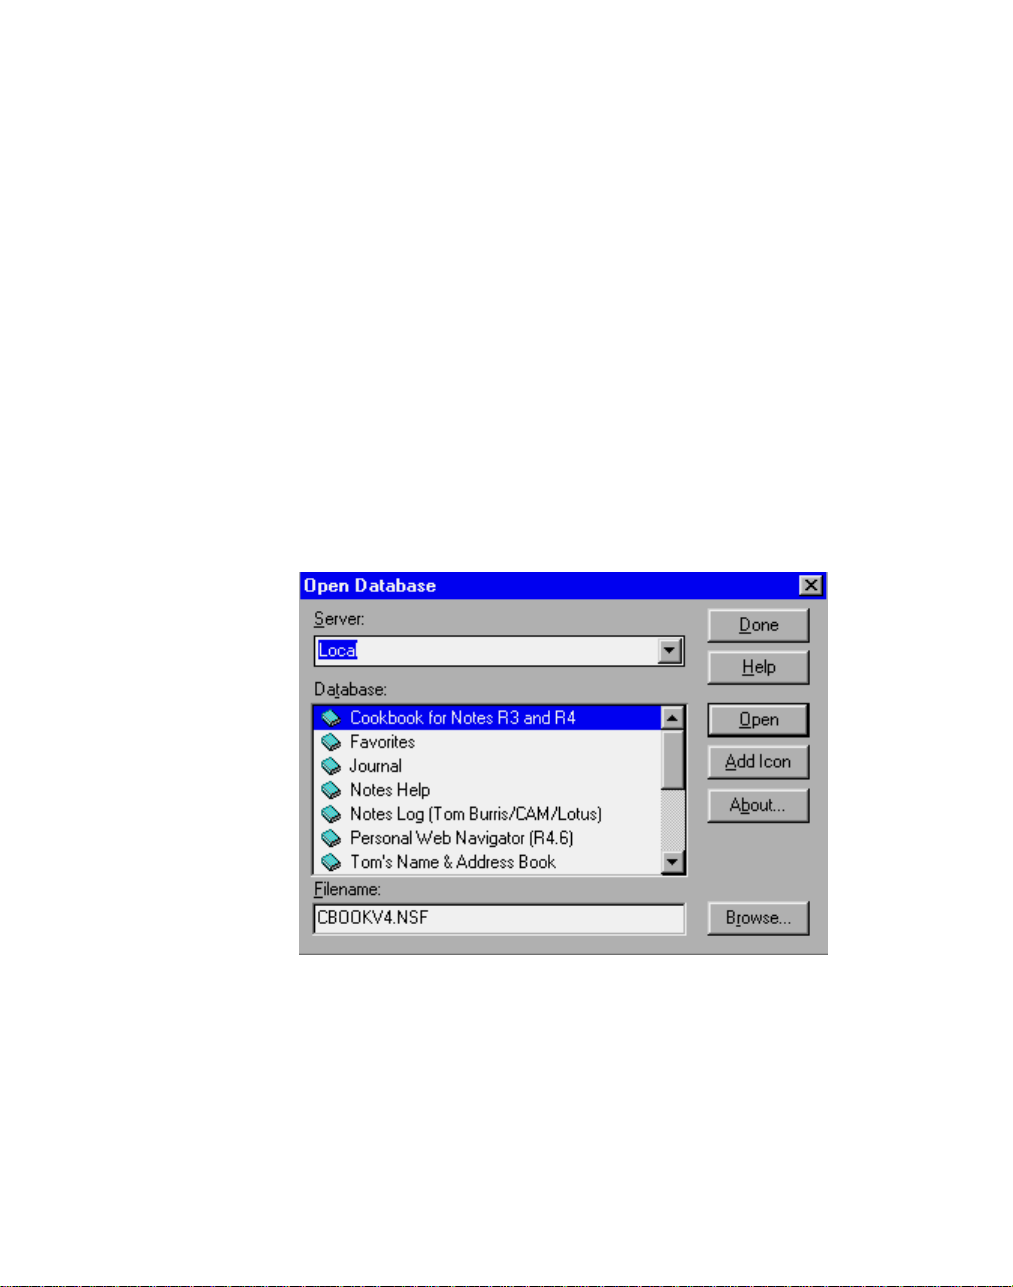
To work with Central, you must first add its icon to your Notes workspace.
1. From within Notes, choose File - Database - Open.
2. Select the server where you installed the LearningSpace templates and
databases in Chapter 2.
3. Open the directory containing the LearningSpace files.
The LearningSpace Central database is in a subdirectory of the Notes
data directory. Typically, this subdirectory is called “lspace,” however
you may have named it differently.
4. Select LearningSpace Central from the list and click the Add Icon button.
5. Click Done.
13
Page 20

About creating a new course using Central
To use Central to create a course, you must:
Be a member of the LearningSpace Admin group in the server Name &
Address book or be entered in the Access Control List (ACL) for Central
as a Manager with the [InstructorStaff] ro le selected. For more information,
see “Assigning access to LearningSpace files” in Chapter 2.
(As a member of the LearningSpace Admin group) have “Create new
database” access to the server. “Create new database” access is set in the
server document in the server Name & Address book. For more
information, see the Notes Administrator’s Guide.
You can perform the procedures described in this chapter from any
computer connected to the Notes server where Central resides. You can also
configure a course on a computer that is not connected to the server and
create the course databases later when you are connected. For more
information, see “Deferred creation of course databases” in Chapter 5.
Important
follow the steps in Chapter 2 to create the LearningSpace directory structure
and copy the LearningSpace files into the proper directories.
With Central, you create a new course by providing information in a series
of dialog boxes. Some of the information in the dialog boxes is required.
Fields containing required information are marked by a red flag.
These ten dialog boxes are used in the course creation process:
New Course Options
Course Information
Course Locations
Schedule Options
CourseRoom Options
MediaCenter Options
Assessment Manager Options
Course Access
Additional Options
Summary
If you have questions about any of the fields in the course creation dialog
boxes, click the Help button in the dialog box for guidance.
Before you can create a course using Central, you must first
14 LearningSpace Installation and Administration Guide
Page 21

If you make a mistake or want to review the options you selected, you can
return to previous dialog boxes by choosing “Back” and clicking OK.
Creating a new course
1. Open LearningSpace Central.
If this is your first time opening Central, a banner appears with
information about Central. Press the ESC key to close the banner.
2. Click the Administrator Tools button.
3. Click Create New Course.
When asked if you have a valid license, click Yes if you have a valid
license to create a LearningSpace course. Otherwise, click No. You must
obtain a license before creating a LearningSpace course.
You will see the screen below as the first of a series of screens to create
a new course.
Chapter 3: Creating a Course with LearningSpace Central 15
Page 22

New Course Options
1. Select an option for how you want to create the course.
Create new blank course – creates a course from the LearningSpace
templates. The course is created with whatever options you specify and
has no documents.
Create from CoursePack – creates a course from a “packed” course. The
new course inherits all the settings and documents in the packed course.
A CoursePack is a course that was created and saved for distribution.
Packing a course saves all the course documents and specified options in
a Notes database so that it can be used to create a new course or
supplement an existing course. For more information about packing and
unpacking courses, see the LearningSpace Instructor Guide or on-line
Instructor Help.
Note
presented with all the course options described in the following
procedures. The options have already been specified in the CoursePack.
2. Select a customization Library.
You can use a customization library to modify the appearance and
design of the LearningSpace course databases. A customization library is
a set of templates that an experienced Notes database designer can
modify to change the design of course databases. Any courses assigned
to that particular customization library inherit the design changes. You
can assign any number of courses to a single customization library.
With this option, you select the customization library you want to assign
to the course you are creating. Your choices are:
None – if you do not want to customize the databases for this course
Use default library – if you want the course to inherit design changes
from the default customization library. The default customization library
is the set of templates placed in the “design\default” subdirectory of the
LearningSpace installation directory (usually called “lspace”) when you
installed LearningSpace.
Select from available libraries – allows you to select from existing
customization libraries for the new course. Use this option if a
customization library has already been created that you want to assign
to the new course. If you select this option, select the customization
library from the list that appears.
Create new library – creates a new set of customization templates and
places them in the subdirectory of the Design directory that you specify.
After creating the course, a qualified Notes database designer can
modify the customization templates. If you select this option, specify the
subdirectory of the Design directory in which you want to store the new
If you are creating a course from a CoursePack, you will not be
16 LearningSpace Installation and Administration Guide
Page 23

customization library. The new design library will be based on the
existing default design library, so whatever changes you have made to
the default library will serve as the starting point for the new library.
Note The design of the new course will not be updated with the design
library until the template refresh process is run on the server. Usually,
this takes place overnight. However, to manually run the process, you
select each of the new course databases on the Notes workspace, then
choose File - Database - Refresh.
3. If you want to enter a Course Description, deselect the “Defer entering of
full course description” option. If you want to create the description later
(or allow the course designer to create it), leave this option selected.
4. Select the “Detach the LearningSpace DLL if needed” option.
The Dynamic Link Library (DLL) allows LearningSpace to know where
you put custom design libraries in the directory structure. This option
causes the DLL file to be written to your computer’s hard drive if: 1) you
chose to use a customization library for the course; and 2) the DLL is not
already on your computer.
5. Click OK.
6. If, in step 3, you chose to create a course description, the Course
Description document opens so you can enter the description.
The course description is a Rich Text field that allows you to use various
font styles, add images, and so on.
When you are done, click the “Click to continue creating the course”
button.
CoursePack filename
If you have chosen to create a new course from an existing CoursePack, you
are prompted for the name of the CoursePack file. Course packs are stored in
the “lspack” subdirectory of the directory in which you installed Central.
1. Enter the name of the CoursePack file.
2. Click OK.
Chapter 3: Creating a Course with LearningSpace Central 17
Page 24

Course Information
The following is the Course Information dialog box:
1. In the Name of Course field, enter the full name of the new course.
For example: Time Management Skills
2. In the Title for Databases field, enter the name you want to appear on
the database icons for the new course. The name is limited to a total of 20
characters, including spaces.
For example, if you enter “Time Mngment,” the LearningS pace databases
for the new course will be named “Time Mngment Schedule,” “Time
Mngment MediaCenter,” and so on.
3. (Optional) In the Course Code field, enter any number or abbreviation
for the course code you want.
4. In the Course Type field, select Corporate or Academic.
This option affects the type of information prompted for in Course
Profile documents. If you choose “Corporate,” the profile prompts
students for “Company Name,” for example. If you choose “Academic,”
the profile will prompt for information relating the their school, and
so on.
5. Click OK.
18 LearningSpace Installation and Administration Guide
Page 25

Course Locations
The illustration shows the Course Locations dialog box:
1. In the Default directory field, enter the subdirectory where you want the
course to be stored.
When LearningSpace was installed, a subdirectory was created under
the Notes data directory. Typically, the name of this subdirectory is
“lspace,” however you could have named it differently. In LearningSpace
documentation, this directory is referred to generically as the
LearningSpace Installation directory.
Each LearningSpace course you create using this copy of Central is
stored in a subdirectory of the LearningSpace Installation directory.
Choose a name for the new course directory that reflects the name of the
course. For example: timemgt. The name can be between one and eight
characters, and cannot include spaces, periods, or dashes.
2. Click in any other field in the dialog box.
When you do so, Central populates each of the directory fields in the
dialog box with the default directory and puts the default names of the
LearningSpace course databases in the appropriate fields.
It is strongly recommended that you keep all course databases in a
Tip
single subdirectory of the lspace directory, and that you use the default
names for the LearningSpace databases.
Chapter 3: Creating a Course with LearningSpace Central 19
Page 26

3. If this course will not be using assessments, deselect the “Enable
Assessment Manager?” option. Otherwise, leave this option selected.
Tip If you are not sure whether instructors will want to use the utilities
in the Assessment Manager, accept the default setting. Instructors can
change this option later.
4. Click OK.
Schedule options
1. Choose a Schedule structure option.
The word you select is used in the Schedule database to label each unit
of the schedule. If you are not certain which option to choose, accept the
default. The schedule structure can be changed later. For more
information, refer to “About changing course attributes” in the
LearningSpace Instructor Guide or on-line Instructor Help.
2. If you want to enable the course designer to allow students to create or
join discussions from Schedule documents, leave the “Show Start/Join
Discussion buttons” option selected. Otherwise, deselect this option.
3. If you want to enable the course designer to allow students to begin
or resume assignments from Schedule documents, leave the “Show
Begin/Resume Assignment buttons” option selected. Otherwise,
deselect this option.
4. Click OK.
CourseRoom options
CourseRoom documents created by members of a student team can have
a variety of privacy options.
Note Instructors have access to all team documents in the CourseRoom.
1. If you want to enable students to create CourseRoom documents that are
private to other students (not necessarily on the same team), select the
“Allow privacy between students?” option.
Note All CourseRoom documents — regardless of their privacy
option — can be viewed by course instructors.
2. Click OK.
20 LearningSpace Installation and Administration Guide
Page 27

MediaCenter option
1. If you want to enable the course designer to allow students to create or
join discussions from MediaCenter documents, leave the “Show Start/Join
Discussion buttons” option selected. Otherwise, deselect this option.
2. If you want students to be able to create their own annotations to
MediaCenter documents, leave the “Show Annotations buttons?”
option selected.
3. Click OK.
Assessment Manager options
This dialog box only appears if you selected “Enable Assessment Manager?”
in the Course Locations dialog box.
In some cases, you may want an Assessment Manager for a course, but may
not use all of its features. This dialog box allows you to select the parts of the
Assessment Manager you want to use.
1. If you want to enable automatic grading of assessments in the course,
leave the “Is this course graded?” option selected. Otherwise, deselect
this option.
This option allows LearningSpace to automatically grade certain
question types in assessments when the instructor retrieves completed
assessments.
2. If you want to enable e-mail notifications to students, select the “Mail
Acknowledgments?” option. Otherwise, deselect this option
This option causes e-mail messages to be sent to students when an
instructor retrieves completed assessments or assignments and allows
instructors to notify students when their grades are posted. For this
option to work, students must have entered e-mail addresses in their
profile documents, and must choose to accept notifications.
3. (Optional) Edit the Default Assessment Instructions.
This text provides information to students about taking an assessment.
These are the default instructions. Instructions for individual
assessments can be modified when you create the assessment.
4. Click OK.
Chapter 3: Creating a Course with LearningSpace Central 21
Page 28

Course Access
1. In the Administrators Names list, enter the names of administrators for
the course. Separate each name with a comma.
Click the pop-up list button to select names from the Name &
Address books. You can select individual or group names, and then click
the Add button. Click the pop-up list button at the top to switch between
Name & Address books.
Administrators are given access to Central and all the course databases.
This access is not available to other users.
Enter only the names of the people who will have the task of
administering all the courses.
Note
course. The same person can be designated as both an administrator and
an instructor.
Important
field before you enter the name of someone who will be responsible for
managing access to the LearningSpace course.
It is important to make sure an administrator is designated for the
Do not remove your name from the Administrators’ Names
2. In the Instructors’ Names field, click the pop-up list button to select
names from the Name & Address books.
In the dialog box that appears, click the pop-up list button at the top to
switch between Name & Address books. For help using the Name &
Address book selection box, click the Help button in the dialog box.
22 LearningSpace Installation and Administration Guide
Page 29

To add instructors to a course, they must first be listed in the Name &
Address book on the server. You do not have to add instructors to a
course now. For more information about adding instructors to a course
once a course has been created, see “Managing course enrollment” in
Chapter 5.
Instructors can see views and access options in course databases that are
hidden to students.
3. Click the Instructor Access list to change the default access level for
instructors.
Select Manager if the instructor will be adding or removing students
from the course enrollment, or performing other administrative tasks for
the course. Select Editor if an instructor will be facilitating a course, but
not performing any administrative tasks.
4. In the Student Names field, click the pop-up list button to select names
from the Name & Address books. You can also select group names.
In the dialog box that appears, click the pop-up list button at the top to
switch between Name & Address books. For help using the Name &
Address book selection box, click the Help button in the dialog box.
To add students to a course, they must first be listed in the Name &
Address book on the server. You do not have to add students to a course
now. For more information on adding participants to a course once a
course has been created, see “Managing course enrollment” in Chapter 5.
Tip You can add group names to the Student Names field. Create the
group in the Name & Address book, giving it a name such as
“LS_coursename,” where coursename is the name of the course, then
populate the group with student names. If you use this method, keep in
mind that Central cannot automatically create profiles for the students in
the group.
Note If you are enrolling a student who is an instructor or
administrator for another course, LearningSpace lowers that
participant’s access to Central to the student access level.
5. If you want to automatically create profiles for students and instructors,
make sure the “Create personal profiles?” option is selected.
If you select this option, Central creates profiles for students and
instructors in the Profiles database for the course. It then populates the
profiles with any relevant information available about the participant
from the Name & Address book, such as phone number and address.
6. Click OK.
Chapter 3: Creating a Course with LearningSpace Central 23
Page 30

Additional options
1. In the “Servers to Install Course on” field, enter the names of each server
where the course databases will be replicated. Separate each server
name with a comma.
If your site uses hierarchical names, make sure you use the full hierarchical
name for each server (for example: ServerWest/Acme/Education). Click
the pop-up list button to select servers from the Name & Address
books. In the dialog box that appears, click the pop-up list button at the
top to switch between the Name & Address books.
Central creates a new replica of the course databases on the servers
specified in the list.
Important
where you want to create replicas. This is set in the server document in
the Name & Address book. For more information, see the Notes
Administrator’s Guide.
2. Click the Default Access list box to change the default access.
The choices are: No Access, Reader, or Author.
This field sets the defau lt access to the course databases. Se lect No Access
to create a course environment closed to everyone except enrolled students.
Select Reader as the default access to allow anyone to audit the course,
but not participate in course discussions and work. Select Author as the
default access to create an open course environment, accessible to
anyone with access to the Notes server.
For more information about database access, see Notes Help.
3. If you want to add the course databases to your Notes workspace, select
the option labeled “Click here to add database icons to Notes desktop.”
If you do not add the icons to your workspace now, you can do so later
either manually or using Central.
4. If you do not want to create the course databases right now, select the
option labeled “Click here to defer the creation of the course databases.”
This option is helpful if you are not currently connected to the server.
For example, if you are working from a laptop, you might want to defer
the creation of the databases until the next time you connect to the
server. For information about creating the course once you are connected
to the server, see “Deferred creation of course databases” in Chapter 5.
5. Click OK.
You must have “Create new replicas” access to the servers
24 LearningSpace Installation and Administration Guide
Page 31

Summary
The Summary dialog box allows you to review the options you selected in
the course creation procedure.
Click the Course Description button to see the course description (unless
you deferred its creation). Click the Names buttons to see the list of
administrators, instructors, or students. To create the course, click OK.
LearningSpace creates the course based on your specifications. This may
take a few minutes. When the course is successfully created, a message
appears to remind you about setting up the LearningSpace Admin group.
Click OK.
Course creation is complete!
If you deferred creation of the course databases, a dialog box appears
explaining what you must do to create the databases later. Courses for which
databases have not yet been created are listed in the Courses view in Central
and are marked by a red “x.” A green check mark indicates that the
databases for the course have been created.
For information about creating the course databases, see “Deferred creation
of course databases” in Chapter 5.
Chapter 3: Creating a Course with LearningSpace Central 25
Page 32

If you chose not to add the course database icons to your workspace, you
can do so at any time (assuming you have created the course databases).
For more information, see “Adding database icons to your workspace” in
Chapter 5.
Once you have created the course databases, course instructors can use the
databases to create the contents of their courses. To prepare instructors for
designing the content of courses, you should:
Provide them with information about how to add the course databases
to their Notes workspace (if they are connected to the server).
Make sure they know they can access LearningSpace Help by clicking
the Help button in the Action bar in any LearningSpace course database.
26 LearningSpace Installation and Administration Guide
Page 33

Chapter 4
Upgrading a Course
This chapter describes how to upgrade courses created using LearningSpace
Release 2.0.
Upgrading a Release 2.0 course
These are the steps you must perform to upgrade a Release 2.0 course to
Release 2.5:
Shut down and restart the Domino server.
Install the new versions of the LearningSpace files on the server.
Replace the design of your existing Central.
Replace the design of the Multimedia Library
Run the automatic upgrade process from within the new version of Central.
Tell students who were using a local replica of the old course that they
should create a new local replica.
Instruct students to recover their documents marked Private to Myself
from the pre-upgrade version of the course.
Important
there are no users accessing the course you are upgrading. It is not
recommended that you upgrade an active course. It is best to upgrade after a
course is completed.
When you perform the procedures in this section, make sure
Note
must be in the LearningSpace Admin group in your server Name & Address
book to perform these steps.
You need Manager access to the existing LearningSpace course and
Shut down and restart the Domino server
Before beginning the upgrade process, shut down the Domino server and
restart it. Perform this step from the server, not from a workstation.
1. At the server console, type exit and press ENTER.
The server will shut down.
2. Double-click the Domino icon to restart the server.
27
Page 34

Installing LearningSpace files on the server
If you haven’t already done so, install the latest LearningSpace files onto
your server. The following procedure works for Notes clients and servers
running OS/2, Windows 95, or Windows NT.
Note for users installing from a UNIX Notes client: Before you can install
the LearningSpace files using a UNIX Notes client, you must perform the
procedure described in a text file called install.txt. The text file is included on
your LearningSpace CD. After performing the procedure, continue with the
steps in this chapter.
You can install the LearningSpace files either from the Domino server or
from a Notes workstation connected to the server via a high-speed network
connection.
1. Place the LearningSpace CD in your CD-ROM drive.
2. Choose File - Database - Open.
3. In the Filename field, enter d:\upgrade.nsf, where d: is the letter
designating your CD-ROM drive.
4. Click Open.
When Installing LearningSpace from a CD, you will be prompted to
cross certify. This certificate is used to validate that the version of
LearningSpace you received is authentic.
5. Follow the directions in the dialog boxes as they appear.
The Upgrade database will replace or refresh your LearningSpace files
with the upgraded versions.
Replacing the design of Central
Since you use Central to upgrade courses, you should make sure you are
using the latest version of Central.
Important Note for enabling Web access to Central: To give students Web
access to Central (and the LearningSpace courses), make sure the default
access in the Central Access Control List is set as follows:
Default access: Author
Create and Delete documents should be selected
No Roles should be selected
1. From the Notes workspace, click the Central database icon once to select
it.
2. From the Notes menu bar, choose File - Database - Replace Design.
The Replace Database Design dialog box will appear.
28 LearningSpace Installation and Administration Guide
Page 35

3. Select your server as the template server.
This will give you a list of template files to use. Scroll down to the LS
Central R2.5 template.
4. From the list of templates, select the LS Central R2.5 template.
5. Click Replace.
You will be prompted with a warning that the design will be changed.
6. Click Yes.
Replacing the design of the Multimedia Library
Make sure you are using the latest version of the LearningSpace Multimedia
Library.
1. From the Notes workspace, highlight the Multimedia Library database
with a single click on its icon.
2. From the Notes menu bar, choose File - Database - Replace Design.
The Replace Database Design dialog box will appear.
3. Select your server as the template server.
This will give you a list of template files to use. Scroll down to the LS
Multimedia Library R2.5 template.
4. From the list of templates, select the LS Multimedia Library R2.5
template (weblib.ntf).
5. Click Replace.
You will be prompted with a warning that the design will be changed.
6. Click Yes.
Automatically upgrading the course databases
You can use the upgraded Central database to automatically upgrade course
databases created in Release 2.0. When Central upgrades a course, it stores
the old course databases in a directory called lspace\larchive\subdir where
subdir is the subdirectory of lspace where the course was originally stored.
To run the automatic upgrade process:
1. Open the LearningSpace Central database.
2. Click the Administrator Tools button.
3. Select the course you want to upgrade.
Chapter 4: Upgrading a Course 29
Page 36

4. Choose Actions - Replace with current template.
This runs an automatic process that upgrades the design templates of the
course databases to Release 2.5.
5. When the warning appears, read it, and then click OK.
6. Click OK when the message appears with a reminder about adding
administrators.
Creating new local replicas of the upgraded course databases
The upgrade process changes the replica ID of the course databases.
Therefore, you should make sure that any students or instructors who had
been using local replicas of the old course databases create new replicas of
the upgraded course databases.
For more information about replicating course databases, see LearningSpace
Student Help. For more detailed information, see Notes Help.
Instructing students to recover their private documents
If you are upgrading a course that is currently active, you have to assist
students in recovering their private documents. This is why it is
recommended that you upgrade only inactive courses.
The upgrading procedure copies all course documents except those the student
marked “Private to myself.” Therefore, you should tell students and instructors
to recover th eir pri vate do cume nts by follo win g th e pro cedure des cri bed he re.
The private documents of the person who performed the upgrade
Note
procedure are copied to the upgraded CourseRoom database automatically.
All others must copy their private documents to the upgraded CourseRoom
manually.
1. Add the archived copy of the CourseRoom to your Notes workspace.
Choose File - Database - Open.
You’ll have to supply students and instructors with the correct path to
the archived database. The path should be lspace\larchive\subdir where
subdir is the subdirectory where the course had been stored before
upgrading. They enter this in the Open Database dialog box in the
filename field to select the archived database, and press Add Icon, and
then press Done.
2. Open the old CourseRoom database.
30 LearningSpace Installation and Administration Guide
Page 37

3. In the Discussions view, select the private documents you want to copy
to the upgraded course.
For multiple selections, hold down the SHIFT key as you click on
documents.
4. Choose Edit - Copy.
5. Close the database.
6. You can now remove the old database icon from your Notes workspace.
Choose Edit - Clear, and then click Yes, to remove the old database icon.
7. Choose File - Database - Open and add the new CourseRoom database
icon to your Notes workspace.
In the Open Database dialog box, select the server, then select the
CourseRoom database, and click Open to open the upgraded
CourseRoom database.
In the Discussions view, choose Edit - Paste.
The documents you copied from the old CourseRoom database are
inserted into the new database.
8. Close the Courseroom database.
Upgrading a Release 2.0 Design Library
If you modified the LearningSpace Design Library for Release 2.0. you will
have to manually change the Release 2.5 Default Design Library to reflect
your changes. There is no way to automatically upgrade a design library.
In Release 2.5, you can create or assign a distinct Design Library to a specific
course or you can use the Default Design Library. To use your Release 2.0
Design Library with a specific course, create the course along with a new
Design Library as explained in Chapter 3, then modify the new Design
Library to reflect the modifications you made to the Release 2.0 Design
Library. If you want the Design Library to affect all courses, make your
modifications to the R el ease 2.5 Default Desi gn Library in the design\default
subdirectory of the LearningSpace installation directory (usually called
“Lspace”).
Chapter 4: Upgrading a Course 31
Page 38

Chapter 5
Administering a Course with LearningSpace Central
This chapter provides information about using LearningSpace Central to
perform a variety of administrative functions.
To perform the procedures in this chapter, you must be either an administrator
for th e c o urse or an instru ctor with M anager acce s s to the course data ba ses.
For more information on assigning roles for a course, see “Assigning instructor
and administrator roles” in this chapter.
About using Central to administer a course
When you create a course, LearningSpace composes a Course Profile
document and places it in LearningSpace Central. Administrators (and
instructors performing administrative tasks) use the Course profile document
to modify asp ects of the cour se, maintain course enroll ment, and so on.
You can use Central to perform a wide range of administrative tasks, all of
which are documented in the LearningSpace Instructor Guide and in on-line
Instructor Help. This chapter presents only a subset of the administrative
tasks. In particular, this chapter covers:
Deferred creation of course databases
Adding database icons to your workspace
Enabling Web browser access to courses
Setting access levels to courses
Managing course enrollment
Deferred creation of course databases
If you chose to defer creation of the course databases during the course
creation process, you can use Central to create them the next time you are
connected to the server.
To use Central to create a course, you must:
Be a member of the LearningSpace Admin group in the server
Name & Address book or have Manager access to Central with the
[InstructorStaff] role selected. For more information, see “Assigning
access to LearningSpace files” in Chapter 2.
33
Page 39

Set the LearningSpace Admin group to have “Create new database”
access to the server. “Create new database” access is set in the server
document in the server Name & Address book. For more information,
see the Notes Administrator’s Guide.
1. In Notes, open LearningSpace Central.
2. Click the Administrator Tools button.
Courses without course databases are labeled with a red “x” in the
“Exists on Server” column of the list.
3. Select the course for which you want to create course databases and click
the Course Tools button.
4. Select Create Course Databases.
5. Click OK.
Central creates the databases according to the information you specified
during the course creation process and places the .nsf files in the
directory you specified.
When the creation process is finished, LearningSpace prompts you to
put the names of the course administrators in the LearningSpace Admin
group in the servers Name & Address book.
34 LearningSpace Installation and Administration Guide
Page 40

Adding database icons to your workspace
If you chose not to add the course database icons to your workspace during
the automatic course creation pro ces s, yo u can do so lat er using Central.
Note
see Notes Help.
You can also perform this operation manually. For more information,
1. In Notes, open LearningSpace Central.
2. Click the Administrator Tools button.
3. Select the course for which you want to add database icons to your
workspace.
4. Click the Course Tools button.
5. Select “Add database icons to desktop” and click OK.
Central adds the database icons to your Notes workspace.
Enabling Web browser access to courses
Once you have installed LearningSpace and created courses, you can make
them accessible to students using Web browsers.
LearningSpace Release 2.5 runs on Domino Release 4.5 or higher servers.
The Domino server supports access to Notes databases via the Internet. Since
LearningSpace courses are Notes databases stored on a Domino server, the
LearningSpace courses will be available to the Web once you set up your
Domino Web server.
This document does not provide information on setting up a Domino Web
server. For information on setting up a Domino Web server, refer to Working
with Lotus Notes and the Internet. Chapter 9, “Domino Administrator’s
Information” is especially useful. The book is part of the documentation for
Notes Release 4.5 or higher.
Here are some suggestions for setting up a Domino server to provide access
to LearningSpace courses on the Web.
In the Server Name & Address book
Aside from the options described in Working with Lotus Notes and the Internet,
here are two recommended settings:
1. In the server document in the Name & Address book on the server, click
the Security section to expand it.
2. Set the “Allow anonymous HTTP connections” option to Yes, if some of
your courses will be configured for open enrollment (allowing anyone to
participate). Otherwise, check No.
Chapter 5: Administering a Course with LearningSpace Central 35
Page 41

3. Set the “Check passwords” option to Enabled.
4. (UNIX servers only) In the HTTP Server section of the document, enter
the common name of the server in the Host Name field.
Make sure you use the exact case when entering the server name.
The “common name” is the server name without the hierarchical parts.
For example, if the hierarchical name of the server is
ServerOne/ACME/Marketing, the common name would be
“ServerOne.”
5. Save and close the document.
In the NOTES.INI file on the Domino server
You will probably want to have Web access to LearningSpace courses start
up automatically when the server is started. To do so:
1. Open the NOTES.INI file on the Domino server for editing.
2. Find the line beginning with “ServerTasks.”
3. Add Http at the end of the line.
4. Save and close the file.
5. Restart the Domino server.
Setting access levels to courses
The access levels you set for course participants depend on two factors:
1. The role instructors will be playing in the course
2. Whether the course will be an open or closed environment for students
This section describes:
Assigning instructor and administrator roles
Creating an open or closed course environment
Guidelines for setting instructor access levels
Any participant designated as an “instructor” can perform a variety of tasks
including creating and deleti ng documents in the course databas es, access in g
the Assessment Manager, and doing instructor-oriented tasks for a course.
In some cases, instructors may have a larger role. They might, for example,
control class enrollment or change some attributes of course design. If instructors
are going to be performing administrative tasks such as enrolling students,
they must be given Manager access to the course databases. If instructors will
be facilitating a course, but not performing any administrative or course
design functions, they sh ould be given Editor access to the course databases.
36 LearningSpace Installation and Administration Guide
Page 42

Tip If you are not sure of the scope of a particular instructor’s role in a
course, assign Editor access. If it becomes apparent that expanded access is
needed, you can change the access level at any time.
For more information, see “Assigning instructor and administrator roles”
in this chapter.
Assigning instructor and administrator roles
You assign instructor and administrator roles by placing participant names
in the Instructor and Administrator lists in the Course Profile document in
Central.
1. In Notes, open LearningSpace Central.
2. Click the Administrator Tools button.
3. Select the course you want to modify.
4. Click the Edit Course button.
The Course Profile document opens. This document lists the current
values of the course attributes.
5. Click the icon to the left of the Course Access section.
6. To designate the instructors, type their names in the Instructors’ Names
field or click the pop-up list button and select their names from a
Name & Address book. If your organization uses hierarchical naming
for Notes IDs, be sure to use their full hierarchical names.
Designating participants as instructors assigns them the [InstructorStaff]
role in the Access Control Lists for the course databases.
Chapter 5: Administering a Course with LearningSpace Central 37
Page 43

7. If the instructor will be performing administrative or course design tasks
in addition to facilitating the course, select Manager from the Instructor
Access pop-up list. Otherwise, select Editor.
Tip If you are not sure of the scope of a particular instructor’s role in a
course, assign Editor access. If it becomes apparent that expanded access
is needed, you can change the access level at any time.
8. To desig n a te course ad m i n i s tr a t o rs, type their n am e s i n t h e Admini s t ra t o rs
Names field or click the pop-up list button and select their names
from a Name & Address book.
Designating administrators assigns them the [LSAdmin] role in the
Access Control Lists for the all course databases and Central.
9. Click OK.
10. Click Close.
If you’re asked whether you want to save your changes, click Yes.
About open and closed course environments
There are two types of course environments: open and closed.
An open environment allows any user with access to the Domino server to
participate fully or audit a course. An open environment might be
appropriate for a course that trains people in how to use a particular
commercial product if universal access to the course would be
advantageous.
To create an open environment where anyone can participate in a course
(create and edit their own documents), set the Default Access for the course
databases to Author. To create an open environment in which anyone can
audit a course (read documents), set the Default Access for the course
databases to Reader. In a course with an open environment, you do not have
to maintain student enrollment.
In most cases, you will use a closed environment. In a closed environment,
only the students you specify as being enrolled in the course have access to
the LearningSpace databases.
Students enrolled in a course are automatically given Author access to the
Schedule, MediaCenter, CourseRoom, and Profiles databases. Author access
allows them to create documents and edit only the documents they create.
To create a closed environment for a course, set the Default Access for the
course databases to No Access. In closed course environments, you or other
administrators or instructors must maintain course enrollment. For more
information, see “Managing course enrollment” in this chapter.
38 LearningSpace Installation and Administration Guide
Page 44

Creating an open or closed course environment
1. In Notes, open LearningSpace Central.
2. Click the Administrator Tools button.
3. Select the course you want to modify.
4. Click the Edit Course button.
The Course Profile document opens. This document lists the current
values of the course attributes.
5. Click the icon to the left of the Additional Options section.
6. Select an option in the Default Access field.
Open course environment: Select Author or Reader. Participants with
Author access can fully participate in a course by creating and editing
their own documents. Participants with Reader access can read
documents, but they cannot create or edit documents.
Closed course environment: Select No Access. Only enrolled students
can access the course.
7. Click OK.
8. Click the Close button.
Chapter 5: Administering a Course with LearningSpace Central 39
Page 45

Managing course enrollment
In a closed course environment, all course participants must be enrolled in
the course.
All participants accessing a course in a closed environment, whether they
access the course using Notes or a Web browser, must be listed in the Name
& Address book. The Name & Address book is the source from which you
draw names for the course enrollment.
Once participants have been entered in the Name & Address book, to enroll
them in a specific course as an administrator, instructor, or student, you
must enter their names in the Course Profile document using Central.
This section describes:
Adding participants to the Name & Address book
Adding students to a course
Removing participants from a course
Adding participants to the Name & Address book
To add a person to the Name & Address book on a server, you must have at
least Author access to the Name & Address book. For more information, ask
your Notes administrator or refer to the Notes Administrator’s Guide.
1. In Notes, open the Name & Address book on the server where you
installed the LearningSpace files (Chapter 2).
2. In the Navigator under Folders and Views, click People.
3. Click the Add Person button.
4. Enter the participant’s first and last name in the First Name and Last
Name fields.
5. Enter the participant’s full name in the User Name field.
The name you enter in the User Name field is the name you will use
when enrolling a participant in a LearningSpace course.
If the participant will access the course using Notes and your site uses
hierarchical names, enter the participant’s full hierarchical name. For
more information, refer to the Notes Administrator’s Guide.
6. If participants will access the course using a Web browser, enter their
e-mail address in the “Short name and/or Internet address” field.
7. If participants will access the course using a Web browser, enter a
password for them in the “HTTP password” field.
The HTTP password allows you to maintain security for databases
accessible from the Web. Participants accessing LearningSpace courses
40 LearningSpace Installation and Administration Guide
Page 46

over the Web are prompted to enter their name (as it appears in the
User Name field in the Name & Address book) and their password
(as it appears in the HTTP password field).
Important Make a written record of all HTTP passwords you assign.
When you save the Person document in the Address book, it will be
encrypted. You must have a written record to supply participants with
their passwords.
8. (Optional) If the information is available, fill out other fields in the
document.
9. Click Save.
10. Click Close.
11. Close the Name & Address book.
Adding students to a course
When you create a new course, you can add students and instructors to the
enrollment list. As a course progresses, you add new students and instructors.
To ensure that you have the proper permission to perform this procedure,
make sure you are listed as an administrator for the course or as an
instructor with Manager access.
1. In Notes, open LearningSpace Central.
2. Click the Administrator Tools button.
3. In the view, select the course to which you will add students.
4. Click the Edit Course button.
The Course Profile document opens. This document lists the current
values of the course attributes.
5. Click the icon to the left of the Course Access section.
6. In the Students Names list, click the button to select the student
names from a Name & Address book.
For help using the Name & Address book selection box, click the Help
button on the dialog box.
Chapter 5: Administering a Course with LearningSpace Central 41
Page 47

You can also type a participant name into the list. Make sure you enter
the participant’s user name as specified in the Name & Address book.
Enter one name per line. If your site uses hierarchical names, make sure
you enter the participant’s full hierarchical name.
7. Repeat Step 6 until all the names have been added.
8. Click OK.
9. Click the Close button.
Removing students from a course
1. Open LearningSpace Central.
2. Click the Administrator Tools button.
3. In the view, select the course from which you will remove students.
4. Click the Edit Course button.
The Course Profile document opens. This document lists the current
values of the course attributes.
5. Click the icon to the left of the Course Access section.
6. Next to the Students Names list, click the pop-up list button and
select the student’s name in the Add list (on the right side of the dialog
box), and click the Remove button.
For help using the Name & Address book selection dialog box, click the
Help button on the dialog box.
You can also remove names by deleting them directly from the
Administrators, Instructors, or Student Names lists using the Delete or
Backspace keys.
7. Repeat Step 6 for as many participants as you need to remove.
8. Click OK.
9. Click the Close button.
42 LearningSpace Installation and Administration Guide
Page 48

LearningSpace Modules — Access and Uses
Course Participant
Student, employee,
trainee
Checks and tracks
assignments
Receives instructions
from instructor
Completes assessments
and surveys
Receives course
updates
Navigates between
databases
Navigates through
course assignments
and activities
Accesses items in the
MediaCenter
Reads assignments
Accesses information
outside of
LearningSpace
Adds items to Personal
Folder *
Makes private
annotations on local
copies of MediaCenter
documents
Chooses to begin
participation in
CourseRoom activities
Participates in course
Collaborates on team
projects (if part of
course)
Asks questions - public
and private
Submits assignments to
course instructor
Receives feedback on
ideas or projects
Makes group decisions
using polling feature
Edits his or her own
‘home-page’
Views other participant
profiles
Views team profiles
Assessment ManagerProfilesCourseRoomMediaCenterSchedule
The course participant is not
authorized to use or see the
Assessment Manager.
Course Instructor
Trainer, instructor,
professor
Structures course and
learning objectives
Delivers course
assignments
Updates participants
on changes in the
Schedule
Delivers assessments
and surveys
Presents course
materials, reference
materials and materials
on CD-ROM
Structures content
in a searchable
knowledge-base
Adds materials to
MediaCenter
Posts references and
resources external to
LearningSpace
(including ‘hot’ links
to Web)
*Due to HTML restrictions, this feature is not supported on the Web.
Monitors and facilitates
discussions
Provides guidance
Delivers feedback
Monitors individual
and group progress
Motivates, encourages,
and supports
participants
Reviews private notes
from students
Collects and grades
work assignments
Creates his or her own
instructor ‘home-page’
Creates the framework
for participant pages
(to be edited and filled
in by participant)
Views other profiles
Creates team profiles
Creates and grades
quizzes and exams
Creates and summarizes
surveys
Posts assessments and
surveys to the Schedule
Grades short answer
questions on exams and
quizzes
Views grades
E-mails grades back to
participants
Assigns a general grade
(that is, for course
participation)
Provides feedback to
individuals and teams
 Loading...