

Page 1

z/VM
Getting Started with Linux on System z
version6release1
SC24-6194-00
Page 2

Page 3

z/VM
Getting Started with Linux on System z
version6release1
SC24-6194-00
Page 4

Note:
Before using this information and the product it supports, read the information under “Notices” on page 143.
This edition applies to version 6, release 1, modification 0 of IBM z/VM, (product number 5741-A07) and to all
subsequent releases and modifications until otherwise indicated in new editions.
This edition replaces SC24-6096-03.
© Copyright International Business Machines Corporation 2009.
US Government Users Restricted Rights – Use, duplication or disclosure restricted by GSA ADP Schedule Contract
with IBM Corp.
Page 5

Contents
About this document .........v
Intended audience ............v
Conventions and terminology used in this document v
Where to find more information .......vi
Additional Publications .........vi
How to send your comments to IBM . . ix
If you have a technical problem........ix
Summary of changes.........xi
SC24-6194-00, z/VM Version 6 Release 1 .....xi
Chapter 1. About z/VM ........1
Overview of the Control Program (CP) .....3
Central processing units (CPUs) .......3
Storage ...............3
DASD and minidisks ..........4
Temporary minidisks ..........4
Virtual disks in storage ..........4
Virtual readers, punches, and printers .....4
The virtual machine console ........4
Overview of the CP spool file system .....7
The user directory ...........8
Overview of the Conversational Monitor System
(CMS) ................9
Minidisks and the CMS access mode .....9
CMS files ..............11
The PROFILE EXEC ..........12
The Help system ...........13
The CMS file editor XEDIT .........15
Input mode .............17
Overview of changing files ........18
SAVE, FILE, QUIT, and QQUIT.......19
Summary of Linux and z/VM similarities ....20
Chapter 2. Planning for Linux virtual
servers ..............21
Overview of z/VM capacity planning .....22
Estimating memory and CPU requirements....25
Overview of estimating memory and CPU
requirements .............25
Steps for estimating memory and CPU
requirements .............27
Guidelines for estimating the amount of DASD you
need.................28
For z/VM paging ...........28
For the Linux file system .........29
Planning your network ..........30
TCP/IP networking options for Linux ....30
Giving Linux virtual servers access to
cryptographic hardware for SSL acceleration . . 31
Planning for user management ........32
Steps for obtaining documentation and media . . . 34
Chapter 3. Changing the system
configuration ............35
Overview of the SYSTEM CONFIG file .....35
Steps for adding a paging, spooling, or user volume 35
Steps for releasing the primary parm disk ....37
Steps for updating the CP-owned volume list . . . 37
Steps for updating the default system identifier . . 39
Steps for updating the user volume list .....40
Steps for setting up warm start, clearing tdisk space,
and other features ............41
Steps for controlling access to devices at startup . . 43
Steps for defining a virtual switch .......44
Steps for setting addresses for consoles .....46
Steps for updating special escape character defaults 47
Steps for checking the syntax of the SYSTEM
CONFIG file ..............48
Steps for restoring CP’s access to the primary parm
disk .................49
Chapter 4. Configuring the Directory
Maintenance Facility .........51
Steps for enabling DirMaint .........51
Steps for changing the passwords for DirMaint
service machines ............52
Steps for configuring DirMaint ........53
Steps for authorizing users to perform DirMaint
tasks.................54
Steps for controlling where DirMaint creates
minidisks ...............55
Steps for copying the current USER DIRECT file . . 57
Steps for putting the configuration into production
and starting DirMaint ...........58
Steps for automatically starting DIRMAINT . . . 59
Steps for testing DirMaint .........60
Step for modifying the OPERATOR’s directory entry 60
Chapter 5. Configuring TCP/IP ....63
Setting up the production TCP/IP .......63
Steps for automatically starting TCP/IP .....63
Chapter 6. Restarting z/VM and
checking the system.........67
Steps for restarting z/VM .........67
Steps for checking paging and spooling space . . . 67
Step for checking the system identifier .....68
Step for checking the user volume list .....68
Steps for checking features .........69
Step for checking offline devices .......69
Step for checking the virtual switch ......69
Step for checking character defaults ......70
Steps for checking TCP/IP .........70
Chapter 7. Creating your first Linux
virtual machine and installing Linux . . 71
© Copyright IBM Corp. 2009 iii
Page 6

Overview of defining virtual machines for Linux . . 71
Steps for defining a master virtual machine for
Linux ................71
Steps for setting up LINMSTR’s disks .....75
Installing Linux in a virtual machine ......77
Overview of installing Linux in a virtual machine 77
Example of using FTP to get the Linux boot files 79
Example of punching Linux boot files to the
virtual machine reader..........80
Example of booting (IPL) the Linux boot files
from the virtual machine reader ......81
(Optional) Steps for loading Linux automatically at
logon ................82
Steps for taking a snapshot of system performance 120
Using the CP Monitor and Performance Toolkit for
VM.................123
Overview of the CP Monitor and Performance
Toolkit for VM ............123
Configuring Performance Toolkit for VM . . . 124
Using monitoring to analyze performance and
capacity ..............133
Steps for using CP commands to improve
performance..............135
Chapter 12. Servicing z/VM .....137
z/VM service concepts ..........137
Chapter 8. Cloning Linux virtual
servers ..............83
Steps for cloning a Linux virtual server .....83
Chapter 9. Setting up basic system
automation .............85
Starting and stopping virtual machines
automatically ..............85
Steps for automatically starting Linux virtual
servers and other virtual machines .....85
Steps for enabling Linux virtual servers to shut
down automatically ..........87
Setting up the programmable operator .....88
Overview of the programmable operator . . . 88
Steps for setting up the routing table .....89
Steps for setting up the programmable operator 92
Steps for automating Linux virtual consoles . . 93
Steps for testing your automation ......95
Chapter 10. Performing run-time tasks 97
Overview of console types .........97
Real operation tasks ...........98
Step for monitoring the logical operator console 98
Step for restarting z/VM ........100
Step for managing real devices ......100
Step for managing users.........105
Virtual machine operation tasks .......107
Steps for using CP commands at the Linux
virtual console ............108
Archiving and backing up critical data .....112
Overview of archiving z/VM system data . . . 112
Archiving virtual server disks .......113
Chapter 11. Monitoring performance
and capacity ............117
Overview of performance monitoring .....117
Monitoring Linux virtual servers with
Performance Toolkit for VM .......118
Overview of the z/VM scheduler......118
Appendix. Example of using FTP to
install Linux from the hardware
management console ........139
Linking the HMC removable media to your z/VM
logical partition ............139
FTPing to the HMC removable media .....140
Notices ..............143
Trademarks ..............145
Glossary .............147
Bibliography............149
Where to Get z/VM Information .......149
z/VM Base Library ...........149
Overview..............149
Installation, Migration, and Service .....149
Planning and Administration .......149
Customization and Tuning ........149
Operation and Use ..........149
Application Programming ........149
Diagnosis..............150
z/VM Facilities and Features ........150
Data Facility Storage Management Subsystem
forVM..............150
Directory Maintenance Facility for z/VM . . . 150
Open Systems Adapter/Support Facility . . . 150
Performance Toolkit for VM .......151
RACF Security Server for z/VM ......151
Remote Spooling Communications Subsystem
Networking for z/VM .........151
Prerequisite Products ...........151
Device Support Facilities ........151
Environmental Record Editing and Printing
Program ..............151
Additional Publications ..........151
Index ...............153
iv
z/VM: Getting Started with Linux on System z
Page 7

About this document
This document describes how to configure and use z/VM®functions and facilities
for Linux®servers running on the IBM®System z®platform (hereafter referred to
as the mainframe). The document provides requirements and guidelines to
implement during z/VM installation, but primarily assumes you have installed
z/VM and are ready to deploy Linux in virtual machines.
Early sections acquaint you with z/VM and take you from the point after z/VM
installation to the point where you are ready to install your first Linux server. At
that point you must turn to the installation documentation provided by your Linux
distributor. Following the deployment of your first Linux server, you can replicate
or clone additional servers.
When you finish the early sections, you will have two or more Linux servers
running on z/VM with TCP/IP connections to the network. Subsequently, you can
turn to vendor-supplied documentation to install applications on Linux. Later
sections cover operations, administration, performance, and other day-to-day bare
essentials.
Intended audience
This document is designed to help anyone who does system programming,
administration, or operation, but has limited knowledge of z/VM and wants to get
started deploying Linux servers on z/VM. Before you begin, you must:
v Understand mainframe hardware concepts, such as logical partitions (LPARs)
and I/O
v Know and have used the Linux operating system
v Know and have used TCP/IP.
The environment for your z/VM system environment is assumed to include:
v A mainframe with an OSA-Express device
v z/VM version 6 release 1
v Directory Maintenance Facility
v Performance Toolkit for VM
v If you do not have an external file server for the Linux code, you might need an
NFS or FTP server.
Conventions and terminology used in this document
This document is primarily a cookbook; that is, it provides instructions about how
to accomplish a task or goal. When required, background concepts are provided to
help you understand a key z/VM function or facility. Instructions and background
concepts are separated but linked together through cross-references, providing an
efficient path through the instructional material. At the beginning of each set of
instructions, you will see a Before you begin section, which explains what you
need to know or to do before you perform the task. Cross-references in the Before
you begin section take you to the necessary background concepts. Thus, if you
already know the necessary concepts, you do not need to read those background
topics and can simply follow the instructions.
© Copyright IBM Corp. 2009 v
Page 8

Though the topics in this document are self-sufficient, you might want to explore a
function or facility in detail. Some topics end with a list of documents that you can
use to understand a function or facility in detail.
In general, new terms (in italics) are defined in the context they are introduced.
Sometimes the manual focuses on the virtual machine functions (the virtual
hardware) and other times the complete Linux server system (the virtual machine
and the Linux operating system as a whole). When focusing on the virtual machine
functions only, the term virtual machine or virtual machine for Linux is used. The
term Linux virtual server refers to the complete Linux system (virtual machine
hardware and the Linux operating system as a whole) running on z/VM.
Commands and statements that you must type are in bold while system responses
are in normal font.
Example: In the example, you would type “query processors”. The rest of the
example is the system response:
query processors
PROCESSOR 00 MASTER
PROCESSOR 01 ALTERNATIVE
Ready;
Variable information appears in bold italics, which means you must substitute
your own values for the variable.
Example: For the command, you would need to supply your own password for
the variable new_password.
dirm add linmstr like linux pw new_password
A vertical ellipsis
.
.
.
indicates system responses that have been removed for clarity.
Where to find more information
For z/VM terms used in this document, see z/VM: Glossary or use the z/VM HELP
Facility (for more information about glossary terms and the z/VM HELP Facility,
see “Glossary” on page 147).
For more information about related publications, see “Bibliography” on page 149.
Additional Publications
For white papers, IBM Redbooks®publications, and other useful information about
Linux on the mainframe, visit the z/VM resources for Linux on IBM System z Web
site at:
http://www.vm.ibm.com/linux/
Publications you might be interested in are:
vi z/VM: Getting Started with Linux on System z
Page 9

v z/VM and Linux on IBM System z: The Virtualization Cookbook for SLES9, SG24-6695
v Security on z/VM, SG24-7471
Links to Other Online Documents
If you are viewing the Adobe®Portable Document Format (PDF) version of
this document, it might contain links to other documents. A link to another
document is based on the name of the requested PDF file. The name of the
PDF file for an IBM document is unique and identifies the edition. The links
provided in this document are for the editions (PDF names) that were current
when the PDF file for this document was generated. However, newer editions
of some documents (with different PDF names) might exist. A link from this
document to another document works only when both documents reside in
the same directory.
About this document vii
Page 10

viii z/VM: Getting Started with Linux on System z
Page 11

How to send your comments to IBM
We appreciate your input on this publication. Feel free to comment on the clarity,
accuracy, and completeness of the information or give us any other feedback that
you might have.
Use one of the following methods to send us your comments:
1. Send an e-mail to mhvrcfs@us.ibm.com
2. Visit the z/VM reader's comments Web page at www.ibm.com/systems/z/os/
zvm/zvmforms/webqs.html
3. Mail the comments to the following address:
IBM Corporation
Attention: MHVRCFS Reader Comments
Department H6MA, Mail Station P181
2455 South Road
Poughkeepsie, NY 12601-5400
U.S.A.
4. Fax the comments to us as follows:
From the United States and Canada: 1+845+432-9405
From all other countries: Your international access code +1+845+432-9405
Include the following information:
v Your name and address
v Your e-mail address
v Your telephone or fax number
v The publication title and order number:
z/VM V6R1 Getting Started with Linux on System z
SC24-6194-00
v The topic and page number related to your comment
v The text of your comment
When you send comments to IBM, you grant IBM a nonexclusive right to use or
distribute your comments in any way it believes appropriate without incurring any
obligation to you.
IBM or any other organizations will only use the personal information that you
supply to contact you about the issues that you submit to IBM.
If you have a technical problem
Do not use the feedback methods listed above. Instead, do one of the following:
v Contact your IBM service representative.
v Contact IBM technical support.
v Visit the z/VM support Web page at www.vm.ibm.com/service/
v Visit the IBM mainframes support Web page at www.ibm.com/systems/
support/z/
© Copyright IBM Corp. 2009 ix
Page 12

x z/VM: Getting Started with Linux on System z
Page 13

Summary of changes
This document contains terminology, maintenance, and editorial changes. Technical
changes or additions to the text and illustrations are indicated by a vertical line to
the left of the changes. Some program updates might be provided through z/VM
service by program temporary fixes (PTFs) for authorized program analysis reports
(APARs), which also might be available for some prior releases.
SC24-6194-00, z/VM Version 6 Release 1
This edition supports the general availability of z/VM V6.1. Changes made are:
v A step was added to “Steps for copying the current USER DIRECT file” on page
57.
v Other minor technical and editorial changes.
© Copyright IBM Corp. 2009 xi
Page 14

xii z/VM: Getting Started with Linux on System z
Page 15
Chapter 1. About z/VM
This topic is a z/VM primer and covers general VM concepts, such as editing and
finding files, required to complete z/VM system tasks.
When you log onto z/VM, you have the functional equivalent of a real computer
and its associated devices at your fingertips. This functional equivalent of a
computing system is called a virtual machine. Virtual machines are not real, but do
work like real systems. Everyone in your entire organization can use z/VM to
share the resources of a single computer, while at the same time accessing the
system as if each is the only user.
Figure 1 shows a stylized representation of a real mainframe computing system.
Each real computing system has one or more central processing units (CPUs),
storage (memory), peripheral devices for input and output, such as disks, tapes,
printers, and displays, and the operator console. The operating system manages all
these resources to do work.
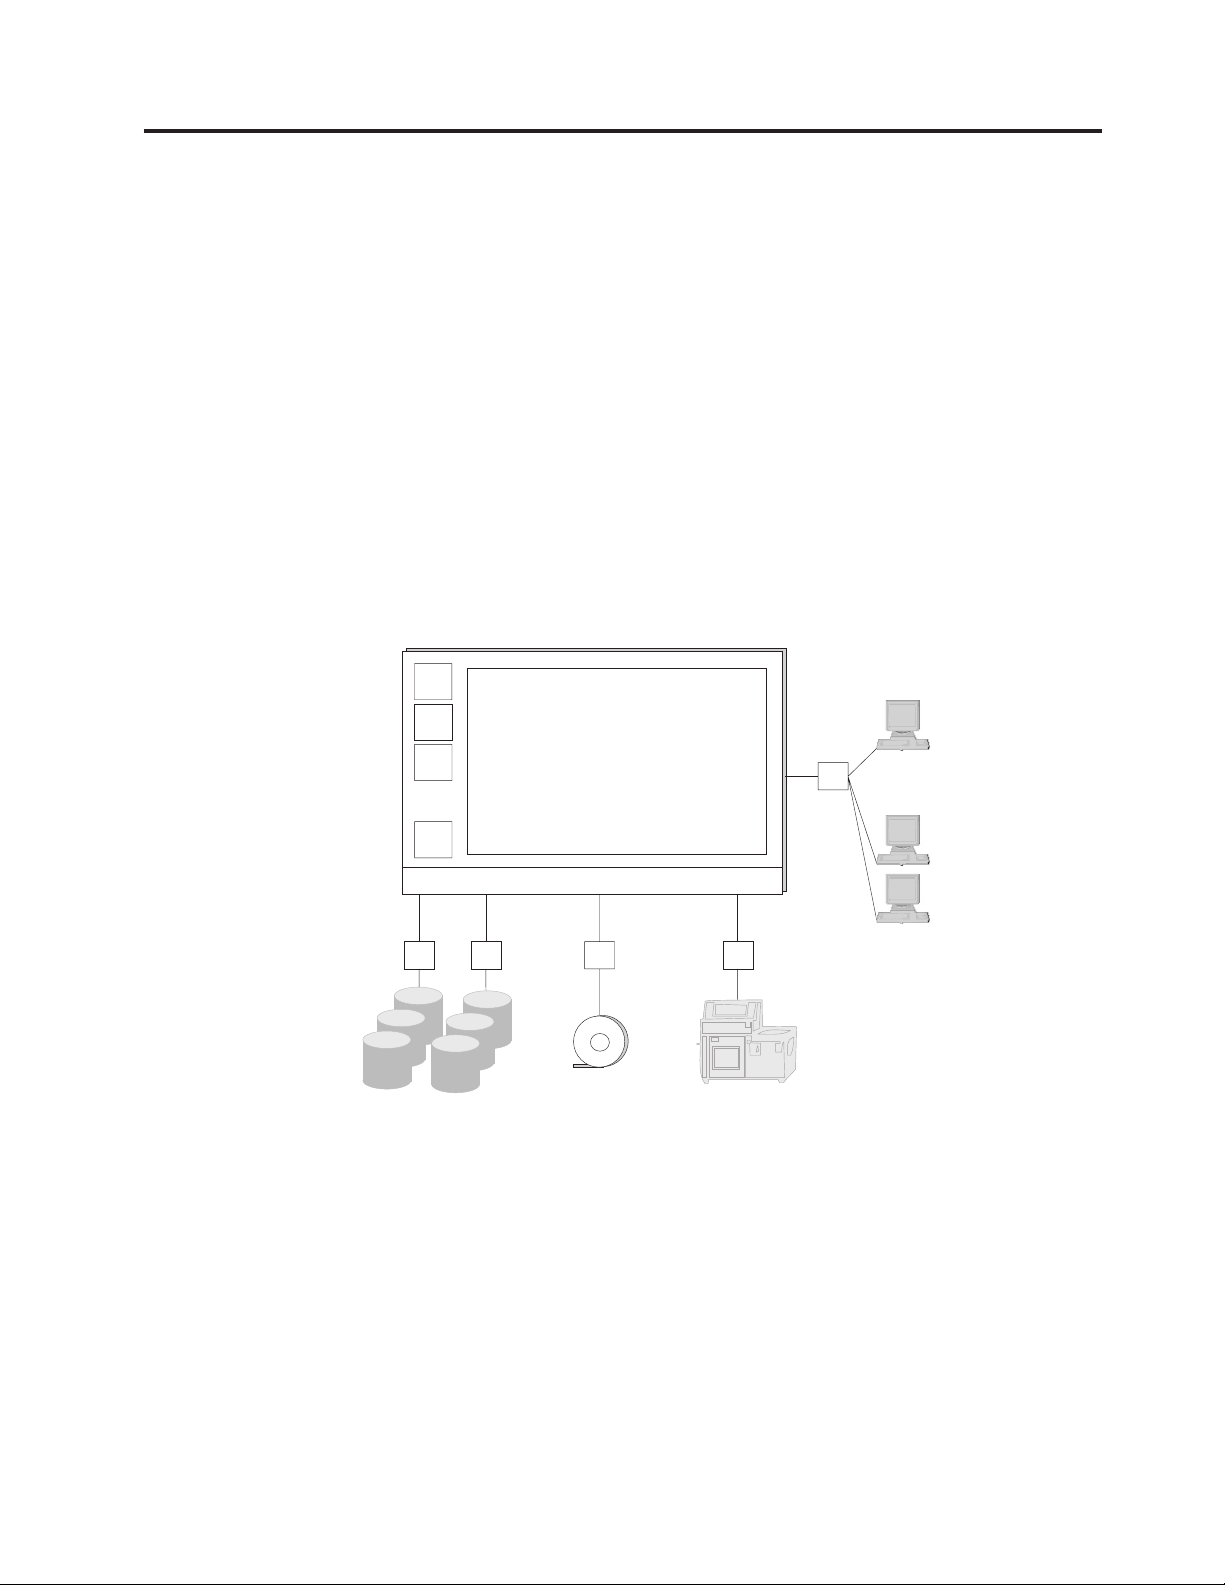
CPU
0
CPU
1
CPU
2
.
.
.
CPU
n
central storage
operator
console
operating system
channels
control
units
disk
tape printer
user
displays
Figure 1. Representation of a mainframe computing system
z/VM virtualizes real computing resources so that each user appears to have a
complete mainframe computing system, as shown in Figure 2 on page 2. This
means each virtual machine can run its own operating system to manage its virtual
resources. It also means you can perform virtual machine tasks as if they were real
machine tasks: you can boot (perform an initial program load of) an operating
system, attach and detach devices, and manage the work of your virtual machine
operating system.
© Copyright IBM Corp. 2009 1
Page 16
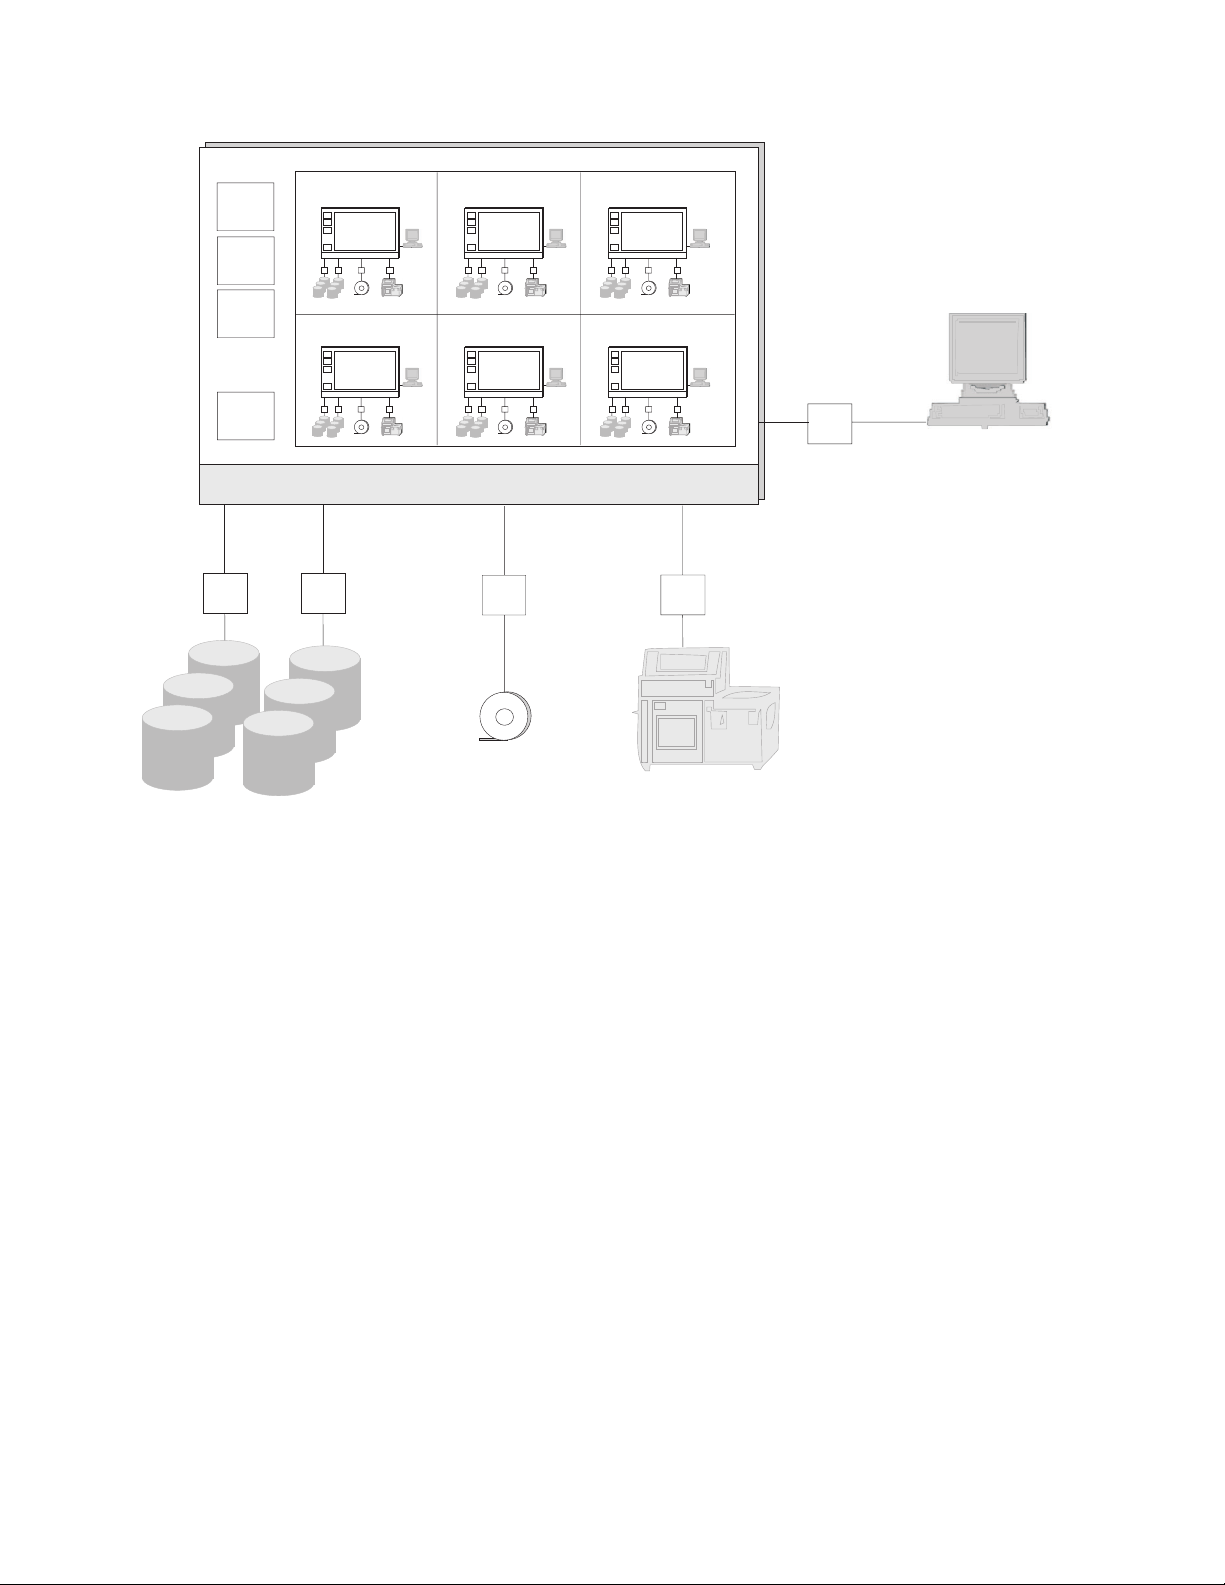
channels
control
units
CPU
0
CPU
1
CPU
2
.
.
.
CPU
n
Linux
.
.
.
Linux
.
.
.
Linux
.
.
.
CMS
.
.
.
Linux (other)
.
.
.
.
.
.
z/VM
z/VM operator
console
disk printer
Figure 2. Representation of virtual machines
A virtual machine is directly associated with a z/VM user ID or logon identifier.
When you log onto z/VM, you have a virtual machine at your disposal and
control the virtual machine the way a system operator controls the real hardware.
Some user IDs (virtual machines) are given special privileges to control z/VM and
the real machine. For example, the OPERATOR has special privileges allowing
control of real machine resources. Another user, usually called MAINT, has special
privileges to change z/VM code, apply z/VM maintenance, and add new users.
Whether or not users have special privileges, they all perform their tasks through a
virtual machine. So, as shown in Figure 2, some virtual machines run Linux, while
others run other operating systems, such as the Conversational Monitor System
(CMS) (more about CMS in a moment).
The Control Program (CP) is the component of z/VM that manages the resources
of a single computer so that multiple computing systems (virtual machines) appear
to exist. Think of CP as a supervisor (or hypervisor) program running in a layer
between the hardware and virtual machines. When you are working in the CP
environment, you are provided with CPU (central processing unit) functions, input
and output devices, and storage. Through CP, each virtual machine can run its
own operating system, such as Linux, z/OS
tape
®
, or z/VM itself.
Operating systems running in virtual machines are often called guests. Other terms
and phrases you might encounter are:
2 z/VM: Getting Started with Linux on System z
Page 17

v Running first level: running directly on the hardware, which is what z/VM does.
v Running second level or running under VM or running on (top of) VM: running as a
guest.
During its time slice, a guest actually runs on the real machine. The hardware
microcode handles most guest program instructions and CP takes control only
when necessary, which maintains good performance.
The Conversational Monitor System (CMS) is the interactive component of z/VM.
CMS is a single-user operating system that runs in a virtual machine. Typically,
each directory entry (user definition) has a statement that loads the CMS operating
system at logon time (see “The user directory” on page 8). CMS is not only an
end-user interactive component, but a home for running system utilities and tasks,
such as TCP/IP and system management functions. At the z/VM level, systems
personnel use CMS to manage z/VM itself and guests. At the guest level, you can
use CMS to define resources for your virtual machine, so loading CMS is useful
even if you plan subsequently to load Linux into the same virtual machine.
Overview of the Control Program (CP)
CP acts as a hypervisor layer between the hardware and virtual machines. Each
virtual machine appears to have its own CPU, storage (memory), and devices. In
reality, these items can be
v Real. For example, you can dedicate a real network interface to a virtual
machine for its exclusive use.
v Shared. For example, the CPU is shared through time sharing and real storage is
shared as virtual storage. What appears as real storage to a guest is actually
virtual storage to CP.
v Simulated. For example, a virtual switch is a simulated LAN networking switch.
CP transparently maps virtual devices and resources to their real counterparts.
Topics in this section explain how CP manages computer resources for virtual
machines.
Central processing units (CPUs)
A virtual machine can have up to 64 virtual CPUs. If capable of running in
multiprocessor mode, your virtual machine operating system dispatches work on
its virtual CPUs as if it were running on real hardware. CP handles the dispatching
of work on your virtual CPUs to real CPUs.
Guideline: Never give a virtual machine more virtual CPUs than there are real
CPUs.
Usually virtual machines share all CPUs, but a real CPU can be dedicated to a
virtual machine, which means that the CPU is reserved for that virtual machine’s
exclusive use. This obviously has an impact on the performance of other virtual
machines in the system.
Storage
Mainframe storage is analogous to memory in a personal computer. CP commands
refer to memory as storage, so do not confuse the term “storage” with disk or tape
storage.
Chapter 1. About z/VM 3
Page 18

Each virtual machine has its own virtual storage. CP manages the residency of
virtual machine’s pages in real storage through paging. Pages that have not been
referenced can be moved out of real storage into either expanded storage or onto a
paging device. When a virtual machine requires a page no longer in real storage, a
page fault occurs and CP brings the missing page back into real storage.
CP has facilities that allow portions of real storage to be shared by many virtual
machines. Such portions are called shared segments. This sharing economizes on real
storage and requires less paging, thereby improving performance. For example, the
CMS nucleus is shared in real storage by all virtual machines that loaded CMS by
name; that is, every CMS virtual machine mapsa1MBsegment of virtual storage
to the same 1 MB of real storage.
DASD and minidisks
DASD, the mainframe term for disk drives, stands for “direct access storage
device” and is analogous to a hard disk drive on a personal computer. A single
real DASD is called a volume or real volume. Each volume has a label or volume serial
number (volser) that identifies the volume to z/VM.
Of special importance is the way z/VM shares DASD. CP can logically partition
real DASD volumes into minidisks, which is analogous to dividing a personal
computer hard disk into multiple partitions. A minidisk has its own label, which is
distinct from the real DASD label. Each virtual machine can have one or more
minidisks and those minidisks are under control of the guest operating system. To
the guest, a minidisk appears as an entire DASD volume (though smaller) and the
guest runs channel programs as normal to do I/O. Behind the scenes, CP reorients
the channel programs: the guest perceives all minidisks as starting at cylinder 0,
but the real DASD volume has only one cylinder 0, so CP must modify the
cylinder offsets in the channel program to address DASD cylinders owned by the
guest.
Temporary minidisks
You can create a temporary minidisk from a special pool of real disks. The disk
lasts as long as the virtual machine is logged on. At logoff, the temporary minidisk
is deleted and the space returned to the available temporary disk pool.
Virtual disks in storage
Virtual disks in storage are similar to temporary minidisks, except the disks are
mapped to storage rather than the cylinders of real disks. Using virtual disks in
storage avoids the need for disk I/O. CP manages the virtual disk pages as part of
its real memory management.
Virtual readers, punches, and printers
These devices are not associated with real devices, but are implemented through
the spool file system. For more information, see “Overview of the CP spool file
system” on page 7.
The virtual machine console
The virtual machine console or virtual console is the primary interface to the virtual
machine. When you log on to a virtual machine from a local terminal or a remote
workstation, the virtual console is associated with the terminal session. From the
4 z/VM: Getting Started with Linux on System z
Page 19

console, you can enter CP commands, such as loading (IPL) an operating system.
The virtual console is the device an operating system views as its system or
hardware console.
Note: The key assignments for your keyboard might differ from standard key
assignments. Some 3270 emulators allow you to remap the key assignments;
for example, the Clear function might be assigned to the ESC key on some
keyboards and the Pause/Break key on others. Consult your display
documentation for key mappings.
As you do work on your console, the lower right corner of the screen displays
various status notices. The notices tell you what is happening in the system at the
present time. If you forget what these notices mean, you can come back to this
section for reference.
CP READ
This notice means that the Control Program (CP) is waiting for you to
enter a command.
VM READ
This notice means that a virtual machine operating system, such as CMS, is
waiting for you to enter a command.
RUNNING
This notice means the virtual machine is working on something. For CMS,
this means CMS is ready for you to enter a command.
MORE ...
This notice means that there is more information than can fit on the
current screen. After a pause (which depends on the terminal settings for
your virtual machine), the next screen of information is displayed. To view
the next screen right away, press the Clear key. To hold this information on
the screen, press the Enter key, which changes MORE... to HOLDING.
HOLDING
This notice means the system is waiting for you to clear the screen before
showing you more information. The notice appears when the screen
displays MORE... and you press the Enter key. The notice can also appear
when another user sends you a message. To cancel the hold, press the
Clear key.
NOT ACCEPTED
This notice means that the system is working on something and is too
busy to accept another command. Wait several seconds and issue your
command again.
Related information
For more information about virtual consoles, see “Using a Virtual Machine
Operator’s Console” in z/VM: Virtual Machine Operation.
CP commands
CP provides you with commands that allow you to view and manipulate your
virtual hardware (virtual CPUs, virtual storage, minidisks, and other devices). To
issue some CP commands, you need to be in a special privilege class assigned to
you in the user directory. Privilege classes are denoted by the letters A through Z,
the numbers 1 through 6, or the word ″Any.″ For the tasks explained in this
document, the user IDs you use have all the required privilege classes (like
superusers in Linux).
Chapter 1. About z/VM 5
Page 20

Related information
For more information about privilege classes, see “Privilege Classes” in z/VM: CP
Commands and Utilities Reference.
Examples of using the CP commands: QUERY displays information about your
virtual machine.
1. To display virtual CPUs, class G users can issue the QUERY VIRTUAL CPUS
command:
query virtual cpus
CPU 00 ID FF05152120640000 (BASE)
Ready;
The response tells you the virtual machine has one base virtual CPU whose
address is 00.
2. To display available storage (memory), class G users can issue the QUERY
STORAGE command:
query virtual storage
STORAGE = 512M
Ready;
The response tells you the virtual machine has 512 megabytes of storage.
3. To display information about minidisks, class G users can issue the QUERY
VIRTUAL DASD command:
query virtual dasd
DASD 0120 3390 PK5001 R/O 250 CYL ON DASD 810B SUBCHANNEL = 000D
DASD 0190 3390 SYGEMC R/O 130 CYL ON DASD 7355 SUBCHANNEL = 0005
DASD 0191 3390 USGE24 R/W 10 CYL ON DASD 7378 SUBCHANNEL = 0000
DASD 019A 3390 PK5001 R/O 400 CYL ON DASD 810B SUBCHANNEL = 0009
DASD 019D 3390 US7E0K R/O 250 CYL ON DASD 801C SUBCHANNEL = 0006
The response tells you the virtual machine has 5 minidisks, one of which is
read/write (R/W); the others are read only (R/O).
4. To display information about network devices such as the Open Systems
Adapter, class G users can issue the QUERY VIRTUAL OSA command:
query virtual osa
OSA F5F0 ON OSA F599 SUBCHANNEL = 0000
F5F0 DEVTYPE OSA CHPID 76 OSD
F5F0 QDIO-ELIGIBLE QIOASSIST-ELIGIBLE
OSA F5F1 ON OSA F59A SUBCHANNEL = 0001
F5F1 DEVTYPE OSA CHPID 76 OSD
F5F1 QDIO-ELIGIBLE QIOASSIST-ELIGIBLE
OSA F5F2 ON OSA F59B SUBCHANNEL = 0002
F5F2 DEVTYPE OSA CHPID 76 OSD
F5F2 QDIO-ELIGIBLE QIOASSIST-ELIGIBLE
5. To display the size of real storage, class B and E users can issue the QUERY
STORAGE command:
query storage
STORAGE = 512M
Note: QUERY VIRTUAL option displays information about the virtual machine.
The keyword “VIRTUAL” is optional for the class G user. For privileged
6 z/VM: Getting Started with Linux on System z
Page 21

users (those with privilege classes other than G), using QUERY without the
keyword “VIRTUAL” displays information about the real machine. For
instance, QUERY VIRTUAL STORAGE displays the virtual storage size of
the virtual machine while QUERY STORAGE (class B and E) displays the
real machine storage size.
Related information
z/VM: CP Commands and Utilities Reference, SC24-6175
Overview of the CP spool file system
In the early days of computing, input to the computer came from punched cards
loaded into a card reader. You used a key punch to record your program on
punched cards, then loaded the cards into a card reader, which interpreted your
cards and loaded your program into the computer. Output from the program was
written to a printer. z/VM preserves this bit of computing history through virtual
reader, punch, and printer devices, also called unit record devices. Unit record
devices provide a handy way to send files from one virtual device to another, to
other virtual machines, or to real devices (such as real printers). For instance, you
can think of a file being sent from one virtual machine to another as the virtual
equivalent of taking a card stack from one computer and loading the stack onto
another computer’s card reader.
Behind the manipulation of these files is a CP file system called the spool file
system. CP manages spool files on one or more DASD volumes that act as
temporary storage areas. A spool file is a collection of data along with device
control instructions for processing on a unit record device. Spooling is the
processing of files created by or intended for virtual readers, punches, and printers.
Through CP and CMS commands, you can send spool files from one virtual device
to another, from your virtual machine to another, and to real devices.
By convention, each virtual machine has a virtual reader at virtual device number
00C, a virtual punch at virtual device number 00D, and a virtual printer at virtual
device number 00E. Your virtual reader is like the in-box of an e-mail system,
except more than just e-mail can be placed there. Through your virtual punch, you
can place a copy of an entire operating system into the system spool, then use the
CP IPL command to load and run that operating system in your virtual machine.
“Installing Linux in a virtual machine” on page 77 shows you how to use this
z/VM facility.
Some important commands that operate on spool files are:
v SPOOL. Use the CP SPOOL command to set control options for one or more of
your virtual spool devices. A handy way to keep a log of your system activity is
to spool your console (SPOOL CONSOLE *, meaning send the console log to
yourself), which keeps all your console activity in a spool file. When you close
your console (SPOOL CONSOLE STOP CLOSE), your console log is sent to you.
v QUERY READER ALL. This CP command lets you view information about spool
files in your virtual reader.
v RDRLIST. This CMS command displays information about your reader files in a
full-screen interactive display.
v RECEIVE. This CMS command moves a file from your reader onto a minidisk.
v PUNCH. This CMS command punches (copies) a CMS file to your virtual
punch.
Chapter 1. About z/VM 7
Page 22

Related information
For information about managing spool files for the entire z/VM system, start with
the summary topics on controlling spool files in z/VM: System Operation, SC24-6233:
v Control Spool Files in the Print Queue
v Control Spool Files in the Reader Queue
v Control Spool Files in the Punch Queue
For information about managing spool files for your virtual machine, see “Using
Spooled Devices to Print, Punch, and Read Information,” in z/VM: Virtual Machine
Operation, SC24-6241.
For command help, see z/VM: CP Commands and Utilities Reference, SC24-6175, and
z/VM: CMS Commands and Utilities Reference, SC24-6166.
For online help, type help on the CMS command line, then press the Enter key.
The user directory
The z/VM user directory (or user registry) describes the configuration and operating
characteristics of each virtual machine that can be created by CP. A z/VM user
directory exists in two forms: a source form that consists of one or more CMS files,
and an object form, compiled from the source, on a CP-formatted disk.
Each virtual machine has a directory entry. Here is a sample directory entry. The
callouts in reverse type next to each statement correspond to explanations that
follow the sample.
Note: In this document the user directory is modified by using the IBM Directory
Maintenance program, DirMaint
™
, which handles both source and object
forms of the user directory. Information about the directory entries is shown
for educational purposes only. Unless explicitly instructed to do so, do not
attempt to update the user directory source files manually.
1 USER LINUXC MYPASS 256M 1G G
2 IPL CMS
3 MACHINE ESA 4
4 CONSOLE 0009 3215
5 NICDEF BC0 TYPE QDIO LAN SYSTEM VSWITCH1
6 SPOOL 000C 3505 A
SPOOL 000D 3525 A
SPOOL 000E 1403 A
7 LINK MAINT 0190 0190 RR
...
8 MDISK 0191 3390 1595 50 VMLU1A MR
MDISK 0200 3390 0001 3338 LX1519 MR
MDISK 0201 3390 0001 3338 LX1559 MR
MDISK 0202 3390 0001 3338 LX1599 MR
1. The USER statement begins a directory entry. The user ID for this virtual
machine is LINUXC. “MYPASS” is the user’s logon password. The virtual
machine has a default storage of 256 megabytes (“256M”), but you can redefine
storage up to a maximum of 1 gigabyte (“1G”). The second “G” means the
virtual machine user is a general class user and can control functions for this
virtual machine only.
2. The IPL statement indicates which operating system to load when you log on
to the virtual machine. The example shows that CMS will be loaded. Loading
CMS is handy because it allows you to make changes to the normal
8 z/VM: Getting Started with Linux on System z
Page 23

environment as well as run some REXX™EXECs (script-like executable files) to
set up Linux. After changing the environment, you can load Linux into the
virtual machine.
3. The MACHINE statement describes the processor architecture of the virtual
machine. The maximum number of virtual CPUs that can be defined for this
virtual machine is four. The default is one.
4. The CONSOLE statement defines the operating console (virtual console) for the
virtual machine. CMS requires console type 3215. If supported by the operating
system, you can specify 3270 or issue the CP command TERMINAL CONSOLE
3270 in the PROFILE EXEC prior to loading the operating system.
5. The NICDEF statement defines this virtual machine’s attachment to a z/VM
virtual switch.
6. SPOOL statements define the unit record devices. By convention, device
number 000C is for the virtual reader (type 3505), device number 000D is for
the virtual punch (type 3525), and device number 000E is for the virtual printer
(type 1403).
7. LINK statements provide access to another virtual machine’s minidisks.
8. MDISK statements define minidisks owned by the virtual machine. The format
of the statement is:
MDISK devno type start_cyl extent vol_label access_mode
where
devno
Is the virtual device number of the minidisk.
type
Is the disk type of the real disk; typically 3390.
start_cyl
Is the real disk starting location of the first cylinder of the minidisk.
extent
Is the minidisk size in cylinders.
vol_label
Is the volume label of the real disk.
access_mode
Is the access mode. MR means the virtual machine has read/write access.
Related information
“Creating and Updating a User Directory,” in z/VM: CP Planning and
Administration, SC24-6178
Overview of the Conversational Monitor System (CMS)
Just as you can interact with Linux or UNIX®through a bash or Korn shell, you
can interact with z/VM through CMS. Like a shell, you can use CMS to edit files,
run EXECs (script-like executable files) or programs, modify the virtual machine
environment, or modify z/VM itself. CMS is to z/VM as a shell is to Linux or
UNIX.
Minidisks and the CMS access mode
CMS, like other operating systems running in a virtual machine, can access
minidisks to store and retrieve files. For CMS, each minidisk has an access mode
Chapter 1. About z/VM 9
Page 24

represented by an alphabetic letter that determines how CMS searches for files. In
Linux, path variables defining directories determine the search order for files. CMS
searches for files among minidisks based on the alphabetical order of the access
mode. First, CMS looks on the A minidisk, then the B minidisk, and so forth.
The 191 minidisk holds a special place in CMS. A 191 minidisk to a CMS user is
like the home file directory for a Linux user. CMS always tries to access a user’s
191 minidisk as access mode A. The CMS 191 minidisk is often called the “A-disk.”
To see your CMS minidisks and their access modes, use the QUERY ACCESSED
command. QUERY ACCESSED is similar to the df command in Linux. To access
minidisks that are not already in the CMS access order, use the ACCESS command.
Example of viewing and accessing CMS minidisks
1. To view your accessed CMS minidisks, type the QUERY ACCESSED command
and press the Enter key:
Ready;
query accessed
Mode Stat Files Vdev Label/Directory
A R/W 595 191 CHA191
E R/O 1776 201 IDTOOL
S R/O 690 190 CMS21
Ready;
The column under “Mode” shows the access mode for each minidisk. In the
example, there are three minidisks accessed as A, E, and S.
Notice that while in CMS all commands end with a “Ready;” prompt,
indicating that CMS is ready to do more work.
2. To assign an access mode, use the ACCESS command. Example: To access the
minidisk at virtual address 491 as B, type this command and press the Enter
key:
Ready;
access 491 b
DMSACP723I B (491) R/O
Ready;
The response tells you minidisk 491 is accessed read only (R/O) as B.
3. If you assign a mode currently assigned to another minidisk, the new minidisk
replaces the current minidisk:
Ready;
access 19d d
DMSACC724I 19D replaces D (200)
DMSACP723I D (19D) R/O
Ready;
4. To remove a minidisk from an access mode, use the RELEASE command:
Ready;
release b
Ready;
10 z/VM: Getting Started with Linux on System z
Page 25

CMS files
CMS files have a file name, file type, and file mode. File names and file types can be
up to 8 characters long. The file mode corresponds to the access mode of the
minidisk.
Examples:
PROFILE EXEC A1
MYDOC LISTING A1
DNFPFS LISTPS B1
By convention, some file types have special meanings. For example, EXEC is the
file type for a file that contains executable statements, LISTING is the file type for
text files, and LISTPS is the file type for PostScript
To view and manipulate files, use the FILELIST command. FILELIST is similar to
the dir command in Linux.
Examples of using FILELIST
1. To view all the files on your A-disk, type this command and press the Enter
key:
filelist
Result: You see something like this:
®
files.
CHASTING FILELIST A0 V 169 Trunc=169 Size=253 Line=1 Col=1 Alt=0
Cmd Filename Filetype Fm Format Lrecl Records Blocks Date Time
CHASTING NETLOG A0 V 108 2132 53 10/15/03 16:02:30
KIJL0CMD HGENRPT A1 V 119 13 1 10/13/03 12:00:40
KIJL0CMD LOG A1 V 122 131 2 10/13/03 12:00:37
KIJL0CMD SCRIPT A1 V 81 454 4 10/13/03 12:00:37
REXEC HELPTCPI A1 V 79 133 2 10/13/03 10:26:11
NETSTAT HELPTCPI A1 V 79 749 9 10/13/03 10:25:31
2. In the “Cmd” column, you can type commands that are issued against the file
on that line.
Example: To edit a file in the filelist, type the XEDIT command in the “Cmd”
column:
CHASTING FILELIST A0 V 169 Trunc=169 Size=253 Line=1 Col=1 Alt=0
Cmd Filename Filetype Fm Format Lrecl Records Blocks Date Time
xedit CHASTING NETLOG A0 V 108 2132 53 10/15/03 16:02:30
KIJL0CMD HGENRPT A1 V 119 13 1 10/13/03 12:00:40
KIJL0CMD LOG A1 V 122 131 2 10/13/03 12:00:37
KIJL0CMD SCRIPT A1 V 81 454 4 10/13/03 12:00:37
REXEC HELPTCPI A1 V 79 133 2 10/13/03 10:26:11
NETSTAT HELPTCPI A1 V 79 749 9 10/13/03 10:25:31
3. Use “/” and “=” to avoid extra typing when you enter a command in
FILELIST. The “/” means “this file” and “=” can be used to repeat a file name,
file type, or file mode.
Example: To copy a file called REXEC HELPTCPI from minidisk A to minidisk
D, type this command and press the Enter key (typing over the other columns
is OK):
Chapter 1. About z/VM 11
Page 26

CHASTING FILELIST A0 V 169 Trunc=169 Size=253 Line=1 Col=1 Alt=0
Cmd Filename Filetype Fm Format Lrecl Records Blocks Date Time
CHASTING NETLOG A0 V 108 2132 53 10/15/03 16:02:30
KIJL0CMD HGENRPT A1 V 119 13 1 10/13/03 12:00:40
KIJL0CMD LOG A1 V 122 131 2 10/13/03 12:00:37
KIJL0CMD SCRIPT A1 V 81 454 4 10/13/03 12:00:37
copy/==d HELPTCPI A1 V 79 133 2 10/13/03 10:26:11
NETSTAT HELPTCPI A1 V 79 749 9 10/13/03 10:25:31
4. To see only certain files, use “*” as a wildcard character.
Example: To find any file on any accessed disk with a file type SCRIPT, type
this command and press the Enter key:
filelist * script *
Result: You see something like this:
CHASTING FILELIST A0 V 169 Trunc=169 Size=555 Line=32 Col=1 Alt=0
Cmd Filename Filetype Fm Format Lrecl Records Blocks Date Time
APLANBD SCRIPT A1 V 65 20 1 7/16/02 12:31:01
APROGBD SCRIPT A1 V 80 213 3 7/16/02 12:30:05
B2HSYS SCRIPT Q1 V 113 4910 45 6/17/02 10:42:25
B2HMSG SCRIPT Q1 V 76 670 7 6/17/02 10:42:04
B2H SCRIPT Q1 V 72 107 1 5/20/02 0:47:02
B2HAPP SCRIPT Q1 V 86 3129 25 5/20/02 0:47:02
B2HEXA SCRIPT Q1 V 93 1390 10 5/20/02 0:47:02
B2HINF SCRIPT Q1 V 81 1389 14 5/20/02 0:47:02
B2HSETUP SCRIPT Q1 V 70 175 2 5/20/02 0:47:02
B2HUSE SCRIPT Q1 V 89 2622 25 5/20/02 0:47:02
ACRONYMS SCRIPT V1 V 962 62886 769 4/05/01 16:27:39
VMSERVE SCRIPT V1 V 103 3180 31 1/24/01 8:48:49
The PROFILE EXEC
The PROFILE EXEC is a special executable file analogous to the .profile (or
.bash_profile) in Linux and UNIX. Every time a CMS user logs on, CMS runs the
PROFILE EXEC residing on the 191 minidisk, file mode A. You can use the
PROFILE EXEC to set up your virtual machine environment; for instance, access
disks, set up special PF keys, or even load another operating system in your
virtual machine. In Chapter 7, “Creating your first Linux virtual machine and
installing Linux,” on page 71, you learn how to set up a PROFILE EXEC for your
Linux virtual servers.
There can be times when you do not want the PROFILE EXEC to execute when
you log on. For example, assume your PROFILE EXEC automatically loads Linux.
If you have just shut down Linux and want to start CMS, but prevent Linux from
being loaded again, you can prevent CMS from executing the PROFILE EXEC by
issuing access (noprof. When you IPL (load) CMS, you see an identifier line
displayed and CMS pauses with VM READ in the lower right corner of the
display. At that point you can issue access (noprof:
12 z/VM: Getting Started with Linux on System z
Page 27

IPL CMS
z/VM V6.1.0 2004-09-30 16:24
access (noprof
The Help system
z/VM provides online help through the CMS Help system. The HELP command is
like the man command in Linux. You can find full descriptions of z/VM commands
by using the HELP command. By issuing help, you can access the main help menu
for z/VM:
HELP TASKS Task Help Information line 1 of 39
(c) Copyright IBM Corporation 1990, 2003
z/VM Help, main panel
This panel lists other Help panels that provide information about
various z/VM functions, topics, and tasks.
To view a Help panel, move the cursor to any character of the name
and press the ENTER key or the PF1 key.
HELPINFO - HELP Facility topics
MENUS - z/VM Help menus
TASKS - Basic z/VM tasks - good choice for beginners
COMMANDS - z/VM commands available to general users
CMS - CMS commands
CP - CP commands
QUERYSET - QUERY and SET commands and subcommands
TCPIP - TCP/IP commands
PF1= Help 2= Top 3= Quit 4= Return 5= Clocate 6= ?
PF7= Backward 8= Forward 9= PFkeys 10= 11= 12= Cursor
VM READ GDLVME
====>
Macro-read 1 File
To get quicker access to command information, you can issue the HELP command
with one of the keywords you see in the main menu. Example: For quick access to
the information about the CP IPL command, issue:
help cp ipl
Chapter 1. About z/VM
13
Page 28

Examples of using the HELP command
1. To get help for all the CP commands, type this command and press the Enter
key:
help cp menu
Result: You see a screen like this:
CP MENU Menu Help Information line 1 of 32
(c) Copyright IBM Corporation 1990, 2003
Help for CP commands
To display a Help panel, move the cursor to any character
of the name and press the ENTER key or the PF1 key.
An asterisk (*) preceding the name indicates a MENU panel.
A colon (:) preceding the name indicates a TASK panel.
*CPQUERY *XLINK CPACcess DISCARD LOCate RESTART SYStem
*CPSET *XSPOOL CPCAche DISConn LOCATEVM RETAIN TAg
*CPUTIL :DUMPS CPHX DISPlay LOCK REWind TERMinal
*DEFINE :DYNIO CPLISTfi DRain LOGoff SAVESEG TRace
*DELETE :HELP CPRELeas DUmp Logon SAVESYS TRANsfer
*DETACH #CP CPTRAP DUPlex Message SCREen TRSAVE
*DISABLE ACNT CPTYPE ECho MODify SEND TRSOurce
*DISPLAY ACTivate CPU ENable MONitor SET UNCOUPLE
PF1= Help 2= Top 3= Quit 4= Return 5= Clocate 6= ?
PF7= Backward 8= Forward 9= PFkeys 10= 11= 12= Cursor
====>
Macro-read 1 File
2. To get help for a specific command (for example, CP QUERY), type this
command and press the Enter key:
help cp query
Result: You see a screen like this:
CP QUERY All Help Information line 1 of 11
(c) Copyright IBM Corporation 1990, 2003
QUERY
Purpose
You can display various information about your virtual machine by using the
QUERY command operands.
For information on the individual QUERY command operands, press PF11.
***EndofFile***
PF1= 2= Top 3= Quit 4= Return 5= Clocate 6= ?
PF7= Backward 8= Forward 9= PFkeys 10= 11= Related 12= Cursor
====>
Related information
v z/VM: CMS Primer, SC24-6172
14 z/VM: Getting Started with Linux on System z
Macro-read 1 File
Page 29

v For more advanced information, see z/VM: CMS User’s Guide, SC24-6173.
v For online help, type help on the CMS command line, then press the Enter key.
The CMS file editor XEDIT
CMS provides a file editor called XEDIT, which is a not only a full-screen editor,
but a powerful programming tool. XEDIT has functions similar to vi in Linux. This
topic introduces you to basic editing functions.
To enter an editing session, use the XEDIT command. Example: To create a new
file called MY FILE A, type this command and press the Enter key:
xedit my file a
Without any modifications, an editing screen looks like this.
MY FILE A1 F 80 Trunc=80 Size=0 Line=0 Col=1 Alt=0 1
DMSXIN571I Creating new file: 2
4
=====***TopofFile*** 5
|...+....1....+....2....+....3....+....4....+....5....+....6....+....7...6
=====***EndofFile***
3
3
====> 7
8 XEDIT 1File
Numbers in the figure explanations match the reverse type call-outs in the figure:
1. File identification line. The first line displays the file name, file type, file mode
and other file characteristics. “F 80” means the length of a line is fixed at 80
characters. “Trunc=80” means any characters beyond the 80-character length are
truncated. “Size=0” means there are no lines in this file. “Line=0” means the
current line is 0 (more about the current line in point 5 on page 16). “Col=1” is
the position of the column pointer (more about the column pointer in point 6
on page 16). “Alt=0” means the file has had no alterations.
2. Message line. XEDIT communicates with you by displaying messages on the
second and third lines.
3. File area. This part of the screen is available to display the file. You can make
changes to the file by moving the cursor under any line and typing over the
characters, or by using special keys to insert or delete characters. You can make
as many changes as you want on the displayed lines before pressing the Enter
key. When you press the Enter key, the changes are made to the copy of the file
that is kept in virtual storage. The SAVE or FILE subcommand permanently
records those changes on the copy of the file that resides on disk.
Chapter 1. About z/VM 15
Page 30

Because a file can be too long to fit on one screen, various subcommands scroll
the screen so you can move forward and backward in a file. Scrolling the
screen is like turning the pages of a book.
4. Prefix area. The prefix area is the five left-most columns on the screen, and it
displays five equal signs (=====). Each line in the file has a prefix area. You
can perform various editing tasks such as deleting a line by entering short
commands, called prefix subcommands, in the prefix area of a line.
5. Current line. The current line is the file line in the middle of the screen (above
the scale). It is highlighted, appearing brighter than the other file lines.
The current line is important because most subcommands perform their
functions starting with the current line. Naturally, the line that is current
changes during an editing session as you scroll the screen, move up and down,
and so forth. When the current line changes, the line pointer (not visible on the
screen) moves. Many XEDIT subcommands perform their functions starting
with the current line and move the line pointer when they are finished.
6. Scale. The scale appears under the current line to help you edit. It is like the
margin scale on a typewriter.
The vertical bar (|) in column one on the scale is the column pointer. Various
subcommands perform their functions within a line starting at the column
pointer, which you can move to different positions on the scale by using XEDIT
subcommands. The current column is the column under which the column
pointer is positioned.
7. Command line. The large arrow (====>) at the bottom of the screen points to
the command input area. One way you communicate with the editor is to enter
XEDIT subcommands on this line. You can type subcommands in uppercase or
lowercase or a combination of both, and many can be abbreviated. For
example, BOTTOM, Bottom, and b are all valid ways to type the BOTTOM
subcommand (which scrolls the file to the bottom).
8. Status area. The lower right corner displays the current status of your editing
session, for example, edit mode or input mode, and the number of files you are
editing. The status area in the figure shows you are editing one file.
Tip: If you want to explore XEDIT and its capabilities, type “help” at the XEDIT
command line, which opens the XEDIT help menu.
16 z/VM: Getting Started with Linux on System z
Page 31

Input mode
By issuing the subcommand INPUT at the command line (you can abbreviate the
subcommand as “i”), you enter input mode.
MY FILE A1 F 80 Trunc=80 Size=9 Line=0 Col=1 Alt=0
DMSXMD573I Input mode:
***TopofFile***
|...+....1....+....2....+....3....+....4....+....5....+....6....+....7....+....
_ 1
2
====>***Input Zone***3
Input-mode 1 File
XEDIT places the cursor 1 at the beginning of the input zone 2. The input
zone is an area in which you can place data. You can start typing at the cursor
and, when you reach the end of a line, press the new line (Enter) key to return the
cursor to the beginning of the next line. If you press the new line key on a line
without data, XEDIT returns the file to editing mode.
XEDIT blocks the command line 3 because you cannot enter subcommands
while in input mode.
Example of using input mode
1. Issue this command:
xedit my file a
2. On the command line, type input and press the Enter key.
3. Type this phrase, then press the Enter key:
CP is the z/VM hypervisor
4. Type this phrase, then press the Enter key:
CMS is the interactive component of z/VM
5. Type this phrase, then press the Enter key:
XEDIT is the CMS editor
Chapter 1. About z/VM
17
Page 32

6. Press the Enter key.
Result: Your XEDIT screen looks like this:
MY FILE A1 F 80 Trunc=80 Size=3 Line=3 Col=1 Alt=3
DMSXMD587I XEDIT:
=====***TopofFile***
===== CP IS THE Z/VM HYPERVISOR
===== CMS IS THE INTERACTIVE COMPONENT OF Z/VM
===== XEDIT IS THE CMS EDITOR
|...+....1....+....2....+....3....+....4....+....5....+....6....+....7...
=====***EndofFile***
====>
Tip: XEDIT changed all lowercase letters to uppercase. To prevent this, issue the
subcommand set case mixed before you add text.
Overview of changing files
The simplest way to change a file is to type over text on a line. However, there are
times when you want to add or delete data in a file. Special keyboard keys and
XEDIT subcommands help you do that:
v Insert key. When you press the insert key, the XEDIT cursor changes shape. By
placing the cursor on a line, you can insert text between existing letters.
v Delete key. By placing the cursor on a line and pressing the delete key, the
character to the right of the cursor is deleted and the line closes up.
v ADD and INPUT prefix commands. By moving the cursor to the prefix area,
typing “a” and pressing the Enter key, you create a new line in the file. If you
want to add five lines, type “a5” in the prefix area.
The INPUT prefix command behaves similarly.
v DELETE prefix command. By moving the cursor to the prefix area, typing “d”
and pressing the Enter key, you delete a line. If you want to delete five lines,
type “d5” in the prefix area.
v LOCATE subcommand. You can find strings in the file by using the LOCATE
subcommand. XEDIT scrolls the file to the line in which the string occurs. The
invocation is l/string or simply /string. Example: To find an occurrence of
the word “interactive” in a file, issue this command from the XEDIT command
line:
XEDIT 1File
====> l /interactive
or simply:
====> /interactive
18 z/VM: Getting Started with Linux on System z
Page 33

Example of changing files
Assume you are still editing the file in “Example of using input mode” on page 17.
1. From the XEDIT command line, type this command and press the Enter key:
====> top
2. To prevent XEDIT from turning lowercase letters to uppercase, type this
command on the command line, then press the Enter key:
====> set case mixed ignore
3. Move the cursor to the first prefix area, type “a”, then press the Enter key.
4. On the new line, type this phrase:
z/VM has many components
5. Type over the next line so the letters are in their proper case:
CP is the z/VM hypervisor
6. Create two blank lines between the first and second lines by typing “i2” in the
second prefix area and pressing the Enter key.
7. Delete one of the blank lines by typing “d” in the prefix area, then pressing the
Enter key.
8. From the XEDIT command line, locate the word “EDITOR”:
====> /editor
Result: You should see a screen like this:
MY FILE A1 F 80 Trunc=80 Size=5 Line=5 Col=1 Alt=0
=====***TopofFile***
===== z/VM has many components
=====
===== CP is the z/VM hypervisor
===== CMS IS THE INTERACTIVE COMPONENT OF Z/VM
===== XEDIT IS THE CMS EDITOR
|...+....1....+....2....+....3....+....4....+....5....+....6....+....7...
=====***EndofFile***
====>
XEDIT 1File
SAVE, FILE, QUIT, and QQUIT
SAVE, FILE, QUIT, and QQUIT are XEDIT subcommands:
v Use SAVE when you want to save changes to a file permanently but continue
editing the file.
Chapter 1. About z/VM 19
Page 34

v Use FILE when you want to save changes to a file permanently and quit editing
the file.
v Use QUIT to quit editing a file you have not changed. If you have made any
changes, XEDIT issues a message:
DMSXSU577E File has been changed; type QQUIT to quit anyway
v Use QQUIT to quit a file and not save any changes you have made since the last
save. The subcommand is handy if you decide you do not want any of the
changes you have been currently making or if you want to be sure you have not
changed a critical file.
Related information
v z/VM: CMS Primer, SC24-6172
v For more advanced information, see z/VM: XEDIT User’s Guide, SC24-6245.
Summary of Linux and z/VM similarities
Though Linux and z/VM differ in many ways, they have similar functions and
commands. Table 1 summarizes the similarities:
Table 1. Linux and z/VM similarities
Linux z/VM (CP and CMS)
boot IPL (initial program load)
df command QUERY ACCESSED command
dir command FILELIST command
file directory disk access mode
kernel Control Program (CP)
man command HELP command
memory storage
.profile PROFILE EXEC
script EXEC
shell Conversational Monitor System (CMS)
user registry user directory
vi XEDIT
20 z/VM: Getting Started with Linux on System z
Page 35

Chapter 2. Planning for Linux virtual servers
This topic covers system requirements and recommendations you need to follow
before you install z/VM.
Figure 3 is an example of a mainframe configured for z/VM, Linux guests, and
other operating systems.
Linux virtual
machines for
development,
Linux virtual
machines for
production
LPAR running
z/OS
test, and
production
replication
LPAR running
z/VM
LPAR running
z/VM
Mainframe
Figure 3. Example mainframe configuration
One logical partition (LPAR) is devoted to Linux production under z/VM. Another
LPAR is devoted to Linux application development and test under z/VM; you
might also run a replica of your production guests for testing purposes within this
LPAR. Finally, another LPAR runs another operating system, such as z/OS.
The number of Linux guests you need to run depends on many factors. This topic
discusses:
v Capacity requirements
v Memory and CPU requirements
v DASD space you need
v Network planning
v User management planning
v Obtaining your Linux distribution
© Copyright IBM Corp. 2009 21
Page 36

Overview of z/VM capacity planning
An important element of z/VM capacity planning is knowing what z/VM is good
at: the value of z/VM is its ability to consolidate distributed Linux workloads that
under-utilize CPUs or do not require peak processing at the same time. z/VM
improves the cost and performance efficiencies because it shares CPU cycles
among virtual servers that, if distributed on separate servers, would be idle. There
are three key characteristics that you should look for when deciding whether a
Linux server could be consolidated on z/VM. Look for Linux workloads that:
v Under-utilize CPUs
v Do not require peak processing at the same time as others
v Have idle times, so that z/VM can share processing cycles with other Linux
virtual servers.
Distributed servers running applications being considered for consolidation that
run at high utilization throughout the day and peak with other candidate
applications are poor candidates for consolidation. In general, the lower the
utilization of a candidate application, or the more solitary its peaks are compared
to other candidates under consideration, the more likely it can be consolidated.
Likewise, consider a benchmarking strategy that recognizes the real-world
characteristics of your Linux workloads. A typical (inappropriate) approach is to
conduct atomic measurements that compare throughput of a single instance of an
application at a CPU utilization of 100%. This type of benchmarking practice, while
simple and easy to conduct, yields inappropriate and misleading expectations of
capacity because the practice does not incorporate any of the real-world
operational characteristics or highlight any of the elements and advantages of
consolidation. While such benchmark comparisons may be appropriate in a
distributed paradigm for assessing capacity and performance of standalone servers
running a single instance of an application, these comparisons are flawed when
evaluating z/VM and the mainframe. The flaw is that such comparisons inflate the
true operational utilization and throughput of the standalone distributed servers
and do not account for the ability of z/VM to share idle cycles among virtual
servers, which is not possible on under-utilized standalone distributed servers.
Conducting a benchmark in such a fashion simply answers the question that, if
you had one server running one instance of an application at an assumed
utilization of 100%, how much throughput can you expect. In a consolidation case,
that is not the question to ask. The question when designing a methodology for
assessing capacity for consolidation is how many distributed workloads can you fit
on z/VM using the true operational utilization and throughput of those workloads
you are considering.
Once you have selected the right set of applications and their servers for
consolidation, establish a base set of measurements that capture the real
operational throughput of the servers. Figure 4 on page 23 shows a simplified
consolidation example, in which there were many application instances running on
separate standalone servers. Each of these application servers were 10% busy
producing 74 transactions per second.
22 z/VM: Getting Started with Linux on System z
Page 37

Applications on
distributed servers
10% average CPU
Same applications running in virtual servers on z/VM
App
1
74 tps
App
1
74
tps
App
40
74 tps
Figure 4. Server consolidation example
When you have established the baseline of 74 transactions per second for the
distributed servers, define an equal number of z/VM virtual servers in which to
run the applications.
To assess the system capacity required to support the same volume of work, tune
the workload driver so that each instance of the application running in a virtual
server produces the same transaction rate as its distributed counterpart.
App
2
74
tps
App
3
74
tps
App
4
74
tps
App
5
74
tps
z/VM
LPAR
App
36
74
tps
App
37
74
tps
App
38
74
tps
App
39
74
tps
App
40
74
tps
The previous example showed an even distribution of work activity. However, the
vast majority of real-world workloads skew the distribution of work. At any given
moment, some applications are active while others are less active or idle. Unless
your workload is evenly distributed, consider skewing the workload distribution
as part of your capacity assessment.
Chapter 2. Planning for Linux virtual servers 23
Page 38

40
V
.
.
i
.
r
30
.
t
.
u
.
20
a
.
l
.
.
10
S
9
8
e
7
r
6
5
v
4
e
3
2
r
1
A
Increasing throughput
Figure 5. Workload distribution patterns (Part 1 of 3)
40
V
.
.
i
.
r
30
.
t
.
u
.
20
a
.
l
.
.
10
S
9
8
e
7
r
6
5
v
4
e
3
2
r
1
B
Increasing throughput
Figure 5. Workload distribution patterns (Part 2 of 3)
40
V
.
.
i
.
r
30
.
t
.
u
.
20
a
.
l
.
.
10
S
9
8
e
7
r
6
5
v
4
e
3
2
r
1
Figure 5. Workload distribution patterns (Part 3 of 3)
Figure 5 shows three workload distribution patterns. Workload distribution pattern
A represents the prior example of an even distribution of work activity among the
24 z/VM: Getting Started with Linux on System z
C
Increasing throughput
Page 39

applications. This pattern shows the worst-case, in which all workloads demand
resources at the same time, rather than the characteristics of most production
environments. Workload distribution patterns B and C show truer operational
characteristics: at any given moment, some applications are busy while others are
idle or less busy; and at different times, different applications are busy.
Figure 6 shows the relative throughput capacity of each of patterns A, B, and C.
A
B
C
Increasing throughput
Figure 6. Relative throughput for patterns A, B, and C
Such distributions reflect the real world and place far less stress on the system
because they are more cache-friendly and can result in sharply higher capacity
results. Likewise, if your workload has characteristics of a skewed distribution,
incorporate this aspect into your benchmarking methodology.
Estimating memory and CPU requirements
In most cases, initial system sizings are done with the assistance of IBM, your
business partner, or consultant. This section gives you an appreciation for the
things considered during an initial sizing and the things you should consider as
you add work to your system.
To get you started, this topic gives you some basic knowledge about estimating the
memory and CPU requirements for your Linux virtual servers. Such estimating is
not an exact science and your experience may vary, but following the guidelines in
this topic should help you get started, after which you need to measure the
performance and fine tune your system. Topics in Chapter 11, “Monitoring
performance and capacity,” on page 117 help you fine-tune your initial
configuration.
Overview of estimating memory and CPU requirements
Memory for the LPAR
A key factor in determining memory resources is the memory required for your
applications. If the applications are new, you must estimate or start at some initial
size; you can determine existing application memory requirements if the
applications are currently running on other platforms. For example, you may not
know how much memory a new WebSphere
®
application requires, so you can start
Chapter 2. Planning for Linux virtual servers 25
Page 40

with 200 MB for the size of the Java™Virtual Machine. Additionally, WebSphere
Application Server requires 60 MB of memory.1So the total for your new
application would be 260 MB. If you have an existing WebSphere application you
know requires 250 MB of memory, the total with WebSphere Application Server
would be 310 MB.
The total memory requirement for your applications, plus memory required for
each Linux operating system and z/VM itself, give you an estimate of the memory
required for a given LPAR. Do not pad the total memory figure.
Many customers prefer to isolate their applications by running each one in a
separate virtual machine. Another strategy is to combine more than one application
in a virtual machine, keeping the number of Linux guests to a minimum rather
than creating one Linux guest for each application. The reason is that each Linux
guest brings with it some overhead: each Linux operating system itself requires
additional memory, and even an idle Linux guest uses some CPU resources. Also,
applications sometimes can share middleware, which conserves memory. If it
conforms to your installation’s policy, you might be able to combine more than one
application in a virtual machine, thereby saving memory. For example, several
WebSphere applications can share the same WebSphere Application Server and the
JVM in one virtual machine rather than each application having its own
WebSphere Application Server and JVM in its own virtual machine, which would
multiply the number of virtual machines and require more total memory.
Of the total memory requirement, start by allocating 75% to central storage and
25% to expanded storage. (Though z/OS no longer supports expanded storage,
z/VM and the hardware do.) There are performance advantages to allocating
expanded storage. Because z/VM is a 64-bit system, it seems as though allocating
all memory to central storage makes sense. However, z/VM manages a paging
hierarchy that uses expanded storage first, then slower DASD. Pages move to the
slower paging DASD when not referenced within a given time limit. But, if pages
are referenced again within the time limit, they can be brought back into central
storage rapidly. This paging design gives a more consistent response to users.
During system operations, measure actual memory usage to test the initial memory
allocation, which assumes all your guests need the estimated amount of memory
all the time. Just as CPU demand has peaks and valleys, so does memory usage.
Memory for the virtual machines
For the general case of server consolidation, keep the virtual machine size small.
How small you can define the virtual machine depends on the applications and
workloads running in those virtual machines. Various Linux distributions might
have minimum requirements as low as 64 MB. Some applications run fine in those
minimum configurations. Other applications and workloads might require larger
virtual machines. Avoid defining a virtual machine larger than it needs to be,
because Linux uses excess memory for file and buffer caches. On a standalone
system, these buffers can be very helpful for certain workloads to avoid I/O.
However, in a virtual environment, the extra memory consumed adds to overall
system memory contention. Such cases could cause a negative impact greater than
the positive impact of I/O avoidance, which is especially true in configurations in
which data is shared heavily between guests and is mostly read. In those
configurations, z/VM minidisk caching can help avoid I/O. As a general guideline,
define the virtual machine memory size to keep Linux on the verge of swapping.
1. Current requirements. For more information about Java and WebSphere memory requirements, consult Java and WebSphere
documentation.
26 z/VM: Getting Started with Linux on System z
Page 41

Lower the memory size until you see Linux begin to swap, then increase the
virtual machine memory to the next bigger size.
Another way to reduce the memory requirements is through discontiguous saved
segments (DCSS). A DCSS is an area of virtual storage outside the address range of
a virtual machine. The area can contain read-only data or reentrant code. A DCSS
connects discontiguous segments to a virtual machine’s address space so programs
can be fetched. DCSSs can be shared by many virtual machines, so total virtual
memory required might be reduced. This reduced requirement for virtual memory
can:
v Reduce CP paging requirements.
v Allow a given z/VM instance to support more Linux virtual machines.
v Reduce the amount of Linux disk I/O by having file systems, block devices, and
shared objects in DCSSs.
A Linux guest machine uses DCSSs through the DCSS block device driver.
Related information
v This manual shows you how to set up a swap disk on a z/VM minidisk. Other
options are available, such as using a virtual disk in storage. For more
information on swap disk options, see “Linux Performance when running under
VM” (http://www.vm.ibm.com/perf/tips/linuxper.html).
v For more information about DCSS block device drivers, see Linux on System z:
Device Drivers, Features, and Commands on the IBM developerWorks
System z Web site entitled “Documentation for Development stream” at:
http://www.ibm.com/developerworks/linux/linux390/documentation_dev.html
®
Linux on
Real CPU requirements
The real CPU requirement is not simply a function of a single server: rather, the
requirement is a function of all your virtual servers combined (see “Overview of
z/VM capacity planning” on page 22). You must consider what each of your
applications require and then estimate the overall CPU requirement. Your IBM
representative, business partner, or consultant offer services to help you perform
this task.
When defining z/VM LPARs, it is recommended that you assign a minimum of
two logical processors. You have the option of dedicating the processors to the
LPAR or sharing them with other LPARs. It is also possible to set different
processing weights to LPARs, which gives more processor resources to one over
another. For instance, you might give your production LPAR 60% weight and your
test LPAR 40%.
Virtual CPU requirements
In general, follow this guideline: define as many virtual CPUs as needed
(maximum CPU resources required), but do not exceed the number of real
processors assigned to this LPAR. Extra virtual CPUs just add to the overhead and
potentially increase the software multiprocessing factors.
Steps for estimating memory and CPU requirements
Before you begin: Read “Overview of estimating memory and CPU requirements”
on page 25 to understand background topics.
Perform these steps to estimate memory and CPU requirements:
Chapter 2. Planning for Linux virtual servers 27
Page 42

1. Determine a set of applications that will run in a Linux virtual server. The set
might include one or more applications that process a given workload. For
example, if you use a WebSphere application, you need to include the
WebSphere application server and the JVM.
2. Determine the total memory requirement for the application set.
3. Add the memory requirement for the Linux operating system to the
application set memory requirement. Enter the result in the left column in
Table 2.
4. If you plan to run the same application set in more than one Linux virtual
server (for instance, you want to have replicated virtual servers to distribute
the workload), multiply the result from step 3 times the number of replicated
servers. Enter the result in the right column in Table 2.
5. Repeat steps 1 through 4 for each application set.
6. Add up all the figures in the right column of Table 2, including the memory
requirement for z/VM, to get a total.
7. Calculate the central and expanded storage sizes.
8. Record the number of real CPUs available, which helps you determine how
many virtual CPUs each virtual machine has.
Table 2. Memory requirements worksheet
Application set plus Linux
1
2
3
4
5
x Number of virtual
servers
x Memory estimate
(MB)
z/VM: 40
Total:
Central storage estimate (Total x .75):
Expanded storage estimate (Total x .25):
Number of real CPUs:
You are done estimating. Later, you will measure your system’s performance and
fine tune the configuration.
Guidelines for estimating the amount of DASD you need
Here are some guidelines on estimating the amount of DASD you need.
For z/VM paging
v Provide sufficient paging DASD for the paging subsystem. As shipped, z/VM
has one full paging volume, which might be sufficient for your system. A rule of
thumb is to provide twice as much DASD space as your total virtual storage
28 z/VM: Getting Started with Linux on System z
Page 43

requirement. This value can be decreased by a fraction of the real memory
available. See “Paging Space” in z/VM: CP Planning and Administration.
v Add paging space on a volume basis: do not use the paging volume for other
purposes.
“Steps for adding a paging, spooling, or user volume” on page 35 tells you how
to add a paging volume.
Related information
For information about how z/VM uses DASD space and DASD space calculations,
see “Direct Access Storage Requirements” in z/VM: CP Planning and Administration,
SC24-6178.
For the Linux file system
v For disks for each Linux virtual server, the simplest guideline is to provide one
3390-3 at a minimum. A one-volume configuration supports many of the default
packages installed by each Linux distribution. The need for additional DASD
space depends on which additional products you install, the levels of those
products, the size of user applications associated with those products, and
end-user data.
Linux views disk space in bytes while z/VM views disk space according to the
device geometry (for example, number of cylinders). Regardless of the 3390
model, each cylinder holds approximately 670 KB when formatted. A 3390-3 has
3338 usable cylinders, which means it can hold about 2.2 GB when formatted.
The difference between 3390 models is the number of cylinders the model has. A
3390-9 has three times the capacity of a 3390-3, so it holds approximately 6.6 GB.
Consult product documentation for additional DASD space requirements. Your
Linux distributor will tell you how much disk space to use for minimum and
full installations.
v Eliminating certain Linux packages can help reduce your DASD requirements.
Consider a minimal Linux installation to save disk space.
v Another strategy to save DASD is to divide up the Linux file system into
read-only and read/write minidisks, then share the read-only minidisks among
the virtual machines running Linux.
v Do not dedicate DASD to Linux (that is, do not allocate an entire DASD to
Linux for its exclusive use). Instead, use minidisks for Linux volumes, especially
those whose I/O operations are primarily read operations, to take advantage of
minidisk caching. The z/VM Control Program by default maintains a minidisk
cache for better performance. However, if there are many write operations to the
minidisk, the extra Control Program overhead used to maintain the cache
outweighs the benefits of caching. If the I/O operations include many write
operations, turn off minidisk caching for the minidisk by using the CP command
SET MDCACHE MDISK or the MINIOPT statement in the user directory.
v The Parallel Access Volume facility allows a controller to offer multiple device
numbers that resolve to the same DASD, which allows I/O to the same DASD
to happen concurrently. If you do not have the Parallel Access Volume facility,
each DASD can do only one I/O at a time. To have your Linux file system
perform well without the Parallel Access Volume facility, you can spread the file
system across separate volumes and use the Linux logical volume manager,
which maximizes the opportunity for the I/Os to the volumes to happen
concurrently. For example, you could set up two stripes so Linux can do two
I/Os at a time. Note that the volumes should be on separate controllers to avoid
contention.
Chapter 2. Planning for Linux virtual servers 29
Page 44

Planning your network
To use Linux, you need to connect to your TCP/IP network.
You need to determine:
v The device addresses of your network interface.
v The host name and domain name of your Linux virtual servers
v The IP address and the subnet mask
v Depending on the connectivity type, the broadcast name server and network
addresses.
v Whether you plan to have your Linux virtual servers use the cryptographic
facility for SSL acceleration.
TCP/IP networking options for Linux
z/VM provides two broad categories for TCP/IP connectivity for Linux guests:
v Real network interfaces with connections to the LAN. A real network connection
may be through any device supported by Linux, including IBM Open Systems
Adapters and channel-attached devices. The real device (as defined in the
Input/Output Configuration Data Set) must be dedicated to the virtual machine
running Linux. You can do this by providing DEDICATE entries in the CP
directory entry for the virtual machine or by using the CP ATTACH command.
v Virtual network interfaces, which allow the real connections to be shared,
maximizing throughput. Virtual network connections include:
– Guest LAN. Through a guest LAN, z/VM simulates OSA-Express or
HiperSockets
communication adapters. Such connections enable guests to communicate
through a LAN rather than through point-to-point connections. If the guests
require external connectivity, that connection requires a virtual machine acting
as a router between the guest LAN and the external connection.
– Virtual switch. A virtual switch is a special kind of guest LAN. In addition to
providing a network of virtual adapters, the switch can be connected directly
to an OSA-Express QDIO adapter. This capability allows you to gain
connectivity to external LAN segments without requiring a router, reducing
CPU utilization and latency associated with providing external connectivity
through a router.
™
microcode to allow you to connect guest systems to
The virtual switch is the preferred way to connect your Linux machines to the
network, but there are other legacy connection types. For more information, see
“Networking Options in z/VM” in z/VM: Connectivity, SC24-6174.
Figure 7 on page 31 is a diagram of a virtual switch called VSWITCH1. Coupled to
the virtual switch through NICDEF directory statements are Linux virtual servers.
The DTCVSW1 service virtual machine
2
, running a subset of the TCP/IP stack, is
the virtual switch controller. The full TCP/IP stack runs in the TCPIP service
virtual machine, the z/VM production TCP/IP. The two service virtual machines
are kept separate so you can operate them independently.
Due to the advantages of virtual switches, this document shows you how to set up
a virtual switch configuration only. IBM created the TCP/IP and user directory
2. A service virtual machine or service machine is virtual machine that provides a system service, such as accounting, error recording,
or monitoring.
30 z/VM: Getting Started with Linux on System z
Page 45

changes for the default virtual switch controllers DTCVSW1 and DTCVSW23, but
there are other tasks you must do. These tasks are intermingled with other
configuration tasks in Chapter 3, “Changing the system configuration,” Chapter 5,
“Configuring TCP/IP,” and Chapter 7, “Creating your first Linux virtual machine
and installing Linux.” To place the tasks in context, Table 3 summarizes how to
configure TCP/IP and a virtual switch.
Table 3. Task roadmap for configuring TCP/IP and a virtual switch
Subtask Associated instructions (see...)
Define a virtual switch for z/VM “Steps for defining a virtual switch” on page 44
Configuring the production TCP/IP “Setting up the production TCP/IP” on page 63
Configuring TCP/IP to be logged on
automatically
Connecting your virtual machine to the
virtual switch
Configuring Linux to use the virtual
switch
“Steps for automatically starting TCP/IP” on
page 63
“Overview of defining virtual machines for
Linux” on page 71
Your Linux installation documentation. For
Linux, the connection is defined as an
OSA-Express device.
LINUX0
VSWITCH
CONTROLLER
ON
nicdef 600...
vswitch1
OSA-Express
Figure 7. Example of a virtual switch
Related information
“Networking Options in z/VM” in z/VM: Connectivity, SC24-6174
LINUX2LINUX1 LINUX4LINUX3 LINUX5 LINUX6TCPIP DTCVSW1
nicdef 600...
vswitch1
nicdef 600...
vswitch1
z/VM virtual switch VSWITCH1
CP
switch
Physical LAN
nicdef 600...
vswitch1
nicdef 600...
vswitch1
nicdef 600...
vswitch1
nicdef 600...
vswitch1
Giving Linux virtual servers access to cryptographic hardware for SSL acceleration
To run Linux as a guest under z/VM with access to cryptographic hardware for
SSL acceleration, you must
3. A second virtual switch controller is available for failover: CP automatically chooses another virtual switch controller should the
first one fail.
Chapter 2. Planning for Linux virtual servers 31
Page 46

1. Define the cryptographic facility for the LPAR in which z/VM runs through the
Hardware Configuration Definition.
2. Define the cryptographic capability for each Linux virtual machine in the user
directory.
3. Have the z90crypt device driver integrated into the Linux operating system.
Some distributions have the device driver integrated, while other distributions
require you to install it.
The user directory statement CRYPTO APVIRT provides access to the cryptographic
hardware and allows the z90crypt device driver to use cryptographic instructions.
z/VM manages a pool of hardware cryptographic queues that are shared among
all the guests using the cryptographic facility. You can create more guests that
share the cryptographic facility than the actual number of hardware queues
available. Even though the hardware queues are shared, the data remains isolated
and is not vulnerable or exposed to other Linux images.
“Steps for defining a master virtual machine for Linux” on page 71 shows you
how to add the CRYPTO APVIRT user directory statement to the master Linux virtual
machine, which means all replicas of this master have access to the cryptographic
facility. If you prefer, you can leave this statement out of the master Linux virtual
machine and add the user directory statement to individual Linux virtual machines
only.
z/VM provides CP commands to manage the cryptographic facility. See “Step for
managing real devices” on page 100, and “Virtual machine operation tasks” on
page 107.
Related information
v For more information about defining the cryptographic facility for the LPAR in
which z/VM runs, consult your hardware and Hardware Configuration
Definition documentation.
v For more information about z/VM's support for the cryptographic facility, see
“Using a Cryptographic Coprocessor Facility” in z/VM: CP Planning and
Administration.
v For information about setting up secure SSL communications, see “Configuring
the SSL Server” in z/VM: TCP/IP Planning and Customization.
v For information about the z90crypt device driver, see Linux on System z: Device
Drivers, Features, and Commands on the IBM developerWorks Linux on System z
Web site entitled “Documentation for Development stream” at:
http://www.ibm.com/developerworks/linux/linux390/documentation_dev.html
Planning for user management
To add a new user to z/VM, you must create a directory entry for a new virtual
machine. Through native facilities, you can update a file called USER DIRECT,
then run the DIRECTXA utility to compile the source file and place the new user
directory online. The USER DIRECT file is simply a CMS file containing various
directory statements. A virtual machine definition is a grouping of directory
statements beginning with a USER statement and ending with either the next
USER statement or the end of the file.
You can administer the user directory by editing the USER DIRECT file, then
placing the user directory online through the DIRECTXA command. However, such
a method of user management is cumbersome and error prone. Because the user
32 z/VM: Getting Started with Linux on System z
Page 47

directory is so important for z/VM, a corrupt or invalid online user directory can
be disastrous. For example, if you inadvertently overlap minidisk definitions, it
could cause serious data loss. If your z/VM system has more than a handful of
virtual machines, it makes little sense to manage users manually. You need an
automated facility.
The Directory Maintenance Facility for z/VM (often called DirMaint) is just such
an automated facility. DirMaint is a CMS application that helps you manage your
z/VM user directory through a simplified command interface and automated
facilities. DirMaint commands, which are like their corresponding directory
statements, initiate user directory transactions. DirMaint error checking ensures
that only valid changes are made to the user directory, and that only authorized
personnel are able to make the requested changes. Any transaction requiring the
allocation or deallocation of minidisk extents can be handled automatically. You
can control all user-initiated transactions through passwords and record
transactions for auditing purposes.
When you activate DirMaint, you give control over the user directory to the
DIRMAINT service virtual machine. The source USER DIRECT file on the MAINT
virtual machine’s 2CC disk is no longer valid and you must not use the
DIRECTXA command. DirMaint maintains and updates the online user directory.
You interact with the DIRMAINT service machine through commands to make
changes to the user directory.
A handy DirMaint function for virtual machines is the capability to define template
(or prototype) directory entries. With this function, you can clone a virtual machine
with a few commands by instructing DirMaint to create a new virtual machine like
the prototype entry and to replicate the prototype’s disks. For more information
about using templates for cloning virtual machines, see Chapter 8, “Cloning Linux
virtual servers,” on page 83.
DirMaint also has a service virtual machine called DATAMOVE. The service
machine moves the contents of CMS-formatted minidisks from one disk to another,
then erases the contents of the CMS minidisks being deleted. Because these
functions are time consuming, the functions are offloaded from the DIRMAINT
service machine to the DATAMOVE service machine, making DIRMAINT available
to process commands.
Directory Maintenance Facility is preinstalled on your system in a disabled state.
To use DirMaint, you must first pay a license fee, then enable the feature and
configure it. Table 4 gives you an overview of the tasks involved for enabling and
configuring DirMaint.
Table 4. Task roadmap for enabling and configuring DirMaint
Subtask Associated instructions (see...)
Enabling the Directory Maintenance
Facility
“Steps for enabling DirMaint” on page 51
Chapter 2. Planning for Linux virtual servers 33
Page 48

Table 4. Task roadmap for enabling and configuring DirMaint (continued)
Subtask Associated instructions (see...)
Configuring the Directory Maintenance
Facility
v “Steps for changing the passwords for
DirMaint service machines” on page 52
v “Steps for configuring DirMaint” on page 53
v “Steps for authorizing users to perform
DirMaint tasks” on page 54
v “Steps for controlling where DirMaint creates
minidisks” on page 55
v “Steps for copying the current USER DIRECT
file” on page 57
v “Steps for putting the configuration into
production and starting DirMaint” on page 58
v “Steps for automatically starting DIRMAINT”
on page 59
Testing and using the Directory
Maintenance Facility
v “Steps for testing DirMaint” on page 60
v “Step for modifying the OPERATOR’s directory
entry” on page 60
Related information
v Program Directory for IBM z/VM Directory Maintenance Facility Feature at:
http://www.ibm.com/eserver/zseries/zvm/library/
v z/VM: Directory Maintenance Facility Tailoring and Administration Guide, SC24-6190
Steps for obtaining documentation and media
You must obtain your Linux distribution documentation and installation media.
Before you begin: You need to decide which Linux distribution you will use.
Perform these steps to obtain documentation and media:
1. Obtain Linux documentation according to your distribution:
v SUSE Linux documentation at http://www.suse.com
v Red Hat, Inc., documentation at http://www.redhat.com
2. Access the installation media provided with your distribution. You need access
to:
v The Linux system files (kernel, parm file, and initial RAM file)
v A UNIX-based FTP or NFS server attached to your network.
You are finished when you have obtained the documentation and access to
installation media.
34 z/VM: Getting Started with Linux on System z
Page 49

Chapter 3. Changing the system configuration
This topic tells you how to change the z/VM system by updating the SYSTEM
CONFIG file.
Overview of the SYSTEM CONFIG file
The SYSTEM CONFIG file contains the primary system definitions used when CP
is booted (IPLed). All of the information needed to configure CP statically comes
from this file. As a system programmer, you should become familiar with this file.
The SYSTEM CONFIG file resides in the same location as the bootable CP kernel.
Both objects, along with other files and modules, reside on a special
CMS-formatted minidisk. Minidisks containing such objects are called parm disks
because when allocated those disks are given a special record category type called
“PARM”. There can be more than one parm disk allocated in a z/VM system for
backup and recovery. However, for any specific IPL, only one parm disk is used to
load code and configuration files.
Related information
“Using Configuration Files” in z/VM: CP Planning and Administration, SC24-6178.
Steps for adding a paging, spooling, or user volume
z/VM classifies DASD volumes according to their use. In this topic, you format
and allocate paging, spooling, and user volumes. A paging volume is a volume
owned by CP that is used by the paging subsystem; a spooling volume is a volume
owned by CP that is used by the spooling subsystem for spool files; and a user
volume is a DASD volume that CP uses for minidisks.
Before you can attach a paging, spooling, or user volume, you must format and
label the volume. Later, you will update the CP-owned volume list in SYSTEM
CONFIG to include new paging and spooling volumes, and the user volume list in
SYSTEM CONFIG to include user volumes, so you need to format the new
volumes now. Use the CPFMTXA utility program. Then use CPFMTXA to allocate
the volumes as paging, spooling, or user volumes.
Before you begin: You need to know how many paging, spooling, and user
volumes you need. See “Guidelines for estimating the amount of DASD you need”
on page 28.
You need to log on as MAINT. You need to have one or more real DASD volumes
connected to your computer.
Perform these steps to format a paging, spooling, or user volume:
1. Attach the volume to MAINT.
Example: If the volume is at real address 202, type this command and press
the Enter key:
© Copyright IBM Corp. 2009 35
Page 50

attach 202 *
DASD 0202 ATTACHED TO MAINT 0202 WITH DEVCTL
Ready;
2. Start CPFMTXA:
cpfmtxa 202
3. Type in these responses and press the Enter key in response to each prompt:
ENTER FORMAT, ALLOCATE, LABEL, OR QUIT:
format
ENTER THE CYLINDER RANGE TO BE FORMATTED ON DISK 0202 OR QUIT:
000 end
ENTER THE VOLUME LABEL FOR DISK 0202:
label
FORMAT WILL ERASE CYLINDERS 00000-00544 ON DISK 0202
DO YOU WANT TO CONTINUE? (YES|NO)
yes
.
.
.
ENTER INPUT COMMAND:
end
ICK00002I ICKDSF PROCESSING COMPLETE. MAXIMUM CONDITION CODE WAS 0
ENTER ALLOCATION DATA
.
.
.
where label is a volume label (for instance, PAG002 for a paging volume,
SPL002 for a spooling volume, or USR002 for a user volume).
4. In response to the “ENTER ALLOCATION DATA” prompt, type one of these
responses and press the Enter key:
v If you are creating a paging volume:
page 0 end
end
v If you are creating a spooling volume:
spol 0 end
end
v If you are creating a user volume:
perm 0 end
end
Result: You see more messages from the program. Finally, you see this:
ICK00002I ICKDSF PROCESSING COMPLETE. MAXIMUM CONDITION CODE WAS 0
5. Detach the volume.
detach 202
DASD 0202 DETACHED
Ready;
6. Repeat these steps for other paging, spooling, and user volumes you need.
36 z/VM: Getting Started with Linux on System z
Page 51

7. Record the volume label and allocation type for each volume you have
defined. You will use this information later when updating the CP-owned
volume list.
You are done for now. Later, you will make these volumes available to CP for its
use.
Steps for releasing the primary parm disk
Before you begin updating the SYSTEM CONFIG file, you must end CP’s access to
the primary parm disk.
Before you begin: You need to log on as MAINT.
Perform these steps to release the primary parm disk:
1. Instruct CP to end its access to the primary parm disk. Type this command
and press the Enter key:
cprelease a
CPRELEASE request for disk A scheduled.
HCPZAC6730I CPRELEASE request for disk A completed.
Ready;
2. Access the primary parm disk (MAINT’s CF1). Type these commands and
press the Enter key after each command:
link * cf1 cf1 mr
Ready;
access cf1 z
Ready;
You know you are done when you have access to the CF1 disk.
Steps for updating the CP-owned volume list
The CP-owned volume list is the place where you specify the labels of paging and
spooling volumes that CP should automatically attach to the system during IPL.
These volumes contain the system data for your z/VM system. All other volumes
on the system are considered user volumes.
Before you begin: You need to format and allocate your paging and spooling
volumes. See “Steps for adding a paging, spooling, or user volume” on page 35.
You need to end CP’s access to the primary parm disk. See “Steps for releasing the
primary parm disk.”
Perform these steps to update the CP-owned volume list:
1. Edit the SYSTEM CONFIG file. Type this command and press the Enter key:
xedit system config z
Chapter 3. Changing the system configuration
37
Page 52

Result: You see a file like this:
SYSTEM CONFIG Z1 F 80 Trunc=80 Size=277 Line=4 Col=1 Alt=0
***TopofFile***
/**********************************************************************/
/* SAMPLE SYSTEM CONFIG FILE */
/**********************************************************************/
/* */
/* Rules of the config file: */
/* */
/* 1) REXX style comments are permitted */
/* */
/* 2) Configuration commands can be continued to next line via a */
/* trailing comma on the previous line */
/* */
/* 3) IMBED statements can be used to imbed other files that */
/* reside on the PARMDISK into the configuration file */
/* */
/* 4) The IMBED record is of the format: IMBED fn ft */
/* */
/* 5) Tolerance record can be used to signal whether CP should */
/* tolerate errors in some sections of the CONFIG file or not; */
/* default is to have tolerance on (that is to tolerate errors) */
/* */
====>
2. Find the section titled “CP_Owned Volume Statements.” At the XEDIT
command line, type this command and press the Enter key:
====> /cp_owned volume statements
3. Move the cursor to a CP-owned slot marked “Reserved.”
4. Type over the word “Reserved” with the volume label of a paging or spooling
volume that you allocated in “Steps for adding a paging, spooling, or user
volume” on page 35.
Example: If you are adding a spooling volume called “SPL001,” type in that
volume label and use the space bar to remove the rest of the characters in the
word “Reserved.”
5. Move the cursor to the next line and repeat step 4 for the other paging and
spooling volumes you have allocated.
6. Save the file. At the XEDIT command line, type this command and press the
Enter key:
====> save
38 z/VM: Getting Started with Linux on System z
Page 53

You should now see something like this:
SYSTEM CONFIG Z1 F 80 Trunc=80 Size=277 Line=74 Col=1 Alt=0
/**********************************************************************/
/* CP_Owned Volume Statements */
/**********************************************************************/
CP_Owned Slot 1 610RES
CP_Owned Slot 2 610SPL
CP_Owned Slot 3 610PAG
CP_Owned Slot 4 610W01
CP_Owned Slot 5 610W02
CP_Owned Slot 6 SPL001
CP_Owned Slot 7 RESERVED
CP_Owned Slot 8 RESERVED
CP_Owned Slot 9 RESERVED
CP_Owned Slot 10 RESERVED
CP_Owned Slot 11 RESERVED
CP_Owned Slot 12 RESERVED
CP_Owned Slot 13 RESERVED
Steps for updating the default system identifier
The default system identifier appears on printed output separator pages and the
status area of 3270 display screens. z/VM assigns the identifier ZVMV6R10 to all
z/VM version 6 release 1 systems. If you have many z/VM systems, it is difficult
to determine which z/VM system you are logged onto unless you make the
system identifier unique for each system.
Before you begin: You need to end CP’s access to the primary parm disk. See
“Steps for releasing the primary parm disk” on page 37.
Perform these steps to update the default system identifier:
1. Edit the SYSTEM CONFIG Z file. Type this command and press the Enter key:
xedit system config z
2. Find the line “System_Identifier_Default.” At the XEDIT command line, type
this command and press the Enter key:
====> /system_identifier_default
3. Replace the default system identifier with your own:
System_Identifier_Default mysystem
where mysystem is your system identifier, such as VM610A.
4. Save the file. At the XEDIT command line, type this command and press the
Enter key:
====> save
Chapter 3. Changing the system configuration
39
Page 54

You should now see something like this:
SYSTEM CONFIG Z1 F 80 Trunc=80 Size=277 Line=114 Col=1 Alt=0
/**********************************************************************/
/* System_Identifier Information */
/**********************************************************************/
System_Identifier_Default VM610A
Steps for updating the user volume list
Just as there is a list of DASD volumes that CP should automatically attach to the
system during IPL for access to CP system areas, there is a list of DASD volumes
that CP should automatically attach to the system for user minidisk definitions.
Because all minidisks are managed by CP, all volumes that house minidisks must
be attached to the z/VM system. CP must control the volumes so it can reorient
channel programs initiated by a guest operating system. The guest perceives its
disks as starting at cylinder 0, but the true location of the guest’s minidisk starts at
an offset of real cylinder 0.
If no user volumes are attached to the system at IPL time, the real devices housing
minidisks need to be attached manually (see “Step for managing real devices” on
page 100). Otherwise, virtual machines will have no disks. To avoid manual
attachment, you can tell CP to look for DASD volume labels and attach those
devices at IPL time.
The USER_VOLUME_LIST statement directs CP to attach specific user DASD
volumes at z/VM load (IPL) time. The USER_VOLUME_INCLUDE statement
allows you to create a general volume identifier and to include all volumes that
match the general identifier. For example, if all your Linux user volumes have a
volume identifier starting with V2LX, you can add this statement:
User_Volume_Include V2LX*
Tip: If a volume is normally attached to the system using a
USER_VOLUME_INCLUDE statement, CP does not notify the operator if the
volume is not mounted. If a user volume is necessary for normal system operation,
specify it with a USER_VOLUME_LIST statement so that the operator is notified
during system initialization if the volume is not mounted.
Before you begin: You need to format and allocate the user volumes you need. See
“Steps for adding a paging, spooling, or user volume” on page 35.
You need to end CP’s access to the primary parm disk. See “Steps for releasing the
primary parm disk” on page 37.
Perform these steps to update the user volume list:
1. Edit the SYSTEM CONFIG Z file. Type this command and press the Enter key:
xedit system config z
2. Find the section titled “User_Volume_List.” At the XEDIT command line, type
this command and press the Enter key:
====> /user_volume_list
40 z/VM: Getting Started with Linux on System z
Page 55

3. Move the cursor to the “User_Volume_List” statements.
4. Blank out the comments (“/*” and “*/”) on either side of the
“User_Volume_List” statement and add the DASD label for the user volume.
Example:
User_Volume_List LINUSR
5. Move the cursor after the User_Volume_List statements. In the prefix area,
type “i” and press the Enter key:
00107 User_Volume_List LINUSR
00108 /* User_Volume_List USRP02 */
00109 /* User_Volume_List USRP03 */
00110 /* User_Volume_List USRP04 USRP05 USRP06 USRP07 */
i
6. Add a User_Volume_Include statement.
Example:
User_Volume_Include V2LX*
7. If necessary, repeat steps 4, 5, and 6.
8. When you finish the User_Volume_Include statements, press the Enter key.
9. Save the file. At the XEDIT command line, type this command and press the
Enter key:
====> save
You should now see something like this:
SYSTEM CONFIG Z1 F 80 Trunc=80 Size=253 Line=101 Col=1 Alt=3
/**********************************************************************/
/* User_Volume_List */
/* These statements are not active at the present time. They are */
/* examples, and can be activated by removing the comment delimeters. */
/* Multiple labels can be stacked on one statement. */
/**********************************************************************/
User_Volume_List LINUSR
/* User_Volume_List USRP02 */
/* User_Volume_List USRP03 */
/* User_Volume_List USRP04 USRP05 USRP06 USRP07 */
User_Volume_Include V2LX*
Steps for setting up warm start, clearing tdisk space, and other features
The FEATURES statement in SYSTEM CONFIG allows you to modify attributes
associated with the running system at IPL time. In this procedure, you will modify
some of the features:
v The Auto_Warm_IPL feature causes CP to bypass prompting for start options,
provided the previous system shutdown was successful. The feature allows for a
fully automated startup of z/VM.
Chapter 3. Changing the system configuration 41
Page 56

v The Clear_TDisk feature causes CP to erase temporary disks fully (that is,
overwrite the entire temporary disk with zeros) after those disks are detached.
The feature prevents another user who may define an identically sized
temporary disk from accessing data written by the previous user.
v The Retrieve defines the default and maximum number of retrieve buffers
allowed per user on your system. Retrieve buffers create a command history,
from which users can retrieve commands previously issued. Command retrieval
is usually assigned to a program function key such as PF12 (F12). The
assignment is through the CP SET command, SET PF12 RETRIEVE. By pressing
PF12, a command is retrieved and written back into the command area on the
terminal screen. You probably do not need to change these settings.
v The Passwords_on_Cmds feature tells CP whether to prompt users for
passwords when using the CP AUTOLOG, LINK, or LOGON commands.
v The Disconnect_timeout feature controls whether and when a virtual machine is
logged off after it has been forced to disconnect. You will turn this feature off, so
that any virtual machine that has been forced to disconnect will not be logged
off.
v The ShutdownTime and Signal ShutdownTime features enable a virtual machine
to register with CP to receive a shutdown signal when z/VM is shutting down
(see “Steps for enabling Linux virtual servers to shut down automatically” on
page 87). CP waits to shut itself down until the time interval (in seconds) is
exceeded, or all of the virtual machines enabled for the signal shutdown have
reported a successful shutdown. Some Linux distributions support this function,
which allows Linux to shut down cleanly before z/VM shuts down.
Before you begin: You need to end CP’s access to the primary parm disk. See
“Steps for releasing the primary parm disk” on page 37.
Perform these steps to update the FEATURES statement:
1. Edit the SYSTEM CONFIG Z file. Type this command and press the Enter key:
xedit system config z
2. Find the line containing the text “Set_Privclass” in the section titled “Features
Statement.” At the XEDIT command line, type this command and press the
Enter key:
====> /set_privclass
3. At the command line, type this command and press the Enter key:
====> i
4. Type this line (indent three spaces), then press the Enter key twice:
Enable ,
You might also change the comments for “Auto_Warm_IPL” and
“Clear_TDisk”.
5. Under “Passwords_on_Cmds ,”:
a. Change the three instances of “yes” to “no”. You might also want to
change the comments for these lines to reflect your change.
42 z/VM: Getting Started with Linux on System z
Page 57

b. Move the cursor to the line containing the text “Logon no”. After the word
“no” place a space and a comma.
6. Move the cursor to the prefix area on the line “Vdisk Userlim 144000 blocks ,”,
type “i4” followed by a space, then press the Enter key.
7. Type these features (indent as shown) on the new lines:
Disconnect_timeout off
Set ,
ShutdownTime 30 ,
Signal ShutdownTime 500
8. Save the file. At the XEDIT command line, type this command and press the
Enter key:
====> save
You should now see something like this:
SYSTEM CONFIG Z1 F 80 Trunc=80 Size=258 Line=148 Col=1 Alt=4
Features ,
Disable , /* Disable the following features */
Set_Privclass , /* Disallow SET PRIVCLASS command */
Enable ,
Auto_Warm_IPL , /* Bypass prompting at IPL */
Clear_TDisk , /* Clear TDisks when detached */
Retrieve , /* Retrieve options */
Default 20 , /* Default.... default is 20 */
Maximum 255 , /* Maximum.... default is 255 */
MaxUsers noLimit , /* No limit on number of users */
Passwords_on_Cmds , /* What commands allow passwords? */
Autolog no , /* ... AUTOLOG does not */
Link no , /* ... LINK does not */
Logon no , /* ... and LOGON does not, too */
Vdisk Userlim 144000 blocks , /* Maximum vdisk allowed per user */
Disconnect_timeout off
Set,
ShutdownTime 30 ,
Signal ShutdownTime 500
Steps for controlling access to devices at startup
Sometimes your z/VM system may have access to devices that you do not want to
be varied online during IPL. For instance, the devices may duplicate labels of
devices used by your production system, or may be in use by other LPARs or
systems. You can specify ranges of devices that z/VM should not vary online
during IPL.
Before you begin: You need to end CP’s access to the primary parm disk. See
“Steps for releasing the primary parm disk” on page 37.
Perform these steps to control access to devices at startup:
1. Edit the SYSTEM CONFIG Z file. Type this command and press the Enter key:
xedit system config z
2. Find the section titled “Status of Devices.” At the XEDIT command line, type
this command and press the Enter key:
Chapter 3. Changing the system configuration 43
Page 58

====> /status of devices
3. Find the line containing the text “Online_at_IPL.” At the XEDIT command
line, type this command and press the Enter key:
====> /online_at_ipl
4. At the command line, type this command and press the Enter key:
====> i
5. Type this line, then press the Enter key twice:
Offline_at_IPL rdevs,
where rdevs is a list of real device numbers.
Example:
Offline_at_IPL 0291–0592,
6. Save the file. At the XEDIT command line, type this command and press the
Enter key:
====> save
You should now see something like this:
SYSTEM CONFIG Z1 F 80 Trunc=80 Size=284 Line=210 Col=1 Alt=0
/**********************************************************************/
/* Status of Devices */
/**********************************************************************/
Devices ,
Online_at_IPL 0000-FFFF,
Offline_at_IPL 0291-0592,
Sensed 0000-FFFF
Steps for defining a virtual switch
The recommended facility to use when virtual machines need to have network
connectivity with each other is a z/VM virtual switch. You can define a virtual
switch dynamically using the CP DEFINE VSWITCH command, but attempts by
guests to use the virtual switch fail if you do not do this before guests try to use it.
Such a situation is disruptive to the Linux boot process. To be sure the virtual
switch is always available for your Linux guests, define a virtual switch in the
SYSTEM CONFIG file.
For an overview on configuring TCP/IP for Linux, see “TCP/IP networking
options for Linux” on page 30.
This procedure defines the virtual switch for z/VM. Subsequent topics explain
how to set up TCP/IP and your virtual machines to use the virtual switch.
44 z/VM: Getting Started with Linux on System z
Page 59

Before you begin: You need to end CP’s access to the primary parm disk. See
“Steps for releasing the primary parm disk” on page 37.
Perform these steps to define a virtual switch:
1. Edit the SYSTEM CONFIG Z file. Type this command and press the Enter key:
xedit system config z
2. Find the section titled “Status of Devices.” At the XEDIT command line, type
this command and press the Enter key:
====> /status of devices
3. Find the line containing the text “Sensed.” At the XEDIT command line, type
this command and press the Enter key:
====> /sensed
4. At the command line, type this command and press the Enter key:
====> i
5. Type these lines, then press the Enter key twice.
DEFINE VSWITCH switch_name RDEV rdev [PRIROUTER]
MODIFY VSWITCH switch_name GRANT userid
where:
switch_name
is a name you give the virtual switch
rdev
is the real device address of your QDIO OSA-Express device
userid
is the user ID of a virtual machine for which you are granting access to the
virtual switch.
Note that the PRIROUTER (primary router) option is in brackets, indicating it
is optional. The PRIROUTER option is required if any of your Linux virtual
servers will act as a router to other networks. If you specify the PRIROUTER
option, do not use the brackets.
Example: If the switch name is VSWITCH1, the real device address of your
OSA-Express device is BC0, and your virtual machine is LINUX0, add these
lines:
DEFINE VSWITCH VSWITCH1 RDEV BC0
MODIFY VSWITCH VSWITCH1 GRANT LINUX0
6. Repeat the MODIFY VSWITCH command with the GRANT option for each
user ID you wish to use the virtual switch.
Chapter 3. Changing the system configuration 45
Page 60

7. Save the file. At the XEDIT command line, type this command and press the
Enter key:
====> save
You should now see something like this:
SYSTEM CONFIG Z1 F 80 Trunc=80 Size=286 Line=210 Col=1 Alt=0
/**********************************************************************/
/* Status of Devices */
/**********************************************************************/
Devices ,
Online_at_IPL 0000-FFFF,
Offline_at_IPL 0291-0592,
Sensed 0000-FFFF
DEFINE VSWITCH VSWITCH1 RDEV BC0
MODIFY VSWITCH VSWITCH1 GRANT LINUX0
Steps for setting addresses for consoles
During the first IPL of your z/VM system, you needed to specify a load parameter
so you could communicate with the Stand-Alone Program Loader (SAPL). The
reason is the new z/VM system did not know which device address to use to
display messages and prompts. The installation system includes default device
addresses for use as the system operator console and emergency messages console,
but these addresses rarely correspond to your production hardware configuration.
So you will not need to use the SAPL each time you IPL z/VM, you need to
supply the address of your IPL console and your emergency messages console on
the Operator_Consoles statement.
During IPL, CP tries each device on the Operator_Consoles statement (from left to
right) until it finds an active device. If no devices on the list are active, CP loads a
disabled wait state and terminates.
The emergency message console is used as an additional console during failures.
Define the emergency console with the Emergency_Message_Console statement.
Before you begin: You need to end CP’s access to the primary parm disk. See
“Steps for releasing the primary parm disk” on page 37. You need to know the real
device addresses for the operator console and the emergency message console.
Perform these steps to set up addresses for consoles:
1. Edit the SYSTEM CONFIG Z file. Type this command and press the Enter key:
xedit system config z
2. Find the Operator_Consoles statement. At the XEDIT command line, type this
command and press the Enter key:
====> /operator_consoles
3. Replace all device addresses on the Operator_Consoles statement with the real
device addresses for your operator consoles.
46 z/VM: Getting Started with Linux on System z
Page 61

Notes:
a. You can have one or more console addresses.
b. If you are not using 3270 devices on your system and are using 3270
integrated consoles instead, the keyword “System_3270” designates a
full-screen integrated 3270 console (also known as SYSG) and the keyword
“System_Console” designates an integrated line mode 3270 console (also
known as SYSC).
4. Use the same addresses for the Emergency_Message_Console statement as you
did for the Operator_Consoles statement.
5. Save the file. At the XEDIT command line, type this command and press the
Enter key:
====> save
You should now see something like this:
SYSTEM CONFIG Z1 F 80 Trunc=80 Size=286 Line=222 Col=1 Alt=0
/**********************************************************************/
/* Console Definitions */
/**********************************************************************/
Operator_Consoles 0021 System_3270 System_Console
Emergency_Message_Consoles 0021 System_3270 System_Console
Steps for updating special escape character defaults
z/VM provides special escape characters that, when included in terminal input
streams, tell CP to perform an action before evaluating subsequent characters in
the stream. An important escape character is the line end character; this character,
followed by “cp” indicates that what follows is a CP command and should not be
given to Linux. The default line end character is “#”.
Example: Issuing:
#cp query time
sends the QUERY TIME command to CP rather than Linux.
Unfortunately, the default line end character is “#”, which is also a special
character for Linux. For example, the prolog to a shell script usually has a
character string known as the “shebang” consisting of the characters “#!” followed
by the path to the shell program used to evaluate the shell script. If you enter
those characters on a virtual machine console (for example, while using the line
mode editor ed), CP strips off the # symbol and attempts to evaluate the characters
as command input.
You can change the default special escape characters for each virtual machine
individually, or set a system-wide default. If the primary purpose of your z/VM
system is for Linux virtual servers, it makes sense to change the default
system-wide. Chapter 10, “Performing run-time tasks,” on page 97 shows you how
to change the special escape characters for an individual virtual machine.
Chapter 3. Changing the system configuration 47
Page 62

Before you begin: You need to end CP’s access to the primary parm disk. See
“Steps for releasing the primary parm disk” on page 37.
Perform these steps to update system-wide special escape character defaults:
1. Edit the SYSTEM CONFIG Z file. Type this command and press the Enter key:
xedit system config z
2. Find the section entitled “Special characters for system set here.” At the XEDIT
command line, type this command and press the Enter key:
====> /special characters for system set here
3. Move the cursor to the line with the text “Escape”, then move it to the first
quote mark.
4. Type “OFF”.
Char_Delete OFF , /* System default ... @ */
Escape OFF , /* System default ... " */
Line_Delete OFF , /* Default is cent sign */
5. Move the cursor to “Line_End”, and replace “#” with “%”.
Line_End '%' , /* System default ... # */
6. Save the file. At the XEDIT command line, type this command and press the
Enter key:
====> save
You should now see something like this:
SYSTEM CONFIG Z1 F 80 Trunc=80 Size=286 Line=233 Col=1 Alt=0
/**********************************************************************/
/* Special characters for system set here */
/**********************************************************************/
Character_Defaults ,
Char_Delete OFF , /* System default ... @ */
Escape OFF , /* System default ... " */
Line_Delete OFF , /* Default is cent sign */
Line_End '%' , /* System default ... # */
Tab OFF /* System default ... " */
Steps for checking the syntax of the SYSTEM CONFIG file
Be sure the SYSTEM CONFIG file has the correct syntax by using the CPSYNTAX
command.
Before you begin: You need to end CP’s access to the primary parm disk. See
“Steps for releasing the primary parm disk” on page 37.
Perform these steps to check the syntax of the SYSTEM CONFIG file:
1. Access the 193 disk as X. From the command line, type this command and
press the Enter key:
48 z/VM: Getting Started with Linux on System z
Page 63

access 193 x
2. If you are still editing SYSTEM CONFIG, exit the XEDIT session. From the
XEDIT command line, type this command and press the Enter key:
====> file
3. Run the CPSYNTAX command. From the command line, type this command
and press the Enter key:
cpsyntax system config
Configuration file processing complete -- no errors encountered.
Ready;
4. Check for a zero return code. If you do not get a zero return code, modify the
SYSTEM CONFIG file.
You are done when you get a zero return code from CPSYNTAX.
Steps for restoring CP’s access to the primary parm disk
You need to configure DirMaint and TCP/IP, so do not shut down z/VM at this
point. Because you are not shutting down, you need to restore CP’s access to the
parm disk.
Before you begin: You need to log on as MAINT.
Perform these steps to restore the primary parm disk:
1. Release MAINT’s access to the parm disk.
release z
Ready;
2. Change MAINT’s read/write access to read-only.
link * cf1 cf1 rr
Ready;
3. Restore CP’s access to the parm disk.
cpaccess maint cf1 a sr
You should see responses like:
cpaccess maint cf1 a sr
CPACCESS request for mode A scheduled.
Ready;
CPACCESS request for MAINT's 0cf1 in mode A completed.
Chapter 3. Changing the system configuration
49
Page 64

50 z/VM: Getting Started with Linux on System z
Page 65

Chapter 4. Configuring the Directory Maintenance Facility
This topic describes how to configure the Directory Maintenance Facility
(DirMaint). For an overview of DirMaint and user management, see “Planning for
user management” on page 32.
If you need to repeat these tasks, be sure to shut DirMaint down.
Steps for enabling DirMaint
Before you begin: You need to have a license for the DirMaint product. For
ordering information, see the announcement letter for z/VM or contact your IBM
representative.
Perform these steps to enable DirMaint:
1. Log onto MAINT.
2. Check that MAINT has write access to minidisk 51D.
a. From the command line, type this command and press the Enter key:
query accessed
Mode Stat Files Vdev Label/Directory
A R/W 9 191 MNT191
B R/W 130 5E5 MNT5E5
C R/W 59 2CC MNT2CC
D R/W 185 51D MNT51D
S R/O 689 190 MNT190
Y/S R/O 1008 19E MNT19E
Ready;
b. If 51D is not accessed as R/W, type this command and press the Enter key:
link maint 51d 51d m
Ready;
Note: If MAINT cannot access 51d in R/W mode, another user has the link
as R/W and must change its access to R/O. Do not use mw mode
for MAINT’s link.
3. Access MAINT’s 51D. From the command line, type this command and press
the Enter key:
access 51d d
Ready;
4. Enable DirMaint. From the command line, type this command and press the
Enter key:
service dirm enable
Result: The command:
v Sets DirMaint as ENABLED within CP.
v Updates the SYSTEM CONFIG file on the primary parm disk.
© Copyright IBM Corp. 2009 51
Page 66

Continue to the next steps.
Steps for changing the passwords for DirMaint service machines
As shipped with z/VM, the DIRMAINT, DATAMOVE, and 6VMDIR10 virtual
machines have directory entries, but with “NOLOG” instead of passwords, which
prevents the virtual machine from being logged on. You must change the directory
entries to include passwords.
Before you begin: You must log onto MAINT.
Perform these steps to update DIRMAINT’s password:
1. Edit the USER DIRECT file.
xedit user direct c
2. Find the directory entry for DIRMAINT. On the XEDIT command line, type
this command and press the Enter key:
====> /USER DIRMAINT
3. Type your password over the word “NOLOG”. If you need to insert
characters, press the Insert key. Example:
USER DIRMAINT MYPASSWD 32M 64M BDG
.
.
.
4. Repeat steps 2 and 3 for the DATAMOVE user.
5. Similarly, change the default password for the 6VMDIR10 user.
6. Check 6VMDIR10 for this statement:
.
.
.
LINK MAINT 2CC 2CC RR
.
.
.
If the statement does not exist, add it to the LINK statements for this user.
7. Save the file. From the XEDIT command line, type this command and press
the Enter key:
====> file
8. Place the new user directory online. From CMS, type this command and press
the Enter key:
directxa user direct c
z/VM USER DIRECTORY CREATION PROGRAM - VERSION 5 RELEASE 1.0
EOJ DIRECTORY UPDATED AND ON LINE
Ready; T=0.13/0.15 14:33:34
9. Disconnect from MAINT.
Tip: Before you disconnect from a virtual machine like MAINT, issue the CP
command SET RUN ON. This command causes any programs running in the
virtual machine to continue running even if the virtual machine enters a CP
52 z/VM: Getting Started with Linux on System z
Page 67

READ state. You can place CP SET RUN ON in MAINT’s PROFILE EXEC to
avoid having to execute the command every time you disconnect from
MAINT.
set run on
disc
Continue to the next steps.
Steps for configuring DirMaint
6VMDIR10 is the user ID that does service and maintenance for DirMaint. In
keeping with the practice for products maintained by the VMSES/E component of
z/VM, the virtual machine user ID is the same as the product identifier. In this
procedure, you use 6VMDIR10 to configure DirMaint.
Before you begin: Make sure the DIRMAINT virtual machine is logged off. You
need to log onto the 6VMDIR10 virtual machine.
Perform these steps to perform an initial configuration:
1. Access the 492 minidisk:
acc 492 u
2. Issue this command:
dir2prod samp 6vmdir10 dirm
.
.
.
DIR2PROD: Copy of 2C2 samples to 1DF disk has completed.
DIR2PROD: Normal Termination.
Ready; T=0.13/0.19 07:47:30
3. Issue this command:
dir2prod access_new 6vmdir10 dirm
.
.
.
DMSACP726I 492 u releases
DIR2PROD: Normal Termination
Ready;
4. Access the 11F disk a z. From the command line, type this command and
press the Enter key:
access 11f z
Ready;
5. Create a file called CONFIGAA DATADVH Z. From the command line, type
this command and press the Enter key:
xedit configaa datadvh z
Tip: Files with the naming convention CONFIGnn DATADVH (nn can be
alphabetic or numeric) provide DirMaint override instructions. If there are
multiple CONFIG* DATADVH files, all are processed in reverse EBCDIC
Chapter 4. Configuring the Directory Maintenance Facility 53
Page 68

order (CONFIG99 before CONFIG0 before CONFIGZ9 before CONFIGA,
before CONFIG). For now, keep it simple by creating only one, CONFIGAA
DATADVH.
6. At the XEDIT command line, type this command and press the Enter key:
====> input
7. Add these statements to the file:
CONFIGAA DATADVH Z2 V 80 Trunc=80 Size=5 Line=1 Col=1 Alt=0
====>
|...+....1....+....2....+....3....+....4....+....5....+....6....+....7...
0***TopofFile***
1 ALLOW_ASUSER_NOPASS_FROM= VSMSERVE *
2 DATAMOVE_MACHINE= DATAMOVE vmnetid *
3 DISK_CLEANUP= YES
4 ONLINE= IMMED
5 RUNMODE= OPERATIONAL
6***EndofFile***
where vmnetid is the VM network identifier. The network identifier is the
same as the system identifier you defined in “Steps for updating the default
system identifier” on page 39.
8. To exit input mode, press the Enter key twice.
9. Save the file. From the command line, type this command and press the
Enter key:
====> file
10. Release the 11F disk. From the command line, type this command and press
the Enter key:
rel z
Ready;
Continue with the next steps.
Steps for authorizing users to perform DirMaint tasks
The AUTHFOR CONTROL file specifies user IDs allowed to perform authorized
DirMaint tasks. It would be convenient to specify certain user IDs to do these
tasks; otherwise, you need to log on the DIRMAINT virtual machine each time you
want to do them. In this procedure, you authorize MAINT to perform DirMaint
tasks.
Before you begin: You need to log onto the 6VMDIR10 virtual machine.
Perform these steps to create the authorization file:
1. Create and edit the AUTHFOR CONTROL file on the J-disk.
xedit authfor control j
54 z/VM: Getting Started with Linux on System z
Page 69

2. On the XEDIT command line, type this command and press the Enter key to
enter input mode:
====> input
3. Type these lines in the input area:
.
.
.
ALL MAINT * 140A ADGHOPS
ALL MAINT * 150A ADGHOPS
4. Press the Enter key twice to return to editing mode.
5. From the XEDIT command line, type this command and press the Enter key:
====> file
Continue to the next steps.
Steps for controlling where DirMaint creates minidisks
The EXTENT CONTROL file tells DirMaint where to allocate minidisks. The file is
divided into sections. The first section identifies DASD extents on individual
devices that can be used for minidisk allocation. The next section allows you to
group devices by name and refer to them by a single name. For example, you can
create a group called SYSTEM for minidisks related to system user IDs, or a group
called LINUX for minidisks related to virtual machines for Linux. Grouping allows
you to separate user minidisks from system-related minidisks.
Before you begin: Make sure the DIRMAINT virtual machine is logged off. You
need to log onto the 6VMDIR10 virtual machine.
Perform these steps to control where DirMaint creates minidisks:
1. Edit the EXTENT CONTROL file on the J-disk.
xedit extent control j
2. Find the section labelled “:REGIONS”. From the XEDIT command line, type
this command and press the Enter key:
====> /:regions
3. Move the cursor to the prefix area for the line containing “*RegionID”. Type
“i” in the prefix area and press the Enter key:
00034 * ******************************************************
00035 :REGIONS.
i *RegionId VolSer RegStart RegEnd Type
4. Move the cursor to the body of the blank line and type a statement with this
pattern:
RegionId VolSer RegStart RegEnd Type
Chapter 4. Configuring the Directory Maintenance Facility 55
Page 70

where
RegionId
Is the name of the region. Region names must be unique. If a region
entry shares the same name with another region entry, the first record is
used, the second entry is ignored. Region names may consist of the
characters A-Z, 0-9, #, @, and $. DirMaint requires that this field be eight
characters or less.
VolSer
Is the volume label of the real DASD. This value represents the value
placed into volser field on any minidisks generated from this region.
Volume IDs supported by DirMaint consist of a maximum of six
characters A-Z, 0-9, #, @, and $. VolSer must be unique.
RegStart
Is the starting cylinder for this region.
RegEnd
Is the ending cylinder for this region.
Type
Is the device type of the DASD.
Example: This statement labels an entire 3390-03 with a volume label 430LIN
as LINUX01:
LINUX01 430LIN 001 END 3390-03
(END is a special keyword specifying the last cylinder.)
5. Repeat step 4 on page 55 for all the volumes you need for your Linux virtual
servers.
Note: The region names must be unique.
6. Immediately after the volume statements for Linux virtual servers, add this
statement for creating minidisks for other virtual machines.
610W02 610W02 1 END devtype
where devtype is the device type of volume 610W02.
7. Move the cursor to the prefix area for the line containing “*GroupName”.
Type “i2” in the prefix area and press the Enter key:
00121 :GROUPS.
i2 *GroupName RegionList
8. Type these two lines:
GRPLNX (ALLOCATE ROTATING)
GRPLNX LINUX01
If you have additional regions, add those region IDs to the second line.
Example:
GRPLNX LINUX01 LINUX02 LINUX03
56 z/VM: Getting Started with Linux on System z
Page 71

9. Move the cursor to the prefix area for the line with “* USERID ADDRESS”,
type “i2” in the prefix area, then press the Enter key:
00139 :EXCLUDE.
i2 * USERID ADDRESS
00141 :END.
10. Type these two lines:
MAINT 012*
SYSDUMP1 012*
11. Save the file. From the XEDIT command line, type this command and press
the Enter key:
====> file
Your file should look similar to this:
EXTENT CONTROL J2 V 254 Trunc=254 Size=89 Line=35 Col=1 Alt=0
====>
35 :REGIONS.
36 *RegionId VolSer RegStart RegEnd Dev-Type Comments
.
.
.
46 LINUX01 430LIN 1 END 3390-03
.
.
.
57 610W02 610W02 1 END 3390-03
58 :END.
59 :GROUPS.
60 *GroupName RegionList
61 DVHUSR (ALLOCATE ROTATING)
.
.
.
65 GRPLNX (ALLOCATE ROTATING)
66 GRPLNX LINUX01 LINUX02 LINUX03
.
.
.
71 :END.
72 :EXCLUDE.
73 * UserId Address
74 MAINT 012*
75 SYSDUMP1 012*
76 :END.
.
.
.
Continue to the next steps.
Steps for copying the current USER DIRECT file
Before DirMaint is activated, the current USER DIRECT source file on MAINT’s
2CC matches the online user directory. By copying the current USER DIRECT
source file from MAINT’s 2CC to the 6VMDIR10’s J-disk, you create a starting
point for DirMaint. From the USER DIRECT file, DirMaint processes the statements
to create its own internal working structure for the user directory.
Important: After performing these steps, do not use the USER DIRECT file on
MAINT’s 2CC. To remind you that you must not use the file, you could rename it
to USER NO-USE or USERDRCT UPBYDIRM.
Before you begin: You need to log onto 6VMDIR10.
Chapter 4. Configuring the Directory Maintenance Facility 57
Page 72

Perform these steps to copy the current USER DIRECT file:
|
|
|
|
1. Link to MAINT’s 2CC minidisk:
link maint 2cc 2cc mr multiple
2. Access the 2CC minidisk (MAINT’s 2CC, which is linked to 6VMDIR10):
access 2cc z
3. Copy MAINT’s USER DIRECT file to 6VMDIR10’s J-disk as USER INPUT:
copy user direct z user input j
4. Release the linked minidisk:
release z (detach
Continue with the next steps.
Steps for putting the configuration into production and starting DirMaint
In these steps, you place the DirMaint configuration into production and start
DirMaint.
Before you begin: You need to log onto 6VMDIR10. Later, when you log onto
DIRMAINT, you need to know the log-on password you defined in “Steps for
changing the passwords for DirMaint service machines” on page 52.
Perform these steps to put the configuration into production and start DirMaint:
1. From the CMS command line, type this command and press the Enter key:
dir2prod prod 6vmdir10 dirm
2. Log off 6VMDIR10. Type this command and press the Enter key:
logoff
3. Log onto DIRMAINT.
4. Start the DirMaint program:
dvhbegin
.
.
.
DVHWAI2140I Waiting for work on 04/02/09 at 18:47:38.
5. Disconnect DIRMAINT. Type this command and press the Enter key:
cp disc
Continue to the next steps.
58 z/VM: Getting Started with Linux on System z
Page 73

Steps for automatically starting DIRMAINT
In this procedure, you update AUTOLOG1’s PROFILE EXEC to automatically log
on (autolog) DIRMAINT when z/VM starts.
Before you begin: You need to log onto MAINT.
Perform these steps to have DIRMAINT automatically logged on:
1. Link to the AUTOLOG1 191 minidisk. Type this command and press the Enter
key:
link autolog1 191 091 mr
Ready;
2. Access the 091 minidisk as Z. Type this command and press the Enter key:
access 091 z
Ready;
3. Edit AUTOLOG1’s PROFILE EXEC. Type this command and press the Enter
key:
xedit profile exec z
4. Go to the bottom of the file. From the XEDIT command line, type this
command and press the Enter key:
====> bot
5. Add the new XAUTOLOG statements. From the XEDIT command line, type
“input”, press the Enter key, then type these lines. Press the Enter key after
you type each line:
ADDRESS COMMAND CP XAUTOLOG DIRMAINT
ADDRESS COMMAND CP XAUTOLOG DATAMOVE
ADDRESS COMMAND CP LOGOFF
6. Press the Enter key.
Result: The file should look like this:
PROFILE EXEC Z2 V 80 Trunc=80 Size=7 Line=4 Col=1 Alt=1
***TopofFile***
/***************************/
/* Autolog1 Profile Exec */
/***************************/
ADDRESS COMMAND CP AUTOLOG VMSERVS VMSERVS
ADDRESS COMMAND CP AUTOLOG VMSERVU VMSERVU
ADDRESS COMMAND CP AUTOLOG VMSERVR VMSERVR
ADDRESS COMMAND CP AUTOLOG DTCVSW1
ADDRESS COMMAND CP AUTOLOG DTCVSW2
ADDRESS COMMAND CP XAUTOLOG DIRMAINT
ADDRESS COMMAND CP XAUTOLOG DATAMOVE
ADDRESS COMMAND CP LOGOFF
Chapter 4. Configuring the Directory Maintenance Facility
59
Page 74

7. Save the file. At the XEDIT command line, type this command and press the
Enter key:
====> file
8. Detach the 091 minidisk (AUTOLOG1’s 191). Type this command and press
the Enter key:
release z (det
Ready;
You are done.
Steps for testing DirMaint
This procedure tests DirMaint. The command you use allows MAINT to issue
DirMaint commands without a password.
Before you begin: You need to know the password for MAINT.
Perform these steps to test DirMaint:
1. Log onto MAINT.
2. From the CMS command line, type this command and press the Enter key:
dirm needpass no
3. When prompted, type MAINT’s password and press the Enter key.
You see these messages:
dirm needpass no
DVHXMT1181R Enter the current logon password of MAINT at DVHTEST6 for
DVHXMT1181R authentication. It will not be displayed on the
DVHXMT1181R terminal. To exit without processing the command, just
DVHXMT1181R press ENTER.
DVHXMT1191I Your NEEDPASS request has been sent for processing.
MAINT AT DVHTEST6; T=0.05/0.06 18:53:02
DVHREQ2288I Your USEROPTN request for MAINT at * has been accepted.
DVHBIU3450I The source for directory entry MAINT has been updated.
DVHBIU3456I Object directory update is not required for this source
DVHBIU3456I update.
DVHREQ2289I Your USEROPTN request for MAINT at * has completed;
DVHREQ2289I with RC = 0.
You are done.
Step for modifying the OPERATOR’s directory entry
In Chapter 9, “Setting up basic system automation,” on page 85, you set up the
programmable operator facility, which requires that the OPERATOR virtual
machine automatically load (IPL) CMS when it is logged on. This procedure uses
DirMaint to modify the OPERATOR’s directory entry to include a statement that
loads CMS.
Before you begin: You need to be logged onto MAINT.
60 z/VM: Getting Started with Linux on System z
Page 75

Perform this step to modify the OPERATOR’s directory entry:
v From the command line, type this command and press the Enter key:
dirm for operator ipl cms
DVHXMT1191I Your IPL request has been sent for processing.
Ready;
DVHREQ2288I Your IPL request for OPERATOR at * has been accepted.
DVHBIU3450I The source for directory entry OPERATOR has been updated.
DVHBIU3423I The next ONLINE will take place via Diagnose 84.
DVHBIU3428I Changes made to directory entry OPERATOR have been placed
DVHBIU3428I online.
DVHBIU3427I Changes made to directory entry OPERATOR by MAINT at
DVHBIU3427I ZVMLINUX have been placed online.
DVHREQ2289I Your IPL request for OPERATOR at * has completed; with RC
DVHREQ2289I = 0.
You know you are done when you see a zero return code from DirMaint.
Chapter 4. Configuring the Directory Maintenance Facility 61
Page 76

62 z/VM: Getting Started with Linux on System z
Page 77

Chapter 5. Configuring TCP/IP
In this topic, you configure TCP/IP, if you have not already done so, and configure
TCP/IP to start automatically whenever z/VM is initialized.
For an overview on configuring TCP/IP for Linux, see “TCP/IP networking
options for Linux” on page 30.
Setting up the production TCP/IP
During z/VM installation, you had the option to set up a static connection to the
TCP/IP network through the IPWIZARD. Such a configuration is suitable for
installations that employ only static (as opposed to dynamic) network routes. If
you want a more comprehensive TCP/IP network, you need to follow the
instructions in z/VM: TCP/IP Planning and Customization, SC24-6238.
Table 5 outlines the tasks you must do:
Table 5. Task roadmap for the production TCP/IP
Subtask Associated instructions (see...)
Setting up your production TCP/IP If you set up a static connection during z/VM
Setting up TCP/IP to be automatically
started
installation and are satisfied with this
configuration, this task is optional.
If you want a more comprehensive TCP/IP
network, you need to follow the instructions in
z/VM: TCP/IP Planning and Customization,
SC24-6238.
“Steps for automatically starting TCP/IP”
Steps for automatically starting TCP/IP
This procedure ensures the TCPIP virtual machine is always started when you IPL
z/VM. Except for a few system user IDs, the AUTOLOG1 virtual machine
automatically starts virtual machines at IPL time through its PROFILE EXEC. By
placing an additional XAUTOLOG command for TCPIP in AUTOLOG1’s PROFILE
EXEC, that virtual machine is automatically logged on when you IPL z/VM.
Before you begin: You need to log on as MAINT.
Perform these steps to ensure TCP/IP is started at IPL time:
1. Link to the AUTOLOG1 191 minidisk. Type this command and press the Enter
key:
link autolog1 191 091 mr
Ready;
© Copyright IBM Corp. 2009
63
Page 78

2. Access the 091 minidisk as Z. Type this command and press the Enter key:
access 091 z
Ready;
3. Edit AUTOLOG1’s PROFILE EXEC.
a. Type this command and press the Enter key:
xedit profile exec z
b. Go to the bottom of the file. From the XEDIT command line, type this
command and press the Enter key:
====> bot
c. Move up one line (The last line logs off AUTOLOG1. You need to execute
the XAUTOLOG commands before logging off AUTOLOG1). From the
XEDIT command line, type this command and press the Enter key:
====> up 1
d. From the XEDIT command line, type this command and press the Enter
key:
input
4. Add the new XAUTOLOG statement.
ADDRESS COMMAND CP XAUTOLOG TCPIP
5. Press the Enter key twice.
Result: The file should look like this:
PROFILE EXEC Z2 V 80 Trunc=80 Size=7 Line=4 Col=1 Alt=1
***TopofFile***
/***************************/
/* Autolog1 Profile Exec */
/***************************/
ADDRESS COMMAND CP AUTOLOG VMSERVS VMSERVS
ADDRESS COMMAND CP AUTOLOG VMSERVU VMSERVU
ADDRESS COMMAND CP AUTOLOG VMSERVR VMSERVR
ADDRESS COMMAND CP XAUTOLOG DTCVSW1
ADDRESS COMMAND CP XAUTOLOG DTCVSW2
ADDRESS COMMAND CP XAUTOLOG DIRMAINT
ADDRESS COMMAND CP XAUTOLOG DATAMOVE
ADDRESS COMMAND CP XAUTOLOG TCPIP
ADDRESS COMMAND CP LOGOFF
6. Save the file. At the XEDIT command line, type this command and press the
Enter key:
====> file
64 z/VM: Getting Started with Linux on System z
Page 79

7. Detach the 091 minidisk (AUTOLOG1’s 191). Type this command and press
the Enter key:
release z (det
Ready;
You are done.
Chapter 5. Configuring TCP/IP 65
Page 80

66 z/VM: Getting Started with Linux on System z
Page 81

Chapter 6. Restarting z/VM and checking the system
After making changes to the system, configuring DirMaint, and setting up the
network configuration, restart z/VM and check that the changes you want were
made. This topic explains how to do that.
Steps for restarting z/VM
In this procedure, you restart (IPL) z/VM and log onto MAINT, from which you
can check that all your configuration changes are in effect.
Before you begin: You need to be logged on as MAINT. Be sure you have checked
the syntax of the SYSTEM CONFIG file (see “Steps for checking the syntax of the
SYSTEM CONFIG file” on page 48). Be sure other important z/VM processing is
complete.
Perform these steps to restart z/VM:
1. Type this command and press the Enter key:
shutdown reipl
Result: When the system shuts down and re-IPLs, you see a number of IPL
messages. z/VM restores the system to the same state as it was prior to
shutdown (for instance, with OPERATOR disconnected).
2. To get a z/VM logo, press the Enter key.
3. Log onto MAINT.
You are done. Go on to the next procedure.
Steps for checking paging and spooling space
Before you begin: You need to be logged on as MAINT.
Perform these steps to check that paging and spooling space matches your
intended definitions:
1. Type this command and press the Enter key. Check the response for paging
volumes.
query alloc page
VOLID RDEV START END PAGES IN USE PAGE USED
------ ---- ------ ------ ------ ------ ------ ---610PAG C331 0 3338 601020 13646 31175 2%
SUMMARY 601020 13646 2%
USABLE 601020 13646 2%
Ready; T=0.01/0.01 10:07:56
EXTENT EXTENT TOTAL PAGES HIGH %
------ ------ ----
© Copyright IBM Corp. 2009
67
Page 82

2. Type this command and press the Enter key. Check the response for spooling
volumes.
query alloc spool
VOLID RDEV START END PAGES IN USE PAGE USED
------ ---- ------ ------ ------ ------ ------ ---610SPL C330 0 3338 601020 1964 8432 1%
SUMMARY 601020 1964 1%
USABLE 601020 1964 1%
Ready; T=0.01/0.01 10:15:22
EXTENT EXTENT TOTAL PAGES HIGH %
------ ------ ----
You are done. Go on to the next procedure.
Step for checking the system identifier
Before you begin: You need to be logged on as MAINT.
Perform this step to check the system identifier:
v Type this command and press the Enter key. Check the response for your system
identifier.
identify
MAINT AT system VIA RSCS 02/20/04 20:11:10 UTC FRIDAY
Ready;
where system is the system identifier.
Step for checking the user volume list
Before you begin: You need to be logged on as MAINT.
Perform this step to check the user volume list:
v Type this command and press the Enter key. Check for responses for the user
volumes you defined previously. In the response, SYSTEM means the volume is
a user volume.
query dasd
DASD 0190 CP SYSTEM CMS20 2
DASD AB24 CP OWNED 610RES 59
DASD AB25 CP OWNED 610W01 63
DASD C32F CP OWNED 610W02 1
DASD C330 CP OWNED 610SPL 0
DASD C331 CP OWNED 610PAG 0
DASD DB35 CP SYSTEM LNX001 0
DASD DB36 CP SYSTEM LNX002 0
DASD DB3F CP SYSTEM LNX003 0
DASD DB40 CP SYSTEM LNX004 0
Ready; T=0.01/0.01 10:19:29
68 z/VM: Getting Started with Linux on System z
Page 83

Steps for checking features
Before you begin: You need to be logged on as MAINT.
Perform these steps to check features:
1. Check the shutdown time periods. Type these commands and press the Enter
key after each command:
query shutdowntime
System shutdown time: 30 seconds; previous shutdown time: n seconds.
Ready;
query signal shutdowntime
System default shutdown signal timeout: 500 seconds
Ready;
2. Check the number of retrieve buffers. Type this command and press the Enter
key:
query retrieve
10 buffers available. Maximum of 20 buffers may be selected.
Ready;
Step for checking offline devices
Before you begin: You need to be logged on as MAINT.
Perform this step to check offline devices:
v Type this command and press the Enter key:
query dasd offline
DASD 1440 OFFLINE , DASD 1441 OFFLINE , DASD 1442 OFFLINE , DASD 1443 OFFLINE
Step for checking the virtual switch
Before you begin: You need to be logged on as MAINT.
Perform this step to check the virtual switch:
v Type this command and press the Enter key:
query vswitch details
VSWITCH SYSTEM VSWITCH1 Type: VSWITCH Connected: 0 Maxconn: INFINITE
PERSISTENT RESTRICTED NONROUTER Accounting: OFF
VLAN Unaware
State: Ready
IPTimeout: 5 QueueStorage: 8
Portname: UNASSIGNED RDEV: 0BC0 Controller: DTCVSW1 VDEV: 0BC0
VSWITCH Connection:
RX Packets: 0 Discarded: 27 Errors: 0
TX Packets: 0 Discarded: 0 Errors: 0
RX Bytes: 0 TX Bytes: 0
Device: 0BC0 Unit: 000 Role: DATA
Ready;
The response shows the virtual switch is defined and ready for use (“State:
Ready”), but no virtual machine is using it (“Connected: 0”).
Chapter 6. Restarting z/VM and checking the system 69
Page 84

Step for checking character defaults
Before you begin: You need to be logged on as MAINT.
Perform this step to check character defaults:
v Type this command and press the Enter key:
query terminal
LINEND % , LINEDEL OFF, CHARDEL OFF, ESCAPE OFF, TABCHAR "
LINESIZE 080, ATTN OFF, APL OFF, TEXT OFF, MODE VM, HILIGHT OFF
CONMODE 3215, BREAKIN IMMED , BRKKEY PA1 , SCRNSAVE OFF
AUTOCR ON , MORE 050 010, HOLD ON , TIMESTAMP OFF, SYS3270 OFF
Ready;
The response should show the LINEND character is “%” and that the LINEDEL,
CHARDEL, and ESCAPE characters are “OFF.”
Steps for checking TCP/IP
Before you begin: You need to log on as TCPMAINT.
Perform these steps to check TCP/IP:
1. From the command line, type this command and press the Enter key:
ifconfig -a
name inet addr: ip_address mask: mask
Ready;
UP BROADCAST MULTICAST MTU: 1492
vdev: vdev rdev: rdev type: QDIO ETHERNET portname: UNASSIGNED
ipv4 router type: NONROUTER ipv6: DISABLED
cpu: 0 forwarding: ENABLED
RX bytes: 127217 TX bytes: 126518
You defined the interface name (name), IP address (ip_address), mask (mask),
virtual device address (vdev), and real device address (rdev) for your
production TCP/IP through the IPWIZARD (see “Setting up the production
TCP/IP” on page 63).
2. To check the network interface, ping the gateway. In the command, ip_address
is the IP address of your gateway.
ping ip_address
Ping Level level 610: Pinging host ip_address.
PING: Ping #1 response took 0.008 seconds. Successes so far 1.
Ready;
Enter 'HX' followed by 'BEGIN' to interrupt.
3. To check the network interface, ping an address outside your subnetwork. In
the command, ip_address is an address outside your subnetwork.
ping ip_address
Ping Level level 610: Pinging host ip_address.
PING: Ping #1 response took 0.008 seconds. Successes so far 1.
Ready;
You are done checking the system configuration.
Enter 'HX' followed by 'BEGIN' to interrupt.
70 z/VM: Getting Started with Linux on System z
Page 85

Chapter 7. Creating your first Linux virtual machine and installing Linux
This topic covers configuring your first Linux virtual machine and installing your
first Linux operating system.
Overview of defining virtual machines for Linux
Previous sections have shown you how to configure z/VM functions and facilities
in order to create the system infrastructure for your virtual machines: configuring
z/VM, enabling and configuring DirMaint, and configuring TCP/IP. This section
and the next, Chapter 8, “Cloning Linux virtual servers,” on page 83, show you
how to install your first Linux operating system and then use a replication or
cloning process to create additional Linux virtual servers quickly. The cloning
process allows you to create a new Linux virtual server without the need to install
the Linux operating system from scratch.
Before you begin defining Linux servers, read Chapter 2, “Planning for Linux
virtual servers,” on page 21.
The basic subtasks are:
Table 6. Task roadmap for setting up Linux virtual servers
Subtask Associated instructions (see...)
Define a prototype and create your first
virtual machine from the prototype
Install the Linux operating system in the
virtual machine.
Replicate, or clone, additional Linux virtual
servers through DirMaint prototype and
CLONEDISK functions.
“Steps for defining a master virtual machine
for Linux”
Follow the instructions for your Linux
distribution. To get started, see “Installing
Linux in a virtual machine” on page 77.
“Steps for cloning a Linux virtual server” on
page 83
Steps for defining a master virtual machine for Linux
These steps tell you how to define a master virtual machine that uses the default
2.2G on a 3390-3 DASD.
In this procedure, you modify two sample files, LINDFLT DIRECT and LINUX
PROTODIR. LINDFLT DIRECT is a shared profile for all Linux systems and
defines common definitions for all your Linux virtual servers. LINUX PROTODIR
is designed to define unique characteristics of a virtual machine, such as the DASD
definitions.
Before you begin: Log on to MAINT.
© Copyright IBM Corp. 2009 71
Page 86

Perform these steps to define the master virtual machine:
1. Get the LINDFLT and LINUX samples from DirMaint.
a. From the command line, type these commands and press the Enter key:
dirm send lindflt direct
dirm send linux protodir
Result: DirMaint sends the sample files to MAINT’S reader.
b. If you have other files in your reader, queue the two files you get from
DirMaint with the ORDER command.
Example: DirMaint sent you LINDFLT DIRECT and LINUX PROTODIR
with spool identifiers 0004 and 0005, and you already have spool files 0001,
0002, and 0003 in your reader. Issue this command to queue the two files
from DirMaint:
order rdr 4 5
0000002 FILES ORDERED
Ready;
c. Receive the sample files. From the command line, type these commands
and press the Enter key:
receive
File LINDFLT DIRECT A1 created from LINDFLT DATADVH A1 received from DIRMAINT at system
receive
File LINUX PROTODIR A1 created from LINUX DATADVH A1 received from DIRMAINT at system
2. Edit LINDFLT DIRECT. From the command line, type this command and press
the Enter key:
xedit lindflt direct a
Result: Your LINDFLT DIRECT looks like:
PROFILE LINDFLT
CLASS G
IPL CMS
MACHINE ESA
MAXSTORAGE 2047M
OPTION QUICKDSP
STORAGE 128M
CONSOLE 0009 3215 T
NICDEF 600 TYPE QDIO LAN SYSTEM VSWITCH1
SPOOL 000C 2540 READER *
SPOOL 000D 2540 PUNCH A
SPOOL 000E 1403 A
LINK MAINT 0190 0190 RR
LINK MAINT 019D 019D RR
LINK MAINT 019E 019E RR
LINK TCPMAINT 0592 0592 RR
Notes:
a. If you log onto virtual machines cloned from LINDFLT DIRECT, the
command IPL CMS places the virtual machine in VM READ state. You
must press the Enter key to finish loading CMS.
b. The name of the virtual switch must match the name you used when you
defined the virtual switch for the system. See “Steps for defining a virtual
switch” on page 44.
72 z/VM: Getting Started with Linux on System z
Page 87

c. For all virtual machines that you clone using LINDFLT DIRECT, you
cannot define other devices at virtual addresses 600, 601, and 602. All those
virtual machines will have the same virtual device addresses for the virtual
switch.
3. If you want to give all your cloned Linux virtual machines access to the
cryptographic facility:
a. Add a line before the OPTION statement:
00000***TopofFile***
00001 PROFILE LINDFLT
00002 CLASS G
00003 IPL CMS
00004 IUCV ALLOW
00005 MACHINE ESA
a MAXSTORAGE 2047M
00007 OPTION QUICKDSP
00008 STORAGE 128M
b. On the new line, type:
CRYPTO APVIRT
For more information about the cryptographic facility, see “Giving Linux
virtual servers access to cryptographic hardware for SSL acceleration” on page
31.
4. If you make any changes to LINDFLT DIRECT, save the file with the XEDIT
FILE command. From the XEDIT command line, type this command and press
the Enter key:
====> file
5. Edit LINUX PROTODIR.
a. From the XEDIT command line, type this command and press the Enter
key:
xedit linux protodir
Result: Your LINUX PROTODIR looks like:
USER LINUX NOLOG
INCLUDE LINDFLT
MDISK 191 3390 AUTOG 0050 LINGROUP MR
MDISK 150 3390 AUTOG 3088 LINGROUP MR
MDISK 151 3390 AUTOG 0200 LINGROUP MR
b. Change the minidisk size for MDISK 191 to 0005:
MDISK 191 3390 AUTOG 0005 LINGROUP MR
c. Change each occurrence of “LINGROUP” to “GRPLNX”:
MDISK 191 3390 AUTOG 0005 GRPLNX MR
MDISK 150 3390 AUTOG 3088 GRPLNX MR
MDISK 151 3390 AUTOG 0200 GRPLNX MR
Chapter 7. Creating your first Linux virtual machine and installing Linux
73
Page 88

Notes:
a. For the swap disk 151, you could use a virtual disk, but be aware of the
impact a virtual disk has on your system. See “Linux Performance when
running under VM” (http://www.vm.ibm.com/perf/tips/linuxper.html).
b. “GRPLNX” matches the region name you created in “Steps for controlling
where DirMaint creates minidisks” on page 55.
6. If you make any changes to LINUX PROTODIR, save the file with the XEDIT
FILE command. Otherwise, quit the file: from the XEDIT command line, type
this command and press the Enter key:
====> quit
7. Install the LINDFLT DIRECT and LINUX PROTODIR files.
a. Start by testing for the existence of a user called LINDFLT. Issue:
dirm for lindflt get lock
v If the GET LOCK command succeeded, issue:
dirm for lindflt replace
v If the GET LOCK command did not succeed, issue:
dirm add lindflt
b. Install LINUX PROTODIR. Issue:
dirm file linux protodir
8. Use DirMaint to define the master virtual machine (LINMSTR). Type this
command and press the Enter key:
dirm add linmstr like linux pw new_password
where new_password is the password for logging on LINMSTR. new_password
must be 8 characters long and must contain both numbers and letters.
9. If you decide you want to delete a virtual machine you cloned, type this
command and press the Enter key:
dirm for userid purge
where userid is the user ID of the virtual machine you want to delete.
Guidelines:
v You might want to create additional prototypes (fn PROTODIR) for meeting
differing processing requirements of your Linux virtual servers. You can use
naming conventions that indicate the processing requirements satisfied by each
prototype. For instance, you might want to create a small memory prototype
(128 MB virtual machine called LINUX128), a medium memory prototype (256
MB virtual machine called LINUX256), and a large memory prototype (512 MB
virtual machine called LINUX512), then create small, medium, and large master
virtual machines, into which you can install the Linux operating system and
appropriate application packages or middleware (the large master could have
74 z/VM: Getting Started with Linux on System z
Page 89

WebSphere, for instance). Then, during the cloning process, you can select the
master prototype that meets the needs of your clone.
v The LINUX PROTODIR consumes an entire 3390-3 volume. To help slow the
consumption of 3390-3 volumes, you can split the Linux file system into
read-only and read/write portions and share the read-only portion. You should
be familiar with Linux file system usage practices before attempting to set up
read-only portions of the file system. To do this, you need to create a master
Linux virtual server that can update the minidisk to which other Linux virtual
servers are linked in read-only mode through the LINK command or LINK
directory statement.
Note: There are important maintenance issues here: running Linux virtual
servers do not get updates to the read-only disk until those servers are
recycled. Also, a running Linux system linked to read-only disks might
crash if those disks are updated while it is running. So, you need to
develop a maintenance plan to determine how to update the read-only
disk and when to recycle Linux virtual servers.
v If you want to see the entire user directory entry for a user, issue the following
commands:
dirm for user_id get nolock
...
RDR FILE nnn SENT FROM DIRMAINT PUN WAS 8116 RECS 0027 CPY 001 A NOHOLD NOKEEP
...
peek nnn (for *
where user_id is the user ID you want to see and nnn is the reader spool file
identifier.
You know you are done when DirMaint tells you LINMSTR is created.
Steps for setting up LINMSTR’s disks
In this procedure, you format LINMSTR’s 191 disk and create a PROFILE EXEC.
Each clone you create gets a replica of this 191 disk.
Because the 191 disk has only five cylinders, it is too small to hold the Linux boot
files for installing the Linux operating system. It would also be a waste of disk
space to increase the size of the 191 disk to accommodate the Linux boot files,
since each clone would get the same sized disk and the clones do not need a larger
disk. Instead, this procedure has you create a 192 disk for LINMSTR only. The
larger 192 disk can hold the Linux boot files and this disk will not be replicated in
the clones.
Before you begin: You need to log on to MAINT. Later in this procedure, you
need to log onto LINMSTR.
Chapter 7. Creating your first Linux virtual machine and installing Linux 75
Page 90

Perform these steps to set up LINMSTR’s disks:
1. Log onto MAINT and from the command line, type this command and press
the Enter key:
dirm for linmstr amdisk 192 devtype autov 50 610W02
DVHXMT1191I Your AMDISK request has been sent for processing.
Ready;
DVHREQ2288I Your AMDISK request for LINMSTR at * has been accepted.
DVHSCU3541I Work unit 18124944 has been built and queued for processing.
DVHSHN3541I Processing work unit 18124944 as MAINT from ZVMLINUX,
DVHSHN3541I notifying MAINT at ZVMLINUX, request 62 for LINMSTR sysaffin
DVHSHN3541I *; to: AMDISK 0192 devtype AUTOV 50 610W02
DVHBIU3450I The source for directory entry LINMSTR has been updated.
DVHDRC3428I Changes made to directory entry LINMSTR have just been
DVHDRC3428I placed online.
DVHSHN3430I AMDISK operation for LINMSTR address 0192 has finished (WUCF
DVHSHN3430I 18124944).
DVHREQ2289I Your AMDISK request for LINMSTR at * has completed; with
DVHREQ2289I RC = 0.
where devtype is the disk device type of volume 610W02 (for instance, 3390).
2. Log onto LINMSTR.
Note: After the logon messages, you receive a message because the 191 disk is
not formatted. Disregard this message:
DMSACP112S A(191) device error
3. Format the 191 disk with the CMS FORMAT command. From the command
line, type these commands and press the Enter key:
format 191 a
DMSFOR603R FORMAT will erase all files on disk A(191). Do you wish to continue?
Enter 1 (YES) or 0 (NO).
1
DMSFOR605R Enter disk label:
lin191
DMSFOR733I Formatting disk A
DMSFOR732I 5 cylinders formatted on Z(191)
Ready;
4. Create a PROFILE EXEC on the 191 disk.
a. Issue this command:
xedit profile exec a
b. On the XEDIT command line, type this command and press the Enter key:
====> input
c. Type in these statements, then press the Enter key twice.
Rule: The first line of any PROFILE EXEC must be a comment. Comments
are bounded by “/*” and “*/”.
/* Sample PROFILE EXEC for Linux servers */
"CP TERM LINEND %" /* Use %CP to talk to CP */
"CP SET PF12 RETRIEVE" /* Recall previous commands */
"CP TERM MORE 1 0" /* Clear screen after 1 sec */
"CP SET RUN ON" /* CP READ won't stop server*/
"CP TERM HOLD OFF" /* (Look in book) */
"ACCESS 592 Z" /* Get to TCP/IP functions */
76 z/VM: Getting Started with Linux on System z
Page 91

Note: Add ’CP TERM LINEND %’ in case the system default line end
character is changed.
Guideline: In Chapter 9, “Setting up basic system automation,” on page 85,
you automate the Linux virtual console, which requires a modification of
the PROFILE EXEC for each Linux virtual server you want to automate. If
you prefer to have this function part of every Linux clone, you can add the
required statement now. See “Steps for automating Linux virtual consoles”
on page 93.
d. Save the file. On the XEDIT command line, type this command and press
the Enter key:
====> file
5. Format the 192 disk with the CMS FORMAT command. From the command
line, type these commands and press the Enter key:
format 192 a
DMSFOR603R FORMAT will erase all files on disk A(192). Do you wish to continue?
Enter 1 (YES) or 0 (NO).
1
DMSFOR605R Enter disk label:
lin192
DMSFOR733I Formatting disk A
DMSFOR732I 50 cylinders formatted on A(192)
Ready;
You are done when you finish formatting the 192 disk.
Installing Linux in a virtual machine
Though you need to follow the instructions from your Linux distribution to install
and configure Linux, and those instructions differ from distribution to distribution,
virtual machine facilities and tasks common to all distributions are covered in this
section.
Overview of installing Linux in a virtual machine
You must follow your distribution documentation to install the Linux operating
system in your new LINMSTR virtual machine, which you created in “Steps for
defining a master virtual machine for Linux” on page 71. For information about
obtaining your Linux distribution, see “Steps for obtaining documentation and
media” on page 34. This topic includes information about your virtual machine
configuration that you should know for your Linux distribution.
To get the installation and configuration process started, Linux distributions follow
this pattern:
Chapter 7. Creating your first Linux virtual machine and installing Linux 77
Page 92

Stage Description
1 Use FTP to move the Linux boot files to a target virtual machine. As of this
writing, popular Linux distributions require you to ftp the files to your virtual
machine.
Examples: SUSE Linux uses these boot files:
v VMRDR IKR. The Linux kernel built for use with a ram disk.
v INITRD. The initial ram disk image.
v PARM FILE. The generic parm file for use with the ram disk system.
Red Hat, Inc., Linux uses these boot files:
v KERNEL IMG. The Linux kernel.
v INITRD IMG. The initial ram disk image.
v REDHAT PARM. The generic parm file for use with the ram disk system.
Notes:
1. You must ftp the Linux kernel and ram disk image files to the virtual
machine by specifying them as binary files with a VM record format of fixed
length 80. It is recommended that you use the z/VM FTP command to
transfer the files. If you use the FTP command, use the commands “bin” and
“locsite fix 80” before you make the transfer. If you use the workstation FTP
client, issue the commands “bin” and “quote site fixrecfm 80” before you
make the transfer. See “Example of using FTP to get the Linux boot files” on
page 79.
2. If the hardware management console (HMC) supports accessing HMC
removable media from the z/VM logical partition, you do not need a remote
FTP server to get the Linux installation files. See “Example of using FTP to
install Linux from the hardware management console,” on page 139.
2 Punch the Linux boot files to the virtual machine reader. See “Example of
punching Linux boot files to the virtual machine reader” on page 80.
3 Boot (IPL) Linux from the virtual machine reader. See “Example of booting (IPL)
the Linux boot files from the virtual machine reader” on page 81.
4 Use the tools and documentation from your Linux distribution to install and
configure Linux.
Note: Installation of Linux itself, not just the transfer of the installation files, can
also be accomplished using FTP.
During Linux configuration, you need to know these important points about the
LINMSTR virtual machine configuration:
v When you log on to LINMSTR, CMS is loaded automatically and the PROFILE
EXEC is automatically executed. This allows you to interact with z/VM to get
the Linux installation process started.
v Load the Linux boot files onto the 192 disk. The 191 disk is too small to hold the
boot files. You must access 192 as your A-disk:
access 192 a
DMSACC724I 192 replaces A (191)
Ready;
v The default memory for LINMSTR is 128 MB.
v The 150 minidisk is for the Linux root file system.
v The 151 minidisk is for the Linux swap space.
78 z/VM: Getting Started with Linux on System z
Page 93

v LINMSTR connects to the IP network through the virtual network interface
connection that you defined in LINDFLT PROTODIR. There are three qeth
device addresses that start at the virtual address that you defined on the
NICDEF statement.
Example: If you used the statement:
NICDEF 600 TYPE QDIO LAN SYSTEM VSWITCH1
the qeth device addresses you enter during Linux configuration are 0.0.0600,
0.0.0601, and 0.0.0602.
For information about device drivers, see Linux on System z: Device Drivers,
Features, and Commands on the IBM developerWorks Linux on System z Web site
entitled “Documentation for Development stream” at:
http://www.ibm.com/developerworks/linux/linux390/documentation_dev.html
Guidelines:
v Before you install Linux, format the 150 and 151 minidisks. From the CMS
command line, type these commands, press the Enter key, then answer the
prompts:
format 150 z
.
.
.
format 151 x
v During the Linux installation process, predefine extra device addresses, making
it unnecessary to do this after the system has been installed and loaded. When
needed, you can add DASD easily through the CP LINK command. This
strategy helps you avoid additional steps to add new DASD.
v After you install Linux, check for Linux service packs and apply them before
you clone Linux virtual servers.
v Ensure your Linux server /etc/resolv.conf points to the correct name server.
v If you want to use the signal shutdown function for all your Linux systems, you
can make the required modification now so it will be included in all clones. See
“Steps for enabling Linux virtual servers to shut down automatically” on page
87.
v If you want to monitor the performance of Linux virtual servers with the
Performance Toolkit for VM, you might need to install additional software on
the master Linux so all clones automatically get the monitoring software. See
“Monitoring Linux virtual servers with Performance Toolkit for VM” on page
118.
Example of using FTP to get the Linux boot files
This topic is an example of how to use FTP to get the Linux boot files from a
remote server.
Tip: If you do not have an external FTP server or do not want to create an external
connection due to security concerns, you can install Linux by accessing a DVD or
removable medium in the hardware management console (HMC) through FTP. For
more information, see “Example of using FTP to install Linux from the hardware
management console,” on page 139.
In this example, parts in bold indicate commands you would issue. First, access as
your A-disk a disk large enough to hold the boot files (the 192 disk in the
example). Note the command locsite fix 80, which sets the VM file format to
fixed length 80, the file format necessary for punching the binary files to the
virtual machine reader.
Chapter 7. Creating your first Linux virtual machine and installing Linux 79
Page 94

Note: Because the directory containing the Linux boot files varies based on the
Linux distribution and distribution level, the directory information used in
the FTP GET commands in this topic is for example use only.
access 192 a
DMSACC724I 192 replaces A (191)
Ready;
ftp 9.185.246.25
VM TCP/IP FTP Level 54
Connecting to 9.185.246.25, port 21
220 linux390 FTP server (Version wu-2.4.2-VR17(1) Thu May 18 03:18:13 EDT 2000)
ready.
USER (identify yourself to the host):
user_ID
>>>USER user_ID
331 Password required for user_ID.
Password:
>>>PASS ********
230 User user_ID logged in.
Command:
bin
>>>TYPE i
200 Type set to I.
locsite fix 80
Command:
get /boot/s390x/vmrdr.ikr
>>>PORT 9,185,246,26,4,5
200 PORT command successful.
>>>RETR /boot/s390x/vmrdr.ikr
150 Opening BINARY mode data connection for vmrdr.ikr (1511884 bytes).
226 Transfer complete.
1511920 bytes transferred in 1.972 seconds. Transfer rate 766.69 Kbytes/sec.
Command:
get /boot/s390x/initrd suse.initrd
>>>PORT 9,185,246,26,4,7
200 PORT command successful.
>>>RETR /boot/s390x/initrd
150 Opening BINARY mode data connection for initrd (9862505 bytes).
8299680 bytes transferred.
226 Transfer complete.
9862560 bytes transferred in 12.366 seconds. Transfer rate 797.55 Kbytes/sec.
Command:
asc
>>>TYPE a
200 Type set to A.
Command:
get /boot/s390x/parmfile parm.file
>>>PORT 9,185,246,26,4,8
200 PORT command successful.
>>>RETR /boot/s390x/parmfile
150 Opening ASCII mode data connection for parmfile (38 bytes).
226 Transfer complete.
40 bytes transferred in 0.081 seconds. Transfer rate 0.49 Kbytes/sec.
Command:
quit
Example of punching Linux boot files to the virtual machine reader
This example shows commands used to punch Linux boot files to the virtual
machine reader. When you punch files to the reader, note the spool identifiers
(0126, 0127, and 0128 in the example–yours will differ) so if there are other reader
files present you can queue (ORDER) the reader files in the proper order.
80 z/VM: Getting Started with Linux on System z
Page 95

spool punch * close
Ready;
punch vmrdr ikr a (noh
RDR FILE 0126 SENT FROM LINMSTR PUN WAS 0126 RECS 3129 CPY 001 A NOHOLD NOKEEP
Ready;
punch parm file a (noh
RDR FILE 0127 SENT FROM LINMSTR PUN WAS 0127 RECS 3129 CPY 001 A NOHOLD NOKEEP
Ready;
punch suse initrd a (noh
RDR FILE 0128 SENT FROM LINMSTR PUN WAS 0128 RECS 3129 CPY 001 A NOHOLD NOKEE
Ready;
order reader 126 127 128
0000003 FILES ORDERED
Ready;
Tip: If you forget the spool file identifiers, issue QUERY RDR ALL.
Example of booting (IPL) the Linux boot files from the virtual machine reader
This example shows how you get the Linux installation and configuration started
by booting (IPL) the virtual machine reader.
ipl 00c clear
.
.
.
Linux version release (root@ikr_rdr.suse.de)
.
.
.
Command line is: ramdisk_size=32768 root=/dev/ram0 ro
We are running under VM
This machine has no IEEE fpu
Initial ramdisk at: 0x02000000 (9862560 bytes)
Detected device 2000 on subchannel 0000 - PIM = 80, PAM = 80, POM = FF
Detected device 2001 on subchannel 0001 - PIM = 80, PAM = 80, POM = FF
Detected device 0202 on subchannel 0002 - PIM = C0, PAM = C0, POM = FF
Detected device 0192 on subchannel 0003 - PIM = C0, PAM = C0, POM = FF
Detected device 0200 on subchannel 0004 - PIM = C0, PAM = C0, POM = FF
Detected device 0201 on subchannel 0005 - PIM = C0, PAM = C0, POM = FF
Detected device 000C on subchannel 0006 - PIM = 80, PAM = 80, POM = FF
Detected device 000D on subchannel 0007 - PIM = 80, PAM = 80, POM = FF
Detected device 000E on subchannel 0008 - PIM = 80, PAM = 80, POM = FF
.
.
.
Here is an example of some of the errors you might see on your virtual machine
console when formatting DASD during the Linux IPL. These errors are normal and
are not a problem.
dasd_erp(3990): /dev/dasda ( 94: 0),0150@01: 074ab5c0: 00000000 00000000 0000
0000 00000000
dasd_erp(3990): /dev/dasda ( 94: 0),0150@01: 074ab5d0: 00000000 00000000 0000
0000 00000000
dasd_erp(3990): /dev/dasda ( 94: 0),0150@01: Failed CCW (074ab5b8) already lo
gged
end_request: I/O error, dev 5e:01 (dasd), sector 524320
EXT3-fs error (device dasd(94,1)): read_inode_bitmap: Cannot read inode bitmap -
block_group = 2, inode_bitmap = 16777472
EXT3-fs error (device dasd(94,1)) in ext3_new_inode: IO failure
EXT3-fs error (device dasd(94,1)): ext3_new_inode: reserved inode or inode > ino
des count - block_group = 0,inode=1
EXT3-fs error (device dasd(94,1)) in ext3_new_inode: IO failure
EXT3-fs error (device dasd(94,1)): ext3_new_inode: reserved inode or inode > ino
des count - block_group = 0,inode=2
EXT3-fs error (device dasd(94,1)) in ext3_new_inode: IO failure
At this point, you would continue with instructions for your Linux distribution.
See “Overview of defining virtual machines for Linux” on page 71.
Chapter 7. Creating your first Linux virtual machine and installing Linux 81
Page 96

Tip: When interacting with the Linux installation program, you might enter virtual
machine console mode. For instance, the installation program might tell you to
press Enter to accept a default option and pressing the Enter key results in the VM
READ state. If this happens, simply press the Enter key again. For more
information about virtual machine console states, see “The virtual machine
console” on page 4. Also, see “Virtual machine operation tasks” on page 107.
(Optional) Steps for loading Linux automatically at logon
Once you are satisfied with your Linux master, you might want to automate the
loading of Linux whenever its virtual machine is logged on. You can do this by
placing an IPL command in the PROFILE EXEC.
logged on, the PROFILE EXEC automatically executes and, through the IPL
command, loads the Linux operating system.
Because the same PROFILE EXEC is replicated in every clone, this automation
makes it convenient for systems with many Linux virtual servers. Chapter 9,
“Setting up basic system automation,” on page 85 shows you how to automate the
startup of Linux virtual servers whenever z/VM itself loads; thus whenever z/VM
loads, all your virtual machines are logged on and, in turn, each virtual machine
loads the Linux operating system.
Before you begin: You need to be logged onto the LINMSTR virtual machine.
Perform these steps to load Linux automatically at logon:
4
Whenever the virtual machine is
1. If Linux is operating, shut it down.
2. Load (IPL) CMS. Issue this command:
ipl cms
z/VM V6.1.0 2004-02-11 16:57
.
.
.
Ready;
3. Edit the PROFILE EXEC. Issue this command:
xedit profile exec
4. At the bottom of the file, add this line:
.
.
.
"CP IPL 150 CLEAR"
5. Save the file. From the XEDIT command line, issue this command:
====> file
You are done.
4. As an alternative to using the PROFILE EXEC, you can use the COMMAND directory control statement to specify a command or
a list of commands to be issued automatically whenever the Linux virtual machine is logged on. Note that the commands to be
executed may be of any class, and that privileged commands can therefore be executed this way without having to give the
virtual machine the associated privilege class. For more information, see the COMMAND directory control statement in z/VM: CP
Planning and Administration, SC24-6178.
82 z/VM: Getting Started with Linux on System z
Page 97

Chapter 8. Cloning Linux virtual servers
This topic covers a rudimentary way to replicate (or clone) Linux virtual servers.
In Chapter 7, “Creating your first Linux virtual machine and installing Linux,” on
page 71, you created the LINUX prototype and installed the Linux operating
system into LINMSTR. In this topic, you create a clone or replica of LINUX, copy
the Linux file system from LINMSTR to the clone, and change the IP address of
the clone in the Linux configuration files.
Steps for cloning a Linux virtual server
These steps tell you how to clone a Linux virtual server using DirMaint.
Before you begin: You need to
v Be sure that LINMSTR is not running so the new clone can use LINMSTR’s IP
address. You will use LINMSTR’s IP address temporarily for each Linux clone
during the cloning process. Since no two Linux virtual servers can have the
same IP address at the same time, you must clone Linux servers one at a time,
then customize them.
v Have the new IP address for the cloned Linux virtual server.
v Log on as MAINT.
Perform these steps to clone a Linux virtual server:
1. Add a clone of LINUX to the user directory. Issue this DirMaint command:
dirm add linux02 like linux pw new_password
where you supply a password for new_password.
2. Unlock LINMSTR’s directory entry. From the command line, type this
command and press the Enter key:
dirm for linmstr unlock
DVHXMT1191I Your UNLOCK request has been sent for processing.
Ready;
DVHREQ2288I Your UNLOCK request for LINMSTR at * has been accepted.
DVHREQ2289I Your UNLOCK request for LINMSTR at * has completed; with
DVHREQ2289I RC = 0.
3. Clone the disks from LINMSTR to the clone LINUX02. From the command
line, type these DirMaint commands and press the Enter key after each one:
dirm for linux02 clonedisk 191 linmstr 191
dirm for linux02 clonedisk 150 linmstr 150
dirm for linux02 clonedisk 151 linmstr 151
Tip: Cloning might take time. You are ready to move to the next step after
your work units have completed successfully. To determine the status of your
work units, type this command and press the Enter key:
dirm query datamove *
4. Log onto LINUX02 and IPL the Linux operating system.
© Copyright IBM Corp. 2009 83
Page 98

5. Telnet to the new Linux virtual server and update the network configuration
files to make permanent the network changes.
Example: On a SUSE SLES9 system, you need to modify the IP address and
host name through a tool like yast2.
6. Shut down the Linux operating system in LINUX02 and reboot. Check that the
Linux operating system reboots properly and that the network connections are
correct.
7. Try pinging this Linux server or try to access a remote site from this Linux
server.
You know you are done when the Linux operating system reboots properly and
the network connections are correct.
84 z/VM: Getting Started with Linux on System z
Page 99

Chapter 9. Setting up basic system automation
This section covers basic forms of z/VM system automation:
v Starting and stopping virtual machines automatically
v Automating z/VM system and virtual machine operations through the
programmable operator facility.
Starting and stopping virtual machines automatically
You can start and stop virtual machines manually, but it is more convenient to
have z/VM do these tasks automatically. This topic shows you how to:
v Start your Linux virtual servers and important virtual machines automatically.
You already configured DirMaint to start automatically in “Steps for
automatically starting DIRMAINT” on page 59, and TCP/IP in “Steps for
automatically starting TCP/IP” on page 63. Now you will do the same for other
virtual machines.
By including the CP XAUTOLOG command in the AUTOLOG1 virtual
machine’s PROFILE EXEC, a virtual machine starts automatically when z/VM is
loaded (IPL). The AUTOLOG1 user ID is the default user that z/VM logs on at
IPL time. When logged on, AUTOLOG1 executes its PROFILE EXEC, which can
contain an XAUTOLOG command to start a virtual machine that runs Linux or
any other vital system service. In turn, each virtual machine executes its own
PROFILE EXEC, which contains the necessary commands to establish its
operating environment; in the case of Linux, the PROFILE EXEC can load the
Linux operating system (see “(Optional) Steps for loading Linux automatically at
logon” on page 82.)
v Stop Linux virtual servers automatically. You can enable Linux to perform an
orderly shutdown whenever you shut down z/VM or force the Linux virtual
machine to log off with the FORCE command. Because Linux shuts down
gracefully, Linux does not have to examine or repair disks when rebooting.
Additionally, Linux can notify network monitors that it is shutting down.
Prior to shutting down or forcing a virtual machine to log off, z/VM sends a
signal to enabled virtual machines to shut down. The SYSTEM CONFIG file sets
the amount of time that z/VM allows a virtual machine operating system to
process a shutdown signal. In this topic, you configure Linux to process a
shutdown signal.
Related information
z/VM: CP Planning and Administration, SC24-6178
Steps for automatically starting Linux virtual servers and other virtual machines
This procedure configures the AUTOLOG1 virtual machine to startup virtual
machines automatically whenever z/VM starts.
Before you begin: You need to log on as MAINT.
© Copyright IBM Corp. 2009 85
Page 100

Perform these steps to start virtual machines at startup (IPL) time:
1. Link to the AUTOLOG1 191 minidisk. Type this command and press the Enter
key:
link autolog1 191 091 mr
Ready;
2. Access the 091 minidisk as Z. Type this command and press the Enter key:
access 091 z
Ready;
3. Edit AUTOLOG1’s PROFILE EXEC.
a. Type this command and press the Enter key:
xedit profile exec z
b. Go to the bottom of the file. From the XEDIT command line, type this
command and press the Enter key:
bot
c. Move up one line (The last line logs off AUTOLOG1. You need to execute
the XAUTOLOG commands before logging off AUTOLOG1). From the
XEDIT command line, type this command and press the Enter key:
====> up 1
d. From the XEDIT command line, type this command and press the Enter
key:
====> input
4. Add these XAUTOLOG statements. Press the Enter key after you type each
line:
ADDRESS COMMAND CP XAUTOLOG MONWRITE
ADDRESS COMMAND CP XAUTOLOG PERFSVM
Note: These statements start the MONWRITE and PERFSVM virtual machines,
which you are enabling in anticipation of setting up performance
monitoring (see “Using the CP Monitor and Performance Toolkit for
VM” on page 123).
5. For each Linux virtual server you want started automatically, add this
statement:
ADDRESS COMMAND CP XAUTOLOG userid
where userid is the user ID of the Linux virtual machine.
6. After every third XAUTOLOG statement that starts a Linux virtual server, add
this statement:
ADDRESS COMMAND CP SLEEP 15 SEC
86 z/VM: Getting Started with Linux on System z
 Loading...