

Page 1

iSeries
Using central site distribution to install multiple iSeries
servers
Page 2

Page 3

iSeries
Using central site distribution to install multiple iSeries
servers
Page 4

© Copyright International Business Machines Corporation 1998, 2001. All rights reserved.
US Government Users Restricted Rights – Use, duplication or disclosure restricted by GSA ADP Schedule Contract
with IBM Corp.
Page 5

Contents
Using central site distribution to install multiple iSeries servers ..............1
What’s new for V5R1 ...............................1
Print this topic ..................................2
Central site distribution terms and concepts .......................2
Upgrading a Target Site System to PowerPC Technology .................3
Distribution methods and the process flow .......................4
Electronic distribution and installation of licensed programs ................7
Total system package option or preloaded system option .................9
Release-Level interoperability ...........................10
Fix (PTF) level of the central and target systems ....................10
Planning licensed program distribution .........................14
Before you install the central site system onto a target system ...............14
Distributing license information ..........................14
Creating the IBM licensed program distribution media or premastering tape ..........19
Copying the IBM licensed program distribution media and Licensed Internal Code .......20
Installing OS/400 and other licensed programs on a target site system ............20
Documentation for target site system ........................20
Installing a new iSeries server ...........................21
Language files for the target site system .......................21
User profiles and device configuration distribution to a target system ............22
Installing applications and restoring objects using a user-defined installation program .......24
Using the QLPUSER program ...........................24
Verifying the operation of the QLPUSER program at the target site system ..........25
Working with installation profiles ..........................26
Preparing and installing distribution media .......................43
Before creating a distribution or premastering media with GO LICPGM Menu Option 40 .....43
Using CD-ROMs for installing Licensed Internal Code ..................45
Preparing the distribution or premastering media ....................46
Installing the distribution media at the target site system .................51
Optional tasks for installing distribution media .....................52
Central site distribution cover sheet ..........................55
Distribution media stacking order ...........................55
© Copyright IBM Corp. 1998, 2001 iii
Page 6

iv iSeries: Using central site distribution to install multiple iSeries servers
Page 7

Using central site distribution to install multiple iSeries servers
It is sometimes desirable to duplicate some or all of a system’s programs, including the operating system,
onto another system. To do this with a minimum of effort and maximum benefits you should do some
planning and consider the options available for performing a licensed program distribution. This set of
pages is designed to help you with these planning decisions. Then these pages will show you a step by
step procedure for implementing the duplication. The whole process includes:
v Central site distribution terms and concepts
This gives you an idea of the terms that will be used and the basic requirements for the central site
process to continue successfully, such as Release-level interoperability and the system fix (PTF) level.
You will also be introduced to some basic options such as the choices for distribution media.
v Planning licensed program distribution
This section takes you through decisions that affect the content of the licensed program distribution. You
will consider language files, distributing license information, licensed program distribution media,
Licensed Internal Code, OS/400 licensed program, manuals for target site system, and user profiles and
device configuration.
v Installing applications and restoring objects using a user-defined installation program
This section shows you how to use a program to automate some of the central site process. The
program can restore user profiles, configurations, and install applications.
v Preparing and installing distribution media
This section takes you through the final steps to install the central site system code on the target site
system. First you will get instruction on the things to do before you create a distribution or premastering
media. Then the instructions will cover installing the distribution media at the target site system,
including the use of an alternative installation device. Finally there will be a list of optional tasks for
installing distribution media.
v Central site distribution cover sheet
This cover sheet gives the people at the target site any special information they need. It is sent along
with the distribution media.
v Distribution media stacking order
This page contains a link to a 24 page PDF file that you can print out. The table gives information on
what files are needed for each application.
What’s new for V5R1
There have been a few changes to this information for V5R1.
View and print all associated documents
You can now access all the information about creating distribution media from one central location at Print
this topic.
Updated list of programs that do not support secondary languages
Because these programs do not support secondary languages, you do not need to save these programs at
the central site system when you want to distribute secondary languages to target site systems.
Updated the stacking order
You can use the stacking order to verify that all of the files you saved from the central site system were
correctly transferred to your distribution media.
How to see what’s new or changed:
© Copyright IBM Corp. 1998, 2001 1
Page 8

To help you see where technical changes have been made, this information uses:
v The
v The
image to mark where new or changed information begins.
image to mark where new or changed information ends.
Print this topic
v Installing multiple iSeries servers using distribution media (about 530 KB) contains the following topics:
– Information about creating distribution media
– Planning for creating distribution media
– Creating the distribution media
v Stacking order (about 59 KB) contains the stacking order for your distribution media. Print this PDF file
to verify that you correctly transfered all of the files to the distribution media.
v Cover letter (about 3 KB) is a sample letter that contains sample instructions for the central system to
provide to the target systems for using the distribution media.
To save a PDF on your workstation for viewing or printing:
1. Open the PDF in your browser (click the link above).
2. In the menu of your browser, click File.
3. Click Save As...
4. Navigate to the directory in which you would like to save the PDF.
5. Click Save.
If you need Adobe Acrobat Reader to view or print these PDFs, you can download a copy from the Adobe
Web site
(www.adobe.com/prodindex/acrobat/readstep.html).
Central site distribution terms and concepts
The distribution of a central site system is different from the normal distribution of application programs,
system control information, and data in a distributed systems network. One difference is that the
distribution media the central site sends to a target system site can be either tape, CD-ROM, or DVD.
Another difference is that you must attend the target site system while installing licensed programs.
These pages highlight some of techniques and considerations that are needed to develop a plan for:
v Distributing licensed programs in a distributed systems network.
v Distributing licensed programs to other systems that operate more independently.
The systems discussed in this page are the central site system and the target site system.
v Central site system. This system is licensed to receive the distribution media from IBM. In a distributed
systems network, the central site system is usually defined to be the focal point in a communications
network for alerts, application design, and network management tasks.
The central site system can also distribute licensed programs to other systems that operate
independently of the central site system. However, these systems depend on the central site system for
distributing licensed programs.
Media created by the central site supports the following:
– Software already at V3R6 or later (runs only on PowerPC AS processors).
– Software already at V4R1 or later (runs only on PowerPC AS processors).
– Performing a CISC to RISC upgrade, where the target release is V4R2 or later.
2 iSeries: Using central site distribution to install multiple iSeries servers
Page 9

– The upgrade happens to both the hardware and software in the same process.
Note: You must upgrade hardware and software at the same
time when upgrading from CISC to RISC. This is unique
to CISC to RISC upgrades.
– Having the central site upgrade to PowerPC Technology and V4R3 or above, but having the target
sites remain at a previous release level with existing hardware.
You must be running on PowerPC AS hardware to create media for a target site system that you
upgrade to PowerPC Technology. See Upgrading a target site system to PowerPC Technology for
more details.
v Target site system. This system depends on the central site system for distribution of licensed
programs. This system is possibly unattended, and is probably not licensed to receive licensed program
media from IBM.
A target site system can be one of the following:
– Part of a distributed systems communications network.
– Operate independently of the central site system but rely on the central site for licensed program
distributions and application development and maintenance.
The distribution tasks should occur at the following times:
1. The initial distribution by the central site system
2. The distribution of fixes between releases
3. The distribution of an upgrade for IBM-supplied licensed programs
There are a number of terms, concepts, and choices you should become know about. Understanding the
following topics will help in the planning stage of the Central Site Distribution process.
v Distribution methods and the process flow
This details the two distribution methods at your disposal. The flow of each process, either media (tape
or DVD) or premastered CD-ROMs, is shown.
v Electronic distribution and installation of licensed programs
This tells about options for distributing IBM licensed programs and customer applications electronically
from a central site system.
v Total system package option or preloaded system option
When you choose the total system package option or the preloaded system option for ordering a new
system, the system will come with licensed programs installed and configured hardware.
v Release-level interoperability
The central site system and the target site have compatable software releases. Interoperability is the
ability of one system to exchange data or objects with another system.
v Fix (PTF) level
Fixes are available to update licensed program code between releases. It is important that both the
central site system and target site system be at the current fix level.
Upgrading a Target Site System to PowerPC Technology
You must be running on PowerPC AS hardware to create media for a target site system that you upgrade
to PowerPC Technology.
When you upgrade a target site system to an iSeries server with PowerPC Technology, you upgrade the
hardware and software at the same time.
Note: Systems that are running the V3R7 or Version 4 operating systems are already using PowerPC AS
software. This topic does not apply to such systems.
Using central site distribution to install multiple iSeries servers 3
Page 10

Note: For more information about the following upgrade methods, see the AS/400 Road Map for Changing
to PowerPC Technology, SA41-5150. Each target site must be upgraded to PowerPC Technology as
described in that book.
Three methods are available to change your target site system to PowerPC Technology:
v Unload/reload method
When you use this method, you save your information to tape (unload) before the hardware upgrade
process. You restore your information from tape (reload) after the hardware upgrade process.
v Replacing-a-release method
When you use this method, you prepare your data for a new disk format before the hardware upgrade
process. The hardware service representative converts your disk storage during the upgrade process.
You do not have to reload data.
v Side-by-side method
When you use this method, you install an entirely new system (with a PowerPC AS processor) in
parallel with your existing system. Usually, you run the two systems in parallel during a transition period.
When you are satisfied with object conversion and testing, you move the system with the PowerPC AS
processor into production.
Many times, the parts that are required to upgrade an existing system to PowerPC AS hardware are nearly
sufficient to construct a temporary, stand-alone operational system. Because of this, the Staged Upgrade
Offering is available for many MES upgrades for an additional charge. IBM’s intent with the Staged
Upgrade Offering is to provide enough equipment with the MES. In this way, you can construct a limited
test environment at minimal additional expense. You will need to purchase or rent some additional
equipment, such as disk units, tape attachment features, or a workstation controller. This equipment is
used to construct a configuration that is suitable for object conversion and limited testing.
You can use the Staged Upgrade Offering with all three upgrade methods. Your marketing representative
can help you determine whether the Staged Upgrade Offering is available for your configuration and
whether it is appropriate for your situation. The Staged Upgrade Offering may reduce the time that your
system is unavailable during the upgrade. However, careful planning and technical skills are necessary to
use this offering successfully.
For more information about the Staged Upgrade Offering, see the AS/400 Road Map for Changing to
PowerPC Technology, SA41-5150.
In the AS/400 Road Map for Changing to PowerPC Technology, you can find work sheets that you can
use for planning upgrades. You can customize these work sheets for the needs of each target site system.
Note: In this book, the target system is a system that depends
on the central site for distribution of licensed programs. In
the AS/400 Road Map for Changing to PowerPC
Technology, the target system is a system that is being
upgraded to PowerPC Technology.
Distribution methods and the process flow
There are two basic methods available to the central site system for distributing licensed programs.
Create the IBM licensed program distribution media at the
central site system
Central Site System Central Site System
Create tapes for premastering CD-ROM
Create distribution media at the central site system Use the qlpHandleCdState API to put job in premastering
state
4 iSeries: Using central site distribution to install multiple iSeries servers
Page 11

GO LICPGM Menu Option 40
(Create a distribution media)
Distribution Tape Premastering Tape
Install Licensed Internal Code and licenced programs Use the qlpGenCdPermasteringInfo API to create
distribution set map and to return information about the
Target Site System Save the distribution set map to media
Use the qlpHandleCdState API to disable the job for
Work with your CD-ROM mastering service to plan the
Send the tape and the plan to your mastering service
Create the premastering tape
(GO LICPGM Menu Option 40)
saved files
premastering
content of your CD-ROM volumes
Get back the CD-ROM prototype
Verify the CD-ROM prototype and authorize a production
run for your distribution copies
Distribute the production run copies to target sites
Install Licensed Internal Code and licenced programs
Target Site System
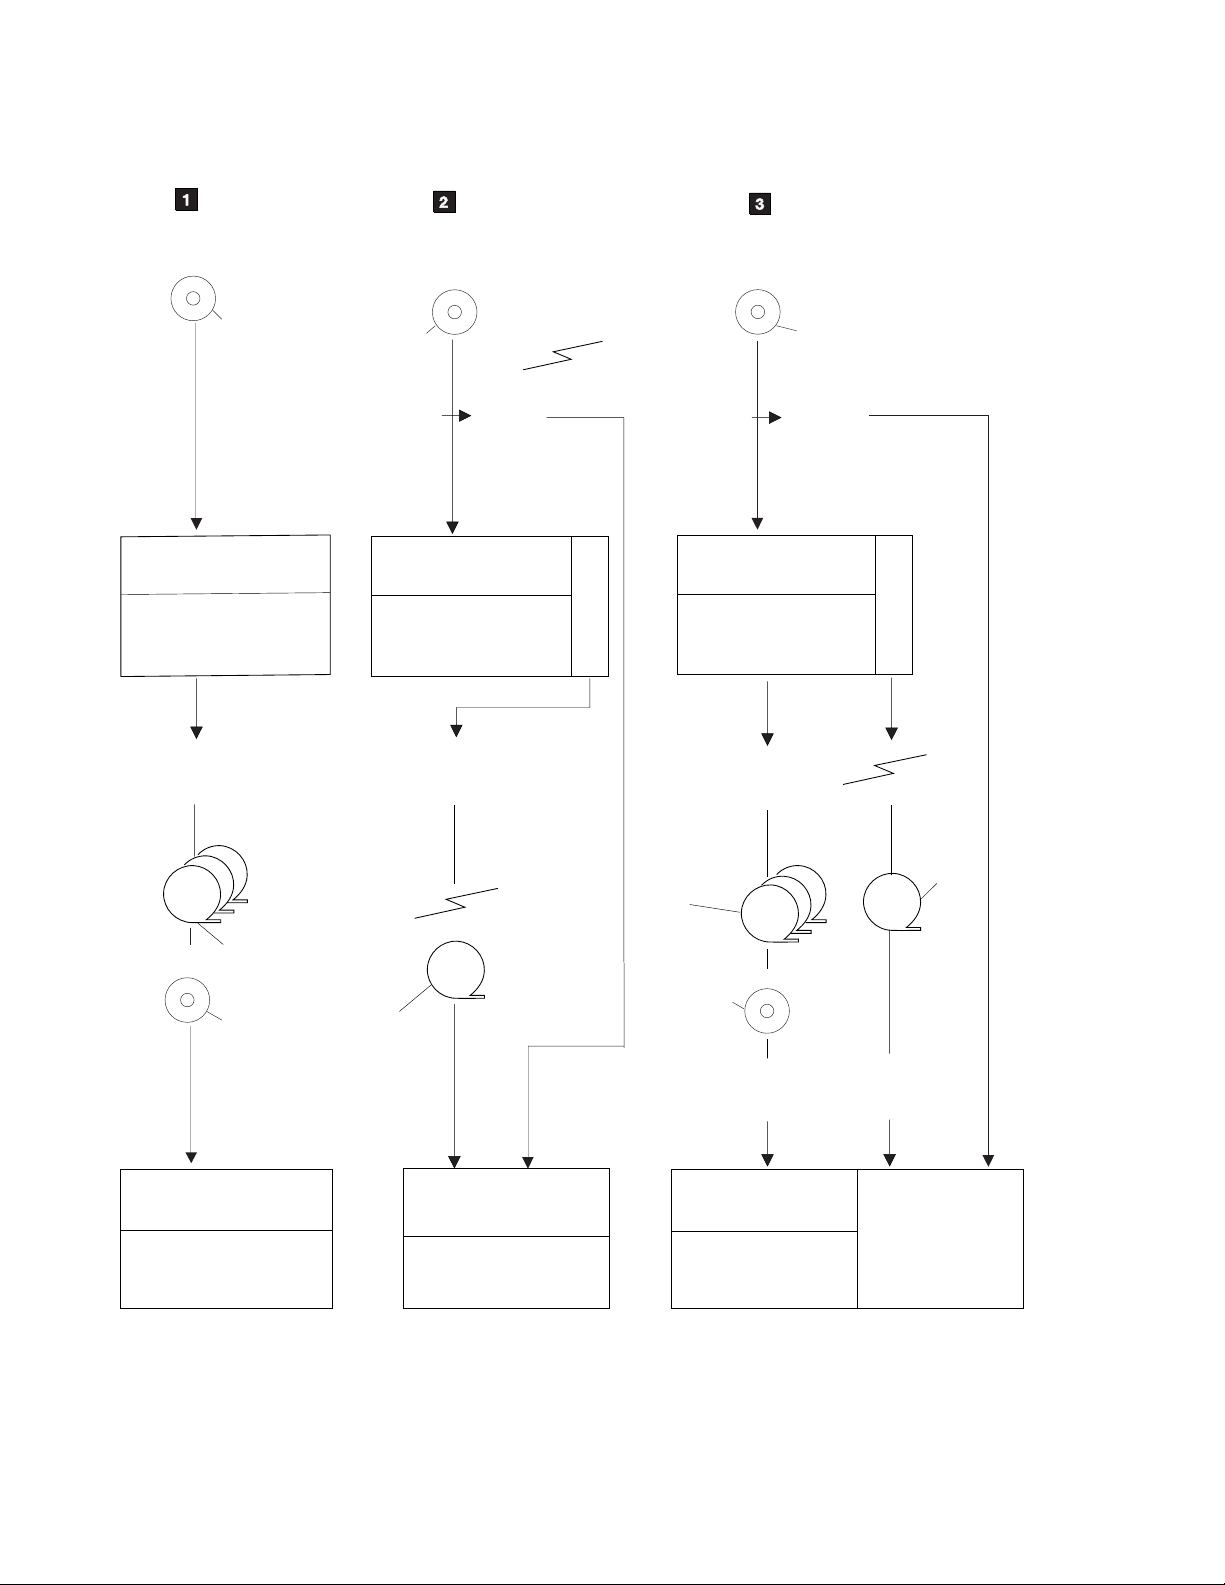
Method 1 - Create the IBM licensed program distribution media at the central site system (from media tape or DVD). Install the IBM-supplied licensed program distribution media at the central site system. Then
select option 40 (Create a distribution media) on the GO LICPGM (Work with Licensed Programs) menu to
create a distribution media. This media is then distributed to target site systems.
Method 2 - Create tapes for premastering CD-ROM (from CD-ROM). Install the IBM-supplied licensed
program distribution media at the central site system. Then select option 40 (Create a distribution media)
on the GO LICPGM menu to create a tape. This tape is used as input for the CD-ROM premastering
process.
Note:
The distribution media that the central site distributes to a target site includes:
v The IBM Licensed Internal Code
v The OS/400 Licensed Program
v The installation profile
v The user-defined installation program
Using central site distribution to install multiple iSeries servers 5
Page 12

v Other licensed programs
v User libraries
v fixes
Method 1 - Create the IBM licensed program distribution media at the central site system
This method uses option 40 (Create a distribution media) on the GO LICPGM menu to create a distribution
media. You can then distribute and install the media on other systems. You can also distribute user
libraries that contain applications. However, the central site system must provide the target site systems
with instructions on how to install the user libraries or provide a user-defined installation program.
One advantage to this method is program temporary fix (PTF) management. You can apply fixes at the
central site system before distributing the licensed programs by using this method. The licensed programs
with applied fixes will be distributed when you create your distribution media.
Another advantage to this method is an installation profile. The target site system can use the automatic
installation method by using an installation profile. The automatic installation method reduces the number
of tasks the operator must perform during the installation at the target site system. Working with
installation profiles contains information about installation profiles.
The central site system should have adequate resources, such as auxiliary storage, to handle all licensed
programs needed at the target site systems. This is also true for applications that are developed at the
central site system for target site systems.
Target site system resources (for example, auxiliary storage) must be sufficient to receive distributions
(licensed programs and applications) from the central site system. For more information about resources
that are required for licensed program distributions, see Software Installation
Another resource consideration is a common tape exchange media such as a 1/2-inch tape cartridge, or
DVD.
For the current operating system, any combination of iSeries servers that use the same type of media, can
use method 1 to install IBM Licensed Internal Code at a target site system.
A hardware service representative installs the Licensed Internal Code during a CISC to RISC upgrade.
However, you may be able to reduce the software installation time for a target site by creating a tape that
has fixes applied to the Licensed Internal Code.
.
Method 2 - Create tapes for premastering CD-ROM
If you plan on distributing your software on CD-ROM, you can use these two application program
interfaces (APIs) to get the required information needed for the premastering process:
v The Handle CD-ROM Premastering State (qlpHandleCdState) API is used to place your job into a
premastering state.
v The Generate CD-ROM Premastering Information (qlpGenCdPremasteringInfo) API is then used to
return information about the size of the tape files saved. It also returns information that shows which
CD-ROM volume the files reside on. This API also creates the distribution set map.
For more information on APIs, see CL and APIs.
Premastering is the process of creating a tape that can be used as input to generate a CD-ROM. The tape
contains the data which is used to create a CD-ROM image that can be read on a CD-ROM drive.
The qlpHandleCdState API allows you to do the following:
6 iSeries: Using central site distribution to install multiple iSeries servers
Page 13

v Place your job in a premastering state. When the job is in this state, all save operations (SAVOBJ,
SAVLIB, SAVLICPGM, SAV, etc.) result in information being stored about the sizes of these tape files.
This information is then used by the Generate CD-ROM Premastering Information
(qlpGenCdPremasteringInfo) API to generate the QDSETMAP bytestream file. Also, while in this state,
the data format that is written to tape is changed slightly so it can be restored from the CD-ROM.
v Query the existing state of your job as well as optionally getting information about saves that may have
already taken place. In case you are interrupted, this lets you know where you have left off and where
to restart. As input to the qlpHandleCdState API you need to specify a distribution set map identifier.
This identifier is used to ensure that correct information is returned about the saved files.
v Take your job out of a premastering state.
Note: Ending your job also takes your job out of a premastering
state.
The qlpGenCdPremasteringInfo API allows you to do the following:
v Create a bytestream file in the root directory. This file contains information about which tape files reside
on each CD-ROM volume. The name of the file is /qlpnnnnnnnnnn where nnnnnnnnnn is the name of
the distribution set map identifier provided as an input parameter to this API. For more information, see
Saving the contents of the bytestream file.
The only valid characters for nnnnnnnnnn in the set map identifier are uppercase letters A through Z,
numeric characters 0 through 9, and underscore (_).
v Retrieve information about the files saved when the job was enabled for CD-ROM premastering by
using the qlpHandleCdState API. This information includes:
– The tape file name.
– The corresponding CD-ROM file name.
– The CD-ROM volume it is placed on.
– The volume serial position in this set of CD-ROMs.
Electronic distribution and installation of licensed programs
IBM licensed programs and customer applications can be distributed and installed electronically from a
central site system. There are two options available.
You can use Management Central if you are running on a TCP/IP network instead of a SNA network.
Management Central is a part of Operations Navigator.
You can also use the System Manager/400 licensed program provides centralized services for software
distribution and installation on other systems in SNA and TCP/IP networks. To receive licensed programs
and applications electronically from the central site system, both the central site system and the target site
system must have the latest release level of the Managed System Services/400 licensed program
installed.
Note: The Managed System Services/400 licensed program
cannot be installed remotely on the target site system
from the central site system.
The benefits in using electronic distribution from the central site system are:
v Fewer errors because distribution and installation plans can be created, reviewed, and tested before
sending updates to the managed system sites.
v Reduced operation costs because the central site system tracks job status.
Installation methods
Using central site distribution to install multiple iSeries servers 7
Page 14

The basic methods for installing the distribution media at the target site system are:
v Automatic installation
Automatic installation means that the operator at the target site system simply loads distribution media
as prompted.
v Manual installation
When manual installation is used, the operator at the target site system must perform several tasks to
install the system with the distribution media.
v Alternative installation device
Using the new Alternative installation device support, the system continues the operation with media in
the Alternative installation device.
Automatic installation in the central site process
Note: If you are performing a CISC to RISC upgrade, do not use
the automatic installation method.
Automatic installation means that the operator at the target site system simply loads distribution media as
prompted.
Note: If you are using a tape device instead of the optical device
optimized for CD-ROM or DVD, you should verify that the
tape unit is varied on. Also, verify that the tape device is
allocated to your system.
When you perform an automatic installation at the target site system, you read the values that control the
installation from an installation profile on the distribution media. When you perform an automatic
installation, the primary language you use on the distribution media is the same as the primary language
that you load.
Using an installation profile to install media containing licensed programs, fixes (PTFs), and application
programs has the following advantages:
v Operator interaction during the installation is reduced to mounting media as prompted.
v Allows the central site planner to create customized installation profiles to control the installation at the
target site system.
v Provides the capability to restart after a failure, including bypassing parts of the installation that were
successful.
v Reduces or eliminates messages during the installation.
v Allows the central site planner to install applications or further customize the system after a successful
installation using a user-defined installation program.
Automatic installation can be used to install distribution media that was created by either of the two
methods previously described.
If Method 1 - Create the IBM licensed program distribution media at the central site system - is used, then
you must create an installation profile. Working with installation profiles contains information about
installation profiles.
Manual installation in the central site process
Note: If you are performing a CISC to RISC upgrade, use the
manual installation method.
8 iSeries: Using central site distribution to install multiple iSeries servers
Page 15

When manual installation is used, the operator at the target site system must perform several tasks to
install the system with the distribution media. Displays are presented that allow the operator to customize
the installation. The manual process allows you to change the default install options. This includes:
v Restoring language objects
v Job and output queue options
v Restore options:
– System information
– Edit descriptions
– Job descriptions
– Subsystem descriptions
– Message reply list
Use the manual installation process if you are doing any of the following installation procedures:
v Performing a CISC to RISC upgrade
v Adding storage
v Installing additional licensed programs that are not on the distribution media
For more information about installing your new release, see Software Installation
.
Alternative installation device in the central site process
A function introduced in V4R1M0 allowed you to perform installation procedures and recovery procedures
by using a combination of devices. Prior to this, you had to attach devices to the first system bus before
you could perform these types of activities. (The first system bus connects to the service processor IOP.
Typically we attach the optical device or tape devices that are used for installations to this location.) With
the release of V4R1, you could now use a combination of devices that are attached on the first system
bus and on additional buses. This function is still available in the current operating system. The Alternative
installation device does not attach to the first system bus.
If you use this function, the system uses existing support (a device on the first system bus). This support
is to install or recover enough of the Licensed Internal Code required to perform an IPL with IPL-type D.
Note: We require a Licensed Internal code CD-ROM for this
part.
There are some specific install and recovery implications for Models 600 and 620 when you use an
Alternative installation device.
Using the new Alternative installation device support, the system continues the operation with media in the
Alternative installation device. This new function supports installation and recovery from tape media.
Examples of these are SAVSYS tapes or distribution tapes which you created, that contain Licensed
Internal Code and may contain the operating system, licensed programs, and data.
Some models, that typically have 3590 tape devices attached, may see a performance improvement when
using an Alternative installation device for save operations.
Total system package option or preloaded system option
IBM provides the Total System Package (TSP) option or the preloaded system option for ordering a new
system. When you receive these options, they come with licensed programs installed and configured
hardware.
Using central site distribution to install multiple iSeries servers 9
Page 16

Total System Package systems and preloaded systems are licensed to receive their own IBM distribution
media and fixes. Licensed program distribution need not be a part of central site system activity.
Distributing applications and system control information can be done through communications in a
distributed systems network or by
Release-Level interoperability
It is the responsibility of the central site to ensure that the central site and the target site have compatable
software releases. This is especially important if you want to have objects and data interchange between
systems.
Note: You can see the installed release of licensed programs by
using option 10 (Display licensed programs) on the Work
with Licensed Programs menu. This displays the release
of licensed programs that were initially shipped with an
operating system release or modification level. Use the
Display Software Resources (DSPSFWRSC) command to
see the release of licensed programs not initially shipped
with an operating system release or modification. You can
also use this command to see what Program Request for
Price Quotations (PRPQs) and licensed program offerings
(LPOs) are installed on the system.
Interoperability is the ability of one system to exchange data or objects with another system. The
exchange can be performed electronically or by physical media (such as tape). Either system may initiate
the exchange.
An iSeries server interoperates with another iSeries server when exchanging data or when saving and
restoring objects.
For more information on saving objects to a system running a previous release, see the chapter on
release-to-release support in Backup and Recovery
.
Exchanging data between different release levels
The source system (the system that sends the information) and the system that receives the information
must be within the supported release levels. If the source system is at the current release level, the
system receiving information can be at V3R2M0 or any level of Version 4 operating system.
Saving and restoring objects between different release levels
Objects that are interoperable must be saved by specifying either a specific release level or *PRV for the
value of the target release (TGTRLS) parameter.
For more information on saving objects to a system running a previous release, see Backup and Recovery
.
Licensed programs can be saved and restored similar to other objects as long as the release level is
compatible with the operating system release level. For more information about compatible levels of
licensed programs, refer to Licensed Program Information section in Software Installation
.
Fix (PTF) level of the central and target systems
IBM periodically makes fixes available to update licensed program code between releases. For information
on avaliable fixes, see Managing fixes with Management Central.
10 iSeries: Using central site distribution to install multiple iSeries servers
Page 17

For detailed information about working with fixes and Licensed Internal Code fixes, see ″Working with
Program Temporary Fixes″ in the Basic System Operation, Administration, and Problem Handling,
SC41-5206. The page, Central site system distribution of fixes, pertains to central site system
management and the distribution of fixes. This information is intended to supplement the Basic System
Operation, Administration, and Problem Handling book.
Depending on the licensing option you are using, fixes are available to the central site system or to target
site systems in two ways:
v Corrective service
– On media accompanied by a cover letter that describes the contents of the media
– From the service support system by way of electronic customer support
v Preventive service
– Cumulative PTF media
It is the responsibility of the central site system to control the PTF level of the target site systems.
Fixes (PTFs) for Network Interoperability
To exchange objects in a network between systems running V3R2M0 or any Version 4 operating system,
and systems running earlier releases, apply fixes to the earlier systems. You cannot restore objects to
earlier systems until you apply fixes to the earlier systems. You can avoid a delay by ordering the needed
fixes and applying them now to the systems that will remain at earlier release levels.
For the systems that remain at the V3R2M0 release level, you will need to order and apply PTF SF33467.
This will enable exchanging data between V3R2M0 systems and current systems. You will receive several
corequisite fixes when you order any of the fixes shown. These are needed for the following:
v Restoration of save files
v Database objects
v Journal receivers
v Program objects
v Objects that are associated with byte stream files:
– Document objects (*DOC)
– Stream File objects (*STMF)
– Symbolic Link objects (*SYMLNK)
Central site system distribution of fixes
The central site system planner should coordinate the PTF levels of the central site system and the target
site system. This ensures that all systems are at the same level. See Managing fixes with Management
Central for information on obtaining and applying fixes. The central site system planner should also verify
correct system operation before the fixes are distributed to target site systems. To coordinate the PTF level
of the target site systems, one of the following methods can be used:
v Apply fixes at the central site system. Distribution media is created at the central site system using the
GO LICPGM menu option 40 (Create a distribution tape). This media is installed at the target site
system, replacing Licensed Internal Code Copy A and Copy B and installs licensed programs at the
central site system PTF level. This method can be used for first installation, upgrade installation, or
distribution of cumulative packages. The advantages of this approach are:
– No special PTF installation instructions are needed at the target site system.
– The target site system will be at the same PTF and release levels as the central site system.
v Distribute fixes to target site systems. If the central site system distributes individual or cumulative fixes
to target site systems, the central site system must provide instructions on installing the fixes. It must
also keep a record of the target site system PTF level.
Using central site distribution to install multiple iSeries servers 11
Page 18
The different methods of distributing fixes to target site systems are shown in the following illustration.
First Installa tion
or Upgrade
IBM
CD-ROM
Distribution
Media
Central Site
System
LPs Installed
with
PTFs Applied
Create
Distribution
Media
Individual PTFs
SAVF by way
of electronic
or
CD-ROM
PTF
Media
or CPYPTF or CPYPTF
Central Site
System
Load and Apply
Object
Distribution or
SNDPTF
customer support
S
A
V
F
Cumulative
PTF Package
Central Site
System
Load and Apply
Create
Distribution
Media
CD-ROM
PTF
Media
S
A
V
F
or
Ta il or ed
Ta pe
Load and Apply
RV2Q628-1
Central Site
Distribution
or
Ta pe
Central Site
CD-ROM
Distribution
Media
Ta rg e t S i t e
System
LPs Installed
with
PTFs Applied
Ta il or ed
Ta pe
or
or
Ta rg e t S i t e
System
Load and Apply
Central
Distribution
Media
CD-ROM
Distribution
Media
Central Site
System Installa tion
Instructions
LPs Installed
PTFs Applied
or
Ta il or ed
PTF Installati on
Instructions
or or
Ta rg e t S i t e
System
with
The numbers at the beginning of the following paragraphs correspond to the reverse image numbers on
the previous illustration.
(1)
12 iSeries: Using central site distribution to install multiple iSeries servers
Page 19

First installation or upgrade installation of licensed programs and fixes at the central site system using the
AS/400 Road Map for Changing to PowerPC Technology, SA41-5150, and Software Installation
.
The PTF cumulative package is shipped with the IBM CD-ROM distribution media as a separate CD-ROM.
You should load and apply these fixes, using the PTF Shipping Information Letter, before you create your
distribution media. This ensures you distribute the latest level of the licensed programs and that all target
site systems at the same release level have the same fixes applied. If fixes are applied at the central site
system, the target site system does not have to apply fixes.
Fix considerations for an upgrade installation at the central site system are the same as first installation.
The central site system should apply the fixes that come with the release so the latest PTF level is on the
central site system distribution media.
(2)
Individual fixes ordered and received at the central site system.
Individual fixes may be installed between releases, either at the central site system or target site systems.
To control the PTF level of target site systems, you should use the Display PTF (DSPPTF) command. This
ensures the central site system is aware of the PTF level of target site systems.
An individual PTF save file can be distributed to the target site system by doing one of the following:
v Using the object distribution command Send Network File (SNDNETF).
v Copying the PTF save file to media using the Copy Program Temporary Fix (CPYPTF) command.
Note:
The SNDNETF command can only be used if SNA Distribution Services (SNADS) is active on both the
central site system and the target site system.
You can also distribute fixes electronically using the Send PTF (SNDPTF) command. This command is
part of the System Management/400 licensed program.
(3)
Cumulative PTF packages ordered and received from IBM for central site system.
Instructions for installing PTF cumulative packages at the central site system are included with the
cumulative PTF package. To distribute a cumulative package to target site systems:
v Use the Copy PTF (CPYPTF) command to duplicate the PTF package and the printed instructions.
Then send them to the target site system locations for attended installing.
v If you decide to create a tailored media, tailor it to include only the selected items you want to distribute.
How to tailor a fixes media is discussed in Distributing fixes to remote systems.
The tailored fixes media can be distributed to target site systems by doing one of the following:
– Sending the media to the target locations.
– Distributing the media through your distributed system network as save files.
v Load and apply the package at the central site system. Then use option 40 (Create a distribution media)
on the GO LICPGM menu to distribute the licensed programs with fixes applied to target site systems.
v If the central site system received fixes on media and wants to distribute the fixes using object
distribution, use the Copy PTF (CPYPTF) command to copy the fixes to a save file. For more
information about handling fixes, see Distributing fixes to remote systems.
Using central site distribution to install multiple iSeries servers 13
Page 20

Planning licensed program distribution
There are a number of things to consider when planning a central site distribution. Some concerns about
whether or not objects with security-sensitive attributes can be restored are addressed in Before you install
the central site system onto a target system.
License considerations and handling of such programs is covered in:
v Distributing license information
This section tells you about distributing license information for products that use the OS/400 license
management function.
v Creating the IBM licensed program distribution media or premastering tape
This section explains how to create a distribution media at the central site system. There are also
instructions for creating a tape for premastering the CD-ROM. You will also select which installation
profile to use and which licensed programs and OS/400 optional programs to put on your distribution
media.
v Copying the IBM licensed program distribution media and Licensed Internal Code
This section explains how to duplicate both tape and optical media and how to copy Licensed Internal
Code.
v Installing OS/400 and other licensed programs on a target site system
This section explains how to distribute all or part of OS/400 and other licensed programs.
Besides license concerns, you will have to consider:
v Manuals for target site system
Each new system comes with users and service manuals. This lets you know which manuals need to
be ordered for each target system.
v Installing a new iSeries server
If the target system or central system is new, this explains what to expect.
v Language files for the target site system
This explains what to do in order to copy the primary and secondary language files onto the distribution
media so you can install them at your target site systems.
v User profiles and device configuration distribution to a target system
This page gives you all the references to set up the user profiles and device configuration from the
central site system for use on the target site system.
Before you install the central site system onto a target system
The Allow Object Restore (QALWOBJRST) system value specifies whether or not objects with
security-sensitive attributes can be restored. It is important to set the value to *ALL before performing the
following system attributes:
v Installing a new release of OS/400
v Installing new licensed programs
v Applying fixes
v Recovering the system
So that these activities do not fail, set the value of QALWOBJRST to *ALL. To ensure System Security,
return the QALWOBJRST value to your normal setting after completing the system
Distributing license information
License information can be distributed for products that use the OS/400 license management function. IBM
supplies usage limit information for only the central site system. The central site must then determine the
usage limits for each target site system and do one of the following:
v Load the usage limit information on the media that is given to each target site.
14 iSeries: Using central site distribution to install multiple iSeries servers
Page 21

v Have an end user at each target site enter the information.
License key distribution will help you learn more about distributing licence keys.
If the products are already installed, use the Work with License Information (WRKLICINF) command to
display a list of products and features that use license management. License information can be changed
using the WRKLICINF command and distributed from a central site system to a target site system. For any
product that uses the OS/400 license management function the license information includes:
v Usage limit
v Message queues to receive messages
v Log violations indicator
The current list of license users is not distributed from the central site system to the target site system.
The license information is distributed with the QUSRSYS library and is installed at the target site system
only when a new license term is installed. The license term is the length of time the authorized usage limit
for a licensed program lasts. The usage limit can last for a version, a release, or a modification level. For
IBM products, the authorized usage limit lasts for the entire version.
For example, the license term for product X is by version, meaning that the authorized usage limit is valid
for the entire version of the product. Once license information has been installed for product X, it will not
be installed again until a new version of product X is distributed. The license information is preserved at
the target site system when new release and modification levels are installed. When a new version of
product X is distributed, the usage limit may need to be changed on the target site system.
You may need to learn more about:
v Setting the usage limit on the target site system
v Client Access
v System configuration data
v Save and restore strategy
v Electronic Customer Support considerations
License key distribution
Every keyed licensed program requires a key file in order for the program to run. These files must be
distributed to the target site systems along with the program files and license information. These pages will
acquaint you with concerns about license key duplication.
v Distributing software license keys using a duplication command
This section will explain how to prepare the license key files for distribution.
v Estimating the size of a license key information file
You may want to estimate the size of the licence key information files you send to the target site
system. This page gives a simple method for doing this.
v Verifying software license key information is loaded
You should add the additional step of verifying that the necessary software license key information is
loaded on each target site system. This page will show you the procedure to do this.
v Distributing software license information for keyed compliance products
This section introduces the four options you have for distributing software license information for keyed
compliance products from a central site system to a target site system.
Distributing software license keys using a duplication command: You can distribute software license
keys using the Duplicate Tape (DUPTAP) command for tape media or the Duplicate Optical (DUPOPT)
command for optical media.
Using central site distribution to install multiple iSeries servers 15
Page 22

If you use this command, you must get the license information onto the system before or after the
installation of copied IBM distribution media.
Distributing software license information on distribution media describes how to create a license
information file. If you name the file QALZALPKEY and restore it or send it electronically to the QSYS library
before the upgrade, all appropriate software license information is automatically loaded during the software
upgrade.
Estimating the size of a license key information file: If you plan to add a license information file to
your product media or send a license information file electronically, you can estimate the size of the
license information file.
Each license information file has a record length of 101 bytes. The total number of bytes is the number of
systems multiplied by the number of products multiplied by 101 bytes.
For example, if you have one iSeries server and one product using the license management function, the
total number of bytes for the license information file is 101 bytes (1x1x101). If you have five iSeries
servers and 5 products using the license management function, the total number of bytes for the license
key file is
Verifying software license key information is loaded: You should consider adding an additional step
to your distribution process to verify that the necessary software license key information is loaded on each
target site system.
Note: No IBM product has keyed compliance.
A warning message that specifies the date that the grace period will expire is sent each day the product is
used. The message is sent to the QSYSOPR message queue and any other message queues that you
have defined through the Change License Information (CHGLICINF) command.
There are two basic methods to verify that the necessary software license information is loaded on the
target site system.
Manual Verification
A person at the target site system should perform the following steps:
1. Run the Work with License Information (WRKLICINF) command. A list of all the installed products that
use the OS/400 license management function is displayed.
2. Press F11 to display usage information.
3. Verify that the usage limit for each product is not 0.
Program Verification
You can use QLPUSER or another program to verify that the usage limit for each product is not 0. Use the
Retrieve License Information (QLZARTV) API to retrieve the usage limit for each installed product that
requires software license information. Verify that the usage limit is not 0.
Distributing software license information for keyed compliance products - options: The following
four options are available for distributing software license information for keyed compliance products from
a central site system to a target site system:
1. Distributing on paper
2. Distributing on media
3. Loading software license information by using the QLPUSER program
4. Distributing electronically
16 iSeries: Using central site distribution to install multiple iSeries servers
Page 23

Setting the usage limit on the target site system
For IBM products, the usage limit must be set for all products that use OS/400 license management.
The authorized usage limit must be set to match the licensing agreement each time a new license term is
installed for the licensed program. Use one of the following commands to set the usage limit:
v Work with License Information (WRKLICINF), then choose option 2 to Change License Information
v Change License Information (CHGLICINF)
The authorized usage limit for the target site system may be different from the usage limit at the central
site system. If so, the WRKLICINF command or the CHGLICINF command must be run on the
Client Access and the distribution of licensed programs
Client Access must be installed on each personal computer. Refer to Client Access Express for Windows -
Setup
for more information on how to install Client Access.
System configuration data
System configuration refers to the locations of components in the iSeries server.
System configuration data must be considered separately when doing central site system distributions to a
target site system. System configuration data consists of:
v The hardware configuration of each system.
v The resource names for devices on each system.
v The IPL device and alternate IPL devices for each system.
v The cable information for work station controllers and communication devices.
Because this information may be different for each system, system configuration data should not be part of
central site system distributions. The system configuration data has meaning only for the system on which
it was created.
Note: The only time distributing system configuration data is
practical in a central site distribution process is when all of
the systems on the distribution have exactly the same
hardware configuration.
When each system leaves the factory, the essential system configuration data is installed on the system.
The remainder of the system configuration data is completed by the service representative when the
system is installed. At this point, the Display Hardware Resource (DSPHDWRSC) command is used to
print the system configuration. A copy is filed in a safe and convenient location.
Use the Save Configuration (SAVCFG) command to save the system configuration data for backup
purposes.
The system configuration printout is needed at each target site system to locate parts during problem
resolution and to configure the system.
The resource names assigned by the system must be used when creating configuration descriptions.
To make this configuration data available to the central site system in a network, have the central site
system perform a remote sign-on, and use one of the following commands:
v DSPHDWRSC (Display Hardware Resource)
v WRKHDWRSC (Work with Hardware Resources)
These commands will display the system configuration at the
Using central site distribution to install multiple iSeries servers 17
Page 24

Save and restore strategy for central site distribution
The save and restore strategy should be considered when making distributions from a central site system.
The save and restore strategy can vary from target site systems that are attended and somewhat
independent of other systems to unattended systems in a distributed systems network.
The save and restore strategy should be considered for central site management when saving and
restoring System Resources Management (SRM) database objects and associated configuration
description objects. The save and restore functions (save configuration and restore configuration) save and
restore SRM database objects. Because of this capability, you should not specify the parameter *ALL
when using the Restore Configuration (RSTCFG) command, unless you also want to restore SRM
database objects.
Attended Target Site Systems
The strategy for saving and restoring the attended target site systems can be defined by using the normal
save and restore activities. The saving information is described in Backing up your server. The restoring
information is in Backup and Recovery
saving the system, licensed programs, and user libraries for each individual system.
Unattended Systems in a Communications Network
The design and control of the save and restore strategy for unattended target site systems is the
responsibility of the central site system. The central site system decides what critical user information must
be saved, and can provide, through communications,
. Normal save and restore activities allow for flexibility when
Electronic Customer Support considerations for central site distribution
On the first installation of the operating system from the central site system distribution media, the
electronic customer support data will include the name, address, and telephone numbers that were
established at the central site system. The target site system must do the following to correct the
electronic customer support data:
1. Change the electronic customer support data telephone numbers that are automatically dialed by
running the following control language (CL) programs:
v For service, type CALL QESPHONE and press the Enter key.
v For marketing, type CALL QTIPHONE and press the Enter key.
The toll-free telephone numbers for the target site systems must be checked since different prefixes
may be needed to make the target site systems dial correctly. In many cases, different toll-free
numbers may be required. You can contact the service branch office to get the correct numbers to
use. Contact the marketing branch office to get the local telephone numbers to use if any IBM link
functions will be available from the target site systems.
2. The information in the contact database must also be changed to include a person and a voice
telephone number at the location of the iSeries system. This telephone number is needed to ensure
that any service calls placed by using the iSeries electronic customer support are handled properly. To
change the contact database:
a. Enter the Work with Support Contact Information (WRKCNTINF) command from any command
line.
b. Select option 2 (Work with Local Service Information) on the Work with Support Contact
Information display.
When the Work with Local Service Information display is shown, select option 2 (Change Service
Contact Information). This shows the Change Service Contact Information display on which you can
change the contact database.
18 iSeries: Using central site distribution to install multiple iSeries servers
Page 25

You can have all service calls from the target site system returned to a central site system person or
group, such as a help desk. The service branch office can have a special message included in the
service call. The message is used to give special instructions to the service representative.
Creating the IBM licensed program distribution media or premastering tape
The GO LICPGM menu allows you to create a distribution media at the central site system to distribute
licensed programs to target site systems. The GO LICPGM menu also allows you to create a tape for
premastering the CD-ROM. Using the GO LICPGM menu, you can select which installation profile to use
and which licensed programs and OS/400 optional programs to put on your distribution media.
You can also distribute user libraries and applications to target site systems. User libraries can be installed
at the target site system with directions from the central site system or through a user-defined installation
program. See Installing applications and restoring objects using a user-defined installation program for
more information.
When you choose option 40 (Create a distribution media) on the GO LICPGM menu, you create tapes
similar to those shown below.
Distribution Media Contents Example
Note: The User Profiles (QFILEUPR) file and the Device
Configuration (QFILEIOC) file will not appear on the list of
file names that are supplied by IBM. However, these files
appear on the distribution media you create using option
40 (Create a distribution media).
After the media is created, you can display the distribution media by using the Display Tape (DSPTAP)
command. This lets you verify the contents of the distribution media. You should include a listing from
using the DSPTAP command with the distribution media you send to the target site system.
Note: If distribution to the target site system is on CD-ROM or
DVD, use the Display Optical (DSPOPT) command to
verify the contents of the CD-ROM or DVD. You should
include a listing from using the WRKOPTVOL command
with the CD-ROM or DVD you send to the target site
system.
The target site system uses the listing to locate a specific licensed program on the distribution media.
Distribution media stacking order contains a list of file names that can be on your distribution media.
To do an installation at the target site system, do one of the following:
v See the book AS/400 Road Map for Changing to PowerPC Technology, SA41-5150, if you upgrade the
target site system from CISC to RISC.
v If the target site system is already running on an iSeries server with a PowerPC AS processor, see the
Software Installation
.
You should prepare instructions for the target site system to install your distribution media. See Preparing
and installing distribution media for instructions. Once the licensed programs have been installed, you
should include instructions for restoring user libraries if you have included them on your distribution media.
If you use the automatic installation method, you can install user libraries by using the QLPUSER program
in the QGPL library. See for instructions on how to create a program that performs installation tasks and
sends the appropriate instructions to the target site system operator.
Using central site distribution to install multiple iSeries servers 19
Page 26

Copying the IBM licensed program distribution media and Licensed Internal Code
If you have two media units, you can duplicate the distribution media or fix tapes by using the Duplicate
Tape (DUPTAP) command for tape media or the Duplicate Optical (DUPOPT) command for optical media.
Licensed Internal Code
The Licensed Internal Code included on the IBM distribution media contains the most recent changes
when new licensed programs are released. The new version is included on the central site system
distribution media when you use LICPGM menu option 40 (Create a distribution tape) at the central site
system. Install the new version of Licensed Internal Code on all target site systems to keep them at the
same release level. You can provide instructions to the target site systems or use the instructions on
replacing the Licensed Internal Code in Software Installation
.
Installing OS/400 and other licensed programs on a target site system
Depending on your licensing option, the OS/400 licensed program may or may not be installed on all
target site systems for the first distribution of licensed programs. Use the installation procedures described
in Software Installation
Optional parts of OS/400 and other licensed programs
Option 40 (Create a distribution media) on the GO LICPGM menu guides you through the save menus and
allows you to save selected licensed programs on your distribution media. This allows the central site
planner to decide which licensed programs and optional parts of OS/400 to include on the distribution
media distribution media.
IBM corporation may distribute other licensed programs independently of an OS/400 release. These
licensed programs do not appear on the Work With Install Licensed Programs (GO LICPGM) display,
however, you can still restore them using option 11 by adding them to the list or you can use the Restore
Licensed Program (RSTLICPGM) command. When using the automatic installation method, the
RSTLICPGM command can be contained in a QLPUSER program. See Installing applications and
restoring objects using a user-defined installation program for more information about a QLPUSER
program. You can save these licensed programs by using the Save Licensed Program (SAVLICPGM)
command.
to install the licensed programs at a new target site system.
Documentation for target site system
You should review your licensing option agreement to determine which IBM information comes with your
licensing agreement and which information you have to order separately. The requirements for the target
site systems vary with the type of environment they operate in.
A minimum selection of information for target site systems should include:
v AS/400 Road Map for Changing to PowerPC Technology, SA41-5150 (Only for CISC to RISC
upgrades.)
v Local Device Configuration, SC41-5121
v Software Installation
v Backing up your server for information on saving your data
v Backup and Recovery
v Basic system security and planning
20 iSeries: Using central site distribution to install multiple iSeries servers
for recovery information
Page 27

v Getting started with iSeries 400
This information and a copy of the sample central site distribution cover sheet in Central Site Distribution
Cover Sheet should be sufficient for basic
Installing a new iSeries server
The first installation of a new iSeries server at the central site system or target site system usually involves
the service representative, who sets up and tests the hardware. (Some customers set up their systems.)
Before turning the system over to you, the service representative configures and tests the electronic
customer support. Also, a copy of the system configuration list is filed with Getting started with iSeries 400.
Language files for the target site system
The IBM licensed program distribution media contains the primary language files. The distribution media
you create at the central site system copies the primary language files so you can install them at your
target site systems.
Primary language for the target site system
When the distribution media are installed at the target site system, the primary language is the same as at
the central site system. The primary language is the language that is installed on the system as the default
language used to display and print information.
Secondary languages for the target site system
If you are distributing secondary languages to target site systems, do the following to make sure that
secondary languages are distributed:
1. Save the QSYS29xx library at the central site system by using the Save Library (SAVLIB) command.
Note: In the name of the library above, xx represents the
national language version feature code for the secondary
language.
2. Save the licensed programs at the central site system by using the Save Licensed Program
(SAVLICPGM) command, specifying 29xx for the LNG parameter.
For example:
SAVLICPGM LICPGM(5722WDS) DEV(TAP01) LNG(29xx)
There are several licensed programs that do not support secondary languages. Therefore, you do not
need to save the products on the following list at this time:
v
v 5722-SS1 options 6, 7, 8, 13, 18, 21, 26, 27, 32, and 36 through 41
v
v 5716-DCT options 1 through 24
v 5716-FNT options 1 through 15
v 5716-FN1 options 1 through 5
v
v 5722-WDS options 35, 45, 55, and 60 through 64
v 5722-BR1 options 1 and 2
OBJTYPE(*LNG) ENDOPT(*LEAVE)
5722-JV1 options 3, 4, and 5
5722-RD1 options 5, 11, and 12
v 5722-XW1 option 1
3. Restore the QSYS29xx library on the target site system by using the Restore Library (RSTLIB)
command.
Using central site distribution to install multiple iSeries servers 21
Page 28

Note: In the name of the library above, xx represents the
national language version feature code for the secondary
language.
4. Restore the licensed programs on the target site system by using the Restore Licensed Program
(RSTLICPGM) command, specifying 29xx for the LNG parameter.
For example:
RSTLICPGM LICPGM(5722WDS) DEV(TAP01) RSTOBJ(*LNG) LNG(29xx) ENDOPT(*LEAVE)
There are several licensed programs that do not support secondary languages. Therefore, you do not
need to restore the products that are listed above (refer to step #2)at this time.
Notes:
1.
2. If a double-byte character set (DBCS) secondary language is being distributed to the target site
system, a DBCS primary language must be installed on the target site system.
3. The central site system may have a single-byte character set (SBCS) primary language. If so, the only
way to distribute a DBCS secondary language to the target site system is by using the Duplicate Tape
(DUPTAP) command for tape media or the Duplicate Optical (DUPOPT) command for optical media.
4. Before you install a secondary language on your system, go to National Language Support,
SC41-5101-01, for more information about installing and using secondary languages.
5. If you are installing a DBCS secondary language, you must have a DBCS primary language installed
on your system. You can install a SBCS secondary language on a system with a DBCS primary
language.
User profiles and device configuration distribution to a target system
If you want to distribute user profiles and configuration data automatically at the target site system by
using a user-defined installation program, see Installing applications and restoring objects using a
user-defined installation program.
Note: If you are performing a CISC to RISC upgrade, see the AS/400 Road Map for Changing to
PowerPC Technology, SA41-5150.
You will need to distribute the central system’s user profiles and device configuration to the target systems.
Using user profiles distribution to a target system
Initial Distribution
For the initial distribution, you can either:
v Use the IBM-supplied user profiles and security set-up that is created when the central site system
distribution media is installed at the target site system. You can change the security information for
target site systems later by doing one of the following:
– Using a distributed systems network
– Using instructions that are prepared by the central site system
– Distributing the tailored security information, or
v Use option 40 (Create a distribution media) on the GO LICPGM menu to create the media at the central
site system. Then use the Restore User Profile (RSTUSRPRF) command at the target site system to
copy the security that is used at the central site system.
See Basic system security and planning for information about IBM-supplied security.
22 iSeries: Using central site distribution to install multiple iSeries servers
Page 29

New Release Distribution
If you have user profiles and their authorities to objects set up on your target site systems, you probably
would not want to restore user profiles and authorities again.
For a new release installation, the target site system user profiles will remain intact using the installation
process.
Using device configuration
Initial Distribution
To configure devices for target site systems, the central site system must know the resource names that
are assigned to the devices at each target site system. To get target site system resource names and do
the device configuration, use one of the following methods:
v Use automatic configuration to configure the devices at the target site system.
v Obtain the resource names for devices from the target site systems when they are installed. A printed
copy of the system configuration printout with resource names is available when the service
representative installs the target site system. You can also obtain this data by using the Display
Hardware Resource (DSPHDWRSC) command or the Work With Hardware Resources (WRKHDWRSC)
command. The central site system can now do the device configuration and one of the following:
– Send the configuration to the target site system.
– Include the configuration in a user library that is stacked on the distribution media.
v Create a pass-through environment in a user library on the distribution media. Instructions for creating a
pass-through environment are explained in the Alerts Support, SC41-5413.
Use the pass-through environment after the distribution is installed at the target site system. Then do a
remote sign-on and view the rack/system configuration data for the target site system. Construct the
device configuration for the target site system and use a control language (CL) program to create the
device descriptions at the target site system.
You could also use this pass-through environment to change other configuration management elements
such as:
– System values
– Network attributes
– User profiles
– Local and remote configuration lists
You can use the electronic customer support communications line (always LIN011) for your
pass-through environment.
New Release Installation
If device configuration has been done at the target site systems, you probably will not want to restore
configuration again.
Automatic Configuration
Target site systems could be installed and have local devices and controllers configured at the time of an
initial program load (IPL). This is done by using the automatic configuration option on the Set Major
System Options menu. This option creates device descriptions by using standard device names, device
names that are based on resource names, or System/36 names for the following:
v Local work station controllers
v Devices
v Tape units
Using central site distribution to install multiple iSeries servers 23
Page 30

v Optical units
v Diskette units
v Twinaxial or token-ring attached personal computers
Note: You can specify the device descriptions naming
convention as part of an installation profile. See Working
with installation profiles for information about installation
profiles.
However, the central site system must be aware of this configuration if the central site system distributes
application programs that are used by different systems.
Note: Remote communications are not configured using this
option.
Installing applications and restoring objects using a user-defined installation program
When you use automatic installation, you can perform many tasks automatically by creating a program.
This program performs the tasks and sends the appropriate instructions to the target site system operator.
You can manage profiles, authorizations and similar properties and programs with the following tools:
v Restore user profiles by using the Restore User Profile (RSTUSRPRF) command.
v Restore configuration information by using the Restore Configuration (RSTCFG) command.
v Restore authorizations by using the Restore Authority (RSTAUT) command.
v Install applications by using Control Language (CL) commands.
v Install user products that are packaged by the System Manager/400 licensed program by using the
Restore Licensed Program (RSTLICPGM) command.
v Install new licensed programs that IBM distributes independently of an OS/400 release.
Before you create a distribution media, copy the program that is appropriate for the target site system to
QLPUSER in the QGPL library. This is done using the QLPUSER program. During an automatic
installation, the program runs after installation of all IBM-supplied programs, assuming the distribution
media contains the QLPUSER program in the QGPL library. You can also verify the operation of the
QLPUSER program at the target site system.
Note: If the QLPUSER program already exists in the QGPL
library, the system deletes the program during automatic
installation before the restoring the QGPL library. This
ensures that the distribution media will control additional
processing. The central site must have a separate copy of
the QLPUSER program if it uses automatic installation of
IBM-supplied media.
Working with installation profiles will give you the procedures necessary to create and alter installation
profiles.
Using the QLPUSER program
To perform many tasks automatically, you must create a program in the QGPL library and call it
QLPUSER. This program performs these tasks, and sends appropriate instructions to the operator at the
target site system.
24 iSeries: Using central site distribution to install multiple iSeries servers
Page 31

The following example is a control language (CL) program that sends an instruction to the operator at the
target site system. It also restores a library that contains an application and copies the command to start
the application in the QGPL library:
Note: The &DEVICE parameter in the example is the name of
your media device. The &SUCCESS parameter is used as an
indication of whether or not all licensed programs installed
successfully.
PGM PARM(&DEVICE &SUCCESS)
DCL VAR(&DEVICE) TYPE(*CHAR) LEN(10)
DCL VAR(&SUCCESS) TYPE(*CHAR) LEN(1)
IF COND(&SUCCESS *EQ '1') THEN(DO)
SNDUSRMSG MSG('Load the tape in ' *CAT &DEVICE *CAT +
RSTLIB SAVLIB(APP1) DEV(&DEVICE)
CRTDUPOBJ OBJ(STRAPP1) FROMLIB(APP1) +
ENDDO
ELSE
SNDUSRMSG MSG('One or more licensed programs failed to +
ENDPGM
Note: All program objects need to be converted to be compatible
'and press the Enter key.')
OBJTYPE(*CMD) TOLIB(QGPL)
install.')
with PowerPC Technology before distributing them to the
target site system. If program objects have not been
converted, you can force the conversion of observable
programs by using the Force object conversion
(FRCOBJCVN) parameter on the RSTLIB command.
You should keep a copy of your QLPUSER program in one of your user libraries. If you have several
target site systems that need unique processing, you should create a separate program for each target
site system.
You should test your user-defined installation program to make sure that it works as expected before
creating the distribution media.
Verifying the operation of the QLPUSER program at the target site system
After the target site system has completed installation of distribution media, the operator at the target site
system should verify that the installation was successful. Selecting option 50 (Display log for messages)
on the GO LICPGM menu does this. For more information about option 50 on the GO LICPGM menu, see
Software Installation
If you used the QLPUSER program in the QGPL library, the system may display the following messages.
These messages appear when the target site system uses Option 50 (Display log for messages) to verify
the installation:
v CPI3D80: User installation processing started
v CPC3D85: User installation processing completed
v CPI3D8B: User installation processing failed
You should instruct the target site system to verify that they received the ″User install processing
completed″ message. If the target site system received the ″User install processing failed″ message, this
indicates that the system did run the QLPUSER program in the QGPL library. However, one or more errors
occurred. None of these messages may have appeared. If so, this indicates that the QLPUSER program in
.
Using central site distribution to install multiple iSeries servers 25
Page 32

the QGPL library did not exist on the distribution media. It may also indicate that the installation of the
IBM-supplied products failed in such a way that the QLPUSER program could not be called.
Notes:
1. QGPL and QUSRSYS need to install successfully, or else the QLPUSER will not be called.
2. Some severe errors may cause the install to end immediately, in which case the QLPUSER Program
will not be called.
Working with installation profiles
Using an installation profile provides many advantages to you, but the key advantage is that it allows you
to use the automatic installation method. Use the Working with the Installation Profiles display to create or
work with an installation profile.
An installation profile contains your choices of the tasks that you want to happen during the installation
process. The choices you make when creating an installation profile only affect the target site system, not
the central site system.
Use the following to create or work with an installation profile:
v Creating an installation profile
v Changing an installation profile
v Displaying an installation profile
v Deleting an installation profile
Advantages of using an installation profile
Using an installation profile to install the media that contains licensed programs and application programs
has the following advantages:
v Reduces or eliminates tasks an operator at the target site system must do other than mounting
distribution media
v It allows the central site planner to create customized installation profiles to control the installation at the
target site system
v It provides the capability to restart after a failure, including bypassing parts of the installation that were
successful
v It reduces or eliminates messages during the installation
v It allows the central site planner to install applications or further customize the system after a successful
installation. It achieves this by using a user-defined installation program.
When you use an installation profile, you eliminate the following operator tasks:
v Select function to restore Licensed Internal Code
v Select option to install the operating system
v Confirm the installation of the operating system
v Select a language feature
v Confirm a language feature
v Select installation options
v Select IPL options
v Work with Licensed Programs menu
Work with installation profiles display
The Work with Installation Profiles display appears when you select option 41 (Work with installation
profiles) on the GO LICPGM menu. To get the GO LICPGM menu, type GO LICPGM on the command line
and press the Enter key.
26 iSeries: Using central site distribution to install multiple iSeries servers
Page 33

Notes:
1. For option 41 to appear on the GO LICPGM menu, you must have both *SAVSYS special authority
and *USE (or higher) authority to the QLPAUTO file in the QUSRSYS library.
If option 41 does not appear on the GO LICPGM menu, contact your system security officer.
2. To create, change, or delete installation profiles, you must have *CHANGE authority to the QLPAUTO
file in the QUSRSYS library
The Work with Installation Profiles display allows you to do the following:
v Create a new installation profile.
v Change an existing installation profile.
v Delete an existing installation profile.
v Display an existing installation profile.
+————————————————————————————————————————+
| Work with Installation Profiles |
| |
| Type options, press Enter. |
| 1=Create 2=Change 4=Delete 5=Display |
| |
| Installation |
| Opt Profile Text |
| _ __________ |
| _ QCHGPRILNG Change primary language |
| _ QIBMRPLRLS IBM replace current release |
| _ QINSNEWSYS Install new AS/400 |
| _ QRPLRELLVL Replace current release |
| |
| |
| |
| |
| |
| |
| |
| |
| |
| |
| F3=Exit F12=Cancel |
| |
+————————————————————————————————————————+
You can perform multiple tasks at the same time by using the Work with Installation Profiles display. For
example, you can create a new installation profile and delete an existing installation profile at the same
time.
IBM corporation provides you with four installation profiles that you can change to meet your requirements.
You can use these three installation profiles or create your own profiles. The IBM-supplied installation
profiles are:
v QCHGPRILNG: Change the primary language by using the media that contains the secondary
language.
If you use the QCHGPRILNG installation profile, ensure the following:
– The target site system must already have the V4R3 level of the Licensed Internal Code, the IBM
Operating System/400 Version 4 (OS/400) licensed program, and all of the appropriate target site
system licensed programs installed.
– Distribute a separate copy of the media that contains the secondary language to the target site
system. Since secondary language media is distributed only on CD-ROM, premastering must be
done and distribution made to the target site on CD-ROM.
– Do not select any licensed program from the Save Licensed Programs display when creating your
distribution media.
Using central site distribution to install multiple iSeries servers 27
Page 34

– The QCHGPRILNG installation profile cannot be used to install additional licensed programs at the
target site system using the automatic installation method.
v QINSNEWSYS: Install a new AS/400
To use the QINSNEWSYS installation profile, the target system must already have the V4R3 level of the
Licensed Internal Code installed.
v QRPLRELLVL: Replace the current release with a new release. The system replaces Licensed
Programs that are at the same version, release, and modification as on the media.
v QIBMRPLRLS: Replace the current release with a new release. The system does not replace Licensed
Programs that are at the same version, release, and modification as on the media.
Creating an installation profile
Select option 1 (Create) on the Work with Installation Profiles display to create an installation profile. Some
or all of the displays listed below are shown depending on the options you select. Follow the instructions
on these displays to complete the task. You can change the options or choose the defaults on these
displays.
v Create Profile Details
v Create OS/400 Installing Options
v Create Restore Options
v Create Major System Options
v Create Licensed Program Options
If you need more information about the displays, see Creating and changing an installation profile.
Details: Creating and changing an installation profile: The following information goes into further
detail about creating or changing an installation profile. You may or may not need this information after
using the preceding information in Creating an installation profile or Changing an installation profile.
After you select option 1 (Create) or option 2 (Change) on the Work with Installation Profiles display, the
following display appears (example only):
Note: The word Create appears as the first word in the display
title if you select option 1 (Create). The word Change
appears as the first word in the display title if you select
option 2 (Change). That is the only difference between the
displays when creating and changing an installation
profile.
Change Profile Details Display
+————————————————————————————————————————+
| Change Profile Details |
| |
| Installation Profile.......: INSTALLX |
| |
| Type choices, press Enter. |
| |
| Type of install . . . 1 1=Replace current release with new release |
| 2=Install new AS/400 |
| 3=Change primary language using media |
| containing secondary language |
| |
| Text......... Installs Release X_________________________ |
| |
| |
| |
| |
| |
| |
28 iSeries: Using central site distribution to install multiple iSeries servers
Page 35

| |
| |
| |
| F3=Exit F12=Cancel |
| |
+————————————————————————————————————————+
The Change Profile Details display contains the following information:
v Installation profile
This field is an output-only field. The system automatically displays the installation profile name
(INSTALLX in the example) you created or chose on the Work with Installation Profiles display.
v Type of install
This input field specifies the type of installation you want. The number of the installation option you
choose is used to prompt you for the displays required to complete this task. It is also used to provide
appropriate defaults for those prompts.
If option 1 (Replace current release with new release) is selected, a new release is installed on the
system.
Take Note!
Do not select this option if you are performing a CISC to RISC upgrade. Instead, see the AS/400 Road Map for
Changing to PowerPC Technology, SA41-5150 book for information about upgrading to PowerPC Technology.
When you select option 2 (Install new AS/400), the target system must already have the current level of
the Licensed Internal Code installed.
If option 3 (Change primary language using media containing secondary language) is selected, be
aware of the following:
– The target site system must already have the current level of the Licensed Internal Code, the
OS/400 licensed program, and all of the appropriate licensed programs for the target system
installed.
– A separate copy of the media containing the secondary language must be distributed to the target
site system.
– Do not select any licensed program from the Saved Licensed Programs display when creating your
distribution media.
– Option 3 cannot be used to install additional licensed programs at the target site system using the
automatic installation method.
v Text
This is an input field. You can enter any descriptive information about the installation profile (up to 50
characters).
Change OS/400 Installing Options Display
If you select option 1 (Replace current release with new release), the version of the Change OS/400
Installing Options display shown is similar to the one below. The same is true if option 2 (Install new
AS/400) is selected for the Type of install prompt on the Change Profile Details display.
If you select option 3 (Change primary language using media containing secondary language) for the
prompt, a different version of the Change OS/400 Installing Options display is shown.
+————————————————————————————————————————+
| Change OS/400 Installing Options |
| |
| Installation Profile.......: INSTALLX |
| |
| Type choices, press Enter. |
Using central site distribution to install multiple iSeries servers 29
Page 36

| |
| Restore option...... 1 1=Restore programs and language objects |
| from distribution media |
| 2=Do not restore programs or language |
| objects |
| 3=Restore only language objects from |
| distribution media |
| |
| |
| |
| Clear job and output |
| queues......... N Y=Yes, N=No |
| |
| |
| |
| |
| F3=Exit F12=Cancel |
| |
+————————————————————————————————————————+
The OS/400 Installing Options display contains the following information:
v Installation profile
This field is an output-only field. The system automatically displays the installation profile name
(INSTALLX in the example) you created or chose on the Work with Installation Profiles display.
v Restore option
This input field specifies what objects will be restored during the installation of the OS/400 licensed
program.
– If you select option 1, the programs and language objects are restored from the distribution media.
– If you select option 2, the current programs and language objects are left on the system.
– If you select option 3, only those objects that make up the national language are loaded on the
system.
v Clear job and output queues
This is an input field. If you want to clear the job and output queues during the installation, type Y (Yes).
If you do not want to clear the job and output queues, type N (No).
Change Restore Options Display
If you select option 1 (Restore programs and language objects from distribution media) on the OS/400
Installing Options display, the Change Restore Options display (example only) is shown:
+————————————————————————————————————————+
| Change Restore Options |
| |
| Installation Profile.......: INSTALLX |
| |
| Type choices, press Enter. |
| |
| System information... 3 1=Restore, 2=Do not restore |
| 3=Target system default |
| |
| Edit descriptions . . . 3 1=Restore, 2=Do not restore |
| 3=Target system default |
| |
| Message reply list... 3 1=Restore, 2=Do not restore |
| 3=Target system default |
| |
| Job Descriptions.... 3 1=Restore, 2=Do not restore |
| 3=Target system default |
| |
| Subsystem Descriptions . 3 1=Restore, 2=Do not restore |
| 3=Target system default |
30 iSeries: Using central site distribution to install multiple iSeries servers
Page 37

| |
| |
| |
| F3=Exit F12=Cancel |
| |
+————————————————————————————————————————+
The Change Restore Options display contains the following information:
v Installation profile
This field is an output-only field. The system automatically displays the installation profile name
(INSTALLX in the example) you created or chose on the Work with Installation Profiles display.
v System information
– If you select option 1 (Restore), the system values are restored from the media. This is the
recommended option for installing a new iSeries server.
– If you select option 2 (Do not restore), the system is installed with no change to the system values or
the network attributes that are currently on the system.
– If you select option 3 (Target system default), the installation program decides which installation
option to use during the installation process (based on the state of the target system). This is the
recommended option for installing a new release.
Note: If you select option 3 (Target system default), you need to
verify the setting of the QALWOBJRST system value for
each target site system. To verify the setting, use the
WRKSYSVAL (Work with System Values) command on
each target site system. Make sure that this system value
is *ALL. If the QALWOBJRST system value is something
other than ALL, software installs from the distribution
media that is created using the target system default may
fail.
v Edit descriptions
– If you select option 1 (Restore), the edit descriptions are loaded from the installation media. This is
the recommended option for installing a new iSeries server.
– If you select option 2 (Do not restore), the system is installed with no change to the edit descriptions
currently on the system.
– If you select option 3 (Target system default), the installation program decides which installation
option to use during the installation process (based on the state of the target system). This is the
recommended option for installing a new release.
v Message reply list
This is an input field.
– If you select option 1 (Restore), the message reply list is loaded from the installation media. This is
the recommended option for installing a new iSeries server.
– If you select option 2 (Do not restore), the system is installed with no change to the message reply
list currently on the system.
– If you select option 3 (Target system default), the installation program decides which installation
option to use during the installation process (based on the state of the target system). This is the
recommended option for installing a new release.
v Job Descriptions
This is an input field.
– If you select option 1 (Restore), the job descriptions are loaded from the installation media.
– If you select option 2 (Keep customization), the job descriptions from the media are customized with
the values that existed on the system before the installation.
Using central site distribution to install multiple iSeries servers 31
Page 38

– If you select option 3 (Target system default), the installation program decides which installation
option to use during the installation process (based on the state of the target system). If the job
descriptions already exist, they will be used to customize the descriptions from the installation media.
If the job descriptions do not exist, the descriptions from the installation media will be used.
v Subsystem descriptions
This is an input field.
– If you select option 1 (Restore), the subsystem descriptions are loaded from the installation media.
– If you select option 2 (Keep customization), the subsystem descriptions from the media are
customized with the values that existed on the system before the installation.
– If you select option 3 (Target system default), the installation program decides which installation
option to use during the installation process (based on the state of the target system). If the
subsystem descriptions already exist, they will customize the descriptions from the installation media.
If the subsystem descriptions do not exist, the descriptions from the installation media are used.
Change OS/400 Installing Options Display
If you select option 3 (Change primary language using media containing secondary language) on the
Change Profile Details display, the Language feature prompt (example only) is shown:
+————————————————————————————————————————+
| Change OS/400 Installing Options |
| |
| Installation Profile.......: INSTALLX |
| |
| Type choices, press Enter. |
| |
| Language feature..... 2924 Code |
| |
| Clear job and output |
| queues ......... N Y=Yes, N=No |
| |
| |
| |
| |
| |
| |
| |
| |
| |
| |
| |
| F3=Exit F12=Cancel |
| |
+————————————————————————————————————————+
The Change OS/400 Installing Options display contains the following information:
v Installation profile
This field is an output-only field. The system automatically displays the installation profile name
(INSTALLX in the example) you created or chose on the Work with Installation Profiles display.
v Language feature
You can specify a language feature code for the primary language in this input field. Language feature
code 2924 is shown in the example; a different language feature code may be shown in your case.
For a list of language feature codes, place the cursor in this field and press the Help key.
v Clear job and output queues
This is an input field. If you want to clear the job and output queues during the installation, type Y (Yes).
If you do not want to clear the job and output queues, type N (No).
Change Major System Options Display
32 iSeries: Using central site distribution to install multiple iSeries servers
Page 39

After you press the Enter key from the Change Restore Options display or the Change OS/400 Installing
Options display, the Change Major System Options display is shown (example only):
+————————————————————————————————————————+
| Change Major System Options |
| |
| Installation profile.......: INSTALLX |
| |
| Type choices, press Enter. |
| |
| Enable automatic |
| configuration... *SAME *SAME, Y=Yes, N=No |
| |
| Device configuration |
| naming ...... *SAME *SAME, *NORMAL |
| *S36, *DEVADR |
| |
| Default special |
| environment.... *SAME *SAME, *NONE, *S36 |
| |
| |
| |
| |
| |
| |
| F3=Exit F12=Cancel |
| |
+————————————————————————————————————————+
The Change Major System Options display contains the following information:
v Installation profile
This field is an output-only field. The system automatically displays the installation profile name
(INSTALLX in the example) you created or chose on the Work with Installation Profiles display.
v Enable automatic configuration
The value *SAME means that the current values are being used at the target site system without
changing those values. The value Y (Yes) automatically configures local devices. An N (No) indicates no
automatic configuration. Specifying a value other than *SAME causes the QAUTOCFG system value to
be changed at the target site system. For more information about automatic configuration, see Local
Device Configuration, SC41-5121.
v Device configuration naming
The value *SAME means using the current values at the target site system without changing those
values. The value *NORMAL uses a naming convention unique to the iSeries server. For example,
DSP01 and PRT01 for display stations and printers, TAP01 and DKT01 for media and diskettes. The
value *S36 uses a naming convention similar to System/36. For example, W1 and P1 for display
stations and printers, T1 and I1 for media and diskettes. The value *DEVADR uses device names that
are derived from resource names. Specifying a value other than *SAME causes the QDEVNAMING
system value to be changed at the target site system. For more information about device configuration
naming, see Local Device Configuration, SC41-5121.
v Default special environment
The value *SAME means using the current values at the target site system without changing those
values. The value *NONE indicates there is no special environment. The value *S36 sets up the
System/36 environment. Specifying a value other than *SAME causes the QSPCENV system to be
changed at the target site system.
Change Licensed Program Options Display
After you press the Enter key from the Change Major System Options display, the Change Licensed
Program Options display is shown (example only):
Using central site distribution to install multiple iSeries servers 33
Page 40

+————————————————————————————————————————+
| Change Licensed Program Options |
| |
| Installation Profile.......: INSTALLX |
| |
| Type choices, press Enter. |
| |
| Install option... 4 1=Installed products |
| 2=All products |
| 3=New products |
| 4=Target system default |
| |
| |
| Installation device . *ALTIPL *ALTIPL, Name |
| |
| Replace if current . Y Y=Yes, N=NO |
| |
| Automatic IPL.... Y Y=Yes, N=NO |
| |
| |
| |
| |
| F3=Exit F12=Cancel |
| |
+————————————————————————————————————————+
The Change Licensed Program Options display contains the following information:
v Installation profile
This field is an output-only field. The system automatically displays the installation profile name
(INSTALLX in the example) you created or chose on the Work with Installation Profiles display.
v Install option
– Installed products: Specifies to install all licensed programs and optional items of the licensed
programs that are currently installed on the target system.
When you use this option to install licensed programs, the system estimates the amount of auxiliary
storage needed to perform the installation. If you do not have enough auxiliary storage to load the
new release, the system issues an error message.
Note: For an install to complete successfully when this option is
selected, the distribution media must contain all products
currently shown on option 10 of the GO LICPGM menu.
The media must also be installed on the target site
system.
– All products: Specifies to install all licensed programs and optional items of the licensed programs
that are found on the distribution media.
– New products: Specifies to install only those licensed programs and optional items of the licensed
programs that do not already exist on the system. Choose this option if you are adding new licensed
programs to the target system.
When you use this option, the system does not calculate the amount of auxiliary storage needed to
perform the installation.
– Target system default: Specifies to have the installation program decide which option to use during
the installation process. If the target site system has any operating system options from an earlier
release or has any licensed programs that are currently installed, the system uses option 1 (Installed
products). If the target site system does not have any operating system options from an earlier
release or has any licensed programs currently installed, the system uses option 2 (All products).
When you use this option, the system does not calculate the amount of auxiliary storage needed to
perform the installation.
v Installation device
34 iSeries: Using central site distribution to install multiple iSeries servers
Page 41

Type the name of the installation media device you are using for the installation process.
The value *ALTIPL means the installation media device used to install the operating system is used.
Select this option if you are creating an installation profile for use at several target systems that may
use different names for installation media devices.
v Replace if current
The value Y (Yes) specifies to replace existing products that are already installed at the same level that
is on the installation media. An N (No) specifies to not replace existing products that are already
installed at the same level that is on the installation media. The default value is Yes.
v Automatic IPL
The value Y (Yes) specifies to perform an automatic IPL after the install process is complete. An
automatic IPL is done only if the installation function completes successfully. An N (No) specifies not to
perform an automatic IPL. The Sign On display is shown after the installation process is complete.
When you have finished creating or changing an installation profile, press the Enter key to
complete the task.
Changing an installation profile
Select option 2 (Change) on the Work with Installation Profiles display to change an installation profile.
Some or all of the displays listed below are shown depending on the options you select. Follow the
instructions on these displays to complete the task. You can change the options or choose the defaults on
these displays.
v Change Profile Details
v Change OS/400 Installing Options
v Change Restore Options
v Change Major System Options
v Change Licensed Program Options
If you need more information about the displays, see Creating and changing an installation profile.
Details: Creating and changing an installation profile: The following information goes into further
detail about creating or changing an installation profile. You may or may not need this information after
using the preceding information in Creating an installation profile or Changing an installation profile.
After you select option 1 (Create) or option 2 (Change) on the Work with Installation Profiles display, the
following display appears (example only):
Note: The word Create appears as the first word in the display
title if you select option 1 (Create). The word Change
appears as the first word in the display title if you select
option 2 (Change). That is the only difference between the
displays when creating and changing an installation
profile.
Change Profile Details Display
+————————————————————————————————————————+
| Change Profile Details |
| |
| Installation Profile.......: INSTALLX |
| |
| Type choices, press Enter. |
| |
| Type of install . . . 1 1=Replace current release with new release |
| 2=Install new AS/400 |
| 3=Change primary language using media |
| containing secondary language |
Using central site distribution to install multiple iSeries servers 35
Page 42

| |
| Text......... Installs Release X_________________________ |
| |
| |
| |
| |
| |
| |
| |
| |
| |
| F3=Exit F12=Cancel |
| |
+————————————————————————————————————————+
The Change Profile Details display contains the following information:
v Installation profile
This field is an output-only field. The system automatically displays the installation profile name
(INSTALLX in the example) you created or chose on the Work with Installation Profiles display.
v Type of install
This input field specifies the type of installation you want. The number of the installation option you
choose is used to prompt you for the displays required to complete this task. It is also used to provide
appropriate defaults for those prompts.
If option 1 (Replace current release with new release) is selected, a new release is installed on the
system.
Take Note!
Do not select this option if you are performing a CISC to RISC upgrade. Instead, see the AS/400 Road Map for
Changing to PowerPC Technology, SA41-5150 book for information about upgrading to PowerPC Technology.
When you select option 2 (Install new AS/400), the target system must already have the current level of
the Licensed Internal Code installed.
If option 3 (Change primary language using media containing secondary language) is selected, be
aware of the following:
– The target site system must already have the current level of the Licensed Internal Code, the
OS/400 licensed program, and all of the appropriate licensed programs for the target system
installed.
– A separate copy of the media containing the secondary language must be distributed to the target
site system.
– Do not select any licensed program from the Saved Licensed Programs display when creating your
distribution media.
– Option 3 cannot be used to install additional licensed programs at the target site system using the
automatic installation method.
v Text
This is an input field. You can enter any descriptive information about the installation profile (up to 50
characters).
Change OS/400 Installing Options Display
If you select option 1 (Replace current release with new release), the version of the Change OS/400
Installing Options display shown is similar to the one below. The same is true if option 2 (Install new
AS/400) is selected for the Type of install prompt on the Change Profile Details display.
36 iSeries: Using central site distribution to install multiple iSeries servers
Page 43

If you select option 3 (Change primary language using media containing secondary language) for the
prompt, a different version of the Change OS/400 Installing Options display is shown.
+————————————————————————————————————————+
| Change OS/400 Installing Options |
| |
| Installation Profile.......: INSTALLX |
| |
| Type choices, press Enter. |
| |
| Restore option...... 1 1=Restore programs and language objects |
| from distribution media |
| 2=Do not restore programs or language |
| objects |
| 3=Restore only language objects from |
| distribution media |
| |
| |
| |
| Clear job and output |
| queues......... N Y=Yes, N=No |
| |
| |
| |
| |
| F3=Exit F12=Cancel |
| |
+————————————————————————————————————————+
The OS/400 Installing Options display contains the following information:
v Installation profile
This field is an output-only field. The system automatically displays the installation profile name
(INSTALLX in the example) you created or chose on the Work with Installation Profiles display.
v Restore option
This input field specifies what objects will be restored during the installation of the OS/400 licensed
program.
– If you select option 1, the programs and language objects are restored from the distribution media.
– If you select option 2, the current programs and language objects are left on the system.
– If you select option 3, only those objects that make up the national language are loaded on the
system.
v Clear job and output queues
This is an input field. If you want to clear the job and output queues during the installation, type Y (Yes).
If you do not want to clear the job and output queues, type N (No).
Change Restore Options Display
If you select option 1 (Restore programs and language objects from distribution media) on the OS/400
Installing Options display, the Change Restore Options display (example only) is shown:
+————————————————————————————————————————+
| Change Restore Options |
| |
| Installation Profile.......: INSTALLX |
| |
| Type choices, press Enter. |
| |
| System information... 3 1=Restore, 2=Do not restore |
| 3=Target system default |
| |
| Edit descriptions . . . 3 1=Restore, 2=Do not restore |
| 3=Target system default |
Using central site distribution to install multiple iSeries servers 37
Page 44

| |
| Message reply list... 3 1=Restore, 2=Do not restore |
| 3=Target system default |
| |
| Job Descriptions.... 3 1=Restore, 2=Do not restore |
| 3=Target system default |
| |
| Subsystem Descriptions . 3 1=Restore, 2=Do not restore |
| 3=Target system default |
| |
| |
| |
| F3=Exit F12=Cancel |
| |
+————————————————————————————————————————+
The Change Restore Options display contains the following information:
v Installation profile
This field is an output-only field. The system automatically displays the installation profile name
(INSTALLX in the example) you created or chose on the Work with Installation Profiles display.
v System information
– If you select option 1 (Restore), the system values are restored from the media. This is the
recommended option for installing a new iSeries server.
– If you select option 2 (Do not restore), the system is installed with no change to the system values or
the network attributes that are currently on the system.
– If you select option 3 (Target system default), the installation program decides which installation
option to use during the installation process (based on the state of the target system). This is the
recommended option for installing a new release.
Note: If you select option 3 (Target system default), you need to
verify the setting of the QALWOBJRST system value for
each target site system. To verify the setting, use the
WRKSYSVAL (Work with System Values) command on
each target site system. Make sure that this system value
is *ALL. If the QALWOBJRST system value is something
other than ALL, software installs from the distribution
media that is created using the target system default may
fail.
v Edit descriptions
– If you select option 1 (Restore), the edit descriptions are loaded from the installation media. This is
the recommended option for installing a new iSeries server.
– If you select option 2 (Do not restore), the system is installed with no change to the edit descriptions
currently on the system.
– If you select option 3 (Target system default), the installation program decides which installation
option to use during the installation process (based on the state of the target system). This is the
recommended option for installing a new release.
v Message reply list
This is an input field.
– If you select option 1 (Restore), the message reply list is loaded from the installation media. This is
the recommended option for installing a new iSeries server.
– If you select option 2 (Do not restore), the system is installed with no change to the message reply
list currently on the system.
– If you select option 3 (Target system default), the installation program decides which installation
option to use during the installation process (based on the state of the target system). This is the
recommended option for installing a new release.
38 iSeries: Using central site distribution to install multiple iSeries servers
Page 45

v Job Descriptions
This is an input field.
– If you select option 1 (Restore), the job descriptions are loaded from the installation media.
– If you select option 2 (Keep customization), the job descriptions from the media are customized with
the values that existed on the system before the installation.
– If you select option 3 (Target system default), the installation program decides which installation
option to use during the installation process (based on the state of the target system). If the job
descriptions already exist, they will be used to customize the descriptions from the installation media.
If the job descriptions do not exist, the descriptions from the installation media will be used.
v Subsystem descriptions
This is an input field.
– If you select option 1 (Restore), the subsystem descriptions are loaded from the installation media.
– If you select option 2 (Keep customization), the subsystem descriptions from the media are
customized with the values that existed on the system before the installation.
– If you select option 3 (Target system default), the installation program decides which installation
option to use during the installation process (based on the state of the target system). If the
subsystem descriptions already exist, they will customize the descriptions from the installation media.
If the subsystem descriptions do not exist, the descriptions from the installation media are used.
Change OS/400 Installing Options Display
If you select option 3 (Change primary language using media containing secondary language) on the
Change Profile Details display, the Language feature prompt (example only) is shown:
+————————————————————————————————————————+
| Change OS/400 Installing Options |
| |
| Installation Profile.......: INSTALLX |
| |
| Type choices, press Enter. |
| |
| Language feature..... 2924 Code |
| |
| Clear job and output |
| queues ......... N Y=Yes, N=No |
| |
| |
| |
| |
| |
| |
| |
| |
| |
| |
| |
| F3=Exit F12=Cancel |
| |
+————————————————————————————————————————+
The Change OS/400 Installing Options display contains the following information:
v Installation profile
This field is an output-only field. The system automatically displays the installation profile name
(INSTALLX in the example) you created or chose on the Work with Installation Profiles display.
v Language feature
You can specify a language feature code for the primary language in this input field. Language feature
code 2924 is shown in the example; a different language feature code may be shown in your case.
Using central site distribution to install multiple iSeries servers 39
Page 46

For a list of language feature codes, place the cursor in this field and press the Help key.
v Clear job and output queues
This is an input field. If you want to clear the job and output queues during the installation, type Y (Yes).
If you do not want to clear the job and output queues, type N (No).
Change Major System Options Display
After you press the Enter key from the Change Restore Options display or the Change OS/400 Installing
Options display, the Change Major System Options display is shown (example only):
+————————————————————————————————————————+
| Change Major System Options |
| |
| Installation profile.......: INSTALLX |
| |
| Type choices, press Enter. |
| |
| Enable automatic |
| configuration... *SAME *SAME, Y=Yes, N=No |
| |
| Device configuration |
| naming ...... *SAME *SAME, *NORMAL |
| *S36, *DEVADR |
| |
| Default special |
| environment.... *SAME *SAME, *NONE, *S36 |
| |
| |
| |
| |
| |
| |
| F3=Exit F12=Cancel |
| |
+————————————————————————————————————————+
The Change Major System Options display contains the following information:
v Installation profile
This field is an output-only field. The system automatically displays the installation profile name
(INSTALLX in the example) you created or chose on the Work with Installation Profiles display.
v Enable automatic configuration
The value *SAME means that the current values are being used at the target site system without
changing those values. The value Y (Yes) automatically configures local devices. An N (No) indicates no
automatic configuration. Specifying a value other than *SAME causes the QAUTOCFG system value to
be changed at the target site system. For more information about automatic configuration, see Local
Device Configuration, SC41-5121.
v Device configuration naming
The value *SAME means using the current values at the target site system without changing those
values. The value *NORMAL uses a naming convention unique to the iSeries server. For example,
DSP01 and PRT01 for display stations and printers, TAP01 and DKT01 for media and diskettes. The
value *S36 uses a naming convention similar to System/36. For example, W1 and P1 for display
stations and printers, T1 and I1 for media and diskettes. The value *DEVADR uses device names that
are derived from resource names. Specifying a value other than *SAME causes the QDEVNAMING
system value to be changed at the target site system. For more information about device configuration
naming, see Local Device Configuration, SC41-5121.
v Default special environment
40 iSeries: Using central site distribution to install multiple iSeries servers
Page 47

The value *SAME means using the current values at the target site system without changing those
values. The value *NONE indicates there is no special environment. The value *S36 sets up the
System/36 environment. Specifying a value other than *SAME causes the QSPCENV system to be
changed at the target site system.
Change Licensed Program Options Display
After you press the Enter key from the Change Major System Options display, the Change Licensed
Program Options display is shown (example only):
+————————————————————————————————————————+
| Change Licensed Program Options |
| |
| Installation Profile.......: INSTALLX |
| |
| Type choices, press Enter. |
| |
| Install option... 4 1=Installed products |
| 2=All products |
| 3=New products |
| 4=Target system default |
| |
| |
| Installation device . *ALTIPL *ALTIPL, Name |
| |
| Replace if current . Y Y=Yes, N=NO |
| |
| Automatic IPL.... Y Y=Yes, N=NO |
| |
| |
| |
| |
| F3=Exit F12=Cancel |
| |
+————————————————————————————————————————+
The Change Licensed Program Options display contains the following information:
v Installation profile
This field is an output-only field. The system automatically displays the installation profile name
(INSTALLX in the example) you created or chose on the Work with Installation Profiles display.
v Install option
– Installed products: Specifies to install all licensed programs and optional items of the licensed
programs that are currently installed on the target system.
When you use this option to install licensed programs, the system estimates the amount of auxiliary
storage needed to perform the installation. If you do not have enough auxiliary storage to load the
new release, the system issues an error message.
Note: For an install to complete successfully when this option is
selected, the distribution media must contain all products
currently shown on option 10 of the GO LICPGM menu.
The media must also be installed on the target site
system.
– All products: Specifies to install all licensed programs and optional items of the licensed programs
that are found on the distribution media.
– New products: Specifies to install only those licensed programs and optional items of the licensed
programs that do not already exist on the system. Choose this option if you are adding new licensed
programs to the target system.
When you use this option, the system does not calculate the amount of auxiliary storage needed to
perform the installation.
Using central site distribution to install multiple iSeries servers 41
Page 48

– Target system default: Specifies to have the installation program decide which option to use during
the installation process. If the target site system has any operating system options from an earlier
release or has any licensed programs that are currently installed, the system uses option 1 (Installed
products). If the target site system does not have any operating system options from an earlier
release or has any licensed programs currently installed, the system uses option 2 (All products).
When you use this option, the system does not calculate the amount of auxiliary storage needed to
perform the installation.
v Installation device
Type the name of the installation media device you are using for the installation process.
The value *ALTIPL means the installation media device used to install the operating system is used.
Select this option if you are creating an installation profile for use at several target systems that may
use different names for installation media devices.
v Replace if current
The value Y (Yes) specifies to replace existing products that are already installed at the same level that
is on the installation media. An N (No) specifies to not replace existing products that are already
installed at the same level that is on the installation media. The default value is Yes.
v Automatic IPL
The value Y (Yes) specifies to perform an automatic IPL after the install process is complete. An
automatic IPL is done only if the installation function completes successfully. An N (No) specifies not to
perform an automatic IPL. The Sign On display is shown after the installation process is complete.
When you have finished creating or changing an installation profile, press the Enter key to
complete the task.
Displaying an installation profile
Option 5 (Display) on the Work with Installation Profiles display is for viewing only. You cannot select
options or enter information by using the display function. The displays show only the values that you
selected on the Work with Installation Profiles display and displays that follow.
For example, when you select option 5 (Display) on the Work with Installation Profiles display, the Display
Profile Details display appears showing only the values you previously selected. Consider this example:
+————————————————————————————————————————+
| Display Profile Details |
| |
| Installation Profile : INSTALLX |
| |
| Type of install . . : 1 1=Replace current release with new release |
| |
|Text......... Install new AS/400 |
| |
| |
| |
| |
| |
| |
| |
| |
| |
| |
| |
| Press Enter to continue. |
| |
| |
| F3=Exit F12=Cancel |
| |
+————————————————————————————————————————+
When you have finished displaying an installation profile, press the Enter key to complete the task.
42 iSeries: Using central site distribution to install multiple iSeries servers
Page 49

Deleting an installation profile
After you select option 4 (Delete) on the Work with Installation Profiles display, the following display
appears (example only):
+————————————————————————————————————————+
| Confirm Delete of Profiles |
| |
| Press enter to confirm your choices for 4=Delete. |
| Press F12 to return to change your choices. |
| |
| |
| Installation |
| Opt Profile Text |
| 4 INSTALLX Install Release X |
| |
| |
| |
| |
| |
| |
| |
| |
| |
| |
| |
| |
| F12=Cancel |
| |
+————————————————————————————————————————+
Press the Enter key to delete an installation profile and to
Preparing and installing distribution media
After you have done all the initial planning and made decisions about handling licensed programs, fixes,
and which distribution method to use, it is time to start the tasks needed to duplicate the Central Site
System onto the Target Site Systems.
This section contains a summary of central site system distribution tasks which include information on:
v Before creating a distribution or premastering media with GO LICPGM Menu Option 40
Here are some steps that will avert problems further down in the central site process.
v Using CD-ROMs for installing Licensed Internal Code
If you are using CD-ROMs to install Licensed Internal Code you will need a pointer to the QCDIML file.
This section gives the information you need to set this up properly.
v Preparing the distribution or premastering media
Once all the decisions have been made, this section will show you how to create the media for
distribution or premastering.
v Installing the distribution media at the target site system
This shows you what needs to be done at the target site system to install the distribution media.
v Optional tasks for installing distribution media
Here are ten tasks that will help you perform optional tasks from installing secondary languages to
installing user objects.
Before creating a distribution or premastering media with GO LICPGM Menu Option 40
Perform the following before you create a distribution or premastering media with GO LICPGM Menu
Option 40:
Using central site distribution to install multiple iSeries servers 43
Page 50

v If you create media on a 9401 Model 150, make sure that you use that media in a 9401 Model 150.
Attention
If you see message CPZ2015, you are trying to install the operating system that is intended for a 9401 Model 150 on
another iSeries model. If you are installing from a SAVSYS media, the media was created on a 9401 Model 150
iSeries server.
v Create or change your user-defined installation program (if you are using a user-defined installation
program). See Installing applications and restoring objects using a user-defined installation program for
information about user-defined installation programs.
v If the target sites will use an alternative installation device, they need both the distribution media and
the Licensed Internal Code CD-ROM.
v The Allow Object Restore (QALWOBJRST) system value specifies whether or not objects with
security-sensitive attributes can be restored. It is important to set the value to *ALL before performing
the following system attributes:
– Installing a new release of OS/400
– Installing new licensed programs
– Applying fixes
– Recovering the system
These activities may fail if the value of QALWOBJRST is not set to *ALL. To ensure the System
Security, return the QALWOBJRST value to your normal setting after completing the system activity.
v Use the WRKSYSVAL (Work with System Values) command to determine the setting for the
QALWOBJRST (allow object restore option) system value. The system uses this value to specify
whether or not to restore security-sensitive objects. Such objects include system state objects or objects
that adopt authority. The QALWOBJRST system value defaults to *ALL, but for additional security
controls, you may want to change it to another value. However, before creating the distribution media,
be sure to set this value to *ALL. If the value is something other than *ALL, software installs from the
media may fail making the distribution media unusable.
v Create or change your installation profile or use an IBM-supplied installation profile (if the target site
system is using automatic installation). See Working with installation profiles for information about
installation profiles.
v Make sure that the most current fixes (PTFs) are installed on the central site system. See Managing
fixes with Management Central for information about fixes.
v Compress objects. You can use the Compress Object (CPROBJ) command to compress selected
IBM-supplied and user objects to save disk space on the iSeries server.
Note: You should package the OS/400 Example Tools Library
before distribution to the target site system. Before you
use the Example Tools library on the target system, you
must unpackage it.
– Type the following command to package the Example Tools library:
CALL QUSRTOOL/PACKAGE (’*ALL’ 1)
Press the Enter key.
v Rename or delete the history logs on the central site system so they do not get distributed to the target
site system. Do this just before creating the distribution media. To rename or delete the history logs, do
the following:
1. Type the following command to turn all message logging off:
CHGMSGQ MSGQ(QHST) DLVRY(*DFT)
2. Type the Display History Log (DSPLOG QHST) command to make sure that all messages are
written to the history log:
44 iSeries: Using central site distribution to install multiple iSeries servers
Page 51

DSPLOG QHST
Press the Enter key after the history log is shown.
3. Type the Work with Objects and Display All History Logs (WRKOBJ QSYS/QHST*) command to
work with all of the history logs:
WRKOBJ QSYS/QHST*
Press the Enter key.
4. Use the rename or delete option on each history log to make sure the history logs will not be
distributed to the target site system.
Using CD-ROMs for installing Licensed Internal Code
If CD-ROMs are used to install Licensed Internal Code, block 15 of the CD-ROM must contain a pointer to
the QCDIML file. This information cannot be calculated ahead of time due to the size of the path table not
being known. Once all the files for the first CD-ROM are placed into the byte stream, QCDIML should be
added as the last file. Then calculate the offset to this file in 512 byte blocks and place that information in
logical sector 15 of the CD-ROM.
The header of the initial microcode load (IML) structure is located on the media and uses the contents of
logical sector 15. Block address 15 contains a pointer to the IML (in this case QCDIML) header.
The first 32 bytes of block 15 on the media are defined in the following table:
Byte Description
0-3 Descriptor. These bytes must contain the EBCDIC
characters ’IMP1’ (x’C9D4D7F1’) which qualify the media
as an iSeries server IPL media.
4-7 Reserved. These bytes are reserved and must be
hexadecimal zeros.
8-9 Field Length. These bytes contain the length in bytes of
the IPL pointer substructure which includes this field. This
field must contain x’0008’.
10 Reserved. This byte is reserved and must be hexadecimal
zeros.
11 Identifier. This byte must be x’01’ and identifies the
following data as a four byte pointer to the IPL header.
12-15 IPL Media Header Pointer. This right-justified four-byte
field is the offset in hexadecimal notation from the start of
the media (logical sector 0) to the location of the IPL file
(QCDIML). It is in units of 512-byte logical blocks. The
value must never be greater than ’0003FFFC’X.
16-32 Reserved. These bytes are reserved and must be
hexadecimal zeros.
An example of this coded in comment form follows:
/****************************************************************/
/* */
/* The record has the following format: */
/* CHAR(4) - 'C9D4D7F1'X (Indicates pointer record) */
/* CHAR(4) - '00000000'X (reserved) */
/* CHAR(2) - '0008'X (length of pointer data, */
/* including this length field) */
/* CHAR(1) - '00'X (reserved) */
/* CHAR(1) - '01'X (indicates pointer value follows)*/
/* CHAR(4) - '000000C4'X (pointer to IML Header in number */
/* of 512 byte blocks from */
/* sector 0 ==> */
/* (As an example, if the IML file was going to start in */
/* sector 48, here is how it would be calculated. Start */
Using central site distribution to install multiple iSeries servers 45
Page 52

/* counting at 0, so it really is 49. Each sector is 2k */
/* and there are four 512 byte blocks per sector. Thus */
/* 4*49 = 196 = 'C4'x) */
/* CHAR(16) - '00...00'X (reserved) */
/* */
/****************************************************************/
Use the SAVSYS command or option 40 of the GO LICPGM menu with your job in a premastering state.
When you use the SAVSYS command in the premastering state, you write to tape a template version of
this structure with the label QCDIMLP. The pointer in the template
Preparing the distribution or premastering media
Creating the distribution or premastering media requires a dedicated system and both *SAVSYS and
*JOBCTL special authority.
If an error occurs while preparing the media, use the job log and history log to determine the error.
You may need to Consider compression and decompression of licensed programs if hard drive space is a
concern.
If the target site system is using automatic installation, you must create or change an installation profile or
use an IBM-supplied installation profile. Working with installation profiles contains information about
creating or changing an installation profile and using an
Considerations for compressing and decompressing licensed programs
IBM ships licensed programs in a compressed state to save disk space on the iSeries server. When you
install a compressed licensed program, it automatically and permanently decompresses if the system has
enough free disk space.
At least 250 MB of free disk space is needed if you are replacing a release using option 1 (Restore
Licensed Internal Code) on the Install Licensed Internal Code (LIC) menu. At least 1000 MB of free disk
space is needed if you are installing a release on a system that has been initialized using option 2 (Install
Licensed Internal Code and Initialize the System). The CL Programming
on automatic decompression of objects. Automatic decompression of licensed programs does not affect
installation time.
Once started, automatic decompression stops if the system detects that there is not enough free storage
available (250 MB).
Notes:
1. Programs (*PGM), service programs (*SRVPGM), and modules (*MODULE) automatically and
permanently decompress the first time they are used.
2. The first time a compressed panel (*PNLGRP), menu (*MENU), printer file (*FILE with attribute PRTF),
or display file (*FILE with attribute DSPF) is used, it is temporarily decompressed. If such a temporarily
decompressed object is used five times or for more than two consecutive days on the same initial
program load (IPL), it is permanently decompressed.
Usually, an operation on a compressed object takes a little longer than if the object were decompressed. If
a very large compressed object decompressing, the system will send the message, ″Operation in
progress. Please wait″.
When creating distribution or premastering media, you may decide to do one of the following:
v Leave all the licensed programs that have high usage decompressed.
book has more information
46 iSeries: Using central site distribution to install multiple iSeries servers
Page 53

v Distribute some of a licensed program in a compressed state and some of the program in a
decompressed state.
Note: If creating a premastering media, files on CD-ROMs
cannot span volumes. Therefore, you may want to
compress objects so that the resulting saved file fits on
the CD-ROM.
If you distribute licensed programs on a media in compressed form, you need to explicitly compress them
using the Compress Object (CPROBJ) command. You can compress both IBM objects and your own
user-created objects. IBM program objects can be compressed only in the restricted state. The CL
Programming
book has more details about compressing objects. The text includes a
recommendation on how to speed up the compression operation by using multiple jobs.
Note: IBM recommends the following actions to help you reduce
the amount of disk space used on the target site system.
At the same time, these actions ensure that frequently
used objects decompress:
v Compress everything you are sending to the target site
system.
v Use the objects on the central site system in the same
manner they will be used on the target site system. Do
so at least five times for panel groups, menus, printer
files, and display files.
v Create the distribution or premastering media.
Using central site distribution to install multiple iSeries servers 47
Page 54

Preparing the Distribution or Premastering media
The numbers on this page correspond to the reverse image numbers in the figure above.
48 iSeries: Using central site distribution to install multiple iSeries servers
Page 55

(1)
Use the qlpHandleCdState API to place your job in a premastering state.
(2)
Type GO LICPGM to see the Work with Licensed Program menu. Select option 40 (Create distribution
media) to guide you through the displays to create the distribution media.
(3)
If you are not operating under the controlling subsystem, the online help information for the Transfer Job
(TFRJOB) command shows you how to transfer your job to the controlling subsystem so you can end
subsystems. After you transfer your job to the controlling subsystem, make sure that you repeat step (1).
(4)
The online help information explains the process of creating a distribution media.
(5)
Specify the command defaults for the Media Devices, Check for Active Files, and Message Queue
Delivery prompts. The media devices can be any media devices attached to the system that have the
same format as the target site system.
Note: For specific information about data compression and data
compaction, see the data compression and data
compaction topics in The Backup and Recovery
.
(6)
The End Subsystems (ENDSBS) command ends all subsystems.
(7)
Specify the name of the installation profile you want to save on the SAVSYS media. If you specify *NONE,
the target site system cannot use automatic installation. If you specify the name of an installation profile,
the target site system can use automatic installation to eliminate all user interaction. However, automatic
installation will not eliminate loading distribution media. When complete, you will receive a message which
verifys the installation was successful. See Working with installation profiles for information about
installation profiles.
(8)
The Save System (SAVSYS) command saves the Licensed Internal Code, the OS/400 licensed program,
security objects, configuration objects, and SRM objects.
(9)
Save the QGPL library after the SAVSYS. The LIBRARY parameters are QGPL, and the LABEL parameter
is a constant that has the primary language identifier of the central site system. For example,
QGPL.vrmll.xx is a language identifier where v is the version, r is the release, m is the modification, and ll
Using central site distribution to install multiple iSeries servers 49
Page 56

is the level. The two x’s are the last two digits of the primary language ID. DVD labeling is different and
and QGPL can be found at /QUSRLIBS/Qvrmllxx/QGPL, where vrm, ll, and xx are the same as explained
under the tape label support.
(10)
Save the QUSRSYS library after saving QGPL. The LIBRARY parameters are QUSRSYS, and the LABEL
parameter is a constant that has the primary language identifier of the central site system. For example,
QUSRSYS.vrmll.xx is a language identifier where v is the version, r is the release, and m is the
modification. The two l’s are the level indicator. The two x’s are the last two digits of the primary language
ID. DVD labeling is different and and QGPL can be found at /QUSRLIBS/Qvrmllxx/QGPL, where vrm, ll,
and xx are the same as explained under the tape label support.
(11)
Type a 1 next to the licensed programs you want to include on your distribution media from the Save
Licensed Programs menu. You must select the OS/400 Extended Base,OS/400 Online Informationand, and
OS/400 - Extended Base Directory Support licensed programs. The system saves all parts of the licensed
program, including program objects, language objects, document or folder objects, or IFS objects.
(12)
The Start the Controlling Subsystem (STRSBS) command starts the controlling subsystem.
(13)
If you are distributing secondary languages to target site systems, do the following to make sure that
secondary languages are distributed:
1. Save the QSYS29xx library at the central site system by using the Save Library (SAVLIB) command.
Note: In the name of the library above, xx represents the
national language version feature code for the secondary
language.
2. Save the licensed programs at the central site system by using the Save Licensed Program
(SAVLICPGM) command, specifying 29xx for the LNG parameter.
For example:
SAVLICPGM LICPGM(5722WDS) DEV(TAP01) RSTOBJ(*LNG)LNG(29xx) ENDOPT(*LEAVE)
There are several licensed programs that do not support secondary languages. Therefore, the
following list of products does not need to be saved at this time:
v
5722-JV1 options 3, 4, and 5
v 5722-SS1 options 6, 7, 8, 13, 18, 21, 26, 27, 32, and 36 through 41
v
v 5716-DCT options 1 through 24
v 5716-FNT options 1 through 15
v 5716-FN1 options 1 through 5
v
5722-RD1 options 5, 11, and 12
v 5722-WDS options 35, 45, 55, and 60 through 64
50 iSeries: Using central site distribution to install multiple iSeries servers
Page 57

v 5722-BR1 options 1 and 2
v 5722-XW1 option 1
(14)
If user libraries are to be distributed, use the Save Library (SAVLIB) command to save the user libraries on
the distribution media. If user directories are to be distributed, use the Save (SAV) command to save the
user directories on the distribution media. The QLPUSER program in the QGPL library can be used to
restore the user libraries at the target site system. See Installing applications and restoring objects using a
user-defined installation program for information about creating a program that performs installation tasks.
(15)
You may have other licensed programs to be distributed that do not appear on the Save Licensed
Programs display. If so, use the Save Licensed Program (SAVLICPGM) command to save the new
licensed program on the distribution media.
(16)
The Generate CD-ROM Premastering Information (qlpGenCdPremasteringInfo) API is used to return
information about the size of the media files saved and about which CD-ROM volume the files reside on.
This API also creates the distribution set map.
(17)
For information on how to save the distribution set map to media, see Saving the contents of the
bytestream file.
(18)
Use the qlpHandleCdState API to take your job out of a premastering state.
(19)
Type the Change Message Queue (CHGMSGQ) command to set the delivery parameter for the QHST
message queue to the previous value (before you created the distribution media). This turns all message
logging
Installing the distribution media at the target site system
Attention
If you see message CPZ2015, you are trying to install the operating system that is intended for a 9401 Model 150 on
another model OS/400. If you are installing from a SAVSYS media, the media was created on a 9401 Model 150
iSeries server.
You need to use installation media that is not intended for 9401 Model 150 iSeries servers. See Things to do before
you create a distribution or premastering media with GO LICPGM Menu Option 40.
Contact your software service provider if you do not have this media.
+————————————————————————————————————————+
| Message |
| |
| Message ID ......: CPZ2015 Type.......: Information |
| From program .....: __________ Severity.....: 99 |
| |
| Message.....: Theoperating system on the installation |
Using central site distribution to install multiple iSeries servers 51
Page 58

| media that is in use is not authorized for this model of AS/400. |
| |
| Cause......: Thecontent of the installation media that is |
| in use will function only on designated models of IBM AS/400 |
| Advanced Series business computing systems. |
| |
| Recovery ....: Refer to the recovery appendix of the Software |
| Installation book. |
| |
| |
| |
| |
| |
| |
| Press Enter to end installing. |
| |
| |
| ______________________________________________________________________________ |
+————————————————————————————————————————+
Install the distribution media by using Software Installation .
Note: The system configuration for a target site system must be
saved on media before the installation of the remote site
system licensed program. See System Configuration Data
for more information about saving the system
configuration for a target site system.
The central site system must provide instructions on installing user libraries and applications to the target
site systems or supply a user-defined installation program.
You can copy the cover sheet in Central Site Distribution Cover Sheet to include with your distribution
media.
You should include a listing from the Display media (DSPTAP) command with the distribution media you
send to the target site system. The listing can be used by the target site system to locate a specific
licensed program on the media.
Optional tasks for installing distribution media
The following tasks are optional. However, you may want to perform them when you install your
distribution media.
These tasks can be done automatically using a user-defined installation program (see Installing
applications and restoring objects using a user-defined installation program), or by manual installation.
You may want the user-defined installation program to restore user profiles or configuration information
from the distribution media. If so, the user-defined installation program must instruct the operator at the
target site system to mount a distribution media. This media contains the user profiles or configuration
information and System Resource Management database.
52 iSeries: Using central site distribution to install multiple iSeries servers
Page 59

Optional Tasks for Installing Distribution Media
Optional Tasks for Installing Distri bution Tapes
Distribution
Tap e
RSTUSRPRF
command
Licensed
Internal
Code
OS/400
Licensed
Program
Primary
Language
Files
User
Profiles
Configuration
Objects
QGPL
QUSRSYS
OS/400
Optional
Programs
Restore User Profile
Device .......
User profile
RSTCFG command
Restore Configuration
Objects
RSTOBJ command
Restore Hardware Rack
Configuration
For 9406 systems using
RSTOBJ and WRKHDWPRD
commands
GO LICPGM
Work with Licensed
Programs
Manual installation
1. Install all licensed
programs from media
Manual installati on
Licensed progra ms option 2=ALL
Tape device .... see chart
Automatic IPL opti on .... N
RSTLIB command
Other
Licensed
Programs
Licensed
Program
Media
Secondary
Languages
User
Libraries
RSTDLO command
RSTLIB command
Restore Librar y
Saved library..QSYS29 xx
Device ....devi ce,*SAVF
Restore Document
Library Object
Document......QWP29xx
Restore Librar y
Saved library .. .
Device....device,*SAVF
RSTAUT command
Restore Authority
User Profile
RSTLICPGM co mmand
Restore Licensed Programs
Other products that do not appear on the
Install Licensed Programs display
RV2Q629-2
The following numbers correspond to the reverse image numbers in the figure above.
Restoring User Profiles and Configuration Objects
For a new release installation, the target site user profiles, system configuration description objects, and
System Resource Management (SRM) database objects remain intact using the installation process. If you
want to replace these objects with the ones on the distribution media, do the following:
(1)
Using central site distribution to install multiple iSeries servers 53
Page 60

Type the Restore User Profile (RSTUSRPRF) command. The parameters on this command can be
furnished by the central site system, or you can refer to Backup and Recovery
.
(2)
Type the Restore Configuration (RSTCFG) command. The parameters on this command can be furnished
by the central site system, or you can refer to Backup and Recovery
Note: When using the Restore Configuration (RSTCFG)
command, do not specify the *ALL parameter for the SRM
keyword.
.
(3)
Restore the system configuration data that was previously saved on media. Use the Restore Object
(RSTOBJ) command to restore objects to the system from media. Then use the Work with Hardware
Products (WRKHDWPRD) command to replace the system configuration.
Use the Display Tape (DSPTAP) command if your media is tape, or the Display Optical (DSPOPT)
command if your media is optical, to locate your user profiles and configuration data objects.
Installing Additional Licensed Programs
(4)
Type GO LICPGM from the command line and select option 1 (Install all licensed programs from media).
(5)
Select option 2 (All licensed programs).
Type the name of the distribution media unit for the target system and press the Enter key.
See Software Installation
for specific information on installing additional licensed programs.
Installing Secondary Languages
(6)
If you have secondary languages on your distribution media, restore the QSYS29xx library by using the
Restore Library (RSTLIB) command.
Note: In the name of the library above, xx represents the
national language version feature code for the secondary
language.
(7)
Restore the licensed programs on the target site system by using the Restore Licensed Program
(RSTLICPGM) command, specifying 29xx for the LNG parameter.
For example:
RSTLICPGM LICPGM(5722WDS) DEV(TAP01) RSTOBJ(*LNG)
LNG(29xx) ENDOPT(*LEAVE)
54 iSeries: Using central site distribution to install multiple iSeries servers
Page 61

There are several licensed programs that do not support secondary languages. Therefore, the following list
of products does not need to be restored at this time:
v
v 5722-SS1 options 6, 7, 8, 13, 18, 21, 26, 27, 32, and 36 through 41
v
v 5716-DCT options 1 through 24
v 5716-FNT options 1 through 15
v 5716-FN1 options 1 through 5
v
v 5722-WDS options 35, 45, 55, and 60 through 64
v 5722-BR1 options 1 and 2
v 5722-XW1 option 1
5722-JV1 options 3, 4, and 5
5722-RD1 options 5, 11, and 12
Installing User Objects
(8)
If you have user libraries on your distribution media, restore them using the Restore Library (RSTLIB)
command. If you have user objects in directories on your distribution media, restore them using the
Restore (RST) command.
(9)
Restore the object use authorities by using the Restore Authority (RSTAUT) command.
Installing New Licensed Programs
(10)
If you have other licensed programs to install that do not appear on the Install Licensed Programs display,
you can still restore them using option 11 by adding them to the list or you can use the Restore Licensed
Program (RSTLICPGM) command.
Central site distribution cover sheet
The central site system must provide instructions to the target site systems for installing user libraries and
applications.
You can print and copy the cover sheet to include with your distribution media.
With the distribution media you send to the target site system:
v If distribution to the target site system is on tape, include a listing from using the Display Tape
(DSPTAP) command.
v If distribution to the target site system is on CD-ROM or DVD, include a listing from using the Display
Optical (DSPOPT) command.
Use the listing at the target site system to locate a specific licensed program on the media.
Distribution media stacking order
Central Site Distribution gives you the instructions you need to install multiple iSeries servers. The
attached .PDF file contains the stacking order for your distribution media. Print this .PDF file to verify that
you correctly transfered all of the files to the distribution media.
Using central site distribution to install multiple iSeries servers 55
Page 62

For a printable copy of the table, click here.
56 iSeries: Using central site distribution to install multiple iSeries servers
Page 63

Page 64

Printed in U.S.A.
 Loading...