

Page 1

Page 2

First Edition (February 1999)
The following paragraph does not apply to the United Kingdom or any country where such provisions are
inconsistent with local law:
INTERNATIONAL BUSINESS MACHINES CORPORATION PROVIDES THIS PUBLICATION "AS IS" WITHOUT ANY
WARRANTY OF ANY KIND, EITHER EXPRESS OR IMPLIED, INCLUDING, BUT NOT LIMITED TO, THE LIMITED
WARRANTIES OF MERCHANTABILITY OR FITNESS FOR A PARTICULAR PURPOSE. Some states do not allow
disclaimers or express or implied warranties in certain transactions; therefore, this statement may not apply to you.
This publication could include technical inaccuracies or typographical errors. Changes are periodically made to the
information herein; these changes will be incorporated in new editions of the publication. IBM may make improvements
or changes in the products or the programs described in this publication at any time.
Requests for technical information about IBM products should be made to your IBM Authorized Dealer or your IBM
Marketing Representative.
Copyright International Business Machines Corporation 1999. All rights reserved. Note to US Government
Users — Documentation related to restricted rights — Use, duplication, or disclosure is subject to restrictions set forth
in GSA ADP Schedule Contract with IBM Corp.
Page 3

IBM ThinkPad i Series 1400 User's Reference Supplement
This booklet provides additional information not found in the IBM
ThinkPad i Series 1400 User's Reference and other publications
which came with your IBM ThinkPad i Series 1400 computer.
Copyright IBM Corporation 1999 iii
Page 4

iv
Page 5

Contents
IBM ThinkPad i Series 1400 User's Reference Supplement . iii
Chapter 1. Identifying the Hardware Features ......... 1
Front View of the Computer ...................... 2
Rear View of the Computer ...................... 3
Chapter 2. Distinctive Functions of the Computer ...... 5
ThinkPad i Series 1400 DVD ..................... 6
Enjoying DVD Movies ........................ 6
Hints, Tips and Limitations ..................... 7
Using the Audio Features ....................... 9
Display Modes . . . . . . . . . . . . . . . . . . . . . . . . . . . . 11
Notebook Manager . . . . . . . . . . . . . . . . . . . . . . . . . . 13
POST Page . . . . . . . . . . . . . . . . . . . . . . . . . . . . 13
Boot Sequence Page ....................... 14
Power Management Page .................... 14
BIOS Utility . . . . . . . . . . . . . . . . . . . . . . . . . . . . . . 16
System Information . . . . . . . . . . . . . . . . . . . . . . . . 17
Basic System Settings ...................... 18
Startup Configuration . . . . . . . . . . . . . . . . . . . . . . . 19
Onboard Devices Configuration ................. 21
System Security . . . . . . . . . . . . . . . . . . . . . . . . . . 21
Power Management . . . . . . . . . . . . . . . . . . . . . . . . 22
Load Default Settings ....................... 23
Starting System Programs ..................... 25
Chapter 3. Using Passwords . . . . . . . . . . . . . . . . . . . 27
Setting a Password .......................... 29
Chapter 4. Additional Information . . . . . . . . . . . . . . . 31
Attaching a Television to Your Computer ............. 32
Chapter 5. Additional Notices . . . . . . . . . . . . . . . . . . 35
Year 2000 Readiness and Instructions .............. 36
Macrovision Copyright Protection Statement ........... 37
Notice to European Users of the IBM ThinkPad Modem .... 38
Copyright IBM Corporation 1999 v
Page 6

Warning Notice to New Zealand Users of the IBM ThinkPad
Modem . . . . . . . . . . . . . . . . . . . . . . . . . . . . . . . . 39
vi
Page 7

Chapter 1. Identifying the Hardware Features
Copyright IBM Corporation 1999 1
Page 8

Front View of the Computer
Front View of the Computer
The figure below shows the IBM ThinkPad i Series 1400 computer
with a 14.1-inch color LCD screen.
2 IBM ThinkPad i Series 1400 Supplement
Page 9
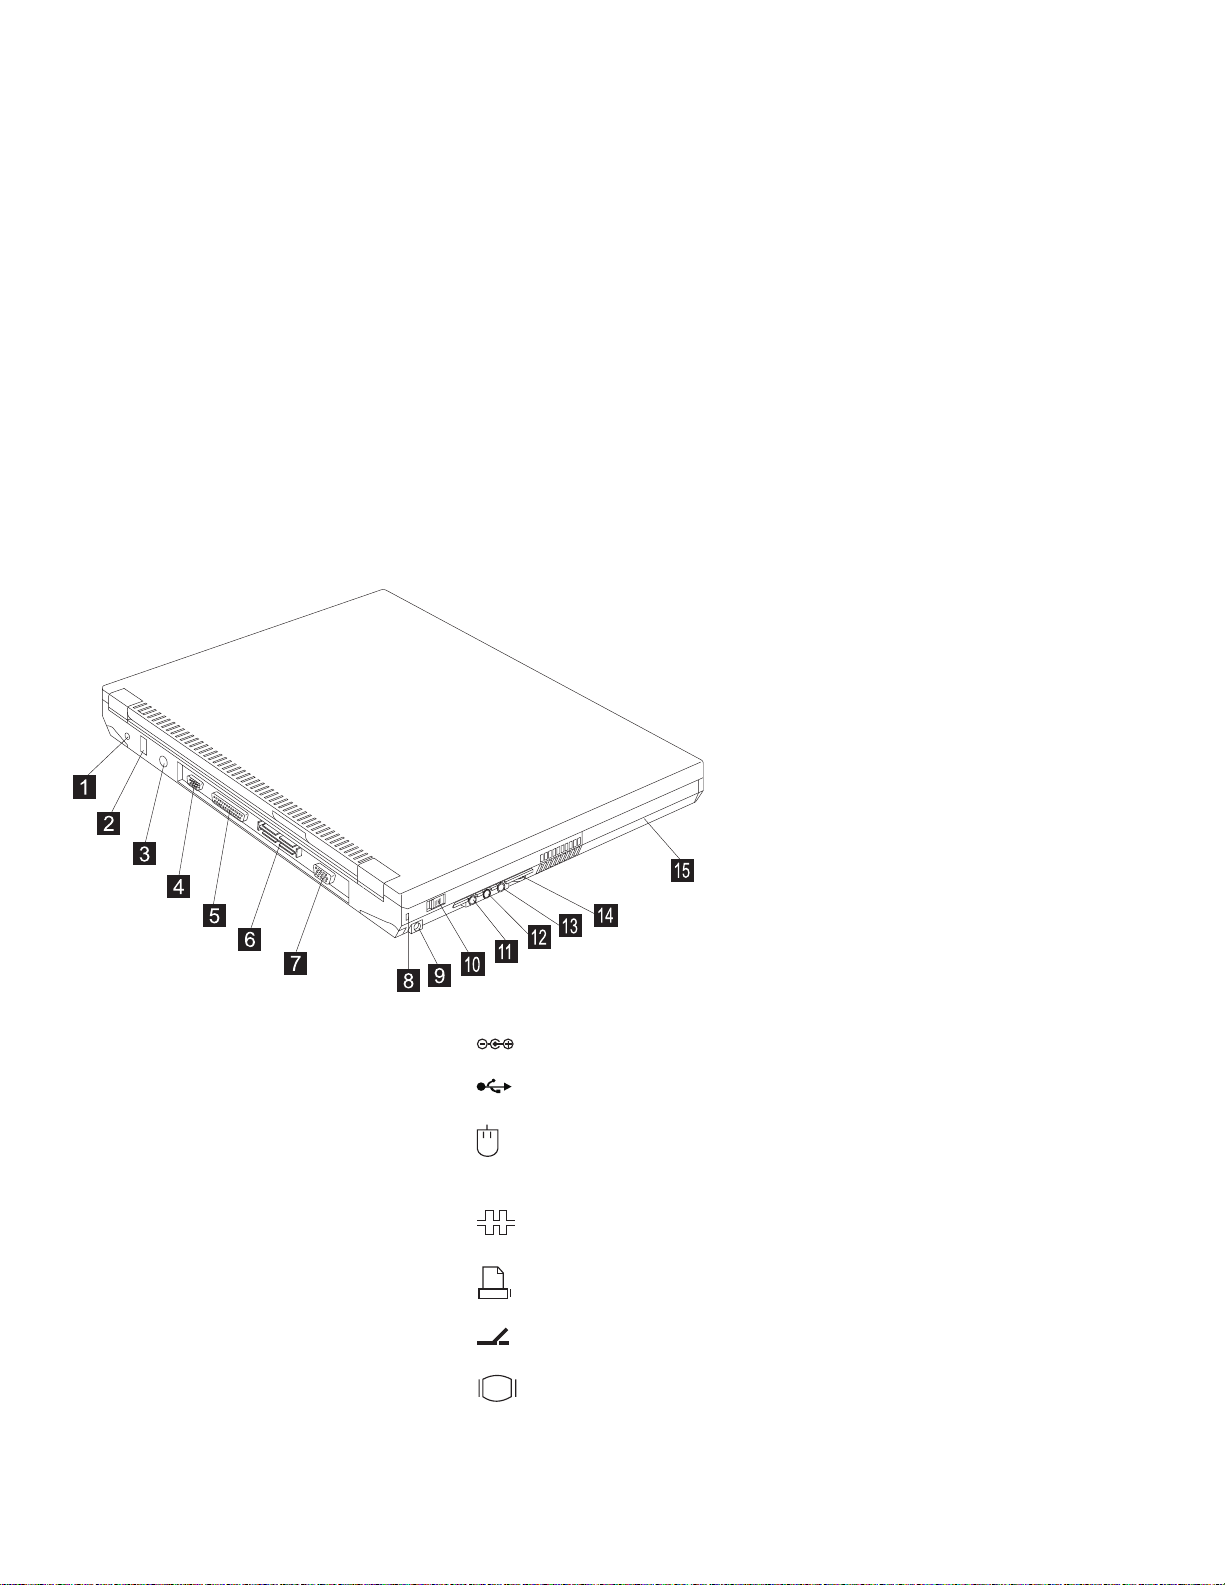
Rear View of the Computer
The figure below updates the location of connectors on the rear and
right of the IBM ThinkPad i Series 1400 computer.
Rear View of the Computer
(1)
(2)
(3)
(4)
(5)
(6)
(7)
Chapter 1. Identifying the Hardware Features 3
The power jack is where the AC Adapter cable is con-
nected.
The universal serial bus (USB) allows you to connect any
device that conforms to the USB standard.
The external-input-device connector is used to attach a
mouse, external keyboard, or external numeric keypad to the computer.
The serial connector is where you connect a 9–pin, serial-
device cable.
The parallel connector is where you connect a parallel-
printer signal cable.
The system-expansion connector allows you to connect the
port replicator.
The external-monitor connector is where you attach the
external monitor.
Page 10

Rear View of the Computer
(8)
The security keyhole is used with a mechanical lock.
(9) The TV-out jack is where you connect a television or external
display devices with an S-video in-out cable.
(10)
(11)
(12)
(13)
(14)
(15) The battery pack is a built-in power source for the computer.
The power switch turns the computer on and off.
The headphone jack, a ⅛inch (3.5mm) diameter jack, is where
you connect stereo headphones or external speakers.
The line-in jack, a ⅛inch (3.5mm) diameter jack, is where
you connect an external audio device.
The microphone jack, a ⅛inch (3.5mm) diameter jack, is
where you connect a self-powered stereo microphone.
Note: Do not plug any device into the microphone jack except a
microphone.
The audio volume control adjusts the volume of the
speakers.
4 IBM ThinkPad i Series 1400 Supplement
Page 11

Chapter 2. Distinctive Functions of the Computer
Copyright IBM Corporation 1999 5
Page 12

ThinkPad i Series 1400 DVD
ThinkPad i Series 1400 DVD
Some models of the ThinkPad i Series 1400 computer come with a
built-in DVD-ROM drive.
Enjoying DVD Movies
DVD Movie Regions
DVD movies are divided into the following regions.
Country or Region Movie Region
U.S.A., Canada 1
Europe, Middle East, South Africa,
Japan
Southeast Asia, Taiwan, Korea (South) 3
Latin America, Australia, New Zealand 4
Former U.S.S.R., parts of Africa, India 5
People's Republic of China 6
2
The ThinkPad i Series 1400 DVD allows you to play DVD movies
of a selected region. Make sure the DVD movie you are using is
of that region. You will not be able to play DVD movies of other
regions.
CAUTION:
The first time you run the Mediamatics DVD Player, you need to
set the region code. Make sure you insert a DVD that corresponds to the region code that you will set. Otherwise, you will
not be able to view DVD movies of any region.
To start playing a DVD movie, do as follows:
1. Push the DVD-ROM eject button on the side of the computer;
then pull out the DVD-ROM tray.
2. Fit your DVD on the center pivot. Firmly press the DVD down
until you hear it click into place.
6 IBM ThinkPad i Series 1400 Supplement
Page 13
ThinkPad i Series 1400 DVD
3. Push the tray into the computer until it fully closes.
4. Click on Start.
5. Move the cursor to Programs, Mediamatics DVDExpress; then
click on Mediamatics DVD Player.
Note: Click on the Help button for more information on how to
use the DVD movie playback software.
Hints, Tips and Limitations
Refer to the table below when troubleshooting problems related
to your ThinkPad i Series 1400 DVD:
Problem Action
No sound is coming from
the speakers.
The control buttons on the
DVD movie playback software do not work.
The computer plays region 1 DVD movies. Make sure the DVD
movie you are using is a region 1 DVD. You will not be able to
play DVD movies of other regions.
Check the following:
Try adjusting the audio volume
control.
Check if the sound is muted in the
DVD movie playback software.
Check if the sound is muted in the
operating system.
The DVD movie playback software is
reading the DVD-ROM. Wait for a few
seconds before trying the buttons again.
Chapter 2. Distinctive Functions of the Computer 7
Page 14

ThinkPad i Series 1400 DVD
The computer plays back DVD movies at 256 colors.
If the computer enters standby mode during DVD movie play-
back, the DVD movie will start playing from the beginning again
when you resume from standby mode.
Do not change the screen resolution during DVD movie play-
back.
DVD movie playback requires Microsoft DirectXX** version 2 or
higher.
8
IBM ThinkPad i Series 1400 Supplement
Page 15

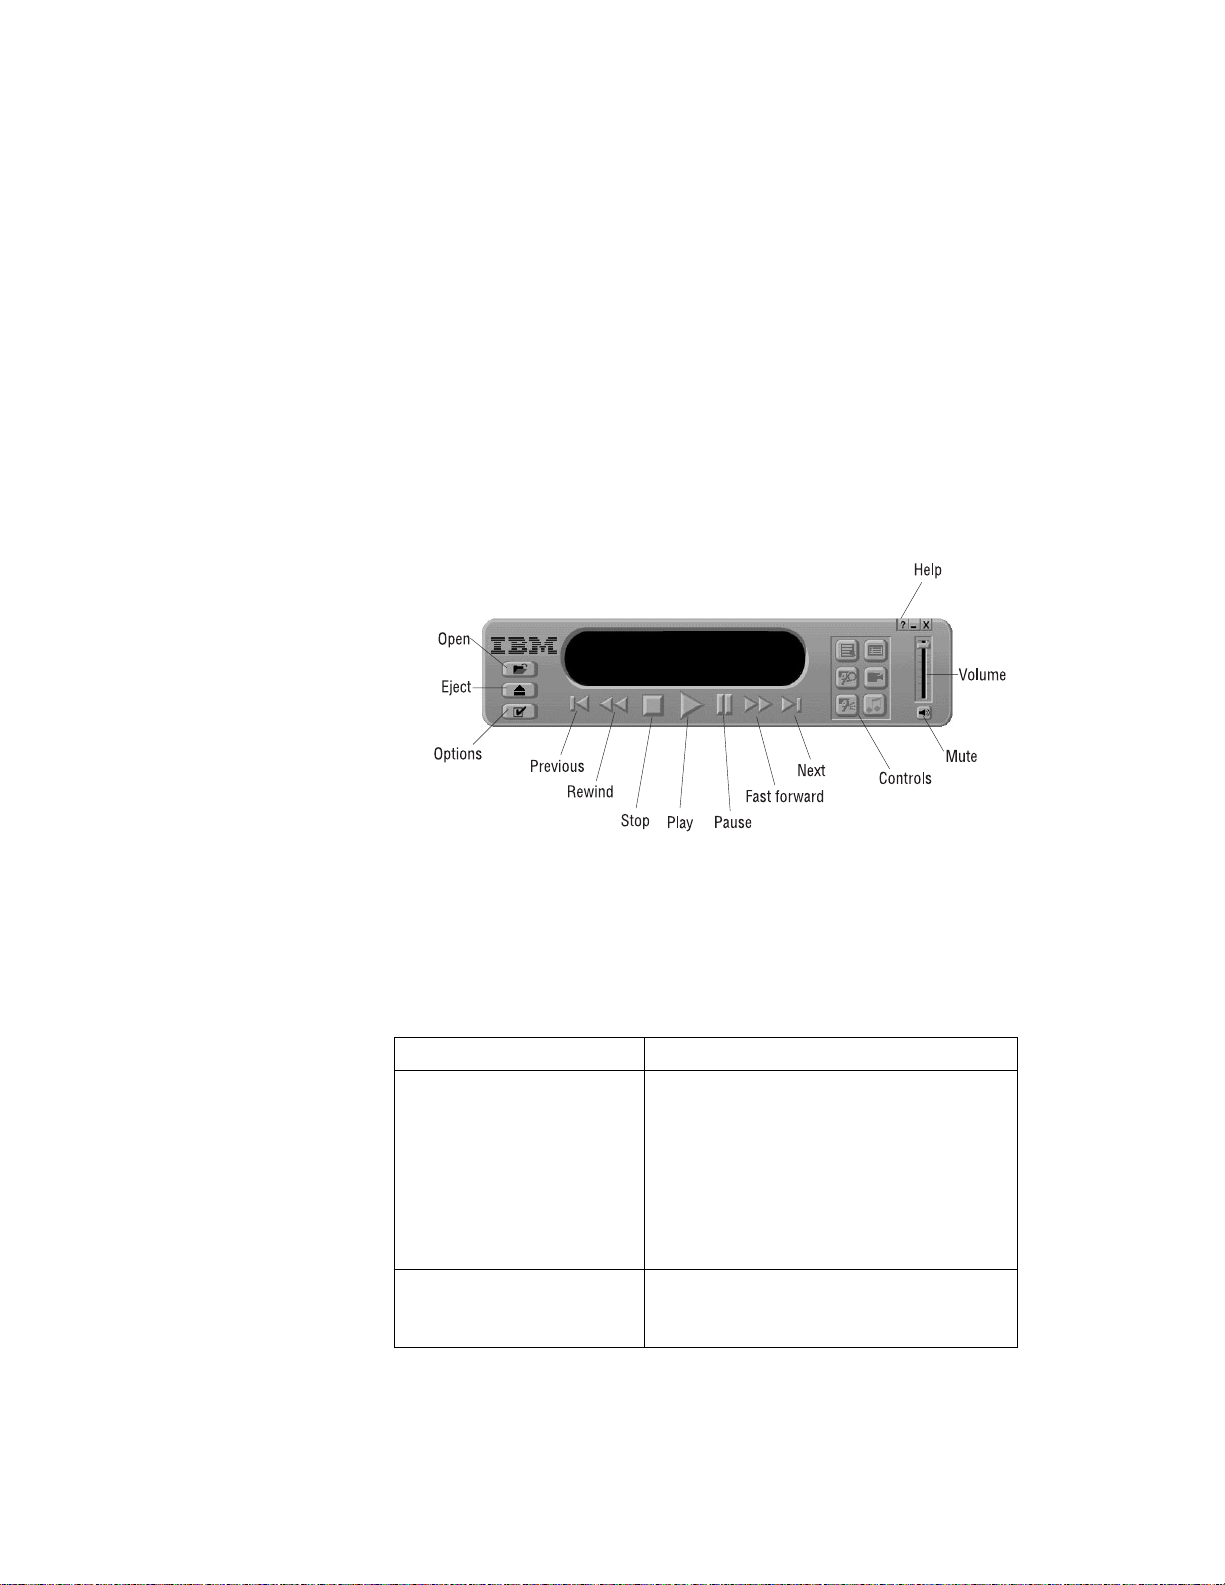
Using the Audio Features
The ThinkPad i Series 1400 computer allows you to play music CDs
without turning on the computer by using the audio CD control panel
located on the front of the computer. When the computer is on, you
can also use the audio CD control panel to control the playback of
music CDs.
Note: Using the audio CD control panel to control music CD play-
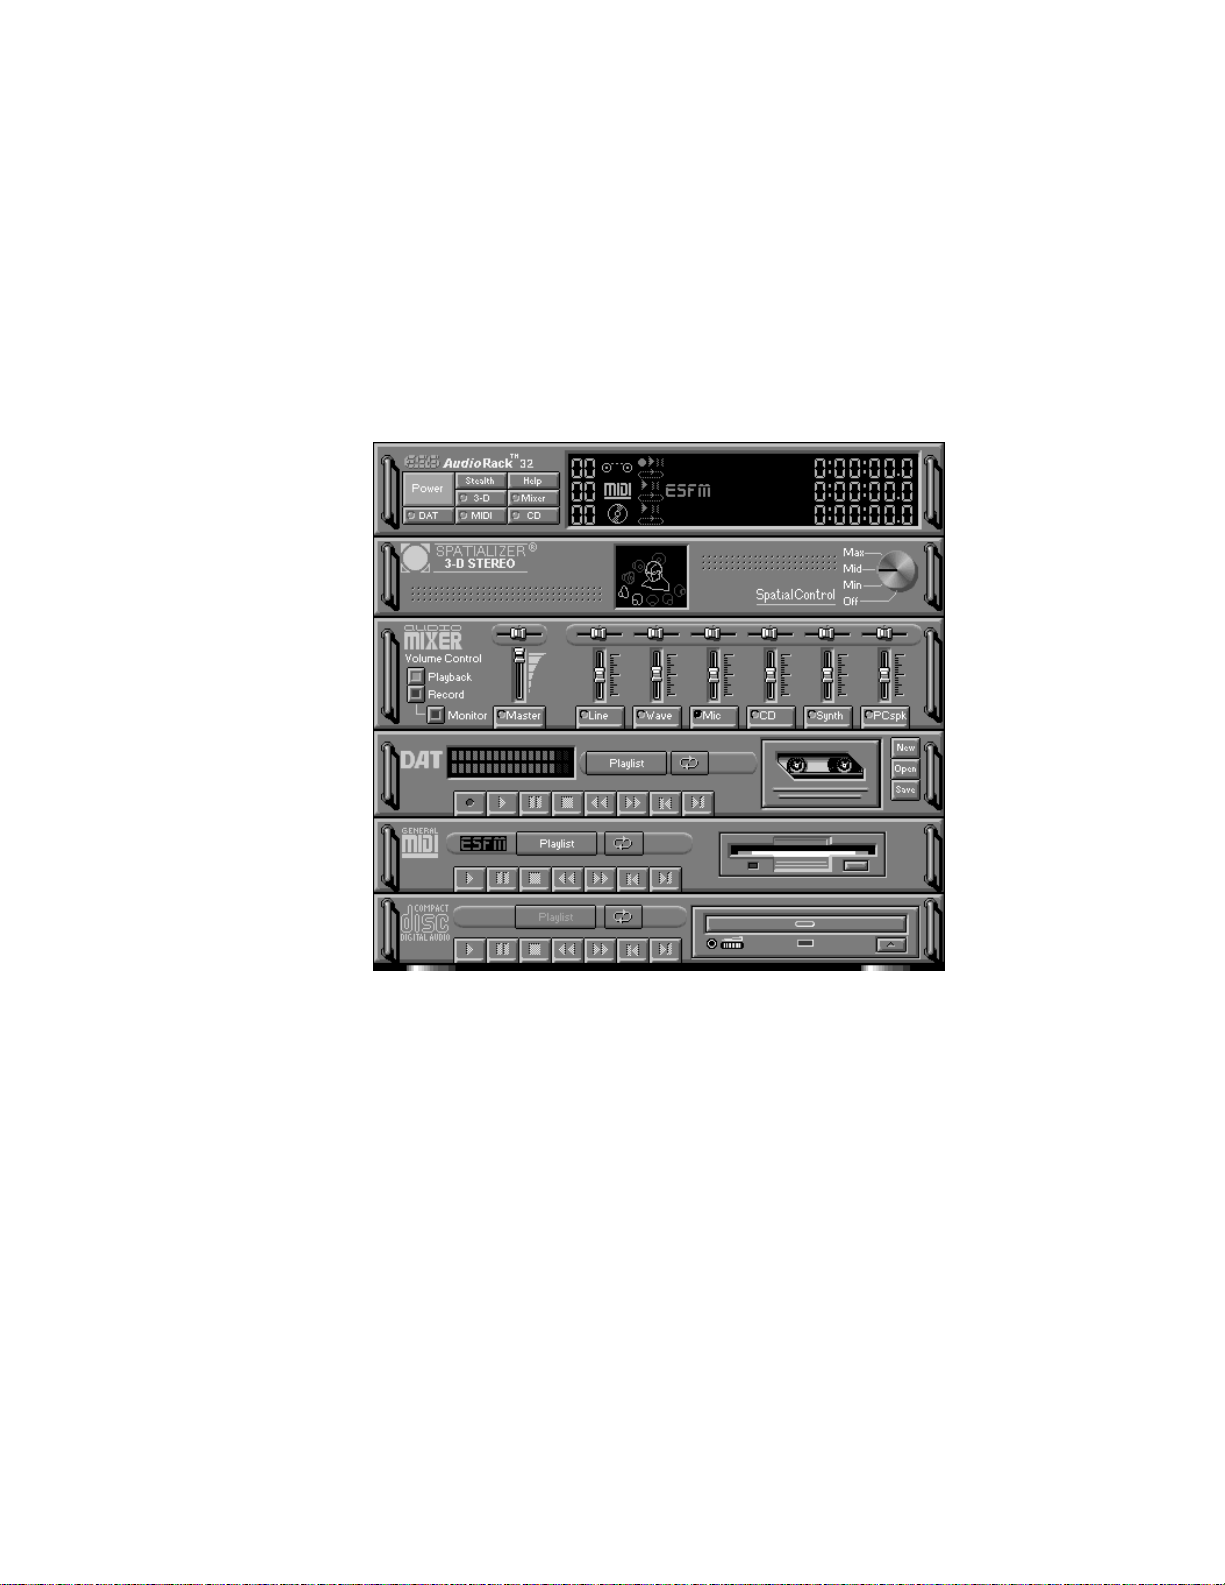
The ThinkPad i Series 1400 comes with the ESS** AudioRack audio
support software. This software allows you to play music CDs, MIDI
files, as well as play and record wave files.
To run the ESS AudioRack, do as follows:
1. Click on Start.
2. Move the cursor to Programs, AudioRack 32, then click on
AudioRack 32.
Using the Audio Features
back with the computer on requires the ESS AudioRack and
ShortCut Keys Utility programs to be installed.
Chapter 2. Distinctive Functions of the Computer 9
Page 16
Using the Audio Features
10 IBM ThinkPad i Series 1400 Supplement
Page 17

Display Modes
Display Modes
The ThinkPad i Series 1400 computer has an LCD that supports an
XGA (1024x768 resolution) video mode or an SVGA (800x600 resolution) video mode. The following table shows the various display
modes (resolution and color depth) available with your computer or
external monitor. Use this table to set the display output (LCD Panel
Only, External monitor or Both).
Note: When installing an operating system, you must install the
display driver supplied with the computer to use SVGA mode.
Display output on the LCD, or both on the LCD and external
monitor (LCD Panel Only or Both).
Resolution Supported Color Depth
640x480 (VGA) 16, 256, 65,536, and 16,777,216
800x600 (SVGA) 256, 65,536, and 16,777,216
1024x768 (XGA)
(available only for 14.1-inch and
13.3–inch models)
256, 65,536, and 16,777,216
Display output only on the external monitor (External monitor).
Supported Color
Resolution
640x480 (VGA)
800x600 (SVGA)
1024x768 (XGA)
Chapter 2. Distinctive Functions of the Computer 11
Depth Frame Rate
256
65,536
16,777,216
256
65,536
16,777,216
256
16,777,216
60 Hz, 75 Hz, or 85
Hz
60 Hz, 75 Hz, or 85
Hz
60 Hz, 75 Hz, or 85Hz65,536
Page 18

Display Modes
Supported Color
Resolution
1280x1024 256 60 Hz
Note: If you are using an old external monitor, the resolution and
Depth Frame Rate
color depth might be limited.
12 IBM ThinkPad i Series 1400 Supplement
Page 19

Notebook Manager
POST Page
Notebook Manager
Updated sections in the Notebook Manager include the following:
In the POST page, you can define how you want your computer to
behave at startup.
The POST page displays the following items:
Enable Screen Expansion.
the screen on your computer. For more information, see the
User's Reference.
Enable ACPI OS Fast POST.
when ACPI is active on your computer.
Fast POST allows your computer to start up and resume from
hibernation mode faster. When enabled, the BIOS communicates
with the Windows 98 operating system with ACPI about Plugand-Play resources settings and information about previous start
ups.
Enable Silent Boot.
startup messages.
Chapter 2. Distinctive Functions of the Computer 13
When enabled, the computer hides the
When enabled, the computer expands
enables or disables Fast POST
Page 20

Notebook Manager
Boot Sequence Page
Enable hotkey beep.
beeps when an Fn key function is pressed.
In the Boot Sequence page, you can specify the startup sequence of
the drives in your computer.
When enabled, the computer gives off
The Boot Sequence page allows you to set the startup sequence of
the drives in your computer by simply dragging and dropping the
drives in the list window.Click on the Help button to learn more about
these startup sequence settings.
Power Management Page
In the Power Management page, you can set various options related
to power management.
14
IBM ThinkPad i Series 1400 Supplement
Page 21

Notebook Manager
The Power Management page displays the following items:
Will not standby even if LCD is closed.
When enabled, the computer will continue operation even if the LCD is closed. You may
want to enable this option when you attach an external monitor
and other external devices to the computer.
Enable battery low warning beep.
When enabled, the computer
gives off warning beeps when the computer is running low on
battery.
Enable sleep upon battery low.
When enabled, the computer
enters hibernation mode when the computer is running low on
battery.
Note: In a battery-low condition, the computer enters hibernation
mode if the hibernation file created by Sleep Manager is
present and valid. For more information, see the User's
Reference.
Chapter 2. Distinctive Functions of the Computer 15
Page 22

BIOS Utility
BIOS Utility
Your computer provides a BIOS Utility which allows you to select
various setup parameters:
System Information: View information about the computer.
Basic System Settings: Set date and time.
Startup Configuration: Set startup options.
Onboard Devices Configuration: Set device resource settings.
System Security: Set a password.
Power Management: Set power management settings.
Load Default Settings: Load the default settings for all parame-
ters.
To start the BIOS Setup Utility, do as follows:
1. Remove any diskette from the diskette drive, and remove any
CD from the CD-ROM drive; then turn off the computer.
2. Turn on the computer.
3. As the ThinkPad logo is being displayed, a message appears
"Press F1 for IBM BIOS Setup Utility"; press F1.
The BIOS Utility menu appears:
16
IBM ThinkPad i Series 1400 Supplement
Page 23

BIOS Utility
BIOS Utility
System Information
Basic System Settings
Startup Configuration
Onboard Devices Configuration
System Security
PowerManagement
Load Default Settings
↑↓ ↵= Move highlight bar, = Select, Esc = Exit
4. Move to an item you want to change using the up/down arrow
keys, and press Enter.
A submenu is displayed.
5. Change the items you wish to change.
To change the value of an item, use the left/right arrow keys.
6. Press Esc to exit from the submenu.
7. Press Esc from the main menu and press Enter to save your
changes and exit from the BIOS Setup Utility menu.
Your computer restarts.
Note: If you would like to discard your changes, select No and
press Enter.
System Information
Selecting the System Information item and pressing Enter displays
the following "System Information" submenu.
Chapter 2. Distinctive Functions of the Computer 17
Page 24

BIOS Utility
System Information Page 1/1
CPU Type & Speed -----------------Diskette Drive A ---------------------System with --------------------------Hard Disk Drive ---------------------HDD Serial Number ----------------System BIOS Version --------------VGA BIOSVersion -------------------
PgUp PgDn = Move screen, Esc = Exit
Pentium II 366 Mhz
1.44MB 3.5-inch
CD-ROM
6194 MB
ZC2ZCFC7037
V3.0 R01-A0f
V01.10.0000
The "Basic System Settings" submenu includes the following:
CPU Type and Speed shows the type and speed (in Megahertz)
of the processor.
Diskette Drive A shows information on the diskette drive.
System with shows information on the internal high-capacity
media drive.
Hard Disk Drive shows the capacity of the hard disk drive.
HDD Serial Number shows the serial number of the hard disk
drive.
System BIOS Version shows the BIOS version of the computer.
VGA BIOS Version shows the BIOS version of the computer's
video.
Basic System Settings
Selecting the Basic System Settings item and pressing Enter displays the following "Basic System Settings" submenu.
18
IBM ThinkPad i Series 1400 Supplement
Page 25

BIOS Utility
Basic System Settings Page 1/1
Date ----------------------------------------Time -----------------------------------------
↑↓ ←→= Move highlight bar, = Change setting, F1 = Help
The "Basic System Settings" submenu includes the following:
Date sets the system date.
Time sets the system time.
Note: You can also set the current date and time in Windows 98.
Startup Configuration
Selecting the Startup Configuration item and pressing Enter displays the following "Startup Configuration" submenu.
[Fri Jan 08, 1999]
[16:19:10]
Chapter 2. Distinctive Functions of the Computer 19
Page 26

BIOS Utility
Startup Configuration Page 1/1
Boot Display -------------------------------------------Screen Expansion -----------------------------------USB Function Support -----------------------------Hotkey Beep -------------------------------------------
ACPI OS FastPOST --------------------------------
Silent Boot -------------------------------------PnP OS -----------------------------------------
Boot Drive Sequence:
1st. ----------------------------------------------2nd. ---------------------------------------------3rd. -----------------------------------------------
↑↓ ←→= Move highlight bar, = Change setting, F1 = Help
[Auto]
[Enabled ]
[Disabled]
[Enabled ]
[Disabled]
[Enabled ]
[Enabled ]
[Floppy Disk]
[CD-ROM]
[Hard Disk]
This submenu is used to set startup options and change the startup
sequence of the drives in your computer. It includes the following:
Boot Display sets the display output device on start up.
Screen Expansion expands or shrinks the screen on your com-
puter.
USB Function Support enables or disables the USB function on
your computer.
Hotkey Beep enables or disables beeps when an Fn key func-
tion is pressed.
ACPI OS Fast POST enables or disables Fast POST when ACPI
is active on your computer.
Fast POST allows your computer to start up and resume from
hibernation mode faster. When enabled, the BIOS communicates
with the Windows 98 operating system with ACPI about Plugand-Play resources settings and information about previous start
ups.
– Silent Boot enables or disables the startup screen.
– PnP OS enables or disables PCMCIA card support on your
computer.
20
IBM ThinkPad i Series 1400 Supplement
Page 27

BIOS Utility
Boot Drive Sequence (1st, 2nd and 3rd) specifies the start up
sequence of local drives.
Onboard Devices Configuration
Selecting the Onboard Devices Configuration item and pressing
Enter displays the following "Onboard Devices Configuration"
submenu.
Onboard Devices Configuration Page 1/1
Serial Port ----------------------------------------------
Base Address ----------------------------------IRQ ------------------------------------------------
Parallel Port ---------------------------------------------
Base Address --------------------------------------IRQ ---------------------------------------------------Operation Mode -----------------------------------ECP DMA Channel --------------------------------
↑↓ ←→= Move highlight bar, = Change setting, F1 = Help
Note: You do not need to change the settings in the screen because
[Enabled ]
[3F8h]
[4 ]
[Enabled ]
[3BCh]
[7 ]
[ ECP ]
[1]
the default settings are already optimized for you. Changing
the values may cause device conflicts.
The "Onboard Devices Configuration" submenu includes the
following:
Serial Port section enables and sets the resources values for
the serial port.
Parallel Port section enables and sets the resource values for
the parallel port.
System Security
Selecting the System Security item and pressing Enter displays the
following "System Security" submenu.
Chapter 2. Distinctive Functions of the Computer 21
Page 28

BIOS Utility
System Security Page 1/1
Setup Password--------------------------------------Power-onPassword ---------------------------------Hard Disk Password---------------------------------
↑↓ ←→= Move highlight bar, = Change setting, F1 = Help
This submenu is used to set the power-on password, setup password, and hard disk password. Refer to Chapter 3, “Using
Passwords” on page 27 for details.
Power Management
Selecting the Power Management item and pressing Enter displays
the following "Power Management" submenu.
[ None ]
[ None ]
[ None ]
22
IBM ThinkPad i Series 1400 Supplement
Page 29

BIOS Utility
Power Management Page 1/1
Will not Enter Standby evenif the LCD is closed ------Battery-low Warning Beep ------------------------------------
Sleep Upon Battery-low ---------------------------------------
↑↓ ←→= Move highlight bar, = Change setting, F1 = Help
[Disabled]
[Enabled ]
[Enabled ]
The "Power Management" submenu includes the following:
Will not Enter Standby even if the LCD is closed enables or
disables the computer to continue operation even if the LCD is
closed.
Battery-low Warning Beep enables or disables beeps when the
computer is running low on battery.
Sleep Upon Battery-low enables or disables the computer to
enter hibernation mode if the computer is running low on battery.
Note: In a battery-low condition, the computer enters hibernation
mode if the hibernation file created by Sleep Manager is
present and valid. See the User's Reference for more
information.
Load Default Settings
Selecting this item displays the following dialog box.
Do you want to load default settings?
[Yes] [No]
Chapter 2. Distinctive Functions of the Computer 23
Page 30

BIOS Utility
To load factory-default settings for all the parameters in the BIOS
Utility, select Yes and press Enter. Otherwise, select No and press
Enter.
CAUTION:
Selecting Yes will erase all your changes.
IBM ThinkPad i Series 1400 Supplement
24
Page 31

Starting System Programs
Your ThinkPad computer has a collection of system or utility programs for easy configuration. The following procedures show how to
start system programs.
Sleep Manager
To start the Sleep Manager, do as follows:
1. Click on Start.
2. Move the cursor to Programs, Sleep Manager, then click on
ShortCut Keys Utility
To start the ShortCut Keys Utility, do as follows:
1. Click on Start.
2. Move the cursor to Programs, then click on ShortCut Keys
Starting System Programs
Sleep Manager.
Utility.
Online User's Guide
To start the Online User's Guide, do as follows:
1. Click on Start.
2. Move the cursor to Programs, ThinkPad i Series 1400,
then click on ThinkPad i Series 1400 User's Guide.
Chapter 2. Distinctive Functions of the Computer 25
Page 32

26 IBM ThinkPad i Series 1400 Supplement
Page 33

Chapter 3. Using Passwords
The password-setting feature helps to prevent your computer from
being used by others. Once you set a password, a prompt appears
on the screen each time you turn on the computer. You must enter
your password at the prompt. You cannot use the computer unless
you type the correct password. You can set the following passwords
on your computer:
Power-on password
Set the power-on password to protect your computer from use by
another person. It provides the following security features:
– You need to type the power-on password at startup. There-
fore, unauthorized users cannot use your computer.
– You need to type the power-on password when resuming
from hibernation mode. Therefore, unauthorized users cannot
use your computer.
Setup password
Set the setup password to prevent unauthorized changes to your
computer's configuration. It provides the following security
features:
– You need to type the setup password to access the BIOS
Utility. Therefore, unauthorized users cannot make changes
to your computer's configuration.
– You need to type the setup password to access the Note-
book Manager in Windows 98. Therefore, unauthorized users
cannot make changes to your computer's configuration.
Hard disk password
The hard disk password provides an extra measure of security.
Even if you set a power-on password, another user can remove
the hard disk drive in your computer and put it in a different computer to access your data. If you set a hard disk password,
however, another person cannot access the data on your hard
Copyright IBM Corporation 1999 27
Page 34

disk without knowing the password. It provides the following
features:
– You need to type the hard disk password at startup.
– If the hard disk drive is moved to another computer, the hard
disk password must be typed at startup. Therefore, unauthorized users cannot access your hard disk even if the drive is
removed from the computer.
– The hard disk password is required when the computer
resumes from suspend mode.
Other password
Some Microsoft operating systems provide special Windows
passwords. Refer to that system's user's guide for information on
how to set, change, and use these passwords.
Do Not Forget Your Password
If you forget your hard disk or setup password, you have to take
your computer to an IBM reseller or IBM marketing representative
to have the password reset. Proof or purchase is required, and
an additional charge might be required for the service.
28 IBM ThinkPad i Series 1400 Supplement
Page 35

Setting a Password
Setting a Password
To set a password, do the following:
1. Restart the computer.
2. As the ThinkPad logo is being displayed, a message appears
"Press F1 for IBM BIOS Setup Utility"; press F1.
The BIOS Utility menu appears.
3. Select System Security and press Enter. The "System Security"
submenu appears:
System Security Page 1/1
Setup Password--------------------------------------Power-onPassword ---------------------------------Hard Disk Password---------------------------------
↑↓ ←→= Move highlight bar, = Change setting, F1 = Help
[ None ]
[ None ]
[ None ]
Setup Password Selecting this displays a window for setting
the setup password.
Power-On Password Selecting this displays a window for
setting the power-on password.
Hard Disk Password Selecting this displays a window for
setting the hard disk password.
4. Select the type of password you want to set, and press the
left/right arrow key. The set password box appears.
Chapter 3. Using Passwords 29
Page 36

Setting a Password
5. Type your desired password and press Enter.
Note: You can type a maximum of seven random characters
using a combination of letters (A to Z) and numbers (0 to
9
). Uppercase and lowercase letters (for example, A and
a
) are treated as the same character.
If you type a wrong character, use the Backspace key to
erase it and then type the correct one.
6. Type your password again and press Enter to verify it.
Note: Write down the password and keep it in a safe place.
Do Not Forget Your Password
If you forget your hard disk or setup password, you have to take
your computer to an IBM reseller or IBM marketing representative
to have the password reset. Proof or purchase is required, and
an additional charge might be required for the service.
30 IBM ThinkPad i Series 1400 Supplement
Page 37

Chapter 4. Additional Information
Your ThinkPad i Series 1400 computer has an Intel mobile
Pentium II processor with on-die external cache or an Intel
mobile Celeron processor.
If you are using a ZV PC Card, insert it into the upper slot.
Your ThinkPad i Series 1400 computer has a TV-out (S-Video
output) jack that allows you to connect your computer to external
display devices.
Copyright IBM Corporation 1999 31
Page 38

Attaching a Television to Your Computer
You can attach a television (NTSC or PAL) to your computer and
display the computer screen on it. To display the computer screen on
television, do the following:
1. Turn off the computer and television.
2. Connect an S-video in-out cable (1) to the video-out port (2);
then connect your television.
3. Set the external display device.
a. Click on Start.
b. Move the cursor to Settings; then click on Control Panel.
c. Double-click on Display.
d. Click on the Settings tab.
e. Click on the Advanced... button.
f. Click on the NeoMagic tab.
g. Set the external display device. You can also set advanced
settings by click on Advanced Settings.
32
IBM ThinkPad i Series 1400 Supplement
Page 39

Attaching a Television to Your Computer
Notes:
1. The S-video in-out cable (1) and audio in-out cable are not supplied with your computer; you must purchase them.
2. If your video equipment has only one audio-input connector, use
the left-audio connector of the audio cable.
Chapter 4. Additional Information 33
Page 40

34 IBM ThinkPad i Series 1400 Supplement
Page 41

Chapter 5. Additional Notices
Copyright IBM Corporation 1999 35
Page 42

Year 2000 Readiness and Instructions
Year 2000 Readiness and Instructions
This is a Year 2000 Readiness Disclosure.
A product is Year 2000 Ready if the product, when used in accord-
ance with its associated documentation, is capable of correctly processing, providing and/or receiving date data within and between the
20th and 21st centuries, provided all other products (for example,
software, hardware, and firmware) used with the product properly
exchange date data with it.
This IBM PC hardware product has been designed to process fourdigit date information correctly within and between the 20th and 21st
centuries. If your IBM computer is on when the century changes, you
should turn it off and then back on again once, or restart the operating system, to ensure that the internal clock resets itself for the
new century.
This IBM PC product cannot prevent errors that might occur if software you use or exchange data with is not ready for the Year 2000.
IBM software that comes with this product is Year 2000 Ready.
However, software from other companies might come with this IBM
PC product. IBM cannot take responsibility for the readiness of that
software. You should contact the software developers directly if you
wish to verify readiness, understand limitations, or look for any software updates.
To learn more about IBM PC products and the Year 2000, visit our
Web site at http://www.pc.ibm.com/year2000. The information and
tools there can help you with your Year 2000 transition plan, especially if you have multiple IBM PCs. IBM encourages you to check
periodically for updated information.
IBM ThinkPad i Series 1400 Supplement
36
Page 43

Macrovision Copyright Protection Statement
Macrovision Copyright Protection Statement
This device is protected by U.S. patent numbers 4631603, 4577216,
4819098, 4907093, and other intellectual property rights. The use of
Macrovision's copy protection technology in the device must be
authorized by Macrovision and is intended for home and other limited
pay-per-view use only, unless otherwise authorized in writing by
Macrovision. Reverse engineering or disassembly is prohibited.
Chapter 5. Additional Notices 37
Page 44

Notice to European Users of the IBM ThinkPad Modem
Notice to European Users of the IBM ThinkPad Modem
This equipment has been approved to Council Decision 98/ 482/EC "CTR 21" for pan-European single terminal connection to the Public
Switched Telephone Network (PSTN). However, due to differences
between the individual PSTNs provided in different countries, the
approval does not, of itself, give an unconditional assurance of successful operation on every PSTN termination point. In the event of
problems, you should contact your equipment supplier in the first
instance.
38 IBM ThinkPad i Series 1400 Supplement
Page 45

Notice to European Users of the IBM ThinkPad Modem
Warning Notice to New Zealand Users of the IBM ThinkPad Modem
The grant of a Telepermit for a device in no way indicates
Telecom acceptance of responsibility for the correct operation of
that device under all operating conditions.
In particular the higher speeds at which this modem is capable of
operating depend on a specific network implementation which is
only one of many ways of delivering high quality voice telephony
to customers. Failure to operate should not be reported as a fault
to Telecom.
In addition to satisfactory line conditions a modem can only work
properly if:
1. it is compatible with the modem at the other end of the call
and
2. the application using the modem is compatible with the application at the other end of the call - e.g. accessing the
Internet requires suitable software in addition to a modem.
Some parameters required for compliance with Telecom's Tele-
permit requirements are dependent on the equipment (PC) associated with this device. The associated equipment shall be set to
operate within the following limits for compliance with Telecom's
Specifications:
1. There shall be no more than 10 call attempts to the same
number within any 30 minute period for any single manual
call initiation.
2. The equipment shall go on-hook for a period of not less than
30 seconds between the end of one attempt and the beginning of the next attempt.
3. Where automatic calls are made to different numbers, the
equipment shall go on-hook for a period of not less than 5
seconds between the end of one attempt and the beginning
of the next attempt.
Chapter 5. Additional Notices 39
Page 46

Warning Notice to New Zealand Users of the IBM ThinkPad Modem
4. The equipment shall be set to ensure that calls are answered
between 3 and 30 seconds of receipt of ringing (S0 set
between 2 and 10). This ensures:
a. a person calling your modem will hear a short burst of
ringing before the modem answers. This confirms that
the call has been successfully switched through the
network.
b. caller identification information (which occurs between
the first and second ring cadences) is not destroyed.
The preferred method of dialling is to use DTMF tones (ATDT...)
as this is faster and more reliable than pulse (decadic) dialling. If
for some reason you must use decadic dialling, your communications program must be set up to record numbers using the following translation table as this modem does not implement the
New Zealand "Reverse Dialling" standard.
Number to be dialled: 0 1 23456789
Number to program into
computer:
0987654321
Note that where DTMF dialling is used, the numbers should be
entered normally.
NOTE THAT FAULT CALLOUTS CAUSED BY ANY OF THE
ABOVE CAUSES MAY INCUR A CHARGE FROM TELECOM.
40 IBM ThinkPad i Series 1400 Supplement
 Loading...