

Page 1

IBM T60 THINKPAD MANUAL
IT SERVICES
OKANAGAN COLLEGE
www.okanagan.bc.ca./helpdesk
1
Page 2

Table of Contents
Welcome to your T60 IBM ThinkPad................................................................................ 3
Starting your computer ....................................................................................................... 4
ThinkVantage...................................................................................................................... 4
Pointing Devices................................................................................................................. 5
Using an LCD projector...................................................................................................... 5
DVDs .................................................................................................................................. 5
CD Writing.......................................................................................................................... 5
Connecting to the OC wireless network ............................................................................. 6
Customizing your desktop .................................................................................................. 7
A quick guide to careful saving.......................................................................................... 8
Using the network to share files with others....................................................................... 8
Using mystorage to access your F: drive............................................................................9
Connecting to the network through VPN (Virtual Private Network)............................... 10
Web Browsers and pop-ups.............................................................................................. 11
People.okanagan.bc.ca...................................................................................................... 11
The standard OC software install...................................................................................... 11
Novell................................................................................................................................ 13
MyOkanagan..................................................................................................................... 13
WebCT.............................................................................................................................. 13
Outlook ............................................................................................................................. 14
Telephone system.............................................................................................................. 14
Important Note - Access databases................................................................................... 14
Another Important Note – Laptop Security...................................................................... 14
Ask Us............................................................................................................................... 14
Where to go for help......................................................................................................... 14
2
Page 3
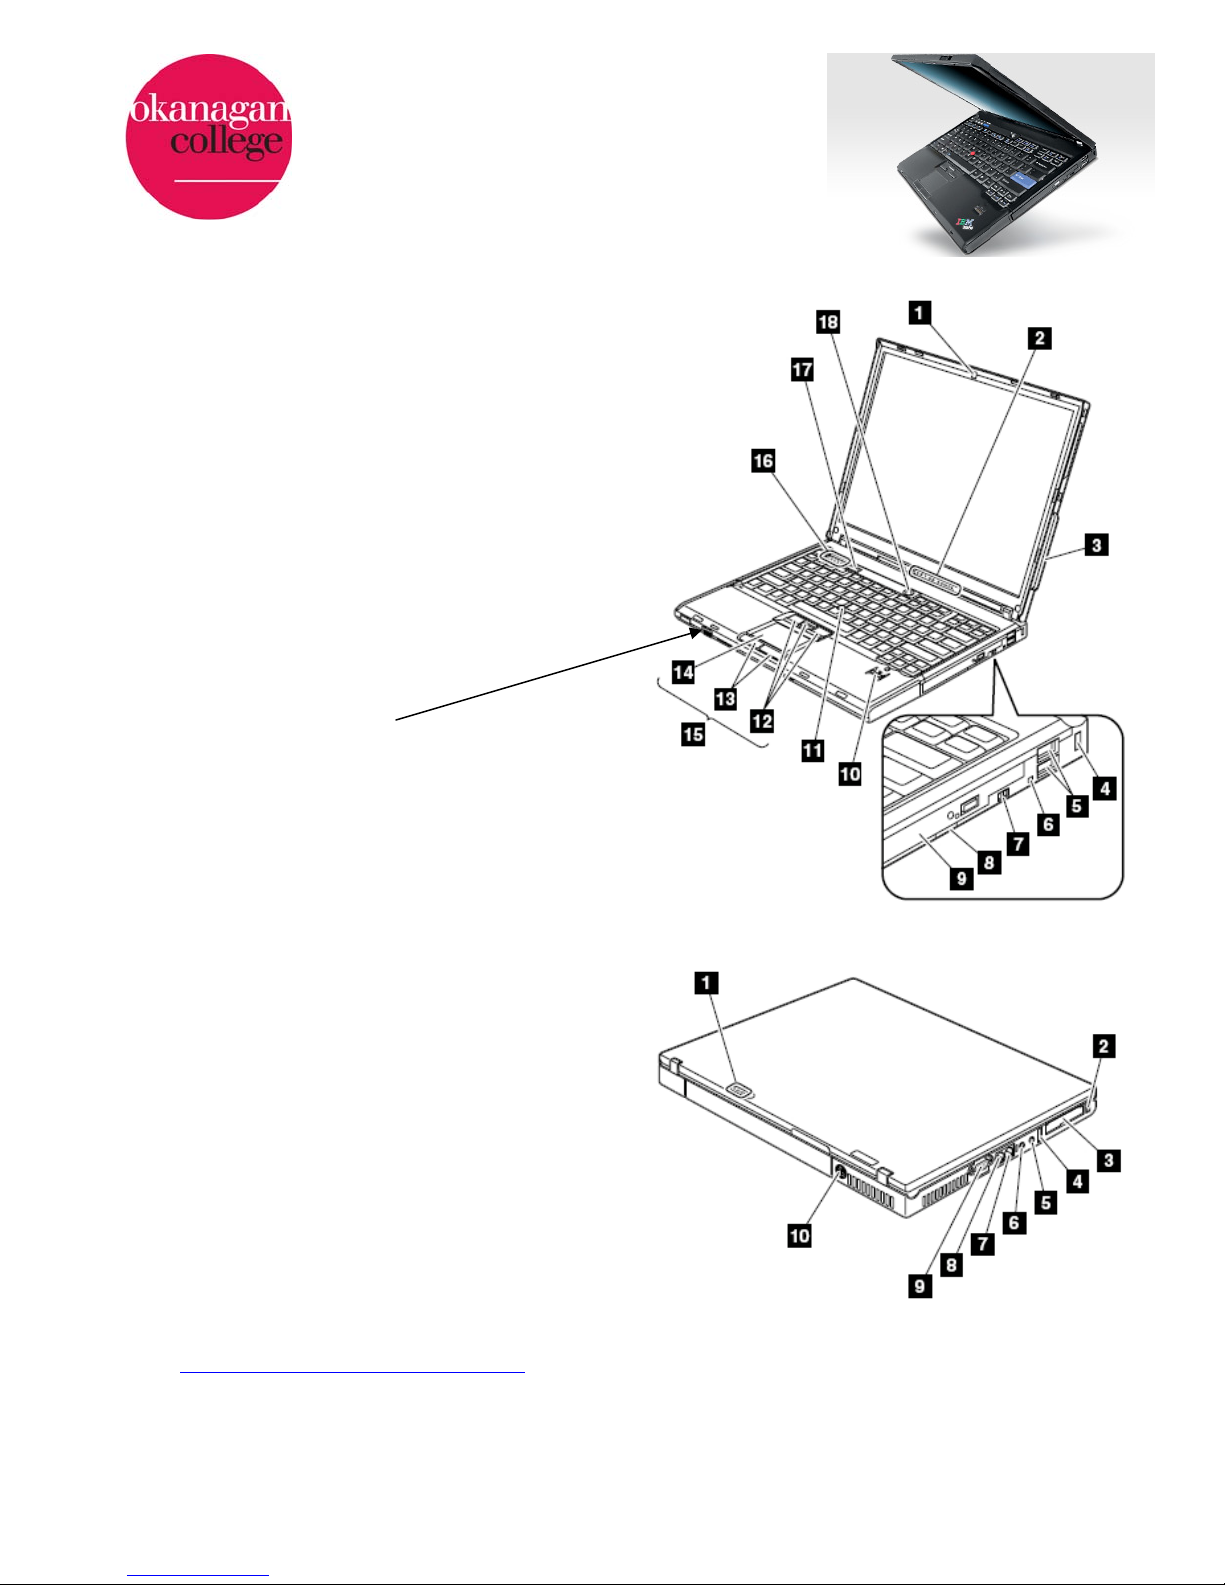
Welcome to your T60 IBM ThinkPad
Front view:
1. ThinkLight
2. Status indicators
3. Wireless antenna
4. Security key hole
5. USB connectors
6. CD/DVD status
7. CD/DVD latch
8. CD/DVD eject button
9. CD/DVD drive
10. Fingerprint reader (not on all machines)
11. TrackPoint pointing stick
12. TrackPoint buttons
13. Touch pad buttons
14. Touch pad
15. UltraNav
16. Volume Control buttons
17. ThinkVantage button
18. Power switch
19. Wireless switch
Rear view:
1. Status indicators
2. PC Card eject buttons
3. PC Card slot
4. USB connector
5. Microphone jack
6. Stereo headphone jack
7. Ethernet network connector
8. Telephone modem connector
9. External monitor connector
10. AC power connector
User guide info at
http://www-307.ibm.com/pc/support
3
Page 4

Starting your computer
Press and hold the power button at the top of the keyboard (18) for a couple seconds.
After the computer does some boot-up things, you’ll see a Novell log-in screen asking you for a
username and password.
If you’re plugged in to the college network using an Ethernet cable from your laptop to a
network connection on the wall, you can enter your Novell username and your Novell password
(see page 12 for more details on what your Novell log-in might be). The computer will search
the various servers to validate your account and after a few moments your normal desktop will
appear.
When you’re not plugged into the college network using an Ethernet cable, you have to put a
checkmark in the box labeled Workstation only then enter your Novell username and
password. If you need internet access, you can use the college’s wireless network. See page 5
for more information on wireless.
Things you may need to plug in at this point
Ethernet cable – connects from left side of computer (7) to network port in wall.
Mouse – plugs into USB port (5) on right side of computer.
AC adapter – plugs into power connector (10) on back of computer.
ThinkVantage
The blue ThinkVantage button (17) launches the ThinkVantage Productivity Center which has
shortcuts to the help desk, webmail and wireless connectivity.
Next to the ThinkVantage button, there are dedicated buttons to mute, lower, and raise the
computer’s sound output levels.
Your laptop has built-in speakers (just under the front of the keyboard) and a built in
microphone (the two little holes below the Fn key bottom left of the keyboard.)
The microphone jack (5) only accepts microphone level inputs. You can’t connect a line level
signal such as the output from a tape recorder, or the headphone jack of a portable stereo. It
will distort.
The little blue icons on some of the F keys at the top of the keyboard mean they have
additional functions. You select those functions by holding down the blue Fn (Function) button
at the bottom left of the keyboard, then pressing the appropriate F key.
For example:
Fn-F3 turns the computer’s monitor off. Press any key to turn it on again. If you’re connected
to an LCD projector, you can use Fn-F3 to temporarily darken the projection screen.
Fn-F4 puts the computer to sleep and wakes it up again
Fn-F5 turns on your computer’s wireless antenna on or off
Fn-F7 sends the computer’s screen image to the VGA port on the right side (and through that to
an LCD projector or external monitor)
Fn- F12 puts the computer into hibernate mode – it’s like shutting down, but your open
documents will come up again when you wake it up
Fn- Home and Fn-End make the computer screen brighter or darker (darker conserves battery
power)
Fn- PgUp turns on a little light built into the top of the screen (for when you’re doing
presentations in the dark)
Fn-spacebar enlarges the screen view (useful when you want to show small text at giant size)
4
Page 5

Pointing Devices (all 3 devices are active simultaneously)
Mouse – plug a mouse into any USB port.
TouchPad – slide your finger around on the touchpad (14). The buttons below the touchpad are
left and right clicks.
TrackPoint – the pencil eraser-thing in the middle of the keyboard (11)
Put the tip of your finger on it and gently push in different directions. The 3 buttons below the
space bar work with the TrackPoint. The outside buttons are left and right click, the middle
button turns the TrackPoint into a scroller.
You’ll get a little scrolling symbol on the screen. What part of the screen scrolls depends on
where the symbol is.
I like to put my mouse in the lower USB port, leaving the upper port open for USB flash drives
and other devices. There’s also another USB port on the left side of the computer.
Using an LCD projector
If you turn on the LCD projector first, then connect the cable to the laptop’s external monitor
connector (5), then turn on the laptop, the computer will usually recognize the projector as an
external monitor and show what’s on the laptop screen up on the projection screen. If it
doesn’t, try Fn-F7 to run the Presentation Director and choose where to show the computer
image. The Presentation Director lives at Start > Programs > Accessories > Administrative Tools
> ThinkVantage.
DVDs
The standard CD/DVD drive (9) can play all kinds of CDs and DVDs. It can write to CD-R and CDRW discs, but cannot record onto DVD discs. Press the button on the drive door to open the
tray. and insert the disc. Gently push the tray back in to close it. If the window doesn’t
automatically come up asking which program to use to play a DVD, you can go to START >
PROGRAMS > ACCESSORIES > ENTERTAINMENT > MEDIA PLAYER CLASSIC. Then pull down File to
Open DVD.
CD Writing
Right click on a file or folder you want to put on the CD and select Send To > Drag-to-Disc Drive
(D). To complete the process, open My Computer. Right click on the CD and pull down to
“Write these files to CD.” The disc will eject when it’s finished writing.
5
Page 6

Connecting to the OC wireless network (from any campus)
Press the ThinkVantage button (17).
(or go to Start, Programs, Accessories, Administrative Tools,
ThinkVantage, Productivity Center)
Turn on your Wireless Radio by selecting Power
On/Off Wireless Radio and turning the Power On.
Note: there’s also switch on the front of the laptop
(19) that turns on the wireless radio. Make sure this
switch is on before you try to connect.
Click Open Access Connections at the bottom left of
the screen.
Click the Find button at the top left of this screen.
You’ll get a listing of all the available wireless
connections. Click on the OC access point that
looks most promising and click Connect.
6
Page 7

Customizing your desktop
I like to put my commonly used applications on the task bar. Here’s how.
Click Start, Settings, Control Panel, Taskbar and Start Menu.
Unlock the taskbar and click OK.
Locate your most commonly used applications (ie. MS Word)
using Start, Programs … and drag them down to the task bar.
They’ll show up at the bottom of the screen like this:
You can also use the same locate and drag process to put a
shortcut on your desktop, but I think the taskbar version is
tidier.
You can also change your Start menu from Classic to XP style
using Start, Settings, Taskbar and Start Menu.
7
Page 8

Where did my files go?
A quick guide to careful saving.
There are several places where you can
save your work. By default a file is saved to
My Documents (but where exactly is that?)
If you click the Up icon
you can sometimes figure out where you
actually are. In this case it’s not helpful
because My Documents is just a shortcut on
the desktop.
After some exploring I discovered that this
instance of My Documents actually lives on the laptop’s hard drive. By opening the My
Computer icon on the desktop, I found a folder called Document and Settings, then MMinions,
and finally My Documents.When I opened that folder, the address bar told me exactly where
my files were: C:\Documents and Settings\MMinions\My Documents
When you’re connected to the OC network through an Ethernet cable, you will have another My
Documents folder that lives on a big network server. It’s usually the F: drive. Always take a
moment to figure out where your file is actually being saved – on the drive in your laptop, or on
a network drive.
Using the network to share files with others.
Drive K: is shortcut that points to the root of the users’ data drive on your home campus file
server. Through drive K: you can access any file/directory that you have been given rights to. You
cannot access, or even see, files and directories that you do not have rights to.
Every department has a shared folder that can be accessed through drive K: where shared files
can be saved. Everyone in your department has rights to see, read, write, modify, create and
erase files and directories in this shared area. Additionally there are shared folders fo r
students/instructors and shared folders for all staff and faculty. The paths to each of
these shared folders are as follows:
1. Shared Departmental: K:\adm\[department]\shared\, where [department] is replaced with your
actual department.
As an example IT Services (once upon a time known as Computer and Media Services) has a
shared folder at:
K:\adm\cms\shared
2. Shared with All Staff and Faculty: K:\adm\shared\
Remember that this folder is wide open to all staff and faculty at OC.
3. Shared Instructor/Student: K:\ins\shared\
All staff and faculty have full access rights to this shared folder, but students have rights to only
see and read files in this folder. Some of the directories below K:\ins\shared have been opened
up to students to be able to write into for saving test results and assignments.
8
Page 9

You can put files into the shared folders on drive K: and anyone with OC network access, and the
proper rights, can access them. Usually you have to send them an e-mail telling them where to
find the the files because some of the shared folders on drive K: are quite large and have a
complex folder structure.
Accessing the OC network from off-campus
There are 2 ways to access files stored on the OC network when you’re not plugged in to an
Ethernet port on campus.
1 - using the mystorage web interface from any internet browser
• login with Novell credentials
2 - using VPN (virtual private network)
• login with email credentials, then run your Novell login
Using mystorage to access your F: drive
When you’re running wireless or using the internet from home, you don’t have a direct
connection to the files on your OC network drive. However, you can retrieve a file using a web
interface called mystorage.
Launch an internet browser and enter the following address: http://mystorage.okanagan.bc.ca
You will be asked for a username and password. Because this is your Novell network space, you
need to enter your Novell username and password. After a few moments you will see a
directory listing. Drive-F@OUC is your network My Documents folder.
Open Drive-F@OUC and select the file you want and download it to your laptop. You then make
the changes you want, then upload it back to your Drive F: My Documents folder.
Using mystorage to share a file when you’re wireless or surfing from home.
Log in to http//mystorage.okanagan.bc.ca as above.
Open Kalamalka-Users, KLO-Lib-Users, Penticton-Users, or Sal-Users as necessary and navigate
to the shared folder where you want to put the file.
Click on File and pull down to Upload to select the file you want to put on the K: drive.
9
Page 10

Connecting to the network through VPN (Virtual Private
Network)
VPN gives you full access to your network drives when you’re
logged in over wireless or from home.
Click on the OC VPN icon on your desktop.
Log in using your e-mail username and password.
Logging into Novell
Once you connect
through VPN, run the
Novell Login to
get access to
your network
files.
Your Novell log-in should automatically turn on iPrint which gives you access to your regular
network printer
When you’re connected through VPN you have to pay
extra attention to where you’re saving things.
The My Documents folder on your desktop of your
laptop points to the folder on the hard drive of your
laptop. To get at your My Documents folder on the
network drive, open the My Computer icon. Your
network drive is generally F:
If you don’t have a VPN icon on your desktop you can add one:
Go to Start > Control Panel > Network Connections.
Create a New Connection.
Select Connect to the network at my workplace.
Select Virtual Private Network.
Call it OC VPN.
The IP address is: klo-vpn-1.okanagan.
If you don’t have a Novell login icon on your desktop you can add one:
Go to Start > Programs > Accessories > Novell Login. Right-click and pull down to Send to
Desktop (create shortcut).
If Novell Login doesn’t appear under accessories, do a search for loginw32.exe. It should have
an ‘N’ icon beside. Right click on the file and pull down to Send to Desktop.
10
Page 11

Web Browsers and pop-ups
A pop-up is a little window that appears in front of a web
page. Often they’re used for annoying advertising so most
web browsers are set to automatically block pop-ups. But
some pop-ups are useful, even essential. Here’s how to
allow pop-ups from certain sites (like Okanagan.bc.ca)
Internet Explorer:
Pull down Tools to Pop-up Blocker to Pop-up blocker settings.
Enter the address of the website you want to allow pop-ups from and click Add.
Firefox:
Pull down Tools to Options and select Content.
Click on Exceptions and enter the address of the
website you want to allow pop-ups from and click
Allow.
Recommended sites to allow:
okanagan.bc.ca (OC site)
olc-new.okanagan.bc.ca (webct)
my.okanagan.bc.ca (OC portal)
To temporarily allow a pop-up, hold the Ctrl key while you
click on the link.
People.okanagan.bc.ca
Web space is provided for faculty and staff to create personal web pages to support
instructional delivery, scholarly pursuits or in support of their work at OC. You can request this
space through the MyOkanagan Employee tab under OC Express Requests & Notices.
The standard OC software install
browsing the web
MS Internet Explorer (v.6) Firefox (free download)
(note: Firefox 2.0 is not currently compatible
with My Okanagan
MS Office (XP or 2003)
word processing – MS Word
presentations – MS PowerPoint
spreadsheets – MS Excel
viewing pdf files
Adobe Reader
creating pdf files
PDF Creator Adobe Acrobat Professional
viewing/editing images
IrFan View Adobe Photoshop Elements
MS Photo Editor (part of Office XP)
MS Office Picture Manager (part of Office 2003)
. options/upgrades to consider
11
Page 12

listening to audio
WinAmp iTunes (free download)
recording/editing audio
none Audacity (free download)
playing video
Windows Media Player Quicktime (free download)
RealPlayer (free download)
FlashPlayer (free download)
editing video
Windows Movie Maker Adobe Premiere Elements
uploading files to a website
FileZilla
creating web pages
st
Page 2000 Dreamweaver
1
Netscape Composer (free download)
12
Page 13

A Quick Guide to usernames and passwords
Novell
This gets you into the OC network. You can use any computer that’s connected via an Ethernet
cable (ie. Any computer in any lab at any campus). Note that when you’re not connecting from
your home campus it may take a little longer as the network has to search other servers to
authenticate your identity.
The My Documents folder that comes up will be your network F: drive.
You also use your Novell login to get into your own laptop when it’s not hardwired to the
network by selecting Workstation Only and logging in. Every 180 days Novell will require you to
change your password. You can’t reuse a previous one. You will have a few courtesy logins
under the old password so you don’t have to change it immediately – you have time to think up
a new one. Note that if you change your password
on a machine that’s hardwired to the network, but
you haven’t connected your laptop except by
wireless, your laptop will retain the old password
until it’s connected using an Ethernet cable, at
which point the new password will be activated on
your laptop.
Your username and password will be sent to the
person who requested that you be given a Novell
account.
Once you’ve successfully logged in to Novell, it’s
worth making a note of your Tree, Context and
Server. This information can be useful when you’re
having trouble logging in from a different
computer.
MyOkanagan
Logging in to MyOkanagan gives you access to a range of content and services available only to
OC staff and students. My Okanagan is organized by tabs, the selection and contents of which
are specific to your role within the College.
Home gives you access to an e-mail account (yourname@myokanagan.bc.ca
Most people set this up to forward to their regular e-mail (yourname@okanagan.bc.ca
My Courses lists courses you are teaching or taking. Instructors can put some kinds of course
content directly into MyOkanagan, or set it up to automatically launch the WebCT course.
The Employee tab has benefits forms, web reqs for purchasing, and lots of other useful
administrative things under the general heading OC Express.
Your MyOkanagan account is created automatically when you become an employee.
Your username is your 9 digital OC ID number.
Your initial password is your date of birth in mmddyy format. If your date of birth is not
available, your initial password will be the last 6 digits of your employee ID.
WebCT
This is an online Learning Management System. Every credit course offered at OC automatically
has a WebCT course shell created for it.
Your username is generally your 9 digit OC ID number.
Your password is generally your birthdate in mmddyy format. (there are some exceptions – CS
instructors and students often have their username and password created manually using some
combination of their first and last names)
)
)
13
Page 14

Outlook
MS Outlook is the standard e-mail client for OC.
The full version can be used when you’re hardwired into the OC network.
When you’re running wireless or surfing from home, you use the Web version which is accessed
through Quick Links on the OC home page. (or http://mail.okanagan.bc.ca/exchange
Your username is generally your first initial and your last name, all lowercase, no spaces or
punctuation.
Your initial password should be available from whoever requested that your account be set up.
Telephone system
Dial the 4 digit local to connect to anyone within OC.
dial 9 +the local 7 digit number to make local calls.
dial * 3 then your personal 5 digit long distance code, then # 9 then the long distance number
(you request your 5 digit long distance code using a form in OC Express.
To send somebody voice mail, dial 80 + their local.
The on-campus emergency number is 6699.
Important Note - Access databases:
If you are running Access 2003, do not open any shared Access 97 files. They will be converted
to 2003 format making them unavailable to anyone running a previous version of the software.
Another Important Note – Laptop Security:
Do not leave your laptop unattended. You are responsible for this laptop until you return it to
IT Services.
Ask Us
Where to go for help.
http://www.okanagan.bc.ca/helpdesk
Help Desk phone: 4444
IT Services Office Hours
M-F 8:30 – 4:30 (winter)
M-F 8.00 - 4.00 (summer)
WebCT Help
Phone: 4848
http://www.okanagan.bc.ca/helpdesk
http://www.okanagan.bc.ca/edtech
Created by:
Mike Minions
IT Services
March 2007
Third Printing
)
14
 Loading...