

Page 1

SR9 AGP
4X DVI-I
Graphics Adapter
User's Guide Supplement
OPTIONS
by IBM
Page 2

Note: Before using this information and the product it supports, be sure to read
the information under “Product warranty and notices” on page 2-1.
First Edition (September 1999)
The following paragraph does not apply to the United Kingdom or any country where such
provisions are inconsistent with local law: INTERNATIONAL BUSINESS MACHINES
CORPORATION PROVIDES THIS PUBLICATION “AS IS” WITHOUT WARRANTY OF
ANY KIND, EITHER EXPRESS OR IMPLIED, INCLUDING, BUT NOT LIMITED TO, THE
IMPLIED WARRANTIES OF MERCHANTABILITY OR FITNESS FOR A PARTICULAR
PURPOSE. Some states do not allow disclaimer of express or implied warranties in certain
transactions, therefore, this statement may not apply to you.
This publication could include technical inaccuracies or typographical errors. Changes are
periodically made to the information herein; these changes will be incorporated in new editions of
the publication. IBM may make improvements and/or changes in the product(s) and/or the
program(s) described in this publication at any time.
It is possible that this publication may contain reference to, or information about, IBM products
(machines and programs), programming, or services that are not announced in your country.
Such references or information must not be construed to mean that IBM intends to announce such
IBM products, programming, or services in your country.
Requests for technical information about IBM products should be made to your IBM reseller or
IBM marketing representative.
Copyright International Business Machines Corporation 1999. All rights reserved.
Note to U.S. Government Users — Documentation related to restricted rights — Use, duplication
or disclosure is subject to restrictions set forth in GSA ADP Schedule Contract with IBM Corp.
Page 3

Contents
Safety: Read first ................................ iv
Registering your option ............................ v
About this book ................................ v
Part 1: Installation Guide . . . . . . . . . . . . . . . . . . . . . . . 1-1
Part 2: Appendixes . . . . . . . . . . . . . . . . . . . . . . . . . . . 2-1
Product warranty and notices ........................ 2-1
Notices . . . . . . . . . . . . . . . . . . . . . . . . . . . . . . . . . . . . 2-3
Trademarks . . . . . . . . . . . . . . . . . . . . . . . . . . . . . . . . . . 2-4
Copyright IBM Corp. 1999 iii
Page 4

Safety: Read first
Before installing this product, read the Safety Information.
Antes de instalar este produto, leia as Informações de Segurança.
Před instalací tohoto produktu si přečtěte příručku bezpečnostních instrukcí.
Læs sikkerhedsforskrifterne, før du installerer dette produkt.
Ennen kuin asennat tämän tuotteen, lue turvaohjeet kohdasta Safety
Information.
Avant d'installer ce produit, lisez les consignes de sécurité.
Vor der Installation dieses Produkts die Sicherheitshinweise lesen.
Prima di installare questo prodotto, leggere le Informazioni sulla Sicurezza
Lees voordat u dit product installeert eerst de veiligheidsvoorschriften.
Les sikkerhetsinformasjonen (Safety Information) før du installerer dette
produktet.
Antes de instalar este produto, leia as Informações sobre Segurança.
Pred inštaláciou tohto zariadenia si pečítaje Bezpečnostné predpisy.
Antes de instalar este producto lea la información de seguridad.
Läs säkerhetsinformationen innan du installerar den här produkten.
iv User's Guide Supplement
Page 5

Registering your option
Thank you for purchasing OPTIONS by IBM . Please take a few moments to register
your product and provide us with information that will help IBM to better serve you in
the future. Your feedback is valuable to us in developing products and services that
are important to you, as well as in developing better ways to communicate with you.
Register your option on the IBM Web site at:
http://www.ibm.com/pc/register
IBM will send you information and updates on your registered product unless you
indicate on the Web site questionnaire that you do not want to receive further
information.
About this book
This supplement provides the following information:
Description of the product
Preparing for installation and taking antistatic precautions
Installing an SR9 AGP 4X DVI-I Graphics Adapter
Installing the software
Software setup and adjustment
Product warranty information and trademark notices
This information is translated into the following languages:
English
German
French
Italian
Spanish
Brazilian Portuguese
Japanese
For emission notices and help and service information, refer to the Adapter Option
User's Guide.
Note: The illustrations in this manual might be slightly different from your hardware.
v
Page 6

vi User's Guide Supplement
Page 7

Part 1: Installation Guide
Product description
The IBM SR9 AGP 4X DVI-I Graphics Adapter uses an S3 Savage 4 graphics
engine to help your monitor provide superior performance with digital video and 3D
graphics. The graphics adapter provides 128-bit graphics processing for 2D graphics
acceleration, 32-bit rendering, and 3D texture compression. Additionally, the graphics
adapter MPEG2/DVD motion compensation feature enhances full-motion video
playback.
The graphics adapter contains Accelerated Graphics Port (or AGP) 4X technology,
which has data transfer rates of more than 1,000MB
enhanced 3D graphics performance. The graphics adapter also supports the DVI-I
interface on both analog and digital monitors.
In addition to this supplement, your option package contains:
graphics adapter
DVI-A 15-way dongle, blue
Installation CD for SR9 AGP 4X DVI-I Adapter with S3 SAVAGE4 Xtreme
Adapter Option User's Guide
1
per second, allowing for
Preparing for installation
Before you install a graphics adapter, you must take the following precautions in order
to prevent static electricity from damaging electronic parts.
Before touching any electronic parts, drain the static electricity from your body.
You can do this by touching the metal frame of your computer.
Do not remove the graphics adapter from the antistatic shipping container until
you are ready to install it. When you remove an adapter from your computer,
place it back in its original container.
When handling the graphics adapter, hold it by its edges, and avoid touching its
circuitry.
1
MB means approximately 1 000000 bytes of data.
Copyright IBM Corp. 1999
1-1
Page 8

Installing the SR9 AGP 4X DVI-I Graphics
Adapter
To install the SR9 AGP 4X DVI-I Graphics Adapter:
1. Turn off all attached devices; then turn off your computer. Unplug the power
cords of all attached devices and your computer. Remove the cover from your
computer. For instructions on how to remove your computer’s cover, refer to the
documentation that comes with your computer.
For IBM computers, refer to About Installing Options for instructions on opening
the computer cover, removing existing adapter cards, and installing adapter cards
in expansion slots.
2. Remove any previously installed graphics adapter cards. If you have no other
graphics adapter cards, but your computer system board has built-in VGA
graphics capability, make sure the VGA graphics capability is disabled. For
information on disabling the VGA graphics capability on your computer, see the
documentation that comes with your computer.
3. Choose an AGP expansion slot.
Note: Inserting a graphics adapter into the wrong type of slot might damage
your adapter, your computer, or both.
To identify the location of each type of expansion slot in your computer, refer to
the documentation that comes with your computer.
Note: Do not insert the plastic tab next to the connector pins into the expansion
slot.
4. Remove the expansion slot cover for the expansion slot you intend to use. Save
the screw to use with the mounting bracket.
5. Position the graphics adapter over the expansion slot you have chosen. Push the
graphics adapter in firmly and evenly until it is fully seated in the slot.
1-2 User's Guide Supplement
Page 9

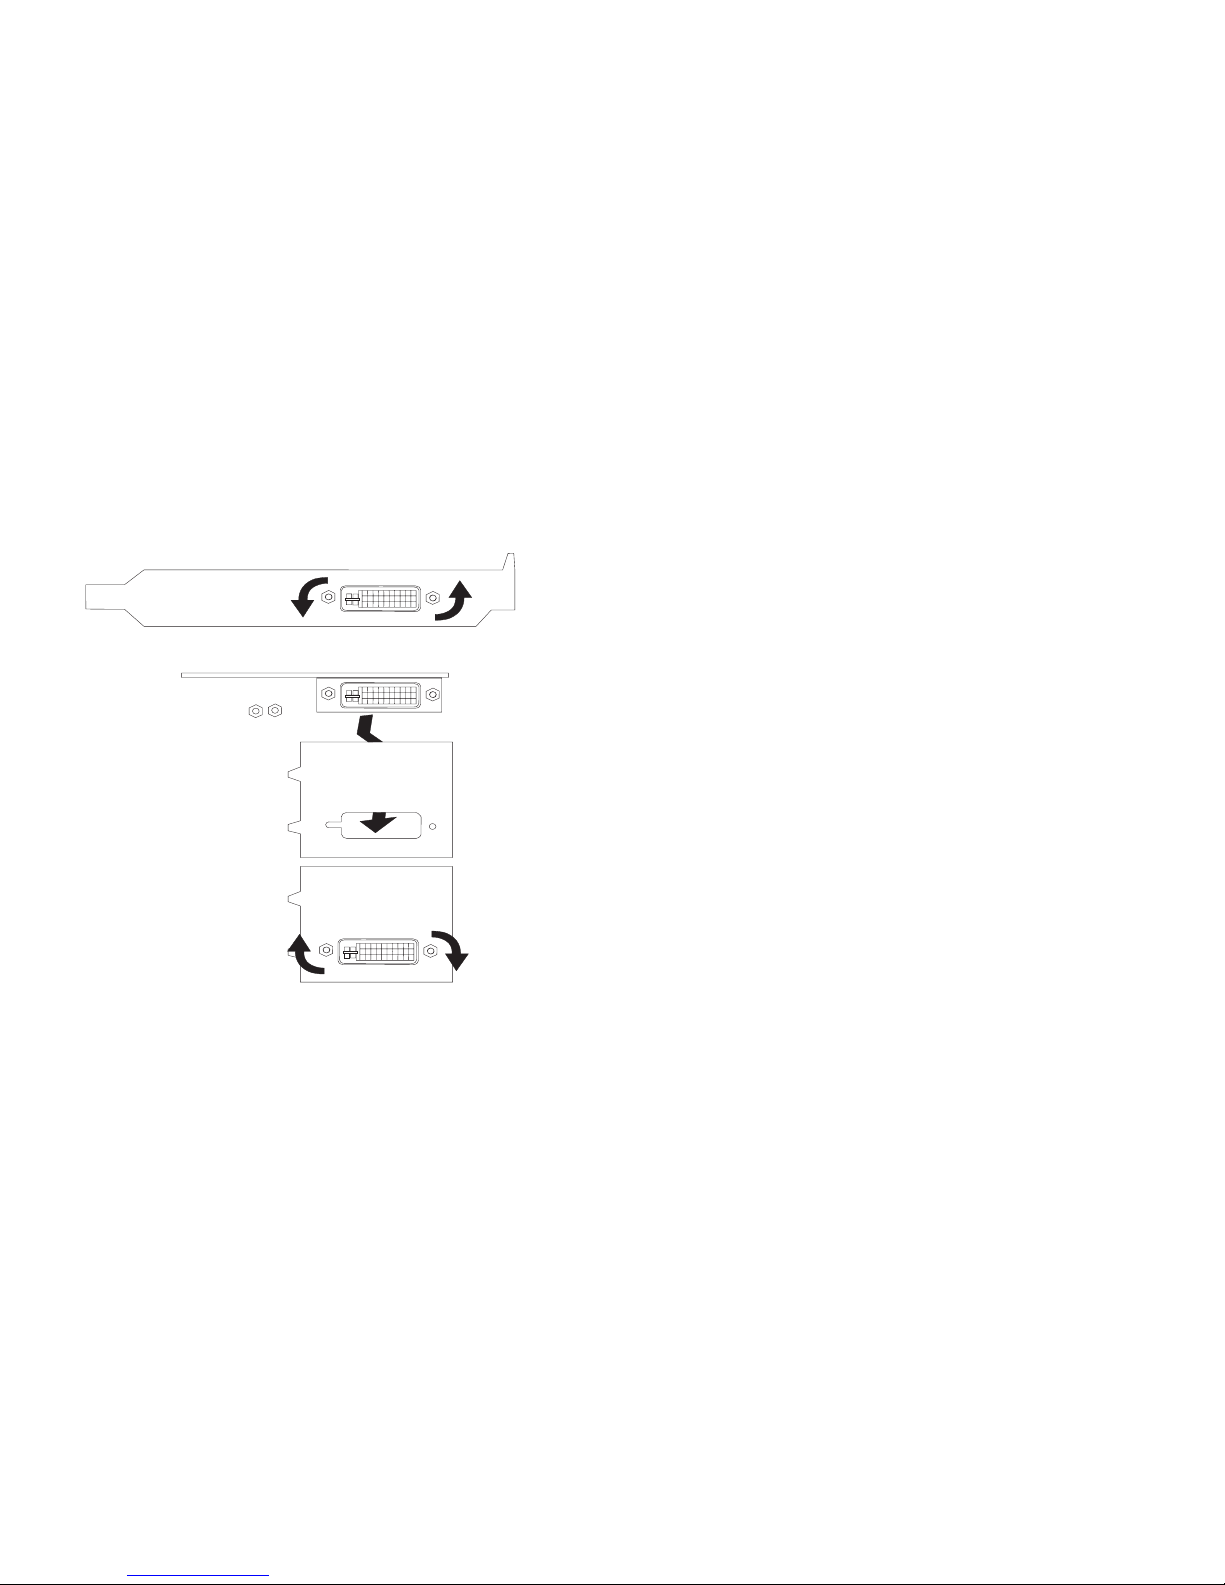
6. Using the screw from the expansion slot cover, secure the mounting bracket of
the graphics adapter to the computer frame.
This graphics adapter comes with a bracket for the ATX-type computer already
attached. To attach the bracket for an NLX-type computer to the graphics
adapter, follow the diagram below.
7. Replace the cover on your computer.
8. If you have a standard analog monitor, attach the included blue dongle to the
monitor connector on the graphics adapter; then plug your monitor cable into the
dongle. If you have a digital or analog monitor with DVI-I connectors, plug your
monitor cable directly into the blue connector on the graphics adapter. Plug the
other end of the monitor cable into your monitor.
Refer to the documentation that comes with your monitor to make sure that the
monitor is properly set up.
9. Plug the cables for any other attached devices into your computer. Plug the
power cables for the computer, monitor, and other attached devices into a power
outlet; then turn on your computer and all attached devices.
Part 1: Installation Guide 1-3
Page 10

Installing the software
This section has instructions for installing the software and device drivers for the SR9
AGP 4X DVI-I Graphics Adapter. Instructions are for installing the software with
Microsoft Windows 95, Microsoft Windows 98 or Microsoft Windows NT
Workstation 4.0. Refer to the section for the operating system that you use.
Installing the software for Windows 95
Windows 95 automatically detects the graphics adapter when it is installed, but you
must also install the device drivers and utility software. To do so, follow these
instructions.
1. After you install the graphics adapter and restart your computer, Windows 95
automatically detects the graphics adapter. If appropriate display drivers have not
been previously installed, Windows 95 reports finding a PCI adapter (even if you
have an AGP card). When the New Hardware Wizard opens, click Next.
2. When prompted to choose device drivers, click to check the box next to Driver
from disk provided by hardware manufacturer.
Note: The installation messages might vary depending on which version of
Windows 95 is installed on your computer. If the message you see is different
than the one in these instructions, choose the message which is closest in meaning
to the one used here.
3. Locate the installation CD included with this option. Insert the CD into your
CD-ROM or DVD-ROM drive.
4. Click Browse and locate the Win95 directory on the installation CD. If prompted
for a specific file, select SR9.INF.
5. Follow the instructions on your screen to complete the installation; then restart
your computer if it does not do so automatically.
Installing the software for Windows 98
Windows 98 automatically detects the graphics adapter when it is installed, but you
must also install the device drivers and utility software. To do so, follow these
instructions.
1. After you install the graphics adapter and restart your computer, Windows 95
automatically detects the graphics adapter. When the New Hardware Wizard
opens, click Next.
2. On the next window, click to check the box next to Search for the best
driver for your device; then click Next.
3. Locate the installation CD included with this option. Insert the CD into your
CD-ROM or DVD-ROM drive.
4. Choose CD-ROM and then click Next.
5. Enable the Specify a Location option; then click the Browse button and locate
the Win98 directory on the installation CD.
1-4 User's Guide Supplement
Page 11

6. The Add New Hardware Wizard detects the device driver. Click Next.
7. Follow the instructions on your screen to complete the installation; then restart
your computer if it does not do so automatically.
Installing the software for Windows NT Workstation
Follow these instructions to install the device drivers and utility software for Windows
NT Workstation.
1. After installing the graphics adapter, start up your computer in VGA mode.
During the start up process, Windows NT Workstation will prompt you to choose
between VGA mode and normal mode; select VGA mode.
2. Log in as a user who is able to change system settings.
3. A warning message might appear which says Invalid display settings...;
click OK to continue.
4. With the right mouse button, click on the desktop; then click Properties.
5. Click the Settings tab; then click Display Type....
6. The Display Type window opens. In the Adapter Type section, click Change....
7. Locate the installation CD included with this option. Insert the CD into your
CD-ROM or DVD-ROM drive.
8. Click Have Disk...; then click Browse and locate the WinNT40 directory on the
installation CD.
9. Click to select the SR9.INF file; then click Open.
10. Follow the instructions on your screen to complete the installation. When
prompted to do so, restart your computer.
11. When your computer restarts, you will see a warning message which says
Invalid display settings: A new display driver has been installed.
The default resolution is being used by the system. Click OK and
select a new resolution setting.
12. Test the new resolution setting before accepting it. If your monitor displays a
blank or distorted screen, your monitor does not support the resolution setting you
chose; select a different setting.
Note: If you accidently accept a resolution setting not supported by your
monitor, you must restart your computer in VGA mode and select a
different setting.
Part 1: Installation Guide 1-5
Page 12

Utility software setup and adjustment
The graphics adapter software that you installed includes the Number Nine Hawkeye
utility. To open Hawkeye, double-click the Number Nine icon on the taskbar. The
Hawkeye Properties Control Panel opens. The property sheets are listed below, along
with a description of the settings or information available on each sheet.
Information
This sheet contains information about the manufacturer of the Hawkeye utility,
Number Nine Visual Technology. The information includes the mailing address and
Web site address for the company.
Monitor adjustment
On this sheet you can adjust the refresh rate setting for your monitor. Select the new
refresh rate setting from the drop-down list.
Status
This sheet lists the software version you have, as well as listing hardware
configuration information for your graphics adapter.
Resolution exchange
On this property sheet you can change the settings for your monitor resolution, the
resolution for your virtual workspace, and change the number of colors displayed on
your monitor screen.
Change your monitor resolution setting in the Monitor section of this property sheet.
In the list of available resolution settings, click the setting you want. Once you choose
a new setting and click OK, the monitor screen will blank out for a few seconds, then
return at the new resolution setting.
Change the number of colors displayed on your monitor screen in the Colors section
of this property sheet. Click to check the circle next to the color setting you want.
Restart Windows to enable the new color setting.
Note: The number of available monitor resolutions may change depending on how
many colors you want to have displayed on your monitor screen.
Change your virtual resolution setting in the Virtual section of this property sheet.
Expanded virtual resolutions can increase the size of your Windows desktop. Display
the expanded desktop area by moving your mouse cursor past the border of the area
displayed on your monitor. This is also called panning to another section of the
expanded desktop area. In the list of available resolution settings, click the setting you
want. Once you choose a new setting and click OK, the monitor screen will blank out
for a few seconds, then return at the new resolution setting.
1-6 User's Guide Supplement
Page 13

Note: The number of available virtual resolution settings depends on the amount of
memory on your graphics adapter and the active monitor resolution.
Click Apply to save your changes and continue. Click OK to save your changes and
close Hawkeye. Click Cancel to discard your changes and close Hawkeye.
Chameleon Cursor
On this property sheet you can adjust the color and size settings for your mouse
cursor. There are three slider bars the Color section of this property sheet. To change
the color of your cursor, click on each of the slider bars and move the slider up or
down until you have the color adjusted the way you want it. In the Cursor size
section of this property sheet, click on the size you want. Click Apply to save your
changes and continue. Click OK to save your changes and close Hawkeye. Click
Cancel to discard your changes and close Hawkeye.
Color perfect
On this property sheet you can adjust the appearance of colors on your monitor screen.
To change the appearance of the colors, click the slider bars next to each color and
move it up or down until the color appearance is the way you want it. Click Apply to
save your changes and continue. Click OK to save your changes and close Hawkeye.
Click Cancel to discard your changes and close Hawkeye.
Part 1: Installation Guide 1-7
Page 14

Installation Guide (Translate)
Product description
The IBM SR9 AGP 4X DVI-I Graphics Adapter uses an S3 Savage 4 graphics
engine to help your monitor provide superior performance with digital video and 3D
graphics. The graphics adapter provides 128-bit graphics processing for 2D graphics
acceleration, 32-bit rendering, and 3D texture compression. Additionally, the graphics
adapter MPEG2/DVD motion compensation feature enhances full-motion video
playback.
The graphics adapter contains Accelerated Graphics Port (or AGP) 4X technology,
which has data transfer rates of more than 1,000MB
enhanced 3D graphics performance. The graphics adapter also supports the DVI-I
interface on both analog and digital monitors.
In addition to this supplement, your option package contains:
graphics adapter
DVI-A 15-way dongle, blue
Installation CD for SR9 AGP 4X DVI-I Adapter with S3 SAVAGE4 Xtreme
Adapter Option User's Guide
1
per second, allowing for
Preparing for installation
Before you install a graphics accelerator adapter, you must take the following
precautions in order to prevent static electricity from damaging electronic parts.
Before touching any electronic parts, drain the static electricity from your body.
You can do this by touching the metal frame of your computer.
Do not remove the graphics adapter from the antistatic shipping container until
you are ready to install it. When you remove the graphics adapter from your
computer, place it back in its container.
When handling the graphics adapter, hold it by its edges, and avoid touching its
circuitry.
1-8 User's Guide Supplement
Page 15

Installing the SR9 AGP 4X DVI-I Graphics
Adapter
To install the SR9 AGP 4X DVI-I Graphics Adapter:
1. Turn off all attached devices; then turn off your computer. Unplug the power
cords of all attached devices and your computer. Remove the cover from your
computer. For instructions on how to remove your computer’s cover, refer to the
documentation that comes with your computer.
For IBM computers, refer to About Installing Options for instructions on opening
the computer cover, removing existing adapter cards, and installing adapter cards
in expansion slots.
2. Remove any previously installed graphics adapter cards. If you have no other
graphics adapter cards, but your computer system board has built-in VGA
graphics capability, make sure the VGA graphics capability is disabled. For
information on disabling the VGA graphics capability on your computer, see the
documentation that comes with your computer.
3. Choose an AGP expansion slot.
Note: Inserting a graphics adapter into the wrong type of slot might damage
your adapter, your computer, or both.
To identify the location of each type of expansion slot in your computer, refer to
the documentation that comes with your computer.
Note: Do not insert the plastic tab next to the connector pins into the expansion
slot.
4. Remove the expansion slot cover for the expansion slot you intend to use. Save
the screw to use with the mounting bracket.
5. Position the graphics adapter over the expansion slot you have chosen. Push the
graphics adapter in firmly and evenly until it is fully seated in the slot.
Part 1: Installation Guide 1-9
Page 16
6. Using the screw from the expansion slot cover, secure the mounting bracket of
the graphics adapter to the computer frame.
This graphics adapter comes with a bracket for the ATX-type computer already
attached. To attach the bracket for an NLX-type computer to the graphics
adapter, follow the diagram below.
7. Replace the cover on your computer.
8. If you have a standard analog monitor, attach the included blue dongle to the
monitor connector on the graphics adapter; then plug your monitor cable into the
dongle. If you have a digital or analog monitor with DVI-I connectors, plug your
monitor cable directly into the blue connector on the graphics adapter. Plug the
other end of the monitor cable into your monitor.
Refer to the documentation that comes with your monitor to make sure that the
monitor is properly set up.
9. Plug the cables for any other attached devices into your computer. Plug the
power cables for the computer, monitor, and other attached devices into a power
outlet; then turn on your computer and all attached devices.
1-10 User's Guide Supplement
Page 17

Installing the software
This section has instructions for installing the software and device drivers for the SR9
AGP 4X DVI-I Graphics Adapter. Instructions are for installing the software with
Microsoft Windows 95, Microsoft Windows 98 or Microsoft Windows NT
Workstation 4.0. Refer to the section for the operating system that you use.
Installing the software for Windows 95
Windows 95 automatically detects the graphics adapter when it is installed, but you
must also install the device drivers and utility software. To do so, follow these
instructions.
1. After you install the graphics adapter and restart your computer, Windows 95
automatically detects the graphics adapter. If appropriate display drivers have not
been previously installed, Windows 95 reports finding a PCI adapter (even if you
have an AGP card). When the New Hardware Wizard opens, click Next.
2. When prompted to choose device drivers, click to check the box next to Driver
from disk provided by hardware manufacturer.
Note: The installation messages might vary depending on which version of
Windows 95 is installed on your computer. If the message you see is different
than the one in these instructions, choose the message which is closest in meaning
to the one used here.
3. Locate the installation CD included with this option. Insert the CD into your
CD-ROM or DVD-ROM drive.
4. Click Browse and locate the Win95 directory on the installation CD. If prompted
for a specific file, select SR9.INF.
5. Follow the instructions on your screen to complete the installation; then restart
your computer if it does not do so automatically.
Installing the software for Windows 98
Windows 98 automatically detects the graphics adapter when it is installed, but you
must also install the device drivers and utility software. To do so, follow these
instructions.
1. After you install the graphics adapter and restart your computer, Windows 95
automatically detects the graphics adapter. When the New Hardware Wizard
opens, click Next.
2. On the next window, click to check the box next to Search for the best
driver for your device; then click Next.
3. Locate the installation CD included with this option. Insert the CD into your
CD-ROM or DVD-ROM drive.
4. Choose CD-ROM and then click Next.
5. Enable the Specify a Location option; then click the Browse button and locate
the Win98 directory on the installation CD.
Part 1: Installation Guide 1-11
Page 18

6. The Add New Hardware Wizard detects the device driver. Click Next.
7. Follow the instructions on your screen to complete the installation; then restart
your computer if it does not do so automatically.
Installing the software for Windows NT Workstation
Follow these instructions to install the device drivers and utility software for Windows
NT Workstation.
1. After installing the graphics adapter, start up your computer in VGA mode.
During the start up process, Windows NT Workstation will prompt you to choose
between VGA mode and normal mode; select VGA mode.
2. Log in as a user who is able to change system settings.
3. A warning message might appear which says Invalid display settings...;
click OK to continue.
4. With the right mouse button, click on the desktop; then click Properties.
5. Click the Settings tab; then click Display Type....
6. The Display Type window opens. In the Adapter Type section, click Change....
7. Locate the installation CD included with this option. Insert the CD into your
CD-ROM or DVD-ROM drive.
8. Click Have Disk...; then click
Browse and locate the WinNT40 directory on
the installation CD.
9. Click to select the SR9.INF file; then click Open.
10. Follow the instructions on your screen to complete the installation. When
prompted to do so, restart your computer.
11. When your computer restarts, you will see a warning message which says
Invalid display settings: A new display driver has been
installed. The default resolution is being used by the
system. Click OK and select a new resolution setting.
12. Test the new resolution setting before accepting it. If your monitor
displays a blank or distorted screen, your monitor does not support the
resolution setting you chose; select a different setting.
Note: If you accidently accept a resolution setting not supported by your
monitor, you must restart your computer in VGA mode and select
a different setting.
1-12 User's Guide Supplement
Page 19

Utility software setup and adjustment
The graphics adapter software that you installed includes the Number Nine
Hawkeye utility. To open Hawkeye, double-click the Number Nine icon on
the taskbar. The Hawkeye Properties Control Panel opens. The property
sheets are listed below, along with a description of the settings or information
available on each sheet.
Information
This sheet contains information about the manufacturer of the Hawkeye
utility, Number Nine Visual Technology. The information includes the
mailing address and Web site address for the company.
Monitor adjustment
On this sheet you can adjust the refresh rate setting for your monitor. Select
the new refresh rate setting from the drop-down list.
Status
This sheet lists the software version you have, as well as listing hardware
configuration information for your graphics adapter.
Resolution exchange
On this property sheet you can change the settings for your monitor
resolution, the resolution for your virtual workspace, and change the number
of colors displayed on your monitor screen.
Change your monitor resolution setting in the Monitor section of this
property sheet. In the list of available resolution settings, click the setting you
want. Once you choose a new setting and click OK, the monitor screen will
blank out for a few seconds, then return at the new resolution setting.
Change the number of colors displayed on your monitor screen in the Colors
section of this property sheet. Click to check the circle next to the color
setting you want. Restart Windows to enable the new color setting.
Note: The number of available monitor resolutions may change depending
on how many colors you want to have displayed on your monitor
screen.
Part 1: Installation Guide 1-13
Page 20

Change your virtual resolution setting in the Virtual section of this property
sheet. Expanded virtual resolutions can increase the size of your Windows
desktop. Display the expanded desktop area by moving your mouse cursor
past the border of the area displayed on your monitor. This is also called
panning to another section of the expanded desktop area. In the list of
available resolution settings, click the setting you want. Once you choose a
new setting and click OK, the monitor screen will blank out for a few
seconds, then return at the new resolution setting.
Note: The number of available virtual resolution settings depends on the
amount of memory on your graphics adapter and the active monitor
resolution.
Click Apply to save your changes and continue. Click OK to save your
changes and close Hawkeye. Click Cancel to discard your changes and close
Hawkeye.
Chameleon Cursor
On this property sheet you can adjust the color and size settings for your
mouse cursor. There are three slider bars the Color section of this property
sheet. To change the color of your cursor, click on each of the slider bars
and move the slider up or down until you have the color adjusted the way you
want it. In the Cursor size section of this property sheet, click on the size
you want. Click Apply to save your changes and continue. Click OK to
save your changes and close Hawkeye. Click Cancel to discard your changes
and close Hawkeye.
Color perfect
On this property sheet you can adjust the appearance of colors on your
monitor screen. To change the appearance of the colors, click the slider bars
next to each color and move it up or down until the color appearance is the
way you want it. Click Apply to save your changes and continue. Click OK
to save your changes and close Hawkeye. Click Cancel to discard your
changes and close Hawkeye.
1-14 User's Guide Supplement
Page 21

Product registration
Thank you for purchasing OPTIONS by IBM . Please take a few moments
to register your product and provide us with information that will help IBM to
better serve you in the future. Your feedback is valuable to us in developing
products and services that are important to you, as well as in developing
better ways to communicate with you. Register your option on the IBM Web
site at:
http://www.ibm.com/pc/register
IBM will send you information and updates on your registered product unless
you indicate on the Web site questionnaire that you do not want to receive
further information.
Product service and warranty information
For technical support, support hours, and warranty terms and conditions, see
the enclosed inserts, or contact your IBM reseller or IBM marketing
representative.
Part 1: Installation Guide 1-15
Page 22

1-16 User's Guide Supplement
Page 23

Part 2: Appendixes
Product warranty and notices
The following warranty information applies to products purchased in the
United States, Canada, and Puerto Rico. For warranty terms and conditions
for products purchased in other countries, see the enclosed Warranty insert, or
contact your IBM reseller or IBM marketing representative.
International Business Machines Corporation Armonk, New York, 10504
Statement of Limited Warranty
The warranties provided by IBM in this Statement of Limited Warranty apply only to Machines you
originally purchase for your use, and not for resale, from IBM or your reseller. The term
“Machine” means an IBM machine, its features, conversions, upgrades, elements, or accessories,
or any combination of them. Unless IBM specifies otherwise, the following warranties apply only
in the country where you acquire the Machine. If you have any questions, contact IBM or your
reseller.
Machine: SR9 AGP 4X DVI-I Graphics Adapter
Warranty Period*: One Year
*Contact your place of purchase for warranty service information.
Production Status
Each Machine is manufactured from new parts, or new and used parts. In some cases, the
Machine may not be new and may have been previously installed. Regardless of the Machine's
production status, IBM's warranty terms apply.
The IBM Warranty for Machines
IBM warrants that each Machine 1) is free from defects in materials and workmanship and 2)
conforms to IBM's Official Published Specifications. The warranty period for a Machine is a
specified, fixed period commencing on its Date of Installation. The date on your receipt is the
Date of Installation, unless IBM or your reseller informs you otherwise.
During the warranty period IBM or your reseller, if authorized by IBM, will provide warranty
service under the type of service designated for the Machine and will manage and install
engineering changes that apply to the Machine.
For IBM or your reseller to provide warranty service for a feature, conversion, or upgrade, IBM
or your reseller may require that the Machine on which it is installed be 1) for certain Machines,
the designated, serial-numbered Machine and 2) at an engineering-change level compatible with
the feature, conversion, or upgrade. Many of these transactions involve the removal of parts and
their return to IBM. You represent that all removed parts are genuine and unaltered. A part that
replaces a removed part will assume the warranty service status of the replaced part.
If a Machine does not function as warranted during the warranty period, IBM or your reseller will
repair it or replace it with one that is at least functionally equivalent, without charge. The
replacement may not be new, but will be in good working order. If IBM or your reseller is
Copyright IBM Corp. 1999 2-1
Page 24

unable to repair or replace the Machine, you may return it to your place of purchase and your
money will be refunded.
If you transfer a Machine to another user, warranty service is available to that user for the
remainder of the warranty period. You should give your proof of purchase and this Statement to
that user. However, for Machines which have a life-time warranty, this warranty is not
transferable.
Warranty Service
To obtain warranty service for the Machine, you should contact your reseller or call IBM. In the
United States, call IBM at 1-800-772-2227. In Canada, call IBM at 1-800-565-3344. You may
be required to present proof of purchase.
IBM or your reseller will provide certain types of repair and exchange service, either at your
location or at IBM's or your reseller's service center, to restore a Machine to good working order.
When a type of service involves the exchange of a Machine or part, the item IBM or your
reseller replaces becomes its property and the replacement becomes yours. You represent that all
removed items are genuine and unaltered. The replacement may not be new, but will be in good
working order and at least functionally equivalent to the item replaced. The replacement assumes
the warranty service status of the replaced item. Before IBM or your reseller exchanges a
Machine or part, you agree to remove all features, parts, options, alterations, and attachments not
under warranty service. You also agree to ensure that the Machine is free of any legal
obligations or restrictions that prevent its exchange.
You agree to:
1. obtain authorization from the owner to have IBM or your reseller service a Machine that you
do not own; and
2. where applicable, before service is provided —
a. follow the problem determination, problem analysis, and service request procedures that
IBM or your reseller provide,
b. secure all programs, data, and funds contained in a Machine, and
c. inform IBM or your reseller of changes in a Machine's location.
IBM is responsible for loss of, or damage to, your Machine while it is 1) in IBM's possession or
2) in transit in those cases where IBM is responsible for the transportation charges.
Extent of Warranty
IBM does not warrant uninterrupted or error-free operation of a Machine.
The warranties may be voided by misuse, accident, modification, unsuitable physical or operating
environment, improper maintenance by you, removal or alteration of Machine or parts
identification labels, or failure caused by a product for which IBM is not responsible.
THESE WARRANTIES REPLACE ALL OTHER WARRANTIES OR
CONDITIONS, EXPRESS OR IMPLIED, INCLUDING, BUT NOT LIMITED TO,
THE IMPLIED WARRANTIES OR CONDITIONS OF MERCHANTABILITY AND
FITNESS FOR A PARTICULAR PURPOSE. THESE WARRANTIES GIVE YOU
SPECIFIC LEGAL RIGHTS AND YOU MAY ALSO HAVE OTHER RIGHTS
WHICH VARY FROM JURISDICTION TO JURISDICTION. SOME
JURISDICTIONS DO NOT ALLOW THE EXCLUSION OR LIMITATION OF
EXPRESS OR IMPLIED WARRANTIES, SO THE ABOVE EXCLUSION OR
LIMITATION MAY NOT APPLY TO YOU. IN THAT EVENT SUCH
WARRANTIES ARE LIMITED IN DURATION TO THE WARRANTY PERIOD.
NO WARRANTIES APPLY AFTER THAT PERIOD.
2-2 User's Guide Supplement
Page 25

Limitation of Liability
Circumstances may arise where, because of a default on IBM's part or other liability you are
entitled to recover damages from IBM. In each such instance, regardless of the basis on which
you are entitled to claim damages from IBM (including fundamental breach, negligence,
misrepresentation, or other contract or tort claim), IBM is liable only for:
1. damages for bodily injury (including death) and damage to real property and tangible
personal property; and
2. the amount of any other actual direct damages or loss, up to the greater of U.S. $100,000 or
the charges (if recurring, 12 months' charges apply) for the Machine that is the subject of the
claim.
UNDER NO CIRCUMSTANCES IS IBM LIABLE FOR ANY OF THE
FOLLOWING: 1) THIRD-PARTY CLAIMS AGAINST YOU FOR LOSSES OR
DAMAGES (OTHER THAN THOSE UNDER THE FIRST ITEM LISTED ABOVE);
2) LOSS OF, OR DAMAGE TO, YOUR RECORDS OR DATA; OR 3) SPECIAL,
INCIDENTAL, OR INDIRECT DAMAGES OR FOR ANY ECONOMIC
CONSEQUENTIAL DAMAGES (INCLUDING LOST PROFITS OR SAVINGS),
EVEN IF IBM OR YOUR RESELLER IS INFORMED OF THEIR POSSIBILITY.
SOME JURISDICTIONS DO NOT ALLOW THE EXCLUSION OR LIMITATION
OF INCIDENTAL OR CONSEQUENTIAL DAMAGES, SO THE ABOVE
EXCLUSION OR LIMITATION MAY NOT APPLY TO YOU.
Notices
References in this publication to IBM products, programs, or services do not imply that IBM
intends to make these available in all countries in which IBM operates. Any reference to an IBM
product, program, or service is not intended to state or imply that only that IBM product,
program, or service may be used. Subject to IBM’s valid intellectual property or other legally
protectable rights, any functionally equivalent product, program, or service may be used instead
of the IBM product, program, or service. The evaluation and verification of operation in
conjunction with other products, except those expressly designated by IBM, are the responsibility
of the user.
IBM may have patents or pending patent applications covering subject matter in this document.
The furnishing of this document does not give you any license to these patents. You can send
license inquiries, in writing, to:
IBM Director of Licensing
IBM Corporation
500 Columbus Avenue
Thornwood, NY 10594
U.S.A.
Any references in this publication to non-IBM Web sites are provided for convenience only and
do not in any manner serve as an endorsement of those Web sites. The materials at those Web
sites are not part of the materials for this IBM product and use of those Web sites is at your own
risk.
Part 2: Appendixes 2-3
Page 26

Trademarks
The following terms are trademarks of the IBM Corporation in the United States or other
countries or both: Microsoft, Windows, and Windows NT are trademarks or registered
trademarks of Microsoft Corporation in the United States or other countries or both.
Other company, product, and service names may be trademarks or service marks of others.
2-4 User's Guide Supplement
Page 27

Page 28

IBM
Part Number: P00N7823
Printed in U.S.A.
P N7823
 Loading...