

Page 1

Supplement to the RS/6000 7043 43P Series (SA38-0511
and SA38-0512)
Service Guide and User’s Guide
IBM
SN32-9080-01
Page 2

Second Edition (December 2000)
Before using this information and the product it supports, read the information in “Appendix. Notices” on page 15.
©International Business Machines Corporation 2000. All rights reserved.
Note to U.S. Government Users - Documentation related to restricted rights - Use, duplication, or disclosure is subject
to the restrictions set forth in the GSA ADP Schedule Contract with IBM Corp..
Page 3

Contents
About This Book .......................v
ISO 9000 ..........................v
Online Publications .......................v
Related Publications ......................v
Trademarks .........................v
Chapter 1. 7043–140 and 7043–150 Fansink Removal and Replacement
Procedures ........................1
Identifying the Fansink Number...................1
Determining the Fansink Assembly Number to be Replaced .........1
7043–140 and 7043–150 Fansink Removal and Replacement Procedures ....2
Removing and Replacing the 7043–140 System Board Fansink .......2
Removing and Replacing the 7043–150 System Board Fansink .......4
Chapter 2. 7043–150 System Features................7
System Features .......................7
Bus Architecture.......................7
Microprocessor .......................7
Memory.........................7
Diskette Drive .......................7
Drives ..........................7
Power Supply .......................7
Keyboard and Mouse .....................8
Front-Panel Display......................8
Input/Output Ports ......................8
Security Features ......................8
Setting the SCSI Security Jumpers .................9
System Board Locations for Model 150................10
System Board, Cables, and Accessories ...............12
Appendix. Notices ......................15
Reader’s Comments — We’d Like to Hear From You ..........17
iii
Page 4

iv Supplement to the Service Guide and User’s Guide
Page 5

About This Book
This supplement provides updates to the following publications:
RS/6000 7043 43P Series User’s Guide
v
RS/6000 7043 43P Series Service Guide
v
ISO 9000
ISO 9000 registered quality systems were used in the development and manufacturing
of this product.
Online Publications
RS/6000 and pSeries 680 publications are available online. To access the online books,
visit our Web site at: http://www.rs6000.ibm.com/resource/hardware_docs/
Related Publications
The following publications are available:
v The system unit’s users guide contains information about using the service processor
to help understand processor controls.
v The system unit’s service guide contains information for service representatives when
they install the fansink feature hardware.
, SA38-0511
, SA38-0512
Trademarks
The following terms are trademarks of International Business Machines Corporation in
the United States, and other countries, or both:
v AIX
v IBM
Other company, product, and service names may be trademarks or service marks of
others.
v
Page 6

vi Supplement to the Service Guide and User’s Guide
Page 7
Chapter 1. 7043–140 and 7043–150 Fansink Removal and Replacement Procedures
This chapter provides information on replacing defective 7043–140 and 7043–150
fansinks without having to replace the entire system board.
Identifying the Fansink Number
The following table contains information to help you determine the correct fansink to be
replaced on both the 7043–140 and 7043–150 system boards. Obtain the correct fan(s)
before going on-site to replace the fansink assembly. The fan that is not used should be
returned to the parts depot. The defective fan should be disposed of locally.
Table 1. Fansink Assembly Numbers.
System Board Fansink Assembly Numbers
7043–140 09P1125 or 09P1126
7043–150 09P1126 or 09P1129
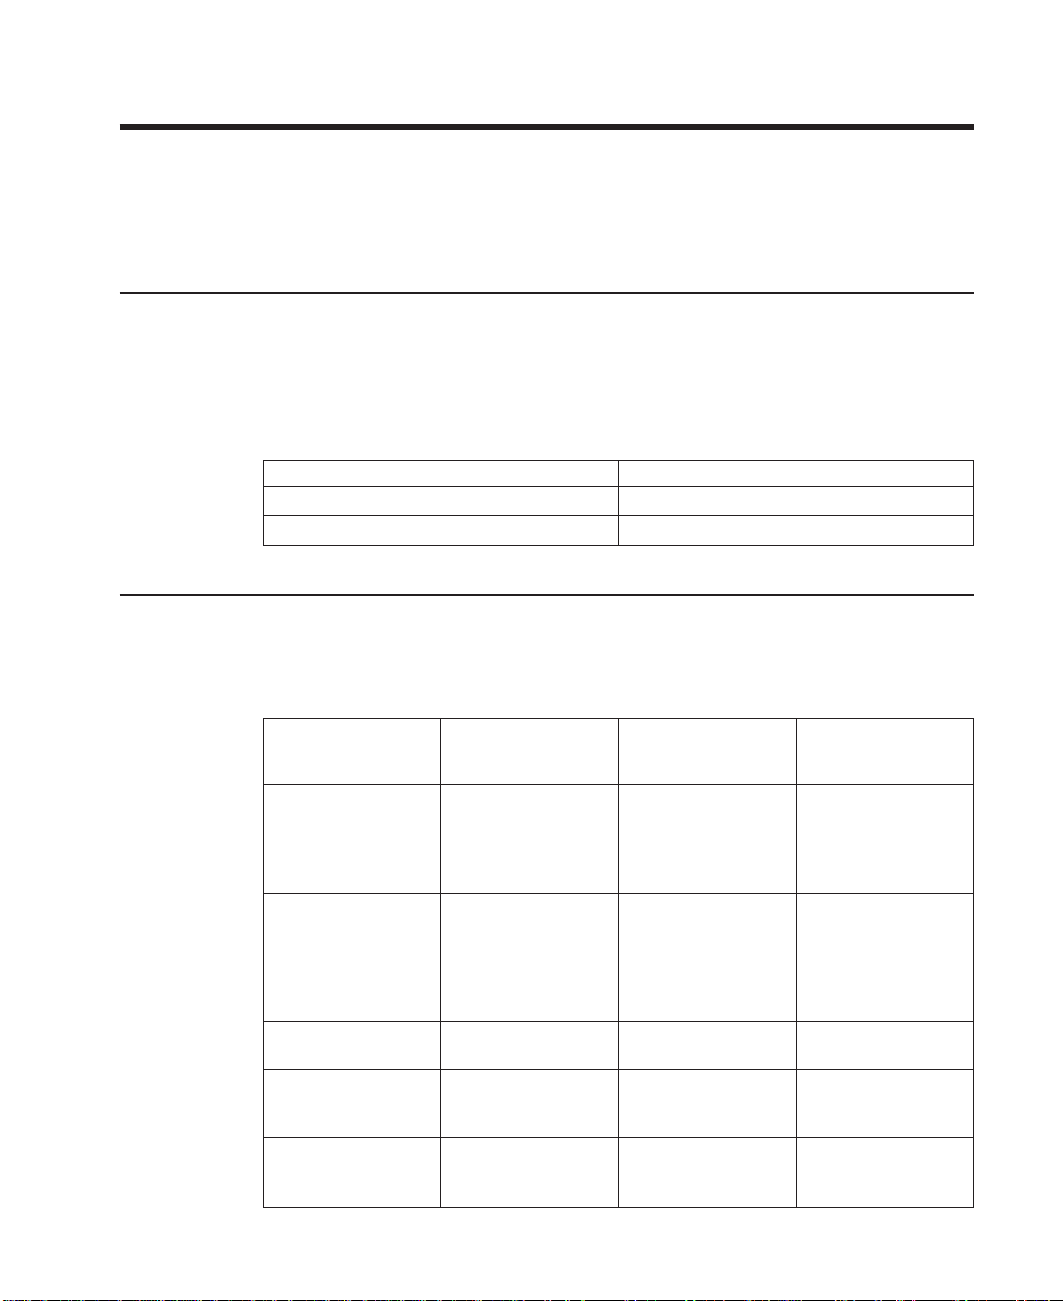
Determining the Fansink Assembly Number to be Replaced
The following table lists the correct fansink numbers for each system board assembly
part number.
Table 2. Fansink numbers by System Board Assembly and FRU Numbers.
Machine Type FRU Part Numbers System Board
7043–140 166 MHZ 11K4571, 73H4571,
93H7142
7043–140 200MHZ 11K0382, 93H2573,
93H7143
7043–140 233MHZ 93H6023 08L0281, 93H6024,
7043–140 233MHZ 11K0383 00P1608, 03N3978,
7043–140 332MHZ 11K0384, 93H9334 00P1609, 03N3979,
Assembly Part
Numbers
00P1606, 03N2407,
03N3976 11K0385,
93H4496, 93H4605
93H5700, 93H5688,
93H7139 93H9952
00P1607, 03N2408,
03N3977 11K0386,
93H4497, 93H4606
93H5689, 93H6025,
93H7140 93H9953,
93H9954
93H9955
11K0387 41L5248,
41L6095
11K0388 41L6099,
93H9337, 93H9956
Fansink Number
09P1125
09P1125
09P1125
09P1126
09P1126
1
Page 8
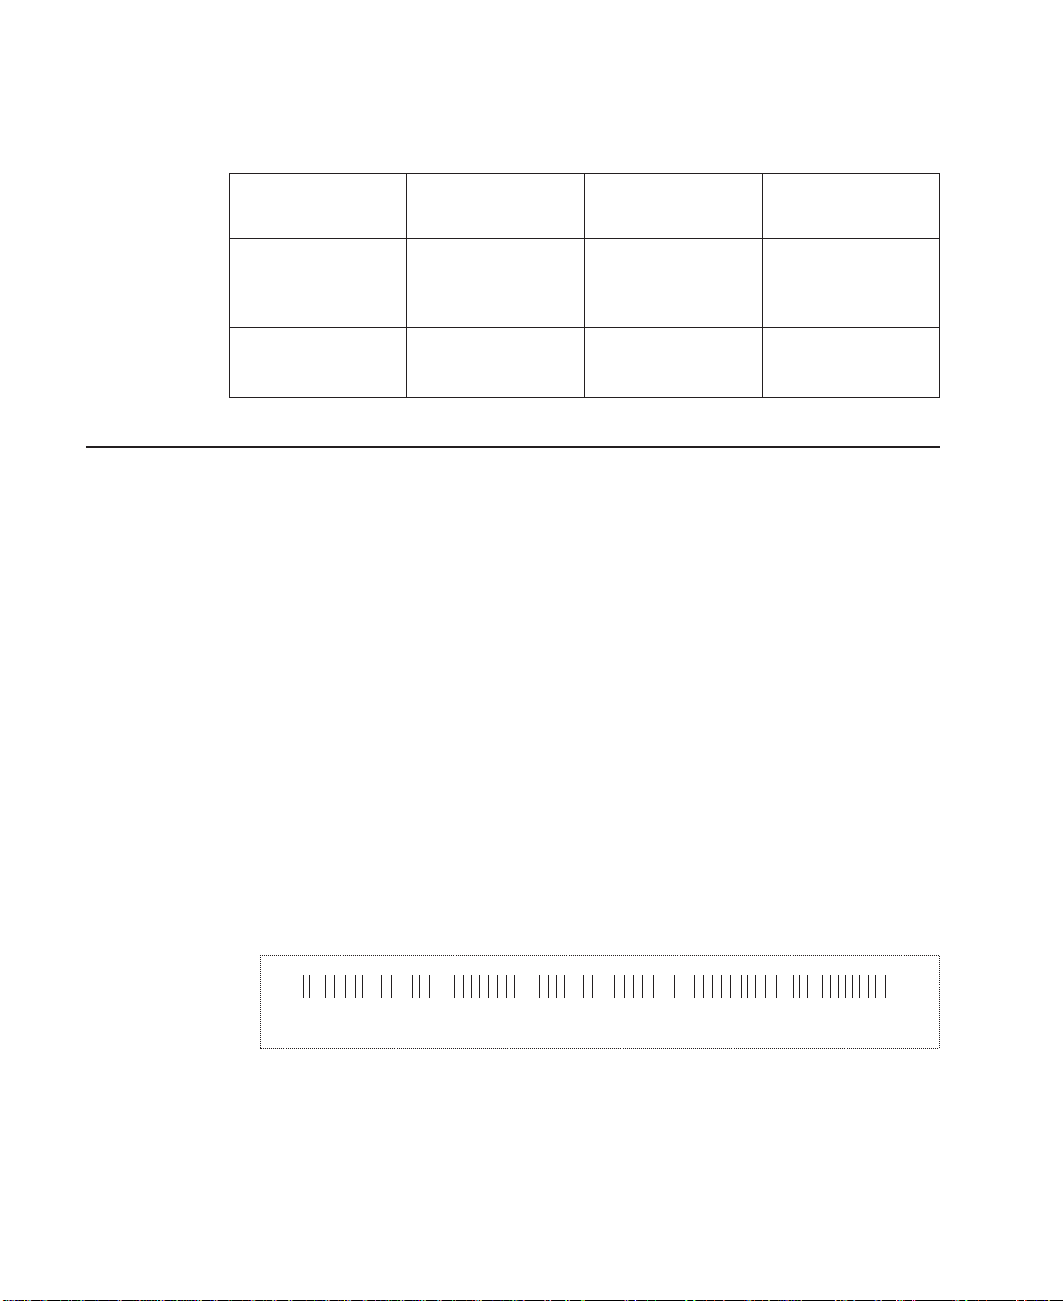
Table 2. Fansink numbers by System Board Assembly and FRU
Numbers (continued).
Machine Type FRU Part Numbers System Board
7043–150 375MHZ
New Version System
Board
7043–150 375MHZ
New Version System
Board
08L8446, 11K0157,
11K0459 41L5177,
41L5912, 41L5518
41L5590
11K0459, 41L5912 11K0017, 11K0650 09P1129
Assembly Part
Numbers
03N2526, 08L1363,
11K0148 11K0464,
41L5172, 41L5517
41L5588, 41L5911
Fansink Number
09P1126
7043–140 and 7043–150 Fansink Removal and Replacement Procedures
This section contains instructions for removing and replacing defective fansinks on both
the 7043–140 and 7043–150 system boards.
Removing and Replacing the 7043–140 System Board Fansink
Removal
1. Inform the customer that the system must be powered off for approximately one
hour for the fan to be replaced.
2. To power off the system, refer to the ″Removal and Replacement Procedures″
chapter in the
described in ″Cover Removal″ and continue to unlock and remove the cover.
3. Determine the system board assembly part number by noting the white barcode
label attached to the card.
Locate the assembly part number in the leftmost alphanumeric block of characters,
following the first three characters, which are always 11S. In the following example,
the assembly part number is 41L5812.
The FRU part number is in the center alphanumeric block of characters, following
the first three characters which are always FRU. In the following example, the FRU
part number is 41L5912.
RS/6000 7043–43P Series Service Guide
. Power off the system as
11S 2YL1109140246 FRU 90541L581 41L5912
After you have identified both the system board assembly part number and the FRU
part number, see the table in “Determining the Fansink Assembly Number to be
Replaced” on page 1 to determine the appropriate fan to be replaced.
2 Supplement to the Service Guide and User’s Guide
Page 9

4. To remove the disk drive bracket, refer to the ″Removing Internal Drive″ section of
RS/6000 7043–43P Series Service Guide
the
. Carefully place the bracket assembly
on top of the power supply (leave the hard files plugged in).
Note: Disconect temporarily any PCI Adapter Card installed in slot 5 in order to
remove the disk drive bracket.
5. Locate the CPU fansink on the planar under the disk drive and unplug it.
Fansink Location
6. Unclip the heatsink by pushing down and away on the finger tab.
7. Tilt the fansink toward the front of the system and slide the narrow buckle off the
front socket tab.
8. Remove the defective fansink assembly and discard.
Do not
Note:
wipe off the remaining thermal grease from the top of the existing
CPU chip on the system board assembly.
Chapter 1. 7043–140 and 7043–150 Fansink Removal and Replacement Procedures 3
Page 10

Replacement
1. If you are replacing a fansink 09P1125, install the new component by hooking the
side opposite the finger tab and then pushing the finger tab side down until it locks
into position.
OR
If you are replacing a fansink 09P1126, first remove the paper pull tab to expose the
thermal grease underneath. Install the new fansink by hooking the side opposite the
finger tab and then pushing the finger tab side down until it locks into position.
2. Plug the new fansink into the system board connector of the old fansink.
3. Reinstall the disk drive bracket assembly (and any PCI Adapter Cards that were
removed from slot 5).
4. Reinstall the top cover.
5. Power on the system and run diagnostics.
Removing and Replacing the 7043–150 System Board Fansink
Removal
1. Inform the customer that the system must be powered off for approximately one
hour for the fan to be replaced.
2. To power off the system, refer to the ″Removal and Replacement Procedures″
chapter in the
described in ″Cover Removal″ and continue to unlock and remove the cover.
3. Determine the system board assembly part number by noting the white barcode
label attached to the card.
Locate the assembly part number in the leftmost alphanumeric block of characters,
following the first three characters, which are always 11S. In the following example,
the assembly part number is 41L5812.
The FRU part number is in the center alphanumeric block of characters, following
the first three characters which are always FRU. In the following example, the FRU
part number is 41L5912.
RS/6000 7043–43P Series Service Guide
. Power off the system as
11S 2YL1109140246 FRU 90541L581 41L5912
After you have identified both the system board assembly part number and the FRU
part number, see the table in“Determining the Fansink Assembly Number to be
Replaced” on page 1 to determine the appropriate fan to be replaced.
4. To remove the disk drive bracket, refer to the ″Removing Internal Drive″ section of
the
RS/6000 7043–43P Series Service Guide
Note: If a hard file is attached to the disk drive bracket, unplug the hard file before
removing the bracket assembly.
4 Supplement to the Service Guide and User’s Guide
.
Page 11

5. Locate and unplug the fan and disconnect the fansink assembly power cable from
the CPU fansink connector (J26).
Note: There are two possible fansink connections for this system board: right-angle
finger tabs, and wire springs.
Fansink Location
6. To remove a fansink with right-angle finger tabs, unclip the heatsink by pushing
down and away on the fingertab. Remove the fansink assembly and discard.
Note:
Do not
wipe off the remaining thermal grease from the top of the existing
CPU chip on the systemboard.
7. To remove a fansink with wire springs, push down and away on the wire loop to
disengage the fansink assembly. Gently lift the fansink vertically up and off without
rocking the fansink.
Attention: While removing the closed loop fansink, severe damage may occur
which would require replacing the entire system board assembly. To
minimize the risk for system damage, be sure to perform the above
operation
no less than 30 seconds after powering off the system
, while
the heatsink is still hot. Warm adhesive between the heatsink and CPU
chip will be less likely to pull the aluminum cap off the chip.
Chapter 1. 7043–140 and 7043–150 Fansink Removal and Replacement Procedures 5
Page 12

Replacement
1. If you are replacing a fansink 09P1126, first remove the paper pull tab to expose the
thermal grease underneath. Install the new fansink by hooking the side opposite the
finger tab and then pushing the finger tab side down until it locks into position.
OR
If you are replacing a fansink 09P1129, remove the adhesive protective paper on
the bottom of the heatsink and place the fansink assembly into the metal bracket on
the system board assembly. Secure the ends of the wire loop under the edge of the
metal bracket.
2. Plug the new fansink into the system board connector of the old fansink.
3. Reinstall the disk drive bracket assembly.
4. Reinstall the top cover.
5. Power on the system and run diagnostics.
6 Supplement to the Service Guide and User’s Guide
Page 13

Chapter 2. 7043–150 System Features
This chapter contains information specific to both the 250MHz and 375MHz options for
the Model 150, and applies to the RS/6000 7043 43P Series User’s Guide and the
RS/6000 7043 43P Series Service Guide. All other information is consistent with the
system books.
System Features
Bus Architecture
Five 32-bit PCI adapter slots are available:
v Slots 2 and 3, primary
v Slots 1, 4, and 5, secondary
Microprocessor
v PowerPC 604e 250 MHz with 1MB parity synchronous L2 cache
v PowerPC 604e 375 MHz with 1MB parity synchronous L2 cache
Memory
v 64MB-1GB
v 4 memory module sockets for 64MB, 128MB, or 256MB dual inline memory-module
kit with ECC SDRAM EDO (extended data out)
Diskette Drive
Drives
Power Supply
v Standard: 3.5-inch, 1.44MB
Hard Disk Drives
v 4.5GB, 9.1GB, and 18.2GB Ultra drives
v Maximum supported: 3 internal
CD-ROM Drive
v 32x speed 5.25-inch, with sliding tray (no caddy required)
Other Drives
v Drive bays can accommodate 5.25-inch or 3.5-inch drives, such as hard disk drives,
CD-ROM drives, tape drives, or other removable media drives.
v Autoranging 250 watt, usable with 115 V ac or 230 V ac (Supports Wakeup-on-LAN)
7
Page 14

Keyboard and Mouse
v Standard: 101–Key Enhanced keyboard
v Optional: 101/102 or 106–Key Enhanced Keyboard
v Standard: 3-button mouse
Front-Panel Display
v 4-digit LED diagnostics display
Input/Output Ports
v 25-pin Parallel
v 9-pin Serial (2)
v 8-pin Tablet
v Keyboard
v Mouse
v Ultra SCSI (16-bit)
v 100/10 Base 5 Ethernet
v 100/10 Base T Ethernet
v Audio Line-in and Audio Line-out
v Microphone
v Headphone
Security Features
v Cover lock
v Tie-down (optional)
v Power-on password
v Privileged-access password
v SCSI security jumpers on system board
8 Supplement to the Service Guide and User’s Guide
Page 15

Setting the SCSI Security Jumpers
Note: Carefully read and follow the safety guidelines detailed in the corresponding
section of the
To increase system unit security, the external SCSI connector can be disabled by
changing jumpers inside the system unit.
1. Locate the SCSI security jumpers in the following figure.
RS/6000 7043 43P Series User’s Guide
, SA38-0511.
2. To disable the external SCSI connector, move the jumper on J35 to the front two
pins, and move the jumper on J36 to the rear two pins.
Chapter 2. 7043–150 System Features 9
Page 16

System Board Locations for Model 150
B1 Battery connector
J1 Wakeup-on-LAN jumper
J2 5x5 Auxiliary 5v connector
J3 Audio input connector
J4 Internal SCSI connector #2
J5 CD-ROM audio connector
J6 CD-ROM audio connector
J7 Power connector
J8 Power connector
J10 Media fan connector
J11 Memory Connector 1
10 Supplement to the Service Guide and User’s Guide
Page 17

J13 Audio output connector
J15 Remote Power-up Jumper
J16 Diskette drive connector
J17 Microphone jack
J18 Reset Connector
J19 Memory Connector 3
J20 Power-on Password jumper
J22 Headphone jack
J23 Serial port connector 2
J24 Serial port connector 1
J25 Tablet port connector
J26 CPU fansink connector
J27 System fan connector
J28 Memory Connector 2
J30 System fan connector
J32 Privileged-Access Password jumper
J33 Internal SCSI 16-bit connector
J35 SCSI security jumper
J36 SCSI security jumper
J38 External SCSI connector
J39 Riser card connector
J40 Power Switch connector
J41 Op Panel Connector
J42 Power Indicator LED connector
J43 Hard disk activity LED connector
J45 Ethernet twisted pair connector
J46 Internal Speaker connector
J49 Parallel port connector
J50 Ethernet AUI
J56 Mouse port connector
J59 Keyboard port connector
J139 Memory Connector 4
Chapter 2. 7043–150 System Features 11
Page 18

System Board, Cables, and Accessories
12 Supplement to the Service Guide and User’s Guide
Page 19

Index
Number
1 09P0168 1 System Board (250 MHz)
2 27F4212 6 Screw
3 39H8697 1 Hex Standoff
4 19L1808 1-4 64MB DIMM
5 93H1821 1 Diskette Cable Assembly
6 40H7572 1 SCSI Cable Assembly
7 93H6151 1 Ultra Cable Assembly (Optional)
8 08L1417 1 Riser Card
9 07L9115 1 Vertical Stand
10 40H6328 2 9-pin to 25-pin Serial Port Converters
11 11H2168 1 Display Cable Toroid Kit
12 15F8409 1 Battery
13 65G8850 1 CD-ROM drive audio cable
FRU Number Units Per Assy Description
19L1809 1-4 128MB DIMM
29L3302 1-4 256MB DIMM
Chapter 2. 7043–150 System Features
13
Page 20

14 Supplement to the Service Guide and User’s Guide
Page 21

Appendix. Notices
This information was developed for products and services offered in the U.S.A.
The manufacturer may not offer the products, services, or features discussed in this
document in other countries. Consult the manufacturer’s representative for information
on the products and services currently available in your area. Any reference to the
manufacturer’s product, program, or service is not intended to state or imply that only
that product, program, or service may be used. Any functionally equivalent product,
program, or service that does not infringe any intellectual property right of the
manufacturer may be used instead. However, it is the user’s responsibility to evaluate
and verify the operation of any product, program, or service.
The manufacturer may have patents or pending patent applications covering subject
matter described in this document. The furnishing of this document does not give you
any license to these patents. You can send license inquiries, in writing, to the
manufacturer.
The following paragraph does not apply to the United Kingdom or any country
where such provisions are inconsistent with local law: THIS MANUAL IS
PROVIDED ″AS IS″ WITHOUT WARRANTY OF ANY KIND, EITHER EXPRESSED OR
IMPLIED, INCLUDING, BUT NOT LIMITED TO, THE IMPLIED WARRANTIES OF
NON-INFRINGEMENT, MERCHANTABILITY OR FITNESS FOR A PARTICULAR
PURPOSE. Some states do not allow disclaimer of express or implied warranties in
certain transactions; therefore, this statement may not apply to you.
This information could include technical inaccuracies or typographical errors. Changes
are periodically made to the information herein; these changes will be incorporated in
new editions of the publication. The manufacturer may make improvements and/or
changes in the product(s) and/or the program(s) described in this publication at any
time without notice.
Information concerning products made by other than the manufacturer was obtained
from the suppliers of those products, their published announcements, or other publicly
available sources. The manufacturer has not tested those products and cannot confirm
the accuracy of performance, compatibility or any other claims related to products made
by other than the manufacturer. Questions on the capabilities of products made by other
than the manufacturer should be addressed to the suppliers of those products.
15
Page 22

16 Supplement to the Service Guide and User’s Guide
Page 23

Reader’s Comments — We’d Like to Hear From You
Supplement to the RS/6000 7043 43P Series Service Guide and User’s Guide
Order Number: SN32–9080–01
Overall how satisfied are you with the information in this book?
Very
Satisfied
Overall Satisfaction hhhhh
Satisfied Neutral Dissatisfied Very
Dissatisfied
How satisfied are you that the information in this book is:
Very
Satisfied
Accurate hhhhh
Complete hhhhh
Easy to find hhhhh
Easy to understand hhhhh
Well organized hhhhh
Applicable to your tasks hhhhh
Satisfied Neutral Dissatisfied Very
Dissatisfied
Please tell us how we can improve this book:
Thank you for your response. May we contact you? h Yes h No
When you send comments to us, you grant us a nonexclusive right to use or
distribute your comments in any way we believe appropriate without incurring
any obligation to you.
Name
Company or OrganizationCompany
Number
Phone NumberPhone
or Organization
Address
17
Page 24

Cut or Fold
Along Line
Fold and Tape
Please do not Staple
BUSINESS REPLY MAIL
POSTAGE WILL BE PAID BY ADDRESSEE
Information Development
Department H6DS-9561
11400 Burnet Road
Austin, TX 78758-3493
Fold and Tape
Please do not Staple
Fold and Tape
NO POSTAGE
NECESSARY
IF MAILED IN THE
UNITED STATES
Fold and Tape
18 Supplement to the Service Guide and User’s Guide
Cut or Fold
Along Line
Page 25

Page 26

IBMR
Part Number: 09P2506
Printed in the United States of America
on recycled paper containing 10%
recovered post-consumer fiber.
December 2000
SN32-9080-01
(1P) P/N: 09P2506
 Loading...