

Page 1
Front cover
Geac System21
commerce.connect
Implementation on the IBM iSeries Server
Gain useful insights through the
product overview
Follow the step-by-step guide to
install commerce.connect
Learn helpful usage and
performance tips and techniques
Yessong Johng
Colin Brown
Jim Hirsch
John Lawler
ibm.com/redbooks
Page 2

Page 3

International Technical Support Organization
Geac System21 commerce.connect:
Implementation on the IBM
~ iSeries Server
December 2002
SG24-6526-00
Page 4

Note: Before using this information and the product it supports, read the information in “Notices” on
page vii.
First Edition (December 2002)
This edition applies to Geac call.connect Version 1.1, vendor.connect 1.1, and System21 3.5.2b SP4 or SP5.
© Copyright International Business Machines Corporation 2002. All rights reserved.
Note to U.S. Government Users Restricted Rights -- Use, duplication or disclosure restricted by GSA ADP Schedule Contract with IBM
Corp.
Page 5

Contents
Notices . . . . . . . . . . . . . . . . . . . . . . . . . . . . . . . . . . . . . . . . . . . . . . . . . . . . . . . . . . . . . . . . . vii
Trademarks . . . . . . . . . . . . . . . . . . . . . . . . . . . . . . . . . . . . . . . . . . . . . . . . . . . . . . . . . . . . . viii
Preface . . . . . . . . . . . . . . . . . . . . . . . . . . . . . . . . . . . . . . . . . . . . . . . . . . . . . . . . . . . . . . . . . ix
The team that wrote this redbook. . . . . . . . . . . . . . . . . . . . . . . . . . . . . . . . . . . . . . . . . . . . . . ix
Become a published author . . . . . . . . . . . . . . . . . . . . . . . . . . . . . . . . . . . . . . . . . . . . . . . . . . ix
Comments welcome. . . . . . . . . . . . . . . . . . . . . . . . . . . . . . . . . . . . . . . . . . . . . . . . . . . . . . . . .x
Chapter 1. The .connect applications . . . . . . . . . . . . . . . . . . . . . . . . . . . . . . . . . . . . . . . . 1
1.1 call.connect . . . . . . . . . . . . . . . . . . . . . . . . . . . . . . . . . . . . . . . . . . . . . . . . . . . . . . . . . . . 2
1.2 vendor.connect . . . . . . . . . . . . . . . . . . . . . . . . . . . . . . . . . . . . . . . . . . . . . . . . . . . . . . . . 4
Chapter 2. Architecture of the commerce.connect products . . . . . . . . . . . . . . . . . . . . . 7
2.1 The need for an architecture. . . . . . . . . . . . . . . . . . . . . . . . . . . . . . . . . . . . . . . . . . . . . . 8
2.1.1 Key Enterprise JavaBeans and WebSphere Application Server benefits. . . . . . . . 8
2.1.2 The architecture moving forward. . . . . . . . . . . . . . . . . . . . . . . . . . . . . . . . . . . . . . . 9
2.1.3 The development process. . . . . . . . . . . . . . . . . . . . . . . . . . . . . . . . . . . . . . . . . . . 10
2.1.4 Implementation . . . . . . . . . . . . . . . . . . . . . . . . . . . . . . . . . . . . . . . . . . . . . . . . . . . 10
2.1.5 The design methodology: Using Unified Modelling Language . . . . . . . . . . . . . . . 10
2.2 Messaging: Java Message Service and IBM WebSphere MQ . . . . . . . . . . . . . . . . . . . 12
2.2.1 call.connect . . . . . . . . . . . . . . . . . . . . . . . . . . . . . . . . . . . . . . . . . . . . . . . . . . . . . . 12
2.2.2 vendor.connect . . . . . . . . . . . . . . . . . . . . . . . . . . . . . . . . . . . . . . . . . . . . . . . . . . . 14
2.3 Overview of process.connect . . . . . . . . . . . . . . . . . . . . . . . . . . . . . . . . . . . . . . . . . . . . 15
2.4 Architectural representation . . . . . . . . . . . . . . . . . . . . . . . . . . . . . . . . . . . . . . . . . . . . . 16
2.4.1 Architectural goals and constraints . . . . . . . . . . . . . . . . . . . . . . . . . . . . . . . . . . . . 16
2.4.2 Non-functional architectural considerations . . . . . . . . . . . . . . . . . . . . . . . . . . . . . 16
2.4.3 Functional architectural considerations. . . . . . . . . . . . . . . . . . . . . . . . . . . . . . . . . 17
2.5 Reusing and extending System21 business logic. . . . . . . . . . . . . . . . . . . . . . . . . . . . . 17
2.5.1 Accessing System21 RPG business logic . . . . . . . . . . . . . . . . . . . . . . . . . . . . . . 17
Chapter 3. Installing and setting up call.connect. . . . . . . . . . . . . . . . . . . . . . . . . . . . . . 19
3.1 Skills and prerequisites for installing, running WebSphere Application Server . . . . . . . 20
3.1.1 Skills . . . . . . . . . . . . . . . . . . . . . . . . . . . . . . . . . . . . . . . . . . . . . . . . . . . . . . . . . . . 20
3.1.2 Prerequisites . . . . . . . . . . . . . . . . . . . . . . . . . . . . . . . . . . . . . . . . . . . . . . . . . . . . . 20
3.1.3 System21 authorization code for Order Management (OM) . . . . . . . . . . . . . . . . . 22
3.2 Standard installation procedures. . . . . . . . . . . . . . . . . . . . . . . . . . . . . . . . . . . . . . . . . . 22
3.2.1 Installing Order Management and call.connect. . . . . . . . . . . . . . . . . . . . . . . . . . . 23
3.2.2 WebSphere installation and configuration. . . . . . . . . . . . . . . . . . . . . . . . . . . . . . . 24
3.2.3 Journaling . . . . . . . . . . . . . . . . . . . . . . . . . . . . . . . . . . . . . . . . . . . . . . . . . . . . . . . 27
3.2.4 Stored procedures and SQL . . . . . . . . . . . . . . . . . . . . . . . . . . . . . . . . . . . . . . . . . 29
3.2.5 Java Message Service . . . . . . . . . . . . . . . . . . . . . . . . . . . . . . . . . . . . . . . . . . . . . 31
3.2.6 User profiles . . . . . . . . . . . . . . . . . . . . . . . . . . . . . . . . . . . . . . . . . . . . . . . . . . . . . 36
3.2.7 System21 data set up . . . . . . . . . . . . . . . . . . . . . . . . . . . . . . . . . . . . . . . . . . . . . . 39
3.2.8 Java Web Start . . . . . . . . . . . . . . . . . . . . . . . . . . . . . . . . . . . . . . . . . . . . . . . . . . . 39
3.2.9 Backup . . . . . . . . . . . . . . . . . . . . . . . . . . . . . . . . . . . . . . . . . . . . . . . . . . . . . . . . . 52
3.3 call.connect housekeeping . . . . . . . . . . . . . . . . . . . . . . . . . . . . . . . . . . . . . . . . . . . . . . 52
3.3.1 Daily backups . . . . . . . . . . . . . . . . . . . . . . . . . . . . . . . . . . . . . . . . . . . . . . . . . . . . 52
3.3.2 Stopping WebSphere . . . . . . . . . . . . . . . . . . . . . . . . . . . . . . . . . . . . . . . . . . . . . . 52
3.3.3 Starting call.connect . . . . . . . . . . . . . . . . . . . . . . . . . . . . . . . . . . . . . . . . . . . . . . . 53
© Copyright IBM Corp. 2002. All rights reserved. iii
Page 6

3.3.4 Restoring IFS objects . . . . . . . . . . . . . . . . . . . . . . . . . . . . . . . . . . . . . . . . . . . . . . 53
3.4 Troubleshooting . . . . . . . . . . . . . . . . . . . . . . . . . . . . . . . . . . . . . . . . . . . . . . . . . . . . . . 53
3.4.1 WebSphere node name . . . . . . . . . . . . . . . . . . . . . . . . . . . . . . . . . . . . . . . . . . . . 54
3.4.2 Errors on starting the client . . . . . . . . . . . . . . . . . . . . . . . . . . . . . . . . . . . . . . . . . . 54
3.4.3 Errors when running the client . . . . . . . . . . . . . . . . . . . . . . . . . . . . . . . . . . . . . . . 54
3.4.4 Cached data and .bl and .cd files . . . . . . . . . . . . . . . . . . . . . . . . . . . . . . . . . . . . . 54
3.4.5 Log files and debugging . . . . . . . . . . . . . . . . . . . . . . . . . . . . . . . . . . . . . . . . . . . . 55
3.5 Manual configuration. . . . . . . . . . . . . . . . . . . . . . . . . . . . . . . . . . . . . . . . . . . . . . . . . . . 56
3.5.1 Non-standard Order Management and call.connect installation . . . . . . . . . . . . . . 56
3.5.2 WebSphere manual configuration. . . . . . . . . . . . . . . . . . . . . . . . . . . . . . . . . . . . . 57
3.5.3 Manual client installation. . . . . . . . . . . . . . . . . . . . . . . . . . . . . . . . . . . . . . . . . . . . 61
3.6 Alternative configurations . . . . . . . . . . . . . . . . . . . . . . . . . . . . . . . . . . . . . . . . . . . . . . . 62
3.6.1 Setting up a test instance of WebSphere . . . . . . . . . . . . . . . . . . . . . . . . . . . . . . . 62
3.6.2 Setting up an iSeries server for a test system. . . . . . . . . . . . . . . . . . . . . . . . . . . . 63
3.6.3 Server configuration . . . . . . . . . . . . . . . . . . . . . . . . . . . . . . . . . . . . . . . . . . . . . . . 64
3.6.4 WebSphere administration . . . . . . . . . . . . . . . . . . . . . . . . . . . . . . . . . . . . . . . . . . 65
3.6.5 Manual client installation. . . . . . . . . . . . . . . . . . . . . . . . . . . . . . . . . . . . . . . . . . . . 66
Chapter 4. Installing and setting up vendor.connect. . . . . . . . . . . . . . . . . . . . . . . . . . . 73
4.1 Preparing for the installation . . . . . . . . . . . . . . . . . . . . . . . . . . . . . . . . . . . . . . . . . . . . . 74
4.1.1 Skills required . . . . . . . . . . . . . . . . . . . . . . . . . . . . . . . . . . . . . . . . . . . . . . . . . . . . 74
4.2 Installing vendor.connect . . . . . . . . . . . . . . . . . . . . . . . . . . . . . . . . . . . . . . . . . . . . . . . 74
4.2.1 System21 base . . . . . . . . . . . . . . . . . . . . . . . . . . . . . . . . . . . . . . . . . . . . . . . . . . . 75
4.2.2 Java components and configuration files . . . . . . . . . . . . . . . . . . . . . . . . . . . . . . . 75
4.2.3 Restoring libraries. . . . . . . . . . . . . . . . . . . . . . . . . . . . . . . . . . . . . . . . . . . . . . . . . 76
4.2.4 Installing and configuring WebSphere . . . . . . . . . . . . . . . . . . . . . . . . . . . . . . . . . 76
4.2.5 IBM HTTP Server for iSeries. . . . . . . . . . . . . . . . . . . . . . . . . . . . . . . . . . . . . . . . . 79
4.2.6 MQSeries . . . . . . . . . . . . . . . . . . . . . . . . . . . . . . . . . . . . . . . . . . . . . . . . . . . . . . . 88
4.2.7 Work Management Trigger Handler for the iSeries. . . . . . . . . . . . . . . . . . . . . . . . 89
4.2.8 Active Architecture framework . . . . . . . . . . . . . . . . . . . . . . . . . . . . . . . . . . . . . . . 89
4.2.9 JConnects server . . . . . . . . . . . . . . . . . . . . . . . . . . . . . . . . . . . . . . . . . . . . . . . . . 92
4.2.10 Setting up new vendor.connect user IDs and supplier IDs . . . . . . . . . . . . . . . . . 92
4.2.11 Database synchronization from System21 to the vendor.connect database . . 103
4.2.12 Testing the vendor.connect Web site . . . . . . . . . . . . . . . . . . . . . . . . . . . . . . . . 105
4.2.13 Backing up the configuration components . . . . . . . . . . . . . . . . . . . . . . . . . . . . 105
4.3 Changing the iSeries on which the application is running. . . . . . . . . . . . . . . . . . . . . . 105
4.4 Housekeeping . . . . . . . . . . . . . . . . . . . . . . . . . . . . . . . . . . . . . . . . . . . . . . . . . . . . . . . 105
4.4.1 Daily . . . . . . . . . . . . . . . . . . . . . . . . . . . . . . . . . . . . . . . . . . . . . . . . . . . . . . . . . . 105
4.4.2 Stopping . . . . . . . . . . . . . . . . . . . . . . . . . . . . . . . . . . . . . . . . . . . . . . . . . . . . . . . 105
4.4.3 Starting . . . . . . . . . . . . . . . . . . . . . . . . . . . . . . . . . . . . . . . . . . . . . . . . . . . . . . . . 106
4.4.4 Restoring the vendor.connect IFS objects . . . . . . . . . . . . . . . . . . . . . . . . . . . . . 106
Chapter 5. Performance tuning . . . . . . . . . . . . . . . . . . . . . . . . . . . . . . . . . . . . . . . . . . . 107
5.1 Hardware. . . . . . . . . . . . . . . . . . . . . . . . . . . . . . . . . . . . . . . . . . . . . . . . . . . . . . . . . . . 108
5.2 Operating System/400 (OS/400) . . . . . . . . . . . . . . . . . . . . . . . . . . . . . . . . . . . . . . . . . 109
5.2.1 SQL server job configuration . . . . . . . . . . . . . . . . . . . . . . . . . . . . . . . . . . . . . . . 109
5.2.2 Toolbox JDBC driver. . . . . . . . . . . . . . . . . . . . . . . . . . . . . . . . . . . . . . . . . . . . . . 113
5.2.3 Subsystems and memory pools . . . . . . . . . . . . . . . . . . . . . . . . . . . . . . . . . . . . . 115
5.2.4 Automatic performance adjustment . . . . . . . . . . . . . . . . . . . . . . . . . . . . . . . . . . 121
5.2.5 Manual performance adjustment. . . . . . . . . . . . . . . . . . . . . . . . . . . . . . . . . . . . . 122
5.3 Stateless and stateful connections, datasources, connection pools, etc. . . . . . . . . . . 122
5.3.1 Stateful connections . . . . . . . . . . . . . . . . . . . . . . . . . . . . . . . . . . . . . . . . . . . . . . 122
5.3.2 Stateless connections. . . . . . . . . . . . . . . . . . . . . . . . . . . . . . . . . . . . . . . . . . . . . 123
iv Geac System21 commerce.connect: Implementation on the iSeries Server
Page 7

5.3.3 Total connections and SQL server jobs . . . . . . . . . . . . . . . . . . . . . . . . . . . . . . . 124
5.4 Performance topics for Java virtual machine (JVM) settings . . . . . . . . . . . . . . . . . . . 124
5.4.1 Initial Java heap size. . . . . . . . . . . . . . . . . . . . . . . . . . . . . . . . . . . . . . . . . . . . . . 125
5.4.2 Maximum Java heap size . . . . . . . . . . . . . . . . . . . . . . . . . . . . . . . . . . . . . . . . . . 125
5.4.3 Verbose garbage collection . . . . . . . . . . . . . . . . . . . . . . . . . . . . . . . . . . . . . . . . 126
5.4.4 Static compilation . . . . . . . . . . . . . . . . . . . . . . . . . . . . . . . . . . . . . . . . . . . . . . . . 127
Chapter 6. Tips and techniques. . . . . . . . . . . . . . . . . . . . . . . . . . . . . . . . . . . . . . . . . . . 137
6.1 The iSeries integrated file system . . . . . . . . . . . . . . . . . . . . . . . . . . . . . . . . . . . . . . . . 138
6.1.1 Using File Transfer Protocol (FTP) with the iSeries IFS . . . . . . . . . . . . . . . . . . . 139
6.1.2 Mapping a PC drive to the iSeries IFS . . . . . . . . . . . . . . . . . . . . . . . . . . . . . . . . 140
6.1.3 Editing an iSeries stream file using a PC editor . . . . . . . . . . . . . . . . . . . . . . . . . 142
6.1.4 Stream files and CCSID . . . . . . . . . . . . . . . . . . . . . . . . . . . . . . . . . . . . . . . . . . . 142
6.1.5 The cd command . . . . . . . . . . . . . . . . . . . . . . . . . . . . . . . . . . . . . . . . . . . . . . . . 143
6.1.6 Managing stream files with the OS/400 WRKLNK command . . . . . . . . . . . . . . . 143
6.1.7 Other stream file commands. . . . . . . . . . . . . . . . . . . . . . . . . . . . . . . . . . . . . . . . 144
6.1.8 Stream file authority . . . . . . . . . . . . . . . . . . . . . . . . . . . . . . . . . . . . . . . . . . . . . . 145
6.1.9 Editing an iSeries stream file using the OS/400 EDTF command. . . . . . . . . . . . 146
6.2 The Qshell. . . . . . . . . . . . . . . . . . . . . . . . . . . . . . . . . . . . . . . . . . . . . . . . . . . . . . . . . . 146
6.2.1 Managing stream files with Qshell commands . . . . . . . . . . . . . . . . . . . . . . . . . . 148
6.2.2 The touch and setccsid commands. . . . . . . . . . . . . . . . . . . . . . . . . . . . . . . . . . . 149
6.2.3 Viewing an iSeries stream file using the Qshell tail command . . . . . . . . . . . . . . 149
6.2.4 Qshell scripts . . . . . . . . . . . . . . . . . . . . . . . . . . . . . . . . . . . . . . . . . . . . . . . . . . . 150
6.3 Checking the QEJBSBS subsystem . . . . . . . . . . . . . . . . . . . . . . . . . . . . . . . . . . . . . . 152
6.3.1 Instance monitor jobs . . . . . . . . . . . . . . . . . . . . . . . . . . . . . . . . . . . . . . . . . . . . . 153
6.3.2 Instance administration jobs . . . . . . . . . . . . . . . . . . . . . . . . . . . . . . . . . . . . . . . . 153
6.3.3 Specifying ports . . . . . . . . . . . . . . . . . . . . . . . . . . . . . . . . . . . . . . . . . . . . . . . . . 155
6.3.4 Application server jobs . . . . . . . . . . . . . . . . . . . . . . . . . . . . . . . . . . . . . . . . . . . . 155
6.4 WebSphere versions on the iSeries, your console system, and clients . . . . . . . . . . . 156
6.4.1 Checking the WebSphere PTF level on the iSeries . . . . . . . . . . . . . . . . . . . . . . 156
6.4.2 Checking the WebSphere PTF level on a PC. . . . . . . . . . . . . . . . . . . . . . . . . . . 157
6.5 Common problems with commerce.connect on iSeries . . . . . . . . . . . . . . . . . . . . . . . 158
6.5.1 Problems connecting the console to WebSphere on the iSeries . . . . . . . . . . . . 158
6.5.2 Checking the iSeries name as required by WebSphere . . . . . . . . . . . . . . . . . . . 159
6.5.3 Checking the iSeries database name . . . . . . . . . . . . . . . . . . . . . . . . . . . . . . . . . 160
Related publications . . . . . . . . . . . . . . . . . . . . . . . . . . . . . . . . . . . . . . . . . . . . . . . . . . . . 161
IBM Redbooks . . . . . . . . . . . . . . . . . . . . . . . . . . . . . . . . . . . . . . . . . . . . . . . . . . . . . . . . . . 161
Other resources . . . . . . . . . . . . . . . . . . . . . . . . . . . . . . . . . . . . . . . . . . . . . . . . . . . . . . 161
Referenced Web sites . . . . . . . . . . . . . . . . . . . . . . . . . . . . . . . . . . . . . . . . . . . . . . . . . . . . 161
How to get IBM Redbooks . . . . . . . . . . . . . . . . . . . . . . . . . . . . . . . . . . . . . . . . . . . . . . . . . 161
IBM Redbooks collections. . . . . . . . . . . . . . . . . . . . . . . . . . . . . . . . . . . . . . . . . . . . . . . 161
Index . . . . . . . . . . . . . . . . . . . . . . . . . . . . . . . . . . . . . . . . . . . . . . . . . . . . . . . . . . . . . . . . . 163
Contents v
Page 8

vi Geac System21 commerce.connect: Implementation on the iSeries Server
Page 9

Notices
This information was developed for products and services offered in the U.S.A.
IBM may not offer the products, services, or features discussed in this document in other countries. Consult
your local IBM representative for information on the products and services currently available in your area. Any
reference to an IBM product, program, or service is not intended to state or imply that only that IBM product,
program, or service may be used. Any functionally equivalent product, program, or service that does not
infringe any IBM intellectual property right may be used instead. However, it is the user's responsibility to
evaluate and verify the operation of any non-IBM product, program, or service.
IBM may have patents or pending patent applications covering subject matter described in this document. The
furnishing of this document does not give you any license to these patents. You can send license inquiries, in
writing, to:
IBM Director of Licensing, IBM Corporation, North Castle Drive Armonk, NY 10504-1785 U.S.A.
The following paragraph does not apply to the United Kingdom or any other country where such
provisions are inconsistent with local law: INTERNATIONAL BUSINESS MACHINES CORPORATION
PROVIDES THIS PUBLICATION "AS IS" WITHOUT WARRANTY OF ANY KIND, EITHER EXPRESS OR
IMPLIED, INCLUDING, BUT NOT LIMITED TO, THE IMPLIED WARRANTIES OF NON-INFRINGEMENT,
MERCHANTABILITY OR FITNESS FOR A PARTICULAR PURPOSE. Some states do not allow disclaimer of
express or implied warranties in certain transactions, therefore, this statement may not apply to you.
This information could include technical inaccuracies or typographical errors. Changes are periodically made
to the information herein; these changes will be incorporated in new editions of the publication. IBM may make
improvements and/or changes in the product(s) and/or the program(s) described in this publication at any time
without notice.
Any references in this information to non-IBM Web sites are provided for convenience only and do not in any
manner serve as an endorsement of those Web sites. The materials at those Web sites are not part of the
materials for this IBM product and use of those Web sites is at your own risk.
IBM may use or distribute any of the information you supply in any way it believes appropriate without incurring
any obligation to you.
Information concerning non-IBM products was obtained from the suppliers of those products, their published
announcements or other publicly available sources. IBM has not tested those products and cannot confirm the
accuracy of performance, compatibility or any other claims related to non-IBM products. Questions on the
capabilities of non-IBM products should be addressed to the suppliers of those products.
This information contains examples of data and reports used in daily business operations. To illustrate them
as completely as possible, the examples include the names of individuals, companies, brands, and products.
All of these names are fictitious and any similarity to the names and addresses used by an actual business
enterprise is entirely coincidental.
COPYRIGHT LICENSE:
This information contains sample application programs in source language, which illustrates programming
techniques on various operating platforms. You may copy, modify, and distribute these sample programs in
any form without payment to IBM, for the purposes of developing, using, marketing or distributing application
programs conforming to the application programming interface for the operating platform for which the sample
programs are written. These examples have not been thoroughly tested under all conditions. IBM, therefore,
cannot guarantee or imply reliability, serviceability, or function of these programs. You may copy, modify, and
distribute these sample programs in any form without payment to IBM for the purposes of developing, using,
marketing, or distributing application programs conforming to IBM's application programming interfaces.
© Copyright IBM Corp. 2002. All rights reserved. vii
Page 10

Trademarks
The following terms are trademarks of the International Business Machines Corporation in the United States,
other countries, or both:
Redbooks(logo)™
AS/400®
DB2®
DB2 Universal Database™
IBM®
IBM eServer™
iSeries™
MQSeries®
OS/390®
OS/400®
Perform™
Redbooks™
S/390®
SecureWay®
SP™
TCS®
VisualAge®
WebSphere®
The following terms are trademarks of International Business Machines Corporation and Lotus Development
Corporation in the United States, other countries, or both:
Lotus® Notes® Word Pro®
The following terms are trademarks of other companies:
ActionMedia, LANDesk, MMX, Pentium and ProShare are trademarks of Intel Corporation in the United
States, other countries, or both.
Microsoft, Windows, Windows NT, and the Windows logo are trademarks of Microsoft Corporation in the
United States, other countries, or both.
Java and all Java-based trademarks and logos are trademarks or registered trademarks of Sun Microsystems,
Inc. in the United States, other countries, or both.
C-bus is a trademark of Corollary, Inc. in the United States, other countries, or both.
UNIX is a registered trademark of The Open Group in the United States and other countries.
SET, SET Secure Electronic Transaction, and the SET Logo are trademarks owned by SET Secure Electronic
Transaction LLC.
Other company, product, and service names may be trademarks or service marks of others.
viii Geac System21 commerce.connect: Implementation on the iSeries Server
Page 11

Preface
This IBM Redbook introduces the new Geac commerce platform .connect applications – the
call.connect and vendor.connect applications. These applications extend and enhance the
capabilities of Geac System21 into the intranet and Internet.
This redbook targets consultants or customers who work with these .connect applications. It
explains how to install, maintain, integrate, and manage these applications on the IBM
~ iSeries server. It also helps you to understand the architecture and middleware used
by the applications.
Prior to reading this book, you must be familiar with the basic, traditional use of the iSeries or
AS/400 and System21. For example, you should know how to enter simple commands and
understand such concepts as the library list. Similarly for System21, you should be familiar
with the menus and such tasks as defining a System21 user.
As necessary throughout the book, detail is provided about the newer, less traditional features
of the iSeries such as the integrated files system (IFS), Qshell, Java, and WebSphere.
The team that wrote this redbook
This redbook was produced by a team of specialists from around the world working at the
International Technical Support Organization, Rochester Center.
Yessong Johng is an IBM Certified IT Specialist at the IBM International Technical Support
Organization, Rochester Center. He specializes in WebSphere and Domino implementation
on iSeries, with a focus on their integration. Recently Yessong expanded his expertise to
include Linux and its solutions on the iSeries server.
Colin Brown is a Senior Software Architect at Geac United Kingdom (UK). He has 15 years
of experience in software design and implementation. He holds a degree in computer
science. His area of expertise includes Enterprise JavaBean (EJB) component development.
Jim Hirsch is a Test Manager at Geac UK. He has 20 years of experience in various IT
disciplines. He holds a degree in math from London University. His areas of expertise include
AS/400, iSeries, and Geac System21.
John Lawler is a Technical Consultant at Geac UK. He has 18 years of experience in IT. He
holds a degree in mathematics from Oxford University. His areas of expertise include AS/400,
iSeries, UNIX, Windows NT, RPG, C, Java, and WebSphere.
Become a published author
Join us for a two- to six-week residency program! Help write an IBM Redbook dealing with
specific products or solutions, while getting hands-on experience with leading-edge
technologies. You'll team with IBM technical professionals, Business Partners and/or
customers.
Your efforts will help increase product acceptance and customer satisfaction. As a bonus,
you'll develop a network of contacts in IBM development labs, and increase your productivity
and marketability.
© Copyright IBM Corp. 2002. All rights reserved. ix
Page 12

Find out more about the residency program, browse the residency index, and apply online at:
ibm.com/redbooks/residencies.html
Comments welcome
Your comments are important to us!
We want our Redbooks to be as helpful as possible. Send us your comments about this or
other Redbooks in one of the following ways:
Use the online Contact us review redbook form found at:
ibm.com/redbooks
Send your comments in an Internet note to:
redbook@us.ibm.com
Mail your comments to:
IBM Corporation, International Technical Support Organization
Dept. JLU Building 107-2
3605 Highway 52N
Rochester, Minnesota 55901-7829
x Geac System21 commerce.connect: Implementation on the iSeries Server
Page 13

Chapter 1. The .connect applications
This redbook covers the two Geac .connect applications:
call.connect
vendor.connect
This chapter introduces you to these two applications.
Geac also offers the following applications, which provide security, process control and
messaging, and integration with System21:
1
secure.connect
process.connect
inter.connect
These are part of the commerce platform.
commerce.connect that supports the integration of applications and processes with
System21. commerce.platform includes:
The process.connect business modeling tool and workflow engine to define and automate
business processes
Secure.connect to manage and control user access to information and processes
A series of components that contain the business rules and connections needed to
integrate System21 with external applications
To learn how vendor.connect uses process.connect and inter.connect, see Chapter 2,
“Architecture of the commerce.connect products” on page 7.
commerce.platform is the element of
© Copyright IBM Corp. 2002. All rights reserved. 1
Page 14

1.1 call.connect
Geac call.connect fills two roles. First, it is a telesales-oriented product. It is intended to help
call center personnel actively sell to the customer and create and foster personal
relationships.
To support this type of active sales, call center personnel need instant access to all relevant
information for the calling customer. Typical information includes order history, account
information, and product information. The ability to quickly enter an order (complete with stock
allocation, customer pricing, and credit checking) while the customer is still on the telephone
is paramount. This should be backed up by the ability to script the conversation to highlight
selling and promotion opportunities.
Companies need to classify their markets and customers and determine their policy in
satisfying conflicting priorities and supplies. Geac call.connect is a customer service and
order taking application that is designed to be deployed in this fast moving and complex
environment to meet these requirements.
call.connect is a component-based order capture application. This component-based
approach allows the Geac Professional Services Organization to build solutions that optimize
the order capture process for individual customers. Indeed, this component-based approach
allows Geac consultants to build new order capture solutions for sales force automation or
mobile computing, for example.
Figure 1-1 shows a typical call.connect window. The top two-thirds of the window show the
Reactive Sales page. This contains products that are relevant to the particular customer to
which the operator is selling. These products may be ones that the customer buys on a
regular basis, ones that are on special promotion, or ones that are on the special price list for
the customer. The bottom third of this window shows a configurable set of tabs. These pages
contain information about the current customer, which may help the operator in the telesales
environment.
2 Geac System21 commerce.connect: Implementation on the iSeries Server
Page 15
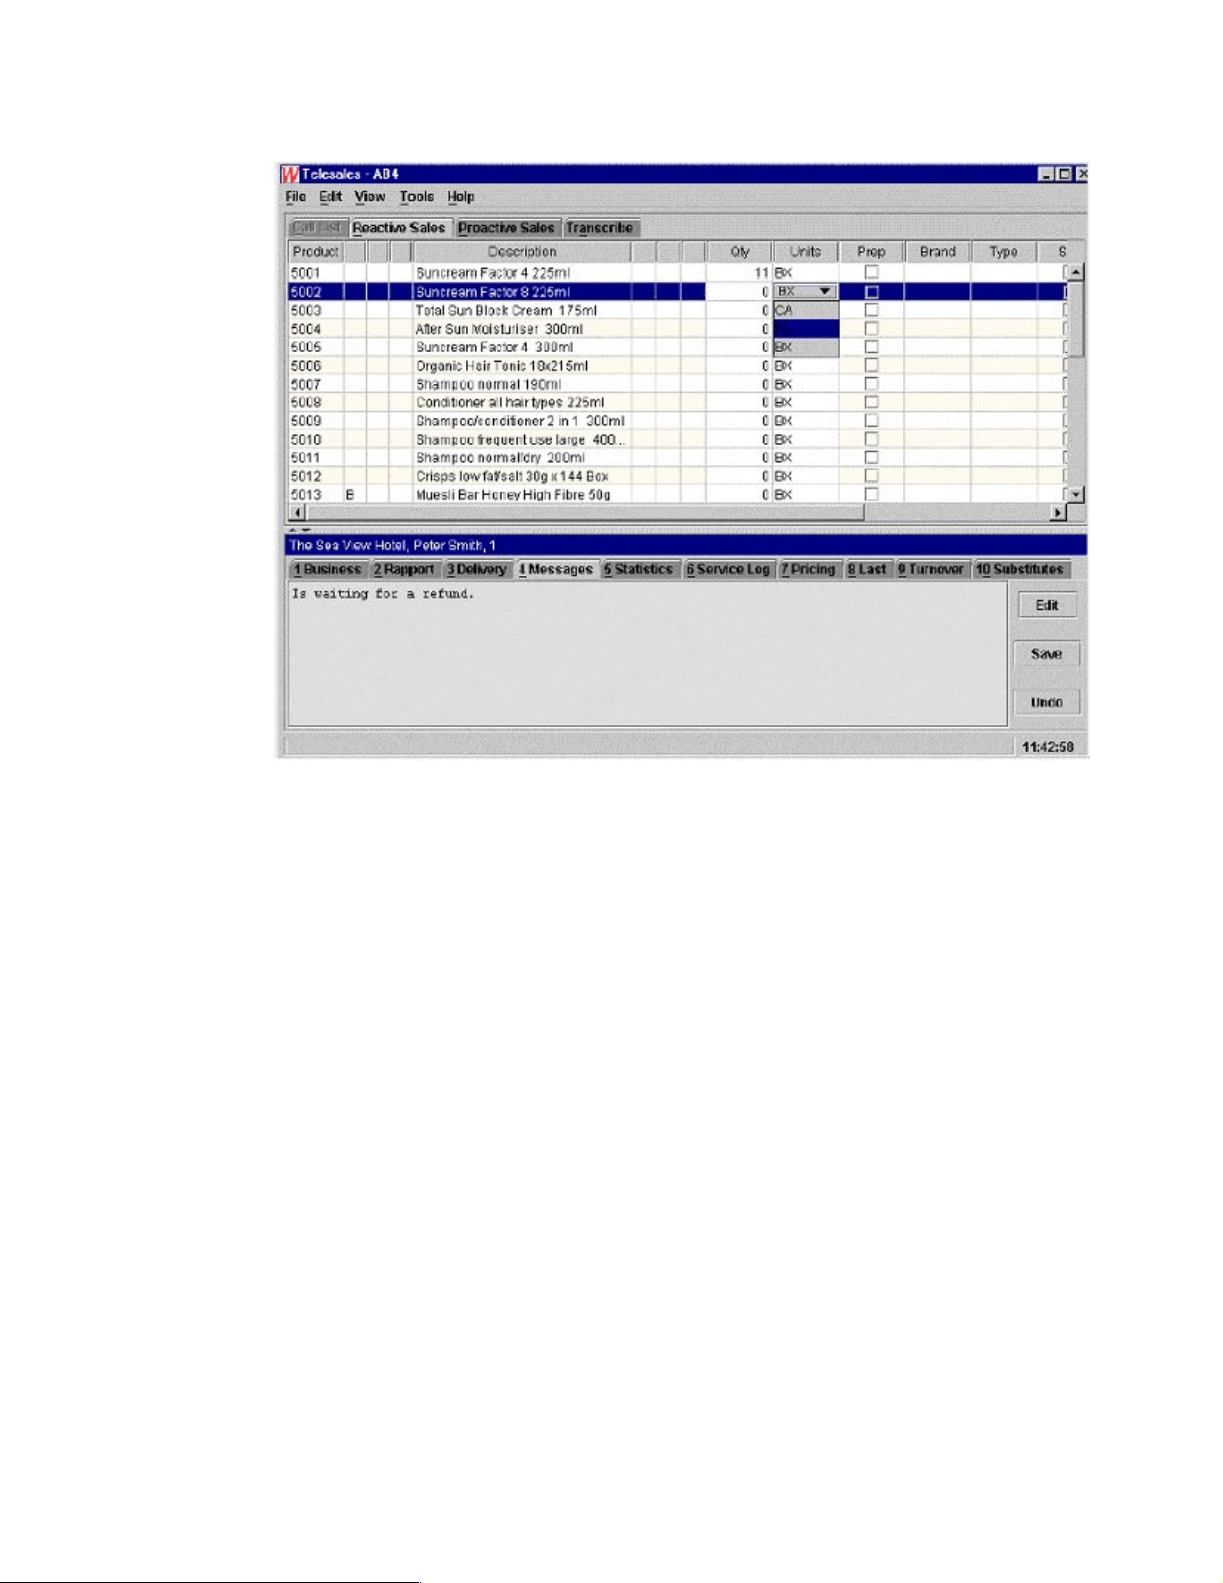
Figure 1-1 The call.connect buying list
call.connect is a flexible order capture process that includes the following facilities:
Dynamic buying lists: The lists of products that the customer is likely to purchase is
created by combining a fixed list of products with a dynamic list, based on rules applied to
previous purchase history.
Call management: Supervisors have access to a call-management application that allows
them to track the progress of calls and re-assign them to operators to ensure adequate
throughput. Operators can be assigned a skill level to aid the allocation of customer calls
to operators.
Stock allocation: Rule-based stock allocation and sourcing engine.
Promotions: A rule-based promotions engine supports a variety of promotions (for
example, buy one get one free), special prices, discounts, and loyalty points.
Active selling: Includes support for up-sell and cross-sell.
Up-sell prompts the operator to
suggest a higher value product to appropriate customers. For example, when the operator
selects a 21-inch television, call.connect prompts an up-sell opportunity to sell a 25-inch
television.
Cross-sell prompts the operator to offer associated products. For example,
when the operator selects a video recorder, call.connect suggests some blank tapes to go
with it.
Order management: Includes standing orders, order copy, and the ability to “park” an
order for later completion. call.connect is a “front-office” order capture and customer
service application that integrates with System21 for order fulfilment processing (picking,
despatch, etc.). The component-based approach allows the application to be extended to
support, for example, integration with call-center telephone exchanges to provide efficient
call routing and improved customer responsiveness.
Chapter 1. The .connect applications 3
Page 16
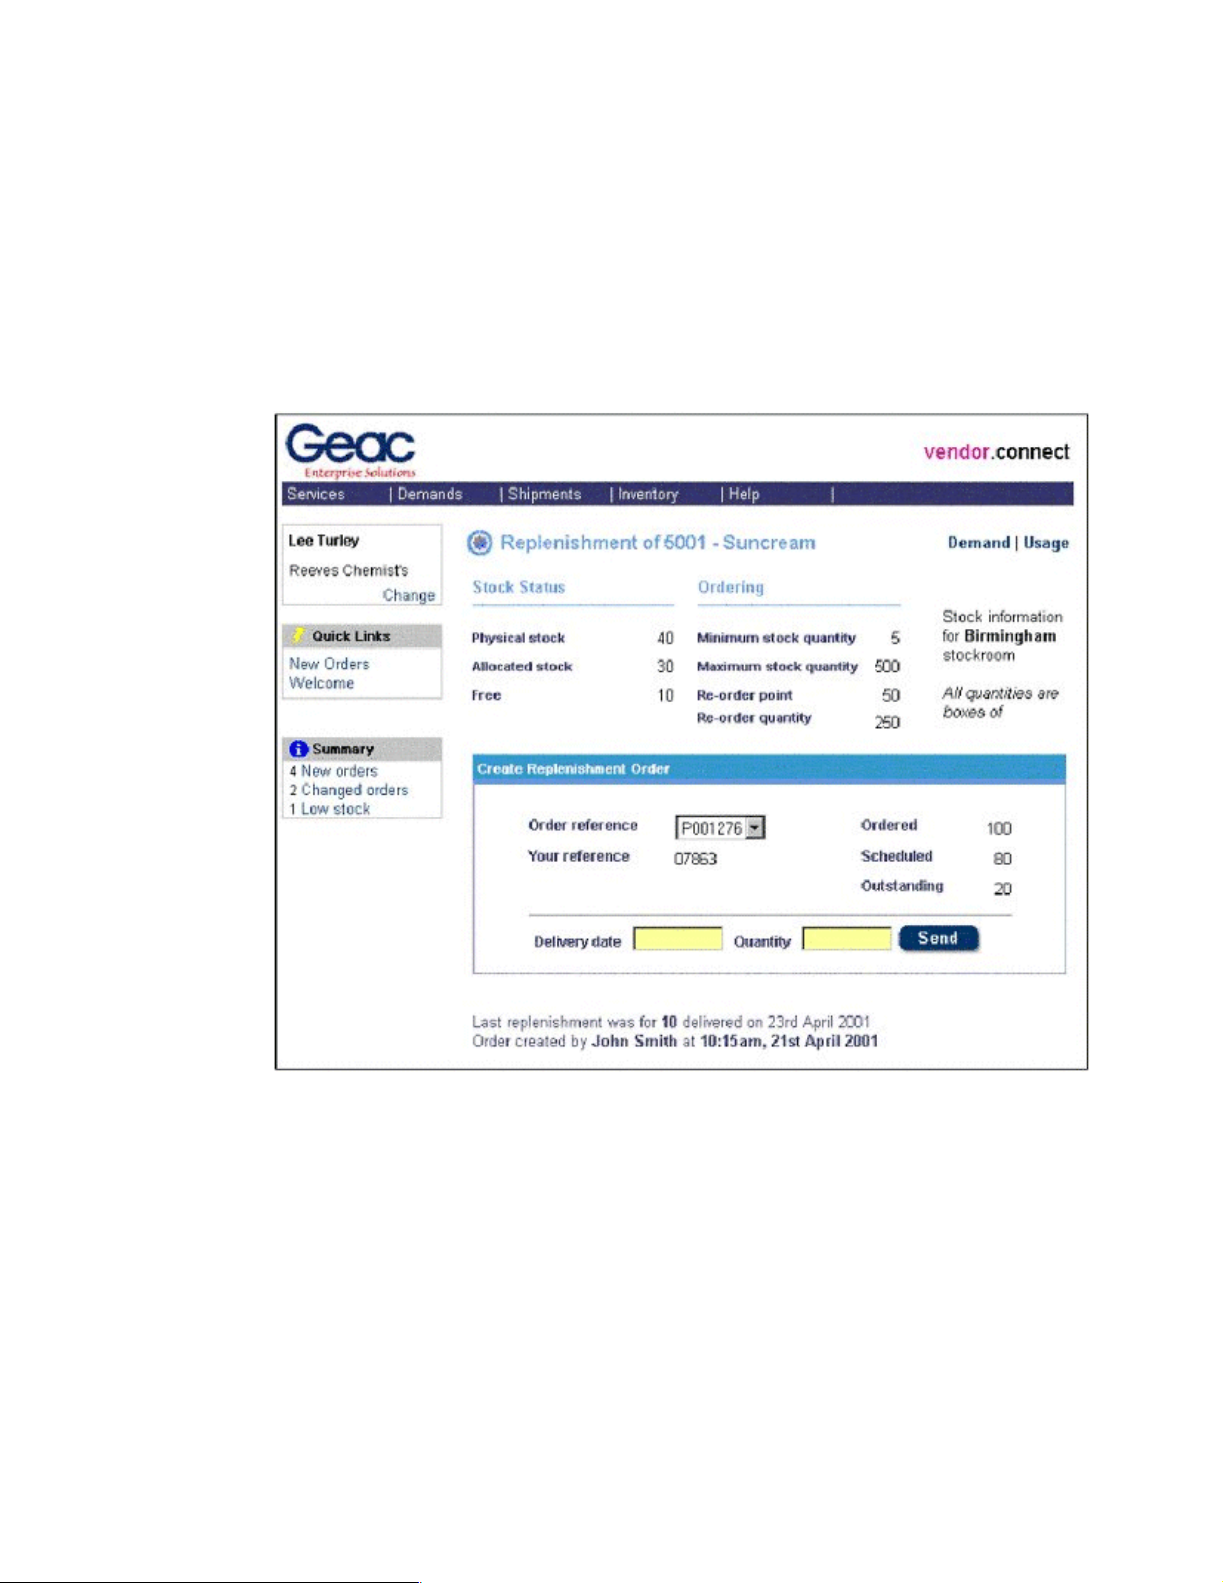
1.2 vendor.connect
Geac vendor.connect is a supplier self-service application. It is designed to support a
cooperative relationship between customers using System21 and their suppliers. It makes
information available, exchanges business documents, and allows controlled direct update
facilities.
vendor.connect improves supplier communication, aids planning, and reduces inventory
investment in the supply chain. Figure 1-2 shows an example of the vendor.connect
Replenishment page.
Figure 1-2 The vendor.connect Replenishment page
vendor.connect supports a number of supplier relationships. This includes vendor-managed
inventory, direct delivery to the end customer, and normal purchase orders. vendor.connect
provides:
Web-based interfaces to System21 to support:
– Enquiries on orders, returns, and receipts
– Displays of relevant System21 information to the supplier
– New orders and changes to orders since the supplier last visited the site are
highlighted for convenience
– A search facility and rule-based exception notification
Order transmission: In addition to the ability to print or fax orders, you can send orders to
the suppler as e-mail attachments. A Web page allows the supplier to acknowledge receipt
of the order and update the System21 purchase order appropriately.
4 Geac System21 commerce.connect: Implementation on the iSeries Server
Page 17

Supplier planning: An enquiry allows the supplier to view the stock status and demand for
products for which they are the preferred supplier. The demand enquiry includes relevant
information from System21 – unallocated sales orders, expected demand from Material
Requirements Planning (MRP), expected demand from Distributed Requirements
Planning (DRP), and a historical demand element based on sales and customer-specific
filters (for example, sales current year to date or previous year to date).
Maintain blanket order delivery schedule: Allows the supplier to amend a blanket
purchase order to specify planned delivery dates and quantities.
Promise date update: Allows the supplier to specify the date they plan to make the delivery.
For direct delivery orders, the supplier updates the promise date for the associated sales
order and e-mails the customer with the delivery notification.
Create Advanced Shipping Notification (ASN): Allows the supplier to construct a shipment
from current order lines and amend quantities on the delivery as required.
Support for entering packaging details to allow shipping documentation to be created.
Allows the customer to receive against the ASN. This reduces the time it takes to get
products into the warehouse.
Delivery of direct customer orders: Allows the supplier to build the details of a direct
shipment to an end customer. They can use this as the start of an @ctive process to
initiate customer billing.
Documentation print: Allows the supplier to print standard shipping documentation
(barcode labels, quality reports, etc.) to be sent with the shipment.
Chapter 1. The .connect applications 5
Page 18

6 Geac System21 commerce.connect: Implementation on the iSeries Server
Page 19

Chapter 2. Architecture of the
commerce.connect products
The products that make up the commerce.connect platform originate from a diverse
background. The challenge and vision is to bring these applications together into a single
coherent, product strategy. This requires an architecture that can encompass the entire
technology spectrum from the legacy applications to the leading-edge Enterprise Java
applications.
2
This chapter explains the key parts of the architecture, specifically the architecture of
call.connect and vendor.connect, which are the two applications that were designed and
developed from the ground up around an Enterprise JavaBean (EJB)/Java 2 Platform,
Enterprise Edition (J2EE) architecture. Both of these applications integrate with System21.
This chapter also highlights the key integration points.
© Copyright IBM Corp. 2002. All rights reserved. 7
Page 20

2.1 The need for an architecture
Why is an architecture necessary? Can’t we simply write programs that deliver the function
that is required? The reasons for having an architecture are:
Ever increasing demands are placed on systems in terms of security and availability.
The need to extend the system to both customers and suppliers across the Internet is
growing rapidly. Applications need to have this capability “architected in”.
The need to reduce the product development life-cycle, while delivering more complex
systems at the same time, means that Geac simply cannot develop its systems from
scratch or the infrastructure required.
There is a need to connect different systems (both Geac and external systems) to provide
a viable, reliable, and robust solution.
To meet these requirements, Geac has to rely more and more on infrastructure or middleware
to provide these services. In turn, this means that Geac should clearly architect, develop, and
deploy its software to maximize the benefits that the chosen middleware offers.
Over two years ago, as part of the strategic alliance with IBM, Geac chose to base its new
e-business enterprise applications around WebSphere.
The WebSphere suite of products enables Geac to develop, deploy, and integrate
next-generation e-business applications. This includes such applications for
business-to-business e-commerce. Geac also supports business applications from simple
Web publishing through enterprise-scale transaction processing, extending applications to
incorporate mobile devices, etc.
The entire WebSphere philosophy allows Geac, as an Enterprise Application Developer, to
build, integrate, and deliver solutions more timely to market using WebSphere. WebSphere is
the cornerstone of IBM’s enterprise development strategy. There is little functional or time
availability differences between the release of WebSphere on the iSeries server and
WebSphere on Windows 2000. This allows Geac to deploy its J2EE applications on the
platform that is best suited to the particular customer.
Many of the middleware services provided by WebSphere form part of IBM’s implementation
of the J2EE specification. J2EE defines the standard for developing multi-tier enterprise
applications. J2EE simplifies enterprise applications by basing them on standardized,
modular components, providing a complete set of services to those components, and
handling many details of application behavior automatically, without complex programming.
However, it is true (from practical experience) that both the EJB specification and WebSphere
do not completely remove or absolve the implementor of the responsibility of using the above
services appropriately. Performance needs to be “designed” into the application. Key
architectural decisions still need to be made within the constraints and goals of the project
and these decisions need to be well documented and understood by everyone involved in the
project. This ensures a consistent and high quality approach when designing and
implementing a large-scale project.
2.1.1 Key Enterprise JavaBeans and WebSphere Application Server benefits
The Architectural Specification Geac follows is Enterprise JavaBeans 1.0 (EJB 1.0). As
discussed, the Application Server that Geac uses to implement this specification is IBM’s
WebSphere Application Server Advanced Edition. If the applications that Geac were
implementing were entirely PC-based, WebSphere Advanced Edition would not be
necessary, but this is not the case.
8 Geac System21 commerce.connect: Implementation on the iSeries Server
Page 21

The EJB standard is a server-side Java-based component architecture for building multi-tier,
distributed, enterprise applications. WebSphere Application Server provides such services
as:
Authentication and security services: Are provided either via the host operating system
or through Lightweight Directory Access Protocol (LDAP).
Transaction management: Ensures integrity of data, not just within a single database,
but across the enterprise.
Resource pooling: Allows more efficient use of valuable system resources. This is
especially important in a large Internet deployment scenario, where there may be
thousands rather than tens of users apparently concurrently using the system.
Clustering and high availability: Enable scalability and ease the implementation of a
fault tolerant high availability system.
Developing EJBs and deploying within WebSphere offers other key benefits that are often
overlooked in the context of a single project, but that
strategy of the company.
For the first time in Geac’s System21 development history, they can deploy the
WebSphere-based Business Application (in the form of EJB components) that they develop
on almost any Enterprise Server where there is a business benefit. Currently Geac’s
requirements are restricted to iSeries and Windows NT or Windows 2000. But in the wider
Geac worldwide context, they could deploy onto OS/390 and most UNIX variants, including
Linux.
must be considered within the technical
As the e-marketplace develops, a significant number of third-party EJB components will
become available. A simple example of this is be Secure Credit Card Authorization. Using a
common architecture across multiple components reduces the number of possible failure
points, simplifies deployment, and in this example, can actually guarantee true transaction
integrity.
2.1.2 The architecture moving forward
Java standards relating to the enterprise have evolved over the past couple of years. The
biggest push on standards by IBM, Sun, and others has been around J2EE. J2EE
encompasses all of the Java standards relating to middleware and enterprise application
development. The EJB specification is now part of the J2EE standard.
Geac’s architectural strategy is to follow, comply with, and implement J2EE solutions. For
example, in the short to medium term, Geac will:
Use JMS as its messaging subsystem with MQSeries as the message transport layer
wherever possible. This allows for maximum flexibility and reliability between Java- and
non-Java-based systems.
Ensure that the Geac’s infrastructure software, such as process.connect and
inter.connect, not only coexist on the same server as one of its WebSphere EJB-based
applications, but will take full advantage of the facilities offered by WebSphere.
Implement and support the next generation of Web Technologies such as Universal
Description, Discovery, and Integration (UDDI). For more information, see:
http://www.uddi.org
Chapter 2. Architecture of the commerce.connect products 9
Page 22

2.1.3 The development process
Geac uses a development process based around the Rational Unified Process, but heavily
modifies it. Development process refers to a process that starts at project inception and goes
all the way through deployment onto the customer’s site. Rational Software is the prime
contributor to the Rational Unified Process.
A key process difference to the normal Geac approach is that the process is iteration-based,
rather than traditional waterfall based. The process splits the project into several smaller
deliverables rather than one large deliverable at the end of the project. Therefore, a project
can consist of several smaller iterations each with identifiable, measurable objectives.
Another key difference is that the process focuses on risk elimination. The idea is that
identified high risks (for example, potential technical problems) are addressed early on in the
process to avoid large surprises later on. This reduces the risk of costly failures late in the
project. For more information, see:
http://www.rational.com
The architecture has a key role to play in the development process. Early in the process, any
requirements that may impact the architecture, such as the “user interface is going to be
Web-based and PC client-based“, are taken into account and the risk is assessed. When
there are high technical risks to a project, these risks are mitigated in an “elaboration phase”,
which attempts to develop a “proof of concept” deliverable that focuses on the specific risks.
A risk that Geac identified was the need to re-use the existing System21 RPG code base for a
specific business function. Geac saw this as a high risk area, because of the different
technologies involved and potential performance considerations. If a viable solution could not
be found, this would greatly increase the cost of the project because of the need to rewrite
large parts of existing business logic in Java.
2.1.4 Implementation
All software development is carried out under VisualAge for Java 3.5.4. Developers test and
deploy locally in the WebSphere Test Environment before testing on the iSeries server. The
database is always DB2 Universal Database (UDB) for iSeries. Geac uses a shared
VisualAge Repository for Source Code control.
2.1.5 The design methodology: Using Unified Modelling Language
Geac uses the Unified Modelling Language (UML) for both high-level and detailed design. It
uses Rational Rose as the design tool that supports UML.
Geac’s design methodology is more a component than strict object-oriented (OO)-based
design. It designs and implements course grained components based around business
subsystems. Each of these subsystems has one or more defined interfaces.
10 Geac System21 commerce.connect: Implementation on the iSeries Server
Page 23
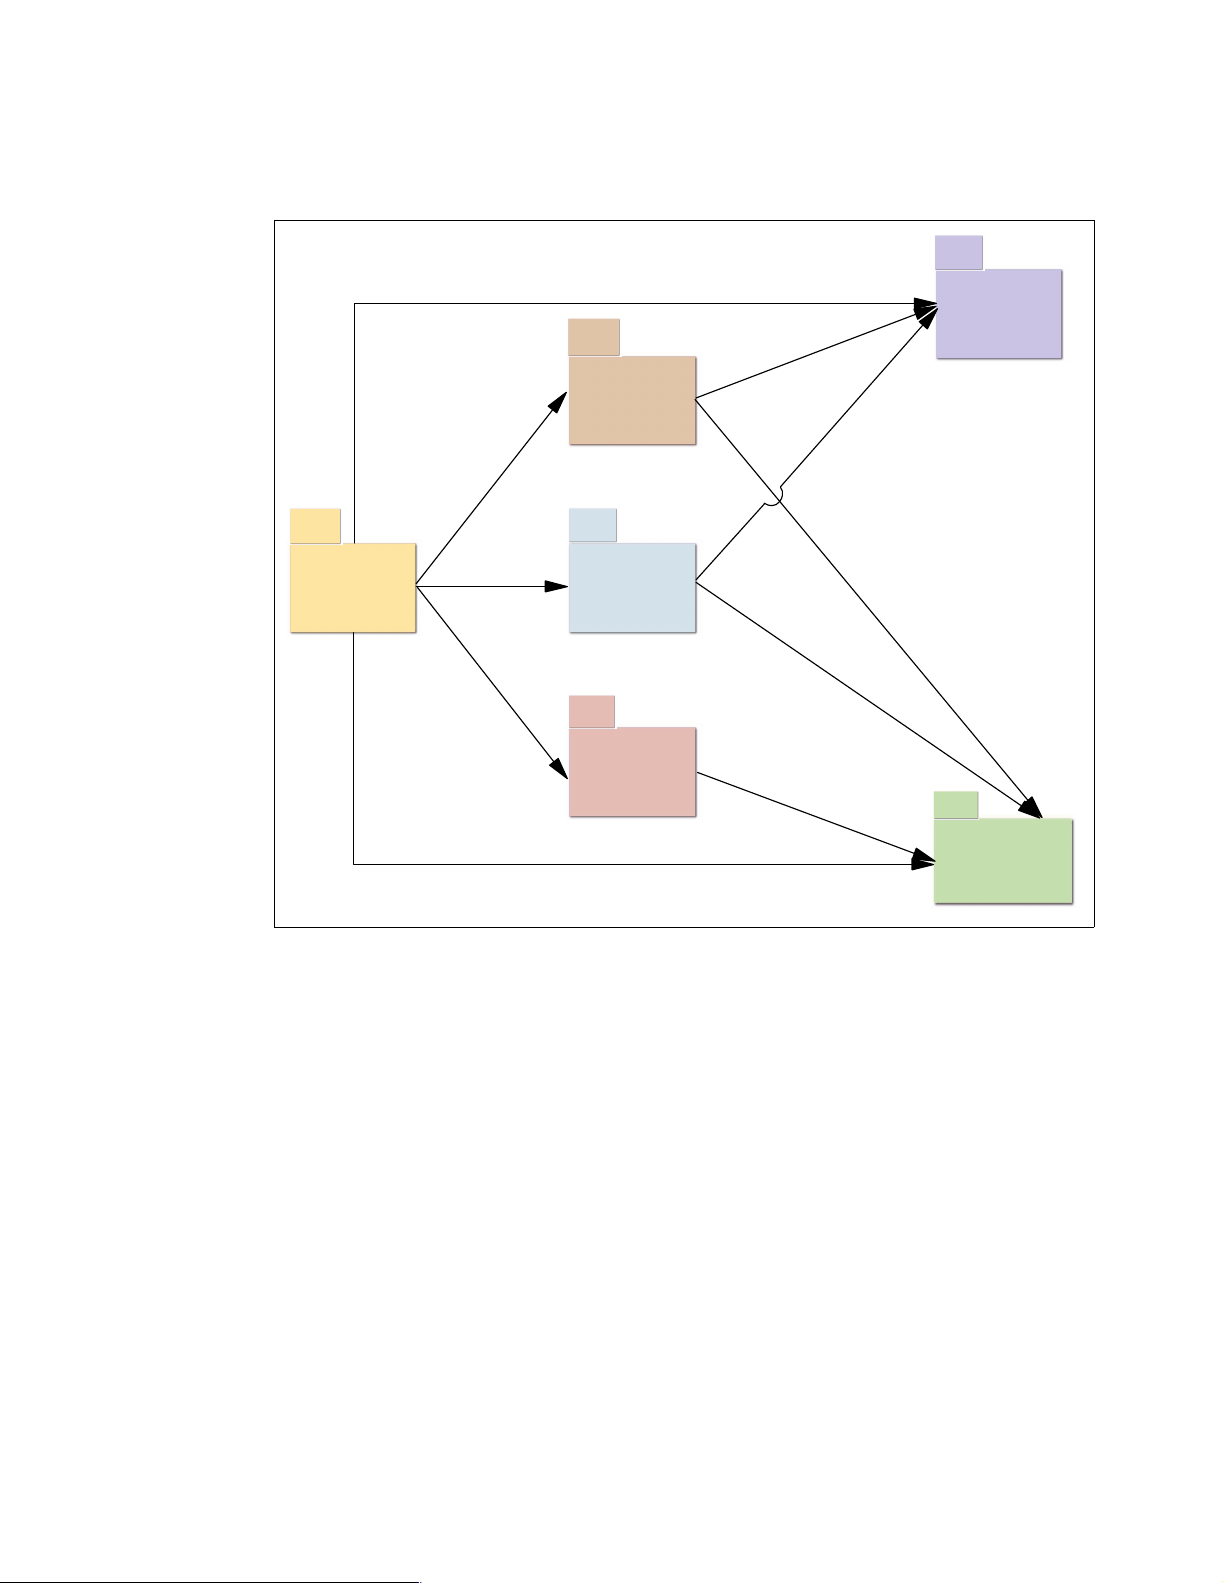
Figure 2-1 shows an example of the primary relationship between the main SalesOrder
subsystem and its dependencies for call.connect.
Item
Supply
SalesOrder
Pricing
Delivery
Planning
Figure 2-1 SalesOrder subsystem dependencies
Customer
Chapter 2. Architecture of the commerce.connect products 11
Page 24
For vendor.connect, Figure 2-2 shows the relationship between the controlling servlet and the
vendor.connect subsystems.
supplier
contract
Generic
Servlet
Figure 2-2 vendor.connect dependencies
call.connect components are designed to be extensible, reusable, and replaceable. This
means that the business functionality can be extended without needing to cut and paste
entire programs. This helps to reduce maintenance overhead and allows existing code to be
reused.
shipment
purchaseorder
fulfillment
2.2 Messaging: Java Message Service and IBM WebSphere MQ
The term messaging refers to the sending of structured information between two or more
subsystems. Typically the message is sent asynchronously. That is that the sender can
continue to run without waiting for a reply from the receiver. Also, the sender and receiver
typically run as separate processes and possibly on physically separate machines.
2.2.1 call.connect
Both call.connect and vendor.connect use asynchronous messaging to meet specific
requirements:
call.connect uses messaging to meet two requirements:
To send information back to the client user interface (UI) such as “the order has been put
on hold due to credit problems”, or “a given item is out of stock”
To allow for time-consuming steps to be completed asynchronously, for example, order
completion when the order is actually committed into System21
12 Geac System21 commerce.connect: Implementation on the iSeries Server
Page 25
call.connect messaging is implemented using IBM’s implementation of the Java Message
Service (JMS), which itself uses MQSeries as the underlying messaging facility. You can
learn more about JMS at:
http://java.sun.com/products/jms/index.html
Figure 2-3 shows how call.connect uses messaging.
PC Client
Client request
Order information
WebSphere Application
Server
Call Business
Logic
SalesOrder
Subscriber
Figure 2-3 call.connect messaging usage
Event
Queue
SalesOrder
SalesOrder
EJB
EJB
Publish SalesOrder
Business Event
Adding a Sales Order Line scenario
This example explains what happens when an order line is added to a Sales Order by an
operator:
1. The SalesOrder EJB processes the addline in the normal way.
2. The Business Event Addline is published.
3. Control returns back to the client ready for further input.
4. The SalesOrder subscriber is a separate process that listens for SalesOrder events and
receives the Addline message.
5. The subscriber calls back into the SalesOrder EJB to perform a “check for unusual
quantity” request to see if the customer normally orders this amount of stock for the item
concerned.
6. If the quantity ordered is unusual, the SalesOrder subscriber notifies the PC client by
making a call back into the client. The client displays the notification text in the UI status
bar.
Chapter 2. Architecture of the commerce.connect products 13
Page 26
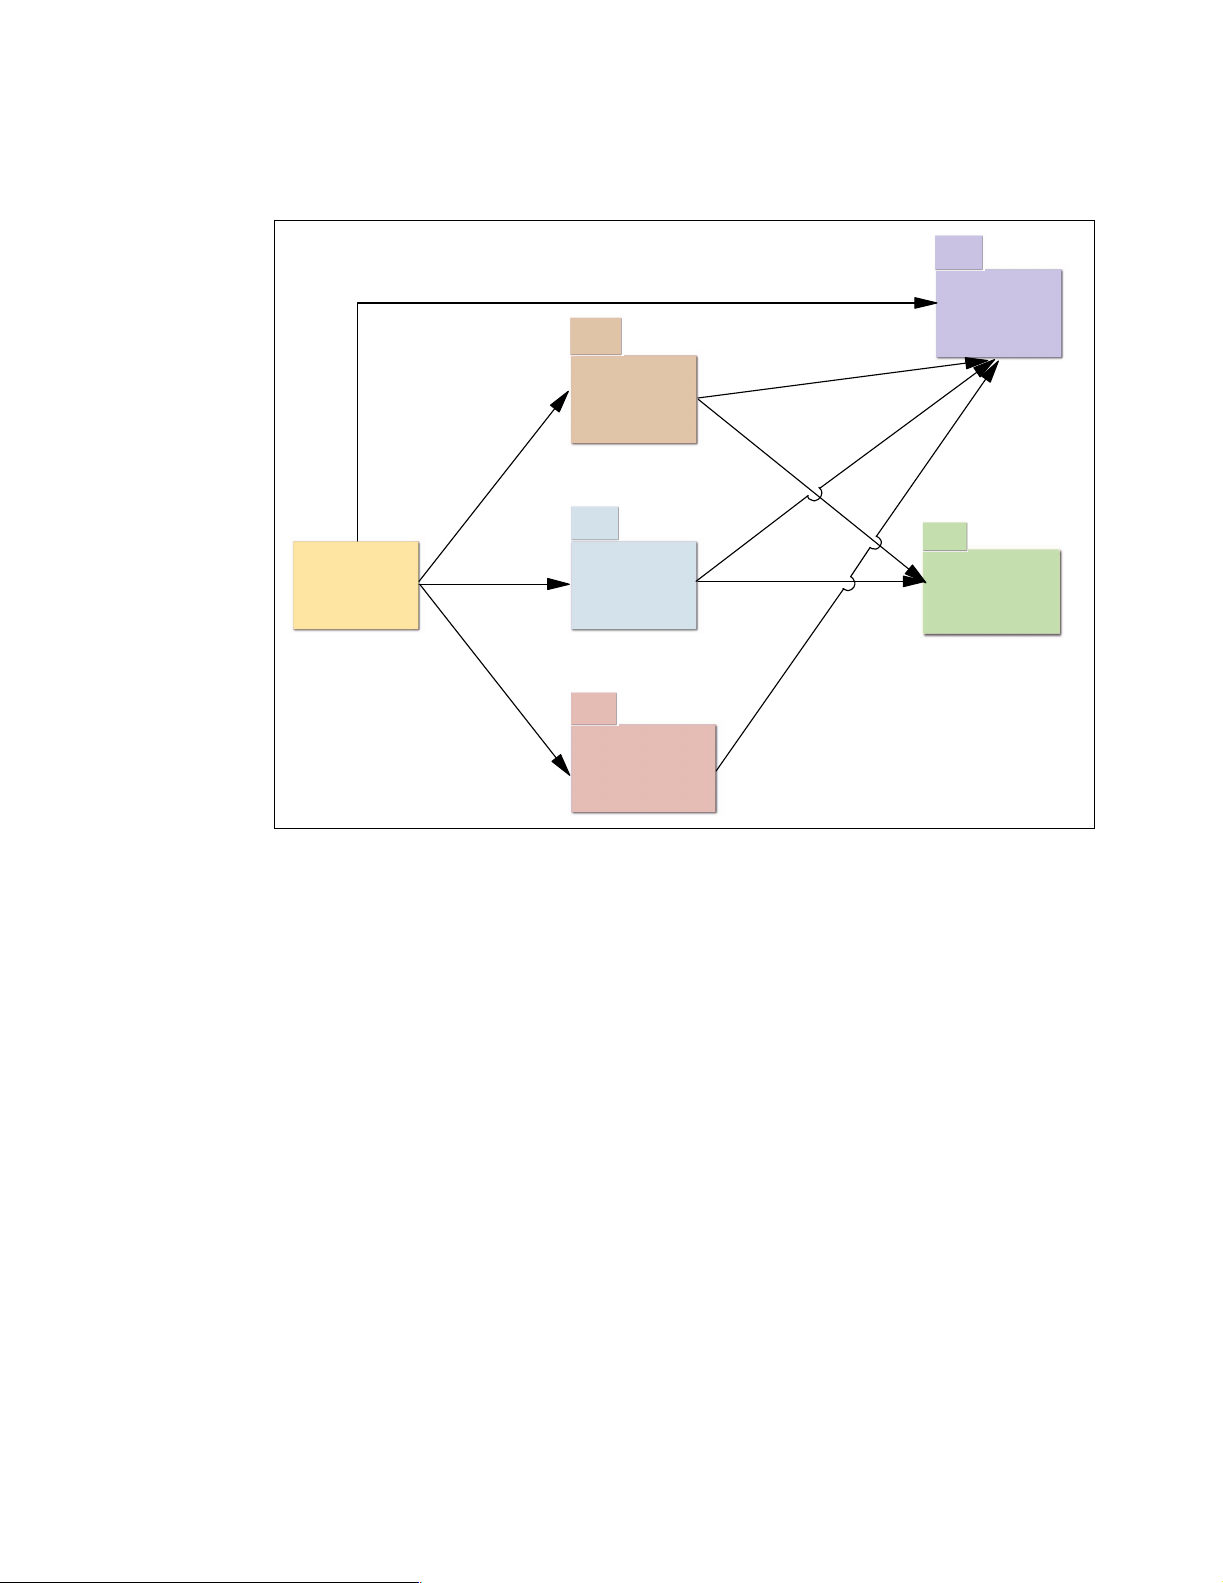
2.2.2 vendor.connect
vendor.connect uses messaging in conjunction with process.connect. The main requirement
is to synchronize and respond to changes in System21 data such as purchase order updates.
Figure 2-4 shows how this is achieved.
Flow of Information to vendor.connect after System21 Update
Program
Flow starts here
System21
Application
Application
Update
Export
Queue
inter.connect
Channel
Manager
BOD/Java
Mappings
Trigger
Triggers
System21
database
Method
process.connect
fired
Trigger
Queue
Upload
Triggers
Handler
@ctive Modular
Events
Message
Reader
Trigger
Rules
Update
inter.connect
Event
Queue
WebSphere Application
Server
Purchase Order
EJB
System21 Export
Connector
Mapping
XSLT
Map Event Image
to XML BOD
Properties
DB update
via SQL
Export
Queue
vendor.connect
database
Key
Key
System21
commerce.connect
vendor.connect
Figure 2-4 vendor.connect messaging usage
MQSeries is used as the underlying message transport facility by process.connect.
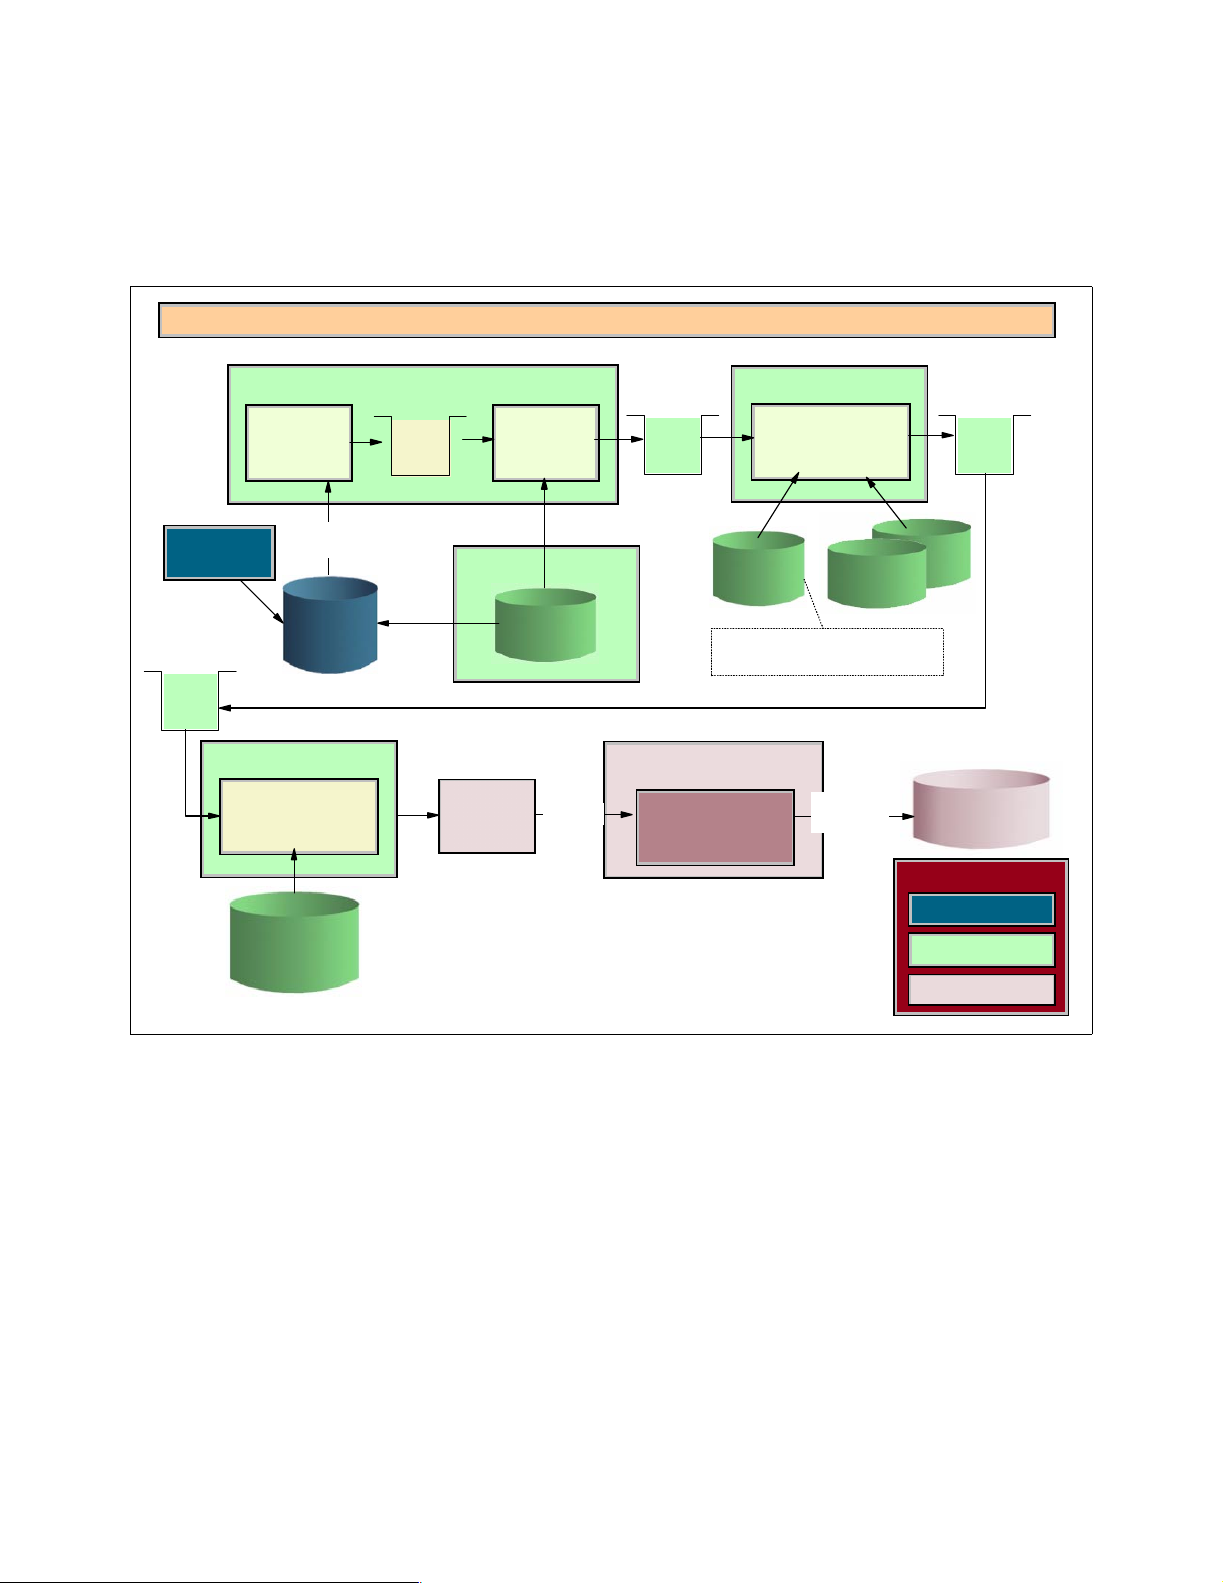
Figure 2-5 shows the relationship between the .connect applications, the commerce.connect
platform, System21, and the IBM middleware-WebSphere and MQSeries application server.
14 Geac System21 commerce.connect: Implementation on the iSeries Server
Page 27
PC Client Rich
Java Swing UI
Web Browser
UI
.connect application
Middleware
Call
Business
Function
call.connect
EJBs
SQL via JDBC
HTML Web Pages
vendor.
connect
Servlets/JSPs
Call Business Function
vendor.connect
EJBs
Send XML Document
inter.
connect
Via Jacada Server
System21 Business
Function
Web server
EJB Container
Authenticate/
Authorize
User
commerce.connect
System21
secure.
connect
Send XML Document
WebSphere MQ
process.
connect
System21
Database
Product Interaction Overview
Figure 2-5 Relationship between the .connect applications
2.3 Overview of process.connect
process.connect provides a business modelling tool and workflow engine to define and
automate business processes. It delivers optimal business processes that electronically
improve the performance of mid-market companies. It integrates the commerce.platform and
the commerce.connect applications, @ctive Processes and @ctive Modeler, to deliver rapid
modelling, implementation, and execution of critical-business activities.
process.connect can also integrate the processes of the System21 organization with those of
its suppliers or customers. A process can interact with customers (or suppliers) by sending an
Database Triggers
Chapter 2. Architecture of the commerce.connect products 15
Page 28

e-mail requesting information. The e-mail reply is then used to control the next step in the
process. For example, in an order fulfilment process, if an order cannot be fully allocated, the
process can e-mail the customer and ask if a part shipment is acceptable. Links in the e-mail
send a yes or no response back to the process, which continues appropriately.
2.4 Architectural representation
The deployment requirements (for example, must be able to run on a single iSeries machine)
considerably affect the overall architecture in terms of physical location of database, code,
etc. However, Geac ensures that the architecture is not constrained by these physical
limitations.
There is a logical view of the architecture that identifies each significant layer of the system
and shows how that layer maps onto a design and implementation tiered architecture. For
example, Geac can deploy the Business Logic for vendor.connect onto either the iSeries
server or Windows 2000.
2.4.1 Architectural goals and constraints
In an ideal world, the architecture allows and assists the product team to build the ultimate
system with infinite flexibility, scalability, ease of use, and installation. In the real world, each
interested stakeholder has their priorities for the system.
For a sales person, the system should be seen as infinitely flexible and expandable. In reality,
meeting these aspirations may lead to an architecture that is overly complex and
cumbersome for the main day-to-day running of the system. Therefore the architecture is a
trade-off between many requirements.
2.4.2 Non-functional architectural considerations
This section details the key requirements of the system that may significantly impact the
architecture:
Compatibility with System21: The architecture needs to consider that all .connect
applications have a constraint that they must be compatible with System21.
Performance and scalability: The system must meet specific volume and response time
requirements for the project where the product will be deployed.
Re-usability: Both call.connect and vendor.connect were originally developed as part of
individual specific customer projects. The justification for the development of is that Geac
expects to have a significant amount of design and implementation re-use for future
projects. Therefore, the ability to re-use and extend the core business logic is vital to the
success of the product.
The follow on to re-usability is supportability: Geac must be able to enhance and add
functionality to the product while supporting existing installations from the common design
and code base.
e-commerce support: The call.connect EJB Business Logic components form the
back-end order entry system for the Geac e-commerce solution, web.connect. Therefore,
the architecture must support or be extendible to support the Web deployment model of
servlets, JavaServer Pages (JSPs), etc.
Deployability: In the short term, where possible, both call.connect and vendor.connect
should be deployable on a single iSeries running alongside System21 on the same
physical hardware. Due to hardware and system software constraints, it may be necessary
16 Geac System21 commerce.connect: Implementation on the iSeries Server
Page 29

to upgrade the hardware, software, or both. The minimum hardware requirements
obviously depend on the usage profile of the customer as well as the base WebSphere
Application Server requirements.
2.4.3 Functional architectural considerations
This section details current known functional requirements that may likely have a major
impact on the architecture of the system.
The deployment influence
Certain aspects of the architecture are strongly influenced by the targeted deployment
implementation platform of Java, WebSphere, and EJB.
What? No entity beans?
From previous architectural prototypes, and call.connect Release 1, and the current level of
EJB support within WebSphere, Geac chose not to use EJB entity beans for database
access. This was primarily on the grounds of performance, which was found to be significantly
slower than the equivalent hand-crafted Java Database Connectivity (JDBC) database
access.
There were also concerns over issues to do with legacy integration, specifically RPG
programs potentially accessing the same tables as those mapped by an entity bean. This was
an indication that there could be further performance problems.
Geac intends to re-evaluate the use of entity beans for the next release of call.connect. The
main benefits are of improved productivity and maintainability.
Session beans
The EJBs that contain the call.connect and vendor.connect Business Logic are designed and
deployed as
specific data (for example, Order Number) across method calls.
In theory (and proven in practice by using the WebSphere Performance Monitor), this allows
the EJB container (WebSphere) to pool session beans, thereby reducing the resource usage
on the system. Even if there are 75 telesales operators all entering orders into the system,
there may be only 10 instances of the Sales Order Session Bean actively running (and
consuming system resources) on the system.
stateless session beans. This means that they do not (directly) maintain any state
2.5 Reusing and extending System21 business logic
This section details the options that are available when considering how to maximize the
reuse of existing legacy application logic.
2.5.1 Accessing System21 RPG business logic
The need to reuse existing System21 logic was identified early on in the original call.connect
project. The following technical options were available.
IBM Toolbox for Java (previously AS/400 Toolbox for Java)
This is an obvious candidate. This has many classes for accessing iSeries objects including
calling programs.
Chapter 2. Architecture of the commerce.connect products 17
Page 30

There are two disadvantages:
The first is primarily stylistic. Using Toolbox for Java would make Java look more iSeries
specific.
The second is that Toolbox for Java would form its own connection independently of any
JDBC connection. This would mean that updates made by iSeries programs called in this
way could not easily be part of the same commit transaction as updates made through
JDBC.
The first objection is more apparent than real. Toolbox for Java is 100% Pure Java. Therefore,
its use does not restrict the portability of the Java code. The second objection is more
significant.
Java Native Interface (JNI)
Sun defines a technique for calling between Java and native code called the Java Native
Interface
the Sun documentation discusses C and C++, but it is also possible with RPG on the iSeries.
At V4R4 and V4R5, it was quite difficult to integrate Java and RPG. At V5R1, it became much
easier. If V4R5 had to be supported, then the coding complexity would be an issue.
At V5R1, there was no longer an issue but another objection remained. JNI is a direct call and
the native code would have to be on the same system. This would force an element of Java
onto the iSeries and restrict the deployment options for the application. The entire application
would not have to be on the iSeries since some form of remote invocation could be used, but
would add a considerable degree of complexity.
. By native, Sun means non-Java code supported by the underlying platform. All of
Stored procedures
There are two forms of stored procedure on the iSeries server. They may be written in
Structured Query Language (SQL) or in most other supported languages for example, RPG
and CL.
Geac does the reverse of typical usage. It does not have a stored procedure and then decide
to write it in RPG. Instead, Geac already has RPG and creates a stored procedure, which
becomes the program. This stored procedure can then easily be called using JDBC from
Java. For a programmer who has learned basic SQL and JDBC, this is easy.
The choice
JNI is probably the best performing option. However, its restrictions on deployment options
eliminated it. Also V5R1 did not exist at the time that Geac made the choice, and the
complexity of JNI prior to V5R1 counted against it.
The performance of the IBM Toolbox for Java and stored procedure options is similar. The
coding complexity is similar but stored procedures have the advantage of similarity with other
SQL. The final decision was made based on the ability of stored procedures to share
connections and partake in transactions.
18 Geac System21 commerce.connect: Implementation on the iSeries Server
Page 31

Chapter 3. Installing and setting up
call.connect
This chapter explains how to install and set up call.connect and vendor.connect. Prior to
reading this chapter, you must be familiar with the skills listed for each product and have
knowledge about System21 and its configuration.
Installing call.connect involves a number of steps on both the server and on each client.
Before starting, be sure to verify that all prerequisites are in place. Use care in following the
steps that are provided. Failure to do so can result in problems with the installation of these
products. Once these products are configured, they require little or no maintenance.
3
Throughout the installation instructions, you will see variables in
variables, you need to provide a real name. For example, for the variable <
change it to the name of the machine you are using.
italics
. For each of these
iSeries
>, you must
© Copyright IBM Corp. 2002. All rights reserved. 19
Page 32

3.1 Skills and prerequisites for installing, running WebSphere Application Server
This section outlines the skills you need for the installation and the prerequisites that must be
in place before you start.
3.1.1 Skills
You must be familiar with the workstation, particularly with the operation of the keyboard and
mouse. You should also be familiar with the following applications, which are used in the
call.connect configuration. Although instructions are provided at each stage, a complete
beginner may find the installation to be difficult and may need help from someone with more
experience.
Windows NT Explorer
Notepad and Wordpad or other tool to edit files (for example, .bat and .xml files)
Client Access
MS-DOS
OS/400 commands
A Web browser (for example, Internet Explorer)
System21
In addition, you should also be familiar with:
WebSphere Application Server
CL programming on the iSeries
SQL
For straightforward configurations, you may be able to proceed regardless of your familiarity
with these items.
3.1.2 Prerequisites
Before you install WebSphere Application Server, make sure that you have met all hardware
and software prerequisites. The following sections list the iSeries hardware requirements,
iSeries software requirements, workstation hardware requirements, and workstation software
requirements.
For more information, see:
http://www-1.ibm.com/servers/eserver/iseries/software/websphere/wsappserver/docs/doc.htm
iSeries hardware requirements
Any of the following servers (recommended minimums) are required:
iSeries Model 170 with processor feature 2385
iSeries Model 720 with processor feature 2062
iSeries Model 270 with processor feature 2252
iSeries Model 820 with processor feature 2396
1 GB of memory (recommended minimum)
Note: You may use earlier systems than these recommended minimums in environments
that support a limited number of users and where longer server initialization times can be
tolerated.
Table 3-1 lists the disk requirements.
20 Geac System21 commerce.connect: Implementation on the iSeries Server
Page 33

Table 3-1 Disk space requirements
Installation option During installation After installation
*BASE (client application development software only) 500 MB 250 MB
Option 1 (includes *BASE and WebSphere
Application Server environment)
650 MB 450 MB
iSeries software requirements
The minimum software required for your iSeries includes:
OS/400 Version 4 Release 4, or later (in an unrestricted state): To install and run
WebSphere Application Server Advanced Edition for iSeries on your iSeries server.
iSeries user profile with *ALLOBJ authority: To install WebSphere Application Server
Advanced Edition for iSeries on your iSeries server.
iSeries Developer Kit for Java (5769-JV1), Version 1.2 (option 3)
OS/400 Qshell Interpreter (5769-SS1, option 30): For using the scripts that are included
with the product and for local installation (installing to your iSeries server from the
CD-ROM of your iSeries server).
OS/400 Host Servers (5769-SS1, option 12): For remote installation (installing to your
iSeries server from the CD-ROM of another workstation). You can start the host servers by
using the Start Host Server (STRHOSTSVR) command. On the iSeries command line,
type:
STRHOSTSVR *ALL
The QSERVER subsystem must be running on iSeries.
TCP/IP Connectivity Utilities for iSeries (5769-TC1): To configure and run WebSphere
Application Server. It is also needed if you are using remote installation (installing
WebSphere Application Server on your iSeries server from the CD-ROM of another
workstation). To start TCP/IP on iSeries, enter the Start TCP/IP (STRTCP) command on
the iSeries command line.
HTTP Server for iSeries (5769-DG1): To support requests for servlets and JavaServer
Pages resources managed by WebSphere Application Server. It is also needed if you plan
to use Secure Sockets Layer (SSL) protocol. If you plan to deploy only enterprise beans,
HTTP Server for iSeries is not needed. call.connect optionally uses Sun’s Java Web Start
technology to allow dynamic updates of client applications. Java WebStart requires an
HTTP Server to service update requests. However, call.connect can be used without
enabling these features.
DB2 Universal Database (UDB) for iSeries: Must be configured to work with WebSphere
Application Server for iSeries if you plan to connect to the local database. Optionally, this
database may be on a different machine than the iSeries server that is running
WebSphere Application Server. We recommend that you use the local iSeries database
during the initial WebSphere Administration Server setup.
Entry in the relational database directory that points to *LOCAL: To run WebSphere
Application Server on iSeries.
To view the current settings, enter the Work with Relational Database Directory Entry
(WRKRDBDIRE) command. You can add a directory entry by entering the Add Relational
Database Directory Entry (ADDRDBDIRE) command.
The maximum number of jobs allowed for the iSeries SQL server jobs should be set to
*NOMAX. Use the Change Prestart Job Entry (CHGPJE) command to change the prestart
job entry for the SQL server jobs. For example, you would enter:
CHGPJE SBSD(QSYSWRK) PGM(QSQSRVR) MAXJOBS(*NOMAX)
Chapter 3. Installing and setting up call.connect 21
Page 34

DB2 Query Manager and SQL Development Kit for iSeries (5769-ST1): This is an
optional product that can be helpful in developing client applications.
All necessary fixes: For a current list of fixes, see:
http://www.iSeries.ibm.com/WebSphere
When you reach this site, click PTFs.
Workstation hardware requirements
Workstations and software configurations, other than those in the following list, are capable of
running WebSphere. However, they are not included here because they have not been tested
running call.connect.
The capable workstations include any Intel-based personal computer capable of running any
of the following operating systems:
Windows NT Server or Workstation V4.0
Windows 2000 Server or Advanced Server
Support for a communications adapter or an appropriate network interface
40 MB of free disk space (minimum)
96 MB of memory (minimum)
CD-ROM drive
Workstation software requirements
The minimum software required an each workstation running call.connect includes:
One of the following operating systems:
– Windows NT Server V4.0, SP 6A or later
– Windows 2000 Server or Advanced Server
IBM Development Kit for Java: Windows NT IBM enhanced Java Development Kit, Version
1.2.2
Note: These products are included on the WebSphere Application Server Advanced
Edition workstation CD-ROM:
TCP/IP must be installed and running on your workstation
A Web browser that supports HTML 4 and cascading style sheets (CSS)
Client Access
You can install these products by selecting the IBM JDK 1.2.2 install option when you
install the Administrative Console.
3.1.3 System21 authorization code for Order Management (OM)
You must obtain an authorization code, from your Geac distributor, for the System21 Order
Management application (and all other System21 applications) before you can use it. You
must apply the code in the usual way.
3.2 Standard installation procedures
This section provides detailed instructions for installing call.connect. It includes sections on a
basic standard setup using the configuration supplied on the CD and a section on setting up
the new System21 application Order Management.
22 Geac System21 commerce.connect: Implementation on the iSeries Server
Page 35

Checklist of the basic steps
Table 3-2 summarizes the steps required to install and configure call.connect. You can find
additional information on each step in the following sections. For full details, see the
call.connect Installation Guide
Table 3-2 Summary of the call.connect installation and configuration
Step Action Completed
1 Load System21, including standard applications and the Order Management
application
2 Load Java components and configuration files for call.connect
3 Install and configure WebSphere Application Sever
4 Set up journaling
5 Create stored procedures and run SQL scripts
6 Set up Java Message Service (JMS)
7 Create user profiles
8 Set up System21 data
9 Install Java Web Start
10 Back up the installation (for example, the entire configuration)
.
Geac
3.2.1 Installing Order Management and call.connect
This section explains how to load the Order Management System21 application and the
call.connect IFS objects.
Note: This redbook does not provide instructions for installing System21. You can find
information on installing System 21 and current details regarding your installation scenario
in the
Geac System21 Installation and Setup Guide
System21 base
To run call.connect, you need to load at least the following System21 applications at V3.5.2b
Service Pack 5:
Application Manager
Geac System21
Advanced Order Entry (AO)
Distribution Requirements Planning (DR)
Inventory (IN)
Order Entry (OE)
Cash Management (CS)
General Ledger (GL)
Sales Ledger (SL)
You can obtain these applications from your Geac distributor.
.
System21 Order Management (OM)
In addition to the System21 applications, you must load the Order Management System21
module. This module is supplied on the call.connect CD. Follow these instructions:
Chapter 3. Installing and setting up call.connect 23
Page 36

1. From the CD, load the Order Management module as explained in the readme file of the
CD. This installs the following libraries:
– OSLOMF3: Contains data files
– OSLOMD3: Contains all other Order Management objects
The source is available in the OSLOMS3 library, but this requires a special order and is not
normally shipped.
2. After you install the libraries, initialize the application with the following command:
AMINSAPP APSR(O) APPL(OM) RLSL(03) LIB(OSLOMD3)
3. Apply the authorization code for OM with the command:
STRIPGCF
4. Select option 4 and enter the codes that are provided next to the Order Management
application.
Java components and configuration files
All other components of call.connect are on the call.connect CD. You can load them by
following the instructions in the readme file.
The components are then loaded onto the iSeries in the /OrderManagement folder. This
folder contains the following subfolders:
Cfg
Log
Deployed
Client
Mgr
Stored procedures
SQL scripts
3.2.2 WebSphere installation and configuration
This section explains how to start the WebSphere administration server, import the
configuration file, and start the application.
You can find complete instructions about how to install and configure WebSphere Application
Server on the WebSphere Application Server Web site at:
http://www-1.ibm.com/servers/eserver/iseries/software/websphere/wsappserver/docs/doc.htm
Starting the administration server
To start the administration server, follow these steps:
1. On the iSeries, enter the command:
STRSBS SBSD(QEJB/QEJBSBS)
This starts the QEJB Subsystem and two auto-start jobs QEJBADMIN and QEJBMNTR.
WebSphere cannot start until the administration server is ready.
2. To find out the status of the administration server, check the job log for job QEJBADMIN.
Enter the following command:
WRKACTJOB SBS(QEJBSBS)
3. Type 5 next to QEJBADMIN to view the job.
24 Geac System21 commerce.connect: Implementation on the iSeries Server
Page 37

4. Select option 10 to view the job log. Wait until you see the message WebSphere
administration server QEJBADMIN ready. This may take several minutes. The first start
after the installation may be even slower.
Importing the configuration file
Important: To import the configuration file, the WebSphere instance must be running, but
the console
Run the import tool inside Qshell. Follow these steps:
1. Run the Start Qshell (STRQSH) command. After each command, wait for the dollar ($)
signs to appear.
2. Switch to the current directory within Qshell. Enter the following command (Figure 3-1):
cd /QIBM/ProdData/WebASAdv/bin
must not be running.
Figure 3-1 Importing the WebSphere configuration to an iSeries called homer
3. Import the Config.xml configuration file from OrderManagement/Config.
4. To use the delivered file to configure the default instance on an iSeries server, enter the
following command. Substitute your server name for
XMLConfig -adminNodeName <iSeries> -import /OrderManagement/Config/Config.xml
-substitute
"nodename=<iSeries>;dir=/OrderManagement;appname=SalesOrder;container=SalesOrder"
iSeries
. Enter:
The system may run for several minutes.
Notes:
Leave a space before each - sign, and leave a space after each keyword, for
example, -adminNodeName , -import , and -substitute .
There is only one pair of quotes around the entire substitution string.
Chapter 3. Installing and setting up call.connect 25
Page 38

The import includes:
The node
The SalesOrder application and all contents
The JDBC driver required
The datasource required.
The config.xml file contains the following variables, which are substituted on the import
command and replaced with real names:
$NodeName$: This is the WebSphere node name. The node name in WebSphere is case
sensitive. This is relevant when you start the console with AdminClient and when you
specify an Internet Inter-ORB Protocol (IIOP) address for a Java Naming and Directory
Interface (JNDI) lookup (for example, within the batch files that start client programs). It is
also relevant to tools such as the XML export/import utility.
Usually the name is entirely in lowercase. On some systems, it is entirely in uppercase
and could, in theory, be a mixture of both.
If you find that the console fails to start with such messages as “Could not get
attributes” (similar to when the service/subsystem is not started), but the service is
started, then the problem may be that you are using the incorrect case on the name.
You can verify the required name by using the following SQL to look at a WebSphere table:
select NAME
from EJSADMIN/NODE_TABLE
This shows the node name exactly as WebSphere wants it to appear. Do not be tempted
to change the contents of this table. It is liable to make things worse rather than better.
Note: You must have QSECOFR user authority to read this table.
$AppName$: This is the application name that is typically SalesOrder for the default
instance.
$Dir$: This is the root directory for the installation. This is the directory that contains the
subdirectories cfg, deployed, and log. For the default instance, this is usually
/OrderManagement.
Note: The application name should be less than 11 characters in length so that you can
clearly see it on the iSeries server when you use the WRKACTJOB SBS(QEJBSBS)
command. Longer names are allowed but must be truncated when viewed this way.
$ContainerName$: This is the container name that is typically the same as the
application name, but can be different.
Starting the application
To start the application, follow these steps:
1. Start a WebSphere console. In a command prompt, change the directory to:
..\WebSphere\appserver\bin
Note: This is a standard directory for a default installation of the console. However, you
can install the console in a different directory if necessary.
26 Geac System21 commerce.connect: Implementation on the iSeries Server
Page 39

2. To start the console for the specified machine in the default environment, enter the
command:
adminclient <iSeries> <Port Number>
This may be quite slow. If an instance other than the default instance is required, enter the
port number. Otherwise, you may leave this blank.
3. Wait for the message “Console Ready” to appear in the console. The topology view
appears by default.
4. Open the node, application server, and container to display the beans. Click the
Application Server. Click Start and wait. The beans turn blue as they start. This may take
several minutes.
3.2.3 Journaling
Because WebSphere applications run under commitment control, files used by call.connect
must be journaled. There are many options to provide different levels of security.
Since files from different libraries must be journaled, the journal receiver and the journal must
be created in a new library rather than an existing System21 library. The following files must
be journaled to operate call.connect:
All physical files in library OSLOMF3
The following files in library OSLD1F3:
– INP40
– INP60
– OEP05
– OEP40
– OEP41
– OEP45
– OEP45E
– OEP55
– OEP56
However, merely journaling these files does not give the user the full advantages of journaling
such as extra security.
Performance improves if files are journaled to an auxiliary storage pool (ASP). You can use
the commands in the following sections with or without an ASP.
Journaling the files without an ASP
To journal these files without an ASP, complete the following steps. These are sample
commands only and may be varied as required.
1. Sign on as QSECOFR.
2. Create a new library for the journal receiver and journal, for example, OSLF3:
CRTLIB LIB(OSLF3) TEXT('OSL journal library')
3. Create a journal receiver:
CRTJRNRCV JRNRCV(OSLF3/OSL0001) THRESHOLD(50000) TEXT('System21 journal receiver.')
4. Create a journal:
CRTJRN JRN(OSLF3/OSL) JRNRCV(OSLF3/OSL0001) MNGRCV(*SYSTEM) DLTRCV(*YES) TEXT('System21
journal')
Chapter 3. Installing and setting up call.connect 27
Page 40

Journaling the files with an ASP
To journal the files using an ASP, follow these steps:
1. Create a separate library for the journal receiver:
CRTLIB LIB(OSLF3R) TEXT('OSL journal receiver library')
2. Create a journal receiver:
CRTJRNRCV JRNRCV(OSLF3R/OSL0001) ASP(2) THRESHOLD(50000) TEXT('System21 journal
receiver.')
3. Create the journal:
CRTJRN JRN(OSLF3/OSL) JRNRCV(OSLF3/OSL0001) MNGRCV(*SYSTEM) DLTRCV(*YES) TEXT('System21
journal')
Journaling a single file
To journal a single file, such as OMP00, use the following command:
STRJRNPF FILE(OSLOMF3/OMP00) JRN(OSLF3/OSL) OMTJRNE(*OPNCLO)
Journaling multiple files within a library
To journal multiple files in a library, follow these steps:
1. Start the Programming Development Manager (PDM):
STRPDM
2. Select option 9 (Work with user-defined options).
3. You see the Specify Option File to Work With display (Figure 3-2). Press Enter to accept
the defaults (File QAUOOPT, Library QGPL, and Member QAUOOPT).
Figure 3-2 Working with user-defined options
4. On the next display, press F6 to create a new user-defined option.
5. On the Create User-Defined Option display (Figure 3-3), enter the following information for
the parameters listed:
28 Geac System21 commerce.connect: Implementation on the iSeries Server
Page 41

– Option = SJ
– Command = STRJRNPF FILE(&L/&N) JRN(OSLF3/OSL) OMTJRNE(*OPNCLO)
Press Enter.
Figure 3-3 Creating a user-defined option
6. You return to the list of user-defined options. Press F3.
7. You return to the PDM menu. Select option 2 (Work with objects).
8. On the Work with Objects display, complete these tasks:
a. Enter the library that contains the files to journal for example, OSLOMF3.
b. Under object, set:
• Name: *ALL
• Type: *FILE
• Attribute: PF-DTA
Press Enter.
9. On the next display, type SJ next to each file that you want to journal. To journal
physical files, type SJ on the first line and press F13.
3.2.4 Stored procedures and SQL
You can easily run the stored procedures and other SQL commands by using Client Access.
However, you can cut and paste the commands into an iSeries SQL session if required.
Stored procedures
Stored procedures link Java components with RPG programs. There are several of these
procedures that must be created using the SQL scripts in the /OrderManagement/Stored
Procedures folder. To create them, use the Client Access SQL tool, which is in iSeries
Operations Navigator.
all
Chapter 3. Installing and setting up call.connect 29
Page 42

To run SQL scripts, follow these steps:
1. Open the /Ordermanagement/Stored Procedures folder in Windows Explorer and
double-click the script you want to run.
2. Sign on as a valid user, and the script opens.
3. Select Connection-> JDBC Setup (ODBC setup pre-release V4R5).
4. The Client Access Express ODBC Setup (32-bit) window (Figure 3-4) opens. Click the
Format tab.
5. Ensure that the system naming convention (*SYS) is selected.
Figure 3-4 Client Access setup for the naming convention
6. Click the Translation tab.
7. Ensure that Translate CCSID 65535 is set.
8. Click the Server tab (Figure 3-5).
9. Ensure that the correct library list is set. Set the default libraries as:
,oslomf3, oslomd3, osld1f3, osld2f3, oslslf3, oslglf3
Note: Do not forget to include the initial comma (,) in the list.
30 Geac System21 commerce.connect: Implementation on the iSeries Server
Page 43

Figure 3-5 Client Access server setup
10.After you make all necessary changes, click Apply and then click OK.
As an alternative, you can perform these steps:
1. Open Operations Navigator.
2. Sign on as OMUSER.
3. Expand the iSeries.
4. Right-click the database and select Run SQL Scripts.
5. Open the /OrderManagement/Stored Procedures folder.
6. Double-click the script to select it.
7. Change the parameters as indicated in the previous set of instructions.
The scripts all start with a DROP PROCEDURE instruction. This removes any previously
installed stored procedures. However, this does not run the first time the scripts start. In this
case, position the cursor on the second line of the script. Then select Run-> From Selected.
Other SQL
Some static data must be set up. You achieve this by running the SQL scripts in the SQL
Scripts folder. Use the Client Access SQL tool as explained in the previous section and run all
the scripts in this folder.
3.2.5 Java Message Service
JMS is used to send messages from the server to the client. It is used when, for example,
there are supply problems or the order is suspended. It is also used to allow complex time
consuming steps to be completed asynchronously, for example when the order is written to
System21.
Ensure that WebSphere is started.
Chapter 3. Installing and setting up call.connect 31
Page 44

The prerequisites include:
WebSphere 3.5.5
MQSeries 5.2
MA88 MQSeries classes for Java and Java Message Service (requires V4R5 or later)
Setting up MQSeries
This section explains how to configure MQSeries on the iSeries to be used by call.connect.
Then it explains how to map the MQSeries queues onto JMS queues.
Creating a queue manager
First you must create a queue manager as explained here:
1. If the subsystem QMQM is not started (check by using the Work with Subsystem
(WRKSBS) command), enter the following command:
STRSBS QMQM/QMQM
2. Enter the Work with Message Queue Manager (WRKMQM) command.
3. Press F6 (Create queue manager).
4. On the Create Message Queue Manager display (Figure 3-6), complete the following
fields:
– Message Queue Manager Name: CALLCONNECTQM
– Te xt ‘description’: ‘Call Connect Queue Manager’
– Undelivered Message Queue: SYSTEM.DEAD.LETTER.QUEUE
Press Enter to create the message queue manager.
Figure 3-6 Create Message Queue Manager display
5. Start the queue manager.
6. On the Start Queue Manager display, enter option 14 next to CALLCONNECTQM and
press Enter.
7. Wait until the Status changes to
Note: You need to start the queue manager before you can create any queues.
32 Geac System21 commerce.connect: Implementation on the iSeries Server
Active. Then press F5 to refresh the display.
Page 45

Creating a queue
Now create a queue as explained here:
1. On the Start Queue Manager display, type 18 next to CALLCONNECTQM and press
Enter.
2. The Work with MQM Queues display appears. Press F6 to create the queue.
3. On the Create MQM Queue display (Figure 3-7), press F9 to display all parameters.
a. Complete the following fields as shown here:
• Queue Name: SALESORDER.QUEUE
• Queue Type: *LCL
• Te xt ‘description’: Sales Order Queue
• Default Message Persistence: *YES
Figure 3-7 Create MQM Queue display
b. Press Enter to create the message queue.
Granting authority
Next, you must grant authority for both the queue manager and queue:
1. Enter the Grant MQM Object Authority (GRTMQMAUT) command for your queue
manager.
2. On the Grant MQM Object Authority display (Figure 3-8), follow these steps:
a. Complete the fields as shown here:
• Object Name: CALLCONNECTQM
• Object Type: *MQM
• User Names: *PUBLIC (see note below)
• Authority: *ALL
• Message Queue Manager Name: CALLCONNECTQM
b. Press Enter to grant authority.
Chapter 3. Installing and setting up call.connect 33
Page 46

Figure 3-8 Create MQM Object Authority display for your queue manager
3. Enter the GRTMQMAUT command again to grant MQM object authority to your queue.
4. On the Grant MQM Object Authority display (Figure 3-9), complete the following fields as
shown here:
– Object Name: SALESORDER.QUEUE
– Object Type: *Q
– User Names: *PUBLIC (see the following note)
– Authority: *ALL
– Message Queue Manager Name: CALLCONNECTQM
Note: You do not need to give object authority to all users (*PUBLIC). But, you can give
it only to the appropriate accounts. QEJB needs full authority to these objects and the
user under whom the SalesOrderRecevier.sh runs. This user is currently OMUSER.
Press Enter to grant authority.
Figure 3-9 Grant MQM Object Authority display for your queue
34 Geac System21 commerce.connect: Implementation on the iSeries Server
Page 47

Additional files needed
You need the following files to configure and run your message receiver:
JMSAdmin.sh: JMSAdmin tool executable from QSH
JMSAdmin.config: Configuration file used by JMSAdmin
SendTestMessage.sh: Enables test messages to be sent
You can find these programs in the /OrderManagement/mq directory on the iSeries server. If
these files are missing, map to the iSeries root directory using Windows Explorer, navigate to
the mq directory, and copy the missing files.
You may need to edit the JMSAdmin.config file. You can do this by using Windows Explorer.
Alter the line that starts with PROVIDER_URL…… so that it points to the correct port number on
your iSeries, for example:
PROVIDER_URL=iiop://localhost:900/
Creating the JNDI/MQ objects
Follow these steps to create the JNDI/MQ objects:
1. Use Qshell to create the objects. Enter the STRQSH command.
2. Change the directory, using cd directory name, to where you installed the JMSAdmin
files, for example:
cd /OrderManagement/Build/mq
3. Type the following command:
JMSAdmin.sh
Press Enter. The JMSAdmin tool creates the objects within the namespace stated in your
JMSAdmin.config file.
4. Type the following commands in the order shown in your qsh session. Press Enter after
you enter each command:
Note: You must use the exact case as shown here.
def ctx(geac)
change ctx(geac)
def qcf(CallConnectQueueManager) qmgr(CALLCONNECTQM)
def q(SalesOrderQueue) qmgr(CALLCONNECTQM) queue(SALESORDER.QUEUE)
end
You have now created your JNDI/MQ objects. Press F3 to exit Qshell.
Standard properties
Add the following properties to your standard.properties file either on the iSeries server or
client:
MQ.queue.manager=geac/CallConnectQueueManager
MQ.queue=geac/SalesOrderQueue
messaging=1
You can also add “fakeunusual=1” if you want to test unusual messages through JMS or
MQSeries.
Chapter 3. Installing and setting up call.connect 35
Page 48

Additional WebSphere configuration
Add the following argument to the command line arguments within your application server.
This enables the Message Listener to start and close automatically with the enterprise beans.
-Dcom.ibm.ejs.sm.server.ServiceInitializer=
jba.rose.salesorder.messaging.SalesOrderListener
Testing the messaging
After call.connect is up and running, you can verify whether the messaging is working
correctly by testing it as explained here:
1. Run the call.connect product.
2. Open a call.
3. Create an order.
4. Enter an order line with the quantity of 10.
5. This should create a JMS message that should be delivered back to the client. If the JMS
message was not delivered, consult the error logs.
Note: You can also test whether messaging is working by using QSH (your enterprise
beans in WebSphere must be running). Type the following text into your QSH session:
. ./SendTestMessage.sh “now type your message here”
Press Enter.
6. Your SalesOrderListener should now receive your message. Check your call.connect logs
to see your received message.
3.2.6 User profiles
This section explains how to set up user profiles on the iSeries server, in the call.connect user
directory and within System21.
Job description
The call.connect library list is set within a job description OSLOMD3/OMJOBD that is
supplied as already configured in the OSLOMD3 library. The library list should contain:
OSLOMF3, OSLD1F3, OSLD2F3, OSLSLF3, OSLGLF3, OSLCSF3, OSLOMD3, OSLOEP3,
OSLINP3, IPGAMF4, IPGCFF4, IPGAMP4, OSLOIF4, OSLOID4, OSLWTP3, OSLGLD3,
OSLSLD3, IPGCFP4, and OSLCSD3.
However, if you must use other .connect products or other products that use a workflow,
change the job description to include OSLWFF3 in its library list.
Creating iSeries user profiles
You must create iSeries user profiles for all call.connect users. To do this, sign on as QSECOFR
and create the profiles as required.
In addition, you must create a special user profile, normally OMUSER with password
OMUSER, to be used by JDBC connections. Be sure to use the job description within this
user profile. Set the profile with QUSER authority. Then set the CCSID accordingly as follows:
United Kingdom: CCSID = 285
United States: CCSID = 37
Other countries (regions): Set as required
36 Geac System21 commerce.connect: Implementation on the iSeries Server
Page 49

Sign on as QSECOFR and create the profile as shown here:
CRTUSRPRF USRPRF(OMUSER) TEXT('call.connect user profile') JOBD(OSLOMD3/OMJOBD) CCSID(285)
Setting up call.connect users in the XML user directory
You must set up all call.connect users on the server in the XML file
/OrderManagement/log/UserDirectory.xml, with the same user IDs as those created on the
iSeries. Open this XML file in a notepad and copy the following section:
<entry dn="cn=John Smith, ou=eCommerce, ou=Studley,o=Geac,c=UK">
<objectclass>
<oc-value>top</oc-value>
<oc-value>person</oc-value>
<oc-value>organizationalPerson</oc-value>
<oc-value>inetOrgPerson</oc-value>
<oc-value>ePerson</oc-value>
<oc-value>s21User</oc-value>
</objectclass>
<attr name="cn"><value>John</value></attr>
<attr name="sn"><value>Smith</value></attr>
<attr name="uid"><value>Operator1</value></attr>
<attr name="userpassword">Teacup</value></attr>
<attr name="mail"><value>-none-</value></attr>
<attr name="s21username"><value>-none-</value> </attr>
</entry>
Note the following explanation:
cn Common name
sn Surname
uid User ID for call.connect
userpassword Password for call.connect
You can edit the entries under dn (distinguished name), but they should be the same for all
entries:
ou Organizational unit
o Organization
c Country (region)
Amend the names and profiles as required. Most of this information is for memo purposes.
The only mandatory lines are the user ID and the password (
uid and userpassword). The user
ID should not have spaces in it because this also needs to be a valid iSeries sign on.
Setting up System21 user profiles
All the users defined as call.connect users in the XML user directory must have a System21
user profile. They must also be defined as operators within the Order Management
application.
To set up a System21 user profile, follow these steps:
1. Sign on to the iSeries as a user with access to System21 common functions. When
delivered, QPGMR has the required authority.
2. Enter the following command to access the main functions:
STRIPGCF
3. Select option 1 from the menu and enter the user ID to maintain.
4. Press F17 and type option 1 next to each menu that begins with
Chapter 3. Installing and setting up call.connect 37
OM. Press Enter.
Page 50

5. On each display, press F15 to authorize the user to all options on that menu.
6. After all displays are presented, press F12 to return to the main user profile maintenance
display.
7. Select F19 and type 1 next to the OM 03 application. Press Enter.
8. Type 1 next to all companies that are valid for this user. Press Enter.
For more information, see Chapter 1 in the Geac System21
Enterprise Framework
manual.
Administration Functions Active
Setting up an operator
This section explains how to set up an operator. It assumes that the user is authorized to the
OM menus as explained earlier and that the OM company profile is already configured.
1. Sign on to the iSeries server using the profile OMUSER.
2. Enter the command:
AM3
3. On the Option line, enter:
/OMM
This displays the OMM menu.
4. On the OMM menu, select option 1.
5. Add or maintain the operator codes as required. Now all users should have an iSeries
profile, an XML profile, and a System21 profile. They should also be set up as operators.
Figure 3-10 shows an example display of setting up an operator profile.
Figure 3-10 Operator setup display
For more information, see the
38 Geac System21 commerce.connect: Implementation on the iSeries Server
System21 Setup for call.connect
manual.
Page 51

3.2.7 System21 data set up
System21 data setup is covered in the
Basic System21 Setup for call.connect
manual. You
must complete this setup in order for call.connect to operate successfully. This section
outlines the steps to configure the Order Management module (see Table 3-3). These steps
assume that other parts of System21, such as customers, items, depots, etc., are already
setup.
Table 3-3 System21 Order Management setup
Step Action Completed
1 Create a search family code
2 Create an Order Management company profile
3 Create buying lists
4 Create buying list rules
5 Create operator profiles
6 Create teams
7 Create OM customer details
8 Create OM customer contacts
9 Create outgoing call schedules
10 Create item sales details
11 Create supply rules and policies
12 Create supply points
13 Create customer and item attributes
14 Generate call lists
3.2.8 Java Web Start
This section provides instructions for a straightforward way to configure a new iSeries. Two
HTTP Servers are available at different releases of the operating system:
IBM HTTP Server for AS/400 (original): For V4R4 and earlier
IBM HTTP Server for iSeries (powered by Apache): For V5R1 and later
V4R5 supports both original and powered by Apache.
Ensuring that the HTTP administrative server is ready
The following steps are the same for both servers:
1. Verify that the HTTP Server software is loaded. On the iSeries, type the following
command:
GO LICPGM
2. On the display that appears, select option 10 (Display). Check the suffixes. Look for DG1.
If you do not find it, load it before you proceed to the next step.
3. Start the HTTP Server. On the iSeries, run the command:
STRTCPSVR SERVER(*HTTP) HTTPSVR(*ADMIN)
Chapter 3. Installing and setting up call.connect 39
Page 52

4. Verify that the server is running. Enter the following command:
WRKACTJOB
5. Verify that ADMIN jobs are running in the QHTTPSVR subsystem.
Configuring the HTTP Server on the iSeries
To configure the HTTP Server on the iSeries server, follow these steps:
1. In a Web browser, type:
http://<iSeries>:2001
Enter your iSeries server name for iSeries. This is the port on which the administration of
HTTP is listening.
2. Sign on as QSECOFR.
3. The AS/400 Tasks page appears as shown in Figure 3-11. In this example, the pages are
for an iSeries called
Needjava
. Select IBM HTTP Server for AS/400.
Figure 3-11 HTTP Server configuration
40 Geac System21 commerce.connect: Implementation on the iSeries Server
Page 53

4. The IBM HTTP Server for AS/400 page appears as shown in Figure 3-12. Select the
Configuration and Administration icon on the left.
Figure 3-12 HTTP Server configuration
From this point forward, the instructions are different depending on whether you are using
IBM HTTP Server (original) or IBM HTTP Server (powered by Apache).
Chapter 3. Installing and setting up call.connect 41
Page 54

Configuring an HTTP Server for iSeries (original)
To configure an IBM HTTP Server (original) at V4R5 or earlier, follow these steps. First, you
should see the IBM HTTP Server Configuration and Administration page (Figure 3-13). Click
the Configurations option on the left.
Figure 3-13 IBM HTTP Server Configuration and Administration page
Next you need to create a new configuration and a new instance, based on the IBM-supplied
configurations and instances. This is explained in the following sections.
42 Geac System21 commerce.connect: Implementation on the iSeries Server
Page 55

Creating a configuration
Follow these steps to create a configuration:
1. Under the Configurations option, select the Create configuration link.
2. The Create configuration page appears (Figure 3-14). Follow these steps:
a. Insert the name of the configuration, such as the iSeries name.
b. Select the Create based on existing configuration option and enter CONFIG.
c. Click Apply.
Figure 3-14 Create configuration page
3. Select the Request Processing option on the left and select the Request routing link.
Chapter 3. Installing and setting up call.connect 43
Page 56

4. The Request routing page (Figure 3-15) appears. Insert the following actions, templates,
and replacement file paths. This allows the system to find actual files when the user logs
on to call.connect. Be sure to click the Insert after radio button:
Action URL template Replacement file path
Pass /callconnect/ /ordermanagement/client/index.html
Pass /callconnect/*.gif /ordermanagement/client/*.gif
Pass /callconnect/callconnect.jnlp /ordermanagement/client/callconnect.jnlp
Pass /callconnect/*.jar /ordermanagement/client/*.jar
Pass /callconnect/setup.exe /ordermanagement/client/setup.exe
Pass /callconnect/help/ /ordermanagement/client/help/introduction.htm
Pass /callconnect/help/*.gif /ordermanagement/client/help/*.gif
Click Apply.
Figure 3-15 Request routing page
5. Select the Languages and Encoding link on the left. Then select MIME types.
44 Geac System21 commerce.connect: Implementation on the iSeries Server
Page 57

6. The MIME types page (Figure 3-16) appears. Enter the following information for the
system to recognize the .jnlp and .htm extensions. Be sure to click the Insert after radio
button:
– .jnlp extension
• File extension: .jnlp
• Content type/subtype: application/x-java-jnlp-file
• Encoding: 8 bit
• Quality: 1.0
– .htm extension
• File extension: .htm
• Content type/subtype: text/HTML
• Encoding: 8 bit
• Quality: 1.0
• Character Set: ISO-8859-1
Click Apply.
Figure 3-16 MIME types page
Chapter 3. Installing and setting up call.connect 45
Page 58

Creating an instance
Now you must create a server instance:
1. On the left-hand panel, select Server Instances and then the Create server instance
link.
2. The Create server instance page (Figure 3-17) appears. Follow these steps:
a. Enter the server instance name, such as the iSeries name.
b. Enter the configuration that was just created.
c. Click Create.
Figure 3-17 Create server instance page
You see the message "Message The server instance was successfully created".
In WRKACTJOB SBS(QHTTPSVR), you now see ADMIN jobs and jobs with the name of the
instance that was just created. All should be in
Now follow the steps in “Configuring CallConnect.jnlp” on page 51.
46 Geac System21 commerce.connect: Implementation on the iSeries Server
wait states.
Page 59

Configuring an HTTP Server for iSeries (powered by Apache)
This section explains how to configure an HTTP Server for iSeries (powered by Apache) from
the point where Configuration and Administration was selecteda:
1. To begin, the Manage HTTP Servers page (Figure 3-18) should be displayed. Select
Administration (if it is not already selected) from the options across the top of the page.
2. Under HTTP Server Creation in the left-hand panel, select Create HTTP Server.
Figure 3-18 Manage HTTP Servers page
Chapter 3. Installing and setting up call.connect 47
Page 60

3. The Create HTTP Server page (Figure 3-19) appears. Fill in the following information
when prompted on each page that appears next. Click Next on each page to advance.
– Type of server: HTTP Server (powered by Apache) –
– Server name: Give a suitable name. Could be the iSeries name.
– Configure base on existing: No
– Server root: Select the default
– Document root: Select the default
– IP address and TCP/IP port: Select the default
– Logging: Combined
Click Finish on the last page.
recommended
Figure 3-19 HTTP Server configuration 2 (Apache)
4. At the top of the page, select Configuration.
5. Under Configuration structure, verify that
bold.
6. You should see the
Under Web Site Definition, select Serve New Directory wizard. Click Next.
48 Geac System21 commerce.connect: Implementation on the iSeries Server
HTTP Server Name
HTTP Server Name
(HOMERA) global settings page (Figure 3-20).
global settings appears in
Page 61

Figure 3-20 HTTP Server name (HOMERA) global settings page
7. On the Serve New Directory wizard, complete the following tasks:
a. Select Static Web Pages and Files.
b. For Directory to Serve from, enter the client directory, such as
<iSeries>/OrderManagement/client.
c. For Alias, enter the name required on the browser, such as /callconnect/.
d. Click Finish.
8. Click the OrderManagement/client directory under Configuration structure to select it.
Chapter 3. Installing and setting up call.connect 49
Page 62

9. On the Director /OrderManagement/client page (Figure 3-21), under Processing
Requests, click Content Negotiation.
Figure 3-21 Directory /OrderManagement/client page
10.On the Content Negotiation page, scroll about half way down the page to Additional Meta
(MIME) information (Figure 3-22). Then follow these steps:
a. Click Add.
b. Enter the following information:
• File Extension: .jnlp
• Type: content-type
• Value: application/x-java-jnlp-file
c. Click Add.
d. Enter the following information:
• File Extension: .jar
• Type: content-type
• Value: application/x-zip-compressed
e. Click Add.
f. Click Apply.
50 Geac System21 commerce.connect: Implementation on the iSeries Server
Page 63

Figure 3-22 Additional Meta (MIME) information for file extensions section
11.At the top of the page, select Administration.
12.Click the Manage HTTP Servers link in the left-hand panel.
13.On the Manage HTTP Servers page (Figure 3-18 on page 47), stop the HTTP Server and
then start it.
Attention: For increased security, configure the aliases in a similar way to those
suggested for the original server.
Configuring CallConnect.jnlp
In Windows Explorer, modify the /ordermanagement/client/callconnect.jnlp file as follows to
reflect the alias that you previously set:
codebase="http://<iSeries>/callconnect/"
Change the server name. Also change the following line to point to the correct iSeries and
port number:
<property name="java.naming.provider.url" value="iiop://<iSeries>:900"/>
The default port number for the default instance of WebSphere is 900.
Configuring JWS.bat
After you set up the HTTP Server, configure JWS.bat as explained here:
1. In Windows Explorer, enter your iSeries name in the following line in the
/ordermanagement/client/JWS.bat file:
"C:\Program Files\Java Web Start\javaws" http://<iSeries>/callconnect/CallConnect.jnlp
Chapter 3. Installing and setting up call.connect 51
Page 64

2. Launch Java Web Start for the first time. In a Web browser, go to:
3. Click Install Java Web Start.
4. Select Run this program from its current location.
5. Select Yes to install and run setup.exe from the iSeries.
6. After this runs, select Launch call.connect to run the application. On the first time
7. Enter the following information:
3.2.9 Backup
http://<iSeries>/callconnect/
through, when you reach the prompt “Do you want to install and run: call.connect?”, select
Start.
– Default User: User for call.connect
– Default Password: Password for user
– S21 Company: XX (the AR company to be used)
This creates a desktop icon to run call.connect. Future launches of call.connect
automatically access the latest updates to the client software. Furthermore, you only need
to enter your user ID and password.
Note: This user must be a valid user that is set up in the XML User Directory, defined to
System21, and set up as an operator in Order Management.
After you have a satisfactory and working system, back up System21 and the integrated files
system (IFS) objects. For System21 backup, see
To back up the IFS objects, use the SAV command on the iSeries. The following example
shows how to back up the /OrderManagement folder to tape:
SAV DEV('/qsys.lib/tap01.devd') OBJ(('/OrderManagement'))
3.3 call.connect housekeeping
call.connect requires little housekeeping after you set it up and start running it.
3.3.1 Daily backups
Back up the System21 file libraries as usual, including library OSLOMF3.
The buying lists displayed in call.connect display items that were ordered in the last six
weeks. To keep them up to date, run Generate Buying Lists, option 11/OMP, every night. You
can set this up as an auto day, end job in the System21 Machine manager.
Certain data is cached in WebSphere so users may want to stop and start WebSphere daily
or weekly as explained in the following sections.
3.3.2 Stopping WebSphere
Geac System21 Installation Guide.
This section offers helpful information for situations where the iSeries is powered down or you
want to stop and start WebSphere overnight.
52 Geac System21 commerce.connect: Implementation on the iSeries Server
Page 65

Under normal circumstances, the application (for example, SalesOrder) continues to run in
WebSphere when the admin job QEJBADMIN is stopped. This means that to stop the system
overnight, the easiest way is to end QEJBSBS by using the following command:
ENDSBS SBS(QEJBSBS) OPTION(*IMMED)
This is a standard, tested iSeries command. It has the advantage of ending the JMS jobs and
any extra WebSphere instances. Users who want to end the subsystem more gently, may
want to use *CNTRLD end with a time limit. If you do not specify a time limit, the subsystem
will never end, because the JMS jobs keep running.
As an alternative for stopping and starting jobs, use XMLConfig as in a WebSphere
configuration. However, keep in mind that this method has not yet been fully tested by Geac.
3.3.3 Starting call.connect
To start call.connect, assuming the SalesOrder application was left running, you must follow
the steps to start WebSphere using either a default instance or other instances as explained
in the following sections.
Starting WebSphere (default instance)
With a default instance, you simply start QEJBSBS by using the following command:
STRSBS SBSD(QEJB/QEJBSBS)
This starts QEJBADMIN, QEJBMNTR, and the SALESORDER application. It requires some
time, possibly several minutes to start.
Starting WebSphere (other instances)
If you need to start more than one instance of WebSphere, use the following command:
CALL PGM(OSLOMD3/STRWSSVR) PARM(TEST)
This starts the test instance. You may start other instances while the default instance is still
starting.
3.3.4 Restoring IFS objects
If for any reason you need to restore the IFS objects for call.connect, use the following
command. Keep in mind that the system must have been previously backed up as
recommended in 3.3.1, “Daily backups” on page 52:
RST DEV('/qsys.lib/tap01.devd') OBJ(('/OrderManagement'))
3.4 Troubleshooting
If you followed the installation instructions exactly, the installation should proceed smoothly.
The primary cause of problems, particularly for those not experienced in these areas, is any
errors in installation steps. Therefore, if the system does not start correctly, you must first
carefully recheck all the installation steps.
You may also find the points in the following sections to be helpful. They are based on
experiences gained from installations carried out over several months on different iSeries
servers.
Chapter 3. Installing and setting up call.connect 53
Page 66

3.4.1 WebSphere node name
The node name in WebSphere is case sensitive. This is relevant when you start the console
with AdminClient and when you specify an IIOP address for a JNDI lookup (for example,
within the batch files which start client programs). It is also relevant to tools such as the XML
export or import utility.
Usually the name is entirely in lowercase. However, on some systems, it is entirely in
uppercase and could, in theory, be a mixture of both.
If you find that the console fails to start with such messages as "Could not get attributes"
(similar to when the service/subsystem is not started), but the service is started, then the
case of the name may be the problem.
You can verify the required name by using the following SQL to look at a WebSphere table:
select NAME
from EJSADMIN/NODE_TABLE
This shows the node name exactly as WebSphere wants it. Do not be tempted to change the
contents of this table. It is liable to make things worse rather than better. (You need to have
QSECOFR authority to read this table.)
3.4.2 Errors on starting the client
Verify that there are no tabs or spaces after any of the parameters in standard.properties,
particularly if using the CCClient method where these are set up manually.
With data errors, once you sign on to the call.connect GUI, verify that advanced pricing is
switched on for the company in use.
Also check that the search family code is set up in the OM company profile.
3.4.3 Errors when running the client
If pricing, tax, or discounting does not work correctly, check that the library list for the job
description used by OMUSER is correct.
If amended data does not appear, for example an OM item specification that is newly setup,
delete the .bl object in the log folder (see the following section). If you still have problems, stop
and start the beans in WebSphere to update the cached data.
3.4.4 Cached data and .bl and .cd files
To make call.connect as fast as possible, data from more stable files is cached in WebSphere.
If these files change, the new data will not be available to call.connect until the application
server is stopped and restarted. The following information is cached:
User profiles as held in /OrderManagement/log/UserDirectory.xml
System21 company profiles
In addition, buying list and customer data is held in files in the /OrderManagement/log folder.
These files are of type .bl and .cd respectively. These files are normally updated by the
System21 options on menu /OMP, Generate Buying Lists and Call List Generation. You may
delete the files if necessary, for example, for testing purposes.
54 Geac System21 commerce.connect: Implementation on the iSeries Server
Page 67

3.4.5 Log files and debugging
There are log files for both the client and the server, where you can find output produced
while the applications are running. For normal running, it is more efficient to minimize the
output to these files. However, if an error arises without an obvious solution, it is a good idea
to check these log files, which may have information on the cause of the error.
In addition, varying the logging level in the configuration files can change the amount of
output to give more clues as to the cause of the problem. JMS and Pre Generate Buying Lists
also have log files, which you may view, although the level cannot be changed.
Setting up logging on the client
This section explains how to set up logging on the client.
Java Web Start
Output from the client, if using Java Web Start, is directed to the file c:\Winnt\Profiles\<
on user>\
callconnect.log.
signed
To change the logging level, go to the file C:\Winnt\Profiles\
the following line:
log4j.rootCategory=ERROR, basic
Possible values instead of ERROR are WARN and DEBUG. DEBUG is the highest level. For
example, it produces the most output.
<s
igned on user
>\log.cfg. Change
Manually configured client
If you are using a manual client configuration, then the logged output is in a file as directed in
log.cfg, which is in the CCClient folder (see 3.5.3, “Manual client installation” on page 61). In
the log.cfg file, find a line, as shown in the following example, to see where the logged output
will be:
log4j.appender.basic.File=C:\\callConnect\\CCClient\\callConnect.log
In addition, the following line shows the logging level:
log4j.rootCategory=ERROR, basic
You may change ERROR to WARN or DEBUG to produce more output.
Server
The server has three log files for output. The first two, called standard output (stdout) and
standard error (stderr), are defined in the application server in WebSphere. The logging level
cannot be changed. Remember, if they are in WebSphere with an exclamation mark in front of
them, for example !stdout, they are cleared every time WebSphere is restarted and logged
information is lost.
The third output file is defined in the /OrderManagement/cfg/log.cfg file in the following line:
log4j.appender.basic.File=/OrderManagement/log/OrderManagement.log
At the end of the log.cfg file, the following command defines the logging level:
log4j.rootCategory=ERROR, basic
As mentioned in the previous section, you may change ERROR to WARN or DEBUG to
increase the level of information output.
Chapter 3. Installing and setting up call.connect 55
Page 68

Loadlog.bat
If the logging level on the server is changed, these changes do not normally take effect until
you stop and restart WebSphere. However, you can avoid this if you manually installed the
CCClient folder. The loadlog.bat file in the /OrderManagement/CCClient folder may be run.
You can change the logging level on the server to whatever is currently specified in the
/OrderManagement/cfg/log.cfg file. You must edit this file (right-click the file and select Edit)
as follows before you run it:
1. Set the path to the Callconnect folder:
set ROSEAO_PATH=C:\CallConnect
2. Set the server:
set SERVER=<iSeries>
3. Set the port number to the port required:
start javaw -Djava.naming.provider.url=iiop://%SERVER%:900…
PreGenerate Buying Lists
The PreGenerateBuyingLists.log file is out put when you run System21 option 11/OMP. It is in
the /OrderManagement/log folder by default. In test systems, you may modify the
OSLOMD3/OM311CLP program to direct the output somewhere else.
3.5 Manual configuration
The standard installation instructions assume that the user wants to install call.connect in the
easiest way. Since many variations are possible, this section includes extra information on
alternative setups.
3.5.1 Non-standard Order Management and call.connect installation
You may want to install to libraries and folders other than those used in the standard
installation. This section explains how to achieve this.
System21 and Order Management
All System21 applications may be installed in non-standard libraries. For more information,
see the
If call.connect is installed in non-standard files on the server, the OSLOMD3/OM311CLP CL
program may be amended if required. It runs Buying List Generate 11/OMP in System21.
Java components and configuration files
You may install these components and configuration files anywhere on your iSeries server.
However, it is generally simpler to keep all the subfolders in one folder.
If you want to install them somewhere other than in /OrderManagement, then you must
amend the configuration files listed in the following sections. For each file, we assume that
call.connect was installed to /OrderManagement/test.
Geac System21 Setup and Installation Guide.
/OrderManagement/test/cfg/ejb_default
Open this file in a notepad, and change the following lines:
environment.dir=/OrderManagement/test/cfg
log.config=/OrderManagement/test/cfg/log.cfg
56 Geac System21 commerce.connect: Implementation on the iSeries Server
Page 69

/OrderManagement/test/cfg/log.cfg
Open this file in a notepad, and change the following line:
log4j.appender.basic.File=/OrderManagement/log/OrderManagement.log
/OrderManagement/test/cfg/standard.properties
Open this file in a notepad, and ensure that the following parameters are set as shown here:
Datasource.stateless=as400Source
system21.currentcompany=<The company you want to use>
system21.user=OMUSER
system21.password=OMUSER
system21.glcompany=<The GL company you want to use>
/OrderManagement/test/client/PreGenerateBuyingLists.sh
Open this file in a notepad, and change the following line:
export ROSEAOHOME=/OrderManagement/test
You must also amend the following lines if a test instance of WebSphere is running (see 3.6,
“Alternative configurations” on page 62). In this example,
of WebSphere called
echo java -Djava.naming.provider.url=iiop://localhost:902
java -Djava.version=1.2 -Djava.naming.provider.url=iiop://localhost:900
test
:
3.5.2 WebSphere manual configuration
port 902
is used to run an instance
If you are not using the XML import method to configure WebSphere, then proceed as
explained in this section. The instructions refer to the standard instance of WebSphere and
standard file structure. If you are using a test instance, vary the file paths accordingly.
Starting QEJBSBS on the iSeries
Follow these steps:
1. Sign on to the iSeries as QSECOFR.
2. Start the QEJBSBS subsystem as for the standard configuration.
3. Verify that QEJBADMIN and QEJBMNTR are active.
4. Check the job log of QEJBADMIN for the message “WebSphere administration servers
QEJBADMIN ready”. This may take a while, but do not proceed until you see this message in
the job log.
Starting the WebSphere console on a PC
Follow these steps:
1. In a command prompt, change the directory to:
..\WebSphere\appserver\bin
This is the standard directory for WebSphere installations. If it is somewhere else, amend
the path accordingly.
2. To start the console for the specified machine in the default environment, enter the
following command:
adminclient <iSeries>
This may take some time.
3. Wait for the message “Console Ready”. The WebSphere topology view appears by default
as shown in Figure 3-23.
Chapter 3. Installing and setting up call.connect 57
Page 70

Figure 3-23 WebSphere console
Creating JDBC drivers
In the WebSphere console, create a Native JDBC driver as explained here:
1. Select the Ty pes tab. On the Types page, select JDBC Drivers, right-click, and select
Create.
Alternatively, you can select the Topology tab. Select WebSphere Administrative
Domain, right-click, and select Create-> JDBC driver.
2. In the JDBC Drivers Create window, you can enter anything for Name, but “Native” is
conventional on an iSeries server. For Implementation class, select the one that ends
DB2Driver.
3. Wait for the message, “Create completed successfully”.
4. In the Topology page, right-click the driver and select Install. This is not necessary for a
native driver.
5. Select iSeries-> Browse for JAR file-> QIBM-> ProdData-> Java400-> ext->
db2_classes.jar.
6. Increase the number of connections. See Chapter 5, “Performance tuning” on page 107.
Creating DataSources
The call.connect software is delivered with the ejb_default file on both the client and server
set to use a data source called jt400. If you want to use another data source, then you need to
modify these files to reflect the new name.
On the iSeries, in the /OrderManagement/cfg folder, find ejb_default.cfg. Check the
standard.properties to ensure that the datasource.stateless name is the same as the
jndi.datasource parameter in ejb_default.cfg.
58 Geac System21 commerce.connect: Implementation on the iSeries Server
Page 71

After you decide a name, create the data source as explained here:
1. Click the Types tab. On the Types page, select DataSource, right-click, and select
Create.
Alternatively, you can click the To pology tab. Right-click WebSphere Administrative
Domain and select Create-> DataSource.
2. Enter the following values in the Create a DataSource panel:
Data Source Name = jt400 (or as specified in ejb_default.cfg)
Database name = <iSeries>;naming=system;translate binary = true
If additional options are required, for example, jdbc trace, then add ;trace = true and so
on here.
3. Create and wait for the completion message.
Setting the node parameters
The Deployed JAR directory should be set to the folder that will contain the JAR files for
deployment. In a standard deployment, this is /OrderManagement/Deployed.
1. In WebSphere, select Topology. Click the iSeries node and in the Dependent Classpath.
2. Manually enter the names of all the “_logic” JAR files + jevServerSupport.jar + log4j.jar,
fully qualified using the naming system of the server machine, for example:
/OrderManagement/Deployed/application_logic.jar:/OrderManagement/Deployed/salesorder_log
ic.jar:…/OrderManagement/Deployed/jevServerSupport.jar:/OrderManagement/Deployed/
log4j.jar
Note: ONLY LOGIC JARS HERE + jevServerSupport.jar + log4j.jar
3. Apply and wait for the completion message.
Creating the application server
To create the application server, follow these steps:
1. Click the To pology tab and the iSeries node. Right-click the node and select Create->
Application Server.
2. On the window that appears, for Name, type SalesOrder or anything that makes sense.
The name must be less than or equal to 10 characters in length because this name will
appear in the WRKACTJOB SBS(QEJBSBS) command.
3. For command line arguments, manually key the entry. The easiest way to do this is to
open a notepad session and create the following string. Then cut and paste it into
WebSphere:
-Xms512m -Djev.config=/OrderManagement/cfg/ejb_default.cfg -classpath
/OrderManagement/deployed/fixes.jar:/OrderManagement/deployed/log4j.jar:/OrderManagement
/deployed/xerces.jar:/OrderManagement/deployed/util.jar:/OrderManagement/deployed/
secman.jar:/OrderManagement/deployed/jevServerSupport.jar:/OrderManagement/deployed/
log4j-full.jar:/OrderManagement/deployed/enquiries_logic.jar:/OrderManagement/deployed/
security_logic.jar:/OrderManagement/deployed/core_application.jar:/OrderManagement/
deployed/core_technical.jar:/OrderManagement/deployed/roseao_logic.jar:/OrderManagement/
jms/openjms-0.5.jar:/OrderManagement/jms/openjms-rmi-0.5.jar:/OrderManagement/jms/
jms.jar:/OrderManagement/jms/exolabcore-0.1.jar:/OrderManagement/deployed/
salesorder_msg.jar:/OrderManagement/deployed/messaging_logic.jar:/OrderManagement/client
/roseao_client.jar
There are no spaces or line feeds after -classpath in this statement.
4. Set the working directory as /OrderManagement/log.
Chapter 3. Installing and setting up call.connect 59
Page 72

5. Use the WRKLNK / command to ensure that *PUBLIC has *RWX authority to this folder.
An exclamation mark (!) in front of the stdout and stderr files means that they will be
cleared each time WebSphere is restarted, which is recommended.
6. Create the application server and wait for a message.
7. Start the application server to ensure that it is configured correctly. If it turns blue, click OK
and then stop it. Otherwise investigate the problem and correct it before you proceed.
Creating an EJB container
Follow these steps:
1. On the application server that you just created, right-click and select Create EJB
Container.
2. For Name, enter anything sensible, such as SalesOrderContainer or the same name as
the application server.
3. Create the EJB container and wait.
4. Start the application server and EJB container to ensure that they are configured correctly.
If they turn blue, click OK and then stop them. Otherwise investigate the problem and
correct it before you proceed.
Creating enterprise beans
In the container that you just created, create the enterprise beans:
1. Right-click the container and select Create-> Enterprise Bean.
2. Browse for the JAR file. Be patient because this takes time. Do not double-click the file.
3. Drag the window with another IBM window behind to verify that it is working. If it is
processing, multiple images of the front window appear.
4. If the Deployed JAR directory is set correctly on the node, then the contents of this
directory appear by default, for example /OrderManagement/Deployed for a standard
configuration. If you did not set this correctly, change the “Look in” directory at the top of
the browse window.
5. Click the _deployed JAR file, for example RoseAO_deployed.jar, to select it.
6. A message appears about the number of beans being deployed. You may see a “Not yet
deployed” message. Click OK.
7. Do not enable workload management. Select No when a message about work
management appears.
8. Then one message appears for each bean. Click OK for each message them even though
it may seem like nothing has happened.
9. Start the application server, container, and beans to ensure that they are configured
correctly. If they turn blue, click OK, close the console, and leave them running. Otherwise
investigate any problems and correct them.
The console should look like the example in Figure 3-24.
60 Geac System21 commerce.connect: Implementation on the iSeries Server
Page 73

Figure 3-24 WebSphere console after deployment
3.5.3 Manual client installation
For a simple setup for one or two users, it is possible and easier to configure each client
individually rather than using Java Web Start. However, configuring each client individually is
not as well controlled as Java Web Start. Each user has their own set of client software,
where with Java Web Start, only one set of software is installed on the server.
To install the client software manually, follow the instructions provided here. They assume that
you want to install the software to a folder, called callConnect, on your C drive. If you want to
install the software somewhere else, amend the path accordingly:
1. Copy the jre folder from /OrderManagement to the c:\callConnect folder on your client.
2. Copy the CCClient folder from CD to c:\callConnect\CCClient.
Attention: You must maintain this structure. That is, the jre must be at the same level in
your file structure as in the client folder.
3. Verify that the files within c:\callConnect\CCClient are correctly configured as listed in the
following sections.
Ejb_default.cfg
The contents of this file are:
environment.dir=C:\\callConnect\\CCClient\\
jndi.as400Source=jdbc/jt400
log.config=C:\\callConnect\\CCClient\\log.cfg
Chapter 3. Installing and setting up call.connect 61
Page 74

Log.cfg
Check the following line:
log4j.appender.basic.File=C:\\callConnect\\CCClient\\callConnect.log
callConnect.bat
Verify that the ROSEAO_PATH is set as follows:
set ROSEAO_PATH=C:\callConnect
set SERVER=<iSeries>
Verify that the CLIENT_PATH is set as follows:
set CLIENT_PATH=%ROSEAO_PATH%\CCClient
If you are using a test instance, change the port number in the following line:
start javaw -Djava.naming.provider.url=iiop://%SERVER%:900 etc
Running the manually configured client
Create a desktop icon pointing to callConnect.bat. The first time you run this, it displays:
Default User: User for call.connect
Default Password: Password for user
S21 Company: XX (the AR company to be used)
S21 GL Company: XX (the GL company to be used)
S21 User Name: OMUSER or user set up in 3.2.6, “User profiles” on page 36
S21 Password: OMUSER
Datasource: as400Source. This must be the JNDI name used in ejb_default. It is not the
name of the datasource set up in WebSphere.
After the first time, the system requests only the user and password to sign on. Remember,
users and passwords are case sensitive.
3.6 Alternative configurations
This section provides information about alternative configurations of WebSphere and
call.connect. It is useful to anyone who wants to set up testing facilities for example.
3.6.1 Setting up a test instance of WebSphere
The instructions in 3.2, “Standard installation procedures” on page 22, explain how to install
and configure call.connect using the default instance of WebSphere, which runs on port 900.
The call.connect software on the CD comes pre-configured to run this instance in a folder
named OrderManagement. However, it is often useful or necessary to set up other instances
of WebSphere. For example, this would allow you to test fixes in the form of new EJBs before
you move them to the live system. Users may want to use different System21 data for testing.
However, this alone does not require a different configuration of WebSphere. It merely
requires a different job description and a user profile to use that job description.
The steps outlined in Table 3-4 are required to configure a different instance of WebSphere.
62 Geac System21 commerce.connect: Implementation on the iSeries Server
Page 75

Table 3-4 Steps required to configure a WebSphere instance
Step Action Completed
1 Set up test data in System21, including OM (optional)
2 Set up journaling
3 Set up a test job description
4 Set up a test user specifically for JDBC connections
5 Configure server
6 Run stored procedures and SQL scripts (optional)
7 Configure WebSphere
8 Configure JMS
9 Configure Java Web Start or install client software
3.6.2 Setting up an iSeries server for a test system
This section explains how to set up a test system for the various parts of call.connect installed
on the iSeries server.
System21 data
To use a set of test data, you may set up a separate System21 environment. Normally, this
involves setting up alternative libraries with different data or a copy of live data. A frequently
used method is to change the name of the standard library OSLD1F3, OSLSLF3, etc. to
TSTD1F3, TSTSLF3, etc. Within System21, these test libraries are used in place of the live
libraries.
In the rest of this section, TST… is used to refer to test libraries and other variables, but you
can use other names. It is also possible to use different libraries for other object so that you
may also create such libraries as TSTOMD3, etc.
Journaling
Journal the test files. The minimum set of files is the same as for the standard configuration,
but in the TST libraries. You must set up new libraries TSTF3 and optionally TSTF3R for the
journal. You may optionally set up the receiver, if an ASP is used.
Job description
The default configuration comes with a preconfigured job description OMJOBD, with its library
list already set. This job description is used by a special user OMUSER to set the library lists
for JDBC connections.
To use the test libraries, you must create a test job description, such as TSTJOBD. This can
be held in the TSTF3 library. The job description library list should include TSTOMF3,
TSTD1F3, TSTD2F3, TSTSLF3, TSTGLF3, TSTCSF3, TSTOMD3, TSTOEP3, TSTINP3,
TSTGLD3, TSTSLD3, IPGAMF4, IPGCFF4, IPGAMP4, IPGCFP4. TSTOIF4, TSTOID4,
TSTWTP3, and TSTCSD3.
If any of these libraries are not created, then the previous list should show the corresponding
OSL version.
If other .connect products or other products that use a workflow are running, you must add
TSTWFF3 to the job description library list.
Chapter 3. Installing and setting up call.connect 63
Page 76

Test user
You must set up a test user profile, such as TSTUSR, for the JDBC connections for the test
instance. This user must use the job description created previously.
You do not need extra profiles for the test system in UserDirectory.XML or System21.
3.6.3 Server configuration
Copy the server objects into a new folder, such as /OrderManagement/test. This folder is
used in the examples throughout the following sections. Next, change the configuration files
listed in the following sections.
Server ejb_default.cfg
Change ejb_default.cfg to point to the correct place for environment.dir and log.config, for
example:
environment.dir=/OrderManagement/test/cfg
log.config=/OrderManagement/test/cfg/log.cfg
Server log.cfg
Edit log.cfg so that log4j.appender.basic.File points to the log folder, for example:
log4j.appender.basic.File=/OrderManagement/test/log/OrderManagement.log
Server standard.properties
Edit standard.properties as shown here:
Datasource.stateless: <
system21.currentcompany:
system21.user:
system21.password:
system21.glcompany:
See 3.6.4, “WebSphere administration” on page 65, for more information about the
datasource.
<
The datasource you want to use
<
The company you want to use
The test user defined previously
<
Password for this user
<
The GL company you want to use
>
>
>
>
>
Client folder
Edit or view the file PreGenerateBuyingLists.sh in the client folder to ensure it points to the
correct files as follows:
export ROSEAOHOME=/OrderManagement/test
Amend the port number on the echo java and java commands at the end of this script to
point to the appropriate port depending on the instance of WebSphere used. The default is
900, so to use port 902 change:
localhost:902
Stored procedures
Create the stored procedures in the same way as for the default instance. However, be sure
that the library list is set as tstomf3, tstomd3, tstd1f3, tstd2f3, tstslf3, and tstglf3.
In addition, it is possible that the actual RPG programs (not just the data files) may be in test
libraries. In this case, create new copies of the scripts and amend them to point at the new
libraries (for example, TSTOMD3).
64 Geac System21 commerce.connect: Implementation on the iSeries Server
Page 77

3.6.4 WebSphere administration
This section covers the topics related to WebSphere.
Starting the administration server
QEJBSBS must be running. If the default instance is not required, QEJBADMIN and
QEJBMNTR may be ended. Follow these steps:
1. Sign on as QSECOFR.
2. To start a WebSphere instance called
CALL PGM(OSLOMD3/STRWSSVR) PARM(TEST)
3. Jobs TESTADMIN and TESTMNTR should be displayed in the QEJBSBS subsystem.
Check the job log of TESTADMIN and wait for the message “WebSphere administration
server TESTADMIN ready”, similar to the default system.
WebSphere cannot start until the administration server is ready.
test
, call program STRWSSVR:
Importing the configuration file
Attention: To import the configuration file, the WebSphere instance must be running.
However, the console must
Follow these steps:
1. The import tool needs to run within Qshell. Run the start Qshell command, and after each
command, wait for $ signs to appear.
STRQSH
2. Switch the current directory within Qshell:
cd /QIBM/ProdData/WebASAdv/bin
3. Import the configuration file Config.xml from OrderManagement/Config.
4. To use the delivered file to configure the test instance running on port 902 on an iSeries,
use the following command, substituting your server name for
XMLConfig -adminNodeName <iSeries> -import /OrderManagement/test/Config/Config.xml
-instance test -nameServiceHost <iSeries
not be running.
iSeries
> -nameServicePort 902
:
Notes:
Leave a space before each - sign. Leave a space after each keyword, for example
-adminNodeName , -import , and -substitute .
There is only one pair of quotes around the entire substitution string.
The config.xml file contains the following variables, which are substituted on the import
command and replaced with real names:
$NodeName$: This is the WebSphere node name. It is usually the system name, but it is
case sensitive.
$dir$: This is the root directory for the installation. This is the directory that contains the
subdirectories: cfg, deployed, and log. For an instance called
/OrderManagement/test. The EJBs to be deployed are in
/OrderManagement/Test/Deployed.
Chapter 3. Installing and setting up call.connect 65
test
, this could be
Page 78

$appname$: This is the application name, such as SalesTest. It should be different from
the default application name so that they can be distinguished if they are both running
together.
Note: The application name should be less than 11 characters in length. This way you
can see it clearly on the iSeries using the WRKACTJOB SBS(QEJBSBS) command.
Longer names are allowed, but they are truncated when viewed this way.
$container$: This is the container name, which is typically the same as the application
name, but it can be different.
Starting application server
Follow the steps to start the application server and its beans:
1. Start the application.
2. Start a WebSphere console.
3. In a command prompt, change the directory to:
..\WebSphere\appserver\bin
Note: This is a standard directory after a default installation of the console, but you may
install it someplace else.
4. To start the console, enter the command:
adminclient <iSeries> <Port Number>
For this example, to start a console for the instance running on port 902, you may enter:
adminclient <iSeries 902>
5. Wait for message “Console Ready” to appear in the console. The topology view is
displayed by default.
6. Open the node, application server, and container to display the beans.
7. Click the application server. Click Start and then wait. The beans turn blue as they start.
This may take several minutes.
3.6.5 Manual client installation
For one or two test users, it may be easier to use a manually installed client rather than Java
Web Start. To change from live to test versions of Java Web Start, you must change the
configuration each time, although they are fairly simple. Details on both are included here.
For a simple setup for one or two users, it is possible to configure a client individually rather
than using Java Web Start. This is simpler than using JWS, but is not as well controlled. Every
user will have their own set of client software, whereas with JWS, only one set is installed on
the server.
To install the client software manually, follow the instructions provided here. They assume that
you want to install the software to a folder, called callConnect, on your C drive. If you want to
install the software somewhere else, amend the path accordingly:
1. Copy the jre folder from /OrderManagement/test to a folder c:\callConnect\test on your
client.
2. Copy the CCClient folder from /OrderManagement/test to c:\callConnect\test\CCClient.
66 Geac System21 commerce.connect: Implementation on the iSeries Server
Page 79

Important: You must maintain this structure. For example, the jre folder must be at the
same level in your file structure as the client folder.
3. Verify that the files within c:\callConnect\CCClient are correctly configured as listed in the
following sections.
Ejb_default.cfg
Verify the contents of this file as they are shown here:
environment.dir=C:\\callConnect\\test\\CCClient\\
jndi.as400Source=jdbc/jt400
log.config=C:\\callConnect\\test\\CCClient\\log.cfg
Log.cfg
Check the following line:
log4j.appender.basic.File=C:\\callConnect\\test\\CCClient\\callConnect.log
callConnect.bat
Verify that the ROSEAO_PATH is set as follows:
set ROSEAO_PATH=C:\callConnect\test
set SERVER=<iSeries>
Verify that the CLIENT_PATH is set as follows:
set CLIENT_PATH=%ROSEAO_PATH%\CCClient
If using a test instance, change the port number in the following line to 902, for example:
start javaw -Djava.naming.provider.url=iiop://%SERVER%:900 etc
Running the manually configured client
Create a desktop icon pointing to callConnect.bat. The first time you run this, it displays:
Default User: User for call.connect
Default Password: Password for user
S21 Company: XX (the AR company to be used)
S21 GL Company: XX (the GL company to be used)
S21 User Name: OMUSER or user set up in 3.2.6, “User profiles” on page 36
S21 Password: OMUSER
Datasource: as400Source. This must be the JNDI name used in ejb_default. It is not the
name of the datasource set up in WebSphere.
After the first time, the system requests only the user and password to sign on. Remember,
users and passwords are case sensitive.
Testing Java Web Start
Follow the steps for a standard configuration until you reach the create configuration step.
Then complete the steps in the following sections for your HTTP Server.
HTTP Server for iSeries (original)
Configure your IBM HTTP Server for iSeries (original) as explained in the following steps:
1. Under the Configurations option, select the Create Configuration link.
2. The Create Configuration page appears (see Figure 3-14 on page 43 for an example).
Follow these steps:
Chapter 3. Installing and setting up call.connect 67
Page 80

a. Insert the name of the configuration, such as the iSeries name.
b. Select the Create based on existing configuration option and enter CONFIG.
c. Click Apply.
3. Select the Request Processing option on the left and select the Request routing link.
4. The Request routing page (see Figure 3-15 on page 44 for an example) appears. Insert
the following actions, templates, and replacement file paths. Be sure to click the Insert
after radio button:
Index Action URL Template Replacement File Path
Pass /callconnect/test/ /ordermanagement/test/client/index.html
Pass /callconnect/test/*.gif /ordermanagement/test/client/*.gif
Pass /callconnect/test/callconnect.jnlp /ordermanagement/test/client/callconnect.jnlp
Pass /callconnect/test/*.jar /ordermanagement/test/client/*.jar
Pass /callconnect/test/setup.exe /ordermanagement/test/client/setup.exe
Pass /callconnect/test/help/ /ordermanagement/test/client/help/introduction.htm
Pass /callconnect/test/help/*.gif /ordermanagement/test/client/help/*.gif
5. Select the Languages and Encoding link on the left. Then select MIME types.
6. The MIME types page (see Figure 3-16 on page 45 for an example) appears. Enter the
following information for the system to recognize the .jnlp and .htm extensions. Be sure to
click the Insert after radio button:
– .jnlp extension
• File extension: .jnlp
• Content type/subtype: application/x-java-jnlp-file
• Encoding: 8 bit
• Quality: 1.0
– .htm extension
• File extension: .htm
• Content type/subtype: text/HTML
• Encoding: 8 bit
• Quality: 1.0
• Character Set: ISO-8859-1
Click Apply.
Now you create the instance:
1. On the left-hand panel, select Server Instances and then the Create server instance
link.
2. The Create server instance page (Figure 3-17) appears. Follow these steps:
a. Enter the server instance name, such as the iSeries name.
b. Enter the configuration that was just created.
c. Click Create.
You see the message “Message The server instance was successfully created”.
In WRKACTJOB SBS(QHTTPSVR), you now see ADMIN jobs and jobs with the name of the
instance that was just created. All should be in
wait states.
HTTP Server for iSeries (powered by Apache)
Configure your IBM HTTP Server for iSeries (powered by Apache) as explained in the
following steps:
68 Geac System21 commerce.connect: Implementation on the iSeries Server
Page 81

1. At the top of the page, select Configuration.
2. Under Configuration structure, verify that
HTTP Server Name
global settings appears in
bold.
3. You should see the
HTTP Server Name
(HOMERA) global settings page (see Figure 3-20
on page 49 for an example). Under Web Site Definition, select Serve New Directory
wizard. Click Next.
4. On the Serve New Directory wizard, complete the following tasks:
a. Select Static Web Pages and Files.
b. For Directory to Serve from, enter the client directory, such as
iSeries/OrderManagement/test/client.
c. For Alias, enter the name required on the browser, such as /callconnect/test/.
d. Click Finish.
5. Click the OrderManagement/client directory under Configuration structure to select it.
6. On the Director /OrderManagement/client page (Figure 3-21), under Processing
Requests, click Content Negotiation.
7. On the Content Negotiation page, scroll about half way down to Additional Meta (MIME)
information (Figure 3-22). Then follow these steps:
a. Click Add.
b. Enter the following information:
• File Extension: .jnlp
• Type: content-type
• Value: application/x-java-jnlp-file
c. Click Add.
d. Enter the following information:
• File Extension: .jar
• Type: content-type
• Value: application/x-zip-compressed
e. Click Add.
8. Click Apply.
9. At the top of the page, select Administration.
10.Click the Manage HTTP Servers link in the left-hand panel.
11.On the Manage HTTP Servers page (Figure 3-25), stop the HTTP Server and then start it.
Chapter 3. Installing and setting up call.connect 69
Page 82

Figure 3-25 Manage HTTP Servers page: Stopping the server
Configuring CallConnect.jnlp
In Windows Explorer, modify the file /ordermanagement/test/client/callconnect.jnlp as follows
to reflect the alias that you previously set up:
codebase="http://<iSeries>/callconnect/test/"
Change the server name. Also change the following line to point to the correct iSeries and
port number:
<property name="java.naming.provider.url" value="iiop://<iSeries>:900"/>
The default port number for the default instance of WebSphere is 900. If you use the test
instance, as recommended in this chapter, you should change the port number to 902.
Configuring JWS.bat
In Windows Explorer, enter your iSeries name in the following line in the
/ordermanagement/test/client/JWS.bat file:
"C:\Program Files\Java Web Start\javaws" http://<iSeries>/callconnect/test/CallConnect.jnlp
Changing to another instance
If you want to change to another instance of WebSphere, such as test to default, then you
have to change the client configuration files as created by the Java Web Start installation.
Users may want to create two versions of these files and swap them as required.
These files are installed to C:\Winnt\Profiles\<
70 Geac System21 commerce.connect: Implementation on the iSeries Server
signed on user>.
Page 83

The files to modify are:
ejb_default.cfg
log.cfg
standard.properties
See 3.6.5, “Manual client installation” on page 66.
Chapter 3. Installing and setting up call.connect 71
Page 84

72 Geac System21 commerce.connect: Implementation on the iSeries Server
Page 85

Chapter 4. Installing and setting up
vendor.connect
This chapter explains how to install and set up Geac’s vendor.connect product.
4
Throughout the installation instructions, you will see variables in
variables, you need to provide a real name. For example, for the variable <
change it to the name of the machine you are using.
Keep in mind that all the required components are on the vendor.connect CD. However,
throughout this chapter, references are made to the Geac applications
@ctive Modeler, and secure.connect. vendor.connect users may install these applications,
although they are not essential.
This chapter also refers to a folder named
Jacada that required for vendor.connect. You may obtain a Jacada server from your Geac
distributor, although one is not required for vendor.connect.
Jacada, which contains all the components of
italics
. For each of these
iSeries
commerce.platform,
>, you must
© Copyright IBM Corp. 2002. All rights reserved. 73
Page 86

4.1 Preparing for the installation
This section discusses the activities and checks that are required before you begin installing
vendor.connect.
4.1.1 Skills required
You must be familiar with the workstation, particularly with the operation of the keyboard and
mouse. You should also be familiar with the following applications, which are used in the
vendor.connect configuration. Although instructions are provided at each stage, a complete
beginner may find the installation to be difficult and may need help from someone with more
experience.
Windows NT Explorer
Notepad and Wordpad or other tool to edit files for example, .bat and .xml files
FTP
Client Access
MS-DOS
OS/400 commands
A Web Browser for example, Internet Explorer
System21
Qshell
In addition, you should also be familiar with the following products or tools:
WebSphere Application Server.
CL programming on the iSeries
Shell scripts
SQL
@ctive modeler
For straightforward configurations, you may be able to proceed regardless of your familiarity
with these items.
4.2 Installing vendor.connect
This section explains how to install vendor.connect. It even explains a basic setup using the
configuration that is supplied on the CD.
Basic steps checklist
Table 4-1 summarizes the steps that are required to install and configure vendor.connect. You
can find additional information about each step in the sections that follow.
Table 4-1 vendor.connect installation checklist
Step Action Completed
1 Load System21, including distribution and finance applications, Advanced
Receiving (AG), Vendor Scheduling (VS), and Work Management
2 Load Java components and configuration files for vendor.connect
3 Restore extra libraries for vendor.connect
4 Install and configure WebSphere
5 Install and configure an HTTP Server
74 Geac System21 commerce.connect: Implementation on the iSeries Server
Page 87

Step Action Completed
6 Set up on the iSeries
7 Configure MQSeries
8 Install and configure the Work Management trigger handler
9 Active Architecture framework
10 Set up the Jconnects server
11 User IDs and security (LDAP or XML)
12 Set up database synchronization
13 Test the configuration
14 Back up the configuration
vendor.connect components
Several different types of objects are required for this installation such as iSeries library, JAR,
and configuration files. You can learn more about these in the following sections.
4.2.1 System21 base
Note: This redbook does not provide instructions for installing System21. You can find
information on installing System 21 and current details regarding your installation scenario
in the
Geac System21 Installation and Setup Guide
.
To run vendor.connect, you need to load at least the following System21 applications at
V3.5.2b Service Pack 5:
Application Manager
Geac System21
Work Management
Inventory (IN)
Order Entry (OE)
Purchase Management (PM)
Vendor Scheduling (VS)
Advanced Receiving (AG)
Cash Management (CS)
General Ledger (GL)
Sales Ledger (SL)
Purchase Ledger (PL)
You can obtain these applications from your Geac distributor.
4.2.2 Java components and configuration files
All other components of vendor.connect are on the vendor.connect CD. To load them, follow
the instructions in the readme file.
Chapter 4. Installing and setting up vendor.connect 75
Page 88

4.2.3 Restoring libraries
Three additional libraries are delivered in the AS400 folder. These are held as save files. To
restore them, use File Transfer Protocol (FTP) to copy them from your workstation to the
iSeries server. See the following steps for an example:
1. Open a DOS prompt and enter the following commands:
CD C:\AS400
FTP <iSeries>
2. Enter a user name and password for the iSeries.
3. Enter the following commands in the order shown:
Bin
Cd <the library where you want to put the Save File>
Put <Save File name>
Quit
Figure 4-1 shows an example of how this appears on the DOS prompt.
Figure 4-1 FTP commands to copy a Save File from N:\AS400 to QGPL on an iSeries called Needjava
4. The Save Files are called authsystem, oslvcf3, and oslvcd3. After they are on the iSeries,
use the Restore Library command to restore the libraries (of the same name).
4.2.4 Installing and configuring WebSphere
The instructions in the following section are specific to the vendor.connect installation. For
complete instructions on installing and configuring WebSphere Application Server, go to:
http://www-1.ibm.com/servers/eserver/iseries/software/WebSphere/wsappserver/docs/doc.htm
It is possible to use the default instance of WebSphere. However, you may want to create a
new instance, which may easily have an HTTP instance attached to it. To use the default
instance, start QEJBSBS as shown in the following example. Then stop the QEJBADMIN and
QEJBMNTR jobs and restart them, using the strwasinst command with the HTTP
parameter.
To create a new instance, start a Qshell session with the following command:
STRQSH
76 Geac System21 commerce.connect: Implementation on the iSeries Server
Page 89

Wait for the $ sign to appear after each entry.
Creating a new instance
To create a new instance called VC on port 905, enter:
crtnewinst -instance VC -bootstrap 905 -lsd 9005
For full details, see the WebSphere Application Server documents on the Web at:
http://www-1.ibm.com/servers/eserver/iseries/software/WebSphere/wsappserver/docs/as400v35/
docs/doccntr.pdf
Starting the administration server
To start the administration server, follow these steps:
1. On the iSeries, enter the command:
STRSBS SBSD(QEJB/QEJBSBS)
This starts the QEJB subsystem and two autostart jobs QEJBADMIN and QEJBMNTR.
2. WebSphere cannot start until the administration server is ready. To find out the status of
the administration server, check the job log for the QEJBADMIN job. Enter the following
command:
WRKACTJOB SBS(QEJBSBS)
3. On the next display, type 5 next to QEJBADMIN to view the job.
4. Select option 10 to view the job log. Wait until the message “WebSphere administration
server QEJBADMIN ready.” appears. This may take several minutes.
Starting the instance
Once QEJBSBS is running, the instance created above may start. If the default instance is
not required for other purposes, QEJBADMIN and QEJBMNTR may be cancelled. To start the
new instance, go to Qshell and enter the following command:
strwasinst -instance VC -http VC
This command starts the WebSphere instance VC that uses an HTTP Server instance, which
is also called VC.
Importing the configuration file
Important: To import the configuration file, the WebSphere instance must be running, but
the console
The import tool needs to run within Qshell. Follow these steps:
1. Run the Start Qshell (STRQSH) command and after each command wait for $ signs to
appear.
2. Change the current directory within Qshell. Enter the following command:
cd /QIBM/ProdData/WebASAdv/bin
3. Import the config.xml configuration file from VendorConnect/Config.
4. To use the delivered file to configure the default instance on an iSeries server, use this
command, substituting your server name for
XMLConfig -adminNodeName <iSeries> -import /VendorConnect/VC.xml
-substitute "nodename=<iSeries>;host=<iSeries+domain>;port=<port number>;IP=<IP
address>"
It may run for some minutes.
must not be running.
iSeries
:
Chapter 4. Installing and setting up vendor.connect 77
Page 90

Notes:
Leave a space before each - sign. Leave a space after each keyword, for example,
-adminNodeName , -import , and -substitute .
There is only one pair of quotes around the entire substitution string.
Figure 4-2 shows an example of an imported configuration.
QSH Command Entry
$
> cd /QIBM/ProdData/WebASAdv/bin
$
===> XMLConfig -adminNodeName homer -import /VendorConnect/vc.xml -substitute "
nodname=homer;host=homer.jba.co.uk;port=85;IP=123.456.001.157"
_
F3=Exit F6=Print F9=Retrieve F12=Disconnect
F13=Clear F17=Top F18=Bottom F21=CL command entry
Figure 4-2 Importing the WebSphere configuration to an iSeries called homer
The import includes:
The node
The data source and JDBC driver
The applications required for vendor.connect
The config.xml file contains the following variables, which are substituted on the import
command and replaced with real names:
$NodeName$: This is the WebSphere node name, which is case sensitive. This is
relevant when you start the console with AdminClient and when you specify an Inter-ORB
Protocol (IIOP) address for a Java Naming and Directory Interface (JNDI) lookup (for
example, within the batch files which start client programs). It is also relevant to tools such
as the XML export/import utility.
Usually the name is entirely in lowercase, However, on some systems, it is entirely in
uppercase, and in theory, could be a mixture of both. If you find that the console fails to
start with such messages as “Could not get attributes” (similar to when the
service/subsystem is not started) but the service is started, then problem may be the case
of the name.
You can verify the required name by using the following SQL to look at a WebSphere table:
select NAME
from EJSADMIN/NODE_TABLE
This shows the node name exactly as WebSphere wants it to appear. Do not be tempted
to change the contents of this table. It is liable to make things worse rather than better.
78 Geac System21 commerce.connect: Implementation on the iSeries Server
Page 91

Note: You must have QSECOFR user authority to read this table.
$host$: This is the iSeries name and domain, such as needjava.jab.co.uk.
$port$: This is the port for the WebSphere instance running vendor.connect.
$IP$: This is the IP address of the iSeries server.
Starting the application
To start the application, follow these steps:
1. Start a WebSphere console. In a command prompt, change the directory to:
..\WebSphere\appserver\bin
Note: This is a standard directory for a default installation of the console. However, you
can install the console in a different directory if necessary.
2. To start the console for the specified machine in the default environment, enter the
command:
adminclient <iSeries> <Port Number>
This may be quite slow. If an instance other than the default instance is required, enter the
port number. Otherwise you may leave this blank.
3. Wait for the message “Console Ready” to appear in the console. The topology view
appears by default.
4. Open the node, application server, and container to display the beans and servlets. You
should see the application servers VennConn, VCSync, and Receiving. Click the
Application Server. Click Start and wait. The beans and servlets turn blue as they start.
This may take several minutes.
4.2.5 IBM HTTP Server for iSeries
vendor.connect is a Web-based application. For it to run, you must configure the HTTP Server
as explained in the following sections. Two HTTP Servers are available:
IBM HTTP Server for AS/400 (original): For V4R4 and earlier
IBM HTTP Server for iSeries (powered by Apache): For V5R1 and later
Ensuring that the HTTP Server is ready
The following steps are the same for both servers:
1. Verify that the HTTP Server software is loaded. On the iSeries, type the following
command:
GO LICPGM
2. On the display that appears, select option 10 (Display). Check the suffixes. Look for DG1.
If you do not find it, load it before you proceed to the next step.
3. Start the HTTP Server. On the iSeries, run the command:
STRTCPSVR SERVER(*HTTP) HTTPSVR(*ADMIN)
4. Verify that the server is running. Enter the following command:
WRKACTJOB
5. Verify that ADMIN jobs are running in the QHTTPSVR subsystem.
Chapter 4. Installing and setting up vendor.connect 79
Page 92

Configuring the HTTP Server on the iSeries
To configure the HTTP Server on the iSeries server, follow these steps:
1. In a Web browser, type:
http://<iSeries>:2001
Enter your iSeries server name for iSeries. This is the port on which the administration of
HTTP is listening.
2. Sign on as QSECOFR.
3. The AS/400 Tasks page appears as shown in Figure 4-3. In this example, the pages are
for an iSeries called
Needjava
. Select IBM HTTP Server for AS/400.
Figure 4-3 AS/400 Tasks page
80 Geac System21 commerce.connect: Implementation on the iSeries Server
Page 93

4. The IBM HTTP Server for AS/400 page appears as shown in Figure 4-4. Select the
Configuration and Administration icon on the left.
Figure 4-4 IBM HTTP Server for AS/400 page
Configuring IBM HTTP Server for iSeries (original)
This section explains how to install IBM HTTP Server for iSeries (original) on an iSeries
server. The instructions to install IBM HTTP Server for iSeries (powered by Apache) are not
currently available. The following steps apply to a configuration using the original server on
V4R5 or earlier.
Chapter 4. Installing and setting up vendor.connect 81
Page 94

After you select the Configuration and Administration icon, as stated in the previous section,
the IBM HTTP Server Configuration and Administration page appears as shown in Figure 4-5.
Select the Configurations link from the left-hand panel on the page.
Figure 4-5 IBM HTTP Server Configuration and Administration page
Now you need to create a new configuration and a new instance, based on the IBM-supplied
configurations and instances.
Creating a configuration
Follow these steps to create a configuration:
1. Under the Configurations option, select the Create configuration link.
2. The Create configuration page appears (Figure 4-6). Follow these steps:
a. Insert the name of the configuration, such as the iSeries name.
b. Select the Create based on existing configuration option and enter CONFIG.
c. Click Apply.
82 Geac System21 commerce.connect: Implementation on the iSeries Server
Page 95

Figure 4-6 Create configuration page
Creating an instance
Now you must create a server instance:
1. On the left-hand panel, select Server Instances and then the Create server instance
link.
Chapter 4. Installing and setting up vendor.connect 83
Page 96

2. The Create server instance page (Figure 4-7) appears. Follow these steps:
a. Enter the server instance name, such as the NEW in our example.
b. Enter the configuration that was just created, which is CC in this example.
c. Click Create.
Figure 4-7 Create server instance page
You see the message “Message The server instance was successfully created”.
In WRKACTJOB SBS(QHTTPSVR), you now see ADMIN jobs and jobs with the name of the
instance that was just created. All should be in
wait states. The first one should be in a
CNDW wait state.
Setting up on the iSeries
This section explains how to set up journaling for certain files. It discusses special user
profiles for vendor.connect that use a specifically configured job description to give
vendor.connect its library list. This section also explains how to set up extra System21 data
and database triggers for the required files.
Journaling
Because WebSphere applications run under commitment control, you must journal files that
are used by vendor.connect. Since you must journal files from different libraries, you must
create the journal receiver and the journal in a new library rather than in an existing System21
library. You must journal the files listed on the following page to operate vendor.connect.
However, merely journaling these files does not give you full advantages of journaling such as
extra security.
Performance improves if files are journaled to an auxiliary storage pool (ASP). The following
steps provide commands for use with and without an ASP.
84 Geac System21 commerce.connect: Implementation on the iSeries Server
Page 97

You must journal the following files at a minimum:
All physical files in the OSLVCF3 library (except for files named XAPnn if they were there)
The PMP02 and PMP09 files in the OSLD1F3 library
The AGP00, AGP10, and AGP20 files in the OSLD2F3 library
To journal these files with
no ASP, follow these steps:
Note: The following commands are sample commands only. You may vary them as
required.
1. Sign on as QSECOFR.
2. Create a new library for the journal receiver and journal such as OSLF3:
CRTLIB LIB(OSLF3) TEXT('OSL journal library')
3. Create a journal receiver:
CRTJRNRCV JRNRCV(OSLF3/OSL0001) THRESHOLD(50000) TEXT('System21 journal receiver.')
4. Create a journal:
CRTJRN JRN(OSLF3/OSL) JRNRCV(OSLF3/OSL0001) MNGRCV(*SYSTEM) DLTRCV(*YES) TEXT('System21
journal')
To journal the files using an ASP, follow these steps:
1. Create a separate library for the journal receiver:
CRTLIB LIB(OSLF3R) TEXT('OSL journal receiver library')
2. Create a journal receiver:
CRTJRNRCV JRNRCV(OSLF3R/OSL0001) ASP(2) THRESHOLD(50000) TEXT('System21 journal
receiver.')
3. Create the journal as shown in step 4 in the previous sequence of steps.
To journal a single file, such as ADDRESS, use the following command:
STRJRNPF FILE(OSLVCF3/ADDRESS) JRN(OSLF3/OSL) OMTJRNE(*OPNCLO)
To journal multiple files within a library, complete the following steps.
Note: This is the recommended method.
1. Start the Programming Development Manager (PDM):
STRPDM
2. Select option 9 (Work with user-defined options).
Chapter 4. Installing and setting up vendor.connect 85
Page 98

3. The Specify Option File to Work With display (Figure 4-8) appears. Press Enter to accept
the defaults (File QAUOOPT, Library QGPL, and Member QAUOOPT).
Specify Option File to Work With
Type choices, press Enter.
File . . . . . . . . . . QAUOOPT Name, F4 for list
Library . . . . . . . . QGPL *LIBL, *CURLIB, name
Member . . . . . . . . . QAUOOPT Name
F3=Exit F5=Refresh F12=Cancel
Figure 4-8 Working with the user-defined options
4. On the next panel, press F6 to create a new user-defined option.
5. On the Create User-Defined Option display (Figure 4-9), enter the following information:
– Option: SJ
– Command: STRJRNPF FILE(&L/&N) JRN(OSLF3/OSL) OMTJRNE(*OPNCLO)
Press Enter.
6. You return to the list of user-defined options. Press F3.
Create User-Defined Option
Type option and command, press Enter.
Option . . . . . . . . . SJ Option to create
Command . . . . . . . . . STRJRNPF FILE(&L/&N) JRN(OMF3/OSL) OMTJRNE(*OPNCL
O)
F3=Exit F4=Prompt F12=Cancel
Figure 4-9 Create User-Defined Option display
7. You return to the PDM menu. Select option 2 (Work with objects).
8. On the next display, enter the library that contains the files to journal for example, OSLOMF3.
Under object, set:
86 Geac System21 commerce.connect: Implementation on the iSeries Server
Page 99

– Name: *ALL
– Type: *FILE
– Attribute: PF-DTA
9. On the following display, type SJ next to each file that you want to journal. To journal
all
physical files, type SJ on the first line and press F13.
User profiles
The vendor.connect library list is controlled by a job description attached to a special user
profile as defined here.
Job description: The vendor.connect library list is set within a job description OSLVCF3
in the OSLVCF3 library that is supplied as already configured. If you must use other
.connect products, you must change this job description library list to include the extra
libraries.
User profile: You must create a user profile. As a standard, this should be called OSLVCF3.
This user must have its job description set to OSLVCF3 as explained earlier. Set the current
library to OSLVCF3. To create a user profile, enter the following command:
CRTUSRPRF USRPRF(OSLVCF3) CURLIB(OSLVCF3) TEXT(vendor.connect) JOBD(OSLVCF3/OSLVCF3)
System21 data setup
Follow these steps to set up the System21 data:
1. Using Data File Utility (DFU) or SQL, check the PM company profile record
OSLD1F3/PMP10. Note the value of the RAVN10 field (Receiving Address Vendor
Number).
2. Set the RECEIVINGADDRESSVENDOR field in OSLVCF3/COMPANYPROFILE to the
value in RAVN10.
3. Set NEXTSHIPMENTNUMBER = 0 and update it.
4. Create a record in file OSLVCF3/UNIQUEIDENTIFIER for each company on PMP10 with
file UNIQUEID = 0.
5. Check file OSLWFF3/WFP98 to ensure that it contains the following record:
HOST98 blank
PTAP98 MQ
PMRF98 TRIGGER.OUT
PMIF98 WM.TRIGGER.OUT
PVL198 0
PVL298 0
Database triggers
You must add database triggers to the following files:
In library OSLD1F3: PMP02, PMP03, PMP06, and PMP09
In library OSLPLF3: PLP05
To add database triggers, there must not be any locks on the file. For each file, you must add
*INSERT, *UPDATE, and *DELETE triggers. Use the following command to add an *INSERT
trigger to PMP02. Change the TRGEVENT parameter to create the *UPDATE and *DELETE
triggers:
ADDPFTRG FILE(OSLD1F3/PMP02) TRGTIME(*AFTER) TRGEVENT(*INSERT) PGM(OSLWFF3/WF500A)
RPLTRG(*YES) ALWREPCHG(*YES) THDSAFE(*UNKNOWN) MLTTHDACN(*SYSVAL) TRGUPDCND(*ALWAYS)
The TRGUPDCND is only necessary for the *UPDATE trigger.
Chapter 4. Installing and setting up vendor.connect 87
Page 100

4.2.6 MQSeries
This section explains how to set up MQSeries for vendor.connect.
Creating a queue manager
You must first create a queue manager:
1. Enter the following command:
WRKMQM
If a default queue manager doesn't already exist, create one using the following command:
CRTMQM MQMNAME(VCQM) TEXT('vendor.connect queue manager') DFTQMGR(*YES)
Alternatively, press F6 on the WRKMQM display. You must create your queue manager as
the default. You cannot change this at a later date. AIF database triggering only works with
the default. We recommend that you call the queue manager the same name as the
iSeries name, but it is not required.
2. Grant authorization to the MQSeries Manager by using the following command:
GRTMQMAUT OBJ(VCQM) OBJTYPE(*MQM) USER(*PUBLIC) AUT(*ALL)
3. On the WRKMQM display, select option 14 (Start the Work Queue Manager).
4. On the next display, select option 20 (Work with Channels).
5. On the Work with Channels display, create new channels with the following command:
CRTMQMCHL CHLNAME(WM.TRIGGER.CHL) CHLTYPE(*SVRCN) TRPTYPE(*TCP).
CRTMQMCHL CHLNAME(AIF.TRIGGER.CHL) CHLTYPE(*SVRCN) TRPTYPE(*TCP).
Alternatively, you can press F6 from the Work with Channels display.
6. Create new queues as follows:
CRTMQMQ QNAME(AIF.TRIGGER.OUT) QTYPE(*LCL) MQMNAME(*DFT)
CRTMQMQ QNAME(WM.TRIGGER.OUT) QTYPE(*LCL) MQMNAME(*DFT)
CRTMQMQ QNAME(WM.TRIGGER.OUT1) QTYPE(*LCL) MQMNAME(*DFT)
7. Grant authority to all the queues with the command:
GRTMQMAUT OBJ(queue name above) OBJTYPE(*Q) USER(*PUBLIC) AUT(*ALL) MQMNAME(*DFT)
Alternatively from WRKMQM, select option 18 (Work with queues) and press F6.
To ensure that MQSeries is automatically restarted if the machine is shut down for any
reason, change the machine’s IPL procedure to include the following commands:
STRSBS SBSD(QMQM/QMQM)
STRMQM
STRMQMCSVR
STRMQMLSR
Note that because the commerce.platform software currently only works with the MQSeries
queue manager set as the default queue manager, no parameters are needed for the
STRMQMxxx commands.
If all the subsystems are routinely taken down for backups, etc., then you must update the
subsystems restart to also execute the previous four commands.
88 Geac System21 commerce.connect: Implementation on the iSeries Server
 Loading...