

Page 1

IBM ThinkPad
SelectaDock III
User's Guide
Page 2

Page 3

IBM ThinkPad
IBM
SelectaDock III
User's Guide
Page 4

Note
Before using this information and the product it supports, be sure to read the general information in Appendix C.
First Edition (September 1997)
The following paragraph does not apply to the United Kingdom or any country where such provisions are
inconsistent with local law:
INTERNATIONAL BUSINESS MACHINES CORPORATION PROVIDES THIS PUBLICATION “AS IS” WITHOUT ANY
WARRANTY OF ANY KIND, EITHER EXPRESS OR IMPLIED, INCLUDING, BUT NOT LIMITED TO, THE LIMITED
WARRANTIES OF MERCHANTABILITY OR FITNESS FOR A PARTICULAR PURPOSE. Some states do not allow
disclaimer or express or implied warranties in certain transactions; therefore, this statement may not apply to you.
This publication could include technical inaccuracies or typographical errors. Changes are periodically made to the
information herein; these changes will be incorporated in new editions of the publication. IBM may make
improvements or changes in the products or the programs described in this publication at any time.
Requests for technical information about IBM products should be made to your IBM Authorized Dealer or your IBM
Marketing Representative.
Some parts of this manual are taken or adopted from the Adaptec EZ-SCSI documentation with permission from
Adaptec, Inc. IBM Corporation has rights and responsibility for this manual.
Copyright International Business Machines Corporation 1997. All rights reserved.
Portions of this manual are Copyright 1993, 1997. Adaptec, Inc. All rights reserved.
Note to U.S. Government Users — Documentation related to restricted rights — Use, duplication or disclosure is
subject to restrictions set forth in GSA ADP Schedule Contract with IBM Corp.
Page 5

Contents
Electrical Safety Notices ........................ v
Important Points (Read This First) ................ vii
Chapter 1. Introduction . . . . . . . . . . . . . . . . . . . . . . 1-1
Checking Your Items ......................... 1-2
SelectaDock III Highlights ...................... 1-3
Location . . . . . . . . . . . . . . . . . . . . . . . . . . . . . . . . 1-6
Status Indicators . . . . . . . . . . . . . . . . . . . . . . . . . . . 1-7
Preparing to Use the SelectaDock System (ThinkPad 760/765) 1-8
Attaching the SelectaBase to the SelectaDock III system ... 1-11
Detaching the SelectaBase from the SelectaDock III system . 1-14
Docking the ThinkPad to the SelectaDock system ....... 1-15
Chapter 2. Installing Options . . . . . . . . . . . . . . . . . . 2-1
Handling Internal Options ...................... 2-2
Supported Devices . . . . . . . . . . . . . . . . . . . . . . . . . . 2-3
Installing a Device in the UltraBay II Tray ............. 2-6
Installing a Device in the Device Space ............. 2-10
Installing a PCI or an ISA Adapter Card ............. 2-13
Installing a PC Card ........................ 2-16
Using the MIDI/Joystick Port ................... 2-18
Connecting External SCSI Devices ............... 2-20
Chapter 3. System Configuration . . . . . . . . . . . . . . . . 3-1
Setting Up an IDE Device ...................... 3-2
Setting Up a SCSI Device ...................... 3-6
Setting Up An Adapter Card .................... 3-8
System Resources Assignment ................... 3-9
Chapter 4. Using the Security Features ............ 4-1
SelectaDock III Security Features ................. 4-2
Security Function for Your SelectaDock system ......... 4-3
Maintaining While Sharing the SelectaDock System ....... 4-5
Chapter 5. Hints, Tips, and Limitations ............ 5-1
Hints and Tips ............................ 5-2
Limitations . . . . . . . . . . . . . . . . . . . . . . . . . . . . . . . 5-5
Chapter 6. Troubleshooting . . . . . . . . . . . . . . . . . . . 6-1
Copyright IBM Corp. 1997 iii
Page 6

Attention Indicator . . . . . . . . . . . . . . . . . . . . . . . . . . 6-3
Isolating a Problem Unit ....................... 6-5
Troubleshooting Guide . . . . . . . . . . . . . . . . . . . . . . . 6-10
Running Tests . . . . . . . . . . . . . . . . . . . . . . . . . . . 6-22
Requesting Service . . . . . . . . . . . . . . . . . . . . . . . . . 6-24
Appendix A. Using the SCSI Support Software ....... A-1
Installing the EZ-SCSI ........................ A-2
Online Information . . . . . . . . . . . . . . . . . . . . . . . . . . A-5
Formatting Utilities . . . . . . . . . . . . . . . . . . . . . . . . . . A-5
Appendix B. Specifications . . . . . . . . . . . . . . . . . . . B-1
Physical Characteristics . . . . . . . . . . . . . . . . . . . . . . . B-1
Environmental Requirements . . . . . . . . . . . . . . . . . . . . B-2
Electrical Characteristics . . . . . . . . . . . . . . . . . . . . . . B-3
External Interfaces . . . . . . . . . . . . . . . . . . . . . . . . . . B-3
IBM Power Cords ........................... B-4
Appendix C. Product Warranty, Notices, and Statements . C-1
Federal Communications Commission (FCC) Statement .... C-5
Canadian Department of Communications Compliance
Statement . . . . . . . . . . . . . . . . . . . . . . . . . . . . . . C-5
Avis de conformité aux normes du ministère des
Communications du Canada ................... C-6
European Community (EC) Directive Conformance Statement . C-6
Index . . . . . . . . . . . . . . . . . . . . . . . . . . . . . . . . . . X-1
iv IBM ThinkPad SelectaDock III User's Guide
Page 7

Electrical Safety Notices
DANGER
Before you install or remove the option, unplug the power cord.
DANGER
Power is controlled by the power switch of the computer. In an emergency, turn off the power by
unplugging the SelectaDock III power cord. The electrical outlet should be near the SelectaDock III and
should be easily accessible.
DANGER
To avoid a shock hazard:
Do not connect or disconnect any cables or perform installation, maintenance, or reconfiguration of
this product during an electrical storm.
The power cord must be connected to an outlet that has been properly wired and grounded
according to your local wiring rules.
This equipment must have an earth ground.
Apparaten skall anslutas till jordat uttag när den ansluts till ett nätverk.
Jordet stikkontakt skal benyttes når apparatet tilkobles datanett.
Laite on liitettävä maadoitettuun pistorasiaan.
Any equipment to which this product is attached to must also be connected to an outlet that has
been properly wired and grounded according to your local wiring rules.
Contents v
Page 8

DANGER:
Electrical current from power, telephone, and communication
cable is hazardous. To avoid shock hazard, connect and
disconnect cables as shown below when installing, moving, or
opening the covers of this product or attached the devices.
The power cord must be used with a properly grounded outlet.
To Connect
Turn everything OFF.
First, attach all cables to devices.
Attach the signal cables to
receptacles.
Attach the power cord to an outlet.
To Disconnect
Turn everything OFF.
First, remove the power cord from
the outlet.
Remove signal cables from
receptacles.
Remove all cables from devices.
Turn the device ON.
Note: In the U.K., by law, the
telephone line cable must be
connected after the power cord.
Note: In the U.K., by law, the
power cord must be disconnected
after the telephone line cable.
vi IBM ThinkPad SelectaDock III User's Guide
Page 9

Important Points (Read This First)
When you use the SelectaDock system for the first time, note the following important points:
Make sure that your ThinkPad is a PCI bus computer system.
The SelectaDock system supports only PCI bus computers. It does not support ISA bus
computers, even though the SelectaDock Base Model I supports both PCI and ISA bus
computers.
Supported ThinkPads are:
– ThinkPad 760E, 760ED, 760EL, 760ELD, 760XD, and 760XL
– ThinkPad 765D and 765L
– ThinkPad 770
The ThinkPad 760 and 765 user must do the following before docking it to the
SelectaDock system for the first time.
1. (Windows 95 user) Copy the INF files. (Refer to “Preparing to Use the SelectaDock
System (ThinkPad 760/765)” on page 1-8.)
2. Update the system program (flash BIOS).
3. Install the Battery Check Utility (ThinkPad 765 user only).
4. Update the ThinkPad Configuration program.
5. Update PC Card Director .
Refer to
Program Installation Guide
to update or install these programs.
Power on your ThinkPad after docking it to the SelectaDock system for the first
time.
If the operating system in your ThinkPad supports hot and warm docking , this operation
enables the hot and warm docking.
PC Card Director is a program to support PCMCIA Rel 2.1.
Hot docking means docking while the computer is operating or in standby mode. Warm docking
means docking while the computer is in suspend mode.
Copyright IBM Corp. 1997 vii
Page 10

viii IBM ThinkPad SelectaDock III User's Guide
Page 11

Chapter 1. Introduction
Highlight
This chapter describes the overall functions of the SelectaDock III
system. Read this chapter before you use the SelectaDock III
system.
This chapter contains:
Checking Your Items ......................... 1-2
SelectaDock III Highlights ...................... 1-3
Supported Systems . . . . . . . . . . . . . . . . . . . . . . . . 1-3
Features of the SelectaDock III system ............ 1-4
SelectaDock system Function According to Operating System 1-5
Location . . . . . . . . . . . . . . . . . . . . . . . . . . . . . . . . 1-6
Status Indicators . . . . . . . . . . . . . . . . . . . . . . . . . . . 1-7
Preparing to Use the SelectaDock System (ThinkPad 760/765) 1-8
Attaching the SelectaBase to the SelectaDock III system ... 1-11
Detaching the SelectaBase from the SelectaDock III system . 1-14
Docking the ThinkPad to the SelectaDock system ....... 1-15
Cold Docking . . . . . . . . . . . . . . . . . . . . . . . . . . . 1-15
Cold Undocking . . . . . . . . . . . . . . . . . . . . . . . . . 1-17
Hot or Warm Docking for Windows 95 ............ 1-18
Copyright IBM Corp. 1997 1-1
Page 12

Checking Your Items
When you unpack your SelectaDock III system, check to be sure that
you have the following items. If any item is missing or damaged, call
IBM or your point of purchase.
SelectaDock III system Power cord
User's Guide (This book) 10 diskettes
Program Installation Guide
or
3 diskettes and a CD-ROM
1-2 IBM ThinkPad SelectaDock III User's Guide
Page 13

SelectaDock III Highlights
The IBM ThinkPad SelectaDock III system is designed to expand the
functions of your ThinkPad computer.
Hereafter, we call the SelectaBase 770 or SelectaDock Base Model I
is referred to as the
SelectaDock III and the SelectaBase as the
Supported Systems
You can use the SelectaDock III system with following ThinkPad
computers:
SelectaBase
, and the combination of the
SelectaDock system
Chapter 1. Introduction 1-3
IBM ThinkPad 760E, 760ED, 760EL, 760ELD, 760XD, and
760XL
IBM ThinkPad 765D and 765L
IBM ThinkPad 770
Page 14

The SelectaDock III system works with the following combinations:
SelectaDock System Combination
SelectaDock III SelectaBase 770 No No Yes
SelectaDock
Base Model I
Note: The SelectaBase 770 and the SelectaDock Base Model I are port replicators. Either of them provides
you the full docking system functions with this SelectaDock III. The SelectaDock III system needs one of these
SelectaBases. Which one you need depends on the model of your ThinkPad computer.
ThinkPad 760E/760ED
ThinkPad 760EL/760ELD
ThinkPad 760XD/760XL
Yes Yes No
ThinkPad 765D
ThinkPad 765L
ThinkPad 770
Features of the SelectaDock III system
When you dock your ThinkPad to the SelectaDock system, your
total system will have the following additional features.
Two PCI/ISA shared slots and one PCI slot
A half height bay for IDE or SCSI device
An UltraBay II tray for one UltraBay II device
An UltraBay tray for an UltraBay device (option)
Two USB connectors
Two (type-II) PCMCIA slots
One SCSI connector
Hot and warm docking support
Capability for sharing the SelectaDock system
Security for the ThinkPad computer, devices inside the
SelectaDock system and the SelectaDock system itself.
Note:
Attaching or detaching your computer to or from the
SelectaDock system is called
docking
or
undocking
.
A swappable device for the ThinkPad 770 computers.
A “ThinkPad 760 UltraBay Options Tray for SelectaDock III” can
be purchased separately.
A swappable device for the ThinkPad 760 computers.
1-4 IBM ThinkPad SelectaDock III User's Guide
Page 15

SelectaDock system Function According to Operating System
The following table shows the relationship between functions of the
SelectaDock system and the operating system in your ThinkPad
computer.
Table 1-1. Matrix of the Function and Operating System
Function DOS Windows
3.11
ThinkPad 760E, 760ED, 760EL, 760ELD, 760XD, 760XL, 765D, or 765L
EZ-SCSI Yes Yes NA NA NA NA
PCMCIA Rel. 2 Yes Yes Yes Yes Yes Yes
CardBus No No No No No No
ThinkPad 770
EZ-SCSI Yes Yes NA NA NA NA
PCMCIA Rel. 2 Yes Yes Yes Yes Yes Yes
CardBus Yes Yes Yes No No No
Note:
The Option Diskette for SelectaDock III contains EZ-SCSI for DOS and Windows 3.11.
PC Card Director supports PCMCIA Release 2.1.
Windows NT 3.51 native support.
PCMCIA Release 2.1 support by preload.
CardBus support by preload.
Windows
95
Windows
NT (3.51)
Windows
NT (4.0)
OS/2
Warp/Marlin
Chapter 1. Introduction 1-5
Page 16

Location
1-6 IBM ThinkPad SelectaDock III User's Guide
Page 17

Status Indicators
Symbol Indicator Name Meaning
1 Docked The computer is correctly docked with the SelectaDock
system.
Power On The computer power is turned on.
Note: The “Docked” indicator changes to the “Power-On”
indicator when the computer power is turned on.
2 Suspend Mode The computer is in suspend mode.
3 Diskette Drive in
Use
4 Hard Disk in Use The IDE device in the SelectaDock system or in your
5 Attention Turns on or blinks to alert users about an operation.
Chapter 1. Introduction 1-7
The diskette drive in the computer or the UltraBay II is being
used.
Note: When an external diskette drive is used, the indicator
on the IBM ThinkPad FDD External Attachment Kit
turns on.
computer is accessed.
Page 18

Preparing to Use the SelectaDock System (ThinkPad
760/765)
The ThinkPad 760 and 765 user needs to copy the INF files. Do the
following:
Note: Check which version of Windows 95 you have before copying
the INF files:
1. Double-click on My Computer, Control Panel, then
System.
2. Note the version of the Windows 95 in the System field.
For example, 4.00.950 or 4.00.950 B.
1
Insert the SelectaDock III Option Diskette into the A drive.
2
Open the Windows command prompt screen.
3
Type CD C:\WINDOWS\INF
4
Overwrite the INF files with the following command:
COPY A:\xxxx\ .INF C:
Note: If the Windows 95 version is 4.00.950, type 95 instead of
xxxx.
If the Windows 95 version is 4.00.950 B, type 95 B instead of
xxxx.
5
Press Enter.
6
Reboot the computer to make the change effective.
The ThinkPad 760 and 765 user also need to do the following:
1
Update the system program.
2
Update the ThinkPad Configuration program.
3
Update PC Card Director.
1-8 IBM ThinkPad SelectaDock III User's Guide
Page 19

Refer to the
Program Installation Guide
to update or copy these
programs.
The following diskettes or CD-ROM is supplied for updating these
programs:
For diskette installation:
SelectaDock III Option Diskette
System Program Service Diskette for VGA/SVGA
System Program Service Diskette for XGA
IBM ThinkPad Utility Diskette for Windows 3.1
IBM ThinkPad Utility Diskette for Windows NT
IBM ThinkPad Utility Diskette for Windows 95
IBM ThinkPad Utility Diskette for OS/2
Battery Installation Check Utility Diskette
IBM ThinkPad PC Card Director for Windows NT 4.0
IBM ThinkPad PC Card Director for OS/2 and Windows 95
For CD-ROM installation:
SelectaDock III Option Diskette
System Program Service Diskette for VGA/SVGA
System Program Service Diskette for XGA
ThinkPad Utility Program and PC Card Director (CD-ROM)
Note:
You can get the following diskettes from the Internet URL
http://www.us.pc.ibm.com/support/thinkpad/thinkpad_support.html
Chapter 1. Introduction 1-9
IBM ThinkPad Utility Diskette for DOS, Personalization
IBM ThinkPad PC Card Director for DOS and Windows 3.1
Page 20

ThinkPad Configuration Program
The IBM ThinkPad utility diskette contains the ThinkPad
Configuration program. Using this program, you can easily set
up and customize the built-in devices, such as the parallel port or
infrared port.
The ThinkPad Configuration program also provides the Device
Configuration Management System which automatically detects
any system resource conflict (such as IRQ, DMA, I/O address, or
memory conflict). Therefore, the ThinkPad Configuration program
makes it easy for you to install a new device or software.
IBM ThinkPad PC Card Director
PC Card Director is a utility program to make PC Cards easy to
use by:
Turning on and setting up a PC Card when you insert it in a
PC Card slot.
Showing what type of PC Card is in your computer.
Allowing you to register an application program for a
particular PC Card and starting the program automatically
when the card is installed.
1-10 IBM ThinkPad SelectaDock III User's Guide
Page 21

Attaching the SelectaBase to the SelectaDock III system
The following procedure describes how to attach the SelectaBase to
the SelectaDock III system.
Note: The picture shows a SelectaBase 770 port replicator. To
attach the SelectaDock Base Model I to the SelectaDock III
system, do the same procedure.
1
Make sure that the security key on the SelectaBase is set to
the Unlock position.
2
Remove the connector cover by pulling out the hooks on both
sides 1 ; then lift up the cover 2 .
Chapter 1. Introduction 1-11
Page 22

3
Place the SelectaBase on the SelectaDock III system.
a) Align the guides of the SelectaDock III 1 with the slits on
the underside of the SelectaBase.
b) Place the SelectaBase on the SelectaDock III so that the
first triangle on the SelectaBase lines up with the triangle
on the SelectaDock III (as shown in the circle).
1-12 IBM ThinkPad SelectaDock III User's Guide
Page 23

4
Slide the SelectaBase to connect to the SelectaDock III 1 ;
then lock the SelectaBase to the SelectaDock III by sliding the
lock upward 2 .
Note: Make sure that the second triangle on the SelectaBase
lines up with the triangle of the SelectaDock III (as
shown in the circle).
5
Attach the connector cover to the SelectaDock system
You have completed the attachment of the SelectaBase to the
SelectaDock III.
Chapter 1. Introduction 1-13
Page 24

Detaching the SelectaBase from the SelectaDock III system
To disassemble the SelectaDock system, do as follows:
Note: The picture shows a SelectaBase 770 port replicator. To
detach the SelectaDock Base Model I to the SelectaDock III
system, do the same procedure.
1
Remove the connector cover.
2
Disconnect all peripheral cables from the SelectaDock system.
3
Disconnect the power cord from the SelectaDock system.
4
Unlock the port replicator from the SelectaDock III system by
sliding the lock downward.
5
Set the security key to the unlock position 1 ; then release the
port replicator 2 .
Note: Use the finger hole as shown in the figure when you
release the port replicator.
6
Attach the connector cover to the SelectaDock III system
You have completed disassembling the SelectaDock system.
1-14 IBM ThinkPad SelectaDock III User's Guide
Page 25

Docking the ThinkPad to the SelectaDock system
This section describes how to dock and undock the ThinkPad
computer to or from the SelectaDock system
Notes:
1. The computer you are going to dock must be a PCI bus
architecture computer. If you accidentally dock an ISA bus
computer, the SelectaDock III warns you with the Attention
indicator and beeps.
2. For the ThinkPad 760 and 765 with Windows 95 user:
You need to copy the INF files and update the system program
before you first dock your computer to the SelectaDock III
system. “Preparing to Use the SelectaDock System
(ThinkPad 760/765)” on page 1-8 .
There are three mode when you dock or undock the ThinkPad to the
SelectaDock system as follows:
Cold docking or undocking:
Docking or undocking while the computer is powered off.
Hot docking or undocking:
Docking or undocking while the computer is operating or in
standby mode.
Warm docking or undocking:
Note: Hot or warm docking or undocking is supported by only
Cold Docking
To dock your computer to the SelectaDock system in cold mode, do
as follows:
Chapter 1. Introduction 1-15
Docking or undocking while the computer is in suspend mode.
Windows 95. If you use the other operating system, cold dock
or undock your computer.
1
Turn off your computer.
2
Disconnect all peripheral devices cables from your computer.
Page 26

3
If you want to protect the drives under the keyboard after
docking, set the lock on your computer. (See the computer
user's guide for the procedure.)
4
Plug the power cord in the power connector of the SelectaDock
III, and then into an electrical outlet.
5
Dock your computer to the SelectaDock system. (See the
manual of the SelectaBase.)
a) Check that the Docked indicator 1 is lit.
b) Turn the security key to the locked position 2 if you want
to secure the devices. Then remove the key.
6
Turn on your computer, using its power switch. The
SelectaDock system powers on automatically; then the
computer starts to boot. Check that the Power On indicator
on the status indicator of the SelectaDock III is lit.
You have completed to dock the ThinkPad to the SelectaDock
system.
For Windows 95 user, continue to the next.
Windows 95 begins to check the status of the SelectaDock system
and restarts a couple of times.
Follow the instructions that appear on the screen.
During this operation, Windows 95 creates a configuration profile for
the SelectaDock system named Dock x.
1-16 IBM ThinkPad SelectaDock III User's Guide
Page 27

Notes:
a) x can be any number.
b) The message “Version Conflict” might appear on the screen.
Answer Yes to the prompt “Do you want to keep this file?.”
7
In Windows 95, double-click on My computer, Control Panel,
and System.
8
Click on the Hardware Profile tab.
9
Make sure the new profile, Dock x, is created. Select the
Device Manager tab and make sure that the new devices are
displayed in the device list.
If Dock x is not created, repeat from step 1 on page 1-15.
Note: If the symbol “!” or “X” appears next to a device symbol, a
resource conflict might have occurred. For the system
resource assignment, go to “System Resources Assignment”
on page 3-9.
Once the new hardware profile Dock x has been created, you
can dock or undock your computer in hot or warm mode.
Cold Undocking
This procedure describes how to undock your computer from the
SelectaDock system when the computer power is turned off.
You have completed the cold undocking.
Chapter 1. Introduction 1-17
1
Turn off your computer.
2
Turn the security key to the eject position to eject the computer.
3
Grasp the computer and lift it out.
Page 28

Hot or Warm Docking for Windows 95
Docking
In the boot process after cold docking, the operating system tries to
set a configuration including the devices installed in the SelectaDock
system. After the configuration has been set up, you can dock your
computer in hot or warm mode. The SelectaDock system devices
immediately become available to your computer.
Undocking
To use hot or warm undocking for Windows 95, do the following:
1
Request the eject by either of the following:
Select Eject PC in the Start menu.
or
Turn the security key to the eject position and release the
key.
An eject request is made to the operating system.
Considerable time may be required to complete the eject
process.
Note: To see if the eject process has completed, click on Start.If
Eject PC appears, undocking is still in progress. If not, the
eject process has completed.
2
When you hear the beep sound, turn the security key to the
eject position again to eject the computer from the SelectaDock
system.
Note: If the operating system rejects the request, messages
appear on the screen explaining the reason. In this
case, use cold undocking.
1-18 IBM ThinkPad SelectaDock III User's Guide
Page 29

Chapter 2. Installing Options
Highlight
You can expand the capability of your ThinkPad by installing
options. This chapter explains how to install the options.
After you complete the installation of the options, go to Chapter 3
to configure your system.
This chapter contains:
Handling Internal Options ...................... 2-2
Supported Devices . . . . . . . . . . . . . . . . . . . . . . . . . . 2-3
UltraBay II Tray .......................... 2-3
Device Space . . . . . . . . . . . . . . . . . . . . . . . . . . . 2-4
Adapter Card Slots ........................ 2-4
PC Card Slots ........................... 2-5
USB Ports . . . . . . . . . . . . . . . . . . . . . . . . . . . . . 2-5
Installing a Device in the UltraBay II Tray ............. 2-6
Installing a Device in the Device Space ............. 2-10
Installing a PCI or an ISA Adapter Card ............. 2-13
Installing a PC Card ........................ 2-16
Using the MIDI/Joystick Port ................... 2-18
Connecting External SCSI Devices ............... 2-20
Copyright IBM Corp. 1997 2-1
Page 30

Handling Internal Options
DANGER
Before you install or remove the option, unplug the power cord.
CAUTION
The CD-ROM drive uses a laser system. To ensure correct use of this product, carefully
read the manual that came with the CD-ROM drive and keep the manual for future
reference. If the unit requires maintenance, have it serviced by authorized personnel.
Use of controls, adjustments, or procedures other than those specified may result in
hazardous radiation exposure.
To prevent direct exposure to the laser beam, do not open the enclosure.
Attention
Do not open the static-protective package containing the option until you are instructed to do so.
Static electricity can damage the option.
When you are instructed to install the option, observe these precautions as you open the
static-protective package:
Touch the static-protective package containing the option to a metallic portion of the
SelectaDock III for at least 2 seconds. This action reduces the static electricity from the
package and from your body.
Do not touch any exposed circuitry on the option.
Prevent other people from touching the option.
Limit your movement. Movement can cause static-electricity buildup.
Always handle the option carefully and by its edges.
If you
must
put the option down after it has been removed from the package, place the option
on the static-protective package on a level surface. Do not place the option on a metal table.
If the SelectaDock III system has a dust cover over the UltraBay, remove it.
2-2 IBM ThinkPad SelectaDock III User's Guide
Page 31
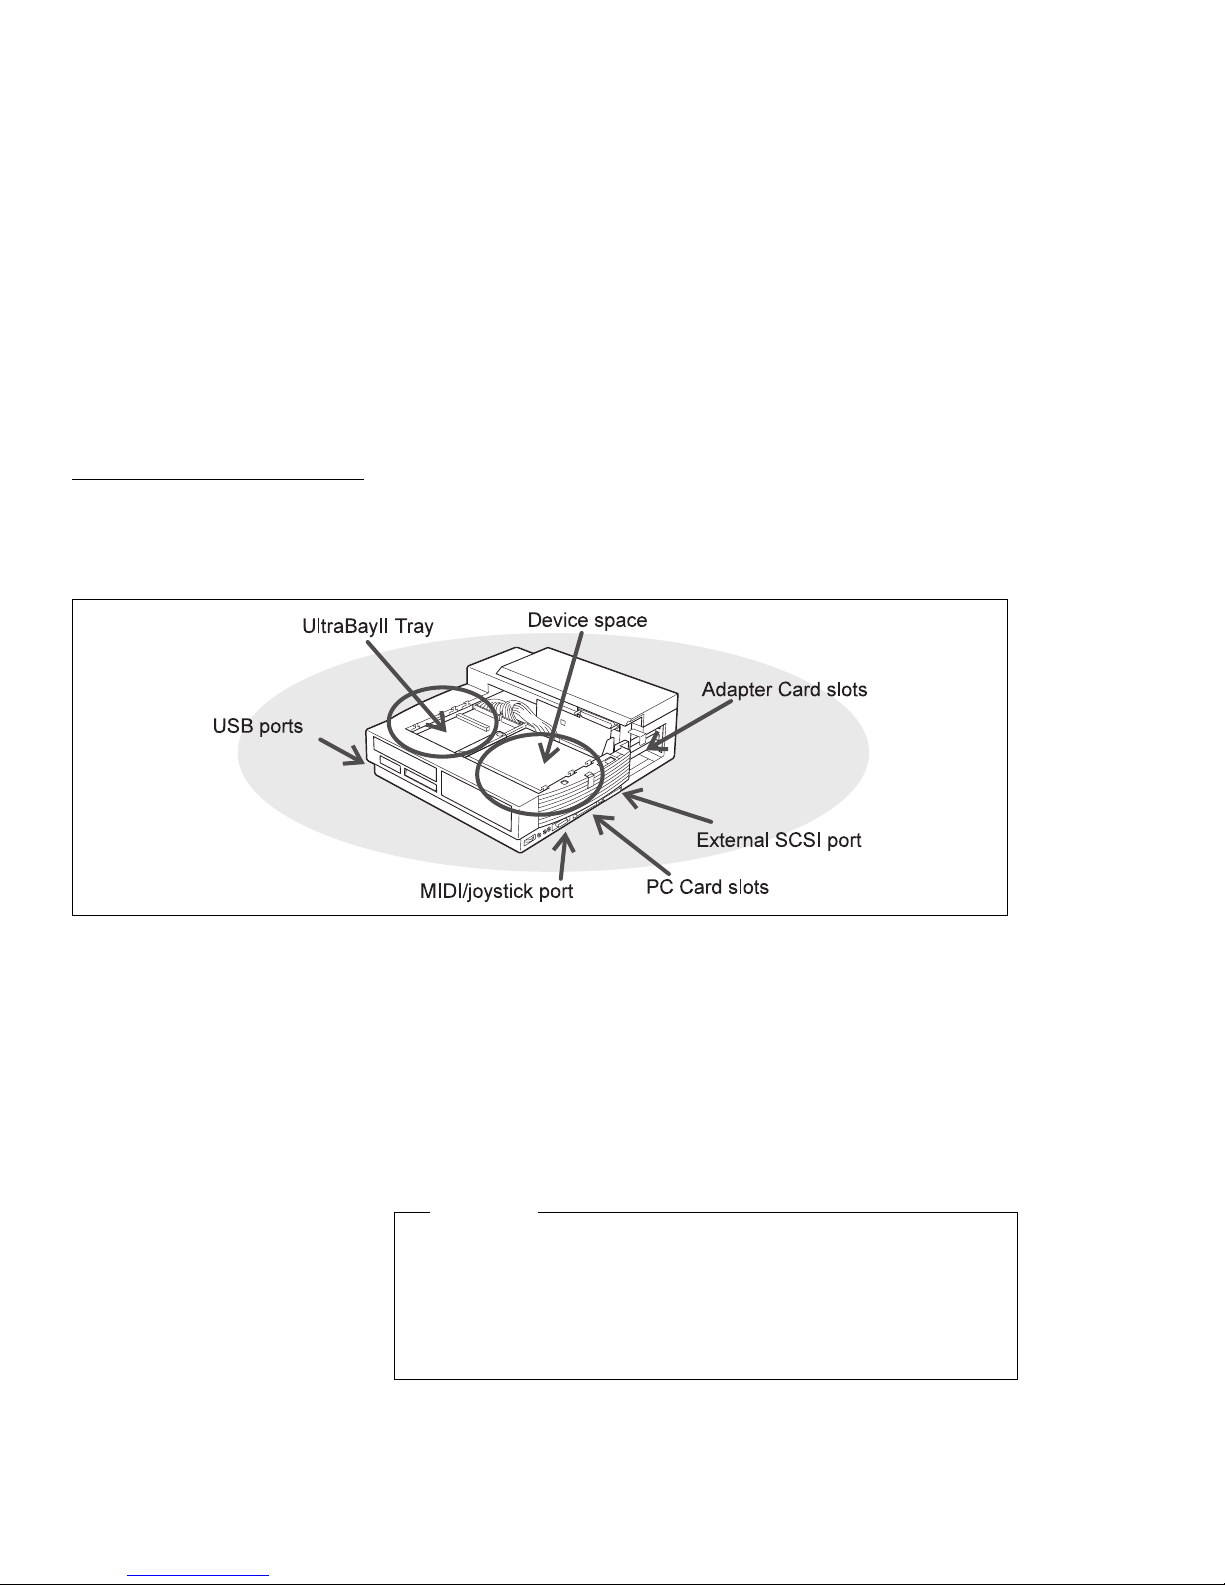
Supported Devices
UltraBay II Tray
The SelectaDock III system has an UltraBay II tray and device space
to install an optional drive. In the back are adapter card slots. In the
side are an external SCSI port, PC Card slots, and a MIDI/joystick
port.
The UltraBay II tray accommodates the following options:
Diskette drive (FDD)
IDE devices
– CD-ROM drive
– Hard disk drive (HDD) with attachment
Only one diskette drive can be attached to the SelectaDock III
system at the same time. When an external diskette drive is
attached, do not install a diskette drive in the UltraBay II. Trying
to operate with more than a single drive can destroy diskette
data.
Note: If you want to install the UltraBay device used in the ThinkPad
Chapter 2. Installing Options 2-3
Each drive should be compatible with the UltraBay II of the
ThinkPad 770 series computer.
Attention
760 computer, replace the UltraBay II tray with the ThinkPad
Page 32
Device Space
The SelectaDock III system accommodates the following options in
the device space.
IDE drive
SCSI drive
Before installing any drive, examine the connector on the
SelectaDock III system and connect the correct drive.
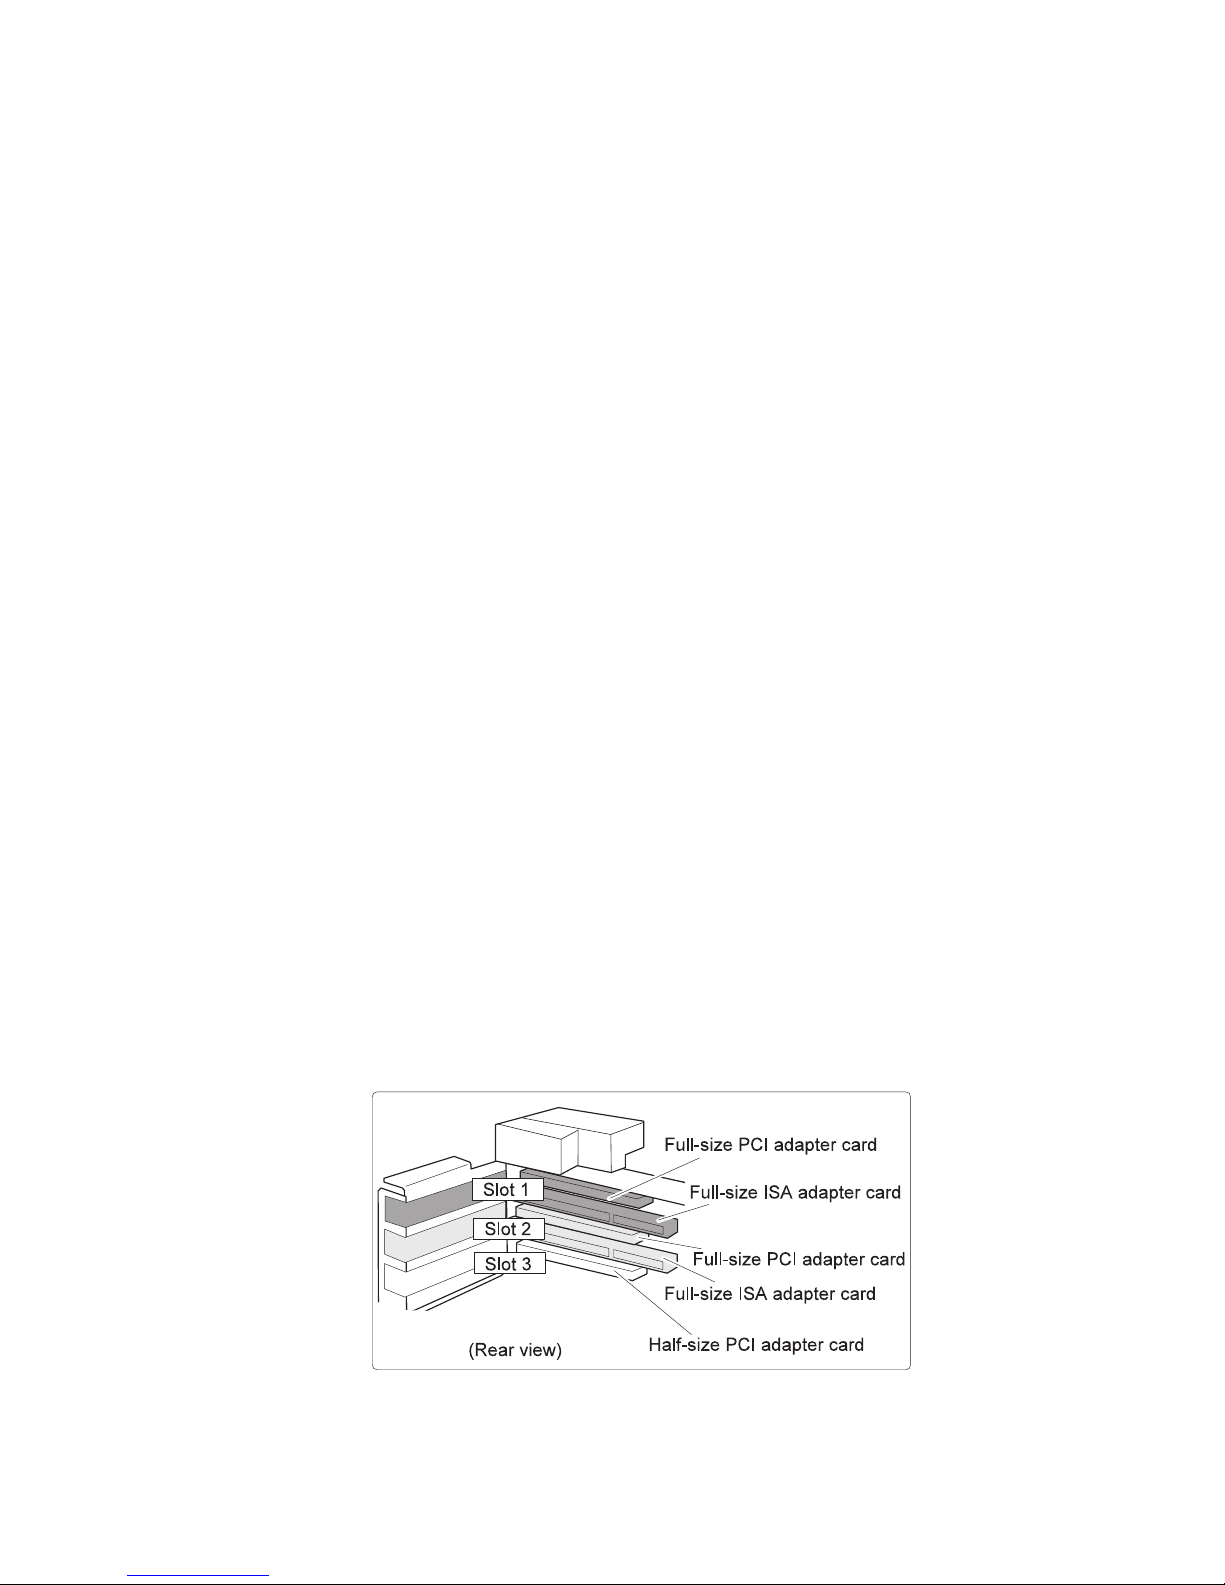
Adapter Card Slots
The SelectaDock III system has slots to accommodate the following
types of adapter cards:
Slot 1: Full-size PCI adapter card (upper connecter)
Slot 2: Full-size PCI adapter card (upper connecter)
Slot 3: Half-size PCI adapter card
760 UltraBay Options Tray for SelectaDock III, which can be
purchased separately.
– CD-ROM drive
– Hard disk drive
or
Full-size ISA adapter card (lower connector)
or
Full-size ISA adapter card (lower connector)
2-4 IBM ThinkPad SelectaDock III User's Guide
Page 33

PC Card Slots
USB Ports
Wake-on LAN (WOL) Support
The SelectaDock III system supports the following wake-on LAN
cards.
Note: Only the ThinkPad 770 user can use the wake-on LAN
function.
IBM Auto Wake Token Ring ISA Adapter (55H6760)
IBM 100/10 EtherJet PCI Adapter w/WOL (85H9921)
IBM PCI Wake On LAN Token Ring Adapter (86H1880)
Two PC card slots on the SelectaDock III system can accommodate
either of the following PC Card combinations:
2 Type I or Type II Cards
1 Type III Card (lower slot only)
The universal serial bus (USB) function is not supported in the
ThinkPad 760 and 765 computers. Only the ThinkPad 770 computer
can use this function.
Chapter 2. Installing Options 2-5
Page 34

Installing a Device in the UltraBay II Tray
Before installing a device into the UltraBay II tray, make sure that:
Power is turned off.
The computer is undocked.
The SelectaBase port replicator is detached.
To install the device, do the following:
1
Slide and push the lever 1 .
2
Remove the spacer if there is one.
Note: In the UltraBay II tray, a spacer is initially included when
the SelectaDock III system is shipped.
2-6 IBM ThinkPad SelectaDock III User's Guide
Page 35

3
Install the UltraBay II device you are going to use.
Make sure that the device is fully engaged with the connector.
Note: If you install an HDD, install it into the attachment first; then
install the HDD-attachment assembly into the UltraBay II tray.
Chapter 2. Installing Options 2-7
Page 36

4
If you want to secure the device in the UltraBay II tray, lock the
eject button as follows:
a)
Unlatch the UltraBay II tray with pushing the latch 1 and
rotate it clockwise 2 .
b)
Pull the UltraBay II tray forward 3 .
c)
Slide the lock lever on the left side of the UltraBay II tray
4 .
d)
Reinstall the UltraBay II tray; then latch the bay.
You have finished installing the device into the UltraBay II tray.
After installing the device, go to Chapter 3 to configure the
system.
2-8 IBM ThinkPad SelectaDock III User's Guide
Page 37

When removing
To remove the device from the UltraBay II tray:
1.
Unlock the device eject lock if you secured the device in the
tray.
2.
Slide and push the lever 1 ; the device in the tray releases.
3.
Remove the device.
Note: Do not remove the drive before shutdown the operating
Chapter 2. Installing Options 2-9
system. When you slide the lever 1 during the operating
system is working, beep sounds.
Page 38

Installing a Device in the Device Space
To install an IDE or a SCSI drive in the device space do the
following:
When installing an IDE device
An IDE device has three modes: master, slave, and cable select.
Select the cable select mode before installing the IDE device into
the SelectaDock III system. See the instructions in the manual
accompanying your IDE device. If you cannot select the cable
select mode, do one of the following:
If no hard disk is installed in the UltraBay II tray, set the
mode to master mode.
If a hard disk is installed in the UltraBay II tray, set the mode
to slave mode.
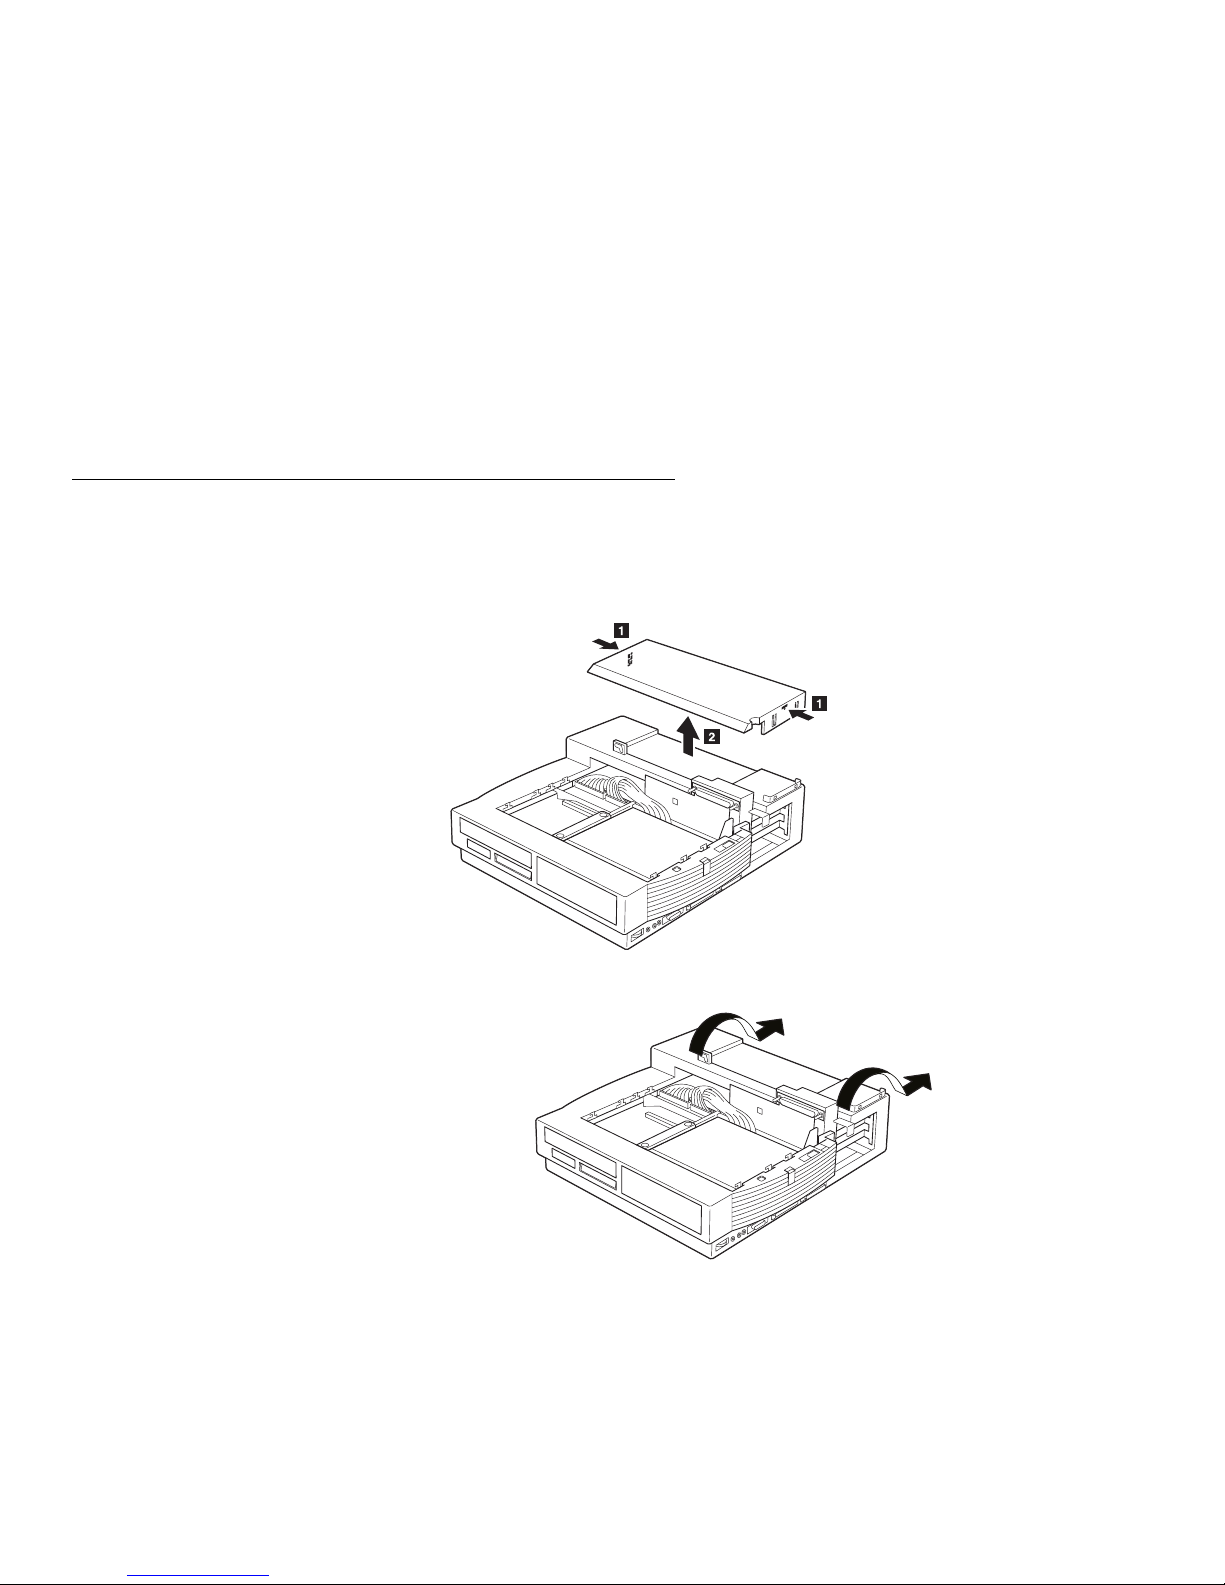
1
Remove the front top cover 1 .
2-10 IBM ThinkPad SelectaDock III User's Guide
Page 39
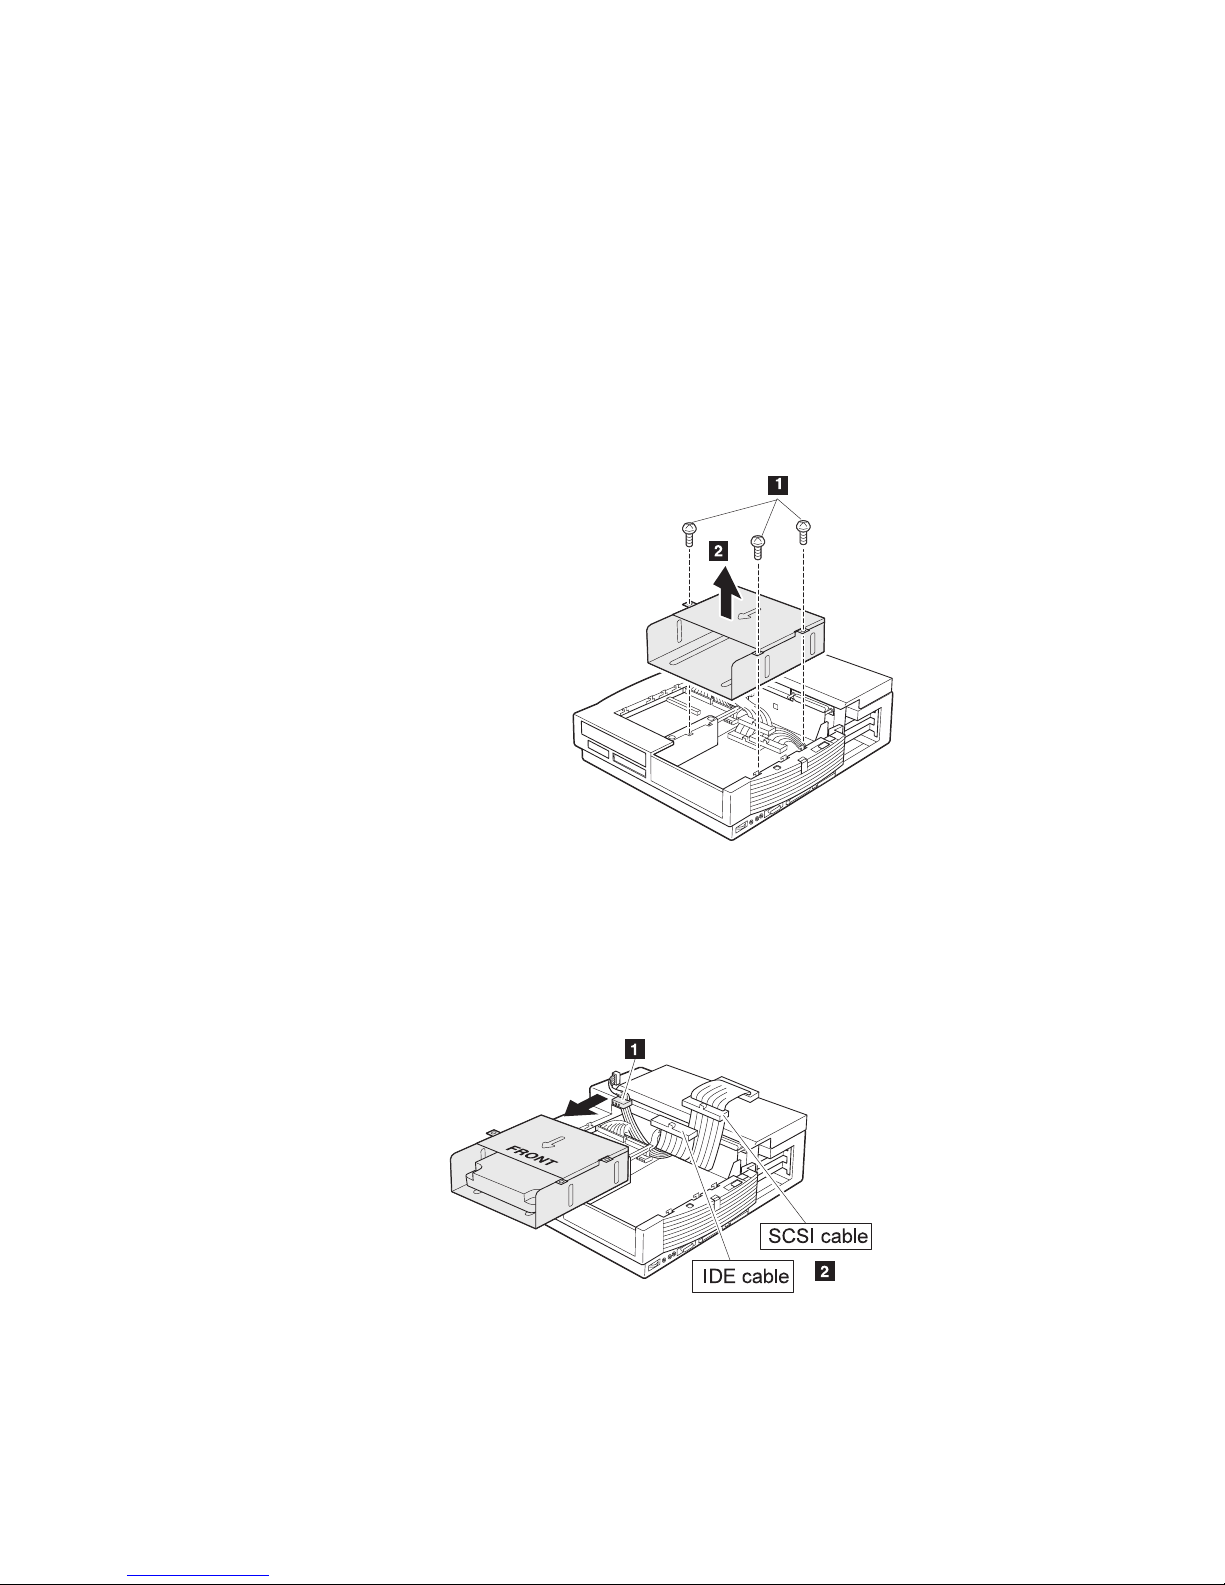
2
Remove the three screws 1 ; then pull the frame upward 2 .
3
Screw the drive into the frame.
Note: Make sure the device is oriented properly.
4
Connect the power cable 1 and IDE cable or SCSI cable 2
to the drive in the frame. If necessary, connect the audio cable
also.
Chapter 2. Installing Options 2-11
Page 40

5
Replace the frame into the device space 1 ; then drive in the
screws 2 .
Note: Make sure the cables are not above the device space.
6
Reinstall the front top cover.
You have finished installing the drive into the device space.
After installing the device, go to Chapter 3 to configure the
system.
2-12 IBM ThinkPad SelectaDock III User's Guide
Page 41
Installing a PCI or an ISA Adapter Card
To install an adapter card in the SelectaDock III system, do the
following:
1
Remove the connector cover by pulling out the hooks on both
sides 1 ; then lift up the cover 2 .
2
Open and remove the rear cover.
Chapter 2. Installing Options 2-13
3
Set the adapter card switches or jumpers (if needed) using the
instructions supplied with the adapter card. For future
reference, record any switch or jumper information in this
guide.
Page 42

4
Remove the screws holding the metal bracket. Then remove
the metal bracket.
5
Install the adapter card.
Note: In slots 1 and 2, the upper (smaller) connector is for a
PCI adapter card. The lower (larger) connector is for
an ISA adapter card. In slot 3, the connector is for a
half-size PCI adapter card.
2-14 IBM ThinkPad SelectaDock III User's Guide
Page 43
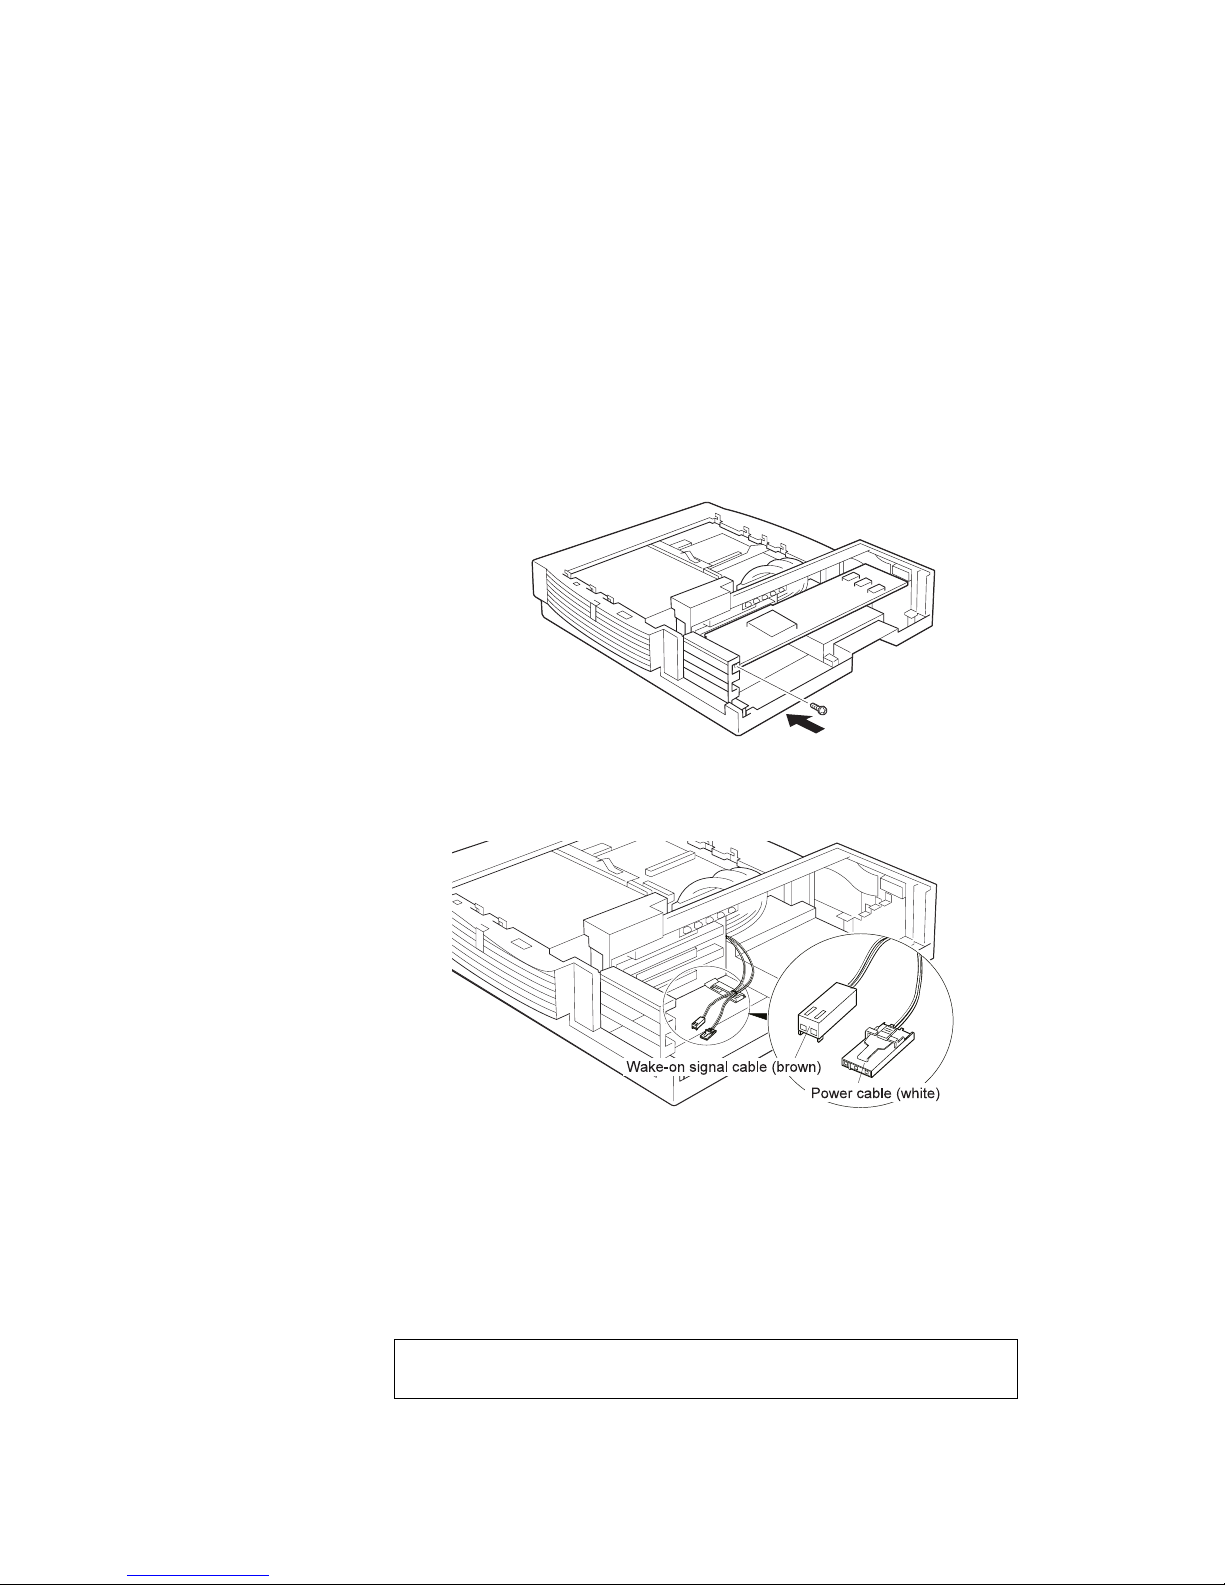
6
Drive in the screw that held the metal bracket to secure the
adapter card in the socket.
If you are installing the wake-on LAN card, connect the
wake-up signal cable (brown) and power cable (white) to each
connector on the LAN card.
You have finished installing the adapter card.
After attaching the adapter card, go to Chapter 3 to configure the
system.
Chapter 2. Installing Options 2-15
7
Attach and close the rear cover.
8
Reconnect the cables and power cord.
9
Attach the connector cover to the SelectaDock III system.
Page 44

Installing a PC Card
To install a PC Card, do the following:
1
Slide the PC Card lock to the unlocked position.
2
Determine which slot to use. A Type III card must be inserted
in the lower slot only.
3
Align the card in the slot, and insert until it is fully seated.
Note: Make sure the PC Card is fully installed into the slot.
Loose installation will cause an error.
4
Slide the PC Card lock to the locked position for PC Card
security.
You have finished installing a PC Card.
2-16 IBM ThinkPad SelectaDock III User's Guide
Page 45

Plug & Play for PC Card
Once you installed the PC Card Director and the device driver for
the PC Card, you can use the card as soon as you install it into
the slot of the SelectaDock III system. This is called plug & play.
Refer to the user's guide of your computer for details.
When Removing
To remove the card, press the corresponding eject button.
Note: If you have difficulty pressing with your finger, use a
pointed device as follows:
Chapter 2. Installing Options 2-17
Page 46

Using the MIDI/Joystick Port
The SelectaDock III system provides a MIDI/joystick port as a
functional replacement for the same port on the computer. The MIDI
signals through this port are sent directly the computer's MIDI port.
Therefore, if your computer does not have a MIDI port, you cannot
use the MIDI feature.
The SelectaDock III system has a game controller for the joystick.
Even if your computer does not have a game controller, the
controller in the SelectaDock system is available and takes control
through the ThinkPad Configuration program. When you use a
joystick connected to the SelectaDock system, you must enable the
game feature with the ThinkPad Configuration program.
To use the MIDI/joystick port, do the following:
1
Turn off the computer, and remove the power cord from the
SelectaDock system.
2
Connect a MIDI connector or a joystick cable to the port.
3
Connect the other end of the cable to a MIDI equipment
connector or a joystick.
2-18 IBM ThinkPad SelectaDock III User's Guide
Page 47

Note
When you have a Sound Blaster–compatible ISA adapter
card installed, do not use the MIDI/joystick port. Otherwise,
the computer will have resource conflict problems.
When you use such a card, disable the port feature with the
ThinkPad Configuration program.
You have finished connecting the MIDI/joystick port.
Chapter 2. Installing Options 2-19
Page 48
Connecting External SCSI Devices
You can connect external SCSI devices to the SCSI connector. The
SCSI controller in the SelectaDock system is compatible with the
Fast SCSI (Ultra-SCSI) Adaptec AIC-7860 controller, and provides a
50-pin half-pitch SCSI connector.
To install the drives, follow the installation instructions that came with
the SCSI device.
Notes
External SCSI cables are supplied with the drive. As an
alternative, you can purchase them at a computer store.
Turn on all external SCSI devices before you turn on the
system.
See “Setting Up a SCSI Device” on page 3-6 for information
on configuring the system.
2-20 IBM ThinkPad SelectaDock III User's Guide
Page 49

Chapter 3. System Configuration
Highlight
After installing any option devices, you need to configure your
computer using ThinkPad Configuration program. This chapter
explains how to configure your computer.
Note: When you configure your computer, undock it from the the
SelectaDock system.
This chapter contains:
Setting Up an IDE Device ...................... 3-2
For DOS . . . . . . . . . . . . . . . . . . . . . . . . . . . . . . 3-2
For Windows 3.1, Windows NT, Windows 95, or OS/2 Warp 3-3
Setting Up a SCSI Device ...................... 3-6
For Windows 95 .......................... 3-6
Setting Up An Adapter Card .................... 3-8
For DOS . . . . . . . . . . . . . . . . . . . . . . . . . . . . . . 3-8
For Windows 3.1, Windows NT, Windows 95, or OS/2 Warp 3-8
System Resources Assignment ................... 3-9
Copyright IBM Corp. 1997 3-1
Page 50

Setting Up an IDE Device
If you installed an IDE device in the SelectaDock system, make sure
that an IDE controller is enabled. This procedure depends on the
operating system in your computer.
For DOS
For the ThinkPad 760 and 765 user, do as follows:
1
2
3
For the ThinkPad 770 user, do as follows:
1
At the DOS command prompt, enter:
PS2 ? IDE2
to show the status of the IDE adapter.
If it is disabled, enter:
PS2 IDE2 Enable
to enable it.
Reboot the computer to make the change effective.
You have finished the setup.
Select a PCI IRQ with the PS2 ? PCIIRQ command.
Note: Do not use IRQ 11 and IRQ 15. You have to disable a
device or port to set an IRQ for the SelectaDock III system.
When you select an IRQ, a hardware conflict message
appears. Disable the device currently assigned to that IRQ.
2
Reboot the computer to make the change effective.
3
At the DOS command prompt, enter:
PS2 ? IDE3
to show the status of the IDE adapter.
4
If it is disabled, enter:
PS2 IDE3 Enable
to enable it.
3-2 IBM ThinkPad SelectaDock III User's Guide
Page 51

5
Reboot the computer to make the change effective.
You have finished the setup.
For Windows 3.1, Windows NT, Windows 95, or OS/2 Warp
For the ThinkPad 760 and 765 user, do as follows:
1
Select the ThinkPad folder.
2
Select the ThinkPad Configuration icon.
3
Click on the Docking Station ( ) button.
4
Select Enable IDE device.
5
Click on OK; then close the ThinkPad Configuration program.
6
Reboot the computer to make the change effective.
For the ThinkPad 770 with Windows 95 user, do as follows:
1
Click on Start, move the cursor over Program, and ThinkPad,
and click on ThinkPad Configuration.
Note: Do not use IRQ 11 and IRQ 15. You have to disable a
Chapter 3. System Configuration 3-3
2
Click on the Docking Station ( ) button.
3
Set only the 1st IRQ in the next window.
device or port to set an IRQ for the SelectaDock III system.
When you select an IRQ, a hardware conflict message
appears. Disable the device currently assigned to that IRQ.
4
Click on OK; then close the ThinkPad Configuration program.
5
Reboot the computer to make the change effective.
6
Select the ThinkPad folder.
Page 52

7
Select the ThinkPad Configuration icon.
8
Click on the Docking Station ( ) button.
9
Select Enable IDE device in the docking station.
10
Select 3rd IRQ.
11
Click on OK; then close the ThinkPad Configuration program.
12
Reboot the computer to make the change effective.
For the ThinkPad 770 with Windows NT and OS/2 Warp user, do
as follows:
1
Select the ThinkPad folder.
2
Select the ThinkPad Configuration icon.
3
Click on the Docking Station ( ) button.
4
Click on Advanced.. button.
5
Click on PCI Device Setup button.
6
Set only the 1st IRQ in the next window.
Note: Do not use IRQ 11 and IRQ 15. You have to disable a
device or port to set an IRQ for the SelectaDock III system.
When you select an IRQ, a hardware conflict message
appears. Disable the device currently assigned to that IRQ.
7
Click on OK; then close the ThinkPad Configuration program.
8
Reboot the computer to make the change effective.
9
Select the ThinkPad folder.
10
Select the ThinkPad Configuration icon.
3-4 IBM ThinkPad SelectaDock III User's Guide
Page 53

11
Select the Docking Station ( ) button.
12
Select Enable IDE device.
13
Select Third; then select one of the selections in the Third IDE
device window.
14
Click on OK; then close the ThinkPad Configuration program.
15
Reboot the computer to make the change effective.
Chapter 3. System Configuration 3-5
Page 54

Setting Up a SCSI Device
After installing a SCSI device in the SelectaDock III system,
configure your computer by referring to section or manual applicable
for the operating system you use:
For Windows 95
For DOS and Windows 3.1
For other operating systems
the operating system or SCSI device.
Note: For Windows NT user and use other drive than CD-ROM and
hard disk drive that does not depend on the Adaptec SCSI
hard disk peripheral, get the 2940 driver from the following
Web. site:
http://www.adaptec.com/
To update the SCSI controller, do as follows:
1
Double-click on My Computer, Control Panel, and System.
2
Click on the Device Manager tab.
3
Click on the + mark of the SCSI Controller selection.
A submenu appears.
4
Select Adaptec AHA-294X/78XX PCI SCSI Controller by
clicking on it; then click on the Properties button.
Appendix A .
The manual supplied with
5
Click on the Driver tab.
6
Click on Update Driver.
7
Insert the option diskette in the diskette drive; then make sure
that Yes (Recommended) is selected.
8
Click on Next.
3-6 IBM ThinkPad SelectaDock III User's Guide
Page 55

9
Click on Finish.
10
Click on OK in the “Insert Disk” window.
The Copying File.. window appears.
11
Change C:\WINDOWS\OPTIONS\CABS to A:\
12
Click on OK.
Follow the instructions on the windows.
SCSI ID
A SCSI ID must be assigned and a terminator must be installed
at the end of the device daisy chain. Refer to the following
sections when you set up the SCSI device.
Each device attached to a SCSI connector must have a different
SCSI ID. 7 is the default ID for a SCSI device in the
SelectaDock system, and 0—6 is the ID for external SCSI device.
See your SCSI device documentation for instructions on how to
set the SCSI ID.
Internal SCSI device termination:
External SCSI device termination:
Chapter 3. System Configuration 3-7
SCSI Termination
The internal SCSI cable automatically terminates at its
end. When installing a SCSI device in the SelectaDock
system, disable or remove the terminations.
When connecting an external SCSI device, terminate the
SCSI device at the end of the daisy chain. Make sure
any other SCSI device is not terminated.
Page 56

Setting Up An Adapter Card
Before you configure an adapter card with the ThinkPad
Configuration program, read the following note:
Note:
Perform this step before docking your computer to the
SelectaDock system for the first time.
If you have installed a non-plug & play (legacy ISA) adapter
card, assign system resources to the adapter card you just
installed by using the ThinkPad Configuration program on your
computer. For more information, see page 3-15.
To configure your system, use the ThinkPad Configuration program.
Do the following, depending on the operating system you are using:
For DOS
1
At the DOS command prompt, enter:
PS2 ?
to determine which command you can use to assign system
resources. See the online book of the computer for command
details.
2
Assign the system resources.
To install the device driver for the operating system, continue the
installation instructions described in the documentation shipped with
the adapter card.
For Windows 3.1, Windows NT, Windows 95, or OS/2 Warp
1
Select the ThinkPad folder.
2
Select the ThinkPad Configuration icon.
3
Click on the Docking Station ( ) button.
4
Fill in all the items for the system resource information. Click
on the Help button if you need an explanation about an item.
3-8 IBM ThinkPad SelectaDock III User's Guide
Page 57

System Resources Assignment
In most cases, your computer will automatically assign the system
resources when you install a new device. For example, your
computer will assign such resources as the
(IRQ) and the
modem. Other devices may need such system resources as
Memory Access
maximum value, for example the maximum value for IRQ on your
computer is 16 (0–15).
For information about the system resources available on your
computer, see online book or user's guide of your computer.
Sometimes Windows 95 does not allocate the resources correctly
since the resource may already be allocated to another device. This
is called a system resource
must set the system resources manually by using either method:
Input/Output
(DMA) and
Interrupt Request
(I/O) ports when you install a PC Card
Memory
conflict
. Each system resource has a
or
contention
. In this case, you
level
Direct
Device Manager
ThinkPad Configuration program
Before you allocate the system resources manually, you must find
out the currently available system resources by doing the following:
1
Double-click on My Computer, Control Panel, and System;
then click on the Device Manager tab. The current devices
are listed.
2
Click on the Computer icon at the top of the device list and
click on Properties.
The View Resources window showing the resources (IRQ, I/O
ports, DMA and memory) currently available appears:
of Windows 95
of your ThinkPad computer.
Chapter 3. System Configuration 3-9
Page 58
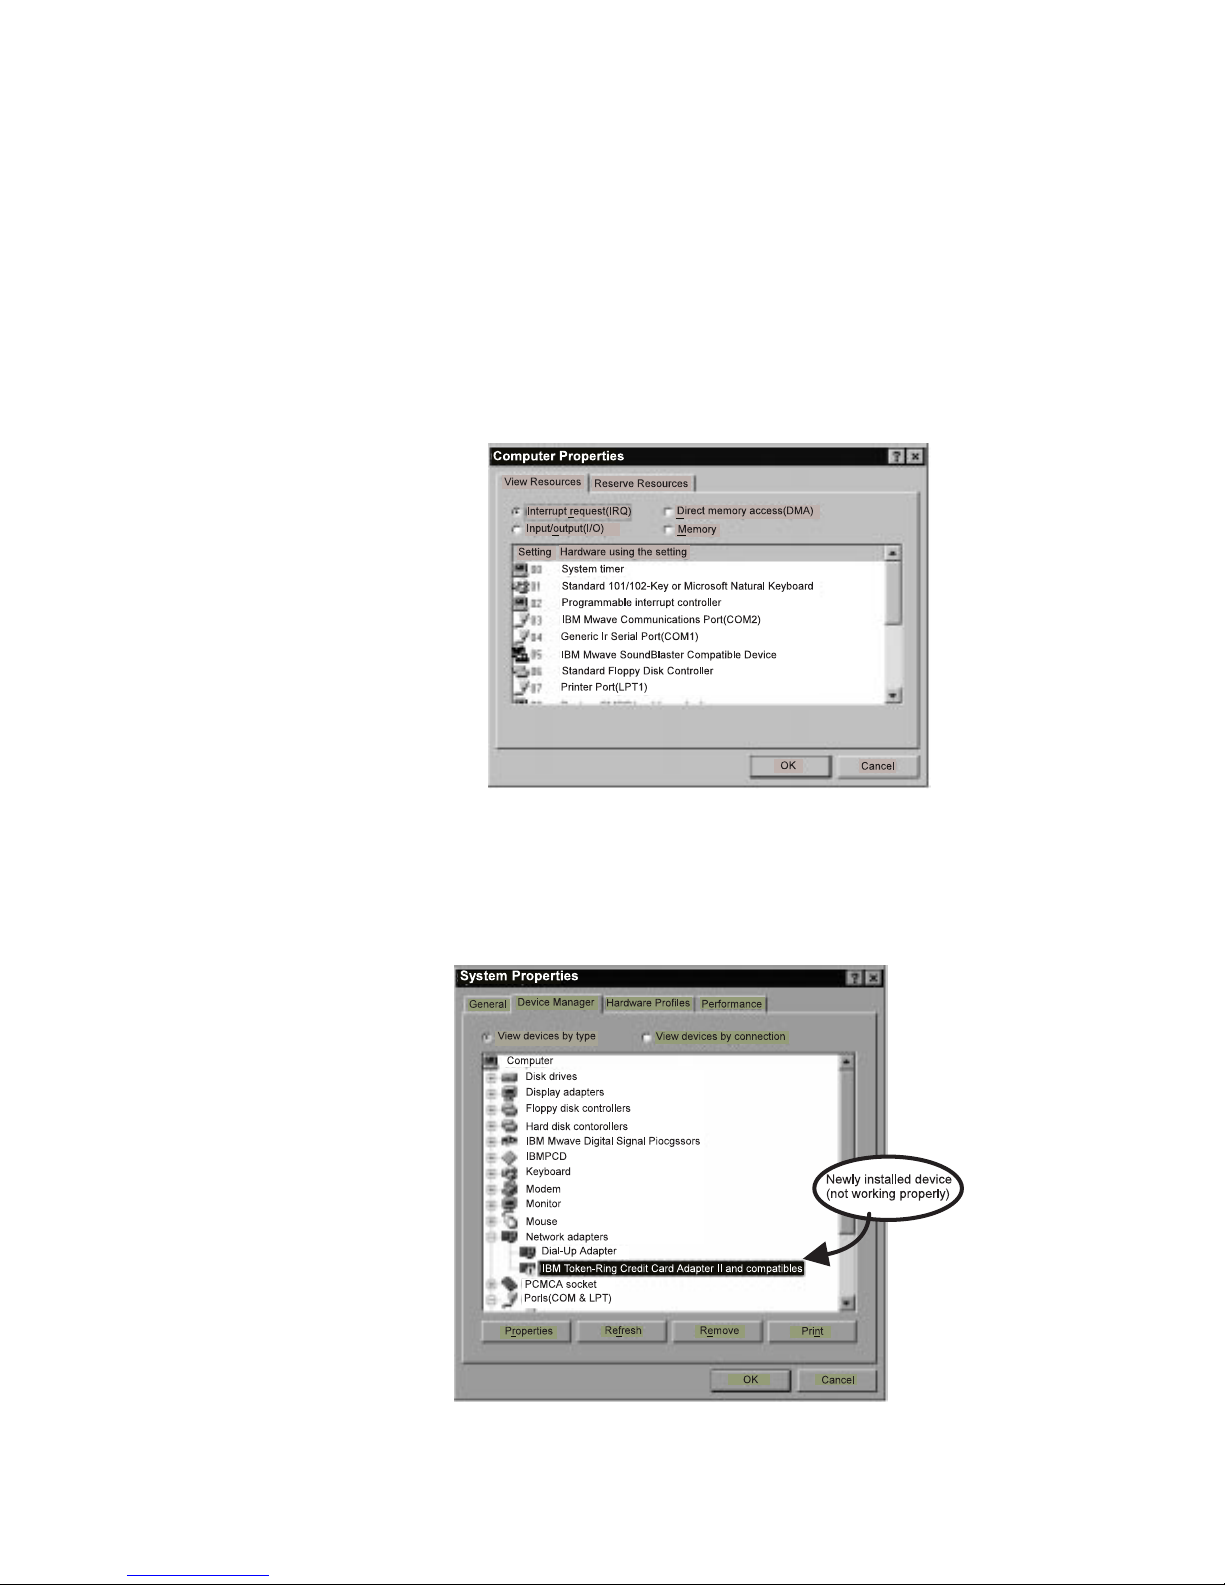
3
Double-click on My Computer, Control Panel, and System;
then click on the Device Manager tab. The Windows 95
Device Manager window appears.
The symbol “!” or “x” appears next to the device symbol which
is causing the conflict.
3-10 IBM ThinkPad SelectaDock III User's Guide
Page 59
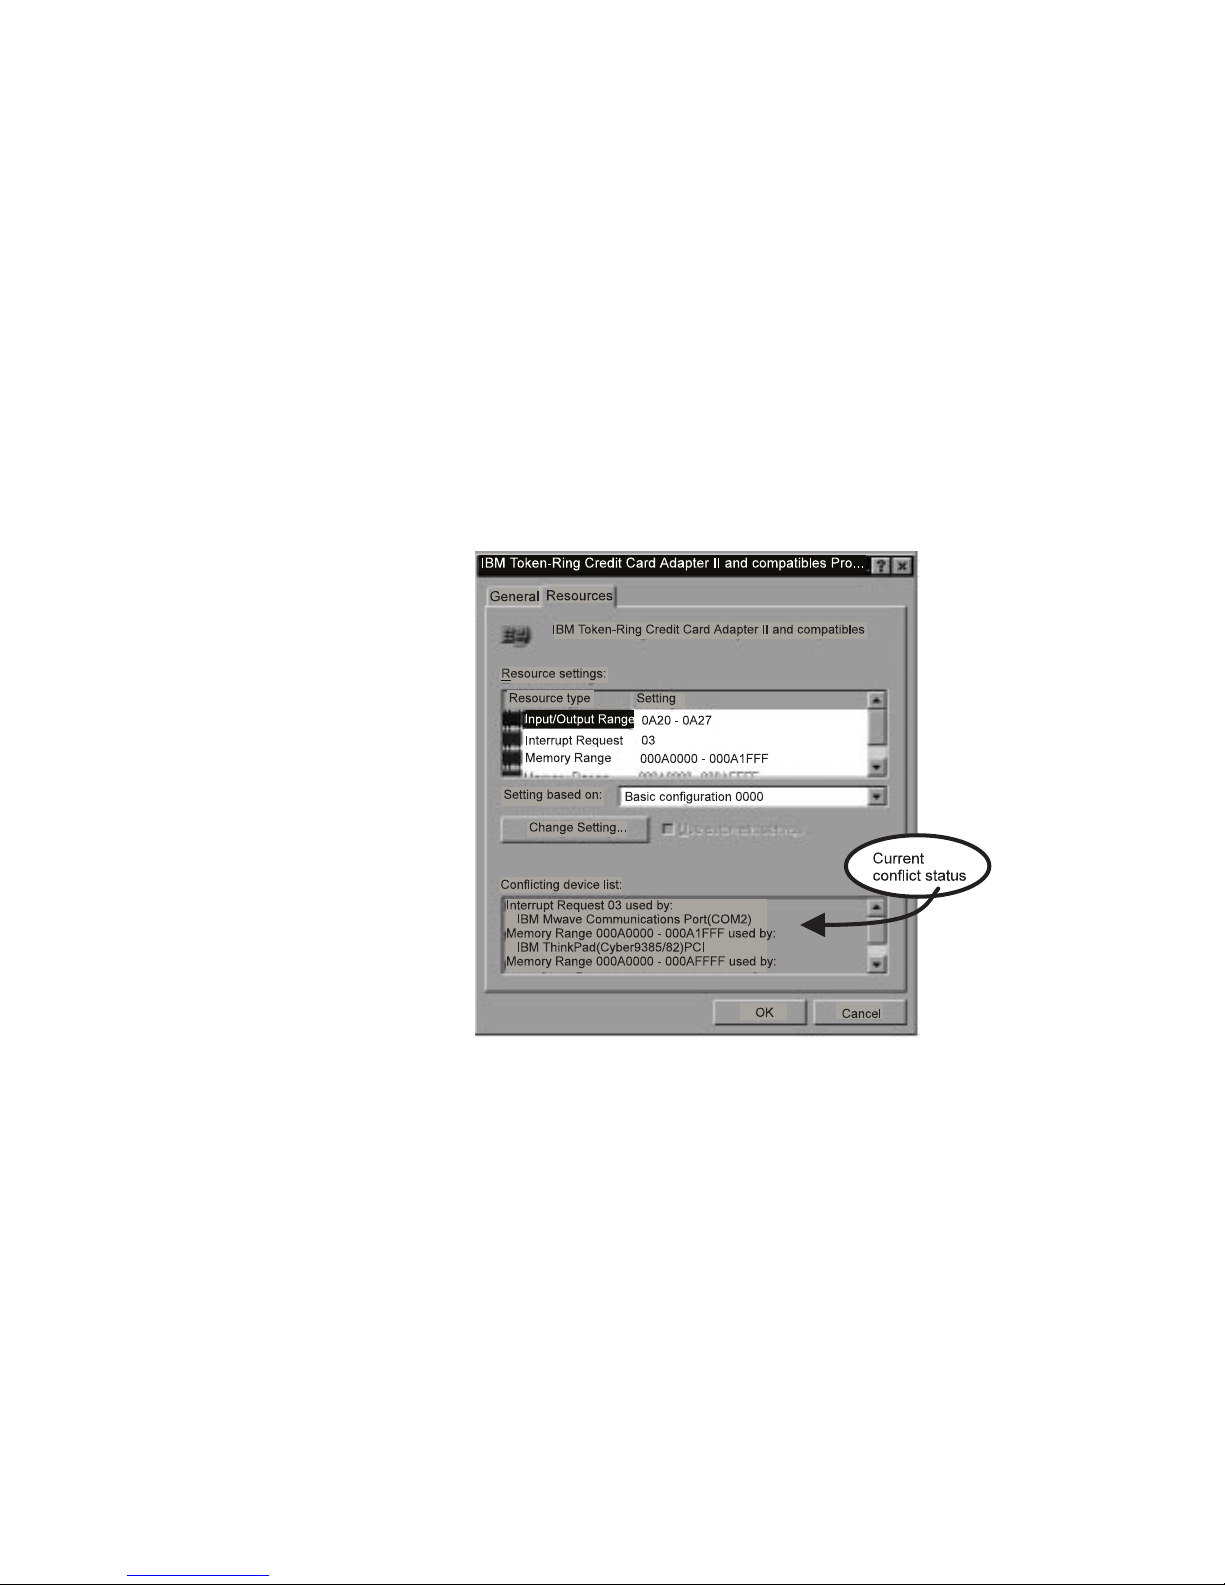
4
Highlight the device, in this case the IBM Token-Ring Credit...
device and click on Properties, the Resources tab, and then
on Set Configuration Manually. The Conflicting device list
box appears.
Chapter 3. System Configuration 3-11
5
Remove the checkmark on Use automatic settings.
6
Click on the Basic configuration ... button on the right and
select a different value.
Page 60

If the messages in the Conflicting device list box
disappear, click on OK and go on to step 8.
If the messages still remain, click on Change Setting and
continue to the next step.
3-12 IBM ThinkPad SelectaDock III User's Guide
Page 61

7
Change the conflicting values one by one by editing the
following window:
Chapter 3. System Configuration 3-13
Page 62
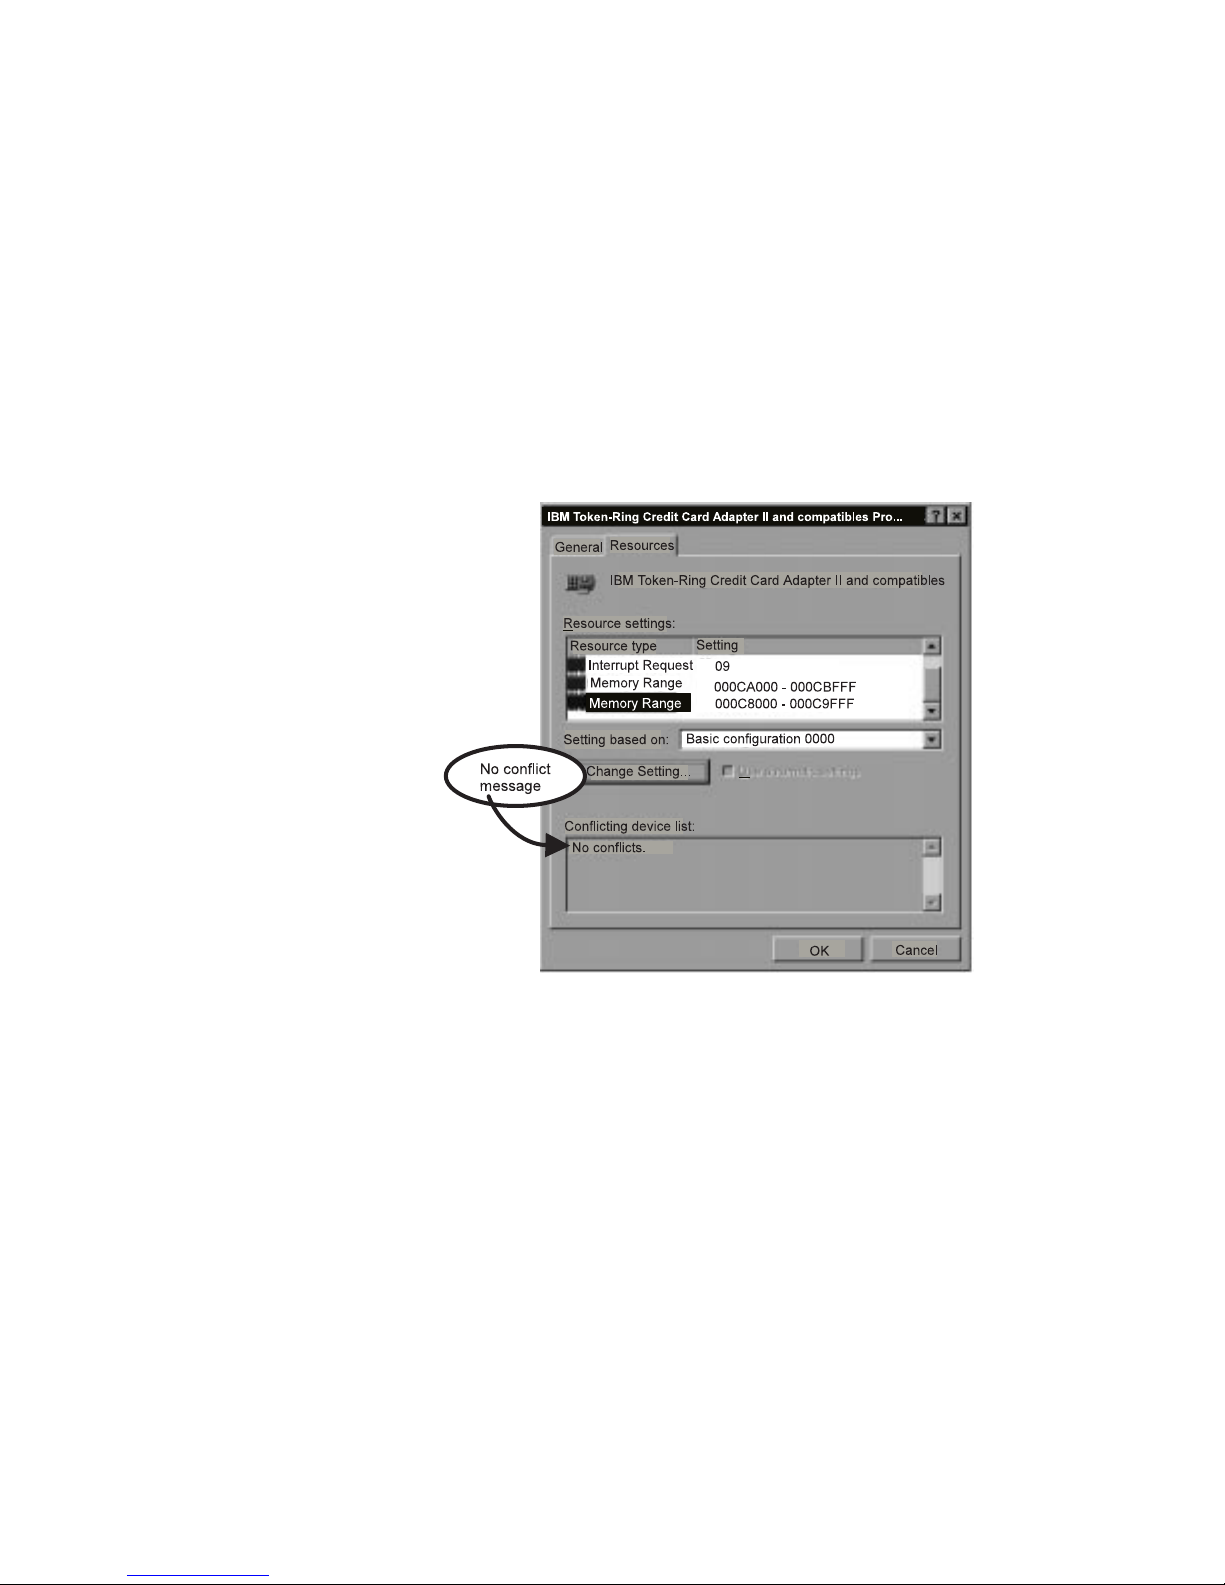
8
When all conflicting values have been corrected, No conflicts
is displayed in the Conflicting device list box.
9
Open the Device Manager again after you restart Windows 95
to make sure the new device is working properly.
If you still cannot start up the device:
Read the manual that came with the device since some devices
work only within a fixed memory range, on a fixed I/O port, or at
a fixed IRQ level. The manuals may describe these limitations.
Unregister the device from the Device Manager, and then
reinstall it.
It may be that no more system resources are available—for
example, all IRQ values have been used already or there is no
vacant memory available.
Inquire with the manufacturer of the device.
3-14 IBM ThinkPad SelectaDock III User's Guide
Page 63

Memo
The system resources you assign are:
IRQ (hardware interrupt request):
There are 16 IRQs in the system, but certain IRQs are
reserved by the system. You can assign unused IRQs
for the newly installed devices.
DMA (direct memory access channel):
There are 8 DMA channels: 0 through 7. Certain DMA
channels are reserved by the system. This resource is
typically used by such adapters as sound cards and
SCSI adapters for transferring large blocks of data.
I/O address:
The input/output (I/O) address space extends from
X'0000' to X'FFFF'. The I/O ports of the features and
adapters are mapped here.
Memory address:
This area is for BIOS ROM or the memory-mapped I/O
area of the adapters.
IRQs and memory addresses are typically the most likely sources
of conflict. For instance, if an ISA adapter card (typically the
Sound Blaster adapter) in your SelectaDock system is using DMA
channel 1, it will conflict with the audio feature in the computer
that uses DMA channels 0 and 1 when enabled.
Always try to select proper values to avoid resource conflict.
Refer to “System Resources Assignment” on page 3-9 to
resolving the resource conflict.
Chapter 3. System Configuration 3-15
Page 64

3-16 IBM ThinkPad SelectaDock III User's Guide
Page 65

Chapter 4. Using the Security Features
Highlight
This chapter describes the security features of the SelectaDock
system. The multiuser lock make it easy to manage security
when a database on the SelectaDock system is shared by
several users.
This chapter contains:
SelectaDock III Security Features ................. 4-2
Security Function for Your SelectaDock system ......... 4-3
PC Card Lock and Device Eject Lock ............. 4-3
Security Key . . . . . . . . . . . . . . . . . . . . . . . . . . . . 4-3
Cable Lock . . . . . . . . . . . . . . . . . . . . . . . . . . . . . 4-3
Multiuser Lock . . . . . . . . . . . . . . . . . . . . . . . . . . . 4-4
Maintaining While Sharing the SelectaDock System ....... 4-5
Each User managing the Password .............. 4-5
Administrator Managing the Password ............. 4-6
Copyright IBM Corp. 1997 4-1
Page 66

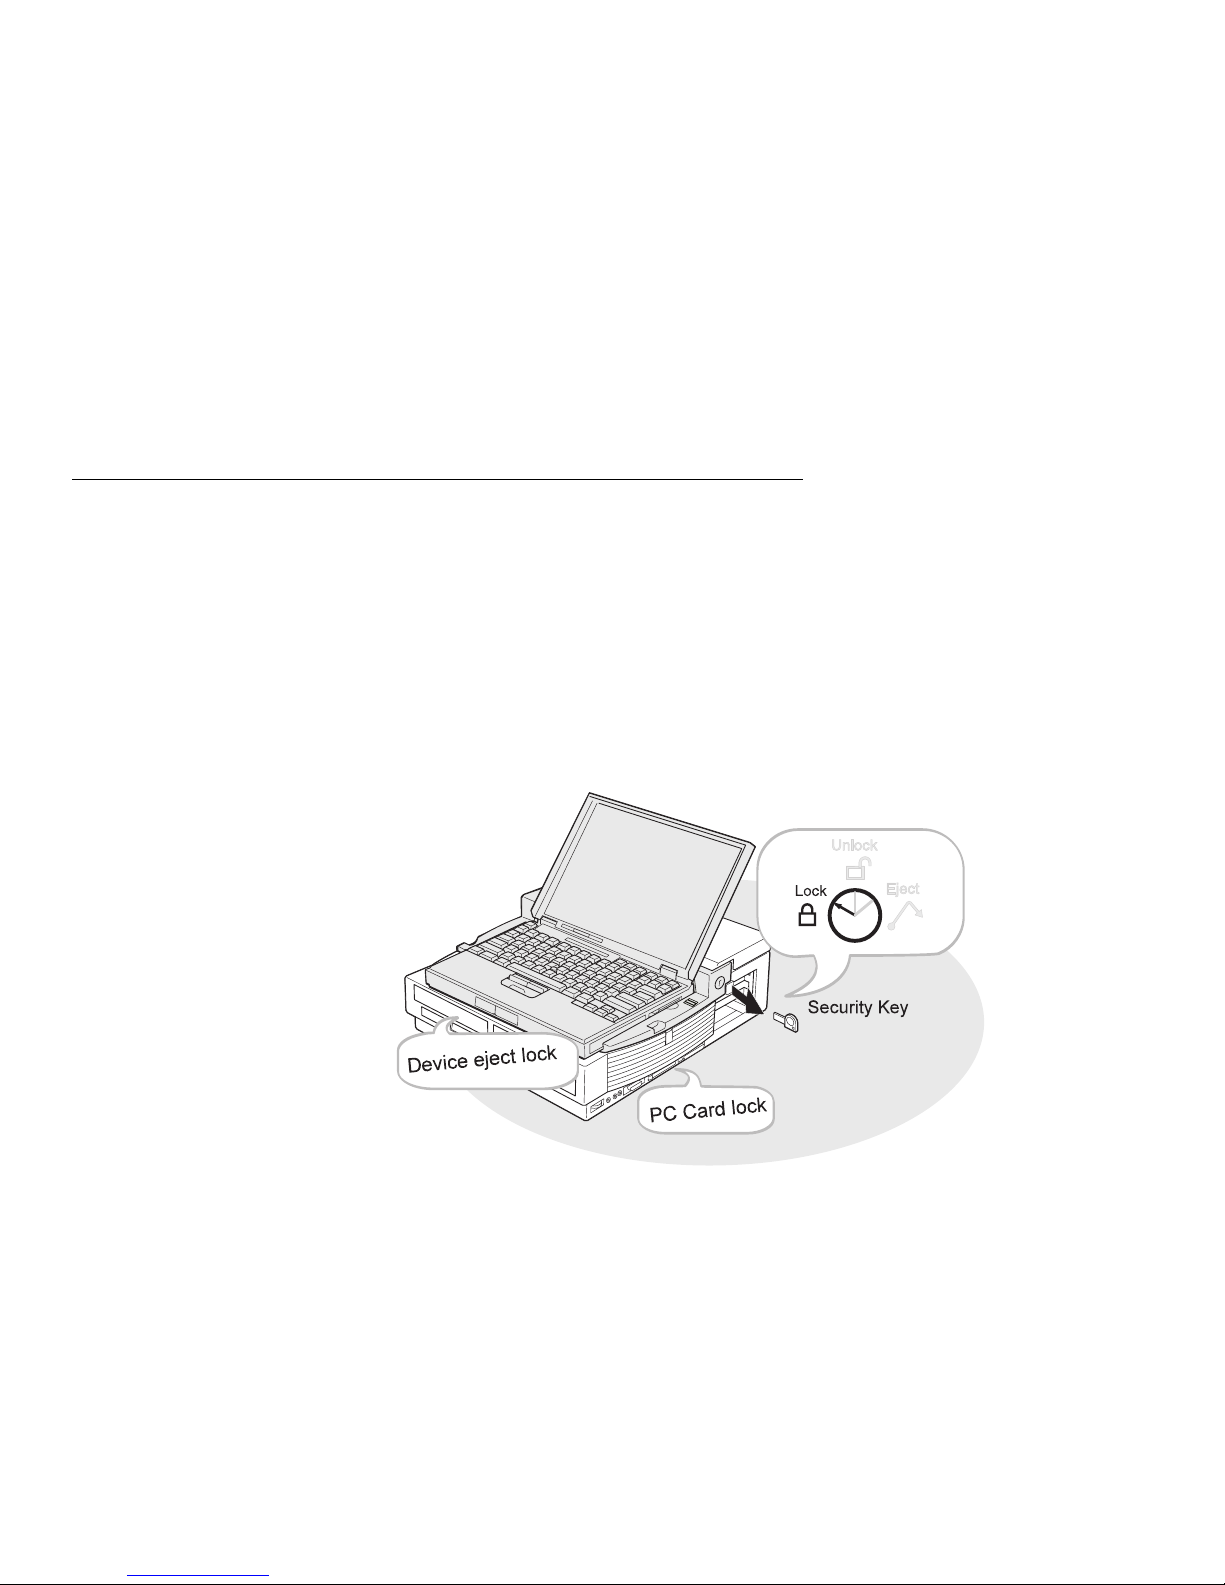
SelectaDock III Security Features
Location Secured Device How to Use
1
UltraBay II latch
2
Mechanical lock hole
3
Multiuser lock
4
PC Card lock
5
SelectaBase lock
6
Device eject lock
Device in the
UltraBay II tray
SelectaDock system This is the hole for installing the cable lock (See
SelectaDock system use this lock with the cable lock to make sharing the
PC Card Slide this button forward before docking the
SelectaBase After docking the SelectaBase, slide this button
Device in the
UltraBay II tray
This latch prevent the UltraBay II tray from being
opened. To release the tray, push this latch and
rotate it clockwise.
“Cable Lock” on page 4-3 for more information.)
SelectaDock system secure.
SelectaBase to make the PC Card eject button
inaccessible.
upward to make the SelectaBase nondetachable.
After installing the device in the UltraBay II tray, slide
this button backward to prevent any device in the
tray from being removed.
4-2 IBM ThinkPad SelectaDock III User's Guide
Page 67
Security Function for Your SelectaDock system
This section describes the security features of the entire SelectaDock
system.
PC Card Lock and Device Eject Lock
To secure PC Cards and any device in the UltraBay II tray, lock the
PC Card lock and the device eject lock before attaching the
SelectaBase to the SelectaDock III system.
Security Key
To secure the ThinkPad computer in the SelectaDock system, set
the security key to the Lock position and remove the key.
Cable Lock
Attach the cable lock key and set it the Lock position; then remove it.
The SelectaDock system is secured.
Note: You can purchase the cable lock from a computer store.
Install the cable lock as shown. Refer to the instructions that came
with the lock for more information.
Chapter 4. Using the Security Features 4-3
Page 68

Multiuser Lock
If several users will be sharing the SelectaDock system, use the
multiuser lock. When you use the feature, you also need to
install the cable lock to secure the SelectaDock system itself.
When the multiuser lock is set, the security key is fixed in the Unlock
position and cannot be removed. Thus, the each user who shares
the SelectaDock system does not need his or her own security key.
Each user can dock or undock their computer without a key.
4-4 IBM ThinkPad SelectaDock III User's Guide
Page 69

Maintaining While Sharing the SelectaDock System
If the Multiuser lock is enabled, authorized people can access the
data on the hard disk drive in the SelectaDock III system and an
authorized ThinkPad computer can be attached to the SelectaDock
III system.
If each user manages the password:
All authorized users know the password (HDP) of the
SelectaDock system and each his or her own password
(HDP or PAP) for the ThinkPad.
“Each User managing the Password”
If the system administrator manages the password:
The system administrator sets the password to the
SelectaDock system (HDP) and all authorized ThinkPads
(PAP), and does not inform the users of the password.
Each authorized user can use the SelectaDock system
without knowing the password.
“Administrator Managing the Password” on page 4-6
Note:
HDP: Hard disk password
PAP: Supervisor password
Each User managing the Password
To set the password to the common hard disk in the SelectaDock
system, do as follows:
Chapter 4. Using the Security Features 4-5
1
The administrator sets the HDP for the drive to be shared as
follows:
a)
Remove the common hard disk from the SelectaDock
system; then install it into the one of the ThinkPad
computers.
b)
Set the hard disk password to the common hard disk.
Note: See the user's guide of the computer for how to set
the password.
Page 70

c)
Replace the common hard disk drive in the SelectaDock III
system.
d)
Inform all authorized users of the password.
2
When a user turns on a computer docked with the shared
SelectaDock system, the computer prompts for the HDP. The
user must enter the correct password.
3
Users can set their own HDP for any other hard disk drive
installed in their own ThinkPad or they can set their own PAP.
Administrator Managing the Password
To set up the password for the authorized users, do as follows.
Note
This procedure is for the system administrator. He or she sets
the HDP to the common hard disk, and the PAP to each
authorized ThinkPad computer.
The system administrator should not let the users know the
supervisor password or the hard disk password.
1
Remove the common hard disk from the SelectaDock system;
then install it into the one of the ThinkPad computers.
2
Set the HDP to the common hard disk.
Note: See the user's guide of the computer for how to set the
password.
3
Remove the common hard disk from the computer and reinstall
it in the SelectaDock system.
4
Set a supervisor password for each authorized ThinkPad.
Note: This PAP must be the same as the HDP for the
SelectaDock system.
Now the SelectaDock system is ready to be used by authorized
users. The users dock their computers in the SelectaDock system
4-6 IBM ThinkPad SelectaDock III User's Guide
Page 71

using cold docking. As long as the ThinkPad computer has a PAP
that is same as the HDP of the SelectaDock system, the users can
access the common hard disk without entering and knowing the
password. If someone attempts to dock a ThinkPad computer that
does not have the same PAP as the HDP of the SelectaDock
system, the system prompts for the password. Since only the
system administrator knows this password, an unauthorized user can
never access the data of the SelectaDock system.
Chapter 4. Using the Security Features 4-7
Page 72

4-8 IBM ThinkPad SelectaDock III User's Guide
Page 73

Chapter 5. Hints, Tips, and Limitations
Highlight
When a computer is docked to or undocked from the
SelectaDock system, the computer environment or configuration
changes. To use the computer effectively and ensure the safety
of your data, you need to pay attention to several points raised in
this chapter.
This chapter contains:
Hints and Tips ............................ 5-2
Limitations . . . . . . . . . . . . . . . . . . . . . . . . . . . . . . . 5-5
Copyright IBM Corp. 1997 5-1
Page 74

Hints and Tips
Item Hints and Tips
Drive letter After you dock the computer to and undock it from the
SelectaDock system, the drive letters assigned to the drives in
the computer and in the docking system might change. This
might cause some problems; for example, a program running
normally in the undocked state might not work after docking.
To avoid problems caused by a change of the drive letter:
Check the new drive letters after docking.
Do not make a primary partition on the hard disk drive in the
SelectaDock system.
Check the source drive and the target drive when you make
a file copy or file move operation.
Check the drive of the file to be erased.
Check the drive you will format.
Do not register programs on the desktop of your operating
system when the drive letter of the program changes from
the docked to the undocked state.
When multiple
configurations are not
supported
(depending on the operating
system)
5-2 IBM ThinkPad SelectaDock III User's Guide
If the operating system does not support the selection of device
drivers with a multiple configuration, you need to configure all the
necessary device drivers for the docked configuration. Then
when you boot the operating system after undocking the
computer error messages appear indicating that devices are not
available.
Page 75

Item Hints and Tips
Installing OS/2 Warp To install OS/2 Warp from a SCSI CD-ROM drive that is
connected to the SelectaDock SCSI connector, do as follows:
1
Make a copy of Diskette 1 of the operating system:
a) Insert Diskette 1 and a blank diskette in drives A and B.
b) Type the following command at the command prompt
screen:
diskcopy a: b:
c) Press Enter.
2
Copy AIC7870.ADD from the SelectaDock Option Diskette
to the root directory of the copied Diskette 1. The root
directory is the first directory on the diskette. AIC7870.ADD
overwrites any existing versions of the device drivers
included on the copied Diskette 1.
3
Start installation by inserting the Installation Diskette into
drive A and restarting the system. When prompted to insert
Diskette 1, insert the copy that you created.
4
Follow the instructions in the
complete the installation of OS/2 Warp.
OS/2 Warp User's Guide
to
Installing Windows NT To install the Windows NT, see the relevant ThinkPad online
book.
Using the SCSI device driver
bundled with Windows 95
Chapter 5. Hints, Tips, and Limitations 5-3
The SCSI device driver bundled with Windows 95 does not
support the suspend and resume function. When you use such
SCSI devices, you must disable suspend and hibernation as
follows:
1
Open the ThinkPad Configuration folder, and click on the
Docking Station ( ) button.
2
Deselect Suspend/hibernate while docked if it has been
selected.
3
Click on OK to close the ThinkPad Configuration program.
Page 76

Item Hints and Tips
Parameter for the socket
service
I/O address for the game
port
Using an ethernet adapter
card
If you are installing one of the
following Ethernet option
adapter cards in the docking
station and connect cables in
a daisy chain (serial
connection):
3Com EtherLink III
SMC EtherCard Elite Ultra
LAN Adapter
Novell NE2000plus ISA
Ethernet Adapter
Power Supply of the
ThinkPad and SelectaDock
system
When using a “Point Enabler” supplied with a PC Card in the PC
Card slot of the SelectaDock system, use IG1=Y rather than
IG0=Y as the socket service parameter.
The I/O address for the game port is assigned to address
X'0201'. This address cannot be changed.
You must obtain one of the following adapter connectors:
P/N 329517, manufactured by AMP
P/N UG-306/U, manufactured by HIROSE
Attach the adapter connector to the adapter card connector.
Then you can attach the T-shape Ethernet cable to the adapter
connector.
When you dock the computer to the SelectaDock system,
connect the ac power cord to the SelectaDock system. You
cannot use a docked computer powered only with the
battery pack.
Note: The SelectaDock system does not have any power switch.
The computer power is controlled by the computer's power
switch even if it is docked in the SelectaDock system.
Charging the battery pack When a computer is docked in the SelectaDock system, and the
power is not turned on, the battery pack is charged. When
computer power is turned on, charging occurs only if power
consumption by the computer is low, depending on the power
management of the computer.
5-4 IBM ThinkPad SelectaDock III User's Guide
Page 77

Limitations
Item Limitation
Using a diskette drive Even though the SelectaDock III system can support either
external or internal diskette drives, you can use only one at a
time.
Attention
If you connect two diskette drives and attempt to use both of
them, data on both of diskettes will be lost.
Using ISA or PCI adapter
cards
Suspend and resume
functions
Consider card compatibility when you purchase an ISA or a PCI
adapter card.
The SelectaDock III system does not support the REFRESH
signal for an ISA bus when the computer is attached. Therefore
the following ISA adapter cards are not supported:
IBM-Multi Port Card (part number 00F5529)
IBM-Multi Port 2 Card (part number 33F8791)
DRAM memory cards
ISA cards that use the REFRESH signal to detect whether
the bus is working
ISA cards that use the REFRESH signal as a clock counter
The suspend and resume function are not supported when
you dock the ThinkPad 760 or 765 in the SelectaDock
system.
If you are using DOS or Windows 3.1, the suspend and
resume functions are not supported if an ASPI8IBM.SYS
(SCSI) driver is loaded.
If you are using Windows 95, the suspend and resume
functions are not supported when an AIC-7860 (SCSI) driver
is loaded by Windows 95 and if it is enabled by the device
manager (when the checkbox is selected).
The suspend and resume functions are not supported if an
adapter card or PC Card is installed in a card slot.
Chapter 5. Hints, Tips, and Limitations 5-5
Page 78

Item Limitation
Allocating I/O resources When the I/O resources X'330' to X'333' are allocated to an
adapter card installed in the SelectaDock system with the
ThinkPad 760EL and 765L docked, you must disable the ESS
function (audio) by using the ThinkPad Configuration program.
5-6 IBM ThinkPad SelectaDock III User's Guide
Page 79

Chapter 6. Troubleshooting
Troubleshooting procedures
Troubleshoot the system with the following procedures:
1.
Determine the meaning of the Attention indicator behavior.
2.
Isolate the problem unit.
3.
Recover the system by using the troubleshooting guide.
4.
Run the test, if you need to.
5.
Request service.
This chapter contains:
Attention Indicator . . . . . . . . . . . . . . . . . . . . . . . . . . 6-3
Isolating a Problem Unit ....................... 6-5
Checking the ThinkPad Computer ............... 6-7
Checking the ThinkPad and SelectaBase Combination ... 6-8
Checking the SelectaDock III system .............. 6-8
Troubleshooting Guide . . . . . . . . . . . . . . . . . . . . . . . 6-10
Visible Problems . . . . . . . . . . . . . . . . . . . . . . . . . 6-11
Setup Problems . . . . . . . . . . . . . . . . . . . . . . . . . 6-13
Startup Problems . . . . . . . . . . . . . . . . . . . . . . . . 6-14
PC Card Problems ....................... 6-14
UltraBay II Device Problems .................. 6-15
Device Space Problems .................... 6-16
SCSI Device Problems ..................... 6-17
Audio Problems . . . . . . . . . . . . . . . . . . . . . . . . . 6-18
Sound Blaster Problems .................... 6-18
MIDI/Joystick (Game) Port Problems ............. 6-18
Adapter Problems . . . . . . . . . . . . . . . . . . . . . . . . 6-19
USB Port Problems ....................... 6-19
Wake-up on LAN problems .................. 6-20
Intermittent Problems . . . . . . . . . . . . . . . . . . . . . . 6-20
Resource Conflict Problems .................. 6-21
Running Tests . . . . . . . . . . . . . . . . . . . . . . . . . . . 6-22
Internal Drive Test ........................ 6-22
SCSI Subsystem Test ..................... 6-23
If the Test Detects No Error .................. 6-23
Requesting Service . . . . . . . . . . . . . . . . . . . . . . . . . 6-24
Copyright IBM Corp. 1997 6-1
Page 80

Important
This chapter is to be used for the problems caused by the
SelectaDock system only. For problems caused by products
other than the SelectaDock system, use the documentation for
that product.
The tests in this chapter are designed to test IBM products only.
Other products may cause misleading error information or
incorrect computer responses. Refer to the instructions supplied
with those products for testing information.
You should analyze all problems not caused by the SelectaDock
system by using the documentation provided with the product.
This book covers problems unique to the SelectaDock system—in
other words, problems that occur only when the SelectaDock
system is used.
If you have done all the actions recommended in this guide and
the problem is still not fixed, have the SelectaDock III system
serviced.
6-2 IBM ThinkPad SelectaDock III User's Guide
Page 81

Attention Indicator
The SelectaDock system uses a combination of the Attention
indicator and beeps to let you know when the docking or undocking
operation you are attempting is not acceptable.
The Attention indicator also lights when an unacceptable drive is
installed in the UltraBay II.
The following table shows what action should be taken when the
Attention indicator is lit or blinking:
Symptom Cause What to Do
The system beeps and the
Attention indicator stays on.
1. An unsupported device is
attached to the UltraBay II
connector, or a computer
without a PCI bus is being
docked.
2. Three or more IDE drives
are installed in the
SelectaDock system.
3. An external ac/dc adapter
is connected to the
SelectaBase port replicator
or ThinkPad computer.
1. Verify that the device in
the UltraBay II is installed
correctly or designed for
the bay, or undock the
computer. ISA bus
computers are not
supported.
2. Remove the extra IDE
drive or drives from the
SelectaDock system.
Only two IDE drives are
accepted a time.
3. Undock the computer and
remove the external ac/dc
adapter cable from the
SelectaBase.
Chapter 6. Troubleshooting 6-3
Page 82

Symptom Cause What to Do
The system beeps and the
Attention indicator blinks.
The system beeps twice and
the Attention indicator blinks
once.
1. An eject attempt was
made (the security key
was turned to the Eject
position) while the
computer was using the
SelectaDock system.
(This is only for DOS or
Windows 3.1 users with
the beep turned on.)
1. Close any application
programs, such as a
program on a hard disk
drive installed in the
SelectaDock system, and
then try to eject again.
2. Return the eject lever of
the UltraBay II tray to the
Lock position.
2. An attempt was made to
eject the device in the
UltraBay II while the
computer was in operation
or suspend mode.
The hot or warm undocking
has been successful and the
Eject the computer from the
SelectaDock system.
computer is ready to be
ejected.
Because physical characteristics of the connectors for an
ISA-bus-architecture computer are the same as those for a
PCI-bus-architecture computer, it is possible to dock an incompatible
computer. To protect the computer and the SelectaDock system
from this improper operation, the SelectaDock system warns you with
the Attention indicator and beeps. The table summarizes the
reactions of the SelectaDock system when an ISA bus computer is
docked.
6-4 IBM ThinkPad SelectaDock III User's Guide
Page 83

Computer
Status
(ISA Bus) What Happens What You Must Do
Turned on
and running
In standby
Suspended
Hibernated
Turned off
The computer is turned off immediately.
The Attention indicator lights to indicate that an
incorrect computer has been docked.
The Attention indicator lights to notify that an
incorrect computer has been docked.
Undock the computer.
After undocking, the Attention
indicator turns off.
Isolating a Problem Unit
To simplify the problems, isolate which of the following units causes
the problem:
The ThinkPad computer
The combination of the computer and the SelectaBase port
replicator
The SelectaDock system
Chapter 6. Troubleshooting 6-5
Page 84

Use the following steps to determine what is causing your problem:
1
Check the ThinkPad
computer. (“Checking the
ThinkPad Computer” on
page 6-7)
2
Check the ThinkPad and
SelectaBase. (“Checking
the ThinkPad and
SelectaBase Combination”
on page 6-8)
3
Check the SelectaDock III.
(“Checking the
SelectaDock III system” on
page 6-8)
4
Check the software you
used.
To solve the problems,
refer to the user's guide of
the computer
To solve the problems,
refer to the setup guide of
the SelectaBase.
To solve the problems,
refer to “Troubleshooting
Guide” on page 6-10.
To solve the problems,
refer to the
documentations for the
software.
If the problem source is obvious, such as broken hardware, go
directly to “Troubleshooting Guide” on page 6-10 for further
instructions.
Note: Make a note of all error messages, and be prepared to give
them to the service representative if you need to call for
service.
6-6 IBM ThinkPad SelectaDock III User's Guide
Page 85

Checking the ThinkPad Computer
Check whether the computer runs correctly. Try the same job that
failed on your computer alone after undocking it from the
SelectaDock system.
Note: If you can't do the same job on your computer only, go to
“Test the ThinkPad Computer.”
1
Turn off the computer; then undock it.
2
Attach all necessary external devices directly to the computer.
3
Run the same jobs with just the computer.
Did the same problem remain?
Yes The problem is possibly caused by the following:
The computer
The peripherals
Cables that connects the computer and the
peripherals
Setup, operation, or software
Refer to the user's guide of your computer to further
analyze the problem.
Test the ThinkPad Computer
If you can't do the same job on just your computer, run the system
diagnostic program.
Did any error return?
Yes The problem is possibly caused by your computer. Refer to
No The problem occurs only when the computer is docked. Go
Chapter 6. Troubleshooting 6-7
No The problem occurs only when the computer is docked.
Go to step “Checking the ThinkPad and SelectaBase
Combination” on page 6-8.
the user's guide of your computer.
to the next section.
Page 86

Checking the ThinkPad and SelectaBase Combination
Check whether the computer runs correctly when docked to the
SelectaBase. Do the same job on your computer after docking to it
to the SelectaBase
If you cannot run the same job that created your problem, go to the
next section.
1
Dock your computer to the SelectaBase and reconnect all
external devices to the SelectaBase.
2
Run the same jobs.
Did the same problem remain?
Yes The SelectaBase is causing the problem. Refer to the
SelectaBase setup guide to resolve the problem.
No Go to the next section.
Checking the SelectaDock III system
You are here because your problems occur only when you use the
computer docked to the SelectaDock system.
1
Dock your SelectaBase and the computer to the SelectaDock
III. Then connect the ac power cord to the SelectaDock III, but
do not turn the power on yet
Did the docked indicator on the SelectaDock III panel turn
on?
Yes The SelectaDock III detected that your computer is
docked. Go to the next step.
No Your computer is not docked correctly. Go to “Setup
Problems” on page 6-13, and take the corrective
actions provided.
6-8 IBM ThinkPad SelectaDock III User's Guide
.
Page 87

2
Turn on the external devices, and then the computer.
Note: This sequence is important because the computer
checks during its power-on self-test that the devices are
powered on and ready.
Did the Attention indicator on the SelectaDock III panel
turn on or blink?
Yes An incorrect docking status has been detected. Go to
“Setup Problems” on page 6-13, and take the actions
provided.
No Go to the next question.
Did the Power-On indicator on the SelectaDock system
panel turn on?
Yes Go to the next question.
No Go to “Setup Problems” on page 6-13, and take the
actions provided.
Did the boot operation finished as expected?
Yes Go to “Troubleshooting Guide” on page 6-10.
No Go to “Startup Problems” on page 6-14, and take the
actions provided.
Chapter 6. Troubleshooting 6-9
Page 88

Troubleshooting Guide
Find your problem symptom and go to the page indicated.
Troubleshooting Chart Page
Visible problems 6-11
Setup problems 6-13
Startup problems 6-14
PC Card problems 6-14
UltraBay II device problems 6-15
Drive space problems 6-16
SCSI drive problems 6-17
Audio problems 6-18
Sound Blaster problems 6-18
MIDI/joystick (game) port problems 6-18
Adapter problems 6-19
USB port problems 6-19
Wake-up on LAN problems 6-20
Intermittent problems 6-20
Resource conflict problems 6-21
Other problems
Note: Run diagnostic tests on all the devices
installed or attached to the SelectaDock system.
6-10 IBM ThinkPad SelectaDock III User's Guide
6-22
Page 89

Visible Problems
Problem Action
Hardware, such as the
cover, is broken.
You cannot undock the
computer.
The Attention indicator is
lit or blinking.
When hardware is broken, have the SelectaDock system serviced.
See the warranty statement on page C-2 for any service charge that
may be incurred if the problem was caused by improper use.
Turn off the computer; then undock it from the SelectaDock system.
When no electricity is applied to the SelectaDock system, undocking
can be done mechanically. If removal is very difficult, have the
SelectaDock system serviced.
The system uses security features to detect an inappropriate docking
or undocking operation to prevent further problems.
1. Verify that the computer to be docked is a supported model. The
computer must use PCI architecture. If you are not sure about
the architecture of the computer, see its user's guide. The
following ThinkPad models are supported:
760E, 760ED, 760EL, 760ELD, 760XD, and 760XL
765D and 765L
770
2. If this indicator comes on when you turn the security key to the
Eject position, check if the computer is performing some tasks
that would be abnormally terminated if the computer was
undocked.
3. If this indicator comes on when you install a drive in the UltraBay
II, verify that the drive is supported by the SelectaDock system.
4. Verify that no more than two IDE devices are installed.
5. Verify that no ac/dc cable is connected to the SelectaBase port
replicator.
The security lock key is
missing, or you need extra
keys.
Your computer does not
suspend or resume while
docked.
Chapter 6. Troubleshooting 6-11
the SelectaBase setup guide for ordering instructions.
Check if any adapter card is inserted in a card slot. Suspend and
resume functions are not supported under this condition.
Page 90

Problem Action
After updating the
ThinkPad Configuration
program and PC Card
Director, an error
message window, such as
Battchk, appears when
you reboot the system.
Did you install the Battery Check Utility?
If not, install the program (refer to
Program Installation Guide
).
6-12 IBM ThinkPad SelectaDock III User's Guide
Page 91
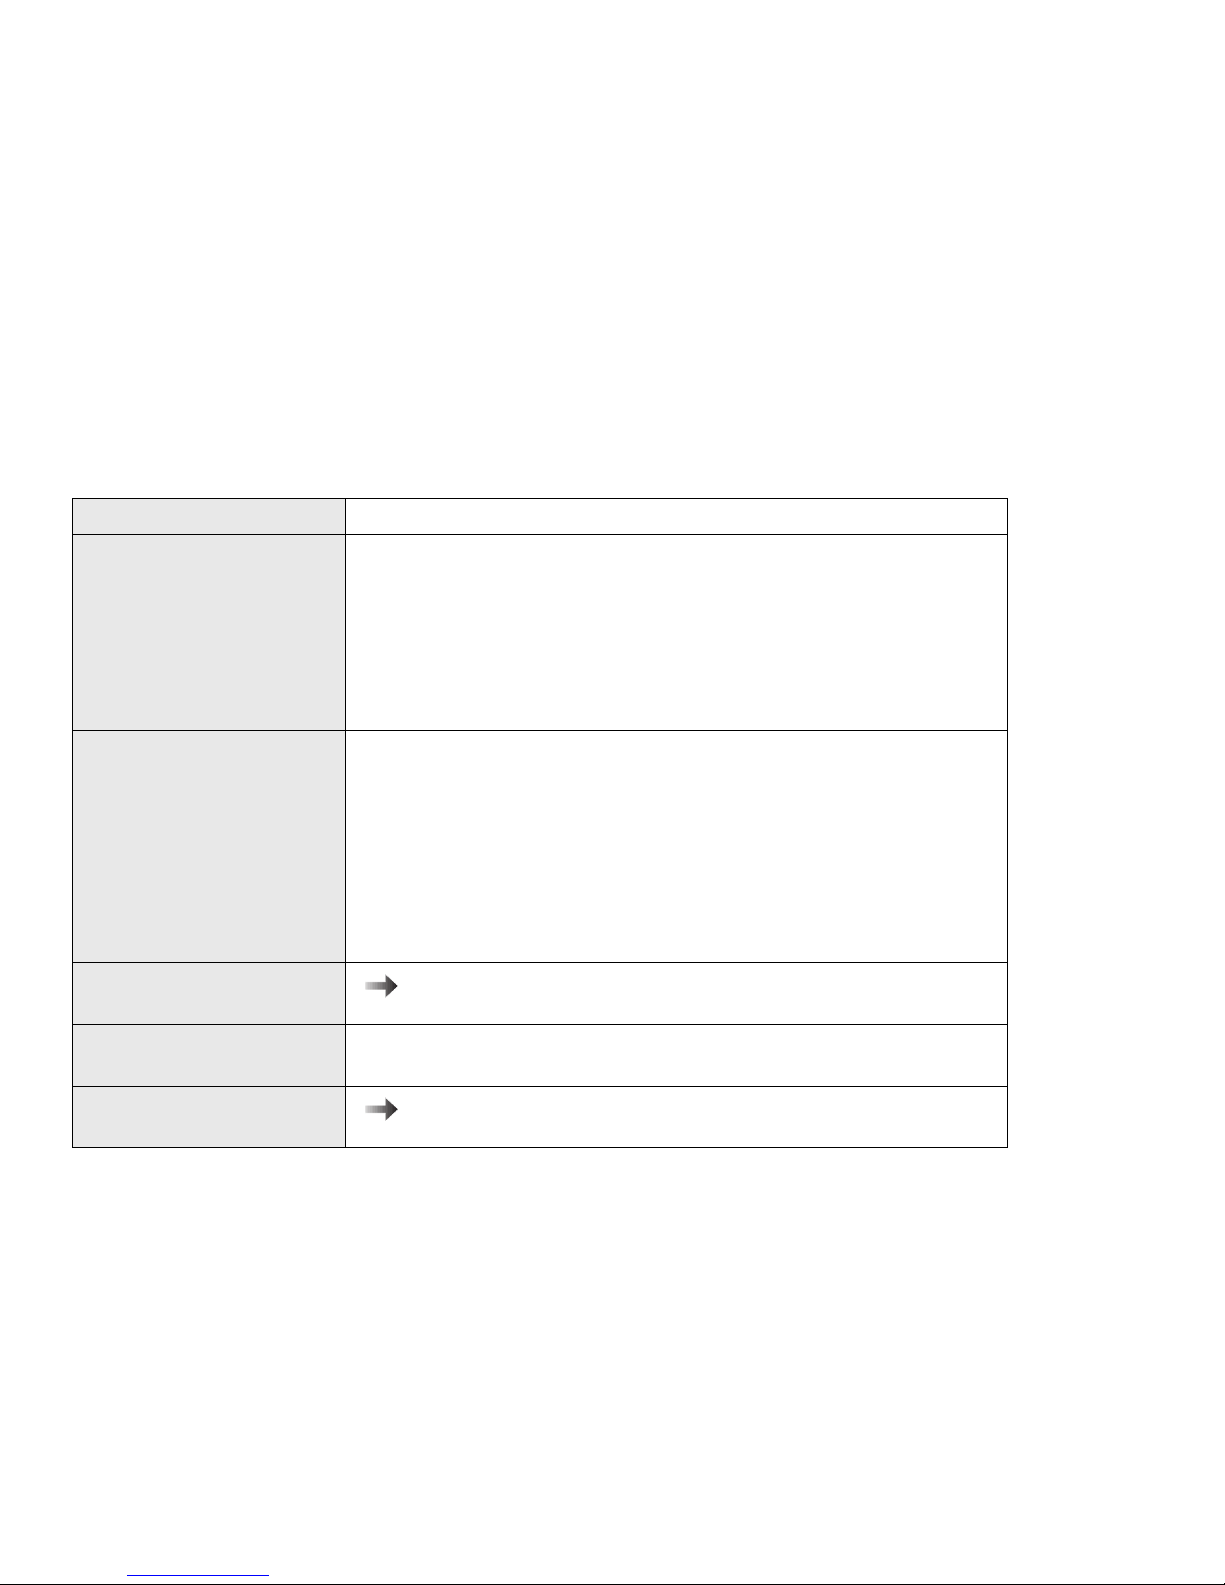
Setup Problems
Problem Action
The Docked indicator
does not come on.
The Power-On indicator
does not come on.
The Attention indicator is
lit or blinking.
Other indicators
malfunction.
You cannot undock the
computer.
Verify that:
1. The power cord is correctly plugged into a working electrical
outlet and into the SelectaDock system.
2. The computer is correctly docked. Retry the docking operation.
Note: Turn off the computer when you dock it to the SelectaDock
system
Verify that:
1. The Docked indicator is on. If not, do the actions listed for the
“Docked indicator does not come on.”
2. The Attention indicator is
not
on. If it is lit or blinking, do the
actions listed in “Visible Problems” on page 6-11.
3. The computer power switch is operating correctly.
4. The electrical current does not exceed the maximum limit.
“Visible Problems” on page 6-11 .
If the other indicators do not turn on or off correctly, have the
SelectaDock system serviced.
“Visible Problems” on page 6-11 .
Chapter 6. Troubleshooting 6-13
Page 92

Startup Problems
Problem Action
The operating system
startup fails when docked.
Verify that:
1. The device for the boot operation is turned on and ready. Turn
2. The drive letters used for the boot operation are correct. The
3. The drive operates correctly when running device diagnostics.
4. The computer resource assignments do not conflict when the
PC Card Problems
Problem Action
An installed PC Card does
not work.
Verify that:
1. The PC Card is correctly installed.
on the device power before the computer power when the drive
has an independent power source.
drive letters might have changed automatically when docked.
“Running Tests” on page 6-22 for details.
computer is docked.
“Resource Conflict Problems” on page 6-21 if you suspect a
resource conflict.
“Installing a PC Card” on page 2-16 .
2. The PC Card can be used without problems when installed
directly in your computer. If not, pursue the problem using the
troubleshooting guide in the computer's user's guide first.
3. The PC card is correctly set up, including computer resource
assignments and device driver installation.
Run the diagnostic test for the PCMCIA slot.
“Running Tests” on page 6-22 .
6-14 IBM ThinkPad SelectaDock III User's Guide
Page 93
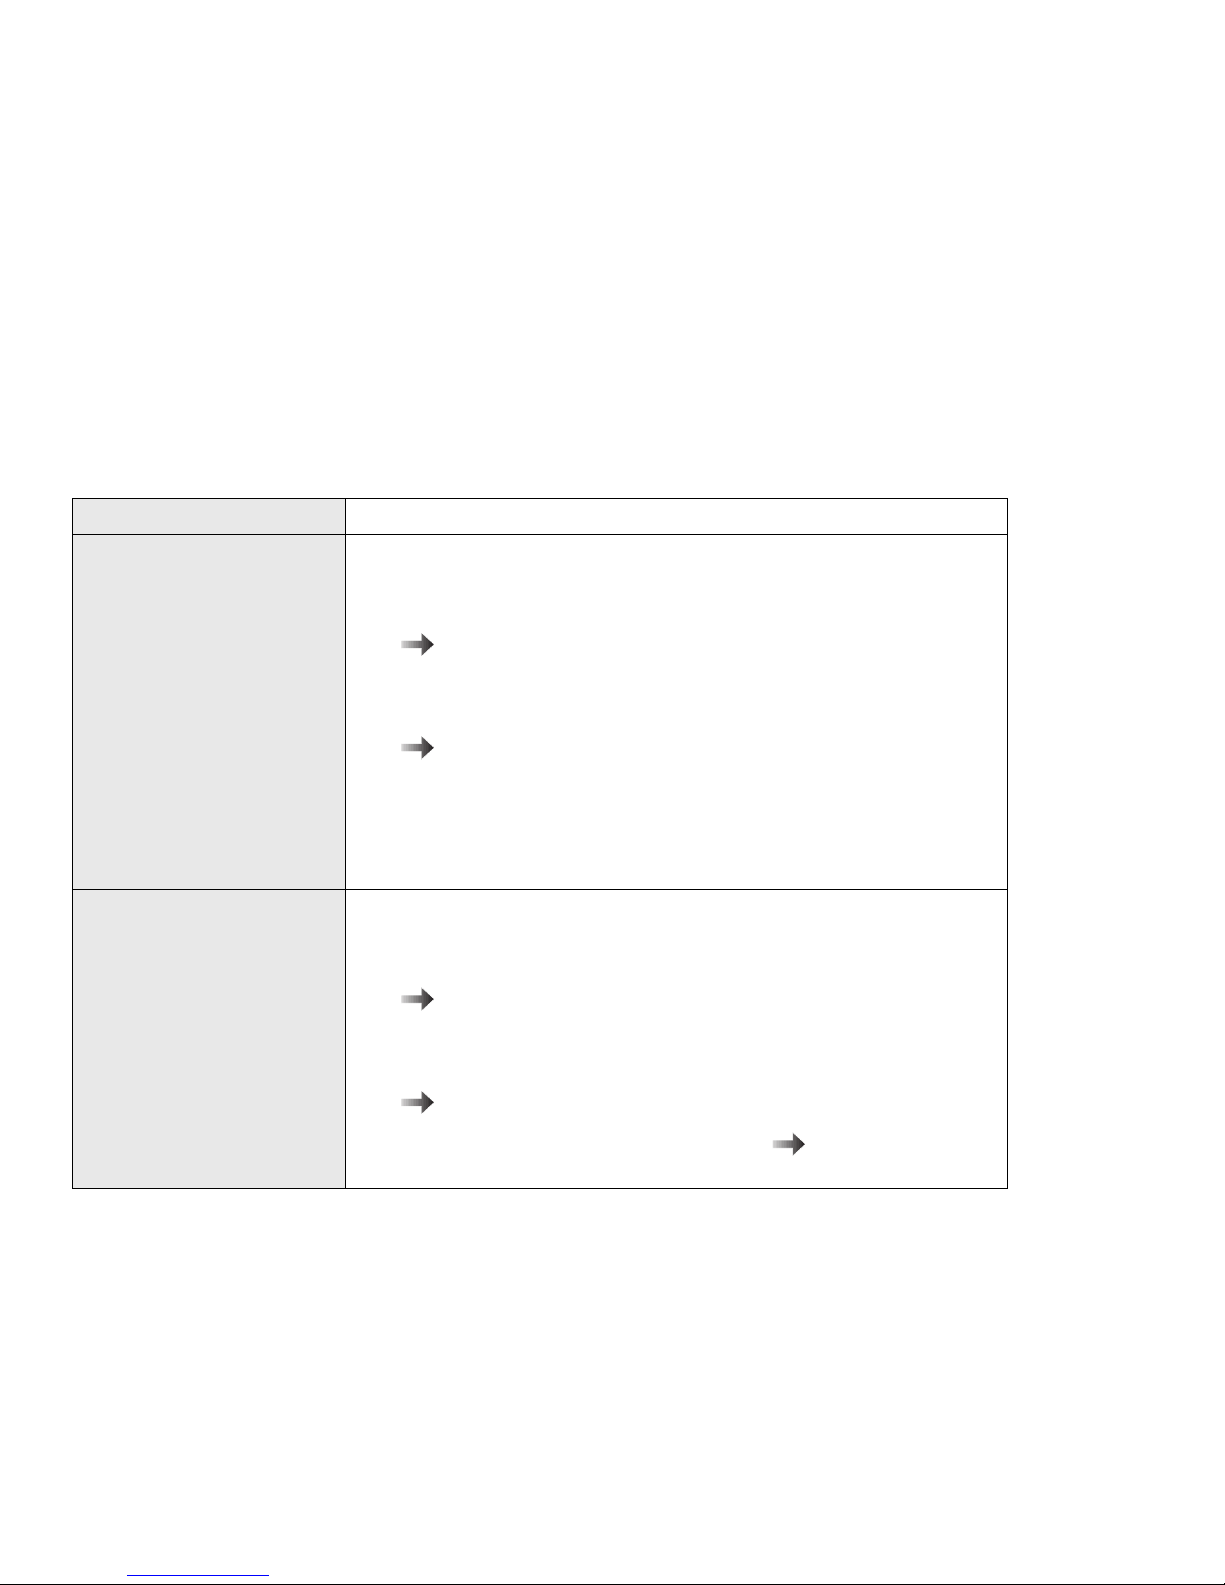
UltraBay II Device Problems
Problem Action
The CD-ROM drive, DVD
drive, or diskette drive in
the UltraBay II does not
work.
The hard disk drive in the
UltraBay II does not work.
Verify that:
1. The drive is engaged firmly to the UltraBay II connector. Remove
and reinstall the drive.
“Installing a Device in the UltraBay II Tray” on page 2-6
2. The drive works correctly if installed in the computer's UltraBay II.
3. The drive works correctly when the drive test is run.
“Running Tests” on page 6-22 .
4. Correct setup (including resource assignment and device driver
installation) was done when you installed the device.
5. No more than two IDE devices are installed, including a device in
the device space.
Verify that:
1. The drive is connected firmly in the UltraBay II connector.
Remove and reinstall the drive.
“Installing a Device in the UltraBay II Tray” on page 2-6
2. The drive works correctly if installed in the computer's UltraBay II.
3. The drive works correctly when running drive tests.
“Running Tests” on page 6-22 .
4. The hard disk password is correctly set. User's guide of
your computer for instructions to set the password.
Chapter 6. Troubleshooting 6-15
Page 94

Device Space Problems
Problem Action
The IDE device in the
device space does not
work.
The SCSI drive in the
device space does not
work.
Verify that:
1. The device is engaged firmly to the device space connector.
Remove and reinstall the device.
2. Correct setup (including resource assignment and device driver
installation) was done when you installed the device.
3. No more than two IDE devices are installed including the devices
on the UltraBay II tray.
4. IDE 2 is enabled.
5. The mode selection has been set correctly.
Verify that:
1. The device is engaged firmly to the device space connector.
Remove and reinstall the device.
2. Correct setup (including resource assignment and device driver
installation) was done when you installed the device.
3. The terminator is disabled.
Run the test
“SCSI Subsystem Test” on page 6-23 .
6-16 IBM ThinkPad SelectaDock III User's Guide
Page 95
SCSI Device Problems
Problem Action
The SCSI drives do not
work.
Check these things first if an error message indicates that the
software programs cannot find a SCSI drive (for example, a CD-ROM
drive or hard disk drive) connected to the SCSI bus:
1. Be sure your computer is docked.
2. Be sure that termination is correctly set for all devices on the
SCSI bus as described.
3. Be sure the cables connecting the external and internal SCSI
drives and the host adapter are attached securely. Also be sure
the pin-1 orientation is correct for internal cables. If all
connections are secure and if you have ruled out other possible
problems, try replacing the cable.
4. Be sure CD-ROM drives and other SCSI drives are attached to a
power source and are turned on.
Verify that:
1. If all of the SCSI drives do not work:
a) For external SCSI drives, check that the SCSI terminator is
installed correctly at the last device.
b) Ensure that the SCSI drive driver is installed correctly.
“Installing the EZ-SCSI” on page A-2
c) Run the test
d) If you have a known-good drive, attach only it to the SCSI
connector, and then run the test to verify. If the drive runs
without errors, the SCSI controller in the SelectaDock system
is working correctly. Suspect one of the drives.
2. If the only one drive in a daisy chain does not work:
“SCSI Subsystem Test” on page 6-23 .
a) Run the drive test to verify the drive operation. Follow the
b) Ensure that the SCSI settings are correct.
The system does not boot
from the SCSI drive.
Chapter 6. Troubleshooting 6-17
Boot operation from a SCSI drive is not supported.
messages from the test.
“Installing the EZ-SCSI” on page A-2
Page 96

Audio Problems
Problem Action
Audio equipment does not
work.
Verify that:
1. The audio equipment works when connected directly to the
2. The audio equipment is designed to be supported by this product.
3. When only the audio from the CD-ROM installed in the
Run the test
Sound Blaster Problems
Problem Action
The Sound Blaster or
compatible adapter card
does not work.
Verify that:
1. The MIDI/joystick port was disabled by the ThinkPad
2. The game port of your computer has also been disabled.
computer.
Appendix B, “Specifications” on page B-1
SelectaDock system does not work, have the SelectaDock III
system serviced.
“Internal Drive Test” on page 6-22 .
Configuration program.
User's guide of your computer.
MIDI/Joystick (Game) Port Problems
Problem Action
The game port does not
work.
6-18 IBM ThinkPad SelectaDock III User's Guide
Verify that:
1. The game port switch is set to Enable through the ThinkPad
Configuration program.
“Using the MIDI/Joystick Port” on page 2-18 for details.
2. The computer supports the MIDI port, if the problem occurs only
when in MIDI operation.
Page 97

Adapter Problems
Problem Action
The adapter does not
work.
Verify that:
1. The adapter is designed for the SelectaDock system adapter slot.
2. You followed all the installation instructions described in
3. The system resources are assigned correctly by its utility
4. The driver disk is up to date. Contact the driver manufacturer.
See the adapter documentation that came with the option to diagnose
problems.
USB Port Problems
Problem Action
A connected USB device
does not work.
Verify that:
1. The USB device is connected correctly.
2. The USB device correctly installed in the computer. If not, see
“Installing a PCI or an ISA Adapter Card” on page 2-13.
program, if the adapter card is a non-PnP ISA adapter bus type.
The accompanying disk may support only older desktop
computers.
the troubleshooting section of the ThinkPad user's guide first.
3. The USB device is set up correctly, including the computer
resource assignment and device driver installation.
Open the System Properties window to see the resource conflict.
Note: To open this window, double-click on My Computer,
Run the diagnostic test for USB port.
“Internal Drive Test” on page 6-22
Chapter 6. Troubleshooting 6-19
Control Panel, and System; then click on the Device
Manager tab.
Page 98

Wake-up on LAN problems
Problem Action
The system does not
wake on when using
Wake-on LAN adapter
installed even when
Wake-on Packed
provided.
Verify that:
1. The type of computer is correct. Only a ThinkPad 770 computer
2. The LAN adapter card in the slot of the SelectaDock system
3. The LAN cable is connected to the LAN adapter.
4. Both the power code and the Wake-up signal code is connected
5. AC power is supplied to the computer when it is powered off.
6. The Wake-up feature is enabled.
Intermittent Problems
Problem Action
An intermittent problem
occurs.
The problem can be difficult to analyze because it occurs just once in
a while. If your SelectaDock system has such a problem, verify that:
1. The computer is firmly attached to the SelectaDock system.
supports this feature.
supports the Wake-up LAN feature.
to the LAN adapter used for the Wake-up operation.
To operate the Wake-up feature, ac power must be supplied to
the computer when it is turned off.
2. All cables and power cords are securely connected to the
SelectaDock system and to the attached options.
3. The SCSI drive is correctly terminated.
If these items are correct and the problem still occurs, write down
what the problem is and what the system was doing when the
problem occurred. Then contact your place of purchase or service
representative for help.
6-20 IBM ThinkPad SelectaDock III User's Guide
Page 99

Resource Conflict Problems
Problem Action
You suspect that the
computer resources
assigned for the
configured devices have
conflicts when you docked
the computer. Or you
have identified a resource
conflict—that is, two or
more features or adapters
are using the same IRQ,
DMA, I/O address, or
memory address.
Note: If your problem does
in the following order:
1. Try to change one of the settings (if possible) for the conflicting
adapters, PC Cards, or ThinkPad features, so that the conflict is
resolved.
Determine if you can change the settings for the newly installed
adapters first, so that the existing configuration is not disturbed.
Try changing the settings for the ThinkPad features and the
existing adapters or cards or both only if the new adapters or
cards are not configurable. (If you change the settings for the
previously working hardware configuration, you might have to
modify the setup of the corresponding software drivers
accordingly.) See the associated software documentation for
details.
2. If you cannot get a conflict-free combination, try to disable one or
more of the ThinkPad devices to eliminate the conflict.
For example, to use the Sound Blaster adapter, you will need to
disable the audio device in the computer to free the DMA channel
1.
You may have to modify the choices for more than two adapters
or ThinkPad devices or both to get a conflict-free combination.
not
appear to be caused by a resource conflict, the suggested actions are
1. Check the
user's guide
for the device's installation instructions.
2. Check the adapter manual for software driver installation instructions.
3. Make sure that the adapters, connectors, and cables are firmly installed and connected.
4. Contact your point of purchase.
5. If the adapter is not manufactured by IBM, call the adapter manufacturer.
6. Call the IBM Help Center.
Chapter 6. Troubleshooting 6-21
Page 100
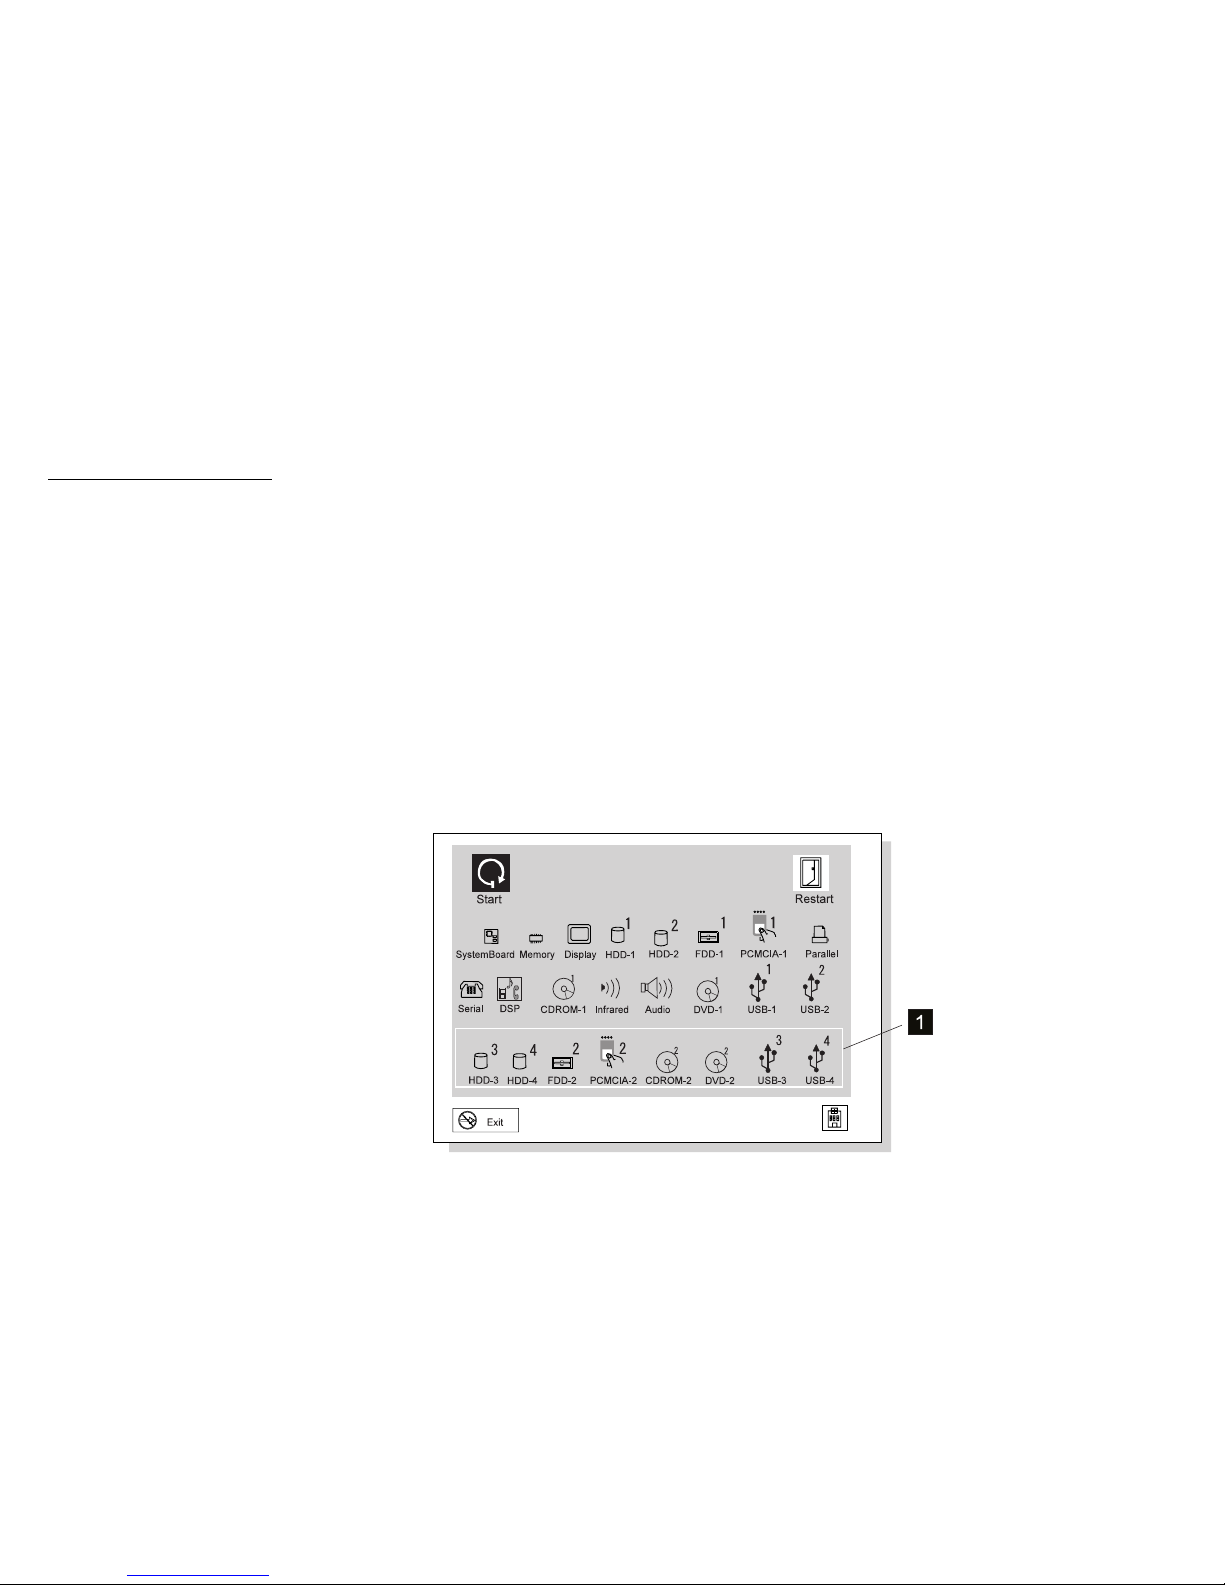
Running Tests
Internal Drive Test
The diagnostic test program for internal devices is provided in the
Easy-Setup program contained in your computer.
The Easy-Setup test program on the computer is used to test the
device in the SelectaDock system. This section explains how to
select the devices in the SelectaDock system. If you need
instructions to invoke the test, or interpret the test results, see the
user's guide for your computer.
The following figure shows an example of the test devices selection
menu. Devices in the SelectaDock system closed by a rectangular
box 1 .
The testable devices in the SelectaDock system are:
Hard disk drive in the UltraBay or the UltraBay II
Diskette drive in the UltraBay or the UltraBay II
PCMCIA slots
CD-ROM drive in the UltraBay or the UltraBay II
DVD in the UltraBay II
USB port
If an error is detected, an error code is displayed near the device
icon on the screen. You can find the error description of the error
codes in the user's guide for your computer.
6-22 IBM ThinkPad SelectaDock III User's Guide
 Loading...