

Page 1

ERserver
iSeries
Query for iSeries Use
Version 5
SC41-5210-04
Page 2

Page 3

ER s e r v e r
iSeries
Query for iSeries Use
Version 5
SC41-5210-04
Page 4

Note
Before using this information and the product it supports, be sure to read the information in
“Notices” on page 261.
Fifth Edition (September 2002)
This edition applies only to reduced instruction set computer (RISC) systems.
© Copyright International Business Machines Corporation 2000, 2002. All rights reserved.
US Government Users Restricted Rights – Use, duplication or disclosure restricted by GSA ADP Schedule Contract
with IBM Corp.
Page 5

Contents
About Query for iSeries Use ............................ix
Who should read the Query for iSeries Use book .....................ix
Part 1. Introduction to Query for iSeries ....................1
Chapter 1. What is Query for iSeries? ........................3
Query for iSeries fundamentals ............................3
Files, fields, and record formats in Query for iSeries ...................3
Query for iSeries definitions ............................5
Libraries in Query for iSeries ............................5
Major functions of Query for iSeries ..........................5
Chapter 2. General operating information for Query for iSeries ..............7
Practicing with Query for iSeries ...........................7
Getting started with Query for iSeries .........................7
When you are finished working with Query for iSeries ..................7
Telling Query for iSeries what you want .........................7
Using prompts and default values in Query for iSeries ..................7
Using Query for iSeries function keys ........................8
Using lists in Query for iSeries ...........................9
Using Query for iSeries commands ..........................11
Using the Query Utilities menu............................11
Using the Work with Queries display .........................12
Choosing a single Query for iSeries task .......................12
Choosing multiple Query for iSeries tasks ......................13
Working with a list of Query for iSeries queries ....................14
Selecting a library for your Query for iSeries queries ..................16
Displaying the format of constants in Query for iSeries ...................17
Query for iSeries profile information ..........................18
Handling Query for iSeries messages and errors .....................18
Changing your Query for iSeries queries .......................18
Part 2. Defining and using Query for iSeries query definitions .........21
Chapter 3. Creating a Query for iSeries query definition .................27
Starting Query for iSeries query definition .......................27
Selecting definition steps when defining a Query for iSeries query ..............28
Selecting options for a Query for iSeries query definition .................29
Moving through the Query for iSeries definition displays .................30
When you return to the Query for iSeries Define the Query display .............30
Considerations for creating Query for iSeries queries ...................30
Selecting files, records, and fields for Query for iSeries .................30
Suggested sequence of tasks for creating Query for iSeries queries .............31
Chapter 4. Specifying and selecting files for a Query for iSeries query ...........33
Specifying file selections for a Query for iSeries query ...................33
Choosing a file for a Query for iSeries query .....................34
Choosing a library for a Query for iSeries query ....................34
Choosing a member or record format for a Query for iSeries query .............35
Selecting multiple files for a Query for iSeries query...................35
Confirming your options for a Query for iSeries query ..................36
Handling errors on the Query for iSeries Specify File Selections display ...........36
© Copyright IBM Corp. 2000, 2002 iii
Page 6

Selecting files on the Query for iSeries Select File display .................37
Selecting file members on the Query for iSeries Select Member display ............39
Selecting record formats on the Query for iSeries Select Record Format display .........40
Displaying all files selected on the Query for iSeries Display File Selections display ........41
Joining files in a Query for iSeries query ........................42
Types of joins in a Query for iSeries query ......................43
How to join files in a Query for iSeries query .....................43
Rules for joining files in a Query for iSeries query ...................44
Examples of joining files in a Query for iSeries query ..................46
Sequencing secondary files for a primary join in a Query for iSeries query ..........49
Displaying all join tests in a Query for iSeries query ....................53
Handling missing fields in a Query for iSeries query ....................54
Handling missing fields during file selection process of a Query for iSeries query ........55
Handling missing fields when starting to change or display a Query for iSeries query ......55
Chapter 5. Defining result fields in Query for iSeries ..................57
Creating results fields in Query for iSeries .......................57
Query for iSeries result field name .........................58
Query for iSeries expressions ...........................58
Query for iSeries numeric expressions ........................59
Query for iSeries character expressions .......................60
Query for iSeries character functions ........................61
Date, time, and timestamp expressions in Query for iSeries ................66
Displaying constants format in Query for iSeries ....................69
Date, time, and timestamp arithmetic operations in Query for iSeries .............69
Date arithmetic operation in Query for iSeries .....................70
Time arithmetic operation in Query for iSeries .....................73
Durations in Query for iSeries ...........................73
Date, time, and timestamp functions in Query for iSeries ..................74
CHAR Query for iSeries function ..........................74
DATE Query for iSeries function ..........................75
DAY Query for iSeries function ..........................75
DAYS Query for iSeries function ..........................76
HOUR Query for iSeries function ..........................76
MICROSECOND Query for iSeries function ......................77
MINUTE Query for iSeries function .........................77
MONTH Query for iSeries function .........................78
SECOND Query for iSeries function.........................78
TIME Query for iSeries function ..........................79
TIMESTAMP Query for iSeries function .......................79
YEAR Query for iSeries function ..........................80
Additional date, time, and timestamp functions in Query for iSeries .............80
Converting date formats in Query for iSeries ......................80
Converting date for output to a database file in Query for iSeries ..............80
Converting date for output to a display or printer in Query for iSeries ............81
General considerations when creating an expression in Query for iSeries ............83
Column headings in Query for iSeries .........................85
Length and decimal positions in Query for iSeries ....................85
Example of defining a result field in Query for iSeries ..................86
Adding or removing result fields in Query for iSeries ...................86
Chapter 6. Selecting and sequencing fields in Query for iSeries ..............87
Letting Query for iSeries select and sequence fields....................87
Selecting fields and specifying their sequence in Query for iSeries ..............87
Chapter 7. Selecting records in Query for iSeries ...................91
iv Query for iSeries Use V5R2
Page 7

Letting Query for iSeries select records ........................91
Selecting the records you want in Query for iSeries ....................91
Comparison fields in Query for iSeries ........................92
Comparison values in Query for iSeries .......................93
Comparison tests in Query for iSeries ........................95
Using more than one comparison test in Query for iSeries ................101
Adding and removing comparisons in Query for iSeries .................103
Chapter 8. Selecting sort fields in Query for iSeries ..................105
Letting Query for iSeries determine the order of records for you ...............105
Selecting the sort fields you want to use in Query for iSeries ................105
Additional sort considerations in Query for iSeries ...................108
Chapter 9. Selecting a collating sequence in Query for iSeries ..............111
Letting Query for iSeries select a collating sequence ...................111
Setting your default collating sequence in Query for iSeries................111
Purpose of a collating sequence in Query for iSeries ...................111
Collating sequence and CCSIDs in Query for iSeries ..................112
How a collating sequence affects Query for iSeries....................112
Selecting a Query for iSeries collating sequence ....................113
Using the hexadecimal collating sequence in Query for iSeries ..............113
Using the language collating sequence for your country in Query for iSeries .........114
Defining your own collating sequence in Query for iSeries ................115
Selecting a translation table in Query for iSeries....................116
Selecting a system sort sequence in Query for iSeries .................117
Chapter 10. Specifying report column formatting in Query for iSeries ...........119
Formatting the columns of the Query for iSeriesquery report ................119
Column spacing in Query for iSeries reports .....................119
Column headings in Query for iSeries reports.....................119
Length and decimal positions in Query for iSeries reports ................120
Omitting fields from a Query for iSeries report ....................121
Editing numeric fields in Query for iSeries reports ....................122
Defining numeric field editing in Query for iSeries reports ................122
Describing numeric field editing in Query for iSeries reports ...............124
Describing date/time field editing display in Query for iSeries reports ............127
Specifying an edit code in Query for iSeries reports ..................129
Specifying edit words .............................131
Chapter 11. Specifying report summary functions in Query for iSeries reports .......135
Types of summary functions in Query for iSeries reports .................135
Summarizing columns in Query for iSeries reports ....................137
Location of column summary values in Query for iSeries reports...............137
Chapter 12. Defining Query for iSeries report breaks..................139
Defining a Query for iSeries report break .......................139
Defining report break formatting in Query for iSeries reports ................143
Skip to new page in Query for iSeries reports ....................143
Suppress summaries in Query for iSeries reports ...................143
Break text in Query for iSeries reports .......................144
Chapter 13. Selecting output type and output form in Query for iSeries reports .......145
Selecting the output type and form you want in Query for iSeries reports ...........145
Form of output of Query for iSeries reports .....................146
Line wrapping in Query for iSeries reports ......................146
Wrapping width in Query for iSeries reports .....................147
Contents v
Page 8

Record on one page in Query for iSeries reports ...................147
Displaying wrapping widths in Query for iSeries reports .................147
Defining output to the printer in Query for iSeries reports ................148
Defining output of Query for iSeries reports to a database file...............154
Using an existing output file definition in Query for iSeries reports .............155
Building a new output file definition in Query for iSeries reports ..............156
Using an output database file created by Query for iSeries ................161
Chapter 14. Specifying Query for iSeries processing options ..............163
Purpose of Query for iSeries processing options ....................163
Rounding numeric field values during Query for iSeries processing ..............164
Ignoring decimal data errors during Query for iSeries processing ..............164
Ignoring character substitution warnings during Query for iSeries processing ..........165
Using collating sequence for all character comparisons during Query for iSeries processing . . . 165
Chapter 15. Exiting and running a Query for iSeries query ...............167
Ending a Query for iSeries query definition ......................167
Saving a Query for iSeries query definition......................167
Running a Query for iSeries query..........................169
Using function key F5 when running a Query for iSeries query ..............169
Running a Query for iSeries query from the Query for iSeries menu ............169
Running a Query for iSeries query from the Exit This Query display ............169
Running a Query for iSeries query from the Work with Queries display ...........170
Running a Query for iSeries query using the RUNQRY command .............171
Chapter 16. Working with Query for iSeries query definitions ..............173
Changing a Query for iSeries query definition......................173
Starting changes by copying a Query for iSeries query definition .............173
Changes you can make to a Query for iSeries query ..................173
Considerations for changing Query for iSeries queries .................176
Copying a Query for iSeries query definition ......................177
Renaming a Query for iSeries query definition .....................178
Deleting a Query for iSeries query definition ......................178
Displaying a Query for iSeries query definition .....................179
Printing a Query for iSeries query definition ......................180
Information printed for a Query for iSeries query definition ................181
Example of printed record format information for a Query for iSeries query definition ......182
Part 3. Advanced information about Query for iSeries ............185
Chapter 17. Additional information about Query for iSeries for programmers ........187
Files with different record formats in Query for iSeries ..................187
File sharing considerations in Query for iSeries .....................187
Overriding database files in Query for iSeries......................187
DBCS considerations when defining result fields in Query for iSeries .............187
Joining files in Query for iSeries ..........................188
Using *ALL in Query for iSeries ..........................188
Using fields other than sort fields for report breaks in Query for iSeries ............188
Result field length and decimal positions in Query for iSeries ................188
Tips for dealing with presentation length and decimal positions in Query for iSeries.......188
Length and decimal positions used for internal numeric calculations in Query for iSeries .....189
Example: Increasing the decimal precision for result fields in Query for iSeries ........190
Selecting records (ignoring field case) in Query for iSeries ................191
Part 4. Appendixes .............................193
vi Query for iSeries Use V5R2
Page 9

Appendix A. Differences between Query for iSeries and Query/36 ............195
Conceptual Differences ..............................195
Operational Differences ..............................195
Command differences between System/36 and Query for iSeries commands ..........197
Migration differences between System/36 and Query for iSeries definitions ...........197
Appendix B. Practice exercise for Query for iSeries query ...............199
Query for iSeries query exercise: Creating an IDDU definition................199
Query for iSeries query exercise: Creating a database file .................203
Query for iSeries query exercise: Entering data .....................203
Query for iSeries query exercise: Creating and running a query ...............206
Query for iSeries query exercise: Creating a query...................207
Query for iSeries query exercise: Changing a query ...................211
Query for iSeries query exercise: Creating an advanced query ...............215
Appendix C. Query for iSeries performance tips and techniques .............231
Introduction to Query for iSeries query processing ....................231
Keyed sequence access paths in Query for iSeries ..................231
Select/omit access paths in Query for iSeries.....................232
Access plans in Query for iSeries .........................232
File definitions and data in Query for iSeries ......................233
File definitions in Query for iSeries.........................233
File data considerations for Query for iSeries .....................234
Defining queries for Query for iSeries ........................234
Query for iSeries performance when designing or changing queries ............234
Define result fields in Query for iSeries .......................235
Select and sequence fields in Query for iSeries ....................235
Select records in Query for iSeries.........................235
Select sort fields in Query for iSeries ........................236
Select collating sequence in Query for iSeries ....................237
Specify report summary functions in Query for iSeries .................237
Select output type and output form in Query for iSeries .................237
Specify processing options in Query for iSeries ....................238
Using join operations in Query for iSeries .......................238
Performance tips for join operations in Query for iSeries.................239
Miscellaneous tips and techniques for Query for iSeries ..................240
Batch processing for Query for iSeries .......................240
Query for iSeries performance tuning ........................241
Query for iSeries migration considerations N to N-1 ..................241
Query for iSeries status messages..........................241
Query for iSeries debug mode messages .......................242
Appendix D. Preventing users from running Query for iSeries queries interactively......243
Appendix E. Coded character set identifiers (CCSIDs) in Query for iSeries .........245
CCSID marking in Query for iSeries .........................247
CCSIDs and collating sequences in Query for iSeries...................248
Query for iSeries language sequences .......................249
CCSID conversions for Query for iSeries options and functions ...............249
Displaying a Query for iSeries query ........................249
Changing a Query for iSeries query ........................250
Getting a list of objects with text in Query for iSeries ..................250
Defining a Query for iSeries query .........................250
Defining a collating sequence in Query for iSeries ...................250
Getting a list of formats or members with text in Query for iSeries .............251
Saving a Query for iSeries query definition......................251
Contents vii
Page 10

Running a Query for iSeries query.........................251
Running a default query in Query for iSeries .....................251
Selecting records at run time in Query for iSeries ...................251
CCSIDs and Query for iSeries query definition items ...................252
CCSID and file selections in Query for iSeries ....................252
CCSID and join tests in Query for iSeries ......................252
CCSID and result field expressions in Query for iSeries .................252
CCSID and result field column headings in Query for iSeries ...............253
CCSID and sort fields in Query for iSeries ......................253
CCSID and record selection tests in Query for iSeries .................253
CCSID and summary functions in Query for iSeries ..................253
CCSID and column formatting and editing in Query for iSeries ..............253
CCSID and report breaks in Query for iSeries ....................253
CCSID and break and final text in Query for iSeries ..................253
CCSID and cover page, page headings and footings in Query for iSeries ..........253
CCSID compatibility considerations in Query for iSeries ..................254
Bibliography .................................259
Notices ...................................261
Trademarks ..................................262
Index ....................................263
viii Query for iSeries Use V5R2
Page 11

About Query for iSeries Use
Query for iSeries is a decision support utility you can use to obtain information from the DB2 UDB for
iSeries. This book describes how to use Query for iSeries to select, arrange, and analyze information
stored in one or more database files to produce reports and other data files.
You may need to refer to other IBM books for more specific information about a particular topic.
For a list of publications related to this book, see the “Bibliography”.
Who should read the Query for iSeries Use book
This book is intended for people creating query reports and managing data on the iSeries system.
Before you use this book, you must be familiar with the introductory material for using the iSeries system.
You do not have to understand how to use a high-level programming language to use Query for iSeries.
© Copyright IBM Corp. 2000, 2002 ix
Page 12

x Query for iSeries Use V5R2
Page 13

Part 1. Introduction to Query for iSeries
Chapter 1. What is Query for iSeries? ........................3
Query for iSeries fundamentals ............................3
Files, fields, and record formats in Query for iSeries ...................3
Double-byte character set (DBCS) fields in Query for iSeries ...............4
UCS2 level 1 character set support in Query for iSeries .................4
Data definition languages and utilities support in Query for iSeries .............4
Query for iSeries definitions ............................5
Libraries in Query for iSeries ............................5
Major functions of Query for iSeries ..........................5
Chapter 2. General operating information for Query for iSeries ..............7
Practicing with Query for iSeries ...........................7
Getting started with Query for iSeries .........................7
When you are finished working with Query for iSeries ..................7
Telling Query for iSeries what you want .........................7
Using prompts and default values in Query for iSeries ..................7
Using Query for iSeries function keys ........................8
Checking the results before printing the Query for iSeries report..............8
Printing what you see on your Query for iSeries display .................9
Using lists in Query for iSeries ...........................9
Displaying a Query for iSeries list .........................9
Selecting items in a Query for iSeries list......................10
Special library names in Query for iSeries .....................10
Using Query for iSeries commands ..........................11
Using the Query Utilities menu............................11
Using the Work with Queries display .........................12
Choosing a single Query for iSeries task .......................12
Specifying a Query for iSeries query and its library ..................13
Choosing multiple Query for iSeries tasks ......................13
Working with a list of Query for iSeries queries ....................14
Selecting a Query for iSeries query name from a list .................14
Using Query for iSeries list subsets ........................14
Positioning a list of Query for iSeries queries ....................15
Using F11 to display additional information about Query for iSeries queries .........15
Selecting a library for your Query for iSeries queries ..................16
Other considerations when you are trying to locate or use a particular Query for iSeries query 17
Displaying the format of constants in Query for iSeries ...................17
Query for iSeries profile information ..........................18
Handling Query for iSeries messages and errors .....................18
Changing your Query for iSeries queries .......................18
© Copyright IBM Corp. 2000, 2002 1
Page 14

2 Query for iSeries Use V5R2
Page 15

Chapter 1. What is Query for iSeries?
Query for iSeries is an IBM®licensed program and a decision support utility that can be used to obtain
information from the DB2 Universal Database for iSeries database. It can obtain information from any
database files that have been defined on the system using Operating System/400 (OS/400
description specifications (DDS), the OS/400 interactive data definition utility (IDDU), or DB2 UDB for
iSeries Structured Query Language (SQL).
You use Query to select, arrange, and analyze information (data) stored in one or more database files to
produce reports and other data files. You can create your own query definitions and then run them, you
can run existing queries that you did not create, or you can even run a default query against a particular
database file (using an unnamed query). You determine what data the query is to retrieve, the format of
the report, and whether it should be displayed, printed, or sent to another database file.
You can use Query to obtain information from a single file or a combined set of up to 32 files. You can
select all the fields, or a few of the fields and organize them as you want them to appear in the type of
output chosen. You can have all records in the files included in the output, or you can select only a few to
be included, using record selection tests. These and other functions are described in detail later.
|
This chapter begins by introducing basic information about Query, and then it introduces all the major
|
tasks (such as creating, displaying, or running query) that can be done using Query.
Query for iSeries fundamentals
®
) data
Several elements on your system organize and store information, or data, so that you and other system
users can work with it to get the results that you need. The following topics introduce those elements, tell
you about them and how they relate to you and Query, and direct you to other publications where you can
find more information.
Files, fields, and record formats in Query for iSeries
Information, or data, is organized and stored on your system in various forms, primarily in objects called
database files (usually referred to as just files). A file contains individual units of information, called
records, that each contain related pieces of data. Each piece of information in a record is called a field,
and how the fields are organized is defined in a record format (often just called a format).
When you run a query to produce a report, Query uses the files, fields, and record formats to get the
information you want from the database, in the form of records, and uses those records to produce a
query report.
For example, an employee name and address file named NAMEADDR might contain a group of records that
identify one employee in each record (see Figure 1). Each record has several fields that contain the name
and address of an employee. The fields in each record might have names like NAME, STREETADDR, CITY,
STATE, and ZIPCODE. This order of the fields might be specified in a record format also named NAMEADDR.
NAME STREETADDR CITY STATE ZIPCODE
Susan P Gantner 907 Abbey Hwy Mushroom Manor OR 67891
Perry C Swenson 19821 Metro Hwy. St. Paul OR 67891
Matt F Thomas 961 S 19th Ave Piney Island OR 67890
Figure 1. Three Records in NAMEADDR File (Using Record Format NAMEADDR)
© Copyright IBM Corp. 2000, 2002 3
Page 16

Another record format, named ZIPADDRESS, might be defined for a file that might be location-oriented and
contain only the ZIPCODE, STATE, CITY, and STREETADDR fields, in that order (see Figure 2).
ZIPCODE STATE CITY STREETADDR
67891 OR Mushroom Manor 907 Abbey Hwy
67891 OR St. Paul 19821 Metro Hwy.
67890 OR Piney Island 961 S 19th Ave
Figure 2. Three Records in NAMEADDR File (Using Record Format ZIPADDRESS)
Query retrieves the data you want from the files you choose. It uses certain fields (and record formats)
from those files to select, sort, calculate, and summarize that data in the form you want. It also produces
the query reports containing that data.
Double-byte character set (DBCS) fields in Query for iSeries
Some countries use pictographs or symbolic characters in their language. DBCS fields must be used for
such data. As a general rule, if your national language uses single-byte character set (SBCS) characters,
your files do not contain DBCS data. You can ignore any on-line help information that refers to DBCS data.
Notes:
1. To properly display DBCS data, you need a DBCS-capable display.
2. In Query, the following naming convention is used for DBCS data:
v Character data refers to both SBCS and DBCS character data.
v DBCS data refers to any type of DBCS data, including bracketed-DBCS and DBCS-graphic data
types.
v Bracketed DBCS refers to DBCS-open, DBCS-either, or DBCS-only data types.
UCS2 level 1 character set support in Query for iSeries
UCS2 Level 1 is a 16-bit encoding for graphic characters. When doing business in a worldwide
environment you need the ability to enter and process data from more than one national language. For
example, a list of customer names may contain German, Greek, English, and Thai characters that must be
printed or displayed on the same device at the same time.
™
Query for iSeries
treats UCS2-graphic data the same as GRAPHIC or VARGRAPHIC data. A
UCS2-graphic field is a DBCS-graphic field tagged with a UCS2 CCSID.
The VARCHAR and VARGRAPHIC functions help you write queries that include UCS2 data.
Data definition languages and utilities support in Query for iSeries
Query can query data in files that are created using different data definition languages or products.
Although the description given above applies to all the files on your system, the names or concepts that
might be used depend on the programming language or product (like IDDU, DDS, and DB2 UDB for
iSeries) that is used to define the files.
|
If you are not a programmer and you want to create a file that you can query from Query, you may want to
|
use IDDU to create the file. If a programmer can create the file for you, he might use IDDU, DDS and
|
control language (CL), or the DB2 UDB for iSeries program to create the file. Consider the following:
|
v IDDU is a menu-driven utility used to define files, fields, and record formats, to store all those definitions
|
in a data dictionary, and to create the files so they can be used to store data. A file defined using IDDU
|
can have more than one format. For more information about IDDU, see the IDDU Use book.
|
v The data file utility (DFU) is used to add, change, and delete data in a database file. You can use DFU
|
directly, or you can use some of its function through the Enter data option of the IDDU Work with
|
Database Files display. For more information about DFU, see the ADTS/400: Data File Utility book.
4 Query for iSeries Use V5R2
Page 17

v CL and DDS use the same terms and descriptions as IDDU, but they provide additional support for files.
|
Using DDS and CL commands, you can define and create physical files and logical files to indicate how
|
fields are to be organized in files.
|
A physical file contains the fields of data, as records, but logical files do not. A physical file contains at
|
least one record format. The field order in a physical file determines the format of the records.
|
A logical file gives a different view of the data stored in one physical file or in several physical files. A
|
logical file does not contain data. That is, a logical file lets you see information in records that are stored
|
in physical files as though the records actually existed that way. This is accomplished without having to
|
duplicate and store that data on the system in that logical view (thus, the name logical file). A logical file
|
can use a subset of the fields in one physical file, a composite of all or some of the fields in several
|
physical files, or even a mixture of fields from physical and other logical files. Join logical files can have
|
only one record format, but nonjoin logical files can have more than one record format.
|
For more information about physical files, logical files, CL, and DDS, refer to the CL Programming
|
book.,
|
v The DB2 UDB for iSeries program uses a relational model of data; that is, all data is perceived as
|
existing in tables. On the iSeries system, DB2 UDB for iSeries objects are created and maintained as
|
OS/400 objects. The following table shows the relationship between OS/400 terms and DB2 UDB for
|
iSeries relational database terms:
|
|
OS/400 Term DB2 UDB for iSeries Term
||
Library Collection. Consists of a library, journal, journal receiver, data dictionary, and DB2 UDB for
||
|
|
Physical file Table. A set of columns and rows.
||
Record Row. The horizontal part of a table containing a serial collection of columns.
||
Field Column. The vertical part of a table of one data type.
||
Logical file View. A subset of columns and rows of one or more tables.
||
|
iSeries catalog. A collection groups related objects and allows the user to find the objects by
name.
Query for iSeries definitions
|
You use a query to get information from database files to produce a report. The file or files that a query
uses to get the information and what is to be done with that information are defined and stored in a query
definition. A query definition is an object (with type *QRYDFN) and it contains all the details that Query
needs to find and use the files in the way you specify, and to produce the results that you expect.
To create a query definition, you follow a sequence of displays that guide you through the process of
defining and saving a query definition. Once you have defined your query (and even while you are defining
your query), you can run it (as a query) to produce the reports that you need.
Libraries in Query for iSeries
A library is a place on the system to store objects, including the query definitions and files that you use in
Query for iSeries. Therefore, when you are working with queries and files, you may need to specify the
library where a query or file is stored.
Major functions of Query for iSeries
Two primary Query displays, the Query menu and the Work with Queries display, are the starting point for
the major tasks that you can do using Query. (See Figure 3 on page 6.) Another important display is the
Define the Query display, which starts all the tasks in a query definition.
v The Query menu allows you to start working with queries, run a query, or delete a query. It also allows
|
you to start working with files.
|
v The Work with Queries display allows you to do specific tasks with one or more queries. You can
|
create, change, display, copy, delete, or run a query, or print a query definition.
|
Chapter 1. What is Query for iSeries? 5
Page 18
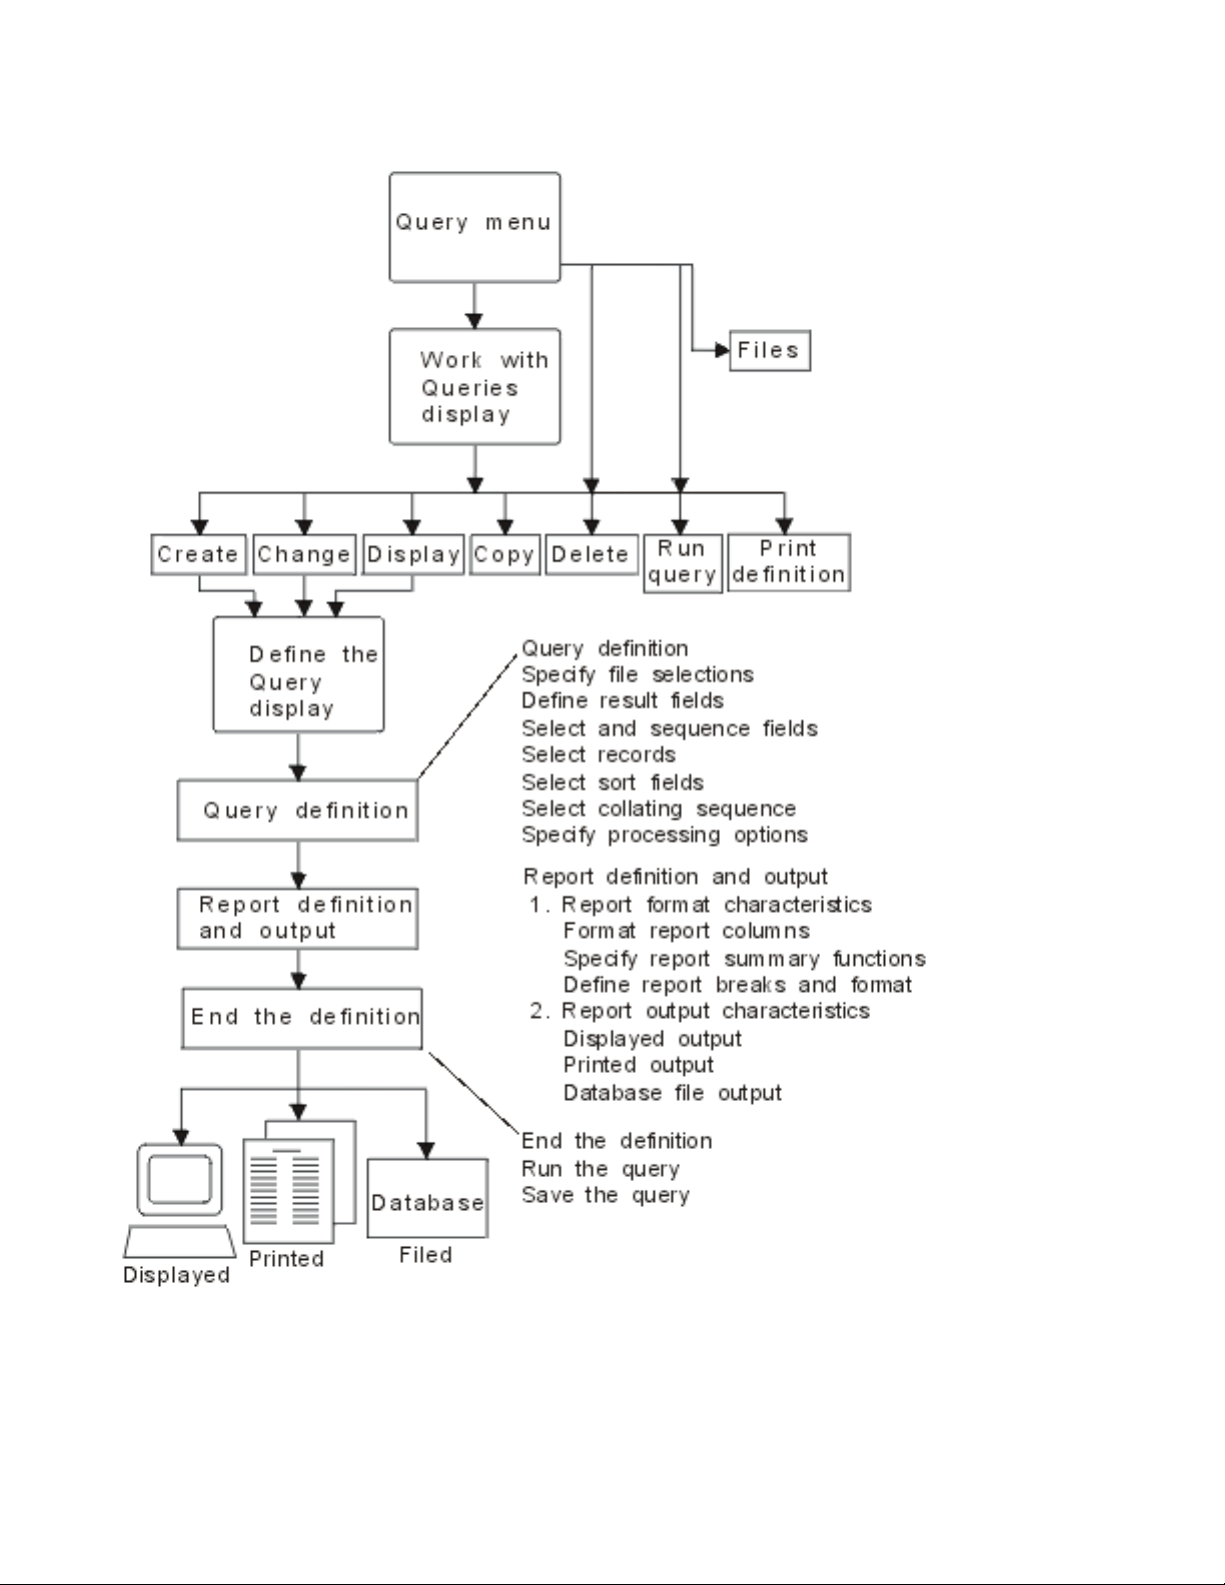
Figure 3. Major Tasks on the Query Menu and the Work with Queries Display
6 Query for iSeries Use V5R2
Page 19

Chapter 2. General operating information for Query for iSeries
This chapter describes the general operating information for Query, such as getting started with Query,
using prompts and lists, how you can check your query definition before it is finished, how to use the
function keys, and error recovery procedures.
Practicing with Query for iSeries
Appendix B, “Practice exercise for Query for iSeries query”, provides practice examples that you can do in
order to quickly become familiar with Query.
Getting started with Query for iSeries
You can access Query in a variety of ways. To use Query, you can do any of the following:
v Use the Work With Query (WRKQRY) command by typing WRKQRY and pressing the Enter key. This
|
causes the Work with Queries display to appear.
|
v Use the Start Query (STRQRY) command by typing STRQRY and pressing the Enter key. This causes the
|
Query menu to appear. Typing GO QUERY and pressing the Enter key has the same effect.
|
From the Query menu, you can choose to work with queries, run a query, delete a query, work with files,
or do an office-related task.
From the Work with Queries display you can:
v Create, change, copy, delete, display, print, or run a query if you came from the Query menu or the
WRKQRY command.
v Create, change, copy, delete, or display a query definition.
|
v Create, change, copy, delete, or display a query definition.
|
When you are finished working with Query for iSeries
When you are finished working with Query, you can exit from the Work with Queries display by pressing
either F3 (Exit) or F12 (Cancel).
Telling Query for iSeries what you want
When you work with a query, Query shows you a series of displays that ask (or prompt) you for:
v What information you want Query to get from a file or files
v Whether you want the information printed or displayed as a report or output as data in another file
v How you want the report to look
Query gathers all of this information from what you enter on the displays.
Using prompts and default values in Query for iSeries
Prompts are the system’s way of asking you what it needs to know in order to fulfill your request. You
need only “fill in the blank.” Often, the prompt even lists the possible correct choices, so you only need to
type the choice that fits what you are doing. If you are not sure what information you are supposed to
supply at a prompt, you can move the cursor to the prompt and press the Help key.
Also, when a display appears, some of the prompts are already filled in. These values are called default
values—they are the values assumed by the system if you do not specify anything yourself. You can leave
a default value the way it is, or if you want, you can change it to another value by moving the cursor to the
prompt and typing over the default value.
© Copyright IBM Corp. 2000, 2002 7
Page 20

Using Query for iSeries function keys
Function keys like Enter, Help, and Print can be used at any time with any query display. However, not all
the function keys (such as F3, F4, and F11) apply to all displays. Each display shows, at the bottom of the
display, which function keys are commonly used with that display (all the available keys may not be
shown). If you want to know how all the available keys work on a particular display, move the cursor to the
function key section of that display and press the Help key.
Checking the results before printing the Query for iSeries report
Function keys F5 (Report) and F13 (Layout) can be used to check the results of your work at many points
in the query definition process. That is, during query definition, you can use these keys to see if you are
getting the output results you expected. If so, you can continue on with confidence; if not, you can make
whatever changes are necessary to get what you want before you move on to the next definition step. In
some situations, looking at the layout may be more useful than looking at the report, and vice versa (for
example, F13 can be used when there is no data in a file that is used by the query).
Before printing a query report, remember the following:
v F5 (Report) uses all the information you have defined so far in this and previous definition steps to run
the query and display the results. The results are shown on the Display Report display in report form.
Note: If Query finds errors in numeric fields when your query is run, an error message might be
displayed or the field value might be shown in the output as plus signs (++++). Plus signs are
also used to indicate division by zero and overflow (when the overflow occurs as data is being
taken from the file). You can specify that Query ignore any numeric field errors—see “Ignoring
decimal data errors during Query for iSeries processing” on page 164 for more information.
Asterisks (*****) are shown if the field length and/or number of decimal positions was changed
on the Specify Report Column Formatting display to a size too small for the value to be shown.
When the query is run, if Query finds conversion errors either in the date, time, or timestamp
fields, or in character fields due to the coded character set identifier (CCSID), plus signs (++++)
are shown in the output. Plus signs are also shown if the data is not good or overflows.
Field, break text, minimum, maximum, average, and total values can be null and are represented by a
dash (-) on the display.
v F13 (Layout) uses all the information that you have defined so far to show the column heading and field
layout without actually running the report.
On the Display Report Layout display, Xs show SBCS character data and 9s show numeric data. The
current date, time, or timestamp shows where date, time, or timestamp data is.
If floating-point fields are present:
v 9‘s and 0’s, followed by E +029, represent single-precision data.
v 9‘s and 0’s, followed by E +299, represent double-precision data.
v You may also see 1.00 for a floating-point field if the data is smaller than the size selected by Query
(which is a length of four with two decimal positions).
If you are using a DBCS-capable display and if DBCS fields are present, you may see:
v Double-byte J’s, which represent DBCS-only data. DBCS-only fields contain only DBCS data.
v Double-byte O’s, which represent DBCS-open (mixed) data. DBCS-open (mixed) fields contain DBCS
data, SBCS data, or a mixture of both types of data.
v Double-byte E’s, which represent DBCS-either data. DBCS-either fields contain either all SBCS data or
all DBCS data, but not both in the same field.
v Double-byte G’s, which represent DBCS-graphic data. DBCS-graphic fields contain only DBCS-graphic
data.
8 Query for iSeries Use V5R2
Page 21

DBCS characters take twice the amount of space of SBCS characters. In addition, a shift-out character
precedes DBCS data, and a shift-in character follows the data. The shift-out and shift-in characters are
called DBCS bracket characters. DBCS-graphic data is stored in the database without bracket characters;
however, the bracket characters are present when DBCS-graphic data is displayed or printed.
Although you must use a DBCS display to type or read data contained in DBCS fields, you do not need to
use a DBCS display to display the layout of a report that uses DBCS fields. However, the layout may not
be readable.
You can look at the displayed results and determine whether the spacing between columns, the length of
each field, and the column headings produce the results you want.
Note: The displayed report or report layout contains all the entries or changes that you have made this
far, including those typed just before you pressed F5 or F13.
Printing what you see on your Query for iSeries display
You can use the Print key to print a copy of what you see on any Query display at any time. You may find
this useful during query definition, for example, when you type many values in the fields on a display, such
as on the Define Result Fields display or on the Select Records display. The printed copy of the displayed
information is printed on the printer that is associated with your display station.
You can also use the Print key, when needed, to print the displayed output of the function keys F5
(Report) and F13 (Layout). However, only what is shown on the display is printed. If your report or layout
is wider than the display and you have not specified that line wrapping be used, the far right side of the
report is cut off and is not printed. In this case, you could use the shift function keys to move text lines to
the right and then press the Print key again to obtain a printout of the remainder (or possibly just more) of
the report.
Using lists in Query for iSeries
For many displays, Query provides lists of items that can be used to complete the prompts. Those items
might include:
v Libraries you are authorized to use
v Queries you are authorized to use
v Files you are authorized to use
v Record formats for a specified file
v Members for a specified file
v Fields available for your query
v Translation tables
The lists eliminate the need to memorize names, and they also reduce the number of potential typing
errors.
Displaying a Query for iSeries list
You can obtain a list of an item (for example, a list of files or a list of libraries) by moving the cursor to the
prompt and pressing F4 (Prompt) so that the list appears. Note that you cannot display a list for just any
item on a display; the items for which lists are available are signified by a comment next to the prompt that
you can use F4 to obtain a list.
You could also obtain a particular subset of a list of items by typing a generic name or a special library
name in the prompt or prompts before you press F4. (For more information on special library names, see
“Special library names in Query for iSeries” on page 10.) Typing a generic name (such as ABC*)ina
prompt that allows generic names limits the items in the list by choosing only the items that begin with
those characters (ABC).
Chapter 2. General operating information for Query for iSeries 9
Page 22

The number of items shown in the list part of the display varies, depending on what form the list is in and
the amount of space used by the prompt part of the display. Sometimes a new display will appear that
shows the list. If all items in a list do not fit on the display, you can use the page keys to page forward and
backward through the list.
Selecting items in a Query for iSeries list
You can select an item from a list by doing one of the following:
v Typing the name and an option number in the first position in the list.
v Selecting an item directly from the list by typing a number next to the name in the list. By selecting an
item directly from the list by typing a number next to it, you often can select more than one item and
thus save a lot of time and typing.
You may be able to display, from a list, a long comment about a file, a record format, a file member, or a
field. Long comments may provide extensive information about their content. If a long comment is defined
for a file, a record format, a file member, or a field, you can move the cursor to its name and press F23 to
display the long comment.
Note: If the field is a result field, the entire expression defining the result field is shown as a long
comment.
Special library names in Query for iSeries
You can specify any of the following special library names to search the associated libraries for query
definitions, files, or translation tables:
Special Library Name
Description
*CURLIB The current library being used for your job. It is the only library searched. If no current
library is found, QGPL is searched.
*LIBL All the libraries in the library list for your job. They are searched in the order they are
listed.
*USRLIBL All the user libraries that are in the user part of the library list for your job. They are
searched in the order they are listed.
*ALLUSR All the user libraries on the system that you have the authority to use and other libraries
that you have authority to use whose names begin with the letter Q. *ALLUSR does not
list certain System/36
in alphabetical order.
*ALL All the libraries on the system that you have the authority to use. They are searched in
alphabetical order.
GENERIC* All libraries starting with characters that precede an asterisk that you have authority to use
are searched. For example, you can specify STA* to search all libraries starting with STA.
If you specify *CURLIB in the Library prompt, Query changes it to the name of the library currently being
used in your job. That library name is displayed in place of *CURLIB.
Note: You can use only those libraries for which you have the necessary authority. If you specify a special
library name that contains libraries you do not have authority for, you will see queries in only those
libraries in that list for which you do have the authority.
™
libraries that begin with the # character. The libraries are searched
10 Query for iSeries Use V5R2
Page 23

Using Query for iSeries commands
A command is a statement used to request a function of the system. This means you need only
remember a command that is a few characters long instead of remembering all the individual instructions
or taking the time to go through a series of menus.
Query has four commands, which can be entered from any command line:
v STRQRY brings up the Query menu.
v WRKQRY brings up the Work with Queries display.
v Run Query (RUNQRY) runs an existing query, or you can use it to run a default query. This command
can also be embedded in CL programs so that you could, for example, run several queries overnight.
v Delete Query (DLTQRY) deletes one or several query definitions.
For detailed information about how you can use these commands, see the CL Reference information in
the iSeries Information Center.
Using the Query Utilities menu
The Query Utilities menu allows you to select Query tasks for working with queries, running queries that
have previously been defined, deleting query definitions, or working with files.
QUERY Query Utilities
Select one of the following:
Query for iSeries
1. Work with queries
2. Run an existing query
3. Delete a query
SQL/400
10. Start SQL/400 Query Manager
Query management
20. Work with query management forms
21. Work with query management queries
22. Start a query
23. Analyze a Query for iSeries definition
Selection or command
===>
F3=EXIT F4=PROMPT F9=RETRIEVE F12=CANCEL F13=USER SUPPORT
F16=OS/400 MAIN MENU
(C) COPYRIGHT IBM CORP. 1980, 1991.
More...
If you select option 1 (Work with queries) and press the Enter key, the Work with Queries display is
shown. On that display, you can specify which query you want to work with and in what way. The tasks
that can be started using that display (including additional ways for running and deleting queries) are
introduced in “Using the Work with Queries display” on page 12.
If you select option 2 (Run an existing query) on the Query Utilities menu, you are shown the prompt
displays for the Run Query (RUNQRY) command. You can use this command to run a query and produce
a query report of the data selected from one or more database files. You can use this command to run an
existing query (one that is defined and stored by name on the system) or to run a “default” query (one that
is unnamed and that uses mostly system-supplied values). If you do not know the name of a query or
library, use option 1 (Work with queries) so that you can get a list of queries and libraries.
Chapter 2. General operating information for Query for iSeries 11
Page 24

If you select option 3 (Delete a query) on the Query Utilities menu, you are shown the prompt display for
the Delete Query (DLTQRY) command. You can use this command to delete a query definition. If you do
not know the name of a query or library, use option 1 (Work with queries) so that you can get a list of
queries and libraries.
There are other tasks that you can do that are not part of Query but may be related to it or may be
convenient to get to from the Query Utilities menu:
v If you select option 30 to work with files, the Files (FILE) menu is displayed. From that menu, you can
do a file-related task (display, copy, delete, save, restore, or edit) or you can use a different file-related
utility such as IDDU or DFU, or a licensed program, such as the DB2 UDB for iSeries program. For
example, you can use IDDU to define and create files, and you can use either IDDU or DFU to type
data into the files.
v If you select option 31 to do an office-related task, the Office Tasks (OFCTSK) menu is displayed. From
that menu, you can choose to work with documents or folders, with office security, or with OfficeVision
or Client Access.
Using the Work with Queries display
The Work with Queries display is the major starting point for working with one or more queries at a time.
Using this display, you can select (and, therefore, start) one or more of the following primary tasks:
|
v Create a new query definition.
|
v Change, copy, display, or delete an existing query definition.
|
v Print the definition of a query.
|
v Run a query to select data from files and produce a report using that data.
Part 2 of this book describes these primary Query tasks. Creating query definitions is described in
Chapters 3 through 14, running queries is described in Chapter 15, and the remaining tasks (changing,
copying, displaying, printing, and deleting query definitions) are described in Chapter 16.
Choosing a single Query for iSeries task
To work with a query, you need to determine which query you want to work with, and you need to select
the task you want to do. To select a task, you can type the number of the task you want to do in the
Option prompt on the Work with Queries display, or if a list of query names is shown, you can type the
number of the task in the Opt column (as shown in Figure 4 on page 13). These are the tasks that you can
choose from:
Query Task Description of Task
1=Create Creates (defines) a new query. When this option is processed, the Define the Query
display is shown so you can start defining a query.
2=Change Changes an existing query definition. The Define the Query display is shown for this
option also.
3=Copy Copies an existing query definition. The Copy Queries display is shown.
4=Delete Deletes an existing query definition. The Confirm Delete of Queries display is shown.
5=Display Shows the definition of a query without being able to change it. (To change the query,
choose option 2.) The Define the Query display is shown.
6=Print definition
|
|
Prints a query definition. For more information, see “Printing a Query for iSeries query
definition” on page 180.
8=Run in batch
|
|
Runs a query in batch, reducing the resource drain caused by running the query
interactively.
12 Query for iSeries Use V5R2
Page 25

9=Run Runs a query. Query displays a report, prints a report, or puts the data into a database
|
|
|
file, depending on what is specified in the query definition. For information about running
queries, see Chapter 15.
Specifying a Query for iSeries query and its library
To identify the query you want to work with, you can type the name of the query (in the Query prompt) and
the name of the library (in the Library prompt) in which it is to be stored (or is already stored). Or you can
look at a list of query names or library names and then select the name you want— see “Choosing
multiple Query for iSeries tasks”.
If you specify the name of a query, Query assumes that it already exists and searches for it in the library
specified in the Library prompt. If you specified a special library name (such as *LIBL) or a generic library
name (such as ABC*), the first query found with the name you specified is used; libraries are searched in
alphabetical order (except for *LIBL and *USRLIBL).
If you are creating a query, you do not need to name it unless you want to save it for later use. For more
information on creating queries, see Chapter 3, “Creating a Query for iSeries query definition”.
Choosing multiple Query for iSeries tasks
If you position the cursor on the Query prompt and press F4 (Prompt) to show a list, the list contains the
names of all the queries that are in the library (or libraries) indicated by the Library prompt. Only the
queries and libraries for which you have the necessary authority are shown. The following display shows
some sample query names.
Work with Queries
Library........ QGPL Name, *LIBL, F4 for list
Subset ........ __________ Name, generic*
Position to...... __________ Starting character(s)
Type options (and Query), press Enter.
1=Create 2=Change 3=Copy 4=Delete 5=Display 6=Print
8=Run in batch 9=Run
Opt Query Opt Query
_ __________
_ ACCTPAYFEB _ PAYROLLMAR
_ ACCTPAYMAR
_ ACCTRECFEB
_ ACCTRECMAR
_ INTFEB
_ INTMAR
_ INVFEB
_ INVMAR
_ PAYROLLFEB
F3=Exit F4=Prompt F5=Refresh F11=Display text
F12=Cancel F19=Next group
Figure 4. Work with Queries Display (Multiple-Column List)
You can type any option number (except a 1) beside the name of each query that you want to select from
|
the list. If selecting multiple queries, you can select and mix the options according to the types of work you
|
need to do. For example, if you need to run a query, delete another query, and copy a third query, you can
|
page through the list looking for the query names and select all three options on this display at one time.
|
You can also type an option number (including 1) and a query name in the top position of the list as well.
|
Chapter 2. General operating information for Query for iSeries 13
Page 26

You can select as many as 30 queries from the list, as well as type a query name and option in the first
list position of this display. Query processes the requests in the order that they appear in the list, starting
first with the option and query that you typed in the first list position (in the input fields of the Option and
Query columns).
When you select multiple options and the list contains multiple columns of names only (such as in Figure 4
on page 13), the processing order of the columns is top to bottom and left to right. That is, Query
processes all the selected queries in the leftmost column first, then the second column, and so on.
(However, if the selected options include queries that are to be copied or deleted, Copy Queries or
Confirm Delete of Queries displays are shown when the first query with one of those options is found.
Then Query groups together all others with the same option, by library, for you to verify what you want
done.)
Working with a list of Query for iSeries queries
When you work with a list (in this case, a list of queries), Query provides several functions to help you.
Here are some possibilities:
v To see all the queries in a different library or group of libraries, you can press the Enter key after
changing the value in the Library prompt and typing blanks or an asterisk (*) in the Subset prompt. You
are shown all the queries that you have the authority to use that exist in that library or group of libraries.
(You indicate which libraries are to be checked by specifying a library name, a special library name
[such as *LIBL], or a generic library name [in the form of ABC*]intheLibrary prompt.)
v To see a particular subset (a smaller group) of query names, you can type a generic name (in the form
of ABC*)intheSubset prompt and press the Enter key. If you know at least the starting characters in the
name you are looking for, this function can reduce the time needed to locate it.
v To see if more than one library contains a specific query name, you can type that query name in the
Subset prompt and type *ALL in the Library prompt before you press the Enter key. You are shown all
the queries by that name for which you have the authority to use.
v To position the list to a specific name, type the name (or the starting characters in the name) in the
Position to prompt and press the Enter key. This function can also reduce the time needed to locate a
name.
v You can also use a combination of these things at the same time. For example, you could specify a
different library name, generic library name, or special library name in the Library prompt, a subset
value (of query names) in the Subset prompt, a specific query name or the starting characters of a
query name in the Position to prompt, and then press the Enter key to show the desired subset list of
query names.
These functions are described in the following topics.
Selecting a Query for iSeries query name from a list
If you are working with a list of queries, you can select a query by using one of the following methods:
v You can use the top position in the list to type the name of a query (and library name, if the Library
column is shown) you want to create or use. (To select an existing query, it must be available for
use—see “Other considerations when you are trying to locate or use a particular Query for iSeries
query” on page 17.)
If you are creating a query, you can check this list to see what names are already used before you type
a new name. Then, type the new name in the first list position (in its input field) and type a 1 next to it.
v You can work with a query (or queries) in the list by typing an option next to the query(s). (To select a
query, it must be available for use—see “Other considerations when you are trying to locate or use a
particular Query for iSeries query” on page 17.)
Using Query for iSeries list subsets
You can use the Subset prompt to see a smaller group (subset) of query names. To do so, type the
starting characters (in the form of ABC*) that identify the group of queries that you want to display, and
press the Enter key. All the queries whose names start with those characters in the specified library or
14 Query for iSeries Use V5R2
Page 27

library group are shown. For example, if you typed IN* in the Subset prompt, you might see a list of query
names like: INTEREST, INTFEB, INTMARCH, INVENTORY, INVFEB, INVMARCH, and so on. (The queries are
shown alphabetically for each library.)
You can also specify a complete name (without an *) in the Subset prompt. Continuing the previous
example, if you want to see which libraries contain queries named INVENTORY, type that complete query
name in the Subset prompt.
If you want to return to the full list previously shown, blank out the subset value (or type an * as the subset
value) and press the Enter key again.
Positioning a list of Query for iSeries queries
When a list of query names is shown, they are shown in alphabetical order within each library.
You can use the special values *TOP or *BOT to position to the top or bottom of the list. If it is a long list,
you may want to move (change the position within) the list so that it starts with a particular query name.
You can do this by typing one of the following in the Position to prompt:
v All of the characters in an existing query name
v One or more of the starting characters in the name
When you press the Enter key, Query moves the list so that the fully specified name (or, in a list for a
specific library, the first name with the specified starting characters) is now shown at the top of the list.
If there is no Library column present and if there is no query name in the list that starts with those
characters, Query moves the list to the name closest to, and in front of, the position that the name would
have been in. However, if there is a Library column present and there is no query name that exactly
matches the value in the Position to prompt, the list is not repositioned.
Two other methods are also available to move through a long list of queries:
v You can use the page up and page down keys to go forward or backward through the list.
v You can use F19 (Next group) to advance to the start of the next library’s list of query names.
Using F11 to display additional information about Query for iSeries queries
When a list is displayed, you can use F11 (Display text) to alternate between showing a list of just the item
names (such as queries, fields, and so on) and showing a list of both the item’s name and the text that
describes each item. When you press F11, the text—if any was specified when the item was created or
changed—is shown next to each item name in the list. Some additional information may also be shown;
for example, when you display the text for a list of queries, the date that each of the queries was created
or last changed is also displayed.
Following is an example of how the Work with Queries display might appear when F11 is used.
Chapter 2. General operating information for Query for iSeries 15
Page 28

Work with Queries
Library........ QGPL Name, *LIBL, F4 for list
Subset ........ __________ Name, generic*
Position to...... __________ Starting character(s)
Type options (and Query), press Enter.
1=Create 2=Change 3=Copy 4=Delete 5=Display 6=Print
8=Run in batch 9=Run
Opt Query Text Changed
_ __________
_ ACCTPAYFEB Accounts payable for February 02-29-88
_ ACCTPAYMAR Accounts payable for March 03-31-88
_ ACCTRECFEB Accounts receivable for February 02-29-88
_ ACCTRECMAR Accounts receivable for March 03-31-88
_ INTFEB Customer acct interest accumulated - Feb. 02-29-88
_ INTMAR Customer acct interest accumulated - March 03-31-88
_ INVFEB Ending inventory for February 02-29-88
_ INVMAR Ending inventory for March 03-31-88
_ PAYROLLFEB Total payroll, by day, for February 02-29-88
F3=Exit F4=Prompt F5=Refresh F11=Display names only
F12=Cancel F19=Next group
More
After you press F11, all lists on all the Query displays that use F11 are shown in the form you chose until
you press F11 again.
Selecting a library for your Query for iSeries queries
The library name indicates where you want to store a new query or where an existing query is already
stored. (If you are creating a query, you do not need to specify a library name if you do not intend to save
the query.) Also, if you decide later during query definition that you do want to save the query, you are
given another opportunity to specify (a query name and) a library name at the end of definition time.
If this is the first time you are using Query, your current library is supplied as the library name. If you do
not have a current library, QGPL is used. When you specify a different library name, a special library
name, or a generic library name, Query supplies that name the next time you use this display. You can
use the same value each time, or you can change it to a different library or library group. (See “Query for
iSeries profile information” on page 18 for more information.)
To look at or use a different library, or a list of libraries from which you can choose, do either of the
following:
v Type the name of the library, a generic library name, or a special library name in the Library prompt and
press the Enter key. A list of all the queries in that library or group of libraries for which you have the
authority to use is shown. If there are multiple libraries, the queries are listed in alphabetical order within
each library. The libraries themselves are shown in alphabetical order if *ALL, *ALLUSR, or a generic
library name is specified. If you specify *LIBL or *USRLIBL, the libraries are shown in the order that they
are listed in the library list.
If you specify a library name or special value that contains no query definitions (or none that you have
authority to use), a message is displayed indicating there were no queries.
If the list of queries is not empty but one of the libraries in the group is being used or is damaged, a
message is displayed indicating that the list may be incomplete.
v Move the cursor to the Library prompt and either leave the prompt blank or type a generic name or a
special library name, then press F4 to list the libraries. A list of the libraries that you are authorized to
use is shown.
16 Query for iSeries Use V5R2
Page 29

Other considerations when you are trying to locate or use a particular Query for iSeries query
You should be aware of other considerations when you are trying to locate or use a particular query. To
use a query:
v You must have the authority needed to use the query definition. You may need to either ask the owner
of the query, the administrator, or security officer to give you the type of authority that is necessary. For
more information about the types of authority, see “Giving authority to others to your Query for iSeries
query” on page 168.
v You must have the authority needed to use the library containing the query definition.
v The query (or the library) must not be in use in such a way that it cannot be shared. For example, if the
owner is making changes to the definition of the query or if the system operator is saving the library that
contains the query, you may need to wait a short time before you can use the query. If the Text and
Changed columns are blank in a query list with the text displayed, the query is being used.
Displaying the format of constants in Query for iSeries
If you create or change a query and specify a date or time constant in an OS/400 format or a numeric
constant with a decimal separator, that format must match the format description or separator shown on
the Display Constants Format display. To check what OS/400 format or separator you must use, press F17
from either the Select Records display or the Define Result Fields display.
Note: If you are sending queries between countries that use the comma for a decimal separator, put a
blank after each comma separating arguments in a function, such as SUBSTR or VALUE.
Display Constants Format
Query......: QRY1 Option .....: CHANGE
Library....: QGPL CCSID......: 65535
Use an SAA format to enter a date or time constant, or
use the format described by the following values.
Use the decimal separator shown.
Query definition values
Date format....: *MDY
Date separator . . : /
Time format....: *HMS
Time separator . . : :
Decimal separator . : .
Press Enter to continue.
F12=CANCEL
The Display Constants Format display appears when you:
v Change a query from the Work with Queries display and either at least one date or time constant is
specified in the query definition in an OS/400 format other than the date or time format specified for
your job.
v Display a query from the Work with Queries display and your job format for the date or time is different
from an OS/400 date or time format constant that is specified in the query definition.
v Use the run-time record selection option of the RUNQRY command and your job format for the date
or time is different from an OS/400 date or time format constant specified in the query definition.
v Use the run-time record selection option with the QRYRUN procedure and your job format for the date
or time is different from an OS/400 date or time format constant specified in the query definition.
Chapter 2. General operating information for Query for iSeries 17
Page 30

v Change or display a query from the Work with Queries display or use the run-time record selection
option of the RUNQRY command, and the query was defined with a numeric constant and the decimal
separator saved with the query does not match your current decimal separator.
v Press F17 from the Select Records display.
v Press F17 from the Define Result Fields display.
OS/400 date formats are MDY, YMD, DMY, and JUL. The valid OS/400 time format is HHMMSS.
Query for iSeries profile information
Query creates and maintains a query profile for each user. The profile is automatically created the first
time you use the Query utility program, and its values are updated automatically whenever you specify
certain values or press certain keys. You do not have to worry about creating or changing this profile.
You may notice that some prompts on some of the displays are already filled in when the display is first
presented to you. These values may have been obtained from your profile, because Query uses it to make
your definition tasks easier by providing certain information at the appropriate time.
The values that are stored in your Query profile are:
v The library you last used on the Work with Queries display
v The library you last used to specify your first file selection on the Specify File Selections display
v The library you last used to specify where database file output was to be stored
v Your list column mode (whether displays are to show names and text or just names only)
v Your report/layout display width (80 or 132)
v The current collating sequence option
v Your collating sequence and coded character set identifier (CCSID)
v The collating sequence table and library name
Handling Query for iSeries messages and errors
You should not worry about making errors while working with Query. Query either prompts you for needed
input or issues an error message. You can correct your errors by responding to either of these. If you want
to obtain help for any message that Query issues to you, move the cursor to the message line and press
the Help key or F1.
Some of the things that may go wrong are:
v You specify a value that is not listed as a possible choice.
v You are not authorized to use a query, file, or table that you specified, or a file is currently being used.
v You change your mind after entering something.
Changing your Query for iSeries queries
Whether you change your mind about something you have already entered because it was a mistake or
because you thought of a better way to get what you want, you will find it is very easy to change things in
Query.
If you are still creating or changing your query, you can go back to previous displays by using F12. If you
press F12 on a display, all of the new entries or changes you made on that display are ignored. Pressing
F10 on a display keeps all of your new entries or changes and shows you the previous display. You can
also return to the Define the Query display and choose the option(s) that you want to change or add.
If you define and save the query before you notice that the results are not what you want, just choose
option 2 (Change) on the Work with Queries display and change the query. When changing a query, you
18 Query for iSeries Use V5R2
Page 31

select only the option(s) that need to be changed and then, when you are shown the appropriate display,
you need only type the new choices or change the incorrect ones. Everything else you defined earlier
remains defined; you do not have to redefine the whole query.
If you just want to quit, press F3 (Exit) to go to the Exit This Query display. On the Exit This Query display,
indicate whether you want to save or run the query (or do both), and then press the Enter key. Afterwards,
if you have not selected other options, the Work with Queries display appears. Press F3 to exit Query.
Chapter 2. General operating information for Query for iSeries 19
Page 32

20 Query for iSeries Use V5R2
Page 33

Part 2. Defining and using Query for iSeries query definitions
Chapter 3. Creating a Query for iSeries query definition .................27
Starting Query for iSeries query definition .......................27
Selecting definition steps when defining a Query for iSeries query ..............28
Selecting options for a Query for iSeries query definition .................29
Moving through the Query for iSeries definition displays .................30
When you return to the Query for iSeries Define the Query display .............30
Considerations for creating Query for iSeries queries ...................30
Selecting files, records, and fields for Query for iSeries .................30
Suggested sequence of tasks for creating Query for iSeries queries .............31
Chapter 4. Specifying and selecting files for a Query for iSeries query ...........33
Specifying file selections for a Query for iSeries query ...................33
Choosing a file for a Query for iSeries query .....................34
Choosing a library for a Query for iSeries query ....................34
Choosing a member or record format for a Query for iSeries query .............35
Selecting multiple files for a Query for iSeries query...................35
Using file IDs for a Query for iSeries query .....................36
Confirming your options for a Query for iSeries query ..................36
Removing a option for a Query for iSeries query ...................36
Handling errors on the Query for iSeries Specify File Selections display ...........36
Selecting files on the Query for iSeries Select File display .................37
Selecting file members on the Query for iSeries Select Member display ............39
Selecting record formats on the Query for iSeries Select Record Format display .........40
Displaying all files selected on the Query for iSeries Display File Selections display ........41
Joining files in a Query for iSeries query ........................42
Types of joins in a Query for iSeries query ......................43
How to join files in a Query for iSeries query .....................43
Rules for joining files in a Query for iSeries query ...................44
Examples of joining files in a Query for iSeries query ..................46
Example: Selecting matched records from all selected files in a Query for iSeries query ....47
Example: Selecting matched records using a primary file in a Query for iSeries query .....48
Example: Selecting unmatched primary file records in a Query for iSeries query .......48
Sequencing secondary files for a primary join in a Query for iSeries query ..........49
Example: Sequencing secondary files in a Query for iSeries query ............49
Displaying all join tests in a Query for iSeries query ....................53
Handling missing fields in a Query for iSeries query ....................54
Handling missing fields during file selection process of a Query for iSeries query ........55
Handling missing fields when starting to change or display a Query for iSeries query ......55
Chapter 5. Defining result fields in Query for iSeries ..................57
Creating results fields in Query for iSeries .......................57
Query for iSeries result field name .........................58
Query for iSeries expressions ...........................58
Query for iSeries numeric expressions ........................59
Query for iSeries character expressions .......................60
Query for iSeries concatenation operation .....................60
Query for iSeries character functions ........................61
SUBSTR Query for iSeries function ........................61
DIGITS Query for iSeries function ........................62
VALUE Query for iSeries function ........................62
VARCHAR Query for iSeries function .......................63
VARGRAPHIC Query for iSeries function......................65
Date, time, and timestamp expressions in Query for iSeries ................66
© Copyright IBM Corp. 2000, 2002 21
Page 34

Query for iSeries date .............................67
Query for iSeries time .............................67
Query for iSeries timestamp ..........................68
Displaying constants format in Query for iSeries ....................69
Date, time, and timestamp arithmetic operations in Query for iSeries .............69
Date arithmetic operation in Query for iSeries .....................70
Subtracting dates in Query for iSeries .......................70
Incrementing and decrementing dates in Query for iSeries ...............71
Converting a numeric field to a date field in Query for iSeries ..............71
Working with numeric dates in Query for iSeries ...................71
Time arithmetic operation in Query for iSeries .....................73
Incrementing and decrementing times in Query for iSeries ...............73
Timestamp arithmetic operation in Query for iSeries ..................73
Durations in Query for iSeries ...........................73
Labeled duration in Query for iSeries .......................73
Date duration in Query for iSeries ........................73
Time duration in Query for iSeries ........................73
Timestamp duration in Query for iSeries ......................74
Date, time, and timestamp functions in Query for iSeries ..................74
CHAR Query for iSeries function ..........................74
DATE Query for iSeries function ..........................75
DAY Query for iSeries function ..........................75
DAYS Query for iSeries function ..........................76
HOUR Query for iSeries function ..........................76
MICROSECOND Query for iSeries function ......................77
MINUTE Query for iSeries function .........................77
MONTH Query for iSeries function .........................78
SECOND Query for iSeries function.........................78
TIME Query for iSeries function ..........................79
TIMESTAMP Query for iSeries function .......................79
YEAR Query for iSeries function ..........................80
Additional date, time, and timestamp functions in Query for iSeries .............80
Converting date formats in Query for iSeries ......................80
Converting date for output to a database file in Query for iSeries ..............80
Converting date for output to a display or printer in Query for iSeries ............81
Example 1—Converting from MMDDYY to YYDDD format in Query for iSeries ........81
Example 2—Converting from MMDDYY to YYDDD format in Query for iSeries ........81
Example 3—Converting from YYDDD to MMDDYY format in Query for iSeries ........82
Example 4—Converting from MMDDYY to YYDD format in Query for iSeries ........82
General considerations when creating an expression in Query for iSeries ............83
Column headings in Query for iSeries .........................85
Length and decimal positions in Query for iSeries ....................85
Example of defining a result field in Query for iSeries ..................86
Adding or removing result fields in Query for iSeries ...................86
Chapter 6. Selecting and sequencing fields in Query for iSeries ..............87
Letting Query for iSeries select and sequence fields....................87
Selecting fields and specifying their sequence in Query for iSeries ..............87
Chapter 7. Selecting records in Query for iSeries ...................91
Letting Query for iSeries select records ........................91
Selecting the records you want in Query for iSeries ....................91
Comparison fields in Query for iSeries ........................92
Comparison values in Query for iSeries .......................93
Fields as values in Query for iSeries .......................94
Character constants as values in Query for iSeries ..................94
22 Query for iSeries Use V5R2
Page 35

Numeric constants as values in Query for iSeries...................94
Date, time, timestamp constants as values in Query for iSeries .............95
Null values in Query for iSeries .........................95
Comparison tests in Query for iSeries ........................95
Date, time, or timestamp comparisons in Query for iSeries ...............96
Testing for equal (EQ) and not equal (NE) in Query for iSeries ..............96
Testing for IS Null (IS) and ISNOT Null (ISNOT) in Query for iSeries ...........96
Testing for greater (GT or GE), less (LT or LE), and range (RANGE) in Query for iSeries ....96
Testing for values in a list (LIST NLIST) in Query for iSeries ...............97
Testing for values that are similar (LIKE NLIKE) in Query for iSeries ............98
Testing for DBCS LIKE (like) and NLIKE (not like) in Query for iSeries ...........99
Using more than one comparison test in Query for iSeries ................101
Adding and removing comparisons in Query for iSeries .................103
Chapter 8. Selecting sort fields in Query for iSeries ..................105
Letting Query for iSeries determine the order of records for you ...............105
Selecting the sort fields you want to use in Query for iSeries ................105
Additional sort considerations in Query for iSeries ...................108
Chapter 9. Selecting a collating sequence in Query for iSeries ..............111
Letting Query for iSeries select a collating sequence ...................111
Setting your default collating sequence in Query for iSeries................111
Purpose of a collating sequence in Query for iSeries ...................111
Collating sequence and CCSIDs in Query for iSeries ..................112
How a collating sequence affects Query for iSeries....................112
Selecting a Query for iSeries collating sequence ....................113
Using the hexadecimal collating sequence in Query for iSeries ..............113
Using the language collating sequence for your country in Query for iSeries .........114
Defining your own collating sequence in Query for iSeries ................115
Selecting a translation table in Query for iSeries....................116
Selecting a system sort sequence in Query for iSeries .................117
Chapter 10. Specifying report column formatting in Query for iSeries ...........119
Formatting the columns of the Query for iSeriesquery report ................119
Column spacing in Query for iSeries reports .....................119
Column headings in Query for iSeries reports.....................119
Length and decimal positions in Query for iSeries reports ................120
Omitting fields from a Query for iSeries report ....................121
Editing numeric fields in Query for iSeries reports ....................122
Defining numeric field editing in Query for iSeries reports ................122
Describing numeric field editing in Query for iSeries reports ...............124
Decimal point in Query for iSeries reports .....................125
Thousands separator in Query for iSeries reports ..................125
Show negative sign in Query for iSeries reports ...................125
Left negative sign in Query for iSeries reports ...................125
Right negative sign in Query for iSeries reports ...................126
Show currency symbol in Query for iSeries reports..................126
Left currency symbol in Query for iSeries reports ..................126
Right currency symbol in Query for iSeries reports ..................126
Print zero value in Query for iSeries reports ....................127
Replace leading zeros in Query for iSeries reports ..................127
Replace with option in Query for iSeries reports...................127
Single leading zero in Query for iSeries reports ...................127
Describing date/time field editing display in Query for iSeries reports ............127
Date/time separator in Query for iSeries reports ...................128
Specifying an edit code in Query for iSeries reports ..................129
Part 2. Defining and using Query for iSeries query definitions 23
Page 36

Edit code in Query for iSeries reports ......................129
Optional edit code modifier in Query for iSeries reports ................131
Specifying edit words .............................131
Edit word in Query for iSeries reports ......................131
Edit word for summary total in Query for iSeries reports ................133
Chapter 11. Specifying report summary functions in Query for iSeries reports .......135
Types of summary functions in Query for iSeries reports .................135
Summarizing columns in Query for iSeries reports ....................137
Location of column summary values in Query for iSeries reports...............137
Chapter 12. Defining Query for iSeries report breaks..................139
Defining a Query for iSeries report break .......................139
Defining report break formatting in Query for iSeries reports ................143
Skip to new page in Query for iSeries reports ....................143
Suppress summaries in Query for iSeries reports ...................143
Break text in Query for iSeries reports .......................144
Chapter 13. Selecting output type and output form in Query for iSeries reports .......145
Selecting the output type and form you want in Query for iSeries reports ...........145
Form of output of Query for iSeries reports .....................146
Line wrapping in Query for iSeries reports ......................146
Wrapping width in Query for iSeries reports .....................147
Record on one page in Query for iSeries reports ...................147
Displaying wrapping widths in Query for iSeries reports .................147
Defining output to the printer in Query for iSeries reports ................148
Printer device in Query for iSeries reports .....................149
Form size in Query for iSeries reports ......................149
Start line in Query for iSeries reports .......................150
End line in Query for iSeries reports .......................150
Line spacing in Query for iSeries reports .....................150
Print definition in Query for iSeries reports .....................150
Specifying spooled output overrides in Query for iSeries reports .............150
Defining the printout cover page of Query for iSeries reports ..............152
Defining the page headings and footings in Query for iSeries reports ...........153
Defining output of Query for iSeries reports to a database file...............154
Using an existing output file definition in Query for iSeries reports .............155
Building a new output file definition in Query for iSeries reports ..............156
Specifying an output database file for Query for iSeries reports .............157
Summary-only output of a Query for iSeries report to a database file ...........160
Using an output database file created by Query for iSeries ................161
Chapter 14. Specifying Query for iSeries processing options ..............163
Purpose of Query for iSeries processing options ....................163
Rounding numeric field values during Query for iSeries processing ..............164
Ignoring decimal data errors during Query for iSeries processing ..............164
Ignoring character substitution warnings during Query for iSeries processing ..........165
Using collating sequence for all character comparisons during Query for iSeries processing . . . 165
Chapter 15. Exiting and running a Query for iSeries query ...............167
Ending a Query for iSeries query definition ......................167
Saving a Query for iSeries query definition......................167
Storing the Query for iSeries query definition ....................167
Describing the Query for iSeries query definition ..................168
Giving authority to others to your Query for iSeries query ...............168
Running a Query for iSeries query..........................169
24 Query for iSeries Use V5R2
Page 37

Using function key F5 when running a Query for iSeries query ..............169
Running a Query for iSeries query from the Query for iSeries menu ............169
Running a Query for iSeries query from the Exit This Query display ............169
Running a Query for iSeries query from the Work with Queries display ...........170
Running a Query for iSeries query using the RUNQRY command .............171
Chapter 16. Working with Query for iSeries query definitions ..............173
Changing a Query for iSeries query definition......................173
Starting changes by copying a Query for iSeries query definition .............173
Changes you can make to a Query for iSeries query ..................173
Considerations for changing Query for iSeries queries .................176
Changing your collating sequence on Query for iSeries queries .............176
Copying a Query for iSeries query definition ......................177
Renaming a Query for iSeries query definition .....................178
Deleting a Query for iSeries query definition ......................178
Displaying a Query for iSeries query definition .....................179
Printing a Query for iSeries query definition ......................180
Information printed for a Query for iSeries query definition ................181
Example of printed record format information for a Query for iSeries query definition ......182
Part 2. Defining and using Query for iSeries query definitions 25
Page 38

26 Query for iSeries Use V5R2
Page 39

Chapter 3. Creating a Query for iSeries query definition
This chapter describes the process of creating a query (that is, defining a query definition object) that can
be used to query one or more files in the DB2®UDB for iSeries. The chapter begins with selecting option
1 (Create) on the Work with Queries display, and then it introduces the Define the Query display and the
11 possible definition steps you can use to define a query or change part of an existing query definition.
The details for each of the definition steps are described later, in Chapters 4 through 14. The details for
each of the other major tasks then follow in Chapters 15 and 16.
Starting Query for iSeries query definition
You start query definition by selecting option 1 (Create) on the Work with Queries display and, optionally,
by specifying the name of the query you want to create.
To specify a query name, you can type the name of the query (Query prompt) that you want to define, and
you can specify the name of the library (Library prompt) in which it is to be stored. Or, you can look at a
list of query names or library names to select the query name and the library name you want to use.
For example, you might specify CUSNAMQRY as the name of a query definition that you would use to query
the CUSTNAME file. If you do not specify a library name, the query is stored in the library identified in the
Library prompt (the QGPL library in this example).
Work with Queries
Type choices, press Enter.
Option ....... _ 1=Create 2=Change 3=Copy 4=Delete
Query ....... __________ Name, F4 for list
Library...... QGPL Name, *LIBL, F4 for list
F3=Exit F4=Prompt F5=Refresh F12=Cancel
5=Display 6=Print definition
8=Run in batch, 9=Run
If you are creating a query (definition), you do not need to name it unless you want to save it for later use.
(The query does not exist as a definition object on the system until you save it.) If you do name it, use the
normal rule for naming objects, which follows:
The query name must begin with an alphabetic character (A through Z, $, #, or @) and can be followed by
no more than 9 alphanumeric characters (A through Z, 0 through 9, $, #, @, ., or _).
Note: To use this query in a multilingual environment, use A-Z or 1-9.
Because most system-supplied objects on the iSeries system begin with Q, your query names should not
start with a Q.
© Copyright IBM Corp. 2000, 2002 27
Page 40

If you position the cursor on the Query prompt and press F4 (Prompt) to show a list, it contains the names
of all the queries that are in the library (or libraries) indicated by the Library prompt. You can get a smaller
list by typing a generic name in the Query prompt before you press F4. The generic name shows in the
Subset prompt when the list is shown.
When you are creating a query, you can check this list to see what names are already used before you
choose a new name. Type the new name in the first list position (in its input field) and type a 1 next to it.
For more information on using lists on the Work with Queries display, see “Working with a list of Query for
iSeries queries” on page 14.
Selecting definition steps when defining a Query for iSeries query
When you specify option 1 (Create) on the Work with Queries display, you are shown the Define the
Query display (another key display) where you select one, several, or all of the 11 definition steps
(options) needed to define your query.
The only definition step that you are required to select is Specify file selections.Youdo not have to select
all of these definition steps—use only those that you need. Most of these steps do not have to be done in
a specific order (although the order shown is recommended when you need to use most of them). Each
step you select is a separate process that shows you one or more displays as you need them.
Define the Query
Query......: Option .....: Create
Library.....: QGPL CCSID .....: 37
Type options, press Enter. Press F21 to select all.
1=Select
Opt Query Definition Option
1 Specify file selections
_ Define result fields
_ Select and sequence fields
_ Select records
_ Select sort fields
_ Select collating sequence
_ Specify report column formatting
_ Select report summary functions
_ Define report breaks
_ Select output type and output form
_ Specify processing options
F3=Exit F5=Report F12=Cancel
F13=Layout F18=Files F21=Select all
The Define the Query display is the primary display from which you start defining your query.
From this display, you can select options that define, generally speaking, the four major parts of a
complete query definition:
v The first six options define the query itself, including the files you want to query, the fields to be used
in each file, and the records to be selected.
v The next three options define what the report is to look like, including which columns are to be
summarized and when (using report breaks).
v The second to last option defines where the report is to go and what values are to be used when it is
sent there.
v The last option defines how numeric calculation results are processed and if substitution
characters are allowed during the conversion of character fields.
28 Query for iSeries Use V5R2
Page 41

Selecting options for a Query for iSeries query definition
To select options that you want to use from those listed in the Query Definition Option column, typea1in
the Opt (option) column beside each of those options, then press the Enter key. The displays for the
options you select are then shown one after the other so you can create those parts of the query
definition.
Following are brief descriptions of each of the definition steps.
Specify file selections
This option is required, and you use it to specify the file or files from which you want your query to
obtain information. If you specify more than one file, you are shown the displays on which you
specify how you want the files joined.
Define result fields
Use this option to define fields that do not exist in your files but you want to use in your query. For
example, your selected file(s) contains a field representing the number of weeks, but it does not
contain a field representing the number of days, and you want your report to show days, not
weeks. You can define a result field that will hold the results of a calculation that uses the number
of weeks to determine the number of days.
Select and sequence fields
Use this option to select the fields (from your selected file(s) and your result fields) that you want
to appear on your report. You also specify in what order you want them to appear.
Select records
Use this option to select records, from your selected file or files, if you only want particular records
to be included in your report.
Select sort fields
Use this option to specify what fields to sort on so that your output records appear in a particular
order (such as alphabetically or in descending or ascending order).
Select collating sequence
Use this option to select a collating sequence for your query. The collating sequence you select
can affect many different things in your query, including record selection and the order of records
when they are sorted. The collating sequence usually relates to your country’s language. You can
also specify a different language for a particular query. You can set your collating sequence
defaults while defining your first query and thereby never have to change the collating sequence
again.
Specify report column formatting
Use this option to change the column headings, column spacing, numeric editing, length, and
decimal positions for fields that appear in your report.
Select report summary functions
Use this option to specify one or more (or all) of the types of summary functions for each field in
your report: total, average, minimum value, maximum value, and count.
Define report breaks
Use this option to specify how to break your report into groups of records.
Select output type and output form
Use this option to specify if you want your output to be displayed, printed, or sent to a database
file. If you want your output printed, you also specify printer attributes. You also use this option to
specify whether you want detailed or summary-only output.
Specify processing options
Use this option to specify if you want the results of your query calculations to be truncated or
rounded, if you want decimal data errors ignored, or if you want to ignore character substitution
warnings during conversion.
Chapter 3. Creating a Query for iSeries query definition 29
Page 42

You can specify one, several, or all of the options shown. To select all of them, press F21.
Moving through the Query for iSeries definition displays
For each option you select, Query shows you the definition displays for that step. (The words shown for
each option on the Define the Query display match the title of the first display shown for that definition
step.) After you specify your definition values on a display, press the Enter key to have them included in
the query definition and to go to the next display in the sequence. Whenever you need to go backward in
the sequence, press F10 (Process/previous) to keep what you have entered on a display and then show
the previous display, or press F12 (Cancel) to ignore what you have entered on a display and then show
the previous display.
After you go forward through all of the options that you need, press the Enter key to return to the Define
the Query display. Then, you can select more options, change your selections, or end the definition of this
query.
When you return to the Query for iSeries Define the Query display
When you return to this display, Query displays a > symbol beside all those definition steps that currently
have definition values that are different from the system-supplied (default) values. This is also true if you
are changing or displaying an existing definition.
Also, if you are creating or changing a definition, a message is shown to remind you to press F3 (Exit) to
save the query changes and/or run the query at this time. When you press F3, the Exit this Query display
is shown so you can specify both choices. (If you want to look at or change more definition steps first, you
can type a 1 next to each option as before, and press the Enter key.)
If there are any definition errors in the options you used, they are highlighted in reverse image when you
return to this display; you should correct the errors before you use the Exit key.
Considerations for creating Query for iSeries queries
The following are reminders, tips, and techniques for creating queries.
Selecting files, records, and fields for Query for iSeries
Query can use files created using IDDU, DDS, or the DB2 UDB for iSeries program. For a description of
file organization, see the IDDU Use book.
When you create a query, if you do not select and sequence the fields to be reported by the query, Query
selects the following:
v For reports, the first 500 of the following:
– Fields chosen as sort fields on the Select Sort Fields display, in the sequence they appear on that
display
– Result fields in the order they are defined on the Define Result Fields display
– Fields that can be used by Query in the record format(s), in the sequence they appear in the record
format(s) (those in the first file selection, followed by those from the second, and so on)
v For database output:
– All data in the record format
– Result fields defined on the Define Result Fields display
For database output, maximum record length is limited to 32 766 bytes (32 740 bytes if variable-length or
null-capable fields are part of the record). In some cases, the maximum record length will be less than
these limits.
30 Query for iSeries Use V5R2
Page 43

Suggested sequence of tasks for creating Query for iSeries queries
The following is a suggested sequence of tasks to create queries:
1. Define result fields before selecting and sequencing fields.
2. Specify comparisons used for selecting records before selecting and sequencing fields.
3. Select and sequence fields and specify sort fields before you reformat columns.
4. Select sort fields before you define report breaks.
5. Press F5 to view your query results and F13 to view your report layout before and after you reformat
columns.
You can use a query to quickly sort records in a data file. Simply select the sort fields, choose database
as the output device, and specify the output database name.
Chapter 3. Creating a Query for iSeries query definition 31
Page 44

32 Query for iSeries Use V5R2
Page 45

Chapter 4. Specifying and selecting files for a Query for iSeries query
This chapter describes how you select and use one or more database files that are to be queried for
information. Specifying file selections (the first option on the Define the Query display) is the first of the 11
steps that you can use to define a query. This step includes specifying (or changing) what files you want to
select for your query, seeing what files are already selected, and specifying the join characteristics when
more than one file is selected. This step also allows you to select, when necessary, file members and
record formats for the files.
Notes:
1. Although this chapter discusses this step primarily for the task of creating a query definition, most of
the information also applies to the tasks of changing or displaying an existing definition.
2. If you are creating a query,a1isalready supplied by the system for the Specify file selection option
on the Define the Query display, and it cannot be removed. This is the only option in the definition
process that you must select when you are creating a query.
3. If you make changes to any of the file selection values in this step, Query attempts to keep whatever
parts of the definition that are still valid. For example, if a field in a file being removed from the
definition also exists in a file being added (as a replacement), the field’s uses in other parts of the
definition (such as part of the sort definition) are kept. (However, it is your responsibility to determine
whether the field in the replacement file contains the kind of information you want.)
The displays related to the file selection process are:
v File selection displays (for one or more files):
– Specify File Selections
– Select Library (optional)
– Select File (optional)
– Select Member (optional)
– Select Record Format (optional)
v File join displays (for multiple files only):
– Specify Type of Join
– Specify How to Join Files
Specifying file selections for a Query for iSeries query
The file selection process includes selecting each file from which your query will get data and also
specifying the library containing the file, the file member, and the record format (or using the values
supplied by Query when the display first appears). If you select multiple files, the process also includes
specifying the file join characteristics.
After you have selected your definition steps on the Define the Query display and you press the Enter key
or F21 (Select all), the first display that you see is the Specify File Selections display.
© Copyright IBM Corp. 2000, 2002 33
Page 46

Specify File Selections
Type choices, press Enter. Press F9 to specify an additional
file selection.
File.......... __________ Name, F4 for list
Library ....... QGPL Name, *LIBL, F4 for list
Member......... *FIRST Name, *FIRST, F4 for list
Format......... *FIRST Name, *FIRST, F4 for list
F3=Exit F4=Prompt F5=Report F9=Add file
F12=Cancel F13=Layout F24=More keys
BOTTOM
The Specify File Selections display is used to specify one or more database files that you want to query
for the data in your report. You can specify as many as 32 files to be queried, and you can assign unique
3-character identifiers to each one. (You can also specify the same file twice, if you need to join it to itself;
if you do, it counts as two files in the query definition. For example, you might specify the same file twice
but use two different record formats.)
If you are creating or changing a query definition, you should complete all the information needed for one
file selection before you start on the next one. Based on the values you enter and the key you press,
Query shows you the displays you need. The order of prompting within each file selection is: file, library,
member, and record format. (If you have not completed all the information in a file selection, several of the
F keys will not work until you supply the needed information.)
The following special values are shown in the prompts for each file selection group when it is first shown:
*FIRST (for members and record formats) and *ID (for file IDs if shown). These and others that you may
specify (like *LIBL for libraries) are changed when you press the Enter key; they are changed to the actual
values that will be used when the query is run. Special values for member names are not changed.
The initial value shown in the Library prompt of the first file selection group is the value that you used in
the file selection step in a previous query definition. For the remainder of the file selections, the initial
value is the same as is used in the first group.
Choosing a file for a Query for iSeries query
To choose a file, move the cursor to the File prompt and type the name of a file.
If you want to choose a file from a list of file names, you can press F4 (with the cursor at the File prompt).
The Select File display is shown, and on this display you can choose one or more files for your query.
Note: If the File prompt is blank before you press F4, you can select multiple files from the Select File
display; if it is not blank, you can select only one file.
Choosing a library for a Query for iSeries query
Because the files you want to select may be in different libraries, you can specify a different library name,
generic library name, or special library name for each file selection.
34 Query for iSeries Use V5R2
Page 47

v If you type a generic library name (in the form of ABC*) or special library name in this prompt and press
the Enter key, that library group is searched for the file named in the File prompt. If the file is found in
one of the libraries, the name of that library replaces the special library or generic name.
v If you type a generic library name (in the form of ABC*) or a special library name and then press F4 with
the cursor in this prompt, the specified list of library names is shown on the Select Library display.
When you select the library you want from the list and press the Enter key, you return to this display
with the selected name filled in. For an explanation of these special library names, see “Special library
names in Query for iSeries” on page 10.
If you specify *CURLIB as the library name for a file selection and you do not have a current library, QGPL
replaces the *CURLIB value.
Choosing a member or record format for a Query for iSeries query
Similarly, for each file selection, if you want to choose from a list of members or record formats, move the
cursor to that prompt and press F4 to see the associated display, and select the member name (or format
name) you want to be used with that file. Then, when you return to the Specify File Selections display, that
name is shown in the prompt. If you did not select a member name, Query supplies *FIRST in the Member
prompt. If you did not select a format name, Query resolves the special default value and supplies the first
format name in the Format prompt.
Selecting multiple files for a Query for iSeries query
If you want to include additional files for your query, press F9 (Add file) each time you want another file
selection. If you have completed the previous file selections for this query, a new group of prompts is
shown for you to fill in; the File prompt is blank, and the other prompts show default values that you can
change. (However, if you have not filled in a file name for one of the file selections, F9 moves the cursor
to the blank File prompt instead of giving you a new file selection.)
Specify File Selections
Type choices, press Enter. Press F9 to specify an additional
file selection.
File.......... EXAMPFILE Name, F4 for list
Library ....... QGPL Name, *LIBL, F4 for list
Member......... *FIRST Name, *FIRST, F4 for list
Format......... *FIRST Name, *FIRST, F4 for list
File ID ........ T01 A-Z99, *ID
File.......... __________ Name, F4 for list
Library ....... QGPL Name, *LIBL, F4 for list
Member......... *FIRST Name, *FIRST, F4 for list
Format......... *FIRST Name, *FIRST, F4 for list
File ID ........ *ID A-Z99, *ID
F3=Exit F4=Prompt F5=Report F9=Add file
F12=Cancel F13=Layout F24=More keys
Bottom
If you are working with multiple files on this display, use the page keys to move forward or backward in the
list of file selections. If you press F18 (Files), you can also see this information in a different form. F18
takes you to the Display File Selections display and shows you the names of all the files, libraries, file
members, record formats, and file IDs for all the files currently defined in this query definition.
If you try to leave the Specify File Selections display before you specify how multiple files are to be joined,
Query assumes that the type of join is a 1 (Matched records) and shows you the Specify How to Join Files
display so you can specify the necessary join test specifications.
Chapter 4. Specifying and selecting files for a Query for iSeries query 35
Page 48

Using file IDs for a Query for iSeries query
File IDs are used when you select more than one file. Although Query assigns a file ID value to each file
selection, you can specify your own identifier.
Note: When you are creating a query, the File ID prompt is not shown for your first file selection.
However, if you select more than one file, you will see that Query has assigned the value T01 as
the file ID of your first file. You will have to go back and change the file ID if you want to assign
your own file ID values.
The file ID allows you to uniquely identify fields that have the same name but are in different files. You can
specify from one to three characters; the first character must be alphabetic, $, #, or @, and the last two
can be alphabetic, numeric, or $, #, or @. Examples of valid identifiers are: A, B, B03, AEX, and $99.
Note: If you are creating queries that are distributed to other systems or are used in a multilingual
environment, use only A-Z and 1-9.
If you do not specify a file ID (that is, you do not change the value *ID in the File ID prompt), Query
resolves the value *ID to the number of the file selection, if not already used, or to the lowest possible
value that is available in the range of Tnn, where nn is a number from 1 to 32.
Although file IDs are assigned to each file on the Specify File Selections display, you do not have to use
them in other parts of the query definition unless you need to use a field that has the same name in more
than one of the files in the query. You must use file IDs every time for identical field names, to ensure that
the correct field is used from the files. For all the other field names, (that is, those that occur in only one
file in the query definition), you do not need to use the file IDs.
If you decide to change a file ID, Query keeps any definition values already assigned for field selection,
sort field selection, and so on. (You must change the ID, if used, for join tests, result field expressions,
record selection values, and break text.) However, if you move a file ID to a different selection group, all
the definition values you specified are lost, even if all of the names in the from and to file selections are
the same.
Confirming your options for a Query for iSeries query
When you are creating a query definition, you see a message that asks you to verify the values you just
defined. This message appears when you press the Enter key after defining file selection values. You
should verify your choices made thus far, then either continue selecting files or end the file selection
process after confirming your choices. To end file selection, press the Enter key again.
When you are changing an existing query definition, you see a different message when you press the
Enter key, and the values that you changed are shown in reverse image. Again, you should verify your
changes and then press the Enter key a second time to actually have them changed in the definition. You
do not have to press the Enter key twice if you make no changes or if you change only member names.
Removing a option for a Query for iSeries query
Whether you are creating or changing a definition, if you decide you do not want to keep one of the files in
the definition, you can remove it by blanking out the File prompt. When you press the Enter key or F5,
F10, or F13, that file selection is removed.
By removing a file selection, you may cause an error elsewhere in your definition. This occurs if the file
you removed was used in a join test or a field from a removed file was used to define a result field.
Handling errors on the Query for iSeries Specify File Selections display
An error message is shown when you press the Enter key, F5, F10, or F13.
v If you did not type a file name
36 Query for iSeries Use V5R2
Page 49

v If you typed a file name and left blank any of the Library, Member,orFormat prompts for the file
v If there is a problem with one of the values you typed
The cursor is positioned to the blank prompt or the prompt in error, and the message describes the error
for that prompt. For example, you may have typed the name of a file that you do not have the authority to
use.
If there is more than one error, you will see the next one after you have corrected the first one.
Selecting files on the Query for iSeries Select File display
The Select File display shows you a list of files from which you can select one or more files that your
query is to get data from, or you can select one to receive the output from your query. This display
appears if you position the cursor on the File prompt of a display and then press F4 (Prompt). (This
display appears only when you are creating or changing a query definition.) The following is an example of
how the Select File display might appear.
Select File
File ID....: T01
Library....... CUSTINV Name, *LIBL, F4 for list
Subset ....... __________ Name, generic*
Position to..... __________ Starting character(s)
Type option (and File), press Enter.
1=Select
Opt File
_ FILE1
_ CUSTMAST_1
_ CUSTMAST_2
_ CUSTMAST_3
_ EXAMPFILE1
_ EXAMPFILE2
_ INVMAST
_ TESTFILE_A
_ TESTFILE_B
F4=Prompt F11=Display text F12=Cancel F24=More keys
Bottom
At the top of the display, a field named File ID may or may not appear. The File ID field is shown only if
you came from the Specify File Selections display and pressed F4 (Prompt) in a nonblank File prompt. If
the file ID is shown, it is the file ID of the file selection group that the cursor was positioned to on the
previous display.
If the File prompt was blank and you pressed F4 on the Specify File Selections display, the File ID field is
not shown on this display, and you can then select multiple files here. If the File prompt had a name or a
generic name to get a subsetted list and you pressed F4 on the Specify File Selections display, the File ID
field is shown as Tnn on this display, and you can select only one file.
If you came from the Define Database File Output display or Specify Dependent Value Qualifiers display,
you can select only one file on this display.
The list on this display includes all files (for which you have the needed authority) that are in the library
shown at the top of the display. If you came from the Specify File Selections display, that library is the one
indicated in the Library prompt below the File prompt in which the cursor was positioned when you
pressed F4 for this list. If you specified a generic file name (in the form of ABC*) as a file name on the
Chapter 4. Specifying and selecting files for a Query for iSeries query 37
Page 50

Specify File Selections display, it is used as a subset value on this display, and only file names starting
with those generic characters are included in the list. (You can specify another subset value on this display
to change the subset shown.)
You can use the Library prompt to see the files that exist in a different library or group of libraries.
If you want to select a particular library from a list of libraries, press F4 with the cursor positioned in the
Library prompt. The list that is shown contains only the libraries that you have the authority to use.
v If you press F4 when the prompt contains a library name, *LIBL, or blanks, you see the libraries that are
in the *LIBL library list.
v If you press F4 when the prompt contains a generic library name or any of the other special library
names, you see the group of libraries represented by that value.
If you do not want or need to see a list of libraries, type the name of a library, a generic library name (in
the form of ABC*), or one of the following special library names: *CURLIB, *LIBL, *USRLIBL, *ALLUSR,or
*ALL.
Note: If you type *CURLIB and you do not have a current library, QGPL is used.
After you have entered a value in the Library prompt at the top of the display, press the Enter key and a
list of the files that you are authorized to use from that library appears.
If you typed in a generic library name or special library name, a Library column appears on the display so
that you are able to determine in which library a particular file resides.
Select File
Library....... CUST* Name, *LIBL, F4 for list
Subset ....... __________ Name, generic*
Position to..... __________ Starting character(s)
Type option (and File and Library), press Enter.
1=Select
Opt File Library Opt File Library
_ __________ __________
_ CUSTMAST_1 CUSTINV _ CUSTRELFEB CUSTREL
_ CUSTMAST_2 CUSTINV _ CUSTRELJAN CUSTREL
_ CUSTMAST_3 CUSTINV _ CUSTRELMAR CUSTREL
_ EXAMPFILE1 CUSTINV
_ EXAMPFILE2 CUSTINV
_ INVMAST CUSTINV
_ TESTFILE_A CUSTINV
_ TESTFILE_B CUSTINV
F4=Prompt F11=Display text F12=Cancel F24=More keys
Bottom
If a Library column is present, you can specify a library name, generic library name, or special library
name in the Library prompt in conjunction with a typed-in option number and file name to complete a file
selection. If you typed a generic name or special library name in the Library prompt, it will be resolved to
the name of the first library (in the specified group of libraries) that contains a file with that name.
To see a smaller group of file names, move the cursor to the Subset prompt and type the starting
characters followed by an asterisk (*) to identify the group you want to see, and press the Enter key. All
the files whose names begin with those characters in the specified library or library group are shown. (If no
* is used, only the file(s) with the specified name is shown.)
38 Query for iSeries Use V5R2
Page 51

To return to the complete list of file names, blank out this prompt (or put an * in it) and press the Enter
key.
To move (position) the list of file names so that it starts with a particular name, move the cursor to the
Position to prompt and type all of the characters or one or more of the starting characters in the name you
want, and press the Enter key. (Do not add an * after the starting characters in this prompt.) If a specific
library name is used in the Library prompt, Query moves the list so that the first position shown contains
the first file name that starts with the characters you typed.
If there is no file name in the list that starts with those characters, Query moves the list to the name
closest to, and in front of, the position where the name would have appeared. If a special library name or
generic library name is used in the Library prompt, the list is repositioned only if the Position to prompt
value exactly matches a complete file name.
Use F11 to alternate between showing a list of only file names to showing a list of both file names and text
describing the files.
Once you have located the files you want, type a 1 beside each file name (if more than one is allowed),
including the file name in the top position in the list. If you are selecting multiple files, you can select as
many 32 files, including those previously selected for this query. Note that if join logical files are used, you
are only able to select less than 32 files because each file used in the join logical file is counted as one of
the 32 files. For example, if three physical files were joined into one join logical file, this join logical file is
counted as three files, not one.
After you have made your file selections, press the Enter key to return to the Specify File Selections
display. All the files you selected are added to the file selections, if any, that were there previously. (Any
blanked out file selections are filled in first and new ones are added at the end as needed.) The files are
added, each with its own group of file selection prompts, in the same order as they existed on the Select
File display. They are also assigned file IDs to match the number of the file selection or, if that number is
taken, to the lowest possible value that is available in the range of T01 through T32, which you can
change if you wish.
Selecting file members on the Query for iSeries Select Member display
The Select Member display appears when you position the cursor on the Member prompt of a display and
press F4 (Prompt). The Select Member display shows you a list of members and allows you to select the
one from which your query can obtain data or the one to which the output from your query is received.
This display appears only when you are creating or changing a query definition.
Chapter 4. Specifying and selecting files for a Query for iSeries query 39
Page 52

Select Member
File ID .....: T01
File.......: EXAMPFILE1
Library ....: CUSTINV
Type option (and Member), press Enter.
1=Select
Opt Member
_ __________
_ EXAMPMBR1
_ EXAMPMBR2
_ EXAMPMBR3
Bottom
F11=Display text F12=Cancel
If you came from the Specify File Selections display or Specify Dependent Value Qualifiers display, you
can specify which member you want your query to get data from. If you came from the Define Database
File Output display, you can specify which member you want the query data to be put into.
At the top of the display, the File ID field is shown if you came here from the Specify File Selections
display. The file ID is the file identifier of the file that is shown in the File field. This file is the one for which
you want to choose a member. The Library field shows the library in which the file is stored.
The names of the member that currently exist in the file shown at the top of the display are shown in the
Member column. You can choose a member by either typinga1intheOpt column to the left of the
member or by typing a member name (anda1intheOpt column next to it) in the first position in the list.
If you specify a member name in the top position, that member must also exist at this time. If you specify
*FIRST or *LAST, the member name on the previous display is changed to that value. Then, either the first
or the last member that exists in the file at the time the query is run is the member that is used. If you
came from the Define Database File Output display, you can also specify *FILE in the first position in the
list.
You can use F11 to alternate between showing a list of only member names to showing a list of both
member names and text describing the members.
When you press the Enter key on the Select Member display, the member that you specify is then shown
in the Member prompt on the display that you return to. If you return to the previous display without
selecting or specifying a name, the previous member name or value is not changed.
Selecting record formats on the Query for iSeries Select Record Format display
The Select Record Format display appears when you position the cursor on the Format prompt of the
Specify File Selections display and press F4 (Prompt). The Select Record Format display shows you a list
of record formats from which you can select the one you want your query to use with a selected file
member. This display appears only when you are creating or changing a definition.
40 Query for iSeries Use V5R2
Page 53

Select Record Format
File ID .....: T01
File.......: EXAMPFILE1
Library ....: CUSTINV
Type option (and Format), press Enter.
1=Select
Opt Format
_ __________
_ EXAMPFMT1
_ EXAMPFMT2
_ EXAMPFMT3
Bottom
F11=Display text F12=Cancel F23=Long comment
At the top of the display, the File ID field shows the file ID of the file that appears in the File field. This file
is the one for which you want to choose a record format. The Library field shows the library in which the
file is stored.
The names of the record formats that you can select for the file shown at the top of the display are shown
in the Format column. You can choose a record format by either typinga1intheOpt column to the left of
the record format or by typing a record format name (anda1intheOpt column next to it) in the first
position in the list.
If you specify a record format name in the top position, that record format must also exist at this time. If
you specify *FIRST, the format name on the previous display is changed to the actual name of the first
record format in the file. It is possible that some record formats cannot be used with certain file members,
but this is not determined until the Specify File Selections display is processed.
You can use F11 to alternate between showing a list of only record format names to showing a list of both
record format names and text describing the record formats.
When you press the Enter key, you return to the Specify File Selections display, and the name of the
format that you selected is shown in the Format prompt that you came from. If you return to the previous
display without selecting or specifying a name, the previous record format name or value is not changed.
Displaying all files selected on the Query for iSeries Display File Selections display
The Display File Selections display appears when you press F18 (Files) from a display where F18 is listed
on the bottom of the display. The Display File Selections display shows all the files that you selected for
use in the query. For each file, this display shows you the file ID, the library containing the file, and the file
member and record format that are to be used. The information on this display is for your information only;
it cannot be changed here.
Chapter 4. Specifying and selecting files for a Query for iSeries query 41
Page 54

Display File Selections
ID File Library Member Format
T01 EXAMPFILE1 CUSTINV *FIRST EXAMPFILE1
T02 EXAMPFILE2 CUSTINV *FIRST EXAMPFILE2
Press Enter to display the join tests.
F12=Cancel
Bottom
If multiple file selections are shown, you can press the Enter key to show the join type and all the join
tests for these same files. However, if you came to this display from the Specify File Selections, Change
File Selections, Specify Type of Join, or Specify How to Join Files display, the Enter key returns you to the
previous display. F12 and the Enter key (not F18) can be used to alternate between the Display Join Tests
display and this display.
Joining files in a Query for iSeries query
Once you have used the Specify File Selections display to select all the files that you want used for your
query, if more than one file was selected, you must tell Query how you want to join the files when they are
used to get data from their fields. You use the following two displays to specify all the join specifications for
your query:
v The Specify Type of Join Files display allows you to specify the type of join you want to use. There are
three ways that you can join the files for selecting the records you want.
v The Specify How to Join Files display allows you to indicate the fields to be used to join the files. You
specify which fields are to be used and how they are to be compared with fields in the other files.
For a record to be selected, the join specifications for all the files are used to determine whether a
matching record exists in each of the files joined in the query. A match occurs when, for each specified file,
the contents of its fields selected for comparison match the test condition(s) given on the Specify How to
Join Files display. Depending on whether there is a match and which type of join is specified on this
display, the records are then selected and used in the output as determined by the other join specifications
given on the Specify How to Join Files display and the record selection specifications given on the Select
Records display.
When Query determines that a record is to be selected from the specified files, it uses the data in all the
fields and files selected for the query to produce a single output record. This output record is included in
the query report or in an output database file.
42 Query for iSeries Use V5R2
Page 55

Types of joins in a Query for iSeries query
Specify Type of Join
Type choice, press Enter.
Type of join........ 1 1=Matched records
F3=Exit F5=Report F10=Process/previous
F12=Cancel F13=Layout F18=Files
2=Matched records with primary file
3=Unmatched records with primary file
There are three types of joins, or three ways that you can select matched or unmatched records from the
specified files. You can:
v Select only records that have matching records in all the specified files.
v Select all primary records, and include all matching secondary records. Primary records exist in the
primary file. The primary file is the first file selected on the Specify File Selections display. Secondary
records exist in secondary files. Secondary files are all of the files selected after the primary file on the
Specify File Selections display. After the join is done, the record selection tests, if any, are applied to
determine which records are selected.
v Select only the primary records that have one or more unmatched secondary records, and include all
the secondary records that also match.
All three types of joins use the same join fields and join tests specified on the Specify How to Join Files
display. They also all use the other specifications in the query definition the same way to select records
and produce the output.
Use the second join type (type 2) if you want to use every record in the primary file, whether or not it has
a matching record in the secondary file(s).
Use the third join type (type 3) if you want to see which records in the primary file do not have matching
records in the secondary file(s).
How to join files in a Query for iSeries query
Use the Specify How to Join Files display to specify the join tests needed when more than one file has
been selected for your query. Use this display to tell Query how to join (combine) the files and record
formats by specifying pairs of fields with a test value; each test value indicates how those fields must
compare before Query can select the record. The result of every test in the join specifications must be true
before the matching records in each of the files are joined as one record for the record selection tests that
follow.
When comparing character values, all values must be marked with compatible CCSIDs. When comparing
SBCS character values, all values and any collating sequence to be applied must be marked with
compatible CCSIDs.
Chapter 4. Specifying and selecting files for a Query for iSeries query 43
Page 56

Note: See “CCSID and join tests in Query for iSeries” on page 252 for information on how CCSIDs can
affect your join selections.
Specify How to Join Files
Type comparisons to show how file selections related, press Enter.
Tests: EQ, NE, LE, GE, LT, GT
Field Test Field
______________ _____ ______________
______________ _____ ______________
______________ _____ ______________
______________ _____ ______________
______________ _____ ______________
________________________________________________________________________
Field Field
A.NBR B.NAME
A.NAME B.PHONE
A.ADDR B.SERIAL#
A.ZIP
B.NBR
F3=Exit F5=Report F10=Process/previous F11=Display text
F12=Cancel F13=Layout F18=Files F24=More keys
Bottom
Bottom
For each test, you specify two fields to be tested and the test value to be used. Look for a field in one file
that contains the same (or similar) information that can be found in a field of the other file, such as a name
or identification number. Specify the names of the fields (including their file identifiers, if needed) on either
side of the test value.
For example, if you specify the EQ (equal) test value between two fields, the test result is true if both fields
contain the same value. (The EQ value is almost always used.)
Field Test Field
A.NAME EQ B.NAME
In this example, both fields are named NAME, so the file identifiers (A and B) are included with the field
names.
Rules for joining files in a Query for iSeries query
Note: To indicate that you do not want to specify join tests, use the *ALL join. All records from one file are
joined to all records in the secondary file or files without any kind of selection.
The rules for join tests are:
v For two files to be selectively joined, they must have at least one field in common. (Note that having a
field in common does not mean that the field names are the same.) This is also true for logical
database files, even though they may be based on fields with different names in the physical file over
which the logical file is created.
v If you select option 2 (Matched records with primary file) or option 3 (Unmatched records with primary
file) on the Specify Type of Join display, the combined length of fields used in the join test must be less
than or equal to 2000 bytes. For DBCS fields, each DBCS character counts as two bytes. If fields
contain bracketed-DBCS data, the shift characters are counted in the length.
v You can only use the EQ test value to join any of your selected files to a join logical file.
v Fields in each join test must come from different files.
v You can use more than one test for a given pair of files. If you specify option 2 or 3 (both using a
primary file) in the Type of join prompt on the Specify Type of Join display, the test values must be the
same for all the tests used in that pair of files.
44 Query for iSeries Use V5R2
Page 57

v A field name must be preceded by a 1- to 3-character file identifier if that field name is used in more
than one file selected for the query.
v You can specify up to 100 join tests.
v For a matched-record join, if one or both fields in a join test are null, the records are not joined.
v The data in both fields of a join test must be the same type (for example, both character), except that
date, time, or timestamp fields can be compared to SBCS character, DBCS-either, or DBCS-open fields
that contain a correct representation of a date, time, or timestamp. Dates in character fields must be
either in the date format of the query or in an SAA
®
format— the SAA format is recommended. Date,
time, and timestamp fields are identified by an L, T, or Z, respectively, in the Dec column of the field list.
Note: When comparing a date, time, or timestamp field with an SBCS, DBCS-either, or DBCS-open
character field, use a character field for which each value can be recognized as an SAA
formatted date, time, or timestamp. If the character field contains a correct representation of a
date, time, or timestamp but in other than an SAA format, you may get unexpected results. When
you run a query that uses a non-SAA format for date, time, or timestamp values in character
fields, and query has no setting for a non-SAA literal date value, use the CHGJOB command to
make sure your job date format and separator match the format and separator in the character
field values.
If some of the fields contain bracketed double-byte characters, you can use these DBCS fields for both
fields, or you can use an SBCS character field for one field and a DBCS-either or DBCS-open field for
the other field. Bracketed-DBCS fields are identified by a J, O, or E in the Dec column in the list of
fields. Press F11 to see the Dec column if it is not currently shown.
A DBCS-graphic field can be compared only to another DBCS-graphic field. DBCS-graphic fields are
identified byaGintheDec column. Collating sequence is not applied to DBCS-graphic fields used in
join comparisons.
Valid comparisons for join tests are:
– Numeric field with numeric field
– SBCS character field with:
- SBCS character
- Date
- Time
- Timestamp
- DBCS-either
- DBCS-open
– Date field with:
- Date
- SBCS character
- DBCS-either
- DBCS-open
– Time field with:
- Time
- SBCS character
- DBCS-either
- DBCS-open
– Timestamp field with:
- Timestamp
- SBCS character
Chapter 4. Specifying and selecting files for a Query for iSeries query 45
Page 58

- DBCS-either
- DBCS-open
– DBCS-either field with:
- SBCS character
- Date
- Time
- Timestamp
- DBCS-either
- DBCS-open
- DBCS-only
– DBCS-open field with:
- SBCS Character
- Date
- Time
- Timestamp
- DBCS-either
- DBCS-open
- DBCS-only
– DBCS-only field with:
- DBCS-either
- DBCS-open
- DBCS-only
– DBCS-graphic field with:
- DBCS-graphic
– UCS2-graphic field with:
- UCS2-graphic
v Only the data fields specified in the join specifications for each file are used to join the files. For the
purposes of joining the files, the other fields in the files are ignored.
v Character fields of different lengths can be joined.
v A fixed-length character field can be compared to a variable-length character field. Variable-length fields
are identified byaVintheDec column in the list of fields.
v If you specified option 1, matched records, on the Specify Type of Join display, you can type *ALL in the
first four spaces of the left field, but only in the first field name position, rather than specifying any join
test. If *ALL is used, each record in the first file is joined to every record in the other files. For example,
if a file of 2000 records is joined to a file of 3000 records using *ALL, the result is a joined file of
6000000 records. Using *ALL can significantly degrade the performance of your query. If join tests are
not specified between each file, those files without a test are joined using the *ALL method.
Note: The fields you use to join the files do not have to be used in selecting the records or included in
the query report. You can use those same fields in other ways in the query definition, such as for
record selection or as part of the output of the query.
Examples of joining files in a Query for iSeries query
Consider an example where you want to join a master name and address file named RESIDENTS to a name
and telephone number file name PHONELIST.
46 Query for iSeries Use V5R2
Page 59

You can obtain several different results from a file join when you use different combinations of join tests
and options on the Specify How to Join Files display.
Following are some examples of how you might use the three different types of joins. All of the examples
assume that A.NAME EQ B.NAME was specified on the Specify How to Join Files display.
Example: Selecting matched records from all selected files in a Query for iSeries query
Typea1ifyouwant records selected from each file only if they have a match with at least one record in
each and every one of the other selected files. That is, for a record to be selected, all the files must have
a matching record as determined by the join specification(s). A match occurs when, for each file used in
the query, the contents of its fields selected for comparison match the test condition(s) given on the
Specify How to Join Files display. (This type, option 1, has no primary or secondary files; all files are
treated equally.)
In this example, if you join files A and B using option 1 (Matched records), the query report contains the
following records. (The report fields and layout are not important here.)
Chapter 4. Specifying and selecting files for a Query for iSeries query 47
Page 60

Example: Selecting matched records using a primary file in a Query for iSeries query
Typea2ifyouwant to include in the query output every record in the primary file and all the matching
records from all the other (secondary) files, whenever they exist. Every record in the primary file is
selected whether or not it has a match. (The primary file is always the one that was selected first in your
query definition.) Exception: if a field from the primary file used in a join test is null, the primary record is
not selected.
In this example, the RESIDENTS file is the primary file, so all of its records (numbered 1 through 6) are
included in the query report, assuming all of the records meet the selection tests on the Select Records
display. The PHONELIST file is the only secondary file being used, and it supplies a telephone number for
each primary record that it matches; the NAME field is used as the comparison test field in both files. Note
also that record 4 is included twice in the report, because Richard A Klein has two records, each with a
different telephone number, in the secondary file.
If a secondary file does not have a record that matches the join specifications of the primary file’s record,
blanks (for character fields), zeros (for numeric fields), or January 1, 0001 (for date fields) are used as
data for that secondary file’s selected fields. If these fields are included as output fields in the query report,
the substituted characters or values are used in the report. In the example, the PHONE field shows blanks
because it was coded as a character field. In the case where the fields are null-capable, the specified
default values are used as data for that secondary file’s selected fields. If a default value is not specified, a
null value is shown as a dash (-).
Note: If the secondary file was defined using DDS, values other than blanks zeros, and January 1, 0001
can be used when the DFT keyword defines default values for any of the fields. If the DFT keyword
specifies a default value for a field that is used in the query report, the default value is substituted
in the report when the secondary file does not have a matching record.
Example: Selecting unmatched primary file records in a Query for iSeries query
Typea3ifyouwant to select, in the primary file, only records that lack matches in at least one secondary
file. That is, you want to select every primary record that does not have a matching record in all the
secondary files. For example, if four files were joined and only two of the three secondary files had
matching records, then a record containing the selected information in the primary and two matching
secondary files (and the default data, if any, from the unmatched secondary file) is included as a single
record in the query output.
This type of join is typically used to list records that are missing in one or more secondary files.
48 Query for iSeries Use V5R2
Page 61

In our example, the RESIDENTS file is still the primary file, so only its records that do not have a matching
secondary record are included in the query report. The PHONELIST file has two such unmatched records;
the residents identified in records 2 and 6 do not have a telephone number, so there are no records for
them in the secondary file. (The NAME field is used again as the comparison test field in both files.)
As with the previous type of join, blanks (for character fields) or zeros (for numeric fields) are used as the
data for a missing record in a secondary file’s selected fields. Or, if the DDS DFT keyword was used to
define default values, those default values are used instead. (In our example, the PHONE field shows
blanks, since it was coded as a character field and no DFT value was defined for the PHONE field.)
Sequencing secondary files for a primary join in a Query for iSeries query
The order in which you specify secondary files on the Specify File Selections display is important for some
joins.
Specifically, the order of secondary files is important if all of the following are true:
v The join type is 2 (primary matched) or 3 (primary unmatched). Both types have one primary file,
followed by secondary files.
v The query specifies three or more files in all.
v One or more secondary files do not have join tests connecting them to the primary file.
If these points apply to your query, then follow the secondary file sequence rule:
Use join tests to connect each secondary file to a file listed above it on the Specify File Selections display.
For instance, when joining four files, use a join test to connect the second file to the first, and use another
test to join the third file to the first or second file. The fourth file can be connected to any of the other files.
Example: Sequencing secondary files in a Query for iSeries query
To show how the secondary file sequence rule ensures that you get the desired results when you join
more than two files, the following example uses three files in two ways, correctly and incorrectly. The first
method, the correct method, produces five records when the files are joined. The incorrect method
produces 15 records. The only difference between the methods is that the order of the second and third
files is changed. For primary joins, Query joins files in the order indicated on the Specify File Selections
display, not in the order indicated by the join tests.
Three files named CUSTOMER, PURCHASE, and ITEM are to be joined so that a report can be produced that
lists each customer’s name and city, the item purchased (one item per line in the report), and a description
of the item. (For example, if Monique Pottier bought three items, the report should have three lines for her,
with each line listing her name, city, one item, and the item description.) If the customer did not make any
purchases, the report should include the customer once in the list with blank item and description fields.
Chapter 4. Specifying and selecting files for a Query for iSeries query 49
Page 62

Correct method:
On the Specify File Selections display, type the CUSTOMER file first, the PURCHASE file second, and the ITEM
file third. Specify the file IDs A, B, and C, respectively. The join type is 2 (Matched records with primary
file). The join tests are:
A.NAME EQ B.NAME
B.ITEM EQ C.ITEM
Query performs the file join in two steps:
Step 1: Join the first two files, A and B.
Query joins the files in the order listed, starting with file A (CUSTOMER), and file B (PURCHASE). Query joins
each record in file A to any record in file B for which the NAME field in A is equal to the NAME field in B.
Because this query is join type 2 (primary matched), every record in the primary file A is included in the
join. If a record in file A (such as Martinez) has no match in B, Query joins it to a default record for file B,
which has blank values for fields. The result of step 1 in our example is a file called AB. (Note that AB is a
working file used to build the joined file that you want in your report. You cannot see file AB.)
Step 2: Join file AB to file C.
Query joins each record in file AB to every record in ITEM file C for which B.ITEM equals C.ITEM. If a record
in AB (such as Martinez) has no match in file C, Query joins it to a default record for file C, which is also
blank. This completes the join operation. Each record in primary file A is represented one or more times in
the five records.
50 Query for iSeries Use V5R2
Page 63

Incorrect method:
On the Specify File Selections display, type the CUSTOMER file first, and specify the file ID as A. Type the
ITEM file second (file C), and the PURCHASE file third (file B), which is in the opposite order from the correct
method. Note that each file has the same file ID as before. Specify the join type and join tests the same
as before. This method does not follow the secondary file sequence rule because file C is not connected
by a join test to the file (A) listed above it.
Chapter 4. Specifying and selecting files for a Query for iSeries query 51
Page 64

Query performs the file join in two steps:
Step 1: Join the first two files, A and C.
Query joins the files in the order listed, starting with file A (CUSTOMER), and file C (ITEM). But there is no join
test that compares a field in A to a field in C. Query joins every record in file A (one record at a time) to
52 Query for iSeries Use V5R2
Page 65

every record in file C. Because there are three records in A and five records in C, the result is 15 records.
The join tests are not used in this step. The result of step 1 this time is a working file called AC.
Step 2: Join file AC to file B.
Query joins each record in file AC to every record in PURCHASE file B for which A.NAME equals B.NAME and
B.ITEM equals C.ITEM. If a record in AC (such as Martinez) has no match in B, Query joins it to a default
record for file B, which is blank. This completes the join operation.
The incorrect method produces 15 records, which is 10 too many. Each customer has five records, one for
each item description, even if the customer made no purchases. Note that if the ITEM file has 1000 records
instead of five, the correct method still selects five records, but the incorrect method selects 3000 records.
Also, the ITEM and DESCRIPT values for Martinez are not blank as they should be.
In summary, this problem does not affect queries with join type 1 (matched), queries with just two files, or
queries that use the primary file in each join test. In this example, the logical order to specify files is
CUSTOMER, PURCHASE, and ITEM, with PURCHASE in the middle because it is the connection between the
CUSTOMER and ITEM files. This logical order is also the correct order.
Displaying all join tests in a Query for iSeries query
When you press the Enter key on the Display File Selections display (see “Displaying all files selected on
the Query for iSeries Display File Selections display” on page 41), the Display Join Tests display is shown.
The information on this display is for your information only; none of the entries can be changed here. (The
following display shows some sample information.)
Display Join Tests
Type of join......: Matched Records
Field Test Field
A.NAME EQ B.NAME
Press Enter to continue.
F12=Cancel
Bottom
The Display Join Tests display shows:
v The type of join being used to join all the files in the query. One of three join types can be specified:
– Matched records
– Matched records with primary file
– Unmatched records with primary file
The primary file, used in the last two types, is the first file listed on the Display File Selections display.
For more information, press F11 (Search index), type joining files as the index search words, then press
the Enter key.
v The join tests being used to join the files.
Chapter 4. Specifying and selecting files for a Query for iSeries query 53
Page 66

The Field columns show the fields being used to join the files. Each field name can have two parts: the
file ID and the actual name of the field, separated by a period. For example, if a field named CUSTNUM
exists in files T01 and T02 used in this query, they would be shown as T01.CUSTNUM and T02.CUSTNUM.To
find the files associated with the file IDs (such as T01), press F12 to show the Display File Selections
display.
The Test column shows the test values that determine how the files are to be joined.
Handling missing fields in a Query for iSeries query
The Fields Missing from File Definition display is shown when report fields (that is, fields used in the
report) that were in a file selection used by the query are now missing from that file selection. Fields that
are missing from files originally selected in a query can cause errors or give you bad results when the
query is run. They may have been used, for example, to define result fields or to select or sort records in
addition to being selected for output.
Fields Missing from File Definition
Query .....: QRY1 Option.....: Change
Library....: LIB1
File......: FILEA
Library....: LIBA
Format.....: FMT1
File ID ....: T01
The following fields may have been used in the query, and were expected
in this file definition, but were not found.
Field
NAME
ADDR
PHONE
SERIAL#
Press Enter to continue recovery of query definitions.
F12=Cancel
This display is shown at least once for each file selection that has missing fields. Once you are aware that
fields are missing, you may want to press F12 (Cancel) to bypass seeing any additional displays of
missing fields. Or, if you want to see which of the other file selections may have missing fields, use the
Enter key to see each display, one after the other. You might also want to return to a previous display and
use F5 (Report) to run the query and see how the report is affected by the missing fields.
Either you must remove the fields from wherever they are used in the query definition, or you must select
different files or formats that contain those fields. Or, you can leave Query and check the files or formats
themselves. If this display appeared when you first started to change or display a query, something may
have changed in the files or formats since the query was created or last changed. For example, a record
format definition may have had one or more of its fields deleted, or an IDDU-defined file may have been
linked to a dictionary definition but is now unlinked or is linked to a different definition.
The situations that can cause this display to appear are:
v When you specify a different file selection. This can occur while you are changing a query or are
defining a new query that already has file selections specified.
v When you start to change or display an existing query definition.
54 Query for iSeries Use V5R2
Page 67

Handling missing fields during file selection process of a Query for iSeries query
While you were changing a query, or were defining a new query that already had file selections specified,
you chose the Specify file selections option on the Define the Query display. Then, on the Specify File
Selections display, you selected a file or format that does not have all of the report fields that your first
selection contained. As a result, this display was shown with the missing fields.
For this situation, when you press F12 or the Enter key, you return to the Specify File Selections display
without affecting your previous file (and format) selections. Once there: you can still confirm the file
selections and continue by pressing the Enter key (even though Query found fields missing in the current
file selections); you can specify a different file on the display and then press Enter; or you can press F12
to leave the file selections unchanged and then leave Query to go do something about the file (or format)
definitions.
If you choose to press the Enter key as soon as you return to the Specify File Selections display,
confirming that you want to use the current file selections, Query uses as much of the file, format, and field
information as it can for the file selections now in this query. It removes all the missing fields from the
query definition for some of the definition steps, such as Select and sequence fields and Select sort fields.
When you select a logical file for use with Query or DB2 UDB for iSeries programs without specifying any
sort fields, unpredictable results may occur. For example, you may not receive the logical view of the
physical file.
After Query has done all it can, it shows the Specify How to Join Files display if the query uses multiple
files and there are errors caused by missing fields; otherwise, it continues with the definition steps selected
on the Define the Query display, or it returns you to the Define the Query display. On the Define the Query
display, any other field-related definition steps affected by the missing fields are shown in reverse image.
You must select each of these definition steps, such as Define result fields and Select records, and correct
the problems caused by the missing fields. On the definition displays for the affected steps, the
expressions or selection tests that use fields that are now missing are highlighted.
Handling missing fields when starting to change or display a Query for iSeries query
When you started to change or display an existing query (by specifying option 2 or 5 on the Work with
Queries display), one of the following occurred:
v Query determined that one or more report fields are no longer in a file or format used by the query; the
fields have been removed since the query was defined or was last changed.
v Query found a file that was unusable (for example, the query may have been migrated from another
system but a file containing the fields was not) and showed the Change File Selections display. On that
display, you selected a different file to correct that problem, but its record format does not have all of
the fields that your first selection contained.
For these two situations, when the Fields Missing from File Definition display is shown, you can either
press F12 or press the Enter key:
v If you choose to press the Enter key, you might see the Fields Missing from File Definition display again
if there are additional missing fields to be displayed for this or another file. If not, Query uses as much
of the file, format, and field information as it can for the file selections now in this query. It removes all
the missing fields from the query definition for some of the definition steps, such as the Select and
sequence fields and Select sort fields steps. When you select a logical file for use with Query or DB2
UDB for iSeries programs without specifying any sort fields, unpredictable results may occur. For
example, you may not receive the logical view of the physical file.
After Query has done all it can, it shows the Define the Query display. On it, other field-related definition
steps affected by the missing fields are shown in reverse image. You must select each of these
definition steps, such as Specify file selections, Define result fields, and Select records, and correct the
Chapter 4. Specifying and selecting files for a Query for iSeries query 55
Page 68

problems caused by the missing fields. You must also ensure that none of the fields were used in break
test values on the Format Report Break display. On the definition displays for the affected steps, the
expressions or selection tests that use fields that are now missing are highlighted.
v If you press F12 (Cancel), you return to the Work with Queries display without affecting your previous
file (and field) selections. You can press the Enter key to go again (assuming you were there once) to
the Change File Selections display and select another file. Or, you can press F3 (Exit) to stop working
with queries, leave Query, and then work with the files or formats.
56 Query for iSeries Use V5R2
Page 69

Chapter 5. Defining result fields in Query for iSeries
This chapter describes how you define result fields. They need to be defined in your query if the
information that you want to present in your report does not exist as a field in your selected file(s). For
example, you want your report to show the number of days, but your database file only has a field
containing the number of weeks. You can define a result field that contains the number of days by creating
an expression that performs a calculation on the number of weeks.
After you have defined a result field, you can use it like any other field that exists in your selected file(s).
You can include the result field in your output, you can use it to define another result field, you can use it
as a sort field, and so on.
While you are defining result fields, a list in the lower part of the display assists you by showing the names
of fields in the files selected for your query. If you want to see additional information about each field such
as descriptive text, length, and decimal positions, use F11 (Display text) to switch between the
multiple-column list and the single-column list. This information is very useful when you are deciding on a
result field name and when you are building your expressions. The page keys will present all the fields
available, four at a time. For more information on using F11, see “Using F11 to display additional
information about Query for iSeries queries” on page 15.
In most cases, the result fields that you define appear in your query output, but selecting them for output is
optional since some result fields are only needed as an intermediate step to obtain a final result. For
example, you might define a result field only for the purpose of selecting records, and you do not want the
result field to appear on the report.
Creating results fields in Query for iSeries
The Define Result Fields display appears if you typed a 1 next to the Define result fields option on the
Define the Query display. You use the Define Result Fields display to create the result fields that you need
for your query. (The following display has some sample fields listed in the bottom part.)
Define Result Fields
Type definitions using field names or constants and operators, press Enter.
Operators: +, -, *, /, SUBSTR, ||, DATE...
Field Expression Column Heading Len Dec
__________ _________________________________ ____________________ _____ __
__________ _________________________________ ____________________ _____ __
_________________________________________________________________________
Field Field Field Field
ACCTNUMBER STREETADDR TELENUMBER DATELASTPD
LASTNAME CITY CRLIMIT
INIT STATE BALDUE
COMPANY ZIPCODE PASTDUE
F3=Exit F5=Report F9=Insert F11=Display text
F12=Cancel F13=Layout F20=Reorganize F24=More keys
_________________________________ ____________________
_________________________________ ____________________
_________________________________ ____________________
_________________________________ ____________________
Bottom
Bottom
To define a result field, you specify a unique name for the result field by entering a name in the Field
column on the Define Result Fields display. You cannot specify the name of a field that exists in your
selected file(s)—the list in the lower part of the display shows you these field names. To page through the
field list, position the cursor in the list part of the display and use the page keys. (A one-word indicator
© Copyright IBM Corp. 2000, 2002 57
Page 70

always appears below and to the right of the list to tell you where you are in the list. More... means that
there are more items after, and possibly before, the items currently shown. Bottom means that you are at
the end of the list, but there may be more items before those currently shown.) Use F19 (Next group) to
reposition the list at the beginning of the next logical group of fields (the cursor can be anywhere when
you use F19). (The first group is selected fields, if any, and the second group is sort fields, if any. If there
are not selected fields, then the fields are grouped by file, and within each file grouping, the fields are
listed in the order in which they appear in the file definition.)
You can specify the length and number of decimal positions for a numeric result field by filling in the Len
and Dec prompts on this display, or you can have Query determine the length and decimal positions for
you by leaving the prompts blank.
You can specify a column heading for any result field. If you leave the prompt blank, the result field name
is used as the column heading for the result-field definition.
Query for iSeries result field name
Since Query result field names are similar to database field names, create them according to the following:
v Start the name with an alphabetic character (A through Z, $, #, or @) and use no more than 9
alphanumeric characters (A through Z, 0 through 9, $, #, @, or _) for the remaining characters. Do not
use blanks within the name.
Note: Use A-Z or 1-9 if this query is sent to other systems or used in a multilingual environment.
v Do not use any names from the list on the lower part of the display or the names of other result fields.
Enter an expression that creates the desired value for your result field.
Query for iSeries expressions
In Query for iSeries, an expression is a representation of a value with field names, constants, functions,
or keywords appearing alone or in combination with operators. It can be either a numeric, character
(SBCS or DBCS), date, time or timestamp expression:
v A numeric expression assigns numbers or performs an operation (calculation) on them. Numeric
expressions can contain the following operators:
+ (Addition)
− (Subtraction)
* (Multiplication)
/ (Division)
v A character expression assigns characters or performs an operation on them. Character expressions
can contain the following operators or functions:
|| (Concatenation operator)
SUBSTR (Substring function)
VALUE (Value function)
DIGITS (Digits function)
Note: See “CCSID and result field expressions in Query for iSeries” on page 252 to see how CCSIDs
are handled for the concatenation symbol.
v A date expression performs an operation on a date. Date expressions can contain the following
operators or functions:
+ (Addition)
− (Subtraction)
CHAR
DATE
58 Query for iSeries Use V5R2
Page 71

DAY
DAYS
MONTH
YEAR
v A time expression performs an operation on a time. Time expressions can contain the following
operators or functions:
+ (Addition)
− (Subtraction)
CHAR
TIME
HOUR
MINUTE
SECOND
MICROSECOND
v A timestamp expression performs an operation on a timestamp. Timestamp expressions can contain
the following operators or functions:
+ (Addition)
− (Subtraction)
CHAR
TIMESTAMP
If any argument can be null, the result field can be null. If any argument is null, the result is null.
Query for iSeries numeric expressions
To define a numeric result field (that is, a result field that contains numbers) for your query, you need to
follow the rules for creating numeric expressions. A numeric expression for a result field can contain the
following, alone or in combination:
v Numeric field names (names of fields that contain numbers). You can use the names of numeric fields
listed on the lower part of the display (numeric fields have numbers shown in the Len and Dec columns)
and the names of previously defined numeric result fields. For example, you can multiply two numeric
fields and put the total in a result field named AMOUNT:
AMOUNT = QUANTITY * PRICE
v Numeric constants (any numbers such as 4 or −12.5). The rules for using numeric constants are:
– The total length can be no more than 31 digits. (For a single-precision floating-point constant, the
total length can be no more than nine digits. For a double-precision floating-point constant, the total
length can be no more than 17 digits.) This includes the digits both to the left and right of the
decimal point but does not include the decimal point. All the digits can be to the right of the decimal
point.
– Use the correct decimal separator. Press F17 to show the decimal separator that must be used (see
“Displaying the format of constants in Query for iSeries” on page 17).
– Do not use a currency symbol (like $5000), and do not use thousands separators (like 5,000).
v Numeric functions. The VALUE function returns the first value that is not null. See “VALUE Query for
iSeries function” on page 62.
Other examples of numeric expressions for a field named AMOUNT are:
QUANTITY
5
5+6
5 + QUANTITY
Chapter 5. Defining result fields in Query for iSeries 59
Page 72

When you do more than one calculation within a numeric expression, use parentheses to tell Query in
what order to do the calculations and to make the expression easier to understand. If you use nested
parentheses for example, 60*(A−(B+C)), the calculations are done for the innermost pair first (in the
example, B+C), then the next innermost pair, and so on. If you do not use parentheses, Query first does
multiplication and division, left to right, and then addition and subtraction, left to right. For example, (5 +
4)*2equals 18, but 5+4*2equals 13.
Be aware that the result of a numeric expression, especially one containing division and multiplication
operations, is truncated or rounded depending on what you specify on the Specify Processing Options
display (see Chapter 14, “Specifying Query for iSeries processing options”). If you divide by zero, your
query may not run.
Query for iSeries character expressions
To define a character result field (that is, a result field that contains SBCS or DBCS characters) for your
query, you need to follow the rules for creating character expressions. A character expression for a result
field can contain the following, alone or in combination:
v Character field names (names of fields that contain SBCS or DBCS characters). You can use the
names of SBCS- or DBCS-character fields listed on the lower part of the display (in the Dec column,
SBCS-character fields have blanks or Vs (if variable length), DBCS-only fields have Js, DBCS-open
fields have Os, DBCS-either fields have Es, and DBCS-graphic fields have Gs) and the names of
previously defined SBCS- or DBCS-character result fields.
v Character constants (SBCS or DBCS characters enclosed in apostrophes, such as ’ABCdef123’ or
’This text includes blanks and special characters **$$’). The rules for using character constants
are:
– The character constant must be enclosed in apostrophes.
– Any combination of letters, numbers, or special characters (for example, $ or #) can be used.
– If two apostrophes are used within a character string, the two apostrophes become a single
apostrophe in the output. For example, ’October’s Profits’ becomes October’s Profits.
– Words with lowercase and uppercase letters are used exactly as typed.
– If a character constant represents a valid date, time, or timestamp, and is used with a date, time, or
timestamp field, it is considered a date, time, or timestamp constant.
– A DBCS character constant must include DBCS shift-out and shift-in characters, represented by the
characters < and > in the following example: ’<D1D2D3>’. A DBCS-graphic character constant must
be preceded by an uppercase or lowercase G, for example, G’<D1D2D3>’.
v Character operators and functions (one or more concatenation operations and character functions
SUBSTR, DIGITS, and VALUE—see “Query for iSeries character functions” on page 61).
Query for iSeries concatenation operation
Character expressions can include one or more concatenation operations. Concatenation operations must
be specified in the form:
value-1 || value-2
v Value-1 and Value-2 are the character fields or character constants that are to be concatenated. You
can use SBCS- and DBCS-character field names (including character result fields) and character
constants (including DBCS-open, DBCS-only, and DBCS-graphic constants). A DBCS-graphic field can
be concatenated only with another DBCS-graphic field or constant.
v Two logical OR symbols (||) make up the concatenation operator used to join the two values. (See
“CCSID and result field expressions in Query for iSeries” on page 252 to see how CCSIDs are handled
for the concatenation symbol.)
60 Query for iSeries Use V5R2
Page 73

For example, if a character constant ’Dr. ’ and a character field named LASTNAME containing the value
Smith are concatenated, the result is a field containing the value Dr. Smith. Other examples of character
expressions are:
NAME
’Mr.’
’Mr.’ || NAME
FIRSTINIT || MIDINIT
If any field is null-capable, the resulting field is null-capable. If any field used in a concatenation is null, the
resulting expression is null.
Except for the case of two DBCS-open fields, if all concatenated values are either fixed-length fields or
constants, the result is a fixed-length field. The concatenation of two DBCS-open fields results in a
DBCS-open field that allows for the varying lengths that can result from concatenating DBCS-open fields.
If any field is variable-length, the result is a variable-length field.
A UCS2-graphic field can only be concatenated with another UCS2-graphic field.
The CCSID of the result is as follows:
v CCSID 65535 if any field or constant has CCSID 65535.
v Mixed CCSID if any field has a mixed CCSID.
v CCSID of a file field has precedence over result fields or constants.
v CCSID of result fields has precedence over constants.
v CCSID assigned to the result will be the CCSID of the first of the two values if both concatenated
values are fields from the file, or both are result fields.
v CCSID 65535 is assigned to a DBCS-graphic constant if the job CCSID is a single-byte CCSID with no
associated DBCS CCSID.
Query for iSeries character functions
Character expressions can include the character functions SUBSTR, DIGITS, and VALUE.
SUBSTR Query for iSeries function
The SUBSTR function returns part of a character value. The form is:
SUBSTR ( value , offset )
,length
v Value is the name of a character field (including result fields that are already defined), a character
expression, or a character constant. It can be an SBCS or DBCS field, an SBCS constant, a
DBCS-open constant, a DBCS-only constant, or a DBCS-graphic constant. A SUBSTR operation on a
DBCS-only or DBCS-either field produces an SBCS character data type. A SUBSTR operation on a
DBCS-open field produces a DBCS-open data type. A SUBSTR operation on a DBCS-graphic field
produces a DBCS-graphic data type. If Value is a field, the CCSID of the result is the CCSID of the
field. If Value is a constant, the CCSID of the result is the associated CCSID of the job of the user who
creates the query (or of the user who changes the query, if the original CCSID was 65535).
v Offset is the starting character position within the field or character constant. An expression can also be
used for the offset.
v Length is the number of characters that make up the substring. An expression may be used for length.
You do not need to specify a length. If you do not, the resulting substring is the entire field or character
constant from Offset to the end.
You must use commas between the substring elements; blanks are allowed after the commas. If you are
sending queries between countries that use the comma for a decimal point, put a blank after the comma
separating the offset and length.
Chapter 5. Defining result fields in Query for iSeries 61
Page 74

Example of a character field substring: If a character field named ALPHA containing the value ABCDEFGHI is
used in SUBSTR(ALPHA,4,3), the result is a character field containing DEF. If you do not specify a value for
Length, the result is DEFGHI.
If the Offset and Length values cause the substring to exceed the right end of the field, you will receive an
error message. If any argument can be null, the result field can be null. If any argument is null, the result
is null.
If a variable-length field is used for Value, the result is a variable-length field. If either Offset or Length is
an expression, the result is a variable-length field.
For SBCS, DBCS-open, DBCS-only, and DBCS-either fields, Offset and Length refer to bytes, including
shift-out and shift-in characters. For example, if FIELD1 contains string <A1B1C1D1E1F1>, the operation
SUBSTR(FIELD1,2,3) results in a character field containing A1B.
For DBCS-graphic fields, Offset and Length refer to the number of double-byte characters. Shift-out and
shift-in characters in a graphic constant are ignored. For example, the operation
SUBSTR(G’<A1B1C1D1E1F1>’,2,3) results in a graphic field containing B1C1D1.
DIGITS Query for iSeries function
The DIGITS function returns a character representation of a number. The form is:
DIGITS ( expression )
The argument must be an integer or decimal value. The result of the function is a fixed-length character
string. The CCSID of the string is the default SBCS CCSID at the application server. If the argument can
be null, the result can be null. If the argument is null, the result is a null value.
The result is a string of digits that represents the absolute value of the argument without regard to its
scale. The result does not include a sign or a decimal point. The result includes any necessary leading
zeros so that the length of the string is:
v 5, if the argument is a small binary value with no decimal positions.
v 10, if the argument is a large binary value with no decimal positions.
v The length of the argument, if the value is a packed, zoned, or binary field with decimal positions.
Example:
DIGITS(JOBCODE)
VALUE Query for iSeries function
The VALUE function can be used in any type of expression: character, numeric, date, time, or timestamp.
The VALUE function, VALUE(x,y), returns the first argument that is not null. The arguments are evaluated
in the order in which they are specified. The arguments must be compatible; character string arguments
are not compatible with numbers. X is a field and Y can be a field, value, or a list of fields or values. X can
be any data type and may be a previously defined result field or any file field.
The result can be null only if all arguments can be null; the result is null only if all arguments are null. The
X value is not checked to determine if it is null-capable.
Example:
VALUE(commission, 0)
If commission is null, the result is 0.
62 Query for iSeries Use V5R2
Page 75

Note: If you are sending queries between countries that use the comma for a decimal point, put a blank
after each comma separating values in a list of numeric values.
The selected argument is converted, if necessary, to the attributes of the result. The attributes of the result
are determined as follows:
v If the arguments are dates, the result is a date. If the arguments are times, the result is a time. If the
arguments are timestamps, the result is a timestamp.
v If the arguments are constants, the CCSID of the result is the CCSID that would result if the arguments
were concatenated.
v If all arguments are fixed-length, the result is a fixed length of n, where n is the length of the longest
argument.
v If any argument is variable length, the result is variable-length with length attribute n, where n is the
length attribute of the argument with the greatest length attribute.
v If the arguments are numbers, the data type of the result is the data type that would result if the
arguments were added.
v If all arguments are DBCS-only, the result is DBCS-only.
v If the arguments are any combination of bracketed-DBCS, the result is DBCS-open.
v If the arguments are DBCS-graphic, the result is DBCS-graphic.
If X is a DBCS-graphic field, Y fields and constants must all be DBCS-graphic. If X is not a DBCS-graphic
field, no Y fields or constants may be DBCS-graphic.
The CCSID of the result is as follows:
v CCSID 65535 if any field or constant has CCSID 65535.
v Mixed CCSID if any field has a mixed CCSID.
v CCSID of a file field has precedence over result fields or constants.
v CCSID of result fields has precedence over constants.
v CCSID assigned to the result will be the CCSID of the first of the two values if both concatenated
values are fields from the file, or both are result fields.
v CCSID 65535 is assigned to a DBCS-graphic constant if the job CCSID is a single-byte CCSID with no
associated DBCS CCSID.
VARCHAR Query for iSeries function
The VARCHAR function returns a varying-length character string representation of a string. VARCHAR
|
supports conversion from CHARACTER to VARCHAR and UCS-2 GRAPHIC to VARCHAR. Conversion of
|
numeric type data is not supported. VARCHAR supports conversion from CHARACTER to VARCHAR and
|
UCS-2 GRAPHIC to VARCHAR. Conversion of numeric type data is not supported.
|
VARCHAR ( expression
, length
DEFAULT , ccsid
The first argument must be a string expression; it must not be DBCS-graphic data.
The second argument, if specified as a length, is the length attribute of the resulting varying-length string.
The second argument must be an integer constant between 1 and 32740 if the first argument is not
nullable or between 1 and 32739 if the first argument is nullable. If the first argument is mixed data, the
second argument cannot be less than 4. If the second argument is not specified or DEFAULT is specified,
the result length is determined as follows, where n is the length attribute of the first argument.
v If the first argument is SBCS or mixed data, the result length is n.
v If the first argument is UCS2 graphic data and the result is SBCS data, the result length is n.
)
Chapter 5. Defining result fields in Query for iSeries 63
Page 76

v If the first argument is UCS2 graphic data and the result is mixed data, the result length is (2.5*(n-1)) +
4.
The third argument, if specified, must be a valid SBCS or mixed CCSID. If it is a SBCS CCSID, the first
argument cannot be a DBCS-either or DBCS-only string.
The result of the function is the character string that would result if the character string expression was
assigned to a varying-length host variable with a length attribute of n, where n is the length attribute of the
result. If the length attribute of the argument is greater than the length attribute of the result, truncation is
performed and no warning is returned.
The result data type is VARCHAR.
If the ccsid (third argument) is not specified:
v If the first argument is SBCS character, then the result is SBCS character. The CCSID of the result is
the same as the CCSID of the first argument.
v If the first argument is mixed (DBCS-open), DBCS-only, or DBCS-either then the result is mixed. The
CCSID of the result is the same as the CCSID of the first argument.
v If the first argument is non-UCS2 graphic, then the result is mixed. The CCSID of the result is the
associated mixed CCSID of the DBCS CCSID.
v If the first argument is UCS2 then the CCSID of the result is the job CCSID. If the job CCSID is mixed,
then the result type is mixed. If the job CCSID is SBCS, then the result is SBCS character.
If the ccsid is specified:
v The result is dependent on the specified CCSID. If ccsid is a SBCS CCSID, then the result type is
SBCS character. If ccsid is a mixed CCSID, then the result type is mixed character.
v The CCSID of the result is the ccsid.
If the first argument can be null, the result can be null; if the first argument is null, the result is the null
value.
Following are examples of using VARCHAR to convert from CHARACTER to VARCHAR and UCS-2
GRAPHIC to VARCHAR:
RESCHAR varchar(char1,10,37)
where char1 is a character field to be converted
10 is the length of the output variable
37 is the ccsid of the output variable
RESUCS2 varchar(ucs2,8,37)
where ucs2 is a UCS-2 graphic field to be converted
8 is the length of the output variable
37 is the ccsid of the output variable
Following are examples of using VARCHAR to convert from CHARACTER to VARCHAR and UCS-2
|
GRAPHIC to VARCHAR:
|
|
RESCHAR varchar(char1,10,37) where char1 is a character field to be
|||
|
|
|
|||
RESUCS2 varchar(ucs2,8,37) where ucs2 is a UCS-2 graphic field
|
|
|
converted, 10 is the length of the
output variable, and 37 is the CCSID
of the output variable
to be converted, 8 is the length of the
output variable, and 37 is the ccsid of
the output variable
64 Query for iSeries Use V5R2
Page 77

VARGRAPHIC Query for iSeries function
The VARGRAPHIC scalar function provides a way to convert:
v character data (SBCS and Mixed) to DBCS graphic.
v character data (SBCS and Mixed) to UCS2 graphic.
v UCS2 graphic to UCS2 graphic.
v DBCS graphic to UCS2 graphic.
VARGRAPHIC ( expression
,
length DEFAULT ,ccsid
)
The VARGRAPHIC function returns a graphic string representation of a string expression.
The first argument must be a string expression and must not be bit data.
The second argument, if specified as length, is the length attribute of the result and must be an integer
constant between 1 and 16370 if the first argument is not nullable or between 1 and 16369 if the first
argument is nullable.
If the second argument is not specified or DEFAULT is specified, the length attribute of the result is the
same as the length attribute of the first argument.
In the following rules, S denotes one of the following:
v If the string expression is a host variable containing data in a foreign encoding scheme, S is the result
of the expression after converting the data to a CCSID in a native encoding scheme.
v If the string expression is data in a native encoding scheme, S is that string expression.
If the third argument is specified, the CCSID of the result is the third argument. It must be a DBCS or
UCS2 CCSID. The CCSID cannot be 65535.
If the third argument is not specified, the CCSID of the result is determined by a mixed CCSID, let M
denote that mixed CCSID. M is determined as follows:
v If the CCSID of S is a mixed CCSID, M is that CCSID.
v If the CCSID of S is an SBCS CCSID:
– If the CCSID of S has an associated mixed CCSID, M is that CCSID.
– Otherwise the operation is not allowed.
DBCS Substitution
M Result CCSID Description
930 300 Japanese EBCDIC X’FEFE’
933 834 Korean EBCDIC X’FEFE’
935 837 S-Chinese EBCDIC X’FEFE’
937 835 T-Chinese EBCDIC X’FEFE’
939 300 Japanese EBCDIC X’FEFE’
5026 4396 Japanese EBCDIC X’FEFE’
5035 4396 Japanese EBCDIC X’FEFE’
Character
The result of the function is a varying-length graphic string. If the expression can be null, the result can be
null. If the expression is null, the result is the null value. If the expression is an empty string or the
EBCDIC string X’0E0F’, the result is an empty string.
Chapter 5. Defining result fields in Query for iSeries 65
Page 78

The actual length of the result depends on the number of characters in the argument. Each character of
the argument determines a character of the result. Regardless of the CCSID, every double-byte code point
in the argument is considered a DBCS character, and every single-byte code point in the argument is
considered an SBCS character with the exception of the EBCDIC mixed data shift codes X’0E’ and X’0F’.
v If the nth character of the argument is a DBCS character, the nth character of the result is that DBCS
character.
v If the nth character of the argument is an SBCS character that has an equivalent DBCS character, the
nth character of the result is that equivalent DBCS character.
v If the nth character of the argument is an SBCS character that does not have an equivalent DBCS
character, the nth character of the result is the DBCS substitution character.
The equivalence of SBCS and DBCS characters depends on M.
If the result is UCS2 then, each character of the argument determines a character of the result. The nth
character of the result is the UCS2 equivalent of the nth character of the argument.
Date, time, and timestamp expressions in Query for iSeries
Date, time, and timestamp data types and values can be assigned to result fields. A date, time, or
timestamp expression for a result field can contain the following, alone or in combination:
v Date, time, or timestamp field names (names of fields that contain date, time, or timestamp values)
v Character constants (SBCS or DBCS characters enclosed in apostrophes— see examples and rules
under “Query for iSeries character expressions” on page 60.)
v Date, time, and timestamp functions and operations (one or more of the following functions and
arithmetic operations):
+ (Addition)
− (Subtraction)
CHAR
CURRENT
VALUE
DATE
DAY
DAYS
MONTH
YEAR
TIME
HOUR
MINUTE
SECOND
MICROSECOND
TIMESTAMP
v Durations (a length of time, represented by a labeled duration, date duration, time duration, or
timestamp duration— see “Durations in Query for iSeries” on page 73.)
Character constants can represent date, time, or timestamp values when used with date, time, or
timestamp fields or functions. They can be used in expressions and treated like a date, time or timestamp.
For example, a date constant may be subtracted from a date field.
A date, time, or timestamp expression for a result field can contain the following either alone or in
combination:
66 Query for iSeries Use V5R2
Page 79

Query for iSeries date
A date expression is a three-part value (year, month, and day) designating a point in time under the
Gregorian calendar, which is assumed to have been in effect from the year 1 A.D.
0001 to 9999. The month range is 1 to 12. The day range is 1 to x, where x is 28, 29, 30, or 31,
depending on the month.
A date starts with a digit and has a length of at least 6 characters. Trailing blanks can be included.
Leading zeros can be omitted from the month and day portions. Valid formats allowed for dates are listed
in Table 1. Each format is identified by name and includes an associated abbreviation (used by the CHAR
function) and an example of its use.
Table 1. Formats for Representations of Date Data Types
Format Name Abbreviation Date Format Example
International Standards
Organization
IBM USA Standard USA mm/dd/yyyy 10/12/1987
IBM European Standard EUR dd.mm.yyyy 12.10.1987
Japanese Industrial
Standard Christian era
OS/400 format DMY
ISO yyyy-mm-dd 1987-10-12
JIS yyyy-mm-dd 1987-10-12
DD/MM/YY
YMD
MDY
JUL
YY/MM/DD
MM/DD/YY
YYDDD
YYYYDDD
1
12/10/87
87/12/10
12/10/87
87/344
1987/344
The year range is
The date separator can be either
a period (.), slash (/), comma (,),
dash (-), or blank space for the
OS/400 date format data types.
Note about using SAA date format: To prevent confusion about the date value, use the Systems
Application Architecture
®
(SAA) date formats (ISO, USA, EUR, or
JIS) when specifying date constants in a multilingual environment or
when a query is to be displayed or changed by different people.
If the OS/400 two-digit year format is used, the range of dates is from 1940 through 2039. Any year from
40 through 99 is assumed to have a century of 19. Any year from 00 through 39 is assumed to have a
century of 20. If a value outside of that range is in a field with a two-digit year format, it will be shown on a
report as +’s. Use the CHAR function on that field specifying a SAA date format, and then select the result
field for the report.
Query for iSeries time
A time expression is a three-part value (hour, minute, and second) that designates the time of day using a
24-hour clock. The hour range is 0 to 24, while the minute and second range is 0 to 59. If the hour is 24,
the minute and second specifications are both zero.
A time data type starts with a digit and has a length of at least 4 characters. Trailing blanks can be
included; a leading zero can be omitted from the hour part of the time, and seconds can be omitted
entirely. If you choose to omit seconds, 0 seconds is assumed. Thus, 13.30 is equivalent to 13.30.00.
1. Historical dates do not always follow the Gregorian calendar. Dates between 1582-10-04 and 1582-10-15 are accepted as valid
dates although they never existed in the Gregorian calendar.
Chapter 5. Defining result fields in Query for iSeries
67
Page 80

Valid formats for times are listed in Table 2. Each format is identified by name and includes an associated
abbreviation (for use by the CHAR function) and an example of its use.
Table 2. Formats for Representations of Time Data Types
Format Name Abbreviation Time Format Example
International Standards Organization ISO hh.mm.ss 13.30.05
IBM USA Standard USA hh:mm am or pm 1:30 pm
IBM European Standard EUR hh.mm.ss 13.30.05
Japanese Industrial Standard
Christian era
OS/400 format - HMS 13:30:05
JIS hh:mm:ss 13:30:05
Note: Time separators can be either a period (.), slash (/), comma (,), dash (-), or a blank space. Use the
CHGJOB command to change the OS/400 date or time format separators.
In the USA time format, the hour must not be greater than 12 and cannot be 0 except for the special case
of 00:00 AM. Using the International Standards Organization (ISO) format of the 24-hour clock, the
correspondence between the USA format and the 24-hour clock is as follows:
USA Format
24 Hour-Clock
12:01 am through 12:59 am
00.01.00 through 00.59.00
01:00 am through 11:59 am
01.00.00 through 11.59.00
12:00 pm (noon) through 11:59 pm
12.00.00 through 23.59.00
12:00 am (midnight)
24.00.00
00:00 am (midnight)
00.00.00
The system always uses 00.00.00. Only the user can enter 24.00.00.
Query for iSeries timestamp
A timestamp expression is a seven-part value (year, month, day, hour, minute, second, and microsecond)
that designates a date and time as previously defined. The time part includes a fractional specification of
microseconds.
A timestamp data type starts with a digit and has a length of at least 16 characters. The complete
representation of a timestamp has the form yyyy-mm-dd-hh.mm.ss.nnnnnn. Trailing blanks can be
included. Leading zeros can be omitted from the month, day, and hour part of the timestamp. Trailing
zeros can be truncated or omitted entirely from microseconds. You do not need to specify microseconds. A
timestamp of yyy-mm-dd-hh.mm.ss is acceptable. If you choose to omit any digit of the microseconds
portion, an implicit specification of 0 is assumed. Thus, 1990-3-2-8.30.00.10 is equivalent to
1990-03-02-08.30.00.100000.
A timestamp expression with a time of 24.00.00.000000 can be accepted.
68 Query for iSeries Use V5R2
Page 81

Displaying constants format in Query for iSeries
The Display Constants Format display shows you what date or time format you must use if you specify a
date or time constant and do not use an SAA format.
Display Constants Format
Query......: QRY1 Option .....: CHANGE
Library....: QGPL CCSID......: 65535
Use an SAA format to enter a date or time constant, or
use the format described by the following values.
Use the decimal separator shown.
Query definition values
Date format....: *MDY
Date separator . . : /
Time format....: *HMS
Time separator . . : :
Decimal separator . : .
Press Enter to continue.
F12=CANCEL
The Display Constants Format display appears when you:
v Change a query from the Work with Queries display and at least one date or time constant is specified
in the query definition in an OS/400 format other than the date or time format specified for your job.
v Display a query from the Work with Queries display and your job format for the date or time is different
from an OS/400 date or time format constant that is specified in the query definition.
v Use the run-time record selection option of the RUNQRY command and your job format for the date
or time is different from an OS/400 date or time format constant specified in the query definition.
v Use the run-time record selection option with the QRYRUN procedure and your job format for the date
or time is different from an OS/400 date or time format constant specified in the query definition.
v Press F17 from the Select Records display.
v Press F17 from the Define Result Fields display.
OS/400 date formats are MDY, YMD, DMY, and JUL. The valid OS/400 time format is HHMMSS.
Date, time, and timestamp arithmetic operations in Query for iSeries
Addition and subtraction operations can be performed on date, time, and timestamp values to determine
the result-field value.
Note: If an addition operand is a date, time, or timestamp value, the other operand must be a duration.
The following rules apply to date, time, and timestamp addition:
v If one operand is a date, the other operand must be either a date duration or a labeled duration of
years, months, or days.
v If one operand is a time, the other operand must be either a time duration or a labeled duration of
hours, minutes, or seconds.
v If one operand is a timestamp, the other operand must be a duration. Any duration type is valid.
Chapter 5. Defining result fields in Query for iSeries 69
Page 82

Subtraction rules are different from addition rules because a date, time, or timestamp value cannot be
subtracted from a duration. Also, subtracting two date, time, or timestamp values is not the same as
subtracting a duration from a date, time, or timestamp value.
The following rules apply to date, time, and timestamp subtraction:
v If the first operand is a date, the second operand must either be a:
– Date
– Date duration
– Character representation of a date
– Labeled duration of years, months, or days
v If the second operand is a date, the first operand must either be a:
– Date
– Character representation of a date
v If the first operand is a time, the second operand must either be a:
– Time
– Time duration
– Character representation of a time
– Labeled duration of hours, minutes, or seconds
v If the second operand is a time, the first operand must either be a:
– Time
– Character representation of a time
v If the first operand is a timestamp, the second operand must either be a:
– Timestamp
– Character representation of a timestamp
– Duration
v If the second operand is a timestamp, the first operand must either be a:
– Timestamp
– Character representation of a timestamp
Date arithmetic operation in Query for iSeries
Dates can be subtracted, added to (incremented) or subtracted from (decremented).
Subtracting dates in Query for iSeries
The result of subtracting one date (DATE2) from another (DATE1) is a date duration that specifies the
number of years, months, and days between the two dates. The data type of the result is a
packed-decimal numeric. If DATE1 is greater than or equal to DATE2, DATE2 is subtracted from DATE1.
However, if DATE1 is less than DATE2, DATE1 is subtracted from DATE2, and the sign of the result is
made negative. The following procedural description clarifies the steps involved in the operation RESULT =
DATE1 - DATE2.
If DAY(DATE2) < = DAY(DATE1)
then DAY(RESULT) = DAY(DATE1) - DAY(DATE2).
If DAY(DATE2) > DAY(DATE1)
then DAY(RESULT)=N+DAY(DATE1) - DAY(DATE2)
where N = the last day of MONTH(DATE2).
MONTH(DATE2) is then incremented by 1.
If MONTH(DATE2) < = MONTH(DATE1)
then MONTH(RESULT) = MONTH(DATE1) - MONTH(DATE2).
If MONTH(DATE2) > MONTH(DATE1)
70 Query for iSeries Use V5R2
Page 83

then MONTH(RESULT) = 12 + MONTH(DATE1) - MONTH(DATE2).
YEAR(DATE2) is then incremented by 1.
YEAR(RESULT) = YEAR(DATE1) - YEAR(DATE2).
For example, the result of DATE(’3/15/2000’)-’12/31/1999’ is 215, or a duration of 0 years, 2 months, and
15 days.
Incrementing and decrementing dates in Query for iSeries
The result of adding a duration to or subtracting a duration from a date is itself a date. It must be between
January 1, 0001 and December 31, 9999 inclusive. If a duration of years is added or subtracted, only the
year portion of the date is affected.
If a duration of months is added or subtracted, only the months and years are affected. The day portion is
unchanged unless the result is not valid (September 31, for example).
Adding or subtracting a duration of days affects the day portion and possibly the month and year.
Date durations, either positive or negative, may be added to and subtracted from dates. The result is a
date that has been incremented or decremented by a specified number of years, months, and days.
When adding durations to dates, adding one month to a given date gives the same date one month later
unless that date does not exist. Then, the date is set to the last day of the later month. For example,
January 28 plus one month gives you February 28. But January 29, 30, or 31 plus one month results in
February 28 or in a leap year, February 29.
Note: If one or more months is added to a given date and the same number of months is subtracted from
the result, the final date is not necessarily the same as the original date.
Converting a numeric field to a date field in Query for iSeries
The following is a way to convert a numeric field that contains a date to a date data-type field.
In this example, the job date format is YMD and the job date separator is /. A file contains a numeric date
field call NUMDATE, length 6, which contains dates in the format MDY (month day year). The first value in
NUMDATE is 011392.
Create the following result fields:
CHARDATE DIGITS(NUMDATE)
CHARDAT2 SUBSTR(CHARDATE,5,2)||’/’||
NEWDATE DATE(CHARDAT2)
SUBSTR(CHARDATE,1,2)||’/’||
SUBSTR(CHARDATE,3,2)
NEWDATE contains the internal representation of year 1992 month 01 day 13. If the date is shown on the
report, it shows as 92/01/13.
Note: If the date value resulting is outside the range of 1940 through 2039, it will show as +’sonthe
report. Use the CHAR function to see the correct value.
Working with numeric dates in Query for iSeries
If you are using numeric fields to represent dates, you can use arithmetic operations to manipulate the
dates without using the Query date functions. Example 1 shows a method of converting a numeric field
containing a date from MMDDYY format to YYMMDD format. Example 2 shows the reverse conversion:
YYMMDD format to MMDDYY format.
Example 1: Working with numeric dates in Query for iSeries: The following query defines a
MMDDYY numeric field conversion to a YYMMDD numeric field, which is more suitable for sorting and for
Chapter 5. Defining result fields in Query for iSeries 71
Page 84

selection on specific year, month, and day values. The marked (*) lines are necessary and a sample report
follows. If you require rounding for fields in the report (instead of truncation), you can add to each of the
intermediate expressions a minus one half, as follows: MM = (MMDDYY/10000)-0.5.
Example 1
5728QU1 R03 M00 900824 IBM OS/400 Query 10/04/90 14:17:45 Page 1
Query.................YYMMDD02
Library...............CRP
Query text ..............MMDDYY to YYMMDD
Collating sequence ..........Hexadecimal
Processing options
* Use rounding ............No
Ignore decimal data errors .....No (default)
Selected files
ID File Library Member Record Format
T01 MMDDYY QTEMP MMDDYY MMDDYY
Result fields
Name Expression Column Heading Len Dec
* MM (mmddyy/10000) 2 0
* DD (mmddyy/100 - (mm * 100)) 2 0
* YY (mmddyy - (mm*10000 + dd*100)) 2 0
* YYMMDD (yy*10000)+(mm*100)+dd 6 0
***** END OF QUERY PRINT *****
MM DD YY YYMMDD MMDDYY
08 31 90 900831 083190
*** END OF REPORT ***
Example 2: Working with numeric dates in Query for iSeries: This example shows the reverse in
formatting— converting a numeric YYMMDD to MMDDYY. The marked (*) lines are necessary and a
sample report follows.
Example 2
Query.................YYMMDD01
Library...............CRP
Query text ..............YYMMDD to MMDDYY
Collating sequence ..........EBCDIC
Processing options
* Use rounding ............No
Ignore decimal data errors .....No (default)
Special conditions
*** All records selected by default ***
Selected files
ID File Library Member Record Format
T01 YYMMDD QGPL JUNK YYMMDD
Result fields
Name Expression Column Heading Len Dec
* YY (yymmdd/10000) 2 0
* MM (yymmdd/100 - (yy * 100)) 2 0
* DD (yymmdd - (yy*10000 + mm*100)) 2 0
* MMDDYY (mm*10000)+(dd*100)+yy 6 0
***** END OF QUERY PRINT *****
MM DD YY MMDDYY YYMMDD
08 31 90 083190 900831
*** END OF REPORT ***
72 Query for iSeries Use V5R2
Page 85

Time arithmetic operation in Query for iSeries
Times can be subtracted, incremented, or decremented. The result of subtracting one time (TIME2) from
another (TIME1) is a time duration that specifies the number of hours, minutes, and seconds between the
two times.
For example, the result of TIME(’11:02:26’) − (’10:32:56’) is 2930; a duration of 0 hours, 29 minutes,
and 30 seconds.
Incrementing and decrementing times in Query for iSeries
The result of adding or subtracting a duration from time is itself a time. If a duration of hours is added or
subtracted, only the hours portion of the time is affected. The minutes and seconds remain unchanged. If
a duration of minutes is added or subtracted, only the minutes and hours if necessary are affected. Adding
or subtracting a duration of seconds affects the seconds portion and possibly the minutes and hours.
Timestamp arithmetic operation in Query for iSeries
Timestamps can be subtracted, incremented, or decremented. The result of adding or subtracting a
duration from a timestamp is a timestamp. Date and time arithmetic is the same as previously defined,
except that an overflow or underflow of hours is carried into the date portion of the result.
Durations in Query for iSeries
A duration represents a length of time. There are four types: labeled, date, time, and timestamp.
Labeled duration in Query for iSeries
A labeled duration represents a specific unit of time expressed as a number followed by one of the
following duration keywords:
YEAR, YEARS
MONTH, MONTHS
DAY, DAYS
HOUR, HOURS
MINUTE, MINUTES
SECOND, SECONDS
MICROSECOND, MICROSECONDS
A labeled duration can only be used as an operand if the other operand is of type date, time or timestamp.
For example:
HIREDATE + 2 MONTHS + 14 DAYS
is a valid expression.
HIREDATE + (2 MONTHS + 14 DAYS)
is not a valid expression. In both expressions, the labeled durations are 2 MONTHS and 14 DAYS.
Date duration in Query for iSeries
A date duration represents years, months, and days expressed as a DECIMAL (8,0) number. To be
properly interpreted, the number must have the formatyyyymmdd where yyyy represents the number of
years, mm the number of months, and dd the number of days. The result of subtracting one date value
from another, as in the expression HIREDATE — BIRTHDATE, is a date duration. Example:
HIREDATE - BIRTHDATE
Time duration in Query for iSeries
A time duration represents hours, minutes and seconds expressed as a DECIMAL (6,0) number. To be
properly interpreted , the number must have the format hhmmss where hh represents the number of
hours,mm the number of minutes, and ss the number of seconds. The result of subtracting one time value
from another is a time duration.
Chapter 5. Defining result fields in Query for iSeries 73
Page 86

Timestamp duration in Query for iSeries
A timestamp duration represents a number of years, months, days, hours, minutes, seconds, and
microseconds expressed as a DECIMAL (20, 6) number. To be properly interpreted, the number must have
the format yyyymmddhhMMsszzzzzz , where yyyy , mm , dd , hh, MM , ss and zzzzzz represent,
respectively, the number of years, months, days, hours, minutes, seconds and microseconds. The result of
subtracting one timestamp value from another is a timestamp duration.
Date, time, and timestamp functions in Query for iSeries
The following functions can be performed on date, time, and timestamp values:
CHAR Query for iSeries function
The CHAR function returns a character representation of a date, time, or timestamp value. An optional
second argument dictates the SAA format for the result string. The first argument must be a date, time, or
timestamp. The second argument, if used, is the name of a character format. The form is:
CHAR ( expression )
,ISO
,USA
,EUR
,JIS
The result of the function is a fixed-length character constant. If the first argument can be null, the result
can be null. If the first argument is null, the result is null. Other rules depend on the data type of the first
argument as follows:
v If the first argument is a date:
– A format should be specified, especially if:
- The query is to be used by different users.
- The query is to be sent to a different machine.
- A date has a two-digit year format attribute and the values may not be in the range of 1940
through 2039. Use this function to see the date in a four-digit year SAA format.
– If the second argument is omitted, the string format is the job format.
– The result is the character string representation of the date in the format specified by the second
argument.
– The result length is 10 if a format is specified, 8 if no format is specified.
v If the first argument is a time:
– If the second argument is omitted, the string format is the job format.
– The result is the character string representation of a time in the format specified by the second
argument.
– The result length is 8.
v If the first argument is a timestamp:
– The second argument is not applicable and must not be specified.
– The result is the character string representation of a timestamp.
– The result length is 26.
Example:
CHAR(HIREDATE,USA)
74 Query for iSeries Use V5R2
Page 87

DATE Query for iSeries function
The DATE function returns a date from a value. The form is:
DATE ( expression )
The argument must be either a:
v Timestamp
v Date
v Positive number or expression less than 3 652 059
v Valid character representation of a date
v Character representation with a length of 7
If the argument is a character representation of length 7, it must represent a valid date in the form yyyynnn
where yyyy represents the year digits and nnn represents digits between 001 and 366, signifying a day in
that year.
The result of this function is a date. If the argument can be null, the result can be null. If the argument is
null, the result is null.
v If the argument is a timestamp, the result is the date part of the timestamp.
v If the argument is a date, the result is that date.
v If the argument is a number, the result is the date that is n−1 days after January 1, 0001.
v If the argument is a character value, the result is the date represented by the character string.
Note: If the OS/400 two-digit year format is used, the range of dates is 1940 through 2039. Any year from
40 through 99 is assumed to have a century of 19. Any year 00 through 39 is assumed to have a
century of 20. If a value outside of that range is in a field with a two-digit year format, it will be
shown on a report as +’s. Use the CHAR function on that field specifying a SAA date format, and
then select the result field for the report.
Example:
DATE(STRDATE)
DAY Query for iSeries function
The DAY function returns the day part of a value. The form is:
DAY ( expression )
The argument must be either a:
v Date
v Timestamp
v Date duration
v Timestamp duration
The result of the function is a binary field. If the argument can be null, the result can be null. If the
argument is null, the result is null.
If the argument is a date or a timestamp, the result is the day part of the value, which is a binary field with
a value between 1 and 31.
Chapter 5. Defining result fields in Query for iSeries 75
Page 88

If the argument is a date duration or a timestamp duration, the result is the day part of the value, a binary
field with a value between −99 and 99. A nonzero result has the same sign as the argument.
Example:
RESULT(DAY) = DAY(HIREDATE)
RESULT(DAY) would equal a value between 1 and 31.
DAYS Query for iSeries function
The DAYS function returns a numeric representation of a date. The form is:
DAYS ( expression )
The argument must be either a:
v Date
v Timestamp
v Valid character representation of a date
The result of the function is a binary field. If the argument can be null, the result can be null. If the
argument is null, the result is null.
The result is one more than the number of days from January 1, 0001 to D, where D is the date that
would occur if the DATE function were applied to the argument.
Example:
RESULT(DAY) = DAYS(CURRDATE) - DAYS(HIREDATE)
RESULT(DAY) equals a number representing the number of days between these two dates.
HOUR Query for iSeries function
The HOUR function returns the hour part of a value. The form is:
HOUR ( expression )
The argument must be either a:
v Time
v Timestamp
v Time duration
v Timestamp duration
The result of the function is a binary field. If the argument can be null, the result can be null. If the
argument is null, the result is null.
If the argument is a time or a timestamp, the result is the hour part of the value, which is a binary field
with a value between 0 and 24.
If the argument is a time duration or a timestamp duration, the result is the hour part of the value, which in
a binary field with a value between −99 and 99. A nonzero result has the same sign as the argument.
Example:
HOUR(TIME) where time = 12:11:22
76 Query for iSeries Use V5R2
Page 89

The resulting value of HOUR would equal 12.
MICROSECOND Query for iSeries function
The MICROSECOND function returns the microsecond part of a value. The form is:
MICROSECOND ( expression )
The argument must be either a:
v Timestamp
v Timestamp duration
v Valid character representation of a timestamp
The result of the function is a binary field. If the argument can be null, the result can be null. If the
argument is null, the result is null.
If the argument is a timestamp, the result is the microsecond part of the timestamp, which is a binary field
with a value between 0 and 999999.
If the argument is a timestamp duration, the result is the microsecond part of the timestamp duration,
which is a binary field with a value between −999999 and 999999.
Example:
MICROSECOND(TIMESTAMP) where TIMESTAMP = 1991-10-22-12.15.23.123456
The resulting value of MICROSECOND equals 123456.
MINUTE Query for iSeries function
The MINUTE function returns the minute part of a value. The form is:
MINUTE ( expression )
The argument must be either a:
v Time
v Timestamp
v Time duration
v Timestamp duration
The result of the function is a binary field. If the argument can be null, the result can be null. If the
argument is null, the result is null.
If the argument is a time duration or a timestamp duration, the result is the minute part of the value, which
is a binary field with a value between &minus 99 and 99. A nonzero result has the same sign as the
argument.
Example:
MINUTE(TIMESTAMP) where TIMESTAMP = 1991-10-22-12.15.23.123456
The resulting value of MINUTE equals 15.
Chapter 5. Defining result fields in Query for iSeries 77
Page 90

MONTH Query for iSeries function
The MONTH function returns the month part of a value. The form is:
MONTH ( expression )
The argument must be either a:
v Date
v Timestamp
v Date duration
v Timestamp duration
The result of the function is a binary field. If the argument can be null, the result can be null. If the
argument is null, the result is null.
If the argument is a date duration or a timestamp duration, the result is the month part of the value, which
is a binary field with a value between &minus 99 and 99. A nonzero result has the same sign as the
argument.
Example:
MONTH(TIMESTAMP) where TIMESTAMP = 1991-10-22-12.15.23.123456
The resulting value of MONTH equals 10.
SECOND Query for iSeries function
The SECOND function returns the seconds part of a value. The form is:
SECOND ( expression )
The argument must be either a:
v Time
v Timestamp
v Time duration
v Timestamp duration
The result of the function is a binary field. If the argument can be null, the result can be null. If the
argument is null, the result is null.
If the argument is a time or timestamp, the result is the seconds part of the value, which is a binary field
with a value between 0 and 59.
If the argument is a time duration or a timestamp duration, the result is the seconds part of the value,
which is a binary field with a value between −99 and 99. A nonzero result has the same sign as the
argument.
Example:
SECOND(TIMESTAMP) where TIMESTAMP = 1991-10-22-12.15.23.123456
The resulting value of SECOND equals 23.
78 Query for iSeries Use V5R2
Page 91

TIME Query for iSeries function
The TIME function returns a time from a value. The form is:
TIME ( expression )
The argument must be either a:
v Time
v Timestamp
v Valid character representation of a time
The result of the function is a time value. If the argument can be null, the result can be null. If the
argument is null, the result is null.
v If the argument is a timestamp, the result is the time part of the timestamp.
v If the argument is a time, the result is that time.
v If the argument is a character string, the result is the time represented by the character string.
Example:
TIME(TIMESTAMP) where TIMESTAMP = 1991-10-22-12.15.23.123456
The resulting value of TIME equals 12.15.23.
TIMESTAMP Query for iSeries function
The TIMESTAMP function returns a timestamp from a value or a pair of values. The form is:
TIMESTAMP ( expression )
expression
The rules for the arguments depend on whether or not the second argument is specified.
v If only one argument is specified, it must be either a:
– Timestamp
– Valid character representation of a timestamp
– Character string of length 14
Note: A character string of length 14 must be a string of digits that represents a valid date and time in
the form yyyyMMddhhmmss where yyyy is the year, MM is the month, dd is the day, hh is the
hour, mm is the minute, and ss is the seconds.
v If both arguments are specified, the first argument must be a date or a valid character representation of
a date. The second argument must be a time or a valid character representation of a time.
The result of the function is a timestamp. If either argument can be null, the result can be null. If either
argument is null, the result is null.
If both arguments are specified, the result is a timestamp with the date specified by the first argument and
the time specified by the second argument. The microsecond part of the timestamp is zero.
If only one argument is specified and it is a timestamp, the result is that timestamp. If only one argument
is specified and it is a character string, the result is the timestamp represented by that character string.
The timestamp represented by a string of length 14 has a microsecond part of zero.
Example:
Chapter 5. Defining result fields in Query for iSeries 79
Page 92

RESULT(x) = TIMESTAMP(DATEFRNK,TIMEFRNK)
YEAR Query for iSeries function
The YEAR function returns a numeric representation of the year part of a value. The form is:
YEAR ( expression )
The argument must be either a:
v Date
v Timestamp
v Date duration
v Timestamp duration
The result of the function is a binary field. If the argument can be null, the result can be null. If the
argument is null, the result is null.
If the argument is a date or a timestamp, the result is the year part of the value, which is a binary field
with a value between 1 and 9999.
If the argument is a date duration or a timestamp duration, the result is the year part of the value, which is
a binary field with a value between −9999 and 9999. A nonzero result has the same sign as the argument.
Example:
YEAR(TIMESTAMP) where TIMESTAMP = 1991-10-22-12.15.23.123456
The resulting value of YEAR is the numeric value 1,991.
Additional date, time, and timestamp functions in Query for iSeries
Based on the system clock, the CURRENT function used with DATE, TIME, TIMESTAMP, or TIMEZONE
returns the current system value corresponding to the function used. The TIMEZONE function is used to
allow an easy conversion to Greenwich Mean Time (GMT) by subtracting CURRENT(TIMEZONE) from a
local time value.
Note: If these functions are used more than once within a Query definition, all values are based on a
single clock reading.
If your job date format is different than the format used in the query, Query for iSeries uses the job date
format. If you use CURRENT(DATE) as a break field, you may get unexpected results when the job and
query date format are different.
Example:
CURDAT = CURRENT(DATE)
CURTSP = CURRENT(TIMESTAMP)
Converting date formats in Query for iSeries
You may sometimes encounter circumstances in which you want to generate a report with the date in a
format other than the one defined when the file was created.
Converting date for output to a database file in Query for iSeries
To convert a date field to a format different from the input file, you must externally define the output file
with DDS specifying the date format for the output date field. This conversion occurs automatically.
80 Query for iSeries Use V5R2
Page 93

Converting date for output to a display or printer in Query for iSeries
You can use the date functions to convert an input date field to a different format. Examples 1 and 2 show
two methods of converting a date field from the MMDDYY format to the YYDDD format. Examples 3 and 4
show the reverse conversions, from YYDDD to MMDDYY format.
Note: For ease of reading, multiple panel views are merged into single screen images.
Example 1—Converting from MMDDYY to YYDDD format in Query for iSeries
The following Define Result Fields panel defines an MMDDYY to YYDDD date conversion. The conversion
is done completely within the panel.
Define Result Fields
Type definitions using field names or constants and operators, press Enter.
Operators: +, -, *, /, SUBSTR, ||, DATE...
Field Expression Column Heading Len Dec
YY________ SUBSTR(CHAR(MMDDYY),7,2)_________ ____________________ _____ __
_________________________________ ____________________
_________________________________ ____________________
CHARJAN01_ ’01/01/’ || YY___________________ ____________________ _____ __
JAN01_____ DATE(CHARJAN01)__________________ ____________________ _____ __
DDD_______ SUBSTR(DIGITS(DAYS(MMDDYY)-DAYS(J ____________________ _____ __
YYDDD_____ YY_||_’/’_||_DDD_________________ ____________________ _____ __
_______________________________________________________________________________
Field Text Len Dec
MMDDYY Date field in MMDDYY format 8 L
F3=Exit F5=Report F9=Insert F11=Display names only
F12=Cancel F13=Layout F20=Reorganize F24=More keys
_________________________________ ____________________
_________________________________ ____________________
_________________________________ ____________________
_________________________________ ____________________
AN01)+1),10,3)___________________ ____________________
_________________________________ ____________________
_________________________________ ____________________
_________________________________ ____________________
Bottom
Example 2—Converting from MMDDYY to YYDDD format in Query for iSeries
This examples shows an alternative method for the same conversion done in example 1. The conversion
is done completely within the panel. This method requires that the date format for the current job must be
set to YYDDD. When this circumstance exists, the DATE function automatically does the conversion.
Chapter 5. Defining result fields in Query for iSeries 81
Page 94

Define Result Fields
Type definitions using field names or constants and operators, press Enter.
Operators: +, -, *, /, SUBSTR, ||, DATE...
Field Expression Column Heading Len Dec
YYDDD_____ DATE(MMDDYY)_____________________ ____________________ _____ __
_________________________________ ____________________
_________________________________ ____________________
__________ _________________________________ ____________________ _____ __
_______________________________________________________________________________
Field Text Len Dec
MMDDYY Date field in MMDDYY format 8 L
F3=Exit F5=Report F9=Insert F11=Display names only
F12=Cancel F13=Layout F20=Reorganize F24=More keys
_________________________________ ____________________
_________________________________ ____________________
Bottom
Bottom
The commands to run the query in example 3 are:
CHGJOB DATFMT(*JUL)
RUNQRY QRY(YYDDD)
Example 3—Converting from YYDDD to MMDDYY format in Query for iSeries
The following Define Result Fields panel defines a YYDDD to MMDDYY date conversion. The conversion
is done completely within the panel.
Define Result Fields
Type definitions using field names or constants and operators, press Enter.
Operators: +, -, *, /, SUBSTR, ||, DATE...
Field Expression Column Heading Len Dec
YY________ SUBSTR(DIGITS(YEAR(YYDDD)),9,2)__ ____________________ _____ __
_________________________________ ____________________
_________________________________ ____________________
MM________ SUBSTR(DIGITS(MONTH(YYDDD)),9,2)_ ____________________ _____ __
DD________ SUBSTR(DIGITS(DAY(YYDDD)),9,2)___ ____________________ _____ __
MMDDYY____ MM_||_’/’_||_DD_||_’/’_||_YY_____ ____________________ _____ __
_______________________________________________________________________________
Field Text Len Dec
YYDDD Date field in YYDDD format 6 L
F3=Exit F5=Report F9=Insert F11=Display names only
F12=Cancel F13=Layout F20=Reorganize F24=More keys
_________________________________ ____________________
_________________________________ ____________________
_________________________________ ____________________
_________________________________ ____________________
Bottom
Example 4—Converting from MMDDYY to YYDD format in Query for iSeries
This example shows an alternative method for the same conversion done in example 3. The conversion is
done completely within the panel. This method requires that the date format for the current job must be set
to MMDDYY. When this circumstance exists, the DATE function automatically does the conversion.
82 Query for iSeries Use V5R2
Page 95

Define Result Fields
Type definitions using field names or constants and operators, press Enter.
Operators: +, -, *, /, SUBSTR, ||, DATE...
Field Expression Column Heading Len Dec
MMYYDD_____ DATE(YYDDD)_____________________ ____________________ _____ __
_________________________________ ____________________
_________________________________ ____________________
__________ _________________________________ ____________________ _____ __
_______________________________________________________________________________
Field Text Len Dec
YYDDD Date field in YYDDD format 6 L
F3=Exit F5=Report F9=Insert F11=Display names only
F12=Cancel F13=Layout F20=Reorganize F24=More keys
_________________________________ ____________________
_________________________________ ____________________
Bottom
Bottom
The commands to run the query in example 4 are:
CHGJOB DATFMT(*MDY)
RUNQRY QRY(MMDDYY)
General considerations when creating an expression in Query for iSeries
Following are some general rules you should use when you are creating expressions:
v Character constants that represent dates are evaluated using the date format stored in the query
definition.
v Your expression can have a single value, or it can use as many operands and operators needed to fit in
the three lines provided on the Define Result Fields display.
v Do not use a result field in select records tests or as a sort field if it may have a division by zero or
overflow result.
v You can avoid dividing by zero by doing one of the following:
– When you select records, either by means of a select/omit logical file or by means of record
selection tests on fields other than the result field, select only records that will not cause a division
by zero.
– If a dividend for the definition of a result field will always be zero, try the following change to the
expression:
Original expression--> FIELD=P/X
Revised expression---> S = .00001
FIELD=P/(X+S)
Note: In the expression S, the number of zero digits before the 1 digit should be two more than the
decimal precision of the original expression.
– If a dividend for the definition of the result field will not be zero when the divisor is, the following
change to the expression prevents an overflow condition.
Original expression--> FIELD=P/X
Revised expression---> S = .00001
FIELD = (P*X) / ((X*X) + S)
Chapter 5. Defining result fields in Query for iSeries 83
Page 96

– If your expression performs a division operation, avoid dividing by zero by defining the denominator
as the result field just before the result field with a division. Then, for all logical OR groupings of
record selection, add a logical AND test stating the denominator must not equal zero.
v On the three lines provided, you can split a field name, numeric constant, or character string at the end
of one line and continue it at the beginning of the next. When you split a field name or a numeric
constant, do not put spaces at the end of the first line or at the beginning of the next line because
Query then treats it as two field names or numeric constants. Character constants (that is, characters
enclosed in apostrophes) can be split at any point. A DBCS character constant can be split by placing a
shift-in character in the last position of the upper line and a shift-out character in the first position of the
lower line.
v When using a field to divide, you must also select that field not equal to zero as the first selection
before any other result fields are processed, as in the following example:
v
1. AND/OR Field Test Value
2. ODQYSD NE 0
3. AND OMCRMM EQ 0
4. AND OMSTAT EQ ’50’
5. AND ODSTAT NE ’99’
6. AND PCT LT 90
7. AND PCT LT 90
8. AND OMUSOR LIST ’DT’’ET’’SR’’RT’
v To make your expressions easier to read, you can use blanks between field names and operators.
v You can create up to 100 result fields.
v Substring and concatenation operations are not allowed with date, time, timestamp or numeric fields. To
circumvent this, use the CHAR function around the date, time, or timestamp field and the DIGITS
function for numeric fields.
Query determines the data type of the result field according to the following:
If the first value in the expression is a numeric field name, a numeric constant (like the number 7 or
−3.14), or a function that returns a numeric value, then the result field is numeric.
If the SUBSTR function is used, the result field is an SBCS character field if the value is SBCS,
DBCS-only, or DBCS-either. The result field is a DBCS-open field if the value is DBCS-open. The result
field is a DBCS-graphic field if the value is DBCS-graphic. A substring of a fixed-length field can be
either a variable- or fixed-length field, depending on how you define the length and offset.
If the expression is a constant, field, or function, the data type of the result field is the data type of the
constant, field, or value returned by the function.
If the concatenation operation is used and all of the values being concatenated are DBCS-only, the
result field is DBCS-only.
If the concatenation operation is used and all of the values being concatenated are DBCS-graphic, the
result field is DBCS-graphic.
If the concatenation operation is used and one of the values being concatenated is DBCS-either, or if
the expression contains a mixture of SBCS and bracketed-DBCS fields or constants, the result field is
DBCS-open.
If a variable-length field is concatenated to either a fixed or variable-length field, the result is a
variable-length field.
If two or more fixed-length fields are concatenated, the result is a fixed-length field.
If two fixed-length DBCS fields are concatenated, the result is a variable-length field.
84 Query for iSeries Use V5R2
Page 97

Column headings in Query for iSeries
If you want to specify a column heading to be used for a result field, type the heading you want on the
three lines (up to 20 characters each) of the display that correspond to your result field. The heading will
appear in your query output exactly as you enter it on the three lines.
If you do not want any heading for a result field, type *NONE in the first five positions on the first line for
that field. (You must use all capital letters, and the remainder of the line and the next two lines must be
blank.) If you do not specify either a heading or *NONE, Query uses the result field name as the column
heading.
Length and decimal positions in Query for iSeries
For character (SBCS and DBCS), date, time, and timestamp result fields, you must leave the Len and Dec
values blank. If you do not specify anything in the Len and Dec columns when you define a result field,
Query determines the length of the result field. When Query determines these values, you have fewer
things to consider when changing expressions. If you want to know the length of the result field, press F13
to see the layout of the report and count the number of 9s (numeric fields) and Xs (SBCS character fields).
If you are using a DBCS-capable display and have DBCS data, count the number of:
Double-byte Js, which represent DBCS-only data
Double-byte Os, which represent DBCS-open (mixed) data
Double-byte Es, which represent DBCS-either data
Double-byte Gs, which represent DBCS-graphic data
For date, time, or timestamp fields, look at the length of the current date, time, or timestamp in the result
field.
For numeric result fields, length is the total number of digits in the field. It includes the number of digits to
the left and right of the decimal point but not the decimal point itself. Decimal is the number of decimal
positions to the right of the decimal point. If you want to type your own value for the length, to prevent
unexpected results, you should first read “Length and decimal positions in Query for iSeries reports” on
page 120 and “Result field length and decimal positions in Query for iSeries” on page 188. Also, observe
the following:
v If you specify a value for Len, you must also specify a value for Dec (decimal positions).
v If you increase or decrease the value in Dec, you should increase or decrease the value in Len the
same amount. Also, you may need to change these values later if you make changes to the numeric
expression.
v If you leave Len and Dec blank, Query changes the value if the expression changes.
If you are creating result fields by using multiplication and division operations, you may be able to reduce
the length value if the actual data in your files will not require the maximum field size as established by
Query. For example, an inventory master file would typically have a PRICE field and a QUANTITY field. Both
fields would have to have sufficient length to handle the largest value possible. When these two fields are
multiplied to create a result field called AMOUNT, the maximum length would be the sum of the sizes of both
fields. Since items with high prices are usually stocked in low quantities, the maximum field size for AMOUNT
would probably be too large for practical use (for example, in a report).
Note: If you want to decrease the field length because you only want a certain number of positions shown
on a report, you should not change the field length on the Define Result Fields display. Change the
field length on the Specify Report Column Formatting display instead. If you specify a field length
on the Define Result Fields display, the result of an numeric expression may be truncated or
rounded, depending on what you specify on the Specify Processing Options display.
Chapter 5. Defining result fields in Query for iSeries 85
Page 98

Example of defining a result field in Query for iSeries
An example of how you would create a numeric result field called DAYS using the expression WEEKS * 7
and using the report column heading Total Days is shown on the following display. The second input area
shows how you would define a character result field called GREETING with a value of ‘Have a nice day‘
and no column heading.
Type definitions using field names or constants and operators, press Enter.
Operators: +, -, *, /, SUBSTR, ||, DATE...
Field Expression Column Heading Len Dec
DAYS WEEKS * 7 Total _____ __
GREETING ’Have a nice day’ *NONE _____ __
_________________________________________________________________________
Field
MONTHS
WEEKS
YEAR
F3=Exit F5=Report F9=Insert F11=Display text
F12=Cancel F13=Layout F20=Reorganize F24=More keys
Define Result Fields
Days
Bottom
Bottom
Note: See “CCSID and result field expressions in Query for iSeries” on page 252 for information on how
CCSIDs affect result fields.
Adding or removing result fields in Query for iSeries
Adding a result field to your query definition requires positioning the cursor to the top half of the display
and using F9 to insert a blank set of result field definition lines. After you have entered the information
necessary to define your new result field or fields, they are inserted after the set where the cursor was
positioned when you pressed F9. Note that a result field must be defined before it can be used as part of
an expression to create another result field.
Once you have positioned the cursor in the top half of the display, the page down key will continue to
show you the next two field definitions until you reach the last nonblank definition in the list. Page up
shows you the previous two definitions until you reach the beginning of the list.
To remove a result field, blank out all references to the field and its definition on the Define Result Fields
display. You must remove all other occurrences of it from your query, but Query leads you to any
occurrence of that result field in other expressions or in other parts of the query definition.
86 Query for iSeries Use V5R2
Page 99

Chapter 6. Selecting and sequencing fields in Query for iSeries
This chapter describes how you select fields that you want to include in your query output and how you
indicate in what sequence the fields are to appear. They appear in a query report from left to right based
on the sequence number that you enter for each field. Query gives you the opportunity to select fields from
all your selected files and from all the result fields defined in your query.
Letting Query for iSeries select and sequence fields
If you did not type a 1 next to the Select and sequence fields option on the Define the Query display,
Query selects and sequences up to the first 500 fields available in your query. If the file(s) you have
selected contains only a few small fields that would all easily fit in 132 positions (the standard width of
printed output) and you do not care about the sequence of the output, letting Query select and sequence
fields for you makes good sense and may save you some time. Selecting only the fields you want in your
query may, however, improve the performance when the query is run.
The Select and Sequence Fields display is shown during query definition if you typed a 1 next to the
Select and sequence fields option on the Define the Query display. You can press F12 (Cancel) to return
you to the previous display if you have changed your mind and now want Query to select and sequence
fields for you. (Anything you typed on the display is ignored.)
Selecting fields and specifying their sequence in Query for iSeries
The Select and Sequence Fields display is shown below with some sample fields from a customer master
file shown in the Field column.
Select and Sequence Fields
Type sequence number (0-9999) for the names of up to 500 fields to
appear in the report, press Enter.
Seq Field Seq Field
____ ACCTNUMBER ____ PASTDUE
____ COMPANY ____ DATELASTPD
____ FIRSTNAME ____ CURRENTDAT
____ MIDDLEINIT ____ YEAR
____ LASTNAME ____ MONTH
____ STREETADDR
____ CITY
____ STATE
____ ZIPCODE
____ TELENUMBER
____ CRLIMIT
____ BALDUE
F3=Exit F5=Report F11=Display text F12=Cancel
F13=Layout F20=Renumber F21=Select all F24=More keys
Bottom
You make your selections by specifying a sequence number from 0 through 9999 in front of each field you
want to select. Use the numbers in ascending sequence. The lowest numbered field is positioned on the
far left of your output (or is the first field in your database file). If you change your mind about the fields
you have selected, you can delete a field from the output by removing the number you specified in front of
it. To change the sequence of the selected fields, just change the numbers.
© Copyright IBM Corp. 2000, 2002 87
Page 100

After making new selections or changing old ones, press the Enter key to rearrange them on the display in
the new sequence. You can then renumber them with new sequence numbers in added amounts of 10
(10, 20, 30, and so on) by pressing F20. Renumbering can make it easier to add a field within the
sequence later.
Only those fields that you have selected so far appear in your output. If you want the remaining fields
(those with no numbers to the left of them) to appear in your output and you do not particularly care how
they are arranged, press F21 (Select all). Query arranges the list beginning with those fields that you
already selected, and then it supplies sequence numbers for all of the remaining fields in the order that
they appeared in the list. (F21 is available only if you are creating or changing a query definition.)
When you make selections or change the sequence and press the Enter key, Query rearranges the fields
to match the sequence you specified and displays the message Press Enter to confirm. If you are
satisfied with the selections and sequence, press the Enter key again to end field selection. If you make
any changes before you press the Enter key, the message is shown again, and you must press the Enter
key once more to continue.
The fields are shown on the display in the following order:
1. All fields selected on this display, in the sequence specified. If no fields are selected, the fields chosen
as sort fields (if any) for this query are listed first, in the order they were given priority on the Select
Sort Fields display. (See Chapter 8, “Selecting sort fields in Query for iSeries”.)
2. Any result fields that have been defined for this query but have not been selected.
3. All other fields, in the order they exist in the record format definitions for the selected files. Fields that
are not selected from the first file are listed first, followed by those in the second file, and so on.
Following is an example of how you might select and sequence fields so that a query of the customer
master file produces a report that shows COMPANY, ACCTNUMBER, and PASTDUE in that order.
Select and Sequence Fields
Type sequence number (0-9999) for the names of up to 500 fields to
appear in the report, press Enter.
Seq Field Seq Field
2 ACCTNUMBER 3 PASTDUE
1 COMPANY ____ DATELASTPD
____ FIRSTNAME ____ CURRENTDAT
____ MIDDLEINIT ____ YEAR
____ LASTNAME ____ MONTH
____ STREETADDR
____ CITY
____ STATE
____ ZIPCODE
____ TELENUMBER
____ CRLIMIT
____ BALDUE
F3=Exit F5=Report F11=Display text F12=Cancel
F13=Layout F20=Renumber F21=Select all F24=More keys
Bottom
If you then pressed the Enter key, the Query would rearrange the fields so that COMPANY is in the first
position in the list, ACCTNUMBER is in the second position, and PASTDUE is in the third position. You could also
press F20 so that the selected fields are renumbered in added amounts of 10.
88 Query for iSeries Use V5R2
 Loading...