

IBM Rack Power Distribution Unit, Distributed Power InterconnectRack Power Distribution Unit Installation And Maintenance Manual
Page 1

IBM Distributed Power Interconnect
Rack Power Distribution Unit
Installation and Maintenance Guide
IBM
Page 2

Page 3

IBM Distributed Power Interconnect
Rack Power Distribution Unit
Installation and Maintenance Guide
IBM
Page 4

Note: Before using this information and the product it supports, be sure to read the warranty information in Appendix A,
“Warranty information,” on page 17 and the notices information in Appendix B, “Notices,” on page 29.
First Edition (March 2003)
© Copyright International Business Machines Corporation 2003. All rights reserved.
US Government Users Restricted Rights – Use, duplication or disclosure restricted by GSA ADP Schedule Contract with
IBM Corp.
Page 5

Contents
Safety . . . . . . . . . . . . . . . . . . . . . . . . . . . . . . . . . . . . . . . . . . . . . . . . . . . . . . . . . . . . . v
Chapter 1. Introduction . . . . . . . . . . . . . . . . . . . . . . . . . . . . . . . . . . . . . . . . . . . . . . 1
Chapter 2. Installing PDUs with the vertical-mounting plate . . . . . . . . . . . . . . . . 3
Chapter 3. Installing PDUs with the 1U-mounting bracket . . . . . . . . . . . . . . . . . . 7
Chapter 4. Hardware maintenance information . . . . . . . . . . . . . . . . . . . . . . . . . . 11
Field replaceable unit part numbers . . . . . . . . . . . . . . . . . . . . . . . . . . . . . . . . . . . . . 11
Getting help and technical assistance . . . . . . . . . . . . . . . . . . . . . . . . . . . . . . . . . . . 12
Before you call . . . . . . . . . . . . . . . . . . . . . . . . . . . . . . . . . . . . . . . . . . . . . . . . . . . 12
Using the documentation . . . . . . . . . . . . . . . . . . . . . . . . . . . . . . . . . . . . . . . . . . . 12
Getting help and information from the World Wide Web . . . . . . . . . . . . . . . . . . . 13
Software service and support. . . . . . . . . . . . . . . . . . . . . . . . . . . . . . . . . . . . . . . . 13
Hardware service and support . . . . . . . . . . . . . . . . . . . . . . . . . . . . . . . . . . . . . . . 13
Chapter 5. Rack PDU Specifications. . . . . . . . . . . . . . . . . . . . . . . . . . . . . . . . . . . 15
Appendix A. Warranty information . . . . . . . . . . . . . . . . . . . . . . . . . . . . . . . . . . . . 17
Warranty period . . . . . . . . . . . . . . . . . . . . . . . . . . . . . . . . . . . . . . . . . . . . . . . . . . . . 17
Problem determination . . . . . . . . . . . . . . . . . . . . . . . . . . . . . . . . . . . . . . . . . . . . . 17
Warranty service and support . . . . . . . . . . . . . . . . . . . . . . . . . . . . . . . . . . . . . . . 18
International Warranty Service . . . . . . . . . . . . . . . . . . . . . . . . . . . . . . . . . . . . . . . 19
Purchasing additional services. . . . . . . . . . . . . . . . . . . . . . . . . . . . . . . . . . . . . . . 19
IBM Statement of Limited Warranty Z125-4753-06 8/2000 . . . . . . . . . . . . . . . . . 20
Part 1 - General Terms . . . . . . . . . . . . . . . . . . . . . . . . . . . . . . . . . . . . . . . . . . . . . 20
Part 2 - Country-unique Terms . . . . . . . . . . . . . . . . . . . . . . . . . . . . . . . . . . . . . . . 22
Appendix B. Notices. . . . . . . . . . . . . . . . . . . . . . . . . . . . . . . . . . . . . . . . . . . . . . . . 29
Edition notice . . . . . . . . . . . . . . . . . . . . . . . . . . . . . . . . . . . . . . . . . . . . . . . . . . . . . . 29
Trademarks . . . . . . . . . . . . . . . . . . . . . . . . . . . . . . . . . . . . . . . . . . . . . . . . . . . . . . . . 30
Important notes. . . . . . . . . . . . . . . . . . . . . . . . . . . . . . . . . . . . . . . . . . . . . . . . . . . . . 30
Product recycling and disposal . . . . . . . . . . . . . . . . . . . . . . . . . . . . . . . . . . . . . . . . . 31
Power cords . . . . . . . . . . . . . . . . . . . . . . . . . . . . . . . . . . . . . . . . . . . . . . . . . . . . . . . 31
© Copyright IBM Corp. 2003 iii
Page 6

iv IBM Distributed Power Interconnect Rack Power Distribution Unit:Installation and Maintenance Guide
Page 7

Safety
Before installing this product, read the Safety Information.
Antes de instalar este produto, leia as Informações de Segurança.
Pred instalací tohoto produktu si prectete prírucku bezpecnostních instrukcí.
Læs sikkerhedsforskrifterne, før du installerer dette produkt.
Lees voordat u dit product installeert eerst de veiligheidsvoorschriften.
Ennen kuin asennat tämän tuotteen, lue turvaohjeet kohdasta Safety Information.
Avant d'installer ce produit, lisez les consignes de sécurité.
Vor der Installation dieses Produkts die Sicherheitshinweise lesen.
Prima di installare questo prodotto, leggere le Informazioni sulla Sicurezza.
Les sikkerhetsinformasjonen (Safety Information) før du installerer dette produktet.
Antes de instalar este produto, leia as Informações sobre Segurança.
© Copyright IBM Corp. 2003 v
Page 8

Antes de instalar este producto, lea la información de seguridad.
Läs säkerhetsinformationen innan du installerar den här produkten.
Important:
All caution and danger statements in this documentation begin with a number. This
number is used to cross reference an English caution or danger statement with
translated versions of the caution or danger statement in the IBM NetBAY Rack Safety
Information book.
For example, if a caution statement begins with a number 1, translations for that
caution statement appear in the IBM NetBAY Rack Safety Information book under
statement 1.
Be sure to read all caution and danger statements in this documentation before
performing the instructions. Read any additional safety information that comes with
your server or optional device before you install the device.
vi IBM Distributed Power Interconnect Rack Power Distribution Unit:Installation and Maintenance Guide
Page 9

Statement 4:
DANGER
Electrical current from power, telephone, and communication cables is
hazardous.
To avoid a shock hazard:
• Do not connect or disconnect any cables or perform installation,
maintenance, or reconfiguration of this product during an electrical
storm.
• Connect all power cords to a properly wired and grounded electrical
outlet.
• Connect to properly wired outlets any equipment that will be attached
to this product.
• When possible, use one hand only to connect or disconnect signal
cables.
• Never turn on any equipment when there is evidence of fire, water, or
structural damage.
• Disconnect the attached power cords, telecommunications systems,
networks, and modems before you open the device covers, unless
instructed otherwise in the installation and configuration procedures.
• Connect and disconnect cables as described in the following table
when installing, moving, or opening covers on this product or
attached devices.
To Connect: To Disconnect:
1. Turn everything OFF.
2. First, attach all cables to devices.
3. Attach signal cables to connectors.
4. Attach power cords to outlet.
5. Turn device ON.
1. Turn everything OFF.
2. First, remove power cords from outlet.
3. Remove signal cables from connectors.
4. Remove all cables from devices.
Safety vii
Page 10

Statement 8:
DANGER
• Plug power cords from devices in the rack cabinet into electrical
outlets that are located near the rack cabinet and are easily accessible.
• Each rack cabinet might have more than one power cord. Be sure to
disconnect all power cords in the rack cabinet before servicing any
device in the rack cabinet.
• Install an emergency-power-off switch if more than one power device
(power distribution unit or uninterruptible power supply) is installed in
the same rack cabinet.
• Connect all devices installed in a rack cabinet to power devices
installed in the same rack cabinet. Do not plug a power cord from a
device installed in one rack cabinet into a power device installed in a
different rack cabinet.
Statement 9:
DANGER
Overloading a branch circuit is potentially a fire hazard and a shock
hazard under certain conditions. To avoid these hazards, ensure that your
system electrical requirements do not exceed branch circuit protection
requirements. Refer to the information that is provided with your device
for electrical specifications.
WARNING: Handling the cord on this product or cords associated with accessories
sold with this product, will expose you to lead, a chemical known to the State of
California to cause cancer, and birth defects or other reproductive harm. Wash
hands after handling.
ADVERTENCIA: El contacto con el cable de este producto o con cables de
accesorios que se venden junto con este producto, pueden exponerle al plomo, un
elemento químico que en el estado de California de los Estados Unidos está
considerado como un causante de cancer y de defectos congénitos, además de otros
riesgos reproductivos. Lávese las manos después de usar el producto.
viii IBM Distributed Power Interconnect Rack Power Distribution Unit:Installation and Maintenance Guide
Page 11
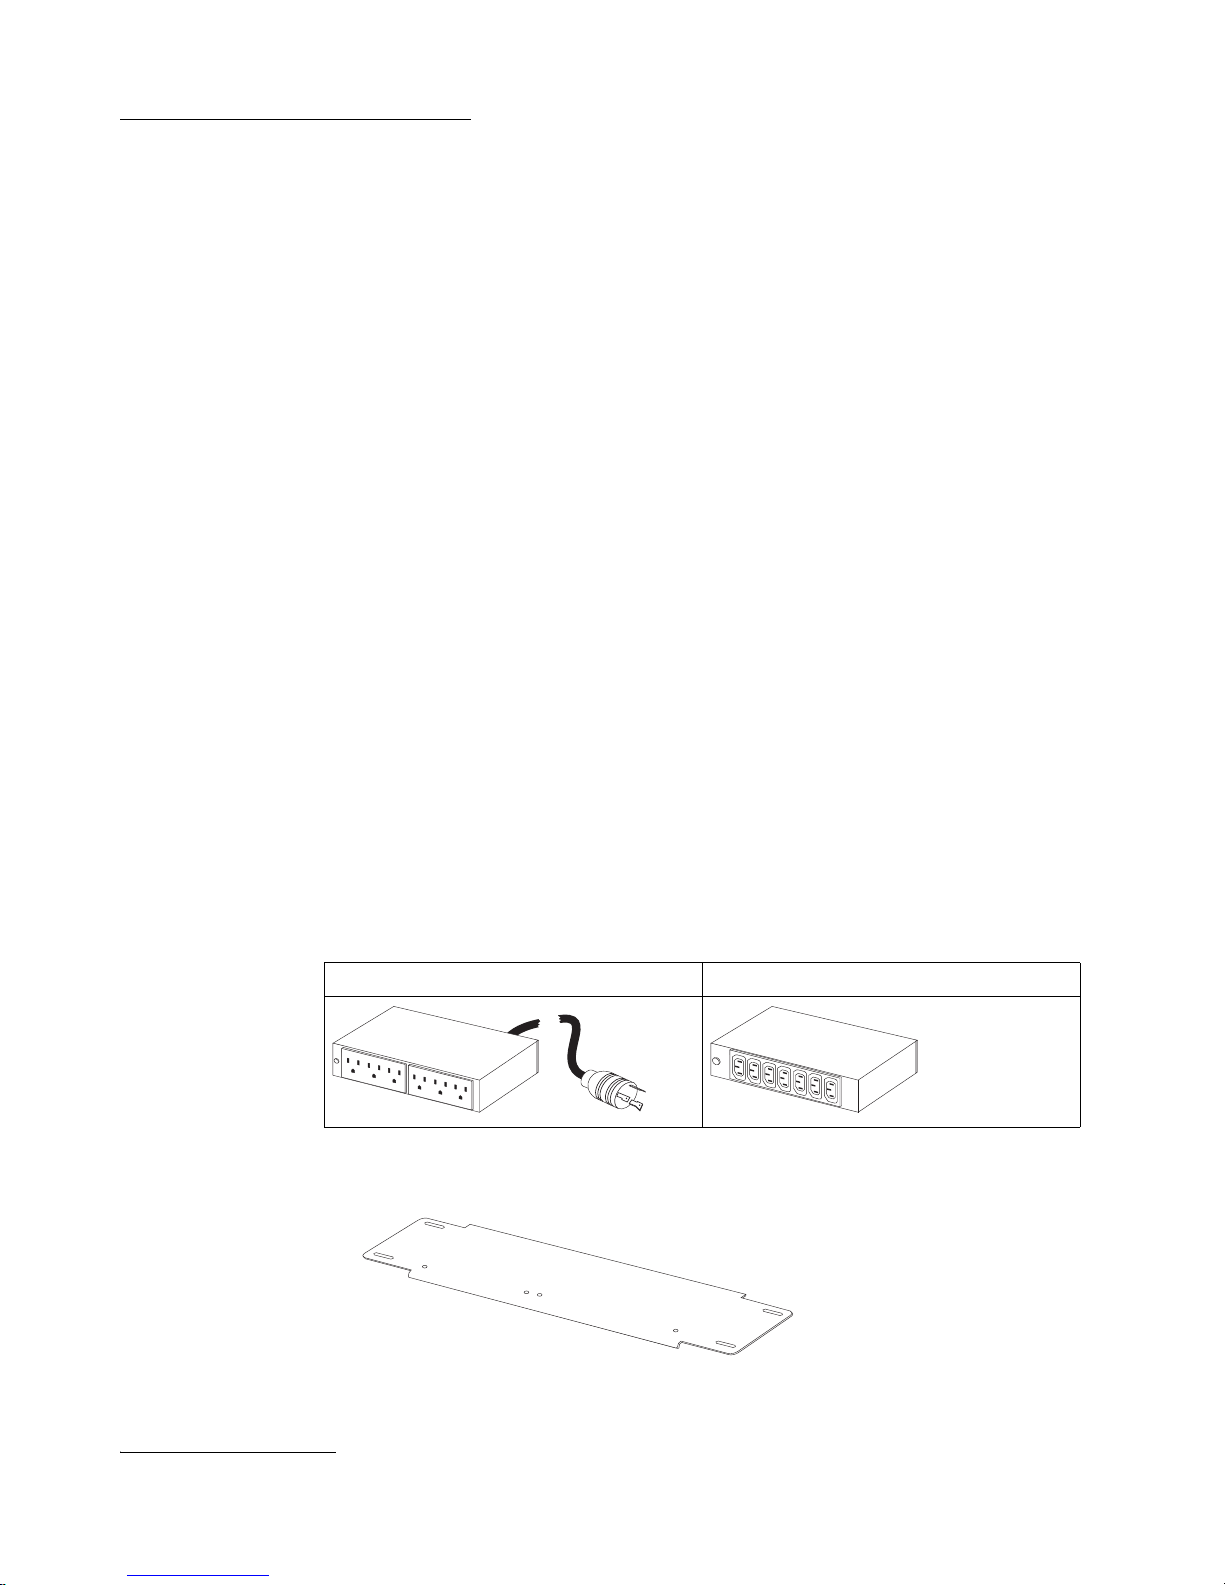
Chapter 1. Introduction
The IBM® Distributed Power Interconnect 100-127V Rack Power Distribution Unit
(PDU) comes with a fixed power cord and enables you to connect up to six devices to
a single dedicated power source. The Universal Rack PDU comes with a country or
region-specific power cord and enables you to connect up to seven devices to a single
dedicated power source, such as an electrical outlet, a Front-end PDU, or an
uninterruptible power supply.
The latest version of this publication is available from the IBM Web site. Go to
http://www.ibm.com/ and click Support & downloads. In the Technical Support
keyword search field, type "DPI PDU" and click Go. The latest version of this
publication will be in the list of publications displayed.
The 100-127V and Universal Rack PDUs have a green LED to indicate when power is
supplied to the outlets. The LED lights when the Rack PDU is connected to a power
source and the circuit breaker is in the On position.
Note: The illustrations in this documentation might differ slightly from your hardware.
You can install PDUs vertically in the side of a rack cabinet, or horizontally within 1U
of
EIA mounting space in a rack cabinet. The mounting hardware that comes with this
option enables you to install two PDUs beside each other in the same mounting space
within a rack cabinet.
The following parts come with your Rack PDU:
• 100-127V Rack PDU with fixed power cord OR Universal Rack PDU with a
country or region-specific power cord
Notes:
1. In the United States, the Universal Rack PDU comes with both a low-voltage
and a high-voltage power cord.
2. Universal Rack PDUs also come with one IEC 320-C19 to IEC 320-C20
power cable for connecting the Rack PDU to a Front-end PDU.
100-127V Rack PDU Universal Rack PDU
• One small vertical-mounting plate
. One U is equal to 4.45 cm (1.75 in.)
© Copyright IBM Corp. 2003 1
Page 12
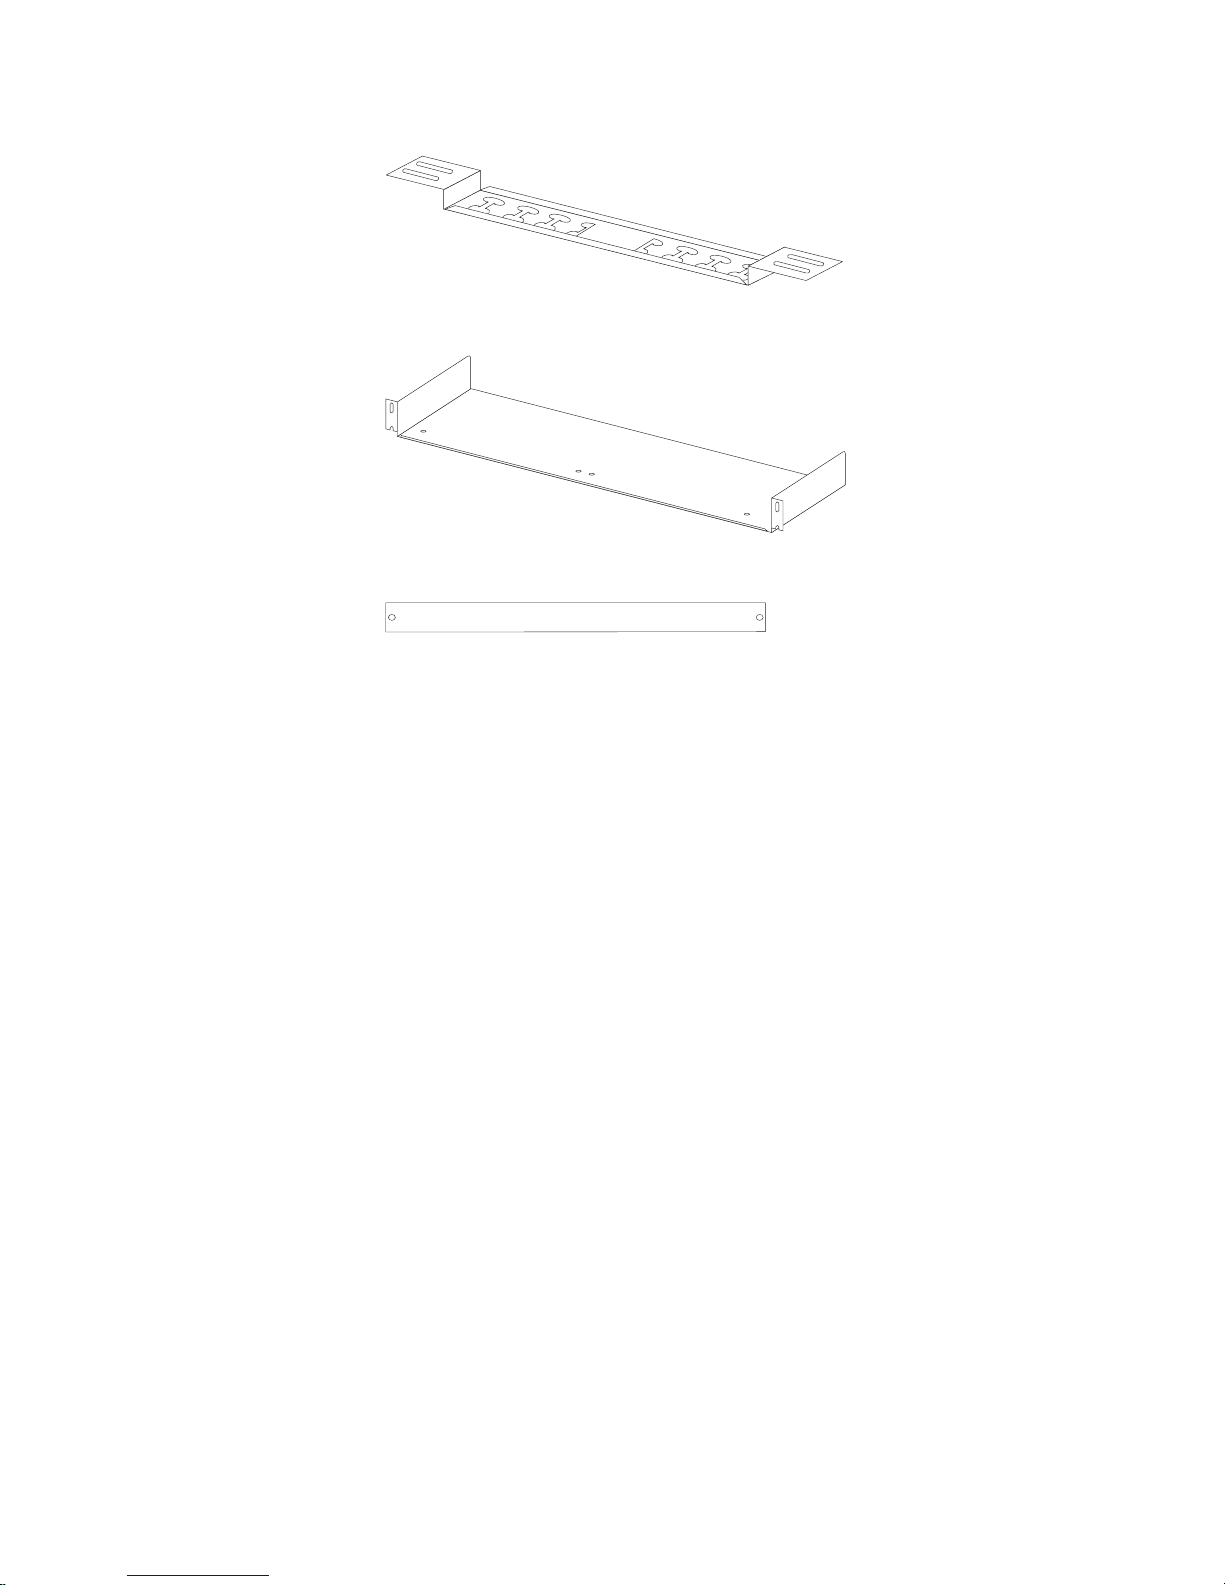
• One cable-management bracket (for vertical installations)
• One 1U-mounting bracket
• One 1U blank filler panel
• Miscellaneous hardware kit (for attaching the Rack PDU to a mounting plate or
bracket and installing the Rack PDU in a rack cabinet)
• Cable straps
• IBM NetBAY
™
Rack Safety Information book
• This documentation
Notes:
1. Power cables for devices that you will connect to the 100-127V Rack PDU or the
Universal Rack PDU do not come with the Rack PDU.
2. You will have some unused parts depending upon how you install the Rack PDU.
You will need the following tools to install the Rack PDU in a rack cabinet:
• One Phillips screwdriver
• One 10 mm (11/32-in.) wrench
• One cage-nut-insertion tool or flat-blade screwdriver (for installing cage nuts in
some rack cabinets)
2 IBM Distributed Power Interconnect Rack Power Distribution Unit:Installation and Maintenance Guide
Page 13
Chapter 2. Installing PDUs with the vertical-mounting plate
Complete the following steps to install 100-127V or Universal Rack PDUs in the side
of a rack cabinet, using the vertical-mounting plate. The illustrations in this chapter
show a Universal Rack PDU, but the steps for installing a 100-127V Rack PDU are the
same.
Note: The mounting holes on upper and lower side braces in a rack side
compartment must be between 48.6 cm (19.1 in.) and 56.9 cm (22.4 in.) apart. If your
rack cabinet has movable side braces, refer to your rack cabinet documentation for
information about relocating your side braces if they are not already spaced for this
installation.
1. Refer to your rack cabinet documentation for additional information.
Note: Removing the rack doors and side panels might make installing PDUs
easier.
2. Verify that the circuit-breaker switch is in the Off position before installing a Rack
PDU.
OFF
15A
O
ON
OFF
O
I
3. Attach a Rack PDU to the vertical-mounting plate with two M3x5 screws that come
with the Rack PDU. Make sure that the countersink holes in the vertical-mounting
plate are facing away from the Rack PDU.
15A
OFF
O
ON
ON
I
I
4. If you have a second Rack PDU to install, install it on the vertical-mounting plate
with two M3x5 screws that come with the second Rack PDU.
Note: You can install Rack and Front-end PDUs on the same vertical-mounting
plate.
© Copyright IBM Corp. 2003 3
Page 14
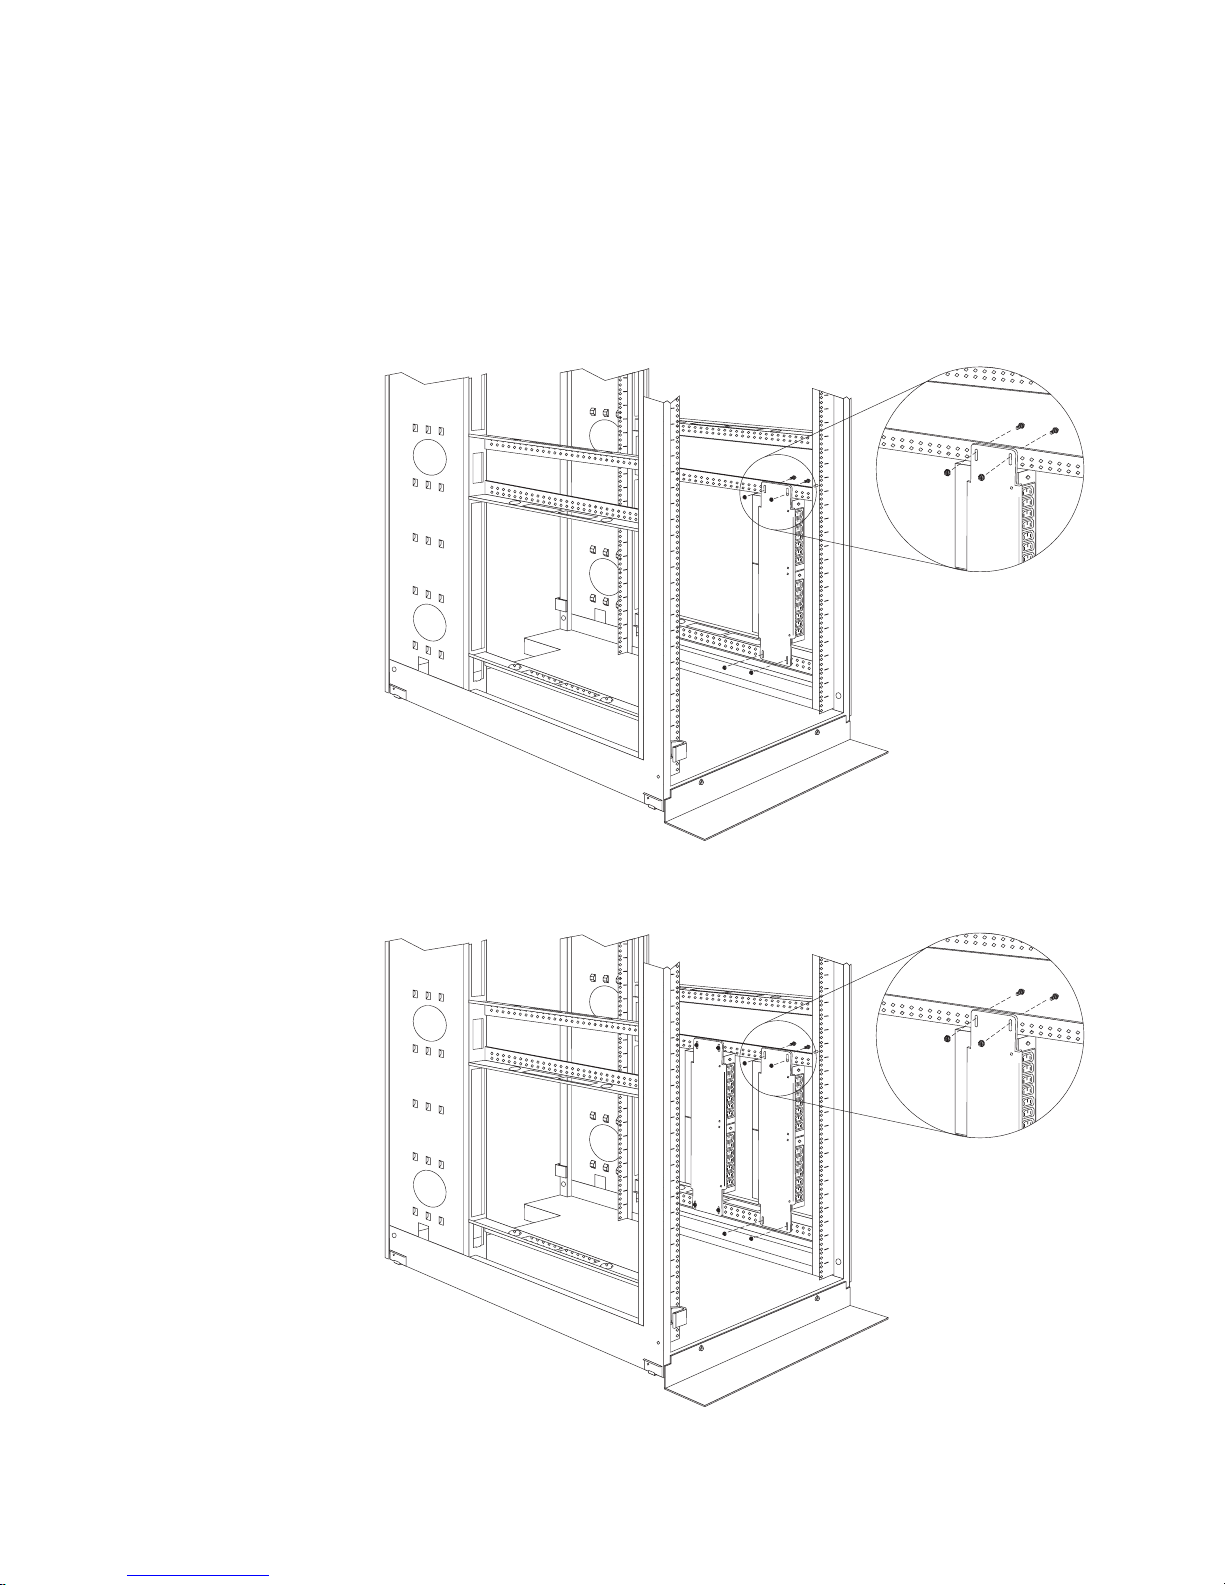
5. While one person holds the vertical-mounting plate in the side of the rack cabinet,
attach the plate to the side braces with four M6 screws and nuts that come with
the Rack PDU.
Notes:
a. Leave enough space to allow you to connect and disconnect power cables.
b. If you are going to install a second vertical-mounting plate or a cable-
management bracket in the same side of the rack cabinet, leave enough
space between this vertical-mounting plate and the rear EIA mounting flanges
for the second installation.
6. If you install a second vertical-mounting plate in the same side of the rack cabinet,
repeat steps 2 on page 3 through 5 as required; then, go to step 8 on page 5
4 IBM Distributed Power Interconnect Rack Power Distribution Unit:Installation and Maintenance Guide
Page 15

7. Install the optional cable-management bracket beside the vertical-mounting plate
with four M6 screws and nuts that come with the Rack PDU.
8. If you installed a Universal Rack PDU, connect the power cord that comes with the
Rack PDU to the inlet on the Rack PDU. Repeat this step for all Universal Rack
PDUs.
9. Route the power cords from each Rack PDU toward the rack cabinet side braces;
then, route the power cords along a side brace towards the back of the rack
cabinet and secure the power cords with the cable straps that come with the Rack
PDU.
10. Route each power cord toward a dedicated power source. Use the provided cable
straps to secure power cords along the way. Use the openings in the rack cabinet,
if you must exit the rack cabinet to connect to a power source.
Chapter 2. Installing PDUs with the vertical-mounting plate 5
Page 16

11. After you connect the power cords to properly wired and grounded dedicated
power sources, you can turn on the Rack PDU circuit breakers; then, connect
other devices in the rack cabinet to the power outlets on the Rack PDUs.
12. Route all the other power cables neatly, using the cable-management bracket if
installed, and secure the power cables with cable straps.
Note: To route a power cable through the cable-management bracket, route the
cable through an opening in the bracket and against an upper or lower tab on the
bracket, as shown below. Use cable straps as required.
Ta b
6 IBM Distributed Power Interconnect Rack Power Distribution Unit:Installation and Maintenance Guide
Page 17

Chapter 3. Installing PDUs with the 1U-mounting bracket
Complete the following steps to install 100-127V or Universal Rack PDUs in a 1U
space within a rack cabinet, using the 1U-mounting bracket. The illustrations in this
chapter show a Universal Rack PDU, but the steps for installing a 100-127V Rack
PDU are the same.
1. Refer to your rack cabinet documentation for additional information.
Notes:
a. Removing rack doors and side panels might make installing PDUs easier.
b. Use cage nuts for rack cabinets with square holes, or clip nuts for rack
cabinets with round holes.
c. If your rack cabinet requires cage nuts, use the cage-nut-insertion tool or a
flat-blade screwdriver to install them.
Cage
nuts
Cage
nuts
Clip
nuts
2. Verify that the circuit-breaker switch is in the Off position before installing a Rack
PDU.
OFF
15A
O
ON
OFF
O
I
OFF
15A
O
ON
ON
I
I
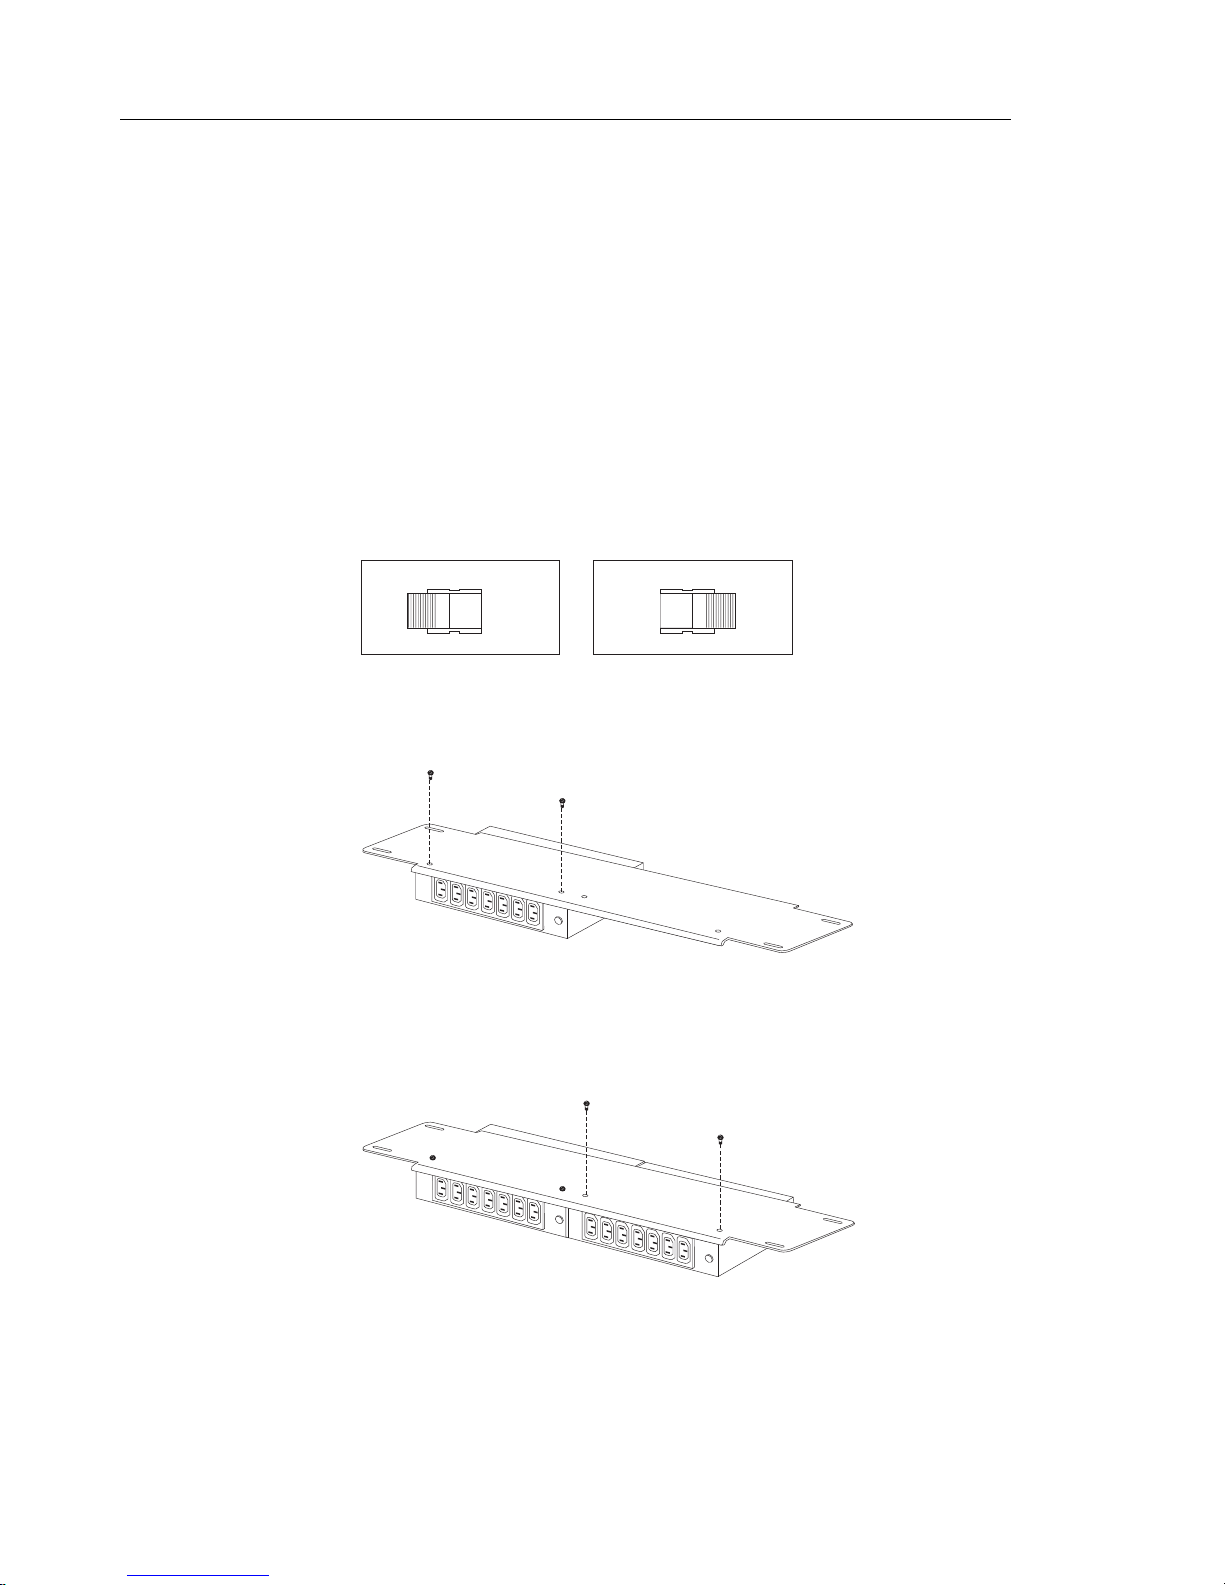
3. Attach a Rack PDU to the 1U-mounting bracket with two M3x5 screws that come
with the Rack PDU.
© Copyright IBM Corp. 2003 7
Page 18

4. If you have a second Rack PDU to install, install it on the 1U-mounting bracket
with two M3x5 screws that come with the second Rack PDU.
Note: You can install Rack and Front-end PDUs on the same 1U-mounting
bracket.
5. Determine the 1U space within the rack cabinet where you are going to install the
Rack PDUs; then, while one person holds the 1U-mounting bracket in place,
attach the bracket to the front or the rear of the rack cabinet with four M6 screws
and clip nuts or cage nuts that come with the Rack PDU.
Note: Leave enough space to allow you to connect and disconnect power cables.
6. If you install the Rack PDUs in the rear of the rack cabinet, you must install the 1U
blank filler panel on the front of the rack cabinet at the same U level as the 1Umounting bracket. Use two M6 screws that come with the Rack PDU.
8 IBM Distributed Power Interconnect Rack Power Distribution Unit:Installation and Maintenance Guide
Page 19

7. Some rack cabinets have 1U mounting space in the side of the rack cabinet where
you can install the 1U-mounting bracket as shown below.
Note: You will not install the 1U blank filler panel if you install your Rack PDUs
this way.
8. If you installed a Universal Rack PDU, connect the power cord that comes with the
Rack PDU to the inlet on the Rack PDU. Repeat this step for all Universal Rack
PDUs.
9. Route the power cords from each Rack PDU toward the rack cabinet side braces;
then, route the power cords along a side brace towards the back of the rack
cabinet and secure the power cords with the cable straps that come with the Rack
PDU.
Chapter 3. Installing PDUs with the 1U-mounting bracket 9
Page 20

10. Route each power cord toward a dedicated power source. Use the provided cable
straps to secure power cords along the way. Use the openings in the rack cabinet,
if you must exit the rack cabinet to connect to a power source.
11. After you connect the power cords to properly wired and grounded dedicated
power sources, you can turn on the Rack PDU circuit breakers; then, connect
other devices in the rack cabinet to the power outlets on the Rack PDUs.
12. Route all the other power cables neatly and secure the power cables with cable
straps.
10 IBM Distributed Power Interconnect Rack Power Distribution Unit:Installation and Maintenance Guide
Page 21

Chapter 4. Hardware maintenance information
This chapter contains information about IBM field replaceable unit (FRU) availability
for 100-127V and Universal Rack PDUs. Troubleshooting and servicing of complex
problems should be performed only by trained service personnel.
Attention: The 100-127V and Universal Rack PDUs do not contain any serviceable
parts.
This chapter also contains information about how to obtain help and technical
assistance for the Rack PDUs.
Field replaceable unit part numbers
IBM FRU part numbers are subject to change without notice. This section contains a
listing of the FRU part numbers available at the time this document was published.
FRU Part # Description
32P1728 100-127V Rack PDU with fixed power cord
32P1729 Universal Rack PDU without power cord
73P5843 Mounting hardware kit
00N7700 2 m (6.6 ft) IEC 320-C19 to IEC 320-C20 power cable for connecting to a Front-
end PDU
12J5116 2.5 m (8.2 ft) IEC 320-C19 to NEMA L5-20P Rack PDU power cord
12J5118 2.5 m (8.2 ft) IEC 320-C19 to NEMA L6-20P Rack PDU power cord
55H6643 2.5 m (8.2 ft) IEC 320-C19 to CEE7-VII Rack PDU power cord (Europe)
36L8822 2.5 m (8.2 ft) IEC 320-C19 to IEC 309 2P+Gnd Rack PDU power cord
(Denmark)
12J5122 2.5 m (8.2 ft) IEC 320-C19 to SI32 Rack PDU power cord (Israel)
12J5126 2.5 m (8.2 ft) IEC 320-C19 to CEI 23-16 Rack PDU power cord (Italy)
12J5124 2.5 m (8.2 ft) IEC 320-C19 to SABS 164 Rack PDU power cord (South Africa)
12J5987 2.5 m (8.2 ft) IEC 320-C19 to BS 1363/A Rack PDU power cord (United
Kingdom)
12J5128 2.5 m (8.2 ft) IEC 320-C19 to AS/NZ 3112 Rack PDU power cord (Australia /
New Zealand)
01K9851 2.5 m (8.2 ft) IEC 320-C19 to GB 2099.1 Rack PDU power cord (China)
49P2114 2.5 m (8.2 ft) IEC 320-C19 to NBR 6147 Rack PDU power cord (Brazil)
49P2082 2.5 m (8.2 ft) IEC 320-C19 to IS 6538 Rack PDU power cord (India)
36L8884 2.5 m (8.2 ft) IEC 320-C19 to IRAM 2073 Rack PDU power cord (Argentina)
© Copyright IBM Corp. 2003 11
Page 22

Getting help and technical assistance
If you need help, service, or technical assistance or just want more information about
IBM products, you will find a wide variety of sources available from IBM to assist you.
This appendix contains information about where to go for additional information about
IBM and IBM products, what to do if you experience a problem with your xSeries
IntelliStation
®
system, and whom to call for service, if it is necessary.
Before you call
Before you call, make sure that you have taken these steps to try to solve the problem
yourself:
• Check all cables to make sure that they are connected.
• Check the power switches to make sure that the system is turned on.
• Use the troubleshooting information in your system documentation, and use the
diagnostic tools that come with your system.
• Go to the IBM Support Web site at http://www.ibm.com/pc/support/ to check for
technical information, hints, tips, and new device drivers.
• Use an IBM discussion forum on the IBM Web site to ask questions.
™
or
You can solve many problems without outside assistance by following the
troubleshooting procedures that IBM provides in the online help or in the publications
that are provided with your system and software. The information that comes with your
system also describes the diagnostic tests that you can perform. Most xSeries and
IntelliStation systems, operating systems, and programs come with information that
contains troubleshooting procedures and explanations of error messages and error
codes. If you suspect a software problem, see the information for the operating system
or program.
Using the documentation
Information about your IBM xSeries or IntelliStation system and preinstalled software,
if any, is available in the documentation that comes with your system. That
documentation includes printed books, online books, README files, and help files.
See the troubleshooting information in your system documentation for instructions for
using the diagnostic programs. The troubleshooting information or the diagnostic
programs might tell you that you need additional or updated device drivers or other
software. IBM maintains pages on the World Wide Web where you can get the latest
technical information and download device drivers and updates. To access these
pages, go to http://www.ibm.com/pc/support/ and follow the instructions. Also, you can
order publications through the IBM Publications Ordering System at
http://www.elink.ibmlink.ibm.com/public/applications/publications/cgibin/pbi.cgi.
12 IBM Distributed Power Interconnect Rack Power Distribution Unit:Installation and Maintenance Guide
Page 23

Getting help and information from the World Wide Web
On the World Wide Web, the IBM Web site has up-to-date information about IBM
xSeries and IntelliStation products, services, and support. The address for IBM
xSeries information is http://www.ibm.com/eserver/xseries/. The address for IBM
IntelliStation information is http://www.ibm.com/pc/intellistation/.
You can find service information for your IBM products, including supported options, at
http://www.ibm.com/pc/support/. If you click Profile from the support page, you can
create a customized support page. The support page has many sources of
information and ways for you to solve problems, including:
• Diagnosing problems, using the IBM Online Assistant
• Downloading the latest device drivers and updates for your products
• Viewing Frequently Asked Questions (FAQ)
• Viewing hints and tips to help you solve problems
• Participating in IBM discussion forums
• Setting up e-mail notification of technical updates about your products
Software service and support
Through IBM Support Line, you can get telephone assistance, for a fee, with usage,
configuration, and software problems with xSeries servers, IntelliStation workstations,
and appliances. For information about which products are supported by Support Line
in your country or region, go to http://www.ibm.com/services/sl/products/.
For more information about Support Line and other IBM services, go to
http://www.ibm.com/services/, or go to http://www.ibm.com/planetwide/ for support
telephone numbers.
Hardware service and support
You can receive hardware service through IBM Integrated Technology Services or
through your IBM reseller, if your reseller is authorized by IBM to provide warranty
service. Go to http://www.ibm.com/planetwide/ for support telephone numbers.
In the U.S. and Canada, hardware service and support is available 24 hours a day, 7
days a week. In the U.K., these services are available Monday through Friday, from 9
a.m. to 6 p.m.
Chapter 4. Hardware maintenance information 13
Page 24

14 IBM Distributed Power Interconnect Rack Power Distribution Unit:Installation and Maintenance Guide
Page 25

Chapter 5. Rack PDU Specifications
When connected to a dedicated power source, the 100-127V and Universal Rack
PDUs conform to UL1950, CSA 22.2-950, EN-60950, and IEC-950 standards. The
following table contains the product specifications for the 100-127V and Universal
Rack PDUs.
Height 41.5 mm (1.63 in.)
Width 222.5 mm (8.76 in.)
Depth 114.5 mm (4.51 in.)
Additional Clearance 100-127V Rack PDU: 20 mm (0.79 in.) for circuit
Weight 100-127V Rack PDU: 1.7 kg (3.7 lb), with fixed line
Operating temperature at 0-914 m
(0-3000 ft)
Operating temperature at 914-2133 m
(3000-7000 ft)
breaker; 2.5 mm (0.1 in.) for outlets
Universal Rack PDU: 20 mm (0.79 in.) for circuit
breaker; 3.0 mm (0.12 in.) for outlets
cord
Universal Rack PDU: 1.3 kg (2.8 lb), without
power cord
10°-35° C (50°-95° F)
10°-32° C (50°-90° F)
Operating humidity 8-80% (non-condensing)
Rated voltage 100-127V Rack PDU: 100-127 V ac, 15 A, single-
phase
Universal Rack PDU: 100-240 V ac, 15 A, singlephase
Rated frequency 50-60 Hz
Maximum power rating 100-127V Rack PDU: 1900 VA
Universal Rack PDU: 3600 VA
Circuit breaker Two-pole, 15 A with time-delay protection
Power inlet 100-127V Rack PDU: Fixed line cord with L5-15P
connector rated at 15 A
Universal Rack PDU: IEC 320-C20 inlet rated at
16 A (VDE) / 20 A (UL/CSA)
Power outlets 100-127V Rack PDU: Six NEMA 5-15 outlets rated
at 10 A (VDE) / 15 A (UL/CSA)
Universal Rack PDU: Seven IEC 320-C13 outlets
rated at 10 A (VDE) / 15 A (UL/CSA)
© Copyright IBM Corp. 2003 15
Page 26

If you are connecting Rack PDUs to a 120-127 V ac power source, connect each Rack
PDU power cord to a separate branch circuit.
If you are connecting Rack PDUs to a 200-240 V ac power source, and the branch
circuit rating is:
• 13 A or less, connect each Rack PDU power cord to a separate branch circuit.
• 14-19 A, do not connect more than two Rack PDU power cords to the same
branch circuit.
• 20 A or greater, you can connect up to three Rack PDU power cords to the same
branch circuit.
16 IBM Distributed Power Interconnect Rack Power Distribution Unit:Installation and Maintenance Guide
Page 27

Appendix A. Warranty information
This section contains information about your warranty period and the service and
support that are provided by your warranty.
Warranty period
The warranty period varies by machine type and country or region.
Contact your place of purchase for warranty service information. Some IBM Machines
are eligible for on-site warranty service depending on the country or region where
service is performed.
Prior to on-site warranty service, you are required to go through problem
determination with an IBM service specialist call center technician.
This paragraph applies only to products with a warranty period of 3 years on parts and
1 year on labor. A warranty period of 3 years on parts and 1 year on labor means that
IBM will provide warranty service without charge for:
1. parts and labor during the first year of the warranty period
2. parts only, on an exchange basis, in the second and third years of the warranty
period. IBM will charge you for any labor it provides in performance of the repair or
replacement.
The IBM Machine Warranties Web site at
http://www.ibm.com/servers/support/machine_warranties/ contains a worldwide
overview of the IBM Statement of Limited Warranty for IBM Machines, a glossary of
terms used in the Statement of Limited Warranty, Frequently Asked Questions (FAQ),
and links to Product Support Web pages. The IBM Statement of Limited Warranty is
available from this Web site in 29 languages in Portable Document Format (PDF).
Machine - IBM Distributed Power Interconnect Rack Power Distribution Unit
Country or region Warranty period Service delivery method
Worldwide Parts - 3 years, labor - 3 years Customer carry-in or mail-in
Problem determination
Prior to on-site warranty service, you are required to go through problem
determination with an IBM service specialist call center technician. The service
specialist will run diagnostic tests on the hardware and check the software.
Running diagnostics: The IBM service specialist will help you determine
whether your equipment is functioning as specified. It might be necessary to isolate
the failing xSeries, Netfinity
any active production environment to run diagnostics and perform defect-isolation
programs. You are responsible for making the system, IBM component, or both
available for running diagnostics and defect-isolation programs.
®
, or IntelliStation system; IBM component; or both from
© Copyright IBM Corp. 2003 17
Page 28

Checking software: The IBM service specialist will help you ensure that the
correct BIOS code, firmware, device drivers, and other supporting IBM software are
installed and correctly configured. It might be necessary to manually gather
information about the relevant software levels or run IBM-approved utility programs to
gather this information. It might be necessary to isolate the failing system from any
active production environment to gather this information. You are responsible, with
assistance from the service specialist, for gathering this information. The IBM
Statement of Limited Warranty does not include on-site assistance with this activity.
Warranty service and support
With the original purchase of an IBM xSeries or IntelliStation system, you have access
to extensive service and support. During the IBM Machine warranty period, you may
call IBM or your reseller for problem-determination assistance under the terms of the
IBM Statement of Limited Warranty.
The following services are available during the warranty period:
• Problem determination - Trained personnel are available to assist you with
determining if you have a hardware problem and deciding what action is
necessary to fix the problem.
• IBM hardware repair - If the problem is determined to be caused by IBM
hardware under warranty, trained service personnel are available to provide the
applicable level of service, either on-site or at an IBM service center as
determined by IBM.
• Engineering Change management - Occasionally, there might be changes that
are required after a product has been shipped from IBM. In those instances, IBM
will make Engineering Changes (ECs) available that apply to your hardware.
• Customer replaceable units (CRUs) - Some parts of IBM xSeries and
IntelliStation systems are designated as customer replaceable units. IBM ships
CRUs to you for replacement by you. CRUs include keyboards, monitors, memory,
diskette drives, hard disk drives, and mice (this list is not inclusive of all CRUs).
The following items are not covered under warranty service:
• Replacement or use of non-IBM parts. All IBM parts contain a 7-character
identification in the format IBM FRU XXXXXXX.
• Identification of software problem sources.
• Installation of customer replaceable units (CRUs).
• Installation and configuration of BIOS code, firmware, or device drivers that are
designated as customer installable.
See the IBM Statement of Limited Warranty for a full explanation of IBM warranty
terms. Be sure to retain your proof of purchase to obtain warranty service.
Please have the following information ready when you call:
• The machine type and model of your IBM hardware product (if available)
• Serial numbers of your IBM hardware products
• A description of the problem
• The exact wording of any error messages
• Hardware and software configuration information
18 IBM Distributed Power Interconnect Rack Power Distribution Unit:Installation and Maintenance Guide
Page 29

International Warranty Service
If you travel with your xSeries or IntelliStation system or relocate it to a country or
region where your system is sold and serviced by IBM or IBM resellers authorized to
perform warranty service, International Warranty Service (IWS) is available during the
warranty period. Eligible IBM systems are identified by their four-digit machine types.
You can obtain IWS through the service delivery method (such as depot, carry-in, or
on-site) provided in the servicing country or region. Service methods and procedures
vary by country or region, and some service or parts might not be available in all
countries and regions. Service centers in certain countries or regions might not be
able to service all models of a particular machine type. In addition, some countries or
regions might have fees and restrictions that apply at the time of service.
To determine whether your system is eligible for IWS, go to
http://www.ibm.com/pc/support/ and click Warranty lookup.
Purchasing additional services
During and after the warranty period, you can purchase additional services, such as
support for IBM and non-IBM hardware, operating systems, and application programs;
network setup and configuration; upgraded or extended hardware repair services; and
custom installations. Service availability and service name might vary by country or
region.
For more information about these services, contact your IBM marketing
representative.
Appendix A. Warranty information 19
Page 30

IBM Statement of Limited Warranty Z125-4753-06 8/2000
Part 1 - General Terms
This Statement of Limited Warranty includes Part 1 - General Terms and Part 2 Country-unique Terms. The terms of Part 2 replace or modify those of Part 1. The
warranties provided by IBM in this Statement of Limited Warranty apply only to
Machines you purchase for your use, and not for resale, from IBM or your reseller. The
term “Machine” means an IBM machine, its features, conversions, upgrades,
elements, or accessories, or any combination of them. The term “Machine” does not
include any software programs, whether pre-loaded with the Machine, installed
subsequently or otherwise. Unless IBM specifies otherwise, the following warranties
apply only in the country where you acquire the Machine. Nothing in this Statement of
Limited Warranty affects any statutory rights of consumers that cannot be waived or
limited by contract. If you have any questions, contact IBM or your reseller.
The IBM Warranty for Machines: IBM warrants that each Machine 1) is free from
defects in materials and workmanship and 2) conforms to IBM's Official Published
Specifications (“Specifications”). The warranty period for a Machine is a specified,
fixed period commencing on its Date of Installation. The date on your sales receipt is
the Date of Installation unless IBM or your reseller informs you otherwise.
If a Machine does not function as warranted during the warranty period, and IBM or
your reseller are unable to either 1) make it do so or 2) replace it with one that is at
least functionally equivalent, you may return it to your place of purchase and your
money will be refunded.
Extent of Warranty: The warranty does not cover the repair or exchange of a
Machine resulting from misuse, accident, modification, unsuitable physical or
operating environment, improper maintenance by you, or failure caused by a product
for which IBM is not responsible. The warranty is voided by removal or alteration of
Machine or parts identification labels.
THESE WARRANTIES ARE YOUR EXCLUSIVE WARRANTIES AND REPLACE
ALL OTHER WARRANTIES OR CONDITIONS, EXPRESS OR IMPLIED,
INCLUDING, BUT NOT LIMITED TO, THE IMPLIED WARRANTIES OR
CONDITIONS OF MERCHANTABILITY AND FITNESS FOR A PARTICULAR
PURPOSE. THESE WARRANTIES GIVE YOU SPECIFIC LEGAL RIGHTS AND
YOU MAY ALSO HAVE OTHER RIGHTS WHICH VARY FROM JURISDICTION TO
JURISDICTION. SOME JURISDICTIONS DO NOT ALLOW THE EXCLUSION OR
LIMITATION OF EXPRESS OR IMPLIED WARRANTIES, SO THE ABOVE
EXCLUSION OR LIMITATION MAY NOT APPLY TO YOU. IN THAT EVENT, SUCH
WARRANTIES ARE LIMITED IN DURATION TO THE WARRANTY PERIOD. NO
WARRANTIES APPLY AFTER THAT PERIOD.
Items Not Covered by Warranty: IBM does not warrant uninterrupted or error-free
operation of a Machine. Any technical or other support provided for a Machine under
warranty, such as assistance via telephone with “how-to” questions and those
regarding Machine set-up and installation, will be provided WITHOUT WARRANTIES
OF ANY KIND.
Warranty Service: To obtain warranty service for a Machine, contact IBM or your
reseller. If you do not register your Machine with IBM, you may be required to present
proof of purchase.
During the warranty period, IBM or your reseller, if approved by IBM to provide
warranty service, provides without charge certain types of repair and exchange
service to keep Machines in, or restore them to, conformance with their Specifications.
20 IBM Distributed Power Interconnect Rack Power Distribution Unit:Installation and Maintenance Guide
Page 31

IBM or your reseller will inform you of the available types of service for a Machine
based on its country of installation. At its discretion, IBM or your reseller will 1) either
repair or exchange the failing Machine and 2) provide the service either at your
location or a service center. IBM or your reseller will also manage and install selected
engineering changes that apply to the Machine.
Some parts of IBM Machines are designated as Customer Replaceable Units (called
“CRUs”), e.g., keyboards, memory, or hard disk drives. IBM ships CRUs to you for
replacement by you. You must return all defective CRUs to IBM within 30 days of your
receipt of the replacement CRU. You are responsible for downloading designated
Machine Code and Licensed Internal Code updates from an IBM Internet Web site or
from other electronic media, and following the instructions that IBM provides.
When warranty service involves the exchange of a Machine or part, the item IBM or
your reseller replaces becomes its property and the replacement becomes yours. You
represent that all removed items are genuine and unaltered. The replacement may not
be new, but will be in good working order and at least functionally equivalent to the
item replaced. The replacement assumes the warranty service status of the replaced
item. Many features, conversions, or upgrades involve the removal of parts and their
return to IBM. A part that replaces a removed part will assume the warranty service
status of the removed part.
Before IBM or your reseller exchanges a Machine or part, you agree to remove all
features, parts, options, alterations, and attachments not under warranty service.
You also agree to
1. ensure that the Machine is free of any legal obligations or restrictions that prevent
its exchange;
2. obtain authorization from the owner to have IBM or your reseller service a
Machine that you do not own; and
3. where applicable, before service is provided:
a. follow the problem determination, problem analysis, and service request
procedures that IBM or your reseller provides;
b. secure all programs, data, and funds contained in a Machine;
c. provide IBM or your reseller with sufficient, free, and safe access to your
facilities to permit them to fulfill their obligations; and
d. inform IBM or your reseller of changes in a Machine's location.
IBM is responsible for loss of, or damage to, your Machine while it is 1) in IBM's
possession or 2) in transit in those cases where IBM is responsible for the
transportation charges.
Neither IBM nor your reseller is responsible for any of your confidential, proprietary or
personal information contained in a Machine which you return to IBM or your reseller
for any reason. You should remove all such information from the Machine prior to its
return.
Limitation of Liability: Circumstances may arise where, because of a default on
IBM's part or other liability, you are entitled to recover damages from IBM. In each
such instance, regardless of the basis on which you are entitled to claim damages
from IBM (including fundamental breach, negligence, misrepresentation, or other
contract or tort claim), except for any liability that cannot be waived or limited by
applicable laws, IBM is liable for no more than
1. damages for bodily injury (including death) and damage to real property and
tangible personal property; and
2. the amount of any other actual direct damages, up to the charges (if recurring, 12
months' charges apply) for the Machine that is subject of the claim. For purposes
Appendix A. Warranty information 21
Page 32

of this item, the term “Machine” includes Machine Code and Licensed Internal
Code.
This limit also applies to IBM's suppliers and your reseller. It is the maximum for
which IBM, its suppliers, and your reseller are collectively responsible.
UNDER NO CIRCUMSTANCES IS IBM LIABLE FOR ANY OF THE FOLLOWING: 1)
THIRD-PARTY CLAIMS AGAINST YOU FOR DAMAGES (OTHER THAN THOSE
UNDER THE FIRST ITEM LISTED ABOVE); 2) LOSS OF, OR DAMAGE TO, YOUR
RECORDS OR DATA; OR 3) SPECIAL, INCIDENTAL, OR INDIRECT DAMAGES
OR FOR ANY ECONOMIC CONSEQUENTIAL DAMAGES, LOST PROFITS OR
LOST SAVINGS, EVEN IF IBM, ITS SUPPLIERS OR YOUR RESELLER IS
INFORMED OF THEIR POSSIBILITY. SOME JURISDICTIONS DO NOT ALLOW
THE EXCLUSION OR LIMITATION OF INCIDENTAL OR CONSEQUENTIAL
DAMAGES, SO THE ABOVE LIMITATION OR EXCLUSION MAY NOT APPLY TO
YOU.
Governing Law: Both you and IBM consent to the application of the laws of the
country in which you acquired the Machine to govern, interpret, and enforce all of your
and IBM’s rights, duties, and obligations arising from, or relating in any manner to, the
subject matter of this Agreement, without regard to conflict of law principles.
Part 2 - Country-unique Terms
AMERICAS
BRAZIL
Governing Law: The following is added after the first sentence:
Any litigation arising from this Agreement will be settled exclusively by the court of Rio
de Janeiro.
NORTH AMERICA
Warranty Service: The following is added to this Section:
To obtain warranty service from IBM in Canada or the United States, call 1-800-IBMSERV (426-7378).
CANADA
Governing Law: The following replaces “laws of the country in which you acquired
the Machine” in the first sentence:
laws in the Province of Ontario.
UNITED STATES
Governing Law: The following replaces “laws of the country in which you acquired
the Machine” in the first sentence:
laws of the State of New York.
ASIA PACIFIC
AUSTRALIA
The IBM Warranty for Machines: The following paragraph is added to this Section:
The warranties specified in this Section are in addition to any rights you may have
under the Trade Practices Act 1974 or other similar legislation and are only limited to
the extent permitted by the applicable legislation.
22 IBM Distributed Power Interconnect Rack Power Distribution Unit:Installation and Maintenance Guide
Page 33

Limitation of Liability: The following is added to this Section:
Where IBM is in breach of a condition or warranty implied by the Trade Practices Act
1974 or other similar legislation, IBM's liability is limited to the repair or replacement of
the goods or the supply of equivalent goods. Where that condition or warranty relates
to right to sell, quiet possession or clear title, or the goods are of a kind ordinarily
acquired for personal, domestic or household use or consumption, then none of the
limitations in this paragraph apply.
Governing Law: The following replaces “laws of the country in which you acquired
the Machine” in the first sentence:
laws of the State or Territory.
CAMBODIA, LAOS, AND VIETNAM
Governing Law: The following replaces “laws of the country in which you acquired
the Machine” in the first sentence:
laws of the State of New York.
The following is added to this Section:
Disputes and differences arising out of or in connection with this Agreement shall be
finally settled by arbitration which shall be held in Singapore in accordance with the
rules of the International Chamber of Commerce (ICC). The arbitrator or arbitrators
designated in conformity with those rules shall have the power to rule on their own
competence and on the validity of the Agreement to submit to arbitration. The
arbitration award shall be final and binding for the parties without appeal and the
arbitral award shall be in writing and set forth the findings of fact and the conclusions
of law.
All proceedings shall be conducted, including all documents presented in such
proceedings, in the English language. The number of arbitrators shall be three, with
each side to the dispute being entitled to appoint one arbitrator.
The two arbitrators appointed by the parties shall appoint a third arbitrator before
proceeding upon the reference. The third arbitrator shall act as chairman of the
proceedings. Vacancies in the post of chairman shall be filled by the president of the
ICC. Other vacancies shall be filled by the respective nominating party. Proceedings
shall continue from the stage they were at when the vacancy occurred.
If one of the parties refuses or otherwise fails to appoint an arbitrator within 30 days of
the date the other party appoints its, the first appointed arbitrator shall be the sole
arbitrator, provided that the arbitrator was validly and properly appointed.
The English language version of this Agreement prevails over any other language
version.
HONG KONG AND MACAU
Governing Law: The following replaces “laws of the country in which you acquired
the Machine” in the first sentence:
laws of Hong Kong Special Administrative Region.
INDIA
Limitation of Liability: The following replaces items 1 and 2 of this Section:
1. liability for bodily injury (including death) or damage to real property and tangible
personal property will be limited to that caused by IBM's negligence;
2. as to any other actual damage arising in any situation involving nonperformance
by IBM pursuant to, or in any way related to the subject of this Statement of
Appendix A. Warranty information 23
Page 34

Limited Warranty, IBM's liability will be limited to the charge paid by you for the
individual Machine that is the subject of the claim.
JAPAN
Governing Law: The following sentence is added to this Section:
Any doubts concerning this Agreement will be initially resolved between us in good
faith and in accordance with the principle of mutual trust.
NEW ZEALAND
The IBM Warranty for Machines: The following paragraph is added to this Section:
The warranties specified in this Section are in addition to any rights you may have
under the Consumer Guarantees Act 1993 or other legislation which cannot be
excluded or limited. The Consumer Guarantees Act 1993 will not apply in respect of
any goods which IBM provides, if you require the goods for the purposes of a business
as defined in that Act.
Limitation of Liability: The following is added to this Section:
Where Machines are not acquired for the purposes of a business as defined in the
Consumer Guarantees Act 1993, the limitations in this Section are subject to the
limitations in that Act.
PEOPLE'S REPUBLIC OF CHINA (PRC)
Governing Law: The following replaces this Section:
Both you and IBM consent to the application of the laws of the State of New York
(except when local law requires otherwise) to govern, interpret, and enforce all your
and IBM’s rights, duties, and obligations arising from, or relating in any manner to, the
subject matter of this Agreement, without regard to conflict of law principles.
Any disputes arising from or in connection with this Agreement will first be resolved by
friendly negotiations, failing which either of us has the right to submit the dispute to the
China International Economic and Trade Arbitration Commission in Beijing, the PRC,
for arbitration in accordance with its arbitration rules in force at the time. The
arbitration tribunal will consist of three arbitrators. The language to be used therein will
be English and Chinese. An arbitral award will be final and binding on all the parties,
and will be enforceable under the Convention on the Recognition and Enforcement of
Foreign Arbitral Awards (1958).
The arbitration fee will be borne by the losing party unless otherwise determined by
the arbitral award.
During the course of arbitration, this Agreement will continue to be performed except
for the part which the parties are disputing and which is undergoing arbitration.
EUROPE, MIDDLE EAST, AFRICA (EMEA)
THE FOLLOWING TERMS APPLY TO ALL EMEA COUNTRIES:
The terms of this Statement of Limited Warranty apply to Machines purchased from
IBM or an IBM reseller.
Warranty Service: If you purchase an IBM Machine in Austria, Belgium, Denmark,
Estonia, Finland, France, Germany, Greece, Iceland, Ireland, Italy, Latvia, Lithuania,
Luxembourg, Netherlands, Norway, Portugal, Spain, Sweden, Switzerland or United
Kingdom, you may obtain warranty service for that Machine in any of those countries
from either (1) an IBM reseller approved to perform warranty service or (2) from IBM. If
you purchase an IBM Personal Computer Machine in Albania, Armenia, Belarus,
24 IBM Distributed Power Interconnect Rack Power Distribution Unit:Installation and Maintenance Guide
Page 35

Bosnia and Herzegovina, Bulgaria, Croatia, Czech Republic, Georgia, Hungary,
Kazakhstan, Kirghizia, Federal Republic of Yugoslavia, Former Yugoslav Republic of
Macedonia (FYROM), Moldova, Poland, Romania, Russia, Slovak Republic, Slovenia,
or Ukraine, you may obtain warranty service for that Machine in any of those countries
from either (1) an IBM reseller approved to perform warranty service or (2) from IBM.
If you purchase an IBM Machine in a Middle Eastern or African country, you may
obtain warranty service for that Machine from the IBM entity within the country of
purchase, if that IBM entity provides warranty service in that country, or from an IBM
reseller, approved by IBM to perform warranty service on that Machine in that country.
Warranty service in Africa is available within 50 kilometers of an IBM authorized
service provider. You are responsible for transportation costs for Machines located
outside 50 kilometers of an IBM authorized service provider.
Governing Law: The applicable laws that govern, interpret and enforce rights, duties,
and obligations of each of us arising from, or relating in any manner to, the subject
matter of this Statement, without regard to conflict of laws principles, as well as
Country-unique terms and competent court for this Statement are those of the country
in which the warranty service is being provided, except that in 1) Albania, BosniaHerzegovina, Bulgaria, Croatia, Hungary, Former Yugoslav Republic of Macedonia,
Romania, Slovakia, Slovenia, Armenia, Azerbaijan, Belarus, Georgia, Kazakhstan,
Kyrgyzstan, Moldova, Russia, Tajikistan, Turkmenistan, Ukraine, and Uzbekistan, the
laws of Austria apply; 2) Estonia, Latvia, and Lithuania, the laws of Finland apply; 3)
Algeria, Benin, Burkina Faso, Cameroon, Cape Verde, Central African Republic,
Chad, Congo, Djibouti, Democratic Republic of Congo, Equatorial Guinea, France,
Gabon, Gambia, Guinea, Guinea-Bissau, Ivory Coast, Lebanon, Mali, Mauritania,
Morocco, Niger, Senegal, Togo, and Tunisia, this Agreement will be construed and the
legal relations between the parties will be determined in accordance with the French
laws and all disputes arising out of this Agreement or related to its violation or
execution, including summary proceedings, will be settled exclusively by the
Commercial Court of Paris; 4) Angola, Bahrain, Botswana, Burundi, Egypt, Eritrea,
Ethiopia, Ghana, Jordan, Kenya, Kuwait, Liberia, Malawi, Malta, Mozambique,
Nigeria, Oman, Pakistan, Qatar, Rwanda, Sao Tome, Saudi Arabia, Sierra Leone,
Somalia, Tanzania, Uganda, United Arab Emirates, United Kingdom, West
Bank/Gaza, Yemen, Zambia, and Zimbabwe, this Agreement will be governed by
English Law and disputes relating to it will be submitted to the exclusive jurisdiction of
the English courts; and 5) in Greece, Israel, Italy, Portugal, and Spain any legal claim
arising out of this Statement will be brought before, and finally settled by, the
competent court of Athens, Tel Aviv, Milan, Lisbon, and Madrid, respectively.
THE FOLLOWING TERMS APPLY TO THE COUNTRY SPECIFIED:
AUSTRIA AND GERMANY
The IBM Warranty for Machines: The following replaces the first sentence of the first
paragraph of this Section:
The warranty for an IBM Machine covers the functionality of the Machine for its normal
use and the Machine's conformity to its Specifications.
The following paragraphs are added to this Section:
The minimum warranty period for Machines is six months. In case IBM or your reseller
is unable to repair an IBM Machine, you can alternatively ask for a partial refund as far
as justified by the reduced value of the unrepaired Machine or ask for a cancellation of
the respective agreement for such Machine and get your money refunded.
Extent of Warranty: The second paragraph does not apply.
Appendix A. Warranty information 25
Page 36

Warranty Service: The following is added to this Section:
During the warranty period, transportation for delivery of the failing Machine to IBM will
be at IBM's expense.
Limitation of Liability: The following paragraph is added to this Section:
The limitations and exclusions specified in the Statement of Limited Warranty will not
apply to damages caused by IBM with fraud or gross negligence and for express
warranty.
The following sentence is added to the end of item 2:
IBM’s liability under this item is limited to the violation of essential contractual terms in
cases of ordinary negligence.
EGYPT
Limitation of Liability: The following replaces item 2 in this Section:
as to any other actual direct damages, IBM's liability will be limited to the total amount
you paid for the Machine that is the subject of the claim. For purposes of this item, the
term “Machine” includes Machine Code and Licensed Internal Code.
Applicability of suppliers and resellers (unchanged).
FRANCE
Limitation of Liability: The following replaces the second sentence of the first
paragraph of this Section:
In such instances, regardless of the basis on which you are entitled to claim damages
from IBM, IBM is liable for no more than: (items 1 and 2 unchanged).
IRELAND
Extent of Warranty: The following is added to this Section:
Except as expressly provided in these terms and conditions, all statutory conditions,
including all warranties implied, but without prejudice to the generality of the foregoing
all warranties implied by the Sale of Goods Act 1893 or the Sale of Goods and Supply
of Services Act 1980 are hereby excluded.
Limitation of Liability: The following replaces items one and two of the first
paragraph of this Section:
1. death or personal injury or physical damage to your real property solely caused by
IBM's negligence; and
2. the amount of any other actual direct damages, up to 125 percent of the charges (if
recurring, the 12 months' charges apply) for the Machine that is the subject of the
claim or which otherwise gives rise to the claim.
Applicability of suppliers and resellers (unchanged).
The following paragraph is added at the end of this Section:
IBM's entire liability and your sole remedy, whether in contract or in tort, in respect of
any default shall be limited to damages.
ITALY
Limitation of Liability: The following replaces the second sentence in the first
paragraph:
In each such instance unless otherwise provided by mandatory law, IBM is liable for
no more than:
1. (unchanged)
2. as to any other actual damage arising in all situations involving nonperformance by
26 IBM Distributed Power Interconnect Rack Power Distribution Unit:Installation and Maintenance Guide
Page 37

IBM pursuant to, or in any way related to the subject matter of this Statement of
Warranty, IBM's liability, will be limited to the total amount you paid for the Machine
that is the subject of the claim.
Applicability of suppliers and resellers (unchanged).
The following replaces the third paragraph of this Section:
Unless otherwise provided by mandatory law, IBM and your reseller are not liable for
any of the following: (items 1 and 2 unchanged) 3) indirect damages, even if IBM or
your reseller is informed of their possibility.
SOUTH AFRICA, NAMIBIA, BOTSWANA, LESOTHO AND SWAZILAND
Limitation of Liability: The following is added to this Section:
IBM's entire liability to you for actual damages arising in all situations involving
nonperformance by IBM in respect of the subject matter of this Statement of Warranty
will be limited to the charge paid by you for the individual Machine that is the subject of
your claim from IBM.
UNITED KINGDOM
Limitation of Liability: The following replaces items 1 and 2 of the first paragraph of
this Section:
1. death or personal injury or physical damage to your real property solely caused by
IBM's negligence;
2. the amount of any other actual direct damages or loss, up to 125 percent of the
charges (if recurring, the 12 months' charges apply) for the Machine that is the
subject of the claim or which otherwise gives rise to the claim;
The following item is added to this paragraph:
3. breach of IBM's obligations implied by Section 12 of the Sale of Goods Act 1979 or
Section 2 of the Supply of Goods and Services Act 1982.
Applicability of suppliers and resellers (unchanged).
The following is added to the end of this Section:
IBM's entire liability and your sole remedy, whether in contract or in tort, in respect of
any default shall be limited to damages.
Appendix A. Warranty information 27
Page 38

28 IBM Distributed Power Interconnect Rack Power Distribution Unit:Installation and Maintenance Guide
Page 39

Appendix B. Notices
This information was developed for products and services offered in the U.S.A.
IBM may not offer the products, services, or features discussed in this document in
other countries. Consult your local IBM representative for information on the products
and services currently available in your area. Any reference to an IBM product,
program, or service is not intended to state or imply that only that IBM product,
program, or service may be used. Any functionally equivalent product, program, or
service that does not infringe any IBM intellectual property right may be used instead.
However, it is the user’s responsibility to evaluate and verify the operation of any nonIBM product, program, or service.
IBM may have patents or pending patent applications covering subject matter
described in this document. The furnishing of this document does not give you any
license to these patents. You can send license inquiries, in writing, to:
IBM Director of Licensing
IBM Corporation
North Castle Drive
Armonk, NY 10504-1785
U.S.A.
INTERNATIONAL BUSINESS MACHINES CORPORATION PROVIDES THIS
PUBLICATION “AS IS” WITHOUT WARRANTY OF ANY KIND, EITHER EXPRESS
OR IMPLIED, INCLUDING, BUT NOT LIMITED TO, THE IMPLIED WARRANTIES OF
NON-INFRINGEMENT, MERCHANTABILITY OR FITNESS FOR A PARTICULAR
PURPOSE. Some states do not allow disclaimer of express or implied warranties in
certain transactions, therefore, this statement may not apply to you.
Edition notice
This information could include technical inaccuracies or typographical errors.
Changes are periodically made to the information herein; these changes will be
incorporated in new editions of the publication. IBM may make improvements and/or
changes in the product(s) and/or the program(s) described in this publication at any
time without notice.
Any references in this information to non-IBM Web sites are provided for convenience
only and do not in any manner serve as an endorsement of those Web sites. The
materials at those Web sites are not part of the materials for this IBM product, and use
of those Web sites is at your own risk.
IBM may use or distribute any of the information you supply in any way it believes
appropriate without incurring any obligation to you.
© Copyright International Business Machines Corporation 2003. All rights
reserved.
Note to U.S. Government Users Restricted Rights — Use, duplication, or disclosure
restricted by GSA ADP Schedule Contract with IBM Corp.
© Copyright IBM Corp. 2003 29
Page 40

Trademarks
Important notes
The following terms are trademarks of International Business Machines Corporation in
the United States, other countries, or both:
e-business logo NetBAY
Eserver Netfinity
IBM ServerProven
IntelliStation xSeries
Other company, product, or service names may be trademarks or service marks of
others.
Processor speeds indicate the internal clock speed of the microprocessor; other
factors also affect application performance.
CD-ROM drive speeds list the variable read rate. Actual speeds vary and are often
less than the maximum possible.
When referring to processor storage, real and virtual storage, or channel volume, KB
stands for approximately 1000 bytes, MB stands for approximately 1 000 000 bytes,
and GB stands for approximately 1 000 000 000 bytes.
When referring to hard disk drive capacity or communications volume, MB stands for
1000000 bytes, and GB stands for 1000 000 000 bytes. Total user-accessible
capacity may vary depending on operating environments.
Maximum internal hard disk drive capacities assume the replacement of any standard
hard disk drives and population of all hard disk drive bays with the largest currently
supported drives available from IBM.
Maximum memory may require replacement of the standard memory with an optional
memory module.
IBM makes no representation or warranties regarding non-IBM products and services
that are ServerProven
merchantability and fitness for a particular purpose. These products are offered and
warranted solely by third parties.
®
, including but not limited to the implied warranties of
IBM makes no representations or warranties with respect to non-IBM products.
Support (if any) for the non-IBM products is provided by the third party, not IBM.
Some software may differ from its retail version (if available), and may not include user
manuals or all program functionality.
30 IBM Distributed Power Interconnect Rack Power Distribution Unit:Installation and Maintenance Guide
Page 41

Product recycling and disposal
This unit contains materials such as circuit boards, cables, electromagnetic
compatibility gaskets, and connectors which may contain lead and copper/beryllium
alloys that require special handling and disposal at end of life. Before this unit is
disposed of, these materials must be removed and recycled or discarded according to
applicable regulations. IBM offers product-return programs in several countries. For
country-specific instructions, refer to the following Web site:
http://www.ibm.com/ibm/environment/products/prp.shtml.
This product may contain a sealed lead acid, nickel cadmium, nickel metal
hydride, lithium, or lithium ion battery. Consult your user manual or service
manual for specific battery information. The battery must be recycled or
disposed of properly. Recycling facilities may not be available in your area. For
information on disposal of batteries, contact your local waste disposal facility.
In the United States, IBM has established a collection process for reuse, recycling, or
proper disposal of used IBM sealed lead acid, nickel cadmium, nickel metal hydride,
and battery packs from IBM equipment. For information on proper disposal of these
batteries, contact IBM at 1-800-426-4333. Have the IBM part number listed on the
battery available prior to your call.
Power cords
For your safety, IBM provides a power cord with a grounded attachment plug to use
with this IBM product. To avoid electrical shock, always use the power cord and plug
with a properly grounded outlet.
IBM power cords used in the United States and Canada are listed by Underwriter's
Laboratories (UL) and certified by the Canadian Standards Association (CSA).
For units intended to be operated at 115 volts: Use a UL-listed and CSA-certified cord
set consisting of a minimum 18 AWG, Type SVT or SJT, three-conductor cord, a
maximum of 15 feet in length and a parallel blade, grounding-type attachment plug
rated 15 amperes, 125 volts.
For units intended to be operated at 230 volts (U.S. use): Use a UL-listed and CSAcertified cord set consisting of a minimum 18 AWG, Type SVT or SJT, three-conductor
cord, a maximum of 15 feet in length and a tandem blade, grounding-type attachment
plug rated 15 amperes, 250 volts.
For units intended to be operated at 230 volts (outside the U.S.): Use a cord set with a
grounding-type attachment plug. The cord set should have the appropriate safety
approvals for the country in which the equipment will be installed.
IBM power cords for a specific country or region are usually available only in that
country or region.
Appendix B. Notices 31
Page 42

32 IBM Distributed Power Interconnect Rack Power Distribution Unit:Installation and Maintenance Guide
Page 43

Page 44

IBM@
Part Number: 02R2738
(1P) P/N:02R2738
*1P02R2738*
 Loading...