

Page 1

IBM Flat Panel Monitor
Rack Mount Kit II Installation Instructions
IBM
Page 2

Page 3

IBM
IBM Flat Panel Monitor
Rack Mount Kit II Installation Instructions
Page 4

Notice
Before using this information and the product it supports, please be sure to read the general information under
“Product warranties and notices” on page 11.
Second Edition (May 2001)
The following paragraph does not apply to the United Kingdom or any country where such provisions are inconsistent with
local law: INTERNATIONAL BUSINESS MACHINES CORPORATION PROVIDES THIS PUBLICATION “AS IS” WITHOUT
WARRANTY OF ANY KIND, EITHER EXPRESS OR IMPLIED, INCLUDING, BUT NOT LIMITED TO, THE IMPLIED WARRANTIES
OF MERCHANTABILITY OR FITNESS FOR A PARTICULAR PURPOSE. Some states do not allow disclaimer of express or implied
warranties in certain transactions, therefore, this statement may not apply to you.
This publication could include technical inaccuracies or typographical errors. Changes are periodically made to the information
herein; these changes will be incorporated in new editions of the publication. IBM may make improvements and/or changes in the
product(s) and/or the program(s) described in this publication at any time.
This publication was developed for products and services offered in the United States of America. IBM may not offer the products,
services, or features discussed in this document in other countries, and the information is subject to change without notice. Consult
your local IBM representative for information on the products, services, and features available in your area.
Requests for technical information about IBM products should be made to your IBM reseller or IBM marketing representative.
Copyright International Business Machines Corporation 2001. All rights reserved.
Note to U.S. Government Users — Documentation related to restricted rights — Use, duplication or disclosure is subject to
restrictions set forth in GSA ADP Schedule Contract with IBM Corp.
Page 5

Contents
Introduction and installation overview .................................... 1
Removing the existing flat panel monitor stand .............................. 2
Installing the new monitor stand ....................................... 4
Installing an optional console switch ..................................... 9
Getting help, service, and information .................................... 10
Product warranties and notices ........................................ 11
Warranty Statements . . . . . . . . . . . . . . . . . . . . . . . . . . . . . . . . . . . . . . . . . . . . . . . . 11
IBM Statement of Limited Warranty for United States, Puerto Rico, and Canada (Part 1 - General
Terms) . . . . . . . . . . . . . . . . . . . . . . . . . . . . . . . . . . . . . . . . . . . . . . . . . . . . . 11
IBM Statement of Warranty Worldwide except Canada, Puerto Rico, Turkey, United States (Part 1 -
General Terms) . . . . . . . . . . . . . . . . . . . . . . . . . . . . . . . . . . . . . . . . . . . . . . . . 13
Part 2 - Worldwide Country-Unique Terms ................................. 15
Notices . . . . . . . . . . . . . . . . . . . . . . . . . . . . . . . . . . . . . . . . . . . . . . . . . . . . . . . . 17
Trademarks . . . . . . . . . . . . . . . . . . . . . . . . . . . . . . . . . . . . . . . . . . . . . . . . . . . . . 17
Copyright IBM Corp. 2001 iii
Page 6

Figures
1. Removing the cable cover, hinge cover, and stand cover ....................... 2
2. Removing the plastic cable clamp ..................................... 2
3. Removing the existing monitor stand from the monitor ......................... 3
4. Removing the hinges from the new monitor stand ........................... 4
5. Installing the hinges on the flat panel monitor .............................. 4
6. Installing the monitor on the new monitor stand ............................. 5
7. Installing the flat panel monitor in the keyboard tray .......................... 6
8. Storing the power supply and routing cables ............................... 7
9. Installing the cable cover, hinge cover, and stand cover ........................ 7
10. Comparing the new hinge cover to the old hinge cover ........................ 7
11. Routing the keyboard cable ........................................ 8
12. Installing the console switch mounting brackets ............................. 9
13. Installing the selector switch in the rack cabinet ............................. 9
iv Copyright IBM Corp. 2001
Page 7

Introduction and installation overview
With the IBM Flat Panel Monitor Rack Mount Kit II, you can install an IBM T540, T54, or T55 flat panel
monitor inside your rack cabinet. The monitor sits in a compatible keyboard tray, as shown in Figure 7 on
page 6, which also stores a space-saver keyboard. You can also mount a console switch above the tray
to attach more than one server to the flat panel monitor and keyboard.
Note: There is no room to store a mouse in the keyboard tray after installing the rack mounting kit.
Because the space-saver keyboard has a built-in pointing device, a mouse is not required.
The Flat Panel Monitor Rack Mount Kit II comes with the following parts:
One base with preinstalled hinge assembly
One new hinge cover
One power supply spacer
One monitor mounting hardware package
Two console server selector switch mounting brackets
One switch mounting hardware package
IBM Flat Panel Monitor Rack Mount Kit II Installation Instructions
You will need a medium flat-blade screwdriver and a number 2 Phillips screwdriver to install the Flat Panel
Monitor Rack Mount Kit II. Refer to the documentation that comes with the rack cabinet, keyboard tray, or
console server selector switch for further information about those products.
Note: The illustrations in this documentation might be slightly different from your hardware.
The following general steps are required to install the Flat Panel Monitor Rack Mount Kit II. You can skip
steps that do not apply or have already been performed.
1 Install the keyboard tray according to its installation instructions and ensure 3U of rack mounting
space is available for the tray and the Flat Panel Monitor Rack Mount Kit II.
2 Remove the existing flat panel monitor stand as shown in “Removing the existing flat panel monitor
stand” on page 2.
3 Install the Flat Panel Monitor Rack Mount Kit II and flat panel monitor in the keyboard tray. See
“Installing the new monitor stand” on page 4 for details on installing the rack mounting kit.
4 Install an optional console switch, if necessary, as shown in “Installing an optional console switch”
on page 9.
Copyright IBM Corp. 2001 1
Page 8
Removing the existing flat panel monitor stand
Use the following steps to remove the existing flat panel monitor stand from your monitor:
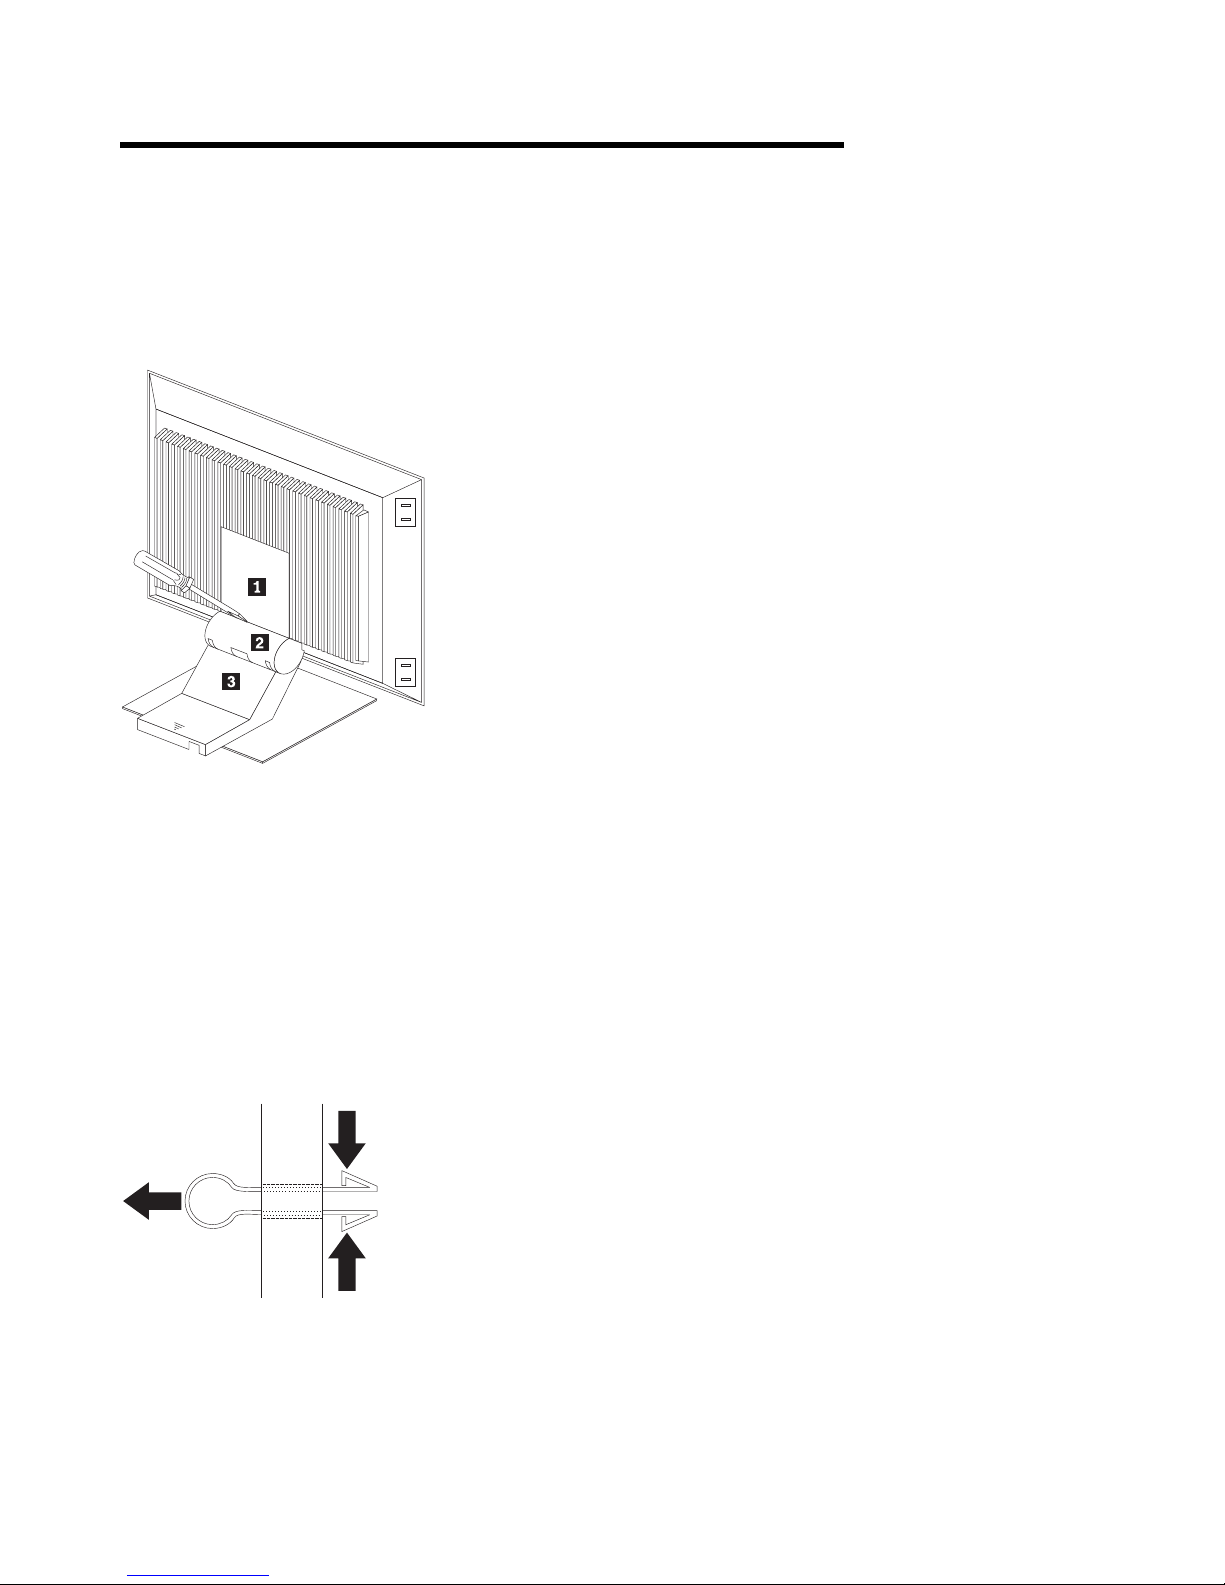
1. Unplug the flat panel monitor and disconnect the power cord from the flat panel monitor power supply.
2. Carefully use a flat-blade screwdriver to pry the bottom of the cable cover 1 up and remove it. Save
the cable cover for later reinstallation.
Figure 1. Removing the cable cover, hinge cover, and stand cover
3. Squeeze the sides of the hinge cover 2 and remove it.
Note: Even though this hinge cover is not used with the Flat Panel Monitor Rack Mount Kit II, do not
discard it. Store it with the other monitor stand parts you remove for possible future use.
4. Gently push the stand cover 3 and slide it backwards until it is completely off the stand.
5. Disconnect the signal cable and power cord from the flat panel monitor. Carefully remove and save
the plastic cable clamp to free the power cord.
Note: The plastic cable clamp is reusable and is needed to secure the power cord after installing the
Flat Panel Monitor Rack Mount Kit II on the flat panel monitor.
Figure 2. Removing the plastic cable clamp
2 Copyright IBM Corp. 2001
Page 9

6. Lay the monitor facedown on a cushioned surface and remove the six screws that secure the hinges
to the flat panel monitor.
Figure 3. Removing the existing monitor stand from the monitor
7. Lift off the hinge and monitor stand assembly. Store this assembly in a safe place for possible future
use.
Removing the existing flat panel monitor stand 3
Page 10
Installing the new monitor stand
Refer to “Removing the existing flat panel monitor stand” on page 2 for instructions on how to remove the
existing stand from the flat panel monitor. Before installing the new stand, install the keyboard tray in the
rack cabinet according to the instructions that come with the rack cabinet or the keyboard tray option.
Note: The Flat Panel Monitor Rack Mount Kit II and keyboard tray require 3U of rack mounting space. If
the keyboard tray does not have at least 2U of clearance above it, relocate the keyboard tray
within the rack cabinet.
Use the following steps to install the Flat Panel Monitor Rack Mount Kit II:
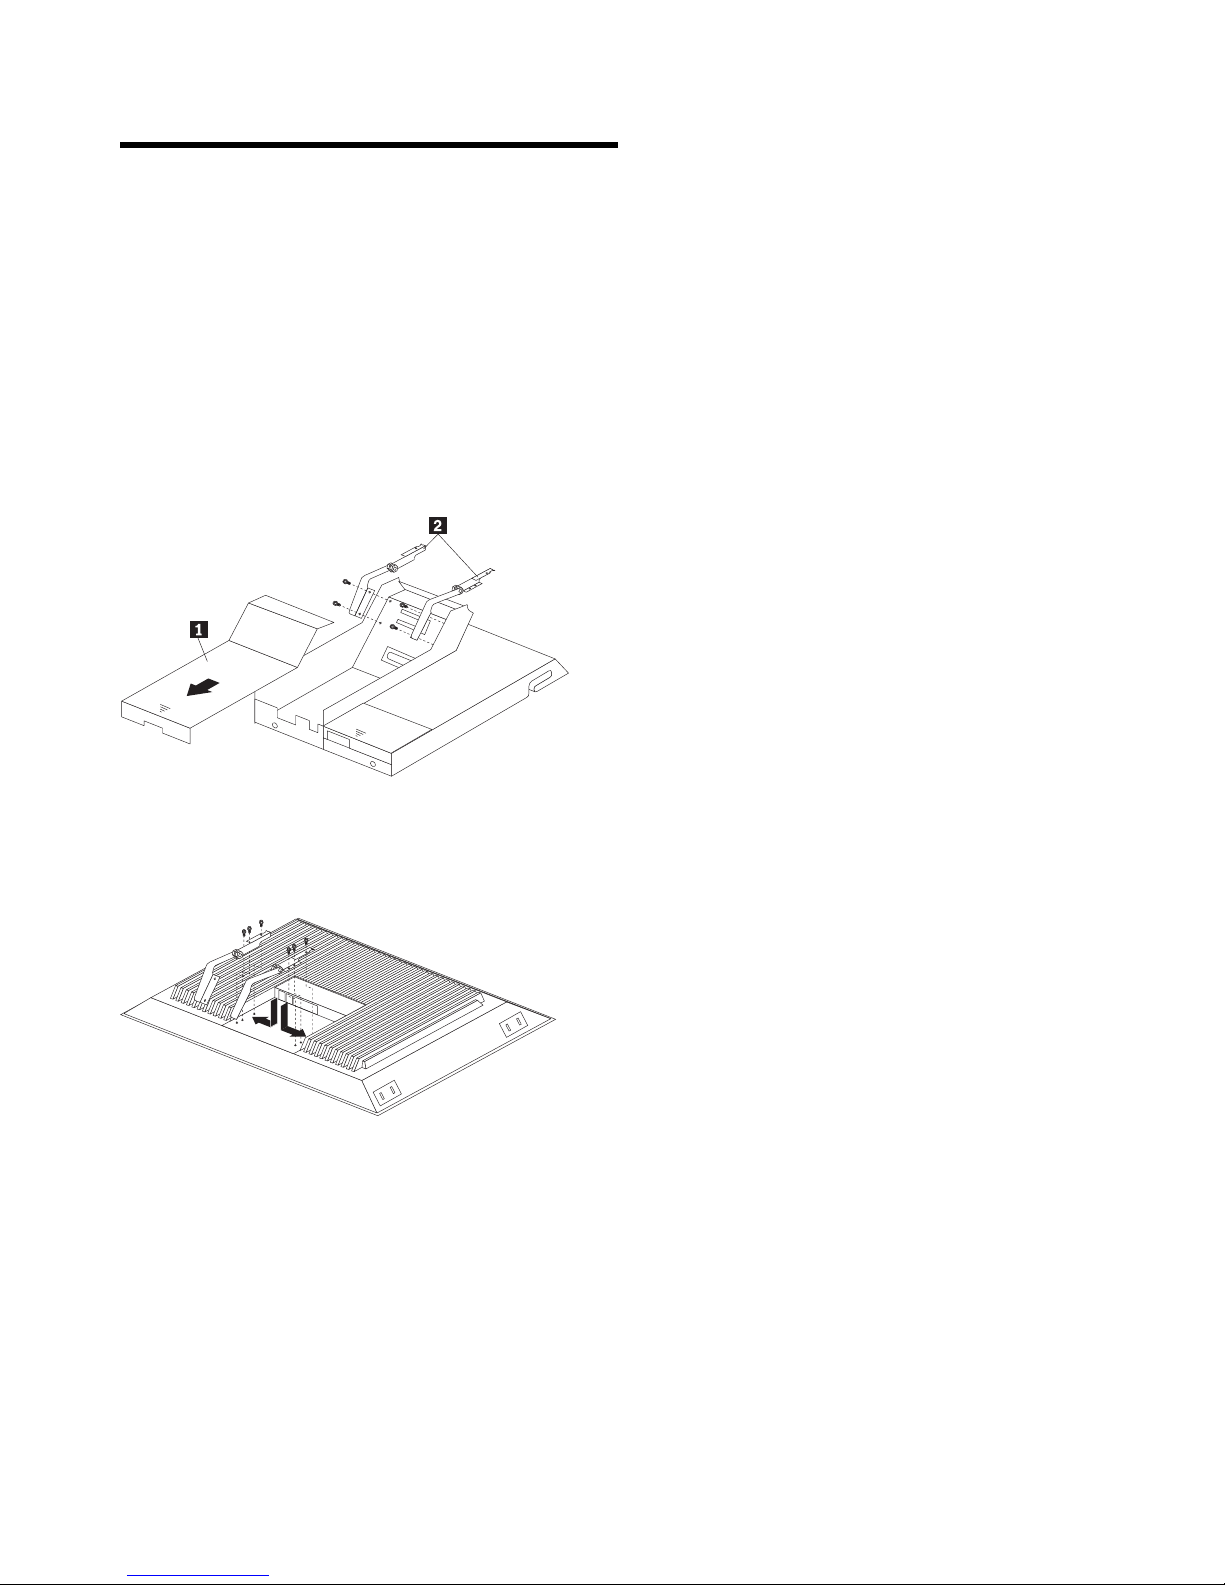
1. Remove the cable cover 1 from the new monitor stand; then, remove the four screws (two per
hinge) that secure the hinges 2 to the stand.
Figure 4. Removing the hinges from the new monitor stand
2. Install the hinges on the flat panel monitor, using the six screws that you removed from the old monitor
stand.
Figure 5. Installing the hinges on the flat panel monitor
Note: Be sure to slide each hinge into place on the back of the monitor and align the holes in the
hinges with holes on the monitor.
4 Copyright IBM Corp. 2001
Page 11

3. Lower the flat panel monitor onto the new monitor stand, making sure that you align the holes in the
stand with holes in the hinges; then, secure the flat panel monitor to the monitor stand with the four
screws that you removed earlier.
Figure 6. Installing the monitor on the new monitor stand
You have now finished attaching the flat panel monitor to its stand. The rest of the installation process
involves preparing the keyboard tray for storage and routing cables.
Notes:
a. You must remove any keyboard or mouse that is already in the keyboard tray before continuing.
b. You will not be able to store a mouse in the keyboard tray after installing the Flat Panel Monitor
Rack Mount Kit II.
c. You can only store a space-saver keyboard in the keyboard tray.
Installing the new monitor stand 5
Page 12
4. Install the mounting studs 2 and bumpers 3 that come in the monitor mounting hardware package.
Figure 7. Installing the flat panel monitor in the keyboard tray
Note: Clean the installation area on the keyboard tray with a suitable cleaning agent, such as
alcohol, before installing the rubber bumpers on the front of the keyboard tray.
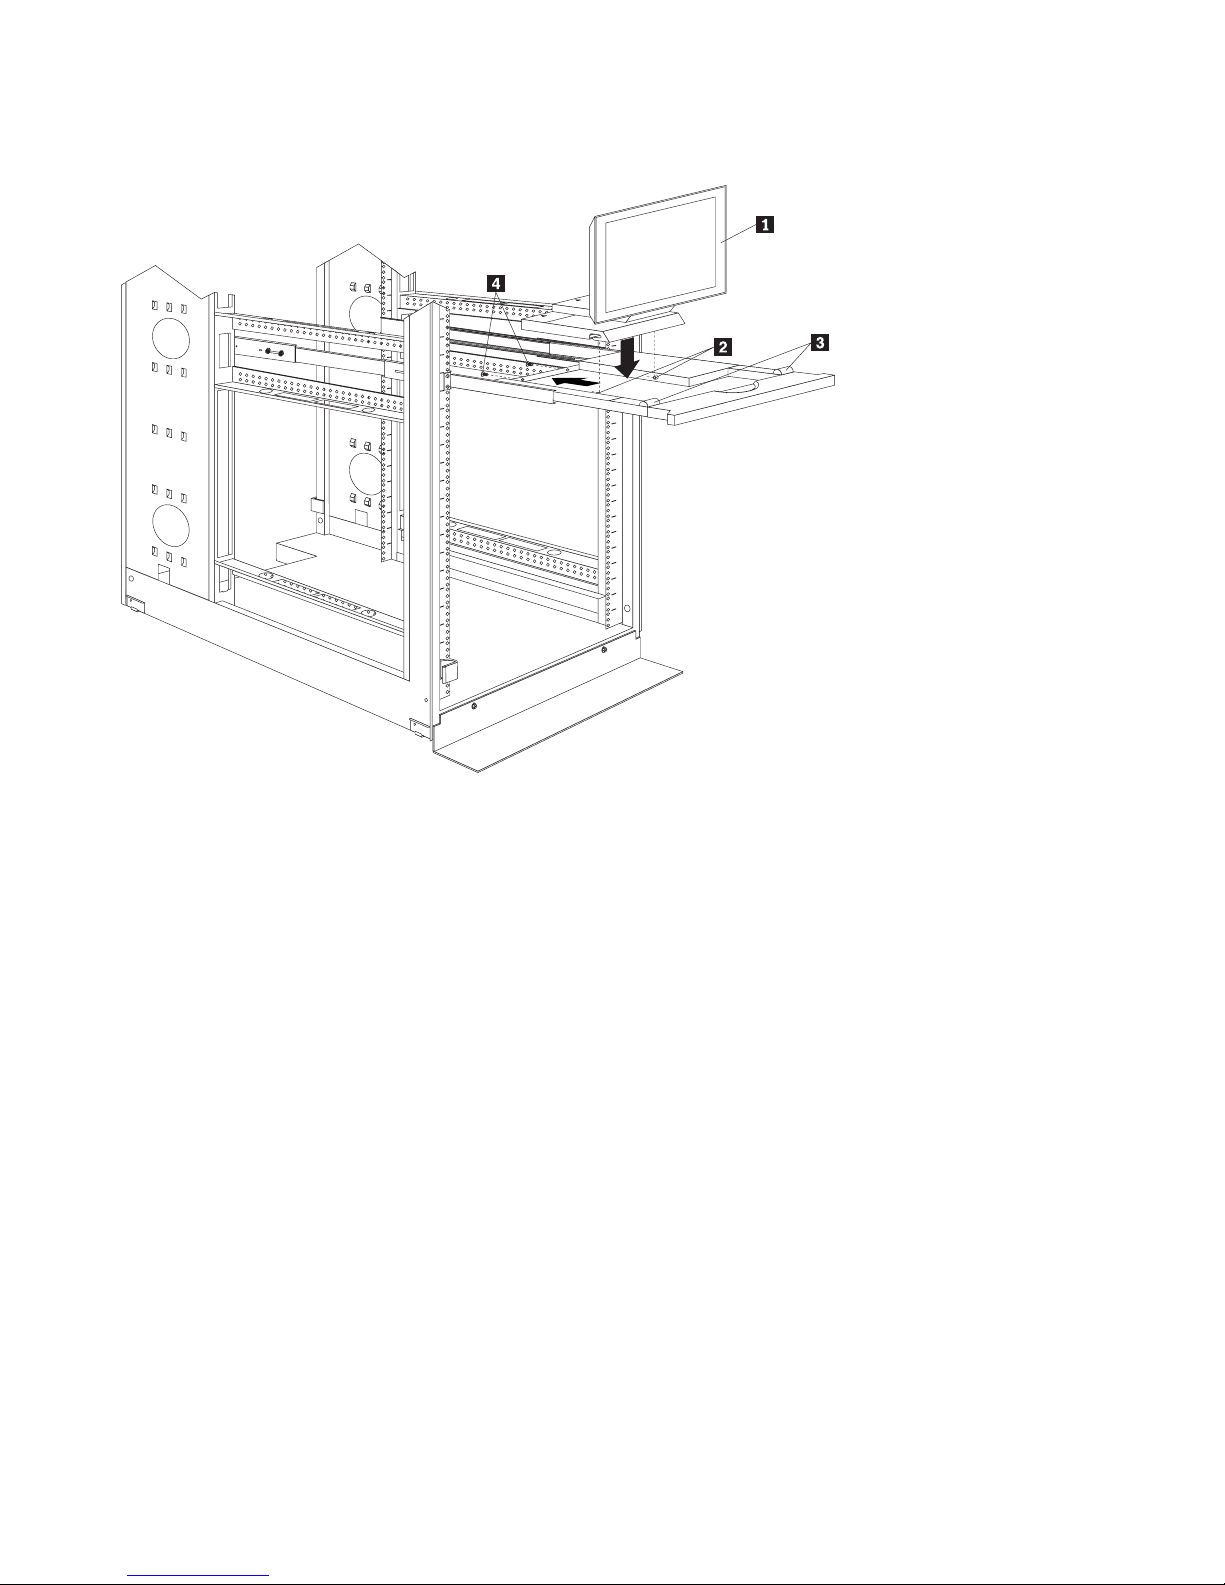
5. Open the flat panel monitor 1 to its full upright position and align the grooves in the stand with the
mounting studs 2 in the keyboard tray. When the monitor stand is sitting inside the keyboard tray,
slide it towards the back until it stops.
Note: Install or remove the flat panel monitor only when the display is in its upright position.
6. Secure the monitor stand in the back of the keyboard tray with the two provided screws 4.
6 Flat Panel Monitor Rack Mount Kit II Installation Instructions
Page 13
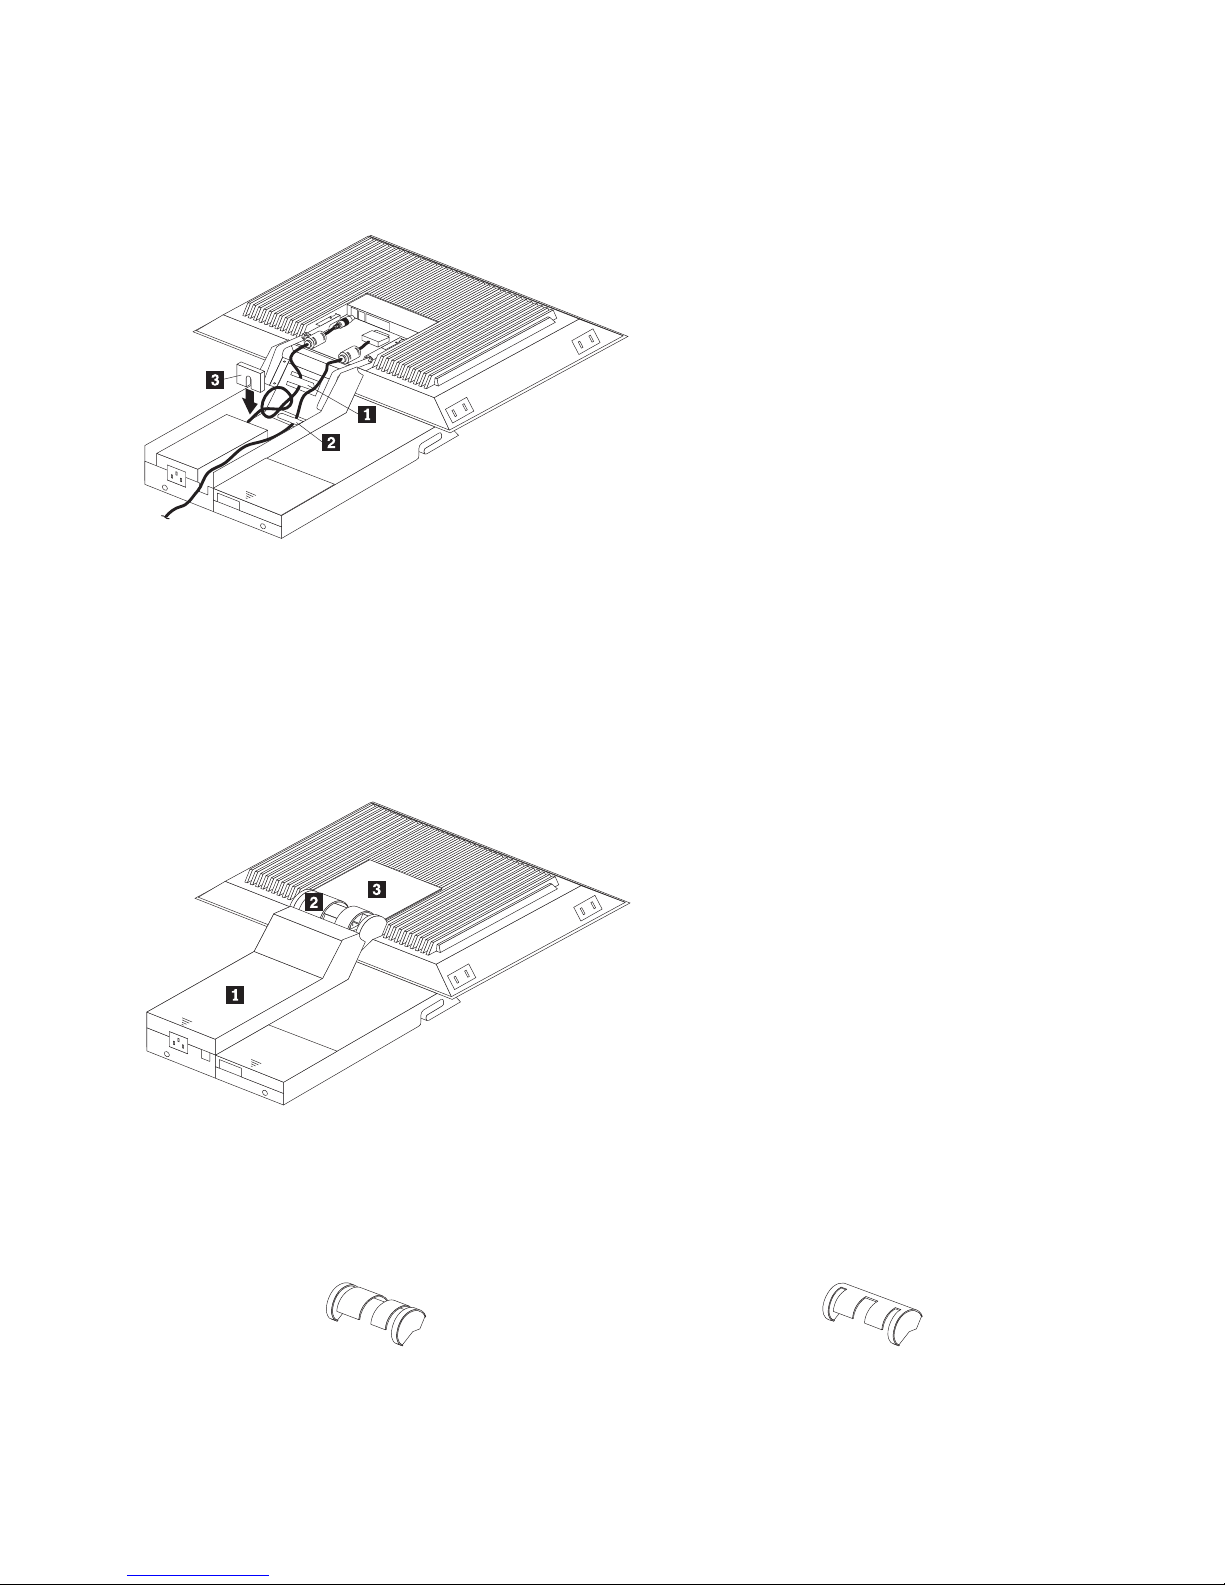
7. Place the flat panel monitor power supply, which came with your flat panel monitor, inside the monitor
stand. If necessary, insert the power supply spacer 3 behind the power supply and over the cable
to keep the power supply in place.
Figure 8. Storing the power supply and routing cables
8. Connect the power supply to the monitor and route the cable under the tab near the top of the monitor
stand 1; then, secure the power cable with the cable clamp you removed from the original stand and
coil excess cable inside the monitor stand.
9. Connect the monitor signal cable to the monitor and route it under the tab in the bottom of the monitor
stand 2 and out the back of the stand through the hole provided.
10. Replace the monitor stand cover 1.
Figure 9. Installing the cable cover, hinge cover, and stand cover
11. Snap the new hinge cover 2 into place over the hinge assembly.
Note: Be sure to use the new hinge cover that comes with the Flat Panel Monitor Rack Mount Kit II
because it has deeper grooves to accommodate the new hinge assembly.
New hinge cover Old hinge cover
Figure 10. Comparing the new hinge cover to the old hinge cover
12. Snap the cable cover 3 into place on the back of the flat panel monitor.
Installing the new monitor stand 7
Page 14

13. Fold the flat panel monitor down until it rests on the rubber bumpers; then, gently push back and
remove the small cable exit cover 1 on the monitor stand.
Figure 11. Routing the keyboard cable
14. Route the space-saver keyboard cable through the hole in the front of the base and out the opening in
the back where you removed the small cover; then, place the keyboard (with its adjustable feet fully
down) inside the keyboard tray.
Note: You must open the flat panel monitor to its full upright position so that you can install the
keyboard and route its cable.
15. Fold the flat panel monitor down again until it rests on the rubber bumpers; then, reinstall the small
cable exit cover 1.
16. Slide the keyboard tray into the rack cabinet; then, neatly route and secure all cables in the rack
cabinet using the provided cable straps.
You can now connect the power cord to the flat panel monitor and connect the display to a server. If
you have an optional console switch, you can install it now as shown in “Installing an optional console
switch” on page 9.
8 Flat Panel Monitor Rack Mount Kit II Installation Instructions
Page 15

Installing an optional console switch
You can use a console switch to attach more than one server to a single monitor and space-saver
keyboard. The console switch option is available separately, but additional mounting brackets come with
the Flat Panel Monitor Rack Mount Kit II. You can use mounting brackets that come with the console
switch to mount it vertically in the rack cabinet. Instructions for vertical mounting come with the console
switch.
Installing the console switch above the keyboard tray is an alternative to mounting it vertically inside your
rack cabinet. You must use the mounting brackets that come with the Flat Panel Monitor Rack Mount Kit
II if you mount the console switch just above the keyboard tray. Enough clearance must exist for the
keyboard tray (and attached flat panel monitor) to slide completely into the rack cabinet.
Use the following procedure to install a console switch above the keyboard tray:
1. Secure the two provided brackets to your console switch with two screws per side.
Two
Three
KM
Two
KM
Three
KM
One
Reset
Aux.
KM
KM
Three
KM
Two
KM
Three
KM
1
0
Important
Information
Figure 12. Installing the console switch mounting brackets
Note: There are two sets of mounting holes on the brackets. You can install the console switch even
with the back of the rack cabinet or recessed inside, depending on how you install the
brackets.
2. Install the console switch 1 above the keyboard tray, securing it with four screws (two per side) in
the rear of your rack cabinet.
R
eset
O
ne
Aux.
Two
KM
T
hre
e
KM
Two
KM
T
hre
e
KM
T
hree
KM
Two
KM
T
hree
KM
KM
Important
Information
1
0
Figure 13. Installing the selector switch in the rack cabinet
Note: Be sure to leave one U between the keyboard tray and the console switch so that the
keyboard tray and flat panel monitor 2 can slide fully into the rack cabinet.
3. Neatly route the monitor signal cable and clamp with provided cable straps as necessary.
Copyright IBM Corp. 2001 9
Page 16

Getting help, service, and information
If you need help, service, technical assistance, or just want more information about IBM products, you will
find a wide variety of sources available from IBM to assist you.
With the original purchase of an IBM hardware product, you have access to extensive support coverage.
During the IBM hardware product warranty period, you may call the IBM Personal Computer HelpCenter
(1-800-772-2227 in the U.S.) for hardware product assistance covered under the terms of the IBM
Statement of Limited Warranty.
The following services are available during the warranty period:
Problem Determination - Trained personnel are available to assist you with determining if you have a
hardware problem and deciding what action is necessary to fix the problem.
IBM Hardware Repair - If the problem is determined to be caused by IBM hardware under warranty,
trained service personnel are available to provide the applicable level of service.
Engineering Change Management - Occasionally, there might be changes that are required after a
product has been sold. IBM or your reseller, if authorized by IBM, will make Engineering Changes
(ECs) available that apply to your hardware.
Be sure to retain your proof of purchase to obtain warranty service. Refer to the IBM hardware warranty
for a full explanation of IBM's warranty terms.
Please have the following information ready when you call:
Machine Type and Model
Serial numbers of your IBM hardware products
Description of the problem
Exact wording of any error messages
Hardware and software configuration information
On the World Wide Web, the IBM Personal Computing Web site has up-to-date information about IBM
Personal Computer products and support.
Some helpful addresses are:
http://www.ibm.com Main IBM home page
http://www.ibm.com/pc IBM Personal Computing
http://www.ibm.com/pc/support IBM Personal Computing Support
http://www.ibm.com/pc/us/accessories Options by IBM (U.S.)
http://www.ibm.com/pc/us/eserver/xseries IBM xSeries Servers (U.S.)
http://www.ibm.com/pc/techconnect IBM TechConnect
You can select a country-specific Web site from these pages.
If you select Profile from the support page, you can create a customized support page that is specific to
your hardware, complete with Frequently Asked Questions, Parts Information, Technical Hints and Tips,
and Downloadable Files. You will have the information you need, all in one place. In addition, you can
choose to receive e-mail notifications whenever new information becomes available about your registered
products. You also can access online support forums, which are community sites monitored by IBM
support staff.
10 Copyright IBM Corp. 2001
Page 17

Product warranties and notices
This section contains important product warranty and notice information about your product.
Warranty Statements
The warranty statements consist of two parts: Part 1 and Part 2. Part 1 varies by country. Part 2 is the
same for both statements. Be sure to read both the Part 1 that applies to your country and Part 2.
United States, Puerto Rico, and Canada (Z125-4753-05 11/97)
(Part 1 - General Terms on page 11)
Worldwide except Canada, Puerto Rico, Turkey, and United States (Z125-5697-01 11/97)
(Part 1 - General Terms on page 13)
Worldwide Country-Unique Terms
(Part 2 - Country-Unique Terms on page 15)
IBM Statement of Limited Warranty for United States, Puerto Rico, and
Canada (Part 1 - General Terms)
This Statement of Limited Warranty includes Part 1 - General Terms and Part 2 - Country-unique Terms. The terms of Part 2 may
replace or modify those of Part 1. The warranties provided by IBM in this Statement of Limited Warranty apply only to Machines
you purchase for your use, and not for resale, from IBM or your reseller. The term “Machine” means an IBM machine, its features,
conversions, upgrades, elements, or accessories, or any combination of them. The term “Machine” does not include any software
programs, whether pre-loaded with the Machine, installed subsequently or otherwise. Unless IBM specifies otherwise, the following
warranties apply only in the country where you acquire the Machine. Nothing in this Statement of Warranty affects any statutory
rights of consumers that cannot be waived or limited by contract. If you have any questions, contact IBM or your reseller.
Machine - IBM Flat Panel Monitor Rack Mount Kit II
Warranty Period* - One Year
*Contact your place of purchase for warranty service information. Some IBM Machines are eligible for On-site warranty
service depending on the country where service is performed.
The IBM Warranty for Machines
IBM warrants that each Machine 1) is free from defects in materials and workmanship and 2) conforms to IBM's Official Published
Specifications. The warranty period for a Machine is a specified, fixed period commencing on its Date of Installation. The date on
your sales receipt is the Date of Installation, unless IBM or your reseller informs you otherwise.
During the warranty period IBM or your reseller, if approved by IBM to provide warranty service, will provide repair and exchange
service for the Machine, without charge, under the type of service designated for the Machine and will manage and install
engineering changes that apply to the Machine.
If a Machine does not function as warranted during the warranty period, and IBM or your reseller are unable to either 1) make it do
so or 2) replace it with one that is at least functionally equivalent, you may return it to your place of purchase and your money will be
refunded. The replacement may not be new, but will be in good working order.
Extent of Warranty
The warranty does not cover the repair or exchange of a Machine resulting from misuse, accident, modification, unsuitable physical
or operating environment, improper maintenance by you, or failure caused by a product for which IBM is not responsible. The
warranty is voided by removal or alteration of Machine or parts identification labels.
THESE WARRANTIES ARE YOUR EXCLUSIVE WARRANTIES AND REPLACE ALL OTHER WARRANTIES OR
CONDITIONS, EXPRESS OR IMPLIED, INCLUDING, BUT NOT LIMITED TO, THE IMPLIED WARRANTIES OR
CONDITIONS OF MERCHANTABILITY AND FITNESS FOR A PARTICULAR PURPOSE. THESE WARRANTIES
GIVE YOU SPECIFIC LEGAL RIGHTS AND YOU MAY ALSO HAVE OTHER RIGHTS WHICH VARY FROM
Copyright IBM Corp. 2001 11
Page 18

JURISDICTION TO JURISDICTION. SOME JURISDICTIONS DO NOT ALLOW THE EXCLUSION OR LIMITATION
OF EXPRESS OR IMPLIED WARRANTIES, SO THE ABOVE EXCLUSION OR LIMITATION MAY NOT APPLY TO
YOU. IN THAT EVENT, SUCH WARRANTIES ARE LIMITED IN DURATION TO THE WARRANTY PERIOD. NO
WARRANTIES APPLY AFTER THAT PERIOD.
Items Not Covered by Warranty
IBM does not warrant uninterrupted or error-free operation of a Machine.
Unless specified otherwise, IBM provides non-IBM machines
Any technical or other support provided for a Machine under warranty, such as assistance via telephone with “how-to” questions and
those regarding Machine set-up and installation, will be provided
WITHOUT WARRANTIES OF ANY KIND.
WITHOUT WARRANTIES OF ANY KIND.
Warranty Service
To obtain warranty service for the Machine, contact your reseller or IBM. In the United States, call IBM at 1-800-772-2227. In
Canada, call IBM at 1-800-565-3344. (In Toronto, call 416-383-3344.) You may be required to present proof of purchase.
IBM or your reseller provides certain types of repair and exchange service, either at your location or at a service center, to keep
Machines in, or restore them to, conformance with their Specifications. IBM or your reseller will inform you of the available types of
service for a Machine based on its country of installation. IBM may repair the failing Machine or exchange it at its discretion.
When warranty service involves the exchange of a Machine or part, the item IBM or your reseller replaces becomes its property and
the replacement becomes yours. You represent that all removed items are genuine and unaltered. The replacement may not be
new, but will be in good working order and at least functionally equivalent to the item replaced. The replacement assumes the
warranty service status of the replaced item.
Any feature, conversion, or upgrade IBM or your reseller services must be installed on a Machine which is 1) for certain Machines,
the designated, serial-numbered Machine and 2) at an engineering-change level compatible with the feature, conversion, or upgrade.
Many features, conversions, or upgrades involve the removal of parts and their return to IBM. A part that replaces a removed part
will assume the warranty service status of the removed part.
Before IBM or your reseller exchanges a Machine or part, you agree to remove all features, parts, options, alterations, and
attachments not under warranty service.
You also agree to
1. ensure that the Machine is free of any legal obligations or restrictions that prevent its exchange;
2. obtain authorization from the owner to have IBM or your reseller service a Machine that you do not own; and
3. where applicable, before service is provided
a. follow the problem determination, problem analysis, and service request procedures that IBM or your reseller provides,
b. secure all programs, data, and funds contained in a Machine,
c. provide IBM or your reseller with sufficient, free, and safe access to your facilities to permit them to fulfill their obligations,
and
d. inform IBM or your reseller of changes in a Machine's location.
IBM is responsible for loss of, or damage to, your Machine while it is 1) in IBM's possession or 2) in transit in those cases where IBM
is responsible for the transportation charges.
Neither IBM nor your reseller is responsible for any of your confidential, proprietary or personal information contained in a Machine
which you return to IBM or your reseller for any reason. You should remove all such information from the Machine prior to its return.
Production Status
Each IBM Machine is manufactured from new parts, or new and used parts. In some cases, the Machine may not be new and may
have been previously installed. Regardless of the Machine's production status, IBM's appropriate warranty terms apply.
Limitation of Liability
Circumstances may arise where, because of a default on IBM's part or other liability, you are entitled to recover damages from IBM.
In each such instance, regardless of the basis on which you are entitled to claim damages from IBM (including fundamental breach,
negligence, misrepresentation, or other contract or tort claim), IBM is liable for no more than
1. damages for bodily injury (including death) and damage to real property and tangible personal property; and
2. the amount of any other actual direct damages, up to the greater of U.S. $100,000 (or equivalent in local currency) or the
charges (if recurring, 12 months' charges apply) for the Machine that is the subject of the claim.
This limit also applies to IBM's suppliers and your reseller. It is the maximum for which IBM, its suppliers, and your reseller are
collectively responsible.
12 Flat Panel Monitor Rack Mount Kit II Installation Instructions
Page 19

UNDER NO CIRCUMSTANCES IS IBM LIABLE FOR ANY OF THE FOLLOWING: 1) THIRD-PARTY CLAIMS
AGAINST YOU FOR DAMAGES (OTHER THAN THOSE UNDER THE FIRST ITEM LISTED ABOVE); 2) LOSS OF,
OR DAMAGE TO, YOUR RECORDS OR DATA; OR 3) SPECIAL, INCIDENTAL, OR INDIRECT DAMAGES OR
FOR ANY ECONOMIC CONSEQUENTIAL DAMAGES (INCLUDING LOST PROFITS OR SAVINGS), EVEN IF IBM,
ITS SUPPLIERS OR YOUR RESELLER IS INFORMED OF THEIR POSSIBILITY. SOME JURISDICTIONS DO NOT
ALLOW THE EXCLUSION OR LIMITATION OF INCIDENTAL OR CONSEQUENTIAL DAMAGES, SO THE ABOVE
LIMITATION OR EXCLUSION MAY NOT APPLY TO YOU.
IBM Statement of Warranty Worldwide except Canada, Puerto Rico,
Turkey, United States (Part 1 - General Terms)
This Statement of Warranty includes Part 1 - General Terms and Part 2 - Country-unique Terms. The terms of Part 2 may replace
or modify those of Part 1. The warranties provided by IBM in this Statement of Warranty apply only to Machines you purchase for
your use, and not for resale, from IBM or your reseller. The term “Machine” means an IBM machine, its features, conversions,
upgrades, elements, or accessories, or any combination of them. The term “Machine” does not include any software programs,
whether pre-loaded with the Machine, installed subsequently or otherwise. Unless IBM specifies otherwise, the following warranties
apply only in the country where you acquire the Machine. Nothing in this Statement of Warranty affects any statutory rights of
consumers that cannot be waived or limited by contract. If you have any questions, contact IBM or your reseller.
Machine - IBM Flat Panel Monitor Rack Mount Kit II
Warranty Period* - One Year
*Contact your place of purchase for warranty service information. Some IBM Machines are eligible for On-site warranty
service depending on the country where service is performed.
The IBM Warranty for Machines
IBM warrants that each Machine 1) is free from defects in materials and workmanship and 2) conforms to IBM's Official Published
Specifications. The warranty period for a Machine is a specified, fixed period commencing on its Date of Installation. The date on
your sales receipt is the Date of Installation, unless IBM or your reseller informs you otherwise.
During the warranty period IBM or your reseller, if approved by IBM to provide warranty service, will provide repair and exchange
service for the Machine, without charge, under the type of service designated for the Machine and will manage and install
engineering changes that apply to the Machine.
If a Machine does not function as warranted during the warranty period, and IBM or your reseller are unable to either 1) make it do
so or 2) replace it with one that is at least functionally equivalent, you may return it to your place of purchase and your money will be
refunded. The replacement may not be new, but will be in good working order.
Extent of Warranty
The warranty does not cover the repair or exchange of a Machine resulting from misuse, accident, modification, unsuitable physical
or operating environment, improper maintenance by you, or failure caused by a product for which IBM is not responsible. The
warranty is voided by removal or alteration of Machine or parts identification labels.
THESE WARRANTIES ARE YOUR EXCLUSIVE WARRANTIES AND REPLACE ALL OTHER WARRANTIES OR
CONDITIONS, EXPRESS OR IMPLIED, INCLUDING, BUT NOT LIMITED TO, THE IMPLIED WARRANTIES OR
CONDITIONS OF MERCHANTABILITY AND FITNESS FOR A PARTICULAR PURPOSE. THESE WARRANTIES
GIVE YOU SPECIFIC LEGAL RIGHTS AND YOU MAY ALSO HAVE OTHER RIGHTS WHICH VARY FROM
JURISDICTION TO JURISDICTION. SOME JURISDICTIONS DO NOT ALLOW THE EXCLUSION OR LIMITATION
OF EXPRESS OR IMPLIED WARRANTIES, SO THE ABOVE EXCLUSION OR LIMITATION MAY NOT APPLY TO
YOU. IN THAT EVENT, SUCH WARRANTIES ARE LIMITED IN DURATION TO THE WARRANTY PERIOD. NO
WARRANTIES APPLY AFTER THAT PERIOD.
Items Not Covered by Warranty
IBM does not warrant uninterrupted or error-free operation of a Machine.
Unless specified otherwise, IBM provides non-IBM machines
Any technical or other support provided for a Machine under warranty, such as assistance via telephone with “how-to” questions and
those regarding Machine set-up and installation, will be provided
Product warranties and notices 13
WITHOUT WARRANTIES OF ANY KIND.
WITHOUT WARRANTIES OF ANY KIND.
Page 20

Warranty Service
To obtain warranty service for the Machine, contact your reseller or IBM. You may be required to present proof of purchase.
IBM or your reseller provides certain types of repair and exchange service, either at your location or at a service center, to keep
Machines in, or restore them to, conformance with their Specifications. IBM or your reseller will inform you of the available types of
service for a Machine based on its country of installation. IBM may repair the failing Machine or exchange it at its discretion.
When warranty service involves the exchange of a Machine or part, the item IBM or your reseller replaces becomes its property and
the replacement becomes yours. You represent that all removed items are genuine and unaltered. The replacement may not be
new, but will be in good working order and at least functionally equivalent to the item replaced. The replacement assumes the
warranty service status of the replaced item.
Any feature, conversion, or upgrade IBM or your reseller services must be installed on a Machine which is 1) for certain Machines,
the designated, serial-numbered Machine and 2) at an engineering-change level compatible with the feature, conversion, or upgrade.
Many features, conversions, or upgrades involve the removal of parts and their return to IBM. A part that replaces a removed part
will assume the warranty service status of the removed part.
Before IBM or your reseller exchanges a Machine or part, you agree to remove all features, parts, options, alterations, and
attachments not under warranty service.
You also agree to
1. ensure that the Machine is free of any legal obligations or restrictions that prevent its exchange;
2. obtain authorization from the owner to have IBM or your reseller service a Machine that you do not own; and
3. where applicable, before service is provided
a. follow the problem determination, problem analysis, and service request procedures that IBM or your reseller provides,
b. secure all programs, data, and funds contained in a Machine,
c. provide IBM or your reseller with sufficient, free, and safe access to your facilities to permit them to fulfil their obligations, and
d. inform IBM or your reseller of changes in a Machine's location.
IBM is responsible for loss of, or damage to, your Machine while it is 1) in IBM's possession or 2) in transit in those cases where IBM
is responsible for the transportation charges.
Neither IBM nor your reseller is responsible for any of your confidential, proprietary or personal information contained in a Machine
which you return to IBM or your reseller for any reason. You should remove all such information from the Machine prior to its return.
Production Status
Each IBM Machine is manufactured from new parts, or new and used parts. In some cases, the Machine may not be new and may
have been previously installed. Regardless of the Machine's production status, IBM's appropriate warranty terms apply.
Limitation of Liability
Circumstances may arise where, because of a default on IBM's part or other liability, you are entitled to recover damages from IBM.
In each such instance, regardless of the basis on which you are entitled to claim damages from IBM (including fundamental breach,
negligence, misrepresentation, or other contract or tort claim), IBM is liable for no more than
1. damages for bodily injury (including death) and damage to real property and tangible personal property; and
2. the amount of any other actual direct damages, up to the greater of U.S. $100,000 (or equivalent in local currency) or the
charges (if recurring, 12 months' charges apply) for the Machine that is the subject of the claim.
This limit also applies to IBM's suppliers and your reseller. It is the maximum for which IBM, its suppliers, and your reseller are
collectively responsible.
UNDER NO CIRCUMSTANCES IS IBM LIABLE FOR ANY OF THE FOLLOWING: 1) THIRD-PARTY CLAIMS
AGAINST YOU FOR DAMAGES (OTHER THAN THOSE UNDER THE FIRST ITEM LISTED ABOVE); 2) LOSS OF,
OR DAMAGE TO, YOUR RECORDS OR DATA; OR 3) SPECIAL, INCIDENTAL, OR INDIRECT DAMAGES OR
FOR ANY ECONOMIC CONSEQUENTIAL DAMAGES (INCLUDING LOST PROFITS OR SAVINGS), EVEN IF IBM,
ITS SUPPLIERS OR YOUR RESELLER IS INFORMED OF THEIR POSSIBILITY. SOME JURISDICTIONS DO NOT
ALLOW THE EXCLUSION OR LIMITATION OF INCIDENTAL OR CONSEQUENTIAL DAMAGES, SO THE ABOVE
LIMITATION OR EXCLUSION MAY NOT APPLY TO YOU.
14 Flat Panel Monitor Rack Mount Kit II Installation Instructions
Page 21

Part 2 - Worldwide Country-Unique Terms
ASIA PACIFIC
AUSTRALIA: The IBM Warranty for Machines: The following paragraph is added to this Section:
The warranties specified in this Section are in addition to any rights you may have under the Trade Practices Act 1974 or other
legislation and are only limited to the extent permitted by the applicable legislation.
Extent of Warranty: The following replaces the first and second sentences of this Section:
The warranty does not cover the repair or exchange of a Machine resulting from misuse, accident, modification, unsuitable physical
or operating environment, operation in other than the Specified Operating Environment, improper maintenance by you, or failure
caused by a product for which IBM is not responsible.
Limitation of Liability: The following is added to this Section:
Where IBM is in breach of a condition or warranty implied by the Trade Practices Act 1974, IBM's liability is limited to the repair or
replacement of the goods or the supply of equivalent goods. Where that condition or warranty relates to right to sell, quiet
possession or clear title, or the goods are of a kind ordinarily acquired for personal, domestic or household use or consumption, then
none of the limitations in this paragraph apply.
PEOPLE'S REPUBLIC OF CHINA: Governing Law: The following is added to this Statement:
The laws of the State of New York govern this Statement.
INDIA: Limitation of Liability: The following replaces items 1 and 2 of this Section:
1. liability for bodily injury (including death) or damage to real property and tangible personal property will be limited to that caused by
IBM's negligence;
2. as to any other actual damage arising in any situation involving nonperformance by IBM pursuant to, or in any way related to the
subject of this Statement of Warranty, IBM's liability will be limited to the charge paid by you for the individual Machine that is the
subject of the claim.
NEW ZEALAND: The IBM Warranty for Machines: The following paragraph is added to this Section:
The warranties specified in this Section are in addition to any rights you may have under the Consumer Guarantees Act 1993 or
other legislation which cannot be excluded or limited. The Consumer Guarantees Act 1993 will not apply in respect of any goods
which IBM provides, if you require the goods for the purposes of a business as defined in that Act.
Limitation of Liability: The following is added to this Section:
Where Machines are not acquired for the purposes of a business as defined in the Consumer Guarantees Act 1993, the limitations in
this Section are subject to the limitations in that Act.
EUROPE, MIDDLE EAST, AFRICA (EMEA)
The following terms apply to all EMEA countries.
The terms of this Statement of Warranty apply to Machines purchased from an IBM reseller. If you purchased this Machine from
IBM, the terms and conditions of the applicable IBM agreement prevail over this warranty statement.
Warranty Service
If you purchased an IBM Machine in Austria, Belgium, Denmark, Estonia, Finland, France, Germany, Greece, Iceland, Ireland, Italy,
Latvia, Lithuania, Luxembourg, Netherlands, Norway, Portugal, Spain, Sweden, Switzerland or United Kingdom, you may obtain
warranty service for that Machine in any of those countries from either (1) an IBM reseller approved to perform warranty service or
(2) from IBM.
If you purchased an IBM Personal Computer Machine in Albania, Armenia, Belarus, Bosnia and Herzegovina, Bulgaria, Croatia,
Czech Republic, Georgia, Hungary, Kazakhstan, Kirghizia, Federal Republic of Yugoslavia, Former Yugoslav Republic of Macedonia
(FYROM), Moldova, Poland, Romania, Russia, Slovak Republic, Slovenia, or Ukraine, you may obtain warranty service for that
Machine in any of those countries from either (1) an IBM reseller approved to perform warranty service or (2) from IBM.
The applicable laws, Country-unique terms and competent court for this Statement are those of the country in which the warranty
service is being provided. However, the laws of Austria govern this Statement if the warranty service is provided in Albania,
Armenia, Belarus, Bosnia and Herzegovina, Bulgaria, Croatia, Czech Republic, Federal Republic of Yugoslavia, Georgia, Hungary,
Kazakhstan, Kirghizia, Former Yugoslav Republic of Macedonia (FYROM), Moldova, Poland, Romania, Russia, Slovak Republic,
Slovenia, and Ukraine.
The following terms apply to the country specified:
EGYPT: Limitation of Liability: The following replaces item 2 in this Section:
Product warranties and notices
15
Page 22

2. as to any other actual direct damages, IBM's liability will be limited to the total amount you paid for the Machine that is the subject
of the claim.
Applicability of suppliers and resellers (unchanged).
FRANCE: Limitation of Liability: The following replaces the second sentence of the first paragraph of this Section:
In such instances, regardless of the basis on which you are entitled to claim damages from IBM, IBM is liable for no more than:
(items 1 and 2 unchanged).
GERMANY: The IBM Warranty for Machines: The following replaces the first sentence of the first paragraph of this Section:
The warranty for an IBM Machine covers the functionality of the Machine for its normal use and the Machine's conformity to its
Specifications.
The following paragraphs are added to this Section:
The minimum warranty period for Machines is six months.
In case IBM or your reseller are unable to repair an IBM Machine, you can alternatively ask for a partial refund as far as justified by
the reduced value of the unrepaired Machine or ask for a cancellation of the respective agreement for such Machine and get your
money refunded.
Extent of Warranty: The second paragraph does not apply.
Warranty Service: The following is added to this Section:
During the warranty period, transportation for delivery of the failing Machine to IBM will be at IBM's expense.
Production Status: The following paragraph replaces this Section:
Each Machine is newly manufactured. It may incorporate in addition to new parts, re-used parts as well.
Limitation of Liability: The following is added to this Section:
The limitations and exclusions specified in the Statement of Warranty will not apply to damages caused by IBM with fraud or gross
negligence and for express warranty.
In item 2, replace “U.S. $100,000” with “1.000.000 DEM.”
The following sentence is added to the end of the first paragraph of item 2:
IBM's liability under this item is limited to the violation of essential contractual terms in cases of ordinary negligence.
IRELAND: Extent of Warranty: The following is added to this Section:
Except as expressly provided in these terms and conditions, all statutory conditions, including all warranties implied, but without
prejudice to the generality of the foregoing all warranties implied by the Sale of Goods Act 1893 or the Sale of Goods and Supply of
Services Act 1980 are hereby excluded.
Limitation of Liability: The following replaces items one and two of the first paragraph of this Section:
1. death or personal injury or physical damage to your real property solely caused by IBM's negligence; and 2. the amount of any
other actual direct damages, up to the greater of Irish Pounds 75,000 or 125 percent of the charges (if recurring, the 12 months'
charges apply) for the Machine that is the subject of the claim or which otherwise gives rise to the claim.
Applicability of suppliers and resellers (unchanged).
The following paragraph is added at the end of this Section:
IBM's entire liability and your sole remedy, whether in contract or in tort, in respect of any default shall be limited to damages.
ITALY: Limitation of Liability: The following replaces the second sentence in the first paragraph:
In each such instance unless otherwise provided by mandatory law, IBM is liable for no more than: (item 1 unchanged) 2)as to any
other actual damage arising in all situations involving non-performance by IBM pursuant to, or in any way related to the subject
matter of this Statement of Warranty, IBM's liability, will be limited to the total amount you paid for the Machine that is the subject of
the claim.
Applicability of suppliers and resellers (unchanged).
The following replaces the second paragraph of this Section:
Unless otherwise provided by mandatory law, IBM and your reseller are not liable for any of the following: (items 1 and 2 unchanged)
3) indirect damages, even if IBM or your reseller is informed of their possibility.
SOUTH AFRICA, NAMIBIA, BOTSWANA, LESOTHO AND SWAZILAND: Limitation of Liability: The following is added to this
Section:
IBM's entire liability to you for actual damages arising in all situations involving nonperformance by IBM in respect of the subject
matter of this Statement of Warranty will be limited to the charge paid by you for the individual Machine that is the subject of your
claim from IBM.
16 Flat Panel Monitor Rack Mount Kit II Installation Instructions
Page 23

TURKIYE: Production Status: The following replaces this Section:
IBM fulfils customer orders for IBM Machines as newly manufactured in accordance with IBM's production standards.
UNITED KINGDOM: Limitation of Liability: The following replaces items 1 and 2 of the first paragraph of this Section:
1. death or personal injury or physical damage to your real property solely caused by IBM's negligence;
2. the amount of any other actual direct damages or loss, up to the greater of Pounds Sterling 150,000 or 125 percent of the charges
(if recurring, the 12 months' charges apply) for the Machine that is the subject of the claim or which otherwise gives rise to the claim.
The following item is added to this paragraph:
3. breach of IBM's obligations implied by Section 12 of the Sale of Goods Act 1979 or Section 2 of the Supply of Goods and
Services Act 1982.
Applicability of suppliers and resellers (unchanged).
The following is added to the end of this Section:
IBM's entire liability and your sole remedy, whether in contract or in tort, in respect of any default will be limited to damages.
NORTH AMERICA
CANADA: Warranty Service: The following is added to this Section:
To obtain warranty service from IBM, call 1-800-565-3344. In Toronto, call 416-383-3344.
UNITED STATES OF AMERICA: Warranty Service: The following is added to this Section:
To obtain warranty service from IBM, call 1-800-772-2227.
Notices
References in this publication to IBM products, programs, or services do not imply that IBM intends to
make these available in all countries in which IBM operates. Any reference to an IBM product, program,
or service is not intended to state or imply that only that IBM product, program, or service may be used.
Subject to IBM’s valid intellectual property or other legally protectable rights, any functionally equivalent
product, program, or service may be used instead of the IBM product, program, or service. The evaluation
and verification of operation in conjunction with other products, except those expressly designated by IBM,
are the responsibility of the user.
IBM may have patents or pending patent applications covering subject matter in this document. The
furnishing of this document does not give you any license to these patents. You can send license
inquiries, in writing, to:
IBM Director of Licensing
IBM Corporation
North Castle Drive
Armonk, NY 10504-1785
U.S.A.
Trademarks
The following terms are trademarks of the IBM Corporation in the United States or other countries or both:
IBM
Other company, product, and service names may be trademarks or service marks of others.
Product warranties and notices 17
Page 24

IBM
Part Number: 32P0100
Printed in U.S.A.
32P1
 Loading...