

Page 1

®
EDNord - Istedgade 37A - 9000 Aalborg - telefon 96333500
QMS magicolor LX
Printe r User’s Guide
1800409-001A
Page 2

The following are trade marks or reg istered trad emarks of their resp ective owne rs.
EDNord - Istedgade 37A - 9000 Aalborg - telefon 96333500
Those list ed as regi ster ed ar e r egis tered in t he U nite d Sta tes Pat ent and Tr adema rk
Office . Som e tra demar ks are also regis tered in oth er cou ntri es. O ther produc t
names mentio ned in this m anual may be tr ademark s or registered trademarks of
their respective owners. QMS
seal, PS Executive Series
, QMS-PS, the QMS logo, Crown, the Crown
, ma gicolor, ma gicolor LX/QMS, I nc. PostScript
is a trademark of Adobe Systems for a page description language, which may be
registe red in certai n juri sdic tions. Throughout this man ual , “Pos tScr i pt Leve l 2”
is used to refer to a set of capabilities defined by Adobe Systems for its PostScript
Level 2 page description language. These capabilities, among others, are
implemented in this product through a QMS-developed emulation that is
compatible with Adobe’s PostScript Level 2 language. Adobe
Illustrator
FreeHand
LaserWriter
AutoCAD
Dataproduc ts
Cromalin
VMS
EFIColor
Data Design. Ethernet
Helvetica
Schoolbook
PaintJet
Disp layWrite
Chancery
, Adobe Photoshop, Tekton/Adobe Systems. Aldus, Aldus
, Aldus PageMaker/Aldus. Apple, AppleTalk, ColorSync,
, Macintosh, LocalTalk, EtherTalk/Apple Computer.
/Autodes k, Inc. Centr onics /Centronics Data Computer Corporation.
/Dataproducts Corporation. CompuServe/H & R Block.
/Du Pont. CorelDRAW, Vent ura Publ isher/Corel. D EC, DECnet,
, LN03/Digital Equipment Corporation. FotoFlow/Agfa.
/Electronic s for Imaging. ColorSen se/Kodak. Dreams/Innovative
, Times, Optima, Palatino, New Century
/Linotype-Hell AG and/or its subsidiaries. HP, HP PCL, HP-GL,
, ColorPro/Hewlett-Packard. IBM, IBM PC, AT, Token-Ring,
/IBM. Intel/Intel. ITC Avant Garde Gothic, ITC Zapf
, ITC Zapf Din gbats, ITC Bo okma n, ITC Garamond/International
/Xerox. Harvard Graphics/ Software Publishing.
, Adobe
Typeface Corporation, registered in the United States and in some foreign
countries. © 1994 ITC. Park Avenue
Freestyle
, Revue/Esselte Pendaflex in the USA, Letraset Canada Ltd. in
Canada, and Esselte Letraset Ltd. elsewhere. © 1994 Letraset. Lotus
Lotus Manuscript
Microsoft
Micrografx
, MS-DOS, Excel, PowerPoint, Windows/Microsoft.
/Lotus Development. Matchprint, Color Key/3M.
, Micrografx Designer/Micrografx. MultiMate/MultiMate
International, an Ashton-Tate company. Novell
/International Color Consortium. PhoneNET/Farallon Computing.
ICC
SuperPaint
WordPerfect
Laser Print
Inc. PANTONE
/Silicon Beach Software. UNIX /AT&T Bell Laboratories.
/WordP erfect. Wo rdStar/Mic roPro Interna tion al. H ammermi ll,
/International Paper. QuarkXPress /Quark, Inc. POCE/Pantone,
is Pantone’s check-standard trademark for color reproduction
and color reproduction materials. The ENERGY STAR
/Kingsley/ATF Type. Letraset, Aach en,
1-2-3,
NetWare/Novell.
logo/United States
Environmental Protection Agency. The ENERGY STAR emblem does not
represent EPA endorsement of any product or service.
Page 3

Dear Customer,
EDNord - Istedgade 37A - 9000 Aalborg - telefon 96333500
Mark Twain once sa id th at on ly tw o thin gs in lif e are ce rtain : deat h and taxes .
Well, if he were living today, we’re sure he’d add manuals to this list. Just about
everyt hing you buy is accom pa ni ed by a manu al —a nd yo ur new QM S pr in te r is
no exception . Now, we know that even though we’ve devot ed our lives to writing
manuals, very few people actually enjoy reading them. So we’ve written this
manual with you in mind. However, there are more of you out there than there are
prin ters, an d you all nee d somet hing d iffere nt. Be cause o f this, we’ve t ried to
design yo ur manua l to hel p you r ea ch your des tin at i on as ea si ly as poss i bl e:
Table of Contents—Use this section as a ro ad map t o discover what there is to
see in the manua l and how the sectio ns are rel ated .
Overvi e w of t he Do cum e nta ti on —This section functions as a Welcome Center.
It’ll g iv e you a n id ea about wh at ’s in th is ci ty (y our u se r’s gui de ) a s well as in
other nearby cities (other useful documentation).
Overview of the Manual—As long as you’re at the Welcome Center, you
probably want a list of local attractions . This section let s you know which chapte rs
you really shouldn’t miss and which you need to visit only i f you have the time
and interest, or a special purpose. It’s pretty much the same information as in the
table of contents, but in a descriptive format.
Headers, Footers, and Tab Dividers—Use these features as road signs to help
you locate the section of the manual you want to visit.
Index—W hile s ome pe ople like to w ande r through a ci ty, st opping wher ever t hey
find s omethin g i n teresti ng , othe rs like t o call ah e ad to make a reservation f or a
specif ic hotel or re staurant . Our Blue Pa ges speed you t o the infor mation you want
quickly and wit hout unnec essar y detours. Easy on, easy off . We think you ’ll find
the blue color espec ially useful when you h ave more t han one m anual in t he binder.
We hope you enjoy your new QMS printer (and traveling through its manuals,
too!).
Your QMS Technical Writer
Page 4

EDNord - Istedgade 37A - 9000 Aalborg - telefon 96333500
4
♦
Page 5

Table of Contents
EDNord - Istedgade 37A - 9000 Aalborg - telefon 96333500
Chapter 1 Introduction
Introduction. . . . . . . . . . . . . . . . . . . . . . . . . . . . . . . . . . 1-1
About This Manua l. . . . . . . . . . . . . . . . . . . . . . . . . . . . 1-2
Optional Documentation . . . . . . . . . . . . . . . . . . . . . 1-4
Other Doc u menta t ion. . . . . . . . . . . . . . . . . . . . . . . . 1-5
Typograp hic Conventions . . . . . . . . . . . . . . . . . . . . 1-6
Printer Features. . . . . . . . . . . . . . . . . . . . . . . . . . . . . . . 1-7
Color Lase r Tec hnol ogy . . . . . . . . . . . . . . . . . . . . . 1-7
QCOLOR Technol ogy. . . . . . . . . . . . . . . . . . . . . . . 1-7
Multiple Resolut io n s . . . . . . . . . . . . . . . . . . . . . . . . 1-8
Software Loadable System (SL S) . . . . . . . . . . . . . . 1-8
Energy Saver Mode . . . . . . . . . . . . . . . . . . . . . . . . . 1-8
QMS Crown Operating System. . . . . . . . . . . . . . . . 1-9
Media Flexibility . . . . . . . . . . . . . . . . . . . . . . . . . . 1-11
Automatic Jam Recovery. . . . . . . . . . . . . . . . . . . . 1-11
Convenient Co ntr ol Panel Oper ation. . . . . . . . . . . 1-11
PS Executive Series Uti liti es. . . . . . . . . . . . . . . . . 1-12
PostScript Level 2 Compa tibil ity . . . . . . . . . . . . . 1-12
Resident HP PCL 5C and HP-GL Emul atio n . . . . 1-12
Intel RISC-base d Contro ll er . . . . . . . . . . . . . . . . . 1-12
39 Resident PostScript Fonts. . . . . . . . . . . . . . . . . 1-13
Printer Option s. . . . . . . . . . . . . . . . . . . . . . . . . . . . 1-13
Chapter 2 Initial Printer Setup
Introduction. . . . . . . . . . . . . . . . . . . . . . . . . . . . . . . . . . 2-1
Finding a Good Location for You r Printe r. . . . . . . . . . 2-2
Location Requirements . . . . . . . . . . . . . . . . . . . . . . 2-2
What’s Included in the Shipment . . . . . . . . . . . . . . . . . 2-4
QMS Product Registration. . . . . . . . . . . . . . . . . . . . 2-5
Unpacking the Printer. . . . . . . . . . . . . . . . . . . . . . . . . . 2-6
Installing De velope r an d Toner Cartri dge s . . . . . . . . 2-11
i
Page 6

Removing the Pressure-Release Pi eces . . . . . . . . . . . 2-20
EDNord - Istedgade 37A - 9000 Aalborg - telefon 96333500
Installing the Cleani ng Pad and Oil Bottle. . . . . . . . . 2-24
Installing the Wast e Tone r Pac k. . . . . . . . . . . . . . . . . 2-30
Installing the OPC Belt Car tridge. . . . . . . . . . . . . . . . 2-32
Filling the Paper Casse tte. . . . . . . . . . . . . . . . . . . . . . 2-38
Starting the Printer . . . . . . . . . . . . . . . . . . . . . . . . . . . 2-43
Connecting the Power Cord. . . . . . . . . . . . . . . . . . 2-43
Using the Power Switches. . . . . . . . . . . . . . . . . . . 2-44
The Start-up Page . . . . . . . . . . . . . . . . . . . . . . . . . . . . 2-44
Installing Optio ns . . . . . . . . . . . . . . . . . . . . . . . . . . . . 2-46
Chapter 3 Connecting the Printer
Introduction. . . . . . . . . . . . . . . . . . . . . . . . . . . . . . . . . . 3-1
Connecting to a Network . . . . . . . . . . . . . . . . . . . . . . . 3-1
About Macintosh Networks. . . . . . . . . . . . . . . . . . . 3-1
Connecting to a Macin tosh. . . . . . . . . . . . . . . . . . . . . . 3-2
What You Need . . . . . . . . . . . . . . . . . . . . . . . . . . . . 3-2
Making the Conne ction . . . . . . . . . . . . . . . . . . . . . . 3-3
Printing fro m the Ma c intosh . . . . . . . . . . . . . . . . . . 3 -3
Installing the Printer Ut ilitie s. . . . . . . . . . . . . . . . . . 3-4
Installing Lase rW ri ter 8. x
and the magi color LX 4.1 PPD . . . . . . . . . . . . . . . . 3-5
Installing Pri nt er Descri pt ion File s . . . . . . . . . . . . . 3-7
Testing Ma ci nt osh Communica ti on. . . . . . . . . . . . . 3-8
Where to Go Now . . . . . . . . . . . . . . . . . . . . . . . . . . 3-9
Connecting to a PC. . . . . . . . . . . . . . . . . . . . . . . . . . . 3-10
What You Need . . . . . . . . . . . . . . . . . . . . . . . . . . . 3-10
How to Choose a Cable . . . . . . . . . . . . . . . . . . . . . 3-10
Making the Conne ctio n . . . . . . . . . . . . . . . . . . . . . 3-11
PC Printing Softwa re . . . . . . . . . . . . . . . . . . . . . . . . . 3-12
PS Executive Seri es Pri nte r Utili ty Softwa re . . . . 3-13
Installing a Color PostSc ript Print er Drive r . . . . . 3-13
Installing the Windows 3. 1 Driver . . . . . . . . . . . . 3-14
Printer Description File s (PC) . . . . . . . . . . . . . . . . 3-16
Testing Parallel Commu nic at io n . . . . . . . . . . . . . . . . 3-17
Testing Serial Communic at io n. . . . . . . . . . . . . . . . . . 3-19
Checking Serial Commu nic atio n Set tings. . . . . . . 3-20
ii
Page 7

About the Printer’s Comm un icat ion Modes. . . . . . . . 3-22
EDNord - Istedgade 37A - 9000 Aalborg - telefon 96333500
Simultaneous Inter face Opera tion (SIO). . . . . . . . 3-23
Emulation Sensing Processin g (ESP) Mode s . . . . 3-23
Chapter 4 Printer Configuration
Introduction. . . . . . . . . . . . . . . . . . . . . . . . . . . . . . . . . . 4-1
Printer Configuration Methods. . . . . . . . . . . . . . . . . . . 4-1
Configuration Method Priorities . . . . . . . . . . . . . . . 4-2
The Printer’s Control Panel . . . . . . . . . . . . . . . . . . . . . 4-3
The LCD Message Window . . . . . . . . . . . . . . . . . . 4-4
The Control Panel LEDs . . . . . . . . . . . . . . . . . . . . . 4-4
The Functi on Keys. . . . . . . . . . . . . . . . . . . . . . . . . . 4-5
Using the Configuration Menu. . . . . . . . . . . . . . . . . . . 4-8
Password-protected Menu s . . . . . . . . . . . . . . . . . . . 4-8
Selecting Options. . . . . . . . . . . . . . . . . . . . . . . . . . . 4-8
Entering Alphan um eri c Values. . . . . . . . . . . . . . . 4-10
Saving Configuration Se le ct ions. . . . . . . . . . . . . . 4-12
The Main Menu Groups . . . . . . . . . . . . . . . . . . . . . . . 4-14
The Install ation Menu. . . . . . . . . . . . . . . . . . . . . . . . . 4-15
Installation/ Ope rator Pa sswrd . . . . . . . . . . . . . . . . 4-15
Installation/ Use Ope ra tor Pwd. . . . . . . . . . . . . . . . 4-16
Installation/Adm in Password. . . . . . . . . . . . . . . . . 4-16
Installation/ Use Adm i n Pwd . . . . . . . . . . . . . . . . . 4-16
The Operator Control Menu. . . . . . . . . . . . . . . . . . . . 4-17
Operator Contr ol/Med ia . . . . . . . . . . . . . . . . . . . . 4-17
Operator Contr ol/Cop ie s . . . . . . . . . . . . . . . . . . . . 4-18
Operator Contr ol/Col la tion . . . . . . . . . . . . . . . . . . 4-18
Operator Control/Orientation. . . . . . . . . . . . . . . . . 4-18
Operator Contr ol/Inp utb in. . . . . . . . . . . . . . . . . . . 4-18
Operator Control/Chain Inputbi n s. . . . . . . . . . . . . 4-19
Operator Contr ol/ Col or Se par ation. . . . . . . . . . . . 4-19
Operator Contr ol/Col or Mod el . . . . . . . . . . . . . . . 4-19
Operator Contr ol/ Man ual Fee d Siz e . . . . . . . . . . . 4-19
The Administ ra tion Men u . . . . . . . . . . . . . . . . . . . . . 4-20
Administ rat ion/Commu nic at io n s. . . . . . . . . . . . . . 4-21
Administ rat ion/Emulations . . . . . . . . . . . . . . . . . . 4-28
iii
Page 8

Administ ratio n/Sp ecia l Pages . . . . . . . . . . . . . . . . 4-37
EDNord - Istedgade 37A - 9000 Aalborg - telefon 96333500
Administ ratio n/St ar tup Options. . . . . . . . . . . . . . . 4-39
Administ rat io n/Memory . . . . . . . . . . . . . . . . . . . . 4-42
Administ rat io n/E ngine. . . . . . . . . . . . . . . . . . . . . . 4-46
Administ rat ion/Miscell an eous. . . . . . . . . . . . . . . . 4-50
Administ ratio n/Di sk Ope rat io ns . . . . . . . . . . . . . . 4-52
The Optional Features Menu s. . . . . . . . . . . . . . . . . . . 4-54
Document Option Comma n ds . . . . . . . . . . . . . . . . . . 4-56
Header/Trail er Page Commands . . . . . . . . . . . . . . 4-56
Header/Trail er Infor mati on Comma nds . . . . . . . . 4-56
HP-GL Emulation Features Comman ds . . . . . . . . 4-57
HP-PCL Emulation Fea tures Co mm ands . . . . . . . 4-57
Lineprint er Emula tion Fe ature s Com mands . . . . . 4-57
PostScript Emul ation Feature s Com m and s. . . . . . 4-58
Printer Featu res Co mm and s. . . . . . . . . . . . . . . . . . 4-58
Chapter 5 Print Media and Daily Operations
Introduction. . . . . . . . . . . . . . . . . . . . . . . . . . . . . . . . . . 5-1
Refilling the Media Cassette. . . . . . . . . . . . . . . . . . . . . 5-1
Manual Feed . . . . . . . . . . . . . . . . . . . . . . . . . . . . . . . . . 5-3
Printing Transpa ren ci es . . . . . . . . . . . . . . . . . . . . . . . . 5-6
Printing Labels . . . . . . . . . . . . . . . . . . . . . . . . . . . . . . . 5-7
Printing on Letterh ea d or Other Prepri nt ed Media . . . . 5-8
Printing on 3-Hol e or Other Pre-p unc hed Medi a. . . . . 5-8
Printing Envelopes . . . . . . . . . . . . . . . . . . . . . . . . . . . . 5-8
Printing on Thi ck Pape r Stock s . . . . . . . . . . . . . . . . . . 5-8
Page Sizes, Imag ea ble Reg ion s and Margi n s. . . . . . . 5-10
Page Sizes . . . . . . . . . . . . . . . . . . . . . . . . . . . . . . . 5-10
Selecting a nd Storing Media. . . . . . . . . . . . . . . . . . . . 5-11
Media Selection. . . . . . . . . . . . . . . . . . . . . . . . . . . 5-11
Media Storage . . . . . . . . . . . . . . . . . . . . . . . . . . . . 5-11
Collating . . . . . . . . . . . . . . . . . . . . . . . . . . . . . . . . . . . 5-12
Configuri ng the Printe r for Collat io n . . . . . . . . . . 5-12
Changing Pri nt Job Reso lut io n . . . . . . . . . . . . . . . 5-14
Adjusting Pri nt Densi ty . . . . . . . . . . . . . . . . . . . . . . . 5-15
Cancelling and Ending Pr int Jobs. . . . . . . . . . . . . . . . 5-17
Cancelling a Print Job . . . . . . . . . . . . . . . . . . . . . . 5-17
iv
Page 9

Sending an End-of-Jo b Indi cato r. . . . . . . . . . . . . . 5-17
EDNord - Istedgade 37A - 9000 Aalborg - telefon 96333500
Diagnosti c and Spec ial Pa ges. . . . . . . . . . . . . . . . . . . 5-19
The Start-up Page. . . . . . . . . . . . . . . . . . . . . . . . . . 5-19
The Status Pages . . . . . . . . . . . . . . . . . . . . . . . . . . 5-20
The Sample Page . . . . . . . . . . . . . . . . . . . . . . . . . . 5-21
The Registra tion Pa ge . . . . . . . . . . . . . . . . . . . . . . 5-21
Header and Trailer Page s. . . . . . . . . . . . . . . . . . . . 5-21
Chapter 6 Consumables and Preventative Maintenance
Introduction. . . . . . . . . . . . . . . . . . . . . . . . . . . . . . . . . . 6-1
Storing and Handling Consumabl es. . . . . . . . . . . . . . . 6-1
Storing Consumables. . . . . . . . . . . . . . . . . . . . . . . . 6-2
Handling Consum able s . . . . . . . . . . . . . . . . . . . . . . 6-2
Replacing Consum able s . . . . . . . . . . . . . . . . . . . . . . . . 6-4
Replac ing a Toner C artridge . . . . . . . . . . . . . . . . . . 6-4
Replac ing a De v elo per Cartri dge . . . . . . . . . . . . . . 6-7
Replacing the OPC Belt Car tri dge . . . . . . . . . . . . . . 6-9
Replacing the Cleani ng Pad and Oil Bot tle. . . . . . 6-12
Replacing the W ast e Tone r Pac k. . . . . . . . . . . . . . 6-14
Moving the Printer . . . . . . . . . . . . . . . . . . . . . . . . . . . 6-18
Removing the Fuser Unit and Oil Bottl e. . . . . . . . 6-19
Removing and Replacing
Pressure-Re lease Pieces. . . . . . . . . . . . . . . . . . . . . 6-22
Preventati ve Ma int enance. . . . . . . . . . . . . . . . . . . . . . 6-25
General Tips for Extending Printer Life . . . . . . . . 6-26
Cleaning the Printer. . . . . . . . . . . . . . . . . . . . . . . . 6-26
Cleaning the Charge r Unit. . . . . . . . . . . . . . . . . . . 6-27
Cleaning the Pre- Cha rge r Unit . . . . . . . . . . . . . . . 6-31
Cleaning Reg ist er and Transfer Rollers . . . . . . . . 6-34
Cleaning the Paper E xit Rol le rs and Plates. . . . . . 6-37
Cleaning the Pape r-Fe ed Roller
and the Manual-Feed Be lts . . . . . . . . . . . . . . . . . . 6-38
Cleaning the Exte rio r of Your Printer. . . . . . . . . . 6-41
v
Page 10

Chapter 7 Optimizing Color Output
EDNord - Istedgade 37A - 9000 Aalborg - telefon 96333500
Introduction. . . . . . . . . . . . . . . . . . . . . . . . . . . . . . . . . . 7-1
QCOLOR Autom atic Colo r Cont rol . . . . . . . . . . . . . . 7-1
Enabling QCOLOR for Windows. . . . . . . . . . . . . . 7-1
Enabling QCOLOR for the Macintosh . . . . . . . . . . 7-4
Fine-Tuning Colo r Output . . . . . . . . . . . . . . . . . . . . . . 7-6
Printer Default Ha lftone Set tings . . . . . . . . . . . . . . 7-6
Dithe r Pat tern. . . . . . . . . . . . . . . . . . . . . . . . . . . . . . 7-9
Gamma Corre ct ion. . . . . . . . . . . . . . . . . . . . . . . . . 7-10
Printer-Resident Color Rende ri ng Dic tionaries . . 7-10
Color Manag emen t. . . . . . . . . . . . . . . . . . . . . . . . . . . 7-12
Device Calibra tion. . . . . . . . . . . . . . . . . . . . . . . . . 7-12
Color Matchin g . . . . . . . . . . . . . . . . . . . . . . . . . . . 7-12
Methods of Col or Match ing. . . . . . . . . . . . . . . . . . . . 7-13
Color Matchin g wit h a CMS . . . . . . . . . . . . . . . . . 7-13
Color Matchin g with PostSc ri pt Level 2. . . . . . . . 7-14
®
PANTONE
* Color Matching . . . . . . . . . . . . . . . 7-15
The Resident PostScript Fonts . . . . . . . . . . . . . . . . . . 7-18
The Resident HP PCL Fonts. . . . . . . . . . . . . . . . . . . . 7-20
Chapter 8 Printer Options
Introduction. . . . . . . . . . . . . . . . . . . . . . . . . . . . . . . . . . 8-1
The Sheet Feeder . . . . . . . . . . . . . . . . . . . . . . . . . . . . . 8-1
Installing the Sheet Feeder. . . . . . . . . . . . . . . . . . . . 8-1
Using the Envelope Cassette . . . . . . . . . . . . . . . . . . . . 8-5
Font and Emulation Card s . . . . . . . . . . . . . . . . . . . . . 8-10
Using Font and Emulation Cards. . . . . . . . . . . . . . 8-10
Security Card s. . . . . . . . . . . . . . . . . . . . . . . . . . . . . . . 8-13
Using a Security Card . . . . . . . . . . . . . . . . . . . . . . 8-13
Removing the Control le r Board. . . . . . . . . . . . . . . . . 8-18
Replacing the Controller Board . . . . . . . . . . . . . . . . . 8-20
Single In-Line Memo ry Modules (SIMMs) . . . . . . . 8-22
* Pantone, Inc.’s check-standard trademark for color and color reproduction materials.
vi
Page 11

Installing a Netwo rk Inter face . . . . . . . . . . . . . . . . . . 8-26
EDNord - Istedgade 37A - 9000 Aalborg - telefon 96333500
Using an Optional Network In terfa ce . . . . . . . . . . 8-32
Centroni cs to Datapro ducts Conversion. . . . . . . . . . . 8-33
Internal Hard Di sk Installation. . . . . . . . . . . . . . . . . . 8-39
Using External Hard Disks. . . . . . . . . . . . . . . . . . . . . 8-43
Identify ing External Hard Disks . . . . . . . . . . . . . . 8-45
Formatting an External Hard Disk. . . . . . . . . . . . . 8-45
Installing a n Opti ona l Card Font or Emulation. . . 8-47
Removing an Optio nal Car d Font or Emul atio n . 8-48
Formatting the Internal Hard Disk. . . . . . . . . . . . . . . 8-50
Installing Print Syste m Softwa re and Font s. . . . . . . . 8-51
Chapter 9 Troubleshooting
Introduction. . . . . . . . . . . . . . . . . . . . . . . . . . . . . . . . . . 9-1
Responding to Status Messages . . . . . . . . . . . . . . . . . . 9-1
Service Call Messages. . . . . . . . . . . . . . . . . . . . . . . 9-4
Clearing Medi a Jams . . . . . . . . . . . . . . . . . . . . . . . . . . 9-6
Clearing Misfe ed Jam s. . . . . . . . . . . . . . . . . . . . . . . 9-6
Clearin g Inner Jam s. . . . . . . . . . . . . . . . . . . . . . . . . 9-9
Clearing Oute r Jam s. . . . . . . . . . . . . . . . . . . . . . . . 9-14
If the Media Jam Message St ays On. . . . . . . . . . . 9-17
Jam Recov ery. . . . . . . . . . . . . . . . . . . . . . . . . . . . . 9-17
Preventing Med ia Jam s. . . . . . . . . . . . . . . . . . . . . . . . 9-18
Preventi ng Enve lop e Jam s. . . . . . . . . . . . . . . . . . . 9-19
Internal Hard Disk Proble ms . . . . . . . . . . . . . . . . . . . 9-19
Miscellaneous Prob lems: A Quick Che ck . . . . . . . . . 9-20
IBM PC and Compati ble Com pu ter Che ckl ist . . . 9-22
Apple Macinto sh Che cklist. . . . . . . . . . . . . . . . . . 9-22
Mechanical Problems . . . . . . . . . . . . . . . . . . . . . . . . . 9-24
Control Panel Select io ns Don’t Take Eff ect. . . . . 9-24
Data LED Stays Li t . . . . . . . . . . . . . . . . . . . . . . . . 9-24
No Start-up Pa ge . . . . . . . . . . . . . . . . . . . . . . . . . . 9-24
Printer Reset s. . . . . . . . . . . . . . . . . . . . . . . . . . . . . 9-25
Printer Lock s Up . . . . . . . . . . . . . . . . . . . . . . . . . . 9-26
Blank Page s . . . . . . . . . . . . . . . . . . . . . . . . . . . . . . 9-26
Not All Pages Print . . . . . . . . . . . . . . . . . . . . . . . . 9-26
vii
Page 12

Print Quality Probl em s. . . . . . . . . . . . . . . . . . . . . . . . 9-28
EDNord - Istedgade 37A - 9000 Aalborg - telefon 96333500
Generally Poor Print Qual ity. . . . . . . . . . . . . . . . . 9-28
Specific Print Quality Problem s . . . . . . . . . . . . . . 9-28
Placing a Service Call. . . . . . . . . . . . . . . . . . . . . . . . . 9-34
Appendix A QMS Customer Support
QMS Customer Support. . . . . . . . . . . . . . . . . . . . . . . . A-1
QMS National Service . . . . . . . . . . . . . . . . . . . . . . . . . A-3
QMS World-wide Offices . . . . . . . . . . . . . . . . . . . . . . A-4
Appendix B Technical Specifications
Print Engine . . . . . . . . . . . . . . . . . . . . . . . . . . . . . . . . . B-1
Controller . . . . . . . . . . . . . . . . . . . . . . . . . . . . . . . . . . . B-2
Internal Hard Di sk . . . . . . . . . . . . . . . . . . . . . . . . . . . . B-3
Electrical Requirements . . . . . . . . . . . . . . . . . . . . . . . . B-3
Environm e nta l Re qui re me nt s. . . . . . . . . . . . . . . . . . . . B-4
Media Handling . . . . . . . . . . . . . . . . . . . . . . . . . . . . . . B-5
Consumables. . . . . . . . . . . . . . . . . . . . . . . . . . . . . . . . . B-7
Options . . . . . . . . . . . . . . . . . . . . . . . . . . . . . . . . . . . . . B-8
SIMMs . . . . . . . . . . . . . . . . . . . . . . . . . . . . . . . . . . B-9
Warrant y Considerations . . . . . . . . . . . . . . . . . . . . . . . B-9
How Consumables Affect Your Warranty . . . . . . . B-9
How Electrostat ic Disch arg e
Affects Your War ran ty . . . . . . . . . . . . . . . . . . . . . B-10
Cable Pinouts . . . . . . . . . . . . . . . . . . . . . . . . . . . . . . . B-11
LocalTalk. . . . . . . . . . . . . . . . . . . . . . . . . . . . . . . . B-11
Macintosh to Serial . . . . . . . . . . . . . . . . . . . . . . . . B-11
Serial . . . . . . . . . . . . . . . . . . . . . . . . . . . . . . . . . . . B-12
IBM PC/XT, PC/AT ,
and Compa ti ble Computer s. . . . . . . . . . . . . . . . . . B-12
Centroni cs Par alle l. . . . . . . . . . . . . . . . . . . . . . . . . B-13
Notes to the Centronics Parall el
Cable Pinouts Table. . . . . . . . . . . . . . . . . . . . . . . . B-14
1284 Parallel . . . . . . . . . . . . . . . . . . . . . . . . . . . . . B-15
Dataprodu cts Para llel. . . . . . . . . . . . . . . . . . . . . . . B-16
viii
Page 13

Appendix C Notices
EDNord - Istedgade 37A - 9000 Aalborg - telefon 96333500
FCC Compliance . . . . . . . . . . . . . . . . . . . . . . . . . . . C-1
Canadian Users . . . . . . . . . . . . . . . . . . . . . . . . . . . . C-1
Vfg 1046/1984 Conform it y State ment . . . . . . . . . . C-2
Bescheinigung des Herstel lers/I mp ort eur s . . . . . . . C-2
Declara tion of Ma nufacturer/ Im porter . . . . . . . . . . C-2
Electroni cs Em issi on s . . . . . . . . . . . . . . . . . . . . . . . C-2
Laser Safety. . . . . . . . . . . . . . . . . . . . . . . . . . . . . . . C-3
Proprietary Statement . . . . . . . . . . . . . . . . . . . . . . . C-3
Copyright Notice . . . . . . . . . . . . . . . . . . . . . . . . . . . C-3
Manual Notice . . . . . . . . . . . . . . . . . . . . . . . . . . . . . C-3
Colophon . . . . . . . . . . . . . . . . . . . . . . . . . . . . . . . . . C-4
Appendix D Additional Technical In form ation
Introduction. . . . . . . . . . . . . . . . . . . . . . . . . . . . . . . . . . D-1
How Your Printer Works . . . . . . . . . . . . . . . . . . . . . . . D-1
Memory. . . . . . . . . . . . . . . . . . . . . . . . . . . . . . . . . . . . . D-3
Memory Mana ge me nt . . . . . . . . . . . . . . . . . . . . . . . D-3
The Memory Clients. . . . . . . . . . . . . . . . . . . . . . . . . . . D-4
Frame Buffer . . . . . . . . . . . . . . . . . . . . . . . . . . . . . . D-5
PostScript Heap . . . . . . . . . . . . . . . . . . . . . . . . . . . . D-5
Spool Buffers. . . . . . . . . . . . . . . . . . . . . . . . . . . . . . D-5
PostScript Font Cach e . . . . . . . . . . . . . . . . . . . . . . . D-6
Emulation. . . . . . . . . . . . . . . . . . . . . . . . . . . . . . . . . D-6
Temporary Emulation . . . . . . . . . . . . . . . . . . . . . . . D-7
Display List . . . . . . . . . . . . . . . . . . . . . . . . . . . . . . . D-8
Disk Cache. . . . . . . . . . . . . . . . . . . . . . . . . . . . . . . . D-8
MB Printer Mem . . . . . . . . . . . . . . . . . . . . . . . . . . . D-9
System Memory. . . . . . . . . . . . . . . . . . . . . . . . . . . . D-9
Hard Disk Managem ent . . . . . . . . . . . . . . . . . . . . . . . . D-9
Spooling Overflow. . . . . . . . . . . . . . . . . . . . . . . . . D-10
PS Protocol . . . . . . . . . . . . . . . . . . . . . . . . . . . . . . . . . D-10
PS Protocol Menu for
Optional Network Interfaces. . . . . . . . . . . . . . . . . D-12
Advantages. . . . . . . . . . . . . . . . . . . . . . . . . . . . . . . D-13
ix
Page 14

Glossary
EDNord - Istedgade 37A - 9000 Aalborg - telefon 96333500
Index
Implementation . . . . . . . . . . . . . . . . . . . . . . . . . . . D-13
Updated DOCs . . . . . . . . . . . . . . . . . . . . . . . . . . . . . . D-14
PCL 5 Emulation Terminolo gy . . . . . . . . . . . . . . . . . D-14
Font . . . . . . . . . . . . . . . . . . . . . . . . . . . . . . . . . . . . D-14
Font Index Num be r . . . . . . . . . . . . . . . . . . . . . . . . D-15
Object. . . . . . . . . . . . . . . . . . . . . . . . . . . . . . . . . . . D-15
Resource. . . . . . . . . . . . . . . . . . . . . . . . . . . . . . . . . D-16
Updated PCL 5 DOCs . . . . . . . . . . . . . . . . . . . . . . . . D-17
x
♦
Page 15

Introduction
EDNord - Istedgade 37A - 9000 Aalborg - telefon 96333500
Chapter highlights:
■ About the documentation
■ About your printer
Chapter 1
Page 16

EDNord - Istedgade 37A - 9000 Aalborg - telefon 96333500
Page 17

Introduction
EDNord - Istedgade 37A - 9000 Aalborg - telefon 96333500
This chapter provides a brief overview of the printer, an
explanatio n of the printer documentation, and an explanation of the
printer’s main features and benefits.
Chapter 1
REMOTE
SWITCH
Fig. 1.1 The QMS magicolor LX
The magicolor LX produ ces 300 or 600 dpi color or mono ch rome
prints, using advanced color laser technology combined with the
QMS Crown mul titasking print er operating system. The magicolo r
LX prints in color at a rate of 3 to 6 pages per minute, and in
monochrome at 12 pages per minute. It prints on plain or laser paper
and on transparencies, envelopes, labels, and thick stock, and
supports l etter, legal, executi ve, and A4 media sizes. It also features
an Energy Saver mode for reduced power consumption when not
printing. The printer ships with either 12 or 24 MB of RAM. See
“Printer Features,” later in this chapter, for a detailed list of your
printer’s capabilities.
Introduction 1-1
Page 18

Chapter 1
EDNord - Istedgade 37A - 9000 Aalborg - telefon 96333500
About This Manual
This User’s Guide is organized in three parts, Installati on (chapters
1 through 3), Operation (chapters 4 through 6), and Reference (the
rest of the manual). A tab for each of these sections was included
with your manual: insert them at the beginning of the appropriate
chapters to make it easier to navigate the manual.
Installation
■ Chapter 1: Introduction
Gives an overview of the printer documentation and the
printer’s major features; it also discusses the QMS Crown
operating system and l aser prin ting.
■ Chapter 2: Initial Printer Set up
Directs you in unpacking and install ing the print er.
■ Chapter 3: Connecting the Printer
Discusses Simultaneous Interface Operation (SIO) and
Emulation Sensing Processor (ESP) mode, and explains
how to connect the pri nter to a host through the Local Talk,
parallel, or serial port.
Operation
■ Chapter 4: Printer Configuratio n
Describes control panel components and functions and
tells how to use the Configuration menu to configure the
printer to your printing requirements.
■ Chapter 5: Print Media and Daily Operations
Discusses print media sizes, loading, handling, and
storage. It also covers operations such as printing
1-2 Introduction
Page 19

envelopes, transparencies, thick stock, and labels,
EDNord - Istedgade 37A - 9000 Aalborg - telefon 96333500
adjusting print density, and canceling or ending print jobs.
■ Chapter 6: Consumables and Preventative Mai ntenance
Guides you through hand ling and replaci ng consum ab les,
such as the toner, developer, cleanin g pad, oil bo ttle, OPC
belt cartridge, and waste toner pack. It also covers moving
and preventative maintenance for the printer.
Reference
■ Chapter 7: Optimizing Co lor Out put
Chapter 1
Discusses Q
COLOR, the QMS automatic color control
technology, explains how to fine-tune color options,
discusses color match ing, and lists the pri nter’s typefaces.
■ Chapter 8: Printer Options
Describes installing and using optional printer hardware,
such as font, emulation, and security cards; memory
upgrades (SIMMs); hard disks; and network interface
cards. Also explains how to upgrade the syst em so ftwa re.
■ Chapter 9: Troubleshooting
Explains how to clear jams and interpret status messages;
outlines po ssible print quali ty problem s and solutio ns; and
explains how to place a service call.
■ Appendix A: QMS Customer Support
Lists sources of help and information .
■ Appendix B: Technical Specifications
Provides technical specifications for the printer and lists
available supplies and replacement parts. This appendix
also gives the recomm ended pin outs for LocalTalk, serial,
Introduction 1-3
Page 20

Chapter 1
EDNord - Istedgade 37A - 9000 Aalborg - telefon 96333500
Optional Documentation
The following optional manuals are available from your QMS
vendor:
IBM PC/XT, IBM PC/AT, and parallel (Centronics and
Dataproducts) cables.
■ Appendix C: Notices
Presents legal, safety, and other notices.
■ Appendix D: Additional Technical Information
Provides information on how your printer works, and on
customizing the print er’s memory all o catio n.
■ Glossary
Explains many of the terms used in the document ati on.
■ QMS Crown Document Opti on Comm ands
This document lists and explains Document Option
Commands (DOCs). You insert these commands into
documents or separator files t o en able j ob-sp ecific pri nter
features (or special features that your application or page
description language can’t access). In most cases, only
advanced network users and system administrators need
this information.
■ QMS Crown Network Notes
These notes provide tips for getting the best performance
from your printer if it’s connected t o a network through the
parallel or serial port. In most cases, only advanced
network users and system administrators need this
information. This manual is contained on a disk. The
README file on the disk explains how to access the
manual.
1-4 Introduction
Page 21

■ HP PCL 5 Emulation T echnical R eference
EDNord - Istedgade 37A - 9000 Aalborg - telefon 96333500
This document covers the HP PCL 5 emulation. In most
cases, only advanced PCL 5 users and system
administrators need this information.
■ QMS Crown Technical Reference
This document provides advanced technical information,
including information on communication protocols,
HP-GL emulation, HP PCL emulation, CCITT, and
PostScript emulation. In most cases, only advanced users
and system administrators need this information. This
manual is contained on a disk. The README file on the
disk explains how to access the manual.
Other Documentation
Other sources of informatio n you may find help ful are
■ HP PCL 5C Technical Support Notes
Chapter 1
These notes cover the HP PCL 5C color commands. They
are available free through CompuServe, the QMS bulleti n
board, and Q-FAX. Appendix A, “QMS Customer
Support,” of this document explains how to use these
services.
■ Printer Option Documentation
If you purchased a printer option (for example, a direct
network interface card), you may have received separate
documentation for it. Check chapter 8, “Printer Options,”
of this manual for additional option information.
■ Electronic Informati on
CompuServe, th e In ternet, ou r bul letin b oa rd, and Q-F AX
are all sources of information from QMS. Appendix A,
Introduction 1-5
Page 22

Chapter 1
EDNord - Istedgade 37A - 9000 Aalborg - telefon 96333500
Don’t forget that the documentation for yo ur application, operating
system, and net work probably contains useful p rinting information.
Typographic Conventions
Mixed-Case
Courier
“QMS Customer Su pport,” of this manual explains how to
use these sources.
Text you type, and messages and information
displaye d on th e co mp uter monitor
Mixed-Case
Italic
Courier
UPPERCASE
COURIER
lowercase bold PostScript operators
lowercase italic Variable information in text and PostSc ript variables
UPPERCASE File and ut il it y nam e s
↵ Press the Enter key (PC) or Return key (Macintosh)
^X Press and hold down the Ctr l key (PC) while you type
Variable text you type; replace the italicized word(s)
with infor mation specif ic to your pr inter or workst ation
Informatio n disp layed in the print er messa ge windo w
the following letter.
NOTE: Notes contain tips, extra information, or important
information that deserves emphasis or reiteration.
CAUTION: Cautions present information that you need to know
to avoid equipment damage or extreme annoyance.
WARNING!
Warnings indicate the possibility of personal injury if a procedure is not performed exactly as described in the
manual.
1-6 Introduction
Page 23

Chapter 1
EDNord - Istedgade 37A - 9000 Aalborg - telefon 96333500
ACHTUNG!
beschriebene Vorgehensweise, da sonst Verletzungsgefahr
bestehen könnte.
Bitte halten Sie sich exakt an die im Handbuch
Printer Features
The following overview acquaints you with the printer’s major
features and their benefits. Consult the table of contents or index
(blue pages) of this manual to find more information on the
features.
Color Laser Technology
The magicolor LX laser printer features advanced color-laser
technology that allows it to produce inexpensive, durable, 300 or
600 dpi prints on plain paper or transparencies, at 3 to 6 color pages
and 12 monochrome pages per minute.
QCOLOR Technology
The magicolor LX laser printer features QCOLOR, a
QMS-developed technology for automatically optimizing color
printing, for Windows and Macintosh applicati ons. When enabled,
Q
COLOR configures the magicolor LX for the best output quality
based on the contents of the document (for exampl e, text , line art,
presentation graphics, phot ographs , or scans).
Introduction 1-7
Page 24

Chapter 1
EDNord - Istedgade 37A - 9000 Aalborg - telefon 96333500
The magicolor LX print er also support s d evice-independent color,
either directly or through a color management system, such as
Apple’s ColorSync and Pantone’s POCE. This printer also
supports the PANTONE
model for color reproduction in graphic arts and publ ishing, to help
you see the most accurate PANTONE Color simulations for
proofing. Chapter 7, “Optimizing Color Output,” contains more
information on QMS Automatic Color Control and color
management systems.
Multiple Resolutions
If you purchased a printer with 12 MB RAM, you can print color
or monochrome documents in 300 dpi or monochrome document s
in 600 dpi. You can print col or and monochrome documents in 600
dpi if you install addit ional RAM in the pri nter. The magicolor LX
ships with either 12 or 24 MB of RAM. See appendix B, “Technical
Specifications,” for specific information on RAM requirements
and color resolution.
®
* MATCHING SYSTEM, the standard
Software Loadable System (SLS)
Your printer has a software loadable system, SLS, which allows
you to replace or upgrade its system software from a host. Future
enhancements to the system softw are can be easily installed as they
become available from QMS.
* Pantone, Inc.’s check-standard trademark for color and color reproduction materials.
1-8 Introduction
Page 25

Chapter 1
EDNord - Istedgade 37A - 9000 Aalborg - telefon 96333500
Energy Saver Mode
The magicolor LX printer’s Energy Saver option allows it to
automatically enter a lower-power state after no print jobs have
been received for a certain length of ti me (which you define). The
Energy Star version of the magicolor LX printer (look for an
Energy Star label on the back of
the printer) is compliant with
US Environmental Protection
Agency (EPA) Energy Star
regulations. The EPA Energy
Star Computers program
promotes the use of
energy-efficient personal computers, monitors, and printers and the
reduction of air pollution caused by power generation. See
“Administration/Engine/Energy Saver ” in chapter 4, “Printer
Configuration ,” for information on Energy Saver options.
NOTE: The addition of some optional interfaces, in some
combinations, may cause the product to become
non-Energy Star compliant.
QMS Crown Operating System
Your printer features the QMS Crown multitasking printer
operating system. Some of it s features are
■ Multitasking
The printer receives, compiles, processes, and prints
simultaneously, so jobs are printed more quickly and the
host is free sooner.
■ Simultaneous Interface Operation
All interface s are active at the same time, buffering and
processing data until p ages can be printed, whi ch increases
Introduction 1-9
Page 26

Chapter 1
EDNord - Istedgade 37A - 9000 Aalborg - telefon 96333500
throughput. (Each input buffer can be expanded with
optional mem ory. )
■ Emulation Sensing Processor Technolo gy
When in ESP mode (selectable through PS Executive
Series Utilities or the control panel), the printer analyzes
incoming data and selects the appropriate pri nter language
from those available, so users don’t have to set switches or
send commands to use different printer emulations. ESP
mode works with most popular commercially available
applications.
■ Context Swit ch ing
After initial use, the state of an emul ation and downloaded
data (fonts, macros, overlays) is preserved for as long as
the printer power is on, so repetitive downloading is
unnecessary.
■ Compile-ahead Processing
Pages are compiled into intermediate, compressed blocks
of data that can be imm ediately and more easi ly rasterized
or more efficiently stored for concurrent compiling,
rasterizing, and printing. This allows the printer to
maintain full print speed under maximum job activity.
■ User-configurable Input Buffers
Printer memory can be configured to enable the most
efficient spoo ling for a particul ar environm ent. Chapter 4,
“Printer Configuration,” contains more information on
printer memory.
■ Spooling Overflow
Data is spooled transparently to the internal hard disk, so
input buffers aren’t limited to RAM capacity.
■ Compressed Data Format
1-10 Introduction
Page 27

Chapter 1
EDNord - Istedgade 37A - 9000 Aalborg - telefon 96333500
Data is compressed so that ent ire document s can be stored
in the printer, allowing us ers to take advantage of advanced
document handling features such as jam recovery without
resendin g files.
Media Flexibility
With this printer, you can print on plain paper,laser paper,
transparencies, labels, envelopes, and thick stock in letter, A4,
executive, and legal sizes. Plain paper, economical and widely
available, is the ideal choice when adding spot color to reports,
newsletters, and other documents. Laser paper, such as
Hammermill’s Laser Print , allows the richest col or output and most
consistent coverage (especially for large areas) for the highest
quality document s or prepress proofs. See chapt er 5, “Print Med ia
and Daily Operations,” for detail ed information on different media
types.
Automatic Jam Recovery
The printer has jam recovery, so that after a jam is removed, the
printer automatically reprint s the jamm ed page(s) and fini shes th e
job.
Convenient Control Panel Operation
The keypad and message window on the control panel allow e asy
access to the Configuration menu, through which you can change
printer defaults to suit your needs. The message window and the
LEDs indicate printer status. Messages can be displayed in Engli sh,
French, Spanish, or German. An optional security card allows
access through the printer control panel to be password protected,
so that only users who know the password can change printer
configuration.
Introduction 1-11
Page 28

Chapter 1
EDNord - Istedgade 37A - 9000 Aalborg - telefon 96333500
PS Executive Series Utilities
Once you install this software on your ho st, use its menus to access
printer features, such as printer naming and font and emulation
downloading. PS Exec also contains sample files that illustrate
some of your printer’s capabilities. The PS Exec software is
accompanied by Macintosh screen fonts and a P C screen printing
utility. You can also load new system software through PS Exec.
A README file explains how to install PS Executive Series
Utilities, and its onli ne help expl ains how to use the utili ti es.
PostScript Level 2 Compatibility
The printer’s Level 2 emulation is fully compatible with Adobe’s
PostScript Level 2 page description language, whose features
include devic e-independent color, i mproved memory and resource
management, data compressio n/decompressi on filters, and pattern
and form caching. Full support (selectable through PS Executive
Series Utilities or the control panel) for Po stScript Level 1 files is
also included in this print er.
Resident HP PCL 5C and HP-GL Emulation
Your printer emulates the HP PaintJet XL300 PCL 5C printer. This
emulation supports the complete set of color commands in the
XL300, 13 outline typefaces, and 7 PCL Courier and Lineprinter
bitmap fonts (see “The Resident HP PCL Fonts” in chapter 7,
“Optimizing Color Output,” for a font list). It also supports
HP-GL/2 vector graphics. This printer also emulates the followin g
HP-GL plotters: 7550A, 7470A, 7475A, an d ColorP ro .
Intel RISC-based Controller
A 33 MHz Intel 80960CF RISC microprocessor boosts processing
speed.
1-12 Introduction
Page 29

Chapter 1
EDNord - Istedgade 37A - 9000 Aalborg - telefon 96333500
39 Resident PostScript Fonts
Your printer comes with 39 licensed PostScript fonts. All these
fonts have multilingual character sets. See “The Resident
PostScript Fonts” in chapter 7, “Optimizing Color Output,” for a
list.
Printer Options
■ Full-color 600 dpi print ing in all supported page sizes
If you upgrade to 28 MB RAM or more, you can print
four-color documents in all supported page sizes in 600
dpi. See appendix B, “Technical Specifications,” for
specific information on RAM requirements and color
resolution.
■ User-upgradable RAM (Random Access Memory)
The resident RAM is user-upgradable to as much as 64
MB, which allows your printer’s capacities to grow with
your needs. Additi onal RAM expands p rinting capabili ties
and can improve system performan ce.
■ Font and Emulati on Cards
Fonts and printer em ulations are contained on sm all printer
circuit boards called cards, which can be plugged into slots
on the front of the printer. Contact your QMS vendor for
a complete list of available cards.
■ Direct Network Interface for Ethernet or Token-Ring
A direct network interface is available for DECnet,
EtherTalk, LAN Manager/LAN Server, Novell NetWare,
TCP/IP, and EtherTalk on Ethernet networks, as well as
LAN Manager/LAN Server, Novell NetWare, and TCP/IP
on Token-Ring networks.
■ Hard disk expandability
Introduction 1-13
Page 30

Chapter 1
EDNord - Istedgade 37A - 9000 Aalborg - telefon 96333500
Your printer comes standard with an upgradable 80 MB
internal hard disk. Als o, through th e resident 25-pin S CS I
connector port, the printer’s capabilities can be expanded
with up to six external hard disks. A hard disk provides
storage for a cache of character bitmaps, downloaded
outline fonts , and other files.
■ 250-sheet Optional Sheet Feeder
The cassette in the opt ional sh eet feeder can hold up to 250
sheets, which allows you to spend less time refilling
cassettes and to use different types of media more
conveniently (for example, you could load transparencies
in the standard cassette and plain paper in the
sheet-feeder’s cassette.)
■ Envelope Cassette
You can purchase an envelope cassette from your QMS
vendor. This cassette holds up to 30 DL or Com 10
envelopes and fits in the standard or optional
media-cassette slot.
1-14 Introduction
♦
Page 31

Initial Printer Setup
EDNord - Istedgade 37A - 9000 Aalborg - telefon 96333500
Chap ter highli ghts:
■ Finding a good locat ion for your printer
■ Unpacking your printer
■ Installing the developer and tone r
■ Installing the cleaning pad, oil, bottle, and waste toner pack
■ Installing OPC belt cartridge and paper cassette
■ Printing a start-up page
Chapter 2
Page 32

EDNord - Istedgade 37A - 9000 Aalborg - telefon 96333500
Page 33

Introduction
EDNord - Istedgade 37A - 9000 Aalborg - telefon 96333500
This chapter explains how to set up the printer for the first time.
For quick information on replacing print media, developer, and
toner after the initial setup, s ee chapters 5 and 6, “Print Media an d
Daily Operations,” and “Consumables and Preventative
Maintenance.”
NOTE: We recommend that you have the printer set up by a
QMS-authorized technician. The instructions in this
chapter are provided for people experienced in working
with printers, but must be followed carefully to avoid
damage to the printer. QMS reserves the right to charge
for repairs necessitated by improper installation. See
appendix B, “QMS Customer Support,” for information
on contacting QMS.
Chapter 2
Initial Printer Setup 2-1
Page 34

Chapter 2
EDNord - Istedgade 37A - 9000 Aalborg - telefon 96333500
Finding a Good Location for Your Printer
Location Requirements
Your printer should locat ed
■ On a hard, level surface (maximum 1° slant) capa ble of
supporting the printer weight (approximately 106 lbs/48
kg).
■ Away from cooling sources, heating sources, extreme
temperature changes, direct sunlight, excessive dust , and
corrosive chemicals or vapors.
■ Away from any strong electromagnetic field (such as that
created by an air conditioner) and excessive vibration.
■ In an area with a moderate temperature (64° to 81° F; 18°
to 27° C).
■ In an area with a relative humidity of 60% to 70%.
■ An appropriate di stance from the host: less than 6 feet (1. 8
meters) for parallel communic ation, less than 25 feet (7.5
meters) for serial communication.
■ Near an electrical outlet.
2-2 Initial Printer Setup
Page 35

Chapter 2
EDNord - Istedgade 37A - 9000 Aalborg - telefon 96333500
■ With proper clearance and ventilation area: left side 36"
(90 cm), righ t side 4" (10 cm), front 28" (70 cm), rear 16"
(40 cm).
■ With enough space for you to open the printer and to access
the paper cassette(s). Figure 2.1 illustrates the proper
clearance for your printer.
Fig. 2.1 Printer Cleara nce
Power Requirements
Your printer requires a properly grounded (earth connection) 120
volt (±12 volts) outlet. The required frequency is 60 Hz (±2 Hz).
The electrical connection should be direct, not via a branched
socket, and should be surge-protected. Noise-generating
equipment shouldn’t be connected to the same electrical outlet as
the printer.
Initial Printer Setup 2-3
Page 36

Chapter 2
EDNord - Istedgade 37A - 9000 Aalborg - telefon 96333500
What’s Included in the Shipment
In addition to this manual, your shipment should contain the
following it ems:
■ QMS magicolor LX printer
■ OPC belt cartridge
■ 4 developer cartridges (1 each yellow, magenta, cyan,
black)
■ 4 toner cartridges (1 each yellow, magenta, cyan, black)
■ Cleaning pad
■ Oil bottle
■ Waste toner pack
■ Power cord
■ PS Executive Series Utilities disks
■ Softload system back-up disks (includes printer system
software and PostScript fonts on DOS and Macintosh
disks, and PCL fonts on a DOS disk).
Interface cables aren’t included with the printer. Contact yo ur QMS
vendor if you need cables. See chapter 3 , “Connecting the P rinter,”
for information on cables, and appendix B, “Technical
Specifications,” for cable pinouts. If you find any part of the
shipment missing or damaged, contact the shipping company or
your QMS vendor immediately. Don’t return any merchandise to
the manufacturer without authorizati on.
2-4 Initial Printer Setup
Page 37

Chapter 2
EDNord - Istedgade 37A - 9000 Aalborg - telefon 96333500
QMS Product Registration
Register your QMS product now. In the US, call (800) 637-8049
to register. In other countries, see appendix A, “QMS Customer
Support,” for the appropriate numb er.
Initial Printer Setup 2-5
Page 38

Chapter 2
EDNord - Istedgade 37A - 9000 Aalborg - telefon 96333500
Unpacking the Printer
The packing materials that protect the print er during shi pment must
be removed. You might want to save the packing materials in case
you ever have to move or ship the printer.
CAUTION: You may damage the printer if you turn it on before
all packing materials a re removed.
WARNING!
The printer weighs approximately 106 lbs (48 kg)
without consumab l es. Do not at tempt to lift it by yoursel f.
ACHTUNG!
Der Drucker hat ein Gewicht von ungefähr 48 kg.
Bitte versuchen Sie niemals, den Drucker alleine anzuheben
oder zu transportieren.
1. Remove everything except the printer from the shipping
carton (fig. 2.2).
2. With the assistance of anoth er person, grasp the printer by the
four ridged finger grips (two on each side of the printer) and
lift it out of the carton and remov e the plas tic wrap (fig. 2.2).
2-6 Initial Printer Setup
Page 39

Chapter 2
EDNord - Istedgade 37A - 9000 Aalborg - telefon 96333500
Fig. 2.2 Unpacking the Printer
Initial Printer Setup 2-7
Page 40

Chapter 2
EDNord - Istedgade 37A - 9000 Aalborg - telefon 96333500
3. Before you begin setup, take a few minutes to look over
figures 2.3 and 2.4. They provide a quick overview of the
exterior parts of your printer.
2-8 Initial Printer Setup
Page 41

Fig. 2.3 Front View of the P r i nt er
EDNord - Istedgade 37A - 9000 Aalborg - telefon 96333500
Chapter 2
Fig. 2.4 Back View of the Printer
Initial Printer Setup 2-9
Page 42

Chapter 2
EDNord - Istedgade 37A - 9000 Aalborg - telefon 96333500
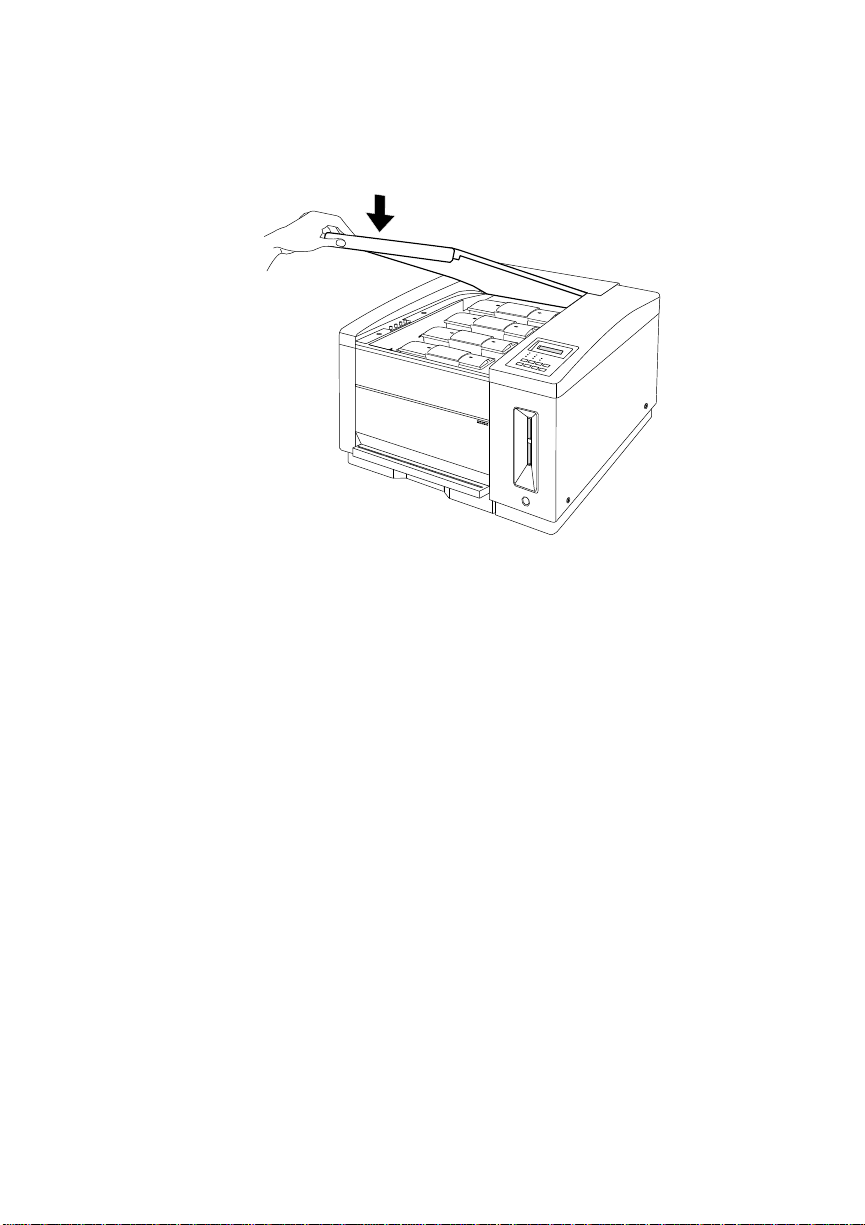
4. Remove the two p olysty rene inserts from the top cover of t he
5. Remove all packing t ape from the exte rior of the print er.
6. Grasp the front end of the top cover and lift it up to remove it
printer.
(fig. 2.5). Then, set the cov er aside for now.
Fig. 2.5 Remove the Top Cover (front view)
7. Remove the two p olystyrene shipp ing spacers from inside th e
printer.
2-10 Initial Printer Setup
Page 43

Chapter 2
EDNord - Istedgade 37A - 9000 Aalborg - telefon 96333500
Installing Developer and Toner Cartridges
When you load developer and tone r cartridg es, the colors m ust be
in a set order from the back of the printer to the front. Black should
be loaded in the slot closest to the rear of the printer, followed by
cyan, then magenta, and finally yellow in the front slot.
BK
C
M
Y
Fig. 2.6 Cartridge Loading Order (fron t vie w)
WARNING!
The developer and toner are highly combustible
powders; never burn them. Also, avoid inhaling loose developer or toner or getting them around your eyes; they can cause
respiratory probl ems and eye irritation .
ACHTUNG!
Bei Entwickler und Toner handelt es sich um
gefährliche Pulver, die leicht entzündlich sind; sie dürfen
deshalb niemals mit offenem Feuer in Berührung kommen.
Einatmen oder Berührung mit Haut und Augen ist ebenfalls
zu vermeiden, da dieses zu Beeinträchtigungen der Atemwege,
Haut oder Augenreizungen führen könnte.
Initial Printer Setup 2-11
Page 44

Chapter 2
EDNord - Istedgade 37A - 9000 Aalborg - telefon 96333500
CAUTION: The same color developer and toner cartridges must
always be loaded in the same place on the printer. To prevent
accidental mixing of colors, each toner cartridge has pins that are
keyed to fit only the developer cartridge of the corresponding color.
Never force a toner cartridge onto the wrong developer cartridge.
This can damage the cartridges and the printer.
NOTE: A developer cartridge must be installed before the toner
1. Remove the developer cartridge from its protective bag,
cartridge of the same color.
starting with the black cartridge. (The developer cartridges are
color-coded on their tops.)
2-12 Initial Printer Setup
Page 45

Chapter 2
EDNord - Istedgade 37A - 9000 Aalborg - telefon 96333500
2. Grasp the two green latches, one at e ach end of th e cartridge,
and raise them straight up (fig. 2.7) to open them.
3. Holding the developer cartridge by the green latches, gently
lower it into the open cartridge slot closest to th e ba ck end of
the printer until it seats firml y under the securing latch es (fig.
2.7).
Fig. 2.7 Load Dev elop er Cart ri d ge (fr on t view)
Initial Printer Setup 2-13
Page 46

Chapter 2
EDNord - Istedgade 37A - 9000 Aalborg - telefon 96333500
4. Close the green latches by pushing them forward and down to
hold the developer cartridge in pla ce (fig. 2.8).
Fig. 2.8 Close Latch es (rear view)
2-14 Initial Printer Setup
Page 47

Chapter 2
EDNord - Istedgade 37A - 9000 Aalborg - telefon 96333500
5. Grasp the tab on the top of the developer cartridge. Pull the
tab and attached clear tape st raight up and out of the c artridge,
making sure the tape comes completely out (fig. 2.9). Then,
discard the tab and tape.
Fig. 2.9 Remove Sealing Tape (rear vie w)
6. Locate the toner cartridge that matches the color of the
developer cartridge just installed, and remove it from its
protective bag. (Toner cartridges are color-coded—black,
cyan, magenta, or yellow—on the top.)
Initial Printer Setup 2-15
Page 48

Chapter 2
EDNord - Istedgade 37A - 9000 Aalborg - telefon 96333500
7. Hold the toner cartridge as shown in figure 2.10, and shake it
horizontally . This distributes toner evenl y inside the cartridge
and helps assure quality printing .
Fig. 2.10 Distribute Toner in Cartridge
2-16 Initial Printer Setup
Page 49

Chapter 2
EDNord - Istedgade 37A - 9000 Aalborg - telefon 96333500
8. Hold and squeeze the toner cartridge across the center (fig.
2.11), and align it with the developer cartridge of the same
color. Make sure the pins on the back side of the toner
cartridge line up with th e notches o n th e developer c artridge.
CAUTION: Never force a toner cartridge onto the wrong developer
cartridge. Not only will this damage the cartridges, but also the
pressure can damage the printer.
9. Lower the toner cartridge until it fits firmly onto the notches
on the developer cartridge (fig. 2.11).
Fig. 2.11 Align Cartridges (rear view)
Initial Printer Setup 2-17
Page 50

Chapter 2
EDNord - Istedgade 37A - 9000 Aalborg - telefon 96333500
10. Press the top of the toner cartridge until the cartridge latches
11. Grasp th e tab on the top of the ton er cartri dge.
12. Hold the t oner cartridge in place wi th one hand as you pull the
securely in place.
tab and attached clear tape straight up and completely out of
the cartridge (fig. 2. 12) using the ot her hand. Then d iscard the
tab and tape.
Fig. 2.12 Remove Se ali ng Tape (rear vie w)
13. Repeat steps 1-12 to load the cyan, then the magenta, and
finally the yellow d eveloper and toner cartridges, mak ing sure
each toner cartridge is loaded onto the corresponding
developer cartridge.
2-18 Initial Printer Setup
Page 51

Chapter 2
EDNord - Istedgade 37A - 9000 Aalborg - telefon 96333500
When you finish, the black cartridges should be in the last slot
toward the back of the printer, then the cyan in the next slot, the
magenta in the third slot coming forward, and the yellow in the
front sl ot .
After the toner and developer are installed, you need to remove the
pressure-release pieces.
Initial Printer Setup 2-19
Page 52

Chapter 2
EDNord - Istedgade 37A - 9000 Aalborg - telefon 96333500
Removing the Press ure -Rel eas e Piece s
Two pressure-release pieces help relieve tension on t he fuser rollers
to protect the rollers from accidental damage during shipment.
These pieces must be removed before printing. Use the following
procedure to remove these pieces:
1. With the top cover still off, pull up on the paper exit unit latch
and then tilt the unit back and down t o open it (fig. 2.1 3).
Fig. 2.13 Open the Pape r Exit Uni t (rear view)
2. Pull back the two latches (one on each side) of the separator
pawl unit to unlock it. Then, tilt the pawl unit back in the
direction of paper exi t unit at the back of the pri nter (fig. 2.14).
2-20 Initial Printer Setup
Page 53

Fig. 2.14 Open Separator Pawl Unit (front view)
EDNord - Istedgade 37A - 9000 Aalborg - telefon 96333500
Chapter 2
Initial Printer Setup 2-21
Page 54

Chapter 2
EDNord - Istedgade 37A - 9000 Aalborg - telefon 96333500
3. Open the pressure-release lever on the e nd of the f user unit
(fig. 2.15).
Fig. 2.15 Open the Lever (rear view)
2-22 Initial Printer Setup
Page 55

Chapter 2
EDNord - Istedgade 37A - 9000 Aalborg - telefon 96333500
4. Grasp the tab end of one of the green pressure-release pieces
and gently pull it up and out of the printer (fig. 2.16). Remove
the piece at the other end of t he fuser roller in the same manner.
Fig. 2.16 Remove Bo th Piece s (fron t view)
5. Store the two pressure-release pieces in a safe place.
NOTE: You need to reinstall both pieces if you move the
printer farther than just across a table or from one side of a
room to another—especially if the printer may not remain
level or may be j ost led. S ee “Mov ing you r Pri nter” in chapter
6 for details o n replacing these pieces. Also, reinstall both
pieces if the printer wil l not be used for 2 weeks or more.
6. Close the pressure-release lever on the end of the fuser unit.
Once the pressure-release pieces are removed, you need to install
the cleaning pad and oil bottle.
Initial Printer Setup 2-23
Page 56

Chapter 2
EDNord - Istedgade 37A - 9000 Aalborg - telefon 96333500
Installing the Cle ani ng Pad and Oi l Bottle
The cleaning pad removes printing debris (such as excess toner and
paper dust) from the fusing unit. The oil keeps toner from sticking
to the fuser rollers. Instructi ons fo r ins tall in g the cleanin g pad and
oil bottle are given in this sect ion . Replacing the cleaning p ad and
oil bottle are covered in chapter 6, “Consumabl es and Preventati ve
Maintenance.”
To install the cleaning pad and oil bottle
1. Remove the cleaning pad and oil bottle from their protective
bags.
2-24 Initial Printer Setup
Page 57

Chapter 2
EDNord - Istedgade 37A - 9000 Aalborg - telefon 96333500
2. Holding the cleaning p ad by its center t ab, ali gn the cente r of
the tab with the triangle mark on the printer (tab-side away
from the triangle) (fig. 2.17).
3. Slide the pad i nto the slot ab ove the heat roller (fig. 2.17). Th e
pad is correctly positioned when it is centered snugly in the
slot.
Fig. 2.17 Install the Cleaning Pad (front view)
Initial Printer Setup 2-25
Page 58

Chapter 2
EDNord - Istedgade 37A - 9000 Aalborg - telefon 96333500
4. Snap the separator pawl unit closed (fig. 2.18).
Fig. 2.18 Close Separator Pawl Unit (front view)
2-26 Initial Printer Setup
Page 59

Chapter 2
EDNord - Istedgade 37A - 9000 Aalborg - telefon 96333500
5. Pull open the spring latch on the outer edge of the oil bottle
retainer, and lift the retainer up and toward the center of the
printer (fig. 2.19).
NOTE: The spout of the oil bottle has a seal to prevent oil
from spilling unti l the bottle is installed on the pin in the fuser
slot.
6. Hold the bottle, spout end down with the label facing the
printer’s front, over the slot in the top of the fuser unit (fig.
2.19).
7. Lower the bottle into place, making sure the spout on the
bottom of the bottle aligns with the pin in the fuser slot. The
bottle is positioned co rrectly when it fits snugly in the slot and
is flush with the top of the fuser unit.
Fig. 2.19 Install the Oil Bottle (rear view)
Initial Printer Setup 2-27
Page 60

Chapter 2
EDNord - Istedgade 37A - 9000 Aalborg - telefon 96333500
8. Close the oil bottle retainer, making sure the lat ch snaps back
9. Close the p ap er exit unit (fig. 2.20).
in place.
Fig. 2.20 Close the Pape r Ex it Unit (rear view)
2-28 Initial Printer Setup
Page 61
Chapter 2
EDNord - Istedgade 37A - 9000 Aalborg - telefon 96333500
10. Replace the top cover (fig. 2.21).
Fig. 2.21 Replace the Top Cover (front view)
Now install the waste toner pack. The next section covers this
process.
Initial Printer Setup 2-29
Page 62

Chapter 2
EDNord - Istedgade 37A - 9000 Aalborg - telefon 96333500
Installing the Waste Toner Pack
NOTE: For information on replacing a used waste toner pack, see
chapter 6, “Consumables and Preventative
Maintenance.”
To install the waste toner pack
1. Remove the waste toner pack from its protectiv e bag.
2. Follow the instructions accompanying the pack for
assembling it, being careful not to puncture the bag.
3. Open the waste toner door by pushing the cover on the
top-right corner (fig. 2.22).
Fig. 2.22 Open the Wast e Toner Door (side vie w)
2-30 Initial Printer Setup
Page 63
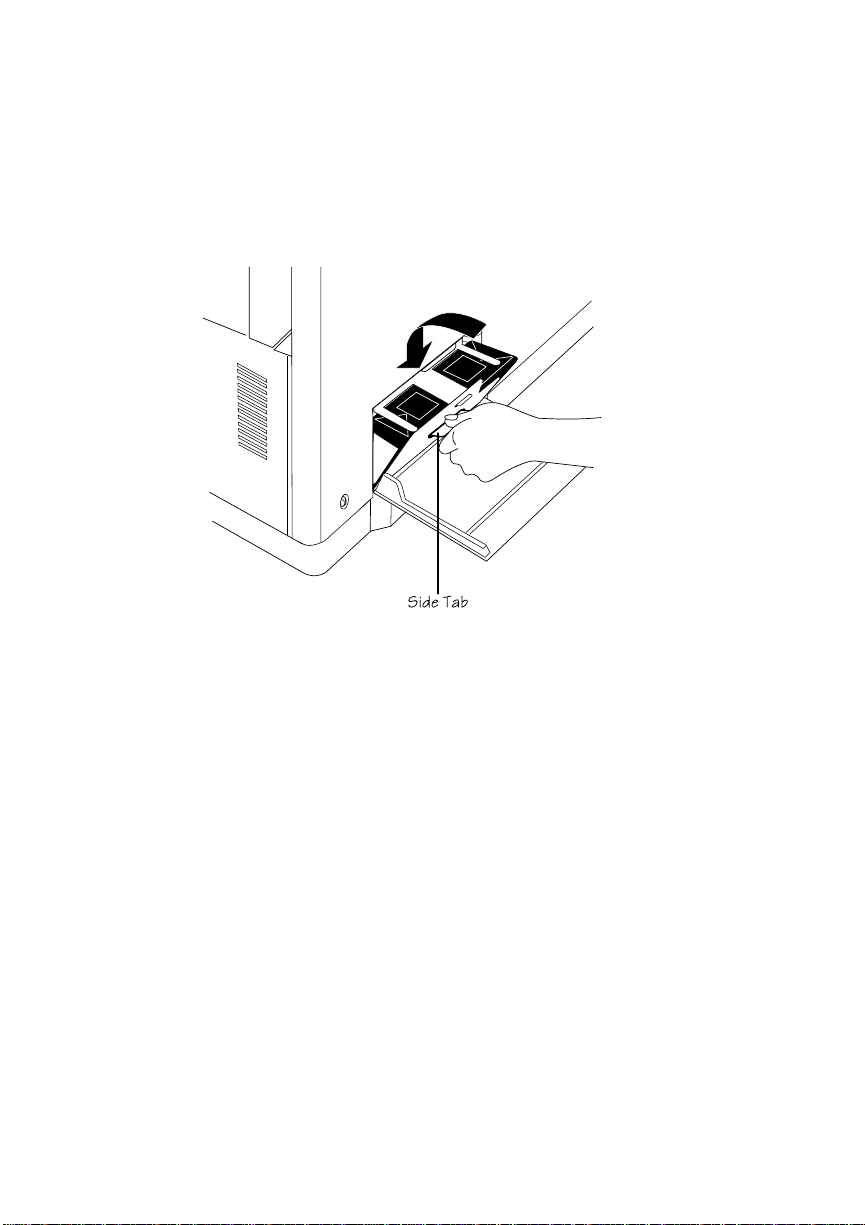
4. Holding the waste toner pack by the side tab, insert the pack
EDNord - Istedgade 37A - 9000 Aalborg - telefon 96333500
into the printer until it fits securely (fig. 2.23). Then, lift up
slightl y on the tab to be sure the pack is level and cente red.
Fig. 2.23 Insert the Waste Toner Pack in the Pri nt er
Chapter 2
5. Close the waste toner door.
Initial Printer Setup 2-31
Page 64
Chapter 2
EDNord - Istedgade 37A - 9000 Aalborg - telefon 96333500
Installing the OPC Belt Cartridge
This section covers installing the OPC (Organic Photoconductor)
belt cartridge into your printer. See “How Your P rin ter Works” in
appendix D for details on the role the OPC belt plays in printing.
Replacing the cartridge is covered in chapter 6, “Consumables and
Preventative Maintenance.”
To install the OP C cartridg e
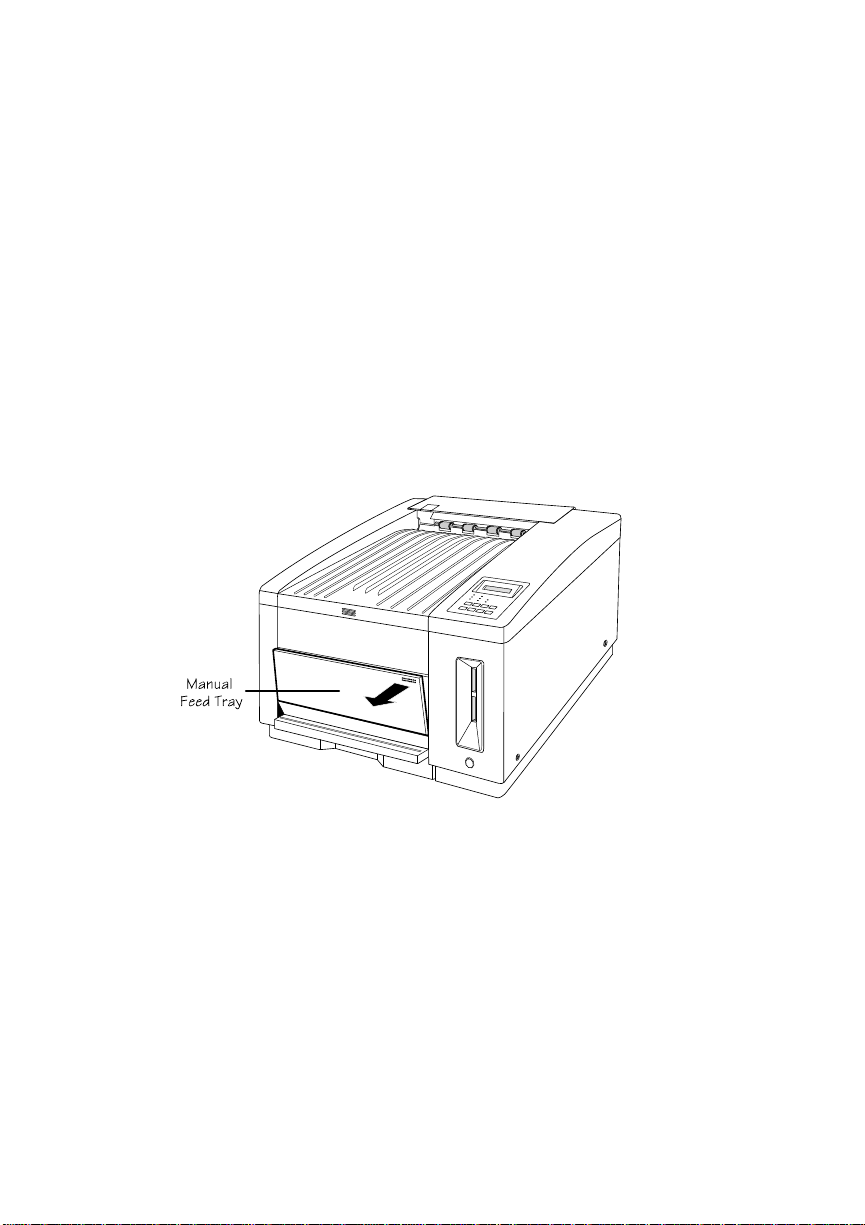
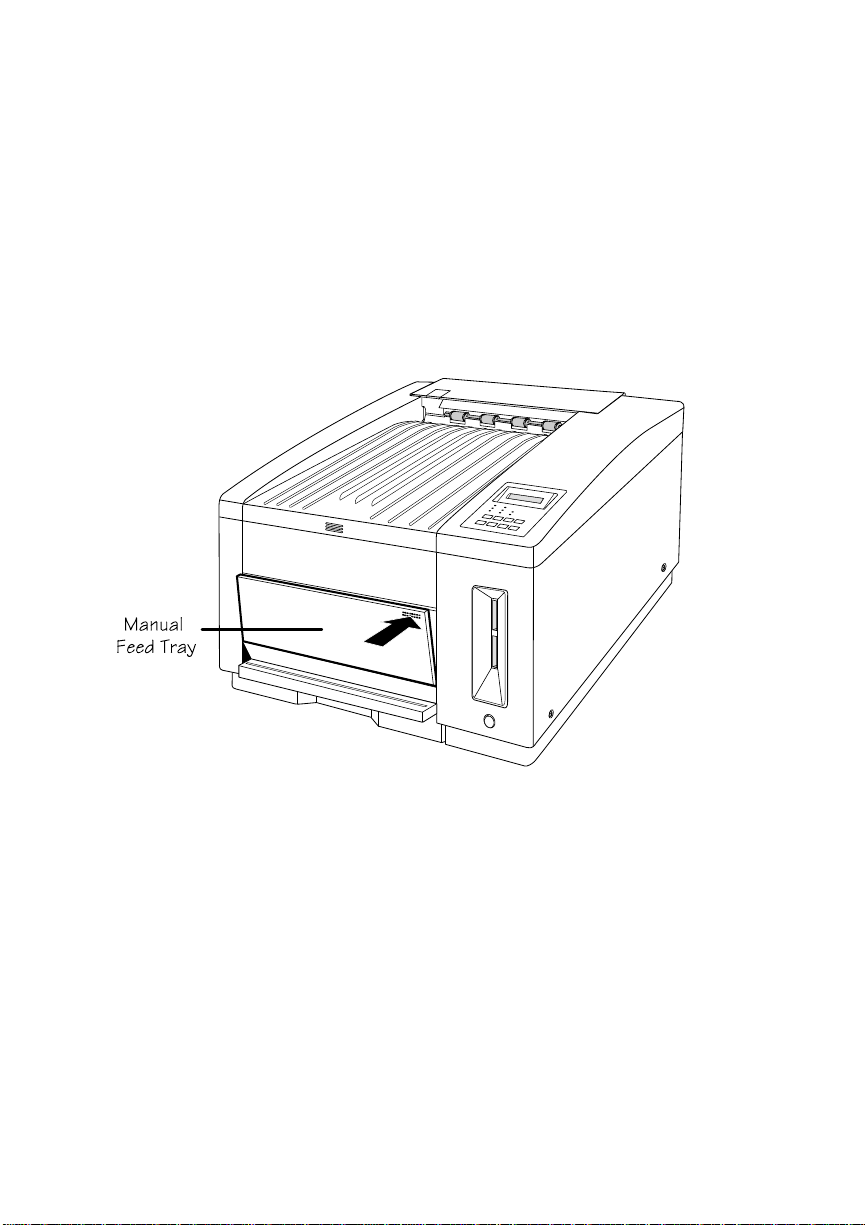
1. Open the manual feed tr ay (fig. 2.24) by pushi ng the top-right
corner to release the spring latch.
Fig. 2.24 Open the Ma nual Feed Tr ay
2-32 Initial Printer Setup
Page 65

Chapter 2
EDNord - Istedgade 37A - 9000 Aalborg - telefon 96333500
CAUTION: The OPC belt is extremely sensitive to bright lights
and direct sunlight. Do not remove the cartridge from its protective
bag until you are ready to install it. Limit exposure to light of 800
lux (the average fluorescent lighting in an office) to under 2
minutes. If exposure exceeds this, put the belt into a dark place,
like inside the p rinter, to recover; depending on exposure, recovery
may take up to 2 hours.
Also, handle the belt cartridge carefully. The belt is extremely
sensitive to hand oils and scratches, both of which will reduce print
quality.
2. Remove the OPC belt cartri dge from its prot ect ive bag.
NOTE: Be sure to save the protective bag to use during printer
cleaning and maintenance when the OPC belt cartridge is out
of the printer.
Initial Printer Setup 2-33
Page 66

Chapter 2
EDNord - Istedgade 37A - 9000 Aalborg - telefon 96333500
3. Remove the pressure release and tens ion release pin sets (one
set on the left and one on the right) from the OPC belt cartridge
(fig. 2.25).
NOTE: The pressure release and tens ion release pin s prote ct
the belt and its cleaning blade by relieving tension during
shipment. Save these pins to reinst all them if you need to shi p
the printer later.
Fig. 2.25 Remove the Release Pins
2-34 Initial Printer Setup
Page 67

Chapter 2
EDNord - Istedgade 37A - 9000 Aalborg - telefon 96333500
4. Make sure the green handle on the end of the OPC belt
cartridge is turned up (unlocked).
5. Slide the cartridge three-quarters of the way into the printer
until the notch es on each side of the botto m rest on the lip of
the manual feed tray (fig. 2.26).
Fig. 2.26 Slide Cartridge Part ially into Printer
Initial Printer Setup 2-35
Page 68
Chapter 2
EDNord - Istedgade 37A - 9000 Aalborg - telefon 96333500
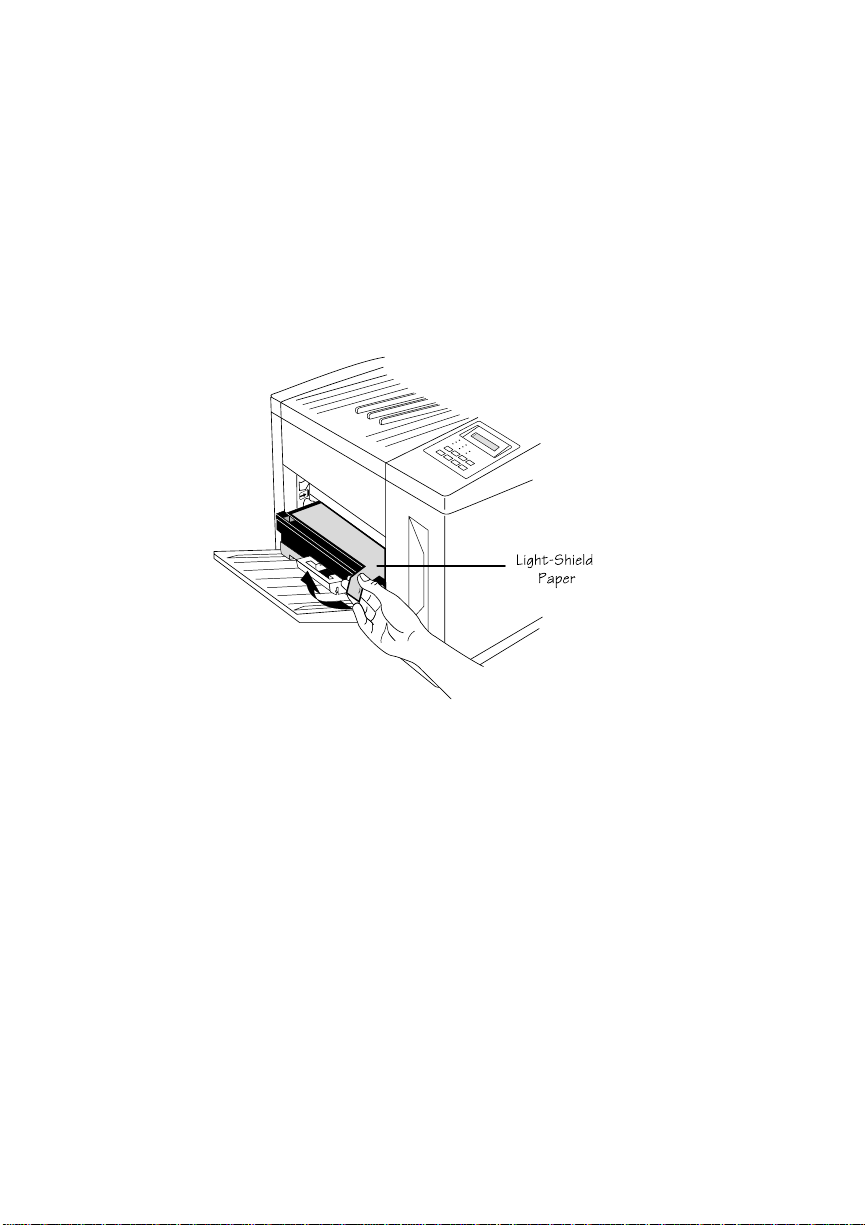
6. Remove the black light-shield paper from the OPC belt by
pulling the tab on the front as shown in figure 2.27 and pullin g
the paper straight out of the printer.
NOTE: If the light-shield paper doesn’t slide out easily or if
it should begin to tear, pull the OPC belt cartridge a little
farther out of the printer and try again.
Fig. 2.27 Remove the Light-S hield Pap er
2-36 Initial Printer Setup
Page 69
Chapter 2
EDNord - Istedgade 37A - 9000 Aalborg - telefon 96333500
7. Firmly slide the cartridge the rest of the way into the printer
until it snaps into place. It is in place when you can see the
green arrows inside the metal frame of the printer.
8. Turn the green end-handle on the cartridge down to close it
and lock the cartridge in place.
9. Close the manual feed tray (fig. 2.28 ).
Fig. 2.28 Close the Ma nual Feed Tray
Initial Printer Setup 2-37
Page 70

Chapter 2
EDNord - Istedgade 37A - 9000 Aalborg - telefon 96333500
Filling the Paper Casset te
Instructions are given here for loading and printing on letter- or
A4-size paper. Chapter 5, “Print Medi a and Daily Operations,” has
instructions for refilling the cassette, for printing on other media
types and sizes, and for inserting media manually. Chapter 5 also
contains information about margins and imageable areas.
1. Pull the paper cassette out of the printe r (fig. 2.29).
Fig. 2.29 Remove the Paper Cassette
2-38 Initial Printer Setup
Page 71

Chapter 2
EDNord - Istedgade 37A - 9000 Aalborg - telefon 96333500
2. Make sure the size key slide on the back end o f the cassette i s
set for letter- or A4-size media (fig. 2.30).
NOTE: The printer comes from the factory configured to print
on letter- or A4-si ze media. If you want to print on a different
size media, see “Refilling the Media Cassett e” in chapter 5 for
information. Al so, see chapter 4, “Printer Con figurati on,” for
information on setting si z e through the control panel.
EX LT A4 LG
EX LT A4 LG
Fig. 2.30 Check the Cassette Size Key Slide
Initial Printer Setup 2-39
Page 72

Chapter 2
EDNord - Istedgade 37A - 9000 Aalborg - telefon 96333500
3. From the pap er wrapping, determin e which is the print ing side
4. Fan the paper (fig. 2.31) to prevent the sheets from sticking
of the paper (an arrow points in the direction of the printing
side on most wrappers). Then remove a stack of paper
approximately 1" /2 7 mm (250 sheets) or less.
NOTE: Make sure the paper is in good condition, free of such
things as folds , tears, or wrinkl es.
together. Align the edges of the stack on a flat surface.
Fig. 2.31 Fan the Paper
2-40 Initial Printer Setup
Page 73

Chapter 2
EDNord - Istedgade 37A - 9000 Aalborg - telefon 96333500
5. Load the paper printing-side up in the cassette, top end first
for letterhead or preprint ed media. (Printing on the wrong si de
may reduce print quality.) Make sure the paper lies flat and
does not exceed the upper-limit mark on the cassette for foil
(transparencies) or paper (fig. 2.32). Overloading the cassette
can cause a jam.
Paper
Foil
Paper
Foil
Fig. 2.32 Load the Paper
6. Adjust the paper guides o n e ach side and o n the trail ing edge
of the media so that they rest lightly against the media without
causing it to buckle.
Initial Printer Setup 2-41
Page 74

Chapter 2
EDNord - Istedgade 37A - 9000 Aalborg - telefon 96333500
7. Slide the filled c assette into the printer (fig. 2.33) until it snaps
firmly into place and is flush with the front of the printer.
Fig. 2.33 Slide the Cassette into the Printer
2-42 Initial Printer Setup
Page 75

Starting the Printer
EDNord - Istedgade 37A - 9000 Aalborg - telefon 96333500
After you have unpacked the pri nter and installed the con sumables,
you need to connect the power cord and turn on the two power
switches.
Connecting the Power Cord
The power connector is on the back of the prin ter on the lower-left
side.
CAUTION: Make sure that the main power switch on the back of
the printer is off (the O is pressed down). Make sure the remote
power switch on the front is off (the button i s out).
1. Connect one end of the power cord to the rear of the printer
(fig. 2.34).
Chapter 2
Fig. 2.34 Connect the Power Cord
Initial Printer Setup 2-43
Page 76

Chapter 2
EDNord - Istedgade 37A - 9000 Aalborg - telefon 96333500
2. Connect the opposite end of the power cord to a grounded,
Using the Power Switches
There are two power switches on your printer, a main switch on
the rear and a remote switch (for convenience) on the front. Only
one switch has to be off to turn off the printer; however, both
switches must be on to turn o n the p rinter. Tu rn on the back switc h
by setting it to the on (|) position. Turn on the front switch by
pressing it in.
CAUTION: If the printer won’t be used for several days (such as
over a weekend), or if any maintenance work is done, make sure
at least one of the power switches is off. This reduces wear and
extends the life of the fuser.
When first turned on, the printer goes through an initialization
warm-up and self-testi ng period of approximately 4 minut es. Close
to the end of this process, the prin ter produces a start-up page (see
the next section for information on the start-up page). When
warm-up is compl et e, IDLE displays in the message window.
surge-protected, electrical outlet.
NOTE: If the start-up page does not print, see chapter 9,
“Troubleshoot in g. ” Make sure yo u wai t lon g eno ugh f or
the initializati on process to finis h.
The Start-up Page
When you initially turn on your printer, a start-up page prints in
approximately 4 minut es. This page gives basic informati on about
the printer, such as the printer’s name, the PostScript emulation
level and version, and various printer settings. For a detailed list of
2-44 Initial Printer Setup
Page 77

Chapter 2
EDNord - Istedgade 37A - 9000 Aalborg - telefon 96333500
what the start-up page includes, see “The Start-Up P age” in chapter
5.
If the start-up page prints, and the p rint qualit y is good, go to chapter
3, “Connecting the Printer. ”
Otherwise, see chapter 9, “Troubleshooting,” for more
information, and be aware of the followi ng warnin g.
WARNING!
Be sure to turn the printer off (both switches),
and then unplu g it before checki ng your insta llation .
ACHTUNG!
Bitte schalten Sie unbedingt den Drucker aus
und ziehen Sie den Netzstecker heraus bevor Sie die korrekte
Installation des Druckers überprüfen.
Initial Printer Setup 2-45
Page 78

Chapter 2
EDNord - Istedgade 37A - 9000 Aalborg - telefon 96333500
Installing Options
If you purchased any printer options, such as extra memory or
emulations, install these now. If installation instructions are
included with the option, follow those, and be sure to check for
additional ins tructions in chapte r 8, “Printer Option s.” Then return
to chapter 3, “Connecting the Printer,” to finish setting up your
printer.
2-46 Initial Printer Setup
♦
Page 79

Connecting the Printer
EDNord - Istedgade 37A - 9000 Aalborg - telefon 96333500
Chap ter highli ghts:
■ Connecting to a network
■ Connecting to a Macintosh
■ Connecting to a PC
■ About printer communi cat ion modes
Chapter 3
Page 80

EDNord - Istedgade 37A - 9000 Aalborg - telefon 96333500
Page 81

Introduction
EDNord - Istedgade 37A - 9000 Aalborg - telefon 96333500
This chapter explains how to connect your printer to a host
computer after you have set it up according to the instructions in
the previous chapter, “Initi al P rint er Setup. ”
Connecting to a Network
If you’ve purchased a network interface for your printer, see
chapter 8, “Printer Options,” for installation information, and see
your network and your interface kit documentation for further
details.
About Macintosh Networks
If you’re connecting to a print network such as TOPS or
AppleShare using LocalTalk-type connecto rs and boxes, see your
Macintosh and network docum entati on for detail s spe cific to your
setup.
Chapter 3
All Macintosh users on a network must use the same version of
LaserWriter to run corr ectly. For example, if the network has a
mixture of LaserWriter 7.0 and 8.x, it will experience frequent
reinitialization problems. Also, to get color output, you must use
LaserWriter and Laser Prep 6.0 or higher. (System 6 users must
also all have the same version of Laser Prep unless they’re using
LaserWriter 6.1 or higher.) Check the version number by selecting
the LaserWriter icon, then holding down the Command key whi le
pressing the lette r I. The driver version number appears in the Info
window.
Connecting the Printer 3-1
Page 82

Chapter 3
EDNord - Istedgade 37A - 9000 Aalborg - telefon 96333500
Connecting to a Macintos h
What You Need
To connect your printer to a single Ma cint osh, yo u need th e item s
shown in the illust ratio n below:
■ Two PhoneNET-type transformer boxes
You need one with a DIN-8 connector for the printer port
and one with the connector required by your Macintosh
(usually a DIN-8).
■ RJ11 (telephone) cable
■ Terminating resistors—p robably two
If you’re replacing a printer already connected to a Macintosh, you
probably already have this equipment.
Fig. 3.1 Macintosh-Pri nt er Interf ac e Cab le s and Por t
3-2 Connecting the Printer
Page 83

Chapter 3
EDNord - Istedgade 37A - 9000 Aalborg - telefon 96333500
NOTE: If you’re connecting more than one Macintosh to the
printer, in an AppleTalk network, see your PhoneNET
and Macintosh documen tati on for informatio n.
Making the Connection
CAUTION: Turn off both the printer and the Macintosh before
making the connectio n.
1. Plug the connector from one transformer bo x into the printer’s
LocalTalk port.
2. Plug the connector from the other transformer box into the
Macintosh.
3. Connect the two transform er boxes wi th the tel ephone cable.
4. Put terminating resistors into any open sockets in the
transformer boxes. This ensures proper communication
between the Macintosh and the printer and helps speed up data
transmi ssion.
5. Turn on the printer.
Printing from the Macintosh
If your Macintosh was previously connected to a PostScript print er,
you can probably start printing now. See your application
documentation for instructions on sending a document to the
printer or see “Testing Macintosh Communication,” later in this
chapter.
However, to take advantage of all your printer’s special features
(like Q
and type selection), or if you’ve never printed to a PostScript
printer before, you need to take a few minutes to load the following
software from the Macintosh dis ks we shipped wit h your prin ter:
Connecting the Printer 3-3
COLOR automatic color con trol technology, and media size
Page 84

Chapter 3
EDNord - Istedgade 37A - 9000 Aalborg - telefon 96333500
■ PS Executive Series printer utilities
PS Exec is a utilities software package for controlling the
printer from the Maci ntosh. For exampl e, through PS Exec
you can turn off the start-up page, install printer-resident
screen fonts, rename the printer, download fonts, manage
hard disks, and print font samples. Many of the procedures
described in this manual involve using PS Exec.
■ LaserWriter 8.x and the magicol or LX 4.1 PPD file
Although your Macintosh system software came with a
LaserWriter driver, we recommend you install
LaserWriter 8.x and the magicolor LX PPD (a printer
description file) so you can take advantage of special
printer features (like Q
COLOR automatic color control
technology, and media size and type sele ctio n).
■ Application -sp ecific print er files
If you plan to print from Aldus PageMaker, Aldus
FreeHand, Aldus PrePrint, Adobe Separator, or
QuarkXPress, you’ll also want to install the latest printer
description file (PPD, PDX, or PDF) for your particular
software. (You can probably print without them, but you
may not be able to access all your printer’s features, and
you may get an error message telling you to change the
printer name.)
Installing the Printer Utilities
1. Insert the Macintosh F ormat PS Executive Series Utilities disk
in your Macintosh.
2. Double-click the PSExec3.xx.sea file.
3. In the window that appears, choose Continue.
4. In the window that appears, specify a folder to install the
utilities t o and ch oose Sav e.
3-4 Connecting the Printer
Page 85

Chapter 3
EDNord - Istedgade 37A - 9000 Aalborg - telefon 96333500
5. After all the files are extracted, choose Quit.
6. Open the Utilities folder in the PSExec 3.xx Folder and
double-click PSInst all to personalize the program.
7. Double-click the PSExec icon to run the program.
Check the README file for updates, and see the PS Exec
Help for information on using the program.
Installing LaserWriter 8.x and the magicolor LX 4.1 PPD
1. If you haven’t already, follow the instruction s given above in
“Installing t he Printer Ut ilit ies. ”
2. Make backup copies of your current LaserWriter drive rs and
the contents of your Printer Descriptions folder. (If you use
System 7, these files are stored in the Extensions folder in
your System Fold er. If you use System 6, these files are stored
in the System Folder. )
3. Delete your LaserWriter 8 preferences files. (If you use
System 7, this file is stored in the Preferences folder in your
System Folder. If you use System 6, this file is stored in the
System Fold er. )
4. Open the PSExec 3.xx Folder, then the Drivers folder, then
the LaserWriter folder to display the LaserWriter 8.x icon
(among other things).
5. Drag the LaserWriter 8.x icon to your current System Fold er.
(The system knows where to copy it. If you’re prompted for
permission to copy the file to the folder, choose OK.)
6. System 7 users: Create a folder called Printer Descriptions
inside the Extensions folder inside the System Folder, if one
doesn’t already exist.
Connecting the Printer 3-5
Page 86

Chapter 3
EDNord - Istedgade 37A - 9000 Aalborg - telefon 96333500
7. Open the PPDs folder in side the Driv ers folder in the PSExec
8. Open the Ver 4.1 folder inside the PPDs fo lder.
9. Select the magicolor LX PPD in the Ver 4.1 folder and drag
10. From t he Apple menu , choose Choo se r.
11. In the Chooser window, select the LaserWriter 8.x icon and
12. Choose the Setup button.
13. Exit the Chooser.
System 6 users: Create a folder called Printer Descriptions
inside the System Folder, i f one doesn’t already exist.
3.xx Folder.
it to the Printer Descri pti ons folder you created in step 4.
select the QMS magico lor LX.
This causes the LaserWriter to query the printer and
automaticall y choose the appropriate PPD.
Now, when you go into your appl ication, you can access QMS
printing options (like Q
COLOR color control) by choosing
Options in your application’s Print dialog box. For
information on the printer-specific features in the Options
dialog box, see chapter 7, “Op ti mi zing Color Output.”
Note for Users of Aldus Applications
If you use an Aldus app lication , when you want to print , hold
down the Opt ion key while selecting Prin t from the File menu.
This brings up the LaserWriter window, which contains the
QMS printing op tions like Q
Aldus applications bypass LaserWriter and use an Aldus
printer driver, which wou ld prevent you from accessing QMS
color printing options.)
3-6 Connecting the Printer
COLOR color control. (Normally,
Page 87

Chapter 3
EDNord - Istedgade 37A - 9000 Aalborg - telefon 96333500
Note for Adobe Photoshop Users
If you use Adobe Ph otoSh op, go to Phot oShop’s Page Setu p
dialog box, and select Use P rin ter’s Default Screen under t he
Screens option. (This allows yo ur choices in the QMS driver
to take effect.)
Installing Printer Description Files
If you plan to print from Adobe Separator, Aldus PageMaker,
Aldus FreeHand, Aldus PrePrint, or QuarkXPress, install the
appropriate printer description file (PPD, PDX, and/or PDF) as
described below:
NOTE: The application should be ins talled before you install th e
printer description file(s).
1. If you haven’t already, follow the instruction s given above in
“Installing t he Printer Ut ilit ies. ”
2. Install the appropriate printer description file(s) for your
application from the Drive rs folder in the PS Exec folder:
If you use Adob e Sep arator, in stall the PPD file. Your Separator
documentation explain s where to put it.
If you use Aldus PageMaker 5.x, insta ll the ve r sio n 4.1 P PD in
the Printer Descriptions fold er.
If you use Aldus PageMaker 4.x, install the version 3.0 PPD and
PDX files in the PPDs folder in the Aldus folder in the System
Folder.
If you use Aldus FreeHand 4.x, install the v ersion 4. 1 PPD in th e
Printer Descriptions folder.
Connecting the Printer 3-7
Page 88

Chapter 3
EDNord - Istedgade 37A - 9000 Aalborg - telefon 96333500
If you us e Al dus Free Ha nd 3 .x, install the version 3.0 PPD and
PDX files in the PPDs folder in the Aldus folder in the System
Folder.
If you use A ldus PrePrint, install the version 3.0 PPD and PDX
files in the PPDs folder in t he Aldus folder in th e System F old er.
If you use QuarkXPress, install the magicolor LX PDF in the
same folder as QuarkXPress. QuarkXPress 3 .3 allows you to access
either a PDF or a PPD, but in order to have access to all of your
printer’s features, we recommend that you use the PDF. To select
the PDF, go to Quark’s Page Setup dialog box and hold down the
Shift key while clicking the Printer Type listbox. (The selections
that appear italicized are PPDs and the selections that appear
non-italicized are PDFs.) Als o in the Page Setup dialog box, make
sure the EFIColor profile selecti on is “None.”
Note that the Quark LPI setting you choose determines which
printer halftone settings are used. The table below shows which
printer halftone setti ng is used for each Quark LPI setti ng:
LPI Halftone
15 to 44 Printer default
45 to 54 53 lpi x 45 de gre es
55 to 79 71 lpi x 45 de gre es
80 to 89 80 lpi x 45 de gre es
90 to 99 Enhanced
100 to 125 106 lpi x 45 degrees
126 and higher Printer defaul t
Testing Macintosh Communication
You can test communication between the printer selected in the
Chooser and the Macintosh by sending a fil e to the print er from an
application (see your application documentation for more
information), or by printing a directory, as described here:
3-8 Connecting the Printer
Page 89

Chapter 3
EDNord - Istedgade 37A - 9000 Aalborg - telefon 96333500
1. Display a disk or folder window.
2. From the File menu, choose Page Setup. Select paper size,
printing orientation, and any other necessary options. Then
select OK.
3. From the File menu, choose Print Directory or Prin t Window.
A dialog bo x app ears.
4. Select the printing options you want, then click Print or OK.
(Choose the Save button to save your settings for future print
jobs.) A directory prints. (If no page prints, check chapter 9,
“Troubleshooting.”)
Where to Go Now
You’re now ready to print from your Macintosh.
From this poi nt , you’ll probably perform most printing tasks from
your application. For specific information, check the printing
section in your appli c atio n docum entati on.
For information on print media types and sizes, see chapter 5, “Print
Media and Daily Operations.” For information about using your
printer’s color-printing features, see chapter 7 of this manual,
“Optimizing Color Output.”
Connecting the Printer 3-9
Page 90

Chapter 3
EDNord - Istedgade 37A - 9000 Aalborg - telefon 96333500
Connecting to a PC
If you have a brand-new computer, before connecting the printer,
you should follow the manufacturer’s instructions for setting up t he
computer, including (if it’s not already installed) any operating
system softw are, such as DOS and Win dows.
What You Need
To connect your printer to a single PC, you need one of the
following interface cables (not included with your printer, but
available at any computer store):
■ a parallel cable (with 36-pin and 25-pin male connectors)
■ or a serial cable (with a 25-pin male and a 9- or 25-pin
female connector, depending on the computer’s serial
port)
If you’re replacing a printer, you probably already have the
necessary cables.
How to Choose a Cable
We recommend using a p arallel cabl e if possi ble, because parallel
communication doesn’t require printer configuration, while serial
communication often does. However, if the printer is more than 6
feet (1.8 meters) from the computer, we recommend using a serial
cable for better communication.
NOTE: Interface cables should be no longer than 6 feet (1.8
meters) for parallel or 25 feet (7.6 meters) for serial
communication.
3-10 Connecting the Printer
Page 91

Chapter 3
EDNord - Istedgade 37A - 9000 Aalborg - telefon 96333500
Making the Connection
CAUTION: If you’re connecting the printer to a single computer,
turn off both systems first.
1. At back of the printer, attach one end of the cable to the
appropriate port.
Parallel users: Connect the 36-pin end of the cable to the
printer port labeled “p arallel, ” and close the cli ps.
Fig. 3.2 Parallel Ports
Serial users: Connect the male end of the cable to the printer
port labeled “serial,” and tight en the screws.
Fig. 3.3 Serial Ports
NOTE: The port covered with a metal bracket is the SCSI port,
which is used for connecting external hard disks.
Connecting the Printer 3-11
Page 92

Chapter 3
EDNord - Istedgade 37A - 9000 Aalborg - telefon 96333500
2. At the computer, attach the other end of the cable to
appropriate port. (The parallel port is female, and the serial
port is male.)
3. Turn on the printer and the compute r.
4. Test communication.
Parallel users: You can do this by sending a file from one of
your applications or you can see “Testing Parallel
Communication, ” late r in this chapter.
Serial users: You can do this by sending a file from one of
your applications or you can see “Testing Serial
Communication, ” late r in this chapter.
5. See “PC Printing Software,” below to finish connecting the
printer.
PC Printing Softwa re
If you’re replacing a color PostScript printer, you can probably sta rt
printing now with the printing software already in place. You can
refer to your application documentatio n for instructions on sending
documents to the printer.
However, if you want to be able to use all your printer’s special
features (like Q
COLOR automatic color control technology, media
size and type selection, and collation), or if you’ve never printed
to a color PostScript printer before, we recommend you take a few
minutes to make sure you have the following printing software
installed:
■ PS Executive Series Utilities
■ A color PostScript printer driver
3-12 Connecting the Printer
Page 93

Chapter 3
EDNord - Istedgade 37A - 9000 Aalborg - telefon 96333500
■ Printer description files (if you use QuarkXPress 3.3,
Aldus PageMaker, or Adobe PhotoShop)
PS Executive Series Printer Utility Software
PS Exec, included o n the DOS disks we s hipped wi th your p rinter,
is a utility for controlling the printer from the computer. For
example, through PS Exec you can turn off the start-up page,
rename the printer, download fonts, manage hard disks, print font
samples, or print a file containing four-color simulations of
Pantone-identi fied col ors and t he pe rcentage of the process col ors
used to create them. Many of the procedures described in this
manual involve using PS Exec. The README file on the PS
Executive disk explains how to install the program, and the on-line
help explains how to use it.
Installing a Color PostScript Printer Driver
If you’re using Windows, we recommend that you install the
QMS-developed Wind ows driver. See “Installing t he Windows 3.1
Driver,” below.
If you’re using a non-Windows application, read the printing
section of the application documentation for information on
choosing a color PostScript driver. If the application does not
provide a color PostScript driver, contact the application
manufacturer to see if one has become available sinc e you bought
the program. Also, color PostScript drivers for some applications
are available through the QMS Corporate Bulletin Board System
and through CompuServe; see appendix A, “QMS Customer
Support,” for inform atio n.
Also, check to see if application notes (tips for printing from
specific applications) are available for your application from
Connecting the Printer 3-13
Page 94

Chapter 3
EDNord - Istedgade 37A - 9000 Aalborg - telefon 96333500
Q-FAX, the QMS bulletin board, or CompuServe. Appendix A,
“QMS Customer Support,” explains how to use these QMS
information services.
Installing the Windows 3.1 Driver
NOTE: The QMS-developed Windows driver supports all the
printer’s advanced capabilities. However, if you
experience printing problems while using our driver with
a particular applicati on, or if you r applicatio n (like Aldus
PageMaker) requires the use of the Mi crosoft PostS cript
driver, then we recommend using the Microsoft driver
along with the QMS WPD file, to add printer-specific
capabilities to the driver. (In this case, the QMS driver
for Windows can remain loaded in order to be used for
other applications.) The QMS WPD file is on the
Windows Drivers disk, shi pped wit h th e printer. See the
README file on the disk for information on using the
WPD.
Install the QMS driver for Windows (QSCRIPT.DRV) using the
following procedure:
1. Turn on your computer, start Windows, and insert the QMS
“Windows Driver” disk (shipped with your printer) into the
computer’s 3.5" floppy drive.
2. In Windows, open File Manager and display the contents of
the QMS Windows Driver disk.
Double-click the File Manager icon (usually located in
Program Manager’s Main window) and double-click the
appropriate disk-drive icon (the drive the Windows disk is in)
at the top of the File Manager window.
3-14 Connecting the Printer
Page 95

Chapter 3
EDNord - Istedgade 37A - 9000 Aalborg - telefon 96333500
3. Drag the QSCRIPT.HLP file from the QMS disk to the
WINDOWS\SYSTEM directory.
4. Open the Windows Control Panel and double-click the
Printers icon.
The Control Panel icon is usually located in Program
Manager’s Main window.
5. In the Printers dialog box, choose the Add button .
6. From the List of Printers that appears, choose Install Unlisted
or Updated Printer and choose the Install bu tton.
7. In the text b ox that appears, t ype the nam e of the flopp y driv e
(for example, A:\) the Windows di sk is in and choose OK.
8. In the Add Unlisted or Updated Printer dialog box, select
“QMS PostScrip t Print er” and choose OK.
If you see the followi ng message: "Ins ert Microsoft Wi ndows
3.1 Disk #5 or a disk with the updated SSERIFF.FON file
in...," choose the Cancel but ton.
9. Choose the Connect butt on to configure your printer port.
10. In the Conn ect dialo g box, select the appropriate host port in
the Ports list and choose OK.
11. Choose the Setup button, and in the Printers section of the
dialog box that ap pears, choos e your p rinter (magi color LX).
12. Choos e OK to retu rn to the Print e rs dialog box.
13. Choose Set As Default Printer to make the QMS printer the
default printer.
14. Rep eat steps 5 through 1 2 to install the QMS driver for other
ports or choose Close to exit the Prin ters dial og box .
Now you can set printer options from your application by choosing
Print Setup from t he application’s F ile menu and then cho osing the
Connecting the Printer 3-15
Page 96

Chapter 3
EDNord - Istedgade 37A - 9000 Aalborg - telefon 96333500
Options button . Choose the Help button in any of the driver dialo g
boxes for informati on on dri v er opti ons.
Printer Description Files (PC)
Printer descri pti on files for Windows applications a re inclu ded o n
the Windows Drivers di sk shipp ed with your print e r:
If you use Qu arkXPress 3.3, after you in stall the QMS driver for
Windows, install the magicolor LX PDF according to the
instructions in your QuarkXPress documentation for installing
PDFs. The table below shows which printer halftone setting will
be in effect for the Quark LPI setting chosen:
LPI Halftone
15 to 44 Printer default
45 to 54 53 lpi x 45 de gre es
55 to 79 71 lpi x 45 de gre es
80 to 89 80 lpi x 45 de gre es
90 to 99 Enhanced
100 to 125 106 lpi x 45 degrees
126 and higher Printer defaul t
If you use PageMaker 5.x, use the versi on 4 PPD on our Windows
Drivers disk. Also, Aldus requires that the Microsoft PostScript
driver (version 3.56 or later) be used with PageMaker. See your
PageMaker documentation for instal lation instructions. To be able
to access magicol or LX features from t he Microsoft driver, add the
QMS WPD file (also on our Windows Drivers disk) to the
Microsoft driver. See the README file on our Windows D rivers
disk for information on adding our WPD. Note th at the QMS driver
for Windows can be loaded to be used for applications besides
PageMaker.
3-16 Connecting the Printer
Page 97

If you use Adobe Photoshop, for best output quality use the
EDNord - Istedgade 37A - 9000 Aalborg - telefon 96333500
QMS-supplied Wi ndows driv er. Then, so th at choices in the QMS
driver take effect, go to PhotoShop’s Page Setup dialog box, and
select Use Printer’s Default Screen under the Screens option.
Testing Parallel Com muni cat ion
1. Go to the DOS C:\ prompt.
2. Create a short PostScript test file called PRINTEST.PS by
typing th e followi ng com mands :
copy con printest.ps↵
showpage↵
^D^Z↵
To type ^D and ^Z, press and hold down the Ctrl key while
you type the letters d and z. These are end-of-file characters.
You must type showpage, which is a PostScript command
telling the printer to eject a page, in lowercase letters. The ↵
symbol means press the Enter key, as it does throughout our
documentation.
Chapter 3
3. At the DOS C: \ p rompt , send PRINTEST. PS to the pri nter by
typing th e followi ng com mand:
print printest.ps↵
If prompted for the name of the list device, type the name of
the parallel port the printe r is connected to, for example,
lpt1↵
NOTE: If the computer has more than one parallel port, they’re
probably labeled. If not, check the computer
documentation for the LPT port names .
Connecting the Printer 3-17
Page 98

Chapter 3
EDNord - Istedgade 37A - 9000 Aalborg - telefon 96333500
If the printer and computer are communicat ing, a blank page should
eject from the printer. You are ready to start printing.
If a blank page does not eject and you typed the file correctly, check
your AUTOEXEC.BAT file to see if LPT1 (the parallel port) is
being directed to COM1 (t he serial port). If the AUTOEXEC.BAT
file contains the followin g line, del ete it:
Then type
in the AUTOEXEC.BAT file so that print jobs are sent until the
printer accepts them. Reboot and try the comm unicatio n test again.
See chapter 9, “Troubleshooting,” and refer to your DOS
documentation for more info rmati on.
MODE LPT1:=COM1:
mode lpt1:,,p
3-18 Connecting the Printer
Page 99

Testing Serial Com muni cation
EDNord - Istedgade 37A - 9000 Aalborg - telefon 96333500
1. Go to the DOS C:\ prompt.
2. Create a short PostScript test file called PRINTEST.PS by
typing th e followi ng com mands :
copy con printest.ps↵
showpage↵
^D^Z↵
To type ^D and ^Z, press and hold down the Ctrl key while
you type the letters d and z. These are end-of-file characters.
You must type showpage, which is a PostScript command
telling the printer to eject a page, in lowercase letters. The ↵
symbol means press the Enter key, as it does throughout our
documentation.
3. At the DOS C: \ p rompt , send PRINTEST. PS to the pri nter by
typing th e followi ng com mand:
print printest.ps↵
Chapter 3
If prompted for the name of the list device, type the name of
the serial port you’ re using at t he comput er, for example,
com1↵
NOTE: If the computer has more than one serial port, they’re
probably labeled. If not, check the computer
documentation for the COM port names.
If a blank page ejects from the printer, the printer and the
computer are communi cating. You are ready to start prin ting.
If a blank page does no t eject and you typed the fil e correctly,
make sure the print e r’s s erial p ort s etti ngs mat ch th ose of t he
PC. See “Checking Serial Communicati on Sett ing s,” below.
Connecting the Printer 3-19
Page 100

Chapter 3
EDNord - Istedgade 37A - 9000 Aalborg - telefon 96333500
Checking Serial Communication Settings
If the serial communicat ion test described above doesn’t work, then
make sure your printer’s serial port settings (baud rate, parity, data
bits, and st op bits) match thos e of the PC.
To find out what the PC’s serial settings are, look in your
AUTOEXEC.BAT file (in the root directory) for a command line
like this:
MODE COM1:9600,N,8,1,P
In this example, the PC’s serial port communication settings are
9600 for baud rate, n (no) parity, 8 data bits, and 1 stop bits. The p
stands for infinite retry.
To find out what the print er’s serial settings are, check the pri nter’s
start-up page, which print ed out when you first turned it on. It list s
the printer’s current serial port settings. To change them to match
the PC serial settings, use the printer control panel as described
below:
1. Press the print er control panel Onl ine/Offline key to make the
Online LED go out.
2. Press the Menu key to ent er the top-level m enu, then press the
Next key until the message window dis plays
OPERATOR CONTROL
ADMINISTRATION
3. Press the Select key to enter the Administration menu, then
press the Next key until the message window di spl ay s
ADMINISTRATION
COMMUNICATIONS
4. Press the Select key to enter the Com municati ons menu, then
press the Next key until the message window di spl ay s
3-20 Connecting the Printer
 Loading...