

Page 1

®
QMS 1725E Print System Getting Started
1800385-001B
Page 2

Trademarks
The following are tradema rks or registered trademarks of their respective ow ners.
Other product names m entioned in this m anual may a lso be trade marks or reg istered
trademarks of their resp ective owners. Re gistered trademar ks are register ed in the
United States Patent and Trademark Office; some trademarks ma y also be re gistered in
other countries. QMS and the QMS logo are r egistered tradema rks of QMS, Inc., and
Crown, the Crown seal, Crow nNet, PS Executiv e Series, an d QUIC are trademark s of
QMS, Inc. PostScript is a trademar k of Adobe Sys tems Incorpor ated for a page
description language a nd may be regis tered in certain jurisdic tions. Throug hout this
manual, “PostScript Lev el 2” is used to refer to a set of c apabiliti es defined by Ado be
Systems for its PostSc ript Level 2 page description language. Thes e capabilities,
among others, are implem ented in this produc t through a QMS- developed emulation
that is compatible with Adobe's PostScript Lev el 2 language. Ado be/Adobe Systems
Incorporated. 3Com, 3+Open/3 Com Cor poration. AppleTalk, EtherTalk, LaserWriter,
LocalTalk, Macintosh, TrueType/Apple Computer, Inc. Banyan, VINES/Banyan.
CompuServe/H & R Block. DEC, DECnet, LN03, VM S/Digital Equipment Co rporation.
Hewlett-Packard, HP, PCL, HP-GL, LaserJet/H ewlett-Packa rd Co. IBM PC, Token-Ring/
International Business Ma chines Cor poration. Intellifont/A gfa Division, Miles , Inc.
Gothic BBB-Medium & Ryumin Light KL/Morisaw a and Company, Ltd. Centronics/
Centronics Data Comput er Corp oration. M icrosoft, M S-Wi ndows/Mi crosoft Corpor atio n.
Novell and NetWare/Novell, Inc. The ENER GY STAR™ logo/United States
Environmental Protection Agency. The ENERGY STAR emblem does not represent EPA
endorsement of any produ ct or servic e. UNIX/UNIX Sys tems Laboratories . Ethernet/
Xerox Corporation.
Proprietary Statement
The digitally encoded software included w ith your QMS 172 5E Print Syste m is
Copyrighted © 1995 by QM S, Inc. All Rights R eserved. This software may not be
reproduced, modified, d isplay ed, tr ans ferred, or cop ied in any form or in any manner or
on any media, in whole or in par t, without the express written permiss ion of QMS, Inc.
Copyright Notice
This manual is Copyrighted © 1995 by QM S, Inc., One Mag num Pass, Mob ile, AL
36618. All Rights Reserve d. This manual m ay not be copie d in whole or in pa rt, nor
transferred to any other me dia or language, w ithout the express written permiss ion of
QMS, Inc.
Page 3

Dear Customer,
Although your new QMS printer is the result of the latest and most
advanced engineering techniques in the electronic industry, it isn’t
necessary for you, the user, to understand every detail of the printer’s
design in order to make it do what you bought it for. But there are
some things you’ll need to know about your printer, and we’ve
included guidebooks to help you get started.
We’ve designed your user’s guide to help you find the in formation you
need as quickly and easily as possible:
n
Table of Contents—Use this section as a road map to discover
what’s in the Getting Started guide.
n
About the Documentati on —T his section functions as a Welcome Center. It gives you an idea about what’s in your Getting
Started guide as well as in the other documen tation that has
accompanied your printer.
n
About This Guide—This section describes the same information
as in the table of contents, but in a descriptive format.
n
Headers, Footers, and Tab Dividers—Use these as markers to
help you locate the section of the manual you want quickly.
n
Index—The blue pages at the end of each guide will help you find
the specific information you need.
We hope you enjoy your new QMS printer and find our guides helpful
and informative. Your QMS Technical Writer
Page 4

Page 5
ContentsContents
1 Introduction
Introduction .................................................................................. 1-2
Abo u t the Pr inte r ..... . .................. . ................................ . ................ 1-2
About the Documentati on ................. ........... ........ ............. ...... ....1-2
Standard Product Documentation 1-3
Optional Documentation 1-4
Related Documentation 1-5
Abo u t Th is Guide .. .. .............. . ................................................. . ....1-6
Typographic Conventions 1-7
Printer Features ........ ............. ...... .............. ..... .............. ....... .........1-7
Media Flexibility 1-8
Multiple Resolutions 1-8
Five Resident Emulations 1-8
Resident Fonts and Symbol Sets 1-9
QMS Crown Technology 1-9
Page 6
Software Loadable System (SLS) 1-12
Remote Console 1-12
PCMCIA Card Slot 1-12
Printer Options 1-13
What’s Next? .............................................................................. 1-15
2 Setting Up Your Printer
Introduction . . .... ... ..... ...... . ....... .... ... ..... ...... . ....... ..... .. ..... ...... ... ..... .. 2-2
Finding a Good Lo catio n ...... ....... ..... ...... ... ..... ..... ....... ....... .... ..... 2-2
Location Requirements 2-2
Power Requirements 2-3
Checking Shipment Contents .................................................... 2-4
Registering the Printer 2-4
Removing Pa ckin g Materi als .......................... ..... ....... ...... ..... ... .. 2-5
Removing the Shipping Spacers 2-5
Removing Paper from the Transfer Charge Roller 2-6
Installing the Toner Cartridge .................................................... 2-7
Installing the Paper Cassettes ................................................... 2-9
Attaching the Face-up Tray ...................................................... 2-10
Installing the Media Guide Arm ................................................ 2-11
Connecting the Power Cord ..................................................... 2-12
Turning on the Prin ter .... ....... ...... ..... ... ..... ....... ..... ....... .... ..... ..... 2-12
Printing a Start-up Page ............................................................2-13
Enabling/Disabling the Start -up Page 2-14
Installing Options ...................................................................... 2-15
What’s Next? .............................................................................. 2-15
3 Connecting to a PC
Introduction . . .... ... ..... ...... . ....... .... ... ..... ...... . ....... ..... .. ..... ...... ... ..... .. 3-2
QMS 1725E Print System G etting Startedii
Page 7

What You Need .......................... ............ .......................................3-2
Making the Connec tion ......... ...... ....... ....... ..... ....... ....... ....... ....... ..3 -3
Testing Communication ..............................................................3-5
Creating the Test File 3-5
Sending the Test File 3-5
Verifying the Serial Port Setting Changes 3-10
PC Printing Software .............................. ..... ..... .........................3-10
Installing PS Executive Series Printer Utility Software 3-10
Installing a PostScript Printer Driver 3-11
PC Screen Fonts 3-12
What’s Next? ...................................... ........................................3 -12
4 Connecting to an Ethernet
Network
Introduction .................................................................................. 4-2
Connecting to the Network .........................................................4-2
Thin-Wire Ethernet 4-3
Twisted-Pair Ethernet 4-4
Installing the Software ................................................. .. .. .. ..........4-4
DOS 4-4
Macintosh System 4-5
OS/2 4-5
UNIX 4-7
Windows 4-9
Configuring the Interface ..........................................................4-10
EtherTalk 4-10
LAN Manager/LAN Server 4-11
NetWare 4-11
TCP/IP 4-13
Configuring the Network ...........................................................4-13
EtherTalk 4-13
LAN Manager/LAN Server 4-14
NetWare 4-17
TCP/IP 4-18
iii
Page 8
If You Have Trouble ...................................................................4-19
For More Information .......................... ...................................... 4-19
What’s Next? .............................................................................. 4-20
5 Control Panel
Introduction . . .... ... ..... ...... . ....... .... ... ..... ...... . ....... ..... .. ..... ...... ... ..... .. 5-2
Control Panel Indicators ............................................................. 5-3
Message Window ......................................................................... 5-4
Control Panel Keys ...................................................................... 5-5
What’s Next? ................................................................................ 5-7
A QMS Customer Support
Sources of Supp ort ... ..... ....... ...... ..... ..... ..... ..... ..... ....... ...... ..... .....A -2
Your QMS Vendor A-2
Your Application Vendor A-2
Q-FAX A-2
The QMS Corporate Bulletin Board System A-3
CompuServe A-3
Internet A-3
QMS Customer Technical Assurance (CTA) A-4
QMS National Service A-5
QMS World-wide Offices .............................................................A-6
B Configuration Menu
Configuration Menu .....................................................................B-2
Index
v
QMS 172 5 E Pri nt System Getting Startediv
Page 9
1
Introduction
In This Chapter...
n
About the printer
n
About the documentation
n
About this manual
n
Printer features and user benef it s
Page 10
About the
Printer
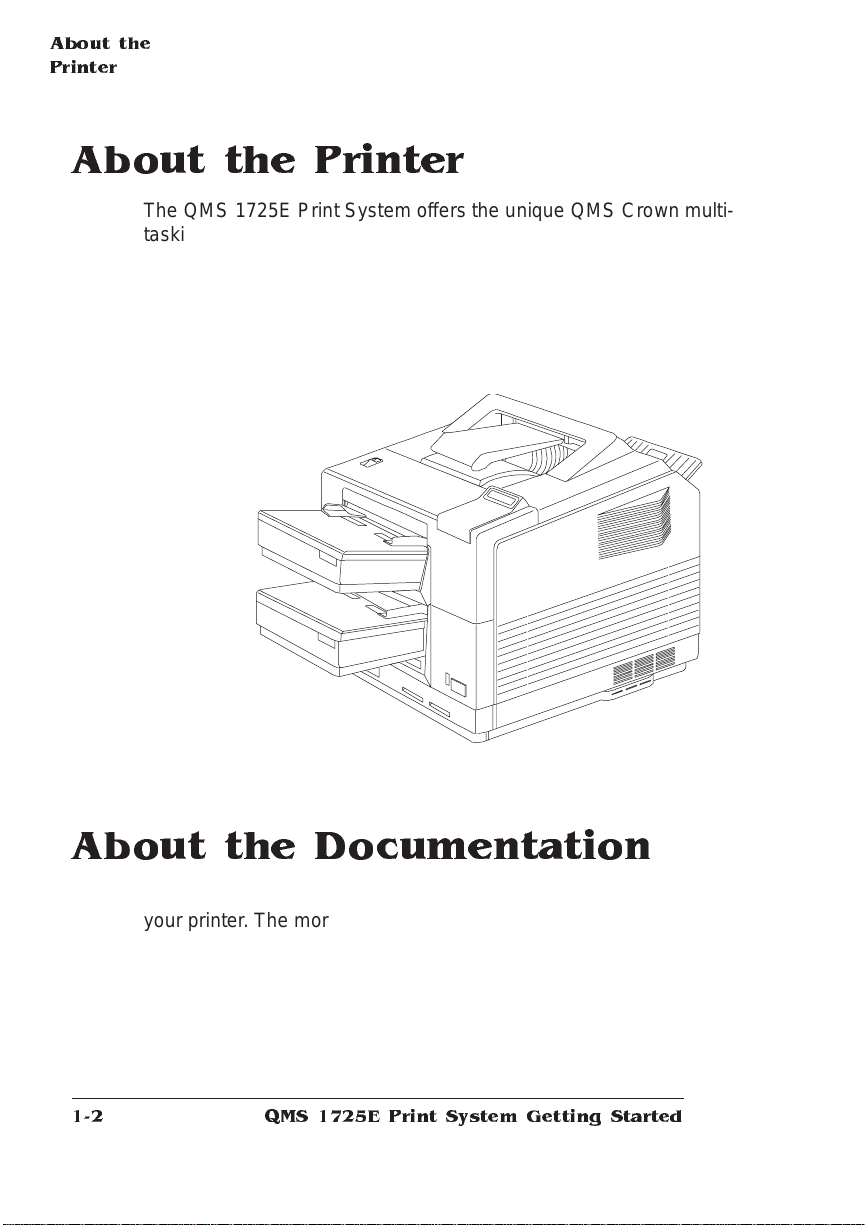
About the Printer
The QMS 1725E Print System offers the unique QMS Crown mult itasking operating system, superior performance, extensive connectivity, upgrade options including duplex printing, and flexible emulatio n
support.
In addition, it prints 17 pages per minute (let te r/A4 paper size) and is
a high-quality 300x300 and 600x600 dpi multiple-resolution desktop
printer.
About the Documentation
The documentation provides a window int o the many capabili tie s of
your printer. The more familiar you are with the documentat ion, the
easier it’ll be for you to achieve the results you want from your printer.
Several pieces of documentation accompany your printe r. If you’ve
ordered printer options, you’ll have even more manu als. But don’t
worry—you don’t have to read them all before you’re able to use your
printer. In fact, some of them you may never have to refer to at all,
QMS 172 5 E Pri nt System Getting Started1-2
Page 11
About the
Documentation
depending on the type of documents you print and the environment in
which you print them.
This section will give you an idea of how we’ve organized inf ormation
and which documents you’ll probably refer to the most.
Standard Product Docum entation
The following document atio n is shipped with your print er:
n
QMS 1725E Print System Getting Started
You're looki ng at this manual right now. It contains detailed, illustrated instruction s to guide you as you unpack and set up your
printer and connect it to a host computer . In addition, it introduces
you to the printer’s control panel. The “About Th is Manua l” section later in this chapter details the content s of this manual.
QMS 1725E Print System Operation
n
This manual guides you through the day-to-day operation of your
printer. It includes information on replacing print media and toner,
using advanced printing features, handling and cleani ng your
printer, improving print quality, and troubleshooting printer problems.
QMS 1725E Print System Reference
n
This manual provides information you may need only once in a
while, such as information on typefaces and fonts, the control
panel menu, memory, job modes, the PS protocol option, HP-G L
color encoding, and installing and using printe r options. This
manual also provides technical specifi cati ons, a list of printersupported QMS Document Option Command s (DOC), character
tables, and a glossary of frequently used terms.
QMS CrownNet Interface Syste m Administ rator’s Guide
n
This manual guides you through the Network 2 menu used in
configuring the Ethernet interface. You will also find the information you need for using the CrownAdmin and CrownNet Manager
software here.
Introduction
1-3
Page 12
About the
Documentation
n
QMS Crown Network Notes
Refer to this manual for tips on using your QMS 1725E Print System if you’re connecting to a network. It discusses 3Com
3+Open, Banyan VINES, LAN Manager-based LA Ns, Novell NetWare, TCP/IP, UNIX, and VMS /DE Cnet . In most cases, only
advanced network users and system administrat ors need this
information.
This manual is provided on disk in encapsulated PostScript
(EPS) form. Refer to the REA DM E file on the dis k for informat ion
on printing a hard copy of the manual.
QMS Crown Remote Console User’s Guide
n
For network administrators using the print er’s Remote Console
feature, this manual provides inform ation and instruct ion on how
to control and monitor printer functions through net work commu nications.
QMS Crown Techni cal Referen ce Manual
n
This manual provides advanced technical inform ation, including
information on communication protocols and printer emulations.
In most cases, only advanced users and system administrators
need to access this inf ormation.
This manual is provided on disk in encapsulated PostScript
(EPS) form. Refer to the REA DM E file on the dis k for informat ion
on printing a hard copy of the manual.
n
Printer Option Docum ent ation
If you purchased a printer option (for example, a CrownNet inter-
face card for a Token-Ring network), you probably received separate documentation fo r it. See chapte r 6, “Printer Opt ions, ” of the
QMS 1725E Print System Reference
information.
guide for additional option
Optional Documentation
The following document atio n is available as an optional purchase.
Contact your QMS vendor.
QMS 172 5 E Pri nt System Getting Started1-4
Page 13
About the
Documentation
n
QMS
Crown Document Option Commands
Document Option Commands (DOCs) are sof tware codes you
insert in documents to enable printer fe atu res that cannot be
accessed by your application or page description langu age. This
manual lists and explains all of the DOCs. The Document Option
Commands supported by your printer are liste d in appendix C,
“Document Option Commands,” of the
QMS 1725E Print System
Reference.
Using QMS DOC, you can develop one driver to support all languages and emulations for your printer. Also, you can use host
network management software to create custom ized netwo rk
printer queues for all users connected to the printer. In most
cases, only advanced users and system administrators need this
information.
HP PCL 5 Emulation Techni cal Referen ce
n
This manual provides HP PCL 5 emulation inf orm ation for users
experienced in working with both the PCL and HP-GL printer languages, commands, and concepts. It includes a list of printersupported commands for th e PCL 5 emulat ion to enable you to
use the advanced features of your printer.
Related Documentation
Don’t forget that your application, host operating system, and network
documentation all contain useful printing inform ation.
Introduction
1-5
Page 14
About This
Guide
About This Guide
This guide provides detailed information on how to set up your QMS
1725E Print System and how to use the contro l panel. It is divided
into the following sections:
n
Chapter 1—Intr odu ction
Presents an overview of the documentation and of the printer’s
features.
n
Chapter 2—Setting Up Your Printer
Guides you in selecting a location for your printer and explains
how to unpack and set up your printer.
n
Chapter 3—Connecti ng to a PC
Explains how to connect the printer to an IBM PC or compatible
computer.
n
Chapter 4—Connecti ng to an Ethernet Netwo rk
Explains how to connect the printer using the built-i n Ethernet
port, how to install the software, and how to configure the interface and the network.
n
Chapter 5—Using the Con trol Panel
Introduces the parts of the printer control panel.
n
Appendix A—QM S Custom er Suppo rt
Provides world-wide product sales and support telephone numbers and describes how to communicate with QMS through the
QMS Bulletin Board, CompuS e rve, the Internet and Q-FAX.
n
Appendix B—Con fig urati on Men u
Illustrates the printer’s menu structure.
QMS 172 5 E Pri nt System Getting Started1-6
Page 15
Typographic Conventions
The following typographic conve ntions are used in this manual:
Printer
Features
Mixed-Case
Cour ier
Mixe d-Case
Italic
Courier
UPPERCASE
COUR IER
lowercase bold PostScript operators and DOS commands
lowercase italic
UPPERCASE File and utility names
↵ Press the Enter key (PC) or Return key (Macintosh)
^ Press and hold down the Ctrl key (PC)
Text you type, and messages and information displayed
on the screen
Variable text you type; replace the italicized word(s) with
information specific to your printer or computer
Information displayed in the printer message window
Variable information in text
» Note: Notes contain tips, extra informati on, or important information that
deserves emphasis or reiteration.
O
Caution:
Cautions present information that you need to know to avoid
equipment damage, process fail ure, or extreme annoyance.
M
WARNING!
Warnings indicate the possibili ty of pers onal injury if a specific
procedure is not performed exactly as described in the m anual.
ACHTUNG!
Bitte halten Sie sich exakt an die im Handbuch beschriebene
Vorgehensweise, da sonst Verletzungsge fahr bestehen könnte.
Printer Features
This brief overview will acquaint you with your printer’s major features
and how they can benefit you. Specific chapters throughout the documentation contain more info rm ation on each fe ature. Consult the
index or the table of contents in each guide to locate this information.
Introduction
1-7
Page 16

Printer
Features
Media Flexibility
Your printer sup ports print medi a of different sizes— A4, executive,
legal, letter—and in both portrait and landscape orientatio ns.
User Benefit—You can print on commonly used media sizes.
Multiple Resolutions
The printer supports two print resolutions: 300x300 and 600x600 dpi
(dots per inch).
User Benefit—Two resolutions allow you to customize the quality of
your output according to its use: 300x300 dpi for most hardcopy
needs, 600x600 dpi for high resolution output.
Five Resident Emulations
Your printer supports printing in HP PCL5, HP-GL, Lineprinter, CCITT,
and PostScript emula tion s.
User Benefit—Most applicat ion s can print directly to the printer.
HP PCL 5 Emulation
The printer emulates the Hewlet t -Packard LaserJet IIIS i at both
300x300 dpi (bitmap and scalable fonts) and 600x600 dpi (scalable
fonts only). The available resolution for HP-GL/2 is 300x300 dpi.
HP-GL Emulation
The printer provides HP-GL plotter emulation (7470A, 7475A, 7550A,
and ColorPro) at 300x300 dpi and 600x600 dpi.
Lineprinter Emulation
The Lineprinter emul ati on prints sim ple, unformat ted text files at
300x300 and 600x600 dpi. Each text line ends with a carriage return.
CCITT
This emulation supports CCITT Group 3 1-D, Group 3 2-D, and
Group 4. Key features specific to this emulation inclu de a stream-ori-
QMS 172 5 E Pri nt System Getting Started1-8
Page 17

Printer
Features
ented data flow system, concise data attribute set, and enhanced performance.
PostScript Level 2 Emulation and Level 1
Compatibility
The QMS 1725E Print System’s Level 2 emulation allows you to take
full advantage of your printer's high print resolution (up to 600x600
dpi). The Level 2 emulation is compatible with Adobe’s PostScript
Level 2 language while providing additional capabilities. QMS Level 2
emulation supports extensive graphics ca pabil ities to control t he
appearance of text, geometric shapes and images, and impro ves
memory and resource management. Full support for PostScript Level
1 files is also included.
Resident Fonts and Symbol S ets
Your printer comes with 12 PostScript typeface families containing 39
licensed fonts, and it provides TrueType font support (in PostSc ript
emulation only). All resident PostS cript typeface families have mu lti lingual character sets. The printer also has 7 resident bitmap HP PCL
fonts in 25 symbol sets each, 12 resident scalable HP PCL fonts in 35
symbol sets each, 1 resident scalable HP PCL font in 5 symbol sets,
and 40 resident HP-GL symbol sets.
User Benefit—With so many resident fonts and symbol sets, there is
less need for time-consuming downloadin g.
QMS Crown Technology
The QMS Crown multitasking operat ing s ystem provides fast processing speeds, networking capability, and higher printer performance while maintaining outstanding print quality.
Compile-Ahead Technology and True Multitasking
Compile-ahead technology keeps all of your printer’s resources busy
to improve throughput. While the engine is printi ng a page,
compile-ahead technology uses available printer mem ory to prepare
the subsequent pages of the document (or the next job). With pages
Introduction
1-9
Page 18
Printer
Features
ready in memory, the engine continues pri nting as it deposits printed
pages in the output tray. (In other words, compiling, rasterizing , and
printing all work independently but simult aneously.)
User Benefit—Because print job processing time is significantly
reduced, you spend less time waiting for your documents to print.
Simultaneous Interface Operation (SIO)
Other printers may have mult iple int erf ace ports, but your QMS
all
1725E Print System is unique because SIO allows
ports—Ethernet, parallel, serial, and an optional interfa ce —to be
at the same time
active
The multiple interfaces let you connect to any Ethe rnet network or
directly to an IBM or compatible PC. The printer also wo rks in many
minicomputer and main frame co mpu ter environm ents .
User Benefit—You can have more than one computer printing to the
printer. Each interface has an input buffer (which may be expanded
with additional memory) that receives data while anot her interface is
being used to print.
.
of its interface
Emulation Sensing Processor (ESP) Technology
Most printers can recognize only their native comma nd languag e.
However, using a form of artif icial intel ligen ce , ESP technology a nalyzes incoming file data from any of the printer ’s interfaces, selects
the appropriate emulation from those insta lled on the printe r, and processes the print job.
User Benefit—When your printer is in ESP mo de, you can easily
print PostScript, HP PCL5, HP -GL, CCITT, and Lineprinter documents without chan ging printer swi tch settings or sending soft ware
commands to accomm odat e different print er la nguages.
QMS 172 5 E Pri nt System Getting Started1-10
Page 19

Printer
Features
Context Switching
After its initial use, the state of an emulat ion and downl oaded dat a
(such as fonts, macros, and overlays) are preserved for as long as
the printer power is on.
User Benefit—Repetit ive download ing of emulat ion s, font s, m acros,
and overlays is unnecessary, saving you time.
Compressed Data Formats
Crown printers convert data received from the input buffer s into
intermediate, compressed blocks until the data is needed for printing.
These compressed blocks of data are designed to be processed
rapidly by the printer, and many more can be stored in memory at one
time than can traditional bitmapped image s.
User Benefit—This increases the speed of printer features such as
collation and autom at ic ja m recovery.
Automatic Jam Recovery
With most printers, if a media jam occurs, you must remove the
jammed media and then reprint the job. On a QMS Crown printer, if
the Page Recovery menu option is set to “on,” and a media jam
occurs, once you remove the jammed media, the printer reprints the
jammed page and then cont inue s with the print job. This is possible
because compressed data formats allow more pag e s to be stored in
memory. The printer remembers the last page printed, pulls the necessary information from memory, and automatically reprints any lost
pages.
User Benefit—You save time and print media because it’s unnecessary to resend a print job after clearing a media jam.
Introduction
1-11
Page 20

Printer
Features
Software Loadable System (SLS)
Your printer has a software load able s ystem , which allows you to
replace or upgrade its system software from a host computer.
User Benefit—Future enhancem ents to the system software ca n be
easily installed as they become available from QMS.
» Note: The software loadable system mentioned in this section does not
modify the code used by QM S CrownNet Interface cards.
Remote Console
The Ethernet network inte rface and its accompanying software all ow
your printer to establish a Remote Console connection vi a EtherTalk,
LAN Manager/LAN Se rver, Novell NetWare, and TCP/IP. Printer status that requires user intervention is displayed on the remote console.
For example, a status messag e may indicat e that paper is lo w, the
output bin is full, or a media jam has occurred. The QMS
Interface System Admi nistrato r’s Manual
ning a Remote Console session, and the QMS
sole User’s Guide
and configure the printer. A copy of each manual is shipped with your
printer.
explains how to use a Remote Console to control
has information on begin-
Crown Remote Con-
CrownNet
User Benefit—The ability to control your printe r from a remote console as well as from the printer’s own control panel means you don’t
have to leave your workstation every time the printer needs attent ion.
Moreover, you’ll know right away if the printer is tied up with a media
jam or other simple problem requiring user inte rventio n.
PCMCIA Card S lot
There are two slots on the front of the printer under the lower paper
cassette. These slots support font and security cards (see the following section, “Printer Optio ns,” for det ails).
User Benefit—The PCM CIA slot gives your printer a flexible inter face for added features and future expansion.
QMS 172 5 E Pri nt System Getting Started1-12
Page 21
Printer
Features
Printer Options
The following options are available for your QMS 1725E Print System. Contact your QMS vendor for purchase information.
Upgradable RAM (Random Access Memory)
The QMS 1725E Print System comes with 8 MB of RAM. However,
you can upgrade this RAM to 64 MB through the installation of SIMMs
(single in-line memory mod ules). A dditiona l RAM allows you to print
at higher resolutions on certain media sizes, download and cach e
fonts, and attach and use multiple hard disks. Addit iona l RAM also
increases the printer’s buffer (the area where data sent from the host
computer is stored), allowing you to send large data-intensive files to
the printer without tying up the host for long period s.
User Benefit—Your printer ’s memory can be upgraded as your
needs grow.
Fonts
Optional fonts are available in three different formats.
n
The optional Intellifon t SIMM increases the numbe r of fonts available to the HP PCL 5 emulation on your printer from 20 to the 37
PCL 5 fonts available on a Hewlett-Packard LaserJet 4Si.
n
The HP ProCollection fonts and special P ostscript fonts are contained on font cards or must be downloaded to an optional printer
hard disk. Font cards can be inserted in either of the two card
slots.
n
The printer also supports an optional Kanji SCSI hard disk that
allows you to print the Japanese fonts Ryumin Light KL and
Gothic Medium BBB (both licensed to QMS by Morisawa and
Company, Ltd.) as well as the fonts Mincho Medium, Mincho
Heavy, Gothic Bold, and Gothic Heavy (licensed to QMS by
Introduction
1-13
Page 22
Printer
Features
TypeBank ). These fonts can be printed at a variety of point sizes
and in different styles and resolutions.
Contact your QMS vendor for a complete list of available fonts.
User Benefit—Optiona l fonts increa se the print er ’s functionali ty and
allow you to create more distinctive docu ments.
Emulations
Optional emulations, such a s LN03 and QUIC II, are contained on
disks and must be downloaded to an optional printer hard disk.
User Benefit—Extra emul ations allow you to print docume nts c reated in printer languages other than tho se resident on the printer.
Security Card
An optional security card allows you to password-protect the printer’s
configuration menu. Th e card can be inserted in the PCMCI A (Personal Computer Memory Card Intern atio nal Associatio n) card slot.
User Benefit—A security card restricts access to the configuration
menu to those users with valid password s, thus ensuring that defaul t
settings are not changed inappropriatel y.
Network Interfaces
The QMS 1725E Print System can use optional interf a ces such as
LocalTalk, IBM 3270, IBM 5250A, or one of the CrownNet NICs (network interface cards) running multiple protocols. Conta ct your QMS
vendor for a list of available protocols.
User Benefit—Optiona l interf aces provi de flexibili ty and fast data
transfer in complex network environments.
Hard Disk Expandability
The QMS 1725E Print System provides support for an optional int ernal SCSI hard disk and three external SCSI hard disks.
User Benefit—Hard disks provide t rue virtual memor y as well as
storage for character bitmaps, downloaded outl ine fo nts, and other
files.
QMS 172 5 E Pri nt System Getting Started1-14
Page 23

What's Next?
Chapter 2, “Setting Up Your Printer,” explains how to find a good loca-
tion for the printer, unpack the printer, install a toner cartridge, load
and install paper cassettes, and print a start-up page.
v
What's Next?
Introduction
1-15
Page 24

Page 25

2
Setting Up Your Printer
In This Chapter...
n
Finding a good location for the printer
n
Unpacking the printer
n
Installing a toner cartridge
n
Loading and installing paper cassettes
n
Printing a start-up page
Page 26
Introduction
Introduction
This chapter explains how to set up your QMS 1725E Print System
for the first time.
It includes information on finding a good location for the printer,
unpacking it and checking the shipment content s, inst alling a toner
cartridge and paper cassette, and printing a start-up page.
Finding a Good Location
Your QM S 1725E Print System operates in alm ost any comput ing
environment. However, when selecting your printer’s location, use the
following guidelines.
Location Requirements
n
Away from cooling sources, heat ing sources, extreme tem pera-
ture changes, direct sunlight, excessive dust, and corrosive
chemicals or vapors.
n
Away from any strong electromagnetic field (such as that created
by an air conditioner) and excessive vibration.
n
Temperature range of 50° F (10° C) to 9 0° F (32.5°C).
n
Relative humidit y range of 20% to 80%.
n
Level (with less than 2° slope) and capable of supporting the
printer weight, which is about 50 lbs (23 kg) for the printer only.
n
An appropriate distance from the host comp uter, based on your
operating environment— 6 feet (1.8 m eters) or less for parallel
connection or 25 feet (7.5 meters) or less for a serial connection.
n
Well ventilated. Leave space on each side of the printer for ade-
quate ventilation.
QMS 172 5 E Pri nt System Getting Started2-2
Page 27
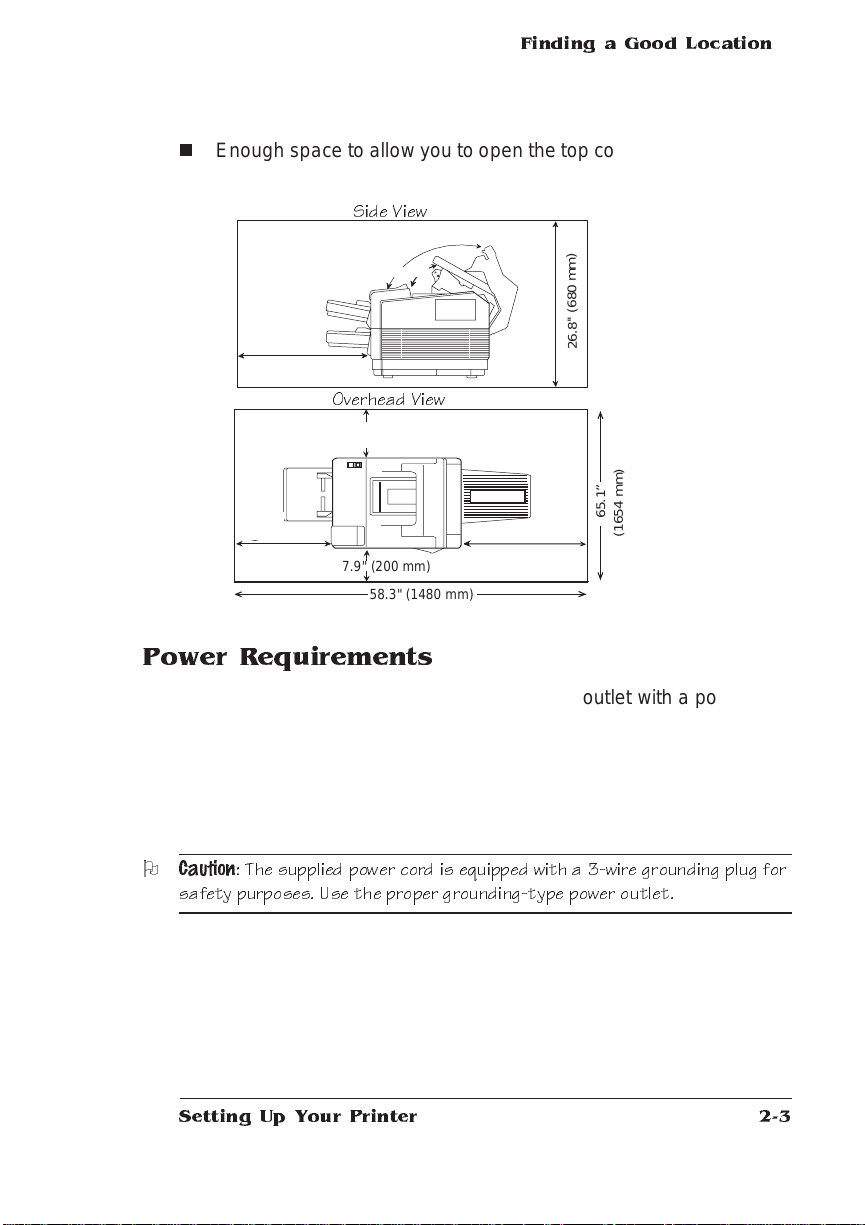
Finding a Goo d Location
n
Enough space to allow you to open the top cover, access the rear
delivery tray, and slide out the paper cassettes.
Side V ie w
)
m
m
0
8
6
(
'
'
8
.
6
2
21.7'' (550 mm)
Overhead View
39.4'' (1000 mm)
65.1”
(1654 mm)
21.7'' (550 mm)
7.9'' (200 mm)
58.3'' (1480 mm)
15.7'' (400 mm)
Power Requirements
Your printer requires a prope rly grounded AC outlet with a power
range of ±10% of the rated voltage (100, 110/120, or 220/240 V).
Noise-generating equipment should not be connected to the same
electrical outlet as the printer. The recommended frequency is 50 Hz
±2 Hz for 100 and 220/240 V systems and 60 Hz ±2 Hz for 110/120 V
systems.
O
Caution
: The supplied power cord is equipped with a 3-wire grounding plug for
safety purposes. Use the proper grounding-type power outlet.
Setting Up Your Printer
2-3
Page 28

Checking Shipment Contents
Checking Shipment Contents
In addition to this manual, your shipment consists of the following
items. As you unpack the printer in the next section, make sure that
all of these items are included in your shipment before setting up your
printer. If any items are missing or damaged, contact your shipping
company or your QMS vendor. See appendix A, “QMS Customer
Support,” for world-wide product sales and support information.
n
QMS 1725E Print System
n
Two 500-sheet letter or A4 p aper cassettes
n
Power cord
n
Warranty and registration card
n
Toner cartridge
QMS 1725E Print System Operation
n
n
QMS 1725E Print System Reference
n
QMS CrownNet Interface Syste m Administ rator’s Guide
n
QMS Crown Network Notes
n
QMS Crown Techni ca l Reference Manual
n
QMS Crown Remote Console User’s Guide
n
Documentation binder
n
PS Executive Series Util ities softw are (on disk)
» Note: Interface cables are not included with the printer. If you ne ed cables,
contact your QM S vendor or a local computer s tore. Chapter 3, Connecting
to a PC, and chapt er 4, Connecting to an Ethernet Network, provid e
information on the type of cable you need.
(on disk)
guide
guide
(on disk)
Registering the Printer
QMS is committed to develop ing print systems tha t offer you flexible,
efficient solutions, so we’re interested in knowing how you plan to use
your printer. Register now.
QMS 172 5 E Pri nt System Getting Started2-4
Page 29
Removing Pa cking Materials
To register by mail, fill out and send in your warranty card. To register
by telephone, in the US call QMS toll-free at (800) 637-8049. In other
countries, refer to appendi x A, “QM S Customer Support,” for the
appropriate telephone number.
Removing Packing Materials
O
Caution:
order. Follow the unpacking instructions in the order given. Damage to the
printer may result if the printe r is turned on bef ore all packing ma terials are
removed.
The packing materials consist of several pieces of cardboard, foam,
tape, and shipping spacers. Y ou must remove the tape and cardboard
from the inside of the paper cassettes and from the inside and outside
of your printer.
Its import ant that you remove the packing materials in the proper
Removing the Shipping Spacers
O
Caution
: You could damage your printer if you operate it before removing the
shipping s pacers.
The shipping spacers are the plastic pieces with orange tags inside
the printer. Remove these plastic shipping spacers before you turn on
the printer. To remove the shipping spacers, follow these steps:
Setting Up Your Printer
2-5
Page 30

Removing Packing Materials
1 Pull the top cover release bu tton (lo cated on top of the
printer opposite the contro l panel ) forwar d to open the
printer top section.
2 Locate the two spacers with orange tags.
One is on each side of the fuser assembly.
3 Grasp the spacers and gentl y pull them out from un der the
fuser assembly.
4 Check inside the printer to make sure there are no other
packing materials.
Removing Paper from the Tr ansfer Charge Roller
O
Caution
: Make sure you leave this s heet of paper in place until the spacers
have bee n removed. Permanent damage to the roller could result if any
contaminants get on the rolle r.
QMS 172 5 E Pri nt System Getting Started2-6
Page 31

Installing the Toner Cartridge
1 Gently open the up pe r transfer gu ide doo r by liftin g the
green handle.
2 Remove the protective sheet of paper by lifting it out in the
direction of the arrow.
Avoid touching the protruding edges of the fuser assem bly.
Fuser
assembly
Upper transf er
guide d oor
Green
handle
Installing the Toner Cartridge
O
Caution:
the car tridge from its protective bag unti l you are ready to install it.
1 Hold the cartridge as sho wn in the illustrati on below and
2 Open the top of the printer halfway.
Setting Up Your Printer
The toner cart ridge is sensitive to direct sunlight. Do not remove
gently rock it from side to side, distri bu ti n g the tone r.
2-7
Page 32

Installing the Toner Cartridge
3 Gently push the car tr idge in to the top of the printer unti l it
fits firmly.
You may nee d to steady the top of the printer with your other
hand.
4 Grasp the tab protrudin g from the le ft side of the toner c ar-
tridge and flex it to break it loose.
QMS 172 5 E Pri nt System Getting Started2-8
Page 33

Installing the Paper Cassettes
5 Firmly pull the tab and sealin g tape straigh t out unti l all 22
inches (56 cm) of clear tape are com p letel y ou t of the cartridge.
Discard the tab and tape.
6 Make sure the toner cartri dg e is in positio n by pushin g it in
as far as it will go; then close the print er.
Installing the Paper Cassettes
1 Remove the cassette covers.
Discard the cardboard packing materials from inside the cassettes.
2 Load the cassettes with paper.
Make sure the paper lies flat.
Label
» Note: A label on the cassette shows which paper size to use. Use only
that si ze. As a cass e tte is inserted in the printer, i t sends an
identifying signal to the printers controller board so the printer can
Setting Up Your Printer
2-9
Page 34

Attaching the Face-up Tray
determine the paper size installed.
3 Place the covers on the cassettes.
4 Slide the filled cassettes into the op en ings in front of the
printer.
Attaching the Face-up Tray
1 In an upward direction, insert the two-end tabs of the face-up
tray into the slot on the back of the printer.
2 Allow the extended part of the tray to lean back until it rests
easily.
2
QMS 172 5 E Pri nt System Getting Started2-10
1
Page 35

Installing the M e di a Guide
Arm
Installing the Media Guide Arm
1 Locate the hinged media guide arm holder above the top out-
put bin.
Media guide arm holder
2 Open the hold er by fli pp ing it tow ard you unti l you see the
slot for the media guide arm.
Slot
Setting Up Your Printer
2-11
Page 36

Connecting the Power Cord
3 Insert the tab on the end of the media guide arm into the slot.
Lower the arm onto the top output bin.
Tab
Media guide a rm
Connecting the Power Cord
1 Plug one end of the power cord into the connector just below
the main power swi tch on the back of the prin ter.
2 Plug the other end of the power cord into a stand ard el ectri-
cal wall outlet (ground ed A C outl et ).
Turning on the Printer
1 Push in the | on the main power swi tch, locate d on the back
of the printer above the power cord .
QMS 172 5 E Pri nt System Getting Started2-12
Page 37

Printing a Start- u p Page
2 Press the front power swi tc h located on the front, right sid e
of the printer.
» Note: The Ready light flashes as the printe r warms up, and then the
message display flashes several messages. After a b rief warm-up time,
approximately 90 seconds, the printer produces a start-up page.
Printing a S tart-up Page
When you turn on the printer, a start-up page prints. This page gives
you an overview of your QMS 1725E Print System.
The following information prints on the start-up page:
n
Printer product name
n
Cumulative num ber of printed sh eets
n
Amount of resident RAM (in bytes)
n
Number of PostScript typefa ces in ROM
n
Default resolution
n
Software version, revision, and release numb ers
n
Firmware level number
n
Address and status (on or off line) of attached hard disk(s), if any
n
Emulation and protocol informat ion of all standard and optiona l
interfaces
If the start-up page prints with all the start-up page informat ion, and
the print quality is good, you may install any optional hardware you
Setting Up Your Printer
2-13
Page 38

Printing a Start-up Page
have purchased. Follow the installation procedures described in the
chapter 6, “Printer Options,” in the
that came with your option kit. Otherwise, see chapter 6, “Troubleshooting,” of the
with printing a start-up page.
M
WARNING!
correct printe r installation.
Turn the printer off and unplug the power cord before checking for
Operation
Reference
guide for more information on proble ms
guide or the manual
ACHTUNG!
Netzstecker heraus, b evor Sie die korrekte Installation des Druckers
überprüfen.
Schalten Si e bitte den Drucker aus und ziehen Sie auch den
Enabling/Disabling the Start-up Page
A start-up page automatically print s when you turn on your print system. However, you can save time, paper, and toner by disabling the
start-up page.
If you need the information included on the start-up page, (for exam ple, to provide to QMS Customer Technical Assurance), you can use
the PS Executive Series Utilities or the print er control panel to print a
status page instead of a start-up page.
1 To use the PS Executive Series Util ities, see the PS Exe cu-
tive Series Utilities on-line documentation for complete information.
2 To use the printer control panel (Admi nistratio n/ Sta rtup
Options/Do S ta rt Pag e menu), see “Ena bl ing/ Disa bl ing the
Start-up Page” in chap ter 4, “Printe r Confi gu ratio n,” of the
Reference
guide for compl ete in form ation.
QMS 172 5 E Pri nt System Getting Started2-14
Page 39

Installing Options
If you purchased any printer options, such as extra memory (SIMMs)
or a hard disk, you can install them now. If installation instructions are
included with the option, follow them. If not, installat ion inst ructio ns
are included in chapter 6, “Printer Options,” of the
What's Next?
Now that you’ve set up your printer, go to chapter 3, “Connecting to a
PC,” or chapter 4, “Connecting to an Ethernet Network,” of this manual to connect your printer to a host computer . If you have an optional
LocalTalk interf ace, go to chapter 6, “Printe r Optio ns,” in the
guide for instructions on installing and using the optional Local-
ence
Talk interface.
Installing Options
Reference
guide.
Refer-
v
Setting Up Your Printer
2-15
Page 40

Page 41

3
Connecting to a PC
In This Chapter . . .
n
Connecting via the parallel po rt
n
Connecting via the serial port
Page 42

Introduction
Introduction
This chapter describes how to connect your printer to a PC vi a t he
parallel port and/or the serial port .
If you have a brand-new PC, before connecting the printer you should
follow the manufacturer’s instructions for setting up the computer and
installing (if it's not already instal led) any operati ng system software,
such as DOS and Windows.
What You N eed
Interface cables are not included with your printer. If you’re replacing
a printer, you may already have the necessary cables. If not, contact
your QMS vendor or a local computer store.
To connect your printer to a single PC, you need one of the following:
n
A parallel cable with a 36-pin male and a 25-pin mal e connector
or
n
A serial cable with a 9-pin female and a 9- or 25-pin female connector (depending on your computer’s serial port), and a null
modem adapter
» Note: Appendix B in the
configuring the serial connection.
Reference
guide provid e s cable pinouts for
Choosing a Cable
Parallel cable— If a parallel port is available on your comput e r, we
recommend using a parallel cable. Your printer supports both IEEE
1284 bidirectional and Centronics pa rallel commu nicat ion. The type
of parallel cable you use depends on the type of parallel communication your computer suppo rts (check your computer user’s guide if
you’re unsure).
n
If your computer supports IEEE 1284 bidirectional parallel c ommunication, you need an IEEE 1284 bidi rectiona l parallel cable
QMS 172 5 E Pri nt System Getting Started3-2
Page 43

(IEEE 1284 is indicated on the cable). This cable must be 6.5
feet/2 meters or less in length.
n
If your computer suppo rts only Centronics (IEEE 488) unidirectional commun ication, you ma y use either a n Centroni c s parallel
cable (unmarked on cable) or an IEEE 1284 bidirectional parallel
cable (IEEE 1284 is indicated on the cable). However, we recommend an IEEE 1284 cable. The IEEE 1284 cable must be 6.5
feet/2 meters or less in length while the Centronics cable may be
longer.
Serial cable—If the printer is more than about 6.5 feet/2 meters from
the computer, we recommend using a serial cable for better communication. For best results, the serial cable should be les s than 25 feet/
7.6 meters long.
Making the Connection
Making the
Connection
O
Caution
: If youre connecting the printer to a single PC, turn off both systems
first.
1 Attach the cable to the printer and the PC.
n
Parallel Cable
To C om puter To P r inter
25-pin male
Connecting to a PC
36-pin male
3-3
Page 44

Making the
Connection
n
a Connect the 25-pin end of the cable to the PC’s parallel port.
b Tighten all screws.
c Connect the 36-pin end of the cable to the printer ’s parallel
port (it’s labeled “PARALLEL ”).
d Close the clips.
Serial Cable
To Computer
To Printer
9-pin female
or
9-pin female
25-pin female
a Connect the serial cable (with the null modem adapter
attached) to the PC’s 9- or 25-pin male serial port.
b Connect the other end of the cable to the printer ’s serial port
(labeled “SERIAL”).
c Tighten all screws.
2 Turn on both the printer and the PC.
3 Test communicatio n betw een the pr inte r and the PC.
You can do this by printing a file from one of your applications, or
you can see the following section, “Testi ng Com mun icati on.”
» Note: Check your applicat ion documentation a nd Q-FAX (see Appendix
A, QMS Customer Support) for application notes.
QMS 172 5 E Pri nt System Getting Started3-4
Page 45

Testing Comm unication
To test communicati on betwee n your printer and your PC, first create
a short file that ejects a page from the printer. Then send the file to
the printer.
Creating the Test File
To create the test file, type the following comm and s at the DOS
prompt:
Testing
Communication
copy con printest.ps
showpage↵
^D^Z↵
You can use eithe r uppercase or lowercase letters; however, you
must type the PostScrip t showpage operator in lowercase letters.
The ↵ symbol means to press the E nter key. To produce the ^D and
^Z, press and hold down the Ctrl key while you type the appropriate
letters (d and z). These characters signify the end of the file and must
always be included.
↵
Sending the Test File
Parallel Communication
1 To send the PRINTEST.PS file you just created to the printer,
type
print printest.ps↵
2 If you’re prompted for the na me of the list devic e, type
lpt1↵
or type the name of the PC’s parallel port to which the printer is
connected (for example, lpt2 or lpt3).
» Note: If the c omputer has more than one parallel port, they're probably
labeled. If not, check the computer documentation for the parallel port
names.
Connecting to a PC
3-5
Page 46

Testing
Communica tion
3 If the printer and PC are communicating, a blank page ejects
from the printer. Skip ahead to “PC Printing Software ” to finish connecting the printer.
If a blank page doesn’t eject and you typed the file correctly, you
may want to check your AUTOEXEC.BAT file to see if LPT1 (the
parallel port) is being directed to COM1 (the serial port):
a If the AUTOEXEC. BAT file contains the line
b Then type
c Reboot the PC and try the comm uni cati on test again.
mode lpt1:=com1:
delete it.
mode lpt1:,,p↵
The P tells the PC to continue sending print jobs until the
printer accepts them .
See chapter 6, “Troubleshooting,” of the
refer to your DOS documentatio n for more informati on.
Operation
guide and
Serial Communication
1 To send the PRINTEST.PS file you just created to the printer,
type:
print printest.ps↵
2 If you’re prompted for the nam e of the list device, type:
com1↵
or type the name of the PC’s serial port to which the printer is
connected (for example, com2 or com3).
» Note: If the c omputer has more than one se rial port, they're probably
labeled. If not, check the computer documentation for the COM port
names.
3 If the printer and PC are communicating, a blank page ejects
from the printer. Skip ahead to “PC Printing Software ” to finish connecting the printer.
QMS 172 5 E Pri nt System Getting Started3-6
Page 47

Testing
Communication
If a blank page doesn’t eject and you typed the file correctly, you
may want to check your AUTOEXEC.BAT file in DOS to make
sure that the printer ’s serial port settings m atch th ose of the PC.
a Look for a command line like this in your AUTOE X EC. BAT
file:
mode com1: 9600,n,8,1,p
In this example, the serial port setting s are 9600 for baud
rate, N (no) parity, 8 data bits, and 1 stop bit. The P stands for
infinite retry.
» Note: If the mode stateme nt isnt present in your AUTOEXEC.BAT
file, you may temporarily s et the
prompt to continue this test by typing the command line as shown
above. To make this s etting permanent you w ill need to add the
mode
statement in your AUTOEXEC.BAT file and reboot the P C.
b Check the start-up page, which prints when you turn on the
printer (unless you disabled it). This tells you the current
serial port settings for the printer.
mode
parameters at the DOS
c If the serial settings (baud rate, parity, data bits, and stop bits)
shown on the start-up page match those in your
AUTOEXEC.BAT file, you need make no further changes. Go
to the section “Special PC Concerns,” later in this chapte r.
If the printer’s serial port settings are different from your PC’s
settings, use the printer control panel , as described in the following section, “Changing Serial Port Settings,” to make them
match.
Changing Serial Port Settings
Since your printer is configured at the factory for the most typical
printing environments, the serial settings in your AUTOEXEC.BAT file
and on the start-up page may be the same. However, if they differ,
you must configure the printer to use the serial settings specif ied in
the AUTOEXEC.BAT file.
The following instructions explai ns how to use the printer control
panel to configure the printer’s serial settings:
Connecting to a PC
3-7
Page 48

Testing
Communica tion
1 Press the printer contro l panel Online/ Offli ne key.
The indicator goes out and the mes sage window displa ys
2 Press the Menu key to enter the top-l evel menu.
3 Press the Next key one or more times until the message win-
dow displ ay s
4 Press the Select key to enter the Administratio n menu .
5 Press the Next key one or more times until the message win-
dow displ ay s
6 Press the Select key to enter the Com mun ic atio ns menu .
7 Press the Next key one or more times until the message win-
dow displ ay s
IDLE
OPERATOR CONTROL
ADMINISTRATION
ADMINISTRATION
COMMUNICATIONS
COMMUNICATIONS
SERIAL
8 Press the Select key to enter the Ser ial menu .
9 Press the Next key one or more times until the message win-
dow displ ay s
SERIAL
BAUD RATE
10 P ress the Selec t key to enter the Baud Rate menu.
The message window displays the currently selected baud ra te:
*9600 BAUD
» Note: The as teri sk * denotes the selection in the menu that is currently
active.
11 Press the Next key to cycl e throu gh the list of baud rates.
QMS 172 5 E Pri nt System Getting Started3-8
Page 49

Testing
Communication
Available baud rates are
300 BAUD 4800 BAUD
600 BAUD 9600 BAUD
1200 BAUD 19200 BAUD
2400 BAUD 38400 BAUD
» Note: RS232 baud rates 19200 and 3 8400 require RTS/CTS protocol.
XON/XOFF protocol is not supported at baud rates of 19200 and
38400.
12 Whe n the baud rate you want is disp lay ed, press the Select
key.
The message window momenta rily displays
RATE
IS SELECTED
(where RATE is the baud rate you selected) and then
SERIAL
BAUD RATE
13 If you want to change other settin gs, use the Next key to
scroll to the setting you want to change, then repeat the pro-
cedure described in steps 6 through 8. Otherw ise press the
Online/Offline key.
The message window displays
SAVE CHANGES?
NO
14 To save your change, press the Next key so that the mes-
sage window displays
SAVE CHANGES?
YES
15 P ress the Selec t key to save the change.
The Online/Offline ind icato r lights, and the me ssage window dis -
plays
IDLE
Connecting to a PC
3-9
Page 50
PC Printing Software
Verifying the Serial Port Setting Changes
1 Reboot the printer.
2 Compare the serial port settings listed on the start-up pag e
to those in you r A UTO EXE C. B AT file.
3 Try the communication test again.
If a blank page ejects from the printer, the printer and the computer are communicati ng. Contin ue with “PC Print ing S of tware,”
to finish connecting the printer. If a blank page does not eject and
you typed the file correctly, see chapter 6, “Troubleshooting,” in
the Operation guide, and refer to your DOS documenta tio n for
more information.
PC Printing Software
If you’re replacing a PostScript printer, you can probably start printing
now with the printing software already in place. Refer to your application documentation for instructions on sending document s to the
printer.
However, if you want to be able to use all your printer ’s special features (like collation, 600x600 dpi, and gamma correction), or if you've
never printed to a PostScript printer before, we recommend you take
a few minutes to make sure you have the following printing softwa re
installed:
n
PS Executive Series Util ities
n
A PostScript printer driver
Installing PS Executive Series Printer Utility Software
PS Exec, included on the DOS format disks we shipped with your
printer, is a utilities program for controlling the printer from the com puter. For example, through PS Exec you can turn off the start-up
QMS 172 5 E Pri nt System Getting Started3-10
Page 51

PC Printing
Software
page, rename the printer, download fonts, print font samples, and
manage hard disks. Many of the procedures described in this manual
involve using PS Exec. The README file on the PS Executive disk
explains how to install the program, and the on-line help explains how
to use it.
Installing a PostS cript Printer Driver
If you’re using Windows, we recommend that you install the
QMS-developed Windows driver (PSCRI PT. DRV), which is on the
disk called Windows Drivers (shipped with the printer). Instructions for
installing and activat ing th e drive r are in the READM E file on tha t
disk.
» Note: The QMS-de veloped Windows driver suppor ts all the printers media
sizes. However, if you ex perience printing problems while using our driver, try
using the Microsoft driver provide d with Windows, along w ith our W PD file,
which is on the W indows Drivers disk included wi th the printer. See the
README file on the dis k for information on using the WPD.
If you’re using a non-Win do ws app licati on , read the printing section of the application document ation for inf ormatio n on choosing a
PostScript driver. If the application does not provide a PostScript
driver, contact the application manufacturer to see if one has become
available since you bought the program. Also, P ostS cript drivers for
some applications are availabl e through the QM S Corporate Bullet in
Board System and through CompuS erve; see appendi x A, “QMS
Customer Support,” for informati on.
Also, check to see if application notes (tips for printing from specific
applications) are available for your applicat ion from Q-FAX, the QMS
bulletin board, or CompuSe r ve. Appendix A, “QMS Custom er Support,” explains how to use these QMS informatio n services.
Connecting to a PC
3-11
Page 52

What's Next?
PC Screen Fonts
Screen fonts allow you to see on the screen how your document
looks before it is printed. However, you can use the printer fon ts with out having the corresponding screen fonts.
You may be able to obtain PC screen fonts from your applicati on
manufacturer or from the QMS electronic fa x system Q-FAX, which
will fax you a request form to order the PC screen fonts. (See appendix A, “QMS Customer Support,” for inform ation.)
What's Next?
Now that you’ve connected your print er to a PC, contin ue with chapter 5, “Control Panel,” to learn about the printer’s control panel keys,
indicators, and message window.
v
QMS 172 5 E Pri nt System Getting Started3-12
Page 53

4
Connecting to an Ethernet Network
In This Chapter . . .
n
Connecting to the network
n
Installing the software
n
Configuring the interface
n
Configuring the network
Page 54

Introduction
Introduction
The Ethernet port, also referred to as the QMS CrownNet network
interface, is a combinat ion of hard ware and ho st software that allows
your QMS 1725E printer to be connected to an Ethernet network that
supports the following:
Operating System Protocol
AppleTalk EtherTalk
LAN Manager/LAN Server NetBIOS/NetBEUI
NetWare IPX/SPX
TCP/IP TCP/IP
Connecting to the Ethernet port consists of four steps:
n
Connecting to the network
n
Installing the software
n
Configuring the interface
n
Configuring the network
The rest of this chapter explains these steps in more detail.
Connecting to the Network
The Ethernet port supports two typ es of connecti on s:
n
Thin-wire Ethernet (10Base2, BNC connector)
n
Twisted-pair Ethernet (10BaseT, RJ45 connector)
QMS 172 5 E Pri nt System Getting Started4-2
Page 55

Connecting to the Network
Thin-Wire Ethernet
Thin-wire Ethernet connections use BNC connecto rs.
» Note: Unless the BNC T conne ctor described in steps 1 and 2 is already
installed on the thin-wire Ethernet cable, your networks operation is
disrupted during the connection p rocess. See your network adm inistrator
before continuing.
1 Turn off the printer and unplug the power
cord.
2 Attach one section of thin-wi re E thern et
cable to one end of the BNC “T” connec-
tor.
» Note: If the B NC T connector is already
installed, go to step 3.
To
printer
port
3 Attach another section of thin-wi re Ether-
net cable or a 50 ohm termi na tor to the
other end of the BNC “T” connector.
4 Attach the BNC “T” connector to the BNC Ethernet port.
5 Plug in the printer’s power cord.
6 Turn on the printer.
Connecting to an Ethernet Netwo rk
4-3
Page 56

Installing the Software
Twisted-Pair Ethernet
Twisted-pair Ethernet connections use RJ45 connectors.
1 Turn off the printer and unplug the
power cord.
2 Connect one end of the twisted-pair
Ethernet cabl e to the printer’s RJ45
Ethernet port.
3 Connect the other end of the cable to
the 10BaseT concentrator.
4 Plug in the printer’s power cord.
5 Turn on the printer.
Installing the Software
CrownAdmin software is provided for DOS/ Windo ws and Macintosh
System, CrownNet Manager software is provided for OS/2, and UNIX
host software is provided for UNIX. Use the appropriate procedure to
install the software on your host.
O
Caution: We recommend that you make ba ckup copies of the appropriate
disks. St ore them in a safe pl ace; use the copies to ins tall the s oftware
DOS
1 With the PC on, insert the CrownAdmin software for DOS
disk in the disk drive.
2 At the DOS C> prompt, type
x
:install
x
where
the pathname of the drive/directory containing the
is the driv e in wh ich y ou in sert ed the di sk ,
QMS 172 5 E Pri nt System Getting Started4-4
source destination
↵
source
.
is
Page 57

Installing the Softw are
installation software, and
the dir ec tor y in w hic h t he s oft war e w ill b e i nst all ed ( for
examp le, a:install a: c:\crownadm↵).
» Note: You cant i nsta ll the utilities by copying files from the disks. You
must run the installation program.
3 When the installati on is comp lete, remove the disk from the
disk drive and store it in a safe place .
4 Skip to “Configuring the Interface, ” later in this chapter.
destination
is the full pathnam e of
Macintosh System
1 With the Macintosh on, insert the Crow nAdm in for Mac in-
tosh disk in the disk drive.
2 If necessary, double-click the Util iti es disk ico n to open the
disk window.
3 Copy the CrownAdm in file by dragging the CrownA dmi n
icon from the Utilities window to the Maci nto sh har d dis k.
4 When the installati on is comp lete, remove the disk from the
disk drive and store it in a safe place .
5 Skip to “Configuring the Interface, ” later in this chapter.
OS/2
This is a two-part procedure. Some of the utilities are installed on the
print server and others on the workstation.
» Note: For information on inst alling the utilities directly on the workstati on,
(bypassing the print server and pri nting directly to the printer), see the
QMS Crow nNet Interface System Administrators Guide.
Print Server
1 At the LAN Manager/LAN Server print server, log into the net-
work as the system administrator.
2 Insert the CrownNet Manager for OS / 2 disk in the disk drive.
Connecting to an Ethernet Netwo rk
4-5
Page 58

Installing the Software
3 Open an OS/2 win do w, and at the C> prompt, chan ge to th e
drive in which you inserted the CrownNet Man age r disk (for
example, a:↵).
4 At the drive prompt type
lsminst
where
Manager disk, and
Manager will be installed (for example, lsminst a: c:↵).
x
is the drive in which you inserted the CrownNet
x: y
:↵
y
is the drive on which CrownNet
» Note: If youve previously installed the CrownNe t Manager, you can use
x:y
lsminst
software
The installation program creates and installs the software in
a directory named
» Note: You cant install the utilities by copying files from the disks. You
must run the installation program
5 Remove the disk from the disk drive and store it in a safe
place.
6 To start the CrownNet Manager for OS/2 automati cally each
time the print server is turned on, add the fol lowi ng commands, in this order, at the end of the ST ARTUP.CMD file (but
before any @EXIT comm an d):
» Note: The -m option minimizes the CrownNet Manager window to an icon
after t he program opens
7 To start the CrownNet Manager now, open an OS/2 window
and type th e following commands:
.
set crownman=c:\crown
start c:\crown\crownman.exe -m
set crownman=c:\crown↵
start c:\crown\crownman.exe↵
: /u↵
to force installati on of the upgraded
y
:\CROWN.
.
.
The CrownNet Manager window appears.
8 To install specific ports, choose In stal l from the Crown Net
Manager wi ndo w.
QMS 172 5 E Pri nt System Getting Started4-6
Page 59

Installing the Softw are
9 In the Installation of CrownNet P orts di alog box, selec t the
appropriate pri nter port(s) an d choos e Install .
The selected ports are displayed in the CrownNet Manager
window.
» Note: Port names are either the default or those chosen in Interface
Configuration, later in this chapter
.
Workstation
Use this procedure to install the CrownAdmin software on the workstation. CrownAdm in lets you use Remote Console; it is not necessary for printing via OS/2.
1 With the workstation running, insert the disk con tain ing the
CrownAdmin softwar e for DOS or Window s in the disk drive.
2 Open a session unde r OS/2:
x
n
OS/2 version 1.
n
OS/2 version 2.
—Open a DOS Window session.
x
—Open a WIN-OS/2 session.
3 Refer to the DOS or Windows inform ati on elsewher e in this
section, “Software I nstal lati on ,” for furth er instructi on s.
» Note: You cant i nstall the utilities by copying files from the disks. You
must run the installation program
4 When the installati on is comp lete, remove the disk from the
disk drive and store it in a safe place .
5 Skip to “Configuring the Interface, ” later in this chapter.
.
UNIX
» Note: The procedure des cribed here is for UNIX Host Software installation
from disk. If you have a cartridge or tape, refer to the instal lation
documentation accompanying the cartridge or tape.
1 Log on the UNIX system as root.
Connecting to an Ethernet Netwo rk
4-7
Page 60

Installing the Software
2 Change to the directory in which you wan t the UNIX utilities
installed.
The utilities automatically create and are installed in a
directory named QMSoft in the current directory.
» Note: This directory must be able to be mounted by all network nodes
that need to access the printer.
3 If a PC file system (PCFS ) is avail ab le on the UNIX hos t,
mount the di sk .
For information on mounting a DOS FAT-formatted disk refer
to the UNIX man page.
4 Transfer the HS_TAR ima ge file to the UNIX hos t directo ry
where the file is to be expanded.
» Note: If the UNIX host doesnt support PCFS, transfer the image from a
PCFS-capable device (such as a DOS system) to the UNIX system v ia
binary F TP
.
5 In the directory in which the image file is located, expand the
tar image file by typing
tar xvf hs_tar↵
6 Change to the newly created QMS oft director y:
cd QMSoft↵
7 Run the Qinstall install ati on u tility by typi ng
./Qinstall↵
8 Follow the instructions on the screen. When the instal la tion
is complete, the followi ng messag e displa y s:
QMS UNIX Host Software installation complete
9 Copy the addprt and qpr utilitie s and thei r associa te d man-
ual pages to standard directorie s. For exam ple,
cp addprt /usr/bin↵
cp qpr /usr/bin↵
cp man/addprt.1 /usr/man/man1↵
cp man/qpr.1 /usr/man/man1↵
QMS 172 5 E Pri nt System Getting Started4-8
Page 61

Installing the Softw are
10 If you’re using SNMP to manage your network using SunNet
Manager, copy the appropriate fil es to the S unN et Mana ger
agents directory. See your SunNet Manager docum e ntati on
for more informatio n.
11 Update the printer’s Internet name and address in the
/etc/hosts file.
12 Run the QMS addprt uti lity by typi ng
addprt↵
13 Fo llow the instructi ons on the screen.
14 Whe n the install ati on is complete, rem ove the disk from the
disk drive and store it in a safe place .
15 S kip to “Config uring the Interface, ” later in this chapter.
Windows
1 With the PC on and Windows runni ng , insert the disk con -
taining the CrownAd mi n software for Wind ow s in the disk
drive.
2 From the File menu in Program M anag er cho ose Ru n.
» Note: You cant i nstall the utilities by copying files from the disks. You
must run the installation program
3 In the Run dialog box, type
x
:setup↵
where
Utilities disk (for example, a:setup↵) and choose OK.
4 When prompted , specify the direc tory in which to instal l the
utilities.
5 Follow the instructions on the screen.
6 When the installati on is comp lete, remove the disk from the
disk drive and store it in a safe place .
7 Continue with the next section , “Config uring the Interface.”
Connecting to an Ethernet Netwo rk
x
is the name of the drive in which you inserted the
.
4-9
Page 62

Configuring the Interface
Configuring the Interface
This section describes the quick config uration procedure for the
printer interface. For a complete discussion of all of the configuration
options available through the Admin istrat ion/ Com municat ions/CrownNet menu, see chapter 2, “Interface Confi gurati on,” of the
CrownNet Interface System Administrator’s Guide
You can make these config uration changes throug h any of the following means:
n
Printer Control Panel—F o r inform ati on on usi ng the print er co ntrol panel to change configuration menu settings, refer to chapter
4, “Printer Configuratio n,” of the
n
CrownAdmin (for DOS , Macintosh System, or Windo ws) or
CrownNet Manager for OS /2—For more information on using
this software, refer to the appropriate chapter in the system
administrator’s guide.
» Note: CrownAdmin/C rownNet software is not available for the UNIX
environment
.
Reference
guide.
QMS
.
n
Remote Conso le—Fo r information on accessing Remote Console, refer to the appropriate chapter in the system administ rator’s guide. For information on using Remote Console, refer to the
QMS Crown Remote Console User’s Guide
.
EtherTalk
1 If your network has more than on e zone , use the Adm inistra -
tion/Communications/ Network 2/ Crow nNet/ EtherTalk/Zone
Name/Zone Part 1 and Zone Part 2 menus to enter the name
of the zone to which the printer is attached.
» Note: The two Zone Part x menus al low you to identify 1 zone with a
name up to 32 characters long. (Up to 16 characters can be entered in
each of the two me nus). You cannot use t hese two menus to identify
two zones. Trailing spaces are not considered part of the zone name. All
standard printable ASCI I characters are valid except the @ a nd '
symbols.
QMS 172 5 E Pri nt System Getting Started4-10
Page 63

Configuring the I nterface
2 Skip to “Configuring the Network,” la ter in this chapter.
LAN Manager/LAN Server
1 One unique printer name is broadca st to the network. Use
the Administration /Co m mun ica tion s/Netwo rk 2/Cro wn Net/
Lan Manager/Printer Nam e m en u to enter the name of the
printer.
» Note: The name can be up to 16 characters long
Spaces and lowercase cha racters a re not all owed. However, Underscore
characters (_) are allowed to s imulate multiword names (for exa mple,
PRODUCT_MKTG).
2 Skip to “Configuring the Network,” la ter in this chapter.
.
NetWare
If you want something other than the default settings, use the following procedure to name the file and print servers. These names must
be unique.
xxxx
» Note: In CrownAdmin, the printer shows up as
System-
and
the printe r start-up page.
1 In the Administration/Communications/Network 2/CrownNet/
» Note: The three File Srv Name[x] menus allow you to identify 1 file server
hardwareaddre ss
hardwareaddr ess
NetWare/Config PServer/File Srv Name[1], File Srv Nam e[2],
and File Srv Name[3] menus, enter the name of the target file
server.
with a name up to 48 characters long. (Up to 16 characters can be
entered in each of the three menus). You cannot use these three menus
to identify three file servers.
Spaces and lowercase characters are not allowed within file server
names. However, underscore characters (_) are allowed to simulate
multiword names (for example, PUBS_SERVER). At the printer control
panel only, a space must be used following the last character of the file
server name to end the name.
, where
is the printers hardware address as found on
QMS-
xxxx
is the printer model number
-Print-
Connecting to an Ethernet Netwo rk
4-11
Page 64

Configuring the Interface
2 In the Administration/Communications/
NetWare/Config PServer/PServer Name[1], PServer Name[2],
and PServer Name[3] men us, enter the na me of the confi gured print server.
» Note: The three PServer Name[x] menus allow you to identi fy one print
server w ith a nam e up to 48 characters long. (Up to 16 characters can
be entered in each of the three menus). You cannot use these three
menus to identi fy three print serve rs.
Spaces and lowercase characters are not allowed in print server
names. How ever, underscore characters (_) are allowed to simulate
multiword names ( for example , PUBS_PSERV ER). At the printer control
panel only, a space must be used fol lowing the las t character of the
print s erver name to end the name.
3 In the Administration/Communications/Network 2/CrownNet/
NetWare/RN Printer/Printer Slot # menu, enter the printer slot
number.
» Note: This number must match the slot number chosen in the Printer
Configuration submenu of the Print Server Configuration menu in the
NetWare PCONSOLE utility.
4 In the Administration/Communications/Network 2/CrownNet/
NetWare/RN Printer/PServer Name[1], PServer Name[2], and
PServer Name[3] m enu s, enter the nam e of the print serve r.
Network 2
/CrownNet/
» Note: The three PServer Name[x] menus allow you to identify 1 print
server w ith a nam e up to 48 characters long. (Up to 16 characters can
be entered in each of the three menus). You cannot use these three
menus to identi fy three print serve rs.
Spaces and lowercase characters are not allow ed. How ever, unde rscore
characters (_) are allowed to s imulate multiword names (for exam ple,
PUBS_PSERVER). At the printer control panel only, a space must be
used f ollowing the last character of the print server nam e to end the
name.
5 Reset the NIC by using the Administrati on /Co mmun ic atio ns/
Network 2/CrownNet/ Com mo n/So ft Reset menu.
6 Skip to “Configuri ng the Network,” la ter in this chap ter.
QMS 172 5 E Pri nt System Getting Started4-12
Page 65

Configuring the Ne t wo rk
TCP/IP
1 If necessary , in the Administration/Communications/Network
2/CrownNet/TCPIP/Internet Address menu, enter the
printer’s Internet address.
The factory default Internet address is 161.033.128.024.
2 If necessary , in the Administration/Communications/Network
2/CrownNet/TCP I P/Defau lt Router menu enter the Internet
address of the default router.
The factory default router address is 000.000.000.000.
3 If necessary , in the Administration/Communications/Network
2/CrownNet/TCP I P/S ubnet Mas k me nu enter the printer’s
subnet mask.
The default subnet m ask is 0 00.000.0 00.000. This s etting
provides autom atic sensin g of gate ways . If you iden tify a
subnet m ask , aut om at ic s ensi ng i s d isa ble d.
4 Continue with “Confi gu ri ng the Network. ”
Configuring the Network
EtherTalk
1 With the Macintosh runni ng , from the App le menu, ope n the
Chooser.
2 Click the LaserWriter i con .
3 If your network has more than on e zone , click the nam e of
the default zone.
The printer nam e is automa tically d isplaye d in the d efault
zone.
4 Select the name of the printer.
Connecting to an Ethernet Netwo rk
4-13
Page 66

Configuring the Network
5 Click the close box.
LAN Manager/LAN Server
1 With the CrownNet Manager for OS/2 installed and running,
add the printer by clicking the Instal l entry on the action bar.
The printer appears in the list displayed on the screen (for
example, QMS_080086000001).
2 Use the appropriate sectio n bel ow to create a print queu e
and assign it to the printe r.
OS/2 Version 1.x
If you’re using OS/2 version 2.x, skip to the next section.
» Note: This is the standard method of adding a printer in OS/2 version 1.x.
The procedure is repeated here for your convenience.
Add a Printer
1 With the Print Manager open , from the Setup menu choose
Printers...
2 In the Printers dialog box, choose Add. ..
» Note: If youre working with a n existing printer, select the printer name
and choose Change.
The Add Printer (or Change Printer) dialog box appears.
3 In the Name field, type the printer name (only if you are add-
ing a printer).
The printer name is local to the workstation and is used to
associate queues with phy sical printers. It can be the same
as the name used at the printer.
4 In the Device box, select the printer’s pipe name.
name
Pipe names have th e form \PIPE\QMS_
the printer’s default hardware address or the printer name
set in the “Interface Configuration” section, earlier in this
chapter.
QMS 172 5 E Pri nt System Getting Started4-14
where
name
is
Page 67

Configuring the Ne t wo rk
5 Select IBMNULL as the printer driver.
6 If appropriate, fill in the Description and Printer Timeo ut
Transmission Retry boxes.
7 Choose Add. .. to return to the Pri nters dial og box.
» Note: If youre working with a n existing printer, choose Change
.
8 In the Printers dialog box, choose OK to return to the Print
Manager.
Add a Print Queue
1 With the Print Manage r still open, from the Setu p menu
choose Queues...
2 In the Queues dialo g bo x, choo se Add. ..
» Note: If youre working with a n existing queue, select the queue to be
changed and then choose Cha nge.
The Add Queue (or Change Queue) dialog box appears.
3 In the Name field type a nam e for the queue (on ly if addi n g a
queue).
This is the name available to workstations on the network. It
can be the sam e as the na me se t for the pri nter.
4 If appropriate, fill in the Description , Queu e Driver, Priority,
and Scheduling boxes.
» Note: Separator pages are not currently supported
.
5 Select the printer name you identified in the previous section
from the list of Printer s.
This name will be displayed in the box titled Select the
Printer to be Used by This Qu eue.
6 Choose Add. .. to return to the Qu eue dialog box.
» Note: If youre working with a n existing queue, choose Change.
Connecting to an Ethernet Netwo rk
4-15
Page 68

Configuring the Network
7 In the Queue dialog box choo se OK to retur n to the Print
Manager wi ndo w.
8 Skip to “Print Queue Sharing.”
OS/2 Version 2.x
» Note: This is t he standard method of installing a printer in OS/2 version 2.x.
1 With OS/2 running , doub le-cl ic k the Templates folder.
2 Hold down the right mo use button and drag the Prin ter ico n
out to the Workplace Shell (or into a folde r).
3 Type a name in the Printer Name field.
4 Select a printer driver from the Default Printer Driver list.
IBMNUL L is rec omm en de d.
5 Select a pipe name from the Outp ut Port li st.
Pipe names have th e form \PIPE\QMS_
the printer’s default hardware address or the printer name
set in the “Interface Configuration” section, earlier in this
chapter.
If a QMS pipe is not available, make sure you have installed
the CrownNet Ma nager for OS /2.
6 Choose Create to confirm the new printer definition.
7 Continue with the fol lowi ng section , “Prin t Queu e Shari ng.”
name
where
Print Queue Sharing
To access a print queue from other workstations or servers on the
network, the queue must be a shared resource. The following procedure is only one of the ways a queue can be shared. For other methods, see your LAN Manager/LAN Server documenta tion.
» Note: You need administrator privileges to perform this operation.
1 If necessary, with OS/2 running, open an OS/2 window.
QMS 172 5 E Pri nt System Getting Started4-16
name
is
Page 69

Configuring the Ne t wo rk
2Type
net share
where
created above.
» Note: While queue and printer names may differ in OS/2 version 1.x, they are
the same in version 2.x.
queue_name
queue_name
/print↵
is the q u eue or prin ter obj ec t yo u
NetWare
Add a Print Server
1 From any network wo rkstati on , log in as supe rvi sor to the
file server you want to service the printer.
2 Start the NetWare PCONSOLE utility.
3 At the Available Options menu, select P rint Server Info rma-
tion and press Enter.
4 To create a new print server, press the Ins[ert] key on the
workstation keyboard.
5 Type the name (up to 48 characters) of the new print server,
and press Enter.
6 Press Esc to return to the Available Options menu .
Assign a Print Server to a Print Que ue
1 From the Available Options m en u, select P rin t Queu e Info r-
mation and press Enter.
2 If you want to select an existing print que ue to be serviced
by the print server, skip to step 4.
If you want to create a new print queue, press the Ins key.
3 Type the name of the new prin t queue and press En ter.
4 Select the queue you want the print server to service, and
press Enter.
Connecting to an Ethernet Netwo rk
4-17
Page 70

Configuring the Network
5 In the Print Queue Inform atio n menu select Qu eue Servers
and press Enter.
6 Press the Ins key to display the Que ue Server C an didates
menu.
7 Select the appropriate print serve r name and press Enter.
8 Press Esc four times to displa y the Exit PCO NSO LE menu .
9 Select Yes and press Enter to save your changes and exit
from PCONSOLE.
TCP/IP
1 Log on the UNIX system as root.
2 Edit the system host table by adding the following line to the
/etc/hosts file:
internetaddress hostname
where
(Administration/Communications/Network 2/CrownNet/
TCPIP/I n t er net Addr es s menu) and
the host.
3 If necessary, set the hardware address.
O
Caution: We strongly recommend that you do not change the hardware
address.
If you’re working on a system other than a UNIX system, set
the hardware address through the printer control panel.
If you’re working on a UN IX system , send th e hardw are
address to the print server by typing
where
hardwareaddress
the form
internetaddress
arp -s
ping
hostname hardwareaddress
hostname
hostname
##.##.##.##
QMS 172 5 E Pri nt System Getting Started4-18
is the Internet ad dress of the printer
hostnam e
↵
is the name of the host and
is the hardware address of the printer (in
as found on the printer start-up page
is the nam e of
temp↵
Page 71

If You Have Trouble
and in the Administration/Communications/Network 2/
CrownN et /Co mmo n/H W Add ress m enu ).
» Note: You can also send the hardw are address of a UNIX system
through the BOOT P and RARP uti lities .
If You Have Trouble
If you have trouble connecting and configuring your Etherne t interface, check the following:
n
Is the printer connected to the network?
n
Is the printer plugged in, turned on, and correctly configured?
n
Do the printer start-up and stat us pag es list the interf ace? Is the
configuration informa tion correct?
n
Is the interface enabled ?
n
Is the appropriate protocol (or protocols ) enabled?
n
Are all printer and protocol addresses configured correctly?
For More Information
In addition to this chapter, the following documentation contain s information you may need when using the Ethernet interfa ce:
QMS CrownNet Interface Syste m Administ rator’s Guide
n
vides detailed configurat ion and ut ilit y info rmat ion.
QMS Crown Remote Console User’s Guide
n
use Remote Console to control printing from a workstation any-
where on the network.
n
Your network docum entat ion— Cont ains inform ation on printin g.
Connecting to an Ethernet Netwo rk
—Pro-
—Explains how to
4-19
Page 72

What's Next?
What's Next?
Now that you’ve connected your printer to an Etherne t net work, continue with chapter 5, “Control Panel, ” to learn about the printer’s control panel keys, indicators, and messag e window.
v
QMS 172 5 E Pri nt System Getting Started4-20
Page 73

5
Control Panel
In This Chapter...
n
Control panel indicators
n
Control panel messa ge window
n
Control panel keys
Page 74

Introduction
Introduction
The control panel, located on the front of the printe r, allows you to
direct the printer ’s operation. In addition, it displays the current status
of the printer, including any condition th at needs your attention.
The control panel consists of the following parts:
n
Sixteen indicator s provide printer status info rmation and ide nti fy
the current media source.
n
A message window displays status and configuration information.
Nine keys allow you to control the printer.
Message Window
QMS 172 5 E Pri nt System Getting Started5-2
Page 75
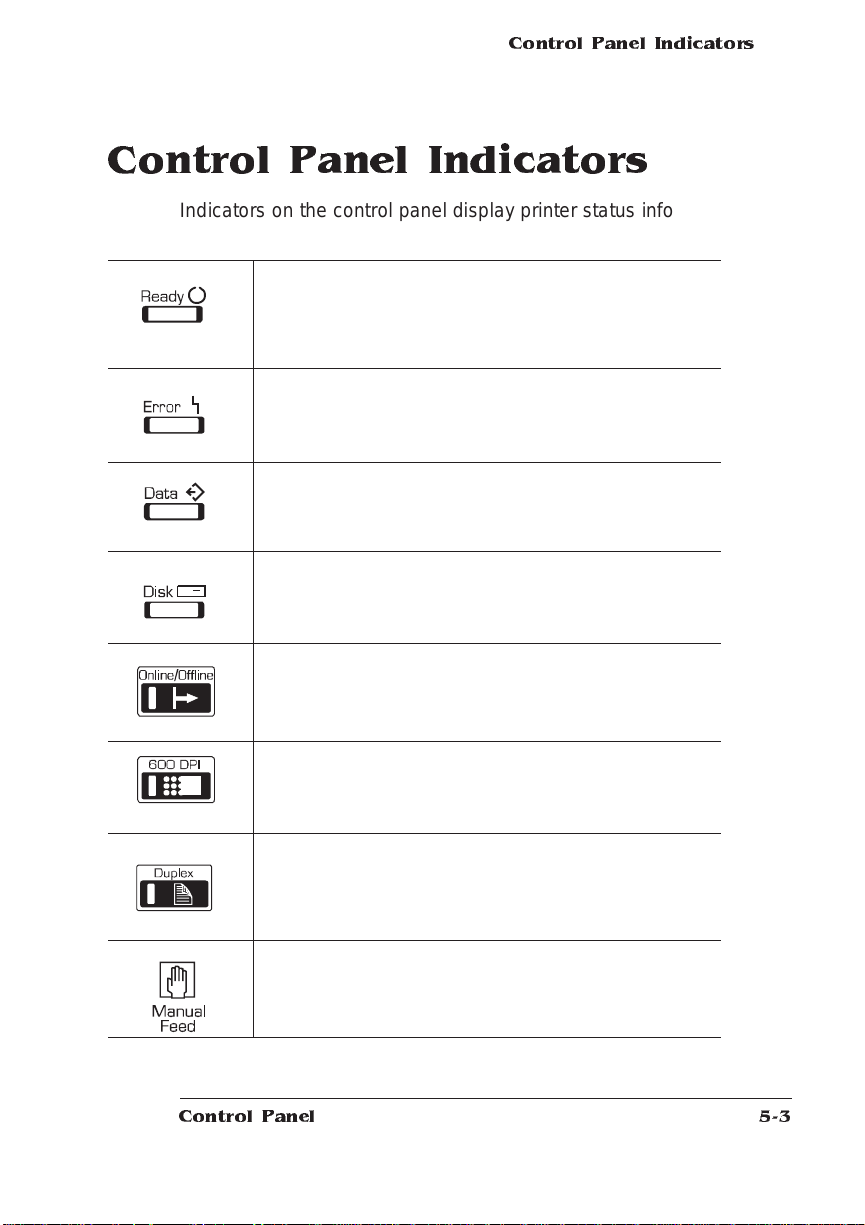
Control Panel Ind icato rs
Control Panel Indicators
Indicators on the control panel display printe r status inf orma tion , current media source, and paper jam locations.
Flashes when the printer is warming up. It remains on
when the printer is ready to receive a print job and while it
is processing or printing a job (unless an error is
encountered).
Lights when the printer requires operator intervention.
This indicator is usually accompanied by a status
message in the message window.
Lights when the printer is receiving data from one or more
of the simultaneous interfaces.
Lights when printer’s hard disk is being accessed.
Lights when the printer is on line and ready to accept and
process new print jobs. Press it once to take the printer off
line (the indicator is not lighted) and make the printer
ready for configuration.
Lights when the print resolution is set to 600 dots per inch.
Lights when the duplex option is installed and duplex
printing is chosen.
Lights when manual feed is chosen as the inputbin.
Control Panel
5-3
Page 76

Message Window
This light will flash to indicate the printer is terminating the
current print job.
Envelope feeder (optional)
select indicator
Jam indicator
(4). Light in area of
suspected jam
location.
Message Window
The control panel message window provides status and configuration
information. Status messages are listed in chapter 6, “Troubleshooting,” of the
Operation
Setting the Message Window Language
Status messages and configuration me nus can be displayed in the
message window in English, French, German , or Spanish. If you
need to change the message window language, use the Keypad Language option in the Administration/M iscellane ous menu.
guide.
Upper paper cassette select
indicator
Lower paper cassette select
indicator
QMS 172 5 E Pri nt System Getting Started5-4
Page 77

Control Panel Ke ys
If you’re not familiar with using the configurat ion m enu, refer to ch apter 4, “Printer Confi gurati on, ” of the
Reference
information.
Menu Administration/Miscellaneous/Keypad Language
Choices E nglish, Fre nch, German, Spanish
Default English
Notes The printer must be restarted for changes to the Keypad
Language menu to take effect. You can either let the printer
restart automatically after you save the change and exit from
the configuration menu, or you can wait for the change to take
effect the next time you manually turn on the printer.
Control Panel Keys
Press the Online/Offline key once to take the printer off
line (the indicator goes out). You must take the printer off
line before using all other keys except the Cancel key.
guide for complet e
Control Panel
When the printer goes off line, the communication por ts
are closed, so no new data is accepted. The printer
continues printing until it has finished all jobs in process.
Although jobs continue to compile and print using the data
already received, a job may be interrupted, causing it to
wait for more incoming data before printing resumes.
When the printer is off line, press the Online/Offline key
once to place it back on line and ready to accept new print
jobs (the indicator goes back on). If a remote console has
the printer off line, pressing the Online/Offline key will not
take effect until the console puts the printer back on line.
5-5
Page 78

Control Panel Keys
Press the Cancel key to cancel all print jobs currently
printing, interpreting, or spooling; or to send an end-of-job
indicator to print jobs waiting for incoming data. The
printer then resumes printing other print jobs in the queue.
If you press the Cancel key by mistake, or if you decide
not to cancel a print job after pressing this key, press the
Menu key to “cancel” the Cancel key’s function.
Press the 600 DPI key to choose between printing at 300
dots per inch or 600 dots per inch. The indicator is on
when the resolution is set to 600 dots per inch.
Press the Duplex key to choose duplex printing. The
indicator is on when the printer is set for duplex printing.
Press the Tray Select key to choose the cassette (input
bin) from which the printer should draw media.
Press the Next key to advance through the list of
selections or options for the current menu. When
changing character information, use this key to advance to
the next choice for the current input character.
Press the Previous key to return to the previous selection
or option for the current menu. When changing character
information, use this key to return to the previous choice
for the current input character.
Press the Menu key to access the configuration menu
after the printer goes off line. When you’re changing
printer configuration, press this key to cancel a change
(before pressing the Select key), to return to a previous
menu, or to return to a previous character when entering
character information.
QMS 172 5 E Pri nt System Getting Started5-6
Page 79

Press the Select key to access a menu or to choose a
displayed menu option.
What's Next?
Now, you’re ready to print. For more information on the day-to-day
operation of your printer, refer to the
nical informati on, ref er to the
v
What's Next?
Operation
Reference
guide. For more tech-
guide.
Control Panel
5-7
Page 80

Page 81

A
QMS Customer Support
In This Chapter . . .
n
Sources of customer support
n
QMS world-wide offices
Page 82

Sources of Support
Sources of Support
Several sources of help and information are availa ble, dependin g on
the type of help you need:
Your QMS Vendor
Your local vendor (the one from whom you bought the printer) may be
best equipped to help you. Your vendor has specially trai ned se rvice
technicians available to answer questions, and the equipment to analyze your printer problems.
Your Application Vendor
Often, “printing” problems ha ve more to do with the application being
used than with the printer. In this case, the application ma nufa cturer
is the best source of help.
Q-FAX
Q-FAX, a QMS information retrieval service, provides appl icati on
notes, technical support notes on comm on print ing proble ms, and
information about printer sp ecifi catio ns, opt ions, accessories, consumables, and prices.
In the United States and Canada, call (800) 633-7213 to reach QFAX. In all other countries, call (334) 633-3850. Have your fax number handy when you call (or place the call from your fax machine's
handset).
You can choose to have either a directory (a list of currently available
documents on a particular topic) or a specific docum ent sent to you.
The first time you call, request the directory (press 2 on your phone or
fax keypad when prompted). Then call back to request sp ecific documents. You can order up to three documents per call.
QMS 172 5 E Pri nt System Getting StartedA-2
Page 83

Sources of
Support
The QMS Corporate Bulletin Board System
The QMS Corporate Bulletin Board Sy stem (BBS ) contains te chnical
support notes, application not es, drivers, pat ches, and ut ilities. T echnical questions not requiring an immed iate respon se can be left on
electronic mail for the Sysop (System Operato r).
The bulletin board [(334) 633-3632] operates at 1200, 2400, 9600,
and 14400 baud, 8 data bits, no parity, 1 stop bit, with XMODEM ,
YMODEM, and ZMODEM capabilities. Contact QMS Customer Technical Assurance for more inform ation about the bulletin board.
CompuServe
Through CompuServe, you can ask general (non-technical) questions, share information with other users, and access printing information and programs. When you use CompuServe, type the following
command:
n
go qmsprint takes you to the forum where QMS is located.
The QMS library section contains appli catio n notes, printer drivers,
utilities, technical information, and announcement files.
Internet
The QMS server provides access to technical reports, new product
announcements, a trade show schedule, and other general information about QMS.
You can access the QMS server via any one of the many web viewers
available to Internet users. If you don’t have access to a web viewer,
we recommend the NC SA Mo sa ic web viewer (Mosaic i s at
ftp.ncsa.uiuc.edu ). The QMS home page is at http://w w w.qms.com/.
The QMS ftp resource is ftp.qms.com.
QMS Customer Support
A-3
Page 84

Sources of
Support
QMS Customer Technical Assurance (CTA)
QMS Customer Techn ical Assurance is available M-F, 7:00 am-6:00
pm, Central Standard Time, at (334) 633-4500 (US). Y ou can also fax
questions to CTA at (334) 633-3716 (US). Please indicate whether
you would like a fax or a phone call.
If you call for assistance, have the following information ready so our
technicians can help you more quickly:
n
Your phone number, fax number, and shippin g address
n
A description of the problem
n
The printer model and serial numb er
n
The type of host computer you are using
n
The type and version of operating system you are using
n
The interface you are using, and, if serial, the protocol
n
The application and version you are using
n
The emulation you are using
n
Your print er firmware ve rsion (listed on t he status and start-up
pages)
QMS 172 5 E Pri nt System Getting StartedA-4
Page 85

Sources of
Support
QMS National Service
The following numbers are valid in the US. To contact QMS in other
countries, see the list of world-wide offices inthe following section.
(800) 762-8894 Call for service information and
maintenance pricing for repair of a ll
QMS printers and printers of
various other manufacturers.
(800) 858-1597 On-Site Service and Depot Repair
Information 7:00 am -7:00 pm,
Central Standard Time
(334) 633-4300 Spare Parts Ordering and
Information 8:00 am - 5:00 pm
Central Standard Time
QMS Customer Support
A-5
Page 86
QMS World-
wide O ffice s
QMS World-wide Offices
United States/
Latin America
Asia-Pacific QMS Asia-Pacific
Canada QMS Canada, Inc.
QMS, Inc.
One Magnum Pass
Mobile, AL 36618
(334) 633-4300
Product Information: (800) 523-2696
OEM Information: (800) 631-2692
Consumables: (800) 777-7782
Fax: (334) 633-4866
E-mail: info@qms.com
Latin America Fax: (334) 639-3347
Auckland 64 (9) 630 7912
Melbourne 61 (3) 899 5777
Sydney 61 (2) 901 3235
Tok yo (81) (3) 3437 40 30
9630 Rte. Trans-Canadienne
Saint-Laurent, Québec H4S 1V9
Telephones: (514) 333-5940, (800) 361-3392
Fax: (514) 333-5949
National Service: (800) 268-4969
National Service Fax: (905) 673-7676
Offices in Ottawa, Québec City, Toronto, and Vancouver
Europe, Middle
East, Africa
v
Düsseldorf (49) 211/596 1333
London (44) 1 784 442255
Maarssen (31) 3465 51 333
Paris (33) (1) 4107 9393
Stockholm (46) (8) 725 5680
QMS 172 5 E Pri nt System Getting StartedA-6
Page 87

B
Configuration Menu
In This Chapter . . .
n
Configuration Menu Diagram s
Page 88

Configuration
Menu
Configuration Menu
» Note: The Installation menu ap pears only when an optional security card is
installed.
Press
Press
QMS 172 5 E Pri nt System Getting StartedB-2
Page 89

Press
Configuration
Menu
Configuration Menu
B-3
Page 90

Configuration
Menu
Press
v
QMS 172 5 E Pri nt System Getting StartedB-4
Page 91

Index
10Base2 4-2
10BaseT 4-2
600 DPI key 5-6
A
About the printe r 1-2
Application
Notes, QMS 3-11
Applications
PC 3-11
Automatic Jam Recovery 1- 1 1
B
BNC connection 4-2
Bulletin board
QMS 3-11
Bulletin board, QMS A-3
C
Cables
PC interface 3-2
Cancel key 5-6
CCITT 1-8
Communication
Testing, parallel port 3-5
Communication, testing
Serial port 3-6
Compile-Ahead Technology 1-9
Compressed Data Formats 1-11
CompuServe A-3
Configuration
Ethernet network 4-13
Ethernet port 4-10
Menu diagrams B-2,3,4
Connection 3-3
Ethernet port 4-2
Parallel por t 3-3
Page 92

Context Switching 1-11
Control panel
Indica tors 5-3
LEDs 5-3
Message window 5-4
CrownAdmin software
Installation, DOS 4-4
Installation, Macintosh 4-5
Installation, Windows 4-9
CrownNet Manager software
Installation, OS/2 4-5
Customer support, QMS A-2
D
Documentation 1-2, 1-3
Optional 1-4
DOS
CrownAdmin software 4-4
DOS commands
mode 3-7
Driver
PC 3-10
See also
Windows 3-11
Duplex key 5-6
Printer driver
E
Emulation Sensing Processor (ESP)
Technology 1-10
Emulations 1-14
Ethernet
10Base2 4-2
10BaseT 4-2
Thin-wire Ethernet 4-2
Twisted-pair Ethernet 4-2
Ethernet port
BNC connector 4-2
Configuration 4-10
Configuration, network 4-13
Connection 4-2
CrownAdmin software, DOS 4-4
CrownAdmin, Macintosh 4-5
RJ45 connector 4-2
Software in stallation 4-4
Troubleshooting 4-19
EtherTalk
Configuration, Ethernet port 4-10
Configuration, network 4-13
H
Hard Disk Expandability 1-14
HP PCL 5 Emulation 1-8
HP ProCollection 1-13
HP-GL Emulation 1-8
I
Indicators, control pa nel 5-3
Internet A-3
K
Kanji 1-13
L
LAN Manager/LAN Server
Configuration, Ethernet port 4-11
Configuration, network 4-14
LAN Server
See
LAN Manager/LAN Server
LaserJet 4Si 1-13
LEDs 5-3
Lineprinter Emulation 1-8
Location requirements 2-2
M
Macintosh
CrownAdmin software 4-5
Menu key 5-6
Message window 5-4
mode command (DOS) 3-7
I-2 QMS 17 25E Print System Getting StartedIndex
Page 93

N
NetWare
Configuration, Ethernet port 4-11
Configuration, network 4-17
Network Interfaces 1-14
Next key 5-6
Novell NetWare
See
NetWare
O
Online/Offline k ey 5-5
Optional fonts 1-13
Options, printer 1-13
OS/2
CrownNet Manager installation 4-5
P
Parallel Cable 3-2
Parallel port 3- 3
Testing communication 3-5
PC
Applications 3-11
Driver 3-10
PS Executive Series Utilities 3-10
Screen fonts 3-12
Software 3-11
Testing parallel port 3-5
PCMCIA Card Slot 1-12
PostScript Level 2 Emulation and
Level 1 1-9
PostScript operators
showpage 3-5
Power requirements 2-3
Previous key 5-6
Printer driv er
PostScript emulation 3-11
Windows 3-11
Printer Featu res 1-7
Printer Optio ns 1-13
PS Executive Series Utilities 3-10
Q
QMS
Bulletin board 3-11
Q-FAX 3-11, A-2
Registration, printer 2-4
QMS Crown Technology 1-9
R
Registration, printer 2-4
Remote Console 1-12
Resident Fonts and Symbol Sets 1-9
RJ45 connector 4-2
S
Screen fonts
PC 3-12
Security Card 1-14
Select key 5-7
Serial Cable 3-3
Serial port 3-6
Parameters, changing 3-7
Testing communication 3-6
Service
QMS, World-wide A-6
United States A-4
Shipment
Contents 2-4
showpage operator (PostScript) 3-5
Simultaneous Interface Operation
(SIO) 1-10
Software
PC 3-11
Software Loadable System (SLS) 1-12
Start-up page
Disabling 2-14
Enabling 2-14
Information 2-13
Printing 2-1 3
Support
CompuServe A-3
I-3QMS 1725E Pr int System Getting StartedIndex
Page 94

Customer A-2
Internet A-3
QMS bulletin board A-3
QMS, World-wide A-6
Technical A-4
United States A-4
T
TCP/IP
Configuration, Ethernet port 4-13
Configuration, network 4-18
Test file, creating 3-5
Testing communication 3-6
Testing, PC
Parallel port 3-5
Thin-wire Ethernet 4-2
Tray Select key 5-6
Troubleshooting
Ethernet port 4-19
Twisted-pair Ethernet 4-2
Typographic Conventions 1-7
U
UNIX
Utilities, installation 4-7
Upgradable RAM (Random Access
Memory) 1-13
W
Windows
CrownAdmin software 4-9
Windows driver 3-11
v
I-4 QMS 17 25E Print System Getting StartedIndex
 Loading...