

Page 1

Personal
Computer
PCjr
Hardware
Reference
Library
Guide
to
Operations
6322959
Page 2

LIMITED
WARRANTY
The
International Business Machines Corporation warrants this
IBM
Personal
Computer Product to be in good working order for a periodofone year from the
date of purchasefrom IBM or an AuthorizedIBM Personal Computer Dealer. Should
this Product fail to be in good working order at any time during this one
year
warranty
period,
IBM
will, at its option,
repairorreplace this
Product
at no
additional charge except as
set
forth below. Repair parts and replacement Products
willbefurnishedonan
exchange
basis
and
willbeeither
reconditionedornew.
All
^ '
replaced parts
and
Products
become
the propertyofIBM.
This
limited
warranty
does
not include service to repair damage to the
Product
resulting from accident, disaster,
misuse,
abuse,ornon-IBM
modificationofthe
Product.
Limited
Warranty
service may be obtained by delivering the
Product
during the one
year warranty period to an Authorized IBM Personal Computer Dealer, or any IBM
Service/Exchange
Center
and providing proofofpurchase date. If this Product is
delivered by mail, you agree to insure the
Product
or assume the riskofloss or
damage in transit, to
prepay
shipping charges to the warranty service location
and
to
use the original shipping container or equivalent. Contact an Authorized IBM
Personal Computer Dealer or write to IBM Personal Computer, Sales and Service,
P.O.
Box
1328-W,
Boca
Raton,
Florida
33432,
for
further
information.
ALL
EXPRESS
AND
IMPLIED
WARRANTIES
FOR
THIS
PRODUCT
INCLUDING
THE
WARRANTIES
OF
MERCHANTABILITY
AND
FITNESS
FORAPARTICULAR
PURPOSE,
ARE
LIMITED
IN
DURATION
TO
A
PERIOD
OF
ONE
YEAR
FROM
THE
DATE
OF
PURCHASE,
AND
NO
WARRANTIES,
WHETHER
EXPRESS
OR
IMPLIED,
WILL
APPLY
AFTER
THIS
PERIOD.
SOME
STATES
DO
NOT
ALLOW
LIMITATIONS
ON
HOW
LONG
AN
IMPLIED
WARRANTY
LASTS,
SO
THE
ABOVE
LIMITATIONS
MAY
NOT
APPLY
TO
YOU.
IF
THIS
PRODUCT
IS
NOT
IN
GOOD
WORKING
ORDER
AS
WARRANTED
ABOVE,
YOUR
SOLE
REMEDY
SHALL
BE
REPAIR
OR
REPLACEMENT
AS
PROVIDED
ABOVE.
IN
NO
EVENT
WILL
IBM
BE
LIABLE
TO
YOU
FOR
ANY
DAMAGES,
INCLUDING
ANY
LOST
PROFITS,
LOST
SAVINGS OR
OTHER
INCIDENTAL
OR
CONSEQUENTIAL
DAMAGES
ARISING
OUT
OF
THE
USE
OF
OR
INABILITY
TO
USE
SUCH
PRODUCT,
EVEN
IF
IBM
OR
AN
AUTHORIZED
IBM
PERSONAL
COMPUTER
DEALER
HAS
BEEN
ADVISED
OF
THE
POSSIBILITY
OF
SUCH
DAMAGES,
OR
FOR
ANY
CLAIM
BY
ANY
OTHER
PARTY.
SOME
STATES
DO
NOT
ALLOW
THE
EXCLUSION
OR
LIMITATION
OF
INCIDENTAL
OR
CONSEQUENTIAL
DAMAGES
FOR
CONSUMER
PRODUCTS,
SO
THE
ABOVE
LIMITATIONS
OR
EXCLUSIONS
MAY
NOT
APPLY
TO
YOU.
THIS
WARRANTY
GIVES
YOU
SPECIFIC
LEGAL
RIGHTS,
AND
YOU
MAY
ALSO
HAVE
OTHER
RIGHTS
WHICH
MAY
VARY
FROM
STATE
TO
STATE.
FOR
WARRANTY
SERVICE
OR
ASSISTANCE
IT
IS
RECOMMENDED
THAT
THIS
PRODUCT
BE
RETURNED
TO
THE
AUTHORIZED
IBM
PERSONAL
COMPUTER
DEALER
FROM
WHOM
IT
WAS
PURCHASED
OR
TO
ANY
IBM
SERVICE/EXCHANGE
CENTER.
Page 3

Personal
Computer
PCyr
Hardware
Reference
Library
Guide
to
Operations
Page 4

First Edition Revised (November 1983)
Changes
are
periodically made to
the
information
herein; these
changes will be incorporated in new editions
of
this publication.
Products
are
not
stocked
at
the address below. Requests for
copies
of
this
product
and
for technical information
about
the
system should be
made
to
your
authorized
IBM
Personal
Computer
dealer.
A Reader's
Comment
Form
is provided at the
back
of this
publication.Ifthis
form
has
been removed,
address
comments
to
IBM
Corporation,
Personal
Computer,
P.O.
Box
1328-C, Boca
Raton,
Florida
33432.
IBM
may
use
or
distribute
any
of
the
information you supply in any way it believes appropriate without
incurring any obligations whatever.
® Copyright International Business Machines
Corporation
1983
Page 5

FEDERAL
COMMUNICATIONS
COMMISSION
RADIO
FREQUENCY
INTERFERENCE
STATEMENT
^
Warnii^:
This
equipment
has
been
certified
to
comply with
the
limits for a Class B computing
device, pursuant to Subpart J of
Part
15 of
FCC
rules. Only peripherals (computer input/output
devices, terminals, printers,
etc.)
certified to
comply
with
the
Class B limits
may
be
attachedtothis
computer. Operation with non-certified peripherals
is likely to result in interference to radio and TV
reception.
INSTRUCTIONS
TO
USER
This equipment generates
and
uses radio frequency
energy and if not installed and used properly, i.e., in
strict
accordance
with
the
operating
instructions,
reference
manuals,
and
the
service
manual,
may
cause
interference to radioortelevision reception.Ithas
been
tested
and
found to comply with
the
limits
for
a Class B
computing device pursuant to Subpart J of Part 15 of
FCC
Rules, which
are
designed to provide reasonable
protection against suchinterference when operated in a
residential
installation.
Page 6

IV
If this equipment does cause interference to radio
or
television reception,
which
can
be
determined
by
turning
the
equipment
off
and
on,
the
user
is
encouragedtotrytocorrect
the
interference
by
one
or
more
of
the
following
measures:
•
Reorient
the
receiving
antenna.
•
Relocate
the
equipment
with
respecttothe
receiver.
•
Move
the
equipment
away
from
the
receiver.
•
Plug
the
equipment
intoadifferent
outlet
so
that
equipment
and
receiver
are
on
different
branch
circuits.
•
Ensure
that
side
option
mounting screws,
attachment
connector
screws,
and
ground
wires
are
tightly secured.
• If peripherals
not
offered
by
IBM
are
used with this
equipment,itis suggested
that
you
use
shielded,
grounded cables with in-line filters, if necessary.
If necessary, consiilt yom:dealer service representative
for
additional suggestions.
The manufacturer is
not
responsible for any radio or
TV
interference
caused
by
unauthorized
modifications
to this equipment. It is the responsibility of
the
user to
correct
such
interference.
CAUTION
This
productisequipped
withaUL
listed
and
CSA-certified plug
for
the
user's safety.
It
is to be
used
in conjimction
withaproperly
grounded
115
Vac
receptacle
to
avoid
electrical shock.
Page 7

Preface
Color
tabs
are
on
the
first page
of
each
section.
The
color
tabs
are labeled to help
you
quickly find
the
information
you
need.
The
seven
sections
in
this
book
are:
Section 1, "Setting Up Your IBM PCjr," explains how
to
cable
your
IBM
PCy>.
Section 2, "Getting Started," shows you how to run the
"Keyboard Adventure" stored in your IBM PCjr.
Section 3, "The Keyboard," explains how to use your
keyboard.
Page 8

VI
Section 4, "ChoosingKeys," shows you how to use your
IBM
VCjr
keyboard
with
books
written
for
the
IBM
Personal
Computer
keyboard.
Section 5, "The IBM
PC/r
Options," is a Section in
which
you
can
keep
any
information
you
receive
when
you
buy
an
option
for
your
IBM
PCyr.
Section 6, "Testing Your IBM PC/r," contains a set of
instructions
that
help
you
determine if your
IBM
PC/r
is
operating
properly.
Section 7, "Cartridges," explains how to take care of
cartridges
and
how
to use
them
with
your
IBM
PC/r.
1
a
Page 9

Contents
^
SECTIONl.
SETTING
UP
YOUR
IBM
PC/r...
1-1
Installation
1-5
SECTION
2.
GETTING
STARTED
2-1
What
to
Expect
When
You
Turn
Your
IBM
PCyr Power on 2-3
Running
the
Keyboard
Adventure
2-6
SECTION
3.
THE
KEYBOARD
3-1
Introduction
3-3
Using
the
Keyboard
3-4
Centering
the
Information
on
the
Screen
...
3-9
Keyboard
Modes
3-13
System
Reset
3-25
Additional Keyboard Features 3-26
SECTION
4.
CHOOSING
KEYS
4-1
Introduction
4-3
When
to
Use
the
Keyboard
Differences
Chart
4-5
Using the Keyboard Difference
Chart
4-6
Keyboard Difference
Chart
4-9
SECTION5.THE
IBM
PC/r
OPTIONS
5-1
Instructions
5-3
SECTION
6.
TESTING
YOUR
IBM
PCjr
6-1
Introduction
6-3
First Things
First
6-5
Error
Message
Table
6-17
Running the IBM
PC/r
Tests 6-21
Service
Information
6-37
Test
Tag
1 - Diskette Drive
Test
6-39
vu
Page 10

VIII
Test Tag 4 - Television and 40-Column
Display Test 6-45
Test
Tag
8-80
Column Display
Test
6-55
IBM
Color
Display
Check
Out
Procedure..
6-69
Test
Tag
5 - Light
Pen
Test
6-83
Test
Tag
6 -
IBM
PCyr
Attachable
Joystick
Test
6-87
Test
Tag
9 -
Sound
Test
6-93
Test
Tag
J -
IBM
PCjr
Keyboard
Test
..
6-103
Test
Tag
G -
IBM
PCjr
Internal
Modem
Test
6-111
Test
Tag
A -
IBM
Personal
Computer
Graphics
Printer
Test
6-115
IBM
Graphics
Printer
Check
Out
6-119
Procedure
SECTION
7.
CARTRIDGES
7-1
Introduction
7-3
How
to
Handle
Cartridges
7-5
HowtoInsert
and
Remove
Cartridges .
7-6
Index
I-l
Page 11

SECTION
1.
SETTING
UP
YOUR
IBM
PC/>
Contents
Installation
1-5
Setup
1-1
Page 12

Notes:
1-2
Setup
Page 13

Replace this page with the setup pages from your
IBM
PC/r
carton.
Setup
1-3
Page 14

Notes:
1-4
Setup
Page 15

rv
Installation
Install
your
display
or
television now, using
the
instructions that come with your IBM Color Display or
IBM
Connector
for
Television.
Then
return
here.
Connector
Composite
for
TV
Connector
Audio
Connector
Connector
for
IBM
Color
Display
When
your
display
or
television is installed,
continue
with Section 2, "Getting Started."
Note: Diskette
errors
may
be caused if
your
display
is
within
15
centimeters
(6 inches)
of
your
IBM
PCyr. This problem is easily cured by moving your
display away from the
IBM
PC^'r.
Installation
1-5
Page 16

Notes:
1-6
Installation
Page 17

SECTION
2.
GETTING
STARTED
Contents
What
to
Expect
When
You
Turn
Your
IBM
PCyr
Power
On
2-3
Running
the
Keyboard
Adventure
2-6
It's Easy/
We'll
Take
You
Step
By
Step.
B
90
Getting
Started
2-1
Page 18

Notes:
2-2
Gettii^
Started
Page 19

What
to
Expect
When
You
Turn
Your
IBM
PC/>
Power
On.
Important
Whenever
your
IBM
PCjr
does
not
respond
as described in this book, go
to Section 6, "Testing your IBM
PCjr"
Someofthe
colors
shown
in this
book
may
be
different
than
the
colors
on
the
screen. This
happens
because aU
televisions
and
displays
do
not
produce
the
same
colors.
If you are asked if your screen looks like an example in
this
book,
the
question
reaUy refers to
the
shapes
of
the
color
blocks
and
figures.
To
operate
properly, your IBM
PCjr
keyboard must be
in
front
of
your
IBM
PCjr
and
no
more
than
6.1
meters
(20
feet)
away.
Your
IBM
PCjr
and
the
keyboard are connected by an invisible beam, so don't
place an5rthing between them that will block that beam.
Getting
Started
2-3
Page 20

Do
not
turn your IBM VCjr power on yet.
Let's
take a
minute to review what should happen when you do.
It take's a few seconds for something to appear on the
screen.
Whenitdoes,itlooks
like
this:
This
screeniscalled
the
IBM
Color
Bar
screen
and
it
appears for a few seconds. While it does, your IBM
PCy/-
is checking itself to be sure it is ready to go to
work.
After
your IBM VCjr has checked itself
and
finds that everything is working correctly, you hear one
short beep
and
the screen changes.
2-4
Getting
Started
Turn
your
display
or
television
power
on.
/-N
Page 21

rv
Turn
your
IBM
PCyr
power
on.
I
Thisisthe
international
symbol
for
On.
O
Thisisthe
international
symbol
for
Off.
Following
the
IBM
Color
Bar
screen,
the
IBM
Personal
Computer
BASIC
Message
Screen
appears.
Adjust the contrast, brightness and
fine
tuning
on
your
display
or
television
soitis
comfortable
for
you.
The
IBM
Personal
Computer
Basic
Version
01.20
Copyright
IBM
Corp.1981
XXXXX
Bytes
free
OK
ItWHl
2I:1II.'H
3(^1331
4BEHi
5
Getting
Started
2-5
Page 22

Running
the
Keyboard Adventure
r-n
Press
the
Esc
key. This
key
is in
the
upper left
comer
of your keyboard.
If you makea mistakeand press anyother key before you
press Esc, you
will
not be able to run the "Keyboard
Adventure."
If the
screen
didnot
change
when
you
pressed the Esc key, turn your IBM
PQ>*
power off,
wait about five seconds, turn it on again, and press the
Esc
key.
Your
screen
should
now
look
like
this:
You are now ready to start the "Keyboard Adventure".
If your IBM PCyr did not respond correctly, go to
Section 6, "Testing your IBM PCyr."
2-6
Getting
Started
Page 23

You
will
not
hear
the
sounds
this
book
describes if
you
are using a display
that
does
not
have a
speaker
and
amplifier
attached
to
it.
Getting
Started
2-7
Page 24

We would like
youtomeet
P.C., who will be your guide
through this "Keyboard Adventure."
If
you
are
ready
to
join
P.C.,
let's
begin.
On
the
right sideofyour
keyboard
are
four
keys
grouped
together.
Each
of
these
keys
has
an
arrow
next
toitandagreen
stripe
under
it.
I
III
IiTt
CiOOOODDDDODOMC:^
O:
ODOCDOOOODOOi'
OODODOOOOODOl
O
CDOOOOOOOOI
o i j
oo
2-8
Getting
Started
Page 25

These keys are called cursor control keys. In computer
talk, a cursor is a character (sometimes a blinking line
or
block)
that
shows
you
where
you
are
on
the
screen.
You
can
moveacursor
up,
down,
right,
or
left
with
the
cursor
control
keys.
In this part of your "Keyboard Adventure," P.C. will
pretend
to
beacursortoshow
you
how
to
move
around
the
screen.
Each
of
the
cursor
control
keys
moves
P.C.
in
the
directionofthe
arrow. If a
cursor
control
key
is
pressed
and
released,
P.C.
will
move
one
position
and
stop. If
the
keyisheld
down
P.C.
will
continue
to
move.
Getting
Started
2-9
Page 26

Move
P.C.
to
the
top
of
the
screen
by
holding
down
the
Cursor
Up
key.
(This key has the word "Home"
under
it.)
Did
you
hearabeep
when
P.C.
reached
the
very
top?
A
beep
sounds
whenever
P.C.
goes as
far
as he
can
go
in
one
direction
on
this
screen.
Now,
let's
find
out
what
that
strange
object
is on
the
left
side
of
the
screen.
2-10
Getting
Started
/-N
Page 27

Using
the
cursor
control
keys,
move
P.C.
through
the
object
on
the
left
sideofyour
screen.
(Make
sure
the
object
disappears
from
the
screen.)
HINT:
If this
doesn't
work
the
first time
you
try it,
just
continue
to
move
P.C.
around
the
object
until it
vanishes
from
the
screen.
What's
happened
to
the
box?
Is
thatasecret
door
that
just
opened?
Do
you
suppose
there's
any
connection
between
the
object
and
the
unlocking of
the
door?
Let's
see
if we
can
solve this mystery.
Perhaps
P.C.
can
help
us!
Using
the
cursor
control
keys,
move
P.C.
to
the
opening
of
the
box.
i:,
Getting
Started
2-11
Page 28

Now, if you were P.C., wouldn't you be curious enough
to
peek
inside
the
box?
2-12
Getting
Started
Move
P.C.
as
far
down into
the
box
as possible.
Page 29

What
happened???
As
you
can
see,
there's
no
need
to
worry.
P.C.
is
back.
Getting
Started
2-13
Page 30

In
fact,
P.C.isready
to
guide
you
through
another
adventure.
Let's
find
out
what
P.C.
wants
you
to do.
Perhaps
if
you
press
the
cursor
control
keys again...
Press
each
cursor
control
key
once.
Do
you
have
any
idea
what
P.C.
is doing?
2-14
Getting
Started
Page 31

It
looks
asif a keyboardisbeing
built.
Seehow
closely
thosefour
blocks
resemble
the fourcursorcontrol
keys
you just pressed? Notice the pattern they make on the
screen.
Press the Cursor Right key again -
three
or
four
times-and
watch
the
screen
closely.
Look at the small
Une
moving across the top of your
screen as you press the Cursor Right key.
Press
the
Cursor
Left
key
several
times.
Remember when we told you about the cursor? Well,
this is a cursor. Cursors come in different styles.
Some,
like
this
one,
are
little
Unes.
Some
are
blocks.
Some are bright, and some will even blink at you to
catch your eye. But they all do the same thing - they let
you know where you can place something on the
screen.
Getting
Started
2-15
Page 32

As you can see, you are in control of the cursor now
and
can
moveitto
the
left
or
right.
Let's
make
this
cursor
work
for
you.
Type
your
first
name
in lowercase
letters.
If you make a mistake, press the Cursor Left key until
the cursor is
under
the letter you
want
to change.
Then
type the correct letter over the incorrect one.
(Afterwards, make sure you move the cursor to the
right of the last letter you
t5rped
and then continue
typing.)
Is your first name on the screen? How does it feel to
see your name in lights? (For now, we are pretending
that your name is Tommy.)
2-16
Getting
Started
Page 33

Now let's begin your name with a capital letter:
Shift
Press
the
Cursor
Left
key
until
the
cursor is
under
the first letter of your
name.
Locate
one
of
the
keys
marked
"Shift".
'
Shift
QOMO
OD
Dcap
30C^O0
OODOC-L^i
DQOCDOODDOdb
^^OODODDCOD
ut
Getting
Started
2-17
Page 34

Hold
down
a Shift key, and, at
the
same time, retype the first letter of
your
name.
Tommy
Suppose you wanted to type something in uppercase
letters.
There
are
two
ways you could do this.
The
first
way would be to hold down a Shift key and, at the same
time, type the letters. But, an easier way is to use the
CapsLock
key.
Just
for
fun,
use
the
CapsLock
key
to
type
your
first
name
in uppercase letters. To do
that:
Press
the
CapsLock
key
and
release
it.
CODCODODD
U (
If
you
look at your screen, you will see
that
the cursor
is already
under
the second letter of your name. So...
2-18
Getting
Started
Page 35

Type
the
restofyour first
name
again.
TOMMY
Didyour name appear in uppercaseletters on the
screen?
If
so:
Press
the
CapsLock
key
again to
turn
off
uppercase.
Bythe
way,
thisis a keythat youhaveto press
twice
-
the first time to lock the keyboard in uppercase and a
second
time
to
unlock
it.
REMEMBER:
•
Press
CapsLock
once
to
get
uppercase.
• Press CapsLock again to return to lowercase.
Getting
Started
2-19
Page 36

You have just seen how using the cursor control keys
moves the cursor to letters you want to change. The
process of changing what you type is called editing.
You have also seen that you can use a Shift key to make
uppercase letters and the CapsLock key to lock your
keyboard
in uppercase.
A few words now about the most important key on the
keyboard - the Enter key. This key is on the right side
of your keyboard just above the right Shiftkey.
oddoddddddSl.-lld
ti
OOOOOOPODOijbtJ
HI
D
OODDOODDDOcklJo
CP
OODOODDDODCP
DO
D ' '
ODD
D
Remember the strange object in the upper left corner of
the last screen? Do you rememberhowit disappeared
from the screen when P.C. moved through it? That
object was the Enter key. It was the key that allowed
P.C.to "enter"
into
the
next
adventure
by
opening
the
box.
Just as it helped P.C. enter the box, the Enter key will
do special thingsfor you. It
will
carry your
messages
to
the computer and allow you to give the computer a
command or deposit information into its memory.
2-20
Getting
Started
Page 37

Let's
useitnow.
Press
the
Enter
key
and
watch the
top
of
your
screen.
What happened to your name??? The printing is gone,
and
the
cursor is
back
at the upper left
comer
of your
screen. Don't worry, though. It isn't lost forever. The
Enter key just "entered" your nameinto the computer's
memory.
Later, after we introducemoreof the keys,
we'll show you what a good memory the computer
reaUy
has.
The next few keys you
wiU
use confuse some people.
These
arethe
keys
that
give
youthe
lowercase
"o", the
uppercase "O", and the zero. Let's look at themon the
screen.
Getting Started
2-21
Page 38

Press the zero (0) key. It is on the
top
rowofyour
keyboard
nexttothe
9
key.
After P.C. places the zero (0) key on the screen
keyboard,
look
at
the
screen.
Notice
that
the
zero
has
a
diagonal line through it.
Now, press the key with the letter
"O" aboveit. It is just under the
zero
key
on your keyboard.
P
Do these look different to you? Look closely. There is
no diagonal linein the lowercase letter "o" on your
screen.
Also
the
lowercase
letter
"o"
is
smaller
than
the
zero.
2-22
Getting
Started
Page 39

rv
Now,
locate
either
one
of
the
Shift
keys.
Hold
down
one
of
the
Shift keys,
and,
at
the
same
time,
type
the
letter
"O".
Look
at
the
screen.
You
should
see
the
uppercase
letter
"O".
Notice there is no diagonal line in it, either.
Getting
Started
2-23
Page 40

Let's
take
a look at two
other
keys
that
may
be
confusing
because
they
look
so
much
alike.
These
are
the lowercaseletter
"1"
key and the number "1" key.
We
are
going to
show
you
the
difference
between
them.
Press the key with the letter "1" on
it. It is just under the letter
"O"
key.
Press the number
one
(1) key. It is
on
the
top
rowofthe
keyboard.
Notice
that
the
lowercase
letter
"1" is
thinner
than
the
number"!".
2-24
Getting
Started
Page 41

In
the
future,
make
sure
you
don't
use
the
uppercase
letter
"O"
or
lowercase
letter
"o"
for
the
zero
"0."
Also
don't
use
the
lowercase
letter
"1"
for
the
number
"
1This
can be especially important to you later
when
you
write
your
own
computer
programs.
The
computer
knows
whichiswhich,
so
you
can't
fool
it!
A really
great
feature
of
your
IBM
PCyr
keysisthat
they
will
repeatifthey
are
held
down.
This
feature
is
called typematic.
We'll
prove
it to you.
Hold
down
the
zero
(0)
key.
Look
at the row of zeros you've just made! (Be careful,
not
to
holdakey
down
too
long
unless
you
really
want
what
you just
typed
to be repeated.)
Getting
Started
2-25
Page 42

Let's
now
take
a look at a misunderstood key. It is just
above
the
Enter
key
and
hasaleft
arrow
above
it.
Do
you
see it?
It
is called
the
Backspace key.
Now,
press
the
Backspace
key.
OODODDOOODOOmZP
D
ODoooooaooDOon
CD
DDOODDDOOOOcLi
O
CDOOOOOOOOOOCD
OG
t~ii
CD
After
B.C.
has
placed
the
key
on
the
screen keyboard,
let's
see
what
it
does.
2-26
Getting
Started
Press
the
Backspace key until
the
cursor
returns
to
the
top
left
of
your
screen.
Page 43

Notice
that,
as it
moved
backward,iterased
all
of
the
letters
and
numbers
that
were
there.
The
Backspace
keyisuseful
for
erasing
whatisto
the
left
of
the
cursor.
But,
when
you
want
to
go
back
to
correct
an
error
you've
made
without
losing
the
other
characters
you've
printed
on
the
screen,
you
must
use
the
Cursor
Left
key,
not
the
Backspace
key.
Getting
Started
2-27
Page 44

Another
key
you
should
meetisthe
Space bar. It is
the
long
baratthe
bottom
of
your
keyboard.
ODOCpOOOOOOilOCiP
D
£Z3
OD
ctcc
cccooiD
on
cocoooooooooodJ
o
D
OO^OOOCOC^O
CJ
OD
o
t"
•—p
qq
o
One
thing
to
remember
about
the
Space
baristhat
it
erases as it moves forward.
You
should only use it
when
you
wantaspace
between
characters.
Press
the
Space
bar
once
and
release
it quickly.
Now,
watch
the
screen.
We
had
P.C.
bringinthe
Space
bar
differently
to
show
you
thatitlooks
unlike
any
other
key
on
the
keyboard.
2-28
Getting
Started
Page 45

rN
Now,
let's
print something
on
the
screen.
Type:
P.C.isterrific.
(Remember
to
press
the
Space
bar
after
typing
each
word.)
If
you
tjrpe fast,
you
wiU
havetowait
until
P.C.
places
the
rest
of
the
keys
on
the
keyboard
before
aUofthe
words
appear
on
the
screen.
Now,
hold
down
the
Cursor
Left
key
until
the
cursor
moves
back
to
the
first
letter
on
the
line,
and
then
release
it.
j Now hold down the Space bar.
See
how
the
Space
bar
erases
the
letters
on
the
screen
as it moves forward?
(After
erasing
the
letters, use
the
Backspace
key
to
move
the
cursor
back
to
the
far
left
of
the
screen.)
Getting
Started
2-29
Page 46

We are
now
going to show you several keys
that
must
be used with
other
keys to
perform
actions.
One
such
key is the Alternate (Alt) key,
and
the other is the
Function
(Fn)
key.
—.-€:pODDoooc:::;3a
CP
ftjaqmcoccDoucJ
o
O
l^ofjOCOOODOO
OO
IQOOO
Press
the
Alt
key.
Itisthe
key
with
a
blue
border
around
it-to
the
left
of
the
Space
bar.
Did
you
notice
that
the
screen
turned
blue?
This
happened
to
show
you
that
any
key
withablue
stripe
underitcan
be
used
with
the
Alt
keytodo special
things.
(We
thought
this
would
be
an
easy
way
for
yov
to
remember
them.)
2-30
Getting
Started
Page 47

Now, let's see what happens when you press and hold
the Alt key and press the Backslash key at the same
time. (The Backslash key is located above the
CapsLock
key.)
Press
and
hold the Alt key and, at
the
same time, press
the
Backslash
key.
You should see a backslash printed on your screen. (If
itisthe
backslash,
it
will
look
like
the
mark
on
the
blue
stripe
under
the
key.)
ore
Just to show you what happens without the Alt key;
Press
the
Backslash separately.
Getting
Started
2-31
Page 48

What you see on your screen now is a slash,
not
a
backslash. (The slash is the mark on the upper left
above the key.)
Let's
look at
the
Fn
key. Like
the
Alt
key, it is used
with
other
keys to do special things.
Are
you
ready
for
some surprises?
First,
press
the
Fn
key.
Itisthe
key
with
the
green
border
around
it - to
the
right
of
the
Backspace
key.
OOOOOOOOOl
ODODDDOODOCOOn
O
ODOOOOODOODcU
C
DODDODDODODa
OD
innn
c
2-32
Getting
Started
Page 49

You've probably guessed that the screen turned green
to show you that allkeys used with the Fn key have a
green
stripe
under
them.
When any of the keys with green stripes under them are
used with the
Fn
key to perform an action, that action
is calleda function. The keys are calledFunction
keys.
We should tell you, though, that we've giventhese keys
special functions only for this "Keyboard Adventure"
program. Other computer programs you use will assign
their own special meanings to these keys.
Are
you
ready
to
be
entertained?
Press
the
Fn
key
and
release it.
Now
press
the
F6
key.
Ithen
,v
Look at the screen. It should have changed color. Did
it?
Getting
Started
2-33
Page 50

"L
If you want to go back to the first color, press the Fn
key, release it, and then press the F5 key.
Just
for
fun,
press
the
Fn
key;
release
it.
Now
press
the
F4
key.
--3
then
Press
the
Fn
key;
release
it.
Now
press
the
F3
key.
then
Pretty
screens,
weren't
they?
Let's
try
another
function key combination. This time:
s^nr
7^.
then
Press
the
Fn
key;
release
it.
Now
press
the
F2
key.
2-34
Getting
Started
Page 51

Amazing
what
you
can
do with
these
function keys!
If
you
would hke to continue
the
music, just press
the
Fn
key
and
F2
key
again.
If
you
want
to
stop
the
musicatany
time,
press
the
Fn
key
and
then
the
Break
key. This key
combination
is
used
when
you
want
to
stopaprogram
that
is running.
Let's
do
that
now.
Press
the
Fn
key;
release
it.
Now
press
the
Break
key.
then
You
just
saw
that
the
Fn
key
can
also
be
used
with
special
letter
keys
as well as
number
keys
to
perform
functions.
By
the
way,
remember
when
we
told
you
that
the
computer
hadagood
memory?
We're
going to
prove
that
to
you
now.
Press
the
Fn
key
and
then
the
FIO
key.
Now
watch
the
top
of
your
screen.
Getting
Started
2-35
Page 52

The
Fn
and
FIO
key
combination
brings
back
what
was
on
your
screen
when
you
last
pressed
the
Enter
key.
TOM
NAY
If
your
name
didn't
reappear,
you
may
have
accidentally
pressed
the
Enter
key
when
something
else
was
on
the
screen.
In
that
case,
type
your
name
again
now
and
press
the
Enter
key.
Then,
press
the
Fn
key
followed
by
the
FIO
key.
For
the
next
few
minutes,
let's
watch
P.C.
finish
building
the
keyboard.
(Do
you
know
that
P.C.
can
remember
up to 15 keys at
one
time! To
prove
it, try
pressing
one
right
after
the
other
until
you've
pressed
15 keys.)
2-36
Getting
Started
D
DDDDD
O
CSODDDD
DODOO
_
Doaao^czDOD
:j
cjuu
o
=cD
Page 53

rN
Press
the
rest
of
the
keys in
any
order
and
as quickly as you hke -
but
not
more
than
15
at
one
time.
thelastkeysyoupressed
m
You
should
now
have
all
of
the
keys
in
place
on
your
screen
keyboard.
Just
to
make
sure
you
do...
Press
the
Fn
key
and
then
the
F7
key.
Pressing
the
Fn
key
and
the
F7
key
bringsinthe
rest
of
the
keys
(in
case
you've
forgotten
some).
then
Getting
Started
2-37
Page 54

Now
for
another
surprise:
Press
the
Fn
key
and
then
the
F8
key.
then
Press
any
one
of
the
four
cursor
control
keys.
Y A
PqUp
mi
Pq
On
It
looks
like
P.C.
has
come
back
to
life!
2-38
Getting
Started
Move
P.C.
around
the
screen
by
using
the
cursor
control
keys.
Page 55

[iDu^r
OC^^^iLi^^DDOOO
£U
O
aODDI^^DODotDOO
(
B<
tOOPD
i
1
Thisisjust
like
old
times,
isn't
it,
when
P.C.
was
pretending
he
wasacursor.
To
let
P.C.
rest,
you
would
press
the
Fn
key
and
F8
key
again.
Press
the
Fn
Key
and
then
the
F8
keyasecond
time.
Now
that
the
real
cursorisback,
you
can
do
some
typing
for
funifyou
would
like.
Take
as
much
time
as
you
want.
When
you
are
ready
to
move
on,
turn
to
the
next
page.
Getting
Started
2-39
Page 56

Now
that
we've
come
to
the
end
of
this
adventure,
we're
sure
you'd
like to
know
how
it ends
and
how
you
can
beginitagain
later.
If
you
wanted
to
go
back
from
this
point
and
start
over,
you
would
hold
down
one
of
the
Shift
keys
and
then
press
the
Fn
key
and
the
F9
key.
(Then
you
would
begin again at Step 4 of the "Keyboard Adventure.")
Shift
If
you
wanted
to
repeat
only
the
keyboard
part
of
this
program,
you
would
hold
down
one
of
the
Shift keys
and
then
press
the
Fn
key
and
the
FIO
key.
(Then
you
would begin again at Step 10 of the "Keyboard
Adventure.")
2-40
Getting
Started
Page 57

To exit the "Keyboard Adventure" entirely, you would
press
and
hold the Control (Ctrl) and Alt keys while
you
press
the
Delete
(Del) key.
These
keys are called
System
Reset
keys
because
they
restart
your
computer.
You
will
learn
more
about
them
and
the
rest
of
the
keys
in
the
keyboard
section
of
this
book.
Let's exit from the "Keyboard Adventure" now.
To end the "Keyboard Adventure"
program,
press
and
hold
the
Ctrl
and
Alt
keys
while
you
press
the
Del
Key.
The
IBM
Personal
Computer
Basic
Version
01.20
Copyright
IBM
Corp
1981
XXXXX
Bytes
free
OK
iLU'ii
?fiTtT7H
aCBngi4HEQi
You should now have the "IBM Personal Computer"
BASIC
Messageinfront
of you.
(Of
course, if
you
wanted to return to the "Keyboard Adventure" from
this
screen,
you
could
always
press
the
Esc
key-just
as
you
did
to
get
here
the
first time.)
Getting
Started
2-41
Page 58

Now that your journey through the "Keyboard
Adventure" is over, we hope you had fun and learned
something,
too.
Feel
free
to
come
back
for
a visit
anytime.
The
next
time
you
join us, you
may
discover
some secret adventures.
Did
we tell
you
what
happens
when
you
press
the
Fn
and
FX
keyorthe
Shift +
Fn
+
the
F2
keys? If
you
want
to find
out
about
them,
you'll
just
have
to
come
back
and
experiment
with
the
keyboard.
2-42
Getting
Started
Page 59

If you ever want to run the "Keyboard Adventure"
again,
you
ean
do
this by pressing
the
Esc
key
when
the
"IBM Personal Computer BasicMessage Screen"
appears.
Remember,
this is
the
screen
that
appears
after
you
turn
your
IBM
VCjr
power
on.
Continue now with Section 3, "The Keyboard."
Getting
Started
2-43
Page 60

Notes:
2-44
Getting
Started
Page 61

SECTION
3.
THE
KEYBOARD
Contents
Introduction
3-3
Using
the
Keyboard
3-4
Centering
the
Information on
the
Screen
3-9
Keyboard
Modes
3-13
System
Reset
3-25
Additional Keyboard
Features
3-26
Keyboard
3-1
Page 62

Notes:
3-2
Keyboard
Page 63

Introduction
This
section
shows
you
howtouse
your
IBM
PCyr
keyboard
to
operate
your
IBM
PCy'r.
When
you
press
a key,
your
keyboard
sends
a message
to
your
IBM
PCyr.
The
program
you
use tells
your
IBM
PCyr
what
to
do
with
that
message.
For
instance,
when
you are playing a game, your
"J"
key may make a frog
jump.
But
when
you
are
using a
program
to
write
a
letter
to your friend,
that
same
key
simply types
the
letter
"J".
Keyboard
3-3
Page 64

Using
the
Keyboard
All keys
on
the
keyboard
are
typematic. This
means
that
each
key
repeats
as
long
as
you
hold
the
key
down.
Thisisthe
keyboard
that
comes
with
your
IBM
PCyr.
The
positions
of
the
keys
are
much
like
those
of
a
standard
typewriter.
Most
keys
on
the
keyboard
have
an
uppercase
(capital)
letter
andalowercase
(small)
letter.
Your
keyboard
has
some
extra
keys
thatatypewriter
doesn't
have.
Thisisthe
Enter
key.
3-4
Keyboard
Page 65

in' '
i'T-a
This is
the
Print
Screen
(Prt
So) key.
If
you
haveaprinter
and
you
press
the
Fn
key
and
then
press
the
Prt
So
key,
the
printer
printsacopy
of
the
information
that
is
on
the
screen.
Thisisthe
Backspace
(•«-)
key.
When
pressed,iterases
the
character
to
the
left
of
the
cursor
and
moves
the
cursor
one
position
to
the
left.
The
zero
"0"
and
the
letter
"O"
are
]
seenastwo
different
characters
by
your
IBM
PCyr.
The
zero
appears
on
your
screen
with
a Une
through
it.
Do
not
use
the
zero
when
you
want
the letter
"O"
to appear.
The
number
one
"1"
and
the
letter'T'
are
also
seen
as
two
different
characters
by
your
IBM
PCjr.
Do
not
use
the
number
one
(1) key when you want the letter'T
to
appear.
When
pressed,
the
Space
bar
createsablank
on
the
screen
and
moves
the
cursor
to
the
right.
Keyboard
3-5
Page 66

Thisisthe
Escape
(Esc)
key.
Thisisthe
Tab
key.
3-6
Keyboard
Page 67
# HQ U
These
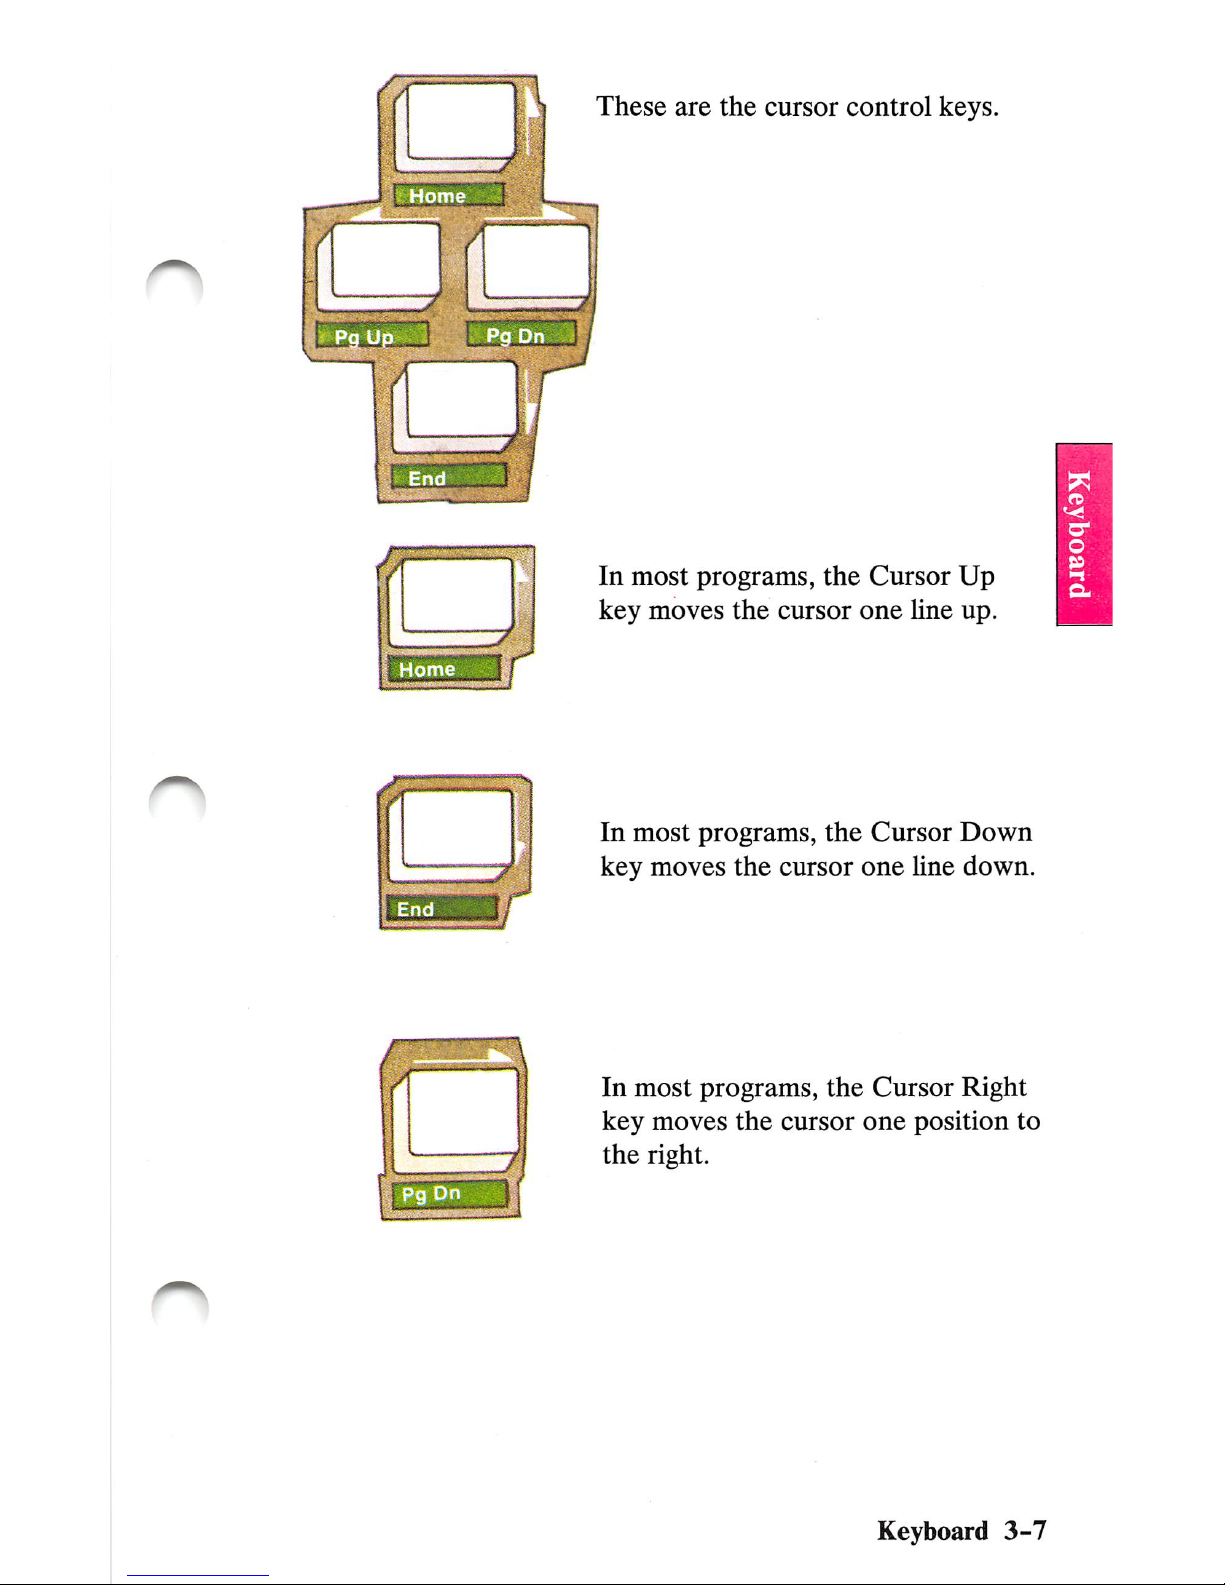
are
the
cursor
control
keys.
In
most
programs,
the
Cursor
Up
key
moves
the
cursor
one
line
up.
In
most
programs,
the
Cursor
Down
key
moves
the
cursor
one
line
down.
In
most
programs,
the
Cursor
Right
key
moves
the
cursor
one
position
to
the
right.
Keyboard
3-7
Page 68

ii
3-8
Keyboard
In
most
programs,
the
Cursor
Left
key
moves
the
cursor
one
position
to
the
left.
Page 69

Centering
the
Information
on
the
Screen
If
the
writing
on
your
screenisnot
centered,
you
can
move
it.
f BM Pers<
f
3nC1.20
BM
Personal
Computer
Basic
an C1.20
Copyright
IBM
Corp.
1981
;X
Bytes
free
3DH3il
403331
n
The
writing
on
this
screen
needs
to
be
moved
to
the
right.
Keyboard
3-9
Page 70

If
the
writing
on
your
display's screen needs to be
movedtothe
right,
you
can
do this
by
pressing
and
holding
and
and
then
pressing
Each
time
you
press
the
cursor
right
key
while holding
Ctrl
and
Alt,
the
writing
on
the
screen
moves
one
space
to
the
right.
When
the
writing
on
the
screeniscentered,
release
aU
three
keys.
3-10
Keyboard
Page 71

The
IBM
Personal
Computer
Basic
Version
C1.20
Copyright
IBM
Corp.
XXXXX
Bytes
free
OK
mOl
2l:tli:B
3(133314
The
writing
on
this
screen
needs
to
be
moved
to
the
left. If
the
writing
on
your
display's
screen
needs
to
be
moved
to
the
left,
you
can
do this
by
pressing
and
holding
and
and
then
pressing
Q
Each
time
you
press
the
cursor
left
key
whUe
holding
Ctrl
and
Alt,
the
writing
on
the
screen
moves
one
space
to
the
left.
Keyboard
3-11
Page 72

Notes:
3-12
Keyboard
Page 73

Keyboard
Modes
The
keyboard
can
be
placed
into
these
modes:
Regular
mode
Shift
mode
CapsLock
mode
Alternate
mode
Control
mode
Function
mode
Let's
see
how
the
keys
change
for
each
of
these
modes.
Keyboard
3-13
Page 74

Regular
Mode
regular
When
you
turn
your
IBM
VCjr
power
on,
the
keyboard
is in
the
Regular
mode.
The
keyboard
remains
in
the
Regular
mode
until
you
change
that
mode.
Regular
mode
means
that
all
alphabetic
keys
are
in lowercase.
3-14
Keyboard
Page 75

Shift
Mode
There
are
two
shift
keys
on
your
keyboard.
In
the
Shift
mode,
all keys
type
in
uppercase.
To
put
the
keyboard
into
the
Shift
mode,
press
and
hold
either
Shift
key
and
then
press
the
key
you
have
chosen
to
work
with
it.
The
key
you
have
chosen
must
be
pressed
while
the
Shift
keyisheld
down.
Shift
mode
ends
and
Regular
mode
returns
when
you
remove
your
finger
from
the
Shift
key.
When
you
first
turn
your
IBM
PCjr
power
on,
the
IBM
Personal
Computer
BASIC
Message
Screen
appeared.
Using
this
screen
and
the
following
instructions
try
your
keyboard.
Keyboard
3-15
Page 76

Remember,
when
you first
turn
your
IBM
PCyr
power
on,
your
keyboard
is in
lowercase.
Some
keys
have
bothawhite
andablack
character
above
them.
The
white
character
above
the
keys
shows
the
lowercase
numbers
and
symbols.
The
black
character
above
the
keys
shows
the
uppercase
symbols.
3-16
Keyboard
For
instance,
lookatthe
key
in
the
top
row
marked
Press
it.
The number
"4"
appears on the
screen.
Now
press
and
hold
down
a
key.
Then press i j:
A $
now
appears.
Page 77

CapsLock
Mode
To
put
the
keyboard
into
the
CapsLock
mode,
press
the
CapsLock
key
once
and
release
it.
In
the
CapsLock
mode,
the
lettersAthroughZappear
in
uppercase.
The
keyboard
staysinthe
CapsLock
mode
until
you
press
CapsLock
again.
If
you
want
to
typealowercase
letter
orablack
symbol, while
the
keyboard
is in
the
CapsLock
mode,
you
have
to
press
the
Shift
key.
You
can
type
lowercase
characters
whileinthe
CapsLock
mode
by
pressing
and
holding
the
Shift
key
and
then
pressing
the
key
for
the
character
you
have
chosen
to
appear
in
lowercase.
Keyboard
3-17
Page 78

To
cancel
the
CapsLock
mode, press
CapsLock
again
and
release it.
Your
keyboard
then
returnstothe
Regular mode.
3-18
Keyboard
Page 79

Alternate
Mode
In
the
Alternate
mode,
some
keys
will
display
different
symbols
when
usedincombination
with
the
Alternate
(Alt)
key.
Notice
that
the
Alt
key
hasablue
border.
Allofthe
keys
used
with
the
Alt
key
are
marked
withablue
stripe
underneath
them.
The
symbols displayed
by
using
these
keys
with
the
Alt
key
are
showninthe
blue
stripes
below
the
keys.
Keyboard
3-19
Page 80

ODODODO
DDOO
ODD
£J
DDDOOOOOOD
CD
O
DODDDDD
L-J
OODOODO
The
key
you
have
chosen
to use
with
Alt
must
be
pressed
while
the
Alt
keyisheld
down.
Alternate
mode
ends
when
you
stop
pressing
the
Alt
key.
Your
keyboard
then
returns
to
the
Regular
mode.
3-20
Keyboard
Page 81

Control
Mode
The
Control
key
(Ctrl)
on
the
left side of
your
keyboard
performs
functions
that
are
determined
by
the
program
you
use.
To
put
the
keyboard
in
Control
Mode,
press
and
hold
the
Control
key
and
then
press
the
key
you
have
chosen
to
work
with
it.
Control
Mode
ends
when
you
stop
pressing
the
Ctrl
key.
Keyboard
3-21
Page 82

Function
Mode
The
border
around
the
Function
(Fn)
key
is green.
When
you press
the
Fn
key,
the
keyboard
waits
for
you
to press
oneofthe
keys
withagreen
stripe
underneath
it.
The
number
of
the
function
each
key
performs
is
showninthe
green
stripe
underneath
the
key.
The
program
you
are using determines
what
that
key
does.
To
use
the
Function
mode,
first
press
and
release
the
Fn
key.
Then
press
the
green
striped key you desire.
After
you
press
the
green
striped
key,
the
Function
mode
is
canceled.
If
you
have
more
than
one
function
to
perform,
you
may
press
and
hold
the
Fn
key
while
pressing
the
other
green
striped
keys.
3-22
Keyboard
Page 83

If you press
the
Fn
key
by accident, press
the
Shift
key
to
cancel
the
Function
mode.
You
can
lock
your
keyboard
in
the
Function
mode
by
pressing
and
holding
the
Shift
and
Fn
keys
and
then
pressing
the
Bsc
key.
When
locked
in
the
Function
mode,
all keys
with
green
stripes
perform
their
functions
without
needing
the
Fn
key
pressed
first.
To
unlock
the
Function
mode,
press
and
hold
Shift
and
Fn
and
then
press
Bsc.
I i
ci;
% A ( )
crm
crzra
cm
aoooDOyc:
oo
tJODODCDCjO
O
Keyboard
3-23
Page 84

Notes:
3-24
Keyboard
Page 85

System
Reset
While using
your
IBM
PCyr
there
will
be
many
times
that
you
will
want
to
performasystem
reset
or
(reset),
(reset
and
system
reset
mean
the
same thing).
There
are
two
ways
to
reset
yoxir
IBM
PC/r
while
you
are
using it.
The
first
wayisto
turn
your
IBM
VCjr
power
off,
wait
five
seconds,
then
turn
power
on.
The
second
way
is to
use
your
keyboard,
follow
the
illustration
shown
below.
Press
and
holdf
and
27
Then
press
(!
Release
all
three
keys.
Some
things
that
you
might
useareset
for
are:
1
Startingaprogram
over
again.
2
Loadingaprogram
fromadiskette.
Keyboard
3-25
Page 86

Additional Keyboard
Features
Keyboard
Legs
Your
IBM
PCyr
keyboardisequipped
with
adjustable
legs.
You
can
find
the
position
thatiscomfortable
to
you,
by
tjq)ing
on
the
keyboard
with
the
legs up
and
then
down.
Keyboard
Clicker
Your
IBM
VCjr
hasafeature
called
the
Keyboard
Chcker.
When
this
featureisturned
on,
every time
you
pressakey
you
will
hear
a clicking sound.
To
turn
the
Keyboard
Clicker
on
press
and
hold
CTRL
and
ALT
and
then
press
CapsLock.
To
turn
the
clicker
off
press
and
hold
CTRL
and
ALT
and
then
press
CapsLock.
Continue with Section4, "Choosing Keys".
3-26
Keyboard
Page 87

SECTION
4.
CHOOSING
KEYS
Contents
Introduction
4-3
When
to
Use
the
Keyboard
Differences
Chart
....
4-5
Using
the
Keyboard
Difference
Chart
4-6
Keyboard
Difference
Chart
4-9
Choosing Keys
4-1
Page 88

Notes:
4-2
Chooidi^Keys
Page 89

Introduction
Some
program
books
were
written
to
be
used
with
an
IBM
Personal
Computer
keyboard.
You
can
still
use
these programs
and
their
books
with
your
IBM
PCyr
and
its
keyboard.
This
section
shows
you
the
differences
between
your
keyboard
and
the
IBM
Personal
Computer
keyboard.
Use
this
section
as a guide
when
runningaprogram
written
to
be
used
with
an
IBM
Personal
Computer
keyboard.
If
you
haveadiskette
drive installed
you
may
run
your
"Exploring the IBM
PCjr"
diskette, which is located in
the
back
of
the
Guide to Operations
binder.
For
information
on
how
to
operate
your
diskette
drive,
refer
to
the
operating
instructions
in
the
Diskette
Drive
Option
Installation
and
Operating
Instructions
in
Section
5.
If
you
have
any
options
to install, install
them
now.
The
carton
that
your
optionispacked
in
contains
the
instructions
for
installing
your
option.
If
you
do
not
have
any
options
to install go
to
Section
7, "Cartridges".
Choosing
Keys
4-3
Page 90

Notes:
4-4
Chooang
Keys
Page 91

When
to
Use
the
Keyboard
Differences
Chart
Before you begin to use
one
of your programs, look at
the
book
that
comes
with
it. If
your
program
book
refers to keys
on
the
IBM
Personal
Computer
keyboard, use
the
Keyboard Difference Chart.
If your program
book
refers to
the
IBM
PCjr
keyboard
you will
not
have to refer to the keyboard chart.
The
following pages explain
the
use
of
this chart.
Choosing
Keys
4-5
Page 92

Using
the
KeyboardDifference
Chart
Let's
takeafew
minutes
to
leam
how
to
use
the
Keyboard
Difference
Chart.
You
will
be
surprised
how
easyitis
to
teU
which
keys
you
should
use.
Suppose
you
are
using a
program
withabook
written
for
an
IBM
Personal
Computer
keyboard.
You
decide
to
print
your
file
and
the
program
book
tells
you
to do
this
by
pressing
the
F2
key.
Even
though you see an
F2
key
on
your keyboard, it
will
not
work
the
way
the
program
book
describes.
The
bookisnot
refering to
the
IBM
PCjr
keyboard.
Go
to
your
Keyboard
Difference
Chart.
The
left
column
lists
the
keys
on
the
IBM
Personal
Computer
keyboard.
The
right column hsts
the
keys
you should use to get
the
same results
on
your IBM
PCyr
keyboard.
Your
program
has
instructed
youtouse
F2,
so
you
need
to
find
F2
in
the
left
column
of
the
chart.
4-6
Choosing Keys
Page 93

Now
look
across
the
page to
the
IBM
VCjr
keyboard
column. You will see
"Fn
then
F2"
in green. This
means that, on your IBM
PC/r
keyboard, you press
the
green bordered Function key to go into the Function
mode
and
then
press the key with the green stripe
and
F2
underneath
it.
Thisisthe
sameaspressing
the
F2
key on the IBM Personal Computer keyboard.
PressingfF2
] on the
IBM
Personal
Computer
keyboard
is
the
same
as
pressing
and
IM
on
the
IBM
PCyr
keyboard
OK,
let's
suppose
you
are using a
program
that
tells
you
to press Ctrl/Break.
Control
Break
wiU
not
work
the
way
the
program
book
describes.
The
bookisnot
referingtothe
IBM
PCy>
keyboard.
Choosing Keys
4-7
Page 94

Look
at
your
Keyboard
Difference
Chart.
In the left column, you see "Ctrl/Break (or Break)". If
you follow
that
line over to the
IBM
VCjr keyboard
column, you see that you get
Ctrl/Break
by pressing
the
green
bordered
Fn
key
and
the
Break
key
with
the
green
stripe.
Press
f'
'
1
then
'
That's
all
there
is to it!
You
may
wanttospend
some
time
lookingatthe
chart
untU
you
feel
comfortable
with
it.
Most
of
the
key
combinations
are
color
coded
on
your
keyboard.
This
chart
has
been
reproduced
onacardinthe
front
of
this book. You can
put
this card beside your IBM PCyr
when
you
are
using
programs
written
for
an
IBM
Personal
Computer
keyboard.
4-8
Choosing
Keys
Page 95

Keyboard
Difference
Chart
IBM
Personal
Computer
Keys
and
Key
Combinations
Cordless
Keyboard
Equivalent
Keys
and
Key
Combinations
F1
Fn
then
F1
F2
Fn
then
F2
F3
Fn
then
F3
F4
Fn
then
F4
F5
Fn
then
F5
F6
Fn
then
F6
F7
Fn
then
F7
F8
Fn
then
FB
F9
Fn
then
F9
F10
Fn
then
F10
Shift/FI
thru
F10
Hold
Shift
Press
Fn
then
F1
thru
F10
Ctrl/FI
thru
F10
Hold
Ctrl
Press
Fn
then
F1
thru
F10
Alt/FI
thru
F10
Hold
Alt
Press
Fn
then
F1
thru
F10
Ctrl/Break
(or
Break)
Fn
then
Break
Ctrl/End
Ctrl
with
Fn
then
End
Ctrl/PrtSc
(Echo
Print)
Fn
then
Echo
Ctrl/Home
Ctrl
with
Fn
then
Home
Ctrl/Num
Lock
(Pause)
Fn
then
Pause
Ctrl/PgDn
Ctrl
with
Fn
then
Pg Dn
Ctrl/PgUp
Ctrl
with
Fn
then
Pg Up
ShIft/PrtSc
(Print
Screen)
Fn
then
Prt
Sc
Scroll
Lock
Fn
then
Sc
Lock
Num
Lock
Hold
Alt
Press
Fn
then
N
PgUp
Fn
then
Pg Up
PgDn
Fn
then
Pg Dn
Home
Fn
then
Home
End
Fn
then
End
\
Alt
with
/
'
Alt
with
'
\
Alt
with
I
~
Alt
with
]
u
Enter
All
256
extended
codes
Num
Lock
Hold
Alt
then
Numeric
Value
Choosing
Keys
4-9
Page 96

Notes:
4-10
Choosing Keys
Page 97

SECTION
5.
THE
IBM
PC/r
OPTIONS
Contents
Instructions
5-3
Options
5-1
Page 98

Notes:
5-2
Optioiis
Page 99

Instructions
Insert
the
instructions
you
receive
with
options
into
this
section. Notice
the
black tabs
on
the right edge
of
the
next
page.
Each
set
of
option
information
also
has
a
black
tab
on
the
right side. As
you
install
an
option,
insert
the
information
you
receive
withitbehind
the
matching
black
tab
on
the
next
page, as
shown
below.
Options
5-3
Page 100

Notes:
5-4
Options
 Loading...