

Page 1

NetVista
™
Quick Reference
Inside:
- Safety, warranty, and other notices
- Computer setup
- Software recovery
- Troubleshooting and diagnostics
- IBM help and service
Page 2

Page 3

NetVista
™
Quick Reference
Page 4

Note
Before using this information and the product it supports, be sure to read “Safety
notices” on page v, Appendix A, “Warranty information” on page 31, and
Appendix B, “Notices” on page 49.
Second Edition (October 2002)
© Copyright International Business Machines Corporation 2002. All rights reserved.
US Government Users Restricted Rights – Use, duplication or disclosure restricted by
GSA ADP Schedule Contract with IBM Corp.
Page 5

Contents
Safetynotices.....................v
Lithium battery notice ...................vi
Modem safety information .................vii
Lasercompliancestatement.................viii
Additional help .....................xi
Chapter 1. Arranging your workspace .............1
Comfort........................1
Using wireless keyboards and USB connectors ...........3
Chapter 2. Setting up your computer .............5
Turningonpower....................10
Finishingthesoftwareinstallation...............10
Completing important tasks .................10
Installing other operating systems ...............11
Shutting down the computer ................11
Recording your computer information .............11
Chapter 3. Recovering software ...............13
Performing a software recovery................13
Solvingrecoveryproblems.................14
Recovering or installing device drivers .............15
Chapter 4. Troubleshooting and diagnostics ..........17
Basictroubleshooting...................17
IBM Enhanced Diagnostics .................20
Errorcodes......................21
POST beep codes ....................22
Chapter 5. Getting information, help, and service.........25
Getting information ...................25
Getting help and service ..................25
Purchasing additional services ................29
Appendix A. Warranty information ..............31
Warranty period.....................31
Warranty service and support ................35
IBM Statement of Limited Warranty Z125-4753-06 8/2000 .......37
Appendix B. Notices ...................49
Television output notice ..................50
© Copyright IBM Corp. 2002 iii
Page 6

Trademarks......................50
Electronic emissions notices .................51
Federal Communications Commission (FCC) and telephone company
requirements.....................54
Power cord notice ....................57
iv Quick Reference
Page 7

Safety notices
DANGER
Electrical current from power, telephone, and communication cables is
hazardous.
To avoid a shock hazard:
v Do not connect or disconnect any cables or perform installation,
maintenance, or reconfiguration of this product during an electrical storm.
v Connect all power cords to a properly wired and grounded electrical
outlet.
v Connect to properly wired outlets any equipment that will be attached to
this product.
v When possible, use one hand only to connect or disconnect signal cables.
v Never turn on any equipment when there is evidence of fire, water, or
structural damage.
v Disconnect the attached power cords, telecommunications systems,
networks, and modems before you open the device covers, unless
instructed otherwise in the installation and configuration procedures.
v Connect and disconnect cables as described in the following table when
installing, moving, or opening covers on this product or attached devices.
To connect:
1. Turn everything OFF.
2. First, attach all cables to devices.
3. Attach signal cables to connectors.
4. Attach power cords to outlet.
5. Turn device ON.
To disconnect:
1. Turn everything OFF.
2. First, remove power cords from outlet.
3. Remove signal cables from connectors.
4. Remove all cables from devices.
DANGER
Le courant électrique provenant de l’alimentation, du téléphone et des câbles
de transmission peut présenter un danger.
Pour éviter tout risque de choc électrique :
v Ne manipulez aucun câble et n’effectuez aucune opération d’installation,
d’entretien ou de reconfiguration de ce produit au cours d’un orage.
v Branchez tous les cordons d’alimentation sur un socle de prise de courant
correctement câblé et mis à la terre.
© Copyright IBM Corp. 2002 v
Page 8

v Branchez sur des socles de prise de courant correctement câblés tout
équipement connecté à ce produit.
v Lorsque cela est possible, n’utilisez qu’une seule main pour connecter ou
déconnecter les câbles d’interface.;
v Ne mettez jamais un équipement sous tension en cas d’incendie ou
d’inondation, ou en présence de dommages matériels.
v Avant de retirer les carters de l’unité, mettez celle-ci hors tension et
déconnectez ses cordons d’alimentation, ainsi que les câbles qui la relient
aux réseaux, aux systèmes de té lécommunication et aux modems (sauf
instruction contraire mentionnée dans les procédures d’installation et de
configuration).
v Lorsque vous installez, que vous déplacez, ou que vous manipulez le
présent produit ou des périphériques qui lui sont raccordés, reportez-vous
aux instructions ci-dessous pour connecter et déconnecter les différents
cordons.
Connexion:
1. Mettez les unités hors tension.
2. Commencez par brancher tous les
cordons sur les unités.
3. Branchez les câbles d’interface sur des
connecteurs.
4. Branchez les cordons d’alimentation
sur des prises.
5. Mettez les unités sous tension.
Déconnexion:
1. Mettez les unités hors tension.
2. Débranchez les cordons d’alimentation
des prises.
3. Débranchez les câbles d’interface des
connecteurs.
4. Débranchez tous les câbles des unités.
Lithium battery notice
CAUTION:
Danger of explosion if battery is incorrectly replaced.
When replacing the battery, use only IBM Part Number 33F8354 or an
equivalent type battery recommended by the manufacturer. The battery
contains lithium and can explode if not properly used, handled, or disposed of.
Do not:
v Throw or immerse into water
v Heat to more than 100°C (212°F)
v Repair or disassemble
Dispose of the battery as required by local ordinances or regulations.
ATTENTION
vi Quick Reference
Page 9

Danger d’explosion en cas de remplacement incorrect de la batterie.
Remplacer uniquement par une batterie IBM de type ou d’un type équivalent
recommandé par le fabricant. La batterie contient du lithium et peut exploser
en cas de mauvaise utilisation, de mauvaise manipulation ou de mise au rebut
inappropriée.
Ne pas :
v Lancer ou plonger dans l’eau
v Chauffer à plus de 100°C (212°F)
v Réparer ou désassembler
Mettre au rebut les batteries usagées conformément aux règlements locaux.
Modem safety information
To reduce the risk of fire, electrical shock, or injury when using telephone
equipment, always follow basic safety precautions, such as:
v Never install telephone wiring during a lightning storm.
v Never install telephone jacks in wet locations unless the jack is specifically
designed for wet locations.
v Never touch uninsulated telephone wires or terminals unless the telephone
line has been disconnected at the network interface.
v Use caution when installing or modifying telephone lines.
v Avoid using a telephone (other than a cordless type) during an electrical
storm. There may be a remote risk of electric shock from lightning.
v Do not use the telephone to report a gas leak in the vicinity of the leak.
Consignes de sécurité relatives au modem
Lors de l’utilisation de votre matériel téléphonique, il est important de
respecter les consignes ci-après afin de réduire les risques d’incendie,
d’électrocution et d’autres blessures :
v N’installez jamais de cordons téléphoniques durant un orage.
v Les prises téléphoniques ne doivent pas être installées dans des endroits
humides, excepté si le modèle a été conçu à cet effet.
v Ne touchez jamais un cordon téléphonique ou un terminal non isolé avant
que la ligne ait été déconnectée du réseau téléphonique.
v Soyez toujours prudent lorsque vous procédez à l’installation ou à la
modification de lignes téléphoniques.
v Si vous devez téléphoner pendant un orage, pour éviter tout risque de choc
électrique, utilisez toujours un téléphone sans fil.
Safety notices vii
Page 10

v En cas de fuite de gaz, n’utilisez jamais un téléphone situé à proximité de la
fuite.
Laser compliance statement
Some IBM Personal Computer models are equipped from the factory with a
CD-ROM drive or a DVD-ROM drive. CD-ROM drives and DVD-ROM drives
are also sold separately as options. CD-ROM drives and DVD-ROM drives are
laser products. These drives are certified in the U.S. to conform to the
requirements of the Department of Health and Human Services 21 Code of
Federal Regulations (DHHS 21 CFR) Subchapter J for Class 1 laser products.
Elsewhere, these drives are certified to conform to the requirements of the
International Electrotechnical Commission (IEC) 825 and CENELEC EN 60 825
for Class 1 laser products.
When a CD-ROM drive or a DVD-ROM drive is installed, note the following
handling instructions.
CAUTION:
Use of controls or adjustments or performance of procedures other than
those specified herein might result in hazardous radiation exposure.
Removing the covers of the CD-ROM drive or DVD-ROM drive could result in
exposure to hazardous laser radiation. There are no serviceable parts inside the
CD-ROM drive or DVD-ROM drive. Do not remove the drive covers.
Some CD-ROM drives and DVD-ROM drives contain an embedded Class 3A
or Class 3B laser diode. Note the following statement.
DANGER
Laser radiation when open. Do not stare into the beam, do not view directly with
optical instruments, and avoid direct exposure to the beam.
DANGER:
Certains modèles d’ordinateurs personnels sont équipés d’origine d’une unité
de CD-ROM ou de DVD-ROM. Mais ces unités sont également vendues
séparément en tant qu’options. L’unité de CD-ROM/DVD-ROM est un
appareil à laser. Aux État-Unis, l’unité de CD-ROM/DVD-ROM est certifiée
conforme aux normes indiquées dans le sous-chapitre J du DHHS 21 CFR
relatif aux produits à laser de classe 1. Dans les autres pays, elle est certifiée
être un produit à laser de classe 1 conforme aux normes CEI 825 et CENELEC
EN 60 825.
viii Quick Reference
Page 11

Lorsqu’une unité de CD-ROM/DVD-ROM est installée, tenez compte des
remarques suivantes:
ATTENTION: Pour éviter tout risque d’exposition au rayon laser, respectez
les consignes de réglage et d’utilisation des commandes, ainsi que les
procédures décrites.
L’ouverture de l’unité de CD-ROM/DVD-ROM peut entraîner un risque
d’exposition au rayon laser. Pour toute intervention, faites appel à du
personnel qualifié.
Certaines unités de CD-ROM/DVD-ROM peuvent contenir une diode à laser
de classe 3A ou 3B. Tenez compte de la consigne qui suit:
DANGER
Rayonnement laser lorsque le carter est ouvert. Évitez toute exposition directe des
yeux au rayon laser. Évitez de regarder fixement le faisceau ou de l’observer à l’aide
d’instruments optiques.
Safety notices ix
Page 12

x Quick Reference
Page 13

Additional help
This Quick Reference provides the information for installing your IBM
®
computer and starting the operating system. This publication also includes
basic troubleshooting information, software recovery procedures, help and
service information, and warranty information.
The User Guide for your computer has information about installing optional
hardware. This Portable Document Format (PDF) file is available through
Access IBM on your computer desktop. Use Adobe Acrobat Reader to read and
print your User Guide for use when installing optional hardware.
Access IBM is on your desktop or click Start → Access IBM to learn more
details about the following topics:
v Using your computer
v Installing hardware options
v Connecting communication cables
v Troubleshooting common problems
v Registering your computer
If you have Internet access, you can get the most up-to-date hints, tips,
Frequently Asked Questions, and discussion forums, as well as the User Guide
for your computer from the World Wide Web. For computer service
technicians, the Hardware Maintenance Manual is also available. To access any of
this information, point your browser to http://www.ibm.com/pc/support/.
Type your machine type and model number in the Quick Path field, and click
Go.
© Copyright IBM Corp. 2002 xi
Page 14

xii Quick Reference
Page 15

Chapter 1. Arranging your workspace
To get the most from your computer, arrange both the equipment you use and
your work area to suit your needs and the kind of work you do. Your comfort
is of foremost importance, but light sources, air circulation, and the location of
electrical outlets also can affect the way you arrange your workspace.
Comfort
Although no single working position is ideal for everyone, here are a few
guidelines to help you find a position that suits you best.
Sitting in the same position for a long time can cause fatigue. A good chair can
make a big difference. The backrest and seat should adjust independently and
provide good support. The seat should have a curved front to relieve pressure
on the thighs. Adjust the seat so that your thighs are parallel to the floor and
your feet are either flat on the floor or on a footrest.
When using the keyboard, keep your forearms parallel to the floor and your
wrists in a neutral, comfortable position. Try to keep a light touch on the
keyboard and your hands and fingers relaxed. You can change the angle of the
keyboard for maximum comfort by adjusting the position of the keyboard feet.
Viewing Distance
Lower
Back
Support
Seat
Height
Adjust the monitor so the top of the screen is at, or slightly below, eye level.
Place the monitor at a comfortable viewing distance, usually 51 to 61 cm (20 to
24 in.), and position it so you can view it without having to twist your body.
Also position other equipment you use regularly, such as the telephone or a
mouse, within easy reach.
© Copyright IBM Corp. 2002 1
Page 16

Glare and lighting
Position the monitor to minimize glare and reflections from overhead lights,
windows, and other light sources. Even reflected light from shiny surfaces can
cause annoying reflections on your monitor screen. Place the monitor at right
angles to windows and other light sources, when possible. Reduce overhead
lighting, if necessary, by turning off lights or using lower wattage bulbs. If you
install the monitor near a window, use curtains or blinds to block the sunlight.
You might have to adjust the Brightness and Contrast controls on the monitor
as the room lighting changes throughout the day.
Where it is impossible to avoid reflections or to adjust the lighting, an antiglare
filter placed over the screen might be helpful. However, these filters might
affect the clarity of the image on the screen; try them only after you have
exhausted other methods of reducing glare.
Dust buildup compounds problems associated with glare. Remember to clean
your monitor screen periodically using a soft cloth moistened with a
nonabrasive liquid glass cleaner.
Air circulation
Your computer and monitor produce heat. The computer has a fan that pulls in
fresh air and forces out hot air. The monitor lets hot air escape through vents.
Blocking the air vents can cause overheating, which might result in a
malfunction or damage. Place the computer and monitor so that nothing blocks
the air vents; usually, 51 mm (2 in.) of air space is sufficient. Also, make sure
the vented air is not blowing on someone else.
Electrical outlets and cable lengths
The location of electrical outlets and the length of power cords and cables that
connect to the monitor, printer, and other devices might determine the final
placement of your computer.
When arranging your workspace:
v Avoid the use of extension cords. When possible, plug the computer power
cord directly into an electrical outlet.
v Keep power cords and cables neatly routed away from walkways and other
areas where they might get kicked accidentally.
For more information about power cords, see “Power cord notice” on page 57
of this book.
2 Quick Reference
Page 17

Using wireless keyboards and USB connectors
Some models of the Rapid Access III Keyboard and the Rapid Access III
Wireless Keyboard have USB connectors at the rear of the keyboard. You can
use these USB connectors for small devices that have their own power supply.
USB devices that require power must be connected to the front or rear of the
computer.
The IBM Rapid Access III Wireless Keyboard and ScrollPoint
®
Wireless Mouse
come with an IBM Dual Wireless Receiver. Connect the receiver into one of the
USB connectors at the front or rear of the computer. The Rapid Access Wireless
Keyboard and the ScrollPoint Wireless Mouse operate with this receiver.
If your keyboard and mouse come with software and documentation, use and
refer to that information when installing your keyboard and mouse.
Important
When using wireless devices, be certain that no items are placed between
the device and the receiver. Items left between the wireless receiver and
the device might interfere with wireless function.
Notes:
1. Cable connectors for USB devices fit only one way. They cannot be
connected incorrectly.
2. Do not place the IBM Dual Wireless Receiver on top of the power supply.
Chapter 1. Arranging your workspace 3
Page 18

4 Quick Reference
Page 19
Chapter 2. Setting up your computer
Note: Your computer might not have all of the connectors that are described in
this chapter.
Use the following information when setting up your computer. Look for the
small connector icons on the back of your computer.
If your computer cables and connector panel have color-coded connectors,
match the color of the cable end with the color of the connector. For example,
match a blue cable end with a blue connector, a red cable end with a red
connector.
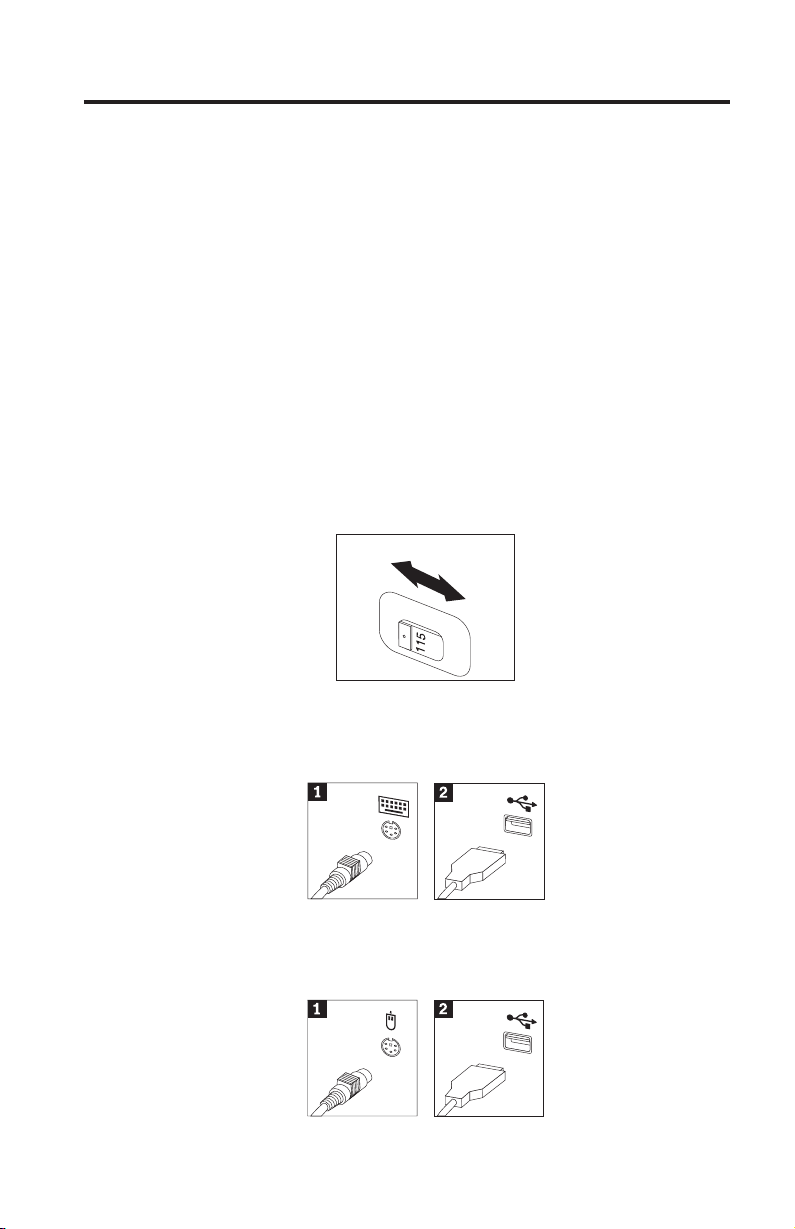
1. Check the position of the voltage-selection switch on the rear of the
computer. Use a ballpoint pen to slide the switch, if necessary.
v If the voltage supply range is 90–137 V ac, set the switch to 115 V.
v If the voltage supply range is 180–265 V ac, set the switch to 230 V.
2. Your keyboard cable might have a standard keyboard connector1 or a
Universal Serial Bus (USB) connector2. Connect the keyboard cable to
the appropriate keyboard connector.
3. Your mouse cable might have a standard mouse connector1 or a USB
connector 2. Connect the mouse cable to the appropriate mouse
connector.
© Copyright IBM Corp. 2002 5
Page 20
4. If you have the IBM Dual Wireless Receiver, connect the receiver into one
of the USB connectors at the front or rear of the computer. Arrange the
IBM Rapid Access III Wireless Keyboard and ScrollPoint Wireless mouse
in a position which will be comfortable for you.
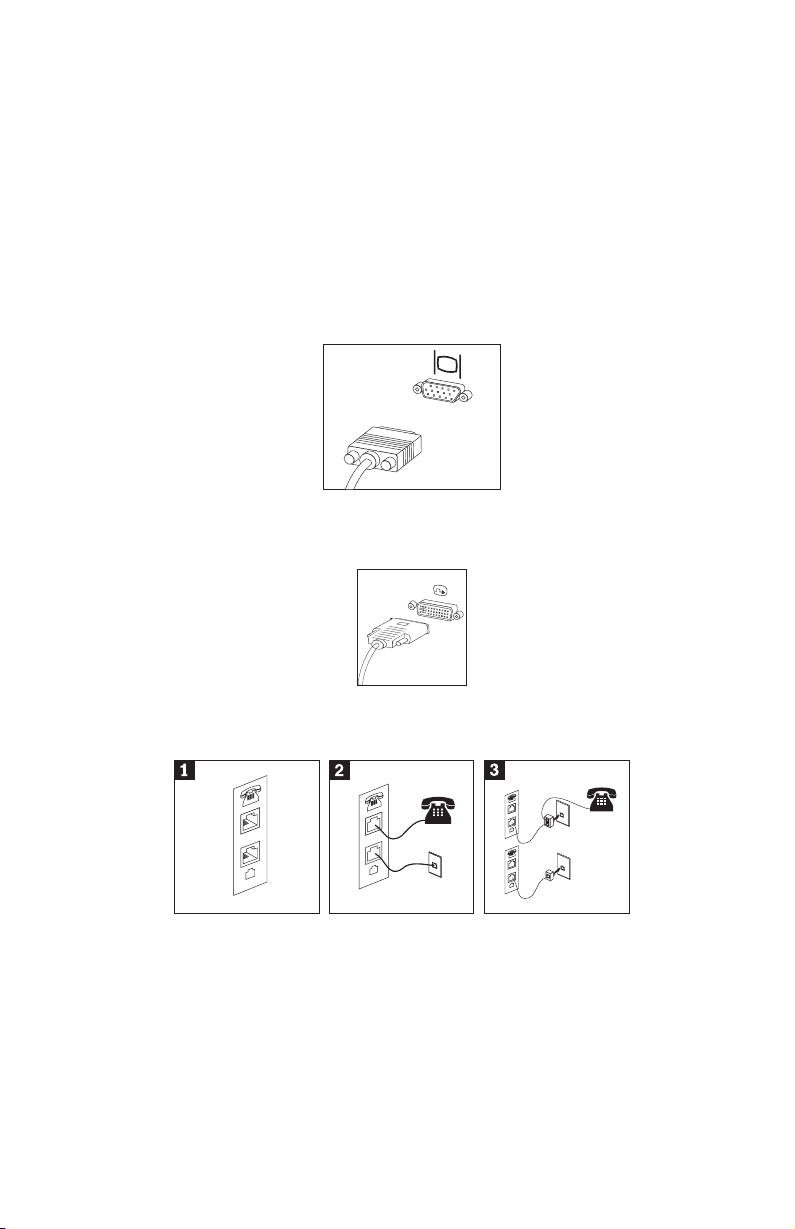
5. Connect the monitor cable to the monitor connector on the computer.
v If you have a Standard Video Graphics Array (SVGA) monitor, connect
the cable to the connector as shown.
Note: If your model has two monitor connectors, be sure to use the
connector on the accelerated graphics port (AGP) adapter.
v If you have a digital video interface (DVI) monitor, connect the cable to
the connector as shown.
6. If you have a modem, connect the modem using the following
instructions.
E
N
O
H
E
N
O
H
P
E
N
I
L
E
N
O
H
P
E
N
I
L
P
E
N
I
L
E
N
O
H
P
E
N
I
L
1 Use this dual connection on the back of the computer to set up your modem.
2 Attach one end of the telephone cable to the telephone and the other end to the
telephone connector on the back of the computer. Attach one end of the modem
cable to the modem connector on the back of the computer and the other end to
the telephone outlet.
3 In some cases, a splitter or converter is required to attach the cables to the
telephone outlet, as shown at the top of this illustration. You can also use the
splitter without the telephone, as shown at the bottom of the illustration.
6 Quick Reference
Page 21

7. If you have audio devices, attach them using the following instructions.
For more detailed information about speakers, see steps 8 and 9.
1 Audio line-in This connector receives audio signals from an external audio
2 Audio line-out This connector sends audio signals from the computer to external
3 Microphone Use this connector to attach a microphone to your computer when
4 Headphone Use this connector to attach headphones to your computer when
device, such as a stereo system.
devices, such as powered stereo speakers.
you want to record sound or if you use speech-recognition
software.
you want to listen to music or other sounds without disturbing
anyone. This connector might be located on the front of the
computer.
8. If you have powered speakers with an ac adapter, use the following
instructions.
a. Connect the cable that runs between the speakers, if necessary. On
some speakers, this cable is permanently attached.
b. Connect the ac adapter cable to the speaker.
c. Connect the speakers to the computer.
d. Connect the ac adapter to the ac power source.
9. If you have unpowered speakers with no ac adapter, use the following
instructions.
Chapter 2. Setting up your computer 7
Page 22
a. Connect the cable that runs between the speakers, if necessary. On
some speakers, this cable is permanently attached.
b. Connect the speakers to the computer.
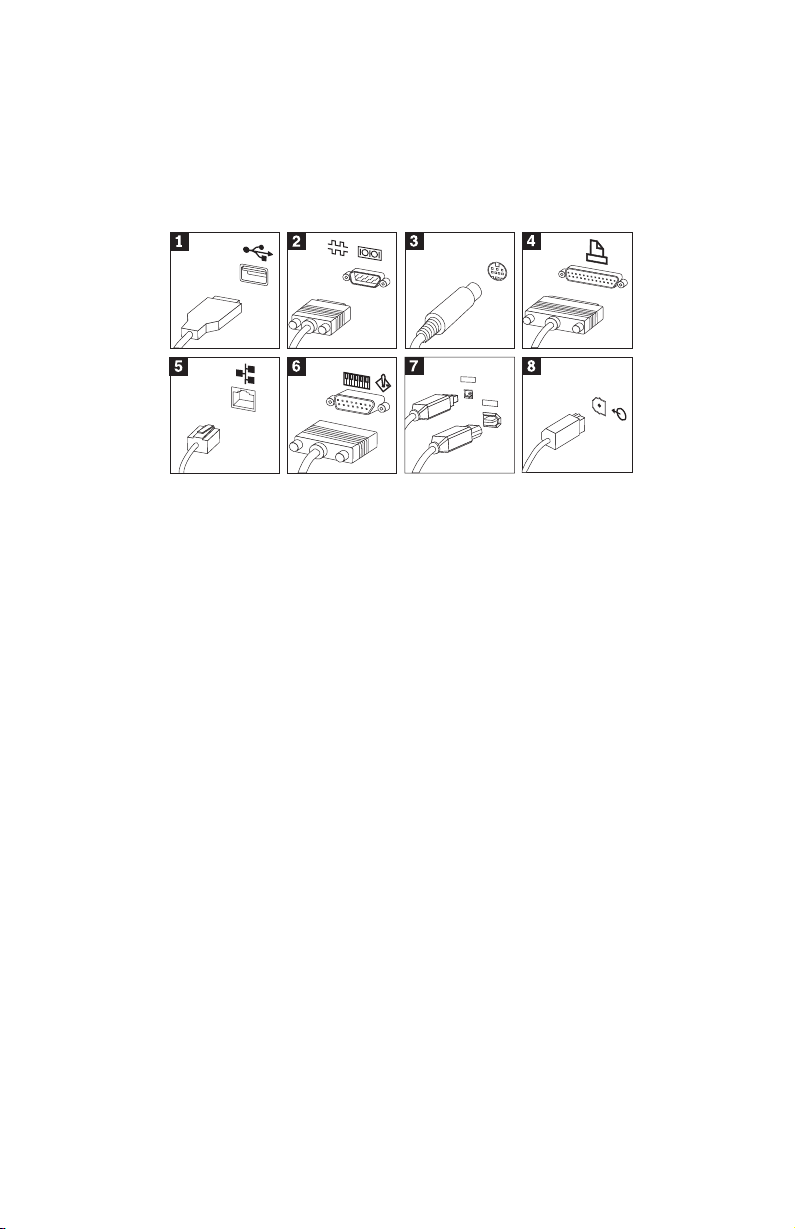
10. Connect any additional devices that you have. Your computer might not
have all connectors that are shown.
1
3
9
4
1
3
9
4
8 Quick Reference
Page 23

1 USB Use these connectors to attach a device that requires a Universal
2 Serial Use this connector to attach an external modem, serial printer, or
3 S-video Use this connector to attach a television set that has an S-Video
4 Parallel Use this connector to attach a parallel printer or any other device
5 Ethernet Use this connector to attach the computer to an Ethernet-type local
Serial Bus (USB) connection, such as a USB scanner, printer, or
personal digital assistant (PDA).
other device that uses a 9-pin serial connector.
connector. This connector is present on some high-performance
video adapters.
that requires a 25-pin parallel connection.
area network or to a cable modem.
Important
To operate the computer within FCC limits when it is
connected to an Ethernet network, use a Category 5 Ethernet
cable.
6 MIDI/joystick Use this connector to attach a joystick, gamepad, or a musical
7 IEEE 1394 This connector is sometimes called Firewire because it transmits
8 S/PDIF The S/PDIF connector enables you to connect consumer digital
instrument digital interface (MIDI) device such as a MIDI
keyboard.
data rapidly. There are two types of IEEE 1394 connectors: the
4-pin and the 6-pin. IEEE 1394 offers connection to several types of
consumer electronics, including digital audio devices and scanners.
equipment such as digital audio tape (DAT) devices, CD drives,
and other S/PDIF-compatible devices.
11. Connect the power cords to properly grounded electrical outlets.
Note: For more information about connectors, see Access IBM on your
computer desktop.
Chapter 2. Setting up your computer 9
Page 24

Turning on power
Turn on the monitor and other external devices first, and then turn on the
computer. When the power-on self-test (POST) is finished, the IBM logo
window closes. If your computer has preinstalled software, the software
installation program starts.
If you experience any problems during startup, see Chapter 4,
“Troubleshooting and diagnostics” on page 17 and Chapter 5, “Getting
information, help, and service” on page 25.
Finishing the software installation
Important
Read the license agreements carefully before using the programs on this
computer. These agreements detail your rights, obligations, and
warranties for the software on this computer. By using these programs,
you accept the terms of the agreements. If you do not accept the
agreements, do not use the programs. Instead, promptly return the entire
computer for a full refund.
After you start the computer for the first time, follow the instructions on the
screen to complete the software installation. If you do not complete the
software installation the first time the computer is turned on, unpredictable
results might occur. When the installation is complete, click Access IBM on
your desktop to learn more about your computer.
Completing important tasks
After you have set up your computer, perform the following tasks, which will
save you time and trouble later:
v Create a Recovery Repair diskette. Your computer has a built-in program, the
Product Recovery program, that restores the operating system. Normally,
this program can be accessed with the F11 key during computer startup. If
the F11 prompt becomes unusable or not visible, the Recovery Repair diskette
will restore access to the Product Recovery program. See “Creating a
Recovery Repair diskette” on page 14.
v Create an Enhanced Diagnostics diskette. The Enhanced Diagnostics tool can
isolate hardware problems and is part of the Product Recovery program.
Making an Enhanced Diagnostics diskette ahead of time assures you use of
the Enhanced Diagnostics tool if the Product Recovery program becomes
inaccessible. See “Creating an IBM Enhanced Diagnostics diskette” on
page 20.
10 Quick Reference
Page 25

v Record your computer machine type, model, and serial number. If you need
service or technical support, you will probably be asked for this information.
See “Recording your computer information”.
Keep this Quick Reference in a safe place. It is the only publication that has
important information about reinstalling factory-installed software. Chapter 3,
“Recovering software” on page 13 contains the information about recovering
factory-installed software.
Installing other operating systems
If you install your own operating system, follow the instructions that come
with your operating-system CDs or diskettes. Remember to install all device
drivers after you install your operating system. Installation instructions are
usually provided with the device drivers.
Shutting down the computer
When you are ready to turn off your computer, always follow the shutdown
procedure for your operating system. This prevents the loss of unsaved data or
damage to your software programs. To shut down the Microsoft
®
Windows
®
operating system select Shut down or Turn off computer.
Recording your computer information
Recording information about your computer can be helpful if you ever need to
have your computer serviced. The service technician will probably ask you for
this information.
Chapter 2. Setting up your computer 11
Page 26

The machine type, model, and serial number are labeled on your computer.
Use the following table to record this information.
Product name ______________________________________________
Machine type and model ______________________________________________
Serial number (S/N) ______________________________________________
Date of purchase ______________________________________________
Register your computer over the Internet when you first visit the IBM Web
site. When you register your computer with IBM, you will receive the
following benefits:
v Faster service when you call IBM for help
v Automatic notification of free software and special promotional offers
Go to http://www.ibm.com/pc/register/ and follow the on-screen
instructions. See Access IBM for more information on how to register your
computer.
12 Quick Reference
Page 27

Chapter 3. Recovering software
The Product Recovery Program will reinstall your computer operating system
and factory-installed software. The Product Recovery Program is located on a
separate partition on your hard disk. Be sure to read the important notes under
“Performing a recovery” before using the Product Recovery program. The
Product Recovery program runs independently of the operating system.
Performing a software recovery
Important
Understand the following information before recovering your software:
v Perform a recovery only as a last resort after you have tried using all
other diagnostic and troubleshooting tools.
v If possible, make backup copies of your data files before starting the
recovery process. The recovery process deletes all information that is
stored on the primary hard disk partition (usually drive C).
v If the Product Recovery program does not work or will not start as
described, see “Solving recovery problems” on page 14.
To recover your factory-installed software use the Product Recovery program
on the hard disk. This section provides instructions for using this program. If
you have any problems running the Product Recovery program, see “Solving
recovery problems” on page 14.
To perform a software recovery, use the following procedure:
1. Make backup copies of your data files, if possible. Any files on the hard
disk that are not backed up will be lost during recovery.
2. Turn off your computer for at least 5 seconds. Press and hold the F11 key
while you press the power button to start the Product Recovery program.
Did the Product Recovery menu display?
Yes .GotoStep3.
No. Go to “Solving recovery problems” on page 14.
3. When the Product Recovery program starts, you might have the
opportunity to select an operating system. If a menu of operating systems
is displayed, use the arrow keys (↑↓) to select the appropriate operating
system, and press Enter.
© Copyright IBM Corp. 2002 13
Page 28

4. Follow the instructions on the screen. Your computer might restart during
the recovery process, possibly more than once. When the recovery process
is finished, a completion message is displayed. When the Product Recovery
program is finished, the factory-installed software is restored.
Notes:
1. After recovery, you might have to reinstall device drivers for some devices.
If you need to reinstall device drivers, see “Recovering or installing device
drivers” on page 15.
2. Some computers come with Microsoft Office or Microsoft Works
preinstalled. If you need to recover your Microsoft Office or Microsoft
Works applications, you must use the Microsoft Office CD or Microsoft Works
CD. These CDs are provided only with computers that come with Microsoft
Office or Microsoft Works preinstalled.
3. The original hard disk drive has been replaced, the Product Recovery
program is not available on the new hard disk. See Chapter 5, “Getting
information, help, and service” on page 25 for information on how to
contact IBM.
Solving recovery problems
If you are unable to access the Product Recovery program, either the Product
Recovery program is damaged, or there is a problem with the hard disk
partition that contains the Product Recovery program. Go to “Creating and
using a Recovery Repair diskette”. If using the repair diskette does not solve
the problem, IBM will provide a Product Recovery CD. See Chapter 5, “Getting
information, help, and service” on page 25 for details.
Creating and using a Recovery Repair diskette
If for some reason you do not see the F11 prompt (used to start product
recovery) when you turn on your computer, the Recovery Repair diskette can
be used to recover the prompt.
Note: Some models might display (To interrupt normal startup, press
Enter) prompt. If this is displayed, press Enter. If the F11 prompt is not
displayed, the Recovery Repair diskette can be used to recover the
prompt.
Creating a Recovery Repair diskette
Note: To create the Recovery Repair diskette the operating system must be
functioning.
To create a Recovery Repair diskette, use the following procedure:
1. Start your computer and operating system.
14 Quick Reference
Page 29

2. Use Windows Explorer or My Computer to display the directory structure
of your hard disk.
3. Open the ibmtools folder, which is usually on drive C.
4. Double-click RRDISK.BAT, and follow the instructions on the screen.
Using the Recovery Repair diskette
To use the Recovery Repair diskette, use the following procedure:
1. Shut down the operating system, and turn off the computer.
2. Insert the Recovery Repair diskette into the diskette drive.
3. Turn on the computer, and follow the instructions on the screen
Note: If the repair operation finishes without error, the F11 prompt will be
displayed the next time you restart your computer.
If an error message is displayed during the repair operation and the repair
operation cannot be completed, you might have a problem with the Product
Recovery program or the partition that contains the Product Recovery
program. See Chapter 5, “Getting information, help, and service” on page 25
for further information.
Recovering or installing device drivers
Before you can recover or install device drivers, your operating system must be
installed on your computer. Make sure that you have the documentation and
software media for the device.
Device drivers for IBM-installed devices are located on the computer hard disk
(usually drive C) in the ibmtools\drivers folder. The instructions for installing
device drivers (readme.txt) are also located in the ibmtools\drivers folder.
Other device drivers are on the software media that come with individual
devices.
The latest device drivers for IBM-installed devices are also available on the
World Wide Web at http://www.ibm.com/pc/support/.
To recover a device driver for an IBM-installed device, use the following
procedure:
1. Start your computer and operating system.
2. Use Windows Explorer to display the directory structure of your hard disk.
3. Open the ibmtools folder.
4. Open the drivers folder. Within the drivers folder are several subfolders
that are named for various devices that are installed in your computer (for
example, audio, video, and so on).
5. Open the appropriate subfolder.
Chapter 3. Recovering software 15
Page 30

6. Use one of the following methods to recover the device driver:
v In the device subfolder, look for a readme.txt file or other file with the
.txt extension that contains information about reinstalling the device
driver. This file might be named after the operating system, such as
win98.txt. Follow the instructions in this file.
v If the device subfolder contains a file with an.inf extension, you can use
the Add New Hardware program (located in the Windows Control
Panel) to reinstall the device driver. Not all device drivers can be
reinstalled using this program. In the Add New Hardware program,
when prompted for the device driver that you want to install, click Have
Disk and Browse. Then select the appropriate device-driver (.inf) file
from the device subfolder.
v In the device subfolder, look for a setup.exe file. Double-click
SETUP.EXE, and follow the instructions on the screen.
16 Quick Reference
Page 31

Chapter 4. Troubleshooting and diagnostics
This chapter describes some basic troubleshooting and diagnostic tools. If your
computer problem is not described here, use Access IBM for more detailed
troubleshooting information.
Basic troubleshooting
Symptom Action
The computer does not
start when you press the
power button.
The monitor screen is
blank.
Verify that:
v The power cord is plugged into the rear of the computer
and into a working electrical outlet.
v If your computer has a secondary power switch on the
back of the computer, ensure that it is switched on. Check
the power indicator on the front of the computer to ensure
that the power is on.
If you cannot correct the problem, have the computer
serviced.
Verify that:
v The monitor cable is securely attached to the rear of the
monitor and to the rear of the computer.
v The monitor power cord is plugged into the monitor and
into a working electrical outlet.
v The monitor is turned on, and the brightness and contrast
controls are set correctly.
v The monitor signal cable is securely connected to the
monitor and to the monitor connector on the computer.
Note: If your computer has two monitor connectors, verify
that your monitor is connected to the one in the accelerated
graphics port (AGP) option slot rather than the one in the
rear of the system board. See Step 5 on page 6.
If you cannot correct the problem, have the computer
serviced.
© Copyright IBM Corp. 2002 17
Page 32

Symptom Action
The keyboard does not
work. The computer
does not respond to the
keyboard.
The Rapid Access III
Keyboard does not work
The Rapid Access III
Wireless Keyboard does
not work.
Verify that:
v The computer and monitor are turned on and the
brightness and contrast controls are set correctly.
v The keyboard is securely connected to the keyboard
connector on the computer.
v No keys are stuck.
If you cannot correct the problem, have the computer
serviced.
Verify that:
v The computer is turned on.
v The keyboard is securely connected to a USB connector on
the rear of the computer.
v No keys are stuck.
If you cannot correct the problem, have the computer
serviced.
When the wireless receiver is installed, a software utility
provides status icons and help information in the lower-right
corner of your desktop, just above the default Windows task
bar. Click ? (help) to find more information about the
wireless keyboard.
v Verify that the computer is turned on and the brightness
controls are set correctly.
v Verify that no keys are stuck.
v Change the batteries in the keyboard.
v Change the channel on the keyboard.
The mouse does not
work. The computer
does not respond to the
mouse.
18 Quick Reference
If you cannot correct the problem, have the computer
serviced.
Verify that:
v The computer and monitor are turned on and the
brightness and contrast controls are set correctly.
v The mouse is securely connected to the mouse connector
on the computer.
If you cannot correct the problem, have the computer
serviced.
Page 33

Symptom Action
The ScrollPoint III
Mouse does not work.
Clean the mouse. Verify that:
v The computer is turned on and the brightness controls are
set correctly.
v The mouse is securely connected to a USB connector on
the computer.
If you cannot correct the problem, have the computer
serviced.
The ScrollPoint III
Wireless Mouse does not
work.
When the wireless receiver is installed, a software utility
provides status icons and help information in the lower-right
corner of your desktop just above the default Windows task
bar. Click ? (help) to find more information about the
wireless keyboard.
v Clean the mouse.
v Verify that the computer is turned on and the brightness
controls are set correctly.
v Change the batteries in the mouse.
v Change the channel on the mouse.
If you cannot correct the problem, have the computer
serviced.
The operating system
will not start.
Verify that:
v There is no diskette in the diskette drive.
v The startup sequence includes the device where the
operating system resides. Usually, the operating system is
on the hard disk.
During startup, look for the prompt to start the IBM Setup
Utility program (or Configuration/Setup Utility program).
Press the function key that is specified.
Verify the startup sequence in the IBM Setup Utility
program.
An error code is
displayed before the
operating system starts.
The computer beeps
multiple times before the
operating system starts.
If you cannot correct the problem, have the computer
serviced.
Write down the code number, and see “Error codes” on
page 21.
Verify that no keys are stuck down.
If you cannot correct the problem, have the computer
serviced.
Chapter 4. Troubleshooting and diagnostics 19
Page 34

IBM Enhanced Diagnostics
The IBM Enhanced Diagnostics program runs independently of the operating
system. You can use this program to test hardware components of your
computer. You can use this program when other methods are not available or
have not been successful in isolating a possible hardware problem.
You can run the IBM Enhanced Diagnostics program using the Product
Recovery program on your hard disk. Alternatively, you can create an IBM
Enhanced Diagnostics diskette from the Product Recovery program.
You can also download the latest version of the Enhanced Diagnostics program
from http://www.ibm.com/pc/support/ on the World Wide Web. Type your
machine type and model number into the Quick Path field to find the
downloadable files that are specific to your computer.
Running IBM Enhanced Diagnostics from the Product Recovery program
Use the following steps to run diagnostics from the Product Recovery program:
Note: If the Product Recovery program on your computer hard disk is
damaged or not accessible, the IBM Enhanced Diagnostics can be run
from the Enhanced Diagnostics diskette.
1. Shut down your operating system, and turn off the computer.
2. When you turn on your computer, press and hold the F11 key until the
Product Recovery menu is displayed.
3. Depending on your operating system, you might be prompted to select a
system setting. If no prompt is displayed, go to the next step.
4. When the main menu is displayed, select System Utilities.
5. From the System Utilities menu, select Run Diagnostics. The IBM
Enhanced Diagnostics program starts. When you are finished running
diagnostics, you will be returned to the Product Recovery main menu.
6. Restart the computer.
Creating an IBM Enhanced Diagnostics diskette
Use the following steps to create an IBM Enhanced Diagnostics diskette from the
Product Recovery program:
1. Shut down your operating system, and turn off the computer.
2. When you turn on your computer, press and hold the F11 key until the
Product Recovery menu is displayed.
3. Depending on your operating system, you might be prompted to select a
system setting. If no prompt is displayed, go to the next step.
4. From the main menu, select System Utilities.
20 Quick Reference
Page 35

5. Select Create a diagnostic diskette, and follow the instructions on the
screen.
6. When prompted, insert a blank, formatted diskette into the diskette drive,
and follow the instructions on the screen.
Note: You can also download the latest version of the diagnostic program
from http://www.ibm.com/pc/support/ on the World Wide Web. In
the Quick Path field, type your machine type to find the downloadable
files specific to your computer.
Running the IBM Enhanced Diagnostics diskette
Use the following steps to run the IBM Enhanced Diagnostics diskette:
1. Shut down the operating system, and turn off the computer.
2. Insert the IBM Enhanced Diagnostics diskette into the diskette drive.
3. Turn on your computer.
4. Follow the instructions that are displayed on the screen. For help, press F1.
5. When the program finishes, remove the diskette from the diskette drive.
6. Shut down or restart your computer.
Error codes
The following table includes some of the more common error codes that might
be displayed when your computer is performing the power-on self-test (POST).
v Record error codes that are displayed. If you call for service, you will be
asked for the error codes.
v If there are multiple error codes, always work to solve problems in the order
in which the error codes are displayed. Usually, solving the first error code
will solve succeeding ones.
v If the error code is not in the following table, more in-depth troubleshooting
is required.
– If the operating system starts when you turn on your computer, see “IBM
Enhanced Diagnostics” on page 20 to run diagnostics. Also, use Access
IBM for more information on problem solving.
– If the operating system will not start, have the computer serviced.
Code Description Action
161 or 0250 The battery is defective. Replace the battery. See the battery
replacement procedure in your online
User Guide, which is available
through Access IBM.
Chapter 4. Troubleshooting and diagnostics 21
Page 36

Code Description Action
162 or 0251 A change in device
301, 303, 0211,
or 0212
0280 Previous startup was
860x (x=any
number)
configuration occurred.
A keyboard error has occurred. Verify that:
incomplete; the default
configuration was used.
A pointing device or mouse
error has occurred.
Verify that:
v All external devices are turned on.
v All devices are properly installed
and securely connected.
If you cannot correct the problem,
have the computer serviced.
v The keyboard is properly
connected.
v No keys on the keyboard are stuck.
If you cannot correct the problem,
have the computer serviced.
The previous POST was not
completed successfully. POST loads
default values and offers to run IBM
Setup Utility.
This error is cleared the next time the
computer is turned on.
Verify that the pointing device or
mouse is securely attached.
If you cannot correct the problem,
have the computer serviced.
POST beep codes
Another way for POST to notify you of errors is through a series of audible
beeps. A beep pattern represents a numeric value and provides further
information about the location of a potential problem.
The following are the most common POST beep codes that you might hear
when starting your computer.
Beep pattern Description Action
1-3-3-1 No on-screen message. Beeps
occur before video initialization.
22 Quick Reference
Remove and reinstall the dual inline
memory modules (DIMMs).
If the problem persists, have the
computer serviced.
Page 37

Beep pattern Description Action
1-3-1 RAM test has failed Remove and reinstall the dual inline
memory modules (DIMMs).
If the problem persists, have the
computer serviced.
Here are some general guidelines for working with POST beep codes:
v Record any beep patterns that you hear. If you call for service, you will be
asked for the beep patterns.
v If the beep pattern is not in this book, more in-depth troubleshooting is
required.
– If the operating system starts when you turn on your computer, use
Access IBM to learn how to run IBM Enhanced Diagnostics and see the
entire online troubleshooting procedures.
– If the operating system will not start, have the computer serviced.
Chapter 4. Troubleshooting and diagnostics 23
Page 38

24 Quick Reference
Page 39

Chapter 5. Getting information, help, and service
If you need help, service, or technical assistance or just want more information
about IBM products, you will find a wide variety of sources available from
IBM to assist you. This section contains information about where to go for
additional information about IBM and IBM products, what to do if you
experience a problem with your computer, and whom to call for service should
it be necessary.
Getting information
Information about your IBM computer and preinstalled software, if any, is
available in the documentation that comes with your computer. That
documentation includes printed books, online books, README files, and help
files. In addition, information about IBM products is available on the World
Wide Web.
On the World Wide Web, the IBM Web site has up-to-date information about
IBM Personal Computer products and support. The address for the IBM
Personal Computing home page is http://www.ibm.com/pc/.
You can find support information for your IBM products, including supported
options, at http://www.ibm.com/pc/support/.
If you click Profile from the support page, you can create a customized
support page that is specific to your hardware, complete with Frequently
Asked Questions, Parts Information, Technical Hints and Tips, and
Downloadable Files. In addition, you can choose to receive e-mail notifications
whenever new information becomes available about your registered products.
You can order publications through the IBM Publications Ordering System at
http://www.elink.ibmlink.ibm.com/public/applications/publications/
cgibin/pbi.cgi.
Getting help and service
If you have a problem with your computer, you will find a wide variety of
sources available to help you.
Using the documentation and diagnostic programs
Many computer problems can be solved without outside assistance. If you
experience a problem with your computer, the first place to start is the
troubleshooting information in your computer documentation. If you suspect a
© Copyright IBM Corp. 2002 25
Page 40

software problem, see the documentation, including README files and online
help, that comes with the operating system or application program.
Most IBM computers and servers come with a set of diagnostic programs that
you can use to help you identify hardware problems. See the troubleshooting
information in your computer documentation for instructions on using the
diagnostic programs.
The troubleshooting information or the diagnostic programs might tell you that
you need additional or updated device drivers or other software. IBM
maintains pages on the World Wide Web where you can get the latest technical
information and download device drivers and updates. To access these pages,
go to http://www.ibm.com/pc/support/ and follow the instructions.
Calling for service
If you have tried to correct the problem yourself and still need help, during the
warranty period, you can get help and information by telephone through the
IBM PC HelpCenter
period:
v Problem determination - Trained personnel are available to assist you with
determining if you have a hardware problem and deciding what action is
necessary to fix the problem.
v IBM hardware repair - If the problem is determined to be caused by IBM
hardware under warranty, trained service personnel are available to provide
the applicable level of service.
v Engineering Change management - Occasionally, there might be changes
that are required after a product has been sold. IBM or your reseller, if
authorized by IBM, will make selected Engineering Changes (ECs) available
that apply to your hardware.
®
. The following services are available during the warranty
The following items are not covered:
v Replacement or use of non-IBM parts or nonwarranted IBM parts. All
warranted parts contain a 7-character identification in the format IBM FRU
XXXXXXX.
v Identification of software problem sources.
v Configuration of BIOS as part of an installation or upgrade.
v Changes, modifications, or upgrades to device drivers.
v Installation and maintenance of network operating systems (NOS).
v Installation and maintenance of application programs.
Refer to your IBM Statement of Limited Warranty for a full explanation of IBM
warranty terms. Be sure to retain your proof of purchase to obtain warranty
service.
26 Quick Reference
Page 41

In the U.S. and Canada, these services are available 24 hours a day, 7 days a
week. In the U.K., these services are available Monday through Friday, from
9:00 a.m. to 6:00 p.m.
Note: Response times vary; may exclude some holidays.
If possible, be at your computer when you call. Please have the following
information ready:
v Machine type and model
v Serial numbers of your IBM hardware products
v Description of the problem
v Exact wording of any error messages
v Hardware and software configuration information
Telephone numbers
Phone numbers are subject to change without notice. For the most up-to-date
phone numbers, go to http://www.ibm.com/pc/support/ and click Support
Phone List.
Country Telephone number
Austria Österreich 01-24 592 5901
Belgium - Dutch Belgie 02-210 9820
Belgium - French Belgique 02-210 9800
Canada Toronto only 416-383-3344
Canada Canada - all other 1-800-565-3344
Denmark Danmark 45 20 82 00
Finland Suomi 09-459 6960
France France 02 38 55 74 50
Germany Deutschland 07032-1549 201
Ireland Ireland 01-815 9200
Italy Italia 02-7031 6101
Luxembourg Luxembourg 298-977 5063
Netherlands Nederland 020-514 5770
Norway Norge 66 81 11 00
Portugal Portugal 21-791 51 47
Spain España 91-662 49 16
Sweden Sverige 08-477 4420
Switzerland Schweiz/Suisse/Svizzera 058-333 0900
United Kingdom United Kingdom 01475-555 055
U.S.A. and Puerto Rico U.S.A. and Puerto Rico 1-800-772-2227
Chapter 5. Getting information, help, and service 27
Page 42

In all other countries or regions, contact your IBM reseller or IBM marketing
representative.
Other services
IBM Update Connector™is a remote communication tool that you can use with
some IBM computers to communicate with the HelpCenter. Update Connector
enables you to receive and download updates for some of the software that
might come with your computer.
If you travel with your computer or relocate it to a country where your
NetVista machine type is sold, your computer might be eligible for
International Warranty Service, which automatically entitles you to obtain
warranty service throughout the warranty period. Service will be performed by
IBM or by IBM resellers who are authorized to perform warranty service.
Service methods and procedures vary by country, and some services might not
be available in all countries. International Warranty Service is delivered
through the method of service (such as depot, carry-in, or on-site service) that
is provided in the servicing country. Service centers in certain countries might
not be able to service all models of a particular machine type. In some
countries, fees and restrictions might apply at the time of service.
To determine whether your computer is eligible for International Warranty
Service and to view a list of the countries where service is available, go to
http://www.ibm.com/pc/support/, and click Warranty Lookup. Eligible IBM
computers are identified by their four-digit machine types. For more
information about International Warranty Service, see Service Announcement
601-034 at http://www.ibm.com/. Click Support & downloads, click
Announcement letters, and click Announcements search.IntheSearch by
letter number only field, type 601-034, and click Search.
IBM Integrated Technology Services offers a broad range of information
technology support, implementation, and management services. For more
information about these services, refer to the Integrated Technology Services
Web site at http://www.ibm.com/services/its/.
For technical assistance with the installation of, or questions related to, Service
Packs for your preinstalled Microsoft Windows product, refer to the Microsoft
Product Support Services Web site at http://support.microsoft.com/directory/,
or you can contact the IBM HelpCenter. Some fees might apply.
28 Quick Reference
Page 43

Purchasing additional services
During and after the warranty period, you can purchase additional services,
such as support for IBM and non-IBM hardware, operating systems, and
application programs; network setup and configuration; upgraded or extended
hardware repair services; and custom installations. Service availability and
service name might vary by country or region.
For more information about these services, see the online information.
Chapter 5. Getting information, help, and service 29
Page 44

30 Quick Reference
Page 45

Appendix A. Warranty information
This section contains the warranty period for your product, information about
obtaining warranty service and support, and the IBM Statement of Limited
Warranty.
Warranty period
The warranty period varies by machine type and country or region.
Notes:
v Contact your place of purchase for warranty service information. Some IBM
Machines are eligible for on-site warranty service depending on the country
or region where service is performed.
v A warranty period of 3 years on parts and 1 year on labor means that IBM
will provide warranty service without charge for:
1. parts and labor during the first year of the warranty period
2. parts only, on an exchange basis, in the second and third years of the
warranty period. IBM will charge you for any labor it provides in
performance of the repair or replacement.
v The IBM Machine Warranties Web site at
http://www.ibm.com/servers/support/machine_warranties/ contains a
worldwide overview of the IBM Limited Warranty for IBM Machines, a
glossary of terms used in the Statement of Limited Warranty, Frequently
Asked Questions (FAQ), and links to Product Support Web pages. The IBM
Statement of Limited Warranty is available from this Web site in 29
languages in Portable Document Format (PDF).
Machine
Type
2254 United States and Canada Parts - 1 year
2256
2257
2289 China (PRC) Parts - 3 years
© Copyright IBM Corp. 2002 31
Europe, Middle East, Africa, and China (PRC) Parts - 3 years
United States Parts - 3 years
All other countries and regions worldwide Parts - 1 year
Australia, New Zealand, Bangladesh, India, Indonesia,
Malaysia, Philippines, Singapore, Sri Lanka, Vietnam,
Brunei, China (Hong Kong S.A.R.), Taiwan, and Thailand
Country or region Warranty
Period
Labor - 1 year
Labor - 3 years
Labor - 1 year
Labor - 1 year
Labor - 3 years
Parts - 1 year
Labor - 1 year
Page 46

Machine
Type
6029 Europe, Middle East, Africa, and China (PRC) Parts - 3 years
United States, Canada, Australia, New Zealand,
Bangladesh, India, Indonesia, Malaysia, Philippines,
Singapore, Sri Lanka, Vietnam, Brunei, China (Hong
Kong S.A.R.), Taiwan, and Thailand
Japan Parts - 1 year
6336
6337
6339
6341
6342
6346
6347
6348
6790
6791
6792
6793
6794
6823 Argentina, Europe, Middle East, and Africa Parts - 3 years
6824 China (PRC) Parts - 3 years
United States and Canada Parts - 1 year
Argentina, Europe, Middle East, Africa, and China (PRC) Parts - 3 years
United States, Canada, Latin America (except Argentina),
Australia, New Zealand, Bangladesh, India, Indonesia,
Malaysia, Philippines, Singapore, Sri Lanka, Vietnam,
China (Hong Kong S.A.R), Taiwan, and Thailand
Japan Parts - 1 year
All countries and regions worldwide Parts - 3 years
United States, Canada, Europe, Middle East, Africa, Latin
America, Australia, and New Zealand
Bangladesh, India, Indonesia, Malaysia, Philippines,
Singapore, Sri Lanka, Vietnam, China (PRC), China
(Hong Kong S.A.R), Taiwan, and Thailand
Japan Parts - 1 year
United States and Latin America (except Argentina) Parts - 3 years
All other countries and regions worldwide Parts - 1 year
Australia, New Zealand, Bangladesh, India, Indonesia,
Malaysia, Philippines, Singapore, Sri Lanka, Brueni,
Vietnam, China (Hong Kong S.A.R), Taiwan, and
Thailand
Country or region Warranty
Period
Labor - 3 years
Parts - 3 years
Labor - 1 year
Labor - 1 year
Labor - 1 year
Labor - 3 years
Parts - 3 years
Labor - 1 year
Labor - 1 year
Labor - 3 years
Parts - 3 years
Labor - 3 years
Parts - 3 years
Labor - 1 year
Labor - 1 year
Labor - 3 years
Labor - 1 year
Labor - 1 year
Labor - 3 years
Parts - 3 years
Labor - 1 year
32 Quick Reference
Page 47

Machine
Type
Country or region Warranty
Period
6825 Europe, Middle East, and Africa Parts - 3 years
Labor - 3 years
United States, Canada, Australia, and New Zealand Parts - 3 years
Labor - 1 year
6826 Europe, Middle East, and Africa Parts - 3 years
Labor - 3 years
Australia and New Zealand Parts - 3 years
Labor - 1 year
China (Hong Kong S.A.R) and Japan Parts - 1 year
Labor - 1 year
8301 United States, Canada, Argentina, Europe, Middle East,
Africa, and China (PRC)
Parts - 3 years
Labor - 3 years
Japan Parts - 1 year
Labor - 1 year
All other countries and regions worldwide Parts - 3 years
Labor - 1 year
8302 All countries and regions worldwide Parts - 3 years
Labor - 3 years
8303 United States, Canada, Argentina, Europe, Middle East,
Africa, and China (PRC)
Parts - 3 years
Labor - 3 years
Japan Parts - 1 year
Labor - 1 year
All other countries and regions worldwide Parts - 3 years
Labor - 1 year
8304 All countries and regions worldwide Parts - 3 years
Labor - 3 years
8305 United States, Canada, Argentina, Europe, Middle East,
Africa, and China (PRC)
Parts - 3 years
Labor - 3 years
Japan Parts - 1 year
Labor - 1 year
All other countries and regions worldwide Parts - 3 years
Labor - 1 year
8306 All countries and regions worldwide Parts - 3 years
Labor - 3 years
8307 United States, Canada, Argentina, Europe, Middle East,
Africa, and China (PRC)
Parts - 3 years
Labor - 3 years
Japan Parts - 1 year
Labor - 1 year
All other countries and regions worldwide Parts - 3 years
Labor - 1 year
Appendix A. Warranty information 33
Page 48

Machine
Type
8308 All countries and regions worldwide Parts - 3 years
8309
8310
8311 United States, Canada, Latin America, Australia, New
8312
8313
8314
8315 United States and Latin America Parts - 1 year
8317 United States, Latin America, Europe, Middle East,
8318 All countries and regions worldwide Parts - 3 years
8319 United States, Canada, Latin America, Europe,
Argentina, Europe, Middle East, Africa, and China (PRC) Parts - 3 years
United States, Canada, Latin America (except Argentina),
Australia, New Zealand, Bangladesh, India, Indonesia,
Malaysia, Philippines, Singapore, Sri Lanka, Vietnam,
Brunei, China (Hong Kong S.A.R.), Taiwan, and Thailand
Zealand, Bangladesh, India, Indonesia, Malaysia,
Philippines, Singapore, Sri Lanka, Brueni, Vietnam,
Thailand, and Japan
Argentina, Europe, Middle East, Africa, and China (PRC) Parts - 3 years
United States, Canada, Latin America (except Argentina),
Australia, New Zealand, Bangladesh, India, Indonesia,
Malaysia, Philippines, Singapore, Sri Lanka, Vietnam,
Brunei, China (Hong Kong S.A.R.), Taiwan, and Thailand
Africa, Australia, New Zealand, and China (PRC)
Canada, Bangladesh, India, Indonesia, Malaysia,
Philippines, Singapore, Sri Lanka, Vietnam, Brunei,
Thailand, China (Hong Kong S.A.R.), and Taiwan
Japan Parts - 1 year
Middle East, Africa, and China (PRC)
Australia, New Zealand, Bangladesh, India,
Indonesia, Malaysia, Philippines, Singapore, Sri Lanka,
Vietnam, Brunei, Thailand, China (Hong Kong S.A.R.),
and Taiwan
Japan Parts - 1 year
Country or region Warranty
Period
Labor - 3 years
Labor - 3 years
Parts - 3 years
Labor - 1 year
Parts - 1 year
Labor - 1 year
Labor - 3 years
Parts - 3 years
Labor - 1 year
Labor - 1 year
Parts - 3 years
Labor - 3 years
Parts - 3 years
Labor - 1 year
Labor - 1 year
Labor - 3 years
Parts - 3 years
Labor - 3 years
Parts - 3 years
Labor - 1 year
Labor - 1 year
34 Quick Reference
Page 49

Warranty service and support
With the original purchase of an IBM computer, you have access to extensive
support. During the IBM Machine warranty period, you may call IBM or your
reseller for problem-determination assistance under the terms of the IBM
Statement of Limited Warranty.
The following services are available during the warranty period:
v Problem determination - Trained personnel are available to assist you with
determining if you have a hardware problem and deciding what action is
necessary to fix the problem.
v IBM hardware repair - If the problem is determined to be caused by IBM
hardware under warranty, trained service personnel are available to provide
the applicable level of service, either on-site or at an IBM service center as
determined by IBM.
v Engineering Change management - Occasionally, there might be changes
that are required after a product has been shipped from IBM. In those
instances, IBM will make Engineering Changes (ECs) available that apply to
your hardware.
The following items are not covered under warranty service:
v Replacement or use of non-IBM parts. All IBM parts contain a 7-character
identification in the format IBM FRU XXXXXXX.
v Identification of non-IBM software problem sources.
v Installation of customer replaceable units (CRUs).
v Installation and configuration of machine code or licensed internal code that
is designated as customer installable.
If you do not register your computer with IBM, you might be required to
present proof of purchase to obtain warranty service.
Before you call for service
You can solve many computer problems without outside assistance by
following the troubleshooting procedures that IBM provides in the online help
or in the publications that are provided with your computer and software.
Most computers, operating systems, and application programs come with
information that contains troubleshooting procedures and explanations of error
messages and error codes. The information that comes with your computer
also describes the diagnostic tests that you can perform.
If you suspect a software problem, refer to the information for the operating
system or application program.
Appendix A. Warranty information 35
Page 50

Call for service
If possible, be at your computer when you call. Please have the following
information ready:
v Machine type, model, and serial number
v Description of the problem
v Exact wording of any error messages
v Hardware and software configuration information
To find the telephone number for the HelpCenter nearest you, see “Telephone
numbers” in the “Getting information, help, and service” chapter.
36 Quick Reference
Page 51

IBM Statement of Limited Warranty Z125-4753-06 8/2000
Part1-General Terms
This Statement of Limited Warranty includes Part 1 - General Terms and Part 2
- Country-unique Terms. The terms of Part 2 replace or modify those of Part 1.
The warranties provided by IBM in this Statement of Limited Warranty apply
only to Machines you purchase for your use, and not for resale, from IBM or
your reseller. The term “Machine” means an IBM machine, its features,
conversions, upgrades, elements, or accessories, or any combination of them.
The term “Machine” does not include any software programs, whether
pre-loaded with the Machine, installed subsequently or otherwise. Unless IBM
specifies otherwise, the following warranties apply only in the country where
you acquire the Machine. Nothing in this Statement of Limited Warranty
affects any statutory rights of consumers that cannot be waived or limited by
contract. If you have any questions, contact IBM or your reseller.
The IBM Warranty for Machines: IBM warrants that each Machine 1) is free
from defects in materials and workmanship and 2) conforms to IBM’s Official
Published Specifications (“Specifications”). The warranty period for a Machine
is a specified, fixed period commencing on its Date of Installation. The date on
your sales receipt is the Date of Installation unless IBM or your reseller informs
you otherwise.
If a Machine does not function as warranted during the warranty period, and
IBM or your reseller are unable to either 1) make it do so or 2) replace it with
one that is at least functionally equivalent, you may return it to your place of
purchase and your money will be refunded.
Extent of Warranty: The warranty does not cover the repair or exchange of a
Machine resulting from misuse, accident, modification, unsuitable physical or
operating environment, improper maintenance by you, or failure caused by a
product for which IBM is not responsible. The warranty is voided by removal
or alteration of Machine or parts identification labels.
THESE WARRANTIES ARE YOUR EXCLUSIVE WARRANTIES AND
REPLACE ALL OTHER WARRANTIES OR CONDITIONS, EXPRESS OR
IMPLIED, INCLUDING, BUT NOT LIMITED TO, THE IMPLIED
WARRANTIES OR CONDITIONS OF MERCHANTABILITY AND FITNESS
FOR A PARTICULAR PURPOSE. THESE WARRANTIES GIVE YOU
SPECIFIC LEGAL RIGHTS AND YOU MAY ALSO HAVE OTHER RIGHTS
WHICH VARY FROM JURISDICTION TO JURISDICTION. SOME
JURISDICTIONS DO NOT ALLOW THE EXCLUSION OR LIMITATION
OF EXPRESS OR IMPLIED WARRANTIES, SO THE ABOVE EXCLUSION
OR LIMITATION MAY NOT APPLY TO YOU. IN THAT EVENT, SUCH
WARRANTIES ARE LIMITED IN DURATION TO THE WARRANTY
PERIOD. NO WARRANTIES APPLY AFTER THAT PERIOD.
Appendix A. Warranty information 37
Page 52

Items Not Covered by Warranty: IBM does not warrant uninterrupted or
error-free operation of a Machine. Any technical or other support provided for
a Machine under warranty, such as assistance via telephone with “how-to”
questions and those regarding Machine set-up and installation, will be
provided WITHOUT WARRANTIES OF ANY KIND.
Warranty Service: To obtain warranty service for a Machine, contact IBM or
your reseller. If you do not register your Machine with IBM, you may be
required to present proof of purchase.
During the warranty period, IBM or your reseller, if approved by IBM to
provide warranty service, provides without charge certain types of repair and
exchange service to keep Machines in, or restore them to, conformance with
their Specifications. IBM or your reseller will inform you of the available types
of service for a Machine based on its country of installation. At its discretion,
IBM or your reseller will 1) either repair or exchange the failing Machine and
2) provide the service either at your location or a service center. IBM or your
reseller will also manage and install selected engineering changes that apply to
the Machine.
Some parts of IBM Machines are designated as Customer Replaceable Units
(called “CRUs”), e.g., keyboards, memory, or hard disk drives. IBM ships CRUs
to you for replacement by you. You must return all defective CRUs to IBM
within 30 days of your receipt of the replacement CRU. You are responsible for
downloading designated Machine Code and Licensed Internal Code updates
from an IBM Internet Web site or from other electronic media, and following
the instructions that IBM provides.
When warranty service involves the exchange of a Machine or part, the item
IBM or your reseller replaces becomes its property and the replacement
becomes yours. You represent that all removed items are genuine and
unaltered. The replacement may not be new, but will be in good working order
and at least functionally equivalent to the item replaced. The replacement
assumes the warranty service status of the replaced item. M any features,
conversions, or upgrades involve the removal of parts and their return to IBM.
A part that replaces a removed part will assume the warranty service status of
the removed part.
Before IBM or your reseller exchanges a Machine or part, you agree to remove
all features, parts, options, alterations, and attachments not under warranty
service.
You also agree to
1. ensure that the Machine is free of any legal obligations or restrictions that
prevent its exchange;
38 Quick Reference
Page 53

2. obtain authorization from the owner to have IBM or your reseller service a
Machine that you do not own; and
3. where applicable, before service is provided:
a. follow the problem determination, problem analysis, and service request
procedures that IBM or your reseller provides;
b. secure all programs, data, and funds contained in a Machine;
c. provide IBM or your reseller with sufficient, free, and safe access to
your facilities to permit them to fulfill their obligations; and
d. inform IBM or your reseller of changes in a Machine’s location.
IBM is responsible for loss of, or damage to, your Machine while it is 1) in
IBM’s possession or 2) in transit in those cases where IBM is responsible for
the transportation charges.
Neither IBM nor your reseller is responsible for any of your confidential,
proprietary or personal information contained in a Machine which you return
to IBM or your reseller for any reason. You should remove all such information
from the Machine prior to its return.
Limitation of Liability: Circumstances may arise where, because of a default
on IBM’s part or other liability, you are entitled to recover damages from IBM.
In each such instance, regardless of the basis on which you are entitled to
claim damages from IBM (including fundamental breach, negligence,
misrepresentation, or other contract or tort claim), except for any liability that
cannot be waived or limited by applicable laws, IBM is liable for no more than
1. damages for bodily injury (including death) and damage to real property
and tangible personal property; and
2. the amount of any other actual direct damages, up to the charges (if
recurring, 12 months’ charges apply) for the Machine that is subject of the
claim. For purposes of this item, the term “Machine” includes Machine
Code and Licensed Internal Code.
This limit also applies to IBM’s suppliers and your reseller. It is the
maximum for which IBM, its suppliers, and your reseller are collectively
responsible.
UNDER NO CIRCUMSTANCES IS IBM LIABLE FOR ANY OF THE
FOLLOWING: 1) THIRD-PARTY CLAIMS AGAINST YOU FOR DAMAGES
(OTHER THAN THOSE UNDER THE FIRST ITEM LISTED ABOVE); 2)
LOSS OF, OR DAMAGE TO, YOUR RECORDS OR DATA; OR 3) SPECIAL,
INCIDENTAL, OR INDIRECT DAMAGES OR FOR ANY ECONOMIC
CONSEQUENTIAL DAMAGES, LOST PROFITS OR LOST SAVINGS,
EVEN IF IBM, ITS SUPPLIERS OR YOUR RESELLER IS INFORMED OF
THEIR POSSIBILITY. SOME JURISDICTIONS DO NOT ALLOW THE
EXCLUSION OR LIMITATION OF INCIDENTAL OR CONSEQUENTIAL
DAMAGES, SO THE ABOVE LIMITATION OR EXCLUSION MAY NOT
APPLY TO YOU.
Appendix A. Warranty information 39
Page 54

Governing Law: Both you and IBM consent to the application of the laws of
the country in which you acquired the Machine to govern, interpret, and
enforce all of your and IBM’s rights, duties, and obligations arising from, or
relating in any manner to, the subject matter of this Agreement, without regard
to conflict of law principles.
Part2-Country-unique Terms
AMERICAS
BRAZIL
Governing Law: The following is added after the first sentence:
Any litigation arising from this Agreement will be settled exclusively by the
court of Rio de Janeiro.
NORTH AMERICA
Warranty Service: The following is added to this Section:
To obtain warranty service from IBM in Canada or the United States, call
1-800-IBM-SERV (426-7378).
CANADA
Governing Law: The following replaces “laws of the country in which you acquired
the Machine” in the first sentence:
laws in the Province of Ontario.
UNITED STATES
Governing Law: The following replaces “laws of the country in which you acquired
the Machine” in the first sentence:
laws of the State of New York.
ASIA PACIFIC
AUSTRALIA
The IBM Warranty for Machines: The following paragraph is added to this Section:
The warranties specified in this Section are in addition to any rights you may
have under the Trade Practices Act 1974 or other similar legislation and are
only limited to the extent permitted by the applicable legislation.
Limitation of Liability: The following is added to this Section:
Where IBM is in breach of a condition or warranty implied by the Trade
Practices Act 1974 or other similar legislation, IBM’s liability is limited to the
40 Quick Reference
Page 55

repair or replacement of the goods or the supply of equivalent goods. Where
that condition or warranty relates to right to sell, quiet possession or clear title,
or the goods are of a kind ordinarily acquired for personal, domestic or
household use or consumption, then none of the limitations in this paragraph
apply.
Governing Law: The following replaces “laws of the country in which you acquired
the Machine” in the first sentence:
laws of the State or Territory.
CAMBODIA, LAOS, AND VIETNAM
Governing Law: The following replaces “laws of the country in which you acquired
the Machine” in the first sentence:
laws of the State of New York.
The following is added to this Section:
Disputes and differences arising out of or in connection with this Agreement
shall be finally settled by arbitration which shall be held in Singapore in
accordance with the rules of the International Chamber of Commerce (ICC).
The arbitrator or arbitrators designated in conformity with those rules shall
have the power to rule on their own competence and on the validity of the
Agreement to submit to arbitration. The arbitration award shall be final and
binding for the parties without appeal and the arbitral award shall be in
writing and set forth the findings of fact and the conclusions of law.
All proceedings shall be conducted, including all documents presented in such
proceedings, in the English language. The number of arbitrators shall be three,
with each side to the dispute being entitled to appoint one arbitrator.
The two arbitrators appointed by the parties shall appoint a third arbitrator
before proceeding upon the reference. The third arbitrator shall act as chairman
of the proceedings. Vacancies in the post of chairman shall be filled by the
president of the ICC. Other vacancies shall be filled by the respective
nominating party. Proceedings shall continue from the stage they were at when
the vacancy occurred.
If one of the parties refuses or otherwise fails to appoint an arbitrator within 30
days of the date the other party appoints its, the first appointed arbitrator shall
be the sole arbitrator, provided that the arbitrator was validly and properly
appointed.
The English language version of this Agreement prevails over any other
language version.
HONG KONG AND MACAU
Appendix A. Warranty information 41
Page 56

Governing Law: The following replaces “laws of the country in which you acquired
the Machine” in the first sentence:
laws of Hong Kong Special Administrative Region.
INDIA
Limitation of Liability: The following replaces items 1 and 2 of this Section:
1. liability for bodily injury (including death) or damage to real property and
tangible personal property will be limited to that caused by IBM’s
negligence;
2. as to any other actual damage arising in any situation involving
nonperformance by IBM pursuant to, or in any way related to the subject
of this Statement of Limited Warranty, IBM’s liability will be limited to the
charge paid by you for the individual Machine that is the subject of the
claim.
JAPAN
Governing Law: The following sentence is added to this Section:
Any doubts concerning this Agreement will be initially resolved between us in
good faith and in accordance with the principle of mutual trust.
NEW ZEALAND
The IBM Warranty for Machines: The following paragraph is added to this Section:
The warranties specified in this Section are in addition to any rights you may
have under the Consumer Guarantees Act 1993 or other legislation which
cannot be excluded or limited. The Consumer Guarantees Act 1993 will not
apply in respect of any goods which IBM provides, if you require the goods
for the purposes of a business as defined in that Act.
Limitation of Liability: The following is added to this Section:
Where Machines are not acquired for the purposes of a business as defined in
the Consumer Guarantees Act 1993, the limitations in this Section are subject to
the limitations in that Act.
PEOPLE’S REPUBLIC OF CHINA (PRC)
Governing Law: The following replaces this Section:
Both you and IBM consent to the application of the laws of the State of New
York (except when local law requires otherwise) to govern, interpret, and
enforce all your and IBM’s rights, duties, and obligations arising from, or
relating in any manner to, the subject matter of this Agreement, without regard
to conflict of law principles.
42 Quick Reference
Page 57

Any disputes arising from or in connection with this Agreement will first be
resolved by friendly negotiations, failing which either of us has the right to
submit the dispute to the China International Economic and Trade Arbitration
Commission in Beijing, the PRC, for arbitration in accordance with its
arbitration rules in force at the time. The arbitration tribunal will consist of
three arbitrators. The language to be used therein will be English and Chinese.
An arbitral award will be final and binding on all the parties, and will be
enforceable under the Convention on the Recognition and Enforcement of
Foreign Arbitral Awards (1958).
The arbitration fee will be borne by the losing party unless otherwise
determined by the arbitral award.
During the course of arbitration, this Agreement will continue to be performed
except for the part which the parties are disputing and which is undergoing
arbitration.
EUROPE, MIDDLE EAST, AFRICA (EMEA)
THE FOLLOWING TERMS APPLY TO ALL EMEA COUNTRIES:
The terms of this Statement of Limited Warranty apply to Machines purchased
from IBM or an IBM reseller.
Warranty Service: If you purchase an IBM Machine in Austria, Belgium,
Denmark, Estonia, Finland, France, Germany, Greece, Iceland, Ireland, Italy,
Latvia, Lithuania, Luxembourg, Netherlands, Norway, Portugal, Spain,
Sweden, Switzerland or United Kingdom, you may obtain warranty service for
that Machine in any of those countries from either (1) an IBM reseller
approved to perform warranty service or (2) from IBM. If you purchase an
IBM Personal Computer Machine in Albania, Armenia, Belarus, Bosnia and
Herzegovina, Bulgaria, Croatia, Czech Republic, Georgia, Hungary,
Kazakhstan, Kirghizia, Federal Republic of Yugoslavia, Former Yugoslav
Republic of Macedonia (FYROM), Moldova, Poland, Romania, Russia, Slovak
Republic, Slovenia, or Ukraine, you may obtain warranty service for that
Machine in any of those countries from either (1) an IBM reseller approved to
perform warranty service or (2) from IBM.
If you purchase an IBM Machine in a Middle Eastern or African country, you
may obtain warranty service for that Machine from the IBM entity within the
country of purchase, if that IBM entity provides warranty service in that
country, or from an IBM reseller, approved by IBM to perform warranty service
on that Machine in that country. Warranty service in Africa is available within
50 kilometers of an IBM authorized service provider. You are responsible for
transportation costs for Machines located outside 50 kilometers of an IBM
authorized service provider.
Appendix A. Warranty information 43
Page 58

Governing Law: The applicable laws that govern, interpret and enforce rights,
duties, and obligations of each of us arising from, or relating in any manner to,
the subject matter of this Statement, without regard to conflict of laws
principles, as well as Country-unique terms and competent court for this
Statement are those of the country in which the warranty service is being
provided, except that in 1) Albania, Bosnia-Herzegovina, Bulgaria, Croatia,
Hungary, Former Yugoslav Republic of Macedonia, Romania, Slovakia,
Slovenia, Armenia, Azerbaijan, Belarus, Georgia, Kazakhstan, Kyrgyzstan,
Moldova, Russia, Tajikistan, Turkmenistan, Ukraine, and Uzbekistan, the laws
of Austria apply; 2) Estonia, Latvia, and Lithuania, the laws of Finland apply;
3) Algeria, Benin, Burkina Faso, Cameroon, Cape Verde, Central African
Republic, Chad, Congo, Djibouti, Democratic Republic of Congo, Equatorial
Guinea, France, Gabon, Gambia, Guinea, Guinea-Bissau, Ivory Coast, Lebanon,
Mali, Mauritania, Morocco, Niger, Senegal, Togo, and Tunisia, this Agreement
will be construed and the legal relations between the parties will be
determined in accordance with the French laws and all disputes arising out of
this Agreement or related to its violation or execution, including summary
proceedings, will be settled exclusively by the Commercial Court of Paris; 4)
Angola, Bahrain, Botswana, Burundi, Egypt, Eritrea, Ethiopia, Ghana, Jordan,
Kenya, Kuwait, Liberia, Malawi, Malta, Mozambique, Nigeria, Oman, Pakistan,
Qatar, Rwanda, Sao Tome, Saudi Arabia, Sierra Leone, Somalia, Tanzania,
Uganda, United Arab Emirates, United Kingdom, West Bank/Gaza, Yemen,
Zambia, and Zimbabwe, this Agreement will be governed by English Law and
disputes relating to it will be submitted to the exclusive jurisdiction of the
English courts; and 5) in Greece, Israel, Italy, Portugal, and Spain any legal
claim arising out of this Statement will be brought before, and finally settled
by, the competent court of Athens, Tel Aviv, Milan, Lisbon, and Madrid,
respectively.
THE FOLLOWING TERMS APPLY TO THE COUNTRY SPECIFIED:
AUSTRIA AND GERMANY
The IBM Warranty for Machines: The following replaces the first sentence of the
first paragraph of this Section:
The warranty for an IBM Machine covers the functionality of the Machine for
its normal use and the Machine’s conformity to its Specifications.
The following paragraphs are added to this Section:
The minimum warranty period for Machines is six months. In case IBM or
your reseller is unable to repair an IBM Machine, you can alternatively ask for
a partial refund as far as justified by the reduced value of the unrepaired
Machine or ask for a cancellation of the respective agreement for such Machine
and get your money refunded.
44 Quick Reference
Page 59

Extent of Warranty: The second paragraph does not apply.
Warranty Service: The following is added to this Section:
During the warranty period, transportation for delivery of the failing Machine
to IBM will be at IBM’s expense.
Limitation of Liability: The following paragraph is added to this Section:
The limitations and exclusions specified in the Statement of Limited Warranty
will not apply to damages caused by IBM with fraud or gross negligence and
for express warranty.
The following sentence is added to the end of item 2:
IBM’s liability under this item is limited to the violation of essential contractual
terms in cases of ordinary negligence.
EGYPT
Limitation of Liability: The following replaces item 2 in this Section:
as to any other actual direct damages, IBM’s liability will be limited to the total
amount you paid for the Machine that is the subject of the claim. For purposes
of this item, the term “Machine” includes Machine Code and Licensed Internal
Code.
Applicability of suppliers and resellers (unchanged).
FRANCE
Limitation of Liability: The following replaces the second sentence of the first
paragraph of this Section:
In such instances, regardless of the basis on which you are entitled to claim
damages from IBM, IBM is liable for no more than: (items 1 and 2 unchanged).
IRELAND
Extent of Warranty: The following is added to this Section:
Except as expressly provided in these terms and conditions, all statutory
conditions, including all warranties implied, but without prejudice to the
generality of the foregoing all warranties implied by the Sale of Goods Act
1893 or the Sale of Goods and Supply of Services Act 1980 are hereby
excluded.
Limitation of Liability: The following replaces items one and two of the first
paragraph of this Section:
1. death or personal injury or physical damage to your real property solely
caused by IBM’s negligence; and
2. the amount of any other actual direct damages, up to 125 percent of the
Appendix A. Warranty information 45
Page 60

charges (if recurring, the 12 months’ charges apply) for the Machine that is the
subject of the claim or which otherwise gives rise to the claim.
Applicability of suppliers and resellers (unchanged).
The following paragraph is added at the end of this Section:
IBM’s entire liability and your sole remedy, whether in contract or in tort, in
respect of any default shall be limited to damages.
ITALY
Limitation of Liability: The following replaces the second sentence in the first
paragraph:
In each such instance unless otherwise provided by mandatory law, IBM is
liable for no more than:
1. (unchanged)
2. as to any other actual damage arising in all situations involving
nonperformance by IBM pursuant to, or in any way related to the subject
matter of this Statement of Warranty, IBM’s liability, will be limited to the total
amount you paid for the Machine that is the subject of the claim.
Applicability of suppliers and resellers (unchanged).
The following replaces the third paragraph of this Section:
Unless otherwise provided by mandatory law, IBM and your reseller are not
liable for any of the following: (items 1 and 2 unchanged) 3) indirect damages,
even if IBM or your reseller is informed of their possibility.
SOUTH AFRICA, NAMIBIA, BOTSWANA, LESOTHO AND SWAZILAND
Limitation of Liability: The following is added to this Section:
IBM’s entire liability to you for actual damages arising in all situations
involving nonperformance by IBM in respect of the subject matter of this
Statement of Warranty will be limited to the charge paid by you for the
individual Machine that is the subject of your claim from IBM.
UNITED KINGDOM
Limitation of Liability: The following replaces items 1 and 2 of the first paragraph
of this Section:
1. death or personal injury or physical damage to your real property solely
caused by IBM’s negligence;
2. the amount of any other actual direct damages or loss, up to 125 percent of
the charges (if recurring, the 12 months’ charges apply) for the Machine
that is the subject of the claim or which otherwise gives rise to the claim;
46 Quick Reference
Page 61

The following item is added to this paragraph:
3. breach of IBM’s obligations implied by Section 12 of the Sale of Goods Act
1979 or Section 2 of the Supply of Goods and Services Act 1982.
Applicability of suppliers and resellers (unchanged).
The following is added to the end of this Section:
IBM’s entire liability and your sole remedy, whether in contract or in tort, in
respect of any default shall be limited to damages.
Appendix A. Warranty information 47
Page 62

48 Quick Reference
Page 63

Appendix B. Notices
IBM may not offer the products, services, or features discussed in this
document in all countries. Consult your local IBM representative for
information on the products and services currently available in your area. Any
reference to an IBM product, program, or service is not intended to state or
imply that only that IBM product, program, or service may be used. Any
functionally equivalent product, program, or service that does not infringe any
IBM intellectual property right may be used instead. However, it is the user’s
responsibility to evaluate and verify the operation of any non-IBM product,
program, or service.
IBM may have patents or pending patent applications covering subject matter
described in this document. The furnishing of this document does not give you
any license to these patents. You can send license inquiries, in writing, to:
IBM Director of Licensing
IBM Corporation
North Castle Drive
Armonk, NY 10504-1785
U.S.A.
INTERNATIONAL BUSINESS MACHINES CORPORATION PROVIDES THIS
PUBLICATION “AS IS” WITHOUT WARRANTY OF ANY KIND, EITHER
EXPRESS OR IMPLIED, INCLUDING, BUT NOT LIMITED TO, THE IMPLIED
WARRANTIES OF NON-INFRINGEMENT, MERCHANTABILITY OR FITNESS
FOR A PARTICULAR PURPOSE. Some jurisdictions do not allow disclaimer of
express or implied warranties in certain transactions, therefore, this statement
may not apply to you.
This information could include technical inaccuracies or typographical errors.
Changes are periodically made to the information herein; these changes will be
incorporated in new editions of the publication. IBM may make improvements
and/or changes in the product(s) and/or the program(s) described in this
publication at any time without notice.
The products described in this document are not intended for use in
implantation or other life support applications where malfunction may result
in injury or death to persons. The information contained in this document does
not affect or change IBM product specifications or warranties. Nothing in this
document shall operate as an express or implied license or indemnity under
the intellectual property rights of IBM or third parties. All information
contained in this document was obtained in specific environments and is
presented as an illustration. The result obtained in other operating
environments may vary.
© Copyright IBM Corp. 2002 49
Page 64

IBM may use or distribute any of the information you supply in any way it
believes appropriate without incurring any obligation to you.
Any references in this publication to non-IBM Web sites are provided for
convenience only and do not in any manner serve as an endorsement of those
Web sites. The materials at those Web sites are not part of the materials for this
IBM product, and use of those Web sites is at your own risk.
Television output notice
The following notice applies to models that have the factory-installed
television-output feature.
This product incorporates copyright protection technology that is protected by
method claims of certain U.S. patents and other intellectual property rights
owned by Macrovision Corporation and other rights owners. Use of this
copyright protection technology must be authorized by Macrovision
Corporation, and is intended for home and other limited viewing uses only
unless otherwise authorized by Macrovision Corporation. Reverse engineering
or disassembly is prohibited.
Trademarks
The IBM logo and the following terms are trademarks of the IBM Corporation
in the United States, other countries, or both:
HelpCenter
IBM
NetVista
ScrollPoint
Update Connector
Lotus, Freelance, and Word Pro are trademarks of Lotus Development
Corporation and/or IBM Corporation in the United States, other countries, or
both.
Microsoft, Windows, and Windows NT are trademarks of Microsoft
Corporation in the United States, other countries, or both.
PC Direct is a trademark of Ziff Communications Company in the United
States, other countries, or both and is used by IBM Corporation under license.
Other company, product, or service names may be the trademarks or service
marks of others.
50 Quick Reference
Page 65

Electronic emissions notices
The following paragraph refers only to machine types 6790, 6791, 6792, 6793,
6794, 6823, and 6825.
This computer is classified as a Class B digital device. However, this computer
includes a built-in network interface controller (NIC) and is considered a Class
A digital device when the NIC is in use. The Class A digital device rating and
compliance notice are primarily because the inclusion of certain Class A
options or Class A NIC cables changes the overall rating of the computer to
Class A.
Cet ordinateur est enregistré comme un appareil numérique de classe B.
Toutefois, lorsque la carte réseau qu’il contient est utilisée, il est considéré
comme un appareil de classe A. Il a été déclaré de classe A dans l’avis de
conformité car la présence de certaines options de classe A ou de câbles de
carte réseau de classe A modifie ses caractérisques et le rend conforme aux
normes de la classe A.
The following paragraph refers only to machine types 6826, 8301, 8302, 8303,
8304, 8305, 8306, 8307, 8308, 8309, 8310, 8311, 8312, 8313, 8314, 8315, 8317, 8318,
and 8319.
This computer is classified as a Class B digital device and includes an
integrated Gigabit Ethernet interface. This computer is classified as a Class A
device when the Gigabit Ethernet is in use.
Class B notices
These notices refer to machine types 2254, 2256, 2257, 2289, 6029, 6336, 6337,
6339, 6341, 6342, 6346, 6347, 6348, 6790, 6791, 6792, 6793, 6794, 6823, 6824, 6825,
6826, 8301, 8302, 8303, 8304, 8305, 8306, 8307, 8308, 8309, 8310, 8311, 8312, 8313,
8314, 8315, 8317, 8318, and 8319.
Federal Communications Commission (FCC) statement
Note: This equipment has been tested and found to comply with the limits for
a Class B digital device, pursuant to Part 15 of the FCC Rules. These limits are
designed to provide reasonable protection against harmful interference in a
residential installation. This equipment generates, uses, and can radiate radio
frequency energy and, if not installed and used in accordance with the
instructions, may cause harmful interference to radio communications.
However, there is no guarantee that interference will not occur in a particular
installation. If this equipment does cause harmful interference to radio or
television reception, which can be determined by turning the equipment off
and on, the user is encouraged to try to correct the interference by one or more
of the following measures:
v Reorient or relocate the receiving antenna.
Appendix B. Notices 51
Page 66

v Increase the separation between the equipment and receiver.
v Connect the equipment into an outlet on a circuit different from that to
which the receiver is connected.
v Consult an IBM authorized dealer or service representative for help.
Properly shielded and grounded cables and connectors must be used in order
to meet FCC emission limits. Proper cables and connectors are available from
IBM authorized dealers. IBM is not responsible for any radio or television
interference caused by using other than recommended cables and connectors or
by unauthorized changes or modifications to this equipment. Unauthorized
changes or modifications could void the user’s authority to operate the
equipment.
This device complies with Part 15 of the FCC Rules. Operation is subject to the
following two conditions: (1) this device may not cause harmful interference,
and (2) this device must accept any interference received, including
interference that may cause undesired operation.
Responsible party:
v International Business Machines Corporation
v New Orchard Road
v Armonk, NY 10504
v Telephone: 1-919-543-2193
Tested To Comply
With FCC Standards
FOR HOME OR OFFICE USE
Industry Canada Class B emission compliance statement
This Class B digital apparatus complies with Canadian ICES-003.
Avis de conformité à la réglementation d’Industrie Canada
Cet appareil numérique de la classe B est conforme à la norme NMB-003 du
Canada.
European Union EMC Directive conformance statement
This product is in conformity with the protection requirements of EU Council
Directive 89/336/EEC on the approximation of the laws of the Member States
relating to electromagnetic compatibility. IBM cannot accept responsibility for
any failure to satisfy the protection requirements resulting from a
nonrecommended modification of the product, including the fitting of non-IBM
option cards.
This product has been tested and found to comply with the limits for Class B
Information Technology Equipment according to CISPR 22/European Standard
52 Quick Reference
Page 67

EN 55022. The limits for Class B equipment were derived for typical residential
environments to provide reasonable protection against interference with
licensed communication devices.
Class A notices
Federal Communications Commission (FCC) statement
Note: This equipment has been tested and found to comply with the limits for
a Class A digital device, pursuant to Part 15 of the FCC Rules. These limits are
designed to provide reasonable protection against harmful interference when
the equipment is operated in a commercial environment. This equipment
generates, uses, and can radiate radio frequency energy and, if not installed
and used in accordance with the instruction manual, may cause harmful
interference to radio communications. Operation of this equipment in a
residential area is likely to cause harmful interference, in which case the user
will be required to correct the interference at his own expense.
Properly shielded and grounded cables and connectors must be used in order
to meet FCC emission limits. IBM is not responsible for any radio or television
interference caused by using other than recommended cables and connectors or
by unauthorized changes or modifications to this equipment. Unauthorized
changes or modifications could void the user’s authority to operate the
equipment.
This device complies with Part 15 of the FCC Rules. Operation is subject to the
following two conditions: (1) this device may not cause harmful interference,
and (2) this device must accept any interference received, including
interference that may cause undesired operation.
Industry Canada Class A emission compliance statement
This Class A digital apparatus complies with Canadian ICES-003.
Avis de conformité à la réglementation d’Industrie Canada
Cet appareil numérique de la classe A est conforme à la norme NMB-003 du
Canada.
Australia and New Zealand Class A statement
Attention: This is a Class A product. In a domestic environment this product
may cause radio interference in which case the user may be required to take
adequate measures.
European Union EMC Directive conformance statement
This product is in conformity with the protection requirements of EU Council
Directive 89/336/EEC on the approximation of the laws of the Member States
relating to electromagnetic compatibility. IBM cannot accept responsibility for
any failure to satisfy the protection requirements resulting from a
nonrecommended modification of the product, including the fitting of non-IBM
option cards.
Appendix B. Notices 53
Page 68

This product has been tested and found to comply with the limits for Class A
Information Technology Equipment according to CISPR 22/European Standard
EN 55022. The limits for Class A equipment were derived for commercial and
industrial environments to provide reasonable protection against interference
with licensed communication equipment.
Attention: This is a Class A product. In a domestic environment this product
may cause radio interference in which case the user may be required to take
adequate measures.
Taiwan Class A warning statement
Federal Communications Commission (FCC) and telephone company requirements
1. This device complies with Part 68 of the FCC rules. A label is affixed to the
device that contains, among other things, the FCC registration number,
USOC, and Ringer Equivalency Number (REN) for this equipment. If these
numbers are requested, provide this information to your telephone
company.
Note: If the device is an internal modem, a second FCC registration label is
also provided. You may attach the label to the exterior of the
computer in which you install the IBM modem, or you may attach
the label to the external DAA, if you have one. Place the label in a
location that is easily accessible, should you need to provide the
label information to the telephone company.
2. The REN is useful to determine the quantity of devices you may connect to
your telephone line and still have those devices ring when your number is
called. In most, but not all areas, the sum of the RENs of all devices should
not exceed five (5). To be certain of the number of devices you may connect
54 Quick Reference
Page 69

to your line, as determined by the REN, you should call your local
telephone company to determine the maximum REN for your calling area.
3. If the device causes harm to the telephone network, the telephone company
may discontinue your service temporarily. If possible, they will notify you
in advance; if advance notice is not practical, you will be notified as soon
as possible. You will be advised of your right to file a complaint with the
FCC.
4. Your telephone company may make changes in its facilities, equipment,
operations, or procedures that could affect the proper operation of your
equipment. If they do, you will be given advance notice to give you an
opportunity to maintain uninterrupted service.
5. If you experience trouble with this product, contact your authorized
reseller, or call IBM. In the United States, call IBM at 1-800-772-2227.In
Canada, call IBM at 1-800-565-3344. You may be required to present proof
of purchase.
The telephone company may ask you to disconnect the device from the
network until the problem has been corrected, or until you are sure the
device is not malfunctioning.
6. No customer repairs are possible to the device. If you experience trouble
with the device, contact your Authorized Reseller or see the Diagnostics
section of this manual for information.
7. This device may not be used on coin service provided by the telephone
company. Connection to party lines is subject to state tariffs. Contact your
state public utility commission or corporation commission for information.
8. When ordering network interface (NI) service from the local Exchange
Carrier, specify service arrangement USOC RJ11C.
Canadian Department of Communications certification label
NOTICE: The Industry Canada label identifies certified equipment. This
certification means that the equipment meets telecommunications network
protective, operational and safety requirements as prescribed in the appropriate
Terminal Equipment Technical Requirements documents. The Department does
not guarantee the equipment will operate to the user’s satisfaction.
Before installing this equipment, users should ensure that it is permissible to
be connected to the facilities of the local telecommunications company. The
equipment must also be installed using an acceptable method of connection.
The customer should be aware that compliance with the above conditions may
not prevent degradation of service in some situations. Repairs to certified
equipment should be coordinated by a representative designated by the
supplier. Any repairs or alterations made by the user to this equipment, or
equipment malfunctions, may give the telecommunications company cause to
request the user to disconnect the equipment.
Appendix B. Notices 55
Page 70

Users should ensure for their own protection that the electrical ground
connections of the power utility, telephone lines, and internal metallic water
pipe system, if present, are connected together. This precaution may be
particularly important in rural areas.
Caution: Users should not attempt to make such connections themselves, but
should contact the appropriate electric inspection authority, or electrician, as
appropriate.
NOTICE: The Ringer Equivalence Number (REN) assigned to each terminal
device provides an indication of the maximum number of terminals allowed to
be connected to a telephone interface. The termination on an interface may
consist of any combination of devices subject only to the requirement that the
sum of the Ringer Equivalence Numbers of all the devices does not exceed 5.
Étiquette d’homologation du ministère des Communications du Canada
AVI S : L’étiquette d’Industrie Canada identifie le matériel homologué. Cette
étiquette certifie que le matériel est conforme aux normes de protection,
d’exploitation et de sécurité des réseaux de télécommunications, comme le
prescrivent les documents concernant les exigences techniques relatives au
matériel terminal. Le ministère n’assure toutefois pas que le matériel
fonctionnera à la satisfaction de l’utilisateur.
Avant d’installer ce matériel, l’utilisateur doit s’assurer qu’il est permis de le
raccorder aux installations de l’entreprise locale de télécommunications. Le
matériel doit également être installé en suivant une méthode acceptée de
raccordement. L’abonné ne doit pas oublier qu’il est possible que la conformité
aux conditions énoncées ci-dessus n’empêche pas la dégradation du service
dans certaines situations.
Les réparations de matériel homologué doivent être coordonnées par un
représentant désigné par le fournisseur. L’entreprise de télécommunications
peut demander à l’utilisateur de débrancher un appareil à la suite de
réparations ou de modifications effectuées par l’utilisateur ou à cause de
mauvais fonctionnement.
Pour sa propre protection, l’utilisateur doit s’assurer que tous les fils de mise à
la terre de la source d’énergie électrique, des lignes téléphoniques et des
canalisations d’eau métalliques, s’il y en a, sont raccordés ensemble. Cette
précaution est particulièrement importante dans les régions rurales.
Avertissement : L’utilisateur ne doit pas tenter de faire ces raccordements
lui-même; il doit avoir recours à un service d’inspection des installations
électriques ou à un électricien, selon le cas.
56 Quick Reference
Page 71

AVI S : L’indice d’équivalence de la sonnerie (IES) assigné à chaque dispositif
terminal indique le nombre maximal de terminaux qui peuvent être raccordés
à une interface. La terminaison d’une interface téléphonique peut consister en
une combinaison de quelques dispositifs, à la seule condition que la somme
d’indices d’équivalence de la sonnerie de tous les dispositifs n’excède pas 5.
Power cord notice
For your safety, IBM provides a power cord with a grounded attachment plug
to use with this IBM product. To avoid electrical shock, always use the power
cord and plug with a properly grounded outlet.
IBM power cords used in the United States and Canada are listed by
Underwriter’s Laboratories (UL) and certified by the Canadian Standards
Association (CSA).
For units intended to be operated at 115 volts: Use a UL-listed and
CSA-certified cord set consisting of a minimum 18 AWG, Type SVT or SJT,
three-conductor cord, a maximum of 15 feet in length and a parallel blade,
grounding-type attachment plug rated 15 amperes, 125 volts.
For units intended to be operated at 230 volts (U.S. use): Use a UL-listed and
CSA-certified cord set consisting of a minimum 18 AWG, Type SVT or SJT,
three-conductor cord, a maximum of 15 feet in length and a tandem blade,
grounding-type attachment plug rated 15 amperes, 250 volts.
For units intended to be operated at 230 volts (outside the U.S.): Use a cord set
with a grounding-type attachment plug. The cord set should have the
appropriate safety approvals for the country in which the equipment will be
installed.
IBM power cords for a specific country or region are usually available only in
that country or region.
IBM power cord part
number
13F9940 Argentina, Australia, China (PRC), New Zealand, Papua New
Used in these countries and regions
Guinea, Paraguay, Uruguay, Western Samoa
Appendix B. Notices 57
Page 72

IBM power cord part
number
13F9979 Afghanistan, Algeria, Andorra, Angola, Austria, Belgium,
13F9997 Denmark
14F0015 Bangladesh, Burma, Pakistan, South Africa, Sri Lanka
14F0033 Antigua, Bahrain, Brunei, Channel Islands, China (Hong Kong
14F0051 Liechtenstein, Switzerland
14F0069 Chile, Ethiopia, Italy, Libya, Somalia
14F0087 Israel
1838574 Thailand
6952301 Bahamas, Barbados, Bermuda, Bolivia, Brazil, Canada, Cayman
Used in these countries and regions
Benin, Bulgaria, Burkina Faso, Burundi, Cameroon, Central
African Rep., Chad, China (Macau S.A.R.), Czech Republic,
Egypt, Finland, France, French Guiana, Germany, Greece,
Guinea, Hungary, Iceland, Indonesia, Iran, Ivory Coast, Jordan,
Lebanon, Luxembourg, Malagasy, Mali, Martinique,
Mauritania, Mauritius, Monaco, Morocco, Mozambique,
Netherlands, New Caledonia, Niger, Norway, Poland,
Portugal, Romania, Senegal, Slovakia, Spain, Sudan, Sweden,
Syria, Togo, Tunisia, Turkey, former USSR, Vietnam, former
Yugoslavia, Zaire, Zimbabwe
S.A.R.), Cyprus, Dubai, Fiji, Ghana, India, Iraq, Ireland, Kenya,
Kuwait, Malawi, Malaysia, Malta, Nepal, Nigeria, Polynesia,
Qatar, Sierra Leone, Singapore, Tanzania, Uganda, United
Kingdom, Yemen, Zambia
Islands, Colombia, Costa Rica, Dominican Republic, Ecuador,
El Salvador, Guatemala, Guyana, Haiti, Honduras, Jamaica,
Japan, Korea (South), Liberia, Mexico, Netherlands Antilles,
Nicaragua, Panama, Peru, Philippines, Saudi Arabia,
Suriname, Taiwan, Trinidad (West Indies), United States of
America, Venezuela
58 Quick Reference
Page 73

Page 74

Part Number: 59P7518
Printed in U.S.A.
(1P) P/N: 59P7518
 Loading...