

Page 1

Multi-Port
USB Hub
User's Guide
Page 2

Note: Before using this information and the product it supports, be sure to read
the information under Appendix C, “Product warranties and notices” on page 2-3.
First Edition (February 2000)
The following paragraph does not apply to the United Kingdom or any country where such
provisions are inconsistent with local law: INTERNATIONAL BUSINESS MACHINES
CORPORATION PROVIDES THIS PUBLICATION “AS IS” WITHOUT WARRANTY OF
ANY KIND, EITHER EXPRESS OR IMPLIED, INCLUDING, BUT NOT LIMITED TO, THE
IMPLIED WARRANTIES OF MERCHANTABILITY OR FITNESS FOR A PARTICULAR
PURPOSE. Some states do not allow disclaimer of express or implied warranties in certain
transactions, therefore, this statement may not apply to you.
This publication could include technical inaccuracies or typographical errors. Changes are
periodically made to the information herein; these changes will be incorporated in new editions of
the publication. IBM may make improvements and/or changes in the product(s) and/or the
program(s) described in this publication at any time.
This publication was developed for products and services offered in the United States of America.
IBM may not offer the products, services, or features discussed in this document in other
countries, and the information is subject to change without notice. Consult your local IBM
representative for information on the products, services, and features available in your area.
Requests for technical information about IBM products should be made to your IBM reseller or
IBM marketing representative.
Copyright International Business Machines Corporation 2000. All rights reserved.
Note to U.S. Government Users — Documentation related to restricted rights — Use, duplication
or disclosure is subject to restrictions set forth in GSA ADP Schedule Contract with IBM Corp.
Page 3

Contents
Registering your option ............................ iv
About this book ................................ iv
Part 1: Installation and user’s guide ................ 1-1
Part 2: Appendixes . . . . . . . . . . . . . . . . . . . . . . . . . . . 2-1
Appendix A. Problem solving . . . . . . . . . . . . . . . . . . . . . . . . 2-1
Appendix B. Help and service information ................. 2-2
Online technical support ............................ 2-2
Telephone technical support .......................... 2-2
Appendix C. Product warranties and notices ................ 2-3
Warranty Statements . . . . . . . . . . . . . . . . . . . . . . . . . . . . . . 2-3
Notices . . . . . . . . . . . . . . . . . . . . . . . . . . . . . . . . . . . . 2-12
Trademarks . . . . . . . . . . . . . . . . . . . . . . . . . . . . . . . . . . 2-12
Electronic emission notices .......................... 2-13
Japanese statement of compliance for products less than or equal to 20 A per
phase . . . . . . . . . . . . . . . . . . . . . . . . . . . . . . . . . . . . 2-16
Copyright IBM Corp. 2000 iii
Page 4

Registering your option
Thank you for purchasing this IBM
your product and provide us with information that will help IBM to better serve you in
the future. Your feedback is valuable to us in developing products and services that
are important to you, as well as in developing better ways to communicate with you.
Register your option on the IBM Web site at:
http://www.ibm.com/pc/register
IBM will send you information and updates on your registered product unless you
indicate on the Web site questionnaire that you do not want to receive further
information.
product. Please take a few moments to register
About this book
This manual contains instructions for installing and using your IBM Multi-Port USB
Hub. The manual is divided into two parts:
Part 1: Installation and user’s guide
This section contains the product description, installation instructions, and
use information in the following languages:
English
German
French
Spanish
Italian
Brazilian Portuguese
Japanese
Part 2: Appendixes
This section contains problem-solving, help and service information, the
product warranties, and notices.
Note: The illustrations in this manual might be slightly different from your hardware.
iv IBM Multi-Port USB Hub
Page 5

Part 1: Installation and user’s guide
This guide contains the product description, installation instructions, and product use
information.
Product description
The IBM Multi-Port USB Hub provides a quick and convenient connection to multiple
devices through one simple connection to your IBM ThinkPad computer. The nine
ports on the hub enable you to connect the following devices to the computer while
the computer is on:
Up to five Universal Serial Bus (USB) devices
Printer
Serial device
Note: The hub will not work with a serial mouse.
Standard keyboard
Standard mouse
In addition to this book, the option package includes:
Multi-Port USB hub
AC/DC power adapter
Note: All power supplies are universal. However, for worldwide use, you must
purchase the correct wall adapter or line cord for your country or region.
USB cable, 2.0 ft (0.6 m)
IBM Multi-Port USB Hub Option Diskette
Note: The hub supports the Microsoft
You might need your Windows 98 installation CD or diskettes to install
the device drivers on the Option Diskette.
Windows 98 operating system only.
Installing the hub
To install the hub:
1. Turn on the computer.
2. Insert the IBM Multi-Port USB Hub Option Diskette into the diskette drive.
(Insert your Windows 98 installation CD into the CD-ROM drive if you are
prompted to do so by the on-screen instructions. If you do not have a CD-ROM
drive, insert the first Windows 98 installation diskette into the diskette drive.)
Copyright IBM Corp. 2000 1-1
Page 6

3. Insert the barrel connector at the end of the ac/dc power adapter into the
power-adapter connector on the rear of the hub 1; then connect the other end of
the cord to an electrical outlet.
4. Connect one end of the two-foot USB cable to the computer USB connector and
the other end of the cable to the USB cable connector on the front of the hub
2.
The Add New Hardware wizard window opens and displays a message that it
detects a generic USB hub device driver.
1-2 IBM Multi-Port USB Hub
Page 7

To add the hub device driver:
1. Click Next.
2. Select Search for the best driver for your device.
3. Click Next.
4. Select Floppy disk drives.
5. Click Next.
6. Select The updated driver (Recommended).
7. Click Next twice.
8. Click Finish.
The Add New Hardware wizard window opens and displays a message that it
detects the IBM USB-Parallel Converter.
To add the IBM USB-Parallel converter device driver:
1. Click Next.
2. Select Search for the best driver for your device.
3. Click Next.
4. Select Floppy disk drives.
5. Click Next twice.
6. Click Finish.
The Add New Hardware wizard window opens and displays a message that it
detects a USB Human Interface Device.
To add the USB human interface device driver:
1. Click Next.
2. Select Search for the best driver for your device.
3. Click Next.
4. Select Floppy disk drives.
5. Click Next twice.
6. Click Finish.
The Add New Hardware wizard window opens and displays a message that it
detects the IBM USB Serial Converter.
To add the IBM USB serial converter device driver:
1. Click Next.
2. Select Search for the best driver for your device.
3. Click Next.
4. Click Floppy disk drives.
5. Click Next twice.
6. Click Finish.
If the Add New Hardware wizard window opens, complete the installation by
using the following instructions.
a. Click Next twice.
b. Click Finish.
Part 1: Installation and user’s guide 1-3
Page 8

The device driver installation is complete. You can now use the hub. For more
information on using the hub, go to “Using the hub” on page 1-5.
Uninstalling the hub software
To uninstall the hub device drivers:
1. Disconnect the hub from the computer. For information on disconnecting the
hub, go to “Disconnecting and reconnecting the hub” on page 1-7.
2. Insert the IBM Multi-Port USB Hub Option Diskette into the diskette drive.
3. Click Start.
4. Select Run.
5. Click the Browse.... button.
6. Select the diskette drive (a:\) from the Look in pull-down menu.
7. Double-click Uninst.exe.
8. Click Yes to confirm uninstallation.
9. Click Yes to restart your computer.
1-4 IBM Multi-Port USB Hub
Page 9

Using the hub
This section contains information on using the hub.
Locating the hub connectors
Use the following illustration to locate where to connect a device to the hub.
Note: For use guidelines on devices connected to the hub, refer to “Understanding
device-usage guidelines” on page 1-8.
1 USB connectors
This is where you connect USB devices.
Note: You can also connect a USB device to the USB connector on the front of the
hub.
2 Serial port
This is where you connect a serial device.
Note: You cannot use a serial mouse with the hub.
3 Power-adapter connector
This is where you connect the ac/dc power adapter.
4 Bidirectional printer connector
This is where you connect a printer. This connector does not work with other parallel
port devices.
5 Standard keyboard connector
This is where you connect a standard keyboard.
6 Standard mouse connector
This is where you connect a standard mouse.
Part 1: Installation and user’s guide 1-5
Page 10
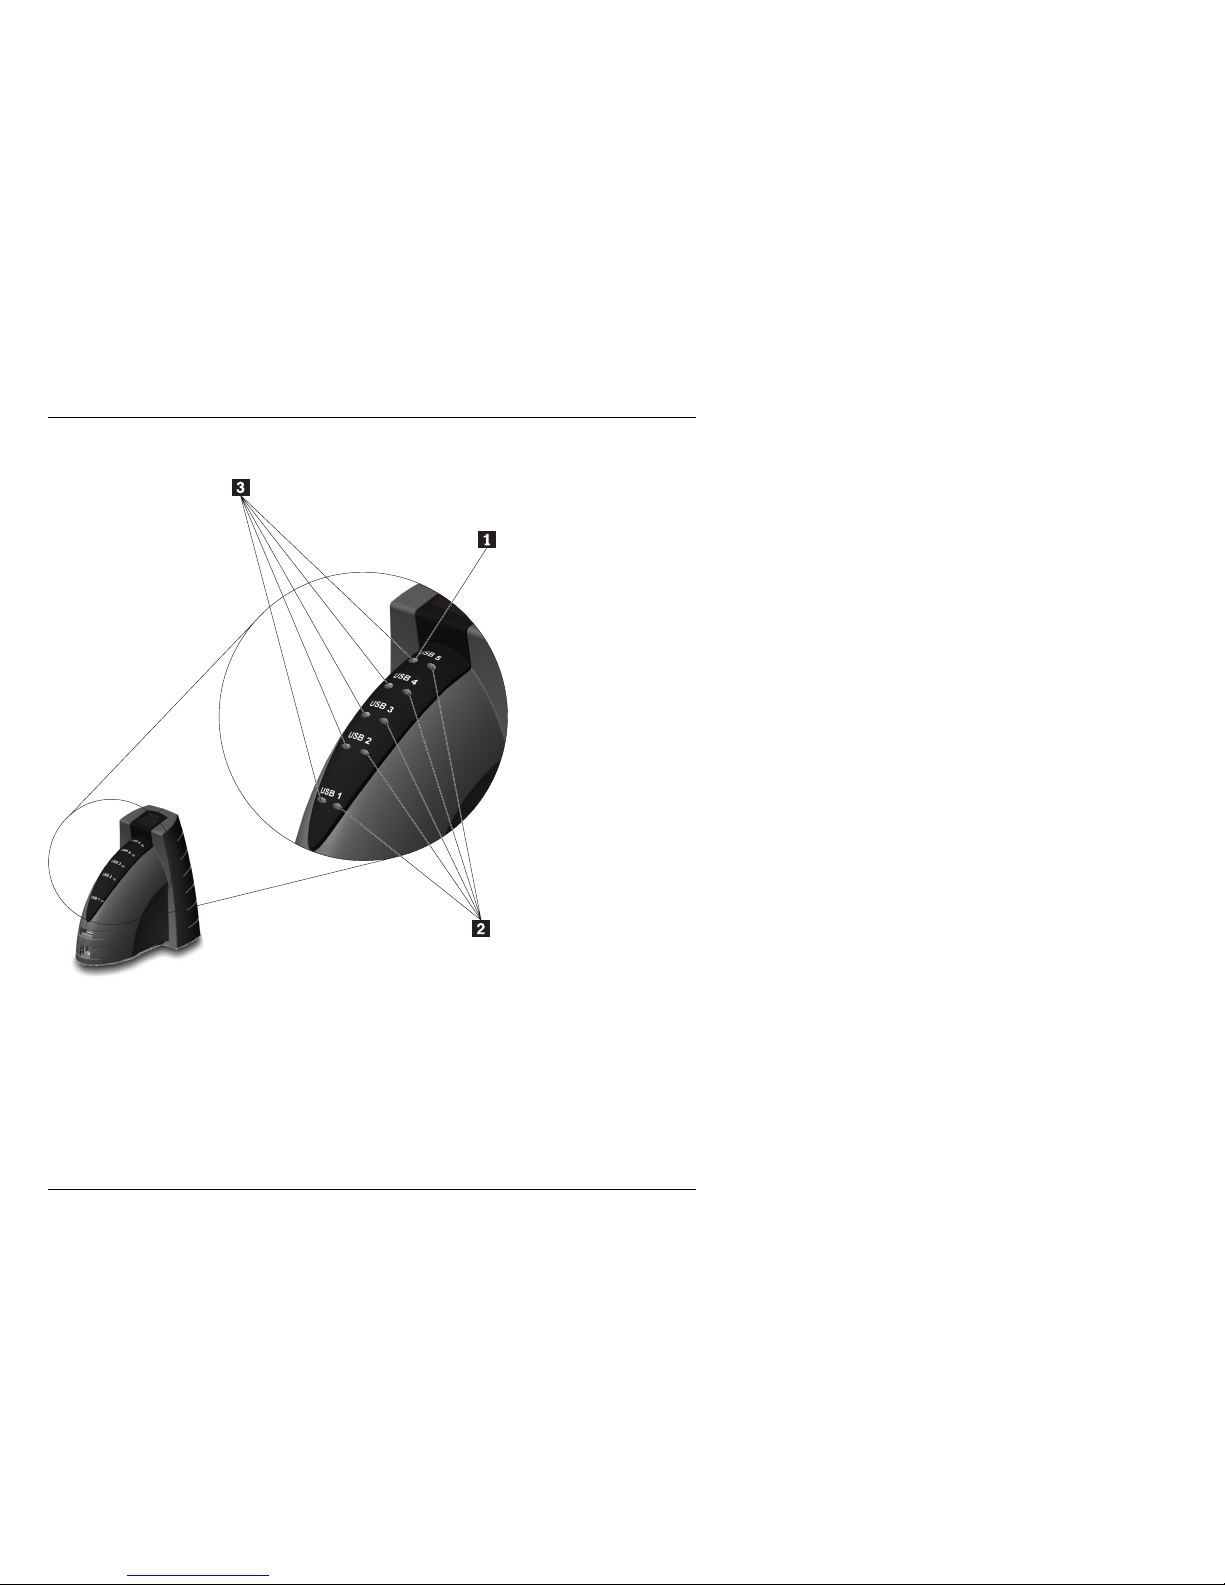
Locating the hub indicators
There are 11 LEDs on the front of the hub. When the hub is turned on, the LEDs
light until the hub completes a verification of the attached devices. The green LEDs
3 light when high-speed USB devices are connected to the USB connectors. The
yellow LEDs 2 light when low-speed USB devices are connected to the USB
connectors. The power LED on the top of the unit 1 lights when the ac/dc power
adapter is connected to the hub. The LED for a connected device flashes if the device
is receiving data from or sending data to the computer.
Setting up a printer connected to the hub
If you have connected a printer to the hub, you must use the following instructions to
give the hub printer connector an LPT assignment:
1. Click Start.
2. Select Settings.
3. Click Printers.
4. Double-click Add Printer. The Add Printer Wizard window opens.
5. Click Next.
6. Select Local Printer.
7. Click Next.
8. Select the manufacturer of your printer from the list on the left.
9. Select the printer model from the list on the right.
1-6 IBM Multi-Port USB Hub
Page 11

10. Click Next.
If the device driver is already installed on your system and you are prompted to
keep it or to replace it, select Keep existing driver (recommended); then click
Next.
11. Select IBM USB-Parallel Port. The wizard assigns this connector to LPT2.
12. Click Next.
13. Select Yes to make the printer that is connected to the hub the default printer.
14. Click Finish.
15. Click OK when the printer device driver installation completes.
Using a serial device
If the computer does not detect a device after you connect it to the hub, you have a
serial device that is not “plug-and-play.” To install a serial device that is not
“plug-and-play”:
1. Connect power to the device.
2. Connect the serial device to the hub serial port.
3. Click Start.
4. Select Settings.
5. Click Control Panel.
6. Double-click the Add new hardware icon.
7. Click Next twice.
8. Select Yes (recommended); then click Next.
9. Select Yes (recommended) again; then click Next.
10. Click Detail..... Verify that the device is in the displayed list.
11. Click Finish.
12. Click Next.
If the operating system does not complete the installation, follow these instructions:
1. Select Search for the best driver for your device; then click Next.
2. Click Next.
3. Click Finish.
The serial device installation is complete. You can now use the serial device.
Disconnecting and reconnecting the hub
You do not need to turn off your computer to disconnect or reconnect the USB hub.
To disconnect the hub from the computer, simply unplug the USB cable from the
computer. To reconnect the hub, reconnect the USB cable to the computer. The
devices and their device drivers are activated when you connect the cable.
Part 1: Installation and user’s guide 1-7
Page 12

Understanding device-usage guidelines
Before you begin using the devices connected to the hub, be sure to note the following
device-usage guidelines:
Do not activate resource-intensive devices at the same time because USB
limitations might cause a degradation in the performance and the speed of the
devices. For example, do not start a USB scanner while you are using a USB
camera. Instead, close the application for the camera; then start the scanner.
The hub printer port works only with printers; it does not work with other parallel
devices. However, the printer port does support bidirectional communication
between the printer and the computer.
Use only a standard or USB mouse with the hub. USB limitations prevent the
use of serial input devices, such as a mouse, through the serial port. Use a USB
graphic tablet because a standard graphic tablet might work like a serial mouse.
1-8 IBM Multi-Port USB Hub
 Loading...