

Page 1

L190
User’s Guide
IBM ThinkVisionTM Monitor L190
English
Page 2

First Edition (December / 2004)
Note: For important information, refer to the Monitor Safety and Warranty manual that comes with this monitor.
iii
Page 3

Contents
Safety (Read first).......................................................................................................2
Setting up the monitor ...............................................................................................5
Product description ..............................................................................................5
Handling instructions............................................................................................5
Kensington security slot .......................................................................................6
Workplace preparation.........................................................................................7
Adjusting the monitor position..............................................................................7
Working practices.................................................................................................8
Caring for your monitor ........................................................................................8
Connecting your monitor......................................................................................9
Turning on your monitor.....................................................................................10
Device driver installation .........................................................................................11
Windows 95/98...................................................................................................11
Windows 2000/Me..........................................................................................................12
Windows XP ...................................................................................................................13
Automatic Image setup ............................................................................................14
Image setup .......................................................................................................14
Image setup for DOS .........................................................................................15
Image setup for Windows 95, Windows 98, Windows 2000, Windows NT,
Windows Me, or Windows XP
..................................................................................
16
ENGLISH
Manual Image setup .................................................................................................17
Adjusting your LCD monitor ...................................................................................18
User controls......................................................................................................18
On-screen display (OSD) controls .....................................................................19
Further information ..................................................................................................22
Display modes ...................................................................................................22
Power management...........................................................................................23
Product disposal ................................................................................................23
Troubleshooting .......................................................................................................24
Help and service information .............................................................................26
Specifications ...........................................................................................................27
Service information ..................................................................................................28
Notices and trademarks...........................................................................................29
1
Page 4
2
Page 5

Always observe the following precautions to reduce the risk of injury and property damage.
Do not attempt to service a product yourself unless instructed to do so by the IBM Support Center. Use
only an IBM authorized service provider who is approved to repair your particular product.
Note: Some parts can be upgraded or replaced by the customer. These parts are referred to as Customer
Replaceable Units, or CRUs. IBM expressly identifies CRUs as such, and provides documentation with
instructions when it is appropriate for customers to replace those parts. You must closely follow all
instructions when performing such replacements. Always make sure that the power is turned off and that
the product is unplugged from any power source before you attempt the replacement. If you have any
questions or concerns, contact the IBM Support Center.
Use only the power cords and power adapters supplied by the product manufacturer.
Never wrap a power cord around the power adapter or other object. Doing so can stress the cord in ways
that can cause the cord to fray, crack or crimp. This can present a safety hazard.
Always route power cords so that they will not be walked on, tripped over, or pinched by objects.
Protect the cord and power adapters from liquids. For instance, do not leave your cord or power adapter
near sinks, tubs, toilets, or on floors that are cleaned with liquid cleansers. Liquids can cause a short
circuit, particularly if the cord or power adapter has been stressed by misuse. Liquids can also cause
gradual corrosion of the power cord terminals and/or the connector terminals on the adapter which can
eventually result in overheating.
Always connect power cords and signal cables in the correct order and ensure that all power cord
connectors are securely and completely plugged into receptacles.
ENGLISH
Do not use any power adapter that shows corrosion at the ac input pins and/or shows signs of
overheating (such as deformed plastic) at the ac input or anywhere on the power adapter.
Do not use any power cords where the electrical contacts on either end show signs of corrosion or
overheating or where the power cord appears to have been damaged in any way.
Ensure that extension cords, surge protectors, uninterruptible power supplies, and power strips that you
use are rated to handle the electrical requirements of the product. Never overload these devices. If power
strips are used, the load should not exceed the power strip input rating. Consult an electrician for more
information if you have questions about power loads, power requirements, and input ratings.
If a receptacle (power outlet) that you intend to use with your computer equipment appears to be damaged
or corroded, do not use the outlet until it is replaced by a qualified electrician.
Do not bend or modify the plug. If the plug is damaged, contact the manufacturer to obtain a replacement.
Some products are equipped with a three-pronged plug. This plug fits only into a grounded electrical
outlet. This is a safety feature. Do not defeat this safety feature by trying to insert it into a non-grounded
outlet. If you cannot insert the plug into the outlet, contact an electrician for an approved outlet adapter or
to replace the outlet with one that enables this safety feature. Never overload an electrical outlet. The
overall system load should not exceed 80 percent of the branch circuit rating. Consult an electrician for
more information if you have questions about power loads and branch circuit ratings.
3
Page 6

Be sure that the power outlet you are using is properly wired, easily accessible, and located close to the
equipment. Do not fully extend power cords in a way that will stress the cords.
Connect and disconnect the equipment from the electrical outlet carefully.
All IBM personal computers contain a non-rechargeable coin cell battery to provide power to the system
clock. In addition many mobile products such as ThinkPad notebook PCs utilize a rechargeable battery
pack to provide system power when in portable mode. Batteries supplied by IBM for use with your product
have been tested for compatibility and should only be replaced with IBM approved parts.
Never attempt to open or service any battery. Do not crush, puncture, or incinerate batteries or short
circuit the metal contacts. Do not expose the battery to water or other liquids. Only recharge the battery
pack strictly according to instructions included in the product documentation.
Battery abuse or mishandling can cause the battery to overheat, which can cause gasses or flame to
"vent" from the battery pack or coin cell. If your battery is damaged, or if you notice any discharge from
your battery or the buildup of foreign materials on the battery leads, stop using the battery and obtain a
replacement from the battery manufacturer.
Batteries can degrade when they are left unused for long periods of time. For some rechargeable batteries
(particularly Lithium Ion batteries), leaving a battery unused in a discharged state could increase the risk
of a battery short circuit, which could shorten the life of the battery and can also pose a safety hazard.
Do not let rechargeable Lithium-Ion batteries completely discharge or store these batteries in a discharged
state.
Computers generate heat when turned on and when batteries are charging. Notebook PCs can generate a
significant amount of heat due to their compact size. Always follow these basic precautions:
• Do not leave the base of your computer in contact with your lap or any part of your body for an
extended period when the computer is functioning or when the battery is charging. Your computer
produces some heat during normal operation. Extended contact with the body could cause discomfort
or, potentially, a skin burn.
• Do not operate your computer or charge the battery near flammable materials or in explosive
environments.
• Ventilation slots, fans and/or heat sinks are provided with the product for safety, comfort, and reliable
operation. These features might inadvertently become blocked by placing the product on a bed, sofa,
carpet, or other flexible surface. Never block, cover or disable these features.
CD and DVD drives spin discs at a high speed. If a CD or DVD is cracked or otherwise physically damaged,
it is possible for the disc to break apart or even shatter when the CD drive is in use. To protect against
possible injury due to this situation, and to reduce the risk of damage to your machine, do the following:
• Always store discs in their original packaging
• Always store discs out of direct sunlight and away from direct heat sources
• Remove discs from the computer when not in use
• Do not bend or flex discs, or force them into the computer or their packaging
• Check discs for cracks before each use. Do not use cracked or damaged discs
4
Page 7

Setting up the monitor
Product description
The IBM ThinkVision Monitor, L190, is a TFT LCD Color Monitor.
It requires a computer with a suitable on-board sub-system or Video
Adapter card that can support SXGA 1280 x 1024, XGA 1024 x 768,
SVGA 800 x 600, or VGA 640 x 480 at 60Hz.
In addition to your monitor, your option package includes the following:
• User's Guide and Installation Files CD
• Monitor Safety and Warranty Information Manual
• IBM ThinkVision Monitor L190 Setup Guide
• Power Cord
• L190 ThinkVision Monitor
• Analog Interface Cable - Attached to Monitor
Handling instructions
ENGLISH
Do not support the monitor within
the screen area. The Liquid
Crystal Display is glass and can
be damaged by rough handling or
excessive pressure.
1. Lift the monitor by placing your hands where indicated by the arrow in
the figure below.
2. Before using your monitor for the first time, remove the clear protective
film from the front of the screen.
5
Page 8
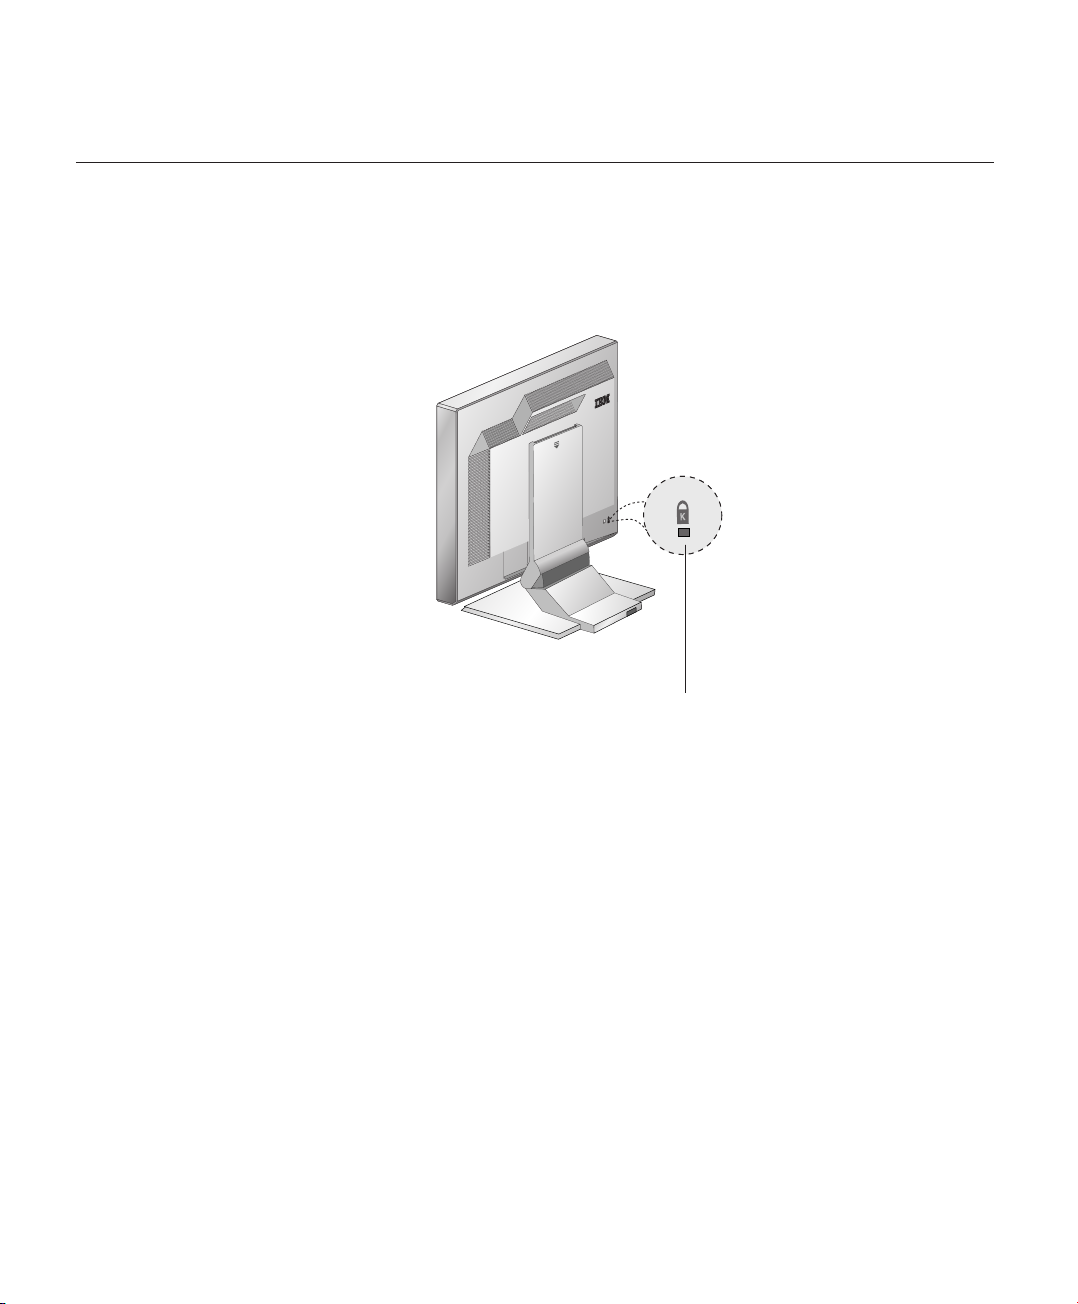
Kensington security slot
This slot can be used to connect to a locking cable. Locking cables can be
purchased separately at most computer stores.
Kensington security slot
6
Page 9
Workplace preparation
ENGLISH
This section gives advice
i
on what you should
consider before you set up
your monitor.
Height
Position the monitor so that the top of the screen is slightly below your eye
level when you sit at your workstation.
Orientation
1. Choose a position that gives the least reflection from lights and windows,
usually at a right angle to any windows.
2. Position the monitor directly in front of you so that you do not have to twist
your body to use it.
3. Tilt the monitor to a comfortable viewing angle.
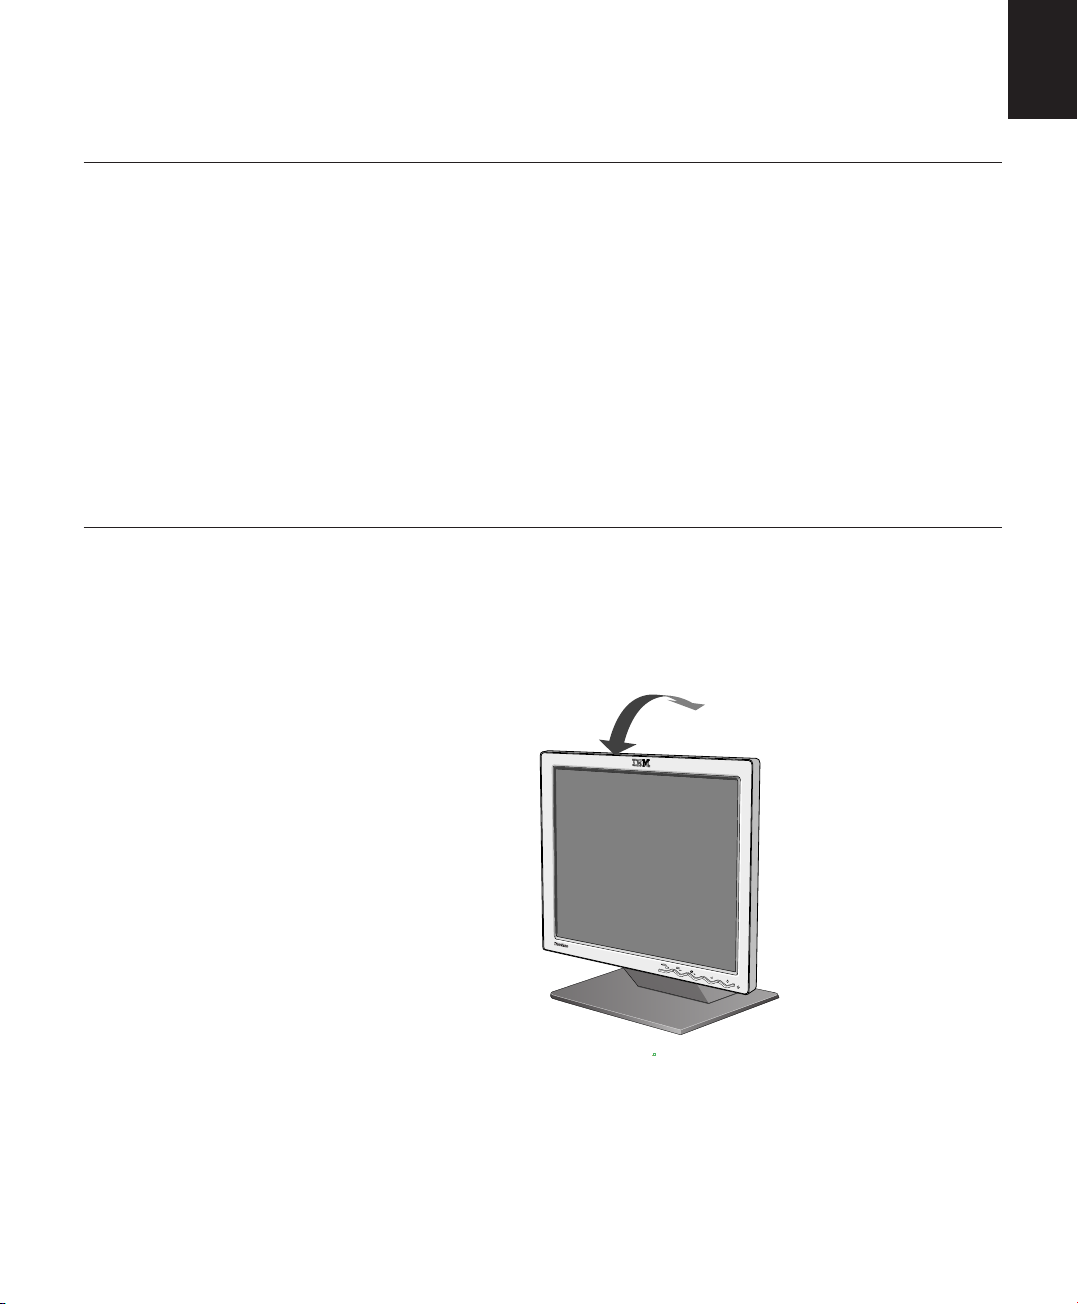
Adjusting the monitor position
With the IBM Flat Panel
i
Monitor, you can adjust its
position in various ways for
maximum comfort.
Viewing angle
You can tilt the screen forward and backward as shown below in Figure A.
Figure A
77
Page 10

Working practices
This section gives advice
i
on how you can work
comfortably and reduce
fatigue.
Rest
Take regular breaks. Vary your posture, stand up and stretch occasionally
as prolonged use of computer workstations can be tiring.
Back
Sit back in your chair and use the backrest.
Hands
Adjust the seat height so that your forearms are approximately horizontal
and your wrists are straight when using the keyboard. Your upper arms
should be relaxed with your elbows near your body.
Use a light touch on the keyboard, keeping your hands and fingers relaxed.
Allow a space in front of the keyboard to rest your wrists when not typing.
Consider using a wristpad.
Eyesight
Working with monitors, in common with any prolonged close work, can be
visually demanding. Look away from the screen periodically and have your
eyesight checked regularly.
Screen settings
Set the screen brightness and contrast to a comfortable level. You may
have to adjust these settings as the lighting changes during the day. Many
application programs let you select color combinations which can help you
to view in comfort. See the User controls section on page 18 for more
information.
Caring for your monitor
Be sure to disconnect the power cord from your monitor before you perform
any maintenance on the monitor. Clean your monitor as follows:
• Gently wipe the covers and the screen with a soft cloth, do not use
solvents or abrasives.
• Never drop water or other liquid into your monitor.
• Remove finger marks and grease with a damp cloth and mild detergent.
• Never use flammable cleaning materials to clean your IBM monitor or
any other electrical apparatus.
• Do not rub, touch, or tap the surface of the screen with sharp or
abrasives items such as a ballpoint pen or screwdriver. This type of
contact may result in a scratched piture tube.
• Do not use any type of cleaner containing an anti-static solution or similar
additive as this may scratch the screen's coating.
• Never apply detergent or other liquid directly to the screen. Dampen the
8
cloth and then wipe.
Page 11

Connecting your monitor
Be sure to read the Safety
Information located in the
Monitor Safety and Warranty
Information Manual before
carrying out this procedure.
1. Turn off your computer and all attached devices. Next, unplug all power
cords to your computer and all attached devices.
2. Connect the signal cable.
• The analog signal cable is already connected to your monitor
(See in Figure A).
• When connecting the analog signal cable, connect the free end of the
attached signal cable to the 15-pin monitor port on the computer and
tighten the screws.
ENGLISH
Figure A
3. Connect the power cord to the monitor and then plug the power cord into
a properly grounded outlet. Next, reconnect the power cords to your
computer and all attached devices.
9
Page 12

Turning on your monitor
1. Turn on your computer.
2. Turn on your monitor by pushing and releasing the power switch marked " "
at the front of the bezel.
• To turn off your monitor, push and release the power switch again.
3. To update or install device drivers, follow the instructions in the Device driver
installation section on page 11.
4. If you are using the analog connector, run Image setup by following the
instructions in the Automatic Image setup section on page 14.
10
Page 13

Device driver installation
Installing the device driver in Windows 95 or Windows 98
This section must be
completed before
continuing with the
Windows 95 or Windows 98
Image setup on page 14.
On LCD monitors, unlike
i
CRTs, a faster refresh rate
does not improve display
quality. For optimal
performance, use either 1280 x
1024 at a refresh rate of 60Hz
or 640 x 480 at a refresh rate
of 60Hz.
To install the device driver in Microsoft®Windows®95 or Windows 98, do
the following:
Note:
You must download files from the User’s Guide and Installation Files CD to
use the Plug and Play feature in Windows 95 or Windows 98.
1. Turn off the computer and all attached devices.
2. Ensure that the monitor is connected correctly.
3. Turn on the monitor and then the system unit. Allow your computer to
start the Windows 95 or Windows 98 operating system.
Your computer’s Plug and Play code might warn you that your system
hardware has changed. This means that it has detected your new
monitor for the first time.
4. Open the Display Properties window by clicking Start -> Settings ->
Control Panel and then double-clicking on the Display icon.
5. Click the Settings tab.
6. If you are using Windows 95, complete the following steps:
a. Click the Change Display Type button.
b. Click the Change Monitor Type button.
c. Proceed to Step 7.
If you are using Windows 98, complete the following steps:
a. Click the Advanced button.
b. Click the Monitor tab.
c. Open the Update Device Driver Wizard window by clicking on the
Change button and then select the Next button.
d. Select Display a list of the known drivers for this device so that
I can choose a specific driver and then select the Next button.
e. Proceed to Step 7.
7. Insert the User’s Guide and Installation Files CD into the CD drive and
click the Have Disk button.
8. Click OK.
9. Ensure that the CD drive letter is selected, and then select the
DRIVERS folder.
10. Select IBM L190 monitor and click OK. The files will be copied from
the CD to your hard disk drive.
11. Close all open windows and remove the CD.
12. Restart the computer.
The system will automatically select the maximum refresh rate and
corresponding Color Matching Profiles.
ENGLISH
11
Page 14

Installing the device driver in
Windows 2000 or Windows Me
This section must be
completed before
continuing with the
Windows 2000, Windows Me
Image setup on page 14.
On LCD monitors, unlike
i
CRTs, a faster refresh rate
does not improve display
quality. For optimal
performance, use either 1280 x
1024 at a refresh rate of 60Hz
or 640 x 480 at a refresh rate
of 60Hz.
To install the device driver in Microsoft Windows 2000 Professional or
Microsoft Windows Millennium Edition (Me), do the following:
Note:
You must download files from the User’s Guide and Installation Files CD to
use the Plug and Play feature in Windows 2000 or Windows Me.
1. Turn off the computer and all attached devices.
2. Ensure that the monitor is connected correctly.
3. Turn on the monitor and then the system unit. Allow your computer to
start the Windows 2000 or Windows Me operating system.
4. Open the Display Properties window by clicking Start -> Settings ->
Control Panel and then double-clicking on the Display icon.
5. Click the Settings tab.
6. Click the Advanced button.
7. Click the Monitor tab.
8. Click the Properties button.
9. Click the Driver tab.
10. Open the Upgrade Device Driver Wizard window by clicking on
Update Driver and then click the Next button.
11. Select Display a list of the known drivers for this device so that
I can choose a specific driver and then click the Next button.
12. Insert the User’s Guide and Installation Files CD into the CD drive and
click the Have Disk button.
13. Click OK.
14. Ensure that the CD drive letter is selected, and then select the
DRIVERS folder.
15. Select IBM L190 monitor and click OK. The files will be copied from
the CD to your hard disk drive.
16. Close all open windows and remove the CD.
17. Restart the computer.
The system will automatically select the maximum refresh rate and
corresponding Color Matching Profiles.
12
Page 15

ENGLISH
Installing the device driver in
This section must be
completed before
continuing with the
Windows XP Image setup on
page 14.
To install the device driver in Windows XP, do the following:
Note:
You must download files from the User’s Guide and Installation Files CD to
use the Plug and Play feature in Windows XP.
Windows XP
1. Turn off the computer and all attached devices.
2. Ensure that the monitor is connected correctly.
3. Turn on the monitor and then the system unit. Allow your computer to
start the Windows XP operating system.
4. Open the Display Properties window by clicking Start -> Settings ->
Control Panel and then double-clicking on the Display icon.
On LCD monitors, unlike
i
CRTs, a faster refresh rate
does not improve display
quality. For optimal
performance, use either 1280 x
1024 at a refresh rate of 60Hz
or 640 x 480 at a refresh rate
of 60Hz.
5. Click the Settings tab.
6. Click the Advanced button.
7. Click the Monitor tab.
8. Click the Properties button.
9. Click the Driver tab.
10. Open the Hardware Update Wizard window by clicking on Update
Driver and then click the Next button.
11. Select Install from a list or Specific location(Advanced) and then
click the Next button.
12. Insert the User’s Guide and Installation Files CD into the CD drive and
click the Have Disk button.
13. Click OK.
14. Ensure that the CD drive letter is selected, and then select the
DRIVERS folder.
15. Select IBM L190 monitor and click OK. The files will be copied from
the CD to your hard disk drive.
16. Close all open windows and remove the CD.
17. Restart the computer.
The system will automatically select the maximum refresh rate and
corresponding Color Matching Profiles.
13
Page 16

Automatic Image setup
Image setup
Before carrying out this
section, it is very important
that the correct monitor
drivers have been installed.
(See pages 11 and 13. )
The Setup Utility included
i
on the setup CD displays a
test pattern of dots. It does not
replace or modify the display
drivers.
The Image setup
i
instructions require the
monitor to be warmed up for 15
minutes. This is not required
for normal operation.
If your computer does not
i
run with the setup CD
shipped with the monitor, refer
to Manual Image setup on
page 17.
When you first use your monitor, you must perform Auto Setup for analog
input. This procedure sets up your monitor to process the video signals
from your computer without image discoloration or smearing. After you
perform Auto Setup, the settings are stored and used each time you turn on
the monitor.
In order to optimize the displayed image a set-up utility is provided on the
IBM User’s Guide and Installation Files CD. Operation of this utility is
dependent on the operating system on your computer. You may choose to
run Image setup for each operating system that you use. This means that if
you sometimes use your monitor while running any version of Windows and
sometimes also use it from within DOS (not a DOS window), you must run
Image setup for both Windows and DOS. You may run versions of Image
setup in any order.
Before you begin
computer video mode is set in the range of the supported screen
resolution shown in the table on page 22.
You should perform
Image setup
for your computer, make sure the
Image setup
for each screen mode you use.
The Image setup process
i
only applies to the current
screen mode. When a new
mode is selected, repeat this
section to reset the monitor.
14
Page 17

Image setup for DOS
ENGLISH
If the monitor is in standby
i
mode, it may automatically
turn off while you are waiting for
it to warm up. If this happens,
turn off the monitor and turn it
on again after a few seconds.
If you are using PC-DOS/V,
i
change to U.S. mode by
typing CHEV US and pressing
enter at the command prompt.
The size and diversity of the
i
dot pattern varies with the
screen resolution.
If the screen flickers, repeat
i
the setup several times until
the flicker is minimized, or
adjust it manually by following
the instructions in Manual
Image setup on page 17.
To set up the monitor automatically in DOS, do the following.
1. Turn on the monitor first; then turn on the computer.
If the message "Check Signal Cable" is displayed, or if nothing is
displayed, check:
• That the video interface cable is not connected properly.
• The correct video adapter card is not installed.
• The correct supported display mode is selected for your computer.
2. Wait approximately 15 minutes for the monitor to warm up.
3. Insert the User's Guide and Installation Files CD into the computer's
CD-ROM drive.
4. Display the command prompt screen of the DOS full-screen display.
5. Type d:\TESTPAD where d is the letter of the CD-ROM drive.
6. Press enter.
7. Select the number for the color or text mode you want to set up.
8. Select the number for the video mode you want to set up. You can
repeat this process for as many color and video modes as you need.
9. When the dot pattern appears, press the " " button at the bottom of
the monitor. This activates the Auto setup procedure, which will
optimize the display settings with the provided dot-patterns.
The screen will momentarily turn black while auto adjustment proceeds.
When finished, the Image setup message disappears and the screen
returns to a normal display.
10. To clear the Image setup test pattern, press the Esc key on your
keyboard.
11. Type Exit at the command prompt to return to Windows.
If you use other operating systems, perform the appropriate Auto setup for
those systems using instructions given in
Image setup Windows 95, Windows 98, Windows NT, Windows 2000,
Windows Me, or Windows XP on page 16.
15
Page 18

Image setup for Windows 95, Windows 98, Windows NT, Windows 2000, Windows Me, or Windows XP
If the monitor is in standby
i
mode, it may automatically
turn off while you are waiting for
it to warm up.
The size and diversity of the
i
dot pattern varies with the
screen resolution.
To set up the monitor automatically in Windows 95, Windows 98, Windows
NT, Windows 2000, Windows Me, or Windows XP, do the following:
1. Turn on the monitor first; then turn on the computer.
If the message "Check Signal Cable" is displayed, or if nothing is
displayed, check:
• That the video interface cable is not connected properly.
• The correct video adapter card is not installed.
• The correct supported display mode is selected for your computer.
2. Wait approximately 15 minutes for the monitor to warm up.
3. If the icon bar and tool bar are displayed, drag them to the bottom of the
screen.
4. Insert the User's Guide and Installation Files CD into the computer's
CD-ROM drive.
5. Check the operating system installed on your computer and follow the
instructions from the table below.
Operating system installation steps
Operating
System
Windows 95
Windows 98,
Windows 2000,
Windows NT,
Windows Me or
Windows XP
Step 1
Open program manager
Select
RUN
Step 2 Step 3
Select
RUN
Type e:\TESTPAT where e is the
letter of your CD-ROM drive, then
press Enter.
1616
6. When the dot pattern appears, press the " " button at the bottom of
the monitor. This activates the Image setup procedure, which will
optimize the display settings with the provided dot-patterns.
•The screen will momentarily turn black while auto adjustment
proceeds. When finished, the Image setup message disappears and
the screen returns to a normal display.
7. To clear the Image setup test pattern, press the Esc key on your
keyboard.
You have completed the monitor setup for Windows. If you are using the
DOS operating system, go to "Image setup for DOS" on page 15.
Page 19

Manual Image setup
ENGLISH
If the monitor is in standby
i
mode, it might automatically
turn off while you are waiting
for it to warm up.
Normally, you can complete the setup procedure using Automatic Image setup;
however, if your screen image is still distorted after you perform Image setup or
the setup CD does not run on your system, perform Manual Image setup.
To manually adjust the image setting, do the following:
1. Turn on the monitor and wait approximately 15 minutes for it to warm
up.
2. Display the image you most frequently use on the screen.
3. Press the OSD Enter button " " at the bottom of the monitor to display
the initial OSD menu.
4. Use the Right Arrow button " " to select the Image setup icon " "
and press the OSD Enter button " " to access the function.
5. Use the Right Arrow button " ", to select manual. Press the OK
button " " twice to select clock.
6. Use the Arrow buttons to manually adjust to correct for jitter or noise in
the image. Press the OK button " ".
7. Press OK " " and use the Arrow buttons to adjust phase, then press
OK " ".
Press OK " " again to save and exit. Then press Exit button " "
twice to exit OSD.
You have completed the monitor setup.
17
Page 20

Adjusting your LCD monitor
ThinkVision
User controls
The image is already
i
optimized for many display
modes, however the user
controls can be used to adjust
the image to your liking.
The settings are saved
i
after adjustment and
when exiting the OSD and
will be effective thereafter.
USER CONTROL FEATURES
Icon Monitor controls
Switches the monitors on and off.
Displays main OSD menu and selects highlighted menu item.
and
Icon Direct access functions
Moves the cursor to highlight icons or make adjustments.
Exits from current OSD menu.
Displays the Brightness adjustment.
Executes automatic image setup.
CONTROLS LOCK / UNLOCK
This feature allows you to secure the current control settings,
while allowing the user to adjust Brightness, so that they cannot
be inadvertently changed. Push and hold the enter button [ ] for
10 seconds; the message “Menu is Locked” appears.
You can unlock the OSD controls at any time by pushing the enter
button [ ] for 10 seconds; the message “Menu is Unlocked” will
appear.
18
Page 21

On-screen display (OSD) controls
Brightness/Contrast
Exit
OK
Brightness/Contrast
Brightness:
Adjusts overall screen brightness.
Cancel
OK
Brightness
0
92
100
Cancel
OK
ENGLISH
The LCD monitor needs
i
time to become thermally
stable the first time you turn it
on each day. Thus, to achieve
more accurate adjustments for
parameters, allow the LCD
monitor to warm up for at least
15 minutes before making any
screen adjustment.
OSD functions
OSD Icon
The settings adjustable with the user controls are viewed through the On Screen Display (OSD). Press the enter button " " to display the main OSD
menu.
Initial appearance of OSD
Main menu
Sub menu Adjustment screen
Description
Sub menus Control and adjustments
Brightness /
Contrast
Image
Position
Adjusts brightness
Brightness
Adjusts contrast
Contrast
Moves the screen left and right.
Horizontal
Position
Moves the screen up and down.
Vertical
Position
19
Page 22

OSD Icon
Description
Sub menus Control and adjustments
Image Setup
Image
Properties
Automatic
Manual
Color
The Image setup function is used to
adjust the level of noise in the video
signal, which causes horizontal lines
or areas on the screen where the
image appears to be unstable and
jitter or shimmer. This can be adjusted
automatically or manually.
If manual is selected, the user will go
to the manual adjustment screen.
Select the Color mode you find most
comfortable or fine tune the colors
using the Custom menu, if necessary.
• Clock
• Phase
• Save
Preset
•
6500K
(Pink White)
•
7200K
(Normal White)
•
9300K
(Blue White)
If Auto is selected, the image
will automatically adjust.
This selection enables you to
adjust the focus of the display,
remove any horizontal noise, and
sharpen the image of the
characters.
20
Custom
•
R
•
G
•
B
•
Save
Increases or decreases redness
Increases or decreases greenness
Increases or decreases blueness
Page 23

ENGLISH
Options
OSD Icon
Information
Language
Menu Position
Accessibility
Reset
Description
Displays the detailed information of
mode, model name, serial number
and microcode.
The language chosen affects only the
language of the OSD.
Select one of the five languages to
use for the OSD.
Your selection does not affect any
software running on the computer.
Changes the position of the OSD on
the screen.
Reset should return all available
functions to their factory presets.
Note: The language will not change
unless it is adjusted through the
Language menu.
Change button repeat rate and menu
time-out setting.
Sub menus
• English
• Français
• Italiano
• Deutsch
• Español
•
Default
Custom
•
H
•
V
•
Save
• Cancel
• Reset
Button
repeat rate
•
Off
•
Default
•
Slow
Menu time out
Controls and adjustments
Moves the OSD to the center
of the screen.
Adjusts speed of button.
Adjusts the length of time for
which the menu will stay on
the screen before it
disappears.
Exit
Exits from current OSD menu.
21
Page 24

Further information
Display modes
If your computer has
i
previously been used with
a CRT monitor and is currently
configured to a display mode
outside the range that the Flat
Panel monitor can display, you
may need to re-attach the CRT
monitor temporarily until you
have reconfigured the
computer, preferably to 1280 x
1024 at 60Hz.
Note: VESA timings are as
detailed in the VESA
“Display Monitor Timing
Specification”. Version 1.0,
Revision 0.8, Dated
09/17/98.
The display mode the monitor uses is controlled by the computer.
Therefore, you should refer to your computer documentation for details on
how to change display modes.
The image size, position and shape may change when the display mode
changes. This is normal and the image can be readjusted using Image
setup and the monitor controls.
Unlike CRT monitors, which require a high refresh rate to minimize flicker,
TFT technology is inherently flicker-free. If possible, configure your
computer for 1280 x 1024 addressability at 60Hz vertical refresh rate.
For the display modes listed below, the screen image has been optimized
during manufacture.
Factory set display modes
Addressability
640 x 350 70.8 Hz 31.5 kHz
640 x 480 59.9 Hz 31.5 kHz
640 x 480 66.6 Hz 35.0 kHz
640 x 480 72.8 Hz 37.8 kHz
640 x 480 75.0 Hz 37.5 kHz
720 x 400 70.1 Hz 31.5 kHz
800 x 600 60.3 Hz 37.8 kHz
800 x 600 72.1 Hz 48.0 kHz
800 x 600 75.0 Hz 46.8 kHz
832 x 624 74.5 Hz 49.7 kHz
1024 x 768 60.0 Hz 48.3 kHz
1024 x 768 70.0 Hz 56.4 kHz
1024 x 768 75.0 Hz 60.1 kHz
1152 x 870 75.0 Hz 68.6 kHz
1152 x 900 65.9 Hz 61.8 kHz
1280 x 1024 † 60.0 Hz 63.9 kHz
1280 x 1024 70.0 Hz 74.4 kHz
1280 x 1024 75.0 Hz 79.9 kHz
1280 x 1024 76.0 Hz 81.1 kHz
† Recommended
Refresh rate Horizontal frequency
22
Page 25

Power management
To benefit from power management, the monitor must be used in
conjunction with a computer that implements the Video Electronics
Standards Association (VESA) Display Power Management Signaling
(DPMS) Standard.
The power management feature is invoked when the computer recognizes
that you have not used your mouse or keyboard for a user-definable period.
There are several states as described in the table below.
As an Energy Star 2000®Partner, IBM has determined that this product
meets the Energy Star 2000 guidelines for energy efficiency.
For optimal performance switch off your monitor at the end of each working
day, or whenever you expect to leave it unused for long periods during the
day.
ENGLISH
Product disposal
State
On
Active off
* There may be a slight delay before the picture reappears.
The fluorescent lamps in the liquid crystal display contain a small amount of
mercury. Dispose of it as required by local ordinances and regulations.
Power
Indicator
Steady green
Steady amber
Screen
Normal
Blank
Restoring
Operation
Press a key or
move the mouse.*
Compliance
ENERGY
STAR 2000
23
Page 26

Troubleshooting
If you have a problem setting up or using your monitor, you may be able
to solve it yourself. Before calling your retailer or IBM Support Center, try
the suggested actions that are appropriate to your problem.
Problem
Screen is
blank and
power
indicator is off.
Screen is blank
and power
indicator is
steady green.
Screen is blank
and power
indicator is
steady amber.
Possible
cause
No power to
monitor.
Brightness
and Contrast
may be too
low.
The monitor is
in the Power
Management
Standby state.
Suggested action Reference
••
Ensure that the electrical outlet
and the monitor are both
switched on.
••
Check that the power cord
is firmly plugged into the
electrical outlet and the power
supply unit.
••
If the power cord plug has
a removable fuse, replace it.
••
Try another power cord.
••
Try another electrical outlet.
••
Check the power connection at
the back of the panel.
••
Adjust brightness and contrast.
••
Press any key on the keyboard
or move the mouse to restore
operation.
••
Check the Power Management
software on your computer.
••
Press the
between analog and digital
mode. If the panel is the wrong
mode for the signal being
provided, the monitor appears
to go into sleep mode.
" " button to switch
"Connecting
your monitor"
section on
page 9.
"User
controls"
section on
page 18.
"Power
management"
section on
page 23.
24
Page 27

ENGLISH
For image problems, you
i
may want to run Image
setup again before referring to
this section. In most cases,
Image setup can fix the
problems. See Automatic
Image setup for the computer
on page 14 for details.
Problem
Screen is blank
and power
indicator is
flashing green
every 0.5
second
Check
Signal
Cable
message is
shown and
power indicator
is steady amber.
Image appears
to be smeared
Image appears
to be discolored
A few dots are
missing,
discolored, or
inappropriately
lighted.
Possible
cause
Display mode of
computer
the
outside the
range of the
monitor
The monitor is
not receiving a
video signal
There are noises
in the video
signal
The color setting
may be incorrect.
A small number of missing, discolored, or lighted dots may be
present on the screen, which is an intrinsic characteristic of the
TFT LCD technology and is not an LCD defect.
is
Suggested action Reference
••
Reconfigure key on the
computer to use a supported
display mode.
••
Check that the signal cable
is firmly connected to the
computer.
••
Check that no pins are bent
in the signal cable connector.
••
Select Image setup menu
in the OSD. Then select
Manual to adjust Clock / Phase
settings.
••
Adjust the Color settings.
"Further
information"
section on
page 22.
"Connecting
your monitor"
section on
page 9.
"User
controls"
section on
page 20.
"User
controls"
section on
page 20.
25
Page 28

Help and service information
If you are unable to correct the problem yourself, you may seek further help
as follows:
Call the IBM Service and Support.
In the U.S.A and Puerto Rico call 1-800-426-7378
In Canada (Toronto only) call 416-383-3344
In Canada (all other) call 1-800-565-3344
If possible, stay by your
i
computer. Your Technical
Support Representative may
wish to go through the problem
with you during the call.
More help, late-breaking
i
news and details of the
latest accessories for these
products may be found on the
worldwide web at:
http://www.pc.ibm.com/us/
accessories
In other countries contact your dealer, retailer, or other IBM authorized
service representative.
Before calling, please have available as much of the following information as
possible:
1. Model and serial number from the label on your monitor.
2. Purchase receipt.
3. Description of problem.
4. Computer type and model.
5. System configuration (hardware fitted, etc.).
6. System BIOS version number.
7. Operating System and version number.
8. Display driver version number.
9. Video Adapter Type.
26
Page 29

Specifications
H
W
D
T
h
i
n
k
V
i
s
i
o
n
H
D
W
ENGLISH
Power consumption figures
i
are for the monitor and the
power supply combined.
This color monitor (Type-model 9329-xx9) uses a 19.0-inch TFT LCD.
With Stand
Height:
413.0 mm (16.26 in.)
Width:
408.0 mm (16.06 in.)
Depth:
222.0 mm (8.74 in.)
4.2 kg (9.259 lbs)
6.1 kg (13.45 lbs)
19.0 inch (481.84 mm)
376.32 mm
301.056 mm
0.294 mm (H) x 0.294 mm (V)
100 - 240 Vac 60/50 ± 3Hz
1A
< 40 W
< 2 W
< 1 W
Analog-75 ohm 0.7V
1280 pixels (max)
1024 lines (max)
135 MHz
Weight
Image
Power Input
Power
Consumption
Video Input
Without Stand
Height:
346.0 mm (13.12 in.)
Width:
408.0 mm (16.06 in.)
Depth:
59.6 mm (2.35 in. )
Without Stand:
With Stand:
Viewable Image Size:
Maximum Height:
Maximum Width:
Pixel Pitch:
Supply Voltage:
Rated Current:
On Mode:
Sleep Mode:
Off Mode:
Input Signal:
Horizontal Addressability:
Vertical Addressability:
Clock Frequency:
Sync Input
Communications
Supported Display
Type
VESA DDC:
Standard modes :
Analog - Separate
DDC 1/2B
IBM, VESA, MAC
Modes
Horizontal Frequency:
Vertical Frequency:
Environment
Temperature:
Operating:
Storage:
Shipping:
Humidity:
Operating:
Storage:
Shipping:
30-83 kHz
55-76 Hz
10 to 35° C
- 20 to 60° C
- 20 to 60° C
10 to 80%
5 to 95%
5 to 95%
27
Page 30

Service information
The following parts are for use by IBM service, or IBM authorized dealers,
to support the customer warranty. Parts are for service use only.
Model Type 9329-Ax9
P/N
73P4590
73P4592
22P9262
73P4593
73P4595
Description
FRU Monitor
FRU Stand
FRU Video Cable
User's Guide CD
Setup Guide
Video
Analog
Analog
Analog
Color
Business Black
Business Black
Business Black
MTM Geography
9329-AB9
9329-AB9
9329-AB9
9329-xx9
9329-xx9
WW
WW
WW
WW
WW
28
Page 31

Notices and trademarks
This section contains information on notices and trademarks.
Notices
IBM may not offer the products, services, or feature discussed in this document in all
countries. Consult your local IBM representative for information on the products and
services currently available in your area. Any reference to an IBM product, program,
or service is not intended to state or imply that only that IBM product, program, or
service may be used. Any functionally equivalent product, program, or service that
does not infringe any IBM intellectual property right may be used instead. However, it
is the user's responsibility to evaluate and verify the operation of any non-IBM
product, program, or service.
IBM may have patents or pending patent applications covering subject matter
described in this document. The furnishing of this document does not give you any
license to these patents. You can send license inquiries, in writing, to:
IBM Director of Licensing
IBM Corporation
North Castle Drive
Armonk, NY 10504-1785
U.S.A
The following paragraph does not apply to the United Kingdom or any country
where such provisions are inconsistent with local law: INTERNATIONAL
BUSINESS MACHINES CORPORATION PROVIDES THIS PUBLICATION “AS IS”
WITHOUT WARRANTY OF ANY KIND, EITHER EXPRESS OR IMPLIED,
INCLUDING, BUT NOT LIMITED TO, THE IMPLIED WARRANTIES OF NONINFRINGEMENT, MERCHANTABILITY OR FITNESS FOR A PARTICULAR
PURPOSE. Some states do not allow disclaimer of express or implied warranties in
certain transactions, therefore, this statement may not apply to you.
ENGLISH
This information could include technical inaccuracies or typographical errors.
Changes are periodically made to the information herein; these changes will be
incorporated in new editions of the publication. IBM may maker improvements and/or
changes in the product(s) and/or the program(s) described in this publication at any
time without notice.
IBM may use or distribute any for the information you supply in any way it believes
appropriate without incurring any obligation to you.
Any references in this publication to non-IBM Web sites are provided for
convenience only and do not in any manner serve as an endorsement of those Web
sites. The materials at those Web sites are not part of the materials for this IBM
product, and use of those Web sites is at your own risk.
29
Page 32

Trademarks
The following terms, used in this publication, are trademarks or service marks of the
IBM Corporation in the United States, other countries, or both;
IBM
IBM logo
ThinkPad
ThinkVision
NERGY STAR and the ENERGY STAR logo are U.S Govt. registered trademarks.
E
Microsoft, Windows, and Windows NT are trademarks of Microsoft Corporation in the
United States, other countries, of both.
Other company, product, and service names may be trademarks or service marks of
other.
© Copyright International Business Machines Corporation 2004. All rights reserved.
30
 Loading...