

Page 1

Installing and configuring InfoSphere Streams on a
virtual machine
RedHat Enterprise Linux on VMware
Skill Level: Intermediate
Edward J Pring (pring@us.ibm.com)
Senior Software Engineer
IBM
08 Apr 2010
IBM® InfoSphere™ Streams is designed for large streaming applications that may
span many Linux servers. When developing applications for InfoSphere Streams, or if
you are just evaluating the product, you may find it more convenient to install it onto a
virtual machine. Installing onto a virtual machine enables you to design and test
streaming applications from your regular laptop or workstation computer. This tutorial
provides a step-by-step procedure for installing and configuring InfoSphere Streams
with Red Hat Enterprise Linux and Eclipse on a VMware virtual machine.
Section 1. Introduction
IBM InfoSphere Streams provides a highly scalable platform for analyzing structured
and unstructured data while it is in motion. InfoSphere Streams provides an intuitive
and extensible development environment for creating, compiling, and deploying
streaming applications.
Streaming applications are composed of streams (reliable, ordered, one-way
message flows), operators (configurable functions that filter, aggregate, enrich, or
transform the messages in streams) and adapters (specialized operators that
continuously ingest data and output analysis results).
InfoSphere Streams provides a rich set of general-purpose operators, plus
Installing and configuring InfoSphere Streams on a virtual machine Trademarks
© Copyright IBM Corporation 2010. All rights reserved. Page 1 of 37
Page 2
developerWorks® ibm.com/developerWorks
containers for reusing existing C/C++ and Java® code as streaming operators.
InfoSphere Streams can also be extended with toolkits of domain-specific operators.
Streaming applications are declared as a data flow graph with the Stream
Processing Language. The flow graph specifies the data types the application's
streams will carry, which adapters and operators will process the data as it flows
through the application, and how the operators will be interconnected by streams.
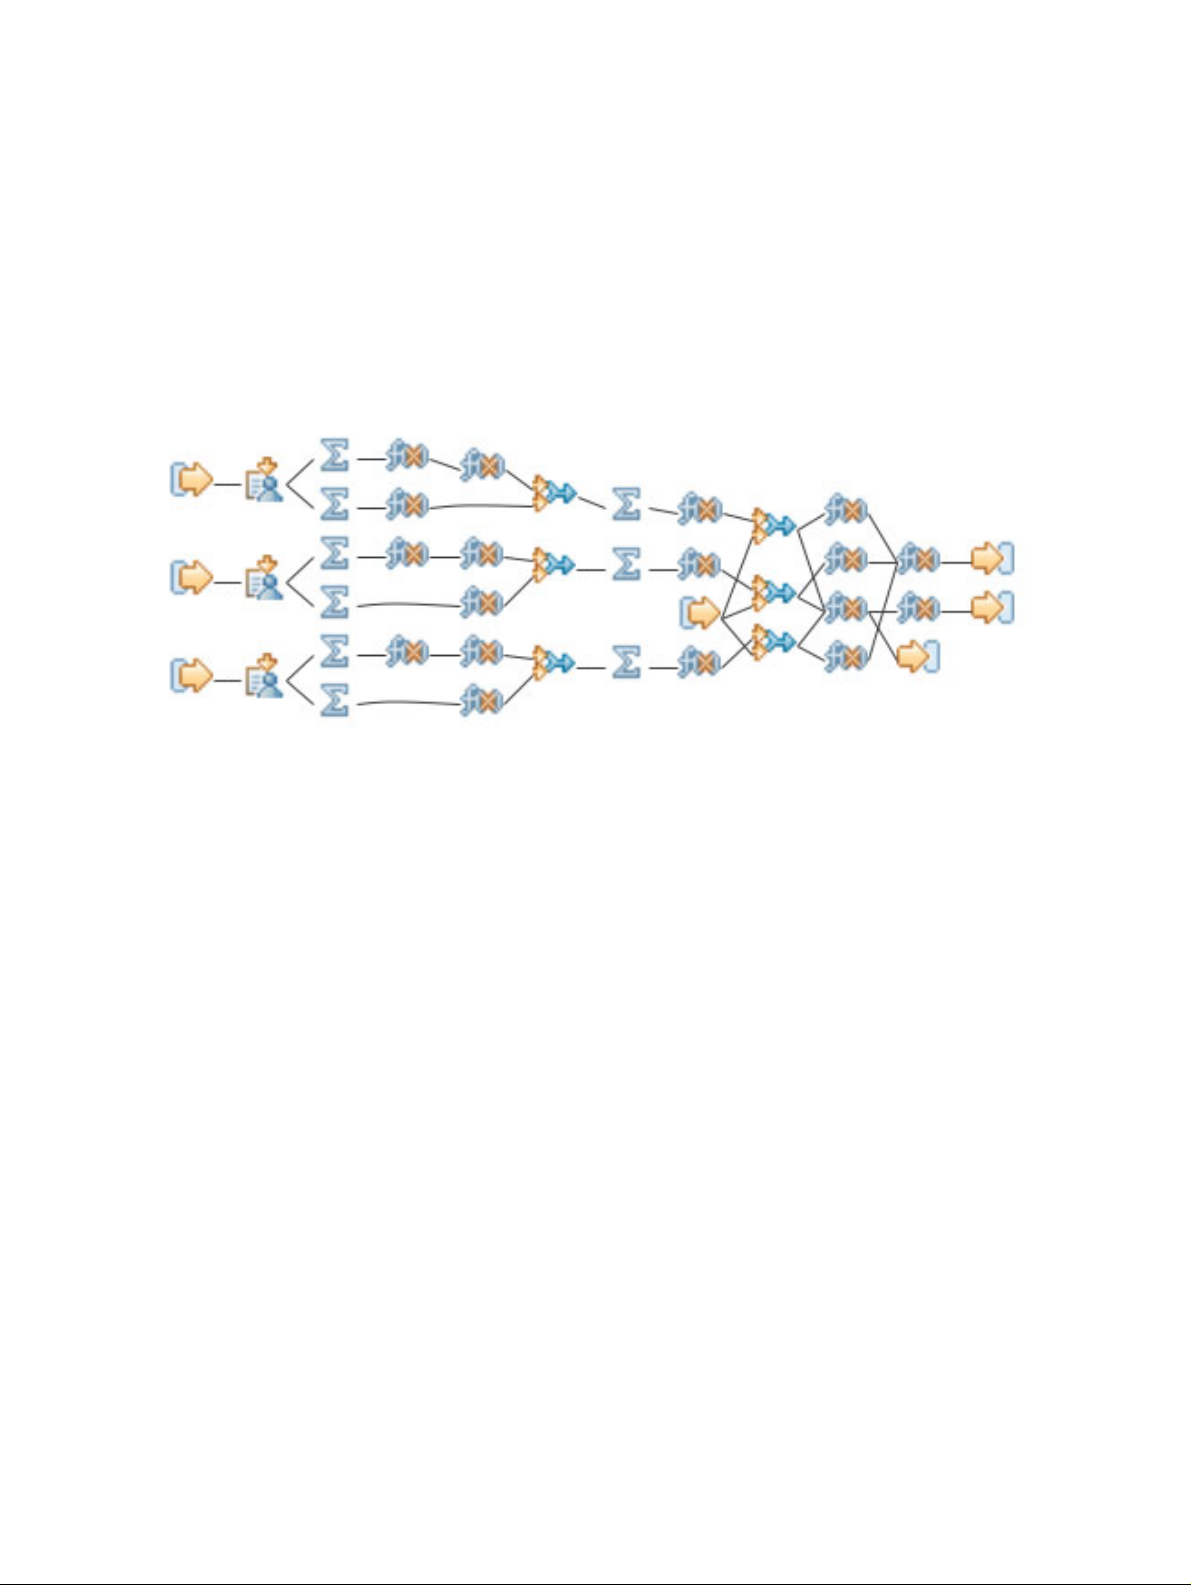
Figure 1 illustrates the data flow graph for a streaming application.
Figure 1. Streaming application flow graph
Large streaming applications can span more than a hundred Linux server machines.
When developing applications for InfoSphere Streams, you may find it more
convenient to install it onto a virtual machine. Installing onto a virtual machine
enables you to design and test streaming applications from your regular laptop or
workstation computer.
This tutorial guides you through a step-by-step procedure for creating a
self-contained InfoSphere Streams development environment on a virtual machine.
To accomplish this, you install and configure these four software products:
• VMware provides a virtual machine capability for Microsoft Windows and
Apple Mac computers. (Refer to http://www.vmware.com/products/.)
• Red Hat Enterprise Server provides the operating system for IBM
InfoSphere Streams. (Refer to https://www.redhat.com/rhel/server/.)
• IBM InfoSphere Streams provides a streaming runtime and application
development tools. (Refer to
http://www.ibm.com/software/data/infosphere/streams/.)
• Eclipse provides the integrated application development platform for the
InfoSphere Streams Studio tools. (Refer to http://www.eclipse.org/.)
This tutorial outlines the specific installation steps you need to take with each
Installing and configuring InfoSphere Streams on a virtual machine Trademarks
© Copyright IBM Corporation 2010. All rights reserved. Page 2 of 37
Page 3

ibm.com/developerWorks developerWorks®
product and suggests specific values for many configuration steps. However, you
should refer to the official documentation for each product for details, options, and
clarification. Refer to the Resources section of this tutorial for links to the products'
documentation.
Following are the main tasks covered by the tutorial:
• Obtain product distribution packages
• Install VMware
• Install and configure Red Hat Enterprise Linux
• Install IBM InfoSphere Streams
• Install Eclipse and InfoSphere Streams Studio
• Verify the install
Many of the steps depend on previous steps, so you should execute all the steps in
the order in which they are presented.
Section 2. Obtain product distribution packages
Before you begin, you need to obtain each of the software products listed below.
You should have at least 30GB of available disk space on your computer for the
distribution packages and the virtual machine that you will create.
You can obtain the distribution packages for these products and technologies
through your company, or download them from the Web sites that are provided. In
either case, you need to obtain licenses for the products. Free time-limited licenses
are available for the first three products in the list and the Eclipse license is free with
no time limit. Refer to the Resources section of this tutorial for additional links for
each of the products.
Note: Make sure you have the same version (either the 32-bit or 64-bit) for Red Hat
Enterprise Linux, IBM InfoSphere Streams, and Eclipse.
• VMware Workstation for Windows, release 7, or VMware Fusion for Mac
OS X, version 3.
Refer to http://www.vmware.com/products/ to obtain VMware products.
The distribution package is an executable install program of about
400MB. Depending on your operating system, the package has a name
Installing and configuring InfoSphere Streams on a virtual machine Trademarks
© Copyright IBM Corporation 2010. All rights reserved. Page 3 of 37
Page 4

developerWorks® ibm.com/developerWorks
similar to either VMware-workstation-full-7.0.1-227600.exe for
Microsoft Windows, or Vmware-Fusion-3.0.0-204229.dmg for Mac
OS X.
• Red Hat Enterprise Linux, release 5.
Refer to https://www.redhat.com/rhel/server/ to obtain the Red Hat
Enterprise Linux product. The distribution package is a DVD disc image of
about 3,330MB. The 64-bit version has a name similar to
RHEL5.4-Server-20090819.0-x86_64-DVD.iso.
• IBM InfoSphere Streams, release 1.2.
Refer to
https://www14.software.ibm.com/webapp/iwm/web/reg/pick.do?lang=en_US&source=SWG-STREAMS_TRIAL
to obtain a trial version of IBM InfoSphere Streams. The distribution
package is a compressed directory archive of about 300MB. It has a
name of either Streams-1.2.0-i386-el5-trial.tar.gz for the
32-bit version, or Streams-1.2.0-x86_64-el5-trial.tar.gz for
the 64-bit version.
If you use the trial version of IBM InfoSphere Streams, you also need to
download the license file from the same Web site as the distribution
package. The license file is named
LicenseCert_1.0.0.0.trial.txt.
• Eclipse integrated development platform, release 3.5, plus the IMP
technology for Eclipse, version 0.1.v201001291500.
The Eclipse distribution package is a compressed directory archive of
about 160MB. The 64-bit version has a name similar to
eclipse-SDK-3.5.2-linux-gtk-x86_64.tar.gz.
You also need the IMP technology for the Eclipse platform, which is
available from http://download.eclipse.org/technology/imp/. InfoSphere
Streams requires IMP technology release v0.1.v201001291500. The IMP
technology distribution package is a compressed directory archive of
about 45MB with the name
org.eclipse.imp.update_0.1.v201001291500.zip.
Section 3. Install VMware
Installing and configuring InfoSphere Streams on a virtual machine Trademarks
© Copyright IBM Corporation 2010. All rights reserved. Page 4 of 37
Page 5

ibm.com/developerWorks developerWorks®
VMware Workstation (for Microsoft Windows operating system) or VMware Fusion
(for Mac OS X operating system) allows you to create a virtual machine on your
computer. Within that virtual machine, you can then run Red Hat Enterprise Linux,
which is the operating system that InfoSphere Streams requires.
This section of the tutorial provides a summary of the VMware install procedure. For
more details, refer to the Resources section of this tutorial for links to the VMware
Workstation User's Manual or the Getting Started with VMware Fusion manual.
Locate the VMware distribution package
Locate your VMware distribution package. Depending on your operating system, the
package has a name similar to either
VMware-workstation-full-7.0.1-227600.exe for Microsoft Windows, or
Vmware-Fusion-3.0.0-204229.dmg for Mac OS X.
This file contains the VMware install program.
Install VMware Workstation or VMware Fusion
Install the VMware Workstation or VMware Fusion product from the distribution
package as you would any other software product for your computer.
Follow the instructions that accompany your evaluation or purchase license to obtain
a license key. To activate the product, launch the VMware application. Then, from
the menu bar select VMware > License ....
Copy and paste your license key into the Serial Number field of the "Licensing"
dialog.
Section 4. Install and configure Red Hat Enterprise Linux
Red Hat Enterprise Linux provides the operating system for InfoSphere Streams and
Eclipse.
Follow the steps in this section to install Red Hat Enterprise Linux in a virtual
machine provided by VMware. For more details, refer to the Resources section of
this tutorial for links to the Red Hat Enterprise Linux Installation Guide and
Deployment Guide.
Installing and configuring InfoSphere Streams on a virtual machine Trademarks
© Copyright IBM Corporation 2010. All rights reserved. Page 5 of 37
Page 6

developerWorks® ibm.com/developerWorks
Note: Red Hat Enterprise Linux, InfoSphere Streams, and Eclipse are available in
both 32-bit and 64-bit versions. You may use either version, but you must use the
same version for all three products.
Locate the Red Hat Enterprise Linux distribution package
Locate your Red Hat Enterprise Linux distribution package file. This file contains a
DVD disc image, which contains the Red Hat Enterprise Linux install program. The
64-bit version has a name similar to
RHEL5.4-Server-20090819.0-x86_64-DVD.iso.
Start installing Red Hat Enterprise Linux
Follow these steps to create a virtual machine within your computer and begin to
install Red Hat Enterprise Linux in it. you need about 20 gigabytes of free space on
your computer's disk drive for the virtual machine's disk.
1. Launch the VMware application that you installed in the previous section.
2. From the VMware menu bar, select File > New ....
3. On the "Create a new virtual machine" dialog, click continue without a
disc.
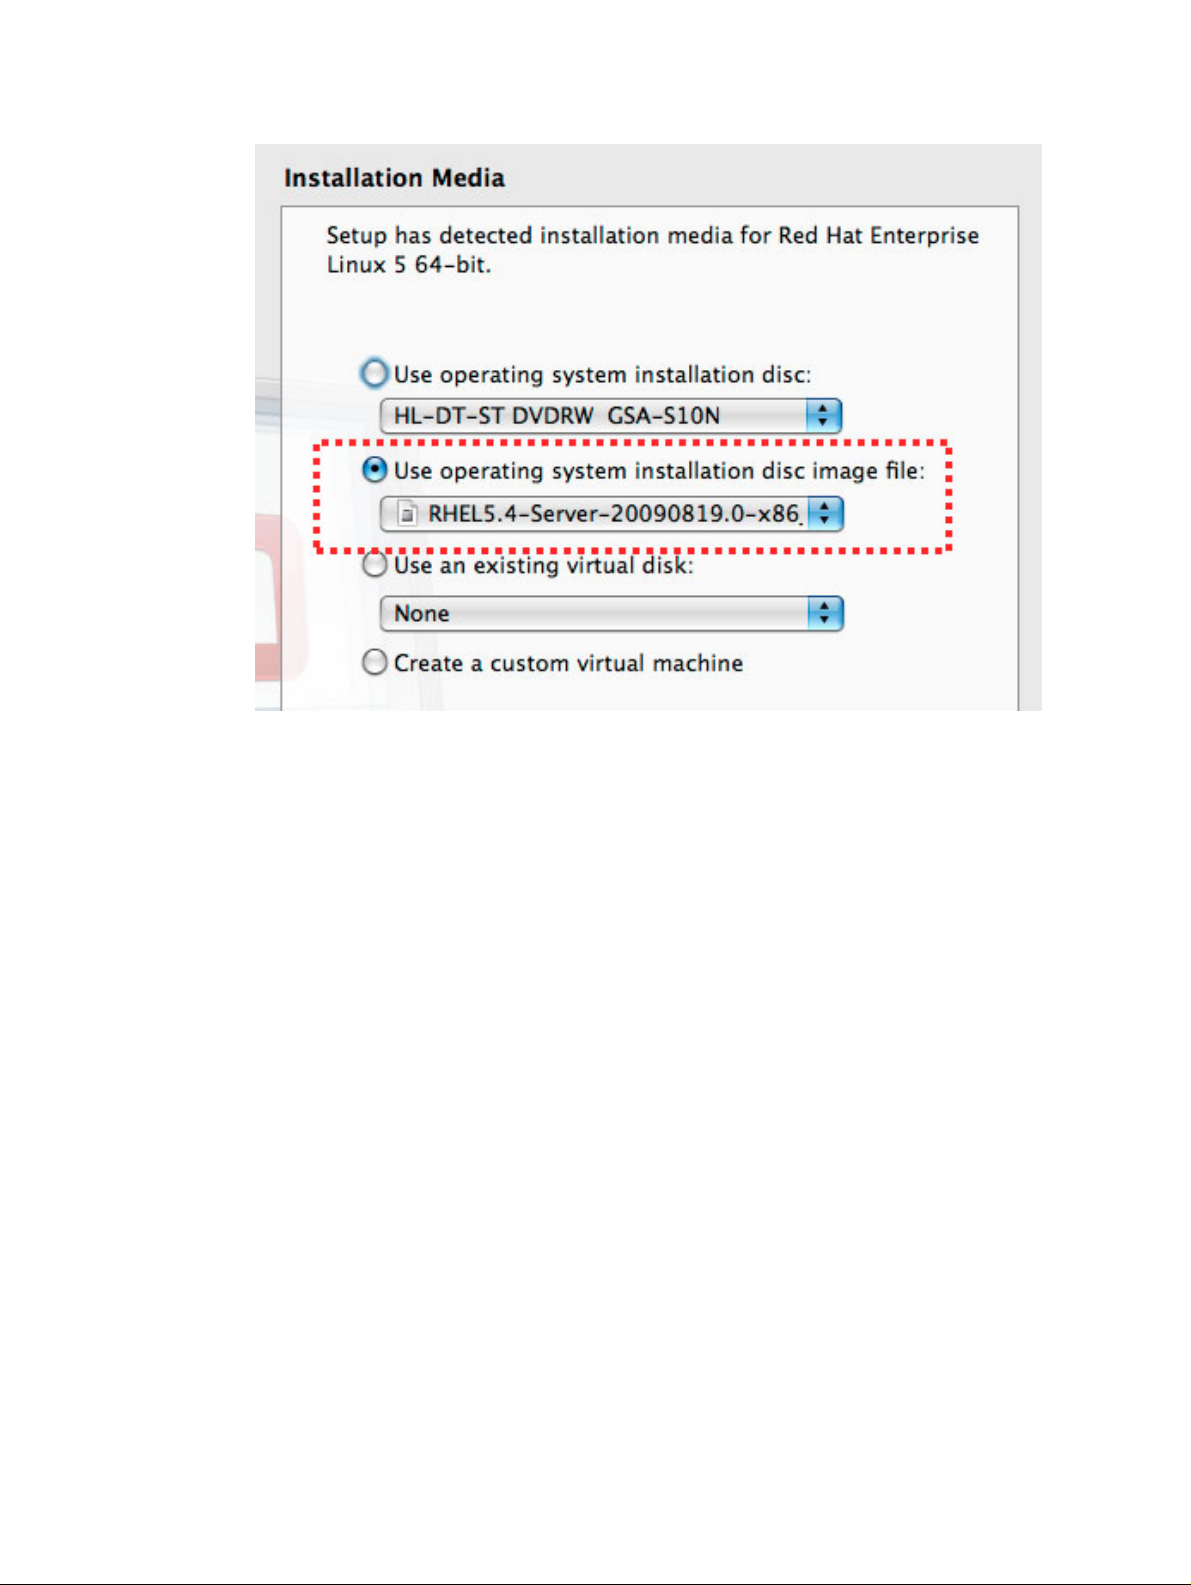
4. On the "Installation Media" dialog, select Use operating system
installation disc image file, select the .iso file that contains your Red
Hat Enterprise Linux distribution package (Figure 2), and then click
Continue.
Figure 2. VMware Installation Media is RHEL DVD image
Installing and configuring InfoSphere Streams on a virtual machine Trademarks
© Copyright IBM Corporation 2010. All rights reserved. Page 6 of 37
Page 7
ibm.com/developerWorks developerWorks®
5. On the "Choose Operating System" dialog, verify that the Operating
System field is set to Linux.
6. Also on the "Choose Operating System" dialog, verify that the Version
field is set to either Red Hat Enterprise Linux 5 or Red Hat Enterprise
Linux 5 64-bit, depending on whether you downloaded the 32-bit or
64-bit version, and click Continue.
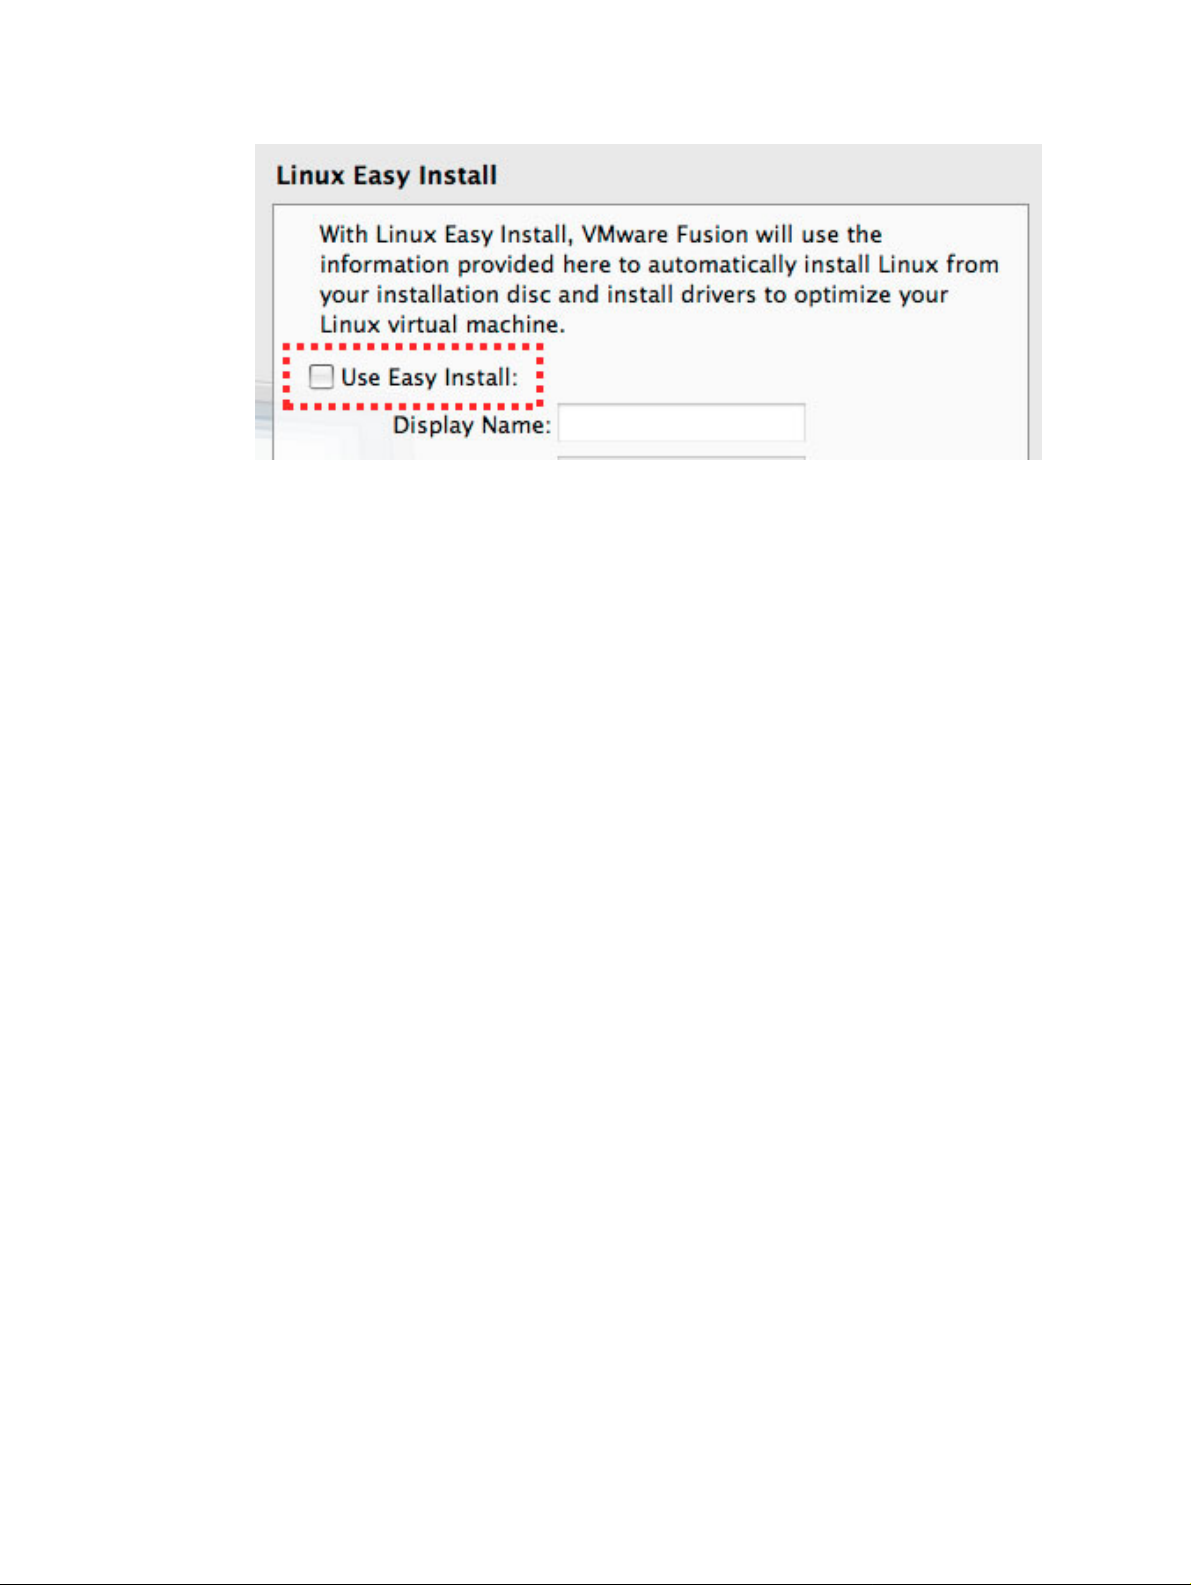
7. When you see a dialog that offers to install Linux automatically, choose to
install manually instead. Do this by either deselecting the Use Easy
Install option (Figure 3), or by selecting I will install the operating
system later. This ensures that you see all of the Red Hat Enterprise
Linux install dialogs described below.
Figure 3. VMware Linux Easy Install option disabled
Installing and configuring InfoSphere Streams on a virtual machine Trademarks
© Copyright IBM Corporation 2010. All rights reserved. Page 7 of 37
Page 8
developerWorks® ibm.com/developerWorks
8. On the "Finish" dialog, accept the default virtual machine configuration.
9. On the "RED HAT ENTERPRISE LINUX 5" dialog, go to the boot prompt,
and press your Enter/Return key.
10. On the "CD Found" dialog, verify that Skip is selected (with the keyboard,
not the mouse), and press your Enter/Return key.
11. On the "Language Selection" dialogs, click Next.
12. On the "Installation Number" dialog, select Skip entering installation
number, click OK, and then click Skip.
13. On the "Partition Table" warning dialog, click Yes.
14. On the "Partitioning Layout" dialog, verify that Remove Linux partitions
on selected drive and create default layout is selected, click Next, and
then click Yes.
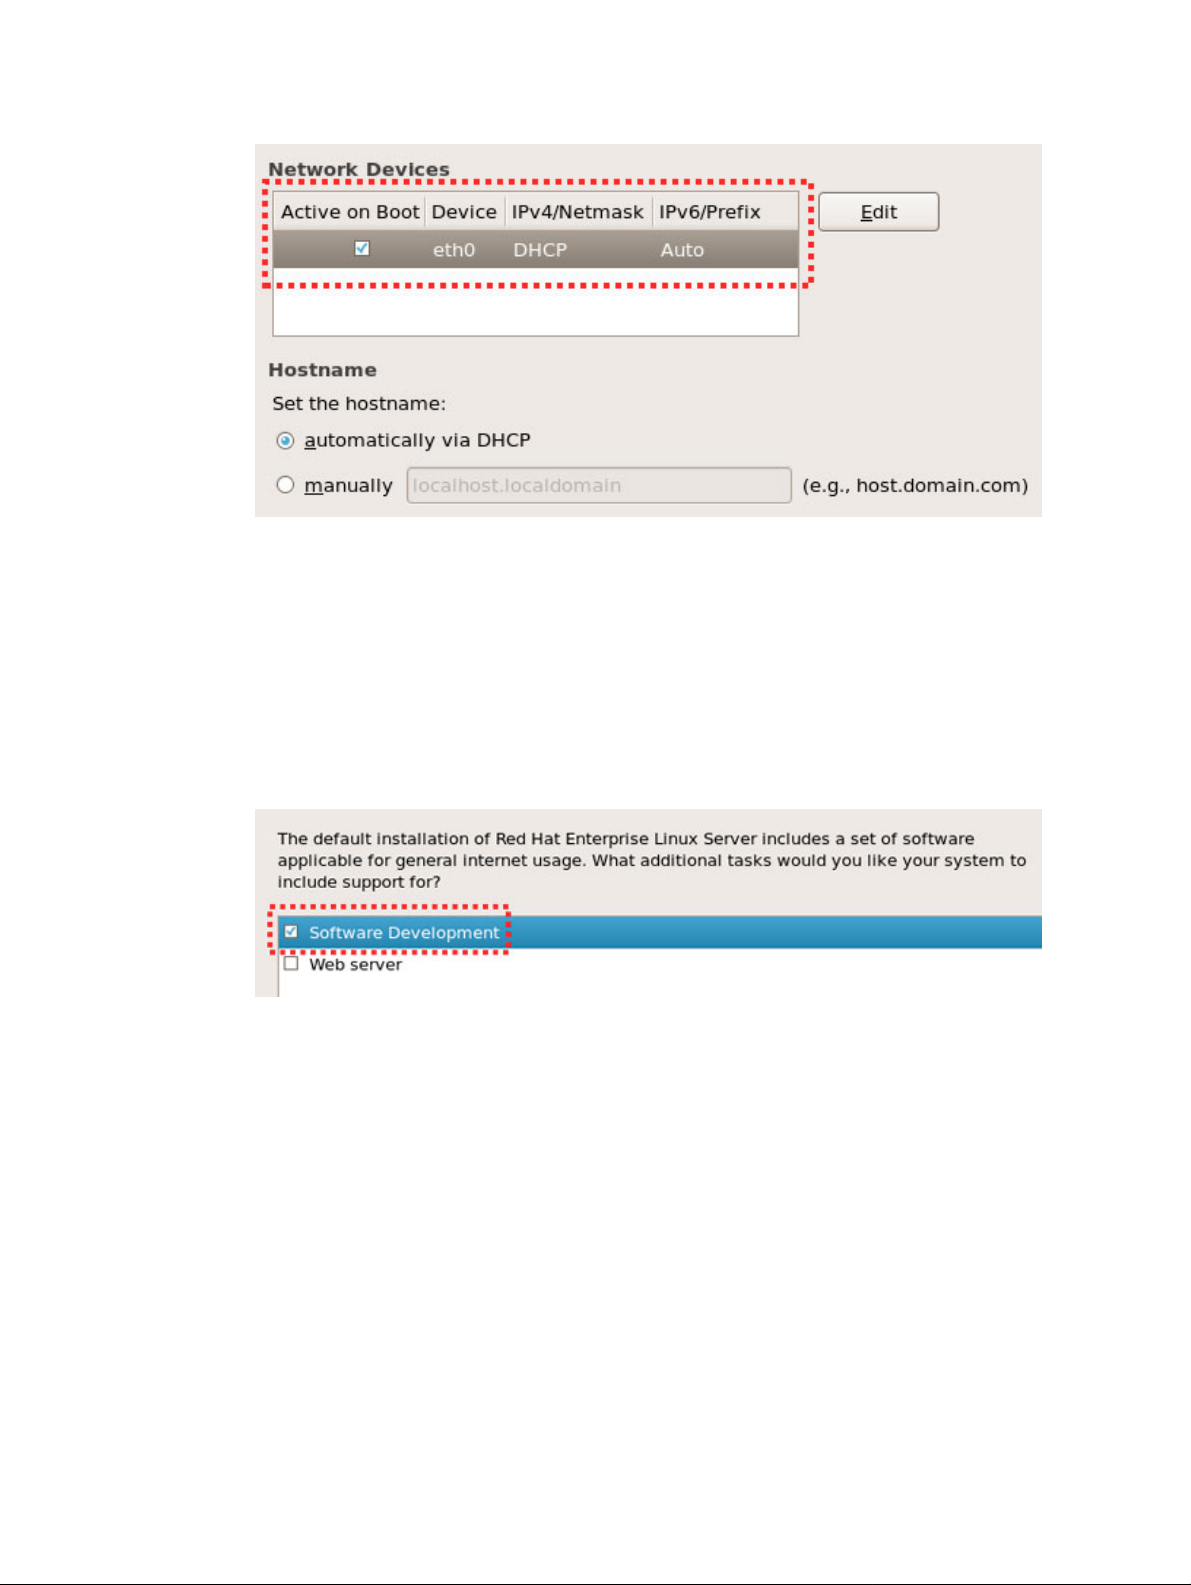
15. On the "Network Devices" dialog, verify that a virtual ethernet device
named eth0 is defined and active (Figure 4), and then click Next.
Figure 4. RHEL verifying ethernet interface
Installing and configuring InfoSphere Streams on a virtual machine Trademarks
© Copyright IBM Corporation 2010. All rights reserved. Page 8 of 37
Page 9
ibm.com/developerWorks developerWorks®
16. On the "Region" dialog, select your local time zone and click Next.
17. On the "Root Account" dialog, enter a password twice and click Next.
Make sure you remember this password — you will need to enter it
several times in subsequent steps of this tutorial.
18. On the "Software Customization" dialog, select the Software
Development option (Figure 5), select Customize now, and then click
Next.
Figure 5. RHEL selecting Software Development packages
19. On the "Software Packages" dialog, accept at least the default packages
in each category plus any additional packages you want and click Next.
20. Click Next again to start the Linux install process. You can expect the
Linux install process to continue for about 15 to 20 minutes without
requiring any further interaction.
21. When the Linux install process prompts you to reboot, do so.
Finish installing Red Hat Enterprise Linux
After the Linux install process reboots, follow these steps to finish installing Red Hat
Installing and configuring InfoSphere Streams on a virtual machine Trademarks
© Copyright IBM Corporation 2010. All rights reserved. Page 9 of 37
Page 10
developerWorks® ibm.com/developerWorks
Enterprise Linux.
1. On the "Welcome" dialog, accept the defaults and click Forward.
2. On the "License Agreement" dialog, accept the defaults and click
Forward.
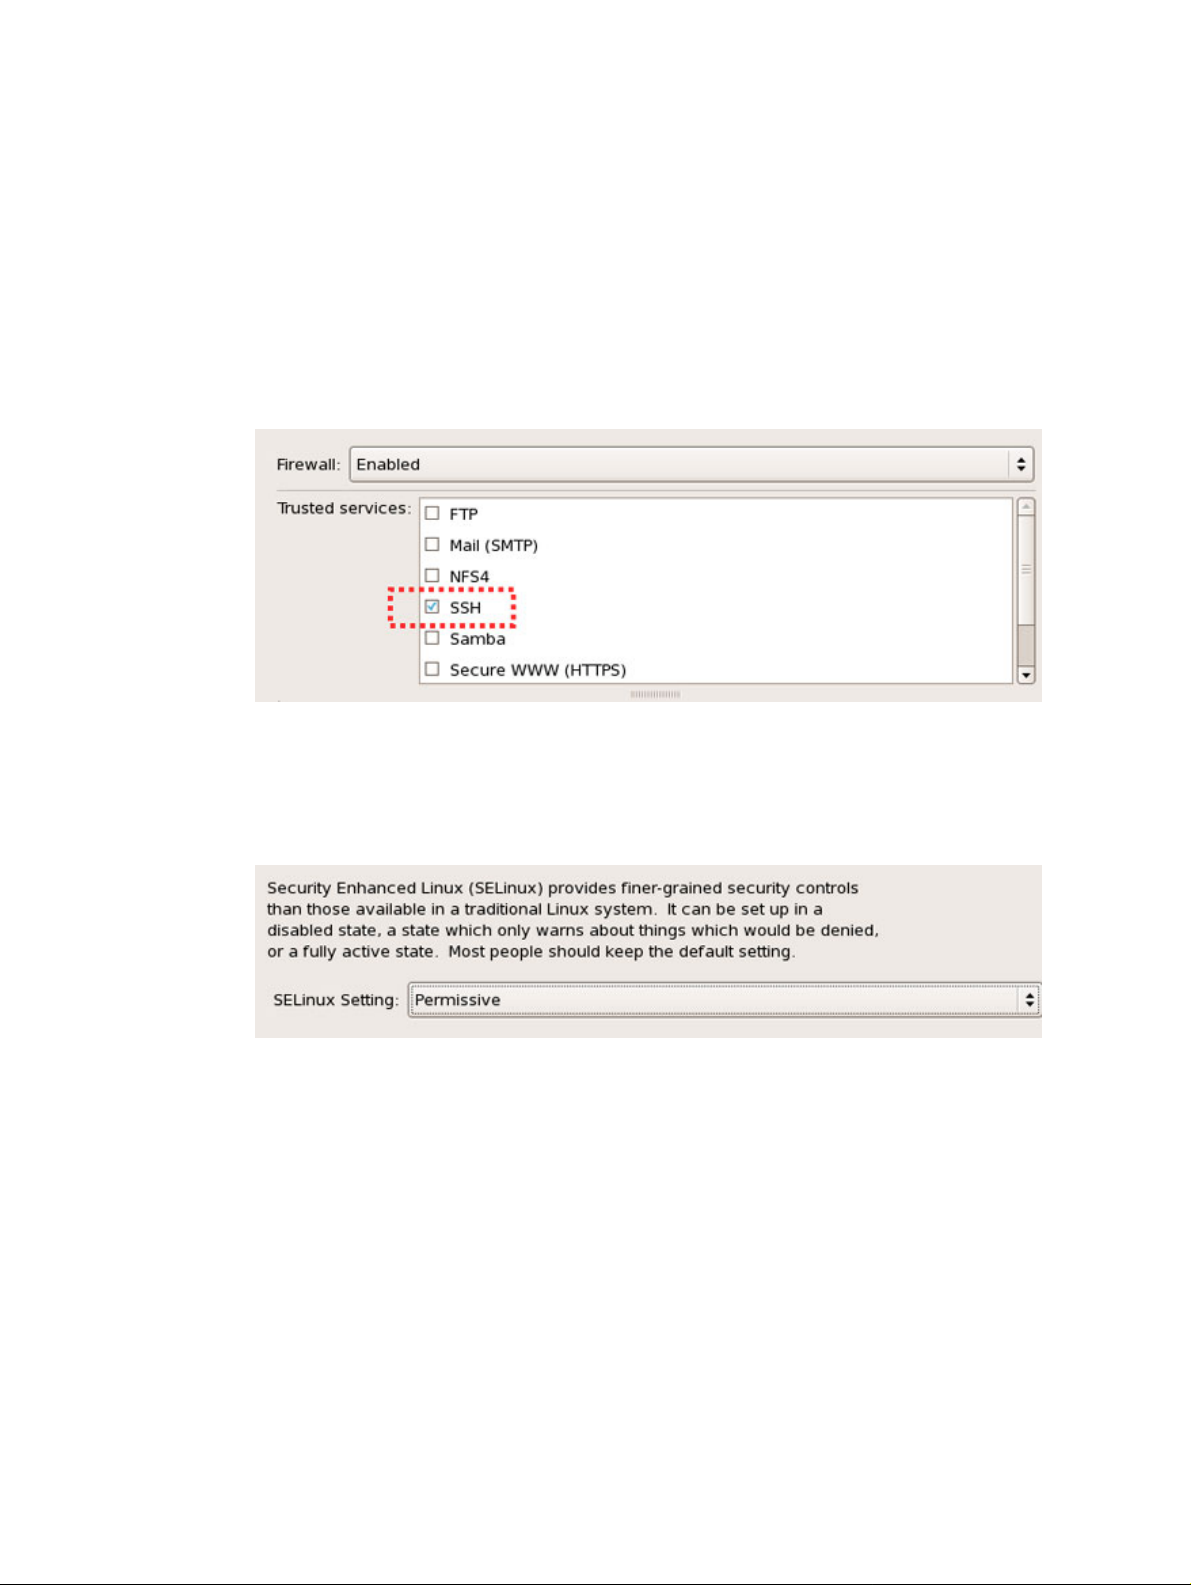
3. On the "Firewall" dialog, verify that the SSH service is selected (Figure 6),
click Forward, and then click Yes.
Figure 6. RHEL enabling SSH service
4. On the "SELinux Setting" dialog, select Permissive (Figure 7). (Do not
select Enforcing or Disabled.) Click Forward, and then click Yes. (For
more information on SELinux, see the A note about SELinux section of
this tutorial.)
Figure 7. RHEL changing SELinux
5. On the "Kdump" dialog, accept the default and click Forward.
6. On the "Date and Time" dialog, set the date and local time, and click
Forward.
7. On the "Software Updates" dialog, select No, I prefer to register at a
later time, click Forward, click No, thanks, and then click Forward
again.
8. On the "Create User" dialog, do not enter any names or passwords, just
click Forward, and then click Continue.
Installing and configuring InfoSphere Streams on a virtual machine Trademarks
© Copyright IBM Corporation 2010. All rights reserved. Page 10 of 37
Page 11

ibm.com/developerWorks developerWorks®
9. On the "Sound Card" dialog, click Play to test, and then click Forward.
10. On the "Additional CDs" dialog, click Finish.
11. Reboot Linux again if you are prompted to do so.
12. After Linux reboots, when it prompts you to log in, log in as username
root with the password you specified on the "Root Account" dialog in the
steps of the previous section. The following steps for configuring Linux
must be executed while logged in as root. However, InfoSphere Streams
does not require root privileges. Subsequent steps in this tutorial instruct
you on how to create a Linux user account for InfoSphere Streams.
Install VMware Tools
By installing the VMware Tools package on your Linux virtual machine, you get
access to convenient connections between Linux and Windows or Mac OS X for
common user tasks.
Before installing the VMware Tools package, make sure the Red Hat Enterprise
Linux disc image has been disconnected from your virtual machine's CD/DVD drive.
If not, you can disconnect it by right-clicking its Linux Desktop icon, and selecting
Eject from the context menu.
After the disc image has been ejected from the virtual CD/DVD drive, follow these
steps to install the VMware Tools package.
1. From the VMware menu bar, select Virtual Machine > Install VMware
Tools (Figure 8).
Figure 8. RHEL mounting VMware Tools DVD image
Installing and configuring InfoSphere Streams on a virtual machine Trademarks
© Copyright IBM Corporation 2010. All rights reserved. Page 11 of 37
Page 12

developerWorks® ibm.com/developerWorks
2. When the "VMware Tools" window appears on the Linux Desktop, open
the VMwareTools -xxxx.tar.gz package with the Archive Manager by
double-clicking its icon.
3. In the Archive Manager, select the vmware-tools-distrib package and
extract it onto the Linux Desktop.
4. Open the vmware-tools-distrib folder on the desktop by double-clicking its
icon.
5. Run the vmware-install.pl program by double-clicking its icon in the
folder, and then clicking run in terminal (Figure 9).
Figure 9. RHEL executing VMware Tools install program
Installing and configuring InfoSphere Streams on a virtual machine Trademarks
© Copyright IBM Corporation 2010. All rights reserved. Page 12 of 37
Page 13

ibm.com/developerWorks developerWorks®
6. At each prompt in the Terminal window from the vmware-install.pl
program, accept the default value by pressing your Enter/Return key.
Set the network host name and domain name
Follow these steps to set a host name (for example, yourhost) and a domain name
(for example, yourdomain.com) for the Linux virtual machine, and bind them to the
IP address of the virtual ethernet device named eth0.
1. Open a Linux Terminal window (not a Mac OS X Terminal window) by
using the Linux Desktop menu bar and selecting Applications >
Accessories > Terminal.
2. To find the IP address of the virtual ethernet adapter, enter the following
command in the Linux Terminal window:
/sbin/ifconfig -a
On the line after eth0, following inet addr is the IP address of the
Installing and configuring InfoSphere Streams on a virtual machine Trademarks
© Copyright IBM Corporation 2010. All rights reserved. Page 13 of 37
Page 14

developerWorks® ibm.com/developerWorks
virtual machine's ethernet device. The address will be in the range
192.168.xxx.yyy, as illustrated in Figure 10.
Figure 10. RHEL displaying virtual ethernet IP address
3. From the Linux Desktop menu bar, select System > Administration >
Network to open the "Network Configuration" window. When prompted,
enter the password for user root.
4. From the "Network Configuration" window, click the DNS tab.
5. In the Hostname field, enter your host name and host domain in the
format yourhost.yourdomain.com (Figure 11).
Figure 11. RHEL configuring /etc/sysconfig/network file
6. From the Network Configuration menu bar, select File > Save.
7. Your host name and host domain are now saved in the
/etc/sysconfig/network file, which should look similar to the
following:
NETWORKING=yes
NETWORKING_IPV6=no
HOSTNAME=yourhost.yourdomain.com
Installing and configuring InfoSphere Streams on a virtual machine Trademarks
© Copyright IBM Corporation 2010. All rights reserved. Page 14 of 37
Page 15

ibm.com/developerWorks developerWorks®
8. Click the Hosts tab.
9. Click the New icon to display the "Add / Edit Hosts entry" window, and fill
it in as described below and as shown in Figure 12:
• In the Address field, enter the IP address of your virtual ethernet
adapter. This is the address in the format you determined in Step 2
with the format 192.168.xxx.yyy.
• In the Hostname field, enter the same name you entered in the
Hostname field on the DNS tab.
• In the Aliases field, enter your host name (for example, yourhost).
Figure 12. RHEL configuring /etc/hosts file
10. Click OK on the "Add / Edit Hosts entry" window, and then from the
Network Configuration menu bar select File > Save.
11. Your host name, host domain, and IP address are now saved in the
/etc/hosts file, which should look similar to the following:
127.0.0.1 localhost.localdomain localhost
::1 localhost6.localdomain6 localhost6
192.168.199.135 yourhost.yourdomain.com yourhost
12. Follow these steps to restart the Linux network interface:
a. Open the "Service Configuration" window by going to the Linux
Desktop menu bar and selecting System > Administration >
Installing and configuring InfoSphere Streams on a virtual machine Trademarks
© Copyright IBM Corporation 2010. All rights reserved. Page 15 of 37
Page 16

developerWorks® ibm.com/developerWorks
Server Settings > Services.
When prompted, enter the root password again.
b. On the Background Services tab, scroll down through the list of
services, select network, and verify that there is a check mark in
the box to its left.
c. Click the Restart icon at the top of the list.
d. When the dialog indicating that the network restart was successful
appears, click OK.
13. Verify that the host name, domain name, and IP address are all set
correctly by entering the following commands in the Linux Terminal
window, and confirming that each one prints the value indicated:
hostname --fqdn ... should print 'yourhost.yourdomain.com'
hostname --short ... should print 'yourhost'
hostname --domain ... should print 'yourdomain.com'
hostname --ip-address ... should print '192.168.xxx.yyy'
ping yourhost ... should print 'PING yourhost.yourdomain.com (192.168.xxx.yyy)'
Create a Linux user account
Next, you need to create a Linux user account for InfoSphere Streams.
If your computer runs Mac OS X and you want to share files between your virtual
machine and your computer, you should create the Linux user account with the
same user name and user number as your computer's user account. If not, you can
choose any Linux user name and accept the default user number.
If you need to find your Mac OS X user number, open a Terminal window on your
computer (not in your virtual machine) and enter the following command:
id
The number following uid= is your user number.
Follow these steps to create a Linux user account.
1. From the Linux Desktop menu bar, select System > Administration >
Users and Groups.
Installing and configuring InfoSphere Streams on a virtual machine Trademarks
© Copyright IBM Corporation 2010. All rights reserved. Page 16 of 37
Page 17

ibm.com/developerWorks developerWorks®
2. From the "User Manager" window, click Add User.
3. Enter your user name and a password.
4. Select Specify user ID manually.
5. Enter your user number.
6. Click OK.
Login to your Linux user account
The remaining Linux configuration steps can be done from your Linux user account.
So follow these steps to log out from the root account and log in as the Linux user
you just created.
1. From the Linux Desktop menu bar, select System > Log out 'root' ....
2. After logging out, when Linux prompts you to log in again, login to your
Linux user account by entering your Linux user name and password.
Create an SSH key pair for your Linux user account
Follow these steps to create an SSH key pair for your Linux user account.
1. From the Linux Desktop menu bar, select Applications > Accessories >
Terminal to open a Linux Terminal window.
2. To create an SSH key pair, enter the following command in the Linux
Terminal window:
ssh-keygen -t dsa
3. Press your Enter/Return at each prompt until the ssh-keygen program
finishes.
4. Enter the following commands in the Linux Terminal window:
cat ./.ssh/id_dsa.pub >> ./.ssh/authorized_keys
chmod 0600 ./.ssh/*
Installing and configuring InfoSphere Streams on a virtual machine Trademarks
© Copyright IBM Corporation 2010. All rights reserved. Page 17 of 37
Page 18

developerWorks® ibm.com/developerWorks
5. Verify that SSH is working by entering the following commands at the
prompt in the Linux Terminal window, and confirming that the response to
each one is your user name:
ssh localhost whoami
ssh yourhost whoami
ssh yourhost.yourdomain.com whoami
ssh 192.168.xxx.yyy whoami
Install additional Linux RPM packages
InfoSphere Streams depends on many Linux software packages, called RPMs, that
you need to install in your virtual machine before you can install InfoSphere Streams
itself. Some of these packages were installed when you selected Software
Development during the Linux install step above. Follow these steps to install
several more packages that are distributed with Red Hat Enterprise Linux. RPMs
must be installed with root privileges. Later in the tutorial, you will install more
packages that are distributed with InfoSphere Streams.
1. Re-connect the disc image you downloaded to your virtual machine's
virtual CD/DVD by going to the VMware menu bar and selecting Virtual
Machine > CD/DVD > Connect CD/DVD.
2. From the Linux Desktop menu bar, select Applications > Accessories >
Terminal to open a Linux Terminal window.
3. In the Linux Terminal window, enter the following commands:
su
cd /media/red-hat-enterprise-linux-disc-image/Server/
rpm -ivh binutils-devel-*.rpm
rpm -ivh libicu-devel-*.rpm
rpm -ivh libtool-ltdl-*.rpm
rpm -ivh perl-Digest-*.rpm
rpm -ivh perl-XML-Parser-*.rpm
rpm -ivh perl-XML-Simple-*.rpm
rpm -ivh perl-XML-NamespaceSupport-*.rpm
rpm -ivh perl-XML-SAX-*.rpm
exit
After you enter the su command, you will be prompted for the root user
password. Also, note that the cd command may contain space characters
that should be escaped with backslash characters.
Optionally, update the emacs editor
Installing and configuring InfoSphere Streams on a virtual machine Trademarks
© Copyright IBM Corporation 2010. All rights reserved. Page 18 of 37
Page 19

ibm.com/developerWorks developerWorks®
If you use the emacs text editor, you may want to update the release (21.4.1) that
Red Hat Enterprise Linux installs by default.
Follow these steps to update emacs to the current release (23.1.1).
1. From the Linux Desktop menu bar, select Applications > Accessories >
Terminal to open a Linux Terminal window.
2. In the Linux Terminal window, enter the following commands:
su
wget http://ftp.gnu.org/pub/gnu/emacs/emacs-23.1.tar.gz
tar -xvzf emacs-23.1.tar.gz
cd emacs-23.1
./configure
make
make install
exit
After you enter the su command, you will be prompted for the root user
password.
3. When you start emacs after updating it, you may want to enable the new
window decorations. To do so, go to the emacs menu bar and select
Options > Show/Hide > Fringe > On the Right. Then select Options >
Show/Hide > Fringe > Buffer Boundaries > In Right Fringe.
Section 5. Install IBM InfoSphere Streams
InfoSphere Streams includes both a streaming runtime and Streams Studio, which is
a set of Eclipse platform plug-ins that assist you in developing streaming
applications. After you follow the steps in this section, you will have the following two
subdirectories in your Linux home directory:
• The Streams runtime programs subdirectory is
/home/username/InfoSphereStreams/
• The Streams runtime configuration subdirectory is
/home/username/.streams/
InfoSphere Streams is available in both 32-bit and 64-bit versions. Make sure the
version you choose matches the version of Red Hat Enterprise Linux you installed in
your virtual machine.
Installing and configuring InfoSphere Streams on a virtual machine Trademarks
© Copyright IBM Corporation 2010. All rights reserved. Page 19 of 37
Page 20

developerWorks® ibm.com/developerWorks
This section of the tutorial provides a summary of the InfoSphere Streams install
procedure. For more details, refer to the Resources section of this tutorial for links to
the InfoSphere Streams Installation and Administration Guide, Studio Installation
and User's Guide, and online documentation.
Locate the InfoSphere Streams distribution package
Locate your InfoSphere Streams distribution package. This is a compressed
directory archive named either Streams-1.2.0-i386-el5-trial.tar.gz for
the 32-bit version, or Streams-1.2.0-x86_64-el5-trial.tar.gz for the 64-bit
version. The package contains the InfoSphere Streams installer program, plus
additional Linux software packages that InfoSphere Streams depends on.
Follow these steps to extract the distribution package onto the Linux system in your
virtual machine.
1. Copy the InfoSphere Streams distribution package into your virtual
machine's disk drive. For example, you could drag the tar.gz file from
your computer's Desktop to the Linux Desktop.
2. Double-click the Linux Desktop icon for the distribution package to launch
the Archive Manager.
3. Click Extract to decompress the distribution package into a temporary
directory. The temporary directory created by the Archive Manager from
the distribution package contains the InfoSphere Streams installer
program (a file named InfoSphereStreamsSetup.bin) and a
subdirectory (named rpm). The rpm subdirectory contans additional Linux
software packages that are called RPMs and have .rpm at the end of
their names.
Install additional Linux RPM packages
Before installing InfoSphere Streams, follow these steps to install several Linux
software packages, called RPMs, that InfoSphere Streams depends on. These
dependent RPMs are in the rpm subdirectory of the temporary directory that was
created when you unpacked the InfoSphere Streams distribution package.
1. From the Linux Desktop menu bar, select Applications > Accessories >
Terminal to open a Linux Terminal window.
2. In the Linux Terminal window, enter the following commands:
Installing and configuring InfoSphere Streams on a virtual machine Trademarks
© Copyright IBM Corporation 2010. All rights reserved. Page 20 of 37
Page 21

ibm.com/developerWorks developerWorks®
su
cd .../your-temporary-directory/rpm/
rpm -ivh ibm-java-*.rpm
rpm -ivh graphviz-*.rpm
rpm -ivh perl-Statistics-Descriptive-*.rpm
exit
After you enter the su command, you will be prompted for the root user
password. Figure 13 shows an example of what your desktop looks like
while running these commands.
Figure 13. Streams installing additional RPMs
Create a ParserDetails.ini file
Follow these steps to create a ParserDetails.ini file. You have to create this
file after installing the perl-XML RPMs, and before installing InfoSphere Streams.
1. From the Linux Desktop menu bar, select Applications > Accessories >
Terminal to open a Linux Terminal window.
2. In the Linux Terminal window, enter the following commands:
su
perl -MXML::SAX -e "XML::SAX->add_parser(q(XML::SAX::PurePerl))->save_parsers()"
exit
After you enter the su command, you will be prompted for the root user
password. The perl command creates a
/usr/lib/perl5/vendor_perl/5.8.8/XML/SAX/ParserDetails.ini
file. For more details on this step, refer to
http://perl-xml.sourceforge.net/faq/#parserdetails.ini.
Installing and configuring InfoSphere Streams on a virtual machine Trademarks
© Copyright IBM Corporation 2010. All rights reserved. Page 21 of 37
Page 22

developerWorks® ibm.com/developerWorks
Install InfoSphere Streams runtime
Follow these steps to install the InfoSphere Streams runtime.
1. Double-click the Desktop icon for the InfoSphereStreamsSetup.bin
program you unpacked into a temporary directory from the InfoSphere
Streams distribution package, and click Run on the dialog asking if you
want to run the file or display its contents (Figure 14).
Figure 14. Streams executing install program
2. If you encounter an SELinux warning dialog, click Continue. (For more
information on SELinux, see the A note about SELinux section of this
tutorial.)
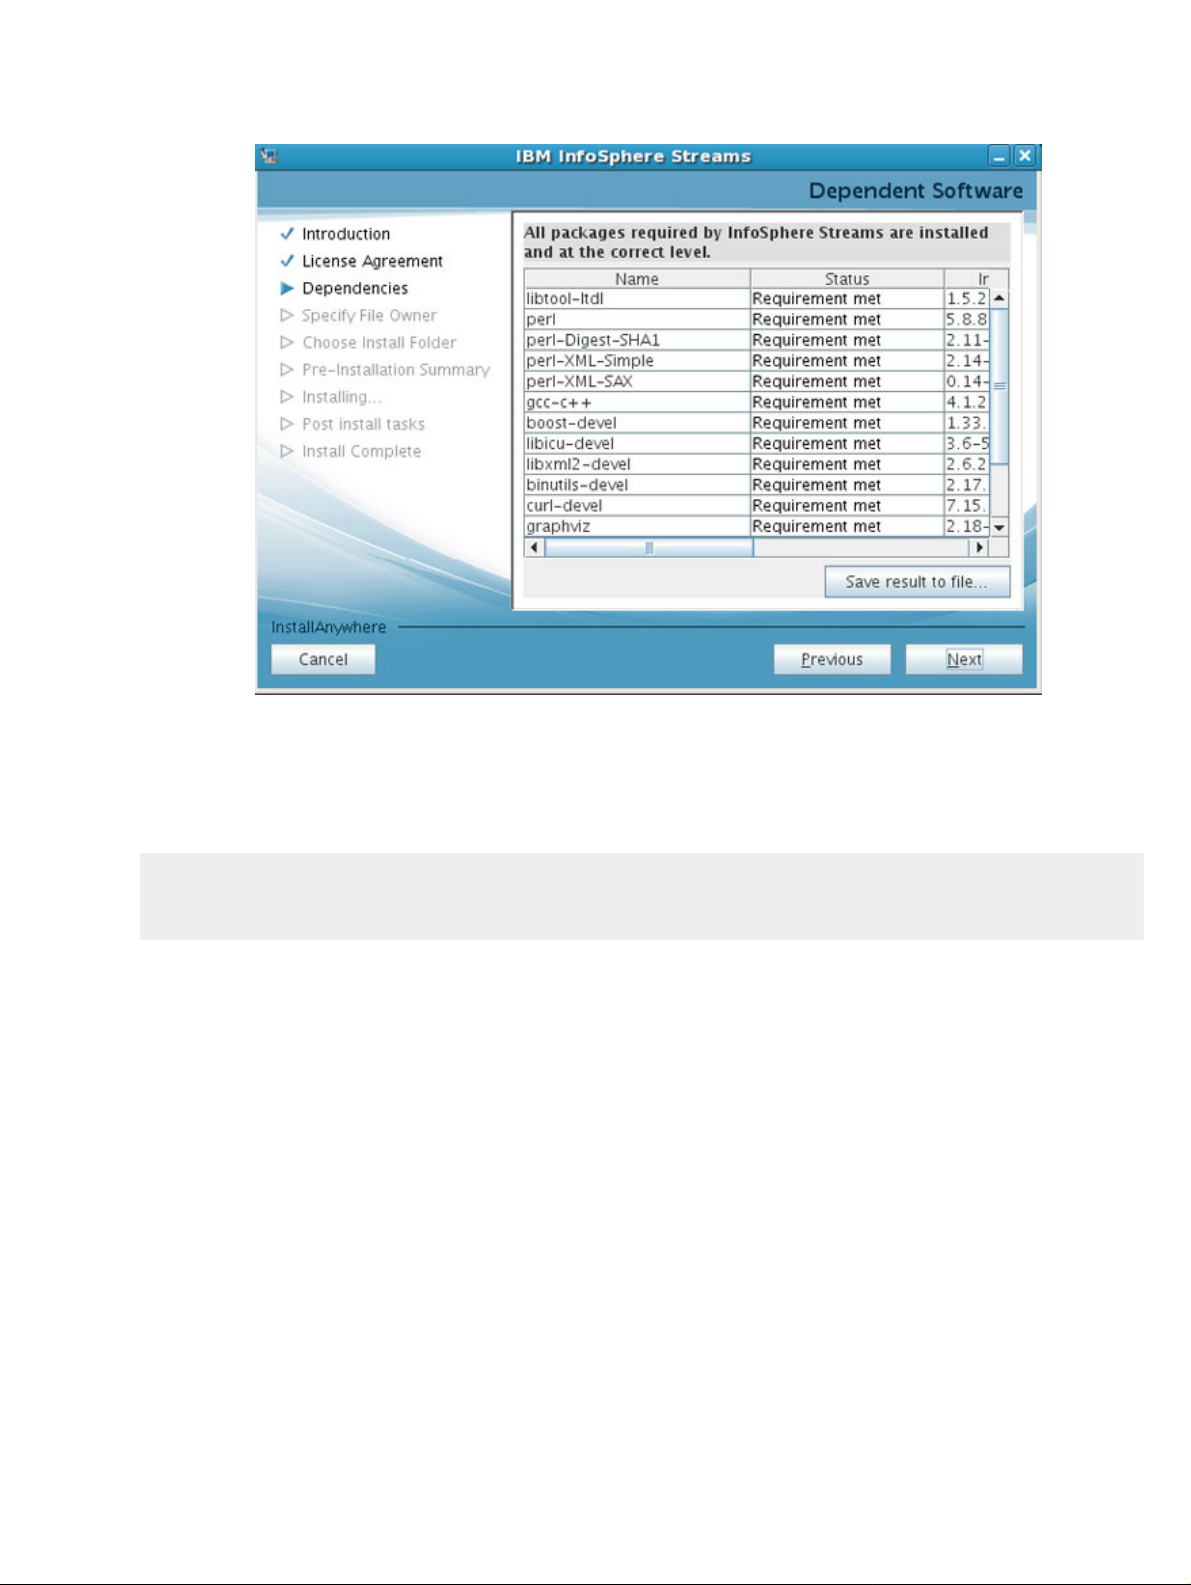
3. During the Dependencies step of the installation, the install program
checks if all the packages required by InfoSphere Streams are installed
and at the correct level (Figure 15). Confirm that all of the packages have
a status of Requirement met and click Next.
Figure 15. Streams checking RPM dependencies
Installing and configuring InfoSphere Streams on a virtual machine Trademarks
© Copyright IBM Corporation 2010. All rights reserved. Page 22 of 37
Page 23
ibm.com/developerWorks developerWorks®
4. Accept the defaults on each subsequent dialog and click Next until the
install program finishes.
5. After the install program finishes, edit the .bashrc file in your RHEL
home directory and append the following lines to the end of it:
source $HOME/InfoSphereStreams/bin/streamsprofile.sh -s
export JAVA_HOME=/opt/ibm/java-x86_64-60
export PATH=.:$JAVA_HOME/bin:$PATH
6. To activate the lines added to your .bashrc file, log out and then log
back in using your Linux user account.
Activate trial license, if necessary
If you are using the trial version of IBM InfoSphere Streams, you need to follow
these steps to activate the trial license.
1. From the Linux Desktop menu bar, select Applications > Accessories >
Terminal to open a Linux Terminal window.
2. In the Linux Terminal window, enter the following commands:
Installing and configuring InfoSphere Streams on a virtual machine Trademarks
© Copyright IBM Corporation 2010. All rights reserved. Page 23 of 37
Page 24

developerWorks® ibm.com/developerWorks
cd .../your-temporary-directory/Licenses/
streamtool checklicense
exit
This message confirms that the trial license has been activated: The
Streams product license check passed.
Create another SSH key pair
Follow these steps to create another SSH key pair for the InfoSphere Streams
runtime.
1. From the Linux Desktop menu bar, select Applications > Accessories >
Terminal to open a Linux Terminal window.
2. In the Linux Terminal window, enter the following command:
streamtool genkey
Optionally, install syntax highlighting for Linux text editors
If you intend to use a Linux text editor such as vi, jedit, or emacs to view Streams
Processing Language source files, you should install the appropriate syntax
highlighting macros.
The text editor syntax highlighting macros are available in the
/home/username/InfoSphereStreams/doc/spade/syntax-highlighters
directory.
For instructions on installing the macros, refer to Chapter 15 of the Programming
Model and Language Reference manual, which is linked to from the Resources
section of this tutorial.
Section 6. Install Eclipse and InfoSphere Streams Studio
InfoSphere Streams includes both a streaming runtime and Streams Studio, which is
a set of Eclipse platform plug-ins that assist you in developing streaming
applications. Now that you have installed the runtime, you are ready to install Eclipse
Installing and configuring InfoSphere Streams on a virtual machine Trademarks
© Copyright IBM Corporation 2010. All rights reserved. Page 24 of 37
Page 25

ibm.com/developerWorks developerWorks®
and InfoSphere Streams Studio. After you follow the steps in this section, you will
have the following two subdirectories in your Linux home directory:
• The subdirectory for the Streams Studio programs is
/home/username/eclipse/
• The subdirectory for the configuration files and applications is
/home/username/workspace/
InfoSphere Streams and Eclipse are available in both 32-bit and 64-bit versions.
Make sure the versions you choose match the version of Red Hat Enterprise Linux
you installed in your virtual machine.
This section of the tutorial provides a summary of the Eclipse install procedure. For
more details, refer to the Resources section of this tutorial for links to the Workbench
User Guide and the Eclipse online documentation.
Install the Eclipse integrated development environment
Locate your Eclipse distribution package. The 64-bit version has a name similar to
eclipse-SDK-3.5.2-linux-gtk-x86_64.tar.gz.
The distribution package file contains a compressed directory, which contains the
Eclipse integrated development platform. Eclipse does not have an installer
program; to install you simply decompress the distribution package into your home
directory and launch Eclipse from that directory. Follow these steps to extract the
distribution package onto the Linux system in your virtual machine.
1. Copy the Eclipse distribution package into your virtual machine's disk
drive. For example, you could drag the tar.gz file from your computer's
Desktop to the Linux Desktop.
2. Double-click the Desktop icon for the Eclipse distribution package to
launch the Archive Manager.
3. Click Extract to decompress the distribution package directly into your
home directory (not onto your Linux Desktop).
The /home/username/eclipse directory created by the Archive
Manager contains a program named
/home/username/eclipse/eclipse. This is the program you use to
launch the Eclipse integrated development platform.
Installing and configuring InfoSphere Streams on a virtual machine Trademarks
© Copyright IBM Corporation 2010. All rights reserved. Page 25 of 37
Page 26

developerWorks® ibm.com/developerWorks
Install the IMP technology for Eclipse
Follow these steps to install the IMP technology for Eclipse.
1. Locate the IMP technology distribution file named
org.eclipse.imp.update_0.1.v201001291500.zip, and copy it
into your virtual machine's disk drive. For example, you could drag the file
from your computer's Desktop to the Linux Desktop.
2. Launch Eclipse by clicking the /home/username/eclipse/eclipse
icon.
3. From the Eclipse menu bar, select Help > Install New Software ….
4. On the "Install" dialog, click Add ....
5. On the "Add Site" dialog, click Archive..., select the IMP technology
distribution file, and then click OK.
6. From the list of available software packages (Figure 16), select the
following:
• Under IMP, select IMP Runtime (Incubation), version 0.1.103
• Under IMP Prerequisites, select LPG Runtime, version 2.0.17
Then click Next.
Figure 16. Eclipse installing IMP technology
Installing and configuring InfoSphere Streams on a virtual machine Trademarks
© Copyright IBM Corporation 2010. All rights reserved. Page 26 of 37
Page 27

ibm.com/developerWorks developerWorks®
7. Click Next on the subsequent dialogs until the install program finishes.
8. Restart Eclipse when prompted to do so.
Install InfoSphere Streams Studio
After Eclipse restarts, follow these steps to install the InfoSphere Streams Studio
plug-ins.
1. From the Eclipse menu bar, select Help > Install New Software ….
2. On the "Install" dialog, click Add ....
3. On the "Add Site" dialog, click Local ..., select the
/home/username/InfoSphereStreams/eclipse directory, and then
click OK.
4. From the list of available software packages (Figure 17), select all four
InfoSphere Streams names:
• InfoSphere Streams Core Libraries
Installing and configuring InfoSphere Streams on a virtual machine Trademarks
© Copyright IBM Corporation 2010. All rights reserved. Page 27 of 37
Page 28

developerWorks® ibm.com/developerWorks
• InfoSphere Streams External Libraries
• InfoSphere Streams Studio
• InfoSphere Streams Studio Graph Views
Then click Next.
Figure 17. Eclipse installing InfoSphere Streams Studio
5. Click Next on the subsequent dialogs until the install program finishes.
6. Restart Eclipse when prompted to do so.
Optionally, install other Eclipse development tools
After Eclipse restarts, you may want to install additional Eclipse development tools.
For example, if you plan to develop user-defined operators (UDOPs) or user-defined
functions for InfoSphere Streams, you may want to install the Eclipse C/C++
Development Tools (CDT). Its plugins can be installed from the Protramming
Languages section of the Eclipse update site at
http://download.eclipse.org/releases/galileo.
Another example would be, if you plan to develop user-defined built-in operators
(UBOPs) or Perl/Spade mixed-mode applications (DMM source files) for InfoSphere
Streams, you may want to install the Eclipse Perl Integration (EPIC) tool. Its plug-ins
can be installed from the Eclipse update site at http://e-p-i-c.sf.net/updates/testing.
Section 7. Verify the install
Installing and configuring InfoSphere Streams on a virtual machine Trademarks
© Copyright IBM Corporation 2010. All rights reserved. Page 28 of 37
Page 29

ibm.com/developerWorks developerWorks®
At this point, you have created a self-contained InfoSphere Streams development
environment in a virtual machine on your computer. Follow the steps in this section
to verify that all the products are properly installed and configured so that they can
work together.
Run a sample application
To verify that all four products are installed correctly and work together properly, run
one of the sample applications provided with InfoSphere Streams. For example, the
vwap application consumes a pre-recorded stock market feed with sample data and
detects bargains for several specified securities by comparing bid and offer quotes
to the security's volume-weighted average price (VWAP). This sample application
produces no output.
Follow these steps to run the vwap application.
1. From the Eclipse menu bar, select Window > Open Perspective > Other
....
2. On the "Open Perspective" dialog, select InfoSphere Streams Studio
and click OK.
3. From the Eclipse menu bar, select File > Import ….
4. On the "Import" dialog, expand the InfoSphere Streams Studio item,
select Existing SPADE Application into Workspace, and then click
Next.
5. In the "SPADE Application Import Wizard" dialog, click Browse ...,
navigate to /home/username/InfoSphereStreams/samples/apps, and then
click OK.
6. In the SPADE Applications field, select the vwap sample application and
click Finish.
7. In the "Project Explorer" pane, expand the vwap project, and select the
vwap.dps source file.
8. Also in the "Project Explorer" pane, double-click the vwap.dps source
file, and confirm that the source editor, the Outline view, the Application
Graph view, and the Application Graph Detail view, are all displayed in a
way that is similar to what is shown in Figure 18.
Figure 18. Studio views of sample application source code
Installing and configuring InfoSphere Streams on a virtual machine Trademarks
© Copyright IBM Corporation 2010. All rights reserved. Page 29 of 37
Page 30

developerWorks® ibm.com/developerWorks
9. Right-click the vwap.dps source file. From the context menu (Figure 19),
select Run as > Submit SPADE Application to Streams instance.
Figure 19. Studio running sample application
10. On the "Confirm Launch" dialog, click OK. The "Console" pane shows the
application being compiled and executed.
11. When the "Streams Live Graph" pane shows the application flow graph,
verify that all operators are green and all streams between operators are
connected (Figure 20).
Figure 20. Studio verifying sample application is running
Installing and configuring InfoSphere Streams on a virtual machine Trademarks
© Copyright IBM Corporation 2010. All rights reserved. Page 30 of 37
Page 31

ibm.com/developerWorks developerWorks®
12. To stop the application, right-click the vwap.dps source file to display its
context menu. From the context menu, select Run as > Stop Streams
instance.
Run a sample application that fails
For a brief introduction to the application development workflow for streaming
applications, follow these steps to compile and run an application that fails.
1. From the Eclipse menu bar, select Window > Open Perspective > Other
....
2. On the "Open Perspective" dialog, select InfoSphere Streams Studio
and click OK.
3. To create a trivial application, right-click in the empty "Project Explorer"
pane to display the context menu, and select New > SPADE Application
Project.
4. Append the following operators to the end of the skeleton dps file:
stream aStream(anInteger: Integer , aFloat: Float , aString: String)
:= Source() ["file:///anInputFile.csv", csvformat, nodelays] {}
Nil := Sink(aStream) ["file:///anOutputFile.csv", csvformat, nodelays] {}
5. To compile and execute the Spade application, go to the "Project
Explorer" pane and right-click the dps file. From the context menu, select
Run As ... > Submit SPADE Application to Streams instance.
6. After the application has been compiled and is executing, verify that the
Streams Live Graph view appears, and that it looks similar to the Spade
Installing and configuring InfoSphere Streams on a virtual machine Trademarks
© Copyright IBM Corporation 2010. All rights reserved. Page 31 of 37
Page 32

developerWorks® ibm.com/developerWorks
Application Graph view.
7. Within a few seconds, the Source operator in the Streams Live Graph
view will change color from green to red. This indicates that the operator
has failed. The failure is the expected behavior in this scenario.
8. To discover the reason for PE failures such as this, move the cursor over
the red Source operator, wait for a pop-up dialog to appear, and note the
PE number, which is labelled as PE Id (Figure 21).
Figure 21. Studio identifying failed PE in test application
9. Launch the File Browser. Go to the Linux Desktop menu bar and select
Applications > System Tools > File Browser.
10. Navigate to the directory containing PE logs. In the File Browser, select
File System > tmp > streams.spade@username > jobs > 0.
11. Open the log for the PE that failed. For example, if the PE number is 4,
you would double-click the file named pe4.pa.out.
12. Look for an ERROR ... Exception message near the beginning of the
log file. For example, Figure 22 shows a message with the text: failed
to properly open workload file
'.../data/anInputFile.csv'. The Source operator failed because
its input file does not exist. This error is expected, because you have not
yet created this input file.
Figure 22. Studio locating error record in PE log
Installing and configuring InfoSphere Streams on a virtual machine Trademarks
© Copyright IBM Corporation 2010. All rights reserved. Page 32 of 37
Page 33

ibm.com/developerWorks developerWorks®
13. Cancel the failed job. Return to Eclipse, right-click the dps file in the
"Project Explorer" pane. From the context menu, select Run As … >
Cancel SPADE Application on Streams Instance.
14. To create the missing data/anInputFile.csv file, right-click the data
directory in the "Project Explorer" pane. From the context menu, select
New > File.
15. In the "New File" dialog, enter anInputFile.csv in the File name field
and click Finish.
16. In the .../data/anInputFile.csv editor pane, enter lines containing
integers, floats, and strings separated by comma characters, similar to the
following:
1,1.1111,one
2,2.2222,two
3,3.3333,three
17. Re-run the Spade application. Right-click the dps file, and from its context
menu, select Run As ... > Submit SPADE Application to Streams
instance.
18. To verify that the application is now working, expand the data directory in
the "Project Explorer" pane, and confirm that it now contains a file named
anOutputFile.csv.
19. Double-click the anOutputFile.csv file and confirm that its contents
shown in the .../data/anInputFile.csv editor pane match your
sample input (Figure 23).
Figure 23. Studio verifying test application is running
Installing and configuring InfoSphere Streams on a virtual machine Trademarks
© Copyright IBM Corporation 2010. All rights reserved. Page 33 of 37
Page 34

developerWorks® ibm.com/developerWorks
20. Stop the Streams runtime. Right-click the dps file in the "Project Explorer"
pane, and from its context menu, select Run As ... > Stop Streams
Instance.
A note about SELinux
This tutorial recommends that you install Linux with SELinux (Security Enhanced
Linux) set to Permissive. The SELinux restrictions may raise alerts when some
applications improperly request access to system resources. A pop-up dialog warns
you when this happens. To learn which application caused the alert, what restriction
it has encountered, and how to resolve the issue, go to the Linux Desktop menu bar,
and select Applications > System Tools > SELinux Troubleshooter.
The settroubleshoot browser displays detailed information about each SELinux alert.
The production Linux servers where your own applications will be deployed may run
with SELinux set to Enforcing. If so, then you may want to change SELinux to
Enforcing in your virtual machine as well. When SELinux is set to Enforcing,
InfoSphere Streams should be installed with Linux root privileges.
If you need to change the SELinux setting to Enforcing, go to the Linux Desktop
menu bar, and select System > Administration > SELinux Management. When
prompted, enter your Linux root password. In the "SELinux Administration" dialog,
change the Current Enforcing Mode field from Permissive to Enforcing.
You may have to reboot your virtual machine to activate the change to Enforcing.
You should also re-install InfoSphere Streams with Linux root privileges in the
/opt/ibm/ system directory.
Installing and configuring InfoSphere Streams on a virtual machine Trademarks
© Copyright IBM Corporation 2010. All rights reserved. Page 34 of 37
Page 35

ibm.com/developerWorks developerWorks®
Section 8. Conclusion
After completing this tutorial, you have a self-contained InfoSphere Streams
development environment installed on your computer. You have also confirmed that
all of the products you installed are working together correctly and have gained
some experience in running streaming applications with them.
The /home/username/InfoSphereStreams/samples directory contains many
more sample applications that you can import into Streams Studio. Some of them
demonstrate how individual operators work, while others demonstrate how many
operators can be composed to process complex streaming data. To gain more
experience with IBM InfoSphere Streams, explore the sample applications.
This tutorial has provided you a convenient, portable environment for designing,
developing, and testing streaming applications. When you are ready to deploy your
applications on a cluster of Linux servers, use Eclipse to export your SPADE
projects from your computer, and then import them directly into a production
InfoSphere Streams instance.
Figure 24. Streaming application flow graph
Installing and configuring InfoSphere Streams on a virtual machine Trademarks
© Copyright IBM Corporation 2010. All rights reserved. Page 35 of 37
Page 36

developerWorks® ibm.com/developerWorks
Section 9. Resources
Learn
• Learn about VMware at http://www.vmware.com/products/
• Read the VMware documentation at
http://www.vmware.com/support/pubs/
• Learn about Red Hat Enterprise Linux at
https://www.redhat.com/rhel/server/
• Read the Red Hat Enterprise Linux documentation at
http://www.redhat.com/docs/manuals/enterprise/#RHEL5
• Learn about IBM InfoSphere Streams at
http://www-01.ibm.com/software/data/infosphere/streams/ and
http://www.ibm.com/developerworks/wikis/display/streams/Home
• If you are using the trial version of IBM InfoSphere Streams, please read
the "Getting Started with the Trial" document at
https://www.ibm.com/developerworks/wikis/download/attachments/129008718/IBMInfoSphereStreams-Trial_v1.2.0.0.pdf
• Read the IBM InfoSphere Streams manuals at
http://www.ibm.com/developerworks/wikis/display/streams/InfoSphere+Streams+Version+1.2.0.0+Product+Documentation
or http://publib.boulder.ibm.com/infocenter/streams/v1r2/index.jsp
• Learn about the Eclipse integrated development platform at
http://www.eclipse.org/home/categories/index.php?category=ide
• Read the Eclipse documentation at http://help.eclipse.org/galileo/index.jsp
Obtain products and technologies
• Obtain VMware for your computer from http://www.vmware.com/products/
• Obtain Red Hat Enterprise Server from
https://www.redhat.com/rhel/server/
Installing and configuring InfoSphere Streams on a virtual machine Trademarks
© Copyright IBM Corporation 2010. All rights reserved. Page 36 of 37
Page 37
ibm.com/developerWorks developerWorks®
• Obtain the trial version of IBM InfoSphere Streams from
https://www14.software.ibm.com/webapp/iwm/web/reg/pick.do?lang=en_US&source=SWG-STREAMS_TRIAL
• Obtain the Eclipse integrated development platform from
http://www.eclipse.org/downloads/
• Obtain the IMP technology for Eclipse from
http://download.eclipse.org/technology/imp/
Discuss
• Use the InfoSphere Streams Forum at
https://www.ibm.com/developerworks/wikis/display/streams/Infosphere+Streams+Forum
to ask questions, and share your experiences, solutions, and best
practices.
About the author
Edward J Pring
Edward Pring is a Senior Programmer at the IBM T.J. Watson
Research Center. He has contributed to a wide range of IBM products
and technologies, including operating systems, publishing applications
and terminal emulators for mainframes, virus protection for personal
computers, network automation for the Digital Immune System, and
visualization and performance analysis for Web Services. He is
currently developing streaming applications for financial services. His
patent portfolio spans all of these fields. He holds an M.S. degree in
computer science from New York University and a B.S. degree in
mathematics from Stanford University.
Installing and configuring InfoSphere Streams on a virtual machine Trademarks
© Copyright IBM Corporation 2010. All rights reserved. Page 37 of 37
 Loading...