

Page 1

Infoprint Color 8
User’s Guide
• Print Media
• Problem Solving
• Service and Support
• Maintenance
• Printer Control
• Specifications
Page 2

2
Note!
Before using this information and the product it
supports, be sure to read the general information
under "Notices".
First Edition (September 1999)
The following paragraph does not apply to any other country where such provisions are inconsistent with local
law .
INTERNATIONAL BUSINESS MACHINES CORPORATION PROVIDES THIS PUBLICATION "AS IS"
WITHOUT WARRANTY OF ANY KIND, EITHER EXPRESS OR IMPLIED, INCLUDING, BUT NOT
LIMITED TO THE IMPLIED WARRANTIES OF MERCHANTABILITY OR FITNESS FOR A
PARTICULAR PURPOSE. Some states do not allow disclaimer of express or implied warranties in certain
transactions, therefore, this statement may not apply to you.
Changes are made periodically to this publication.
Requests for IBM publications should be made to your IBM representative or to the IBM branch office serving
your locality .
IBM may use or distribute any information you supply in any way it believes appropriate without incurring any
obligation to you.
Copyright 1999 International Business Machines. All rights reserved. Note to U.S. Government Users-
Documentation related to restricted rights-Use, duplication, or disclosure is subject to restrictions set forth in
GSA ADP Schedule Contract with IBM Corp.
Page 3

3
Notices
References in this publication to IBM products, programs or services do not imply that IBM intends to make
these available in all countries in which IBM operates. Any reference to an IBM licensed product, program,
or service is not intended to state or imply that only IBM's product, program, or service may be used. Any
functionally equivalent product, program, or service that does not infringe any of IBM's intellectual property
rights may be used instead of the IBM product. Evaluation and verification of operation in conjunction with
other products, except those expressly designated by IBM, is the user's responsibility.
Any performance data contained in this document was obtained in a controlled environment based on the use
of specific data. The results that may be obtained in other operating environments may vary significantly.
Users of this document should verify the applicable data in their specific environment. Therefore, su ch data
does not constitute a performance guarantee or warranty.
IBM may have patents or pending patent applications covering subject matter in this document. The
furnishing of this document does not give you any license to these patents. You can send license inquiries, in
writing, to the IBM Corporation, IBM Director of Licensing, 506 Columbus Ave., Thornwood, N.Y. 10594
U.S.A.
Trademarks
IBM and Infoprint Color 8 are registered trademarks of the IBM Corporation in the United States or other
countries or both. The following terms are trademarks or registered trademarks of other companies:
Adobe, Acrobat, Acrobat Reader, Illustrator, PageMaker, Photoshop, PostScript and Type Manager are
trademarks of Adobe Systems Inc., which may be registered in certain jurisdictions. CorelDRAW is a
registered trademark of Corel Corporation. E
NERGY STAR is a registered trademark of the United States
Environmental Protection Agency. HP and PCL are registered trademarks of Hewlett-Pac kard. Macintosh is a
trademark of Apple Computer, Inc., registered in the U.S. and other countries. Macromedia and FreeHand are
registered trademarks of Macromedia, Inc. PANTONE is a registered trademark of Pantone, Inc. QuarkXPress
is a registered trademark of Quark, Inc. and all applicable affiliated companies. Windows is either a registered
trademark or a trademark of Microsoft Corporation in the United States and/or other countries.
Page 4

4
Notices (continued)
ENERGY STAR
As an ENERGY STAR® Partner,
IBM has determined that this
product meets the E
NERGY STAR
guidelines for energy efficiency.
Page 5

5
Contents
Print Media ............................8
Selecting Paper ................................... 9
Selecting Paper Trays ........................ 11
Using Output Bins ............................ 12
Loading Paper Tray 1 ....................... 13
Printing on Special Media................ 16
General Information ....................... 17
Loading Multiple Media Pieces...... 20
Loading Single Sheets
(Manual Feed) ............................ 24
Setting Automatic Tray Switching ... 27
Summary of Usable Print Media ..... 28
Problem Solving .................. 29
Paper Jams ........................................ 30
Clearing Paper Input Jams.............. 31
Clearing a Paper Feed Jam ............. 33
Clearing a Paper Exit Jam............... 35
Print Quality Problems .................... 38
Display Messages ............................. 46
Normal Operation ........................... 46
Maintenance.................................... 49
Problems ......................................... 51
Call For Service ............................... 56
Page 6

6
Service and Support............ 57
Service Information ........................ 58
IBM Printers Website ..................... 59
The IBM Customer Technical
Support .......................................... 60
Purchasing Supplies ....................... 61
Consumables ................................... 62
Accessories...................................... 63
Maintenance........................ 64
Setting the Color Registration ......... 65
Replacing the Toner Cartridges ....... 68
Replacing the Image Drum
Cartridges........................................ 73
Replacing the Toner Waste Box ....... 80
Replacing the Transfer Belt Unit ..... 83
Replacing the Oil Roller ................... 89
Replacing the Fuser .......................... 93
Page 7

7
Printer Control .................... 98
The Control Panel ............................. 99
Using the Printer Menus ................ 105
Using the Level 1 Menu ................ 106
Using the Level 2 Menu ................ 123
Color Registration Using the
Control Panel ................................ 126
Adjusting Color Balance................. 129
The User Maintenance Menu......... 140
Categories ..................................... 141
Using the PAPER SIZE Menu ......... 150
Using the TRAY SELECT Menu ...... 152
Using the POWER SAVE Menu ...... 154
Printing Test Pages ........................ 156
Printing the Menu Settings........... 157
Printing the Font Sample Page ..... 158
Printing the Demo Page ............... 159
Enhanced by Heidelberg ................ 160
Specifications .....................161
Page 8

Print Media
• Selecting Paper
• Selecting Paper Trays
• Using Output Bins
• Printing on Special Media
• Setting Automatic Tray Switching
• Summary of Usable Print Media
Page 9

9
Selecting Paper
When you buy paper, keep in mind that
page printers require a smooth finish paper.
For most applications, paper rated for color
copiers and color laser printers should work
well with your printer.
Bear in mind that the color tones on the
printed page depend upon the whiteness of
the paper. For best reproduction, we
recommend paper with a whiteness rating of
at least 90.
Important!
Before buying any large quantity of a
particular paper, always test a
sample first.
Usable Paper Weights
Paper Tray 1: 20 to 28 lb
(75 to 105 g/m2)
1
Paper Tray 2: 5.8 inches
2
Front Tray: 5.5 inches, Paper Tray 2:
8.3 inches
Optional High Capacity
Paper Tray 2: 20 to 28 lb
(75 to 105 g/m2)
Front Tray: 20 to 44 lb bond,
110 lb. index
(75 to 165 g/m2)
Usable Paper Sizes
Usable: Letter, 13" or 14" Legal,
Executive, A4, A5, B5, A6
Width Range: 3.41 to 8.5 inches
(86.4 to 216 mm)
Length Range: 5.82 to 14 inches
(140 to 355 mm)
Page 10

10
Selecting Paper (continued)
Usable Paper Types
Smooth, non-textured, long grain
Color copier-type paper or paper with a
Sheffield rating of 100 to 250
Paper Composition
100% wood pulp or low cotton content
Note: Most papers have some cotton or
rag content. Avoid papers with a high
cotton or rag content.
Storing Paper
If paper is stored improperly, print quality
could be affected!
Store paper in a dark, dry place such as
a closet or a cabinet.
Do not open the package until you are
read to use it.
Always store paper lying flat or it may
curl.
Ideally, store paper at a constant
temperature of 70ºF (21.1ºC) with less
than 50% relative humidity.
Discard the top sheet from each ream of
paper before loading it into the paper
tray; it may be contaminated with glue or
dust.
Page 11

11
Selecting Paper Trays
There are three places to feed paper into
the printer:
1) Paper Tray 1 which takes 500 sheets of
20 lb paper
2) Front Tray which takes 100 sheets of 20
lb paper
3) Optional High Capacity Paper Tray 2
which holds 500 sheets of 20 lb paper
Click here for a Summary of Usable Print
Media.
Caution!
Any type of media, including transparencies, as well as the ink on letterhead
stationery or preprinted forms must
withstand 392ºF (200ºC) for 0.1 second.
Page 12

12
Using Output Bins
Rear Exit
Use the rear exit for transparencies,
labels, or card stock.
Pages print face up.
Tray holds 100 sheets of 20 lb paper.
Pages stack in reverse order.
Top Exit
The top exit is normally used for routine
printing.
Pages print face down.
Bin holds 250 sheets of 20 lb paper.
Pages stack in the order fed.
Your printer has two exit paths: top and rear.
Page 13

13
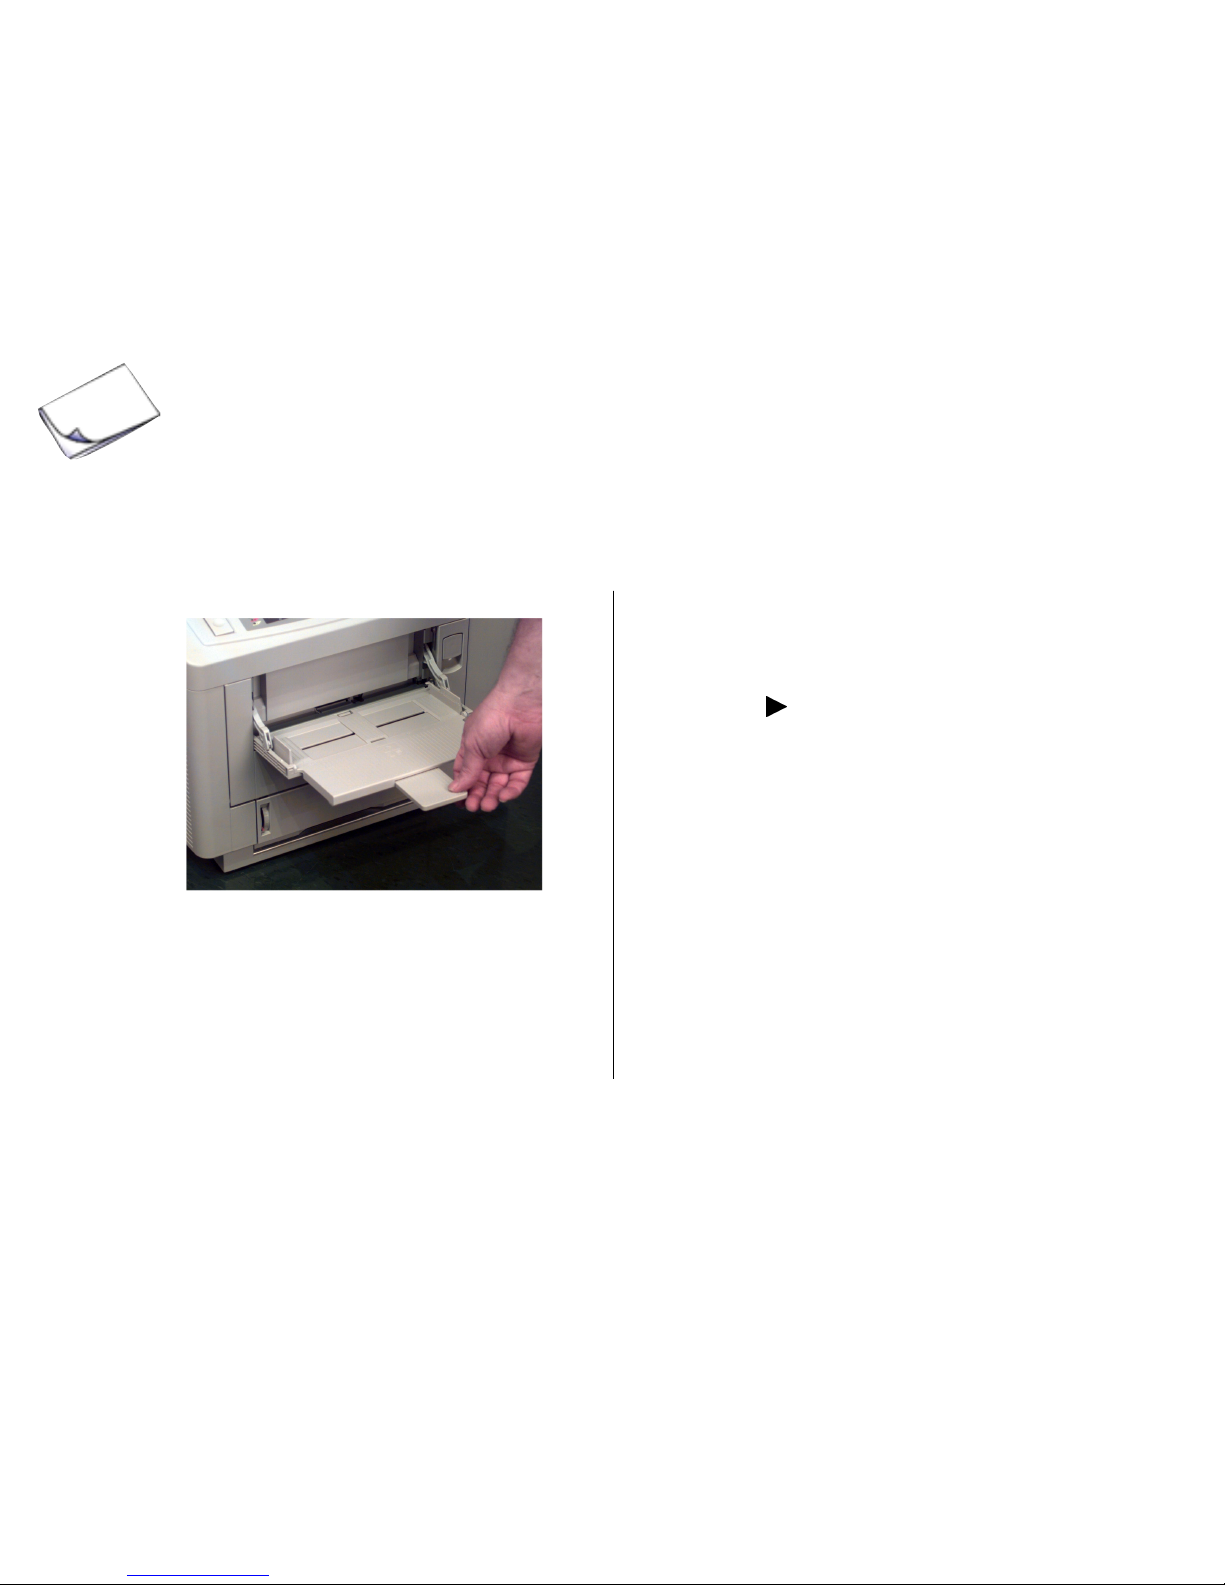
Loading Paper Tray 1
1. Pull the paper tray out of the printer. 2. Adjust the rear and side paper guides.
This will help to avoid paper jams.
Page 14

14
Loading Paper Tray 1 (continued)
3. Fan a stack of paper (up to 500 sheets,
20 lb) and place it in the tray under the
tabs, with the side to be printed facing
up.
Note: Do not fill the tray above the
PAPER FULL marks.
4. Push the tray back into the printer until it
locks in place.
Page 15

15
Loading Paper Tray 1 (continued)
The Paper Tray Gauge
The paper drawer gauge on the front of the
printer indicates how much paper is left in
the tray. This eliminates the need to open
the drawer to check how much paper is left.
Page 16

16
Printing on Special Media
Click for details on
General Information
Loading Multiple Media Pieces
Loading Single Sheets (Manual Feed)
Page 17

17
Printing On Special Media: General Information
Use the front tray to print on special media
without having to change the paper you
have loaded in the tray(s). You can print up
to 100 pieces of media or you can use the
front tray as a manual feed unit to print
individual pieces on-the-fly.
For media other than standard paper, you
must use the Special Media Stacker (rear
exit path). This eliminates curling, and for
labels, it eliminates peeling.
Important!
Whenever you change to paper of a
different thickness or different media,
such as tranparencies or card stock, be
sure to change the MEDIA TYPE setting on the printer menu to match the
new paper youre using. This ensures
optimum print quality.
Use the front tray for
Standard weight paper: special forms,
letterhead, unusual sizes
- Up to 100 sheets
- 20 to 28 lb
- Letter, 13" or 14" Legal, Executive, A4,
A5, B5, A6
- Either top or rear exit
(continued)
Page 18

18
Printing On Special Media: General Information
(continued)
Heavy weight paper such as index or
card stock
- Up to 100 sheets
- Up to 44 lb bond or 110 lb index
- Letter, 13" or 14" Legal, Executive, A4,
A5, B5, A6
- Use rear exit only
Labels
Important!
Carrier sheet and label adhesive
must withstand the fusing process
heat of 392ºF (200ºC) for 1 second.
Label adhesive must not be exposed;
if it is, it will cause jamming in the
printer.
- Up to 100 sheets, Letter or A4 size
- Use label sheets designed for laser
printers
- Labels must cover the entire carrier
sheet
- Use rear exit only
Page 19

19
Printing On Special Media: General Information
(continued)
Transparencies
Important!
Transparencies must withstand the
fusing process heat of 392ºF (200ºC)
for 1 second without wrinkling or
gumming up.
- Up to 50 sheets, Letter or A4 size
- Use transparencies designed for laser
printers; removable stripe must be on
the short edge. Load transparencies
with the stripe face down, on the edge
feeding into the printer.
- Use rear exit only
- Use only the transparencies
recommended in this manual. Other
types may damage the fuser.
Important!
Do NOT use transparencies with
paper backing or with a removable
stripe down the long edge.
Page 20

20
Printing On Special Media:
Loading Multiple Media Pieces
To set up the printer for multiple-piece print
jobs using the front tray:
1. In your software program
a. Enter the printer setup menu.
b. Select front tray or auto front feeder.
c. Select the media type, size and
orientation. Be sure to set the media
type to ensure optimum print quality.
2. Lower the printers front tray.
Page 21
21
Printing On Special Media:
Loading Multiple Media Pieces (continued)
3. Open the tray, then pivot out the extender.
a. Press Online (printer goes offline).
b. Press Tray Select.
c. Press Enter.
d. Press © until FRONT TRAY appears
on the display.
e. Press Enter to select the front tray.
An asterisk appears to indicate the
new default setting.
f. Press Online to engage the setting
and exit the menu.
4. Select the front tray as the default paper
input from the display panel:
Page 22

22
Printing On Special Media:
Loading Multiple Media Pieces (continued)
6. Adjust the front tray paper width guides
for the media you will be using, and load
the print media.
Note: Insert letterhead paper face-up,
with the top edge of the paper nosed
into the printer.
5. Open the rear exit tray (not required for
standard weight paper).
Page 23

23
Printing On Special Media:
Loading Multiple Media Pieces (continued)
7. Send the print job.
Note: Your software application will
override settings you make in the
printer menu.
Page 24
24
Printing On Special Media:
Loading Single Sheets (Manual Feed)
You can use the front tray as a manual
feeder to print an individual piece without
having to change any of the menu settings.
To set up the printer for manual feed:
1. In your software program
a. Enter the printer setup menu
b. Select front tray or auto front feeder.
c. Select the media type, size and
orientation. Be sure to set the media
type to ensure optimum print quality.
2. Lower the printers front tray.
Page 25

25
Printing On Special Media:
Loading Single Sheets (Manual Feed)
(continued)
4. Open the rear exit tray (not required for
standard weight paper).
3. Open the tray, then pivot out the
extender.
Page 26

26
Printing On Special Media:
Loading Single Sheets (Manual Feed)
(continued)
6. Send the print job from your software.
7. When prompted, press Page Eject on
the printer control panel.
The page prints.
5. Adjust the paper width guides on the
front tray for the size media you will be
using and load the print media.
Note: Insert the media face-up, with the
top edge nosed into the printer.
Page 27

27
Setting Automatic Tray Switching
To activate this feature:
1. Press Online.
The printer goes offline.
2. Press Tray Select.
3. Press Menu 1 to move to the AUTO
TRAY SWITCH item.
6. Press © once.
The selection changes to ON.
7. Press Enter to register the change.
An asterisk appears next to ON.
8. Press Online to exit the Menu Mode.
Important!
Size settings made in your application software will override the
printers operator panel settings.
To increase the paper feed capacity, you
can set your printer to automatically feed
paper from the front feeder or from the
optional High Capacity Second Paper Tray
when the paper tray is empty.
When this feature is active, if all paper
sources have the same paper size selected,
the printer normally feeds paper in the
following sequence:
(1) Paper Tray 1
(2) Optional Paper Tray 2
(3) Front Tray
If the paper source has a different paper
size selected, it is skipped.
Page 28

28
Summary of Usable Print Media
Media Paper Transparencies* Labels Card Stock
Input Paper Tray 1 Front Tray Front Tray Front Tray
or Front Tray
Exit Top or Rear Rear Only Rear Only Rear Only
Use 20 to 28 lb Transparencies Labels Up to 110 lb
Laser Print designated for designated for
laser printers laser printers
Recommended # 90H3760 #02N7726 or
24 lb #02N7732
Sizes All** Letter or A4 Letter or A4 All**
* If using a sensing stripe, use transparencies with a removable sensing stripe across the
bottom of the leading edge. Do NOT use transparencies with paper backing or with a
removable stripe down the long edge. Use only the transparencies recommended in
this manual. Other types may damage the fuser.
** All = Letter, 13" or 14" Legal, Executive, A4, A5, B5, A6
Page 29

2929
2929
29
Problem Solving
• Paper Jams
• Print Quality Problems
• Display Messages
Page 30

3030
3030
30
Paper Jam
ss
ss
s
If paper jams in the printer, the attention light goes on and a message locates the jam.
Click an error message for details on how to clear the jam.
• PAPER INPUT JAM: Between the paper tray and the first image drum.
• PAPER FEED JAM: Under the image drums.
• PAPER EXIT JAM: In the fuser or between the fuser and the exit.
Page 31

3131
3131
31
Clearing Paper Input Jams
Paper has jammed between the tray and the
first image drum cartridge.
1.Lift the interior access knob and pull the
cover down.
2. Pull out any paper.
If paper has advanced up to the first
image drum and resists pulling, use the
Paper Feed Jam procedure. Click
here for details.
Page 32

3232
3232
32
Clearing Paper Input Jams (continued)
3. Pull out the paper tray and remove any
partially fed sheets.
4. Check the paper in the tray—it should be
neatly stacked, no sheets bent or stuck
together.
5. Push the tray in gently—a full tray is
heavy and can damage the printer if it is
slammed shut.
Page 33

3333
3333
33
Clearing a Paper Feed Jam
2. Lift out each image drum cartridge and
check underneath for sheets of paper.
Important!
Protect the drum cartridges from
scratching and exposure to strong
light—especially sunlight. For best
protection, place them in the black
lightproof bags supplied.
<2-25> High temperature; switch off the printer and
allow at least 20 minutes for parts in this area to cool
before handling.
CAUTION:
Paper has jammed under the image drums.
1. Press the OPEN button and lift the top
cover all the way open.
Page 34

3434
3434
34
3. When you have uncovered any sheets of
paper, carefully remove them. If possible, pull forward to avoid spilling toner.
Be careful—below the image drums
is the transfer belt. Do not scratch
the transfer belt. Do not use sharp
instruments.
4. Place each image drum cartridge back
into position in the locating slots at each
side of the printer. Be sure to match the
colored label on each cartridge with its
corresponding colored label in the
printer.
5. Close the top cover and press down
firmly on both sides to make sure that it
is locked.
Clearing a Paper Feed Jam (continued)
Page 35

3535
3535
35
Clearing a Paper Exit Jam
Paper has jammed in the fuser or between
the fuser and the paper exit.
1. Press the OPEN button and lift the top
cover all the way open.
2. Push the two blue fuser latch levers
toward the rear of the printer.
3. Lift the fuser by its two handles straight
up and out of the printer.
<2-25> High temperature; switch off the printer and
allow at least 20 minutes for parts in this area to cool
before handling.
CAUTION:
Page 36

3636
3636
36
4. Pull the sheet of paper out of the fuser.
5. Lower the fuser back into the printer,
press down firmly to seat it, then pull on
the two blue levers to make sure the
fuser is locked in position.
Clearing a Paper Exit Jam (continued)
Page 37

3737
3737
37
6. Open the rear exit tray.
7. Look into the rear of the printer and
remove any pieces of paper you find.
8. Close the rear exit tray.
Clearing a Paper Exit Jam (continued)
9. Close the top cover and press down
firmly on both sides to make sure that it
is locked. Printing continues automatically when you close the top cover, after
a short pause to allow the fuser to warm
up.
Page 38

3838
3838
38
Print Quality Problems
The Infoprint Color 8 is really four printers in one—one for each of the three primary colors
and one for black. The factors causing print quality problems may affect only one or two
colors, or all four, so the results may be unpredictable.
If you notice fuzziness or changes in color balance that are not connected to a particular
software package, check the symptoms and possible causes in this section. You can use the
color bars at the bottom of the menu test printout to help isolate which color is causing the
problem.
• Blank sheets printed/one or more
colors missing
• Entire page or one color prints faintly
• Gray or speckled background
• Page prints all one color
• Page has repeating marks
• An oblong area of faint or off-color
print
• Vertical white or color streaking, or
faint areas
• Faded or off-color vertical stripes
• Vertical black or color lines
• Fuzzy print
• White blotches or faded gray areas
when temperature or humidity is high
or low
• Printed page is light or blurred in one
or more colors
• Bold characters and dark lines are
smeared
• Pages curl excessively
Page 39

3939
3939
39
Blank sheets printed/one or more colors
missing.
Reason:
An image drum cartridge may have been
exposed to light, or LED array or image
drum contacts may have failed.
Solution:
Leave image drum cartridge in total
darkness for several hours. If this fails to
restore it, install a new image drum
cartridge.
Reason:
Empty or missing toner cartridge.
Solution:
Install new toner cartridge.
Entire page or one color prints faintly.
Reason:
Empty toner cartridge. Pages get fainter
after toner is used up.
Solution:
Install new toner cartridge.
Reason:
LED array is dirty.
Solution:
Clean the LED array with LED Lens
Cleaner.
Page 40

4040
4040
40
Page has gray or speckled background.
Reason:
Static electricity causes toner to stick to
background.
Solution:
Change paper to an acceptable laser bond
and use a humidifier.
Reason:
Image drum has been exposed to light.
Solution:
Leave image drum cartridge in total
darkness for several hours. If this fails to
restore it, install a new image drum
cartridge.
Page prints all one color.
Reason:
Hardware problem.
Solution:
Contact your service representative.
Click here for service information.
Page has repeating marks.
Reason:
Damaged image drum cartridge causes
repetitive marks due to surface nicks and
scratches.
Solution:
Install new image drum cartridge for the
color of the marks.
Page 41

4141
4141
41
An oblong area of faint or off-color print
appears on each page.
Reason:
“Dropout” caused by using cotton bond
paper in high humidity. Moisture has
affected paper.
Solution:
Change to a different type of paper or use a
dehumidifier; check toner.
Vertical white or color streaking, or faint
areas on page.
Reason:
Toner is low and does not distribute properly
or the drum is worn out.
Solutions:
(1) Replace toner cartridge.
(2) Check drum and replace if necessary.
Reason:
One or more of the LED arrays are dirty.
Solutions:
(1) Clean the LED arrays.
(2) Contact your service representative.
Click here for service information.
Faded or off-color vertical stripes.
Reason:
One or more of the LED arrays are dirty.
Solution:
Clean the LED arrays.
Page 42

4242
4242
42
Vertical black or color lines.
Reason:
Toner is low.
Solution:
Replace the toner cartridge.
Reason:
Scratched image drum.
Solution:
Replace the image drum cartridge for the
color of the lines.
Reason:
Hardware problem.
Solution:
Contact your service representative.
Click here for service information.
Fuzzy print.
Reason:
The LED arrays are dirty.
Solution:
Clean the LED array.
Page 43

4343
4343
43
White blotches or faded gray areas when
temperature or humidity is high or low.
Reason:
Difficult environment.
Solution:
Check toner. If okay, adjust the SETTING
item in Menu 2.
Printed page is light or blurred in one or
more colors.
Reason:
Toner is low for one or more colors.
Solution:
Replace toner cartridge for the affected
color.
Reason:
Paper used is not designed for laser
printers.
Solution:
Switch to a recommended paper. Click
here for information on paper.
Reason:
One or more of the LED arrays are dirty.
Solution:
Clean the LED arrays.
Page 44

4444
4444
44
Bold characters and dark lines are
smeared.
Reason:
Toner is low for one or more colors.
Solution:
Replace toner cartridge for the affected
color.
Pages curl excessively.
Reason:
Printing on wrong side of paper.
Solutions:
(1) Turn paper over in tray.
(2) When installing paper, make a note of
the print side arrow on the paper package,
then install the paper “print side down” in the
paper tray.
Reason:
Moisture in paper because of improper
storage.
Solution:
Avoid storing paper in areas of excessive
temperature changes and humidity.
Reason:
High humidity.
Solution:
Recommended operating humidity is
20-80%.
Page 45

4545
4545
45
Display Messages
Messages on the display panel show the status of the printer. This list gives an explanation of
each message and what you should do, if anything.
If these procedures do not solve the problem, click here for information on how to get
service and support.
Click a category for details:
• Normal operation: No action necessary.
• Maintenance: Replace consumables as indicated.
• Problems: Take action as indicated.
• Call for Service: Printer needs service if turning the printer off and then on again
does not clear the message.
Page 46

4646
4646
46
Display Messages—Normal Operation
ON LINE
Printer is ready to receive information.
OFF LINE
Printer is not ready to receive information.
PRINTING
Data is printing.
PROCESSING
Data is being processed.
DATA PRESENT
Data is in the printer but has not yet been printed.
FLUSHING JOB
(PostScript) The printer is deleting the current job.
RESET TO FLUSH
(PostScript) Data currently in the printer can be deleted by pressing Online, and then Clear
Buffer.
Page 47

4747
4747
47
RESET
Press Clear Buffer to delete data left in the printer and return the printer to the defaults you
have set.
COPY [number]/[total]
If more than two copies have been selected from the menu, this gives a running count of the
number of copies being printed.
POWER SAVING
The printer is in power saving mode—the heating unit has been turned off to save energy.
When data is sent to the printer, it automatically warms up briefly before printing.
PRINT DEMO PAGE
The printer is printing a demo page.
PRINT SETTINGS
The printer is printing a list of the menu settings.
PRINT FONTS
The printer is printing a page giving samples and information on all fonts currently available.
Page 48

4848
4848
48
[paper size] [tray]
PAPER REQUEST
The printer is requesting a different size paper in the indicated tray. Load the requested paper
in the tray.
[paper size] MANUAL
[media type] REQUEST
Insert a page of the indicated size and type in the manual feed. Click here for details.
Page 49

4949
4949
49
Display Messages—Maintenance
PAPER OUT
[paper size] [tray]
The indicated tray is either empty or not installed. Click here for instructions on adding
paper.
TNR LOW [color]
One or more toner cartridges are nearly empty. The status lights also indicate which color(s).
Have the necessary cartridge available. Click here for toner replacement instructions.
[color]
TONER EMPTY
The indicated toner has run out—this message appears 50 pages after the TNR LOW
message. Install a new toner cartridge. Click here for toner replacement instructions.
You can clear this message by opening and closing the printer cover; the message appears
again after 20 pages are printed.
OIL ROLLER LIFE
The fuser oil roller needs to be replaced. When the ATTENTION light is on, the printer can
continue to function. When the ATTENTION light is flashing, replace the oil roller
immediately. Click here for oil roller replacement instructions.
Page 50

5050
5050
50
CHG DRUM [color]
One or more of the image drums needs to be replaced. The status lights also indicate which
color(s). Click here for image drum replacement instructions.
WASTE TNR
NR FULL
The waste toner box is almost full. Be prepared to replace it when the WASTE TONER FULL
message appears.
WASTE TONER FULL
The waste toner box is full. Click here for waste toner box replacement instructions.
FUSER LIFE
The fuser needs to be replaced. Click here for fuser replacement instructions.
BELT LIFE
The transfer belt needs to be replaced. Click here for transfer belt replacement
instructions.
Page 51

5151
5151
51
Display Messages—Problems
COVER OPEN
The top cover is open. Close it and press down firmly at both sides to lock it
PAPER INPUT JAM
CHECK [tray]
Paper has jammed between the paper tray indicated and the first image drum. Click here
for clearing instructions.
PAPER FEED JAM
CHECK [tray]
Paper has jammed under the image drums. Click here for clearing instructions.
PAPER EXIT JAM
REMOVE THE PAPER
Paper has jammed either in the fuser or between the fuser and the exit. Click here for
clearing instructions.
Page 52

5252
5252
52
ERROR PAPER SIZE
CHECK [tray]
The paper size detected by the printer in the tray indicated is incorrect for the current print
job. Make sure the size of the paper in the tray matches the size your software calls for.
TRAY n NOT INSTALLED
The indicated paper tray is not installed properly. Remove the tray and reinstall it—click
here for instructions.
TRAY 1 INSTALL
The printer is trying to automatically switch to the second paper tray when Tray 1 paper ran
out. Do not remove Tray 1 until the automatic switching process is complete.
ERROR MEMORY
OVERFLOW
The current page is too complex and cannot be printed. Try simplifying the page or reducing
the resolution to 300 dpi. If this happens often, consider adding memory to the printer. Click
here for information on memory upgrades and other options.
Page 53

5353
5353
53
ERROR RECEIVE
BUFFER OVERFLOW
The transfer of data from the computer to the printer is not properly coordinated. Check the
printer cable and printer interface menu settings. Adding optional memory can also help the
problem. Click here for information on memory upgrades and other options.
TNR SNS [color]
Make sure the indicated image drum is installed. If it is, lift it out and check the black lever on
the right side (facing the printer) of the metal rod below the image drum—make sure there is
no paper blocking it and that it moves freely.
CANNOT USE A6
PAPER ON TRAY 2
The second paper tray cannot feed A6 size paper. Use Tray 1 or the manual feed slot.
BELT NOT INSTALLED
The transfer belt unit is not installed correctly. Open the top and left-hand side covers, check
and reinstall as necessary. Click here for transfer belt installation instructions.
The printer will not function until this error is corrected.
Page 54

5454
5454
54
WASTE TONER BOX NOT INSTALLED
The waste toner box is not installed correctly. Open the left-hand side cover, check and
reinstall as necessary. Click here for waste toner box installation instructions.
The printer will not function until this error is corrected.
OIL ROLLER NOT INSTALLED
The oil roller is not installed correctly. Open the top cover, check, and reinstall as necessary.
Click here for oil roller installation instructions.
The printer will not function until this error is corrected.
ERROR
D6 [#########]
Yellow image drum is not installed properly. Open the top cover, check, and reinstall as
necessary. Click here for image drum installation instructions.
ERROR
D7 [#########]
Magenta image drum is not installed properly. Open the top cover, check, and reinstall as
necessary. Click here for image drum installation instructions.
Page 55

5555
5555
55
ERROR
D8 [#########]
Cyan image drum is not installed properly. Open the top cover, check, and reinstall as
necessary. Click here for image drum installation instructions.
ERROR
D9 [#########]
Black image drum is not installed properly. Open the top cover, check, and reinstall as
necessary. Click here for image drum installation instructions.
ERROR
DF [#########]
The transfer belt unit is not installed correctly. Open the top and left-hand side covers, check
and reinstall as necessary. Click here for transfer belt installation instructions.
ERROR
E0 [#########]
The fuser unit is not installed correctly. Open the top and left-hand side covers, check and
reinstall as necessary. Click here for fuser installation instructions.
Page 56

5656
5656
56
Display Messages - Call For Service
EEPROM RESETTING
or
ERROR
[nn] [#########]
where nn is not listed above
or
ERROR CONTROLLER
[nn-########]
If you see any of these messages, turn the printer off, then turn it on again. If this does not
clear it, make a note of the error message, and call IBM Customer Technical Support. Click
here for service information.
Page 57

• Service Information
• Purchasing Supplies
Service and Support
Page 58

58
Service Information
Note: This information is valid for the United States and Canada only.
If you cant solve your printer problem after reading this manual, contact these sources for
service or support.
Click for more information.
IBM Printers Website
IBM Technical Customer Support
Page 59

59
IBM Printers Website
Visit the IBM Printing Systems Company Web Site at
http://www.printers.ibm.com
for the latest information on:
Software drivers
Product guides
Customer support
Documentation
Page 60

60
The IBM Customer Technical Support
If you still cannot solve the problem, IBM customer technical support is available at no
additional charge during the warranty period. In the U.S.A. and Canada call 1-800-358-6661.
Have your printer serial number ready. The serial number is next to the toner cartridge on the
printer frame. It is also listed in the Printer Details section of the printer configuration page. If
you are asked for a machine type, specify Infoprint Color 8.
If you need IBM operating system support (for example, AIX, OS/2, OS/400, and MVS),
contact IBM software support (1-800-237-5511 in the U.S.A., 1-800-465-2222 in Canada).
Page 61

61
Purchasing Supplies
Printing supplies can be ordered through your IBM authorized printer or printer supplies
reseller. If you have no reseller, you can call 1-888-IBM-PRINT (1-888-426-7746) in the
U.S.A. or Canada to ask for an authorized dealer or to order from IBM Printer Supplies.
In other countries, contact your point of purchase for information about where to order
supplies. In Europe, you can call the IBM Supplies Fulfillment Operation at 31-43-350 2756
or at the following numbers:
❏ Belgium: 0800 71950 ❏ Germany: 0130 818005
❏ Denmark: 80015534 ❏ Italy: 1-678 78349
❏ Finland: 08001-13110 ❏ Norway: 800-11389
❏ France: 0800 905871
Before you order, know your printer model number (see the front of the printer) and have the
correct part number and description of the item.
Click for descriptions and part number listings:
Consumables
Accessories
Page 62

62
Consumables
Black Toner Cartridge kit, type C1 Part # 02N7211
Yellow Toner Cartridge kit, type C1 Part # 02N7209
Magenta Toner Cartridge kit, type C1 Part # 02N7210
Cyan Toner Cartridge kit, type C1 Part # 02N7208
Black Image Drum kit, type C1 Part # 02N7215
Yellow Image Drum kit, type C1 Part # 02N7213
Magenta Image Drum kit, type C1 Part # 02N7214
Cyan Image Drum kit, type C1 Part # 02N7212
Transfer Belt kit Part # 02N7230
Fuser kit, 120V Part # 02N7216
Fuser kit, 220V Part # 02N7217
Oil Roller kit Part # 02N7218
Toner Waste Box Part # 02N7219
Page 63

6363
6363
63
Accessories
High Capacity Paper Tray 2 kit ............... Part # 02N7189
Provides additional
500-sheet paper capacity.
8MB Memory Expansion kit (SIMM) ....... Part # 63H2465
16MB Memory Expansion kit (SIMM) ..... Part # 63H2467
32MB Memory Expansion kit (SIMM) ..... Part # 63H2469
Note: Memory Expansion kits must be installed in matched pairs. For example, to add
32 MB of memory, you must order and install two 16MB Memory Expansion kits.
IBM Network Card (Token Ring) ............. Part # 02N7190
IBM Network Card (Ethernet) ................. Part # 02N7191
Page 64

• Setting the Color Registration
• Replacing the Toner Cartridges
• Replacing the Image Drums
• Replacing the Toner Waste Box
• Replacing the Transfer Belt
• Replacing the Oil Roller
• Replacing the Fuser
Maintenance
Page 65

65
Setting the
Color Registration
Setting the Color Registration Using the Color Registration Utility
Setting the Color Registration Using the Control Panel
Page 66

66
Setting the Color Registration
Using the Color Registration Utility
4. Click Print Color Calibration page.
The printer prints a color test page with 9
sections, each with a series of lined
boxes in it.
5. Beginning with section #1, find the box
where no color shows in the spaces
between the black lines. On the screen,
scroll to the number of that box in list box
#1 (yellow, left). Then, do the same thing
for sections 2 through 9.
1. Open the Color Registration Utility:
On the Macintosh, in the Infoprint Color
8 program group, double-click Color
Registration Utility, then double-click
IBM Infoprint Color 8 Col Reg.
In Windows 95/98/NT 4.0, click Start ®
Programs ® IBM Infoprint Color 8 ®
Color Registration Utility.
2. Windows only: Make sure Infoprint
Color 8 on LPT1: is highlighted in the
box (if you are using a port other than
LPT1:, make sure that port is
highlighted).
3. Select the paper tray you want to
calibrateyou can set color registration
for each tray separately.
Page 67

67
Setting the Color Registration
Using the Color Registration Utility (continued)
6. Click Send changes to the printer.
The printer prints another color test
page. This time, the box where no color
shows should be box 0 for each section.
If it isnt, repeat steps 3 through 5 until it
does.
7. Click Close.
Page 68

68
Replacing the Toner Cartridge
Always install the toner cartridge in the
corresponding color image drum.
Replacing the Toner Cartridges
Toner Cartridge Life
Toner cartridge life depends on the page
density, that is, the percentage of the
particular color applied to each page that is
printed. An average business letter is printed
at 3% to 5% density. Graphics density is
usually higher and can be significantly
higher. The higher the print density, the
more toner is used.
On the average, a toner cartridge will
produce about 3,000 pages at 5% print
density.
Note: The first set of toner cartridges
you place in your Infoprint Color 8
printer will only produce about 2000
pages. This is normal, as the new
image drum reservoirs and developing
roller system must saturate with toner.
Yellow
Magenta
Cyan
Black
Page 69

69
Replacing the Toner Cartridges (continued)
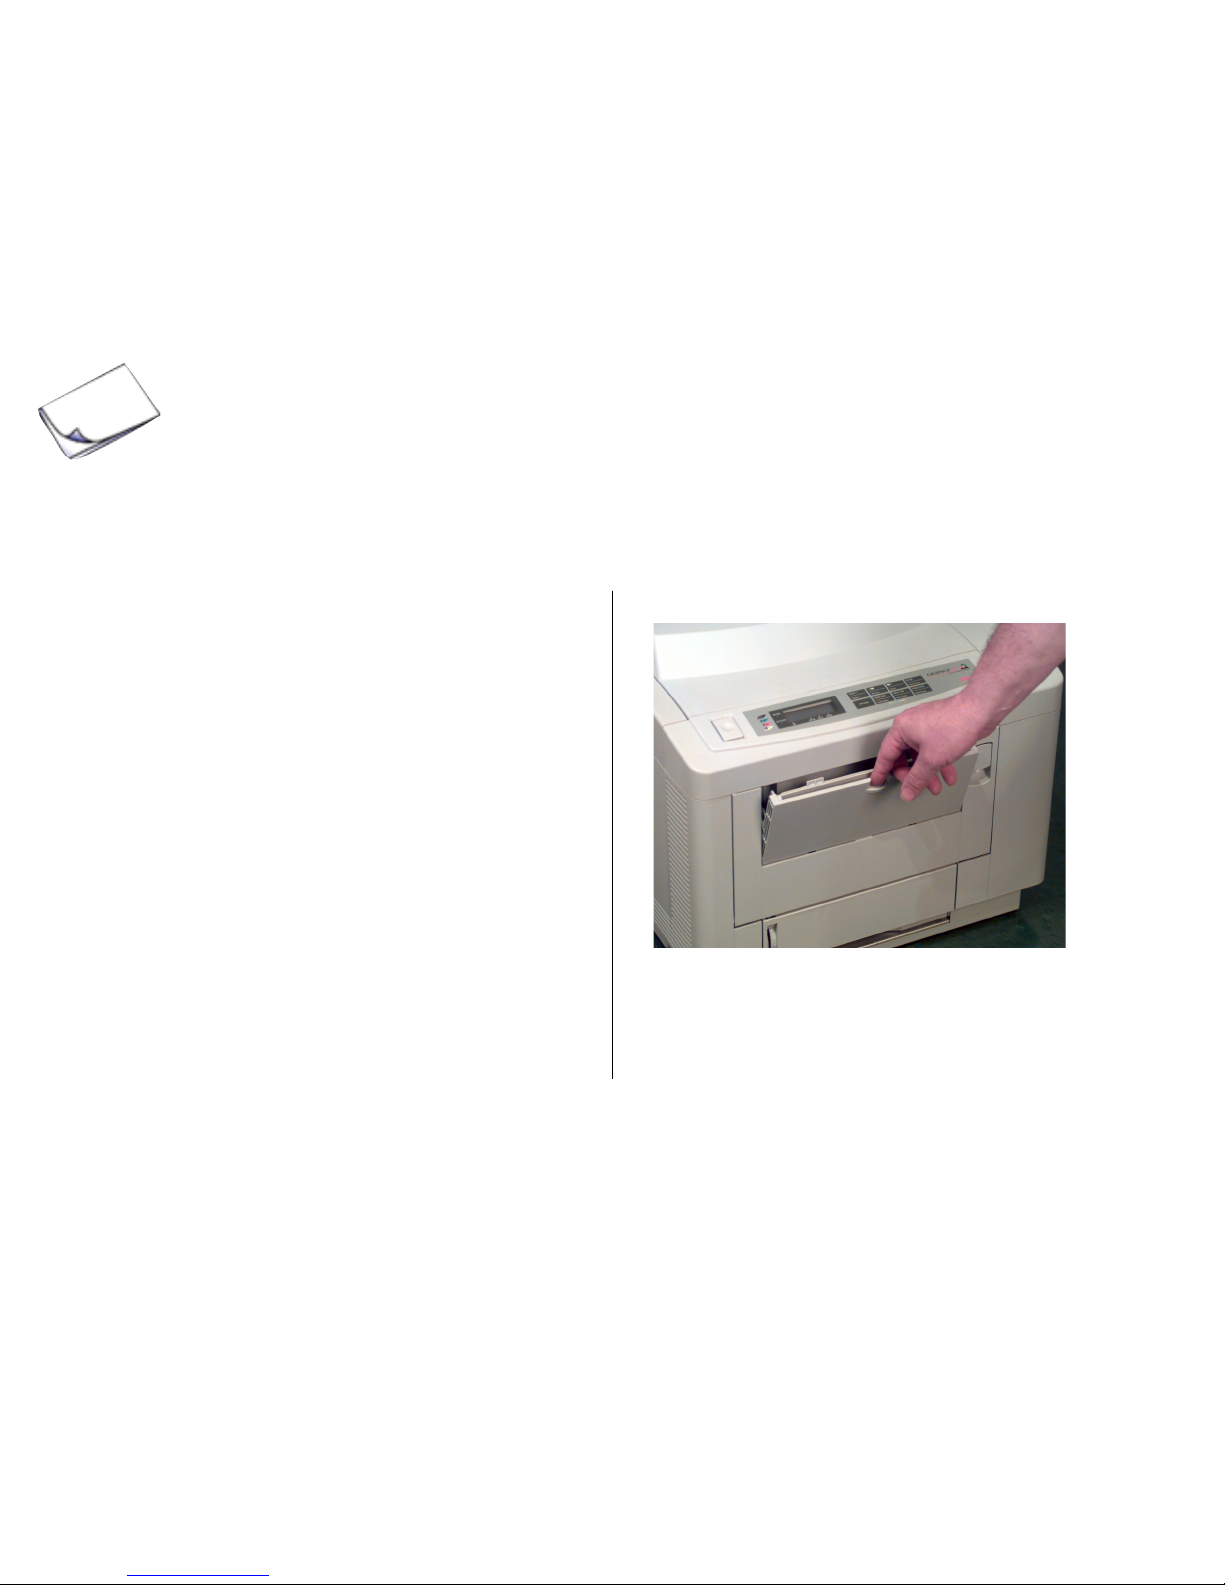
2. Press the OPEN button and lift the
cover.
To make this easy, each image drum, toner
cartridge, and slot in the printer has a label
marked with its corresponding color:
1. Turn the printer off and wait for the
fuser to cool down.
<2-25> High temperature; switch off the printer and
allow at least 20 minutes for parts in this area to cool
before handling.
CAUTION:
Page 70

70
Replacing the Toner Cartridges (continued)
4. Remove the new toner cartridge from the
packaging and shake it from side to side
a few times to distribute the toner evenly.
5. Peel the tape off the bottom of the
cartridge.
3. Locate the toner cartridge which needs
replacement. Pull the blue lock lever
toward the front of the printer, remove
the used toner cartridge and dispose of it
in accordance with local regulations.
Page 71

71
Replacing the Toner Cartridges (continued)
7. Lower the right side of the cartridge,
aligning the slot with the ridge in the
image drum.
8. Push the blue lock lever toward the back
of the printer until it stops.
6. Insert the left end of the toner cartridge
into the toner well, placing the recess in
the end of the toner cartridge under the
tab on the image drum.
Tab: colors must
match
Page 72

72
Replacing the Toner Cartridges (continued)
10. Close the printer cover, pressing down
to lock it in place.
9. Open the LED Lens Cleaner supplied
with the toner cartridge and use it to
clean the LED arrays on the underside of
the printer cover.
Page 73

73
Replacing the Image Drum Cartridges
Replacing the Image Drum
Always install the image drum and toner
cartridge in the corresponding color printer
slot:
Image Drum Life
The life of the image drums depends on the
operating temperature, the humidity, the
type of paper used, and the number of
pages per job.
Each time you print or turn the printer on
and off, the drum has to rotate to start up
and to wind down. As a result, frequent onepage print jobs will wear down your drum
more quickly than multiple-page print jobs.
The image drum should normally last up to
12,000 pages for continuous printing or up
to 8,000 pages at 3 pages per job. These
numbers are approximate since you wont
print the same number of pages each time,
and environmental conditions and paper
type used may vary.
Yellow
Magenta
Cyan
Black
Page 74

74
Replacing the Image Drum Cartridges (continued)
1. Turn the printer off and wait for the
fuser to cool down.
2. Press the OPEN button and lift the
cover.
To make this easy, each image drum, toner
cartridge, and slot in the printer has a label
marked with its corresponding color.
<2-25> High temperature; switch off the printer and
allow at least 20 minutes for parts in this area to cool
before handling.
CAUTION:
Page 75

75
Replacing the Image Drum Cartridges (continued)
4. Unwrap the new image drum cartridge
and remove the protective sheet and
shipping insert.
Important!
Do not touch the drums shiny green
surface!
3. Lift out the used image drum/toner
cartridge and discard both in accordance
with local regulations.
Page 76

76
Replacing the Image Drum Cartridges (continued)
5. Insert the new image drum cartridge by
matching the color-coded label on the
image drum with the color-coded label in
the printer.
6. Remove the new toner cartridge from the
packaging and shake it from side to side
a few times to distribute the toner evenly.
7. Peel the tape off the bottom of the
cartridge.
Page 77

77
Replacing the Image Drum Cartridges (continued)
9. Lower the right side of the cartridge,
aligning the slot with the ridge in the
image drum.
10. Push the blue lock lever toward the
back of the printer until it stops.
8. Insert the left end of the toner cartridge
into the toner well, placing the recess in
the end of the cartridge under the tab on
the image drum.
Ta b
Page 78

78
Replacing the Image Drum Cartridges (continued)
12. Close the printer cover, pressing down
to lock it in place.
11. Open the LED Lens Cleaner supplied
with the toner cartridge and use it to
clean the LED arrays on the underside
of the printer cover.
Page 79

79
Replacing the Image Drum Cartridges (continued)
13. Reset the Drum Counter:
a. Press Online, then press and hold
Menu 1/Menu 2 until COLOR REG.
ADJUST appears on the display.
b. Press Menu 1/Menu 2 until ENGINE
COUNT RESET appears.
c. Press Enter. CYAN DRUMCNT
RESET appears.
d. Press Menu 1/Menu 2 until the
message corresponding to the drum
you are replacing appears. For
example, if you are replacing the
magenta image drum:
MAGENTA DRUMCNT
RESET
c. Press Enter.
RESETTING briefly appears on the
second line of the display.
d. Press Online.
Page 80

80
Replacing the Toner Waste Box
3. Remove the toner waste box (loaded on
two metal spring clips in the base of the
printer): press down on the handle,
swing it away from the printer and lift it
out.
Discard the used toner waste box in
accordance with local regulations.
When you see the message WASTE TNR
NR FULL on the printer display, you need to
change the toner waste box:
1. Turn the printer off.
2. Pull the latch on the left side of the
printer and open the side panel.
Page 81

81
Replacing the Toner Waste Box (continued)
5. Place the new toner waste box on top of
the metal spring clips in the printer.
Press down on the handle and push the
toner waste box into the printer until it is
upright, then release it. The box will rise
into place.
4. Orient the new toner waste box with the
handle up and the drive coupling toward
the front of the printer.
Drive Coupling
Page 82

82
Replacing the Toner Waste Box (continued)
6. Close the side panel and turn the printer
back on.
Note: Make sure that the toner waste
box drive coupling is slightly below and
in front of the coupling on the printer.
Drive Coupling
Printer Coupling
Page 83

83
Replacing the Transfer Belt Unit
1. Turn the printer off and wait for the
fuser to cool down.
2. Press the OPEN button and lift the
printer cover.
When you see the message BELT LIFE on
the printer display, you need to change the
Transfer Belt Unit:
<2-25> High temperature; switch off the printer and
allow at least 20 minutes for parts in this area to cool
before handling.
CAUTION:
Page 84

84
Replacing the Transfer Belt Unit (continued)
3. Pull the latch and open the left side panel.
down on the handle, pivot it away from
the printer and lift it out. Set the toner
waste box aside; you will reinstall it after
replacing the transfer belt unit.
4. Remove the toner waste box: press
Page 85

85
Replacing the Transfer Belt Unit (continued)
6. Pull the unit out, then grab both sides
and remove it from the printer
7. Discard the belt unit.
5. Lift the blue handle on the transfer belt
unit to release it.
Important!
The belt unit is heavy; use both
hands to support it.
Page 86

86
Replacing the Transfer Belt Unit (continued)
9. Lift the handle and push the unit all the
way into the printer, then lower the
handle to lock it in place.
8. Place the new transfer belt unit on the
guide rails in the printer.
Page 87

87
11. Close the side panel.
10. Put the toner waste box back in the
printer (place it on the metal spring
clips, push down, swing it over until
upright, release).
Note: Make sure that the toner waste
box drive coupling is slightly below and
in front of the coupling on the printer.
Replacing the Transfer Belt Unit (continued)
Page 88

88
Replacing the Transfer Belt Unit (continued)
b. Press Menu 1/Menu 2 until ENGINE
COUNT RESET appears.
c. Press Enter. CYAN DRUMCNT
RESET appears.
d. Press Menu 1/Menu 2 until the
following message appears:
BELT COUNT
RESET
e. Press Enter.
RESETTING briefly appears on the
second line of the display.
f. Press Online.
14. Set the color registration.
12. Close the printer cover, pressing down
to lock it in place.
13. Reset the transfer belt unit counter:
a. Press Online, then press and hold
Menu 1/Menu 2 until COLOR REG.
ADJUST appears on the display.
Page 89

89
1. Turn the printer off and wait for the
fuser to cool down.
2. Press the OPEN button and lift the
printer cover.
Replacing the Oil Roller
When you see the message OIL ROLLER
LIFE on the printer display, you need to
change the oil roller.
<2-25> High temperature; switch off the printer and
allow at least 20 minutes for parts in this area to cool
before handling.
CAUTION:
Page 90

90
Replacing the Oil Roller (continued)
then lift it out and discard it.3. Push the lock lever back toward the rear
of the printer to unlatch the oil roller.
4. Lift the right end of the oil roller, pull it to
the right to disengage it from the fuser,
Page 91

91
Replacing the Oil Roller (continued)
6. Make sure the lock lever is still toward
the back of the printer, then lower the
right end of the oil roller into the fuser
and pull the lock lever forward to secure
it in place.
5. Remove the blue space from the new oil
roller. Hold the oil roller with the yellow
warning label on top and facing you,
then lower it into the fuser, sliding the left
end under the retaining edge.
Retaining Edge
Page 92

92
Replacing the Oil Roller (continued)
7. Close the printer cover.
8. Turn the printer back on.
9. Reset the oil roller counter:
a. Press Online, then press and hold
Menu 1/Menu 2 until COLOR REG.
ADJUST appears on the display.
b. Press Menu 1/Menu 2 until ENGINE
COUNT RESET appears.
c. Press Enter. CYAN DRUMCNT
RESET appears.
d. Press Menu 1/Menu 2 until OIL
ROLLER COUNT RESET appears.
e. Press Enter.
RESETTING briefly appears on the
second line of the display.
f. Press Online.
Page 93

93
Replacing the Fuser
Note: To replace the fuser you need
both a new fuser and a new oil roller.
1. Turn the printer off and wait for the
fuser to cool down.
2. Press the OPEN button and lift the
printer cover.
When you see the message FUSER LIFE
on the printer display, it is time to change
the fuser.
<2-25> High temperature; switch off the printer and
allow at least 20 minutes for parts in this area to cool
before handling.
CAUTION:
Page 94

94
Replacing the Fuser (continued)
4. Lift the fuser out of the printer. Discard
both the fuser and the oil roller.
3. Push the blue lock levers on either side
of the fuser back toward the rear of the
printer to unlatch the fuser.
Page 95

95
Replacing the Fuser (continued)
5. Open the new fuser and push the oil
roller lock lever toward the back.
6. Hold the new oil roller with the yellow
warning label on top and facing you,
then lower it into the fuser, sliding the left
end under the retaining edge.
Page 96

96
Replacing the Fuser (contined)
7. Make sure the lock lever is still toward
the back of the printer, then lower the
right end of the oil roller into the fuser
and pull the lock lever forward to secure
it in place.
8. Lower the fuser (warning labels facing
you) into the printer. Press down firmly to
properly seat the unit.
Page 97

97
b. Press Menu 1/Menu 2 until ENGINE
CNT RESET appears.
c. Press Enter. CYAN DRUMCNT
RESET appears.
d. Press Menu 1/Menu 2 until the
following message appears:
FUSER COUNT
RESET
d. Press Enter.
RESETTING briefly appears on the
second line of the display.
e. Press Online.
Replacing the Fuser (continued)
9. Close the printer cover.
10. Reset the fuser counter:
a. Press Online, then press and hold
Menu 1/Menu 2 until COLOR REG.
ADJUST appears on the display.
Page 98

98
Printer Control
• Control Panel
• Printer Menus
• Color Registration (front panel)
• Color Balance (front panel)
• Test Pages
• Enhanced by Heidelberg
Page 99

99
The Control Panel
Click on a part of the control panel for more details:
• Control Panel Lights
•
Paper Size indicator
•
Buttons
•
Display messages
Page 100

100
Control Panel Lights
READY Light (Amber)
On: Printer is online, ready to receive data; holding nonprinted data
Off: Printer is offline, unable to receive data; initializing; warming up; error
Blinking: Printer is printing a menu, fonts, or demo page; printer is receiving data; printer
is printing data from the buffer
ATTENTION Light (Red)
On: Warning—toner is low, change drum, or near end of fuser life; oil roller; transfer
belt
Off: Normal state
Blinking: Operator assistance required—paper jam, paper out, paper request, or service
required
 Loading...