

Page 1

Infoprint 1410 MFP
User’s Guid e
S510-2803-00
Page 2

Page 3

Infoprint 1410 MFP
User’s Guid e
S510-2803-00
Page 4

at
PO
©
US
Note:
Before using this information and the product it supports, be sure to read the general information under “Notices”.
First Edition: March 2004
The following paragraph does not apply to the United Kingdom or any country where such provisions are
inconsistent with local law: INTERNATIONAL BUSINESS MACHINES CORPORATION PROVIDES THIS
MANUAL ″AS IS″ WITHOUT WARRANTY OF ANY KIND, EITHER EXPRESSED OR IMPLIED, INCLUDING,
BUT NOT LIMITED TO, THE IMPLIED WARRANTIES OF MERCHANTABILITY AND FITNESS FOR A
PARTICULAR PURPOSE. Some states do not allow disclaimer of express or implied warranties in certain
transactions. Therefore, this may not apply to you.
IBM does not warrant that the contents of this publication or the accompanying source code examples, whether
individually or as one or more groups, will meet your requirements or that the publication or the source code is
error-free.
Requests for copies of this publication and for technical information about IBM products should be made to your
IBM authorized Dealer, your IBM Marketing Representative or to the IBM branch office serving your locality.
IBM Printing Systems welcomes your comments. For your convenience, a form for reader’s comments is provided
the back of this publication. You may send your comments by fax to 1-800-524-1519 within the U.S., by fax to
1-303-924-6873 outside the U.S., by e-mail to printpub@us.ibm.com, or mail your comments to:
INFORMATION DEVELOPMENT
IBM PRINTING SYSTEMS
DEPARTMENT H7FE BUILDING 004N
BOX 1900
BOULDER CO 80301-9191
Note: Visit our home page at http://www.ibm.com/printers
When you send information to IBM, you grant IBM a nonexclusive right to use or distribute the information in any
way it believes appropriate without incurring any obligation to you.
However, the following copyright notice protects this documentation under the Copyright laws of the United States
and other countries which prohibit such actions as, but not limited to, copying, distributing, modifying, and making
derivative works.
Copyright International Business Machines Corporation 2004. All rights reserved.
Government Users Restricted Rights – Use, duplication or disclosure restricted by GSA ADP Schedule Contract
with IBM Corp.
Page 5

Contents
Notices ............................................................................................................8
Edition notice ................................................................................................................... 9
Licensing notice ............................................................................................................. 10
Safety inform a t io n ............ .............................................................................................. 12
Cautions and w a rn in g s ...... ........................................ .. .. ................................................ 1 2
Electronic emission notices ............................................................................................ 12
Noise emissi o n le v e ls ..................................................................................................... 1 4
Laser notices ..................................................................................................................15
Chapter 1: Overview ...................................................................................16
Chapter 2: Printing, copying, faxing, and scanning ................................17
Tips on storing media ..................................................................................................... 17
Scanning inf o rm a t io n ..................................................................................................... 17
Avoiding jams when scanning .................... .. ............................................ ................17
Scanning to e-m a il or FTP ...... .. ............................................................................... ... .. . 18
Build a To: list ........................................................................................................... 18
Search for name ................................................................................................. 18
Manual e-mail addresses . .. ............................................. ........................ ........... 19
Manual FTP address ........................................................... .. ........................ ..... 19
View To: list ....................... ................................................................................. 19
Specify original size ............................................................................................ 19
Specify orientation .............................................................................................. 19
Specify content ................................................................................................... 19
Specify format .................................................................................................... 20
Set darkness ................................................................. ... .. ................................ 20
Set resolutio n ................ .. .. ..................................................... ... .. ....................... 20
Enter a subject line ............................................................................................. 20
Scanning to PC ......... ... ....................................... ... .. ...................................................... 20
Create a Scan Profile ............................................................................................... 20
Use ScanBack u tility .......... ................................................................................. 20
Use the Web pages ....................... .....................................................................21
Copying information ....................................................................................................... 24
Making copies ................................................................................................................ 24
2
Page 6

Contents
Quick copies ............................................................................................................. 24
Select numbe r of copies ........................................................................................... 24
Specify copy from size ............................................................................................. 24
Set copy to size ........................................................................................................ 25
Set collatio n ......... ..................................................................................................... 25
Set scale ............. ... ............................................................................... .. ... .............. 25
Set darkness ..................................................................... .. ... .................................. 25
Specify content ......................................................................................................... 25
Set the duplex feature .............................................................................................. 25
Set paper save r ............ ............................................................................................ 26
Set margin sh ift ...... .. ................................................................................................ 26
Set time stamp ....... .................................................................. .. .. ............................ 26
Set overlay ...... .. ....................................................................................................... 26
Examples of typical jobs ........................................................................................... 26
Job 1: single page ..............................................................................................27
Job 2: mixed con te n t ....... .. ................................................................................. 27
Job 3: use paper sa v e r .... ........................... .. .. .................................................... 27
Job 4: two-sided (duplex) copies from one-sided originals ................................28
Job 5: enlarge cop ie s ...... .. ................................................................................ . 28
Using Duplex with your scan original for a two-si ded copy ....................... ...............28
Interrupting a job to make a copy ............................................................................. 29
Canceling a copy ...................................................................................................... 29
Faxing information ......................................................................................................... 29
Quick fax .................................................................................................................. 29
Sending faxes .......................................................................................................... 30
Build a Fax To: list .................................................................................................... 30
Save a Fax To: list ................................................................................................... 30
Specify original size ................................................................................................. 30
Set resolutio n ...... ..................................................................................................... 3 0
Specify content ......................................................................................................... 31
Set darkness ..................................................................... .. ... .................................. 31
Manual Fax ..................................................... ................. ............................... .........31
Examples of typical fax jobs ..................................................................................... 31
Job 1: one page .................................................................................................. 31
Job 2: multiple pages ......................................................................................... 32
Job 3: text/graphics content ............................................................................... 32
Job 4: photo ... ... .................................................................................................. 32
Canceling fax jobs .................................................................................................... 32
Canceling a pen d i n g o r c ur re n t ly transmitting fa x jo b ................. ....................... 32
Canceling an incoming fax job ........................................................................... 33
Printing information .......................... .. .. .................................................................. .. ... ... 33
Avoiding jams when printing .................... .. .................... .................... .................... ..33
Sending a job to print ............................................................................................... 34
Printing from a Windows environment ................................................................ 34
Printing from a Macintosh co m p u te r .......................... .. .. .............. .. .. ............. ... .. . 35
3
Page 7

Contents
Printing the m e nu s et tings page ......... .............. .. ........................................ .. ............ 35
Printing a font sample list ......................................................................................... 36
Canceling a print job from the MFP control panel ............................................... ..... 36
Canceling a print job from your computer ................................................................ 36
Printing a directory list .............................................................................................. 36
Print Held Jobs—using the Print and Hold function ....................................................... 37
Selecting a us e r n a me .......... .. ... .......................... .. .. ................................................ 3 7
Selecting the ty p e of He ld Jo b ......... .. ...................................................................... 37
Confidential jobs ................................................................................................. 37
Reserve Print ...................................................................................................... 39
Repeat Print ...................................................... .................... .............................39
Verify Print .......................................................................................................... 39
Sending a held print job ............................................ ........................................ ....... 39
Printing and d e le ting held jobs ... ............. .. .. ............. ... .. ............. .. ... ............. .. .. ........ 4 0
Chapter 3: Media specifications and guidelines ......................................41
Scan media spe c ifications and g u id e lin e s ..................................................................... 41
Scan media sou rce specifica tions .... .. ... ............. .. .. ............. ... .. ............. .. ... ............. . 41
Loading scan media .............................................................. ...................................41
Loading scan media in the ADF ............................................ .. .................... .. ..... 42
Loading scan media in the scanner flatbed ......................... .................... .. ......... 44
Print media specifications and guidelines ....................... .................. .................. ...........47
Specifications for print media ................................................................................... 48
Storing print media ................................................................................................... 52
Print media guidelines .............................................................................................. 52
Paper ..................................................................................................................52
Letterhead .......................................................................................................... 53
Transparen c ie s ................................................................................................... 53
Envelopes .. .. ................................................................................ .. .. ................... 54
Labels ................................................................................................................. 55
Card stock ............................................................... .. .. .............. .. .. ..................... 5 6
Using the duplex feature for printing ......................... .......................................... ..... 57
Duplex printing on letterhead ................................................................................... 57
Using Duplex Bind .................................................................................................... 57
Loading print media ..................... .............................................................. ...............58
Loading the standard tray or the optional 250-sheet tray .............................. ..... 59
Loading the optional 500-sheet tray ................................................................... 64
Using and loading the multipurpose feeder ......................................... .. .............69
Loading the multipurpose feeder .......................... ...................... .. ......................72
Using the output bins ............................................................................................... 77
Using the standard output bin .................................... ........................................77
Using the rear output bin .................................................................................... 78
4
Page 8

Contents
Chapter 4: Clearing jams ............................................................................81
Identifying the media path ..................... .................... .................... .................... .............81
Jams in the ADF ............................................................................................................ 83
Entering the ADF ...................................................................................................... 83
In the ADF ..... .. .. ................................................................................ .. .. ................... 84
Opening top cover during scanning .................. ....................................... ................85
Jammed due to missing scan media or poor positioning in the ADF .......................85
Jams under the print cartridge ............................................. .................. ................... ..... 85
Jams behind the upper front door and the rear output bin door .....................................87
Before reaching the standard output bin .................................................................. 87
Jams in the fuser ............................................................................................................ 90
Exiting to the standard output bin .................................................................................. 91
Jams behind the rear output bin door .............. .. .......................................... ..................92
Jams in the multipurpose feeder ............................... ..................................................... 94
Jams in the tray 1 area .................................................................................................. 95
Jams in the tray 2 area .................................................................................................. 96
Jams inside a tr a y aft e r clearing the me ta l stop ........... .. .............. .. .. ............. ... .. ............ 97
Jams under the MFP ............................... .. ........................................................ .............98
Chapter 5: Maintenance ...........................................................................101
Conserving supplies ..................................................................................................... 101
Maintaining your MFP .................................................................................................. 101
Ordering supplies .........................................................................................................101
Ordering a pick roller assembly .............................................................................. 101
Ordering a sep a r a to r p ic k roller .. .. .......................................................................... 1 0 1
Ordering a print cartridge ....................... .. ......................................................... .. ... 102
Storing the print cartridge ............... ................................................................. .............102
Replacing the print cartridge ................................ .................... ....................................102
Removing the used print cartridge .................... ..................................... ................103
Cleaning under the print cartridge .......................................................................... 104
Installing the ne w p rin t ca rt ridge ............................................................................ 1 0 5
Cleaning the printhead lens .................................... .. ...................... ...................... .. ..... 108
Replacing the pick roller assembly and the separat or pick roller ................................. 109
Cleaning the ADF .........................................................................................................114
Cleaning the ADF window ............................................................................................ 115
Cleaning the scanner flatbed .................................... .......................................... ......... 117
5
Page 9

Contents
Chapter 6: Troubleshooting .....................................................................118
Solving basic MFP problems ........................................................................................ 118
Solving printing problems ............................................................................................. 119
Solving print quality problems ...................................................................................... 123
Solving fax problems .................................................................................................... 129
Solving ADF problems ................................................................................................. 130
Solving scanner flatbed problems ................................................................................130
Solving option problems ............................................................................................... 130
Solving network printing problems ............................................................................... 131
Solving other problems ................................................................................................ 132
Calling for service ......................................................................................................... 132
Chapter 7: Administration ........................................................................133
Disabling control panel menus ..................................................................................... 133
Enabling menus ........................................................................................................... 133
Restoring factory defaults ............................................................................................ 134
Linking trays ................................................................................................................. 134
Disabling tra y lin k in g .... .. ..................................................................... ................... 135
Removing the MFP from an optional drawer ................................................................135
Removing optional cards ................................ ..............................................................136
Understanding fonts .....................................................................................................142
Typefaces an d fo n ts ............ .. ........................... .. ........................................ .. .......... 142
Weight and style ........................ ................................... .................................... 142
Pitch and poin t s iz e ........... ... ............................................................................ 143
Bitmapped and scalable fonts ................................. .. .......................................... ... 144
Resident fonts ........................................................................................................145
Chapter 8: Using the MFP control panel and menus .............................151
Understanding the MFP control panel ............ ..............................................................151
Home screen .................... ..................................................... ................... ..............152
Buttons ................................................................................................................... 152
Menus ..........................................................................................................................155
Menu tree ................ .. .................... .. .................... .. .................... .. .................... .. ..... 155
Administration ........................................................................................................ 161
Paper Menu ......................................................................................................161
Default Menus .................................................................................................. 165
Print Reports .................................................................................................... 198
Network/US B ............ ............ ............. ............. ........... ............. .............. ........... . 199
6
Page 10

Contents
Copy ...... .. ................................................................................ .. .. .......................... 208
Fax ......................................................................................................................... 212
E-mail ..................................................................................................................... 216
Print/Profi les ............. .................. ................. .................. ............... .................. ........ 220
Profiles ............................................................................................................. 220
Managing shortcuts - creating, entering, deleting ....................... .................................221
Creating a fax shortcut ........................................................................................... 221
Creating an e-mail or FTP shortcut ........................................................................ 221
Entering shortcuts .................................................................................................. 221
Deleting shortcuts .................................................................................................. 221
Chapter 9: Understanding the MFP control panel messages ...............222
MFP messages ............................................................................................................ 222
Index ............................................................ ................................................ 233
7
Page 11

Notices
• Edition not i c e
• Trademarks
• Licensing notice
• Safety information
• Cautions and warnings
• Electronic emission notices
• Noise emission levels
• Laser notices
Notices
8
Page 12

Notices
Edition notice
Edition: November 2003
© 2003 Lexmark International, Inc.
All rights reserved.
UNITED STATES GOVERNMENT RIGHTS
This software and any accomp anying document ation pro vided under this agreement are commerci al
computer software and documentation developed exclusively at private expense.
Trademarks
Lexmark, MarkVision, and MarkNet are trademarks of Lexmark International, Inc., registered in the
United States and/or other countries.
PictureGrade and Scanback are trademarks of Lexmark International, Inc.
®
PCL
is a registered trademark of the Hewlet t-Packard Company. PCL is Hewlett-Packard
Company’s designation of a set of printer commands (language) and functions incl uded in its printer
products. This mul tifunction printer (MFP) is intended to be compatible with the PCL language. This
means the MFP recognizes PCL commands used in various applicat ion progr ams , and that the MFP
emulates the functions corresponding to the comm ands.
®
PostScript
Systems’ designation of a set of printer commands (language) and functions included in its s oftware
products. This MFP is intended to be compatible with the PostScript 3 language. This means the
MFP recognizes PostScript 3 commands used in various application programs, and that the MFP
emulates the functions corresponding to the comm ands.
is a registered trademark of Adobe Systems Incorporated. PostScript 3 is Adobe
The followi ng terms are trademarks or registered trademarks of these companies:
Albertus The Monotype Corporation plc
Antique Olive Monsieur Marcel OLIVE
Apple-Chancery Apple Computer, Inc.
Arial The Monotype Corporation plc
Candid Agfa Corporation
CG Omega Product of Agfa Corporation
CG Times Based on Times New Roman under license from The Monotype
Corporation plc, is a product of Agfa Corporation
Chicago Apple Computer, Inc.
Clarendon Linotype-Hell AG and/or its subsidiaries
Eurostile Nebiolo
Edition notice
9
Page 13

Notices
Geneva Apple Computer, Inc.
GillSans The Monotype Corporation plc
Helvetica Linotype-Hell AG and/or its subsidiaries
Hoefler Jonathan Hoefler Type Foundry
ITC Avant Garde Gothic International Typeface Corporation
ITC Bookman International Typeface Corporation
ITC Lubalin Graph International Typef ace Corporation
ITC Mona Lisa International Typeface Corporation
ITC Zapf Chancery International Typeface Corporation
Joanna The Monotype Corporation plc
Marigold Arthur Baker
Monaco Apple Computer, Inc.
New York Apple Computer, Inc.
Oxford Arthur Baker
Palatino Linotype-Hell AG and/or its subsidiaries
Stempel Garamond Linotype-Hell AG and/or its subsidiaries
Taffy Agfa Corporation
Times New Roman The Monotype Corporation plc
TrueT ype Apple Computer, Inc.
Univers Linotype-Hell AG and/or its subsidiaries
Wingdings Microsoft Corporation
Other trademarks are the property of their respective owner s.
Licensing notice
The MFP resident software contains:
• Software de veloped and copyrighted by Lexmark
• Lexmark modified softwar e licensed under the provi sions of the GNU General Pub lic License
version 2 and the GNU Lesser General Public License version 2.1
• Software licensed under the BSD license and w arranty statements
• Software licensed under other agreements
Licensing no tice
10
Page 14

Notices
Click the title of the document you want to review:
BSD License and Warranty statements
GNU General Public License
Other legal statements
The Lexmark modified GNU li censed softwar e is free softw are; y ou can redistrib ute it and/ or modify it
under the terms of the licenses refe renced above. These licenses do not provide you any rights to
the Lexmark copyrighted software in this MFP.
Since the GNU licensed software that the Lexmark modifications are based upon is supplied
explicitly wi thout warr anty, use of the Lexmark modified v ers ion is similarly pro vided without w arr anty.
See the warranty disclaimers in the referenced licenses for addit ional details.
Licensing no tice
11
Page 15

Notices
Safety information
• If your product is not marked with this symbol , it must be connected to an electrical outlet
that is properly grounded.
CAUTION: Do not use the fax feature during a lightning storm. Do not set up this product or
make any electrical or cabling connections, such as the power cord or telephone, during a
lightning storm.
• The power cord must be connected to an electrical outlet that is near the product and easily
accessible.
• Refer service or repairs, other than those described in the operating instructions, to a
professio nal service person.
• This product is designed, tested, and appro v ed to meet strict global safety standards with the
use of specific Lexmark components. The safety features of some parts may not always be
obvious. Lexmark is not responsible for the use of other replacement parts.
• Your product uses a laser.
CAUTION: Use of controls or adjustments or performance of procedures ot her than those
specified herein ma y result in hazardous radiation exposure.
• Your product uses a printing process that heats the print media, and the heat may cause the
print media to release emissions. You must understand the section in your operating
instructions that discusses the guideli nes for selecting print media to avoid the possibility of
harmful emissions.
• This product contains mercury in the lamp (<5mg Hg). Disposal of mercury may be regulated
due to environmental cons ider at ions . For disposal or recycling information, cont act y our local
authorities or the Electronic Industries Alliance: www.eiae.org.
Cautions and warnings
CAUTION: A caution identifies something that might cause you harm.
Warning: A warning identifies something that might damage your MFP hardware or softwa re.
Electronic emission notices
Federal Commu nications Commissio n (F CC ) compl i an c e
information statement
The MFP, Type 4541-001, has been tested and found to comply with the limits for a Class A digital
device , pursuant to P art 15 of the FCC Rules. Operation is subject to the f ollowing tw o conditions: (1)
this device may not cause harmful interference, and (2) this device must accept any interference
received, includi ng interference that may cause undesired operation.
The FCC Class A limits are designed to provide reasonable protection against harmful interference
when the equipment is operated in a commercial envir onment. This equipment gener ates , uses , and
Safety informat ion
12
Page 16

Notices
can radiate radio frequency energy and, if not installed and used in accordance with the instruction
manual, may cause harmful interference to radio communications. Operation of thi s equipment in a
residential area is likely to cause harmful interference, in which case the user will be required to
correct the interference at his own expense.
The manufacturer is not responsible for any radio or television interference caused by using other
than recommended cables or by unauthorized changes or modifications to this equipment.
Unauthorized changes or modifications could void the user's authority to operate this equipment.
Note: To assure compliance with FCC regulations on electromagnetic interference for a
Class A computing device, use a properly shielded and grounded cable such as
Lexmark part number 1329605 for parallel attach or 12A2405 f or USB att ach. Use
of a substitute cable not properly shielded and grounded may result in a violation
of FCC regulations.
Industry Canada compliance st atement
This Class A digital apparatus meets all requirements of the Canadian Interf erence-Causing
Equipment Regulations.
Avis de conformité aux normes de l’industrie du Canada
Cet appareil numérique de la classe A respecte toutes les exigences du Règlement sur le matériel
brouilleur du Canada.
European Community (EC) directives conformity
This product is in conformity with the protection requirements of EC Council directives 89/336/EEC,
73/23/EEC, and 1999/5/EC on the approximation and harmonization of the laws of the Member
States relating to electromagnet ic compatibility and safety of electrical equipment designed for use
within certain voltage limits and on radio equipment and telecommunications terminal equipment.A
declaration of conformity with the requirements of the directives has been signed by the Director of
Manufacturing and Technical Support, Lexmark International, S.A., Boigny, France.
This product satisfies the Class A limit s of EN 55022 and safety requirements of EN 60950.
Radio interference notice
Warning: This is a Class A product. In a domestic environment, this product may cause rad io
interference, in which case, the user may be required to take adequate measures.
Electronic emission notices
13
Page 17

Notices
Japanese VCCI notice
Noise emission levels
The followi ng measurements wer e made in accordance wit h ISO 7779 and reported in conformance
with ISO 9296.
1-meter average sound pressure, dBA
Printing (simplex) 51
Copying from the automatic document feeder 52
Scanning from the automatic document feeder 47
Idling 30
Noise emission levels
14
Page 18

Notices
Laser notices
Laser advisory label
A laser notice label may be affixed to this MFP as shown:
Laser statement
The MFP is certified in the U.S. to conform to the requirements of DHHS 21 CFR Subchapter J for
Class I (1) laser products, and elsewhere is certified as a Class I laser product conf orming to the
requirements of IEC 60825-1.
Class I laser products are not considered to be hazardous. The MFP contains internally a Class IIIb
(3b) laser that is nominally a 5 milliwatt gallium arsenide laser operating in the wavel ength region of
770-795 nanometers. The laser system and MFP are designed so there is never any human access
to laser radiation abo ve a Class I level during normal operation, user maintenance, or prescribed
service condition.
Laser notices
15
Page 19

1
Overview
The follo wing il lustr ations sho w the st andard m ultifuncti on printer (MFP), t he MFP configured with an
optional 250-sheet drawer, and the MFP configured with an optional 500-sheet drawer.
Standard MFP
Optional
250-sheet
drawer
Note: You may only use one of the optional dra wers at a time.
Optional 500-sheet
drawer
Overview
16
Page 20

2
Printing, copying, faxing, and scanning
This chapter provides examples of typical jobs, as well as information on avoiding jams, printing
certain types of jobs, and canceling a print job from the control panel.
Tips on storing media
There are two types of media — scan media and print media. Scan media is what is placed in the
automatic document feeder (ADF) or on the scanner flatbed. Some types of scan media cannot be
run through the ADF, so it has to be placed on the scanner flatbed.
Print media, which is paper, card stock, transparencies, labels, and envelopes, is loaded into print
media sources which are the trays and the multipurpose feeder. Card stock, transparencies, labels,
and envelopes are sometimes referred to as specialty media.
Store your print media properly. For more information, see Storing print media in Media
specifications and guidelines.
Scanning information
Avoiding jams when scanning
Place scan media in the appropriate place — either the automatic document feeder (ADF) or the
scanner flatbed. If y ou are unsure if your document will cause a jam in the ADF, we recommend that
you scan it using the scanner flat bed.
The ADF only accommodates paper in the fol lowing sizes: A4, A5, JIS B5, folio, letter, legal,
executive, statement. The ADF can handle paper weights up to 60–120 g/m
You may place up to 50 sheets of 20 lb paper in the ADF.
Some tips for scan media to a void jams in the ADF are:
• Do not load wrinkled, creased, damp, or curled scan media.
• Do not overload the ADF. The ADF can accommodate 50 sheets of 20 lb paper.
• Do not force a stack of scan media under the stack height limiter.
2
(16–32 lb).
Printing, copying, faxing, and scanning
17
Page 21

Printing, copying, faxing, and scanning
The followi ng cannot be fed by the ADF:
• Paper with clip or staple attached
• Paper with ink not totally dry
• Paper with inconsistent thickness, such as envelopes
• Paper with wrinkles, curls, folds, or tears
• Paper that is too large or too small (use the scanner flatbed instead)
• Paper with an odd (non-rectangular) shape
• Paper with perforations on its side
• Tracing paper, coated paper, carbonless paper
• Items other than papers, such as cloth, metal, or over head projector (OHP) film
• Notched paper
• Photographic paper
• Very thin paper
Scanning to e-mail or FTP
Note: You must set up e-mail and FTP before you can use them. See E-mail/FTP
Settings for information about setting up e-mail and FTP.
You can scan a document directly to an e-mail address or File Transfer Protocol (FTP) site. This
section describes the settings and options available. Once you have built a To: list and chosen the
settings you wa nt, press Start to begin scanning at any time.
Note: FTP is the protocol used across a network for exchanging files.
Build a To: list
You can add multiple e-mail recipients, or one FTP destination, to the To: list.
Search for name
Press E-mail, highli ght Search for name, and press the Select button ✓. Use ✓ and the navigation
arrow buttons to enter the name you are looking for. When you have entered the name or the first
part of the name, highlight Find and then press ✓. When the results are displayed, use the up and
down arrows to highlight the name you want, and then press ✓.
Scanning to e-mail or FTP
18
Page 22

Printing, copying, faxing, and scanning
Manual e-mail addresses
Press E-mail, highlight Manual e-mail address, and then press ✓. Use ✓ and the navigation
arrow buttons to enter the recipient’s e-mail address. You can enter multiple e-mail addresses by
separating each address with a comma. Highlight Done, and then press ✓ to retu rn to the E-mail
menu.
Manual FTP address
Press E-mail, highlight Manual FTP address, and then press ✓. Use ✓ and the navigation arrow
buttons to enter the FTP address. You can only enter one FTP address. Highlight Done, and then
press ✓ to return to the E-mail menu.
View To: list
Press E-mail, and then highlight View To: list to vi ew the li st y ou hav e bui lt to v erify you hav e the
correct recipients. If you need to remove a recipient, use the up and down arrow buttons to highlight
the recipient’s address, and then press ✓ to select that recipient. Use the navigation arro w button s to
highlight Delete, and then press ✓ to delete the recipient’s name from the To: list.
Once you bui ld a To: list, you can save it for future use. Use the navigation arrow buttons to highlight
Save List, and then press ✓. The To: list is saved as a shortcut, and the new shortcut number is
displayed. You can change the name and number of the shortcut by browsing to the IP address or
host name of the MFP. Save the change and continue with processing the e-mail.
Specify original size
To specify the original size of your scan, use the navigation arrow buttons to highlight Options from
the E-mail menu, and then press ✓. Use the navigation arrow buttons to highlight What will be
scanned, and then press ✓. Press the left or right arrow until you see the size you need.
Specify orientation
To specify the orientation of your scan, use the navigation arrow buttons to highlight Options from
the E-mail menu, and then press ✓. Use the navigation arrow buttons to highlight What will be
scanned, and then press ✓. Press the down ar ro w until Orientation is highlighted, and then pres s
the left or right arrow to select portrait or landscape orientati on.
Specify content
To specify the type of content on your original document, use the navigation arrow buttons to
highlight Options from the E-mail menu, and then press ✓. Use the navigation arrow buttons to
highlight What will be scanned, and then press ✓. Press the down arrow until Content is
highlighted. Press the left or right arrow to choose the content type that matches your original
document. Choose among Text/Graphics, Photo, and Text.
Scanning to e-mail or FTP
19
Page 23

Printing, copying, faxing, and scanning
Specify format
To specify the format in which your scans ar e sent, use the navigation arrow buttons to highlight
Options from the E-mail menu, and then press ✓. Use the navigation arrow buttons to highlight
What will be sent, and then press ✓. Press the down arrow until Format is highlighted. Pr ess the
left or right arrow to choose the type of file t o be attached to your e-mail. Choose among PDF, PS,
TIFF, and JPEG. For information on these types, see Format.
Set darkness
To adjust the resolution of your scanned documents, use the navigation arrow buttons to highlight
Options from the E-mail menu, and then press ✓. Use the navigation arrow buttons to highlight
What will be sent, and then press ✓. Press the down arrow until Darkness is highlighted. Press
the right arrow to increase the darkness or the left arrow to decrease the darkness.
Set resolution
To adjust the resolution of your scanned documents, use the navigation arrow buttons to highlight
Options from the E-mail menu, and then press ✓. Use the navigation arrow buttons to highlight
What will be sent, and then press ✓. Press the down arrow until Resolution is highlighted.
Press the right arrow to increase the resolution, or the left arrow to decrease the resolution. The
higher the resolution you choose, the larger the file size is.
Note: Color impacts the resolution range. See Color in What will be scanned for more
information.
Enter a subject line
To enter a unique subject line, use the navigati on arrow b utt ons to highlight Options from the E-mail
menu, and then press ✓. Use ✓ and the navigation arrow bu ttons to type the subj ect. Highlight Done,
and then press ✓ to return to the E-mail menu Options screen.
Scanning to PC
Create a Scan Profile
A scan profile includes important information about your original document and presets the MFP
control panel to those settin gs. The ScanBack™ Utility is an easy way to create Scan Profiles. You
can also browse to the IP address or host name of the MFP to create Scan Profiles.
Use ScanBack utility
The ScanBack Utility is shipped on the drivers CD.
Scanning to PC
20
Page 24

Printing, copying, faxing, and scanning
Step 1: Set up your Scan Profile
1 Launch the ScanBack Utility. If you install ed the software using the def ault directories, click
à Programs à ScanBack à ScanBack Utility.
Start
2 Select the MFP you w ant to use. I f none are l isted, see your support person to obtain a li st, or
click the Setup button to manually search for an IP address or hostname. You must select an
MFP to continue creating a profile.
3 Follow the instructions on the screens to define the type of document being scanned and the
kind of output you want to create. Available settings are determined by the capabilities of the
MFP you select.
4 Make sure to check:
• Show MFP Instructions—if you want to view or print the final directions
• Create Shortcut—if you want to save this group of settings to use again
5 Click Finish. A dialog box displays your scan profile information and the status of the
received images.
Step 2: Scan your original documents
1 Locate the MFP you specified in the scan profile.
2 Load all pages face up in the ADF or face down in the scanner flatbed. See Loading scan
media in the ADF and Loading scan media in the scanner flatbed for more info rmation
and illustrations for orientation.
3 On the control panel, press Print/Profiles.
4 Press the down arrow until Profiles is highlighted, and then press ✓.
5 Press the down arrow until your profile name is highlighted, and then press ✓ to start
scanning.
Note: If you are using the scanner flatbed, observe the co ntrol panel to see mess ages. If
prompted to choose Scan Next Page, Done, or Cancel, place the next page on
the scanner flatbed, highlight Scan Next Page, and then press ✓ to continue
scanning. Highlight Done and press ✓ when all the pages have been scanned.
6 Return to your computer . Your output file is sav ed in the specif ied dire ctory or launched in the
application you specified.
Use the Web pages
The Web pages are stored in your MFP.
Note: If the pages you browse to are blank, see page 132.
Scanning to PC
21
Page 25

Printing, copying, faxing, and scanning
Step 1: Set up your Scan Profile
1 Type the IP address or host name of t he MFP in the URL field of your br owser , and then pres s
Enter.
2 Click Scan to Profile.
3 Click Create Scan Profile.
4 Select your scan settings. For more explanation about the settings , see Custom Scan
Profile settings on page 23.
5 Click Next.
Note: Some versions of Windows operat ing systems have f irewalls enab led. Contact your
support person for assistance with the fir ewall.
Step 2: Select a storage location
1 Specify a path and file name for saving the scan output file to your computer. For example,
browse to your desktop, find the appropriate directory, and type in a file name.
2 Assign a Profile Name. This is the name that appears in the profile list on the MFP control
panel.
3 Click Submit. A Scan Profile window appears on your desktop indicating that your computer
is waiting to receive the scan output file.
Step 3: Scan your original documents
1 Locate the MFP you specified in the scan profile.
2 Load all pages face up in the ADF or face down in the scanner flatbed. See Loading scan
media in the ADF and Loading scan media in the scanner flatbed for more info rmation
and illustrations for orientation.
3 On the control panel, press Print/Profiles.
4 Highlight Profiles, and then press ✓.
5 Press the down arrow until your Profile Name is highlighted, and then press Select to start
scanning.
Note: If you are using the scanner flatbed, observe the co ntrol panel to see mess ages. If
prompted to choose Scan Next Page, Done, or Cancel, place the next page on
the scanner flatbed, highlight Scan Next Page, and then press ✓ to continue
scanning. Highlight Done and press ✓ when all the pages have been scanned.
Scanning to PC
22
Page 26

Printing, copying, faxing, and scanning
6 Return to your computer when the job is finished. The job status window changes to Image
Received. Once your scan output file appears in the list, you can select it and launch an
application to open the file.
Note: Scan Profiles are not stored. Once the window is closed, the associated profile is
removed from the control panel list.
Custom Scan Profile settings
Menu Settings Description
Quick Setup Custom Lets you customize the scan job settings.
Text—BW - PDF
Text—BW - TIFF
Text/Graphics—BW - PDF
Text/Graphics—Color - PDF
Photo—Color - JPEG
Photo—Color - TIFF
Format Type JPEG, PDF, TIFF and PS Determines the final output format of the scanned
Content Text, Text/Graphics, Photo Describes the content of the original documents being
Color Color (24 bit), Gray (8 bit),
BW (1 bit)
Resolution -- ————————— ++
A range is provided.
Original Size A4, A5, JIS B5, Letter, Legal,
Executive, Folio, Statement,
(3 x 5 in.) Photo,
(4 x 6 in.) Photo, Business
Card
• Lists preset formats.
• Lets you customize the brightness, set the size of
your original documents, and the orientation of your
scan file output.
document.
scanned.
Describes the color scale of the original documents
being scanned. BW is Black and White.
Sets the resolution of the scanned document output
file.
Use the left and right arrow buttons to move through
the range.
Tells the scanner the scan media size of the original
documents being scanned.
Orientation Portrait, Landscape Determines the orientation of your scanned document
output file.
Compression JPEG, Zlib, Packbits,
CCITT G4, None
Darkness A scale of 1 to 9 with 1 being
the lightest setting and 9 being
the darkest.
JPEG Quality A scale of 5 to 90 with 5 being
the least amount of quality and
90 being the best.
There are different compression types for each format.
To lighten or darken text and images on the printed
page.
As the JPEG Quality increases, the size of the output
file increases also.
Scanning to PC
23
Page 27

Printing, copying, faxing, and scanning
Custom Scan Profile fields within the menus
Field Settings Description
Save to Type in the path or browse to the
location
Profile Name Type in a unique name • Name that appears in the MFP control panel.
Path where scanned file is to be located.
• Select this name in the MFP control panel to
activate the scan profile.
Copying information
Making copies
Load pages to be copied either face up in the automatic document feeder (ADF) or face down on the
scanner flatbed. (See Loading scan media in t he ADF and Loading scan media in the scanner
flatbed for more information.) This section describes the different settings available for copy jobs.
Once you have chosen the settings you want, press Start to begin copying.
Note: If the MFP is processing a job, y ou may interrupt t o make a cop y. See Interrupting
a job to make a copy for more information.
Quick copies
To make one copy of a document, load your original documents into the ADF, or place your first
original on the scanner flatbed, and press Start. The device automatically enters Copy mode and
begins copying.
Select number of copies
To select the number of copi es for your job, from the Home screen, t ype t he number of copies on t he
keypad. The device automatically enters Copy mode. From any other screen, press Copy, and then
type the number of copies using the numeric keypad. You can also highlight Copies on the control
panel, and then press the left or right arrows to increase or decrease the number of copies.
Specify copy from size
To specify the original size scan med ia you ar e cop ying fr om, press Cop y, press the down arro w until
Copy From is highlighted, and then press the right or left arrow until y ou see the si ze you need.
Copying information
24
Page 28

Printing, copying, faxing, and scanning
Set copy to size
To choose the size print media your copies will be made on, press Cop y, press the down arrow until
Copy To is highlighted, and then press the right or left arrow until you see the size you need. Your
original document is automatically scaled up or down to fi t the Copy To print media size.
Set collation
To enable or disable col lation f or multiple page jobs, press Copy, press the down ar ro w unti l Collate
is highlighted, and then press the right or left arr ow to turn collate on or off. Collation orders your
multiple page job as 1, 2, 3, 1, 2, 3, 1, 2, 3 rather t han 1, 1, 1, 2, 2, 2, 3, 3, 3.
Set scale
To set the scale of your copies in terms of a percentage of your original document, press Copy, press
the down arrow until Scale is highlighted, and then press the right arrow to increase the output
scale, or the left arro w button to decrease the output scale.
Set darkness
To adjust the darkness of your copies, press Copy, press the down arrow until Darkness is
highlighted, and then press the right arr ow t o increase the darkness, or the l eft arro w to dec rease the
darkness.
Specify conte n t
To specify the type of cont ent contained i n you r original document, pr ess Copy, press the do wn arro w
until Options is highlighted, and then press ✓. Use the left and right arrow buttons to choose the
content type that matches your origina l document. Choose among Text/Graphics, Photo, and
Text.
Set the duplex feature
To turn duplex copying on or off, press Copy , press the do wn arrow until Options is highlighted, and
then press ✓. Press the down arrow button unti l Duplex is highlighted. Use the left and right arrow
buttons to set duplexing to off, long edge, or short edge.
Note: To copy double-sided original documents, you must use the scanner flatbed, and
scan each side.
Making copies
25
Page 29

Printing, copying, faxing, and scanning
Set paper saver
You can choose to save paper by arranging more than one copied page per output sheet. To access
this feature , press Cop y, press the down ar ro w until Options is highlighted, and t hen press ✓. Press
the down arrow until Paper Saver is highlighted, and then press the left or right arrow until you see
the paper saver format you want.
Set margin shift
You can adjust the margin on your copies to provide extra margin width for binding. Press Copy,
press the down arrow until Options is highlighted, and then press ✓. Press the down arrow until
Margin Shift is highlighted, and then press the left or right arrow until you see the extra width you
want for the margin, from 0.25 to 2 inches.
Set time stamp
To enable or disable the ti me and date stamp on y our copies , pres s Copy, press the down arrow until
Options is highlighted, and then press ✓. Press the down arrow until Time Stamp is highlighted,
and then press the left or right arro w to turn Time Stamp on or off. Time stamp prints the current time
and date in the upper left corner of your copies, i f the device has previously been set to the current
time.
Set overlay
Choose a text to be displayed in gray bac kground lettering on your copies. Press Copy, press the
down arrow until Options is highlighted, and then press ✓. Press the down arrow until Overlay is
highlighted, and then press the left or right arrow until you see the over lay message you want.
Standard selections are Urgent, Confidenti al, Copy, Draft, and Custom.
You can also create a custom overlay through the Web page which appears on the control panel
once you’ve created it. Custom is the word on the control panel for you to select, but the overlay
message prints the text you created. See Overlay for more inf o rmation.
Examples of typical jobs
The following examples show how to change the settings to perform specific copying jobs.
If you are using the scanner flat bed, follow the control panel messages. If prompted to Scan Next
Page, place the next page on the scanner flatbed and then press Start or ✓ to continue scanning.
Highlight Done and press ✓ when all pages are scanned.
Making copies
26
Page 30

Printing, copying, faxing, and scanning
Job 1: single page
1 Place the document face down on the scanner flatbed or face up in the ADF. See Loading
scan media in the ADF and Loading scan media in the scanner flatbed for more
information and illustrations for proper orientation.
2 Press Start.
Job 2: mixed content
Make eight copies of a two page, letter size document containing one illustration.
1 Load all pages face up in the ADF. See Loading scan media in the ADF for more
information and illustrations for proper orientation.
2 Press Copy.
3 Press 8 on the keypad.
4 Press the down arrow until Options is highlighted, and then press ✓.
5 Press the left or right arrow button until Text/Graphics appears. Content is highlighted.
6 Press Start.
Job 3: use paper saver
Make three copies of a four page document which contains only photographs, but minimize paper
usage.
1 Load all pages face up in the ADF. See Loading scan media in the ADF for more
information and illustrations for proper orientation.
2 Press Copy.
3 Press 3 on the keypad.
4 Press the down arrow until Collate is highlighted, and then press the left or right arrow until
you see On.
5 Press the down arrow until Options is highlighted, and then press ✓.
6 Press the left or right arrow until you see Photo. Content is highlighted.
7 Press the down arrow until Paper Saver is highlighted, and then press t he left or right arro w
until you see 4 on 1 port.
8 Press Start.
Making copies
27
Page 31

Printing, copying, faxing, and scanning
Job 4: two-sided (duplex) copies from one-sided originals
Make a legal size , tw o page do cument fit on a dupl exed, letter size page f or i nsertion into a standard
size notebook. The original documents contain several graphics as well as text.
1 Load all pages face up in the ADF. See Loading scan media in the ADF for more
information and illustrations for proper orientation.
2 Press Copy.
3 Press the down arrow until Copy From is high lighted.
4 Press the left or right arrow until you see Legal.
5 Press the down arrow until Options is highlighted, and then press ✓.
6 Press the left or right arrow until you see Text/Graphics. Content is highlighted.
7 Press the down arrow until Duplex is highlig hted.
8 Press the left or right arrow until you see Long Edge.
9 Press Start.
Job 5: enlarge copies
Enlarge a black and white drawing so you can see it better and make annotations.
1 Place the document face down orient ed properly on the scanner flatbed. See Loading scan
media in the scanner flatbed for more information and illustrations for proper orientation.
2 Press Copy.
3 Press the down arrow until you see Scale.
4 Press and hold the right arrow to move quickly through the scale.
5 Release the button when 125% appears on the display.
6 Press the down arrow until Options is highlighted, and then press ✓.
7 Press the left or right arrow until you see Text. Content is highlighted.
8 Press Start.
Using Duplex with your scan original for a two-sided copy
If you have a two-sided scan media original copy and want to make a two-sided copy of it:
1 Open the scanner flatbed cover. See page 44 for an illustration.
2 Place the original document face do wn on the scanner flatbed and close the cover.
3 Press Copy.
Making copies
28
Page 32

Printing, copying, faxing, and scanning
4 Press the down arrow button until Options is highlighted, and then press ✓.
5 Press the down arrow button until Duplex is highlighted.
6 Use the left and right arrow buttons to set Duplex to either Long Edge or Short Edge. For
more information on long edge and short edge, see the illustrations on page 58.
7 Press Start. The first side is scanned.
8 Open the scanner flatbed cover, turn the original document over, close the cover, highlight
Scan Next Page, and press ✓.
9 Highlight Done, and press ✓.
Interrupting a job to make a copy
Unless disabled by your support person, printing may be interrupted to make a copy quickly.
1 Press the Stop button to stop the MFP.
2 Load the original document face up in the ADF or face down in the scanner flatbed. See
Loading scan media in the ADF and Loading scan media in the scanner f latbed for more
information and illustrations for orientation.
3 Press the right arrow button to highl ight Insert immediate copy job, and press
✓.
4 Set any values for Copies or any other setting that you want.
5 Press Start.
Scanning ... appears and the copy prints.
Canceling a copy
Once you hav e started a copy job , if you need to cancel it, use the na vigation ar row b uttons to
highlight Cancel, and then press ✓.
Faxing information
To send a quick fax, see Quick fax. For all other fax procedures, you must press the Fax button to
enter the Fax menu.
Quick fax
If you have a fax destination stored as a shortcut, you can send a fax to that destination very quickly
from the Home screen. Press #, and then enter the shortcut number on the numeric keypad. Load
Fa xi ng information
29
Page 33

Printing, copying, faxing, and scanning
your original documents face up in the ADF, or place your fi rst original document face down on the
scanner flatbed, and then press Start.
Sending faxes
Your MFP can fax to single or multiple recipients. You can send faxes immediately, or schedule them
to be sent at a later time. Load pages to be faxed either face up in the ADF or face down on the
scanner flatbed. This section describes the different settings available for fax jobs. Once you have
built a Fax To: list and chosen the settings you want, press Start to begin faxing.
Build a Fax To: list
You can add multiple recipients to the Fax To: list. For each recipient, use the numeric keypad to
enter the phone number and any special dialing codes, or # and the shortcut number. The “||” button
represents a dial pause.
Press ✓ after you enter each phone number if you have another number to enter. The Fax To: list
scrolls up to give you space for your next entry.
To add a recipient stored as a shortcut, highlight Search and press ✓. Search for your shortcut
based on the recipient’s name or based on the shortcut number assigned when you first saved the
shortcut. A list is presented. Highlight the numbers you want to select in the list. Each number is
highlighted when a check mark appears to the left of it. Highlight Done, and then press ✓. All
numbers highlighted become shortcuts.
Save a Fax To: list
Once you build a Fax To: list, you can save it for future use. Use the navigation arrow buttons to
highlight Save, and then press ✓. The Fax To: list is saved as a shortcut, and the new shortcut
number is displayed. You can change the name and number of the shortcut by browsing to the IP
address or host name of the MFP.
Specify original size
To specify the original size of your fax, use the navigation arrow butt ons to highlight Options from
the main Fax screen, and then press ✓. Press the left or right arrow until you see the size you want.
Set resolution
To set a resolution for your fax, use the navigation arrow buttons to highlight Options, and then
press ✓. Press the down arrow until Resolution is highlighted, and then press the left or right arrow
to select the resolution you want. The higher the resoluti on you use, the longer each page takes to
send.
Fa xi ng information
30
Page 34

Printing, copying, faxing, and scanning
Specify conte n t
To specify the type of content on your original document, use the navigation arrow buttons to
highlight Options, and then press ✓. Press the down arrow until Content is highlighted. Press the
left or right arrow to choose the content type that matches your original document. Choose among
Text/Graphics, Photo, and Text.
Set darkness
To adjust the darkness of your f ax es , use the na vigation arr ow b uttons to highli ght Options, and then
press ✓. Press the down arrow until Darkness is highlighted. Press the right arrow to increase the
darkness or the left arrow to decrease the darkness.
Manual Fax
If your MFP shares a phone line with a telephone through the use of a line spli tt er, you can use
manual fax to begin sending or receiving faxes after beginning a phone call.
To enter manual fax mode, press Fax. Highlight Options and press ✓. Highlight Manual Fax and
press ✓.
You can also begin manual f ax by pressing # and then 0 from the Home screen.
Within manual fax:
• Highlight Begin Scanning and press ✓ to scan and transmit a single page on the scanner
flatbed, or all scan media loaded in the scanner ADF.
• Highlight Prescan and press ✓ to scan multiple originals one at a time on the scanner
flatbed. Highlight Scan Next Page and press ✓ to scan each new page, and then highlight
Done and press ✓ to transmit all pages.
• Highlight Begin Receiving and press ✓ to begin receiving an incoming fax.
Examples of typical fax jobs
Job 1: one page
1 Place the document face down on the scanner flatbed or face up in the ADF.
2 Press Fax.
3 Enter the fax recipi ent phone number on the numeric keypad.
4 Press Start.
Fa xi ng information
31
Page 35

Printing, copying, faxing, and scanning
Job 2: multiple pages
1 Load all pages face up in the ADF.
2 Press Fax.
3 Enter the fax recipi ent phone number on the numeric keypad.
4 Press Start.
Job 3: text/graphics content
1 Load all pages face up in the ADF.
2 Press Fax.
3 Enter the fax recipi ent phone number on the numeric keypad.
4 Use the navigation arrow buttons to highlight Options, and then pr ess ✓. Press the down
arrow until Content is highlighted. Press the left or right arrow until you see
Text/Graphics.
5 Press Start.
Job 4: photo
1 Place the photo face down on the scanner flatbed.
2 Press Fax.
3 Enter the fax recipi ent phone number on the numeric keypad.
4 Use the navigation arrow buttons to highlight Options, and then pr ess ✓. Press the down
arrow until Content is highlighted. Press the left or right arrow until y ou se e Photo .
5 Press the down arrow until Resolution is highlighted. Press the right arrow until you see
Super Fine.
6 Press Start.
Canceling fax jobs
You may cancel pending or i n coming faxes, or faxes that are currently transmitting.
Canceling a pending or currently transmitting fax job
1 Press Stop.
2 Press the down arrow button until you highlight Cancel Faxes, and then press ✓.
Fa xi ng information
32
Page 36

Printing, copying, faxing, and scanning
3 Press the down arrow b utton unt il you r each the f ax job number y ou sent. Press ✓ to highlight
it. A number is highlighted when an x appears to the left of it.
Note: If you want to cancel more than one fax job at this point, highlight other fax job
numbers in this list.
4 Press the left arrow button to highlight Delete, and then press ✓.
Canceling fax(es). appears on the control panel.
Canceling an incoming fax job
Once you hear the ringing tone of an incoming fax, notice that the Receiving message appears on
the control panel. Once you see this message:
1 Press Stop.
2 Press the down arrow button until you highlight Cancel Faxes, and then press ✓.
3 Press the down arrow button until you reach Incoming fax. Press ✓ to highlight it. It is
highlighted when an x appears to the left of it.
4 Press the left arrow button to highlight Delete, and then press ✓.
Canceling fax(es). appears on the control panel.
Printing information
Avoiding jams when printing
If you select appropriate print media (paper, transparencies, labels, and card stock) for your MFP,
you’re helping to have trouble-free printing. See Print media guidelines for more information.
Note: We recommend that you try a limited sample of any print media you are considering
using with the MFP before purchasing large quantities.
By carefully selecting print medi a and loading it properly, you should be ab le t o av o id most jams . See
the follo w ing for instructions on loading and using print media:
• Loading the standard tray or the optional 250-sheet tray
• Loading the optional 500-sheet tray
• Using and loading the multipurpose feeder
If you do experience a jam, see Clearing jams for instructions.
Printing information
33
Page 37

Printing, copying, faxing, and scanning
The followi ng hints can help you av oid jams:
• Use only recommended print media. See Print media guidelines for more information.
• Do not load wrinkled, creased, damp, or curled print media.
• Flex, fan, and straighten print media before you load it. If jams do occur with print media, try
feeding one sheet at a time through the multipurpose feeder.
• Do not overload the print media sources. Make sure the stack height does not exceed the
maximum height indicated by the labels in the sources.
• Do not use print media that you have cut or trimmed.
• Do not mix print media sizes, weights, or types in the same print media source.
• Make sure the recommended print side is face down when loading all trays, and the
recommended print side is face up when loading the multipurpose feeder.
• Keep print media stored in an acceptable environment. See Storing print media for more
information.
• Do not remove trays during a print job.
• Push all trays in firmly after loading them.
• Make sure the guides in the trays are properly positioned for the size print media y ou have
loaded. Make sure the guides are not placed too tig htly against the stack of print media.
• Card stock must fed from the multipurpose feeder and exit to the rear output bin. See Using
the rear output bin for more information.
• Envelopes may be sent to the standard output bin; however, if the envelopes exit to the rear
output bin there is less curl.
• Make sure all cables that connect to the MFP are correctly attached, so they do not interfere
with the rear output bin. Refer to the Setup Guide for more information.
Sending a job to print
Printing from a Windows environment
1 Load print media. (See Loading print med ia for more information. )
2 From your application, open the file you want to print.
3 From the File menu, select Print Setup.
4 Verify the correct MFP is selected in the Print Setup dialog box.
5 In the Print Setup dialog box, c li ck Properties, Options, or Setup (depending on the
application), select the print media type and size, and then click OK.
6 Click OK or Print.
Printing information
34
Page 38

Printing, copying, faxing, and scanning
Printing from a Macintosh computer
1 Load print media. (See Loading print med ia for more information. )
2 From your application, open the file you want to print.
3 From the File menu, select Page Setup.
4 Verify the correct MFP is selected in the dialog box.
5 From the Paper menu, select the page size you are using, and then click OK.
6 From the File menu, click Print.
Printing the menu settings page
The menu settings page shows information including:
• Current settings for each of the menu items for all menus
• Cartridge information
• A list of installed options and features
• Installed MFP memory
• Device statistics
Print a menu settings page to revie w the def ault print, f ax, cop y, and e-mail settings, and to verif y that
MFP options are installed correctly.
1 Make sure the MFP is on.
2 Press the Administration (key) button.
3 Press the right arrow button to highl ight Print Reports, and then press ✓.
4 Press ✓ again to select Menu Settings Page.
Note: With the Menu Settings Page, you can verify:
• that the amount of memory installed is correctly listed under “Device
Information.”
• that the trays are configured fo r the sizes and types of print media you loaded.
• that the network information and server information are correct.
• that the options you installed are correctly listed under “Installed Features.”
If an option you installed is not l isted, turn the MFP off, unplug the power cor d, and
reinstall the option. Refer to the Setup Guide for information on installing options.
Printing information
35
Page 39

Printing, copying, faxing, and scanning
Printing a font sample list
To print samples of all the fonts currently available for your MFP:
1 Make sure the MFP is on.
2 Press the Administration (key) button.
3 Press the right arrow button to highl ight Print Reports, and then press ✓.
4 Press the down arrow button until you reach Print Fonts, and then press ✓.
5 Press the down arrow button until you reach either PCL Fonts or PS Fonts.
• Select PCL Fonts to print a listing of the fonts available to the PCL emulator.
• Select PS Fonts to print a listing of the fonts a vailable to the PostScript 3 emulator.
6 Press ✓.
The message Printing Font List appears.
Canceling a print jo b from the MFP control panel
If the job you want to canc el is printing or in the device print queue:
1 Press the Print/Profiles or Stop button.
2 Press the down arrow button until you reach Cancel Print Jobs.
3 Press ✓. A list of print jobs appears. Use the up and down arrows to scroll through the list.
Highlight the job you need to cancel. Press ✓.
4 Use the left arrow butt on to highlight Delete.
5 Press ✓. The print jobs that you highlighted are then deleted. The message Canceling
print job(s). appears.
Canceling a print job from your computer
Search on your computer for the correct screens that let y ou cancel or delete your print jobs.
Printing a directory list
A directory list shows all the resources stored in flash memory. To print:
1 Make sure the MFP is on and the Ready message appears on the control panel.
2 Press the Administration (key) button.
3 Press the right arrow button to highl ight Print Reports, and then press ✓.
Printing information
36
Page 40

Printing, copying, faxing, and scanning
4 Press the down arrow button until you reach Print Directory, and then press ✓.
The message Printing Directory List appears and remains on the control panel until
the page prints.
Print Held Jobs—using the Print and Hold function
Print Held Jobs accesses the Print and Hold function. When sending a job to the MFP, you can
specify in the driver that you want the MFP to hold the job in memory. When you are ready to print
the job, you must go to the MFP and use the control panel menus to identify whi ch held j ob y ou w ant
to print. (See Using the MFP control pa nel and menus for information on using the control panel.)
Note: All held jobs (Reserve Print, Repeat Print, Verify Print, and Confidential) may be
deleted if the MFP requires extra memory to process additional held jobs.
Confidential jobs and Verify Print jobs are deleted from MFP memory once all
copies are printed.
Selecting a user name
All confidential and held jobs have a user name associated with them. If you are on a network, the
user name is the same as your computer name on the network. If you are locally attached to the
MFP, you must create a user name in the print driver dialog when you send the job.
To access all held jobs or confidential jobs, you must first select your user name from a list of user
names for print jobs . When the li st is presented, use the up and do wn arrows to scroll thr ough the list.
Press ✓ once you find your user name for your job.
Selecting the type of Held Job
There are four types of jobs you can hold:
• Confidential Print Jobs—print a confidential job when you can be at the MFP to retr ieve it
• Reserve Print Jobs—dela y printing a job
• Repeat Print Jobs—request extr a copies of a job at a later time
• Verify Print Jobs—verify one copy before pr inting additional copies
Confidential jobs
When you send a job to the MFP, you can enter a personal identification number (PIN) from the
driver. The PIN must be four digits using the n umbers 1–6. The job is t hen held i n MFP memory until
you enter the same four-digit PIN from the control panel and choose to print or delete the job. This
ensures that the job does not print until you ret rieve it, and no one else using the MFP can print the
job.
Print Held Jobs—using the Pr int and Hold function
37
Page 41

Printing, copying, faxing, and scanning
Printing a confidential job
Send your job to print. From the print driver, enter your personal identification number (PIN).
Note: Your print job and PIN are retained in the MFP memory; however, if the MFP is
turned off, the confidential job is discarded.
Entering a PIN
1 Press the Print/Profiles button.
2 Press the down arrow button until Print Held Jobs is highlighted.
3 Press the ✓ button. A list of user names appears on the display.
4 Press the down arrow b u tton until y our user name is highl ight ed, and then pres s ✓. The user
name is highlighted when a check mark appears to the left of your user name.
The following prompt appears, where the field <username> is your true user name:
Enter PIN for
<username>
_
5 Enter your PIN using the numeric keypad. Press ✓.
A list of all print jobs matching your user name and PIN appears on the display.
6 Select the print jobs you want to print by using the up and down arrow buttons. Press
✓ to highlight the print job. Your selections are indicated by an X that appears to the l eft of the
job name. You may select more than one print job.
7 Press the left arrow button to highlight Print, and then press ✓. A Copies screen appears.
Print Held Jobs—using the Pr int and Hold function
38
Page 42

Printing, copying, faxing, and scanning
8 Select the number of copies y ou want to print by using the left and right arrow buttons or
specify the number using the numeric keypad.
9 Press ✓. The Selected job submitted for printing. message appears.
Note: After printing the job, the MFP deletes the confidential job from memory.
Reserve Print
If you send a Reserve Print job , the MFP does not print the job immediately, but stores the job in
memory so you can print the job later. Reserve Print jobs may be deleted if the MFP requires extra
memory to process additional held jobs.
See Printing and deleting held jobs for more information.
Repeat Print
If you send a Repeat Print job, the MFP prints all requested copies of the job and stores the job in
memory so you can print additional copies later. You can print additional copies as long as the job
remains stored in memory.
See Printing and deleting held jobs for more information.
Verify Print
If you send a Verify Print job, the MFP prints one copy and holds the remaining copies you requested
from the driver in MFP memory. Use Verify Print to examine the first copy to see if it is satisfact o ry
before printing the remaining copi es.
See Printing and deleting held jobs if you need help printing the additional copies stored in
memory.
Sending a held print job
To send a print job and hold it at the MFP:
1 From your application, click Print and select the MFP.
2 Click Properties on the Print dialog.
3 Select the Other Options tab from the Properties dialog.
4 Click Print and Hold.
5 Click the type of Held Print Job you want to send: Confidential, Verify, Reserve, or Repeat.
6 If your user name is not automatically detected, enter a user name.
For Confidential Held Print Jobs, enter a four-digit PIN (range from 1–6).
7 Click OK.
8 Click OK.
Print Held Jobs—using the Pr int and Hold function
39
Page 43

Printing, copying, faxing, and scanning
Printing and delet ing held jobs
Once held jobs are stored in MFP memory, you can use the MFP control panel to specify what you
want to do with one or more of the jobs. You can select either Confidential Job or Held Jobs (Repeat
Print, Reserve Print, and Verify Print jobs), then you select your user name from a list. If you select
Confidential Job, you must enter the personal identification numb er (PIN) you specified in the driver
when you sent the job. See Confidential jobs for more information.
1 To access held jobs from the control panel, press the Print/Profiles button.
2 Press the down arrow button to highlight Print Held Jobs. Press ✓.
3 Use the up and down arrow but tons to highlight the user name on the jobs.
Note: If a confidential job exists , which i s recognizab l e in the lis t because after your us er
name a space and the word “Confidential” fol lows , y ou are pro mpted to enter y our
PIN number by th e PI N request sc reen. Enter your PIN number using the numeric
keypad. See Confidential jobs for more information.
4 Use the up and down arrow but tons to scroll through the list of job names on the Pick Jobs
screen. You may highlight jobs and press ✓ to select one or more jobs. If you cannot see the
entire job name use right arrow button to scroll to the end of the job name.
5 Use the navigation arrow buttons to highlight Print, and then press ✓. The Number of
Copies query screen appears.
6 Press and release the right or left arrow b u ttons to scroll to the number of copies you want.
Press ✓. This number of copies prints for each print job you selec ted in the list. The message
Selected jobs submitted for printing. appears.
Note: If some jobs in the list are not needed, y ou may first highlight these jobs, press ✓,
and then highlight Delete and press ✓. The message Selected jobs deleted.
appears.
Print Held Jobs—using the Print and Hold function
40
Page 44

3
Media specifications and guidelines
This chapter provides specif ications for each type of media that can be used with your MFP.
There are two types of media — scan media and print media. Scan media is what is placed in the
automatic document feeder (ADF) or on the scanner flatbed. Some types of scan media cannot be
run through the ADF, so it has to be placed on the scanner flatbed.
Print media, which is paper, card stock, transparencies, labels, and envelopes, is loaded into print
media sources which are the trays and the multipurpose feeder. Card stock, transparencies, labels,
and envelopes are sometimes referred to as specialty media.
Scan media specifications and guidelines
Scan media source specifications
Source Scan media supported Sizes supported Weight Capacity
Scanner
automatic
document
feeder (ADF)
Paper A4, A5, JIS B5, folio, letter,
legal, executive, statement
60–120 g/m
(16–32 lb)
2
50 sheets of 20
lb paper
Scanner flatbed Paper, envelopes, labels,
transparencies, card
stock, or any type of
document made of paper
that is flat, such as a
book, magazine, map,
pamphlet, or receipt
To avoid jams in the ADF, see Avoidi ng jams when scanning.
A4, A5, JIS B5, letter,
executive, statement,
3 x 5 in., 4 x 6 in., business
card
Any size that fits the
scanner flatbed window,
which measures
216 x 297 mm
(8.5 x 11.7 in.)
Non-applicable Non-applicable
Loading scan media
You can load or place all sorts of items to be scanned to make a copy, to be scanned to e-mail, or to
be scanned to fax. Based on the type o f item y ou ha ve, whether it be a stack of pages or a book, the
ADF or the scanner flatbed accommodates the item.
Media specifications and guidelines
41
Page 45

Media specifications and guidelines
Loading scan media in the ADF
1 Push the guides to the size you are loading.
2 Load the scan media face up in the ADF with the edge going under the stack height limiter.
Guide
Guide
Stack height limit er
3 Adjust the guides so they lightly touch the edge of the st ack if you loaded a stack of scan
media.
Note: Do not force a stack of scan media under the stack height limiter. This may result
in ADF jams. The ADF can accommodate 50 sheets of 20 lb paper.
Scan media specifications and guidelines
42
Page 46

Media specifications and guidelines
Orienting scan media correctly in the ADF
All scan media loads the same way, but the orientation of the printed side of your job makes a
difference . Use the following illustration to sho w you how to turn your scan media based on if it has a
landscape orientation or a portrait orientation.
Landscape
orientation
Portrait
orientation
Scan media specifications and guidelines
43
Page 47
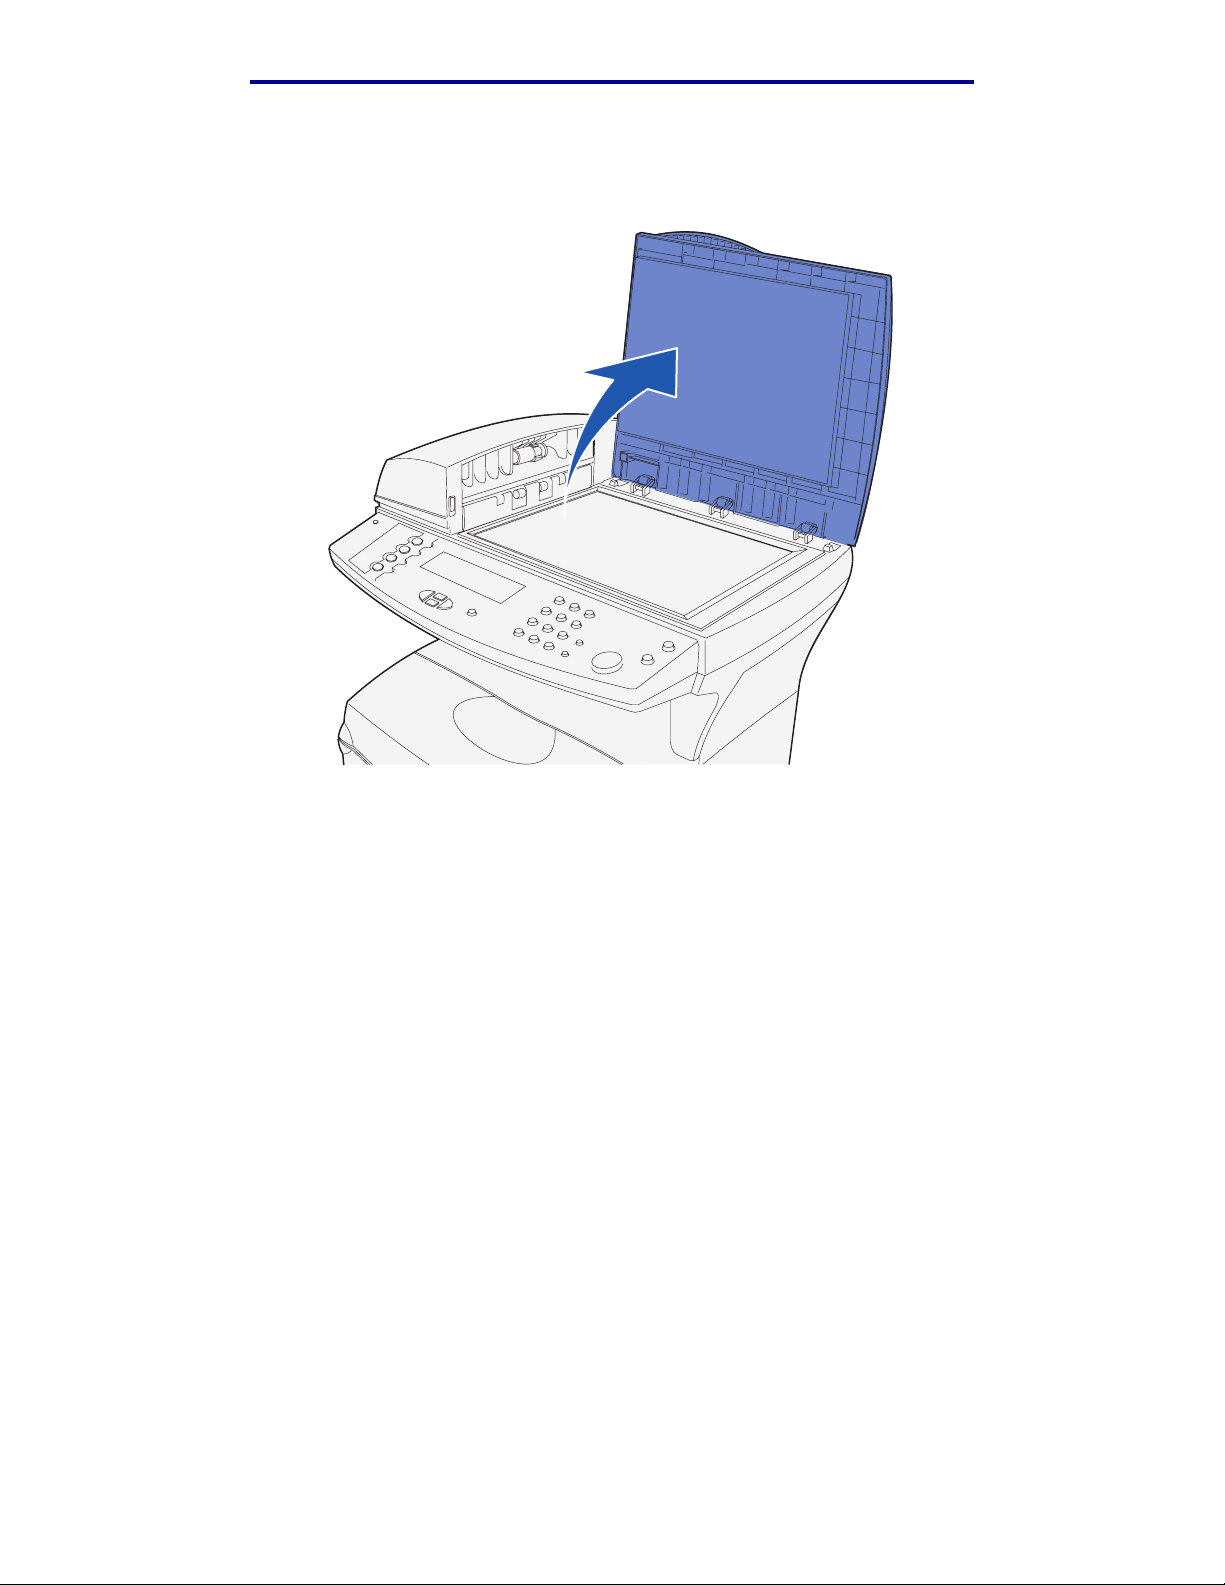
Media specifications and guidelines
Loading scan media in the scanner flatbed
1 Open the scanner flatbed cover.
Scan media specifications and guidelines
44
Page 48

Media specifications and guidelines
2 Position your item f a ce down on the scanner glass with the top left corner of the item placed
at the left corner of the glass.
a For an item with portrait orientation, the item is placed this way:
Scan media specifications and guidelines
45
Page 49

Media specifications and guidelines
b For an item with landscape orientation, the item is placed this way:
Note: If you load a book, note that the cov er of the scan ner flatbed aut omatically adjusts
to accommodate the depth of the book.
3 Close the scanner flatbed cover.
Scan media specifications and guidelines
46
Page 50

Media specifications and guidelines
Print media specifications and guidelines
Your MFP provides high quality printing on a variety of print media. You must consider a number of
things concerning print media before you print. This section provides information to help you make
print media selections, how to care for the print media, and how to load it in the standard tray
(250-sheet letter size tray) and the optional tray which is part of the optional 500-sheet drawer.
Specifications for print media details the types and quantities of print media you can load in each
of the sources. For more information on selecting speci fic print media, see Print media guidelines.
We recommend that you try a limited sample of any print media you are considering using with the
MFP before purchasing large quantities.
The following information refers to items in the Print media source specifications table and
provides helpful tips about print media and sources:
• Capacities are for 20 lb paper, unless otherwise noted.
• You can send labels and transparencies to the standard output bin; how ever, they may print
more successfully when sent to the rear output bin.
• The followi ng sizes or types of print media must exit to the rear output bin:
– Print media 165.1 mm (6.5 in.) or less in length
– 3 x 5 in. and 4 x 6 in. index cards and card stock
• Envelopes may curl less if they exit to the rear output bin.
Print media specifications and guidelines
47
Page 51

Media specifications and guidelines
Specifications fo r print media
Print media source specifications
Print media
Source
Tray 1
(standard
250-sheet tray)
Tray 2 (optional
250-sheet tray)
Tray 2 (optional
500-sheet tray)
Multipurpose
feeder
supported
Paper,
paper labels,
transparencies
Paper only A4, A5, JIS B5,
Paper only A4, JIS B5, folio,
Pape r , e nvelopes,
transparencies,
card stock
Sizes supported Weight Capacity
A4, A5, JIS B5,
folio, letter, legal,
executive,
statement
folio, letter, legal,
executive,
statement
letter, legal,
executive
Minimum:
76.2 x 127 mm
(3 x 5 in.)
Maximum:
216 x 355.6 mm
(8.5 x 14 in.)
Supports all sizes
listed in Supported
print media sizes.
60–90 g/m
(16–24 lb)
60–90 g/m
(16–24 lb)
60–90 g/m
(16–24 lb)
60–199 g/m
(16–53 lb)
2
2
2
250 sheets of paper
50 transparencies
100 sheets of paper labels
250 sheets of paper
500 sheets of paper
2
100 sheets of paper
10 envelopes
20 transparencies
10 sheets of card stock
Print media specifications and guidelines
48
Page 52

Media specifications and guidelines
Print media output specifications
Print media
Output device
Rear output bin Paper, envelopes,
Standard output bin Paper, envelopes,
supported
labels,
transparencies, card
stock
labels,
transparencies, card
stock
Sizes supported Weight Capacity
A4, A5, JIS B5, folio,
letter, executive,
60–199 g/m
(16–53 lb)
2
20 sheets of paper
statement, 7 3/4
envelope (Monarch), 9
envelope, 10 envelope
(Com-10 ), D L
envelope, C5 env elope,
B5 envelope, other
envelope
2
A4, A5, JIS B5, folio,
letter, legal, executive,
60–199 g/m
(16–53 lb)
150 sheets of
paper
statement, universal,
7 3/4 envelope
(Monarch), 9 envelope,
10 envelope (Com-10),
DL envelope, C5
envelope, B5 envelope,
other envelope
Note: Print duplex jobs only on paper weighing 16–24 lb.
Duplex unit specifications
Exits to the standard output bin Exits to the rear output bin
Sizes supported A4, JIS B5, folio, letter, legal A4, JIS B5, folio, letter, legal
Weight 60–90 g/m
2
(16–24 lb)
1
Print media exits to the rear output bin if it is open.
2
Legal size paper sent to the rear output bin stacks improperly when too many sheets accumulate.
75–90 g/m
(20–24 lb)
Remove paper often from this bin.
The multipurpose feeder accepts print media withi n the following dimensions:
Minimum Maximum
Width 76.2 mm (3 in.) 216 mm (8.5 in.)
Length 127 mm (5 in.) 355.6 mm (14 in.)
The multipurpose feeder accepts print media within a weight range of 60–199 g/m
(16–53 lb).
2
2
1
2
Print media specifications and guidelines
49
Page 53

Media specifications and guidelines
The following information refers to items in the Supported print media sizes table and provides
helpful tips about print media sizes your MFP supports.
• Legal size paper sent to the rear exit bin stacks improperly when too many sheets
accumulate. Remove the paper often from this bin.
• Select Univers al siz e when using a no nstandard siz e sheet of print media. Set the actual size
from your application.
• Envelopes may be sent to the standard output bin; however, they may curl less if sent to the
rear output bin.
• Select Other Envel ope size when using a nonstandard size of envelope. The MFP formats
the envelope for the maximum size (9.02 x 14 in.). Set the actual size from y our application.
Supported print media sizes
✓ - indicates
support
✕ - indicates
no support
Print media
A4 210 x 297 mm
A5 148 x 210 mm
JIS B5 182 x 257 mm
Letter 215.9 x 279.4 mm
Legal 215.9 x 356 mm
Executive 184.2 x 266.7 mm
Folio 215.9 x 330 mm
Statement 139.7 x 215.9 mm
Universal 216 x 356 mm
Dimensions
(8.27 x 11.7 in.)
(5.83 x 8.27 in.)
(7.17 x 10.12 in.)
(8.5 x 11 in.)
(8.5 x 14 in.)
(7.25 x 10.5 in.)
(8.5 x 13 in.)
(5.5 x 8.5 in.)
(8.5 x 14 in.)
Tray 1 (250-sheet
tray)
Tray 2 (optional
250-sheet drawer)
Tray 2 (optional
500-sheet drawer)
Paper
✓✓✓✓✓✓✓
✓✓✕✓✓✓✕
✓✓✓✓✓✓✓
✓✓✓✓✓✓✓
✓✓✓✓✓✓✓
✓✓✓✓✓✓✓
✓✓✓✓✓✓✓
✓✓✕✓✓✓✕
✓✓✓✓✓✓✓
Multipurpose feeder
Standard output bin
Rear output bin
Duplex
Print media specifications and guidelines
50
Page 54

Media specifications and guidelines
Supported print media sizes(continued)
✓ - indicates
support
✕ - indicates
no support
Print media
7 3/4
Envelope
(Monarch)
9 Envelope 98.4 x 225.4 mm
10 Envelope
(Com-10)
DL Envelope 110 x 220 mm
C5 Envelope 162 x 229 mm
B5 Envelope 176 x 250 mm
Other
Envelope
(Universal)
Dimensions
98.4 x 190.5 mm
(3.875 x 7.5 in.)
(3.875 x 8.875 in.)
104.8 x 241.3 mm
(4.125 x 9.5 in.)
(4.33 x 8.66 in.)
(6.38 x 9.01 in.)
(6.93 x 9.84 in.)
356 x 216 mm
(14 x 8.5 in.)
Tray 1 (250-sheet
tray)
Tray 2 (optional
250-sheet drawer)
Tray 2 (optional
500-sheet drawer)
Envelopes
✕✕✕✓✓✓✕
✕✕✕✓✓✓✕
✕✕✕✓✓✓✕
✕✕✕✓✓✓✕
✕✕✕✓✓✓✕
✕✕✕✓✓✓✕
✕✕✕✓✓✓✕
Multipurpose feeder
Standard output bin
Rear output bin
Duplex
Supported special print media types
✓ - indicates
support
✕ - indicates
no support
Print media
Card stock ✕✕✕✓✕✓✕
Paper labels ✓✕✕✕✓* ✓✕
* Labels and transparencies may be sent to the standard output bin; however, they may
print more successfully when sent to the rear output bin.
Tray 1 (250-sheet
tray)
Tray 2 (optional
250-sheet drawer)
Tray 2 (optional
500-sheet drawer)
Multipurpose feeder
Standard output bin
Rear output bin
Duplex
Print media specifications and guidelines
51
Page 55

Media specifications and guidelines
Supported special print media types
✓ - indicates
support
✕ - indicates
no support
Print media
Transparencies ✓✕ ✕ ✓ ✓* ✓✕
* Labels and transparencies may be sent to the standard output bin; however, they may
print more successfully when sent to the rear output bin.
Tray 1 (250-sheet
tray)
Tray 2 (optional
250-sheet drawer)
Tray 2 (optional
500-sheet drawer)
Multipurpose feeder
Standard output bin
Rear output bin
Duplex
Storing print media
Use the follo wing guidelines f or proper print media storag e. These help av oid paper f eeding proble ms
and uneven print quality:
• For best results, store print media in an environment where the temperature is approximately
21°C (70°F) and the relative humidity is 40%.
• Store cartons of print media on a pallet or shelf, rather than directly on the floor.
• If you store individual packages of print media out of the original carton, make sure they rest
on a flat surface so the edges do not buckle or curl.
• Do not place anything on top of the print media packages.
Print media guidelines
Selecting the appropriate print media (paper, transparencies, envelopes, paper labels, and card
stock) for your MFP helps you avoid printing problems.
The following sections contain guidelines for choosing the correct print media.
Paper
For the best print quality, use 75 g/m2 (20 lb) xerographic, grai n long paper. Try a sample of any
paper you are considering using with the MFP before buying large quantities.
When loading paper , note the recommended print side on the paper package, and l oad paper
accordingly. See the following topics for detailed loading instructions:
• Loading the standard tray or the optional 250-sheet tray
• Loading the optional 500-sheet tray
• Using and loading the multipurpose feeder
The following papers are not recommended for use wit h your MFP:
• Paper with a rough or heavily textured surface
Print media specifications and guidelines
52
Page 56

Media specifications and guidelines
• Coated papers, such as erasable bond
• Preprinted papers manufact ured with chemicals that may contaminate the MFP
• Multiple-part forms
• Synthetic papers
• Thermal papers
2
• Recycled paper having a weight less than 75 g/m
Letterhead
Preprinted papers such as letterhead must be able to withstand temperatures up to 200°C (392°F)
without melting or releasing hazar dous emissions . Use inks that are no t aff ected b y th e resin in ton er
or the silicone in the fuser. Inks that are oxidation-set or oil-based should meet these requirements;
latex inks migh t not.
Printing on letterhead
Check with the manufacturer or vendor to determine whether the preprinted letterhead you have
chosen is acceptable for laser MFPs.
(20 lb)
Page orientation is important when printing on letterhead. Use the following table for help when
loading letterhead in the print media sources.
Print media source or
process
Tray 1
(standard tray)
Tray 2
(optional 250-sheet or
500-sheet drawer)
Duplex printing using
tray 1 or tray 2
Multipurpose feeder
(including feeding
individual sheets)
Duplex printing using
the multipurpose
feeder
Print side Portrait Landscape
Face down Front of tray Left side of tray
Face up Rear of tray Not applicable
Face up Logo enters the MFP first Left side of tray
Face down Logo enters the MFP last Not applicable
Top of page
Note: It is possible to load letterhead for simplex (single-sided) or duplex (two-si ded)
printing. See Paper Loading for more information.
Transparencies
You can feed tr ansparencies from the standard 250-sheet tray or the multipurpose feeder. Try a
sample of any transparenci es y ou ar e consi dering using with th e MFP bef or e buying large quantities.
Print media specifications and guidelines
53
Page 57

Media specifications and guidelines
Do not load transparencies in the optional 250-sheet or 500-sheet drawer. To load transparencies in
the multipurpose feeder, see page 75 of Using and loading the multipurpose feeder.
When printing on transparencies:
• Be sure to set the Paper Type to Transparency from the print driver , MarkVision™
Professional, the control panel, or the Web pages to avoid damaging your MFP.
• Use transparencies designed specifically for laser printers. Transparencies must be able to
withstand temperatures of 175°C (347°F) wit hout melting, discoloring, or r eleasing hazardous
emissions.
• To prevent print quality problems , avoid getting fingerprints on the transparencies.
• Before loading transparencies, fan the stack to prevent sheets from sticking together.
Envelopes
You can load up to 10 envelopes in the multipurpose feeder. Try a sample of any env elopes you are
considering using with the MFP before buying large quantities. See page 76 of Using and loading
the multipurpose feeder for loading an envelope instructions.
Print media specifications and guidelines
54
Page 58

Media specifications and guidelines
When printing on envelopes:
• Set the Paper Size to MP Feeder Size sub-menu from the control panel, MarkVision
Professional, or the Web page. Set the Paper Type to Envelope in the MP Feeder Type sub-
menu from the control panel, MarkVision Professional, or the Web pages. Select the size
and type from the print driver.
2
• Use envelopes made from 75 to 105 g/m
fewer print media jams, do not use envelopes that:
– Have excessive curl.
– Are stuck together.
– Are damaged in any way.
– Contain windows, holes, perforations, cutouts or embossing.
– Use metal clasps, string ties, or metal folding bars.
– Have postage stamps attached.
– Have any exposed adhesive when the flap is in the sealed or closed position.
• Use envelopes that can withstand temperatures of 205°C (401°F) without sealing, excessive
curling, wrinkling, or releasing hazardous emissions.
• Adjust the right paper guide to fit the width of the envelopes.
• Load envelopes with the flap side down, and position the short edge nearest the return
address to enter the MFP first. See page 76 of Using and loading the multipurpose feeder
for loading an envelope instructions.
• If you are feeding self-sealing envelopes, open the rear output bin door so envelopes feed
straight out the back of the MFP. The rear output bin holds about 10 envelopes.
(20 to 28 lb) bond paper. F or best perf ormance and
Labels
Your MFP can print on many labels designed for use with laser MFPs. These labels are supplied in
letter size and A4 size sheets. Label adhesives, face sheet (printable stock), and topcoats must be
able to withstand temperatures of 205°C (401°F) and pressure of 25 pounds per square inch (psi).
Try a sample of any labels you are considering using with the MFP before purchasing a large
quantity.
When printing on labels:
• Set the Paper Type to Labels from the print driver, MarkVision Professional, the control
panel, or the Web pages.
• Do not load labels together with paper or transparencies in the same paper source.
• Do not use label sheets with a slick backing material.
• Use full label sheets. Partial sheets may cause labels to peel off during printing, resulting in a
jam. Partial sheets also contaminate your MFP and your cartridge with adhesive, and could
void your MFP and cartridge warranties.
• Use labels that can withstand temperatures of 205°C (401°F) without sealing, excessive
curling, wrinkling, or releasing hazardous emissions.
• Do not print within 1 mm (0.04 in.) of th e edge of the label , of the per f or ations , or bet ween die cuts of the label.
Print media specifications and guidelines
55
Page 59

Media specifications and guidelines
• Do not use label sheets that have adhesive to the edge of the sheet. We recommend zone
coating of the adhesiv e a t least 1 mm (0.04 in.) away from edges. Adhesive material
contaminates your MFP and could void your warranty.
• If zone coating of the adhesiv e is not possib le , a 3 mm (0.125 in.) strip should be remov ed on
the leading and driver edge, and a non-oozing adhesive should be used.
• Remove a 3 mm (0.125 in.) strip from the leading edge to prevent labels from peeling inside
the MFP.
• Portrait orientation is preferred, especially when printing bar codes.
• Do not use labels that hav e exposed adhesive.
MFP maintenance when printing on labels
After continuously printing approximately 10,000 pages of labels (or each time you replace the print
cartridge), complete the following step s to maint ain MFP feeding reliability:
1 Print 5 sheets of paper.
2 Wait approximately 5 seconds.
3 Print 5 more sheets of paper.
Card stock
Card stock is single ply, and has a large array of properties, such as the orientation of paper fibers
and texture, that can significantly affect the print quality.
You may only print card stock from the multipurpose feeder. Card stock must always exit to the rear
output bin.
Try a sample of any card stock you are considering using with the MFP before purchasing a large
quantity.
See Specifications for pri nt media for information on the preferred weight of print media.
When printing on card stock:
• Set the Paper T ype to Card Stoc k fr om the print driver,
panel, or the Web pages.
• Do not use preprinted card stock manufactured with chemicals that may contaminate the
MFP. Preprinting introduces semi-liquid and volatile components in the MFP.
• Do not use card stock that is perforated or creased. It may cause print media jams.
• We recommend the use of grain short card stock.
MFP maintenanc e when printing on card stock
After printing approxi m ately 10,000 pages of card stock (or each time you replace the print
cartridge), complete the following step s to maint ain MFP feeding reliability:
MarkVision Professional, the control
1 Print 5 sheets of paper.
2 Wait approximately 5 seconds.
Print media specifications and guidelines
56
Page 60

Media specifications and guidelines
3 Print 5 more sheets of paper.
Using the duplex feature for printing
Duplex printing (or tw o-sided printing) lets you print on both sides of a sheet of paper. For paper
sizes that are acceptable for duplex printing, see Duplex unit specifications.
Note: Print duplex jobs only on paper weighing 16–24 lb.
Select Duplex from your print driver to print individual duple x jobs.
Warning: As the MFP processes a duplex print job, it partially ejects a sheet to the standard
output bin, and then pulls the sheet back inside. Do not touch the sheet while it is
partially ejected. Doing so could damage the MFP or cause a jam. Remo v e pages
only after they have fully exited the MFP to a bin.
For more inform ation on bins, see Using the output bins.
Duplex printing on letterhead
When duplex printing on letterhead fr om the multipurpose f eeder, load it with the logo face down and
entering the MFP last.
When duplex printing on lette rhead fro m the tr ays, load it with the logo face up and f ac ing to ward the
rear of the MFP.
Using Duplex Bind
When you select duplex bind printing in the print driver or Duplex Bind in the Finishing Menu, you
must select either long edge or short edge binding. The purpose of Duplex Bind is to define the way
duplexed pages are bound, and how the printing on the back of the sheet (even-numbered pages) is
oriented in relation to the printing on the front (odd-numbered pages).
Print media specifications and guidelines
57
Page 61

Media specifications and guidelines
The two values for Duplex Bind are:
Long Edge*
The asterisk (*)
indicates this is the
factory default
setting.
Assumes binding along the long end of the page (left edge for portrait orientation
and top edge for landscape orientation). The following illustration shows longedge binding for portrait and landscape pages:
Back of
sheet
Binding
Front of
next sheet
Binding
Portrait
Back of sheet
Front of ne x t
sheet
Landscape
Short Edge Assumes binding along the short edge of the page (top edge for portrait
orientation and left edge for landscape orientation). The following illustration
shows short-edge binding for portrait and landscape pages:
Back of
sheet
Binding
Binding
Back of
sheet
Front of
next sheet
Landscape
Portrait
Front of
next sheet
Loading print media
Your MFP has two st andard s ource s, t he 250-she et tr ay (standard tray) and the mult ipurpose feeder.
For more inform ation, see Using and loading the multipurpose feeder. Load the print media you
use for the majority of your print jobs in the standard 250-sheet tray.
Proper print media loading helps prevent jams and helps make your printing trouble-free.
Before loading print media, know the recommended pr int side of the print media you are using. This
information is usually indicated on the print media package.
Print media specifications and guidelines
58
Page 62

Media specifications and guidelines
Do not remove tr ays while a job prints or while Busy displays on the control panel. Doing so may
cause a jam.
Loading the standard tray or the optional 250-sheet tray
The following instructions work for loading the standard tray or the tray for the optional 250-sheet
drawer.
Your MFP has one standard 250-sheet tray. You may use the optional 250-sheet drawer or the
optional 500-sheet drawer as a print media source; however, you may use only one of these options
at a time. See your Setup Guide for installation information.
For the siz es and types of print media these trays support, see Print media source specifications.
To load the tray for the optional 500-sheet drawer, see Loading the optional 500-sheet tray.
To load print media in a tray:
1 Remove the tr ay.
2 Press down on the metal plate until it locks into place.
Print media specifications and guidelines
59
Page 63

Media specifications and guidelines
3 Locate the tabs on both of the guides.
Tab
Tab
4 Squeeze the length guide tab and the length guide together, and then slide the guide to the
back of the tray.
5 Squeeze the width guide tab and the width guide together, and then slide the guide all the
way to the right.
Length guide
Width guide
Print media specifications and guidelines
60
Page 64

Media specifications and guidelines
6 Flex the sheets back and forth to loosen them, and then fan them. Do not fold or crease the
print media. Straighten the edges on a level surface.
Hold the print media so the side you want to print on is face down, and the front edge of the
stack is toward the front of the tray.
For infor m ation on loading letterhead, see Printing on letterhead.
7 Place the stack of print media against the left side of the tray and insert it under the metal
stop.
Make sure the print media fi ts easily under the metal stop and is not bent or wrinkled. Do not
raise the metal stop or force print media under it.
Note: Do not exceed the maximum stack height indicated by the maximum stack height
indicator. Overfilling the tray may cause jams.
Metal stop
Maximum stack height indicator
Print media specifications and guidelines
61
Page 65

Media specifications and guidelines
8 Squeeze the width guide tab and the width guide together, and then slide the guide to the
edge of the print media.
9 Squeeze the length guide tab and the length guide together, and then slide the guide to the
edge of the print media.
Note: Sliding the guides too tightly against the print media may cause misfeeds.
Print media specifications and guidelines
62
Page 66
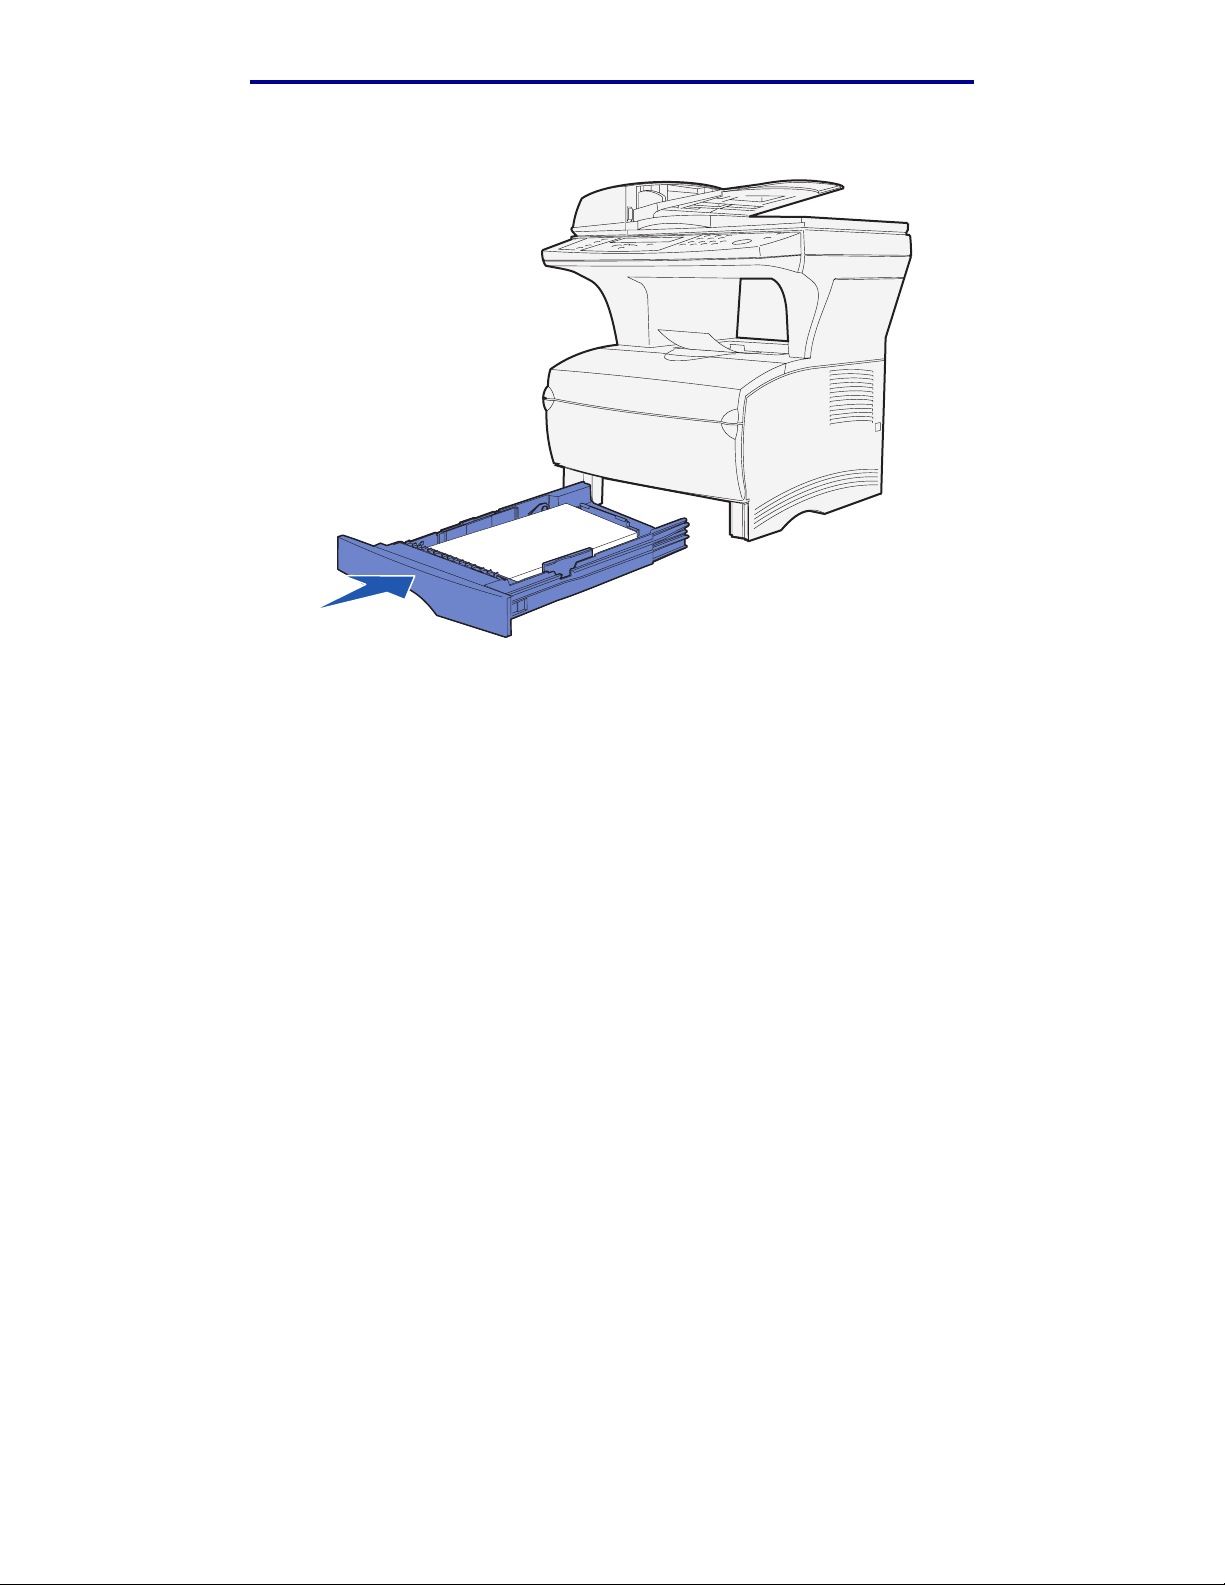
10 Insert the tray.
Media specifications and guidelines
11 Set the paper size and paper type in the menus from the control panel .
Print media specifications and guidelines
63
Page 67

Media specifications and guidelines
Loading the optional 500-sheet tray
The optional 500-sheet tray only accepts paper . It is designed with a special cover at the back of the
tray to shield legal size paper. The cover protects legal size paper from exposure to dust.
To load paper in the tray:
1 Remove the tr ay.
2 Raise the cover.
Print media specifications and guidelines
64
Page 68

Media specifications and guidelines
3 Press down on the metal plate until it locks into place.
4 Locate the tabs on both of the guides.
Tab
Tab
Print media specifications and guidelines
65
Page 69

Media specifications and guidelines
5 Squeeze the length guide tab and the length guide together, and then slide the guide to the
back of the tray.
6 Squeeze the width guide tab and the width guide together, and then slide the guide all the
way to the right.
Length guide
Width guide
7 Flex the sheets back and forth to loosen them, and then fan them. Do not fold or crease the
paper. Straighten the edges on a level surface.
Hold the paper so the side you want to print on is face down, and the front edge of the stack
is toward the front of the tray.
For infor m ation on loading letterhead, see Printing on letterhead.
Print media specifications and guidelines
66
Page 70

Media specifications and guidelines
8 Place the stack of paper against the left side of the tray and insert it under the metal stop.
Make sure the paper fits easily under the me tal stop and is not bent or wrinkled. Do not raise
the metal stop or force paper under it .
Note: Do not exceed the maximum stack height indicated by the maximum stack height
indicator. Overfilling the tray may cause jams.
Metal stop
Maximum stack
height indicator
9 Squeeze the width guide tab and the width guide together, and then slide the guide to the
edge of the paper.
Print media specifications and guidelines
67
Page 71

Media specifications and guidelines
10 Squeeze the length guide tab and the length guide together, and then slide the guide to the
edge of the paper.
Note: Sliding the guides too tightly against the paper may cause misfeeds.
11 Close the cover.
12 Insert the tray.
13 Set the paper size and paper type in the menus from the control panel .
Print media specifications and guidelines
68
Page 72

Media specifications and guidelines
Using and loading the multipurpose feeder
Your MFP has a multipurpose feeder that holds several sizes and types of print media. It is located
on the front of your MFP and can be closed when you are not using it. Reserve the multipurpose
feeder for when you print on different sizes and types of print media, such as card stock,
transparencies, postcards, note cards, and envelopes. You can load a stack of print media, or you
can load single sheets you do not keep in a tray.
If the MFP displays Load MP Feeder, y ou should load the multipurpose feeder. Load the print
media, and then press ✓. If you load a single sheet, the message is displa y ed agai n to prompt y ou to
load the next sheet. See Loading the multipurpose feeder for more inform at io n .
See page 48 of Media specifications and guidelines for a listing of supported types and sizes.
Note: When printing from the multipurpose feeder , be sure to set the Paper Size and
Paper Type.
Follow these guidelines when using the multipurpose feeder:
• Load only one size and type of print media at a time.
• To achieve the best possible print quality, use only high-quality print media that is designed
for use in laser printers. See Print media guidelines for information on selecting types of
print media.
• To prevent jams, do not add print media to the multipurpose feeder when it already contains
print media.
• Do not close the multipurpose feeder while a job is printing. Doing so may cause a jam.
• Load print media with the top edge going into the multipurpose feeder first.
• Do not place objects on the multipurpose feeder. Also, avoid applying excessive force to it.
Print media specifications and guidelines
69
Page 73

Media specifications and guidelines
Opening the multipurpose feeder
1 Locate the finger grips on the multipurpose feeder door.
Finger grips
2 Use the finger grips to pull the door open.
Print media specifications and guidelines
70
Page 74

Media specifications and guidelines
3 Pull the extension out.
Note: If you plan to load envelopes, do not extend the other extension as mentioned in
step 4 on page 71 and step 5 on page 71. Having the first e xtens ion out and the
second one not extended works best with envelopes.
4 Gently press down on the ridge. The e xtension unfolds.
Ridge
5 Guide the extension down gently so the multipurpose feeder is extended fully.
Print media specifications and guidelines
71
Page 75

Media specifications and guidelines
Loading the multipurpose feeder
See Specificat ions for pri nt media f or inf ormation on size s and types of print media y ou can load in
the multipurpose feeder.
1 Slide the width guide all the way to the right.
Print media specifications and guidelines
72
Page 76

Media specifications and guidelines
2 Prepare print media for loading.
Note: Do not load different sizes or types of print media i n the multipurpose f eeder at the
same time. Doing so may cause a jam.
• Flex sheets of paper back and forth to loosen them, and then fan them. Do not fold or
crease the print media. Straighten the edges on a level surface.
• Hold transparencies by the edges and fan them to pre vent feeding failures.
Note: Avoid touching the print side of the tr anspar encies. Be careful not to scratch them.
• Fan envelopes back and forth to loosen them. Do not fold or crease the envelopes.
Straighten the edges on a level surface.
Print media specifications and guidelines
73
Page 77

Media specifications and guidelines
3 Locate the stack height limiter. Do not exceed the maximum stack height by forcing print
media under the stack height limiter. The maximum stack height for an y print media is 10 mm
(0.4 in.). Overfi lling the multipurpose feeder could cause jams.
Stack height limit er
Note: See Print media source specifications for more information.
4 Load the print media.
• Load paper and card stock with the recommended print side face up and the top edge
entering first.
Print media specifications and guidelines
74
Page 78

Media specifications and guidelines
• Load letterhead with the logo face up and the top edge entering first.
Note: If you load letterhead for dupl ex printing, load the sheets with the logo face down
and entering last.
• Load transparencies with the recommended print side face up and the top edge entering
first.
Warning: Never use en velopes with clasps, snaps, windows, coated linings, or self-stick
adhesives. These envelopes may severely damage the MFP.
Print media specifications and guidelines
75
Page 79
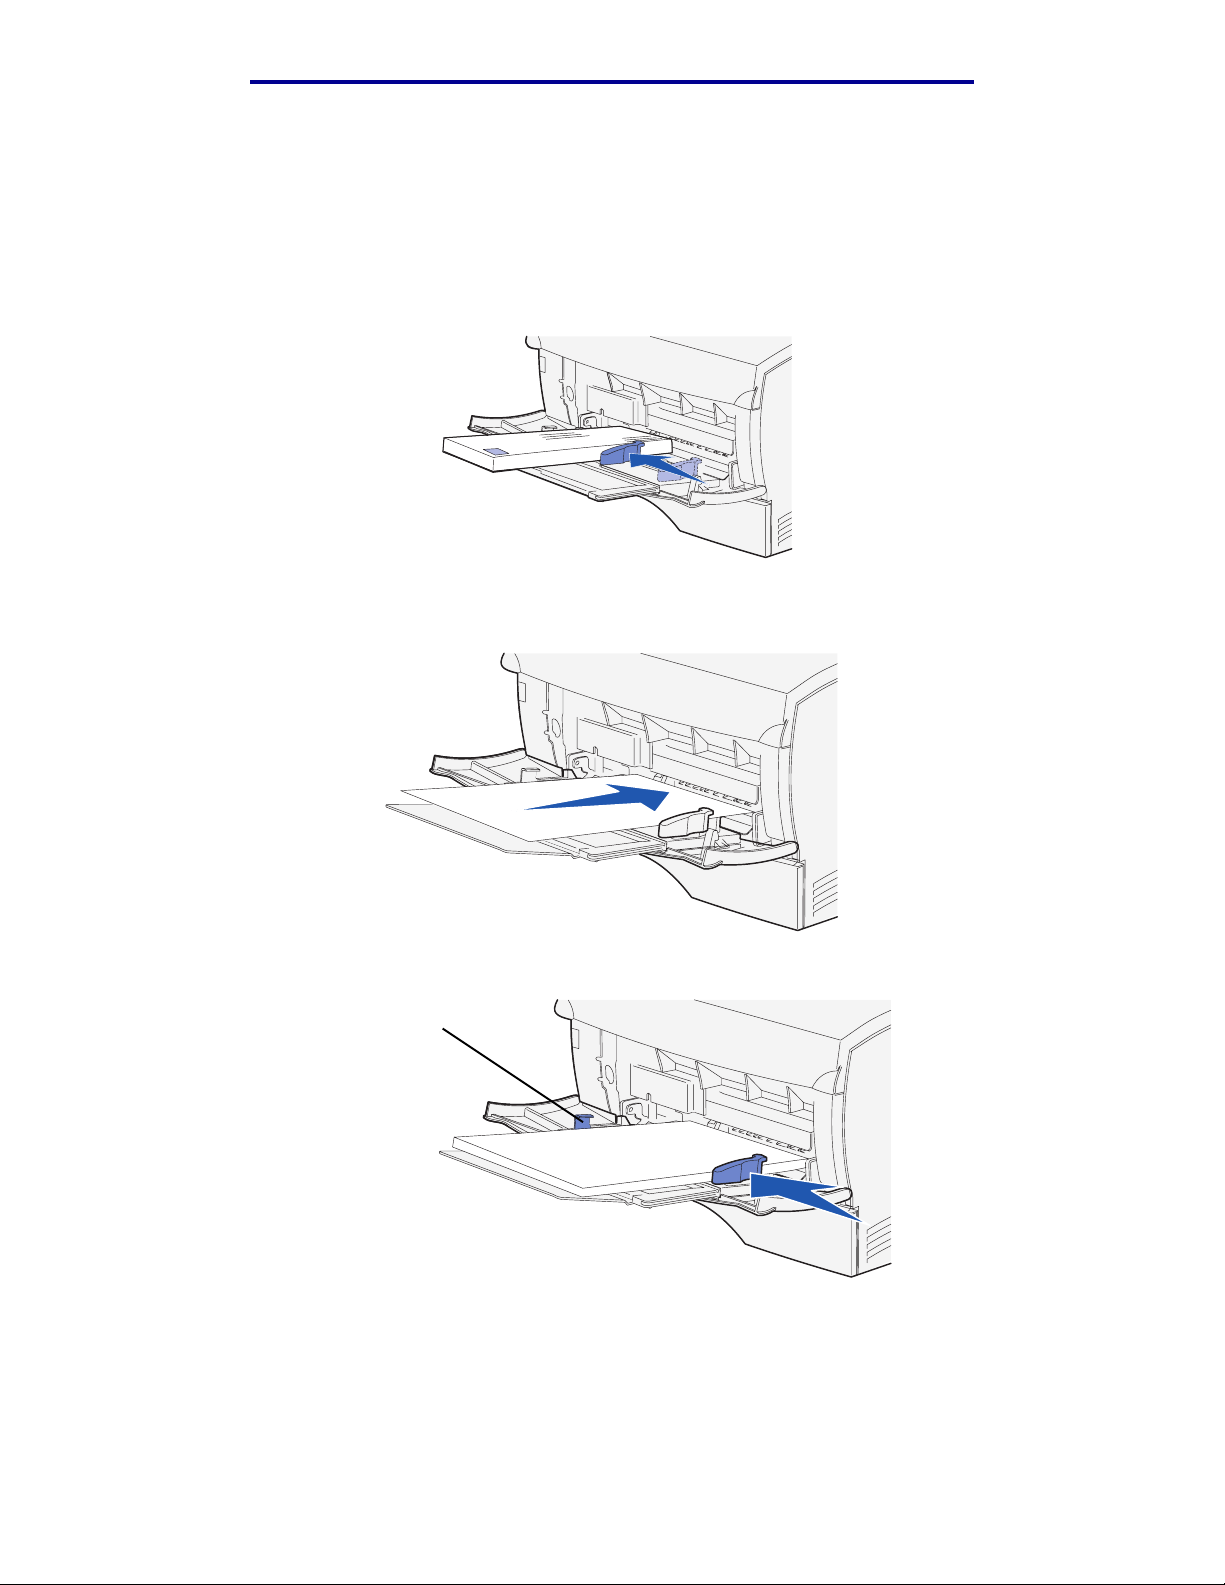
Media specifications and guidelines
• Load envelopes with the flap side down and the stamp area entering last.
Note: For best results, peel-a nd-sti c k envelopes should exit to the rear output bin. Open
the rear output bin when printing on these envelopes.
Do not feed stamped en velopes into the multipurpose feeder. The stamp and addres ses are
shown for envelope orientation only.
5 Slide the print media into the multip urpose feeder slot as f ar as i t will go without damagin g the
print media.
6 Slide the width guide to the left until it lightly touches the edge of the stack.
Stack height limiter
Make sure the print media fits loosely in the multipurpose feeder and is not bent or wrinkled.
7 Set the paper size and paper type in the menus from the contro l panel.
Print media specifications and guidelines
76
Page 80

Media specifications and guidelines
Using the output bins
Using the standard output bin
The standard output bin holds 150 sheets of print media. The MFP automatically sends print jobs to
the standard output bin. All jobs collate face down in this bin.
Standard output bin
Raising the paper rest
The paper rest holds printed jobs at an angle to keep them from sliding out of the bin. Pull the paper
rest forward to raise it.
Print media specifications and guidelines
77
Page 81

Media specifications and guidelines
Using the rear output bin
The MFP automatically sends print jobs to the rear output bin when you open it. The rear output bin
rev erse collates (pages 4, 3, 2, 1) all jobs f ace up. The rear output bin holds 20 sheets of paper.
You may wan t to use the r ear output bin when you print on differ ent sizes and types of print media,
such as paper, transparencies, postcards, note cards, and envelopes.
• Labels and transparencies may print more successfully when sent to the rear output bin.
• Envelopes may curl less if sent to the rear outpu t bin.
• Card stock must always exit to the rear output bin.
Print media that is 165.1 mm (6.5 in.) or less in length must exit to the rear output bin.
Note: Legal size print media sent to the rear exit bin stacks improperly when too many
sheets accumulate. You must remove print media often from this bin.
Print media specifications and guidelines
78
Page 82

Media specifications and guidelines
To use the rear output bin:
1 Grasp the tab in the recessed area of the rear output bin door.
Tab
Print media specifications and guidelines
79
Page 83

2 Pull the door down.
Media specifications and guidelines
3 Pull the extension straight out using the tab.
4 Close the rear output bin door when you finish using it.
Note: Make sure the door closes properly on both sides to prevent jams.
Print media specifications and guidelines
80
Page 84

4
Clearing jams
By carefully selecting media and loading it properly, you should be able to avoid most jams. If jams
do occur , complete the steps in the following sections. If jams occur frequently, see Av oiding jams
when printing.
Note: You must remove all jammed media fr om the enti re paper pat h. A ne w copy of the
page that jammed prints if Jam Recovery is set to On from the control panel or
the Web pages . Setting J am Recov ery to Auto does not guar antee that a ne w cop y
of the page will print.
Identifying the media path
The following illustration shows the path that media travels through the MFP. The path varies
depending on the input source (trays and multipurpose feeder) and output bin you are using.
Side view of the MFPFront view of the scanner and ADF
Optional drawer
Note: To avoid tearing scan media or print media, pull all jams out gentl y and slowly.
Clearing jams
81
Page 85

Clearing jams
Use the follow ing table to locate instructions for jam removal based on the jam message:
Message To clear this jam, see instructions in these sections
290 Scanner jam, remove a ll origi nals
from the scanner
291 Scanner jam, remove a ll origi nals
from the scanner
292 Scanner jam, remove a ll origi nals
from the scanner
293 Scanner jam, replace all orig inals
if restarting jo b
200 Paper jam, r emove Pri nt Cartr idge
to access
201 Paper jam, r emove Pri nt Cartr idge
to access
202 Paper jam, o pen rear door to acces s Jams under the print cartridge
Entering the ADF
In the ADF
Opening top cover during scanning
Jammed due to missing scan media or poor
positioning in the ADF
Jams under the print cartridge
Jams in the tray 1 area
Jams in the tray 2 area
Jams under the print cartridge
Jams behind the upper front door and the rear
output bin door
Jams in the tray 1 area
Jams in the tray 2 area
Jams inside a tray after clearing the metal stop
Jams in the fuser
Jams behind the rear output bin door
Before reaching the standard output bin
Exiting to the standard output bin
230 Paper jam, c heck dupl ex Jams in the fuser
Jams under the MFP
250 Paper jam, c heck MP F eeder Jams in the multipurpose feeder
Identifying the media path
82
Page 86

Clearing jams
Jams in the ADF
There are sev eral jams that may occur in the ADF.
Entering the ADF
The scan media jammed under the top cover of the ADF.
1 Open the top cover of the ADF.
2 Grasp the jammed scan media and pull it out.
3 Press ✓.
Jams in the ADF
83
Page 87

Clearing jams
In the ADF
The scan media jammed under the rollers under the top cover of the ADF.
1 Open the top cover of the ADF.
2 Press the button to release the second cover.
3 Lift the second cover.
4 Grasp the jammed scan media and pull it out.
5 Press ✓.
Jams in the ADF
84
Page 88

Clearing jams
Opening top cover during scanning
A jam occurs when the top cover of the ADF is opened after the scanning process starts.
1 Remove the jam following the directions in Entering the ADF or In the ADF based on how
far the jam is under the top cover.
2 Press ✓.
Jammed due to missing sc an media or poor positioning in the ADF
A jam occurs when scan media is not positioned properly in the ADF or media was not placed in the
ADF.
Posi tion the scan media properly in the ADF and press ✓.
Jams under the print cartridg e
Since the jam may occur farther back in the MFP behind the print cartridge area, you may need to
reach in farther to remove the jam.
1 Open the upper front door.
2 Remove the print cartridge. (See Removing the used print cartridge for instructions.)
CAUTION: The rear portion of the inside of the MFP may be hot.
Note: The ends of the print media may not be visible.
Jams under the print cartridge
85
Page 89

Clearing jams
3 With both hands, pull the print media to the right, and then out.
Note: If the print media resists, stop pulling and access it from the rear output bin door.
See Jams behind the upper front door and the rear output bin door to
continue.
4 Reinstall the print cartridge. (See pages 105 through 106 of Installing the new print
cartridge for instructions.)
5 Close the upper front door.
6 Press ✓.
Jams under the print cartridge
86
Page 90

Clearing jams
Jams behind the upper fr ont door and the rear output bin door
Jams in these areas require opening the rear out put bin door and the upper front door:
• The print media jams before reaching the standard output bin. See Before reaching the
standard output bin.
• The print media jams before exi ting completely into the standard output bin. See Exiting to
the standard output bin.
Before reaching the standard output bin
The print media jams before reaching the standard output bin.
1 Open the rear output bin door.
Jams behind the upper front door and the rear output bin door
87
Page 91

Clearing jams
2 Gently remove the jam based on how much is visible.
• If the middle of the sheet of print media is visible, but not the ends, grasp the print media
on both sides and gently pull it straight out toward you.
Jams behind the upper front door and the rear output bin door
88
Page 92
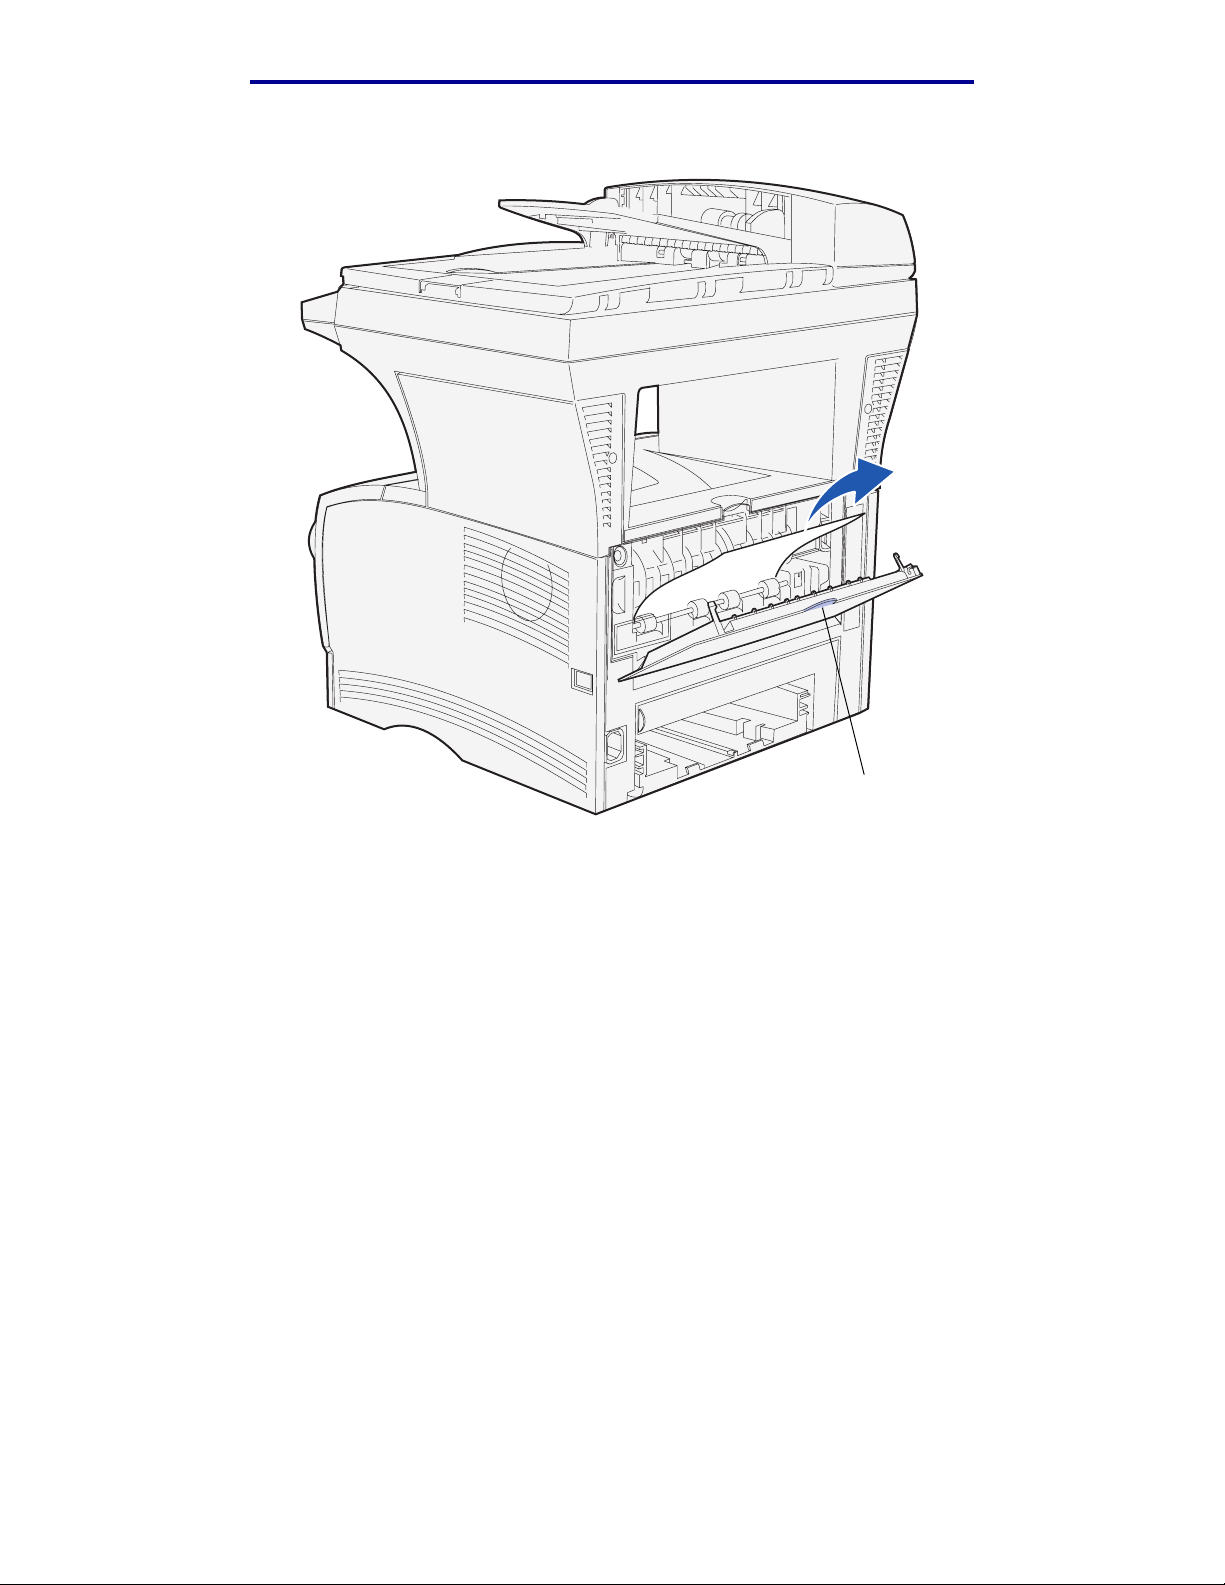
Clearing jams
• If an end of the jam is visible, pull it straight out toward you.
Tab
3 Close the rear output bin door by pushing it in the middle under the tab .
Note: Make sure the door closes on both sides.
4 Press ✓.
Jams behind the upper front door and the rear output bin door
89
Page 93

Clearing jams
Jams in the fuser
1 Open the upper front door. (See page 103 in Removing the used print cartridge if you
need instructions.)
2 Remove the print cartridge. (See Page 104 in Removing the used print cartridge if you
need instructions.)
CAUTION: The inside rear of the MFP may be hot.
3 Locate the jam inside the MFP.
4 Gently pull the jam straight out and then up.
5 Reinstall the print cartridge.
6 Close the upper front door.
7 Press ✓.
Jams in the fuser
90
Page 94

Clearing jams
Exiting to the standard output bin
1 Gently pull the jam straight out.
2 If the print media does not pull easily from here , cont in ue with Jams behind t he rear output
bin door on Page 92.
3 Press ✓.
Exiting to the standard output b i n
91
Page 95

Clearing jams
Jams behind the rear output bin door
This jam occurs when print media less than 152.4 mm (6 in.) in length has attempted to exit to the
standard output bin.
1 Open the rear output bin door.
Jams behind the rear output bin door
92
Page 96

Clearing jams
2 Gently remove the jam.
If the print media resists, stop pulling. Remove the print cartridge, and then pull the jam out.
Note: If you cannot find the jam inside the MFP, check to see i f the print job ha s e xited to
the standard output bin.
3 Leave the rear output bin door open to finish printing any additional pages less than 152.4
mm (6 in.) in length.
4 Press ✓.
Jams behind the rear output bin door
93
Page 97

Clearing jams
Jams in the multipurpose feeder
1 Gently pull the jam straight out of the multipurpose feeder.
2 Press ✓.
Jams in the multipurpose feeder
94
Page 98

Clearing jams
Jams in the tray 1 area
Print media is jammed in the area under the print cartridge, but the jam is not visible.
1 Gently pull tray 1 (standard tray) out and set it aside.
2 Pull the jam straight out.
3 Push the tray in.
4 Press ✓.
Jams in the tray 1 area
95
Page 99

Clearing jams
Jams in the tray 2 area
1 Gently pull tray 2 (optional 250-sheet or 500-sheet tray) out.
2 Pull the jam straight out.
3 Push the tray in.
4 Press ✓.
Jams in the tray 2 area
96
Page 100

Clearing jams
Jams inside a tray after clearing the metal stop
The print media jams as it releases from under the metal stop, but it has not completely exited the
tray. This can occur in any of the trays. You need to check each tray.
1 Pull the tray completely out.
2 Reposition the print media under the metal stop.
Note: If the sheet of print media is damaged, remove it. Do not reposition it.
3 Press down on the print media until the metal plate belo w it locks into place.
4 Inser t th e tray. See Page 63 in Loading print media for an illustration of how to insert the
tray.
5 Press ✓.
Jams inside a tray after clearing the metal stop
97
 Loading...