

Page 1

Informix Product Family
Informix
Version 11.70
IBM Informix Installation Guide
for Windows
GC27-3540-02
Page 2

Page 3

Informix Product Family
Informix
Version 11.70
IBM Informix Installation Guide
for Windows
GC27-3540-02
Page 4

Note
Before using this information and the product it supports, read the information in “Notices” on page B-1.
Edition
This edition replaces GC27-3540-01.
This document contains proprietary information of IBM. It is provided under a license agreement and is protected
by copyright law. The information contained in this publication does not include any product warranties, and any
statements provided in this manual should not be interpreted as such.
When you send information to IBM, you grant IBM a nonexclusive right to use or distribute the information in any
way it believes appropriate without incurring any obligation to you.
© Copyright IBM Corporation 1996, 2011.
US Government Users Restricted Rights – Use, duplication or disclosure restricted by GSA ADP Schedule Contract
with IBM Corp.
Page 5

Contents
Introduction ..................................v
IBM Informix editions ................................v
About this publication ................................v
Types of users ..................................v
What's new in installation for IBM Informix, Version 11.70 ....................v
Example code conventions ..............................viii
Additional documentation ..............................viii
Compliance with industry standards ...........................ix
Syntax diagrams ..................................ix
How to read a command-line syntax diagram .......................x
Keywords and punctuation .............................xi
Identifiers and names ...............................xi
How to provide documentation feedback .........................xii
Chapter 1. Preparing to install Informix and client products on Windows .......1-1
Online notes ...................................1-1
Verify system requirements ..............................1-1
Verify Administrators group membership .........................1-2
Multiple installations of the Informix server on one computer ..................1-2
Choose your installation setup.............................1-2
Plan role separation ................................1-3
Installation directory ................................1-4
User informix ..................................1-5
Other IBM product installation files ...........................1-5
Chapter 2. Installing Informix and client products on Windows ...........2-1
Installing with the GUI typical setup...........................2-1
Installing with the GUI custom setup ..........................2-2
Performing a silent installation of Informix and client products ..................2-4
Performing an inline Informix upgrade on Windows .....................2-5
Log files ....................................2-5
Cluster installations ................................2-6
Overview of implementing a cluster on two nodes .....................2-6
Installing the Informix server on the primary node of a cluster environment ............2-7
Setting up the installation on the cluster primary node ...................2-8
Installing the Informix server on the secondary node of a cluster environment............2-9
Multiple residency ................................2-10
Plan for multiple residency ............................2-10
Creating a new database server instance ........................2-10
Server Instance Manager command-line options .....................2-11
Chapter 3. Post-installation tasks on Windows ..................3-1
Working with the installation .............................3-1
Setup performed by the installation application .......................3-1
Informix program group ...............................3-2
Starting the database server from the Control Panel......................3-3
Starting the database server from the command line .....................3-4
Stopping the database server .............................3-4
Database server configuration after installation .......................3-5
Database server number ..............................3-5
Database server name...............................3-5
Service name and port number ...........................3-6
Dbspace name, location, and size ...........................3-6
Default sbspace name, location, size, and page size .....................3-6
Configuring Informix manually ...........................3-7
© Copyright IBM Corp. 1996, 2011 iii
Page 6

Chapter 4. Removing or modifying Informix and client products...........4-1
Removing Informix software bundle installations ......................4-1
Uninstalling or reducing an Informix database server installation .................4-1
Uninstalling an Informix server installation in silent mode ...................4-2
Appendix. Accessibility ............................A-1
Accessibility features for IBM Informix products ......................A-1
Accessibility features ...............................A-1
Keyboard navigation ...............................A-1
Related accessibility information ...........................A-1
IBM and accessibility...............................A-1
Dotted decimal syntax diagrams ............................A-1
Notices ...................................B-1
Trademarks ...................................B-3
Index ....................................X-1
iv
IBM Informix Installation Guide for Windows
Page 7

Introduction
This introduction provides an overview of IBM®Informix®products and of this
publication as well as the conventions that it uses.
IBM Informix editions
IBM Informix is available in different editions to fit different business needs.
Some of the functionality described in IBM Informix documentation might not be
available for Workgroup Edition. For details on the differences between editions,
see the following Web site: http://www.ibm.com/software/data/informix/ids/
ids-ed-choice/
The license agreement has the specific restrictions for each edition. To view a
license for a particular edition, search for "IBM Informix" on the following Web
site: http://www.ibm.com/software/sla/sladb.nsf
About this publication
This guide explains how to install, configure, and initialize an Informix server on a
computer running a Windows operating system. The documentation assumes that
you are familiar with the operating procedures of your computer and with your
operating system. For information about your operating system, see your Microsoft
Windows documentation.
The following additional products can be installed from the IBM Informix
installation media:
v IBM Informix BladeManager
®
v IBM Informix DataBlade
v IBM Informix ClusterIT
v IBM Informix Connect
v IBM Informix Client Software Development Kit (Client SDK)
v IBM Informix JDBC Driver
v The IBM Informix ODBC Driver can be installed as part of Client SDK.
v IBM Data Server Driver Package
For information about installing Client SDK and related programs, see the IBM
Informix Client Products Installation Guide.
Developers Kit (DBDK)
Types of users
This publication is for database administrators (DBAs) who install IBM Informix
products. This guide assumes that you are familiar with the operating procedures
of your computer and with your operating system. For information about your
operating system, see your Microsoft Windows documentation.
What's new in installation for IBM Informix, Version 11.70
This publication includes information about new features and changes in existing
functionality.
© Copyright IBM Corp. 1996, 2011 v
Page 8

For a complete list of what's new in this release, see the release notes or the
information center at http://publib.boulder.ibm.com/infocenter/idshelp/v117/
topic/com.ibm.po.doc/new_features.htm.
Table 1. What's New in IBM Informix Installation Guide for Windows for Version 11.70.xC4
Overview Reference
The Client SDK installation includes an option to install
the IBM OpenAdmin Tool (OAT) for Informix
When you install the IBM Informix Client Software
Development Kit (Client SDK), Version 3.70, you have an
option to install the OpenAdmin Tool (OAT) for Informix.
The OAT option is also available if you install the IBM
Informix software bundle and you select either Client
SDK or Informix Connect. OAT is a web application for
administering and analyzing the performance of IBM
Informix database servers. You can administer multiple
database server instances from a single OAT installation
on a web server. You can access the web server through
any browser to administer all your database servers.
Table 2. What's New in IBM Informix Installation Guide for Windows for Version 11.70.xC1
Overview Reference
Installation application provides seamless installation
and smarter configuration
See Installing the IBM OpenAdmin Tool (OAT) for
Informix with the Client SDK.
See “Installing with the GUI typical setup” on page 2-1
and “Installing with the GUI custom setup” on page 2-2.
The new installation application, which you start with the
new ids_install command, makes it easier to install and
configure Informix products and features.
v The typical installation has improved default settings.
Use it to quickly install all of the products and features
in the software bundle, with preconfigured settings.
v The custom installation is smarter than before. Use it if
you want to control what is installed on your
computer, for example, you can install specific products
and features or you can enable role separation.
v Regardless of which setup you use, you can create an
instance that is initialized and ready to use after
installation. You must use a custom installation setup if
you want to configure the instance for your business
needs.
vi IBM Informix Installation Guide for Windows
Page 9

Table 2. What's New in IBM Informix Installation Guide for Windows for Version 11.70.xC1 (continued)
Overview Reference
Changes to installation commands
See the documentation topics in Chapter 2, “Installing
Informix and client products on Windows,” on page 2-1
Some installation commands changed to take advantage
of new and changed functionality and to improve
and Chapter 4, “Removing or modifying Informix and
client products,” on page 4-1.
consistency across products and operating systems.
The following commands are not available in Informix
11.70 installation media: installserver, installclientsdk,
installconn. You must use the ids_install command to
install the database server with or without bundled
software. You can still download the standalone IBM
Informix Client Software Development Kit (Client SDK),
IBM Informix Connect, and IBM Informix JDBC Driver
media to install the client software on other computers.
Use the new uninstallids command to remove the server,
any bundled software, or both. You can remove specific
products by using the following commands, which are in
new subdirectories relative to the root directory:
v uninstall/uninstall_server/uninstallserver
v uninstall/uninstall_clientsdk/uninstallclientsdk
v uninstall/uninstall_connect/uninstallconnect
(formerly uninstallconn)
v uninstall/uninstall_jdbc/uninstalljdbc.exe or java
-jar uninstall/uninstall_jdbc/uninstaller.jar
(depending on how you install the JDBC driver)
IBM Data Server Driver Package integrated into
See “Other IBM product installation files” on page 1-5.
installation application
When you use the Informix installation application on
Windows, you can select to install the IBM Data Server
Driver Package with either Informix Client Software
Development Kit or Informix Connect. You do not need
to download installation media for that product from the
web.
Simpler configuration for silent installation
As in previous releases, you can generate a response file
by recording an installation setup done in interactive
mode. However, now you can set configuration
parameters by editing the response file in any text editor
in addition to passing command-line options.
Informix 11.70 comes with one response file,
bundle.properties, for the server and related products. In
previous releases there were two response files:
server.ini and bundle.ini.
Information about embedding Informix instances
In the previous release, information about deploying
embedded instances of Informix was documented along
with the information about installing the database server.
In this release, information about deploying embedded
Informix instances can be found in the Embedding
Informix section of the online information center or in the
new IBM Informix Embeddability Guide.
See “Performing a silent installation of Informix and
client products” on page 2-4.
Introduction vii
Page 10

Table 2. What's New in IBM Informix Installation Guide for Windows for Version 11.70.xC1 (continued)
Overview Reference
New editions and product names
IBM Informix Dynamic Server editions were withdrawn
and new Informix editions are available. Some products
were also renamed. The publications in the Informix
library pertain to the following products:
v IBM Informix database server, formerly known as IBM
Informix Dynamic Server (IDS)
v IBM OpenAdmin Tool (OAT) for Informix, formerly
known as OpenAdmin Tool for Informix Dynamic
Server (IDS)
v IBM Informix SQL Warehousing Tool, formerly known
as Informix Warehouse Feature
For more information about the Informix product family,
go to http://www.ibm.com/software/data/informix/.
Example code conventions
Examples of SQL code occur throughout this publication. Except as noted, the code
is not specific to any single IBM Informix application development tool.
If only SQL statements are listed in the example, they are not delimited by
semicolons. For instance, you might see the code in the following example:
CONNECT TO stores_demo
...
DELETE FROM customer
WHERE customer_num = 121
...
COMMIT WORK
DISCONNECT CURRENT
To use this SQL code for a specific product, you must apply the syntax rules for
that product. For example, if you are using an SQL API, you must use EXEC SQL
at the start of each statement and a semicolon (or other appropriate delimiter) at
the end of the statement. If you are using DB–Access, you must delimit multiple
statements with semicolons.
Tip: Ellipsis points in a code example indicate that more code would be added in
a full application, but it is not necessary to show it to describe the concept being
discussed.
For detailed directions on using SQL statements for a particular application
development tool or SQL API, see the documentation for your product.
Additional documentation
Documentation about this release of IBM Informix products is available in various
formats.
You can access or install the product documentation from the Quick Start CD that
is shipped with Informix products. To get the most current information, see the
Informix information centers at ibm.com
viii IBM Informix Installation Guide for Windows
®
. You can access the information centers
Page 11
and other Informix technical information such as technotes, white papers, and IBM
Redbooks®publications online at http://www.ibm.com/software/data/swlibrary/.
Compliance with industry standards
IBM Informix products are compliant with various standards.
IBM Informix SQL-based products are fully compliant with SQL-92 Entry Level
(published as ANSI X3.135-1992), which is identical to ISO 9075:1992. In addition,
many features of IBM Informix database servers comply with the SQL-92
Intermediate and Full Level and X/Open SQL Common Applications Environment
(CAE) standards.
The IBM Informix Geodetic DataBlade Module supports a subset of the data types
from the Spatial Data Transfer Standard (SDTS)—Federal Information Processing
Standard 173, as referenced by the document Content Standard for Geospatial
Metadata, Federal Geographic Data Committee, June 8, 1994 (FGDC Metadata
Standard).
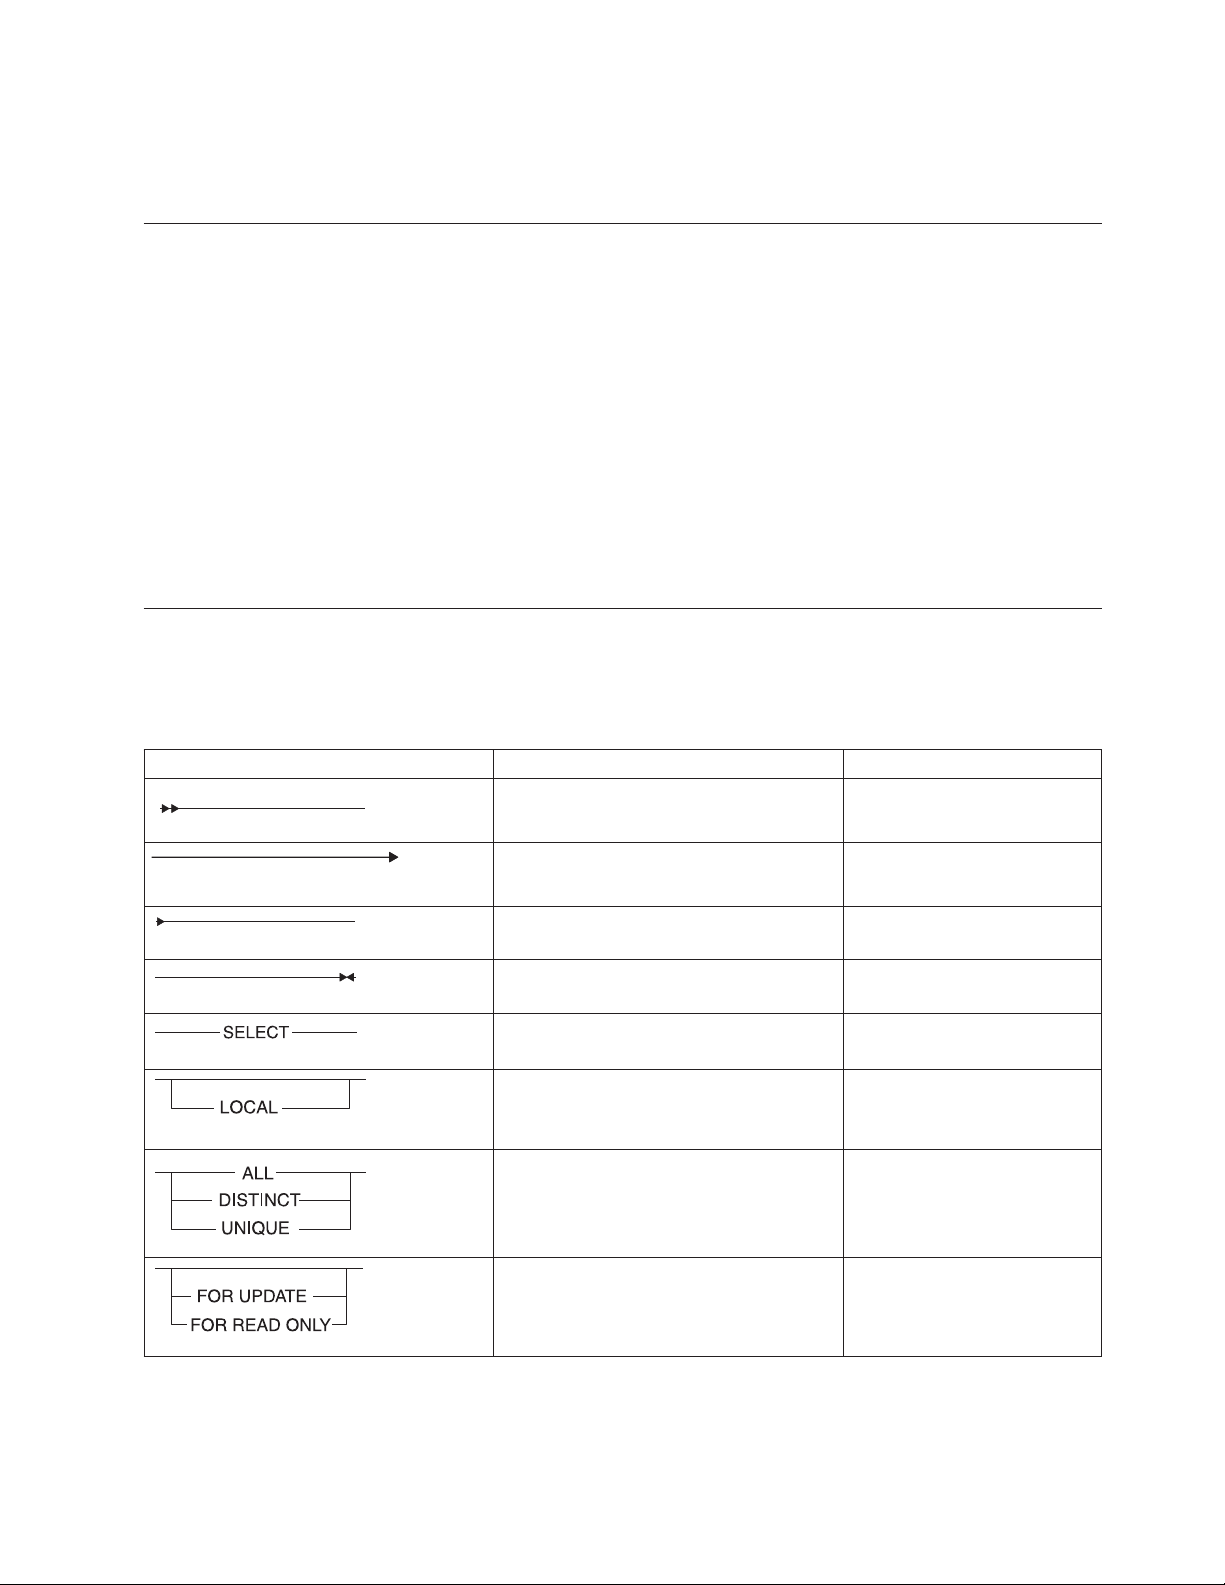
Syntax diagrams
Syntax diagrams use special components to describe the syntax for statements and
commands.
Table 3. Syntax Diagram Components
Component represented in PDF Component represented in HTML Meaning
>>----------------------
----------------------->
>-----------------------
-----------------------><
--------SELECT----------
--+-----------------+--’------LOCAL------’
---+-----ALL-------+---
+--DISTINCT-----+
’---UNIQUE------’
---+------------------+---
+--FOR UPDATE-----+
’--FOR READ ONLY--’
Statement begins.
Statement continues on next
line.
Statement continues from
previous line.
Statement ends.
Required item.
Optional item.
Required item with choice.
Only one item must be
present.
Optional items with choice
are shown below the main
line, one of which you might
specify.
Introduction ix
Page 12
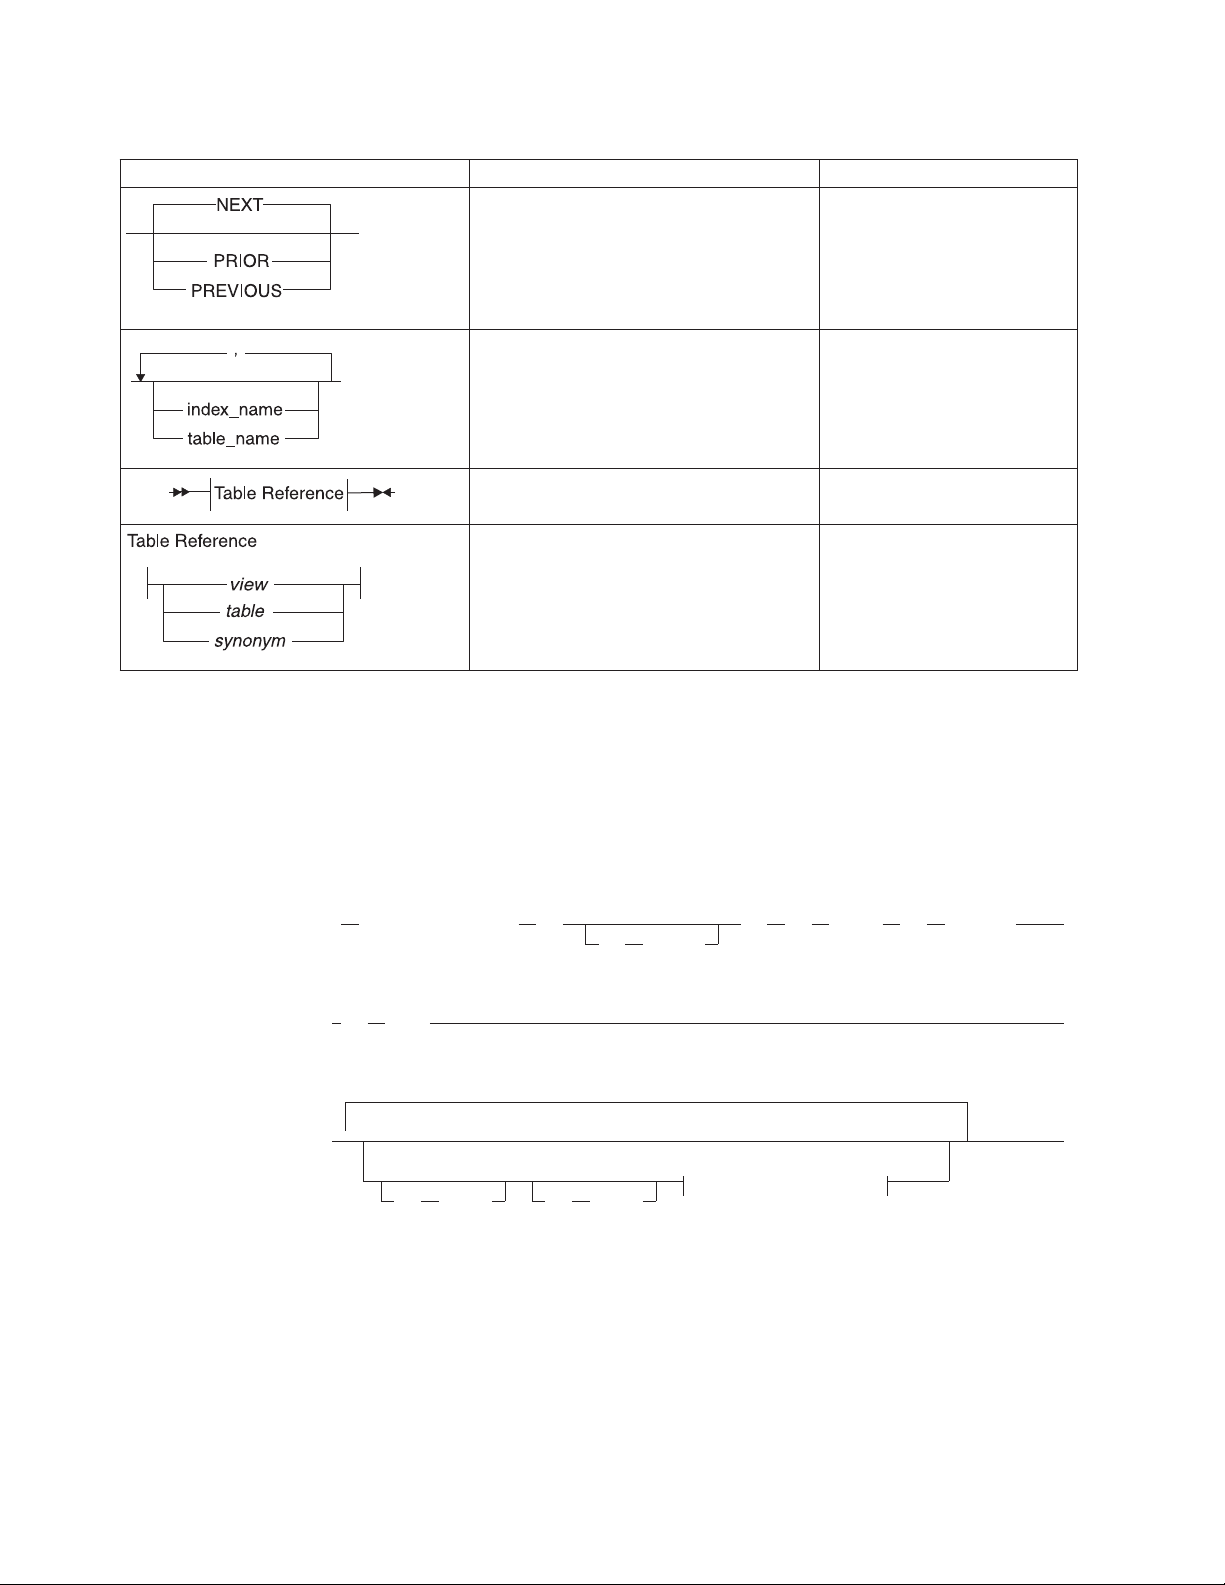
Table 3. Syntax Diagram Components (continued)
Component represented in PDF Component represented in HTML Meaning
.---NEXT---------.
----+----------------+--+---PRIOR--------+
’---PREVIOUS-----’
.-------,-----------.
V|
---+-----------------+--+---index_name---+
’---table_name---’
The values below the main
line are optional, one of
which you might specify. If
you do not specify an item,
the value above the line is
used by default.
Optional items. Several items
are allowed; a comma must
precede each repetition.
>>-| Table Reference |-><
Table Reference
|--+-----view--------+--|
+------table------+
’----synonym------’
How to read a command-line syntax diagram
Command-line syntax diagrams use similar elements to those of other syntax
diagrams.
Some of the elements are listed in the table in Syntax Diagrams.
Creating a no-conversion job
onpladm create job job
-t table
-p project
-n -d device -D database
Reference to a syntax
segment.
Syntax segment.
-S server -T target
Notes:
1 See page Z-1
This diagram has a segment named “Setting the Run Mode,” which according to
the diagram footnote is on page Z-1. If this was an actual cross-reference, you
would find this segment on the first page of Appendix Z. Instead, this segment is
shown in the following segment diagram. Notice that the diagram uses segment
start and end components.
x IBM Informix Installation Guide for Windows
(1)
Setting the Run Mode
Page 13

Setting the run mode:
l
c
-f
d
p
a
u
n N
To see how to construct a command correctly, start at the upper left of the main
diagram. Follow the diagram to the right, including the elements that you want.
The elements in this diagram are case-sensitive because they illustrate utility
syntax. Other types of syntax, such as SQL, are not case-sensitive.
The Creating a No-Conversion Job diagram illustrates the following steps:
1. Type onpladm create job and then the name of the job.
2. Optionally, type -p and then the name of the project.
3. Type the following required elements:
v -n
v -d and the name of the device
v -D and the name of the database
v -t and the name of the table
4. Optionally, you can choose one or more of the following elements and repeat
them an arbitrary number of times:
v -S and the server name
v -T and the target server name
v The run mode. To set the run mode, follow the Setting the Run Mode
segment diagram to type -f, optionally type d, p,ora, and then optionally
type l or u.
5. Follow the diagram to the terminator.
Keywords and punctuation
Keywords are words reserved for statements and all commands except
system-level commands.
When a keyword appears in a syntax diagram, it is shown in uppercase letters.
When you use a keyword in a command, you can write it in uppercase or
lowercase letters, but you must spell the keyword exactly as it appears in the
syntax diagram.
You must also use any punctuation in your statements and commands exactly as
shown in the syntax diagrams.
Identifiers and names
Variables serve as placeholders for identifiers and names in the syntax diagrams
and examples.
You can replace a variable with an arbitrary name, identifier, or literal, depending
on the context. Variables are also used to represent complex syntax elements that
are expanded in additional syntax diagrams. When a variable appears in a syntax
diagram, an example, or text, it is shown in lowercase italic.
Introduction xi
Page 14

The following syntax diagram uses variables to illustrate the general form of a
simple SELECT statement.
SELECT column_name FROM table_name
When you write a SELECT statement of this form, you replace the variables
column_name and table_name with the name of a specific column and table.
How to provide documentation feedback
You are encouraged to send your comments about IBM Informix user
documentation.
Use one of the following methods:
v Send email to docinf@us.ibm.com.
v In the Informix information center, which is available online at
http://www.ibm.com/software/data/sw-library/, open the topic that you want
to comment on. Click the feedback link at the bottom of the page, fill out the
form, and submit your feedback.
v Add comments to topics directly in the information center and read comments
that were added by other users. Share information about the product
documentation, participate in discussions with other users, rate topics, and
more!
Feedback from all methods is monitored by the team that maintains the user
documentation. The feedback methods are reserved for reporting errors and
omissions in the documentation. For immediate help with a technical problem,
contact IBM Technical Support at http://www.ibm.com/planetwide/.
We appreciate your suggestions.
xii IBM Informix Installation Guide for Windows
Page 15

Chapter 1. Preparing to install Informix and client products on Windows
Read the following information and complete the tasks appropriate for your
installation environment.
Online notes
See the release notes, documentation notes, and machine notes in the Release
Information subtopic under the Product Overview topic for useful topics and links
about an IBM
the known and fixed defects for the product or fix pack.
All these notes are in the Information Center at http://publib.boulder.ibm.com/
infocenter/idshelp/v117/index.jsp.
Verify system requirements
See the IBM Informix machine notes for a list of supported Windows operating
systems on which you can install the products.
Important: The following requirements might be lower for your system,
depending on the operating system and environment.
®
Informix®product or fix pack. Also review the online notes about
A typical installation of the IBM Informix software bundle requires approximately
750 MB of disk space. Some installation choices require additional disk space. The
installation application informs you of the total disk space required by your setup
before you copy the binary files to your host computer.
An installation requires approximately 1 GB RAM.
Ensure that you have 1 GB free space available in your temporary directory before
installation. This is to allow the extraction of the installation media and for
running the installation program. This location can be altered by setting the
IATEMPDIR environment variable to a location that contains sufficient storage
prior to invoking the installation program.
32-bit installation media on 64-bit Windows computers
If you want to use the 32-bit installation media on a 64-bit Windows computer, the
Windows 32 on Windows 64 bit compatibility folder (usually %windir%\SysWOW64)
must occur in the path environment variable in front of the native 64 bit folder
(usually %windir%\system32) before installation is started. Failure to meet this
prerequisite can result in an aborted installation because of a missing prerequisite.
The suggested method for starting the installer is to open a command prompt, add
the compatibility folder to path (set path=%windir%\syswow64;%path%), and then
run the installation application from this command prompt.
1. Open a command prompt.
2. Add the compatibility folder to path. For example, if the Windows on Windows
compatibility folder is in %windir%\SysWOW64, set path=%windir%\sysWOW64;
%path%
© Copyright IBM Corp. 1996, 2011 1-1
Page 16

3. Open the ids_install.exe file from this command prompt to start the
installation application instead of clicking the executable file through Windows
Explorer or using another method to open the installation executable file.
To complete the installation, see “Installing with the GUI typical setup” on page
2-1 or “Installing with the GUI custom setup” on page 2-2.
Verify Administrators group membership
Verify that you are logged in as a member of the Windows Administrators group.
For information about how to create groups and add users to groups, see your
Windows documentation.
Multiple installations of the Informix server on one computer
You can complete multiple installations of the Informix 11.70 database server on
the same computer. Each Informix installation on the host computer can run with
its own installation setup, including unique role separation settings.
Copies of the same version
You can install multiple copies of the same version of the Informix server on one
Windows operating system, provided that each installation is placed in a different
directory. A copy refers to an installation in a different location from any other
installation. The benefits of doing this include:
v The ability to test new features before using them in a production database
v The ability to have both 32-bit and 64-bit versions on the same computer
Each installation adds a corresponding program group on the Start > Programs
menu.
The first installation on a computer, by default, does not have an installation
number appended to the program group name. When you install additional copies
of the product on the same computer, a number is appended to the program group
name. The first copy (that is, the second installation of the product on the
computer) has 1 appended at the end of the program group entry, and the number
of each subsequent copy that you install increases by 1. For example, the
installation number of the third copy is 2 and the installation number of the next
copy is 3.
You cannot install copies of IBM Informix Client Software Development Kit or IBM
Informix Connect on a computer that already has an installation of one of these
client products.
Choose your installation setup
Typical setup installs all Informix products on the installation media, with all
features, and requires minimal user input. Custom setup lets you select specific
products and features to exclude from the installation to minimize the footprint
(disk size) and provides options to install the Informix server with more advanced
security and configuration features.
1-2 IBM Informix Installation Guide for Windows
Page 17

Installation application setup types
The installation application has two setup options:
Typical installation
Typical setup is recommended for most database server environments, but
the installation requires more disk space and memory than an installation
created using custom setup.
Custom installation
Custom setup lets you select products and features to exclude from the
installation. Some features are mutually dependent, and must be installed
with one another. The installation application enforces these dependencies.
In addition, custom setup lets you select whether to create a database
server instance automatically after installation. If you create an instance in
custom installation, you have the option to set specific configuration
parameters or to let the installation application set them automatically.
You must select custom setup to complete a domain installation or to
enable role separation.
You can run the installation application on Windows in either of the following
modes:
v Graphical user interface (GUI).
v Silent installation. You can perform a silent installation, an installation method
that requires no user interaction with the installation application after you start
it. Silent installation is useful when you plan to install Informix or related
products on multiple computers. You must have a complete response file, which
indicates how you want the installation to be configured, before you can
perform a silent installation.
Which setup type you select depends on your system architecture, your technical
expertise, and the requirements of your implementation.
Silent installation
Installing database server to run as local system account
Related tasks
“Installing with the GUI typical setup” on page 2-1
“Installing with the GUI custom setup” on page 2-2
“Performing a silent installation of Informix and client products” on page 2-4
Plan role separation
Role separation provides increased database security because the database server
splits administrative tasks into mutually exclusive roles.
If you expect to replicate your installation configuration with silent
installation, read “Performing a silent installation of Informix and client
products” on page 2-4 first.
To install the Informix database server as a local system account on
Windows, you must select a custom installation and complete the
administrative user configuration accordingly. With the option to run the
Informix service as local system, the database server is started using the
Windows local system account, instead of user informix.
Chapter 1. Preparing to install Informix and client products (Windows) 1-3
Page 18

If you do not enable role separation, the Informix-Admin group performs all
administrative tasks. For detailed information about the role separation feature, see
the IBM Informix Security Guide.
Important: You must select custom installation setup to enable role separation. You
cannot turn off role separation after you enable it. To remove role separation from
your system, you must use the uninstaller to remove all database instances and
related files. After the uninstallation, reinstall the database server without role
separation.
If you enable role separation during installation, you are prompted to create
groups and users and add the users to the corresponding groups.
Table 1-1. Role separation
Default group name Role category Role definition
Informix-Admin General Database
Administration
ix_dbsso Database System
Security Officer
ix_aao Auditing Analysis
Officer
ix_users Database Users Accesses the database to perform
Performs general administrative tasks,
such as archiving and restoring data,
monitoring use and performance, and
tuning the system.
Maintains the security of the database
server. Functions of this role include audit
adjustment and changing security
characteristics of storage objects. Creation
of this user role requires selection of a
password during installation.
Audits the records of specific types of
database activities. If someone attempts to
circumvent or corrupt the security
mechanism of the database, these actions
can be traced. Creation of this user role
requires selection of a password during
installation.
end-user tasks. Only users who are
designated as members of the ix_users
group can access the database.
During installation, you can replace these default users and groups with existing
users or groups.
Installation directory
The drive on which the directory exists must be formatted using NTFS. You are
not required to create the directory before installation. IBM Informix software
refers to this installation directory as %INFORMIXDIR%, and often the INFORMIXDIR
environment variable is set to this directory. The installation application suggests a
default %INFORMIXDIR% path, which you can change by typing a different path.
For more information about the INFORMIXDIR environment variable, see the IBM
Informix Guide to SQL: Reference.
1-4 IBM Informix Installation Guide for Windows
Page 19

User informix
User informix is a user account with main authority over an IBM Informix
instance.
User informix is required for most installations because it has the unique user
identifier (UID) to manage and maintain Informix instances and databases on the
host server. The only exception to this requirement is when you install the
Informix server as local system user.
The password for this user account must be protected. Only let trusted database
and security administrators log in as user informix.
If you are installing Informix for the first time on your system and have not
selected the local system user option, the installation program prompts you to
create the informix user by providing a password. If user informix already exists
on your system, the installation program prompts you to confirm the password.
Important: The database server will not start if password standards for user
informix or any other users do not conform to local security standards.
Other IBM product installation files
The IBM Data Server Driver Package is included in the installation media for
Windows.
When you use the Informix installation application on Windows, you can select to
install the IBM Data Server Driver Package with either IBM Informix Client
Software Development Kit (Client SDK) or IBM Informix Connect. If you select to
install the driver, a separate, short installation application starts. If you do not
install the driver during Informix product installation, you can install the driver
separately later. The IBM Data Server Driver Package directory appears on the top
level of the installation media. For more information about the driver, see the IBM
Informix Client Products Installation Guide
Chapter 1. Preparing to install Informix and client products (Windows) 1-5
Page 20

1-6 IBM Informix Installation Guide for Windows
Page 21

Chapter 2. Installing Informix and client products on Windows
Most IBM Informix products, including the database server and the major client
applications, can be installed using a packaged software bundle. You can select
exactly which products you want to install. There is also a selection of supported
installation methods offered to help meet the requirements of specific
environments.
The executable file for the Informix software bundle installation is the
ids_install.exe file on the installation media. If the ids_install.exe file does not
appear on the top level of the media that you have, extract the iif folder
maintaining the folder structure to access the executable file.
If you prefer, you can install each of the following client products individually by
using a separate installation application that is available as a different executable
file:
v Informix Client Software Development Kit (Client SDK)
v Informix Connect
v Informix JDBC Driver
For more information about these individual client installation applications, see the
IBM Informix Client Products Installation Guide regarding Client SDK and Informix
Connect or the IBM Informix JDBC Driver Programmer's Guide.
If you want to use the Informix installation application with screen reader
software, perform the following actions:
1. Install the Java Access Bridge.
2. Start the Informix installation application from the command line with this
command: ids_install.exe LAX_VM=path_name/java.exe
It is recommended that you use IBM Java Runtime Environment (JRE) 1.6 SR7 or
later.
Installing with the GUI typical setup
Select a typical setup in the installation application GUI to install the Informix
database server and client products with all features. Typical installation setup by
default creates a ready-to-use database server instance that is configured for your
host environment.
Verify that you have completed the appropriate "Preparing to install" tasks before
performing the installation. If you are installing the 32-bit Informix server on a
64-bit computer, start the installation from the command line as documented in
“Verify system requirements” on page 1-1.
To install Informix products using the GUI typical setup:
1. Open the ids_install.exe file.
2. Read the license agreement. You must accept it to proceed. Depending on your
selections, you might have to accept more than one license agreement.
3. Accept or change the default installation directory in the Choose Install Folder
window.
© Copyright IBM Corp. 1996, 2011 2-1
Page 22

4. Select Typical in the Installation Type window.
5. Optional: If you do not want to set up a ready-to-use Informix instance as part
of the installation, you must deactivate the Create a server instance option. By
default, the option is checked. If you choose to install without this option, you
can configure and initialize the database server manually after installation is
complete to create a running Informix instance.
6. If you are prompted for an Informix administrator password, enter a password
and record it in a secure location. The installation application creates the
administrator account, and you must have the password to administer the
Informix installation. This user account is referred to as user informix
throughout Informix products and documentation.
7. Verify that the installation summary accurately reflects your installation
options, and that the host computer has enough free space for the total
installation. Go back to adjust the installation options as necessary.
Important: See “Configuring Informix manually” on page 3-7 to set up an
Informix instance if you did not create a server instance in the installation
application.
Related reference
“Choose your installation setup” on page 1-2
“Log files” on page 2-5
Installing with the GUI custom setup
Custom setup lets you exclude some Informix products and features from the
installation to reduce disk space and offers you other ways to configure installation
variables for the requirements of your system.
Verify that you have completed the appropriate "Preparing to install" tasks before
performing the installation. If you are installing the 32-bit Informix server on a
64-bit computer, start the installation from the command line as documented in
“Verify system requirements” on page 1-1.
If you want to use a domain account to administrator Informix instances, you must
run the installer as a user who has both local administrator access and domain
controller administrator access.
To install Informix using GUI custom setup:
1. Open the ids_install.exe file.
Important: If want to record a response file with the installation configuration,
you must start the installation application with a command-line script. See the
documentation about performing a silent installation.
2. Read the license agreement. You must accept it to proceed. Depending on your
selections, you might have to accept more than one license agreement.
3. Accept or change the default installation directory in the Choose Install Folder
window.
4. Select Custom in the Installation Type window, and select the Informix
products and features that you want to install.
a. Click the + character by each component node to view the products and
features contained in that component.
b. Clear checkboxes by products and features that you do not want to install.
The installation application enforces dependencies among products and
2-2 IBM Informix Installation Guide for Windows
Page 23

features. If you cannot configure the selected or cleared features exactly as
you want, it is probably an unsupported installation configuration for your
environment.
Notice that a brief description of a selected component or feature is located
in the GUI window.
Important: If you want to set up clustering for failover support, select
Cluster utility.
5. Optional: Change user authentication settings, depending on your planned
usage of the installation and host environment:
v You can change the user account that runs the Informix database server to a
local system account. Running the Informix server as a local system account
is useful if you are planning to embed the server in an application because
this account is a service that runs as a user without a password requirement.
v If you are installing the server as a local system account and plan to use
Enterprise Replication, create the informix user manually.
v If you are running the installer as a domain administrator and you want to
use a domain account to administrator Informix instances, select Domain.
6. If you are prompted for an Informix administrator password, enter a password
and record it in a secure location. The installation application creates the
administrator account, and you must have the password to administer the
Informix installation. This user account is referred to as user informix
throughout Informix products and documentation.
7. Optional: Enable role separation for auditing procedures.
Important: If you enable role separation, you cannot turn it off after the
product is installed. To remove role separation, you must uninstall the database
server and reinstall it without role separation. To learn more about role
separation, see “Plan role separation” on page 1-3 and click Help in the role
separation window of the installation application.
8. Optional: If you want to set up a ready-to-use Informix instance as part of the
installation, select the Create a server instance option. If you want the server
instance to initialize at creation, click Initialize server. You can either accept
default configuration parameters or customize configuration parameters of the
instance.
Tip: Click Help in this window of the installation application for information
about selecting a default or customized configuration and for information about
the configuration parameters if you select to customize the instance.
If you do not select the Create a server instance option, you can configure and
initialize the database server manually after installation is complete to create a
running Informix instance.
9. Verify that the installation summary accurately reflects your installation
options, and that the host computer has enough free space for the total
installation. Go back to adjust the installation options as necessary.
Important: See “Configuring Informix manually” on page 3-7 to set up an
Informix instance if you did not create a server instance in the installation
application.
Chapter 2. Installing Informix and client products (Windows) 2-3
Page 24

Related reference
“Choose your installation setup” on page 1-2
“Log files” on page 2-5
Performing a silent installation of Informix and client products
To perform a silent installation, which is also known as an unattended installation,
use a response file that contains information about how you want the product
installed. You invoke this response file in a command-line option to perform the
silent installation.
You must be logged in as an administrator on all computers where you are
complete an installation.
To complete a silent installation containing your configuration of a previous
installation, you must have a response file with customized settings of how you
want the product or products installed. The following procedure outlines two
different ways of creating the response file: recording your configuration of an
interactive GUI installation or customizing the bundle.properties template file.
The installation media contains the text-based bundle.properties file that can be
used as a template for creating your response file.
If you know that you have a valid response file already, begin with step 3 in the
following procedure.
1. Create a response file by doing one of the following:
v Run the Informix installation script to start the installation application in GUI
mode, specifying that you want to record the installation in a response file.
ids_install.exe -i gui -r path_name
Substitute path_name with the full path and file name of your response file,
appending .properties at the end of the name.
v Create a copy of the bundle.properties file that is on the installation media
and edit the file for the installation configuration that you want.
Important: Do not overwrite, move, or delete the bundle.properties file
that is shipped in the installation media. You must change the setting for
product license terms agreement to "Accept" in your customized .properties
file for it to function as a response file during silent installation.
2. Copy the response file to the computer where you want to install Informix and
any bundled client programs.
3. Run the silent installation command, indicating the relative or absolute path to
the response file :
v ids_install.exe -i silent -f path_name
4. Repeat steps 2 and 3 for each location where you want to deploy the same
installation setup.
The installation log files are located in the following directories, depending on
which product or products you installed:
v $INFORMIXDIR\IBM_Informix_Software_Bundle_InstallLog.log for an Informix
installation with any client products
v $INFORMIXDIR\IBM Informix_11.70_InstallLog.log for Informix installation
alone
2-4 IBM Informix Installation Guide for Windows
Page 25

v $INFORMIXDIR\IBM_Informix_Client_SDK_InstallLog.log for Client SDK
installation alone
v $INFORMIXDIR\IBM_Informix_Connect_InstallLog.log for Informix Connect
v $INFORMIXDIR\IBM_Informix_JDBC_Driver_InstallLog.log for IBM Informix
JDBC Driver installation alone
Related reference
“Choose your installation setup” on page 1-2
“Log files”
Performing an inline Informix upgrade on Windows
If you have earlier versions of IBM Informix installed, you must use an upgrade
path that is appropriate for your environment.
Important: If you plan to complete an inline upgrade where a previous version of
Informix is already located, before you upgrade you must back up the database
server that you are using (including the data chunks of the existing installation)
and the onconfig and SQLHOSTS files. Be sure to review the IBM Informix
Migration Guide for detailed prerequisites and instructions about the upgrade
method that is appropriate for your environment.
There is no inline upgrade support for Client SDK and Informix Connect
installations. To upgrade one of these client products at the same time you perform
inline upgrade of the database sever, uninstall the old client product installation
and select the client product in the installation application.
Log files
To complete an inline upgrade of the Informix database server:
1. Save copies of the onconfig and SQLHOSTS files of the existing installation.
2. Shut down all instances of the Informix installation before installing the new
version.
3. Install Informix in the $INFORMIXDIR path of the Informix installation that you
want to upgrade.
If you want to remove any features from the upgraded installation, run the
uninstallation application to selectively remove the features.
Installation log files can provide helpful information about a completed installation
or help you identify problems about an installation attempt.
When you install Informix products, the installation application generates log files
in %INFORMIXDIR%. Log files are also created if you attempt to install any of the
products but the installation application does not complete successfully.
The log file %INFORMIXDIR%/IBM_Informix_Software_Bundle_InstallLog.log is
created for any installation using the Informix software bundle. In addition, one or
more of the following log files are created, depending on which product or
products you have chosen to install:
v %INFORMIXDIR%\IBM Informix_11.70_InstallLog.log for Informix installation
alone
v %INFORMIXDIR%\IBM_Informix_Client_SDK_InstallLog.log for Client SDK
installation alone
Chapter 2. Installing Informix and client products (Windows) 2-5
Page 26

v %INFORMIXDIR%\IBM_Informix_Connect_InstallLog.log for Informix Connect
v %INFORMIXDIR%\IBM_Informix_JDBC_Driver_InstallLog.log for IBM Informix
JDBC Driver installation alone
v %INFORMIXDIR%\IBM_Informix_Dynamic_Server_BladeManager_InstallLog.log for
a BladeManager installation
v %INFORMIXDIR%\IBM_Informix_GLS_InstallLog.log for a GLS installation
If the installation application fails, then the log files are placed on the Windows
Desktop.
Related tasks
“Installing with the GUI typical setup” on page 2-1
“Installing with the GUI custom setup” on page 2-2
“Performing a silent installation of Informix and client products” on page 2-4
Cluster installations
IBM Informix supports Microsoft Cluster Server (MSCS), which enables high
availability on Microsoft Windows (Windows 2003, Windows XP and Windows
Vista). MSCS allows you to cluster two Windows computers as redundant
components, or nodes. When a failure occurs on one node in the cluster, Windows
restarts the failed applications (such as the database server) on the surviving node
in the pair.
Important: The database server installation must include the Cluster utility feature
with appropriate installation configuration to set up an MSCS environment. You
must install the Informix software bundle as documented in “Installing the
Informix server on the primary node of a cluster environment” on page 2-7.
MSCS includes the Cluster Administrator, which enables you to designate a cluster
and define resources, resource ownership, and dependencies on other resources. A
resource is a hardware component, such as a shared disk, or a software
application, such as the database server, that is shared between the two nodes in a
cluster.
The Cluster Administrator also enables you to define groups that specify resource
dependencies, so that the Microsoft Resource Manager can move groups of
dependent resources to the surviving node in the event of failover. The Microsoft
Resource Manager is a program that invokes specific start, restart, stop, and
monitoring functions for a resource.
Important: Stop Informix before shutting down the operating system during MSCS
setup to avoid any data loss.
Overview of implementing a cluster on two nodes
After you complete cluster-implementation preparation tasks, you implement a
clustering environment of the database server in three steps:
1. On the primary node, install the Informix server as documented in “Installing
the Informix server on the primary node of a cluster environment” on page 2-7.
2. Convert the database servers to a cluster configuration. This step is
implemented with the ClusterIT utilities:
v Use the clusterIT_a.exe utility to configure Informix on the primary node for
use in a cluster.
2-6 IBM Informix Installation Guide for Windows
Page 27

v Copy the cluster.ini, clusterit_b.exe, and silent_install_11.70.ini files
from %INFORMIXDIR% of the primary node to the directory where you want to
install the database server on the secondary node. These .ini files are in
%INFORMIXDIR% of the primary node as a result of the Informix server
installation there.
v On the secondary node, run the clusterIT_b.exe utility. The utility installs the
Informix server and configures the primary node's database server instance
to run with the instance on the secondary node.
Installing the Informix server on the primary node of a cluster environment
Before you install the server, do the following:
v Decide on an %INFORMIXDIR% path that is a local disk and is the same path on
both the computer with the primary node and the computer with the secondary
node.
v Verify that the shared disks of the cluster can store all chunks. All chunks must
be on shared disks.
After the installations on both primary and secondary nodes, it must be possible to
move the disks from one node to another. While all chunks must be on shared
disks, each %INFORMIXDIR% must be local to each node.
To install the Informix database server on the host computer of a primary node for
the cluster environment:
1. Install the Informix server with the following configuration:
a. Select Custom setup in the installation application.
b. In the Product Selection window that contains the product and feature tree,
select the Cluster utility feature of the core database server family.
c. Specify a domain user informix account.
d. Select the Create a server instance checkbox, and verify that the Initialize
server checkbox is not selected.
See “Installing with the GUI custom setup” on page 2-2 for more information
about custom installation.
2. Edit the onconfig file. For more information about the onconfig file, see the
IBM Informix Administrator's Reference.
3. Put the root dbspace on a shared disk.
4. Move all shared disks to the primary node.
5. Initialize the database server. For more information, see “Database server
configuration after installation” on page 3-5.
6. Create additional dbspaces, if necessary. For more information, see “Dbspace
name, location, and size” on page 3-6. Additional dbspaces must be located on
shared disks.
To complete the cluster setup on the primary node, see “Setting up the installation
on the cluster primary node” on page 2-8.
Chapter 2. Installing Informix and client products (Windows) 2-7
Page 28

Setting up the installation on the cluster primary node
There must be an existing Informix instance on the computer that has been
configured as documented in “Installing the Informix server on the primary node
of a cluster environment” on page 2-7.
When you run the clusterit_a.exe utility on the primary node, ClusterIT performs
the following tasks:
v Extracts the resource .dll (ifxdb920.dll)totheWINDOWS\cluster directory
v Creates an IBM Informix resource group
v Moves all physical disks on which chunks are located to the IBM Informix group
v Creates a virtual IP address and a virtual host name
v Registers the resource type IFXDB920
v Creates the Informix cluster resource
v Sets dependencies
v Sets the Informix cluster resource to online
To set up a cluster on the primary node:
1. Run the clusterit_a.exe utility.
2. In the window that opens when you start the utility, fill out the information
about networking environment, machine names, and configuration for the
cluster node:
a. In the DBSERVERNAME to be clustered text box, enter the name of your
unclustered Informix instance.
b. In the DBSERVERNAME final (when clustered) text box, enter a name for
your Informix instance after it has been converted into a cluster
configuration.
c. In the Physical hostname primary node text box, enter the physical host
name of the primary node.
d. In the Informix password text box, enter your password.
e. Enter the path information in the Full path to the IDS directory on the
Informix RDBMS CD field.
f. Enter the location of the installation (the value of %INFORMIXDIR% must be
located on a local disk and must be identical for both nodes).
g. In the New virtual host name for the database host text box, enter the new
virtual host name.
h. In the virtual IP address for the database host text box, enter the IP
address for the new virtual host.
i. In the Subnetmask text box, enter the value of the Subnetmask for the new
virtual host.
j. Select the network you want to use for the IP address from the Network
menu.
k. Select the Number of shared disks where you have chunks located.
l. Enter the name of the shared disks you use as chunk locations for Informix
from the Shared disks for database text box. These disks are moved to the
Informix group that will be created by the ClusterIT utility. In the event of
failure, the disks you specify here will move over to the other node.
3. Click Convert to Cluster. After conversion, an Informix server comes back
online, but it is now controlled by the Microsoft Cluster Service. The resource
group Informix has been created.
2-8 IBM Informix Installation Guide for Windows
Page 29

The settings that you specified in the clusterit_a.exe utility are written to the newly
created %INFORMIXDIR%/cluster/clusterit.ini file.
You can check the state of the database server by running the onstat command.
Installing the Informix server on the secondary node of a cluster environment
Uninstall any previous Informix installations on the secondary node before
implementing a new cluster installation.
Before starting this task, do the following:
v The primary node installation of the database server is configured following the
“Installing the Informix server on the primary node of a cluster environment” on
page 2-7 instructions.
v Copies of the silent_install_11.70.ini, clusterit_b.exe, and cluster.ini files
in %INFORMIXDIR% on the primary node must be on the secondary node.
v Verify that the INFORMIXDIR environment variable is not set.
v Verify you have Administrator privileges to administer Windows operating
system groups on the computer for the secondary node.
v The following task is documented for environments where user informix runs
the database server instance and is a domain account.
When you run the clusterit_b.exe utility on the secondary node, the utility
performs the following tasks:
v Installs on the secondary node (silent installation)
v Copies registry entries from the primary node
v Copies the configuration file from the primary node
v Makes the resource .dll file (ifxdb920.dll) available on the secondary node
To install the database server in a cluster configuration on the secondary node:
1. Copy the silent_install_11.70.ini file and the cluster.ini file from
%INFORMIXDIR% of the primary node to computer for the secondary node.
2. Run the clusterit_b.exe utility on the secondary node. The IBM Informix
ClusterIT - secondary node window opens.
3. Fill in the text boxes:
a. In the Physical hostname primary node field, enter the physical host name
of the primary node.
b. Enter the full path information in the Full path to the Informix installation
media field.
c. Enter the Instance number for Informix on the secondary node. This
number is the same as that of Informix on the first node.
d. Enter the location of the installation (the value of %INFORMIXDIR% must be
located on a local disk and must be identical for both nodes).
e. Enter your Informix password.
f. In the DBSERVERNAME final (when clustered) text box, enter the name of
the Informix instance in the cluster configuration. On this secondary node,
Informix will be installed directly with this name.
g. Check whether to enable Role separation. For more information, see “Plan
role separation” on page 1-3.
Chapter 2. Installing Informix and client products (Windows) 2-9
Page 30

4. Click Convert to Cluster. After the ClusterIT utility finishes conversion, the
Important: The silent_install_11.70.ini and cluster.ini files contain your
passwords for administering the Informix installation. After you have completed
the clustering environment setup, edit these two .ini files on both the primary
and secondary nodes to remove the passwords. Alternatively, you can delete the
silent_install_11.70.ini file and the cluster.ini file.
Multiple residency
You can set up multiple independent database server environments on the same
computer.
Complete the following tasks to set up multiple residency.
Plan for multiple residency
When you plan for multiple residency on a computer, consider the following
factors:
v Storage space
Each database server must have its own unique storage space. You cannot use
the same disk space for more than one instance of a database server. When you
prepare an additional database server, you must repeat some of the planning
that you did to install the first database server. For example, you must consider
these questions:
– Will you use mirroring? Where will the mirrors reside?
– Where will the message log reside?
– Can you dedicate a tape drive to this database server for its logical logs?
– What kind of backups will you perform?
v Memory
Each database server has its own memory. Can your computer handle the
memory usage that an additional database server requires?
Informix instance tarts on the secondary node.
Creating a new database server instance
Before you set up multiple residency, you must install one database server as
described in Chapter 2, “Installing Informix and client products on Windows,” on
page 2-1. It is not necessary to install more than one copy of the database server
binary files. All instances of the same version of the database server on one
computer can share the same executable files.
To set up multiple residency, use the Server Instance Manager. To use the Server
Instance Manager program, you must have administrative privileges on the
database server. However, local administrator privileges are sufficient, even if the
database server was installed for domain use.
Before you use the Server Instance Manager, verify that you are a member of the
Informix-Admin group. For more information, see “Verify Administrators group
membership” on page 1-2.
The following steps are for using the Server Instance Manager GUI. See “Server
Instance Manager command-line options” on page 2-11 for other ways you can use
this utility.
2-10 IBM Informix Installation Guide for Windows
Page 31

To create a new database server instance:
1. Select Start > Programs > IBM Informix > Server Instance Manager.
2. Select the Installation Method, and click Create New to create a new instance
of the database server.
3. Follow the prompts.
After you enter the required information, the Server Instance Manager installs
services, records environment variables, updates the registry, and creates an
onconfig file for the new database server instance.
Server Instance Manager command-line options
The instmgr.exe utility extends the ability to configure an IBM Informix Dynamic
Server instance with command-line options.
Purpose
The instmgr.exe utility is a command-line version of the Server Instance Manager.
You must have administrative privileges on the database server. However, local
administrator privileges are sufficient, even if the database server was installed for
domain use.
The following table describes the instmgr.exe utility options.
Table 2-1. The instmgr.exe utility options
Option Meaning
®
-alias
DRDA_server_alias
-drdaport DRDA_port
drdasvc
DRDA_service_name
-apw password Specifies the user informix password for a new instance.
-c -n servername -apw
informix_password
-rename -apw
informix_password -n
new_name old_name
-s .ini_filename Initialize the specified instance in silent mode.
-f .ini_ filename Retrieve some information from a partial initialization file, and the
-d -n servername Delete the specified instance.
-dall Delete all instances.
-uall -v version Upgrade all instances to the specified version. (Upgrading a single
-r -v version -n
servername
-rall -v version Revert all instances to the specified version.
-b64 Base64_password Specifies Base64–encoded password.
-l Indicates cluster installation.
Command line for standalone support of DRDA
Creates an instance of the database server.
Rename an existing server name.
remainder from the user.
Warning: This removes related dbspaces and deletes the data.
Warning: This removes related dbspaces and deletes the data.
instance in a multi-instance environment is not supported.)
Revert the specified instance to the specified version.
in the DBMS.
Chapter 2. Installing Informix and client products (Windows) 2-11
Page 32

Table 2-1. The instmgr.exe utility options (continued)
Option Meaning
-system Create database server instance that runs as local system user
instead of user informix. (Informix must be installed as local
system user to use this option.)
2-12 IBM Informix Installation Guide for Windows
Page 33

Chapter 3. Post-installation tasks on Windows
Review the following information after installing IBM Informix.
Working with the installation
After installing IBM Informix, determine how much of the database server setup
the installation application has completed and what actions you must do before
putting the server in production.
The installation sets up a database server that is ready to use and can run on your
system automatically. But you may still want to perform some basic enhancements
before you put the server in production. These tasks show you ways to control the
way Informix runs on your system.
If you have completed a more advanced installation of Informix, these
post-installation tasks might be required in order to work with the database server.
Tip: When you initialize a server, a shortcut is added to the Start menu. To run
commands for an initialized server, click Start > All Programs > IBM Informix >
server_name.
The following tasks are covered in the next topics of the documentation:
v Starting the database server manually.
v Setting up the database server to start whenever Windows starts.
v Stopping the database server.
Two Informix features that require post-installation configuration are the
following:
Global Language Support (GLS)
A feature that enables you to configure the database server to use a
locale other than the default locale, which is U.S. English. For more
information about how to create databases that use the diacritics,
collating sequence, and monetary and time conventions of a different
language, see the IBM Informix GLS User's Guide.
IBM Informix Storage Manager (ISM) (ISM)
A feature that can be used for ON-Bar backup-and-restores. See the IBM
Informix Storage Manager Administrator's Guide for more information.
The DB-Access utility, which is provided with your IBM Informix database server
products, includes one or more demonstration databases. Many examples in IBM
Informix manuals are based on these demonstration databases, and you can use
these databases to explore Informix functionality. The demonstration databases can
be created at any time after installation. See the IBM Informix DB-Access User's
Guide for detailed information about installing, preparing, and working with the
demonstration databases.
Setup performed by the installation application
Before you begin manual post-installation tasks, it is helpful to know some of the
major tasks the installation application has done.
© Copyright IBM Corp. 1996, 2011 3-1
Page 34

A typical installation (and possibly a custom installation, depending on your
choices during setup) performs the following actions to make the database server
ready to run on Windows:
v Configured and installed the database server as a Windows service.
v Created an informix user account and an Informix-Admin administrative group.
The administrative group name is different if you enabled role separation and
changed the name of the Informix-Admin group.
v Automatically assigned the informix user account, under which the database
server runs, to the Informix-Admin group and to the Windows Administrators
group.
v Granted the following advanced privileges to the informix user account:
– Logon as service
– Act as part of the operating system
– Increase quotas
– Replace a process level token
– Debug programs
– Manage auditing and security log
Informix program group
An IBM Informix program group is on the Windows Start menu after installation
completes.
To access the following items on the database server program group, click Start >
Programs > IBM Informix 11.70. The following table describes the program group
menu.
Table 3-1. IBM Informix program group
Menu item Description
Documentation Contains shortcuts to product documentation:
Information Center
A Web-based, powerful online interface
containing the technical information about the
IBM Informix products. Requires a connection
to the Internet. If you do not have a connection
to the Internet, you can find the product
documentation on the installation media.
Release notes
Describes new features of IBM Informix
products. This file also contains information
about any changes to function from previous
releases and any known problems and their
workarounds. Read this file before you use the
database server.
Error Messages Provides a complete list of all of the error messages and
their corrective actions.
Server Instance Manager Creates and configures new server instances and
removes configured server instances.
3-2 IBM Informix Installation Guide for Windows
Page 35

Table 3-1. IBM Informix program group (continued)
Menu item Description
uninstallserver You can select from the following uninstallation options:
Complete Uninstall
Uninstalls the whole Informix installation.
Uninstall Specific Features
Displays the Informix feature tree so that you
can select which features or whole components
that you want to remove.
server-name Opens a Command Prompt window for an initialized
database server instance. You can use that window to
run DB-Access and certain command-line utilities such
as onstat, oncheck, and onspaces. (The oninit utility is
designed to be started by a service rather than from this
window.) If you have more than one database server
instance, there is a shortcut menu for each of them.
Starting the database server from the Control Panel
You can start the database server by starting the IBM Informix service in the
Control Panel.
v You must be a member of the Windows Administrators group.
v The disk space for the database server must be initialized once to prepare the
root dbspace so that it can be used by the database server. If you performed a
typical installation and chose to create a server instance or you performed a
custom installation and chose to create and initialize the server, disk space is
already initialized.
v If you chose not to create a server instance or not to initialize the server during
installation, start the server and initialize the disk space by using the -i option of
the oninit command in the Start Parameters field of the Services application or
with the starts command from the command line.
v If you are upgrading from a previous version of IBM Informix and you are
using the same root dbspace, do not initialize the disk space.
To start the database server from the Control Panel:
1. In Administrative Tools, double-click Services.
2. Double-click Informix IDS - server_name from the list.
3. Optional: Type oninit options in the Start Parameters field.
4. Click OK
5. Click Start.
6. To verify that the server started, use the onstat utility.
Chapter 3. Post-installation tasks (Windows) 3-3
Page 36

Related tasks
“Starting the database server from the command line”
Related reference
The oninit utility (Administrator's Reference)
The onstat utility (Administrator's Reference)
Starting the database server from the command line
You can start the database server by using the starts command from the command
line.
v You must be a member of the Windows Administrators group.
v The disk space for the database server must be initialized once to prepare the
root dbspace so that it can be used by the database server. If you performed a
typical installation and chose to create a server instance or you performed a
custom installation and chose to create and initialize the server, disk space is
already initialized.
v If you chose not to create a server instance or not to initialize the server during
installation, start the server and initialize the disk space by using the -i option of
the oninit command in the Start Parameters field of the Services application or
with the starts command.
v If you are upgrading from a previous version of IBM Informix and you are
using the same root dbspace, do not initialize the disk space.
To start the database server by using the command line:
1. Open a command line.
2. Change to %INFORMIXDIR%\bin.
3. Enter the starts command followed by the server name. For example:
starts server_name
You can add an oninit option. For example, to start the database server without
deleting temporary tables:
starts server_name -p
4. To verify that the server started, use the onstat utility.
Related tasks
“Starting the database server from the Control Panel” on page 3-3
Related reference
The oninit utility (Administrator's Reference)
The onstat utility (Administrator's Reference)
Stopping the database server
To stop the database server from the Control Panel, you must be a member of the
Windows Administrators group. To stop the database server from the command
line, you must be a member of the Informix-Admin group.
To stop the database server:
v From the Control Panel:
1. Select Start > Control Panel > Administrative Tools.
2. Double-click Services.
3-4 IBM Informix Installation Guide for Windows
Page 37

3. Select Informix IDS -server_name from the Service list box.
4. Click Stop.
v From the Command Prompt window:
1. Click Start > Programs > IBM Informix to display the program group for
the database server.
2. Click the database server instance (server_name) to display the Command
Prompt window.
3. In the Command Prompt window, type: onmode -ky.
Database server configuration after installation
To create an IBM Informix instance after installation completes, you can use the
Server Instance Manager or use the standard configuration file (onconfig.std)asa
basis for a new configuration file.
The genoncfg utility is an alternative configuration method if you are comfortable
working in a command-line environment. With this utility, you set a short list of
parameters in an input file, from which the utility then generates an Informix
configuration file that is optimized for both your anticipated usage and your host
environment. You cannot use this utility to change a working configuration file.
The genoncfg utility is documented in the IBM Informix Administrator's Reference.
The following information is provided for advanced users who must manually
start or change configuration of a database server instance.
Database server number
The database server number uniquely identifies a database server if more than one
instance of the database server is installed.
If only one instance of the database server is installed, set this number to 0. The
database server number that you specify is the value for the SERVERNUM
configuration parameter.
The database server uses configuration parameters, set in the onconfig file, during
initialization. For more information about configuration parameters and the
onconfig file, see the “Configuration parameters” topic of the IBM Informix
Administrator's Reference.
To determine how many instances of the database server are installed, run the
Server Instance Manager program. To run the Server Instance Manager program,
select Start > Programs > IBM Informix > Server Instance Manager.
Database server name
The database server name identifies the database server to client applications.
In most cases, you can select the default database server name. The database server
name that you specify is the value for the DBSERVERNAME configuration
parameter.
Database server names must begin with a letter and can contain only letters,
numbers, and the underscore character.
Chapter 3. Post-installation tasks (Windows) 3-5
Page 38

Service name and port number
The service name specifies the service name entry and the port number specifies
the port entry for the database server in the sqlhosts registry.
Specify the service name and port number for the TCP/IP network protocol.
If only one database server instance exists on the computer, the installation
program provides default values. It is recommended that you use these default
values. For subsequent database server instances, you must provide unique values.
Dbspace name, location, and size
A dbspace is a logical collection of chunks to which databases and tables are
assigned.
During installation, the root dbspace is created automatically. You can configure an
additional data dbspace, mirror location, or smart blob drive.
Specify the location and disk-space size for the dbspace:
Primary data location
By default, the primary data location is the current drive. The installation
program displays the amount of available disk space; the default dbspace
size is 200 megabytes.
Smart blob drive
A default smart blobspace can be configured optionally. The default size is
200 megabytes.
Mirror location
The mirrored location serves as the backup area if the primary storage
device fails. The mirrored location should be the same size as the primary
location and should be in a different drive. The data dbspace and the
smart blob can be mirrored on the same drive.
This mirrored location is also the value of the MIRRORPATH configuration
parameter.
Default sbspace name, location, size, and page size
An sbspace is a logical storage area that the database server uses to store smart
large objects (CLOB and BLOB data).
The default sbspace is the location in which the database server stores a smart
large object if you do not specify an sbspace name when you create the smart large
object. The database server also uses the default sbspace to store user-defined
statistics.
Specify the primary and mirror data-storage location for the default sbspace:
Primary Data Location
By default, the Primary Data Location of the sbspace is the current drive
and must have a minimum of 200 megabytes. The installation program
displays the amount of available disk space. This location also specifies the
value of the SBSPACENAME configuration parameter.
Mirror location
The mirrored location serves as the backup area if the primary storage
3-6 IBM Informix Installation Guide for Windows
Page 39

device fails. The mirrored location should be the same size as the primary
location and should be in a different drive.
Size The size of the sbspace should be at least 200 megabytes.
Page size
The size of the sbpage should approximate the size of the most frequently
occurring smart large object that the sbspace holds. The default is one
page.
For more information about sbspaces, see the IBM Informix Administrator's Guide.
Shared server definition computer
The shared server definition computer is the machine hosting the database server
instance with which client computers connect if you are deploying IBM Informix in
a networked Windows environment.
Specify where you want the sqlhosts registry information for the shared server
definition to be stored. You can select either the local host machine or another
computer that hosts a central, shared repository of sqlhosts settings for multiple
database servers in the network.
If you specify another computer on the network, you must set the
INFORMIXSQLHOSTS environment variable on your local computer to the name of the
computer that stores the sqlhosts information.
Configuring Informix manually
Use the Server Instance Manager if you want to configure the database server
manually after installation of the product.
To configure the installed database server:
1. Open the Server Instance Manager utility and specify the following:
v database server number
v database server name
v service name and port number for the TCP/IP network protocol
2. If you selected custom installation setup:
a. Specify a name for the root dbspace.
b. Specify the primary and mirror storage location and disk-space size for the
root dbspace.
c. Specify the name of the default sbspace.
d. Specify the primary and mirror storage location and disk-space size for the
default sbspace.
3. Specify the computer to use for shared server definition for your database
server and administrative tools.
The installation program installs services on the computer and configures the
database server.
4. If you configured a new instance of the database server, you are prompted to
initialize the database server:
v Click Yes to initialize the database server and the root dbspace.
v Click No to skip initialization.
Chapter 3. Post-installation tasks (Windows) 3-7
Page 40

If you skip initialization, you must manually start the database server and
specify the root dbspace size later. For more information on manual
initialization, see “Starting the database server from the Control Panel” on page
3-3.
Database server initialization might take several minutes.
A message indicates that the database server was successfully installed.
5. If you selected other products to install, the installation prompts you to
configure these products.
6. To update the members of the Informix-Admin group, log out and log back in.
This step enables you to run the IBM Informix administration tools.
7. Restart your computer, if prompted.
For more information about configuring the database server manually, see the IBM
Informix Administrator's Guide.
3-8 IBM Informix Installation Guide for Windows
Page 41

Chapter 4. Removing or modifying Informix and client products
The uninstallation application facilitates removal of IBM Informix product
installations and reduction of a database server installation size without total
uninstallation.
Review the following information to uninstall or modify Informix.
Removing Informix software bundle installations
Open the uninstallids.exe file to remove both the database server and all client
products that were installed with the ids_install.exe command of the Informix
software bundle. This method to remove the installed software bundle is faster
than uninstalling each individual product separately.
You must have Windows administrator privileges to complete the uninstallation.
Important: Using the uninstallids.exe command removes all Informix server and
client product installations in the folder, without the option to uninstall only
specific features of an installation. You must start the uninstallation of a specific
product in order to remove some of its features without entirely removing the
program installation. The uninstallation of either Client SDK or Informix Connect
alone is documented in the IBM Informix Client Products Installation Guide. The
uninstallation of the JDBC Driver alone is documented in IBM Informix JDBC
Driver Programmer's Guide
If you have multiple installations of the software on the computer, the
uninstallation application affects only the installations located in the %INFORMIXDIR%
path indicated in the command.
Open the %INFORMIXDIR%\uninstall\uninstall_ids\uninstallids.exe file.
After Informix products are removed, you can manually delete the %INFORMIXDIR%
directory. It is not deleted automatically.
Uninstalling or reducing an Informix database server installation
Use the shortcut on the Windows Start menu to remove an entire Informix server
installation or to remove only specific features of the product.
Shut down all instances of the Informix server before uninstalling the product.
If you have multiple installations of the product on the computer, the
uninstallation application affects only the server installation that created the
Windows Start menu entry from which you are launching the uninstallation.
To uninstall the entire Informix database server installation or just specific features
of the installation:
1. Select Start > Programs > IBM Informix Version 11.70 > uninstallserver.
2. Select one of the following options:
v Complete uninstallation
© Copyright IBM Corp. 1996, 2011 4-1
Page 42

This option removes all installed binary files and product features of the
Informix installation. Use this option with caution. Files and folders created
after the installation are not affected.
v Uninstallation of specific features
If you select this option, you will be prompted to select the database server
features that you want to remove.
3. Follow the prompts in the uninstallation application.
Uninstalling an Informix server installation in silent mode
You can create a response file by recording a GUI-based, interactive uninstallation
of IBM Informix from one location using settings in the GUI application that you
want to replicate. Then you run the silent uninstallation command passing the
response file, although a response file is not necessary if you do not have a
customized installation to deploy.
To create the response file, you must have an installation that you can uninstall in
a way that you plan to reuse for removal of other installations. It is not possible to
do a silent uninstallation of Informix and any of the client products
simultaneously.
If you already have a response file that is ready for silent uninstallation, skip to
step 2
To uninstall Informix in silent mode with a response file:
1. On a command line, start a GUI uninstallation of Informix with the -r option
in the script:
uninstall\uninstall_server\uninstallserver -i gui -r path_name
Substitute path_name with full path and file name of where you want to
generate the response file, appending .properties at the end of the file name.
2. Copy the response file to the location where you want to uninstall Informix.
3. Run the silent uninstallation command, indicating the full path name of the
response file:
uninstall\uninstall_server\uninstallserver -i silent -f path_name
4. For each location where you want to do a silent uninstallation, repeat steps 2
and 3
4-2 IBM Informix Installation Guide for Windows
Page 43

Appendix. Accessibility
IBM strives to provide products with usable access for everyone, regardless of age
or ability.
Accessibility features for IBM Informix products
Accessibility features help a user who has a physical disability, such as restricted
mobility or limited vision, to use information technology products successfully.
Accessibility features
The following list includes the major accessibility features in IBM Informix
products. These features support:
v Keyboard-only operation.
v Interfaces that are commonly used by screen readers.
v The attachment of alternative input and output devices.
Tip: The information center and its related publications are accessibility-enabled
for the IBM Home Page Reader. You can operate all features by using the keyboard
instead of the mouse.
Keyboard navigation
This product uses standard Microsoft Windows navigation keys.
Related accessibility information
IBM is committed to making our documentation accessible to persons with
disabilities. Our publications are available in HTML format so that they can be
accessed with assistive technology such as screen reader software.
You can view the publications in Adobe Portable Document Format (PDF) by using
the Adobe Acrobat Reader.
IBM and accessibility
See the IBM Accessibility Center at http://www.ibm.com/able for more information
about the IBM commitment to accessibility.
Dotted decimal syntax diagrams
The syntax diagrams in our publications are available in dotted decimal format,
which is an accessible format that is available only if you are using a screen reader.
In dotted decimal format, each syntax element is written on a separate line. If two
or more syntax elements are always present together (or always absent together),
the elements can appear on the same line, because they can be considered as a
single compound syntax element.
Each line starts with a dotted decimal number; for example, 3 or 3.1 or 3.1.1.To
hear these numbers correctly, make sure that your screen reader is set to read
punctuation. All syntax elements that have the same dotted decimal number (for
example, all syntax elements that have the number 3.1) are mutually exclusive
© Copyright IBM Corp. 1996, 2011 A-1
Page 44

alternatives. If you hear the lines 3.1 USERID and 3.1 SYSTEMID, your syntax can
include either USERID or SYSTEMID, but not both.
The dotted decimal numbering level denotes the level of nesting. For example, if a
syntax element with dotted decimal number 3 is followed by a series of syntax
elements with dotted decimal number 3.1, all the syntax elements numbered 3.1
are subordinate to the syntax element numbered 3.
Certain words and symbols are used next to the dotted decimal numbers to add
information about the syntax elements. Occasionally, these words and symbols
might occur at the beginning of the element itself. For ease of identification, if the
word or symbol is a part of the syntax element, the word or symbol is preceded by
the backslash (\) character. The * symbol can be used next to a dotted decimal
number to indicate that the syntax element repeats. For example, syntax element
*FILE with dotted decimal number 3 is read as 3 \* FILE. Format 3* FILE
indicates that syntax element FILE repeats. Format 3* \* FILE indicates that
syntax element * FILE repeats.
Characters such as commas, which are used to separate a string of syntax
elements, are shown in the syntax just before the items they separate. These
characters can appear on the same line as each item, or on a separate line with the
same dotted decimal number as the relevant items. The line can also show another
symbol that provides information about the syntax elements. For example, the lines
5.1*, 5.1 LASTRUN, and 5.1 DELETE mean that if you use more than one of the
LASTRUN and DELETE syntax elements, the elements must be separated by a comma.
If no separator is given, assume that you use a blank to separate each syntax
element.
If a syntax element is preceded by the % symbol, that element is defined elsewhere.
The string following the % symbol is the name of a syntax fragment rather than a
literal. For example, the line 2.1 %OP1 refers to a separate syntax fragment OP1.
The following words and symbols are used next to the dotted decimal numbers:
? Specifies an optional syntax element. A dotted decimal number followed
by the ? symbol indicates that all the syntax elements with a
corresponding dotted decimal number, and any subordinate syntax
elements, are optional. If there is only one syntax element with a dotted
decimal number, the ? symbol is displayed on the same line as the syntax
element (for example, 5? NOTIFY). If there is more than one syntax element
with a dotted decimal number, the ? symbol is displayed on a line by
itself, followed by the syntax elements that are optional. For example, if
you hear the lines 5?, 5 NOTIFY, and 5 UPDATE, you know that syntax
elements NOTIFY and UPDATE are optional; that is, you can choose one or
none of them. The ? symbol is equivalent to a bypass line in a railroad
diagram.
! Specifies a default syntax element. A dotted decimal number followed by
the ! symbol and a syntax element indicates that the syntax element is the
default option for all syntax elements that share the same dotted decimal
number. Only one of the syntax elements that share the same dotted
decimal number can specify a ! symbol. For example, if you hear the lines
2? FILE, 2.1! (KEEP), and 2.1 (DELETE), you know that (KEEP) is the
default option for the FILE keyword. In this example, if you include the
FILE keyword but do not specify an option, default option KEEP is applied.
A default option also applies to the next higher dotted decimal number. In
this example, if the FILE keyword is omitted, default FILE(KEEP) is used.
A-2 IBM Informix Installation Guide for Windows
Page 45

However, if you hear the lines 2? FILE, 2.1, 2.1.1! (KEEP), and 2.1.1
(DELETE), the default option KEEP only applies to the next higher dotted
decimal number, 2.1 (which does not have an associated keyword), and
does not apply to 2? FILE. Nothing is used if the keyword FILE is omitted.
* Specifies a syntax element that can be repeated zero or more times. A
dotted decimal number followed by the * symbol indicates that this syntax
element can be used zero or more times; that is, it is optional and can be
repeated. For example, if you hear the line 5.1* data-area, you know that
you can include more than one data area or you can include none. If you
hear the lines 3*, 3 HOST, and 3 STATE, you know that you can include
HOST, STATE, both together, or nothing.
Notes:
1. If a dotted decimal number has an asterisk (*) next to it and there is
only one item with that dotted decimal number, you can repeat that
same item more than once.
2. If a dotted decimal number has an asterisk next to it and several items
have that dotted decimal number, you can use more than one item
from the list, but you cannot use the items more than once each. In the
previous example, you can write HOST STATE, but you cannot write HOST
HOST.
3. The * symbol is equivalent to a loop-back line in a railroad syntax
diagram.
+ Specifies a syntax element that must be included one or more times. A
dotted decimal number followed by the + symbol indicates that this syntax
element must be included one or more times. For example, if you hear the
line 6.1+ data-area, you must include at least one data area. If you hear
the lines 2+, 2 HOST, and 2 STATE, you know that you must include HOST,
STATE, or both. As for the * symbol, you can repeat a particular item if it is
the only item with that dotted decimal number. The + symbol, like the *
symbol, is equivalent to a loop-back line in a railroad syntax diagram.
Appendix. Accessibility A-3
Page 46

A-4 IBM Informix Installation Guide for Windows
Page 47

Notices
This information was developed for products and services offered in the U.S.A.
IBM may not offer the products, services, or features discussed in this document in
other countries. Consult your local IBM representative for information on the
products and services currently available in your area. Any reference to an IBM
product, program, or service is not intended to state or imply that only that IBM
product, program, or service may be used. Any functionally equivalent product,
program, or service that does not infringe any IBM intellectual property right may
be used instead. However, it is the user's responsibility to evaluate and verify the
operation of any non-IBM product, program, or service.
IBM may have patents or pending patent applications covering subject matter
described in this document. The furnishing of this document does not grant you
any license to these patents. You can send license inquiries, in writing, to:
IBM Director of Licensing
IBM Corporation
North Castle Drive
Armonk, NY 10504-1785
U.S.A.
For license inquiries regarding double-byte (DBCS) information, contact the IBM
Intellectual Property Department in your country or send inquiries, in writing, to:
Intellectual Property Licensing
Legal and Intellectual Property Law
IBM Japan Ltd.
1623-14, Shimotsuruma, Yamato-shi
Kanagawa 242-8502 Japan
The following paragraph does not apply to the United Kingdom or any other
country where such provisions are inconsistent with local law: INTERNATIONAL
BUSINESS MACHINES CORPORATION PROVIDES THIS PUBLICATION "AS IS"
WITHOUT WARRANTY OF ANY KIND, EITHER EXPRESS OR IMPLIED,
INCLUDING, BUT NOT LIMITED TO, THE IMPLIED WARRANTIES OF
NON-INFRINGEMENT, MERCHANTABILITY OR FITNESS FOR A PARTICULAR
PURPOSE. Some states do not allow disclaimer of express or implied warranties in
certain transactions, therefore, this statement may not apply to you.
This information could include technical inaccuracies or typographical errors.
Changes are periodically made to the information herein; these changes will be
incorporated in new editions of the publication. IBM may make improvements
and/or changes in the product(s) and/or the program(s) described in this
publication at any time without notice.
Any references in this information to non-IBM websites are provided for
convenience only and do not in any manner serve as an endorsement of those
websites. The materials at those websites are not part of the materials for this IBM
product and use of those websites is at your own risk.
© Copyright IBM Corp. 1996, 2011 B-1
Page 48

IBM may use or distribute any of the information you supply in any way it
believes appropriate without incurring any obligation to you.
Licensees of this program who wish to have information about it for the purpose
of enabling: (i) the exchange of information between independently created
programs and other programs (including this one) and (ii) the mutual use of the
information which has been exchanged, should contact:
IBM Corporation
J46A/G4
555 Bailey Avenue
San Jose, CA 95141-1003
U.S.A.
Such information may be available, subject to appropriate terms and conditions,
including in some cases, payment of a fee.
The licensed program described in this document and all licensed material
available for it are provided by IBM under terms of the IBM Customer Agreement,
IBM International Program License Agreement or any equivalent agreement
between us.
Any performance data contained herein was determined in a controlled
environment. Therefore, the results obtained in other operating environments may
vary significantly. Some measurements may have been made on development-level
systems and there is no guarantee that these measurements will be the same on
generally available systems. Furthermore, some measurements may have been
estimated through extrapolation. Actual results may vary. Users of this document
should verify the applicable data for their specific environment.
Information concerning non-IBM products was obtained from the suppliers of
those products, their published announcements or other publicly available sources.
IBM has not tested those products and cannot confirm the accuracy of
performance, compatibility or any other claims related to non-IBM products.
Questions on the capabilities of non-IBM products should be addressed to the
suppliers of those products.
All statements regarding IBM's future direction or intent are subject to change or
withdrawal without notice, and represent goals and objectives only.
All IBM prices shown are IBM's suggested retail prices, are current and are subject
to change without notice. Dealer prices may vary.
This information is for planning purposes only. The information herein is subject to
change before the products described become available.
This information contains examples of data and reports used in daily business
operations. To illustrate them as completely as possible, the examples include the
names of individuals, companies, brands, and products. All of these names are
fictitious and any similarity to the names and addresses used by an actual business
enterprise is entirely coincidental.
COPYRIGHT LICENSE:
This information contains sample application programs in source language, which
illustrate programming techniques on various operating platforms. You may copy,
B-2 IBM Informix Installation Guide for Windows
Page 49

Trademarks
modify, and distribute these sample programs in any form without payment to
IBM, for the purposes of developing, using, marketing or distributing application
programs conforming to the application programming interface for the operating
platform for which the sample programs are written. These examples have not
been thoroughly tested under all conditions. IBM, therefore, cannot guarantee or
imply reliability, serviceability, or function of these programs. The sample
programs are provided "AS IS", without warranty of any kind. IBM shall not be
liable for any damages arising out of your use of the sample programs.
Each copy or any portion of these sample programs or any derivative work, must
include a copyright notice as follows:
© (your company name) (year). Portions of this code are derived from IBM Corp.
Sample Programs.
© Copyright IBM Corp. _enter the year or years_. All rights reserved.
If you are viewing this information softcopy, the photographs and color
illustrations may not appear.
IBM, the IBM logo, and ibm.com are trademarks or registered trademarks of
International Business Machines Corp., registered in many jurisdictions worldwide.
Other product and service names might be trademarks of IBM or other companies.
A current list of IBM trademarks is available on the web at "Copyright and
trademark information" at http://www.ibm.com/legal/copytrade.shtml.
Adobe, the Adobe logo, and PostScript are either registered trademarks or
trademarks of Adobe Systems Incorporated in the United States, and/or other
countries.
Intel, Itanium, and Pentium are trademarks or registered trademarks of Intel
Corporation or its subsidiaries in the United States and other countries.
Java and all Java-based trademarks and logos are trademarks or registered
trademarks of Oracle and/or its affiliates.
Linux is a registered trademark of Linus Torvalds in the United States, other
countries, or both.
Microsoft, Windows, and Windows NT are trademarks of Microsoft Corporation in
the United States, other countries, or both.
UNIX is a registered trademark of The Open Group in the United States and other
countries.
Other company, product, or service names may be trademarks or service marks of
others.
Notices B-3
Page 50

B-4 IBM Informix Installation Guide for Windows
Page 51

Index
Special characters
%INFORMIXDIR%
environment variable 1-4
A
Accessibility A-1
dotted decimal format of syntax diagrams A-1
keyboard A-1
shortcut keys A-1
syntax diagrams, reading in a screen reader A-1
Accessing database server program group 3-1
Accounts
informix user 3-1
Administrative
groups
adding members to 1-2
privileges, Server Instance Manager 2-10
Administrators group
adding members 1-2
requirements for installing 1-2
Advanced privileges, granted to informix user 3-1
B
Backups
and multiple residency 2-10
configuring storage manager 3-1
base server 1-3
BLOB data 3-6
bundle.properties file 2-4
C
CLOB data 3-6
Cluster
installation
on multiple nodes 1-3, 2-2
Cluster Administrator 2-6
clustering 2-6
ClusterIT utility 2-6
ClusterIT, installing in a Microsoft cluster environment 1-3,
2-2
Command line
initializing database server 3-4
starting database server 3-3, 3-4
stopping database server 3-4
compliance with standards ix
components 1-3
configuration file
creating during installation 2-2
Configuration parameters
DBSERVERNAME 3-5
MIRRORPATH 3-6
SBSPACENAME 3-6
SERVERNUM 3-5
Control Panel
initializing database server 3-3, 3-4
starting database server 3-3
Control Panel (continued)
stopping database server 3-4
Creating
database server instances 2-10
custom installation 1-3, 2-2
D
Database server
uninstalling 4-2
Database server name
description of 3-5
specifying 3-7
Database server number
description of 3-5
specifying 3-7
Database servers
creating new instances 2-10
initializing 3-7
installing
multiple instances 1-4
on multiple nodes 2-6
program group
accessing 3-1
stopping 3-4
DBSERVERNAME configuration parameter 3-5
dbspace
specifying 3-6
dbspaces 3-6
root 3-7
Default sbspace
definition of 3-6
specifying 3-7
Disabilities, visual
reading syntax diagrams A-1
Disability A-1
Disk space, installation requirements 1-1
Dotted decimal format of syntax diagrams A-1
DRDA (Distributed Relational Database Architecture) 1-3, 2-2
E
Environment variable
%INFORMIXDIR% 1-4
Environment variables
INFORMIXSQLHOSTS 3-7
F
failover 2-6
features 1-3
Features
uninstalling 4-1
First-time installation
INFORMIXDIR directory 1-4
fix the installation 3-2
© Copyright IBM Corp. 1996, 2011
X-1
Page 52

G
Global Language Support (GLS) 3-1
Group names 1-4
I
IBM Data Server Driver Package 1-5
industry standards ix
information center 3-2
Informix Storage Manager (ISM) 3-1
informix user 1-5
advanced privileges 3-1
creation of 3-1
Informix-Admin account
creation of 3-1
Informix-Admin group 1-4
updating members 3-7
using Server Instance Manager 2-10
INFORMIXDIR directory
first-time installation 1-4
multiple installation 1-4
upgrade 1-4
INFORMIXSQLHOSTS
environment variable 3-7
Initializing database server 3-3, 3-4, 3-7
installation 2-1
inline upgrade 2-5
prerequisites 1-1
Installation
custom with GUI 2-2
first-time 1-4
typical with GUI 2-1
installation number 1-2
installing
multiple copies on 1 computer 1-2
Installing
database server
custom with GUI 2-2
multiple instances 1-4
on multiple nodes 2-6
typical with GUI 2-1
Instance Configuration Wizard 1-3
L
Large objects (LOBs), smart 3-6
local system user
installing product as 1-3, 2-2
log files 2-5
M
Memory requirements, and multiple residency 2-10
Message log, for multiple residency 2-10
migration 2-5
Mirror location 3-6
root dbspace 3-7
Mirroring, and multiple residency 2-10
MIRRORPATH configuration parameter 3-6
modify installation 3-2
Modifying
installations 4-1
multiple copies on a computer 1-2
multiple installations 1-2
Multiple installations
INFORMIXDIR directory 1-4
Multiple nodes 2-6
Multiple residency 2-10
and backups 2-10
and mirroring 2-10
and multiple binary files, warning 2-10
memory requirements 2-10
message log for 2-10
ONCONFIG file 2-10
planning for 2-10
storage-space requirements 2-10
tape drive 2-10
N
Network protocol
TCP/IP 3-6
O
ON-Bar utility
configuring storage manager 3-1
ONCONFIG file, and multiple residency 2-10
onmode utility 3-4
P
Page size
default sbspace 3-6
Paging file, installation requirements 1-1
Parameters
DBSERVERNAME 3-5
MIRRORPATH 3-6
SBSPACENAME 3-6
SERVERNUM 3-5
Port numbers
defined 3-6
specifying 3-7
Post-Installation tasks 3-1
Primary storage location, root dbspace 3-7
Privileges
advanced 3-1
local 2-10
Server Instance Manager 2-10
program group 3-2
Program, database server group 3-1
R
RAM, installation requirements 1-1
reinstall the installation 3-2
Reinstalling
INFORMIXDIR directory 1-4
release notes 3-2
remove features or products 3-2
repair the installation 3-2
response file 1-3, 2-4
Restore
configuring storage manager 3-1
Role separation 1-4
Root dbspace
disk space requirements 1-1
primary and mirror storage locations 3-7
specifying name 3-7
X-2 IBM Informix Installation Guide for Windows
Page 53

S
sbpage, size 3-6
SBSPACENAME configuration parameter 3-6
sbspaces
default
specifying location 3-6
specifying name 3-7
specifying storage location 3-7
defined 3-6, 3-7
size 3-6
Screen reader
reading syntax diagrams A-1
Server Instance Manager 3-2
command-line options 2-11
DRDA (Distributed Relational Database Architecture) 2-11
Informix-Admin Group 2-10
privileges 2-10
starting 2-10
Server name 3-7
Server number 3-7
SERVERNUM configuration parameter 3-5
Service name
defined 3-6
specifying 3-7
Shared server
specifying 3-7
Shortcut keys
keyboard A-1
shortcut menus 3-2
silent installation 1-3, 2-4
Size
default sbspace 3-6
sbpage 3-6
Smart blob drive 3-6
Smart large objects 3-6
Specifying
database server name 3-7
database server number 3-7
default sbspace 3-7
root dbspace name 3-7
service name 3-7
sqlhosts registry
port entry 3-6
servicename entry 3-6
shared server definition computer 3-7
standards ix
Start menu 3-2
Starting
database server automatically 3-3
starts utility 3-3
Storage locations, specifying 3-7
Storage-space requirements, and multiple residency 2-10
Syntax diagrams
reading in a screen reader A-1
U
uninstallids.exe file 4-1
uninstalling
Informix server 4-1
Informix software bundle 4-1
Uninstalling 4-1
Informix in silent mode 4-2
Updating Informix-Admin group 3-7
upgrading
inline 2-5
Upgrading
INFORMIXDIR directory 1-4
User accounts
informix
creating 3-1
User informix 1-5
Utilities
onmode 3-4
starts 3-3
V
Visual disabilities
reading syntax diagrams A-1
W
Windows Administrators group 1-2
Windows file system, installation requirements 1-1
wizard
see installation application, GUI mode 1-3
T
Tape drives, for multiple residency 2-10
TCP/IP
port number 3-6
service name 3-6
specifying port number 3-7
specifying service name 3-7
typical installation 1-3, 2-1
Index
X-3
Page 54

X-4 IBM Informix Installation Guide for Windows
Page 55

Page 56

Printed in USA
GC27-3540-02
 Loading...