

Page 1

IBM DB2 Connect
Personal Edition
Quick Beginnings
Ve r s i o n 6
IBM
GC09-2830-00
Page 2

Page 3

IBM DB2 Connect
Personal Edition
Quick Beginnings
Ve r s i o n 6
IBM
GC09-2830-00
Page 4

Before using this information and the product it supports, be sure to read the general information under
“Appendix H. Notices” on page 173.
This document contains proprietary information of IBM. It is provided under a license agreement and is protected by
copyright law. The information contained in this publication does not include any product warranties, and any
statements provided in this manual should not be interpreted as such.
Order publications through your IBM representative or the IBM branch office serving your locality or by calling
1-800-879-2755 in the United States or 1-800-IBM-4YOU in Canada.
When you send information to IBM, you grant IBM a nonexclusive right to use or distribute the information in any
way it believes appropriate without incurring any obligation to you.
© Copyright International Business Machines Corporation 1993, 1999. All rights reserved.
US Government Users Restricted Rights – Use duplication or disclosure restricted by GSA ADP Schedule Contract
with IBM Corp.
Page 5

Contents
Welcome to DB2 Connect! ......vii
How This Book is Structured......vii
Conventions ...........viii
Part 1. Introduction to DB2
Connect............ 1
Chapter 1. About DB2 Connect .... 3
Working with DB2 Data ....... 4
Accessing Host or AS/400 DB2 Data
Using DB2 Connect Personal Edition 4
Connections via Communications
Gateway ........... 6
Accessing Host or AS/400 DB2 Data
from the Desktop Using DB2 Connect
Enterprise Edition ........ 8
Accessing DB2 Data from the Web Using
Java ............. 14
Accessing DB2 Data from the Web Using
Net.Data ........... 16
Managing Connections to Databases Using
the Client Configuration Assistant .... 18
Developing Applications Using the DB2
Software Developer’s Kit ....... 18
Running Your Own Applications ....19
Part 2. DB2 Connect: Planning
and Installation.........21
Chapter 4. Installing DB2 Connect on
Windows 9x or Windows NT .....31
Before You Begin .......... 31
Performing the Installation ...... 32
Software Registration ........ 34
Part 3. Preparing Host and AS/400
Databases for DB2 Connect
Communications ........37
Chapter 5. Configuring Host and AS/400
Databases for DB2 Connect .....39
Preparing MVS/ESA or OS/390 for DB2
Connect ............. 39
Summary of Steps ........ 40
Configuring VTAM ........ 40
Configuring DB2 Universal Database for
OS/390 ............ 44
Configuring DB2 for MVS/ESA .... 45
Configuring TCP/IP for DB2 Universal
Database for OS/390 ....... 47
Preparing DB2 Universal Database for
AS/400 for DB2 Connect ....... 52
Preparing DB2 for VSE & VM ..... 53
Part 4. Configuring DB2 Connect
to Communicate with Host and
AS/400 Databases .......55
Chapter 2. Planning for Installation . . . 23
Memory Requirements ........ 23
DB2 Connect Requirements ..... 23
Disk Requirements ......... 23
Estimating Fixed Disk Requirements 24
Software Requirements........ 24
Product Requirements ....... 25
Chapter 3. Installing DB2 Connect on
OS/2..............27
Before You Begin .......... 27
Performing the Installation ...... 27
Software Registration ........ 29
© Copyright IBM Corp. 1993, 1999 iii
Chapter 6. Configuring DB2 Connect to
Host or AS/400 Communications Using
theCCA............57
Configuration Steps ......... 58
Adding a Database Using a Profile . . . 59
Adding a Database Using Discovery 60
Adding a Database Manually .... 62
Chapter 7. Configuring APPC
Communications on the DB2 Connect
Workstation ........... 67
Step 1. Identify and Record Parameter
Values ............. 67
Page 6

Step 2. Update the APPC Profiles on the
DB2 Connect Workstation ....... 70
Configuring IBM eNetwork
Communications Server for Windows NT 70
Configuring IBM eNetwork
Communications Server for Windows NT
SNA API Client ......... 76
Configuring Microsoft SNA Server for
Windows NT .......... 79
Configuring Microsoft SNA Client . . . 88
Step 3. Catalog the APPC or APPN Node 91
Step 4. Catalog the Database as a Database
Connection Service (DCS) Database . . . 92
Step 5. Catalog the Database ...... 92
Step 6. Bind Utilities and Applications to
the Database Server ......... 94
Step 7. Test the Host or AS/400 Connection 94
Chapter 8. Enabling Multisite Updates
(Two-Phase Commit) ........ 97
Enabling Multisite Updates Using the
Control Center ..........101
Starting the Multisite Update Smartguide 101
Smartguide Steps.........101
Testing the Multisite Update Feature 101
Part 5. Configuring DB2 Clients to
Use DB2 Connect........103
Chapter 9. Configuring Client-to-Server
Communications Using the Client
Configuration Assistant .......105
Configuration Steps .........106
Adding a Database Using a Profile . . . 106
Adding a Database Using Discovery 108
Adding a Database Manually ....110
Creating and Using Profiles ......112
Server Profiles..........112
Client Profiles ..........113
Part 6. Using DB2 Connect....117
Chapter 10. Running Your Own
Applications ...........119
Binding Database Utilities.......119
Binding to Host Databases .....120
Binding to DB2 Universal Databases 120
Running CLI/ODBC Programs .....121
Platform Specific Details for CLI/ODBC
Access ............123
Detailed Configuration Information . . 126
Running Java Programs .......127
Configuring the Environment ....128
Java Applications ........129
Java Applets ..........130
Part 7. Appendixes .......131
Appendix A. Basic Task Knowledge. . . 133
Starting the Software Registration Tool . . 133
Starting the Client Configuration Assistant 133
Starting the Control Center ......134
Entering Commands Using the Command
Center .............134
Entering Commands Using the Command
Line Processor ..........136
Command Line Mode .......136
Interactive Input Mode.......137
Working with the System Administrative
Group.............138
Appendix B. Using the Control Center to
Administer DB2 for OS/390 and DB2
Connect Enterprise Edition servers . . . 139
Preparing DB2 for OS/390 Servers for the
Control Center ..........140
Using the Control Center .......140
Appendix C. db2cpic.dll - Extended SNA
Security Codes on Windows NT and
Windows 95 ...........141
Appendix D. How the DB2 Library Is
Structured............143
Completing Tasks with SmartGuides . . . 143
Accessing Online Help ........144
DB2 Information – Hardcopy and Online 146
Viewing Online Information ......153
Accessing Information with the
Information Center ........154
Setting Up a Document Server .....155
Searching Online Information .....156
Printing the PostScript Books......156
Ordering the Printed Books ......157
Appendix E. National Language Support
(NLS).............159
iv Quick Beginnings
Page 7

Code Page and Language Support ....159
Conversion of Character Data .....160
Bidirectional CCSID Support ......162
Bidirectional-specific CCSIDs.....163
Appendix F. Naming Rules ......165
General Naming Rules ........165
Database, Database Alias, and Catalog Node
Name Rules ...........165
Object Name Rules .........166
Username, User ID, Group Name, and
Instance Name Rules ........167
Workstation Name (nname) Rules ....167
DB2SYSTEM Naming Rules ......168
Password Rules ..........168
Appendix G. List Files, Bind Files, and
Packages ............169
List Files Associated with DRDA Servers 170
Appendix H. Notices ........173
Trademarks ...........174
Trademarks of Other Companies ....174
Index .............177
Contacting IBM ..........181
Contents v
Page 8

vi Quick Beginnings
Page 9

Welcome to DB2 Connect!
The DB2 Connect Quick Beginnings
books provide a focused introduction
to the installation and configuration
of DB2 Connect products.
This Quick Beginnings book will guide
you through the planning,
installation, migration (if necessary),
and setup of a DB2 Connect
workstation. Once the DB2 Connect
workstation has been installed and
configured, you will configure a
connection from the workstation to a
DB2 server on a host or AS/400
system (using the Command Line
Processor or DB2 GUI tools).
How This Book is Structured
Setting up DB2 Connect is a multi-step process. The sections in this book
follow the typical sequence of tasks necessary to go from installing DB2
Connect to using client applications with your database.
DB2
Universal
Database
The typical steps to installing and configuring DB2 Connect are as follows:
Step 1. Determine how you want to use DB2 Connect in your network. For
the available options, see “Accessing Host or AS/400 DB2 Data
Using DB2 Connect Personal Edition” on page 4.
Step 2. Verify that you have the correct hardware and software prerequisites
on both your workstation and the host database server. See
“Chapter 2. Planning for Installation” on page 23 for prerequisites.
Step 3. Verify that your host or AS/400 database server is configured to
accept connections from DRDA Application Requesters such as DB2
Connect. See “Part 3. Preparing Host and AS/400 Databases for DB2
Connect Communications” on page 37.
Step 4. The next step is to install your DB2 Connect software. You will use
this workstation to configure and verify your host and AS/400
© Copyright IBM Corp. 1993, 1999 vii
Page 10

connections. For DB2 Connect installation instructions, see “Part 2.
DB2 Connect: Planning and Installation” on page 21.
Step 5. After installation, you will establish the connection between DB2
Connect and your host or AS/400 database system. DB2 Connect
can locate and configure all TCP/IP and most SNA connections for
you. If you are using a supported SNA product that DB2 Connect
does not automatically configure, see the chapter in “Part 4.
Configuring DB2 Connect to Communicate with Host and AS/400
Databases” on page 55 that corresponds to your SNA product.
v DB2 Connect Personal Edition ships with integrated SNA support.
If you need to manually configure the integrated SNA product,
refer to the Installation and Configuration Supplement.
Step 6. Bind the programs and utilities provided with DB2 Connect to your
host or AS/400 database. For instructions on binding programs and
utilities provided with your DB2 Connect product, see “Step 6. Bind
Utilities and Applications to the Database Server” on page 94.
Step 7. You will need to test the connection. See “Chapter 6. Configuring
DB2 Connect to Host or AS/400 Communications Using the CCA”
on page 57 for more information.
Step 8. You are now ready to use DB2 Connect with all your applications.
Step 9. Workstations that will be used for application development should
have the DB2 Software Developer’s Kit installed. See “Part 5.
Configuring DB2 Clients to Use DB2 Connect” on page 103 for
instructions on installing and configuring the DB2 Software
Developer’s Kit.
Step 10. If you want to use this workstation to administer DB2 for OS/390 or
Conventions
This book uses the following highlighting conventions:
v Boldface indicates commands or graphical user interface (GUI) controls
such as names of fields, folders, icons, or menu choices.
v Italics indicates variables that you should replace with your own value. It is
also used to indicate book titles and to emphasize words.
v Monospace indicates file names, directory paths, and examples of text you
enter exactly as shown.
viii Quick Beginnings
DB2 Universal Database for UNIX, Windows NT or OS/2 servers,
install the DB2 Administration Client component of DB2 Connect.
For more information on using Client tools, see “Appendix B. Using
the Control Center to Administer DB2 for OS/390 and DB2 Connect
Enterprise Edition servers” on page 139.
Page 11
This icon marks a fast path. A fast path guides you to information
specific to your configuration where multiple options are available.
This icon marks a tip. It provides additional information that can help
you complete a task.
For a complete description of the DB2 library, see “Appendix D. How the DB2
Library Is Structured” on page 143.
v If you do not follow the documented installation method with the
recommended defaults, it may be necessary to refer to the
Administration Guide and the Command Reference to complete the
installation and configuration.
v The term Windows 32-bit operating systems refers to Windows 95,
Windows 98, or Windows NT.
v The term Windows 9x refers to Windows 95 or Windows 98.
v The term DB2 client refers to a DB2 Run-Time Client or a DB2
Administration Client.
v The term DB2 Universal Database refers to DB2 Universal Database
on OS/2, UNIX, and Windows 32-bit operating systems, unless
otherwise stated.
Welcome to DB2 Connect! ix
Page 12

x Quick Beginnings
Page 13

Part 1. Introduction to DB2 Connect
© Copyright IBM Corp. 1993, 1999 1
Page 14

2 Quick Beginnings
Page 15

Chapter 1. About DB2 Connect
DB2 Connect Enterprise Edition
DB2 Connect Enterprise Edition is a connectivity server that
concentrates and manages connections from multiple desktop clients
and web applications to DB2 database servers running on host or
AS/400 systems. IBM’s DB2 for AS/400, DB2 for OS/390, and DB2 for
VSE & VM databases continue to be the systems of choice for
managing most critical data for the world’s largest organizations.
While these host and AS/400 databases manage the data, there is a
great demand to integrate this data with applications running on
Windows, UNIX, OS/2 and Apple workstations.
DB2 Connect Enterprise Edition enables local and remote client
applications to create, update, control, and manage DB2 databases and
host systems using Structured Query Language (SQL), DB2 APIs
(Application Programming Interfaces), ODBC (Open Database
Connectivity), JDBC (Java Database Connectivity), SQLJ (Embedded
SQLJ for Java), or DB2 CLI (Call Level Interface). In addition, DB2
Connect supports Microsoft Windows data interfaces such as ActiveX
Data Objects (ADO), Remote Data Objects (RDO), and OLE DB.
DB2 Connect Enterprise Edition is currently available for AIX, HP-UX,
Linux, OS/2, Solaris, and Windows NT operating systems. These
servers provide support for applications running on Windows 3.1,
Windows 9x, Windows NT, UNIX (AIX, SCO UnixWare 7, Solaris,
HP-UX, Linux, Silicon Graphics IRIX, SINIX), OS/2, and Apple
Macintosh workstations.
DB2 Connect Personal Edition
DB2 Connect Personal Edition provides access from a single
workstation to DB2 databases residing on servers such as MVS/ESA,
OS/390, OS/400, VM and VSE, as well as to DB2 Universal Database
servers on Windows NT, UNIX, and OS/2. DB2 Connect Personal
Edition provides the same rich set of APIs as DB2 Connect Enterprise
Edition, and also features integrated SNA support on all Windows
platforms.
This product is currently available for OS/2, Linux, Windows 9x, and
Windows NT operating systems.
© Copyright IBM Corp. 1993, 1999 3
Page 16

Working with DB2 Data
As well as providing a relational database to store your data, DB2 lets you
issue requests to administer, query, update, insert, or delete data using local or
remote client applications.
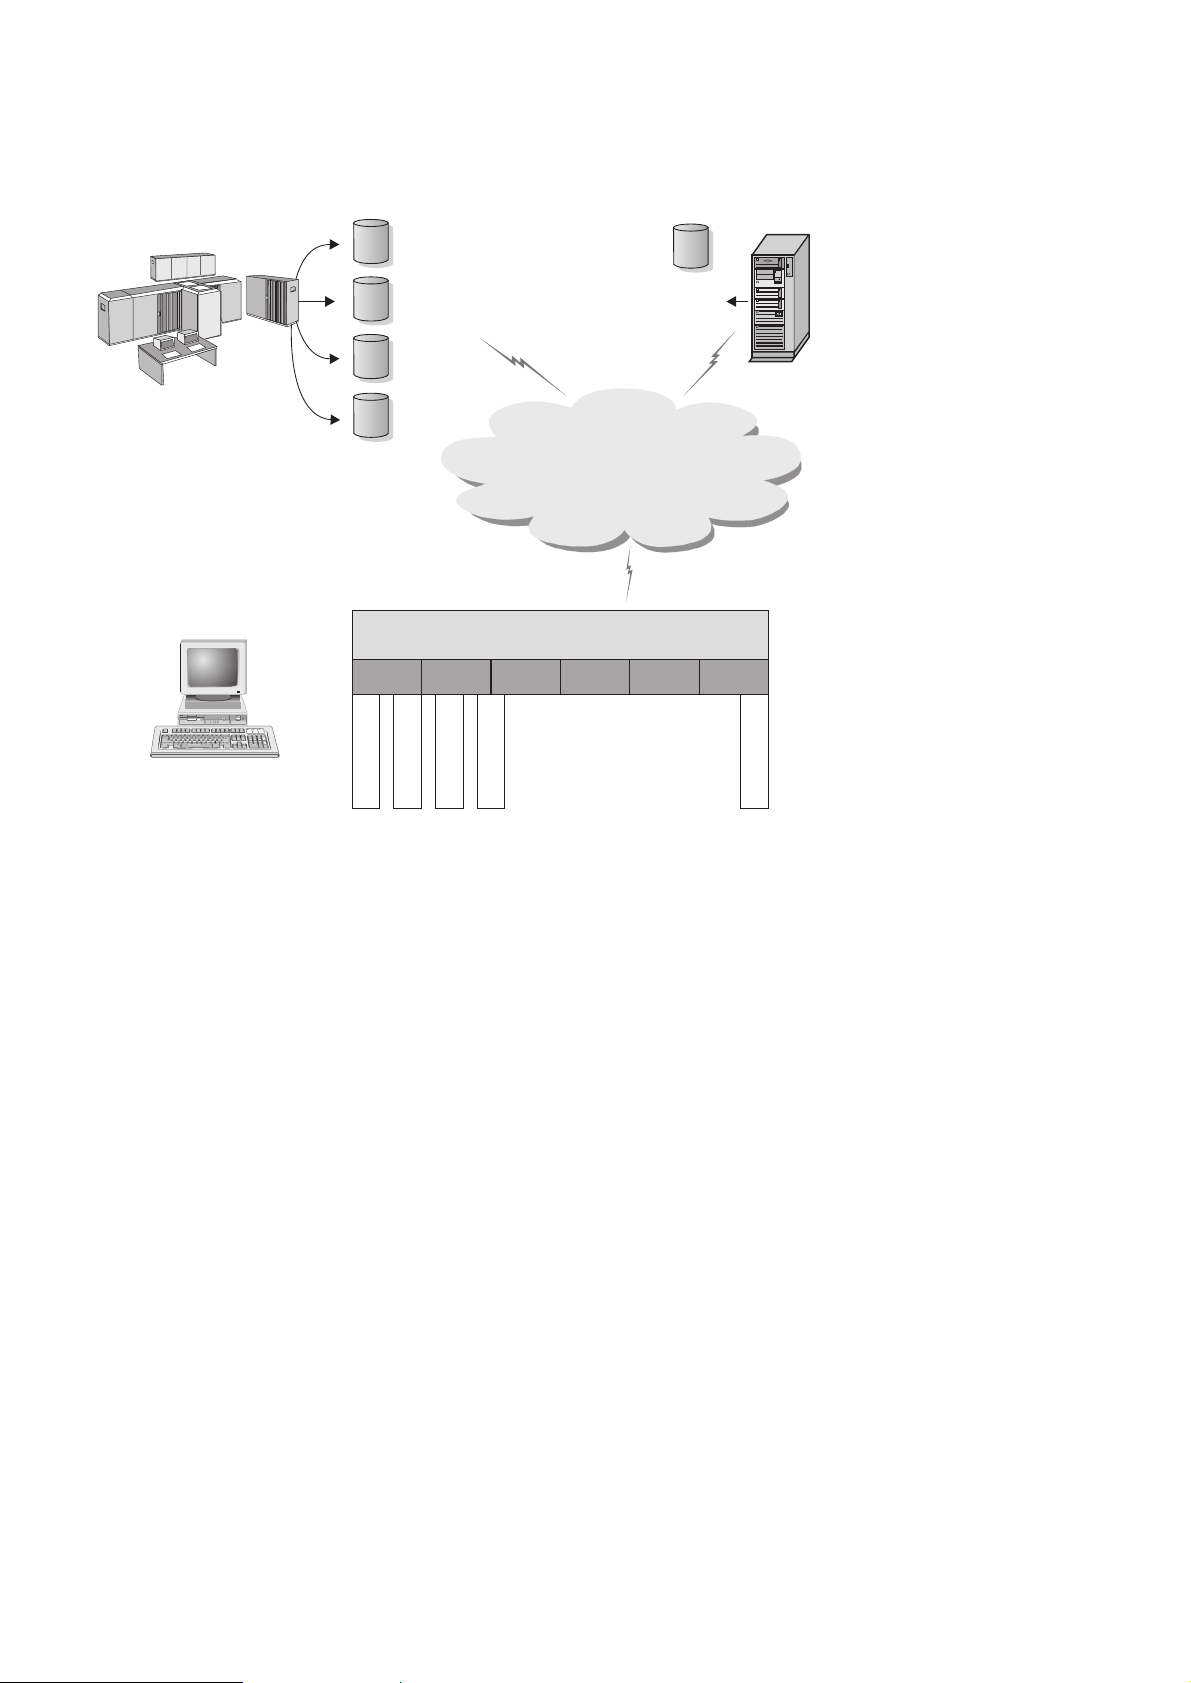
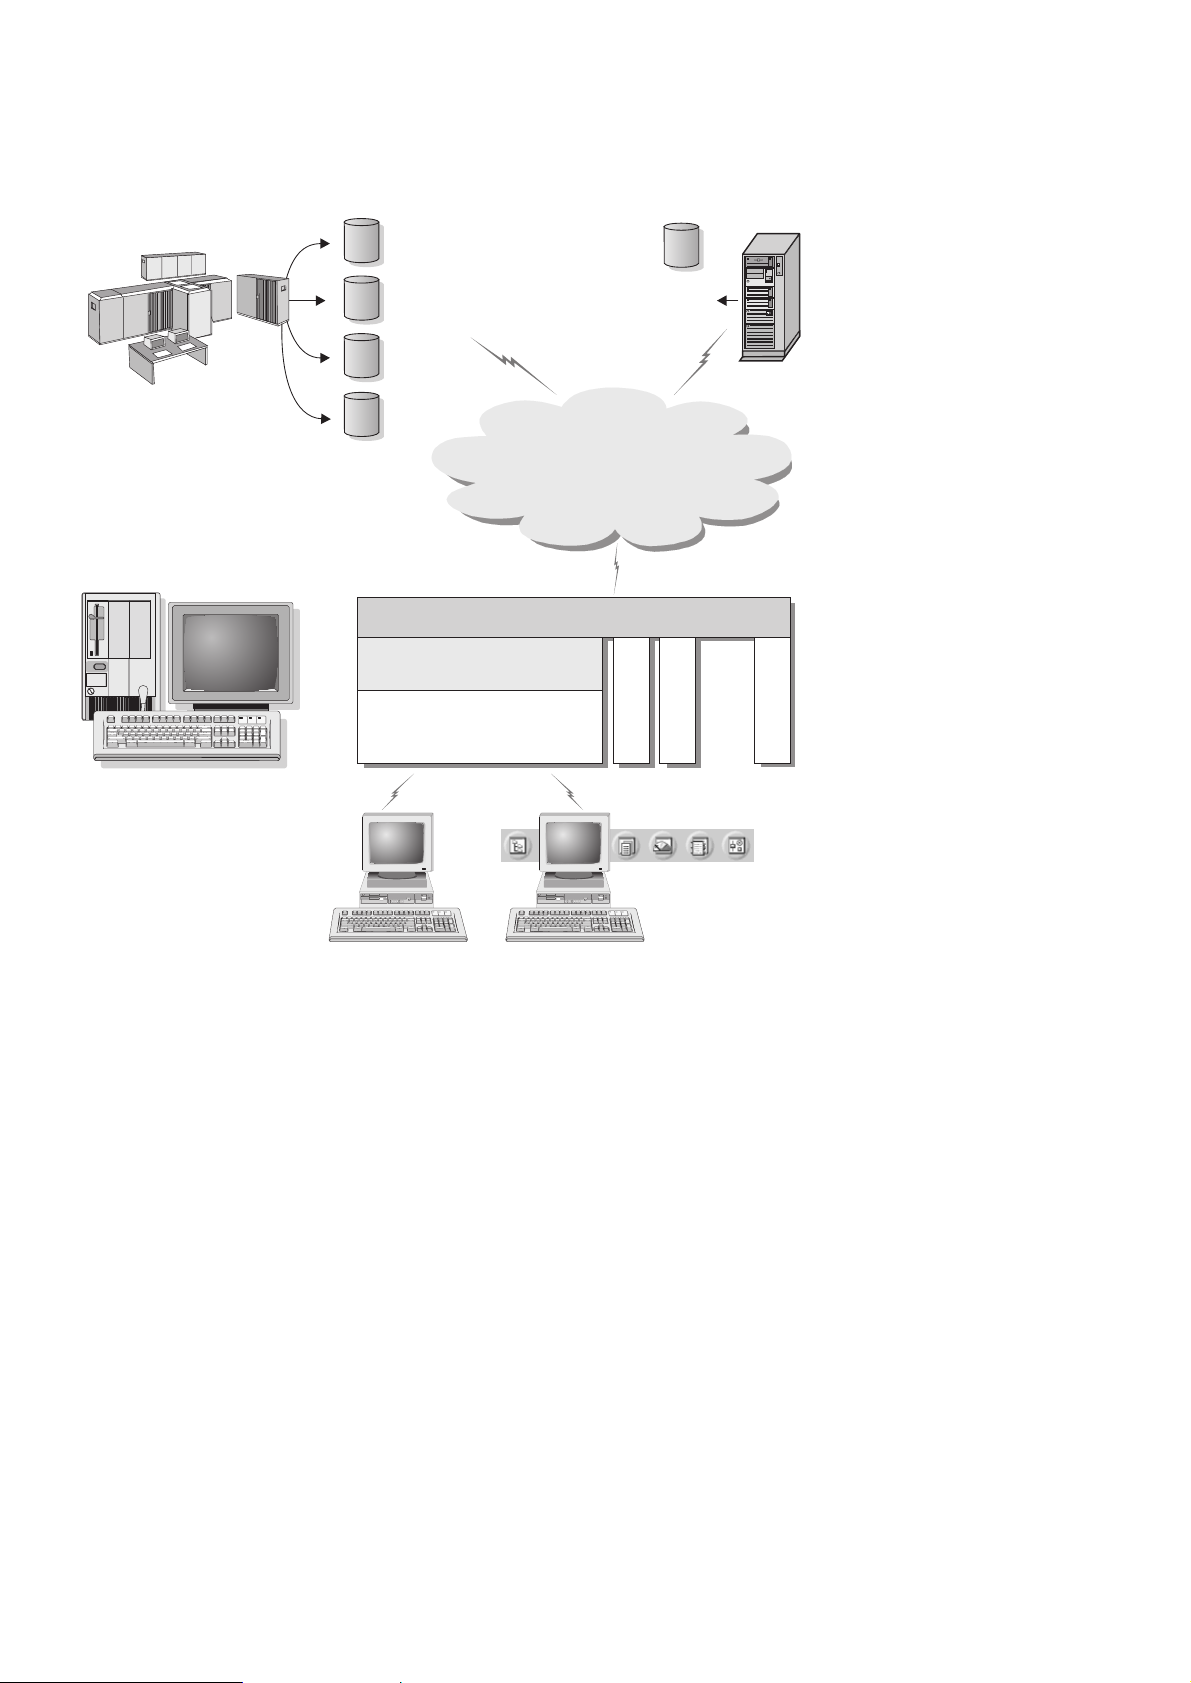
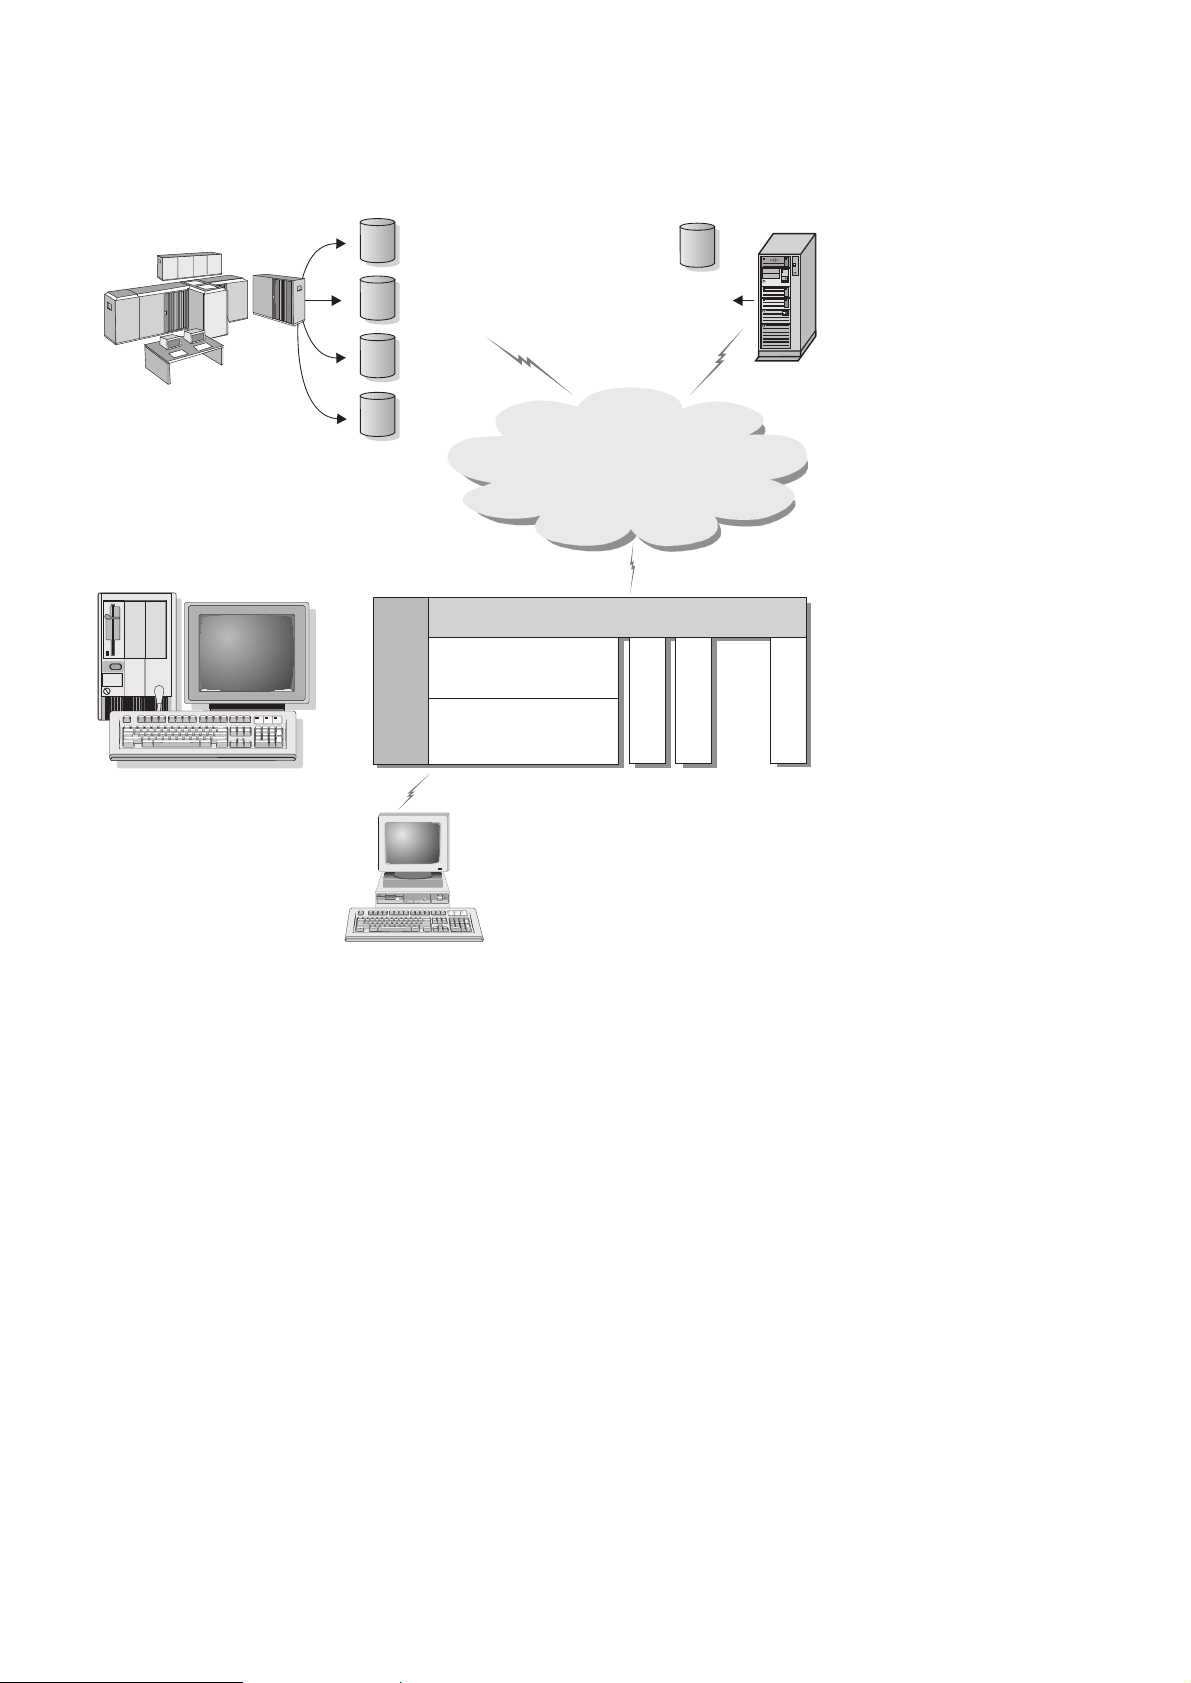
Accessing Host or AS/400 DB2 Data Using DB2 Connect Personal Edition
Direct connection without intermediate servers is a very convenient and
desirable configuration. This is especially true for situations where the host or
the AS/400 database server supports TCP/IP connectivity (for example, DB2
for OS/390 V5.1, or DB2 for AS/400 V4R2, or DB2 for VM 6.1). In such a
configuration, each DB2 Connect workstation establishes a direct TCP/IP
connection to DB2 for OS/390 or, for platforms with integrated SNA Support,
connects via APPC to DB2 for MVS and other host and AS/400 databases.
TCP/IP connectivity requires that the host or AS/400 database support
TCP/IP. At this point, DB2 for OS/390 V5.1, DB2/400 V4R2, and DB2 for VM
V6.1 support native TCP/IP connections. An alternative to native TCP/IP is
MPTN connectivity. MPTN connections require that IBM AnyNet products be
installed on the target database system, but do not require the host or AS/400
database to provide native TCP/IP support.
Figure 1 on page 5 shows workstations directly connected to a host or AS/400
database server. Each workstation has DB2 Connect Personal Edition installed.
4 Quick Beginnings
Page 17
DB2 for
MVS
S/390, S/370
DB2 for
VSE
DB2 for
VM
OS/390
DB2 Connect Personal Edition
ODBC ADO DB2 CLI
Application 1
Application 2
Application 1
Application 2
Not all protocols are supported for all platforms.
APPC TCP/IP*** MPTN
Coax* Ethernet Asynch Twinax**
Application 3
Application 4
DB2 for
AS/400
AS/400
SDLC Token-ring X.25
JDBC SQLJ Emb SQL
...
Application n
* For Host connections only
** For AS/400
*** TCP/IP connectivity requires DB2 for OS/390 V5R1, DB2 for AS/400 V4R2,
or DB2 for VM V6.1
Figure 1. Direct Connection Between DB2 Connect and a host or AS/400 database server
In this environment, if you are using Windows 32-bit operating systems you
can use the DB2 Connect Personal Edition Integrated SNA Support to connect
directly to the host or AS/400 servers. DB2 Connect Integrated SNA Support
permits connections over a variety of local and wide area networks, such as
Token-Ring, Ethernet, SDLC, Twinax, Coax and Asynchronous dial-up. The
DB2 Connect Integrated SNA Support implements both APPC and MPTN
connections over networks using hosts and AS/400 systems that have IBM
AnyNet products installed. Users of OS/2 workstations can use IBM Personal
Communications for OS/2, or IBM Communications Server for OS/2 to
achieve direct APPC and MPTN connectivity.
Chapter 1. About DB2 Connect 5
Page 18

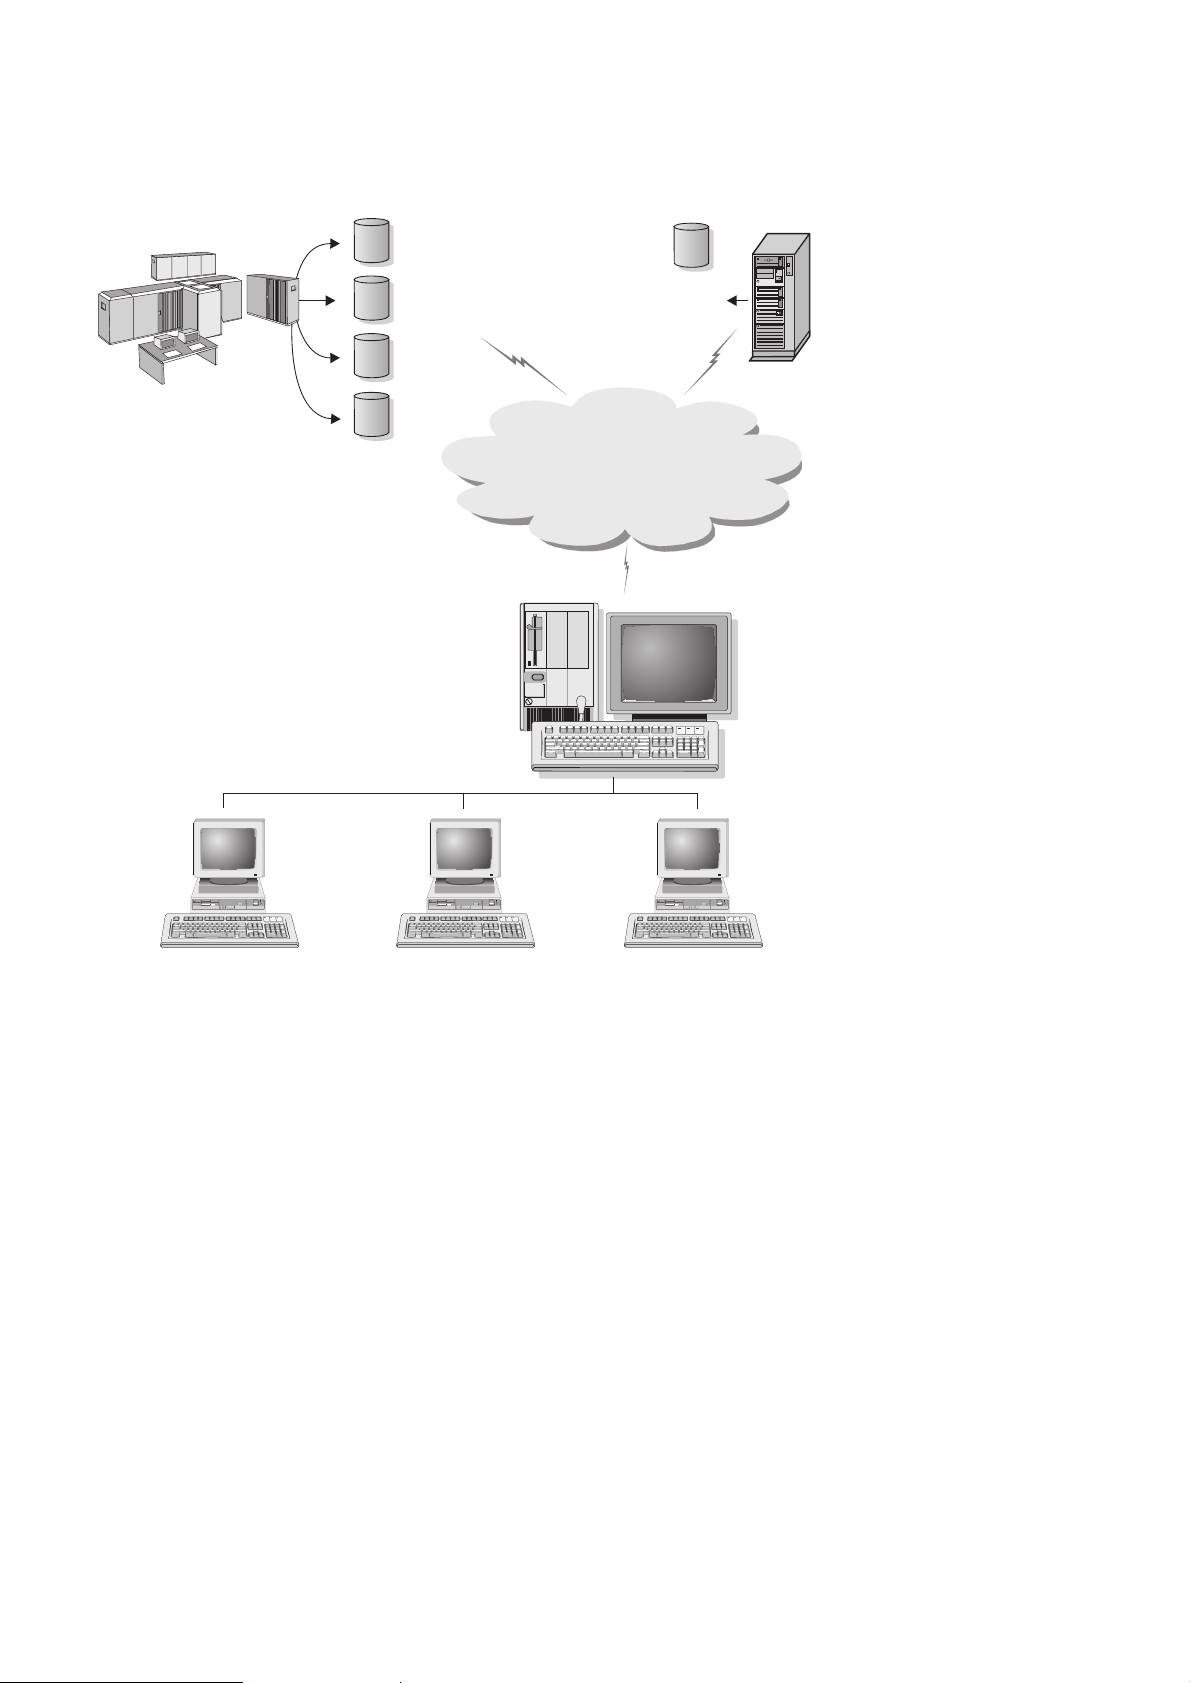
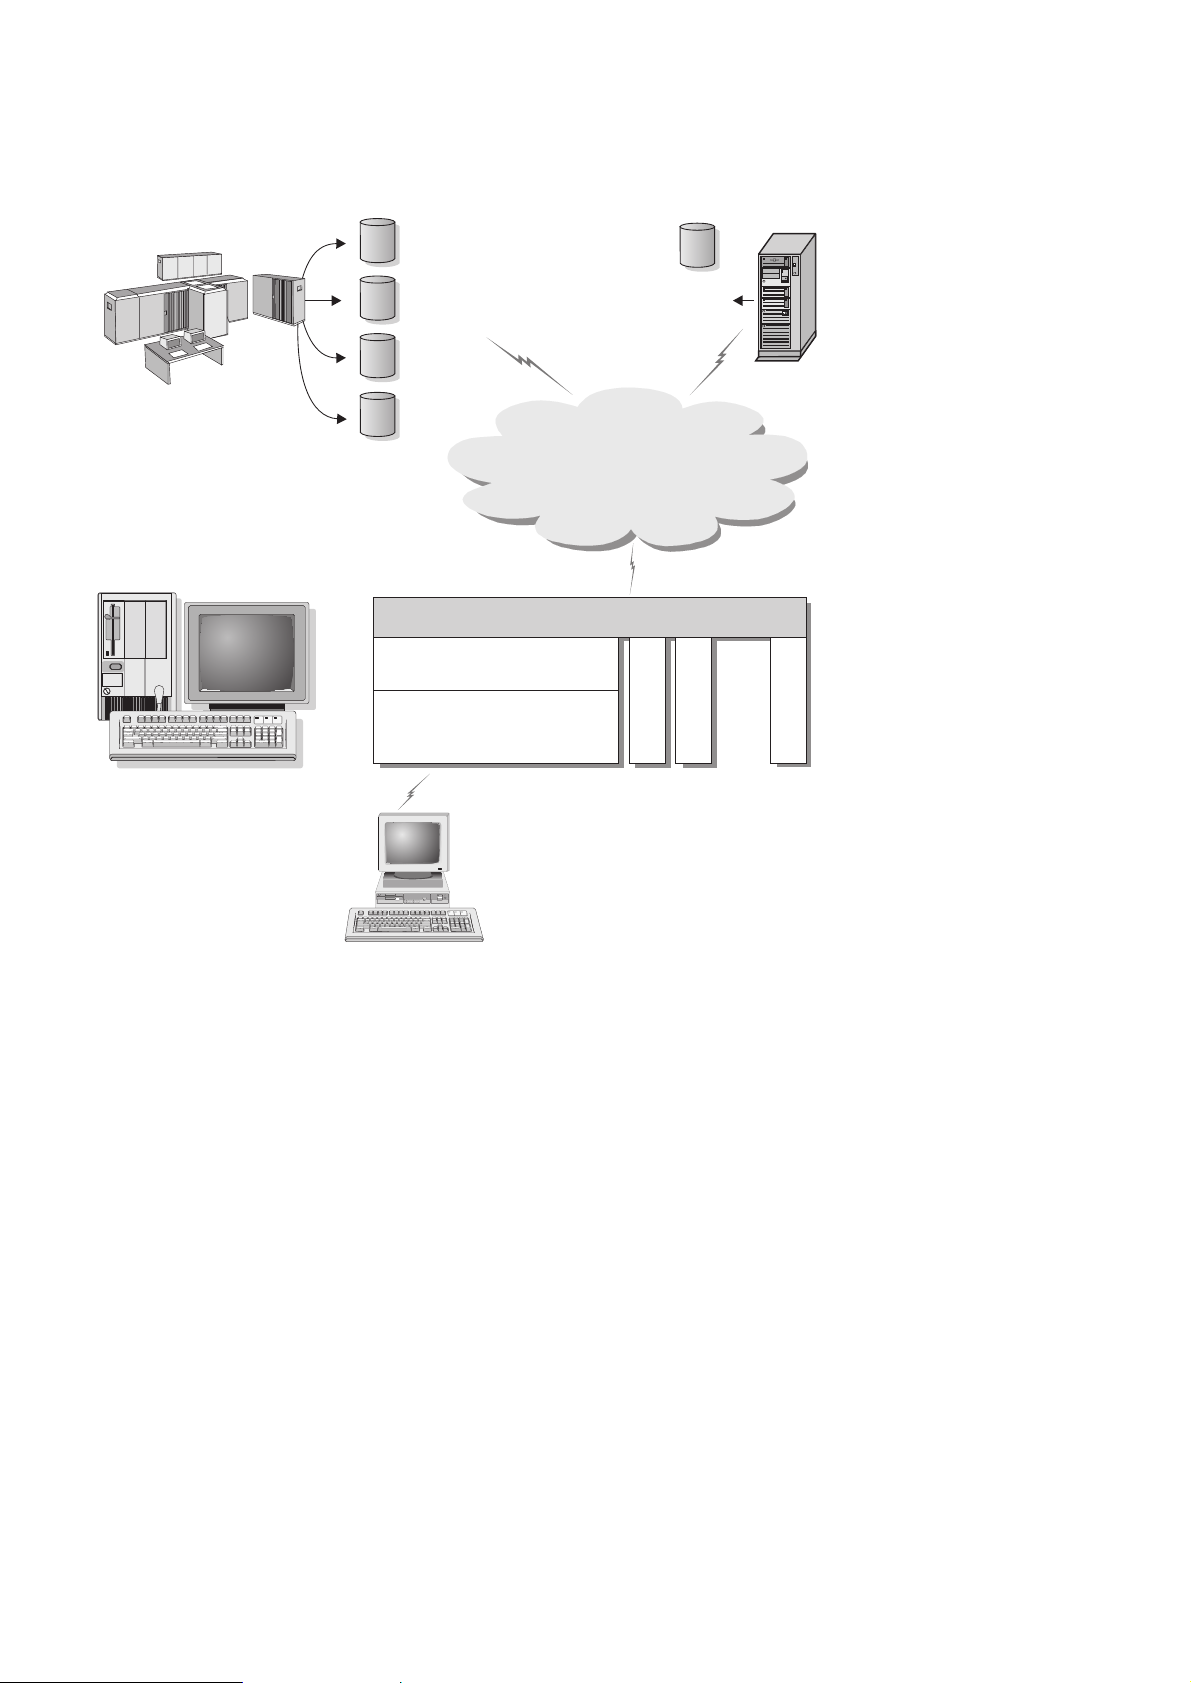
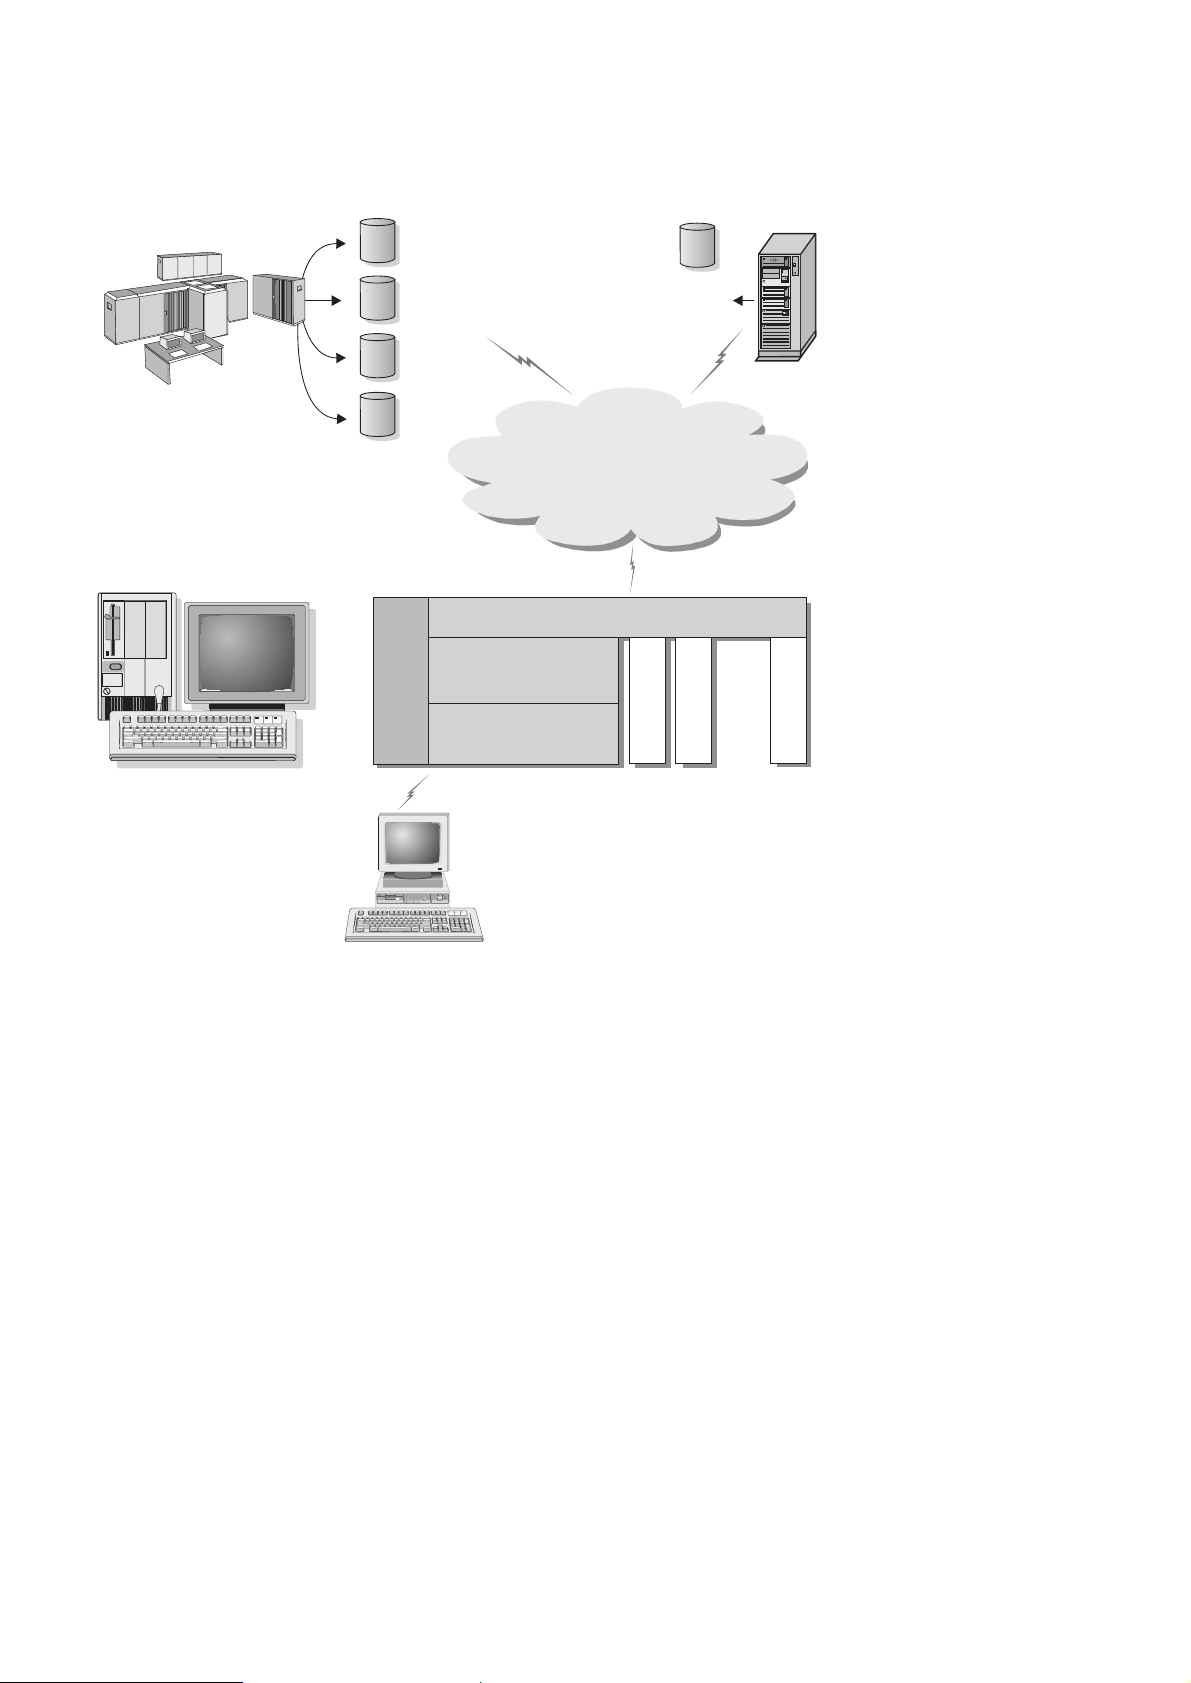
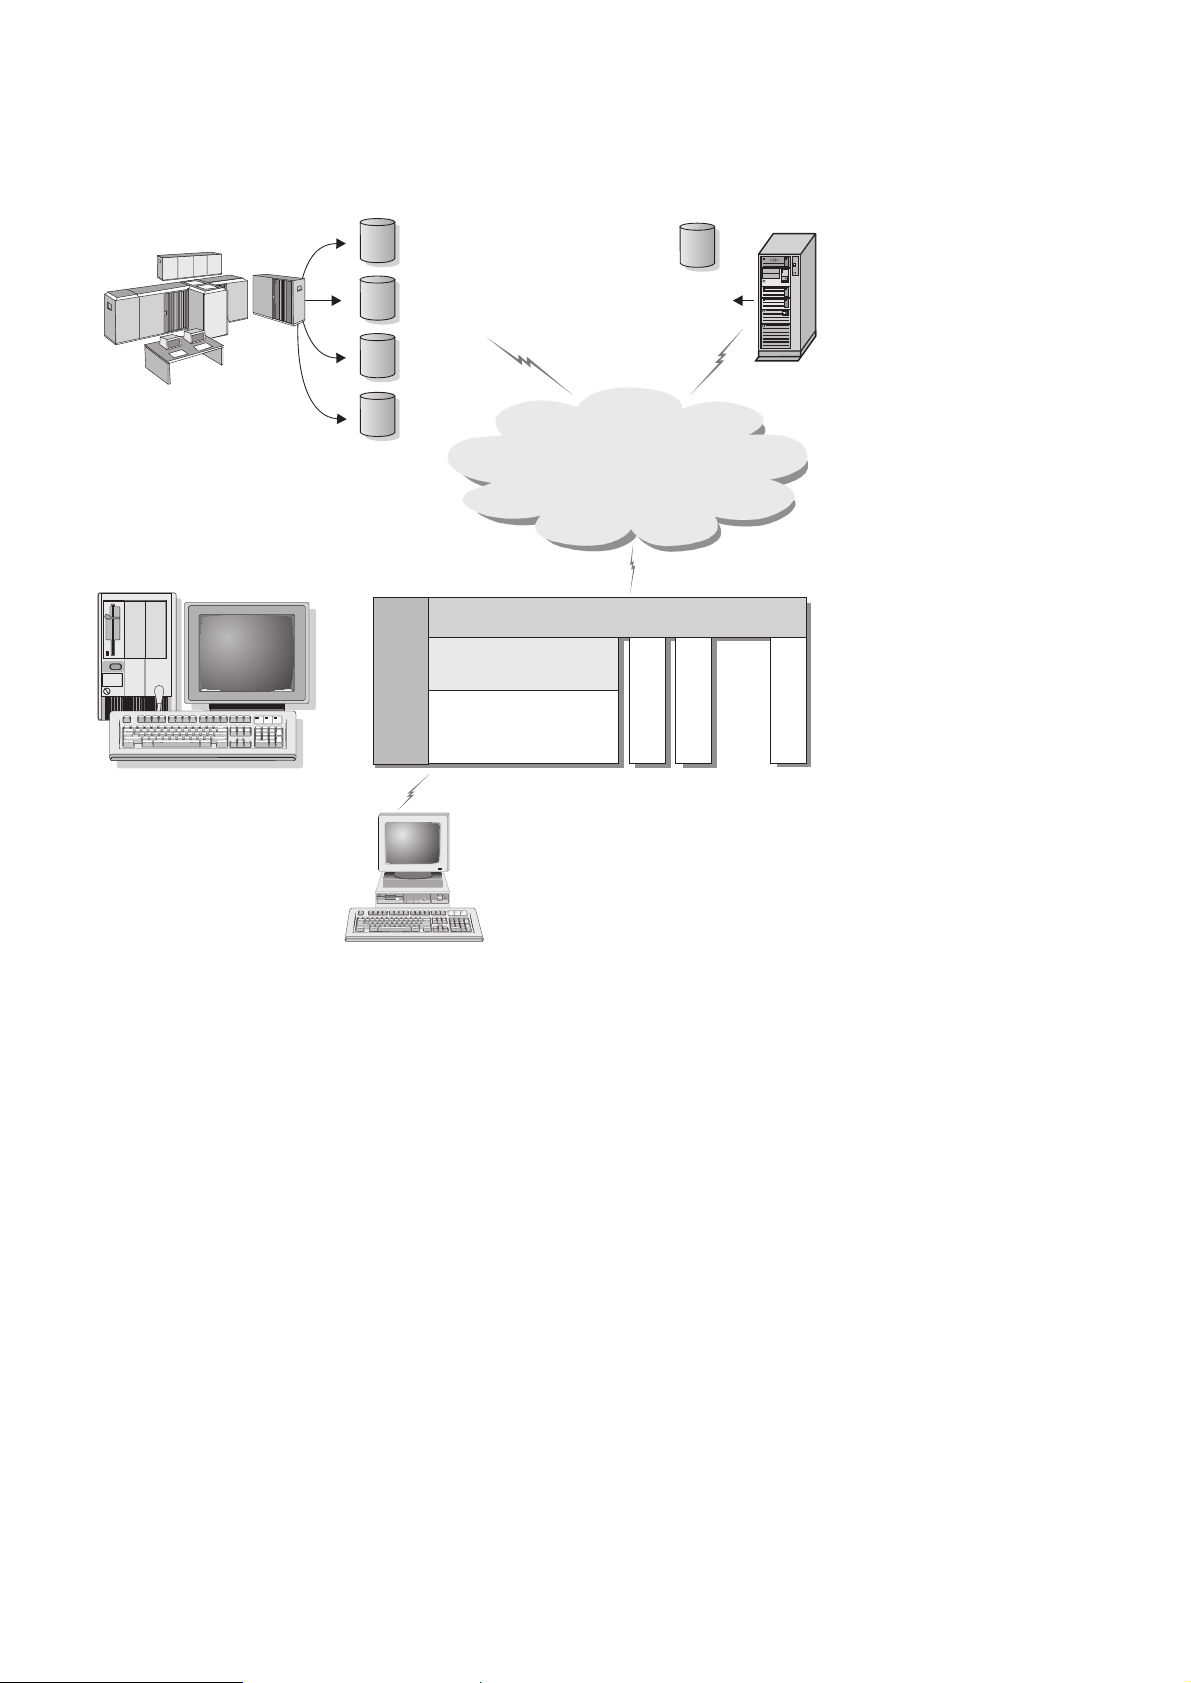
Connections via Communications Gateway
Some organizations prefer to concentrate access to SNA networks through
dedicated SNA Gateways, such as IBM eNetwork Communications Server,
Microsoft SNA Server, or Novell Netware for SAA. DB2 Connect products
support connections through gateways, so this can be a good choice if you
need terminal emulation and other SNA services not provided by DB2
Connect. Figure 2 on page 7 illustrates such a situation.
6 Quick Beginnings
Page 19
DB2 for
MVS
S/390, S/370
DB2 for
VSE
DB2 for
VM
OS/390
SNA Gateway
(eg. IBM eNetwork Communications
Server, Microsoft SNA Server)
IPX/SPX, NetBIOS TCP/IP
DB2 for
AS/400
AS/400
APPC TCP/IP*** MPTN
Coax* Ethernet Asynch Twinax**
SDLC Token-ring X.25
ESCON
DB2 Connect Personal Edition
with SNA Gateway client software
* For Host connections only
** For AS/400
*** TCP/IP connectivity requires DB2 for OS/390 V5R1, DB2 for AS/400 V4R2,
or DB2 for VM V6.1
DB2 Connect Personal Edition
with SNA Gateway client software
DB2 Connect Personal Edition
with SNA Gateway client software
Figure 2. Indirect Connection to host or AS/400 database server via SNA Communications Gateway
Although you can use DB2 Connect Personal Edition with SNA gateways, you
may find DB2 Connect Enterprise Edition a better choice if you want to use
many DB2 Clients. DB2 Connect Enterprise Edition can be installed on the
Chapter 1. About DB2 Connect 7
Page 20
same machine as IBM eNetwork Communications Server or Microsoft SNA
Server, and in many cases it can provide a less expensive and
better-performing solution.
Contact your authorized IBM reseller for additional information about DB2
Connect Enterprise Edition.
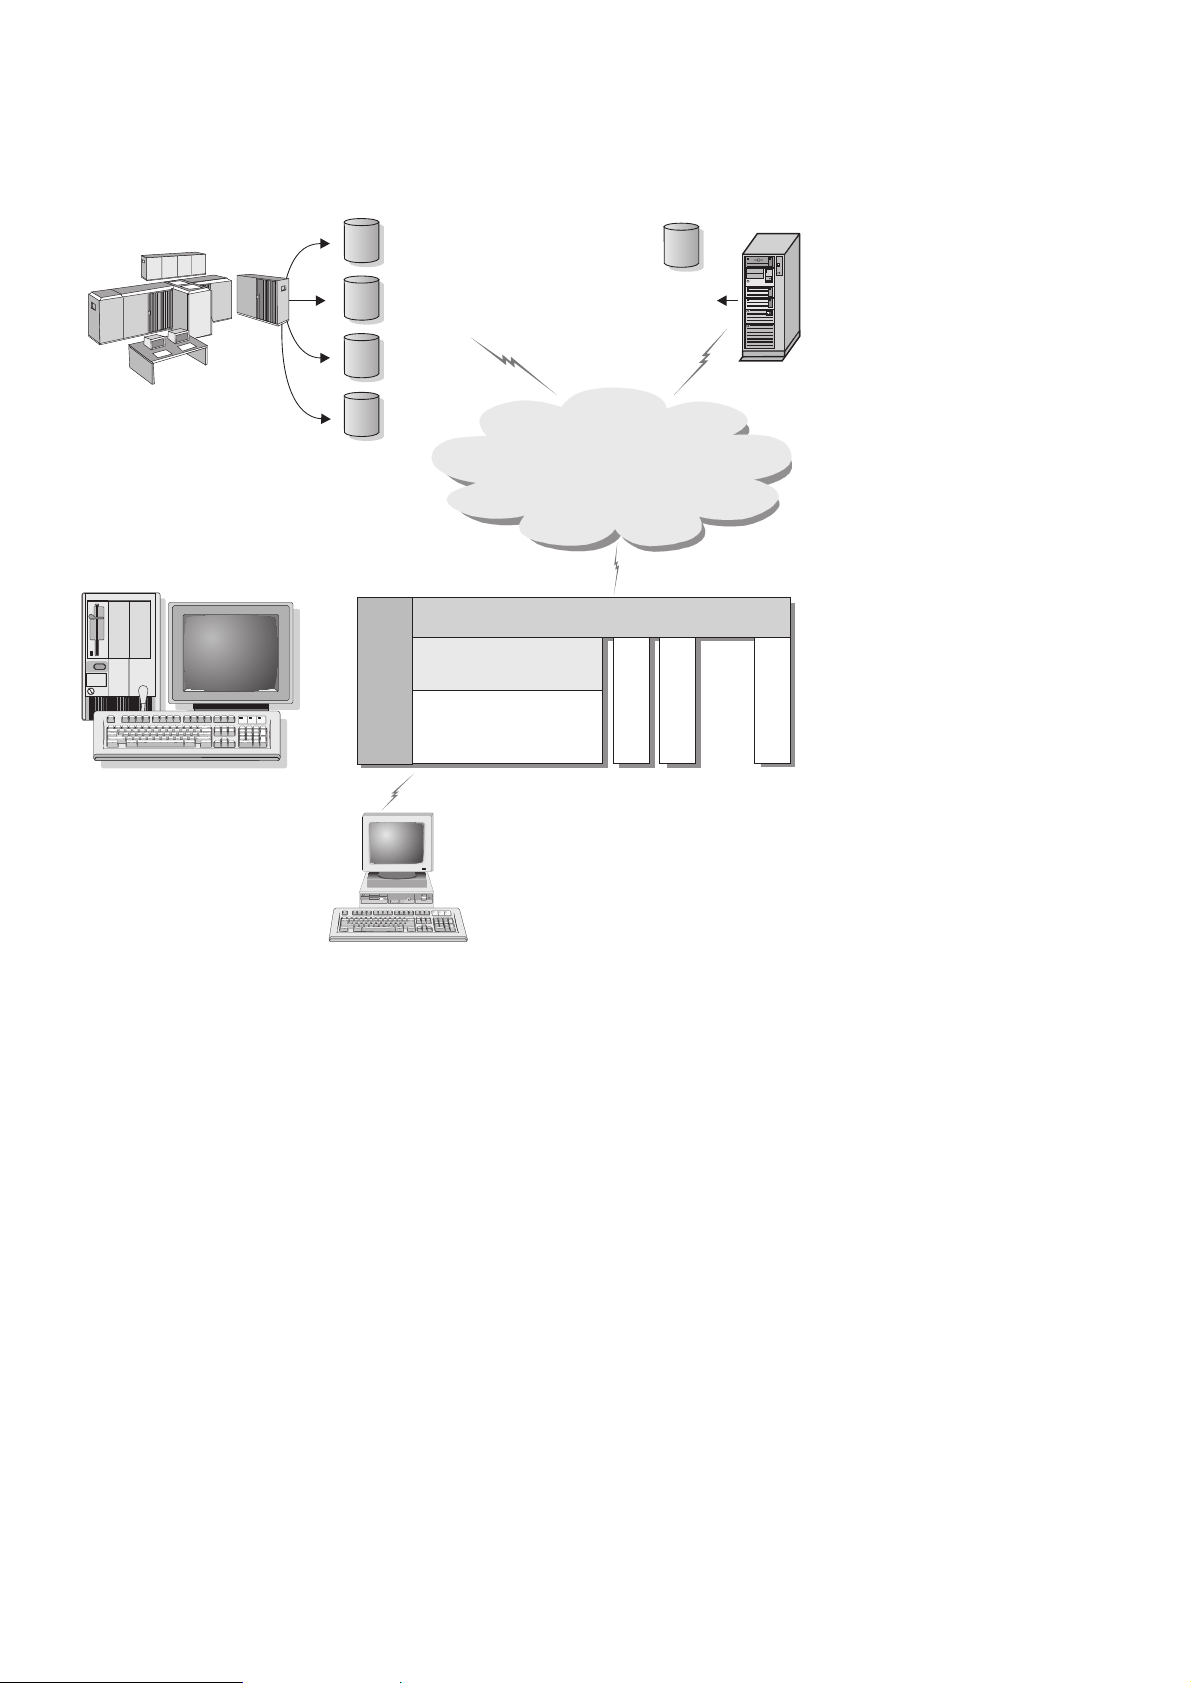
Accessing Host or AS/400 DB2 Data from the Desktop Using DB2 Connect
Enterprise Edition
A DB2 Connect server enables DB2 clients on a LAN access to data that is
stored on host or AS/400 systems.
DB2 Universal Database Enterprise Edition and DB2 Universal
Database Enterprise - Extended Edition include the DB2 Connect
Server Support component. All references to DB2 Connect Enterprise
Edition also apply to the DB2 Connect Server Support component.
DB2 Connect Enterprise Edition is most appropriate for environments where:
v Host and AS/400 database servers do not support native TCP/IP
connectivity and direct connectivity from desktop workstations via SNA is
not desirable (see Figure 3 on page 10).
v Application is implemented using data-aware Java applets (see Figure 7 on
page 15).
v Web servers are used to implement web-based applications (see Figure 8 on
v Middle-tier application server is employed.
v Transaction monitor such as CICS, Encina, Microsoft Transaction Server
Applications are provided with transparent access to host or AS/400 data
through a standard architecture for managing distributed data. This standard
is known as Distributed Relational Database Architecture (DRDA). Use of
DRDA allows your applications to establish a fast connection to host and
AS/400 databases without expensive host components or proprietary
gateways.
A great deal of the data in many large organizations is managed by DB2 for
AS/400, DB2 for MVS/ESA, DB2 for OS/390, or DB2 for VSE & VM.
Applications that run on any of the supported platforms can work with this
data transparently, as if a local database server managed it. DB2 Connect
Enterprise Edition is required for supporting applications which access host or
AS/400 data and exploit transaction monitors (for example, CICS, Encina,
Microsoft Transaction Server) as well as applications that are implemented as
8 Quick Beginnings
page 17, Figure 7 on page 15 and Figure 6 on page 13).
(MTS), Tuxedo, Component Broker, and MQSeries are used (see Figure 4 on
page 11).
Page 21
Java applets. In addition, you can use a wide range of off-the-shelf or
custom-developed database applications with DB2 Connect and its associated
tools. For example, you can use DB2 Connect products with:
v Spreadsheets, such as Lotus 1-2-3 and Microsoft Excel, to analyze real-time
data without having the cost and complexity of data extract and import
procedures.
v Decision support tools, such as Business Objects, Brio and Cognos, and
Crystal Reports, to provide real-time information.
v Database products, such as Lotus Approach and Microsoft Access.
v Development tools, such as PowerSoft PowerBuilder, Microsoft Visual Basic,
and Borland Delphi, to create client/server solutions.
Although DB2 Connect is often installed on an intermediate server machine to
connect DB2 clients to a host or AS/400 database, it is also installed on
machines where multiple local users want to access the host or AS/400
servers directly. For example, DB2 Connect may be installed on a large
machine with many local users. It may also be installed on a Web server,
Transaction Processor (TP) monitor, or other 3-tier application server machines
with multiple local SQL application processes and threads. In these cases, you
can choose to install DB2 Connect on the same machine for simplicity, or on a
separate machine to off-load CPU cycles.
A DB2 Connect server enables multiple clients to connect to host or AS/400
data and can significantly reduce the effort that is required to establish and
maintain access to enterprise data. Figure 3 on page 10 illustrates IBM’s
solution for environments in which you want to use a DB2 client making an
indirect connection to a host or AS/400 database server through DB2 Connect
Enterprise Edition.
In the example, you could replace the DB2 Connect server with a
DB2 server that has the DB2 Connect Server Support component
installed.
Chapter 1. About DB2 Connect 9
Page 22
DB2 for
MVS
S/390, S/370
DB2 for
VSE
DB2 for
VM
OS/390
APPC TCP/IP*** MPTN
Coax* Ethernet Asynch Twinax**
SDLC Token-ring X.25
DB2 Connect Enterprise Edition
Communication Support
APPC, Named Pipes, NetBIOS,
IPX/SPX, TCP/IP
ESCON
DB2 for
AS/400
tion 1
a
Applic
tion 2
a
Applic
...
AS/400
tion n
a
Applic
DB2 Run-Time Client DB2 Administration Client
Not all protocols are supported for all platforms.
* For Host connections only
** For AS/400
*** TCP/IP connectivity requires DB2 for OS/390 V5R1, DB2 for AS/400 V4R2,
or DB2 for VM V6.1
Figure 3. DB2 Connect Enterprise Edition
10 Quick Beginnings
Page 23
DB2 for
MVS
S/390, S/370
DB2 for
VSE
DB2 for
VM
OS/390
APPC TCP/IP*** MPTN
Coax* Ethernet Asynch Twinax**
SDLC Token-ring X.25
DB2 Connect Enterprise Edition
TP Monitor
(eg. CICS, ENCINA, MTS)
Application Business Logic
ESCON
DB2 for
AS/400
tion 1
a
Applic
tion 2
a
Applic
...
AS/400
tion n
a
Applic
TP Monitor Client
Not all protocols are supported for all platforms.
* For Host connections only
** For AS/400
*** TCP/IP connectivity requires DB2 for OS/390 V5R1, DB2 for AS/400 V4R2,
or DB2 for VM V6.1
Figure 4. Using Transaction Monitors with DB2 Connect.
Chapter 1. About DB2 Connect 11
Page 24
DB2 for
MVS
S/390, S/370
Web
Server
DB2 for
VSE
DB2 for
VM
OS/390
APPC TCP/IP*** MPTN
Coax* Ethernet Asynch Twinax**
SDLC Token-ring X.25
ESCON
DB2 Connect Enterprise Edition
WebSphere
Java Servlets,
JSP,
Enterprise Java Beans
DB2 for
AS/400
tion 1
a
Applic
tion 2
a
Applic
...
AS/400
tion n
a
Applic
* For Host connections only
** For AS/400
*** TCP/IP connectivity requires DB2 for OS/390 V5R1, DB2 for AS/400 V4R2,
or DB2 for VM V6.1
Figure 5. Java Server Support.
12 Quick Beginnings
Web Browser
Not all protocols are supported for all platforms.
Page 25
DB2 for
MVS
S/390, S/370
Windows NT Server 4.0
with Option Pack 2
IIS
&
MTS
DB2 for
VSE
DB2 for
VM
OS/390
APPC TCP/IP*** MPTN
Coax* Ethernet Asynch Twinax**
SDLC Token-ring X.25
ESCON
DB2 Connect Enterprise Edition
ADO
ASPs, COM Objects
DB2 for
AS/400
tion 1
a
Applic
tion 2
a
Applic
...
AS/400
tion n
a
Applic
Web Browser
Not all protocols are supported for all platforms.
* For Host connections only
** For AS/400
*** TCP/IP connectivity requires DB2 for OS/390 V5R1, DB2 for AS/400 V4R2,
or DB2 for VM V6.1
Figure 6. DB2 Connect working with Microsoft IIS.
Chapter 1. About DB2 Connect 13
Page 26

Accessing DB2 Data from the Web Using Java
Java Database Connectivity (JDBC) and Embedded SQL for Java (SQLJ) are
provided with DB2 to allow you to create applications that access data in DB2
databases from the Web.
Programming languages containing embedded SQL are called host languages.
Java differs from the traditional host languages C, COBOL, and FORTRAN, in
ways that significantly affect how it embeds SQL:
v SQLJ and JDBC are open standards, enabling you to easily port SQLJ or
JDBC applications from other standards-compliant database systems to DB2
Universal Database.
v All Java types representing composite data, and data of varying sizes, have
a distinguished value, null, which can be used to represent the SQL NULL
state, giving Java programs an alternative to NULL indicators that are a
fixture of other host languages.
v Java is designed to support programs that, by nature, are heterogeneously
portable (also called ″super portable″ or simply ″downloadable″). Along
with Java’s type system of classes and interfaces, this feature enables
component software. In particular, an SQLJ translator written in Java can
call components that are specialized by database vendors in order to
leverage existing database functions such as authorization, schema
checking, type checking, transactional, and recovery capabilities, and to
generate code optimized for specific databases.
v Java is designed for binary portability in heterogeneous networks, which
promises to enable binary portability for database applications that use
static SQL.
v You can run JDBC applets inside a web page on any system with a
Java-enabled browser, regardless of the platform of your client. Your client
system requires no additional software beyond this browser. The client and
the server share the processing of JDBC and SQLJ applets and applications.
The JDBC server and the DB2 client must reside on the same machine as the
Web server. The JDBC server calls the DB2 client to connect to local, remote,
host, and AS/400 databases. When the applet requests a connection to a DB2
database, the JDBC client opens a TCP/IP connection to the JDBC server on
the machine where the Web server is running.
14 Quick Beginnings
Page 27
DB2 for
MVS
S/390, S/370
Web
Server
DB2 for
VSE
DB2 for
VM
OS/390
APPC TCP/IP*** MPTN
Coax* Ethernet Asynch Twinax**
SDLC Token-ring X.25
ESCON
DB2 Connect Enterprise Edition
JDBC driver
DB2 JDBC
Applet Server
DB2 for
AS/400
tion 1
a
Applic
tion 2
a
Applic
...
AS/400
tion n
a
Applic
* For Host connections only
** For AS/400
*** TCP/IP connectivity requires DB2 for OS/390 V5R1, DB2 for AS/400 V4R2,
or DB2 for VM V6.1
Figure 7. Using Java Applets.
JDBC and SQLJ applications can be run from any system that has a DB2 client
installed; a Web browser and a Web server are not required.
Java-enabled Web Browser
Not all protocols are supported for all platforms.
Chapter 1. About DB2 Connect 15
Page 28

For more information on Java enablement, refer to the DB2 Java Enablement
web page at http://www.software.ibm.com/data/db2/java/. For more
information on the JDBC API, point your browser to
http://splash.javasoft.com/.
Accessing DB2 Data from the Web Using Net.Data
Net.Data is provided with DB2 to allow you to create applications that access
data in DB2 databases from the Web.
Use Net.Data to create applications that are stored on a Web server and
viewable from any Web browser. While viewing these documents, users can
either select automated queries or define new ones that retrieve the specified
information directly from a DB2 database.
Automated queries do not require user input; they are links in an HTML
document and, when selected, they trigger existing SQL queries and return
the results from a DB2 database. These links can be triggered repeatedly to
access current DB2 data. Customized queries require user input. Users define
the search characteristics on the Web page by selecting options from a list or
by entering values in fields. They submit the search by clicking on a push
button. Net.Data uses the information that is supplied by the user to
dynamically build a complete SQL statement, and it sends the query to the
DB2 database.
A demonstration of Net.Data applications is available from the IBM Software
Net.Datapage at http://www.software.ibm.com/data/net.data.
Net.Data can be installed with a DB2 server to allow local access to databases.
Net.Datacan be installed with a DB2 client to allow remote access to
databases. In both cases, Net.Data and the Web server must be installed on
the same system.
16 Quick Beginnings
Page 29
DB2 for
MVS
S/390, S/370
Web
Server
DB2 for
VSE
DB2 for
VM
OS/390
APPC TCP/IP*** MPTN
Coax* Ethernet Asynch Twinax**
SDLC Token-ring X.25
ESCON
DB2 Connect Enterprise Edition
Net.Data
Net.Data
Templates
DB2 for
AS/400
tion 1
a
Applic
tion 2
a
Applic
...
AS/400
tion n
a
Applic
Not all protocols are supported for all platforms.
* For Host connections only
** For AS/400
*** TCP/IP connectivity requires DB2 for OS/390 V5R1, DB2 for AS/400 V4R2,
or DB2 for VM V6.1
Figure 8. Net.Data with DB2 Connect.
Web Browser
Chapter 1. About DB2 Connect 17
Page 30

Managing Connections to Databases Using the Client Configuration Assistant
The Client Configuration Assistant (CCA) helps you manage your database
connections to remote servers. The CCA is available on OS/2 and Windows
32-bit operating systems. This is the preferred method to set up any OS/2,
Windows 9x, or Windows NT client to communicate with a server.
You can use the command line processor to set up DB2 clients on any
platform. For more information, refer to the Installation and Configuration
Supplement.
With the Client Configuration Assistant, you can:
v Catalog databases so that they can be used by applications. Three methods
are available:
– Search the network for available databases and selecting one. Client
access is automatically set up for that database. DB2 Connect Personal
Edition is limited in that it cannot search for Host or AS/400 databases,
except through a DB2 Connect Enterprise Edition server.
– Use a database access profile provided by a database administrator to
automatically define your connections. Client access is automatically set
up for that database.
– Manually configure a connection to a database by entering the required
connection parameters.
v Remove cataloged databases, or change the properties of a cataloged
database.
v Test connections to local or remote databases identified on your system.
v Bind applications to a database by selecting utilities or bind files from a list.
v Tune the client configuration parameters on your system. Parameters are
logically grouped and suggested settings are provided on the interface as
parameters are selected.
Developing Applications Using the DB2 Software Developer’s Kit
The DB2 Software Developer’s Kit is a collection of tools that are designed to
meet the needs of database application developers. It includes libraries,
header files, documented APIs, and sample programs to build character-based,
multimedia, or object-oriented applications.
A platform-specific version of the DB2 Software Developer’s Kit is available
for each of the supported operating systems and is currently available in the
DB2 Universal Developer’s Edition and the DB2 Personal Developer’s Edition.
Applications that are developed with the DB2 Software Developer’s Kit will
run on any platform where the equivalent DB2 client component is installed.
18 Quick Beginnings
Page 31

Through a DB2 client, these applications can access all servers and, by using
the DB2 Connect product (or the DB2 Connect functionality supplied with
DB2 Enterprise - Extended or DB2 Enterprise Edition), they can also access
DB2 Universal Database for AS/400, DB2 Universal Database for OS/390, and
DB2 for VSE & VM database servers.
The DB2 Software Developer’s Kit allows you to develop applications that use
the following interfaces:
v Embedded SQL
v Call Level Interface (CLI) development environment (which is compatible
with ODBC from Microsoft)
v Java Database Connectivity (JDBC)
v Embedded SQL for Java (SQLJ)
v DB2 Application Programming Interfaces (APIs) that use administrative
functions to manage a DB2 database.
The DB2 Software Developer’s Kit includes:
v Precompilers for Java, C, C++, COBOL, and FORTRAN.
v Libraries, include files, and code samples to develop applications that use
SQLJ and DB2 CLI.
v JDBC and SQLJ support to develop Java applications and applets.
v Interactive SQL, through the CLP, to prototype SQL statements and perform
ad-hoc database queries.
v An API to enable other application development tools to implement
precompiler support for DB2 directly with their products.
v An SQL92 and MVS Conformance Flagger to identify embedded SQL
statements in applications not conforming to the ISO/ANSO SQL92 Entry
Level standard, or which are not supported by DB2 for OS/390.
For complete information on the functionality of the Software Developer’s Kit,
and instructions on how to use them, as well as a full list of supported
compilers for your platform, refer to the Application Building Guide.
Running Your Own Applications
Various types of applications can access DB2 databases:
v Applications developed using a DB2 Software Developer’s Kit that include
embedded SQL (including Java SQLJ applications and applets), APIs, stored
procedures, user-defined functions, calls to DB2 CLI, or calls to JDBC
applications and applets.
v ODBC applications such as Lotus Approach, Microsoft Visual Basic,
PowerSoft PowerBuilder, Borland Delphi and thousands more.
Chapter 1. About DB2 Connect 19
Page 32

v Net.Data macros containing HTML and SQL.
The DB2 CLI/ODBC driver is an optional component during a DB2 client
install. It is required to run CLI, ODBC, JDBC, and some SQLJ applications.
For more information on running your own applications, refer to the
Installation and Configuration Supplement.
20 Quick Beginnings
Page 33

Part 2. DB2 Connect: Planning and Installation
© Copyright IBM Corp. 1993, 1999 21
Page 34

22 Quick Beginnings
Page 35

Chapter 2. Planning for Installation
If you know that your system meets all the hardware and software
requirements, and you want to begin installing your DB2 product right
away, go to “Chapter 4. Installing DB2 Connect on Windows 9x or
Windows NT” on page 31 or “Chapter 3. Installing DB2 Connect on
OS/2” on page 27.
For information on the DB2 family of products, see “Chapter 1. About
DB2 Connect” on page 3.
There are many components that you might want to use in your environment.
Use the product and planning information in this section to ensure that your
system meets the prerequisites and to decide which components you want to
install.
Before you begin your DB2 product installation, you should determine the
requirements for the system that you are planning to install and configure.
Memory Requirements
This section shows the suggested amount of memory that is required to run a
DB2 product. The memory requirements listed here are estimates; the actual
amounts required depend on the functions you are using. Use this
information to plan for systems with a large number of concurrent clients or
databases.
DB2 Connect Requirements
The amount of memory that you require depends on the applications you
intend to run. We suggest that you have a minimum of 32 MB of memory to
access host or AS/400 databases using DB2 Connect Personal Edition.
Disk Requirements
This section shows the minimum amount of disk space that is required to
install your DB2 product and components. It does not include the disk
requirements necessary for the operating system, application development
tools, and communications products. Consult each product’s documentation
for these values. Estimates for disk space requirements are listed here; the
actual amounts required depend on the functions you are using.
© Copyright IBM Corp. 1993, 1999 23
Page 36

For information about space requirements for data, refer to the Administration
Guide.
Estimating Fixed Disk Requirements
To estimate the disk requirements for a particular configuration, add the
recommended minimum disk sizes for the products and components that you
want to install. Include an allowance for your application data.
Components
Use Table 1 to estimate the amount of disk space you need to install DB2 and
associated components on your operating system.
Table 1. Estimating Disk Requirements
DB2 Connect for OS/2
DB2 Connect Personal Edition 12 MB
DB2 GUI Tools 60 MB
Online documentation in HTML format (English) 31 MB
Far-East Code Page Conversion Support 5 MB
Total Disk Space Required __ MB
DB2 Connect for Windows 32-bit operating systems
Recommended
Minimum Disk (MB)
DB2 Connect Personal Edition 12 MB
DB2 GUI Tools 68 MB
Online documentation in HTML format (English) 31 MB
Far-East Code Page Conversion Support 5 MB
Total Disk Space Required __ MB
Software Requirements
DB2 Connect Personal Edition relies on network software to provide
connectivity to host and AS/400 databases as well as to DB2 Universal
Database servers. Therefore, it is important to establish which network
software you will use before proceeding with the installation.
DB2 Connect Personal Edition uses communication software for establishing
host connectivity and connectivity to DB2 Universal Database servers. For the
host connectivity, your software requirements will depend on:
v The protocol that you will be using (APPC, TCP/IP, or MPTN)
24 Quick Beginnings
Page 37

v Whether you will be using a direct connection (see “Accessing Host or
AS/400 DB2 Data Using DB2 Connect Personal Edition” on page 4), or
connections via an SNA gateway (see “Connections via Communications
Gateway” on page 6).
Product Requirements
Table 2 lists the operating system and communications software required for
DB2 Connect.
Table 2. Software Requirements
Product Hardware/Software
v DB2 Connect Personal
Edition
Requirements
v OS/2 Warp Version 3 and
Version 4
v OS/2 Warp Connect Version 3
v OS/2 Warp Server Version 4
v OS/2 Warp Server Advanced
V4
v OS/2 Warp Server Advanced
V4 with SMP Feature
v OS/2 Warp Server for
e-business
Versions of OS/2 with built-in
communications capabilities
such as OS/2 Warp Connect,
Warp Server, Warp Server
Advanced, and OS/2 Warp
Version 4 are recommended.
Notes:
1. If you plan to install DB2
Connect using TME 10
SystemView, you must have
TME 10 SystemView LAN
Client provided by the OS/2
Warp Server.
2. The DB2 SNMP subagent
requires DPI 2.0 support
provided by the OS/2 Warp
Server installed. If you plan
to use DB2 SNMP subagent
for system management, you
will have to use OS/2 Warp
Server.
Communications
OS/2
APPC, IPX/SPX, NetBIOS, or TCP/IP
v For local IPX/SPX connectivity, you require Novell NetWare
Requester, Version 2.10 or later.
v For local NetBIOS connectivity, you require IBM NTS/2 Version 1.0,
or IBM Communications Manager Version 1.x or later, or IBM OS/2
LAN Requester.
v For TCP/IP connectivity, you require IBM TCP/IP Version 3.0 or
later for OS/2 Warp Versions 3 and 4, and for OS/2 Warp Connect
Version 3. The OS/2 Warp Server Version 4 base operating system
provides TCP/IP connectivity, if selected during installation.
v For SNA (APPC) connectivity, one of the following communications
products is required:
– IBM eNetwork Communications Server for OS/2 Warp Version 5
– IBM eNetwork Personal Communications for OS/2 Warp
Version 4.2
– IBM Communication Server for OS/2 Version 4
Notes:
1. If you plan to use two-phase commit with DB2 Connect and
DRDA host systems, you must install the Syncpoint Manager
(SPM) function and its prerequisites.
2. The DB2 SNMP Subagent requires DPI 2.0 support provided by
the OS/2 Warp Server.
3. Installing clients and servers using TME 10 Netfinity requires
TME 10 Netfinity LAN Client provided by the OS/2 Warp Server.
Chapter 2. Planning for Installation 25
Page 38

Table 2. Software Requirements (continued)
Product Hardware/Software
v DB2 Connect Personal
Edition
Requirements
Windows 32-bit Operating Systems
v Windows 95 Version 4.00.950
or later
v Windows 98
v Windows NT Version 4.0 with
Service Pack 3, or later
Communications
APPC, TCP/IP, and MPTN (APPC over TCP/IP)
v The Windows NT base operating system provides NetBIOS,
IPX/SPX, Named Pipes, and TCP/IP connectivity.
For SNA (APPC) connectivity, one of the following communication
products is required:
v IBM Communications Server for Windows NT Version 5.01 or later
v IBM Personal Communications for Windows NT Version 4.1 or
later
v Microsoft SNA Server Version 4 Service Pack 2 or later
Notes:
1. If SNA two-phase commit is necessary, then IBM Communications
Server for Windows NT Version 5.01 or later is required.
2. If you plan to use DCE (Distributed Computing Environment)
with Version 6 of DB2 Universal Database, you will need:
v A DCE product that is at OSF DCE level 1.1 with IBM DCE for
Windows NT Version 2.0.
v To ensure that if you are connecting to DB2 for OS/390 V5.1
database that it is enabled for DCE support using OS/390 DCE
Base Services Version 3.
In addition, DB2 also supports Gradient PC-DCE for Windows
32-bit operating systems Version 2.0 Runtime Media Kit. For DB2
Connect support, you require DB2/MVS Version 5.1 plus its
prerequisite, OS/390 DCE Base Services version 3 for DCE
support.
Note: With DB2 Connect, you must install DCE Directory Services
on the client and the DRDA server. You do not need DCE installed
on a DB2 Connect Enterprise Edition server.
3. If you plan to use LDAP (Lightweight Directory Access Protocol),
you require the IBM eNetwork LDAP Directory Client Version 3.1.
For more information, refer to the Administration Guide.
4. If you plan to use the ADSTAR Distributed Storage Manager
(ADSM) facilities for backup and restore of your databases, you
require the ADSM Client Version 3 or later.
5. If you have the IBM Antivirus program installed on your
operating system, it must be Version 3.0 or later.
6. If you plan to use the Simple Network Management Protocol
(SNMP) subagent, you require DPI 2.0 provided by IBM Netfinity
Agent.
26 Quick Beginnings
Page 39

Chapter 3. Installing DB2 Connect on OS/2
This section describes how to install DB2 Connect Personal Edition on an
OS/2 workstation. For information on how to deploy this product using a
distributed installation, refer to the Installation and Configuration Supplement.
Before You Begin
Before you begin the installation, be sure that you have the following items
and information:
__ 1. Ensure that your system meets all of the memory, hardware, and
software requirements to install your DB2 product. For more
information, see “Chapter 2. Planning for Installation” on page 23.
__ 2. The type of host connectivity that you want to use (a direct connection
using DB2 Connect Personal Edition or a connection that uses an SNA
gateway).
__ 3. The protocol to be used for host connectivity:
__ a. SNA
__ b. TCP/IP
__ c. MPTN
__ 4. A user ID to perform the installation.
If UPM is installed, the user ID you specify must have Administrator or
Local Administrator authority. Create a user ID with these characteristics
if necessary.
If UPM is not installed, DB2 will install it and set up the userid USERID
with password PASSWORD.
__ 5. A user ID for the Administration Server.
If UPM is installed, the user ID you specify must have Administrator or
Local Administrator authority. Create a userid with these characteristics if
necessary.
If UPM is not installed, DB2 will install it and the userid specified for
the Administration Server will be created.
Performing the Installation
To install your DB2 product, perform the following steps:
© Copyright IBM Corp. 1993, 1999 27
Page 40

Step 1. Log on to the system with the user ID that you created to perform
the installation.
Step 2. Insert the CD-ROM in the drive.
Step 3. Open an OS/2 command window and set the directory to your
CD-ROM drive by entering the following command:
cd x:
where x: represents your CD-ROM drive.
Step 4. Enter the following command:
x:\install
where x: represents your CD-ROM drive.
To manually invoke the installation program, enter the following
command:
x:\install /i language
where x: represents your CD-ROM drive and language represents the
country code for your language.
Step 5. The Welcome window opens.
Step 6. Respond to the install program’s prompts. Online help is available to
28 Quick Beginnings
guide you through the remaining steps. Invoke online help by
clicking on the Help push button or the F1 key at any time. You can
click on the Cancel push button at any time to end the installation.
Page 41

Software Registration
The Software Registration tool is used to register IBM Software with IBM and
update IBM’s Software Customer Profiles. A customer profile contains
identification and demographic information about the users of each IBM
software product. The software registration tool contains information and
instructions on how to register IBM software by modem, telephone, Internet,
FAX, or postal service. To register your software with IBM, perform the
following steps:
Step 1. Start the IBM Software Registration tool. For more information, see
For information on errors encountered during installation, see the
l1.log and l2.log files. These files store general information and
error messages resulting from installation and uninstall activities. By
default, these files are located in the x:\db2log directory; where x:
represents the drive on which your operating system is installed.
For more information, refer to the Troubleshooting Guide.
To set up connections to host or AS/400 database servers, go to one of
the following sections:
v “Chapter 6. Configuring DB2 Connect to Host or AS/400
Communications Using the CCA” on page 57
v “Chapter 7. Configuring APPC Communications on the DB2 Connect
Workstation” on page 67
“Starting the Software Registration Tool” on page 133.
Step 2. Enter the appropriate information and complete the IBM Software
Registration Smart Guide. Click on the Help push button if you need
assistance.
Chapter 3. Installing DB2 Connect on OS/2 29
Page 42

Upgrading from a Try-and-Buy License
To upgrade from a Try-and-Buy license, perform the following steps:
Step 1. Start the Control Center. For more information, see “Starting
the Control Center” on page 134.
Step 2. Click on the License Center icon from the Control Center
toolbar. The License Center opens.
Step 3. Complete the steps to upgrade your DB2 license. For more
information, refer to the License Center’s online help by
pressing the F1 key.
If you are upgrading your DB2 product to a higher entitlement, you
must ensure that you uninstall your current installation of DB2 and
then reinstall your new licensed product.
For example, if you have a Try-and-Buy version of DB2 Workgroup
Edition installed on your machine, and you purchased a license for
DB2 Enterprise Edition, you must ensure that you remove the
installed copy of DB2 Workgroup Edition and then reinstall DB2
Enterprise Edition.
If you did not install the DB2 tools, you can upgrade your
Try-and-Buy license using the db2licm command. For more
information, refer to the Command Reference.
Note: Your Proof of Entitlement and License Information booklets
identify the products for which you are licensed.
30 Quick Beginnings
You are now ready to use DB2 Connect Personal Edition.
Page 43

Chapter 4. Installing DB2 Connect on Windows 9x or
Windows NT
This section describes how to install DB2 Connect Personal Edition on
Windows 32-bit operating systems. For information on how to deploy this
product using a distributed installation or set up a Thin Connect workstation,
refer to the Installation and Configuration Supplement.
Before You Begin
Before you begin the installation, ensure that you have the following items
and information:
__ 1. Ensure that your system meets all of the memory, hardware, and
software requirements to install your DB2 product. For more
information, see “Chapter 2. Planning for Installation” on page 23.
__ 2. The type of host connectivity you will be using:
v Direct connection via TCP/IP
v Direct connection via SNA using Integrated SNA Support or a third
party SNA product
v Connection via SNA Gateway. If using the SNA gateway make sure
that:
– SNA Gateway software is installed and configured on the gateway
server machine and connectivity can be established from the
gateway machine to the host or AS/400. For instructions on
configuring IBM eNetwork Communication Server see
“Configuring IBM eNetwork Communications Server for Windows
NT” on page 70. For instructions on configuring Microsoft SNA
Server see “Configuring Microsoft SNA Server for Windows NT”
on page 79. If you are using another gateway consult the
documentation provided with your SNA Gateway product.
– Client software for your SNA Gateway software is installed and
configured on the workstation where DB2 Connect Personal
Edition is installed. For instructions on configuring client software
for IBM eNetwork Communications Server, see “Configuring IBM
eNetwork Communications Server for Windows NT SNA API
Client” on page 76. For instructions on configuring client software
for Microsoft SNA Server see “Configuring Microsoft SNA Client”
on page 88.
© Copyright IBM Corp. 1993, 1999 31
Page 44

__ 3. For Windows NT, any user account that does not belong to the guests
group. This user account will be used to perform the installation.
Performing the Installation
To install your DB2 product, perform the following steps:
Step 1. Log on to the system with the user account that you created to
perform the installation.
Step 2. Shut down any other programs so that the setup program can update
files as required.
Step 3. Insert the CD-ROM into the drive. The auto-run feature automatically
starts the setup program. The setup program will determine the
system language, and launch the setup program for that language. If
you want to run the setup program in a different language, or the
setup program failed to auto-start, see the tip that follows.
To manually invoke the setup program, perform the following steps:
a. Click on Start and select the Run option.
b. In the Open field, enter the following command:
x:\setup /i language
where:
v x: represents your CD-ROM drive
v language represents the country code for your language (for
example, EN for English). Table 8 on page 159 lists the code for
each available language.
c. Click on OK.
32 Quick Beginnings
Page 45

Step 4. The Welcome window opens.
Step 5. Respond to the setup program’s prompts. Online help is available to
guide you through the remaining steps. Invoke the online help by
clicking on the Help push button or pressing the F1 key at any time.
You can click on the Cancel push button at any time to end the
installation.
For information on errors encountered during installation, see the
db2.log file. The db2.log file stores general information and error
messages resulting from the install and uninstall activities. By
default, the db2.log file is located in the x:\db2log directory, where
x: represents the drive on which your operating system is installed.
For more information, refer to the Troubleshooting Guide.
Based on your component selections, the installation program has:
v Created DB2 program groups and items (or shortcuts).
v Created the following services on Windows NT: DB2 Governor, DB2 JDBC
Applet Server, DB2 Security Server.
v Updated the Windows registry (Windows NT only).
Chapter 4. Installing DB2 Connect on Windows 9x or Windows NT 33
Page 46

Software Registration
The Software Registration tool is used to register IBM Software with IBM and
update IBM’s Software Customer Profiles. A customer profile contains
identification and demographic information about the users of each IBM
software product. The software registration tool contains information and
instructions on how to register IBM software by modem, telephone, Internet,
FAX, or postal service. To register your software with IBM, perform the
following steps:
Step 1. Start the IBM Software Registration tool. For more information, see
Step 2. Enter the appropriate information and complete the IBM Software
To set up connections to host or AS/400 database servers, go to one of
the following sections:
v “Chapter 6. Configuring DB2 Connect to Host or AS/400
Communications Using the CCA” on page 57
v “Chapter 7. Configuring APPC Communications on the DB2 Connect
Workstation” on page 67
“Starting the Software Registration Tool” on page 133.
Registration Smart Guide. Click on the Help push button if you need
assistance.
34 Quick Beginnings
Page 47

Upgrading from a Try-and-Buy License
To upgrade from a Try-and-Buy license, perform the following steps:
Step 1. Start the Control Center. For more information, see “Starting
the Control Center” on page 134.
Step 2. Click on the License Center icon from the Control Center
toolbar. The License Center opens.
Step 3. Complete the steps to upgrade your DB2 license. For more
information, refer to the License Center’s online help by
pressing the F1 key.
If you are upgrading your DB2 product to a higher entitlement, you
must ensure that you uninstall your current installation of DB2 and
then reinstall your new licensed product.
For example, if you have a Try-and-Buy version of DB2 Workgroup
Edition installed on your machine, and you purchased a license for
DB2 Enterprise Edition, you must ensure that you remove the
installed copy of DB2 Workgroup Edition and then reinstall DB2
Enterprise Edition.
If you did not install the DB2 tools, you can upgrade your
Try-and-Buy license using the db2licm command. For more
information, refer to the Command Reference.
Note: Your Proof of Entitlement and License Information booklets
identify the products for which you are licensed.
You are now ready to use DB2 Connect Personal Edition.
Chapter 4. Installing DB2 Connect on Windows 9x or Windows NT 35
Page 48

36 Quick Beginnings
Page 49

Part 3. Preparing Host and AS/400 Databases for DB2
Connect Communications
© Copyright IBM Corp. 1993, 1999 37
Page 50

38 Quick Beginnings
Page 51

Chapter 5. Configuring Host and AS/400 Databases for DB2
Connect
This section describes the steps required to configure host and AS/400
database servers to accept connections from DB2 Connect workstations. These
steps must be performed by users who have the necessary system privileges
and special expertise, such as your network or system administrator and your
DB2 administrator.
For more information on configuring host and AS/400 database servers, refer
to the following publications:
v The DB2 for OS/390 Installation Guide (GC26-8970) contains the most
complete and up-to-date information for DB2 Universal Database for
OS/390.
v The online Connectivity Supplement provided with DB2 Connect contains
selected information on setting up a host or AS/400 database server
communications.
v Distributed Relational Database Cross Platform Connectivity and Applications
(SG24-4311) contains useful post-configuration information.
The sample values used in this section match those used elsewhere in this
book. When you follow the instructions provided you must substitute your
own values for elements such as network name, LU name, and mode name.
Preparing MVS/ESA or OS/390 for DB2 Connect
Your VTAM administrator and your host system administrator must configure
VTAM and OS/390 (or MVS/ESA) to prepare DB2 Universal Database for
OS/390 (or DB2 for MVS/ESA) to receive inbound connection requests from
your DB2 Connect workstation.
This section provides:
v Examples of VTAM definitions required at your DB2 Universal Database for
OS/390 host for use with DB2 Connect SNA connections. These should be
compared with current definitions. See “Configuring VTAM” on page 40.
v Instructions for establishing TCP/IP network connections between DB2
Connect and DB2 Universal Database for OS/390. See “Configuring TCP/IP
for DB2 Universal Database for OS/390” on page 47.
v DB2 host configuration steps (see “Configuring DB2 Universal Database for
OS/390” on page 44, or “Configuring DB2 for MVS/ESA” on page 45).
© Copyright IBM Corp. 1993, 1999 39
Page 52

Many details of these steps have changed with the introduction of DB2
Universal Database for OS/390 Version 5.1. Most of these steps apply to
SNA users, but some also apply to users who will connect to DB2 Universal
Database for OS/390 via TCP/IP.
For a summary of the example VTAM names used throughout this book, see
“Sample Network Element Names (VTAM)” on page 41. For TCP/IP names,
see “Configuring TCP/IP for DB2 Universal Database for OS/390” on page 47.
Summary of Steps
In order to prepare DB2 Universal Database for OS/390 or DB2 for MVS/ESA
to receive connection requests from DB2 Connect, you must complete the
following steps at your DB2 Universal Database for OS/390 host:
Step 1. Verify that the following PTFs for OS/390 are installed:
v PTF UQ06843 for APAR PQ05771
v PTF UQ09146 for APAR PQ07537.
Step 2. Configure VTAM - see “Configuring VTAM”, or:
Step 3. Configure TCP/IP - see “Configuring TCP/IP for DB2 Universal
Database for OS/390” on page 47, or:
Step 4. Configure DB2 Universal Database for OS/390 or DB2 for MVS/ESA
- see “Configuring DB2 Universal Database for OS/390” on page 44,
or “Configuring DB2 for MVS/ESA” on page 45.
Configuring VTAM
To configure VTAM, your VTAM Administrator needs to determine the names
and options to be used on your system. The following definitions must be
provided to enable the DB2 Connect workstation to connect to the host:
1. The VTAM APPL Definition for DB2 Universal Database for OS/390 or
2. The VTAM PU and LU Definitions for DB2 Connect. (The PU and LU
3. The VTAM Log Mode Definition for DB2. (The log mode entry to be used
The sample VTAM definitions are provided in the sections that follow. These
samples use parameters that match the parameters used elsewhere in this
book.
40 Quick Beginnings
DB2 for MVS/ESA. (The APPL name (LU name) for the DB2 subsystem is
NYM2DB2 in these examples.)
definitions for the DB2 Connect workstation are NYX1 and NYX1GW01
respectively in these examples.)
for the connection is IBMRDB in these examples.)
Page 53

Sample Network Element Names (VTAM)
Figure 9 shows the sample VTAM definitions used to configure a host
database server.
DB2 Connect Server:
- Network ID : SPIFNET
- Local Node Name : NYX1 (PU name)
- Local Node ID : 05D27509
- LU Name : SPIFNET.NYX1GW01 (the same LU is used
- LU Alias : NYX1GW01
HOST:
- Network ID : SPIFNET
- Node Name : NYX
- LU Name : SPIFNET.NYM2DB2
- LU Alias : NYM2DB2
- LAN Destination Address : 400009451902 (NCP TIC address)
MODE DEFINITION:
- Mode Name : IBMRDB
DB2 for MVS/ESA:
- Location : NEW_YORK3
SECURITY:
- Security Type : Program
- Authentication Type : DCS
for DB2 Connect,
for DB2 Universal Database,
and for the SPM)
Figure 9. Network Element Names Used in the VTAM Examples
Sample VTAM APPL Definition for OS/390
Figure 10 on page 42 shows the sample VTAM application major node
definitions. In most cases, such a definition will already exist with a different
LU name. Otherwise, this application major node must be defined, and DB2
Universal Database for OS/390 must be customized in order to use the LU
name defined. This name is the Partner LU name required by DB2 Connect.
Chapter 5. Configuring Host and AS/400 Databases for DB2 Connect 41
Page 54

----+----1----+----2----+----3----+----4----+----5----+----6----+----7--
DB2APPLS VBUILD TYPE=APPL
NYM2DB2 APPL APPC=YES, X
Figure 10. Sample VTAM APPL Definition for DB2 Universal Database for OS/390 or DB2 for MVS/ESA
AUTH=(ACQ), X
AUTOSES=1, X
DLOGMOD=IBMRDB, X
DMINWNL=512, X
DMINWNR=512, X
DSESSLIM=2048, X
EAS=6000, X
MODETAB=RDBMODES, X
PARSESS=YES, X
PRTCT=SFLU, X
MODETAB=RDBMODES, X
SECACPT=ALREADYV, X
SRBEXIT=YES, X
VERIFY=NONE, X
VPACING=8
Note: Continuations must begin in column 16, with continuation marks in
column 72.
Sample VTAM PU and LU Definitions for DB2 Connect
If your security policies allow it, it is recommended that you enable DYNPU and
DYNLU in VTAM to allow any PU and LU access through VTAM. Contact your
VTAM administrator for more information.
To enable a specific LU or PU, Figure 11 on page 43 shows the sample VTAM
switched major node definitions.
If you already use SNA applications on the DB2 Connect workstation, then a
PU definition already exists. However, an independent LU definition might
not. The independent LU definition required for DB2 Connect must have
LOCADDR=0 specified.
42 Quick Beginnings
Page 55

----+----1----+----2----+----3----+----4----+----5----+----6----+----7--
SWITCHED MAJOR NODE DEFINITION FOR PU NYX1 and
INDEPENDENT LU NYX1GW01
LOC300 VBUILD TYPE=LOCAL
NYX1 ADDR=01,IDBLK=071,IDNUM=27509,ANS=CONT,DISCNT=NO, X
NYX1GW01 LOCADDR=000,MODETAB=RDBMODES,DLOGMODE=IBMRDB
OTHERLU LOCADDR=002
Figure 11. Sample VTAM Switched Major Node Definition for DB2 Connect
IRETRY=YES,ISTATUS=ACTIVE,MAXDATA=4302,MAXOUT=7, X
MAXPATH=1,PUTYPE=2,SECNET=NO,MODETAB=RDBMODES X
SSCPFM=USSSCS,PACING=0,VPACING=2
Sample VTAM Log Mode Definition for DB2
Figure 12 on page 44 shows the sample VTAM logon mode table definition for
the IBMRDB and SNASVCMG modes. Note that this example specifies a 4K
RUSIZE, which may not be suitable for your environment (for example, if you
are using Ethernet, which has a maximum Frame Size of 1536 bytes). Your
VTAM Administrator should check these values and advise you which mode
table entry name and RUSIZE to specify for DB2 Connect.
Chapter 5. Configuring Host and AS/400 Databases for DB2 Connect 43
Page 56

----+----1----+----2----+----3----+----4----+----5----+----6----+----7---
RDBMODES MODTAB
IBMRDB MODEENT LOGMODE=IBMRDB, DRDA DEFAULT MODE *
SNASVCMG MODEENT LOGMODE=SNASVCMG, DRDA DEFAULT MODE *
Figure 12. Sample VTAM Log Mode Definition for DB2 Connect
TYPE=0, NEGOTIABLE BIND *
PSNDPAC=X'01', PRIMARY SEND PACING COUNT *
SSNDPAC=X'01', SECONDARY SEND PACING COUNT *
SRCVPAC=X'00', SECONDARY RECEIVE PACING COUNT *
RUSIZES=X'8989', RUSIZES IN-4K OUT-4K *
FMPROF=X'13', LU6.2 FM PROFILE *
TSPROF=X'07', LU6.2 TS PROFILE *
PRIPROT=X'B0', LU6.2 PRIMARY PROTOCOLS *
SECPROT=X'B0', LU6.2 SECONDARY PROTOCOLS *
COMPROT=X'D0B1', LU6.2 COMMON PROTOCOLS *
PSERVIC=X'060200000000000000122F00' LU6.2 LU TYPE
PSNDPAC=X'00', PRIMARY SEND PACING COUNT *
SSNDPAC=X'02', SECONDARY SEND PACING COUNT *
SRCVPAC=X'00', SECONDARY RECEIVE PACING COUNT *
RUSIZES=X'8585', RUSIZES IN-1K OUT-1K *
FMPROF=X'13', LU6.2 FM PROFILE *
TSPROF=X'07', LU6.2 TS PROFILE *
PRIPROT=X'B0', LU6.2 PRIMARY PROTOCOLS *
SECPROT=X'B0', LU6.2 SECONDARY PROTOCOLS *
COMPROT=X'D0B1', LU6.2 COMMON PROTOCOLS *
PSERVIC=X'060200000000000000000300' LU6.2 LU TYPE
You must define the SNASVCMG logon mode when using APPC.
Configuring DB2 Universal Database for OS/390
Before you can use DB2 Connect, your DB2 Universal Database for OS/390
Administrator must configure DB2 Universal Database for OS/390 to permit
connections from DB2 Connect workstations. This section indicates the
minimum updates required in order to permit a DB2 Connect client to make a
connection to the DB2 Universal Database for OS/390 database server. For
more detailed examples, refer to the Connectivity Supplement, and the DB2 for
OS/390 Installation Reference.
The following tables need to be updated, depending on the type of
connections you are using (SNA or TCP/IP):
v SYSIBM.LUNAMES for SNA connections
v SYSIBM.IPNAMES for TCP/IP connections
44 Quick Beginnings
Page 57

The sections that follow contain examples of commands to update these tables
for DB2 Universal Database for OS/390. Work with your DB2 Administrator
to determine the updates required for your DB2 Universal Database for
OS/390 system. For more information on the DB2 Universal Database for
OS/390 Communications Database tables, refer to the DB2 Universal Database
for OS/390 SQL Reference.
Updating SYSIBM.LUNAMES
To permit database connection requests to be accepted from any incoming
DB2 Connect LU, just insert a blank row. Use an SQL similar to the following:
INSERT INTO SYSIBM.LUNAMES (LUNAME) VALUES (' ')
Alternatively, if you want to restrict access by LU name, you can use an SQL
command similar to the following to update this table:
INSERT INTO SYSIBM.LUNAMES (LUNAME,
VALUES('NYX1GW01','P','N','O');
SECURITY_OUT,
ENCRYPTPSWDS,
USERNAMES)
Result:
COLUMN EXAMPLE REMARK
====== ======= ======
LUNAME NYX1GW01 Name of the DB2 Connect LU
SECURITY_OUT P
ENCRYPTPSWDS N
USERNAMES O
Updating SYSIBM.IPNAMES
If you want to permit inbound database connection requests for TCP/IP
nodes, you can use an SQL command such as the following to update this
table:
INSERT INTO SYSIBM.IPNAMES (LINKNAME) VALUES(' ')
Configuring DB2 for MVS/ESA
Before you can use the DB2 Connect connection, your DB2 for MVS/ESA
Administrator must configure DB2 for MVS/ESA to permit connections from
the DB2 Connect workstation. To configure DB2 for MVS/ESA, the following
tables need to be updated:
v SYSIBM.SYSUSERNAMES
v SYSIBM.SYSLUNAMES
v SYSIBM.SYSLUMODES
Chapter 5. Configuring Host and AS/400 Databases for DB2 Connect 45
Page 58

The sections that follow contain examples of commands to update these
tables. Work with your DB2 Administrator to determine the options required
for your DB2 for MVS/ESA system.
Updating SYSIBM.SYSUSERNAMES
If you want to use secondary authorization IDs, you can use the following
SQL command to update this table:
INSERT INTO SYSIBM.SYSUSERNAMES VALUES('I','ADBUSER','NYX1GW01',' ',' ');
Result:
COLUMN EXAMPLE REMARK
====== ======= ======
Type I
Authid ADBUSER
LU Name NYX1GW01 Name of the DB2 Connect LU
NewAuthID (blank)
Password (blank)
USERNAME types are: O (outbound translation), I (inbound translation), B
(both inbound and outbound) and blank (no authorization ids are translated,
and no passwords are sent to the server).
Updating SYSIBM.SYSLUNAMES
If you want to restrict access by LU name, you can use an SQL command
similar to the following to update this table:
Result:
Alternatively, just insert a blank row, and this will allow any incoming DB2
Connect LUs to be accepted.
Updating SYSIBM.SYSLUMODES
You can use an SQL command such as the following to update this table:
46 Quick Beginnings
INSERT INTO SYSIBM.SYSLUNAMES VALUES('NYX1GW01','IBMRDB','A','N',' ','I');
COLUMN EXAMPLE REMARK
====== ======= ======
LUNAME NYX1GW01 Name of the DB2 Connect LU
SYSMODENAME IBMRDB
USERSECURITY A
ENCRYPTPSWDS N
MODESELECT
USERNAMES I
INSERT INTO SYSIBM.SYSLUMODES VALUES ('NYX1 ', 'IBMRDB', 150, 'Y');
Page 59

where:
v NYX1 represents the PU name of server involved
v IBMRDB represents the name of VTAM logon mode
v 150 represents the maximum number of conversations
v Y represents the number of sessions preallocated at startup. This can also be
left as N, or blank (the default) for deferred at startup.
Configuring TCP/IP for DB2 Universal Database for OS/390
This section describes how to configure TCP/IP communications between
your DB2 Connect workstation and DB2 Universal Database for OS/390
Version 5.1 or later. It assumes that:
v You are connecting to a single host database via TCP/IP. Multiple host
connections will be handled in exactly the same way, although the port
number and service number required in each case may be different.
v The target database resides on DB2 Universal Database for OS/390 Version
5.1 or later.
v All the necessary software prerequisites are installed.
v DB2 clients have been set up as required.
Prerequisite OS/390 Software for TCP/IP Support
OS/390 R3+ is the minimum operating system level required for TCP/IP
support. OS/390 V2R5+ is the recommended operating system level, and the
best performer.
The following informational APARS for DB2 for OS/390 are regularly updated
with information about PTFs to install for various OS/390 components,
particularly TCP/IP for OS/390. If you use TCP/IP connectivity with DB2 for
OS/390 it is extremely important that you review and apply PTFs and APAR
fixes described in the following DB2 for OS/390 information APARs:
v II11164
v II11263
v II10962
The following fixes are recommended for DB2 for OS/390:
v DB2 for MVS Version 3.1: PTF UQ13906
v DB2 for MVS Version 4.1: PTF UQ13907
v DB2 for OS/390 Version 5.1: PTF UQ13908, PTF UQ17755
Chapter 5. Configuring Host and AS/400 Databases for DB2 Connect 47
Page 60

Collecting Information
Before you can use DB2 Connect over a TCP/IP connection, you must collect
information about both the host database server and the DB2 Connect
workstation. For each host server that you are connecting to via TCP/IP, you
must have the following information:
v The location of the TCP/IP services file at the DB2 Connect workstation:
– On a UNIX system, the location of this file is usually /etc/services.
– On OS/2 Warp Version 4 the location of this file is determined by the
ETC environment variable.
– On Windows NT, the location of this file is <NT install
directory>\system32\drivers\etc\services.
v The location of the TCP/IP hosts file at the DB2 Connect workstation:
– On a UNIX system, the location of this file is usually /etc/hosts.
– On OS/2 Warp Version 4, the location of this file is usually
\mptn\etc\hosts.
– On Windows NT, the location of this file is usually <NT install
path>\system32\drivers\etc\hosts.
You may use a Domain Name Server to avoid maintaining this file on
multiple systems.
v The locations of the equivalent files at the target DB2 Universal Database
for OS/390 host.
v The TCP/IP port number defined to DB2 Universal Database for OS/390.
(Note that the associated service name information is not exchanged between
the DB2 Connect workstation and DB2 Universal Database for OS/390).
Port number 446 has been registered as the default for communication from
a DB2 Connect workstation.
v The TCP/IP addresses and hostnames for both the host and the DB2
Connect workstation.
v The LOCATION NAME of the DB2 for OS/390 database server
v The user ID and password to be used when issuing CONNECT requests for
the database at the host.
Refer to your local network administrator and your DB2 for OS/390
administrator for help getting this information. Use one copy of the example
work sheet, Table 3 on page 49, to plan each TCP/IP connection between DB2
Connect and a host database server.
48 Quick Beginnings
Page 61

Example Worksheet:
Table 3. Example Worksheet for Planning TCP/IP Connections to DB2 Universal
Database for OS/390
Ref. Description Sample Value Your Value
User Information
TCP-1 User Name A.D.B.User
TCP-2 Contact Info (123)-456-7890
TCP-5 User ID ADBUSER
TCP-6 Database Type db2390
TCP-7 Connection type
(must be TCPIP).
Network Elements at the Host
TCP-8 Host name MVSHOST
TCP-9 Host IP address 9.21.152.100
TCP-10 Service name db2inst1c
TCP-11 Port number 446
TCP-12 LOCATION NAME NEW_YORK3
TCP-13 User ID
TCP-14 Password
Network Elements at the DB2 Connect Workstation
TCP-18 Host name mcook02
TCP-19 IP address 9.21.27.179
TCP-20 Service name db2inst1c
TCP-21 Port number 446
DB2 Directory Entries (at the DB2 Connect workstation)
TCP-30 Node name MVSIPNOD
TCP-31 Database name nyc3
TCP-32 Database alias mvsipdb1
TCP-33 DCS database name nyc3
TCPIP TCPIP
Notes:
1. To obtain the host’s IP address TCP-9, enter at the host:
TSO NETSTAT HOME
2. To obtain the port number TCP-11, look for DSNL004I in the DB2 master
address space or system log.
Chapter 5. Configuring Host and AS/400 Databases for DB2 Connect 49
Page 62

Configuring the TCP/IP Connection
Use the manual steps in this section to complete the configuration and make
the connection.
Complete the Worksheet: Complete a copy of the example worksheet for
each TCP/IP host:
1. Fill in the values to be used for the TCP/IP address and hostname of the
DB2 Universal Database for OS/390 host (items 8 and 9).
2. Fill in the values to be used for the TCP/IP address and hostname of the
DB2 Connect workstation (items 18 and 19).
3. Determine the port number or service name to be used for the connection
(items 10 and 11, or 20 and 21).
4. Determine the LOCATION NAME of the DB2 for OS/390 database server
to which you wish to connect.
5. Determine the values to be used for user ID and PASSWORD when
connecting to the host database.
Note that some additional planning considerations may apply, for example if
you are using DCE. See the DB2 Connect User’s Guide.
Update the DB2 Universal Database for OS/390 Host: At your OS/390 host:
1. Verify the host address or the host name.
2. Verify the port number or the service name.
3. Update the services file with the correct port number and service name if
necessary.
4. Update the hosts file (or the Domain Name Server used by the DB2
Universal Database for OS/390 system) with the hostname and IP address
of the DB2 Connect workstation if necessary.
5. Ensure the new definitions are active before attempting to test the
connection. Refer to your host network administrator or change control
staff if necessary.
6. Check with the DB2 Universal Database for OS/390 administrator that you
have a valid user ID, password, and database LOCATION NAME.
7. PING the DB2 Connect workstation, using the correct port number if that
option is supported by TCP/IP on the host system. For example:
ping remote_host_name -p port_number
Update the DB2 Connect Configuration: At a command line prompt, issue
the following command to update the Database Manager Configuration:
where TM_DATABASE can have one of the following settings:
50 Quick Beginnings
db2 update dbm config using TM_DATABASE 1st_conn
Page 63

v 1ST_CONN, the first database that a connection is established to will be
used as the Transaction Manager database for transactions. If this option is
used, then the first database connected to must be either a DB2 Universal
Database Version 5 or later database, or a DB2 Universal Database for
OS/390 Version 5.1 or later database. This is the recommended setting, and
it is the default value for TM_DATABASE.
v database_name, the named database that is connected to will be used. If this
option is used, we recommend that the named database should be either a
DB2 Universal Database version 5 or later database, or a DB2 Universal
Database for OS/390 Version 5.1 or later database.
Update the DB2 Connect Directories:
1. At a command line prompt, issue the following command to catalog the
DB2 for MVS/ESA node:
db2 catalog tcpip node MVSIPNOD remote MVSHOST server db2inst1c
where:
v MVSIPNOD is the local DB2 Connect node name to be used for the
host.
v MVSHOST is the eight-character TCP/IP host name for the DB2
Universal Database for OS/390 host. TCP/IP name lookup must resolve
this name to the correct destination Internet address, either through an
entry in the local hosts file on the DB2 Connect workstation, or via a
Domain Name Server (DNS) referenced by the DB2 Connect
workstation.
v db2inst1c is the port number defined at the DB2 Connect workstation.
This must resolve to the same port number as that defined for use by
DB2 Connect at the DB2 for MVS/ESA host. Alternatively, you can
specify the service name associated with that port.
2. Create entries for the Database and Data Connection Services directories,
as follows (this shows the values used in the sample worksheet):
db2 catalog dcs database NYC3 as NEW_YORK3
db2 catalog database NYC3 as MVSIPDB1 at node MVSIPNOD authentication dcs
where:
v MVSIPDB1 is user-defined and represents the DB2 Connect database
alias for the host database.
v NYC3 is the DB2 Connect database name for the host database.
v MVSIPNOD is the DB2 Connect node name for the host.
v NEW_YORK3 is the DB2 Universal Database for OS/390 LOCATION
NAME for the target database.
Chapter 5. Configuring Host and AS/400 Databases for DB2 Connect 51
Page 64

CONNECT and BIND: Finally, connect to the target host server and bind the
utilities and applications to the server using commands similar to the
following in the command line processor:
connect to MVSIPDB1 user USERID using PASSWORD
bind path/bnd/@ddcsmvs.lst blocking all
sqlerror continue blocking all grant public
disconnect all
where path corresponds to the DB2PATH registry value.
These commands are described in detail in the Command Reference.
Preparing DB2 Universal Database for AS/400 for DB2 Connect
DB2 Connect gives applications on remote systems access to data in your DB2
Universal Database for AS/400 system. In order to set up the connection, the
person installing DB2 Connect needs the following information:
__ 1. The local network name. You can get this information by entering
DSPNETA.
__ 2. The local adapter address. You can get this information by entering
WRKLIND (*trlan).
__ 3. The mode name. You can get a list of mode names by entering
WRKMODD. If the mode IBMRDB has been defined on your AS/400
system, you should use it.
__ 4. The local control point name. You can get this information by entering
DSPNETA.
__ 5. The remote transaction program name. The default is X'07'6DB
(X'07F6C4C2'). The default is always used by DB2 Universal Database
for AS/400. If entering a hexadecimal number is not convenient, an
alias is QCNTEDDM.
__ 6. The relational database name. You can get this information by entering
DSPRDBDIRE. This will display a list. The line containing *LOCAL in
the Remote Location column identifies the RDBNAME which must be
defined to the client. If there is no *LOCAL entry, you can add one, or
use the system name obtained from the DSPNETA command on the
server.
Here is an example screen:
52 Quick Beginnings
Page 65

Display Relational Database Directory Entries
Position to ......
Type options, press Enter.
5=Display details 6=Print details
Relational Remote
Option Database Location Text
_ __________________
_ DLHX RCHAS2FA
_ JORMT2FA JORMT2FA
_ JORMT4FD JORMT4FD
_ JOSNAR7B RCHASR7B
_ RCHASR7B *LOCAL
_ RCHASR7C RCHASR7C
_ R7BDH3SNA RCH2PDH3
_ RCHASDH3 RCHASDH3
When you have obtained these parameters from OS/400, enter your values
into the worksheet that follows:
Table 4. Configuration Parameters from OS/400
Item Parameter Example Your value
A-1 Local network name SPIFNET
A-2 Local adapter address 400009451902
A-3 Mode name IBMRDB
A-4 Local control point name SYD2101A
A-5 Remote transaction
program
A-6 Relational database name NEW_YORK3
X'07F6C4C2'(default)
For further information about how to set up DB2 Universal Database for
AS/400 as an application server, refer to the online Connectivity Supplement
provided with your DB2 Connect product.
More detailed information can also be found in the DRDA Connectivity Guide,
and on the World Wide Web at the V4R4 AS/400 Information Center. The
Information Center can be found at the following URL:
http://as400bks.rochester.ibm.com
Preparing DB2 for VSE & VM
For information about how to set up DB2 for VSE & VM as an application
server, refer to the Connectivity Supplement online document.
More detailed information can also be found in the DRDA Connectivity Guide.
Chapter 5. Configuring Host and AS/400 Databases for DB2 Connect 53
Page 66

54 Quick Beginnings
Page 67

Part 4. Configuring DB2 Connect to Communicate with
Host and AS/400 Databases
© Copyright IBM Corp. 1993, 1999 55
Page 68

56 Quick Beginnings
Page 69

Chapter 6. Configuring DB2 Connect to Host or AS/400
Communications Using the CCA
This section describes how to use the Client Configuration Assistant (CCA) to
configure your DB2 Connect workstation to access host or AS/400 DB2
databases. The configuration steps described in this section apply if you are
connecting to the host or AS/400 system using TCP/IP or SNA (APPC).
The CCA cannot auto-detect or configure the following SNA (APPC)
subsystems:
v IBM eNetwork Communications Server
v Communications Server for Windows NT SNA API Client
v Microsoft SNA Server for Windows NT
To complete the steps in this section, you should be familiar with how to start
the CCA. For more information, see “Starting the Client Configuration
Assistant” on page 133.
To configure communications to a non-host or AS/400 based DB2 database, go to
“Chapter 9. Configuring Client-to-Server Communications Using the Client
Configuration Assistant” on page 105.
To configure communications to a host or AS/400 DB2 database using the command
line processor, or if an SNA product cannot be configured by the CCA, go to the section
that describes the communications protocol that you want to configure:
v TCP/IP - refer to the Installation and Configuration Supplement online document.
v APPC - see “Chapter 7. Configuring APPC Communications on the DB2 Connect
Workstation” on page 67.
With the CCA, you can:
v Configure database connections that applications can use.
v Update or delete existing configured database connections.
v Display the information for existing configured connections.
v Test a connection to a database.
v Enable or disable databases to be configured as CLI or ODBC data sources.
v Export client profiles, or import client and server profiles which contain
information for the setup of a client.
v Update client configuration settings.
v Discover remote databases (if enabled).
v Bind user applications and utilities to databases.
© Copyright IBM Corp. 1993, 1999 57
Page 70

v Change your server password.
The CCA provides three methods to set up a database connection to a server:
v Using a profile.
v Searching the network for databases.
v Manually entering database and communication protocol information for a
server.
Configuration Steps
To configure your workstation to access a host or AS/400 database, perform
the following steps:
Step 1. Log on to the system with a valid DB2 user ID. For more
When you add a database using this configuration method, the
Client Configuration Assistant will generate a default node name for
the server where the database resides.
information, see “Appendix F. Naming Rules” on page 165.
If you are adding a database to a system that has a DB2 Connect
server product installed, log on to this system as a user with System
Administrative (SYSADM) or System Controller (SYSCTRL) authority
on the instance. For more information, see “Working with the System
Administrative Group” on page 138.
Step 2. Start the CCA. For more information, see “Starting the Client
Step 3. Click on the Add Database or Add push button to configure a
Go to the section that describes the configuration method that you want to use:
v “Adding a Database Using a Profile” on page 59.
v “Adding a Database Using Discovery” on page 60.
v “Adding a Database Manually” on page 62.
58 Quick Beginnings
This restriction is controlled by the catalog_noauth database manager
configuration parameter. For more information, refer to the
Administration Guide.
Configuration Assistant” on page 133.
The Welcome window opens each time you start the CCA, until you
add at least one database to your client.
connection.
Page 71

Adding a Database Using a Profile
A profile contains information about instances and databases on a system, and
databases within each instance. For information on profiles, see “Creating and
Using Profiles” on page 112.
If your administrator provided you with a profile, perform the following
steps:
Step 1. Select the Use an access profile radio button and click on the Next
push button.
Step 2. Click on the ... push button and select a profile.
Step 3. You are presented with a list of systems, instances, and databases.
Select the database that you want to add to your system.
Step 4. Select the type of connection that you want to make to the host or
AS/400 database:
v To make a connection through a DB2 Connect gateway, select the
Connect to the server via the gateway radio button.
v To make a direct connection, select the Connect directly to the
server radio button.
Step 5. Click on the Next push button.
Step 6. Enter a local database alias name in the Database alias field and
add a comment that describes this database in the Comment field.
Click on the Next push button.
If you do not specify a database alias name, the default will be the
same as the remote database alias name.
Step 7. Register this database as an ODBC data source.
If you are not planning to use ODBC, click on the Done push button
and go to the next step.
a. Ensure that the Register this database for ODBC check box is
selected.
b. Select the radio button that describes how you would like to
register this database:
v If you would like all users on your system to have access to
this data source, select the As a system data source radio
button.
v If you would like only the current user to have access to this
data source, select the As a user data source radio button.
Chapter 6. Configuring DB2 Connect to Host or AS/400 Communications Using the CCA 59
Page 72

c. If you would like to create an ODBC data source file to share
database access, select the Create a file data source check box
and enter the path and filename for this file in the File data
source name field.
d. Click on the Optimize for application drop down box and select
the application for which you want to tune the ODBC settings.
e. Click on the Done push button to add the database that you
selected. The Confirmation window opens.
Step 8. Click on the Test Connection push button to test the connection. The
Connect to DB2 Database window opens.
If the database that you want to add was not added successfully,
click on the Change push button to change any settings that you may
have incorrectly specified or click on the Help push button for more
information. For even more detailed information, refer to the
Troubleshooting Guide.
Step 9. Enter your user ID and password and click on OK. If the connection
is successful, a message confirming the connection appears.
Step 10. You are now able to use this database. To finish using the Add
Database SmartGuide, click on the Close push button; you can then
add more databases by clicking on the Add push button or exit the
CCA.
Adding a Database Using Discovery
You can use the Discovery feature to search the network for databases. To add
a database to your system using Discovery, perform the following steps:
Step 1. Select the Search the network radio button and click on the Next
Step 2. Click on the [+] sign beside the Known Systems icon to list all the
Step 3. Click on the [+] sign beside a system to get a list of the instances
60 Quick Beginnings
This option cannot return information about pre-Version 5 DB2
systems or any systems where an Administration Server is not
running. For more information, refer to the Administration Guide.
push button.
systems known to your client.
and databases on it.
If the system that contains the database that you want to add is not
listed, perform the following steps:
a. Click on the [+] sign beside the Other Systems (Search the
network) icon to search the network for additional systems.
b. Click on the [+] sign beside a system to get a list of the instances
and databases on it.
c. Select the database that you want to add, click on the Next push
button, and proceed to Step 4.
Page 73

The Client Configuration Assistant may be unable to detect a remote
system if:
v The Administration Server is not running on the remote system.
v The Discovery function times out. By default, the Discovery
function will search the network for 40 seconds; this may not be
long enough to detect the remote system. You can set the
DB2DISCOVERYTIME registry variable to specify a longer period
of time.
v The network that the Discovery request is running on is
configured so that the Discovery request does not reach the remote
system desired.
v You are using NetBIOS as the Discovery protocol. You may need
to set the DB2NBDISCOVERRCVBUFS registry variable to a larger
value to enable the client to receive more concurrent Discovery
replies.
For more information, refer to the Administration Guide.
If the system that you want to add is still not listed, it can be added
to the list of systems by performing the following steps:
a. Click on the Add System push button
b. Enter the required communication protocol parameters for the
remote Administration Server and click on OK. A new system is
added. For more information, click on the Help push button.
c. Select the database that you want to add and click on the Next
push button.
Step 4. You are presented with a list of systems, instances, and databases.
Select the database that you want to add to your system.
Step 5. Select the type of connection that you want to make to the host or
AS/400 database:
v To make a connection through a DB2 Connect gateway, select the
Connect to the server via the gateway radio button.
v To make a direct connection, select the Connect directly to the
server radio button.
Step 6. Click on the Next push button.
Step 7. Enter a local database alias name in the Database alias field and add
a comment that describes this database in the Comment field. Click
on the Next push button.
If you do not specify a database alias name, the default will be the
same as the remote database alias name.
Chapter 6. Configuring DB2 Connect to Host or AS/400 Communications Using the CCA 61
Page 74

Step 8. Register this database as an ODBC data source.
If you are not planning to use ODBC, click on the Done push button
and go to the next step.
a. Ensure that the Register this database for ODBC check box is
selected.
b. Select the radio button that describes how you would like to
register this database:
v If you would like all users on your system to have access to
this data source, select the As a system data source radio
button.
v If you would like only the current user to have access to this
data source, select the As a user data source radio button.
c. If you would like to create an ODBC data source file to share
database access, select the Create a file data source check box and
enter the path and filename for this file in the File data source
name field.
d. Click on the Optimize for application drop down box and select
the application for which you want to tune the ODBC settings.
e. Click on the Done push button to add the database that you
selected. The Confirmation window opens.
Step 9. Click on the Test Connection push button to test the connection. The
Connect to DB2 Database window opens.
If the database that you want to add was not added successfully,
click on the Change push button to change any settings that you may
have incorrectly specified or click on the Help push button for more
information. For even more detailed information, refer to the
Troubleshooting Guide.
Step 10. Enter your user ID and password and click on OK. If the connection
is successful, a message confirming the connection appears.
Step 11. You are now able to use this database. To finish using the Add
Database SmartGuide, click on the Close push button; you can then
add more databases by clicking on the Add push button or exit the
CCA.
Adding a Database Manually
If you have the protocol information for the server that you want to connect
to, you can manually enter all of the configuration information. This method
is analogous to entering commands via the command line processor, however,
the parameters are presented graphically for you.
To add a database to your system manually, perform the following steps:
62 Quick Beginnings
Page 75

Step 1. Select the Manually configure a connection to a DB2 database radio
button and click on the Next push button.
If you are not using Lightweight Directory Access Protocol (LDAP), this
tab will not be shown, skip this step and go to Step 3.
Step 2. Select the radio button that corresponds to the location where you
would like your DB2 directories to be maintained.
v If you would like to maintain the DB2 directories locally, select the
Add database to your local machine radio button and click on the
Next push button.
v If you would like to maintain the DB2 directories globally at an
LDAP server, select the Add database using LDAP radio button
and click on the Next push button.
Step 3. Select the radio button that corresponds to the protocol that you want
to use from the Protocol list and click on the Next push button.
Step 4. Enter the required communication protocol parameters and click on
the Next push button. For more information, click on the Help push
button.
Step 5. Enter the database alias name of the remote database that you want
to add in the Database name field and a local database alias name in
the Database alias field. Add a comment that describes this database
in the Comment field and click on the Next push button.
If you are adding a database that resides on a host or AS/400 system,
the Database name field will appear as follows:
OS/390 or MVS
Location name
AS/400
RDB name
VM or VSE
DBNAME
When a database is created on the remote server, if a database alias
is not specified during database creation, the database is created with
a database alias=database_name; otherwise, the database alias is the
name that was specified when the database was created.
Step 6. Register this database as an ODBC data source.
a. Ensure that the Register this database for ODBC check box is
selected.
b. Select the radio button that describes how you would like to
register this database:
Chapter 6. Configuring DB2 Connect to Host or AS/400 Communications Using the CCA 63
Page 76

v If you would like all users on your system to have access to
this data source, select the As a system data source radio
button.
v If you would like only the current user to have access to this
data source, select the As a user data source radio button.
c. If you would like to create an ODBC data source file to share
database access, select the Create a file data source check box and
enter the path and filename for this file in the File data source
name field.
d. Click on the Optimize for application drop down box and select
the application for which you want to tune the ODBC settings.
e. Click on the Done push button to add the database that you
selected. The Confirmation window opens.
If you are adding a database using the manual method, you can also
select the Node Options tab, the Security Options tab, or the Host or
AS/400 Options tab (if you are adding a host or AS/400 database) to
specify more detailed catalog information. Refer to the online help in
each tab for more information.
If you want to use the default settings for the node, security, and host or
AS/400 (if applicable) options, click on the Done push button and go to
the next step.
Step 7. Click on the Test Connection push button to test the connection. The
Connect to DB2 Database window opens.
If the database that you want to add was not added successfully,
click on the Change push button to change any settings that you may
have incorrectly specified or click on the Help push button for more
information. For even more detailed information, refer to the
Troubleshooting Guide.
Step 8. Enter your user ID and password and click on OK. If the connection
is successful, a message confirming the connection appears.
Step 9. You are now able to use this database. To finish using the Add
Database SmartGuide, click on the Close push button; you can then
add more databases by clicking on the Add push button or exit the
CCA.
When you have finished adding the host or AS/400 database to your system,
we recommended that you bind any DB2 utilities or applications to the
database you just added by performing the following steps:
Step 1. Log on to the system with a user ID that has System Administrative
Step 2. Start the CCA.
64 Quick Beginnings
(SYSADM), Database Administrative (DBADM), or Bind Add
(BINDADD) authority on the database.
Page 77

Step 3. Select the database that you want to bind the utilities and packages
against.
Step 4. Click on the Bind push button.
Step 5. Select the type of bind that you want to perform:
v Select the Bind DB2 utilities radio button if you want to bind
utilities against the database
v Select the Bind applications radio button if you want to bind
applications against the database
Step 6. Click on the Continue push button.
Step 7. Enter a user ID and password to connect to the database.
Step 8. Select the utilities or applications that you want to bind and click on
OK.
Now that you have configured host connections, go to “Chapter 8.
Enabling Multisite Updates (Two-Phase Commit)” on page 97 if you
want to enable the multisite updates feature.
Chapter 6. Configuring DB2 Connect to Host or AS/400 Communications Using the CCA 65
Page 78

66 Quick Beginnings
Page 79

Chapter 7. Configuring APPC Communications on the DB2
Connect Workstation
This section describes how to configure a DB2 Connect workstation to
communicate with a host or AS/400 database server using the APPC
communication protocol. The instructions that follow assume that APPC is
supported on the DB2 Connect and host or AS/400 machines.
You will only need to refer to the instructions in this section if you wish to
configure your APPC connection to a host or AS/400 database by hand. APPC
can often be configured automatically using the Client Configuration Assistant
(CCA). For more information about the CCA, see “Chapter 6. Configuring
DB2 Connect to Host or AS/400 Communications Using the CCA” on page 57.
For further information about the communications requirements of your
platform, see “Software Requirements” on page 24.
The following steps are required to set up a DB2 Connect workstation to use
APPC communications with a host or AS/400 database server:
Step 1. Identify and record parameter values.
Step 2. Update the APPC profiles on the DB2 Connect workstation.
Step 3. Catalog the database.
Step 4. Catalog the APPC or APPN Node.
Step 5. Catalog the database as a Database Connection Service (DCS)
database.
Step 6. Bind utilities and applications to the database server.
Step 7. Test the Host or AS/400 Connection.
Step 1. Identify and Record Parameter Values
Before you configure the DB2 Connect workstation, have your host-side
administrator and LAN administrator fill in copies of the worksheet in Table 5
on page 68 for each host or AS/400 database to which you want to connect.
After you fill in the Your Value entries, you can use the worksheet to configure
APPC communications for DB2 Connect. During the configuration process,
replace the sample values that appear in the configuration instructions with
your values from the worksheet, using the boxed numbers (for example, 1)
to relate the configuration instructions to the worksheet values.
© Copyright IBM Corp. 1993, 1999 67
Page 80

Note: The worksheet and configuration instructions supply suggested or
sample values for required configuration parameters. For other
parameters, use the communications program’s default values. If your
network configuration is different from that used in the instructions,
consult your Network Administrator for values that are appropriate to
your network.
In the configuration instructions, the * symbol denotes entries that need to
be changed but do not have a representation on the worksheet.
Table 5. Worksheet for Planning Host and AS/400 Server Connections
Name at the DB2
Connect
Ref.
Workstation
Network Elements at the Host
1 Host name Local Network Name SPIFNET
2 Partner LU Name Application Name NYM2DB2
3 Network ID SPIFNET
4 Partner Node name Local CP or SSCP Name NYX
5 Target database
name
(target_dbname)
Network or VTAM
Name Sample Value Your Value
OS/390 or MVS:
LOCATION
NAME
VM/VSE:
DBNAME
AS/400:
RDB Name
NEWYORK
6 Link Name or Mode
Name
7 Connection name
(Link name)
8 Remote Network or
LAN address
Network Elements at the DB2 Connect Workstation
9 Network or LAN ID SPIFNET
10 Local Control Point
Name
11 (Local) LU name NYX1GW0A
12 (Local LU) alias NYX1GW0A
Local Adapter or
Destination Address
IBMRDB
LINKHOST
400009451902
NYX1GW
68 Quick Beginnings
Page 81

Table 5. Worksheet for Planning Host and AS/400 Server Connections (continued)
Name at the DB2
Connect
Ref.
Workstation
13 Local Node or NodeIDID BLK 071
14 ID NUM 27509
15 Mode name IBMRDB
16 Symbolic
Destination name
17 (Remote)
Transaction program
(TP) name
Network or VTAM
Name Sample Value Your Value
DB2CPIC
OS/390 or MVS:
X'07F6C4C2'
or DB2DRDA
VM/VSE:
AXE for
VSE, or the
DB2 for
VM db
name for
VM
AS/400:
X'07F6C4C2'
or QCNTEDDM
DB2 Directory Entries (at the DB2 Connect workstation)
19 Node name db2node
19 Security program
20 Local database name
(local_dcsname)
ny
For each server that you are connecting to, fill in a copy of the worksheet as
follows:
1. For network ID, determine the network name of both the host and the
DB2 Connect workstations (1, 3, and 9). Usually these values will
be the same. (For example, SPIFNET.)
2. For the partner LU name (2), determine the VTAM application (APPL)
name for OS/390, MVS, VSE, or VM. Determine the local CP name for
AS/400.
3. For partner node name (4), determine the System Services Control Point
(SSCP) name for OS/390, MVS, VM, or VSE. Determine the local control
point name for an AS/400.
Chapter 7. Configuring APPC Communications on the DB2 Connect Workstation 69
Page 82

4. For database name (5), determine the name of the host database. This is
the LOCATION NAME for OS/390 or MVS, the RDB_NAME for VM or
VSE, or a relational database name for AS/400.
5. For mode name (6 and 15), usually the default IBMDRB is sufficient.
6. For remote network address (8), determine the controller address or local
adapter address of the target host or AS/400 system.
7. Determine the local control point name (10) of the DB2 Connect
workstation. This is usually the same as the PU name for the system.
8. Determine the local LU name to be used by DB2 Connect (11). If you
use a Syncpoint Manager to manage multisite updates (two-phase
commit), the local LU should be the LU used for the SPM. In this case,
that LU cannot also be the Control Point LU.
9. For local LU alias (12), you usually use the same value as for the local
LU name (11).
10. For local node or node ID (13 plus 14), determine the IDBLK and
IDNUM of the DB2 Connect workstation. The default value should be
correct.
11. For symbolic destination name (16), choose a suitable value.
12. For (remote) transaction program (TP) name (17), it is recommended that
you use the defaults listed in the worksheet.
13. Leave the other items blank for now (18 to 21).
Step 2. Update the APPC Profiles on the DB2 Connect Workstation
Use the completed worksheet in Table 5 on page 68 to configure DB2 Connect
APPC communications for access to a remote host or AS/400 database server.
Go to the sections that describe how to configure APPC communications on the
platforms that are present in your network:
v “Configuring IBM eNetwork Communications Server for Windows NT”
v “Configuring IBM eNetwork Communications Server for Windows NT SNA API
Client” on page 76
v “Configuring Microsoft SNA Server for Windows NT” on page 79
v “Configuring Microsoft SNA Client” on page 88
Configuring IBM eNetwork Communications Server for Windows NT
Before you begin, ensure that the IBM eNetwork Communications Server for
Windows NT (CS/NT) you installed meets the following requirements:
70 Quick Beginnings
Page 83

__ 1. It is Version 5.0 or higher if you are planning to update multiple
databases within the same transaction; if you are planning to use
2-phase commit then Version 5.01 of CS/NT is required
__ 2. The IBM Communications Server IEEE 802.2 LAN interface was
installed (this is an installation option for Communications Server)
__ 3. The APAR fixes JR11529 and J$11170 were applied. These fixes are
required to enable cancelling of queries in progress by using
Ctrl-BREAK or issuing the SQLCancel ODBC/CLI call.
__ 4. The LLC2 driver was installed from the CS/NT installation directory.
During installation CS/NT asks if you want to install LLC2. If you are
not sure whether LLC2 was installed with your copy of CS/NT, you
can find out as follows:
a. Click on the Start push button, then select Settings->Control Panel.
b. Double-click on the Network icon.
c. On the Network window, click on the Protocols tab. IBM LLC2
Protocol must be one of the protocols listed. If it is not, you need to
install this protocol from your IBM Communications Server for
Windows NT software. Refer to documentation supplied with
CS/NT for instructions.
To start IBM eNetwork Personal Server, perform the following steps:
Step 1. Click on the Start button and select Programs->IBM
Communications Server-> SNA Node Configuration. The IBM
Communications Server SNA Node Configuration window opens.
Step 2. Select File->New->Advanced from the menu bar. The Configuration
options window opens. Subsequent steps will begin from this
Chapter 7. Configuring APPC Communications on the DB2 Connect Workstation 71
Page 84

window.
To configure IBM eNetwork Personal Server for APPC communications,
complete the perform the following steps:
Step 1. Configure Node
72 Quick Beginnings
a. In the Configuration options field, select Configure Node, then
click on the New push button. The Define the Node window
appears.
b. In the Fully qualified CP name fields, type in the network name
(9) and the local control point name (10)(SPIFNET.NYX1).
c. Optionally, in the CP alias field, type in a CP alias. If you leave
this blank the local control point name (10) will be used (NYX1).
d. In the Local Node ID fields, type in the block ID (13) and the
physical unit ID (14)(05D.27509).
e. Select the appropriate node type. The default is to select the End
Node radio button.
Page 85

f. Click on OK.
Step 2. Configure Devices
a. In the Configuration options field, select Configure devices.
b. Ensure that in the DLCs field, the appropriate DLC is highlighted.
For example, LAN.
c. Click on the New push button. The appropriate window appears
with default values displayed. For example, the Define a LAN
device window.
d. Click on OK to accept the default values.
Step 3. Configure the Gateway
a. In the Configuration options field, select Configure the Gateway,
then click on the New push button. The Define Gateway window
appears.
b. Click on the SNA Clients tab.
c. Ensure that there is a check mark in the Enable SNA API Client
Services check box.
d. Click on OK to accept the default values.
Step 4. Configure Connections
a. In the Configuration options field, select Configure connections.
b. Ensure that in the DLCs field, LAN is highlighted.
c. Click on the New push button. The Define a LAN connection
window appears.
d. On the Basic tab panel:
1) In the Link station name field, type in the name (7)from
the worksheet (LINKHOST).
2) In the Destination address field, type in the address (8)
from the worksheet (400009451902).
e. On the Security tab panel:
1) In the Adjacent CP name fields, type in the network ID (3)
and the Control Point name (4)(SPIFNET.NYX).
2) In the Adjacent CP type field, select the appropriate CP type
(eg. Back-level LEN).
3) Ensure that TG number is set to 0 (the default).
4) Click on OK.
Step 5. Configure Partner LU 6.2
a. In the Configuration options field, select Configure partner LU,
then click on the New button. The Define a partner LU 6.2
window appears.
b. In the Partner LU name fields, type in the network ID (3) and
the partner LU name (2)(SPIFNET.NYM2DB2).
Chapter 7. Configuring APPC Communications on the DB2 Connect Workstation 73
Page 86

c. In the Partner LU alias field, type in the partner LU name (2)
from the worksheet (NYM2DB2).
d. If you are configuring Communications Server for SNA Clients, in
the Fully-qualified CP name fields, type in the network ID (3)
and the adjacent control point SSCP name (4)(SPIFNET.NYX).
Leave the other fields blank.
e. Click on OK.
Step 6. Configure Modes
a. In the Configuration options field, select Configure modes, then
click on the New button. The Define a mode window appears.
b. In the Mode name field (6), type in the mode name (IBMRDB).
c. Click on the Advanced tab and ensure that the Class of Service
Name is set to #CONNECT.
Accept the defaults for the other fields.
d. Click on OK.
Step 7. Configure Local LU 6.2
a. In the Configuration options field, select Configure local LU 6.2,
then click on the New button. The Define a local LU 6.2 window
appears.
b. In the Local LU name field, type in the name (11)fromthe
worksheet (NYX1GW01).
c. Type in a value for the LU session limit field. The default, 0,
specifies the maximum allowed value.
Accept the defaults for the other fields.
d. Click on OK.
Step 8. Configure CPI-C Side Information
a. In the Configuration options field, select Configure CPI-C side
information, then click on the New button. The Define CPI-C side
information window appears.
b. In the Symbolic destination name field, type in the name (16)
from the worksheet (DB2CPIC).
c. In the Mode name field, type in the name (15)fromthe
worksheet (IBMRDB).
d. Click on the radio button beside Use Partner LU alias and select
a Partner LU alias.
e. Specify the TP name. In the TP name field:
v To specify a non-service TP, in the TP name field, type in the
name of the non-service TP, for example DB2DRDA, and ensure
that there is no check mark in the Service TP check box.
74 Quick Beginnings
Page 87

v To specify a service TP, in the TP name field, type in the name
of the service TP, for example 076DB, and ensure that there is a
check mark in the Service TP check box.
Accept the defaults for the other fields.
f. Click on OK.
Step 9. Save the Configuration
a. Select File->Save as from the menu bar. The Save As window
appears.
b. Type in a file name, for example ny3.acg
c. Click on OK.
d. In the window that opens you are asked if you want this
configuration to be the default. Click on the Yes push button.
Step 10. Update the Environment
IBM Personal Communications uses an environment variable called
appcllu to set the default APPC Local LU. You may set this variable
on a per-session basis by opening a command window and typing
set appcllu=local_lu_name, however you will probably find it more
convenient to permanently set the variable. In order to permanently
set the variable in Windows NT, complete the following steps:
Step a. Click the Start push button and select Settings->Control
Panel. Double-click on the System icon. When the System
Properties window appears, select the Environment tab.
Step b. Type appcllu in the Variable field, and type your local LU
name (11)intheValue field.
Step c. Click Set to accept the changes then click OK to exit the
System Properties window.
The environment variable will now remain set for future sessions.
Step 11. Start SNA Node Operations
To start SNA node operations on your machine, complete the
following steps:
Step a. Click on the Start push button, then select Programs->IBM
Communications Server->SNA Node Operations. The
SNA Node Operations window opens.
Step b. From the menu bar, click on Operations and select Start
Node. In the dialog box that opens, select the configuration
file you saved at the end of Step 2 (in our example,
ny3.acg). Click OK.
SNA node operations will now begin running.
Step 12. Registering Communications Server as a Windows NT Service
Chapter 7. Configuring APPC Communications on the DB2 Connect Workstation 75
Page 88

To automatically start Communications Server when the machine is
booted, you can register it as a Windows NT Service.
To register Communications Server as an NT service execute one of
the following commands:
csstart -a
to register Communications Server with the default configuration,
or:
csstart -a c:\ibmcs\private\your.acg
where c:\ibmcs\private\your.acg represents the fully qualified
name of the non-default Communications Server configuration file
you want to use.
Whenever your machine is booted in the future, Communications
Server will be started automatically with the required configuration
file.
You now need to update the DB2 directories, bind utilities and applications to the
server, and test the connection.
The easiest way to do this is to use the Client Configuration Assistant (CCA). For more
information on using the CCA, go to “Chapter 6. Configuring DB2 Connect to Host or
AS/400 Communications Using the CCA” on page 57. However, you can also perform
these steps manually, as described in “Step 3. Catalog the APPC or APPN Node” on
page 91 and the sections that follow.
Configuring IBM eNetwork Communications Server for Windows NT SNA
API Client
Read this section if you have a Windows NT workstation that has IBM
eNetwork Communications Server for Windows NT SNA API Client Version
5.0 or higher installed and you want to connect to an IBM eNetwork
Communications Server for Windows NT server.
The Communications Server for Windows NT server and its SNA API client
act as a split client. This configuration requires that you have an
APPC-enabled application (such as DB2 Connect) running on the SNA API
client workstation.
76 Quick Beginnings
The instructions in this section use a Windows NT client. The
instructions for other supported operating systems are similar; refer
to your Communications Server for Windows NT documentation for
more information.
Page 89

To configure the Windows NT SNA API client for APPC communications,
complete the following steps:
Step 1. Create a user account for the SNA API client on the Communications
Server for Windows NT server
a. Click on the Start button and select Programs->Administrative
Tools (Common)->User Manager. The User Manager window
opens.
b. Select Users->New User from the menu bar. The New User
window opens.
c. Fill in the fields for the new SNA client user accout. For more
information, refer to the Windows NT online help.
d. Ensure that this user account is a member of the Administrators,
IBMCSADMIN, and IBMCSAPI groups:
1) Click on the Groups push button
2) Select a group from the Not member of box and click on the
<- Add push button. Repeat this step for each group that your
user account must belong to.
e. Click on OK.
f. Click on the Add push button.
Step 2. Start the configuration GUI for the IBM eNetwork CS/NT SNA API
Client. Click on the Start push button and select Programs->IBM
Communications Server SNA Client->Configuration. The CS/NT
Chapter 7. Configuring APPC Communications on the DB2 Connect Workstation 77
Page 90

SNA Client Configuration window opens.
Step 3. Configure Global Data
Step 4. Configure APPC Server List
78 Quick Beginnings
a. In the Configuration options box, select the Configure Global
Data option and click on the New push button. The Define Global
Data window opens.
b. Enter the user name for the SNA API client in the User name
field. This is the user name that was defined in Step 1.
c. Enter the password for the user account in the Password and
Confirm Password fields.
d. Click on OK.
a. In the Configuration options box, select the Configure APPC
Server List option. Click on the New push button. The Define
APPC Server list window appears.
Page 91

b. Type in the IP address of the server (for example,
123.123.123.123).
c. Click on OK.
Step 5. Configure CPI-C Side Information
a. In the Configuration options box, select the Configure CPI-C side
information option and click on the New push button. The
Define CPI-C side information window opens.
b. Enter the symbolic destination name (16)intheSymbolic
destination name field.
c. Enter your Local LU alias (12)intheLocal LU alias field.
d. Enter the mode name (15)intheMode name field.
e. Enter the transaction program name (17)intheTP name field.
f. Select the For SNA API Client use check box for this transaction
program.
g. Enter the network ID (3) and partner LU name (2)inthe
Partner LU name field.
h. Click on OK.
Step 6. Save the Configuration
a. Select File->Save As from the menu bar. The Save As window
opens.
b. Type in a file name, and click on the Save push button.
You now need to update the DB2 directories, bind utilities and applications to the
server, and test the connection.
The easiest way to do this is to use the Client Configuration Assistant (CCA). For more
information on using the CCA, go to “Chapter 6. Configuring DB2 Connect to Host or
AS/400 Communications Using the CCA” on page 57. However, you can also perform
these steps manually, as described in “Step 3. Catalog the APPC or APPN Node” on
page 91 and the sections that follow.
Configuring Microsoft SNA Server for Windows NT
This section describes how to configure Microsoft SNA Server Version 4.0 for
Windows NT on your DB2 Connect workstation to connect to host or AS/400
database servers using APPC. Although Microsoft SNA Server will run on
Windows NT 4.0 Workstation, Windows NT 4.0 Server is recommended.
For instructions on how to configure Microsoft SNA Client for Windows NT, go to
“Configuring Microsoft SNA Client” on page 88.
You can define the properties of your SNA connections in the Microsoft SNA
Server Manager (Server Manager). The Server Manager uses an interface
Chapter 7. Configuring APPC Communications on the DB2 Connect Workstation 79
Page 92

similar to that of the Windows NT Explorer. The following illustration shows
the interface. There are two panes in the main window of the Server Manager.
All the configuration options we will be using can be accessed by
right-clicking on objects in the left-hand pane of the window. Every object has
a context menu that you can access by right-clicking on the object.
To configure APPC communications for use by DB2 Connect using Microsoft
SNA Server Manager, perform the following steps:
Step 1. Start the Server Manager by clicking on the Start button and selecting
Programs->Microsoft SNA Server->Manager. The Microsoft SNA
Server Manager window opens.
Step 2. Define the control point name
Step 3. Define the link service (802.2)
80 Quick Beginnings
a. Click on the [+] sign beside the Servers folder.
b. Right-click on SNA Service folder and select the Properties
option. The Properties window opens.
c. Enter the correct NETID (9) and Control Point Name (10)in
the corresponding fields.
d. Click on OK.
Page 93

a. Right-click on the SNA Service icon and select the Insert->Link
Service option. The Insert Link Service window opens.
b. Select DLC 802.2 Link Service.
c. Click on the Add push button.
d. Click on the Finish push button.
Step 4. Define the connection properties
Chapter 7. Configuring APPC Communications on the DB2 Connect Workstation 81
Page 94

a. Right-click on SNA Service and select the Insert->Connection-
>802.2 option. The Connection Properties window opens.
82 Quick Beginnings
b. Enter a connection name (7)intheName field.
c. Click on the Link Service drop-down box and select the SnaDlc1
option.
d. Select the Remote End radio button from the Host System box.
e. Select the Both Directions radio button from the Allowed
Directions box.
f. Select the On Server Startup radio button from the Activation
box.
Page 95

g. Select the Address tab.
h. Fill in the Remote Network Address field (8). Accept the
default numbers in the other fields.
i. Select the System Identification tab.
j. Enter the following information:
1) For the Local Node Name, add the Network ID (9), the
Local PU Name (10), and the Local Node ID (1 plus 14).
Accept the XID Type default.
2) For the Remote Node Name, add the NETID (1) and the
Control Point Name (4). Accept the other defaults
k. Click on OK.
Step 5. Define a local LU
a. Right-click on the SNA Service icon and select the
Insert->APPC->Local Lu option. The Local APPC LU Properties
Chapter 7. Configuring APPC Communications on the DB2 Connect Workstation 83
Page 96

window opens.
b. Enter the following information:
v The LU Alias (12).
v The NETID (9).
v The LU Name (11).
c. Select the Advanced tab.
d. Select the Member of Default Outgoing Local APPC LU Pool
option. Accept the other defaults.
e. Click on OK.
Step 6. Define a remote LU
a. Right-click on SNA Services icon and select the
Insert->APPC->Remote LU option. The Remote APPC Lu
Properties window opens.
b. Click on the Connection drop down box and select the
appropriate connection name (7).
c. Enter the partner LU name (2)intheLU Alias field.
d. Enter the Network ID (1)intheNetwork Name field.
84 Quick Beginnings
The other fields will be filled in by the program. If your LU alias is
not the same as your LU Name, make sure you specify the LU Name
in the appropriate field. The program will fill it in automatically, but
it will be incorrect if the alias and the name are not the same.
e. Click on OK.
Page 97

Step 7. Define a mode
a. Right-click on APPC Modes folder and select the
Insert->APPC->Mode Definition option. The APPC Mode
Properties window opens.
b. Enter the Mode Name 6 in the Mode Name field.
c. Select the Limits tab.
Chapter 7. Configuring APPC Communications on the DB2 Connect Workstation 85
Page 98

d. Enter appropriate numbers for the Parallel Session Limit and
Minimum Contention Winner Limit fields. Your Host-Side or
LAN administrator should be able to supply you with the
numbers if you do not know the limits you should place here.
e. Accept the other defaults, and click on OK.
Step 8. Define the CPIC name properties
a. Right-click on CPIC Symbolic Name folder icon and select the
Insert->APPC->CPIC Symbolic Name option. The CPIC Name
Properties window opens.
86 Quick Beginnings
b. Enter the Symbolic Destination Name (16)intheName field.
c. Click on the Mode Name drop down box and select a mode
name, for example, IBMRDB.
Page 99

d. Select the Partner Information tab.
e. In Partner TP Name box, select the SNA Service TP (in hex)
radio button and enter the Service TP name (17), or select the
Application TP radio button and enter the Application TP name
(17).
f. In the Partner LU Name box, select the Fully Qualified radio
button.
g. Enter the fully-qualified Partner LU Name (1 and 2) or alias.
h. Click on OK.
i. Save the configuration
1) Select File->Save from the menu bar of the Server Manager
window. The Save File window opens.
2) Type a unique name for your configuration into the File Name
field.
3) Click on the Save push button.
You now need to update the DB2 directories, bind utilities and applications to the
server, and test the connection.
The easiest way to do this is to use the Client Configuration Assistant (CCA). For more
information on using the CCA, go to “Chapter 6. Configuring DB2 Connect to Host or
AS/400 Communications Using the CCA” on page 57. However, you can also perform
these steps manually, as described in “Step 3. Catalog the APPC or APPN Node” on
page 91 and the sections that follow.
Chapter 7. Configuring APPC Communications on the DB2 Connect Workstation 87
Page 100

Configuring Microsoft SNA Client
Read this section if you have a Windows NT workstation that has DB2
Connect installed. This section provides step-by-step instructions for setting
up the communications between your DB2 Connect workstation and a
Windows NT workstation that has Microsoft SNA Server V4.0 (or later)
installed.
For instructions on how to configure Microsoft SNA Server Version 4.0 for Windows
NT, go to “Configuring Microsoft SNA Server for Windows NT” on page 79.
Figure 13 on page 89 illustrates the example DB2 Connect Server scenario.
88 Quick Beginnings
 Loading...