

Page 1

®
ThinkPad
Service and Troubleshooting Guide
G40 Series
Page 2

Page 3

®
ThinkPad
Service and Troubleshooting Guide
G40 Series
Page 4

Note
Before using this information and the product it supports, be sure to read the general information under
Appendix A, “Important safety instructions”, on page 43, Appendix B, “Wireless related information”, on
page 49, Appendix C, “Warranty information”, on page 51, and Appendix D, “Notices”, on page 65.
DANGER
v To avoid electric shock hazard, connect and disconnect cables appropriately when installing, moving or opening
the covers of this product or attached devices. Use the power cord with a properly grounded outlet.
v Do not leave the base of your computer in contact with your lap or any part of your body for an extended
period when the computer is functioning or when the battery is charging. Your computer dissipates some heat
during normal operation. This heat is a function of the level of system activity and battery charge level.
Extended contact with your body, even through clothing, could cause discomfort or, eventually, a skin burn.
v To reduce the risk of electric shock, do not use your computer in or near water.
v To avoid electric shock, do not use your computer with the telephone cable connection during an electrical
storm. Do not connect the cable to or disconnect it from the telephone outlet on the wall during an electrical
storm.
v Store packing materials safely out of the reach of children to prevent the risk of suffocation from plastic bags.
v The battery pack contains a small amount of harmful substances. There is danger of an explosion if the battery
pack is incorrectly replaced, exposed to fire or water, short-circuited or disassembled. Keep the battery pack
away from children and do not put it in trash that is disposed of in landfills.
v To reduce the risk of fire, use only No. 26 AWG or thicker telephone cable.
v The fluorescent lamp in the LCD contains mercury. Do not put it in trash that is disposed of in landfills. Rough
handling or dropping the computer can cause the LCD to break and the internal fluid to get into your eyes or
on your hands. Immediately wash the affected areas with water. If symptoms persist, seek medical care.
v Do not disassemble the optical storage drive unit, as this might result in hazardous radiation exposure.
v Avoid direct eye exposure with the laser beam contained in some drives.
First Edition (February 2003)
The following paragraph does not apply to the United Kingdom or any country where such provisions are
inconsistent with local law:
INTERNATIONAL BUSINESS MACHINES CORPORATION PROVIDES THIS PUBLICATION ″AS IS″ WITHOUT
WARRANTY OF ANY KIND, EITHER EXPRESS OR IMPLIED, INCLUDING, BUT NOT LIMITED TO, THE IMPLIED
WARRANTIES OF NON-INFRINGEMENT, MERCHANTABILITY OR FITNESS FOR A PARTICULAR PURPOSE.
Some states do not allow disclaimer of express or implied warranties in certain transactions, therefore, this statement
may not apply to you.
This information could include technical inaccuracies or typographical errors. Changes are periodically made to the
information herein; these changes will be incorporated in new editions of the publication. IBM may make
improvements and/or changes in the product(s) and/or the program(s) described in this publication at any time
without notice.
IBM may use or distribute any of the information you supply in any way it believes appropriate without incurring
any obligation to you.
© Copyright International Business Machines Corporation 2003. All rights reserved.
US Government Users Restricted Rights – Use, duplication or disclosure restricted by GSA ADP Schedule Contract
with IBM Corp.
Page 5

Important Notice for Users
Important Regulatory Notice for Users
The ThinkPad G40 computer complies with the radio frequency and safety
standards of any country or region in which it has been approved for wireless
use. You are requested to install and use your ThinkPad computer in strict
accordance with the local RF regulations. Before you use the ThinkPad G40
computer, please find and read “Regulatory Notice for ThinkPad G40,” the
notice that supplements this Service and Troubleshooting Guide. The notice is
included in the package with this publication.
Information about hard disk capacity
Instead of providing a recovery CD or a Windows®CD with your computer,
®
provides simpler methods of accomplishing the tasks typically
IBM
associated with these CDs. The files and programs for these alternative
methods are on your hard disk, which eliminates having to locate misplaced
CDs and problems associated with using an incorrect CD version.
The complete backup of all the files and programs that IBM preinstalled on
your computer resides in a hidden section, or partition, of the hard disk.
Although hidden, the backups in the partition consume hard disk space.
Therefore, when checking the capacity of your hard disk according to
Windows
smaller than anticipated. This discrepancy is explained by the contents of the
hidden partition. (See “Recovering pre-installed software” on page 31.)
®
you might note that the total capacity of the disk appears to be
For more information about recovering your hard disk to the original
preinstalled contents refer to your on-system help source, Access IBM. Press
the blue Access IBM button or click the Access IBM icon on your desktop, and
then browse the Learn section for various topics that cover backing up and
recovering.
© Copyright IBM Corp. 2003 iii
Page 6

iv ThinkPad
®
G40 Series Service and Troubleshooting Guide
Page 7
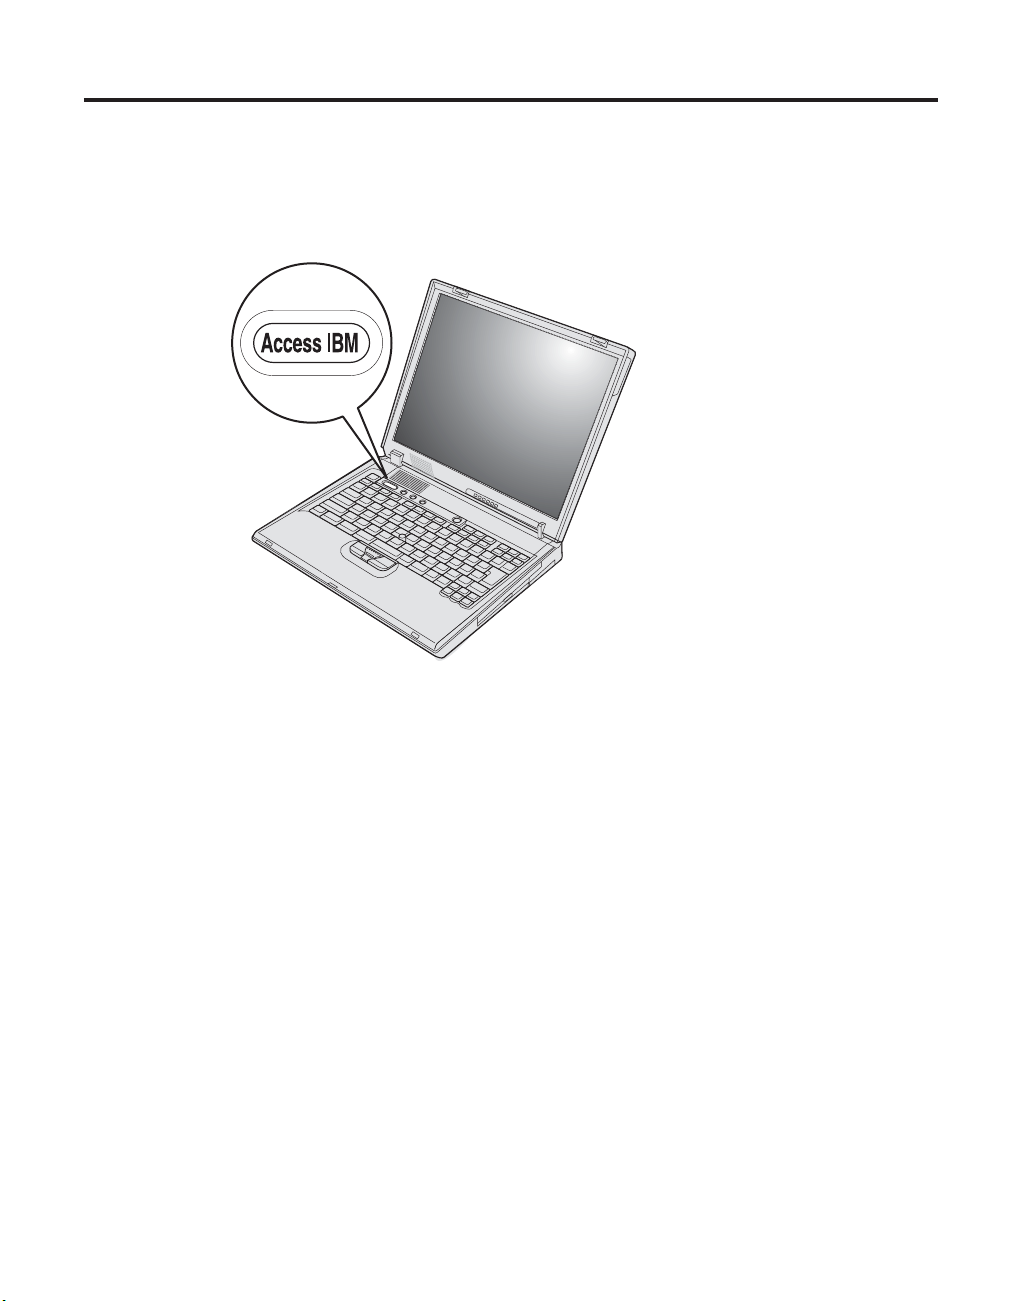
Finding information with Access IBM
The blue Access IBM button can help you in many situations when your
computer is working normally; and even when it is not. At your desktop,
press the Access IBM button to open Access IBM. Access IBM is your
on-board computer help center that brings you informative illustrations and
easy-to-follow instructions for getting started and staying productive. You can
also use the Access IBM button to interrupt the startup sequence of your
computer and start the Access IBM Presdesktop Area. If Windows
start correctly, press the Access IBM button during the startup sequence of
your computer and start the Access IBM Predesktop Area. Use this area to run
diagnostics, restore your backups (assuming you have made backups using
IBM Rapid Restore PC), restore to factory contents (ie, what was there when
you received your computer), start a utility that enalbes you to change your
startup sequence, and get essential system information, and start the IBM
BIOS Setup Utility where you can check and change BIOS settings.
®
does not
Press the Access IBM button to open the application that brings all of IBM’s
resources to you. On the next page, you will see the Welcome page of Access
© Copyright IBM Corp. 2003 v
Page 8
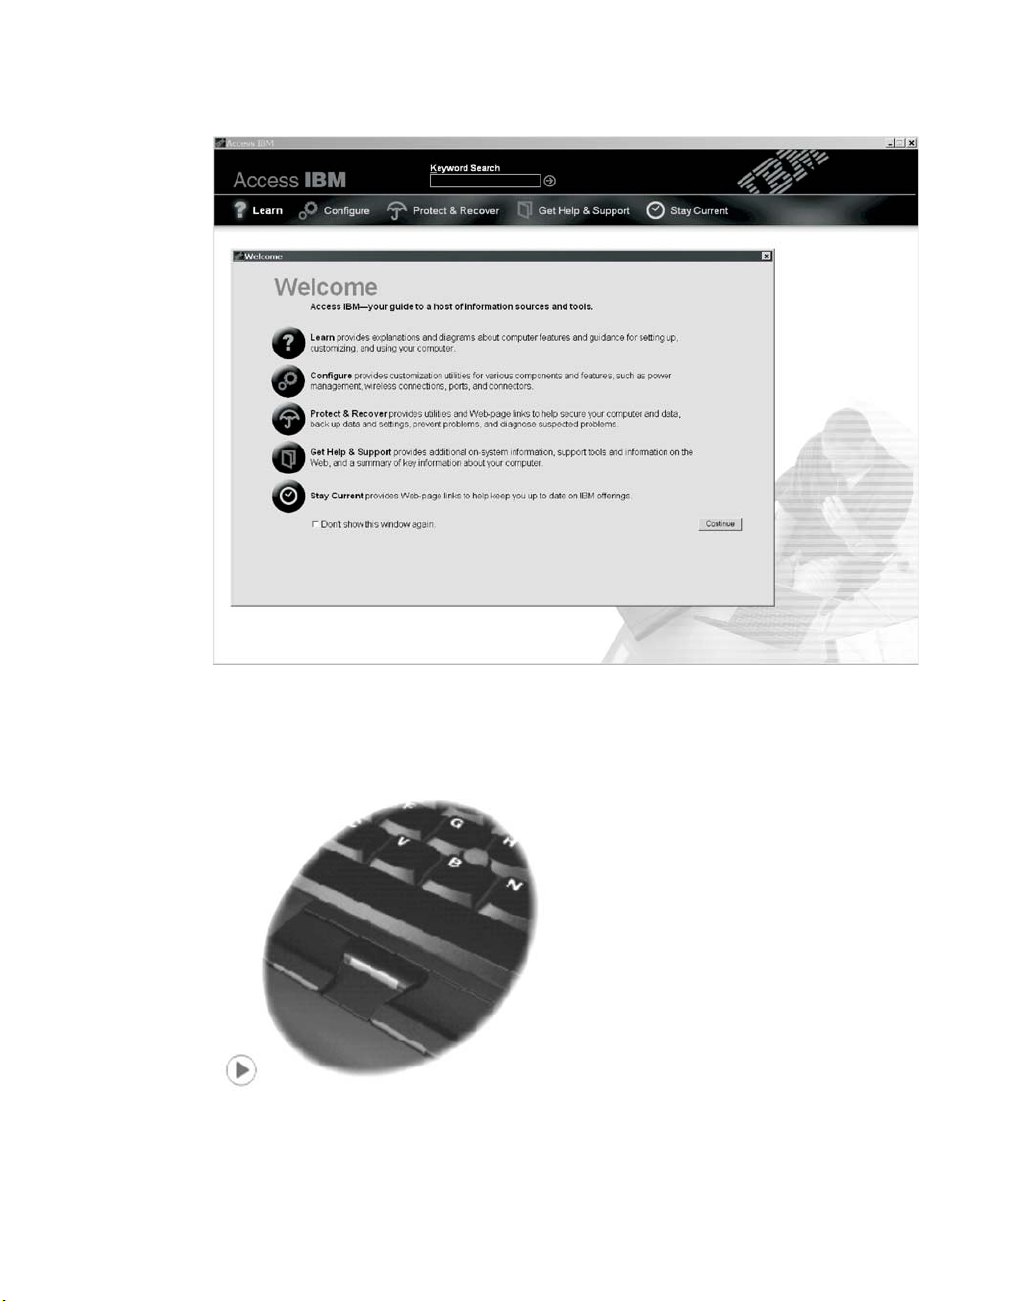
IBM that explains what each part of Access IBM holds to help you.
vi ThinkPad
Some of the topics in your help system contain brief video clips that show
you how to perform certain tasks, such as replacing your battery, inserting a
PC Card, or upgrading your memory. Click the play button to watch the
video clip.
®
G40 Series Service and Troubleshooting Guide
Page 9

Contents
Important Notice for Users.......iii
Important Regulatory Notice for Users . . . iii
Information about hard disk capacity....iii
Finding information with Access IBM . . . v
Chapter 1. Overview of your new ThinkPad
computer .............1
Your ThinkPad at a glance .......2
Features..............3
Specifications ............5
Caring for your ThinkPad computer ....6
Chapter 2. Solving computer problems . . 9
Diagnosing problems .........10
Troubleshooting ...........11
Error messages ..........11
Errors without messages .......15
A password problem ........16
A power switch problem .......17
Keyboard problems ........17
Standby or hibernation problems ....17
Computer screen problems ......20
Battery problems .........23
Hard disk drive problems ......23
Startup problems .........24
Other problems ..........27
Starting BIOS Setup Utility .......29
Recovering pre-installed software .....31
Replacing the hard disk drive ......32
Replacing the battery .........35
Chapter 3. Getting help and service from
IBM...............37
Getting help and service ........38
Getting help on the Web ........38
Calling IBM ............38
Getting help around the world ......41
Appendix A. Important safety instructions 43
Modem safety information .......46
Laser compliance statement .......47
Appendix B. Wireless related information 49
Wireless Interoperability ........49
Usage environment and your Health ....49
Appendix C. Warranty information ....51
Warranty Period ..........51
Warranty service and support ......51
Before you call for service ......52
Calling for service .........52
IBM Statement of Limited Warranty
Z125-4753-06 8/2000 .........53
Part1-General Terms .......53
Part2-Country-unique Terms.....56
Appendix D. Notices.........65
Processing date data .........65
References to Web site addresses .....66
Electronic emission notices .......66
Product notice requirements ......68
Environmental notices for Japan .....68
Trademarks ............69
Index ..............83
© Copyright IBM Corp. 2003 vii
Page 10

viii ThinkPad
®
G40 Series Service and Troubleshooting Guide
Page 11

Chapter 1. Overview of your new ThinkPad computer
Your ThinkPad at a glance .......2
Features..............3
Specifications ............5
Caring for your ThinkPad computer ....6
© Copyright IBM Corp. 2003 1
Page 12
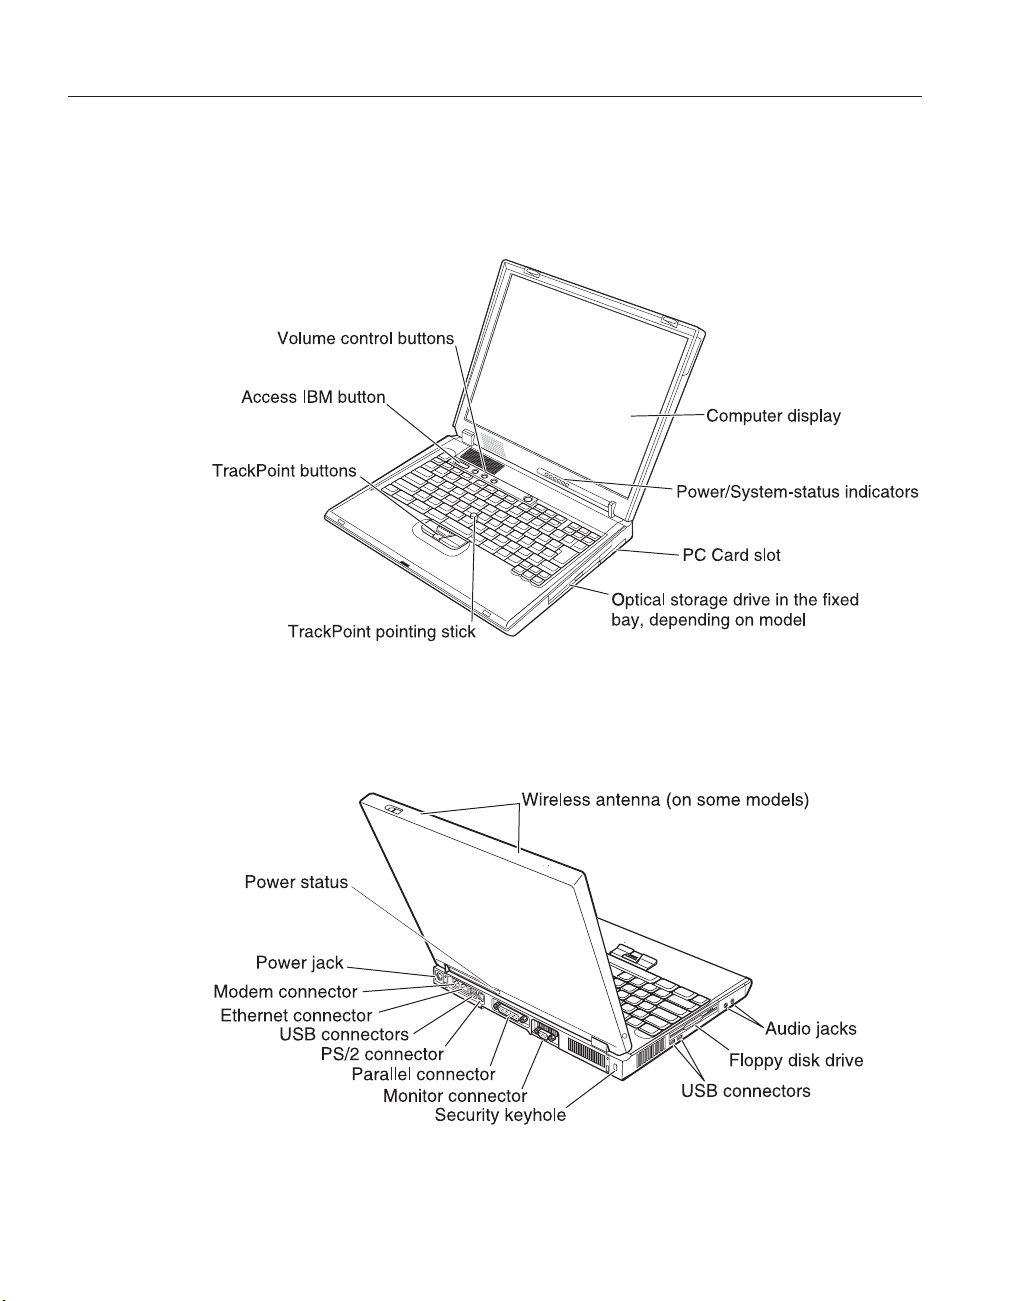
Your ThinkPad at a glance
Your ThinkPad at a glance
Front view
Rear view
2
ThinkPad®G40 Series Service and Troubleshooting Guide
Page 13

Features
Processor
®
v Intel
v Intel
Pentium®4 Processor
®
Celeron®Processor
Memory
v Built-in: 128 MB or 256 MB, depending on the model
v Maximum: 1024 MB
Storage device
v 2.5-inch hard disk drive: 20 GB or 40 GB, depending on the model
Display
The color display uses TFT technology:
v Size: 14.1 inch or 15.0 inch
v Resolution:
– LCD: 1024 x 768 or 1400 x 1050, depending on the model
– External monitor: Up to 1600-by-1200
v Brightness control
Features
Keyboard
v 87-key, 88-key, or 92-key
v TrackPoint
®
v Fn key function
v Access IBM button
v Volume control buttons
v Forward and Back keys
Chapter 1. Overview of your new ThinkPad computer 3
Page 14

Features
Diskette drive
To get the best performance from your diskette drives, use high-quality
diskettes (such as IBM diskettes) that meet or exceed the following standards:
v 1-MB, 3.5-inch, unformatted diskette (2DD):
– ANSI (American National Standards Institute) X3.137
– ISO (International Standards Organization) 8860
– ECMA (European Computer Manufacturers Association) 100
v 2-MB, 3.5-inch, unformatted diskette (2 HD):
– ANSI X3.171
– ISO 9529
– ECMA 125
External interface
v Parallel connector (IEEE 1284A)
v PS/2 mouse/keyboard combination connector
v External-monitor connector
v PC Card slot (Type III)
v Headphone jack
v Microphone jack
v Four Universal Serial Bus (USB 2.0) connectors
v RJ11 telephone connector (available if the modem feature is installed)
v RJ45 Ethernet connector
v Integrated wireless LAN (IEEE 802.11b) feature (on some models)
v Integrated wireless LAN (IEEE 802.11b or IEEE 802.11a/b) feature (on some
models)
4
ThinkPad®G40 Series Service and Troubleshooting Guide
Page 15

Specifications
Specifications
Size
v Width: 329 mm (12.95 in.)
v Depth: 282.5mm (11.2 in.)
v Height: 37.1 mm – 50.9 mm (1.46 in. – 2.00 in.)
Environment
v Maximum altitude without pressurization: 3048 m (10,000 ft)
v Temperature
– At altitudes up to 2438 m (8000 ft)
- Operating with no diskette: 5° to 35°C (41° to 95°F)
- Operating with a diskette: 10° to 35°C (50° to 95°F)
- Not operating: 5° to 43°C (41° to 110°F)
– At altitudes above 3048 m (10,000 ft)
- Maximum operating temperature, 31.3°C (88° F)
Note: When you charge the battery pack, its temperature must be at least
10°C (50°F).
v Relative humidity:
– Operating with no diskette in the drive: 8% to 95%
– Operating with a diskette in the drive: 8% to 80%
Heat output
v 120 W (410 Btu/hr) maximum
Power source (ac adapter)
v Sine-wave input at 50 to 60 Hz
v Input rating of the ac adapter: 100-240 V ac, 50 to 60 Hz
Battery pack
v 12–cell Lithium-ion (Li-Ion) battery pack
– Nominal voltage: 10.8 V dc
– Capacity: 8.8 AH
v 6–cell Lithium-ion (Li-Ion) battery pack
– Nominal voltage: 10.8 V dc
– Capacity: 4.4 AH
v 8–cell Nickel Metal Hydride (NiMH) battery pack
– Nominal voltage: 9.6 V dc
– Capacity: 4.5 AH
Chapter 1. Overview of your new ThinkPad computer 5
Page 16

Caring for your ThinkPad computer
Caring for your ThinkPad computer
Though your computer is designed to function reliably in normal work
environments, you need to use common sense in handling it. By following
these important tips, you will get the most use and enjoyment out of your
computer.
Important tips:
Be careful about where and how you work
v Do not leave the base of your computer in contact with your lap or any
part of your body for an extended period when the computer is functioning
or when the battery is charging. Your computer dissipates some heat during
normal operation. This heat is a function of the level of system activity and
battery charge level. Extended contact with your body, even through
clothing, could cause discomfort or, eventually, a skin burn.
v Place liquids away from your computer to avoid spills, and keep your
computer away from water (to avoid the danger of electrical shock).
v Store packing materials safely out of the reach of children to prevent the
risk of suffocation from plastic bags.
v Keep your computer away from magnets, activated cellular phones,
electrical appliances, or speakers (within 13cm/5 in).
v Avoid subjecting your computer to extreme temperatures (below 5°C/41°F
or above 35°C/95°F).
v Do not block the ventilation openings on the computer.
Be gentle with your computer
v Avoid placing any objects (including paper) between the display and the
keyboard or the palm rest.
v Do not drop, bump, scratch, twist, hit, vibrate, push or place heavy objects
on your computer, display, or external devices.
v Your computer display is designed to be opened and used at an angle
slightly greater than 90 degrees. Do not open the display beyond 180
degrees, as this might damage the computer hinge.
Carry your computer properly
v Before moving your computer, be sure to remove any media, turn off
attached devices, and disconnect cords and cables.
v Be sure your computer is in standby or hibernation mode, or turned off,
before moving it. This will prevent damage to the hard disk drive and data
loss.
v When picking up your open computer, hold it by the bottom. Do not pick
up or hold your computer by the display.
6
ThinkPad®G40 Series Service and Troubleshooting Guide
Page 17

Caring for your ThinkPad computer
v Use a quality carrying case that provides adequate cushion and protection.
Do not pack your computer in a tightly packed suitcase or bag.
Handle storage media and drives properly
v Avoid inserting diskettes at an angle and attaching multiple or loose
diskette labels, as these can lodge in the drive.
v If your computer comes with a CD, DVD, or CD-RW/DVD drive, do not
touch the surface of a disc or the lens on the tray.
v Wait until you hear the CD or DVD click into the center pivot of the CD,
DVD, or CD-RW/DVD drive before closing the tray.
v When installing your hard disk, diskette, CD, DVD, or CD-RW/DVD drive,
follow the instructions shipped with your hardware, and apply pressure
only where needed on the device. See Access IBM, your on-board help
system, for information on replacing your hard disk drive (open Access
IBM by pressing the Access IBM button.).
Take care in setting passwords
v Remember your passwords. If you forget a supervisor or hard disk
password, IBM will not reset it, and you might have to replace your system
board or hard disk drive.
Other important tips
v Your computer modem might use only an analog telephone network, or
public-switched telephone network (PSTN). Do not connect the modem to a
PBX (private branch exchange) or any other digital telephone extension line
because this could damage your modem. Analog phone lines are often used
in homes, while digital phone lines are often used in hotels or office
buildings. If you are not sure which kind of phone line you are using,
contact your telephone company.
v Your computer might have both an Ethernet connector and a modem
connector. If so, be sure to connect your communication cable to the correct
one, so your connector is not damaged. See Access IBM, your on-board help
system, for information on the location of these connectors (press the Access
IBM button to open Access IBM).
v Register your ThinkPad products with IBM (refer to the Web page:
www.ibm.com/pc/register). This can help authorities return your computer
to you if it is lost or stolen. Registering your computer also enables IBM to
notify you about possible technical information and upgrades.
v Only an authorized IBM ThinkPad repair technician should disassemble
and repair your computer.
v Do not modify or tape the latches to keep the display open or closed.
v Take care not to turn your computer over while the ac adapter is plugged
in. This could break the adapter plug.
Chapter 1. Overview of your new ThinkPad computer 7
Page 18

Caring for your ThinkPad computer
v Turn off your computer if you are replacing the hard disk drive.
v If you exchange drives in your computer, reinstall the plastic bezel faces (if
supplied).
v Store your external hard disk, diskette, CD, DVD, and CD-RW/DVD drives
in the appropriate containers or packaging when they are not being used.
Cleaning your computer
Occasionally clean your computer as follows:
v Use a soft cloth moistened with nonalkaline detergent to wipe the exterior
of the computer.
v Avoid spraying cleaner directly on the display or the keyboard.
v Gently wipe the display with a soft, dry cloth. If you see a scratchlike mark
on your display, it might be a stain transferred from the keyboard or the
TrackPoint pointer when the cover was pressed from the outside. Wipe or
dust the stain gently with a soft, dry cloth. If the stain remains, moisten a
soft, lint-free cloth with water that does not contain impurities, wring out
as much of the water as you can, and then wipe the display again. Be sure
to dry the display before closing it.
8
ThinkPad®G40 Series Service and Troubleshooting Guide
Page 19

Chapter 2. Solving computer problems
Diagnosing problems .........10
Troubleshooting ...........11
Error messages ..........11
Errors without messages .......15
A password problem ........16
A power switch problem .......17
Keyboard problems ........17
Standby or hibernation problems ....17
Computer screen problems ......20
Battery problems .........23
Hard disk drive problems ......23
Startup problems .........24
Other problems ..........27
Starting BIOS Setup Utility .......29
Recovering pre-installed software .....31
Replacing the hard disk drive ......32
Replacing the battery .........35
© Copyright IBM Corp. 2003 9
Page 20

Solving computer problems
Diagnosing problems
If you have a problem with your computer, you can test it by using
PC-Doctor®for Windows®. To run PC-Doctor for Windows, do as follows:
1. Click Start.
2. Move the cursor to All Programs (in Windows other than Windows XP,
Programs) and then to PC-Doctor for Windows.
3. Click PC-Doctor.
4. Choose one of the tests from either the Device Categories or the Test
Scripts.
Attention
Running any tests may take several minutes. Make sure you have time
to run the entire test; do not interrupt the test while it is running.
The System Test of the Test Scripts runs some tests of critical hardware
components, but it does not run all of the diagnostic tests in PC-Doctor for
Windows. If PC-Doctor for Windows reports that all of the tests in the System
Test have been run and that it has found no problems, consider running more
of the tests in PC-Doctor for Windows.
If you are preparing to contact IBM for support, be sure to print the test log
so that you can rapidly provide information to the help technician.
10
ThinkPad®G40 Series Service and Troubleshooting Guide
Page 21

Troubleshooting
If you do not find your problem here, refer to Access IBM, your on-board help
system. Open Access IBM by pressing the Access IBM button. The following
section only describes problems that might prevent you from accessing this
help system.
Error messages
Notes:
1. In the charts, x can be any character.
2. The version of PC-Doctor referred to here is PC-Doctor for Windows.
Message Solution
0175: Bad CRC1, stop
POST task
0177: Bad SVP data, stop
POST task.
0182: Bad CRC2. Enter
BIOS Setup and load
Setup defaults.
0185: Bad startup
sequence settings. Enter
BIOS Setup and load
Setup defaults.
0187: EAIA data access
error
0188: Invalid RFID
Serialization Information
Area.
0189: Invalid RFID
configuration
information area
0190: Critical low-battery
error
0191: System Security Invalid remote change
requested.
0199: System Security IBM Security password
retry count exceeded.
The EEPROM checksum is not correct (block #6). Have the computer
serviced.
The EEPROM checksum of the supervisor password is not correct. Have the
computer serviced.
The EEPROM checksum CRC2 is not correct. Enter BIOS setup and load
default setting.
The EEPROM checksum of the startup sequence is not correct. Enter BIOS
setup and load default setting.
The access to EEPROM is failed. Have the computer serviced.
The EEPROM checksum is not correct (block # 0 and 1). The system board
should be replaced, and the box serial number needs to be reinstalled. Have
the computer serviced.
The EEPROM checksum is not correct (block # 4 and 5). The system board
should be replaced, and the UUID needs to be reinstalled. Have the
computer serviced.
The computer turned off because the battery is low. Connect the ac adapter
to the computer and charge the battery, or replace the battery with a fully
charged one.
The system configuration change has failed. Confirm the operation and try
again.To clear the error, enter the IBM BIOS Setup Utility.
This message is displayed if you enter a wrong supervisor password more
than three times. Confirm the supervisor password and try again. To clear
the error, enter the IBM BIOS Setup Utility.
Solving computer problems
Chapter 2. Solving computer problems 11
Page 22

Solving computer problems
Message Solution
01C9: More than one
Ethernet devices are
found. Remove one of
them. Press <Esc> to
continue.
0200: Hard disk error The hard disk is not working. Make sure that the hard disk drive is attached
021x: Keyboard error Make sure that there are no objects placed on the keyboard, or if you have
Your ThinkPad computer has a built-in Ethernet feature, and you cannot
add another such feature by installing an Ethernet device such as a
Mini-PCI Ethernet Card or an Ethernet Daughter Card. If this error message
is displayed, remove the Ethernet device that you installed. Otherwise press
Esc to ignore the warning message. If this does not solve the problem, have
the computer serviced.
firmly. Run the IBM BIOS Setup Utility; then make sure the hard disk drive
is not disabled in the Startup menu.
one, the external keyboard. Turn off the computer, and turn off all attached
devices. Turn on the computer first; then turn on the attached devices.
If you still see the same error code, do the following:
If an external keyboard is connected, do the following:
v Turn off the computer and disconnect the external keyboard; then turn on
the computer. Make sure that the built-in keyboard operates correctly. If it
does, have the external keyboard serviced.
v Make sure that the external keyboard is connected to the correct
connector.
Test the computer by using PC-Doctor.
v If the computer stops during the test, have the computer serviced.
0230: Shadow RAM error The shadow RAM failed. Test your computer’s memory with PC-Doctor. If
you added a memory module just before turning the computer on, reinstall
it. Then test the memory with PC-Doctor.
0231: System RAM error The system RAM failed. Test your computer’s memory with PC-Doctor. If
you added a memory module just before turning the computer on, reinstall
it. Then test the memory with PC-Doctor.
0232: Extended RAM
error
0250: System battery
error
0251: System CMOS
checksum bad
0260: System timer error Have the computer serviced.
0270: Real time clock
error
The extended RAM failed. Test your computer’s memory with PC-Doctor. If
you have increased memory just before turning the computer on, reinstall it.
Then test the memory with PC-Doctor.
The backup battery, which is used to preserve the configuration information,
such as the date and time, while the computer is turned off, is depleted.
Replace the battery and run IBM BIOS Setup Utility to verify the
configuration. If you still have a problem, have the computer serviced.
The system CMOS might have been corrupted by an application program.
The computer uses the default settings. Run IBM BIOS Setup Utility to
reconfigure the settings. If you still see the same error code, have the
computer serviced.
Have the computer serviced.
12
ThinkPad®G40 Series Service and Troubleshooting Guide
Page 23

Solving computer problems
Message Solution
0271: Date and time error Neither the date nor the time is set in the computer. Set the date and time,
using the IBM BIOS Setup Utility.
0280: Previous boot
incomplete
02D0: System cache error The cache is disabled. Have the computer serviced.
02F4: EISA CMOS not
writable
02F5: DMA test failed Have the computer serviced.
02F6: Software NMI
failed
02F7: Fail-safe timer NMI
failed
1802: Unauthorized
network card is plugged
in - Power off and
remove the miniPCI
network card.
1803: Unauthorized
daughter card is plugged
in - Power off and
remove the daughter
card.
Your computer was previously unable to complete the boot process.
Turn the computer off; then turn it on to start the IBM BIOS Setup Utility.
Verify the configuration and then restart the computer either by choosing
the Exit Saving Changes option under the Restart item or by pressing F10.
If you still see the same error code, have the computer serviced.
Have the computer serviced.
Have the computer serviced.
Have the computer serviced.
The Mini-PCI network card is not supported on this computer. Remove it.
The daughter card is not supported on this computer. Remove it.
Chapter 2. Solving computer problems 13
Page 24

Solving computer problems
Message Solution
1810: Hard disk partition
layout error
The power-on password
prompt
The hard disk password
prompt
A problem in recognizing the layout of the partition on the hard disk has
halted the computer startup. Either the IBM Predesktop Area has been
deleted, or the hard disk contains corrupt data. To try to restart your
computer, complete one of the following:
v If the IBM Predesktop Area has been deleted
1. Press F1 to open the IBM BIOS Setup Utility.
2. Select Security –> IBM Predesktop Area–> Access IBM Predesktop
3. Set this item to Disabled.
4. Save and exit.
v If the above fails
1. Press Enter.
2. Click RECOVER TO FACTRY CONTENTS and follow on-screen
Press F1 to open BIOS Setup, or Enter to start the IBM Predesktop Area.
If the computer still does not start, call the IBM HelpCenter. Telephone
numbers are under “Calling IBM” on page 38
A power-on password or a supervisor password is set. Type the password
and press Enter to use the computer. If the power-on password is not
accepted, a supervisor password might have been set. Type the supervisor
password and press Enter. If you still see the same error message, have the
computer serviced.
A hard disk password is set. Type the password and press Enter to use the
computer.
Area.
instructions.
Note: This will permanently erase the entire contents of the hard disk,
and then install software preinstalled by IBM.
If you still see the same error message, have the computer serviced.
Hibernation error The system configuration changed between the time your computer entered
hibernation mode and the time it left this mode, and your computer cannot
resume normal operation.
v Restore the system configuration to what it was before your computer
entered hibernation mode.
v If the memory size has been changed, re-create the hibernation file.
Operating system not
found.
Fan error The cooling fan has failed. Have the computer serviced.
14
ThinkPad®G40 Series Service and Troubleshooting Guide
Verify the following:
v The hard disk drive is correctly installed.
v A startable diskette is in the diskette drive
If you still see the same error message, check the boot sequence, using the
IBM BIOS Setup Utility.
Page 25

Solving computer problems
Message Solution
EMM386 Not Installed —
Unable to Set Page
Frame Base Address.
CardBus Configuration
Error —Device Disabled
Thermal sensing error The thermal sensor is not functioning correctly. Have the computer serviced.
Edit C:\CONFIG.SYS and change a line from
device=C:\WINDOWS\EMM386.EXE RAM
to
device=C:\WINDOWS\EMM386.EXE NOEMS
and save this file.
Press F1 to go to the IBM BIOS Setup Utility. Press F9 and then Enter to
load the default setting.
Press F10 and then Enter to restart the system.
Errors without messages
Problem: When I turn on the machine, nothing appears on the screen and the
machine does not beep while starting up.
Note: If you are not sure whether you heard any beeps, turn off the
computer; then turn it on again, and listen again. If you are using an
external monitor, refer to“Computer screen problems” on page 20
Solution: If a power-on password is set, press any key to display the
power-on password prompt, and then type the correct password and press
Enter.
If the power-on password prompt does not appear, the brightness level might
be set to minimum brightness. Adjust the brightness level by pressing the
Fn+Home.
If the screen still remains blank, make sure that:
v The battery is installed correctly.
v The ac adapter is connected to the computer and the power cord is plugged
into a working electrical outlet.
v The computer power is on. (Turn on the power switch again for
confirmation.)
If these items are properly set, and the screen remains blank, have the
computer serviced.
Problem: When I turn on the machine, nothing appears on the screen, but I
hear two or more beeps.
Chapter 2. Solving computer problems 15
Page 26

Solving computer problems
Solution: Make sure that the memory card is installed correctly. If it is, but
the screen is still blank, and you hear five beeps, have the computer serviced.
Problem: When I turn on the machine, only a white cursor appears on a
blank screen.
Solution: Reinstall your operating system, and turn on the computer. If you
still see only the cursor on the screen, have the computer serviced.
Problem: My screen goes blank while the computer is on.
Solution: Your screen saver or power management may be enabled. Move the
TrackPoint or press a key to exit the screen saver, or press the power switch to
resume from standby or hibernation.
Problem: The DOS full-screen looks smaller.
Solution: If you use a DOS application that supports only 640x480 resolution
(VGA mode), the screen image might look slightly distorted or appear smaller
than the display size. This is to maintain compatibility with other DOS
applications. To expand the screen image to the same size as the actual screen,
start the ThinkPad Configuration Program and click LCD; then select the
Screen expansion function. (The image might still look slightly distorted.)
Note: If your computer has a screen expansion function, you can use the
Fn+F8 keys to expand the screen image. This function is not supported
in Windows
®
XP and Windows®2000.
A password problem
Problem: I forgot my password.
Solution: If you forgot your power-on password, you must take your
computer to an IBM reseller or marketing representative to have the password
canceled.
If you forgot your hard disk password, IBM will not reset your password or
recover data from the hard disk. You must take your computer to an IBM
reseller or an IBM marketing representative to have the hard disk drive
replaced. Proof of purchase is required, and a fee will be charged for parts
and service.
If you forgot your supervisor password, IBM will not reset your password.
You must take your computer to an IBM reseller or IBM marketing
representative to have the system board replaced. Proof of purchase is
required, and a fee will be charged for parts and service.
16
ThinkPad®G40 Series Service and Troubleshooting Guide
Page 27

A power switch problem
Problem: The system does not respond, and you cannot turn off the computer.
Solution: Turn off the computer by pressing and holding the power switch for
4 seconds or more. If the computer is still not reset, remove the ac adapter
and the battery.
Keyboard problems
Problem: Some or all of the keys on the keyboard do not work.
Solution: If the problem occurred immediately after the computer returned
from standby mode, enter the power-on password if any is set.
If an external keyboard is connected, the numeric keypad on your computer
does not work. Use the numeric keypad on the external keyboard.
If an external numeric keypad or a mouse is connected:
1. Turn off the computer.
2. Remove the external numeric keypad or the mouse.
3. Turn on the computer and try using the keyboard again.
Solving computer problems
If the keyboard problem is resolved, carefully reconnect the external numeric
keypad, external keyboard, or mouse, making sure that you have seated the
connectors properly.
If the external numeric keypad, external keyboard, or mouse are not attached,
and any keys on the keyboard still do not work, have the computer serviced.
Problem: A number appears when you type a letter.
Solution: The numeric lock function is on. To disable it, press and hold Shift;
then press NumLk.
Problem: Some or all of the keys on the external numeric keypad do not
work.
Solution: Make sure that the external numeric keypad is correctly connected
to the computer.
Standby or hibernation problems
Problem: The computer enters standby mode unexpectedly.
Chapter 2. Solving computer problems 17
Page 28

Solving computer problems
Solution: If the processor reaches a temperature that is too high, the computer
automatically enters standby mode to allow the computer to cool and to
protect the processor and other internal components. Also, check the settings
for standby mode, using Battery MaxiMiser.
Problem: The computer enters standby mode immediately after Power-on
self-test (POST) (the standby indicator light turns on).
Solution: Make sure that:
v The battery is charged.
v The operating temperature is within the acceptable range. Refer to
“Specifications” on page 5.
If these items are correct, have the computer serviced.
Problem: The critical low-battery error message is displayed, and the
computer immediately turns off.
Solution: The battery power is getting low. Connect the ac adapter to the
computer, or replace the battery with a fully charged one.
Problem: When you take action to return from standby mode, the computer
display remains blank.
Solution: Check whether an external monitor was disconnected while the
computer was in standby mode. Do not disconnect the external monitor while
the computer is in standby mode or hibernation mode. If no external monitor
is attached when the computer resumes, the computer display remains blank
and output is not displayed. This restriction does not depend on the
resolution value. Press Fn+F7 to bring up the computer display.
Problem: The computer does not return from standby mode, or the standby
indicator stays on and the computer does not work.
Solution: If the system does not return from standby mode, it may have
entered standby or hibernation mode automatically because the battery is
depleted. Check the standby indicator.
v If the standby indicator is on, your computer is in standby mode. Connect
the ac adapter to the computer; then press Fn.
v If the standby indicator is off, your computer is in hibernation mode or
power-off state. Connect the ac adapter to the computer; then press power
button to resume operation.
If the system still does not return from standby mode, your system may stop
responding and you cannot turn off the computer. In this case, you need to
18
ThinkPad®G40 Series Service and Troubleshooting Guide
Page 29

Solving computer problems
reset the computer. If you have not saved your data, it may be lost. To reset
the computer, press and hold the power button for 4 seconds or more. If the
system is still not reset, remove the ac adapter and the battery.
Problem: Your computer does not enter standby or hibernation mode.
Solution: Check whether any option has been selected that would disable
your computer from entering standby or hibernation mode.
Problem: The computer does not enter standby mode as set by the timer
under Windows 98.
Solution: The generic CD-ROM or DVD-ROM driver for Windows 98 accesses
the internal CD-ROM or DVD-ROM drive every 3 seconds to see whether a
CD-ROM is inserted there. This prevents your computer from entering
standby mode even after a timeout. To enable the computer to enter standby
mode, do the following:
1. Click Start.
2. Move the cursor to Settings and Control Panel.
3. Click Control Panel, and then double-click System.
4. Click the Device Manager tab.
5. Click the + mark of CD-ROM.
6. Double-click the name of the CD-ROM or DVD-ROM.
7. Click the Settings tab.
8. Clear the Auto insert notification check box.
Windows 98 no longer detects the insertion of a CD-ROM or a DVD-ROM
automatically.
Problem: The Fn+F12 key combination does not cause the computer to enter
hibernation mode.
Solution: The computer cannot enter hibernation mode:
v If the “Hibernation Utility”, the “Configuration Utility”and “Battery
MaxiMizer and Power Management Features” are not installed in Windows
98. To install these items, refer to “Installing device drivers” in the Access
ThinkPad, your on-board help system.
v If the hibernation mode is not enabled. To enable it, do as follows:
For Windows 98:
1. Start the ThinkPad Configuration program.
2. Click Power Management.
3. Click the Hibernate tab.
Chapter 2. Solving computer problems 19
Page 30

Solving computer problems
4. Click the Create hibernation file button.
5. Click the Create Now button.
6. Perform restart.
7. Start the ThinkPad Configuration program.
8. Click Power Management.
9. Click the Hibernate tab.
10. Select the Hibernate support checkbox.
11. Click OK.
For Windows XP or Windows 2000:
1. Start the ThinkPad Configuration Program.
2. Click Power Management.
3. Click the Hibernate tab.
4. Select the hibernate support checkbox.
5. Click OK.
Note: You can enter hibernation mode by pressing Fn+F12 only if the PM
driver for Windows 98, Windows 2000, or Windows XP has been
installed.
Problem: Under Windows XP, the Fn+F3 key combination does not make the
computer screen go blank.
Solution: Windows XP enables multiple users to log on to the system at the
same time. If you are the first user to have logged on to your computer, you
can use the Fn+F3 key combination. Otherwise the combination will not work
on your computer.
Computer screen problems
Problem: The screen is blank.
Solution:
v If the standby status indicator is on (in green), press Fn to resume from the
standby mode.
v If you are using the ac adapter, or using the battery, and the battery status
indicator is on (in green), press Fn+Home to make the screen brighter.
v If you attach an external monitor to your computer, press Fn+F7 to switch
the screen output location.
v If the problem persists, do the “Solution” in the problem below.
Problem: The screen is unreadable or distorted.
20
ThinkPad®G40 Series Service and Troubleshooting Guide
Page 31

Solving computer problems
Solution: Make sure that:
v The display device driver is installed correctly.
v The display resolution and color depth are correctly set.
v The monitor type is correct.
To check these settings, do as follows:
For Windows XP:
1. Click Start.
2. Click Control Panel.
3. Click Appearance and Themes in the Pick a category section.
4. Click Display in the Pick a Control Panel icon section.
5. Click the Settings tab.
6. Check if the Screen resolution and Color quality are correctly set.
7. Click Advanced.
8. Click the Adapter tab.
®
9. Make sure “Intel
information window.
10. Click the Monitor tab.
11. Make sure the monitor type is correct.
82852/82855 GM/GME Chip” is shown in the Adapter
For Windows 2000:
1. Double-click Display in the Control Panel. The Display Properties window
opens.
2. Click the Settings tab.
3. Check if the Colors and Screen area are correctly set.
4. Click Advanced....
5. Click the Adapter tab.
®
6. Make sure “Intel
82852/82855 GM/GME Chip” is shown in Adapter
information window.
7. Click the Monitor tab.
8. Make sure the information is correct.
For Windows 98
1. Double-click Display in the Control Panel. The Display Properties window
opens.
2. Click the Settings tab.
3. Check if the Colors and Screen area are correctly set.
4. Click Advanced....
Chapter 2. Solving computer problems 21
Page 32

Solving computer problems
5. Click the Adapter tab.
6. Make sure “Intel
shown in the window.
7. Click the Monitor tab.
8. Make sure the information is correct.
Problem: Incorrect characters appear on the screen.
Solution: Did you install the operating system or application program
correctly? If they are installed and configured correctly, have the computer
serviced.
Problem: The screen stays on even after you turn off your computer.
Solution: Press and hold the power switch for 4 seconds or more to turn off
your computer; then turn it on again.
Problem: Missing, discolored, or bright dots appear on the screen every time
you turn on your computer.
Solution: This is an intrinsic characteristic of the TFT technology. Your
computer’s display contains multiple thin-film transistors (TFTs). A small
number of missing, discolored, or bright dots on the screen might exist all the
time.
®
82852/82855 GM/GME Graphics Controller –0” is
Problem: A message, “Unable to create overlay window,” appears when you
try to start DVD playback.
or
You get poor or no playback while running video playback, DVD playback, or
game applications.
Solution: Do either of the following:
v If you are using 32-bit color mode, change the color depth to 16-bit mode.
v If you are using a desktop size of 1280×1024 or larger, reduce the desktop
size and the color depth.
v If you are using the Rotation function in the Rotation tab of the “Intel(R)
82852/82855 GM/GME Graphics Controller Properties” window, set it to
Normal.
v Attach the ac adapter.
v Close programs not being used.
22
ThinkPad®G40 Series Service and Troubleshooting Guide
Page 33

Battery problems
Problem: The battery cannot be fully charged by the power-off method in the
standard charge time for your computer.
Solution: The battery might be over-discharged. Do the following:
1. Turn off the computer.
2. Make sure that the over-discharged battery is in the computer.
3. Connect the ac adapter to the computer and let it charge.
If the battery cannot be fully charged in 24 hours, use a new battery.
If the optional Quick Charger is available, use it to charge the over-discharged
battery.
Problem: Your computer shuts down before the battery status indicator shows
empty, -or- Your computer operates after the battery status indicator shows
empty.
Solution: Discharge and recharge the battery.
Problem: The operating time for a fully charged battery is short.
Solving computer problems
Solution: Discharge and recharge the battery. If your battery’s operating time
is still short, use a new battery.
Problem: The computer does not operate with a fully charged battery.
Solution: The surge protector in the battery might be active. Turn off the
computer for one minute to reset the protector; then turn on the computer
again.
Problem: The battery does not charge.
Solution: You cannot charge the battery when it is too hot. If the battery feels
hot, remove it from the computer and allow it to cool to room temperature.
After it cools, reinstall it and recharge the battery. If it still cannot be charged,
have it serviced.
Hard disk drive problems
Problem: The hard disk drive makes a rattling noise intermittently.
Solution: The rattling noise might be heard when:
v The hard disk drive starts accessing the data or when it stops.
Chapter 2. Solving computer problems 23
Page 34

Solving computer problems
v You are carrying the hard disk drive.
v You are carrying your computer.
This is a normal characteristic of a hard disk drive and is not a defect.
Problem: The hard disk drive does not work.
Solution: In the startup menu in IBM BIOS Setup Utility, make sure that there
is no exclamation point ! to the left of the hard disk drive or its child node. If
there is such a mark, the hard disk drive is disabled. Clear the mark to enable
the drive by pressing the Insert key.
Startup problems
Problem: The Microsoft®Windows®operating system will not start.
Solution: Use the Access IBM Predesktop Area to help solve or identify your
problem.
Starting the Access IBM Predesktop is easy. If the Windows operating system
does not start correctly, the Access IBM Predesktop Area will start
automatically. If, for some reason the Access IBM Predesktop Area does not
open automatically, do the following:
1. Turn off your PC, and then turn it back on again.
2. Watch the screen carefully while your PC starts. When the following
prompt is displayed, press the blue Access IBM button to open the Access
IBM Predesktop Area: “To interrupt normal startup, press the blue Access
IBM button.” The Access IBM Predesktop Area opens to the Utilities page.
24
ThinkPad®G40 Series Service and Troubleshooting Guide
Page 35

A window such as this will appear:
Solving computer problems
3. After the Access IBM Predesktop Area opens to the Utilities page, you can
select from the following icons:
v Start setup utility opens the IBM BIOS Setup Utiltiy program.
v Recover to factory contents erases all files on primary partition--the C
drive--and installs the software contents present when your PC was
manufactured. Call the IBM HelpCenter for help and information before
using this recovery method. (See the telephone numbers in this
publication under “Calling IBM” on page 38
v Restore your backups restores backups you have made with IBM Rapid
Restore PC, if backups have been made.
v Run diagnostics starts diagnostics tests to help determine whether there
are problems with your PC and what might be causing them.
v Create diagnostic disks helps you create special disks used during
diagnostic tests.
In the left panel of the Access IBM Predesktop Area, you can click the
following to open other pages or exit the utility:
Startup enables you to change the order of devices in which the PC searches
for the operating system during startup. In some situations, you might need
Chapter 2. Solving computer problems 25
Page 36

Solving computer problems
to start the operating system from a CD drive rather than the hard disk. You
specify those kinds of changes on this page.
Preferences presents various options, depending on your model and
accessories, you can set for the Access IBM Predesktop Area.
Information gathers essential information about your PC that you can provide
to call center technicians, if necessary.
Help provides information about the various pages in Access IBM Predesktop
area.
Exit closes the Access IBM Predesktop Area and resumes the startup sequence
that was interrupted.
26
ThinkPad®G40 Series Service and Troubleshooting Guide
Page 37

Other problems
Problem: The computer locks or does not accept any input.
Solution: Your computer might lock when it enters standby mode during a
communication operation. Disable the standby timer when you are working
on the network.
To turn off the computer, press and hold the power switch for 4 seconds or
more.
Problem: The computer does not turn off with the power switch.
Solution: If the standby indicator is on and you are working under battery
power, replace the battery with a fully charged one or change your power
source to ac power.
If you still have a problem, press and hold the power switch for 4 seconds or
more; this forces the computer to turn off.
Problem: The computer does not start from a device you want, such as a
diskette drive.
Solving computer problems
Solution: Refer to the Startup menu of the IBM BIOS Setup Utility. Make sure
that the startup sequence in the IBM BIOS Setup Utility is set so that the
computer starts from the device you want.
Also make sure that the device from which the computer starts is enabled by
checking that there is no ! mark preceding the device name.
Problem: The computer does not respond.
Solution: IRQs for the PCI are all set as 11. The computer does not respond
because it cannot share the IRQ with other devices. Refer to the ThinkPad
Configuration Program.
Problem: You may receive an “Unsafe Removal of Device” message that
mentions the USB 1.x device when you resume from suspend or hibernation
in Windows 2000.
Solution: You can safely close this message window. It concerns a USB driver
issue in Windows 2000. More information is available at the Microsoft
Knowledge Base Homepage at http://support.microsoft.com/. Just type
“Q328580” and “Q323754” in the search field, and click the search button.
Problem: The computer cannot play a CD, or the sound quality of a CD is not
good.
Chapter 2. Solving computer problems 27
Page 38

Solving computer problems
Solution: Be sure that the disk meets the standard for your country. Usually, a
disk that meets the local standards is marked with a CD logo (as shown
below) on the label. If you use a disk that does not meet these standards, we
cannot guarantee that it will play, or that, if it does play, the sound quality
will be good.
Problem:The system shows slow performance.
Solution: This problem may occur when the ac adapter is not attached. To
prolong battery life with the higher frequency of Intel’s Pentium 4/Celeron
processors, the ThinkPad G40 implements the Dynamic CPU Throttling
feature, which reduces CPU frequency dynamically: 1) when the system
operates in battery mode; 2) when the system increases power consumption;
3) when system temperature increases.
To avoid or reduce this problem, do one or all of the following:
1. Attach the ac adapter.
2. Close applications not being used.
3. Try to lower system temperature by increasing the fan speed with the
Battery MaxiMiser Wizard with Fan Control.
Problem:Playback of DVD is not smooth.
Solution: This problem may occur when the ac adapter is not attached. To
prolong battery life with the higher frequency of Intel’s Pentium 4/Celeron
processors, the ThinkPad G40 implements the Dynamic CPU Throttling
feature, which reduces CPU frequency dynamically: 1) when the system
operates in battery mode; 2) when the system increases power consumption;
3) when system temperature increases.
To avoid or reduce this problem, do one or all of the following:
1. Attach the ac adapter.
2. Close applications not being used.
3. Try to lower system temperature by increasing the fan speed with the
Battery MaxiMiser Wizard with Fan Control.
28
ThinkPad®G40 Series Service and Troubleshooting Guide
Page 39

Starting BIOS Setup Utility
Your computer provides a program, called IBM BIOS Setup Utility, that
enables you to select various setup parameters.
v Config: Set the configuration of your computer.
v Date/Time: Set the date and time.
v Security: Set security features.
v Startup: Set the startup device.
v Restart: Restart the system.
Note: You can set many of these parameters more easily by using the
ThinkPad Configuration Program. For more information on this
Program, refer to the on-board help.
To start IBM BIOS Setup Utility, do as follows:
1. To protect yourself against accidental loss of data, refer to “Backing up
your system registry and configuration” in Access IBM. Open Access IBM
by pressing the Access IBM button. Backing up your registry saves your
computer’s current configuration.
2. Remove any diskette from the diskette drive, and then turn off the
computer.
3. Turn on the computer; then, while the “To interrupt normal startup, press
the blue Access IBM button” message is displayed at the lower-left of the
screen, press the Access IBM button.
The Access IBM Predesktop Area appears on the screen. (If you have
deleted the service partition of the hard disk drive, or replaced the hard
disk drive itself, the Access IBM Predesktop Area does not appear. Refer to
the “Note” below.) Next, double-click the “Start setup utility” icon.
If you have set a supervisor password, the “IBM BIOS Setup Utility” menu
appears after you enter the password. You can start the utility by pressing
Enter instead of entering the supervisor password; however, you cannot
change the parameters that are protected by the supervisor password. For
more information, refer to the on-board help.
Solving computer problems
Note: If the “Startup Interrupt Menu” appears instead of the “Access IBM
Predesktop Area”, press the F1 key to enter the “IBM BIOS Setup
Utility”.
Attention
Do not turn off the computer or unplug the power until you
have exited the BIOS Setup Utility.
4. Using the cursor keys, move to an item you want to change. When the
item you want is highlighted, press Enter. A submenu is displayed.
Chapter 2. Solving computer problems 29
Page 40

Solving computer problems
5. Change the items you wish to change. To change the value of an item, use
the F5 or F6 key. If the item has a submenu, you can display it by pressing
Enter.
6. Press F3 or Esc to exit from the submenu.
If you are in a nested submenu, press Esc repeatedly until you reach the
IBM BIOS Setup Utility menu.
Note: If you need to restore the settings to their original state as of the
time of purchase, press the F9 key to load the default settings. You
can also select an option in the Restart submenu to load the default
settings or discard the changes.
7. Select Restart; then press Enter. Move the cursor to the option you want
for restarting your computer; then press Enter. Your computer restarts.
30
ThinkPad®G40 Series Service and Troubleshooting Guide
Page 41

Recovering pre-installed software
If your hard disk drive data is damaged or accidentally erased, you can
restore the software that was shipped with your computer. This software
includes your pre-installed operating system, applications, and device drivers.
You can restore your pre-installed software using the Product Recovery
program.
The Product Recovery program is in a section of your hard disk drive that is
not displayed by Windows Explorer.
Note: The recovery process might take up to 2 hours.
Attention
All of the files on the primary hard disk partition (usually drive
C) will be lost in the recovery process. Be sure to back up copies
of the files you have saved on your drive C before you begin.
To use the Product Recovery program to restore your pre-installed software,
do the following:
1. If possible, save all your files to media other than your hard disk.
2. Turn off your computer.
3. Turn on your computer. At the prompt, press the Access IBM button. (The
prompt “To interrupt normal startup, press the blue Access IBM button”
appears for only a few seconds. You must press the Access IBM button
quickly.) The Access IBM Predesktop Area appears on the screen.
4. Double-click the “Recover to factory contents” icon. The Product Recovery
program main menu opens.
5. Select the recovery options you want, and then follow the instructions on
the screen.
6. When the Product Recovery program finishes, your computer will restart
and begin the configuration process.
Solving computer problems
Chapter 2. Solving computer problems 31
Page 42

Replacing the hard disk drive
Replacing the hard disk drive
You can replace a damaged hard disk drive yourself.
Note: Replace the hard disk drive only if you have it repaired. The connectors
and bay of the hard disk drive were not designed for frequent changes,
or drive swapping. The Product Recovery program and the Access
ThinkPad Predesktop Area are not contained in the replacement hard
disk drive.
Attention
Handling a hard disk drive
v Do not drop the drive or subject it to physical shocks. Put the drive on
a material, such as soft cloth, that absorbs the physical shock.
v Do not apply pressure to the cover of the drive.
v Do not touch the connector.
The drive is very sensitive. Incorrect handling can cause damage and
permanent loss of data on the hard disk. Before removing the hard disk
drive, make a backup copy of all the information on the hard disk, and
then turn the computer off. Never remove the drive while the system is
operating, in standby mode, or in hibernation mode.
To replace the hard disk drive, do the following:
1. Turn off the computer; then disconnect the ac adapter and all cables
from the computer.
2. Close the computer display, and turn the computer over.
3. Remove the battery.
4. Remove the screw that secures the hard disk drive.
32
ThinkPad®G40 Series Service and Troubleshooting Guide
Page 43

Replacing the hard disk drive
5. Open the computer display; then stand the computer on its side and
remove the hard disk drive by pulling the cover away from the
computer.
6. Do not remove the screws from the sides of the cover; instead, detach the
cover from the hard disk drive by pulling in the direction of the arrows,
first 1 and then 2.
7. Attach the cover to a new hard disk drive.
Chapter 2. Solving computer problems 33
Page 44

Replacing the hard disk drive
8. Insert the hard disk drive and its cover into the hard disk drive bay; then
firmly install them.
9. Turn the computer over so that its bottom side is up. Reinstall the screw.
Note: You can replace the screw with a security screw to prevent the
hard disk drive from being removed easily. The security screw
may not be included in your ship group. You can, however,
purchase the screw directly from NABS at www.nabsnet.com
10. Reinstall the battery.
11. Turn the computer over again. Connect the ac adapter and the cables to
the computer.
34
ThinkPad®G40 Series Service and Troubleshooting Guide
Page 45

Replacing the battery
1. Turn off the computer, or enter hibernation mode. Then disconnect the ac
adapter and all cables from the computer.
Note: If you are using a PC Card, the computer might not be able to enter
2. Close the computer display, and turn the computer over.
3. Slide the battery latch to unlock it 1; then remove the battery 2.
Note: The first position of the battery latch is for releasing the lock of the
Replacing the battery
hibernation mode. If this happens, turn off the computer.
battery.
2
1
Chapter 2. Solving computer problems 35
Page 46

Replacing the battery
4. Align the side of a fully charged spare battery with the side of the battery
space in the computer 1; then gently push the battery into the space 2.
5. Slide the battery latch to lock it.
6. Turn the computer over again. Connect the ac adapter and the cables to
the computer.
36
ThinkPad®G40 Series Service and Troubleshooting Guide
Page 47

Chapter 3. Getting help and service from IBM
Getting help and service ........38
Getting help on the Web ........38
Calling IBM ............38
Getting help around the world ......41
© Copyright IBM Corp. 2003 37
Page 48

Getting help and service
Getting help and service
If you need help, service, technical assistance, or just want more information
about IBM products, you will find a wide variety of sources available from
IBM to assist you. This section contains information about where to go for
additional information about IBM and IBM products, what to do if you
experience a problem with your computer, and whom to call for service
should it be necessary.
Microsoft Service Packs are the latest software source for Windows product
updates. They are available via Web download (connection charges may
apply) or via CD-ROM. For more specific information and links, please go to
http://www.microsoft.com. IBM offers Up and Running technical assistance
with installation of, or questions related to, Service Packs for your IBM
preloaded Microsoft Windows product, please contact the IBM HelpCenter at
the phone number(s) listed in your owner’s manual.
Getting help on the Web
On the World Wide Web, the IBM Web site has up-to-date information about
IBM Personal Computer products and support. The address for the IBM
Personal Computing home page is www.ibm.com/pc
Calling IBM
IBM provides an extensive Web site dedicated to mobile computing and to
ThinkPad computers at www.ibm.com/pc/support
Research this Web site to learn how to solve problems, find new ways to use
your computer, and learn about options that can make working with your
ThinkPad computer even easier.
You also can order publications through the IBM Publications Ordering
System at
www.elink.ibmlink.ibm.com/public/applications/publications/cgibin/pbi.cgi
If you have tried to correct the problem yourself and still need help, during
the warranty period, you can get help and information by telephone through
the IBM PC HelpCenter. The following services are available during the
warranty period:
v Problem determination - Trained personnel are available to assist you with
determining if you have a hardware problem and deciding what action is
necessary to fix the problem.
v IBM hardware repair - If the problem is determined to be caused by IBM
hardware under warranty, trained service personnel are available to provide
the applicable level of service.
38
ThinkPad®G40 Series Service and Troubleshooting Guide
Page 49

Getting help and service
v Engineering change management - Occasionally, there might be changes
that are required after a product has been sold. IBM or your reseller, if
authorized by IBM, will make selected Engineering Changes (ECs) available
that apply to your hardware.
The following items are not covered:
v Replacement or use of non-IBM parts or nonwarranted IBM parts
Note: All warranted parts contain a 7-character identification in the format
IBM FRU XXXXXXX
v Identification of software problem sources
v Configuration of BIOS as part of an installation or upgrade
v Changes, modifications, or upgrades to device drivers
v Installation and maintenance of network operating systems (NOS)
v Installation and maintenance of application programs
Refer to your IBM hardware warranty for a full explanation of IBM warranty
terms. Be sure to retain your proof of purchase to obtain warranty service.
If possible, be near your computer when you make your call in case the
technical assistance representative needs to help you resolve a computer
problem. Please ensure that you have downloaded the most current drivers
and system updates, run diagnostics, and recorded information before you
call. When calling for technical assistance, please have the following
information available:
v Machine Type and Model
v Serial numbers of your computer, monitor, and other components, or your
proof of purchase
v Description of the problem
v Exact wording of any error messages
v Hardware and software configuration information for your system
Telephone numbers
Note: Telephone numbers are subject to change without notice. For the latest
list of IBM HelpCenter telephone numbers and hours of operation, visit
the Support Web site at www.pc.ibm.com/qtechinfo/MIGR-
4HWSE3.html
Country or region Language Telephone Number
Argentina Spanish 0800-666-0011
Australia English 1300-130-426
Chapter 3. Getting help and service from IBM 39
Page 50

Getting help and service
Country or region Language Telephone Number
Austria German 01-24592-5901
Bolivia Spanish 0800-0189
Belgium Dutch
02-210 9820
French
Brazil Portuguese 55-11-3889-8986
Canada English/ French 1-800-565-3344
Chile Spanish 800-224-488
China Mandarin 800-810-1818
Colombia Spanish 980-912-3021
Denmark Danish 45 20 82 00
Ecuador Spanish 1-800-426911 (option #4)
Finland Finnish 09-459 69 60
France French 02 38 55 74 50
Germany German 07032-1549 201
Hong Kong Cantonese 2825-7799
Ireland English 01-815 9200
Italy Italian 02-7031-6101
Japan Japanese *1
Luxembourg French 298-977 5063
Mexico Spanish 001-866-434-2080
Netherlands Dutch 020-514 5770
New Zealand English 0800-446-149
Norway Norwegian 66 81 11 00
Peru Spanish 0-800-50-866
Portugal Portuguese 21-791 51 47
Russia Russian 095-940-2000
Spain Spanish 91-662 49 16
Sweden Swedish 08-477 4420
02-210 9800
in Toronto only call
416-383-3344
40
ThinkPad®G40 Series Service and Troubleshooting Guide
Page 51

Country or region Language Telephone Number
Switzerland German/
Taiwan Mandarin 886-2-2725-9799
United
Kingdom
United States English 1-800-772-2227
Uruguay Spanish 000-411-005-6649
Venezuela Spanish 0-800-100-2011
*1 If you purchased your ThinkPad computer in Japan, the telephone
number of the IBM Help Center is given to you as soon as you finish
registering the computer. For detailed information, visit the Web site
at www.ibm.com/jp/pc/ibmjreg
Getting help around the world
If you travel with your computer or relocate it to a country where your
ThinkPad machine type is sold and serviced by IBM or by IBM resellers who
are authorized to perform warranty service, International Warranty Service is
available for your computer.
Getting help and service
0583-33-09-00
French/
Italian
English 0-1475-555 055
Service methods and procedures vary by country, and some services might
not be available in all countries. International Warranty Service is delivered
through the method of service (such as depot, carry-in, or on-site service) that
is provided in the servicing country. Service centers in certain countries might
not be able to service all models of a particular machine type. In some
countries, fees and restrictions might apply at the time of service.
To determine whether your computer is eligible for International Warranty
Service and to view a list of the countries where service is available, go to
http://www.ibm.com/pc/support/, and click Warranty Lookup. Eligible IBM
computers are identified by their four-digit machine types. For more
information about International Warranty Service, see Service Announcement
601-034 at http://www.ibm.com/. Click Support & downloads, click
Announcement letters, and click Announcements search.IntheSearch by
letter number only field, type 601-034, and click Search.
Chapter 3. Getting help and service from IBM 41
Page 52

Getting help and service
42
ThinkPad®G40 Series Service and Troubleshooting Guide
Page 53

Appendix A. Important safety instructions
DANGER
Electric current from power, telephone, and communication cables is hazardous. To
avoid shock hazard, connect and disconnect cables as shown below when
installing, moving, or opening the covers of this product or attached devices. If the
3-pin power cord is provided with this product, it must be used with a properly
grounded outlet.
To Connect
Turn everything OFF.
First, attach all cables to devices.
Attach the signal cables to
receptacles.
Attach the power cord to an outlet.
To Disconnect
Turn everything OFF.
First, remove the power cord from
the outlet.
Remove signal cables from
receptacles.
Remove all cables from devices.
Turn the device ON.
© Copyright IBM Corp. 2003 43
Page 54

DANGER
Reduce the risk of fire and electric shock by always following basic safety
precautions, including the following:
v Do not use your computer in or near water.
v During electrical storms:
– Do not use your computer with the telephone cable connection.
– Do not connect the cable to or disconnect it from the telephone outlet on the
wall.
DANGER
If the rechargeable battery pack is incorrectly replaced, there is danger of an
explosion. The battery pack contains a small amount of harmful substances. To
avoid possible injury:
v Replace only with a battery of the type recommended by IBM.
v Keep the battery pack away from fire.
v Do not expose it to water or rain.
v Do not attempt to disassemble it.
v Do not short-circuit it.
v Keep it away from children.
44 ThinkPad
Do not put the battery pack in trash that is disposed of in landfills. When
disposing of the battery, comply with local ordinances or regulations and your
company’s safety standards.
DANGER
If the backup battery is incorrectly replaced, there is danger of explosion.
The lithium battery contains lithium and can explode if it is not properly handled
or disposed of.
Replace only with a battery of the same type.
To avoid possible injury or death, do not: (1) throw or immerse the battery into
water, (2) allow it to heat to more than 100 °C (212 °F), or (3) attempt to repair or
disassemble it. Dispose of it as required by local ordinances or regulations and
your company’s safety standards.
®
G40 Series Service and Troubleshooting Guide
Page 55

DANGER Main battery safety notice
DANGER Backup battery safety notice
Appendix A. Important safety instructions 45
Page 56

DANGER
Follow the instruction below when installing or reconfiguring the Mini PCI option.
To avoid shock hazard, disconnect all the cables and the ac adapter when you
install the Mini PCI option or open the covers of the system or attached devices.
Electrical current from power, telephone, and communication cables is hazardous.
CAUTION:
When you have added or upgraded a Mini PCI Card or a memory card, do
not use your computer until you have closed the cover. Never use the
computer when the cover is open.
CAUTION:
The fluorescent lamp in the liquid crystal display (LCD) contains mercury.
Do not put it in trash that is disposed of in landfills. Dispose of it as
required by local ordinances or regulations.
The LCD is made of glass, and rough handling or dropping the computer
can cause the LCD to break. If the LCD breaks and the internal fluid gets
into your eyes or on your hands, immediately wash the affected areas with
water for at least 15 minutes; if any symptoms are present after washing,
get medical care.
CAUTION:
To reduce the risk of fire, use only No. 26 AWG or larger (thicker)
telephone cable.
Modem safety information
To reduce the risk of fire, electrical shock, or injury when using telephone
equipment, always follow basic safety precautions, such as:
Never install telephone wiring during an electrical storm.
Never install telephone jacks in wet locations unless the jack is specifically
designed for wet locations.
Never touch uninsulated telephone wires or terminals unless the telephone
line has been disconnected at the network interface.
46 ThinkPad
®
G40 Series Service and Troubleshooting Guide
Page 57

Use caution when installing or modifying telephone lines.
Avoid using a telephone (other than a cordless type) during an electrical
storm. There may be a remote risk of electric shock from lightning.
Do not use the telephone to report a gas leak in the vicinity of the leak.
Laser compliance statement
An optical storage drive (device), such as a CD-ROM, CD-RW, DVD-ROM
drive and SuperDisk, which can be installed in the IBM ThinkPad computer is
a laser product. The drive’s classification label (shown below) is on the surface
of the drive.
CLASS 1 LASER PRODUCT
LASER KLASSE 1
LUOKAN 1 LASERLAITE
APPAREIL A LASER DE CLASSE 1
KLASS 1 LASER APPARAT
The drive is certified by the manufacturer to comply with the requirements of
the Department of Health and Human Services 21 Code of Federal
Regulations (DHHS 21 CFR) Subchapter J for Class I laser products at the date
of manufacture.
In other countries, the drive is certified to conform to the requirements of
IEC825 and EN60825 for Class 1 laser products.
DANGER
Do not open the optical storage drive unit; no user adjustments or serviceable parts
are inside.
Use of controls, adjustments, or the performance of procedures other than those
specified might result in hazardous radiation exposure.
Class 1 laser products are not considered hazardous. The design of the laser
system and the optical storage drive ensures that there is no exposure to laser
radiation above a Class 1 level during normal operation, user maintenance, or
servicing.
Some drives contain an embedded Class 3A laser diode. Note this warning:
Appendix A. Important safety instructions 47
Page 58

DANGER
Emits visible and invisible laser radiation when open. Avoid direct eye exposure.
Do not stare into the beam or view it directly with optical instruments.
Save these instructions.
48 ThinkPad
®
G40 Series Service and Troubleshooting Guide
Page 59

Appendix B. Wireless related information
Wireless Interoperability
Wireless LAN Mini-PCI Adapter is designed to be interoperable with any
wireless LAN product that is based on Direct Sequence Spread Spectrum
(DSSS) radio technology, and is compliant to:
v The IEEE 802.11 Standard on Wireless LANs, as defined and approved by
the Institute of Electrical and Electronics Engineers.
v The Wireless Fidelity (WiFi) certification as defined by the WECA (Wireless
Ethernet Compatibility Alliance).
Usage environment and your Health
The Wireless LAN Mini-PCI Adapter emits radio frequency electromagnetic
energy like other radio devices. However, the level of energy emitted is far
less than the electromagnetic energy emitted by wireless devices like for
example mobile phones.
Because the Wireless LAN Mini-PCI Adapter operates within the guidelines
found in radio frequency safety standards and recommendations, IBM
believes the integrated wireless cards are safe for use by consumers. These
standards and recommendations reflect the consensus of the scientific
community and result from deliberations of panels and committees of
scientists who continually review and interpret the extensive research
literature.
In some situations or environments, the use of a Wireless LAN Mini-PCI
Adapter card may be restricted by the proprietor of the building or
responsible representatives of the organization. These situations may for
example include:
v Using integrated wireless cards on airplanes, or in hospitals
v In environments where the risk of interference to other devices or services
is perceived or identified as harmful.
If you are uncertain of the policy that applies on the use of wireless devices in
a specific organization (e.g. airport or hospital), you are encouraged to ask for
authorization to use the Wireless LAN Mini-PCI Adapter prior to turning on
the ThinkPad G40 computer.
© Copyright IBM Corp. 2003 49
Page 60

50 ThinkPad
®
G40 Series Service and Troubleshooting Guide
Page 61

Appendix C. Warranty information
This appendix contains warranty information for your ThinkPad, warranty
period, warranty service and support, and the IBM Statement of Limited
Warranty.
Warranty Period
Contact your place of purchase for warranty service information. Some IBM
Machines are eligible for on-site warranty service depending on the country
or region where service is performed or the machine type.
Machine type 2387
Country or region Warranty period
All Parts-3months, labor-3months
Machine type 2388
Country or region Warranty period
All Parts - 1 year, labor - 1 year
Battery pack-3months
Battery pack - 1 year
Machine type 2389
Country or region Warranty period
All Parts - 3 years, labor - 3 years
Battery pack - 1 year
Warranty service and support
With the original purchase of an IBM ThinkPad, you have access to extensive
support. During the IBM Machine warranty period, you may call IBM or your
reseller for problem-determination assistance under the terms of the IBM
Statement of Limited Warranty.
The following services are available during the warranty period:
© Copyright IBM Corp. 2003 51
Page 62

v Problem determination - Trained personnel are available to assist you with
determining if you have a hardware problem and deciding what action is
necessary to fix the problem.
v IBM hardware repair - If the problem is determined to be caused by IBM
hardware under warranty, trained service personnel are available to provide
the applicable level of service, either on-site or at an IBM service center as
determined by IBM.
v Engineering Change management - Occasionally, there might be changes
that are required after a product has been shipped from IBM. In those
instances, IBM will make Engineering Changes (ECs) available that apply to
your hardware.
The following items are not covered under warranty service:
v Replacement or use of non-IBM parts. All IBM parts contain a 7-character
identification in the format IBM FRU XXXXXXX.
v Identification of non-IBM software problem sources.
v Installation of customer replaceable units (CRUs).
v Installation and configuration of machine code or licensed internal code
that is designated as customer installable.
If you do not register your computer with IBM, you might be required to
present proof of purchase to obtain warranty service.
Before you call for service
You can solve many problems without outside assistance by following the
troubleshooting procedures that IBM provides in the online help or in the
publications that are provided with your computer and software.
Calling for service
52 ThinkPad
Most computers, operating systems, and application programs come with
information that contains troubleshooting procedures and explanations of
error messages and error codes. The information that comes with your
computer also describes the diagnostic tests that you can perform.
If you suspect a software problem, refer to the information for the operating
system or application program.
Please have the following information ready:
v Machine type, model, and serial number
v Description of the problem
v Exact wording of any error messages
v Hardware and software configuration information
®
G40 Series Service and Troubleshooting Guide
Page 63

To find the telephone number for the HelpCenter nearest you, see “Telephone
numbers” in Chapter 3, “Getting help and service from IBM”, on page 37
IBM Statement of Limited Warranty Z125-4753-06 8/2000
This warranty statement consists of two parts: Part 1 and Part 2. Be sure to
read Part 1 and the country-unique terms in Part 2 that apply to your country
or region.
Part 1 - General Terms
This Statement of Limited Warranty includes Part 1 - General Terms and Part
2 - Country-unique Terms. The terms of Part 2 replace or modify those of Part
1. The warranties provided by IBM in this Statement of Limited Warranty
apply only to Machines you purchase for your use, and not for resale, from
IBM or your reseller. The term “Machine” means an IBM machine, its features,
conversions, upgrades, elements, or accessories, or any combination of them.
The term “Machine” does not include any software programs, whether
pre-loaded with the Machine, installed subsequently or otherwise. Unless IBM
specifies otherwise, the following warranties apply only in the country where
you acquire the Machine. Nothing in this Statement of Limited Warranty
affects any statutory rights of consumers that cannot be waived or limited by
contract. If you have any questions, contact IBM or your reseller.
The IBM Warranty for Machines
IBM warrants that each Machine 1) is free from defects in materials and
workmanship and 2) conforms to IBM’s Official Published Specifications
(“Specifications”). The warranty period for a Machine is a specified, fixed
period commencing on its Date of Installation. The date on your sales receipt
is the Date of Installation unless IBM or your reseller informs you otherwise.
If a Machine does not function as warranted during the warranty period, and
IBM or your reseller are unable to either 1) make it do so or 2) replace it with
one that is at least functionally equivalent, you may return it to your place of
purchase and your money will be refunded.
Extent of Warranty
The warranty does not cover the repair or exchange of a Machine resulting
from misuse, accident, modification, unsuitable physical or operating
environment, improper maintenance by you, or failure caused by a product
for which IBM is not responsible. The warranty is voided by removal or
alteration of Machine or parts identification labels.
THESE WARRANTIES ARE YOUR EXCLUSIVE WARRANTIES AND
REPLACE ALL OTHER WARRANTIES OR CONDITIONS, EXPRESS OR
IMPLIED, INCLUDING, BUT NOT LIMITED TO, THE IMPLIED
WARRANTIES OR CONDITIONS OF MERCHANTABILITY AND
FITNESS FOR A PARTICULAR PURPOSE. THESE WARRANTIES GIVE
Appendix C. Warranty information 53
Page 64

YOU SPECIFIC LEGAL RIGHTS AND YOU MAY ALSO HAVE OTHER
RIGHTS WHICH VARY FROM JURISDICTION TO JURISDICTION.
SOME JURISDICTIONS DO NOT ALLOW THE EXCLUSION OR
LIMITATION OF EXPRESS OR IMPLIED WARRANTIES, SO THE ABOVE
EXCLUSION OR LIMITATION MAY NOT APPLY TO YOU. IN THAT
EVENT, SUCH WARRANTIES ARE LIMITED IN DURATION TO THE
WARRANTY PERIOD. NO WARRANTIES APPLY AFTER THAT PERIOD.
Items Not Covered by Warranty
IBM does not warrant uninterrupted or error-free operation of a Machine.
Any technical or other support provided for a Machine under warranty, such
as assistance via telephone with “how-to” questions and those regarding
Machine set-up and installation, will be provided WITHOUT WARRANTIES
OF ANY KIND.
Warranty Service
To obtain warranty service for a Machine, contact IBM or your reseller. If you
do not register your Machine with IBM, you may be required to present proof
of purchase.
During the warranty period, IBM or your reseller, if approved by IBM to
provide warranty service, provides without charge certain types of repair and
exchange service to keep Machines in, or restore them to, conformance with
their Specifications. IBM or your reseller will inform you of the available
types of service for a Machine based on its country of installation. At its
discretion, IBM or your reseller will 1) either repair or exchange the failing
Machine and 2) provide the service either at your location or a service center.
IBM or your reseller will also manage and install selected engineering changes
that apply to the Machine.
54 ThinkPad
Some parts of IBM Machines are designated as Customer Replaceable Units
(called “CRUs”), e.g., keyboards, memory, or hard disk drives. IBM ships
CRUs to you for replacement by you. You must return all defective CRUs to
IBM within 30 days of your receipt of the replacement CRU. You are
responsible for downloading designated Machine Code and Licensed Internal
Code updates from an IBM Internet Web site or from other electronic media,
and following the instructions that IBM provides.
When warranty service involves the exchange of a Machine or part, the item
IBM or your reseller replaces becomes its property and the replacement
becomes yours. You represent that all removed items are genuine and
unaltered. The replacement may not be new, but will be in good working
order and at least functionally equivalent to the item replaced. The
replacement assumes the warranty service status of the replaced item. Many
®
G40 Series Service and Troubleshooting Guide
Page 65

features, conversions, or upgrades involve the removal of parts and their
return to IBM. A part that replaces a removed part will assume the warranty
service status of the removed part.
Before IBM or your reseller exchanges a Machine or part, you agree to remove
all features, parts, options, alterations, and attachments not under warranty
service.
You also agree to
1. ensure that the Machine is free of any legal obligations or restrictions that
prevent its exchange;
2. obtain authorization from the owner to have IBM or your reseller service a
Machine that you do not own; and
3. where applicable, before service is provided:
a. follow the problem determination, problem analysis, and service
request procedures that IBM or your reseller provides;
b. secure all programs, data, and funds contained in a Machine;
c. provide IBM or your reseller with sufficient, free, and safe access to
your facilities to permit them to fulfill their obligations; and
d. inform IBM or your reseller of changes in a Machine’s location.
IBM is responsible for loss of, or damage to, your Machine while it is 1) in
IBM’s possession or 2) in transit in those cases where IBM is responsible for
the transportation charges.
Neither IBM nor your reseller is responsible for any of your confidential,
proprietary or personal information contained in a Machine which you return
to IBM or your reseller for any reason. You should remove all such
information from the Machine prior to its return.
Limitation of Liability
Circumstances may arise where, because of a default on IBM’s part or other
liability, you are entitled to recover damages from IBM. In each such instance,
regardless of the basis on which you are entitled to claim damages from IBM
(including fundamental breach, negligence, misrepresentation, or other
contract or tort claim), except for any liability that cannot be waived or
limited by applicable laws, IBM is liable for no more than
1. damages for bodily injury (including death) and damage to real property
and tangible personal property; and
2. the amount of any other actual direct damages, up to the charges (if
recurring, 12 months’ charges apply) for the Machine that is subject of the
claim. For purposes of this item, the term “Machine” includes Machine
Code and Licensed Internal Code.
Appendix C. Warranty information 55
Page 66

This limit also applies to IBM’s suppliers and your reseller. It is the maximum
for which IBM, its suppliers, and your reseller are collectively responsible.
UNDER NO CIRCUMSTANCES IS IBM LIABLE FOR ANY OF THE
FOLLOWING: 1) THIRD-PARTY CLAIMS AGAINST YOU FOR
DAMAGES (OTHER THAN THOSE UNDER THE FIRST ITEM LISTED
ABOVE); 2) LOSS OF, OR DAMAGE TO, YOUR RECORDS OR DATA; OR
3) SPECIAL, INCIDENTAL, OR INDIRECT DAMAGES OR FOR ANY
ECONOMIC CONSEQUENTIAL DAMAGES, LOST PROFITS OR LOST
SAVINGS, EVEN IF IBM, ITS SUPPLIERS OR YOUR RESELLER IS
INFORMED OF THEIR POSSIBILITY. SOME JURISDICTIONS DO NOT
ALLOW THE EXCLUSION OR LIMITATION OF INCIDENTAL OR
CONSEQUENTIAL DAMAGES, SO THE ABOVE LIMITATION OR
EXCLUSION MAY NOT APPLY TO YOU.
Governing Law
Both you and IBM consent to the application of the laws of the country in
which you acquired the Machine to govern, interpret, and enforce all of your
and IBM’s rights, duties, and obligations arising from, or relating in any
manner to, the subject matter of this Agreement, without regard to conflict of
law principles.
Part 2 - Country-unique Terms
AMERICAS
56 ThinkPad
BRAZIL
Governing Law: The following is added after the first sentence:
Any litigation arising from this Agreement will be settled exclusively by the
court of Rio de Janeiro.
NORTH AMERICA
Warranty Service: The following is added to this Section:
To obtain warranty service from IBM in Canada or the United States, call
1-800-IBM-SERV (426-7378).
CANADA
Governing Law: The following replaces “laws of the country in which you acquired
the Machine” in the first sentence:
laws in the Province of Ontario.
UNITED STATES
®
G40 Series Service and Troubleshooting Guide
Page 67

Governing Law: The following replaces “laws of the country in which you acquired
the Machine” in the first sentence:
laws of the State of New York.
ASIA PACIFIC
AUSTRALIA
The IBM Warranty for Machines: The following paragraph is added to this
Section:
The warranties specified in this Section are in addition to any rights you may
have under the Trade Practices Act 1974 or other similar legislation and are
only limited to the extent permitted by the applicable legislation.
Limitation of Liability: The following is added to this Section:
Where IBM is in breach of a condition or warranty implied by the Trade
Practices Act 1974 or other similar legislation, IBM’s liability is limited to the
repair or replacement of the goods or the supply of equivalent goods. Where
that condition or warranty relates to right to sell, quiet possession or clear
title, or the goods are of a kind ordinarily acquired for personal, domestic or
household use or consumption, then none of the limitations in this paragraph
apply.
Governing Law: The following replaces “laws of the country in which you acquired
the Machine” in the first sentence:
laws of the State or Territory.
CAMBODIA, LAOS, AND VIETNAM
Governing Law: The following replaces “laws of the country in which you acquired
the Machine” in the first sentence:
laws of the State of New York.
The following is added to this Section:
Disputes and differences arising out of or in connection with this Agreement
shall be finally settled by arbitration which shall be held in Singapore in
accordance with the rules of the International Chamber of Commerce (ICC).
The arbitrator or arbitrators designated in conformity with those rules shall
have the power to rule on their own competence and on the validity of the
Agreement to submit to arbitration. The arbitration award shall be final and
binding for the parties without appeal and the arbitral award shall be in
writing and set forth the findings of fact and the conclusions of law.
All proceedings shall be conducted, including all documents presented in
such proceedings, in the English language. The number of arbitrators shall be
three, with each side to the dispute being entitled to appoint one arbitrator.
Appendix C. Warranty information 57
Page 68

The two arbitrators appointed by the parties shall appoint a third arbitrator
before proceeding upon the reference. The third arbitrator shall act as
chairman of the proceedings. Vacancies in the post of chairman shall be filled
by the president of the ICC. Other vacancies shall be filled by the respective
nominating party. Proceedings shall continue from the stage they were at
when the vacancy occurred.
If one of the parties refuses or otherwise fails to appoint an arbitrator within
30 days of the date the other party appoints its, the first appointed arbitrator
shall be the sole arbitrator, provided that the arbitrator was validly and
properly appointed.
The English language version of this Agreement prevails over any other
language version.
HONG KONG AND MACAU
Governing Law: The following replaces “laws of the country in which you acquired
the Machine” in the first sentence:
laws of Hong Kong Special Administrative Region.
INDIA
Limitation of Liability: The following replaces items 1 and 2 of this Section:
1. liability for bodily injury (including death) or damage to real property and
tangible personal property will be limited to that caused by IBM’s
negligence;
2. as to any other actual damage arising in any situation involving
nonperformance by IBM pursuant to, or in any way related to the subject
of this Statement of Limited Warranty, IBM’s liability will be limited to the
charge paid by you for the individual Machine that is the subject of the
claim.
58 ThinkPad
JAPAN
Governing Law: The following sentence is added to this Section:
Any doubts concerning this Agreement will be initially resolved between us
in good faith and in accordance with the principle of mutual trust.
NEW ZEALAND
The IBM Warranty for Machines: The following paragraph is added to this
Section:
The warranties specified in this Section are in addition to any rights you may
have under the Consumer Guarantees Act 1993 or other legislation which
®
G40 Series Service and Troubleshooting Guide
Page 69

cannot be excluded or limited. The Consumer Guarantees Act 1993 will not
apply in respect of any goods which IBM provides, if you require the goods
for the purposes of a business as defined in that Act.
Limitation of Liability: The following is added to this Section:
Where Machines are not acquired for the purposes of a business as defined in
the Consumer Guarantees Act 1993, the limitations in this Section are subject
to the limitations in that Act.
PEOPLE’S REPUBLIC OF CHINA (PRC)
Governing Law: The following replaces this Section:
Both you and IBM consent to the application of the laws of the State of New
York (except when local law requires otherwise) to govern, interpret, and
enforce all your and IBM’s rights, duties, and obligations arising from, or
relating in any manner to, the subject matter of this Agreement, without
regard to conflict of law principles.
Any disputes arising from or in connection with this Agreement will first be
resolved by friendly negotiations, failing which either of us has the right to
submit the dispute to the China International Economic and Trade Arbitration
Commission in Beijing, the PRC, for arbitration in accordance with its
arbitration rules in force at the time. The arbitration tribunal will consist of
three arbitrators. The language to be used therein will be English and Chinese.
An arbitral award will be final and binding on all the parties, and will be
enforceable under the Convention on the Recognition and Enforcement of
Foreign Arbitral Awards (1958).
The arbitration fee will be borne by the losing party unless otherwise
determined by the arbitral award.
During the course of arbitration, this Agreement will continue to be
performed except for the part which the parties are disputing and which is
undergoing arbitration.
EUROPE, MIDDLE EAST, AFRICA (EMEA)
THE FOLLOWING TERMS APPLY TO ALL EMEA COUNTRIES:
The terms of this Statement of Limited Warranty apply to Machines purchased
from IBM or an IBM reseller.
Warranty Service:
If you purchase an IBM Machine in Austria, Belgium, Denmark, Estonia,
Finland, France, Germany, Greece, Iceland, Ireland, Italy, Latvia, Lithuania,
Luxembourg, Netherlands, Norway, Portugal, Spain, Sweden, Switzerland or
United Kingdom, you may obtain warranty service for that Machine in any of
Appendix C. Warranty information 59
Page 70

those countries from either (1) an IBM reseller approved to perform warranty
service or (2) from IBM. If you purchase an IBM Personal Computer Machine
in Albania, Armenia, Belarus, Bosnia and Herzegovina, Bulgaria, Croatia,
Czech Republic, Georgia, Hungary, Kazakhstan, Kirghizia, Federal Republic of
Yugoslavia, Former Yugoslav Republic of Macedonia (FYROM), Moldova,
Poland, Romania, Russia, Slovak Republic, Slovenia, or Ukraine, you may
obtain warranty service for that Machine in any of those countries from either
(1) an IBM reseller approved to perform warranty service or (2) from IBM.
If you purchase an IBM Machine in a Middle Eastern or African country, you
may obtain warranty service for that Machine from the IBM entity within the
country of purchase, if that IBM entity provides warranty service in that
country, or from an IBM reseller, approved by IBM to perform warranty
service on that Machine in that country. Warranty service in Africa is available
within 50 kilometers of an IBM authorized service provider. You are
responsible for transportation costs for Machines located outside 50 kilometers
of an IBM authorized service provider.
Governing Law:
The applicable laws that govern, interpret and enforce rights, duties, and
obligations of each of us arising from, or relating in any manner to, the
subject matter of this Statement, without regard to conflict of laws principles,
as well as Country-unique terms and competent court for this Statement are
those of the country in which the warranty service is being provided, except
that in 1) Albania, Bosnia-Herzegovina, Bulgaria, Croatia, Hungary, Former
Yugoslav Republic of Macedonia, Romania, Slovakia, Slovenia, Armenia,
Azerbaijan, Belarus, Georgia, Kazakhstan, Kyrgyzstan, Moldova, Russia,
Tajikistan, Turkmenistan, Ukraine, and Uzbekistan, the laws of Austria apply;
2) Estonia, Latvia, and Lithuania, the laws of Finland apply; 3) Algeria, Benin,
Burkina Faso, Cameroon, Cape Verde, Central African Republic, Chad, Congo,
Djibouti, Democratic Republic of Congo, Equatorial Guinea, France, Gabon,
Gambia, Guinea, Guinea-Bissau, Ivory Coast, Lebanon, Mali, Mauritania,
Morocco, Niger, Senegal, Togo, and Tunisia, this Agreement will be construed
and the legal relations between the parties will be determined in accordance
with the French laws and all disputes arising out of this Agreement or related
to its violation or execution, including summary proceedings, will be settled
exclusively by the Commercial Court of Paris; 4) Angola, Bahrain, Botswana,
Burundi, Egypt, Eritrea, Ethiopia, Ghana, Jordan, Kenya, Kuwait, Liberia,
Malawi, Malta, Mozambique, Nigeria, Oman, Pakistan, Qatar, Rwanda, Sao
Tome, Saudi Arabia, Sierra Leone, Somalia, Tanzania, Uganda, United Arab
Emirates, United Kingdom, West Bank/Gaza, Yemen, Zambia, and Zimbabwe,
this Agreement will be governed by English Law and disputes relating to it
will be submitted to the exclusive jurisdiction of the English courts; and 5) in
Greece, Israel, Italy, Portugal, and Spain any legal claim arising out of this
Statement will be brought before, and finally settled by, the competent court
of Athens, Tel Aviv, Milan, Lisbon, and Madrid, respectively.
60 ThinkPad
®
G40 Series Service and Troubleshooting Guide
Page 71

THE FOLLOWING TERMS APPLY TO THE COUNTRY SPECIFIED:
AUSTRIA AND GERMANY
The IBM Warranty for Machines: The following replaces the first sentence of the
first paragraph of this Section:
The warranty for an IBM Machine covers the functionality of the Machine for
its normal use and the Machine’s conformity to its Specifications.
The following paragraphs are added to this Section:
The minimum warranty period for Machines is six months. In case IBM or
your reseller is unable to repair an IBM Machine, you can alternatively ask for
a partial refund as far as justified by the reduced value of the unrepaired
Machine or ask for a cancellation of the respective agreement for such
Machine and get your money refunded.
Extent of Warranty: The second paragraph does not apply.
Warranty Service: The following is added to this Section:
During the warranty period, transportation for delivery of the failing Machine
to IBM will be at IBM’s expense.
Limitation of Liability: The following paragraph is added to this Section:
The limitations and exclusions specified in the Statement of Limited Warranty
will not apply to damages caused by IBM with fraud or gross negligence and
for express warranty.
The following sentence is added to the end of item 2:
IBM’s liability under this item is limited to the violation of essential
contractual terms in cases of ordinary negligence.
EGYPT
Limitation of Liability: The following replaces item 2 in this Section:
as to any other actual direct damages, IBM’s liability will be limited to the
total amount you paid for the Machine that is the subject of the claim. For
purposes of this item, the term “Machine” includes Machine Code and
Licensed Internal Code.
Applicability of suppliers and resellers (unchanged).
FRANCE
Limitation of Liability: The following replaces the second sentence of the first
paragraph of this Section:
Appendix C. Warranty information 61
Page 72

In such instances, regardless of the basis on which you are entitled to claim
damages from IBM, IBM is liable for no more than: (items 1 and 2 unchanged).
IRELAND
Extent of Warranty: The following is added to this Section:
Except as expressly provided in these terms and conditions, all statutory
conditions, including all warranties implied, but without prejudice to the
generality of the foregoing all warranties implied by the Sale of Goods Act
1893 or the Sale of Goods and Supply of Services Act 1980 are hereby
excluded.
Limitation of Liability: The following replaces items one and two of the first
paragraph of this Section:
1. death or personal injury or physical damage to your real property solely
caused by IBM’s negligence; and
2. the amount of any other actual direct damages, up to 125 percent of the
charges (if recurring, the 12 months’ charges apply) for the Machine that is
the subject of the claim or which otherwise gives rise to the claim.
Applicability of suppliers and resellers (unchanged).
The following paragraph is added at the end of this Section:
IBM’s entire liability and your sole remedy, whether in contract or in tort, in
respect of any default shall be limited to damages.
62 ThinkPad
ITALY
Limitation of Liability: The following replaces the second sentence in the first
paragraph:
In each such instance unless otherwise provided by mandatory law, IBM is
liable for no more than:
1. (unchanged)
2. as to any other actual damage arising in all situations involving
nonperformance by IBM pursuant to, or in any way related to the subject
matter of this Statement of Warranty, IBM’s liability, will be limited to the
total amount you paid for the Machine that is the subject of the claim.
Applicability of suppliers and resellers (unchanged).
The following replaces the third paragraph of this Section:
Unless otherwise provided by mandatory law, IBM and your reseller are not
liable for any of the following: (items 1 and 2 unchanged) 3) indirect damages,
even if IBM or your reseller is informed of their possibility.
SOUTH AFRICA, NAMIBIA, BOTSWANA, LESOTHO AND SWAZILAND
®
G40 Series Service and Troubleshooting Guide
Page 73

Limitation of Liability: The following is added to this Section:
IBM’s entire liability to you for actual damages arising in all situations
involving nonperformance by IBM in respect of the subject matter of this
Statement of Warranty will be limited to the charge paid by you for the
individual Machine that is the subject of your claim from IBM.
UNITED KINGDOM
Limitation of Liability: The following replaces items 1 and 2 of the first paragraph
of this Section:
1. death or personal injury or physical damage to your real property solely
caused by IBM’s negligence;
2. the amount of any other actual direct damages or loss, up to 125 percent
of the charges (if recurring, the 12 months’ charges apply) for the Machine
that is the subject of the claim or which otherwise gives rise to the claim;
The following item is added to this paragraph:
3. breach of IBM’s obligations implied by Section 12 of the Sale of Goods Act
1979 or Section 2 of the Supply of Goods and Services Act 1982.
Applicability of suppliers and resellers (unchanged).
The following is added to the end of this Section:
IBM’s entire liability and your sole remedy, whether in contract or in tort, in
respect of any default shall be limited to damages.
Appendix C. Warranty information 63
Page 74

64 ThinkPad
®
G40 Series Service and Troubleshooting Guide
Page 75

Appendix D. Notices
This publication was developed for products and services offered in the
U.S.A.
IBM may not offer the products, services, or features discussed in this
document in other countries. Consult your local IBM representative for
information on the products and services currently available in your area. Any
reference to an IBM product, program, or service is not intended to state or
imply that only that IBM product, program, or service may be used. Any
functionally equivalent product, program, or service that does not infringe
any IBM intellectual property right may be used instead. However, it is the
user’s responsibility to evaluate and verify the operation of any non-IBM
product, program, or service.
IBM may have patents or pending patent applications covering subject matter
described in this document. The furnishing of this document does not give
you any license to these patents. You can send license inquiries, in writing, to:
IBM Director of Licensing
IBM Corporation
North Castle Drive
Armonk, NY 10504-1785
U.S.A.
Processing date data
This IBM hardware product and IBM software products that might be
packaged with it have been designed, when used in accordance with their
associated documentation, to process date data correctly within and between
the 20th and 21st centuries, provided all other products (for example,
software, hardware, and firmware) used with these products properly
exchange accurate date data with them.
IBM cannot take responsibility for the date data processing capabilities of
non-IBM products, even if those products are preinstalled or otherwise
distributed by IBM. You should contact the vendors responsible for those
products directly to determine the capabilities of their products and update
them if needed. This IBM hardware product cannot prevent errors that might
occur if software, upgrades, or peripheral devices you use or exchange data
with do not process date data correctly.
The foregoing is a Year 2000 Readiness Disclosure.
© Copyright IBM Corp. 2003 65
Page 76

References to Web site addresses
Any references in this publication to non-IBM Web sites are provided for
convenience only and do not in any manner serve as an endorsement of those
Web sites. The materials at those Web sites are not part of the materials for
this IBM product, and use of those Web sites is at your own risk.
Electronic emission notices
Federal Communications Commission (FCC) Statement
ThinkPad G40, machine type 2387, 2388, or 2389
This equipment has been tested and found to comply with the limits for a
Class B digital device, pursuant to Part 15 of the FCC Rules. These limits are
designed to provide reasonable protection against harmful interference in a
residential installation. This equipment generates, uses, and can radiate radio
frequency energy and, if not installed and used in accordance with the
instructions, may cause harmful interference to radio communications.
However, there is no guarantee that interference will not occur in a particular
installation. If this equipment does cause harmful interference to radio or
television reception, which can be determined by turning the equipment off
and on, the user is encouraged to try to correct the interference by one or
more of the following measures:
v Reorient or relocate the receiving antenna.
v Increase the separation between the equipment and receiver.
v Connect the equipment into an outlet on a circuit different from that to
which the receiver is connected.
v Consult an IBM authorized dealer or service representative for help.
66 ThinkPad
Properly shielded and grounded cables and connectors must be used in order
to meet FCC emission limits. Proper cables and connectors are available from
IBM authorized dealers. IBM is not responsible for any radio or television
interference caused by using other than recommended cables and connectors
or by unauthorized changes or modifications to this equipment. Unauthorized
changes or modifications could void the user’s authority to operate the
equipment.
This device complies with Part 15 of the FCC Rules. Operation is subject to
the following two conditions: (1) this device may not cause harmful
interference, and (2) this device must accept any interference received,
including interference that may cause undesired operation.
Responsible Party:
®
G40 Series Service and Troubleshooting Guide
Page 77

International Business Machines Corporation
New Orchard Road
Armonk, NY 10504
Telephone 1-919-543-2193
Industry Canada Class B Emission Compliance Statement
This Class B digital apparatus complies with Canadian ICES-003.
Avis de conformité à la réglementation d’Industrie Canada
Cet appareil numérique de la classe B est conform à la norme NMB-003 du
Canada.
European Community Directive Conformance Statement
This product is in conformity with the protection requirements of EU Council
Directive 89/336/EEC on the approximation of the laws of the Member States
relating to electro-magnetic compatibility. IBM cannot accept responsibility for
any failure to satisfy the protection requirements resulting from a
non-recommended modification of the product, including the fitting of
non-IBM option cards.
This product satisfies the Class B limits of EN 55022.
Appendix D. Notices 67
Page 78

Product notice requirements
The following notice applies to machines equipped with both a DVD and a
TV-out function:
This product incorporates copyright protection technology that is protected by
method claims of certain U.S. patents and other intellectual property rights owned by
Macrovision Corporation and other rights owners. Use of this copyright protection
technology must be authorized by Macrovision Corporation and is intended for home
and other limited viewing use only, unless otherwise authorized by Macrovision
Corporation. Reverse engineering or disassembly is prohibited.
Environmental notices for Japan
Collecting and recycling a disused ThinkPad computer
If you are a company employee and need to dispose of a ThinkPad computer
that is the property of the company, you must do so in accordance with the
Waste Disposal Law. The computer is categorized as industrial waste
containing iron, glass, plastics, and other materials. It should be properly
disposed of by an industrial waste disposal contractor certified by a local
government.
For details, visit the IBM Web site at www.ibm.com/jp/pc/recycle/pc
68 ThinkPad
If you use a ThinkPad computer at home and need to dispose of it, you must
comply with local ordinances and regulations.
Disposing of a ThinkPad computer component containing heavy metal
The printed circuit board of a ThinkPad computer contains heavy metal.
(Soldering with lead is used on the printed circuit board.) To properly dispose
of the disused printed circuit board, follow the instructions in Collecting and
recycling a disused ThinkPad computer.
Disposing of a disused lithium battery
A button-shaped lithium battery is installed on the system board of your
ThinkPad computer to back up the main battery.
If you want to replace it with a new one, contact your place of purchase or
ask for a repair service provided by IBM. If you have replaced it by yourself
and want to dispose of the disused lithium battery, insulate it with vinyl tape,
contact your place of purchase, and follow the instructions. You can also see
the instructions at www.ibm.com/jp/pc/recycle/battery
®
G40 Series Service and Troubleshooting Guide
Page 79

Trademarks
If you use a ThinkPad computer at home and need to dispose of a lithium
battery, you must comply with local ordinances and regulations.
Handling a disused ThinkPad battery pack
Your ThinkPad computer has a lithium ion battery pack or a nickel metal
hydride battery pack. If you are a company ThinkPad computer user and
need to dispose of a battery pack, contact the proper person in IBM sales,
service, or marketing, and follow that person’s instructions. You can also see
the instructions at www.ibm.com/jp/pc/recycle/battery
If you use a ThinkPad computer at home and need to dispose of a battery
pack, you must comply with local ordinances and regulations.
The following terms are trademarks of the IBM Corporation in the United
States or other countries or both:
IBM ThinkPad
HelpCenter TrackPoint
PS/2
Microsoft, Windows, and Windows XP are trademarks of Microsoft
Corporation in the United States and/or other countries.
Intel, Pentium, and SpeedStep are trademarks of Intel Corporation in the
United States and/or other countries. (For a complete list of Intel trademarks,
see www.intel.com/tradmarx.htm)
Other company, product, or service names may be the trademarks or service
marks of others.
Appendix D. Notices 69
Page 80

70 ThinkPad
®
G40 Series Service and Troubleshooting Guide
Page 81

Appendix D. Notices 71
Page 82

To obtain your Notes and/or SmartSuite CD:
To order, call 800-690-3899 (U.S. or
Canada).
Note: Only one CD per license.
Please allow 10 to 15 working days for
delivery. NO RETURNS ACCEPTED.
Important:
You are entitled to one CD per license. The CD and
standard shipping are provided at no additional
charge. Any applicable duties and taxes imposed by
local jurisdictions are extra.
NO PROGRAM SERVICES ARE AVAILABLE FOR THESE PROGRAMS. THEY ARE PROVIDED "AS IS" WITHOUT WARRANTY OF ANY KIND. IBM DISCLAIMS ALL WARRANTIES FOR THESE
PROGRAMS, EITHER EXPRESS OR IMPLIED, INCLUDING BUT NOT LIMITED TO IMPLIED WARRANTIES OF MERCHANTABILITY AND FITNESS FOR A PARTICULAR PURPOSE.
U.S. Government Users Restricted Rights - Use, duplication, or disclosure restricted by GSA ADP Schedule Contract with IBM Corporation.
Lotus, 1-2-3, SmartSuite, Word Pro, Organizer, and Notes are trademarks of Lotus Development Corporation.
IBM and HelpCenter are trademarks of International Business Machines Corporation in the United States, other countries, or both.
Other company, product, and services names may be trademarks or service marks of others.
This offer is subject to change or cancellation without notice.
© Copyright IBM Corporation 1999 2002. All rights reserved.
72 ThinkPad
®
G40 Series Service and Troubleshooting Guide
Page 83

Appendix D. Notices 73
Page 84

Pour obtenir le(s) CD Notes et/ou
SmartSuite :
Pour commander, composez le 800-6903899 (Etats-Unis ou Canada).
Remarque : Un seul CD par licence.
Comptez 10 à 15 jours ouvrables pour la
réception du produit. AUCUN RENVOI NE
SERA ACCEPTE..
Important :
Vous n’avez droit qu’a un seul CD par licence. Le
CD et les frais d’envoi sont gratuits, mais les taxes
et droits en vigueur localement seront factures.
AUCUN SERVICE DE PROGRAMME N’EST DISPONIBLE POUR CES PROGRAMMES. ILS SONT FOURNIS “EN L’ETAT” SANS AUCUNE GARANTIE D’AUCUNE SORTE. IBM EXCLUT TOUTE
GARANTIE, EXPRESSE OU IMPLICITE, NOTAMMENT TOUTE GARANTIE DE QUALITE ET D’ADEQUATION A UN USAGE PARTICULIER.
U.S. Government Users Restricted Rights - Utilisation, duplication ou divulgation limitées par le Contract Schedule ADP GSA avec IBM Corporation.
Lotus, 1-2-3, SmartSuite, Word Pro, Organizer, et Notes sont des marques déposées de Lotus Development Corporation.
IBM et HelpCenter sont des marques déposées de International Business Machines Corporation aux Etats-Unis et/ou dans d’autres pays.
Les noms d’autres services, produits ou sociétés peuvent être des marques déposées ou de service d’autres sociétés.
Cette offre peut faire l’objet d’annulation ou de modification sans avis pré
© Copyright IBM Corporation 1999 2002. Tous droits réservés.
Part Number / Numéro de référence 49P1094
74 ThinkPad
®
G40 Series Service and Troubleshooting Guide
Page 85

Lotus SmartSuite Millennium Edition - License/CD
SmartSuite® Millennium Edition prepares you for a new era in computing. Included with your new IBM Personal
Computer is Lotus SmartSuite Millennium edition for Win. Lotus SmartSuite provides eight innovative
applications with time saving features that give you a head start on your work and guide you through tasks with
fewer steps to perform your tasks. Other highlights include:
• Lotus 1-2-3® spreadsheet
Lotus 1-2-3 Millennium Edition for Windows combines over 15 years of computer productivity
innovations into the world's most famous spreadsheet. 1-2-3 Millennium Edition delivers new easy-to-use tools
to help users complete everyday tasks efficiently and effectively.
• the NEW FastSite intranet publisher
Making its debut is Lotus FastSite -- the suite's new document publishing tool for the Web.
• Organizer® time and contact manager
Lotus Organizer is the award-winning personal and group scheduler with more than 20 million users
worldwide.
• Word Pro® word processor
Lotus Word Pro Millennium Edition for Windows increases word processing productivity for end users by
providing the most advanced technology in the areas of Internet publishing, file compatibility, and
speech recognition.
• Freelance Graphics® presentation graphics
Lotus Freelance Graphics Millennium Edition for Windows transforms presentation graphics into an
everyday visual communications tool for individuals and teams
• Approach® database
Lotus Approach Millennium Edition for Windows is the award-winning relational database that provides
an easy way to query, report on, and analyze data.
• ScreenCam® multimedia software
Lotus ScreenCam is Lotus' 32-bit PC Screen capture software for Windows.
English 1
Appendix D. Notices 75
Page 86

• and SmartCenter Internet information manager
Lotus SmartCenter is SmartSuite Millennium Edition's customizable command center designed to work like a
file cabinet. SmartCenter offers users a simple way to access and organize information from SmartSuite
applications, Lotus Notes and the Internet.
Notes R5 with Messaging License
Also included is a Lotus Notes R5 with Messaging license (No Cal) - the most advanced messaging client for the
intranet. Notes Mail is the messaging client in the Lotus Notes family of versatile, easy-to-use clients. With
integrated e-mail, Web acess, POP3 support, group scheduling, newsgroups, document libraries and discussions,
no other messaging client can match the power and convenience of Lotus Notes. To obtain your CD please
complete the enclosed fulfilment form or obtain media through your Lotus reseller.
KEY FEATURES AND BENEFITS
NEW! Lotus FastSite
A streamlined desktop application that makes Internet publishing fast and easy. You created the
content; now you can easily
format it for publishing to the Internet or your company's intranet.
Year 2000 Ready
Be ready for the new millennium. SmartSuite applications are consistent with Lotus and IBM's
definition for year 2000 readiness.*
Compatibility
With Microsoft Office and most other popular desktop applications. Integration with Lotus Notes and
most other strategic enterprise systems.
Synergy with Lotus eSuite
Share data between eSuite and SmartSuite applications, preserving both content and format.
Minimum System Requirements
SmartSuite Millennium Edition requires:
Hardware
IBM PC or compatible (486 or higher)
VGA adapter and monitor
CD-ROM drive (3.5" media exchange
available) a mouse or other
pointing device.
Software
MS Windows
Memory
8MB RAM for Windows. (12MB or more
recommended) 16MB RAM for Windows NT
FastSite requires 16MB of RAM.
Disk Space
96MB available disk space to install the minimum
features; 29MB of available disk space required to
run from CD-ROM drive.
Browsers
Lotus FastSite requires Microsoft Internet Explorer
3.02 or later (included).
2 English
76 ThinkPad
®
G40 Series Service and Troubleshooting Guide
Page 87

Conditions of Use
If you already have a valid licence for Lotus SmartSuite Millennium edition or for Lotus SmartSuite
97, this document entitles you to make an additional copy of the software for use on the IBM PC
boxed with this Lotus SmartSuite Millennium brochure. If you do not have the CD media for Lotus
SmartSuite Millennium with this IBM PC, this document entitles you to order a CD-Rom
version of SmartSuite Millennium edition for a nominal charge for use with Microsoft Windows 98,
Microsoft Windows 95 or Microsoft Windows NT 4.0. If you already have a valid licence for Lotus
Notes Mail, this document entitles you to make an additional copy of the software for use on the
IBM PC boxed with this Lotus SmartSuite Millennium brochure. If you do not have the CD media for
Lotus Notes Mail with this IBM PC, this document entitles you to order a CD-Rom version of Lotus
Notes Mail for a nominal charge for use with Microsoft Windows.
IBM International Program Licence Agreement
This offer is governed by copyright law and the IBM International Program Licence Agreement that
comes with your IBM PC. Your use of the Lotus SmartSuite Millennium programs or CD-Rom
described in this offer constitutes acceptance of these terms.
License Information/Additional Terms and Conditions These programs are not for resale.
Proof of Entitlement
The Proof of Purchase for the IBM Personal Computer boxed with this Lotus SmartSuite Millennium
brochure should be retained to support your entitlement.
Program Service
Only 30-day "up and running" support is available. See inside this document for information regarding
Lotus Customer Support options.
Statement of Service
These programs are provided "AS IS".
PROGRAMS DESIGNATED AS "NO" ARE PROVIDED WITHOUT A PROGRAM WARRANTY. THEY ARE
PROVIDED "AS IS" WITHOUT WARRANTY OF ANY KIND. IBM DISCLAIMS ALL WARRANTIES FOR
THESE PROGRAMS, EITHER EXPRESS OR IMPLIED, INCLUDING BUT NOT LIMITED TO IMPLIED
WARRANTIES OF MERCHANTABILITY AND FITNESS FOR A PARTICULAR PURPOSE.
U.S. Government Users Restricted Rights - Use, duplication, or disclosure restricted by GSA ADP
Schedule Contract with IBM Corporation. Lotus, 1-2-3, SmartSuite, Approach, Freelance Graphics,
Word Pro, ScreenCam, TeamReview, TeamConsolidate, TeamMail, SmartCenter, and Organizer
are trademarks of Lotus Development Corporation. IBM is a trademark of International Business
Machines Incorporated. Microsoft and Windows NT are trademarks or registered trademarks
of Microsoft Corporation. CompuServe is a trademark of CompuServe Incorporated. Other company,
product, and services names may be trademarks or service marks of others. This offer is subject
to change or cancellation without notice. Lotus SmartSuite Millennium or support might not
be available in all languages or countries.
©
Copyright International Business Machines Corporation
1997. All rights reserved.
English 3
Appendix D. Notices 77
Page 88

IBM Introductory Support
Limited introductory telephone support is included from IBM HelpWare for SmartSuite Millennium, at no charge
for 30 days from date of
purchase, when you register your IBM hardware. Follow these simple guidelines if you encounter a problem or
have a question about Lotus SmartSuite Millennium:
(1) Be at your computer.
(2) Document what you were doing when the problem occurred; write
down the exact text of any messages displayed on your screen.
(3) Create a backup of any files for which you are seeking support.
This service provides "Up and Running" assistance only. Refer to the IBM documentation that comes with your
IBM PC for details of where to
call for this free introductory telephone support.
Lotus Warranty Support
Lotus Warranty support is not included with this offer.
Lotus on the Web
The Lotus Web site provides you with complete access to information about Lotus, its products, Business Partners,
Solutions and Education. Access the site at http://www.lotus.com
Paid Support
You can obtain more extensive support (such as assistance to 'how to'questions) for a fee through Lotus directly
on +44-870-6006123
For more information about Lotus support options, visit the Lotus support web pages at
www.support.lotus.com
For queries with regard to your Smartsuite CD order fulfillment (from the coupon supplied) please E-Mail to:
Ibm_millennium@modusmedia.com
4 English
78 ThinkPad
®
G40 Series Service and Troubleshooting Guide
Page 89

Appendix D. Notices 79
Page 90

80 ThinkPad
®
G40 Series Service and Troubleshooting Guide
Page 91

Appendix D. Notices 81
Page 92

82 ThinkPad
®
G40 Series Service and Troubleshooting Guide
Page 93

Index
A
Access IBM v
B
battery
problems 23
BIOS Setup 29
C
carrying the computer 6
cleaning the computer 8
computer display problems 20
configuration
setup 29
E
electronic help v
error messages 11
errors without messages 15
H
hard disk
problems 23
replacing 32
hibernation problems 17
I
IBM help v
Important Wireless Regulatory
Notice for Users iii
Information about hard disk
capacity iii
S
safety instruction 43
standby problems 17
Startup
problems 24
storage device, replacing 32
T
telephone, help by 38
testing with PC-Doctor 10
ThinkPad Assistant v
W
Web, help by 38
K
keyboard problems 17
O
on-board help v
P
password problems 16
PC-Doctor 10
power switch problems 17
problems, troubleshooting 11
R
recovering software 31
© Copyright IBM Corp. 2003
83
Page 94

84 ThinkPad
®
G40 Series Service and Troubleshooting Guide
Page 95

Page 96

Part Number: 92P1534
(1P) P/N: 92P1534
 Loading...