

Page 1
Page 2

info
580 Division Street
Campbell CA, 95008
Phone (408) 538-2500 Fax (408) 538-2599
Copyright C) 1996 All rights reserved. No portion of this document may be reproduced without prior written authorization.
The Info T echnician
Copyright 1994, 1995, 1996 All Rights Reserved
The material in this document is for informational purposes only and is subject to change
without notice. The manufacturer assumes no responsibility for errors or omissions in this
document, nor any damages resulting from the use of the information contained herein.
Info and ImageReader are trademarks of Info Peripherals. Any other trademarks, registration
marks, or brand names mentioned within this publication are the property of their respective
owners.
Page 3

Tbble of Contents
Chapter IChapter I
Chapter I
Chapter IChapter I
IntrIntr
oductionoduction
Intr
oduction
IntrIntr
oductionoduction
welcomewelcome
welcome
welcomewelcome
Using this manual
Assistance ...................................................................................1-1
What is TWAIN?.........................................................................1-2
A note about application software .................................1-2
Package contents
System requirements
PC and compatibles system requirements 1-4
Mac and compatibles system requirements 1-4
Chapter 2Chapter 2
Chapter 2
Chapter 2Chapter 2
Scanner InstallationScanner Installation
Scanner Installation
Scanner InstallationScanner Installation
PC and compatibles installation .........................................................................2-1
Installing the interface card ................................................................................ 2-1
Connecting the scanner ...................................................................................... 2-2
The Info Technician ............................................................................................ 2-2
Installing the device driver ................................................................................. 2-3
Mac and compatibles installation ....................................................................... 2-3
Scanner installation .......................................................................................2-3
Installing the driver ....................................................................................... 2-4
Installing the application software ..................................................................... 2-4
..................................................................................................................................................................................
.........................................................................................
..................................................................................................................................................................................
2-12-1
2-1
2-12-1
Chapter 3Chapter 3
Chapter 3
Chapter 3Chapter 3
Using yUsing y
Using y
Using yUsing y
Scanning features and controls........................................................................... 3-1
Hardware features .......................................................................................3-1
Software controls .......................................................................................3-2
Scanning images................................................................................................ 3-8
Select the IWAIN source (PC)............................................................................3-8
The scanning process..........................................................................................3-9
Other scanning features .................................................................................... 3-10
AA
A
AA
TT
T
TT
For PC and compatibles only ............................................................................ A-2
For Mac and compatibles only .......................................................................... A-2
Scanner careI...................................................................................................... A-3
Limited two year warranty ................................................................................. A-4
FCC radio frequency interference statement...................................................... A-5
our scannerour scanner
our scanner
our scannerour scanner
ppendix ppendix
ppendix
ppendix ppendix
rr
ouboub
leshootingleshooting
r
oub
leshooting
rr
ouboub
leshootingleshooting
......................................................................................................................................................................................
...........................................................................................
......................................................................................................................................................................................
AA
A
AA
..............................................................................................................................................................................................
...............................................................................................
..............................................................................................................................................................................................
3-13-1
3-1
3-13-1
A-IA-I
A-I
A-IA-I
L I
Page 4

Chapter IChapter I
Chapter I
Chapter IChapter I
introduction
welcome
Thank you for purchasing an Info ImageReader Scanner. This product is the result of our efforts to develop high
technology computer peripherals that are easy to use, affordably priced, and that enhance your computing experience.
Using this manualUsing this manual
Using this manual
Using this manualUsing this manual
This manual includes complete instructions for scanner installation, use, and maintenance. Note that “use,” in this
context, refers to scanner operation independent of tasks performed in conjunction witl application software. This guide
is organized in a “do as you read” format. For best results, perform the tasks as they are presented.
This manual assumes that you have a basic understanding of the DOS and Windows operating system. As a convention,
this guide presents all references to guide names or sections in
difdif
ff
erer
are presented in a
AssistanceAssistance
Assistance
AssistanceAssistance
If you experience difficulties and cannot find solutions within this guide, contact Info’s Technical Support Department at
(408) 538-2510, Monday through Friday, between 8:00 Am and 4:30 Pm, Pacific time. If you wish, you may fax
questions to (408) 538-2577. Provide, a fax number for return contact. We maintain a BBS at (408) 538-2598 that
contains the latest updates to our software, as well as a web site at infoconnection.com.
dif
difdif
f
er
ff
erer
ent ent
ent typeface.
ent ent
italics,
and commands you must type at a command line
If all of our technicians are occupied, please leave your name and phone number on our voice mail system. This system
is intended to avoid excessive “on hold” waiting. You and your questions are important to us and we will respond as
quickly as possible. After hours calls are returned the following working day.
1-1
Page 5

WW
haha
t is t is
TWTW
W
ha
t is
WW
haha
t is t is
TWAIN is the interface that links the scanner with scanning software applications. -TWAIN is an industry standard that
enables you to use the ImageReader with any TWAIN-compliant software application.
With the introduction of Windows 95, the TWAIN specification bat been overhauled to take advantage of the 32-bit
architecture. When you install our scanner driver under Windows 95, you will have two TWAIN sources - one for 16-bit
applications and one for 32-bit applications. Use the following as a guide to select the appropriate source.
TW
TWTW
AIN?AIN?
AIN?
AIN?AIN?
16-bit a16-bit a
16-bit a
16-bit a16-bit a
32-bit a32-bit a
32-bit a
32-bit a32-bit a
hancements provided by the new architecture.
You may experience scanning problems if you do not use the appropriate source.
There is no change to the TWAIN source for Windows 3. 1 x users. Only the 16-bit TWAIN source is installed.
A note aA note a
A note a
A note aA note a
The scanner hardware by itself is not very useful. It takes a combination of the scanner hardware and application
software to perform any task. Before you begin scanning, you need to choose the appropriate application to use for the
task at hand. Please read this section to,gain an understanding of the types of scanning software there are.
Scanning software generally falls into two groups, Graphics (image editing), or OCR (Optical Character Recognition).
Each type has specific features designed to address the technical challenges faced in the scanning of graphics or of text.
Graphics: Software in this category provide’s the user with image editing tools for performing extensive modifications to
art, photographs, or other continuous tone images. While having the
1-2
bout bout
bout
bout bout
pplicapplica
tions tions
pplica
tions are legacy Windows 3.x programs that you are running under Windows 95.
pplicapplica
tions tions
pplicapplica
tions tions
pplica
tions are programs specifically designed for Windows 95, to take advantage of performance en-
pplicapplica
tions tions
aa
pplicapplica
a
pplica
aa
pplicapplica
tion tion
tion
tion tion
softwsoftw
softw
softwsoftw
arar
ar
arar
ee
e
ee
Page 6

ability to scan text, it is not designed to specifically identify individual characters as does OCR software. Any
image scanned using a graphics program can only be saved in a graphics file format. It cannot be saved as an
editable text file.
OCR: Software in this category is designed to recognize alphanumeric characters in preparation for export to
word processing and desktop publishing applications. In other terms, it creates text files. OCR software will
not provide image editing capabilities. If there is no intention of editing a given piece of text (with or without
graphics), it may be simpler to scan and save it as a graphic.
Additional types of applications are available that offer solutions for special or unique tasks. These include
document storage, form scanning, fax utilities, copy utilities, custom screen saver creation, photo album
creation, and so on, If applications are intended to link directly to the scanning device, look for the TWAINcompliant specification. If compliant, they are compatible with Info ImageReader scanners.
PP
acac
kaka
gg
P
ac
PP
acac
Please verify that all materials have been received before setting up and using your scanner. The package
contents are listed in the Quick Start Guide.
e contentse contents
ka
g
e contents
kaka
gg
e contentse contents
System rSystem r
System r
System rSystem r
System requirements are largely dependent on the “work” performed. By work, we are referring to the task
or operation performed using the scanner in conjunction with application software.
Because scanners are capable of inputting large amounts of data in relatively short periods of time, they
commonly push computer systems to the limits of their capabilities. Before beginning any scanning task or
operation, carefully consider your system’s processing capabilities, especially processor speed, RAM, and
available hard disk space. OCR processes, fax operations, and the processing of simple black & white
graphics are least demanding. High resolution scanning of large images in full color creates an extreme
demand for processor time and memory.
equirequir
equir
equirequir
ementsements
ements
ementsements
1-3
Page 7

When you are scanning with the TWAIN interface, the number labeled image size (calculated in bytes) provides the
working file size that is the result of the selected scanning mode, resolution, and image size. Take careful note of this
information.
PC and compaPC and compa
PC and compa
PC and compaPC and compa
386,processororlOO%co patible;486orhigherrecommended
MS DOS 5. 0 or later with Windows 3.1 x, or Windows 95 or later
4 MB RAM; 8 MB or more recommended
25 MB available hard disk space; 50 MB recommended
VGA/SVGA monitor with at least 256 color capability recommended
Mac and compaMac and compa
Mac and compa
Mac and compaMac and compa
Macintosh with 68040 processor or greater
System 7.0 or later
8 MB or more of RAM
tibtib
les system rles system r
tib
les system r
tibtib
les system rles system r
Available 16-bit expansion slot
tibtib
les system rles system r
tib
les system r
tibtib
les system rles system r
4 MB RAM; 8 MB RAM recommended
equirequir
equir
equirequir
equirequir
equir
equirequir
ementsements
ements
ementsements
ementsements
ements
ementsements
1-4
Page 8

Chapter 2Chapter 2
Chapter 2
Chapter 2Chapter 2
Scanner Installation
PC and compatibles installationPC and compatibles installation
PC and compatibles installation
PC and compatibles installationPC and compatibles installation
Installation of the scanner is comprised of few steps and designed to be as easy as possible. The
following instructions walk you through installing the interface card into your PC, and connecting the
scanner and cable. It is important to note that both the scanning hardware and its supporting software
(e.g. Info Technician and the included applications) must be installed in order for the scanner to
operate.
Installing the interface cardInstalling the interface card
Installing the interface card
Installing the interface cardInstalling the interface card
The installation of the scanner’s interface card is a simple process. Because your PC is designed with
room for additional peripherals, the manual that was provided with your computer contains complete
guidelines for case removal and expansion card installation. The graphic and instructions provided
here are intended to supplement that information.
Caution! Caution!
Caution!
Caution! Caution!
and disconnected from the power source. Touch a grounded object before making contact with any
components. Electrostatic discharge can damage the interface card and computer components.
As a safety precaution, the power to the computer and all peripheral equipment should be off
To install the interface card:
I . Remove the computer’s housing.
2 . On the computer’s mother board, select an a vailable 16-bit ISA expansion slot, and remov e its rear
access cover. The slot must be free of dust and dirt to ensure a good connection.
3 . Hold the scanner interface card by the upper edge, and
align the gold-striped connector
slot as displayed in the diagram
with the expansion slot. Press the card firmly into the
the next page.
Page 9
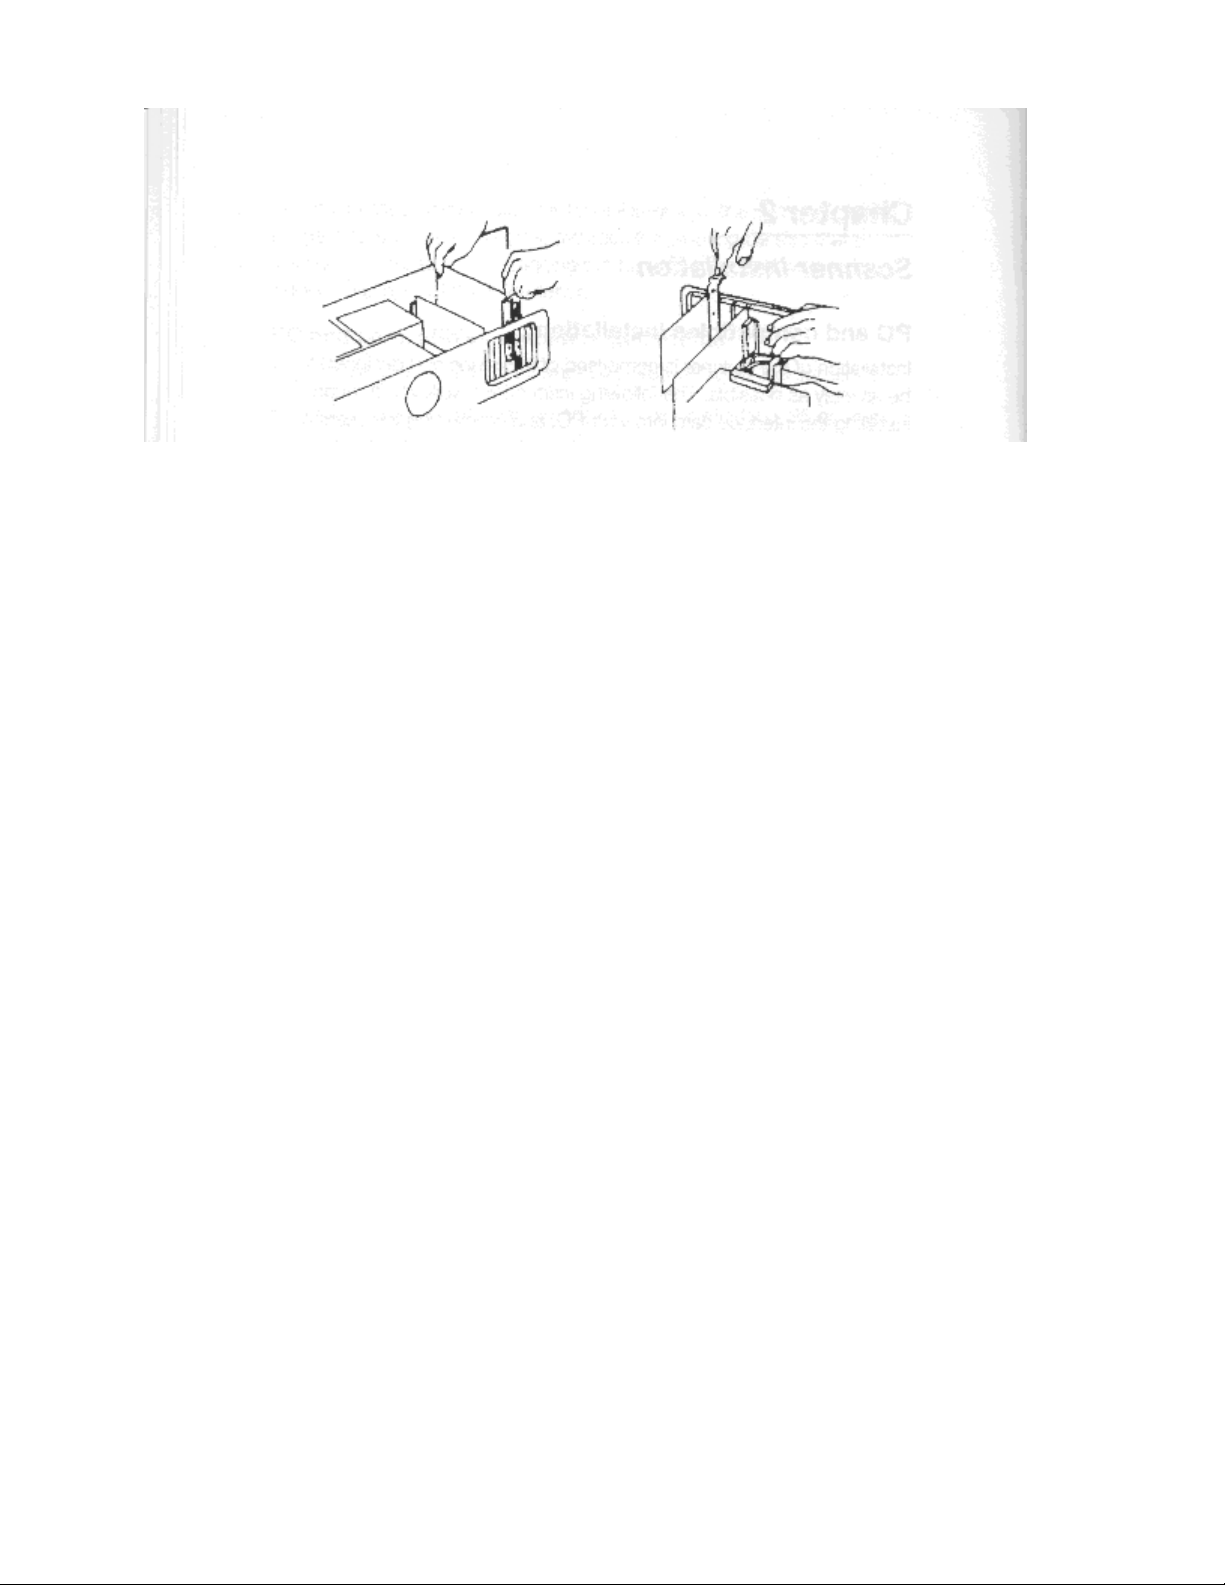
4. Use the slot cover’s screw to retain the interface card. Replace the housing and secure all screws.
5. Reconne t the power source to your computer and any other peripheral equipment.,
Connecting the scannerConnecting the scanner
Connecting the scanner
Connecting the scannerConnecting the scanner
If you have other SCSI devices installed on your system, set the scanner to a unique SCSI ID. Attach the 50-pin SCSI
terminator block to the port on the scanner, and connect the SCSI cable to the terminator block. Place the scanner unit
in the desired location, and route the interface cable to the computer in such a way as to assure it is safe from possible
damage due to pinching or crimping. Insert the 25-pin male connector on the cable into the port on the interface card.
The cable can only be inserted one way - do not force a connection. Connect the power cable as well.
Once the scanner is attached and near the location you want it, unlock the scanning mechanism. The scanner is looked
for transport to avoid damage to the assembly. You must unlock the scanner before you turn it on for the first time.
Failure to do so may cause damage to the scanner, and will void your warranty. Simply turn the dial on the bottom of
the scanner to the unlock position.
TT
he Infhe Inf
o o
TT
ecec
T
he Inf
TT
he Infhe Inf
o
o o
T
ec
TT
ecec
hnicianhnician
hnician
hnicianhnician
The Info Technician is an automatic installation utility that edits and installs the scanner’s device and TWAIN drivers.
These drivers provide the link between the scanning hardware, the scanning application, and the computer’s operating
system.
2-2
Page 10

Installing the deInstalling the de
Installing the de
Installing the deInstalling the de
Run the Info Technician to install the scanner drivers. To do so:
1 . Insert disk 1 of the Info Technician into the computer’s floppy drive.
2.In Windows Program Manager, select the Run command from he File menu. If you are
using Windows 95, select Run from the Start menu on the desktop.
vice drvice dr
vice dr
vice drvice dr
ii
vv
erer
i
v
er
ii
vv
erer
3. Type
4. Follow the on screen directions.
The scanner’s device driver is installed in the proper directory, along with the TWAIN driver.
5. Reboot the computer after the installation is complete to activate
Mac and compatibles installationMac and compatibles installation
Mac and compatibles installation
Mac and compatibles installationMac and compatibles installation
The ImageReader FB is capable of running on a Macintosh or Mac compatibles as well as
PCs. If this unit shipped with Mac software and a plug-in driver (not all models do), read
this section for instructions about installing this scanner on your Mac system.
Scanner installationScanner installation
Scanner installation
Scanner installationScanner installation
Set the scanner to a unique SCSI ID. Attach the 50-pin SCSI terminator block to the port on
the scanner, and connect the SCSI cable to the terminator block. Pace the scanner unit In the
desired location, and route the interface cable to the computer in such a way as to assure it is
safe from possible damage due to pinching or crimping. Insert the 25-pin male connector on
the cable into the SCSI port on your Mac, or the last device on your chain. The cable can
only be inserted one way - do not force a connection. Connect the power cable as well.
A:\SETUP A:\SETUP
A:\SETUP at the command line and click OK. Substitute the
A:\SETUP A:\SETUP
appropriate drive letter if the disk is not in the A drive.
the scanner drivers.
Once the scanner is attached and near the location you want it, unlock the scanning mechanism. The scanner is locked for transport to avoid damage to the assembly. You must unlock
the scanner
Page 11

before you turn it on for the first time. Failure to do so may cause damage to the scanner, and
will void your warranty. Simply turn the dial on the bottom of the scanner to the unlock position.
Turn on the scanner, then start-up your system.
Installing the drInstalling the dr
Installing the dr
Installing the drInstalling the dr
This scanner interfaces with your Mac software through a Plug-in driver. You can use this
scanner with any program that is Plug-in Module (PIM) compatible.
To install the Plug-in driver:
1 . Insert the Plug-in disk into the floppy drive.
2. Double-click the disk icon if it is not already open.
3. Double-click the English folder to open its contents.
4. Locate the plug-ins folder for the application (i.e. PhotoDeluxe)
you will be using to scan. Drag the plug-in module from the English folder on the disk to the
application’s plug-ins folder.
That application can now be opened and used with the scanner. The scanner plug-in should
display on the Acquire list in the File menu.
The ImageReader FB can also simulate an Apple scanner. This “Works Like Apple” driver is to
be used with OCR programs, like OmniPage and TypeReader, that do not support PIM. Simply
drag the “Works Like Apple” driver into your system folder and restart. When you are ready to
use the OCR program, configure it for Apple Scanner or AppleOne Scanner. You can now use
the scanner for OCR processes.
ii
vv
erer
i
v
er
ii
vv
erer
Installing the aInstalling the a
Installing the a
Installing the aInstalling the a
When the hardware and device driver software are installed, install the application software as
described in their respective manuals. The
installing these programs.
2-4
pplicapplica
pplica
pplicapplica
tion softwtion softw
tion softw
tion softwtion softw
arar
ee
ar
e
arar
ee
Quick Start Guide
also contains information about
Page 12

Using your scannerUsing your scanner
Using your scanner
Using your scannerUsing your scanner
Chapter 3Chapter 3
Chapter 3
Chapter 3Chapter 3
Scanning fScanning f
Scanning f
Scanning fScanning f
Before scanning images, it is important to understand the scanners basic hardware features as well as
the software controls.
HarHar
dd
ww
arar
e fe f
eaea
turtur
Har
d
w
ar
HarHar
PP
oo
ww
erer
P
o
w
er
PP
oo
ww
erer
This scanner requires its own power source (use the cable provided), and there is an on/off power
switch on the unit. Always turn the scanner on before you turn the computer on. This allows the
computer to “see” the scanner when it is booting up.
Indicator UghtsIndicator Ughts
Indicator Ughts
Indicator UghtsIndicator Ughts
When you turn the scanner on, the Power indicator is lit. This light remains lit as long as power is
provided to the scanner. When first turned on, the scanner performs a Power On Self Test (POST)
diagnostic. The Ready indicator flashes during the POST diagnostic, then should remain steadily lit.
If the scanner fails the POST diagnostic, or encounters a problem with use, the Ready indicator
remains flashing. Refer to the Appendix for tro ulotestlooting information.
PP
aa
per loadingper loading
P
a
per loading
PP
aa
per loadingper loading
Place the document to be scanned
climensional objects can be easily scanned as well, by laying them on the scanning glass., With bound
materials and other objects, the cover Is designed to lift up at the hinge to accommodate the item being
scanned. Do not force the cover down when scanning these items, it may break or scratch.
e f
dd
ww
arar
e fe f
ea
eaea
tur
turtur
eses
es
eses
eaea
turtur
es and contres and contr
ea
tur
es and contr
eaea
turtur
es and contres and contr
face down
olsols
ols
olsols
on the scanning glass. Books, magazines and other 3-
PP
aa
per sizper siz
per siz
per sizper siz
ee
e
ee
P
a
PP
aa
The scanner will handle documents ranging in size from- a postage stamp to a legal size document
(8.14" x 14"), including A4.
Page 13
PP
aa
per conditionper condition
P
a
per condition
PP
aa
per conditionper condition
If the sheet to be scanned has any of the following conditions, please take the following precautions before scanIning.
· Remove paper clips, pins or staples
* Let wet paper dry first
· Avoid scanning documents with correction fluid (dry or otherwis
This avoids scratching or marring the scanning glass, and ensures
years of beautiful scans.
SoftwSoftw
arar
Softw
SoftwSoftw
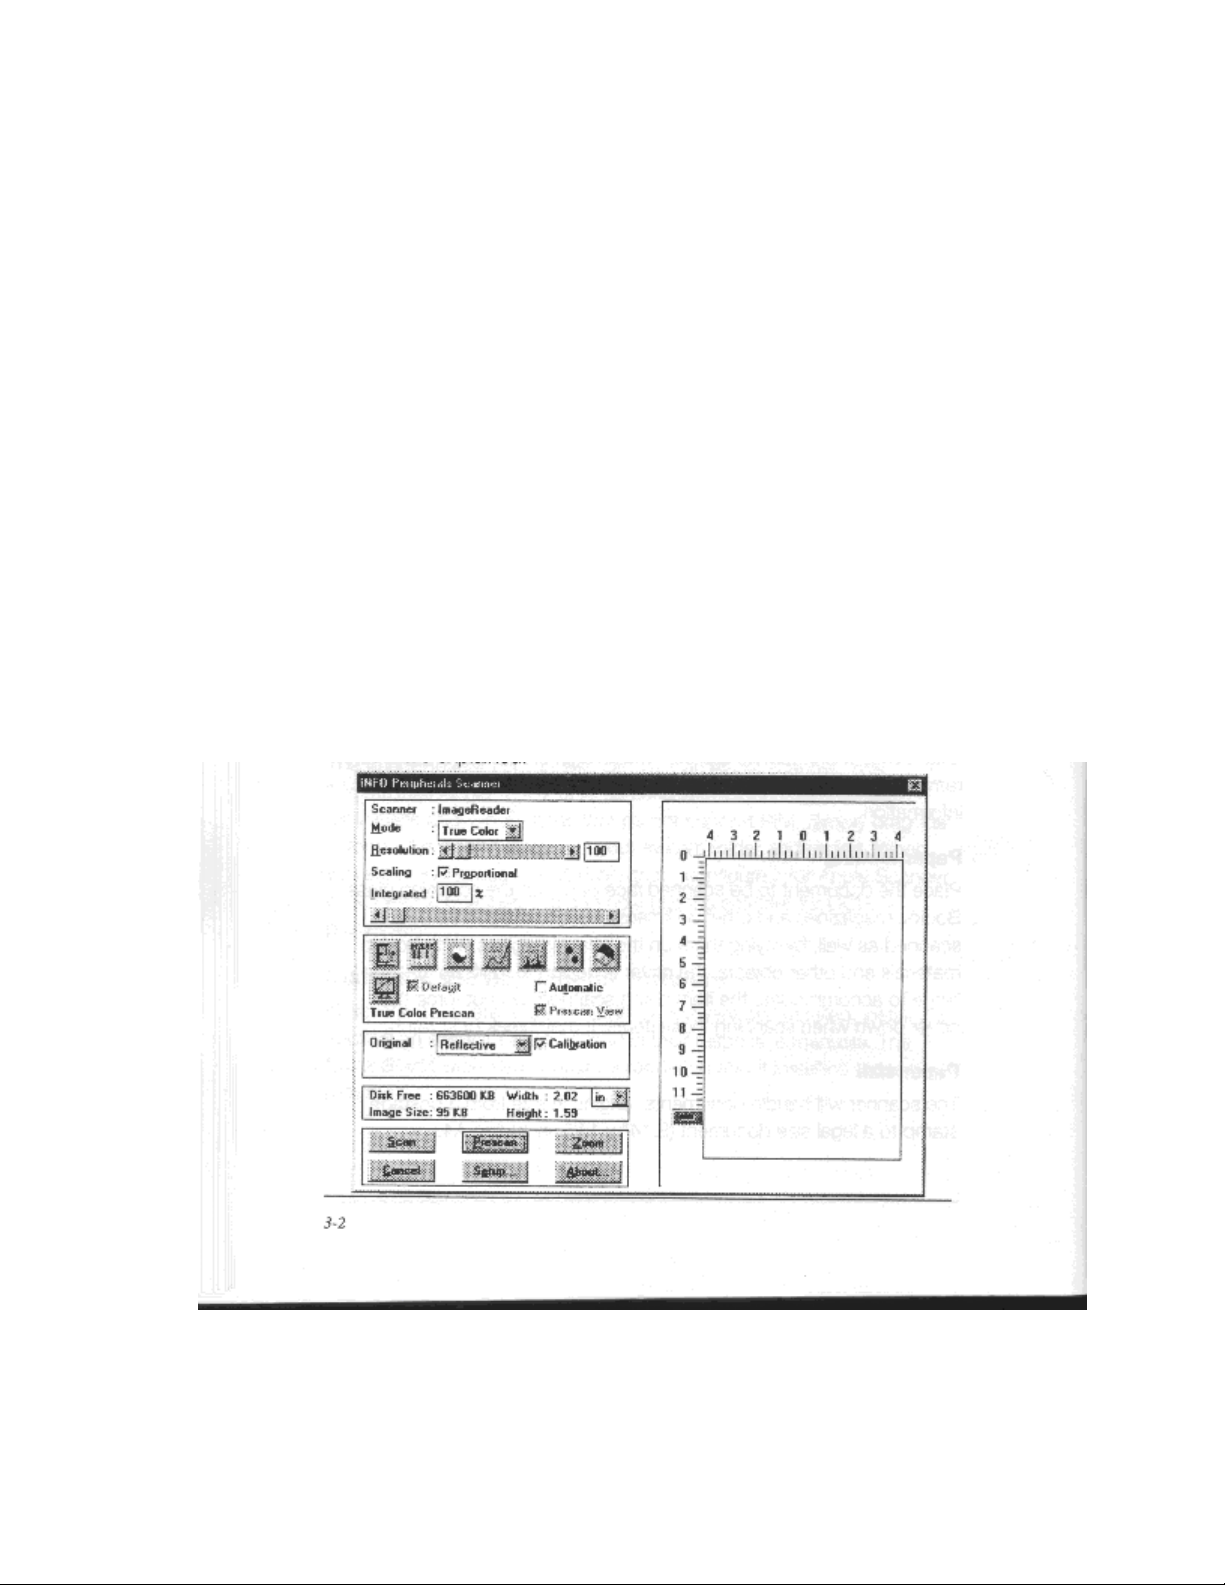
The Info Technician loads a TWAIN-compliant driver. This driver functions as a “user interface” linking the
scanning hardware and application software.
Scanning is initiated from within the’apprication software. All scanning activities are controlled
from the user interface window titled Info Peripherals Scanner. The interface window’s Prescan
command is used to adjust the scanning area, contrast, and intensity before executing the actual
“working” scan. The actual scan is then placed into the application software for viewing, editing,
printing, or storage. In this section, the components and controls of the scanning interface window are explained.
e contre contr
ar
e contr
arar
e contre contr
olsols
ols
olsols
Page 14

PrPr
ee
vievie
w w
WW
indoindo
Pr
PrPr
e
vie
w
ee
vievie
w w
W
WW
indo
indoindo
ww
w
ww
The interface window’s right side displays Prescan images. The Crop Box around the perimeter is used to select the area
you want to scan. Position the pointer over a square, click, hold, and drag the border to adjust the scanning area. The
slider bar on the vertical ruler is also a convenient tool. This slider tells the scanner how far down the page to scan. You
can shorten the time it takes to prescan by adjusting this slider to 11" when scanning letter size documents.
Scan ModeScan Mode
Scan Mode
Scan ModeScan Mode
Your scanning mode options are True Color, Gray Scale, and Bi-tone. These selections indicate the amount of data you
want to capture for the image. Follow these guidelines when selecting a scan mode:
True Color: Scan color images and photographs in True Color mode when you want to capture and reproduce all the
color data. To manage file sizes efficiently, take careful note of the guidelines for resolution (described later) when
scanning in True Color. The combination of True Color and a high dpi can create an extremely large file size.
Gray Scale: What is referred to as black and white photographs are actually gray scale images. Different shades of gray
are used to make up the whole picture. When you scan these types of images, you want to scan using the gray scale
mode. Also use this mode to convert color photographs to black and white. Scanning a color photograph in gray scale
will capture the continuous tones.
Bi-tone: This mode captures black and white only. -Use this rnode when scanning single color (usually black) images,
such as drawings or sketches, business logos, or text. This mode is also used when scanning a document you want to
OCR.
ResolutionResolution
Resolution
ResolutionResolution
Resolution is measured in dots per inch (dpi). The higher the resoluton is set, the more detail in your image is captured.
There are some guidelines you should follow when determining the resolution to scan at. They are detailed on the
following page.
3-4
Page 15

Z
On-line graphics: If you are scanning an image to be used orim-line, such as the Internet, a
BBS or in a multimedia presentation, you ne,odn’t scan any higher than 100 dpi. This is
because a monitor’s resolution is either 72 dpi (Mac), or 96 or 120 dpi (PC), and is not
capable of displaying a higher resolution. Images scanned at 300 dpi and viewed on a
monitor will appear three times as large as the actual image. This enlargement results
because your monitor displays images in a 1: 1 ratio of pixels (or dots), meaning one dot
in the image equals one dot on-screen. At 300 dpi, the image contains 3 times as many
dots when displayed on the monitor.
Faxing images: Any image you intend to fax from a PC-based fax modem should be
scanned at 200 dpi. Fax machines only receive images at 200 dpi, and some programs
may fault if you try to scan at higher resolutions.
Printed images: If you plan to print the images you scan, use the following table to select a
resolution when scanning in color and gray scale. As a general rule, scan at twice the Line
Screen Frequency of the output device. This information can be found in your printer’ s
manual. When scanning in line art mode, scan at the resolution of your printer, usually
300 or 600 dpi. This avoids sizing distortions in your printed images.
Output DeOutput De
Output De
Output DeOutput De
Laser Printer (300 dpi)Laser Printer (300 dpi)
Laser Printer (300 dpi)
Laser Printer (300 dpi)Laser Printer (300 dpi)
Laser Printer (600dpi)Laser Printer (600dpi)
Laser Printer (600dpi)
Laser Printer (600dpi)Laser Printer (600dpi)
Laser Printer (1200 dpi)Laser Printer (1200 dpi)
Laser Printer (1200 dpi)
Laser Printer (1200 dpi)Laser Printer (1200 dpi)
ImagesetterImagesetter
Imagesetter
ImagesetterImagesetter
Color DySub PrinterColor DySub Printer
Color DySub Printer
Color DySub PrinterColor DySub Printer
ScalingScaling
Scaling
ScalingScaling
vicevice
vice
vicevice
5050
50
5050
8585
85
8585
vv
arar
v
ar
vv
arar
Line ScrLine Scr
Line Scr
Line ScrLine Scr
105105
105
105105
iesies
ies
iesies
eeneen
een
eeneen
133133
133
133133
ScanningScanning
Scanning
ScanningScanning
FF
rr
equenciesequencies
F
r
equencies
FF
rr
equenciesequencies
matchmatch
match
matchmatch
300300
300
300300
600600
600
600600
12001200
1200
12001200
ResolutionsResolutions
Resolutions
ResolutionsResolutions
Line Line
ArAr
Line
Line Line
24002400
2400
24002400
tt
Ar
t
ArAr
tt
120120
120
120120
170170
170
170170
210210
210
210210
2x line scr2x line scr
2x line scr
2x line scr2x line scr
ColorColor
Color
ColorColor
266266
266
266266
eeneen
een
eeneen
Use the checkbox to toggle between proportional (set width and height individually) and
integrated (set width and height together) scaling. Enter a percentage in the text box or
use the slider bar to change the scaling values.
3-43-4
3-4
3-43-4
Page 16

FlipFlip
Flip
FlipFlip
This command creates a mirror image of the item scanned.
InIn
vv
erer
sese
In
v
er
se
InIn
vv
erer
sese
This command reverses an image’s display. Black pixels will be white, and white pixels will become black. The
resulting image is like a photo negative of the original.
Brightness and ContrastBrightness and Contrast
Brightness and Contrast
Brightness and ContrastBrightness and Contrast
These controls adjust the brightness and contrast of the image you are about to scan. Increasing the contrast will sharpen
the image, but cause it to look dark. Increase the brightness to lighten the image and compensate for the contrast
selection. Experiment with these controls to determine the look you prefer. Usually these controls are adjusted together
in a 2:1 ratio of brightness to contrast.
CurCur
vv
eses
Cur
v
es
CurCur
vv
eses
The curves function allows you to alter the way different pixel values in your image are adjusted. The diagonal line
shows a Gamma function of input to output pixel values. The default is a straight line, which makes no adjustments to
the pixels. All the pixels that fall below the line are darkened, and those above the line are lightened. The four buttons
in the lower left corner make automatic adjustments for types of images and documents. Use the lower right button for
hazy images, the upper right button for high contrast images, and the lower left button for normal images. The upper left
button restores the curve to its default setting.
LeLe
vv
elsels
Le
v
els
LeLe
vv
elsels
This function displays a histogram of the number of pixels in the image with different values (representing different
colors). The left side represents black, and the right side represents white or solid colors such as red, green or blue. The
histogram is then broken into 256 channels. The left and right numbers above the histogram show the channel numbers,
and the middle number expresses the ratio of channels to the left and to the right of the middle triangle below the
histogram. The shaded slider bar beneath the histogram is the output level control. Slide the left and/or right triangles
inward to give you more channels in regions where pixels are grouped in greater
- - - - - - - - - - - - -
3-5
Page 17

numbers. This will produce an image with greater clarity. If y ou wish to expand one part of the histogram,
rike where there are a large grouping of pixels, move the middle triangle toward that part. Since there are
always 128 channels between the middle triangle and the end point triangles, adjusting them closer together
gives the pixels in that region more channels to work with, and maximize the detail captured.
Color BalanceColor Balance
Color Balance
Color BalanceColor Balance
This control allows you to improve the look of your image, while retaining the detail as you adjust the color
levels in the shadows, midtones and highlights. Shadows effects the dark pixel values of the image, midtone
effects the middle range, or dominate range, of pixels, and highlights effects the light pixel values.
Hue and SaturationHue and Saturation
Hue and Saturation
Hue and SaturationHue and Saturation
This function enables you to change the hue and saturation of your images. Hue distinguishes one color from
another, and by using the hue slide bar, you can adjust the hue angle by shifting the color on the spectrum.
Saturation refers to the purity of color, and by adjusting the saturation slide bar, you can make the color look
more vibrant and intense, or dull and gray, Lightness controls the amount of light acting on the color, and by
using the slide bar, you can make the color lighter or darker.
Monitor Gamma (PC)Monitor Gamma (PC)
Monitor Gamma (PC)
Monitor Gamma (PC)Monitor Gamma (PC)
This control allows you’to change the gamma in your color
you can use this control in conjunction with the other image adjustments to get the image just right. Use the
slider bar to increase or decrease the gamma.
DefaultDefault
Default
DefaultDefault
This button restores the image adjustments to their original settings. The prescan image is also restored to its
unaltered appearance.
AA
utomautoma
utoma
utomautoma
tictic
tic
tictic
A
AA
This function boost the image adjustments to maximum settings and fill the entire spectrum, causing the
image to become more vivid.
images. If the color is off balance in your image,
Page 18

BacBac
kgkg
rr
Bac
BacBac
Check this box to enable scanning in the backgroud while you do other work. This mimics true multitasking, however scanning speed is slowed considerably.
PrPr
Pr
PrPr
Check this item to restore the prescan image to its unaltered appearance with out resetting the image adjustments.
Original Scan MediaOriginal Scan Media
Original Scan Media
Original Scan MediaOriginal Scan Media
Select which media you are scanning. Reflective is pieces like photographs, documents, magazines, etc., and
indicates items will be placed on the scanning glass. Feeder enables use of the optional document feeder if
you have one attached. Transparency enables you to scan negatives, x-rays, slides, etc., if you have the
optional transparency adapter.
DitherDither
Dither
DitherDither
You can select this option when scanning in bi-tone mode. Use a variety of patterns to simulate gray scale in
a black and white image.
InfInf
Inf
InfInf
ound (Mac)ound (Mac)
kg
r
ound (Mac)
kgkg
rr
ound (Mac)ound (Mac)
ee
gcan gcan
e
gcan
ee
gcan gcan
oror
mama
or
ma
oror
mama
VV
ieie
V
ie
VV
ieie
tiontion
tion
tiontion
ww
w
ww
Displays information regarding the image to be scanned such as file size (image size), available disk space
(Disk Free), and scan dimensions. Use this as a guide when determining what scan mode and resolution you
want to scan at. Dimensions, resolution, and scan mode directly effect the file size of your scanned image.
ScanScan
Scan
ScanScan
A scan is the actual image captured at the selected settings. The scan does not appear in the preview window,
it is displayed in the application’s workspace.
PrPr
escanescan
Pr
escan
PrPr
escanescan
A prescan is a low resolution scan of your image displayed in the scanning interface window only. You do a
prescan to make your selections for size, and to make any necessary image adjustments.
Page 19

ZoomZoom
Zoom
ZoomZoom
The scanner zooms in on the portion of the image selected with the crop box, and displays the enlarged area in the
Prescan window. This enables you to select a smaller portion of the image to scan, while giving you the ability to focus
in on the detail you want to capture. Click the Prescan View checkbox to restore the image in the Prescan window.
SetupSetup
Setup
SetupSetup
Opens the SCSI diagnostic table so you can check or change the configuration of your scanner.
Scanning imagesScanning images
Scanning images
Scanning imagesScanning images
Scanning images with your ImageReader scanner is a relatively simple process. The steps below walk you through
selecting the appropriate TWAIN source to use (if you are using a PC), and then scanning an image or document. If you
experience problems during any of these steps, please refer to the appendix at the end of this manual,
You may need to modify the configuration.
Troubleshooting.
Select the Select the
Select the
Select the Select the
Before you can scan with your ImageReader on a PC, you need to tell the application what scanner you are using. The
scanner is referred to as the “source,” and you need to select the appropriate source for the application you are using.
Note:Note:
Note: In some cases, an application’s User Guide may direct you to use the application’s custom “ImageReader’
Note:Note:
driver In these cases, the instructions provided below are inappropriate for that application. Refer to that application’s
user guide for scanning instructions.
1 . Start the image editing application software in Windows.
2. Choose Select Source from the File menu.
3. Follow the appropriate instructions for the Windows version you are running.
WW
indoindo
W
indo
WW
indoindo
Select Info Scanner.
3-8
TWTW
TW
TWTW
ws 3. 1 ws 3. 1
ws 3. 1
ws 3. 1 ws 3. 1
AIN sourAIN sour
AIN sour
AIN sourAIN sour
3. 13. 1
and
3. 1
3. 13. 1
ce (PC)ce (PC)
ce (PC)
ce (PC)ce (PC)
Page 20

WW
indoindo
ws ws
95 95
or laor la
W
indo
ws
ws ws
95
95 95
Note:Note:
Note:
Note:Note:
WW
indoindo
Select either Info Scanner or Info Scanner (TWAIN-32) from the Source list, depending on what type of
application you are scanning into.
terter
or la
ter
or laor la
terter
If you are using a 16-’blt 6ppfld@tioh, and-select info Scanner (TWAIN-
32) as your source, you may get a TWAIN error and not be able to scan. Be sure
to select the correct source to use with 32-bit applications and 16-bit applications. Refer to
4. Click OK.
The application is now set to use your ImageReader to scan.
TT
he scanning prhe scanning pr
T
he scanning pr
TT
he scanning prhe scanning pr
The initiation of the scanning process may vary from application to application. Consult the
application’s manual for more information if the steps below don’t result in a scan. The
instructions provided in these steps assume the application uses the most common process.
To scan an image:
ocessocess
ocess
ocessocess
Coqpter 1, What is TWAIN
for more information,
3-9
1. Start the image editing application.
2. Select Acquire from the File menu. In Windows, this displays the scanning interface window. For Macintosh users, next select the scanner’s plug-in to display the scanning
window.
3. Place the image face down in the scanner, Click Prescan. The prescanned image displays in
the Prescan window.
4. Adjust the image as you desire. Make your selections for scan mode, resolution, etc., and
use the crop box in the Prescan window to select the area you want to scan. Follow the
guidelines described in the previous section to make your selections.
Note:Note:
Note: If the image is not as large as the Crop box, the additional blank area is also
Note:Note:
scanned, creatIng an unnecessadly large file size. Be sure to adjust the Crop box
to fit the exact area you want to scan. To do so, simply click and drag one of the
anchor squares.
Page 21

5. When you are satisfied with the selected settings, click Scan.
The image is scanned using the selected settings, and transf erred into the application’s workspace.
6. Click Cancel to close the scanning interface window.
You are returned to the application, and the scanned image is displayed in the workspace. You may now
manipulate, save, print, or fax the image.
Other scanning fOther scanning f
Other scanning f
Other scanning fOther scanning f
eaea
ea
eaea
turtur
tur
turtur
eses
es
eses
Your ImageReader scanner is capable of scanning all types of documents and images. The scanning instructions provided here are to ensure the installation is complete and your scanner is working properly. For more
detailed instructions about manipulating images once they are scanned, or for using your scanner for OCR,
document archiving/retrieval, and faxing, refer to those applications’ manuals.
3,10
Page 22

AA
ppendix ppendix
A
ppendix
AA
ppendix ppendix
TT
rr
ouboub
r
oub
rr
ouboub
leshootinleshootin
leshootin
leshootinleshootin
T
TT
AA
A
AA
gg
g
gg
Scanner makScanner mak
Scanner mak
Scanner makScanner mak
Confirm that you have unlocked the scanner. The dial on the bottom of the scanner locks and unlocks the
scanning mechanism for transport.
No scanner is displaNo scanner is displa
No scanner is displa
No scanner is displaNo scanner is displa
Verify that your SCSI chain is properly terminated on both ends. Check the SCSI cable, termina tor and
connections by disconnecting them and reattaching them. If the problem still persists, the SCSI cable or
terminator may be defective.
Scanner turScanner tur
Scanner tur
Scanner turScanner tur
The scanner performs a Power-On Self Test (POSI) when first turned on. This tests all the components of the
scanner before operation. If a problem is encountered, the Ready light will continue to blink, indicating a
failed POST test. Try the following:
1. Disconnect the scanner from the computer by powering down and unplugging the SCSI cable and
terminator from the back of the scanner. Turn the scanner on. If it works without the SCSI cable connected,
the cable may have been plugged in wrong or the cable may be defective.
2. If you are using an Automatic Document Feeder or Transparency Adapter, disconnect it from the
scanner and try again.
es a loudes a loud
es a loud
es a loudes a loud
ns on and the Readns on and the Read
ns on and the Read
ns on and the Readns on and the Read
,,
g g
rr
inding noise winding noise w
,
g
r
inding noise w
,,
g g
rr
inding noise winding noise w
yy
ed on med on m
y
ed on m
yy
ed on med on m
y SCSI cy SCSI c
y SCSI c
y SCSI cy SCSI c
hen turhen tur
hen tur
hen turhen tur
hain tahain ta
hain ta
hain tahain ta
y light continy light contin
y light contin
y light continy light contin
ned onned on
ned on
ned onned on
bb
lele
b
le
bb
lele
ues to bues to b
ues to b
ues to bues to b
linklink
link
linklink
If the Ready continues to blink after trying the above, your scanner may be defective.
ErEr
rr
or messaor messa
Er
r
or messa
ErEr
rr
or messaor messa
This error message indicates that the selected scan settings have created a file size that exceeds available disk
space. Reduce the dpi, image size or select a lower mode to reduce the file size.
gg
e e
Cannot CrCannot Cr
g
e
Cannot Cr
gg
e e
Cannot CrCannot Cr
eaea
ea
eaea
te Cacte Cac
te Cac
te Cacte Cac
he or Cache or Cac
he or Cac
he or Cache or Cac
he Bufhe Buf
he Buf
he Bufhe Buf
ff
er Spaceer Space
f
er Space
ff
er Spaceer Space
,,
or or
,
or
,,
or or
A-1
ImaIma
Ima
ImaIma
gg
e e
TT
rr
ansfansf
er Fer F
g
e
T
r
ansf
gg
e e
TT
rr
ansfansf
er F
er Fer F
ailedailed
ailed
ailedailed
Page 23

FF
or PC and compaor PC and compa
F
or PC and compa
FF
or PC and compaor PC and compa
When scanning is initiated, a blank SCSI table displaysWhen scanning is initiated, a blank SCSI table displays
When scanning is initiated, a blank SCSI table displays
When scanning is initiated, a blank SCSI table displaysWhen scanning is initiated, a blank SCSI table displays
tibtib
tib
tibtib
les onlles onl
les onl
les onlles onl
yy
y
yy
Click the Check button to verify the system sees the scanner. If the table remains blank, shut down
your system, including the scanner, When the entire system is powered do wn, turn on the scanner
first, wait a couple of seconds, then restart your system. Open the SCSI diagnostic table and see if
the scanner is displayed. If it does, your system is working properly and you can now scan. If it is
not displayed, your installation was not successful. Reinstall the drivers using the Info Technician
and try again.
TT
he system is halted whe system is halted w
T
he system is halted w
TT
he system is halted whe system is halted w
hen the SCSI diahen the SCSI dia
hen the SCSI dia
hen the SCSI diahen the SCSI dia
gnostic is launcgnostic is launc
gnostic is launc
gnostic is launcgnostic is launc
hedhed
hed Verify there is no SCSI ID conflict an
hedhed
the SCSI chain. Each device on the chain must have a unique ID number .
TWTW
TW
TWTW
AIN ErAIN Er
AIN Er
AIN ErAIN Er
rr
oror
ss
r
or
s
rr
oror
ss
Be sure you have selected the appropriate source for the application you are scanning into. Most 32bit applications require you use the Info Scanner (TWAIN-32) source, and all 16-bit applications
require you use the Info Scanner source.
Grainy ImagesGrainy Images
Grainy Images
Grainy ImagesGrainy Images
Check the video driver settings within Windows. The difference between 16 colors viewed and 256
colors viewed is dramatic. Select 256 Colors (or higher) if the sys em hardware supports such.
FF
or Mac and compaor Mac and compa
F
or Mac and compa
FF
or Mac and compaor Mac and compa
After installing the scannerAfter installing the scanner
After installing the scanner
After installing the scannerAfter installing the scanner
tibtib
tib
tibtib
les onlles onl
les onl
les onlles onl
yy
y
yy
,,
the computer does not star the computer does not star
,
the computer does not star
,,
the computer does not star the computer does not star
t-upt-up
t-up The scanner uses the same SCSI ID
t-upt-up
number as another device on your chain. Each device must have a unique ID number. Reassign the
scanner’s SCSI ID
Scanner does not aScanner does not a
Scanner does not a
Scanner does not aScanner does not a
ppear on the ppear on the
ppear on the
ppear on the ppear on the
AcquirAcquir
Acquir
AcquirAcquir
e mene men
e men
e mene men
uu
u
uu
The scanner driver is not installed properly. Reinstall and try again.
When scanning is initiated, a blank SCSI table displaysWhen scanning is initiated, a blank SCSI table displays
When scanning is initiated, a blank SCSI table displays
When scanning is initiated, a blank SCSI table displaysWhen scanning is initiated, a blank SCSI table displays
Verify the scanner is turned on, and that the SCSI chain is terminated properly, then try again. If the
problem still persists, you may have a defecti ve SCSI cable or terminator.
A-2
Page 24

Scanner carScanner car
Scanner car
Scanner carScanner car
ee
e
ee
Info ImageReader scanners are designed to provide years of trouble free service. To assist in realizing this end, follow the guidelines listed below.
1. Keep the scanner as dust free as possible. Dust particles are a scanner’s worst enemy.
2. If necessary, clean the scanner glas’s with a soft lens cloth.
3. Do not scan documents with correction fluid. This will cause spotting on the scanner glass.
4. Do not scan documents with paper clips or staples. The lens may become scratched.
5. . Do not scan documents joined together with sticky tape or glue.
6. Take care not to open the lid when scanning is in progress.
7. Don’t touch the scanner glass. Fingerprints or scratches will show up as unwanted marks on your
scanned image.
8. Don’t remove the scanner case. There are no consumer servicea ble parts inside. There is a danger
of electric shock, and the warranty will be void.
9. Don’t move the scanner e xcessively or subject it to excessive vibration, as the lens focus may
become distorted.
10. The scanner operates best in temperatures of 5C to 40C (41 F to 104F).
A-3
Page 25

Limited twLimited tw
Limited tw
Limited twLimited tw
Info warrants this scanner to be free of manufacturing defects, both materials and workmanship, for a period of two
years from the date of original purchase. This warranty applies only to the original purchaser. In the event of a defect,
Info will repair this product free of charge, including parts, labor, and return postage.
This warranty does not cover damage, loss, abuse, misuse, unauthorized repair, shipping damage, natural phenomena, or
effects of use other than intended. Info Is not responsible for consequential damages, including but not limited to, lost
profits, lost sales, loss of use, or injury to property.
For scanner service, contact us at (800) 777-3208, and request a Return Authorization (RA) number. Repackage the
product in its original packing container (for protection), and return postage prepaid to:
Include an address, phone number, the RA number, and a description of the scanner’s defect. Enclose a copy of the
original purchase receipt to verify warranty eligibility. Write the RA number legibly on the outside of the package.
o yo y
o y
o yo y
ear wear w
ear w
ear wear w
arar
rr
antyanty
ar
r
anty
arar
rr
antyanty
Info Servic e Center
580 Division Street
Campbell, CA 95003
A-4
Page 26

FCC rFCC r
FCC r
FCC rFCC r
This equipment has been tested and found to comply with the limits for a Class B digital device, pursuant to Part 15 of
the
installation, This equipment generates, uses and can radiate radio frequency energy and, if not installed and used in
accordance with the instructions, may cause harmful interference to radio communications. However, there is no
guarantee that interference will not occur in a particular installation. If this equipment does cause harmful interference
to radio or television reception (which can be determined by turning the equipment off and on), the user is encouraged to
try to correct the interference by one or more of the following measures:
• Reorient or relocate the receiving antenna
• Increase the separation between the equipment and receiver.
• Connect the equipment to an outlet on a circuit different from that which the receiver is connected.
• Shielded interconnect cables and shielded power cord which are supplied with this equipment must be employed
• Consult the dealer or an experienced radio/TV technician for help if the conditions persist.
• Changes or modifications not expressly approved by the manufacturer or authorized service center could void the
adio fradio fr
adio fr
adio fradio fr
FCC FCC
FCC rules. These limits are designed to provide reasonable protection against harmful interference in a residential
FCC FCC
with this equipment to ensure compliance with the pertinent RF emission limits governing this device.
user’s authority to operate this equipment.
equencequenc
equenc
equencequenc
y interfy interf
y interf
y interfy interf
erer
ence staence sta
er
ence sta
erer
ence staence sta
tementtement
tement
tementtement
A-5
Page 27

 Loading...