

Page 1

IBM 10/100 Fast EtherLink® XL
Adapters by 3Com
User Guide
OPTIONS
by IBM
Page 2

The following paragraph does not apply to the United Kingdom or any country
where such provisions are inconsistent with local law:
INTERNATIONAL BUSINESS
MACHINES CORPORATION PROVIDES THIS PUBLICATION “AS IS” WITHOUT WARRANTY
OF ANY KIND, EITHER EXPRESS OR IMPLIED, INCLUDING, BUT NOT LIMITED TO, THE
IMPLIED WARRANTIES OF MERCHANTABILITY OR FITNESS FOR A PARTICULAR PURPOSE.
Some states do not allow disclaimer of express or implied warranties in certain
transactions, therefore, this statement may not apply to you.
This publication could include technical inaccuracies or typographical errors. Changes are periodically
made to the information herein; these changes will be incorporated in new editions of the publication.
IBM may make improvements and/or changes in the product(s) and/or the program(s) described in this
publication at any time.
This publication was produced in the United States of America. This publication was developed for
products and services offered in the United States of America. IBM may not offer the pr oducts, services,
or features discussed in this document in other countries, and the information is subject to change
without notice. Consult your local IBM representative for information on the products, services, and
features available in your area. It is possible that this publication may contain reference to, or
information about, IBM products (machines and programs), programming, or services that are not
announced in your country. Such references or information must not be construed to mean that IBM
intends to announce such IBM products, programming, or services in your country.
Requests for copies of this publication and for technical information about IBM Personal Computer
products should be made to your IBM authorized reseller or IBM marketing representative.
© Copyright International Business Machines Corporation 1998. All rights reserved.
Copyright © 1998, 3Com Corporation. All rights reserved.
ii
Page 3

ONTENTS
C
A
BOUT THIS GUIDE
Finding Specific Information in This Guide 1
Conventions 2
1
I
NTRODUCTION
Industry-Leading Performance 1-2
DynamicAccess Software 1-2
Remote Wake-Up 1-3
Installation and Configuration 1-3
10/100 Mbps Support 1-3
PC and Server Requirements 1-4
How Do I Install the 3C905B-TX Adapter? 1-4
2
I
NSTALLING THE ADAPTER
Connecting to the Network 2-3
Connecting the Remote Wake-Up Cable 2-4
3
I
NSTALLING THE NETWORK DRIVER
Windows 95 3-1
Confirming Installation 3-4
Windows 98 3-5
Confirming Installation 3-5
Upgrading from Windows 95 to Windows 98 3-6
Windows NT 3-6
Windows NT Version 4.0 3-7
Updating the Network Driver 3-7
Installing the Network Driver 3-7
iii
Page 4

Windows NT Version 3.51 3-9
Updating the Network Driver 3-9
Installing the Network Driver 3-9
NetWare for Windows 3.1x, Windows for Workgroups,
and DOS 3-10
AutoLink Requirements 3-10
Running the AutoLink Program 3-11
Installing the Novell NetWare Server Driver 3-12
NetWare Version 4.1 3-12
Multiple Adapters 3-13
Supported Network Drivers 3-14
4
C
HANGING CONFIGURATION
Configuration Settings 4-1
Displaying Configuration Settings 4-2
Changing Configuration Settings 4-2
Changing PACE Configuration 4-4
Selecting PACE Applications 4-4
Changing PACE Ranges and Protocols 4-5
PACE Advanced Options 4-6
Setting Fast IP 4-6
Using the DOS Configuration Program 4-6
A
S
PECIFICATIONS
Specifications A-1
RJ-45 Connector Pin Assignments A-2
B
T
ECHNICAL SUPPORT
Help and Service Information B-1
Step 1. Problem Solving B-2
Step 2. Preparing for the Call B-3
Step 3. Placing the Call to IBM B-3
Additional Technical Support Resources B-4
Troubleshooting B-4
Status LEDs B-4
iv
Page 5

3Com NIC Diagnostics Program B-6
Accessing the 3C905B-TX Adapter Help System B-6
Displaying Release Notes, Frequently Asked Questions,
and the KnowledgeBase B-7
Running the Self-Test B-7
Running the Echo Test B-9
3Com Support Services B-10
Removing the 3C905B-TX Adapter PACE and
3NICDIAGS Software B-12
Windows 95 and Windows NT 4.0 B-12
DOS B-12
Checking the Remote Wake-up Function B-12
3Com DOS Diagnostic Program B-13
Crossover Cable Troubleshooting Tips B-14
Troubleshooting Hubs with Crossover Cable B-15
Frequently Asked Questions B-16
Accessing the 3Com World Wide Web Page B-20
G
LOSSARY
I
NDEX
S
TATEMENT OF LIMITED WARRANTY
N
OTICES
F
EDERAL COMMUNICATIONS COMMISSION
S
TATEMENT
I
NDUSTRY CANADA CLASS
S
TATEMENT
B E
MISSION COMPLIANCE
(FCC)
A
VIS DE CONFORMITÉ À LA RÉGLEMENTATION
D’INDUSTRIE CANADA
v
Page 6

D
EUTSCHE
V
ERTRÄGLICHKEIT
E
UROPEAN UNION
U
NION EUROPÉENNE
ÉLECTROMAGNÉTIQUE
U
NION EUROPEA
U
NIONE EUROPEA
ELECTROMAGNÉTICA
T
RADEMARKS
EMV-D
)
- N
IREKTIVE (ELECTROMAGNETISCHE
- E
- D
)
MISSION DIRECTIVE
- D
IRECTIVE CONFORMITÉ
ORMATIVA
IRECTIVA
EMC
EMC (C
ONFORMIDAD
3C
OM END USER SOFTWARE LICENSE AGREEMENT
vi
Page 7

1-1
1-2
2-1
2-2
2-3
4-1
4-2
A-1
B-1
B-2
B-3
B-4
B-5
IGURES
F
3C905B-TX Adapter 1-1
3C905B-TX Adapter Installation Steps 1-4
Inserting the Adapter 2-2
Connecting the Network Cable to the RJ-45 Port 2-3
Connecting the Adapter to the Connector 2-4
3Com NIC Diagnostics Program General Screen 4-3
3Com NIC Diagnostics Program Properties Screen 4-3
RJ-45 Connector Pin Assignments A-2
LEDs B-5
3Com NIC Diagnostics Program General Screen B-8
Diagnostics Screen B-8
3Com NIC Diagnostics Program Support Screen B-11
Straight-through and Crossover Cable Pinouts B-14
vii
Page 8

ABLES
T
1
Notice Icons 2
2
Text Conventions 2
3-1
Network Driver Text File Names 3-14
4-1 Option Settings 4-1
B-1 LED Descriptions B-5
B-2 Frequently Asked Questions B-16
viii
Page 9

ABOUT THIS GUIDE
About This Guide provides an overview of this guide,
describes guide conventions, and tells you where to look
for specific information.
This guide describes how to install, configure, and
troubleshoot the IBM 10/100 Fast EtherLink® XL Adapters
by 3Com.
If the information in the README.TXT file on the
EtherDisk® diskette shipped with your product differs fr om
the information in this guide, follow the instructions in the
README.TXT file.
Finding Specific Information in This Guide
This table shows where to find specific information in this
guide.
If you are looking for Turn to
Adapter features and PC and server requirements Chapter 1
Installation and cabling information Chapter 2
Network driver installation instructions Chapter 3
Instructions for changing configuration settings Chapter 4
Specifications and RJ-45 pin assignments Appendix A
Technical support Appendix B
Troubleshooting Appendix B
Page 10

2 ABOUT THIS GUIDE
Conventions
Table 1 and Table 2 list conventions that are used
throughout this guide.
Table 1 Notice Icons
Icon Notice Type Description
Information note Important features or instructions
Caution Information to alert you to potential damage to a
program, system, or device
Warning Information to alert you to potential personal injury
Table 2 Text Conventions
Convention Description
Commands The word “command” means you must enter the
command exactly as shown in text and press the Return or
Enter key. Example:
To launch the DOS diagnostics, enter the following
command:
a: install
Screen displays This typeface represents information as it appears on the
screen.
The words “enter”
and “type”
Menu commands and
buttons
Words in italicized
type
When you see the word “enter” in this guide, you must
type something, and then press the Return or Enter key.
Do not press the Return or Enter key when an instruction
simply says “type.”
Menu commands or button names appear in italics.
Example:
From the Help menu, select Contents.
Italics emphasize a point or denote new terms at the place
where they are defined in the text.
Words in bold-face
type
Bold text denotes key features.
Page 11
1
INTRODUCTION
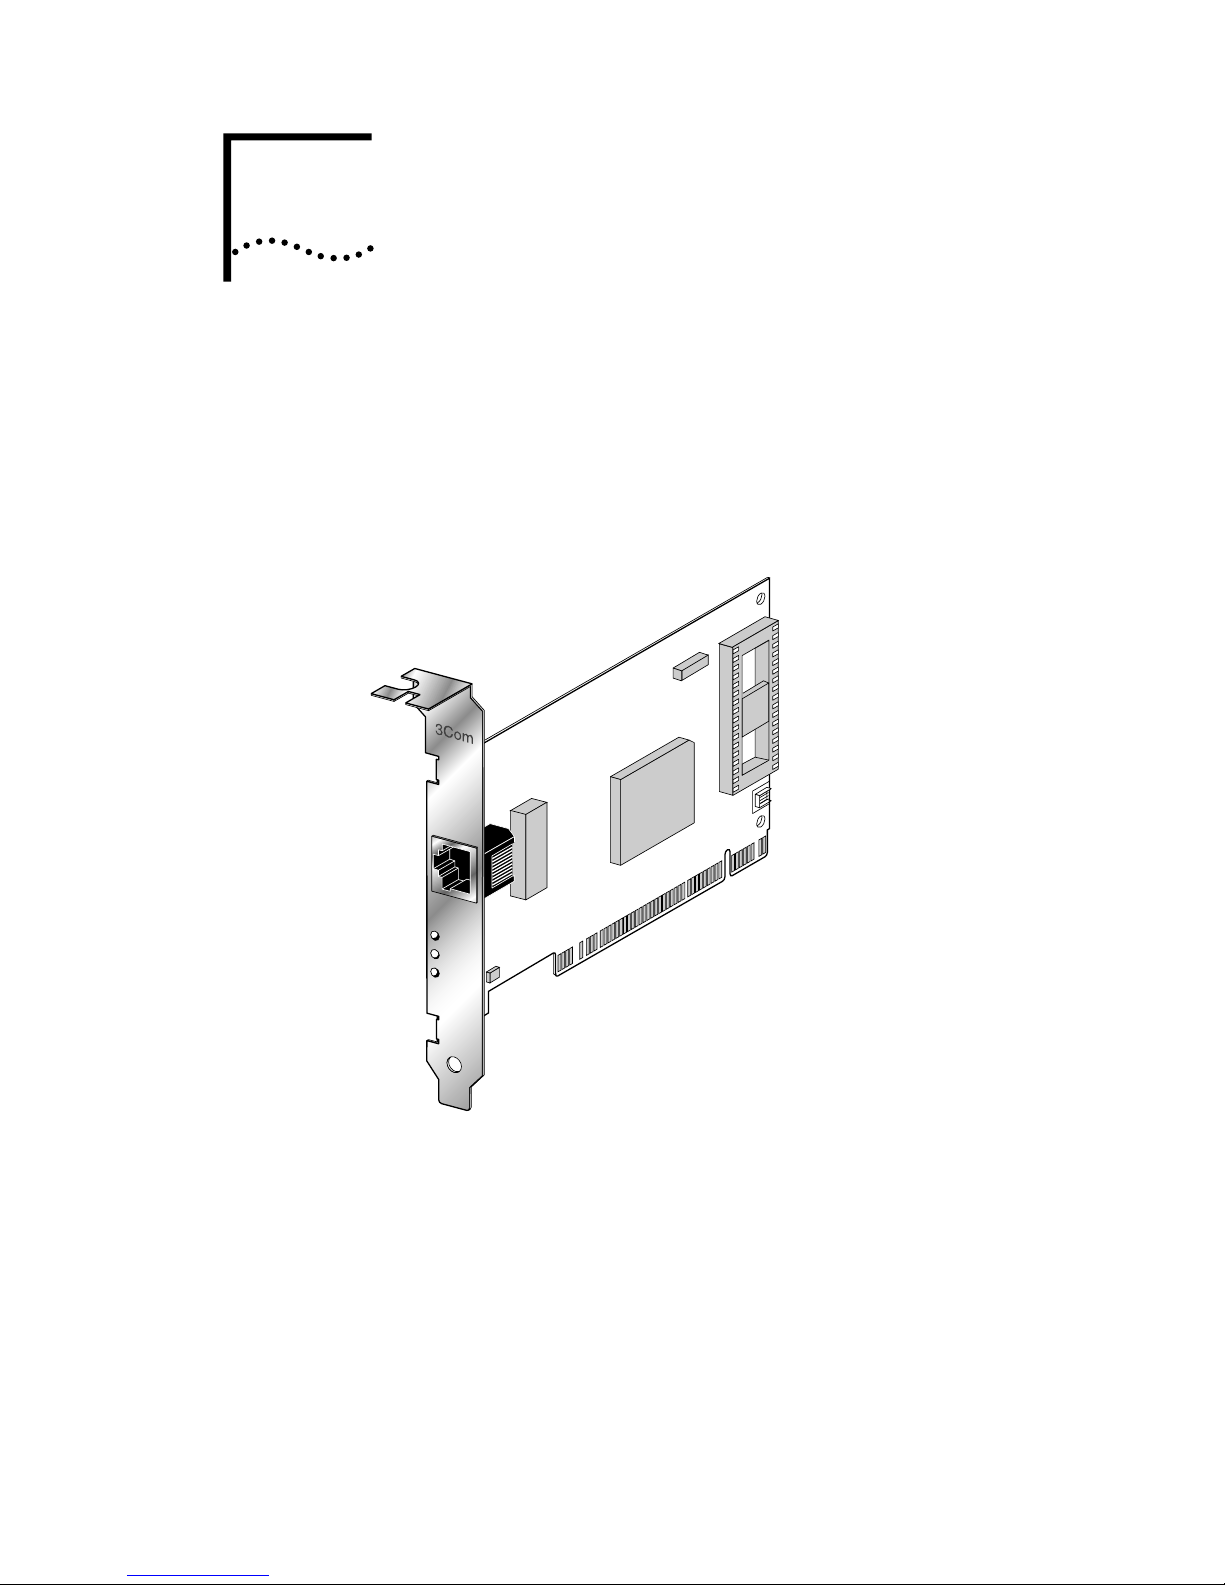
The IBM 10/100 Fast EtherLink® XL Adapters by 3Com
provide a high-performance connection to an Ethernet or
Fast Ethernet network. These adapters operate at 100
Mbps or 10 Mbps automatically, depending on the speed
of the connected hub.
TX
DATA
ACT
10
L
N
100
K
Figure 1-1 3C905B-TX Adapter
There are two types of 3C905B-TX adapters: the 3C905B-TX
adapter with Remote Wake-Up and the 3C905B-TX-NM
adapter without Remote Wake-Up.
The 3Com Remote Wake-Up adapter (3C905B-TX), shown in
Figure 1-1, operates as a wake-up adapter only in PCs with
the Remote Wake-Up connector attached to the PC
motherboard. This adapter provides a network connection
with or without the Remote Wake-Up connector installed.
The 3C905B-TX-NM adapter does not have the Remote
Wake-Up connector or functionality.
Page 12

1-2 CHAPTER 1: INTRODUCTION
Unless specifically indicated, the name 3C905B-TX is used
throughout this guide to refer to both adapters.
This chapter describes the 3C905B-TX adapter features and
PC and server requirements.
Industry-Leading Performance
The 3C905B-TX adapter provides the following
performance features:
■ Interactive Access technology to minimize CPU utilization
■ Parallel Tasking
low processor utilization
■ Full-duplex 10 Mbps and 100 Mbps support
■ Hardware IP checksum enabled for better Internet and
intranet performance
®
II architecture for high thr oughput and
■ Fast IP switching solution that allows you to
cost-effectively scale internetwork performance as
bandwidth requirements increase
■ 32-bit bus master design with full scatter gather and
infinite bursting performance
■ Flow control (IEEE 802.1x), which optimizes performance
in switched networks through efficient data transmissions
DynamicAccess Software
DynamicAccess® software delivers intelligence at the edge of
the network to optimize network performance and control.
DynamicAccess features include PACE™ Interactive Access
technology, dRMON (distributed RMON) support, and
support for PACE real-time and multimedia applications.
PACE class of service drivers enable prioritization of
multimedia and business-critical applications like video
conferencing and distance learning. With the 3Com PACE
drivers, you can set the class of service for each application.
The 3C905B-TX adapter ships with dRMON SmartAgent®
intelligent agents that collect remote management
information used by the Transcend® Edge Monitor System.
Together, they provide full RMON network management
information for both switched and Fast Ethernet networks.
Page 13

Remote Wake-Up
Remote Wake-Up support is enabled for the 3C905B-TX
adapter. If you are using the 3C905B-TX adapter in a PC
that supports Remote Wake-Up through the PCI bus, the
adapter will respond to a remote Wake-Up command or
magic packet signal from a sleep state.
Installation and Configuration
The 3Com NIC Diagnostics program allows you to test
the 3C905B-TX adapter, configure it, and display the
adapter configuration information. If you are running DOS,
you cannot use this program.
The NIC Diagnostics Help system includes the 3C905B-TX
adapter Release Notes, Frequently Asked Questions, and
KnowledgeBase.
Remote Wake-Up 1-3
Microsoft Windows 95 detects the 3C905B-TX adapter and
installs the network driver from 3Com EtherDisk Diskette #2.
The AutoLink™ installation software automatically installs
all Novell NetWare DOS ODI client software into your
operating system.
10/100 Mbps Support
The single RJ-45 connector on the network cable supports
10 Mbps or 100 Mbps speeds.
NWay auto-negotiation enables the 3C905B-TX adapter to
automatically run at the speed that the connected hub
supports. The 3C905B-TX adapter works with products that
comply with IEEE 10BASE-T and 100BASE-TX specifications.
Page 14
1-4 CHAPTER 1: INTRODUCTION
PC and Server Requirements
Your PC or server must have:
■ An 80386, 80486, or Pentium processor
■ An available bus mastering PCI slot
■ A minimum of 640K of memory
Make sure that you are running the latest BIOS for your PC or
server, even if your PC is new. Contact your PC manufacturer
for more information.
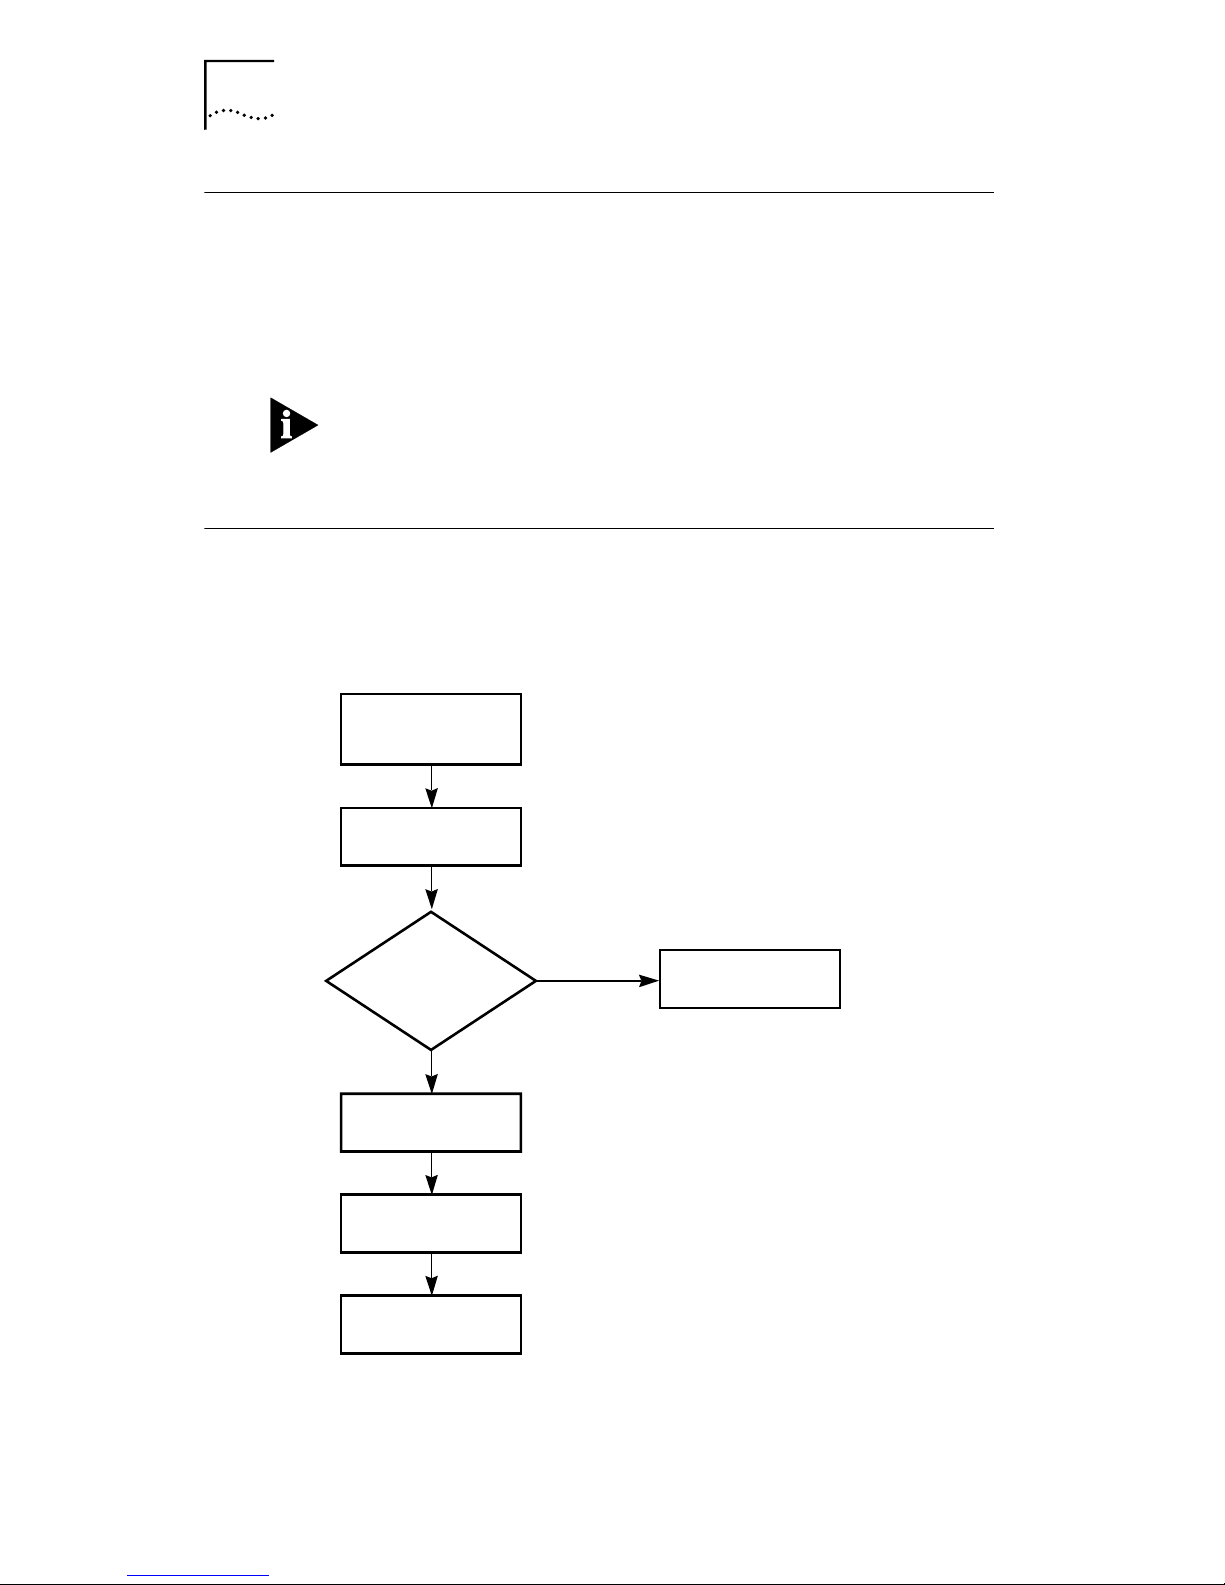
How Do I Install the 3C905B-TX Adapter?
To complete installation, install the adapter in your PC or
server, connect it to the network, and install the network
driver. The installation steps are depicted in Figure 1-2.
Insert
3C905B-TX
adapter
Connect adapter
to network
Which
driver installation
instructions
should I use
?
I do know
Install 3Com
network driver
Reboot
Chapter 2
Chapter 2
I don't know
Chapter 3
Chapter 3
Ask
MIS department
Chapter 3
Log on
to network
Figure 1-2 3C905B-TX Adapter Installation Steps
Proceed to Chapter 2 to install the 3C905B-TX adapter in
your PC or server and connect it to the network.
Page 15

2
INSTALLING THE ADAPTER
There are two types of 3C905B-TX adapters: the 3C905B-TX
adapter and the 3C905B-TX-NM adapter. They are both
installed in your PC and connected to the network in exactly
the same way.
After you connect the 3C905B-TX adapter to the network,
you connect the Remote Wake-Up cable to the motherboar d.
Before you begin, make sure that you have the user guide
and the 3C905B-TX adapter EtherDisk diskettes, and that
your PC meets the requirements described in Chapter 1.
CAUTION: Each adapter is packed in an antistatic container
to protect it during shipment. Before handling the adapter,
touch the metal chassis of your PC. Maintain grounding by
wearing a wrist strap attached to the chassis. Handle the
adapter by its backplate and top edge. Do not touch the
edge connector.
To install the 3C905B-TX adapter in your PC or server and
connect it to the network, follow these steps:
1 Open the shipping container and inspect each item
for damage.
2 Remove all jewelry from your hands and wrists.
Use only insulated or nonconductive tools.
3 Unplug the PC and disconnect all cables.
4 Remove the PC cover.
5 Choose an empty bus mastering PCI slot.
A sample PCI slot is shown in Figure 2-1. If you do not know
how to identify a PCI slot, check your PC documentation or
ask your system administrator. In most PCs, slots 1 and 2 are
bus mastering slots. Use slot 1 for the 3C905B-TX adapter if
possible. If you have a video PCI card, install it in the last slot
(the one farthest from slot 1).
Page 16
2-2 CHAPTER 2: INSTALLING THE ADAPTER
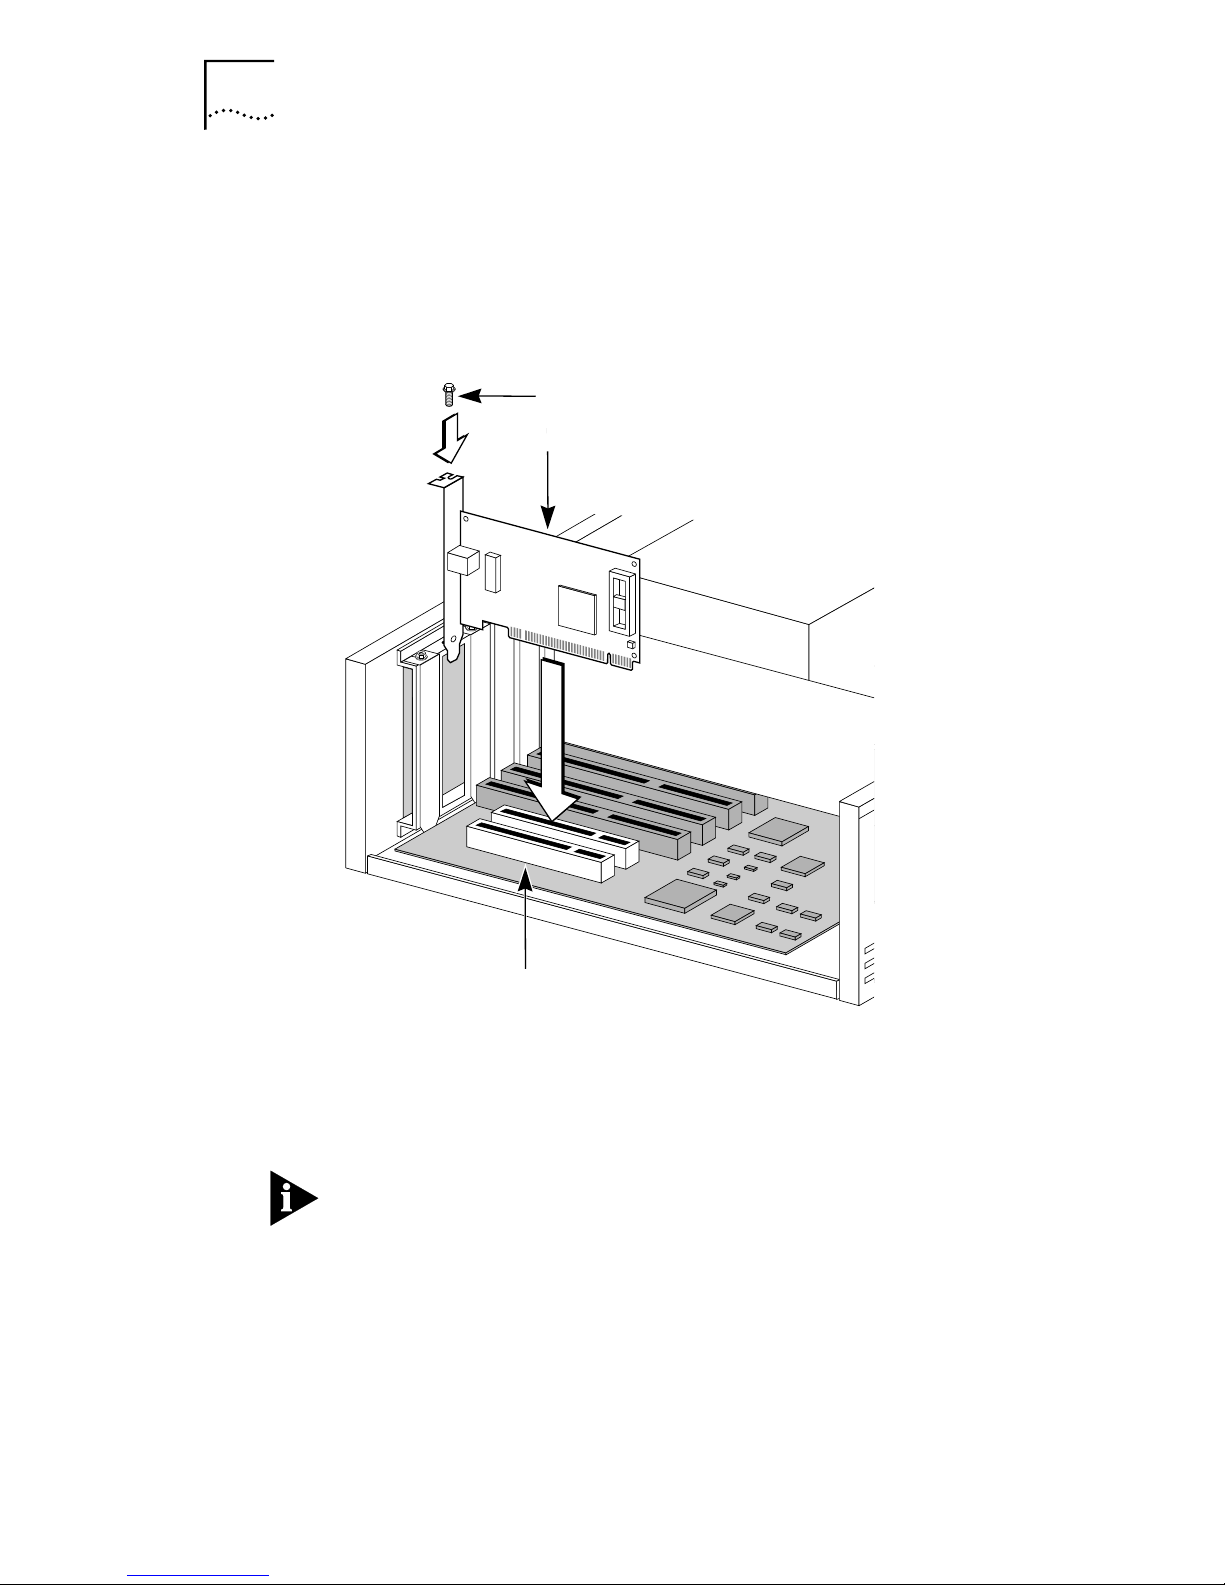
6 Unscrew the screw holding the PCI slot’s backplate
and remove it.
7 Insert the 3C905B-TX adapter into an empty PCI slot,
shown in Figure 2-1.
Make sure that the adapter is firmly seated in the slot.
Screw
3C905B-TX adapter
Figure 2-1 Inserting the Adapter
8 Secure the adapter with the screw you removed
earlier.
If you are installing the Remote Wake-Up connector, go to
“Connecting the Remote Wake-Up Cable,” on page 2-4 at
the end of this chapter before replacing the PC cover.
Remote Wake-Up is only supported in systems that provide
a 3-pin header for a Wake-Up cable.
9 Replace the PC cover and reconnect all previously
connected cables.
10 Turn on the power to the PC.
PCI slot
Page 17

11 Proceed to the next section, “Connecting to the
Network.”
Connecting to the Network
You must connect the adapter to the network before
installing the network driver. To connect the 3C905B-TX
adapter to the network cable, follow these steps:
1 Connect the network cable to the RJ-45 port on the
3C905B-TX adapter, as shown in Figure 2-2.
Connecting to the Network 2-3
TX
RJ-45 port
Data
ACT
L
10
N
K
100
RJ-45
connector
LEDs
Figure 2-2 Connecting the Network Cable to the RJ-45 Port
2 Connect the other end of the network cable to a
10BASE-T or a 100BASE-TX network port.
3 Check the LEDs, shown in Figure 2-2.
After installation, and before you install the network driver,
the LEDs indicate the following:
■ 10 LNK LED - green - 10 Mbps link integrity
■ 100 LNK - green - 100 Mbps link integrity
■ ACT LED - OFF - until the network driver is installed
See Table B-1 for more LED information. If you are not
installing the Remote Wake-Up cable, go to Chapter 3 to
install the network driver.
Page 18

2-4 CHAPTER 2: INSTALLING THE ADAPTER
Connecting the Remote Wake-Up Cable
WARNING: Install the adapter in slot 1 in the PC (as
described earlier) before plugging in the 3-pin connector.
Only properly trained and authorized personnel should
perform service. Contact your PC manufacturer for
information about safe service techniques.
1 Insert the cable into the connector on the adapter,
shown in Figure 2-3.
Twist the cable twice before attaching the cable to the
motherboard.
2 Attach the cable to the connector on the PC
motherboard, as shown in Figure 2-3.
The connector is located in different locations depending
on the PC.
Connect Remote Wake-Up
cable from adapter to
Power
supply
Figure 2-3 Connecting the Adapter to the Connector
motherboard connector
Plug in Remote Wake-Up
cable to connector here
3 Reconnect all cables and replace the PC cover.
The 3C905B-TX Remote Wake-Up adapter is installed. Go
back to the previous section, “Connecting to the Network,”
to complete installation.
Page 19

INSTALLING THE
3
NETWORK DRIVER
This chapter describes how to install the network driver
that completes your PC connection to the network. The
3C905B-TX adapter software is installed with the network
driver.
Instructions are provided for Windows 95, Windows 98,
Windows NT, and NetWare DOS client and server driver
installation. Table 3-1 provides a complete list of supported
drivers and text files that describe how to install them.
Go to the section your MIS department recommends and
follow the instructions to install the network driver on
your PC.
You can obtain the latest network drivers on 3Com’s
World Wide Web site. To access the Web site, enter the
3Com URL into your Internet browser:
http://infodeli.3com.com/infodeli/swlib/n_i_c.htm/
The drivers are in the Support area. On the Support Welcome
screen, scroll down to Latest Drivers and click.
Windows 95
This section describes how to install the network driver
when your PC is running Windows 95. This driver supports
dRMON and PACE technology.
This driver can be used in Microsoft and NetWare
environments, and instructions are included for both.
Y ou need the Windows 95 system installation files (CAB files)
to complete the installation.
Do not use the AutoLink software to install the driver if you
are running Windows 95.
Page 20

3-2 CHAPTER 3: INSTALLING THE NETWORK DRIVER
Follow these steps to install the network driver in a PC
running Windows 95:
1 Install and configure Windows 95 before installing
the 3C905B-TX adapter.
2 Install the 3C905B-TX adapter and connect it to the
network, as described in Chapter 2.
3 Restart the PC.
Windows 95 automatically detects the adapter in the PC.
If Windows 95 does not detect the 3C905B-TX adapter , see
“Troubleshooting” in Appendix B.
4 Select Driver from disk provided by the hardware
manufacturer and click OK.
5 Insert EtherDisk Diskette #2 in your drive and, if the
diskette is in drive A, click OK.
Otherwise, supply the correct drive letter and click OK.
Once the 3Com installation files are read, Windows 95
prompts you for the Windows 95 network installation files.
6 Enter the correct path to the Windows 95 files
(CAB files) and click OK.
If Windows prompts you to reboot, click No.
7 Open the Windows 95 Control Panel.
8 In the Control Panel, double-click Network.
The Network screen appears.
9 For Microsoft networks, select the Configuration tab.
For Novell NetWare networks, go to step 10.
The default Microsoft network setup contains the following
components:
Client for Microsoft Networks
Client for Novell Networks
3Com EtherLink XL Adapter
3Com dRMON SmartAgent PC software
IPX/SPX compatible protocol
NetBEUI protocol
Page 21

Windows 95 3-3
If a protocol is missing, follow these steps:
a Select the protocol and click Add.
b From the Select Network Protocol menu, select
Microsoft in the left pane. In the right pane, select the
protocol and click OK.
If a client is missing, follow these steps:
a Select the client and click Add.
b From the Select Network Client menu, select Microsoft
in the left pane, select the client in the right pane, and
click OK.
10 For NetWar e only, on the Network screen, remove the
following network components, if present:
Microsoft Client for Microsoft Network NetBEUI
The network components should now include:
Client for NetWare Networks
3Com EtherLink XL Adapter
3Com dRMON SmartAgent PC software
IPX/SPX Compatible Protocol
If a protocol is missing, follow these steps:
a Select the protocol and click Add.
b From the Select Network Protocol menu, select
Microsoft in the left pane. In the right pane, select the
protocol and click OK.
If a client is missing, follow these steps:
a Select the client and click Add.
b Select Microsoft.
c Click Client for NetWare Networks and then Properties.
To select the NetWare server, follow these steps:
a Under the General tab, set your preferred server and the
first network drive and click OK.
b Set the primary network logon to Client for NetWare
Networks and click OK.
Page 22

3-4 CHAPTER 3: INSTALLING THE NETWORK DRIVER
11 When the configuration is correct, click the
Identification tab.
■ The computer name is the name of your PC. Give your
PC a unique name of up to 15 characters. The PC name
cannot include blank spaces.
■ A workgroup (such as your department) is composed of
the PCs you usually communicate with and the
workgroup’s shared resources (such as printers).
■ If you use peer group networking, the workgroup name
is your peer group. Peers can see each other when they
look in the Network Neighborhood.
For information on peer-to-peer networking, see the
W95NDIS3.TXT file in the HELP directory on
EtherDisk Diskette #1.
■ Your computer description is visible to other members
of your workgroup in the Network Neighborhood.
12 Click OK.
The network connection is configured. Windows 95
prompts you to restart the PC.
13 Click Yes.
After the PC restarts, you can log on to your network.
If you have problems, see Appendix B.
Confirming Installation
Complete the following procedure to confirm that the
3C905B-TX adapter is properly installed:
1 Double-click the My Computer icon.
2 Double-click the Control Panel icon.
3 Double-click the System icon.
The System Properties box appears, detailing your
system setup.
4 Click the Device Manager tab.
A list of devices appears, arranged by type.
5 Double-click Network Adapters.
The name of the installed 3C905B-TX adapter appears:
3Com EtherLink XL Adapter (3C905B)
Page 23

6 Double-click the 3C905B-TX name to display a
description of the 3C905B-TX adapter and its current
status.
The dialog box confirms that the 3C905B-TX adapter is
working properly. If a yellow exclamation point or a red X
appears next to the adapter name, go to “Frequently Asked
Questions” in Appendix B to troubleshoot the adapter.
7 Click Cancel to leave each dialog box and return to
the Control Panel.
Windows 98
To install the network driver in a PC running Microsoft
Windows 98, insert EtherDisk Diskette #2 when the
Update Device Driver wizard starts and prompts you for
a diskette or CD.
Windows 98 3-5
Do not insert EtherDisk Diskette #1, because the
installation will be unsuccessful.
Continue with the installation by following the prompts on
the screen. For instructions, follow the Windows 95
installation steps on page 3-1 of this chapter.
Confirming Installation
To verify that the network driver was successfully installed
in a PC running Windows 98:
1 From the Windows Start menu, select Settings, and
then select Control Panel.
2 Double-click the System icon, and then select the
Device Manager tab.
3 Double-click Network adapters and make sure that the
name of the EtherLink or Fast EtherLink XL adapter
appears.
If a red X appears next to the name of the adapter, the
installation was not successful. If this occurs, verify that the
adapter is not disabled by following these steps:
a Double-click the name of the adapter.
b Select the General tab.
c Make sure that Disable in this hardware profile is not
selected.
Page 24

3-6 CHAPTER 3: INSTALLING THE NETWORK DRIVER
If the adapter is not disabled and a red X still appears next to
the name of the adapter, update the driver by following
these steps:
a Double-click the name of the adapter.
b Select the Driver tab, and then click the Update Driver
button.
c Insert EtherDisk Diskette #2 when prompted for a disk.
Continue with the installation by following the prompts
on the screen.
If a yellow exclamation point (!) appears next to the name of
the adapter, the installation is not complete. See Appendix B
for troubleshooting help.
Upgrading from Windows 95 to Windows 98
If you are upgrading a PC from Windows 95 to Windows 98
that already has an EtherLink or Fast EtherLink XL (3C90xB)
adapter installed, you may have to update the driver in the
Device Manager using EtherDisk Diskette #2.
Follow the instructions in the previous section, “Verifying
Successful Installation Under Windows 98,” to determine
if you have to update the driver.
Windows NT
This section describes how to install the network driver in a
PC running Windows NT versions 4.0 or 3.51.
Do not use the AutoLink software to install the driver if you
are running Windows NT.
Before you begin, obtain EtherDisk Diskette #2 and
Windows NT installation files (on hard disk, diskettes,
or CD).
Page 25

If Windows NT networking is not installed, you may also
need the following information from your MIS department:
■ Whether you are on a LAN or are connecting to one
through a modem
■ Protocol used in the Microsoft Windows Network
(typically TCP/IP or NetBEUI)
■ Name of the Windows NT server domain or workgroup
you belong to
■ IP address if you are not using DHCP
Windows NT Version 4.0
If you already have the 3C905B-TX network driver and
want to update it, follow the instructions provided in the
next section.
Windows NT 3-7
Updating the Network Driver
To update the driver, follow these steps:
1 Install the 3C905B-TX adapter and connect it to the
network, as described in Chapter 2.
2 Restart the PC and start Windows NT.
3 In the Control Panel, double-click Network.
4 In the Network window, select the Adapter tab.
5 Select 3Com EtherLink XL NIC.
6 Click Update.
7 Insert EtherDisk Diskette #2.
The driver is updated.
Installing the Network Driver
Follow these steps to install the network driver in a PC
running Windows NT version 4.0:
1 Install the 3C905B-TX adapter and connect it to the
network, as described in Chapter 2.
2 Restart the PC and start Windows NT.
3 In the Control Panel, double-click Network.
4 In the Network window, select the Adapter tab.
Page 26

3-8 CHAPTER 3: INSTALLING THE NETWORK DRIVER
If this 3C905B-TX adapter is replacing an adapter already
installed, follow these steps:
a Select the existing adapter (that is being replaced) in the
Installed Adapters group.
b Click Remove.
c Click Yes in the Warning dialog box.
d Reboot the PC and repeat steps 2, 3, and 4.
5 Click Add Adapter.
6 In the Select Network Adapter window, select
Have Disk.
7 Insert EtherDisk Diskette #2 in drive A and in the
Insert Disk window, click OK.
8 In the Select OEM Option box, select 3Com EtherLink
Adapter (3C905B).
9 Click OK.
10 Select the Protocol tab.
11 Select the appropriate protocol for your network.
12 In the Network Settings window, click Close.
If you are prompted for network information, enter the
information supplied by your MIS department.
Windows NT prompts you to reboot.
13 Click Yes to restart your PC.
The driver installation is complete.
To confirm successful installation, double-click the Network
icon in the Control Panel. Click the Adapters tab. The
3C905B-TX adapter should appear in the list. If it does not
appear, see Appendix B for troubleshooting information.
Page 27

Windows NT Version 3.51
If you already have the 3C905B-TX adapter network driver
and want to update it, follow the instructions provided in
the next section.
Updating the Network Driver
To update the driver, follow these steps:
1 Install the 3C905B-TX adapter and connect it to the
network, as described in Chapter 2.
2 Restart the PC and start Windows NT.
3 In the Control Panel, double-click Network.
4 Select the 3Com adapter and click Properties.
5 Record the settings for the adapter resources.
Windows NT 3-9
6 Click Cancel.
7 Double-click Network again in the Control Panel.
8 In the list of Network Software and Adapter Cards,
select the 3Com adapter.
9 Click Update.
10 When prompted, enter the directory path (a:\), insert
EtherDisk Diskette #2, and click OK.
11 Click OK to close the Network dialog box and
complete the process.
Installing the Network Driver
Follow these steps to install the network driver in a PC
running Windows NT version 3.51:
1 Install the 3C905B-TX adapter and connect it to the
network, as described in Chapter 2.
2 Restart the PC and start Windows NT.
3 In the Control Panel, double-click Network.
4 In the Network Settings window, click Add Adapter.
5 In the Add Network Adapter window , select <Other>
Requires disk from manufacturer.
6 Click Continue.
Page 28

3-10 CHAPTER 3: INSTALLING THE NETWORK DRIVER
7 Insert EtherDisk Diskette #2 in drive A and click OK.
8 In the Select OEM Option box, select
3Com EtherLink XL PCI Adapter (3C905B).
9 Click OK.
The Bus Location window appears.
10 Click OK.
Windows NT copies the files from EtherDisk Diskette #2.
If you are prompted for network information, contact your
MIS department for the requested information.
11 In the Network Settings Change window, click OK.
Windows NT completes the installation.
12 Click Restart to restart your PC.
If you have problems, see Appendix B for troubleshooting
information.
NetWare for Windows 3.1x, Windows for Workgroups,
and DOS
The AutoLink program installs DOS client software and
drivers for Novell NetWare in Windows 3.1x, Windows for
Workgroups 3.11, and DOS environments.
CAUTION: Do not use the AutoLink program if you are
running Windows 95, Windows 98, or Windows NT.
The AutoLink program modifies the CONFIG.SYS and
AUTOEXEC.BAT files. It logs on to the server and updates
the client software if your MIS department has already
configured a 3Install account on your server.
AutoLink Requirements
To use the AutoLink program, your computer should have
only one 3C905B-TX adapter installed and have 1 MB of
free hard disk space.
Page 29

NetWare for Windows 3.1x, Windows for Workgroups, and DOS 3-11
Running the AutoLink Program
1 Install the adapter and connect it to the network,
as described in Chapter 2.
2 Reboot, using a DOS diskette.
3 Insert EtherDisk Diskette #1 in drive A.
4 Run the Install program. Enter:
a:install
This opens the main menu.
5 From the main menu, select Auto Install and Config
for NetWare (AutoLink) and press Enter.
6 Select DOS, Windows 3.1x, or Windows for
Workgroups 3.11 and follow the instructions.
7 When the auto installation process is finished,
remove EtherDisk Diskette #1 and reboot the PC.
If you are running Windows 3.1x, after you connect to the
NetWare server, run the WSINSTALL program for full
Windows support. Contact your MIS department for the
location of this NetWare utility.
If you experience problems that occur only when using the
AutoLink program, display or print the AUTOLINK.LOG file.
The AUTOLINK.LOG file contains a list of all the events that
occurred during the AutoLink installation and configuration
process.
■ To display the file, enter:
type autolink.log | more
■ To print the file, enter:
print autolink.log
Page 30

3-12 CHAPTER 3: INSTALLING THE NETWORK DRIVER
Installing the Novell NetWare Server Driver
This driver is installed on a Novell NetWare server running
NetWare 4.1.
The \NWSERVER subdirectory on EtherDisk Diskette #1
contains the driver (3C90X.LAN file) and NetWar e Loadable
Modules (NLMs) needed for NetWare 4.1.
The NetWare server driver can also be used on a NetWare
version 3.12 server. Contact Novell to obtain the NLM
files and for instructions for installing the driver in a 3.12
environment. The NetW are 3.11 server is not supported by
the 3C905B-TX adapter.
NetWare Version 4.1
This section describes how to install the NetWar e server driver
on EtherDisk Diskette #1 on a NetWare version 4.1 server.
To import the server driver into a NetWar e 4.1 server , follow
these steps:
1 Install the NetWare server software.
2 When the NIC Selection menu appears, insert
EtherDisk Diskette #1 in the drive.
3 Press Insert to add a driver externally.
4 Press F3 to change the path.
5 At the A:\ prompt, enter:
nwserver
The installation program gathers the files and prompts you
for an adapter selection.
6 Select 3Com Fast EtherLink XL 10/100 Ethernet NIC.
7 Press Enter to continue the server installation.
Page 31

Multiple Adapters
To support more than one adapter in a server, edit the
AUTOEXEC.NCF file to the following format:
load C:\SERVER\3C90X.LAN PORT=<port1>
NAME=<name1> FRAME=<frametype>
load C:\SERVER\3C90X.LAN PORT=<port2>
NAME=<name2> FRAME=<frametype>
Port1 and port2 are the 3C905B-TX adapter’s PCI port
addresses, and name1 and name2 are user-specified names
assigned to distinguish the multiple adapters.
The FRAME parameter is optional. The default frame type
is Ethernet_802.2. If you want the ODI server driver to
support more than one frame type, then both the unique
NAME= and FRAME= parameters must be paired on each
load driver line. The valid frame types are Ethernet_802.2,
Ethernet_802.3, Ethernet_II, and Ethernet_SNAP.
Installing the Novell NetWare Server Driver 3-13
The protocols must be bound to the specific driver
configuration using the user-assigned unique names.
The following example shows how this can be done:
load C:\SERVER\3C90X.LAN PORT=1000
FRAME=Ethernet_802.3 NAME=ADPONE
load C:\SERVER\3C90X.LAN PORT=2000
FRAME=Ethernet_II NAME=ADPTWO
bind IPX to ADPONE
bind IPX to ADPTWO
The examples used may require other parameters to work
properly. Consult the appropriate Novell NetWare manuals
for details.
Page 32

3-14 CHAPTER 3: INSTALLING THE NETWORK DRIVER
Supported Network Drivers
Table 3-1 provides the text file names and driver names for
supported network drivers. These text files describe how to
install the network driver and are located in the HELP
directory on EtherDisk Diskette #1.
Table 3-1 Network Driver Text File Names
Network
Operating System
Windows 95 W95NDIS.TXT EL90XND3.SYS/
Windows 95 NDIS 2 W95NDIS2.TXT EL90X.DOS
Windows NT WINNT.TXT EL90XND3.SYS/
NetWare Client 32 CLIENT32.TXT 3C90X.LAN
Text File Name Network Driver Name
EL90XND4.SYS
EL90XND4.SYS
NetWare 4.1 Server NETWARE.41X 3C90X.LAN
NetWare OS/2 NWOS2ODI.TXT 3C90X.SYS
NetWare client for DOS,
Windows 3.1, and
Windows for Workgroups
Windows for Workgroups
(NetWare)
Windows for Workgroups
(NDIS 2)
Windows for Workgroups
(NDIS 3)
Banyan VINES BANYAN.TXT EL90X.DOS
Microsoft LAN Manager LANMAN.TXT EL90X.DOS
IBM LAN Server (DOS) LANSRV.TXT EL90X.DOS
IBM LAN Server (OS/2) LANSRV.TXT EL90X.OS2
Artisoft LANtastic LANTASTK.TXT EL90X.DOS
AUTOLINK.TXT
(NETWARE directory)
WFWNETWR.TXT 3C90X.COM
WFWNDIS2.TXT EL90X.DOS
WFWNDIS3.TXT EL90X.386
3C90X.COM
Page 33

CHANGING CONFIGURATION
4
This chapter describes how to display and change
configuration settings for the 3C905B-TX adapter using
the 3Com NIC Diagnostics program.
Before you change the settings, contact your system
administrator.
Configuration Settings
Table 4-1 lists each configuration option, the default
setting, and the available settings.
Table 4-1 Option Settings
.
Option Default Setting Available Settings
Network Driver
Optimization
Full-Duplex Auto Select Enabled, Disabled, Auto Select
Boot PROM Disabled Disabled, 8K, 16K, 32K
Media Type Auto Select 100BASE-TX, 10BASE-T, Auto Select
PACE Disabled Enabled, Disabled
NDIS Driver Speed None 100 Mbps, 10 Mbps (Windows NT only),
Remote Wake-Up No Yes, No
CAUTION: Before setting the 3C905B-TX adapter for
full-duplex, make sure that the switch port is also set to
full-duplex or supports full-duplex and auto-negotiation
(NWay).
Full-duplex at 100 Mbps improves the performance of
switch (hub) connections. The 3C905B-TX adapter
supports full-duplex at 10 or 100 Mbps. If the switch
supports the NWay featur e and full-duplex, the 3C905B-TX
adapter automatically runs in full-duplex.
Normal Minimize CPU Utilization, Maximize
Network Performance, Normal
N/A (Windows 95)
Page 34

4-2 CHAPTER 4: CHANGING CONFIGURATION
Displaying Configuration Settings
If you are running Windows 95, Windows 98, or
Windows NT, use the 3Com NIC Diagnostics program
to display and change configuration settings.
The 3Com NIC Diagnostics program is automatically
installed with the network driver. Driver installation is
described in Chapter 3.
To display the current configuration of the 3C905B-TX
adapter using the 3Com NIC Diagnostics program, follow
these steps:
1 Make sure that the 3C905B-TX adapter is installed
and connected to the network (Chapter 2) and the
network driver is installed (Chapter 3).
2 Start the 3Com NIC Diagnostics program by clicking
the Windows Start menu.
3 Select Programs.
4 Select 3Com NIC Utilities.
5 Select 3Com NIC Diagnostics.
The 3Com NIC Diagnostics Program General screen appears,
as shown in Figure 4-1.
6 Click NIC Details to display the NIC Details screen.
Each configuration setting is displayed with the current
value. Use the scroll bar to display the full list.
Click the Help button to display Help for this screen. Click the
question mark (?) at the top of the screen, drag it to a value,
and click. The pop-up box displays information about the
selected value.
Changing Configuration Settings
To change the 3C905B-TX adapter configuration settings
with the 3Com NIC Diagnostics program, follow these steps:
1 Click the Properties tab on the 3Com NIC Diagnostics
General screen, shown in Figure 4-1.
The 3Com NIC Diagnostics Properties screen appears, as
shown in Figure 4-2.
Page 35

Changing Configuration Settings 4-3
Figure 4-1 3Com NIC Diagnostics Program General Screen
Figure 4-2 3Com NIC Diagnostics Program Properties Screen
Page 36

4-4 CHAPTER 4: CHANGING CONFIGURATION
2 To display the options for each setting, select the
setting and scroll through the options pull-down
menu to the right.
Click the Help button to display Help for this screen. Click the
question mark (?) at the top of the screen, drag it to a value,
and click. The pop-up box displays information about the
selected value.
3 To select a new value, use the pull-down menu and
release the mouse button at the value you want.
4 Click OK.
The new value is selected. Repeat the process to change
any configuration setting on the Properties screen. Click OK
to save values or Cancel to exit without saving values.
Changing PACE Configuration
PACE technology allows you to establish class of service
in order to prioritize multimedia and real-time data.
Prioritization makes sure that critical data for the selected
applications gets through as fast as possible. To use PACE
technology, you must have a switched connection over
switches that are enabled for PACE technology.
Selecting PACE Applications
To select PACE applications, follow these steps:
1 On the Properties screen shown in Figure 4-2, click
PACE Configuration.
The PACE Applications screen appears.
For the PACE driver to recognize high-priority network
traffic, it must know if a stream of network traffic was
generated by a specific PACE application.
2 To enable PACE support for an application, click the
box next to the appropriate application name.
3 Click OK.
Page 37

Changing PACE Configuration 4-5
Changing PACE Ranges and Protocols
You can add information for PACE applications not listed
on the P ACE Applications scr een. You must specify the port
or socket ranges as well as the network protocol being
used. Refer to the PACE application user guide. The PACE
network driver uses these ranges to determine whether a
packet should be treated as high-priority.
1 To add the PACE ranges and protocols, click the
Additional Ranges tab.
The PACE Additional Ranges screen appears.
2 Enter the beginning of the port or socket range for
the application in the Range Start box.
The range should be a four-digit hexadecimal value.
3 Enter the Range End value of the port or socket range
for the application.
The range end should be a four -digit hexadecimal number.
If only one port or socket is needed, Range End should
match Range Start.
4 Select the protocol that the application uses.
The protocol can be TCP, UDP, or IPX. Some applications
support multiple protocols and have port or socket ranges
for each protocol. In this case, the range or protocol must
match the protocol on the PC.
For example, if only TCP/IP is installed, do not enter the
socket range for IPX; otherwise, you could experience a
decrease in performance.
5 Once the Range Start, Range End, and Protocol are
entered, click Add.
The range is added to the list.
To remove a range, select the range in the list and
click Remove.
Page 38

4-6 CHAPTER 4: CHANGING CONFIGURATION
PACE Advanced Options
PACE Advanced Options are used to fine-tune the way the
network driver handles types of PACE traffic. In general,
these values need not be altered. Contact your network
administrator before using these options.
1 To display the PACE Advanced Options screen, click
the Advanced Options tab on the PACE Applications
screen.
The PACE Advanced Options screen appears.
2 Enter new information as required.
3 Click OK to set the new value.
To review the PACE settings descriptions, click Help on the
PACE screens.
Setting Fast IP
You can use Fast IP to improve performance in an
environment where most servers and clients are attached
to a switched network. Contact your system administrator
before you implement Fast IP.
You must have the 3C905B-TX adapter installed and be
running either Windows 95 or Windows NT with TCP/IP
enabled. In this environment, any application that uses
TCP/IP or Microsoft Networking over TCP/IP, FTP, or HTTP
can use Fast IP.
For a detailed explanation of Fast IP, go to the 3Com Web
site at:
http://www.3com.com/
1 Click the Fast IP tab on the PACE Applications screen.
2 To enable Fast IP, click Fast IP enabled on the Fast IP
screen.
3 Click OK to save the change.
Using the DOS Configuration Program
To use the DOS diagnostic program, see the INSTRUCT.TXT
file in the HELP directory on EtherDisk Diskette #1.
Page 39

A
This appendix lists the specifications and connector pin
assignments for the 3C905B-TX adapter.
Specifications
Network Interface
SPECIFICATIONS
10 Mbps Ethernet
10BASE-T
100 Mbps Ethernet
100BASE-TX
Physical Dimensions
Height: 8.57 cm (3.75 in.)
Length: 12.07 cm (4.75 in.)
Environmental Operating Range
Operating temperature: 0˚ to 70 ˚C (32˚ to 158 ˚F)
Humidity: 10 to 90% noncondensing
Power Requirements
Operating voltage: +5 V ± 5% @ 650 mA max
Ethernet IEEE 802.3 industry
standard for a 10 Mbps
baseband CSMA/CD local area
network
Ethernet IEEE 802.3u industry
standard for a 100 Mbps
baseband CSMA/CD local area
network
Page 40

A-2 APPENDIX A: SPECIFICATIONS
12345678
1
2
3
4
5
6
7
8
TD+
TD
_
RD
_
RD+
DATA
TX
ACT
10
100
L
N
K
RJ-45 Connector Pin Assignments
Figure A-1 shows the RJ-45 connector pin assignments for
the 3C905B-TX adapter.
Figure A-1 RJ-45 Connector Pin Assignments
Page 41

TECHNICAL SUPPORT
B
Help and Service Information
If you have questions about your new Options by IBM
product, or require technical assistance, visit the IBM
Personal Computing Web site at:
http://www.pc.ibm.com
for information about IBM, Options by IBM, or IBM Service
and Support. Additionally, you can receive information
from the IBM Automated Fax system at 1-800-426-3395
(in Canada, 1-800-465-3299), or from the Personal
Systems Group Bulletin Board System (PSG BBS) at
1-919-517-0001. You can also get help and information
through the IBM PC HelpCenter, 24 hours a day , seven days
a week. Response time may vary depending on the number
and nature of the calls received.
Marketing, installation, and configuration support through
the HelpCenter will be withdrawn or made available for a
fee, at IBM’s discretion, 90 days after the option has been
withdrawn from marketing. Additional support offerings,
including step-by-step installation assistance, are available
for a nominal fee.
During the warranty period, assistance for replacement or
exchange of defective components is available. In addition,
if your IBM option is installed in an IBM computer, you
might be entitled to service at your location. Your technical
support representative can help you determine the best
alternative.
Page 42

B-2 APPENDIX B: TECHNICAL SUPPORT
Step 1. Problem Solving
You may be able to solve the problem yourself. Before
calling the HelpCenter, please prepare for the call by
following these steps:
1 If you are having installation or configuration
problems, refer to the detailed sections on
installation found in this manual, and review any
README.TXT files found on the installation diskettes.
2 Visit the Service and Support section of the Personal
Computing Web site specific to the model of option
you have purchased. Updated installation
instructions, hints and tips, or updated
system-specific notes are often published in this
section. You might find that later device drivers are
available that will improve the performance and
compatibility for your new option.
If you are installing this option in an IBM computer, also
visit the applicable Web page for that computer model.
These pages might also contain useful hints and tips related
to installation of this option and might refer to BIOS or
device-driver updates required for your computer model.
If you are installing the option in a non-IBM computer , refer
to the manufacturer’s Web site.
3 Uninstall, and then reinstall the option. During the
uninstallation process, be sure to remove any files
that were installed during the previous installation.
Many IBM options include uninstallation programs.
4 Check all cabling to be sure that it is correct as shown
in this manual. When you connect a cable to a cable
connector, pay close attention to the colored stripes
along the edge of the cable, and ensure that they are
matched with PIN 1, on both the computer connector
and the option connector.
5 If your option contains jumpers or switches, be sure
their positions and orientation match the instructions
in this manual.
Page 43

Step 2. Preparing for the Call
To assist the technical support representative, have
available as much of the following information as possible:
1 Option name
2 Option number
3 Proof of purchase
4 Computer manufacturer, model, serial number (if
IBM), and manual
5 Exact wording of the error message (if any)
6 Description of the problem
7 Hardware and software configuration information
for your system
Step 2. Preparing for the Call B-3
If possible, be at your computer. Your technical support
representative might want to walk you through the
problem during the call.
Step 3. Placing the Call to IBM
If you call 90 days or more after the date of withdrawal
or after your warranty has expired, you might be charged
a fee.
For the support telephone number and support hours by
country, refer to the following table or to the enclosed
technical support insert. If the number is not provided,
contact your IBM reseller or IBM marketing representative.
Support 24 hours a day, 7 days a week
Canada 1-800-565-3344
U.S.A. / Puerto Rico 1-800-772-2227
Page 44

B-4 APPENDIX B: TECHNICAL SUPPORT
Additional Technical Support Resources
Online assistance can be obtained through the IBM
Automated Fax System, the Personal Computing Web
page, and the PSG Electronic Bulletin Board System.
Online Technical Support
IBM Personal Computing Web Page www.pc.ibm.com
IBM PSG BBS 1-919-517-0001
IBM Automated Fax System 1-800-426-3395
Troubleshooting
The following sections explain how to isolate and solve
adapter problems, including the following topics:
1-800-465-3299 (in Canada)
■ Status LEDs
■ 3Com NIC Diagnostics program
■ Accessing the 3C905B-TX adapter Help system
■ 3Com support services
■ Removing the 3C905B-TX adapter software
■ Checking Remote Wake-Up
■ Crossover cable troubleshooting tips
■ Frequently Asked Questions
■ Accessing the 3Com World Wide Web page
The 3Com World Wide Web site offers the latest drivers,
troubleshooting information, and software updates in the
Support area. To access the Web site, enter the 3Com URL
address into your Internet browser:
http://infodeli.3com.com/infodeli/swlib/n_i_c.
htm/
Status LEDs
Before the LEDs can be used for troubleshooting, the
adapter must be connected to the network (Chapter 2) and
the network driver must be installed (Chapter 3).
Page 45

Status LEDs B-5
The 3C905B-TX adapter has three status LEDs, as shown in
Figure B-1 and described in Table B-1.
TX
RJ-45 port
DATA
ACT
10
100
L
N
K
ACT LED
10 LNK LED
100 LNK LED
Figure B-1 LEDs
Table B-1 LED Descriptions
LED Description Flashing Steady Off
10 LNK Green:
Link integrity
Reversed
polarity
Good 10BASE-T
connection between
adapter and hub
No connection
between
adapter
and hub
100 LNK Green:
Link integrity
Reversed
polarity
Good 100BASE-TX
connection between
adapter and hub
No connection
between
adapter
and hub
ACT Yellow:
Port traffic for
Network traffic
present
Heavy network
traffic
No traffic
either speed
Page 46

B-6 APPENDIX B: TECHNICAL SUPPORT
3Com NIC Diagnostics Program
Use the 3Com NIC Diagnostics program for Windows 95
and Windows NT to test the 3C905B-TX adapter and
change configuration. To change the adapter’s
configuration, see Chapter 4. If you are running NetWare
Client 32 with the NetWare ODI driver, use the DOS
diagnostic program described in the INSTRUCT.TXT file in
the HELP directory on EtherDisk Diskette #1.
The 3Com NIC Diagnostics program is installed with the
driver. Driver installation is described in Chapter 3. You
must install the driver before you run the program.
Accessing the 3C905B-TX Adapter Help System
You can display the 3C905B-TX adapter Help system,
a Windows Help application that includes 3C905B-TX
adapter Release Notes, Frequently Asked Questions, and
the 3C905B-TX adapter KnowledgeBase. The Help system
was installed with the network driver.
To display the 3Com Help system, follow these steps:
1 Install the 3C905B-TX adapter, connect it to the
network (Chapter 2), and install the driver
(Chapter 3).
2 Click the Windows Start menu.
3 Select Programs.
4 Select 3Com NIC Utilities.
5 Select 3Com NIC Diagnostics Help.
The Help screen for the 3Com NIC Diagnostics General
screen appears.
6 Click the links to display information about each of
the 3Com NIC Diagnostics screens.
Page 47

3Com NIC Diagnostics Program B-7
Displaying Release Notes, Frequently Asked Questions,
and the KnowledgeBase
To access the Release Notes, Frequently Asked Questions,
and KnowledgeBase information, follow these steps:
1 Click the Support tab, shown in Figure B-2.
2 Click the Release Notes button on the Support screen.
The Release Notes Help screen appears.
■ Click the Release Notes link to display tips about
installing and using the 3C905B-TX adapter.
■ Click the Frequently Asked Questions link to display
common questions asked by customers and answered
by 3Com support experts.
■ Click the KnowledgeBase link to display 3C905B-TX
adapter compatibility topics.
To display the entire Help system, click the Help button on
each NIC Diagnostics screen. To display information about
any item on each screen, click the question mark (?), drag it
to the item, and click. The pop-up box displays information
about the selected item.
Running the Self-Test
Run the self-test to check the physical components,
connectors, and circuitry on the adapter.
1 Make sure that the 3C905B-TX adapter is installed
and connected to the network (Chapter 2) and the
network driver is installed (Chapter 3).
2 Start the 3Com NIC Diagnostics program by clicking
the Windows Start menu.
3 Select Programs.
4 Select 3Com NIC Utilities.
5 Select 3Com NIC Diagnostics.
A warning message appears. Click OK to disconnect your
PC from the network to conduct this test.
The 3Com NIC Diagnostics General screen appears, as
shown in Figure B-2.
Page 48

B-8 APPENDIX B: TECHNICAL SUPPORT
Figure B-2 3Com NIC Diagnostics Program General Screen
To access the 3Com NIC Diagnostics program later by
clicking its icon in the system tray, click the check box next
to Enable Tray Control.
6 Click the Diagnostics tab to display the Diagnostics
screen, shown in Figure B-3.
Figure B-3 Diagnostics Screen
Page 49

3Com NIC Diagnostics Program B-9
7 Click Start in the Self-Test area.
The following tests run in sequence:
■ Register Access
■ EEPROM
■ FIFO
■ Ethernet Core Loopback
■ Encoder/Decoder Loopback
■ Interrupt
You can click Stop to stop the tests. Otherwise, the tests
run continuously to completion.
Click the Help button to display help for this screen. Click
the question mark (?) at the top of the screen, drag it to a
test, and click. The pop-up box displays information about
the selected test and what to do if the test fails.
Running the Echo Test
The echo test tests the 3C905B-TX adapter’s ability to
transmit and receive data while on the network.
You need two PCs with 3Com adapters or IBM 10/100
Fast EtherLink XL Adapters by 3Com installed to run an
echo test: one PC to send data and one PC to receive data.
CAUTION: Running the echo test while connected to an
active network can cause intermittent failures. To avoid
this, connect to an inactive network on which only the PC
being tested is operating.
To run the echo test, follow these steps:
1 Make sure that the 3C905B-TX adapter is installed in
the sending PC and connected to the network
(Chapter 2) and that the network driver is installed
(Chapter 3).
2 Install a 3C905B-TX adapter in another PC (the echo
server), connect it to the network, and install the
network driver.
The echo server PC is the responding PC.
Page 50

B-10 APPENDIX B: TECHNICAL SUPPORT
3 On both PCs:
a Click the Windows Start menu.
b Select Programs.
c Select 3Com NIC Utilities.
d Select 3Com NIC Diagnostics.
e Click the Diagnostics tab to display the Diagnostics
screen, shown in Figure B-3.
4 Click Respond on the Diagnostics screen (Figure B-3)
of the responding PC.
The Echo Test Responder screen appears on the
responding PC.
5 Click Start on the Echo Test Responder screen.
6 On the Diagnostics screen (Figure B-3) of the sending
PC, click Send.
7 On the Diagnostics screen (Figure B-3) of the sending
PC, click Start.
The statistics for the test appear in the Statistic section of
the window.
Click the Help button to display Help for this screen. Click
the question mark (?) at the top of the screen and drag it to
a statistic and click. The pop-up box displays information
about the selected statistic.
3Com Support Services
The 3Com NIC Diagnostics Program Support screen, shown
in Figure B-4, provides access to the following support
services:
■ 3Com NIC Diagnostics program
■ 3C905B-TX adapter Release Notes
■ 3Com BBS telephone numbers and modem speeds
■ 3Com World Wide Web information
■ 3Com problem report generator (not available to IBM)
Page 51

3Com NIC Diagnostics Program B-11
1 To access the 3Com NIC Diagnostics support screen,
click the Support tab on the 3Com NIC Diagnostics
program main screen, shown in Figure B-2.
The 3Com NIC Diagnostics Program Support screen
appears, shown in Figure B-4.
Figure B-4 3Com NIC Diagnostics Program Support Screen
■ Click Diagnostics to run the 3Com NIC Diagnostics
program. Refer to the beginning of this chapter for
information on how to use the 3Com NIC Diagnostics
program.
■ Click Release Notes to display the 3C905B-TX adapter
Release Notes, Frequently Asked Questions, and the
3C905B-TX adapter KnowledgeBase.
■ Click BBS Information to display the BBS telephone
numbers and modem speeds.
■ The http... button displays the 3Com World Wide Web
address.
Page 52

B-12 APPENDIX B: TECHNICAL SUPPORT
Removing the 3C905B-TX Adapter PACE and
3NICDIAGS Software
You can remove the PACE and 3NICDIAGS software from
your PC using Windows 95, Windows NT, or DOS.
Windows 95 and Windows NT 4.0
To remove the P ACE and 3NICDIAGS softwar e, follow these
steps:
1 In the Windows Control Panel, select Add/Remove
Programs.
2 Select 3Com NIC Diagnostic Utilities.
3 Click Add/Remove.
The 3C905B-TX adapter software is removed fr om your PC.
DOS
To remove the PACE and 3NICDIAGS software, at the DOS
prompt, enter:
un3c90x.exe
The program removes the 3C905B-TX adapter software.
Checking the Remote Wake-up Function
If the PC does not boot up when a Magic Packet wake-up
packet is sent, perform these general troubleshooting
steps:
1 Verify that the Wake on Link and Wake on Magic
Packet settings are enabled.
a Click the Network Neighborhood icon.
b Click Properties.
c Double-click the 3Com NIC icon and click the
Advanced tab.
Make sure that Wake on Link and Wake on
Magic Packet are enabled. If these settings do not exist,
either the adapter is not a Remote Wake-Up adapter or
the driver installation file is outdated. For the latest
3C905B-TX drivers and installation files, download
EtherDisk diskette 3.1 or later from the 3Com Web site:
http://www.3com.com/
Page 53

3Com DOS Diagnostic Program B-13
2 Verify the driver version.
The driver must be at least version 2.23.40.
a Click Properties.
b Click the Version tab.
c Check the EL90X.SYS driver version.
If the version is lower than 3.1, download an updated
version of the driver from the 3Com Web site:
http://www.3com.com/
3 If the version of the driver is up to date, the
keywords are enabled, and the PC still does not
wake up, check the BIOS.
a Boot the PC and enter the BIOS.
b Locate the Wake-Up on PME signal or Wake-Up on LAN
event setting.
c Verify that the setting is enabled.
If you experience difficulties locating these settings,
consult the reference manual for your PC, or contact
your PC vendor.
4 Remove the PC cover and check the Remote Wake-Up
connection.
Verify that the Remote Wake-Up cable is plugged in to the
adapter as well as to the motherboard. Unplug and reinsert
the cable if necessary.
5 If the adapter still does not wake up, install a known
good working Remote Wake-Up adapter and the
Remote Wake-Up cable in the PC and recheck the PC.
If the PC works, contact your network vendor for a
replacement of the 3Com adapter. After you verify with a
known good working adapter that the PC still does not
wake up, there may be a problem with the motherboard.
Contact your PC vendor.
3Com DOS Diagnostic Program
For information about running the 3Com DOS diagnostic
program, see the INSTRUCT.TXT text file in the HELP
directory on EtherDisk Diskette #1.
Page 54

B-14 APPENDIX B: TECHNICAL SUPPORT
Crossover Cable Troubleshooting Tips
When you work with network cabling, concentrators, and
adapters from different vendors, it is possible to connect
everything and still have no communication between
file servers and workstations.
When there are several unknown variables, it is difficult to
determine which component is broken. Use these tips to
isolate the problem.
1 Determine whether your equipment complies with
the 10BASE-T or 100BASE-TX standard.
This is particularly important for concentrators (hubs or
repeaters).
2 Connect a straight-through cable from the PC to
the hub.
The hub performs an internal crossover so that the signal
can go from TD+ to RD+ and TD– to RD–. When you look
at an RJ-45 connector from the front, pin 1 is identified on
the left-hand side when the metal contacts are facing up.
3 Make sure that the TD+ and TD– wires are twisted
together, and that the RD+ and RD– wires are twisted
together. The example in Figure B-5 shows 10BASE-T
cabling.
.
12345678
Straight-through
10BASE-T cable
1
2
3
4
5
6
7
8
1
2
3
4
5
6
7
8
TD+
TD
RD+
RD
Crossover
10BASE-T cable
1
2
3
4
5
6
7
8
1
2
3
4
5
6
7
8
TD+
TD
RD+
RD
Figure B-5 Straight-through and Crossover Cable Pinouts
Page 55

Crossover Cable Troubleshooting Tips B-15
Using wires from opposing pairs can cause signals to
be lost. For a 100BASE-TX cable, pins #1 and #2, and #3
and #6 must be on the same twisted strand.
Troubleshooting Hubs with Crossover Cable
When there is doubt whether a hub is performing correctly,
or if the impedance settings are in question, a crossover
cable can help you isolate the failing component.
1 Connect a file server and a client PC back to back with
a crossover cable to verify that the adapter and
network operating system are properly configured.
2 To make a crossover cable, simply connect TD+ to RD+
and TD– to RD–.
The cable performs the crossover that is usually performed
by the hub. Make sure that two twisted-pair wires are
used. Figure B-5 shows the pinouts for the crossover cable.
On the straight-through cable, make sure that the wir es are
from the same twisted pair.
If the file server and client PC function together as a small
network, then either the existing cabling or the hub is the
problem.
■ If there is a proper crossover, the appropriate LED
comes on.
■ If there is a straight-through connection, the LED does
not light.
■ A blinking LED indicates that there is a polarity
mismatch (that is, TD+ to RD– instead of TD+ to RD+).
Page 56

B-16 APPENDIX B: TECHNICAL SUPPORT
Frequently Asked Questions
Table B-2 describes some common questions and answers
about the 3C905B-TX adapter.
Table B-2 Frequently Asked Questions
Question Answer
Which PCI slot is best for my
PCI adapter?
Do I have to configure the
3C905B-TX adapter?
What interrupts should I avoid? You should avoid using any interrupts used by
3Com PCI adapters are designed to work in any
bus mastering PCI slot, preferably slot 1. Avoid
any PCI slot next to an ISA slot. This is often a
shared slot and does not support bus mastering.
The adapters perform best in those slots that
support bus mastering data transfers. Refer to
your PC manual for information on which slots
support bus mastering data transfers.
PCI is a self-configuring bus architecture. Most of
the time you only need to install the board in
your PC; PCI does the rest. However, on some
PCI computers, you may be required to configure
the computer’s BIOS manually after installing
your PCI adapter. Refer to the owner’s guide for
your PC.
ISA/EISA boards that do not properly support
shared interrupts (level-triggered).
If you do not know or are unsure whether other
devices or adapters in your PC support shared
interrupts, then avoid using them.
Avoid using the same interrupt as your local hard
drive (normally IRQ 14 for IDE drives and IRQ 11
for most SCSI host adapters), since not all hard
drives support shared interrupts at this time.
Are my Fast EtherLink XL
network drivers
Microsoft-certified?
Are my Fast EtherLink XL Bus
Master ODI drivers
Novell-certified?
(continued)
Avoid using 9 because it cascades with 2.
For Novell NetWare servers, avoid using IRQ 7 or
15. These IRQs only support nonshared devices
and may cause problems if they are shared
between two devices.
Yes, the Fast EtherLink XL network drivers are
Microsoft-certified.
Yes, the Fast EtherLink XL ODI drivers are
Novell-certified.
Page 57

Frequently Asked Questions B-17
Table B-2 Frequently Asked Questions (continued)
Question Answer
How do I remove the 3Com icon
from my system tray?
1 Double-click the 3Com icon to start the 3Com
NIC Diagnostics program.
2 In the right bottom corner of the main
window, click the Enable Tray Control check
box to remove the check mark.
3 Exit the program and the icon will not appear
anymore.
How can I get a SCO driver? You can get the SCO driver from the 3Com
World Wide Web site.
1 Enter the 3Com URL:
http://www.3com.com/
2 Click Drivers.
3 Click Latest Drivers.
4 Download the required files.
■ 90XSCO3.EXE is for SCO Open Desktop.
■ 90xSCO5.EXE is for SCO Open Server.
How can I remove the
3C905B-TX adapter PACE and
3NICDIAGS software?
1 In the Windows 95 Control Panel, select
Add/Remove Programs.
2 Select 3Com NIC Diagnostic Utilities.
Does the 3C905B-TX adapter
support full-duplex?
Why does the 3C905B-TX
adapter install as a “Generic PCI
Ethernet Controller” under
Other Devices in the Device
Manager?
(continued)
3 Click Add/Remove.
The PACE and 3NICDIAGS software is removed
from your PC.
Yes, the 3C905B-TX adapter supports full-duplex
at 10 Mbps and 100 Mbps operation.
When Windows 95 is installed with the
3C905B-TX adapter already installed,
Windows 95 installs the 3C905B-TX adapter as a
generic PCI Ethernet controller. To work around
this problem, follow these steps:
1 In the Device Manager, double-click
Other Devices.
2 Click PCI Ethernet Controller.
3 Click Remove.
4 Restart your PC.
Page 58

B-18 APPENDIX B: TECHNICAL SUPPORT
Table B-2 Frequently Asked Questions (continued)
Question Answer
What should I do if a yellow
exclamation point appears next
to the 3C905B-TX adapter
name?
What is the hardware IP header
checksum?
Does the 3C905B-TX adapter
support NetWare versions 3.11
or 4.0x?
1 In the Device Manager, double-click
Other Devices.
2 Click PCI Ethernet Controller or the duplicate
3C905B-TX NIC entry.
3 Click Remove.
4 Restart your PC.
The header checksum is a field in the IP header.
When the 3C905B-TX adapter receives IP data, it
computes the IP header checksum, and if an
error occurred, the packet is dropped and is not
passed to the protocol stack. By computing the
CRC through hardware, the adapter can increase
the performance of IP traffic and reduce CPU
processing required by the protocol stack.
To avoid having the CRC computed twice (once
in the hardware and again in the software by the
protocol stack), make sure that your IP protocol
does not compute the CRC or if it does, disable
that function.
The 3C905B-TX adapter does not support
NetWare versions 3.11 or 4.0x. These versions
require the use of a server driver that conforms
to the HSM 3.2 specification. 3Com no longer
develops NetWare server drivers to the HSM 3.2
specification.
What does Remote Wake-Up
do?
How can I tell if my PC supports
Remote Wake-Up?
What can wake up the
3C905B-TX adapter?
(continued)
Remote Wake-Up powers up a PC remotely from
standby or suspend mode using a wake-up packet
that is sent through the LAN. With this method, no
one has to be at the PC to turn it on.
Remote Wake-Up is also known as Wake on LAN.
Check to see if there is a 3-pin header for the
Remote Wake-Up connector located on the PC
motherboard and if your PC has a BIOS that
supports wake-up events based on LAN events.
If you are unsure, contact your PC vendor for
further details.
The adapter can be awakened by a Magic Packet
wake-up packet sent by management software,
or by connecting or disconnecting the TP cable.
Page 59

Frequently Asked Questions B-19
Table B-2 Frequently Asked Questions (continued)
Question Answer
What is a Magic Packet? A Magic Packet is a valid Ethernet packet that
contains a synchronization stream immediately
followed by 16 repetitions of the destination MAC
address. This Magic Packet is not protocol-specific
as long as the protocol contains the sync stream
and the 16 repetitions. This Magic Packet can be
routed in order to wake up a remote PC. Since it
is a valid Ethernet address, the Remote Wake-Up
adapter can accept broadcast or multicast packets.
What is a cable
connect/disconnect?
The adapter can also be awakened by
connecting or disconnecting the network cable.
What is Fast IP? Fast IP is software that improves performance on
switched networks. Fast IP allows end systems
(desktops and servers) to discover switched
communication paths. By creating switched
shortcuts, Fast IP allows end stations to bypass
the router and transfer data across wire-speed
switched paths. Fast IP is part of 3Com’s
DynamicAccess software, an advanced network
driver that brings intelligence to end systems to
provide improved network performance and
control.
What are the PC and network
requirements to run Fast IP?
Client requirements:
PC running Windows 95 or Windows NT
(versions 4 or 3.51), 3Com 3C905B-TX adapter,
and the TCP/IP stack
Network requirements:
Switched path between stations and single
broadcast domain
What are the network
configuration requirements for
Fast IP?
Fast IP is designed to bypass the router,
particularly where the router is a bottleneck, as
well as to leverage the switched infrastructure.
For Fast IP to create shortcuts around routers,
there must be a switched path between source
and destination.
What is the performance gain
when using Fast IP?
Fast IP bypasses the router to provide increased
performance in switched networks even if only
a small number of network nodes use Fast IP.
The performance gain obtained when deploying
Fast IP is directly related to traffic load on the
backbone router. The more traffic pumped to the
router, the greater the latency and response time
and the higher the performance gain. Internal tests
show performance increases on the order of
600% when routers are loaded at 70 to 75%.
Page 60

B-20 APPENDIX B: TECHNICAL SUPPORT
Accessing the 3Com World Wide Web Page
The 3Com Web site features news and information about
3Com products, customer service and support, 3Com’s
latest drivers, technical information, and more.
To access 3Com’s World Wide Web site, enter the 3Com
URL into your Internet browser:
http://infodeli.3com.com/infodeli/swlib/n_i_c.
htm/
The Customer Support section has the latest
troubleshooting tips for 3Com adapters.
Page 61

GLOSSARY
10BASE-T
The IEEE 802.3 standard for a 10 Mbps baseband network
on twisted-pair cable.
100BASE-T
The IEEE 802.3 standard for a 100 Mbps baseband
network over twisted-pair cable.
100BASE-TX
The IEEE 802.3 standard for a 100 Mbps baseband
network over two-pair Category 5 UTP or STP wire.
10/100 auto-negotiation (NWay)
Signaling scheme that allows the adapter and the hub to
negotiate between 10BASE-T and 100BASE-T, and
automatically select the highest performance level
supported by both devices.
dRMON
Distributed RMON. The 3C905B-TX adapter SmartAgent
intelligent agents collect remote management information
and send it to the Transcend Edge Monitor System to
provide full RMON network management in switched and
Fast Ethernet networks.
DynamicAccess software
3Com proprietary technology that optimizes network
performance. DynamicAccess features include PACE
Interactive Access technology, dRMON (distributed RMON)
support, Efficient Multicast Control, and support for
PACE real-time and multimedia class of service
applications.
Page 62

2 GLOSSARY
full scatter gather
Technique that reduces CPU utilization by coordinating
multiple storage locations for received data with no CPU
utilization and then collecting it from multiple memory
locations for transmission.
infinite bursting
Technology that enables the 3C905B-TX adapter to move
data continuously across the PCI bus without breaks in the
data transfer previously caused by cache size limitations.
Previously, cache limitations caused the adapter to release
and reacquire the PCI bus after every 64-byte burst. Infinite
bursting increases throughput and reduces CPU utilization
for better performance.
NDIS
Network Driver Interface Specification. Defines the network
driver architecture and interfaces that let a PC support
adapters. This architecture provides a standardized way
to write drivers for network adapters.
network interface card (NIC)
Network interface card. Also called adapter.
PACE technology
Technology that enhances both real-time, interactive
applications and multimedia (data, voice, and video)
applications by enhancing network bandwidth utilization,
reducing latency, controlling jitter, and supporting multiple
traffic priority levels.
Parallel Tasking II architecture
3Com’s third-generation Ethernet adapter architecture.
Parallel Tasking technology accelerates data transfer by
processing data packets simultaneously instead of
sequentially.
PCI
Peripheral Component Interconnect. An advanced
high-performance local bus that supports multiple peripheral
devices. At 33 MHz, the PCI bus transfers data at up to
1056 Mbps.
Page 63

INDEX
Numbers
10/100 auto-negotiation (NWay) 1-3,
4-1
3C90X.LAN file 3-12
3Com NIC Diagnostics program
echo test B-9
self-test B-7
A
adapter
connecting to the network 2-3
installing drivers 3-1
LEDs B-4
network interface A-1
Artisoft LANtastic 3-14
AUTOEXEC.BAT file 3-10
AUTOEXEC.NCF file 3-13
AutoLink auto installation
software 1-3, 3-10
AUTOLINK.LOG file 3-11
auto-negotiation 1-3, 4-1
B
Banyan VINES 3-14
D
diagnostic tests
echo test B-9
self-test B-7
DOS 3-10
drivers, installing 3-1
DynamicAccess features 1-2
E
echo test B-9
F
Fast IP 4-6
Frequently Asked Questions B-16
full-duplex 4-1
H
Help system
accessing B-6
Frequently Asked Questions B-6
KnowledgeBase B-6
Release Notes B-6
C
changing configuration settings 4-2
checking Remote Wake-Up B-12
CONFIG.SYS file 3-10
configuration settings 4-1
confirming adapter installation in
Windows 95 3-4
connecting to the network 2-3
conventions
notice icons, About This Guide 2
text, About This Guide 2
CPU utilization 4-1
crossover cable
cable pinouts B-14
troubleshooting tips B-14
I
IBM LAN Server 3-14
installing drivers
Artisoft LANtastic 3-14
AutoLink 3-14
Banyan VINES 3-14
IBM LAN Server 3-14
LAN Manager 3-14
NetWare Client 32 3-14
NetWare for DOS, Windows 3.1x,
and Windows for
Workgroups 3-10
Page 64

2 INDEX
NetWare server driver 3-12
supported network drivers 3-14
WFW NDIS 2 3-14
WFW NDIS 3 3-14
WFW NetWare 3-14
Windows 95 3-1
16-bit driver 3-14
Windows NT 3-6
installing the adapter 2-1
K
KnowledgeBase B-6
L
LAN Manager 3-14
LAN Server 3-14
LANtastic 3-14
LEDs 2-3, B-4, B-5
M
Media Type option description 4-1
Microsoft LAN Manager 3-14
R
Release Notes B-6
Remote Wake-Up, checking B-12
removing the 3C905B-TXNM-IBM
adapter PACE and 3NICDIAGS
software B-12
RJ-45 connector pin assignments A-2
S
server driver, Novell NetWare 3-12
support services B-10
switch port, setting full-duplex 4-1
T
troubleshooting 4-1, B-4
crossover cable B-14
LEDs B-5
U
updating the network driver
Windows NT 3.51 3-9
Windows NT 4.0 3-7
N
NDIS 2 network driver 3-14
NetWare 3-10
Client 32 3-14
OS/2 3-14
version 4.10 3-12
network driver optimization 4-1
O
operating voltage requirements A-1
P
PACE technology 4-4
advanced options 4-6
PC and server requirements 1-4
physical dimensions A-1
pin assignments A-2, B-15
power requirements A-1
V
VINES 3-14
W
Windows 3.1x 3-10
Windows 95 1-3, 3-1
confirming adapter installation 3-4
installing network driver 3-1, 3-14
Windows for Workgroups 3-10, 3-14
Windows NT 3-6, 3-14
version 3.51 3-9
version 4.0 3-7
World Wide Web (WWW) B-20
Page 65

The following warranty information applies to products purchased in the United States, Canada, and
Puerto Rico. For warranty terms and conditions for products purchased in other countries, see the
enclosed Warranty insert, or contact your IBM reseller or IBM marketing representative.
International Business Machines Corporation Armonk, New York 10504
STATEMENT OF LIMITED WARRANTY
The warranties provided by IBM in this Statement of Limited Warranty apply only to Machines you
originally purchase for your use, and not for resale, from IBM or your reseller. The term “Machine”
means an IBM machine, its features, conversions, upgrades, elements, or accessories, or any
combination of them. Unless IBM specifies otherwise, the following warranties apply only in the
country where you acquire the Machine. If you have any questions, contact IBM or your reseller.
Machine IBM 10/100 Fast EtherLink XL Adapter by 3Com
Warranty Period* 3 years
*Contact your place of purchase for warranty service information
PRODUCT STATUS
Each Machine is manufactured from new parts, or new and used parts. In some cases, the Machine
may not be new and may have been previously installed. Regardless of the Machine’s production
status, IBM’s warranty terms apply.
THE IBM WARRANTY FOR MACHINES
IBM warrants that each Machine 1) is free from defects in materials and workmanship and 2) conforms
to IBM’s Official Published Specifications. The warranty period for a Machine is a specified, fixed period
commencing on its Date of Installation. The date on your receipt is the Date of Installation, unless IBM
or your reseller informs you otherwise.
During the warranty period IBM or your reseller, if authorized by IBM, will provide warranty service
under the type of service designated for the Machine and will manage and install engineering changes
that apply to the Machine.
For IBM or your reseller to provide warranty service for a feature, conversion, or upgrade, IBM or your
reseller may require that the Machine on which it is installed be 1) for certain Machines, the
designated, serial-numbered Machine and 2) at an engineering-change level compatible with the
feature, conversion, or upgrade. Many of these transactions involve the removal of parts and their
return to IBM. You represent that all removed parts are genuine and unaltered. A part that replaces a
removed part will assume the warranty service status of the replaced part.
If a Machine does not function as warranted during the warranty period, IBM or your reseller will repair
it or replace it with one that is at least functionally equivalent, without charge. The replacement may
not be new, but will be in good working order. If IBM or your reseller is unable to repair or replace the
Machine, you may return it to your place of purchase and your money will be refunded.
If you transfer a Machine to another user, warranty service is available to that user for the remainder of
the warranty period. You should give your proof of purchase and this Statement to that user. However,
for Machines which have a life-time warranty, this warranty is not transferable.
WARRANTY SERVICE
To obtain warranty service for the Machine, you should contact your reseller or call IBM. In the United
States, call IBM at 1-800-772-2227. In Canada, call IBM at 1-800-565-3344. You may be required to
present proof of purchase.
IBM or your reseller will provide certain types of repair and exchange service, either at your location or
at IBM’s or your reseller’s service center, to restore a Machine to good working order. Types of service
may vary from country to country. IBM or your reseller will inform you of the available types of service
for a Machine based on its country of installation.
Page 66

When a type of service involves the exchange of a Machine or part, the item IBM or your reseller
replaces becomes its property and the replacement becomes yours. You represent that all removed
items are genuine and unaltered. The replacement may not be new, but will be in good working order
and at least functionally equivalent to the item replaced. The replacement assumes the warranty service
status of the replaced item. Before IBM or your reseller exchanges a Machine or part, you agree to
remove all features, parts, options, alterations, and attachments not under warranty service. You also
agree to ensure that the Machine is free of any legal obligations or restrictions that prevent its
exchange.
You agree to:
1 obtain authorization from the owner to have IBM or your reseller service a Machine that you do not
own; and
2 where applicable, before service is provided—
a follow the problem determination, problem analysis, and service request procedures that IBM or
your reseller provides,
b secure all programs, data, and funds contained in a Machine, and
c inform IBM or your reseller of changes in a Machine’s location.
IBM is responsible for loss of, or damage to, your Machine while it is 1) in IBM’s possession or 2) in
transit in those cases where IBM is responsible for the transportation charges.
EXTENT OF WARRANTY
IBM does not warrant uninterrupted or error-free operation of a Machine.
The warranties may be voided by misuse, accident, modification, unsuitable physical or operating
environment, improper maintenance by you, removal or alteration of Machine or parts identification
labels, or failure caused by a product for which IBM is not responsible.
THESE WARRANTIES REPLACE ALL OTHER WARRANTIES OR CONDITIONS, EXPRESS OR IMPLIED,
INCLUDING, BUT NOT LIMITED TO, THE IMPLIED WARRANTIES OR CONDITIONS OF
MERCHANTABILITY AND FITNESS FOR A PARTICULAR PURPOSE. THESE WARRANTIES GIVE YOU
SPECIFIC LEGAL RIGHTS AND YOU MAY ALSO HAVE OTHER RIGHTS WHICH VARY FROM
JURISDICTION TO JURISDICTION. SOME JURISDICTIONS DO NOT ALLOW THE EXCLUSION OR
LIMITATION OF EXPRESS OR IMPLIED WARRANTIES, SO THE ABOVE EXCLUSION OR LIMITATION MAY
NOT APPLY TO YOU. IN THAT EVENT SUCH WARRANTIES ARE LIMITED IN DURATION TO THE
WARRANTY PERIOD. NO WARRANTIES APPLY AFTER THAT PERIOD.
LIMITATION OF LIABILITY
Circumstances may arise where, because of a default on IBM’s part or other liability you are entitled to
recover damages from IBM. In each such instance, regardless of the basis on which you are entitled to
claim damages from IBM (including fundamental breach, negligence, misrepresentation, or other
contract or tort claim), IBM is liable only for:
1 damages for bodily injury (including death) and damage to real property and tangible personal
property; and
2 the amount of any other actual direct damages or loss, up to the greater of U.S. $100,000 or the
charges (if recurring, 12 months’ charges apply) for the Machine that is the subject of the claim.
UNDER NO CIRCUMSTANCES IS IBM LIABLE FOR ANY OF THE FOLLOWING: 1) THIRD-PARTY CLAIMS
AGAINST YOU FOR LOSSES OR DAMAGES (OTHER THAN THOSE UNDER THE FIRST ITEM LISTED
ABOVE); 2) LOSS OF, OR DAMAGE TO, YOUR RECORDS OR DATA; OR 3) SPECIAL, INCIDENTAL, OR
INDIRECT DAMAGES OR FOR ANY ECONOMIC CONSEQUENTIAL DAMAGES (INCLUDING LOST
PROFITS OR SAVINGS), EVEN IF IBM OR YOUR RESELLER IS INFORMED OF THEIR POSSIBILITY. SOME
JURISDICTIONS DO NOT ALLOW THE EXCLUSION OR LIMITATION OF INCIDENTAL OR
CONSEQUENTIAL DAMAGES, SO THE ABOVE EXCLUSION OR LIMITATION MAY NOT APPLY TO YOU.
Page 67

NOTICES
References in this publication to IBM products, programs, or services do not imply that IBM intends to
make these available in all countries in which IBM operates. Any reference to an IBM product, program,
or service is not intended to state or imply that only that IBM product, program, or service may be used.
Subject to IBM’s valid intellectual property or other legally protectable rights, any functionally
equivalent product, program, or service may be used instead of the IBM product, program, or service.
The evaluation and verification of operation in conjunction with other products, except those expressly
designated by IBM, are the responsibility of the user.
IBM may have patents or pending patent applications covering subject matter in this document. The
furnishing of this document does not give you any license to these patents. You can send license
inquiries, in writing, to:
IBM Director Licensing
IBM Corporation
500 Columbus Avenue
Thornwood, NY 10594
U.S.A.
Any references in this publication to non-IBM Web sites are provided for convenience only and do not
in any manner serve as an endorsement of those Web sites. The materials at those Web sites are not
part of the materials for this IBM product and use of those Web sites is at your own risk.
FEDERAL COMMUNICATIONS COMMISSION (FCC) STATEMENT
Note: This equipment has been tested and found to comply with the limits for a Class B digital device,
pursuant to Part 15 of the FCC Rules. These limits are designed to provide reasonable protection
against harmful interference in a residential installation. This equipment generates, uses, and can
radiate radio frequency energy and if not installed and used in accordance with the instructions, may
cause harmful interference to radio communications. However, there is no guarantee that interference
will not occur in a particular installation. If this equipment does cause harmful interference to radio or
television reception, which can be determined by turning the equipment off and on, the user is
encouraged to try to correct the interference by one or more of the following measures:
■ Reorient or relocate the receiving antenna.
■ Increase the separation between the equipment and receiver.
■ Connect the equipment into an outlet on a circuit different from that to which the receiver is
connected.
■ Consult an IBM authorized dealer or service representative for help.
Properly shielded and grounded cables and connectors must be used in order to meet FCC emission
limits. Proper cables and connectors are available from IBM authorized dealers. IBM is not responsible
for any radio or television interference caused by using other than recommended cables and
connectors or by unauthorized changes or modifications to this equipment. Unauthorized changes or
modifications could void the user’s authority to operate the equipment.
This device complies with Part 15 of the FCC Rules. Operation is subject to the following two
conditions:
1 this device may not cause harmful interference, and
2 this device must accept any interference received, including interference that may cause undesired
operation.
Responsible Party:
International Business Machines Corporation
New Orchard Road
Armonk, NY 10504
Page 68

INDUSTRY CANADA CLASS B EMISSION COMPLIANCE
S
TATEMENT
This Class B digital apparatus complies with Canadian ICES-003.
AVIS DE CONFORMITÉ À LA RÉGLEMENTATION D’INDUSTRIE
C
ANADA
Cet appareil numérique de la classe B est conform à la norme NMB-003 du Canada.
DEUTSCHE EMV-DIREKTIVE (ELECTROMAGNETISCHE
V
ERTRÄGLICHKEIT)
Dieses Gerät ist berechtigt in Übereinstimmung mit dem deutschen EMVG vom 9.Nov.92 das
EG-Konformitätszeichen zu führen.
Der Aussteller der Konformitätserklärung ist die IBM UK, Greenock.
Dieses Gerät erfüllt die Bedingungen der EN 55022 Klasse B.
EUROPEAN UNION - EMISSION DIRECTIVE
This product is in conformity with the protection requirements of EU Council Directive 89/366/ECC on
the approximation of the laws of the Member States relating to electromagnetic compatibility.
IBM can not accept responsibility for any failure to satisfy the protection requirements resulting from a
non-recommended modification of the product, including the fitting of non-IBM option cards.
This product has been tested and found to comply with the limits for Class B Information Technology
Equipment according to CISPR 22 / European Standard EN 55022. The limits for Class B Equipment
were derived for typical residential environments to provide reasonable protection against interference
with licensed communication devices.
UNION EUROPÉENNE- DIRECTIVE CONFORMITÉ
ÉLECTROMAGNÉTIQUE
Ce produit est conforme aux exigences de protection de la Directive 89/336/EEC du Conseil de I’UE sur
le rapprochement des lois des États membres en matière de compatibilité électromagnétique.
IBM ne peut accepter aucune responsabilité pour le manquement aux exigences de protection résultant
d’une modification non recommandée du produit, y compris I’installation de cartes autres que les
cartes IBM.
Ce produit a été testé et il satisfait les conditions de l’équipement informatique de Classe B en vertu de
CISPR22 / Standard européen EN 55022. Les conditions pour l’équipement de Classe B ont été définies
en protection raisonnable contre l’interférence d’appareils de communication autorisés.
UNION EUROPEA - NORMATIVA EMC
Questo prodotto è conforme alle normative di protezione ai sensi della Direttiva del Consiglio
dell’Unione Europea 89/336/CEE sull’armonizzazione legislativa degli stati membri in materia di
compatibilità elettromagnetica.
IBM non accetta responsabilità alcuna per la mancata conformità alle normative di protezione dovuta a
modifiche non consigliate al prodotto, compresa l’installazione di schede e componenti di marca
diversa da IBM.
Le prove effettuate sul presente prodotto hanno accertato che esso rientra nei limiti stabiliti per le
apparecchiature di informatica Classe B ai sensi del CISPR 22 / Norma Europea EN 55022. I limiti delle
apparecchiature della Classe B sono stati stabiliti al fine di fornire ragionevole protezione da
interferenze mediante dispositivi di communicazione in concessione in ambienti residenziali tipici.
Page 69

UNIONE EUROPEA - DIRECTIVA EMC (CONFORMIDAD
ELECTROMAGNÉTICA)
Este producto satisface los requisitos de protección del Consejo de la UE, Directiva 89/336/CEE en lo
que a la legislatura de los Estados Miembros sobre compatibilidad électromagnética se refiere.
IBM no puede aceptar responsabilidad alguna si este producto deja de satisfacer dichos requisitos de
protección como resultado de una modificación no recommendada del producto, incluyendo el ajuste
de tarjetas de opción que no sean IBM.
Este producto ha sido probado y satisface los límites para Equipos Informáticos Clase B de conformidad
con el Estándar CISPR22 y el Estándar Europeo EN 55022. Los límites para los equipos de Clase B se
han establecido para entornos residenciales típicos a fin de proporcionar una protección razonable
contra las interferencias con dispositivos de comunicación licenciados.
TRADEMARKS
The following terms are trademarks of the IBM Corporation in the United States or other countries or
both:
IBM and OS/2 are registered trademarks of International Business Machines Corporation.
The following terms are trademarks of other companies:
Unless otherwise indicated, 3Com registered trademarks are registered in the United States and may or
may not be registered in other countries.
3Com, the 3Com logo, DynamicAccess, EtherDisk, EtherLink, Parallel Tasking, SmartAgent, and
Transcend are registered trademarks of 3Com Corporation. AutoLink and PACE are trademarks of
3Com Corporation.
Artisoft and LANtastic are trademarks of Artisoft, Inc. Banyan and VINES are trademarks of Banyan
Systems, Incorporated. Alpha, DEC, and PATHWORKS are trademarks of Digital Equipment
Corporation. Pentium is a registered trademark of Intel Corporation. Microsoft, Windows, and
Windows NT are trademarks of Microsoft Corporation. Novell and NetWare are trademarks of Novell,
Inc. Open Desktop and SCO are trademarks of The Santa Cruz Operation, Inc.
Other brand and product names may be registered trademarks or trademarks of their respective
holders.
Page 70

3COM END USER SOFTWARE LICENSE AGREEMENT
IMPORTANT: Read Before Using This Product
YOU SHOULD CAREFULLY READ THE FOLLOWING TERMS AND CONDITIONS BEFORE USING
THIS PRODUCT. IT CONTAINS SOFTWARE, THE USE OF WHICH IS LICENSED BY 3COM
CORPORA TION (“3COM”) TO ITS CUSTOMERS FOR THEIR USE ONLY AS SET FORTH BELOW. IF
YOU DO NOT AGREE TO THE TERMS AND CONDITIONS OF THIS AGREEMENT, DO NOT USE THE
SOFTWARE. USING ANY PART OF THE SOFTWARE INDICATES THAT YOU ACCEPT THESE TERMS.
LICENSE: 3Com grants you a nonexclusive license to use the accompanying software program(s) (the
“Software”) subject to the terms and restrictions set forth in this License Agreement. You are not
permitted to lease, rent, distribute or sublicense the Software or to use the Software in a time-sharing
arrangement or in any other unauthorized manner. Further, no license is granted to you in the human
readable code of the Software (source code). Except as provided below, this License Agreement does
not grant you any rights to patents, copyrights, trade secrets, trademarks, or any other rights in respect
to the Software.
The Software is licensed to be used on any workstation or any network server owned by or leased to
you, provided that the Software is used only in connection with a 3Com adapter. You may reproduce
and provide one (1) copy of the Software and supporting documentation for each such workstation or
network server on which the Software is used as permitted hereunder. Otherwise, the Software and
supporting documentation may be copied only as essential for backup or archive purposes in support
of your use of the Software as permitted hereunder. You must reproduce and include all copyright
notices and any other proprietary rights notices appearing on the Software and the supporting
documentation on any copies that you make.
NO ASSIGNMENT ; NO REVERSE ENGINEERING: You may not transfer or assign the Software and/or
this License Agreement to another party without the prior written consent of 3Com. If such consent is
given and you transfer or assign the Software and/or this License Agreement, then you must at the
same time either transfer any copies of the Software as well as the supporting documentation to the
same party or destroy any such materials not transferred. Except as set forth above, you may not
transfer or assign the Software or your rights under this License Agreement.
Modification, reverse engineering, reverse compiling, or disassembly of the Software is expressly
prohibited. However, if you are a European Community (“EC”) resident, information necessary to
achieve interoperability of the Software with other programs within the meaning of the EC Directive on
the Legal Protection of Computer Programs is available to you from 3Com upon written request.
EXPORT RESTRICTIONS: You agree that you will not export or re-export the Software or
accompanying documentation (or any copies thereof) or any products utilizing the Software or such
documentation in violation of any applicable laws or regulations of the United States or the country in
which you obtained them.
TRADE SECRETS; TITLE: You acknowledge and agree that the structure, sequence and organization
of the Software are the valuable trade secrets of 3Com and its suppliers. You agree to hold such trade
secrets in confidence. You further acknowledge and agree that ownership of, and title to, the Software
and all subsequent copies thereof regardless of the form or media are held by 3Com and its suppliers.
UNITED STATES GOVERNMENT LEGEND: All technical data and Software are commercial in nature
and developed solely at private expense. The Software is delivered as Commercial Computer Software
as defined in DFARS 252.227-7014 (June 1995) or as a commercial item as defined in FAR 2.101(a) and
as such is provided with only such rights as are provided in this License Agreement, which is 3Com’s
standard commercial license for the Software. Technical data is provided with limited rights only as
provided in DFAR 252.227-7015 (Nov. 1995) or FAR 52.227-14 (June 1987), whichever is applicable.
You agree not to remove or deface any portion of any legend provided on any licensed program or
documentation delivered to you under this License Agreement.
TERM AND TERMINATION: This license will expire fifty (50) years from the date that you first use the
Software, if it is not earlier terminated. You may terminate it at any time by destroying the Software
and documentation together with all copies and merged portions in any form. It will also terminate
immediately if you fail to comply with any term or condition of this License Agreement. Upon such
termination you agree to destroy the Software and documentation, together with all copies and
merged portions in any form.
Page 71

GOVERNING LAW: This License Agreement shall be governed by the laws of the State of California as
such laws are applied to agreements entered into and to be performed entirely within California
between California residents and by the laws of the United States. You agree that the United Nations
Convention on Contracts for the International Sale of Goods (1980) is hereby excluded in its entirety
from application to this License Agreement.
LIMITED WARRANTY; LIMITATION OF LIABILITY: All warranties and limitations of liability applicable
to the Software are as stated on the Limited Warranty Card or in the product manual accompanying
the Software. Such warranties and limitations of liability are incorporated herein in their entirety by this
reference.
SEVERABILITY : In the event any provision of this License Agreement is found to be invalid, illegal or
unenforceable, the validity, legality and enforceability of any of the remaining provisions shall not in
any way be affected or impaired and a valid, legal and enforceable provision of similar intent and
economic impact shall be substituted therefor.
ENTIRE AGREEMENT: This License Agreement sets forth the entire understanding and agreement
between you and 3Com, supersedes all prior agreements, whether written or oral, with respect to the
Software, and may be amended only in a writing signed by both parties.
3Com is a registered trademark of 3Com Corporation.
3Com Corporation, 5400 Bayfront Plaza, P.O. Box 58145, Santa Clara, CA 95052-8145.
(408) 326-5000
Page 72

 Loading...