

Page 1

Part Number: 46L3834
ThinkPad 570E
Supplement to User's Manuals
You can use the
computer. This supplement presents additions and updates to the information in the user's
reference and the preloaded online book. Use this information instead of the corresponding
section in both of the user's manuals.
“Important safety instructions” on page 2
Presents the safety information.
“Information to be added to the user's reference” on page 4
Presents the information unique to the ThinkPad 570E.
“Updates to the user's reference” on page 7
Presents the updated information of the user's reference.
“Installing the operating systems” on page 10
Includes the following additions and updates to the online book.
Additional information:
– “Installing Windows 98 Second Edition” on page 11
Your ThinkPad 570E computer supports Windows 98 Second Edition. If you install
Windows 98 Second Edition, refer to this section.
Note: Windows 98 is preloaded when you purchase the computer.
To install the support software, use the procedure give in the online book for Windows 98.
Updated information:
ThinkPad 570 User's Reference
(P/N 27L8798) for your ThinkPad 570E
– “Installing Windows 98” on page 12
– “Installing Windows 95” on page 15
Copyright IBM Corp. 2000
1
Page 2

Important safety instructions
DANGER
Reduce the risk of fire and electric shock by always following basic safety
precautions, including the following:
Do not use your computer in or near water.
During electrical storms:
– Do not use your computer with the telephone cable connection.
– Do not connect the cable to or disconnect it from the telephone outlet on the
wall.
DANGER
There is a danger of an explosion if the rechargeable battery pack is incorrectly
replaced. The battery pack contains a small amount of harmful substances. To
avoid possible injury:
Replace only with a battery of the type recommended by IBM.
Keep the battery pack away from fire.
Do not expose it to water or rain.
Do not attempt to disassemble it.
Do not short-circuit it.
Keep it away from children.
Do not put the battery pack in trash that is disposed of in landfills. When disposing
of the battery, comply with local ordinances or regulations and your company's
safety procedures. In the United States, call IBM at 1-800-IBM-4333 for information
on disposal.
2
Page 3

DANGER
There is a danger of an explosion if the backup battery is incorrectly replaced.
The lithium battery (IBM P/N 02K6572 UL–recognized component [file no. MH12210])
contains lithium and can explode if it is not properly handled or disposed of.
Replace only with a battery of the same type.
To avoid possible injury or death, do not: (1) throw or immerse the battery into
water, (2) allow it to heat to more than 100°C (212°F), or (3) attempt to repair or
disassemble it. Dispose of it as required by local ordinances or regulations and
your company's safety procedures.
CAUTION:
To reduce the risk of fire, use only No.26 AWG or larger (thicker) telephone cable.
Save these instructions.
3
Page 4

Information to be added to the user's reference
This section describes the additional information of the user's reference.
Specification
The dimensions of the ThinkPad 570E computer are as follows:
– Processor: Intel Pentium III 450 MHz or 500 MHz.
– Width: 300 mm (11.8 in.)
– Depth: 240 mm (9.4 in.)
– Height: 13.3-inch LCD model: 27.95 mm (1.1 in.)
Infrared features
If you are using Windows NT and use the infrared feature, you need to buy the application
software.
BIOS Setup Utility updates
– Additional function
In the config window of the BIOS Setup Utility, CPU is added. You can disable or enable
the serial number information of the CPU card in this screen.
– Key assign update
The key assign of the BIOS Setup Utility has been updated. Step 2 in the “Selecting the
Startup item” procedure in page 27, is describes as follows:
“+ or - moves the drive up or down in order.”
It is changed to
“F5 or F6 moves the drive up or down in order.”
4
Page 5

Error code
The new error messages are as follows:
Error code/Problem Action
Microphone input is
too low.
0188 Have the computer served.
0189 Have the computer served.
Make sure that Microphone Boost is turned on and set as follows:
1. Double-click the Volume icon on the task bar. The Mixer panel
opens.
2. Click Options.
3. Click Properties.
4. Click the Recording radio button.
5. Click OK.
6. Find the Microphone volume control and click Advanced
7. Check that the Microphone boost or +20 dB and Close.
Using the modem feature
You can use the ThinkPad 570's built-in modem function in a particular country only if IBM has
received approval from the proper authorities in that country. If IBM is not authorized, a
question mark (?) appears to notify you that the modem function is disabled.
You can check the up-to-date listing of countries on the IBM Web site
(http://www.pc.ibm.com/support). The listing is updated when the approval of a country is
received.
To use the modem function in a country where it is authorized, go to the same Web site,
select Notebooks and PC companions from the menu, and download the device and
software.
5
Page 6
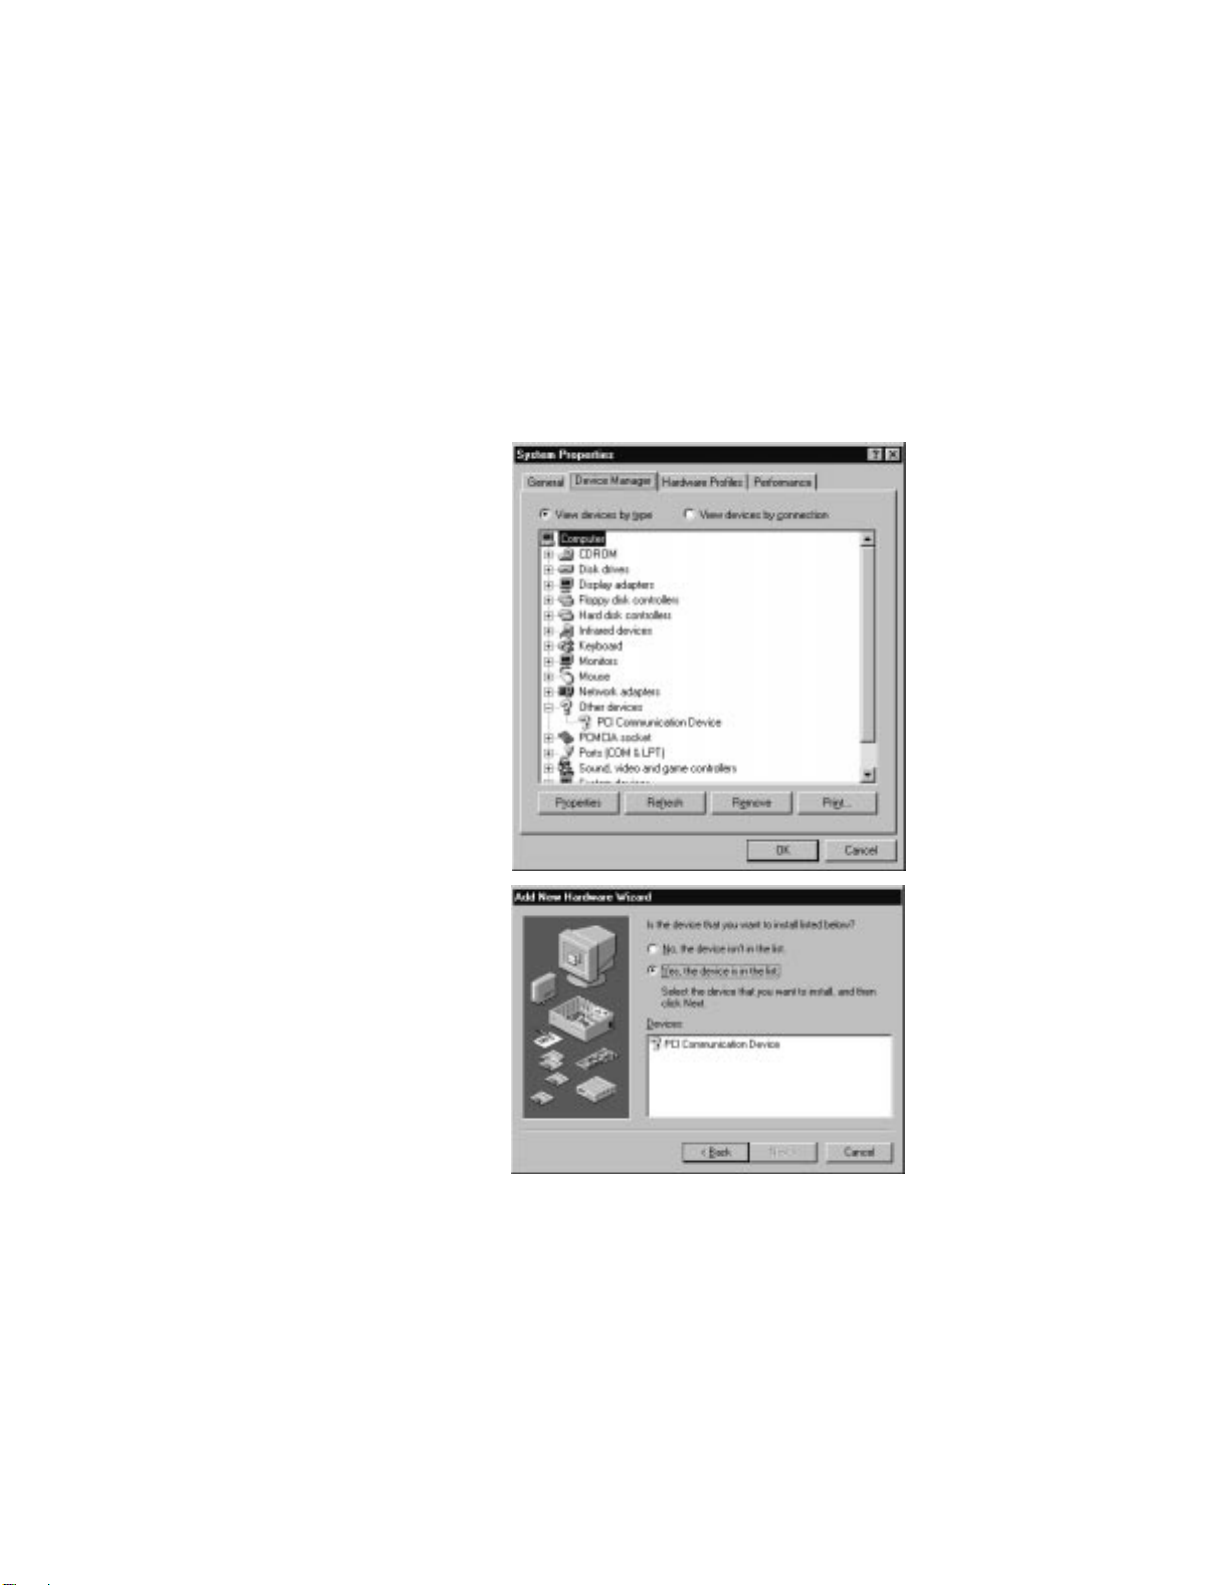
For example, suppose you are in a country
where IBM has not received approval for the
built-in modem. Open the “System Properties”
window, as follows:
1
Double-click My Computer, Control
Panel, and then System.
2
Click the Device Manager tab.
A ? mark appears to the left of both Other
devices and its subdirectory, PCI
Communication Device.
If you click Add New Hardware in the Control
Panel, a ? mark appears to the left of PCI
Communication Device in the Devices box.
6
Page 7

Updates to the user's reference
This section presents updates to the information in the user's reference.
Fn key function
Contrary to what is stated in the user's reference (page 39), the Fn+F11 combination does not
change the processor speed. Instead, the key combination switches between power modes
as follows:
Maximum Performance
Customized
Setting for the TrackPoint
The “Disabling the TrackPoint” section in the user's reference describes how to set
Auto-Disable if you are using certain mouse types. Actually the TrackPoint is set to
Auto-Disable as the default. With this setting, the TrackPoint is disabled automatically if a
mouse is connected to the external-input-device connector and if any of the following is true:
– The system is starting.
– The system is resuming from suspend mode.
– Your computer is attached to the ThinkPad Port Replicator with Advanced EtherJet
Feature.
If no external mouse is connected, the TrackPoint remains enabled.
A mouse that is compatible with the IBM PS/2 Miniature Mouse can work simultaneously with
the TrackPoint if the TrackPoint is set to Enable. To enable the TrackPoint, do as follows:
1
Start the ThinkPad Configuration program.
2
From the drop-down menu, select Enable
3
Click OK.
Note: If you are using a mouse connected to the serial connector or the USB connector, you
should not use the TrackPoint at the same time. Select Disable rather than Enable or
Auto-Disable.
Maximum Battery Life
7
Page 8

Solving computer problems
Suspend or hibernation problem
To troubleshoot this problem, disable the Ethernet port in the Windows NT environment as
follows, rather than using the procedure in the user's reference:
Problem Cause and action
If you are using the port
replicator, resuming
normal operation from
hibernation or suspend
mode takes a long time.
This is not a problem. If you have not connected the network cable,
the computer queries the Ethernet connection until the timeout time is
reached. Connect the network cable if you want to use the Ethernet
network. If you are not using the network, disable the Ethernet port
as follows:
For Windows 98:
1. Double-click a System icon in the Control Panel.
2. Click the Device Manager tab.
3. Double-click Network Adapter.
4. Double-click Intel EtherExpress PRO PCI Adapter.
5. Select the Disable in this hardware profile check box.
6. Click OK.
7. Close all windows.
8. Restart the computer.
For Windows NT:
1. Double-click the Devices icon in the Control Panel.
2. Select Intel EtherExpress PRO Adapter and click Stop.
3. Click Startup... and select Disabled.
4. Click OK.
5. Click Close.
6. Close all windows.
7. Restart the computer by powering it off and on again.
8
Page 9

Trademark
PC-Doctor is a trademark of Watergate Software, Inc., in the United States and/or other
countries.
Power cord information for Argentina
The part number for the power cord for Argentina has been updated as follows:
– Argentina (3-pin) 36L8867
– Argentina (2-pin) 36L8870
AC adapter information update
The ac adapter complies with the Electrical Appliance and Material Control Law of Japan.
Rating: Input ac 100 V 50/60 Hz
Output dc 16 V
Certificate numbers ( ):
91-53393
91-56271
9
Page 10

Installing the operating systems
This section presents additions and updates to the information in the online book.
Additional driver
For Windows 98, Windows 95, and Windows NT users, On Screen Display Driver is supported for
your ThinkPad computer. If you reinstall this driver, you can reinstall it from the Software
Selection CD.
Version
To see what version of Windows 98 you are using, do the following:
1.
Click Start, Setting, and click Control Panel.
2.
Click System.
The following window appears:
Windows 98: Windows 98 4.10.1998
Windows 98 Second Edition: Windows 98 Second Edition 4.10.2222 A
10
Page 11

Installing Windows 98 Second Edition
To install Windows 98 Second Edition, do the following:
1
Insert the Windows 98 CD-ROM into the CD-ROM drive of your computer.
2
Make a temporary directory.
For example, at the DOS prompt, type the following:
MD c:\win98
3
Copy all the cabinet (.CAB) files and installation programs from the Windows 98 CD-ROM to
this directory.
At the DOS prompt, type the following:
COPY src_cd:\WIN98\\.\ c:\win98
where src_cd is the drive letter of the CD-ROM drive letter of your computer, and c:\win98
is the temporary directory that you made in step 2.
4
Replace the Windows 98 CD-ROM with the Software Selection CD.
Note: If the “Application Installer” window appears, exit from it.
5
Copy the latest file from the Software Selection CD to the temporary directory of your
computer's hard disk. At the DOS prompt, type the following:
COPY src_cd:\DRIVERS\SUPPLE98\W98SE\\.\ c:\win98
where src_cd is the drive letter of the CD-ROM drive letter of your computer, and c:\win98
is the temporary directory that you made in step 2.
6
To install APM mode, run the SETUP.EXE with APMINST.INF that you have copied into the
temporary directory (c:\win98), and follow the description on the screen.
For example, type C:\WIN98\SETUP.EXE C:\WIN98\APMINST.INF
For details, refer to SETUP.TXT on the Windows 98 CD-ROM.
7
After installing Windows 98 Second Edition, make sure that the Software Selection CD is in
the CD-ROM drive of your computer, and click Start.
If the “Application Installer” window appears, exit from it.
8
Click Run....
9
In the name box, type the following:
11
Page 12

src_cd:\DRIVERS\SUPPLE98\APM2APM\APM2APM.REG
where src_cd is the drive letter of the CD-ROM.
10
Click OK.
11
Follow the instructions on the screen.
Update the three files of the Windows as follows:
12
Click Start.
13
Click Run...
14
In the name box, type the following:
src_cd:\DRIVERS\W98UP\W98SE\Q239887\239887UP.EXE
where src_cd is the CD-ROM drive letter of your computer.
15
Click OK.
Follow the instruction on the screen.
16
Do steps 12 to 15 for each of these:
src_cd:\DRIVERS\W98UP\W98SE\Q233ð17\233ð17UP.EXE
src_cd:\DRIVERS\W98UP\W98SE\Q242778\242778UP.EXE
where src_cd is the CD-ROM drive letter of your computer.
17
Click OK to reboot the computer.
Installing Windows 98
To install Windows 98, do the following:
1
Insert Windows 98 CD-ROM into the CD-ROM drive of your computer.
2
Make a temporary directory.
For example, at the DOS prompt, type the following:
MD c:\win98
3
Copy all the cabinet (.CAB) file and the installation programs from the Windows 98 CD-ROM
to this directory.
12
Page 13

At the DOS prompt, type the following:
COPY src_cd:\WIN98\\.\ c:\win98
where src_cd is the drive letter of the CD-ROM drive letter of your computer, and c:\win98
is the temporary directory that you made in step 2 on page 12.
4
Replace the Windows 98 CD-ROM with the Software Selection CD.
Note: If the “Application Installer” window appears, exit from it.
5
Copy the latest file from the Software Selection CD to the temporary directory of your
computer's hard disk. At the DOS prompt, type the following:
COPY src_cd:\DRIVERS\SUPPLE98\W98GOLD\\.\ c:\win98
where src_cd is the drive letter of the CD-ROM and c:\win98 is the temporary directory that
you made in step 2 on page 12.
6
Run the SETUP.EXE that you copy in the temporary directory (c:\win98), and follow the
instructions on the screen.
For details, refer to SETUP.TXT on the Windows 98 CD-ROM.
Note: If the following message appears while you are reinstalling the Windows 98, go to
“‘Updating the DBLBUFF.SYS’ on page 15” to update the DBBUFF.SYS file. Then
return to step 6 to continue the installation.
Example of the message:
MSGSRV32 caused a general protection fault in module KRNL386.EXE at ррр1:рр1b51.
MSGSRV32 caused a stack fault in module KRNL386.EXE at ррр1.рррр5595.
RUNDLL32 caused an invalid page fault in module KERNEL32.DLL at р15f:bff9dba7.
MSGSRV32 caused an invalid page fault in module KERNEL32.DLL at р15f:bff9d.
A Fatal Exception рD has occurred at рр28:Cррр1FCE in VXD VMM(р1) + рррррF
A Fatal Exception рE has occurred at р15F:BFF9DBA7.
7
After installing Windows 98, make sure the Software Selection CD is in the CD-ROM drive of
your computer; then click Start.
If the “Application Installer” window appears, exit from it.
8
Click Run...
13
Page 14

9
In the name box, type the following:
src_cd:\DRIVERS\SUPPLE98\APM2APM\APM2APM.REG
where src_cd is the CD-ROM drive letter of your computer.
10
Click OK
11
Follow the instructions on the screen.
You need to update the USB driver. Do the following:
12
Click Start.
13
Click Run...
14
In the name box, type the following:
src_cd:\DRIVERS\W98UP\W98GOLD\QFE8ð4ð4\189591UP.EXE
where src_cd is the CD-ROM drive letter of your computer.
15
Click OK.
The following message appears: “This program installs the Windows 98 USB Wakeup
Update. Do you want to continue?”
16
Click Yes.
17
Click OK to reboot the computer.
Update the IFSMGR.VXD as follows:
18
In the C:\WINDOWS\SYSTEM\VMM32 directory (or in the subdirectory of the SYSTEM\VMM32 in
which Windows 98 is installed), type the following:
REN IFSMGR.VXD IFSMGR__.$$$
19
At the DOS prompt, type the following:
COPY src_cd:\DRIVERS\W98UP\W98GOLD\Q2238ð9\\.\
where src_cd is the CD-ROM drive letter of your computer.
Update the PCI BUS driver as follows:
20
Click Start.
21
Click Run...
14
Page 15

22
In the name box, type the following:
src_cd:\DRIVERS\W98UP\W98GOLD\Q233ð17\233ð17UP.EXE
where src_cd is the CD-ROM drive letter of your computer.
23
Click OK.
Follow the instructions on the screen.
24
Click OK to reboot the computer.
Updating the DBLBUFF.SYS:
you are running the SETUP.EXE to install Windows 98.
1
Click Start.
2
Click Run....
3
Type the following:
src_cd:\DRIVERS\W98UP\W98GOLD\Q2ð9321\2ð9321UP.EXE
where src_cd is the drive letter of the CD-ROM drive letter of your computer.
4
Click OK.
5
Follow the instructions on the screen.
6
The following message appears: “Please type the location where you want to place the
extracted files.” Type the address of the temporary directory (c:\win98), and click OK.
7
Return to step 6 on page 13 to continue the installation of the Windows 98.
You do this procedure only when a message appears while
Installing Windows 95
Some new files must be incorporated at the time of installation.
Note: To install Windows 95 from a CD-ROM drive, create a Startup Disk for Windows 95 so that
you can enable use the CD-ROM drive. Then boot the system with the diskette.
To create the Startup Disk for Windows 95, do as follows:
1. Insert a blank diskette into the diskette drive.
2. Open the Control Panel window.
3. Double-click Add/Remove Program.
4. Click the Startup Disk tab.
15
Page 16

5. Click Create Disk...
6. Follow the instructions on the screen.
Installing Windows 95 OSR1
1
Make sure there is enough space in the hard disk to store the cabinet files and the
installation programs. The amount of the space required may vary, depending on the
national language supported by your version of Windows 95).
2
Make a temporary directory.
For example, at the DOS prompt, type the following:
MD c:\win95
and press Enter.
3
Insert the Windows 95 CD-ROM into the CD-ROM drive.
4
Copy all the cabinet (.CAB) files and the installation programs from the \WIN95 directory of
the Windows 95 CD-ROM to the temporary directory.
At the DOS prompt, type the following:
COPY src_cd:\WIN95\\.\. c:\win95
where src_cd is the drive letter of the CD-ROM drive and c:\win95 is the temporary directory
that you made in step 2.
5
Press Enter.
6
Replace the Windows 95 CD-ROM with the Software Selection CD.
7
Copy the updated files from the Software Selection CD to the temporary directory.
At the DOS prompt, type the following:
COPY src_cd:\DATA\WIN95\cc\OSRðINF\\.\ c:\win95
where src_cd is the drive letter of the CD-ROM drive, cc is the country code, and c:\win95
is the temporary directory that you made in step 2.
8
Press Enter.
9
Install the operating system by entering SETUP.EXE at the temporary directory prompt.
10
Refer to the Windows 95 documentation and the instructions that appear on the screen to
complete the installation.
16
Page 17

11
To activate the PC Card slot, double-click the PC Card icon in the Control Panel. The PC
Card Wizard window launches. Click No twice, and reboot the system.
12
If required, install Service Pack Version 1, available from the Microsoft Web site.
13
After you complete the installation, remove all the files in the temporary directory and then
remove the directory itself, to free the space on the hard disk.
Installing Windows 95 OSR2.1 or OSR2.5:
Windows 95 OSR2.1, do the following:
1
Make sure there is enough space on the hard disk to store the cabinet files and the
installation programs. The amount of space required may vary, depending on the language
supported by your version of Windows 95).
2
Make a temporary directory.
For example, at the DOS prompt, type the following:
MD c:\win95
and press Enter.
3
Insert the Windows 95 CD-ROM into the CD-ROM drive.
4
Copy all the cabinet (.CAB) files and the installation programs from the \win95 directory of
the Windows 95 CD-ROM disk to the temporary directory.
At the DOS prompt, type the following:
COPY src_cd:\WIN95\\.\ c:\win95
where src_cd is the drive letter of the CD-ROM drive, and c:\win95 is the temporary
directory that you made in step 2.
5
Press Enter.
If you have a CD-ROM version of the
6
Replace the Windows 95 CD-ROM with the Software Selection CD.
7
Copy the updated files in the Windows 95 supplementary files from the Software Selection
CD to the temporary directory.
At the DOS prompt, type the following:
COPY src_cd:\DATA\WIN95\cc\OSR2INF\\.\. c:\win95
where src_cd is the drive letter of the CD-ROM, cc is the country code, and c:\win95 is the
temporary directory that you made in step 2.
17
Page 18

8
Press Enter.
9
Type the following:
COPY src_cd:\DATA\WIN95\cc\CARDBUS\\.\. c:\win95
where src_cd is the drive letter of the CD-ROM drive.
10
Press Enter.
11
Install the operating system by entering SETUP.EXE at the temporary directory prompt.
12
Refer to the Windows 95 documentation and the instructions that appear on the screen to
complete the installation.
Disregard the instruction to install USBD.SYS and UHCD.SYS files.
13
Replace the Software Selection CD with the Windows 95 CD-ROM.
14
Change the current drive letter to the CD-ROM drive letter, and do one of the following:
For Windows 95 OSR2.1 CD-ROM users:
CD-ROM.
For Windows 95 OSR2.5 CD-ROM users:
\OTHERS\UPDATES\USB directory of the CD-ROM.
Run \USBSUPP.EXE in the \OTHER\USB. of the
Run \USBSUPP.EXE and \USBUPD2.EXE in the
15
Replace the Windows 95 CD-ROM with the Software Selection CD.
16
At the DOS prompt, type the following:
src_cd:\DATA\WIN95\cc\QFE444\PCCARDUP.EXE
where src_cd is the drive letter of the CD-ROM drive, and cc is the country code.
17
Press Enter.
18
Reboot the system.
19
To replace the Unimodem drivers to support the Intel Video Phone application, from the DOS
prompt, go to C:\WINDOWS\SYSTEM (or the SYSTEM subdirectory where Windows 95 is installed).
20
Press Enter.
21
Refer to the documentation shipped with this version to finish the installation.
22
To active the PC Card slot, double-click the PC Card icon in the Control Panel. The PC
Card Wizard window launches. Click No twice, and reboot the computer.
18
 Loading...