

Page 1
IBM 4019
IBM 4028
IBM 4029
BDT Ergoprint 510, 610II
Unisys AP 9025, 9210
HIgh Yield
Part Number: 1380200
Gram Load: 300 grams
Yield @ 5%: 7,000
Pages per min.:5/10 ppm
Resolution: 300dpi
HIgh Yield Plus
Part Number: 1380520
Gram Load: 450 grams
Yield @ 5%: 9500
Pages per min.:5/10 ppm
Resolution: 300dpi
#1 Phillips Head Screwdriver
Small Flat Blade Screwdriver
Needle Nose Pliers
Anhydrous Isopropyl Alcohol
Damp Cloth
Soft Lint-Free Cloth
Cotton Swabs
Drill
3/32” Drill Bit
Razor Knife
Nipper PLiers
Rubber Cement
Teflon Shims for Electrostatic Roller
Waste Hopper Strip
Plastic Toner Hopper Cover
Tap e(p vc )
Toner Hopper Replacement Mylars (A&B)
Technical Instructions Printers OEM Info Tools 1
Te chnical Resource Center: Toll Free: 800 394.9900 Website: www.futuregraphicsllc.com
Brand names and trademarks are the
properties of their respective holders
and are for descriptive use only.
CORPORATE
LOS ANGELES
T 800 394.9900
818 316.0656
F 800 394.9910
818 313.9568
DALLAS
T 877 499.4989
972 840.4989
F 877 774.1750
972 840.1750
ATLANTA
T 877 676.4223
770 516.9488
F 877 337.7976
770 516.7794
MIAMI
T 800 595.4297
305 594.3396
F 800 522.8640
305 594.3309
TORONTO
T 877 848.0818
905 712.9501
F 877 772.6773
905 712.9502
NEW YORK
T 800 431.7884
631 345.0121
F 800 431.8812
631 345.0690
SYDNEY
T 02 9648.2630
F 02 9648.2635
4019 TECH
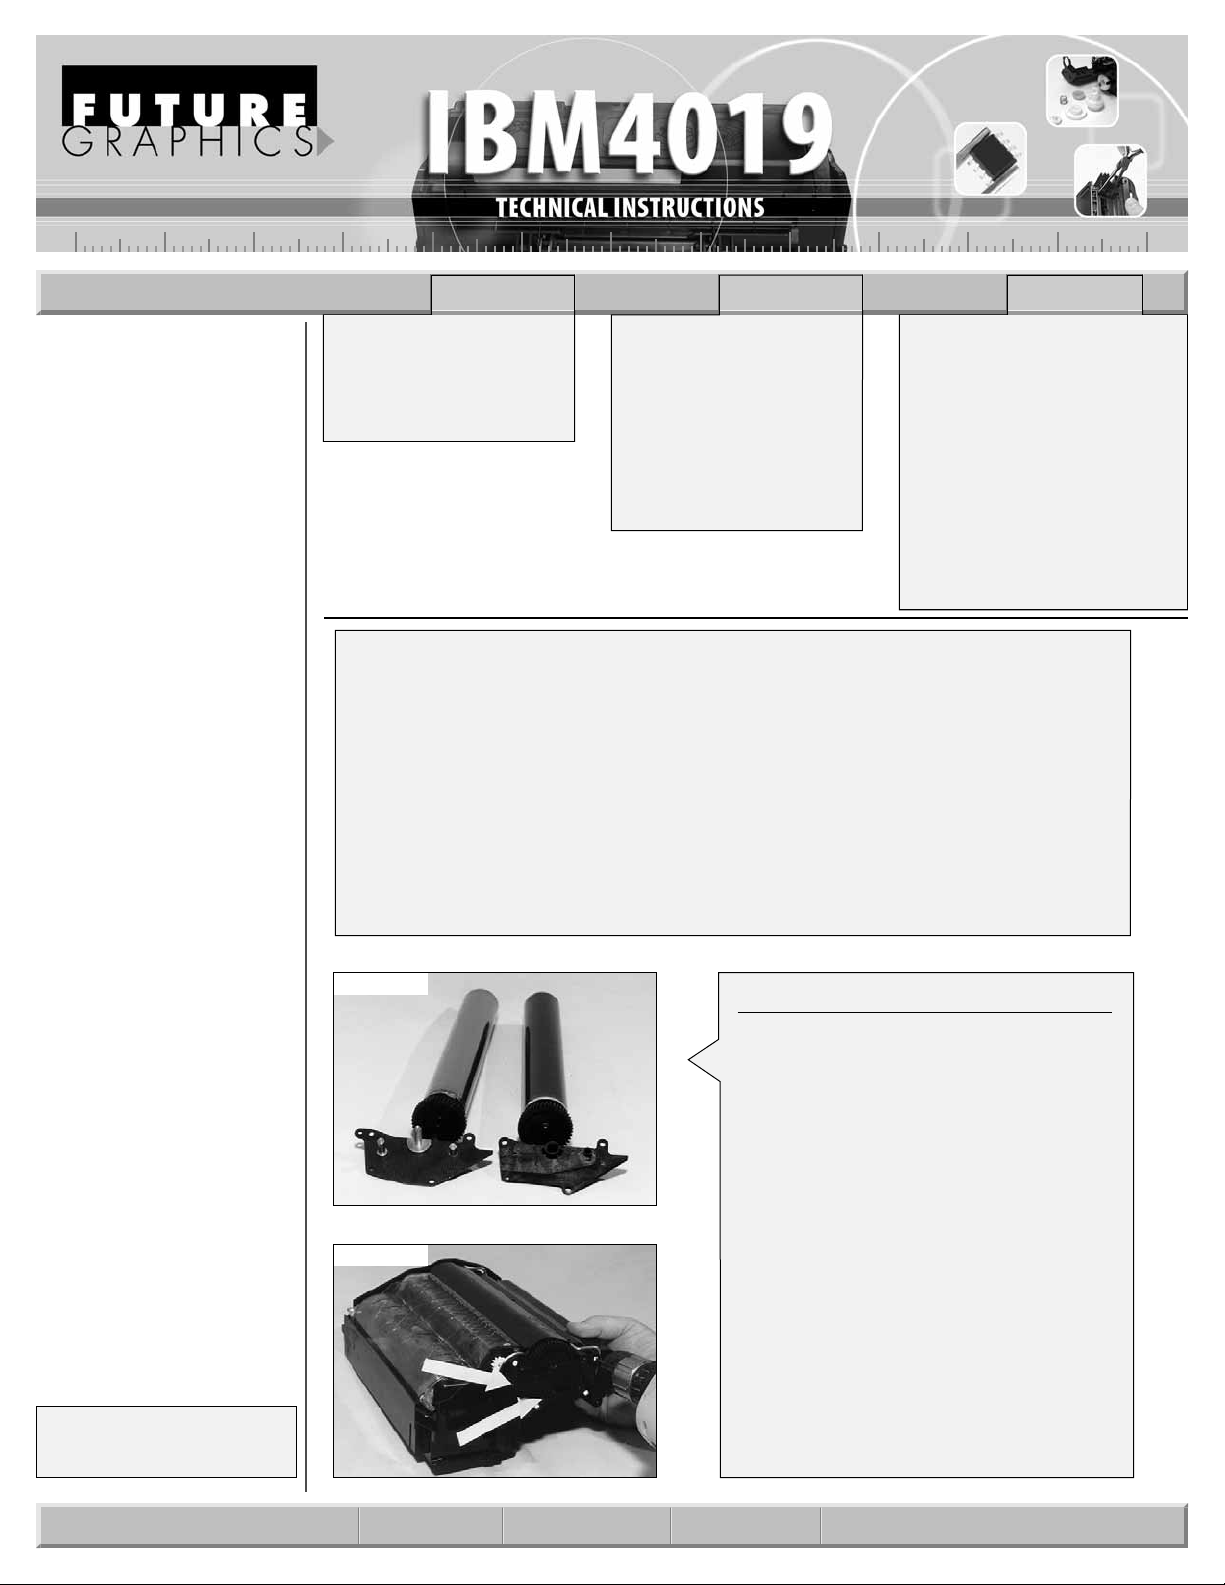
Step 1
Place the cartridge top down on the table
with the drum alignment side plate facing you. For the plastic side plates, drill
three 3/32" holes. These holes are for
screws used in final assembly. For the
metal side plate, drill out the middle of
each plastic rivet head.
(See Photo 1b)
Photo 1a
The 4019 has a standard cartridge holding 300 grams of toner and yielding 7,000
pages, and a plus cartridge that holds 450 grams of toner and yields 9500 pages at
5% coverage.
The 4019 uses a corona wire to charge the drum while the 4039 and 4049 use the
newer PCR technology.
There are two different side plates on the 4019 cartridge and two different drum
gear types. The older side plate (bottom left) is metal, compared with the newer
plastic part (bottom right). In the older unit, the metal spindle fits inside the drum
gear,while the newer drum gear has a plastic spindle that fits inside the plastic side
plate.
(See Photo 1a)
Photo 1b
Page 2
Step 2
Cut off the four heads of the black plastic
rivets (shown in white in Photo #2) with a
razor knife or flush cut nipper pliers.
(See Photo 2)
Photo 2
Step 4
Move the drum shutter rod aside and
remove the drum alignment plate by
pulling it straight out.
(See Photo 4)
Photo 3
Photo 4
Step 5
Using Needle Nose pliers, disconnect the
toner hopper tension springs.
(See Photo 5)
Photo 5
Photo 6
2IBM 4019 Technical Instructions
Need trust-worthy, detailed Technical
Instructions for another engine?
V isit: www.futuregraphicsllc.com
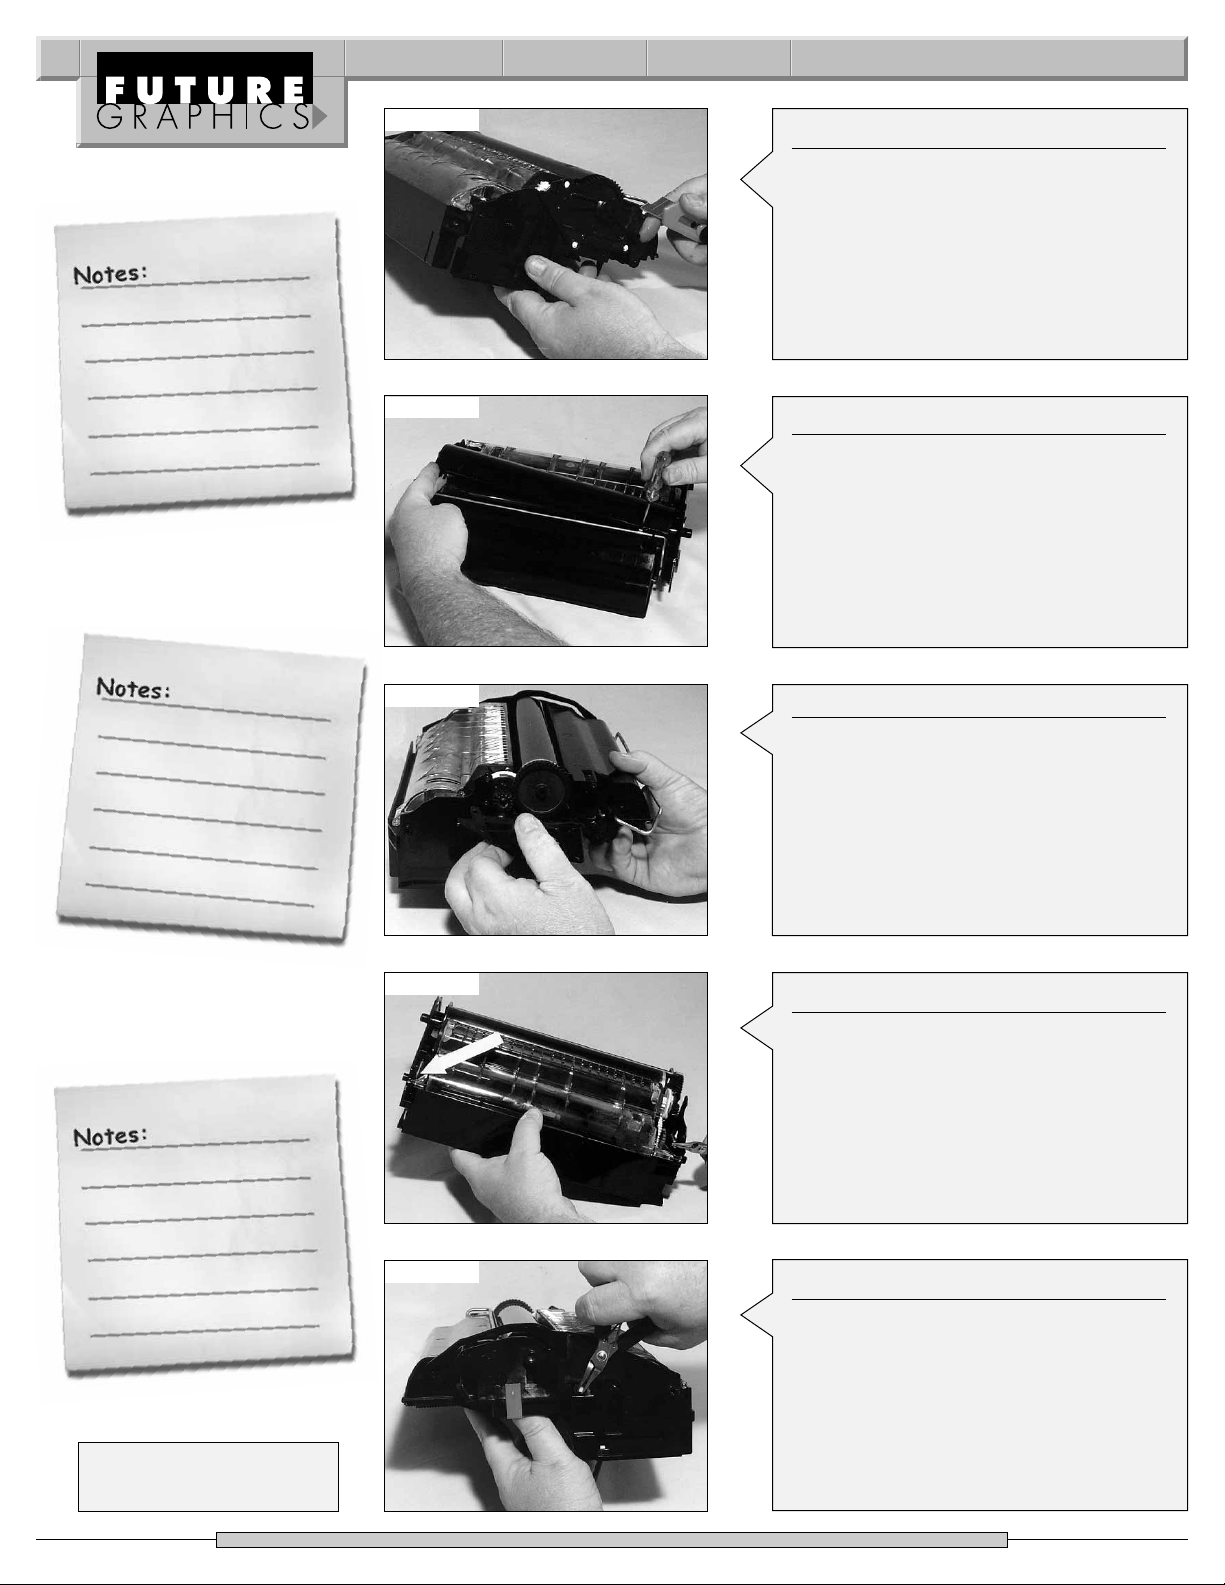
Step 6
Turn the cartridge 180° and remove the
toner hopper guide pin from the rectangular hole.
(See Photo 6)
Step 3
Remove the OPC drum cover from the
shutter rod using a small flat blade screwdriver.
(See Photo 3)
Page 3

Step 9
Lift the alignment plate side of the cartridge enough to expose the lock tab on
the top of the waste hopper and gently
pry the tab with a small flat blade screwdriver, to release the toner hopper.
(See Photo 9a)
Now lift the toner hopper and separate it
from the waste hopper.
(See Photo 9b)
NOTE:An arrow points to the tab being
pulled down by the screwdriver.
Photo 9a
Photo 9b
Need help with a particular remanufacturing problem?
Call the Technical Resource Center from
8am - 5pm PST: 800 394.9900
IBM 4019 Technical Instructions 3
Photo 7
Step 7
Rotate the cartridge 180° again, pull back
the toner hopper with one hand, and
remove the OPC drum with the other.
Wrap the drum in protective cloth or
paper and put it aside until later. You can
usually use the OEM drum one more
cycle after the original OEM cycle.
(See Photo 7)
Photo 8
Photo 10
Step 10
Now,set the toner hopper aside and
remove the waste hopper mylar strip
(recovery blade) opposite the wiper blade.
Dump out the waste toner and clean the
waste hopper with either compressed air
or vacuum.
(See Photo 10)
Step 8
Remove the drum clutch gear assembly
and set it aside.
(See Photo 8)
Page 4

Step11
Wipe down the entire waste hopper with a damp cloth.
Step 13
Use a cotton swab and alcohol to clean all contact points on the side of the waste
hopper.
Photo 12
Step 14
Remove the adhesive backing cover from
a new mylar waste hopper strip and
install it. Be sure that the strip is straight
before pressing it into place.
(See Photo 14)
If the toner hopper tension springs on
each side of the waste hopper are
stretched or weak replace them with new
springs. This will pull the toner hopper
tighter to the OPC drum and allow a better transfer of toner from the electrostatic
roller to the OPC. Now, set aside the completed waste hopper until you are ready
to assemble the cartridge.
Photo 15
4IBM 4019 Technical Instructions
Need trust-worthy, detailed Technical
Instructions for another engine?
V isit: www.futuregraphicsllc.com
Step 15
Holding the toner hopper upright,
remove the paper cover and tape, and
dump out the old toner. Vacuum completely. Then wipe clean with a slightly
damp cloth. Be careful not to damage
mylar strips inside the toner hopper.
(See Photo 15)
Step12
Clean the place where the waste hopper
mylar strip was with a cotton swab and
alcohol.This area must be free of all adhesive and toner. Clean the wiper blade with
a soft cloth. Clean any grease residue
from around the axle with a cotton swab
and alcohol.
(See Photo 12)
Photo 14
Page 5

Step 17
Remove the metering blade tension
spring.
(See Photo 17)
Photo 18a
Photo 18b
Need help with a particular remanufacturing problem?
Call the Technical Resource Center from
8am - 5pm PST: 800 394.9900
IBM 4019 Technical Instructions 5
Photo 16
Step 16
Remove the toner hopper mylar retaining
blade by peeling it away from the toner
hopper.
(See Photo 16)
Photo 17
Photo 19
Step 19
Vacuum out any toner from
within the electrostatic roller cavity.
Remove the black mylar blade from the
inside of the electrostatic roller cavity.
Once the toner hopper is completely
clean, use a swab and isopropyl alcohol
and clean the area where the old mylar
blades were removed. Install new interior
mylar blade “A”.
(See Photo19)
NOTE: If not cleaned completely the new
blades will not adhere to the toner hopper properly, resulting in a leaky toner
hopper.
Step 18
Using a small screwdriver, remove the
electrostatic roller retaining piece. Clean
it with a cotton swab and alcohol and set
aside.Be careful not to lose the little metal
contact clip (not shown).
(See Photo18a)
Remove the electrostatic roller by grasping the shaft and pulling it out and to the
left.
(See Photo18b)
Page 6

Step 20
Replace OEM .010" shims with new .020" Teflon shims on the electrostatic roller and
re-install the roller into the toner hopper.
NOTE: Two old .010" shims may be used on each end if new .020” shims aren’t available.
Re-install the electrostatic roller end piece.
Step 22
Fill the toner hopper with the proper
amount of toner.
(See Photo 22)
Photo 21
Photo 22
Step 23
Place a new toner hopper cover over the
top of the toner hopper. Using tape, seal
the toner hopper cover to the toner hopper.
(See Photo 23)
Photo 23
Photo 24
6IBM 4019 Technical Instructions
Need trust-worthy, detailed Technical
Instructions for another engine?
V isit: www.futuregraphicsllc.com
Step 24
Using a “ScotchBrite”pad,clean a 1-inch
long area on the front of the metering
blade, corresponding to where the
grounding contact strap will touch.
(See Photo 24)
This will help avoid the 1/4" gray horizontal line that appears on the “trailing edge”
of some prints due to a poor ground contact. Clean the bottom edge of metering
blade with a swab and alcohol.
Step 21
Clean the foam roller end shaft and contact strap with a cotton swab and alcohol.
(See Photo 21)
Page 7

Photo 29
Need help with a particular remanufacturing problem?
Call the Technical Resource Center from
8am - 5pm PST: 800 394.9900
IBM 4019 Technical Instructions 7
Photo 25
Step 25
Place a thin film of rubber cement, or a
similar flexible sealant, at each end of the
metal metering blade to keep toner from
leaking at these points.
(See Photo 25)
Photo 26
Photo 31
Step 29
Slide the toner hopper,top down and tilted at an angle, into the waste hopper.
(See Photo 29)
NOTE: Use your right index finger to hold
back the grounding contact strap.
Step 26
Install the new mylar blade “B”,making
sure it is flat and square, with no waves or
wrinkles, and that the bottom edge is
approximately 1/32" above the bottom
edge of the hopper. If it extends too low,
it will cause paper jams. Re-install the
metering blade tension spring.
(See Photo 26)
Step 27
Dust the wiper/recovery blade area with
padding powder.
Step 29
Place a small amount of conductive
grease on the waste hopper drum axle.
Step 30
Hold the toner hopper back with your left
hand while installing the drum with your
right.
(See Photo 30)
Step 31
Using Needle Nose pliers, reinstall the
toner hopper tension springs.
(See Photo 31)
CAUTION: Do not overstretch the
springs.
Photo 30
Page 8

Step 32
Turn the cartridge around and install the
toner hopper guide pin. A small amount
of rubber cement may be used to keep it
in place.
(See Photo 32)
Step 33
Make sure that the toner hopper moves
back and forth against the spring tension
smoothly. Realign the hopper if necessary, then install the cloth gear assembly.
Photo 32
Step 34
Install the drum alignment plate. While
holding the drum shutter rod back, position the four holes in the plate onto the
four black plastic rivet posts.
(See Photo 34)
Photo 34
Photo 35
Step 35
Install screws into holes previously drilled
in Step 1.
(See Photo 35)
Make sure the plate is correctly aligned
and held firmly in place. Turn the drum
against the wiper blade while listening for
noise and testing for undue torque or
stiffness. Proper alignment and free rotation of the drum is essential to good cartridge performance.
Photo 36
Photo 37
8IBM 4019 Technical Instructions
Need trust-worthy, detailed Technical
Instructions for another engine?
V isit: www.futuregraphicsllc.com
Step 37
Clean the corona wire with the cartridge
corona wire cleaner provided by sliding it
in and out several times.
(See Photo 37)
The cartridge is now ready for post
testing.
Step 36
Carefully reinstall the OPC shutter.
(See Photo 36)
Te chnical Resource Center: Toll Free: 800 394.9900 Website: www.futuregraphicsllc.com
Page 9

TAR GET MARKET ENGINE SOLD TO
This engine/printer is sold to
CARTRIDGE MARKET OVERVIEW
OEMCARTRIDGE # OEM STATED PAGE YIELD OEM CARTRIDGE LIST PRICE COMPATIBLE CARTRIDGE RETAIL PRICE
1380200 7,000 Pgs @ 5%
1380520 9,500 Pgs @ 5%
CARTIDGE CROSS COMPATIBILITY
IBM 4019 IBM 4028 IBM 4029
IBM WinWriter 600 Lexmark Laser Printer 5/6/10 BDT Ergoprint510, 61011
Unisys AP 9025, 9210
FUTURE GRAPHICS PRODUCT LISTING
PRODUCT DESCRIPTION ITEM # PACK QTY.
Cartridge Bag 14x18, 2.5 mil Heat-Sealable Black/Silver Anti-Static Foil BAG14X18 100
Cartridge Box 14 1/2x6 5/8x11 1/4, Tape-Top White Box/Blue Print BLUEBAR15X11 25
Cartridge Box Insert Use Box # BLUEBAR15X11, Die Cut Corrugated IBMINSERT 50
Cartridge Tech Guide Remanufacturing Instructions IBM4019TECH 1
Cartridge Warp 15X26 Gray Open cell Foam, Grabs Toner Leaked in Transit FOAMWRAP15X26 10
Developer Roller LMKDVRROL 5
Dev. Roller Washer/Shim Teflon HP1200DRBALDEK 10/150
Doctor Bar Two-Cycle,Double Edge, Flip Over for Second Cycle LMKDRBAR 10
Doctor Bar Tape Prevents Dr.Bar Spring From Falling Out While Shipping Like OEM LMKDRBARTAPE
Drum AEG, Green IBM4019AEG 5/60
Drum Protector Felt Shutter Felt, Adhesive, 5 Inch SHUTTERFELT5 100
Drum Shutter Actuator Tab Triangular Black Plastic IBM4019TAB 50
Hooper Cover/Seal Clear Plastic, Flexible Lid, Use Tape to Seal IBMCOVER 50
Retaining Blade Toner, Inner/Outer Black Mylar, Set of Two IBMRBLADE10SET 10
Retaining Blade Toner, Inner/Wide, Angle cut 9 1/4 x 5/8 IBM4019RBLADEIA 100
Retaining Blade Toner, Inner/Wide, Black 9 1/4 x 5/8 IBM4019RBLADEI 100
Retaining Blade Toner, Outer/Long, Black 9 3/4 x 1/2 IBM4019RBLADEO 100
Recover Blade Waste,Hopper Clear Mylar IBM4019BLADEW 100
Sealing Tips Solutions to Leaking Problems Common to IBM Cartridge IBMSEALTECH 1
Page 10

TECHNICAL TIP
PROBLEM:
SOLUTION:
PROBLEM:
SOLUTION:
Toner 300 gm Bottle Standard Hopper IBM4039TNR300 10
Toner 480 gm Bottle High Yield Hopper IBM4039TNR480 10
Toner With Nomex Felt, Unflocked, Universal IBM 4019-49 IBMWAND 10
Wiper Blade Kuroki IBM4019WBLADEK 10/240
 Loading...