

Page 1

IBM ThinkPad 380XD/385XD
Setup Guide
Page 2

Page 3

IBM
IBM ThinkPad 380XD/385XD
Setup Guide
Page 4

First Edition (November 1997)
IBM might not be offering the products, services, or
features discussed in this document in all countries, and
the information is subject to change without notice.
Consult your local representative for information on the
products, services, and features available in your area.
The following paragraph does not apply to the
United Kingdom or any country where such
provisions are inconsistent with local law:
INTERNATIONAL BUSINESS MACHINES
CORPORATION PROVIDES THIS PUBLICATION “AS
IS” WITHOUT ANY WARRANTY OF ANY KIND,
EITHER EXPRESS OR IMPLIED, INCLUDING, BUT
NOT LIMITED TO, THE LIMITED WARRANTIES OF
MERCHANTABILITY OR FITNESS FOR A
PARTICULAR PURPOSE. Some states do not allow
disclaimers of express or implied warranties in certain
transactions; therefore, this statement may not apply to
you.
This publication could include technical inaccuracies or
typographical errors. Changes are periodically made to
the information herein; these changes will be
incorporated in new editions of the publication. IBM may
make improvements or changes in the products or the
programs described in this publication at any time.
Requests for technical information about IBM products
should be made to your IBM Authorized Dealer or your
IBM Marketing Representative.
Notices
References in this publication to IBM products,
programs, or services do not imply that IBM intends to
make these available in all countries in which IBM
operates. Any reference to an IBM product, program, or
service is not intended to state or imply that only that
IBM product, program, or service may be used. Any
functionally equivalent product, program, or service that
does not infringe any of the intellectual property rights of
IBM may be used instead of the IBM product, program,
or service. The evaluation and verification of operation
in conjunction with other products, except those
expressly designated by IBM, are the responsibility of
the user.
IBM may have patents or pending patent applications
covering subject matter in this document. The furnishing
of this document does not give you any license to these
patents. You can send license inquiries, in writing, to
the IBM Director of Licensing, IBM Corporation, 500
Columbus Avenue, Thornwood, NY 10594, U.S.A.
Trademarks
IBM, ThinkPad, and TrackPoint are trademarks of the
IBM Corporation in the United States or other countries
or both:
Microsoft, Windows, Windows NT, and the Windows 95
flag logo are trademarks or registered trademarks of the
Microsoft Corporation.
Copyright International Business Machines
Corporation 1997. All rights reserved. Note to U.S.
Government Users – Documentation related to restricted
rights – Use, duplication, or disclosure is subject to
restrictions set forth in GSA ADP Schedule Contract with
IBM Corp.
Page 5

Contents
Checking Your Items ....................................... 1
Setting Up Your Computer ................................... 5
Setting Up Windows 95 ..................................... 11
Registering Your Computer................................... 15
Shutting Down Windows 95 .................................. 17
Getting More Information .................................... 19
Copyright IBM Corp. 1997 iii
Page 6

iv IBM ThinkPad 380XD/385XD Setup Guide
Page 7
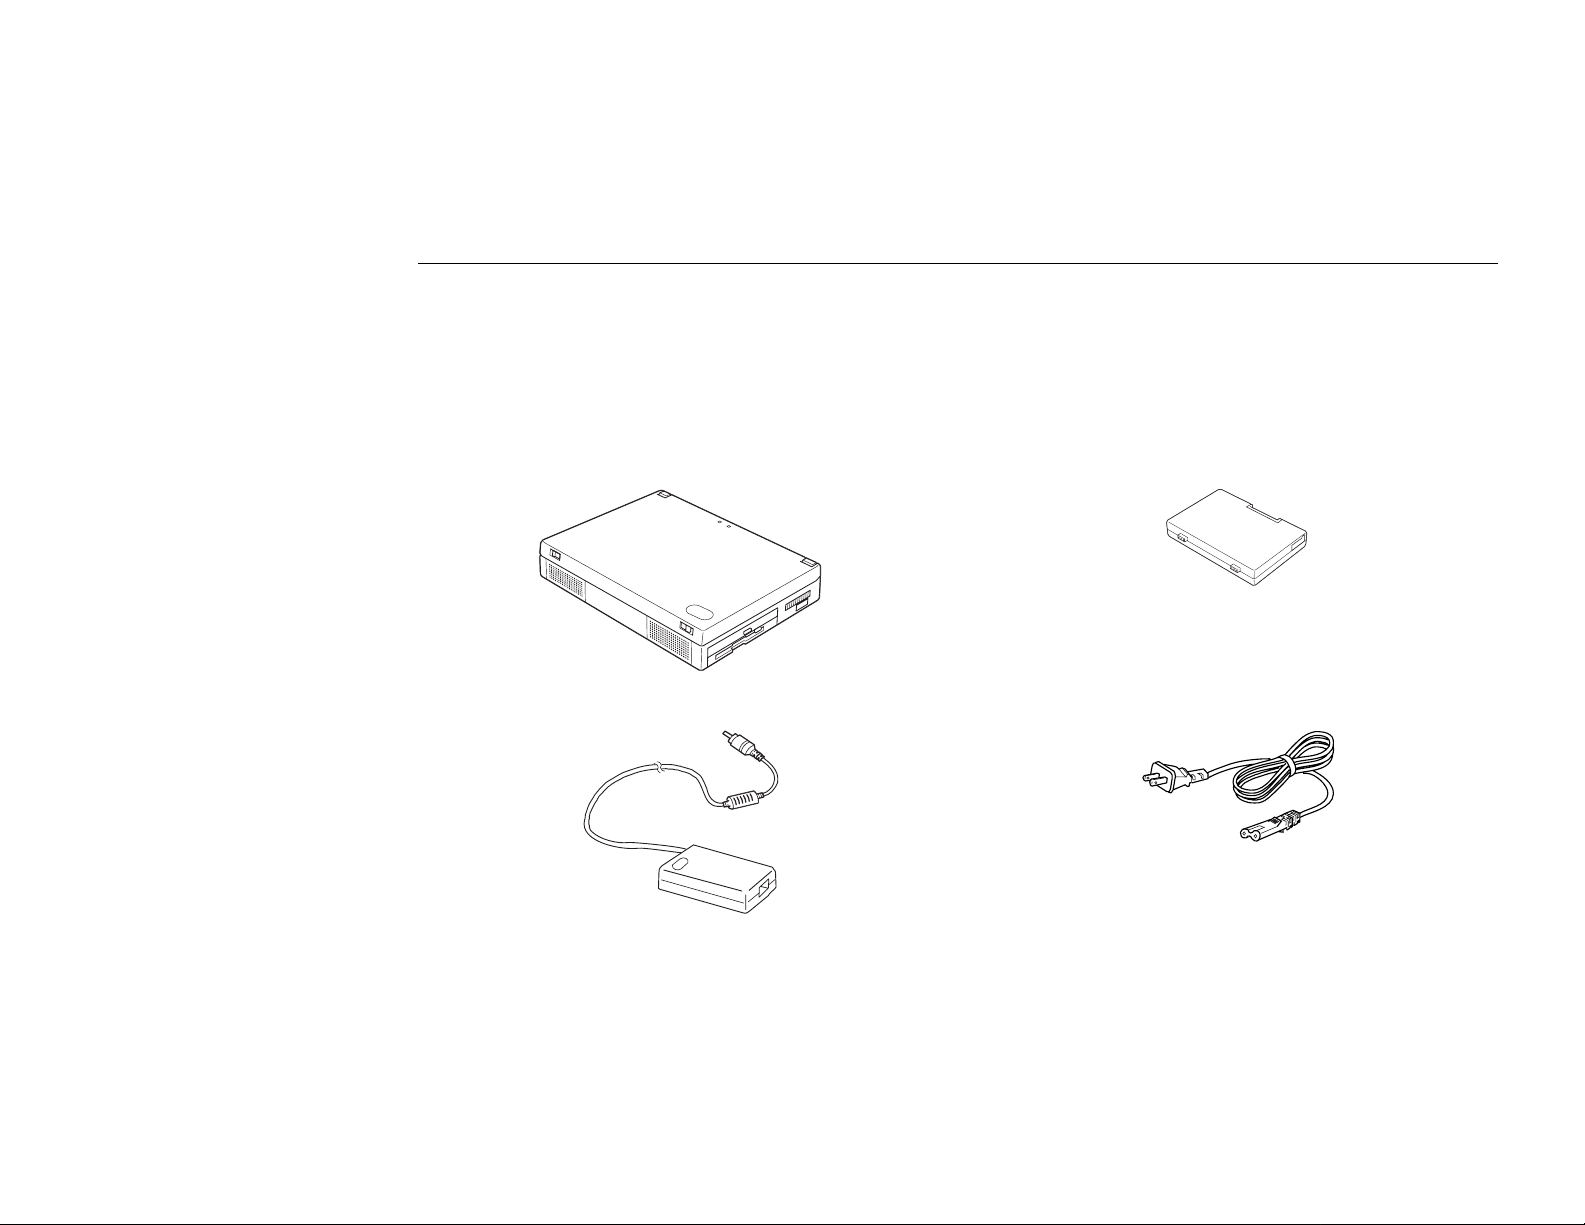
Checking Your Items
Welcome to the world of ThinkPad computers!
First, remove the items from the shipping box. Match the items, one by one, with the following figures. If any item is
missing or damaged, contact your place of purchase.
Computer
AC Adapter Power Cord
Battery Pack
Note: In some countries, a 3-pin power cord (different
from the one shown) comes with your computer.
In this case, make sure you read the electrical
safety notice on page 3.
Copyright IBM Corp. 1997 1
Page 8
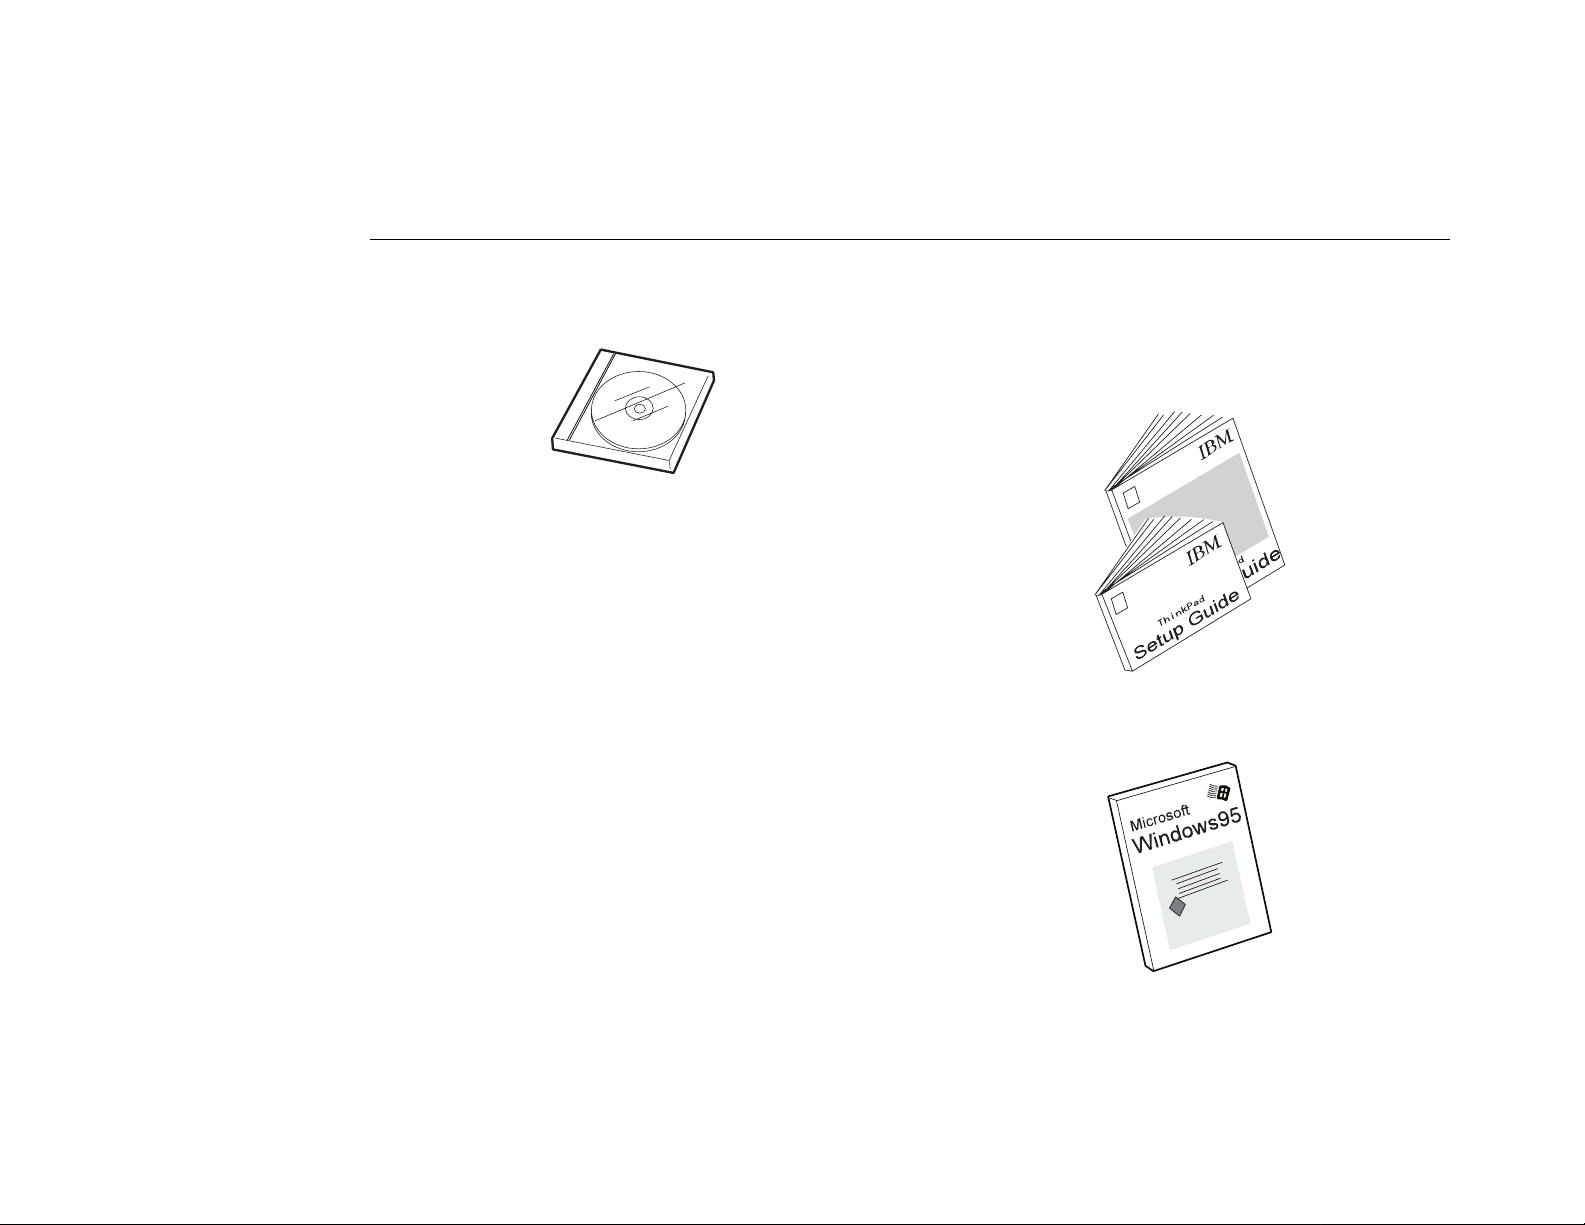
Recovery CD-ROM Package
Note: If your computer is not preloaded with Windows 95,
the Recovery CD-ROM package does not come
with the computer.
ThinkPad Manuals
Setup Guide (this book)
User's Guide
ThinkPad Envelope
This envelope contains:
Introducing Microsoft Windows 95
user's guide (with a CD-ROM)
, the Windows 95
International Service Information
International Program License Agreement booklet
International Program License Agreement information
sheet
Multilingual License Information
Other brochures and flyers
Note: If your computer is not preloaded with Windows
95, the book does not come with the computer.
2
IBM ThinkPad 380XD/385XD Setup Guide
Page 9

Electrical Safety Notice:
If a 3-pin power cord came with your computer, you need to follow this safety notice.
DANGER
Electrical current from power, telephone, and communication cables is hazardous. To avoid shock
hazard, connect and disconnect cables as shown below when installing, moving, or opening the covers
of product or attached devices. The 3-pin power cord must be used with a properly grounded outlet.
Note: In the U.K., by law:
The telephone line cable must be connected after the power cord.
The power cord must be disconnected after the telephone line cable.
Checking Your Items 3
Page 10

4 IBM ThinkPad 380XD/385XD Setup Guide
Page 11
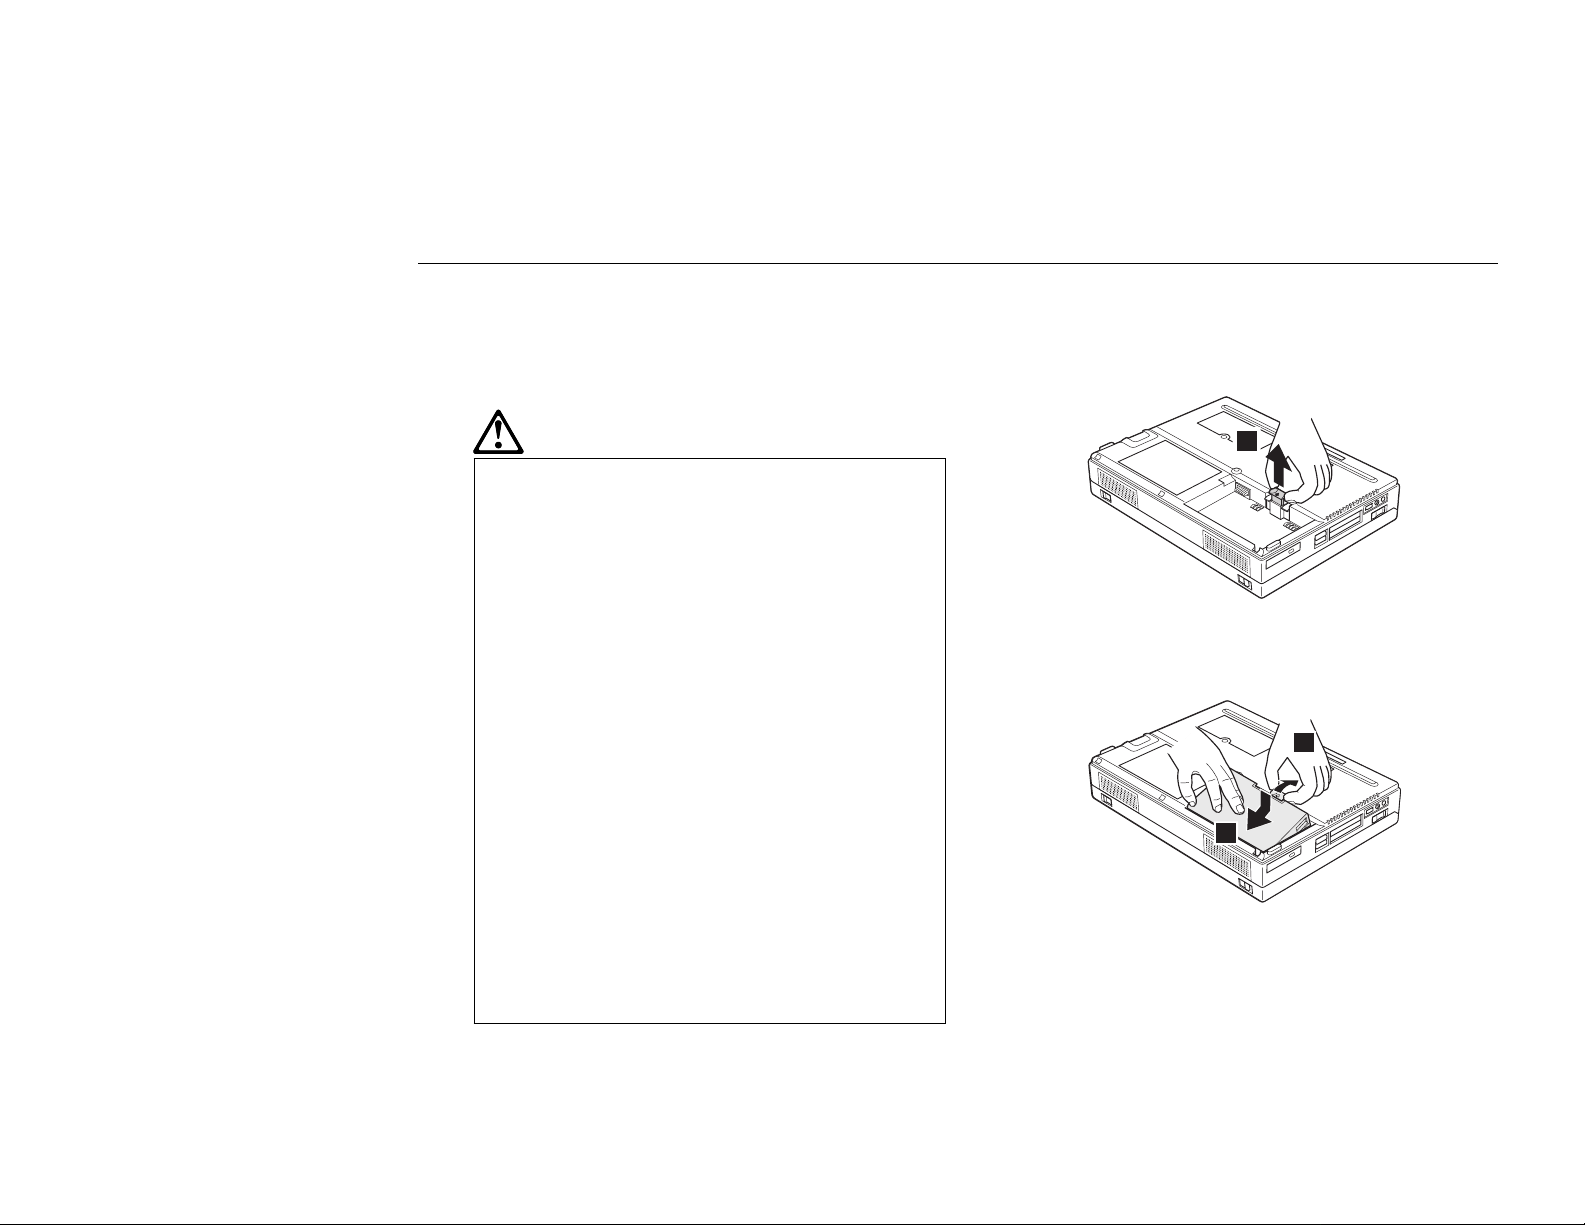
Setting Up Your Computer
You are now ready to assemble and start your computer.
1
Turn the computer upside down.
DANGER
The battery pack provided with your
computer contains a small amount of
harmful substances. To avoid possible
injury:
Keep the battery pack away from fire.
Do not expose the battery pack to
water or rain.
Do not attempt to disassemble the
battery pack.
Avoid mechanical shocks to the
battery.
Always use battery packs
recommended by IBM.
Keep the battery pack away from
children.
2
Install the battery pack.
a) Pull the battery-pack lock upward 1 .
1
b) Install the battery pack as shown 2 , sliding the
battery-pack lock toward the rear of the
computer 3 .
3
2
When disposing of the battery, comply
with local ordinances or regulations or
your company's safety standards.
Copyright IBM Corp. 1997 5
Page 12

c) Press the battery-pack lock downward 4 .
4
3
Turn the computer over again.
4
Connect your printer.
If you have a printer, open the connector cover of
your computer, and connect the printer cable to the
parallel port. Then turn the printer power on.
5
Connect the AC Adapter to the computer
as shown.
1
2
3
6 IBM ThinkPad 380XD/385XD Setup Guide
Page 13

6
Open the liquid crystal display.
7
Turn the power on.
a) Press the liquid crystal display (LCD) latches
1 and open the LCD 2 .
b) Position the LCD so that it is convenient for
viewing. The LCD opens up to 135°.
Attention
Do not force the LCD to open flat.
1
2
1
a) Push and release the power switch to turn the
computer 1 on. The power switch
automatically snaps back to its original position.
b) Adjust the brightness (for a TFT display model)
and the contrast (for an HPA display model) of
the display with the brightness control or the
contrast control 2 .
2
1
TFT
HPA
Setting Up Your Computer 7
Page 14

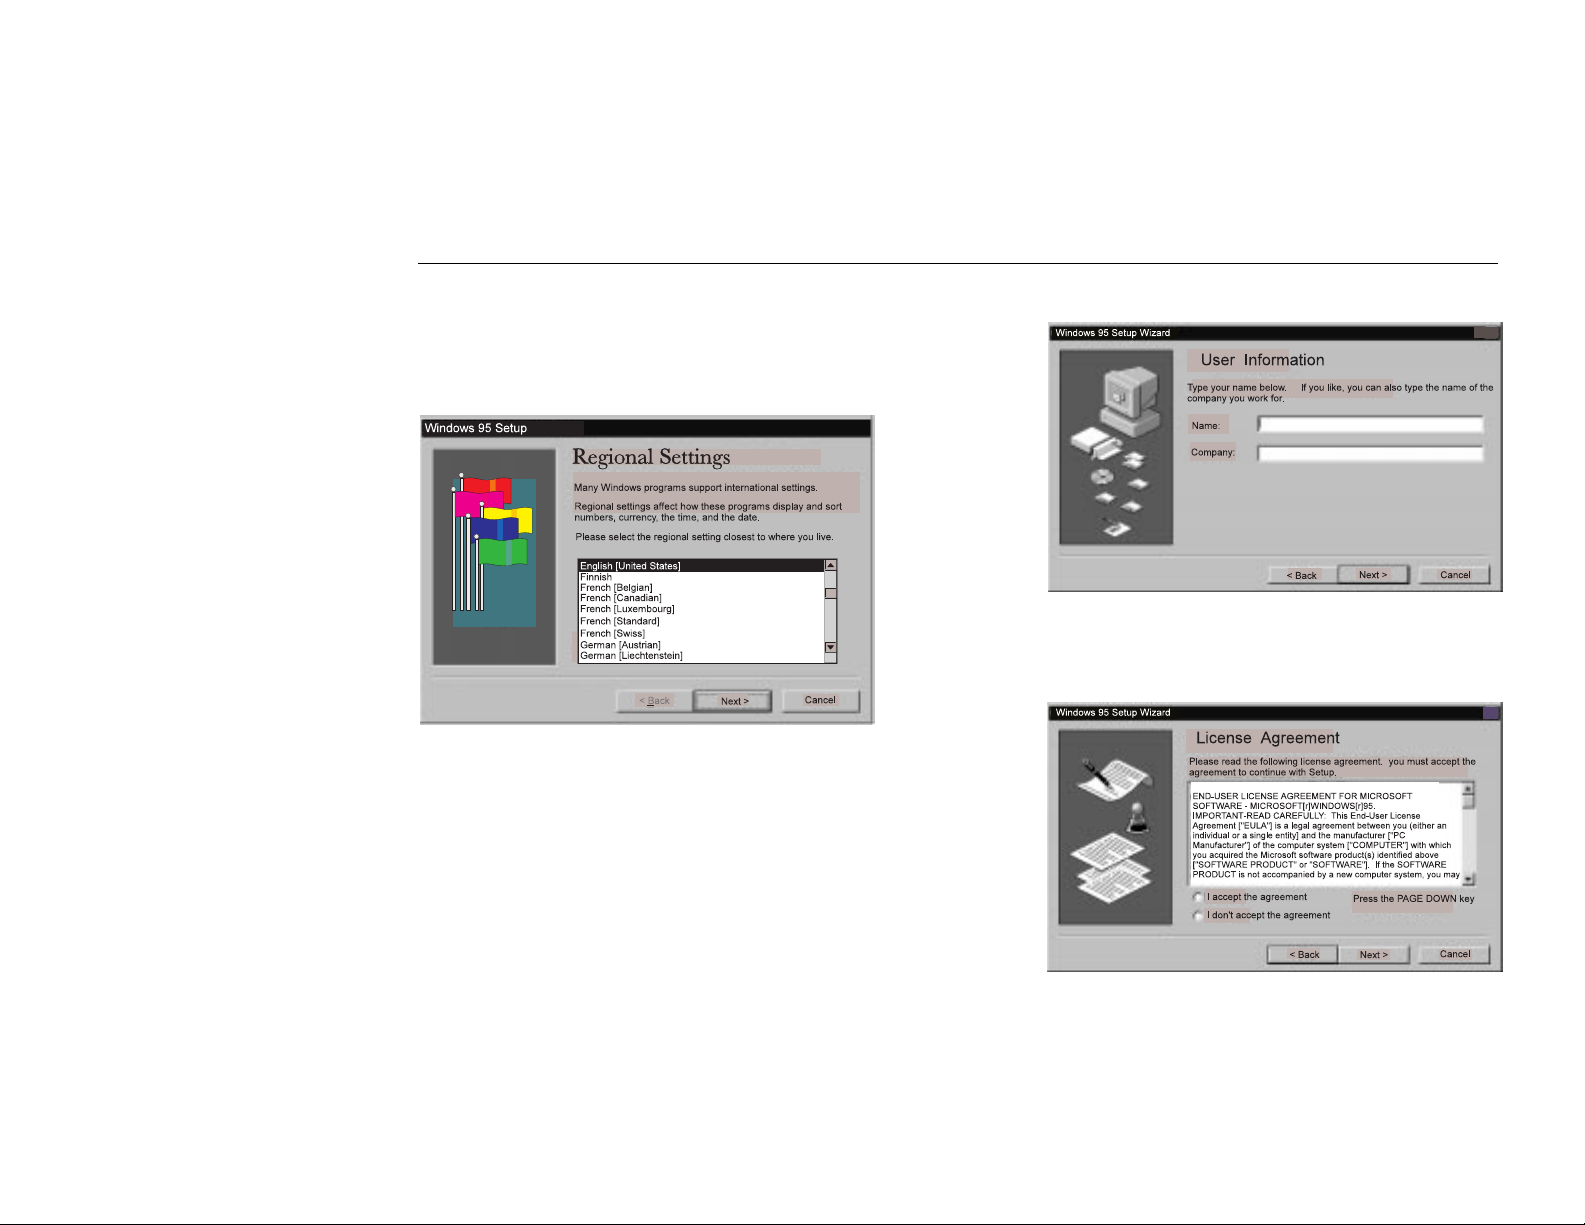
After a single beep, the “Regional Settings” window
appears.
Congratulations if you have the window successfully
displayed! Move on to the following chapter, “Setting
Up Windows 95.”
If any other window appears, a failure might have
occurred in the computer. See the
Guide
.
ThinkPad User's
If you do not know how to operate with the TrackPoint
III, see the following information.
8
IBM ThinkPad 380XD/385XD Setup Guide
Page 15
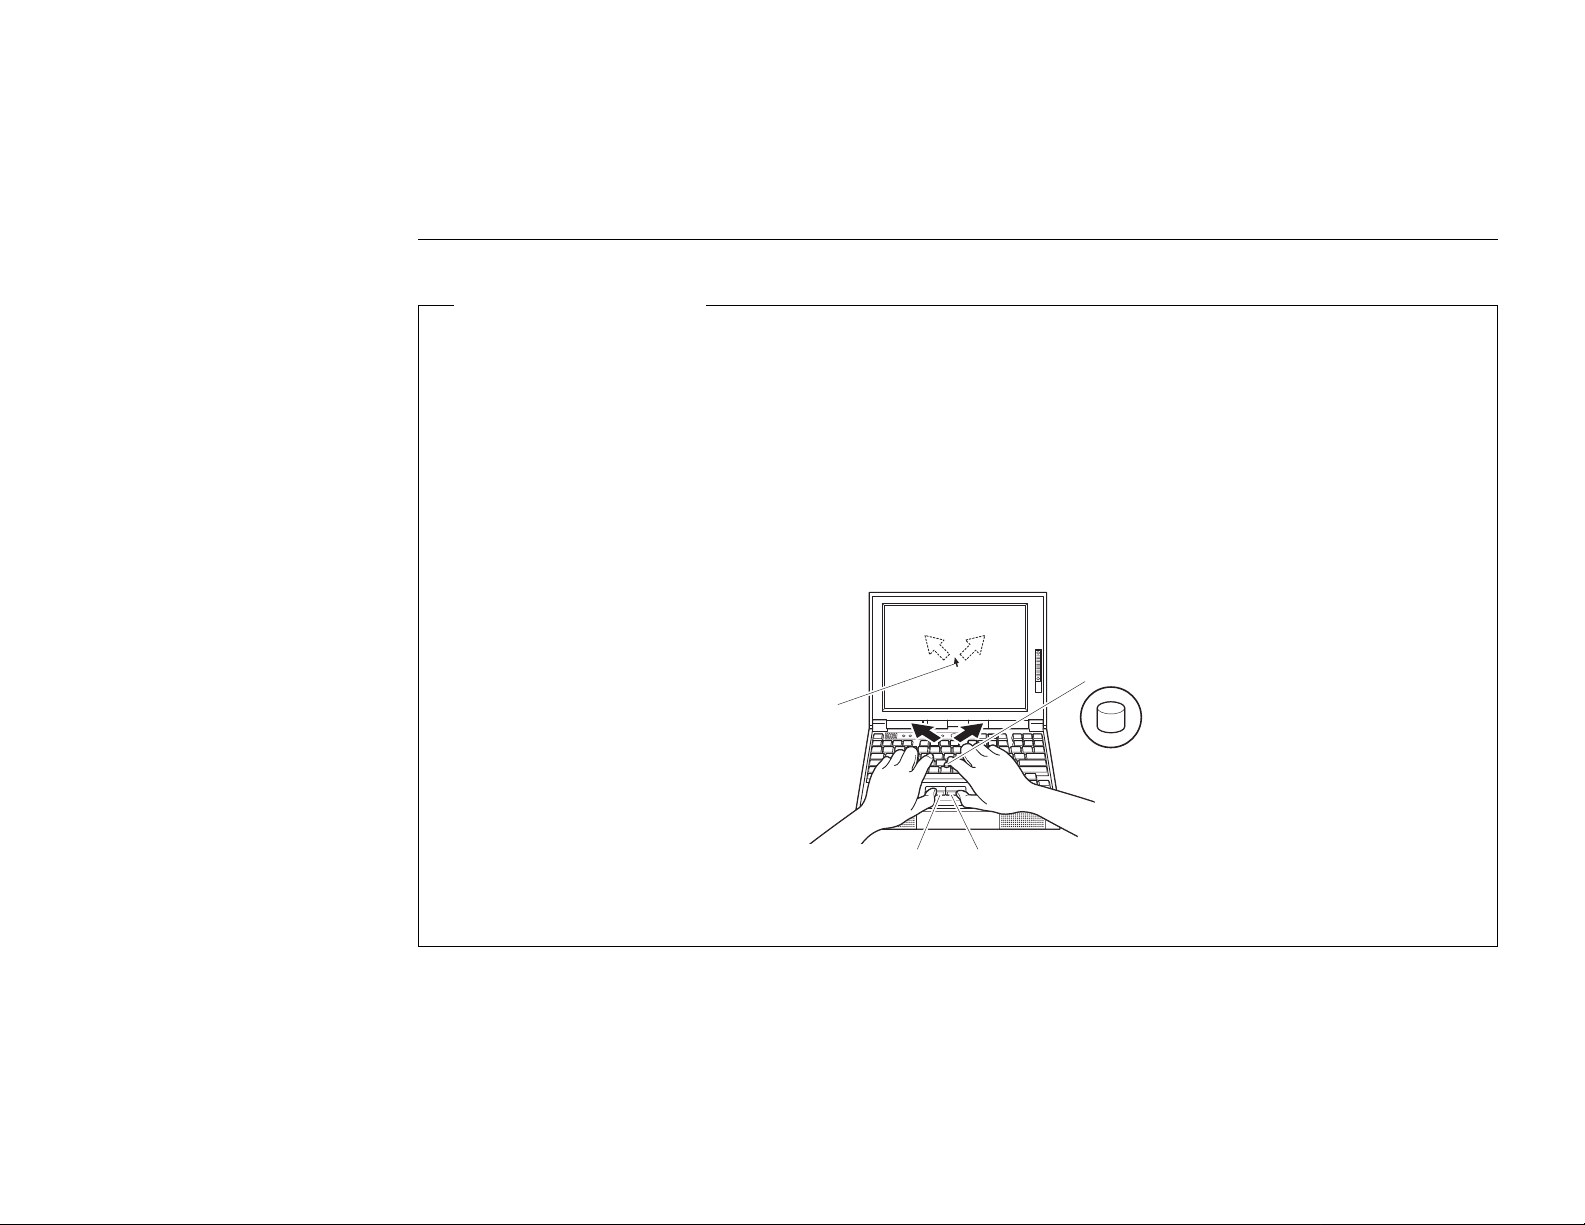
Using the TrackPoint III
The TrackPoint III is a unique device for moving the pointer on the screen. The left and right click buttons function
like the left and right click buttons on a mouse. So you can perform all the mouse operations with the TrackPoint III.
To move the pointer, press gently on the red-topped stick at the center of the keyboard with your left or right index
finger in the direction you want it to move. To select and drag an object, press and hold one of the click buttons
with either thumb as required by your software.
Click means to press the left click button once. Double-click means to press the left click button twice within 1
second.
Stick
Pointer
Left click button
For more information about the TrackPoint III, see the
Setting Up Your Computer 9
Right click button
ThinkPad User's Guide
.
Page 16

10 IBM ThinkPad 380XD/385XD Setup Guide
Page 17
Note: If the system stops while you are setting up
Windows 95, turn the power off and then on again.
The following window should be displayed on your screen:
1
From the list, select the language you will be using.
Then click on Next. The “Keyboard Layout” window
appears.
Setting Up Windows 95
3
Type your name (and company name, if necessary)
in the fields. Then click on Next. The “License
Agreement” window appears:
2
From the list, select the keyboard you will be using.
Then click on Next. The “User Information” window
appears:
Copyright IBM Corp. 1997 11
Page 18
4
Read the contents of the window. If you accept the
agreement, click on I accept the agreement. Then
click on Next. The “Certificate of Authenticity”
window appears:
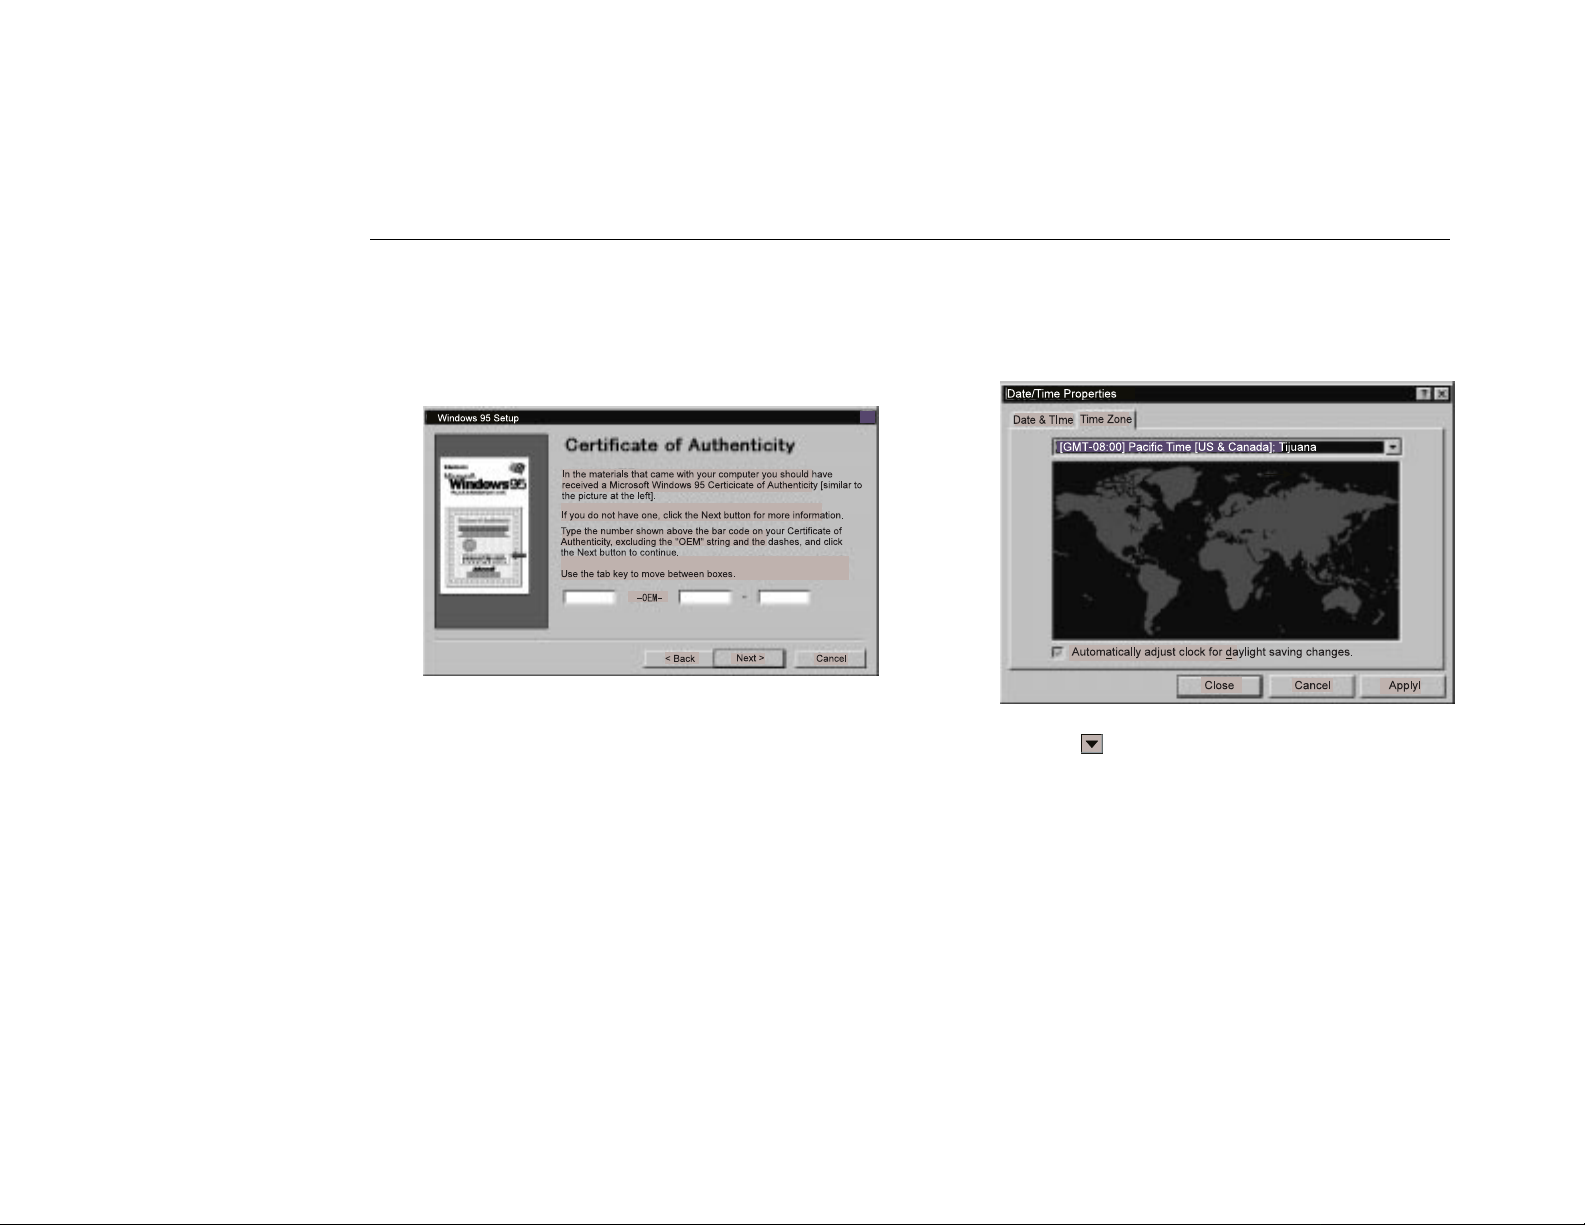
5
Look at the cover page of
Windows 95
find the “Product ID” above the bar code. In the
three input fields of the window, type that number.
Then click on Next. The “Start Wizard” window
appears.
. On your “Certificate of Authenticity,”
Introducing Microsoft
6
Click on Finish to start Windows 95. Some
messages might appear, and then the “Date/Time
Properties” window appears:
7
Click on and select from the list the region
closest to your location.
If you do
for daylight saving time, remove the check from the
checkbox ( ), by clicking on the check mark in the
box.
not
want to automatically adjust the clock
IBM ThinkPad 380XD/385XD Setup Guide
12
Page 19

8
Click on the tab for Date & Time and go to that
page. Check that the date and time are correct. If
not, adjust them. Click on Close. The first “Add
Printer Wizard” window appears:
10
Look for your printer manufacturer in the
Manufacturers list.
If your manufacturer is listed:
Note: If you do not have a printer, or want to set up
a printer later, click on Cancel and skip the
remaining steps. The setup is finished and
you can start using your computer. You can
set up a printer later by clicking on Start,
Settings, Printer after you start Windows 95.
9
Click on Next to set up your printer. The second
“Add Printer Wizard” window appears:
Setting Up Windows 95 13
a) Click on your printer manufacturer.
If your printer model is listed in the Printers list:
b) Select your printer from the list and click on
Next.
If your manufacturer or printer is
a) Click on Have Disk. The “Install from Disk”
window appears.
b) Insert the device driver diskettes that came with
your printer into the diskette drive and click on
OK.
c) Select your printer from the list and click on
Next.
not
listed:
Page 20
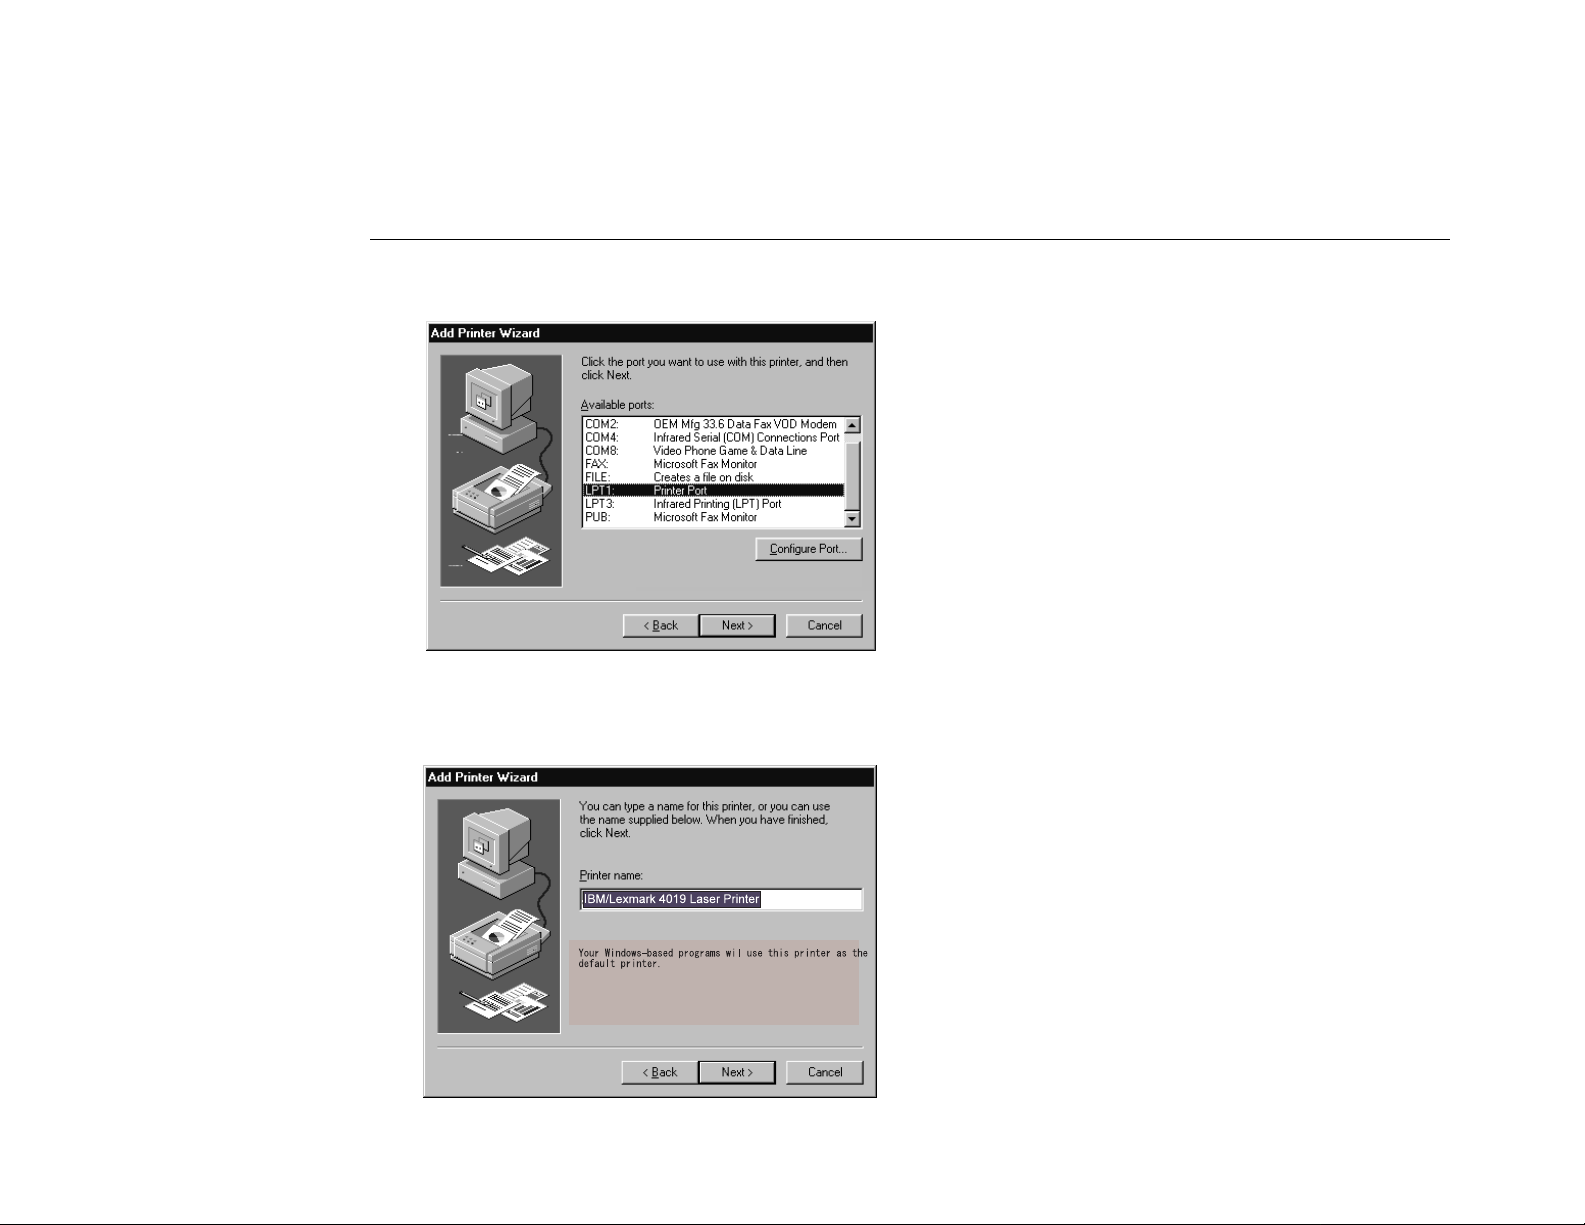
The third “Add Printer Wizard” window appears:
12
Type in a name you want for your printer, and click
on Next. (You can use the name supplied.) The
last “Add Printer Wizard” window appears.
13
Select Yes and click on Finish. A test page is
printed.
14
Did the test page print correctly?
Click on Yes if so. The Windows 95 desktop
appears.
Click on No if not. The “Windows Help” window
appears. Follow this window and solve your
printer problem.
11
Select the port you want to use with the printer, and
click on Next.(LPT1 is a default selection.) The
fourth “Add Printer Wizard” window appears:
IBM ThinkPad 380XD/385XD Setup Guide
14
You can now start using your computer by reading the
ThinkPad User's Guide
To shut down your computer, go to “Shutting Down
Windows 95.”
.
Page 21

Registering Your Computer
After setting up Windows 95, take a few moments to
complete the ThinkPad registration. The information
provided by you will help IBM to better serve you in the
future. To register with Windows 95 desktop, do the
following:
1
Double-click on the Register icon ( ).
2
Follow the instructions on the screen to complete
the registration.
If you want to register your computer later, follow
the same procedure.
Note: If your computer uses other operating system, go to
the following web site to complete registration.
http://www.us.pc.ibm.com/register
Copyright IBM Corp. 1997 15
Page 22

16 IBM ThinkPad 380XD/385XD Setup Guide
Page 23

Shutting Down Windows 95
When you are finished setting up Windows 95 and you
want to shut down, do the following:
1
Click on Start at the bottom left corner of the
screen. The following menu appears:
2
Click on Shut Down. A confirmation message
appears. Shut down the computer? is the default
selection.
3
Click on Yes if you want to shut down the computer.
The power turns off automatically.
Note
When you finish using an application software program
and you want to shut down the computer, close the
program first, and then use this procedure to shut
down Windows 95.
To prevent damage to your computer files, make sure
that you shut down Windows 95 every time you finish.
Copyright IBM Corp. 1997 17
Page 24

18 IBM ThinkPad 380XD/385XD Setup Guide
Page 25

Getting More Information
After you have completed setting up your computer and Windows 95, you can start using your computer:
If you want to learn more about your computer, refer to the
following information:
– Learning about the hardware features
– Using the ThinkPad Configuration program and Easy-Setup
– Installing options and operating the computer
– Using battery power
– Using the security features
– Solving computer problems
– Getting service
– Learning about specifications and product warranties
If you want to perform more complicated tasks with your computer, refer to the
gives you the following information:
– Using your computer in foreign countries
– Using a PC Card
– Resolving system resource conflicts
– Installing software
– Controlling and managing systems over a network
ThinkPad User's Guide
. It gives you the
ThinkPad Online Book
.It
– Solving computer problems
Note: To start the ThinkPad Online Book, refer to the
Copyright IBM Corp. 1997 19
ThinkPad User's Guide
.
Page 26

Attention
Your ThinkPad computer provides two ways to recover lost or damaged software, the Diskette Factory program and
the Recovery CD. For details, refer to the
ThinkPad User's Guide
.
If your computer is not preloaded with Windows 95, the Recovery CD does not come with the computer.
Note: You can get support information through the IBM Internet home page, at the following URL:
http://www.us.pc.ibm.com
IBM ThinkPad 380XD/385XD Setup Guide
20
Page 27
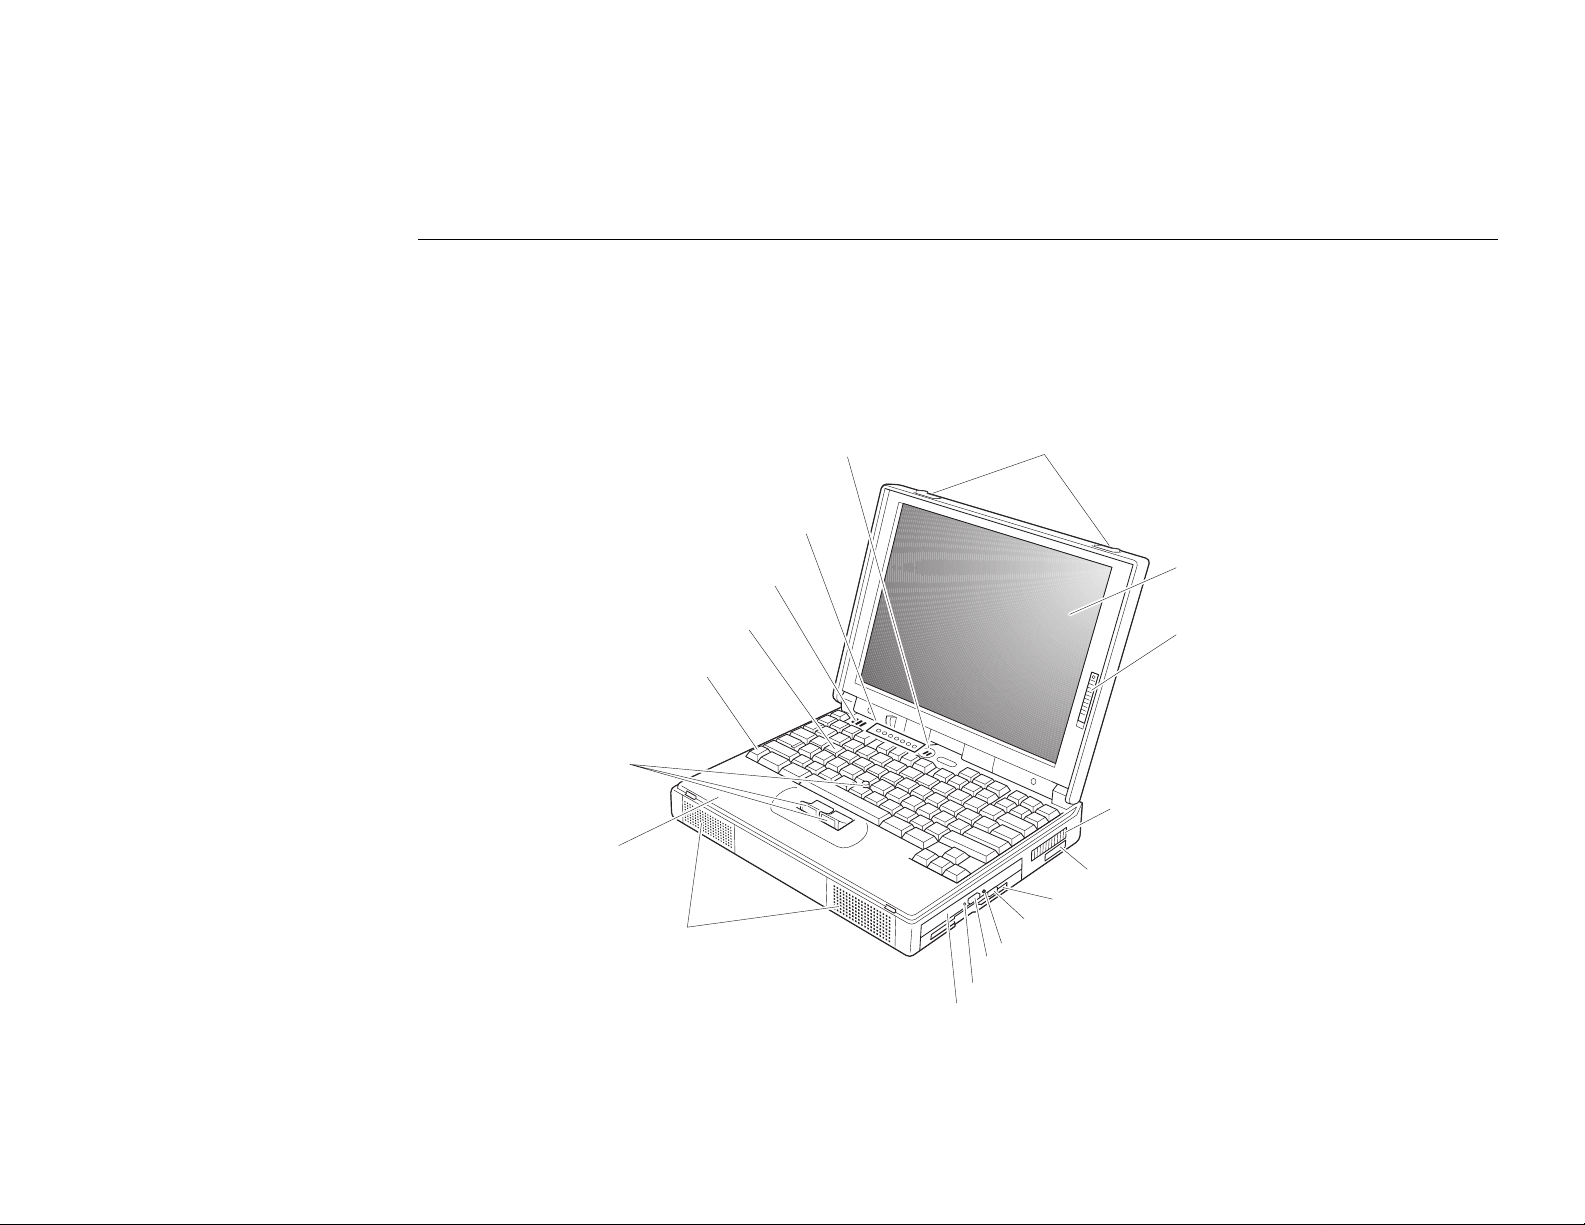
You can identify the hardware features on your computer here.
Front View
TrackPoint III
Palm rest
Built-in microphone
Indicator panel
Subwoofer
Keyboard
Fn key
Stereo Speakers
LCD latches
Color LCD screen
Brightness control
(for a TFT display model)
or
Contrast control
(for an HPA display model)
Fan louver
Infrared port
Diskette drive
Diskette eject button
CD-ROM emergency eject hole
CD-ROM eject button
CD-ROM drive in-use indicator
CD-ROM drive
Getting More Information 21
Page 28

Rear View
External suspend mode
indicator
Connector cover
External battery indicator
Hard disk drive
Security keyhole
PC Card eject buttons
PC Card slots
Volume control
Microphone/line-in jack
Headphone jack
Power switch
Serial connector
Parallel connector
External-monitor connector
Universal serial bus (USB) port
External-input-device connector
Power jack
22 IBM ThinkPad 380XD/385XD Setup Guide
Page 29
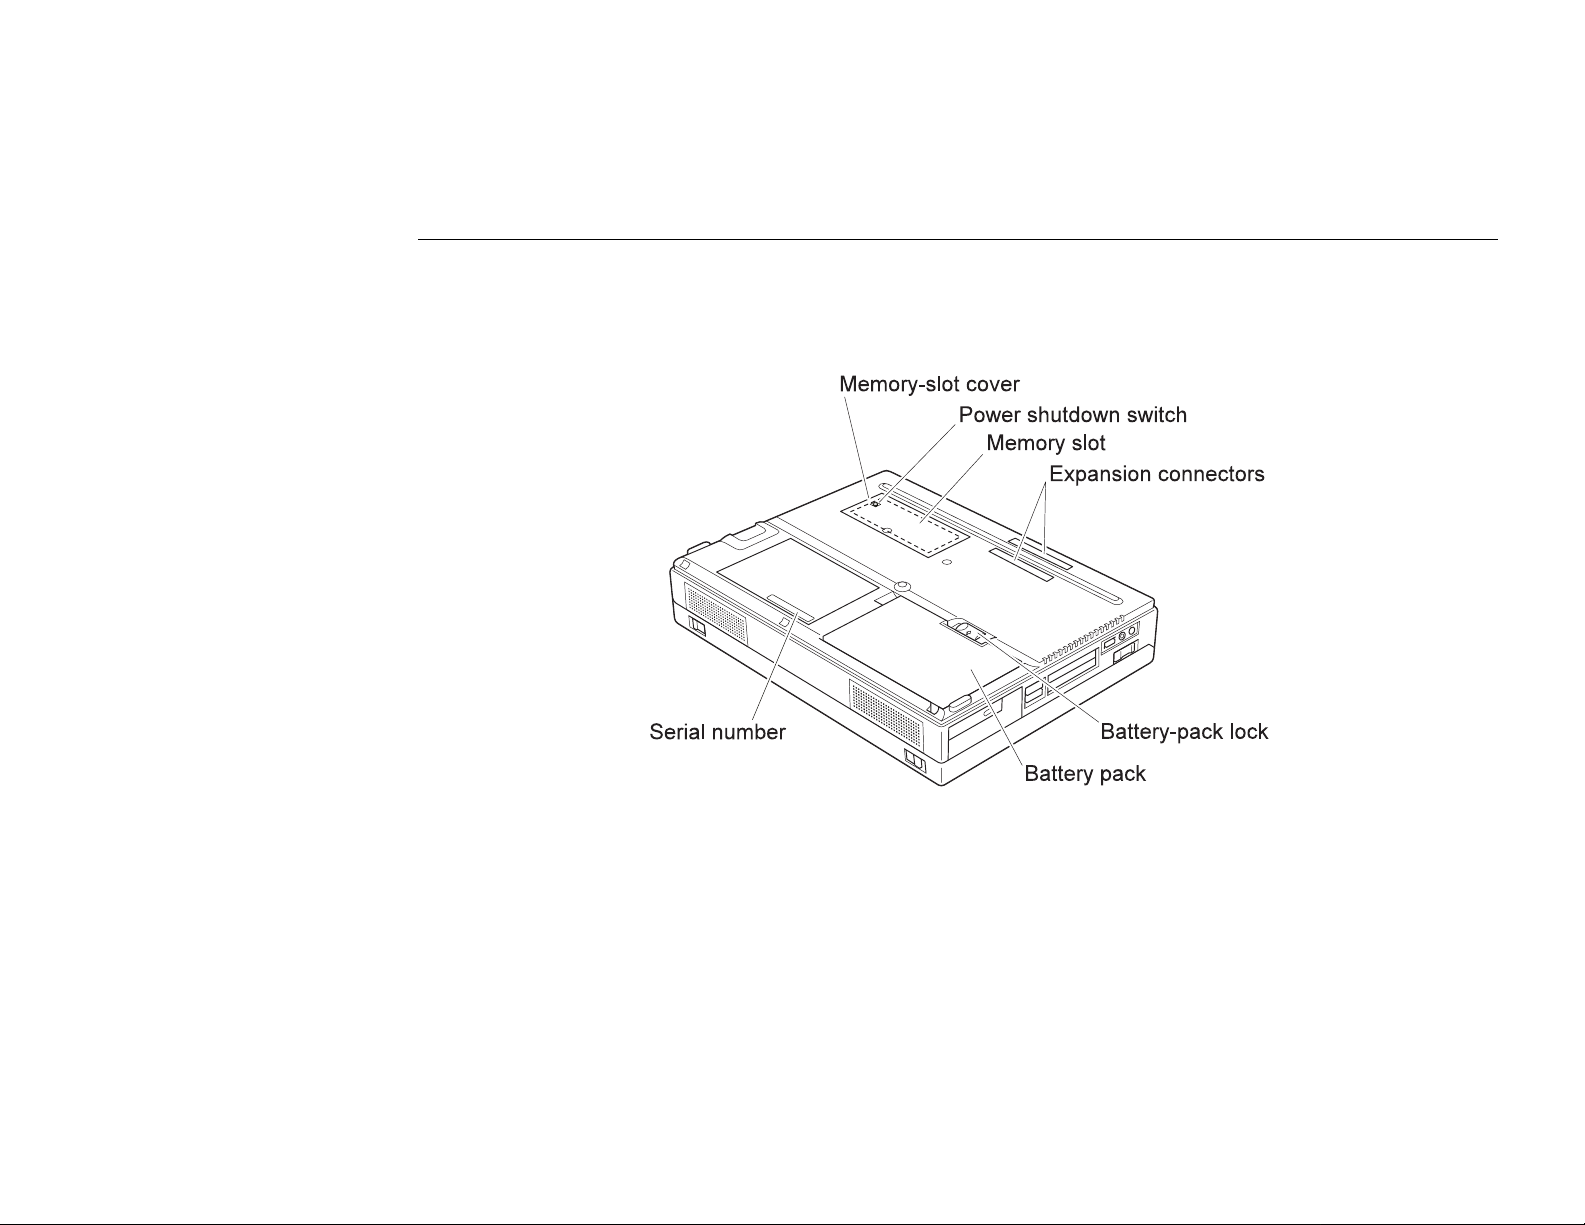
Bottom View (with Battery Pack Installed)
Getting More Information 23
Page 30

24 IBM ThinkPad 380XD/385XD Setup Guide
Page 31

Page 32

IBM
Part Number: 05L2144
Printed in the United States of America
5L2144
 Loading...