

Page 1

Please check out our eBay auctions for more great
deals on Factory Service Manuals:
Page 2

Title: C79DKMST CreationDate: 08/19/97 17:47:41
IBM ThinkPad 770 User's Guide Supplement
Page 3

Title: C79DKMST CreationDate: 08/19/97 17:47:41
Page 4

Title: C79DKMST CreationDate: 08/19/97 17:47:41
IBM
IBM ThinkPad 770 User's Guide Supplement
Page 5

Title: C79DKMST CreationDate: 08/19/97 17:47:41
First Edition (September 1997)
The following paragraph does not apply to the United Kingdom or any country where such provisions are
inconsistent with local law:
INTERNATIONAL BUSINESS MACHINES CORPORATION PROVIDES THIS PUBLICATION “AS IS” WITHOUT ANY
WARRANTY OF ANY KIND, EITHER EXPRESS OR IMPLIED, INCLUDING, BUT NOT LIMITED TO, THE LIMITED
WARRANTIES OF MERCHANTABILITY OR FITNESS FOR A PARTICULAR PURPOSE. Some states do not allow
disclaimers or express or implied warranties in certain transactions; therefore, this statement may not apply to you.
This publication could include technical inaccuracies or typographical errors. Changes are periodically made to the
information herein; these changes will be incorporated in new editions of the publication. IBM may make
improvements or changes in the products or the programs described in this publication at any time.
Requests for technical information about IBM products should be made to your IBM authorized dealer or your IBM
marketing representative.
Copyright International Business Machines Corporation 1997. All rights reserved. Note to U.S. Government
Users – Documentation related to restricted rights – Use, duplication, or disclosure is subject to restrictions set forth in
GSA ADP Schedule Contract with IBM Corp.
Page 6

Title: C79DKMST CreationDate: 08/19/97 17:47:41
The following sections supplement the information contained in the
User's Guide
Using the Digital Audio Out Feature ................. 1
Changing a Power-On Password or HDD Password ....... 2
Removing a Power-On Password or HDD Password ....... 3
Enabling the IDE Drive on the Docking Station .......... 7
Hot and Warm Plug and Unplug Functions ............. 4
Installing the Various Versions of Windows 95 ........... 9
Installing OS/2 Warp ......................... 13
Recovering Lost or Damaged Software .............. 14
Considerations on the Telephony Function ............ 17
Hints and Tips ............................ 18
Notices . . . . . . . . . . . . . . . . . . . . . . . . . . . . . . . . . 22
Contents
.
Setting to 3-Channel IDE Mode .................. 7
Setting to 2-Channel IDE Mode .................. 8
Supported Devices by Operating System ............ 4
Device Restrictions . . . . . . . . . . . . . . . . . . . . . . . . . 5
Versions OSR0 and OSR1 ..................... 9
Versions OSR2 and OSR2.1 .................. 10
OS/2 Warp Version 3 ....................... 13
OS/2 Warp 4 with a Correction Disk .............. 13
Option A . . . . . . . . . . . . . . . . . . . . . . . . . . . . . . 14
Option B . . . . . . . . . . . . . . . . . . . . . . . . . . . . . . 15
Setting the RingCentral Application for New Zealand .... 17
Note for Caller ID Support .................... 17
Receiving Faxes or Mail in Suspend Mode .......... 18
Hot or Warm Docking to the SelectaDock III Docking Station 18
USB Port Considerations ..................... 18
Hot Plugging or Unplugging a PCMCIA Card ......... 19
Using a Second CardBus Card ................. 19
Changing Batteries during Battery-Powered Operation ... 19
Changing the Crystal Audio Device Configuration ...... 20
Using the COM Port in OS/2 .................. 20
Using an External Condenser Microphone ........... 21
Using the NetMeeting Software ................. 21
Using the Bay Eject Lever .................... 21
Product Notice Requirements .................. 22
Notice For Australia ........................ 22
Copyright IBM Corp. 1997 iii
Page 7

Title: C79DKMST CreationDate: 08/19/97 17:47:41
iv
Page 8
Title: C79DKMST CreationDate: 08/19/97 17:47:41
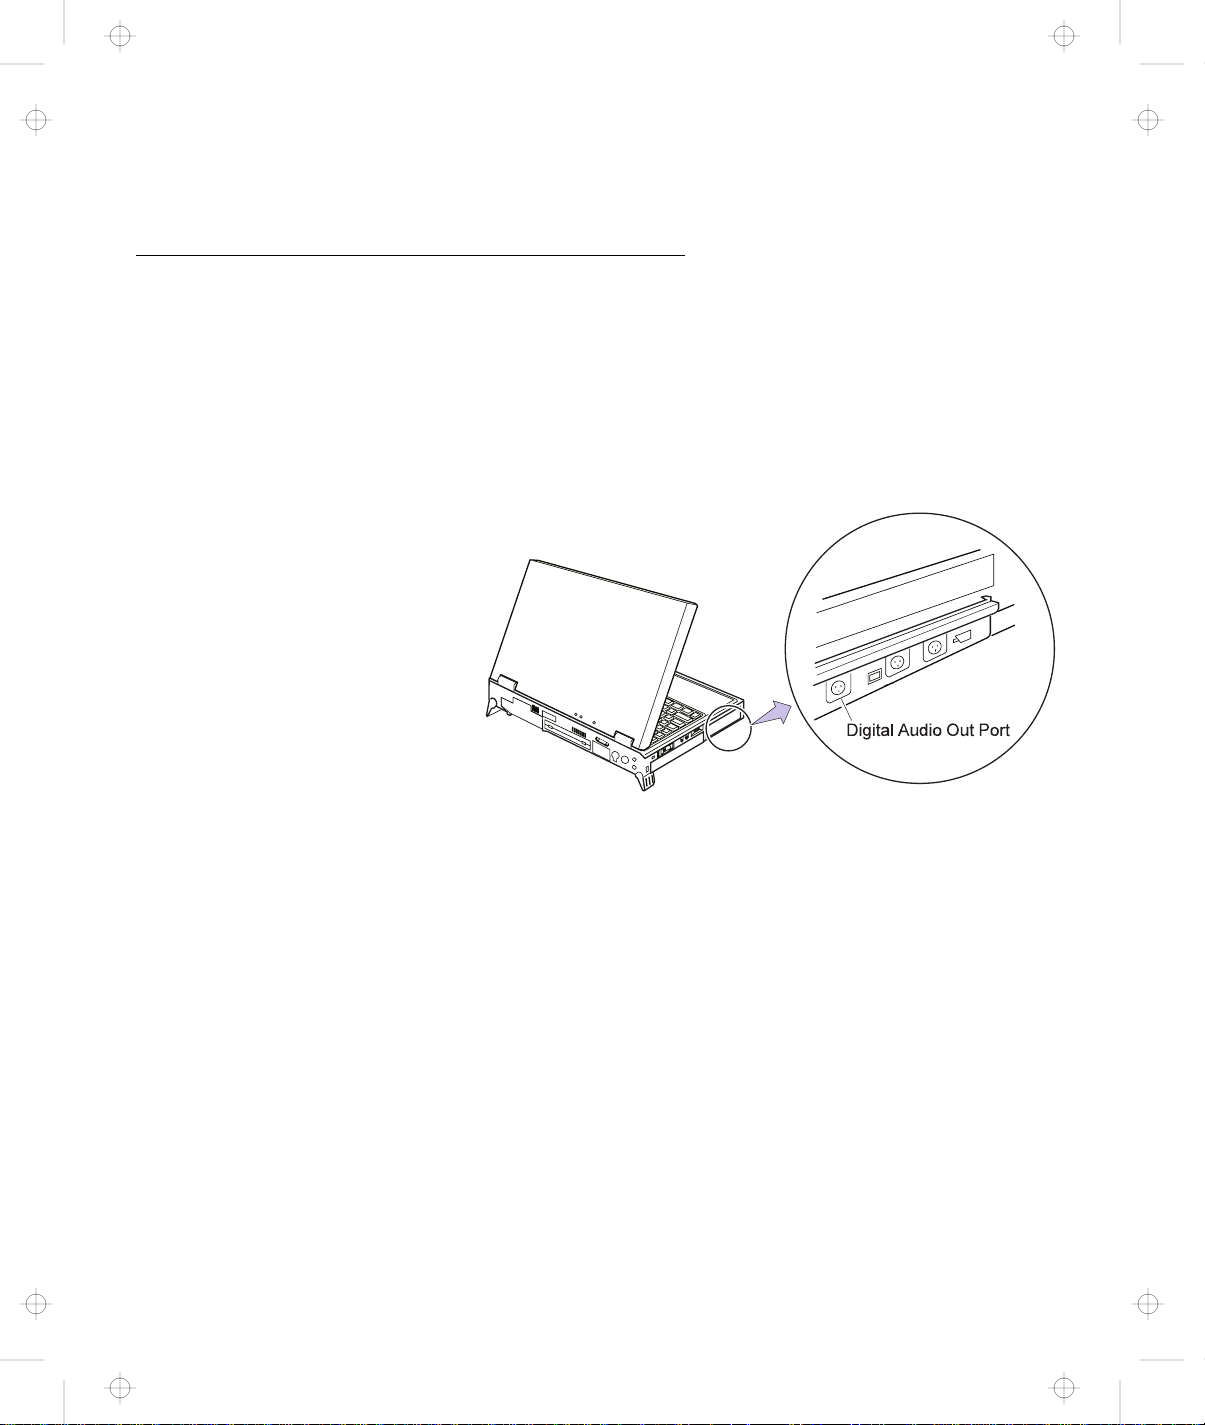
Using the Digital Audio Out Feature
(Models equipped with the DVD and Enhanced Adapter)
To use this feature, you will need the optional DVD drive and the
software shipped with this option. Refer to the user's guide shipped
with this option for instructions on how to use it.
1
Page 9

Title: C79DKMST CreationDate: 08/19/97 17:47:41
Changing a Power-On Password or HDD Password
1
Power off your computer and wait at least 5 seconds; then
power it on again. A password prompt appears.
Note: The Power-on and HDD password prompts look a little
different. The prompt shown above is the Power-on
prompt.
2
Type your current password; then press the Spacebar.
3
Type the new password: then press the Spacebar.
4
Type the new password again to verify it; then press Enter.
You have changed your password.
2
Page 10

Title: C79DKMST CreationDate: 08/19/97 17:47:41
Removing a Power-On Password or HDD Password
1
Power off your computer and wait at least 5 seconds; then
power it on again. A password prompt appears.
Note: The Power-on and HDD password prompts look a little
different. The prompt shown above is the HDD prompt.
2
Type your current password; then press the Spacebar; then
press Enter. You have removed your password.
3
Page 11

Title: C79DKMST CreationDate: 08/19/97 17:47:41
Hot and Warm Plug and Unplug Functions
Your ThinkPad 770 computer enables you to attach or detach
devices dynamically (
hot
or
warm plug
or
unplug
) in the UltraBay.
Hot plug
computer powered on.
Warm plug
your computer is in suspend mode.
The LED light goes on and the beeper beeps. For a description of
the different LED color indications, see “Knowing the LED Color
Indications” in the
or
unplug
or
means to attach or detach a device with your
unplug
User's Guide
means to attach or detach a device while
.
Supported Devices by Operating System
Devices that support the hot and warm plug/unplug function are
shown as follows by operating system:
OS/2 and Windows NT 3.51
Battery Diskette
Drive
Hot
plug
or
unplug
Warm
plug
or
unplug
Yes Yes No No No
Yes Yes No Yes Yes
HDD CD-ROM
Drive
DVD
Drive
4
Page 12

Title: C79DKMST CreationDate: 08/19/97 17:47:41
Windows 95 and Windows NT 4.0
Battery Diskette
Hot
plug
or
unplug
Warm
plug
or
unplug
Notes:
1. The LED might not go on or you might not hear a beep or see a
2. Hot- or warm-plugging or unplugging of an IDE device (CD-ROM
Device Restrictions
The restrictions on some of the devices are as follows:
1. For the Diskette Drive:
Drive
HDD CD-ROM
Drive
DVD
Drive
Yes Yes No Yes Yes
Yes Yes No Yes Yes
message when a device is hot or warm plugged or unplugged
under OS/2 or Windows NT 3.51.
drive or DVD drive) is not supported in 2-channel IDE mode.
You cannot hot-plug or unplug the diskette drive in the UltraBay
when drive A is assigned to the external diskette drive. The
external diskette drive is the drive that is connected to the
system's or to the SelectaBase 770 Port Replicator's external
drive port, or the one installed in the docking station.
This applies to the following conditions:
Your system starts with the external diskette drive attached
and without a diskette drive in the UltraBay.
You set the FDD setting to External using PS2.EXE and start
your system without the internal drive installed (in the
UltraBay) nor the external diskette drive attached.
2. For Other IDE Devices:
HDD:
5
Page 13

Title: C79DKMST CreationDate: 08/19/97 17:47:41
3. For the Battery:
Do not hot unplug a secondary battery from the UltraBay when
the system is working under the secondary battery power. The
power may go off. This may be a situation where you have the
secondary battery inserted in the UltraBay and when:
To see whether your computer is running under the secondary
battery power or not, see the battery status indicator on the LCD
indicator panel.
You cannot use the hot and warm plug and unplug functions.
CD-ROM drive and DVD drive:
You cannot use the hot and warm plug and unplug functions
in 2-channel IDE mode. Refer to the table on page 8.
The AC Adapter is not connected and there is no primary
battery.
The AC Adapter is not connected and the primary battery
power is low.
6
Page 14

Title: C79DKMST CreationDate: 08/19/97 17:47:41
Enabling the IDE Drive on the Docking Station
If you have installed an IDE device (such as a hard disk drive or a
CD-ROM drive) in the docking station, you must change the setting
on your computer to enable the device. By default, your computer
uses the primary IDE channel for the primary hard disk drive
(Primary-Master) and the secondary IDE channel for a device in the
UltraBay II (Secondary-Master). You cannot use the IDE device in
the docking station in this default 2-channel default IDE mode.
To enable an IDE device in the docking station, you must change the
default setting to either of the following:
3-channel IDE mode
2-channel IDE mode
In 3-channel IDE mode, you can still use the hot and warm plug or
unplug functions. An additional IRQ for the third IDE channel is
required.
In 2-channel IDE mode, you do not have to assign an extra IRQ.
However, you will not be able to use hot and warm plug or unplug
functions.
Note: If you change the IDE channel configuration, the drive letter
assignment may be changed.
Setting to 3-Channel IDE Mode
1
Open the ThinkPad Configuration program.
2
Click on the Docking Station ( ) button.
3
Change the IRQ value in IRQ Holder for PCI Steering to a
value other than IRQ 11 or 15 (IRQ 9 is recommended).
4
Select Enable IDE devices. Make sure the third IDE channel
is selected in the list box. By default, the third IDE is
automatically selected.
5
Click on OK to close the dialog box.
6
Select OK in the warning dialog box. The system restarts.
7
Page 15

Title: C79DKMST CreationDate: 08/19/97 17:47:41
Setting to 2-Channel IDE Mode
1
2
3
4
5
6
7
Open the ThinkPad Configuration program.
Click on the Docking Station ( ) button.
Change the IRQ value in IRQ Holder for PCI Steering to a
value other than IRQ 11.
Select Enable IDE devices. The third IDE is automatically
selected.
Select Secondary channel in the IDE channel selection list
box.
Click on Disable Device in the warning message dialog box.
Click on OK to close the dialog box.
8
Select OK in the warning dialog box. The system restarts.
If necessary, change the IRQ value assigned to PCI to 11.
The following table shows the relationship between the devices and
IRQ values:
Device 2-Channel
IDE
Default Mode
HDD IRQ 14, P-M IRQ 14, P-M IRQ 14, P-M
UltraBay II IRQ 15, S-M IRQ 15, S-M IRQ 14, P-S
Docking
station
Legend:
1. P-M: Primary-master
2. P-S: Primary-slave
3. S-M: Secondary-master
4. S-S: Secondary-slave
5. T-M: Third-master
6. T-S: Third-slave
Disabled IRQ 11, T-M
3-Channel
IDE Mode
and T-S
2-Channel
IDE Mode
IRQ 15, S-M
and S-S
8
Page 16

Title: C79DKMST CreationDate: 08/19/97 17:47:41
Installing the Various Versions of Windows 95
The following versions of Windows 95 are available for your
ThinkPad 770:
Retail Release version (
Service Pack Version 1 (
OEM Service Release Version 2 (
OEM Service Release Version 2.1 (
The OSR0 is an off-the-shelf version of Windows 95 and is available
at any retail store. The OSR1 version can be downloaded from the
Microsoft Internet homepage (http://www.microsoft.com). OSR2,
and OSR2.1 versions are available only as preloaded versions.
Since your ThinkPad 770 incorporates several new devices that were
not available when these versions of Windows 95 were announced,
take special precautions when installing or reinstalling these
versions.
Versions OSR0 and OSR1
1
Create a Windows 95 supplementary diskette using the
Diskette Factory program (refer to “Installing Software for
Windows 95” in the online book).
2
Make sure there is enough space in the hard disk to store the
cabinet files and the installation programs (the required space
may vary depending on the language of Windows 95).
OSR0
OSR1
)
)
OSR2
OSR2.1
)
)
3
Make a temporary directory.
For example, enter at the DOS prompt:
MD C:\WIN95
4
Copy all the cabinet (.CAB) files and the installation programs
from the \WIN95 directory of the Windows 95 CD-ROM to this
directory.
For example, enter at the DOS prompt:
COPY src_cd:\WIN95\ . tgt_drv:\tgt_dir
9
Page 17

Title: C79DKMST CreationDate: 08/19/97 17:47:41
5
6
Where src_cd is the drive letter of the CD-ROM drive (C, D,...),
tgt_drv is the drive letter, and tgt_dir is the temporary
directory that you made in step 3.
Insert the Windows 95 supplementary diskette into the diskette
drive and copy the updated files from the Windows 95
supplementary diskette to the temporary directory.
For example, enter at the DOS prompt:
COPY a:\OSR INF\ . tgt_drv:\tgt_dir
Where tgt_drv is the drive letter and tgt_dir is the temporary
directory that you made in step 3.
Install the operating system to the temporary directory by
entering SETUP.EXE at the temporary directory prompt.
7
Refer to the Windows 95 documentation and the instructions
that appear on the screen to complete the installation.
8
If required, install the OSR1 version available from the
Microsoft Internet homepage.
9
If required, remove all the files in the temporary directory and
the directory itself after you complete the installation, to free
the space on the hard disk.
Versions OSR2 and OSR2.1
If you don't have a CD-ROM version of OSR2 or OSR2.1, you
should reinstall them by restoring the original preloaded image from
the Recovery CD. Refer to “Recovering Lost or Damaged Software”
on page 14.
If you have a CD-ROM version of OSR2 or OSR2.1, do the following:
1
Create a Windows 95 supplementary diskette using the
Diskette Factory program (refer to “Installing Software for
Windows 95” in the online book).
10
Page 18

Title: C79DKMST CreationDate: 08/19/97 17:47:41
2
Make sure there is enough space in the hard disk to store the
cabinet files and the installation programs (the required space
may vary depending on the language of Windows 95).
3
Make a temporary directory.
For example, enter at the DOS prompt:
MD C:\WIN95
4
Copy all the cabinet (.CAB) files and the installation programs
from the \WIN95 directory of the Windows 95 CD-ROM disk to
the temporary directory.
For example, enter at the DOS prompt:
COPY src_cd:\WIN95\ . tgt_drv:\tgt_dir
Where src_cd is the drive letter of the CD-ROM drive (C, D,..),
tgt_drv is the drive letter, and tgt_dir is the temporary
directory that you made in step 3.
5
Insert the Windows 95 supplementary diskette into the diskette
drive.
6
Copy the updated files in the Windows 95 supplementary
diskette to the temporary directory.
For example, enter the following at the DOS prompt:
COPY a:\OSR2INF\ . tgt_drv:\tgt_dir
COPY a:\CARDBUS\ . tgt_drv:\tgt_dir
Where tgt_drv is the drive letter, and tgt_dir is the temporary
directory that you made in step 3.
7
Install the operating system to the temporary directory by
entering SETUP.EXE at the temporary directory prompt.
8
Refer to the Windows 95 documentation and the instructions
that appear on the screen to complete the installation.
9
Insert the Windows 95 supplementary diskette into the diskette
drive.
11
Page 19

Title: C79DKMST CreationDate: 08/19/97 17:47:41
10
11
12
13
14
Change the drive letter at the DOS prompt to A and run
\QFE444\PCCARDUP.EXE.
Reboot the system
To replace the Unimodem drivers to support the Intel Video
Phone application, insert the Windows 95 supplementary
diskette into the diskette drive.
From the DOS prompt, go to C:\WINDOWS\SYSTEM (or the SYSTEM
subdirectory where Windows 95 is installed).
Rename the UNIMODEM and UNIMDM.TSP files by entering:
REN UNIMODEM.VXD UNIMODEM.BAK
REN UNIMDM.TSP UNIMDM.BAK
15
Copy a new file by entering COPY A:\UNIMODEM\ .
16
If you are installing OSR2.1, refer to the documentation
shipped with this version.
12
Page 20

Title: C79DKMST CreationDate: 08/19/97 17:47:41
Installing OS/2 Warp
OS/2 Warp Version 3
To complete the installation of OS/2 Warp Version 3, you must
update Disk 1 if you are going to use a hard disk with a capacity of
more than 4.3 GB. You can obtain updated disk information from the
following IBM World Wide Web site:
http://service.software.ibm.com/os2ddpak/index.htm
When the homepage appears, do the following:
1
Click on “Yes, I agree. Show the Device Category List...”
2
Click on “OS/2 Component Updates.”
3
Click on “Installation Diskette Updates.”
4
Click on “>4.3GB IDE Hardfile Support.”
5
Do the instructions that follow.
For additional information, contact the IBM PC Company Help Center
at 1-800-772-2227 in the U.S.
OS/2 Warp 4 with a Correction Disk
1
Create an OS/2 Warp Version 4 Install Diskette 1 Update using
the Diskette Factory Program (refer to “Installing Software for
OS/2 Warp Version 4” in the online book).
2
Install OS/2 Warp Version 4 from the Install Disk.
3
When you are prompted to insert Disk 1, use the new diskette
created in step 1.
4
Continue installing OS/2 Warp Version 4.
13
Page 21

Title: C79DKMST CreationDate: 08/19/97 17:47:41
Recovering Lost or Damaged Software
Option A
Your ThinkPad computer comes with a
use this CD if you accidentally delete your preloaded software or if
you have a hard disk failure. It restores the contents of your hard
disk to the original state (the state when you purchased your
computer).
The Recovery CD package consists of a boot diskette and a
CD-ROM containing the original preload image.
This CD deletes all personal data and configuration settings on your
computer's hard disk and restores it to the original state.
Only a complete set of the original software is restored; no individual
data or application is restored.
Note: If possible, make a back-up copy of your personal files before
you use the Recovery CD.
The recovery process may take up to two hours.
The following recovery options are available:
The ThinkPad 770 computer supports bootable CDs when the
bootable CD function is enabled. To enable this function, do the
following:
Recovery CD
. You should
1
Power off your computer.
2
Power on your computer while pressing and holding the F1
key. Hold the F1 key until the Easy-Setup window appears.
3
Select the Start up icon.
4
Select Power-on.
5
Select the CDROM icon by clicking the mouse button or
pressing the Spacebar.
14
Page 22

Title: C79DKMST CreationDate: 08/19/97 17:47:41
6
7
10
11
12
13
Select OK.
Select Exit.
8
Select Restart and then OK to restart your computer. The
bootable CD-ROM function is now enabled.
9
Connect the CD-ROM drive to your computer.
Power on the computer.
Insert the Recovery CD into the CD-ROM drive.
Press Ctrl+Alt+Delete.
Follow the instructions on the screen.
Option B
14
When a completion message appears, remove the Recovery
CD from the CD-ROM drive.
15
Press the Restart button.
Your computer will restart with the original preload
configuration.
1
Connect the CD-ROM drive and the diskette drive to your
computer.
2
Insert the Recovery CD-ROM Boot Diskette into the diskette
drive.
3
Power on your computer.
4
Insert the Recovery CD into the CD-ROM drive.
5
Follow the instructions on the screen.
Note: You can select from several CD-ROM drive connection
methods. Choose an appropriate option. The recovery
program on the boot diskette includes drivers to support
15
Page 23

Title: C79DKMST CreationDate: 08/19/97 17:47:41
6
7
many devices such as the external CD-ROM, docking
stations, and the hard disk drive. You are prompted if a
user intervention is required.
When a completion message appears, remove the Recovery
CD-ROM Boot Diskette from the diskette drive.
Press the Restart button.
Your computer restarts with the original preload configuration.
16
Page 24

Title: C79DKMST CreationDate: 08/19/97 17:47:41
Considerations on the Telephony Function
Setting the RingCentral Application for New Zealand
The RingCentral1 program allows you to set the number of rings for
incoming messages before it answers the call.
You can set the value by selecting:
Options - Answering - Ring Options
from the RingCentral menu.
The values x and y in the following fields must be between 2 and 5:
Answer after x rings if there are new messages.
Answer after y rings if there are no new messages.
Note for Caller ID Support
The section on the “Telephony Features” in the
mentions the support of the “Answering device with Caller ID”
function. This function can be used only where Caller ID services is
available. Currently, this service is available only in the U.S. and
Canada.
1
RingCentral is a registered trademark of Ring Zero System Inc.
User's Guide
17
Page 25

Title: C79DKMST CreationDate: 08/19/97 17:47:41
Hints and Tips
Receiving Faxes or Mail in Suspend Mode
To receive incoming faxes or mail under OS/2, you must set the
modem settings in the fax application to one of the following:
Hardware FIFO enabled
Hardware Flow Control on
UART 16550A modem
In OS/2 FaxWorks for example, select Utilities, Settings, Modem
Type, and Use HW FIFO (16550A).
If you do not set your modem to one of these settings, you will not
be able to receive an incoming fax or an incoming call in suspend
mode.
Hot or Warm Docking to the SelectaDock III Docking Station
For Windows 95
You may not be able to hot- or warm-dock your computer to the
SelectaDock III docking station when certain PCI cards, PnP ISA
cards, and PCMCIA cards are installed in the docking station. If
such a condition occurs, cold boot the system.
USB Port Considerations
For PCI Cards in the SelectaDock III Docking Station
When the setting of the USB port on your computer is enabled (the
default setting), do not use a PCI Video Card and a PCI Network
Card at the same time in the SelectaDock III docking station. Your
system cannot boot if both cards are inserted.
For the USB Port Setting on the SelectaDock III Docking Station
Do not disable the USB Port on the SelectaDock III. If you disable it,
the system may hang during a hot- or warm-dock or undock
operation. If this occurs, cold boot the system for recovery.
18
Page 26

Title: C79DKMST CreationDate: 08/19/97 17:47:41
If a USB Device is Disabled
If your computer tries to enter suspend mode and the request is
rejected, the device in the USB port may be disabled. When this
occurs, do a hot unplug and plug operation for the USB device.
Hot Plugging or Unplugging a PCMCIA Card
After your computer returns from standby mode to normal operation,
you cannot perform hot plug and unplug operations for certain
Network PCMCIA Cards in the docking station slots. Reboot the
system to solve the problem.
Using a Second CardBus Card
When a CardBus card is already configured in your computer or in
the docking station (SelectaDock III or PC Card Enabler), you must
configure the second CardBus manually by using the Device
Manager. To get to the Device Manager, click on the System icon
in the Control Panel.
Changing Batteries during Battery-Powered Operation
When Switching from the Main Battery to the Secondary Battery
1
Insert the battery pack with the secondary battery into the
UltraBay II.
2
Make sure that the bay eject lever is locked.
3
Wait until the discharge symbol ( ) moves from the main
battery (1) to the second battery (2) icon in the indicator panel.
You can now remove the main battery from the battery bay.
When Changing or Removing the Secondary Battery
1
Unlock the UltraBay II.
2
Wait until the discharge symbol ( ) moves from the secondary
battery (2) to the main battery (1) icon. It takes a few seconds.
You can now remove the secondary battery.
19
Page 27

Title: C79DKMST CreationDate: 08/19/97 17:47:41
Changing the Crystal Audio Device Configuration
To change the audio configuration in Windows NT 3.51, do the
following:
1
2
3
4
Note: If the symbol does not move, it means that the main
battery (1) is not charged and you cannot remove the
secondary battery.
Change the audio resources using the ThinkPad Configuration
Program.
Do
not
restart your computer yet.
Double-click on Control Panel and Drivers.
Select CrystalWare Audio Driver and click on the Setup
button in the Drivers window.
5
Change the audio resources setting.
6
Restart your computer to make the changes effective.
Using the COM Port in OS/2
If the COM port does not work even after you set up this port
correctly using the ThinkPad Configuration program, do the following:
1
Go to System Setup.
2
Select Hardware Manager.
3
Select Folder from the menu item.
4
Select Properties.
5
Under the default pull-down menu, select NO HARDWARE
DETECTION, or change the setting if it is already selected.
6
Start the ThinkPad Configuration program.
7
Set up the COM port to meet your needs.
8
Reboot the system.
20
Page 28

Title: C79DKMST CreationDate: 08/19/97 17:47:41
Using an External Condenser Microphone
The microphone/line-in jack supports the following type of
microphones:
When you want to use an electret condenser microphone, you must
use one that provides its own power source.
Using the NetMeeting Software
When you are hanging up a video phone call in NetMeeting, you
may see a Windows exception error message; “An exception OE has
occurred in VxD VWIN32( 1)...”. This message appears only when
you are making a video phone call directly over the telephone line
and after you use such data sharing tools as the whiteboard, file
transfer, chat, and application sharing. When this error occurs, shut
down Windows and restart your computer. This error does not occur
when you are using the Intel Video Phone for Internet Video
Conferencing software.
A dynamic microphone
A self-battery-powered condenser microphone
Using the Bay Eject Lever
For the 14.1-Inch Model
You can use only one eject lever at a time. When opening the eject
lever, make sure that the other eject lever is closed.
21
Page 29

Title: C79DKMST CreationDate: 08/19/97 17:47:41
Notices
Product Notice Requirements
The following notice applies to machines equipped with a DVD and
Enhanced Video adapter:
This device is protected by U.S. patent numbers 4,631,603,
4,577,216, and 4,819,098 and other intellectual property rights.
The use of Macrovision's copy protection technology in the device
must be authorized by Macrovision and is intended for home and
other limited pay-per-view use only, unless otherwise authorized
in writing by Marcrovision. Reverse engineering or disassembly
is prohibited.
Notice For Australia
The following notice applies when using the telephony functions:
FOR SAFETY REASONS, ONLY CONNECT AUSTEL
PERMITTED OR CERTIFIED EQUIPMENT.
22
Page 30

Title: C79DKMST CreationDate: 08/19/97 17:47:41
Page 31

Title: C79DKMST CreationDate: 08/19/97 17:47:41
IBM
Part Number: 05K7604
Printed in the United States of America
5K76 4
 Loading...