

Page 1

Using Your Personal Computer
PC 330 (Type 6577) and PC 350 (Type 6587)
Page 2

Page 3

IBM
Using Your Personal Computer
PC 330 (Type 6577) and PC 350 (Type 6587)
Page 4

Note
Before using this information and the product it supports, be sure to read the general information under
Appendix B, “Product Warranties, License Agreement, and Notices” on page 73.
Second Edition (June 1996)
The following paragraph does not apply to the United Kingdom or any country where such provisions are
inconsistent with local law: INTERNATIONAL BUSINESS MACHINES CORPORATION PROVIDES THIS
PUBLICATION “AS IS” WITHOUT WARRANTY OF ANY KIND, EITHER EXPRESS OR IMPLIED,
INCLUDING, BUT NOT LIMITED TO, THE IMPLIED WARRANTIES OF MERCHANTABILITY OR FITNESS
FOR A PARTICULAR PURPOSE. Some states do not allow disclaimer of express or implied warranties in
certain transactions, therefore, this statement may not apply to you.
This publication could include technical inaccuracies or typographical errors. Changes are periodically made
to the information herein; these changes will be incorporated in new editions of the publication. IBM may
make improvements and/or changes in the product(s) and/or the program(s) described in this publication at
any time.
It is possible that this publication may contain reference to, or information about, IBM products (machines and
programs), programming, or services that are not announced in your country. Such references or information
must not be construed to mean that IBM intends to announce such IBM products, programming, or services in
your country.
Requests for technical information about IBM products should be made to your IBM reseller or IBM marketing
representative.
Copyright International Business Machines Corporation 1996. All rights reserved.
Note to U.S. Government Users — Documentation related to restricted rights — Use, duplication or disclosure
is subject to restrictions set forth in GSA ADP Schedule Contract with IBM Corp.
Page 5

Contents
Safety Information . . . . . . . . . . . . . . . . . . . . . v
Lithium Battery Notice .................. vi
Laser Compliance Statement ............... vii
Chapter 1. Your Personal Computer .......... 1
What Your Personal Computer Offers .......... 1
Features . . . . . . . . . . . . . . . . . . . . . . . . . . 1
Expandability . . . . . . . . . . . . . . . . . . . . . . . 4
Features at a Glance—Personal Computer ....... 7
Chapter 2. Arranging Your Workspace ........ 9
Comfort . . . . . . . . . . . . . . . . . . . . . . . . . . . . 9
Glare and Lighting ..................... 9
Air Circulation . . . . . . . . . . . . . . . . . . . . . . . 10
Electrical Outlets and Cable Lengths .......... 10
Chapter 3. Operating Your Personal Computer .. 11
Using Controls and Status Indicators ......... 11
Starting Your Personal Computer ........... 13
Using a Mouse ....................... 13
Shutting Down . . . . . . . . . . . . . . . . . . . . . . . 14
Configuring Your Personal Computer ......... 15
Using the Configuration/Setup Utility Program . 16
Viewing the System Summary ............ 16
Setting the Date and Time .............. 17
Passwords . . . . . . . . . . . . . . . . . . . . . . . . 17
Using Advanced Power Management ....... 21
Using System Management .............. 23
Changing Keyboard Speed .............. 23
Changing Monitor Settings .............. 24
Installing Video Device Drivers ............. 25
Adding Memory Modules ................ 26
Updating System Programs ............... 27
Diskettes . . . . . . . . . . . . . . . . . . . . . . . . . . 28
Identifying Diskettes . . . . . . . . . . . . . . . . . . 29
Handling and Storing Diskettes ........... 31
Labeling Diskettes . . . . . . . . . . . . . . . . . . . 32
Inserting and Removing Diskettes .......... 33
Write-Protecting Diskettes . . . . . . . . . . . . . . 34
Formatting Diskettes . . . . . . . . . . . . . . . . . . 35
Copying Diskettes . . . . . . . . . . . . . . . . . . . 35
Using a CD-ROM Drive ................. 36
Handling Compact Discs ............... 36
Loading a Compact Disc ............... 36
Using Locks . . . . . . . . . . . . . . . . . . . . . . . . 37
Locking the Cover and Sliding Door ........ 37
Locking the Keyboard ................. 38
Chapter 4. Taking Care of Your Personal Computer 39
Basics . . . . . . . . . . . . . . . . . . . . . . . . . . . . 39
Cleaning Your Personal Computer ........... 39
Computer and Keyboard ............... 39
Monitor Screen . . . . . . . . . . . . . . . . . . . . . 39
Mouse . . . . . . . . . . . . . . . . . . . . . . . . . . 40
Replacing the Battery ................... 40
Moving Your Personal Computer ............ 41
Chapter 5. Solving Problems . . . . . . . . . . . . . 43
Using Diagnostic Tools .................. 43
Power-On Self-Test (POST) .............. 43
POST Beep Codes ................... 44
Diagnostic Programs . . . . . . . . . . . . . . . . . . 44
Error Messages . . . . . . . . . . . . . . . . . . . . . 45
POST Messages . . . . . . . . . . . . . . . . . . . . . 46
Troubleshooting Charts . . . . . . . . . . . . . . . . 54
Installing Files from Option Diskettes ......... 62
Copyright IBM Corp. 1996 iii
Page 6

Managing TSR Programs ................. 62
Chapter 6. Getting Help, Service, and Information 63
Solving Problems . . . . . . . . . . . . . . . . . . . . . 63
Using the HelpWare Support Family ......... 63
Using Electronic Support Services .......... 63
Getting Information by Fax .............. 64
Getting Help Online .................. 64
Getting Help by Telephone .............. 65
Getting Help Around the World .......... 65
Purchasing Additional HelpWare Services ...... 66
Enhanced PC Support Line .............. 66
900-Number Operating System and Hardware
Support Line . . . . . . . . . . . . . . . . . . . . . . 66
Network and Server Support Line ......... 66
Ordering Support Line Services ........... 67
Warranty and Repair Services ............ 67
Obtaining IBM Operating System Updates ...... 68
Ordering Publications . . . . . . . . . . . . . . . . . . . 68
Appendix A. Computer Records . . . . . . . . . . . 69
Serial Numbers and Keys ................ 69
Device Records . . . . . . . . . . . . . . . . . . . . . . . 71
Appendix B. Product Warranties, License
Agreement, and Notices ................ 73
Hardware Limited Warranty .............. 73
License Information . . . . . . . . . . . . . . . . . . . . 75
Program Name . . . . . . . . . . . . . . . . . . . . . 75
Additional Terms and Conditions .......... 75
Program Services . . . . . . . . . . . . . . . . . . . . 75
Warranty . . . . . . . . . . . . . . . . . . . . . . . . . 75
U.S. Government Users Restricted Rights ....... 75
Other Documentation . . . . . . . . . . . . . . . . . 75
Other Additional Terms and Conditions ...... 76
Notices . . . . . . . . . . . . . . . . . . . . . . . . . . . 77
Trademarks . . . . . . . . . . . . . . . . . . . . . . . 77
Electronic Emission Notices ............. 78
Telecommunication Notices . . . . . . . . . . . . . 79
Power Cord Notice ................... 81
Index . . . . . . . . . . . . . . . . . . . . . . . . . . . . 83
iv Using Your Personal Computer
Page 7
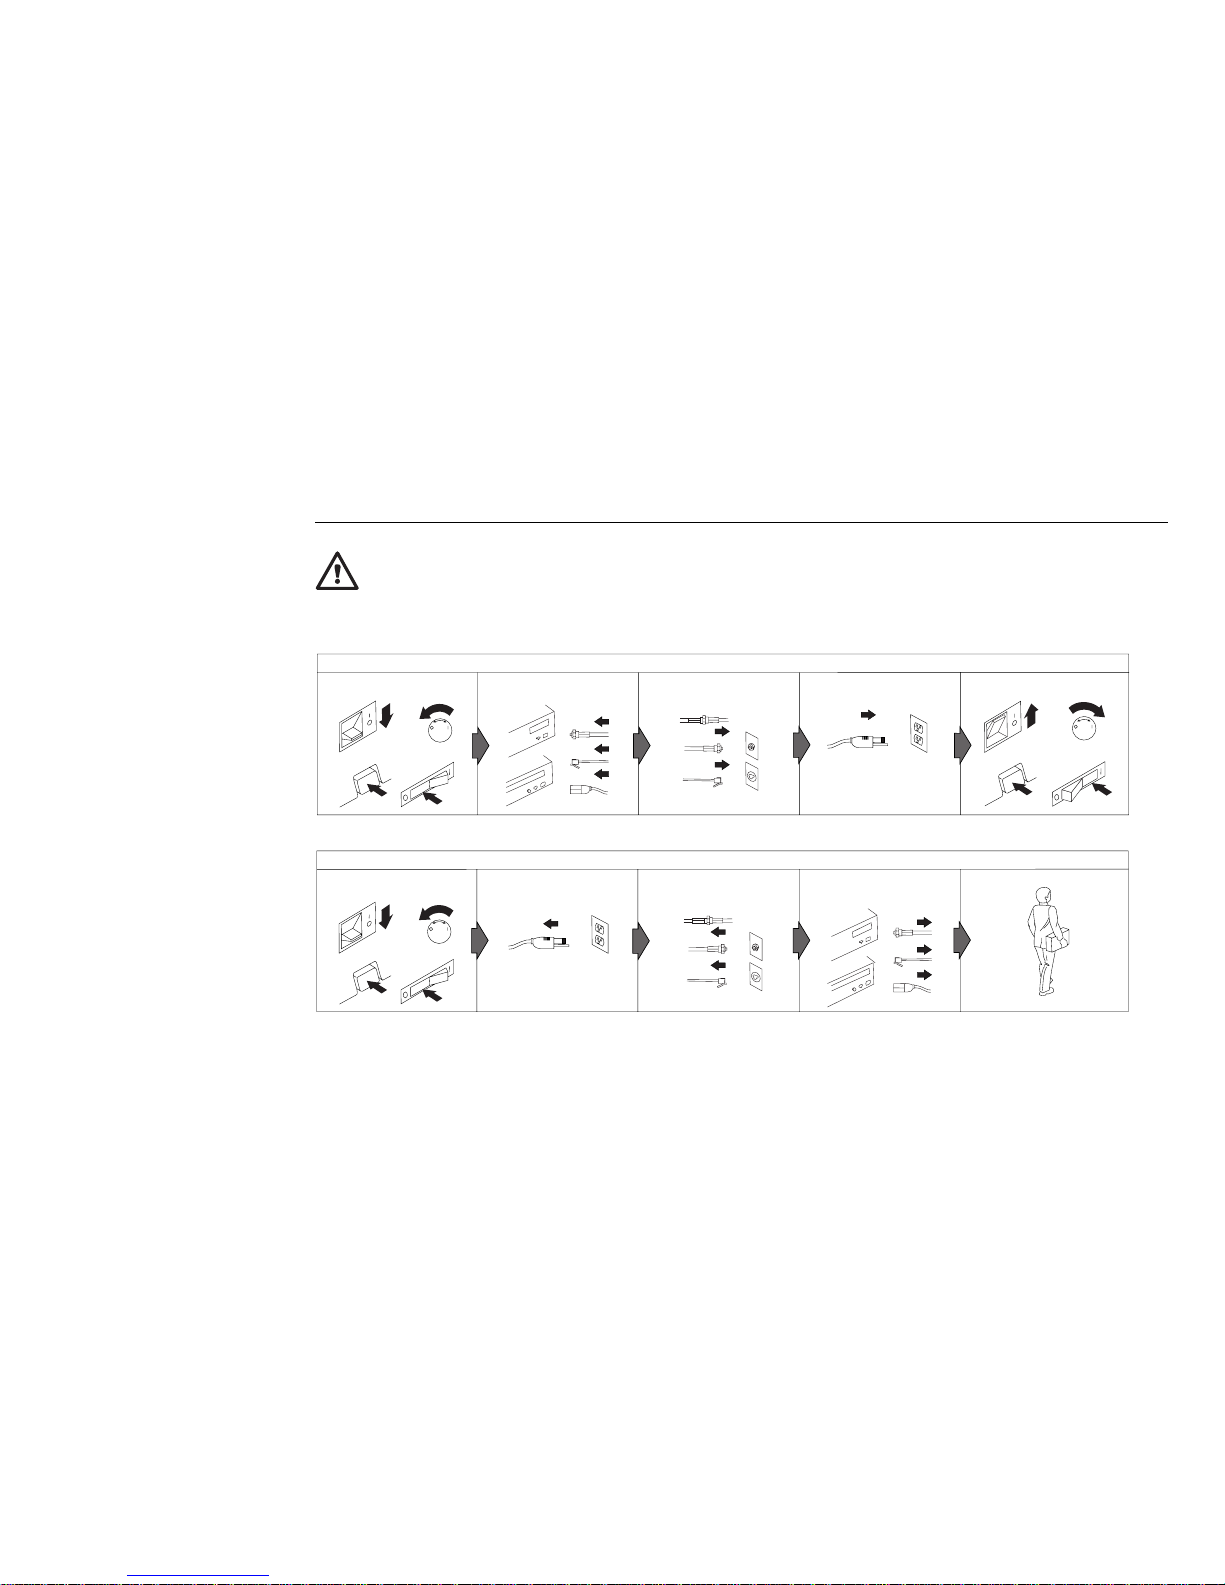
Safety Information
In the U.K., by law, the power cord must be disconnected after the telephone line cable.
To Disconnect
To Connect
Remove all cables
from devices.
Attach power cord
to outlet.
In the U.K., by law, the telephone cable must be connected after the power cord.
1
2
Turn device ON.
DANGER:
First, remove power
cord from outlet.
2
Remove signal cables
from receptacles.
Turn everything OFF.
Turn everything OFF.
Electrical current from power, telephone, and communication cables is hazardous. To avoid shock hazard, connect
and disconnect cables as shown below when installing, moving or opening the covers of this product or attached
devices. The power cord must be used with a properly grounded outlet.
Attach signal cables
to receptacles.
Attach all cables to
devices.
1
Copyright IBM Corp. 1996 v
Page 8

Lithium Battery Notice
CAUTION:
Danger of explosion if battery is incorrectly replaced.
When replacing the battery, use only IBM Part Number 33F8354 or an equivalent type battery recommended by the
manufacturer. The battery contains lithium and can explode if not properly used, handled, or disposed of.
Do not:
Throw or immerse into water
Heat to more than 100°C (212°F)
Repair or disassemble
Dispose of the battery as required by local ordinances or regulations.
ATTENTION
Danger d'explosion en cas de remplacement incorrect de la batterie.
Remplacer uniquement par une batterie IBM de type 33F8354 ou d'un type équivalent recommandé par le fabricant.
La batterie contient du lithium et peut exploser en cas de mauvaise utilisation, de mauvaise manipulation ou de mise
au rebut inappropriée.
Ne pas :
Lancer ou plonger dans l'eau
Chauffer à plus de 100° C (212° F)
Réparer ou désassembler
Mettre au rebut les batteries usagées conformément aux règlements locaux.
vi Using Your Personal Computer
Page 9

Laser Compliance Statement
Some IBM Personal Computer models are equipped from
the factory with a CD-ROM drive. The CD-ROM drive is
a laser product. The CD-ROM drive is certified in the
U.S. to conform to the requirements of the Department of
Health and Human Services 21 Code of Federal
Regulations (DHHS 21 CFR) Subchapter J for Class 1 laser
products. Elsewhere, the drive is certified to conform to
the requirements of the Electrotechnical Commission
(IEC) 825 and CENELEC EN 60 825 for Class 1 laser
products.
Class 1 laser products are not considered to be hazardous.
Safety Information vii
Page 10

viii Using Your Personal Computer
Page 11

Chapter 1. Your Personal Computer
Thank you for selecting an IBM Personal Computer.
This manual contains information about operating and
taking care of your personal computer and solving
problems that might occur. For more detailed
information or a discussion of some of the more technical
aspects of your personal computer, refer to Understanding
Your Personal Computer. If your personal computer comes
with preinstalled software, a convenient online version of
Understanding Your Personal Computer is included. You
can print any portion or all of the online Understanding
Your Personal Computer. The printed version is also
available for separate purchase. For more information,
see “Ordering Publications” on page 68.
If you need to install an option, such as an adapter,
memory, microprocessor upgrade, or security option,
refer to Installing Options in Your Personal Computer, which
is included with your personal computer.
What Your Personal Computer
Offers
Your IBM Personal Computer incorporates many of the
latest advances in personal computer technology and is
easy to expand and upgrade as your needs change.
Features
This section briefly discusses some of the features of your
personal computer. For an easy-to-read summary of the
features, see “Features at a Glance—Personal Computer”
on page 7.
Throughout this manual, the two Personal Computer
models are distinguished by their number of drive bays
and expansion slots. A PC 330 model has three drive
bays and three expansion slots and, a PC 350 model has
five drive bays and five expansion slots.
Support for Pentium Microprocessors
At the core of these powerful computers is an Intel
Pentium microprocessor. This microprocessor gives you
the power and speed you need to take full advantage of
even the most complex business and desktop-publishing
programs. Microprocessor upgrades are available.
PCI Bus
In addition to industry standard architecture (ISA) bus
expansion slots, your personal computer has a
high-performance, industry-standard peripheral
component interconnect (PCI) internal bus. The PCI bus
speeds up the exchange of information between the
microprocessor and peripheral devices within your
personal computer, improving the performance of both
the video monitor and the hard disk drives.
ISA/PCI Adapter Expansion Slots
The PC 330 and PC 350 have three shared ISA/PCI
adapter expansion slots on a riser card. In addition, the
PC 350 provides two dedicated ISA adapter expansion
Copyright IBM Corp. 1996 1
Page 12

slots. Using these ISA/PCI expansion slots, you can
install devices such as a video or graphics adapter, a
small computer system interface (SCSI) adapter, or a local
area network (LAN) adapter.
High-Capacity Hard Disk Drives
Your personal computer comes with an enhanced
integrated drive electronics (IDE) controller installed. It
supports up to four IDE high-capacity hard disk drives.
ECP/EPP Parallel Port
The extended capabilities port (ECP)/enhanced parallel
port (EPP) feature means faster printing of your
documents. It also gives you the capability of attaching
communication and storage devices to the parallel port in
addition to printers.
Serial Ports
Your personal computer comes with ports for connecting
input/output (I/O) devices such as printers and modems.
One standard, 16550-UART serial port comes installed on
your machine.
Universal Serial Bus Connectors
In addition to a 16550-UART serial port, your personal
computer comes with two universal serial bus (USB)
interfaces. USB allows you to connect multiple I/O
devices that previously used serial, parallel, keyboard,
mouse and game ports. Because USB uses Plug and Play
technology, you can add additional devices without
reconfiguring and powering down your personal
computer.
Other advantages to USB connectivity include support for
multimedia and telephony devices, more speed than
previous standard ports, and the potential, multiple
connections you can employ to customize your personal
computer.
Infrared Port
Your personal computer comes with an infrared port
where you can connect an optional infrared transceiver
module. This enables you to transfer data to and from
other infrared-capable computers or printers.
Ease-of-Use Features
Your IBM Personal Computer includes many ease-of-use
features, such as Plug and Play technology and graphical
diagnostic programs.
Plug and Play technology makes adding options easier.
Support for Plug and Play technology is built into the
system board of your personal computer. When you add
an adapter, it is automatically configured as part of the
computer, or you use a setup utility program to integrate
it. In many cases, no switches or jumpers have to be set
inside your personal computer.
2 Using Your Personal Computer
Page 13

For information about Plug and Play technology with
various types of adapters, see Understanding Your Personal
Computer.
If you have a problem with your personal computer, an
easy-to-use graphical diagnostic program can help you
determine whether the hardware is causing the problem.
Advanced Power Management
Energy conservation is an important concern, and the
IBM Personal Computer is designed with this concern in
mind. Energy-saving features are available in the system
software.
Ergonomic Features
Your personal computer provides features that make
components easier to adjust for personal comfort, and
usability.
Security Features
The security features for personal computer protect both
hardware and software. For example, power-on and
administrator passwords can be set so that unauthorized
persons do not gain access to your personal computer
and software. A cover keylock prevents tampering with
your personal computer. A lockable sliding door restricts
access to the removable-media bays. You can select a
secure start-up sequence so that only certain drives are
available.
For a list of security features, see “Features at a
Glance—Personal Computer” on page 7.
Operating-System Support
The personal computer is designed to use a variety of
operating systems to meet your particular needs. You
can use the following operating systems with your
personal computer:
IBM OS/2
IBM OS/2 Warp Connect
IBM PC DOS
DEC PathWorks
DOS with Microsoft Windows
DOS with Microsoft Windows for Work Groups
MS-DOS
Novell NetWare
Novell UnixWare
Solaris
Windows 95
Windows NT
Service and Support
You can obtain assistance for using your personal
computer, as well as service, from a number of sources.
Help is available by phone, fax, and modem. For detailed
information, see Chapter 6, “Getting Help, Service, and
Information” on page 63.
Chapter 1. Your Personal Computer 3
Page 14

Expandability
You can easily expand the capabilities of your personal
computer by adding system memory, adapters that use
the ISA/PCI expansion slots, additional hard disk drives,
diskette drives, or a CD-ROM drive.
Connectivity
If your personal computer is equipped with an Ethernet
or token ring adapter, it is enabled for connection to a
network. Refer to your operating system documentation
for more information.
If your personal computer is equipped with an Ethernet
or token ring adapter that supports the LAN Wake-Up,
your personal computer can be started by a signal sent
from another computer on the LAN.
PCMCIA Ports
You can add optional Personal Computer Memory Card
International Association (PCMCIA) connectors to your
personal computer. PCMCIA support allows you to
expand the I/O and storage capabilities of the computer.
PCMCIA devices are the size of a credit card and are
called PC Cards.
With a PCMCIA option, your personal computer can
have two 68-pin PCMCIA connectos (or sockets) on the
front panel. Each socket can accept type-1, -2, or -3 PC
Cards. Inside the computer, the sockets are connected to
a PCMCIA adapter in an I/O expansion slot. Some
PCMCIA adapters have two additional sockets at the
back of the computer. You can insert and remove most
PC Cards without turning off the computer.
4 Using Your Personal Computer
Page 15
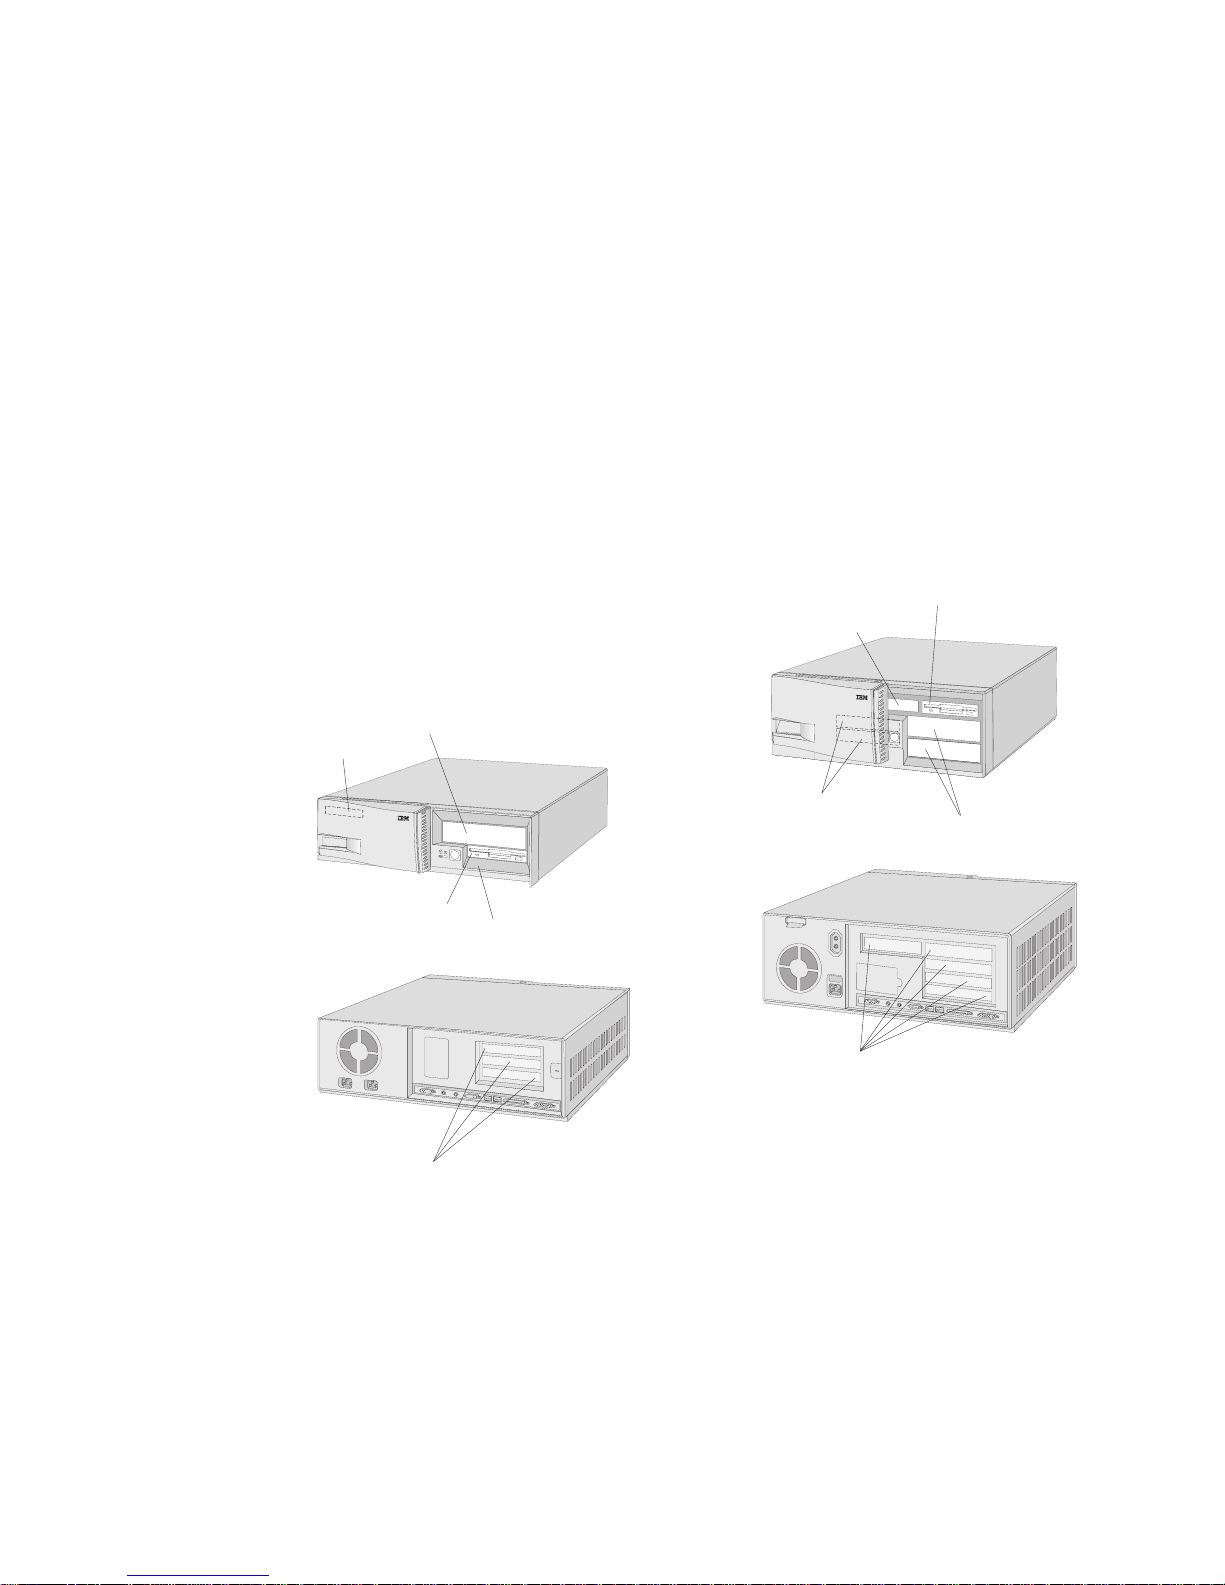
Drive Locations
The following illustrations show the locations of hard
disk drives, diskette drives, and other features of your
personal computer.
PC 330
5.25-Inch Bay
for Optional Drive
PCMCIA
3.5-Inch Diskette Drive
3.5-Inch Internal Bay
for Hard Disk Drive
Expansion Slots
PC 350
5.25-Inch Bays
for Optional Drives
PCMCIA
3.5-Inch Diskette Drive
3.5-Inch Internal Bays
for Hard Disk Drives
Expansion Slots
Chapter 1. Your Personal Computer 5
Page 16
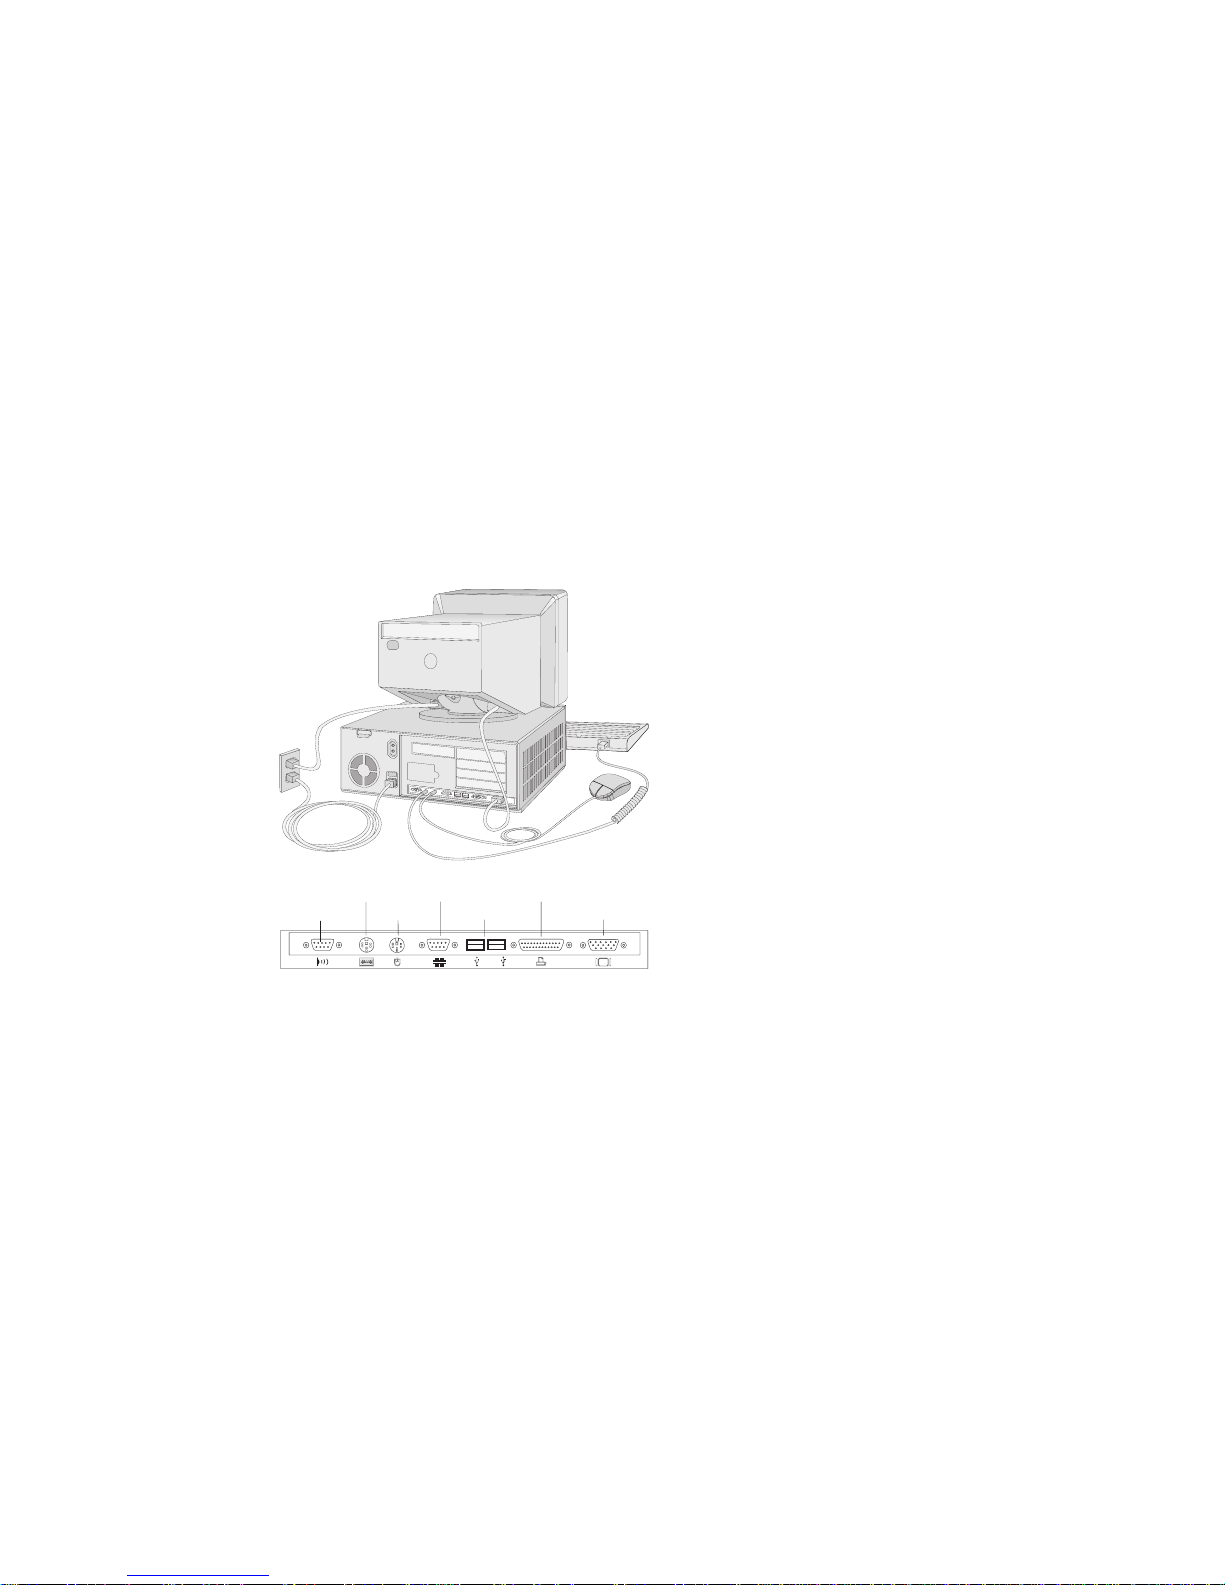
Input and Output Connectors
Display
Keyboard
Mouse
Serial A
A
12
USB
Parallel
Infrared
6 Using Your Personal Computer
Page 17

Features at a Glance—Personal Computer
The following table summarizes the available features in the IBM PC 330 and PC 350. More information about the
features of your personal computer can be found in the Configuration/Setup Utility program. Refer to “Configuring
Your Personal Computer” on page 15.
Packages
PC 330: Three slots, three drive bays
PC 350: Five slots, five drive bays
Microprocessor
Intel Pentium processor
The system board is designed to support
microprocessor speeds from 75 MHz to 200 MHz
(50, 60, or 66 MHz externally)
Memory
192 MB maximum addressable (parity or
nonparity)
60 ns fast page or enhanced data output (EDO)
Four 72-pin SIMM sockets in two banks
– Modules in 4, 8, 16, or 32 MB units
– Matched pair required in each bank
One 168-pin DIMM socket: 8, 16, or 32 MB unit
Flash memory for POST/BIOS
Level-2 Cache
256 KB upgradable to 512 KB
Monitor Support
SVGA
Power-management capable
Diskette Drives
Standard: One 3.5-inch 1.44 MB drive
Maximum: Two
Options:
– 5.25-inch 1.22 MB drive
– 3.5-inch 1.44 MB or 2.88 MB drive
Hard Disk Drives
Standard: One PCI bus-master IDE drive
Maximum: Four
Input/Output Features
ECP/EPP parallel port
One 16550-UART serial port
Two universal serial bus (USB) interfaces
One infrared port
Video port
PS/2 mouse
104-key keyboard, Windows 95 compatible
Video
Accelerated SVGA attached to PCI bus
1 MB DRAM video memory upgradable to 2
MB
Expansion
Pentium OverDrive socket
ISA/PCI Plug and Play support
Power
PC 330: 145 W, 115/230 V ac, 50/60 Hz
PC 350: 200 W, 115/230 V ac, 50/60 Hz
Built-in overload and surge protection
Advanced power management
Security
Power-on password
Administrator password
ISA/PCI riser card
Startup sequence control
Startup without diskette drive, keyboard, mouse
Unattended Start mode (network)
Diskette I/O control
Hard disk I/O control
Serial and parallel port I/O control
Lockable cover
Secure hard disk
Software-readable hardware IDs
System Management
LAN Wake-Up
Wake Up on Ring
Wake Up on Alarm
Operating System Support
IBM OS/2
IBM OS/2 Warp Connect
IBM PC DOS
DEC PathWorks
DOS with Microsoft Windows
DOS with Microsoft Windows for Work Groups
MS-DOS
Novell NetWare
Novell UnixWare
Solaris
Windows 95
Windows NT
Chapter 1. Your Personal Computer 7
Page 18

8 Using Your Personal Computer
Page 19

Chapter 2. Arranging Your Workspace
To get the most from your computer, arrange both the
equipment you use and your work area to suit your
needs and the kind of work you do. Your comfort is of
foremost importance, but light sources, air circulation,
and the location of electrical outlets also can affect the
way you arrange your workspace.
Comfort
Although no single working position is ideal for
everyone, here are a few guidelines to help you find a
position that suits you best.
Sitting in the same position for a long time causes fatigue.
A good chair can make a big difference. The backrest
and seat should adjust independently and provide good
support. The seat should have a curved front to relieve
pressure on the thighs. Adjust the seat so that your
thighs are parallel to the floor and your feet are either flat
on the floor or on a footrest.
When using the keyboard, keep your forearms parallel to
the floor and your wrists in a neutral, comfortable
position. Try to keep a light touch on the keyboard and
your hands and fingers relaxed. You can change the
angle of the keyboard for maximum comfort by adjusting
the position of the keyboard feet.
Viewing Distance
Lower
Back
Support
Seat
Height
Adjust the monitor so the top of the screen is at, or
slightly below, eye level. Place the monitor at a
comfortable viewing distance, usually 51 to 61 cm (20 to
24 in.), and position it so you can view it without having
to twist your body. Also position other equipment you
use regularly, such as the telephone or a mouse, within
easy reach.
Glare and Lighting
Position the monitor to minimize glare and reflections
from overhead lights, windows, and other light sources.
Even reflected light from shiny surfaces can cause
annoying reflections on your monitor screen. Place the
monitor at right angles to windows and other light
sources, when possible. Reduce overhead lighting, if
necessary, by turning off lights or using lower wattage
bulbs. If you install the monitor near a window, use
curtains or blinds to block the sunlight. You might have
Copyright IBM Corp. 1996 9
Page 20

to adjust the Brightness and Contrast controls on the
monitor as the room lighting changes throughout the day.
Where it is impossible to avoid reflections or to adjust the
lighting, an antiglare filter placed over the screen might
be helpful. However, these filters might affect the clarity
of the image on the screen; try them only after you have
exhausted other methods of reducing glare.
Dust buildup compounds problems associated with glare.
Remember to clean your monitor screen periodically
using a soft cloth moistened with a nonabrasive liquid
glass cleaner.
Air Circulation
Your computer and monitor produce heat. The computer
has a fan that pulls in fresh air and forces out hot air.
The monitor lets hot air escape through vents. Blocking
the air vents can cause overheating, which might result in
a malfunction or damage. Place the computer and
monitor so that nothing blocks the air vents; usually, 51
mm (2 in.) of air space is sufficient. Also, make sure the
vented air is not blowing on someone else.
Electrical Outlets and Cable
Lengths
The location of electrical outlets and the length of power
cords and cables that connect to the monitor, printer, and
other devices might determine the final placement of your
computer.
When arranging your workspace:
Avoid the use of extension cords. When possible,
plug the computer power cord directly into an
electrical outlet.
Keep power cords and cables neatly routed away
from walkways and other areas where they might get
kicked accidentally.
For more information about power cords, see “Power
Cord Notice” on page 81.
10 Using Your Personal Computer
Page 21
Chapter 3. Operating Your Personal Computer
This chapter provides information to help you in the
day-to-day use of your personal computer.
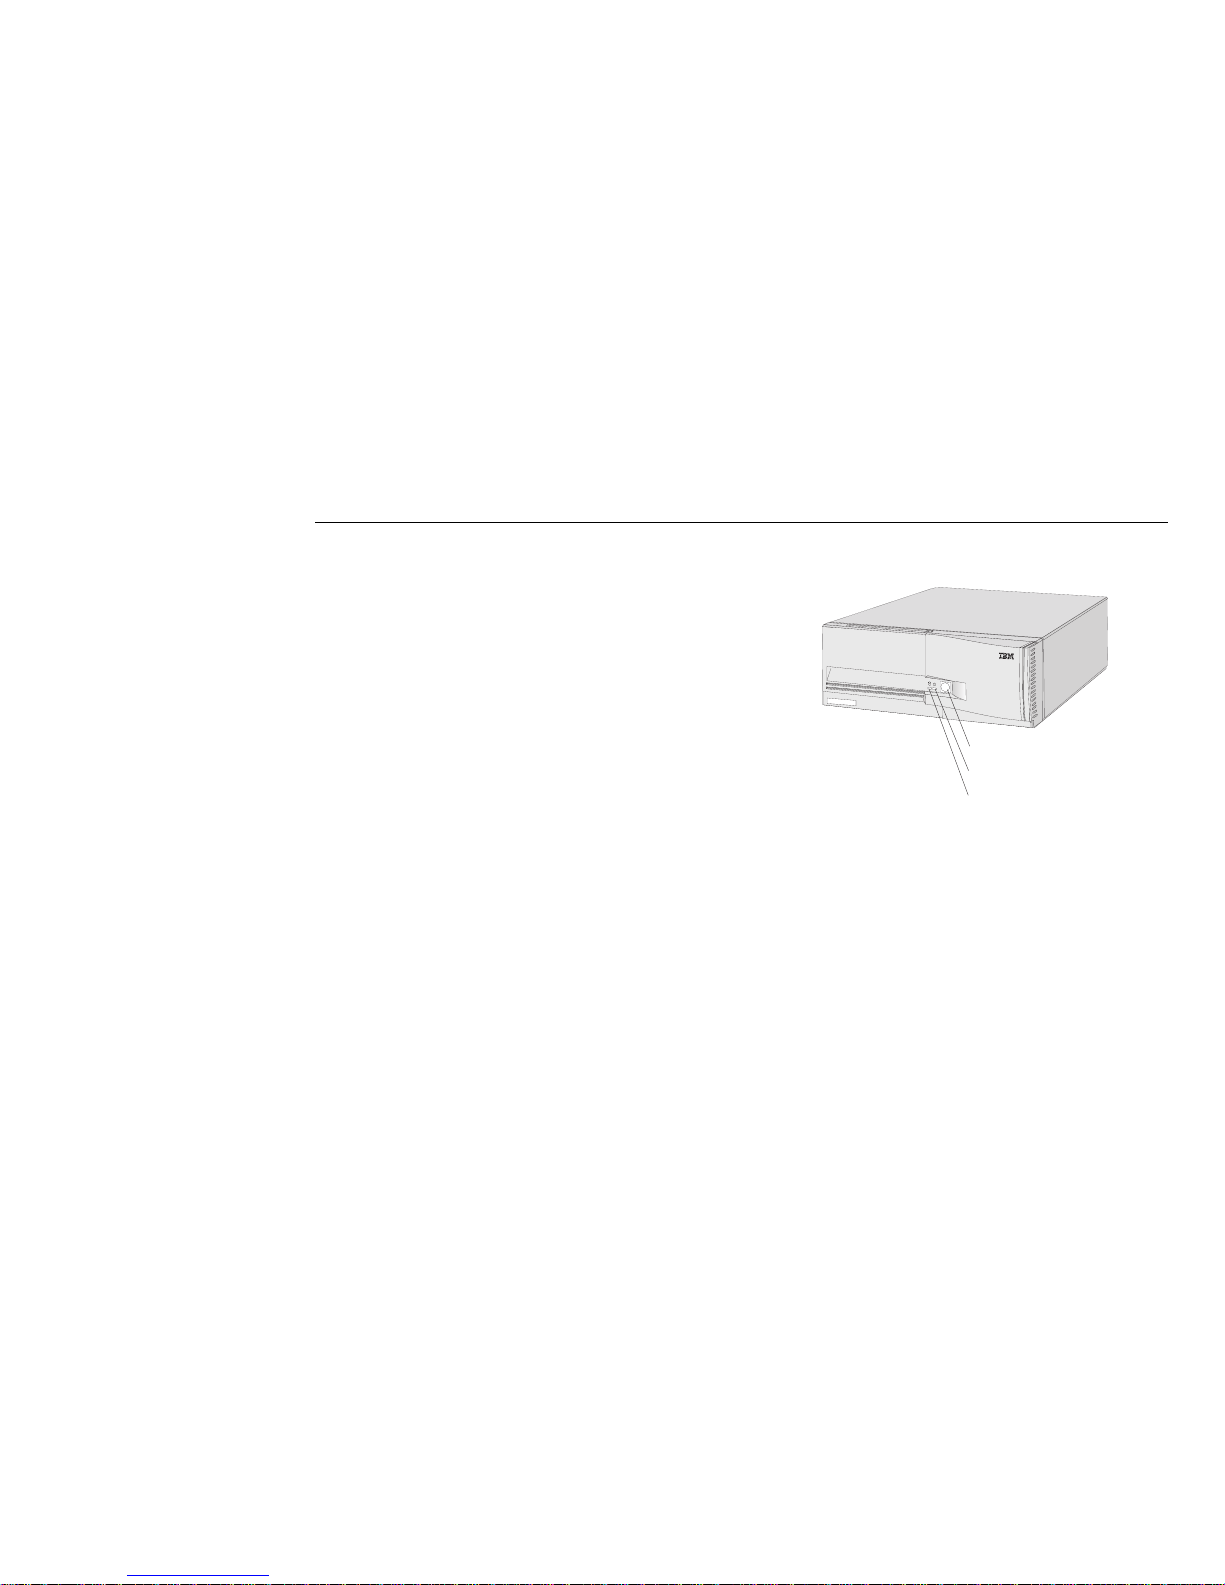
Using Controls and Status
Indicators
The following operating controls and status indicators are
located on the front of your personal computer:
Power Switch
Power-On Light
Hard Disk Drive Light
For both models (door closed)
Power Switch: Press this switch to turn your personal
computer on or off. Do not turn off your personal
computer if the in-use light for the hard disk drive or
diskette drive is on.
Power-On Light: This status indicator lights when you
turn on your personal computer.
Hard-Disk Drive Light: When this light is on, it
indicates that your personal computer is reading from or
writing to the hard disk.
Copyright IBM Corp. 1996 11
Page 22
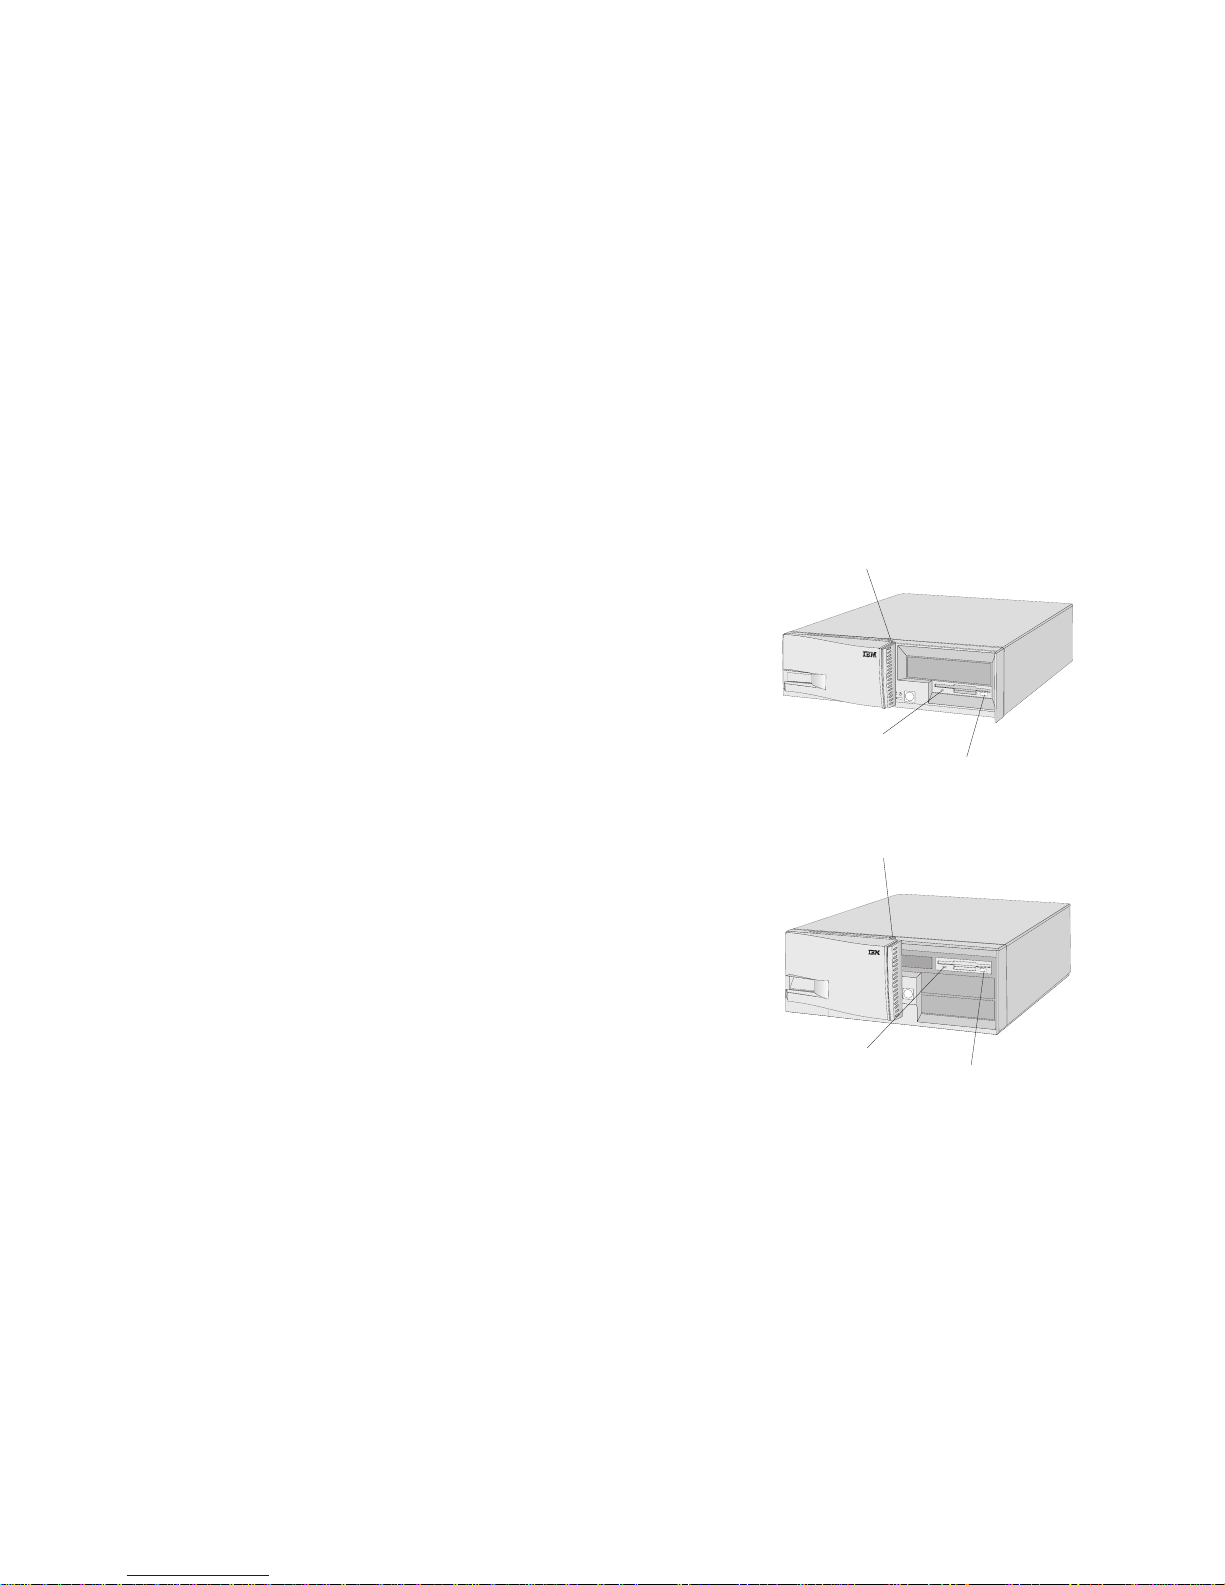
Diskette Eject Button: Push this button to release a
diskette from the drive.
Cover/Door
Lock
Diskette Drive
Light
Diskette Eject
Button
PC 330 (door open)
Cover/Door
Lock
Diskette Drive
Light
Diskette Eject
Button
PC 350 (door open)
Diskette Drive Light: When this light is on, it indicates
that your personal computer is reading from or writing
to a diskette.
Cover and Door Lock: The cover lock secures the cover
and the sliding door on your computer, to deter
tampering with or theft of the internal components.
12 Using Your Personal Computer
Page 23

Starting Your Personal Computer
1. Turn on all external devices, and then turn on your
personal computer. Watch the screen, and listen for a
beep.
Note: If a power-on password has been set, the Enter
password message appears on the screen. Type
the correct password; then press Enter to
continue.
Numbers indicating the amount of memory appear in
the top-left corner of the screen. Your personal
computer is running the power-on self-test (POST).
The Configuration/Setup Utility program symbol
appears in the top-right corner of the screen.
If POST finishes without detecting a problem, you
hear one beep, and the first screen of your
operating system or application program appears.
If POST detects a problem, you hear multiple
beeps or no beep, and an error code and a
description of the error appear. If the problem
might be corrected by a change in a configuration
setting, the Configuration/Setup Utility program
starts automatically, allowing you to attempt to
correct the problem. If you need assistance,
contact your service representative.
If there is no beep, refer to “Troubleshooting
Charts” on page 54. You might need to have
your personal computer serviced.
2. If there is a problem, find your personal computer
response in the following table; then go to the
specified section.
Using a Mouse
A mouse is a device that you use to point to and select
objects on the monitor screen. It connects to your
personal computer by a cable. Some mouse devices
(PS/2 mice) are designed for the round mouse connector
on the back of your personal computer, and others (serial
mice) are designed for the D-shaped serial connector.
You can use either type of mouse, if the correct software
(device driver) is installed.
With a mouse, you can move the pointer on the monitor
screen. If you have never used a mouse before, it might
feel a bit awkward at first. However, with a little
practice, the mouse movements will seem natural.
Place the mouse beside the keyboard on a flat surface or
mouse pad. (A mouse pad is a flat, smooth foam rubber
pad available at most computer stores.) The mouse has a
Computer Response Go to:
After more than one
beep, application program
or operating system
appears.
Blank screen, unreadable
screen, or other unusual
response occurs.
POST error code or
message appears.
“Diagnostic Programs” on page 44.
“Troubleshooting Charts” on page 54.
“Error Messages” on page 45.
Chapter 3. Operating Your Personal Computer 13
Page 24

ball on the bottom, so working on a flat, smooth surface
is important. You can use your right or left hand to
control the mouse, depending on the hand you are most
comfortable using.
Notice that the mouse has two buttons on the top (some
mice have more buttons). Rest your hand comfortably on
the mouse with your index finger on the left button (if
you are using your right hand). IBM mouse programs
provide the option to set up the mouse for left-hand use.
When a mouse is set up for left-hand use, the button
functions are reversed.
Use the left button to select and open objects with the
mouse. Some programs also use the right button in
various ways.
To use the mouse, slide it from side to side and forward
and backward on a flat surface. The pointer on the
monitor screen moves as you move the mouse. When
you see an item that you want to select on the screen,
you simply move the pointer to that item (this is called
pointing). Then you press and release the left button on
the mouse (this is called clicking).
To learn how to use the mouse with the software in your
personal computer, see the software user's guide or
tutorial.
Some programs support only one mouse button, others
support two, and some support three. Despite the
differences, some terms are fairly standard throughout
the industry.
Point Move the mouse so the pointer is on the
object you want.
Click Press and release the mouse button once.
Double-click Rapidly press and release the mouse
button twice.
Drag Point to an object, press the mouse button,
and hold it down as you move the mouse
to relocate the object.
Drop After dragging an object to a new location,
release the mouse button.
Shutting Down
When you are ready to turn off your personal computer,
use an orderly shutdown procedure to prevent the loss of
unsaved data or damage to your software programs.
14 Using Your Personal Computer
Page 25

Configuring Your Personal
Computer
The Configuration/Setup Utility program is stored in the
permanent memory of your personal computer. Using
this program, you can view the current configuration
settings or change the settings of various features. Online
help is available for these features.
The following list gives a brief description of the
categories that appear in the main menu of the
Configuration/Setup Utility program.
System Summary provides information about the
current options and features in your personal
computer. Included in the system summary is
information about the processor, memory, video
controller, caches, diskette drives, and hard disk
drives. For more information, refer to “Viewing the
System Summary” on page 16.
Product Data provides information about the machine
type/model, flash EEPROM revision label, system
serial number and the BIOS date.
Devices and I/O Ports allows you to view and
change information about installed devices. Also,
you can access extra menus to view and change
setups for the serial port, parallel port, video, and
IDE drives. For more information, refer to “Changing
Monitor Settings” on page 24.
Date and Time allows you to view and change the
date and time of your computer's internal clock. For
more information, refer to “Setting the Date and
Time” on page 17.
System Security allows you to secure hard disk
drives and diskette drives. Also, you can set, change,
delete, or erase both power-on and administrator
passwords. For more information, refer to
“Passwords” on page 17.
Start Options provides a menu for viewing or
changing keyboard speeds, startup devices, virus
detection and other features. For more information,
refer to “Changing Keyboard Speed” on page 23.
Advanced Setup provides access to menus where you
can view and change settings for cache control, ROM
shadowing, PCI control, and Plug and Play control.
ISA Legacy Resources provides access to menus
where you can view and change settings for memory
resources, I/O port resources, DMA resources, and
interrupt resources.
Advanced Power Management allows you to view
and change settings that affect the powering off or
power reduction of your personal computer. For
more information, refer to “Using Advanced Power
Management” on page 21.
Tip
You can use the Configuration/Setup Utility program
to view and change the setup of your personal
computer, regardless of which operating system you
are using. However, the settings you select in your
operating system might override any similar settings
in the Configuration/Setup Utility program.
Chapter 3. Operating Your Personal Computer 15
Page 26

Using the Configuration/Setup Utility
Program
To use the Configuration/Setup Utility program:
1. Turn on the computer. If your personal computer is
already on when you start this procedure, you must
shut down the operating system, turn off the
computer, wait a few seconds until all in-use lights go
off, and restart it.
2. When the Configuration/Setup Utility program
prompt appears on the screen during startup, press
F1. The Configuration/Setup Utility menu appears
similar to the one shown in the following figure. Any
value that has changed since the last time the
computer was turned off is indicated by a pointer.
3. Select the appropriate option from the
Configuration/Setup Utility menu.
To select an option, use the up-arrow and
down-arrow keys to highlight the option, and
then press Enter.
Use the right-arrow and left-arrow keys to toggle
between selections for a menu item.
Each option has a Help screen. To view the Help
screen, highlight the option, and then press F1.
Press Esc to return to the previous menu.
4. As you exit from the Configuration/Setup Utility
program, be sure to save the changes you have made.
Select Save Settings from the Configuration/Setup
Utility menu, and press Enter.
à ð
Configuration/Setup Utility
______________________________________________________
Select Option:
System Summary
Product Data
Devices and I/O Ports
Date and Time
System Security
Start Options
Advanced Setup
ISA Legacy Resources
Advanced Power Management
Save Settings
Restore Settings
Load Default Settings
Exit Setup
á
ñ
Figure 1. Configuration/Setup Utility menu
The following sections describe the tasks most personal
computer users need to perform using the
Configuration/Setup Utility program.
Viewing the System Summary
You can use the Configuration/Setup Utility program to
view a summary of the options and features in your
personal computer. To view the system summary:
1. Start the Configuration/Setup Utility program (see
“Using the Configuration/Setup Utility Program”).
16 Using Your Personal Computer
Page 27

2. Select System Summary from the
Configuration/Setup Utility menu. The System
Summary screen appears.
Note: Depending on the model and configuration,
your screen might appear slightly different
from the one shown here.
à ð
System Summary
_______________________________________________________
Processor Pentium
Processor Speed 166 MHz
Math Coprocessor Internal
System Memory 64 KB
Extended Memory 1536 KB
Video Controller S3 Incorporated. Trio 64V+
Cache Size 256 KB
Cache State Enabled
Shadow RAM 384 KB
System ROM Fh - FFFFh
Memory Type Non-parity
Diskette Drive A: 1.44 MB 3.5"
Diskette Drive B: Not Installed
Hard Disk Drive 1286 MB
Hard Disk Drive 1 Not Installed
Hard Disk Drive 2 Not Installed
Hard Disk Drive 3 Not Installed
Mouse Installed
á
ñ
Figure 2. System Summary Screen
Setting the Date and Time
Your personal computer has an internal clock that
maintains the date and time. A battery keeps the clock
active when you turn off the computer.
To set the date and time:
1. Start the Configuration/Setup Utility program (see
“Using the Configuration/Setup Utility Program” on
page 16).
2. Select Date and Time from the Configuration/Setup
Utility menu.
3. Type the date and time in the appropriate fields.
4. Press Enter.
5. Remember to save the changes when you exit from
the Configuration/Setup Utility program.
Your operating system might also have a function for
setting the date and time. Refer to your operating system
documentation for more information.
Passwords
Password protection is available in several forms. You
can set, change, and delete power-on and administrator
passwords with the Configuration/Setup Utility program.
Other password security, such as passwords that lock the
keyboard, might be available through your operating
system or network. See “Locking the Keyboard” on
page 38.
Power-On Password
You do not need to have a power-on password to use
your personal computer, but a password helps protect the
information you store in it. The power-on password
prevents the computer from being started by
unauthorized people, or it locks the keyboard and mouse
Chapter 3. Operating Your Personal Computer 17
Page 28

while allowing the computer and operating system to
start.
When a power-on password is set, you must type the
password before the computer and operating system will
start with the keyboard and mouse activated. The
password does not appear on the screen as you type it. If
you type the wrong password, you receive a screen
message telling you so. If you type the wrong password
three times, you must turn off the computer and start
again. When you type the correct password, the
keyboard and mouse are unlocked, and the computer
begins normal operation.
If you have a PS/2 mouse (that is, if it is connected to the
mouse port) it is affected by the power-on password. If
your mouse is connected to a serial port, it is activated
when the computer is started, regardless of whether a
password is set.
When you set the power-on password, you can choose
one of three password-prompt modes:
On In this mode, you are prompted for the
power-on password when you turn on the
computer. Until the correct password is
entered, the computer will not run the
CONFIG.SYS or AUTOEXEC.BAT instructions,
the operating system will not start, and the
keyboard will remain locked. If you have a
PS/2 mouse, it also will remain locked.
Off This is the Unattended Start mode. When you
turn on the computer, you are not prompted
for the power-on password. If you do not
enter the password, the computer runs the
CONFIG.SYS and AUTOEXEC.BAT
instructions and starts the operating system,
but the keyboard remains locked. If you have
a PS/2 mouse, it also remains locked. If you
enter the power-on password, the keyboard is
unlocked, but the PS/2 mouse remains
disabled. This mode is useful for network
servers and other computers that operate
unattended. If a power failure occurs, the
computer automatically restarts and resumes
operating in the Unattended Start mode when
power is restored, without operator
intervention.
Dual In the Dual mode, the startup behavior of the
computer depends on whether the computer is
started from the computer power switch or is
started by an unattended method, such as a
modem or timer. If you start the computer by
using the power switch, you are prompted for
the power-on password. Until the correct
password is entered, the computer will not run
the CONFIG.SYS or AUTOEXEC.BAT
instructions, the operating system will not
start, and the keyboard and PS/2 mouse will
remain locked. If the computer is started by
an unattended method, you are not prompted
for the power-on password, and the computer
is started in the Unattended Start mode.
18 Using Your Personal Computer
Page 29

Setting and Changing a Power-On Password: Use
the Configuration/Setup Utility program to set or change
a power-on password. You can use any combination of
up to seven characters (A–Z, a–z, and 0–9) for your
power-on password. Keep a record of your password in
a secure place.
To set or change a power-on password:
1. Start the Configuration/Setup Utility program (see
“Using the Configuration/Setup Utility Program” on
page 16).
2. Select System Security from the Configuration/Setup
Utility menu.
3. Select Power-on Password.
4. Type your password and press the down-arrow key.
5. Type your password again.
6. Select Set or Change Power-on Password.
7. At Password Prompt, select On, Off, or Dual.
8. Press Enter.
9. Remember to save the changes when you exit from
the Configuration/Setup Utility program.
Additional Information for PS/2 Mouse Users
The following statement applies to only those who use
a PS/2 mouse; a serial mouse is not affected by the
Unattended Start mode.
The Unattended Start mode prevents the computer
from detecting that a mouse is attached. Therefore,
the mouse device driver will not be loaded
automatically through the CONFIG.SYS or
AUTOEXEC.BAT files when Unattended Start mode is
enabled. You will have to load it later.
If you are using the OS/2 operating system, you must
do one of the following before enabling the
Unattended Start mode:
Remove the mouse driver statement from the
CONFIG.SYS file, or
Set the CONFIG.SYS file so the operating system
does not stop on a device-driver error. For
example, use the PAUSEONERROR=NO
statement.
Chapter 3. Operating Your Personal Computer 19
Page 30

Deleting a Power-On Password: Use the
Configuration/Setup Utility program to delete a
power-on password.
To delete a power-on password:
1. Start the Configuration/Setup Utility program (see
“Using the Configuration/Setup Utility Program” on
page 16).
2. Select System Security from the Configuration/Setup
Utility menu.
3. Select Power-on Password.
4. Select Delete Power-on Password.
5. Press Enter.
6. Remember to save the changes when you exit from
the Configuration/Setup Utility program.
Erasing an Unknown Power-On Password: To erase
an unknown power-on password, you must remove the
computer cover and move the password jumper on the
system board. (See Installing Options in Your Personal
Computer for more information.)
Use the Configuration/Setup Utility program to set a new
password and reconfigure the computer.
Administrator Password
If you are responsible for maintaining the settings of
several computers, you might decide to set an
administrator password. Setting an administrator
password deters unauthorized persons from changing
settings in the Configuration/Setup Utility program.
When an administrator password is set, a user can change
settings in the Configuration/Setup Utility program only
after using that password. If the administrator password
is not entered, the user can only view, not change, the
settings.
When you set an administrator password, you have the
option of specifying whether the user of the computer
will be able to set and change power-on passwords on
the computer.
The administrator password locks out access to the
Configuration/Setup Utility program until the correct
password is entered. When an administrator password is
set, a password prompt appears each time you press F1
to access the Configuration/Setup Utility program.
If a configuration error panel appears when you turn on
the computer, the Configuration/Setup Utility program
usually starts automatically, and the administrator
password prompt appears on the screen. Before you can
use the Configuration/Setup Utility program, you must
type the correct password.
The password does not appear on the screen as you type
it. If you type the wrong password, you receive a screen
message telling you so. If you type the wrong password
three times, you must turn off the computer and start
again. When you type the correct password, the
Configuration/Setup Utility program menu appears.
Setting and Changing an Administrator Password:
Use the Configuration/Setup Utility program to set or
change an administrator password. You can use any
20 Using Your Personal Computer
Page 31

combination of up to seven characters (A–Z, a–z, and 0–9)
for your power-on password. Keep a record of your
password in a secure place.
For more information, refer to Installing Options in Your
Personal Computer.
To set or change an administrator password:
1. Start the Configuration/Setup Utility program (see
“Using the Configuration/Setup Utility Program” on
page 16).
2. Select System Security from the Configuration/Setup
Utility menu.
3. Select Administrator Password.
4. Type your password and press the down-arrow key.
5. Type your password again.
6. Select Set or Change Administrator Password.
7. At Power-on password changeable by user, select
Yes or No.
8. Press Enter.
9. Remember to save the changes when you exit from
the Configuration/Setup Utility program.
Deleting an Administrator Password: Use the
Configuration/Setup Utility program to delete an
administrator password.
To delete an administrator password:
1. Start the Configuration/Setup Utility program (see
“Using the Configuration/Setup Utility Program” on
page 16).
2. Select System Security from the Configuration/Setup
Utility menu.
3. Select Administrator Password.
4. Select Delete Administrator Password.
5. Press Enter.
6. Remember to save the changes when you exit from
the Configuration/Setup Utility program.
Erasing an Unknown Administrator Password: To
erase an unknown administrator password, remove the
computer cover and move the password jumper on the
system board. For information on erasing an unknown
password, See Installing Options in Your Personal Computer.
Use the Configuration/Setup Utility program to set a new
password and reconfigure the computer.
Using Advanced Power Management
Your personal computer comes with built-in
energy-saving capabilities. You can select energy-saving
settings from the Configuration/Setup Utility program.
Advanced Power Management Features
With this option, you can have the computer,
microprocessor, and monitor go into reduced-power
states after a specified period of inactivity. Inactivity is
determined by monitoring the interrupts listed in the
Activity Monitor option in the Configuration/Setup
Utility program. Interrupts for the keyboard, mouse,
hard disk drive, serial ports, and parallel port are usually
monitored for activity. You can specify up to three levels
of power management, each one affecting system power,
Chapter 3. Operating Your Personal Computer 21
Page 32

microprocessor speed, and the monitor, if the monitor
supports Display Power Management Signaling (DPMS).
Level-1 power management occurs after the shortest
period of inactivity. You can specify Levels 2 and 3 if
you want the power consumption to be reduced further
after longer periods of inactivity. The following
power-management options are available at each level:
System power: If you select Off, the system power
will be turned off after the specified period of
inactivity. Off is then automatically selected for any
subsequent levels.
Processor speed: With this option, you specify a
percentage reduction in microprocessor speed. At
any subsequent levels, the microprocessor speed must
be the same or it must be reduced further. Any
activity on a monitored interrupt returns the
microprocessor to full speed.
Display: There are three reduced-power states for
the monitor:
– Standby: In this mode, the screen is blanked, but
the screen image is restored immediately when
any activity is detected.
– Suspend: The monitor uses less power in this
mode than in the Standby mode. The screen is
blanked, but the screen image is restored within a
few seconds after any activity is detected.
– Off: In this mode, the monitor power is turned
off. To restore power to the monitor, you must
press the power switch on the monitor. On some
monitors, you might have to press the power
switch twice.
Attention
If a device, such as a monitor, does not have
power-management capabilities, it can be damaged
when exposed to a reduced-power state.
Before you make energy-saving selections for your
monitor, check the documentation that comes with
your monitor to see if it supports Display Power
Management Signaling (DPMS).
With the Hard File option, you can enable the hard disk
drive to “spin down” (a shutdown of the drive motor)
after about 20 minutes of inactivity on the drive. When
you attempt to read from or write to the disk, full power
is returned to the hard disk drive within a few seconds.
Setting Advanced Power Management Features
To set advanced power management features:
1. Start the Configuration/Setup Utility program (see
“Using the Configuration/Setup Utility Program” on
page 16).
2. Select Advanced Power Management from the
Configuration/Setup Utility menu.
3. Be sure APM BIOS Mode is set to Enabled.
4. Select Automatic Hardware Power Management.
5. Set Automatic Hardware Power Management to
Enabled.
22 Using Your Personal Computer
Page 33

6. Select values for the three levels of power
management, as necessary.
7. Set Hard File to Enabled or Disabled.
8. Press Enter.
9. Remember to save the changes when you exit from
the Configuration/Setup Utility program.
Using System Management
The Automatic Power-On options within the Advanced
Power Management menu allow you to enable and
disable features that turn your personal computer on
automatically.
Wake Up on Ring
When this option is enabled, the computer is turned on
automatically when a ring is detected on a modem. Two
options control this feature:
Serial Port Ring Detect: Set this option to Enabled if
your personal computer has an external modem
connected to the serial port.
Modem Ring Detect: Set this option to Enabled if
your personal computer has an internal modem.
Wake Up on Alarm
With this option, you can specify a date and time at
which the computer will be turned on automatically.
This can be either a single event or a daily event.
LAN Wake-Up
When this option is enabled, the computer is turned on
when it receives a specific signal from another computer
on a local area network (LAN). The computer must have
a network adapter that supports wake-up requests and is
configured properly.
Setting System Management Features
To set system management features:
1. Start the Configuration/Setup Utility program (see
“Using the Configuration/Setup Utility Program” on
page 16).
2. Select Advanced Power Management from the
Configuration/Setup Utility menu.
3. Select Automatic Power On.
4. Select the option you want to set, and set or change
the settings.
5. Press Enter.
6. Remember to save the changes when you exit from
the Configuration/Setup Utility program.
Changing Keyboard Speed
You can change the speed at which the keyboard
responds when you hold down a key. The normal
typematic rate is 10 characters per second, but you can use
the Configuration/Setup Utility program to increase this
rate to 30 characters per second.
To change the keyboard speed:
Chapter 3. Operating Your Personal Computer 23
Page 34

1. Start the Configuration/Setup Utility program (see
“Using the Configuration/Setup Utility Program” on
page 16).
2. Select Start Options from the Configuration/Setup
Utility menu.
3. Set Keyboard Speed to Normal or Fast.
4. Press Enter.
5. Remember to save the changes when you exit from
the Configuration/Setup Utility program.
Changing Monitor Settings
To get the best possible image on your screen and reduce
or eliminate flicker, you might need to reset the resolution
(also called addressability) and refresh rate of your monitor.
Resolution is a measure of sharpness of the image on the
screen, expressed as the number of picture elements, or
pels (for example, 800 x 600). At higher resolutions, the
monitor can show detailed images more clearly.
The refresh rate is the number of times per second that
the electron beam scans from the top to the bottom of the
screen; the refresh rate is expressed in hertz, or frequency
in cycles per second (for example, 72 Hz).
A refresh rate can be interlaced or noninterlaced. With
an interlaced refresh rate, the screen is divided into odd
and even scan lines. In one pass, the electron beam
refreshes the odd lines; in the next pass, it refreshes the
even lines. With a noninterlaced refresh rate, every line
is refreshed on each pass.
Tip
To minimize screen flicker and jitter, set your monitor
for the highest noninterlaced refresh rate that it
supports.
If your monitor complies with the VESA Display Data
Channel (DDC) standard, it is probably already set to
the highest refresh rate that the monitor and video
controller can support. For more information about
DDC, see Understanding Your Personal Computer.
You can easily change the settings for your monitor. But
before you make changes, be sure to review the
information that comes with your monitor. It should
include the resolutions and refresh rates that your
monitor supports. Refer to your operating-system
documentation for information about changing the
resolution.
Attention
Using a resolution or refresh rate that is not
supported by your monitor can damage it. Refer to
the information that comes with your monitor, or
contact the manufacturer of the monitor for further
information.
You can change these settings using the
Configuration/Setup Utility program or other utility
program.
24 Using Your Personal Computer
Page 35

To change the monitor settings:
1. Start the Configuration/Setup Utility program (see
“Using the Configuration/Setup Utility Program” on
page 16).
2. Select Devices and I/O Ports from the
Configuration/Setup Utility menu.
3. Select Video Setup....
If your monitor is DDC compliant and DDC Monitor
checking is set to Enabled, your monitor type might
already be shown in the Video Display Type field.
In this case, the monitor has already provided the
computer with information about its refresh-rate
capabilities, and you do not need to change the
monitor settings. If your monitor is not DDC
compliant, set Video Display Type to Custom, and
continue to the next step.
4. For the resolution your monitor is using, select a
refresh rate that is supported by the monitor. To
minimize flicker and jitter, select the highest
noninterlaced refresh rate available for the resolution
your monitor is using. Within the parameters of the
refresh rates and resolutions supported by your
monitor, you might want to experiment to find which
resolution produces the best image.
5. Press Enter.
6. Remember to save the changes when you exit from
the Configuration/Setup Utility program.
Installing Video Device Drivers
Your personal computer comes with a S3 Trio64V+ video
controller.
To take full advantage of this video controller, some
application programs require custom software, known as
video device drivers. The operating system loads these
programs after the hardware is configured.
Important
If software was preinstalled on your hard disk, the
video device drivers are already installed.
If software was not preinstalled on your hard disk,
you must install the necessary video device drivers.
Be sure to use only S3 Trio64V+ video drivers.
If you have an optional graphics adapter installed in
your computer, refer to the documentation provided
with the adapter for information about installing and
updating video device drivers.
Regardless of whether video device drivers were
preinstalled, in certain situations you might need to
install them yourself, for example, to update existing
drivers, to add drivers for certain software programs, or
to reinstall software after formatting or adding a hard
disk drive.
Chapter 3. Operating Your Personal Computer 25
Page 36

If software was preinstalled in your personal computer,
see About Your Software for video device driver
information.
If software was not preinstalled in your personal
computer, video device drivers are available on CD-ROM
or diskettes that come with your personal computer.
Installation instructions are provided with the media or in
the README files on the diskettes. Technical notes and
explanations of some video device driver features might
also be included in README files located in the
directories that contain the video device drivers.
If your system has OS/2 preinstalled, see the
documentation for that operating system for further
information about video device drivers.
Many application programs include video device drivers
that are compatible with the S3 Trio64V+ video controller.
If a customized video device driver is not included in
your application package, select an SVGA- or
VESA-compatible driver from those supplied by the
manufacturer.
Adding Memory Modules
The main memory in your personal computer uses
memory modules for temporary storage of data and
instructions. These modules are also known as single
in-line memory modules (SIMMs) and dual in-line memory
modules (DIMMs). On the system board, there are four
SIMM sockets and one DIMM socket where you can
install extra memory modules. The SIMMs and DIMMs
that come standard with your personal computer are 60
nanosecond (ns) non-parity modules.
Note: For more information on adding memory modules,
see Installing Options in Your Personal Computer.
26 Using Your Personal Computer
Page 37

Updating System Programs
The system programs include the power-on self-test
(POST) and the basic input/output system (BIOS) code.
A module called electrically erasable programmable ROM
(EEPROM) (sometimes referred to as flash memory) has
replaced the ROM module on the system board. It allows
you to easily update the BIOS and POST information
from an update diskette.
As part of the on-going effort to improve quality, IBM
occasionally makes enhancements to the POST routines
and BIOS code. If updates are required, a diskette
containing updated versions of the system programs will
be made available. Complete instructions will be
provided with the update diskette.
Chapter 3. Operating Your Personal Computer 27
Page 38

Diskettes
Your personal computer can use several types of
diskettes. The information in this section will help you
identify and use diskettes correctly. The following chart
lists diskette drives and the diskettes they support.
Drive Type
Diskettes
Supported
3.5-inch, 1.44 MB 1 MB and 2 MB
3.5-inch, 2.88 MB 1 MB, 2 MB,
and 4 MB
5.25-inch, 1.2 MB 180 KB, 360 KB, and
1.2 MB
Notes:
1. 2.88 MB media might not be supported
by certain operating systems.
2. If a 1.2 MB drive writes to a 180 KB or
360 KB diskette, that diskette might not
be usable in a 360 KB drive.
28 Using Your Personal Computer
Page 39

Identifying Diskettes
The 5.25-inch diskettes have few physical characteristics
to distinguish a 1.2 MB diskette from a 360 KB diskette.
However, the 360 KB diskette generally has a white band
around the center hole. Otherwise, you must rely on the
manufacturer's labels. The 1.2 MB diskettes usually are
called high density (HD); 360 KB diskettes usually are
called double sided/double density (DS/DD). If the diskettes
come with plain labels, you might want to mark the
capacity on each label.
Protective Slide
Top
Top
5.25 Inch3.5 Inch
Diskette Label
Chapter 3. Operating Your Personal Computer 29
Page 40

The 3.5-inch diskettes are not consistently identified by all
diskette manufacturers. Some diskettes are labeled with
the letters HC, HD, or ED to identify the diskette type;
other diskettes might not be labeled. However, there is
one physical characteristic that you can always use to
identify the type of 3.5-inch diskette: Look for a cutout
window at the lower-right corner of the diskette.
The following illustrations identify types of 3.5-inch
diskettes.
No Window
HC
1 MB High Capacity (HC)
HD
Window
2 MB High Density (HD)
ED
Offset Window
4 MB Extra-High Density (ED)
30 Using Your Personal Computer
Page 41

Handling and Storing Diskettes
Inside the protective diskette case is a flexible disk with a
magnetic-sensitive coating. This disk can be damaged by
heat, dust, a magnetic field, or even a fingerprint. Use
the following guidelines when handling and storing
diskettes:
Data is stored on the magnetic surface of the diskette.
On 3.5-inch diskettes, this surface is protected by a
plastic cover. If the cover is damaged, do not use the
diskette, because it could cause permanent damage to
the diskette drive.
A protective slide on the top of a 3.5-inch diskette
covers part of the magnetic surface. The diskette
drive moves this slide to read data from or write data
to the diskette. Do not move this slide, because
fingerprints and dust can cause loss of data.
Keep 5.25-inch diskettes in their covers when you are
not using them. The covers protect the exposed
surfaces on the diskettes.
Never touch the disk itself.
Keep diskettes away from magnets or devices that
create a strong magnetic field, such as electric motors
and generators. Diskettes are sensitive to magnets
found in television sets, stereo speakers, and other
such items. A magnetic field can erase the data on
your diskettes. Do not set diskettes on the monitor or
use magnets to attach notes to your personal
computer.
Do not store diskettes in high temperatures, low
temperatures, or direct sunlight. Temperatures
ranging from 10° C to 52° C (50° F to 125° F) are
acceptable for 5.25-inch diskettes, and 4° C to 53° C
(39° F to 127° F) are acceptable for 3.5-inch diskettes.
Keep diskettes away from heat. The plastic outer
covering might warp, damaging the diskette.
Chapter 3. Operating Your Personal Computer 31
Page 42

Labeling Diskettes
Before using a diskette, label it so that you can identify
the data stored on it. Labels usually come in the package
with the diskettes. Diskette labels can become a problem
if you do not apply them correctly. Loose edges or an
excessive buildup of labels can prevent the diskette from
being inserted or ejected.
To prevent this problem, take the following precautions:
Remove an old label before you apply a new one.
Apply labels carefully to ensure all edges are secure.
Apply labels only to the front of diskettes. Do not
place a label where it interferes with the protective
slide or covers an opening in the protective diskette
case.
Use only a soft, felt-tip pen to write on the label.
Using a pencil or ballpoint pen can damage a
diskette.
32 Using Your Personal Computer
Page 43

Inserting and Removing Diskettes
3.5-Inch Diskette: To insert a 3.5-inch diskette, hold
the diskette with the label facing
up and insert the end with the
protective slide first. Push the
diskette into the 3.5-inch diskette
drive until the diskette clicks into
place.
To remove a 3.5-inch diskette,
press the eject button and slide
the diskette out of the drive. Do
not remove a diskette while the
in-use light is on.
5.25-Inch Diskette: To insert a 5.25-inch diskette,
hold the diskette with the label
facing up and your thumb on the
label. Then slide the diskette
fully into the 5.25-inch diskette
drive until the diskette clicks into
place.
To remove a 5.25-inch diskette,
press the eject button and slide
the diskette out of the drive. Do
not remove a diskette while the
in-use light is on.
Diskette-Drive
In-Use Light
Diskette
Eject Button
3.5-Inch Diskette
Diskette-Drive
In-Use Light
Diskette
Eject Button
5.25-Inch Diskette
Chapter 3. Operating Your Personal Computer 33
Page 44

Write-Protecting Diskettes
It is possible to accidentally format a diskette or
unintentionally write data to a diskette. Important
information can be written over or lost. For this reason,
you should write-protect important diskettes. You can
read data from a write-protected diskette, but you cannot
erase or change the data.
Most diskettes have a write-protect switch or notch that
can be used to prevent data from being written to or
erased from the diskette. If a diskette does not have a
write-protect switch or notch, it is permanently
write-protected.
The 3.5-inch diskette has a write-protect switch on the
back.
Write-Protect
Switch
To allow writing to the diskette, slide the switch so
the write-protect window is covered.
To prevent writing to the diskette, slide the switch so
the write-protect window is open.
The 5.25-inch diskette has a write-protect notch on the
side of the diskette. When you cover the notch with a
write-protect tab or a piece of tape, it is write-protected.
Write-Protect Tab
34 Using Your Personal Computer
Page 45

Formatting Diskettes
You can buy diskettes either formatted or unformatted.
Formatted diskettes are ready to use; unformatted
diskettes must be formatted by your operating system
before you can use them. The format operation checks
the diskette for defects and prepares it for storing data. If
data is already stored on a diskette, the format operation
writes over it, and the data is lost.
The operating-system FORMAT command specifies how
to format a specific type of diskette. Always format
diskettes to their correct capacity. Failing to do so could
cause unreliable results. Differences such as magnetic
coatings, the thickness of the diskette material, and the
recording technique used all affect the formatting
operation. Refer to your operating-system documentation
for detailed information about formatting diskettes.
Note: If you are using DOS and have a 3.5-inch diskette
formatted to an incorrect capacity, use the
FORMAT A:/U command to format the diskette to
the correct capacity. The standard FORMAT A:
command might continue to format the diskette to
the incorrect capacity.
If you plan to share diskettes with other people, you must
know what types of diskette drives they have in their
computers. The following table shows diskette types,
their formatted capacity, and the drives that can use each
diskette.
Copying Diskettes
You can copy one or more files to or from a diskette,
using the COPY command. Groups of files can be copied
faster using the XCOPY command. Both COPY and
XCOPY can copy files to different types of diskettes. For
duplicating a diskette, use the DISKCOPY command.
DISKCOPY requires that both the source diskette (the
diskette you copy from) and the target diskette (the
diskette you copy to) be the same type. Refer to your
operating-system documentation for more information.
Diskette Type
Formatted
Capacity
Drive Type
3.5-inch:
1 MB (HC) 720 KB 1.44 MB or 2.88 MB
2 MB (HD) 1.44 MB 1.44 MB or 2.88 MB
4 MB (ED) 2.88 MB 2.88 MB
5.25-inch:
360 KB (DS/DD) 360 KB 360 KB or 1.2 MB
1.2 MB (HD) 1.2 MB 1.2 MB
Notes:
1. Use FORMAT A:/F:720 to format a 1 MB diskette in a 1.44 MB or
2.88 MB drive.
2. Use FORMAT A:/F:1.44 to format a 2 MB diskette in a 2.88 MB
drive.
3. When a 1.2 MB drive writes to a 360 KB diskette, the diskette might
not be usable in a 360 KB drive.
Chapter 3. Operating Your Personal Computer 35
Page 46

Using a CD-ROM Drive
If your personal computer comes with a compact
disc-read only memory (CD-ROM) drive, or if you have
added one, you are ready to enjoy the benefits of its huge
storage capacity and versatility. A compact disc can store
more than 650 MB of data, such as the huge files needed
for audio, still and full-motion video, and still and
animated graphics.
Follow these guidelines when using a CD-ROM drive:
Do not place the drive where there is:
– High temperature
– High humidity
– Excessive dust
– Excessive vibration or sudden shock
– An inclined surface
– Direct sunlight
Do not insert any object other than a compact disc
into the drive.
Before moving the computer, remove the compact
disc from the drive.
Caution
If you use an optional floor stand to set your
computer with CD-ROM in a vertical position, turn it
so that the computer rests on its left side, as you face
it.
Handling Compact Discs
When handling compact discs, follow these guidelines:
Hold the compact disc by its edges. Do not touch the
surface.
To remove dust or fingerprints, wipe the compact
disc from the center to the outside.
Do not write on the surface.
Do not store or place the compact disc in direct
sunlight.
Do not use benzene, thinners, or other cleaners to
clean the compact disc.
Do not bend the compact disc.
Attention
Wiping the compact disc in a circular direction can
cause loss of data.
Loading a Compact Disc
To load a compact disc into the CD-ROM drive:
1. Press the Eject/Load button. The tray slides out of
the drive.
2. Place the compact disc in the tray with the label
facing up.
3. Close the tray by pressing the Eject/Load button, or
by gently pushing the tray forward.
36 Using Your Personal Computer
Page 47

Attention
When loading a CD, do not manually force the tray
open.
For further information, refer to the publication for your
CD-ROM drive.
Using Locks
To deter unauthorized use of your personal computer,
you can lock the cover, sliding door, and keyboard.
Locking the Cover and Sliding Door
You can use the cover lock and keys to secure the outside
cover and the sliding door on the front panel. You can
lock both the sliding door and the computer cover, the
cover only, or neither. If the sliding door is closed when
you lock the cover, the sliding door is locked.
Attention
If the sliding door is open when you lock the cover,
the sliding door is not locked.
If you lock the cover without locking the sliding door,
and then you want to lock the door also, do the
following:
1. Unlock the cover.
2. Close the sliding door.
3. Lock the cover again, thus locking the sliding door
also.
If a PCMCIA connector is installed in the front of your
personal computer, you can lock it when you lock the
cover and the sliding door. Be sure the small cover panel
for the PCMCIA connector is in place; then lock the
sliding door. When the PCMCIA connector is locked,
you can slide its cover panel only halfway to the right.
Two identical keys are provided with your personal
computer. Locksmiths are not authorized to duplicate
these keys. You must order replacement keys from the
key manufacturer. The key serial number and
manufacturer's address are on a tag attached to the keys.
You might want to record this information in the place
provided in Appendix A, “Computer Records” on
page 69. Store the tag in a safe place.
Chapter 3. Operating Your Personal Computer 37
Page 48

Locking the Keyboard
You can disable the keyboard so that others are unable to
use it.
If a power-on password is set, the keyboard is locked
when you turn on the computer. You must type the
correct password before you can type anything else.
You can enable the power-on password feature with the
Configuration/Setup Utility program. See “Setting and
Changing a Power-On Password” on page 19.
Some operating systems have a keyboard and mouse
lock-up feature. Check the documentation that comes
with your operating system for more information.
38 Using Your Personal Computer
Page 49

Chapter 4. Taking Care of Your Personal Computer
This chapter guides you in proper handling and care of
your computer equipment.
Basics
Here are some basic points about keeping your computer
functioning properly:
Keep your computer in a clean, dry environment.
Make sure it rests on a flat, sturdy surface.
Do not place items on top of the display or cover any
of the vents in the monitor or computer. These vents
provide air flow to keep your computer from
overheating.
Keep food and drinks away from all parts of your
computer. Food particles and spills will make the
keyboard and mouse sticky and unusable.
Do not get the power switches or other controls wet.
Moisture can damage these parts and cause an
electrical hazard.
Always disconnect a power cord by grasping the
plug, not the cord.
Cleaning Your Personal Computer
It is good practice to clean your computer periodically to
protect the surfaces and ensure trouble-free operation.
Computer and Keyboard
Use only mild cleaning solutions and a damp cloth to
clean the painted surfaces of the computer.
Monitor Screen
Do not use abrasive cleaners when cleaning the surface of
the monitor screen. The screen surface is easily scratched,
so avoid touching it with pens, pencil points, and erasers.
To clean the screen surface, wipe it gently with a soft, dry
cloth, or blow on the screen to remove grit and other
loose particles. Then use a soft cloth moistened with a
nonabrasive liquid glass cleaner.
Copyright IBM Corp. 1996 39
Page 50

Mouse
If the pointer on the monitor does not move smoothly
with the mouse, you might need to clean the mouse:
1. Turn the computer off.
2. Disconnect the mouse cable from the computer.
3. Turn the mouse upside down. Unlock the retainer on
the bottom of the mouse by moving it in the direction
indicated by the arrow on the retainer.
4. Turn the mouse right-side up, and the retainer and
ball will drop out.
5. Wash the ball in warm, soapy water, and dry it well.
6. Using a damp cloth, wipe the outside of the mouse
and the retainer. Be sure to wipe the rollers inside
the mouse.
7. Insert the ball and retainer. Lock the retainer by
moving it in the opposite direction of the arrow.
8. Reconnect the mouse cable to the computer.
Replacing the Battery
Your computer has a special type of memory that
maintains the date, time, and the settings for built-in
features, such as serial- and parallel-port assignments
(configuration). A battery keeps this information active
when you turn off the computer.
The battery requires no charging or maintenance
throughout its life; however, no battery lasts forever. If
the battery fails, the date, time, and configuration
information (including passwords) are lost. An error
message is displayed when you turn on the computer.
Refer to Installing Options in Your Personal Computer for
information about replacing the battery.
If you replace the original lithium battery with a
heavy-metal battery or a battery with heavy-metal
components, be aware of the following environmental
consideration: Batteries and accumulators that contain
heavy metals must not be disposed of with normal
domestic waste. They will be taken back free of charge
by the manufacturer, distributor, or representative to be
recycled or disposed of in a proper manner.
40 Using Your Personal Computer
Page 51

Moving Your Personal Computer
Normal shipping and handling can cause loss of data
from a hard disk. If your computer has a hard disk
drive, take the following precautions:
1. Back up all files and data from the hard disk.
Operating systems can vary in the way they perform
backup procedures. Some operating systems save
only data files, while others make copies of
application program files and data files. Refer to your
operating system documentation for information
about software backup.
2. Remove all media (diskettes, compact discs, tapes,
and so on) from the drives.
3. Turn off the computer and all attached devices. Your
hard disk drive automatically parks the read/write
heads in a nondata area. This process prevents
damage to the hard disk.
4. Unplug the power cords from electrical outlets.
5. Note where you have attached your cables to the rear
of the computer; then remove them.
Caution
Do not risk injury by moving or lifting the
computer by yourself. Ask another person to help
you.
If you saved the original shipping cartons and
packing materials, use them to pack the units. If you
are using different cartons, cushion the units to avoid
any damage.
Pack the computer and all devices. Cushion them
well on the sides, top, and bottom to avoid damage.
Chapter 4. Taking Care of Your Personal Computer 41
Page 52

42 Using Your Personal Computer
Page 53

Chapter 5. Solving Problems
This chapter presents an overview of diagnostic tools
available to you. You can use these tools to identify and
correct problems that come up as you use your personal
computer. This chapter also contains information about
terminate-and-stay-resident and a section on how to get
help, service, and additional information.
Using Diagnostic Tools
Computer problems can be caused by hardware,
software, or a user error (for example, pressing the wrong
key). Using the diagnostic aids discussed in this chapter,
you might be able to solve problems yourself or gather
helpful information you can pass on to a service
technician.
You can check the hardware by following the procedures
in this chapter and using the diagnostic programs
preinstalled in your computer.
Caution
Be careful when moving or changing the position of
the computer, monitor, or other components. Do not
attempt to lift any object that you think might be too
heavy for you.
If the hardware checks out OK, and you have not made a
user error, you might have a software problem. If you
suspect that you have a software problem, refer to the
information that comes with the software package.
The following tools are available to diagnose
hardware-related problems:
Power-on self-test (POST)
POST beep codes messages
Diagnostic programs
Error messages
Troubleshooting charts
Option diskettes
Descriptions of these tools follow.
Power-On Self-Test (POST)
Each time you turn on the computer, it performs a series
of tests that check the operation of the base computer.
This series of tests is called the power-on self-test or POST.
POST does the following:
Checks basic system-board operations
Checks the memory operation
Compares the current system configuration with that
established by the Configuration/Setup Utility
program
Starts the video operation
Verifies that the diskette drive is working
Verifies that the hard disk drive is working
While the memory is tested, numbers indicating the
amount of memory appear in the top-left corner of your
screen. The Configuration/Setup Utility program symbol
appears in the top-right corner of your screen, and the
Copyright IBM Corp. 1996 43
Page 54

Configuration/Setup Utility program prompt appears in
the bottom-left corner of your screen.
Tip
Note: The amount of available memory shown might
be somewhat less than expected because of
basic input/output system (BIOS) shadowing in
random access memory (RAM).
If POST finishes without detecting any problems, a single
beep sounds. Then the first screen of your operating
system or application program appears.
If POST detects a problem, an error message appears on
your screen. A single problem can cause several error
messages to appear. When you correct the cause of the
first error message, the other error messages probably
will not appear on the screen the next time you turn on
the system.
POST Beep Codes
POST generates a beeping sound to indicate successful
completion of POST or to indicate that the tests detect an
error.
One beep and the appearance of text on the display
indicates successful completion of POST. More than one
beep indicates that POST detects an error.
Tip
If your computer does not start when you press the
power switch, try the following:
Make sure all cables are securely connected to the
correct locations.
Check to see if the voltage-selection switch is set
to the correct position.
If the problem is not corrected, have your computer
serviced.
Diagnostic Programs
IBM provides programs for diagnosing software and
hardware problems.
QAPlus/WIN-WIN
QAPlus/WIN-WIN, a Windows program, is included in
preinstalled software. QAPlus/WIN-WIN provides an
effective tool for isolating software-related problems,
because it encompasses the entire operating system.
QAPlus/WIN-WIN gathers Windows-related information
and also does some hardware device testing.
QAPlus/PRO
QAPlus/PRO is a DOS diagnostic program that is
available to you either in preinstalled software or on a
diskette.
44 Using Your Personal Computer
Page 55

If your computer has DOS or DOS with Windows
preinstalled, you access QAPlus/PRO by entering
QAPRO at the C:\ prompt. (If you are using Windows
when you want to use QAPlus/PRO, first exit from
Windows, and then enter QAPRO at the C:\ prompt.)
QAPlus/PRO provides similar diagnostic capacity to
QAPlus/WIN-WIN, but it is more balanced between
software and hardware problem determination. The
Windows-related information that is available in
QAPlus/WIN-WIN is not available in QAPlus/PRO.
However, QAPlus/PRO does gather a wealth of
information about the DOS environment, including device
drivers. It more effectively isolates hardware problems
than QAPlus/WIN-WIN, because it is not limited by the
operating system environment.
When OS/2 is preinstalled, QAPlus/PRO is not available
from the hard disk. However, you can use the Diskette
Factory to build the QAPlus/PRO diskette.
If software was not preinstalled in your computer,
QAPlus/PRO is provided on a diskette that comes with
your computer. You access QAPlus/PRO by starting
your computer with the QAPlus/PRO diskette in the first
diskette drive.
Using QAPlus/PRO from a diskette provides the greatest
amount of hardware testing and the least amount of
software problem determination. All customization is
excluded from this testing, including device drivers that
were preinstalled or have been added and
terminate-and-stay-resident programs, so that a clean
environment is presented to the testing tool.
This method of testing is generally used when other
methods are not accessible or have not been successful in
isolating a problem suspected to be hardware related.
CoSession for Windows
If the CoSession for Windows program is preinstalled in
your computer, an IBM HelpWare support person can
use that program to diagnose your system from a remote
location. To use CoSession for Windows, you must have
a modem attached to your computer.
Tip
Contact IBM HelpWare before attempting to use
CoSession for Windows. HelpWare support will
provide specific instructions for setting up and using
this program.
Error Messages
Error messages that appear on the screen might be text,
numeric, or both. There are three types of error
messages:
POST error messages
Messages that appear when POST finds problems
with the hardware during start-up or when a change
in the hardware configuration is found. POST error
messages are 3-, 4-, 5-, 8-, or 12-character
alphanumeric messages and include brief
explanations.
Chapter 5. Solving Problems 45
Page 56

For more information about what caused the error
message to appear and what action to take, refer to
“POST Messages” on page 46.
Diagnostic error messages
Messages that appear if a hardware problem is
detected by a diagnostic test program. The messages
present text information that can be used to identify a
failing part.
Software-generated error messages
Messages that appear if a problem or conflict is
detected by the application program, the operating
system, or both. Error messages for operating-system
and software problems are generally text messages,
but they also can be numeric messages. For
information about these software error messages,
refer to the information that comes with the operating
system or application program, or both.
POST Messages
The computer might display more than one error
message. Often, the first error to occur causes subsequent
errors. Always follow the suggested action for the first
error message that appears.
In the following table, “X” can be any alphanumeric
character.
46 Using Your Personal Computer
Page 57

POST Message
Description
101
102
A failure occurred during testing of the system board and microprocessor.
Action: Have the system unit serviced.
110 A memory parity failure occurred during testing of the system board.
Action: Run the diagnostic tests to verify that a problem exists in the memory-module kits.
See the system memory table in Installing Options in Your Personal Computer to see if you can reconfigure
(swap) your system memory to aid in identifying the defective memory module.
If you cannot identify the defective memory module in this way, have the computer serviced.
114 An adapter read-only memory (ROM) error occurred.
Action: If you can start the computer without the adapters installed, remove all option adapters, reinstall
them one at a time, and retest after reinstalling each one. When an adapter causes a failure, replace it.
If the problem cannot be isolated and corrected, have the system unit serviced.
121 A hardware error occurred.
Action: Have the computer serviced.
161 The battery on the system board is dead.
CAUTION:
Danger of explosion if lithium battery is incorrectly replaced.
Replace the battery with the same or equivalent type recommended by the manufacturer. Dispose of
batteries as required by local ordinances or regulations.
Action: Until you replace the battery, the computer can be used. However, you will have to run the
Configuration/Setup Utility program and set the time and date each time the computer is turned on. (See
Installing Options in Your Personal Computer for additional instructions.)
Chapter 5. Solving Problems 47
Page 58

POST Message
Description
162 A change in device configuration occurred. This error occurs under one or more of the following
conditions:
A new device has been installed.
A device has been moved to a different location or cable connection.
A device has been removed or disconnected from a cable.
A device is failing and is no longer recognized by the computer as being installed.
An external device is not turned on.
An invalid checksum is detected in the battery-backed memory.
Action: Verify that all external devices are turned on. External devices must be turned on before the
computer is turned on.
If you did not add, remove, or change the location of a device, a device is probably failing. Running the
diagnostic programs might isolate the failing device, but you must have the computer serviced.
163 The clock is not working correctly.
Action: Set the correct date and time. If the date and time are set correctly and saved and the 163 error
message reappears, replace the battery.
If this does not correct the problem, have the computer serviced.
Until the computer is serviced, it can be used, but any application programs that use the date and time will
be affected.
164 A change in the memory configuration occurred. This error can be caused by adding memory, removing
memory, or incorrectly installing memory.
Note: The computer can be used with decreased memory capacity.
Action:
1. If you have newly installed memory, see Installing Options in Your Personal Computer to verify that the
new memory is correct for your computer and that the memory module configuration matches one of
the configurations shown in the system memory table.
2. Running the diagnostic tests might isolate the location of the problem memory-module kit and provide
additional information.
3. If the system diagnostic tests detect a failure, have the computer serviced.
48 Using Your Personal Computer
Page 59

POST Message
Description
20X A failure occurred during testing of the memory. This error can be caused by incorrectly installed memory,
a failing memory-module kit, or a system-board failure.
Action:
1. If you just installed memory, see Installing Options in Your Personal Computer to verify that the new
memory is correct for your system unit, that it is installed correctly, and that the memory-module
configuration matches one of the configurations shown in the system memory table.
2. Run the diagnostic tests to verify the problem.
3. If the system diagnostic tests detect a failure, have the computer serviced.
229 An external cache error occurred.
Action: Have the computer serviced.
301
303
A failure occurred during testing of the keyboard and keyboard controller. These error messages also might
be accompanied by continuous beeping.
Action:
Ensure that:
1. Nothing is resting on the keyboard and pressing a key
2. No key is stuck
3. The keyboard cable is connected correctly to the keyboard and to the correct connector on the computer.
Running the diagnostic tests can isolate the computer component that failed, but you must have your
computer serviced.
Note: If you have just connected a new mouse or other pointing device, turn the computer off and
disconnect that device. Wait at least 5 seconds, and then turn the computer on. If the error message
goes away, replace the device.
If the error message remains, have the keyboard and cable or the computer serviced.
601 A failure occurred during testing of the diskette drive and diskette-drive controller. This error can be
caused by a loose or incorrectly connected cable, a failing drive, or a failing system board.
Action: The computer can be used, but one or more diskette drives might not work. Running the
diagnostic tests can isolate the diskette drive that failed, but you must have your computer serviced.
Chapter 5. Solving Problems 49
Page 60

POST Message
Description
602 The computer is not able to start the diskette in the drive. The diskette might be damaged or formatted
incorrectly.
Action: Try another startable diskette that is in working condition.
604 A failure occurred during the testing of a diskette drive.
Action:
1. Verify that the Configuration/Setup Utility program correctly reflects the type of diskette drive you
have installed.
2. Run the system diagnostic programs.
3. If the system diagnostic programs detect a failure, replace the diskette drive.
178X A failure occurred during testing of the hard disk drive or a primary or secondary IDE device.
Action: Run the system diagnostic tests.
1800 A PCI adapter has requested a hardware interrupt that is not available.
Action:
1. Make sure the PCI adapter and any ISA legacy adapters are set correctly in the Configuration/Setup
Utility program. If the interrupt resources settings are not correct, change the settings. Setting the
resources used by ISA legacy adapters to Not available enables the Plug and Play function to configure
around the legacy adapters. For instructions on using the Configuration/Setup Utility program, see
“Configuring Your Personal Computer” on page 15.
2. If all interrupts are being used by ISA legacy adapters, you might need to remove one to make an
interrupt available to the PCI adapter. For instructions on removing adapters, see Installing Options in
Your Personal Computer.
50 Using Your Personal Computer
Page 61

POST Message
Description
1801 A PCI adapter has requested memory resources that are not available.
Action:
1. Make sure the PCI adapter and any ISA legacy adapters are set correctly in the Configuration/Setup
Utility program. If the memory resources settings are not correct, change the settings. Setting the
resources used by ISA legacy adapters to Not available enables the Plug and Play function to configure
around the legacy adapters. For instructions on using the Configuration/Setup Utility program, see
“Configuring Your Personal Computer” on page 15.
2. If all memory resources are being used by ISA legacy adapters, you might need to remove one to make
memory available to the PCI adapter. For instructions on removing adapters, see Installing Options in
Your Personal Computer.
1802 A PCI adapter has requested an I/O address that is not available, or the PCI adapter might be defective.
Action:
1. Make sure the PCI adapter and any ISA legacy adapters are set correctly in the Configuration/Setup
Utility program. Setting the resources used by ISA legacy adapters to Not available enables the Plug
and Play function to configure around the legacy adapters.
2. If the I/O port resources settings are correct, the PCI adapter might be defective. Have the computer
serviced.
1803 A PCI adapter has requested a memory address that is not available, or the PCI adapter might be defective.
Action:
1. Make sure that any ISA legacy adapters are set correctly in the Configuration/Setup Utility program. If
the memory resources settings are not correct, change the settings. Setting the resources used by ISA
legacy adapters to Not available enables the Plug and Play function to configure around the legacy
adapters. For instructions on using the Configuration/Setup Utility program, see “Configuring Your
Personal Computer” on page 15.
2. If the memory resources settings are correct, the PCI adapter might be defective. Have the computer
serviced.
Chapter 5. Solving Problems 51
Page 62

POST Message
Description
1804 A PCI adapter has requested a memory address that is not available.
Action:
1. Make sure that any ISA legacy adapters are set correctly in the Configuration/Setup Utility program. If
the memory resources settings are not correct, change the settings. Setting the resources used by ISA
legacy adapters to Not available enables the Plug and Play function to configure around the legacy
adapters. For instructions on using the Configuration/Setup Utility program, see “Configuring Your
Personal Computer” on page 15.
2. If all memory addresses are being used by ISA legacy adapters, you might need to remove one to make
memory addresses available to the PCI adapter. For instructions on removing adapters, see Installing
Options in Your Personal Computer.
1805 A PCI adapter read-only memory (ROM) error occurred.
Action: Remove all PCI adapters.
If you can start the computer without the PCI adapters, reinstall each adapter, one at a time, and retest.
When an adapter causes a failure, replace it.
If the problem cannot be isolated and corrected, have the computer serviced.
1962 A boot sequence error occurred.
Action:
1. Make sure the adapter option is set correctly in the Configuration/Setup Utility program. If the setting
is not correct, change the setting. For instructions on using the Configuration/Setup Utility program,
see “Configuring Your Personal Computer” on page 15.
2. Make sure all adapters are installed correctly. For instructions on installing adapters, see Installing
Options in Your Personal Computer.
52 Using Your Personal Computer
Page 63

POST Message
Description
2462 A video configuration error occurred.
Action:
1. Make sure the display cables are correctly and securely connected to the system unit.
2. If you just added or removed video memory, use the Configuration/Setup Utility program to make sure
the settings in Video Setup are correct. If the settings are not correct, change the settings. For
instructions on using the Configuration/Setup Utility program, see “Configuring Your Personal
Computer” on page 15.
3. If the error recurs, you might need to replace the video memory module.
4. If the error persists, have the computer serviced.
I9990301 A hard disk failure occurred.
Action: Have the computer serviced.
I9990305 An operating system could not be found.
Action: Run diagnostic tests to verify that the hard disk drive is functioning correctly. If there is a problem
with the hard disk (such as a bad sector), you might have to reinstall the operating system.
If you cannot reinstall the operating system, have the computer serviced.
Other Numbers The computer POST found an error.
Action: Follow the instructions on the screen.
Chapter 5. Solving Problems 53
Page 64

Troubleshooting Charts
You can use the troubleshooting charts in this section to
find solutions to problems that have definite symptoms.
Tip
If you have just added new software or a new
computer option and your computer is not working,
do the following before using the troubleshooting
charts:
Remove the software or device you just added.
Run the diagnostic test programs to determine if
your computer is running correctly.
Reinstall the new software or new device.
When using the troubleshooting charts, look for the
symptom of the problem in the left column of the chart.
You will find instructions and possible solutions to the
problem in the right column of the chart.
54 Using Your Personal Computer
Page 65

Diskette Drive
Problems
Action
Diskette drive in-use
light stays on, or the
system bypasses the
diskette drive.
If there is a diskette in the drive, verify that:
1. The diskette drive is enabled in the Configuration/Setup Utility program.
2. The diskette is good and not damaged. (Try another diskette if you have one.)
3. The diskette is inserted correctly (label up and metal-shutter end first) in the drive.
4. The diskette contains the necessary files to start the computer.
5. Your software program is OK (see Software Problem at the end of these troubleshooting charts).
If the diskette drive in-use light stays on, or the system continues to bypass the diskette drive, have the
computer serviced.
Monitor Self-Tests
Action
Some IBM monitors have their own self-tests. If you suspect a problem with your monitor, refer to the
information supplied with the monitor for adjusting and testing instructions.
If you still cannot find the problem, have the monitor and computer serviced.
Chapter 5. Solving Problems 55
Page 66

Monitor Problems
Action
Wavy, unreadable,
rolling, distorted
screen, or screen jitter.
If the monitor self-tests show the monitor is OK, consider the location of the monitor. Magnetic fields
around other devices (such as transformers, appliances, fluorescent lights, and other monitors) can cause
screen jitter or wavy, unreadable, rolling, or distorted screen images. If this happens, turn off the monitor.
(Moving a color monitor while it is turned on might cause screen discoloration.) Adjust the locations of the
device and the monitor so that they are at least 305 mm (12 in.) apart. Turn the monitor on.
Notes:
1. The distance between monitors and diskette drives should be at least 76 mm (3 in.) to prevent diskette
drive read/write errors.
2. Non-IBM monitor cables might cause unpredictable problems.
3. An enhanced monitor cable with additional shielding is available for Model 9521 and 9527 displays.
See your IBM reseller or IBM marketing representative for information about the enhanced monitor
cable.
If the problem recurs, have the monitor and computer serviced.
Screen flickers. Set the monitor for the highest, noninterlaced refresh rate available.
To reset the refresh rate, use a utility program such as the IBM Personal Computer Configuration/Setup
Utility program. For OS/2, use Set Up Display in Easy Tools for OS/2.
See “Monitors” in Understanding Your Personal Computer for more information about monitors.
The monitor works
when you turn on the
system, but goes
blank when you start
some application
programs.
Verify that the primary monitor cable is connected to the video port.
To find the video port, see Setting Up Your Personal Computer.
Be sure you installed the necessary device drivers for the applications.
Blank screen Verify that:
1. The computer power cord is plugged into the computer and a working electrical outlet.
2. The monitor is turned on and the Brightness and Contrast controls are adjusted correctly.
3. The monitor signal cable is connected to the correct connector on the computer.
If the items above are correct and the screen remains blank, have the computer serviced.
56 Using Your Personal Computer
Page 67

Monitor Problems
Action
Only the cursor
appears.
Have the computer serviced.
Wrong characters
appear on the screen.
Have the computer serviced.
General Problems
Action
Problems such as
broken cover locks or
indicator lights not
working.
Have the computer serviced.
Intermittent Problems
Action
A problem occurs
only occasionally and
is difficult to detect.
Verify that:
1. All cables and cords are securely connected to the rear of the computer and attached options.
2. When the computer is turned on, air is flowing from the rear of the computer at the fan grille. If there
is no air flow, the fan is not working. This causes the computer to overheat and shut down.
3. The last external device in each SCSI chain is terminated correctly. (See your SCSI documentation.)
If the items above are correct, have the computer serviced.
Keyboard, Mouse,
or PointingDevice Problems
Action
All or some keys on
the keyboard do not
work.
1. Make sure the keyboard cable is properly connected to the computer.
2. Make sure the computer and the monitor are turned on.
If the items above are correct, have the computer serviced.
Chapter 5. Solving Problems 57
Page 68

Keyboard, Mouse,
or PointingDevice Problems
Action
The mouse or
pointing device does
not work.
Verify that the mouse or pointing-device cable is securely connected and the device drivers are installed
correctly.
If the problem recurs, have the computer and the device serviced.
Memory Problems
Action
The amount of
memory displayed is
less than the amount
of memory installed.
Review the tip concerning memory on page 44.
Verify that:
1. The memory modules are seated properly.
2. Memory modules are installed in pairs (when required).
3. If you changed the memory, you updated the memory configuration in the Configuration/Setup Utility
program.
If the above items are correct, run the memory test program from the QAPlus/WIN-WIN diagnostic test
program. The system might have detected a bad memory module and automatically reallocated memory to
enable you to continue to operate. If the memory tests detect a failure, have the computer serviced.
“Not enough
memory” message is
displayed.
Verify that terminate-and-stay-resident (TSR) programs are not taking up memory. See “Managing TSR
Programs” on page 62.
58 Using Your Personal Computer
Page 69

Option Problems
Action
An IBM option that
was just installed does
not work.
Verify that:
1. The option is designed for the computer.
2. You followed the installation instructions supplied with the option. See “Installing Files from Option
Diskettes” on page 62 for information about installing option files.
3. The option is installed correctly.
4. You have not loosened any other installed options or cables.
5. You updated the configuration information in the Configuration/Setup Utility program. Whenever
memory or an option is changed, you must update the configuration.
If you are using an expanded- or enhanced-memory manager, such as the DOS expanded memory
specification (EMS) device driver, refer to “Memory” in Understanding Your Personal Computer.
Note: The Plug and Play feature uses memory addresses ED00h to EDFFh. If you use a memory-manager
program or install an ISA legacy adapter, make sure that they do not use addresses within this address
range.
If all of the above items are correct, start QAPlus/WIN-WIN or QAPlus/PRO. If the test programs find no
problem, have the computer and the option serviced.
An IBM option that
used to work does not
work now.
Verify that all of the option hardware and cable connections are secure.
If the option comes with its own test instructions, use those instructions to test the option.
If the items above are correct and the test programs found no problem, have the computer and option
serviced.
If the failing option is a SCSI option, verify that:
1. The cables for all external SCSI options are connected correctly.
2. The last option in each SCSI chain, or the end of the SCSI cable, is terminated correctly.
3. All external SCSI options are turned on. External SCSI options must be turned on before the system is
turned on.
For more information, see your SCSI documentation.
If the problem recurs, have the computer serviced.
Chapter 5. Solving Problems 59
Page 70

Parallel Port
Problems
Action
The number of
parallel ports
displayed is less than
the number of parallel
ports installed.
Verify that:
1. Each port is assigned a unique address.
2. The parallel-port adapter, if you installed one, is seated properly.
If the items above are correct, have the computer serviced.
Serial Port Problems
Action
The number of serial
ports displayed is less
than the number of
serial ports installed.
Verify that:
1. Each port is assigned a unique address.
2. The serial-port adapter, if you installed one, is seated properly.
If the items above are correct, have the computer serviced.
Printer Problems
Action
The printer does not
work.
Verify that:
1. The printer is turned on and is online.
2. The printer signal cable is connected to the correct serial or parallel port on the system. (For the
location of the serial or parallel port, see Setting Up Your Personal Computer.)
Note: Non-IBM printer cables might cause unpredictable problems.
3. You have assigned the printer port correctly in your operating system or application program.
4. You have assigned the printer port correctly using the Configuration/Setup Utility program.
If the items above are correct and the printer still does not work, run the tests described in the manual that
comes with your printer. If the tests show the printer is OK, have the computer serviced.
60 Using Your Personal Computer
Page 71

Software Problem
Action
Is your software
program OK?
To determine if problems are caused by the software, verify that:
1. Your system has the minimum memory requirements needed to use the software. Refer to the
information supplied with the software to verify memory requirements.
Note: If you have just installed an adapter or memory, you might have a memory address conflict.
2. The software is designed to operate on your computer.
3. Other software works on your computer.
4. The software you are using works on another computer.
If you received any error messages when using the software program, refer to the information supplied
with the software for a description of the messages and solutions to the problem.
If the items above are correct and the problem remains, contact your place of purchase or service technician
for help.
Chapter 5. Solving Problems 61
Page 72

Installing Files from Option
Diskettes
An optional device or adapter might come with a
diskette. Diskettes that are included in option packages
usually contain files that the computer needs for
recognizing and activating the options. Until you install
the necessary files, the new device or adapter might cause
error messages.
If your optional device or adapter came with a diskette,
you might need to install some configuration (.CFG) files
or diagnostic files (.EXE or .COM) from the diskette to
your hard disk.
Managing TSR Programs
Terminate-and-stay-resident (TSR) programs are loaded
into memory and stay there so you can access them
whenever you want. If you are loading or using an
application program and receive a message that you do
not have enough memory, TSR programs might be taking
up valuable space.
Check the documentation that comes with each TSR
program to find out how to solve this problem. You
might be able to remove the program from memory for
the rest of your current work session. Sometimes you can
change the order in which the TSR programs are loaded
so that memory is used more efficiently. Or perhaps you
can remove from the AUTOEXEC.BAT file the TSR
programs that you do not use frequently.
See your operating system documentation for assistance
on editing or disabling statements in the
AUTOEXEC.BAT file.
62 Using Your Personal Computer
Page 73

Chapter 6. Getting Help, Service, and Information
If you need help, service, technical assistance, or just
want more information about IBM products, you will find
a wide variety of sources available from IBM to assist
you. This section provides information about those
sources.
Services available and telephone numbers listed are
subject to change without notice.
Solving Problems
Many computer problems can be solved without outside
assistance, by using the online help or by looking in the
online or printed documentation that comes with your
computer or software. Also, be sure to read the
information in any README files that come with your
software.
Most computers, operating systems, and application
programs come with documentation that contains
troubleshooting procedures and explanations of error
messages. The documentation that comes with your
computer also contains information about the diagnostic
tests you can perform.
If you suspect a hardware problem, run the diagnostic
tests and make a note of any error messages you receive.
Then look up the message in the documentation and take
the appropriate action.
If you suspect a software problem, consult the
documentation (including README files) for the
operating system or application program.
Using the HelpWare Support
Family
IBM HelpWare is the solution for IBM PC service and
support wherever IBM products are sold and serviced.
Purchasing an IBM PC hardware product entitles you to
standard help and support during the warranty period.
If you need additional support and services, HelpWare
provides a wide variety of extended services that address
almost any need.
Using Electronic Support Services
If you have a modem, you can get help from several
popular services. Bulletin boards and online information
services provide assistance through question-and-answer
message areas, live chat rooms, searchable databases, and
more.
Technical information is available on a wide range of
topics, such as:
Hardware setup and configuration
Preinstalled software
OS/2, DOS, and Windows
Networking
Communications
Multimedia
In addition, the latest device driver updates are available.
Copyright IBM Corp. 1996 63
Page 74

The IBM PC Company Bulletin Board System (BBS) can
be reached 24 hours a day, 7 days a week. Modem
speeds of up to 14400 baud are supported. Long distance
telephone charges might apply. To access the PC
Company BBS:
In the U.S., call 1-919-517-0001.
In Canada:
– In Halifax, call 902-420-0300.
– In Montreal, call 514-938-3022.
– In Toronto, call 905-316-4255 or 416-956-7877.
– In Vancouver, call 604-664-6461 or 604-664-6464.
– In Winnipeg, call 204-934-2735.
Commercial online services that contain information
about IBM products include:
CompuServe
Use the following GO words: APTIVA, IBMPS2,
ThinkPad, PowerPC, ValuePoint, IBMSVR, or
IBMOBI.
PRODIGY
Use the Jump command; type IBM and select PC
Product Support.
America Online
Use the “Go to” keyword IBM Connect.
On the World Wide Web, the IBM Personal Computers
home page has information about IBM Personal
Computer products and support. The address for the
IBM Personal Computer home page is:
http://www.pc.ibm.com
Getting Information by Fax
If you have a touch-tone telephone and access to a fax
machine, in the U.S. and Canada you can receive by fax
free marketing and technical information on many topics,
including hardware, operating systems, and local area
networks (LANs). You can call the IBM PC Company
Automated Fax System 24 hours a day, 7 days a week.
Follow the recorded instructions, and the requested
information will be sent to your fax machine.
To access the IBM PC Company Automated Fax System,
do the following:
In the U.S., call 1-800-426-3395.
In Canada, call 1-800-465-3299.
Getting Help Online
Online Housecall is a remote communication tool that
allows an IBM HelpWare technical-support representative
to access your PC by modem. Many problems can be
remotely diagnosed and corrected quickly and easily. In
addition to a modem, a remote-access application
program is required. This service is not available for
servers. There might be a change for this service,
depending on the request.
For more information about configuring your PC for
Online Housecall:
In the U.S., call 1-800-772-2227.
In Canada, call 1-800-565-3344.
64 Using Your Personal Computer
Page 75

In all other countries, contact your IBM reseller or
IBM marketing representative.
Getting Help by Telephone
During the warranty period, you can get help and
information by telephone through the IBM HelpWare PC
Support Line. Expert technical-support representatives
are available to assist you with questions you might have
on the following:
Setting up your computer and IBM monitor
Installing and setting up IBM options purchased from
IBM or an IBM reseller
60-day, preinstalled-operating-system support
Arranging for service (on-site or carry-in)
Arranging for overnight shipment of
customer-replaceable parts
In addition, if you purchased an IBM PC Server, you are
eligible for Server Startup Support for 90 days after
installation. This service provides assistance for:
Setting up your network operating system
Installing and configuring interface cards
Installing and configuring network adapters
Please have the following information ready when you
call:
Serial numbers of your computer, monitor, and other
components, or your proof of purchase
Description of the problem
Exact wording of any error messages
Hardware and software configuration information for
your system
If possible, be at your computer when you call.
These services are available 24 hours a day, 7 days a
week (excluding some holidays).
1
In the U.S. and Puerto Rico, call 1-800-772-2227.
In Canada, call 1-800-565-3344.
In all other countries, contact your IBM reseller or
IBM marketing representative.
Getting Help Around the World
If you travel with your computer or need to move it to
another country, you can register for International
Warranty Service. When you register with the
International Warranty Service Office, you will receive an
International Warranty Service Certificate that is honored
virtually worldwide, wherever IBM or IBM resellers sell
and service IBM PC products.
For more information or to register for International
Warranty Service in the U.S. or Canada, call
1-800-497-7426.
1
Response time may vary depending on the number and complexity of incoming calls.
Chapter 6. Getting Help, Service, and Information
65
Page 76

Purchasing Additional HelpWare
Services
During and after the warranty period, you can purchase
additional HelpWare services, such as support for IBM
and non-IBM hardware, operating systems, and
application programs; network setup and configuration;
upgraded or extended hardware repair services; and
custom installations. Service availability and name might
vary by country.
Enhanced PC Support Line
Enhanced PC Support is available for desktop and mobile
IBM computers that are not connected to a network.
Technical support is provided for IBM computers and
IBM or non-IBM options, operating systems, and
application programs on the Supported Products list.
This service includes technical support for:
Installing and configuring your out-of-warranty IBM
computer
Installing and configuring non-IBM options in IBM
computers
Using IBM operating systems in IBM and non-IBM
computers
Using application programs and games
Tuning performance
Installing device drivers remotely
Setting up and using multimedia devices
Identifying system problems
Interpreting documentation
You can purchase this service on a per-call basis, as a
multiple-incident package, or as an annual contract with a
10-incident limit. For more information about purchasing
Enhanced PC Support, see “Ordering Support Line
Services” on page 67.
900-Number Operating System and
Hardware Support Line
In the U.S., if you prefer to obtain technical support on a
pay-as-you go basis, you can use the 900-number support
line. The 900-number support line provides the same
support as the Enhanced PC Support line, except for
application and non-IBM option support.
To access this support, call 1-900-555-CLUB (2582). You
will be notified of the charge per minute.
Network and Server Support Line
Network and Server Support is available for simple or
complex networks made up of IBM servers and
workstations using major network operating systems. In
addition, many popular non-IBM adapters and network
interface cards are supported.
This service includes all of the features of the Enhanced
PC Support Line, plus:
Installing and configuring client workstations and
servers
66 Using Your Personal Computer
Page 77

Identifying system problems and correcting problems
on the client or the server
Using IBM and non-IBM network operating systems
Interpreting documentation
You can purchase this service on a per-call basis, as a
multiple-incident package, or as an annual contract with a
10-incident limit. For more information about purchasing
Network and Server Support, see “Ordering Support Line
Services.”
Ordering Support Line Services
Enhanced PC Support Line and Network and Server
Support Line services are available for products on the
Supported Products list. To receive a Supported Products
list:
In the U.S.:
1. Call 1-800-426-3395.
2. Select document number 11683 for Network and
Server support.
3. Select document number 11682 for Enhanced PC
support.
In Canada, contact IBM Direct at 1-800-465-7999, or:
1. Call 1-800-465-3299.
2. Select the HelpWare catalog.
In all other countries, contact your IBM reseller or
IBM marketing representative.
For more information or to purchase these services:
In the U.S., call 1-800-772-2227.
In Canada, call 1-800-465-7999.
In all other countries, contact your IBM reseller or
IBM marketing representative.
Warranty and Repair Services
You can upgrade your standard hardware warranty
service or extend the service beyond the warranty period.
Warranty upgrades in the U.S. include:
Carry-in service to on-site service
If your warranty provides carry-in repair service, you
can upgrade to on-site repair service, either standard
or premium. The standard upgrade provides a
trained servicer within the next business day (9 a.m.
to 5 p.m., local time, Monday though Friday). The
premium upgrade provides 4-hour average response,
24 hours a day, 7 days a week.
On-site service to premium on-site service
If your warranty provides for on-site service, you can
upgrade to premium on-site service (4-hour average
on-site response, 24 hours a day, 7 days a week).
You also can extend your warranty. HelpWare Warranty
and Repair Services offers a variety of post-warranty
maintenance options, including ThinkPad EasyServ
Maintenance Agreements. Availability of the services
varies by product.
For more information about warranty upgrades and
extensions:
Chapter 6. Getting Help, Service, and Information 67
Page 78

In the U.S., call 1-800-426-7697.
In Canada, call 1-800-465-7999.
In all other countries, contact your IBM reseller or
IBM marketing representative.
Obtaining IBM Operating System
Updates
IBM provides update diskettes, called ServicePaks or
corrective service diskettes (CSDs), to customers who
report a DOS or OS/2 problem for which there is or will
be a corrective program.
You can obtain update diskettes from the following
sources:
IBM PC Company BBS. See “Using Electronic
Support Services” on page 63 for information on how
to access this bulletin board system.
OS/2 BBS. In the U.S. or Canada, call 1-800-547-1283.
OS/2 Technical Support Center. In the U.S. or
Canada, call 1-800-992-4777.
World Wide Web. The address is
http://www.ibm.com
CompuServe and PRODIGY.
IBM reseller or IBM marketing representative.
Ordering Publications
Additional publications are available for purchase from
IBM. For a list of publications available in your country:
In the U.S. and Puerto Rico, call 1-800-879-2755.
In other countries, contact your IBM reseller or IBM
marketing representative.
68 Using Your Personal Computer
Page 79

Appendix A. Computer Records
Serial Numbers and Keys
Record and retain the following information.
Your personal computer keys cannot be duplicated by
locksmiths. If you lose them, order replacement keys
from the key manufacturer. The key serial number and
manufacturer's address are on a tag attached to the keys.
Anyone who has the key serial number and
manufacturer's address can order duplicate keys, so store
the tag in a safe place. If you record the key serial
number on this page, either remove the page and store it
in a secure place, or store this manual in a secure place
when you are not using it.
The locations of the identification numbers are shown in
the illustrations that follow.
Product Name Personal Computer
Serial Number
(S/N)
Machine
Type/Model (M/T)
Key Serial Number
Key Address
Copyright IBM Corp. 1996 69
Page 80

Look for the serial number on the front of the system
unit, at the lower right.
Serial Number
PC 330
Serial Number
PC 350
70 Using Your Personal Computer
Page 81

Device Records
Device Records
Use the following tables to keep a record of the options
installed or attached to your personal computer. This
information can be helpful when you install additional
options in your personal computer or if you ever need to
have your personal computer serviced.
Figure 3. Internal and External Options
Location Option Description
Processor Ø Type:
Keyboard
Mouse Connector Ø IBM Mouse Ø Other:
Video Connector
Figure 3. Internal and External Options
Parallel Connector
Location Option Description
Serial Connector A
System Memory
(Bank 1, SIMM 1)
Ø 4 MB Ø 8 MB Ø 16 MB Ø 32 MB
USB Connector 1
System Memory
(Bank 1, SIMM 2)
Ø 4 MB Ø 8 MB Ø 16 MB Ø 32 MB
USB Connector 2
Infrared Connector
System Memory
(Bank 2, SIMM 3)
Ø 4 MB Ø 8 MB Ø 16 MB Ø 32 MB
System Memory
(Bank 2, SIMM 4)
Ø 4 MB Ø 8 MB Ø 16 MB Ø 32 MB
System Memory
(Bank 0, DIMM)
Ø 8 MB Ø 16 MB Ø 32 MB
Video Memory Ø 1 MB Ø 2 MB
Expansion Slot 1
Expansion Slot 2
Expansion Slot 3
Expansion Slot 4
Expansion Slot 5
Appendix A. Computer Records 71
Page 82

Device Records
Figure 4. Internal Drives
Location Drive Description
Bay 1
Bay 2
Bay 3
Bay 4
Bay 5
72 Using Your Personal Computer
Page 83

Appendix B. Product Warranties, License Agreement, and Notices
Hardware Limited Warranty
The following is the statement of limited warranty for the
United States, Canada, and Puerto Rico.
Statement of Limited Warranty
The warranties provided by IBM in this Statement of Limited Warranty apply
only to Machines you originally purchase for your use, and not for resale, from
IBM or your reseller. The term “Machine” means an IBM machine, its
features, conversions, upgrades, elements, or accessories, or any combination of
them. Unless IBM specifies otherwise, the following warranties apply only in
the country where you acquire the Machine. If you have any questions, contact
IBM or your reseller.
Machine: PC 330 (Type 6577) and PC 350 (Type 6587)
Warranty Period*: Three years
*Contact your place of purchase for warranty service information.
Production Status
Each Machine is manufactured from new parts, or new and used parts.
In some cases, the Machine may not be new and may have been
previously installed. Regardless of the Machine's production status,
IBM's warranty terms apply.
The IBM Warranty for Machines
IBM warrants that each Machine 1) is free from defects in materials and
workmanship and 2) conforms to IBM's Official Published Specifications.
The warranty period for a Machine is a specified, fixed period
commencing on its Date of Installation. The date on your receipt is the
Date of Installation, unless IBM or your reseller informs you otherwise.
During the warranty period IBM or your reseller, if authorized by IBM,
will provide warranty service under the type of service designated for
the Machine and will manage and install engineering changes that apply
to the Machine.
For IBM or your reseller to provide warranty service for a feature,
conversion, or upgrade, IBM or your reseller may require that the
Machine on which it is installed be 1) for certain Machines, the
designated, serial-numbered Machine and 2) at an engineering-change
level compatible with the feature, conversion, or upgrade. Many of
these transactions involve the removal of parts and their return to IBM.
You represent that all removed parts are genuine and unaltered. A part
that replaces a removed part will assume the warranty service status of
the replaced part.
If a Machine does not function as warranted during the warranty
period, IBM or your reseller will repair it or replace it with one that is at
least functionally equivalent, without charge. The replacement may not
be new, but will be in good working order. If IBM or your reseller is
unable to repair or replace the Machine, you may return it to your place
of purchase and your money will be refunded.
If you transfer a Machine to another user, warranty service is available
to that user for the remainder of the warranty period. You should give
your proof of purchase and this Statement to that user. However, for
Machines which have a life-time warranty, this warranty is not
transferable.
Warranty Service
To obtain warranty service for the Machine, you should contact your
reseller or call IBM. In the United States, call IBM at 1-800-772-2227.In
Canada, call IBM at 1-800-565-3344. You may be required to present
proof of purchase.
IBM or your reseller will provide certain types of repair and exchange
service, either at your location or at IBM's or your reseller's service
center, to restore a Machine to good working order.
When a type of service involves the exchange of a Machine or part, the
item IBM or your reseller replaces becomes its property and the
replacement becomes yours. You represent that all removed items are
genuine and unaltered. The replacement may not be new, but will be in
good working order and at least functionally equivalent to the item
replaced. The replacement assumes the warranty service status of the
International Business Machines
Corporation
Armonk, New York, 10504
Copyright IBM Corp. 1996
73
Page 84

replaced item. Before IBM or your reseller exchanges a Machine or part,
you agree to remove all features, parts, options, alterations, and
attachments not under warranty service. You also agree to ensure that
the Machine is free of any legal obligations or restrictions that prevent
its exchange.
You agree to:
1. obtain authorization from the owner to have IBM or your reseller
service a Machine that you do not own; and
2. where applicable, before service is provided —
a. follow the problem determination, problem analysis, and service
request procedures that IBM or your reseller provide,
b. secure all programs, data, and funds contained in a Machine,
and
c. inform IBM or your reseller of changes in a Machine's location.
IBM is responsible for loss of, or damage to, your Machine while it is 1)
in IBM's possession or 2) in transit in those cases where IBM is
responsible for the transportation charges.
Extent of Warranty
IBM does not warrant uninterrupted or error-free operation of a
Machine.
The warranties may be voided by misuse, accident, modification,
unsuitable physical or operating environment, improper maintenance by
you, removal or alteration of Machine or parts identification labels, or
failure caused by a product for which IBM is not responsible.
THESE WARRANTIES REPLACE ALL OTHER WARRANTIES
OR CONDITIONS, EXPRESS OR IMPLIED, INCLUDING, BUT
NOT LIMITED TO, THE IMPLIED WARRANTIES OR
CONDITIONS OF MERCHANTABILITY AND FITNESS FOR A
PARTICULAR PURPOSE. THESE WARRANTIES GIVE YOU
SPECIFIC LEGAL RIGHTS AND YOU MAY ALSO HAVE
OTHER RIGHTS WHICH VARY FROM JURISDICTION TO
JURISDICTION. SOME JURISDICTIONS DO NOT ALLOW
THE EXCLUSION OR LIMITATION OF EXPRESS OR IMPLIED
WARRANTIES, SO THE ABOVE EXCLUSION OR
LIMITATION MAY NOT APPLY TO YOU. IN THAT EVENT
SUCH WARRANTIES ARE LIMITED IN DURATION TO THE
WARRANTY PERIOD. NO WARRANTIES APPLY AFTER
THAT PERIOD.
Limitation of Liability
Circumstances may arise where, because of a default on IBM's part or
other liability you are entitled to recover damages from IBM. In each
such instance, regardless of the basis on which you are entitled to claim
damages from IBM (including fundamental breach, negligence,
misrepresentation, or other contract or tort claim), IBM is liable only for:
1. damages for bodily injury (including death) and damage to real
property and tangible personal property; and
2. the amount of any other actual direct damages or loss, up to the
greater of U.S. $100,000 or the charges (if recurring, 12 months'
charges apply) for the Machine that is the subject of the claim.
UNDER NO CIRCUMSTANCES IS IBM LIABLE FOR ANY OF
THE FOLLOWING: 1) THIRD-PARTY CLAIMS AGAINST
YOU FOR LOSSES OR DAMAGES (OTHER THAN THOSE
UNDER THE FIRST ITEM LISTED ABOVE); 2) LOSS OF, OR
DAMAGE TO, YOUR RECORDS OR DATA; OR 3) SPECIAL,
INCIDENTAL, OR INDIRECT DAMAGES OR FOR ANY
ECONOMIC CONSEQUENTIAL DAMAGES (INCLUDING
LOST PROFITS OR SAVINGS), EVEN IF IBM OR YOUR
RESELLER IS INFORMED OF THEIR POSSIBILITY. SOME
JURISDICTIONS DO NOT ALLOW THE EXCLUSION OR
LIMITATION OF INCIDENTAL OR CONSEQUENTIAL
DAMAGES, SO THE ABOVE EXCLUSION OR LIMITATION
MAY NOT APPLY TO YOU.
74 Using Your Personal Computer
Page 85

License Information
The license information in this booklet is for IBM and non-IBM logo
programs covered by the IBM International Program License
Agreement.
Some programs referred to in this booklet might not be available in all
languages or in all countries. Some programs might be different from
the retail versions and might be customized to work only with the
product with which they are shipped.
Program Name
System Programs
Additional Terms and Conditions
Authorization for Copy and Use on Home/Portable Computer: Not
applicable for these programs.
Transfer of Program: Programs are transferable with written consent
from the party (IBM or its reseller) from whom you acquired the
program.
Proof of Entitlement: The Proof of Purchase for the computer that
contains these programs should be retained in order to support
eligibility provided by IBM or its authorized reseller for warranty
services, future upgrade program prices (if announced), potential special
or promotional opportunities (if any), and as evidence of the end user's
authorized use of these IBM-licensed programs.
Technical support for programs provided with your system is available
on a limited basis. See the publications provided with your system for
details.
Program Services
Availability/Duration of Program Services: No program services are
available for these programs.
Statement of Service: No program services are available. These licensed
programs are provided "AS IS."
Warranty
System Programs – No.
PROGRAMS DESIGNATED AS "NO" ARE PROVIDED WITHOUT A
PROGRAM WARRANTY. THEY ARE PROVIDED "AS IS"
WITHOUT WARRANTY OF ANY KIND. IBM DISCLAIMS ALL
WARRANTIES FOR THESE PROGRAMS, EITHER EXPRESS OR
IMPLIED, INCLUDING BUT NOT LIMITED TO IMPLIED
WARRANTIES OF MERCHANTABILITY AND FITNESS FOR A
PARTICULAR PURPOSE.
U.S. Government Users Restricted
Rights
U.S. Government Users Restricted Rights—Use, duplication, or
disclosure restricted by the GSA ADP Schedule Contract with IBM
Corporation.
Other Documentation
Any other documentation with respect to its licensed program,
including any such documentation referenced herein, is provided for
information purposes only and does not extend or modify the material
contained in the License information.
Appendix B. Product Warranties, License Agreement, and Notices
75
Page 86

Other Additional Terms and Conditions
These additional terms and conditions apply to device drivers, utility
programs, and flash BIOS code (“System Programs”) shipped with an
IBM system (“System”) on diskette or CD-ROM, preinstalled on a
System, created on diskette from a CD-ROM, System, or Local Area
Network (LAN) using a diskette-creation program provided by IBM, or
placed on a LAN. A System includes IBM computers, features,
conversions, upgrades, and options, either separately or in any
combination.
If you are the rightful possessor of a System, or if you have obtained the
System Programs for the sole purpose of maintaining a System, IBM or
the applicable IBM country organization grants you a license to use the
System Programs as part of or in conjunction with a System, or to
restore and maintain the System Programs. You can make copies of the
System Programs and distribute them to the rightful possessor of a
System and install the System Programs for a rightful possessor (but
only to the extent necessary to restore or maintain the System), provided
that you supply such party a copy of this Agreement. Initial use of the
System Programs by such party shall indicate acceptance of this
agreement.
YOU MUST REPRODUCE THE COPYRIGHT NOTICE AND ANY
OTHER LEGEND OF OWNERSHIP ON EACH COPY, OR PARTIAL
COPY, OF A PROGRAM YOU CREATE ON DISKETTE OR OTHER
PORTABLE MEDIUM.
76 Using Your Personal Computer
Page 87

Notices
References in this publication to IBM products, programs, or services do
not imply that IBM intends to make these available in all countries in
which IBM operates. Any reference to an IBM product, program, or
service is not intended to state or imply that only that IBM product,
program, or service may be used. Subject to IBM’s valid intellectual
property or other legally protectable rights, any functionally equivalent
product, program, or service may be used instead of the IBM product,
program, or service. The evaluation and verification of operation in
conjunction with other products, except those expressly designated by
IBM, are the responsibility of the user.
IBM may have patents or pending patent applications covering subject
matter in this document. The furnishing of this document does not give
you any license to these patents. You can send license inquiries, in
writing, to:
IBM Director of Licensing
IBM Corporation
500 Columbus Avenue
Thornwood, NY 10594
U.S.A.
Trademarks
The following terms are trademarks of the IBM Corporation in the
United States or other countries or both:
The following terms are trademarks of other companies:
Microsoft, Windows, Windows NT, MS-DOS, and the Windows 95 logo
are trademarks or registered trademarks of Microsoft Corporation.
UNIX is a registered trademark in the United States and other countries
licensed exclusively through X/Open Company Limited.
Other company, product, and service names, which may be denoted by
a double asterisk (
**
), may be trademarks or service marks of others.
America
Online
America Online, Inc.
CompuServe CompuServe Incorporated
CoSession Triton Technology Inc.
DEC
Pathworks
Digital Equipment Corporation
Intel Intel Corporation
NetWare Novell, Inc.
Novell Novell, Inc.
OverDrive Intel Corporation
PCMCIA Personal Computer Memory Card
International Association
Pentium Intel Corporation
PRODIGY Prodigy Services Company
QAPlus/PRO DiagSoft, Inc.
QAPlus/WIN DiagSoft, Inc.
S3 S3 Incorporated
Solaris Sun Microsystems, Inc.
UnixWare Novell, Inc.
VESA Video Electronics Standards Association
HelpWare OS/2
PowerPC ValuePoint
PS/2 ThinkPad
Appendix B. Product Warranties, License Agreement, and Notices 77
Page 88

Electronic Emission Notices
Federal Communications Commission
(FCC) Statement
Note: This equipment has been tested and found to
comply with the limits for a Class B digital device,
pursuant to Part 15 of the FCC Rules. These limits are
designed to provide reasonable protection against
harmful interference in a residential installation. This
equipment generates, uses, and can radiate radio
frequency energy and, if not installed and used in
accordance with the instructions, may cause harmful
interference to radio communications. However, there is
no guarantee that interference will not occur in a
particular installation. If this equipment does cause
harmful interference to radio or television reception,
which can be determined by turning the equipment off
and on, the user is encouraged to try to correct the
interference by one or more of the following measures:
Reorient or relocate the receiving antenna.
Increase the separation between the equipment and
receiver.
Connect the equipment into an outlet on a circuit
different from that to which the receiver is connected.
Consult an IBM authorized dealer or service
representative for help.
Properly shielded and grounded cables and connectors
must be used in order to meet FCC emission limits.
Proper cables and connectors are available from IBM
authorized dealers. IBM is not responsible for any radio
or television interference caused by using other than
recommended cables and connectors or by unauthorized
changes or modifications to this equipment.
Unauthorized changes or modifications could void the
user's authority to operate the equipment.
This device complies with Part 15 of the FCC Rules.
Operation is subject to the following two conditions: (1)
this device may not cause harmful interference, and (2)
this device must accept any interference received,
including interference that may cause undesired
operation.
Industry Canada Class B Emission Compliance
Statement
This Class B digital apparatus meets the requirements of
the Canadian Interference-Causing Equipment
Regulations.
Avis de conformité à la réglementation d'Industrie
Canada
Cet appareil numérique de la classe B respecte toutes les
exigences du Règlement sur le matériel brouilleur du
Canada.
78 Using Your Personal Computer
Page 89

Telecommunication Notices
Federal Communications Commission (FCC) and Telephone Company
Requirements
1. This adapter complies with Part 68 of the FCC rules. A label is
affixed to the adapter that contains, among other things, the FCC
registration number, USOC, and Ringer Equivalency Number (REN)
for this equipment. If these numbers are requested, provide this
information to your telephone company.
A second FCC registration label is also provided. You may attach
the label to the exterior of the computer in which you install the
IBM modem, or you may attach the label to the external DAA, if
you have one. Place the label in a location that is easily accessible,
should you need to provide the label information to the telephone
company.
2. The REN is useful to determine the quantity of devices you may
connect to your telephone line and still have those devices ring
when your number is called. In most, but not all areas, the sum of
the RENs of all devices should not exceed five (5). To be certain of
the number of devices you may connect to your line, as determined
by the REN, you should call your local telephone company to
determine the maximum REN for your calling area.
3. If the adapter causes harm to the telephone network, the telephone
company may discontinue your service temporarily. If possible,
they will notify you in advance; if advance notice is not practical,
you will be notified as soon as possible. You will be advised of
your right to file a complaint with the FCC.
4. Your telephone company may make changes in its facilities,
equipment, operations, or procedures that could affect the proper
operation of your equipment. If they do, you will be given advance
notice to give you an opportunity to maintain uninterrupted service.
5. If you experience trouble with this product, contact your authorized
reseller, or call IBM. In the United States, call IBM at
1-800-772-2227. In Canada, call IBM at 1-800-565-3344. You may be
required to present proof of purchase.
The telephone company may ask you to disconnect the adapter from
the network until the problem has been corrected, or until you are
sure the adapter is not malfunctioning.
6. No customer repairs are possible to the adapter. If you experience
trouble with the adapter, contact your Authorized Reseller or see
the Diagnostics section of this manual for information.
7. This adapter may not be used on coin service provided by the
telephone company. Connection to party lines is subject to state
tariffs. Contact your state public utility commission or corporation
commission for information.
8. When ordering network interface (NI) service from the local
Exchange Carrier, specify service arrangement USOC RJ11C.
Appendix B. Product Warranties, License Agreement, and Notices
79
Page 90

Canadian Department of Communications Certification Label
NOTICE: The Canadian Department of Communications label
identifies certified equipment. This certification means that the
equipment meets certain telecommunications network protective,
operational, and safety requirements. The Department does not
guarantee the equipment will operate to the user’s satisfaction.
Before installing this equipment, users should ensure that it is
permissible to be connected to the facilities of the local
telecommunications company. The equipment must also be installed
using an acceptable method of connection. In some cases, the
company's inside wiring associated with a single line individual service
may be extended by means of a certified connector assemply (telephone
extension cord). The customer should be aware that compliance with
the above conditions may not prevent degradation of service in some
situations.
Repairs to certified equipment should be made by an authorized
Canadian maintenance facility designated by the supplier. Any repairs
or alterations made by the user to this equipment, or equipment
malfunctions, may give the telecommunications company cause to
request the user to disconnect the equipment.
Users should ensure for their own protection that the electrical ground
connections of the power utility, telephone lines, and internal metallic
water pipe system, if present, are connected together. This precaution
may be particularly important in rural areas.
Caution: Users should not attempt to make such connections
themselves, but should contact the appropriate electric inspection
authority, or electrician, as appropriate.
NOTICE: The LOAD NUMBER (LN) assigned to each terminal device
denotes the percentage of the total load to be connected to a telephone
loop which is used by the device, to prevent overloading. The
termination on a loop may consist of any combination of devices subject
only to the requirement that the sum of the LOAD NUMBERS of all the
devices does not exceed 100.
Étiquette d'homologation du ministère des Communications du
Canada
AVIS : L'étiquette du ministère des Communications du Canada
identifie le matériel homologué. Cette étiquette certifie que le matériel
est conforme à certaines normes de protection, d'exploitation et de
sécurité des réseaux de télécommunications. Le ministère n'assure
toutefois pas que le matériel fonctionnera à la satisfaction de
l'utilisateur.
Avant d'installer ce matériel, l'utilisateur doit s'assurer qu'il est permis
de le raccorder aux installations de l'entreprise locale de
télécommunications. Le matériel doit également être installé en suivant
une méthode acceptée de raccordement. L'abonné ne doit pas oublier
qu'il est possible que la conformité aux conditions énoncées ci-dessus
n'empêchent pas la dégradation du service dans certaines situations.
Les réparations de matériel homologué doivent être effectuées par un
centre d'entretien canadien autorisé désigné par le fournisseur. La
compagnie de télécommunications peut demander à l'utilisateur de
débrancher un appareil à la suite de réparations ou de modifications
effectuées par l'utilisateur ou à cause d'un mauvais fonctionnement.
Pour sa propre protection, l'utilisateur doit s'assurer que tous les fils de
mise à la terre de la source d'énergie électrique, des lignes téléphoniques
et des canalisations d'eau métalliques, s'il y en a, sont raccordés
ensemble. Cette précaution est particulièrement importante dans les
régions rurales.
Avertissement : l'utilisateur ne doit pas tenter de faire ces
raccordements lui-même, il doit avoir recours à un service d'inspection
des installations électriques ou à un électricien, selon le cas.
AVIS : L'INDICE DE CHARGE (IC) assigné à chaque dispositif
terminal indique, pour éviter toute surcharge, le pourcentage de la
charge totale qui peut être raccordé à un circuit téléphonique bouclé
utilisé par ce dispositif. L'extrémité du circuit bouclé peut consister en
n'importe quelle combinaison de dispositifs pourvu que la somme des
INDICES DE CHARGE de l'ensemble des dispositifs ne dépasse pas 100.
80 Using Your Personal Computer
Page 91

Power Cord Notice
For your safety, IBM provides a power cord with a
grounded attachment plug to use with this IBM product.
To avoid electrical shock, always use the power cord and
plug with a properly grounded outlet.
IBM power cords used in the United States and Canada
are listed by Underwriter's Laboratories (UL) and certified
by the Canadian Standards Association (CSA).
For units intended to be operated at 115 volts: Use a
UL-listed and CSA-certified cord set consisting of a
minimum 18 AWG, Type SVT or SJT, three-conductor
cord, a maximum of 15 feet in length and a parallel blade,
grounding-type attachment plug rated 15 amperes, 125
volts.
For units intended to be operated at 230 volts (U.S. use):
Use a UL-listed and CSA-certified cord set consisting of a
minimum 18 AWG, Type SVT or SJT, three-conductor
cord, a maximum of 15 feet in length and a tandem
blade, grounding-type attachment plug rated 15 amperes,
250 volts.
For units intended to be operated at 230 volts (outside the
U.S.): Use a cord set with a grounding-type attachment
plug. The cord set should have the appropriate safety
approvals for the country in which the equipment will be
installed.
IBM power cords for a specific country are usually
available only in that country:
IBM Power
Cord
Part Number
Used in These Countries
13F9940 Argentina, Australia, China (PRC), New
Zealand, Papua New Guinea, Paraguay,
Uruguay, Western Samoa
13F9979 Afghanistan, Algeria, Andorra, Angola,
Austria, Belgium, Benin, Bulgaria, Burkina
Faso, Burundi, Cameroon, Central African
Rep., Chad, Czech Republic, Egypt,
Finland, France, French Guiana, Germany,
Greece, Guinea, Hungary, Iceland,
Indonesia, Iran, Ivory Coast, Jordan,
Lebanon, Luxembourg, Macau, Malagasy,
Mali, Martinique, Mauritania, Mauritius,
Monaco, Morocco, Mozambique,
Netherlands, New Caledonia, Niger,
Norway, Poland, Portugal, Romania,
Senegal, Slovakia, Spain, Sudan, Sweden,
Syria, Togo, Tunisia, Turkey, former USSR,
Vietnam, former Yugoslavia, Zaire,
Zimbabwe
13F9997 Denmark
14F0015 Bangladesh, Burma, Pakistan, South Africa,
Sri Lanka
Appendix B. Product Warranties, License Agreement, and Notices 81
Page 92

IBM Power
Cord
Part Number
Used in These Countries
14F0033 Antigua, Bahrain, Brunei, Channel Islands,
Cyprus, Dubai, Fiji, Ghana, Hong Kong,
India, Iraq, Ireland, Kenya, Kuwait,
Malawi, Malaysia, Malta, Nepal, Nigeria,
Polynesia, Qatar, Sierra Leone, Singapore,
Tanzania, Uganda, United Kingdom,
Yemen, Zambia
14F0051 Liechtenstein, Switzerland
14F0069 Chile, Ethiopia, Italy, Libya, Somalia
14F0087 Israel
1838574 Thailand
62X1045 Bahamas, Barbados, Bermuda, Bolivia,
Brazil, Canada, Cayman Islands, Colombia,
Costa Rica, Dominican Republic, Ecuador,
El Salvador, Guatemala, Guyana, Haiti,
Honduras, Jamaica, Japan, Korea (South),
Liberia, Mexico, Netherlands Antilles,
Nicaragua, Panama, Peru, Philippines,
Saudi Arabia, Suriname, Taiwan, Trinidad
(West Indies), United States of America,
Venezuela
82 Using Your Personal Computer
Page 93

Index
Numerics
1-800 telephone assistance 65
900 number support 66
A
adapter
conflicts 50, 51, 52
problems with 47
adapters, adding 1
adjusting chair 9
administrator password
changing 20
deleting 21
format of 21
setting 20
using 20
administrator password, access controlled by 20
advanced power management
in system software 3
setting 22
using 21
air circulation 9, 10
air vents 10
America Online 64
antiglare filter 10
arranging workspace 9
assistance 63
audio
features 7
B
backing up hard disk drive 41
basic input/output system, updating 27
battery
dead 47
notice vi
replacing 40, 47
safety 47
bays, drive 4, 7
beeps 13, 44
BIOS, updating 27
boot sequence error 52
bulletin boards 63
C
cable lengths 10
cache memory 7, 49
care and cleaning of computer 39
CD-ROM drives
adding 4
using 36
CDs, handling 36
chair adjustments 9
circulation, air 10
cleaning
compact discs 36
computer 39
keyboard 39
monitor 10
monitor screen 39
mouse 40
Copyright IBM Corp. 1996 83
Page 94

clicking with a mouse 14
comfort 9
compact discs, handling 36
CompuServe 64
computer records 69
configuration
See also Configuration/Setup Utility
change 48
video error 53
with Plug and Play 2
Configuration/Setup Utility
at start-up 13
date and time setting 47, 48
time and date setting 47, 48
using 15—25
controls 11, 12
copying diskettes 35
cords, power 10
corrective service diskette (CSD) 68
CoSession for Windows 45
cover, locking 37
CSD 68
D
damage, preventing 39, 41
data collaboration
See audio
date, setting 17, 47, 48
DDC (display data channel) 24
device drivers, video 25
device records 71
diagnostic error messages 46
diagnostic programs 3, 44
diagnostic tools 43
DIMMs 7
diskette drives
adding 4
eject button 12
indicator light 12, 55
problems with 49, 50, 55
record of 72
support for 7
types 28, 35
diskettes
capacities 28, 29, 35
copying 35
ejecting 12, 33
formatting 35
handling 31
inserting 33
labeling 32
problems with 50
removing 12, 33
storing 31
using 28—35
write-protecting 34
display
See monitor
display data channel (DDC) 24
Display Power Management Signaling (DPMS) 22
door, locking 37
double-clicking with a mouse 14
DPMS (Display Power Management Signaling) 22
84 Using Your Personal Computer
Page 95

drag and drop 14
dragging with a mouse 14
drive bays 4, 7
drivers, video 25
dropping with a mouse 14
dual in-line memory modules (DIMMs) 7
dual mode 18
E
ease-of-use features 2
ECP/EPP, support for 2, 7
electrical outlets 10
electronic emission notices 78
electronic support 63
enhanced parallel port, support for 2, 7
error messages 45
Ethernet 4
expansion slots
available 4, 7
installing PCI adapters in 1
extended capabilities port, support for 2, 7
extension cords 10
F
fatigue 9
fax, getting information by 64
features, record of 71
fee services 66
fixed disk drives
See hard disk drives
flash memory 7, 27
flicker 56
flicker, reducing 24
floppy disks
See diskettes
floppy drives
See diskette drives
formatting diskettes 35
G
glare, reducing 9
H
hard disk drives
adding 4
backing up 41
indicator light 11
problems with 50, 53
record of 72
support for 2, 7
with power management 22
help 63
HelpWare 65
home page, IBM Personal Computer 64
I
identification numbers for hardware 69
infrared connector 2, 7
interlaced refresh rate 24
intermittent problems 57
Index 85
Page 96

international warranty service 65
K
key serial numbers 69
keyboard
angle of 9
arm and wrist position 9
cleaning 39
locked by password 18
locking 38
problems with 49, 57
speed, changing 23
support for 7
keys 37, 69
L
LAN wake-up 4, 7, 23
laser compliance statement vii
license agreement 73, 75
license, system programs 75
lighting 9
lights, indicator 11, 12, 55, 57
locks 12, 37, 57
M
memory
addresses used by Plug and Play 59
cache 7, 49
configuration change 48
counting 13, 44, 58
DIMMs 7
memory (continued)
failure during testing 49
flash 7
modules, adding 26
not enough 58
parity failure 47
resource, unavailable 51, 52
ROM error 52
SIMMs 7
supported 7
used by TSR programs 62
video 7
microprocessor
Pentium 1, 7
problems with 47
speed 7
upgrading 1, 7
with advanced power management 22
modem 23
monitor
adjusting for comfort 3
adjusting of 9
cleaning 39
dusting of 10
flicker 24
placement of 9
power-management states 22
problems with 56
refresh rate 24
resolution 24
settings 24
standby 22
support for 7
86 Using Your Personal Computer
Page 97

monitor (continued)
suspend 22
with advanced power management 22
mouse
cleaning 40
clicking 14
double-clicking 14
dragging 14
dropping 14
locked by password 18
pointing 14
problems with 58
PS/2 13, 18
serial 13, 18
support for 7
using 13
with unattended start mode 19
moving the computer 41
N
network and server startup support 65
network and server support services, fee 66
networking 4, 23
noninterlaced refresh rate 24
notices 73
O
office space, arranging 9
Online Housecall 64
online information services 63
operating system
not found 53
support for 3, 7
operating system updates 68
option does not work 59
option files, installing 62
options, installed 71
ordering support line services 67
orderly shutdown 14
OverDrive socket, Pentium 7
P
parallel port
available 7
ECP/EPP 2
number of 60
passwords
administrator 7, 20
dual mode 18
power-on 7, 13, 17
prompt 18
setting and changing 17—21
support for 7
Unattended Start mode 18
PC Cards 4
PC support services, fee 66
PCI
adding adapters 1
bus 1
conflicts with ISA legacy 50, 51, 52
I/O resource problem 51
memory problems 51, 52
Index 87
Page 98

PCI (continued)
read-only memory error 52
riser card 1, 7
PCMCIA
connector, locking 37
support for 4
Pentium OverDrive socket 7
peripheral component interconnect
See PCI
Personal Computer Memory Card International Association
See PCMCIA
planning workspace 9
Plug and Play 2, 7, 59
pointing with a mouse 14
POST
at start-up 13
beep codes 44
error messages 45—53
problem detection by 43
updating 27
power
cord lengths 10
cords 10
indicator light 11
management 22
specifications 7
switch 11
power cord notice 81
power management
See advanced power management
power-on password
changing 19
deleting 20
power-on password (continued)
format of 19
setting 19
unknown 20
using 18
using at start-up 13
power-on self-test
See POST
printer does not work 60
printers
printers, support for 2
privileged-access password
See administrator password
problems, solving
adapter 47
adapter conflicts 50, 51, 52
battery, dead 47
boot sequence error 52
cache memory 49
clock 48
configuration change 48
CoSession for Windows 45
date and time 48
diagnostic tools, using 43
diagnostics, using 3
diskette drive 49, 50, 55
error messages 45
hard disk drive 50, 53
I/O resources 51
indicator lights 57
intermittent 57
keyboard 49, 57
locks 57
88 Using Your Personal Computer
Page 99

problems, solving (continued)
memory 47, 48, 49, 51, 52, 58
microprocessor 47
monitor 56
mouse 58
operating system not found 53
option does not work 59
parallel ports, number of 60
PCI adapter 52
POST error codes 46
POST, using 43
printer does not work 60
QAPlus/PRO 44
QAPlus/WIN-WIN 44
serial ports, number of 60
software 61
startup 13
startup sequence error 52
system board 47
time and date 48
video configuration 53
processor
See microprocessor
PRODIGY 64
publications, ordering 68
Q
QAPlus/PRO 44
QAPlus/WIN-WIN 44
R
recording identification numbers 69
records, device and feature 71
refresh rate 24
remote technical support 64
resolution 24
riser card 1, 7
S
S3 Trio64V+ 25
safety, electrical v
screen filter 10
screen problems 56
security
administrator password 20
features 3, 7
keys 37
locks 12, 37
power-on password 17
write-protecting diskettes 34
serial numbers 69, 70
serial ports
available 7
infrared connector 2
number of 60
universal serial bus connectors 2
server startup support 65
server support 65
service and support 3
ServicePak 68
services, fee 66
Index 89
Page 100

Setup Utility
See Configuration/Setup Utility
shutting down the computer 14
SIMMs 7
single in-line memory modules (SIMMs) 7
software error messages 46, 61
solving problems 63
standby mode for monitor 22
starting the computer 13
startup sequence error 52
status indicators 11, 12, 55, 57
summary, system 16
support 3
support line services, ordering 67
surge protectors 10
suspend mode for monitor 22
system management
LAN wake-up 4, 7, 23
setting 23
wake up on alarm 23
wake up on LAN 4, 7, 23
wake up on ring 7, 23
system programs, updating 27
system summary 16
T
technical support, fee 66
technical support, remote 64
technical support, warranty 65
telecommunication notices 79
telephone assistance 65
terminate-and-stay-resident (TSR) programs 62
time, setting 17, 47, 48
token ring 4
trademarks 77
troubleshooting
See problems, solving
TSR programs 62
turning off the computer 14
turning on the computer 13
typematic rate 23
U
Unattended Start mode 18
universal serial bus connectors 2, 7
updates, operating system 68
V
venting of hot air 10
video
configuration error 53
device drivers, installing 25
port 7
S3 Trio64V+ 25
W
wake up on alarm 7, 23
wake up on LAN 4, 7, 23
wake up on ring 7, 23
warranty 73
warranty extensions and upgrades 67
90 Using Your Personal Computer
 Loading...