

Page 1

S84H-3049-00
IBM PC Servers
PC Server 325 - Type 8639
Hardware Maintenance
Manual Supplement
November 1996
Use this supplement with
the PC Servers
Hardware Maintenance Manual
IBM
Page 2

Note
Before using this information and the product it
supports, be sure to read the general information
under “Notices” on page 139.
First (November 1996)
The following paragraph does not apply to the United
Kingdom or any country where such provisions are
inconsistent with local law: INTERNATIONAL
BUSINESS MACHINES CORPORATION PROVIDES THIS
PUBLICATION “AS IS” WITHOUT WARRANTY OF ANY
KIND, EITHER EXPRESS OR IMPLIED, INCLUDING, BUT
NOT LIMITED TO, THE IMPLIED WARRANTIES OF
MERCHANTABILITY OR FITNESS FOR A PARTICULAR
PURPOSE. Some states do not allow disclaimer of
express or implied warranties in certain transactions,
therefore, this statement may not apply to you.
This publication could include technical inaccuracies or
typographical errors. Changes are periodically made to
the information herein; these changes will be incorporated
in new editions of the publication. IBM may make
improvements and/or changes in the product(s) and/or the
program(s) described in this publication at any time.
It is possible that this publication may contain reference to,
or information about, IBM products (machines and
programs), programming, or services that are not
announced in your country. Such references or
information must not be construed to mean that IBM
intends to announce such IBM products, programming, or
services in your country.
Requests for technical information about IBM products
should be made to your IBM reseller or IBM marketing
representative.
Copyright International Business Machines
Corporation 1996. All rights reserved.
Note to U.S. Government users–Documentation related to
Restricted rights–Use, duplication, or disclosure is subject
to restrictions set forth in GSA ADP Schedule Contract
with IBM Corp.
ii PC Server HMM
Page 3

About This Supplement
This supplement contains diagnostic information,
Symptom-to-FRU Index, service information, error codes,
error messages, and configuration information for the PC
Server 325 Type 8639.
This supplement should be used with the advanced
diagnostic tests and the information in the IBM
Personal
System/2 Hardware Maintenance Manual
(part number
83G8990, form number S52G-9971) and
IBM PC Servers
Hardware Maintenance Manual
(part number 70H0751,
form number S30H-2501 to troubleshoot problems
effectively.
Important
This manual is intended for trained servicers who are
familiar with IBM PC Server products.
Before servicing an IBM product, be sure to review
“Safety Information” on page 126.
iii
Page 4

Related Publications
The following publications are available for IBM products.
For more information, contact IBM or an IBM Authorized
Dealer.
For Information About See Publication
PC Servers IBM PC Servers Hardware
Maintenance Manual
(S30H-2501)
PS/2 Computers IBM Personal System/2
Hardware Maintenance
Manual (S52G-9971)
PS/ValuePoint Computers IBM PS/ValuePoint
Hardware Maintenance
Service and Reference
(S61G-1423)
Laptop, Notebook, Portable,
and ThinkPad Computers
(L40, CL57, N45, N51,
P70/P75, ThinkPad 300,
350, 500, 510, 710T,
Expansion Unit, Dock I,
Dock II)
IBM Mobile Systems
Hardware Maintenance
Manual Volume 1
(S82G-1501)
ThinkPad Computers
(ThinkPad 340, 355, 360,
370, 700, 701, 720, 750,
755)
IBM Mobile Systems
Hardware Maintenance
Manual Volume 2
(S82G-1502)
ThinkPad Computers
(ThinkPad 365, 560, 760,
SelectaDock)
IBM Mobile Systems
Hardware Maintenance
Manual Volume 3
(S82G-1503)
Monitors (Displays)
(February 1993)
IBM PS/2 Display HMM
Volume 1 (SA38-0053)
Monitors
(December 1993)
IBM Color Monitor HMM
Volume 2 (S71G-4197)
IBM Monitors (P/G Series)
(July 1996)
IBM Monitor HMM
Volume 3 (S52H-3679)
IBM 2248 Monitor
(February 1996)
IBM Monitor HMM
Volume 4 (S52H-3739)
Disk Array technology
overview and using the IBM
RAID Configuration Program
Configuring Your Disk Array
booklet (S82G-1506)
Installation Planning for
Personal System/2
computers
Personal System/2
Installation Planning and
Beyond (G41G-2927)
Installation Planning for
Advanced Personal
System/2 Servers
Advanced PS/2 Servers
Planning and Selection
Guide (GG24-3927)
iv PC Server HMM
Page 5

Contents
About This Supplement .............. iii
Related Publications . . . . . . . . . . . . . . . iv
General Checkout/Diagnostics QAPlus/PRO ... 1
General Checkout . . . . . . . . . . . . . . . . . 2
Diagnostics . . . . . . . . . . . . . . . . . . . . 3
PC Server 325 - Type 8639 ............ 13
Features . . . . . . . . . . . . . . . . . . . . . 16
Additional Service Information ........... 18
Locations . . . . . . . . . . . . . . . . . . . . . 88
Symptom-to-FRU Index . . . . . . . . . . . . . 107
Parts Listings . . . . . . . . . . . . . . . . . . 115
Parts Listing (PC Server Advanced Systems
Management Adapter) . . . . . . . . . . . . . 123
Related Service Information .......... 125
Safety Information . . . . . . . . . . . . . . . 126
Battery Notice . . . . . . . . . . . . . . . . . 131
Laser Compliance Statement .......... 132
Software/Hardware Mismatch Problems ..... 133
Undetermined Problems . . . . . . . . . . . . . 135
Problem Determination Tips ........... 136
Phone Numbers, U.S. and Canada ........ 137
Notices . . . . . . . . . . . . . . . . . . . . . 139
Copyright IBM Corp. 1996 v
Page 6

General Checkout/Diagnostics
QAPlus/PRO
General Checkout . . . . . . . . . . . . . . . . . 2
Diagnostics . . . . . . . . . . . . . . . . . . . . 3
Power-On Self-Test (POST) .......... 3
POST Beep Codes .............. 3
Test Programs . . . . . . . . . . . . . . . . . 3
Error Messages . . . . . . . . . . . . . . . . 4
Return Codes . . . . . . . . . . . . . . . . . 5
Using the Test Programs ............ 6
Program Navigation . . . . . . . . . . . . . 6
Intruder Alert . . . . . . . . . . . . . . . . 6
Using the First Letter of a Menu Choice . . 6
Using the Function Keys ......... 6
Command Line Options ......... 7
Viewing the Test Groups .......... 8
Scripting . . . . . . . . . . . . . . . . . . 8
Changing Logical Unit Numbers ....... 8
Test Group Specifications .......... 9
Starting the QAPlus/PRO Diagnostics Diskette 9
Module Testing Mode .......... 9
Running Selected Module Tests ..... 10
Running All Selected Modules ...... 10
Changing Selected Tests in Test Groups . 10
Running an Individual Test ........ 10
Stopping the Tests ............. 11
QAPlus/PRO Diagnostics Control Keys . . . 11
The following Maintenance Analysis Procedure (MAP) and
diagnostic information should be used to isolate problems
on servers that are supported by the QAPlus/PRO
Diagnostics test.
Copyright IBM Corp. 1996 1
Page 7

General Checkout
This general checkout procedure is for computers that are
supported by the QAPlus/PRO Diagnostics test.
Diagnostic error messages appear when a test program
finds a problem with a hardware option. For the test
programs to properly determine if a test
Passed, Failed
, or
Aborted
, the test programs check the error-return code at
test completion. (See “Return Codes” on page 5.)
General error messages appear if a problem or conflict is
found by an application program, the operating system, or
both. For an explanation of these messages, refer to the
information supplied with that software package.
Notes
1. If multiple error codes are displayed, diagnose
the first error code displayed.
2. If the computer reports a POST error, go to the
“Symptom-to-FRU Index” on page 107.
3. If the computer hangs and no error is displayed,
go to “Undetermined Problems” on page 135.
4. If a device cannot be selected from the Module
Test menu, that device might be defective.
001
– Power-off the computer and all external devices.
– Check all cables and power cords.
– Set all display controls to the middle position.
– Insert the QAPlus/PRO Diagnostics diskette into drive A.
– Power-on all external devices.
– Power-on the computer.
– Check for the following responses.
1. One beep.
2. Readable instructions or the Main Menu.
DID YOU RECEIVE THE CORRECT RESPONSES?
Yes No
002
Find the failure symptom in the “Symptom-to-FRU
Index” on page 107.
003
Run the Advanced Diagnostics Test. If necessary, refer to
“Diagnostics” on page 3.
If you receive an error, go to the“Symptom-to-FRU Index”
on page 107 .
2 PC Server HMM
Page 8

Diagnostics
The following tools are available to help identify and
resolve hardware-related problems:
Power-on self-test (POST)
POST Beep Codes
Test programs
Error messages
Diagnostics Diskette
Power-On Self-Test (POST)
Each time you power-on the system, it performs a series of
tests that check the operation of the system and some
options. This series of tests is called the
power-on
self-test
, or
POST
. POST does the following:
Checks some basic system-board operations
Checks the memory operation
Starts the video operation
Verifies that the diskette drives are working
Verifies that the hard disk drive is working
If the POST finishes without detecting any problems, a
single beep sounds and the first screen of the operating
system or application program appears.
If the POST detects a problem, an error message appears
on the screen. A single problem can cause several error
messages to appear. When you correct the cause of the
first error message, the other error messages probably will
not appear on the screen the next time you power-on the
system.
POST Beep Codes
The Power On Self-Test generates a beeping sound to
indicate successful completion of POST or to indicate that
the tests detect an error.
One beep and the appearance of text on the display
indicates successful completion of the POST. More than
one beep indicates that the POST detects an error.
Test Programs
The QAPlus/PRO test programs on the PC Server System
Board Diagnostic Diskette, developed by DiagSoft for
IBM, are the primary method of testing the PC Server. You
can use them to test the IBM components of the system
and some external devices. The amount of time required
to test all components depends on the number of
components. The more optional adapters and devices you
have attached to the system, the longer the testing takes.
Diagnostic programs from the QAPlus/PRO Main Menu
include the following features.
General Checkout/Diagnostics QAPlus/PRO
3
Page 9

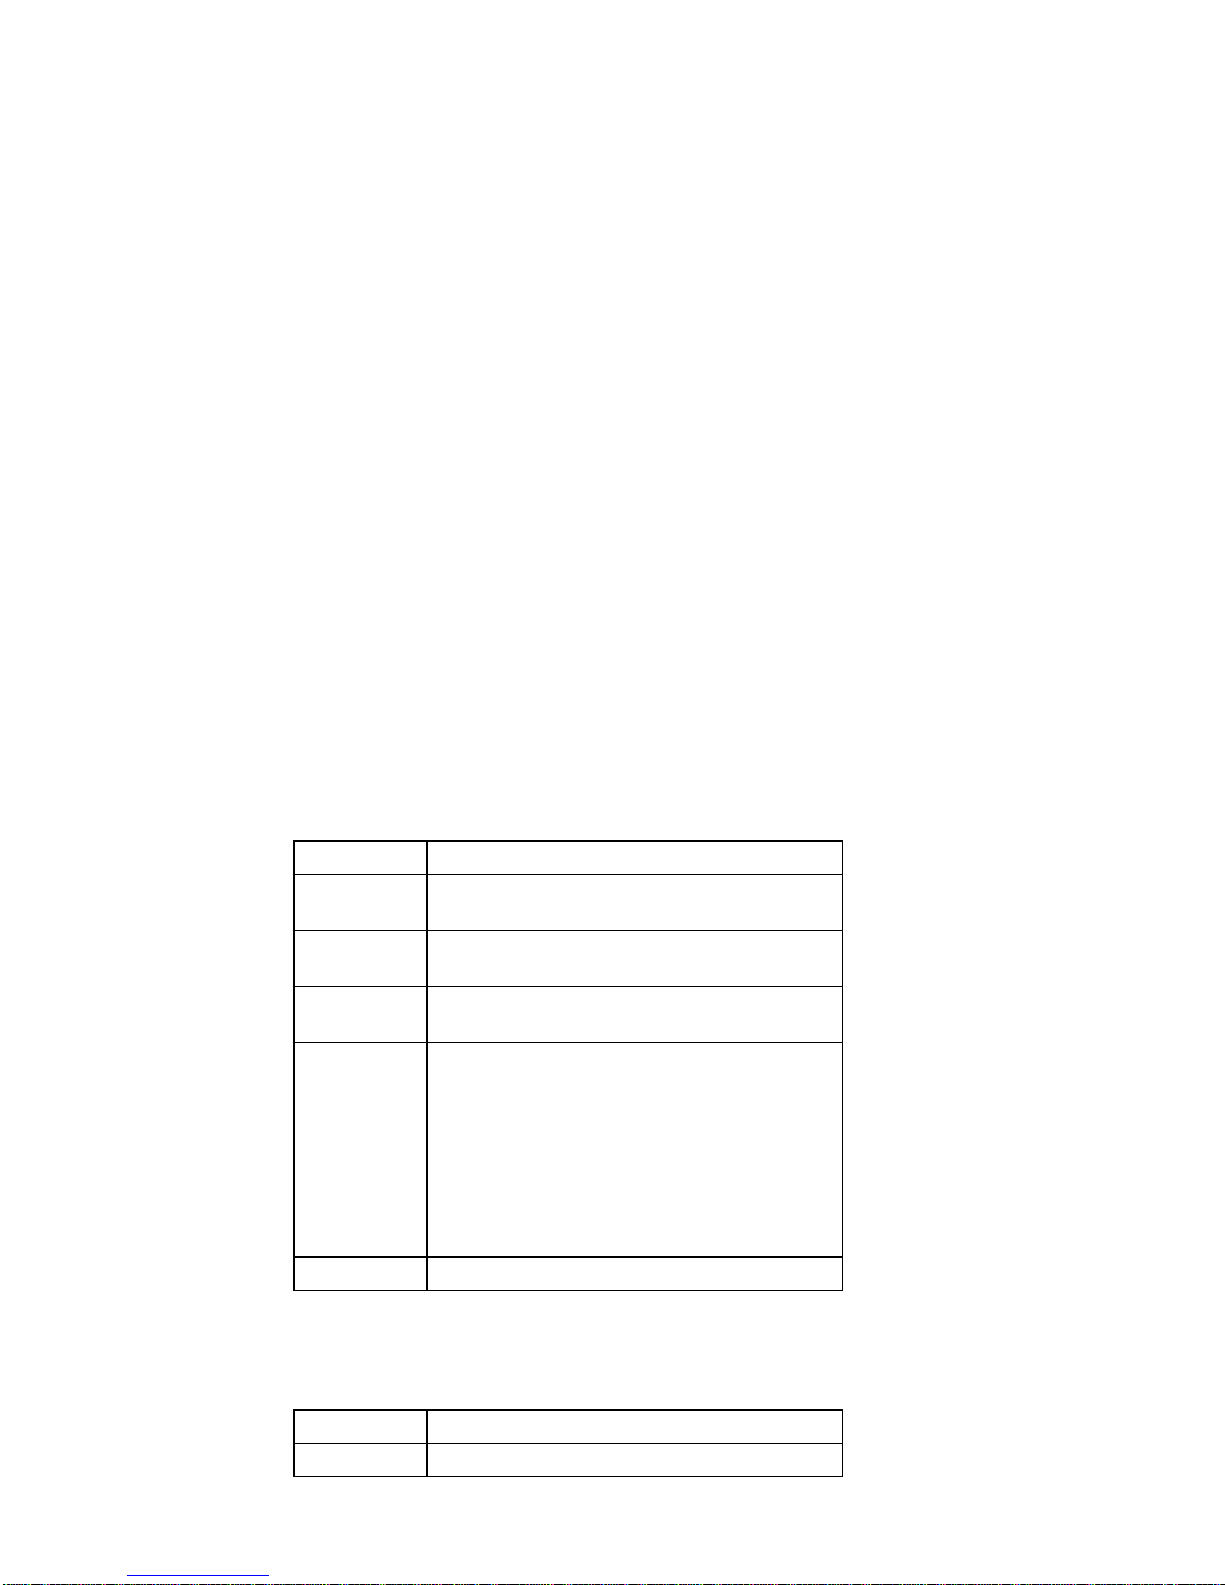
Feature Description
Quick
Check
Identifies most problems associated with the
following major components:
System board
Hard disk drives
Diskette drives
CD-ROM drives
RAM
Serial and parallel ports
Video adapter
Printer
Keyboard
Mouse
Module
Test
Allows you to:
Run groups of tests in batch
Specify parameters to use for each test
(for example, video modes, disk
cylinders, port addresses, and so on)
Specify the number of passes you want
to run (one to continuous)
Log the test results to a text or dBase
Format (DBF) file
Save all test settings for future use
View System Information
View the server's configuration
information. (For example, you can view
the IRQ/DMA assignments, memory
usage, device drivers, and so on.)
Select System Utilities
Format a diskette
Error Messages
Messages generated by the software—the operating
system or application programs—generally are text
messages, but they also can be numeric. Basically, there
are five types of error messages.
POST error messages
Diagnostic error messages
POST beep codes
Software generated messages.
Multiple messages
Error
Message
Description
POST
Error
Messages
Displayed when POST finds problems with
the hardware or detects a change in the
hardware configuration.
POST
Beep
Codes
Sounds emitted from the speaker if POST
finds a problem. One beep indicates POST
completed successfully. Multiple beeps
indicate a problem was found by the POST.
Diagnostic
Error
Messages
Displayed when a test program finds a
problem with a hardware option.
4 PC Server HMM
Page 10

Error
Message
Description
Software
Generated
Error
Messages
Displayed if a problem or conflict is found by
an application program, the operating system,
or both. For an explanation of these
messages, refer to the information supplied
with that software package.
Multiple
Messages
The first error that occurs can cause
additional errors. Follow the suggested
action of the first error displayed. In this
case, the system displays more than one
error message. Always follow the suggested
action instructions for the
first
error message
displayed.
Return Codes
For the test programs to properly determine if a test
Passed, Failed
, or
Aborted
, the test programs check the
error-return code at test completion. To register the test
properly in the test log, the test programs must generate
one of the following return codes:
Return
Code
Description
0 Indicates that the device passed its test.
1 Indicated that the device failed its test.
2 or
greater
Indicates that the test stopped or was
aborted.
General Checkout/Diagnostics QAPlus/PRO 5
Page 11
Using the Test Programs
The test programs provide advanced functions and utilities
for service or support professionals to troubleshoot even
the most difficult problems.
Program Navigation:
You can maneuver within the test programs by typing the
first letter of a menu choice, using the function keys, or
using command-line options.
Intruder Alert:
When you load QAPlus/PRO diagnostics, Intruder Alert
checks for damage to the Diagnostic Diskette. If a virus or
program alteration is detected, the diagnostic programs do
not load.
To suspend Intruder Alert and continue loading the
diagnostic programs, press Esc.
Using the First Letter of a Menu Choice
Throughout the test programs, pressing the first letter of an
option on a menu is the same as moving to that item with
the cursor and pressing Enter; however, this function is
not enabled on Test Group Screens.
Using the Function Keys
Use the following keys to maneuver throughout the test
programs:
Additional functions are available in the Test Module
Selection screen and the Test Group screen using the
following keys:
Keys Action
Enter Select an item, run the test module, or run
the test
Down
Arrow (↓)
Moves the cursor down
Up Arrow
(↑)
Moves the cursor up
F1 Calls up the appropriate Help information.
Use the up arrow key (↑) or the down arrow
key (↓) to scroll through the information.
Pressing F1 from within a Help screen
provides a help index from which you can
select different categories. One of the
important help categories is function key
usage. Pressing Esc exits Help and returns
to where you left off.
Esc Go back to the previous menu
Keys Action
Tab Move to test group (or move to parameters)
6 PC Server HMM
Page 12

Command Line Options
The following Command Line Options are available when
initially loading the diagnostic program from within its
directory of a DOS operating system. Loading
QAPlus/PRO from a DOS system command line allows
selected tests and options to run with minimum memory.
At a DOS operating system prompt, where the
QAPlus/PRO files reside, type QAPLPRO /XXX (where
XXX represents one or more of the following from the list
below) then, press Enter.
Keys Action
Spacebar Toggle modules on/off (or toggle tests on/off)
F2 View test results log
F10 Local menu
+ Next logical unit number (for example, LUN 1,
LUN 2, and so on)
− Previous logical unit number
Command Action
/B&W The /B&W command line option forces the
program to load in Black and White
(Monochrome) mode, which is often more
readable on laptop computers.
/LOG=file The /LOG=file command line option directs
the test programs to start using a specified
Error Log file.
/INT10 The /INT10 command line option forces the
test programs to use the BIOS for screen
writes.
/OXXX The /OXXX command line option, where
XXX=test group (for example, MBD, MEM,
VID, HDU, FDU, KBD, COM, LPT, and so
on), omits the designated test group from
loading.
/OALL The /OALL command line option omits all
test groups from loading. This command
can be used in conjunction with the /IXXX
command.
/IXXX The /IXXX command line option, where
XXX=test group (for example, MBD, MEM,
VID, HDU, FDU, KBD, COM, LPT, and so
on), loads the designated test group for
testing. This option is helpful if you have
insufficient memory available to load all of
the test programs simultaneously.
/USRCONFIG
=file
The /USERCONFIG=file command line
option tells the test programs to look for a
user diagnostic configuration file other than
the default USERDIAG.CFG.
General Checkout/Diagnostics QAPlus/PRO 7
Page 13

Viewing the Test Groups
As you move the cursor bar up or down in the Test Module
Selection window, the right hand screen changes to show
the attributes, parameters, and the selected tests of the
corresponding Test Group. The diamond “♦” mark
indicates a module selected for testing.
The indicated attributes are characteristics of the selected
test module that are used by the test programs to
determine which tests to run or how to run selected tests.
Attributes are also used to limit the allowable range of
parameters (for example, – ending cylinder).
Parameters are values you select to establish the scope of
tests. For example, you can select Extended Memory
testing parameters and limit the testing to a specific range
of test blocks by specifying the starting and ending
memory block. This might be appropriate if prior
experience indicates that problems are likely to exist in a
specific area of memory. By selecting these limiting
parameters, you reduce memory testing time.
Scripting
Scripting allows you to select specific groups of tests,
testing parameters, and options. Your selection is saved
for later use as a test
Script
. To set up a test script, first
select all the appropriate test groups and specific tests you
want to run from the Module Testing section under
Diagnostics. You should also select appropriate testing
parameters and options. See “Program Navigation” on
page 6, for instructions to save a test script.
Changing Logical Unit Numbers
In some instances, you can have more than one logical
unit number (LUN) for a particular module. LUNs
represent individual devices within a test group or module.
For example, you might have two diskette drives or two
hard disk drives; or, you might have base and extended
memory installed in the computer. This configuration might
result in as many as two or three different LUNs in the
Memory Test Group.
Command Action
/SCRIPT
=file[,R]
The /SCRIPT=file[,R] command line option
with the “,R” runs the selected script.
Please see “Scripting” on page 8 for a
description of scripting.
Note
You can use a “–” instead of a “/” as
the command line switch.
8 PC Server HMM
Page 14

From either the Module Test Menu or the Test Group
window, you can change to a different LUN (where
applicable) by pressing the plus (+) key (next LUN), or the
minus (−) key (previous LUN).
Test Group Specifications
In the upper-right-hand portion of the testing screen (or just
the upper portion if you switched to an individual test group
screen) are the specifications for the related test group.
Starting the QAPlus/PRO Diagnostics
Diskette
Note
The “PC Server System Board Diagnostic Diskette”
contains the QAPlus/PRO diagnostics for the PC
Server 325 Type 8639.
1. Insert the QAPlus/PRO Diagnostics Diskette into drive
A.
2. Power-on the computer.
3. When the QAPlus/PRO Diagnostics Main Menu is
displayed, press Ctrl+A.
4. Select Diagnostics; then, press Enter.
5. Follow the instructions that appear on the screen. If
an error is displayed, go to the “Symptom-to-FRU
Index” on page 107.
Module Testing Mode
If the test programs do not find a problem, or you want to
perform in-depth testing, the Module Testing mode
provides a method to run individual tests on a single
module. For example, you can run an individual test for
the diskette drive, or you can run groups of tests for
several modules.
In the Module Testing mode, you can define how many
times each test should run and how the test program
should log the errors.
To start the Module Testing mode:
1. Start the diagnostics diskette. See “Starting the
QAPlus/PRO Diagnostics Diskette.”
2. Select Diagnostic from the Main Menu.
3. Select Module Tests from the next menu.
4. Use the up and down arrow keys (↑ and ↓) to move
the highlight bar from one selection to the next.
5. Follow the instructions on the screen.
General Checkout/Diagnostics QAPlus/PRO
9
Page 15

Note
As you scroll down the selection menu, the Test
Group window to the right changes to correspond to
the highlighted Module.
Running Selected Module Tests
To run all selected tests for a test group:
1. Use the up and down arrow keys (↑ and ↓) to move
the cursor to your selection.
2. Press Enter.
Note
A “♦” appears next to your selection.
Running All Selected Modules
To run all selected test modules:
1. Use the down arrow key (↓) to move the cursor to the
last choice, Run All Selected Modules.
2. Press Enter.
Note
A “♦” appears next to your selection.
Changing Selected Tests in Test Groups
To change selected tests in a Test Group:
1. In the Module Tests Menu, use the up and down
arrow keys (↑ and ↓) to move the cursor to your
selection.
2. Press Tab to move into the expanded Test Group
window.
3. Scroll to the test you want to select or deselect.
Attention
Items indicated by a directly adjacent “*” (red text
on color screens) are destructive tests.
4. Press the spacebar at the highlighted test to toggle
between select (indicated by a “♦”) and deselect.
Note
Pressing the first letter of a test does not activate
the test, unlike menu operation.
5. Press Esc to return to the Test Group.
6. Press Enter to run the selected tests.
Running an Individual Test
To run an individual test:
10 PC Server HMM
Page 16

1. From the expanded Test Group, use the up and down
arrow keys (↑ and ↓) to move to the highlighted bar
to the test you want to run.
2. Press Enter to run the test.
Note
The results of the test appear in the
lower-right-hand Test Log window. Also, if you
enabled Test Logging, the results are recorded in
the Test Log.
3. When the test completes, press Esc to return to the
Test Group Menu.
Stopping the Tests
To stop running a specific test or stop testing after you
have started a test, press Esc while the test is running.
The test pauses at the first possible opportunity, and the
Skip/Abort Test Menu appears with the following options:
QAPlus/PRO Diagnostics Control Keys
The following is a list of the QAPlus/PRO Diagnostics
Control Keys, when used and a description of the
diagnostics response.
Option Action
Continue The test program begins testing where it left
off.
Skip to
next test
The test program skips the current test, but
remaining tests for the selected Test Module
continue.
Skip to
next group
The test program skips the remaining tests in
the current test group.
Abort all
tests
The test program stops and returns to the
previous menu.
Control
Keys
When Used Diagnostics Response
Ctrl+A Main Menu Allows you to select test from
the sub menus that are
highlighted with red letters.
Attention
If selected, these tests
will erase the information
stored on the diskette or
hard disk drive.
Up and
Down
Arrow
Keys
Main Menu
Module Test
Menu
Test Group
Menu
Highlights an item you want to
select.
General Checkout/Diagnostics QAPlus/PRO 11
Page 17

Control
Keys
When Used Diagnostics Response
Space
Bar
Module Test
Menu
Test Group
Menu
Adds a diamond to the left of
the highlighted test. The test
will run when Run All
Selected is highlighted and
the Enter key is pressed.
Also removes the diamond to
the left of the item. The test
will not run when Run All
Selected is highlighted and
the Enter key is pressed.
Tab
Key
Main Menu
Module Test
Menu
Selects the additional test for
the menu you are in.
+/−
Keys
Test Group
Menu
Selects additional test. The
LUN displayed on the top right
Test Group Menu shows which
test is selected and how and
remain (example LUN 1 of 2).
12 PC Server HMM
Page 18

PC Server 325 - Type 8639
Features . . . . . . . . . . . . . . . . . . . . . 16
Additional Service Information ........... 18
Checkpoint Codes . . . . . . . . . . . . . . . 18
Configuration . . . . . . . . . . . . . . . . . 22
Adapters . . . . . . . . . . . . . . . . . . 22
Adapter Considerations . . . . . . . . . 22
Assigning Interrupt Levels .......... 23
EISA Configuration Diskette ......... 23
Backing Up the EISA Configuration Diskette 24
EISA Configuration Menu Selections . . . 24
Recording EISA Configuration Settings . . 25
Starting the EISA Configuration Diskette . 25
EISA Configuration Advanced Function . . 26
EISA, ISA, and PCI Adapters ........ 26
EISA or ISA Features and Options ...... 27
Files . . . . . . . . . . . . . . . . . . 27
Device Drivers . . . . . . . . . . . . . 29
Sample Applications . . . . . . . . . . . 29
Memory . . . . . . . . . . . . . . . . . . 29
PCI Features and Options .......... 30
Configuration Conflicts . . . . . . . . . . . . . 30
Changing the Software Configuration .... 31
Resolving Hardware Configuration Conflicts . 31
Resolving Software Configuration Conflicts . . 32
Configuration/Setup Utility Program ....... 33
Advanced Setup . . . . . . . . . . . . . . 33
Cache Control . . . . . . . . . . . . . . 34
ROM Shadowing . . . . . . . . . . . . 34
PCI Bus Control ............. 34
Devices and I/O Ports ........... 35
Diagnostic Programs . . . . . . . . . . . . . . 36
Option Diskettes . . . . . . . . . . . . . . 36
Installing Additional Test Programs ..... 36
USERDIAG.CFG Example . . . . . . . . . 38
Ethernet Controller . . . . . . . . . . . . . . . 39
Ethernet Controller Messages ......... 39
Novell NetWare Server ODI Driver Messages 40
Novell NetWare DOS ODI Driver Messages . 46
Novell NetWare OS/2 ODI Driver Messages . 52
NDIS 2.01 Driver Messages ......... 54
NDIS 3.0 Driver Messages ......... 57
Packet Driver Messages .......... 59
UNIX Messages . . . . . . . . . . . . . . 62
Ethernet Device Drivers ............ 66
Ethernet Diagnostics . . . . . . . . . . . . . . 67
Backing Up the Ethernet Diagnostic Diskette . 67
Starting the Ethernet Diagnostics ...... 67
Ethernet Ports . . . . . . . . . . . . . . . . . 67
Password . . . . . . . . . . . . . . . . . . . 68
Alarm/Wakeup Settings . . . . . . . . . . . 68
Copyright IBM Corp. 1996 13
Page 19

PC Server Advanced Systems Management
Adapter (FRU No. 76H3240) ......... 69
Installation Requirements . . . . . . . . . . 69
Resetting the Adapter and Clearing the
Configuration . . . . . . . . . . . . . . . 69
System and Adapter Configuration ...... 70
Configuration Considerations: . . . . . . 70
EISA Configuration Utility: ........ 71
Configuration/Setup Utility ISA Legacy
Resources: . . . . . . . . . . . . . . 71
Manual I/O Address and Interrupt
Assignment . . . . . . . . . . . . . . 72
Adapter Configuration: . . . . . . . . . 72
Device Driver Installation .......... 74
OS/2 Device Driver Installation ...... 74
Windows NT Device Driver Installation . . 74
Novell NetWare Device Driver Installation . 75
Adapter Cable to System Board Connections . 76
PC Server 325 ............... 76
PC Server 330 ............... 76
PC Server 704 ............... 77
External Power Control Unit Operation and
Indicators . . . . . . . . . . . . . . . . . 78
Power Supply . . . . . . . . . . . . . . . . . 80
SCSI Drives . . . . . . . . . . . . . . . . . . 82
Setting SCSI IDs .............. 82
Termination Requirements . . . . . . . . . 82
SCSISelect Utility Program ........... 83
Starting the SCSISelect Utility Program . . . 83
SCSISelect Utility Program Options ..... 83
Configure/View Host Adapter Settings .... 84
SCSI Disk Utilities ............. 84
Low-Level Format Program ......... 84
Starting the Low-Level Format Program . . 85
Specifications (PC Server 325 - Type 8639) . . . 86
System/Processor Board Replacement ..... 87
Symmetric Multiprocessors/Multiprocessing . . . 87
Locations . . . . . . . . . . . . . . . . . . . . . 88
Bezels . . . . . . . . . . . . . . . . . . . . 88
Controls and Status Indicators ......... 89
Covers . . . . . . . . . . . . . . . . . . . . 91
Doors . . . . . . . . . . . . . . . . . . . . . 91
Drawer Model Rails .............. 92
Drives . . . . . . . . . . . . . . . . . . . . . 92
Expansion Slots . . . . . . . . . . . . . . . . 93
Input/Output Connectors . . . . . . . . . . . . 94
Internal Drive Bays .............. 95
Keylock Assembly Exploded View ....... 96
Operator Panel and Cable ........... 97
Operator Panel Status Indicators ........ 98
Optional Microprocessor . . . . . . . . . . . 100
Processor Board . . . . . . . . . . . . . . . 101
Processor Board Jumpers ......... 102
System Board . . . . . . . . . . . . . . . . 103
14 PC Server HMM
Page 20

System Board Jumpers .......... 105
U-Bolt Security (Option) ........... 106
Symptom-to-FRU Index . . . . . . . . . . . . . 107
No Beep Symptoms ............. 107
Beep Symptoms . . . . . . . . . . . . . . . 107
Error Codes . . . . . . . . . . . . . . . . . 111
Parts Listings . . . . . . . . . . . . . . . . . . 115
System . . . . . . . . . . . . . . . . . . . 117
Cables . . . . . . . . . . . . . . . . . . . 120
Keyboards (101/102 Key) .......... 121
Power Cords . . . . . . . . . . . . . . . . 122
Parts Listing (PC Server Advanced Systems
Management Adapter) . . . . . . . . . . . . . 123
Cables . . . . . . . . . . . . . . . . . . . 123
PC Server 325 - Type 8639 15
Page 21

Features
Note
The PC Server 325 Type 8639 has Selectable Startup.
Microprocessor
60/180 MHz
1
Pentium Pro
66/200 MHz Pentium Pro
Expandable to two microprocessors
Cache Memory
16 KB level-1 cache
256 KB level-2 internal cache
Memory
Standard: 32 MB (min.), expandable to 512 MB
DIMM (Dual Inline Memory-Module)
– 60 ns
– Buffered EDO (Extended Data Out)
– ECC (Error Correcting Code)
4 DIMM sockets
Diskette Drive
Supports one diskette Drive
Standard: one 3.5-inch, 1.44 MB
Optional (internal):
– 3.5-inch, 2.88 MB
– 3.5-inch, 1.44 MB
Hard Disk Drive
Supports up to 6 SCSI hard disk drives by the system
SCSI controller
– 5 internal SCSI hard disk drives
– 1 external SCSI hard disk drive
CD-ROM Drive
Standard: SCSI
Keyboard and Mouse
(Floor model)
101-key keyboard
Mouse
Expansion Slots
1 PCI
4 shared PCI/EISA
1 EISA
1
MHz denotes internal clock speed of the microprocessor only;
other factors also affect application performance.
16 PC Server HMM
Page 22

Expansion Bays
Two 5.25–inch drive bays
Five 3.5–inch drive bays
The number of bays available for expansion varies by
model.
Upgradable POST and BIOS
POST/BIOS upgrades (when available) can update
EEPROM on the system board
Security Features
Bolt-down capability
Door lock
LogicLock security enabled
Power-on and administrator passwords
Selectable drive-startup
Security-error indicator
Integrated Functions
2 serial ports
Infrared port
1 parallel port
Mouse port
Keyboard port
16–bit Ultra SCSI controller
– 1 External connector (16–bit)
– 1 Internal connector (16–bit)
Ethernet controller
– 10Base–T port
– AUI port
Video controller port, compatible with:
– Super video graphics array (SVGA)
– Video graphics adapter (VGA)
– Color graphics adapter (CGA)
– 1 MB video memory
Power Supply
– 250 watt with voltage switch (115–230Vac)
– Built-in overload and surge protection
– Automatic restart after a momentary loss of
power
PC Server 325 - Type 8639
17
Page 23

Additional Service Information
The following additional service information is for the PC
Server 325 - Type 8639.
“Checkpoint Codes.”
“Configuration” on page 22.
“Configuration Conflicts” on page 30.
“Configuration/Setup Utility Program” on page 33.
“Diagnostic Programs” on page 36.
“Ethernet Controller” on page 39.
“Ethernet Controller Messages” on page 39.
“Ethernet Diagnostics” on page 67.
“Ethernet Ports” on page 67.
“Password” on page 68.
“Power Supply” on page 80.
“SCSI Drives” on page 82.
“SCSISelect Utility Program” on page 83.
“Specifications (PC Server 325 - Type 8639)” on
page 86.
“System/Processor Board Replacement” on page 87.
“Symmetric Multiprocessors/Multiprocessing” on
page 87.
Checkpoint Codes
During POST, the computer displays the status of the
components being tested in the form of Checkpoint (CP)
codes in the upper right-hand corner of the screen. The
following is a list of the CP codes followed by the routine in
process and the boot mode.
CP
Code
Routine Boot Mode
01 Test CPU Regs Cold
02 Wait for RTC Cold
04 Init Timer 0 Cold+Warm+SAD
05 Test DMA Cold+Warm+SAD
06 Test Page Regs Cold+Warm+SAD
07 Verify Refresh Cold
08 Enable Parity Cold+Warm+SAD
09 Clear first 64 K Cold+Warm
0A POST with Stack Cold+Warm+SAD
0B BIOS Shadow Cold+Warm
0C Phase 2 POST Cold+Warm+SAD
0D Init KBD Data Cold+Warm+SAD
10 Test DMS
Locations
Cold+Warm+SAD
12 Test PICs Cold+Warm+SAD
14 Init Vector Table Cold+Warm+SAD
15 Init Keyboard Cold+Warm+SAD
16 Std CMOS
Checksum_NS
Cold+Warm
18 PC Server HMM
Page 24

CP
Code
Routine Boot Mode
17 Check
Configuration
Cold+Warm
20 Test Timer Tick Cold
21 Test Timer 2 Cold+Warm+SAD
23 Test RTC Cold+Warm+SAD+SR
26 vpd_main Cold+Warm
30 Shadow VPD Cold+Warm
31 Save ID Cold+Warm+SAD
32 Check P54C Cold
33 Init Q Boot Cold+Warm
34 Periph Config Cold+Warm+SAD
35 Init Timeout Tables Cold+Warm+SAD
36 Pos_Setup Cold+Warm
37 TCPC Cold+Warm
38 Find Serial Ports Cold+Warm
39 Find Parallel Ports Cold+Warm
3A Enable Timer Init Cold+Warm+SAD
3B Clear Mem Size
Error
Cold
3C Mfg Boot Fork Cold
3D SignOn Cold+Warm
3E CPU Name Cold+Warm
3F CPU Speed Cold+Warm
40 Enable Video SAD
41 Size Memory
Above 64 K
Cold+Warm
42 Password Not
Entered
Cold
43 Test PS2 Mouse Cold+Warm
44 Check for Mouse
Buttons
Cold
45 Init KBD Flags Cold+Warm+SAD
46 Test KBD Cold+Warm
47 TCPC_Error Cold+Warm
48 Mem Test Prompt Cold+Warm
49 Test Memory Cold+SR
4A Clear EBDA Warm
4B Allocate EBDA Cold+Warm+SR
4C xfer_EBDA_vars Cold+Warm+SR
4D Set Warm Boot
Flag
Warm
4E Clear Speed Bits Cold+Warm+SAD
4F E_FLOB Cold+Warm+SAD+SR
50 Enable System
Interrupts
Cold+Warm+SAD+SR
51 C2Sec_Chk Cold
52 Init KBD Cold+Warm+SAD+SR
53 Check for NPX Cold+Warm+SAD+SR
PC Server 325 - Type 8639 19
Page 25

CP
Code
Routine Boot Mode
54 reset_hdctl Cold+Warm+SAD+SR
55 FD_INIT Cold+Warm+SAD+SR
56 Set Floppy Config Cold+Warm+SAD+SR
57 Unlock Early Cold
58 Init A20 Cold+Warm+SAD+SR
59 HD Setup Cold+Warm+SAD+SR
5A PnP_Assign Card
Select Numbers
Cold+Warm+SR
5B Verify CMOS
Config
Cold+Warm+SR
5C Clear Screen Cold+Warm+SAD
5D PnP_Assign
Resources
Cold+Warm+SR
5E Init Time of Day Cold+Warm+SAD+SR
5F Check for Locked
KBD
Cold+Warm+SAD+SR
60 Init Enable NMI Cold+Warm+SAD+SR
61 Set Boot Speed Cold+Warm+SR
62 Set KBD LEDs Cold+Warm+SAD
63 Check for Setup
Hot Key
Cold+Warm
64 CSET_AFT_MTEST Cold+Warm
65 CSET_AFT_CMCFG Cold+Warm+SR
66 CSET_BFR_OPROM Cold+Warm+SR
67 Phase 2 Exit Big
Real
Cold+Warm+SAD+SR
90 Disable Video Cold+Warm+SAD
91 Phase 1 Enter Big
Real
Cold+Warm+SAD
93 Init Refresh Cold+Warm
94 Init Chip_NS Cold+Warm+SAD
95 CSET_Init Cold+Warm+SAD
96 Disable Parity Cold+Warm+SAD
97 Periph Init Cold+Warm+SAD
98 Init RTC Cold+Warm+SAD
99 Init Timer 2 Cold+Warm+SAD
9A Setup GPIO Addr Cold+Warm+SAD
9B Post LED On_NS Cold+Warm+SAD
9C CPU1 LED On_NS Cold+Warm+SAD
B0 Disable Appl 1
Local APIC
Cold+Warm
B3 Display SMP Sign
On
Cold+Warm
B4 AP Cache Init Cold+Warm
D1 Cache Init Cold+Warm+SAD
D3 Cache Configure Cold+Warm+SAD+SR
DA EISA_Hook 6 Cold+Warm+SAD
DB EISA Configure Cold+Warm+SAD
DC EISA Errors Cold+Warm
20 PC Server HMM
Page 26

CP
Code
Routine Boot Mode
E0 Reclaim Onboard
Option ROM Space
Cold+Warm+SAD+SR
EA PCI Reset Cold+Warm
EB PCI Video Cold+Warm
EC PCI Configure Cold+Warm+SR
ED PCI IDE Cold+Warm
EE PCI SCSI Cold+Warm
PC Server 325 - Type 8639 21
Page 27

Configuration
Note
DASD and other adapters may require additional
configuration information.
Configuration is the allocation of the server resources to
organize and interconnect hardware devices and software
programs. The steps required to configure the server
depend on the number and variety of devices and
programs installed.
The PC Server 325 Type 8639 supports the following
types of adapters.
Peripheral Component Interconnect (PCI)
Extended Industry Standard Architecture (EISA)
Industry Standard Architecture (ISA)
The following hardware configuration utility programs are
supplied with the server.
Built-in Configuration/Setup program
Configures system board functions, such as the serial
and parallel port assignments. It also allows you to
set passwords for starting up and accessing the
Setup program, and allows IRQ assignments of PCI
devices.
PC Server 325 EISA Configuration Diskette
Configures EISA and ISA adapters.
Built-in SCSISelect Utility program
Configures SCSI devices. You can use SCSISelect
to change default values, resolve configuration
conflicts, and perform a low-level format on SCSI
hard disk drives.
PC Server Utilities diskette
Use the PC Server Utilities diskette to backup and
restore the CMOS and NVRAM configuration data.
Adapters:
Adding an adapter, such as a communication or audio
adapter, extends the capabilities and power of the server.
For example, a RAID (redundant array of independent
disks) adapter can enhance logical-drive capacity and
performance, and continue operation after a hard-disk
drive failure. Up to six adapters can be installed in the
connectors on the system board
Adapter Considerations:
Three types of adapters are available for the PC Server
325:
PCI adapters
EISA adapters
ISA adapters
22 PC Server HMM
Page 28

The system board in the server contains one 32-bit,
EISA/ISA-bus expansion slot and one 32-bit PCI-bus
expansion slot. The remaining slots are shared PCI/EISA
slots. The server supports only 5.0-volt adapters on the
PCI bus.
High-performance PCI adapters, such as RAID adapters,
are installed in the two PCI slots closest to the processor
board. See “Expansion Slots” on page 93 and “System
Board” on page 103.
Attention
To avoid possible damage to adapters and server
components, be sure the adapters do not touch each
other or the other components (such as the
microprocessor) inside the server.
Assigning Interrupt Levels:
A rotational interrupt technique is used to configure PCI
adapters. This technique enables the installation of PCI
adapters that currently do not support sharing of PCI
interrupts.
Always use the IBM PC Server EISA Configuration
Diskette for the system you are servicing when assigning
interrupts for EISA and ISA adapters. You cannot assign
an EISA or ISA adapter the same interrupt that you have
assigned to a PCI adapter. This is because the server
does not support interrupt sharing among PCI, EISA, and
ISA adapters.
If a situation occurs where you need an additional
interrupt, you can use an interrupt from another function
that you might not need, such as COM2 (Interrupt 3) or
parallel port (Interrupt 5 or 7).
EISA Configuration Diskette:
You must use the EISA Configuration Diskette anytime you
want to change resource allocations, such as:
Adding or removing devices
Moving devices
Changing device function
Resolving conflicts
Adding or removing EISA or ISA adapters
In addition, if you disable the serial, parallel, infrared, or
diskette drive in the Configuration/Setup utility programs,
you might need to run the EISA Configuration Diskette and
make the same change. Refer to the README file on the
EISA Configuration Diskette for more information.
Each time you use the EISA Configuration Diskette to
configure the server, the configuration information is saved
in a
System Configuration Information (SCI)
file and in the
NVRAM configuration. Only devices that you install and
PC Server 325 - Type 8639
23
Page 29

configure correctly appear on the EISA Configuration
screens.
Backing Up the EISA Configuration Diskette:
Use an operating system command, such as the DOS
DISKCOPY command, to make a
complete
backup copy of
the EISA Configuration Diskette. Using the backup copy
can prevent damage to the original diskette. The operating
system documentation provides information on backing up
diskettes.
EISA Configuration Menu Selections:
When you start the EISA Configuration Diskette, an
introductory screen appears. Press Y at the prompt. After
you press Enter, the main menu, Steps in configuring
the computer, appears. The EISA Configuration program
main menu contains five steps:
Step 1: Important EISA configuration information
This step provides information about the differences
between the ISA configuration process and the EISA
configuration process.
Step 2: Add or remove boards
If the server is configured correctly, this step provides a list
of the devices installed in the expansion slots. The Add
choice allows you to add ISA devices to the configuration.
If EISA adapters are installed in the server, and you have
not copied the
.CFG
file to the EISA Configuration
Diskette, you are prompted to insert the adapter's
configuration diskette into the diskette drive. The
.CFG
file
is copied to the diskette. If the adapter's
.CFG
file is
copied to the EISA Configuration Diskette before starting
the diskette, and the adapter is installed in the server,
EISA devices are added automatically.
Step 3: View or edit details
After adding EISA or ISA adapters in Step 2, use the Edit
selection of this step to configure them. Use the Edit
Resources selection of this step for complex
configurations. If you change a setting in this step, you
might have to change a switch or jumper setting on the
system board or on a device.
Note
You can view the settings for PCI devices, but you
cannot change them through the EISA Configuration
utility program. To change settings for PCI devices,
see “PCI Bus Control” on page 34.
Step 4: Examine switches or print report
After Steps 1 and 2 have been completed correctly, this
step displays the correct switch and jumper settings for the
24 PC Server HMM
Page 30

installed devices that have switches and jumpers. Also,
you can choose to print a system configuration report.
Step 5: Save and exit
This step allows you to save the configuration or to discard
the changes before exiting the program.
Use the Up Arrow (↑) or Down Arrow (↓) key to highlight
your selection, then press Enter to make your selection.
To help you track your progress, a checkmark (√) appears
on the main menu next to the completed steps.
You can access help information through:
Help windows, which remain active.
Information windows, which appear automatically as a
result of some configuration activities.
The Help=F1 prompt, which allows you to access the
Help Menu for screens displaying the prompt. To
remove the Help Menu, press Esc.
Recording EISA Configuration Settings:
Record the configuration settings you made in Step 3:
View or edit details and Step 4: Examine switches or
print report on a separate sheet and store it in a safe
place for future reference. If a printer is attached to the
server, you can use the Print Screen key to print these
settings. The settings are helpful when you install
additional options. Also, record the new settings each time
you make changes. Be sure to record the current
configuration settings for the user.
Starting the EISA Configuration Diskette
Note
Use a backup copy of the EISA Configuration
Diskette. (see “Backing Up the EISA Configuration
Diskette” on page 24).
To start the EISA Configuration Diskette:
1. Insert the backup copy of the EISA Configuration
Diskette into the diskette drive.
2. Power-on the computer, or if it is already on, shut
down the operating system and restart the computer.
3. When the first screen appears, press Y and then,
press Enter. Follow the instructions on the screen
until the Steps in configuring the computer menu
appears.
4. Use the Up Arrow (↑) or Down Arrow (↓) keys to
advance through the items on the screen. Use the
Tab key to select choices on the bottom of the screen
Press the Esc key to return to a previous menu.
5. Press Enter to make a selection.
6. Follow the instructions on the screen to view or
change (edit) the configuration information.
PC Server 325 - Type 8639
25
Page 31

Note
Adapters installed in the server appear
automatically on the EISA Configuration screens
after
you copy the adapter's configuration file (file
with an extension of
.CFG
) to the EISA
Configuration Diskette. If you want to manually
add an adapter that you have not yet installed in
the server, add it using Step 2 from the menu.
To configure ISA adapters, follow the instructions
on the screen.
EISA Configuration Advanced Function:
Locking an ISA adapter reserves the selected resources
and prevents the system from using them to resolve
resource conflicts. Use the Advanced function to
lock
ISA
boards. An exclamation mark (!) appears next to locked
adapters.
To use the Advanced functions, do the following:
1. Start the EISA Configuration Diskette (see “Starting
the EISA Configuration Diskette” on page 25).
2. At the main menu, select Step 3, The View or edit
details screen appears.
3. Press F7. The Advanced functions screen appears.
4. Follow the instructions on the screen to:
a. Lock or unlock boards
b. View additional system information
c. Set verification mode
d. Maintain SCI files
EISA, ISA, and PCI Adapters:
Before installing a new device or program, read the
documentation supplied with it. Reading the instructions
helps you determine the steps required for installation and
configuration. The following list provides a preview of the
actions that might be required to configure the server.
When installing different types of adapters at the same
time, install and configure them in the following sequence:
1. ISA
2. EISA
3. PCI
Note
During POST, the server automatically configures PCI
devices.
1. Run the Setup program and record the current
configuration settings. See “Recording EISA
Configuration Settings” on page 25
2. Start the EISA Configuration Diskette. See “Starting
the EISA Configuration Diskette” on page 25.
a. Record the current settings.
26 PC Server HMM
Page 32

b. Install configuration files (.CFG).
Note
If the .CFG files were not supplied with the
adapter, see “Files.”
3. Set jumpers or switches on the server system board.
See “System Board Jumpers” on page 105.
4. Set jumpers or switches on the device. Refer to the
instructions supplied with the adapter.
5. Install the adapter in the server.
6. Install software programs. Refer to the installation
instructions supplied with the software.
7. If necessary, resolve any configuration conflicts. See
“Configuration Conflicts” on page 30.
EISA or ISA Features and Options:
Some ISA and most EISA devices are supplied with option
diskettes. These diskettes can contain any or all of the
following types of information:
Configuration files (.CFG)
Diagnostic files (.DGS)
Device drivers
Sample applications (mini-applications)
To configure the server for an ISA or EISA adapter:
1. Read the documentation supplied with the adapter.
2. Copy any files with the extension of
.CFG
from the
option diskette to the EISA Configuration Diskette.
See “Files” for important information about configuring
ISA adapters.
3. Start the EISA Configuration Diskette (see “Starting
the EISA Configuration Diskette” on page 25).
4. Record the new configuration information (see
“Recording EISA Configuration Settings” on page 25).
5. Save the new configuration settings to the EISA
Configuration Diskette and to the nonvolatile random
access memory (NVRAM) (see “Starting the EISA
Configuration Diskette” on page 25).
6. Set any jumpers or switches on the adapter.
7. Install the adapter in the server.
Files:
A configuration file is required to configure the server for
ISA or EISA adapters. You must copy this configuration
file, which has a file-name extension of
.CFG
, from the
device diskette to the EISA Configuration Diskette before
installing the device in the server. The configuration file
reserves the system resources that the adapter needs to
function properly.
Some ISA adapters are supplied with a diskette that
contains the .CFG file for the adapter. If ISA adapters are
installed that were not supplied with their own CFG files,
PC Server 325 - Type 8639
27
Page 33

you must use the PC Server EISA Configuration Diskette
for the system you are servicing to create a unique .CFG
file for each adapter.
Note
The unique .CFG file is system resource sensitive. To
use a configured adapter card in another system, the
adapter configuration must be cleared. See the
instructions that were supplied with the adapter.
To create a unique .CFG file for an ISA adapter, do the
following:
1. Insert the IBM PC Server EISA Configuration Diskette
for the system you are servicing into diskette drive A.
2. Start the configuration utility program.
3. At the main menu, select Step 2, Add or remove
boards.
4. At the next menu, select the slot in which you
installed the adapter.
5. At the next screen, select OK.
6. At the next screen, press F5; then, select Create
.CFG file.
7. Press Enter.
8. At the Create a board CFG file screen, type in the
adapter manufacturer and description (for example
IBM Token Ring); then, press Enter.
9. Refer to the adapter documentation for information
about specific configuration parameters (such as IRQ
or DMA channel) required for the adapter. Then,
follow the instructions on the screen to enter the
appropriate parameters on the menu.
Notes
1. Normally, ISA adapters do not use every
parameter. Most adapters require only a
port address.
2. The SVGA video controller in the server
requires specific memory and I/O address
assignments to function properly. To avoid
configuration conflicts, do not assign the
following SVGA memory and I/O addresses
to other adapters or options in the server:
Memory address space:
AðððH – C7FFH
I/O address spaces:
ð2Eðh – ð2EFh
ð3Bðh – ð3DFh
46E8h
10. After you type in all of the appropriate parameters,
press F10.
28 PC Server HMM
Page 34

11. At the next screen, carefully verify that the information
is correct; then, press Enter.
12. At the Add Confirmation window, press Enter again.
13. In the next window (add), press Enter. The adapter
description appears in the selected slot.
14. Verify the installation; then press F10.
15. At the next menu, select Save and exit the
configuration utility.
Note
PCI devices do
not
require .CFG files.
Device Drivers:
Device drivers are programs designed to support a specific
type of hardware device. They provide instructions that
enable the computer to interact with the device, or to take
advantage of a device's special feature. The device driver
might be supplied with the operating system, the
application program, or on the option diskette. Not all
devices require device drivers. Refer to the documentation
supplied with the option for additional information.
Sample Applications:
Some optional devices provide small applications or
sampler files. These applications demonstrate the
capabilities of the device and serve as software examples
for programming the device. Refer to the documentation
supplied with the option for additional information.
Memory:
Notes
1. Not performing the following procedure could
result in memory errors, POST error 164, and in
the operating system not recognizing the added
(or removed) memory.
2. After you add or remove memory, you must
update the Configuration/Setup Utilities program.
1. Power-on the server and watch the screen.
2. When the message Press F1 to enter
Configuration/Setup appears, press F1.
3. Select Save Settings, then exit Setup.
Notes
1. The server supports 60 ns, 32 MB, 64 MB, and
128 MB, Buffered EDO, ECC DIMMs.
2. For signal quality, install the largest size DIMM
starting from the outside edge DIMM connector,
J2. See “Processor Board” on page 101.
PC Server 325 - Type 8639 29
Page 35

PCI Features and Options:
PCI devices automatically communicate with the server's
configuration information. This usually results in automatic
configuration of a PCI device. If a conflict does occur,
refer to “Configuration Conflicts” on page 30.
Multiple-function PCI adapters use more than one interrupt.
When installing one of these adapters, IRQ assignments
should be reviewed in the Configuration/Setup utility
programs to assure the IRQ assignments are correct.
The PC Server 325 automatically configures PCI adapters.
This enables the installation of a variety of PCI adapters
that currently do not support sharing of PCI interrupts. For
information on manually overriding the interrupt, see
“Advanced Setup” on page 33.
Configuration Conflicts
The resources used by a server consist of interrupt request
levels (IRQs), direct memory access channels (DMAs), I/O
ports, and memory. This information is useful when a
resource configuration conflict occurs.
Conflicts in the configuration occur if:
A device is installed that requires the same resource
as another device. (For example, if you install an ISA
network adapter and an EISA network adapter, both
requesting
IRQ 5
, only one of the adapters can be
configured.)
A device resource is changed (for example, changing
jumper settings).
A device function is changed (for example, assigning
COM 1
to two different serial ports).
An installed software program requires the same
resource as a hardware device (for example, an
expanded memory specification (EMS) device driver
that uses the address required by the SVGA video
adapter).
The steps required to resolve a configuration error are
determined by the number and variety of hardware devices
and software programs installed in the system.
If a hardware configuration error is detected, a
configuration error
message appears after the server
completes POST, but before the operating system starts.
You can bypass the error or start one of the configuration
utility programs. Use the up and down arrow keys (↑ and
↓) to select Continue or Exit Setup, then, press Enter.
Continue will start the Configuration/Setup Utilities
program. Exit Setup will bypass the error and load the
operating system. You can also press Esc to exit setup
and load the operating system. To start the EISA
Configuration Diskette, insert the diskette in the diskette
drive and press Esc.
30 PC Server HMM
Page 36

The Configuration/Setup Utility program and the EISA
Configuration program configure the system hardware and
PCI interrupt requests. These programs do not consider
the requirements of the operating system or the application
programs.
Changing the Software Configuration:
The best way to resolve memory-address conflicts is to
change the addresses used by the application program or
the device driver.
If a device driver is causing a memory-address conflict,
refer to the operating-system documentation or the
documentation supplied with the device drivers.
Resolving Hardware Configuration
Conflicts:
Use the following information to help resolve hardware
configuration conflicts:
1. Run the Setup program to view and change
resources used by the system board functions and
the PCI interrupt requests (IRQs), if necessary.
Record the current settings before making any
changes. (See “Configuration/Setup Utility Program”
on page 33.)
2. Determine which adapter or device is causing the
error. The EISA Configuration program specifies how
the server checks for resource conflicts. Initially, this
verification mode is set to automatic. Use the
Advanced selection of the EISA Configuration
Diskette's View or edit details screen to change the
setting (see “EISA Configuration Advanced Function”
on page 26).
The automatic verification mode might disable
adapters or system board features. For example, if
you choose IRQ 4 for an adapter, the program
disables Serial Port 1, which uses IRQ 4. If this
happens, and you do not want this feature disabled,
choose another IRQ for the adapter.
If you set the verification mode to
manual
, the
configuration utility program does
not
try to resolve a
conflict. Instead, you have to determine if a resource
conflict has occurred and then resolve the conflict.
When the verification mode is set to manual, an
asterisk (*) appears on the View or edit details screen
next to adapters in conflict.
If the EISA Configuration program cannot resolve a
configuration error, it
deactivates
the adapter and
displays the deactivated status (<>) on the View or
edit details screen. Use the Advanced selection of
the EISA Configuration Diskette's View or edit details
screen to update or copy the server's system
PC Server 325 - Type 8639
31
Page 37

configuration information file (see “EISA Configuration
Advanced Function” on page 26).
3. Change configuration resource allocations. Use the
built-in Setup program to view or change system
board resource allocations. Use the Advanced
selection of the EISA Configuration Diskette's View or
edit details screen to view the available or the used
system resources (see “EISA Configuration Advanced
Function” on page 26). Use the Edit Changes
selection to change resource allocations for complex
configurations.
4. Change adapter jumpers or switches. Jumpers and
switches define the system resources that a device
can use. If the settings are incorrect or set to use a
resource that cannot be shared, a conflict occurs and
the device remains deactivated by the configuration
program. Use the EISA Configuration Diskette's Step
4, Examine switches or print report screen to verify
switches (see “EISA Configuration Menu Selections”
on page 24). Read the documentation supplied with
the device.
5. Change system board jumpers or switches. Remove
the cover; then, refer to the system-board diagram
inside the server.
6. Remove the device or adapter. Some configurations
are not supported (for example, you cannot operate
the server with two PCI SVGA adapters installed).
7. Assign EISA memory addresses starting with DFFFF
(in hexadecimal), and work downward to address
C8000 (in hexadecimal). PCI devices are
automatically assigned memory addresses starting
from C8000 working upwards.
Resolving Software Configuration
Conflicts:
The memory-address space and interrupt levels (IRQs)
used by some hardware options might conflict with
addresses defined for use through application programs or
through use by Expanded Memory Specification, EMS.
(EMS is used only with DOS.)
If there is a conflict, one or more of the following conditions
might exist:
The system cannot load the operating system.
The system does not work.
An application program does not operate, or it returns
an error.
Screen messages indicate a conflict exists.
You can resolve conflicts by changing either the software
or the hardware configuration.
32 PC Server HMM
Page 38

Note
Start the EISA Configuration Diskette to view the
addresses used by the system board functions. Use
the Advanced function of Step 3, View or edit details
to view the addresses used by the adapters. (See
“EISA Configuration Advanced Function” on page 26
for instructions.)
Configuration/Setup Utility Program
To access the Setup program:
1. Remove all diskettes from the server.
Note
Never start the Setup program while using the
EISA Configuration program.
2. Power-on the server and watch the screen. Be ready
to act quickly.
3. After the IBM logo screen appears, you are prompted
to Press <F1> to enter SETUP. As soon as you see
that prompt, press the F1 key. If the Setup program
screen doesn't appear, restart the system and try
again.
Notes
1. If a configuration error occurs, a prompt
appears before the operating system starts
(see “Configuration Conflicts” on page 30).
2. Record the current settings before making
changes to the configuration.
4. Follow the instructions on the screen to view or
change the configuration.
You must
correctly
exit from the Setup program to
save the configuration information.
5. Press Esc or move the cursor to the Exit Setup
option on the menu bar.
6. Select Exit Setup from the menu bar.
7. Select Save changes and exit.
Advanced Setup:
Select Advanced Setup from the Configuration/Setup
Utility program to change values for advanced hardware
features such as cache control and ROM shadowing.
A warning message appears when you select this choice,
to alert you that the system may malfunction if these
options are configured incorrectly. Follow the instructions
on the screen carefully.
Use the Left Arrow (←) and Right Arrow (→) keys to
advance through the options for the selected menu item.
PC Server 325 - Type 8639 33
Page 39

The Advanced Setup choice appears only on the full
Configuration/Setup menu.
Cache Control:
Select this choice to enable or disable
the microprocessor cache state. In addition, you can
define the microprocessor cache type as write-back or
write-through.
You can also enable or disable video BIOS caching, and
define buffers for video option ROM caching.
Use the Left Arrow (←) and Right Arrow (→) keys to
advance through the options for the selected menu item.
ROM Shadowing:
Select this choice to enable ROM
shadowing in specified areas. When these areas are
enabled, the contents can be cached, using the Cache
Control option.
PCI Bus Control:
Select this choice to manually
assign the interrupt requests (IRQs) for PCI adapters
installed in the server, and for the SCSI and Ethernet
controllers on the system board.
You can also enable the generation of a non-maskable
interrupt (NMI) when a PCI data parity error occurs.
If an adapter requires a memory address in the C8000 to
CFFFF (hexadecimal) range, the memory address of the
server's SCSI ROM must be changed. Select SCSI ROM
Address to assign an alternate address.
To enable or disable the CPU to PCI write posting, select
CPU-PCI Write Buffers.
Select Exit Setup to exit from the Configuration/Setup
utility programs Main Menu; then, press Enter.
The system prompts you to confirm your choice. If you
want to make additional changes, you can return to the
Setup Utility. If you made any changes and did not save
them with the Save Settings choice, the system prompts
you to save or discard the changes before exiting the
Configuration/Setup utility programs.
After configuring the server, you can save the CMOS and
NVRAM configuration data to a diskette. This is useful in
case you have to clear CMOS or have to replace the
system board, and want to restore the existing
configuration.
Refer to the README file on the PC Server Utilities
Diskette for specific procedures on backing up and
restoring CMOS and NVRAM configuration data.
34 PC Server HMM
Page 40

Devices and I/O Ports:
Software recognizes ports from their port assignments.
Each port must have a unique port assignment. The
Configuration/Setup utility program normally handles this.
Special hardware or software might require a change to
these assignments.
Select the Devices and I/O Ports choice to view or change
the assignments for devices and input/output ports.
Note
The infrared connector and Serial B connector share a
single port assignment. By default, the infrared
connector is configured as Disabled.
Serial ports can be added by installing a serial adapter in
an expansion slot. See the documentation that is shipped
with the serial adapter for information about port
assignments.
The parallel port can be configured as
bidirectional
.In
bidirectional mode, the server supports Extended
Capabilities Port (ECP) and Enhanced Parallel Port (EPP).
Note
When the parallel port is configured as bidirectional,
use an IEEE 1284-compliant cable. The maximum
length of the cable must not exceed 3 meters (9.8
feet).
To display or change the assignments for devices, or the
infrared, serial, or parallel ports:
Note
If you disable the serial, parallel, infrared ports or the
Diskette drive in the Configuration/Setup Utility
program, you might also need to use the EISA
Configuration diskette to make the same changes.
1. Select Devices and I/O Ports. from the
Configuration/Setup Utility program.
2. Select a device or port; then, use the Left Arrow (←)
and Right Arrow (→) keys to advance through the
settings available.
The Devices and I/O Ports choice appears only on
the full Configuration/Setup menu.
PC Server 325 - Type 8639 35
Page 41

Note
If an Administration password is set, you must enter
the Administration password to view the full
Configuration/Setup menu, otherwise, a limited set of
choices will appear in the Configuration/ Setup menu.
If no Administration password is set, the full
Configuration/Setup menu will appear.
Diagnostic Programs
The QAPlus/PRO diagnostic program developed for IBM
by DiagSoft, Inc. and supplied with the server is the
primary method of testing the server. See “Diagnostics” on
page 3. Option-specific diagnostic files are supplied with
some optional devices and adapters. These files provide a
more specialized test of the option. “Installing Additional
Test Programs” provides additional information about
installing and using diagnostic files. Also, refer to the
documentation supplied with the option for information on
installing and running option-specific diagnostics.
A PC Server PCI Ethernet Diagnostics diskette is supplied
with the PC Server 325 for viewing Ethernet parameters
and testing.
Option Diskettes:
An optional device or adapter might come with a diskette.
If it does, follow the instructions that come with the option.
Different instructions apply depending on whether the
Option Diskette is startable or not startable.
Installing Additional Test Programs:
You can add other test programs to the Diagnostic
Diskette. These other programs are usually provided on
the diskette supplied with a device. After you add the
programs to the Diagnostic Diskette, you can include
information from the programs in the Test Log.
Before the test programs can find these programs to run
as the User Diags test group, information about them must
be included in a file called USERDIAG.CFG. This is an
ASCII text file. It must include the following three items for
each test to run:
Program Name (.COM and .EXE files only)
Test Description of the test to be run
Command-line parameters to be passed to the
program identified in the first item of this list
36 PC Server HMM
Page 42

Notes
1. All of the information for a given test must be on
a single line, and a semicolon (;) must separate
the items on the line.
2. Make sure you press Enter at the end of each
line of text in the USERDIAG.CFG file. This
creates a carriage return line feed (CR LF) which
is necessary for the User Diagnostics to be found
and executed.
3. If the program executable file is in a directory
other than the root directory (or other directory
you have designated to contain the QA files), that
directory must be listed in the PATH= section of
the AUTOEXEC.BAT file on the QAPlus/PRO
diagnostic diskette.
4. You can use a .CFG file other than
USERDIAG.CFG if you use the command line
“USRCONFIG=
filename
,” when running the
diagnostic programs. For example, you might
use: QAPLPRO /USRCONFIG=MYTESTS.CFG.
PC Server 325 - Type 8639 37
Page 43

USERDIAG.CFG Example:
An example USERDIAG.CFG file might look like the
following:
Note
You can have more than one command-line parameter
for any given test.
When you view these tests on the Test Group window for
the User Diag test group, they appear as follows:
(♦) 9600 Baud 5 Line Modem
(♦) Generic 1
(♦) Generic 2
(♦) CMD 1
(♦) CMD 2
(♦) CMD 3
The diagnostic program automatically assigns a test
number to each test. The test numbers start at 201 and
continue upward as needed. The numbers for the tests
listed above are as follows:
202 9600 Baud 5 Line Modem
203 Generic 1
204 Generic 2
205 CMD 1
206 CMD 2
207 CMD 3
Program Name Test
Description
Command-Line
Parameter
BBSMODEM.EXE; 9600 Baud 5
Line Modem;
5
TEST1.EXE; Generic 1;
TEST2.EXE; Generic 2;
TESTALL.EXE; CMD 1; 1
TESTALL.EXE; CMD 2; 2
TESTALL.EXE; CMD 3; 3
38 PC Server HMM
Page 44

Ethernet Controller
The Ethernet controller on the system board provides an
efficient, high-speed interface to a 10-Mbps Ethernet
network, with automatic configuration.
The controller provides full-duplex (FDX) operation.
The controller also provides an automatic sensing function.
The server automatically detects which of the two Ethernet
ports is connected to the network, and then uses that port
for communication. This function, always active, eliminates
the need for a media type parameter and facilitates
changing from one media type to another.
Note
Before installing an IBM PC Ethernet adapter, be sure
to run the Ethernet diagnostics and record the server's
Ethernet configuration information.
Ethernet Controller Messages
Ethernet Controller Messages
The integrated Ethernet controller might display messages
from the following drivers:
Novell NetWare Server ODI
Novell NetWare Server DOS ODI
Novell NetWare Server OS/2 ODI
NDIS Adapter for level 2.01
NDIS Adapter for level 3.0
Packet Driver
SCO UNIX LLI, UnixWare DLPI, and SunSoft Solaris
PC Server 325 - Type 8639
39
Page 45

Novell NetWare Server ODI Driver
Messages:
This section contains the error messages for the Novell
NetWare server ODI driver. The explanation and
recommended action are included with each message.
PCNTNW-NW-026 The MSM is unable to parse a
required custom keyword.
Explanation: The user entered an incorrect parameter
keyword.
Action: Enter the keyword correctly. Then, reload the
driver.
PCNTNW-NW-054 The board did not respond to the
initialization command.
Explanation: The board did not respond when the driver
tried to initialize it.
Action: Perform the following steps:
1. Verify that the Ethernet jumper on the system board
is set to the default, enabled position.
2. Go to “General Checkout/Diagnostics QAPlus/PRO”
on page 1 to run the diagnostic utility.
PCNTNW-NW-58 The board did not respond to the
initialization command.
Explanation: The IRQ setting might be incorrect with the
hardware setting, or the EEPROM might be corrupted.
Action: Perform the following steps:
1. Verify that the IRQ settings in the NET.CFG file
match the configuration settings in the
Configuration/Setup utility programs. See “PCI Bus
Control” on page 34 for information on setting the
interrupt requests.
2. Verify that the EEPROM on the system board is
programmed correctly.
PCNTNW-NW-66 The cable might be disconnected
from the board.
Explanation: The cable might be disconnected from the
server's Ethernet port.
Action: Verify that a cable is connected to the AUI port or
the 10BASE-T port.
40 PC Server HMM
Page 46

PCNTNW-NW-071 The matching virtual adapter could
not be found.
Explanation: You tried to load another instance of the
driver with a different I/O address. This new board could
not be found.
Action: If you installed an IBM Ethernet adapter, make
sure the adapter is seated properly. Also, check the I/O
settings of the board with the settings supplied to the drive.
PCNTNW-NW-072 A resource tag is unavailable.
Explanation: The driver tried to allocate some resources
that were not available.
Action: Add or free some memory in the server. Then,
restart the server.
PCNTNW-NW-073 Unable to allocate memory.
Explanation: The driver failed to allocate the memory
needed for normal operation.
Action: Add more memory, or free some memory
resources in the server. Then, restart the server.
PCNTNW-NW-074 The hardware interrupt cannot be
set.
Explanation: An attempt was made to initialize a given
hardware interrupt. The attempt was not successful.
Action: Perform the following steps:
1. Verify that the Ethernet jumper on the system board
is set to the default, enabled position.
2. Make sure that the interrupt request numbers are set
correctly, and that no other devices are using the
interrupt. See “PCI Bus Control” on page 34 for
more information.
PCNTNW-NW-075 The MLID cannot be registered with
the LSL.
Explanation: An error occurred while the driver was
trying to register with Link Support Layer.
Action: Check the version of Netware Operating System.
Make sure that this driver is correct for the version of
Netware that you are using. Restart the server.
PC Server 325 - Type 8639
41
Page 47

PCNTNW-NW-076 The polling procedure cannot be
added.
Explanation: An error occurred while the driver was
adding a polling procedure to the Netware Operating
System polling routines.
Action: Check the version of Netware Operating System.
Make sure that this driver is correct for the version of
Netware that you are using. Restart the server.
PCNTNW-NW-077 The event notification cannot be
registered.
Explanation: The driver failed to register its event
notification routines with the Netware Operating System.
Action: Check the version of Netware Operating System.
Make sure that this driver is correct for the version of
Netware that you are using. Restart the server.
PCNTNW-NW-078 The firmware file cannot be read.
Explanation: The driver to read a firmware file. The read
process failed.
Action: Make sure that the support files that accompany
the driver are present. Restart the server.
PCNTNW-NW-079 The MLID did not initialize MSMTx
Free Count.
Explanation: The MSMTx Free Count is not initialized
properly.
Action: Restart the server. If the error recurs, replace
the system board.
PCNTNW-NW-084 Unable to allocate memory below the
16 megabyte boundary.
Explanation: A request was made to allocate memory
below 16 megabytes. The request did not complete
successfully.
Action: Free some memory below 16 megabytes, or add
more memory below the 16 megabyte boundary.
PCNTNW-NW-086 The driver parameter block is too
small.
Explanation: The driver parameter block is too small.
Action: Restart the server. If the error recurs, replace
the system board.
42 PC Server HMM
Page 48

PCNTNW-NW-087 The media parameter block is too
small.
Explanation: The driver media parameter block is too
small.
Action: Restart the server. If the error recurs, replace
the system board.
PCNTNW-NW-091 The hardware configuration
conflicts.
Explanation: You tried to load a new frame type for the
existing adapter. The hardware assumptions made in
doing so are incorrect.
Action: Make sure that the hardware configuration
matches the software settings. See “PCI Bus Control” on
page 34 for information on viewing and changing interrupt
requests.
PCNTNW-NW-092 Cannot schedule AES without an
HSM routine.
Explanation: The Netware Operating System needs a
Hardware Support Module routine before it schedules an
AES event.
Action: Restart the server. If the error is still present,
replace the system board.
PCNTNW-NW-093 Cannot schedule interrupt time call
back without an HSM routine.
Explanation: The driver needs a Hardware Support
Module routine before it can schedule an interrupt time call
back.
Action: Restart the server. If the error recurs, replace
the system board.
PCNTNW-NW-094 Cannot set hardware interrupt
without an HSM routine.
Explanation: The driver needs a hardware interrupt call
back routine routine before it sets the interrupt.
Action: Restart the server. If the error recurs, replace
the system board.
PCNTNW-NW-095 Cannot add polling without an HSM
routine.
Explanation: The driver needs an HSM polling routine
before it can start the polling process.
Action: Restart the server. If the error recurs, replace
the system board.
PC Server 325 - Type 8639
43
Page 49

PCNTNW-NW-126 The group bit in the node address
override was cleared.
Explanation: The IEEE address has a group bit
indicating that an address belongs to a group of stations.
This bit is used only as a destination address; it cannot be
used as a source address. You tried to enter a source
address with this bit set. The driver cleared the group bit
of the source address.
Action: None.
PCNTNW-NW-127 The local bit in the node address
override was set.
Explanation: The local bit in the IEEE address format
indicates that the addresses are being managed locally. If
you use the node address override capabilities of this
driver to enter a new address, the local bit should be set.
You entered an address without the local bit set. The
driver has set the local bit.
Action: None.
PCNTNW-NW-164 The device was not found.
Explanation: The driver cannot find an Ethernet
controller in the server.
Action: Perform the following steps:
1. Verify that the Ethernet enable jumper is set to the
default (enable) position.
2. Go to “General Checkout/Diagnostics QAPlus/PRO”
on page 1 to run the diagnostic utility.
PCNTNW-NW-164 Device not found at IOADDRESS.
Explanation: The Ethernet controller cannot be found at
the IO address specified in the NET.CFG file.
Action: Verify that the IO Address in the NET.CFG file
matches with the board. Otherwise, remove the PORT
keyword from the NET.CFG file.
PCNTNW-NW-167 PCI scan specified, device not
found.
Explanation: The driver cannot locate the Ethernet
controller on the PCI bus.
Action: Perform the following steps:
1. Verify that the Ethernet jumper on the system board
is set to the default, enable position.
2. Edit the NET.CFG file to change the BUSTYPE
keyword to PCI1.
3. If the problem persists, go to “General
Checkout/Diagnostics QAPlus/PRO” on page 1 to run
the diagnostic utility.
44 PC Server HMM
Page 50

PCNTNW-NW-180 The DMA parameter is not necessary
for PCI device.
Explanation: The Ethernet controller does not require a
DMA setting.
Action: Delete the DMA parameter from the NET.CFG
file.
PC Server 325 - Type 8639
45
Page 51

Novell NetWare DOS ODI Driver Messages:
This section contains the error messages for the Novell
NetWare DOS ODI device driver. The explanation and
recommended action are included with each message.
PCNTW-DOS-1 The LSL is not loaded.
Explanation: The Link Support support module
(LSL.COM) is not loaded.
Action: Load LSL.COM; then, load the device driver.
PCNTW-DOS-2 The LSL has no more room for a board
using Frame <string>.
Explanation: The maximum number of adapters, whether
virtual or physical, has been registered with the Link
Support Layer. In the PC Server 325, the DOS ODI LSL
can support up to five PCI Ethernet adapters, plus the
Ethernet controller in the system board.
Action: Reduce the number of active adapters in the
systems by removing an adapter, or by decreasing the
number of frame types activated by Multiple Link Interface
Driver (MLID).
PCNTW-DOS-3 Could not find PCNTNW MLID to
unload.
Explanation: A request was made to unload PCNTNW
MLID, but the MLID is not loaded.
Action: None.
PCNTW-DOS-4 A TSR is loaded above the PCNTNW
MLID.
Explanation: You tried to unload the PCNTNW MLID
from memory, but the PCNTNW MLID detected another
Terminate and Stay Resident (TSR) program loaded above
the MLID. For the PCNTNW MLID to unload safely, you
must first unload any TSR programs that were loaded after
you loaded the MLID.
Action: Either unload the other TSR program before
loading the PCNTNW MLID, or unload the TSR program
before attempting this operation.
PCNTW-DOS-5 PCNTNW MLID could not be unloaded;
the operation was aborted.
Explanation: The PCNTNW MLID attempted to remove
the resident PCNTNW MLID from memory, and failed. A
hardware error has probably occurred.
Action: Run the Ethernet diagnostic.
46 PC Server HMM
Page 52

PCNTW-DOS-6 The adapter did not initialize. PCNTNW
did not unload.
Explanation: The hardware did not initialize correctly.
The PCNTNW driver did not load.
Action: Check the hardware. Make sure that the board's
hardware setting matches its settings in the NET.CFG file.
PCNTW-DOS-7 You need another PCNTNW MLID
Section Heading in the NET.CFG file in
order to load the MLID again.
Explanation: You tried to load the PCNTNW MLID a
second time. Normally, you would do this so that you
could use two or more Ethernet controllers in the server.
When two or more of the same type of Ethernet controllers
are installed in the server, an associated PCNTNW MLID
section heading must be specified in the NET.CFG file.
Action: Create a NET.CFG file and add the commands
for both PCNTNW MLID boards to the file. Then, restart
the server.
PCNTNW-DOS-8 A NET.CFG is required to load the
MLID again.
Explanation: You tried to load the PCNTNW MLID a
second time. Normally, you would do this so that you
could use two or more Ethernet controllers in the server.
When two or more of the same type of Ethernet controllers
are installed in the server, an associated PCNTNW MLID
section heading must be specified in the NET.CFG file.
Action: Create a NET.CFG file and add the commands
for both PCNTNW MLID boards to the file. Then, restart
the server.
PCNTNW-DOS-9 The NET.CFG entry has been ignored.
Explanation: The PCNTNW ignored the NET.CFG entry.
Action: Verify that the entries in the NET.CFG file are
correct.
The PCNTNW MLID has been successfully removed.
Explanation: A request was made to unload a PCNTNW
MLID. The PCNTNW MLID has been removed from
memory.
Action: None.
PC Server 325 - Type 8639
47
Page 53

PCNTNW-DOS-11 The MLID does not support frame
<string:>. The PROTOCOL keyword has
been ignored.
Explanation: The NET.CFG files specified the
PROTOCOL option for a PCNTNW MLID. The specified
frame type is not supported by the PCNTNW MLID.
Action: Check the PROTOCOL line in the NET.CFG file
for possible omissions of required dashes and underscores
or any misspellings.
PCNTNW-DOS-12 The protocol keyword must have a
frame type. Entry ignored.
Explanation: The PROTOCOL option was specified in
the NET.CFG file for a PCNTNW MLID. The entry failed
to specify the associated frame type for the protocol ID
addition. An entry in the NET.CFG file for the PROTOCOL
option should use the following format:
LINK DRIVER PCNTNW
PROTOCOL IPX 8137 ETHERNET_II
Action: Specify a frame with the PROTOCOL option.
PCNTNW-DOS-13 The MLID could not register Protocol
ID <string> for protocol stack <string> for
frame type.
Explanation: The PCNTNW MLID could not register the
specified Protocol ID.
Action: Verify the protocol information in the NET.CFG
file.
PCNTNW-DOS-14 This version of LSL is not
supported.
Explanation: The PCNTNW MLID cannot run
successfully using this version of the LSL.
Action: Update the LSL.COM to a newer version.
PCNTNW-DOS-15 The frame type is already activated
for frame <string>. The NET.CFG entry
has been ignored.
Explanation: Two FRAME keywords under the same
main section heading specified the same frame type. A
specified frame type can be specified only once per driver.
Action: Remove the duplicate FRAME keyword entry.
48 PC Server HMM
Page 54

PCNTNW-DOS-16 The node address was incorrectly
specified in NET.CFG.
Explanation: You used the NODE ADDRESS option in
the NET.CFG file to override the node address on the
network board. The number specified was not a valid
Ethernet address. An Ethernet address is six bytes in
length. This error occurs if Bit 0 of the first address byte is
a 1. This bit must always be 0. For example, if the first
byte has the following address, an invalid Ethernet address
is generated.
FIRST BYTE
7 6 5 4 3 2 1 0
0 0 0 0 0 0 0 1
This byte will produce node addresses in the 0100 0000
0000 to 01FF FFFF FFFF range (in hexadecimal), all of
which will be invalid.
Action: Specify a valid node address in the NET.CFG
file.
PCNTNW-DOS-17 An invalid keyword was specified in
NET.CFG on line xx.
Explanation: The keyword specified in the NET.CFG file
is incorrect.
Action: Check the keyword in question. Make sure that
the keyword is correctly spelled.
PCNTNW-DOS-18 The frame type specified in the
NET.CFG file is not supported.
Explanation: The NET.CFG file specified the
PROTOCOL option for a PCNTNW MLID. The specified
frame type is not supported by the PCNTNW MLID.
Action: Check the PROTOCOL line in the NET.CFG file
for possible omissions of required dashes and
underscores, or any misspellings. Check the PCNTNW
MLID documentation for supported frame types.
PCNTNW-DOS-19 An invalid Ethernet node address is
specified in NET.CFG. The MLID modified
the incorrect address bits.
Explanation: The NET.CFG file has an invalid node
address. The PCNTNW MLID modified and corrected the
address.
Action: Verify the node address entries in the NET.CFG
file.
PC Server 325 - Type 8639
49
Page 55

PCNTNW-DOS-50 The board cannot be found.
Explanation: The Ethernet controller is either not
configured correctly or is disabled.
Action: Perform the following steps:
1. Verify that the Ethernet jumper on the system board
is set to the default, enabled position.
2. Check the settings for the Ethernet controller (for
example, the I/O and interrupt request settings)
against the settings in the NET.CFG. See “PCI Bus
Control” on page 34 for information on setting the
interrupt requests.
3. If the problem persists, go to “General
Checkout/Diagnostics QAPlus/PRO” on page 1 to run
the diagnostic utility.
PCNTNW-DOS-54 The board did not respond to the
initialization command.
Explanation: The Ethernet controller initialization failed.
Action: Perform the following steps:
1. Verify that the Ethernet jumper on the system board
is set to the default, enabled position. Go to “General
Checkout/Diagnostics QAPlus/PRO” on page 1 to run
the diagnostic utility.
PCNTNW-DOS-58 The board did not respond to the
initialization command.
Explanation: The IRQ setting might be incorrect with the
hardware setting, or the EEPROM might be corrupted.
Action: Verify that the IRQ settings in the NET.CFG file
match the configuration settings in the Configuration/Setup
utility programs. See “PCI Bus Control” on page 34 for
information on setting the interrupt requests. Verify that
the EEPROM on the system board is programmed
correctly.
PCNTNW-DOS-61 PCI device IRQ number mismatch.
Explanation: The IRQ number specified in the NET.CFG
file does not match with the IRQ number assigned in the
Configuration/Setup utility programs.
Action: Remove the IRQ number in the NET.CFG file.
PCNTNW-DOS-64 The device was not found.
Explanation: The driver cannot find any PCnet device in
the server.
Action: Verify that the Ethernet enable jumper is set to
the default (enable) position. Go to “Ethernet Diagnostics”
on page 67 to run the diagnostic utility.
50 PC Server HMM
Page 56

PCNTNW-DOS-65 Device not found at IOADDRESS.
Explanation: The device was not found at the IO address
specified in the NET.CFG file. The driver cannot find an
Ethernet controller in the server.
Action: Verify that the IO address in the NET.CFG file
matches with the with the board. Otherwise, remove the
PORT keyword from the NET.CFG file.
PCNTNW-DOS-67 PCI scan specified, device not found.
Explanation: The driver cannot locate the Ethernet
controller on the PCI bus.
Action: Perform the following steps:
1. Verify that the Ethernet enable jumper is set to the
default (enable) position.
2. Use the BUSTYPE keyword to specify a value of
PCI1.
3. If the problem persists, go to “Ethernet Diagnostics”
on page 67 to run the Ethernet diagnostics.
PCNTNW-DOS-75 Unsupported bus ID specified.
Explanation: The bus ID number specified in the
NET.CFG file is not supported by Novell.
Action: Correct the bus ID number in the NET.CFG file.
PCNTNW-DOS-76 Wrong bus ID specified.
Explanation: The bus ID number specified in the
NET.CFG file is different from the bus type found in the
server.
Action: Correct the bus ID number in the NET.CFG.
PCNTNW-DOS-80 The DMA parameter is not necessary
for PCI device.
Explanation: The board does not require a DMA setting.
Action: Edit the NET.CFG file to delete the DMA
parameter.
PC Server 325 - Type 8639
51
Page 57

Novell NetWare OS/2 ODI Driver Messages:
This section contains the error messages for the NetWare
OS/2 ODI driver. The explanation and recommended
action is included with each message.
PCNTNW-OS2-1 The LSL is not loaded.
Explanation: The Link Support Layer module (LSL.SYS)
is not loaded.
Action: Load LSL.SYS before loading the driver.
PCNTNW-OS2-21 Could not add the MLID Protocol ID.
Explanation: The PCNTNW MLID could not register the
specified Protocol ID.
Action: Edit the NET.CFG file and correct the protocol
information.
PCNTNW-OS2-22 Could not allocate memory. The
virtual board did not load.
Explanation: The driver could not allocate memory for
the virtual adapter.
Action: Check the system configuration.
PCNTNW-OS2-54 The board did not respond to the
initialization command.
Explanation: The board initialization failed.
Action: Perform the following steps:
1. Verify that the Ethernet enable jumper is set to the
default (enable) position.
2. Go to “General Checkout/Diagnostics QAPlus/PRO”
on page 1 to run the diagnostic utility.
PCNTNW-OS2-56 This interrupt is already used and
cannot be shared.
Explanation: The interrupt is already used by another
device and cannot be shared.
Action: Assign a different IRQ in the Configuration/Setup
utility programs. See “PCI Bus Control” on page 34 for
information on setting the interrupt requests.
PCNTNW-OS2-58 The board did not respond to the
initialization command.
Explanation: The IRQ setting might be incorrect with the
hardware setting, or the EEPROM might be corrupted.
Action: Verify that the IRQ settings in the NET.CFG file
match the configuration settings in the Configuration/Setup
utility programs. See “PCI Bus Control” on page 34 for
information on setting the interrupt requests. Verify that
the EEPROM on the system board is programmed
correctly.
52 PC Server HMM
Page 58

PCNTNW-OS2-61 PCI device IRQ number mismatch.
Explanation: The IRQ number specified in the NET.CFG
file does not match with the IRQ number assigned in the
Configuration/Setup utility programs. The IRQ numbers
might be assigned automatically, or you might have
manually assigned the IRQ number.
Action: Remove the IRQ number in the NET.CFG file.
Or, see “PCI Bus Control” on page 34 for information on
setting the interrupt requests.
PCNTNW-OS2-64 The device was not found.
Explanation: The driver cannot find the Ethernet
controller in the server.
Action: Verify that the Ethernet enable jumper is set to
the default (enable) position. Go to “General
Checkout/Diagnostics QAPlus/PRO” on page 1 to run the
diagnostic utility.
PCNTNW-OS2-65 Device not found at IOADDRESS.
Explanation: The Ethernet controller cannot be found at
the IO address specified in the NET.CFG file.
Action: Verify that the IO address in NET.CFG matches
with the board. Otherwise, remove the PORT keyword
from the NET.CFG file.
PCNTNW-OS2-67 PCI scan specified, device not found.
Explanation: The driver cannot locate the Ethernet
controller on the PCI bus.
Action: Perform the following steps:
1. Verify that the Ethernet jumper on the system board
is set to the default, enable position.
2. Edit the NET.CFG file to change the BUSTYPE
keyword to PCI1.
3. If the problem persists, go to “General
Checkout/Diagnostics QAPlus/PRO” on page 1 to run
the diagnostic utility.
PCNTNW-OS2-73 Unable to allocate memory.
Explanation: The driver could not allocate memory for
the virtual board.
Action: Check the system configuration.
PCNTNW-OS2-80 The DMA parameter is not necessary
to PCI device.
Explanation: The Ethernet controller does not require a
DMA setting. This parameter is not a valid driver
parameter.
Action: Edit the NET.CFG file to delete the DMA
parameter.
PC Server 325 - Type 8639
53
Page 59

NDIS 2.01 Driver Messages:
This section contains the error messages for the NDIS
2.01 drivers. The explanation and recommended action
are included with each message.
PCNTND-DOS-1 Unable to open the Protocol Manager.
Explanation: The NDIS stack is not configured properly.
Action: Check and correct the configuration.
PCNTND-DOS-6 Out of memory while allocating
buffers.
Explanation: The driver could not allocate the requested
buffers.
Action: Check the system configuration. Edit the
PROTOCOL.INI file to reduce the number of Txbuffers and
Rxbuffers specified for the driver.
PCNTND-DOS-7 Protocol Manager device error.
Explanation: The NDIS stack is not configured properly.
Action: Check and correct the configuration.
PCNTND-DOS-8 Bad status for Protocol Manager.
Explanation: The NDIS stack is not configured correctly.
Action: Check and correct the configuration.
PCNTND-DOS-9 Cannot find PROTOCOL.INI entry.
Explanation: The NDIS stack is not configured properly
in the PROTOCOL.INI file.
Action: Check and correct the configuration.
PCNTND-DOS-10 The Protocol Manager ioctl failed.
Explanation: The NDIS stack is not configured properly
in the PROTOCOL.INI file.
Action: Check and correct the configuration.
PCNTND-DOS-11 Protocol Manager registration failed.
Explanation: The NDIS stack is not configured properly.
Action: Check and correct the configuration.
54 PC Server HMM
Page 60

PCNTND-DOS-15 Device not found.
Explanation: The driver cannot find an Ethernet
controller in the server.
Action: Perform the following steps:
1. Verify that the Ethernet enable jumper is set to the
default (enable) position.
2. If the problem persists, go to “General
Checkout/Diagnostics QAPlus/PRO” on page 1 to run
the diagnostic utility.
3. Replace the system board.
PCNTND-DOS-16 PCI scan specified, device not found.
Explanation: The driver cannot locate the Ethernet
controller on the PCI bus.
Action: Perform the following steps:
1. Verify that the Ethernet enable jumper is set to the
default (enable) position.
2. If the problem persists, go to “General
Checkout/Diagnostics QAPlus/PRO” on page 1 to run
the diagnostic utility.
3. Replace the system board.
PCNTND-DOS-21 Board failed checksum test. Please
run configuration utility.
Explanation: The driver cannot find an Ethernet
controller.
Action: Perform the following steps:
1. Verify that the Ethernet enable jumper is set to the
default (enable) position.
2. If the problem persists, go to “General
Checkout/Diagnostics QAPlus/PRO” on page 1 to run
the diagnostic utility.
PCNTND-DOS-23 WARNING: PCNET IRQ found =
Explanation: The IRQ setting in PROTOCOL.INI does
not match the hardware IRQ setting.
Action: Remove the IRQ setting from PROTOCOL.INI (or
match the IRQ setting in PROTOCOL.INI with the
configuration settings in the Configuration/Setup utility
programs. See “PCI Bus Control” on page 34 for
information on setting the interrupt requests.)
PC Server 325 - Type 8639
55
Page 61

PCNTNW-DOS-24 WARNING: PCNET IRQ doesn't
match protocol.ini.
Explanation: The IRQ setting in PROTOCOL.INI does
not match the hardware IRQ setting.
Action: Remove the IRQ setting from PROTOCOL.INI or
match the IRQ setting in PROTOCOL.INI with the
hardware jumper setting.
PCNTNW-DOS-25 PCI scan specified, PCI bus not
found!
Explanation: The driver cannot locate the Ethernet
controller on the PCI bus.
Action: Perform the following steps:
1. Verify that the Ethernet enable jumper is set to the
default (enable) position.
2. Go to “General Checkout/Diagnostics QAPlus/PRO”
on page 1 to run the diagnostic utility.
PCNTNW-DOS-29 WARNING: DMA number is not
necessary for PCI device.
Explanation: The Ethernet controller does not require a
DMA setting.
Action: Remove the DMA setting in PROTOCOL.INI.
PCNTNW-DOS-32 IRQ number is already in use by
another PCNET device.
Explanation: The specified IRQ number is already in use
by another Ethernet controller or device.
Action: Modify the IRQ setting in the PROTOCOL.INI file,
or modify the IRQ settings in the Configuration/Setup utility
programs. See “PCI Bus Control” on page 34 for
information on setting the interrupt requests in the
Configuration/Setup utility programs.
PCNTNW-DOS-33 PCNET device with specified
IOBASE is already in use.
Explanation: The specified IO address number is already
in use by another Ethernet controller or device.
Action: Modify the IO address setting on the hardware,
or modify the IO address setting in the PROTOCOL.INI
file.
56 PC Server HMM
Page 62

NDIS 3.0 Driver Messages:
Windows NT error messages are logged into a log file.
You can view the file with the Event Viewer. Error
messages appear with the “PCNTN3” prefix followed by by
a “Missing Configuration Parameter” message and several
hex numbers. The hex numbers must be converted to
decimal values so that they correspond to the error
numbers used in this manual.
PCNTN3-9 IO base address is already in use by
another PCNET device.
Explanation: The specified IO address number is already
in use by another device.
Action: Modify the IO address setting on the hardware or
modify the IO Address setting in the setup dialog box.
PCNTN3-13 IRQ and/or DMA number is already in use
by another device.
Explanation: The specified IRQ is specified by another
device.
Action: Modify the IRQ setting in the setup dialog box.
PCNTN3-18 PCI scan specified, device not found.
Explanation: The driver cannot locate the Ethernet
controller on the PCI bus.
Action: Perform the following steps:
1. Verify that the Ethernet enable jumper is set to the
default Enable position.
2. If the problem persists, go to “General
Checkout/Diagnostics QAPlus/PRO” on page 1 to run
the diagnostic utility.
PCNTN3-19 LanceOpenAdapter failed.
Explanation: The configuration is set up incorrectly.
Action: Rerun the setup program.
PCNTN3-20 Device at specified IO base address not
found.
Explanation: The Ethernet controller cannot be found at
the specified IO address.
Action: Verify that the IO address matches with the
board. Otherwise, remove the IO Address specification
from the setup.
PC Server 325 - Type 8639 57
Page 63

PCNTN3-21 Device not found.
Explanation: The driver cannot find any PCnet device.
Action: Perform the following steps:
1. Verify that the Ethernet enable jumper is set to the
default Enable position.
2. Go to “General Checkout/Diagnostics QAPlus/PRO”
on page 1 to run the diagnostic utility.
58 PC Server HMM
Page 64

Packet Driver Messages:
This section contains the error messages for the packet
driver. The explanation and recommended action are
included with each message.
PCNTPK-DOS-1 The command syntax is PCNTPK [-n]
[-d] [-w]
<INT=packet_int_no>
[IRQ=int_no] [IOADDR=io_addr]
[DMA=dma_no] [BUSTYPE=bus]
[DMAROTATE] [TP] [LED0=xx]
[BUSTYPE=bus] [LED0=xx]
[LED2=xx] [LED3=xx]
Explanation: The driver command was not entered
correctly.
Action: If you entered the command from the command
line, enter the command with the correct syntax. If the
command is in the AUTOEXEC.NET file, edit the file to
correct the syntax. The only parameters that should be
included are PCNTPK and BUSTYPE=PCI1.
PCNTPK-DOS-2 Unable to reset the PCnet device.
Explanation: The software could not reset the Ethernet
controller.
Action: Perform the following steps:
1. Verify that the Ethernet enable jumper is set to the
default (enable) position.
2. If the problem persists, go to “General
Checkout/Diagnostics QAPlus/PRO” on page 1 to run
the diagnostic utility.
PCNTPK-DOS-3 Unable to initialize the PCnet device.
Explanation: The software could not initialize the
Ethernet controller.
Action: Perform the following steps:
1. Verify that the Ethernet enable jumper is set to the
default (enable) position.
2. Check the interrupt settings in the Configuration/Setup
utility programs. For more information, go to “PCI
Bus Control” on page 34.
3. If the problem persists, go to “General
Checkout/Diagnostics QAPlus/PRO” on page 1 to run
the diagnostic utility.
PC Server 325 - Type 8639
59
Page 65

PCNTPK-DOS-5 There is already a packet driver at
xxxx.
Explanation: The driver is already loaded at this memory
location. It cannot be loaded a second time at the same
location.
Action: Do not reload the driver. If you want to load the
driver at a different memory location, specify another
software interrupt address on the INT parameter.
PCNTPK-DOS-6 <IRQ=int_no> should be between 0
and 15 inclusive.
Explanation: The specified IRQ is out of range for the
Ethernet controller.
Action: Use valid IRQ values.
PCNTPK-DOS-7 Packet driver failed to initialize the
board.
Explanation: The board initialization failed.
Action: Perform the following steps:
1. Verify that the Ethernet enable jumper is set to the
default (enable) position.
2. Go to “General Checkout/Diagnostics QAPlus/PRO”
on page 1 to run the diagnostic utility.
PCNTPK-DOS-8 <INT=packet_int_no> should be in the
range 0x60 to 0x80.
Explanation: The specified software interrupt number is
out of the allowable range.
Action: Specify a valid value for the INT parameter.
PCNTPK-DOS-12 PCI device IRQ number mismatch.
Explanation: The specified IRQ number does not match
with the IRQ number assigned by the PCI BIOS.
Action: Remove the IRQ setting.
PCNTPK-15 The device was not found.
Explanation: The driver cannot find an Ethernet
controller.
Action: Perform the following steps:
1. Verify that the Ethernet enable jumper is set to the
default (enable) position.
2. If the problem persists, go to “General
Checkout/Diagnostics QAPlus/PRO” on page 1 to run
the diagnostic utility.
60 PC Server HMM
Page 66

PCNTPK-DOS-18 PCI scan specified, device not found.
Explanation: The driver cannot locate the Ethernet
controller on the PCI bus.
Action: Perform the following steps:
1. Verify that the Ethernet enable jumper is set to the
default (enable) position.
2. If the problem persists, go to “General
Checkout/Diagnostics QAPlus/PRO” on page 1 to run
the diagnostic utility.
Packet driver is at segment xxxx.
Explanation: The memory address where the packet
driver is loaded is xxxx.
Action: None.
Packet interrupt number xxxx.
Explanation: The interrupt number used by the packet
driver is xxxx.
Action: None.
My Ethernet address is xxxxxxxxxxxx.
Explanation: The Ethernet address of this station is
xxxxxxxxxxxx.
Action: None.
My ARCnet address is xxxx.
Explanation: The ARCnet address of this station is xxxx.
Action: None.
PC Server 325 - Type 8639
61
Page 67

UNIX Messages:
This section contains the error messages for the following
UNIX drivers.
SCO UNIX LLI
UnixWare DPLI
SunSoft Solaris
pnt0-2 PCI search specified, PCI device not
found!
Explanation: The driver cannot locate the Ethernet
controller on the PCI bus.
Action: Perform the following steps:
1. Run netconfig to search for another Ethernet
controller.
2. Verify that the Ethernet enable jumper is set to the
default (enable) position.
3. If the problem persists, go to “General
Checkout/Diagnostics QAPlus/PRO” on page 1 to run
the diagnostic utility.
pnt0-6 Cannot allocate memory for the adapter
during an interrupt. Please check the
Streams parameters.
Explanation: The system is out of Streams memory
blocks.
Action: Perform the following steps:
1. Use the CRASH utility to increase the number of
Streams memory blocks for the failing size.
2. Modify the IRQ settings in the Configuration/Setup
utility programs, or run netconfig to match the
hardware settings.
pnt0-6 Cannot allocate memory for the adapter
during an interrupt! Please check the
Streams parameters.
Explanation: On a SunSoft Solaris system, this message
indicates that the system is out of Streams memory blocks.
Action: Use the CRASH utility to increase the number of
Streams memory blocks for the failing size.
pnt0-7 Cannot allocate memory for the adapter
during reset! Please check the Streams
parameters.
Explanation: The system is out of Streams memory
blocks.
Action: Use the CRASH utility to increase the number of
Streams memory blocks for the failing size.
62 PC Server HMM
Page 68

pnt0-11 device not found!
Explanation: The driver cannot find an Ethernet
controller.
Action: Perform the following steps:
1. Verify that the Ethernet enable jumper is set to the
default (enable) position.
2. Go to “General Checkout/Diagnostics QAPlus/PRO”
on page 1 to run the diagnostic utility.
pnt0-12 device failed checksum test!
Explanation: The driver cannot find an Ethernet
controller.
Action: Perform the following steps:
1. Verify that the Ethernet enable jumper is set to the
default (enable) position.
2. Go to “General Checkout/Diagnostics QAPlus/PRO”
on page 1 to run the diagnostic utility.
pnt0-13 add_intr_handler failed! Interrupts already
enabled.
Explanation: The IRQ specified or found conflicts with
other devices in the system.
Action: Perform the following steps:
1. Modify the hardware settings.
2. Run netconfig to match the hardware settings.
pnt0-14 Cannot locate hardware.
Explanation: The SunSoft Solaris driver cannot find any
Ethernet controller.
Action: Perform the following steps:
1. Verify that the Ethernet enable jumper is set to the
default (enable) position.
2. Go to “General Checkout/Diagnostics QAPlus/PRO”
on page 1 to run the diagnostic utility.
pnt0-15 No more devices to open.
Explanation: The SunSoft Solaris driver cannot find any
more Ethernet controllers.
Action: Perform the following steps:
1. Verify that additional IBM PCI Ethernet adapters are
present or replace the Ethernet adapter that fails to
respond.
2. Go to “General Checkout/Diagnostics QAPlus/PRO”
on page 1 to run the diagnostic utility.
PC Server 325 - Type 8639
63
Page 69

pnt0-17 Device fault... Reset initiated!
Explanation: The SunSoft Solaris driver has been reset
due to device fault.
Action: Perform the following steps:
1. Verify that additional IBM PCI Ethernet adapters are
present or replace the PCnet card that fails to
respond.
2. Go to “General Checkout/Diagnostics QAPlus/PRO”
on page 1 to run the diagnostic utility.
pnt0-19 IRQ found for PCnet hardware does not
match space.c!
Explanation: This is a warning message referring to the
IRQ found in the system.
Action: Ignore this message if you are sure that this is
what you want to do. Otherwise, run netconfig to match
the hardware settings.
pnt0-19 IRQ found for PCnet hardware does not
match pnt.conf!
Explanation: This is a warning message referring to the
IRQ that the SunSoft Solaris driver found in the system.
Action: Ignore this message if you are sure that this is
what you want to do. Otherwise, run netconfig to match
the hardware settings.
pnt0-20 add_intr_handler failed! Unknown
interrupt type.
Explanation: The IRQ specified or found conflicts with
other devices in the system.
Action: Perform the following steps:
1. Modify the hardware settings.
2. Run netconfig to search for another Ethernet
controller.
pnt0-21 add_intr_handler failed! Out of range
interrupt number.
Explanation: The IRQ specified or found conflicts with
other devices in the system.
Action: Perform the following steps:
1. Modify the hardware settings.
2. Run netconfig to search for another Ethernet
controller.
64 PC Server HMM
Page 70

pnt0-22 add_intr_handler failed! Out of range IPL.
Explanation: The IRQ specified or found conflicts with
other devices in the system.
Action: Perform the following steps:
1. Modify the hardware settings.
2. Run netconfig to search for another Ethernet
controller.
pnt0-23 add_intr_handler failed! Vector already
occupied.
Explanation: The IRQ specified or found conflicts with
other devices in the system.
Action: Perform the following steps:
1. Modify the hardware settings.
2. Run netconfig to search for another Ethernet
controller.
pnt0-24 add_intr_handler failed! Vector already
shared at different IPL.
Explanation: The IRQ specified or found conflicts with
other devices in the system.
Action: Perform the following steps:
1. Modify the hardware settings.
2. Run netconfig to search for another Ethernet
controller.
pnt0-26 The DMA number is not necessary for PCI
device.
Explanation: The IBM PCI Ethernet adapter does not
require a DMA setting.
Action: Edit the SPACE.C file to delete the DMA
parameter.
pnt0-29 The IRQ number is already in use by
another
Explanation: The IBM PCI Ethernet adapter
Explanation: The specified IO address is already in use
by
pnt0-31 IO address is not necessary for the PCI
device.
Explanation: The I/O address specified is not required.
Action: Remove the assigned IO address specified for
the Ethernet controller.
PC Server 325 - Type 8639
65
Page 71

Ethernet Device Drivers
The following is a list of Ethernet device drivers and the
directory/path in which they are located for the operating
systems supported by the PC Server 325 - Type 8639.
The device drivers are located on three diskettes labeled
1, 2, and 3. These diskettes are supplied with the server.
Note
The device driver names are printed in bold type.
Disk 1
– NDIS 2.0.1 Driver (DOS, OS/2)
- A:\MSLANMAN.DOS\DRIVERS\ETHERNET\
PCNTND\ PCNTND.DOS
- A:\MSLANMAN.OS2\DRIVERS\ETHERNET\
PCNTND\ PCNTND.OS2
- A:\LANSRVR\PCNTND.OS2
– ODI Driver (DOS, OS/2, Server)
- A:\NOVELL\SERVER\3.1X\PCNTNW.LAN
- A:\NOVELL\SERVER\4.X\PCNTNW.LAN
– Novell Support files
- A:\NOVELL\WKSTN\DOSODI\
PCNTNW.COM
- A:\NOVELL\WKSTN\OS2ODI\
PCNTNW.OS2
– ODI LAPP Driver (DOS)
- A:\LAPP\DOSODI\PCLAPP.COM
– NDIS 3.x for Windows NT 3.51
- A:\WINNT351\AMDPCN.SYS
– SCO UNIX Open Server 5.0 MDI driver
- Driver support is built into SCO UNIX 5.0.
– Unixware 2.0 DLPI driver
- Driver support is built into UNIXWARE 2.x.
Disk 2
– DOS Client for IBM LAN Server
- A:\IBMADOS\PCNTND.DOS
- A:\IBMLSP\PCNTND.DOS
– Packet Driver
- A:\PKTDRVR\PCNTPK.COM
Disk 3
– Sun Solaris Driver (for v2.4)
- This diskette is Unix PkgAdd format. the
driver's name extension is pcnt.
66 PC Server HMM
Page 72

Ethernet Diagnostics
You must use the IBM PC Server PCI Ethernet diagnostic
diskette to perform diagnostic tests on the integrated
Ethernet controller. This diagnostic diskette includes the
LANAID utility program.
Backing Up the Ethernet Diagnostic
Diskette:
Use an operating system command, such as the DOS
DISKCOPY command, to make a
complete
backup copy of
the IBM PC Server PCI Ethernet diagnostic diskette.
Using the backup copy can prevent damage to the original
diskette. The operating system documentation provides
information on backing up diskettes.
Starting the Ethernet Diagnostics:
To start the Ethernet Diagnostic Diskette:
1. Insert the backup copy of the Ethernet diagnostic
diskette into the diskette drive.
2. Power-on the server, or if it is already on, shut down
the operating system and restart the server.
3. Type /diags; then, press Enter.
4. Follow the instructions on the screen.
5. When the diagnostic tests are complete, remove the
diskette from the diskette drive; then, restart the
server.
Ethernet Ports
The PC Server 325 Type 8639 has Ethernet connectors for
10Base-T or Attachment Unit Interface (AUI) devices. The
controller automatically detects which port is connected to
the network, and then uses that port for communication.
Notes
If the server is shipped with an Ethernet interface
cable, it must be installed to comply with FCC
requirements.
The cables used in a 10BASE-T link segment do
not require grounding. However, all of the
devices connected to the cables must be
grounded.
To connect the 10Base-T port to a 10Base-T port on a
repeater, use an unshielded twisted-pair (UTP) cable with
RJ-45 connectors at both ends. Use a straight-through
UTP cable when connecting to a crossover port (also
called MDI-X port), and use crossover cables to connect to
a repeater that is not a crossover port (also known as a
MDI port).
To connect the AUI port to a 10Base-5, 10Base-2, or
10Base-F segment, use an AUI cable.
PC Server 325 - Type 8639
67
Page 73

Password
If a power-on password or administration password is set,
you must type the password and press Enter before POST
will continue.
Note
If an administration password is set and then
forgotten, it cannot be overridden or removed. You
must replace the system board.
If a power-on password is set and forgotten, you can
regain access to the server by using either of the following
methods:
Entering the administration password at the power-on
prompt. Start the Configuration/Setup Utility
programs and change the power-on password.
Changing the position of the power-on password
jumper (J12). See “System Board” on page 103.
When you restart the server, POST proceeds without
prompting for the password for this startup only. Start
the Configuration/Setup Utilities programs and set a
new power-on password. Leave the power-on
password jumper (J12) in its new position, unless you
need to perform this procedure again.
Alarm/Wakeup Settings:
For proper operation of the Alarm/Wakeup Settings
options, set the Password Prompt choice to Off. See
“Configuration/Setup Utility Program” on page 33.
Set the Wakeup features immediately before you plan to
Power-off the server. The server locks and cannot be
used after you exit, saving settings. When the server
restarts, in either Attended or Unattended mode, the
Wakeup features return to the default, disabled settings.
When both Wakeup features are enabled, the server starts
when the first event (time or signal) occurs.
68 PC Server HMM
Page 74

PC Server Advanced Systems
Management Adapter (FRU No.
76H3240)
Note
For a list of FRUs for this product see “Parts Listing
(PC Server Advanced Systems Management Adapter)”
on page 123.
The IBM PC Server Advanced Systems Management
Adapter provides monitoring and event recording functions
for ISA and EISA systems when used with TME 10
NetFinity Version 4.1.
Installation Requirements:
The Adapter can be installed only in ISA or EISA systems.
The Adapter is supported by TME 10 NetFinity Version
4.1.
Note
If the server has TME 10 NetFinity Version 4.0
installed, download the IBM PC Server Advanced
Systems Management Adapter files from:
IBM PC Server World Wide Web page at
http://www.pc.ibm.com/servers/
IBM PC Company Bulletin Board Service (BBS)
at (919) 517-0001
Read the README file for instructions.
Device drivers for OS/2, Microsoft Windows NT, and Novell
NetWare are provided with the Adapter.
Resetting the Adapter and Clearing the
Configuration:
If you removed an adapter from one system and are
reinstalling it in a different system, you must reset the
adapter. (clear the configuration) before you reinstall it to
avoid possible configuration conflicts. With the adapter
removed from the system:
1. Remove the battery from the adapter and set it aside.
2. With a metal paper clip or small metal screwdriver,
short the battery-socket contacts on the adapter
together. This resets the adapter and clears the
configuration.
3. Reinstall the battery on the adapter.
PC Server 325 - Type 8639
69
Page 75

System and Adapter Configuration:
The IBM PC Server Advanced Systems Management
Adapter must be configured after installation.
Configuration Considerations:
The adapter uses only adapter COM B for external
communication, therefore a modem or null-modem
cable must be connected to adapter COM B.
To share adapter COM B with the system, adapter
COM B must be assigned one of the following I/O
addresses:
3F8 (COM 1)
2F8 (COM 2)
3E8 (COM 3)
2E8 (COM 4)
To dedicate the adapter COM B to the adapter only,
adapter COM B must be disabled with the adapter
configuration program to prevent the system from
accessing it.
The adapter COM A is not used by the adapter. For
the system to use adapter COM A, it must be
configured with the adapter configuration program.
Each port I/O address covers eight contiguous
address bytes as shown in the table on page 70.
Make sure there are no conflicts between the adapter
port I/O addresses and interrupts you configure, and
previously assigned system I/O addresses and
interrupts.
The adapter can be configured to the following I/O address
ranges and interrupts:
I/O Address Ranges (hex) Interrupts
100–107 3
120–127 4
140–147 5
168–16F 9
188–18F 10
200–207 11
220–227 14
240–247 15
268–26F N/A
300–307 N/A
Note: Any listed I/O address range can be assigned with
any listed interrupt as long as there are no conflicts with
previously assigned system I/O addresses and interrupts.
If you have an EISA Configuration Utility program
(called System Configuration Utility on some systems)
go to “EISA Configuration Utility:” on page 71.
If you do not have an EISA Configuration Utility
program, and the system's Configuration/Setup Utility
has the ISA Legacy Resources option go to
“Configuration/Setup Utility ISA Legacy Resources:”
on page 71.
70 PC Server HMM
Page 76

If you do not have an EISA Configuration Utility
program or the Configuration/Setup Utility ISA Legacy
Resources option go to “Manual I/O Address and
Interrupt Assignment” on page 72.
EISA Configuration Utility:
1. Load the EISA Configuration Utility program.
2. Select Step 2 from the main menu to add the adapter
and create the CFG file.
3. Display the available I/O addresses. Refer to the list
in the table on page 70 and “Configuration
Considerations:” on page 70, and assign I/O
addresses for the adapter ports.
4. Display the available interrupts.
5. Refer to the list in the table on page 70, and assign
interrupts for the adapter ports.
6. Enter the assigned I/O addresses and interrupts on
the Configuration Data Worksheet on page 72.
7. Follow the on-screen prompts to exit the utility
program.
Go to “Adapter Configuration:” on page 72.
Configuration/Setup Utility ISA Legacy
Resources:
1. Restart the system and run the Configuration/Setup
Utility.
2. Select the ISA Legacy Resources option.
3. Select I/O Port Resources.
4. Refer to the list in the table on page 70 and
“Configuration Considerations:” on page 70, and
reserve I/O addresses for the adapter ports.
5. Enter the reserved I/O addresses on the
Configuration Data Worksheet on page 72.
6. Select Interrupt Resources.
7. Refer to the list in the table on page 70, and reserve
interrupts for the adapter service processor port and
the two adapter COM ports.
8. Enter the reserved interrupts on the Configuration
Data Worksheet on page 72.
9. Follow the on-screen prompts to exit the
Configuration/Setup Utility.
Go to “Adapter Configuration:” on page 72.
PC Server 325 - Type 8639
71
Page 77

Manual I/O Address and Interrupt Assignment:
If you do not have the EISA Configuration Utility program
or the Configuration/Setup Utility ISA Legacy Resources
option follow this procedure.
1. Refer to the lists in the table on page 70 and
“Configuration Considerations:” on page 70, and
select available I/O addresses and interrupts for the
adapter ports.
2. Enter these I/O addresses and interrupts on the
Configuration Data Worksheet below.
Continue with “Adapter Configuration:.”
Adapter Configuration:
1. Power-off the system.
2. Make sure the adapter configuration diskette is not
write protected.
3. Insert the adapter configuration diskette into the
diskette drive.
4. Press Ctrl+Alt+Del to restart the system.
The adapter configuration Flash Utility menu is
displayed:
Flash Utility
Select one:
Configure Service Processor
View Service Processor Configuration
Update Service Processor
Set Up COM Ports
Configure OS Watchdog Timer
Exit
Enter F1=Help F3=Exit
5. Look at the two LED displays on the adapter and
check the dot on each LED for the indications listed in
the table on page 73.
Configuration Data Worksheet
I/O
Address
Interrupt
Service Processor Port
Adapter COM A
Adapter COM B
72 PC Server HMM
Page 78

CR1
CR2
Battery
6. Refer to the configuration data worksheet on page 72
and complete the following steps.
a. Choose Configure Service Processor from the
Flash Utility menu and select the port and IRQ
you entered in the configuration data worksheet.
The utility program writes an SM.INI file to the
diskette. This file is used during the device
driver installation.
b. Follow the on-screen prompts and choose Setup
COM Ports from the Flash Utility menu. Select
the COM port I/O addresses and interrupts you
entered on the configuration worksheet.
CR1 Dot On CR1 Dot Off
Problem indication. Check:
34-pin interface cable
connection
Replace:
Cable then, Adapter.
Note
For Advanced Systems
Management External
Power Control Units,
replace the 10-pin
External Power Source
Cable then, the
External Power Control
Unit.
Normal. Check CR2 Dot.
CR2 Dot Blinking CR2 Dot Off
Normal; microcode is
loaded. Go to step 6.
Microcode is not loaded.
Select Update Service
Processor on the Flash
Utility menu and follow the
prompts. Then return to
step 5 on page 72. If CR2
continues to be off, replace
the adapter battery. (See
“Battery Notice” on
page 131)
Note: If you reset the adapter by following the procedure
“Resetting the Adapter and Clearing the Configuration” on
page 69, CR2 Dot will be off and you must select Update
Service Processor on the Flash Utility menu.
PC Server 325 - Type 8639 73
Page 79

7. Follow the on-screen prompts to exit from the adapter
configuration utility program.
8. Replace the system cover.
Go to “Device Driver Installation” for device driver
installation instructions.
Device Driver Installation:
If the operating system is OS/2, go to “OS/2 Device Driver
Installation.”
If the operating system is Windows NT, go to “Windows
NT Device Driver Installation.”
If the operating system is Novell NetWare, go to “Novell
NetWare Device Driver Installation” on page 75.
OS/2 Device Driver Installation:
The OS/2 adapter device driver is stored in the C:\OS2
and C:\OS2\DLL directories unless otherwise specified by
you. The CONFIG.SYS file is also updated.
To install the adapter device driver and dynamic link library
(DLL):
1. Insert the adapter configuration diskette into the
diskette drive.
2. Open an OS/2 window.
3. At the OS/2 prompt type:
A:
and press Enter.
4. At the A: prompt type:
OS2\SETUP
and press Enter.
5. Follow the menu prompts to complete the installation.
6. Restart the system to activate the device driver.
Refer to the TME 10 NetFinity Version 4.1 documentation
for information on the operation and functions of the
adapter.
Windows NT Device Driver Installation:
The Windows NT adapter device drivers are stored in the
Windows NT system directories.
To install the adapter device drivers:
1. Insert the adapter configuration diskette into the
diskette drive.
2. Log on with administrator privileges.
3. Open a DOS window.
4. At the DOS prompt type:
A:
and press Enter.
5. Type CD\NT
and press Enter.
6. Type SETUP
74 PC Server HMM
Page 80

and press Enter.
The adapter device drivers are loaded and started.
Refer to the TME 10 NetFinity Version 4.1 documentation
for information on the operation and functions of the
adapter.
Novell NetWare Device Driver Installation:
To install the Novell Netware adapter device driver:
1. Insert the adapter configuration diskette into the
diskette drive.
2. At the NetWare prompt type
LOAD A:\NETWARE\SETUP
and press Enter.
3. Follow the on-screen prompts. If you accept the
default choices, the adapter device driver is copied to
the hard disk as SYS:\SYSTEM\IBMSPN.NLM, and
the AUTOEXEC.NCF file is updated.
4. To load the adapter device driver:
a. Restart the system.
Or
b. At the NetWare prompt type
SEARCH ADD path (where
path
is the path
the driver was copied to in step 3)
and press Enter.
At the NetWare prompt type
LOAD IBMSPN port-adrs irq (where
port-adrs
is the port address you selected
and
irq
is the interrupt you selected during
the adapter configuration procedure)
and press Enter.
The adapter device driver will load without
restarting the server.
Refer to the TME 10 NetFinity Version 4.1 documentation
for information on the IBM PC Server Advanced Systems
Management Adapter operation and functions.
PC Server 325 - Type 8639
75
Page 81

Adapter Cable to System Board
Connections:
Note
It is easier to connect the cables to the system board
and Adapter before you install the Adapter in the
system.
(J2)
External Power
Connector
Battery
COM A
Connector
2 x 17 System Board
Interface Connector (J16)
Enhanced Security
Cable (J10)
I C Reserved
Connector (J4)
2
POST LEDs
(CR1) (CR2)
Cable to 325/330
System Board
Power Switch
Connector (J8)
Cable to 325/330
Power Switch (J6)
16 Bit ISA
Connector
COM B
Connector
C2/Monitor
Jumper (J7)
PC Server 325:
Refer to the IBM PC Server 325 Hardware Maintenance
Manual for system board layout.
34-pin cable from Adapter (J16) to System
Management Cable Connector (J19) on system
board.
16-pin cable from Adapter (J8) to Operator Panel
Connector (J7) on system board.
Cable from Operator Panel to Adapter (J6).
PC Server 330:
Refer to the IBM PC Server 330 Hardware Maintenance
Manual for system board layout.
34-pin cable from Adapter (J16) to System
Management Cable Connector (J19) on system
board.
16-pin cable from Adapter (J8) to Operator Panel
Connector (J7) on system board.
Cable from Operator Panel to Adapter (J6).
76 PC Server HMM
Page 82

PC Server 704:
Refer to the IBM PC Server 704 Hardware Maintenance
Manual for system board layout.
Note
The PC Server 704 Adapter installation requires:
34-pin-to-26-pin PC Server Systems
Management Cable (separately purchased)
PC Server Advanced Systems Management
External Power Control Unit (separately
purchased)
26-pin end of the systems management cable to the
System Management Cable Connector (J3G1) on the
system board.
34-pin end of the systems management cable to
Adapter connector (J16).
Connect the External Power Control Unit control
cable, .1/, external power control unit power cord,
.2/, and system power cords, .3/, as shown:
OK
Note
For other ISA or EISA PC Server Advanced Systems
Management Power Unit Connections, see the
Adapter installation instruction.
PC Server 325 - Type 8639 77
Page 83

External Power Control Unit Operation and
Indicators:
The external power control unit provides power to the
system under control of the adapter.
OK
The Power Status LED .2/ On indicates power is
enabled to the system. The Power Status LED Off
indicates power is disabled to the system.
The Cable Attached LED .3/ On indicates the power
unit control cable is connected to the adapter. The
Cable Attached LED Off indicates the external power
control unit control cable is not connected to the
adapter.
If system power from the external power control unit
is disabled by the adapter, press the external power
control unit power on button.1/ to enable system
power from the external power control unit.
78 PC Server HMM
Page 84

Action/FRU
None
1. Press the external power
control unit power on button .1/
to restore system power.
2. Check system power-on switch.
3. Bypass power module unit by
plugging the Server directly into
the AC wall socket.
4. Power module
5. A.C. power cord
1. Connect the cable to the
adapter.
2. External power control unit
signal cable
3. External power control unit
4. Adapter
Indicates
System power is enabled and the
external power control unit signal
cable is connected to adapter.
The adapter has caused system
power to be removed and the
external power control unit signal
cable is connected to adapter.
External power control unit signal
cable is not connected to adapter.
Cable Attached LED .3/
On
On
Off
Power Status LED .2/
On
Off
PC Server 325 - Type 8639 79
Page 85

Power Supply
Note
Verify that the voltage-select switch is set for the
correct voltage. If the voltage switch is set to the
wrong position, permanent damage might occur to the
server when you power it on.
If the power-on indicator is not on, and the power-supply
fan is not running, check the power cord for proper
installation and continuity.
If the power cord is OK, either the power supply is
defective or a defective device is causing the power supply
to shut off. Check the power supply voltages.
The power supply is rated at 250 watts. Too many
devices (adapters or hard disk drives) can cause power
consumption to exceed 250 watts and cause the power
supply to shut down. Remove adapters or devices to
determine if this is the cause.
If the voltages are incorrect, replace the power supply. If
the voltages are correct, and the Symptom-to-FRU index
does not solve the problem, go to “Undetermined
Problems” on page 135.
P1
6
1
P2
6
1
−Lead
Pin
+Lead
Pin
V dc
Minimum
V dc
Maximum
5,6
5
6
6
1
2
3
4
Power Good
+4.8V
+11.52V
−10.8V
+5.25V
+12.60V
−13.2V
−Lead
Pin
+Lead
Pin
V dc
Minimum
V dc
Maximum
1
2
2
2
3
4
5
6
−4.5V
+4.8V
+4.8V
+4.8V
−5.5V
+5.25V
+5.25V
+5.25V
80 PC Server HMM
Page 86

P3
41
P4, P5, P6, P7, and P8
14
P9
5
1
P10/P11
6
1
P12
3
1
−Lead
Pin
+Lead
Pin
V dc
Minimum
V dc
Maximum
2
3
1
4
+4.8V
+11.52V
+5.25V
+12.6V
−Lead
Pin
+Lead
Pin
V dc
Minimum
V dc
Maximum
2
3
1
4
+11.52V
+4.8V
+12.6V
+5.25V
−Lead
Pin
+Lead
Pin
V dc
Minimum
V dc
Maximum
3 1 +4.8V +5.25V
Pin Description
2 - Power On Request
4 EPW (No connection on system board)
5 VFAN (No connection on system board)
−Lead
Pin
+Lead
Pin
V dc
Minimum
V dc
Maximum
4 1 +3.3V +3.5V
5 2 +3.3V +3.5V
6 3 +3.3V +3.5V
−Lead
Pin
+Lead
Pin
V dc
Minimum
V dc
Maximum
3 1 +4.8V +5.25V
Pin Description
2 - Power On Request
PC Server 325 - Type 8639 81
Page 87

SCSI Drives
The server supports
small computer system interface
(SCSI) drives. You can attach multiple SCSI drives to the
two Ultra SCSI connectors on the system board, which
share the same Ultra SCSI bus.
The SCSI controller on the system board can support up to
6 internal SCSI devices and 1 external SCSI device.
If you install additional SCSI devices, you must set a
unique identification (ID) for each SCSI device that you
connect to the Ultra SCSI connector, so that the Ultra
SCSI adapter can identify the devices and ensure that
different devices do not attempt to transfer data at the
same time.
Note
Any information about SCSI drives also applies to
other SCSI devices, such as scanners and backup
tape drives.
Setting SCSI IDs:
The PC Server 325 Type 8639 supports SCSI IDs 0 to 15.
ID 7 is reserved for the Ultra SCSI controller. The
scanning sequence for preinstalled SCSI devices proceeds
from the lowest SCSI ID to the highest, starting with 0.
For 16-bit devices, set the IDs to any unused number
between 8 and 15. For 8-bit devices, set the IDs to any
unused number between 0 and 6.
The preinstalled SCSI CD-ROM drive is shipped with the
SCSI ID set to 3. If the server is shipped with a SCSI hard
disk, it's SCSI ID will be set to 6.
Refer to the instructions supplied with the SCSI devices for
information about setting a SCSI ID.
Termination Requirements:
Both ends of the SCSI cable must be terminated. Install
SCSI devices starting at the ends of the internal and
external SCSI cables. The SCSI device, at the end of the
SCSI cable, should be terminated, otherwise a special
connector, called a terminator, must be used to terminate
the end of the SCSI cable.
If you have only internal SCSI devices connected to the
internal SCSI connector
and
the bulkhead cable has not
been installed, the SCSI controller becomes the
termination for the external SCSI connector.
If internal SCSI devices are attached to the SCSI
controller, the last internal device on the bus (cable) must
be terminated, and the termination must be disabled on the
other devices connected to the SCSI connector. The SCSI
bus on the system board is already terminated.
82 PC Server HMM
Page 88

If you use the internal SCSI connector
and
the external
SCSI connector on the system board, both internal and
external ends of the cable must be terminated.
Refer to the instructions that come with the SCSI device
for more information about termination.
Refer to the instructions that come with the SCSI devices
for information about setting a SCSI ID.
System board jumper J29 must also be jumpered as
follows:
If an 8-bit device is connected to the external SCSI
cable, J29 pins 1-2 must be jumpered.
For any other combination of SCSI devices attached
to the SCSI external or internal cables, J29 pins 2-3
can be jumpered. See “System Board” on page 103
and “System Board Jumpers” on page 105.
SCSISelect Utility Program
The PC Server is shipped with a menu-driven configuration
utility program, called SCSISelect, that allows you to view
and change SCSI settings.
Use the SCSISelect Utility program to:
View and change the default SCSI ID values
Verify and change configuration conflicts
Perform a low-level format on a SCSI hard disk
Starting the SCSISelect Utility Program:
You can access this program when you start the server.
The SCSISelect prompt appears after the IBM PC Server
screen appears briefly and then disappears. Press Ctrl+A
immediately after all drives have spun up.
Note
If the screen displays a Not Ready message, you
might have pressed Ctrl+A before the drives spun up.
Restart the server.
Use the Up Arrow (↑) and Down Arrow (↓) key to move
the highlight bar to the various menu choices. Press Esc
to return to the previous menu. Also, you can press the
F5 key to switch between color and monochrome modes (if
the monitor permits). To change the settings of the
displayed items, follow the directions on the screen.
SCSISelect Utility Program Options:
The following options appear on the SCSISelect Utility
program menu:
Configure/View Host Adapter Settings
SCSI Disk Utilities
PC Server 325 - Type 8639
83
Page 89

Configure/View Host Adapter Settings:
To view or change the SCSI controller settings, select
Configure/View Host Adapter Settings and follow the
instructions on the screen. This menu has the following
selections:
Host Adapter SCSI ID
Change the SCSI ID of the SCSI controller from its
default value of 7.
SCSI Parity Checking
Enable or disable SCSI adapter parity checking. The
default value is
Enabled
. This default value should not
be changed.
Host Adapter SCSI Termination
Configure SCSI controller termination. The default
value is
Low On / High On.
SCSI Device Configuration
Configure SCSI device parameters. Before you can
make updates, you must know the ID of the device
whose parameters you want to configure.
Advanced Configuration Options
View or change the settings for advanced configuration
options. These options include enabling support for
large hard disk drives and support for drives with Ultra
SCSI speed.
SCSI Disk Utilities:
To view the IDs that are assigned to each SCSI device or
to format a SCSI device, select SCSI Disk Utilities from
the SCSISelect Utility program menu.
To use the utility program, select a drive from the list.
Read the screens carefully before making a selection.
Low-Level Format Program:
You can perform a low-level format on hard disk drives
using the
Format Disk
feature of the SCSISelect Utility
program.
Depending on the hard disk capacity, the Low-Level
Format program could take up to two hours.
Use the Low-Level Format program:
When installing software that requires a low-level
format
When recurring messages from the diagnostic tests
directing you to run the Low-Level Format program on
the hard disk
As a last resort before replacing a failing hard disk
drive
84 PC Server HMM
Page 90

Note
Make sure all files on the hard disk are backed up
before doing a low level format. Refer to the
operating-system documentation.
Starting the Low-Level Format Program
Important
The Low-Level Format program erases
all
data and
programs.
1. If the hard disk is working, make a backup copy of all
the files and programs on the hard disk.
2. Select Format disk from the SCSISelect Disk Utilities
menu; then, follow the instructions on the screen.
3. To install an operating system after the hard disk
drive is formatted, refer to the README file in Start
Here on the ServerGuide Main CD.
PC Server 325 - Type 8639 85
Page 91

Specifications (PC Server 325 - Type
8639)
Size
With pedestal:
– Depth: 473 mm (18.6 in.)
569 mm (22.6 in.) with cable cover
– Height: 455 mm (17.9 in.)
– Width: 315 mm (12.4 in.)
Without pedestal:
– Depth: 473 mm (18.6 in.)
569 mm (22.6 in.) with cable cover
– Height: 425 mm (16.7 in.)
– Width: 195 mm (7.7 in.)
Drawer model:
– Depth: 465 mm (18.3 in.)
– Height: 216 mm (8.5 in.)
– Width: 482 mm (19.0 in.)
Weight
Typical server as shipped: 17.0 kg (37.5 lb)
Environment
Air temperature:
– Server on: 10° to 35° C
(50° to 95° F)
Altitude: 0 to 914 m (3000 ft.)
– Server on: 10° to 32° C
(50° to 90° F)
Altitude: 914 m (3000 ft.) to 2133 m (7000 ft.)
– Server off: 10° to 43° C
(50° to 110° F)
Maximum Altitude: 2133 m (7000 ft.)
Humidity:
– Server on: 8% to 80%
– Server off: 8% to 80%
Maximum altitude: 2133 m (7000 ft)
Electrical Input
Sine-wave input (50 to 60 Hz) is required
Input voltage:
– Low range:
- Minimum: 90 V ac
- Maximum: 137 V ac
– High range:
- Minimum: 180 V ac
- Maximum: 265 V ac
– Input kilovolt-amperes (kVA) approximately:
- Minimum configuration as shipped: 0.08 kVA
- Maximum configuration: 0.52 kVA
Total Power Available for Drives
Nominal Operating Current allowed:
– +5 V dc line: 5.3 A
– +12 V dc line: 5.0 A
Heat Output
Approximate heat output in British Thermal Units (BTU)
per hour:
– Minimum configuration: 350 BTU (102 watts)
– Maximum configuration: 860 BTU (251 watts)
86 PC Server HMM
Page 92

System/Processor Board Replacement
When replacing the system board, make sure jumpers,
cables, adapter cards, and processor board are installed
and seated correctly on the new system board.
The PC Server 325 Type 8639 computer might have two
processors, and other components installed on the
processor board. When replacing the processor board,
remove all of the installed components from the old
processor board and install them on the new processor
board. If the problem remains, check the following:
The processor is installed and seated correctly in
socket (U5) on the processor board.
If installed, the optional processor is seated correctly
in socket (U6) on the processor board.
All other components removed from the old processor
board or system board are installed and seated
correctly on the new board.
Note
If the processor(s) are not seated correctly,
intermittent problems can occur.
Symmetric
Multiprocessors/Multiprocessing
The PC Server 325 Type 8639 has a second upgradeable
processor socket on the processor board to support
Symmetric Multiprocessors/Multiprocessing (SMP). The
SMP capability extends processing performance by
allowing tasks to be dispatched to the next available
processor rather then being queued until the busy
processor has completed its task. The SMP capability also
provides a level of high availability in that some operating
systems run in a uni-processor mode if one of the
processors should experience a failure. This function will
allow the LAN to continue operation so that service can be
scheduled at a non-critical time.
Note
If the optional processor is installed, the optional
processor is the boot processor.
PC Server 325 - Type 8639 87
Page 93

Locations
“Bezels”
“Controls and Status Indicators” on page 89
“Covers” on page 91
“Doors” on page 91
“Drawer Model Rails” on page 92
“Drives” on page 92
“Expansion Slots” on page 93
“Input/Output Connectors” on page 94
“Internal Drive Bays” on page 95
“Keylock Assembly Exploded View” on page 96
“Operator Panel and Cable” on page 97
“Operator Panel Status Indicators” on page 98
“Optional Microprocessor” on page 100
“Processor Board” on page 101
“System Board” on page 103
“U-Bolt Security (Option)” on page 106
Bezels
Floor Model
Drawer Model
88 PC Server HMM
Page 94

Controls and Status Indicators
CD-ROM Drive
In-Use Light
Diskette Drive
In-Use Light
Power Switch
CD-ROM Eject Button
Diskette Eject Button
Power-On Light
CD-ROM Drive In-Use Light: This light comes
on when the CD-ROM drive is accessed.
Diskette-Drive In-Use Light: This lights when
the drive is accessing a diskette.
CD-ROM Eject Button: Push this button to
release a CD from the CD-ROM drive.
Power-On Light: This green LED lights when
you power-on the server by pressing the power
switch, and when the server powers on in
unattended mode.
Diskette Eject Button: Push this button to
release a diskette from the drive.
PC Server 325 - Type 8639
89
Page 95

Power Switch: Use this switch to power the
server on manually, or return the server to
standby
mode
. The automatic restart feature, which
enables the server to restart following a
momentary power loss, means that the server is
never completely powered-off. Do not set the
server to standby mode if any of the drive In-Use
lights are on. This might damage the information
stored on a hard disk or diskette.
You can configure the server to start at a specified
date and time, or when it receives a signal from
either serial port.
The result of pressing the power switch varies,
depending on whether the server is in attended,
unattended, or standby mode.
To power-on the server from standby mode,
press and release the power switch.
To power-off the server when in unattended
mode, press the power switch in slowly just
until the power-on light goes out and then
immediately release the switch.
To power-off unattended mode but leave the
server on, press and release the power
switch.
To turn unattended mode and return to
standby mode, press the power switch just
until the power LEDs go out.
90 PC Server HMM
Page 96

Covers
Floor Model
Captive
Screws
Drawer Model
Captive Screws
Doors
Floor Model
Drawer Model
Flange
PC Server 325 - Type 8639 91
Page 97

Drawer Model Rails
Drives
92 PC Server HMM
Page 98

Expansion Slots
EISA/ISA
EISA/ISA
EISA/ISA
EISA/ISA
EISA/ISA
PCI
PCI
PCI
PCI
PCI
6
5
4
3
2
1
Notes
Expansion slots 2 through 5 are shared slots.
That is, the shared slots use the same
expansion-slot opening on the back of the server.
See “System Board” on page 103.
PC Server 325 - Type 8639 93
Page 99

Input/Output Connectors
Infrared Connector
Power Connector
SCSI Knockout
Parallel Connector
Serial Connectors
Expansion Slots
Ethernet Connectors
Keyboard Connector
Mouse Connector
Monitor Connector
Ethernet Connectors: There are two Ethernet
connectors: a DB-15 and an RJ-45. The DB-15
attachment unit interface (AUI) connector is for
attachment of external 10BASE2, 10BASE5, or
10BASE-F medium attachment unit (MAU). The RJ-45
connector is for attachment to the integrated 10BASE-T
(twisted-pair) transceiver.
Note
If the server is shipped with an Ethernet interface
cable, it must be attached to the RJ-45 connector on
the server, and the cable on the 10BASE-T device.
Mouse Connector: This is where the mouse cable
connects to the server. This connector sometimes is
called an auxiliary-device or pointing-device port.
Keyboard Connector: The cable from the keyboard
connects here.
Monitor Connector: The monitor signal cable connects
here.
SCSI Connector: Attach external SCSI devices here.
Parallel Connector: One 25-pin parallel port is provided.
This is where the signal cable for a parallel printer, or
other parallel device, connects to the server.
Infrared Connector: The server has one connector for
an infrared (IR) transceiver module option.
Serial Connectors: Two 9-pin serial connectors, A
(COM1) and B (COM2), are provided. The serial signal
cable for a modem or other serial device usually connects
here. If you are using a 25-pin signal cable, you need a
9-pin to 25-pin adapter cable.
94 PC Server HMM
Page 100

Internal Drive Bays
Internal drives are installed in
bays
. The bays are
numbered 1 through 7.
1
2
3
4
5
6
7
Note
If you install a drive that uses removable media
(diskette, optical disc, or tape), you might need to
remove or change the cover plate.
Bay 1 is for 5.25-inch devices only. Some models
are supplied with a hard disk drive preinstalled in bay
7.
Bay 2 has a preinstalled SCSI CD-ROM drive.
Bay 3 is for 3.5-inch diskette interface devices, such
as a diskette drive or tape backup unit that uses the
diskette cable. All models are supplied with a
diskette drive preinstalled in bay 3.
Bays 4–7 are for 3.5-inch drives.
A full-high drive occupies two bays between bay 3
and 7. If you are installing a removable media device
in bays 3 through 7, you must remove the tray from
the front of both bays.
The PC Server 325 Type 8639 is shipped with a 7
drop, 16-bit SCSI cable.
To install an 8-bit device, you will need a 16-bit to
8-bit SCSI Internal Converter. See “SCSI Drives” on
page 82 for additional information.
The IBM 3.5-inch rewritable optical disc drive requires
a special mounting bracket.
PC Server 325 - Type 8639
95
 Loading...