

Page 1

fS--;
4 ' 4
•
GU21-3207-1
File
NO.3180-1/S360/S370-06
:
E3
Model
1
Display
Station
User's
Guide
K , .
V.
^
Hi*
♦
o
r.
Page 2

GU21-3207-1
File No.
3180-1/S360/S370-06
Model
1
Display
Station
User's
Guide
Page 3

Second Edition (January1985)
This
major
revision
makes
obsolete
GU21
-3207-0.
Changes
or
additions
tothe
text
and
lllustrtins
are
indicated
bya
vertical
line
tothe
left
ofthe
changes
or
additions.
Changes
are
periodically
made
tothe
information
herein;
and
such
changes
will
be
reported in
subsequent
revisions or Technical Nesletters.
This
publication
is.for
planning
purposes
only.
The
information
herein
is
subject
to
changes before the products described become available.
References
in
this
publication
to
IBM
products,
programs,
or
services
do
not
imply
that
IBM
intends
to
rfiake
these
available
in
all
countries
in
which
IBM
operates.
Any
reference
to
an-JBM
licensed
program
in
this
publicatin
is
not
intended
to
state
or
imply
that
only
IBM's
licensed
program
may
used.
Any
functionally
equivalent
program
may
beused
instead.
. /
Requests
foc.lBM
publicatins
should
be
made
to
your
IBM
representative
ortothe
IBM
.
branch
office;Serving
your
locality.
(7'
This
publication
could
contain
technical
inaccuracies
or
typograghical
errors.
IBM
may
useor
distribute
whatever
information
you
supply
in
any
way
it
believes
appropriate
without
incurring
any
obligation
toyou.
©Copyright
International
Business
Machines
Corporation
1984,1985
Page 4

Display
Station
Problems
Display
Station
Setup
Display
Station
Operation
Messages
and
Error
Codes
HowtoObtain
IBM
Service
AppendixesAand
B
Page 5

ABOUT
THIS MANUAL V
Purpose
of This Manual v
Organisation of This Manual v
Summary of Changes vi
IfYou
Need
More
Information vi
CHAPTER
1.3180
SETUP
PROCEDURE
1
Section 1. What Should Be Done Prior to
Setup
1
Section 2. Setting Upthe DisplayStation 5
Section 3. Enteringthe DisplayStation ModelIDand the Keyboard
ID
14
Section 4. Connecting The DisplayStation 19
CHAPTER2.LEARNINGTOOPERATE
THE
DISPLAY
STATION
23
Cleaning 23
Adjusting
TheSlope ofthe
Keyboard
24
Adjusting the Display 25
Operator Information Area 26
Keyboards 27
Power
Switch
29
Security
Keylock
29
DisplayStation Adjustments 30
AdjustingBrightness 30
Adjusting
Contrast 30
Adjusting
Alarm
Volume 30
AdjustingKeyboardClickerVolume 30
Turningthe KeyboardClickerOnorOff 31
Turningthe Cursor
Blink
OnorOff 31
SelectingCursorStyle 31
Selecting Nomialor Reverse Image 31
Selecting DualCase/Mono Case (A,a) 31
Selecting Extended Display 31
Selecting Display
Dim
31
Special
Display
StationAdjustments 31
Selecting KeyboardID 32
Selecting ModelID 32
Selecting KeyboardNumericLock 32
Typewriter-Like
Keyboard
34typewriter/APL
Keyboard
34
Alt
Shift
35
Shift
35
Lock
35
Alphabet, Symbol, and Punctuation Mark 35
Dup 35
Field
Mark
35
PA1
and
PA2
35
Spacebar
37
Cursor
Control
37
New
Line
37
Tab
37
Back
Tab
37
Home
37
Horizontal Positioning 37
DoubleSpeed
Horizontal
Positioning
38
Vertical Positioning
38
Backspace
38
Fwd
and
Back
38
Numeric
Pad
39
Attn
39
Sys Rq 39
Clear 39
CursrSel
^
Er Inp 41
Erase
EOF
41
Print 41
Ident 41
Play
41
Test
41
Setup 41
Recrd 41
Reset
42
DvCnl
42
Insert 42
Delete 42
Enter
43
PF1 - PF24 43
Record 43
Play
^
CHAPTER3.OPERATOR
MESSAGES
AND
ERROR
CODES
45
OperatorMessages 45
Readiness andSystem
Connection
Symbols
46
Do
Not
Enter
(Input-Inhibited)
Messages
47
Reminders
X.21
Switched
Network
52
Shifts
and
Modes
53
DeviceDependent 53
Character
Highlighting
54
Printer Status 54
Cursor
Location
54
Four-Digit
ErrorCodes 55
CHAPTER 4. FIXINGDISPLAYSTATION PROBLEMS 59
Customer
Problem
Analysis
and
Resolution
(CPAR)
59
CPAR
Assistance
59
How To
Use
This
Chapter
59
ReferenceFigures 61
CPAR Procedures 62
CHAPTER
5. ELEMENT REMOVAL AND REPLACEMENT
PROCEDURES
97
How to
Obtain
IBM
Service
97
ElementExchangeand Replacement 98
Display
Element
Removal
and
Replacement
99
Keyboard
Element
Removal
and
Replacement
105
LogicElementRemovaland Replacement 107
Cable Attachment Module Removal and Replacement 111
Packing
Instructions
113
Display Element 113
Logic
Element
114
KeyboardElement 114
Cable
Attachment Module or PowerCord
115
APPENDIX A. BLANK TEMPLATE FOR CUSTOMER
MODIFIABLE KEYBOARD
117
INDEX
"9
Contents
iii
Page 6

Purpose
of
This
Manual
About
This
Manual
This
manualisfor
operators
and
supervisory
personnelofthe
IBM
3180
Display
Station.
This
manual
canbeusedasa learning toolaswellasa
sourceofreference
information.
It
describes
how
to:
Setupthe
display
station
Enter,
modify,
and
remove
information
Use
and
understand
the
functionofeach
key
Respondtomessages
and
error
codes
Perform
common
operator
tasks
Respondtoproblems
Exchange
elements
Pack
elements
that
need
replacing
Obtain
service
from
IBM
Organisation
of
This
Manual
This
manualisdivided
into
chapters
and
appendixes:
Chapter
1 explains
howtosetupand
check
out
the
3180
Display Station. (This
does
not
include
setup
instructions
for
any
features.)
Chapter2explains
howtooperate
the
display
station,
use
the
various keys,
make
display
and
keyboard
adjustments,
and
use
the
record
and
play functions.
Chapter
3 lists
the
operator
messages
and
error
codes,
their
explanations,
and
recovery
procedures.
Chapter4explains
howtodetermine
which
hardware
element
is failing
through
protslem
analysis.
Chapter5explains
howtoexchange,
remove
and
replace
failing
elements
and
howtoobtain
service
from
IBM.
Appendix A
containsasample
IBM
Service/Replacement
Order Form.
AppendixBexplains
howtoModify
Keyboard
Keytops.
About
This
Manual
Page 7

Summary
of
Changes
New information
has
been
added
to this manual to
support
the
typewriter/APL
keyboard.
If
You
Need
More
Information
You
may
wishtorefertooneofthe
following
publications:
•
IBM
3180
Display
Station
Keyboard
Template
Assignment
Sheet
and
Display
Screen
Layout
Sheet,
GX21-9467,
provides
row
and
column
layout
of
the
display
screen.
The
sheet
canbeused
by a
programmertodevelop
screens
and
can
alsobefilled
out
for
the
operatorasa run
sheet.
• IBM
3180
Model1Display
Station
Introduction
and
Preinstallation
Planning
Manual.
GA21-9465.
VI
Page 8
CHAPTER
1.
3180
SETUP
PROCEDURE
1
Section1.What
ShouldBeDone
PriortoSetup
1
Section 2. Setting Up
the
Display Station 5
Section
3. Entering
the
Display
Station
ModelIDand
the
Keyboard ID 14
Section 4. Connecting
the
Display Station 19
Chapter
1.
3180
Setup
Procedure
Page 9

Chapter
1.
3180
Setup
Procedure
SECTION
1.
WHAT
SHOULD
BE
DONE
PRIOR
TO
SETUP
Before
you
begintosetupthe
3180,
make
sure
that:
• The physical and electrical preparation for your 3180 complies with the
requirementsinthe
IBM
3180
Mode!
11ntroduction
and
Preinstaflation
Planning
Manual,
GA21
-9465.
SAFETY
PRECAUTION
The
power
cord
and
plug
(when
supplied)onyour
display
station
have
been
approved
for
use
with
this
display
station
and
meets
the
existing
testing
laboratory/test
house
standards.
For
your
safety,the
power
cord
and
plug
mustbeconnected
to a
properly
wired
and
earthed
outlet.
An
improperlywired
outletorplug
can
place
hazardous
voltages
on
accessible
metal
partsofthis
display
station.
The
customer
is
responsible
for
the
outlet
wiring.
Ifit
becomes
necessarytochange
the
power
cordorplugorif
the
outlet
is
improperly
wired,
have
the
change
made
accordingtolocalornational
code.Anew
power
cord
maybeordered
from
your
IBM
sales
representative.
• The system or control unityou are connectingyour3180 to is set up and
operating.
-
The
term
system
referstothe
controllingorhighest
level
system
in a
configuration.
-
The
term
control
unit
referstoa controlling
device
that
coordinates
work
station
operation
with
system
operation.
• You have a floor plan identifying the location and work stationIDof your
3180.
If
the
preceding
items
have
been
completed,
continue
with
this
setup
procedure.
If
you
are
not
sureorcannot
check
off
all
the
preceding
items,
ask
the
person
who
planned
the
setup.
Chapter1.3180
Setup
Procedure
1
Page 10

SAFETY
PRECAUTION
The display
element
should be movedtoIts highest position before it is
moved from
one
locationtoanother
(refertostep
2.2):
After your displaystation has been unpacked, make sure you have ailof the
following:
•
Display
Element
Security
Keys
Logic
Element
HI'
ri
Keyboard
Element
Keyboard
Template
Page 11

Cable
Attachment
Module
A
Power
Cord
Repair Identification
Tags
(located on
the
backofthe
display
element)
Chapter1.3180
Setup
Procedure
3
Page 12

Notes:
1.
Save
all
packaging
material
for
useifserviceisrequired.
2. Check
that
the
security keys
areinthe
envelope
tapedtothe
topofthe
top
of
the
display
element.
3.
Record
the
key identification
numberincase
the
keys
are
lost
and
replacementisneeded.
4. If you
use
special
keyboard
keytops,
use
AppendixBfor
the
installation
instructions
and
the
form for recording
the
location of special keys.
Page 13

SECTION
2.
SETTING
UP
THE
DISPLAY
STATION
2.1
Remove
the
repair
identification
(RID)
tags
from
the
backofthe
display
element.
Place
them
on
the
logic
element
and
on
the
keyboard
element
in
the
positions
shown
below.
Note:
Service
cannotbeobtained unless
these
tags
have been
installed.
Once
they
have
been
installed,donot
attempt
to
remove
them.
ir
13
C9468007
Chapter1.3180
Setup
Procedure
5
Page 14

2.2
Adjust
the
display
element:
• Pushinthe side knobsand
pull
the display element up
untilitstops.
Tilt
the
display
element
forward.
• Remove
the
tape
from
the
back of
the
display element.
C9468008
Page 15
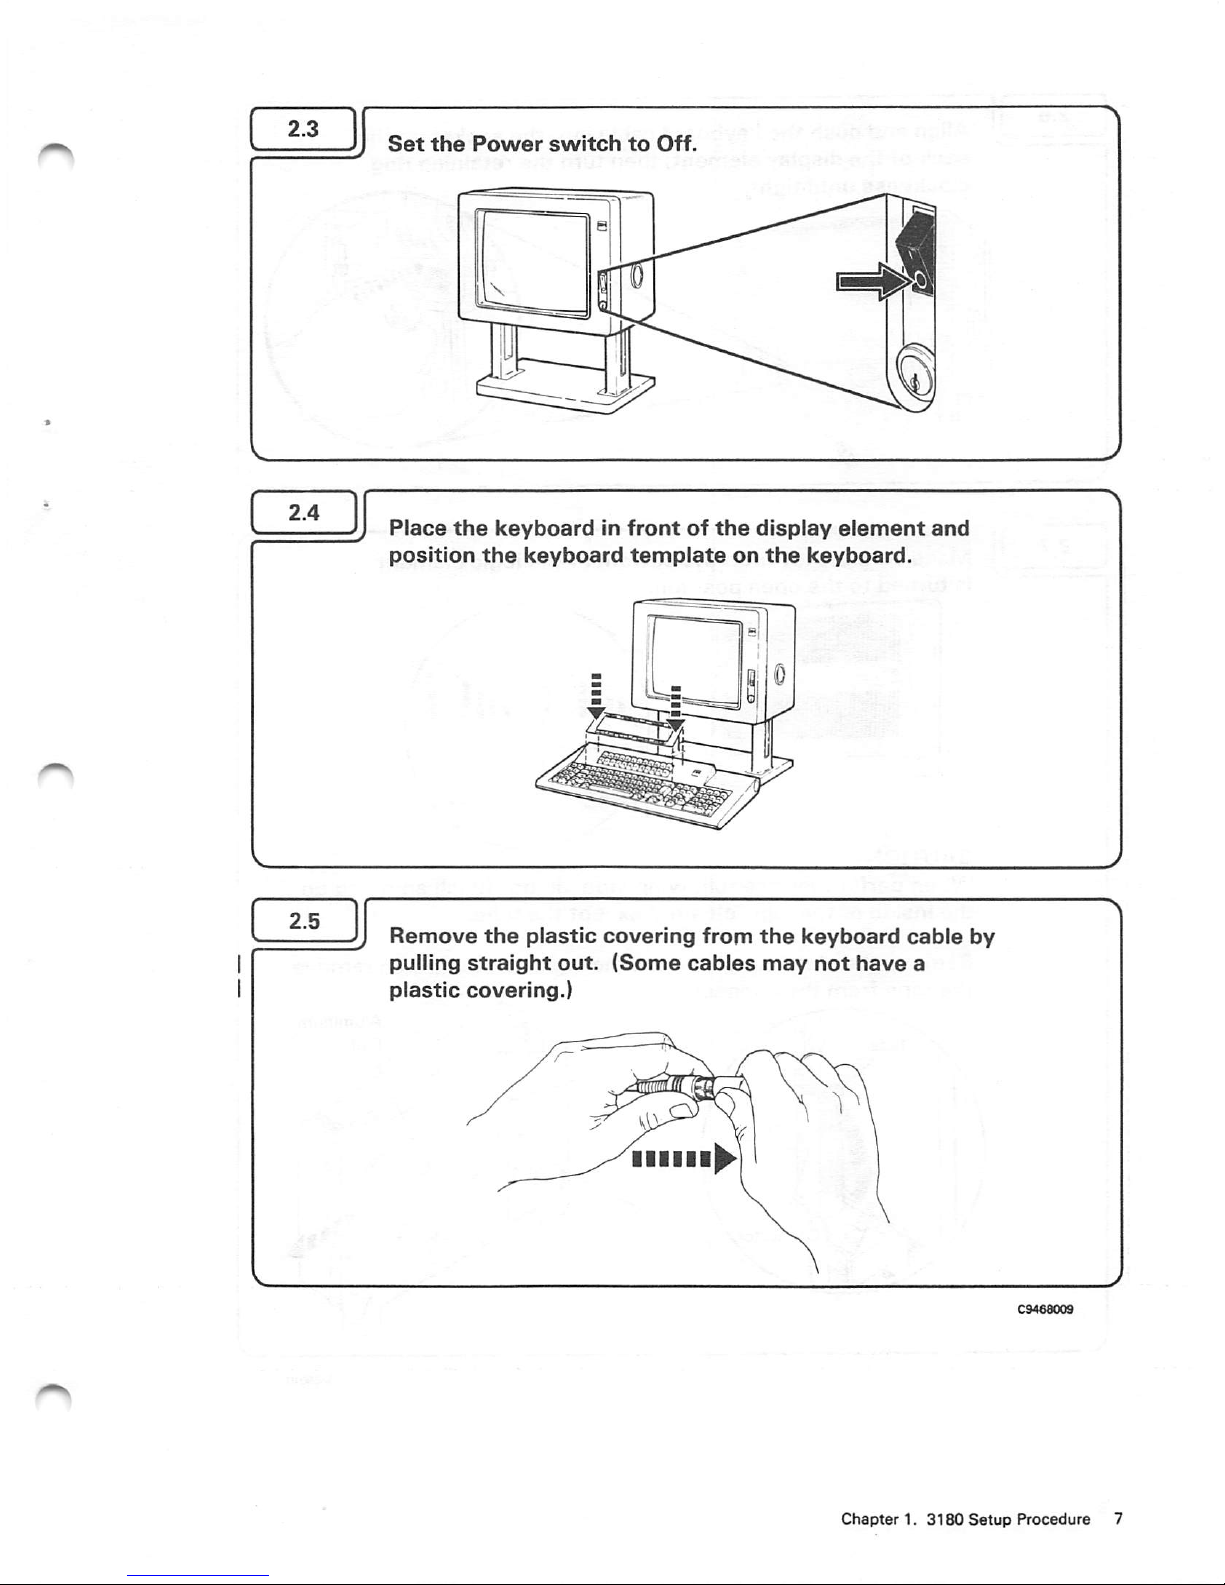
Place
the
keyboard
in
front
of
the
display
element
and
position
the
keyboard
template
on
the
keyboard.
Remove
the
plastic
covering
from
the
keyboard
cable
by
pulling
straight
out.
(Some
cables
may
not
have
a
plastic
covering.)
Chapter1.3180
Setup
Procedure
7
Page 16

IB
Make
sure
the
leveronthe
bottomofthe
logic
element
is
turned
to
the
open
position.
I'M
>>
ill..
..I
!.l
Closed
CAUTION
When
performing
the
following
step,
do
not
touch
anything
on
the
insideofthe
logic
element
except
the
tape.
Remove
the
aluminum
foil
from
the
logic
element;
then
remove
the
tape
from
the
connector.
Aluminum
Taoe
©J
Foil
Fconnectoo
Page 17

Make
sure
the
two
locking
bars
on
the
right
latches
of
the
logic
element
are
pushed
as
shown
below.
Ho
disDla
Locking-
Bars
Latches
Chapter1.3180
Setup
Procedure
Page 18

Firmly
display
are
sei
to
the
Slide
the
locking
bars
on
the
right
latchesasshown
below.
Locking Bars
Page 19

Turn
the
lever
on
the
bottom
of
the
logic
element
to
the
closed
position.
Closed
Chapter1.3180
Setup
Procedure
11
Page 20

i
An
alarm
will
sound,
pause
briefly,
sound
again,
andstop;
then the following display
will
appear:
^EEEBEEEEEEEEEEEEEEEEEEEEEEEEEEEEEEEEJEEEEEEEEEEEEEEEEEEEBEEBEEEEEEEEEEEEEEEEI
h\
" H
NomMl Inlentity H't
/High
InMntitv
H's
I
R«varM
Imsg*
H's
H
'AAAAAAAAAAAAAAAAAAAAMAAAAAAAAAAAAAAAAS;
H
HHHHHKHHKyHHHHtWHHHHHHHHHHKHHHHKHHHHK
H
H ( H
H
HHHHHHHHHHHHNHfHHKHHHHHKHHHHHHHHHHHKH
H
/ H
H H / H
JEEEEEEEBEEEEEEEEEEBEEEEEEEEEEEEEEEEEBEJEEEEEEEEEEJBe^EEEEEEEEEEEEEEEEEEEEEEEEE*
Atinbuiet trom Lgftto Rioht
^•verM
IrrwQe
E
Normal
E
Blinking £
H-ph
Inienxlv
E
Bl*rvk
Pofibon
Undeftcor*
E
Ravara* lmag« E
Cursor
Row
Column
ImtYor mty not b«ditplaysdl
Do
all
the
above
conditions
occur?
Section 3, Entering
the
Display
Station
Model
ID
and
the
Keyboard
ID
Page 21

2.17
If
the
conditions
in
step
2.16
do
not
occur,
do
the
following:
1.
Set
the
Power
switch
to
Off.
2.
Check
to
make
sure
that:
a.
Thereispowertothe
electrical
outlet.
b. The
power
cord is properly connected to
the
display
station
and
to
the
electrical
outlet.
c.
The
tape
has
been
removed
from
the
connector
on
the
logic
element.
(Refertostep
2.7.)
d.
The
logic
element
is securely
fastenedtothe
back
of
the
display
element
and
the
lever on
the
logic
elementisturnedtothe
closed
position. (Refer
to
steps
2.7
through
2.12.)
3.
Set
the
Power
switch
to
On.
Do
the
conditions
in
step
2.16
occur
now?
Yes
No
Section
3, Entering
the
Display
Station
Model
ID
and
the
Keyboard
ID
Chapter
4, Fixing
Display
Station
Problems
C9468015
Chapter1.3180
Setup
Procedure
13
Page 22

SECTION 3. ENTERING THE DISPLAY STATION MODEL ID AND THE
KEYBOARD
ID
Before
you
begin
this
section,
getthe
display
station
modelIDandthe
keyboard
ID
from
the
system
floor
plan
oraskthe
person
who
planned
the
setup.
The
display
station
modelIDisthe screen
size
supported for
your
display
station.
The
keyboardIDisthe
keyboard
option(s)
that issupported by
your
control
unit.
If
you
need
more
information
aboutthe
modelIDand
keyboard
ID,
see
"Special
Display Station
Adjustments"inChapter
2,
3.1
3.2
14
Set
the
Power
switch
to
Off
and
wait
five
seconds.
Press
and
hold
any
keyonthe
keyboard
and
set
the
Power
switch
to
On.
Hold
the
key until
the
following display
appears:
UiAMAAAAAAAAAAAAAAAl
H HHKKKHHKKKKHKKKHKKKKKHKHKHKKKHKHHKKHH H
H H
H KKKKKHKKKHKHK»KKKHKHHaHKKKKXKHKHHKKKH H
Ea £ B
£1
-Display
Station-
Model
ID
BEEeBBEEBBEEEEBS
Note:
There may be additional information on
the
bottom
of
your
display.
You
will
not
need
that
informationtoset
the
display
station
model
ID.
C9468016
Page 23

Press
the
SetUp
r_j
key.
mm
niilH
Bigeiijg|iaili||a|ia|ilSlilf
•Liiiyiiiiiii]
A blinking
diamond
will
appear
on
the
bottomofthe
display.
Press
the
Model
ID
igini|[w[ni!|[||niiii|[i
Biglgliliaiililiaillililiini
I
I
nil
iii|i
iirtiii|i||—
The
display
station
modelIDon
the
bottomofthe
display
will
change.
^ J
Note:
If a
9012
error
code
appears
on
the
bottomofthe
displayorif
nothing
happens,
begin
this
section
again.
Chapter1.3180
Setup
Procedure
15
Page 24

3.5
3.6
16
Keep
pressing
the
IVIodel ID
key
until
the
display
station
model
ID (a
number2through
9)
assigned
to
your
display
station
appears
on
the
bottom
of
the
display.
(If
the
keyispressed
when
a 9isdisplayed,
the
number
changes
to2and
the
cycle
starts
over.)
With
that
display
station
model
IDonthe
bottom
of
the
display,
verify
that
the
correct
keyboard
IDisset.
The
keyboard
IDisdisplayed
to
the
rightofmodel
ID.
Is
the
keyboard
ID
correct?
Yes
3.9
No
rm
C9468018
Page 25

Press
the
Keyboard
ID
SmmSmBBBmbHm
laMlillilliliaiaBilMHIilMl
ilHIMllllilillilllliliaHlilll
[•llBlillMHlilBllilHlllllBH
'ISI'lSllifilil
The
keyboard
ID
number
on
the
bottom
of
the
display
wil)
increase.
Keep
pressing
that
key
until
the
keyboard
ID (a
number
00
through
31
and
then
78)
assigned
to
your
display
station
appears
on
the
bottom
of
the
display.
(If
the
keyispressed
when
78isdisplayed,
the
number
changes
to
GO
and
the
cycle
starts
over.)
Chapter1.3180
Setup
Procedure
17
Page 26

3.9
18
With
the
correct
display
station
model
ID
and
keyboard
ID
on
the
bottom
of
the
display,
press
the
SetUp
BH
nPIDiaiU|U|U(DlDP1L)|IJ|UlE
inooianDiofuiiiJiuiuiuiui
E31DlD[aiDIDPTaiP[0|0^
@ @ 0
key.
iligigia]
upio
g
ppp
u
|U1U|U
|LJ|U
The
display
station
model ID
and
the
keyboard IDfor your
display station is
now
set
and
remains
the
same
until you
change
it.
ContinuetoSection4,Connecting
the
Display
Station.
C9468020
Page 27

SECTION
4.
CONNECTING
THE
DISPLAY
STATION
SAFETY
PRECAUTION
Do
not
connectordisconnect
cables
duringanelectrical
storm.
4.1
4.2
Set
the
Power
switch
to
Off.
Find
the
cable
that
connects
to
the
cable
attachment
module.
Align
the
cable
with
the
connector
on
the
cable
attachment
module;
then
push
in
and
turn
the
cable
clockwise
until
the
pins
snap
into
place.
C9468021
Chapter1.3180
Setup
Procedure
19
Page 28

4.4
4.5
20
Align
the
cable
attachment
module
with
the
opening
on
the
lower
backofthe
display
element.
Push
the
cable
attachment
module
upward
untilitstops;
then
turn
the
knob
until
tight.
C9468022
Page 29

4.6
4.7
Set
the
Power
switch
to
On.
An
alarm
will
sound,
pause
briefly,
sound
again,
and
stop.
A display will
appear
briefly;
then
the
following display
will
appear.
Qorgor
I and a or £
Do
the
above
conditions
occur?
Yes
No
±lJ
4.9
I
C9468023
Chapter 1.
3180
Setup
Procedure 21
Page 30

4.8
Setupiscomplete
on
this
display
station.
j
n
"N
22
If
the
conditionsinstep
4.7
do
not
occur,
do
the
following:
1. Ask
the
system
operator if
the
system or control unit
to which your displaystation is connected is operating
and able to recognise your display station.
2.
Make
sure the cable attachment
module
isconnected
correctly.
3.
Set
the
Power
switchtoOff
and
check
the
cable
connections
at both
ends
to make sure they are properly positioned and
tightened.
4.
Set
the
Power
switch
to
On.
Do
the
conditionsinstep
4.7
occur
now?
Yes
No
Setupiscomplete.
Chapter
4, Fixing
Display
Station
Problems
C9468024
Page 31

Chapter
2.
Learning
to
Operate
the
Display
Station
CHAPTER2.LEARNINGTOOPERATE
THE
DISPLAY
STATION
23
Cleaning 23
Adjusling The Slope of the Keyboard 24
Adjusting the Display 25
Operator InformationArea 26
Keyboards 27
Power
Switch
29
Security Keylock 29
DisplayStation Adjustments 30
AdjustingBrightness 30
AdjustingContrast 30
AdjustingAlarmVolume 30
AdjustingKeyboard ClickerVolume 30
Turning the Keyboard Clicker On or Off 31
Turningthe Cursor
Blink
On or Off 31
Selecting Cursor Style 31
Selecting Normal or Reverse Image 31
Selecting Dual Case/Mono
Case
(A,a) 31
Selecting Extended Display 31
Selecting Display Dim 31
Special Display Station
Adjustments
31
Selecting Keyboard ID 32
Selecting
fvlodel
ID 32
Selecting Keyboard Numeric Lock 32
Typewriter-Like Keyboard 34typewriter/APL Keyboard 34
Alt
Shift
35
Shift
35
Lock
35
Alphabet, Symbol,
and
Punctuation Mark 35
Dup 35
Field
Mark
35
PA1
and
PA2
35
Spacebar
37
Cursor
Control
37
New
Line
37
Tab
37
Back
Tab
37
Home
37
Horizontal Positioning 37
DoubleSpeed
Horizontal
Positioning 38
Vertical
Positioning
38
Backspace
38
Fwd
and
Back
38
Numeric
Pad
39
Cursor
Control
41
New
Line
41
Tab
41
Back
Tab
41
Home
41
Horizontal Positioning 41
Double-Speed
Horizontal Positioning 42
Vertical Positioning
42
Attn
39
SysRq
II
Clear 39
CursrSel
Er Inp 41
Erase
EOF
41
Print 41
Ident 41
Play
41
Test
41
Setup
41
Recrd 41
Reset
42
DvCnl
42
Insert 42
Delete 42
Enter
43
PF1 - PF24 43
Record 43
Play
Page 32

CLEANING
Chapter
2. Learning
to
Operate
the
Display
Station
The
3180
is a tabletop display station. The display station can have any of the
following four
screen
formats:
24
linesof80
characters
each
(1920
characters)
•
32
linesof80
characters
each
(2560
characters)
•
43
linesof80
characters
each
(3440
characters)
•
27
linesof132
characters
each
(3564
characters)
Inthe pages that
follow,
the term system refers to any host system your display
station is connected to. The system can be a control unit or
the
highest-level
system inyourcomputer system. Itcan receive, process, and send back
information
that
you
enteratyour
display
station.
Clean the display surface with a soft, lint-free, cloth moistened with an
ammonia-baseoralcohol-base
glass
cleaner. You can also
use
a cloth
moistened with water and a mild detergent followed by a water-dampened cloth.
Do
not
use
petroleum-base
products.
Chapter 2. Learning to Operate the Display Station 23
Page 33
ADJUSTING
THE
SLOPE
OF
THE
KEYBOARD
24
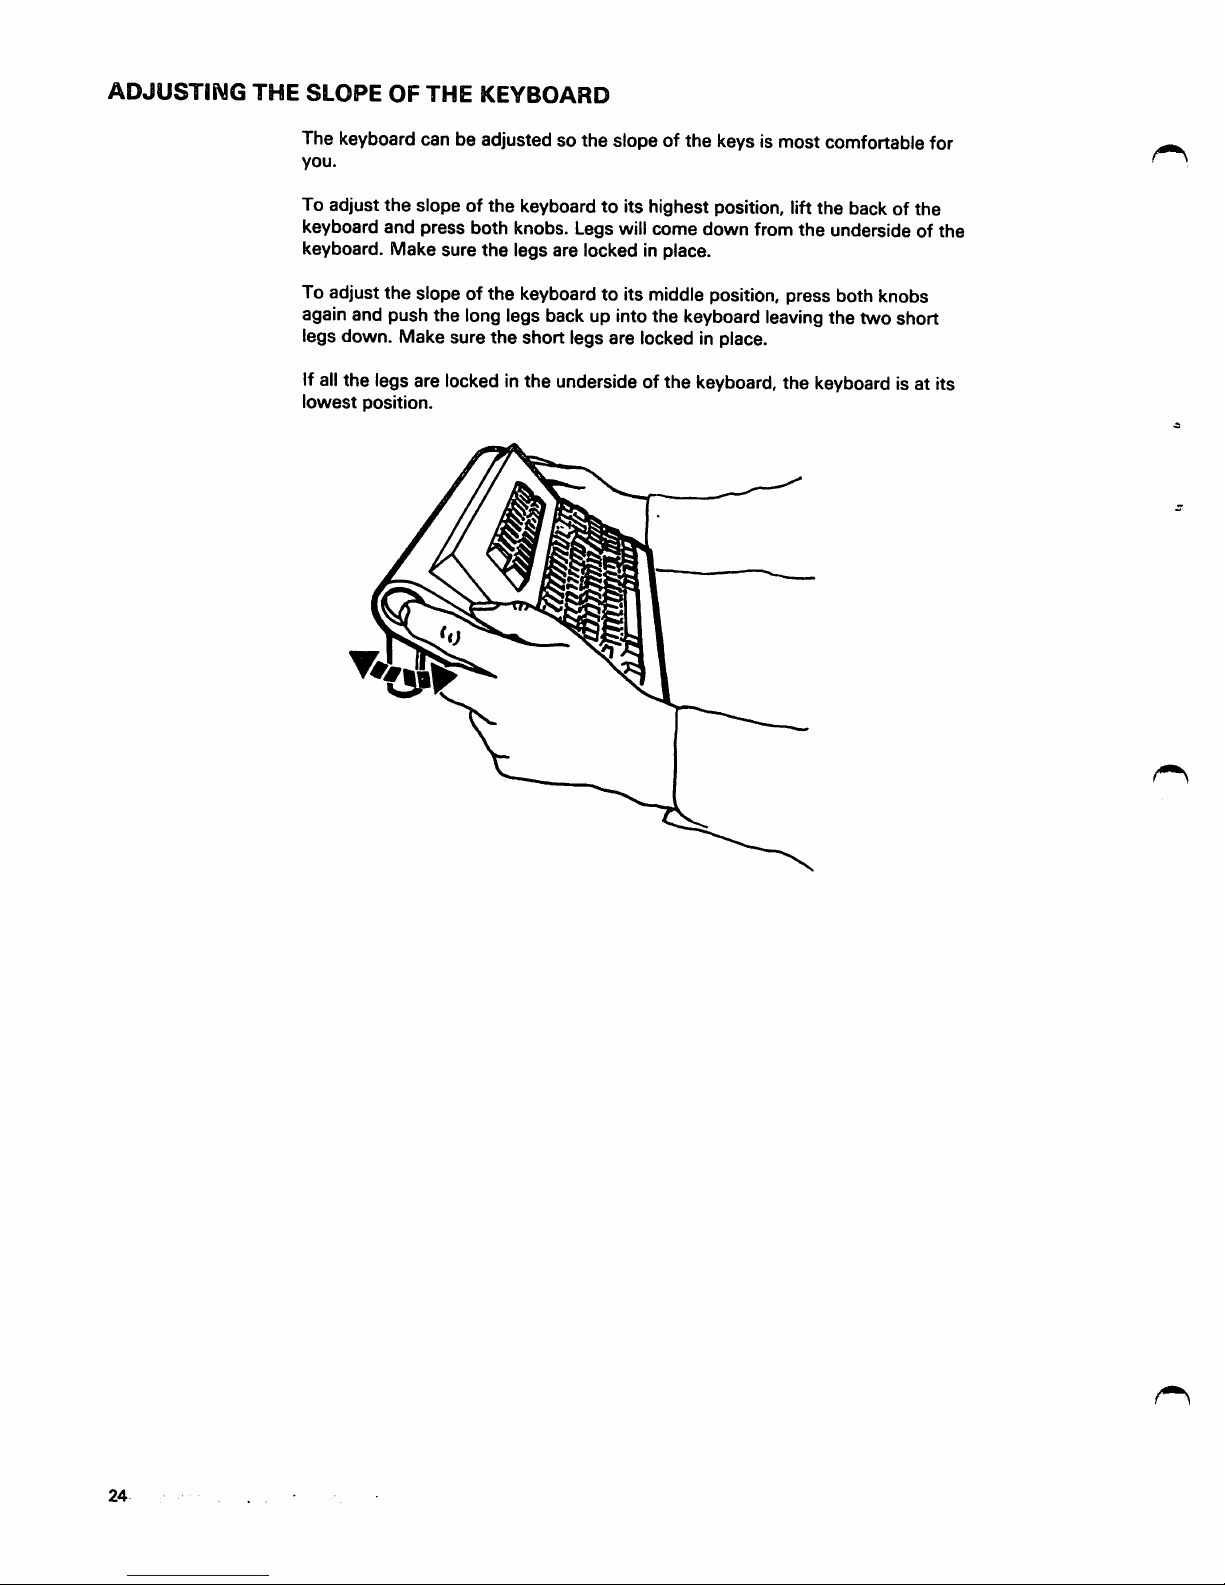
The keyboard can be adjusted so the slope of the keys is most comfortable for
you.
To adjust
the
slopeofthe
keyboardtoits highest position, lift
the
back of
the
keyboard
and
press
both knobs. Legs will
come
down
from
the
underside of
the
keyboard. Make
sure
the
legs
are locked in place.
To adjust the slope of the keyboard to its middle position, press both knobs
again and push the long legs back up into the keyboard
leaving
the two short
legs down. Make sure
the
short legs are locked in place.
Ifall the legs are locked in the underside of the keyboard, the keyboard is at its
lowest
position.
Page 34

ADJUSTING
THE
DISPLAY
-Thedisplay can be moved up or down, rotated, and tilted. To move the display
either up or down, push the knobs on both sides of the display at the
same
time.
Then
lift
the
displayupor
pushitdown.
Ifyou need to relocate the display, make sure the display is in its highest position
before
pickingitup.
To rotate the display, place your hands on both sides of the display near
the
front
edge
and
turn
it in
the
direction you
want.
Chapter
2. Learning to Operate
the
Display Station 25
Page 35
To tilt
the
display, pull upward or
push
downward.
7.
OPERATOR
INFORMATION
AREA
26
The
operator
information area is
the
bottom line of your display screen. It tells
you the operating state of your display station and the system to which your
display
stationisconnected.
RefertoChapter3,Operator
Messages
and
Error
Codesofthis
manual
for
a
complete description of
the
messages
and information
that
can
appear
on this
line.
Page 36

KEYBOARDS
The displaystation can have a typewriter-like keyboard, a typewriter/APL
keyboard, or a data entry keyboard. The following illustration showsthe
keyboards. The light keys are typematic (repeat their action) when held down.
The lightkeys in the top two rows of the keyboard are typematic onlywhen used
in conjunction with the SetUp key.The use of these keys is discussed later in this
chapter.
The right side of the keyboard has a separate
set
of keys that are similar to a
calculator
keyboard.
Typewriter-like
Keyboard
ffT]
fpFis
1 1
rpFi*)ppsIpffo|
pf»i 1 rpRai
fPFaa
<("24
f « CUck
sib*
All
i>vn>
Ho KM Moa»i
*1^
Clccn
8o^
C>«»f
Cwtr
22..
IP
PF'
PFS PF3 .
PF«
»»
PF«
pfr»pra
PF»
PFw
fFn
pfat
-----
twitii'l
O a
till..
Al^rr.
A*
uckj
A S D fF 1 G H J K L
Typewriter/APL Keyboard
0^1
p
I ^ Y^
T1^r|G^
T TrnTFnIoiTrnTrr
znirx^ircMirv^-iifeiTTrNnirM'
DuBl
iflRR
FlMNrS
i-
->
Chapter
2. Learning to
Operate
the
Display
Station
27
Page 37

POWER
SWITCH
Toturn on the display station, press the top half of the switch. Toturn off the
display station, press the bottom half of the switch.
If
youdonot
pressa
key
for
ten
minutes
after
the
display
stationisturnedonand
there is no information sent to the display station from the control unit, the
display
will
automatically
dim
except
for
the operator
information
areaand
cursor. Information,sent to the display station from the control
unit,
may not be
visibleonyour
display.A):(
appearsinthe
operator
information
area.
When
this happens, press any
key
and the
display
content
will
return
(see
Selecting
Display
Dim
laterinthischapter). Whenever youturnon the
display
station,
tests are automatically performed to make sure your display station is operating
correctly.
SECURITY
KEYLOCK
The security
keylock
prevents entering data or
viewing
data on the displaywhen
the
keyisin
the
locked
position.
When
the
keyisin
the
locked
position,
a ^
'S
displayed in
the
operator information area.
To
unlock
the
keylock,
insertthe keyandturn it
clockwise
until
itstops (seethe
following
illustration).
The
key
canbe
removed
when
itisinthe
locked
orthe
unlocked
position.
Power
On
Unlocked
Position
Power
Off
Locked
Position
Chapter 2.
Learning
to Operate the
Display
Station 29
Page 38

DiDma
i
SbB
m
i)
DISPLAY
STATION
ADJUSTMENTS
To make the following adjustments, you must press
the
I Setup
key
first;ablinking
diamond
( 0 )
will
appear
in
I the operator information area. If
the
diamond does not
appear,
turn
off
the
display
station,
waitatleast
five
seconds, and then turn on the display station again.
After you have
pressed
the
SetUp
key, you can
make
one
or several adjustments. When you have finished making
your adjustment(s),
press
the
Setup
key again.
These
adjustments, except for
the
extended display and display
dim, will
stay
as you
set
them
even
when
the
display
stationisturned
off.
Note:
The
keyboard
clickerison
(discussed
laterinthis
chapter), while you are increasing or decreasing the
brightness,
contrast,orkeyboard
clicker volume.
The
clicking
sound
stops
when
the
adjustment
has reached its
highestorlowest
level.
Adjusting
Brightness
decrease
Adjusting
Contrast
decrease
Display contrast is the difference in brightness between
fields that are highlighted and the fields not highlighted.
Adjusting
Alarm
Volume
decrease
Adjusting
Keyboard
Clicker
Volume
decrease
Page 39

Turning
the
Keyboard Clicker OnorOff
PF17
Click
OiiOlfj
If
the
clicker
sounds
when
the
ClickOnOff
key
is
pressed, each timeyou press a keyyou
will
hear the
click
sound.
When
Input
Inhibited)(isonthe
status
line,
you will
not
hear
the
click
sound.
If
the
clicker
does
not
sound
when
the
Click On Off key is
1 pressed, there
will
be no clicksound when you press the
I
keys.
ButifInput
InhibitedJ[isonthe
status
line,
I
there
will
bea
click
sound
each
time
you
pressakey.
Turning
the
Cursor
Blink
OnorOff
Allows
you
cursor.
Cursr
SeUJ^
to
alternately
choose
a blinking or nonblinking
Selecting
Cursor
Style
PF19
Alt
Curst
Allowsyou to choose an underline( )or a block (
cursor.
Selecting
Normal
or
Reverse
Image
pituc
PF20
Rvrse
Image
Allows you to
choose
a display with green characters on a
dark
backgroundordark
charactersona
green
background.
Selecting
Dual
Case/Mono
Case
(A,a)
Allows you to
choose
either
upper
and
lower
case
alphabetic
characters
or only
upper
case
alphabetic
characters.AnA,aoran
A willbedisplayedonthe
operator information area line to the right of
the
diamond
{ 0 ).
Selecting
Extended
Display
Extnd
Pressing the Extnd Dsply displays numbers that are
meaningful to service personnel
only.
Theextended
displayis turned off each time the displaystation is
turned
on.
1 This setting remains ineffect untilyou turn the display
I station off or press
the
Extnd Dsply key again.
Selecting
Display
Dim
^
|selUi|
PF22
No
Dirn
IIfno
keys
are
pressed
andnoinformationisreceived
1 from
the
control unit for
ten
minutes,
the
display will
automatically dim (go blank)
except
for
the
operator
information
area
line
and
the
cursor.
A
appears
on
the operator information area line. When any key is
I pressed, or
information
is received fromthe
control
unit,
the display contents
will
return. Ifyou do not want the
displayscreen to go blank,use this adjustment procedure.
I Once
the
display is
set
to No Dim,the setting cannot be
I changed untilyou turn the display station off.
SPECIAL
DISPLAY
STATION
ADJUSTMENTS
When you change
the
keyboard ID, the model ID, or
select
the
numeric lock, you
must
first do
the
following:
1. Turn
off
the
display
station.
2.
Press
and
hold
down
any
key on
the
keyboard
and
turn on the display station. Continue to hold down
the
key until a
display
appears.
Chapter 2. Learning to Operate the DisplayStation 31
Page 40

Selecting
Keyboard
ID
The
Kbd ID key allows you to
change
the
keyboard
configurationasdefinedbythe
3274
keyboard
definition
utility
program.
The
following
keyboard
IDs
are
available:
78=3278
emulation
ID
00=3180
native
ID
01
through
31 =
Customer
modifiable
keyboard
configuration
The
customer
modifiable
keyboard
configurationIDthat
you
can
use,
willbesuppliedbyyour
system
programmer.
Selecting
Model
ID
Allows
youtochoose
the
display
station
ID.
The
following
are
the
display
station
ModelIDnumbers:
2--Emulate
3278
Model
2
{24x80
screen
size)
3--Emulate
3278
Model
3
(32x80
screen
size)
4-Emulate
3278
Model
4
(43x80
screen
size)
5--Emulate
3278
Model
5
(24x80or27x132
screen
size)
6--24x80
default
screen
size
7-32x80
default
screen
size
8--43x80
default
screen
size
9--27x132
default
screen
size
Note:
For
display
station
ModelIDnumbers
5
through9,the
systemorthe
control
unit
may
produce
screen
sizes
that
differ
from
those
providedinthe
previous
list.
To
determine
the
screen
size
thatisallowed
for
the
display
station
ModelIDnumber
that
you
have
selected,
contact
your
system
programmer.
Selecting
Keyboard
Numeric
Lock
Allows you to
select
the
statusofthe
keyboard
lock
function.
The
numeric lock indicator position in
the
operator
information
areaiseither
blank
(unlocked)
or
displaysanN
(numeric
locked).
The
numeric
lock
limits
the
characters
that
you
can
key
into
a field
designatedbythe
programasa
numeric
field.
When
the
cursor
entersanumeric
field
with
the
numeric
lock on,
your
display
station
automatically
shifts
to
downshift
modeifyou
haveatypewriter-like
keyboard
or
to
upshift
modeifyou
haveadata
entry
keyboard.
When
this
happens,
the
numeric
(NUM)
message
appearsinthe
shifts
and
modes
portionofthe
operator
information
area.
The
only
keys
that
you
can
key
into
the
numeric
fields
are
the
digits 0
through9,decimal
sign
(.),
minus
(-),
and
the
Dup
key.
Pressingakey
for
any
other
displayable
character
displays
the
X :itNUr'l (do
not
enter—numeric
data
only)
messageinthe
operator
information
area
and
disables
your
keyboard.
Pressing
the
Reset
key
unlocks
the
keyboard
and
turns
off
this
message.
You
can
override
the
numeric
lockona
data
entry
keyboard by pressing the numeric shift ( 0 ) key or the
alpha
( (J ) key,
dependingonthe
character
to be
keyed.
You
can
override
the
numeric
lockona
typewriter-like
keyboard by pressing and holding the shift ( 0 ) key
and
then
pressing
the
desired
characterorsymbol
key{s).
Note:
The
shift
lock
numeric
lock.
key
cannot
override
the
Page 41

TYPEWRITER-LIKE
KEYBOARD
Thetypewriter-likekeyboard resembles a typewriter
keyboard in
appearance
and layout. In fact,
mostofthe
keys do
the
same
thing as
the
keys of
the
same
name
on
a
typewriter
keyboard.
Page 42

Some
keys have printing on
the
front. When an Ait key is
pressed
and
held
down
and
then
a key with printing on
the
frontispressed,
the
system
performs
the
action
shownonthe
frontofthe
key
rather
than
the
action
shownonthe
top.
Both
Alt
keys
perfornn
the
same
function.
Shift
When
either
the
leftorthe
right
shift
keyispressed,
the
upper
symbols
shownonthe
facesofthe
dual
character
keys
will
display
when
they
are
pressed.
Lock
Pressing
the
Lock key
locks
the
keyboard
in a
shifted
(uppercase)
condition.
When
the
Lock key is
used,
you
do
not
havetohold
the
shift
key
down,
and
both
hands
are
free
for
typing.
Press
either
shift
key
when
you
are
ready to return
the
keyboard to
the
unshifted (lowercase)
condition.
This
releases
the
lock.
Alphabet,
Symbol,
and
Punctuation
Mark
The
uppercase
characters,
symbols,
and
punctuation
marksonthe
top
portionofthe
keys
are
displayed
when
the
keys
are
usedinconjunction
with
the
shift
and
lock
keys.
When
the
keys
are
used
without
the
shift
and
lock
keys,
lower
case
letters,
symbols,
and
punctuation
marks
on
the
lower
portionofthe
keys
are
displayed.
All
these
keys
are
typamaticifheld
down.
Pressing the Dup key, wiih a shift key he!d down, displays
an
overscore
asterisk
( * )
when
the
A,a (Dual
Case/Mono
Case) key is
settoA.a.
When
the
A.a key is
set
to A, only
the
asterisk is displayed. Also
the
cursor
advancestothe
first
character
locationofthe
next
input
field.
Field
Mark
Pressing the
Field
Mark key, with a shift key helddown,
displays an overscored semicolon ( J )when
the
A,a
key is
set
to A.a.
When
the
A,a key is
set
to A, only
the
semicolon
is displayed.
The
Field Mark key is
used
when
operating with an unformatted displayto indicate the end
ofafieldtothe
program.
PA1
and
PA2
PA1
and
PA2
are
program
access
keys
which
provide a
means of signaling the program or communication with it.
While
your
display
stationissignaling
the
program,
the X
(do
not
enter-time)
message
appearsinthe
operator
information
area,
disabling
your
keyboard.
Most
programs,
when
replying to
these
keys, turn off
the
time
message.
However, this
dependsonthe
program. The
host
program determines how
these
keys are used. !f you
are
not
familiar
with
the
useofthe
PA1
and
PA2
keys,
refertothe
appropriate
user's
program
guide.
Chapter 2. Learning to Operate the Display Station 35
Page 43

TYPEWRITER/APL
KEYBOARD
The typewriter/APL keyboard can be
used
for APL
applications or for
typewriter-like
applications.
When
the
display
stationisfirst
turned
on,
the
typewriter/APL keyboard
operates
the
sameasthe
typewriter-like
keyboard.
All
the
functions
that
are
documentedinthis
manual
for
the typewriter-like keyboard, also apply to the
typewriter/APL keyboard.
The symbols for the typewriter/APL keyboard are orange
and
are located to
the
right of
the
typewriter-like symbols
on
the
topofthe
keys
or on
the
frontofthe
keys.
To activate
the
typewriter/APL keyboard keys,
press
and
hold
down
an ALT
shift
key
and
then
press
the
Backspace/APL
key.
* ' ^ f APL will be
displayed
in
the
operator
information
area.
Once
APLisactive,
the
shift
keys
canbeused
like a
typewritertoselect
the
APL
symbolonthe
upperorlower
partofthe
key
tops.
To
activate APL
symbols
that
areonthe
front of
the
keys,
press
and
hold
downanALT
key
and
then
press
the
desired
APL
key.
The
display
station
canbereturnedtothe
typewriter-like
keyboard
modebypressing
and
holding
down
an ALT key
and
then
pressing
the
Backspace/APL
key. APL will no
longerbedisplayedinthe
operator
information
area.
Page 44
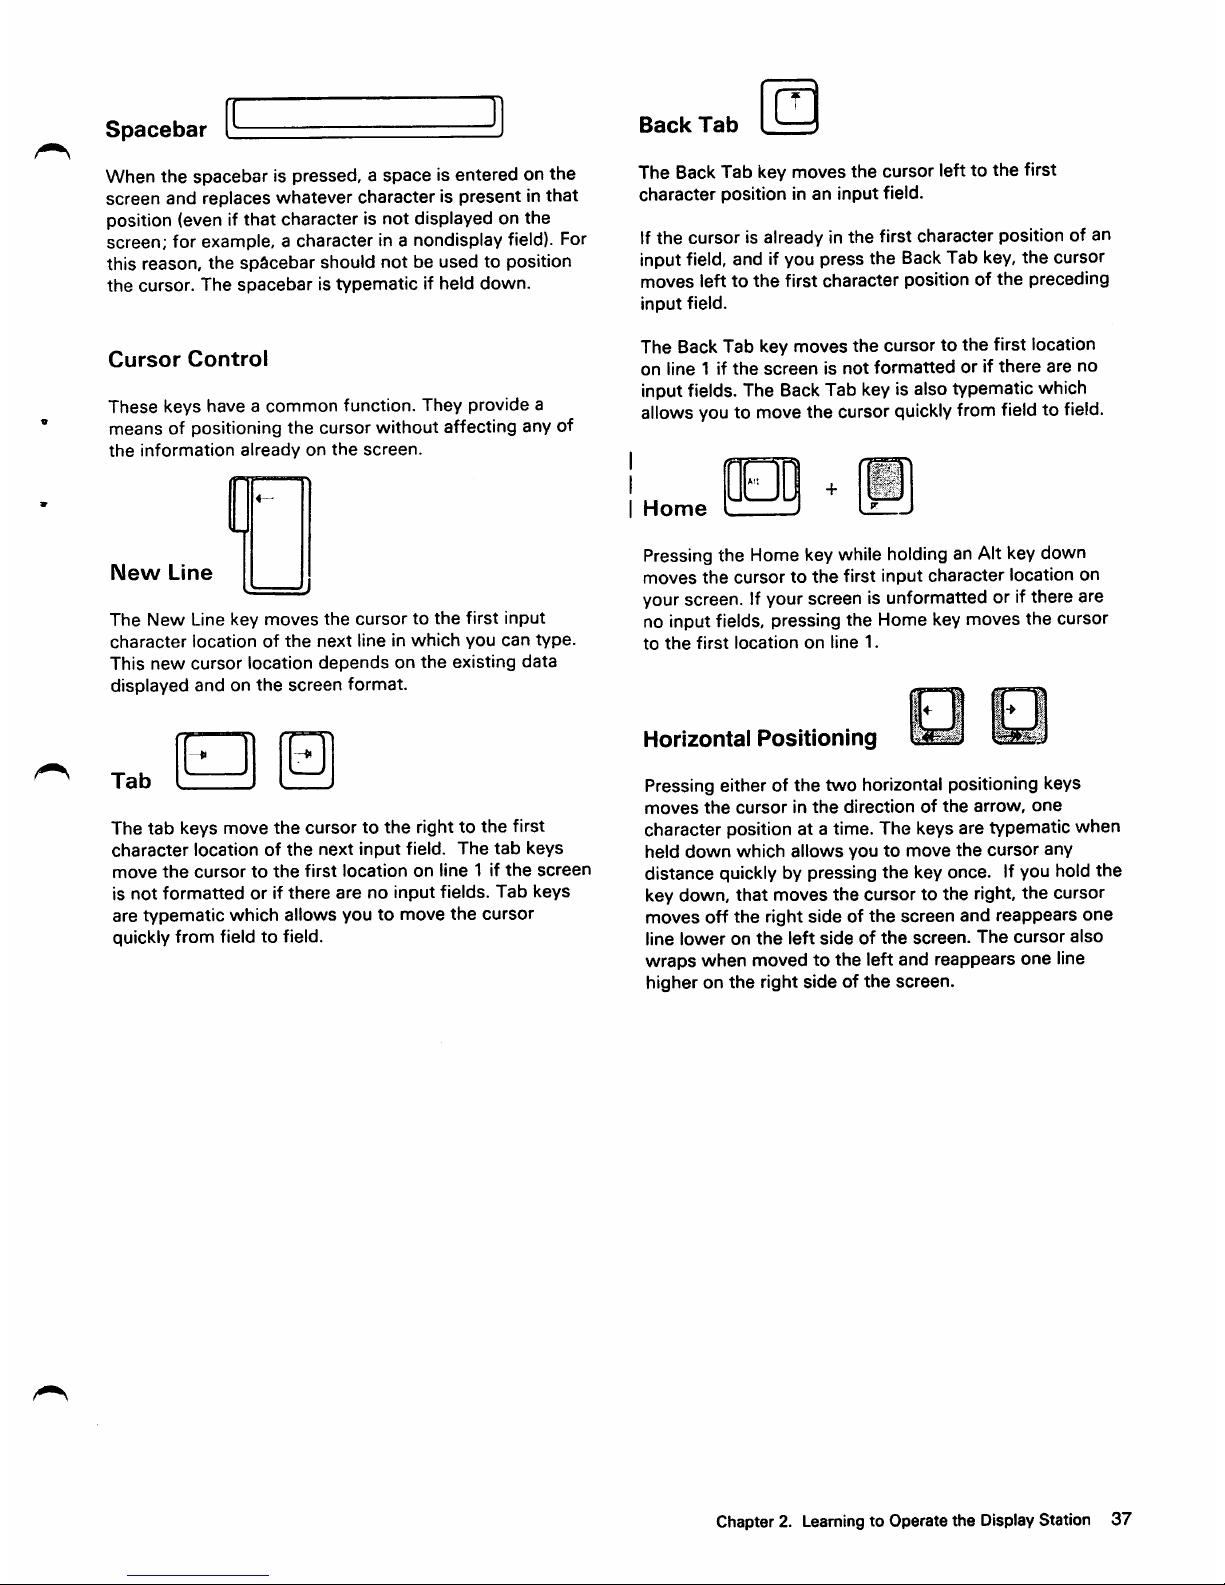
Spacebar
When the spacebar is pressed, a space is entered on the
screen
and
replaces
whatever
characterispresentinthat
position (even if that character is not displayed on the
screen;
for example, a
character
in a nondisplay field). For
this
reason,
the
spacebar
should
notbeused
to position
the
cursor.
The
spacebaristypematicifheld
down.
Cursor
Control
These
keys have a
common
function. They provide a
means of positioning the cursor without affecting any of
the
information
alreadyonthe
screen.
New
Line
The
New
Line key
moves
the
cursortothe
first input
character
locationofthe
next
lineinwhich
you
can
type.
This
new
cursor
location
dependsonthe
existing
data
displayed
andonthe
screen
format.
—K
Tab
The
tab
keys move
the
cursor to
the
right to
the
first
character
locationofthe
next
input
field.
The
tab
keys
move
the
cursortothe
first
location
on
line
1 if
the
screen
is
not
formattedorif
there
arenoinput
fields.
Tab
keys
are
typematic
which allows you to
move
the
cursor
quickly
from
fieldtofield.
Back
Tab
The Back Tab key moves the cursor left to
the
first
character
position in an input field.
If
the
cursor is already in
the
first character position of an
input field, and if you press the Back Tab key,
the
cursor
moves
lefttothe
first
character
position of
the
preceding
input
field.
The Back Tab key
moves
the
cursor to
the
first location
on
line 1 if
the
screenisnot
formattedorif
there
are
no
input fields. The BackTab key is also typematic which
allows you to move the cursor quicklyfrom field to field.
Home
Pressing the Home key while holding an Alt key down
moves
the
cursortothe
first
input
character
location on
your screen. Ifyour screen is unformatted or if there are
no input fields, pressing
the
Home key moves
the
cursor
to
the
first
location
on
line
1.
Horizontal
Positioning
Pressing either of
the
two
horizontal positioning keys
moves
the
cursorinthe
directionofthe
arrow,
one
character position at a time. The keys are typematic when
held
down
which
allows
youtomove
the
cursor
any
distance quickly by pressing the key once. If you hold the
key down,
that
moves
the
cursor to
the
right,
the
cursor
moves
off
the
right
sideofthe
screen
and
reappears
one
line
loweronthe
left
sideofthe
screen.
The
cursor
also
wraps when moved to
the
left and reappears one line
higheronthe
right
sideofthe
screen.
Chapter 2.
Learning
to Operate the
Display
Station
37
Page 45

•••WMHIfflWIMIIBW
•••mWlllllHWIHIllMMI
•••••••••(•••BIEiq
WflW
•HHBHISBBaiMIHHIl
•••
iMBiimmninwiwMll
p
IHBBBBHIBBBWi^M
HBH
fmr^^Ts-.
- _ . -
4
isni^
Double-Speed Horizontal Positioning
Pressing
either
ofthe double-speed
horizontal
positioning
keys, while holding an Alt key down, moves
the
cursor in
the direction of the arrow, two character positions at a
time. The keys are typematic which
causes
the
cursor
to
moveattwice
the
speedofthe
normal
horizontal
positioning keys. When using these keys, the cursor
wrapsatthe
right
and
left
sidesofscreeninthe
same
manner as when you use the
normal
horizontal
positioning
keys.
Vertical
Positioning
The vertical cursor positioning keys move the cursor in
the direction of the arrow, one
line
at a time. The keys are
typematic which allows you to move the cursor any
number of lines quickly by pressing the key once. If a
vertical positioning key is held down, cursor wrap occurs.
In this
case,
the
cursor
reappearsinthe
same
character
position, on
the
opposite
edge
(top or bottom line) of the
screen
that
it occupied before moving off
the
screen.
Backspace
The Backspace key moves the cursor one location to the
leftfor each time
you
press the
key.
This
key
operates
exactly
like
the
horizontal
(left)
positioning key and also is
typematic. Thisduplicationof keyfunction is provided for
operator
convenience.
Fwd
and
Back
An
Alt
keymust be held down when you use the
Fwd
(forward)
orthe
Back
(backward)
keys.
The
forward
and
backward keys are used to move lines (scroll) of
information
onto
the
display or to move lines of
information off
the
display.
These keys are not supported on allsystems. For
information
aboutthe use ofthese
keys,
contactyour
system
programmer.
Page 46

Numeric
Pad
niDiqe
U|U|U|H
u
Uiu
U
ID
u
LI
1°
U
The
numeric
padisthe
group
of keys on
the
right
side
of
the
keyboard.
These
keys
are
similartoa
calculator
keyboard
and
are
provided
for
convenience
when
you
are
entering
numeric
characters.
To
use
the
numeric
pad
(except
Space,
Back Tab,
and
Enter),
the
keyboard
mustbeIn lower shift or an error is signaled.
The
errorthat is signaled is described later in
Chapter
3,
Operator
Messages
and
Error Codes.
Attn
The
Attn
(attention) key
performs
the
function
that
its
name
implies;
that
is, it
providesameansofgetting
the
program's
attention.
The
Attn
key is
operative
only
when
Bis
displayedinthe
operator
information
area.Ifthe
Attn
keyispressed
when
A is
displayedinthe
operator
information area,
the
minus function ( X - f )
message
comesonin
the
operator
information
area.
While
your
display
stationissignaling
the
program,
the
time ( X )
message
comes
on in
the
operator
information
area,
disabling
your
keyboard.
Most
programs,
when
respondingtothis
key,
turn
off
the
time
message.
However,
thisisuptothe
program.
The
program
thatisoperatinginthe
host
systematthe
time
determines
how
the
Attn
keyisused.Ifyou
are
not
familiar
with
the
program's
response
to an
Attn
key
each
time
you
press
it,
refertothe
appropriate
user's
program
guide.
Sys
Rq
Alt
^ *
J
The
SysRq(system
request)
key
canbeused
only
when
you
are
holding an Alt key
down.
The
function
that
this
key
performs
depends
upon
whether
an A or a symbol
is
displayedinthe
operator
information
area.
When
the
-B.
symbolisdisplayedinthe
operator
information area, pressing
the
Sys
Rq key (with an Alt key
held
down)
sendsatest
request
messagetothe
system.
When
theJ.symbolisdisplayedinthe
operator
information area, pressing
the
Sys
Rq key (with an Alt key
held
down)
causes
your
display
screentobe
cleared.
Refertothe
appropriate
user's
program
guide
for
more
information
about
the
useofSys
Rq key.
Clear
Pressing
the
Clear key
erases
or blanks every
character
locationonthe
screen
except
the
operator
information
area,
establishesanunformatted
display,
and
positions
the
cursortothe
first
locationinline
1.
The
clear
key
does
not
change
the
keyboard
shift
status,
butitremoves
the
NUM
messageinthe
operator
information
area
if itison.
When
the
Clear
key is
pressed,
your
display
station
signals
the
program.
While
this
signaling is taking place,
the X
(f^:
(do not enter-time) message appears,
disabling
your
keyboard.
Most
programs
reply to
the
signalbyturning
off
the
time
message.
This,
however,
dependsonthe
program.
Therefore,
the
time
message
may
remainonafter
a Clear key is
pressed.Ifyou
are
not
familiar
with
the
program's
responsetoa
Clear
key,
refer
to
the
appropriate
user's
program
guide.
Chapter
2. Learning to
Operate
the
Display
Station
39
Page 47

Cursr
Sel
In
most
applications,
the
Cursr
Sei
(cursor
select)
key
can
be
usedtoselect
fields
from
a list,
table,ormenu.
There
are
two
typesofselectable
fields
that
can
be
displayedonyour
screen:
selection
fields
and
attention
fields.
You
can
use
the
Cursr
Sel
keytoselect
items
in
selection
field
and
to notify
the
programofyour
selection
by
selectinganattention
field.
The
first
characterofeach
selectable
field on
your
screen
is
calledadesignator
character.
The
designator
character
for a
selection
field Is
eitheraquestion
mark ( ? ) or a
greater
than
( > )
sign.
The
designator
character
for
an
attention
field is an
ampersand
character
( & ) or a
blank
position.
initially,
the
designator
charactersinmostofthe
selection
fieldsonyour
screen
willbequestion
marks.
To
select
an
item
{field),
position
the
cursor
within
the
selection
field
that
you
wanttoselect
and
then
press
the
Cursr
Sel
key.
The
question
markatthe
beginningofthe
selected
field
changestoa
greater
than
signtoindicate
that
the
field
has
been
selected.
If
you
select
the
wrong
field,
you
can
correct
your
mistake
by
selecting
the
field
again
with
the
Cursr
Sel
key.
This
changes
the
greater
than
sign
backtoa
question
mark.
The
correct
field
can
then
be
selected.
After
you
have
completed
your
selections
from
the
screen
(more
than
one
selection
canbemade),
locate
a
selectable
field
(attention
field)
that
hasanampersand
characterora
blank
position
foradesignator
character.
Selecting the attention field turns on the X (do not
enter-time)
message
and
indicatestothe
program
that
you
have
completed
your
selections.
The
data
you
have
selected
can
nowbeacted
uponbythe
program.
The
way
you
endaCursr
Sel
operation
depends
on
the
program,
and
each
one
couldbedifferent.
Refertothe
user's
program
guide
for
specific
information
about
the
program
you
are
using.
Page 48

Er
Inp
Pressing
the
Er Inp
(erase
input) key while holding an Alt
key
down
erasesorblanks
all
input
fieldsonyour
screen.
If
you
haveapermanently
displayed
document
on
the
screen,
and
your
jobisto
fill in
the
blanks,
all
those
areas
in
which
you
can
enter
data
are
erased.
The
cursor
also
movestothe
first
character
locationinthe
first
field
in
which
you
can
begin
keying
data.
Pressing
the
Er Inp key (with Alt), while working with a
screenonwhich
there
arenoinput
fields,
does
not
erase
anything
but
the
cursor
movestothe
first
location
on line
1.
Pressing
the
Er Inp key (with Alt), while
working
with an
unformatted
screen,
erases
all
character
locations
and
moves
the
cursortothe
first
location
on
line
1.
Erase
EOF
Pressing
the
Erase
EOF
(erasetoend
of field)
key
erases
or
blanks
all
character
locations
from
the
cursor
location
to
the
endofthe
field.
The
cursor,
however,
does
not
move.Ifyour
screenisunformatted,
all
character
locations
from
the
cursortothe
last
character
location
on
the
bottom
line
are
erased.
Print
Pressing
the
Print
key
causes
the
informationonyour
screentobe
printedonthe
printer
assignedtoyour
display
station.
The
printer
usedisspecifiedbythe
(
c3-ann)messageonthe
right side of
the
operator
information
area.
I
I
Ident
Idem
The
Ident
keyisused
withanAlt
keytoeither
request
or
change
the
printer ID/printer
class
for a print operation or
to
cause
the
existing
printer
authorizationtobe
displayed
(depending upon
what
is displayed in
the
printer
status
portionofthe
operator
information
area).
Play
The
useofthe
Play key is
described
laterinthis
chapter.
I
Test
Pressing
the
Test
key
when
an Alt key is held
down
prepares
your
display
stationtorun
tests
that
reside
in
the
control
unit.
When
the
Test
keyispressed
withanAlt
key
held
down,
the
following
actions
occur:
•
The
display
screeniscleared.
•
The
test
message
appearsinthe
operator
information
area.
•
All
do not enter
(X)
messages in the operator
information area are removed except X
«=>-«=•;.([!;•
'..0,
X . and X (ifany of these messages
are
displayed,
the
Test
key is inoperative).
SetUp
The
useofthe
SetUp
keyisdescribed
earlierinthis
chapter.
Recrd
The
useofthe
Recrd (record) key is
described
laterinthis
chapter.
Chapter 2. Learning to Operate
the
Display Station 41
Page 49

Reset
The
Reset
key is
usedtorecover
from
X (do
not
enter)
conditions.
Pressing
the
Reset
key
restores
the
keyboard
and
turns
off
thedonot
enter
message
for
alldonot
enter
conditions except X X X
X
o-iR.and
X^
(the
Reset
key
hasnoeffect
when
anyofthese
messages
are
displayed).
The
Reset
key
will
not
operate
when
your
display
station
is
sending
data
to,orreceiving
data
from,
the
system.
Pressing
the
Reset
key
duringanIdent
(print
ident)
key
operation,
causes
the
Ident
key
operationtoend.
The
cursor
reappears
on
the
screen,
and
the
old
printerIDor
printer
class
numberisdisplayedinthe
operator
information
area.
The
Reset
key
can
alsobeusedtoterminateaninsert
mode
operation.
The
Dv Cnl
(device
cancel)
key,
with
an Alt
key
held
down,isusedtorecover
from
a X (do
not
enter)
condition
thatiscausedbya
print
key
operation.
The
Dv Cnl
key
can
alsobeusedtodelete
key
strokes
that
were
savedinRecord
operations.
This
useofthe
Dv
Cnl
keyisdescribed
laterinthis
chapter
under
Record
and
Play.
Insert
The
purposeofthe
Insert
key istoallow
youtoinsert
a
characterorcharacters
into
the
middle
of an
input
field
without
changing
the
characters
that
are
already
displayed
there.
Pressing
the
Insert
key
places
the
keyboardInthe
insert
modeofoperation.
The
insert
mode
symbol
( a )
appearsinthe
operator
information
areatoremind
you
that
your
keyboard
is in
insert
mode.
All
the
keyboard
control keys
perform
normally
when
in
insert
mode.
Delete
Pressing
the
Delete
key
when
the
cursorislocatedInan
input field
deletes
the
character
occupying
the
position
underlinedbythe
cursor.Iterases
the
character
without
leaving a blank. All
charactersInthe
field to
the
right of
that
position
(andonthe
same
line)
are
then
shifted
left
one
position.
The
Delete
key is
typematic,soIf
held
down,
each
character
thatisshifted
lefttothe
cursor
will
be
deleted
until
the
key Is
released.
Page 50

Enter
lEntei
Pressing
the
Enter
key
tells
the
program
that
you
have
completed
your
message
and
are
ready
for
the
informationonyour
screentobe
entered
into
the
host
system.
While
your
display
station
is signaling
the
program,
the X Qj (donotenter-time) message
appearsinthe
operator
information
area,
disabling
your
keyboard.
Most
programs,
when
acting on an Enter key,
turn
off
the
time
message.
However,
this
dependsonthe
program. If you
are
not
familiar with
the
program's
responsetoan Enter key,
refertothe
appropriate
user's
program
guide.
PF1-PF24
gpigp
IPF19
|^F30^|fPF21 1 1
i»F?3^1fpF24
SIOIQIO
n
•
oigppjnp
Application
programs
can
define
the
action
that
occurs
when
any
oneofthePFkeysispressed.
To
determine
the
useofeachPFkey
and
the
action
it
causes,
refertothe
appropriate
user's
program
guide.
Recrd
Record
If
there
is a
number,aword,aphrase,asentence,oran
address
you
use
often,
you
can
use
the
Recrd key
and
a
PF keytosave
those
characters
(keystroke
sequence).
Then
each
time
you
need
the
keystroke
sequence,
you
only
needtopress
the
Play key
and
a PF key to
have
the
keystroke
sequence
played back.
Each
oneofthe24PF
keys
canbeusedtorecord
a
keystroke
sequence.
However,
the
total
number
of
keystrokes
that
can be recorded for all of
the
24 PF keys
is
96.
To
recordakeystroke
sequence:
1.
With
the
display
station
turned
on,
press
the
Recrd
(record) key. A blinking R
appearsinthe
operator
information
area.
2.
Press
any
oneofthe24PF
keys.
TheRstops
blinking.
3.
Type
the
keystroke
sequence
you
want
saved.Asyou
are
typing,
notice
the
number
following
the
R in
the
operator
Information
area
decreases
by
one
each
time
you
press
a key. It
decreasesbytwo
each
time
an Alt key
andashift
key (shift lock,
upper
shift,
numeric
shift, or
Alpha
shift)
are
pressed.
This
number
indicates
how
many
more
keystrokes
you
can
enter.
If
the
number
increases
when
thePFkeyispressed,
thereissomething
already
recordedonthat
PF key. If
you
.do
not
wanttodestroy
whatIsrecorded,
press
the
Recrd
key;
otherwise,
continue
typing.
I 4. Press the Recrd key when you have completed the
keystroke
sequences
you
wishtorecord
for
that
PF
key.
Your keystroke
sequenceissaved,
even
if you turn off
the
display station,
and
can
be played back by pressing
the
play key.
See
Play key
laterinthis
chapter.
Note:
If you
make
a keying error, you
can
move
the
cursor
backtothe
error
and
correctitbut
the
backspace
willberecorded.Abetter
waytocorrect
the
keying
error
istoexit
the
record
function
(press
the
Recrd
key),
reenter
the
record
function
(press
the
Recrd
key
again
and
press
the
same
PF key)
and
enter
the
keystroke
sequence
again.
If
you
start
recording a
keystroke
sequence
butdonot
wanttocomplete
it:
1.
Press
and
hold
down
an Alt (alternate) key.
2,
Press
the
Dv Cnl (device cancel) key.
Chapter
2. LearningtoOperate
the
Display
Station
43
Page 51

MB
iBiiaiBiaiaisiBiiiiBiaiaiiiBBi
mmm
iaiaiii
If
you
wanttoremove
the
keystroke
sequence
savedona
particularPFkey;
1.
Press
the
Recrd
key.
2.
Press
thePFkey
you
usedtorecord
the
keystroke
sequence.
3.
Press
and
hold
downanAlt
(alternate)
key.
4.
Press
the
Dv Cnl
(device
cancel)
key.
I If you
wanttoremove
all
the
keystroke
sequences
saved
on
all
thePFkeys:
1.
Press
the
Recrd
key.
I 2.
Press
and
hold
down
an Alt (alternate) key.
3.
Press
theErInp
(erase
input) key.
To
play
backakeystroke
sequence:
1.
Move
the
cursortowhere
you
want
the
sequence
to
start.
2.
Press
the
Play key. A blinking P
appearsinthe
operator
information
area.
3.
Press
the
samePFkey
you
usedtorecord
the
keystroke
sequence.
ThePstops
blinking.
When
the
play
back
completes,
thePdisappears.
Ifanerror
code
appearsinthe
operator
information
area
during
the
record or play operation,
see
Chapter
3,
Operator
Messages
and
Error
Codes,
for
the
error
code
and
its
meaning.
Page 52
Chapter
3.
Operator
Messages
and
Error
Codes
CHAPTER3.OPERATOR
MESSAGES
AND
ERROR
CODES
45
Operator
Messages
45
Readiness
and
System Connection Symbols 46
Do Not Enter (Input-Inhibited)
Messages
47
Reminders
52
X.21
Switched
Network 52
Shifts
and
Modes
53
Device
Dependent
53
Character
Highlighting 54
Printer
Status
54
Cursor
Location
54
Four-Digit Error
Codes
55
Page 53

Chapter3.Operator Messagesand
Error
Codes
Messages
and
error
codes
appearinthe
operator
inforpDation
area.
The
messages
are
grouped
into
seven
categories
and
are displayed in different
locationsofthe
operator
information
areaasfollows.
o
e
O
0
O
Readiness
Do
not
Reminders
Shifts
Device
Printer
Cursor
and
Enter
and
Dependent
Status
Location
System
Modes
Connection
Note:Ifan
alphameric
code
appearsinthe
operator
information
areaofyour
display,goto
Chapter4,Fixing
Display
Station
Problems,inthis
manual.
ID,LL,L1,L2,L3,L
LK.NV
OPERATOR
MESSAGES
There
are
some
differences
between
the
operator
messages
for
the
3180
attachedtothe
IBM
3274
and
IBM
3276,
and
those
for
the
3180
attachedtothe
IBM 4321
and
IBM
4331.
The
following
messages
are
typical
operator
messages
in
both
cases.
Chapter 3. Operator Messages and Error Codes
45
Page 54

Readiness
and
System
Connection
Symbols
46
The Readiness and System Connection symbols are used either alone or in
combinations to indicate the readinessstatus ofyour
display
station, control
unit,
and
system.
|4|and@
The
IBM
3274(0)or
IBM
3276
(control
unitisworking
(ready).
I The
IBM
43XX
system is
working
(ready).
B.
and
J. The
control
unitisconnected
(online)
tothe
system
under
ruleA(
A.)
or ruleB(1.). Thissymbolturns off when you
perform
an action that requires a response from the system. When the
system
responds,
the
symbol
turns
on again.
I
Your
display
stationisworking
with
your
job
(application
program).
@
Your
display
stationisconnectedtothe
system
operator
(control
program).
l2l
Your
display
stationisconnected
tothe
system
butis
not
connected to your application program or to
the
control program.
N Afterthe call(outgoing or
incoming)
has been established, your
display station is being connected to the system through the
X.21
Switched
Network.
Page 55

Do
Not
Enter
(Input-Inhibited)
Messages
The X
(Do
Not
Enter)
symbol
tells
you
that your
display
station
will
notaccept
input
from
your
keyboard.
Additional
symbols
are
always
displayedtothe
right
ofthe X to definewhyyourinputis not accepted.
X
'',0
Timeisrequired
forthe systemto
perform
the
function
you
requested.
You
must
wait
for
the
functiontobe
completed.
X '''+
All,orpart,
ofthelast
operation
you
tried
wasnot
acceptedbythe
display
station.
Check
your
display to
make
sure
the
operation
you
wanttoperformiscorrect.
Press
the
Reset key to restore your keyboard
and
try
the
operation
again.
><STSTEMThe
systemhas
locked
your
keyboard.
There
may
bea messageon
your display from
the
system.
You
can
wait for
the
system
to restore your keyboard or
press
the
Reset
key to
restore
it yourself.
X You have tried to enter, insert, erase, or delete a character when the
cursor
was
in a
protected
field or you
have
tried to perform a
cursor
select
operation
when
the
cursor
was
not
in a valid
cursor
select
field.
Press
the
Reset
key
and
move
the
cursortoanother
location or
take
a
different
action.
X f: >
You
havetriedto enter moredata intoa
field
than it can
hold.
Press
the
Reset
key
and
correct
the
entry.
X
.^NUM
You
havetriedto enter a non-numericcharacterintoa
numeric
field.
Press
the
Reset
key
and
enter
numeric
data.
X '''
Only
certain
numbers
canbeentered
for
the
operation
you
are
performing.
Press
the
Reset
key
and
enter
the
correct
number.
Chiapter 3.
Operator
Messages
and
Error
Codes
47
Page 56

48
X - f The function you requested is not available.
or
X
-F
Press
the
Reset
key
and
check
the
operator
information
area
for
oneofthe
symbols
listed
belowtodetermineifthe
function
is
permanentlyortemporarily
unavailable.
• Ifa
UlA
or ilB. is displayed,
the
function (except Ident)
is
permanently
unavailable.
Press
the
Reset
key
and
take
a
different
action.
• If @J. is displayed and your cursor blinkattribute does not
work,
the
Print, Ident,
Cursr
Blink,
and
the
Alt
Cursr
keys
are
permanently
unavailable.
Press
the
Reset
key
and
take
a
different
action.
•
If
*^1isdisplayed,
the
functionistemporarily
unavailable.
Press
the
Reset
key,
check
the
screen,
and
try
the
function
again.
• if
noneofthe
above
are
displayed,
the
Ident
function
is
temporarily unavailable while
o-"nn
is displayed (printer Is
printing).
Wait
until
the
printer
endsorpress
the
Reset
key
and
takeadifferent
action.
X ^
nn
Your display station is not operating properly. The error number, nn
or nnn,
defines
the
typeofMachine
Check.
X N
nnn
Press
the
Reset
key
and
continue.Ifthe
problem
persists,
notify
your
supervisor
and
report
this
message,
including
the
numbers,
for
further
action.
X N 210 or Invalid keyboard attached, invalidstatus, or invalid key
code
211
or
received
from
the
controller.
212
Press
the
Reset
Key; if
the
problem
persists,
check
that
the
keyboard ID is
correct
for
the
controller
that
your display station is
attached
to.
X^
225 or Go to
step
4.35, in Chapter 4, FixingDisplay Station Problems in
X^206 this
manual.
nn
There
is a
problem
with
the
communications
line
between
the
and
controller
and
the
system.
The
error
number,
nn or nnn,
defines
the
X
—Vz_nnn
type
of Communication Check.
Press
the
Reset
key
and
continue.Ifthe
problem
persists,
notify
your
supervisor
and
report
this
message,
including
the
numbers, for
further
action.
X
PROGnn
The
control
unit
detectedaprogramming
errorinthe
data
it
and receivedfrom the system. The error number, nn or nnn, defines the
X
PROG
nnn
^ypgQfProgram
Check.
Press
the
Reset
key
and
continue.Ifthe
problem
persists,
notify
your
supervisor
and
report
this
message,
including
the
numbers, for
further
action.
Page 57

X PROG
454
Screen
size error.
Verify
that
your
display
station
modelIDmatches
the
configuration
of
your
controller
(foradescription
ofthe
display
station
model
ID,
see
Chapter
1).
The
printer
connectedtoyour
display
stationisbusy
and
cannot
perform
the
print
operation
you
requested.Ifi=»-«aisdisplayed
onthe
right,
the
printerisbusy
performing
your
print
operation.
If
is
displayed
onthe
right,
the
printerisbusy
performinganoperation
for
another
display
stationorthe
system.
If
you
initiated
the
print
operationbyusing
the
Print
key,
you
can
eitherwaitfor the printoperation to end or cancelthe operation. If
you
cancel
the
operation
and
ca-a is
displayed
you
maybeable
to
select
another
printer.
Ifthe
print
operation
was
initiated
bythe
system,
you
can
cancel
the
print
operation.
However,
ifthe
system
initiates
thesame
print
operationagain, waitfor the printoperationto end.
The Reset key has no effect when this message is displayed.
;.r;
Q)
This
meansthe same as the
><
ca-a-Y;
message,
except
more
time is anticipated before your printoperation is accepted.
The
printer
connected to
your
display
stationis not
working
and
cannot performthe printoperationyou requested. Therefore, your
print request
was
cancelled.
If
you
initiated
the
print
operationbyusing
the
Print
key,
pressthe
Dev Cnl key. You may then select a different printer, try to restore
the
failing printer, or take a different action.
If
a-M
is displayed to the right, the printer stopped working
while printing your own last print operation.
Ifthe printoperation was
initiated
bythe system,youcancancel
the
print
operation.
The Reset key has no effect when this message is displayed.
X
'=»-^
Chapter3.Operator
Messages and
Error
Codes 49
Page 58

50
X
Your
display
station
isnot
authorized
to dothe requested
printer-related
function.
Press
the
Reset key. Appropriate follow-on action
depends
upon
the key you used and upon what appears in
the
printer assignment
positionsinthe
operator
information
area.
1.
After
the
Print
key:
a. If
i=>-a??
is displayed, you should
press
the
Reset
key
and
use
the
Ident keytodisplay your
new
assignment
before
you
request
a print.
b. If nothing is
displayedinthe
printer
assignment
positions
and
a @ is
not
displayed in
the
operator
information
area,
you
are
not
authorizedtoprintatall.
Press
the
Reset
key
and
takeadifferent
action.
c. Ifnothing is displayed and a Si is displayed in the "
operator
information
area,
you
havenoautomatic
authorization.
Press
the
Reset
key. If a
printerisavailable,
you
can
establish
assignmentbyusing
the
Ident
key
plus
two
valid
numerals.
d. If is
displayed,
thereisan
errorinthe
authorization.
Press
the
Reset
key.
Request
assistance,
selectadifferent
printer,ortakeadifferent
action.
2.
After
the
Ident
key
plus
two
numerals:
You
are
not
authorized
for
the
printer
you
specified.
Press
the
Reset
key
and
start
the
Ident
procedure
againortake
other
action.
3.
Immediately
after
the
Ident
key:
You
are
not
authorizedtoprintatall.
Press
the
Reset
key
and
take
other
action.
X The security key on your display station is off.
Turn
the
key
clockwisetounlock
the
keyboard.Ifthe
key
symbol
does
notgoaway,
replace
the
display
element.
(Go to
Chapter
5.)
If
the
problem
still exists,-
replace
the
logic
element.
(GotoChapter
5.)
Page 59

- S The symbol you typed is not recognized by the control unit.
Press
the
Reset
key.
X A message from the control operator was received and rejected.
Press
the
Reset
key.
X - f Youtried to change the PS or highlightingselection when the
program will not allow it. The keyboard is locked as a result.
Press
the
Reset
key.
X
—z-
You
pressed
an X.21 function key
under
the
wrong
conditions.
X
N2
Your
keyboardIDdoes
not
match
the
keyboardIDassignedtoyour
I display station by your control unit.
I
I Press the Reset key or retrythe operation.
Chapter3.Operator
Messages
and
Error
Codes
51
Page 60

Reminders
These
messages
areareminder
that
a condition
occurred.
-y.
nn
The
communication link
that
connects
your control unit to
the
and
systemisproducing
errors.
You
are
unabletocommunicate
with
rtrtn
system.
The
error
number,nnor
nnn,
defines
the
type
of
communication
problem.
This
message
remains
displayed
until
your
control
unit
determines
the
communication
link is
working
properly.
Reserved for future
use
(appears with message). Ignore
this
symbol.
X.21
Switched
Network
The
following
messages
may
not
appear
on all
3180
Model
1s.
52
z_
With
the
X.21
Switched
Networks
feature
installedinyour
display
station,
your
display
stationisreadytocall ortobe
called.
s_[
Inn
With
the
X.21
Switched
Networks
feature
installed in
your
display
station,
your
display
stationisreadytocall
andtobe
called
with
the
status
code
(nn)
that
is knownasthe
Call
Progress
Signal (CPS).
The
CPS is a signal
that
the
network
sends
back to
the
display
stationtoindicate
the
statusofthe
network
or of
the
system.
When
the
network
connection
has
been
established,
the
In-Use
symbol
( N ) is
displayed.
^ tt 7 You
have
pressed
the
Dial key
and
the
display
station
is waiting
for
the
dial digit
numbertobe
typed
in. On
other
display stations,
the
Dial In (
-\z_nn
)
message
will
appearatthe
same
time.
i—uu
The
dial digit
cannotbeenteredatyour keyboard. Another display
station
has
already
originated
the
dial-in.
The
Direct key
was
pressedorthe
dial
digit
number
was
typed
in
and
the
Enter
key
was
then
pressed.
The
message
means
that
the
terminal
is calling
the
system.
.Mnn The status code
(nnornnn
) is being sent back from the network
while an
outgoing
call is in
process.
-
The
terminal is
being
called
from
the
system.
- '-O
The
display
station
is in
the
processofdisconnecting
from
the
network
after
receiving
the
disconnect
commandorafter
the
Disc
key
was
pressed.
-
93
The
display
station
is in local
mode.
When
the
Local key is
pressed,
the
display
station
cannot
communicate.
For
the
display
station
to
599
communicate,
the
Comm
key
mustbepressed.
Page 61

Shifts
and
Modes
These
messages
tell you
what
shift
and
mode
your keyboard is using at
the
time.
NUM
Your keyboard is in numeric mode. Only
the
0 through 9, period (.),
minus (-),
and
dup
keys will be
accepted.
TEXT
Your
keyboard
is in
text
mode.
Your
keyboard
is in
uppershift.
/V
Your
display
station
is in
insert
mode.
Device
Dependent
These
messages
tell
you
what
device
dependent
function
you
are
performing.
0
You
are
R
You
are
P
You
are
T
You
are
Chapter3.Operator
Messages
and
Error
Codes
53
Page 62

Character
Highlighting
These
messages
appear
when
a highlighting attribute is selected.
#
a A
normal
character
was
selected.
A blinking
character
was
selected.
B A
reverse
character
was
selected.
&
An
underscore
character
was
selected.
I
K>
An
operator
selection
was madebya
Field
Inhibit
key
orthe
selection
was
madebythe
program.
^
You
cannot
makeacharacter
highlighting
selection.
The
selection
was
madebythe
system.
Printer
Status
These
messages
are
used
during print
operations
to tell
you
where
the
print
operationisperformed
andtoinform you of
the
progressofthe
print
operation.
You
pressed
the
Ident key to
enteranew
printer assignment. The
next
two
numbers
you
enter
appearinthe
two
underlined
locations
of
the
message.
After
you
enter
a valid
printer
ID or
class,
the
cursor
reappears.
nn
Your display station is authorized to
use
printer
number
nn.
Numbers01through
31 identify individual printers.
Numbers
70
through85identify
classesofprinters.
If
nothingisdisplayed,
you
havenoprinter
assignment.Ifyour
3180isattachedtoa
3276
Control Unit Display
Station,
you
may
use
the
Ident
proceduretoenter
the
printer
numberofan
available
printer;
otherwise
you
cannot
print.
nn
The
assigned
printer
is printing
your
work.
inn
The
selected
printer
failed while printing
your
work.
(See
'=>-N
Printer Not Working.)
Your printer
assignment
has
changed.
If you
press
the
Ident
key,
your
new
printer
assignmentisdisplayed.
CURSOR
LOCATION
54
If
the
cursor
locator is enabled,
the
row/column
position of
the
cursor
is
displayedincolumns
73-80.
r^
Page 63
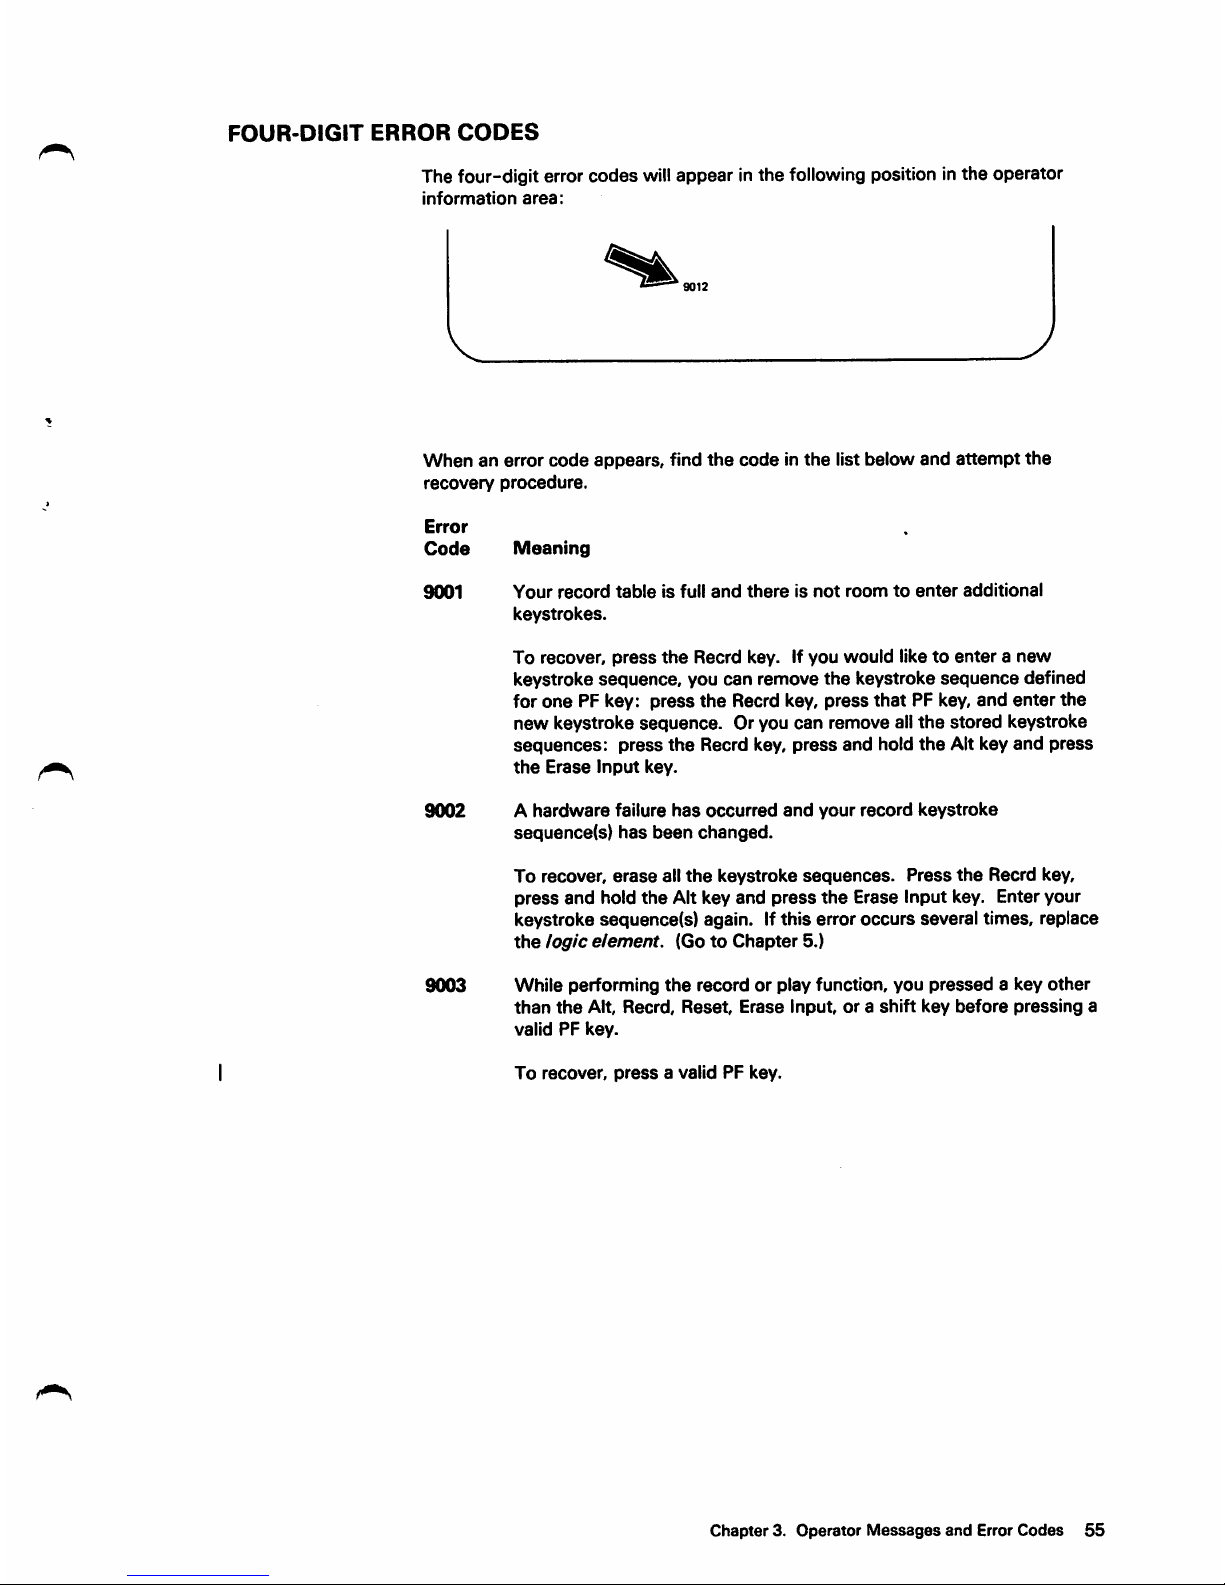
FOUR-DIGIT
ERROR
CODES
The four-digit error codes willappear in the following position inthe operator
information
area:
9012
Whenanerror
code
appears,
find
the
codeinthe
list
below
and
attempt
the
recovery
procedure.
Error
Code
Meaning
9001
Your
record
table
is full
and
thereisnot
roomtoenter
additional
keystrokes.
To
recover,
press
the
Recrd
key. If
you
would
liketoenteranew
keystroke sequence, you can remove
the
keystroke
sequence
defined
for
one
PF key:
press
the
Recrd key,
press
that
PF key,
and
enter
the
new keystroke sequence. Or you can remove all
the
stored keystroke
sequences:
press
the
Recrd key,
press
and
hold
the
Alt key
and
press
the
Erase
Input
key.
9002
A
hardware
failure
has
occurred
and
your
record
keystroke
sequence(s)
has
been
changed.
To recover,
erase
all
the
keystroke
sequences.
Press
the
Recrd key,
press
and
hold
the
Alt key
and
press
the
Erase Input key. Enter your
keystroke
sequence(s)
again. If
this
error
occurs
several times, replace
the
logic
element.
(GotoChapter
5.)
9003
While performing
the
record or play function, you
pressed
a key
other
than
the
Alt, Recrd,
Reset,
Erase
Input, or a
shift
key
before
pressing
a
validPFkey.
To
recover,
press
a valid PF key.
Chapter
3. Operator
Messages
and Error
Codes
55
Page 64

9004
While
performing
the
record
or play function,
you
pressed
a PF key
with
the
Alt
key
pressed.
To
recover,
press
thePFkey
with
the
Alt
key
up.
9005
You
triedtoexit
from
the
record
function
with
different
or
additional
shift
keys
pressedorwith
the
Alt
key
pressed.
These
keys
were
not
pressed
when
the
first
keyofthe
keystroke
sequence
was
recorded.
To
recover,
exit
the
record
function
with
all
the
shift
keys
up.
9006
You
have
exited
the
record
function
in a
different
shift
state
from
when
the
first key of
the
keystroke
sequence
was
recorded.
The
sequence
may
not
play
backinthe
same
shift
state
you
entered
it in.
To
correct
the
keystroke
sequence,
press
the
Recrd key
and
enter
the
keystroke
sequenceinthe
desired
shift
state.
•X
9007 While performing
the
record function, you
pressed
the
Play key or
the
SetUp
key.
These
keys
are
not
valid
sequence
keys.
To
recover,
press
the
Reset
keyora valid
sequence
key.
9008 While performing the play function,
the
shift
state
of your keyboard
changed
when
the
keystroke
sequence
was
played back.
To recover,
press
the
appropriate
shift
keys. If you
wanttocorrect
the
keystroke
sequence,
press
the
Recrd key
and
enter
the
keystroke
sequence
again.
9009
While performing
the
play function, you tried to play back a keystroke
sequence
in a different shift
state
from
the
oneitwas
entered
in.
I To
correct
the
keystroke
sequence,
press
the
Recrd
key
and
enter
the
keystroke
sequenceinthe
desired
shift
state.
9010
While performing
the
play function, you
pressed
a PF key
that
does
not
haveakeystroke
sequence
assignedtoit.
I To recover,
press
a PF key
that
hasakeystroke
sequence
assigned
to
I it, or
press
the
Play key again to
stop
the
play function.
9011 You triedtopress
the
SetUp
key with a shift key
pressed.
To recover,
press
the
SetUp
key with
the
shift key(s) up.
56
Page 65

3012 While performing setup functions, you pressed a key with no setup
function
assignedtoit.
I To recover, press a setup key with a function assigned to it, or leave
1
setup
by pressing
the
SetUp
key again.
9013 While performing the test function, you pressed an
invalid
key.
To recover,
press
a valid PF key.
9015 You pressed the Alt key and the Reset key at the same time.
I To recover, release the Alt key and SetUp key and then press the
1
Reset
key.
9016
You
pressed
several
keysatonce.
To recover,
press
the keys one at a time. If you cannot recover from
the problem, replace the keyboard element. (Go to Chapter 5.)
9017 You pressed a shift sensitive key on the numeric key pad while the
keyboard
was
in an incorrect shift
state.
To recover, press
that
key with the keyboard in the correct shift state.
Chapter 3. Operator Messages and ErrorCodes 57
Page 66

Chapter
4.
Fixing
Display
Station
Problems
CHAPTER
4. FIXING
DISPLAY
STATION
PROBLEMS
59
Customer
Problem
Analysis
and
Resolution
(CPAR)
59
CPAR
Assistance 5§
How
ToUse ThisChapter 59
Reference Figures 61
CPAR
Procedures
62
Page 67

Chapter
4. Fixing Display
Station
Problems
CUSTOMER
PROBLEM
ANALYSIS
AND
RESOLUTION (CPAR)
Thisprocedure is the Customer
Problem
Analysis
and Resolution
(CPAR).
CPAR
is designed to helpyou isolate the
failing
element(s) on yourdisplaystation and
perform
the
necessary replacement procedures.
CPAR
ASSISTANCE
Ifyou cannot complete the
CPAR
instructionsor you do not wish to perform
CPAR:
1. Contact your IBM
sales
representative for assistance.
OR
2. IBM
on-site
assistance
by a
Customer
Engineer is available on a
billable-hourly basis. The Customer Engineer
will
help you perform the
CPAR
and replace the
failing
element(s) with a user owned spare (if
available).
HOW
TO
USE
THIS
CHAPTER
When
you have a display station problem:
START
HERE
1. Make
sure
the
security key is turned clockwise until it
stopsinthe
horizontal
position.
Chapter
4. Fixing Display
Station
Problems
59
Page 68

2. Make sure
the
lever on
the
bottomofthe
logic
element
is turnedtothe
closed
position.
Closed
3. During CPAR,
when
you
compare
your
displaytooneinthis
manual,
make
sure
they
are
exactly
the
same.
4.
Always
listen carefully
for
the
correct
alarm
sequence
(sound,
pause,
sound
again,
and
stop)
after
the
Power
switchisset
to On.
(Use
option
A if
this
does
not
occur.)
5.
Choose
oneofthe
four
optionsAthroughDlisted
below.
Gotothe
step
indicated.
Answer
the
question
withaYes
or No
and
follow
the
arrowtoanother
step
or recovery
procedure.
Continue
through
the
CPAR
until
you
reachasolutiontoyour
problem.
If
you
are
toldtoreplace
two
elements,
the
first
one
listedisthe
one
that
is
most
likely failing
and
will
correct
your
problem
over
90%ofthe
time.
CHOOSE
ONEOFTHE
FOLLOWINGOTHROUGH
Q.
Your
problem
occurred
after
the
Power
switch
was
settoOn
and
before
the
divider
scan
line
(Figure 1) appeared. (Figure 1 may still be
displayed.) ^
Your
problem
occurred
with
the
divider
scan
line
displayed
(Figure 2),
the
ready
indicator
mayormay
notbeon,orafter
you
signed
on
to
the
system.
—
Your
problem
occurs
intermittently
(now
and
then).
You
are
not
sure
when
your
problem
occurred.
Perform
the
following:
1.
Set
the
Power
switchtoOff
and
wait
five
seconds.
2.
Press
and
hold
any
key
and
set
Power
switchtoOn. (You
may
needtoknow
which
key
you
pressed
later.)
3.
Hold
the
key
for
about
ten
seconds.
—
Goto4.35.
Goto4.37.
Page 69

REFERENCE
FIGURES
Figure 1
Figure
2
Cursor
The
two
following
displays
willbereferencedinthe
CPAR
procedures.
Refer to
thenn
whenever
you are unsure of
what
should be on your display.
or0orIanda.or
J.
Divider
Scan
Line
Operator
Information
Area
Divider
Scan
Line
Operator
Information
Area
Chapter
4. Fixing Display
Station
Problems
61
Page 70

CPAR
PROCEDURES
4.2
4.3
62
Did
any
alarm
sound
when
the
Power
switch
was
set
to
On?
Yes
No
4.19
Is
there
an
alpha
or
alphameric
error
code
(ID, LL,
LI,
L2, L3, L4,
L5,L,LK,
NV)
displayed in
the
operator information area of your
display?
Yes
ID.LLL1,LZL3.L4,L5,L,LK,NV
No
Operator
Information
Area
Is
there
a KorKN
error
code
displayedinthe
operator
information
areaofyour
display?
K,KN
Yes
4.28
No
4.4
Operator
Information
Area
C946802S
Page 71

When
the
Power
switch
was
set
to
On,
did
the
alarm
sound
immediately,
pause,
sound
again,
and
then
stop?
Is
the
display
completely
dark?
Did
you
press
and
hold
any
key
for
ten
seconds
when
you
set
the
Power
switch
to
On
(Option
D)?
Chapter 4. Fixing Display Station Problems
63
Page 72

Does
your
screen
match
the
one
below?
(Make
sure
the
characters
and
attributes
are
the
same.
Ignore
the
character
at
locationXand
any
additional
information
that
appearsinthe
lower
right
cornerofthe
display.)
JEEEEEEEEEEEEEEEEEEEEEEEEEEEEEEEEEEEEEEHEEEEEEEEEEEEEEEEEEEgEKEEEEEEEEEEEEEEEEf;*
A
character
appears
in
this
location
if
a
keyispressed
or
stuck
during
(he
poweronsequence.
Normal
Intensity
H s
/High
lr»tensity
H's
i
Reverse
Image
H's
lAAAAAAAAAAAAAAAAAAX;
H
^/^AAAAAAAAAAAAAAAi
H
HHHHHHHHHl/HHHHHHHHHHHHUHIlHHHHHHHHHHHH
H
H.
.. / / H
H HHHKHHHHHHHHHMKHHHIIHHHHHHKHHHHHHKHHHH H
H - / H
H imiiHiBBmiimuuwtiiiminiinnimininiwmnmnnmiiH
H
...
li
•H ' -,
EfflEEfiB
K
H ^ ^ ' H
*EEEEEEEEEEEEEEEEEEEEfiEEJ?EEEEEEEEEEEEEE*EEEE£
EEEEEEEEEEEEEEEEEEEEEEEEEEEEE*
Atihbutes
from Left lo Right
r
Normal
E
""l ^verse
Iroage
E
Blinking E
High
Intensity
E
Blank
Position
Underscore
E
Reverse
image
E
Tlie
solid
block
will
flip-flop
between
these
two
E'saskeys
are
pressed.
Cursor
Row
and
Column
(may or may not
be
displayed!
Page 73

4.8
Does
or
did
your
display
match
the
one
below?
(Make
sure
the
characters
and
attributes
are
exactly
the
same.)
There
may
be
additional
informationinthe
lower
right
corner
of
the
display.
You
do
not
need
that
information
for
this
step.
*EEEEEEEEEEEEEEEEEEEEEEEEEEEEEEEEEEEEEE*EEEEEEEEEEEEEEEEEEEEEEEEEEEEEEEEEEEEEEE*
H H H
H H H
H H H
H H H
H H H
H H H
H H H
H H H
H H H
H H H
H H H
SAAAAAAAAAAAAAAAAAAAAAAAAAAAAAAAAAAAAAASAAAAAAAAAAAAAAAAAAAAAAAAAAAAAAAAAAAAAAAX
H H H
H H
hhhkhhhhhhhhhhhhhhhhhhhhhhhhhhhhhhhhh
h
H H H
H H HHHKHHHHHHHHHHHKHHHHHHKKHHKKHHHHKHHHH H
£1
XEEEEEEEEEEEEEEEEEEEEEEEEEEEEEEEEEEEEEESEEEEEEEEEEEEEEEEEEEEEEEEEEEEEEEEEEEEEEEX
1/1
Yes
No
4.10
4.9
C9468028
Chapter
4. Fixing Display
Station
Problems
65
Page 74

4.9
66
Is
thereacharacter
displayedatX in
the
lower
left
quadrant
of
the
display?
»EEEEEEEEEEEEEEEEEEEEEEEEEEEEEEEEEEEEEE«EEEEEEEEEEEEEEEEP.BREl=:EFPPPBBPPPFPPPPPPFff
*AAAAAAAAAAAAAAAAAAAAAAAAAAAAAAAAAAAAAA*AAAAAAAAAAAAAAAAAAAAAAAAAAAAAAAAAAAAAAA*
H H
H
hhhhhhhhhhhhkhhhhhhhhhhhhhhhhhhhhhhhh
h
H H
H HHKHHHHKHHHHHHHHHHHHHHHHKHHHHHKHHHHHH H
e9
E E
Ed
SEEEEEEEEEEEEEEEEEEEEEEEEEEEEEEEEEEEEEESEEEEEEEEEEEEEEEEEEEEEEEEEEEEEEEEEEEEEEES
18/4
Yes
No
4.29
4.30
CS468029
Page 75

4.10
4.11
Is
the
picture
on
your
display
stationary,
andifcharacters
are
present,
are
they
readable?
Yes
No
4.30
)
Is
there
an
error
code
(9001
through
9017) in
the
operator
information
areaofyour
display?
M.
Yes
T
Chapter3,Operator
Messages
and
Error
Codes
No
4.12
C9468030
Chapter
4. Fixing Display
Station
Problems
67
Page 76

4.12
4.13
68
Does
the
divider
scan
line
appear
on
the
display?
\
Yes
No
4.36
Are
anyofthe
following
five
Do
Not
Enter
messages
displayed
in
the
operator
information
area?
(The
'n'
may
be
any
digit
0
through
9.)
Yes
I 4.35
X
hq
nn
X N
nnn
X
-V
nn
><
-\2_nnn
X
No
4.14
C9468031
Page 77
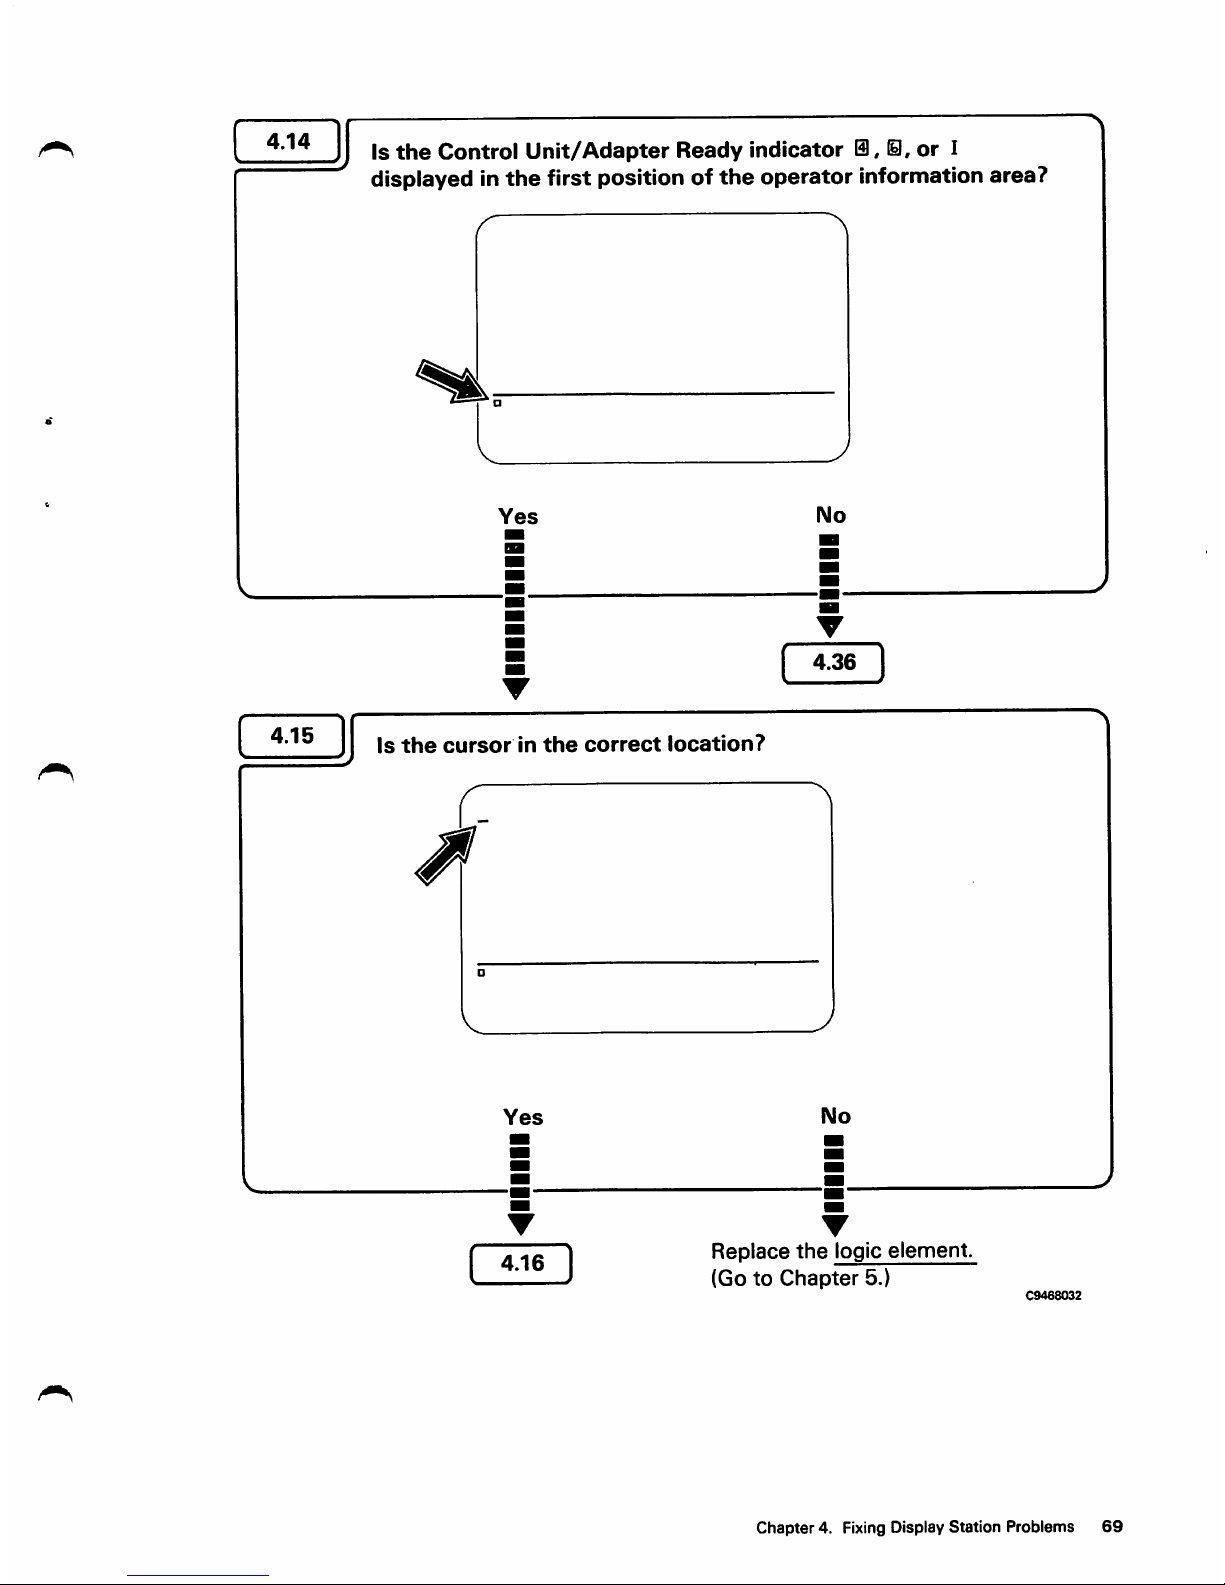
4.14
4.15
Is
the
Control
Unit/Adapter
Ready
indicator
i,
il,
or
I
displayed in
the
first position of
the
operator
information area?
V
Yes
No
4.36
I
Is
the
cursor
in
the
correct
location?
Yes
4.16
No
Replace
the
logic
element.
(GotoChapter
5.)
C9468032
Chapter
4. Fixing Display
Station
Problems
69
Page 78

4.16
4.17
70
Does
your
keyboard
cause
errors?
Yes
4.34
No
Your display
station
should be operational.
If it is not, begin
the
CPAR again. If you
still
cannot
locate
the
proceduretocorrect
your
problem,
contact
your
IBM
sales
representative.
Your display
station
should be operational.
If it is not, begin
the
CPAR again. If you
Do
you
haveadisplay
problem?
(Is
the
display
tilted,
outoffocus,
rolling,
and
so
on?)
Yes
No
4.30
I
4.18
)
C9468033
Page 79
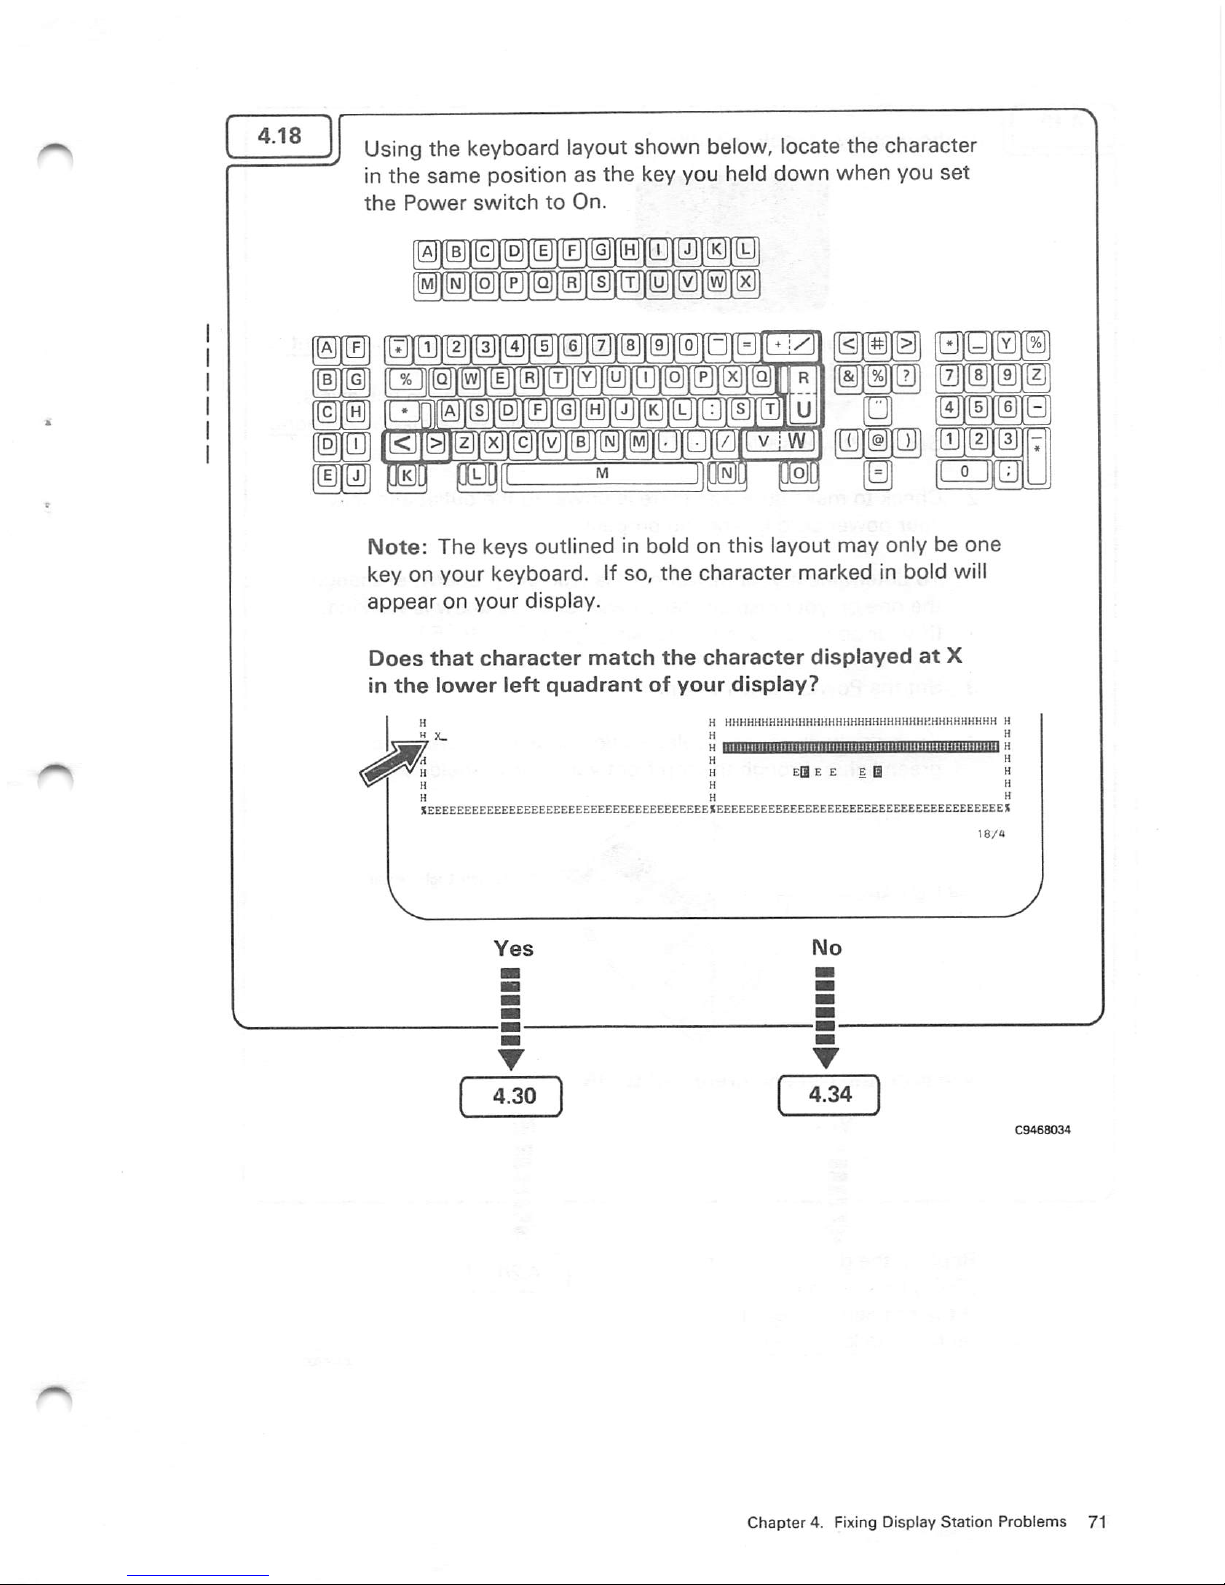
Usingthe keyboard layout shown below, locate the character
in
the
same
positionasthe
key you held
down
when
you
set
the
Power
switch
to
On.
LBJlgllBllBilBlinilllMlillillBll
0 @ ) m r
Note;
The
keys
outlined in bold on
this
layout
may
onlybeone
key on your keyboard. If so,
the
character
marked in bold will
appear
on
your
display.
Does
that
character
match
the
character
displayed
at
X
in
the
lower
left
quadrant
of
your
display?
H H HKHHKHHHHHHKHHHHHHHKKHHHHHKHHHKHHHHHH H
H X_ H "
H K
El
E E E a H
^ H H H
H H H
^FEFFBBFF'^BBBK'^BRRRF.EEEEEEEEEEEEEEEEEEEIEEEEEEEEEEEEEEEEEEEEEEEEEEEEEEEEEEEEEEEH
Chapter
4. Fixing Display
Station
Problems
71
Page 80

Is
the
display
completely
dark?
No
Replace
the
logic
element
{GotoChapter
5.)
If
the
problem
still
exists,
replace
the
display
element.
1.
Set
the
Power
switch
to
Off.
2.
Checktomake
sure
that
thereispower
to
the
outlet
and
that
your
power
cordisworking
properly.
To
determineifyour
power
cordisworking
properly,
exchange
the
oneonyour
display
station
with
one
you
know
is working.
(If
your
power
cordIsnot
working,
gotoChapter
5.)
3.
Set
the
Power
switch
to
On.
4.
From
the
backofthe
display
station,
look
for
the
red
and
green
lights through
the
top
front
vent
(shown below).
Red
Light
Area
Are
both
the
red
and
green
lights
ON?
Replace
the
display
element.
(GotoChapter
5.)
If
the
problem
still
exists,
replace
the
logic
element.
-Green Light Area
Page 81

4.20
Are
both
the
red
and
green
lights
OFF?
Yes
No
111^ [
4.21
1.
Set
the
Power
switch
to
Off.
2.
Disconnect
the
power
cord.
e
3. If
the
fuseisblown,
replace
it. (If you
are
unsure,
replace
it.)
The
fuseislocated
behind
the
plastic
cover
beside
the
power
cord
connection
on
the
backofthe
display
station.
Either
endofthe
fuse
maybeinstalledtothe
right.
A
replacement
fuse
maybepurchased
locallyata
hardware
store.
Fuse
size
for
the
United
States
is 3
Amp
250V;for
World
Trade,
1.5
Amp
250
V.
Slide
open
O
Pull
little
levertoremove
and
replace
fuse.
Q
Slide
closed.
Step
4.20
I
Continued
03468036
Chapter
4. Fixing
Display
Station
Problems
73
Page 82

I
iim^
74
4.
Reconnect
the
power
cord
firmlytothe
display
station
and
the
wall
outlet.
5.
Set
the
Power
switch
to
On.
is
the
red
light
ON
(located
through
the
top
front
vent)?
Yes
No
Your
display
station
should
be
operational.
If it is
not,
begin
the
CPAR
again.Ifyou
still
cannot
locate
the
procedure
to
correct
your
problem,
contact
your
IBM
sales
representative.
Replace
the
display
element.
(GotoChapter
5.)
C9468037
Page 83

Is
the
green
light
ON
(located
through
the
top
front
vent)?
••••(
4.22
)
1.
Set
the
Power
switch
to
Off.
2. Turn the lever on the bottom of the logic element to the
open
position.
Open Closed
3. Slide the locking bars on the right latches of the logic
element
as
shown
below.
Locking
Bars
4. Push in
and
hold the
two
right latches on
the
logic element;
then, while holding
the
latches, pull
the
right side of
the
logic
from
the
display
element.
Latches
Chapter
4. Fixing Display
Station
Problems
75
Page 84

I
76
CAUTION
Do
not
touch
any
parts
on
the
insideofthe
logic
element.
They
can
be
easily
damaged.
5.
Remove
the
two
left
latches
from
the
holes
on
the
display
element.
Latch
6. Turn
the
metal
retaining ringonthe
keyboard
cable
counterclockwise
until
the
cableisloose;
then
disconnect
the
cable
from
the
display
element.
Retaining
Ring
7.
Set
the
Power
switch
to
On.
Is
the
green
light
ON
(located
through
the
top
front
vent)?
Yes
No
Replace
the
display
element.
(GotoChapter
5.)
8.
Set
the
Power
switch
to
Off.
j
Continued
C9468039
Page 85

iim^
9.
Reconnect
the
keyboard
element.
10.
Set
the
Power
switch
to
On.
Is
the
green light
ON
(located through
the
top front vent)?
Yes
No
Replace
the
logic
element.
(GotoChapter
5.)
Replace
the
keyboard element.
(GotoChapter
5.)
Install
the
original logic
element.
(See
Chapter
5 for
the
installation
procedure.)
Is
the
red light
ON
(located through the top front vent)?
IVIo
Yes
111^
Your
display
station
should
be
• operational. If it is not, begin
•
the
CPAR again. If you still
^
cannot
locate
the
procedure
to
Replace
the
logic
element.
correct
your
problem,
contact
(GotoChapter
5.)
|gjy^
sales
representative.
Note:
The burned
out
red light is not causing your problem.
Replacing the logicelement
will
not
fix
the burned out red
light,
but
it will
correct
your
problem.
To fix
the
red light, also replace
the
display element.
(GotoChapter
5.)
C9468040
Chapter4. Fixing Display Station Problems
77
Page 86

Make
sure
the
Power
switch
is
set
to
On.
From
the
back
of
the
display
station,
look
for
the
red
and
green
lights
through
the
top
front
vent.
Red Light Area
Is
the
green
light
ON?
Green Light Area
Replace
the
display
element.
(Go to
Chapter
5.)
Does
the
alarm
turn
ON
and
OFF
continuously?
Replace
the
logic
element.
(Go to
Chapter
5.)
Page 87

4.25
4.26
Does
the
alarm
come
ON
and
stay
ON?
Yes
No
Replace
the
logic
element.
(GotoChapter
5.)
If
the
problem
still
exists,
replace
the
display
element.
Replace
the
logic
element.
(GotoChapter
5.)
Make
sure
the
brightness
controlisset
at
an
appropriate
level
by
doing
the
following:
1.
Press
the
SetUp
key.
+
2.
Press
and
hold
the
o- key until a
suitable
brightnessisobtained.
3.
Press
the
SetUp
key.
Is
the
display
still
completely
dark?
Yes
No
Replace
the
display
element.
(GotoChapter
5.)
If
the
problem
still
exists,
replace
the
logic
element.
Your
problem
should
be
corrected.
If
the
brightness
needs
frequent
adjustment,
replace
the
logic
element.
(GotoChapter
5.)
C9468042
Chapter
4. Fixing Display
Station
Problems
79
Page 88

4.27
80
From
the
following
chart,
find
the
error
code
displayed
on
your
display
and
do
the
recovery
procedure
listed.Ifmore
than
one
error
code
appears,
use
the
one
furthest
to
the
left.
Error
Code
Recovery
Procedure
NV
You
can
continue
operatingbypressing
the
Reset
key.
If
you
continue,
however,
your
record
and
play
keystroke
sequences
will
havetobe
entered
again. Also,
the
brightness, contrast, alarm
and
clicker volumes,
and
so
on,
may
needtobe
entered
again.
If
this
error
occurs
frequently,
replace
the
logic
element.
{GotoChapter
5.)
ID
Reset
your display station model ID. (Refer to
Chapter
1,
Section 3, Entering
the
Display Station Model ID
and
the
Keyboard ID in
this
manual.)
If
your
display
station
model
ID is
set
correctly
and
you
still
haveaproblem,
replace
the
logic
element.
(GotoChapter
5.)
L,
LI.
L5.
or
LL
Replace
the
logic
element.
(GotoChapter
5.)
L2
The27X
132
display
format
is failing.
L3
The32X80display
format
is failing.
L4
The43X80display
format
is failing.
If
you
use
the
failing
format,
replace
the
logic
element.
(GotoChapter
5.)
If
youdonot
use
the
failing
format,
press
the
Reset
key
and
continue
operating.
Continued
C9468043
Page 89

IIBIE
Error
Code
LK
Recovery
Procedure
Without
setting
the
Power
switchtoOff,
turn
the
metal
retaining ring on
the
keyboard cable counterclockwise
until
the
cableisloose;
then
disconnect
the
cable
from
the
display
element.
Retaining
Ring
Does
the
LK
error
code
remain
on
the
display?
Yes
No
Replace
the
logic
element.
(GotoChapter
5.)
install
the
original
keyboard
element.
{See
Chapter5for
installation procedure.)
Replace
the
keyboard
element.
(GotoChapter
5.)
C9468(m
Chapter
4. Fixing Display
Station
Problems
81
Page 90

4.28
4.29
82
From
the
foilowing
chart,
find
the
error
code
displayed
on
your
display
and
do
the
recovery
procedure
listed.
Error
Code
•|
Recovery
Procedure
K
Replace
the
keyboard
element.
(GotoChapter
5.)
If
the
problem
still
exists,
replace
the
logic
element.
KN
Make
sure
the
keyboard
cableissecurely
fastened.
Press
the
Reset
key. If
theKNerror
code
appears
again,
replace
the
keyboard
element.
(GotoChapter
5.)
The
character
displayedatX
indicates
thatakeyisstuck.
H
HHHHHHHHHHHHHHHHHHHHHHHHKHHHKHHHHHHHH
H
H
[HKHUfltBmiHHOtftflMMWUIMItiKtllMgia H
H H
H EffiE E E Q H
H H
H H
n
nnni
H
bL
XEEBEEEEEEEEEEEEEEEEEEEEEEEEEEEEEEEEEEESEEEEEEEEEEEEEEEEEEEEEEEEEEEEEEEEEEEEEEEX
18/a
Check
all
the
keysonyour
keyboard,
including
the
spacebar,
for
any
stuck
keys.
Are
there
any
stuck
keys
on
your
keyboard?
Yes
No
Attempt to fixthe key so
that
it is
no
longer
stuck.
If
you
cannot
fix
the
key,
replace
the
keyboard
elennent.
(GotoChapter
5.)
Replace
the
keyboard
element.
(GotoChapter
5.)
CS46804S
Page 91

Does
your
display
have
oneormoreofthe
following
problems?
The
displayisoutoffocus.
iUwarnBiMruMwwaunwwwwta
MeBmmmtMmormiwmnrrm
tm
im
escoavmMumoKxanMmxvzm
AteKremMvtwmmtnmgxnm
tm
im
pMOtramMumufoimnmomm
femmMmmmnwmmta
xnmmtt
The
displayisreducesInsize.
A«COCrOHUKtMMOPORSTW«rXVZm
A»CDf»OHIMi.WMOrOlinUVWXY<in
AtCOi'OMUKI,.MMyOftSTUVWXVZI}S
A«CO€>OmjKI.UMOraiaTUVWXVZIU
AtCOt'OMUKLMNO^QftSTUVWXVt
It)
AtCOC»OKtJKLMNO»OltSnjV«miS)
AKOC
yOKt«
lAMOrOftSTUVWmia
AtcocfOMUxiMMo^oivruvinfvzm
AtcoiycMUKUMo^oRsnivwmtn
Atcoc'CMUKLkMOPORsniwrmm
ASC0l»OHUKLieN0»O*fTWWXYZIM
AlC0tfQNUKLIM0»QMniVWXV212)
The
charactersatthe
top
are
either
largerorsmaller
than
thoseatthe
bottom.
ABCOEFGKJJKLMNOPQRSTUVWXYZ123
ABCDEFGKIJKLMNOPORSTUVWXYZ123
ABCOEFGKUKLMNOPQRSTUVWXYZ123
ABCOEFGK1JKLMNOPQRSTUVWXYZ123
ABCDEFCHIJKLMNOPaRSTUVWXYZI33
AeCOEFCHIJKlMNOPQRSTUVWXYZI
23
A8COEFGHIJKlMNOPaRSTUVWXYZI23
ABCOEFGHIJKLMNapaRSTUVWXVZI23
ABCOEFGHIjKLMNOPORSTUVWXYZliS
AaCOCFGHIJKLMNOronsTUVWXVZlIS
A»COEFOMIJKLMNO»OBSruV«<XV212J
ABCOtf
OHIJKLMNOfOBSTUVWXVIlIl
*»COEf
OMI4K1.MNOPORSTOVWXVZ1J
J
AeCOEf
OKIJKlMNOPQRSTOVWXYZm
Yes
The
displayisoff
center
and
the
characters
are
overlapping.
ABCOEFGHIJKLMNOPQRSTUVWXyZnS
ABCOEFGKUKLMNOPORSTUVWXyZ123
ABCOEFGKIJKLMNOPQRSTUVWXYZ123
ABCOEFGH1JKLMNOPQRSTUVWXVZ123
ABODE
FGHIJKUMNOPQRSTUVWX
YZ123
ABODE
FGHIJKLMNOPQRSTUVWXyZ
123
ABCOEFGHtJKLMNOPQRSTUVWXYZ123
ABODEFGHIJKLMNOPQRSTUVWXYZ123
ABOOEFGHIJKI.MNOPQRSTUVWXYZI23
ABCDEF6KIJKLMNOPORSTUVWXyZ123
ABCOEFGHIJKLMNOPQRSTUVWXYZia
ABCDEFGKIJKLMNOPQRSTUVWXYZ123
ABCOEFGKIJKLMNOPQRSTUVWXYZ
03
ABCOEFGKIJKLMNOPQRSTUVWXYZI23
The
characters
are
magnified.
BCDEFGHIJKLMN0PQRSTUVWXYZ12
BCDEFGHIJKLMN0PQRSTUVWXYZ12
BCDEFGHIJKLMN0PQRSTUVWXYZ12
BCDEFGHIJKLMN0PQRSTUVWXYZ12
BCDEFGHIJKLMN0P0RSTUVWXYZ12
BCDEFGHIJKLMN0PQRSTUVWXYZ12
BCDEFGHIJKLMN0PQRSTUVWXYZ12
BCDEFGHIJKLMN0PQRSTUVWXYZ12
BC0EFGHIJKLMN0PQRSTUVWXYZ12
BCDEFGHIJKLMN0PQRSTUVWXYZ12
BC0EFGHiJKLMN0PQRSTUVWXYZ12
BCDEFGHIJKLMNOPQRSTUVWXYZ12
The
displayisthe
correct
width,
but
its
heightisreduced
or
increased.
QHIJKLMNi
.
GHIJKLMNi
FGHIJKLMNi
FGHIJKLMNi
FGHIJKLMN
FGHIJKLMN
-jHIJKLMN
3HIJKLMN
3HUKLMN
.
SHIJKLMf
FGKtJKLMi
abcoIfghuklmi
ABCDEFGHIJKLMI
or
RSTUVWXyZI2
RSTUVWXYZl
HSTUVWXYZ1
UVWXYZ1
UVWXYZ1
UVWXYZ1
TUVWXYZI!
^ _TUVWXYZ12
5rstuvwxv|i2
5RSTUVWXY212
3RSTUVWXyZ123
DRSTUVWXYZ123
ABODEFGKIJKLMNOPQRSTUVWXYZt23
ABCOEFGHIJKLMNOPQRSTUVWXYZ123
ABCOEFGHUHLMNOPQRSTUVWXYZ123
ABOOEFGHUKUMKOPQRSTUVWXYZ123
ABODE
FGHIJKLMNOPQHSTUVWX
YZ123
ABODEFGHIJKLMNOPQRSTUVWXYZ123
ABCDEFGHIJKLMNOPQRSTUVWXYZ123
ABCOEFGHUKLMNOPQRSTUVWXYZI23
ABCDEFGKIJKLMNOPORSTUVWXYZI23
ABODEFGHIJKLMNOPORSTUVWXYZ123
ABCDEFGHMKLMNOPQRSTUVWXYZ123
AaCDEFGHIJKLMNOPaRSTUVWXYZ123
ABCOEFGHIJKLMNOPQRSTUVWXyZ123
Replace
the
display
element.
(GotoChapter
5.)
The
display
appearstobe
weaving.
ABCOEFGHIJKLMNOPQRSTUVWXYZ123
ABODE
FGHIJK
LMNOPQRSTUVWXYZ123
ABCOEFGHIJKLMNOPQRSTUVWXYZ123
ABCDEFGHIJKLMNOPQRSTUVWXYZ123
ABCDEFGHUKLMNOPQRSTUVWXYZ123
A8COEFGHUKLMNOPQRSTUWVXYZ123
ABODEFGHIJKLMNOPQRSTUVWXYZ123
ABODE
FGHIJKLMNOPQRSTUVWXYZ123
A0ODEFGMIJKLMNOPORSTUWyXYZ123
ABOOEFGHIJKLMNOPQRSTUVWXYZ123
ABODEFGHIJKLMNOPQRSTUVWXYZ123
ABOOEFGHIJKLMNOPaRSTUVWXYZ123
ABCOEFGHUKLMNOPORSTUVWXYZI23
A0COEFGHIJKLMNOPQRSTUWVXYZ123
The
displayistilted.
There
is a
bright
horizontal
or
vertical
lineinthe
center.
No
4.31
C9468046
Chapter 4. Fixing Display Station Problems
83
Page 92

4.31
84
Does
your
display
have
one
or
more
of
the
following
problems?
The
display
appearstobe
rolling
from
lefttoright
or
from
righttoleft.
^SSZZZZZZZZZZXC-Z-Z-juMMLrjucr
STfrfCffiittt
11<i c f
'5?-r-Hi
.««11i14/
jrrag
VHiWk«MuM*'
The
display
appearstobe
rolling
from
toptobottom
and
from
lefttoright.
Yes
Replace
the
display
element.
(GotoChapter
5.)
If
the
problem
still
exists,
replace
the
logic
element.
The
display
appearstobe
rolling
from
toptobottom
or
from
bottomtotop.
Si
The
display
hasnopicture
and
adjusting
the
brightness
control
hasnoeffect.
No
4.32
C9468047
Page 93

4.32
us
Is
your
display
bright
enough?
ABCDEFGHIJKLV.NOPQRSTUVWXYZ123
ABCOEFGHIJKLMNOPQRSTUVWXYE123
ABCDEFGHIJKLMNOPQRSTUVWXYZ123
ABCDEFGHIJKLMNOPQBSTUVWXY2123
ABCOEPGHIJKLMNOPQnSTUVV/XYZ123
ABCOEFGHIJKLMNOPQRSTUVWXYZ123
ABCOEFGHIJKLMNOPQBSTUVWXYZ123
ABCOEFGHUKLMNOPQRSTUVWXYZ123
ABCDEFGHIJKLMNOPQBSTUVWXY2123
ABCDEFGHIJICLMNOPQRSTUVWXY2t23
ABCDEFGHIJKLMNOPQRSTUVWXYZI23
ABCOEFGHIJKLMNOPQRSTUVV/XYZ123
ABCOEFGHIJKLMNOPQRSTUVWXYZI23
ABCOEFGHIJKLMNOPQBSTUVWXYZ123
No
Yesm^p4.33
Adjust
the
brightness and
contrast
controls on your display
station
by
doing
the
following:
1.
Press
the
SetUp
key.
2.
Press
the%key
untilasuitable
brightnessisobtained.
3. Press the o key until a suitable contrast
between
highlighted
and
normal
fieldsisobtained.
4.
Press
the
SetUp
key.
Is
your
display
bright
enough
now?
Yes
No
Your
problem
should
be
corrected.
If
these
controls
need
frequent
adjustment,
replace
the
loqi'"
plement.
(GotoChapter
5.;
Replace
the
display
element.
(GotoChapter
5.)
If
the
problem
still
exists,
replace
the
logic
element.
C9468048
Chapter4.
Fixing
Display
Station Problems 85
Page 94

4.33
86
Dothe characters on
the
display appear to be incomplete
or
have
missing
dots?
Yes
Replace
the
logic
element.
(GotoChapter
5.)
No
Replace
the
display
element.
(Go to
Chapter
5.)
If
the
problem
still
exists,
replace
the
logic
element.
C9468049
Page 95

4.34
Do
you
have
oneofthe
following
problems?
•
One
key
causes
an incorrect
charactertobe displayed.
•
One
key
causes
no
charactertobe
displayed.
I\lo Replace
the
keyboard element.
m (GotoChapter
5.)
Make
sure
the
display
station
keyboardIDagrees
with
that
expected
by
the
system.
(RefertoChapter2on
how
to
display
and
change
the
keyboard
ID. If
you
are
unsure
of
the
correct keyboard
ID,
check with your
system
operator.)
After
making
sure
the
display
station
keyboard
ID is
set
correctly,
do
you
still
have
the
problem
with
your
keyboard?
Yes
Replace
the
keyboard
element.
(GotoChapter
5.)
if
the
problem
still
exists,
replace
the
logic
element.
No
Your display
station
shouldbeoperational.
If it is not,
begin
the
CPAR
again.Ifyou
still
cannot
locate
the
procedure
to
correct
your
problem,
contact
your
IBM
sales
representative.
C9468050
Chapter 4. Fixing Display Station Problems
87
Page 96

4.35
88
Ifyour problem occurred with the divider scan linedisplayed
(Figure 1),
the
ready indicator may or may not be on. After
you
signed
ontothe
system,
find
your
probleminthe
chart
below
and
do
the
recovery
procedure
listed.
Problem
There
is a KorKN
error
code
displayedinthe
operator
information
area.
A key or several keys on your
keyboard
cause
incorrect
characters
ornocharacters
to
appearonyour
display.
Recovery
Procedure
Gotostep
4.28.
Make
sure
the
keyboard
cableisconnected,
turn
off
the
display
station,
waitatleast
five seconds, and then turn on the display
station
again. If
the
problem
still exists,
gotostep
4.34.
Your
displayisnot
readable
or
stationary.
Replace
the
display element. (Go to Chapter 5.
Ifthe problem still exists, replace the logic
element.
Characters
displayed on
the
display have missing or
extra
dots.
or
Your
attributesorcursor
do
not
function
correctly.
or
Your
display
screen
format
does
not
work
properly.
(Refer to
Chapter
2, for
screen
size
format.)
or
Your
brightness,
contrast,
volume,
and
other
controls
need
frequent
adjustment
or
do
not
work
correctly.
There is a numeric four-digit
error
code
displayedinthe
operator
information
area.
Replace the logic element. (Go to Chapter 5.)
RefertoChapter3,Operator
Messages
and
Error
Codes,inthis
triariuai.
Step
4.35
J Continued
C9468/
^
Page 97

Problem
Recovery
Procedure
You
haveaproblem
with
your
security key, or
Xis
displayedinthe
operator
information
area.
Replace
the
display element. (Go to
Chapter
5.)
If
the
problemstill
exists,
replace
the
logic
element.
Your
display
has
low
contrast,
volume,orbrightness.
Adjust
the
appropriate
controls. (Refer to
Chapter2,LearningtoOperate
the
Display
Station.)
If
these
controls
need
frequent
adjustment,
replace
the
display
element.
(GotoChapter
5.)
If
the
problem
still
exists,
replace
the
logic
e'ement
210,
or
X
212
error
code
appearsinthe
operator
information
areaofyour
display.
This
may
occur
aftera2%
%
error
code
has
been
displayed.
1.
Press
the
Reset
key
and
try
the
failing
operation.
2. If
the
problem
occurs
again,
check
that
the
keyboard
ID is
correct
for
this
display
station.Toselect
the
keyboard
ID,
refertoChapter
2.
An
2%
%
error
code
appearsinthe
operator
information
areaofyour
display.
or
An
XN
225
or
206
error
code
appearsinthe
operator
information
area
of
your
display.
1.
Press
the
Reset
key
and
try
the
failing
operation.
2. If
the
problem
occurs
again,
make
sure
the
other
display
stations
connectedtothe
same
control
unit/adapter
are
working.
If
the
others
are
working,
replace
the
logic
element.
(GotoChapter
5.)
If
the
others
are
not
working,
contact
your
system
operator
and
report
the
error
message.
X ^
nn
where
nnn
is
other
than
2%
%,
225,or206.
or
Press
the
Reset
key
and
continue.Ifthe
problem
persists,
notify
your
supervisor
and
report
this
message,
including
the
numbers,
for
further
action.
X—VzL_nnor
nnn
(n = is
digits
0-9)
No Ready (@,
0,1)
or Rule
(B.,1)appearinthe
operator
information
area.
If
the
other
work
stations
connected
to
this
control
unit/adapter
are working, replace
the
logic
element.
(GotoChapter
5.)
C9468052
Chapter 4. Fixing Display Station Problems
89
Page 98

4.36
90
Are
the
other
work
stations
connected
to
the
same
control
unit/adapter
failing?
No
Yeslll^
Contact
your
system operator
and
report
the
problem.
Perform
the
following:
1. Make sure the cable from the system is not physically damaged
and
is securely
fastenedtothe
system
andtothe
cable
attachment
moduleonyour
display station.
2. Make sure the cable attachment module is securely fastened to
your
display
station.
3. Make sure the display station modelIDand the keyboard
ID
are
set
correctly. (Check with
the
system
operator
if you
are
not
sure
what
your display
station
model ID
and
your
keyboardIDare.) Forinstructions on how to
set
the display
station modelIDand
the
keyboard
ID,
refer to Chapter 1,
Section
3.
Does
the
problem
still
exist?
Yes
Replace
the
logic
element.
(GotoChapter
5.)
If
the
problem
still
exists,
replace
the
cable
attachment
module
and
the
display
element.
No
Your display
station
shouldbeoperational.
If it is not, begin
the
CPAR again. If you
still
cannot
locate
the
proceduretocorrect
your
problem,
contact
your
IBM
sales
representative.
C9488053
Page 99

If
your
problem
occurs
intermittently
{now
and
then)
perform
the
following:
1.
Set
the
Power
switch
to
Off
and
wait
five
seconds.
2.
Press
and
hold
any
key
and
set
the
Power
switchtoOn.
3.
After
the
display
appears,
press
and
hold
the
Alt key;
then
press
the
Test
key. A T will
appear
on
the
status
line.
^'"^SEEEEEEEEEEEEEEEEEEEEEEEEEEEEEEEEEEEEEEHEEEEEEEEEEEEEEEEEEEEEEEEEEEEEEEEEKEEEEE*"^^
IAAAAAAAAAAAAAAAAAAAAAAAWAAAAAAAAAAAAAIAAAAAAAAAAAAAAAAAAAAAAAAAAAAAAAAAAAAAAAH
II H li
<<
H lllll<HHKHKHIIHI<!IHII)IM!!KHHKHMHHIIHIIIfHKHHHHH II
H
IIHHilHHHHHHIlHIIHHHIIilHHHHHHHKIIIIHHIIHHKHHH
H
t. f:
El
fEEEEEEEEEEEEEEEEEEEEEF.EEEEEEEEEEEEEEEElKEKl
KKilllEEF-EEEEEEEEEEKEEEEEEEI
4.
Press
the
key
shown
below.
Chapter
4. Fixing Display
Station
Problems
91
Page 100

5. The display will change,asshown
below and a 3 wil
appear
above
the
T .
6.
Check
the
informationinreverse
image
on
the
lines
to
the
right of D01 £
through
D028.
Do
these
lines
in
reverse
image
contain
all
zeros?
Replace
the
logic
element.
(GotoChapter
5.)
 Loading...