

Page 1

3130 Advanced Function Printer IBM
User's Guide
S544-5337-02
Page 2

Page 3

3130 Advanced Function Printer IBM
User's Guide
S544-5337-02
Page 4

Note
Before using this information and the product it supports, be sure to read the general information under “Notices” on page xi.
Third Edition (September 1996)
The following paragraph does not apply to any other country where such provisions are inconsistent with local law.
INTERNATIONAL BUSINESS MACHINES CORPORATION PROVIDES THIS PUBLICATION “AS IS” WITHOUT WARRANTY OF
ANY KIND, EITHER EXPRESS OR IMPLIED, INCLUDING, BUT NOT LIMITED TO THE IMPLIED WARRANTIES OF
MERCHANTABILITY OR FITNESS FOR A PARTICULAR PURPOSE. Some states do not allow disclaimer of express or implied
warranties in certain transactions, therefore, this statement may not apply to you.
Requests for IBM publications should be made to your IBM representative or to your IBM branch office serving your locality. If you
request publications from the address given below, your order will be delayed because publications are not stocked there.
IBM welcomes your comments. For your convenience, a form for readers' comments is provided at the back of this publication. You
may send your comments by facsimile to 1-800-524-1519, by electronic mail to print_pubs@vnet.ibm.com, or mail your comments to:
IBM Printing Systems Company
Information Development
Department H7FE, Building 003G
P.O. Box 1900
Boulder, CO 80301-9191, U.S.A.
When you send information to IBM, you grant a nonexclusive right to use or distribute the information in any way IBM believes
appropriate without incurring any obligation to you.
Copyright International Business Machines Corporation 1994, 1996. All rights reserved.
Note to U.S. Government Users — Documentation related to restricted rights — Use, duplication or disclosure is subject to
restrictions set forth in GSA ADP Schedule Contract with IBM Corp.
Page 5

Contents
Statement of Limited Warranty ........................... vii
Notices . . . . . . . . . . . . . . . . . . . . . . . . . . . . . . . . . . . . . . . . . . xi
Trademarks . . . . . . . . . . . . . . . . . . . . . . . . . . . . . . . . . . . . . . . . xi
Communications Statements . . . . . . . . . . . . . . . . . . . . . . . . . . . . . xii
Federal Communication Commission (FCC) Statement. ............ xii
Safety Notices . . . . . . . . . . . . . . . . . . . . . . . . . . . . . . . . . . . . . xv
Safety Precautions . . . . . . . . . . . . . . . . . . . . . . . . . . . . . . . . . . . xv
Electrical Safety . . . . . . . . . . . . . . . . . . . . . . . . . . . . . . . . . . . xv
Laser Safety . . . . . . . . . . . . . . . . . . . . . . . . . . . . . . . . . . . . . xv
Preface . . . . . . . . . . . . . . . . . . . . . . . . . . . . . . . . . . . . . . . . . xvii
Audience . . . . . . . . . . . . . . . . . . . . . . . . . . . . . . . . . . . . . . . . . xvii
Organization and Contents of This Guide ...................... xvii
Conventions Used . . . . . . . . . . . . . . . . . . . . . . . . . . . . . . . . . . xviii
Terminology . . . . . . . . . . . . . . . . . . . . . . . . . . . . . . . . . . . . . . xviii
Related Publications . . . . . . . . . . . . . . . . . . . . . . . . . . . . . . . . . . xix
Chapter 1. Introducing the 3130 Printer ..................... 1-1
About the 3130 Printer ................................. 1-2
Printer Models . . . . . . . . . . . . . . . . . . . . . . . . . . . . . . . . . . . . . 1-2
Optional Accessories . . . . . . . . . . . . . . . . . . . . . . . . . . . . . . . . . . 1-2
Model 01S Simplex Printer Features ....................... 1-2
Model 02S High-Capacity Simplex Printer Features .............. 1-3
Model 02D Duplex and Model 03S Simplex Printer Features ......... 1-4
Part Names and Their Functions ........................... 1-5
External View of the Printer ............................ 1-5
Functions—External View . . . . . . . . . . . . . . . . . . . . . . . . . . . . . 1-6
Internal View of the Printer ............................. 1-6
Functions—Internal View . . . . . . . . . . . . . . . . . . . . . . . . . . . . . . 1-7
Relocating the Printer ................................. 1-8
Safety Precautions . . . . . . . . . . . . . . . . . . . . . . . . . . . . . . . . . . . 1-8
Operating Precautions . . . . . . . . . . . . . . . . . . . . . . . . . . . . . . . . . 1-9
Choosing Forms . . . . . . . . . . . . . . . . . . . . . . . . . . . . . . . . . . . . 1-9
Paper and Stock ................................... 1-9
Paper Parameters . . . . . . . . . . . . . . . . . . . . . . . . . . . . . . . . 1-9
Label Parameters . . . . . . . . . . . . . . . . . . . . . . . . . . . . . . . 1-10
Envelope Parameters . . . . . . . . . . . . . . . . . . . . . . . . . . . . . 1-11
Preprinted Paper . . . . . . . . . . . . . . . . . . . . . . . . . . . . . . . . . 1-12
Prepunched Paper . . . . . . . . . . . . . . . . . . . . . . . . . . . . . . . . 1-13
Chapter 2. Performing Basic Tasks ....................... 2-1
Printing Help Pages .................................. 2-2
Understanding Status Messages ........................... 2-2
Starting Print Jobs and Making the Printer Ready ................. 2-3
Interrupting Printing . . . . . . . . . . . . . . . . . . . . . . . . . . . . . . . . . . 2-3
Shutting Down and Powering Off the Printer .................... 2-4
Restarting the Printer ................................. 2-4
Loading Paper and Envelopes ............................ 2-5
Copyright IBM Corp. 1994, 1996 iii
Page 6

Paper Positioning and Guidelines ....................... 2-5
Envelope Positioning and Guidelines ..................... 2-6
Changing the Form Name or Paper Assigned to a Tray ............. 2-7
Handling Messages . . . . . . . . . . . . . . . . . . . . . . . . . . . . . . . . . . 2-7
Clearing Paper Jams .................................. 2-7
Canceling Print Jobs .................................. 2-8
Canceling Internal Print Jobs ........................... 2-8
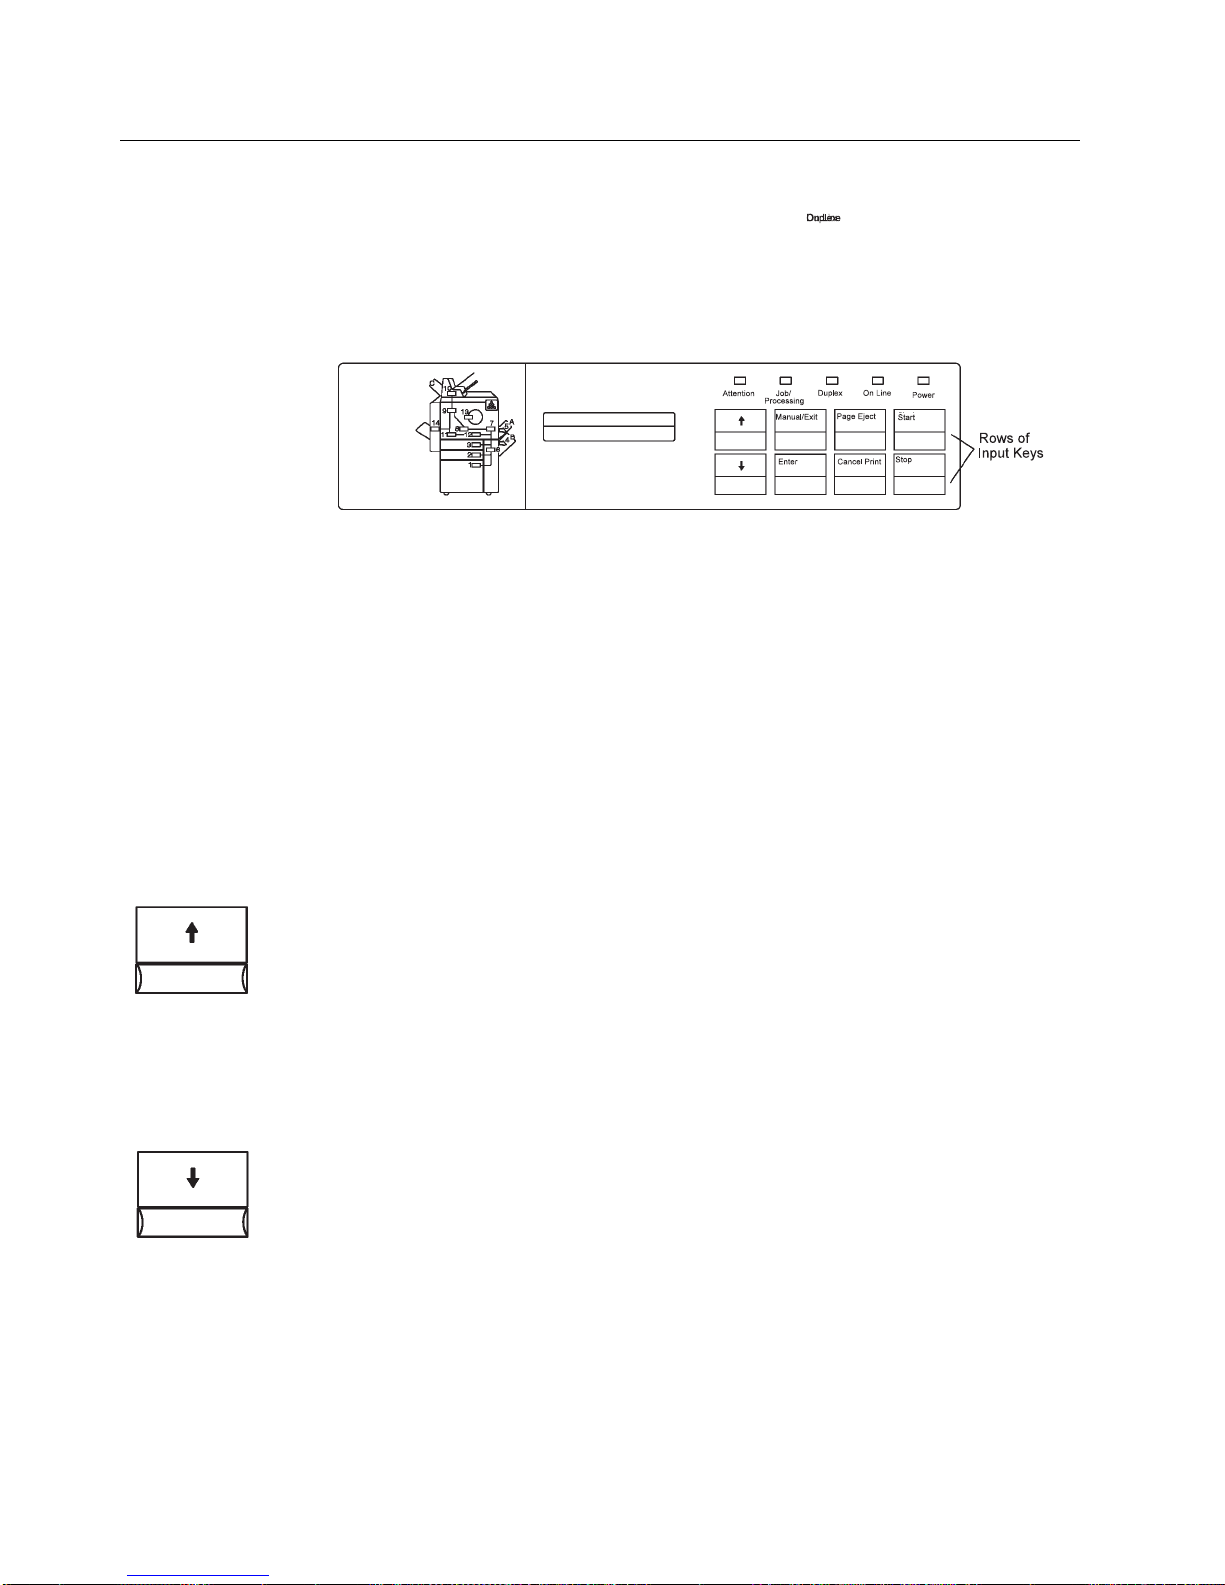
Chapter 3. Using the Operator Panel ....................... 3-1
Input Keys . . . . . . . . . . . . . . . . . . . . . . . . . . . . . . . . . . . . . . . . 3-2
Display . . . . . . . . . . . . . . . . . . . . . . . . . . . . . . . . . . . . . . . . . . 3-4
Status mode . . . . . . . . . . . . . . . . . . . . . . . . . . . . . . . . . . . . . 3-5
Menu Mode . . . . . . . . . . . . . . . . . . . . . . . . . . . . . . . . . . . . . 3-5
Using the Display in Menu Mode ......................... 3-5
Entering and Exiting Menu Mode ....................... 3-6
Navigating through the Menu Items ...................... 3-6
Entering a Password to Access Menu Items ................. 3-6
Selecting Settings and Actions in the Menu ................. 3-7
Menu Tree . . . . . . . . . . . . . . . . . . . . . . . . . . . . . . . . . . . . 3-7
Using the Keyboard ................................ 3-11
Parts of the Display—Keyboard Mode ................... 3-11
Accessing the Keyboard ........................... 3-11
Keyboard Order . . . . . . . . . . . . . . . . . . . . . . . . . . . . . . . . 3-12
Navigating through the Keyboard ...................... 3-13
Selecting a Keyboard Character ....................... 3-13
Selecting and Saving Your Keyboard Entry ................ 3-13
Editing Keyboard Entries ........................... 3-14
Canceling Keyboard Entries ......................... 3-14
Status Indicators . . . . . . . . . . . . . . . . . . . . . . . . . . . . . . . . . . . 3-14
Attention . . . . . . . . . . . . . . . . . . . . . . . . . . . . . . . . . . . . . 3-14
Job/Processing . . . . . . . . . . . . . . . . . . . . . . . . . . . . . . . . . 3-15
Duplex . . . . . . . . . . . . . . . . . . . . . . . . . . . . . . . . . . . . . . 3-15
On Line . . . . . . . . . . . . . . . . . . . . . . . . . . . . . . . . . . . . . 3-15
Power . . . . . . . . . . . . . . . . . . . . . . . . . . . . . . . . . . . . . . 3-15
Intervention Indicator Lights ............................. 3-16
Paper Jam Indicator Lights .......................... 3-16
Toner Indicator Light .............................. 3-16
Beeper . . . . . . . . . . . . . . . . . . . . . . . . . . . . . . . . . . . . . . . . . 3-17
Error Beeper . . . . . . . . . . . . . . . . . . . . . . . . . . . . . . . . . . 3-17
Keys Beeper . . . . . . . . . . . . . . . . . . . . . . . . . . . . . . . . . . 3-17
Tutorial: Using the Menu to Enter a Key Operator Password ......... 3-17
Skills Covered . . . . . . . . . . . . . . . . . . . . . . . . . . . . . . . . . 3-17
Prerequisites . . . . . . . . . . . . . . . . . . . . . . . . . . . . . . . . . . 3-18
Instructions . . . . . . . . . . . . . . . . . . . . . . . . . . . . . . . . . . . 3-18
Chapter 4. Customizing the Printer ........................ 4-1
Configuring Input Trays ................................ 4-2
Tray Names . . . . . . . . . . . . . . . . . . . . . . . . . . . . . . . . . . . . . 4-2
Enabling and Disabling Trays ........................... 4-3
Tray Selection Defaults ............................. 4-4
Changing the Form Name and Paper Size Assigned to a Tray ........ 4-4
Selecting an Autoswitch Tray ........................... 4-5
Tray Name Correspondence ............................ 4-6
Configuring Output Stackers ............................. 4-7
iv 3130 User's Guide
Page 7

Stacker Names . . . . . . . . . . . . . . . . . . . . . . . . . . . . . . . . . . . 4-7
Enabling and Disabling Stackers ......................... 4-8
Stacker Selection Defaults ........................... 4-8
Setting Offset Stacking ............................... 4-8
Selecting Offset Stacking ............................ 4-9
Autolinking the Output Stackers .......................... 4-9
Selecting Autolinking . . . . . . . . . . . . . . . . . . . . . . . . . . . . . . . 4-9
Clearing Autolinked Stackers ......................... 4-10
Configuring the Printer ................................ 4-10
Configuration Menu Items ............................ 4-10
Printer Configuration Menu Item Descriptions ............... 4-11
Setting Printer Configuration Items ....................... 4-11
Printing the Printer Configuration ........................ 4-12
Printing a One-Page Configuration Listing ................. 4-12
Printing a Multi-Page Configuration Listing ................. 4-12
Running Print Quality Samples ........................... 4-13
Running the Demonstration Pack ......................... 4-14
Adjusting the Print (IPDS Only) ........................... 4-14
Determining if You Need to Adjust the Print .................. 4-15
How to Adjust the Print .............................. 4-16
Changing the Key-Operator Password ...................... 4-17
Defining Forms . . . . . . . . . . . . . . . . . . . . . . . . . . . . . . . . . . . . 4-18
Defining a New Form ............................... 4-18
Modifying a Form ................................. 4-20
Deleting a Form .................................. 4-21
Checking the Current Definition of a Form ................... 4-21
Machine Information . . . . . . . . . . . . . . . . . . . . . . . . . . . . . . . . . 4-22
Machine Information Items ............................ 4-22
Viewing Machine Information .......................... 4-22
Configuring Attachments . . . . . . . . . . . . . . . . . . . . . . . . . . . . . . 4-23
Enabling and Disabling Attachments ...................... 4-23
Enabling and Disabling Applications ..................... 4-24
Setting Configuration Parameters ........................ 4-25
Printing the Attachment Configuration ..................... 4-25
Chapter 5. Printing and Paper Handling ..................... 5-1
Powering On and Off the Printer ........................... 5-2
Powering On . . . . . . . . . . . . . . . . . . . . . . . . . . . . . . . . . . . . . 5-2
Powering Off . . . . . . . . . . . . . . . . . . . . . . . . . . . . . . . . . . . . . 5-2
Shutting Down and Restarting the Printer ...................... 5-3
Shutdown . . . . . . . . . . . . . . . . . . . . . . . . . . . . . . . . . . . . . . . 5-3
How to Shut Down the Printer ........................... 5-3
Restart . . . . . . . . . . . . . . . . . . . . . . . . . . . . . . . . . . . . . . . . 5-3
How to Restart the Printer ............................. 5-3
Understanding Status Messages ........................... 5-4
Clearing Information Messages ............................ 5-4
Starting Print Jobs ................................... 5-5
Interrupting Printing . . . . . . . . . . . . . . . . . . . . . . . . . . . . . . . . . . 5-5
Canceling Print Jobs .................................. 5-5
Loading Paper . . . . . . . . . . . . . . . . . . . . . . . . . . . . . . . . . . . . . 5-6
Loading Paper into the Main Tray ......................... 5-7
Loading Paper into the Lower Sub Tray, Upper Sub Tray, or Top Front Tray 5-9
Loading Paper into the Side Tray ........................ 5-13
Adjusting the Side Tray ............................ 5-13
Contents v
Page 8

Positioning Preprinted and Prepunched Paper .................. 5-15
Preprinted Paper (Prepunched or Nonpunched) ............... 5-15
Prepunched (Not Preprinted) .......................... 5-16
Preprinted (Prepunched or Nonpunched) ................... 5-17
Loading Labels . . . . . . . . . . . . . . . . . . . . . . . . . . . . . . . . . . . . 5-17
Loading Envelopes into the Envelope Feeder .................. 5-18
Using the Output Stackers ............................. 5-19
Adjusting the Top Stackers (Base and Upper Stackers) ........... 5-20
Adjusting the Side Stacker ............................ 5-21
Chapter 6. Maintaining the Printer ........................ 6-1
Replacing Supplies . . . . . . . . . . . . . . . . . . . . . . . . . . . . . . . . . . . 6-2
When to Replace Supplies ............................. 6-2
General Guidelines for Supplies .......................... 6-3
Display Messages for Supplies .......................... 6-4
Replacing the Toner Cartridge ........................... 6-5
Replacing the Developer Mix ........................... 6-7
Replacing the Photoconductor Belt ....................... 6-10
Replacing the Transfer Belt Unit ........................ 6-12
Replacing the Fuser Unit ............................. 6-16
Replacing the Cleaner Unit ........................... 6-18
Cleaning the Printer ................................. 6-20
Cleaning the Printer Covers and Trays ..................... 6-21
Printer Cabinet . . . . . . . . . . . . . . . . . . . . . . . . . . . . . . . . . 6-21
Printer Cover Interior ............................. 6-21
Trays and Rollers ............................... 6-21
Cleaning the Drum Unit and Drum Seal .................... 6-23
Cleaning the Paper Guide Rollers and Guard Fingers ............ 6-23
Chapter 7. Handling Operation Problems .................... 7-1
Paper Jams . . . . . . . . . . . . . . . . . . . . . . . . . . . . . . . . . . . . . . . 7-2
Using Paper Jam Indicator Lights to Locate Paper Jams ........... 7-2
Clearing a Paper Jam ............................... 7-3
Clearing Paper from the Side Doors and Top Stackers ............ 7-4
Clearing Paper from the EP Module Area .................... 7-6
Clearing Paper from the Paper Feed Module Area ............... 7-8
Clearing Paper from the Front Trays ...................... 7-12
Clearing Paper from the Stackers ........................ 7-13
Handling Aborts and Program Checks ....................... 7-13
Hard Abort . . . . . . . . . . . . . . . . . . . . . . . . . . . . . . . . . . . . . 7-13
Program Check . . . . . . . . . . . . . . . . . . . . . . . . . . . . . . . . . . 7-13
Correcting Print Quality Problems ......................... 7-14
All Black Print Samples .............................. 7-14
Other Print Samples ............................... 7-14
Appendix A. Display Messages and Codes .................. A-1
Abbreviations . . . . . . . . . . . . . . . . . . . . . . . . . . . . . . . . . . . . G-1
Glossary . . . . . . . . . . . . . . . . . . . . . . . . . . . . . . . . . . . . . . . G-3
Index . . . . . . . . . . . . . . . . . . . . . . . . . . . . . . . . . . . . . . . . . . X-1
vi 3130 User's Guide
Page 9

Statement of Limited Warranty
The warranties provided by IBM in this Statement of Limited Warranty apply only to
Machines you originally purchase for your use, and not for resale, from IBM or an
IBM authorized re-seller. The term “Machine” means an IBM machine, its features,
conversions, upgrades, elements, or accessories, or any combination of them.
Machines are subject to these terms only if purchased in the United States or
Puerto Rico, or Canada, and located in the country of purchase. If you have any
questions, contact IBM or your re-seller.
Machine: 3130
Warranty Period: 90 days
Contact your place of purchase for warranty service information.
Production Status
Each Machine is manufactured from new parts, or new and serviceable used parts
(which perform like new parts). In some cases, the Machine may not be new and
may have been previously installed. Regardless of the Machine's production
status, IBM's warranty terms apply.
The IBM Warranty
IBM warrants that each Machine 1) is free from defects in materials and
workmanship and 2) conforms to IBM's Official Published Specifications. IBM
calculates the expiration of the warranty period from the Machine's Date of
Installation. The date on your receipt is the Date of Installation, unless IBM or your
re-seller informs you otherwise.
During the warranty period, IBM or your re-seller will provide warranty service under
the type of service designated for the Machine and will manage and install
engineering changes that apply to the Machine. IBM or your re-seller will specify
the type of service.
For a feature, conversion, or upgrade, IBM or your re-seller may require that the
Machine on which it is installed be 1) the designated, serial-numbered Machine and
2) at an engineering-change level compatible with the feature, conversion, or
upgrade. Some of these transactions (called “Net-Priced” transactions) may include
additional parts and associated replacement parts that are provided on an
exchange basis. All removed parts become the property of IBM and must be
returned to IBM.
Replacement parts assume the remaining warranty of the parts they replace.
If a Machine does not function as warranted during the warranty period, IBM or
your re-seller will repair or replace it without charge. If IBM or your re-seller is
unable to do so, you may return it to your place of purchase and your money will
be refunded.
If you transfer a Machine to another user, warranty service is available to that user
for the remainder of the warranty period. You should give your proof of purchase
and this Statement to that user.
Copyright IBM Corp. 1994, 1996 vii
Page 10

Warranty Service
To obtain warranty service for the Machine, you should contact your re-seller or call
IBM. In the United States, call IBM at 1-800-IBM-SERV (426-7378). In Canada,
call IBM at 1-800-465-6666. You may be required to present proof of purchase.
Depending on the Machine, the service may be 1) a “Repair” service at your
location (called “On-site”) or at one of IBM's or a re-seller's service locations (called
“Carry-in”) or 2) an “Exchange” service, either On-site or Carry-in.
When a type of service involves the exchange of a Machine or part, the item IBM
or your re-seller replaces becomes its property and the replacement becomes
yours. The replacement may not be new, but will be in good working order.
It is your responsibility to:
1. Obtain authorization from the owner (for example, your lessor) to have IBM or
your re-seller service a Machine that you do not own;
2. where applicable, before service is provided—
a. follow the problem determination, problem analysis, and service request
procedures that IBM or your re-seller provide,
b. secure all programs, data, and funds contained in a Machine,
c. inform IBM or your re-seller of changes in a Machine's location, and
d. for a Machine with exchange service, remove all features, parts, options,
alterations, and attachments not under warranty service. Also, the Machine
must be free of any legal obligations or restrictions that prevent its
exchange; and
3. be responsible for loss of, or damage to, a Machine in transit when you are
responsible for the transportation charges.
Extent of Warranty
IBM does not warrant uninterrupted or error-free operation of a Machine.
Misuse, accident, modification, unsuitable physical or operating environment,
improper maintenance by you, or failure caused by a product for which IBM is not
responsible may void the warranties.
THESE WARRANTIES REPLACE ALL OTHER WARRANTIES, EXPRESS OR
IMPLIED, INCLUDING, BUT NOT LIMITED TO, THE IMPLIED WARRANTIES OF
MERCHANTABILITY AND FITNESS FOR A PARTICULAR PURPOSE.
HOWEVER, SOME LAWS DO NOT ALLOW THE EXCLUSION OF IMPLIED
WARRANTIES. IF THESE LAWS APPLY, THEN ALL EXPRESS AND IMPLIED
WARRANTIES ARE LIMITED IN DURATION TO THE WARRANTY PERIOD. NO
WARRANTIES APPLY AFTER THAT PERIOD.
In Canada, warranties include both warranties and conditions.
Some jurisdictions do not allow limitations on how long an implied warranty lasts,
so the above limitation may not apply to you.
viii 3130 User's Guide
Page 11

Limitation of Warranty
Circumstances may arise where, because of a default on IBM's part (including
fundamental breach) or other liability (including negligence and misrepresentation),
you are entitled to recover damages from IBM. In each such instance, regardless
of the basis on which you are entitled to claim damages, IBM is liable only for:
1. bodily injury (including death), and damage to real property and tangible
personal property; and
2. the amount of any other actual loss or damage, up to the greater of $100,000
or the charge for the Machine that is the subject of the claim.
Under no circumstances is IBM liable for any of the following:
1. third-party claims against you for losses or damages (other than those under
the first item listed above);
2. loss of, or damage to, your records or data; or
3. economic consequential damages (including lost profits or savings) or incidental
damages, even if IBM is informed of their possibility.
Some jurisdictions do not allow the exclusion or limitation of incidental or
consequential damages, so the above limitation or exclusion may not apply to you.
This warranty gives you specific legal rights and you may also have other rights
which vary from jurisdiction to jurisdiction.
Statement of Limited Warranty ix
Page 12

x 3130 User's Guide
Page 13

Notices
References in this publication to IBM products, programs or services do not imply
that IBM intends to make these available in all countries in which IBM operates.
Any reference to an IBM licensed product, program, or service is not intended to
state or imply that only IBM's product, program, or service may be used. Any
functionally equivalent product, program, or service that does not infringe any of
IBM's intellectual property rights may be used instead of the IBM product.
Evaluation and verification of operation in conjunction with other products, except
those expressly designated by IBM, is the user's responsibility.
Any performance data contained in this document was obtained in a controlled
environment based on the use of specific data. The results that may be obtained in
other operating environments may vary significantly. Users of this document should
verify the applicable data in their specific environment. Therefore, such data does
not constitute a performance guarantee or warranty.
IBM may have patents or pending patent applications covering subject matter in
this document. The furnishing of this document does not give you any license to
these patents. You can send license inquiries, in writing, to the IBM Corporation,
IBM Director of Licensing, 506 Columbus Ave., Thornwood, N.Y. 105894 U.S.A.
Trademarks
The IBM 3130 Advanced Function Printer meets the requirements of IEC 950, First
Edition, Amendments 1 and 2. The laser used in the 3130 complies with IEC 825
and EN 60825.
The following terms are trademarks of the IBM Corporation in the United States or
other countries or both:
Advanced Function Presentation
Advanced Function Printing
AFCCU
AFP
AIX
AIX/6000
Application System/400
AS/400
IBM
Intelligent Printer Data Stream
IPDS
MVS/ESA
MVS/SP
MVS/XA
OS/2
OS/400
Personal System/2
Print Services Facility
PS/2
PSF
PSF/6000
RISC System/6000
Copyright IBM Corp. 1994, 1996 xi
Page 14

WIN-OS/2
The following terms are trademarks or registered trademarks of other companies:
Trademark Company
Agfa Agfa-Gevaert A.G.
Agfa Rhombus Agfa-Gevaert A.G.
AXIS AXIS Communication, Inc.
CG Intellifont Miles, Inc.
CG Omega Miles, Inc.
CG Times Miles, Inc. under license from Monotype Corp.
(Times New Roman)
ITC Advant Garde Gothic International Typeface Corp.
ITC Bookman International Typeface Corp.
ITC Zapf Chancery International Typeface Corp.
ITC Zapf Dingbat International Typeface Corp.
Lexmark Lexmark International, Inc.
Marigold AlphaOmega Typography Corp.
NetWare Novell Inc.
PostScript Adobe Systems, Inc.
PCL Hewlett-Packard Co.
PCL5e Hewlett-Packard Co.
TrueType Apple Computer Co.
Univers Linotype AG and Subsidiaries
Windows Microsoft Corp.
Communications Statements
Federal Communication Commission (FCC) Statement.
Note: This equipment has been tested and found to comply with the limits for a
Class A digital device, pursuant to Part 15 of the FCC Rules. These limits are
designed to provide reasonable protection against harmful interference when the
equipment is operated in a commercial environment. This equipment generates,
uses, and can radiate frequency energy and, if not installed and used in
accordance with the instruction manual, may cause harmful interference to radio
communication. Operation of this equipment in a residential area is likely to cause
harmful interference, in which case the user will be required to correct the
interference at his own expense.
Properly shielded and grounded cables and connectors must be used to meet FCC
emission limits. IBM is not responsible for any radio or television interference
caused by using other than recommended cables and connectors or by
unauthorized changes or modifications to this equipment. Unauthorized changes or
modifications could void the user's authority to operate the equipment.
This device complies with Part 15 of the FCC Rules. Operation is subject to the
following two conditions: (1) this device may not cause harmful interference, and
(2) this device must accept any interference received, including interference that
may cause undesired operation.
xii 3130 User's Guide
Page 15

Shielded Cables (European Statement):
Properly shielded and grounded cables
must be used in order to reduce the potential for causing interference to radio and
TV communications and to other electrical or electronic equipment. Such cables
and connectors are available from IBM authorized dealers. IBM cannot accept
responsibility for any interference caused by using other than recommended cables
and connectors.
European Community (EC) Conformity Statement:
This product is in conformity
with the protection requirements of EC Council Directive 89/336/EEC on the
approximation of the laws of the Member States relating to electromagnetic
compatibility. IBM cannot accept responsibility for any failure to satisfy the
protection requirements resulting from a non-recommended modification of the
product, including the fitting of non-IBM option cards.
German Conformity Statement:
Dieses Gerät erfüllt die Bedingungen der EN
55022 Klasse A. Für diese Klasse von Geräten gilt folgende Bestimmung nach
dem EMVG:
Geräte dürfen an Orten, für die sie nicht ausreichend entstört sind, nur mit
besonderer Genehmigung des Bundesminesters für Post und Telekommunikation
oder des Bundesamtes für Post und Telekommunikation betrieben werden. Die
Genehmigung wird erteilt, wenn keine elektromagnetischen Störungen zu erwarten
sind.
(Auszug aus dem EMVG vom 9.Nov.92, Para.3, Abs.4)
The United Kingdom Telecommunications Act 1984:
This apparatus is
approved under approval No. NS/G/1234/J/100003 for the indirect connections to
the public telecommunications systems in the United Kingdom.
Canadian Department of Communications Compliance Statement:
This Class
A digital apparatus meets the requirements of the Canadian Interference-Causing
Equipment Regulations.
Avis de conformité aux normes du ministére des Communications du
Canada:
Cet appareil numérique de la classe A respecte toutes les exigences du
Réglement sur le matériel brouilleur du Canada.
Statement of CISPR 22 Edition 2 Compliance:
Attention
This is a Class A Product. In a domestic environment this product may cause radio
interference in which case the user may be required to take adequate measures.
Notices xiii
Page 16

xiv 3130 User's Guide
Page 17

Safety Notices
There are three levels of safety notices:
DANGER calls attention to a situation that is potentially or extremely hazardous to
people.
CAUTION calls attention to a situation that is potentially hazardous to people.
Attention calls attention to the possibility of damage to a program, device, system,
or data. Attention notices are located throughout this publication, but are not listed
here.
Safety Precautions
Electrical Safety
This printer is inspected and listed by recognized national testing laboratories, such
as Underwriters Laboratories, Inc. (UL) in the U.S.A. and Canadian Standards
Association (CSA) in Canada. Listing of a product by a national testing laboratory
indicates that the product is designed and manufactured in accordance with
national requirements intended to minimize safety hazards. IBM equipment meets
a very high standard of safety in design and manufacture. Remember, however,
that this product operates under conditions of high electrical potentials and heat
generation, both of which are functionally necessary.
Laser Safety
Because the paper and toner used in the printer can burn, you should take normal
precautions to prevent fire. These precautions include common-sense measures,
such as keeping potentially combustible materials (for example, curtains and
chemicals) away from the printer, providing adequate ventilation and cooling,
limiting unattended operation, and having trained personnel available and assigned
to the printer.
This printer complies with the performance standards set by the U.S. Food and
Drug Administration for a Class 1 Laser Product. This means that the printer
belongs to a class of laser products that does not product hazardous laser
radiation. This classification was accomplished by providing the necessary
protective housing and scanning safeguards to ensure that laser radiation is
inaccessible or within Class 1 limits.
There are various tool-operated machine covers that should be moved, removed, or
replaced only by trained service personnel. There are no operator controls or
adjustments associated with the laser.
No operator maintenance is required to keep the product in compliance as a Class
1 Laser Product. No adjustments that affect laser operation or power are
accessible to the operator.
This printer is a Class 1 Laser Product that contains an enclosed Class 3B laser.
Copyright IBM Corp. 1994, 1996 xv
Page 18

xvi 3130 User's Guide
Page 19

Preface
Audience
The
IBM 3130 Advanced Function Printer: User's Guide
and maintain the IBM 3130 Advanced Function Printer.
This publication is intended for users and key operators of the IBM 3130 Advanced
Function Printer. Both users and key operators should have a basic understanding
of computer equipment and computer operations.
user
is someone who sends print jobs to the printer and performs basic functions
A
related to printing and picking up those print jobs. Chapter 2 contains information
about basic tasks that users perform. Chapters 1, 3, 4, 5, and 7 are also directed
to users. Some topics in chapters 3, 4, 5, and 6 describe tasks performed only by
key operators.
explains how to operate
key operator
A
such as replacing the toner cartridge. The key operator helps keep the printer in
optimal working order and changes printer settings as needed. All chapters are
directed to key operators.
administrator
An
designated to set up attachment configurations, job management options, and font
management options for the printer.
customer engineer
A
The customer engineer is responsible for service actions, such as maintaining
preventive maintenance logs and event logs, performing disk operations, and
running printer diagnostics.
is someone designated to handle more complex printer functions,
(either a systems administrator or LAN administrator) is someone
(IBM service representative) may also refer to this publication.
Organization and Contents of This Guide
This publication is designed to provide all basic information needed to operate,
customize, and maintain the printer. It consists of the following chapters:
Chapter 1, “Introducing the 3130 Printer” gives a general description of the
printer features and functions of the 3130 printer. Illustrations are used to
identify key parts of the printer.
Chapter 2, “Performing Basic Tasks” explains the tasks that users perform on a
regular basis. This chapter is designed to be used as a quick reference guide.
Chapter 3, “Using the Operator Panel” describes how to use the operator panel
keys, display, and indicators to control printer functions and set printer
configurations. This chapter also contains a tutorial to help in using the
keyboard to enter characters.
Chapter 4, “Customizing the Printer” describes how to set up the printer so that
it suits your printing environment. It also explains how to set up the printer
attachment.
Copyright IBM Corp. 1994, 1996 xvii
Page 20

Chapter 5, “Printing and Paper Handling” explains how to load paper (including
Chapter 6, “Maintaining the Printer” describes how to keep the printer in good
Chapter 7, “Handling Operation Problems” describes how to identify and solve
Appendix A, “Display Messages and Codes” describes messages and
This publication also contains a list of abbreviations, a glossary, and an index.
Conventions Used
The following typeface conventions are used in this publication.
Names of keys on the operator panel are shown in Helvetica Bold typeface.
Examples are:
user-defined forms) and run the printer. It includes information about using the
printer trays and stackers.
working condition. It describes how to replace consumable parts (other than
paper), a responsibility of key operators.
minor problems that occur during operations.
recommended recovery actions.
Terminology
Press the Enter key.
Press Stop.
Text shown on the operator panel display is shown in Helvetica Narrow typeface.
Examples are:
Scroll to SETUP.
The operator panel displays NOT READY.
Printer Models
This publication refers to the following 3130 printer models:
Model 01S: Simplex
Model 02S: High-capacity simplex
Model 02D: Duplex
Model 03S: Simplex
Paper Input and Output Receptacles
Input receptacles are called
trays
. Output receptacles are called
stackers
.
xviii 3130 User's Guide
Page 21

Related Publications
The following 3130 publications are also available:
IBM 3130 Advanced Function Printer: System Administration Guide
IBM 3130 and 3160 Advanced Function Printer: Safety Information
IBM 3130 Advanced Function Printer: Introduction and Planning Guide
G544-3974
IBM InfoPrint 60; 3130, 3160 and 3935 Advanced Function Printer: Attachment
Configuration Handbook
IBM 3130 Advanced Function Printer: Programming Reference
IBM IPDS Handbook for Printers That Use The Advanced Function Common
Control Unit
The following books contain information that relates to the IBM 3130 Advanced
Function Printer:
Advanced Function Printer: Cut Sheet Paper Reference for Use with IBM
Electrophotographic Printers
, S544-5328
, S544-3978
,
, S544-3977
, S544-5329
, G544-3895
, G544-3915.
Advanced Function Presentation: Printer Information
contains an extensive list of other publications related to Advanced Function
Printing.
Guide to Advanced Function Presentation
Contact your IBM marketing representative for information concerning either the
3130, its publications, or its associated licensed programs.
, G544-3876.
, G544-3290. This book
Preface xix
Page 22

xx 3130 User's Guide
Page 23

Chapter 1. Introducing the 3130 Printer
This chapter introduces some of the features and functions of the IBM 3130
Advanced Function Printer. Descriptions of the following are provided:
Features of the 3130
Printer models
Optional accessories for the 3130
Part names and functions
This chapter also contains basic guidelines concerning:
Relocation information
Safety precautions
Printer operation precautions
Selection of forms (paper specifications)
Copyright IBM Corp. 1994, 1996 1-1
Page 24

About the 3130 Printer
The 3130 printer provides the following standard features:
30 printed impressions of letter-size or A4 paper per minute
Resolution of 240 or 300 pels (dots per inch)
Choice of five attachment methods:
– Ethernet host attachment is standard.
– PC Parallel host attachment is standard.
– One additional interface slot is available for an additional host attachment
(token ring, twinaxial, or SDLC).
An operator panel, including a display and keys for user input
A wide range of paper sizes available
Printer Models
There are four models of the 3130 printer:
Model 01S: Simplex
Model 02S: High-capacity simplex
Model 02D: Duplex
Model 03S: Simplex
Optional Accessories
The following accessories are optional for the printer:
1 500-sheet side stacker (optional for all models)
1 000-sheet dual top stacker (optional for Model 01S simplex and Model 02S
high-capacity simplex printers)
500-sheet side tray (optional for Model 02S high-capacity simplex, Model 02D
duplex, and Model 03S Simplex printers)
250-sheet cassette for front trays (optional for all models)
500-sheet cassette for the side tray (optional for all models)
Envelope feeder (optional for all models but side tray must be installed)
Model 01S Simplex Printer Features
The following are standard features of the 3130 Model 01S simplex printer:
Simplex (single-sided) printing
One internal tray (250-sheet capacity)
One side tray (500-sheet capacity)
Single top paper stacker with offset feature (500-sheet capacity)
1-2 3130 User's Guide
Page 25
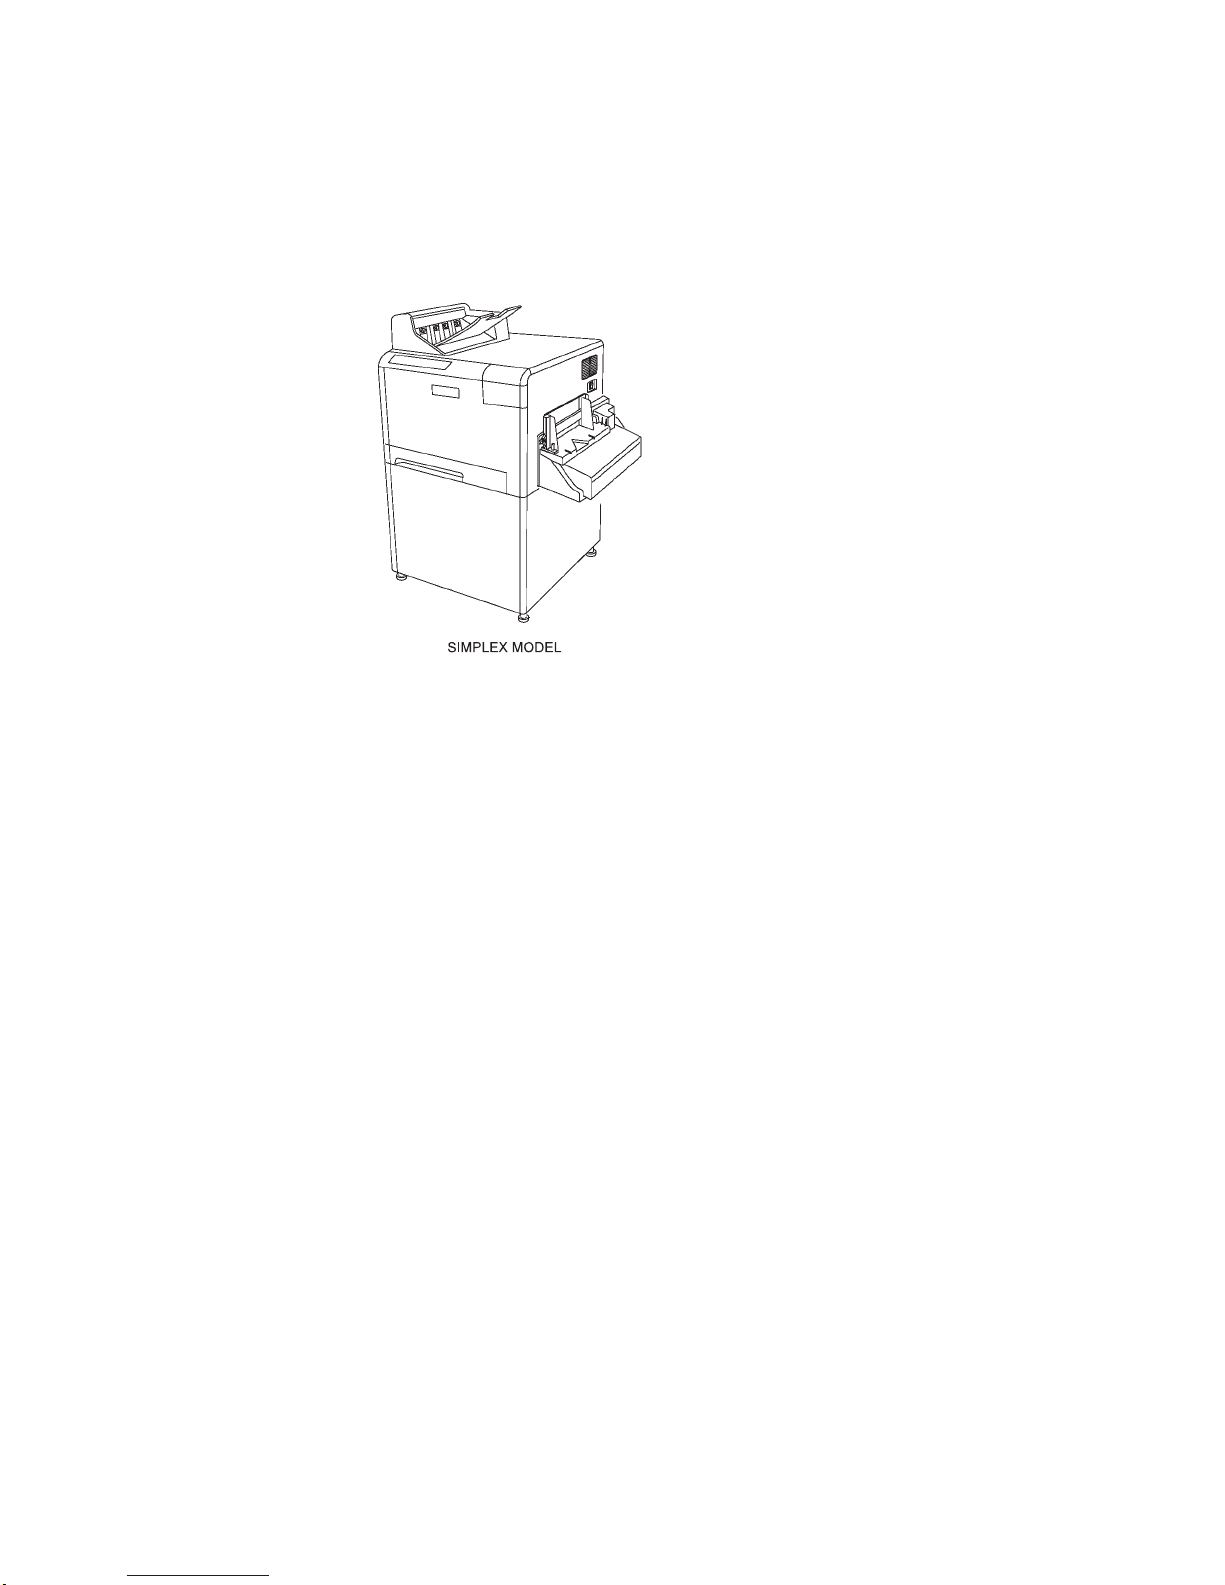
The following are optional features of the 3130 Model 01S simplex printer:
Envelope feeder (100-envelope capacity)
Dual top stacker with offset feature (1 000-sheet capacity)
Side stacker with offset feature (1 500-sheet capacity)
Figure 1-1. Model 01S Simplex Printer with Optional Envelope Feeder
Model 02S High-Capacity Simplex Printer Features
The following are standard features of the 3130 Model 02S high-capacity simplex
printer:
Simplex (single-sided) printing
Four internal trays (three 250-sheet capacity and one 2 000-sheet capacity)
Single top paper stacker with offset feature (500-sheet capacity)
The following are optional features of the 3130 Model 02S high-capacity simplex
printer:
Side tray (500-sheet capacity)
Envelope feeder (100-envelope capacity)
Dual top stacker with offset feature (1 000-sheet capacity)
Side stacker with offset feature (1 500-sheet capacity)
Chapter 1. Introducing the 3130 Printer 1-3
Page 26
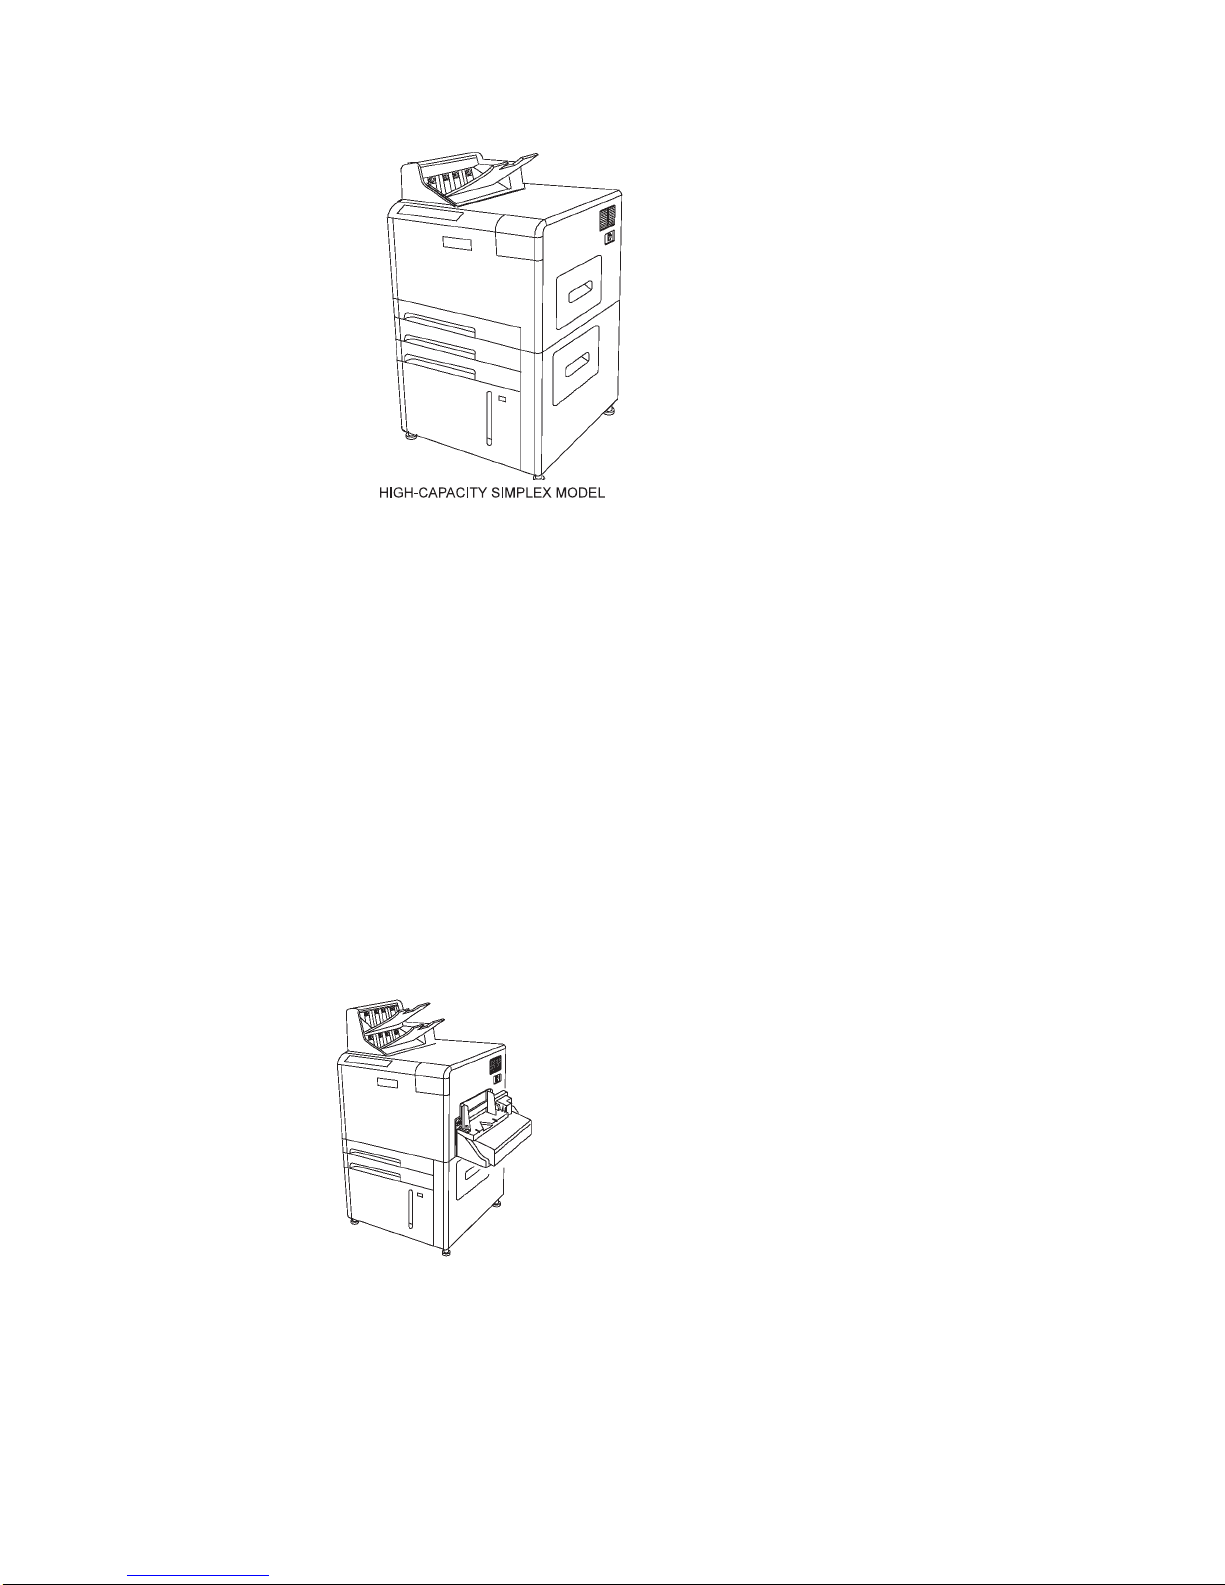
Figure 1-2. Model 02S High-Capacity Simplex Printer
Model 02D Duplex and Model 03S Simplex Printer Features
The following are standard features of the 3130 Model 02D duplex and Model 03S
simplex printers:
Simplex (single-sided) and duplex (double-sided) printing (Model 02D only)
Three internal trays (two 250-sheet capacity and one 2 000-sheet capacity)
Dual top stacker with offset feature (1 000-sheet capacity)
The following are optional features of the 3130 Model 02D duplex and Model 03S
simplex printers:
Side tray (500-sheet capacity)
Envelope feeder (100-envelope capacity)
Side stacker with offset feature (1 500-sheet capacity)
Figure 1-3. Model 02D Duplex and Model 03S Simplex Printers
1-4 3130 User's Guide
Page 27

Part Names and Their Functions
External View of the Printer
Figure 1-4 shows the external parts of the printer. The printer shown includes all
possible trays and stackers.
Figure 1-4. External View of the Printer (All Optional Accessories Are Shown)
Chapter 1. Introducing the 3130 Printer 1-5
Page 28

Functions—External View
Table 1-1 describes each external part.
Table 1-1. Description of External Printer Parts
Front Cover Open to replace consumable assemblies, clear paper jams,
Top Auto-Eject Door Open to clear paper jams. When the side tray is used, it is
Bottom Door Open to clear paper jams.
Stacker Cover Open to clear paper jams.
Toner Supply Cover Open to replace the toner cartridge.
Main Tray Holds up to 2 000 sheets of paper.
Lower Sub Tray Holds up to 250 sheets of paper.
Upper Sub Tray Holds up to 250 sheets of paper.
Top Front Tray Holds up to 250 sheets of paper.
Side Tray Holds up to 500 sheets of paper.
Envelope Feeder Holds up to 100 envelopes.
Operator Panel Contains the indicator lights, input keys, and LCD display.
Upper Stacker Collects the printed paper. It holds up to 500 sheets of
Base Stacker Collects the printed paper. It holds up to 500 sheets of
Side Stacker Collects the printed paper. It holds up to 1 500 sheets of
Power Switch Powers on (turn on) and powers off (turn off) the printer.
Tray Indicator Indicates the main tray is in use. Do not open the main
Tray Window Shows the paper level in the main tray.
or clean the inside of the printer.
installed at this location.
paper. Upper stacker is the name of the top section of a
dual top stacker.
paper. Base stacker is the name of the single top stacker
and also the bottom section of a dual top stacker.
paper.
tray when the indicator light is on.
Internal View of the Printer
Figure 1-5 on page 1-7 shows the internal parts of the printer. The printer is
shown with the front cover open. To access a module or unit, use the indicated
handles or levers. You will need to access these areas to clear paper jams,
replace supplies, and clean the printer.
1-6 3130 User's Guide
Page 29
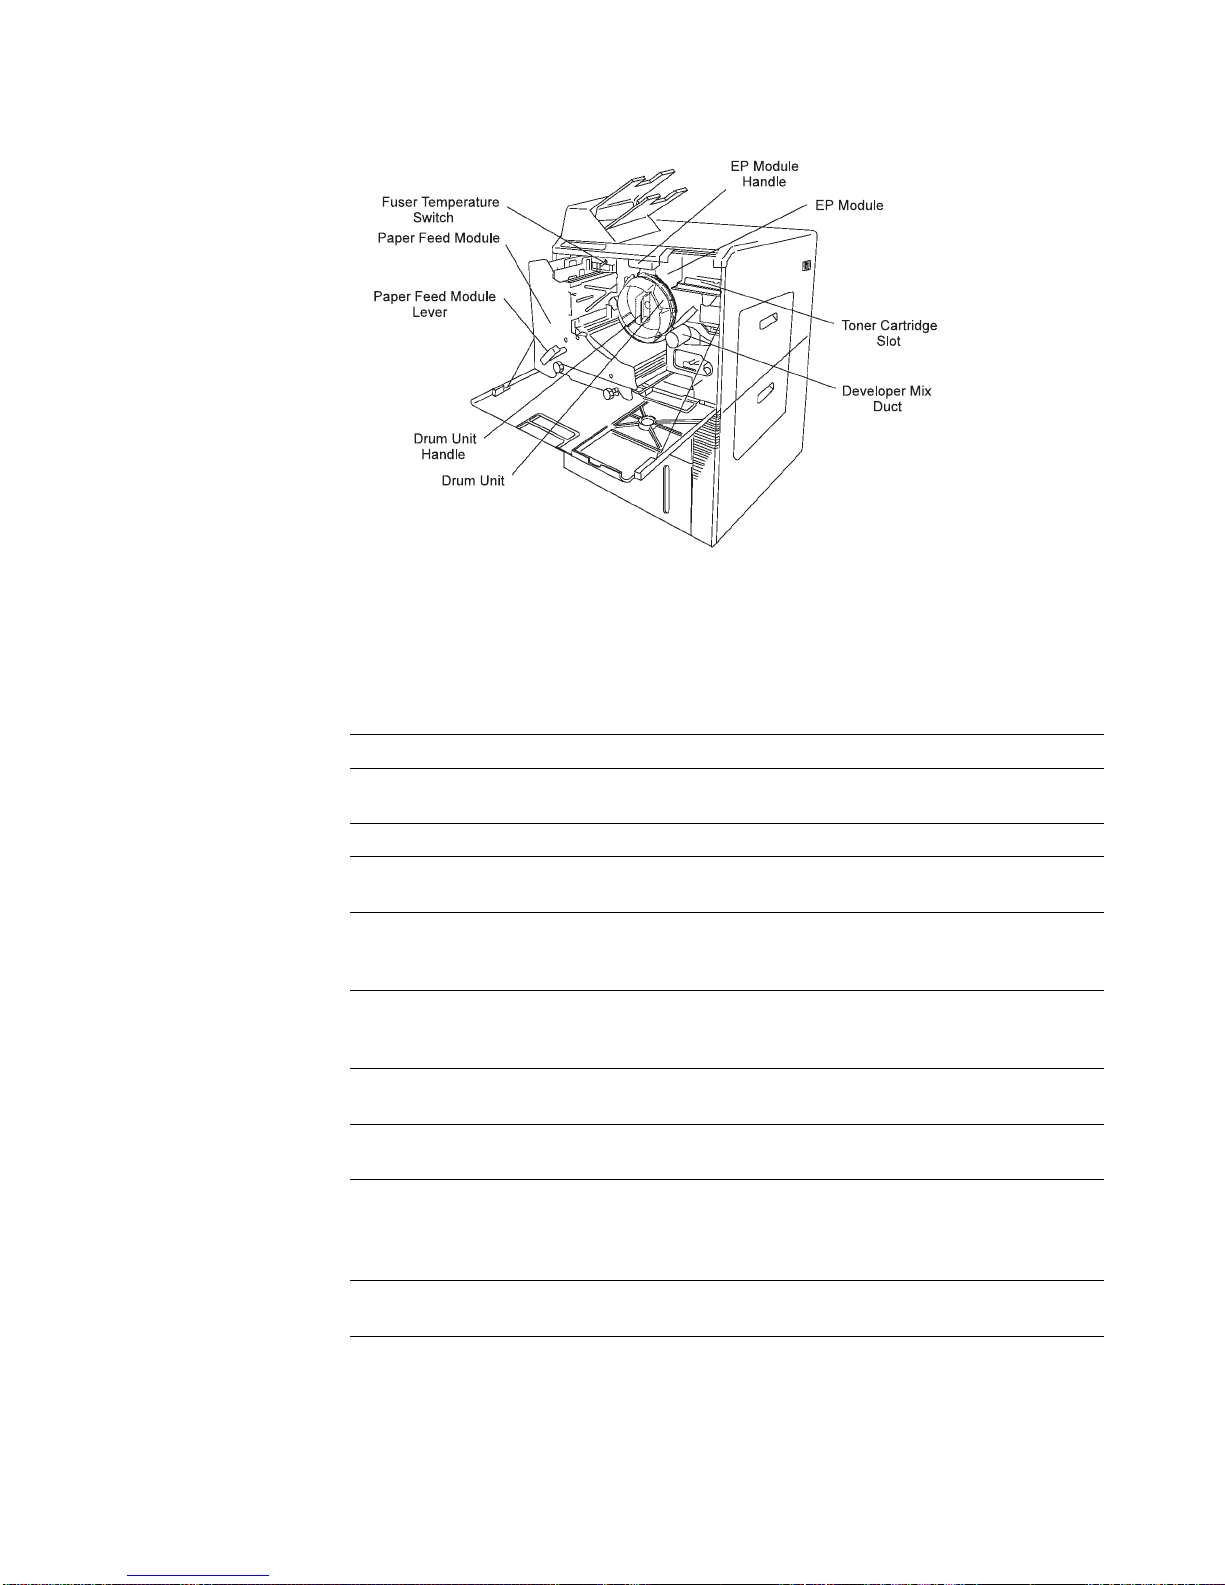
Figure 1-5. Internal View of the Printer
Functions—Internal View
Table 1-2 describes each internal part.
Table 1-2. Description of Internal Printer Parts
Developer Mix Duct Mount the developer mix bottle onto the developer mix duct
Paper Feed Module Consists of the transfer belt assembly and fuser assembly.
Paper Feed Module Lever Turn to the RELEASE position; then pull forward to access
EP Module Consists of the drum unit, cleaner assembly, charger
EP Module Handle Release the paper feed module lever and two lock levers;
Drum Unit Part of the EP module. Consists of the drum and a
Drum Unit Handle Turn to the RELEASE position; then pull forward to access
Fuser Temperature Switch Switch to raise the temperature of the fuser by
Toner Cartridge Slot Insert the toner cartridge into the toner cartridge slot to
to replace the developer mix.
the paper feed module components.
assembly, developer unit, pre-clean unit, and the toner
hopper unit.
then pull the EP module handle forward to access the EP
module components.
photoconductor belt mounted around the drum.
the drum unit components, including the photoconductor.
approximately 10°C to aid in fusing heavier weights of
paper. The normal setting should be used for paper
weights below 27 lb.
replace toner.
Chapter 1. Introducing the 3130 Printer 1-7
Page 30

Relocating the Printer
Whenever the printer is to be moved to another location, a relocation kit is required.
The customer engineer will disconnect and reconnect the printer, but the customer
is responsible for ordering the relocation kit.
The relocation kit part number is 45G1611.
Safety Precautions
Always follow these safety precautions:
Always keep the area around the printer clean. Use the printer under the
proper lighting (500-1 000 lux). Keep sufficient space around the printer so the
paper trays can be pulled forward and the printer can be serviced. Space
required in the vicinity of the printer is as follows:
– Front: 129.5 cm (51 inches)
– Left and right sides: 76 cm (30 inches)
– Rear: 15 cm (6 inches)
Do not place anything on the printer. Keep this guide on a shelf nearby instead
of on top of the printer.
Do not open any covers (except the toner cover and paper trays) during
printing operation. Personal injury might result if moving elements or electrical
parts are accidentally touched.
After opening the front cover, touch only blue parts. Other parts may be hot.
Be particularly careful when working in the fuser unit area. Do not touch the
inside of the fuser unit. The fuser unit becomes very hot, and it may cause
personal injury if accidentally touched.
Toner and developer mix are composed of powdery particles. Avoid inhaling
toner or developer. If the toner or developer mix spill on the floor, immediately
clean with a water-dampened cloth. Do not leave toner or developer mix on
the floor. Developer mix may cause accidents if stepped on as it contains
slippery beads of metal.
Limit your operations to those described in this publication. Contact the
customer engineer or service technician for operations that are not explained in
this publication.
Provide proper ventilation for the printer to prevent high ozone concentration.
Long-term exposure should be limited to 0.1 ppm calculated as an 8-hour time
weighted average concentration. Avoid installing the printer in a room smaller
than or equal to 81 cubic m (1 000 cubic ft), which approximately equals a 3 x
3 m (10 x 10 ft) room. If installing in a space smaller than 81 cubic m (1 000
cubic ft), air exchange ventilation is necessary.
Take care not to allow ties, sleeves, shirts, jewelry, and long hair to be caught
in the printer.
Be careful not to touch the hazardous parts near the caution labels.
Never touch the high voltage portions of the printer (where caution labels are
attached) when the printer is on. Touching these areas may cause personal
injuries.
1-8 3130 User's Guide
Page 31

Operating Precautions
Follow the procedures and instructions described in this publication to optimize
printer performance and to ensure safe operation.
Properly load the paper into the trays to prevent paper skew and paper jams.
See “Loading Paper and Envelopes” on page 2-5 for more information.
Use only paper that complies with the supply specifications, as detailed in
“Choosing Forms.”
Choosing Forms
The following information can help you choose the most appropriate forms to use in
the 3130. Also see
with IBM Electrophotographic Printers
choosing forms.
Paper and Stock
Printing on paper that does not comply with the specifications may result in paper
jams and print quality degradation. The 3130 can use standard white paper, colored
paper, pre-punched or drilled paper, preprinted paper, cardstock, labels, and
envelopes (with optional envelope feeder installed).
Advanced Function Printer: Cut Sheet Paper Reference for Use
for additional specifications to consider when
The following standard paper sizes are supported:
A4 (210 x 297 mm)
Letter (8.5 x 11 in.)
Legal (8.5 x 14 in.)
B4 (257 x 364 mm)
Ledger (11 x 17 in.)
A3 (297 x 420 mm)
B5 (182 x 257 mm)
The following standard envelope sizes are supported:
Commercial #10 (4.5 x 9.5 in.)
International DL (110 x 220 mm)
Select only high quality papers and forms. IBM recommends that you initially test
several reams of special use materials in your 3130 before you purchase large
quantities for a given application. For more detailed information regarding
pretesting,
IBM Electrophotographic Printers.
see Advanced Function Printer: Cut Sheet Paper Reference for Use with
Paper Parameters
Table 1-3 on page 1-10 summarizes recommendations that can help you and your
paper supplier choose paper that is most suitable for your 3130.
Chapter 1. Introducing the 3130 Printer 1-9
Page 32

Table 1-3. Recommended Paper Parameters
Paper Parameter Recommendation
Fiber composition Preferred: 100% chemical wood pulp
Acceptable: Recycled or with cotton content
Color White or pastel colors
Grain direction Parallel to the long dimension
Cutting method Rotary precision cut (Leonids, Will, or equivalent)
Cutting tolerances Length and width: ±0.787 mm (±0.031 in.)
Squareness: All corners 90° ± 0°6′
Basis weight Preferred: 75 g/mò (20-lb) bond
Acceptable: 60 to 160 g/mò (16- to 42-lb) bond†
200 g/mò (110-lb) index paper
Smoothness (Sheffield) 100-200 Sheffield units (75 to 90 g/mò)
Coefficient of static friction 0.35 to 0.62
Stiffness (Tabor Method) Machine direction: 1.7 minimum
Cross direction: 0.8 minimum
Moisture content 3.4 to 5.5 %
Surface resistivity 5x10⁹ to 2.1012 ohms
†For paper heavier than 27-lb bond, you may need to set the fuser temperature switch to the
high setting.
For more detailed information about paper, cardstock, and other forms, see
Advanced Function Printer: Cut Sheet Paper Reference for Use with IBM
Electrophotographic Printers
.
Label Parameters
The 3130 can also print on the paper face of self-sticking adhesive-backed labels in
simplex mode. Because the use of labels may cause more problems than printing
on plain xerographic paper, IBM recommends that you and your label supplier
consider the parameters recommended in Table 1-4 when purchasing labels:
Table 1-4. Recommended Label Parameters
Label Parameter Recommendation
Total basis weight 60-160 g/mò
Caliper 175 microns (6.8 mils) maximum
Face stock smoothness 70 to 200 Sheffield units
For more detailed information about labels, see
Sheet Paper Reference for Use with IBM Electrophotographic Printers
Advanced Function Printer: Cut
.
1-10 3130 User's Guide
Page 33

Envelope Parameters
For optimal printing results, use new 90 g/mò (24-lb) 100% chemically pulped
wood, or 25% cotton bond envelopes. You should try samples of any envelopes
you are considering using in your printer. This includes envelopes with rough or
highly textured surfaces, such as laid finishes.
The laser printing process heats envelopes to a temperature of 175°C (350°F).
Only use envelopes that are able to withstand these temperatures without sealing,
excessive curling, wrinkling, or releasing hazardous emissions. Check with the
manufacturer or vendor of the envelopes you plan to use to determine if they are
usable with laser printers, which heat them to 175°C.
For optimal performance and to prevent paper jams, do not use envelopes that:
Have excessive curl or twist
Are stuck together
Are damaged in any way
Contain windows, holes, perforations, cutouts, or deep embossing
Have exposed flap adhesive when the flap is placed in the sealed or closed
position
Have an interlocking design
Have postage stamps attached
Table 1-5 summarizes recommendations that can help you and your paper supplier
choose envelopes that are most suitable for your 3130.
Table 1-5. Recommended Envelope Parameters
Envelope Parameter Recommendation
Fiber composition Preferred: 100% chemical wood pulp Acceptable: 25%
cotton bond
Total basis weight 75 to 90 g/mò (20 to 24 lb)
Note: Only commercial #10 (4.12 x 9.5 in.) and ISO DL (110 x 220 mm) envelopes that
meet the conditions stated in Table 1-6 on page 1-12 are supported.
Chapter 1. Introducing the 3130 Printer 1-11
Page 34
Table 1-6 shows allowable dimensions for overall length (A) and width (B) of
envelopes as well as limitations on flap width (F) and length (E).
Table 1-6. Allowable Dimensions for Envelope
Dimension Maximum Minimum
A 254 mm 162 mm
B 140 mm 95 mm
C — 41 mm†
D 200 mm 137 mm
E — 110 mm
F 70 mm —
†The C dimension must be 41 mm or greater and the angle (O) must be larger than 0°.
Preprinted Paper
Preprinted paper has ink applied to it before it is used in the 3130 printer. Be sure
that ink used in preprinting is non-volatile and contains drying or resin oils. Ink
must not transfer when fusing temperatures are 200°C (392°F) and pressures are
450 kPA (65 lb/in.ò) for several seconds. IBM recommends the following inks:
The shaded area in the following figure should not contain printing. Printing in this
area can cause false double-sheet feeds.
Cured by ultraviolet
Cured by heat (Tinplate ink)
Dried by oxidative polymerization
1-12 3130 User's Guide
Page 35

Prepunched Paper
Prepunched paper should be flat and without deformation. Discard paper with
ragged or damaged hole edges. Do not allow chads (the little paper bits that result
from punching) or paper dust to adhere to the paper.
Supplies with prepunched holes must conform to the following specifications:
Maximum of four holes
Maximum hole diameter of 10 mm (0.39 in.)
Holes may not be located in or protrude into the area marked by the diagonal
Prepunched paper clearances for A4, B5, and letter-size paper are shown in
Figure 1-6.
lines in the following figures; otherwise, the holes will be detected by the paper
sensor, or the strength of the paper will decrease.
Figure 1-6. Prepunched Paper Clearances—A4, B5, and Letter Size
Chapter 1. Introducing the 3130 Printer 1-13
Page 36

Prepunched paper clearances for A3, B4 and ledger-size paper are shown in
Figure 1-7.
Figure 1-7. Prepunched Paper Clearances—A3, B4, and Ledger Size
1-14 3130 User's Guide
Page 37

Chapter 2. Performing Basic Tasks
This chapter contains information about basic, everyday printer tasks that users
perform. Use this chapter for quick reference.
The following general procedures are described in this chapter:
Printing help pages
Understanding status messages
Starting print jobs and making the printer ready
Interrupting printing
Shutting down the printer
Restarting the printer
Loading paper and envelopes
Changing the form name and paper assigned to a tray
Handling messages
Clearing paper jams
Canceling print jobs
Information in this chapter is intentionally brief. The following chapters contain
more detailed instructions and explanations:
Chapter 3, “Using the Operator Panel”
Chapter 4, “Customizing the Printer”
Chapter 5, “Printing and Paper Handling”
Chapter 7, “Handling Operation Problems”
Copyright IBM Corp. 1994, 1996 2-1
Page 38

Printing Help Pages
You can print internal help pages to keep near the printer for quick reference. The
help pages contain:
The menu tree (an illustration of the display menu options that are available on
the operator panel display)
A help page that contains a labeled illustration of the 3130 printer instructions
for performing basic printer tasks
To print the help pages, do the following:
1. Press the Menu/Exit key. HELP appears on the display.
2. Press the Enter key. PRINT HELP PAGE appears on the display.
3. Press the Enter key. Scroll to PRESS ENTER TO PRINT, and press the Enter
key to request printing. The help pages will be put in the print queue.
Note: If the printer is busy, the help pages may not print immediately.
4. Press the Menu/Exit key to exit the menu.
If you want to change the defaults for quantity, input tray (A4, letter paper only),
stacker, or duplex, scroll to each menu item and change the setting. See “Running
Print Quality Samples” on page 4-13.
Understanding Status Messages
Status messages are displayed in status mode when no intervention messages are
outstanding and the printer is not receiving data. Status messages are displayed
on the operator panel two-line display. The top line shows general status
messages (READY or NOT READY). The bottom line shows printer status
messages (PRINTING, RECEIVING, WARMING UP, SLEEPING, or TRACING).
These messages do not indicate errors; they give information about the current
status of the printer.
Table 2-1 lists both general status and printer status messages. Recommended
user actions follow each explanation.
Table 2-1 (Page 1 of 2). Status Messages and Recommended Actions
Message Recommended Action
READY
NOT READY
RECEIVING
PRINTING
Description:
or network if an attachment is on line.
Action:
Description:
information from a host or network.
Action:
PRINTER HAS BEEN MADE READY appears. The printer will then start to
print if a print job is waiting and an attachment is online.
Description:
network.
Action:
Description:
Action:
The printer is ready to receive information from a host
No action is required.
The printer is in a stopped mode and cannot print
Press Start to make the printer Ready. The message
The printer is receiving information from a host or
No action is required.
The printer is printing a print job.
No action is required.
2-2 3130 User's Guide
Page 39

Table 2-1 (Page 2 of 2). Status Messages and Recommended Actions
Message Recommended Action
WARMING UP
SLEEPING
TRACING
You can scroll to see other messages (if present). Press the down arrow key to
display the messages.
Description:
to print in 1 to 5 minutes.
Action:
will start printing as soon as it warms ups (if print jobs are waiting).
Description:
has turned off due to inactivity. The fuser will turn on and the printer
will warm back up when it receives a print job or, if the printer is in
the Not Ready state, when the Start key is pressed.
Action:
Description:
The tracing operation may slow down throughput and should be
turned off when not needed.
Action:
customer engineer if you think the tracing function was left on in
error.
The printer is warming up. The printer will be ready
Wait for the printer to warm up. If the printer is Ready, it
The printer is in sleep mode, which means the fuser
No action is required.
The printer is tracing an application or attachment.
No action is required. Contact the key operator or
Starting Print Jobs and Making the Printer Ready
To start (or continue) print jobs, do the following:
1. After performing the recovery action (listed in Appendix A, “Display Messages
and Codes”), press Enter to clear any existing error conditions.
2. Press Start. Any pending print jobs will continue or begin printing. If you press
Start again, the message ALREADY STARTED is displayed.
Interrupting Printing
If you want to temporarily stop printing, you can do so at any time. No print job
information will be lost. Any print jobs currently printing will continue after you start
the printer again.
To interrupt printing, do the following:
1. Press Stop. The printer will complete printing the current page and any other
page that is in the print queue. The message STOPPING... appears while the
printer finishes printing. When printing has stopped, the message PRINTER
HAS BEEN MADE NOT READY is displayed.
If you press Stop again, the message ALREADY STOPPED is displayed.
2. If you wish, you may run internal prints, load paper into empty trays, and so on.
3. Press Start to continue printing.
Chapter 2. Performing Basic Tasks 2-3
Page 40

Shutting Down and Powering Off the Printer
A shutdown closes all active functions, disables communications and attachments,
and stops all programs. After the shutdown is completed, a power off and power
on is required to start the printer again.
Attention: Always shut down the printer before powering off.
To shut down and power off the printer, do the following:
1. If the printer is Ready, press Stop.
2. Press Menu/Exit to enter menu mode. HELP is displayed.
3. Press the down arrow key until SYSTEM SHUTDOWN is displayed and press
Enter. PRESS ENTER TO SHUTDOWN is displayed. Press Enter to begin
the shutdown.
4. Wait for the message SHUTDOWN DONE-POWER OFF to be displayed before
you power off.
5. Press the power switch (on the right side of the printer) to the Off (O) position
to power off the printer.
Note: An alternate method to shut down the printer: Press
Restarting the Printer
A restart is similar to a shutdown, but the printer starts up again automatically after
the shutdown. Restart the printer only when instructed to do so in recovery actions.
To restart the printer, do the following:
1. Press the Power On switch (on the right side of the printer) to the On (I)
position to power on the printer.
2. Press Menu/Exit to enter menu mode. HELP is displayed.
3. Press the down arrow key until SYSTEM SHUTDOWN is displayed, and press
Enter PRESS ENTER TO SHUTDOWN is displayed.
4. Press the down arrow key until PRESS ENTER TO RESTART is displayed and
press Enter to begin the restart.
5. Wait for the restart procedure to complete. If the printer displays the message
NOT READY, press Start to make the printer Ready, so the printer can print
waiting print jobs.
Note: If the On Line indicator light is not lit, the printer attachments and/or
at the same time
Down Arrow, Enter, and Start keys. Wait for the SHUTDOWN
DONE-POWER OFF message to appear before you power off the printer.
applications may need to be enabled. Contact the key operator to
enable the attachments.
the
2-4 3130 User's Guide
Page 41

Loading Paper and Envelopes
An OUT OF PAPER message is displayed on the operator panel whenever a tray
is empty. The message names the empty tray. Refer to these labeled illustrations
to determine which tray is out of paper. The printer may have up to six trays
depending on the model and options installed.
Paper Positioning and Guidelines
Refer to the drawings below to ensure that you load the paper in the correct
position for that paper size.
Chapter 2. Performing Basic Tasks 2-5
Page 42

When loading paper, follow these guidelines to prevent paper jams and stacking
problems:
Do not use paper that is creased, folded, or damaged.
Rewrap partially used reams to maintain moisture content.
Pull firmly on the trays to open them.
Load only one size and type of paper into a tray.
Do not add small amounts of paper on top of paper already in the tray.
Do not overfill the tray. Do not load paper above the red line marking (in all
front trays).
See “Loading Paper” on page 5-6 for detailed instructions.
Envelope Positioning and Guidelines
Refer to the drawings below to ensure that you load the envelopes in the correct
position in the envelope feeder.
When loading envelopes, follow these guidelines to prevent paper jams and
stacking problems:
Do not use envelopes that have excessive curl or twist, are stuck together, or
are damaged in any way.
Do not use envelopes that contain windows, holes, perforations, cutouts, or
deep embossing, or that have exposed flap adhesive when the flap is placed in
the sealed or closed position.
Do not use envelopes that have an interlocking design or have postage stamps
attached.
Load only one size and type of envelope into the envelope feeder.
Do not overfill the envelope feeder. Do not load more than 100 envelopes into
the envelope feeder.
See “Loading Envelopes into the Envelope Feeder” on page 5-18 for detailed
instructions.
2-6 3130 User's Guide
Page 43

Changing the Form Name or Paper Assigned to a Tray
If you have changed the form loaded in a tray, you may need to change (or verify)
the form name assigned to that tray. Do this when the message CHECK FORM
NAME FOR TRAY is displayed on the operator panel.
To clear the message and change the form name assigned to a tray:
1. Press Enter to clear the message.
2. Press Menu/Exit to enter menu mode.
3. Press the down arrow key until TRAYS/STACKERS is displayed. Press Enter.
4. Press the down arrow key until the input tray for which you have changed the
loaded form is displayed. Press Enter.
5. Press the down arrow key until FORM NAME is displayed. Press Enter.
6. Press the down arrow key until the form name loaded in the tray is displayed.
Press Enter.
Note: If there is only one form name with the form size you have loaded in the
tray, the printer will automatically choose that form name.
Handling Messages
When you see a message that indicates an error condition, do the following:
1. Find the display message (and code, if present) in Appendix A, “Display
Messages and Codes.”
2. Perform the recovery action recommended for the displayed message and
code.
3. Press Enter to clear the message.
4. Press Start to continue printing.
Clearing Paper Jams
The printer stops printing when a misfeed occurs, and the message PAPER JAM is
displayed on the operator panel.
Do the following to clear the paper jam and the error message:
1. Check the operator panel intervention indicators.
2. If an arrow indicator light is lit, open the corresponding side door and empty the
paper, starting with the upper door,
3. If the top stacker arrow indicator light is lit, clear paper from that area.
before
you open the front cover or trays.
4. Check the intervention indicators again. If any lights remain lit, clear the paper
from the corresponding area.
Paper jams may occur in several areas of the printer. Check the paper path
thoroughly and remove all paper along the paper path according to the
procedures described in Chapter 7, “Handling Operation Problems.”
5. When all the paper is removed and all indicator lights are off, press Enter to
clear the error message from the operator panel.
Chapter 2. Performing Basic Tasks 2-7
Page 44

The message NOT READY, WARMING UP, or SLEEPING may appear on the
display.
6. Press Start to continue printing.
The pages removed from the paper path are reprinted automatically when the
printer starts printing again. If the printer is warming up, printing may take a
few minutes to start.
Note: To ensure that no data is lost, the 3130 may print a few extra pages.
Canceling Print Jobs
You can cancel a print job once that print job has started printing. To cancel a print
job, do the following:
1. Press Stop to stop the printer.
2. Check the output stacker after all sheets have been ejected.
Note: If the print job you want to cancel has finished printing, do not cancel
printing or the next print job will be canceled.
3. If the print job has started but has not yet finished printing, press Cancel Print.
Note: If there are no jobs in the print queue, the message NO PRINT JOBS
TO CANCEL appears.
4. When the prompt message SELECT STACKER TO CANCEL appears, press
Enter. A list of stacker names displays. Scroll to the stacker that is being
used for your job and press Enter.
If you do not want to cancel printing, press the down arrow key to display
RETURN, and press Enter. The print job is not canceled.
5. Press Start to continue printing other print jobs.
Canceling Internal Print Jobs
If you are printing pages generated by the printer itself and not from the data
stream, such as help pages or print quality samples, you can cancel the print job at
any time by pressing any key on the operator panel.
2-8 3130 User's Guide
Page 45

Chapter 3. Using the Operator Panel
This chapter describes the operator panel. The operator panel consists of input
keys, display, status indicators, and intervention indicators.
The operator panel is used to:
Display messages .Show the printer status
Indicate the location of paper jams
Configure and control the printer
This chapter describes each portion of the operator panel:
Input keys
Display
Status indicators
Intervention indicators
Beeper
This chapter also contains a tutorial to help you use the keyboard to enter or
change your password.
Copyright IBM Corp. 1994, 1996 3-1
Page 46
Input Keys
The input key area of the operator panel consists of eight input keys, which are
used to:
Change the state of the printer to Ready or Not Ready, using the Start and
Stop keys
Change between status mode and menu mode, using the Menu/Exit key (see
“Display” on page 3-4 for more information about status mode and menu
mode)
Navigate and select items in the menu, using the Scroll Up and Scroll Down
keys and the Enter key
Each input key is described below.
Scroll Up
Use the Scroll Up key to scroll up through the menu mode items. You can also use
the Scroll Up key to access and scroll through informational messages, aborts, and
program checks. Each time you press the key, the previous menu item or message
displays.
The Scroll Up key operates in a circular scroll fashion; when the top item on a list has
been displayed, the menu rolls over to the last item, and scrolling continues.
If you press the Scroll Up key when there is no information to scroll through or access,
the key press is ignored. No action occurs.
Scroll Down
Use the Scroll Down key to scroll down through the menu mode items. You can also
use the Scroll Down key to access and scroll through status and information
messages. Each time you press the key, the next menu item or message displays.
The Scroll Up key operates in a circular scroll fashion; when the top item on a list has
been displayed, the menu rolls over to the last item, and scrolling continues.
If you press the Scroll Down key when there is no information to scroll through or
access, the key press is ignored. No action occurs.
3-2 3130 User's Guide
Page 47

Menu/Exit
If the display is in status mode, use the Menu/Exit key to switch the display to menu
mode. While in the menu mode, you can scroll through the list of items with the scroll
keys and select items using the Enter key.
If the display is in menu mode, use this key to exit from the menu and switch the
display to status mode.
Enter
While in menu mode, use the Enter key to:
Navigate between menu levels
Select a choice on a menu
Initiate an action
Accept a character or operation for keyboard input
While in keyboard input mode, use the Enter key to select a character, proceed after
an error is posted, or select the keyboard edit operations. See “Using the Keyboard”
on page 3-11 for more information about using the Enter key in keyboard input mode.
While in status mode, press the Enter key to clear an information or error message.
Page Eject
When ASCII jobs are printing, use the Page Eject key to force a page to print (for
applications that do not send a page eject until the page buffer is full).
Note: This key functions for PC parallel attachments only. When IPDS jobs are
printing, this key is not active.
Cancel Print
This key is active only when the printer is receiving or processing a print job and the
printer is in the Not Ready state. (You can put the printer into the Not Ready state by
pressing the Stop key.)
If you press the Cancel Print key when there are no jobs in the print queue, the
message NO PRINT JOBS TO CANCEL appears.
If you press the Cancel Print key when the printer is not stopped, a message is
issued telling you to stop the printer. After the job is canceled at the printer, the job is
deleted at the host queue. This key also cancels internal print jobs (those originated
at the printer).
Verification is required: When you press the Cancel Print key, the message SELECT
STACKER TO CANCEL appears. When you select the output stacker assigned to the
print data stream (either the base, upper, or side stacker) and press Enter, the print
job is canceled.
A CANCEL COMPLETE message indicates that the print job was canceled. To avoid
canceling the print job after pressing the Cancel Print key, scroll to RETURN and
press the Enter key. The printer continues as though the Cancel Print key had not
been pressed.
Note: To avoid canceling another person's print job, verify that the job that is printing
is the job you want to cancel. After you press Stop, wait until pages are
ejected into the stacker. Check those pages. If the print job you wish to
cancel has not finished printing, proceed to cancel the print job. If the print job
has finished printing, do not cancel it, because this would cancel the next print
job sent to the printer.
Chapter 3. Using the Operator Panel 3-3
Page 48

Start
Use the Start key to initiate a request for the printer to change to a Ready state.
Printing proceeds only when the printer is Ready.
You can also use the Start key to attempt to clear some errors and interventions.
Preventive maintenance messages are not cleared.
Start is inactive when the printer is in a Ready state.
Stop
Use the Stop key to initiate a request for the printer to change to a Not Ready state.
If you press the Stop key while the printer is printing, the printer continues to process
the current pages. When processing is completed, the printer stops.
The Stop key is inactive when the printer is in a Not Ready state.
Stop does not cancel a print job, internal or external. Print jobs are canceled using
the Cancel Print key (even while in menu mode). The Stop key stops the printer until
the Start key is pressed. At that time, the printer continues what it had been doing at
the stop.
Display
The LCD display area of the operator panel consists of two rows of 16 characters
each. The following types of information can be displayed:
Printer status
Intervention conditions
Menu operations
The display operates in two modes: status mode and menu mode. These are
described in detail in the following sections.
The display text can appear in one of the following languages, which the operator
can select: English, German, French, Spanish, Brazilian Portuguese, Japanese,
Italian, or Dutch.
3-4 3130 User's Guide
Page 49

Status mode
Menu Mode
Status mode is the normal operating mode. In status mode, the two-line display
contains messages that provide the following types of information:
General status messages (READY or NOT READY) are displayed when no
intervention messages are outstanding and the printer is not receiving data.
Printer status messages (RECEIVING, PRINTING, WARMING UP, SLEEPING,
or TRACING) are displayed when no intervention messages are outstanding
and the printer is not receiving data. These messages indicate the current
condition of the printer.
Notification that replaceable supplies are low or need to be replaced.
Error messages when the printer encounters difficulty.
Confirmation of requested actions.
See Appendix A, “Display Messages and Codes” for a list of messages and their
meanings.
In menu mode, the display shows menus and submenus from which you select
choices to:
Print the help pages
Enable and disable trays and stackers
Perform actions such as shutting down and restarting the printer
Replace supplies
Configure the printer and its attachments
Perform printer setup functions, such as printing samples, setting machine
configuration parameters, defining forms, viewing machine information,
adjusting print, changing passwords, and printing current printer configuration
The menu options are arranged in a “menu tree,” which shows the basic menu
choices. See “Menu Tree” on page 3-7 for an illustration of the menu tree. Not all
menu items are shown.
Using the Display in Menu Mode
Use the menu to configure the printer and its attachments and to perform actions
such as shutting down the printer and entering the password to access
password-protected items.
Menu items are arranged in a “menu tree.” “Menu Tree” on page 3-7 illustrates the
basic menu choices available in menu mode. Not all menu items are shown. From
each main-menu item, you select the second-level submenu item. From the
second-level submenu item, you select the third level submenu items, and so on.
Chapter 3. Using the Operator Panel 3-5
Page 50
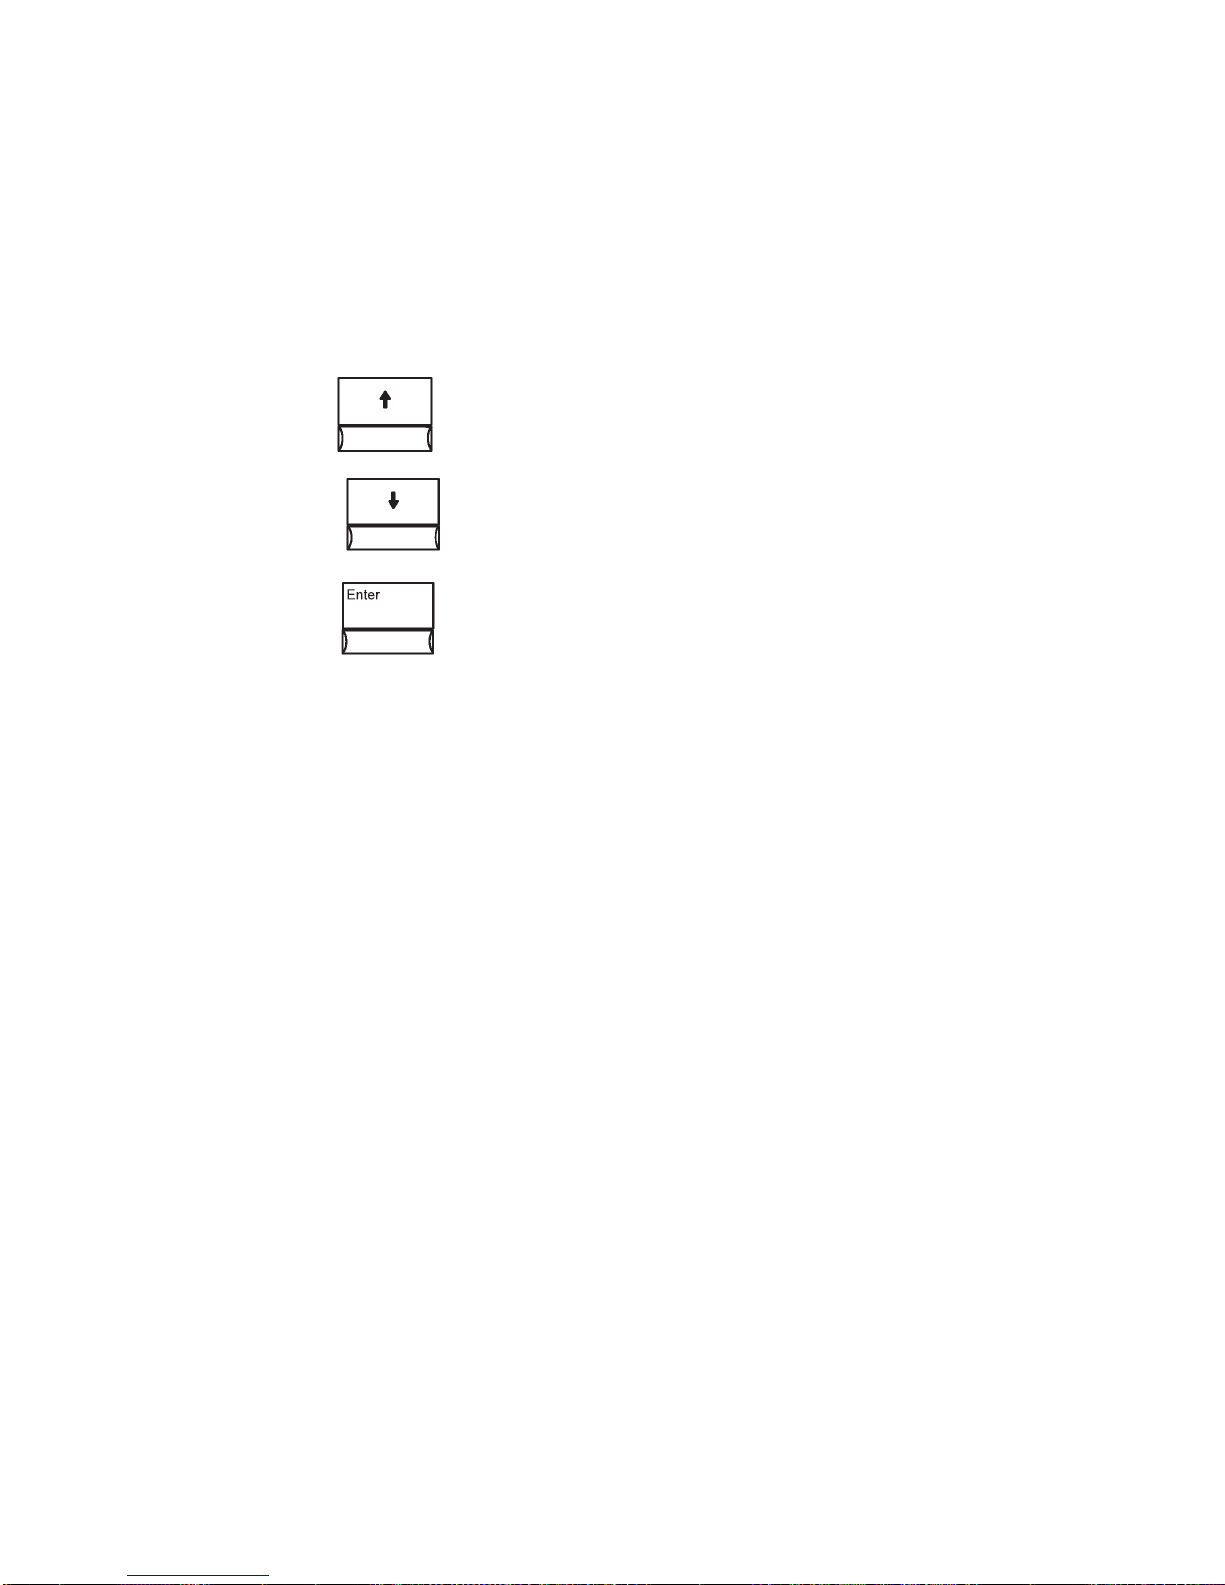
Entering and Exiting Menu Mode
To enter menu mode from status mode, press the Menu/Exit key. To exit menu
mode, press the Menu/Exit key.
Navigating through the Menu Items
When using the display in menu mode, the arrow keys and the Enter key become
navigation and selection keys.
Use the Up Arrow key to scroll up through the menu and submenu
items. When you scroll, the items wrap so that you can access all
items by scrolling either up or down.
Use the Down Arrow key to scroll down through the menu and
submenu items. When you scroll, the items wrap so that you can
access all items by scrolling either up or down.
Use the Enter key to:
Select the main menu item and access its submenu.
Select a submenu item and access its submenu.
Entering a Password to Access Menu Items
The 3130 password feature limits access to some menu items that are restricted to
either the key operator or the customer engineer. When you try to access a
restricted menu item, the message ENTER KEY OP PASSWORD or ENTER CE
PASSWORD appears on the display. If you are a user not assigned to key
operator duties, you cannot access that menu item. All SERVICE menu items are
restricted to the customer engineer.
If you see a request for a password and you are a user without a password, do the
following:
1. Press Enter to clear the message.
2. Press the Up Arrow or Down Arrow key until <CANCEL> is displayed, and
press Enter. Either return to the parent menu item or press Menu/Exit to exit
menu mode.
A user who is not assigned key operator duties can access submenu items only
under the following main menu items:
HELP
TRAYS/STACKERS
SYSTEM SHUTDOWN
Key operators can practice entering a password by completing the tutorial on 3-17.
3-6 3130 User's Guide
Page 51

Selecting Settings and Actions in the Menu
Use the Enter key to:
Select and save a submenu setting from a list, such as any of the following:
– Printer configuration items such as BEEPER>ERROR>OFF
– Attachment configuration items such as ETHERNET>ENABLE
STATUS>ENABLE
– Tray settings such as MAIN TRAY>AUTOSWITCH>NONE
Select characters for a unique value (on the keyboard), such as any of the
following:
– Attachment configuration items such as XID NUMBER
– Number of print samples desired
– Key operator password
Select and save a keyboard entry when you have completed it.
Select and perform an action, such as:
PRESS ENTER TO SHUT DOWN
PRESS ENTER TO RESTART
Items that are currently selected are indicated by an asterisk (*). When only
one item can be selected from a list of choices, * indicates which item is
selected. When you select an item that is not selected, an * appears to the left
of the item to indicate that it is now selected. Pressing Enter on an item that is
preceded by * returns the display to the parent menu item.
Menu Tree
Menu items are arranged in a “menu tree.” The following pages contain illustrations
of the basic menu choices available in menu mode. Not all menu items are shown.
From each main-menu item, you select the second-level submenu item. From the
second-level submenu item, you select the third-level submenu items, and so on.
The first two pages show the available main menu items:
HELP
TRAYS/STACKERS
SYSTEM SHUTDOWN
SUPPLIES
ATTACHMENTS
SETUP
SERVICE
The third page shows the detailed menu items available for MACHINE
CONFIGURATION.
Chapter 3. Using the Operator Panel 3-7
Page 52
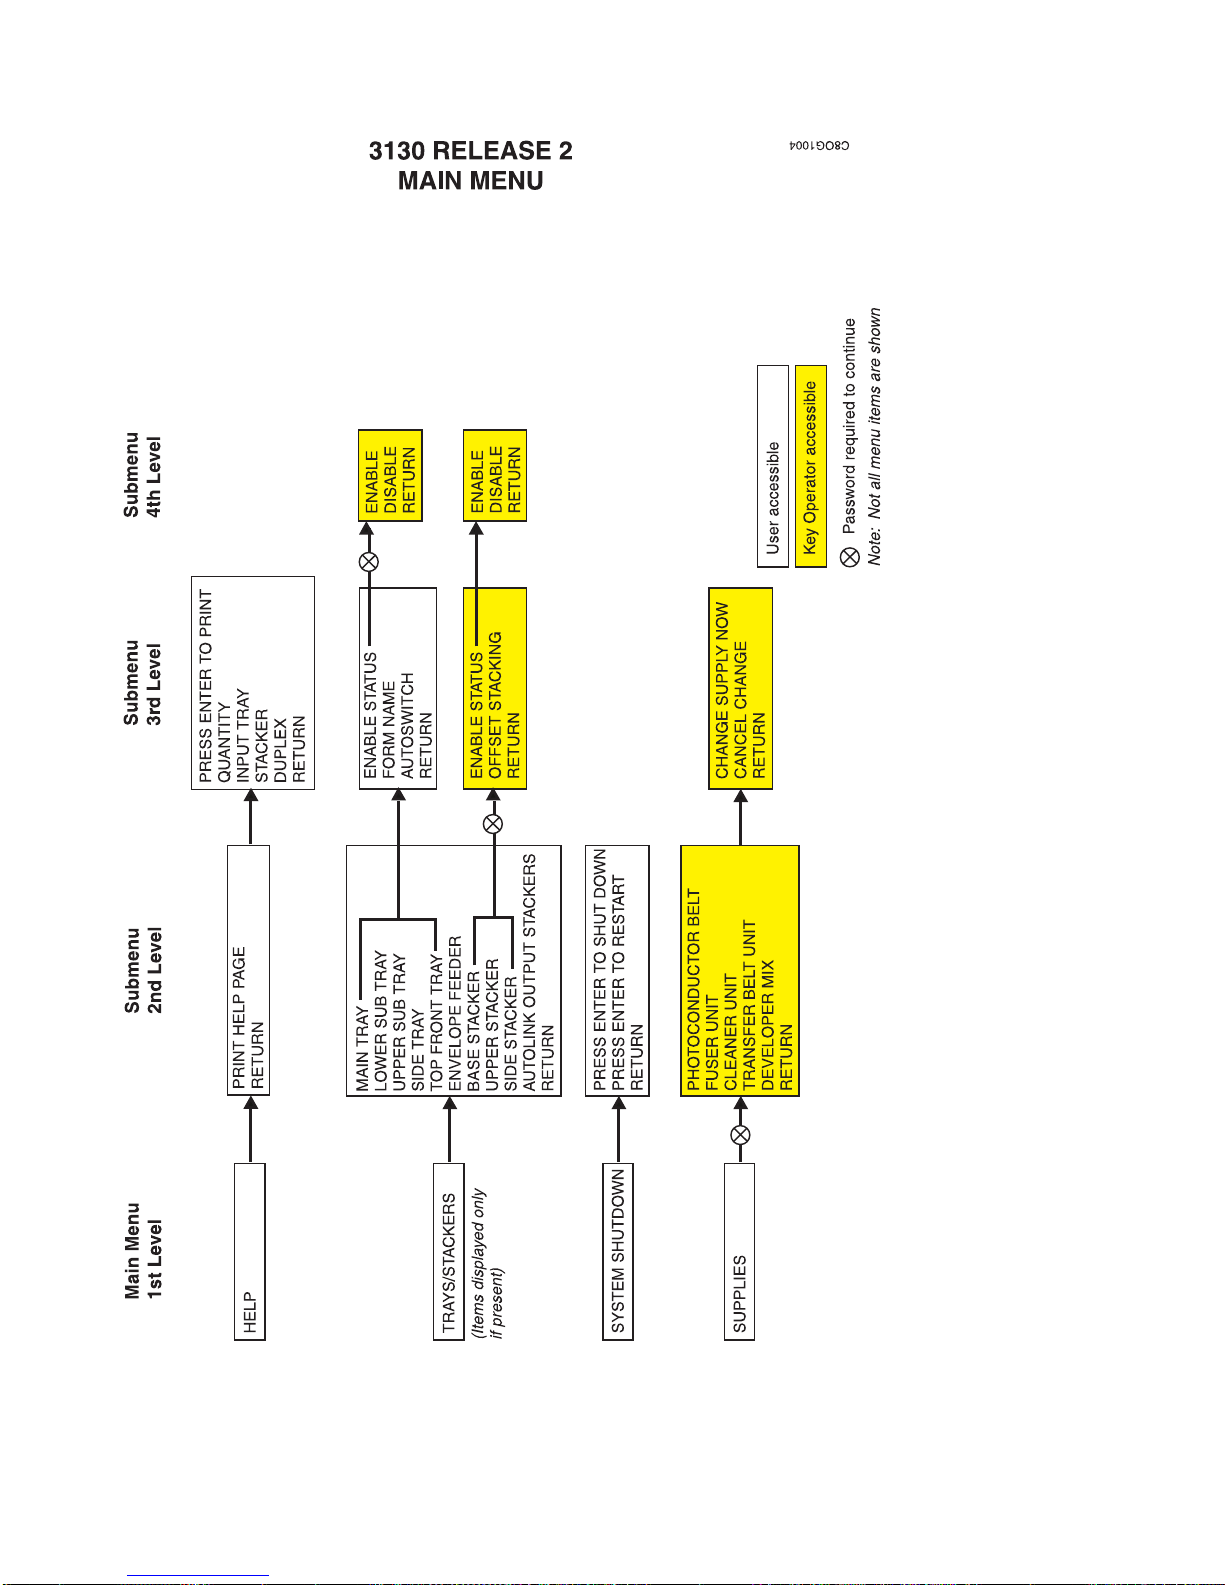
3-8 3130 User's Guide
Page 53

Chapter 3. Using the Operator Panel 3-9
Page 54

3-10 3130 User's Guide
Page 55

Using the Keyboard
Some settings in the menu cannot be selected from a list of choices. Instead, you
select from a scrollable field known as the keyboard.
The contents of the keyboard can vary. Only those characters that are appropriate
for the particular setting are displayed. Possible items are:
Letters of the alphabet
Numbers
Symbols
Editing Operations
Parts of the Display—Keyboard Mode
When you are using the keyboard, the bottom line if the display contains keyboard
choices. The top line contains your input. As you select characters from the
keyboard line, they are displayed on the top line.
Accessing the Keyboard
The keyboard appears when you press the Enter key when a submenu item that
requires unique input is displayed. The keyboard characters and editing operations
appear between < and > symbols on the second line of the display. Only one
keyboard character or operation is displayed at a time.
Note: <OK> appears on the keyboard only after you have made an acceptable
selection.
Chapter 3. Using the Operator Panel 3-11
Page 56

Keyboard Order
Only those characters needed for the specific submenu items you have selected
are displayed. Figure 3-1 shows all possible characters and operations in the
order that they appear on the keyboard. Not all characters appear on the keyboard
for each submenu item. You can access all valid characters by scrolling either up
or down (using the Up Arrow key or the Down Arrow key).
Figure 3-1. Keyboard Scrolling Order
3-12 3130 User's Guide
Page 57

Navigating through the Keyboard
Because you can see only one keyboard character at a time, you must scroll
through the characters one by one until you see the character you want to select.
Use the Up Arrow and Down Arrow keys to move (scroll) through the keyboard.
The following figure shows the use of the Down Arrow key to scroll to the letter
<A>.
Selecting a Keyboard Character
When you have scrolled down to the keyboard character you want to select, press
Enter. The selected keyboard character is then placed on the input line (the top
line) of the display, and the keyboard line (always the second line) returns to its
starting keyboard character <OK>. You can then choose the next character or
value.
The following figure shows the resulting display after you press Enter to select the
letter <A>.
Selecting and Saving Your Keyboard Entry
Press Enter when <OK> is displayed on the keyboard line to select your completed
keyboard entry. After you have finished selecting all the keyboard characters for
your entry, press Enter to select <OK>. The entry is selected and saved, and you
return to the submenu item for which you made the entry.
Chapter 3. Using the Operator Panel 3-13
Page 58

Editing Keyboard Entries
If you want to change one of your keyboard character selections, use the edit
operations <BACKSPACE>, <CLEAR>, or <CANCEL> as follows:
<BACKSPACE> Discards the previous character and displays
<CLEAR> Deletes all characters from the top (input) line.
<CANCEL> Discards any changes to the previous entry and returns to
Canceling Keyboard Entries
If you want to cancel your entry before you have saved it, select <CANCEL> on the
keyboard. Do this by scrolling up or down to the <CANCEL> keyboard entry and
then pressing the Enter key.
Status Indicators
<BACKSPACE> on the bottom line of the keyboard.
the parent menu item.
Five status indicators on the right side of the operator panel indicate printer activity
and existing conditions:
Attention
Job/Processing
Duplex
On Line
Power
During the power-on procedure, the Power indicator flashes. After the printer is
powered on, the indicators light up depending on printer activity and existing
conditions.
Attention
The Attention indicator lets you know when a condition exists that requires your
attention. The Attention indicator has three states. Table 3-1 on page 3-15
describes each state and any recommended actions.
3-14 3130 User's Guide
Page 59

Table 3-1. Attention Indicator State Descriptions
State Description/Action
Blinking
On
(not blinking)
Off
Description
message on the display shows the condition.
Action
in Appendix A, “Display Messages and Codes”), or press Enter
to clear the message. The blinking will stop when the
condition is corrected or the message is cleared.
Description
Action
Arrow key (while in status mode). You can scroll down to see
messages such as DEVELOPER MIX: CHANGE SOON. In some
cases, you can delay performing the recovery action for the
unresolved condition (for example, messages indicating that a
supply needs changing soon). Other unresolved conditions
require correction before the printer can continue printing.
Description
attention.
Action
: A new condition requiring attention exists. The
: Perform the recovery action (listed
: One or more unresolved conditions exist.
: To view any unresolved conditions, press the Down
: No new or unresolved conditions that require
: None.
Job/Processing
When the Job/Processing indicator is lit, data is currently being received,
processed, or printed. When the indicator is not lit, there is no data to be
processed.
Duplex
The Duplex indicator light indicates when the 3130 is printing in duplex mode.
On Line
The On Line indicator is lit when any attachment with a corresponding application
is enabled. The indicator is not lit when all attachments are disabled.
Power
The Power indicator shows whether the printer power is on or off. When the
printer is started, the Power indicator lights up and remains lit until the printer is
powered off. The Power indicator blinks during the power-on procedure.
Chapter 3. Using the Operator Panel 3-15
Page 60

Intervention Indicator Lights
The left side of the operator panel contains a printer icon in a configuration that
closely matches that of your model printer. There are several intervention indicator
lights within the printer icon. Each intervention indicator light identifies an area in
the paper path.
The intervention indicator lights show:
The location of a paper jam (paper jam indicators 1-13)
The door or cover to be opened when a paper jam occurs (arrow indicators A,
B, C)
A toner low condition (toner indicator)
When an intervention indicator light is turned on, it indicates the location in the
printer where a problem exists. There may be more than one intervention indicator
light turned on at any one time.
When the printer senses a problem, you may be required to perform a recovery
action, also known as an intervention. The first step you should take is shown by
an arrow indicator light that is turned on. The display will have a message that
corresponds to the intervention indicator light. After the intervention resolution has
been completed, the indicator light usually turns off within one second. See “Using
Paper Jam Indicator Lights to Locate Paper Jams” on page 7-2 for paper jam
recovery information.
Paper Jam Indicator Lights
When a paper jam occurs, the printer stops printing, and the paper jam indicator
lights show where the paper jam has occurred. See “Clearing a Paper Jam” on
page 7-3 for instructions on clearing paper jams.
Toner Indicator Light
The toner indicator light turns on when the toner supply is low. See “Replacing the
Toner Cartridge” on page 6-5 for instructions on adding toner to maintain print
quality and printer operation.
3-16 3130 User's Guide
Page 61

Beeper
Two types of audible cues are available. The first is the error beeper, which
sounds when a condition requiring intervention occurs. The second is the feedback
that is given when an input key is pressed. Each of these cues is configured using
menu options under the SETUP main menu.
Error Beeper
Menu options used to configure the error beeper are described in the following
table.
Menu Option Description
TIMED The error beeper sounds for three minutes or until a key is
pressed. This is the original factory setting.
CONTINUOUS The error beeper sounds until the intervention is cleared or any key
is pressed.
OFF The error beeper does not sound.
Keys Beeper
Menu options used to configure the keys beeper are described in the following
table.
Menu Option Description
ON The beeper sounds when a key is pressed (except when the
keyboard is displayed).
OFF The beeper does not sound when a key is pressed.
If you press a key at a time when it is not accessible, the key press is ignored.
However, if the keyboard beeper is turned on, a beep sounds when you press an
input key.
Tutorial: Using the Menu to Enter a Key Operator Password
The following tutorial is a hands-on exercise for key operators. It is designed to
provide practice in navigating through the menu and using the keyboard.
Skills Covered
In this tutorial, you will learn how to:
Enter and exit menu mode.
Navigate through the menu.
Make menu selections.
Use the keyboard.
Enter a key operator password.
Chapter 3. Using the Operator Panel 3-17
Page 62
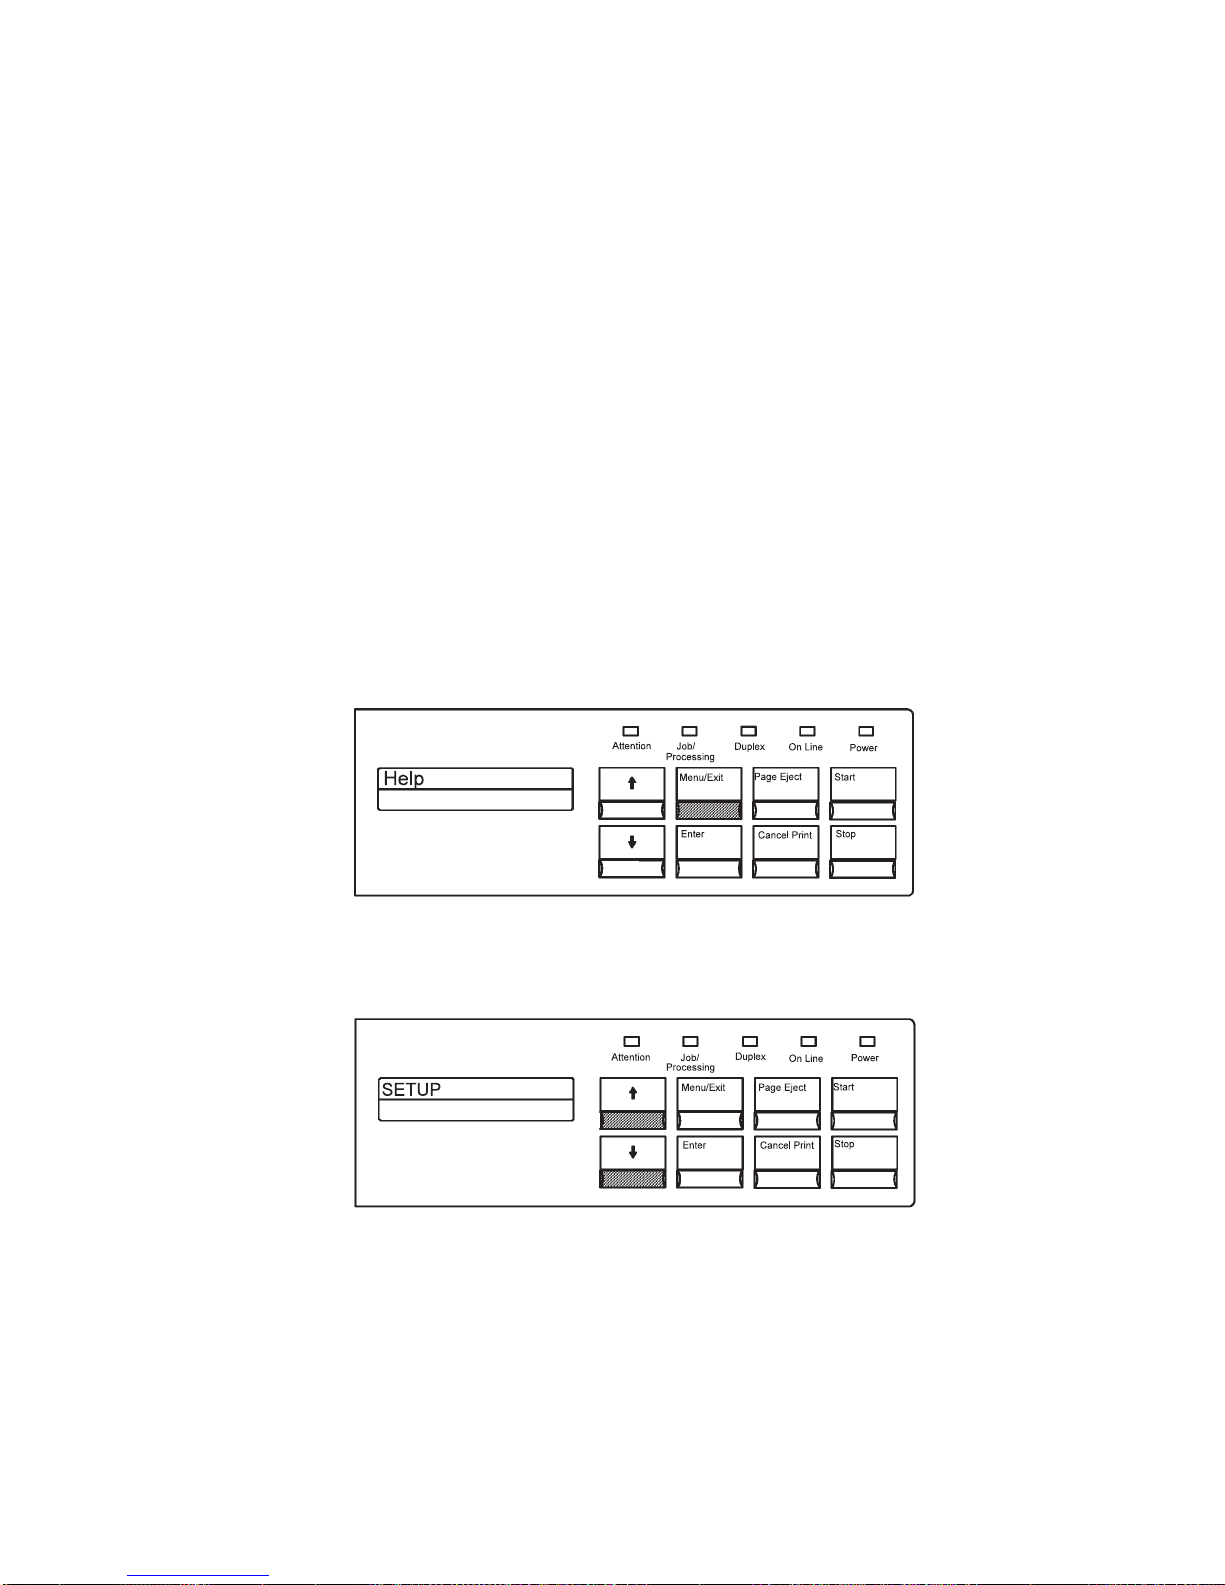
Prerequisites
This tutorial steps you through the process of entering an incorrect and then a
correct key-operator password. In order for the steps in this tutorial to accurately
reflect what you will see displayed on your printer operator panel, the following
conditions must be met:
You have key operator authorization.
The customer engineer has set up a key-operator password.
You know this key-operator password.
The printer is in status mode.
Instructions
The hands-on steps that follow instruct you to enter the password A1. This is not
your correct password; you will enter it as a learning exercise. After entering the
incorrect password, you will be instructed how to clear it. You will then be asked to
enter your correct password.
Follow the steps below.
1. Press the Menu/Exit key to change to menu mode, if it is not already in menu
mode.
2. Press the Down Arrow key several times until you see SETUP displayed.
3. Press the Enter key to select SETUP. Access to SETUP menu items requires
key-operator authorization. A prompt message appears asking you to enter the
key-operator password.
3-18 3130 User's Guide
Page 63

4. Press Enter again. The first item <OK> in the keyboard is displayed on the
second line. <EMPTY> appears on the top line until you select a character and
press Enter (see step 6).
5. Press the Down Arrow key several times to scroll to the letter <A>.
6. Press Enter to select the letter A. The selected character appears on the top
input line. The keyboard line returns to the first item <OK>.
7. Press the Up Arrow key several times to scroll to the number <1>.
Chapter 3. Using the Operator Panel 3-19
Page 64

8. Press Enter to select the number 1. The keyboard line returns to the first item
<OK>.
9. Press Enter again to select the entire entry (by selecting <OK>). Because you
have not entered your correct password, the message PASSWORD
INCORRECT is displayed
Note: The remaining steps are editing steps. They instruct you to clear the
PASSWORD INCORRECT message.
10. Press Enter to return to the keyboard and the previously entered password.
3-20 3130 User's Guide
Page 65

11. Press the Up Arrow key to scroll to <CLEAR>.
12. Press Enter to clear (erase) the incorrect password.
13. Enter your own password using the same procedure you have used in this
tutorial.
After you have successfully entered your password, PRINT SAMPLES (the first
submenu item under SETUP) is displayed.
14. Press Menu/Exit to exit menu mode.
Chapter 3. Using the Operator Panel 3-21
Page 66

3-22 3130 User's Guide
Page 67

Chapter 4. Customizing the Printer
This chapter gives you step-by-step instructions for customizing your printer to
match your particular printing environment and requirements. You can use the
operator panel display to change the printer settings and thus customize the way
the printer operates. Changing the settings is called configuring. You can
configure the trays, stackers, printer attachments, and printer setup.
In this chapter you will find instructions for:
Configuring the input trays
Configuring the output stackers
Configuring the printer
Running print quality samples
Running the demonstration pack
Adjusting the print (IPDS only)
Changing the key-operator password
Defining forms
Viewing machine information
Configuring attachments
Copyright IBM Corp. 1994, 1996 4-1
Page 68

Configuring Input Trays
Both users and key operators can configure certain items relating to the paper input
trays.
A user or key operator can do the following:
Change the paper size and form name assigned to each tray.
Select an autoswitch tray.
Enable and disable trays (key operator only).
Note: Always adjust the input tray itself for the correct paper size before
configuring that tray. See the instructions for loading trays in Chapter 5,
“Printing and Paper Handling.”
Tray Names
Each model of the 3130 printer may have a different set of standard and optional
trays and stackers. The figure below shows each model with all possible trays
installed. Your printer may not have all these trays installed.
Possible input trays are:
Top front tray
Upper sub tray
Lower sub tray
Main tray
Envelope feeder
Side tray
4-2 3130 User's Guide
Page 69

Note: Paper input (feeding) receptacles are called trays. Paper output
receptacles are called stackers.
Enabling and Disabling Trays
The key operator can enable or disable any of the input trays. If a tray is enabled,
it can be used by the printer. If a tray is disabled, it cannot be used.
You may want to disable a tray if it is having problems (for example, frequent paper
jams).
To enable or disable a tray, do the following:
1. Press the Menu/Exit key to enter menu mode.
2. Scroll to the TRAYS/STACKERS menu and press Enter.
3. Scroll to the input tray you want to enable or disable, and press Enter to make
the selection.
4. Press Enter on ENABLE STATUS. You may be prompted to enter the
key-operator password.
5. Scroll to ENABLE, and press Enter to enable the tray. Scroll to DISABLE, and
press Enter to disable the tray.
Note: When you disable a tray that has been designated as the autoswitch
tray for another tray, the informational message AUTOSWITCH NO
LONGER VALID appears. Press Enter, if necessary, to clear this
message.
Chapter 4. Customizing the Printer 4-3
Page 70

Tray Selection Defaults
If the host or network does not tell the printer which tray to use, the printer uses the
following order of priority. All trays may not be present on your printer model.
Priority Model 01S
Simplex
1 Side Tray Main Tray Main Tray
2 Top Front Tray Side Tray Side Tray
3 Lower Sub Tray Lower Sub Tray
4 Upper Sub Tray Upper Sub Tray
Model 02S
High-Capacity
Simplex
Model 02D
Duplex and
Model 03S
Simplex
Note: Default input trays can be configured by data streams.
If the selected tray is not available because the tray is out of paper, has the wrong
paper size, or is removed, the printer stops printing, and a message appears on the
operator panel display. See Appendix A, “Display Messages and Codes” for a list
of messages and their meanings.
Changing the Form Name and Paper Size Assigned to a Tray
If you have changed the form loaded in a tray, you need to change (or verify) the
form name assigned to that tray.
Printing media (paper, forms, and envelopes) used in the printer are called forms.
If there are user-defined forms (defined for specific customer needs, such as
preprinted paper), the paper size may be the same for several user-defined forms.
Each defined form has a unique form name.
You can assign only one form name to a tray at any one time. The side tray
handles only letter and A4 size paper. All other trays handle the following paper
sizes: letter, legal, ledger, A3, A4, B4, and B5. The envelope feeder handles only
#10 or DL envelopes.
Note: Always adjust the input tray itself before configuring that tray. Only those
form names that match the paper size of the current adjusted tray are
available for configuration.
To change the form name assigned to a tray:
1. Press the Menu/Exit key to enter menu mode.
2. Scroll to the TRAYS/STACKERS menu and press Enter.
3. Scroll to the input tray for which you have changed the loaded form and press
Enter to make the selection.
4. Scroll to FORM NAME and press Enter.
5. Scroll to the desired form name and press Enter.
4-4 3130 User's Guide
Page 71

Notes:
1. When loading a new form into a tray, if there is only one form name defined
with the form size you have loaded in the tray, the printer will automatically
choose that form name. If several defined form names have the same size as
the one you have loaded, the message CHECK FORM NAME IN MENU
appears. You must then verify or change the form name assigned to the tray.
2. If you change the form name loaded in a tray that has another tray designated
as the autoswitch tray or has been previously designated as the autoswitch tray
for another tray, then the informational message FORM MISMATCH FOR
AUTOSWITCH appears. Press Enter, if necessary, to clear this message.
Selecting an Autoswitch Tray
You can select an input tray that will automatically start feeding paper when the
originally selected tray becomes empty. When an autoswitch tray has been
assigned to the original input tray, you can reload that original tray after it is empty
and not interrupt printing. An autoswitch tray is used only when the original tray
becomes empty; it is an alternate tray.
Notes:
1. The original factory setting for autoswitch tray is NONE.
2. Before designating an autoswitch tray, you must first select the original tray.
3. You can return the autoswitch tray designation to NONE at any time a job is
not printing.
Do the following to designate an autoswitch tray:
1. Press the Menu/Exit key to enter menu mode.
2. Scroll to the TRAYS/STACKERS menu and press Enter.
3. Scroll to the original input tray for which you wish to assign another tray as the
autoswitch tray and press Enter to make the selection. See the example
below.
4. Scroll to AUTOSWITCH and press Enter.
5. Scroll to the autoswitch tray name and press Enter. It becomes the autoswitch
tray for the tray selected in Step 3.
Example:
The following example selects the side tray as the autoswitch
(alternate) tray for the main tray (original). The procedure is as follows:
1. Press the Menu/Exit key to enter menu mode.
2. Scroll to the TRAYS/STACKERS menu and press Enter.
3. Scroll to MAIN TRAY and press Enter.
4. Scroll to AUTOSWITCH and press Enter.
5. Scroll to SIDE TRAY and press Enter.
Chapter 4. Customizing the Printer 4-5
Page 72

Notes:
1. The autoswitch tray must be loaded with the same form name as the original
tray. If you choose an autoswitch tray that has a different form name loaded in
it, the message WRONG FORM IN AUTOSWITCH TRAY is displayed. You
must then choose a different autoswitch tray.
2. If you choose an autoswitch tray that is disabled, the message AUTOSWITCH
TRAY NOT ENABLED is displayed. You must then choose a different
autoswitch tray. (If you do not choose another one, there will be no autoswitch
tray.)
3. If someone changes the form name loaded in an autoswitch tray, that tray will
no longer act as an autoswitch tray.
4. If no autoswitch tray is selected, the job will stop printing when the original tray
is empty.
5. Before designating an autoswitch tray, you must first select the original tray.
Tray Name Correspondence
The tray names used by the printer are descriptive to make it easier to identify the
trays. However, when users send print jobs to the printer from their workstations,
they may be selecting input and output trays labeled with numbers.
Table 4-1 shows the correspondence between input bin numbers and printer tray
names and between output bin numbers and printer stacker names. Remember
that not all models have all trays and stackers installed.
Note: Select the base stacker or upper stacker for all label printing.
Table 4-1. Input Bin and Output Bin Numbers
Input Bin
Number
1 Main Tray 2 000
2 Lower Sub Tray 250
3 Upper Sub Tray 250
4 Side Tray 500
5 Envelope Feeder 100
6 Top Front Tray 250
Output Bin
Number
1 Base Stacker 500
2 Upper Stacker 500
3 Side Stacker 1 500
Printer Tray Name Capacity (No. of Sheets)
Printer Stacker Name Capacity (No. of Sheets)
4-6 3130 User's Guide
Page 73

Configuring Output Stackers
Only key operators can configure the output stackers. Three tasks compose
stacker configuration:
Enable and disable stackers.
Turn the offset stacking function on or off.
Autolink the stackers.
Stacker Names
Each model of the 3130 printer has standard and optional trays and stackers. The
following figure shows each model with all possible stackers. Your printer may not
have all these stackers installed.
Possible output stackers are:
Upper stacker
Base stacker
Side stacker
Note: Paper input (feeding) receptacles are called trays. Paper output receptacles
are called stackers. If the printer has only a single top stacker, it is called
the base stacker.
Chapter 4. Customizing the Printer 4-7
Page 74

Enabling and Disabling Stackers
The key operator can enable or disable any of the stackers. If a stacker is
enabled, it can be used by the printer. If a stacker is disabled, it cannot be used.
To enable or disable a stacker, do the following:
1. Press the Menu/Exit key to enter menu mode.
2. Scroll to the TRAYS/STACKERS menu and press Enter.
3. Scroll to the stacker you want to enable or disable and press Enter.
4. Press Enter on ENABLE STATUS. You may be prompted to enter the
key-operator password.
5. Scroll to ENABLE, and press Enter to enable the stacker. Scroll to DISABLE,
and press Enter to disable the stacker.
Stacker Selection Defaults
If the data stream is not configured for a specific stacker and the print job does not
instruct the printer which stacker to use, the following order of priority is followed:
Base stacker
Upper stacker
Side stacker
Note: Not all stackers are installed on all printers.
If the selected stacker is not available because it is full, the job stops printing and a
message is displayed.
Setting Offset Stacking
When a stacker has the offset stacking function turned on, print job separation is
indicated by the jogging of forms at the beginning of each print job. This is known
as offset stacking.
4-8 3130 User's Guide
Page 75

You can configure each stacker so that the offset stacking function is enabled or
disabled.
Selecting Offset Stacking
To enable or disable the offset stacking function, do the following:
1. Press the Menu/Exit key to enter menu mode.
2. Scroll to the TRAYS/STACKERS menu and press Enter.
3. Scroll to the name of the stacker for which you want to enable or disable offset
stacking and press Enter. You may be prompted to enter the key-operator
password.
4. Scroll to OFFSET STACKING and press Enter.
5. Scroll to YES, and press Enter to set offset stacking. Scroll to NO and press
Enter to turn off offset stacking.
Autolinking the Output Stackers
The key operator can autolink the output stackers. When the stackers are
autolinked, the printer automatically switches to another stacker when the first
stacker becomes full. The printer continues doing this until all stackers are full.
You can set autolinking to YES or NO.
The printer selects the order in which the stackers are filled, starting with the side
stacker (if installed and enabled). Any stacker that is installed and enabled is used
in autolinking. If a stacker is disabled or is not installed, it is not used.
The following table shows the order in which the printer fills the enabled and
installed stackers. Your printer may not have all stackers installed.
Autolink Order Stacker
1 Side stacker
2 Base stacker
3 Upper stacker
Selecting Autolinking
To select autolinking, do the following:
1. Press the Stop key (if the printer is Ready) to make the printer Not Ready.
2. Press the Menu/Exit key to enter menu mode.
3. Scroll to the TRAYS/STACKERS menu and press Enter.
4. Scroll to AUTOLINK OUTPUT STACKERS and press Enter. You may be
prompted to enter the key-operator password.
5. Scroll to YES and press Enter to select autolinking. Scroll to NO and press
Enter to deselect autolinking.
6. Press the Menu/Exit key to exit menu mode (if desired).
7. Empty all the stackers before pressing Start to continue printing.
Chapter 4. Customizing the Printer 4-9
Page 76

Note: When using autolinked stackers, be sure to completely empty all the
stackers before starting or continuing a print job. If a print job is being
continued, the pages that are printed after autolinking has been
selected will be sent to the first stacker in the autolink order.
Clearing Autolinked Stackers
When the stackers are autolinked, stacker-specific STACKER FULL messages are
displayed as each stacker becomes full. However, the printer stops printing only
after all enabled stackers become full. When all stackers are full and the printer
stops printing, the autolinked stackers can be cleared.
To clear the autolinked stackers, do the following:
1. Completely empty all stackers. The STACKER FULL messages no longer
appear.
2. Press Start to continue printing. Printing does not continue if any of the
stackers are full.
Note: To ensure job integrity, do not press Start until all stackers are
completely empty. Although the printer does not stack forms in full
stackers, it does stack forms in partially full stackers.
Note: If you want to reset the autolink stacker function and start sending pages to
the first stacker in the autolinking order, do the following:
1. Press and hold the Enter key.
2. Press the Page Eject key.
3. Release both keys.
Configuring the Printer
There are several choices you can make regarding how your printer functions.
Establishing the setup that best suits your particular printing environment involves
configuring the printer using the SETUP > MACHINE CONFIGURATION menu
items. Only a key operator or customer engineer can configure the printer.
Configuration Menu Items
Some of the items on the Machine Configuration Menu are discussed in this book
and others are discussed in the
Administration Guide
Job Management
Font Management
3130 Advanced Function Printer: System
.
System Administration Guide
System Administration Guide
, Chapter 4
, Chapter 5
Data Streams
Printer Configuration See Table 4-2 on page 4-11
4-10 3130 User's Guide
System Administration Guide
, Chapter 4
Page 77

Printer Configuration Menu Item Descriptions
Table 4-2 describes general printer configuration items and available values for
each item. These items can be configured by a key operator.
Table 4-2. Printer Configuration Menu Items
Item Available Values Description
DUPLEX ENABLE or DISABLE Duplex indicates whether two-sided printing is enabled or
disabled (duplex model only).
SLEEP TIME (MINUTES) 1-999 minutes or 0
(never sleeps)
BEEPER ERROR
TIMED BEEP
CONTINUOUS
OFF
KEYS
ON
OFF
LANGUAGE ENGLISH, FRENCH,
GERMAN, JAPANESE
KATAKANA, ITALIAN,
SPANISH, BRAZILIAN
PORTUGUESE, DUTCH
PRINT DENSITY LIGHT, MEDIUM, or
DARK
Sleep time is the number of minutes of printer inactivity
(no print jobs) before the fuser turns off. Values 1
through 999 indicate that the printer goes into a “sleep”
state after the selected number of minutes. A value of 0
indicates that the printer never goes into the “sleep”
state; the fuser remains on.
The beeper may be set to sound when the 3130 detects
an error or when keys are pressed.
You can set the ERROR beeper to sound until any
operator panel key is pressed (CONTINUOUS), to sound
for three minutes, or until a key is pressed and then stop
(TIMED BEEP) or to never sound at all (OFF). The
original factory setting is TIMED BEEP.
You can set the KEYS beeper to ON or OFF. The
original factory setting is ON.
Language specifies the language used to display
operator panel text for general users and key operators.
The original factory setting is ENGLISH. (Text for
customer engineer-only items is in English only.)
Print density indicates the degree of print darkness on a
printed page. You can choose a lighter print density to
add detail to a fine line, or a darker print density to
enhance graphics or images. IBM recommends
MEDIUM. The darker selection uses more toner. The
original factory setting is MEDIUM.
Setting Printer Configuration Items
To configure the printer, do the following:
1. Press the Menu/Exit key to enter menu mode.
2. Scroll to the SETUP menu and press Enter. You may be prompted to enter
the key-operator password.
3. Scroll to MACHINE CONFIGURATION and press Enter.
4. Scroll to PRINTER CONFIGURATION and press Enter.
5. Scroll to the submenu item you want to configure and press Enter.
6. Scroll to the desired value, and press Enter to make the selection. Press
Enter again to return to the parent menu. Or use the keyboard to enter your
selection.
Chapter 4. Customizing the Printer 4-11
Page 78

Printing the Printer Configuration
You have two options for printing printer configuration items and their current
settings. One option prints a one-page listing of the current settings for DUPLEX,
SLEEP TIME, BEEPER, LANGUAGE, and PRINT DENSITY. The other option
prints a multi-page listing of the current settings for all options that can be
configured for the printer. This includes attachments, data streams, job
management, and so forth, as well as the settings on the one-page listing.
Printing a One-Page Configuration Listing
To print a one-page listing, do the following:
1. Press the Menu/Exit key to enter menu mode.
2. Scroll to the SETUP menu and press Enter. You may be prompted to enter
the key-operator password.
3. Scroll to MACHINE CONFIGURATION and press Enter.
4. Scroll to PRINTER CONFIGURATION and press Enter.
5. Scroll to PRINT CURRENT CONFIGURATION and press Enter.
6. If you want to specify the number of copies desired, scroll to QUANTITY and
press Enter. Use the keyboard to indicate the number of copies.
7. If you want to specify the input tray desired, scroll to INPUT TRAY and press
Enter. Scroll to the desired tray and press Enter to make the selection. Press
Enter again to return to the parent menu.
8. If you want to specify the stacker desired, scroll to STACKER and press Enter.
Scroll to the desired stacker and press Enter to make the selection. Press
Enter again to return to the parent menu.
9. (Duplex model only with DUPLEX enabled in the printer configuration.) If you
want to specify whether the information is to be printed in duplex or simplex,
scroll to DUPLEX and press Enter. Scroll to YES or NO and press Enter.
Press Enter again to return to the parent menu.
10. Scroll to PRESS ENTER TO PRINT and press Enter to request printing. The
configuration page is put in the print queue.
Note: If the printer is busy, the configuration page may not print immediately.
Printing a Multi-Page Configuration Listing
To print a multi-page listing of all option values, do the following:
1. Press the Menu/Exit key to enter menu mode.
2. Scroll to the SETUP menu and press Enter. You may be prompted to enter
the key-operator password.
3. Scroll to PRINT CURRENT CONFIGURATION and press Enter.
4. If you want to specify the number of copies desired, scroll to QUANTITY and
press Enter. Use the keyboard to indicate the number of copies.
Note: This listing can be quite large. It is recommended that you print one
5. If you want to specify the input tray desired, scroll to INPUT TRAY and press
Enter. Scroll to the desired tray and press Enter to make the selection. Press
Enter again to return to the parent menu.
4-12 3130 User's Guide
copy before requesting multiple copies.
Page 79

6. If you want to specify the stacker desired, scroll to STACKER and press Enter.
Scroll to the desired stacker and press Enter to make the selection. Press
Enter again to return to the parent menu.
7. (Duplex model only with DUPLEX enabled in the printer configuration.) If you
want to specify whether the information is to be printed in duplex or simplex,
scroll to DUPLEX and press Enter. Scroll to YES or NO and press Enter.
Press Enter again to return to the parent menu.
8. Scroll to PRESS ENTER TO PRINT and press Enter to request printing. The
configuration pages are put in the print queue.
Note: If the printer is busy, the configuration pages may not print immediately.
Running Print Quality Samples
You can run print quality samples to test print quality. Print samples are pages of
text or patterns. These pages are generated from the printer itself, not from the
data stream.
Print quality samples can be printed at 300 or 240 pel resolution. Selecting 300
PEL sets the print resolution to 300 dpi; selecting 240 PEL sets the print resolution
to 240 dpi.
When you select 300 PEL, the available print samples are LETTER, PRIMARY,
ALL WHITE, and ALL BLACK. If you specify ALL SAMPLES, all print samples
except ALL BLACK are printed. When you choose ALL BLACK, the printer always
prints four simplex copies of the all black print sample.
When you select 240 PEL, PRIMARY is the only available print sample.
To print the print quality samples, do the following:
1. Press the Menu/Exit key to enter menu mode.
2. Scroll to the SETUP menu and press Enter. You may be prompted to enter
the key-operator password.
3. Press Enter on PRINT QUALITY SAMPLES.
4. Scroll to 300 PEL or 240 PEL and press Enter.
5. Scroll to the type of print samples you want to print and press Enter to make
the selection.
6. If you want to specify the number of copies desired, scroll to QUANTITY and
press Enter. Use the keyboard to indicate the number of copies.
7. If you want to specify the input tray desired, scroll to INPUT TRAY and press
Enter. Scroll to the desired tray and press Enter. Press Enter again to return
to the parent menu.
Note: For ALL SAMPLES, PRIMARY, or ALL BLACK, you can select only
8. If you want to specify the stacker desired, scroll to STACKER and press Enter.
Scroll to the desired stacker and press Enter to make the selection. Press
Enter again to return to the parent menu.
9. (Duplex model only with DUPLEX enabled in the printer configuration.) If you
want to specify that the information be printed in duplex or simplex, scroll to
Chapter 4. Customizing the Printer 4-13
input trays containing LETTER or A4 size paper.
Page 80

DUPLEX and press Enter. Scroll to YES or NO and press Enter to make the
selection. Press Enter again to return to the parent menu.
10. Scroll to PRESS ENTER TO PRINT and press Enter to request printing. The
print sample pages will be put in the print queue.
Note: If the printer is busy, the print sample pages may not print immediately.
Running the Demonstration Pack
You can run the Demonstration Pack to preview the types of printing possible on
the 3130 Printer. The Demonstration Pack also contains useful information about
the 3130 Printer capabilities. These pages are generated from the printer itself, not
from the data stream.
The Demonstration Pack contains samples of all internal fonts.
To print the Demonstration Pack, do the following:
1. Press the Menu/Exit key to enter menu mode.
2. Scroll to the SETUP menu and press Enter. You may be prompted to enter
the key-operator password.
3. Scroll to PRINT DEMO PACK and press Enter.
4. If you want to specify the number of copies desired, scroll to QUANTITY and
press Enter. Use the keyboard to indicate the number of copies.
5. If you want to specify the input tray desired, scroll to INPUT TRAY and press
Enter. Scroll to the desired tray and press Enter. Press Enter again to return
to the parent menu.
Note: You should print the Demonstration Pack on LETTER or A4 size paper.
6. If you want to specify the stacker desired, scroll to STACKER and press Enter.
Scroll to the desired stacker and press Enter to make the selection. Press
Enter again to return to the parent menu.
7. (Duplex model only with DUPLEX enabled in the printer configuration.) If you
want to specify that the information be printed in duplex or simplex, scroll to
DUPLEX and press Enter. Scroll to YES or NO and press Enter to make the
selection. Press Enter again to return to the parent menu.
8. Scroll to PRESS ENTER TO PRINT and press Enter to request printing. The
demonstration pages will be put in the print queue.
Note: If the printer is busy, the demonstration pages may not print
immediately.
Adjusting the Print (IPDS Only)
Do this task when you load preprinted forms, adhesive labels, or other forms that
require a precise registration that is not satisfied by the factory-set default
registration.
All controls required for this task are available under the ADJUST PRINT (IPDS)
submenu. Print adjustment can be done for IPDS jobs only.
4-14 3130 User's Guide
Page 81

In printing, the term
registration
refers to the relative print positions of images. For
example, when you process preprinted forms, the registration is good if the new
image printed by the printer aligns correctly with the preprinted image. Print that
extends beyond box edges and text that overlaps other text are examples of poor
registration.
The figure above illustrates the original factory setting point of origin (vertical=0,
horizontal=0) and the range of possible adjustments (shown much larger than
actual size). The maximum adjustment in any direction from this position is 999
pels (approximately 3 1/2 inches or 90 millimeters). Imagine that your sample page
shows that the text is printing too high and too far to the left in relation to the
preprinted form. To correct this situation, increase the vertical and horizontal
positions (to move the point of origin down and to the right). The next figure shows
the result of changing the vertical position to +7 and the horizontal position to +6.
Determining if You Need to Adjust the Print
Before making any adjustments, determine whether you need to adjust the print.
That is, run a print test to see if you need to change the point of origin on a page
by adding to, or subtracting from, the vertical and horizontal starting positions.
Note: This procedure assumes the following:
Chapter 4. Customizing the Printer 4-15
Page 82

A defined form is loaded in the printer and that form is assigned to the
tray (using the TRAYS/STACKER menu options).
A job is waiting to be run.
Do the following to determine whether you need to adjust the print:
1. Press the Stop key.
2. Press the Menu/Exit key to enter menu mode.
3. Scroll to the SETUP menu and press Enter. You may be prompted to enter
the key operator password.
4. Scroll to ADJUST PRINT (IPDS) and press Enter.
5. Scroll to the form you want to adjust and press Enter.
6. Scroll to the side you want to adjust and press Enter.
7. If you want to specify the number of pages desired for the print test, scroll to
NUMBER OF PAGES and press Enter. Use the keyboard to indicate the
number of copies.
8. If you want to specify the stacker, scroll to STACKER and press Enter. Scroll
to the desired stacker and press Enter to make the selection. Press Enter
again to return to the parent menu.
9. Run a print test of the current setting. You must have a job waiting to be run in
order to run a print test. To start the print test, scroll to PRESS ENTER TO
PRINT and press Enter.
Note: The test pages printed will consist of the next pages in the IPDS data
10. Look at the pages just printed to determine if adjustments are necessary. If
needed, determine how far to adjust the print position.
How to Adjust the Print
The following procedure assumes a defined form is loaded in the printer and a job
is waiting to be run.
Note: If you have just run a test print, as instructed above, start at Step 7.
1. Press the Stop key.
2. Press the Menu/Exit key to enter menu mode.
3. Scroll to the SETUP menu and press Enter. You may be prompted to enter
the key-operator password.
4. Scroll to ADJUST PRINT (IPDS) and press Enter.
5. Scroll to the form you want to adjust and press Enter.
6. Scroll to the side you want to adjust and press Enter.
stream. If no job is waiting, no pages are printed.
Note: If a form is duplex, each side may have unique horizontal and vertical
7. To make a horizontal adjustment, scroll to HORIZONTAL (PELS) and press
Enter. The keyboard is displayed. The keyboard displays the value entered
when this form was last adjusted, or the original factory setting of 0 if this form
has never been adjusted.
4-16 3130 User's Guide
adjustment amounts.
Page 83

8. Use the keyboard to clear the current value. Enter the new value, and then
press Enter when <OK> is displayed. The range is -999 to 999.
When you increase the horizontal value by one, you move the origin right one
pel. When you decrease the horizontal value by one, you move the origin left
one pel. Ten pels equals about one millimeter.
9. To make a vertical adjustment, scroll to VERTICAL (PELS) and press Enter.
The keyboard is displayed. The keyboard displays the value entered when this
form was last adjusted, or the original factory setting of 0 if this form has never
been adjusted.
10. Use the keyboard to clear the current value. Enter the new value, and then
press Enter when <OK> is displayed. The range is -999 to 999.
When you increase the vertical value by one, you move the origin down one
pel. When you decrease the vertical value by one, you move the origin up one
pel. Ten pels equals about one millimeter.
11. If you want to specify the number of pages desired for the print test, scroll to
NUMBER OF PAGES and press Enter. Use the keyboard to indicate the
number of copies.
12. If you want to specify the stacker, scroll to STACKER and press Enter. Scroll
to the desired stacker, and press Enter to make the selection. Press Enter
again to return to the parent menu.
13. Run a print test of the new setting. You must have a job waiting to be run in
order to run a print test. To start the print test, scroll to PRESS ENTER TO
PRINT and press Enter.
Note: The adjusted test pages printed will consist of the next pages in the
IPDS data stream. If no job is waiting, no pages are printed.
14. If the registration is still not correct, repeat Step 7 on page 4-16 through Step
13 until you are satisfied with the registration.
15. When the registration is satisfactory, scroll to RETURN and press Enter or
press Menu/Exit to exit menu mode. The printer stores the horizontal and
vertical adjustment values.
Note: When you adjust the print position for a user-defined form, the 3130
printer automatically stores the new point of origin as part of the current
definition of the form.
16. Press Start to continue printing.
Changing the Key-Operator Password
Either the key operator or the customer engineer can change the key-operator
password. You must enter the current password before you can change it.
1. Press the Menu/Exit key to enter menu mode.
2. Scroll to the SETUP menu and press Enter. You may be prompted to enter
the key-operator password.
3. Scroll to CHANGE PASSWORD and press Enter.
4. Press Enter on KEY OP/ADMIN. ENTER NEW PASSWORD is displayed.
5. Press Enter to access the keyboard.
Chapter 4. Customizing the Printer 4-17
Page 84

Defining Forms
6. Enter the new password using the keyboard. (See “Tutorial: Using the Menu to
Enter a Key Operator Password” on page 3-17 for detailed instructions.)
RE-ENTER THE PASSWORD is displayed.
7. Press Enter to access the keyboard.
8. Enter the new password again to verify it. After you select <OK>, the password
is changed.
Every type of printing media (paper, forms, or envelopes) that you plan to use must
be defined to the printer in the DEFINE FORMS menu. Printing media are called
forms
. Each defined form has a unique form name. Some form names were
included at the time of manufacture. Key operators can define new forms to meet
specific user needs. For example, users might have several preprinted forms, each
with a unique form name. The paper size may be the same on each form, but the
preprinted text and graphics may be different.
Before you can load a form in the printer, that form must first be defined. The
definition of the form consists of:
Form name
Form size
Duplex (two-sided)
Paper orientation: edge sensitivity, side sensitivity (duplex model only with
duplex set to YES), for preprinted or prepunched forms
Definitions of the type of paper, color of paper, weight of paper, and matchall
parameters for the paper (PostScript emulation only). These values are
available for use in custom PostScript applications.
When you access DEFINE FORMS in the SETUP menu, you can add, view,
modify, or delete forms.
Note: Only the forms that are defined in DEFINE FORMS appear in the lists of
available forms to be loaded into each tray (in the TRAYS/STACKERS
menu). You must define a form before that form will appear in the list of
forms that can be loaded for that tray.
Example:
11 IN (LETTER). INVOICE appears in the lists of forms that can be loaded for any
tray adjusted for letter-size paper. If you delete the form INVOICE, it will not
appear in the lists of forms to be loaded for any tray.
You define a form with the form name INVOICE and the form size 8.5 x
Defining a New Form
Add a form any time you load (or plan to load) a form that has not yet been defined
for the printer. Certain standard forms are already defined when the printer comes
from the factory.
To add a new form, do the following:
1. Press the Menu/Exit key to enter menu mode.
2. Scroll to the SETUP menu and press Enter. You may be prompted to enter
the key-operator password.
4-18 3130 User's Guide
Page 85

3. Scroll to DEFINE FORMS and press Enter.
4. Press Enter on ADD FORM NAME. The keyboard is displayed.
5. Use the keyboard to enter the new form name. The form name can consist of
any unique descriptive or numeric name up to 12 characters.
Press Enter on <OK> when you have finished entering the form name. The
ADDING FORM message displays momentarily, and then the FORM ADDED
message displays.
6. Scroll to VIEW /MODIFY FORM and press Enter. A list of all currently defined
forms is displayed.
7. Scroll to the form name just added and press Enter.
8. Press Enter on FORM SIZE.
Note: The default for each new form parameter is indicated by an asterisk (*).
9. Scroll to the form size desired and press Enter to make the selection. Press
Enter again to return to the parent menu.
10. (Duplex model only with DUPLEX enabled in the printer configuration.) Scroll
to DUPLEX and press Enter. Scroll to YES or NO and press Enter to make
the selection. Selecting YES defines the form as two-sided (can be printed on
both sides). Selecting NO defines it as simplex (can be printed on one side
only). Press Enter again to return to the parent menu.
11. Scroll to PAPER ORIENTATION and press Enter.
12. Press Enter on EDGE SENSITIVITY. Scroll to YES or NO and press Enter to
make your selection. If the form is a prepunched form, you may wish to set
EDGE SENSITIVITY to YES. When EDGE SENSITIVITY is set to YES, the
printer rotates the image 180° before printing it on the page. Press Enter
again to return to the parent menu.
13. (Duplex model only with DUPLEX set to YES [Step 10.]) Scroll to SIDE
SENSITIVITY and press Enter. Scroll to YES or NO, and press Enter to make
your selection. If the form is a preprinted form, you may wish to set SIDE
SENSITIVITY to YES. When SIDE SENSITIVITY is set to YES on simplex
jobs, the printer prints a blank side two for each page. Therefore, these
simplex print jobs run at half speed.
If you are running custom-written PostScript jobs that interrogate the printer to
determine media characteristics, do the following steps also:
14. Scroll to TYPE and press Enter.
15. Use the keypad to enter a code that indicates the type of print medium to be
used. Press Enter on <OK>.
16. Scroll to COLOR and press Enter.
17. Use the keypad to enter a code that indicates the color of the print medium.
Press Enter on <OK>.
18. Scroll to WEIGHT and press Enter.
19. Use the keypad to enter the weight of the print medium. Press Enter on <OK>.
20. Scroll to MATCHALL and press Enter.
21. Select YES or NO and press Enter. If you select YES, at least one tray on the
printer must have a form loaded whose form definition includes the criteria
Chapter 4. Customizing the Printer 4-19
Page 86

specified for TYPE, COLOR, and WEIGHT. If none of the forms loaded in the
printer match all three, the job is not printed.
If you select NO, the job is printed even if none of the forms loaded in the
printer matches all three criteria. NO is the original factory setting.
For more information on custom-written PostScript printing, see
Language Reference Manual
Modifying a Form
To modify a form, follow the directions given below. The current settings for each
item are indicated by an asterisk (*).
1. Press the Menu/Exit key to enter menu mode.
2. Scroll to the SETUP menu and press Enter. You may be prompted to enter
3. Scroll to DEFINE FORMS and press Enter.
4. Scroll to VIEW/MODIFY FORM and press Enter. A list of all currently defined
5. Scroll to the form name you wish to modify and press Enter.
6. Press Enter on FORM SIZE.
7. Scroll to the form size desired and press Enter to make the selection. Press
8. (Duplex model only with DUPLEX enabled in the printer configuration.) Scroll
PostScript
by Adobe Systems Inc.
the key-operator password.
forms is displayed.
Enter again to return to the parent menu.
to DUPLEX and press Enter. Scroll to YES or NO and press Enter to make
the selection. Selecting YES defines the form as duplex (can be printed on
both sides). Selecting NO defines it as simplex (can be printed on one side
only). Press Enter again to return to the parent menu.
9. Scroll to PAPER ORIENTATION and press Enter.
10. Press Enter on EDGE SENSITIVITY. Scroll to YES or NO and press Enter.If
the form is a prepunched form, you may wish to set EDGE SENSITIVITY to
YES. When EDGE SENSITIVITY is set to YES, the printer rotates the image
180° before printing it on the page. Press Enter again to return to the parent
menu.
11. (Duplex model only with DUPLEX set to YES [Step 8].) Scroll to SIDE
SENSITIVITY and press Enter. Scroll to YES or NO, and press Enter. If the
form is a preprinted form, you may wish to set SIDE SENSITIVITY to YES.
When SIDE SENSITIVITY is set to YES on simplex jobs, the printer prints a
blank side two for each page. Therefore, these simplex print jobs run at half
speed.
4-20 3130 User's Guide
Page 87

Deleting a Form
You may wish to delete a form that is no longer being used. Deleting a form
removes it from the FORM NAME lists under the TRAYS/STACKERS menu.
Therefore, you cannot assign a deleted form name to a tray.
To delete a form, do the following:
1. Press the Menu/Exit key to enter menu mode.
2. Scroll to the SETUP menu and press Enter. You may be prompted to enter
the key-operator password.
3. Scroll to DEFINE FORMS and press Enter.
4. Scroll to DELETE FORM and press Enter.
5. Scroll to the form name you wish to delete and press Enter.
6. Press Enter on PRESS ENTER TO DELETE to delete the selected form.
Note: To avoid deleting the form when PRESS ENTER TO DELETE is
displayed, scroll to RETURN and press Enter.
Checking the Current Definition of a Form
To view the current definition of a particular form, do the following:
1. Press the Menu/Exit key to enter menu mode.
2. Scroll to the SETUP menu and press Enter. You may be prompted to enter
the key-operator password.
3. Scroll to DEFINE FORMS and press Enter.
4. Scroll to VIEW /MODIFY FORM and press Enter. A list of all currently defined
forms is displayed.
5. Scroll to the form name you wish to view and press Enter.
6. Press Enter on FORM SIZE. The current selection is displayed with an
asterisk (*) next to it. Press Enter again to return to the parent menu.
7. (Duplex model only with DUPLEX enabled in the printer configuration.) Scroll
to DUPLEX and press Enter. The current selection is displayed with * next to
it. YES defines the form as duplex (can be printed on both sides). NO defines
it as simplex (can be printed on one side only). Press Enter again to return to
the parent menu.
8. Scroll to PAPER ORIENTATION and press Enter.
9. Press Enter on EDGE SENSITIVITY. The current selection is displayed with *
next to it. When EDGE SENSITIVITY is set to YES, the printer rotates the
image 180° before printing it on the page. Press Enter again to return to the
higher-level menu.
10. (Duplex model only with DUPLEX set to YES [Step 7].) Scroll to SIDE
SENSITIVITY and press Enter. The current selection is displayed with * next
to it. When SIDE SENSITIVITY is set to YES on simplex jobs, the printer prints
a blank side two for each page. Therefore, these simplex print jobs run at half
speed.
Chapter 4. Customizing the Printer 4-21
Page 88

Machine Information
Information regarding your specific printer is available for viewing only (read only).
This information may be requested by the customer engineer or your system
administrator.
Machine Information Items
The machine information includes the following items:
PRINT COUNT (IMPRESSIONS) The total number of prints (impressions) run on
CODE LEVEL Controller code level
EC LEVEL Engineering change level (for customer
OS LEVEL Operating system level (for customer engineers)
ENGINE CODE LEVEL Microcode level (for customer engineers)
MEMORY (KB) Number of kilobytes of memory installed on the
this printer to the present date
engineers)
control unit system board
AVAILABLE SPOOL SPACE (MB) Amount of available disk space for spooling
PRINTER TYPE 3130 Advanced Function Printer
SERIAL NUMBER Unique number assigned by IBM to each printer
MANUFACTURING PLANT Number that designates the manufacturing plant
Viewing Machine Information
To view machine information, do the following:
1. Press the Menu/Exit key to enter menu mode.
2. Scroll to the SETUP menu and press Enter. You may be prompted to enter
the key-operator password.
3. Scroll to MACHINE INFORMATION and press Enter.
4. Scroll to an item you wish to view and press Enter. The read-only information
is displayed. You cannot change this information.
5. Press Enter to return to the parent menu. View other item information by
repeating the previous step.
ASCII jobs
at which the printer was made
4-22 3130 User's Guide
Page 89

Configuring Attachments
The communications and cable attachments are configured at the time of printer
installation by the customer engineer. However, you may wish to change the
attachment being used or the current attachment configuration. Change this
configuration only when asked to do so by your system administrator or network
administrator. Only key operators or system administrators can change the
attachment configuration.
Attention:
Changing the attachment configuration may make your printer inoperable.
For information on how to set up your system and configure the attachments, see
IBM 3130 Advanced Function Printer: System Administration Guide
.
For information on configuration, see
Configuration Handbook
The 3130 printer supports the following attachments:
Twinaxial
SDLC (SNA)
Token Ring (TCP/IP, NetWare, and SNA)
Ethernet (TCP/IP and NetWare)
PC Parallel
Each attachment has configuration items that are specific to that attachment.
Twinaxial, SDLC (SNA), token ring (TCP/IP and SNA), and Ethernet (TCP/IP)
support an IPDS data stream, but IPDS can be connected to only a single
attachment at a time. Token ring (TCP/IP), Ethernet (TCP/IP), and PC Parallel
support both PCL and PostScript data streams.
.
Enabling and Disabling Attachments
An enabled attachment attempts to establish communication with the host or
network. When the current attachment is enabled and the application that will
receive the data to be printed is enabled, the printer is online. When the current
attachment is disabled, the printer is offline and cannot receive data from the host
or network.
Attention:
IBM Advanced Function Printer: Attachment
The IPDS application must be disabled before you disable token ring SNA or SDLC SNA. See “Disabling
IPDS” on page 4-24.
The Netware application must be disabled before you disable token ring or Ethernet. See “Enabling or
Disabling NetWare, LPR, FTP, or TFTP” on page 4-24.
Chapter 4. Customizing the Printer 4-23
Page 90

To enable or disable attachments, do the following:
1. Press the Menu/Exit key to enter menu mode.
2. Scroll to the ATTACHMENTS menu and press Enter. You may be prompted to
enter the key-operator password.
3. Scroll to the attachments you want to enable or disable, and press Enter.
4. Scroll to ENABLE STATUS and press Enter.
5. Scroll to ENABLE or DISABLE and press Enter. Enable the attachment as
directed by your system administrator.
For information on how to set up and configure the attachments, see
Advanced Function Printer: System Administration Guide
.
IBM 3130
Enabling and Disabling Applications
Enabling IPDS:
Note: Ensure that the attachment that IPDS will be using is enabled before you
begin enabling IPDS.
1. Press the Menu/Exit key to enter menu mode.
2. Scroll to the ATTACHMENTS menu and press Enter. You may be prompted to
enter the key-operator password.
3. Scroll to the APPLICATION SETUP menu and press Enter.
4. Press Enter on IPDS.
5. Scroll to CONFIGURATION and press Enter.
6. Press Enter on SOURCE ATTACHMENT.
7. Scroll to the attachment you want to use to receive IPDS jobs and press Enter.
8. The IPDS menu appears again. Select ENABLE STATUS and press Enter.
9. Press Enter on ENABLE.
To enable the IPDS, do the following:
Disabling IPDS:
1. Press the Menu/Exit key to enter menu mode.
2. Scroll to the ATTACHMENTS menu and press Enter. You may be prompted to
enter the key-operator password.
3. Scroll to the APPLICATION SETUP menu and press Enter.
4. Press Enter on IPDS.
5. Scroll to ENABLE STATUS and press Enter.
6. Scroll to DISABLE and press Enter.
Enabling or Disabling NetWare, LPR, FTP, or TFTP:
NetWare, LPR, FTP, or TFTP, do the following:
1. Press the Menu/Exit key to enter menu mode.
2. Scroll to the ATTACHMENTS menu and press Enter. You may be prompted to
enter the key-operator password.
3. Scroll to the APPLICATION SETUP menu and press Enter.
4-24 3130 User's Guide
To disable the IPDS, do the following:
To enable or disable
Page 91

4. Scroll to the application you want to enable or disable and press Enter.
5. Press Enter on ENABLE STATUS.
6. Press Enter on ENABLE or scroll to DISABLE and press Enter.
Notes:
1. If a particular attachment is enabled when AUTO START is selected, that
attachment is enabled when the printer is made ready and when it is powered
on or restarted.
2. With a 3174 controller, the attachment should be enabled before the host
system is activated.
Setting Configuration Parameters
To configure an attachment, do the following:
1. Press the Menu/Exit key to enter menu mode.
2. Scroll to the ATTACHMENTS menu and press Enter. You may be prompted to
enter the key-operator password.
3. Scroll to the attachments you want to configure, and press Enter to make the
selection.
For information on how to setup and configure the attachments, see
Advanced Function Printer: System Administration Guide
4. Scroll to CONFIGURATION and press Enter.
5. For each parameter, select from the choices, or use the keyboard to enter the
desired value.
For descriptions of configuration parameter values, see
3935 Advanced Function Printer: Attachment Configuration Handbook
Printing the Attachment Configuration
You can print a page that lists the attachment configuration items and their current
settings.
Note: The attachment configuration page prints after the current job completes.
To print the attachment configuration, do the following:
1. Press the Menu/Exit key to enter menu mode.
2. Scroll to the ATTACHMENTS menu and press Enter. You may be prompted to
enter the key-operator password.
3. Scroll to the attachment whose configuration you want to print. Press Enter.
IBM 3130
.
IBM 3130, 3160, and
.
4. Scroll to PRINT CURRENT CONFIGURATION and press Enter.
5. If you want to specify the number of copies desired, scroll to QUANTITY and
press Enter. Use the keyboard to select the number of copies.
6. If you want to specify the input tray desired, scroll to INPUT TRAY and press
Enter. Scroll to the desired tray and press Enter. Press Enter again to return
to the parent menu.
Chapter 4. Customizing the Printer 4-25
Page 92

7. If you want to specify the stacker desired, scroll to STACKER and press Enter.
Scroll to the desired stacker, and press Enter to make the selection. Press
Enter again to return to the parent menu.
8. (Duplex model only with DUPLEX enabled in the printer configuration.) If you
want to specify that the information be printed in duplex or simplex, scroll to
DUPLEX and press Enter. Scroll to YES or NO, and press Enter to make the
selection. Press Enter again to return to the parent menu.
9. Scroll (if necessary) to PRESS ENTER TO PRINT, and press Enter to request
printing. The help pages will be put in the print queue.
Note: If the printer is busy, the help pages may not print immediately.
4-26 3130 User's Guide
Page 93

Chapter 5. Printing and Paper Handling
This chapter describes the paper handling and printing features of the printer. You
will find instructions for:
Powering on and off the printer
Shutting down and restarting the printer
Understanding status messages
Handling information messages
Starting print jobs
Interrupting printing
Canceling print jobs
Loading paper
Positioning preprinted and prepunched forms
Loading labels
Loading envelopes
Using the output stackers
Copyright IBM Corp. 1994, 1996 5-1
Page 94

Powering On and Off the Printer
Turn the printer on (power on) and off (power off) using the switch on the right side
of the printer. The symbols on the switch are “O” for off and “I” for on.
Powering On
When the printer is powered on, it goes through a power-on sequence that takes
approximately 5 minutes. During the power-on sequence, the printer runs a series
of internal tests.
While the printer is running hardware diagnostics, numbers between 200 and 299
appear on the operator panel display. A delay of several minutes occurs after 299
is displayed. Then the printer processes its internal computer programs, with
four-digit numbers appearing on the display.
When the power-on sequence has finished, the READY message appears.
Powering Off
Before you power off the printer, you must always shut down the printer. Shut
down the printer from the SYSTEM SHUTDOWN menu. Do not power off until the
message SHUTDOWN DONE-POWER OFF is displayed.
Attention: Failure to shut down the printer before powering off may damage the printer internal computer
software.
5-2 3130 User's Guide
Page 95

Shutting Down and Restarting the Printer
Both users and key operators may need to shut down and restart the printer.
Shutdown
A shutdown stops all active functions, disables communications and cable
attachments, and stops all programs. A power off and power on is required to start
the printer again.
Shut down the printer only when necessary:
Before turning the printer power off. (A shut down is required whenever
powering off.)
When instructed to do so in recovery procedure instructions.
How to Shut Down the Printer
To shut down the printer, do the following:
1. Press Menu/Exit to enter menu mode.
2. Scroll down to SYSTEM SHUTDOWN and press Enter.
3. Scroll down to PRESS ENTER TO SHUT DOWN, and press Enter to begin the
shutdown. Wait for the message SHUTDOWN DONE-POWER OFF to be
displayed before you power off.
4. Press the power switch (on the right side of the printer) to the off (O) position to
power off the printer.
Restart
A restart is similar to a shutdown, but the printer starts up again automatically after
the shutdown. Use the restart procedure only when instructed to do so in recovery
actions.
How to Restart the Printer
To restart the printer, do the following:
1. Press the Stop key to make the printer NOT READY. (You may need to press
the Stop key twice.)
2. Press Menu/Exit to enter menu mode.
3. Scroll down to SYSTEM SHUTDOWN and press Enter.
4. Scroll down to PRESS ENTER TO RESTART and press Enter to begin the
restart.
5. Wait for the restart procedure to finish. If NOT READY is displayed, press
Start to make the printer Ready, so the printer can print waiting print jobs.
Note: If the On Line indicator light on the operator panel is not lit, you need to
Chapter 5. Printing and Paper Handling 5-3
enable the attachment.
Page 96

Understanding Status Messages
The following messages appear on the operator panel two-line display. These
messages do not indicate errors. They simply give information about the current
status of the printer. Recommended user actions follow each explanation.
Message Description and Recommended Action
READY
NOT READY
RECEIVING
PRINTING
WARMING UP
SLEEPING
TRACING
Description
host or network if an attachment is online.
Action
Description
information from a host or network.
Action
PRINTER HAS BEEN MADE READY appears. The printer can then
start to print if a print job is waiting and the attachment is online.
Description
network.
Action
Description
Action
Description
to print in 1 to 5 minutes.
Action
and the attachment is online, printing starts as soon as the
printer warms ups (if print jobs are waiting).
Description
fuser has turned off due to inactivity. The fuser turns on, and the
printer warms back up when it receives a print job, or, if the
printer is in the Not Ready state, when the Start key is pressed.
Action
Description
attachment. The tracing operation may slow down throughput
and should be turned off when not needed.
Action
think the tracing function was left on in error.
: The printer is ready to receive information from a
: No action is required.
: The printer is in a stopped mode and cannot print
: Press Start to make the printer Ready. The message
: The printer is receiving information from a host or
: No action is required.
: The printer is printing.
: No action is required.
: The printer is warming up. The printer will be ready
: Wait for the printer to warm up. If the printer is Ready
: The printer is in sleeping mode, which means the
: No action is required.
: The control unit is tracing an application or
: Contact the key operator or customer engineer if you
You can scroll to see other messages, if any. Simply press the Down Arrow key to
display the messages.
Clearing Information Messages
Information messages are displayed as needed while the printer is printing. To
clear an information message, press the Enter key.
For information on handling messages that require action, see Appendix A,
“Display Messages and Codes.”
5-4 3130 User's Guide
Page 97

Starting Print Jobs
To start print jobs, do the following:
1. Clear any existing error conditions by performing the recovery action and
pressing the Enter key. (See Appendix A, “Display Messages and Codes.”)
2. Press Start. Any pending jobs in the print queue will begin printing.
Interrupting Printing
If you want to temporarily stop printing, you can do so at any time. No print job
information will be lost. Any print jobs printing continue after you start the printer
again.
To interrupt printing, do the following:
1. Press Stop. The printer finishes printing the current page and any other page
that is in the printer buffer. The message STOPPING... appears while the
printer finishes printing. When printing has stopped, the message PRINTER
HAS BEEN MADE NOT READY is displayed.
If you press Stop again, the message ALREADY STOPPED is displayed.
2. If you wish, you may run internal prints, load paper into empty trays, and so on.
3. Press Start to continue printing.
Canceling Print Jobs
You can cancel a print job that was sent to the printer once that print job has
started printing. To cancel a print job, do the following:
1. Press Stop to stop the printer.
2. Check the output stacker after all sheets have been ejected.
Important: If your print job has finished printing, do not cancel printing or the
3. If the print job has started but has not yet finished printing, press Cancel Print.
Note: If there are no jobs in the print queue, the message NO PRINT JOBS
4. When the prompt message SELECT STACKER TO CANCEL appears, press
Enter. A list of stacker names displays. Scroll to the stacker that is being
used for your job and press Enter.
If you do not want to cancel printing, press the Down Arrow key to display
RETURN and press Enter. The print job is not canceled.
next print job will be canceled.
TO CANCEL is displayed.
5. Press Start to continue printing.
Chapter 5. Printing and Paper Handling 5-5
Page 98

Loading Paper
The printer can have up to six trays depending on the model and options installed.
The following figure shows the name of each tray for each printer model.
When loading paper into a tray, follow these guidelines to prevent paper jams and
stacking problems:
Do not use paper that is creased, folded, or damaged.
Re-wrap partially used reams to maintain moisture content.
Load only one size and type of paper into a tray.
Do not add small amounts of paper on top of paper already in the tray.
Do not overfill the tray. Do not load paper above the red line marking (in all
front trays).
See
Advanced Function Printer: Cut Sheet Paper Reference for Use with IBM
Electrophotographic Printers
explains the correct procedure for opening reams, fanning paper, and determining
curl.
5-6 3130 User's Guide
for additional instructions on loading paper correctly. It
Page 99

Several sizes of paper can be used in your printer, provided they meet certain
guidelines. For best results, use only xerographic paper. See
Function Printer: Introduction and Planning Guide
for specific paper
recommendations.
Table 5-1 shows the sheet capacity and paper sizes for each tray.
Table 5-1. Sheet Capacity and Paper Sizes for Printer Trays
Printer Tray Capacity (20 lb
paper)
Main Tray 2 000 sheets Letter, Legal, Ledger, A3, A4, B4, B5
Lower Sub Tray 250 sheets Letter, Legal, Ledger, A3, A4, B4, B5
Upper Sub Tray 250 sheets Letter, Legal, Ledger, A3, A4, B4, B5
Top Front Tray 250 sheets Letter, Legal, Ledger, A3, A4, B4, B5
Side Tray 500 sheets Letter, A4
Envelope Feeder 100 envelopes† #10, ISO DL
†The envelope feeder can hold up to 100 envelopes depending on the weight of the
envelopes.
Paper Size
IBM 3130 Advanced
When a tray is out of paper or disabled, or when the cassette has been removed
and no other tray is available, the printer stops printing and the operator panel
displays a message. See Appendix A, “Display Messages and Codes,” for a list of
messages and their meanings.
See “Positioning Preprinted and Prepunched Paper” on page 5-15 for more
information about positioning special types of paper.
Loading Paper into the Main Tray
Follow the steps below to load paper into the main tray.
1. Open the main tray.
2. Adjust the size guide according to the paper size.
Use the setting positions marked on the top of the size guide and on the
bottom of the tray. Lift and position the size guide accordingly. Be sure that
both the top and bottom of the guide are properly in place.
Chapter 5. Printing and Paper Handling 5-7
Page 100

3. Position the paper in the tray.
When loading paper, position each paper size as shown in the following
figures.
The corner of the paper must be flush against the corner of the tray, marked
with an arrow (as shown below).
Note: Do not stack paper above the red line.
4. Close the main tray by pushing it back into the cabinet.
5-8 3130 User's Guide
 Loading...