

Page 1

S37L-2095-00
IBM Mobile Systems
WorkPad z50 Mobile Companion (2608-1Ax)
Hardware Maintenance Manual
March 1999
Page 2

© Copyright IBM Corp. 1999 iii
Note
Befor e usi ng th is informati on and the produc t it s up p or ts ,
be sure to r ead th e g eneral inf or m ati on under “Notices”
on page 61.
First Edition (March 1999)
The following paragraph does not apply to the United
Kingdom or any country where such provisions are
inconsistent with local law:
INTERNATIONAL BUSINESS MACHINES
CORPORATION PROVIDES THIS PUBLICATION “AS IS”
WITHOUT ANY WARRANTY OF ANY KIND, EITHER
EXPRESS OR IMPLIED, INCLUDING, BUT NOT LIMITED
TO, THE LIMITED WARRANTIES OF MERCHANTABILITY
OR FITNESS FOR A PARTICULAR PURPOSE. Some
states d o not all ow dis c l aimer or express or implied
warranties in certain transactions; therefore, this statement
may not apply to you.
This publ ication c oul d inc lude tec hn ical inacc ur aci es or
typographical errors. Changes are periodically made to the
information herein; these changes will be incorporated in
new editions of the publication. IBM may make
improvements or changes to the products or the programs
described in this publication at any time.
It is possible that this publication may contain references to,
or information about, IBM products (machines and
programs), programming, or services that are not announced
in your country. Such references or information must not be
construed to mean that IBM intends to announce such IBM
products , program m ing, or services in you r c ountry.
Requests for technical information about IBM products
should b e m ad e t o your IB M aut h o ri z ed d ealer or your IB M
marketing representative.
© Copyright Inter n atio nal Busin es s Mach ine s
Corporation 1999. All rights reserved. Note to US
Government Users – Documentation related to restricted
rights – Use, duplication, or dis c l os ure is subject to
restrictions set forth in GSA ADP Schedule Contract with
IBM Corp.
Page 3

iv IBM Wor kPad z50, Mobile Companion iv
About This Manual
This manual contains service and reference information for
the WorkPad z50, Mobile Companion. Use this manual
along with the diagnostic software to troubleshoot problems
effectively.
This manual is divided into sections as follows:
•
The Introduction section provides general information,
and safety information required to service computers.
•
The product-specific section includes service,
refer ence, and produc t -specif ic par ts inform ati on.
Importa nt
This manual is intended for trained service personnel who
are familiar with WorkPad products.
Before servicing an IBM WorkPad product, be sure to
review the safety information under “Safety Notices” on
page viii and “ S afety Informati on” on pag e xii.
Page 4

© Copyright IBM Corp. 1999 v
Contents
Introduction .........................................................................vii
I
MPORTANT SERVICE INFORMATION VII
FRU Replacement Strategy.......................................................vii
S
AFETY NOTICES (MULTI-LINGUAL TRANSLATIONS) VIII
SAFETY INFORMATION XII
General Safety............................................................................xii
Electrical Safety ........................................................................xiii
Safety Inspection Guide............................................................ xiv
Handling Electrostatic Discharge-Sensitive Devices............. xvi
Grounding R e quirements.........................................................xvi
W
ORKPAD Z50 MOBILE COMPANION (2608) 1
R
EAD THIS FIRST 1
S
CREW TIGHTENING INFORMATION 2
P
RODUCT OVERVIEW 5
C
HECKOUT GUIDE 6
Audio Checkout............................................................................7
Keyboard Checko ut.....................................................................8
Memory Checkout........................................................................8
Modem Checkout .........................................................................9
Power Systems Checkout.............................................................9
Backup Battery Checkout ( N onr echar geable).........................13
The Battery Calibration Application ........................................13
ROM Card Checkout .................................................................14
TrackPoin t Ch e c k o u t .................................................................15
Cradle Checkout ........................................................................15
External Monitor Self-Test ........................................................15
I
NSTALLING THE ROM/DRAM CARD 17
Removing the ROM/DRAM Card..............................................18
Brightness/Contrast Buttons Checkout ....................................19
P
OWER MANAGEMENT FEATURES 20
Full Power Mod e .......................................................................2 0
Suspend Mode ............................................................................20
S
YMPTOM-TO-FRU INDEX 21
Numeric Error Codes ................................................................21
Function-Related Symptoms......................................................23
Indicator-Related Symptoms.....................................................23
Infrared-Related Symptoms.......................................................23
Keyboard- or TrackPoi nt-Related Symptoms..........................24
LCD-Related Symptoms.............................................................24
Peripheral Device Related Symptoms ......................................25
Power-Related Symptoms..........................................................25
Other Symptoms.........................................................................25
Intermitte n t Prob l em s ................................................................26
Undetermined Problems............................................................26
R
UNNING THE DIAGNOSTICS 27
PC Card Slot Test ......................................................................27
UUID ..........................................................................................28
R
ELATED SERVICE PROCEDURES 28
Status Indicators and Control Buttons .....................................28
Application Launching Key Assignm ents.................................29
R
EMOVI NG AND REPLACING DEFECTIVE FRUS 30
Important Notice........................................................................32
Removal reference .....................................................................34
1010 Backup Batteries..............................................................35
1020 ROM/D RA M Card...........................................................36
1030 Battery Pack.....................................................................38
Page 5

vi IBM WorkPad z50, Mobile Companion vi
1040 Keyboard Ass e m bly.........................................................39
1050 Bottom Cover...................................................................40
1060 Mainboar d.......................................................................42
1070 LCD Bez el........................................................................43
1080 LCD Unit..........................................................................44
1090 Inverter Card and LCD Panel........................................45
1110 FPC As s embly..................................................................46
1120 Speaker.............................................................................47
1130 Micropho ne......................................................................47
1140 Audio P or ts......................................................................48
1150 PC Car d Slot Assembly...................................................48
1160 RJ-11 Assembly ...............................................................50
1170 Hardware Button Board.................................................51
1180 Top Cover........................................................................52
L
OCATIONS 53
Front Right View ........................................................................ 5 3
Left View.....................................................................................5 4
Right View ..................................................................................54
Rear View...................................................................................55
Bottom View ...............................................................................55
P
ARTS LISTING 56
System Unit FRU List ................................................................57
LCD Unit Parts Lis t...................................................................58
Miscellaneous and Other Parts.................................................59
Option Parts FRU List...............................................................59
Other Parts .................................................................................59
CRU ............................................................................................59
Tools ...........................................................................................59
Power Cord ................................................................................60
N
OTICES 61
Trademarks ................................................................................61
Page 6

© Copyright IBM Corp. 1998 vii
Introduction
Important Service Information
Important
Software fixes ar e cus t om er ins t al lable. Such f i xes are
located on th e PC C om p an y B ul l et in Board Ser vice
(BBS). The direct line for modem connection is 919-55 70001 or tieline 255-0001 (IBM internal phone number).
Advise customers to contact the PC Company
HelpCenter at 800-722-2227 if they need assistance in
obtaini ng or ins t al li ng software fixes.
Customers in Canada should call IBM HelpPC at 800-5653344 for assistance or down-load information. The Ca nadian
BBS phone numbers are:
Montreal 515-938-3022
Toronto 905-316-4255
Vancouver 604-664-6464
Winnipeg 204-934-2735
FRU Replacement Strategy
Before Replacing Parts
Ensure t h at all s oftware f i xes ar e i ns t all ed pr i or t o
replacing any FRUs listed in this manual.
Use the follow ing strategy to preve nt unnecessary FR U
replac em ent and ser vice expense:
•
If you are instructed to replace a FRU and that
does not correct the problem, reinstall the
original FRU before you continue.
•
Some compu t ers have bot h a proc es sor board and a
mainb oard . If you are instruc t ed t o rep lace either the
processor board or the mainboard, and the first board
that you replaced does not correct the problem,
reinst all t h e original board, and then repl ac e th e ot h er
(processor or s ystem) boar d.
•
If an adapter or device consists of more than one
FRU, an error code may be caused by any of the
FRUs. Before replacing the adapter or device,
remove the FRUs, one by one, to see if the
symptoms change. Replace only the faulty FRU.
Page 7

viii IBM Wor kPad z50, Mobile Companion viii
Safety Notices (Multi-lingual Translations)
In this manual, safety notices appear in English with a page
number r ef erence t o the ap propriat e multi-li ng ual, trans l at ed
safety notice found in this section.
The follow i ng s afety notices are provided in En gl is h, F r enc h,
German, Italian, and Spanish languages.
Safety Notice 1
Befor e the c om put er is pow er ed-on aft er FRU
replacement, make sure all screws, springs, or other
small p arts are in place and are not left loos e insi d e th e
computer. Verify this by shaking the computer and
listeni ng for rat tl in g s ounds. Metallic par ts or metal flak es
can cause electrical shorts.
Avant de remettre l'ordinateur sous tension après
remplacement d' un e unité en cl i ent èl e, vér ifiez qu e tous
les ressorts, vis et autres pièces sont bien en place et
bien fixées. Pour ce faire, secouez l'unité et assurezvous qu'aucun bruit suspect ne se produit. Des pièces
métalliques ou des copeaux de métal pourraient causer
un court-circuit.
Bevor nac h einem FRU- A us t aus c h d er C om put er w i eder
ange schlossen wird, muß sicherge stellt werden, daß
keine Schrauben, Federn oder andere Kleinteile fehlen
oder im Gehäuse vergessen wurden. Der Computer muß
geschüt t elt und auf kl ap p er g eräus che gepr üf t wer d en .
Metallteile oder splitter können Kurzschlüsse erzeugen.
Prima di accendere l'elab or atore dop o ch e è stata
effe ttuata la sostituzione di una FRU, accertarsi che tut te
le viti, le molle e tune le altri parti di piccole dimensioni
siano nella corretta posizione e non siano sparse
all'intern o dell'elaboratore. Verificare ciò scuotendo
l'elab oratore e pres tando att en zione ad eventual i rum or i ;
eventuali parti o pezzetti metallici possono provocare
cortocircuiti pericolosi.
Antes de encender el sis tema despues de sus tituir un a
FRU, compruebe que todos los tornillos, muelles y demás
piezas pequeñas se encuentran en su sitio y no se
encuentran sueltas dentro del sistema. Compruébelo
agitand o el sis t em a y es cuchan do los posibles ruid os qu e
provoc arían. Las piez as m et álicas pued en causar
cort ocirc uitos eléc t ricos.
Page 8

© Copyright IBM Corp. 1998 ix
Safety Notice 2
The battery pack contains small amounts of harmful
substances. Do not disassemble it, throw it into fire or
water, or short-circu it it. Dispos e of the battery as
required by local o rdinances or regulations. Use only the
batter y in th e ap propriat e par ts lis ting when r epl ac in g the
batter y p ac k. Use of an incorr ect batter y can result in
igniti on or exp l os ion of the battery.
La bat terie contient du nicke l. Ne la démontez pas, ne
l'exposez ni au feu ni á l'eau. Ne la mettez pas en courtcircuit. P our l a met tr e au rebut, c onformez - vous a la
réglementation en vigueur. Lorsque vous remplacez la
batterie, veillez à n'utiliser que les modèles cités dans la
liste de pièces détachées adéquate. En eftet, une batterie
inappropriée risque de prendre feu ou d'exploser.
Akkus ent h alten geri ng e M engen von Nick el . Sie durfen
nicht zerl eg t , wiederauf geladen, kurzg es c hl ossen, oder
Feuer oder Wasser ausgesetzt werden. Bei der
Entsorgung die örtlichen Bestimmungen für Sondermüll
beachten. Beim Ersetzen der Batterie nur Batterien des
Typs ver w end en , der in der Ers at zteillis t e auf geführt ist.
Der Eins atz falscher B atterien k ann zu Entzünd un g od er
Explosion führen.
La batter i a c onti ene picc ole quantit à di nic h el. Non
smontarla, gettarla nel fuoco o nell'acqua né
cortocircuitarla. Smaltirla secondo la normativa in vigore
(DPR 915/82, successive dispos izioni e disposizioni
locali). Quando Si sostituisce la batteria, utilizzare
soltanto i tipi inseriti nell'appropriato Catalogo parti.
L'impi eg o di un a batteri a non adatta p otrebbe
determi nare l'incendio o l' es pl os ione della batteria stess a.
Las baterías contienen pequeñas cantidades de níquel.
No las desmonte, ni recargue , ni las eche al fue go o al
agua ni las cortocircuite. Deséchelas tal como dispone la
normativa local. Utilice sólo ba terías que se en c uentren
en la lista de piezas al sustituir la batería. La utilización
de una bat erí a n o apropiad a pu ed e provocar la ig nic i ón o
explosión de la misma.
Page 9

x IBM WorkPad z50, Mobile Companion x
Safety Notice 3
If the LCD br eaks and the fluid from ins i d e th e LCD g ets
into your ey es or on you r hands, i mm ed i at ely wash the
affect ed ar e as wi t h w at er f or at leas t 15 mi nutes. Seek
medica l c are if any symptoms fr om t h e fluid are pres ent
after washing.
Si le panneau d'aftic h ag e à cristaux li qu id es s e brise et
que vous rec ev ez dans les yeux ou sur l es m ai ns u n e
partie du fluide, rincez-les abondamment pendant au
moins quinze minutes. Consultez un médecin si des
symptômes persistent apres le lavage.
Die Leuchts toffröhre im LCD ~BiIdschirm ent h ält
Quecksilber. Bei der Entsorgung die örtlichen
Bestimmungen für Sondermüll beachten. Der LCDBildschirm besteht aus Glas und kann zerbrechen, wenn
er unsachgemaß behandelt wird oder der Computer auf
den Boden fällt. Wenn der Bildschirm beschädigt ist und
die darin befindliche Flüssigkeit in Kontakt mit Haut und
Augen gerät, sollten die betroffenen Stellen mindestens
15 Minuten mit Wasser abgespült und bei Beschwerden
anschl i eß end ein Arzt auf g esucht wer d en .
Nel caso che caso l'LCD si do vesse rompere ed ii liquido
in esso contenut o entrasse in c ontatto c on gli occhi o le
mani, lav ar e im m ediatam en t e le par ti interessate con
acqua corr ente per al m en o 1 5 mi nut i; poi consul tare un
medico se i sintomi dovessero permanere.
Si la LCD se r omp e y el fluido d e su int er i or entra en
contacto con sus ojos o sus manos, lave inmediatamente
las áreas afectadas con agua durante 15 minutos como
mínimo. Obtenga atención medica si se presenta algún
síntom a del fluido despues de lavarse.
Safety Notice 4
To avoid shock, do not remove the plastic cover that
surrounds the lower portion of the inverter card.
Afin d'évi ter tout risque de choc électrique, ne retirez pas
le cache en plastique protegéant la partie inférieure de la
carte d'al im entati on.
Aus Sicherheitsgründen die Kunststoffabdeckung, die
den unteren Teil der Spannungswandlerplatine umgibt,
nicht entfernen .
Per evitare scosse elettriche, non rimuovere la copertura
in plastica che avvolge la parte inferiore della scheda
invertitore.
Para evitar descargas, no qui te la cubierta de plástico
que rodea la parte baja de la tarjeta invertida.
Page 10

© Copyright IBM Corp. 1998 xi
Safety Notice 5
Though m ai n batteries ha ve l ow vol tage, a sh orted or
ground ed battery c an produce enough cur r ent t o bur n
combust i bl e m aterials or per sonnel.
Bien que le voltage des batteries principale s so it peu
élevé, l e court-circ ui t ou l a mise à la masse d'une batt erie
peut produire suf f is am ment de cour an t pour brûler d es
matériaux combustib l es ou c aus er d es br û lures
corporelles gr av es .
Obwohl H au pt b at t er i en ei n e niedrige Sp annung hab en,
können si e doc h b ei Ku rzs c h luß oder Er du ng g en ug
Strom abgeben, um brennbare Materialien zu entzünden
oder Verletzungen bei Personen hervorzurufen.
Sebbene le batterie di alimentazione siano a basso
voltaggio, una batteria in corto ci rcuito o a massa può
fornire corrente sufficiente da bruciare materiali
combust i bi li 0 provocare ustion i al t ecnici di
manut enz i on e.
Aunque las baterías principales tienen un voltaje bajo,
una batería cortocircuitada o con contacto a tierra puede
producir la corriente suficiente como para quemar
material combustible o provocar quemaduras en el
personal.
Safety Notice 6
Before removing any FRU, power-off the com puter,
unplug all power cords from electrical outlets, remove the
batter y p ac k, th en dis connec t any interconnect in g cables.
Avant de r etirer une uni t é r emp l aç able en clièntele,
mettez le système hor s tensio n, débranchez tous les
cordons d'alimentation des socles de prise de courant,
retirez la batterie et déconnectez tous le s cordons
d'interface.
Die St romzufuhr muß abgeschaltet, alle Stromkabel aus
der Steckdose gezogen, der Akku entfernt und alle
Verbindungskabel abge nommen sein, bevor eine F RU
entfernt wir d .
Prima di rimuovere qualsiasi FRU, spegnere il sistema,
scollegare dall e pr ese elettric he tutti i c avi di
alime ntazione, rimuo vere la batteria e poi scollegare i
cavi di interconnessione.
Antes de quitar una FRU, apague el sistema, desenchufe
todos los cables de las tomas de corriente eléctrica, quite
la baterí a y, a c ont in uación, des conect e cu alq uier cabl e
de conexi ón entre disp os it i vos .
Page 11

xii IBM WorkPad z50, Mobile Companion xii
Safety I n fo rmation
The following section contains the safety information that
you need t o be famili ar wit h before s er vic i ng an IB M m ob il e
comput er.
General Safety
Follow these rules to ensure general safety:
•
Observe good housekeeping in the area of the
machines durin g and after maint en ance.
•
When lifti ng an y h ea vy objec t:
1. Ensure you can stand safely without slipping.
2. Distribut e the weight of t h e obj ec t eq u all y
between you r f eet.
3. Use a slow lifting force. Never move suddenly or
twist when you attempt to lift.
4. Lift by standing or by pushing up with your leg
muscles; this action removes the strain from the
muscles in your back.
Do not attempt to lift any
objects that weigh more than 16 kg (35 lb) or
objects that you think are too heavy for you.
•
Do not perform any action that causes hazards to the
cust omer, or th at m ak es t h e equi p m ent unsafe.
•
Before you st art th e m ac hi n e, ens ur e t h at oth er
servic e represen t atives and the custom er ’s personnel
are not in a haz ar d ous pos ition.
•
Place remov ed c over s an d other parts in a safe
place, away from al l personnel, while you are
servicing the machine.
•
Keep your tool case away from walk areas so that
other people will not trip over it.
•
Do not wear loose clothing that can be trapped in the
moving parts of a machine. Ensure that your sleeves
are fastened or roll ed up above your elbows . If your
hair is long, fasten it.
•
Insert the ends of your necktie or scarf inside clothing
or fasten it with a nonconductive clip, approximately 8
centimeters (3 inches) from the end.
•
Do not wear jewelry, chains, metal-frame eyeglasses,
or metal fasteners f or you r cl othing.
Attention: Metal obj ec ts ar e go od el ec t rical
conductors.
•
Wear safet y gl asses when you are: hamm er ing,
drilling, soldering, cutting wire, attaching springs,
using solvents, or working in any other conditions that
might be h az ar d ous to your eyes .
•
After service, reinstall all safety shields, guards,
labels, and ground wir es . Replace any safety devi ce
that is worn or defective.
•
Reinstall all covers correctly before returning the
machine to the customer.
Page 12

© Copyright IBM Corp. 1998 xiii
Electrical Safety
Obser ve th e f ollow i ng rules wh en w orking on el ectrical
equipm en t.
Importa nt
Use only ap proved tool s and t est equ ip m ent. Some han d
tools hav e h and l es c ov ered with a soft m at er i al that does
not insulate you when working with live electrical currents.
Many customers hav e, near th eir equip m ent, ru bb er f l oor
mats that contain small conductive fibers to decrease
electrostatic discharges. Do not use this type of mat to
protect you rself from electrical shoc k.
•
Find the room emergency power-off (EPO) switch,
disconnectin g s witch, or elect r ical outl et. If an
electrical acci d ent occurs, you c an th en operate th e
switch or unplug the power cord quickly.
•
Do not work alone under hazardous conditions or
near equipment that has hazardous voltages.
Disconnect all power before:
- Perf ormin g a m ec hanical ins pecti on
- Working near power supplies
- Removi ng or ins t all i n g m ain units
•
Before you start to work on the machine, unplug the
power cord. If you cannot unplug it, ask the customer
to pow er-off the wall box that su pplies power to the
machine and to lock the wall box in th e off position.
•
If you need to wor k on a m ach ine that h as
exposed
electrical circuits, observe the following precautions:
- Ensure that another person, familiar with the
power- off controls , is near you.
Attention: Another person must be there to
switch off the power, if necessary.
- Use only one han d w h en w ork ing with
powered-on electrical equipment; keep the
other hand in your poc k et or behind your bac k.
Attention: There mus t be a comp l ete cir cuit
to cause electrical shock. By observing the
above rule, you may prevent a current from
passi ng through your body.
- When using testers, set the controls correctly
and use the approved probe leads and
acce ssories for that tester.
- Stand on suitable rubber mats (obtained
locally, if necessary) to insulate you from
grounds suc h as m etal floor strips and
machine frames.
Obser ve th e sp ec i al s afety prec autions wh en y ou
work with very high vol t ages; thes e ins tructions are in
the saf ety s ections of mainten ance inform ation. Use
extrem e c ar e wh en me as ur i ng hi g h vol tages.
Page 13

xiv IBM WorkPad z50, Mobile Companion xiv
•
Regularly inspect and maintain your electrical hand
tools for s afe operati onal condition.
•
Do not use worn or broken tools and testers.
•
Never assume
that p ow er has been disconnec ted
from a circuit. First,
check
that it has been powered-
off.
•
Always look carefully for possible hazards in your
work area. Exam ples of th es e haz ards are m ois t
floors, nongrounded power extension cables, power
surges, and m is s ing safet y grou nds.
•
Do not touch li ve el ec tr ical circ uits w it h the reflect ive
surfac e of a plas t ic d ent al mirror. The surfac e is
conductive; such touching can cause personal injury
and machine damage.
•
Do not service the following parts
with the power on
when they are remov ed f rom their norm al operatin g
pla ces in a mach ine:
- Power supply units
- Pumps
- Blowers and fans
- Motor generators
and similar units. (This practice ensures correct
grounding of the units.)
•
If an electrical accident occurs:
- Use caution; do not become a victim
yourself.
- Switch off power.
- Send another person to get medical aid
while first aid is being administered.
Safety Inspection Guide
The intent of this ins p ect i on guide is to assis t you in
identifying potentially unsafe conditions on these products.
Each mac hi n e, as it w as des igned and built, had r equ ir ed
safety items installed to protect users and service personnel
from injury. This guide addresses only those items.
However , g ood ju dg m ent shoul d b e us ed to id entif y poten tial
safety h az ar ds du e t o att ac hment of n on- IBM featu res or
options not covered by this inspection guide.
If any unsafe conditions are present, you must determine
how serious the apparent hazard could be and whether you
can continue without first correcting the problem.
Consider these conditions and the safety hazards they
present:
•
Electrical hazards, especially primary power (primary
voltag e on the frame c an c ause serious or fatal
electrical shock)
•
Explosive hazards, such as a damaged CRT face or
bulging capacitor
•
Mecha nical hazards, such as loose or missing
hardware
Page 14

© Copyright IBM Corp. 1998 xv
The guid e cons is ts of a s eries of steps present ed in a
checklist. Begin the checks with the power off, and the
power cord disconnected.
Checklist:
1. Check exterior covers for damage (loose, broken, or
sharp ed ges).
2. Power-off the computer. Disconnect the power
cord.
3. Check the power cord for:
a. A third-wire ground connector in good
conditi on . Us e a met er to m eas ure third-wire
ground c ontinuit y f or 0. 1 ohm or less b et w een
the external grou nd pi n and fram e ground.
b. The power cord should be the appropriate type
as specifi ed in th e p arts lis t in gs .
c. Insul at ion must n ot b e fr ayed or worn .
4. Remove the cover.
5. Check for any obvi ous non-IBM alterations. Use
good judg m en t as to t h e s af et y of an y n on- IBM
alterations.
6. Check inside the unit for any obvious unsafe
conditi ons , suc h as metal filin gs , c ontamination, water
or other liq ui ds , or si gns of f ir e or sm ok e d am ag e.
7. Check for worn, fraye d, or pinched cables.
8. Check that the power-supply cover fasteners ( screws
or rivets) have not been removed or tampered with.
Page 15

xvi IBM WorkPad z50, Mobile Companion xvi
Handling Electrostatic
Discharge-Sensitive Devices
Any computer part containing transistors or integrated
circuits (Ics) should be considered sensitive to electrostatic
discharge (ESD). ESD damage can occur when there is a
difference in char g e b etw een objects. Protect agai ns t E SD
damage by equalizing the charge so tha t the machine, the
part, th e wor k m at, an d t h e person handling th e part ar e all
at the same charge.
Notes
1. Use product-specific ESD procedures when they
exceed th e req ui rements noted her e.
2. Make sure that the ESD protective devices you
use have been certified (ISO 9000) as fully
effective.
When hand li ng ESD-s ens it ive parts :
•
Keep the parts in protective packages until they are
inserted into the product.
•
Avoid contact with other people.
•
Wear a ground ed wris t strap agains t your skin t o
eliminate static on your body. Approved static straps
protect t h e us er f r om hig h-oper at in g vol tages (1 10V ) .
•
Prevent the part from touching your clothing. Most
clothing is insulative and retains a charge even when
you are we ari ng a wrist str ap.
•
Use the black side of a grounded w or k m at to provid e
a static-free work surface. The mat is especially
useful when handling ESD-sensit i ve devices. S el ect
a groundi ng s ys tem, suc h as th os e lis ted below , t o
provid e pr ot ection th at m eets t h e sp ecif ic service
requir em en t.
Note
The use of a grounding system is desirable but not required
to protect against ESD damage.
- Attach the ESD ground clip to any frame
ground, ground br aid, or green-wir e ground.
- Use an ESD common ground or reference
point wh en working on a dou bl e- i ns ul ated or
batter y- op erated s yst em . You c an us e c oax or
connector-out s id e sh el ls on t h es e s yst ems .
- Use the round ground-prong of the AC plug on
AC-ope rated computers.
Grounding Requirements
Electrical grounding of the computer is required for operator
safety and correct system function. Proper grounding of the
electrical outl et c an be verifi ed by a c ertified el ectr ic ian.
Page 16

W orkP ad z50 M ob il e C om p ani on 1
WorkPad z50 Mobile Companion (2608)
Read This First
Before you go to the checkout guide, be sure to read this
section.
Important
•
Only certified trained personnel should service
the compu ter .
•
Read FRU service procedures before replacing
any FRUs.
•
Replace FRUs only for the correct model.
When you replace the FRU, make sure the model
of the mach in e and FRU p art nu m b er ar e c orr ec t
by referring to the parts list.
•
FRUs should not be replaced because of a
single, unreproducible failure. Single failures
can occur from a variety of reas ons that have
nothing to do with a hardware problem, such as
cosmic radiation, electrostatic discharge, or
software errors. FRU replacement should be
considered onl y wh en a recur r in g problem exis ts .
If this is suspected, clear the log error and run the
test agai n. Do n ot r epl ace any FRUs if log errors
do not appear.
•
Be careful not to replace a nondefective FRU.
Page 17

2 IBM WorkPad z50, Mobile Companion 2
Screw Tightening Information
Loose screws can cause reliability problems. The IBM
WorkPad z50 addresses this problem with nylon coated
screws. Tighten screws as follows:
Plastic to Plastic
Turn an addition al 90 de g re es af t er th e sc rew head
touches the surface of the plastic part.
90 Degrees More
Plastic
Logic card to Plastic
Turn an addition al 180 degrees after the screw head
tou ches t he s urface of the logic card .
180 Degrees More
Plastic
Logic Card
Torque Driver
If you have a torque driver, refer to the “Torque”
instruction with each step.
Cradle Problems: If you suspect a problem with the
cradle, see “Cradle Checkout” on page 15.
How to Diagnose Multipl e FRUs: When the
adapter or the device has more than one FRU, the error
code could be caused by any of them. Before replacing
multiple FRUs, try removing or exchanging each FRU, one
by one in the designated sequence, to see if the symptoms
change.
Page 18

W orkP ad z50 M ob il e C om p ani on 3
Attention
Pushing the WorkPad z50’s Power but ton will power on
(or resume) the system, or put the system in suspend
mode: there is no powe r-off state.
If the AC Adapter, battery pack, and backup battery are
removed, the system is reset and all the stored data is
lost. There is no lithium battery t o retai n m emory while
these power sources are removed.
What to Do First: The service personnel must fill in the
following information in the par ts exchange form or parts
return form that is attached to the returned FRU:
__ 1 Name and phone number of service pers onnel
__ 2 Date of service
__ 3 Date when the part failed
__ 4 Date of purchase
__ 5 Failure symptoms, error codes appearing on the monitor, and
beep symptoms
__ 6 Procedure index and page number in which t he f ailing F R U
was detected
__ 7 Failing FRU name and part number
__ 8 Machine type, model number, and s erial num ber
__ 9 Customer’s name and address
Befor e ch ec kin g pr oblems wit h t h e c omp uter, det er mi ne
whether the damage is covered under the warranty by
referring to the following:
During th e w arranty p er i od, t h e cus t omer may b e
responsible for repair cost s if the computer damage was
caused by misus e, acc ident, m odif ication, unsuitab l e
physic al or op er ati n g environ m ent, or improp er m ai ntenance
by the customer. The following list provides some common
items th at are n ot c over ed under w arranty an d s om e
symptoms that may indicate that the system was subjected
to stress beyond normal use:
The following is not covered under warranty:
•
LCD pa nel cracked from the application of
excessive force or from being dropped.
•
Scratched (cosmetic) parts
•
Cracked or broken plastic parts, broken latches,
broken pins, or broken connectors caused by
excessive force
•
Damage caused by liquid spilled into the system
•
Damage caused by the improper insertion of a PC
Card or the ins tallati on of an incomp atible card
•
Fuses blown b y attachment of a nons up p or t ed
device
Page 19

4 IBM WorkPad z50, Mobile Companion 4
The f ollowing symptoms m ight indicate damage
caused by non warranted activities:
Missing parts may be a symptom of unauthorized service
or modification.
Attention
When resetting the system, all programs and stored data
other th an th e op erating s yst em wi ll be erased.
Any password that is set for testing purposes should be
disabl ed b ef or e returnin g the WorkP ad z50 to the
customer.
Page 20

W orkP ad z50 M ob il e C om p ani on 5
Product Overview
Refer to th e f oll ow i ng t abl e for an overview of the s ystem
features of the WorkPad z50 Mobile Companion:
Feature Description
Processor NEC VR4121
Chipset NEC VRC4171A
Graphic/Video
Controller
ITE IT8181
OS/APP ROM 20MB (32MB Japan)
Memory 16MB Upgradable to 48MB
Stora ge Memory CompactFlash Type II socket
PC Card One type III slot
I/O Ports RJ-11 Modem port (US/Canada/
Japan m od els onl y)
Infrared
Serial port
Extern al dis pl ay port
Cradle connector
Audio External earphone jack
External microphone jack
Internal speaker
Built-in microphone
Pointing Device TrackPoint III
AC Adapter 45watt type
Internal Modem Onl y av ail ab le for US/C an ad a/Japan
models
Battery Pack 16. 65watt
Backup Battery Size AAA x 2
LCD Display 8.2" (inch) DSTN
Page 21

6 IBM WorkPad z50, Mobile Companion 6
Checkout Guide
Use the following procedure as a guide for computer
problems.
1. Obtain the failing symptoms in as much detail as
possible.
2. Verify the symptoms by attempting to re-create the
failure by runnin g th e diagnostic test (refer to
“Running the Diagnostics
Test” on page 27) or by
repeating the same operati on .
Note
To run the diagnostics test, refer to “Running the
Diagnos t ic s ” on pag e 27.
If the sympt oms are intermitten t an d c ann ot b e re-c r eated
(and therefore not verified), go to “Symptom-to-FRU
Index” on page 21 an d th en go to “Inter mi t t ent P r oblems”
on page 26.
3. Use the following table with the verified symptom to
determine which page to go to. Search the
symptoms colum n, an d fin d t h e desc ri ption th at bes t
matches your sy mptom; then go to the page sho wn in
the “Refer To” column.
Symptoms (Verified) Refer To
Power failure: The
power indicators (AC
Adapter LED or P ower
on/Battery status LE D)
are not lit.
“Power Systems Checkout”
on page 9.
Audio is not properly
functioning.
“Audio Ch ec k out” on pag e 7.
Keyboard does not work
properly.
“Keyboard Checkout” on
page 8.
Internal fax/modem does
not work.
“Modem Checkout” on page 9.
Suspect mainboard or
ROM card problems .
“ROM Card Checkout” on
page 14.
TrackPoint prob l ems . “T r ack P oint Check out ” on
page 15.
Cradle does not
communicate pr op er l y.
“Cradle Checkout” on page
15.
Exte rnal monitor does
not display.
“External Mo nitor Self-Test”
on page 15.
The diagnostic test
detect ed an er r or an d
displ ayed an error cod e.
“Running the Diagnostics
Test ” on page 27.
Page 22

W orkP ad z50 M ob il e C om p ani on 7
Symptoms (Verified) Refer To
Other symptoms (such
as LCD display
problems).
“Symp t om- to-FRU Index” on
page 21.
PC cards do not work.
“PC Card Slo ts Test” on
page 27.
Brightness/contrast
buttons do not work.
“Brightness/Contrast Buttons
Checkout” on page 19.
Audio Checkout
Speaker Checkout: If you suspect a problem with the
speaker do the following:
1. Play an audio file. If no sound is heard, go to the
diagnostic menu (see “Running the Diagnostics Test”
on page 27).
2. Select Audio and r u n the diagn ost ic test .
3. If the test d et ects an au dio probl em , do the foll ow in g:
Click Start, Programs, WorkPad, and then Rapid
Access. Check that “Mute” is not enabled in the
Rapid Ac c ess ut i lit y. Clic k t h e “V ol um e & S oun ds ”
icon in the Control Panel, adjust the volume to mid
position and click any sound: if no sound is heard, do
the follow i ng on e at a ti m e:
• Reseat the connector
• Replace the speaker
• Replace the mainboard
Go to “Microphone Checkout” if the speaker is working
properly.
Microphone Checkout: If you suspect a problem with the
microphone, first check if the speaker is working (see
above), then do the following:
1. Press the microphone button and record and
playback any s oun d.
2. If no sound is heard, do the following one at a time:
• Reseat the microphone cable
• Replace the microphone cable
• Replace the mainboard
Page 23

8 IBM WorkPad z50, Mobile Companion 8
Keyboard Checkout
If the keyboard does not work or an unexpected character
appears, make sure that the flexible cable extending from
the keyboard is correctly seated in the connector on the
mainboard. If the keyboard cable connection is correct, run
the Keyboard Test by doing the following:
1. Go to the diagnostic menu (see “Running the
Diagnos t ic s Test” on pag e 27).
2. Select Keyboard and run the diagnostic test. A
layout of t h e k eyb oard app ears on t h e sc r een.
3. Check that when each key is pr essed, the k ey’s
positi on on th e k eyboard l ay out on the scr een
changes to a blue square.
4. Press OK to end the tes t.
If the tests detect a k eyb oard probl em , d o th e f oll ow in g one
at a time to correct the problem. Do not replace a
no n defec tive FRU:
•
Reseat the keyboard cable.
•
Replace the keyboard .
•
Replace the mainboard.
Memory Checkout
The WorkPad z50 M obi le Compan ion is shipped with 16MB
on-board memory. Memory can be upgraded to 48MB by
adding a single 32MB DRAM card.
Defective memory cards may show an error message during
the POST or cause the system to hang or stop system
operations.
Refer to th e f oll ow i ng t o is olate memory probl ems :
1. Remove all power sources (AC power, battery pack,
and backup battery). Remove any installed DRAM
card from its slot (see page 18).
2. Connect to a power sour ce and turn on t h e
W orkP ad z50.
3. If an error appears during POST, replace the
mainboard.
4. Remove all power sources (AC power, battery pack,
and backup battery) and reinstall the DRAM card.
5. Connect to a power sour ce, then tur n on the
W orkP ad z50.
6. If an error appears during POST, replace the DRAM
card.
Page 24

W orkP ad z50 M ob il e C om p ani on 9
Modem Checkout
If a modem problem occurs, do the following:
1. Open the Terminal program. Double click the “Make
a New Session” icon to open the S es si on Prop ertie s
window.
2. Click “Configure…”. In the Device Properti e s
window check the “Manual Dial” box.
3. Issue the ATA command.
4. If there is no sound, re place the mainboard.
Note:
The US, Canada, and Japan models have an
internal fax/modem; the European models do
not.
Power Systems Checkout
To determine whether a power systems problem is due to
the AC Adapter or the battery pack, do the following:
1. Remove the battery pack.
2. Connect the AC Adapter and lock the battery release
lock. Check that power is supplied .
3. Disconnect the AC Adapter and install the charged
battery pack; then check that power is supplied by the
battery pack.
If you suspect the problem is due to the AC Adapter, go to
“AC Adapter Checkout”.
If you suspect the problem is due to the battery pack, go to
“Battery Pack Checkout”.
Exte rnal Power/Charge Status LE D indicates the following
status:
LED AC Adapter Battery Pack
Charge
Status
Amber Connected
Li-ion (standard or highcapacity battery)
Not full
Green Connected Li-ion (standard or high-
capacity battery)
Full
Green Connected Dry cell battery is
connected or
no battery is connected
—
Not lit
Not
connected
——
Page 25

10 IBM WorkPad z50, Mobile Companion 10
AC Adapter Checkout: You are here because the
W orkP ad z50 f ails onl y w h en the AC Adapt er is us ed.
•
If the power pr ob lem occur s onl y wh en t h e cradle is
used, replace the cradle.
•
If the power-on indicator for the AC Adapter does not
turn on, check the power cord of the AC Adapter for
correct continuity and installation.
1. Unplug the AC Adapter cable from the WorkPad z50
and measure the output volt ag e at the plug of th e AC
Adapter c abl e. S ee th e following figure:
1
2
Pin Voltage (V dc)
1 19 V (+ 1.5 V, - 0 V)
2Ground
a. If the voltage is correct, replace the mainboard.
b. If the voltage is still incorrect, go to the next step.
2. Unplug the AC Adapter cable from the ac power
outlet and w ait 5 mi nutes or lon g er to all ow th e
overvol tage prot ect ion circ uit or other protecti on
circuits to be fully discharged and initialized.
3. Plug the AC Adapter cable into the ac power outlet.
4. Measur e th e out p ut v oltage of th e AC Adapter.
5. If the voltage is still not correct, replace the AC
Adapter.
Note:
An audible noise from the AC Adapter does not
always in dicate a d ef ect.
Page 26

W orkP ad z50 M ob il e C om p ani on 11
Battery Pack Checkout: If the battery pack or the optional
high-capacity battery have a problem, refer to the following:
1. Enter suspend mode by pressing the Power button.
2. Remove the battery pack and check for any
mechanical da mage. Replace the battery pack if it is
damage d.
Note:
Damage to the battery pack caused by the
customer is not covered by the warranty.
3. Remove the batt ery p ack and measure the volt ag e
between the battery terminals. See the following
figure:
7
1
Terminal Voltage (V dc)
1 11.1 V
7 Ground (- )
4. If the voltage is less than 11.1 V dc, the battery pack
has been discharged. Recharge the battery pack.
If the voltage is still less than 11.1 V dc after
recharging, replace the battery pack.
If the battery pack is extremely hot (over 50°C),
replac e the battery p ac k an d t h e mai nb oard.
If the voltage is correct, but you still suspect a
problem with the battery pack, go to “Running the
Diagnos t ic s Test” on pag e 27.
Page 27

12 IBM WorkPad z50, Mobile Companion 12
Checking Operational Charging:
There is no differenc e in
batter y charging ti m e wh eth er th e s ystem is fully operati on al
or not. To check the battery charging, use a discharged
battery pack or a battery pack that has less than 50% of total
power remaining.
Turn on the WorkPad z50 while th e AC A d apt er is c onn ect ed
to the syst em. Th e Ext er n al P ow er /Charg e St atus LE D w il l
change to amber while the battery is charging. When the
battery is fully charged (after about 1 – 2.5 hrs., depending
on the battery’s initial charge) the battery terminal voltage
should be around 12.6V dc. If the voltage is far less, or has
not incr eas ed f r om t h e init ial volt ag e, then repeat the
procedure with another discharged battery pack. If this
brings the same result, then suspect a mainboard failure.
Optional Dry Cell Batter y Checkout: If the optional Dry
Cell Kit (dry cell battery pa ck) has a problem, refer to the
following:
1. Enter suspend mode by pressing the Power button.
2. Remove the dry cell battery pack and measure the
voltage between the battery terminals. See the
following figure:
1
7
Terminal Voltage (V dc)
1 8.8 – 12.8 V
7 Ground (- )
3. If the voltage is less than 8.8 V dc, the dry cell battery
pack has been discharged. Replace the dry cells.
If the dry cell battery pack is extrem ely ho t, it must be
replaced.
Page 28

W orkP ad z50 M ob il e C om p ani on 13
Backup Battery Checkout
(Nonrechargeable)
If removing all power sources except for the backu p battery
results in the system being reset, suspect a problem with the
backup batteries. Refer to the following:
1. Enter suspend mode by pressing the Power button.
2. Remove the AAA batteries and measure the voltage
between the battery terminals. The voltage should be
1.1–1.6 V dc pe r battery.
•
If the voltage is correct, replace the mainboard.
•
If the voltage is less than 1.1 V dc per battery, then
the batteries have been discharged. Replace the
batteries.
•
If the backup battery discharges quickly after
replacement, replace the mainboard.
Note:
Make sure either the battery pack is installed or
the AC Adapter is connected. If the backup
batter i es ar e r em ov ed an d n o ot h er power
sourc e is avai l ab le (AC Adapter or battery pac k),
the syst em is res et , an d al l t h e stored dat a is
lost.
The Battery Calibration Application
The
Battery Calibration
application tests the battery to
ensure that it charges to its full capacity. You must first
connect th e AC Adapter b efore you us e th e B att er y
Calibr ati on applicat i on. Cl ic k Start, Programs, WorkPad.
Click the Battery Calibration ic on t o op en th e "Batter y
Calibr ati on" w in d ow :
Press the Start button to begin the program. You will see
the following dialog window:
Note: If the AC Adapter is not connected when you
start th e Battery Calibrati on applic ati on , you wi ll
see a dialog window prompting you to connect it
before you continue.
Page 29

14 IBM WorkPad z50, Mobile Companion 14
Press OK to close the messag e wi nd ow , then click Start to
begin the calibration. You will see the following dialog
window:
Press OK to close thi s dialog window.
The Batt er y C alib ration ap pl ication will ch arge the Li-ion
battery to its full capacity. When the battery reaches full
capacity, the Bat t er y Cal ibration app licati on wil l allow the
battery to fully discharge. When the battery is fully
dischar g ed, the appl ication wi ll c h arge the batt er y ag ai n.
When the battery h as b een c h ar g ed to 2% of its cap ac it y,
the Battery Calibration application will stop.
Note: During the battery calibration process, the AC
Adapter mus t b e c onn ected at all tim es.
To reduce the time it takes to discharge the
batter y, inc r ease the LCD p an el brightn ess to
the maxi mu m level an d tur n off the autom atic
backl ight control in the Control Panel.
It takes up to 12 hours to calibrate the standard
battery pa ck. The high-capacity battery pack
needs to go through the calibration procedure
twice.
ROM Card Checkout
If you suspect the ROM card has a problem, refer to the
following:
1. Remove all power sources (AC power, battery pack,
and ba ckup batte ry).
2. Reinstall the ROM card.
3. Connect to a power source. If the problem persists,
replace th e RO M card.
Page 30

W orkP ad z50 M ob il e C om p ani on 15
TrackPoint Checkout
The TrackPoint ad jus ts t h e poi nter sensor automat ically.
During this process, the pointer moves on the screen
automatically for a short time. This self-acting pointer
movement can occur when a slig ht , st eady press ur e is
applied to the TrackP oint point er. You mus t readjus t it if the
temper at ur e has exceeded its norm al t em perature range.
This symptom does not indica te a hardware problem. No
servic e act i ons ar e n ec essary if th e poi nt er m ovement st ops
in a short per i od of time.
If a click button problem or a pointing stick problem occurs,
do the following:
1. Go to the diagnostic menu (see “Running the
Diagnos t ic s Test” on pag e 27).
2. Select TrackPoint and run the diagnostics tests.
3. Verify that the item is selected.
4. Move to another item with the pointing stick.
5. Press the pointing stick (press-to-select) and verify
that the item is selected.
6. Verif y that both buttons work c orr ectly.
If the click buttons do not work, replace the mainboard. If
the pointing stick does not work, do the following actions one
at a time to correct the problem. Do not replace a
no n defec tive FRU.
•
Reseat the TrackPoint cable.
•
Replace the keyboard .
•
Replace the mainboard.
Cradle Checkout
Use the f oll owing proc ed ure to isolat e a problem wit h t h e
cradle. The cradle att ac hes to the s yst em exp ansion
connector at the bottom of the WorkPad z50.
1. Enter suspend mode.
2. Remove the failing device from the cradle.
3. Unplug the AC Adapter from the cradle, if attached.
4. Remove the cradle from the WorkPad z50.
5. Reco nnect the failing device directly to the WorkPad
z50. (If anot her devic e is already c onn ec t ed to the
WorkPad z50, remove it first.)
6. If the failing device works properly, replace the cradle.
External Monitor S e lf-Test
If a monitor problem occurs, use the following instructions to
correct the problem:
1. Test the external m on it or and c abl e on another
system to make sure they are working correctly.
2. Connect t h e m onit or t o the WorkPad z 50.
3. Go to the diagnostic menu (see “Running the
Diagnos t ic s Test” on pag e 27) and s elec t Disp lay.
4. If the external monitor does not display correctly,
change the mainboard.
Page 31

16 IBM WorkPad z50, Mobile Companion 16
Page 32

W orkP ad z50 M ob il e C om p ani on 17
Installing the ROM/DRAM Card
This section describes how to install the ROM card or the
optional DRAM card to the WorkPad z50.
Note: When you remove the ROM/ DRAM card, you will lose
all stored data. Before you remove the ROM/DRAM card, be
sure to bac k up all data and app lications in th e base
memory.
Caution: Before removing or inserting the ROM/DRAM card,
all power sources (AC power, the main battery pack, and the
backu p batteries) must be removed.
Follow th ese instruc tions wh en inserti ng th e ROM/DRA M
card:
1. Place the WorkPad z50 into suspend mode and
disconnect AC power.
2. Turn the WorkPad z50 upside down.
3. Remove th e m ain b attery and remove t h e bac ku p
batteries.
4. Unscrew the single (captive) screw that secures the
ROM/DRAM card compartment cover to the chassis.
Remove the cover.
Unscrew the screw
that secures the
ROM/DRAM card cover
to the chassis and
remove the ROM/DRAM
card cover.
ROM card
DRAM card
5. Locate th e RO M/ DR AM card S l ot.
6. Find the notch on the side of the card.
20
Page 33

18 IBM WorkPad z50, Mobile Companion 18
7. With the notched end of the card toward the right side
of the sock et, insert th e c ar d at an an gle of
approximately 20 degrees into the socket; press it in
firmly as shown (1). Gently pivot the card until it snaps
into plac e (2) .
Attention
To avoid d am agi ng t h e ROM/D RAM c ard, d o not touch its
contact edg e.
8. Ensure that the ROM/D RAM card is securely inserted in
the slot.
9. Replace the ROM/DRAM card cover over the memory
slot, aligning the back side of the cover first; then
tighten the screw.
10. Attach the main battery and insert t h e backup batteries.
11. Turn the WorkPad z50 top side up. Connect the AC
Adapter an d c abl es; t h en tur n on th e WorkPad z50 .
Attention
Handling a Screwdriver
•
Use a screwdriver that fits the screw.
•
Use the screwdriver perpendicular to the head of the
screw.
Handle t h e scr ew dr iver prop er l y; otherwis e, you mi gh t
damage the screw.
Removing the ROM/DRAM Card
Note: Before removing the ROM/DRAM card, back up all
data and ap plications in t h e b as e mem ory. All data an d
installed applications will be lost by removing the
ROM/DRAM card. The ROM needs to be reinstalled before
starting the POST or running Windows CE.
Caution: Before removing the ROM/DRAM card, all power
sources (AC power, the main battery pack, and the backup
batteries) must be removed.
Follow these instructions when removing the ROM/DRAM
card:
1. Turn off the WorkPad z5 0.
2. Disconnect AC power.
3. Turn the WorkPad z50 upside down.
4. Remove th e m ain b attery and remove t h e bac ku p
batteries.
Page 34

W orkP ad z50 M ob il e C om p ani on 19
5. Unscrew the single (captive) screw that secures the
ROM/DRAM card compartment cover to the chassis.
Remove the cover.
6. Using your f ing ers or a sm all sc rewdri ver, press out th e
two latches on the sides of the card away from the slots.
The ROM/DRAM card should pop out slightly
.
Removing the DRAM
and ROM Cards
Pull the tabs in
the direct ion of the arrows
to re lease th e cards.
DRAM Card
ROM Card
7. Gently pull out the card.
8. Replace the ROM/DRAM card cover over the memory
slot, aligning the back side of the cover first; then
tighten the screw.
9. Attach the main battery and inse rt the backup batteries.
10. Turn the WorkPad z50 top side up. Connect the AC
Adapter an d c abl es; t h en tur n on th e WorkPad z50 .
Brightness/Contrast Buttons Checkout
If you suspect a problem with the brightness/contrast buttons
do the following actions one at a time to c orr ec t th e pr ob l em.
Do not repla ce a nonde fective FRU:
•
Reseat the inverter cables and connectors to the
mainboard and the LCD panel.
•
Replace the inverter card
•
Replace the mainboard
Page 35

20 IBM WorkPad z50, Mobile Companion 20
Power Management Features
The power management features are designed to save as
much electricity as possible by putting components into a
low-power consumption mode as often as possible. This
low-power mode is referred to as “suspend” mode .
Full Power Mode
The WorkPad z50 op erates in Ful l p ow er m od e wh en pow er
management is disabled and the AC Adapter is connected.
Suspend Mode
In suspend mode, the system is powered off except for the
system DRAM. The WorkPad z50 en ters suspend mode
when the system remains idle for a specified amount of time
or under one of the following conditions:
•
The Power button is pressed.
•
The LCD panel is closed.
•
A Windows CE power ma nagement time-out occurs.
•
The Windows CE Suspend icon is clicked.
•
The battery release lock is released.
•
The remaining battery capacity of the battery pack is
very low.
•
A notification event set in the “Alarms” window of the
World Clock applic ation in the Control Pan el occurs.
Attention
The syst em will not ent er sus pend mode after an idl e
time -out under the following condit ions:
The serial port is connected to another system running
Windows C E s er vices.
The WorkPad z50 is c on n ected to a net w or k through th e
PCMCIA LAN card.
The system will resume to full power mode under one of the
following co nditions:
•
The Power button is pressed while in suspend mode.
•
An application launching key is pressed.
•
The LCD panel is op en ed.
•
An internal fax/modem ring-in occurs.
•
The Microph on e button is pushed.
•
The Notification button is pushed when the
notification LED blinks.
•
A built-in data/fax modem ring occurs.
•
The serial port is connected to another system for
transmi tt i ng and r eceivin g d ata.
Page 36

W orkP ad z50 M ob il e C om p ani on 21
Sympto m-to-FRU Index
The symp tom-to- FR U Index lis ts the s ymp toms and err ors
and the possible causes. The most likely cause is listed first.
Note: Per form th e F RU repl ace ment or ac tion s in t he
sequence shown in the “FRU/Action” columns. If
a FRU replacement did not solve the problem, put
the o riginal part back in the WorkPad z5 0. Do not
replace a nondefective FRU.
This index can also help you determine the next possible
FRUs to be replaced when servicing the WorkPad z50.
Numeric er r or c od es sh ow th e er r ors d etec ted in syst em
operation. In the foll ow i ng er r or c od es, X can be any
number. If no codes are available, use narrative symptoms.
If the symptom is not listed, go to “Undetermined Problems”
on page 26.
Note: For IBM devices not supporte d by diag nostic
code s in WorkPad computers, see the manua l
for that device.
Numeric E rro r C o d es
Symptom / Error FRU / Action in Sequence
1XX
101 IR error
101 IR error
Mainboard
2XX
201 checksum error
202 DRAM test error (on
board)
203 DRAM test error
(DRAM module)
204 VRAM test error
201 ROM checksum error
1. Reinstall ROM card
2. ROM card
3. Mainboard
202 DRAM test error (on
board DRAM)
Mainboard
203 DRAM test error (DRAM
module)
1. Reinstall DRAM module
2. DRAM module
3. Mainboard
204 VRAM test error
Mainboard
3XX
301 Keyboard error
301 Keyboard error
1. Reinstall keyboard
2. Keyboard
3. Mainboard
4XX
Page 37

22 IBM WorkPad z50, Mobile Companion 22
401 LED board error
Symptom / Error FRU / Action in Sequence
401 LED board error
1. LED board
2. Mainboard
5XX
501 Battery error
501 Battery error
1. Battery
2. Mainboard
6XX
601 Audio playback error
602 Audio recording error
601 Audio playback error
1. Speaker
2. Mainboard
602 Audio recording error
1. Microphone
2. Mainboard
7XX
701 Display error
701 Display error
1. LCD panel
2. Mainboard
8XX
801 Serial port test error
801 Serial port error
1. Serial cable
2. Mainboard
9XX
901 PC card/CF test error
901 PC card/CF test error
Mainboard
86XX
8601 Mouse test error
8601 Mouse test error
Mainboard
Page 38

W orkP ad z50 M ob il e C om p ani on 23
Function-Related Symptoms
Symptom / Error
FRU / A
CTION IN SEQUENCE
The system does not
suspend or resume when the
LCD is closed or opened.
1. Go to “Suspend Mode”
on page 20, and c heck
that the Work Pad z50
can enter suspend
mode.
2. LCD panel
3. Mainboard
The memory count (size)
appears different from actual
size.
Go to “Memory Checkout” on
page 8.
The system hangs
intermittently.
Go to “Intermittent Problems”
on page 26.
Indicator-Related Symptoms
Symptom / Error FRU / Action in Sequence
The indicator incorrectly
remains off or on, but system
runs correctly.
Mainboard
The external/power status
LED indicator blinks from
green to amber.
1. Check that a correct
battery is installed.
2. Battery pack
3. Mainboard
The battery indicator does not
turn on when the battery is
installed.
1. Battery pack
2. Mainboard
Infrared-Related Symptoms
Symptom / Error FRU / Action in Sequence
Unable to communicate using
the Infrared (IR) Port.
1. Make sure the setup for
the IR is correct. Use
the WorkPad z50
Configuration utility.
2. Make sure there are no
fluorescent lights near the
WorkPad z50. The
WorkPad z50 may receive
optical noise from the
fluorescent light.
3. Run the advanced
diagnostic test. If an error
occurs, replace the parts
shown by the FRU code.
Page 39

24 IBM WorkPad z50, Mobile Companion 24
Keyboard- or TrackPoint-Related Symptoms
Symptom / Error FRU / Action in Sequence
The keyboard (one or more
keys) does not work.
1. On the Windows
Taskbar, check that
Caps Lock or Num Lock
are not enabled.
2. Reseat the keyboard cable
on the mainboard.
3. Keyboard
4. Mainboard
The TrackPoint does not
work.
1. Check the “TrackPoint”
settings in the C ontrol
Panel.
2. Reseat the keyboard cable
on the mainboard.
3. Go to “TrackPoint
Checkout” on page15.
4. Keyboard
5. Mainboard
The pointer moves
automatically or does not
work corre ctly.
See “TrackPoint Checkout”
on page 15.
LCD-Re lated Symp toms
Symptom / Error FRU / Action in Sequence
LCD backlight not working.
LCD too dark.
LCD brightness cannot be
adjusted.
LCD contrast cannot be
adjusted.
1. Open the “Display
Properties” window in
the Control Panel.
Check that the auto dim
setting is not enabled
under the “Backlight”
tab.
2. Reseat the LCD cable and
connectors.
3. LCD assembly
4. Inverter assembly
5. Mainboard
LCD screen unreadable.
Non-readable characters.
Screen abnormal.
Wrong color displayed.
1. Reseat the LCD cable
and connectors.
2. LCD assembly
3. Inverter assembly
4. Mainboard
LCD has extra horizontal or
vertical lines displayed.
LCD assembly
LCD lid is loose.
1. Hinge screws
2. Hinge group
Page 40

W orkP ad z50 M ob il e C om p ani on 25
Periph era l Devic e R e lated Symp toms
Symptom / Error FRU / Action in Sequence
The external monitor does
not work correctly.
1. Check that the external
monitor is enabled in the
Rapid Access utility.
2. Check that the external
monitor can display at
640x480 and 800x600, @
75Hz refresh rate.
3. Connect the external
monitor to another PC. If
the monitor works fine,
replace the mainboard. If
not, replace the external
monitor.
Serial port device problems.
1. Run serial port wrap
test.
2. Device
3. Mainboard
4. Device cable
Note: The serial port and the
infrared port can not be used at
the same time.
Power-R e lated Symptoms
Symptom / Error FRU / Action in Sequence
System enters suspend
during operation.
1. Go to “Power Systems
Checkout” on page 9.
2. Battery pack
3. Mainboard
4. Check the power outlet
Other Symp toms
Symptom / Error FRU / Action in Sequence
Errors occur only when the
cradle is used.
See “Cradle Checkout” on
page 15.
PC Card slot pin is damaged.
PC Card slots assembly.
Note: If you cann ot find a symptom or an error in this lis t
and the problem remains, see “Undetermined Problems”.
Page 41

26 IBM WorkPad z50, Mobile Companion 26
Intermittent Problems
Intermittent system hang problems can be caused by a
variety of reasons that have nothing to do with a hardware
defect, such as: cosmic radiation, electrostatic discharge, or
software errors. FRU replacement should be considered
only when a recurring problem exists.
When anal yz i ng t h e int ermitt ent problem , d o th e f oll ow in g:
1. Run the diagnostic test for the mainboard in loop
mode.
2. If no error is detected, do not replace any FRUs.
3. If any error is detected, replace the FRU shown by
the FRU code. Rerun the test to verify that no more
errors exi s t.
Undetermined Problems
You are here because the diagnostic tests did not identify
which adap ter or devic e failed, ins t al led devices are
incorrect, a short circuit is suspected, or the system is
inoper at i ve. Follow these procedures to is olat e the failin g
FRU (do not isolate nondefective FRUs).
Verif y that al l at t ac h ed d evices ar e sup p orted by the
W orkP ad z50.
Verify that the power supply being used at the time of the
failure is operating correctly. (See “Power Systems
Checkout” on page 9.)
1. Enter suspend mode.
2. Visually check them for damage. If any problems are
found, replace the FRU.
3. Remove or dis connec t all of the following devic es:
a. Non-IBM devices
b. Devices at t ac h ed t o th e cradle
c. External devices
d. Battery pack
e. DRAM
f. PC Cards
g. Compact Flash Cards
4. Turn on th e W ork P ad z50.
5. Determ in e if the probl em h as ch anged.
6. If the problem does not reoccur, reconnect the
removed de vices one at a ti m e unt il you f ind the
failing FRU.
7. If the problem remains, replace the following FRUs
one at a time. Do not replace a nondefective FRU.
a. Mainb oard
b. LCD ass em bl y
Page 42

W orkP ad z50 M ob il e C om p ani on 27
Running the Diagnostics
The follow i ng table lists t h e sp eci al t ools used in the
diagnostics:
Tool Name FRU P/N
Serial wrap connec tor 05K2846
PCMCIA wr ap c ar d 35G4703
Compact F l as h wr ap c onv er t er 05K2845
Use eith er the TrackPoint or the curs or mo ve keys to int eract
with the tests. The Enter key works the same a s selecting
the OK icon to reply OK.
1. Click Start, then Run. In the "Run” dialog window
Open box, ty pe “\Windo ws\ibmdiag.exe”. Click OK.
The basic diagnostic menu appears.
2. Start the Advanced Diagnostic test by pressi ng
Ctrl+A on the basic diagnostic menu. The Serial and
PC Card devices will app ear on the diag n os t ic m enu.
3. Click on a device to run the test. The test progress
window appears. A confirmation message box will
appear after exiting each test: click Yes if the test
ends wit h out an y er rors.
PC Card Slot Test
Insert the PCMCIA wrap card into the PC card slot for the
PCMCIA test: insert the CompactFlash wrap converter into
the CompactFlash slot for the CompactFlash slot test. Refer
to the previous section, “Running the Diagnostics” to run the
tests.
Page 43

28 IBM WorkPad z50, Mobile Companion 28
UUID
A UUID (universal unique ID) is uniquely assigned to each
system board for system management purposes. The UUID
is stored on the EEPROM on the board.
Related Service Procedures
This sect i on provid es informati on about th e following :
•
“Status Ind icators and Contr ol Buttons”
•
“Applicat i on L au nc hing Key Ass i gn m ent s ” on page 29
Status Indicators and Control Buttons
The system status indicators show the current WorkPad z50
status in dif ferent c ol ors (green and am b er) . The c ont r ol
buttons —1.
Notification
, 3.
Microphone
, and 5.
Power
—are
shown in the illustration below.
Indicator Color Meaning
1.
Notification Amber
The syst em is rec eiving a
transfer call. Push the
Notification but ton to stop
the transfer.
Green The battery is fully
charged or the
rechargeable battery pack
is absent (see “Power
Systems Checkout” on
page 9).
5.
External
Power/Charge
Status (this LED
is on whenever
the AC Adapter
is connected)
Ambe r Battery charging
(see “Power Systems
Checkout” on page 9)
To recor d a message, push the Microphon e button; th e
Voice Recorder window will appear. Click the Record button
to start recording; click the Stop button to stop recording.
There is no record LED.
Page 44

W orkP ad z50 M ob il e C om p ani on 29
Application Launching Key Assignments
The applications k eys are program m ed to launch preset
softwar e ap pl ications. The follow i ng table shows th e
application keys and their corresponding functions:
Key Description
A1 Launch or switch t o th e W ind ows CE Inb ox
A2
Launch Windows Explorer or switch to next
Explorer Window
A3 Launch or switch t o Cal en dar
A4 Launch or switch t o Con tacts
A5 Launch or switch t o T as ks
A6
Launch Poc ket Word or sw itc h to next Poc k et
Word window
A7 Launch Pocket Excel or switch to next Pocket
Excel window
A8 Launch Pocket PowerPoint or switch to next
Pocket PowerPoint window
A9
Launch Pocket Access or switch to next
Pocket Access window
A10 Launc h or switch to Calcul at or
A11 Launc h or switch to Voic e Recor d er
A12 Launch or switch to Rapid Access
To view th e app lication k eys an d t h eir c orr es ponding
functions, click on the Launching Keys icon in the Control
Panel to bring up the “Launching Keys Properties” window.
Page 45

30 IBM WorkPad z50, Mobile Companion 30
Removing and Replacing Defective FRUs
This sect i on provid es informati on on removi n g an d r ep l aci ng
FRUs.
•
Do not damage any part. Only certified and trained
personnel should service the WorkPad z50 Mobile
Companion.
•
The arrows in the “Removals and Replacements”
section show the direction of movement to remove a
FRU, or to turn a screw to release the FRU. The
arrows ar e marked in nu m eric or d er, in squ are
callouts, to show the correct sequence of removal.
•
When other FRUs must be removed before the failing
FRU is removed, they are listed at the top of the
page.
•
To replace a FRU, reverse the removal procedure
and follow any not es th at pertain to r ep l ac em en t .
•
When replacing a FRU, use the correct screw size as
shown in the procedures.
Safety Notice 1: Translati on on pag e viii
Befor e the WorkPad z 50 is pow er ed -on after FRU
replacement, make sure all screws, springs, or other
small p arts are in place and are not left loos e insi d e th e
WorkPad z50. Verify this by shaking the WorkPad z50
and listening for rattling sounds. Metallic parts or metal
flakes can cause electrical shorts.
Safety Notice 2: Translati on on pag e ix
The battery pack contains small amounts of harmful
substances. Do not disassemble it, throw it into fire or
water, or short-circuit it. Dispose of the battery pack or
backup battery as required by local ordinances or
regulations. Use only the battery in the appropriate parts
listing when replacing the battery pack. Use of an
incorrec t b att er y c an res ult in ignit i on or exp l os i on of th e
battery.
Safety No ti ce 6: Tr a nslation o n page xi
Before remov ing any FRU, place the WorkPad z50 in to
suspend mode, un pl ug al l p ow er cords fr om electrical
outlets, then disconnect any interconnecting cables and
remove th e battery p ac k and bac kup batt eries.
CAUTION:
If all power sources are removed from the WorkPad z50,
all data and applica tio ns will be lo st. If the proble m is
considered a software problem stored on DRAM
memory, appr oa ch the probl em from that standpoint
before removing all power sources.
Attention: The mainboard is sensitive to, and can be
damag ed b y, el ectrost atic dis c harge.
Page 46

W orkP ad z50 M ob il e C om p ani on 31
An electrostatic discharge (ESD) str ap (P/N 6405959) m ust
be used to est ab lis h per sonal grounding.
Page 47

32 IBM WorkPad z50, Mobile Companion 32
Important Noti c e
The WorkPad z50 M obi le Compan ion uses sp ec ial nylon coated screws wit h the followi ng c haract er is tic s :
•
They maintain tight connections.
•
They do not easi ly come loose, even wit h sh oc k or
vibration.
But:
•
They need add itional f orce to tight en.
•
They shoul d be used only once.
Do the foll owing when y ou s ervice this m ac hine:
•
Keep the screw kit (P/N 05K5941) in your tool bag.
•
Always use new screws.
•
Use a torque screwdri ver .
Screw Information: The f oll ow in g t yp es of sc r ews are used
in this machine. Use the correct screw in the Screw Kit
(P/N 05K5941) when replacing any FRUs.
Screw
No.
Screw Type
of
Head
Color Length
(mm)
3 Flat
M2.5
Black 4.0/6.0
5 Flat Silver 5.0
6
Pan
M2.0
Silver 4.0/6.0
7 Flat
M2.5
Black 8.0
Page 48

W orkP ad z50 M ob il e C om p ani on 33
Unplugging and Plugging Flexible Cables:
Two types of c abl e an d c onn ec tors are us ed in t h e W or kP ad
z50. Some c onnect ors h ave a clasp, which must b e
unlocked before removing the cable. Unlock the conne ctor
by pullin g up th e cl as p w ith your fingernail or a sm al l flattipped screwdriver. Then pull out the cable from the
connector. Refer to the following illustrations:
Page 49
34 IBM WorkPad z50, Mobile Companion 34
Removal re fe rence
The chart below shows the order for removing FRUs. When
a FRU has been removed, follow the arrows to the FRU (or
FRUs) that can be removed ne xt.
1010 Backup Batteries
1020 ROM/DRAM Card
1030 Battery Pack
1040 Keyb oard Ass em bly
1050 Bottom Cover
1060 Mai nb oard
1070 LCD B ez el
1080 LCD Unit
1090 Inverter Card and LCD
Panel
1120 Speak er
1130 Microphon e
1150 PC Card Slot Assembly
1170 Hardware Button Board
1110 FPC As s em bl y
1160 RJ-11 Assembly
1180 Top Cover
Page 50

W orkP ad z50 M ob il e C om p ani on 35
1010 Backup Batteries
1.Turn the WorkPad z50 upside down.
Step Size (Quantity) Color Torque Length
2
Coin screw
M2.5 (1)
Black 3 kgcm 4.0 mm
Note: You can loosen the captive screw in step 2, but
cannot remove it from the backup battery cover.
Page 51

36 IBM WorkPad z50, Mobile Companion 36
1020 ROM/DRAM Card
•
Backup Batteries (1010)
•
Battery Pack (1030)
Attention
Remove al l power sour ces from th e WorkPad z5 0 before
replacing the ROM/DRAM card.
1.
Turn the WorkPad z50 upside down.
DRAM Card
ROM Card
Step Size (Quantity) Color Torque Length
2 M2.5 (1) Black 3 kgcm 4.0 mm
Note: You can loosen the captive screw in step 2, but
cannot remove it from the ROM/DRAM card cover.
Page 52

W orkP ad z50 M ob il e C om p ani on 37
Page 53
38 IBM WorkPad z50, Mobile Companion 38
1030 Battery Pack
1.
Turn the WorkPad z50 upside down.
Note
At step 3 you must push and hold the battery release lock
as you slide the lock in the direction indicated by the
arrow.
Page 54

W orkP ad z50 M ob il e C om p ani on 39
1040 Keyboard Assembly
•
Backup Batteries (1010)
•
Battery Pack (1030)
Attention
Remove al l power sour ces from th e WorkPad z5 0 before
removi ng t h e k eyb oard ass em bl y.
1.
Turn the WorkPad z50 upside down.
Step Size (Quantity) Color Torque Length
2 M2.5 (5) Black 3 kgcm 6.0 mm
Note: Make sure you use the correct screw and tighten
the screw to the torque specified.
3.
Turn th e WorkPad z50 top sid e up and op en the LCD
panel.
Page 55

40 IBM WorkPad z50, Mobile Companion 40
1050 Bottom Cover
•
Backup Batteries (1010)
•
Battery Pack (1030)
•
Keyboard Assembly (1040)
Page 56

W orkP ad z50 M ob il e C om p ani on 41
Attention!
Attention
Be careful when assembling the bottom cover and the
battery shield not to pinch the cables.
Step Size (Quantity) Color Torque Length
3 M2.5 (4) Black 3 kgcm 6.0 mm
4 M2.0 (2) Silver 3 kgcm 4.0 mm
5 Hex (2) Silver 3 kgcm 5.0 mm
6 M2.5 (2) Black 3 kgcm 8.0 mm
Note: Make sure you use the correct screw and tighten
the screw to the torque specified.
Page 57
42 IBM WorkPad z50, Mobile Companion 42
1060 Mainboard
•
Backup Batteries (1010)
•
Battery Pack (1030)
•
Keyboard Assembly (1040)
•
Bottom Cover (1050)
Step Size (Quantity) Color Torque Length
6 M2.0 (3) N /A 3 kgcm 6.0 mm
Note: Make sure you use the correct screw and tighten
the screw to the torque specified.
Page 58

W orkP ad z50 M ob il e C om p ani on 43
1070 LCD Bezel
Attention
Be careful when lifting the bezel cover loose. The plastic
tabs that h old it s ec ur ely to the LCD un it are easil y
damaged.
Remove the screw
covers
Step Size (Quantity) Color Torque Length
2 M2.5 (2) Black 3 kgcm 4.0 mm
Note: Make sure you use the correct screw and tighten
the screw to the torque specified.
Page 59

44 IBM WorkPad z50, Mobile Companion 44
1080 LCD Unit
•
Backup Batteries (1010)
•
Battery Pack (1030)
•
Keyboard Assembly (1040)
•
Bottom Cover (1050)
•
LCD Bezel (1070)
1.
T
URN THE WORKPAD Z50 OVER.
$
Remove the LCD unit.
Step Size (Quantity) Color Torque Length
3 M2.5 (4) Black 3 kgcm 4.0 mm
Note: Make sure you use the correct screw and tighten
the screw to the torque specified.
Page 60

W orkP ad z50 M ob il e C om p ani on 45
1090 Inverter Card and LCD Panel
•
Backup Batteries (1010)
•
Battery Pack (1030)
•
Keyboard Assembly (1040)
•
Bottom Cover (1050)
•
LCD Bezel (1070)
Page 61

46 IBM WorkPad z50, Mobile Companion 46
Step Size (Quantity) Color Torque Length
1 M2.5 (4) N /A 3 kgcm 4.0 mm
5 Hex (2) N/A 3 kgcm 5.0 mm
Note: Make sure you use the correct screw and tighten
the screw to the torque specified.
1110 FPC Assembly
•
Backup Batteries (1010)
•
Battery Pack (1030)
•
Keyboard Assembly (1040)
•
Bottom Cover (1050)
•
LCD Bezel (1070)
•
Inverter Card and LCD Panel (1090)
Page 62

W orkP ad z50 M ob il e C om p ani on 47
1120 Speaker
•
Backup Batteries (1010)
•
Battery Pack (1030)
•
Keyboard Assembly (1040)
•
Bottom Cover (1050)
1130 Microphone
•
Backup Batteries (1010)
•
Battery Pack (1030)
•
Keyboard Assembly (1040)
•
Bottom Cover (1050)
Page 63

48 IBM WorkPad z50, Mobile Companion 48
1140 Audio Ports
The ear jack and sp eak er ou t por ts are all built int o t h e
mainboard. If any of these devices has malfunctioned, you
must repl ac e t h e mai nb oard.
1150 PC Card Slot Assembly
•
Backup Batteries (1010)
•
Battery Pack (1030)
•
Keyboard Assembly (1040)
•
Bottom Cover (1050)
•
Mainboard (1060)
Step Size (Quantity) Color Torque Length
1 M2.0 (2) N /A 3 kgcm 4.0 mm
Page 64

W orkP ad z50 M ob il e C om p ani on 49
Note: Make sure you use the correct screw and tighten
the screw to the torque specified.
Page 65
50 IBM WorkPad z50, Mobile Companion 50
1160 RJ-11 Assembly
•
Backup Batteries (1010)
•
Battery Pack (1030)
•
Keyboard Assembly (1040)
•
Bottom Cover (1050)
Page 66

W orkP ad z50 M ob il e C om p ani on 51
1170 Hardware Button Board
•
Backup Batteries (1010)
•
Battery Pack (1030)
•
Keyboard Assembly (1040)
•
Bottom Cover (1050)
Step Size (Quantity) Color Torque Length
1 M2.0 (1) N /A 3 kgcm 6.0 mm
Note: Make sure you use the correct screw and tighten
the screw to the torque specified.
Page 67

52 IBM WorkPad z50, Mobile Companion 52
1180 Top Cover
•
Backup Batteries (1010)
•
Battery Pack (1030)
•
Keyboard Assembly (1040)
•
Bottom Cover (1050)
•
Mainboard (1060)
•
LCD Bezel (1070)
•
LCD Unit (1080)
•
Microphone (1130)
•
PC Card Slot Assembly (115 0)
•
RJ-11 Assembly (1160)
•
Hardware Button Board (1170)
Step Size (Quantity) Color Torque Length
1 M2.5 (4) Black 3 kgcm 4.0 mm
Note: Make sure you use the correct screw and tighten
the screw to the torque specified.
Page 68

W orkP ad z50 M ob il e C om p ani on 53
Locations
Front Right View
1.
LCD cover release lat ch
2.
LCD display
3.
Brightness control but tons
4.
Contrast control buttons
5. Notification button
6. Notification LED
7.
Microphone button
8. External Power/Charge status LED
9.
Power button
10.
TrackPoint
11.
TrackPoint but tons
12.
Keyboard
13.
Built-in microphone
Page 69

54 IBM WorkPad z50, Mobile Companion 54
Left Vie w
1.
RJ-11 connector
2.
External earphone jack
3.
Microphone jack
4.
PC card eject button
5.
PC card slot
Right View
1.
External monitor p ort
2.
CompactF lash slot
3.
CompactFlash eject button
4.
Infrared data port
5.
Serial port
Page 70

W orkP ad z50 M ob il e C om p ani on 55
Rear View
1.
Power jack
2.
Battery release lock
3.
Battery release latch
4.
Lock keyhole
Bottom View
1.
Back up b at t ery compar t m ent
2.
Built-in monopho nic speaker
3.
OS ROM an d DRAM c omp artment
4.
Reset switch hole
5.
Cradle connector
6.
Battery pack
Page 71

56 IBM WorkPad z50, Mobile Companion 56
System Unit Parts Listing
1
2
3
4
5
6
7
8
9
10
11
Page 72

WorkPad z50 Mobile Companion (2608-1Ax) 57
System Unit FRU List
No. FRU PART DESCRIPTION FRU ELEMENTS FRU P/N QTY CRU
1 POINTING STICK CAP 84G6536 1
√
K/B ASS’Y (USA) 02K4862 1
K/B ASS’Y (CAN-FRE) 02K4867 1
K/B ASS’Y (FRE) 02K4865 1
K/B ASS’Y (JAP) 02K4863 1
K/B ASS’Y (UK) 02K4864 1
2
K/B ASS’Y (GERMANY) 02K4866 1
TOP COVER ASS’Y 05K5936 1
TOP COVER 1
LED LENS 2
POWER BTN 1
TOUCH BTN (R) 1
TOUCH BTN (L) 1
INDICATOR BTN 2
BATTERY LATCH 1
BATTERY SPRING 1
INDICATOR SPRING 2
TOP ESD MYLAR 1
BATT-REL LATCH 1
BATT-REL BRACKET 1
CUSHION PLATE 1
K/B SEAL SUPPORT 1
K/B WATERPROOF
TAPE
4
EMI SPONGE
(740031*5m/m)
1
3
H/W BTN BOARD ASS’Y 1
MAIN BOARD ASS’Y 10L1217 1
4
MAIN BOARD ASS’Y-EU 30L2168 1
ROM CARD (USA) 10L1218 1
ROM CARD (JAP) 10L1256 1
ROM CARD (FRE) 10L1258 1
5
ROM CARD (GER) 10L1257 1
√
BOTTOM COVER ASS’Y U/C/J 05K5938 1
BOTTOM COVER ASS’Y EMEA 27L6431 1
BOTTOM COVER 1
SMART CARD DOOR 1
BASE ESD MYLAR 1
DOCKING SHUTTER (R) 1
DOCKING SHUTTER (L) 1
VGA DOOR-P 1
SERIAL DOOR-P 1
IR LENS 1
BACKUP BATT TERMINAL 1
RATING LABEL 1
6
RUBBER FOOT 2
7
BATTERY PACK 02K6565 1
√
8
BACKUP BATTERY 02K6566 1
√
BOTTOM DOOR GROUP 05K5939 1
EXTEND DOOR 1
BACKUP BATTERY DOOR 1
DUMMY PC CARD
ASS’Y
1
9
DUMMY CF CARD 1
√
10
PC CARD SLOT ASS’Y 05K5937 1
11
SEE MISC PART GROUP 1
Page 73
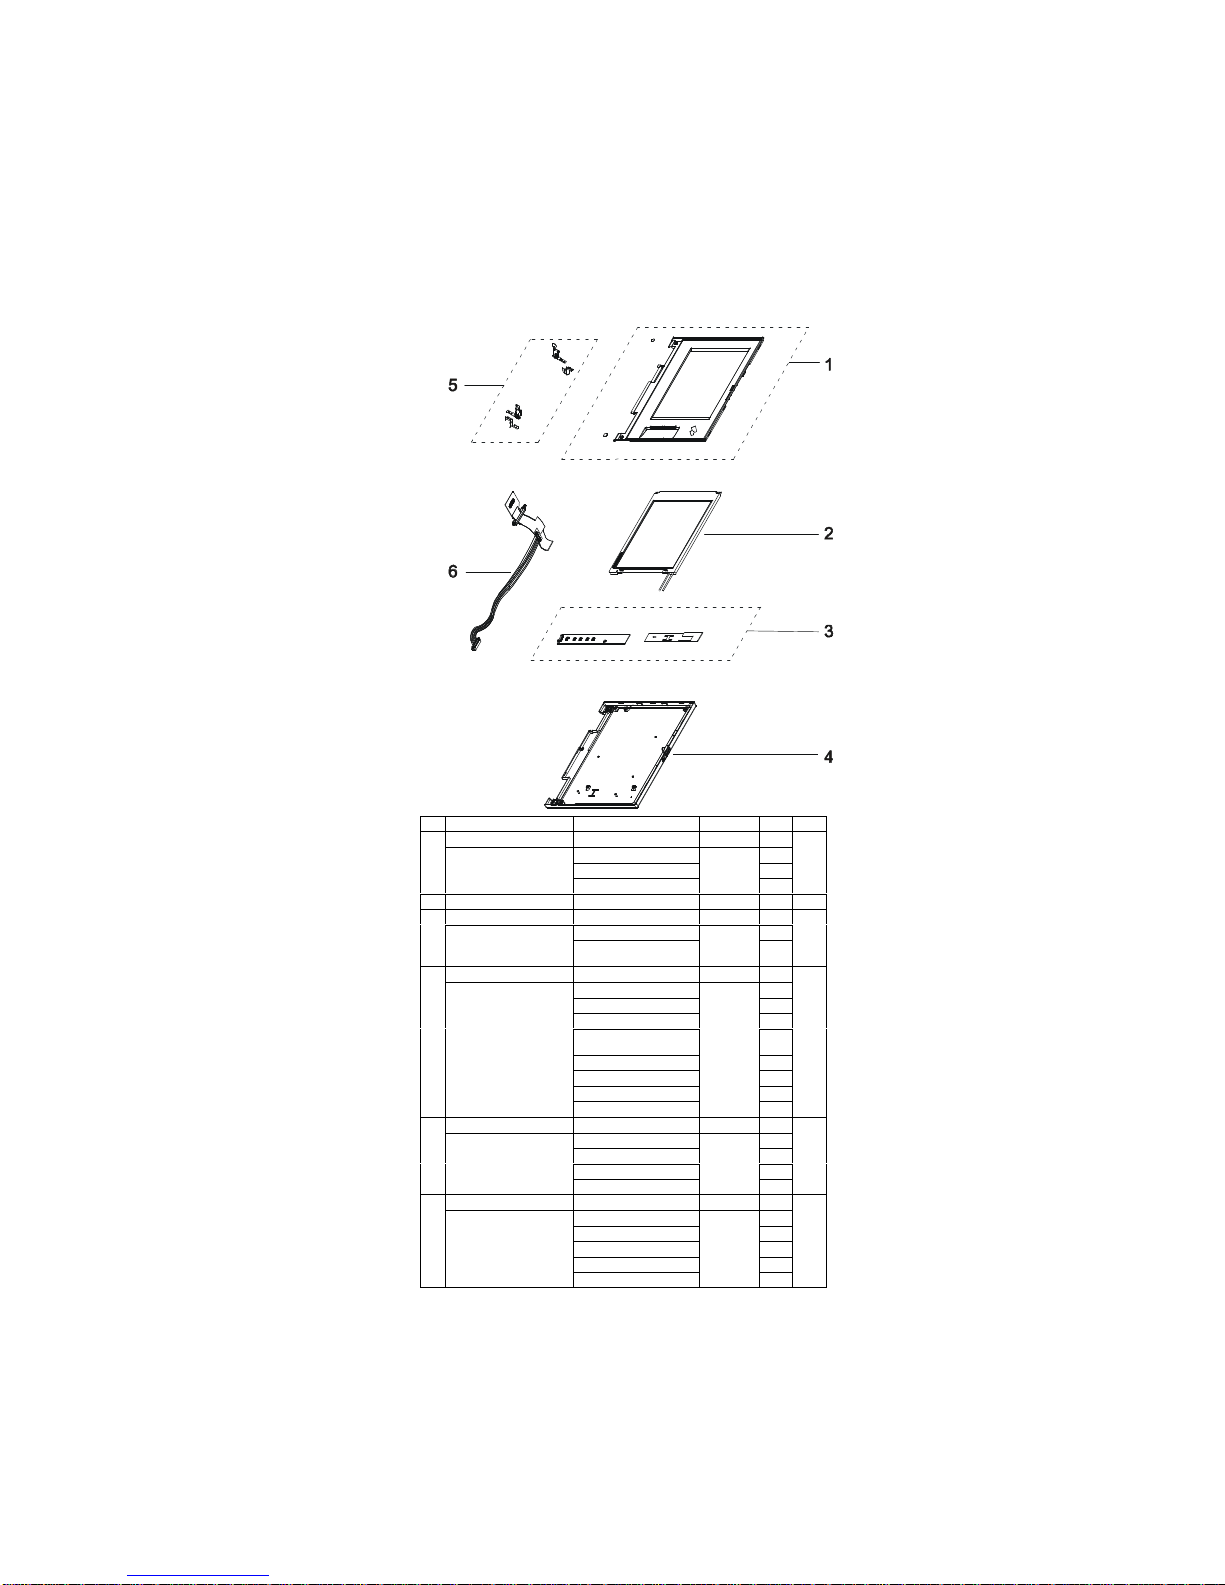
58 IBM WorkPad z50, Mobile Companion (2608-1Ax)
LCD Unit Parts List
No. FRU PART DESCRIPTION FRU ELEMENTS FRU P/N QTY CRU
LCD BEZEL ASS’Y 05K5934 1
LCD BEZEL 1
LCD BUTTON 1
1
SCREW CAP 2
2 LCD MODULE ASS’Y 8.2" DSTN 05K9399 1
INVERTER ASS’Y 10L1216 1
INV. MODULE (AMB) 1
3
INVERTER MYLAR
W/COPPER TAPE
1
LCD COVER ASS’Y 05K5933 1
LCD COVER 1
LCD SHIELD 1
LCD SHIELD TAPE 1
COVER LOGO
(WORKPAD)
1
HOOK KNOB 1
HOOK SPRING 1
MAGNET (LCD COVER) 1
4
LCD MAGNET HOLDER 1
HINGE GROUP 05K5935 1
HINGE (R) 1
HINGE (L) 1
HINGE BRACKET (R) 1
5
HINGE BRACKET (L) 1
FPC AND WIRE GROUP 05K2822 1
LCD FPC ASS’Y 1
FPC COVER SHEET 1
FPC HOLDER (U) 1
FPC HOLDER (L) 1
6
CABLE ASS’Y, IV, 8.2 1
Page 74

WorkPad z50 Mobile Companion (2608-1Ax) 59
Miscellaneous and Other Parts
DESCRIPTION FRU ELEMENTS QTY FRU P/N CRU
MISC PART GROUP 1 1 05K5940
HOOK KNOB 1
HOOK SPRING 1
IR LENS 1
DOCKING SHUTTER 1
RUBBER FOOT 2
COVER SWITCH/B ASS’Y 1
H/W BTN BOARD ASS’Y 1
CABLE ASS’Y, MIC 1
CABLE ASS’Y, RJ-11 1
RJ-11 DOOR (EMEA ONLY) 1
BATT SLOT BRACKET 1
LABEL CAN HOMO,
(US/CA/JA ONLY)
1
SPEAKER BRACKET 1
SPEAKER MYLAR 1
CABLE ASS’Y, SP 1
TAPE 3
MISC PART GROUP 2 1 46L2666
TEMPLATE, TEXT 1
TEMPLATE, ICON 1
STICKER 1
√
SCREW KIT 1 05K5941
SCREW (M2.0*3-P-NI-NYLOK) 10
SCREW (M2.0*6-P-NI-NYLOK 10
SCREW (M2.5*6-I-BNI-NYLOK) 20
SCREW (M2.5*8-1-BNI-NI-NYLOK) 10
SCREW (M2.5*4-P-BNI-NYLOK) 20
STUD 10
I/V NUT 10
SCREW CAP 10
Option Parts FRU List
ITEM DESCRIPTION QTY FRU P/N CRU
MEMORY EXPANSION 32MB 1 20L0244
√
HIGH CAPACITY BATTERY PACK 1 02K6575
√
DRY CELL BATTERY CASE 1 02K6142
√
CRADLE 1 02K6143
√
Other Parts
ITEM DESCRIPTION QTY FRU P/N CRU
SERIAL CABLE 1 05K2823
√
MODEM CABLE 1 05K2824
√
AC ADAPTOR (45w, 2-prong) 1 02K6560
√
AC ADAPTOR (45w, 3-prong) 1 02K6562
√
CRU
To find out which parts can be replaced by the customer, refer to the
tables under “System Unit Parts Listing” starting on page 52. All parts
marked “√” in the CRU column are considered CRU parts.
Tools
See the table of tools on page 26.
Page 75

60 IBM WorkPad z50, Mobile Companion 60
Power Cord
IBM pow er cord s for a specific country are usually available
only in that country:
For 2-pin power cords:
IBM
Power
Cord
Part
Number
Used in These Countries CRU
13H5273 Japan
√
For 3-pin power cords:
IBM
Power
Cord
Part
Number
Used in These Countries CRU
76H3514
Argentina, Australia, Papua New Guinea,
New Zealand, Paraguay, Uruguay
√
76H3516 Bahamas, Barbados, Bermuda, Bolivia,
Canada, Cayman Islands, Colombia, Costa
Rica, Dominican Republic, Ecuador, El
Salvador, Guatemala, Guyana, Haiti,
Honduras, Jamaica, Mexico, Netherlands
Antilles, Nicaragua, Panama, Peru,
Philippines, Saudi Arabia, Suriname,
Taiwan, Trinidad (West Indies), United
States of America, Venezuela
√
76H3518
Austria, Belgium, Bulgaria, Czech Republic,
Egypt, Finland, France, Germany, Greece,
Hungary, Iceland, Indonesi a, Netherlands ,
Norway, Poland, Portugal, Romania,
Slovakia, Spain, Sweden, Turkey, former
Yugoslavia
√
76H3520 Denmark
√
76H3522 Bangladesh, Pakistan, South Afric a, Sri
Lanka
√
76H3524 Abu Dhabi, Albania, Antigua, Bahrain,
Brunei, Dubai, Fiji, India, Ireland, Kenya,
Kuwait, Macao, Malaysia, Nigeria, Oman,
People’s Republic of China (including Hong
Kong), Qatar, Singapore, United Kingdom
√
76H3528 Liechtenstein, Switzerland
√
76H3530 Chile, Ethiopia, Italy, Libya
√
76H3532 Israel
√
76H3535 Korea
√
76H4866 Thailand
√
Page 76

W orkP ad z50 M ob il e C om p ani on 61
Notices
References in this publication to IBM products, programs, or
serv ices do no t imply that IBM in tends to make these
available in all countries in which IBM operates. Any
reference to an IBM product, program, or service is not
intended to state or imply that only that IBM product,
program, or service may be used. Any functionally
equivalent product, program, or service that does not infringe
any of the intellectual property rights of IBM may be used
instead of the IBM product, program, or service. The
evalu ati on an d verification of operati on in c onjunction with
other pr oduc ts , excep t th ose expr ess l y des ignat ed b y IB M,
are the responsibility of the user.
IBM may have patents or pending patent applications
covering subject matter in this document. The furnishing of
this docu m ent does not give you an y licens e to thes e
patents. You can send license inquiries, in writing, to:
IBM Direc t or of Licensi ng
IBM Corporation
500 Columbus Avenue
Thornwood, NY 10594
U.S.A.
Trademarks
The following terms are trademarks of the IBM Corporation
in the Unit ed States or oth er c ou ntr i es or both:
IBM
W orkPad
TrackPoint
Micros oft and W ind ows ar e tradem arks or r eg is tered
tr ade marks of M i crosof t Corp ora ti on.
CompactFlash is the registered trademark of Sandisk
Corporation.
Other c omp any, prod uc t , an d s er vice names , w hich may b e
denoted by a double asterisk (**), may be trademarks or
service marks of others.
Page 77

IBM
Part Number: 37L2095
Printed in U.S.A.
S37L-2ð95-ðð
 Loading...