

Page 1

IBM Network Printer 24
IBM Network Printer 24PS
User's Guide
IBM
S544-5378-01
Page 2

Page 3

IBM Network Printer 24
IBM Network Printer 24PS
User's Guide
IBM
S544-5378-01
Page 4

Note!
Before using this information and the product it supports, be sure to read the general information under “Notices”
on page xv.
Second Edition (January, 1997)
The following paragraph does not apply to any other country where such provisions are inconsistent with local law.
INTERNATIONAL BUSINESS MACHINES CORPORATION PROVIDES THIS PUBLICATION “AS IS” WITHOUT
WARRANTY OF ANY KIND, EITHER EXPRESS OR IMPLIED, INCLUDING, BUT NOT LIMITED TO THE IMPLIED
WARRANTIES OF MERCHANTABILITY OR FITNESS FOR A PARTICULAR PURPOSE. Some states do not allow
disclaimer of express or implied warranties in certain transactions, therefore, this statement may not apply to you.
Changes are made periodically to this publication.
Requests for IBM publications should be made to your IBM representative or to the IBM branch office serving your
locality. If you request publications from the address given below, your order will be delayed, because publications are
not stocked there.
A Reader’s Comment Form is provided at the back of this publication. You may also send comments by fax to
1-800-524-1519, by e-mail to print_pubs@vnet.ibm.com, or by regular mail to:
Department H7FE Building 003G
IBM Printing Systems Company
Information Development
PO Box 1900
Boulder CO USA 80301-9191
IBM may use or distribute whatever information you supply in any way it believes appropriate without incurring any
obligation to you.
Copyright International Business Machines Corporation 1997. All rights reserved.
Note to U.S. Government Users — Documentation related to restricted rights — Use, duplication or disclosure is
subject to restrictions set forth in GSA ADP Schedule Contract with IBM Corp.
Page 5

Contents
Statement of Limited Warranty ........................... xi
Notices . . . . . . . . . . . . . . . . . . . . . . . . . . . . . . . . . . . . . . . . xv
Trademarks . . . . . . . . . . . . . . . . . . . . . . . . . . . . . . . . . . . . . . xv
Energy Star . . . . . . . . . . . . . . . . . . . . . . . . . . . . . . . . . . . . . xvi
Communications Statements for Class A ..................... xvi
Communications Statements for Class B ..................... xvii
Safety Notices . . . . . . . . . . . . . . . . . . . . . . . . . . . . . . . . . . . xix
Safety Precautions . . . . . . . . . . . . . . . . . . . . . . . . . . . . . . . . . . xx
About This Book ................................. xxi
Conventions Used . . . . . . . . . . . . . . . . . . . . . . . . . . . . . . . . . xxi
Related Publications . . . . . . . . . . . . . . . . . . . . . . . . . . . . . . . . xxii
Chapter 1. About Your Printer ........................... 1
Quick Reference . . . . . . . . . . . . . . . . . . . . . . . . . . . . . . . . . . . 1
Describing Printer Features and Options ....................... 2
Describing Standard Features ............................ 6
Identifying Printer Parts and Locations ...................... 7
Optional Features . . . . . . . . . . . . . . . . . . . . . . . . . . . . . . . . . . 13
Duplex Unit . . . . . . . . . . . . . . . . . . . . . . . . . . . . . . . . . . . 13
Upper 500 Sheet Paper Tray (Tray 1) ..................... 13
Lower 500 Sheet Paper Tray (Tray 2) ..................... 13
2000-Sheet Paper Input Drawer (Tray 3) .................... 13
2000-Sheet Finisher . . . . . . . . . . . . . . . . . . . . . . . . . . . . . . . 14
Options Controller Card ............................. 14
US 9 Foot Line Cord .............................. 14
US 6 Foot Chicago Line Cord .......................... 15
Printer Stand . . . . . . . . . . . . . . . . . . . . . . . . . . . . . . . . . . 15
Envelope Feeder . . . . . . . . . . . . . . . . . . . . . . . . . . . . . . . . 15
Printer Memory . . . . . . . . . . . . . . . . . . . . . . . . . . . . . . . . . 15
Hard Drive . . . . . . . . . . . . . . . . . . . . . . . . . . . . . . . . . . . . 16
Adobe PostScript . . . . . . . . . . . . . . . . . . . . . . . . . . . . . . . . 16
IPDS . . . . . . . . . . . . . . . . . . . . . . . . . . . . . . . . . . . . . . . 16
Network Card for Ethernet (10Base2 or 10BaseT) ............... 16
Network Card for Token Ring .......................... 16
Twinax SCS Interface Card ........................... 16
Coax SCS/DSC/DSE Interface ......................... 16
Ordering Optional Features ............................. 17
Ordering Supplies . . . . . . . . . . . . . . . . . . . . . . . . . . . . . . . . . . 19
Describing Resident Fonts ............................. 20
Using Printer Drivers ................................ 22
Obtaining Printer Drivers ............................ 23
Using Network Printer Manager Utility ....................... 24
Obtaining Network Printer Manager Utility ................... 24
Copyright IBM Corp. 1997 iii
Page 6

Using Network Printer Resource Utility ..................... 25
Obtaining Network Printer Resource Utility ................... 25
Using Print Services Facility Software with IPDS ................. 25
Obtaining Adobe Acrobat Portable Data Files ................... 26
Chapter 2. Using the Operator Panel ...................... 27
Understanding the Operator Panel Indicator Lights ................ 29
Using the Operator Panel Keys .......................... 30
Navigating Menus — Two Examples ........................ 31
Example 1 — Printing the Printer Configuration Page ............. 32
Example 2 — Reducing Toner Usage ..................... 36
Performing Other Common Operator Panel Tasks ................. 38
Canceling a Print Job .............................. 38
Selecting Binding for Duplex Print Jobs ..................... 38
Printing a Stored Page (PCL5e Jobs Only) ................... 39
Printing a List of PCL5e Fonts ......................... 39
Printing a List of PostScript Fonts ........................ 39
Printing a List of IPDS Fonts .......................... 39
Adjusting Print Density (Printing Darker or Lighter) ............... 40
Changing the Power-Savings (Sleep Mode) Interval .............. 40
Changing the Language Shown on the Display Panel ............. 41
Understanding Common Messages ........................ 42
Chapter 3. Navigating Through the Operator Panel Menus .......... 43
Test Menu . . . . . . . . . . . . . . . . . . . . . . . . . . . . . . . . . . . . . 46
Paper Menu . . . . . . . . . . . . . . . . . . . . . . . . . . . . . . . . . . . . . 48
Configuration (Config) Menu ............................ 51
Memory Configuration (Memconfig) Menu ..................... 54
Parallel Menu . . . . . . . . . . . . . . . . . . . . . . . . . . . . . . . . . . . . 55
PCL Menu . . . . . . . . . . . . . . . . . . . . . . . . . . . . . . . . . . . . . 56
PS Menu . . . . . . . . . . . . . . . . . . . . . . . . . . . . . . . . . . . . . . 59
Token Ring Menu .................................. 60
Ethernet Menu . . . . . . . . . . . . . . . . . . . . . . . . . . . . . . . . . . . 62
Coax SCS Menu .................................. 64
Twinax SCS Menu ................................. 67
Coax Setup Menu ................................. 69
Twinax Setup Menu ................................ 71
Coax DSC/DSE Menu ............................... 73
IPDS Menu . . . . . . . . . . . . . . . . . . . . . . . . . . . . . . . . . . . . . 75
Machine Information Menu ............................. 80
Language Menu . . . . . . . . . . . . . . . . . . . . . . . . . . . . . . . . . . 81
Chapter 4. Loading Paper and Envelopes ................... 83
Selecting Paper and Other Printable Material ................... 83
Selecting Paper from Printer Drivers and Datastreams .............. 85
Selecting Output as Face Up or Face Down .................. 85
Defining the Printable Area ............................. 85
Storing Paper . . . . . . . . . . . . . . . . . . . . . . . . . . . . . . . . . . . . 87
iv User's Guide
Page 7

Loading Paper . . . . . . . . . . . . . . . . . . . . . . . . . . . . . . . . . . . 88
Loading Letterhead and Prepunched Paper .................. 88
Loading Paper into Trays 1 and 2 ........................ 88
Loading Paper into 2000-Sheet Input Drawer - Tray 3 ............. 92
Loading Paper into Auxiliary Tray ........................ 96
Loading Envelopes into Envelope Feeder ................... 99
Using the Paper Menu ............................... 104
Selecting The Default Input Tray ........................ 104
Selecting The Default Output Bin ........................ 104
Defining the Auxiliary Tray Paper Size ..................... 105
Defining the Envelope Feeder Envelope Size ................. 105
Turning Tray Switching On or Off ........................ 106
Turning Auxiliary Tray Manual Feeding On or Off ............... 106
Stapling Print Jobs ............................... 106
Chapter 5. Clearing Paper Jams ......................... 109
Locating Paper Jams ................................ 115
Removing Paper Jams from the Fuser Area .................. 116
Removing Paper Jams from the Imaging Area ................. 119
Removing Paper Jams from Paper Trays 1 and 2 ............... 121
Removing Paper Jams from 2000-Sheet Input Drawer - Tray 3 ........ 123
Removing Paper Jams from the Auxiliary Tray ................. 124
Removing Paper Jams from the Envelope Feeder ............... 124
Removing Paper Jams from the Duplex Unit .................. 127
Removing Paper Jams from the Face-Up Tray ................. 130
Removing Paper Jams from the Face-Down Tray ............... 131
Removing Paper Jams from the 2000-Sheet Finisher ............. 131
Chapter 6. Maintaining the Printer ....................... 139
Ordering and Replacing Supplies ......................... 139
Changing the Toner Cartridge ........................... 140
Cleaning the Printer ................................ 143
Cleaning the Anti-Static Teeth ......................... 143
Cleaning the Transfer Guide Area ....................... 144
Cleaning the Registration Roller Area ...................... 145
Replacing a Staple Cartridge ............................ 146
Performing a Stapler Test ............................ 148
Chapter 7. Installing Printer Options ...................... 149
Handling Static Sensitive Devices ......................... 150
Installing the Paper Stopper ............................ 151
Installing the Face-Up Tray ............................. 152
Locating Options on the Printer Controller Card .................. 153
Installing SIMM and Hard Drive Options ...................... 154
Installing a SIMM ................................ 155
Installing a Hard Drive .............................. 159
Installing the Options Controller Card ....................... 162
Installing the Network Interface Card ........................ 166
Contents v
Page 8

Installing a Network Interface Card ....................... 166
Installing the Envelope Feeder ........................... 168
Installing the Duplex Unit Option .......................... 171
Installing the 2000-Sheet Input Drawer (Tray 3) Option .............. 174
Installing the 2000-Sheet Finisher Option ..................... 180
Unpacking the 2000-Sheet Finisher ....................... 183
Attaching Output Trays ............................. 185
Attaching the Printer Delivery Slot Adapter ................... 186
Attaching the Guide Rail ............................ 186
Connecting I/O and Power Cables ....................... 190
Installing a Staple Cartridge ............................ 191
Installing the Printer Stand ............................. 193
Chapter 8. Managing Printer Memory ...................... 197
Downloading and Managing Fonts ......................... 197
Describing Printer Memory ............................. 197
DRAM Memory . . . . . . . . . . . . . . . . . . . . . . . . . . . . . . . . . 197
Flash Memory . . . . . . . . . . . . . . . . . . . . . . . . . . . . . . . . . . 198
Hard Drive . . . . . . . . . . . . . . . . . . . . . . . . . . . . . . . . . . . . 198
Estimating Memory Requirements ......................... 199
Using Memory Reduction Technology with Page Protection .......... 200
Chapter 9. Setting Printer Network Addresses ................. 201
Defining Network Configuration Tasks ....................... 201
Using the Operator Panel Keys to Set Network Addresses .......... 202
Setting IP, Subnet Mask, and Gateway Addresses ............... 203
Setting the Locally Administered MAC Address (LAA) ............. 204
Appendix A. Troubleshooting Problems . . . . . . . . . . . . . . . . . . . . 205
Locating Printer Serial Number and Machine Type ................ 205
Troubleshooting Problems: Symptoms and Actions ................ 207
Appendix B. Understanding Printer Messages ................. 215
Status Messages . . . . . . . . . . . . . . . . . . . . . . . . . . . . . . . . . . 216
Error Messages . . . . . . . . . . . . . . . . . . . . . . . . . . . . . . . . . . . 221
Service Messages . . . . . . . . . . . . . . . . . . . . . . . . . . . . . . . . . 231
Appendix C. Solving Print Quality Problems .................. 235
Print Is Too Light .................................. 235
Toner Spots on the Print .............................. 235
Repetitive Marks on the Print ............................ 236
Random Deletions or Light Areas on the Print ................... 236
Vertical Marks on the Print ............................. 237
Vertical Bands of Deletions or Light Areas on the Print .............. 237
Entire Print is Black ................................. 238
Entire Print Is Blank ................................ 238
White Spots Within Black Image Area ....................... 239
Printed Image Rubs Off or Smears ......................... 239
vi User's Guide
Page 9

Tables
The Print Is Damaged ............................... 240
The Printed Image Is Blurred ............................ 240
Appendix D. Installing the Usage Kit ...................... 241
Preparing to Install the Usage Kit ......................... 241
Changing the Auxiliary Feed Pick-up Roller and Separation Pad ......... 242
Changing the Fuser Assembly ........................... 246
Changing the Transfer Charging Roller Assembly ............... 250
Changing the Pick-up and Feed and Separation Rollers ............ 258
Appendix E. Answering Your Questions .................... 273
Appendix F. Specifications . . . . . . . . . . . . . . . . . . . . . . . . . . . 275
Printer Specifications . . . . . . . . . . . . . . . . . . . . . . . . . . . . . . . . 275
Toner Cartridge Specifications ........................... 276
Glossary . . . . . . . . . . . . . . . . . . . . . . . . . . . . . . . . . . . . . . 277
Index . . . . . . . . . . . . . . . . . . . . . . . . . . . . . . . . . . . . . . . . 283
1. 2000-Sheet Finisher Capacity-Standard Paper Sizes ............ 14
2. 2000-Sheet Finisher Capacity-Large Paper Sizes .............. 14
3. Optional Feature Descriptions and Order Numbers ............. 17
4. Supplies Descriptions and Part Numbers .................. 19
5. Supported Media Types and Sizes ..................... 84
6. Printable Area and Margins ......................... 85
7. Memory Requirements . . . . . . . . . . . . . . . . . . . . . . . . . . . . 199
8. Troubleshooting Problems: Symptoms and Actions ............. 207
Contents vii
Page 10

viii User's Guide
Page 11

Figures
1. Printer with Optional Printer Stand ....................... 3
2. Printer with Optional 2000-Sheet Input Drawer ................ 4
3. Printer with Optional 2000-Sheet Finisher ................... 5
4. Printer Parts and Locations—Front and Right View .............. 7
5. Key Printer Parts and Locations—Rear and Left View ............ 9
6. Key Printer Parts and Locations-Optional 2000-Sheet Finisher ....... 11
7. IBM Network Printer 24 Operator Panel ................... 27
8. IBM Network Printer 24PS Operator Panel ................. 28
9. Operator Panel Indicator Lights ....................... 29
10. IBM Network Printer 24/24PS Configuration page .............. 35
11. Operator Panel Menu Map .......................... 45
12. Standard and Duplex Paper Path ...................... 109
13. Standard and Envelope Feeder Paper Path ................. 110
14. 2000-Sheet Paper Input Drawer Paper Path ................ 112
15. 2000-Sheet Finisher Paper Path ....................... 113
16. Controller Card Locations for SIMMs and Hard Drive Options ....... 154
17. Key Envelope Feeder Parts and Locations ................. 168
18. 2000-Sheet Input Drawer .......................... 174
19. Finisher Parts and Accessories ....................... 181
Copyright IBM Corp. 1997 ix
Page 12

x User's Guide
Page 13

Statement of Limited Warranty
The warranties provided by IBM* in this Statement of Limited Warranty apply only to
Machines you originally purchase for your use, and not for resale, from IBM or an IBM
authorized re-seller. The term “Machine” means an IBM machine, its features,
conversions, upgrades, elements, or accessories, or any combination of them.
Machines are subject to these terms only if purchased in the United States or Puerto
Rico, or Canada, and located in the country of purchase. If you have any questions,
contact IBM or your re-seller.
Machine: Network Printer 24 and 24PS
Warranty Period: 12 months
Contact your place of purchase for warranty service information.
Production Status
Each Machine is manufactured from new parts, or new and serviceable used parts
(which perform like new parts). In some cases, the Machine may not be new and may
have been previously installed. Regardless of the Machine's production status, IBM's
warranty terms apply.
The IBM Warranty
IBM warrants that each Machine 1) is free from defects in materials and workmanship
and 2) conforms to IBM's Official Published Specifications. IBM calculates the
expiration of the warranty period from the Machine's Date of Installation. The date on
your receipt is the Date of Installation, unless IBM or your re-seller informs you
otherwise.
During the warranty period, IBM or your re-seller will provide warranty service under the
type of service designated for the Machine and will manage and install engineering
changes that apply to the Machine. IBM or your re-seller will specify the type of
service.
For a feature, conversion, or upgrade, IBM or your re-seller may require that the
Machine on which it is installed be: 1) the designated, serial-numbered Machine and 2)
at an engineering-change level compatible with the feature, conversion, or upgrade.
Some of these transactions (called “Net-Priced” transactions) may include additional
parts and associated replacement parts that are provided on an exchange basis. All
removed parts become the property of IBM and must be returned to IBM.
Replacement parts assume the remaining warranty of the parts they replace.
If a Machine does not function as warranted during the warranty period, IBM or your
re-seller will repair or replace it without charge. If IBM or your re-seller is unable to do
so, you may return it to your place of purchase and your money will be refunded.
Copyright IBM Corp. 1997 xi
Page 14

If you transfer a Machine to another user, warranty service is available to that user for
the remainder of the warranty period. You should give your proof of purchase and this
Statement to that user.
Warranty Service
To obtain warranty service for the Machine, you should contact your re-seller or call
IBM. In the United States or Canada, call your point of purchase or IBM customer
technical support at 1-800-358-6661 from 8:00 a.m. to 8:00 p.m, Eastern Standard
Time. You may be required to present proof of purchase.
Depending on the Machine, the service may be
1. “Repair” service at your location (called “On-site”),
2. “Repair” service at one of IBM's or a re-seller's service locations (called “Carry-in”).
When a type of service involves the exchange of a Machine or part, the item IBM or
your re-seller replaces becomes its property and the replacement becomes yours. The
replacement may not be new, but will be in good working order.
It is your responsibility to:
1. Obtain authorization from the owner (for example, your lessor) to have IBM or your
re-seller service a Machine that you do not own;
2. Where applicable, before service is provided:
a. Follow the problem determination, problem analysis, and service request
procedures that IBM or your re-seller provide,
b. Secure all programs, data, and funds contained in a Machine,
c. Inform IBM or your re-seller of changes in a Machine's location, and
d. Remove all features, parts, options, alterations, and attachments not under
warranty service. Also, the Machine must be free of any legal obligations or
restrictions that prevent its exchange; and
3. If the machine is not shipped in an IBM box, be responsible for loss of, or damage
to, a Machine in transit when you are responsible for the transportation charges.
Extent of Warranty
IBM does not warrant uninterrupted or error-free operation of a Machine.
Misuse, accident, modification, unsuitable physical or operating environment, improper
maintenance by you, or failure caused by a product for which IBM is not responsible
may void the warranties.
THESE WARRANTIES REPLACE ALL OTHER WARRANTIES, EXPRESS OR
IMPLIED, INCLUDING, BUT NOT LIMITED TO, THE IMPLIED WARRANTIES OF
MERCHANTABILITY AND FITNESS FOR A PARTICULAR PURPOSE. HOWEVER,
SOME LAWS DO NOT ALLOW THE EXCLUSION OF IMPLIED WARRANTIES. IF
THESE LAWS APPLY, THEN ALL EXPRESS AND IMPLIED WARRANTIES ARE
xii User's Guide
Page 15

LIMITED IN DURATION TO THE WARRANTY PERIOD. NO WARRANTIES APPLY
AFTER THAT PERIOD.
In Canada, warranties include both warranties and conditions.
Some jurisdictions do not allow limitations on how long an implied warranty lasts, so the
above limitation may not apply to you.
Limitation of Warranty
Circumstances may arise where, because of a default on IBM's part (including
fundamental breach) or other liability (including negligence and misrepresentation), you
are entitled to recover damages from IBM. In each such instance, regardless of the
basis on which you are entitled to claim damages, IBM is liable only for:
1. Bodily injury (including death), and damage to real property and tangible personal
property; and
2. The amount of any other actual loss or damage, up to the greater of $100,000 or
the charge for the Machine that is the subject of the claim.
Under no circumstances is IBM liable for any of the following:
1. Third-party claims against you for losses or damages (other than those under the
first item listed above);
2. Loss of, or damage to, your records or data; or
3. Economic consequential damages (including lost profits or savings) or incidental
damages, even if IBM is informed of their possibility.
Some jurisdictions do not allow the exclusion or limitation of incidental or consequential
damages, so the above limitation or exclusion may not apply to you.
This warranty gives you specific legal rights and you may also have other rights which
vary from jurisdiction to jurisdiction.
Statement of Limited Warranty xiii
Page 16

xiv User's Guide
Page 17

Notices
Trademarks
References in this publication to IBM products, programs or services do not imply that
IBM intends to make these available in all countries in which IBM operates. Any
reference to an IBM licensed product, program, or service is not intended to state or
imply that only IBM's product, program, or service may be used. Any functionally
equivalent product, program, or service that does not infringe any of IBM's intellectual
property rights may be used instead of the IBM product. Evaluation and verification of
operation in conjunction with other products, except those expressly designated by IBM,
is the user's responsibility.
Any performance data contained in this document was obtained in a controlled
environment based on the use of specific data. The results that may be obtained in
other operating environments may vary significantly. Users of this document should
verify the applicable data in their specific environment. Therefore, such data does not
constitute a performance guarantee or warranty.
IBM may have patents or pending patent applications covering subject matter in this
document. The furnishing of this document does not give you any license to these
patents. You can send license inquiries, in writing, to the IBM Corporation, IBM
Director of Licensing, 506 Columbus Ave., Thornwood, N.Y. 10594 U.S.A.
The following terms are trademarks of the IBM Corporation in the United States or other
countries or both:
AIX
Application System/400
AS/400
IBM
Intelligent Printer Data Stream
IPDS
OS/2
OS/400
Personal System/2
Print Services Facility
PS/2
PSF
WIN-OS/2
The following terms are trademarks or registered trademarks of other companies:
Acrobat Adobe Systems, Inc.
Macintosh Apple Corporation
PostScript Adobe Systems, Inc.
PCL5e Hewlett Packard Co.
TonerMiser DPTek
Copyright IBM Corp. 1997 xv
Page 18

Windows Microsoft Corp.
Energy Star
The Environmental Protection Agency (EPA) ENERGY STAR Computers program is a
partnership effort with manufacturers of data processing equipment to promote the
introduction of energy-efficient personal computers, monitors, printers, fax machines,
and copiers to help reduce air pollution and global warming caused by electricity
generation.
IBM Printing Systems Company participates in this program by introducing printers that
reduce power consumption when they are not being used. As an Energy Star Partner,
IBM Printing Systems Company, has determined that this product meets the Energy
Star guidelines for energy efficiency.
Communications Statements for Class A
When either the 2000-sheet input drawer or 2000-sheet finisher feature is installed, the
printer will create a Class A system that is not to be operated in a Class B environment.
Federal Communications Commission (FCC) Statement
Note: This equipment has been tested and found to comply with the limits for a Class
A digital device, pursuant to Part 15 of the FCC Rules. These limits are designed to
provide reasonable protection against harmful interference when the equipment is
operated in a commercial environment. This equipment generates, uses, and can
radiate radio frequency energy and, if not installed and used in accordance with the
instruction manual, may cause harmful interference to radio communications.
Operation of this equipment in a residential area is likely to cause harmful interference,
in which case the user will be required to correct the interference at his own expense.
Properly shielded and grounded cables and connectors must be used in order to meet
FCC emission limits. IBM is not responsible for any radio or television interference
caused by using other than recommended cables and connectors or by unauthorized
changes or modifications to this equipment. Unauthorized changes or modifications
could void the user's authority to operate the equipment.
This device complies with Part 15 of the FCC Rules. Operation is subject to the
following two conditions: (1) this device may not cause harmful interference, and (2)
xvi User's Guide
Page 19

this device must accept any interference received, including interference that may
cause undesired operation.
Canadian Department of Communications compliance statement: This equipment
does not exceed Class A limits per radio noise emissions for digital apparatus, set out
in the Radio Interference Regulation of the Canadian Department of Communications.
Operation in a residential area may cause unacceptable interference to radio and TV
reception requiring the owner or operator to take whatever steps are necessary to
correct the interference.
Avis de conformité aux normes du ministère des Communications du Canada:
Cet équipement ne dépasse pas les limites de Classe A d'émission de bruits
radioélectriques pour les appareils numériques, telles que prescrites par le Règlement
sur le brouillage radioélectrique établi par le ministère des Communications du Canada.
L'exploitation faite en milieu résidentiel peut entraîner le brouillage des réceptions radio
et télé, ce qui obligerait le propriétaire ou l'opérateur à prendre les dispositions
nécessaires pour en éliminer les causes.
The United Kingdom Telecommunications Act 1984: This apparatus is approved
under the approval No. NS/G/1234/J/100003 for the indirect connections to the public
telecommunications systems in the United Kingdom.
Japanese VCCI Class 1 ITE Statement:
Communications Statements for Class B
IBM 4324-001
Note: This equipment has been tested and found to comply with the limits for a Class
B digital device, pursuant to Part 15 of the FCC Rules. These limits are designed to
provide reasonable protection against harmful interference in a residential installation.
This equipment generates, uses, and can radiate radio frequency energy and, if not
installed and used in accordance with the instructions, may cause harmful interference
to radio communications. However, there is no guarantee that interference will not
occur in a particular installation. If this equipment does cause harmful interference to
radio or television reception, which can be determined by turning the equipment off and
on, the user is encouraged to try to correct the interference by one or more of the
following measures:
Reorient or relocate the receiving antenna.
Increase the separation between the equipment and receiver.
Notices xvii
Page 20

Connect the equipment into an outlet on a circuit different from that to which the
receiver is connected.
Consult an IBM authorized dealer or service representative for help.
Properly shielded and grounded cables and connectors (Institute of Electrical and
Electronic Engineers (IEEE) 1284-1994 compliant) must be used in order to meet FCC
emission limits. The parallel cable is IBM Part Number 63H1994 or its equivalent.
Proper cables and connectors are available from IBM authorized dealers. IBM is not
responsible for any radio or television interference caused by using other than
recommended cables and connectors or by unauthorized changes or modifications to
this equipment. Unauthorized changes or modifications could void the user's authority
to operate the equipment.
This device complies with Part 15 of the FCC Rules. Operation is subject to the
following two conditions: (1) this device may not cause harmful interference, and (2)
this device must accept any interference received, including interference that may
cause undesired operation.
Responsible party:
International Business Machines, Corp.
Old Orchard Road
Armonk, NY 10504
Telephone: 1-800-772-227
European Union (EU) Electromagnetic Conformity Statement
This product is in conformity with the protection requirements of EU Council Directive
89/336/EEC on the approximation of the laws of the Member States relating to
electromagnetic compatibility. IBM cannot accept responsibility for any failure to satisfy
the protection requirements resulting from a non-recommended modification of the
product, including the fitting of non-IBM option cards.
EU Conformity Statement: This product has been tested and found to comply with the
limits for Class B Information Technology Equipment according to CISPR 22/European
standard EN 55022. The limits for Class B equipment were derived for typical
environments to provide reasonable protection against interference with licensed
communication devices.
German Conformity Statement:
Dieses Gerät erfüllt die Bedingungen der EN 55022 Klasse B.
Industry Canada Compliance Statement:
This Class B digital apparatus meets the requirements of the Canadian
Interference-causing equipment regulations.
Cet appareil numérique de la classe B respecte toutes les exigences du Réglement sur
le matériel brouiller du Canada.
xviii User's Guide
Page 21

Safety Notices
The United Kingdom Telecommunications Act 1984: This apparatus is approved
under the approval No. NS/G/1234/J/100003 for the indirect connections to the public
telecommunications systems in the United Kingdom.
Japanese VCCI Class 2 ITE Statement:
There are three levels of safety notices:
DANGER calls attention to a situation that is potentially lethal or extremely hazardous
to people.
CAUTION calls attention to a situation that is potentially hazardous to people.
Attention calls attention to the possibility of damage to a program, device, system, or
data. Attention notices are located throughout this publication, but are not listed here.
Notices xix
Page 22

Safety Precautions
Electrical Safety
This printer is inspected and listed by recognized national testing laboratories, such as
Underwriters Laboratories, Inc. (UL) in the U.S.A. and Canadian Standards
Association (CSA) in Canada. Listing of a product by a national testing laboratory
indicates that the product is designed and manufactured in accordance with national
requirements intended to minimize safety hazards. IBM equipment meets a very high
standard of safety in design and manufacture. Remember, however, that this product
operates under conditions of high electrical potentials and heat generation, both of
which are functionally necessary.
Because the paper and toner used in the printer can burn, you should take normal
precautions to prevent fire. These precautions include common-sense measures, such
as keeping potentially combustible materials (for example, curtains and chemicals)
away from the printer, providing adequate ventilation and cooling, limiting unattended
operation, and having trained personnel available and assigned to the printer.
Laser Safety
This printer complies with the performance standards set by the U.S. Food and Drug
Administration for a Class 1 Laser Product. This means that the printer belongs to a
class of laser products that does not produce hazardous laser radiation in a customer
accessible area. This classification was accomplished by providing the necessary
protective housing and scanning safeguards to ensure that laser radiation is
inaccessible or within Class 1 limits.
There are various tool-operated machine covers that should be moved, removed, or
replaced only by trained service personnel. There are no operator controls or
adjustments associated with the laser.
No operator maintenance is required to keep the product in compliance as a Class 1
Laser Product. No adjustments that affect laser operation or power are accessible to
the operator.
This printer is a Class 1 Laser Product that contains an enclosed Class 3B laser.
xx User's Guide
Page 23

About This Book
This book is designed to help you use the Network Printer 24 and 24PS. It describes
how to:
Use the operator panel to navigate menus and control the printer
Load and select paper and other print materials
Clear paper jams
Change printer supplies
Install printer options
Troubleshoot printer problems
Understand messages displayed on the operator panel
Conventions Used
Names of keys on the operator panel and labeled printer parts are shown in bold
typeface. For example:
Press the Enter key.
Press Page Eject.
Set the front paper guide in the slot labeled LTR.
Tips for network administrators are shown in a box:
Network Administrator Tip
Suggestions or tips on improving printer performance are described in this box.
Notes are shown as:
Note: This note provides further explanation.
Important notes are shown in a box:
Important
Notes you must read that contain important information such as handling static
sensitive devices.
Copyright IBM Corp. 1997 xxi
Page 24

Related Publications
The following books contain information that relates to the printer:
IBM Network Printer 24 and 24PS: Quick Setup
up the printer.
IBM Network Printer 24 and 24PS: Safety Instructions
notices in several languages.
IBM Network Printer 24 and 24PS: Service Manual
information for repairing this printer.
IBM Network Printers: PCL5e and PostScript Level 2 Technical Reference
S544-5344, contains technical reference information about Network Printer 24 and
24PS PostScript and PCL5e support for this printer.
IBM Network Printers: IPDS and SCS Technical Reference
technical reference information about Network Printer 24 and 24PS IPDS and SCS
support for this printer.
IBM Network Printers: Ethernet and Token Ring Configuration Guide
describes how to configure the Ethernet and token-ring network interface cards
(this book is shipped with the feature).
IBM Network Printers: Twinax/Coax Configuration Guide
how to configure the twinax and coax network interface cards (this book is shipped
with the feature).
, G544-5375, describes how to set
, G544-5376, contains safety
, G544-5377, provides service
,
, S544-5312, contains
, G544-5240,
, G544-5241, describes
xxii User's Guide
Page 25

Chapter 1. About Your Printer
This chapter provides a description of the printer features, optional features you can
order, supplies you can order, and how to obtain printer drivers and printer software.
Quick Reference
Below is a quick reference to common tasks:
Task Where
Configuring printer network
addresses
Changing the paper source from
the operator panel
Clearing paper jams Go to Chapter 5, “Clearing Paper Jams” on page 109.
Cleaning the printer Go to “Cleaning the Printer” on page 143.
Determining memory requirements
for data streams and optional
features
Finding answers to commonly
asked questions
Installing a usage kit Go to Appendix D, “Installing the Usage Kit” on page 241.
Loading paper Go to “Loading Paper” on page 88.
Ordering supplies Go to “Ordering and Replacing Supplies” on page 139.
Replacing the toner cartridge Go to “Changing the Toner Cartridge” on page 140.
Selecting paper for printing Go to “Selecting Paper and Other Printable Material” on page 83.
Solving error messages Go to “Error Messages” on page 221.
Solving print quality problems Go to Appendix C, “Solving Print Quality Problems” on page 235.
Go to Chapter 9, “Setting Printer Network Addresses” on page 201.
Go to “Using the Paper Menu” on page 104.
Go to Chapter 8, “Managing Printer Memory” on page 197.
Go to Appendix E, “Answering Your Questions” on page 273.
Copyright IBM Corp. 1997 1
Page 26

Describing Printer Features and Options
This network printer offers a maximum of 24 pages per minute throughput for high
volume printing environments. The printer provides up to 3100 sheets of input capacity
and supports various sizes from B5 all the way up to ledger and A3 plus duplex and
finishing options. Simultaneous network and host connections, combined with auto-port
and data stream sensing make this the printer of choice for large workgroups.
Network environments require support of multiple printer data streams. The printer
supports PCL5e and, optionally, PostScript Level 2, and IBM's Intelligent Printer Data
Stream (IPDS) as well as SCS.
This printer supports bi-directional parallel, Ethernet, Token-Ring, Coax, and, Twinax
interfaces.
The bi-directional parallel interface is standard and two of the four optional attachment
cards can be simultaneously installed. This printer automatically switches among
printer data streams, interfaces, and networks.
With the installation of IBM's Network Printer Manager (NPM) utility, system
administrators can easily install, configure, monitor, and manage the printer from
remote locations. The NPM utility has been developed using the industry standard
System Network Management Protocol (SNMP) printer Management Information Base
(MIB) ensuring future support and compatibility.
Large workgroups sharing a network printer require heavy duty, high volume printing
with maximum forms handling flexibility. The printer meets these requirements.
The printer supports paper sizes from B5 all the way up to ledger and A3. In addition
to the broad range of paper sizes, output support can be expanded with the addition of
the 2000-sheet finisher option. With the combination of the large input and output
capacities, printing solutions exist for large print volumes and unattended environments.
Besides large capacity stacking provided with the 2000-sheet finisher, two additional
finishing features are provided: offset jogging and stapling. These additional
capabilities make sending multi-copy jobs to the printer easier than ever. For example,
the existing multi-step process of print, copy, and finish can be transformed into an
efficient print and finish one-step operation with the installation of optional features such
as the 2000-sheet input drawer and 2000-sheet finisher.
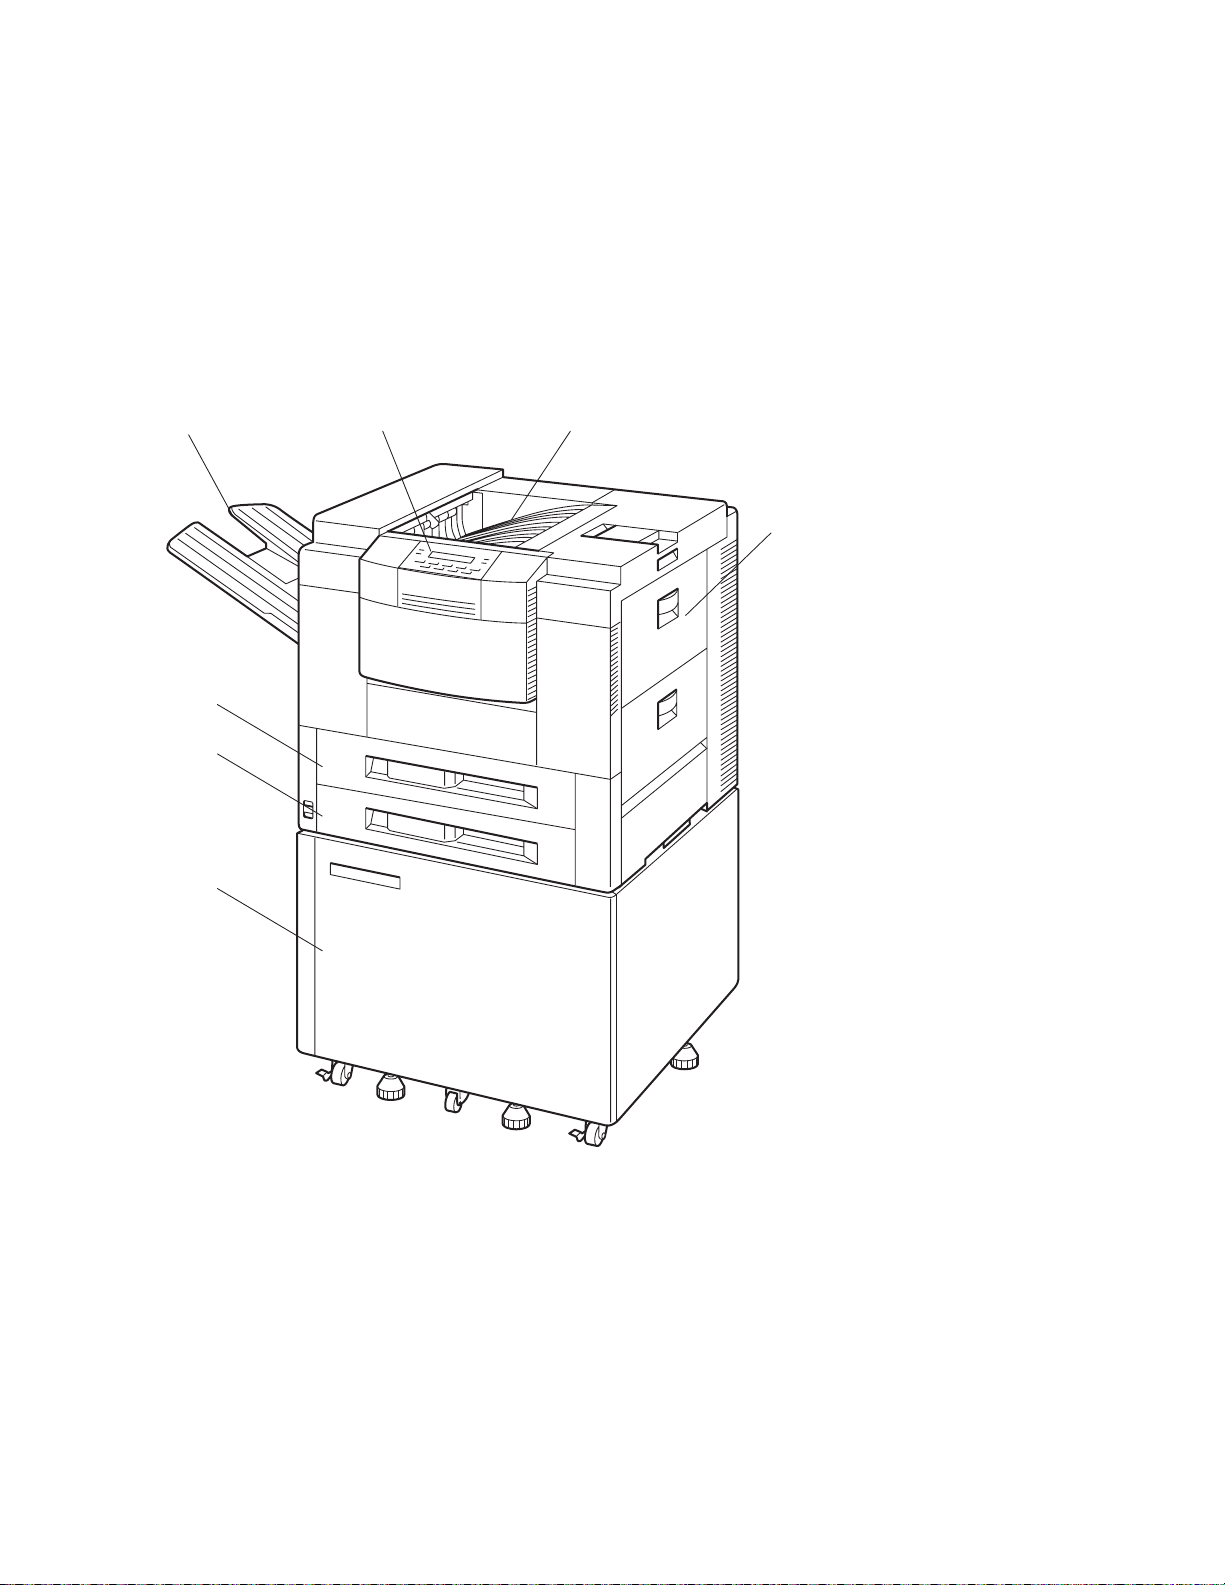
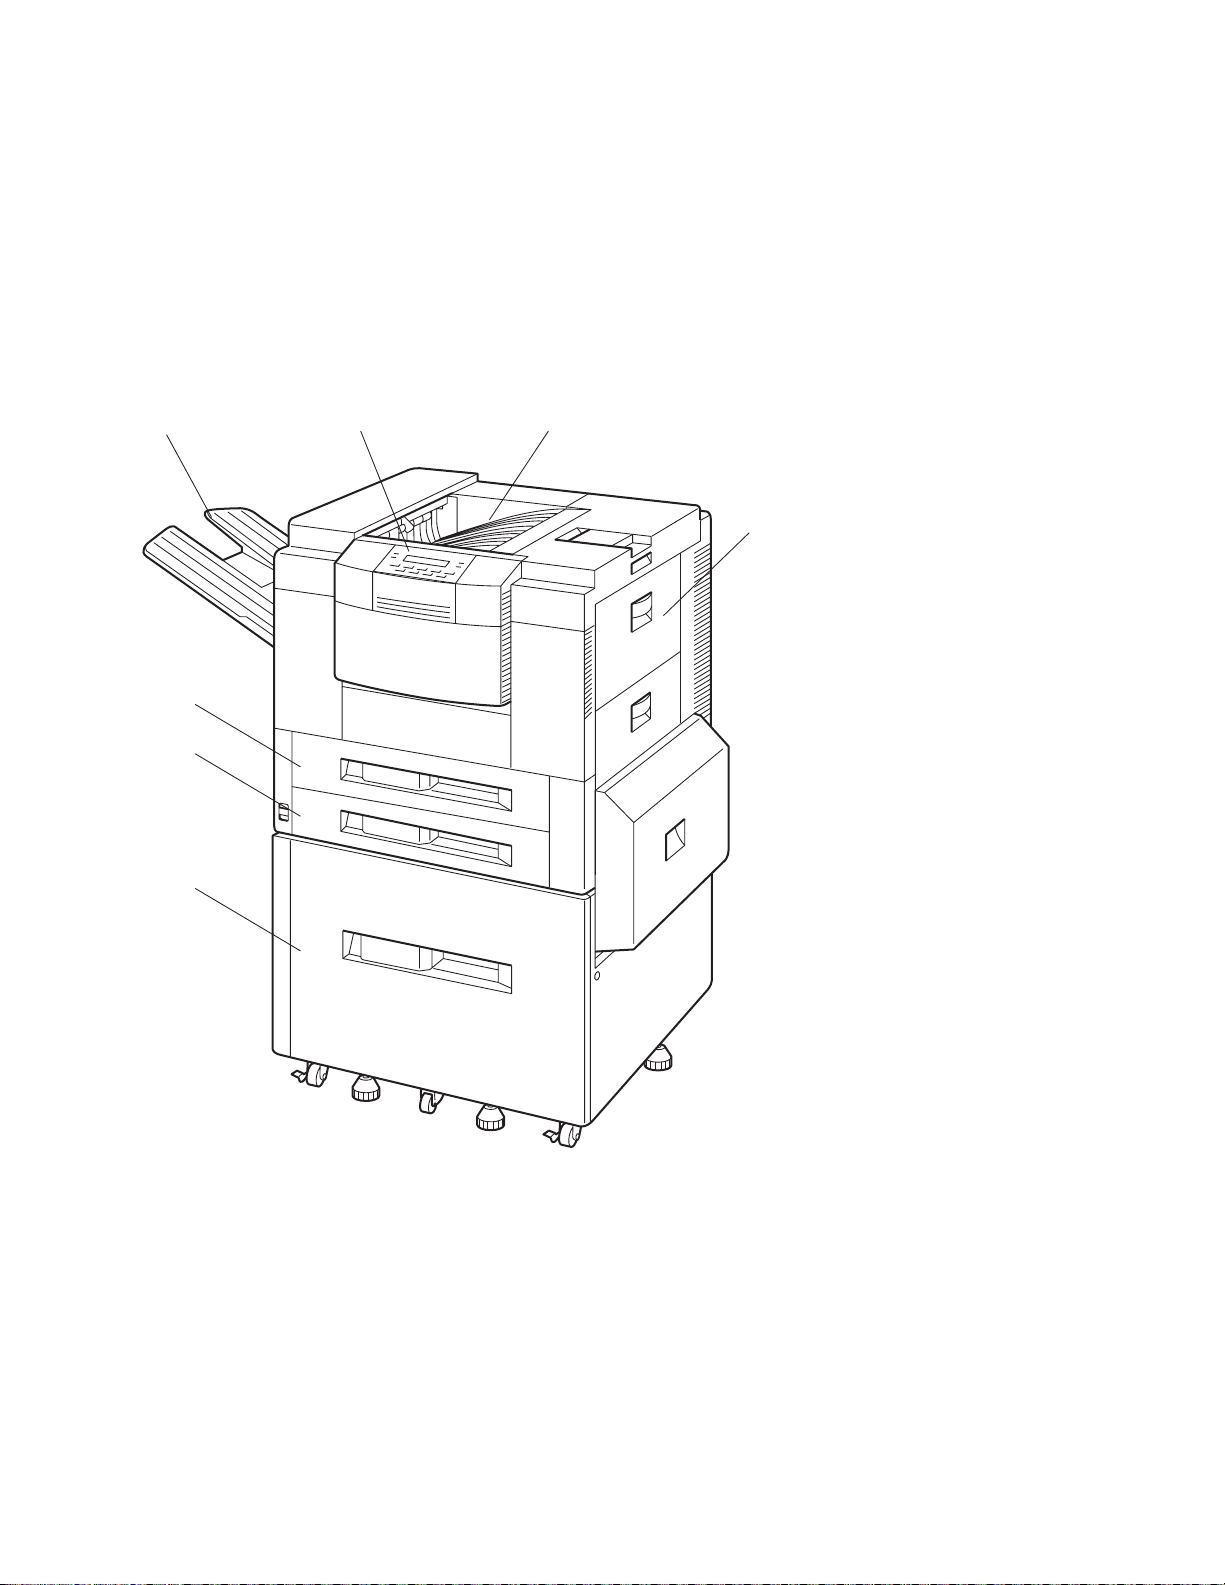
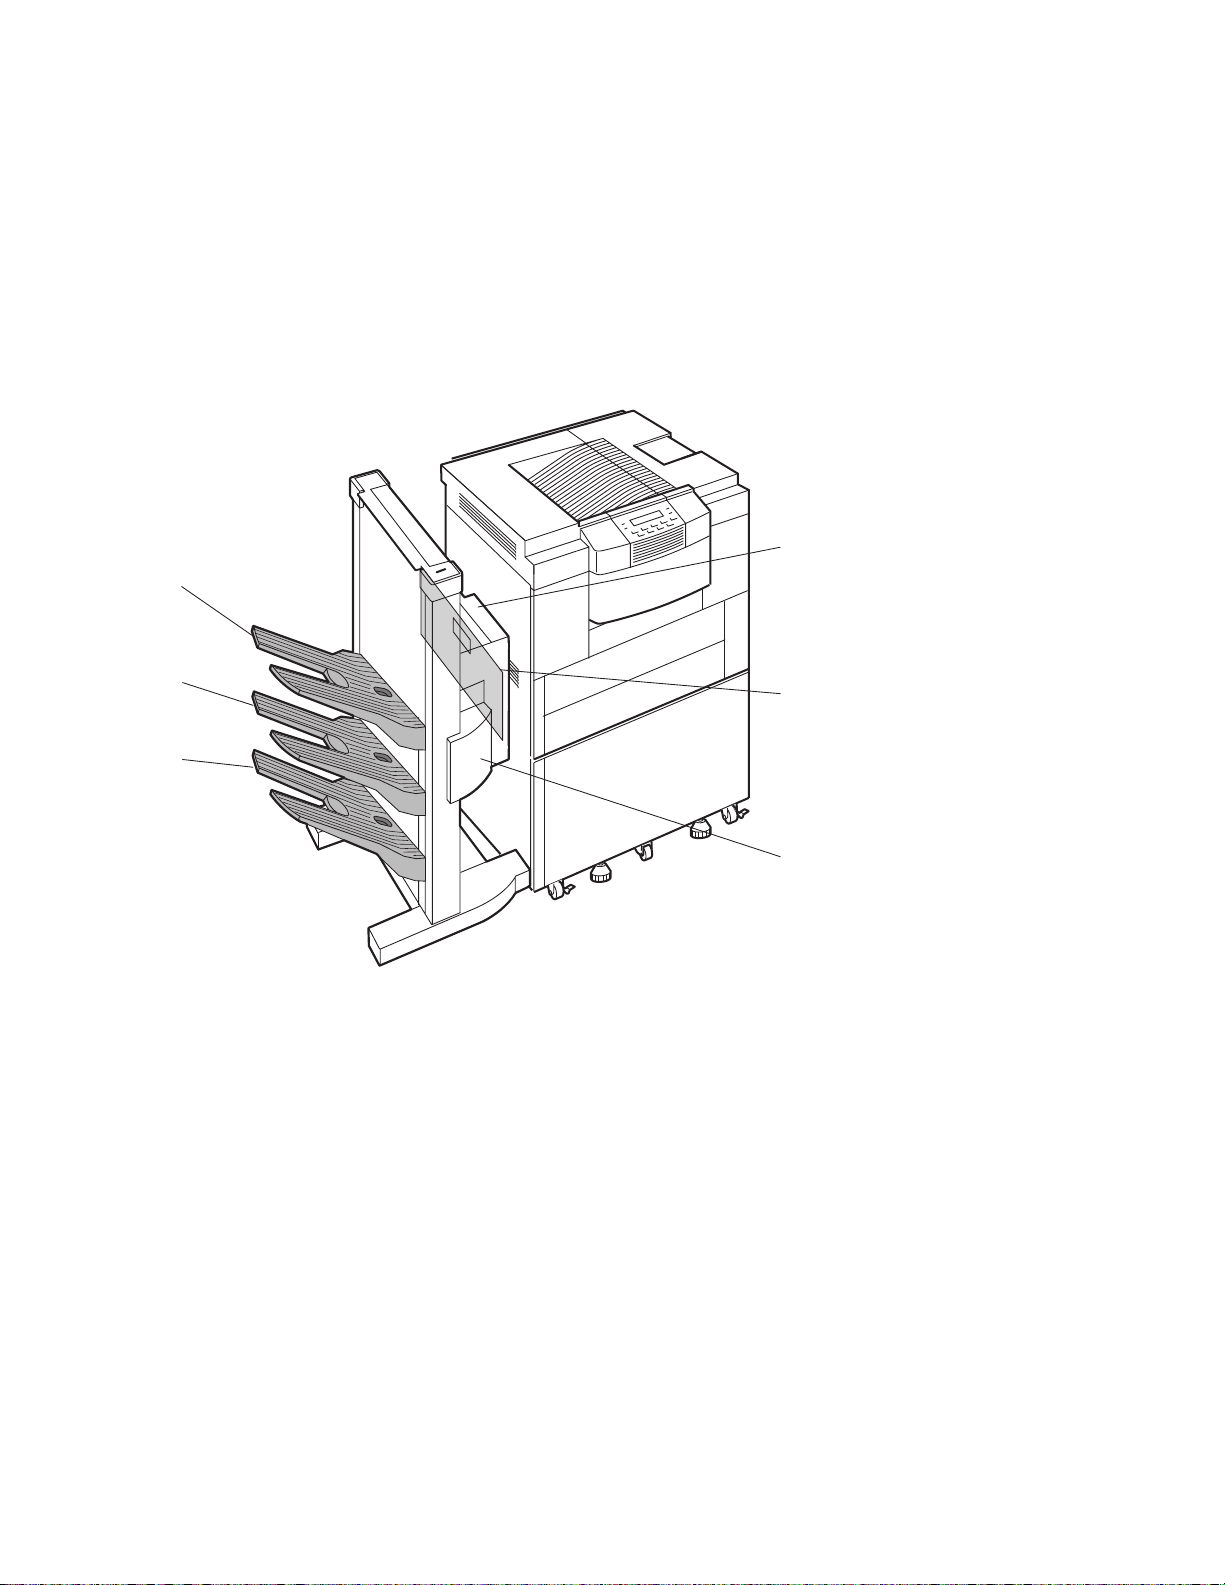
Figure 1 on page 3 shows the Network Printer 24 and 24PS with an optional printer
stand installed, Figure 2 on page 4 shows the Network Printer 24 and 24PS with an
optional 2000-sheet input drawer installed. Figure 3 on page 5 shows the Network
Printer 24 and 24PS with an optional 2000-sheet finisher installed.
2 User's Guide
Page 27
Face Up Tray
Tray 1
Tray 2
Printer
Stand
Operator Panel
Face Down Tray
Auxiliary Tray
c9pu302
Figure 1. Printer with Optional Printer Stand
Chapter 1. About Your Printer 3
Page 28
Face Up Tray
Tray 1
Tray 2
2000 Sheet
Input Drawer
(Tray 3)
Operator Panel
Face Down Tray
Auxiliary Tray
c9pu012
Figure 2. Printer with Optional 2000-Sheet Input Drawer
4 User's Guide
Page 29
Upper
bin
Upper
paper
access
cover
Middle
bin
Lower
bin
Figure 3. Printer with Optional 2000-Sheet Finisher
Lower
paper
access
cover
c9pu138
Stapler
Chapter 1. About Your Printer 5
Page 30

Describing Standard Features
Standard features of the printer include:
Heavy duty printing with a maximum print speed up to 24 pages per minute and a
maximum monthly usage of 100,000 single-sided pages.
High performance 66 Mhz processor.
Resolution of 600 dots per inch (dpi).
PCL5e support including 35 PCL Outline Fonts (Intellifont), 2 PCL Bitmapped
Fonts, and 10 PCL True Type fonts resident on the printer.
Multiple paper support up to A3 and Ledger size.
4 MB of printer memory. The 4 MB of DRAM memory enables fonts to be
downloaded to the printer and helps process print jobs. Additional DRAM and Flash
memory can be ordered to enable more fonts to be downloaded and to help
process large print jobs. For a detailed discussion of printer memory management,
see Chapter 8, “Managing Printer Memory” on page 197.
IEEE 1284 bi-directional parallel interface.
Two paper trays that can hold up to 500 sheets each. Paper tray 1 can hold 500
sheets of A4, B4, Legal, or Letter. Paper tray 2 can hold 500 sheets of A3, A4, B4,
Ledger, Legal, or Letter.
Auxiliary tray can hold up to 100 sheets. The auxiliary tray supports envelope and
paper sizes: A3, A4, B4, B5, C5, COM10, DL, executive, folio, monarch, ledger,
legal, letter, and statement. The auxiliary tray is also used to print labels and
transparencies.
Two output bins: one bin, called the face-down tray, can hold 500 sheets while the
other bin, called the face-up tray, can hold 100 sheets.
Printer drivers for a wide variety of operating systems including AIX, Macintosh,
OS/2, and Windows. See “Using Printer Drivers” on page 22 for detailed
information on printer drivers.
Energy Star compliant. This printer meets Environmental Protection Agency
standards for energy conservation. The printer can be set from the operator panel
to go into a power saving-mode (also called “sleep-mode”) that reduces power
consumption.
TonerMiser ** which reduces toner usage thus increasing the number of pages
you can print from a toner cartridge. (The TonerMiser feature is selected from the
operator panel as ECONO under the Configuration Menu's Quality settings.)
6 User's Guide
Page 31

Identifying Printer Parts and Locations
The following illustrations and text describe key printer parts you use when performing
tasks such as adding paper, removing paper jams, and so on.
Printer Parts and Locations—Front and Right View
Figure 4. Printer Parts and Locations—Front and Right View
Chapter 1. About Your Printer 7
Page 32

1. Full bin sensor
Indicates when the face-down output tray is full.
2. Face-down output tray
Holds approximately 500 sheets of paper delivered face down and collated.
3. Paper stopper
Aligns paper delivered into the face down tray.
4. Top cover
Open the top cover to access the toner cartridge, clear paper jams, and perform
maintenance.
5. Auxiliary output tray
Holds a variety of media such as plain paper, envelopes, labels, and
transparencies. Holds a maximum of 100 sheets of paper.
6. Right cover
Open to remove paper jams.
7. Paper pick up cover
Used with the 2000-sheet input drawer to pass paper to the printer. This cover can
be opened to remove paper jams from the 2000-sheet input drawer (Tray 3).
8. 2000-sheet input drawer (Tray 3)
Optional feature that holds up to 2000 sheets of paper for high-volume printing.
Printer sits atop the 2000-sheet input drawer.
9. 2000-sheet input drawer (Tray 3) adjusters.
Used to support the 2000-sheet input drawer and printer. Can be adjusted to
stabilize the printer. (Illustration also shows casters that enable the printer to be
rolled very short distances.)
10. Paper size indicator
Indicator that show paper size in the paper tray.
11. Paper input Tray 2
Holds 500 sheets of A3, A4, B4, Letter, Legal, or Ledger paper.
12. Power switch
Used to turn power on and off to the printer.
13. Paper size indicators
Indicators that show paper size in the paper trays.
14. Paper input Tray 1
Holds 500 sheets of A4, B4, Letter and Legal.
15. Front cover
Open to remove paper jams. Also opened to remove paper jams from the duplex
unit.
16. Operator control panel
Used for printer operation and status display.
17. Face-up output tray
Holds approximately 100 sheets of paper delivered face up and uncollated.
8 User's Guide
Page 33

Printer Parts and Locations—Rear and Left View
Figure 5. Key Printer Parts and Locations—Rear and Left View
Chapter 1. About Your Printer 9
Page 34

1. Left cover
Open to access or install the optional duplex unit and also remove paper jams.
2. Face-up output tray
Holds approximately 100 sheets of paper delivered face up and uncollated.
3. Left ventilation openings
Enables airflow. Keep these ventilation openings free of obstruction and debris.
4. Power receptacle
Used to attach printer power cable to power source.
5. Input/output connectors
Used to attach data cables between the options controller card and selected
options such as the 2000-sheet input drawer and 2000-sheet finisher.
6. Power receptacle
Used to attach the 2000-sheet input drawer power cable to a power source.
7. Controller card slot
Opening where the controller card and options controller card are mounted inside
the printer.
8. Rear ventilation openings
Enables airflow. Keep these ventilation openings free of obstruction and debris.
10 User's Guide
Page 35

Printer Parts and Locations—Optional 2000-Sheet Finisher
Figure 6. Key Printer Parts and Locations-Optional 2000-Sheet Finisher
Chapter 1. About Your Printer 11
Page 36

1. Upper paper access cover (top cover)
Open to remove paper jams.
2. Lower paper access cover (input cover)
Open to remove paper jams.
3. Stapler cover
Open to access stapler for loading staples or removing jammed staples.
4. Lower output bin
Used to stack paper.
5. Middle output bin
Used to stack paper.
6. Upper output bin
Used to stack paper.
12 User's Guide
Page 37

Optional Features
Optional features that you can order (or may have been ordered and installed on your
printer at the time of purchase) include:
Duplex Unit
Enables printing on both sides of paper. This is often called two-sided printing or duplex
printing. If you order this feature, you may want to consider ordering additional memory
as the printer requires at least 8 MB of DRAM memory to support duplex printing.
Upper 500 Sheet Paper Tray (Tray 1)
Provides replacement for the original paper tray. Tray 1 does not support paper sizes
A3 and ledger.
Lower 500 Sheet Paper Tray (Tray 2)
Provides replacement for the original paper tray. Tray 2 supports paper sizes A3, A4,
B4, Letter, Legal, and Ledger.
2000-Sheet Paper Input Drawer (Tray 3)
Provides up to 2000 sheets of paper in A3, A4, B4, Letter, Legal, or Ledger sizes. The
2000-sheet paper input drawer (Tray 3) is sturdy and sits upon four rollers thus
enabling you to place the printer on top of this feature as shown in Figure 2 on page 4.
If you order this feature, you do not need to order the optional printer stand.
This feature requires that the options controller card feature be installed in the printer.
Chapter 1. About Your Printer 13
Page 38

2000-Sheet Finisher
Supports stacking and stapling of print jobs. The 2000-sheet finisher attaches to the
side of the printer and sits upon rollers. The 2000-sheet finisher is attached to the
printer in place of the face-up tray and requires that the 2000-sheet input drawer be
installed. This feature has three paper bins that store printed jobs.
Table 1. 2000-Sheet Finisher Capacity-Standard Paper Sizes
Paper Size Output Bin Total Sheets
A4, A5, B5, letter or executive Upper 600 sheets
A4, A5, B5, letter or executive Middle 700 sheets
A4, A5, B5, letter or executive Lower 700 sheets
Table 2. 2000-Sheet Finisher Capacity-Large Paper Sizes
Paper Size Output Bin Total Sheets
A3, B4, legal or ledger Upper 300 sheets
A3, B4, legal or ledger Middle 350 sheets
A3, B4, legal or ledger Lower 350 sheets
Included with the 2000-sheet finisher is a stapler. The stapler provides a 2,000 staple
cartridge. The stapler supports three stapling styles: oblique, parallel 1 place, and
parallel 2 places. (For information on using the stapler function, review the information
provided with the printer driver. You select stapling options from the printer driver, not
from the printer operator panel.)
When the stapling feature is used, bin 1 can hold 300 sheets, bins 2 and 3 each can
hold 350 sheets. The stapling feature can staple 20 sheets together in one set. Each
bin can hold up to 30 sets of stapled paper if the total number of sheets is less than
300. (Or a maximum of 15 sets with 20 sheets stapled together per set.)
This feature requires the options controller card and 2000-sheet input drawer features
are installed in the printer.
Options Controller Card
Supports use of the 2000-sheet input drawer (Tray 3) and the 2000 sheet finisher. The
card plugs into the printer controller card to provide use of selected options.
If you plan to use either the 2000-sheet input drawer (Tray 3) or 2000-sheet finisher,
you must also order this feature.
US 9 Foot Line Cord
Enables you to supply power to the printer when the 2000-sheet input drawer (Tray 3)
or 2000 sheet finisher is installed. :
14 User's Guide
Page 39

US 6 Foot Chicago Line Cord
Meets City of Chicago, Illinois specifications.
Printer Stand
Enables you to place the printer on top for easy access. The printer stand is mounted
on four wheels and provides a sturdy stand. The printer stand has doors that open for
paper and supplies storage. If you order the 2000-sheet input drawer (Tray 3), you do
not need to order the printer stand as the printer sits atop the 2000-sheet input drawer
(Tray 3).
Envelope Feeder
Enables envelopes to be fed directly to the printer for printing. Useful for printing large
numbers of envelopes. The envelope feeder supports COM 10, B5, C5, DL, and
Monarch size envelopes. You can stack up to 100 envelopes in the feeder.
Printer Memory
Supports processing of print jobs. There are two kinds of memory available with this
printer: DRAM and Flash.
DRAM Memory
DRAM memory is used to store fonts that are downloaded from the operating system
(this enables fonts to be used that are not resident on the printer).
Additional DRAM memory is required to support optional features, such as duplex
printing. (See Chapter 8, “Managing Printer Memory” on page 197. to determine how
much memory is needed for optional features.)
DRAM memory can be increased to a maximum of 68 MB (4MB installed and two
32MB DRAM SIMMs). DRAM memory is available in 4 MB, 8 MB, 16 MB, and 32 MB
SIMMs. There are two slots provided on the printer controller. To install the maximum
amount of memory, you would install two 32 MB SIMMs. For a detailed discussion on
memory management and to determine how much memory is needed to support data
streams and optional features, see Chapter 8, “Managing Printer Memory” on
page 197.
Flash Memory
Flash Memory is used to store fonts that are downloaded from the operating system
(this enables fonts to be used that are not resident on the printer). Flash memory
enables fonts to be available permanently until you remove the fonts from flash
memory. This is useful if you use a custom designed font or a unique font that is used
in many print jobs. Storing the font on flash memory improves print performance. There
is one slot provided for flash memory. You can order either a 2 MB or 4 MB Flash
SIMM. For a detailed discussion on memory management, see Chapter 8, “Managing
Printer Memory” on page 197.
Chapter 1. About Your Printer 15
Page 40

Hard Drive
Supports processing of print jobs and storage of fonts. Fonts can be stored on the hard
drive which enables the printer to print fonts that are not resident on the printer. The
hard drive is a 2.5 inch drive with 810 MB of storage. You can install only one hard
drive on the printer controller. For a detailed discussion on memory management, see
Chapter 8, “Managing Printer Memory” on page 197.
Adobe PostScript
Provides Adobe PostScript Level 2 support and when installed, supplies 65 PostScript
Adobe Type 1 resident printer fonts. The Adobe PostScript feature is contained on one
SIMM and plugs into the printer controller. The 65 Adobe Type 1 fonts are described in
“PostScript Fonts” on page 21.
Note: If you purchased the IBM Network Printer 24PS, you will not need to order this
feature. Also, the IBM Network Printer 24PS comes with 12 MB of RAM standard to
support PostScript printing.
IPDS
Provides Intelligent Presentation Data Stream (IPDS) support on one SIMM. With IPDS
installed, you can print jobs from applications that use IPDS thus providing compatibility
with many host based printers.
Network Card for Ethernet (10Base2 or 10BaseT)
Enables you to attach this printer to Ethernet based LANs. (A separate manual is
shipped with this feature that describes supported functions.)
Network Card for Token Ring
Enables you to attach this printer to Token Ring based LANs. (A separate manual is
shipped with this feature that describes supported functions.)
Twinax SCS Interface Card
Enables you to attach this printer to host and workstations that use Twinax
communications. (A separate manual is shipped with this feature that describes
supported functions.)
Coax SCS/DSC/DSE Interface
Enables you to attach this printer to host and workstations that use Coax
communications. (A separate manual is shipped with this feature that describes
supported functions.)
16 User's Guide
Page 41

Ordering Optional Features
To order optional features, contact your IBM Authorized Dealer or IBM Sales
Representative.
Table 3 (Page 1 of 2). Optional Feature Descriptions and Order Numbers
Feature Description Feature
Number
Duplex Unit Enables printing on both sides of
paper, which is called duplex.
This feature requires at least 8
MB of DRAM memory to support
duplex printing.
Upper 500 Sheet Paper Tray (Tray1)Provides replacement for original
paper tray. Tray 1 does not
support paper sizes A3 and
Ledger.
Lower 500 Sheet Paper Tray (Tray2)Provides replacement for original
paper tray. Tray 2 supports paper
sizes A3, A4, B4, Letter, Legal,
and Ledger.
2000-Sheet Paper Input Drawer
(Tray 3)
2000-Sheet Finisher Provides ability to staple print jobs
Options Controller Card Supports use of 2000-Sheet Input
Envelope Feeder Enables envelopes to be fed
4MB DRAM SIMM Supports processing of print jobs. 4304 63H2463
8MB DRAM SIMM Supports processing of print jobs. 4308 63H2465
16MB DRAM SIMM Supports processing of print jobs. 4316 63H2467
32MB DRAM SIMM Supports processing of print jobs. 4332 63H2469
2MB Flash SIMM Supports processing of print jobs. 4030 63H2443
Provides up to 2000 sheets of
paper in A3, A4, B4, Letter, and
Legal. This feature requires the
options controller card feature
be installed.
together and stack output. This
feature requires the options
controller card and 2000-sheet
input drawer features are
installed.
Drawer (Tray 3) and 2000-Sheet
Finisher.
directly to the printer for printing.
The envelope feeder supports
COM 10, B5, C5, DL, and
Monarch size envelopes. You can
stack up to 100 envelopes in the
feeder.
4402 63H4470
4503 63H4478
4504 63H4480
4520 63H4472
4620 63H5662
4230 63H4484
4511 63H4476
Part Number
Chapter 1. About Your Printer 17
Page 42

Table 3 (Page 2 of 2). Optional Feature Descriptions and Order Numbers
Feature Description Feature
Number
4MB Flash SIMM Supports processing of print jobs. 4032 63H2444
Hard Drive 810 MB Supports processing of print jobs. 4320 63H2490
Printer Stand Enables printer to be placed on
top and provides for paper
storage. Do not order if you
installed the 2000-sheet input
drawer option.
Adobe PostScript Level 2 SIMM Provides Adobe PostScript Level 2
support and when installed,
supplies 65 PostScript Adobe
Type 1 resident printer fonts.
Do not order this feature if you
purchased the IBM Network
Printer 24PS.
IPDS SIMM Provides Intelligent Presentation
Data Stream (IPDS).
Network Card for Ethernet
(10Base2 or 10BaseT)
Network Card for Token Ring Enables you to attach this printer
Twinax SCS Interface Card Enables you to attach this printer
Coax SCS/DSC/DSE Interface
Card
US 9 Foot Line Cord Attaches to printer when either
US 6 Foot Chicago Line Cord Meets City of Chicago, Illinois
Parallel Printer Cable Parallel printer cable that meets
Enables you to attach this printer
to Ethernet based LANs.
to Token Ring based LANs.
to host and workstations that use
Twinax communications.
Enables you to attach this printer
to host and workstations that use
Coax communications.
2000-Sheet Input Drawer (Tray 3)
or 2000-Sheet Finisher is installed.
specifications.
IEEE Standard 1284-1994 and
provides bidirectional
communication between host and
printer. Cable is 3 meters
(approximately 10 feet) in length.
3050 63H4482
4810 63H5651
4820 63H4490
4161 63H2142
4120 63H2141
4141 63H2445
4171 63H2447
N/A 6952300
N/A 6952301
N/A 63H1994
Part Number
18 User's Guide
Page 43

Ordering Supplies
To order supplies, contact your IBM Authorized Dealer or IBM Printing Systems
Company Supplies. In the United States or Canada, you can contact IBM Printing
Systems Company Supplies by calling toll-free 1-888-IBM-PRINT (1-888-426-7746).
In other countries, contact your point of purchase for information about where to order
supplies or you can call IBM Supplies Fulfillment Operations at the following numbers:
Denmark: 800 15534
Finland: 08001 13110
France: 0590 5871
Germany: 0130 818 005
Italy: 1678 78349
Netherlands 043 350 2756
Spain 900 983131
Sweden: 0207 94270
United Kingdom: 08009 68679
You can also call IBM Supplies Fulfillment Operations at 31-43-350 2756.
Table 4. Supplies Descriptions and Part Numbers
Supply Description Part Number
Toner Cartridge 15,000 impressions (See note 1) 63H5721
Usage kit (Low Voltage) 350,000 impressions (See note 2) 63H5718
Usage kit (High Voltage) 350,000 impressions (See note 2) 63H5719
Staple Cartridges 3 cartridges with 2,000 staples in each
cartridge. Used with the 2000-sheet
finisher's staple function.
Note:
1. For toner cartridge, the approximate average yield was established with a coverage of 5 percent. An
impression is defined as one side of a printed letter size page. (A duplex page or print on both sides of the
paper is defined as two impressions.) The TonerMiser (ECONO Mode) feature can provide double the page
yield, depending upon the type of printing.
2. The usage kit includes a fuser assembly, pick-up rollers, feed rollers, separation rollers, and transfer charging
roller assembly. The 350,000 impressions (pages) is a guideline; see Appendix D, “Installing the Usage Kit”
on page 241 for more information on when you need to install a usage kit.
63H5720
Chapter 1. About Your Printer 19
Page 44

Describing Resident Fonts
Resident fonts, also called internal fonts, are fonts that are stored on the printer. By
storing these fonts on the printer, the fonts do not need to be downloaded from the
operating system which helps improve print time. There are two types of fonts available:
PCL and Adobe PostScript. The PCL fonts are standard, while the Adobe PostScript
fonts are only available if the Adobe PostScript feature is installed or your purchased
the IBM Network Printer 24PS model.
Network Administrator Tip
By using resident fonts, printing time may be improved because the fonts do not
need to be downloaded from the operating system. In a network environment,
reducing the number of fonts that are downloaded per print job could increase print
performance. You may want to encourage your users to select and use from their
applications those fonts that are resident on the printer.
PCL Fonts
The following PCL fonts are resident on the printer. If you are not familiar with these
fonts, you can print a listing of these fonts directly from the printer. See “Printing a List
of PCL5e Fonts” on page 39 for information on printing a font list.
35 PCL Outline Fonts - commonly called Intellifonts:
– Albertus Medium, Albertus Extra Bold
– Antique Olive, Antique Olive Bold, Antique Olive Italic
– CG Omega, CG Omega Bold, CG Omega Italic, CG Omega Italic Bold
– CG Times, CG Times Bold, CG Times Italic, CG Times Bold Italic
– Clarendon Condensed
– Coronet
– Courier, Courier Bold, Courier Italic, Courier Bold Italic
– Garmond Antiqua
– Garmond Halfbett
– Garmond Kursiv
– Garmond Kursiv Halfbett
– Letter Gothic, Letter Gothic Bold, Letter Gothic Italic
– Marigold
– Univers Medium, Univers Bold, Univers Medium Condensed, Univers Medium
Condensed Italic, Univers Bold Condensed Italic
10 True Type Fonts
– Arial, Arial Bold, Arial Italic, Arial Bold Italic
– Symbol
– Times New Roman, Times New Roman Bold, Times New Roman Italic, Times
New Roman Bold Italic
– Wingdings
2 Bit Mapped Fonts
– LinePrinter 16.7 pitch, 8.5 Point (portrait)
20 User's Guide
Page 45

– LinePrinter 16.7 pitch, 8.5 point (landscape)
PostScript Fonts
The optional Adobe PostScript feature or the IBM Network Printer 24PS provides 65
PostScript Adobe Type 1 resident fonts. If you are not familiar with these fonts, you can
print a listing of these fonts directly from the printer. See “Printing a List of PostScript
Fonts” on page 39 for information on printing a font list.
Acaslon Regular, Acaslon Italic, ACaslon Semibold, and ACaslon Semibold Italic
AGaramond Regular, AGaramond Bold, AGaramond Bold Italic, and AGaramond
Italic
Americana and Americana Extra Bold
Barmemo Bold, Barmemo Extra Bold, Barmemo Medium, and Barmemo Regular
Blackoak
Carta
Courier, Courier Bold, Courier Oblique, Courier Bold Oblique
Formata Italic, Formata Medium, Formata Medium Italic, and Formata Regular
Helvetica, Helvetica Bold, Helvetica Oblique, Helvetica Bold Oblique, Helvetica
Condensed, Helvetica Condensed Oblique, Helvetica Narrow, Helvetica Narrow
Bold, Helvetica Narrow Oblique, Helvetica Narrow Bold Oblique
ITC Avant Garde Book, ITC Avant Garde Demi, ITC Advant Garde Book Oblique,
ITC Advant Garde Demi Oblique
ITC Bookman Light, ITC Bookman Demi, ITC Bookman Light Italic, ITC Bookman
Demi Italic
ITC Zapf Chancery Medium Italic
ITC Zapf Dingbats
Lithos Black and Lithos Regular
New Century Schoolbook Roman, New Century Schoolbook Bold, New Century
Schoolbook Italic, New Century Schoolbook Bold Italic
Palatino Roman, Palatino Bold, Palatino Italic, Palatino Bold Italic
Parisian
ParkAvenue
Poetica Supp Ornaments
Symbol
Tekton and Tekton Bold
Times Roman
Times Bold, Times Italic, and Times Bold Italic
Trajan Bold
Woodtype Ornaments Two
Chapter 1. About Your Printer 21
Page 46

Using Printer Drivers
Printer drivers are shipped with this printer to enable users to select many printer
functions without needing to make changes at the printer operator panel. Selections
made by users from the printer drivers always override selections made at the operator
panel.
Network Administrator Tip
Make sure you are familiar with the printer drivers you use on your network. Most
users will not change or select functions from the printer operator panel, but instead
will select functions from the printer driver. It is also important to check the IBM
Home Page and Printing Systems Company Home Page for updated drivers which
may improve print performance.
Most of these printer drivers are shipped with an installation program that assists you in
installing the printer driver on your operating system. Installation information is included
with the printer driver.
The printer may include diskettes which contain printer drivers for the following
systems:
AIX 3.2.5 and AIX 4.1 (colon files)
Macintosh 7.0
OS/2 2.11 and OS/2 Warp
Windows 3.1, Windows 3.11, Windows for Workgroups 3.11, Win-OS/2 for OS/2
2.11, and Windows with OS/2 Warp
Windows 95
Windows NT 3.51
Notes:
1. PostScript drivers are shipped with the optional PostScript feature or with the
printer if you purchased the IBM Network Printer 24PS.
2. For information on attaching this printer using specific attachments, such as Coax,
review the documentation shipped with the attachment feature.
22 User's Guide
Page 47

Obtaining Printer Drivers
Some printer drivers may be made available through the World Wide Web as described
below. These printer drivers may not have been available at the time this printer was
shipped or may have been updated since the printer was shipped.
To obtain printer drivers, follow these steps:
1. Access the IBM Home Page at
Company Home Page at
2. At the IBM Home Page, use the Search tool and search for Network Printer 24 or
24PS. This will lead you to useful information about the printer and printer driver
support.
3. At the IBM Printing Systems Company Home Page, select Printer Drivers/Product
Updates.
4. Use the menu selections to find freeware, printer drivers, software fixes, or
documentation that you want to obtain.
http://www.ibm.com
or the IBM Printing Systems
http://www.can.ibm.com/ibmprinters
.
Chapter 1. About Your Printer 23
Page 48

Using Network Printer Manager Utility
Network Printer Manager (NPM) Utility is an easy to use graphical interface in US
English for network administrators that can alert you to events, such as a paper jam,
out of toner condition, and other information such as number of pages printed.
The initial versions of NPM that are available support these operating systems:
IBM OS/2
Microsoft Windows 95
Microsoft Windows NT (3.51 and 4.0)
NPM enables you to install and configure IBM Network Printers in Local Area Networks
(LANs), including Novell 3.12 and 4.x networks in bindery emulation (printer network
cards can be NDS-configured with NWAdmin). NPM also monitors and provides
network printer status using industry standard, open systems System Network
Management Protocol (SNMP). SNMP supports Management Information Base (MIB)
which is a collection of information that describes the printer's functions and features.
NPM using SNMP can provide status information about the printer such as on or offline,
paper jam, out of toner, and input tray empty. NPM also provides information about
printer properties, such as printer type, pages printed, paper tray, type of paper used,
output bins, network address, options installed, and number of pages printed.
Network Administrator Tip
The Network Printer Manager utility alerts you to events, such as a paper jam or
out of toner, at your workstation. The utility provides a graphical user interface that
enables you to check status of a printer. For instance, a screen is provided that
shows the printer name and the printer status, such as normal, pages printed, and
so on.
If the printer were out of toner, the status would indicate out of toner. An alarm log
is provided so you can view messages such as paper jam.
This utility is a useful tool to help you manage this printer in a network environment.
Other versions will be made available on the WWW through the IBM Printing Systems
Company home page. Follow the instructions below for obtaining updated versions.
Obtaining Network Printer Manager Utility
To obtain Network Printer Manager Utility, follow these steps:
1. Access the IBM Home Page at
Company Home Page at
2. At the IBM Home Page, use the Search tool and search for Network Printer 24 or
24PS. This will lead you to useful information about the printer and Network Printer
Manager.
24 User's Guide
http://www.ibm.com
or the IBM Printing Systems
http://www.can.ibm.com/ibmprinters
.
Page 49

3. At the IBM Printing Systems Company Home Page, select Printer Drivers/Product
Updates.
4. Use the menu selections to find freeware, printer drivers, software fixes, or
documentation that you want to obtain.
Using Network Printer Resource Utility
Network Printer Resource Utility (NPRU) is a utility that enables administrators to
download fonts and PCL macros (overlays) to the printer. Using NPRU, the network
administrator can identify PCL Intellifonts, TrueType fonts, overlays, or PostScript Type
1 fonts on a workstation and download them to temporary or permanent DRAM on the
printer or to Flash memory or a hard drive, if these options are available on the printer.
The network administrator can provide a network address for the NPRU data base of
downloaded resources to workstation users. Those users can then use the printer
driver to connect to the data base, enabling them to select downloaded fonts and
overlays from within their applications.
The NPRU is a separate program that uses the printer driver programs to perform the
download function. For more information about using NPRU, refer to the README file
that is supplied with the utility.
Obtaining Network Printer Resource Utility
NPRU is shipped with the OS/2 printer drivers. To obtain other versions or updates,
follow these steps:
1. Access the IBM Home Page at
Company Home Page at
2. At the IBM Home Page, use the Search tool and search for Network Printer 24 or
24PS. This will lead you to useful information about the printer and Network Printer
Manager.
3. At the IBM Printing Systems Home Page, select Printer Drivers/Product Updates.
4. Use the menu selections to find freeware, printer drivers, software fixes, or
documentation that you want to obtain.
http://www.ibm.com
http://www.can.ibm.com/ibmprinters
or the IBM Printing Systems
.
Using Print Services Facility Software with IPDS
The combination of Print Services Facility software and the Intelligent Presentation Data
Stream (IPDS) provides access to host applications and enhanced error recovery. With
the IPDS feature installed, print jobs using IPDS do not need to be converted into other
data streams, such as PCL.
The following Print Services Facility (PSF) software applications provide print support
for this printer:
PSF/MVS V2.1.0, V2.1.1, and V2.2.0
PSF/VSE V2.1.1
PSF/VM V2.1.1
Chapter 1. About Your Printer 25
Page 50

PSF/400 V3.1, V3.2, and V3.6
– OS/400 AFP=Yes, V2.2, V2.3, and V3.0.5
PSF for AIX V2.1
PSF/2 V2.0
For detailed information, review the appropriate PSF documentation or access
information at
http://www.can.ibm.com/ibmprinters
Obtaining Adobe Acrobat Portable Data Files
This manual is available in Adobe Acrobat Portable Data File (PDF) format for online
viewing and printing. To obtain this manual in PDF format:
1. Access the IBM Home Page at
Company Home Page at
2. At the IBM Home Page, use the Search tool and search for Network Printer 24 or
24PS.
3. At the IBM Printing Systems Home Page, select Printer Drivers/Product Updates.
4. Use the menu selections to find freeware, printer drivers, software fixes, or
documentation that you want to obtain.
http://www.ibm.com
http://www.can.ibm.com/ibmprinters
.
or the IBM Printing Systems
.
26 User's Guide
Page 51

Chapter 2. Using the Operator Panel
This chapter describes how to use the Network Printer 24 and 24PS operator panel.
The operator panel location is shown below:
The operator panel consists of a message display area, status indicator lights, and
operator keys.
Figure 7. IBM Network Printer 24 Operator Panel
Copyright IBM Corp. 1997 27
Page 52

Network Printer
24PS
Power
Online
Menu
Figure 8. IBM Network Printer 24PS Operator Panel
For information about indicator lights, see “Understanding the Operator Panel
Indicator Lights” on page 29.
For information about the most common messages you will see in the message
display area, see “Understanding Common Messages” on page 42. For a
complete listing, see Appendix B, “Understanding Printer Messages” on page 215.
For information about operator panel keys, see “Using the Operator Panel Keys” on
page 30 and “Navigating Menus — Two Examples” on page 31.
For an overview of some of the most common operator panel tasks, see
“Performing Other Common Operator Panel Tasks” on page 38.
For a complete overview of all printer menus, see Chapter 3, “Navigating Through
the Operator Panel Menus” on page 43.
Continue
Item
Page Eject
Value
Cancel Print
Shift
Attention
Enter
c9pu208
28 User's Guide
Page 53

Understanding the Operator Panel Indicator Lights
The indicator lights, which can be on, off, or blinking, are shown in Figure 9.
Figure 9. Operator Panel Indicator Lights
Indicator Condition
Power
Online
Continue
Page Eject
Attention
On
—the printer is on.
Off
—printer is turned off or unplugged from the power outlet.
On
—the printer is online and idle. (Printer must be online to print
jobs.)
Blinking
—the printer is online and receiving or processing data.
Off
—the printer is offline. The printer must be offline before you can
change the menu settings.
On
—a condition that requires operator attention exists. Press the
Continue key to resume printing or press the Cancel Print. key to
cancel printing. (If the Auto-Continue function is on, the printer may
automatically resume printing after thirty seconds. For more
information, see the description of the AUTOCONT item under
“Configuration (Config) Menu” on page 51.)
Off
—the printer is operating normally.
On
—a page or partial page is stored in memory. If you are printing a
PCL5e job, you can press the Page Eject key to print the page. The
Page Eject key has no effect on PostScript or IPDS jobs.
Blinking
—the printer is printing the PCL5e page you pressed the
Page Eject key to print. If you are running a continuous test
(CONTINUOUS TEST from the Test Menu) and you press the
Cancel Print key, the Page Eject indicator blinks to inform you that
the printer is canceling the test.
Off
—no pages are stored in the printer memory.
Blinking
—the printer requires operator attention.
Off
—the printer is operating normally.
Chapter 2. Using the Operator Panel 29
Page 54

Using the Operator Panel Keys
The operator panel keys enable you to configure and operate the printer. They are
located at the bottom of the operator panel.
Use the Online key to take the printer offline or to put it back online.
Note: The printer must be offline before you can change menu settings.
Use the Continue key to continue printing when the Continue light is lit.
Use the Page Eject key to print a PCL5e job that is stored in the memory
buffer of the printer. (The Page Eject indicator light is on when a page is
in the buffer.) The printer prints the page even if it is not complete in the
memory buffer. The Page Eject key does not apply to PostScript or IPDS
jobs.
The printer must be offline to use this key.
Use the Cancel Print key to cancel the current print job. The printer
finishes printing the current page before it cancels the rest of the job.
After the job is canceled, the printer begins printing the next job in the
queue.
The printer must be offline to use this key.
Use the Enter key to change a menu item to a new value when the value
is displayed in the message display area. After you press Enter, an
asterisk (*) appears next to the value indicating that the value is active.
Use the Menu key to scroll through the menu list. As you scroll through
the list, the current menu is displayed in the message display area.
Note: Before you can navigate menus, the printer must be offline.
Use the Item key to scroll through the list of items for the menu listed in
the message display area. As you scroll through the list, the current item
and, if applicable, the current value for the item is displayed in the
message display area, just below the name of the current menu. An
asterisk (*) appears next to the current value.
Use the Value key to scroll through a list of acceptable values for a menu
item.
Note: To select a new value, press the Enter key when the value is
displayed in the message display area. An asterisk (*) appears next to
the value, indicating that it is now active.
Use the Shift key, by pressing and holding the key, to reverse the order in
which you scroll when you use the Menu, Item, or Value keys.
30 User's Guide
Page 55

Navigating Menus — Two Examples
There are two types of menus: action menus and configuration menus.
Action Menus
Action menus contain a list of items you can select to perform specific actions, such as
printing a list of active fonts or printing a printer configuration page. There are two
action menus: the Test Menu and the Machine Info Menu.
To work with action menus:
1. Make sure the printer is offline. If the printer is online, press the Online key to
take it offline.
2. Press the Menu key to display the menu you want.
3. Press the Item key to display the action item you want.
4. Press the Enter key to perform the action you selected.
For an example of working with an action menu, see “Example 1 — Printing the Printer
Configuration Page” on page 32.
Configuration Menus
Configuration menus contain lists of items that define current settings for the printer,
such as default fonts, default input trays and output bins, and attachment configuration
settings.
To work with configuration menus:
1. Make sure the printer is offline. If the printer is online, press the Online key to
take it offline.
2. Press the Menu key to display the menu you want.
3. Press the Item key to display the item you want.
4. Press the Value key to display the value you want.
5. Press the Enter key to change the setting to the value currently displayed in the
message display area. An asterisk (*) appears next to the value after it is selected.
Note: Once you select a new value, it stays selected until you change it or you reset
the printer defaults. Menu settings are saved when you power off the printer.
For an example of working with a configuration menu, see “Example 2 — Reducing
Toner Usage” on page 36.
Chapter 2. Using the Operator Panel 31
Page 56

Example 1 — Printing the Printer Configuration Page
1. Before printing a configuration page, make sure all print jobs are finished. If you
need to immediately print a configuration page, then cancel the job that is currently
printing. See “Canceling a Print Job” on page 38.
2. Make sure the printer is offline. If the printer is online, press the Online key to
take it offline.
3. Press the Menu key once. TEST MENU appears in the message display area.
4. Press the Item key once. CONFIG PAGE appears in the message display area.
Note that the menu name appears on the top line and the action item appears on
the second line.
32 User's Guide
Page 57

5. Press the Enter key to print the configuration page. (If you do not have letter or A4
paper loaded, the message Load Letter may be displayed; press the Continue key
to print the configuration page.) Printing the configuration page takes a moment or
two.
Important
The following figure shows a sample printer configuration page. Your actual
configuration page will contain different information based on installed options
and date of manufacture.
IBM Network Printer 24
Configuration Page
TEST MENU MEMCONFIG MENU MACHINE INFO
CONFIG PAGE
PRINT PS FONTS
PRINT PCL FONTS
PRINT PS DEMO
CONTINUOUS TEST
RESET PRINTER
FACTORY DEFAULT
FORMATDISK
ONLINE HEX PRT
PAPER MENU
SOURCE = TRAY2
OUTPUT = MAIN
TRAYSWITCH = OFF
MANUAL = OFF
AUXSIZE = LETTER
ENVSIZE = COM10
DUPLEX = ON
BINDING = LONG
TRAYRENUM = OFF
CONFIG MENU
JAMRECOVERY = OFF
AUTOCONTINU = ON
DENSITY = 15
PWRSAV=30 MIN
QUALITY = REFINE
PCL SAVE = OFF
PS2 SAVE= OFF
PARALLEL MENU
PERSONALTY= AUTO
BI-DI = ON
PORT TIMEOUT = 15
PCL MENU
PAGEPROT= AUTO
COPIES = 1
PAGESIZE= LETTER
ORIENTAION= P
FORM = 60 LINES
FNTSCR = INTERNAL
FONTNUM = 0
PT.SIZE = 12.00
PITCH = 10.00
SYMSET = ROMAN-8
PS MENU
PAGEPROT= AUTO
COPIES = 1
PRINT ERRS = OFF
ETHERNET MENU
PERSONALTY= AUTO
PORT TMEOUT = 15
PAGECOUNT
ERROR LOG
TONER CTR
FUSER CTR
LANGUAGE MENU
LANG = ENGLISH
INSTALLED OPTIONS
DUPLEX
ENVELOPE FEEDER
PS
ETHERNET
DISK
32 MB Extra Memory
TOTALMEMORY = 36 MB
AUTOSENSED PAPER
TRAY 1= LETTER
TRAY2 = 11 X 17
PRINTER DETAILS
PAGECOUNT = 3330
TONER CTR = 1741
FUSER CTR =1741
CODE LEVELS
CTL 1.04
PCL 1.3.1
PS 1.06
EN 5.16
c9pu136
6. To restore the printer to READY status, press the Online
Network Administrator Tip
The configuration page lists all menus and menus items in the same order as
displayed on the printer operator panel. You can use the configuration page as a
map for the menus. You may want to display a configuration page near the printer
to assist users in selecting menus and menu items.
Chapter 2. Using the Operator Panel 33
Page 58

Reading the Printer Configuration Page
The printer configuration page, as shown in Figure 10 on page 35, lists the following
information:
1. Menus—All of the menu settings currently active for your printer. Note that the list
of menus you see is determined by the options you have installed; for example,
you see the Ethernet Menu only when you have the Ethernet attachment installed.
For a description of all available menus, see Chapter 3, “Navigating Through the
Operator Panel Menus” on page 43.
2. Installed Options—The options and memory you have installed. In this example,
optional Envelope Feeder and Duplex unit are installed.
Important: IBM recommends printing the Printer Configuration Page whenever you
install a new option. Review Installed Options to make sure the printer recognizes
the option you installed. If the option is not listed, reinstall the option again.
3. Autosensed Paper—The paper loaded in various trays. In this example, letter
size paper is loaded in Tray 1 and 11 by 17 inch paper is loaded in Tray 2.
4. Printer Details—Page counts for the printer, the toner cartridge, the fuser, and
printer program code levels.
a. Page Count—The number of pages printed on the printer.
b. Toner CTR—The number of pages printed with the toner cartridge. (You
should reset the toner count whenever you replace the toner cartridge.) See
“Machine Information Menu” on page 80 for more information.
c. Fuser CTR—The number of pages printed with the fuser. (You should reset
the fuser counter whenever you replace the fuser.) See “Machine Information
Menu” on page 80 for more information.
d. Code Levels—The printer program code version levels installed on the printer
for the printer controller, data stream languages, and option code. If you need
to update the printer's “operating system,” also called controller code, or add
an option, you may need to update the following software with different
versions:
e. CTL—The printer controller program code version. (If you need to update the
printer's “operating system,” also called controller code, you will need this
number.)
f. PCL—The PCL data stream version.
g. PS—The PostScript data stream version.
h. EN—The Ethernet version.
Note: If you have other options installed or network interface cards, the list of Code
Levels will be different from the following example.
34 User's Guide
Page 59

IBM Network Printer 24
Configuration Page
TEST MENU MEMCONFIG MENU MACHINEINFO
CONFIG PAGE
PRINT PS FONTS
PRINT PCL FONTS
PRINT PS DEMO
CONTINUOUS TEST
RESET PRINTER
FACTORYDEFAULT
FORMAT DISK
ONLINE HEX PRT
PAPERMENU
SOURCE = TRAY 2
OUTPUT = MAIN
TRAYSWITCH = OFF
MANUAL = OFF
AUXSIZE = LETTER
ENVSIZE = COM10
DUPLEX = ON
BINDING = LONG
TRAYRENUM = OFF
CONFIG MENU
JAMRECOVERY = OFF
AUTOCONTINU = ON
DENSITY = 15
PWRSAV=30 MIN
QUALITY = REFINE
E
F
G
H
1
PRINTER DETAILS
PAGE COUNT = 3330
TONER CTR = 1741
FUSER CTR =1741
CODE LEVELS
CTL 1.04
PCL 1.3.1
PS 1.06
EN 5.16
PCL SAVE = OFF
PS2 SAVE = OFF
PARALLELMENU
PERSONALTY= AUTO
BI-DI = ON
PORT TIMEOUT = 15
PCL MENU
PAGEPROT =AUTO
COPIES = 1
PAGESIZE= LETTER
ORIENTAION= P
FORM = 60 LINES
FNTSCR = INTERNAL
FONTNUM = 0
PT.SIZE= 12.00
PITCH = 10.00
SYMSET = ROMAN-8
PS MENU
PAGEPROT =AUTO
COPIES = 1
PRINT ERRS = OFF
ETHERNET MENU
PERSONALTY= AUTO
PORT TMEOUT = 15
A
B
C
D
PAGECOUNT
ERROR LOG
TONER CTR
FUSER CTR
LANGUAGE MENU
LANG = ENGLISH
INSTALLEDOPTIONS
DUPLEX
ENVELOPE FEEDER
PS
ETHERNET
DISK
32 MB Extra Memory
TOTALMEMORY = 36 MB
AUTOSENSED PAPER
TRAY1= LETTER
TRAY2 = 11 X 17
PRINTER DETAILS
PAGECOUNT = 3330
TONER CTR = 1741
FUSER CTR =1741
CODE LEVELS
CTL 1.04
PCL 1.3.1
PS 1.06
EN 5.16
2
3
4
c9pu241
Figure 10. IBM Network Printer 24/24PS Configuration page
Chapter 2. Using the Operator Panel 35
Page 60

Example 2 — Reducing Toner Usage
The following example shows how to use less toner if you print jobs that do not require
high-quality resolution.
1. Make sure the printer is offline. If the printer is online, press the Online key to
take it offline.
2. Press the Menu key until you see CONFIG MENU.
3. Press the Item key until you see QUALITY=REFINE*. (REFINE is the factory
default; if it has already been changed, you will see the new value instead of
REFINE.)
36 User's Guide
Page 61

4. Press the Value key until you see QUALITY=ECONO.
5. Press the Enter key. An asterisk appears next to ECONO, indicating that it is now
the active value.
6. To restore the printer to READY status, press the Online key.
Chapter 2. Using the Operator Panel 37
Page 62

Performing Other Common Operator Panel Tasks
Below are some common tasks performed at the operator panel. Most other tasks
performed at the operator panel are similar to these tasks. Once you become familiar
with any of these tasks, you should be able to complete other tasks at the operator
panel.
Canceling a Print Job
Situation: You want to cancel the job that is currently printing.
Action:
1. Press the Online key to take the printer offline.
2. Press the Cancel Print key. The current job will be canceled and removed from
the queue after the printer completes the current page.
3. To restore the printer to READY status, press the Online key.
Selecting Binding for Duplex Print Jobs
Situation: You want to select how to print pages in duplex mode and the optional
duplex feature is installed in the printer. The binding item has two values: long or short.
Long prints the paper so that the document can be bound along the long edge, while
short prints the paper so the document can be bound on the short edge. Long is the
most common binding for documents while short is more common for calendars and
presentations.
Action:
1. Press the Online key until you see OFFLINE in the display.
2. Press the Menu key until you see PAPER MENU in the display.
3. Press the Item key until you see BINDING=LONG* in the display. (If this value
has already been changed, a value other than LONG will be displayed.)
4. Press the Value key until you see SHORT.
5. Press the Enter key to select the binding value. An asterisk (*) appears next to
the value, showing that it is active.
6. To restore the printer to READY status, press the Online key.
38 User's Guide
Page 63

Printing a Stored Page (PCL5e Jobs Only)
Situation: The Page Eject indicator is lit, indicating that the printer has stored data that
needs to be printed, but has not received a command to print the page.
Action:
1. Press the Online key to take the printer offline.
2. Press the Page Eject key. The page prints.
3. To restore the printer to READY status, press the Online key.
Note: The Page Eject key is valid only for PCL5e jobs; it does not print pages of
PostScript or IPDS jobs.
Printing a List of PCL5e Fonts
Situation: You want to see a list of the PCL5e fonts installed on the printer.
Action:
1. Press the Online key to take the printer offline.
2. Press the Menu key. TEST MENU appears in the display area.
3. Press the Item key until you see PRINT PCL FONTS.
4. Press the Enter key to print the PCL5e fonts list.
5. After the page prints, press the Online key to restore the printer to READY status.
Printing a List of PostScript Fonts
Situation: You have the optional PostScript Level 2 SIMM installed on your printer and
you want to see a list of the PostScript fonts.
Action:
1. Press the Online key to take the printer offline.
2. Press the Menu key. TEST MENU appears in the display area.
3. Press the Item key until you see PRINT PS FONTS. (This item appears only if
you have the optional PostScript Level 2 SIMM installed on your printer.)
4. Press the Enter key to print the PostScript fonts list.
5. After the page prints, press the Online key to restore the printer to READY status.
Printing a List of IPDS Fonts
Situation: You have the optional IPDS SIMM installed on your printer and you want to
see a list of the IPDS fonts.
Action:
1. Press the Online key to take the printer offline.
2. Press the Menu key. TEST MENU appears in the display area.
Chapter 2. Using the Operator Panel 39
Page 64

3. Press the Item key until you see PRINT IPDS FONTS. (This item appears only if
you have the optional IPDS SIMM installed on your printer.)
4. Press the Enter key to print the PostScript fonts list.
5. After the page prints, press the Online key to restore the printer to READY status.
Adjusting Print Density (Printing Darker or Lighter)
Situation: You want to increase or decrease the print density, making the print darker
or lighter.
Note: Adjusting the density affects toner usage. By setting a higher density value, you
may use more toner.
Action:
1. Press the Online key until you see OFFLINE in the display.
2. Press the Menu key until you see CONFIG MENU in the display.
3. Press the Item key until you see DENSITY=n* in the display, where n is the
density value currently selected. (6 is the factory default.)
4. Press the Value key until you see the value you want to assign to the toner
density; 15 is the darkest print, 0 is the lightest.
5. Press the Enter key to select the new density. An asterisk (*) appears next to the
value, showing that it is active.
6. To restore the printer to READY status, press the Online key.
Changing the Power-Savings (Sleep Mode) Interval
Situation: You want to change the power-savings mode to increase or decrease the
interval. When you first install your printer, the printer is set up to go into
power-savings mode (or sleep mode) after it is inactive for 30 minutes. In this mode,
the printer powers down most of its systems and therefore requires extra time to warm
up when the next print is requested.
Action:
1. Press the Online key until you see OFFLINE in the display.
2. Press the Menu key until you see CONFIG MENU in the display.
3. Press the Item key until you see PWRSAV=30* in the display. (If this value has
already been changed, a number other than 30 will appear in the display.)
4. Press the Value key until you see the value (number of minutes) you want to
assign to the power-saver feature.
5. Press the Enter key to select the new power-savings value. An asterisk (*)
appears next to the value, showing that it is active.
6. To restore the printer to READY status, press the Online key.
40 User's Guide
Page 65

Changing the Language Shown on the Display Panel
Situation: You want to display operator panel messages and menus in a language
other than English.
Action:
1. Press the Online key until you see OFFLINE in the display.
2. Press the Shift and Menu keys simultaneously. you see LANGUAGE MENU.
3. Press the Item key. LANG=ENGLISH* appears as the first menu item unless the
language has already been changed.
4. Press the Value key until you see the language you want to select.
5. Press the Enter key. An asterisk (*) appears next to the language, showing that it
is active.
6. To restore the printer to READY status, press the Online key.
Chapter 2. Using the Operator Panel 41
Page 66

Understanding Common Messages
The message display area is located at the top of the operator panel. The following
table describes the most common display messages. For a list of all messages, see
Appendix B, “Understanding Printer Messages” on page 215.
Message Description/Response
READY The printer is ready to receive a print job.
Response: None required.
WARMING UP... The printer is warming up. When it is ready to print, the message
changes to READY.
Response: None required.
I/O INITIALIZING The network interface card is initializing.
Response: None required.
OFFLINE The printer is offline and cannot receive print jobs.
Response: To receive printing jobs, press the Online key.
PCL PARALLEL The printer is online and receiving data for a PCL5e print job through
the parallel port.
Response: None required.
PS PARALLEL The printer is online and receiving data for a PostScript print job
through the parallel port.
Response: None required.
02 TONER LOW The toner is either low or depleted.
Response: Install a new toner cartridge. See “Changing the Toner
Cartridge” on page 140.
06 COVER OPEN A printer cover is open.
Response: Make sure all printer covers are closed.
LOAD
paper-size
tray
IN
A tray is out of paper. (Similar messages are displayed for the
auxiliary tray and optional envelope feeder.)
Response: Load paper. See “Loading Paper” on page 88.
42 User's Guide
Page 67

Chapter 3. Navigating Through the Operator Panel Menus
This chapter describes how to navigate through the printer menus. The following table
describes the basic function of each menu and lists the page where you can find more
information.
Notes:
1. Note that several of the menus and menu items listed in this book appear on your
operator panel only if you have a particular option installed. To see a list of menus
you can access and options you have installed, print a printer configuration page.
See “Example 1 — Printing the Printer Configuration Page” on page 32.
2. If you are unfamiliar with using the operator panel to work with menus, please read
“Using the Operator Panel Keys” on page 30 and “Navigating Menus — Two
Examples” on page 31 before continuing.
Use this menu To do this See page
TEST MENU Print the configuration page, font lists, and printer test pages; reset
the printer to use factory defaults; print a hexadecimal dump for
troubleshooting purposes.
PAPER MENU Select input trays, output bins, paper sizes, and duplex printing
options.
CONFIG MENU Define how the printer handles paper jams and certain other error
conditions; define toner density, power savings mode, and print
quality.
MEMCONFIG MENU Define whether the printer saves data stream information when it
switches ports.
PARALLEL MENU Define how the printer handles jobs sent through the parallel port,
including the data stream, bi-directional communications, and the
timeout setting.
PCL MENU Define how the printer handles PCL5e jobs including number of
copies, page size, page orientation, lines per page, font source, and
default font.
PS MENU Define how the printer handles PostScript jobs, including number of
copies and whether error messages are printed.
TOKEN RING MENU Define the data stream, timeout, and network address values for the
token-ring attachment.
ETHERNET MENU Define the data stream, timeout, and network address values for the
Ethernet attachment.
COAX SCS MENU Define how the printer handles SCS jobs sent through the coax
attachment.
TWINAX SCS MENU Define how the printer handles SCS jobs sent through the twinax
attachment.
COAX SETUP MENU Configure the coax environment. 69
TWINAX SETUP MENU Configure the twinax environment. 71
46
48
51
54
55
56
59
60
62
64
67
Copyright IBM Corp. 1997 43
Page 68

Use this menu To do this See page
COAX DSC/DSE MENU Define how the printer handles DSC/DSE jobs sent through the coax
attachment.
IPDS MENU Define how the printer handles IPDS jobs. 75
MACHINE INFO MENU Displays page counts, the error log, and the toner and fuser usage
counters.
LANGUAGE MENU Define the language the printer uses to display operator panel
messages and menus.
73
80
81
The following is a menu map you can use as a quick reference for navigating through
the menus. You can also print a printer configuration page and use that page as a
menu map.
Note: Depending upon your printer's configuration, some menus may not be
displayed. For instance, if you do not have a token ring network interface card installed,
the token ring menus are not displayed.
44 User's Guide
Page 69

Network Printer 24
Power
Attention
Online
Menu
Continue
Item
Page Eject
Value
Cancel Print
Shift
Enter
c9pu196
Figure 11. Operator Panel Menu Map
Chapter 3. Navigating Through the Operator Panel Menus 45
Page 70

Test Menu
Use the Test Menu to display basic information about the printer and to perform basic
troubleshooting tasks.
Notes:
1. To perform the action associated with the menu item you select, press the Enter
key.
2. The actual menu items you see depend on what options you have installed. To
find out what options you have installed, print a Printer Configuration Page. See
“Example 1 — Printing the Printer Configuration Page” on page 32.
3. If you are unfamiliar with using the operator panel to work with menus, please read
“Using the Operator Panel Keys” on page 30 and “Navigating Menus — Two
Examples” on page 31 before continuing.
4. If IPDS is the active data stream when the printer is taken offline, the following
Test Menu items will not be available:
CONFIG PAGE
PRINT PS FONTS
PRINT PCL FONTS
PRINT PS DEMO
PRINT SCS CHARS
These items reappear after a port timeout occurs (the length of the timeout
depends on the host or network attachment you use); they also reappear if you
power off the printer, wait twenty seconds, and then power on.
TEST MENU ITEM Description
CONFIG PAGE Prints the Printer Configuration Page. See “Example 1 — Printing the Printer
Configuration Page” on page 32 for more information.
PRINT PS FONTS Prints a list of PostScript fonts installed on the printer. See “Printing a List of
PostScript Fonts” on page 39 for more information.
PRINT PCL FONTS Prints a list of PCL5e fonts installed on the printer. See “Printing a List of PCL5e
Fonts” on page 39 for more information.
PRINT IPDS FONTS Prints a list of resident IPDS fonts installed on the printer.
PRINT PS DEMO Prints the PostScript demo page.
CONTINUOUS TEST Prints continuous test pages. To stop the test, press the Cancel Print key.
RESET PRINTER Cancels the current print job.
PRINT SCS
CHARACTERS
Prints the SCS code page (character set).
46 User's Guide
Page 71

TEST MENU ITEM Description
FACTORY DEFAULT Resets settings to the factory defaults. Note that some values, do not get reset.
These values include LANGUAGE, AUXSIZE, PCL SAVE, PS SAVE, BI-DI, IP
ADDRESS, SUBNET MASK, GATEWAY ADDRESS, and MAC ADDRESS.
Note: To reset all values, do one of the following:
For A4 paper: power the printer off and then power the printer on while
simultaneously pressing the Cancel Print key.
For letter paper: power the printer off and then power the printer on while
simultaneously pressing the Online key.
ONLINE HEX PRT
CANCEL ONLN HEX
CX HEX PRT
CANCEL CX HEX
TX HEX PRT
CANCEL TX HEX
FORMAT DISK Formats the optional hard drive.
STAPLE TEST Staples a test page to make sure the stapler is working correctly. Usually you
ONLINE HEX PRT prints an ASCII hexadecimal dump for troubleshooting purposes.
After you select this item, it changes to CANCEL ONLN HEX. Data that is sent to
the printer is not interpreted but is printed as raw data in hexadecimal values. To
stop printing data in hexadecimal values, select CANCEL ONLN HEX.
CX HEX PRT prints an EBCDIC hexadecimal dump of non-IPDS data coming
across the coax cable; you can use the dump for troubleshooting coax problems.
After you select this item, it changes to CANCEL CX HEX. Data that is sent to the
printer is not interpreted but is printed as raw data in hexadecimal values. To stop
printing data in hexadecimal values, select CANCEL CX HEX.
TX HEX PRT prints a hexadecimal dump for troubleshooting twinax problems. After
you select this item, it changes to CANCEL TX HEX. Data that is sent to the printer
is not interpreted but is printed as raw data in hexadecimal values. To stop printing
data in hexadecimal values, select CANCEL CX HEX.
select this test after replacing a staple cartridge or if the stapler is not stapling
paper. The Stapler test uses A3, A4, B4, 11 x 17, legal, or letter size paper to
staple. One of these paper sizes must be loaded in the printer to perform this test.
Chapter 3. Navigating Through the Operator Panel Menus 47
Page 72

Paper Menu
Use the Paper Menu to select input trays, output bins, paper sizes, and duplex printing
options. The following table describes the settings you can change from the Paper
Menu. An asterisk (*) next to a value means it is the factory default.
Notes:
1. To select a new value, press the Enter key when the value is displayed in the
message display area. An asterisk (*) appears next to the value in the message
display area, indicating that it is now active.
2. Print job values, such as paper size, set with the printer driver or application or
data stream, such as IPDS, override values set at the printer.
3. The actual menu items you see depend on what options you have installed. To
find out what options you have installed, print a Printer Configuration Page. See
“Example 1 — Printing the Printer Configuration Page” on page 32 for more
information.
4. If you are unfamiliar with using the operator panel to work with menus, please read
“Using the Operator Panel Keys” on page 30 and “Navigating Menus — Two
Examples” on page 31 before continuing.
PAPER MENU
ITEM
SOURCE TRAY 1*
TRAY 2
TRAY 3
AUXTRAY
ENVELOPE
VALUE Description
Selects the default paper tray to use. Only installed trays appear
in the list.
TRAY 1 and TRAY 2 are standard input trays.
TRAY 3 is the 2000-sheet input drawer. If this feature is
installed, then TRAY3 becomes the default paper tray
source. If this feature is not installed, it does not appear on
the menu.
AUXTRAY is the flip-down tray located on the right side of
the printer. This tray supports transparencies and labels and
also envelopes and paper.
ENVELOPE is the optional envelope feeder. If this feature is
not installed, it does not appear on the menu.
To locate the paper trays, see Figure 2 on page 4.
48 User's Guide
Page 73

PAPER MENU
ITEM
OUTPUT MAIN*
FACE UP
UP FACE-DOWN
MID FACE-DOWN
LOW FACE-DOWN
UP FACE-UP
MID FACE-UP
LOW FACE-UP
CONTINUOUS
TRAY SWITCH ON*
OFF
VALUE Description
Specifies the default output bin or tray.
MAIN is the face-down output tray. This tray can hold up to
500 sheets.
FACE-UP is the face-up output tray. This tray can hold up to
100 sheets. If the 2000-sheet finisher is installed, the
FACE-UP value will not be displayed as the face-up output
tray is replaced by the 2000-sheet finisher.
The upper (UP), middle (MID) and lower (LOW) output bins
are supported by the optional 2000-sheet finisher. If this
feature is not installed, these bins do not appear on the
menu. The upper bin can hold up to 600 sheets; the middle
and lower bins can hold up to 700 sheets each. (Actual
number of sheets is dependent upon type of paper.)
You can choose whether output is placed face-up or
face-down on the 2000-sheet finisher output bins. For
example, if you want output to be placed face-up in the upper
bin, you would choose UP FACE-UP.
Continuous is supported by the 2000-Sheet Finisher which
enables paper to be stacked in one bin until the bin fills up
and then stacked in the next bin. Paper is stacked
face-down.
When you select CONTINUOUS, the upper bin is the default
bin. After the upper bin fills up with paper, paper is stacked in
middle bin. But if the middle bin (or lower bin) already has
paper stacked in the bin from another print job, an error
message, 29 Output Full is displayed. This is because paper
is not to be stacked on top of an existing print job; this
enables you to find print jobs quicker.
Note: If you want to use the staple function with the
2000-Sheet Finisher, you need to select that function from
the printer driver. You cannot select the staple function from
the operator panel. Each user must determine whether they
want their print job to be stapled. Also, review the printer
driver online help for information on how to select the type of
stapling you want for your print job.
Specifies whether or not to switch to another paper tray if the
current one is empty.
ON—specifies that if the current tray does not contain the
paper size specified by the job, the printer will automatically
look in other trays for the right size of paper.
OFF—specifies no switching. A message is displayed when
a job specifies a paper size that is not available in the current
tray.
Chapter 3. Navigating Through the Operator Panel Menus 49
Page 74

PAPER MENU
ITEM
MANUAL OFF*
AUXSIZE LETTER*
ENVSIZE COM10*
VALUE Description
ON
LEGAL
11 X 17
A3
A4
A5
EXEC
COM10
MONARCH
C5
DL
B4
B5-JIS
B5-ISO
FOLIO
STAMNT
JPOSTD
C5
DL
MONARCH
JPOSTD
B5-ISO
Specifies whether or not paper is to be fed manually from the
auxiliary tray:
OFF—paper feeding is automatic, not manual.
ON—paper feeding is manual, one sheet at a time.
Messages on the operator panel prompt you for each sheet.
Notes:
1. When MANUAL is set to ON, you can only print from the
auxiliary tray.
2. PostScript jobs can override MANUAL=OFF; however,
they cannot override MANUAL=ON. Therefore, if you do
set MANUAL to ON, make sure you reset MANUAL to
OFF after you complete the jobs you want to print
manually.
Defines the paper or envelope size being used in the auxiliary
tray.
Defines the envelope size being used in the envelope feeder.
50 User's Guide
Page 75

PAPER MENU
ITEM
BINDING LONG*
SHORT
DUPLEX OFF*
ON
TRAY RENUM OFF*
1<>2
Network Administrator Tip
If your users want to use the stapling function with the optional 2000-sheet finisher,
they need to select that function from the printer driver. The stapling function cannot
be accessed from the operator panel. Each user must decide if they want their print
job stapled. Make sure your users are aware that the stapling function can staple
20 sheets together in one set. Each bin can hold up to 30 sets of stapled paper if
the total number of sheets is less than 300. (Or a maximum of 15 sets of 20 sheets
stapled together per set.)
VALUE Description
Specifies how to print pages in duplex mode. BINDING is only
displayed if DUPLEX is set to ON.
LONG—prints as if the paper is to be bound along the long
edge of the paper. (On the left for portrait documents, along
the top for landscape documents.) Most documents are
printed using LONG.
SHORT—prints as if the paper is to be bound along the short
edge of the paper. (On the top for portrait documents, on the
left for landscape documents.) Used with documents such as
calendars and presentations where you want to turn the
pages from bottom to top.
Specifies whether to print on one side or both if the duplex unit is
installed.
Specifies tray renumbering (you can only renumber trays 1 and 2;
not tray 3, which is the 2000-sheet input drawer.)
OFF—no tray renumbering
1<>2—tells the printer to treat TRAY1 as TRAY2, and vice
versa.
Configuration (Config) Menu
Use the Configuration Menu to configure the printer. The following table describes the
settings you can change from the Configuration Menu. An asterisk (*) next to a value
means it is the factory default.
Notes:
1. To select a new value, press the Enter key when the value is displayed in the
message display area. An asterisk (*) appears next to the value in the message
display area, indicating that it is now active.
2. Print job values, such as paper size, set with the printer driver or application or
data stream, such as IPDS, override values set at the printer.
3. If you are unfamiliar with using the operator panel to work with menus, please read
Chapter 3. Navigating Through the Operator Panel Menus 51
Page 76

“Using the Operator Panel Keys” on page 30 and “Navigating Menus — Two
Examples” on page 31 before continuing.
CONFIG MENU
ITEM
JAMRECOVERY OFF*
AUTOCONTINUE ON*
DENSITY nn Sets the toner density. nn can be from 0 to 15 where 0 is the
PWRSAV 30 MIN*
QUALITY REFINE*
VALUE Description
Sets the JAMRECOVERY function on or off.
ON
OFF
1HR
2HR
3HR
4HR
OFF
15 MIN
ECONO
NORMAL
OFF—the printer does not keep an image of the printed
page. Jammed pages are not reprinted.
ON—the printer keeps the image for a printed page until the
page successfully exits the printer. Jammed pages are
automatically reprinted. Selecting ON can decrease the
performance of your printer.
Sets the auto-continue function on or off.
ON—following certain types of errors (such as memory
allocation errors), the printer pauses for thirty seconds, and
then continues running.
OFF—following the same types of errors, the printer stops
and waits for operator intervention. (Generally, the operator
either presses the Continue key to continue printing, or the
Cancel Print key to cancel the current job.)
least dense (lightest) and 15 is the most dense (darkest). 6 is the
default value. Please note that increasing the density setting can
increase the amount of toner used. If you find you are using more
than the expected amount of toner, you may want to decrease
the density setting.
Specifies how long the printer is inactive before it goes into
power-savings (sleep) mode. In this mode, the printer powers
down most of its systems and therefore requires extra time to
warm up when the next print is requested.
Specifies the print quality.
REFINE—tells the printer to smooth edges. This setting may
use more toner than the ECONO or NORMAL modes.
ECONO—tells the printer to produce lighter output, thus
saving toner. (ECONO is the same as TonerMiser.)
NORMAL—normal quality.
Note: The printer driver term for REFINE is Edge Refinement.
52 User's Guide
Page 77

Network Administrator Tip
When selecting the Density and Quality settings, keep in mind that these settings
affect toner usage. For example, if you select Density value of 12 and Quality value
of Refine, you will use more toner per print job than a Density value of 6 and
Quality value of Econo. For optimum toner usage, try setting Density to 3 and
Quality to Econo.
The settings you use will depend upon the types of jobs your users print. For
instance, if your users print primarily memos and word processing jobs, try using
the Quality setting of Econo with a lower Density setting. If your users print primarily
spreadsheets or documents with complex graphics, try using the Quality setting of
REFINE and a higher density setting.
If your users include photographs in their print jobs, you may want to use the
NORMAL setting instead of REFINE. Often photographs are scanned or copied at a
low resolution and using the REFINE mode may not improve the quality of the
photographs.
Chapter 3. Navigating Through the Operator Panel Menus 53
Page 78

Memory Configuration (Memconfig) Menu
Use the Memory Configuration Menu to define whether or not the printer saves data
stream information when it switches ports. The following table describes the settings
you can change from the Memory Configuration Menu. An asterisk (*) next to a value
means it is the factory default.
Notes:
1. To select a new value, press the Enter key when the value is displayed in the
message display area. An asterisk (*) appears next to the value in the message
display area, indicating that it is now active.
2. The actual menu items you see depend on how much memory and what options
you have installed. To find out what options you have installed, print a Printer
Configuration Page. See “Example 1 — Printing the Printer Configuration Page”
on page 32 for more information.
3. If you are unfamiliar with using the operator panel to work with menus, please read
“Using the Operator Panel Keys” on page 30 and “Navigating Menus — Two
Examples” on page 31 before continuing.
MEMCONFIG
MENU ITEM
PCL SAVE OFF*
ON
PS2 SAVE OFF*
ON
VALUE Description
Specifies whether or not the printer saves PCL5e information
(downloaded fonts, macros, patterns) when it switches from
PCL5e to another data stream:
OFF—the printer does not save data.
ON—the printer saves data. This option appears only when
your printer has enough memory installed, which for simplex
printing is 10 MB and for duplex printing is 14 MB.
Specifies whether or not the printer saves PostScript information
(downloaded fonts, macros, patterns) when it switches from
PostScript to another data stream:
OFF—the printer does not save data.
ON—the printer saves data. This option appears only when
your printer has enough memory installed, which for simplex
printing is 10 MB and for duplex printing is 14 MB.
54 User's Guide
Page 79

Parallel Menu
Use the Parallel Menu to define how the printer handles communications over the
parallel cable attachment. The following table describes the settings you can change
from the Parallel Menu. An asterisk (*) next to a value means it is the factory default.
Notes:
1. To select a new value, press the Enter key when the value is displayed in the
message display area. An asterisk (*) appears next to the value in the message
display area, indicating that it is now active.
2. If you are unfamiliar with using the operator panel to work with menus, please read
“Using the Operator Panel Keys” on page 30 and “Navigating Menus — Two
Examples” on page 31 before continuing.
PARALLEL
MENU ITEM
PERSONALTY AUTO*
BI-DI ON*
PORT TMEOUT nnn Specifies how many seconds the printer waits for data before it
VALUE Description
Specifies how the printer treats jobs it receives over the parallel
PCL
PS
OFF
attachment.
AUTO—the printer determines if the data stream is PCL5e or
PostScript and handles it accordingly. This is the
recommended value.
PCL—the printer treats all data streams as PCL5e.
PS—the printer treats all data streams as PostScript. This
option appears only if the PostScript SIMM is installed.
Turns bi-directional communications over the parallel attachment
on or off.
ON—the printer receives and sends messages to the host.
OFF—the printer receives messages from the host, but does
not send messages back.
determines there is no more data to receive for the job. The
printer then checks other attachments for jobs, if other
attachments are installed. The valid range is 5 to 300 seconds.
The default value is 15 seconds.
Chapter 3. Navigating Through the Operator Panel Menus 55
Page 80

PCL Menu
Use the PCL Menu to define the way the printer handles PCL5e jobs. The following
table describes the settings you can change from the PCL Menu. An asterisk (*) next
to a value means it is the factory default.
Notes:
1. To select a new value, press the Enter key when the value is displayed in the
message display area. An asterisk (*) appears next to the value in the message
display area, indicating that it is now active.
2. Values set in PCL5e print jobs (either by the print application or the printer driver)
override PCL Menu values you set at the printer.
3. If you are unfamiliar with using the operator panel to work with menus, please read
“Using the Operator Panel Keys” on page 30 and “Navigating Menus — Two
Examples” on page 31 before continuing.
PCL MENU ITEM VALUE Description
PAGEPROT AUTO*
ON
COPIES nnn Specifies how many copies of each job to print. nnn can be from
Sets page protection:
AUTO—the printer protects the minimum amount of memory
necessary to print the page.
ON—the printer reserves enough memory to process an
entire page without compression before it prints the page.
This helps in the rare case where the printer compression
function causes a loss of quality in complex graphics. This
setting is available only when the printer has enough memory
installed. If the printer has the standard 4 MB of memory
installed, this function is not displayed. You need at least 8
MB of memory installed to use the page protection function.
See “Using Memory Reduction Technology with Page
Protection” on page 200 for information on memory
requirements.
1 to 999. 1 is the default.
56 User's Guide
Page 81

PCL MENU ITEM VALUE Description
PAGESIZE LETTER*
LEGAL
A3
A4
A5
B4
11 X 17
EXEC
COM10
MONARCH
C5
DL
B5-JIS
B5-ISO
FOLIO
STAMNT
JPOSTD
ORIENTATION P*
L
FORM nnn LINES Specifies the number of lines per page the printer prints before it
FNTSRC INTERNAL*
SOFT
FONTNUM nn Specifies the default font. nnn is the number of the font. The
PTSIZE nn.nn Specifies the point size of the default font, if it is an outline font.
PITCH nn.nn Specifies the pitch to use for the default font, if the font is
Specifies the default page size for PCL5e jobs.
Specifies the default page orientation.
P—portrait (taller than wide)
L—landscape (wider than tall)
starts a new page. nnn can be from 5 to 128. 60 is the default.
Specifies which font source the printer checks first for a specified
font:
INTERNAL—use the printer's resident fonts first
SOFT—use downloaded fonts first
default is 0. Valid values are 0 to 58. To display a list of
available fonts and their corresponding numbers, select PRINT
PCL FONTS from the Test Menu. See “Printing a List of PCL5e
Fonts” on page 39 for more information.
Valid values are 4 to 999.75. The default is 10.
Note: Point size is only displayed if an outline font is used.
Otherwise, this item is not displayed.
bitmapped (raster). Valid values are .44 to 99.99. The default is
10.
Chapter 3. Navigating Through the Operator Panel Menus 57
Page 82

PCL MENU ITEM VALUE Description
SYMSET ROMAN-8*
ISO L1
ISO L2
ISO L5
PC-8
PC-8D/N
PC-850
PC-852
PC8-TK
WIN L1
WIN L2
WIN L5
DESKTOP
PS TEXT
VN INTL
VN US
MS PUBL
MATH-8
PS MATH
VN MATH
PI FONT
LEGAL
ISO 4
ISO 6
ISO 11
ISO 15
ISO 17
ISO 21
ISO 60
ISO 69
WIN 3.0
Specifies the symbol set to use.
58 User's Guide
Page 83

PS Menu
Use the PS Menu to define the way the printer handles PostScript jobs. The following
table describes the settings you can change from the PS Menu. An asterisk (*) next to
a value means it is the factory default. This menu appears only if you have the
PostScript SIMM installed.
Notes:
1. To select a new value, press the Enter key when the value is displayed in the
message display area. An asterisk (*) appears next to the value in the message
display area, indicating that it is now active.
2. Values set in PostScript print jobs override PS Menu values you set at the printer.
3. If you are unfamiliar with using the operator panel to work with menus, please read
“Using the Operator Panel Keys” on page 30 and “Navigating Menus — Two
Examples” on page 31 before continuing.
PS MENU ITEM VALUE Description
PAGEPROT AUTO*
ON
COPIES nnn Specifies how many copies of each job to print. nnn can be from
PRINT ERRS OFF*
ON
Sets page protection:
AUTO—the printer uses the minimum amount of memory
necessary to print a page.
ON—the printer reserves enough memory to process an
entire page without compression before it prints the page.
This can help in the rare case where the printer compression
scheme causes a loss of quality in complex graphics. This
setting is available only when the printer has enough
memory.
1 to 999. 1 is the default.
Specifies how the printer handles PostScript errors:
OFF—the printer cancels the job, but does not print an error
page.
ON—the printer prints an error page and cancels the job.
Chapter 3. Navigating Through the Operator Panel Menus 59
Page 84

Token Ring Menu
For information about configuring the token-ring attachment, please see
Network Printers: Ethernet and Token Ring Configuration Guide
the Token-Ring Network Interface Card. Chapter 9, “Setting Printer Network
Addresses” on page 201 describes how to define the IP address, default gateway
address, and subnet mask from the operator panel.
Use the Token Ring Menu to configure the token-ring attachment. The following table
describes the settings you can change from the Token Ring Menu. An asterisk (*) next
to a value means it is the factory default. This menu appears only if you have the
token-ring attachment installed.
Notes:
1. To select a new value, press the Enter key when the value is displayed in the
2. If you are unfamiliar with using the operator panel to work with menus, please read
Network Administrator's Tip
IBM
, which comes with
message display area. An asterisk (*) appears next to the value in the message
display area, indicating that is now active.
“Using the Operator Panel Keys” on page 30 and “Navigating Menus — Two
Examples” on page 31 before continuing.
TOKEN RING
MENU ITEM
PERSONALTY AUTO*
PCL
PS
IPDS
PORT TMEOUT nnn Specifies the number of seconds the printer waits for data
IP ADDRESS nnn.nnn.nnn.nnn Specifies the printer's internet protocol address. Consult
VALUE Description
Specifies how the printer treats jobs it receives over the
token-ring attachment:
AUTO—the printer examines the data stream and
handles it accordingly.
PCL—the printer treats all data streams as PCL5e.
PS—the printer treats all data streams as PostScript.
This option appears only if the PostScript SIMM is
installed.
IPDS—the printer treats all data streams as IPDS.
This option appears only if the IPDS SIMM is installed.
before it determines there is no more data to receive for
the job. The printer then checks other attachments for
jobs, if other attachments are installed. Valid values are 5
to 300. The default is 15 seconds.
with your network or LAN administrator before changing
this value. See Chapter 9, “Setting Printer Network
Addresses” on page 201 for more information.
60 User's Guide
Page 85

TOKEN RING
MENU ITEM
SUBNET MASK nnn.nnn.nnn.nnn Specifies the printer's subnet mask. Consult with your
GATEWAY
ADDRESS
MAC ADDRESS nn.nn.nn.nn.nn.nn Specifies the MAC (medium access control) number of the
nnn.nnn.nnn.nnn Specifies the IP address of the default gateway. Consult
VALUE Description
network or LAN administrator before changing this value.
See Chapter 9, “Setting Printer Network Addresses” on
page 201 for more information.
with your network or LAN administrator before changing
this value. See Chapter 9, “Setting Printer Network
Addresses” on page 201 for information on setting the
address.
printer.
Note: Normally, the MAC ADDRESS should be set to the
unique MAC ADDRESS on the network interface card.
You can, however, also use the MAC ADDRESS field to
define locally administered addresses (LAA). Resetting
the printer to factory defaults sets the LAA back to the
MAC address. Each LAA must be unique, so make sure
to consult with your network or LAN administrator before
changing this value. See Chapter 9, “Setting Printer
Network Addresses” on page 201 for information on
setting the address.
Chapter 3. Navigating Through the Operator Panel Menus 61
Page 86

Ethernet Menu
Network Administrator's Tip
For information about configuring the Etherent attachment, please see
Printers: Ethernet and Token Ring Configuration Guide
, which comes with the
IBM Network
Ethernet Network Interface Card. Chapter 9, “Setting Printer Network Addresses”
on page 201 describes how to define the IP address, default gateway address, and
subnet mask from the operator panel.
Use the Ethernet Menu to configure the Ethernet attachment. The following table
describes the settings you can change from the Ethernet Menu. An asterisk (*) next to
a value means it is the factory default. This menu appears only if you have the
Ethernet attachment installed.
Notes:
1. To select a new value, press the Enter key when the value is displayed in the
message display area. An asterisk (*) appears next to the value in the message
display area, indicating that it is now active.
2. If you are unfamiliar with using the operator panel to work with menus, please read
“Using the Operator Panel Keys” on page 30 and “Navigating Menus — Two
Examples” on page 31 before continuing.
ETHERNET MENU
ITEM
PERSONALTY AUTO*
PCL
PS
IPDS
PORT TMEOUT nnn Specifies the number of seconds the printer waits for data
IP ADDRESS nnn.nnn.nnn.nnn Specifies the printer's internet protocol address. Consult
VALUE Description
Specifies how the printer treats jobs it receives over the
Ethernet attachment:
AUTO—the printer examines the data stream and
handles it accordingly.
PCL—the printer treats all data streams as PCL5e.
PS—the printer treats all data streams as PostScript.
This option appears only if the PostScript SIMM is
installed.
IPDS—the printer treats all data streams as IPDS.
This option appears only if the IPDS SIMM is installed.
before it determines there is no more data to receive for
the job. The printer then checks other attachments for
jobs, if other attachments are installed. Valid values are 5
to 300. The default is 15 seconds.
with your network or LAN administrator before changing
this value. See Chapter 9, “Setting Printer Network
Addresses” on page 201 for information on setting the
address.
62 User's Guide
Page 87

ETHERNET MENU
ITEM
SUBNET MASK nnn.nnn.nnn.nnn Specifies the printer's subnet mask. Consult with your
GATEWAY
ADDRESS
MAC ADDRESS nn.nn.nn.nn.nn.nn Specifies the MAC (medium access control) number of the
nnn.nnn.nnn.nnn Specifies the IP address of the default gateway. Consult
VALUE Description
network or LAN administrator before changing this value.
See Chapter 9, “Setting Printer Network Addresses” on
page 201 for information on setting the address.
with your network or LAN administrator before changing
this value. See Chapter 9, “Setting Printer Network
Addresses” on page 201 for information on setting the
address.
printer.
Note: Normally, the MAC ADDRESS should be set to the
unique MAC ADDRESS on the network interface card.
You can, however, also use the MAC ADDRESS field to
define locally administered addresses (LAA). Resetting
the printer to factory defaults sets the LAA back to the
MAC address. Each LAA must be unique, so make sure
to consult with your network or LAN administrator before
changing this value.
See Chapter 9, “Setting Printer Network Addresses” on
page 201 for information on setting the address.
Chapter 3. Navigating Through the Operator Panel Menus 63
Page 88

Coax SCS Menu
Use the Coax SCS Menu to define how the printer handles SCS communications over
the coax attachment. The following table describes the settings you can change from
the Coax SCS Menu. An asterisk (*) next to a value means it is the factory default.
This menu appears only if you have the coax attachment installed.
Notes:
1. To select a new value, press the Enter key when the value is displayed in the
2. Values set in print jobs override Coax SCS Menu values set at the printer.
3. For more information about configuring the coax attachment, see
4. If you are unfamiliar with using the operator panel to work with menus, please read
message display area. An asterisk (*) appears next to the value in the message
display area, indicating that it is now active.
IBM Network
Printers: Twinax/Coax Configuration Guide
.
“Using the Operator Panel Keys” on page 30 and “Navigating Menus — Two
Examples” on page 31 before continuing.
COAX SCS
MENU ITEM
TRAY1
TRAY2
TRAY3
AUX
VALUE Description
COR*
C-PORT
PORT
LAND
Specifies the default orientation for jobs printed from each tray.
TRAY1 and TRAY2 are standard input trays. TRAY 3 is
2000-sheet input drawer. AUX is the auxiliary tray. Each input
can be assigned one of the following default orientations:
COR—computer output reduction: Printing in landscape with
the logical page reduced to fit more data on the physical
page. The printer reduces vertical spacing and uses a
smaller font with less space between letters.
C-PORT—compressed portrait: printing in portrait, but with
spaces reduced between characters (horizontal compression)
so that more text fits on a line. This allows more characters
per line.
PORT—portrait: the page has normal, upright business letter
orientation. (For envelopes from the auxiliary tray, PORT
specifies normal envelope orientation.)
LAND—landscape: the page is wider than long.
64 User's Guide
Page 89

COAX SCS
MENU ITEM
APO ENABLE*
LPI 0
LINE SPACING 1*
CPI nn Specifies the default characters per inch, or pitch. nn can be 0,
CASE DUAL*
MPL nnn Specifies the maximum page length (MPL) in lines per page.
MPP nnn Specifies the maximum print position (MPP). Valid values are 1
VALUE Description
Enables or disables automatic print orientation.
DISABLE
6*
8
2
MONO
ENABLE—if the requested dimensions of the job fit on the
paper, the page is printed either in portrait or landscape,
whichever better fits the dimensions. If the requested
dimensions do not fit on the paper, the default orientation for
the tray (COR, PORT, LAND, or C-PORT) determines how
the sheet is printed.
DISABLE—the page prints using the default orientation for
the tray (COR, PORT, LAND, or C-PORT).
Notes:
1. Values specified in the data stream override values set at the
printer.
2. The factory defaults (orientation set to COR and
APO=ENABLE) give you the most flexibility.
3. The
requested dimensions
CPI, LINE SPACING, MPP, and MPL for the job. These
values can be set in the data stream or on the Coax SCS
Menu.
Specifies a default lines per inch value for jobs received over the
coax attachment. Valid values are 0, 6, and 8. The default is 6.
0 specifies either the value specified in the job or the PCL default
value for the printer.
Specifies single or double spacing:
1—single spacing
2—double spacing
10,12,15,16.7, 20, or 27. The default is 10. 0 specifies a
proportional font (FGID 1452). Note that proportional fonts use
proportional spacing, which may cause unexpected results (for
example, tabular data may appear misaligned).
Specifies the case of the printed text:
DUAL—characters print in the case received
MONO—all characters print in uppercase
Valid values are 1 to 255. 66 is the default. If the MPL value is
set to 1, no vertical formatting will be done, so no form feeds will
be generated for your data. Your application must specify form
feeds.
to 255. 132 is the default. If the MPP value is set to 1, no
horizontal formatting will be done, so no new lines will be
generated for your data. Your application must specify new lines.
are determined by the values of
Chapter 3. Navigating Through the Operator Panel Menus 65
Page 90

COAX SCS
MENU ITEM
CODE PAGE nnn Specifies the code page to use. Code page 037 is the default.
TBM nnnn The top binding margin (TBM) determines the position of line 1
LBM nnnn The left binding margin (LBM) determines the position of column
VALUE Description
037 US, Canada, Netherlands, Portugal
273 Austrian/German
275 Brazil
277 Danish/Norwegian
278 Finnish/Swedish
280 Italian
281 Japanese
284 Spanish
285 UK English
286 Austrian/German (alternate)
287 Danish/Norwegian (alternate)
288 Finnish/Swedish (alternate)
289 Spanish
297 French
500 Belgium, Switzerland / International
871 Icelandic
relative to the top edge of the printable area when printing in
portrait or landscape orientation. TBM is measured in tenths of
an inch, with a default of 0. Valid values are 0 to 99. It applies to
all paper sources.
1 relative to the left edge of the printable area when printing in
portrait or landscape orientation. LBM is measured in tenths of
an inch, with a default of 0. Valid values are 0 to 99. It applies to
all paper sources.
66 User's Guide
Page 91

Twinax SCS Menu
Use the Twinax SCS Menu to define how the printer handles SCS data over the twinax
attachment. The following table describes the settings you can change from the Twinax
SCS Menu. An asterisk (*) next to a value means it is the factory default. This menu
appears only if you have the twinax attachment installed.
Notes:
1. To select a new value, press the Enter key when the value is displayed in the
2. Values set in print jobs override Twinax SCS Menu values set at the printer.
3. For more information about configuring the twinax attachment, see
4. If you are unfamiliar with using the operator panel to work with menus, please read
message display area. An asterisk (*) appears next to the value in the message
display area, indicating that it is now active.
IBM Network
Printers: Twinax/Coax Configuration Guide
.
“Using the Operator Panel Keys” on page 30 and “Navigating Menus — Two
Examples” on page 31 before continuing.
TWINAX SCS
MENU ITEM
TRAY1
TRAY2
TRAY3
AUX
LPI 0
CPI nn Specifies the default characters per inch, or pitch. nn can be 5,
VALUE Description
COR*
C-PORT
PORT
LAND
3
4
6*
8
Specifies the default orientation for jobs printed from each tray
listed on the menu. TRAY1 and TRAY2 are standard input trays.
TRAY 3 is 2000-sheet input drawer. AUX is the auxiliary tray.
Each input can be assigned one of the following default
orientations
COR—computer output reduction: Printing in landscape with
the logical page reduced to fit more data on the physical
page. The printer reduces vertical spacing and uses a
smaller font with less space between letters.
C-PORT—compressed portrait: printing in portrait, but with
spaces reduced between characters (horizontal compression)
so that more text fits on a line. This allows more characters
per line.
PORT—portrait: the page has normal, upright business letter
orientation.
LAND—landscape: the page is wider than long.
Specifies a default lines per inch value. 0 specifies either the
value specified in the job, or the PCL default value for the printer.
10, 12, 15, 17.1, 20, or 27. The default is 10.
Chapter 3. Navigating Through the Operator Panel Menus 67
Page 92

TWINAX SCS
MENU ITEM
CODE PAGE nnn Specifies the default code page to use. The default value is code
APO ENABLE*
VALUE Description
page 037.
037 U.S.A. and Canada
273 Austrian/German
274 Belgium
275 Brazil
277 Danish/Norwegian
278 Finnish/Swedish
280 Italy
281 Japanese (Latin)
282 Portugal
284 Spanish (Latin America)
285 United Kingdom
297 France
500 Multinational (International #5)
871 Iceland
Enables or disables automatic print orientation.
DISABLE
ENABLE—if the requested dimensions of the job fit on the
paper, the page is printed either in portrait or landscape,
whichever better fits the dimensions. If the requested
dimensions do not fit on the paper, the default orientation for
the tray (COR, PORT, LAND, or C-PORT) determines how
the sheet is printed.
DISABLE—the page prints using the default orientation for
the tray (COR, PORT, LAND, or C-PORT).
Notes:
1. Values specified in the data stream override values set at the
printer.
2. The factory defaults (orientation set to COR and
APO=ENABLE) give you the most flexibility.
3. The
requested dimensions
CPI, MPP, and MPL for the job. These values can be set in
the data stream. CPI can be set on the Twinax SCS menu.
The twinax default values for MPP and MPL cannot be set
from a menu; they are 132 for MPP and 62 for MPL.
are determined by the values of
68 User's Guide
Page 93

Coax Setup Menu
Use the Coax Setup Menu to configure the coax attachment. The following table
describes the settings you can change from the Coax Setup Menu. An asterisk (*) next
to a value means it is the factory default. This menu appears only if you have the coax
attachment installed.
Notes:
1. To select a new value, press the Enter key when the value is displayed in the
2. For more information about configuring the coax attachment, see
3. If you are unfamiliar with using the operator panel to work with menus, please read
message display area. An asterisk (*) appears next to the value in the message
display area, indicating that it is now active.
IBM Network
Printers: Twinax/Coax Configuration Guide
.
“Using the Operator Panel Keys” on page 30 and “Navigating Menus — Two
Examples” on page 31 before continuing.
COAX SETUP
MENU ITEM
PORT TMEOUT nnn Specifies the number of seconds the printer waits for data before
IRQ TMEOUT nn Specifies when an IRQ (intervention required) timeout is sent.
HLD TMEOUT nn Specifies the hold timeout value. This value tells the printer how
BUSY TMEOUT nnn Specifies the busy timeout value. This specifies the amount of
EAB ENABLE*
BUFFER SIZE 1920*
VALUE Description
it determines there is no more data to receive for the job. The
printer then checks other installed attachments, and switches to
attachments with jobs waiting. nnn can be from 0 to 255. The
default is 90 seconds.
This tells the printer how long to wait for an intervention required
condition to be corrected before notifying the host of the error. nn
can be from 0 to 20 minutes. The default is 1 minute. 0
specifies to never send an IRQ timeout.
long to wait if the printer is offline for an intervention required
condition to be corrected. After this time elapses, the host is
notified of the error. nnnn can be from 0 to 20 minutes. The
default is 10 minutes. 0 specifies to never send a hold time out.
time to wait (when the printer is connected to multiple ports) for
control to be returned to the coax attachment, before notifying the
host. nnn can be from 0 to 999 minutes. The default is 20
minutes. 0 specifies to never send a busy timeout.
Enables or disables the extended attribute buffer.
DISABLE
Specifies the buffer size in bytes.
960
2560
3440
3564
Chapter 3. Navigating Through the Operator Panel Menus 69
Page 94

COAX SETUP
MENU ITEM
EARLY COMPL ON*
PA1 none Selecting this value and pressing the Enter key sends a PA1
PA2 none Selecting this value and pressing the Enter key sends a PA2
VALUE Description
Turns early print completion on or off for non-IPDS data sent over
OFF
the coax attachment. To turn early print completion on or off for
IPDS data, use the EARLY COMPL item on the IPDS Menu.
ON—sends an “order complete” as soon as data is received.
OFF—waits until the print job is physically complete to send
“order complete.”
signal to the host.
Note: This applies to SCS only; not DSC/DSE or IPDS.
signal to the host.
Note: This applies to SCS only; not DSC/DSE or IPDS.
70 User's Guide
Page 95

Twinax Setup Menu
Use the Twinax Setup Menu to configure the twinax attachment. The following table
describes the settings you can change from the Twinax Setup Menu. This menu
appears only if you have the twinax attachment installed. An asterisk (*) next to a
value means it is the factory default.
Notes:
1. To select a new value, press the Enter key when the value is displayed in the
message display area. An asterisk (*) appears next to the value in the message
display area, indicating that it is now active.
Important! If you change SCS ADDR or IPDS ADDR, you must power off the
printer, wait ten seconds, and then power on the printer for the new value to take
effect.
2. For more information about configuring the twinax attachment, see
Printers: Twinax/Coax Configuration Guide
3. If you are unfamiliar with using the operator panel to work with menus, please read
“Using the Operator Panel Keys” on page 30 and “Navigating Menus — Two
Examples” on page 31 before continuing.
IBM Network
.
TWINAX SETUP
MENU ITEM
SCS ADDR OFF*
n
VALUE Description
The twinax hardware address of the SCS port. n can be from 0 to
6.
Notes:
1. SCS ADDR and IPDS ADDR cannot be set to the same
value.
2. If you change SCS ADDR or IPDS ADDR, you must power
off the printer, wait ten seconds, and then power on the
printer for the new value to take effect.
3. When the optional IPDS SIMM is installed, each IBM
Network Printer can act as two separate printers on the same
twinax port. (The printer cannot be attached to two different
twinax systems using the same twinax card.) One “printer”
prints SCS data to one address (SCS ADDR), and the other
prints IPDS to another address (IPDS ADDR).
Chapter 3. Navigating Through the Operator Panel Menus 71
Page 96

TWINAX SETUP
MENU ITEM
IPDS ADDR OFF*
BUFFER SIZE 1024*
PORT TMEOUT nnn Specifies the number of seconds the printer waits for data before
VALUE Description
The twinax hardware address of the IPDS port. n can be from 0
n
256
to 6.
Notes:
1. SCS ADDR and IPDS ADDR cannot be set to the same
value.
2. If you change SCS ADDR or IPDS ADDR, you must power
off the printer, wait ten seconds, and then power on the
printer for the new value to take effect.
3. When the optional IPDS SIMM is installed, each IBM
Network Printer can act as two separate printers on the same
twinax port. (The printer cannot be attached to two different
twinax systems using the same twinax card.) One “printer”
prints SCS data to one address (SCS ADDR), and the other
prints IPDS to another address (IPDS ADDR).
Specifies the IPDS buffer size in bytes. The SCS buffer size is
always 256.
it determines there is no more data to receive for the job. The
printer then checks other installed attachments, and switches to
attachments with jobs waiting. from 0 to 255. The default is 90
seconds.
72 User's Guide
Page 97

Coax DSC/DSE Menu
Use the Coax DSC/DSE Menu to define how the printer handles DSC/DSE
communications over the coax attachment. The following table describes the settings
you can change from the Coax DSC/DSE Menu. The options you specify apply only to
DSC/DSE mode. An asterisk (*) next to a value means it is the factory default. This
menu appears only if you have the coax attachment installed.
Notes:
1. To select a new value, press the Enter key when the value is displayed in the
message display area. An asterisk (*) appears next to the value in the message
display area, indicating that it is now active.
2. For more information about configuring the coax attachment, see
Printers: Twinax/Coax Configuration Guide
3. If you are unfamiliar with using the operator panel to work with menus, please read
“Using the Operator Panel Keys” on page 30 and “Navigating Menus — Two
Examples” on page 31 before continuing.
IBM Network
.
COAX DSC/DSE
MENU ITEM
PRINT IMAGE ON*
OFF
CR AT MPP+1 ON*
OFF
VALUE Description
Selects printing options in non-SCS mode.
ON
– True Screen image in Local Copy
– True Screen image in Non-SCS print
– Unformatted print in Local Copy
– Unformatted print in Non-SCS print
OFF
– Null line suppression in Local Copy
– Null line suppression in Non-SCS print
– Formatted print in Local Copy
– Formatted print in Non-SCS print
Sets a carriage return relative to the maximum print position
(MPP).
ON—a new line occurs when the carriage return occurs at
MPP+1. The next print position is at the first print position of
the new line (current line + 1, column 1).
OFF—no new line occurs when the carriage return occurs at
MPP+1. The next print position is at the first print position of
the current line (current line, column 1).
Chapter 3. Navigating Through the Operator Panel Menus 73
Page 98

COAX DSC/DSE
MENU ITEM
NL AT MPP+1 ON*
OFF
FF DATA ON*
OFF
FF LAST ON*
OFF
FF VALID OFF*
ON
AUTO FUNCTION OFF*
ON
VALUE Description
Forces a new line at MPP+1.
ON—an additional new line occurs at MPP+1, followed by
the carriage return. The next print position is at the first print
position of the new line (current line + 2, column 1).
OFF—no additional new line when the new line occurs at
MPP+1. The next print position is at the first print position of
the next line (current line + 1, column 1).
Forces the printer to eject the current page.
ON—when a Form Feed command is encountered, the
current page is ejected and the form is indexed to the first
line of the next page. The next print position is at the first
print position of the first line of the next page (next form, line
1, column 1).
OFF—when a Form Feed command is encountered, the
current page is ejected and the form is indexed to the first
line of the next page and spaced one position. The next
print position is at the first print position plus 1 of the first line
of the next page (next form, line 1, column 2).
Determines where to position the next character when the Form
Feed command occurs at the end of the print buffer.
ON—an automatic new line occurs after the print order is
completed (next form, line 2, column 1).
OFF—suppress automatic new line after the print order is
completed (next form, line 1, column 1).
Determines when a form feed command is valid.
ON—a Form Feed command occurs whenever it is
encountered.
OFF—a Form Feed command occurs only if it appears at the
first print position in a line, or at MPP+1. Treats a form feed
at other locations as blanks.
Selects whether the next print position will be on a new line or a
new page.
OFF—a new line will be executed automatically at the end
the print order (when printing of a buffer is completed) unless
a form feed (FF), new line (NL), or carriage return (CR) was
the last character in the print order.
ON—a form feed will be executed automatically at the end of
the print order (when printing of a buffer is completed) unless
a form feed (FF) is the last character in the print order.
74 User's Guide
Page 99

IPDS Menu
The following table describes the settings you can change from the IPDS Menu. An
asterisk (*) next to a value means it is the factory default. This menu appears only if
you have the IPDS SIMM installed.
Notes:
1. To select a new value, press the Enter key when the value is displayed in the
message display area. An asterisk (*) appears next to the value in the message
display area, indicating that it is now active.
2. Values specified in IPDS print jobs override IPDS Menu values set at the printer.
3. If you are unfamiliar with using the operator panel to work with menus, please read
“Using the Operator Panel Keys” on page 30 and “Navigating Menus — Two
Examples” on page 31 before continuing.
IPDS MENU
ITEM
PAGEPROT AUTO*
VALUE Description
ON
Sets page protection:
AUTO—the printer uses the minimum amount of memory necessary to
print a page.
ON—the printer reserves enough memory to process an entire page
without compression before it prints the page. This can help in the
rare case where the printer compression scheme causes a loss of
quality in complex graphics. This setting is available only when the
printer has enough memory.
Chapter 3. Navigating Through the Operator Panel Menus 75
Page 100

IPDS MENU
ITEM
DEF CD PAG nnnn Specifies the default code page. The default value is code page 037.
EMULATION 4028*
DEFAULT FGID nnnnn Specifies the default FGID (Font Typeface Global Identifier), which
CPI nn.n Selects characters-per-inch (pitch) for the default font. Valid values are
VPA CHK ON*
VALUE Description
037 US, Canada, Netherlands, Portugal
038 US English ASCII
260 Canadian French
273 Austrian/German
274 Belgium
276 Canadian French
277 Danish/Norwegian
278 Finnish/Swedish
280 Italian
281 Japanese
284 Spanish
285 UK English
286 Austrian/German (alternate)
287 Danish/Norwegian (Alternate)
288 Finnish/Swedish (Alternate)
290 Japanese/Katakana
297 French
420 Arabic
423 Greek
424 Hebrew
500 Belgium, Switzerland / International
870 Latin 2 Multilingual
871 Icelandic
875 Greek
880 Cyrillic
892 OCR - A
893 OCR - B
905 Turkish
1025 Cyrillic Multilingual
1026 Turkish
Specifies the printer to emulate. Select 4324 only if you have the
4324
OFF
appropriate level of PSF software installed. (Consult with your system
administrator.)
identifies the default resident font the printer uses. The default value is
FGID 416, which specifies Courier 10 point as the default resident font. To
print a listing of all installed IPDS fonts, see “Printing a List of IPDS Fonts”
on page 39.
5.0 to 30.0 in tenths of an inch. The default value is 10.
Turns valid printable area checking on or off.
ON—the printer checks for pels that fall outside the intersection of the
logical and physical pages. If pels fall outside the area, the printer
reports an error to the host if the IPDS Exception Handling Control
command setting requires error reporting.
OFF—The printer does not report pels outside the valid printable area.
76 User's Guide
 Loading...