

Page 1

®
QMS 1725 SLS
Print System
User's Guide
1800332-001B
Page 2
Trademarks
The following are tradema rks or registered trademarks of their respective ow ners.
Other product names m entioned in this m anual may a lso be trade marks or reg istered
trademarks of their resp ective owners. Re gistered trademar ks are register ed in the
United States Patent and Trademark Office; some trademarks ma y also be re gistered in
other countries. QMS and the QMS logo are r egistered tradema rks of QMS, Inc., and
Crown, the Crown seal, Crow nNet, ImageS erver, PS Executive Series, and QU IC are
trademarks of QMS, Inc. PostScript is a trademark of Adobe System s Incor porated for a
page description langu age and may be registered in certain juris dictions. Thr oughout
this manual, “PostScrip t Level 2” is used to refer to a s et of capabilities d efined by
Adobe Systems for its P ostScript Level 2 pag e descr iption language . These
capabilities, among ot hers, are impleme nted in this pr oduct through a Q MS-developed
emulation that is compatible w ith Adobe's P ostScript Level 2 la nguage. A dobe/Adobe
Systems Incorpor ated. AppleTalk, EtherTalk, LaserWriter, LocalTalk, Macin tosh,
TrueTy pe/Apple Computer, Inc. CompuSer ve/H & R Block. DEC, DECnet, LN03, VMS/
Digital Equipment Corporation. H ewlett-Pack ard, HP, PCL, HP-G L, LaserJet/HewlettPackard Co. IBM PC, Token-Ring/International Business Mac hines Corpora tion.
Centronics/Centronics Data Com puter Corporation. Mi crosoft, MS-Window s/Microsoft
Corporation. Novell and N etWare/Novell, Inc. UNIX/UNIX Systems Lab oratories.
Ethernet/Xerox Corporation .
Proprietary Statement
The digitally encoded software included w ith your QMS 172 5 SLS Print Sys tem is
Copyrighted © 1995 by QM S, Inc. All Rights R eserved. This software may not be
reproduced, modified, d isplay ed, tr ans ferred, or cop ied in any form or in any manner or
on any media, in whole or in par t, without the express written permiss ion of QMS, Inc.
Copyright Notice
This manual is Copyrighted © 1995 by QM S, Inc., One Mag num Pass, Mob ile, AL
36618. All Rights Reserve d. This manual m ay not be copie d in whole or in pa rt, nor
transferred to any other me dia or language, w ithout the express written permiss ion of
QMS, Inc.
Page 3

Dear Customer,
Although your new QMS printer is the result of the latest and most
advanced engineering techniques in the electronic industry, it isn’t
necessary for you, the user, to understand every detail of the printer’s
design in order to make it do what you bought it f or. But there are
some things you’ll need to know about your printer, a nd we’ve
included guidebooks to help you get started.
We’ve designed your user’s guide to help you find the in formation you
need as quickly and easily as possible:
n
Table of Conten ts—U se this section as a road map to discover
what’s in the Getting Started guide.
n
About the Documentati on —T his section functions as a Welcome Center. It gives you an idea about what’s in your Setup and
User’s Guide as well as in the other documentat ion that has
accompanied your printer.
n
About This Manual—This section describes the same information as in the table of contents, but in a descriptive format.
n
Headers, Footers, and Tab Dividers—Use these as markers to
help you locate the section of the manual you want quickly.
n
Index—The blue pages at the end of this guide will help you find
the specific information you need.
We hope you enjoy your new QMS printer and find our guides helpful
and informative. Your QMS Techn ical Writer
Page 4

Page 5
Contents
1 Introduction
Abo u t the Pr inte r ..... . .................. . ................................ . ................ 1-2
About the Documentati on ................. ........... ........ ............. ...... ....1-2
Standard Product Documentation 1-3
Related Documentation 1-5
About This Manual .......................................................................1-5
Typographic Conventions 1-5
Printer Features ........ ............. ...... .............. ..... .............. ....... .........1-6
Media Flexibility 1-6
Multiple Resolutions 1-6
Five Resident Emulations 1-7
Sessions Support 1- 8
Resident Font s and Symbol Sets 1-8
QMS Crown Technology 1-8
Software Loadable System (SLS) 1-10
Printer Option s . . ....... .... ..... ..... ..... ....... .... ..... ..... ..... ....... .... ..... .....1-11
Page 6
Using the Contro l Panel ........ ...... ..... ..... ..... ..... ..... ....... ...... ..... ... 1-13
Control Panel Indicators 1-14
Message Window 1-15
Control Pa nel Keys 1-16
2 Printer Configuration
Introduction . . .... ... ..... ...... . ....... .... ... ..... ...... . ....... ..... .. ..... ...... ... ..... .. 2-2
Methods of Confi gu ratio n ..... .... ..... ..... ..... ....... ..... ...... ..... ..... ..... .. 2-2
Using an Application 2-2
Using PS Executive Series Utilities 2-3
Using Printer Commands 2-3
Using the Control Panel 2-3
Configuration Menu ..................................................................... 2-4
How to Move Around the Configuration Menu 2- 5
Accessing the Configuration Menu 2-5
Selecting Configuration Menu Options 2-6
Changing Character Information 2-8
Saving Configuration Changes 2-10
Canceling Configuration Changes 2-11
Setting the Message Window Language 2-11
Restoring the Factory Default Configuration 2-12
Operator Control Menu ............................................................. 2-12
Copies 2-12
Collation 2-13
Orientation 2-13
Inputbin 2-13
Outputbin 2-14
Chain Inputbins 2-14
Manual Feed Size 2-14
Def. Duplex 2-15
Tumble Duplex 2-15
Administration Menu ................................................................. 2-15
Communications ....................................................................... 2-16
Setting Timeouts 2-16
Setting Serial Interface Parameters 2-17
Setting Parallel Interface Parameters 2-23
Emulation 2-24
QMS 1725 SLS Print System User 's Guideii
Page 7
Setting AppleTalk Interface Parameters 2-26
Emulatio ns ........... ............ .............. .............. .............. .............. ... 2-2 9
Setting an ESP Default Emulation 2-29
Setting PostScript Parameters 2-29
Setting HP PCL5 Parameters 2-30
Setting HP-GL Parameters 2-36
Setting Lineprinter Parameters 2-39
Special Pages .............................................................................2-42
Working with Status Pages 2-42
Working with Trailer Pages 2-44
Enabling/Disabling Trailer Pages 2-44
Printer Start-Up Option s ............. ....... ....... ..... ....... ....... ....... .......2 -4 5
Enabling/Disabling the Start-Up Page 2-45
Enabling/Disabling the SYS\START File 2-46
Loading the PostScript Error Handler 2-46
Memory .......................................................................................2-46
QMS Memory Management 2-47
Memory Terms 2-48
Evaluation of Your Printing Environment 2-50
Duplexing and Memory Requirements 2- 51
Memory Clients 2-52
Quick Config 2-52
Configuring Spooling 2-52
PostScript H eap 2-53
PostScript F onts 2-54
Emulation 2-54
Emulation (Temporary) 2-55
Display List 2-55
Disk Cache 2-56
Frame Buffer 2-57
Printer Memory 2-58
Printer Engine Features .............................................................2 -58
Adjusting the Image Alignment 2-58
Setting Default Paper 2-59
Setting Inputbin x Name 2-59
Setting Outputbin x Name 2-60
Setting Default Resolution 2-60
Setting Gamma Correction 2-60
Specifying Page Recovery Action 2-60
Setting Toner Out Action 2-61
Contents iii
Page 8

Setting Manual Feed Timeout 2-61
Setting the Letterhead Option 2-61
Reading the Page Counters 2-62
Miscellaneous ............................................................................ 2-62
Restoring the Factory Default Configuration 2-62
Setting the Message Window Language 2-63
Hard Disks .................................................................................. 2-63
Identifying Hard Disks 2-64
The Disk Operations M enu 2-64
Formatting a Hard Disk 2-65
Collation 2-66
Spool Overflow 2-66
Installation ........... ..... .. ..... .. ..... .. ..... .. ... .... ... .... ... .... . ...... . ...... . ...... . 2-67
Operator Password 2-67
Use Operator Password 2-67
Admin Password 2-67
Use Admin Password 2-68
Using Passwords 2-68
Configuring Optional Features ................................................. 2-68
3 Daily Operations
Introduction . . .... ... ..... ...... . ....... .... ... ..... ...... . ....... ..... .. ..... ...... ... ..... .. 3-2
Preventing Media Jams ......... ................... ............ ..................... .. 3-2
About Paper . .... ... ..... .. ..... .... ... .... ... ..... .. ..... .... ... .... ... ..... .... ... .... ... .. 3-3
Paper Sizes 3-3
Paper Storage 3-4
Paper Feeding ..... ..... ....... ...... ..... ..... ... ....... ....... ..... ...... ... ..... ....... .. 3-5
Cassette Feed 3-5
Manual Feed 3-6
Face-up Output Bin ........ ............. ...... .............. ..... .............. ....... .. 3-8
Printing Tran spa renc ies .............. ..... ....... ...... ..... ..... ..... ..... ....... .. 3-8
Printing La b e l s ... ............................... . ................................ . ......... 3- 9
Printing Envelopes .................................................................... 3 -10
Formatting Data for Envelopes 3-10
QMS 172 5 SLS Print System User's Guideiv
Page 9
Printing a Single Envelope 3-10
The Optional Envelope Feeder 3-11
Tray Chaining .............................................................................3-11
Collating Output .........................................................................3-12
End J ob Mo d e . .......................................... . .................................3-1 4
Common Reasons to Use En d Job Mode 3-15
Using the EOD Commands 3-15
Setting the End Job Mode for the S erial and Parallel Protocols 3-16
Setting the End Job Mode via the Control Panel 3-17
Adding an EOD Command to Your File 3-18
Creating a Network Job Separator 3- 20
Working with S tatus Pa ges ................... ..... ... ....... ...... ..... ..... ... ..3 -20
Identifying a Status Page Type 3-20
Printing a Status Page 3-21
Cancelling/Ending Print Jobs ...................................................3-2 1
Cancelling a Print Job 3-22
Ending a Print Job 3-23
4 Print Quality
Introduction .................................................................................. 4-2
Changing Print Resolution ..........................................................4-2
Setting Default Resolution 4-2
Setting Print Density ....................................................................4-2
Using Gamma Correction . .......... ................... ..................... .........4-3
Terms 4-4
Gamma Correction Concept 4-6
Using the Image Calibrati on Page . ......... ...... .............. ....... .........4-7
5 Printer Care
Introduction .................................................................................. 5-2
When to Replace the Toner Cartrid ge ....... ......... ....... ....... ...... ....5-2
Handling the Toner Cartridge 5-3
Contents v
Page 10
Installing the Toner Cartridge .................................................... 5-3
Handling the Printer .................................................................... 5-5
Keeping the Printer Clean ..... ............ ................... .............. ......... 5-6
Cleaning the Anti-Static Teeth 5-6
Cleaning the Transfer-Guide Lock-Tray and Strip 5-8
Cleaning the Media-Feed-Guide Area 5-9
6 Troubleshooting Printer
Problems
Introduction . . .... ... ..... ...... . ....... .... ... ..... ...... . ....... ..... .. ..... ...... ... ..... .. 6-2
Status Messages ................................................................ ......... 6-2
Service Messages 6-4
HP-GL Error Codes and PCL Error Codes 6-5
PostScript Er rors ....... ..... ....... ...... ..... ..... ..... ..... ..... ....... ...... ..... ..... 6-5
Testing PC Communication ........................................................ 6-6
Creating the Test File 6-6
Sending the Test File 6-7
Verifying the Serial Port Setting Changes 6-11
Testing Macintosh Communication ......................................... 6-12
Printer Problem Checklist ..... ................... ................... .............. 6-12
Media Jams ................................................................................ 6-14
Locations 6-14
Clearing an Input Bin Media Jam 6-15
Clearing an Image-Transfer Area Media Jam 6-17
Clearing a Fuser Assembly Area Media Jam 6-18
Clearing an Output Bin Media Jam 6- 20
Clearing a Duplexer Media Jam 6-21
Problem Descriptions . ..............................................................6-22
Paper Jam Message Stays On 6-22
Data Indicator Stays Lit 6-22
No Advanced Status Page 6-23
No Start-up Page 6-23
Printer Resets 6-23
Blank Pages 6-24
QMS 172 5 SLS Print System User's Guidevi
Page 11
Not All Pages Print 6-24
Printer Will Not Duplex 6-25
Print Quality Problems ..............................................................6-25
Printer Will Not Print 600 dpi 6-26
Image Defects .............................................................................6-26
White or Light Lines 6-26
Light Image (Entire Page) 6-26
Dark Image (Entire Page) 6-27
Stain Along the Edge of the Page 6-27
Stains on the Back of the Page 6- 27
Image Easily Smears when Rubbed 6-27
Placing a Service Call ................................................................6-28
7 Professional Printing
Introduction .................................................................................. 7-2
About Typefaces and Fon ts . ..... ........ ............ ....... .............. ..... ....7 -2
Typeface Classificati on ............................ ..... .............. ....... .........7-3
Typograph y Term s .......... ...... ... ... ...... ..... ... ..... .... ... ....... .... ... ..... ....7-4
Resident Fonts .............................................................................7-7
Resident PostScript Fonts 7-7
Resident HP PCL Fonts 7-9
Resident HP-GL Symbol Sets 7-10
8 Printer Options
Introduction .................................................................................. 8-2
Additional Paper Cassettes .................................. .......................8 -3
The Envelope Feeder ...................................................................8-3
Selecting Envelopes 8-3
Installing the Envelope Feeder 8-3
Duplexer Assem bly ......... ....... ....... ......... ....... ....... ........ ....... ..... ....8-7
Installing the Duplexer Assembly 8-7
Contents vii
Page 12
Font and Emulation Cards ................ .............. ................... ....... 8-11
Installing an Optional Font 8-13
Removing an Optional Font 8-14
Installing Optional Emulation Cards 8-15
Removing a Printer Emulation 8-15
Downloadin g an Em ulatio n Fro m Disk .. ... ..... ..... ....... ....... .... ... 8-17
Security Card .................. ....... ............ ....... ............ ....... .............. 8-18
Removing and Re-ins ta lling the Tray Assem bl y ............. ....... 8-20
Removing the Tray Assembly 8-20
Re-installing the Tray Assembly 8-24
Memory Mod ul es (SIMM s) ................ ....... ...... ... ..... ..... ....... ....... 8-26
Installing a SIMM 8-26
Removing a SIMM 8-29
Installing Optional Interfaces ................................................... 8-30
Installing an Optional Interface Card and Daughterboard 8- 30
Centronics to Dataproducts Con versi on ................................ 8 -36
Hard Disks .................................................................................. 8-38
Internal 8-38
External 8-42
Identifying 8-42
Updating System So ftware .......................... ........ ............. ........ 8-43
Procedure 8-43
A QMS Customer Support
Sources of Supp ort ... ..... ....... ...... ..... ..... ..... ..... ..... ....... ...... ..... .....A -2
B Technical Specifications
Print Engine Specifications ........................................................B-2
Controller Specifications ............................................................B-3
Electrical Requirements . ....... .... ... ..... .... ... ....... .... . ....... ...... . ....... ..B -4
Environmental Requirements ........... ....... .. ..... ..... .... ... ....... .. ..... ..B -4
QMS 172 5 SLS Print System User's Guideviii
Page 13

Physical Characteristics ............................................................. B-4
Print Media ...................................... ........................................ .....B-5
Print Media Sizes B-5
Envelopes B-6
Optional Hardware ......................................................................B-6
Paper Handling B-6
Hard Disks B-7
Consumable Supplies .................................................................B-7
Cable Pinouts .......... ..... ..... ..... ..... ....... ...... ..... ..... ... ....... ....... ..... ... B-8
Centronics Parallel B-8
Serial B-9
IBM PC/XT, PC/AT, and Compatible Computers B-10
LocalTalk (Optional Interface) B-11
Macintosh to Serial B-11
Warranty Considerati ons ......................................................... B-12
Consumables and Your Warranty B-12
Electrostatic Discharge and Your Warranty B-12
C Document Option
Commands
Introduction ................................................................................. C-2
Supported DOCs ....................................... ................... ............ ... C-2
Header/Trailer Page Commands C-2
HP-GL Emulation Commands C-2
HP PCL 5 Emulation Comma nds C-3
Lineprinter Emulation Commands C-3
PostScript Emulation Commands C-4
Printer Commands C-4
Updated DOCs ........................ .................................................. ... C-4
PCL 5 Emulation Terminology C-4
Updated PCL 5 DOCs C-7
CCITT Comma nd s . ..... ....... ....... ......... ....... ...... ....... ....... ....... ..... . C -18
Accessing CCITT Emulation C-18
Command Syntax C-18
Contents ix
Page 14
ImageSize C-19
ImagePosition C-19
Rotation C-20
LineEnd C-20
BlockEnd C-20
EBAMode C-21
BitReverse C-21
InvertImage C-21
Compression C-22
DPI C-22
ImageData C-22
PageEnd C-23
JobEnd C-23
D Sessions
Sessions ...... ........................ .......................... .......................... ..... D-2
What is a Session? D-2
How is a Session Used? D-3
Session Command D-4
Examples D-7
Sessions Document Finishing Terminology D-9
Document Finishing DOC D-10
E Notices
Manual Notice ....... ......... ....... ....... ...... ....... ....... ..... ....... ....... ....... ..E-2
Laser Safety .................................................................................E-2
FCC Complian ce ...... ....... ....... ....... ..... ....... ....... ......... ....... ....... .....E-2
International Notices ...................................................................E-4
Canadian Users E-4
Vfg 1046/1984 Conformity Statement E-4
Bescheinigung des Herstellers/Importeurs E-4
Declaration of Manufacturer/Importer E-4
Electronics Emissions E-5
Colophon ...................................................................................... E-5
QMS 172 5 SLS Print System User's Guidex
Page 15
F Configuration Menu
Menu Diagrams ......................................... ............ ....... ............ .... F -2
Glossary
Index
v
Contents xi
Page 16

Page 17

1
Introduction
In This Chapter...
n
About the printer
n
About the documentation
n
About this manual
n
Printer features and user benef it s
n
Printer options
n
Using the printer’s control panel
n
Printer-host co mmunication
Page 18

About the
Printer
About the Printer
The QMS 1725 SLS Print System offers the unique QM S Crown
multitasking operating system, superior perform ance, extensive
connectivity, upgrade option s including duplex printin g, and flexible
emulation support.
In addition, it prints 17 pages per minute (let te r/A4 paper size) and is
a high-quality 300x300 and 600x600 dpi multiple-resolution desktop
printer.
About the Documentation
The documentation provides a window int o the many capabili tie s of
your printer. The more famil iar you are with the document ation, the
easier it’ll be for you to get the results you want from your printer.
QMS 172 5 SLS Print System User's Guide1-2
Page 19
About the
Documentation
Several pieces of documentation accompany your printe r. If you’ve
ordered printer options, you’ll have even more manu als. B ut don’t
worry—you don’t have to read them all before you’re able to use your
printer. I n fact , som e of them you may never have to refer to at all,
depending on the type of documents you print and the environment in
which you print them.
This section will give you an idea of how we’ve organized inf ormation
and which documents you’ll probably refer to the most.
Standard Product Docum entation
The following document atio n is shipped with your print er:
n
QMS 1725 SLS Print System Setup Guid e
Refer to this guide as you unpack and set up the printer. It contains detailed, illustrated inst ructi ons to guide you as you unpack
and set up your printer and connect it to a host computer. It also
covers installing a toner cartridge and filling the paper trays. Each
person who plans on using this printer should review this document.
QMS 1725 SLS Print System User ’s Guide
n
You're looking at this manual right now. This manual guides you
through the day-to-day operation of your printe r. It include s information on using the printer’s control panel, making configuration
changes, replacing print media, using advanced printing features,
handling and cleaning your printer, improving print quality, and
troubleshooting printer problem s. Th e “About This M anual” sec tion later in this chapter provides more contents of this manual.
Introduction
1-3
Page 20

About the
Documentation
n
PS Executive Series Util ities
On-line documentatio n explains how to install and use the PS
Executive Series Utilities that accompanies your printer. Once
you install this software on your host, use its menus to access the
printer ’s features, such as printer naming, font and emul ation
downloading, and sample files that illustrate some of your
printer ’s capabilities. A Windows driver is also included with this
software. (Before instal ling the util ities, be sure to che c k for a
README.T XT file in case of last-minut e updat es.)
QMS Crown Document Option Com man ds
n
Document Option Commands (DOCs) are sof tware codes you
insert in documents to enable printer fe atu res that cannot be
accessed by your application or page description langu age. This
manual lists and explains all of the DOCs. Using QMS DOC, you
can develop one driver to support all languages and emulations
for your printer. Also, you can use ho st netwo rk management
software to create customized netwo rk printer queues for all
users connected to the printer. In most cases, only advanced
users and system administrators need this informat ion.
QMS Crown Network Notes
n
Refer to this manual for tips on using your QMS 1725 SLS Print
System if you’re connecting to a network. It discusses 3Com
3+Open, Banyan VINES, LAN Manager-based LA Ns, Novell NetWare, TCP/IP, UNIX, and VMS/DECnet . In most cases, on ly
advanced network users and system administrat ors need this
information.
This manual is provided on disk in encapsulated PostScript
(EPS) form. Refer to the REA DM E file on the dis k for informat ion
on printing a hard copy of the manual.
QMS 172 5 SLS Print System User's Guide1-4
Page 21
Related Documentation
Don’t forget that your application, host operating system, and network
documentation all contain useful printing inform ation.
n
Printer Option Docum ent ation
If you purchased a printer option (for example, a CrownNet inter-
face card for a Ethernet network), you probably received separate documentation fo r it. See chapte r 8, “Printer Opt ions, ” for
additional inf ormat ion .
n
Further information on QMS printe rs is available through your
modem or fax machine. See appendix A, “QMS Custome r Support,” for details.
About This Manual
This manual is a complete guide to the features, operation, and maintenance of your QMS 1725 SLS printer. Each chapter begins with
highlights of its contents. An extensive index at the end of the manual
further helps to locate specific topics and a glossary defines relevant
terms. The appendixes contain supplem ent ary info rmat ion such as
cable pinouts, technical specifications, and other printer-related material.
About This
Manual
Typographic Conventions
The following typographic conve ntions are used in this manual:
Mixed-Case
Cour ier
Mixe d-Case
Italic
Courier
UPPERCASE
COUR IER
lowercase bold PostScript operators and DOS commands
Introduction
Text you type, and messages and information displayed
on the screen
Variable text you type; replace the italicized word(s) with
information specific to your printer or com puter
Information displayed in the printer message window
1-5
Page 22

Printer
Features
lowercase italic
UPPERCASE File and utility names
↵ Press the Enter key (PC) or Return key (Macintosh)
^ Press and hold down the Ctrl key (PC)
» Note: Notes contain tips, e xt ra information, or impor tant information that
deserves emphasis or reiteration.
O
Caution:
equipment damage, proces s failure, or extreme annoyance.
M
WARNING!
procedure is not performed exactly as described in the manual.
ACHTUNG!
Vorgehensweise, da sonst Verletzungsgefahr bestehen könnte .
Cautions present information that you need to know to avoid
Warnings indicate the possibility of personal injury if a sp ecifi c
Bitte halten Sie sich exakt an die im Handbuch beschriebe ne
Variable information in text
Printer Features
This brief overview will acquaint you with your printer’s major features
and how they can benefit you. Consult the index or the table of contents to locate this information.
Media Flexibility
Your printer supports print medi a of different sizes— A4, executive,
legal, letter—in portrait and landscape orientations.
User Benefit—You can print on commonly used media sizes.
Multiple Resolutions
The printer supports two print resolutions: 300x300 and 600x600 dpi
(dots per inch).
QMS 172 5 SLS Print System User's Guide1-6
Page 23
Printer
Features
User Benefit—Two resolutions allow you to customize the quality of
your output according to its use: 300x300 dpi for most hardcopy
needs, 600x600 dpi for high-resolut ion out put.
Five Resid ent Emulations
Your printer supports printing in HP PCL5, HP-GL, Lineprinter, CCITT,
and PostScript emula tion s.
User Benefit—Most applicat ion s can print directly to the printer.
HP PCL 5 Emulation
The printer emulates the Hewlet t -Packard LaserJet IIIS i at both
300x300 dpi (bitmap and scalable fonts) and 600x600 dpi (scalable
fonts only). The available resolution for HP-GL/2 is 300x300 dpi.
HP-GL Emulation
The printer provides HP-GL plotter emulation (7470A, 7475A, 7550A,
and ColorPro) at 300x300 dpi and 600x600 dpi.
Lineprinter Emulation
The Lineprinter emul ati on prints sim ple, unformat ted text files at
300x300 and 600x600 dpi. Each text line ends with a carriage return.
CCITT
This emulation supports CCITT Group 3 1-D, Group 3 2-D, and
Group 4. Key features specific to this emulation inclu de a stream-oriented data flow system, concise data attribute set, and enhanced performance.
PostScript Level 2 Emulation and Level 1
Compatibility
The QMS 1725 SLS Print System’s Level 2 emulation allo w s you to
take full advantage of your printer's high print resolution (up to
600x600 dpi). The Level 2 emulation is compatible with Adobe’s PostScript Level 2 language while providing additional capabilit ies. QMS
Level 2 emulation supports extensive graphics capabili ties to control
Introduction
1-7
Page 24

Printer
Features
the appearance of text, geometric shapes and images, and improves
memory and resource management. Full support for PostScript Level
1 files is also included.
Sessions Support
Since your printer supports sessions, it’s possible for you to combine
multiple document s into a single print job with global features th at
override the individual document’s page description—even when the
individual document s are composed from different appli catio ns using
different printer descripti on languages. S e ssions allow you to print
multiple chapters as a book, a series of reports as a batch process, or
“wild card” file selections on UNIX or VMS comput er systems. More
information about sessions and session comm ands are in appendi x
D, “Sessions.”
Resident Fonts and Symbol S ets
Your printer comes with 12 PostScript typeface families containing 39
licensed fonts, and it provides TrueType font support (in Po stSc ript
emulation only). All resident PostS cript typeface families have mu lti lingual character sets. The printer also has 7 resident bitmap HP PCL
fonts in 25 symbol sets each, 12 resident scalable HP PCL fonts in 35
symbol sets each, 1 resident scalable HP PCL font in 5 symbol sets,
and 40 resident HP-GL symbol sets.
User Benefit—With so many resident fonts and symbol sets, there is
less need for time-consuming downloadin g.
QMS Crown Technology
The QMS Crown multitasking operat ing s ystem provides fast processing speeds, networking capability, and hig her printer perf ormance while maintaining outstanding print quality.
Compile-Ahead Technology and True Multitasking
Compile-ahead technology keeps all of your printer’s resources busy
to improve throughput. While the engine is printi ng a page,
compile-ahead technology uses available printer mem ory to prepare
QMS 172 5 SLS Print System User's Guide1-8
Page 25

Printer
Features
the subsequent pages of the document (or the next job). With pages
ready in memory, the engine continues pri nting as it deposits printed
pages in the output tray. (In oth er words, compil ing, rasterizing , and
printing all work independently but simult aneously.)
User Benefit—Because print job processing time is significantly
reduced, you spend less time waiting for your documents to print.
Simultaneous Interface Operation (SIO)
Other printers may have mult iple int erf ace ports, but your QMS 1725
all
SLS Print System is unique because SIO allows
ports—AppleTalk, parallel, serial, and an optional interface—to be
at the same time
active
The multiple interfaces let you connect to any AppleTa lk network or
directly to an IBM or compatible PC. The printer also wo rks in many
minicomputer and main frame co mpu ter environm ents .
User Benefit—You can have m ore than one computer print ing to the
printer. E ach interface has an input buffer (which may be expanded
with additional memory) that receives data while anot her interface is
being used to print.
.
of its interface
Emulation Sensing Processor (ESP) Technology
Most printers can recognize only their native comma nd languag e.
However, using a form of artificial intel ligen ce , ESP technology a nalyzes incoming file data from any of the printer ’s interfaces, selects
the appropriate emulation from those insta lled on the printe r, and processes th e print job.
User Benefit—When your printer is in ESP mo de, you can easily
print PostScript, HP PC L 5, HP-G L, CCI TT, a nd L ineprin ter d ocuments without chan ging printer swi tch settings or sending soft ware
commands to accomm odat e different print er la nguages.
Introduction
1-9
Page 26
Printer
Features
Context Switching
After its initial use, the state of an emulat ion and downl oaded dat a
(such as fonts, macros, and overlays) is preserved for as long as the
printer power is on.
User Benefit—Repetit ive download ing of emulat ion s, font s, m acros,
and overlays is unnecessary, saving you time.
Compressed Data Formats
Crown printers convert data received from the input buffer s into
intermediate, compressed blocks until the data is needed for printing.
These compressed blocks of data are designed t o be processed
rapidly by the printer, and many more can be stored in memory at one
time than can traditional bitmapped image s.
User Benefit—This increases the speed of printer features such as
collation and autom at ic ja m recovery.
Automatic Jam Recovery
With most printers, if a media jam occurs, you must remove the
jammed media and then reprint the job. On a QMS Crown printer, if
the Page Recovery menu option is set to ON and a media jam occurs,
once you remove the jammed media, the print er reprints the jammed
page and then continues with the print job. This is possible because
compressed data format s allow more pag es to be stored in memory.
The printer remembers the last page printed, pulls the necessary
information from memory, and aut om atically reprint s any lost pag es.
User Benefit—You save tim e and print media because it’s unnecessary to resend a print job after clearing a media jam.
Software Loadable System (SLS)
Your printer has a software loadable s ystem , which allows you to
replace or upgrade its system software from a host computer.
User Benefit—Future enhancem ents to the system software ca n be
easily installed as they become available from QMS.
QMS 172 5 SLS Print System User's Guide1-10
Page 27

Printer Options
The following options are available for your QMS 1725 SLS Print System. Contact your QMS vendor for purchase information.
Media Handling Accessories
The optional media handling accessories include legal- and A 4- size
media cassettes, a large-capacity sheet feeder (1500 sheets), and a
duplexing unit. You can also print directly on business or personalsized envelopes with an optional envelope feeder or by using the
manual feed.
User Benefit—Your print er handles a variety of sizes and types of
common print media.
Upgradable RAM (Random Acce ss Memory)
The QMS 1725 SLS Print System comes wit h 13 MB of RAM. How ever, you can upgrade this RAM to 32 MB through the inst alla tio n of
SIMMs (single in-line memory mo dules). Addition al RAM allows you
to print at higher resolutions on certain media sizes, download and
cache fonts, and send large data-intensive files to the printer wit hout
tying up the host for long periods.
Printer Options
User Benefit—Your print er’s memory can be upgraded as your
needs grow.
Fonts
Contact your QMS vendor for a complete list of available fonts.
User Benefit—Optiona l fonts increa se the print er ’s functionali ty and
allow you to create more distinctive docu ments.
Emulations
Your printer provides support fo r optional emulati ons, such as LN03
and QUIC II.
User Benefit—Extra emul ations allow you to print docume nts c reated in printer languages other than tho se resident on the printer.
Introduction
1-11
Page 28
Printer Options
ImageServer
The optional ImageServer kit acts as an interface between docum ent
imaging applications and the prin ter. To purchase the ImageServer
kit, contact you r QMS ven d or.
User Benefit—With thi s option inst alle d, you can load TIFF, CALS
and CCITT emulations. ImageServer enables your p rinter to print at
or near the rated engine speed when working with compl ex, rasterized images.
Network Interfaces
The QMS 1725 SLS Print System can use optional interfaces such as
IBM 3270, IBM 5250A, or one of the CrownNet NICs (network interface cards) running multiple protocols. Contact your QM S vendor for
a list of available protocols.
User Benefit—Optiona l interf aces provi de flexibili ty and fast data
transfer in complex network environments.
Hard Disk Expandability
The QMS 1725 SLS Print System provides support for a larger internal hard disk and optional external SCSI hard disks.
User Benefit—Hard disks provide t rue virtual memor y as well as
storage for character bitmaps, downloaded outl ine fo nts, and other
files.
QMS 172 5 SLS Print System User's Guide1-12
Page 29
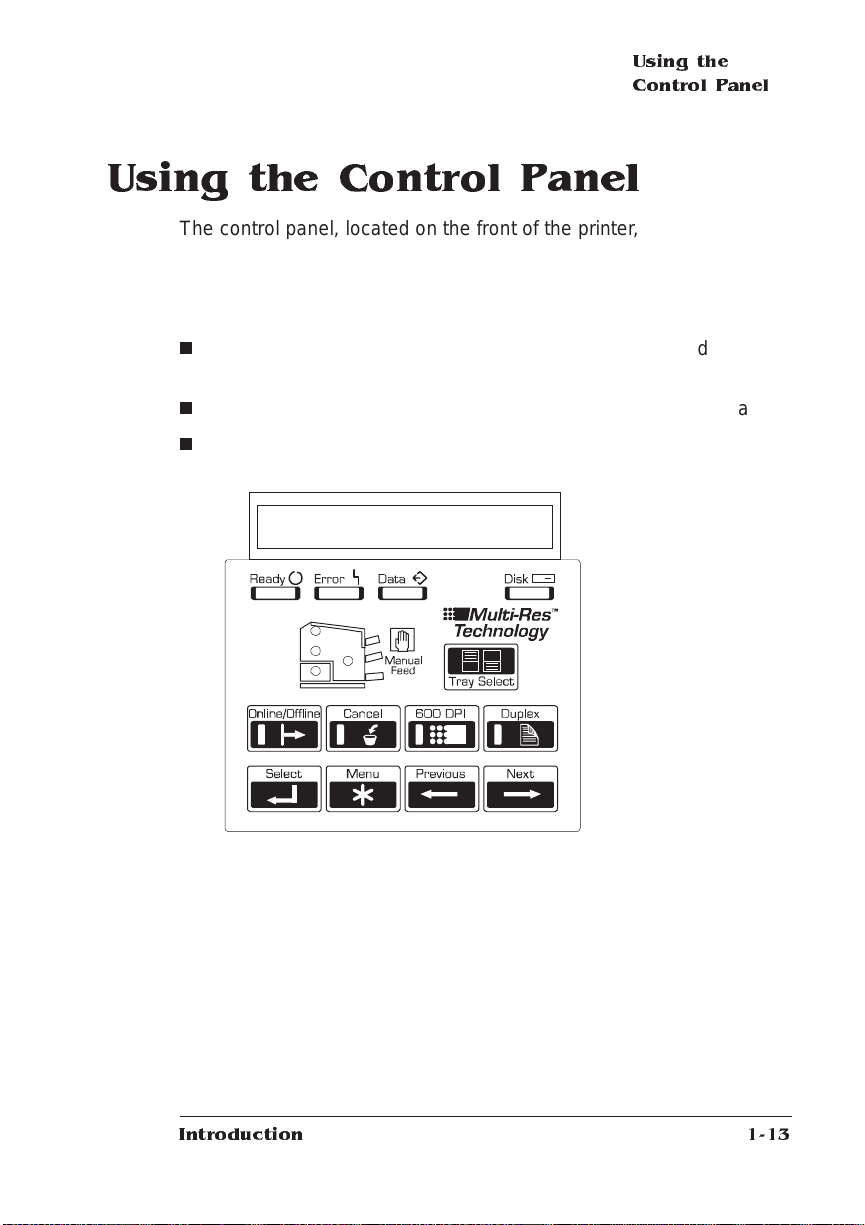
Using the Control Panel
The control panel, located on the front of the printe r, allows you to
direct the printer ’s operation. In addition, it displays the current status
of the printer, inclu ding any co ndit ion that needs your attent ion.
The control panel consists of the following parts:
n
Sixteen indicator s provide printer status info rmation and ide nti fy
the current media source.
n
A message window displays status and configuration information.
n
Nine keys allow you to control the printer.
Message Window
Using the
Control Panel
Introduction
1-13
Page 30

Using the
Control Panel
Control Panel Indicators
Indicators on the control panel display printe r status inf ormat ion , current media source, and paper jam locations.
Flashes when the printer is warming up. It r emains on
when the printer is ready to receive a print job and while it
is processing or pr inti ng a job (unless an error is
encountered).
Lights when the printer requires operator intervention.
This indicator is usually accompanied by a status
message in the message window.
Lights when the printer is receiving data from one or more
of the simultaneous interfaces.
Lights when the printer’s hard disk is being accessed.
Lights when the printer is on line and ready to accept and
process new print jobs. Press it once to take the printer off
line (the indicator is not lighted) and make the printer
ready for configuration.
Lights when the print resolution is set to 600 dots per inch.
Lights when the duplex option is installed and duplex
printing is chosen.
Lights when manual feed is chosen as the inputbin.
QMS 172 5 SLS Print System User's Guide1-14
Page 31

Using the
Control Panel
This light will flash to indicate the printer is terminating the
current print job.
Envelope feeder (optional)
select indicator
Jam indicators
(4). Light in area of
suspected jam
location.
Upper paper cassette select
indicator
Lower paper cassette select
indicator
Message Window
The control panel message window provides status and configuration
information. Status messages are listed in chapter 6, “Troubleshooting Printer Problems.”
Setting the Message Window Language
Status messages and configuration me nus can be displayed in the
message window in English, French, German , or Spanish. If you
need to change the message window language, use the Keypad Language option in the Administration/M iscellane ous menu . If you’re not
familiar with using the configurat ion men u, refer to chapte r 2, “Printe r
Configuration,” for complete information.
Menu Administration/Miscellaneous/Keypad Language
Choices E nglish, Fre nch, German, Spanish
Default English
Notes The printer must be restarted for changes to the Keypad
Language menu to take effect. You can either let the printer
restart automatically after you save the change and exit from
the configuration menu, or you can wait for the change to take
effect the next time you m anually turn on the printer.
Introduction
1-15
Page 32

Using the
Control Panel
Control Panel Keys
Press the Online/Offline key once to take the pr inter off
line (the indicator goes out). You must take the printer off
line before using all other keys except the Cancel key.
When the printer goes off line, the communication por ts
are closed, so no new data is accepted. The printer
continues printing until it has finished all jobs in pr o cess.
Although jobs continue to compile and print using the data
already received, a job may be interrupted, causing it to
wait for more incoming data before printing resumes.
When the printer is off line, press the Online/Offline key
once to place it back on line and ready to accept new print
jobs (the i ndicator goes back on). If a remote console has
the printer off line, pressing the Online/Offline key will not
take effect until the console puts the printer back on line.
Press the Cancel key to cancel all print jobs currently
printing, interpreting, or spooling; or to send an end-of-job
indicator to print jobs waiting for incoming data. The
printer then resumes printing other print jobs in the queue.
If you press the Cancel key by mistake, or if you decide
not to cancel a print job after pressing this key, press t he
Menu key t o “cancel” the Cancel key’s function.
Press the 600 DPI key to choose between printing at 300
dots per inch or 600 dots per inch. The indicator is on
when the resolution is set to 600 dots per inch.
Press the Duplex key to choose duplex printing. The
indicator is on when the printer is set for duplex printing.
QMS 172 5 SLS Print System User's Guide1-16
Page 33

Using the
Control Panel
Press the Tray Select key to choose the cassette (input
bin) from which the printer should draw media.
Press the Next key to advance through the list of
selections or options for the curr ent menu. When
changing character information, use this key to advance to
the next choice for the current input character.
Press the Previous key to return to the previous selection
or option for the current menu. When changing character
information, use this key to return to t h e previous choice
for the current input character.
Press the Menu key to access the configuration menu
after the printer goes off line. When you’re changing
printer configuration, press this key to cancel a change
(before pressing the Select key), to return to a previous
menu, or to return to a previous character when entering
character information.
Press the Select key to access a menu or to choose a
displayed menu option.
v
Introduction
1-17
Page 34

Page 35

2
Printer Configuration
In This Chapter . . .
n
Methods of configu ra tion
n
Configuration me nu
n
Operator control menu
n
Administration menu
n
Installation menu
Page 36

Introduction
Introduction
This chapter begins by listing and describing the different ways you
can configure your printer to meet your special printing needs.
The next section describes how to use the printer control panel to
access the configuration menu and how to make configuration
changes.
The rest of the chapter provides basic printer configuration information about some of the configuration menu options. Menu features are
grouped according to task. Each feature is introduced, then a table
describes the feature’s location in the configuration m enu, the available choices for that feature, and the factory default (the value set at
the factory).
Methods of Configuration
You have different meth ods of co nfi guring your printe r to meet your
printing needs:
n
Through an application
n
Through PS Executive Series Utilities
n
Through printer commands
n
Through the printer control panel
Using an Application
Using your application is the best way to control your printer since
most printing is done on a per-job basis. This helps prevent confusion
in network environments and saves you from making changes at the
printer control panel. Your application documentation explains how to
control your printer settings: probably by choosing options from a
printing menu.
QMS 172 5 SLS Print System User's Guide2-2
Page 37

Methods of
Configuration
Applications use printer drivers to send appropriate commands to the
printer for requested tasks. If your application doesn’t have a QMS
1725 Print System driver, you can se lect a compa rable P ostS cript
driver, such as another QMS driver or a LaserWriter driver. However,
comparable drivers may not allow you to access all of your printer's
features, such as 600x600 dpi printing, duplexing, or co llat ing.
Using PS Executive Series Utilities
You can also use the PS Executive Series Utilities (shipped with your
printer) to control the printer from your host. See the README file on
the utilities disk for inform ati on on install ing th e utiliti es, and see the
utilities on-line help for details on using the sof tware.
Using Printer Commands
Printer commands (such as PostScript operators, QM S Document
Option Commands [DOCs], and HP PCL and HP-GL commands) can
enable job-specific features your application or page description language can’t access. See the
manual, for information on these commands. See appendix C,
mands
“Document Option Commands, ” of this manual fo r a list of DOCs this
printer supports.
QMS Crown Document Option Com-
Using the Control Panel
Your printer is configured at the factory for most typical printing environments, so most users don’t have to use the control panel often.
However, if you do need to change a printer setting for all print jobs
(not just on a per-job basis), you can do so through the control panel.
If you’re working in a shared printing environment, your system
administrator should be the only person to make changes through the
printer’s control panel.
Printer Configuration
2-3
Page 38

Configuration
Menu
Configuration Menu
The printer ’s confi gurat ion men u allows you change the def ault
printer configuration settings. Any changes made to the configuration
will reside as new default settings and affect all subsequent print jobs.
The options in the configuration menu are organi zed under three
main menu s:
n
Operator Control Me nu
Use this menu to select document processing options such as
copy count, choosing input and output paper bins, chaining input
bins, and duplexing (if a duplexing unit is installed). Document
processing selections are usually specified within individual jobs
since each job has its own requirements. However, i f there’s no
way of specifying these selections within an application, use the
control panel to change selections, send the job, and then
change the defaults back.
» Note: Defining do cument processing selecti ons for a particular job
through the control panel is not recommended in a shared environment.
When many system s are using the sam e printer, theres no way of
making sure that no other jobs are s ent to the printer while the
defaults are changed.
n
Administration Menu
Use this menu to maintain print er-host com mun icati on info rmation, and for selecting and configuring printe r emulat ion s, confi guring special pages, printing engi ne calibrat ion, and configu ring
hard disks.
» Note: For information on printer-host communication usi ng an optional
interface, refer to the
Admin istrators Guide
n
Installation Menu
Use this menu to establish passwords for the Operator Control
and Administration menus. This menu displays only when an
optional security card is installed. See chapt er 8, “Printer
Options,” for details on using a security card.
QMS 172 5 SLS Print System User's Guide2-4
QMS CrownNet Interface System
(available through Q M S).
Page 39

Configuration
Menu
How to Move Around the Configuration Menu
Use the control panel keys to move around the printer menu. The top
line of the message window always displays the name of the current
menu, and the bottom line displa ys the name of an option withi n that
menu. The control pane l keys are as follows:
Press the Online/Offline key once to take the pr inter off
line (the indicator goes out). You must take the printer off
line before using all other keys except the Cancel key.
Press the Online/Offline key once to exit the configuration
menu and put the printer back on line, ready to accept
new print jobs (the indicator goes back on).
Press the Menu key to access the configuration menu
after the printer goes off line. When you’re changing
printer configuration, press this key to cancel a change
(before pressing the Select key), to return to a previous
menu, or to return to a previous character when entering
character information.
Press the Next key to advance through the list of
selections or options for the current menu. When
changing character information, use this key to advance to
the next choice for the current input character.
Press the Previous key to return to the previous selection
or option for the current menu. When changing character
information, use this key to return to t h e previous choice
for the current input character.
Press the Select key to access a menu or to choose a
displayed menu option.
Accessing the Configuration Menu
To access the configuration menu, make sure the printer is idle (IDLE
displays in the message window), then press the Online/Offline key to
Printer Configuration
2-5
Page 40

Configuration
Menu
take the printer off line (the Online/Offline indicator is not lighted), and
finally press the Menu key.
Example
The following table shows how to use control panel keys to a ccess
the printer configurat ion me nu. Press the control panel ke ys in the
order shown. The printer responds by displaying a status message or
configuration menu in the me ssage w indow.
» Note: You may nee d to press the Next key more than one time to advance
through the list of options.
Press this
key
Online/
Offline
Menu Access the c onfiguration menu. CONFIGURATION
to... The message
window reads...
Turn off the Online/Offline indicator and
ready the printer for configuration.
IDLE
OPERATOR CONTROL
The printer must be off line and idle before you can access the configuration menu.
Selecting Configuration Menu Options
Once you access the configuration menu, you use the control pane l
keys to move through the menu. Use the following keys:
Press this key to...
Next Advance to the next option or submenu within a menu.
Previous Return to the previous option or submenu within a menu.
Select Select an option or enter a submenu.
Example
To change the default printer emulation from ESP to PostScript, press
the control panel keys in the order shown in the following tabl e.
QMS 172 5 SLS Print System User's Guide2-6
Page 41

Configuration
Menu
» Note: You may nee d to press the Nex t key more than once to advance
through the list of selections or options.
Press this
key
Online/
Offline
Menu Access the c onfiguration menu. CONFIGURATION
Next Advance to the Operator Control/
Select Access the Administration menu ADMINISTRATION
Select Access the Communications menu. COMMUNICATIONS
Next Advance to the Communications/Parallel
Select Access the Parallel menu. PARALLEL
Next Advance to the Parallel/Emulation menu. PARALLEL
Select Access the Emulati on menu. EMUL ATION
Previous Advance to the Emulation/PostScript
Select Select PostScript as the default
Online/
Offlin e or
Menu
Next Advance to the Save Changes?/Yes
Select Select Yes. The printer finishes printing
to... The message
window reads...
Turn off the Online/Offline indicator and
ready the printer for configuration.
Administration menu.
menu.
menu.
emulation.
After 3 seconds you are returned to the
Parallel/Em ulation menu.
Exit from the menu (Online/Offline) or
return to the previous menu (Menu). You
are prompted to save your change(s).
option.
any print jobs in process, saves your
change, and returns to idle.
IDLE
OPERATOR CONTROL
CONFIGURATION
ADMINISTRATION
COMMUNICATIONS
TIMEOUTS
COMMUNICATIONS
PARALLEL
MODE
EMULATION
ESP
EMULATION
POSTSCRIPT
POST SCRIPT
IS SE LECTED
PARALLEL
EMULATION
SAVE CHANGES?
NO
SAVE CHANGES?
YES
IDLE
Printer Configuration
2-7
Page 42

Configuration
Menu
Changing Character Information
Sometimes, rather than selecting an opt ion, you need to enter character information. A character is any letter, digit, or symbol. A field is a
group of characters that have meaning. Use the printer co ntrol panel
to enter character information in the message window during printer
configuration. The maxi mum length of the message wind ow is 16
characters.
Entering character information through the control pane l is similar to
setting the time and date on a digital watch. You e nte r one character
at a time. The current input character flashes. Use the following keys
to change the current input character:
Press this key to...
Next Advance to the next choice for the current input character.
Previous Return to the previous choice for the current input
character.
Once you have changed the current input character, use the following
keys to move the cursor to another input charact er:
Press this key to...
Select Advance the cursor to the next character.
Menu Return the cursor to the previous character.
To exit from the character selection process, move the cursor to the
last character of the input field (the character farthest to the right) and
press the Select key, or move to the first character of the input field
(the character farthest to the left) and press the Menu key.
When you exit, the printer verifies character information and confirm s
it in the message window. If character inform ation is va lid, you’re
returned to the previous menu; if it’s invalid, you’re returned to the
input field. Press the Menu key to cancel any changes to the character inform ati on.
If the current character information is longer than the value that you
need to enter, replace each extra character with a space. The print er
interprets a space at the end of character information as a blank.
QMS 172 5 SLS Print System User's Guide2-8
Page 43

Configuration
Menu
Example
To change the HP-GL emulat ion scaling percen t, press the control
panel keys in the order shown in the following table. Th e printer
responds by displaying a status message or configuration menu in
the message window. An underline indicates the current input character in the message window.
» Note: You may nee d to press the Next key more than one time to advance
through the list of selections or options.
Press this
key
Online/
Offline
Menu Access the c onfiguration menu. CONFIGURATION
Next Advance to the Administration menu. CONFIGURATION
Select Access the Administration menu ADMINISTRATION
Next Advance to the Communications/
Select Access the Emulations menu. EMULATIONS
Next Advance to the Emulations/HP-GL menu. EMULATIONS
Select Access the HP-GL menu. HP-G L
Next Advance to the HP-GL/Scaling Percent
Select Access the Scaling Percent menu. SCALIN G PER CENT
Previous Lower the current character to 0. SCALING PERCE NT
Select Select 0 and move the current character
Next
(5 times)
to... The message
window reads...
Turn off the Online/Offline indicator and
readies the printer for configuration.
Emulation menu.
menu.
to the next 0.
Advance the current character to 5. SCALING PERCE NT
IDLE
OPERATOR CONTROL
ADMINISTRATION
COMMUNICATIONS
COMMUNICATIONS
EMULATIONS
ESP DEFAULT EMUL
HP-GL
PLOT TER
HP-GL
SCALING PERCE NT
00
1
00
0
SCALING PERCE NT
0
00
0
05
Printer Configuration
2-9
Page 44

Configuration
Menu
Select Select 5 and move the current character
to the last 0.
Select Select 50 as the default scaling percent . 50
After 3 seconds you are returned to the
HP-GL/Scaling Percent menu.
Online/
Offlin e or
Menu
Next Advance to the Save Changes?/Yes
Select Select Yes. The printer finishes printing
Exit from the menu (Online/Offline) or
return to the previous menu (Menu). You
are prompted to save your change(s).
option.
any print jobs in process, saves your
change, and returns to idle.
SCALING PERCE NT
050
IS SE LECTED
HP-GL
SCALING PERCE NT
SAVE CHANGES?
NO
SAVE CHANGES?
YES
IDLE
Saving Configuration Changes
Before the printer can accept print jobs with configurat ion changes,
the changes m ust be saved.
Example
To save your configuration changes, press the control panel keys in
the order shown in the following table. The printer responds by displaying a status message in the message window.
Press this
key
Online/
Offlin e or
Menu
Next Advance to the Save Changes?/Yes
Select Select Yes. The printer finishes printing
Online/
Offline
to... The message
Exit from the menu (Online/Offline) or
return to the previous menu (Menu). You
are prompted to save your change(s).
option.
any print jobs in process, saves your
change, and returns to idle.
Turn on the Online/Offline indicator and
ready the printer to accept and print jobs.
QMS 172 5 SLS Print System User's Guide2-10
window reads...
SAVE CHANGES ?
NO
SAVE CHANGES ?
YES
IDLE
IDLE
Page 45

Configuration
Menu
» Note: The printer may need to be restarted before cert ain changes to the
Administration m e nu take effect. Some changes restart the printer auto-
matically while others display the mes s a ge
panel message window. If this message appears, select
REBOOT NOW?
YES
in the control
to restart the
printer and have the change(s) take effect imme di ate ly, or selectNOto wait
until you manually restart the printer for changes to take effect.
Canceling Configuration Changes
If you change a configuration option and then decide to cancel that
change, you can do so when exiting the configuration menu.
Example
To cancel your configuration changes, press the control panel keys in
the order shown in the following table. The printer responds by displaying a status message in the message window.
Press this
key
Online/
Offlin e or
Menu
Select Select No. The printer finishes printing any
Online/
Offline
to... The message
window reads...
Exit from the menu (Online/Offline) or
return to the prev ious menu (Menu ) and be
prompted to save your change.
print jobs in process, does not save your
changes, and returns to idle.
Turn on the Onli ne/Offline indicator and
ready the printer to accept print jobs.
SAVE CHANGES?
NO
IDLE
IDLE
Setting the Message Win do w Langua ge
Status messages and configuration me nus can be displayed in the
message window in English, French, German , or Spanish. If you
need to change the message window language, use the Keypad
Language option in the Administ rati on/M iscell aneous m enu.
Menu Administration/Miscellaneous/Keypad Language
Choices E nglish, Fre nch, German, Spanish
Default English
Printer Configuration
2-11
Page 46

Operator Contr ol
Menu
Notes The printer must be restarted for changes to the Keypad
Language menu to take effect. You can either let the printer
restart automatically after you save the change and exit from
the Configuration menu, or you can wait for the change to take
effect the next time you m anually turn on the printer.
Restoring the Factory Default Configuration
If you need to cancel all of the configuration changes you have made,
you can reset all of the configuration settings to their factory defaults .
Menu Administration/Miscellaneous/Restore Defaults
Choices Yes, No
Default No
Notes This process t a kes several minutes to complete.
Operator Control Menu
The Operator Control menu con sists of the following submenus:
Copies Collati on
Orientation Inputbin
Outputbin Chain Inputbins
Manual Feed Size Def. Duplex
Tumble Dupl ex
Copies
While it is usually preferable to select in your application the num ber
of copies you want to print, you can change the default number of
copies for all print jobs through the printer control pane l.
Menu Operator Control/Copies
Choices 001-999
Default 001
Notes Sets the default number of copies for all subsequent print jobs.
QMS 172 5 SLS Print System User's Guide2-12
Page 47

Operator Contr ol
Menu
Collation
Use this option to arrange multiple copies of a document in sequential
order .
Menu Operator Control/Collation
Choices On, Off
Default On
Notes For additional information on collation, refer to Collating Output
in chapter 3, “Daily Operations.”
Orientation
Specifies whether text and graphics are placed on the pag e in a portrait or landscape orientation.
Menu Operator Control/Orientation
Choices L andscape, Portrait
Default Portrait
Inputbin
Allows you to select the default cassette (input bin) from which media
is drawn into the printe r.
Menu Operator Control/Inputbin
Choices U p per, Lower
Default Upper
Notes The current default input bin is indicated by t he appropriate
LED on the print control panel.
Printer Configuration
2-13
Page 48

Operator Contr ol
Menu
Outputbin
Use this option to indicate the default output bin (tray). You can
choose to have paper exit the printer at either the upper bin or the
face-up bin.
Menu Operator Control/Outputbin
Choices Upper, face-up
Default Upper
Chain Inputbins
Allows you to “chain” input bins (cassettes) so that when the first input
bin empties, the printer will automatically draw media from the second
input bin with the same size and type of media.
Menu Operator Control/Chain Inputbins
Choices On—Swit c h to the next input bin with the same si ze and type
Default On
Notes Use the Operator Control/Inputbin menu to set the defa ult
of media when the default input bin is empty.
Off—Don’t switch input bins; use only the default input bin.
input bin. Make sure the two bins use t he same size media.
Manual Feed Size
Use this option to select the size of the print medium to be fed manually.
Menu Operator Control/Manual Feed Size
Choices Letter , Legal, A4, Execu tive, Com9, Com10, DL, Monarch, and
Envelope (see notes)
Default Letter
Notes The Envelope setting should b e used if your envelope size
doesn’t match any of the other listed envelopes sizes.
QMS 172 5 SLS Print System User's Guide2-14
Page 49

Admi nistr ati on
Menu
Def. Duplex
The Def[ault] Duplex option all ows you to print on the front and back
of each page.
Menu Operator Control/Def. Duplex
Choices On, Off
Default Off
Notes This is an optional feature and supported only if the duplexing
unit and enough memory are installed. See “Quick Config” in
the Memory submenu later in this chapter.
Tumble Duplex
Prints jobs so they can be bound at the top edge (flip-chart style).
Menu Operator Control/Tumble Duplex
Choices On, Off
Default Off
Notes The Operator Control/Def. Duplex option must also be turned
on. This is an optional feature and supported only if the
duplexing unit is installed.
Administration Menu
The Administrati on men u consists of the followi ng subme nus:
Communications Emulations
Special Pages Startup Options
Memory Engine
Miscellaneous Disk Operations
Printer Configuration
(Optional)
2-15
Page 50

Communica tions
Commu n ications
This menu contains several options that all ow you to config ure the
printer's communication parameters to match the host and application
parameters.
» Note: This section contains information on Timeouts, Serial, Parallel and
Emulation menus. For information on printer-host communication using the
Ethernet interface or any options located under the Network 1 submenu
(the Network 1 menu appears only when an optional interface has been
installed), refer to chapter 2, P rinter Configuration, of the
CrownNet Interface System Administrators Guide.
Setting Timeouts
The Timeouts options limit the am ount of time the printe r wai ts on
transmission from the host for various types of data.
Setting a PostScript E mulation Timeou t
The PostScript emulation timeout is the maximum number of seconds
the PostScript emulation waits for incoming data.
QMS
Menu Administration/Communications/Timeouts/PS Wait Timeout
Choices 0 0000-99999
Default 00030 (30 sec.)
Notes A value of 000 is the same as infinity (no timeout).
The job is closed and the next job in the queue begins if all of
the following occur:
n
No additional data is received during the specified
period of time.
n
The interface didn’t tim e out.
An EOD (end-of-document commands) was not seen.
When a print job is sent from a Macintosh, the PS Wait timeout
is automatically changed to 00300 (5 min.).
Large print jobs, such as those generated by graphics or
computer-aided design applications, require timeouts of 00300
(5 min.).
QMS 172 5 SLS Print System User's Guide2-16
Page 51

Communica tio ns
Setting an Emulation Timeout
The emulation timeout is the maximum numb er of secon ds emulations other than PostScript (such as HP-GL, HP PCL5, and Line printer) wait for incoming data.
Menu Administration/Communications/Timeouts/Emul Timeout
Choices 00000-99999
Default 00005 (5 sec.)
Notes A value of 000 is the same as infinity (no timeout).
Setting a Print Job Timeout
The print job timeout is the maxim um num ber of seconds the printer
processes a print job before it ends the job.
Menu Administration/Communications/Timeouts/Job Timeout
Choices 00000-99999
Default 00000 (infinity, no timeout)
Notes A value of 000 is the same as infinity (no timeout).
Setting an ESP Timeout
The ESP timeout is the maximum numbe r of seconds the printer
waits to match an emulation before printing the job in the default emulation.
Menu Administration/Communications/Timeouts/ESP Timeout
Choices 0 0000-99999
Default 00003 (3 sec.)
Notes A value of 000 is the same as infinity (no timeout).
Setting Serial I nterface Parameters
Use the Administration/Communications/Serial menu to set the serial
interface communication values used for printer-host communication.
Printer Configuration
2-17
Page 52

Communica tions
Mode
Enables or disables the serial port.
Menu Administration/Communications/Serial/Mode
Choices Interactive—Establish two-way communication between the
Default Interactive
Notes The printer must be restarted for changes to the Mode menu to
Emulation
Sets the serial interface emul ati o n.
host and the printer.
Noninteractive—E stabli sh on e-wa y commu nication from t h e
host to the printer.
Disabled—Turn off serial communication with the host. The
printer stops accepting print jobs over the serial interface.
take effect. You can either let the printer r e start automaticall y
after you save the change and exit the Configuration menu, or
you can wait f or the change to take effe ct the next time you
manually turn on the printer.
Menu Administration/Communications/Serial/Emulation
Choices E SP, Hexdump, PostScript, PCL5, HPGL, CCITT, Lineprinter
Other optional emulations also appear, if installed.
Default ESP
Minimum Nu mber of Kilobytes for Spooling
Sets the minimum number of kilobytes of system memory allocated to
the serial interface.
Menu Administration/Communications/Serial/Min K Spool
Choices 0 0000-99999
Default 00015
QMS 172 5 SLS Print System User's Guide2-18
Page 53

Communica tio ns
Notes This value must be less than K Mem For Spool.
A 00000 value does not turn off the spooling buffer for the
serial interface. If the value is set to 00000, the printer
calculates the Min K Spool automatically at initialization.
The printer must be restarted for changes t o the Min K Spool
menu to take effect. You can either let the printer restart
automatically after you save th e change and exit the
Configuration menu, or you can wait for the change to take
effect the next time you m anually turn on the printer.
Spooling Timeout
Sets the number of seconds the interface waits for data from the host
before terminat ing a spooled print job.
Menu Administration/Communications/Serial/Spool Timeout
Choices 0 0000-99999
Default 00030
End Job Mode
Enables (and identifies an end-of-job se quence) or disables data
stream sensing for the end-of-documen t (EOD) comm and.
Menu Administration/Communications/Serial/En d J ob Mo de
Choices N one— T he printer recognizes only the PostScript ^ D
command.
QMS EOD—The printer recognizes only the QMS
%%EndOfDocument command.
HP EOD—The printer recognizes only the HP
<ESC>%12345X command.
Default None
Notes See chapter 5, “Additional T echnical Information,” for details on
how to implement this feature on your QMS 1725 SLS Print
System.
Printer Configuration
2-19
Page 54

Communica tions
Default Job Priority
Allows you to specify which jobs are printed first, according to the
interface through which they are received, when jobs are received
simultaneously. For example, you can give jobs received via the serial
interface priority over jobs received via the parallel and AppleTalk
interfaces.
Menu Administration/Communications/Serial/Def Job Prio
Choices 0 01-100 (highest-lowest priority)
Default 001 (highest pr iorit y)
Baud Rate
Sets the rate data is transmitte d (bits per second) over the serial
interface.
Menu Administration/Communications/Serial/Ba ud Rate
Choices 3 00, 600, 1200, 2400, 4800, 9600, 19200, 38400
Default 9600
Notes Baud rates of 19200 and 38400 require hardware flow control
(Administration/Communications/Seri al/Hdwe Flow Ctl menu).
Parity
Sets the check bit used to identify data transmission error s.
Menu Administration/Communications/Serial/Parity
Choices None, Odd, Even
Default None
Notes The printer’s parity setting must match that of the host or
application.
Use the Administration/Communications/Serial/Ignor e Parity
menu to specify how the printer handles parity errors.
Ignore Parity
Specifies how the printer should handle parity errors.
Menu Administration/Communications/Serial/Ignore Parity
QMS 172 5 SLS Print System User's Guide2-20
Page 55

Communica tio ns
Choices Off—Ignore parity errors. The printer prints its best
interpretation of th e charact er (s) affecte d by the error.
On—Don’t ignore parity errors. The printer replaces the
character(s) affe cted by the error with a question mark.
Default Off
Receive Software Flow Control
Sets the software com mu nicat ion proto col use d by the printer to control communication from the host computer.
Menu Administration/Communications/Serial/Rc v Sw Flow Ctl
Choices ETX/ACK, R obust XON/XOFF, None, XON/XOFF
Default None
Transmit Software Flow Control
Sets the software communication protocol used by the host computer
to control communication with the printer.
Menu Administration/Communications/Serial/Xmit Sw Flow Ctl
Choices ETX/ACK, N one, XON/XO FF
Default None
Data Bits
Sets the number of data bits transmitted per chara cter.
Menu Administration/Communications/Serial/Data Bits
Choices 7 Bits, 8 Bits
Default 8 Bits
Stop Bits
Sets the number of stop bits tran smitt ed per characte r.
Menu Administration/Communications/Serial/Stop Bits
Choices 1 Bit, 2 Bits
Default 1 Bit
Printer Configuration
2-21
Page 56

Communica tions
Hardware Flow Control
Controls the flow of data between the printer and the host.
Menu Administration/Communications/Serial/Hdwe Flow Ctl
Choices DSR POL
Defaults DSR POL
Notes If the host uses hardware flow control, s et this option to match
Normal, reverse
DSR
DTR POL
DTR
RTS
CTS
DSR
DTR POL
DTR
RTS
CTS
the type used by the host.
However, to download printer system software to flash ROM
via the serial port, RTS and CTS must be set to On, and the
cable pinouts must be connected as shown in appendix B,
“Technical Specifications.”
Off, on
Normal, reverse
Off, on
Off, on
Off, on
Normal
Off
Normal
On
Off
Off
PS Protocol
Sets the binary communicat ions protocol (BCP) for communicat ing
over a serial interface to a PostScript printer.
Menu Administration/Communications/Serial/PS Pr otocol
QMS 172 5 SLS Print System User's Guide2-22
Page 57

Communica tio ns
Choices Normal—Enable standard, ASCII hex protocol. Data is sent
and received in ASCII format. This mode is recommended if
you do not pri nt binary data. It was designed for data in the
printable ASCII range. Print jobs can alter the PS protocol
value through PostScript operators.
Normal Fixed—Enable standard, ASCII hex proto col. Print
jobs cannot alter this value through PostScript operators.
Binary—Enable Quoted binary communications protocol. Print
jobs can alter this value through PostScript operators. Data in
the printable ASCII range also prints.
Binary Fixed—Enable Quoted binary communications
protocol. Print jobs cannot alter this value through PostScript
operators. Data in the printable ASCII range also prints.
Default Normal
Notes See chapter 5, “Additional Technical Information,” for a full
discussion of PS Protocol.
Setting Parallel Interface Parameters
Use the Administration /Com m unicat ions/ P arallel menu to set the parallel interface values used for printer-host comm uni cati on s.
Mode
The parallel interface supports Centroni c s parallel communi ca tio n as
well as IEEE 1284 bidirectional paral lel communi cati on.
Menu Administration/Communications/Parallel/Mode
Choices E n abled—E stablish one-way communication from the host to
the printer.
Disabled—Turn off parallel communication with the host. The
printer stops accepting print jobs over the parallel interface.
Default Enabled
Printer Configuration
2-23
Page 58

Communica tions
Notes The printer must be restarted for changes to the menu to take
Emulation
Sets the parallel interfa ce emula tio n.
Menu Administration/Communications/Parallel/Emulation
Choices E SP, Hexdump, PostScript, PCL5, HPGL,CCITT, Lineprinter
Default ESP
Minimum Nu mber of Kilobytes for Spooling
Sets the minimum number of kilobytes of system memory allocated to
the parallel interface.
Menu Administration/Communications/Parallel/Min K Spool
Choices 0 0000-99999
Default 00015
Notes This value must be less than K Mem For Spool.
effect. You can either let the printer restart automatically after
you save the change and exit from the Configuration menu, or
you can wait f or the change to take effe ct the next time you
manually turn on the printer.
Other optional emulations also appear, if installed.
A 00000 value does not turn off the spooling buffer for the
parallel interface. If the value is set to 00000, the printer
calculates the Min K Spool automatically at initialization.
The printer must be restarted for changes to the Mi n K Spool
menu to take effect. You can either let the printer restart
automatically after you save th e change and exit the
configuration menu, or you can wait for the change to take
effect the next time you m anually turn on the printer.
QMS 172 5 SLS Print System User's Guide2-24
Page 59

Communica tio ns
Spooling Timeout
Sets the number of seconds the interface waits for data from the host
before terminat ing a spooled print job.
Menu Administration/Communications/Parallel/Spool Timeout
Choices 00000-99999
Default 00030
Data Bits
Sets the number of data bits transmitted per chara cter.
Menu Administration/Communications/Parallel/Data Bits
Choices 7 Bits, 8 Bits
Default 8 Bits
End Job Mode
Enables (and identifies an end-of-job se quence) or disables data
stream sensing for the end-of-documen t (EOD) comm and.
Menu Administration/Communications/Parallel/End Job Mode
Choices N one— T he printer recognizes only the PostScript ^ D
command.
QMS EOD—The printer recognizes only the QMS
%%EndOfDocument command.
HP EOD—The printer recognizes only the HP
<ESC>%12345X command.
Default None
Notes See chapter 5, “Additional T echnical Information,” for details on
how to implement this feature on your QMS 1725 SLS Print
System.
Printer Configuration
2-25
Page 60

Communica tions
Default Job Priority
Allows you to specify which jobs are printed first, according to the
interface through which they are received, when jobs are received
simultaneously.
Menu Administration/Communications/Parallel/Def Job Prio
Choices 0 01-100 (highest-lowest priority)
Default 001 (highest pr iorit y)
Notes For example, you can give jobs received via the parall el
PS Protocol
Sets the binary communicat ions protocol (BCP) for communicat ing
over a parallel interface to a PostScript print er.
Menu Administration/Communications/Parallel/PS Protocol
Choices Normal—Enable standard, ASCII hex protocol. Data is sent
interface priority over jobs received via the serial and
AppleTalk interfaces.
and received in ASCII format. This mode is recommended if
you do not pri nt binary data. It was designed for data in the
printable ASCII range. Print jobs can alter the PS protocol
value through PostScript operators.
Normal Fixed—Enable standard, ASCII hex proto col. Print
jobs cannot alter this value through PostScript operators.
Binary—Enable Quoted binary communications protocol. Print
jobs can alter this value through PostScript operators. Data in
the printable ASCII range also prints.
Binary Fixed—Enable Quoted bi nary communications
protocol. Print jobs can not alter this value through PostScript
operators. Data in the printable ASCII range also prints.
Default Normal
Setting AppleTalk Interface P arameters
Use the A dministration/Communications/AppleTalk menu to set the
AppleTalk i nterface values used for printer-host communication.
QMS 172 5 SLS Print System User's Guide2-26
Page 61

Communica tio ns
Mode
Enables or di s ables the communication i nterface.
Menu Administration/Communications/AppleTalk/Mode
Choices E nabled—E stablish one-way LocalTalk communication (from
the host to the printer).
Disabled—Turn off the LocalTalk interface (the printer stops
accepting LocalTalk interface print jobs).
Default Enabled
Notes The printer must be restarted for changes to the Mode menu to
take effect. You can either let the printer r e start automaticall y
after you save the change and exit the Configuration menu, or
you can wait f or the change to take effe ct the next time you
manually turn on the printer.
Connection
Allows you to enable or disable print spooling.
Menu Administration/Communications/AppleTalk/Connection
Choices C o nventional—Allow one LocalTalk connection and accept
only one print job at a t ime. If two users send print jobs to the
printer, the workstation belonging to the first user is
unavailable until the first job has been printed, and the
workstation belonging to the second user is unavailable until
both jobs have been printed.
Spool—Allow multiple LocalTalk connections and accept
(spools) more than one print job at a time. Workstations are
available while jobs are printing.
Default Conventional
Notes The printer must be restarted for changes to the Connection
menu to take effect. You can either let the printer restart
automatically after you save th e change and exit the
Configuration menu, or you can wait for the change to take
effect the next time you m anually turn on the printer.
Printer Configuration
2-27
Page 62

Communica tions
Minimum Number of Kilobytes for S p o o li n g
Sets the minimum number of kiloby tes of sy s t e m memory allocated to
the LocalTalk interface.
Menu
Choices
Default
Notes
Administration/Communi cati ons/A ppleTalk/Min K Spool
00000-99999
00015
This value must be le s s than the K Mem f or Spool value .
A 00000 value does not turn off the spooling buffe r for the
paralle l inter fa ce. If the v alue is s e t to 00000, the print er
calculate s the Min K Spool automat i ca l l y at initia l ization.
The pri nt er must be res t arted for changes to the Min K Spool
menu to take effect. You can either let the printer restar t
automatica l ly after you s a ve the change and exit from the
Configuration menu, or you can wai t for the change to take
effect the nex t time you manually turn on the printer.
QMS 172 5 SLS Print System User's Guide2-28
Page 63

Emulations
Emulations
Use the Administration /Em ulat ions me nu to set the parame ters for
the available printer em ulat ions. Optional print ing em ulat ion s appear
only if installed.
» Note: To choose an emulation or ESP for a particular interface, use the
appropriate interface menu in the Administration/Communications menu.
Setting an ESP Default Em ulation
The emulation sensing processor (ESP) feat ure of the QMS 1725
SLS Print System analyzes incoming print jobs and identifies which
emulation the pri nter will use. The ESP Def ault Emul sets the ESP
default emulation used when ESP is unable to identify the language
of a print job. This allows the system admi nistrat or to select alternat e
default emulations.
Menu Administration/Emulations/ESP Default Emul
Choices HPGL, Linepr inter, PostScript, PCL5, CCITT
Default PCL5
Notes You must turn the printer off and back on again for the change
to take effect. For more inform ation on ESP, see chapter 5,
“Additional Technical Information.”
Setting PostScript Parameters
This menu allows you to select a PostScript emulati on level. This is
useful if you have files prepared in an application which is not fully
compatible with Adobe’s PostScript Level 2 page description language.
Menu Administr ation/Emulations/PostScript/Emulation Level
Printer Configuration
2-29
Page 64

Emulations
Choices L evel 2—For PostScript Level 2 files and most Level 1 files.
Level 1 B/W—For files that contain onl y black-and-white
PostScript Level 1 operators. This mode does not support the
PostScript color operators; the use of color operators could
cause the print job to fail.
Level 1 Color—For files that contain color PostScript L evel 1
operators. This mode accepts color PostScript Level 1
operators and translates these commands to the appropriate
grayscale. This is the recommended setting for Level 1
compatibility since it contains all of the commands in Level 1 B/
W and the color commands.
Default L evel 2
Setting HP PCL 5 Parameters
For details on the HP PCL 5 language, refer to th e
Language Technical Reference Man u al
( available from Hewlett-
Packard Co.; order part number 5961-0509)
Support Notes
, available free through the QMS Bulletin Board, Q-
HP PCL 5 Print er
HP PCL5C Technical
FAX , and CompuServe, also has inform at ion on HP PCL5C. (See
appendix A, “QMS Customer Su pport, ” to find out how to access the
bulletin board, Q-FAX, and CompuServe.) In addition, appendix C of
this guide has information on the PCL 5 Document Option Commands.
Default Font
Sets the defaul t font for this emul ation.
Menu Administration/Emulations/PCL 5/Default Font
Choices Courier12, Courier12Bold, Courier12Italic, Courier10,
Courier10Bold, Courier10Italic, Lineprinter, Times*,
Times*Italic, Times*Bold, Times*BldItalic, Univ*, Univ*Italic,
Univ*Bold, Univ*BldItalic, UnivCond*, UnivCond*Italic,
UnivCond*Bold, UnivCond*BldItlc, Select by Index
Default Courier12
QMS 172 5 SLS Print System User's Guide2-30
Page 65

Emulations
Notes * represents a scalable font (default point size [12 points] is
used to scale the font and produce the characters in the
selec t ed si ze ) .
If you use Select by Index to select a font by its font index, the
printer uses the Administration/Emulations/PCL5/Default Font
Idx value to choose the default font.
Symbol Set
Sets the character set used by the HP PCL5 emul ati on.
Menu Administr ation/Emulations/PCL 5/Symbol Set
Choices Roman-8, PC-850, PC8-US, PC8-DN, ECMA-94, Legal,
HPGerman, HPSpanish, ISO-2, ISO-4, ISO-6, ISO-10, ISO1 1, ISO-14, ISO-15, ISO-16, ISO-17, ISO-21, ISO-25, ISO-57,
ISO-60, ISO-61, ISO-69, ISO-84, ISO-85, Desktop, PS Math,
Math 8, Microsoft-Pub, Pi-Font , PS-Text, Ventura-Intl,
Ventura-Math, Ventura-US, Windows, PS-Zapf-Dingbats,
Ventur a-Dingbats, Zapf-Dingbats100, Zapf-Dingbats200,
Zapf-Dingbats300
Default Roman-8
Notes Not all symbol sets are available with certain resident fonts.
The Desktop, PS Math, Math 8, Microsoft-Pub, Pi-Font, PSText, Ventura-Intl, Ventura-Math, Ventura-US, and Windows
symbol sets cannot be used with the resident bitmap fonts
Courier 10, Courier 10 Italic, Courier 10 Bold, Courier 12,
Courier 12 Italic, Courier 12 Bold, and LinePrinter.
The five dingbat symbol sets (PS- ZapfDingbats, VenturaDingbats, Zapf-Dingbats100, Zapf-Dingbats200, and ZapfDingbats300) can be used with all fonts.
If a mismatch between a symbol set and font occurs, the
standard PCL font selection mechanism is used to locate a
font that matches the selected symbol set. With the standard
set of fonts distributed for your printer, this matches the
Times* font, but other user-installed fonts could change this
result. See Hewlett-Packard’s
Technical Reference Manual
more information on selecting PCL 5 fonts.
PCL 5 Printer Language
(HP part number 5961-0509) for
Printer Configuration
2-31
Page 66

Emulations
Lines/Inch
Sets the number of lines printed per inch.
Menu Administr ation/Emulations/PCL 5/Lines Per Inch
Choices 1-48
Default 6
Line Termination
Adds an indicator which controls the way the printer interprets CR
(carriage return) and LF (line feed) characters.
Menu Administr ation/Emulations/PCL 5/Line Termi nation
Choices CR=CR, LF=LF
Default CR=CR, LF=LF
Point Size x100
CR=CR+LF, LF=LF
CR=CR, LF=CR+LF
CR or LF=CR+LF
Identifies the point size for scalable fonts in 0.25 point increment s.
Menu Administr ation/Emulations/PCL 5/Point Size x100
Choices 00025-99975 (0. 25-999.75 points)
Default 01200 (12 points)
Notes If the font is not scalable or if a bitm ap font is specified, this
setting is ignored.
Retain Temporary Fonts and Macros
Allows you to choose whether to retain temporary HP PCL5 fonts and
macros at the end of each print job.
Menu Administr ation/Emulations/HP PCL 5/Retain Tem porary
QMS 172 5 SLS Print System User's Guide2-32
Page 67

Emulations
Choices Off—Reset P CL to its default state at the end of each PCL
print job, execute an implicit <ESC>E at the start and end of
the job, and delete any temporary fonts, macros, and patterns.
On—Reset PCL to its default state at the end of each PCL
print job. T emporary fonts, macros, and patterns from previous
PCL print jobs are retained in memory after t he print job has
completed. You can recall these downloaded fonts, macros,
and patterns from within your PCL file without having to
download them again.
On Compatibility—Retain the entire state of PCL as well as the
temporary macros, fonts, and patterns from previous PCL jobs
unless you do one of the following:
n
Change any PCL front panel option
n
Send any PCL-specific DOC—except the
emulation DOC
n
Send any other DOC, such as number of
copies, duplex, orientation, or inputbin
n
Send a PCL job from a different communications port—for example, if the PCL print environment is set for PCL jobs to print from the
parallel port, and a PCL job is sent from the
serial port. If any one of these occurs, the
PCL state is reset to the new default, and the
previous state is lost.
Default Off
Scalable Fonts
Specifies whether to enable or disable the printi ng of HP PCL5 scalable fonts by an application.
Menu Administration/Emulations/HP PCL 5/Scalable Fonts
Choices Enable—Allow selectio n of scalable fonts. When you print
PCL4 documents, PCL5 may substitute scalable fonts that
could cause your PCL 4 documents to print incorrectly.
Disable—Print using bitmap fonts o nly.
Printer Configuration
2-33
Page 68

Emulations
Default Enable
Notes This feature may be useful when pr inting P CL4 documents
Default Font Index
Sets the default font index when Select by Index is chosen in the
Administration /E mulat ions/ PC L 5/Def ault Font menu . If a font by the
same index number exists, it is selected as the default font. This font
must be a cartridge or downloaded soft font.
Menu Administr ation/Emulations/PCL 5/D efault Font Idx
Choices 00000-32767
Default D epends on cartridge or downloaded font(s)
Monochrome HP-GL/2
Allows your printer to emulate a monochrome or color plotter.
Menu Administr ation/Emulations/PCL 5/Monochrome GL/2
Choices Off—Emulate a color plotter (8 pens). Since a monochrome
Default On
which may inadver tentl y select unwanted scalable fonts.
print system has only 2 pen colors (black and white), grayscale
patterns are substituted for other colors.
On—Emulate a monochrome plotter (2 pens).
QMS 172 5 SLS Print System User's Guide2-34
Page 69

Emulations
Notes When set to off, this option maps pen colors as follows:
Pen 0=White, Pen 1=Black, Pen 2=Red, Pen 3=Green, Pen
4=Yellow, Pen 5=Blue, P en 6=Magenta, Pen 7=Cyan.
When set to on, this option tells the printer to map each pen to
its assigned color, then convert the color to a grayscale using
the National Television System Committee (NTSC) color
standard for luminosity c oefficient s (Addit iv e System):
Y = 0.30R + 0.59G + 0.11B
Example of how to use the color standard formula:
White Y = [1*0.30) + (1*0.59) + (1*0.11)]—100% gra y
Black Y = [0*0.30) + (0*0.59) + (0*0.11)]—0% gray
Red Y = [1*0.30) + (0*0.59) + (0*0.11)]—30% gray
Green Y = [0*0.30) + (1*0.59) + (0* 0.11)]—59% gray
Yellow Y = [1*0.30) + (1*0.59) + (0*0.11)]—89% gray
Blue Y = [0*0.30) + (0*0.59) + (1* 0.11)]—11% gray
Magenta Y = [1*0.30) + (0*0.59) + (1*0.11)]—41% gray
Cyan Y = [0*0.30) + (1*0.59) + (1*0.11)]—70% gray
Download Location
Controls the default storage locat ion of PCL obje cts (fonts, ma cros,
and patterns) when it is not otherwise specified through Document
Option Commands.
Menu Administr ation/Emulations/PCL 5/Downld Location
Choices Disk—All downloaded PCL objects are stored in the default
disk resource, if present.
Memory—All downloaded PCL objects are stored in tempo rary
storage in RAM.
Default Disk
Notes Document Option Commands specifying r esources override
this option on a per-job basis.
If this option is set to Disk and no hard disk is i n stalled,
memory is used as the default storage location.
If the printer has both a hard disk and a large amount of
memory, setting this option to Memory enhances printer
performance.
Printer Configuration
2-35
Page 70

Emulations
Setting HP-GL Parameters
Fifteen configuration ch oices are available.
Plotter
Identifies the HP-GL plotter type.
Menu Administr ation/Emulations/HPGL/Pl otter
Choices 7550A, 7475A, 7470A, Colorpro
Default 7550A
Scaling Percent
Identifies the percentag e to reduce or enlarge an image.
Menu Administr ation/Emulations/HPGL/Scali ng Percent
Choices 001-150 (1-150%)
Default 1 00 (100%)
Notes To scale plots, select the paper size originally used for the plot
in the Paper Type menu, and then enter the reduction or
enlargement needed to fit the plot on the new page in the
Scaling Percent menu. If necessary, enter new x,y
coordinates in the Origin menu to reposition the plot on the
page.
Origin
Sets the image offset from the plotte r’s origin in 0.01" increments.
Menu Administration/Emulations/HPGL/Origin/X Direction
Choices 00000-08500 (0"-8.5")
Default 00000
Menu Administration/Emulations/HPGL/Origin/Y Direction
Choices 00000-11000 (0"-11.0")
Default 00000
QMS 172 5 SLS Print System User's Guide2-36
Page 71

Emulations
Reverse Image
Determines whether an image is printe d in reverse.
Menu Administr ation/Emulations/HPGL/Reverse Image
Choices On—Print a white image on a black background.
Off—Print a black image on a white background.
Default Off
Enhanced Mode
Increases the resolution of a downloaded character.
Menu Administration/Emulations/HPGL/Enhanced Mode
Choices On—Uses an increased resolution for the grid
Off—Uses standard resolution for the grid
Default Off
Notes The HP-GL user-defined character (UC) command
downloads and draws characters with an encoding scheme
that uses pen control movements and coordinate sequences.
The characters are drawn on a grid that is superimposed on
the character plot cell.
Expand Mode
Defines a larger imageable area for the selected media type. This
increased imageable area affects the default placement of the scaling
points P1 and P2.
Menu Administration/Emulations/HPGL/Expand Mode
Choices On—Expands the imageable area.
Off—Doesn’t expand the imageable area.
Default Off
Printer Configuration
2-37
Page 72

Emulations
Notes Setting this option to On partially determines the range of
Paper Type
Identifies the original image’s paper size.
Menu Administr ation/Emulations/HPGL/Paper Type
Choices Scale to Paper, A (letter/8. 5" x11.0"), A4 (210x297 m m), B
Default A
Pen 1 - Pen 8
plotter units for a selected media type. When the plotter
senses the media type, it automatically sets the hard clip
limits to 0.591"/15 mm on three sides and to 1.537"/39 mm on
the fourth side. However, if Expand Mode is set to On, then
the limits are set to 0.197"/5 mm on three sides and 1.143"/29
mm on the fourth side.
The HP-GL emulation senses the media size when the Paper
Type is set to Scale to Paper or when it is set to a particular
media size through the control panel or through a QMS
Document Option Command.
(11.0"x17.0"), A3 (297x420 mm)
Sets the width and color for the eight plotter pens. A width and a color
option are available for each pen.
Menu Administration/Emulations/HPGL/Pen
Choices 00-60 (0.1-6.0 mm)
Default P en 1—7 (0.7 mm)
Pen 2—3 (0.3 mm)
Pen 3—3 (0.3 mm)
Pen 4—3 (0.3 mm)
Pen 5—3 (0.3 mm)
Pen 6—3 (0.3 mm)
Pen 7—3 (0.3 mm)
Pen 8—3 (0.3 mm)
Notes A pen width of 00 def aults the to the pixel setting of 0.1 mm.
Menu Administr ation/Emulations/HPGL/Pen
x
/Width
x
/Color
QMS 172 5 SLS Print System User's Guide2-38
Page 73

Emulations
Choices Black, Violet, Brown, Gray - 25%, Gray - 50%,
Gray - 75%, Red, Orange, Yellow, Green, Blue, C yan,
Magenta
Default P en 1—Black (100% black)
Pen 2—Black (100% black)
Pen 3—Red (70% black)
Pen 4—Green (41% black)
Pen 5—Blue (89% black)
Pen 6—Violet (5 9% black)
Pen 7—Orange (25.8% black)
Pen 8—Brown (50% black)
Notes Cyan=30% black, magenta=59% black, and yellow=11%
black.
Setting Lineprinter Parameters
Twelve configuration options are available.
Font
Sets the printer fonts for the current print job .
Menu Administr ation/Em ulations/Lineprinter/Font
Choices All printer-resident PostScript fonts.
Default Courier
Notes Any PostScript fonts available on the printer can be used. To
see a list of available PostScript fonts, print an advanced
status page through the printer configuration menu
(Administration/Special Pages/Status Page Type) or through
the PS Executive Series Utilities.
Point Sz 1 00ths
Sets point size (in .01 point increments) of the font for the current print
job.
Menu Administr ation/Emulations/Lineprinter/Point Sz 100ths
Choices 00400-25600 (4- 256 points)
Default 00880 (8.8 points)
Printer Configuration
2-39
Page 74

Emulations
Character Map
Specifies the type of character map to be used.
Menu Administration/Emulations/Lineprinter/Character Map
Choices ASCII, EBCDIC
Default ASCII
Line Numbering
Specifies if a five-digit number is to be prefixed to the beginning of
each line.
Menu Administration/Emulations/Lineprinter/Line N umbering
Choices On—Number all lines.
Default Off
Tab Stops
Specifies the number of spaces between tab stops.
Off—Don’t number lines.
Menu Administration/Emulations/Lineprinter/Tab Stops
Choices 0-256
Default 8
Line Feed is Carriage Return-Line F eed
Specifies whether each line feed (LF) in the print job is translated to a
carriage return/line feed (CRLF) combination.
Menu Administration/Emulations/Lineprinter/LF is CRLF
Choices On—Translate all line feeds to carriage return/line feed
combinations.
Off—Use lines feeds only as line feeds.
Default On
QMS 172 5 SLS Print System User's Guide2-40
Page 75

Emulations
Carriage Return is Carriage Return-Line Feed
Specifies whether each carriage return (CR) in the print job is translated to a carriage return/line feed (CRLF) combination .
Menu Administration/Emulations/Lineprinter/CR is CRLF
Choices On—Translate all carri age retur ns to line feeds.
Off—Use carriage returns only as carriage returns.
Default Off
Form Feed is Carriage Return-Form Feed
Specifies whethe r each form feed (FF) in the print job is translated to
a carriage return/form feed (CRFF) combination.
Menu Administration/Emulations/Lineprinter/FF is CRFF
Choices On—Translate all form feeds to carriage return/form feed
combinations.
Off—Use form feeds only as form feeds.
Default On
Orientation
Specifies whether text and graphics are placed on the pag e in a portrait or landscape orientation.
Menu Administration/Emulations/Lineprinter/Orientat ion
Choices L andscape, Portrait
Default Portrait
Autowrap
Specifies whether long lines are to be wrapped to the next line
instead of being truncated.
Menu Administration/Emulations/Lineprinter/CRI SCRLF
Choices On—Wrap long lines.
Off—Truncate long lines.
Default Off
Printer Configuration
2-41
Page 76

Special Pages
Lines Per Page
Specifies the number of lines printed on a page bef ore an autom at ic
page eject.
Menu Administration/Emulations/Lineprinter/Lines per Page
Choices 001-128
Default 066
Notes Interline spacing is set to the selected point size. Logical pages
Margins
Defines the left, right, top, and bottom marg ins in 1/100" increment s .
Menu Administration/Emulations/Lineprinter/M argins
Choices Bottom0-1700 (0"-17.00")
Default Bottom 0
consisting of more lines than specified are split into multiple
pages.
Left0-1700 (0"-17.00")
Right0-1700 (0"-17.00")
Top0-1700 (0"-17.00")
Left 0
Right 0
Top 0
Special Pages
Use the Administration /Specia l Pages menu to print special pages,
such as status pages, header pages, and trailer pages. See the
Crown Document Option Commands
on the contents of these special pages.
Working with Status Pages
Printing a status page is a two-step procedure: Identify the type of
status page you want to print, and then print it.
QMS 172 5 SLS Print System User's Guide2-42
QMS
manual for detailed inform at ion
Page 77

Special Pages
Identifying a Status Page Type
Two types of status pages are available.
Menu Administration/Special Pages/Status Page Type
Choices Standard—Lists printer identificati on information, current
memory configuration, timeouts, communication settings, input
buffer sizes, and available fonts.
Advanced— Contains the same information as the standard
status page as well as configuration menu settings, fonts, and
downloaded emulations.
Default Standard
Printing a Status Page
Prints a status page.
Menu Administration/Special Pages/Print Status
Choices Yes, No
Default No
Notes The type of statu s page printed is determined by the selection
made in t h e Status Page Type menu.
Calibration Page
Prints a calibration page.
Menu Administration/Special Pages/Calibration Page
Choices Yes—Prints calibratio n page.
No—Calibration page will not be printed.
Default No
Notes See the Administration/Engine/Image Alignment menu for
calibration instruct i ons.
Working with H eade r Pages
A header page is a separator page that prints before a print job to
help users sort their jobs. The information on the header page can be
customized. See the
QMS Crown Document Option Commands
ual for more information.
Printer Configuration
man-
2-43
Page 78

Special Pages
Enabling/Disabling Header Pages
Menu Administration/Special Pages/Header Page
Choices On—Pr int a header page before each job.
Default Off
Identifying a Header Page Input Source
You can select the input bin (tray or cassette) from which the print er
pulls media when printing the header page.
Menu Administration/Special Pages/Header Inputbin
Choices Upper—Pull header pa ge media fr om the upper input bin.
Default Upper
Notes If you used the Administration/Engine/Inputbin
Off—Don’t print a header page before each job.
Lower—Pull header page media from t he lower input bin.
x
Name options
to change the names of the input bins, these names replace
Upper and Lower in the message window.
Working with Trailer Pag es
A trailer page is a separator page that prints after a print job to help
users sort out their jobs and, if requested, identify print job errors.
Enabling/Disabling Trailer Pages
Menu Administration/Special Pages/Trailer Page
Choices Off—Don’t print a trailer/error page for each print job.
On—Print a trailer/error page for ea ch print job.
On Error—If any print job errors exist, print a trailer page that
lists the errors as well as other tr ailer pa ge information.
Errors Only—If any print job errors exist, print a trailer page
that lists the errors but omits other trailer page information.
Default Off
Notes See the
more information.
QMS 172 5 SLS Print System User's Guide2-44
QMS Crown Document Option Commands
manual for
Page 79

Identifying a Trailer Page Input Source
You can select the input bin (tray or cassette) from which the print er
pulls media when printing the trailer pag e.
Menu Administration/Special Pages/Trailer Inputbin
Choices U pper—Pull trailer page media from the upper input bin.
Lower—Pull trailer page media from the lower input bin.
Default Upper
Notes If you used the Administration/Engine/Inputbin
to change the names of the inputbins, these names r eplace
Upper and Lower in the message window.
Printer Start-Up Options
The Administrati on/S t artu p Opti ons menu allows you to configure
your printer to run certain options automaticall y when you turn it on.
Printer Sta rt-U p
Options
x
Name options
Enabling/Disabling the Start-Up Page
By default, the printer prints a start-up pa ge whe n you turn it on. The
start-up page lists basic information about the printe r, such as it s
name, the PostScript emulation level and version, and various printer
settings. However, you can turn the start-up page off to conserve
paper and toner.
Menu Administration/Startup Options/Do Start Page
Choices Yes—Print a start-up page each ti me the printer is turned on.
No—Don’t print a start-up page each time the printer is turned
on.
Default Yes
Printer Configuration
2-45
Page 80

Memory
Enabling/Disabling the SYS\START File
If you have a hard disk and Do Sys Start is enabled, when the printer
is turned on, the controller checks t he hard disk for a PostScript file
named SYS\START and executes this file.
Menu Administr ation/Startup Options/Do Sys Start
Choices Yes—Check the hard disk for and execute the SYS\START
file when the printer is turned on.
No—Don’t check the hard disk for a SYS\START file.
Default No
Notes This file does not print. Information on creating a SYS\START
file is available via Q-FAX (see appendix A, “QMS Customer
Support,” for information on using Q-FAX).
Loading the PostScript Error Handler
Error Handler is a diagnostic tool that identifies PostScrip t errors
encountered during a print job.
Menu Administr ation/Startup O ptions/Do Error Handler
Choices Yes—Load the Error Handler.
No—Don’t load the Error Handler.
Default No
Notes Refer to the
Systems Incorporated, Reading, PA: Addison-Wesley, 1990,
ISBN 0-201-18127-4) for more information on PostScript
errors.
PostScript Language Reference Manual
(Adobe
Memory
Memory allows your printer to store and retrieve information tha t’s
required to perform many of its tasks. The memory requirements of
each printer are dictated by the applications to be run. Each printer
comes standard with a certain amount of memory, but yo u may add
more memory as necessary.
QMS 172 5 SLS Print System User's Guide2-46
Page 81

Memory
The memory is divided among users (or “clients”), each of which allocated a specific amount (or “block”) of memory. Each memory client is
dedicated to a specific printing and application purpose. Your QMS
1725 SLS Print System allows you to distribute its memory among the
various memory clients where it can best serve your specific printing
needs. The following sections provide informatio n on memory management so you can get the most from your printer.
Generally , there are two main reasons for wanting to reconfigure your
printer’s memory:
n
To achieve maximum performance
n
To enable additional feature s
The ability to configure your printer’s memory doesn’t necessarily
mean that you must change your current configurat ion. If you’re presently using all the features you need and the printer is performing efficiently, you shouldn’t feel compelle d to reconfigure your printer's
memory. J u st remember that if your printing needs change, not only
do you have the ability to inc rease the amo unt of printer mem o r y, but
you also can redistribute it where you feel it would best meet your
printing requirements .
QMS Memory Management
Managing the memory on your printer is much the same as managing
your personal income. In money management, you have a certain
amount of income and many ways of spe nding that income. You
decide where that money goes according to what’s important to you.
There’s no single correct way to manage money, but there is one best
way for you according to your financial obligations.
The same is true for managing the memory on your printer. There’s
no single correct way for everyone to allocate available printer memory. There may be, however, a best way to configure your p rinter 's
memory for maximum efficiency in your specific printing environment.
For example, if you use a large number of PostScript fonts of various
point sizes, you may want to increase the am ount of mem ory allocated to the area specified for PostScript fonts. Or you may want t o
Printer Configuration
2-47
Page 82

Memory
increase memory to the area that minimizes slowdowns when collating large print jobs.
Memory configurat ion affect s these things as well as the number of
jobs that can be accepted by the printer, t he num ber of options available simultaneously, the number of downloadable fonts and emulations that can be stored, and overall printer performance.
Memory Terms
Before you can configure your printer's memory efficient ly, you must
first understand the different types of memory and how they work
together. Your QMS 1725 SLS Print System document atio n uses the
following memory terms:
Hard Disk
The QMS 1725 SLS Print System comes stan dard with an internal
hard disk and has the option of upgrading to a larger internal hard
disk (up to 512 MB) and adding up to six external drives.
SCSI.
See also
Memory
Memory allows your printer to store and retrieve inform ati on. It’s the
space within your printer where information is stored while being
actively worked on.
Memory Client
A memory client is a function that has a dedicated block of memor y.
Each memory client controls certain features. When insufficient memory is allocated to a specific client, the features it controls may not be
accessible.
Excess Memory Client
The memory remaini ng after providing all the other mem ory clients
with their specified amount s of memory is autom at ically added t o the
excess memory client. The frame buffer is the excess memory client
for the QMS 1725 SLS Print Syst em.
QMS 172 5 SLS Print System User's Guide2-48
Page 83

Memory
Storage
Storage is a device which information can be kept. There are three
main types of storage—ROM, RAM, and hard disks.
ROM (Read Only Memory)
ROM contains data and/or machine-executab le instructions that can
be read but not modified. On your QM S 1725 SLS Print Syst em , the
operating system code, resident fonts, and resident em ulations are
stored in ROM. This information is not lost when the printer’s power is
turned off.
RAM (Random Access Memory)
RAM is the memory your printer uses to perform each task. It can be
written to and read from. Once a task is complete, the memory is free
again to be used for another file. This memo ry is volatile, so if your
printer loses power while a file is being sent, the file must be resent.
The number and type of features you can run on your printer simultaneously depend on the amount of RAM you have and how that RAM
is distributed. Your print er comes with 13MB of RAM, but it is upgradable to 32 MB by adding Single In-line Me mory Mo dules (SI MM s).
RAM Disk
Also called a virtual disk, the RAM disk is an area of RAM that is used
to simulate an additiona l hard disk. Data can be writt en and read
more quickly than on a hard disk, but a RAM disk loses any information stored on it when the printer’s power is turned off. The spooling
buffer is a RAM disk client.
SCSI (Small Computer System In terface)
The printer’s SCSI port (located on the interface panel on the back of
the printer) allows you to connect optional SCSI hard disks that provide storage for fonts, emulations, and other files. Hard disks are also
used to increase collation capacity and provide a secondary storage
area for spooled data, while providing virtual mem or y capabilities.
Printer Configuration
2-49
Page 84

Memory
Physical Memory
Physical memory refers to the amount of RAM installe d in the printer.
Spool
Spooling is temporary storage to hold print jobs unti l the printer is
available to process them.
Evaluation of Your Pr inting Environment
The first step in allocating your printer’s memory is to define your
printing needs. Each of your printer ’s features requires a minimum
amount of memory. I f you use a feature, you must allocate enoug h
memory to the client that controls it. On the other hand, if there are
features you don’t use, you can take the me mory in the clients th at
control the unused features and assign it to other clients that need
additional mem or y.
Evaluation Questions
To get a better idea of what your printing requirements and your
printer ’s capabilities are, answe r the following que stions:
1 How much RAM does your printer have (standard and additional
memory)?
2 Do you have the option of installing addit ional memory if it’s
needed?
3 Does your printer have any external hard disks connected? If so,
how many and what size?
4 Which resident emulations will you be running?
5 Will you be loading any non-resident emulations? If so, how many
and which ones?
6 How many printer ports will be connected?
7 Do you have an optional interface connected?
8 How many people will be using this printer simultaneously?
QMS 172 5 SLS Print System User's Guide2-50
Page 85

Memory
9 How many downloadable fonts will you be using? What sizes?
From which emulation?
10 Wil l you use many different sizes of fonts/typ efaces?
11 How large are the files you typically print? How large is the larg-
est file you’ll be printing ?
12 Are most of your files text, or are any graphics intensive?
13 Wil l you want to download fonts, forms, or operators to memo ry?
14 Wil l you be collating docu men ts? If so, how large and complex
will these documents be?
15 What med ia si ze s will you be using?
16 Wil l you be printing at 300x300 dpi or 600x600 dpi?
After you have answered all of these questions, read the following
sections to find out which memory clients cont rol features you plan to
use and which memory clients control fea tures you don’t need.
Duplexing and Memory Requirements
Additional memory is required for duplexing at 600 dpi resolution on
legal-size media. The following chart represents the minimum amount
of memory needed to print various paper sizes at 300 or 600 dpi resolution. In m ost cases, the minimum amount of mem ory do es not
allow the printer to run at rated speed. The amounts shown assume
the Page Recovery function (Administrat ion /Engin e/Page Recovery)
is turned on.
300 dpi 600 dpi
Paper Size Si mplex Duplex Simplex Duplex
Letter 8MB 8MB 8MB 12MB
Legal 8MB 8MB 12MB 16MB
A4 8MB 8MB 8MB 12MB
Executive 8MB 8MB 8MB 12MB
Printer Configuration
2-51
Page 86

Memory
Memory Clients
This submenu allows you to allocate the printer ’s memory (RAM )
among the various memory client s. Th e flexibility of defi ning m emo ry
available to clients allows experienced users to optimize the printer's
performance according to a given set of conditions.
O
Caution:
printer.
Quick Config
In addition to the ability to set each client’s memory allocation through
the Memory submenu, yo ur Q MS 1725 SLS Print System also has a
Quick Config option to aid you in setting your printer for your specific
environment. The Quick Config option is intended to allow you to
specify the following item s:
n
Resolution (300 or 600 dpi)
n
Printing mode (simplex or duplex)
Misallocated memory m ay hinder the performance l evel of the
n
Page size (letter/executive, A4, or legal)
The Quick Config menu uses these items to allocate the printe r ’s
memory. The print er does not allow item s to be selected that do not
work with the amount of RAM currently installed in the printer.
If you are uncertain about how to configure your printer’s memory,
use only the Quick Config option in this submen u.
Configuring Spooling
The K Mem for Spool, listed on the status page as Host Input, is the
total number of kilobytes of RAM allocated to all spooling buffers. This
memory client stores incoming data from the various interfaces until it
is processed and printed.
Menu Admi nistrat ion/Memory/ K Mem for Spool
Status Page
Alias
Host Input
QMS 172 5 SLS Print System User's Guide2-52
Page 87

Memory
Choices 00112-99999
Default Variable
Notes This value must be greater than the sum of the Min K Spool for
all installed and enabled interfaces.
If you change the K Mem for Spool value, the printer
automatically restarts after you save your changes and exit
from the configuration menu.
When the sum of the Min K Spool for all interfaces is less than K Mem
for Spool, memory is allocat ed as follows:
1 Interfaces with Min K Spool (in the Administrati on/ Commun i ca-
tions menu) value greater than zero to receive their specified allocation.
2 Half of the remaining memory is equally distri bute d among any
interfaces with a Min K Spool value of zero.
3 The other half of the remaining memory is called floa t memory.
This memory is divided among all ports wit h a Min K Spool value
of zero. If only one port has a Min K Spool value of zero, that port
receives all float memory.
PostScript Heap
The K Mem for PSHea p, listed on the status page as Heap, is the
number of kilobytes of RAM dedicated to the PostScript emulat ion
interpreter. This memory client holds downloaded PostScript emulation fonts, operators, and forms.
Menu Administration/Memory/K Mem for PSHeap
Status Page
Alias
Choices 0 1024-99999
Default Variable
Notes If you change the K Mem for PSHeap value, the printer
Printer Configuration
Heap
automatically restarts after you save your changes and exit
from the configuration menu.
2-53
Page 88

Memory
PostScript Fonts
The K Mem for PS Fonts, listed on the statu s page as Font Cache, is
the number of kilobytes of RAM dedicated to caching previously
scaled bitmap representations of fonts for the PostS cript emulat ion
interpreter.
Menu Administration/Memory/K Mem for PS Fonts
Status Page
Alias
Choices 00088-99999
Default Variable
Notes This memory setting can reduce the number of times a
Emulation
Font Cache
PostScript font mu st be converted from outline form to bitmap
form, thus reducing processing time.
If you change the K Mem for PS Fo nts value, the printer
automatically restarts after you save your changes and exit
from the Configuration menu.
The K Mem Emulation is the number of kilobytes of RAM to be used
by non-PostScript emulat ion s for temporary storage and for loadi ng
optional emulations.
Menu Administr ation/Memory/K Mem Emulat ion
Choices 00768-99999
Default Variable
Notes If you receive an emulation error, you may need to increase
the amount of memory for this client.
If you change the K Mem Emulation value, the printer
automatically restarts after you save your changes and exit
from the configuration menu.
QMS 172 5 SLS Print System User's Guide2-54
Page 89

Memory
Emulation (Temporary)
The K Mem Emul Tmp is the number of kilobytes of RAM to be used
by non-PostScript emulation s for storing downlo aded (soft) font s,
forms, or macros.
Menu Administration/Memory/K Mem Emul Tmp
Choices 00256-99999
Default Variable
Notes This value must be greater than the sum of the Min K Spool for
all installed and enabled interfaces.
disappears when the printer is turned off.
This client is listed as Temporary on the status page.
Increasing this client’s si ze increases the number of PCL
downloaded fonts which can be accepted.
If you change the K Mem Emul Tmp value, the printer
automatically restarts after you save your changes and exit
from the Configuration menu.
Data in this client
Display List
The K Mem Display is the number of kilobytes of RAM dedicated to
the display lists. The display list holds the intermediate representation
of pages to be printed. Increasing the size of the Display List
increases the number of pages that can be collated. The maximum
number of pages that can be collated is 100 pages.
Menu Administration/Memory/K Mem Display
Choices 00128-99999
Default Variable
Notes If you change the K Mem Display value, the printer
automatically restarts after you save your changes and exit
from the configuration menu.
Printer Configuration
2-55
Page 90

Memory
Disk Cache
The K Mem Disk Cache is the number of kilobytes of RAM dedicated
to the disk cache. This memory client speeds file system throughput
on any installed hard disks by storing frequently used data in system
memory instead of continually storing it to and retrieving it from a hard
disk.
Menu Administration/Memory/K Mem Disk Cache
Choices 00032-99999
Default Variable
Notes If no hard disk is used, the disk cache should be set to the
The amount of memory needed for this memory client depends on the
size and number of hard disks, the number of subdirectories on each
disk, and the amount of memory dedicated to caching.
minimum. The printer then reallocates the released memory to
other clients that need additional memory.
If one or more hard di sks are used, they remain unavailable
until sufficient memor y is available to the disk cache.
If you change the K Mem Disk Cache value, the printer
automatically restarts after you save your changes and exit
from the configuration menu.
» Note: If sufficient memory is avai lable to the disk cache, all d isks are
accessible. If insufficient memory is available to the disk cache, some disks
may b e accessible while others may not be.
The recommended amount of memory for the disk cache client is
n
120 KB minimum
n
0.5 KB per MB of disk storage total for all disks
For example, the recommend ed amo unt of mem ory for the disk
cache for a single 120 MB hard disk is 180 KB, and for two 120 MB
hard disks it is 240 KB. These are recommended values. The printer
will still operate with a sma ller cache, but decre ased perform ance
may result.
QMS 172 5 SLS Print System User's Guide2-56
Page 91

Memory
Frame Buffer
The Frame Buffer me mory client holds rasterized or bit map ped
images of page faces which are ready to be sent to t he print engine .
A frame holds the contents of each single page image.
Claculating the Frame Buffer Size
The following formulas should help you determine th e minimu m num ber of kilobytes required in the frame buffer for any printing situat ion.
Your printer may require additional memory in the frame buffer to print
at a rated speed.
paper feed width (inches) x horizon. resolution (dpi) ÷ 8 = scanline
width (bytes)
paper feed length (inches) x vert. resolution(dpi) = number of scanlines
scanline width (bytes) x number of scanlines = total frame buffer
memory (bytes)
bytes ÷
1024 = KB
For example, if you are printing a duplex, 8.5 x 11.0'' page at 600 dpi,
with the short edge of the page fed into the printer first, your equation
would look like this:
(8.5 x 600) / 8 = 638 bytes (scanline width)
11 x 600 = 6,600 (number of scanlines)
638 x 6,600 = 4,210,800 bytes or
4,210,800 ÷ 1024 = 4,113 kilobytes
Now, si nce in this example you are duplexing, you must double the
frame buffer memor y to 8,421,600 byt es or 8,225 KB.
If you are uncertain about how to configure your printer’s memory,
use only the Quick Config menu. Memory is then autom at icall y allocated to the memory clients that require it. Any excess memory is
allocated to the Frame Bu ffer client .
Printer Configuration
2-57
Page 92

Printer Engine
Features
Printer Memory
MB Printer Mem , listed as Sy stem Use on the stat u s pag e, is the
number of megabytes of RAM available to be split among the various
memory clients. The size of this client's mem or y limits the number of
jobs that may be queued simultaneously. When this client's memory
is exhausted, the printer slows down, and the hosts are forced to wait.
Menu Administration/Memory/MB Print er Mem
Status Page
Alias
Choices N one--For infor mation only.
Default Depends on the amount of memory installed.
Notes This memory client is not user-configurable.
System Use
Printer Engine Features
Through the Administratio n/Engi ne menu you can set print enginerelated parameters.
Adjusting the Image Alig nm ent
This option allows you to adjust the horizontal and vertical placement
of printed images.
To check image alignment, print a standard status page (Admini stration/Speci al Pa ges/P rint Status). When the printer is placing im ages
properly, the alignment angle bar in the lower-left corner of the status
page is 0.5"/12.7 mm from the left and bottom edges of the page. If
the angle bar is off, use the Administrat io n /Engi ne/I m age A lignm ent
option to align the image horizon tally and vertically in pixel increments (1/300" or 0.08 mm). There are separate adjustmen ts for the
front and back of a sheet for duplex alignment.
» Note: Engine constra ints may limit the accuracy of pixel alignment.
QMS 172 5 SLS Print System User's Guide2-58
Page 93

Printer Engine
Features
Horizontal Offset
Menu Administration/Engine/Image Alignment/Horiz Offset
Choices 0 0000-00300 (0.00"/0 mm-1.00"/25.4 mm)
Default 00100 (0.33"/.84 mm)
Notes Values above 100 move the image to the right.
Values below 100 move the image to the left.
Vertical Offset
Menu Administration/Engine/Image Alignment/Vertical Offset
Choices 0 0000-00300 (0.00"-1.00")
Default 00100 (0.33"/.84 mm)
Notes Values above 100 move the image down.
Values below 100 mo ve the image up.
Vertical Duplex Offset default = 00150
Setting Default Paper
Default Paper is used when the default media is requ ested but the
default input bin is missing from the engi ne so there’s no way to
sense the media size automaticall y.
Menu Administration/Engine/Default Paper
Choices Letter, A4
Default Letter
Setting Inputbin x Name
These options are used to name input bins 1 and 2.
Menu Administration/Engine/Inputbin x Name
Choices Up to 16 alphanumeric characters
Default Inputbin 1 “upper” / Inputbin 2 “lower”
Printer Configuration
2-59
Page 94

Printer Engine
Features
Setting Outputbin x Name
These options are used to name output bins 1 and 2.
Menu Administration/Engine/Outputbin x Name
Choices Up to 16 alphanumeric characters
Default Outputbin 1 “upper”/ Outputbin 2 “face up”
Setting Default Resolution
This option sets the print engine’s default resoluti on.
Menu Administration/Engine/Def Resolution
Choices 300 dpi—300x300 dpi resolution.
600 dpi—600x600 dpi resolution.
Default 600 dpi
Setting Gamma Correction
This option sets the print engine’s gamma correction.
Menu Administration/Engine/Gamma Correction
Choices 0,1,2,3
Default 0
Notes Gamma correction produces optimum print quality for
halftones. For information on gamma correction, see chapt er
guide
4, “Print Quality,” in this
.
Specifying Page Recovery A ction
When a media jam or other similar error occurs, the printer can reprint
the job starting from the page on which the jam occurred.
Menu Administration/Engine/Page Recovery
Choices On—Repri nts from the page on which the jam or error
occurred.
Off—Doesn’t reprint a print job when a jam or error occurs.
Default On
QMS 172 5 SLS Print System User's Guide2-60
Page 95

Printer Engine
Features
Setting Toner Out Action
You can configure the print er to stop or to continue printing when a
TONER OUT error message is displayed in the me ssage window.
Menu Administration/Engine/Toner Out Act.
Choices Continue—Printing when a TONER OUT message display s.
Stop— No printing when a TONER OU T message displays.
Default Continue
Setting Manual Feed Tim eou t
This option allows you to set the amount of time the printe r waits for
paper to be inserted into the manual feed slot before it cancels the
job.
Menu Administration/Engine/Man. Feed Timeout
Choices 00000 - 00300 seconds
Default 00060 seconds
Notes A value of 00000 sets the timeout to infinity
Setting the Letterhead Option
This option only appe ar s if the duplexing unit is installed on the
printer. The letterhead option allows you to print both simplex and
duplex jobs on letterhead paper from the sam e input bin (cassette)
without having to sort the pages manually.
Menu Administration/Engine/Letterhead
Choices On, off
Default Off
Notes Letterhead paper must be loaded face down in the input bin
with the bottom edge inserted first into the pr inter. You may
notice a decrease in the printing speed dependi ng on the mi x
of simplex and duplex pages.
Printer Configuration
2-61
Page 96

Miscellaneous
Reading the Page Counters
The page count of the pages printed can be read from the message
window or through a remote console without t he need for a status
page to be printed.
Menu Administration/Engine/Page Counters/Sheets Print ed
Choices Ten-digits, non-conf igurable. (For information only.)
Default Current page count
Notes The sheets printed number represents the number of media
pages that have been fed through the printer. A duplexe d page
increments this counter by only one.
Menu Administration/Engine/Page Counters/Faces Printed
Choices Ten-digits, non-conf igurable. (For information only.)
Default Current faces printed count
Notes The faces printed number represents the number of page
faces that have been printed. A duplexed page would
increment this counter by two.
Miscellaneous
The Miscellaneous submenu allows yo u to change printer configu rations, such as defaults and message window language.
Restoring the Factory D efault Configuration
If you need to cancel all of the configuration changes you have made,
you can reset all of the configuration settings to their factory defaults .
Menu Administration/Miscellaneous/Restore Defaults
Choices Yes, No
Default No
Notes This process t a kes several minutes to complete.
QMS 172 5 SLS Print System User's Guide2-62
Page 97

Setting the Message Window Language
Status messages and configuration me nus can be displayed in the
message window in English, French, German, or Spanish.
Menu Administration/Miscellaneous/Keypad Language
Choices E nglish, Fre nch, German, Spanish
Default English
Notes The printer must be restarted for changes to the Keypad
Language menu to take effect. You can either let the printer
restart automatically after you save the change and exit from
the Configuration menu, or you can wait for the change to take
effect the next time you m anually turn on the printer.
Hard Disks
Use the Administration /Di sk Operation s menu to perform disk operation processes that appear only when optional hard disks are
installed.
Hard Disks
O
Caution
: If you connect to this printer a n external hard disk you previously
used w ith an earl ier QMS Crown printer, this QM S 1725 SLS Print System
software release willautomatically reorganize the files on the h ard disk whe n
the printe r is turned back on again. (The printer release number is listed on
both the start-up and t he status page.) Once this reorganization is done,
the fil es on the hard disk can no longer be accessed if the hard disk is
reattached to an earlier QM S Crown printe r.
This reorganization process takes time. If, when you first turn the printer on
after a ttaching a previously used hard dis k, it does not come on line
immediately, be patient. Interrupting the reorgani zation process could
cause a ll files on the hard disk to be lost.
Printer Configuration
2-63
Page 98

Hard Disks
Identifying Hard Disks
The documentation th at comes with your external SCS I (Small Computer System Interface ) hard disk should conta in all of the n ecessary
information for connecting and configuring the disk.
Device Numbers
Hard disks are identified by device numbers which you assign. Valid
choices for external SCSI hard disks range from DSK0 to DSK5.
However, you cann ot repeat numb e r s; each device numb er must be
unique. The recommended device number for the internal SCSI hard
disk, if present, is DSK6.
Internal Disk
DSK6
Optional Disks
(DSK0 - DSK5)
» Note: For the printer t o recognize any attached hard disk(s), each hard
disk must be turned on before you turn on the printer. DISK ON LINE
appears on the start-up page if the printer re cognizes the disk(s).
The Disk Op erations Menu
The Administrati on/D i sk Operati ons menu cont ains all of the opt ions
you need to format a hard disk, as well as to install option al font s on
and remove them from a hard disk.
» Note: The install, re move, and format disk operations do not include support
for a Font Folio disk. You must download the fonts to your hard disk from
host appli cations.
QMS 172 5 SLS Print System User's Guide2-64
Page 99

Hard Disks
Error Messages
The following three messages may appear while you are using the
Disk Operations menu.
Message Meaning Action
FORMAT FAILED The hard disk cannot be
used.
WRITE ERROR The hard disk
encountered a write
error, or there is no room
for the data on the hard
disk or i n RAM.
Press the Menu key to
remove the message, and
contact your QMS vendor.
Press the Menu key to
remove the message, and
restart the operation from
the beginning.
Formatting a Hard Disk
O
Caution:
be lost. You would then have to reload the system softw are. Refer to
Installing Print System S oftware Upgrades, in chapter 8 for instructions
on loading system software.
If you format the internal hard disk, the printers system code will
You have two ways of formatting a hard dis k:
n
PS Executive Series Util ities
n
Printer configurat ion menu
Using PS Executive Series Utilities
The PS Executive Series Utilit ies offer form at ti ng opti ons for both
Macintosh and PC setups. See the on-line document at ion fo r details
on formattin g di sks.
Using the Printer Co nfiguration Menu
After you have accessed t he Administrat ion /Di sk Operation s menu,
press the control panel keys in the order shown in the following table.
The printer responds by displaying a status message in the message
window. Always turn on any external hard disks prior to turning
on the printer.
Printer Configuration
2-65
Page 100

Hard Disks
» Note: You may need to press the Next key one or more times to advance
through the list of selections or options.
Use this
key
Select Access the Administration/Disk
Select Access the Format Disk/Dsk#: menu. FORMAT DISK
Next Scroll through the list of attached di sks. FORMAT DISK
Select Select the disk and display a format
Select Be gin the formatt ing process. The hard
» Note: After an unformatted disk is formatted and the
COMPLETE
to... The message window
reads...
DISK OPERATIONS
Operations/Format Disk menu.
confirmation message.
disk is formatt e d while the system
reboots.
You are informed when the formatting
process is complete. The printer then
reboots, and a start-up page prints (if
enabled).
FORMAT DISK
DSK#:
DSK:
FORMAT DISK
ARE YOU SURE?
FORMAT DISK
FORMATTING...
FORMAT DISK
FORMAT COMPLETE
x
x
FORMAT
message displays, you m ust turn t he printer off and back on
again be fore the printer can recognize the disk.
Collation
This option is used to specify which disk and how much of that disk
should be used to store collated print jobs when the jobs cannot be
accommodated by RAM sp ace. Th e printer sc rolls through all the
installed hard disk addresses. Refer to “Collat ing Ou tput , ” in chapter
3, “Daily Operations,” for more inform ation.
Spool Overflow
This option is used to specify which disk and how much of that disk
should be used to store print jobs when the jobs can not be accommodated by RAM. The maxim um setting varies according to the disk
size installed in the printer.
QMS 172 5 SLS Print System User's Guide2-66
 Loading...