

IBKorea TRU650 User Manual
TRU 650 ACCESS CONTROL SYSTEM USERS GUIDE
TRU 650
Fingerprint Reader Unit – Access Control System
USER’S GUIDE
Rev 2.1.xc
IBKorea. Ltd.
#818, Woolim Lions Valley 311-3, Sangdaewon-dong
Jungwon-gu, Seoungnam-si, Gyeonggi-do
www.ibkr.co.kr
- 1 -
Copyrighted by Integrated Biometrics Inc., 2008

TRU 650 ACCESS CONTROL SYSTEM USERS GUIDE
1.0 BIO-I BACS ENROLL & MANAGEMENT SOFTWARE .......................................................... - 3 -
1.1 Logging In. .............................................................................................................................................. ..................................... - 3 -
1.2 Screen Navigation ...................................................................................................................... ................................................. - 4 -
1.3 Menu Selection “Configuration” ....................................................................................................................... ........................ - 5 -
1.4 Menu Selection “Management” ............................................................................................................ ..................................... - 8 -
1.6 TRU & Forced Controls ................................................................................................................................................. ......... - 14 -
1.7 “Force Control Allocation to TRU” section. ........................................................................................................... ......... - 16 -
1.8 TRU for Approval Tab ........................................................................................................................................................... .. - 18 -
1.9 Access Time Setup ......................................................................................................................................... ............................ - 20 -
1.11 [Group: Access Time] Setup ................................................................................................................................... ............... - 23 -
1.12 [TRU : Group – Access Time] Setup ..................... ....... .................................................................................... ..................... - 25 -
2.0 CHECKS TO CONFIRM SET-UP AND ACCESS PRIVILEGES FOR A USER .................... - 25 -
2.1 Confirm TRU. ................................................................................................................................... .................................. - 25 -
2.2 Confirm Access Times assigned to Group. .................... ................................................................................................... - 25 -
2.3 Confirm Group and Access Times assigned to TRU.................................................................................... ............................ - 25 -
2.3 Confirm User assigned to Group with Access Times. .................................................................................................... .. - 26 -
3.0 MENU SELECTION “TOOLS” .............................................................................................. - 27 -
3.1 Monitoring ........................................................................................................................................................................ ......... - 27 -
3.2 Logs ......................................................................................................................... .......................................................... ......... - 29 -
3.3 Query Manager ................................................................................................................................................................ ......... - 32 -
3.4 TRU Update ................................................................................................................................ ............................................... - 32 -
4.0 BACKING-UP DATA ............................................................................................................. - 34 -
4.1 Database Back-up ................................................................................................................................................ ..................... - 34 -
4.2 Database Restore ..................................................................................................................................................................... .. - 36 -
4.3 Log data Back-up .......................................................................................................................................... ............................ - 37 -
4.4 Log Restore ........................................................................................................................................................................ ........ - 38 -
5.0 BIO-I BACS KEY WORD DEFINITIONS ............................................................................ - 39 -
- 2 -
Copyrighted by Integrated Biometrics Inc., 2008
TRU 650 ACCESS CONTROL SYSTEM USERS GUIDE
r
1.0 Bio-I BACS Enroll & Management Software
1.1 Logging In.
1.1.1 Start the Enroll & Management software by double clicking on the “Bio-I BACS” Icon found on
your desktop. You may also log on to the software through “Start\All Programs\Integrated Biometrics
LLC\Bio-IBACS.”
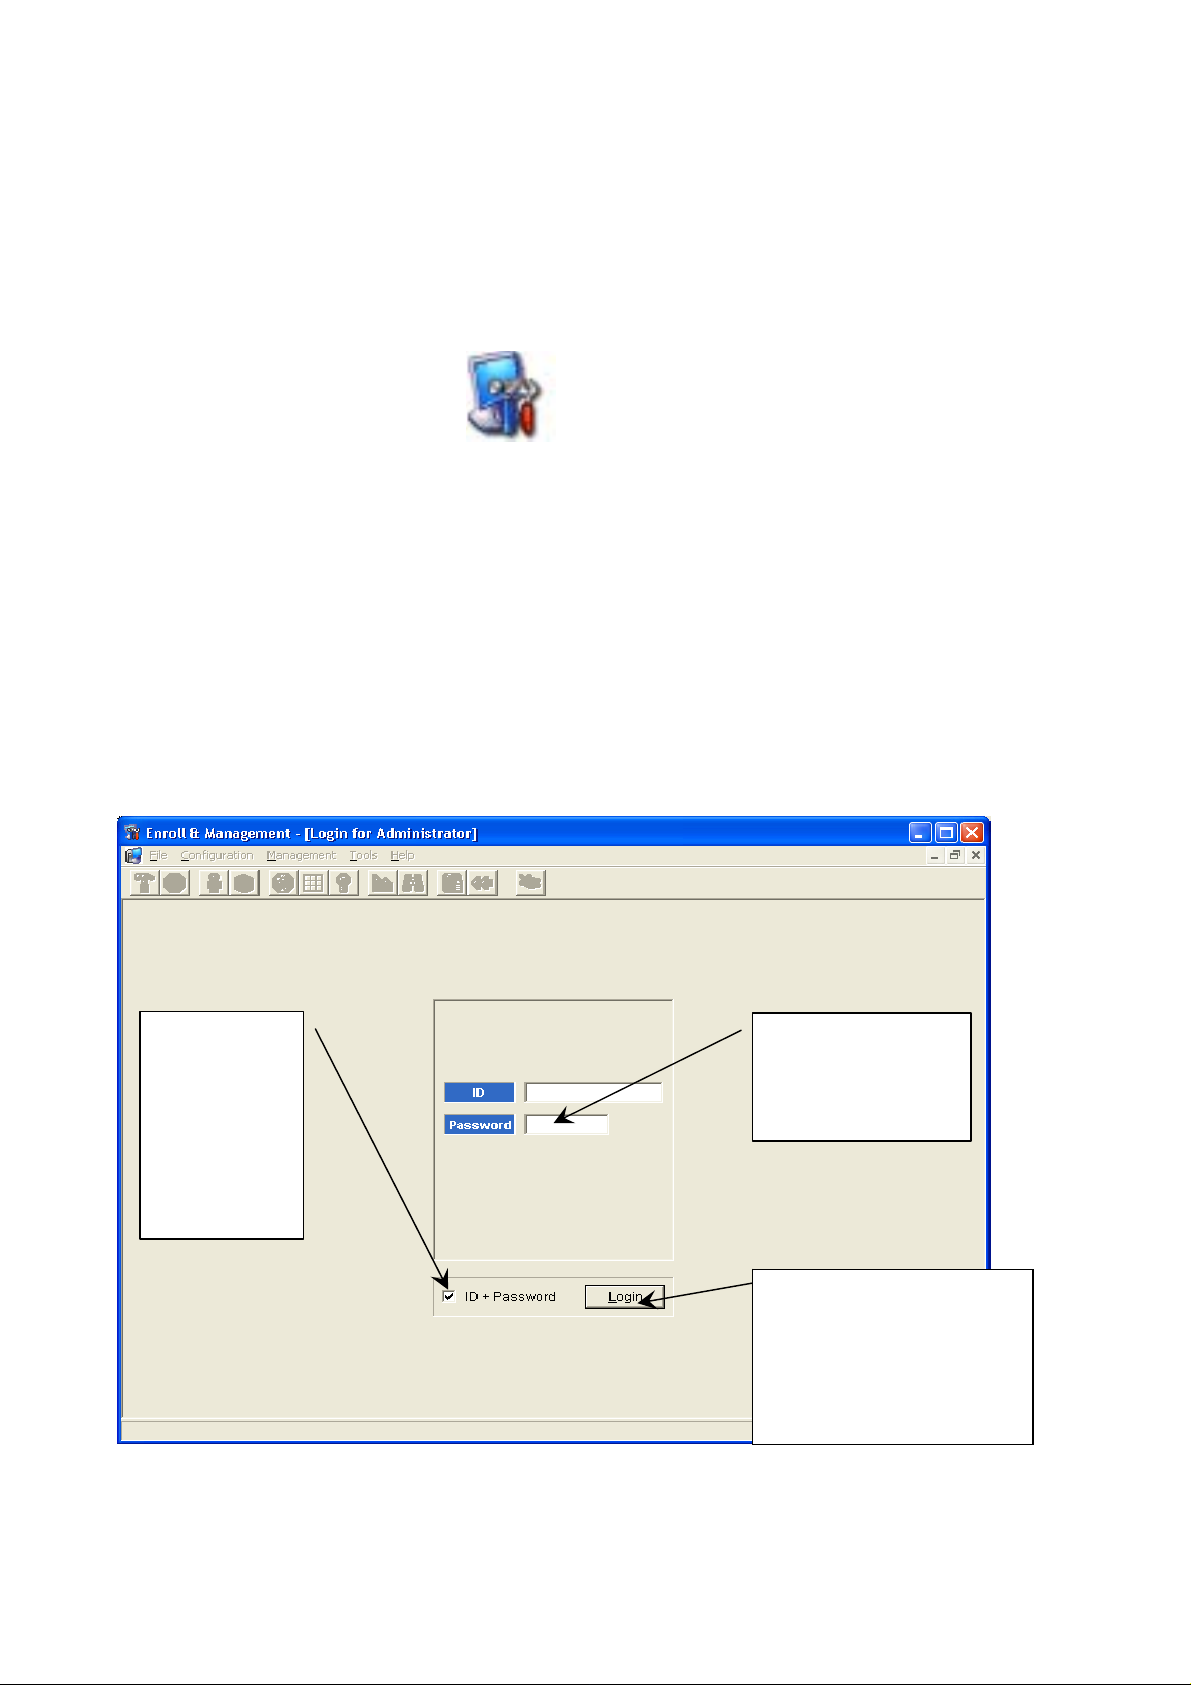
1.1.2 This will bring up the “Enroll & Management – [Login for Administrator]” window shown below.
1.1.3 The first time someone logs in, you will need to log in as the default user “Admin”, using default
settings, since no one is enrolled yet. Click on the box “ID + Password.” The default “ID” is “1111” and
the default “Password” is “111 1. ” Ent er these in the appropriate boxes a nd Click “Login.”
1.1.4 The “[Identified]” window should appear and read “User: Admin, Type: Administrator.” Click
“OK.” You should now be logged into the “Bio-I BACS” program and the “Enroll & Management – [Log
Monitor]” window should appear. Y o u have successfully logged in.
1.1.5 After you have enrolled as an “Administrator” User, and have enrolled your fingerprint, you can log
in from this screen simply by clicking the “Logi n” button, and placing your fi nger on the sensor.
Check this
box when
logging in for
the first time,
or anytime
you choose to
log in via ID
& Password
- 3 -
Copyrighted by Integrated Biometrics Inc., 2008
Enter 1111 for ID
and 1111 for
password then click
Login
After you have enrolled
your fingerprint, you can
log in simply by clicking
the Login button and
placing your finger on the
senso
TRU 650 ACCESS CONTROL SYSTEM USERS GUIDE
1.2 Screen Navigation
1.2.1 The software can be navigated by two methods. The Menu Selections File, Configuration,
Management, etc., are across the top of each window. Each of these selections has a drop down menu for
the various functions. See example below.
1.2.2 Under the Menu Selections, there are Icons that are short cuts to these functions. See the example
below.
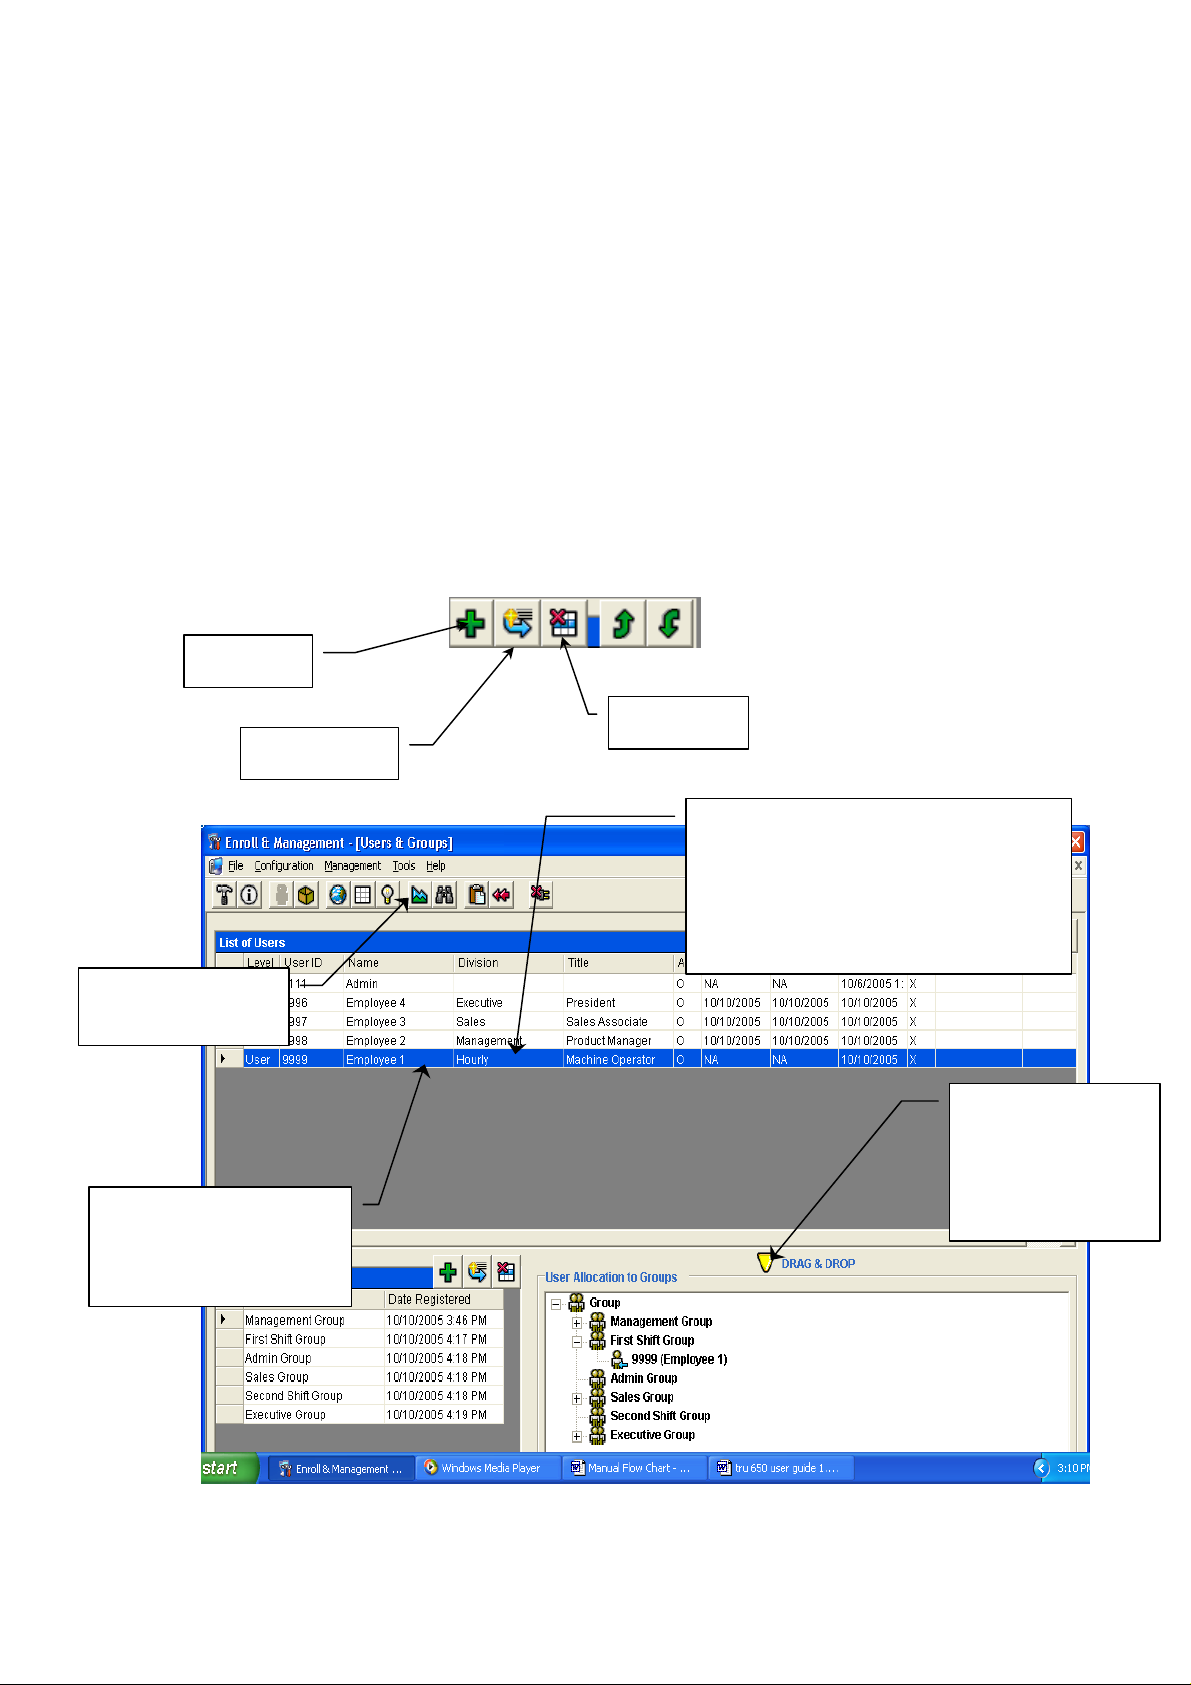
1.2.3 Another method of Modifying active Users, or Groups, or TRU’s, etc., is to click on an active line,
which will highlight it. Then right click, which will display a menu box with selections such as “Modify”,
“Delete”, “Detach”, etc. See example below.
1.2.4 Attaching “Users” and “Access Times” to “Groups”, and attaching “Groups” to “TRU’s” is
accomplished by simply Drag ging and Dropping. See exampl e be low.
Menu Selection
Shortcut Icons
Click on an Active Line
to highlight and hold,
then drag and drop
Add Icon
Delete Icon
Modify Icon
Click on an Active Line to highlight,
and then right click. A drop down
menu with functions s uch as Modify,
Delete, etc. will display. This is an
alternative to highlighting and using
the “Active Section” Icons.
All windows with
Drag and Drop
capability are
designated with
this Icon.
- 4 -
Copyrighted by Integrated Biometrics Inc., 2008

TRU 650 ACCESS CONTROL SYSTEM USERS GUIDE
1.2.5 Some windows also contain “Tabs.” These tabs are located at th e top or bottom of some windows.
Click on these tabs to access options for the windows that are displayed.
1.2.6 In the active sections of each window, the sections where you can add or modify etc., there are
function Icons. These Icons are shown below.
1.3 Menu Selection “Configuration”
1.3.1 Settings
Click on Menu Selection “Configuration.” The Drop Down menu will present two choices. Click on
“Settings.” You will see the “Enroll & Management – [Settings]” screen shown below. The
manufacturer’s settings should not need changing. Only your Network Administrator can make that
decision.
1.3.1.1 The Database Connection. Click on the “Test(T)” button in the left side of the screen in the
“DBMS Info” section. The window that appears should read “Database Connections Succeeded.”
This confirms the Database Connection. Click “Yes” to save.
1.3.1.2 Test the Authentication Server Connection. Click on the “Test(E)” button in the
“Authentication Server Info” section on the right side. The window that appears should read
“Authentication Server Connection Su cceeded.” This confirms th e Authentication Server con nection.
Click “Yes” to save.
1.3.1.3 “Log Image, save when authentication fails” box in bottom left. Checking this box will save
the images when Authentication fails. This can be useful in examining Failed Auth entication s, in Log
Search function, to look fo r problems with the image.
1.3.1.4 “Save when authentication succeeds” box in lower middle. Checking this box will give you a
log of succeeded images for examination.
1.3.1.5 “Search Number” box in lower left. When you search images in the “Tools Menu”, this
number determines how many images will be retrieved in “Batches.” The Manufacturers setting is
1000. The higher the setting the longer it will take to retrieve each “Batch.”
- 5 -
Copyrighted by Integrated Biometrics Inc., 2008

p
Database Connection
Test Button
Check this box to
save fingerprint
images for Failed
Authentications
TRU 650 ACCESS CONTROL SYSTEM USERS GUIDE
Authentication
Server Test Button
This number
determines the size of
“Batches” when
performing a search
1.3.2 Divisions & Titles
1.3.2.1 Click on the Menu Selection “Configuration.” The Drop Down menu will present two choices.
Click on “Divisions & Titles.”
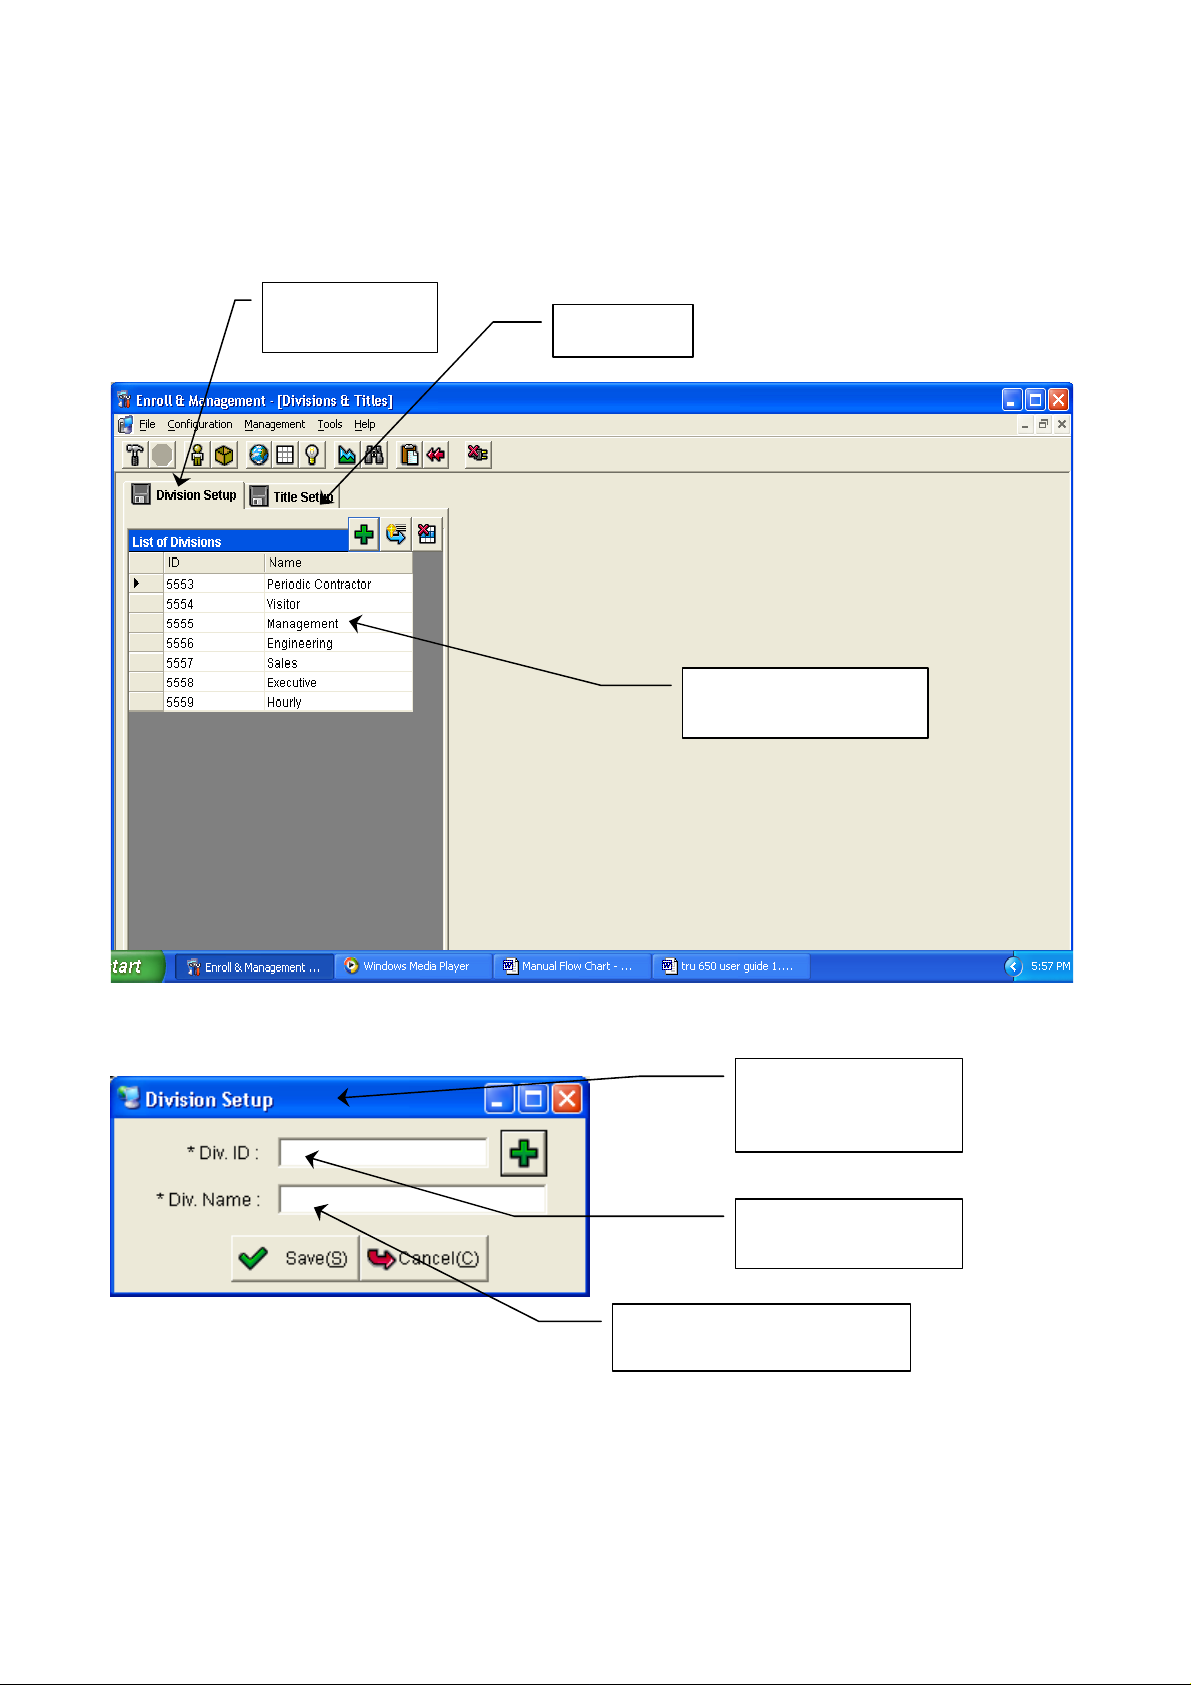
1.3.2.2 You will see the window “Enroll & Management – [Divisions & Titles] shown below.
1.3.2.3 Click on the “Division Setup” tab. Click on the “Add” Icon. The “Division Setup” box shown
below will appear. Fill in a unique “Div. ID” number and a “Div. Name.” Click “Save.” The new
entry will show in the “List of Divisions.”
1.3.2.4 Next, click on the “Title Setup” tab. Go through the same process as with Division Setup.
Check this box to Save
fingerprint images for
Successful Authentications
You must click
“Save” to input
u
dated information
- 6 -
Copyrighted by Integrated Biometrics Inc., 2008
TRU 650 ACCESS CONTROL SYSTEM USERS GUIDE
p
Note: Divisions and Titles are not required for the operations of the access control system. They
are for descriptive purposes only and have no effect on th e granting of access privileges.
Division Setup
Tab
Add Icon
List of Divisions that
have been added
Setup window that
appears when you
click the Add Icon
Fill in Div. ID and
Div. Name fields
You MUST click “Save” to
in
ut updated information
- 7 -
Copyrighted by Integrated Biometrics Inc., 2008

TRU 650 ACCESS CONTROL SYSTEM USERS GUIDE
1.4 Menu Selection “Management”
1.4.1 User & Group
1.4.1.1 Enrolling Users.
1.4.1.1.1 Click on the Menu Selection “Management” and select “User & Group” from the
Dropdown Menu.
1.4.1.1.2 In the top section, “List of Users”, click on the “Add” Icon. The “Users”
window shown below will appear.
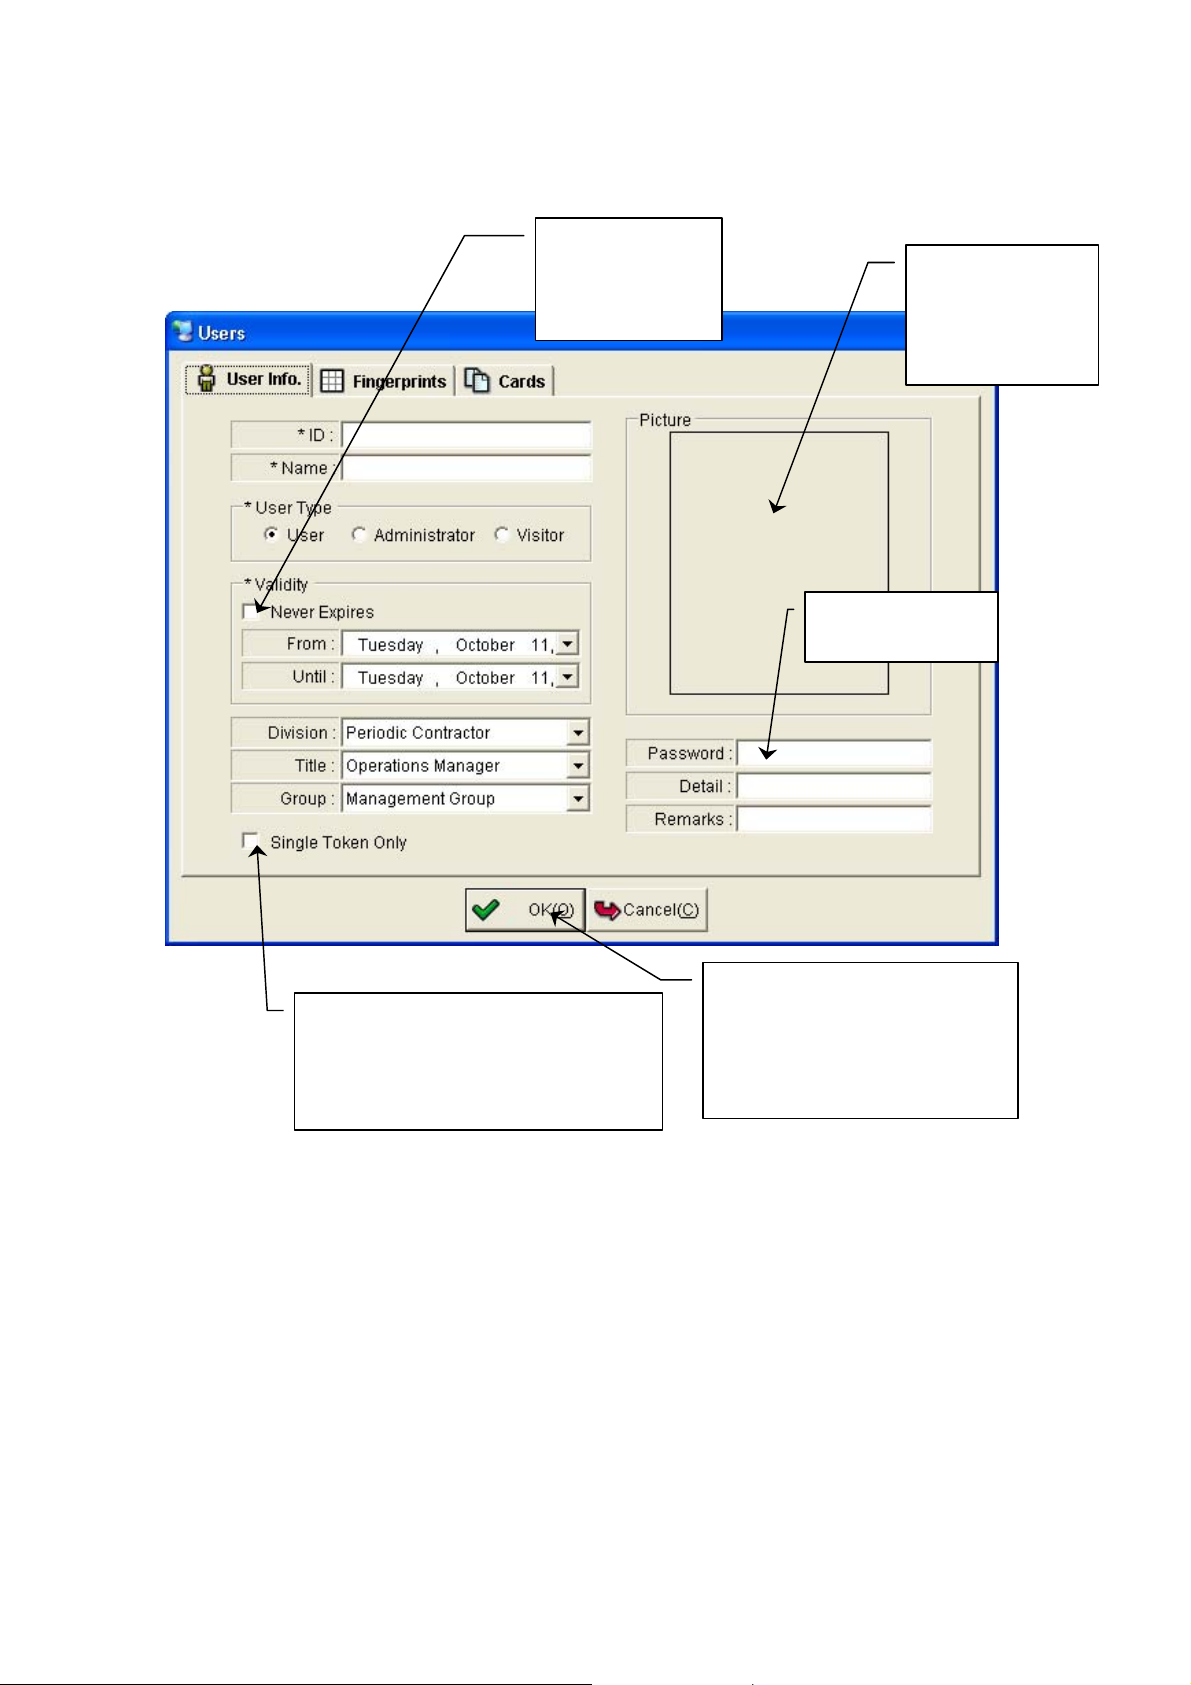
1.4.1.1.3 Click on the “User Info” tab. Fill in a unique “ID” number. This field only accepts
numeric characters. Note: This is the ID that will be used to logon the Bio-I BACS software if they
do not choose to log in biometrically.
1.4.1.1.4 Fill in the name field.
1.4.1.1.5 Click “User Type” radio button “User,” “Administrator,” or “Visitor.” User Type
assigned should be based on the following.
• Administrator – Has full access to the Bio-i BACS software and available to be assigned
door access.
• User – Available to be assigned door access, but does not have access to Bio-I BACS
software.
• Visitor – Same as user but you must supply an expi ra tio n da te .
1.4.1.1.6 Use the drop down menus be side “Div isio n”, “Title”, and “Group ” to assign th ese. No te:
Division and Title are used for descriptive purposes only and are not required for access system
use. Note: A User must be assigned to a Group to be granted access privileges, but they do not
have to be assigned in this window. A User can also be assigned to a Group by Drag and Drop in
the “Management\User & Groups” window.
1.4.1.1.7 Assign a password of their choice in the “Password” field. Note: This is the password
that will be used to logon to the Bio-i BACS software, if they choose not to logon biometrically
then when you log on, you will use your ID and this password..
1.4.1.1.8 The “Detail” and “Remarks” fields are for descriptive purposes only and can be left
blank or filled in with any desired information.
1.4.1.1.9 In the “Picture” section in the top right, a photo of the User can be entered by placing
your cursor in the picture window and right clicking. Then click on “Add/Modify Picture” and a
search window will appear to enable you to select a picture.
1.4.1.1.10 Click on the “Single Token Only” box to allow Access by Fingerprint only. This setting
for individual Users, will override TRU’s that have been designated as Multi-Token use.
- 8 -
Copyrighted by Integrated Biometrics Inc., 2008
TRU 650 ACCESS CONTROL SYSTEM USERS GUIDE
g
Check Never
Expires for
users expected
to be lon
term
Right Click here
and choose
“Add/Modify” to
add a picture
Enter Password
here
On ALL input windows, you
Check the Single Token box to
allow access only with Fingerprint
for this User on TRU’s that are set
up for Multi Token use.
1.4.2 Enrolling Fingerprints
1.4.2.1 Click on the Menu Selection “Management” and select “User & Group” from the
Dropdown Menu.
1.4.2.2 In the top section “List of Users” click on the “Add” Icon. The “Users” window will
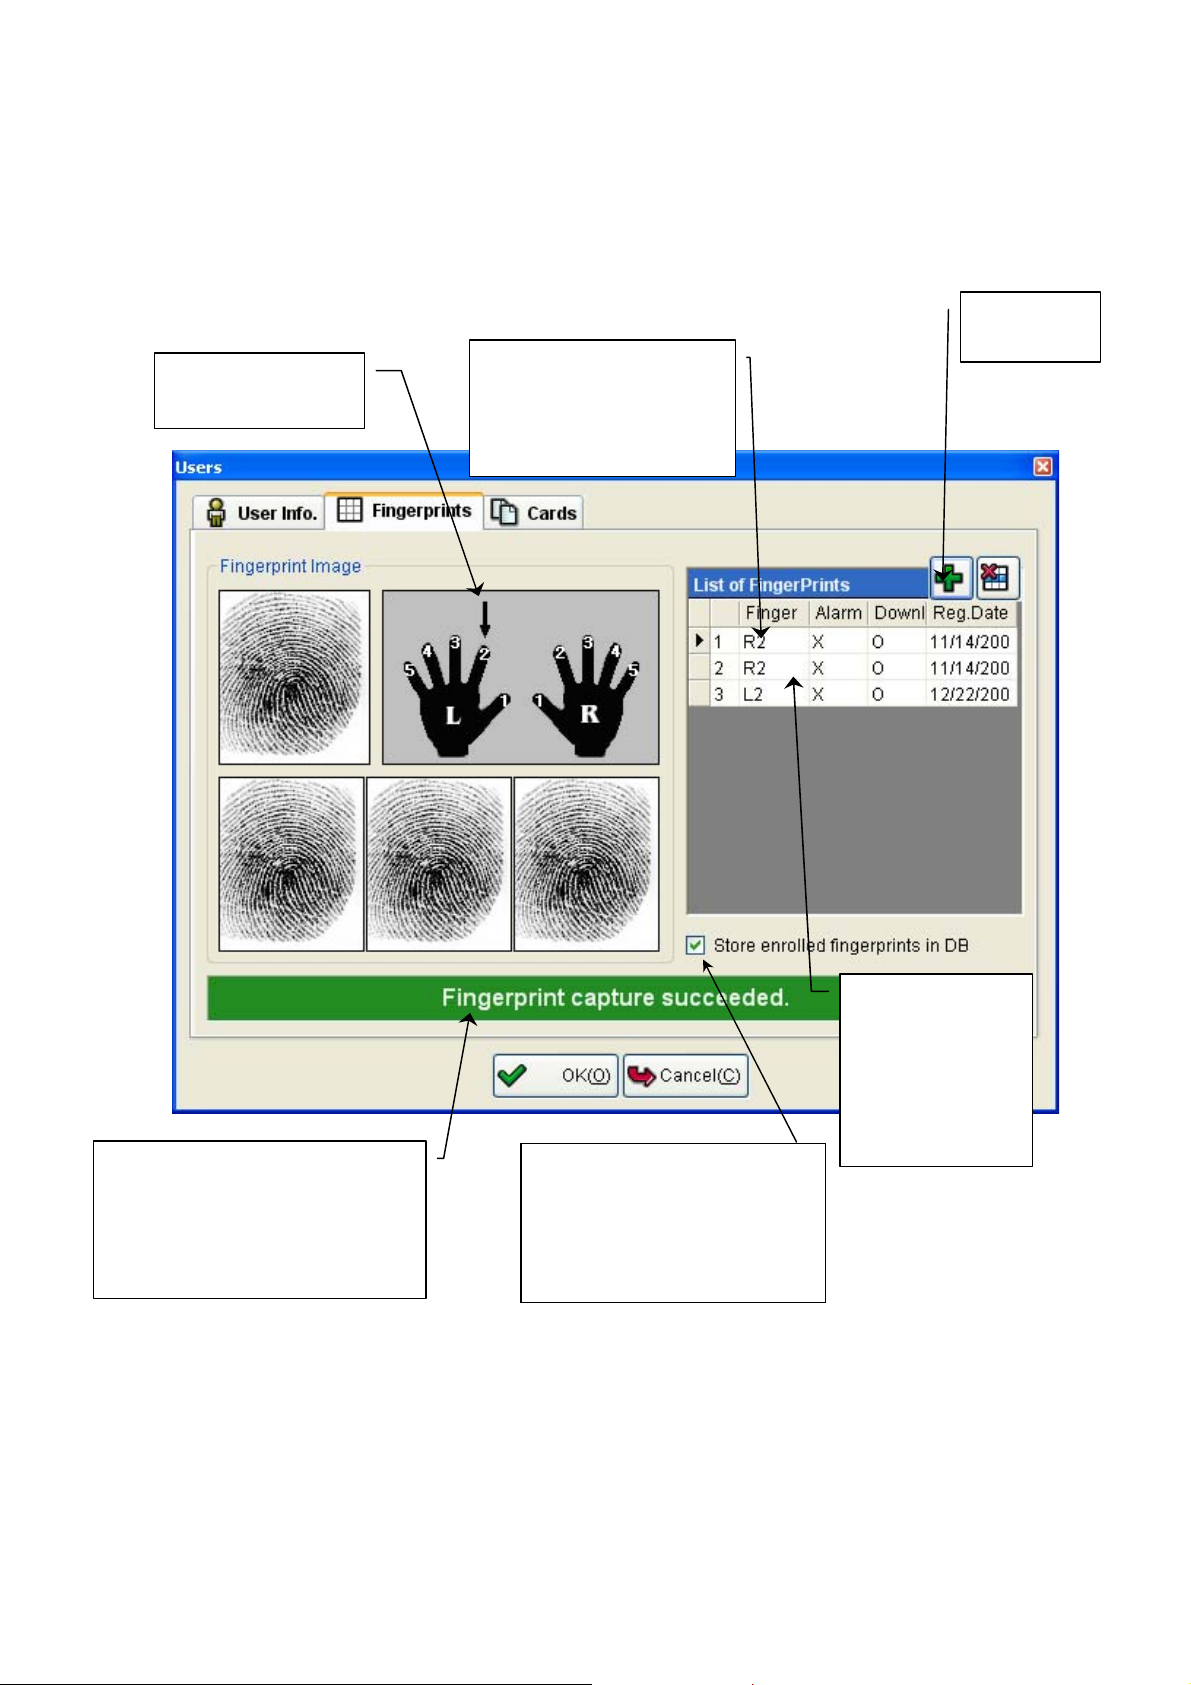
appear. Click on the “Fingerprints” tab. The window shown below will appear. If the user exists,
you can choose the user by double-clicking on their line or right clicking and choosing modify.
1.4.2.3 To Enroll a Fingerprint, first choose which finger to enroll by clicking on that finger.
Example – R2 is right index.
- 9 -
Copyrighted by Integrated Biometrics Inc., 2008
MUST click “OK”, to save
inputted information. You can
navigate to other tabs, on any
window, prior to saving.

TRU 650 ACCESS CONTROL SYSTEM USERS GUIDE
1.4.2.4 Next, click on the “Add” Icon. There is a prompt field at the bottom of this window. The
prompt will instruct to “Scan your finger.” Place your finger on the USB enrollment sensor. The
prompt will then instruct you to “Remove your finger.” Take your finger off the sensor. This
prompt will instruct you three times to Scan, and then remove, to obtain three images.
1.4.2.5 At this point the pro mpt will read “Fingerp rint capture succeeded” or
“Fingerprint capture failed.” If it reads “Succeeded”, you can exit this screen by clicking “OK”, or
proceed to add another fingerprint image, for a different finger, by clicking on that finger and
repeating this process. If it reads “Failed”, you can attempt enrollment of the same finger again, or
try a different finger. It is recommended to enroll at least two fingers per user, one from each hand.
1.4.1.6 After successful fingerprint enrollment you may exit this window by clicking “OK” or
select one of the other tabs in this window. If you choose to exit this window you MUST click
“OK” to save inputted information. NOTE: IT IS RECOMMENDED TO CHECK THE BOX
TO STORE THE USERS FINGERPRINT IN THE DATABASE! This is very useful for
troubleshooting poor quality enrollments.
1.4.2.7 After successful enrollment, the section on the right of this screen “List of Finger Prints”,
will list all enrolled fingers for this User. There are two functions that can be set in this section.
1.4.2.8 The first function is to designate as an Alarm Finger, or not. Highlight the desired
enrollment finger by clicking on that line, example sh own – R2. If there is an “X” in the “Alarm”
box, it designates this finger is “NOT” set as an alarm finger. Right Click on this line. You will
receive three options. We will address alarm option “Set to Alarm Finger” first. If you click on this
option it will set this finger, when used, to trigger the Alarm that your System Administrator
configures. When you designate as Alarm Finger with this option, there will be an “O” in the alarm
field. You disarm this finger from the Alarm function by the same process.
1.4.2.9 Next, with the desired enrollment fing er highlighted, right click. This time choose the
function “Set to Download .” The default for this function sets all fingers enrolled to download.
This setting is shown with an “O” in the download column. If for some reason the TRU looses
Network connection, the selected finger enro llments that have been downloaded will st ill be able
to be used. They are downloaded to the memor y in the TRU itself. It is recommended to set only
one finger to download, as memory in the TRU is limited. Authentication Time will increase with
the number of templates stored. Set with an “X”, in this column, finger enrollments are
not to be downloaded.
- 10 -
Copyrighted by Integrated Biometrics Inc., 2008
TRU 650 ACCESS CONTROL SYSTEM USERS GUIDE
Click on the finger
to be enrolled
Highlight desired finger
and Right Click, to Set
as Alarm finger or
disarm as Alarm finger.
Click on
Add Icon
Prompt Field will read “Scan
your finger”, then “Remove
your finger” three times. Then it
will prompt fingerprint c ap ture
Succeeded or Failed.
1.4.3 Enrolling Prox Cards
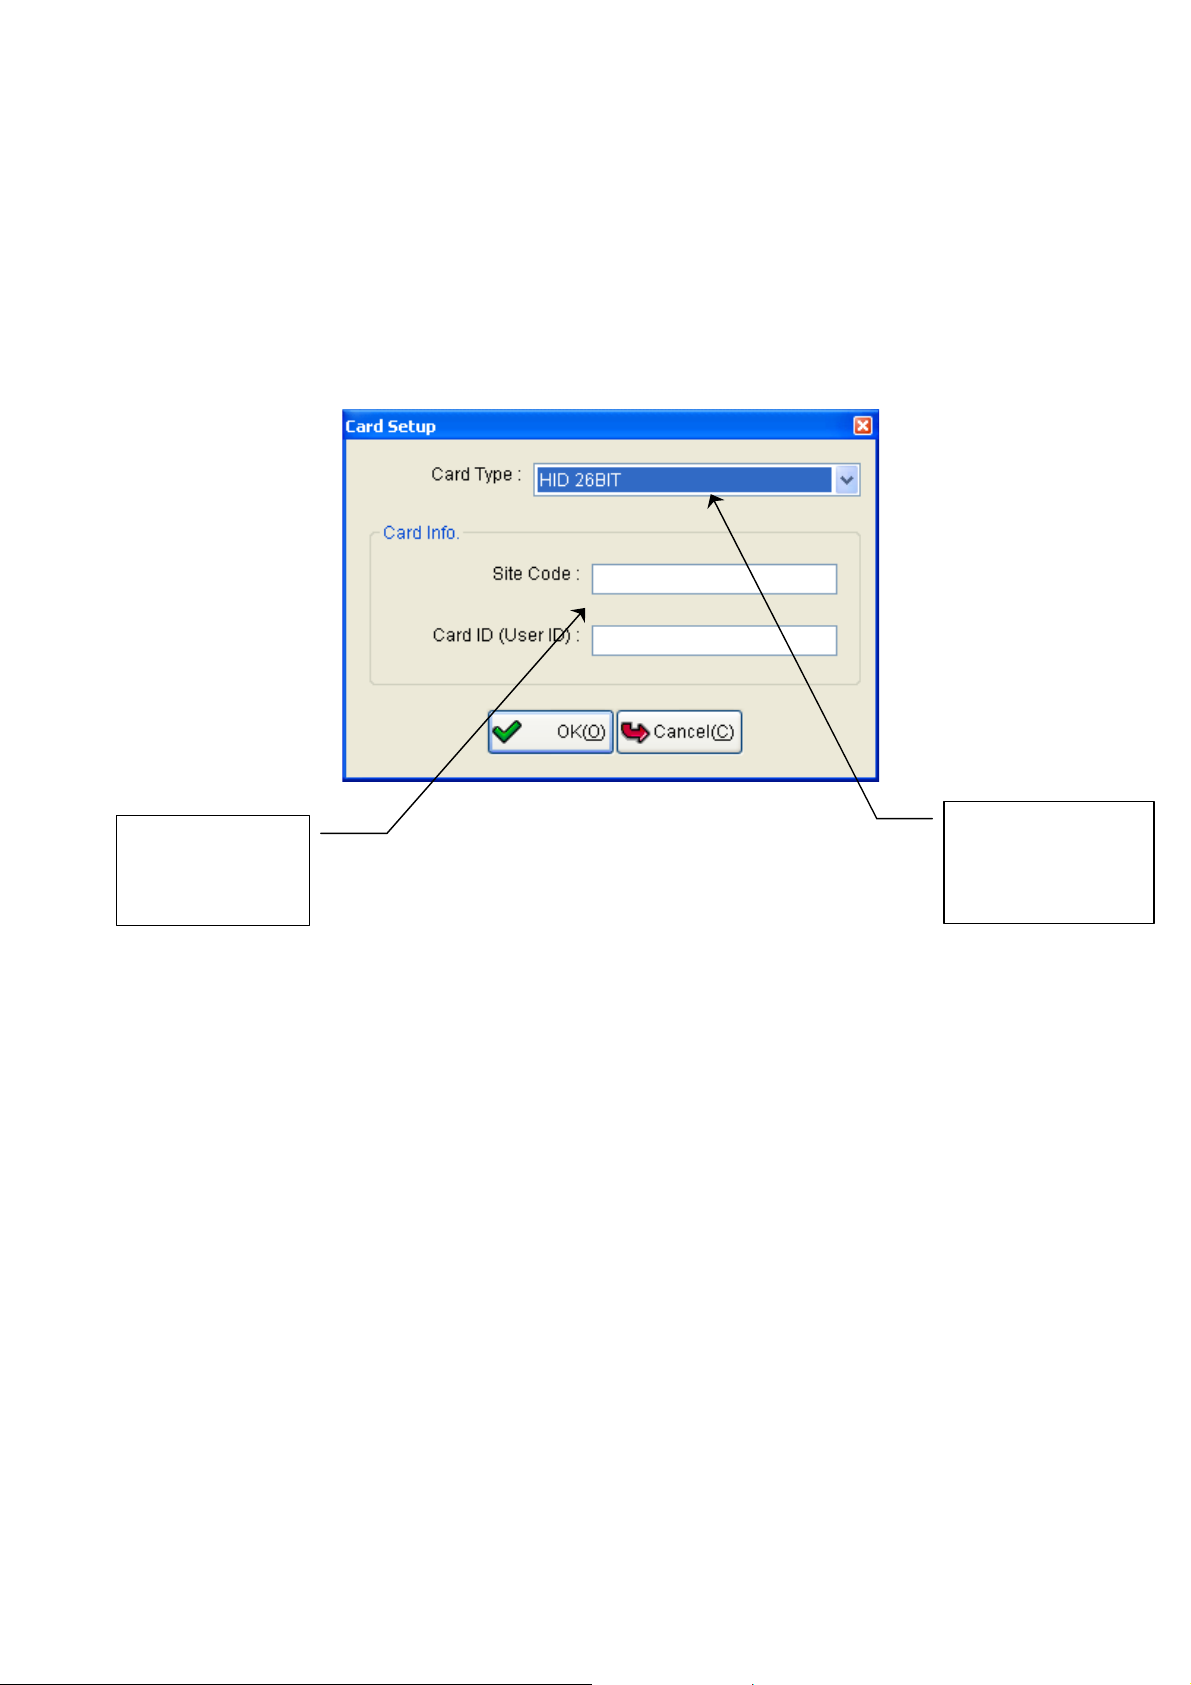
1.4.3.1 The final tab on this window is “Cards.” Click on this tab to assign a Prox card to the user.
Click on the “Add” Icon and the “Card Setup” window shown below will appear.
NOTE: This check box will
cause the fingerprint image
to be stored in the database.
We recommend that this be
checked
- 11 -
Copyrighted by Integrated Biometrics Inc., 2008
Highlight desired
finger and Right
Click, to Set as
Download or
disarm from
downloading
TRU 650 ACCESS CONTROL SYSTEM USERS GUIDE
1.4.3.2 Enter Card Type from drop down menu. Default card type is HID. See your System
Administrator.
1.4.3.3 Next, fill in the “Site Code” and “Card ID (User ID)” fields. The information for
inputting in these fields is provided by the Card Manufactur er .
1.4.3.4 Click “OK” to save and exit.
Site Code and
Card ID number
filled in here
1.5.1 Setting up Groups
Click on Menu Selection “Management” and select “User & Group.”
1.5.1.1 In the lower left section “List of Groups”, click on the “Add” Icon.
1.5.1.2 This will bring up the “Groups” wi ndow. Fill in a unique name.
1.5.1.3 Helpful hint - When naming Groups, it can be helpful to add to the end of the name the
word “Group.” For instance, instead of naming the Group “First Shift”, name it “First Shift
Group.” This helps in the screens where you visually check Groups, and Access Times, and Users.
1.5.2 Assigning Users to Groups
Click on Menu Selection “Management” and select “User & Group.” The screen shown below will
appear.
- 12 -
Copyrighted by Integrated Biometrics Inc., 2008
Enter Card Type
here from the Drop
Down menu
 Loading...