


iBasso Audio DX300 User Manual

iBasso Audio
Gain
USER GUIDE

Contents
Package Components
Main Features
Specifications
Names of Parts & Functions
Android Basic Features Introduction
WiFi Connection/Bluetooth Connection
Application (APP) Installation/App, to Uninstall/USB Connections
System Settings
Power Off/Reboot/System Switching
iBasso Mango Music Player Application
Playback Screen (home screen)
Music Screen
Settings Screen
Mango OS
System Switching
Mango OS User Interface
To Return to The Android System
MTP
MQA
2-4
5-6
7-8
9-13
14-25
15-16
17-20
21-25
26
27-59
27
28-38
39-58
59-62
59
60
61
62
63
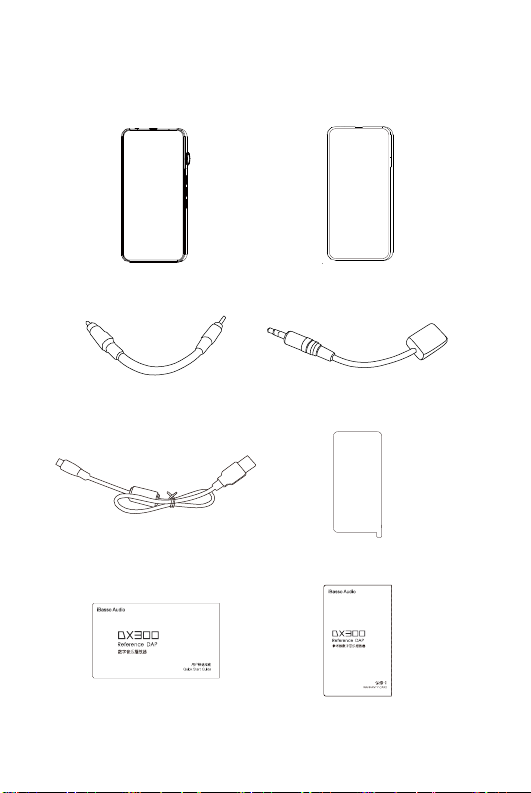
Package Components
Leather CaseDX300 Player
Coaxial Cable Balanced Burn-in Cable
USB-C cable Screen Protector
Quick Start Guide Warranty Card
2

Leather Case:
Use the leather case to protect the DX300 chassis from
scratches.
Coaxial Cable:
Connect the coaxial cable to an external DAC, to allow
the DX300 to work as a digital transport.
Balanced Burn-in Cable:
Plug the burn-in cable into the output socket and keep
playing music to burn-in the DX300. The burn-in process
helps the DX300 sound reach its full potential by forming
the capacitors and stabilizing the electronic components
used.
USB-C Cable:
Connect the USB-C cable to a computer for charging,
data transfer, and USB-DAC function.The USB-C cable
can also be used with a USB charger to charge the
battery.
Screen Protector:
Use the screen protector to protect the DX300 screen
from scratches.
Warranty Card:
The warranty will be requested at the time of warranty
repair. Please retain the warranty card.
Quick Start Guide:
This reviews the basic functions of the DX300.
3

Tips for burn-in
The use of the cable is very straightforward. The burn-in
cable is used to form the capacitors and to condition the rest
of the circuitry. The method for burn-in is to use normal
resolution music, as higher resolution causes more heat due
to the higher demand on the system. Also, use a normal
listening volume, as the higher volume will have a higher
power consumption therefore more heat will be generated.
While burning in the DX300, both the balanced and the single
ended components are being affected and burned in.
The burn-in time can be from 100 to 200 hours and the
burn-in doesn't have to be continual. You can power off the
player and continue the burn-in process after a few days. It
is also not mandatory to use the burn-in cable, we supply it
as a convenience for when you are not listening to the DX300
and you would like to get your dap conditioned as soon as
possible. You can also just listen to the player and enjoy the
music as your player goes through this process while playing
through IEMs or headphones.
4

Main Features
Quad Cirrus Logic CS43198 DAC Chips are incorporated,
-
with a four-channel balanced headphone amplification circuit.
-
Bit for Bit playback with support up to 32bit/384kHz.
-
Support of Native DSD up to 256x.
-
6.5″ IPS full screen (1080*2340), with In-Cell capacitive
touch panel.
-
Support of QC3.0 and PD2.0 quick charge.
-
2 Accusilicon ultra-low phase noise Femtosecond
oscillators.
-
USB DAC function that supports up to 32bit/384kHz and
DoP DSD128.
-
USB digital output that outputs up to PCM 32bit/384kHz,
Native DSD256, and DoP DSD128
-
14nm Octa-Core Qualcomm Snapdragon 660 SoC.
-
6GB LPDDR4X + 128GB ROM.
-
Mini coaxial output that supports up to 24bit/384kHz and DoP
DSD128.
-
Support of 5G WiFi with 2x2 MIMO antenna and Bluetooth 5.0.
-
Support SDXC and SDHC Micro SD cards.
-
Support USB3.1 Superspeed transfer.
5

-
3 settings for hardware gain control.
-
100 steps for volume control.
-
Patented replaceable AMP card design.
-
Audio Formats Supported: MQA, APE, FLAC, WAV, WMA, AAC,
ALAC, AIFF, OGG, MP3, DFF, DSF, and DXD.
-
Support for M3U playlists.
-
Patented dual battery power structure with dedicated power
management for each battery. 4000mAh 3.8V Li-Polymer
battery for the digital section and 2000mAh 3.8V Li-Polymer
battery for the AMP card section.
6

Specifications
4.4mm/2.5mm Balanced Phone Port:
Maximum output level:
Output Power:
Frequency Response:
Dynamic Range:
THD+N:
Crosstalk:
Output impedance:
3.5mm Single Ended Phone Out:
7.1Vrms
1240mW@32ohm, 168mW@300ohm
10Hz~40kHz +/-0.3dB
S/N:
125dB
125dB
-113dB (no Load, 3Vrms)
-109dB (300R Load)
-101dB (32R Load)
-120dB
0.39ohm
Maximum output level:
Output Power:
Frequency Response:
S/N:
Dynamic Range:
THD+N:
Crosstalk:
Output impedance:
3.5Vrms
350mW@32ohm, 34mW@300ohm
10Hz~40kHz +/-0.3dB
123dB
123dB
-111dB (no Load, 2Vrms),
-107dB (300R Load)
-95dB (32R Load)
-103dB
0.43ohm
7

4.4mm/2.5mm Balanced
Line Out:
Maximum output level:
Frequency Response:
S/N:
Dynamic Range:
THD+N:
Crosstalk:
3.5mm Single Ended Line Out:
Maximum output level:
Frequency Response:
S/N:
Dynamic Range:
THD+N:
Crosstalk:
15hours
Average Play Time:
((The play time varies with different
resolutions, volume used and headphone/IEM
loads.)
7.1Vrms
10Hz~40kHz +/-0.3dB
125dB
125dB
-111dB (no Load, 3Vrms)
-119dB
3.5Vrms
10Hz~40kHz +/-0.3dB
123dB
123dB
-111dB (no Load, 2Vrms),
-103dB
8

Names of Parts & Functions
Micro SD
Coaxial Output Port
USB-C Port
4.4mm Balanced
2.5mm Balanced
Amp Card
3.5mm Single Ended
9

Mini Coaxial Output Port:
Use the furnished coaxial cable to play music stored in the
DX300 on an external device with a coaxial input port. Mini
coaxial output has the highest output priority which would
close the phone out or line out when coaxial cable plugged
in. The output of this port is up to 24bit/384kHz or DoP
DSD128.
USB-C Port
Connect the DX300 to a computer or a USB charger to charge
the DX300.
Connect the DX300 to a computer to allow the DX300 to work
as a card reader or an external storage.
Connect the DX300 to an OTG storage device to play music
files stored in this OTG storage device.
Connect the DX300 to a Windows PC or a Mac computer to
work as a USB DAC.
3.5mm Single Ended Output
Plug in the 3.5mm single-ended monitor and output sound
through the phone port.
When LO is selected, this phone out port works as a 3.5mm
single ended line out port.
4.4mm Balanced Output
Plug in the 4.4mm balanced earphone and output sound through
the 4.4mm balanced phone port.
When LO is selected, this port works as a 4.4mm balanced line
out port.
2.5mm Balanced Output
Plug in the 2.5mm balanced earphone and output sound through
the 2.5mm balanced phone port.
When LO is selected, this port works as a 2.5mm balanced line
out port.
10

Coaxial Output Port
USB-C
6.5inch LCD
Power/Volume
Previous/Rewind
Play/Pause
Next/Fast Forward
11

Power:
Short Press - Power the LCD screen on and off.
Long Press - To display the pop up window with three
options that are Power off, Reboot, and To Mango.
Volume:
Rotate the wheel clockwise to increase the volume.
Rotate the wheel counter clockwise to decrease the volume.
Previous/Rewind:
Short Press - Replay previous track.
Long Press - Rewind.
Play/Pause:
Short Press - Play/Pause.
On the Mango OS, long press the play button
to lock the screen.
Next/Fast Forward:
Short Press - Play the next track.
Long Press - Fast forward.
12

Basic Operation:
Power on/off:
1. Press and hold the power button to power on.
2. After the DX300 is powered on, a long press of the Power
button to display the pop up window, press Power Off button
to power off the DX300.
Power on/off the screen:
Single press the power button to power on/off the screen after
the DX300 has been powered on.
Reset:
When the DX300 stops unexpectedly during operation and the
keys are no longer responsive, press and hold the power button
for 10 seconds to reset the DX300.
Charging:
DX300 supports two quick charge protocols, QC3.0 and PD2.0.
Charging can be done with a standard 5V USB charger or with
quick charger that is compliant the stated 2 protocols. A full
charge takes about 2.5 hours with the afore mentioned quick
charge types.
Connecting to a computer to work as a USB DAC:
Connecting to a computer to work as a USB DAC:
The DX300 can work as a USB DAC for Windows PC, Mac
computer, and Linux computer. It is driver free on Windows PC,
Mac computer, and Linux computer. For Windows PC, the DX300
supports WASAPI protocol.
The DX300 supports up to 32bit/384kHz PCM, and DSD DoP up
to 128x when be used as a USB-DAC.
13
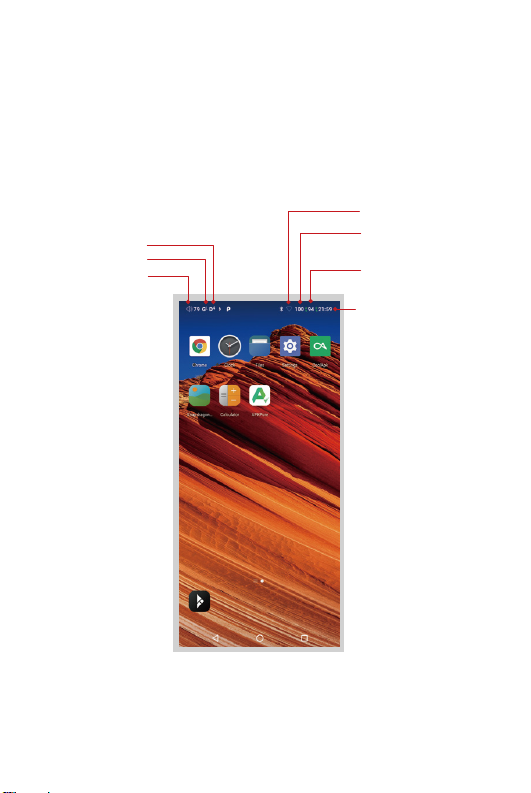
Android Basic Features
Introduction
WiFi
Digital Filter
Gain
Volume
Battery indicator
for analog section
Battery indicator for
digital section
Time
14

WiFi Connection:
① On the Android desktop, from the top, swipe down
the screen to display the notification bar.
② Press the Wireless local area network(WLAN) to turn
on the WiFi function. The first time you enter the
WLAN, you need to choose the hot spot you will be
using and enter the password. From this point
forward your password for this hotspot will be
remembered and you simply press the WLAN icon
to connect to the WiFi internet.
15

Bluetooth Connection:
① On the Android desktop, swipe down from the top
of the screen to display the notification bar.
② Press the Bluetooth icon to turn on the Bluetooth
function. The DX300 will automatically search for
the nearby Bluetooth device. At the same time, the
DX300 will be visible to the nearby devices.
Choose the device that you would like to pair with.
After the device has been paired, you can use the
DX300 in the Bluetooth mode.
16
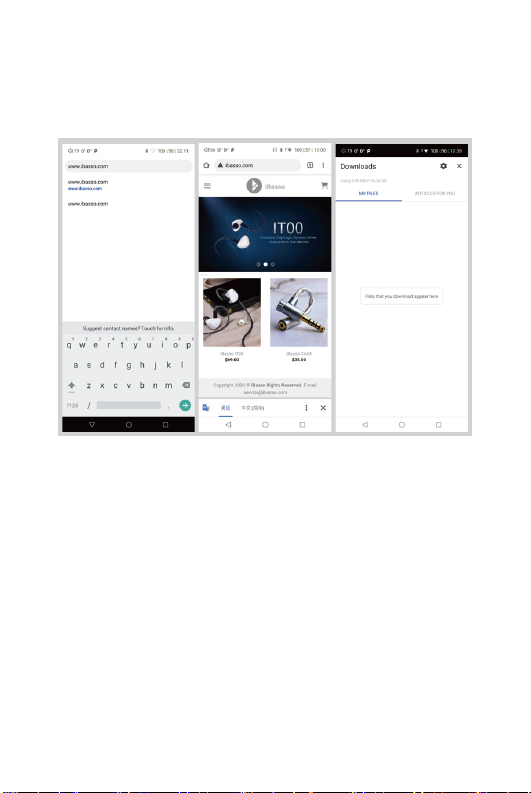
APP Installation:
Method 1:
① APKPure and CoolAPK are pre-installed on the
DX300. They are similar to Play Store.
② Launch one of them.
③ Search for the APP that you would like to install.
④ Download the APP and install it.
Method 2:
① Press the internet browser on the desktop.
② Enter the website address of the APP.
③ Find the download icon on the website and start
the download.
④ Return to the desktop and open download
manager.
⑤ Press the on downloaded app and install it.
17

App, to Uninstall:
① Press the Settings icon on the desktop and scroll
down and press APPs.
② Press the APP that you would like to uninstall.
③ Press uninstall to delete the APP.
18
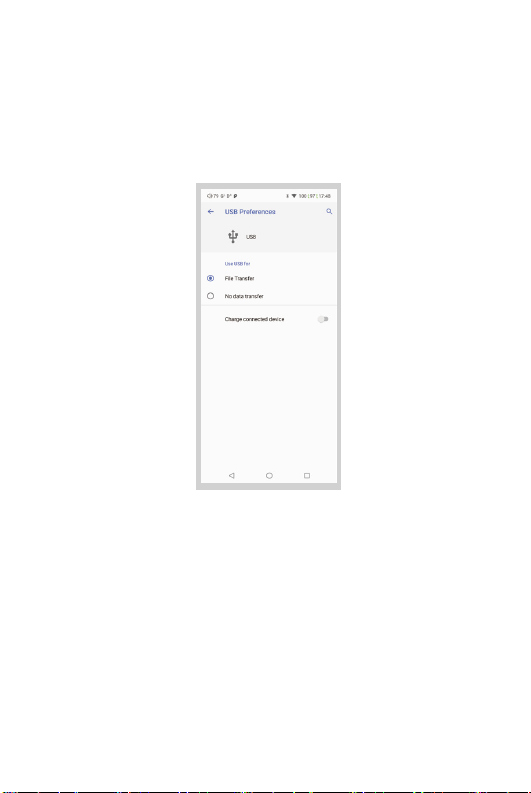
USB Connections:
Connect the DX300 to the computer using the furnished
USB-C cable. The DX300 will show on the computer as
an external storage. Users can transfer files by copying
and pasting.
*If you are using a Mac computer, please make sure the
MTP software Android File Transfer is installed.
19