

Page 1
GUITAR & BASS AUTO TUNER
GU1
OWNER’S MANUAL
Caution
1
To avoid short circuit, electric shock, or
malfunction:
Do not disassemble or attempt to repair this unit.
Do not place this unit in locations of high
temperature or high humidity (such as nearby
heating equipment, in direct sunlight, in a
bathroom, or on a wet fl oor).
Do not place this unit where it will be subjected
to heavy vibration.
Do not place this unit in dusty or dirty locations.
Do not operate this unit with wet hands.
2
To avoid damage:
Do not apply excessive force to the switches or
other controls.
Do not drop this unit.
3
Cleaning:
Do not use thinner, alcohol, or other solvents to
clean this unit.
4
To prevent battery failure:
Remove the battery if you won't be using this unit
for an extended time.
Features & Functions
1
POWER button
Turns the power on/off.
2
DISPLAY button
Switches the tuning display mode. Each time you
press the DISPLAY button, the mode will cycle
between the following two settings:
NEEDLE – STROBE
* In the STROBE mode, tuning deviation is
indicated by the speed of the strobe indicator.
The indicator fl ashes in a counter-clockwise
direction if the pitch being tested is fl at (lower
than the displayed note), and in a clockwise
direction if the pitch being tested is sharp
(higher). The fl ashing stops when the pitch is
correctly set.
3
MODE button
Switches the tuning mode. Each time you press
the MODE button, the tuning mode will cycle
between the following two settings: Guitar auto
tuner - Bass auto tuner
4
FLAT button
Adjusts the fl atted (“dropped”) tuning relative
to the regular tuning. You can tune to dropped
tuning ranging from one to four semitones below
the regular tuning. Each time you press the FLAT
button, the note will be fl attened by one half step
from standard tuning pitch.
5
Liquid Crystal Display (LCD)
When you turn the power on, the LCD will show
the following settings:
DISPLAY = NEEDLE
MODE = Guitar/Bass auto tuner
A GUITAR, BASS: Select GUITAR for turning a
guitar, and select BASS for bass.
B The note names are displayed for guitar and
bass respectively as follows. Numbers indicate
the string number, and letters indicate the
name of the chromatic note in English.
GUITAR = 7B, 6E, 5A, 4D, 3G, 2B, 1E
BASS = 5B, 4E, 3A, 2D, 1G, HC
NOTE: The closest chromatic note name to the
pitch being played will be displayed.
C
: Indicates the dropped tuning setting.
6
INPUT JACK
The input jack for electrical instruments. If you
are tuning an electric guitar, acoustic-electric
guitar or electric bass, connect the output of
your instrument to the INPUT jack of the tuner.
However in this case, you will not be able to use
the internal mic to tune an acoustic instrument.
7
MICROPHONE
Use the internal mic when you want to tune an
instrument that does not have a pickup, such
as an acoustic guitar. However, the internal mic
cannot be used if a plug is inserted into the INPUT
jack.
8 Tuning guide LEDs
The LED in the center will light up when the
pitch being tested matches the displayed note.
The LED at the left will light up if the pitch being
tested is fl at, and the LED at the right will light up
if the pitch being tested is sharp.
AUTOMATISCHES STIMMGERÄT FÜR GITARRE & BASS
GU1
BEDIENUNGSANLEITUNG
Vorsicht
1
Um K urz sch lüs se, elek tri sch e Schläge oder
Funktionsstörungen zu vermeiden:
Nehmen Sie das Gerät nicht ausei nander und
versuchen Sie nicht, es zu reparieren.
Platzieren Sie dieses Gerät nicht an extrem
heißen oder feuchten Orten (zum Beispiel in der
Nähe von Heizungen, in direktem Sonnenlicht, im
Bad oder auf einem feuchten Fußboden).
Setzen Sie dieses Gerät keinen starken
Erschütterungen aus!
Platzieren Sie dieses Gerät nicht an staubigen
oder schmutzigen Orten!
Bedienen Sie dieses Gerät nicht mit nassen Händen!
2
Um Beschädigungen zu vermeiden:
Üb en Si e keine übe rmä ßigen Dru ck auf die
Schalter oder andere Bedienungselemente aus.
Lassen Sie dieses Gerät nicht fallen!
3
Reinigung:
Verwenden Sie zum Reinigen keine Lösungsmittel,
Alkohol oder andere Reinigungsmittel.
4
Um Schäden an der Batterie zu vermeiden:
Nehmen Sie die Batterie heraus, wenn Sie das
Gerät längere Zeit nicht benutzen.
Merkmale & Funktionen
1
POWER-Taste
Schaltet das Gerät ein und aus.
2
DISPLAY-Taste
Schaltet den Stimmanzeigemodus um. Mit jedem
Druck auf die DISPLAY-Taste schaltet der Modus
zwischen den folgenden beiden Einstellungen
um:
NEEDLE - STROBE
* Im STROBE-Modus wird die Stimmabweichung
durch die Geschwindigkeit der Strobeanzeige
dargestellt. Die Anzeige blinkt gegen den
Uhrzeigersinn, wenn der getestete Ton
niedriger als die angeze igte Note ist, und im
Uhrzeigersinn, wenn der getestete Ton höher ist.
Das Blinken hört auf, wenn die Tonhöhe korrekt
ist.
3
MODE-Taste
Schaltet den Stimmmodus um. Mit jedem Druck auf
die MODE-Taste schaltet der Stimmmodus zwischen
den folgenden beiden Instrumenten um: Gitarre - Bass
4
FLAT-Taste
Zur Einstellung der verminderten (“dropped”)
Stimmung relativ zur normalen Stimmung. Sie
kön nen ein e Alt era tion von einem bis zu vie r
Halbtönen unter der angezeigten Note einstellen.
Mit jedem Druck auf die FLAT-Taste wird die Note
um einen Halbton unter der Standard-Tonhöhe
vermindert.
5
Flüssigkristallanzeige (LCD)
Wenn Sie das Gerät einschalten, erscheinen im
LCD die folgenden Einstellungen:
DISPLAY = NEEDLE
MODE = automatisches Stimmgerät Gitarre/Bass
A
GUITAR, BASS: Wählen Sie GUITAR zum
Stimmen einer Gitarre oder BASS für einen Bass.
B
Die Notennamen werden für eine Gitarre bzw. einen
Bass wie folgt angezeigt. Ziffern kennzeichnen die
Saitennummer und Buchstaben kennzeichnen den
Namen der chromatischen Note auf Englisch.
GUITAR = 7B (deutsches H), 6E, 5A, 4D, 3G, 2B
(deutsches H), 1E
BASS = 5B (deutsches H), 4E, 3A, 2D, 1G, HC
HINWEIS: Es wird der dem erzeugten Ton am
nächsten liegende chromatische
Notenname angezeigt.
C
: Zeigt die Einstellung der Tiefalteration an.
6
INPUT-Buchse:
Die Eingangsbuchse für elektrische Instrumente.
Wenn Sie eine E-Gitarre, eine akustischelektrische Gitarre oder einen E-Bass stimmen
möchten, verbinden Sie den Ausgang Ihres
Instruments mit der Eingangsbuchse INPUT des
Stimmgerätes. In diesem Fall kann das interne
Mikrofon jedoch nicht mehr zum Stimmen eines
akustischen Instrumentes verwendet werden.
7
MICROPHONE:
Benutzen Sie das interne Mikrofon, wenn Sie
ein akustisches Instrument ohne Tonabnehmer
stimmen möchten, z. B. eine akustische Gitarre.
Das eingebaute Mikro kann jedoch nicht benutzt
werden, wenn ein Stecker in der Eingangsbuchse
INPUT eingesteckt ist.
8
Stimm-LEDs
Die LED in der Mitte leuchtet auf, wenn der getestete
Ton mit der angezeigten Note übereinstimmt. Die
linke LED leuchtet auf, wenn der getestete Ton zu
niedrig ist, und die rechte LED leuchtet auf, wenn
der getestete Ton zu hoch ist.
Stimmen
Für präzises Stimmen beachten:
• Wenn Sie mit dem Stimmgerät ein akustisches
Instrument stimmen, vermeiden Sie die Nähe
von anderen S chal lquellen wie z. B. Ra dios
oder Fernsehgeräten, da der Schall aus
anderen Geräten dazu führen kann, dass das
interne Mikrofon den Ton des Instrumentes
nicht mehr richtig erfasst.
• Stell en Sie beim S timmen einer elektris chen
Gitarre/Bass die maximale Lautstärke ein und
verwenden Sie die hinteren Tonabnehmer
(Steg), um die beste Stimmung zu erreichen.
• Um die jeweils nächste Saite präziser stimmen
zu können, sollt en Sie z uvor nachklingende
Saiten mit der Hand abdämpfen.
Stimmen im NEEDLE-Modus:
1. Elektrische Instrumente: Verb ind en Sie
den Ausgang Ihres Instruments mit der
Eingangsbuchse INPUT des Stimmgerätes.
Akustische Instrumente: L ass en Si e die
Eingangsbuchse INPUT frei. Benutzen Sie das
eingebaute Mikrofon.
2. Z um St im me n e in es el ek trisc he n Bas se s
drücken Sie nach dem Einschalten des Gerätes
einmal die MODE-Taste, damit oben rechts im
Display BASS angezeigt wird.
3. U m d as Ins tru men t m it Tie fal ter ati on zu
stimmen, ändern Sie die Einstellung auf den
gewünschten Wert durch Drücken der FLATTaste. Mit jedem Druck auf die Taste wird die
Note um einen Halbton vermindert.
4. Wenn die Tonhöhe der zu stimmenden Saite
mehr als 50 Cents von der korrekten Tonhöhe
abweicht, stimmen Sie die Saite, bis der
richtige Notenname in der Anzeige erscheint
und eine der Stimm-LEDs aufl euchtet. Wenn
die Tonhöhe der Saite innerhalb von 50 Cents
der korrekten Tonhöhe liegt, stimmen Sie die
Saite von einer niedrigeren Tonhöhe aus, bis
die Nadel an der Pfeilmarkierung in der Mitte
stehenbleibt.
5. Bleibt die Stimmnadel an der Pfeilmarkierung
in der Mitte stehen, ändert sich die Farbe des
LCD-Displays zu orange und die Stimm-LED
in der Mitte leuchtet auf. Der Stimmvorgang ist
jetzt abgeschlossen.
Stimmen im STROBE-Modus:
1. Elektrische Instrumente: Verb ind en Sie
den Ausgang Ihres Instruments mit der
Eingangsbuchse INPUT des Stimmgerätes.
Akustische Instrumente: L ass en Si e die
Eingangsbuchse INPUT frei.
2. Z um St im me n e in es el ek trisc he n Bas se s
drücken Sie nach dem Einschalten des Gerätes
einmal die MODE-Taste, damit oben rechts im
Display BASS angezeigt wird.
3. Verwenden Sie das interne Mikrofon, um das
Instrument mit Tiefalteration zu stimmen,
und ändern Sie die Einstellung auf den
gewünschten Wert durch Drücken der FLATTaste. Mit jedem Druck auf die Taste wird die
Note um einen Halbton vermindert.
4. Wenn die Tonhöhe der zu stimmenden Saite
mehr als 50 Cents von der korrekten Tonhöhe
abweicht, stimmen Sie die Saite, bis der
richtige Notenname in der Anzeige erscheint
und eine der Stimm-LEDs aufl euchtet. Wenn
di e Ton höh e de r S aite in nerh alb von 50
Cents der korrekten Tonhöhe liegt, stimmen
Sie die Saite so, dass die Strobeanzeige
ge gen den Uh rzei ger sin n bl ink t u nd di e
Blinkgeschwindigkeit null wird. Die Anzeige
blinkt gegen den Uhrzeigersinn, wenn das
Instrument zu tief (niedriger als die korrekte
Tonhöhe ) un d im Uhrzei gers inn , we nn d as
Instrument zu hoch gestimmt ist.
5. Bei einer Blinkgeschwindigkeit von null ändert
sich die Farbe des LCD-Di splays zu orange
und die Stimm-LED in der Mitte leuchtet auf.
Der Stimmvorgang ist jetzt abgeschlossen.
Einsetzen/Wechseln der Batterien
Technische Daten
Modus: Autom . Git arr e sti mme n/Aut om. Bas s
stimmen
Anzeigemodus: NEEDLE-Modus/STROBE-Modus
Stimmbereich: A0 (27,5 Hz) - C8 (4.186 Hz)
Stimmnotennamen: 7B (deutsches H), 6E, 5A,
4D, 3G, 2B (deutsches H), 1E
(E-Gitarre, akustische Gitarre)
5B (deutsches H), 4E, 3A, 2D,
1G, HC (E-Bass, akustischer
Bass)
Tiefalteration: 1 - 4 Halbtöne
Genauigkeit: ± 1 Cent
Anzeige: LCD, LEDs
Eingang: Internes Mikro, INPUT-Buchse
Stromversorgung: Zwei AAA-Batterien (3V)
Abmessungen: 94 (B) x 53 (T) x 15 (H) mm
Gewicht: 80 g (einschl. Batterien)
* Ausführung und Technische Daten können sich
aus Gründen der Fortentwicklung des Produkts
ohne Ankündigung ändern.
1
Drücken Sie auf den Clip
an der linken Geräteseite
und öffnen Sie die Rückwand.
2
Legen Sie zwei AAABatterien ein und
achten Sie dabei auf
die richtige Polarität.
Setzen Sie die MinusSeite zur Feder.
3
Setzen Sie die Rückwand in die Aussparungen auf der Batterieseite ein und drücken
Sie den Deckel gegen
das Gerät bis der Clip
hörbar einrastet.
ACCORDEUR AUTOMATIQUE POUR GUITARE ET BASSE
GU1
MANUEL DE L’UTILISATEUR
Attention
1
Pour éviter des courts-circuits, des
électrocutions ou des disfonctionnements:
N’essayez jamais de démonter ou réparer cet appareil.
Evitez de placer cet appareil dans des endroits
soumis à une chaleur ou une humidité excessive
(p. ex. près d’un radiateur, en plein soleil, dans
une salle de bains ou sur un sol humide).
Evitez de soumettre cet appareil à de fortes vibrations.
Evitez de placer cet appareil dans des endroits
poussiéreux ou sales.
N’utilisez pas cet appareil avec des mains humides.
2
Pour éviter des dommages:
N’appliquez pas trop de pression sur les
commutateurs et autres commandes.
Ne laissez pas tomber cet appareil.
3
Nettoyage:
N’utilisez pas de détergent, de benzène ou
d’autres solvants pour nettoyer cet appareil.
4
Pour économiser la pile:
Si vous n’utilisez pas cet appareil pendant une
période prolongée, retirez la pile.
Caractéristiques et fonctions
1
Bouton POWER
Permet de mettre l’appareil sous/hors tension.
2
Bouton DISPLAY
Per met de séle cti onner l e mo de d’affichag e.
Cha que fois que vous appuyez sur le b out on
DISPLAY, le mode bascule entre les deux
réglages suivants:
AIGUILLE – STROBE
* En m ode STROB E, la vitesse de l’ indicateur
stro boscop ique indi que dans quell e mes ure
la note jouée est tro p ha ute ou trop bass e.
L’indicateur clignote en se d éplaçant dans le
sens inverse des aiguilles d’une montre lorsque
la note jouée est trop grave (plus basse que la
note affichée), et inversement lorsque la note
jouée est trop aiguë (plus haute). L’indicateur
arrête de clignoter lorsque la hauteur de la note
est correctement réglée.
3
Bouton MODE
Perm et de sé lectionner le mode d’accorda ge.
Cha que fois que vous appuyez sur le b out on
MODE, le mode d’accordage bascule entre les
deux réglages suivants : accordeur automatique
pour guitare - accordeur automatique pour basse
4
Bouton FLAT
Permet de sélectionner un accordage plus grave
(« en Drop ») que l’accordage traditionnel. Vous
pouvez baisser la tonalité de un à quatre demitons par rapport à l’accordage traditionnel.
Cha que fois que vous appuyez sur le b out on
FLAT, la tonalité d’accordage baisse d’un demiton.
5
Affi chage à cristaux liquides (LCD)
Lorsque vous mettez l’appareil sous tension,
l’écran LCD affi che les réglages suivants:
DISPLAY = AIGUILLE
MODE = accordeur automatique pour guitare/basse
A
GUITAR, BASS : sélectionnez GUITAR pour accorder
une guitare ou BASS pour accorder une basse.
B
Les noms des notes s’affi chent respectivement
comme suit pour les guitares et les basses. Les
chiffres indiquent le numéro de la corde et les
lettres le nom de la note chromatique en anglais.
GUITARE = 7B, 6E, 5A, 4D, 3G, 2B, 1E
BASSE = 5B, 4E, 3A, 2D, 1G, HC
REMARQUE : l’écran affi che le nom de la note
chromatique la plus proche de la
note jouée.
C
:
Indique que le réglage de l’accordage est trop bas.
6
Prise INPUT :
Prise d’entrée pour les instruments électriques. Si
vous accordez une guitare électrique, une guitare
électro-acoustique ou une basse électrique,
co nnectez la sor ti e de votre in st ru ment à la
prise INPUT de l’accordeur. Dans ce cas, vous
ne pouvez pas utiliser le microphone interne
permettant d’accorder un instrument acoustique.
7
MICROPHONE:
Utilisez le microphone interne lorsque vous
souhaitez accorder un instrument sans micro,
comme une guitare acoustique. Vous ne pouvez
toutefois pas utiliser le microphone interne si un
instrument est raccordé à la prise INPUT.
8
Témoins :
Le témoin cent ral s’all ume lorsq ue la ha uteur
de la note jouée correspond à celle de la note
affi chée. Le témoin de gauche s’allume lorsque
la note jouée est trop basse, tandis que le témoin
de droite s’allume si la notre jouée est trop haute.
Procédure d'accordage
Pour accorder votre instrument avec précision:
•
Evitez d’utiliser cet accordeur à proximité d’une
radio ou d’un téléviseur lorsque vous accordez un
instrument acoustique, et ce car les sons émis par
d’autres appareils peuvent empêcher le microphone
de capter avec précision le son de l’instrument.
•
Pour accorder une guitare/basse électrique de
manière optimale, montez le volume au maximum
et utilisez le micro chevalet de l’instrument.
• Pour un accordage précis, bloquez les cordes
avec votre main au fur et à mesure que vous
les accordez.
Accordage en mode AIGUILLE:
1.
Instruments électriques: connectez la sortie de
votre instrument à la prise INPUT de l’accordeur.
Instruments acoustiques: n’insérez pas de câble
dans la prise INPUT. Utilisez le microphone interne.
2.
Pour accorder une basse électrique, appuyez
une fois sur le bouton Mode après avoir mis
l’accordeur sous tension pour affi cher l’indication
BASS dans le coin supérieur droit de l’écran.
3.
Pour baisser la tonalité de l’instrument,
appuyez sur le bouton FLAT pour sélectionner
l’accordage bémol souhaité. Chaque fois que
vous appuyez sur ce bouton, la tonalité est
abaissée d’un demi-ton.
4.
Si la tonalité de la corde diffère de plus de 50
cents par rapport à la tonalité correcte, accordez
la corde jusqu’à ce que le nom de la note correcte
s’affi che sur l’écran LCD et que l’un des témoins
s’allume. Si la tonalité de la corde diffère de moins
de 50 cents par rapport à la tonalité correcte,
accordez la corde jusqu’à ce que l’aiguille s’arrête
au niveau de la fl èche au centre de l’écran.
5.
Lorsque l’aiguille s’arrête au niveau de la fl èche
centrale, l’écran LCD devient orange et le témoin
central s’allume. L’accordage est alors terminé.
Accordage en mode STROBE:
1. Instruments électriques: connectez la sortie de
votre instrument à la prise de l’accordeur.
Instruments acoustiques: n’insérez pas de câble
dans la prise INPUT. Utilisez le microphone interne.
2.
Pour accorder une basse électrique, appuyez une
fois sur le bouton Mode après avoir mis l’accordeur
sous tension pour affi cher l’indication BASS dans le
coin supérieur droit de l’écran.
3.
Pour baisser la tonalité de l’instrument, appuyez sur
le bouton FLAT pour sélectionner l’accordage bémol
souhaité. Chaque fois que vous appuyez sur ce
bouton, la tonalité est abaissée d’un demi-ton.
4.
Si la tonalité de la corde diffère de plus de 50 cents
par rapport à la tonalité correcte, accordez la corde
jusqu’à ce que le nom de la note correcte s’affi che
sur l’écran LCD et que l’un des témoins s’allume. Si
la tonalité de la corde diffère de moins de 50 cents
par rapport à la tonalité correcte, accordez la corde
jusqu’à ce que l’indicateur stroboscopique clignote
en se déplaçant dans le sens inverse des aiguilles
d’une montre et que la vitesse de clignotement soit
nulle. L’indicateur clignote en se déplaçant dans
le sens inverse des aiguilles d’une montre lorsque
la tonalité de votre instrument est trop grave (plus
basse que la tonalité correcte) et inversement
lorsque la tonalité est trop aiguë (plus haute).
5. Lorsque la vitesse de clignotement est nulle,
l’écran LCD devient orange et le témoin central
s’allume. L’accordage est alors terminé.
Installation/remplacement des piles
Fiche technique
Mode: accordage automatique guitare/basse
Mode d’affi chage: mode AIGUILLE/STROBE
Plage d’accordage: A0 (27,5 Hz) - C8 (4 186 Hz)
Notes d’accordage: 6E, 5A, 4D, 3G, 2B, 1E, 7B (guitare
électrique, guitare acoustique)
5B, 4E, 3A, 2D, 1G, HC (basse
électrique, basse acoustique)
Accordage bémol: 1 à 4 demi-tons
Précision: ± 1 cent
Affi chage: LCD, témoins
Entrée: microphone interne, prise INPUT
Alimentation: 2 piles AAA (3V)
Dimensions: 94 (L) x 53 (P) x 15 (H) mm
Poids: 80 g (piles comprises)
* Les caractéristiques et la conception peuvent être
modifi és sans avis préalable, pour des raisons
d’amélioration du produit.
1
Maintenez enfoncé
le clip situé sur la
gauche de l’appareil
et ouvrez le couvercle
arrière.
2
Insérez deux piles AAA
en veillant à respecter la
polarité. Orientez le pôle
négatif vers le ressort.
3
Insérez la charnière
du couvercle arrière
dans l’encoche
située à côté des
piles et appuyez
jusqu’à ce que le clip
se bloque en place.
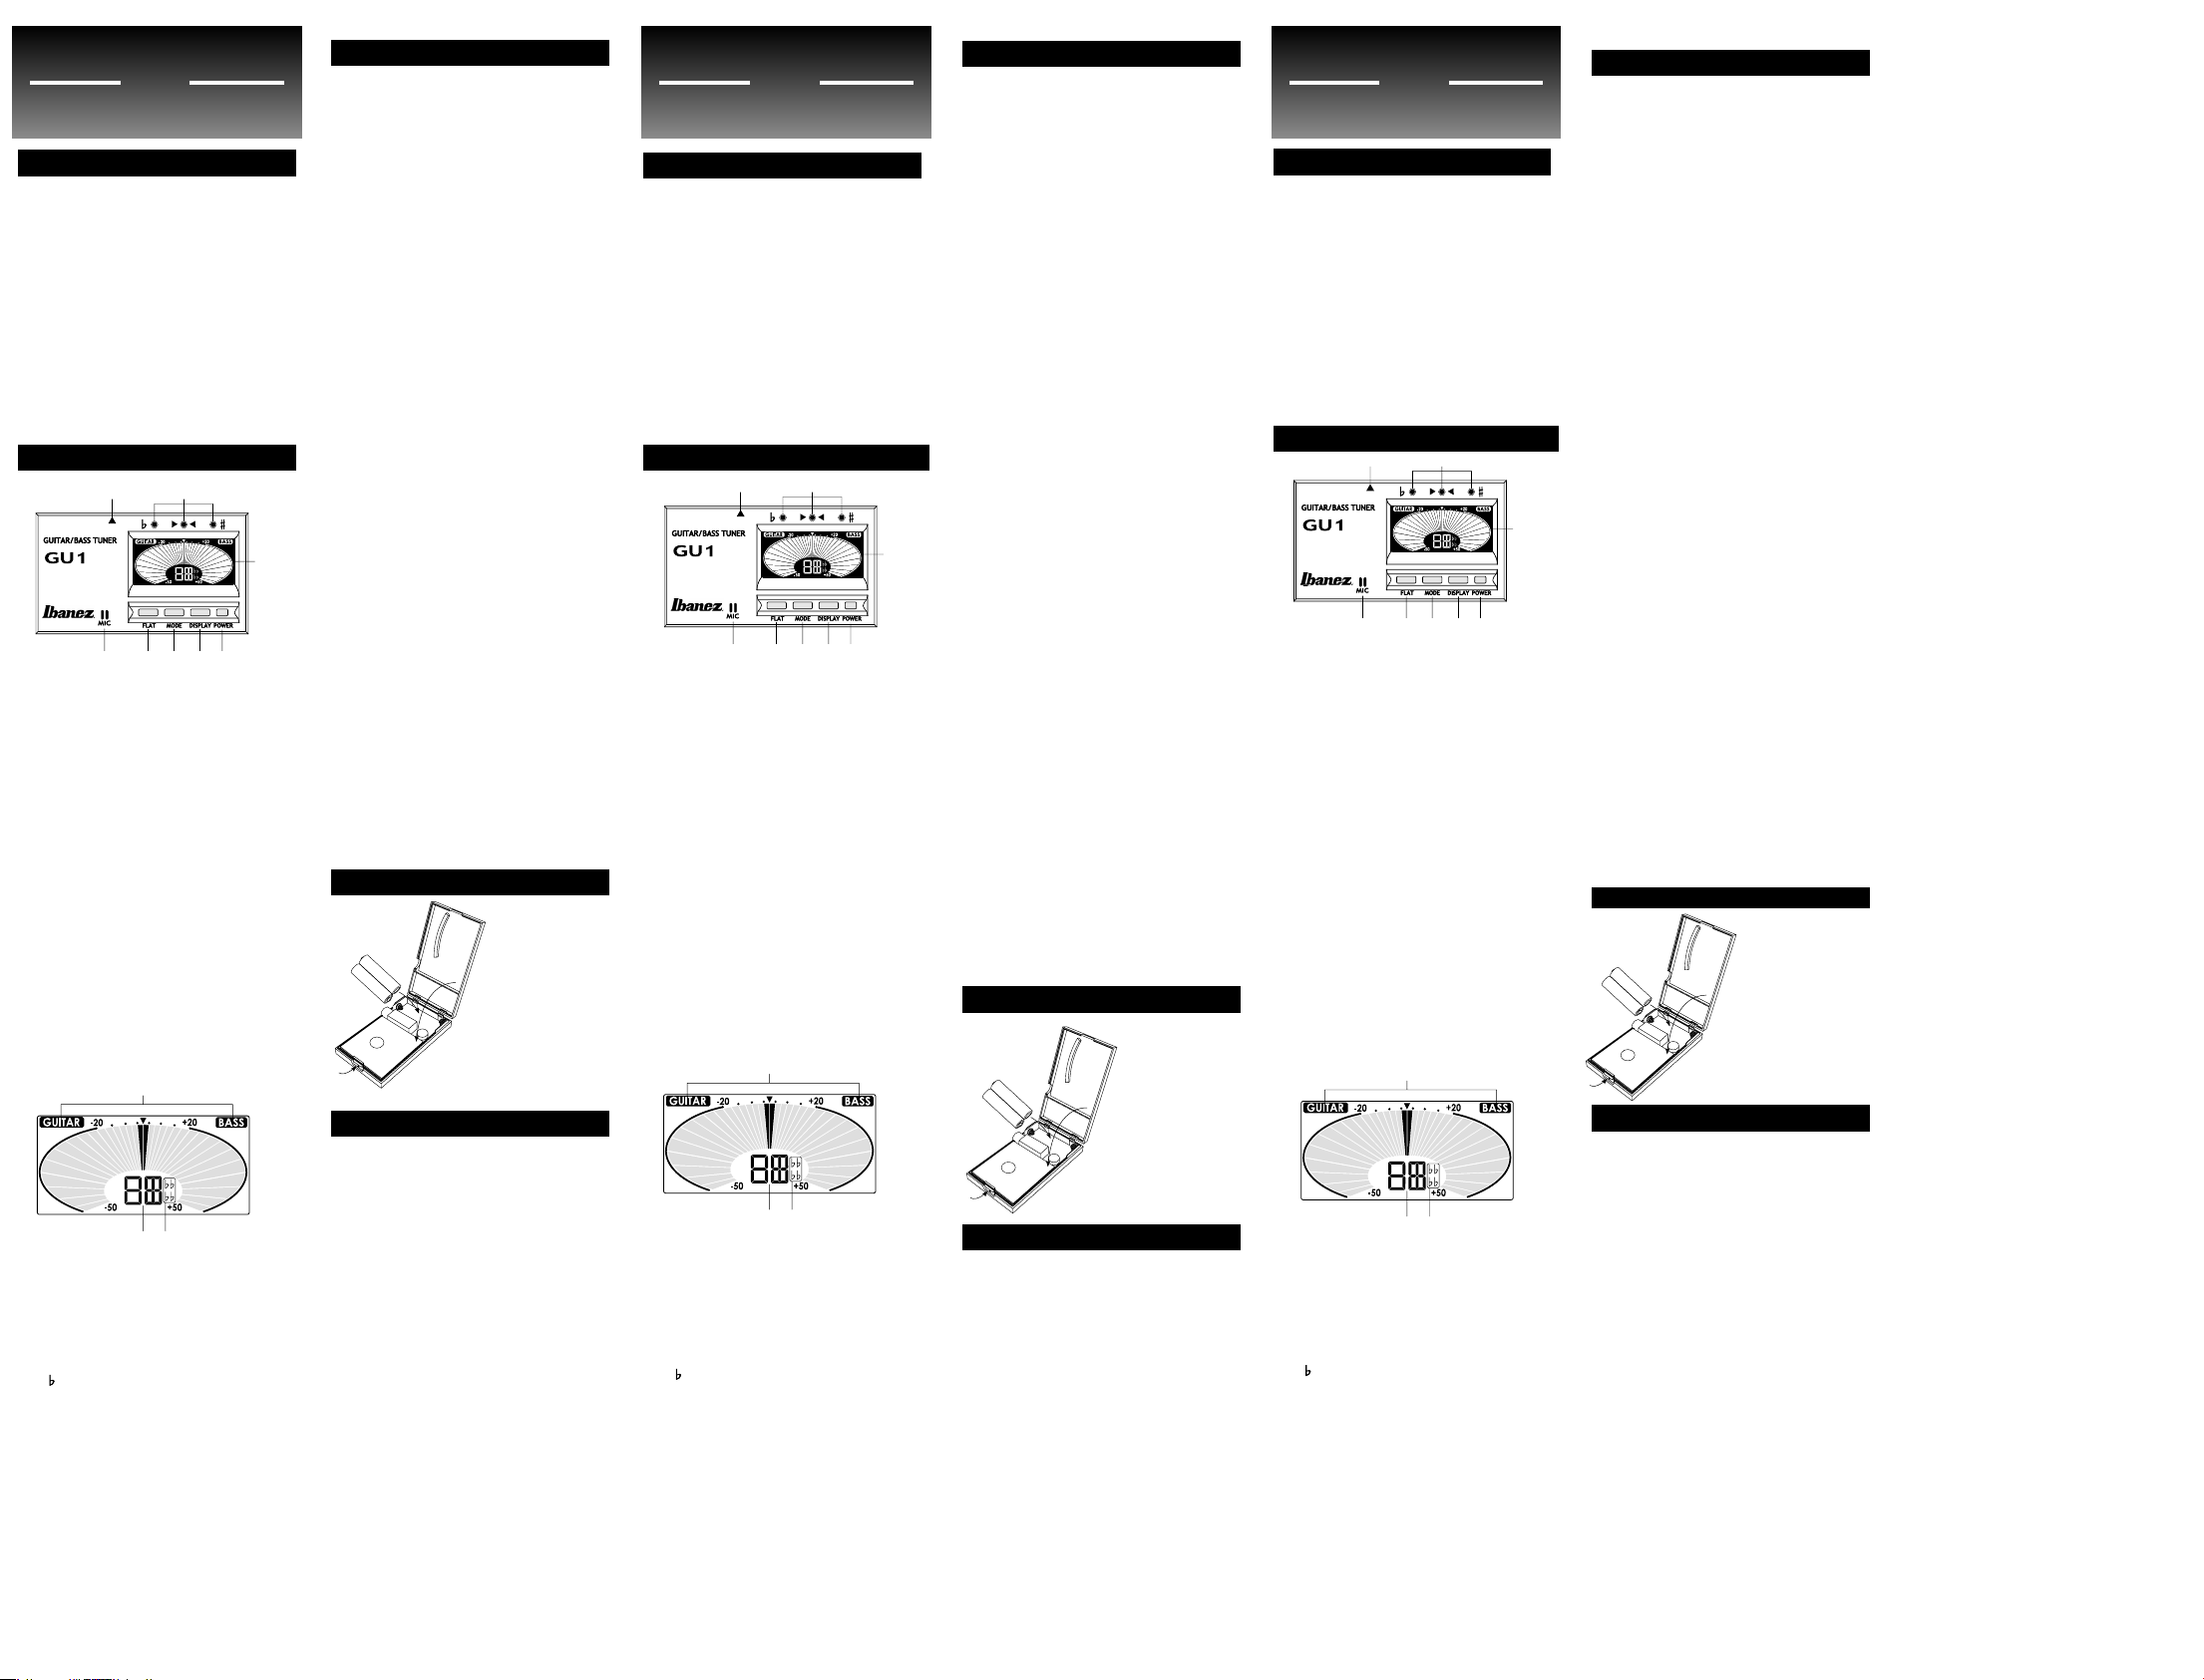
2
3
1
A
BC
6
8
5
12
34
7
Tuning Procedure
For accurate tuning:
•
Do not use this tuner near other sound-emitting
devices such as radios or televisions when tuning
an acoustic instrument, as the sound coming
from other devices may prevent the mic from
accurately picking up the sound of the instrument.
• When tuning an e lectri c g uitar/ bass, set the
volume to maximum and use the rear (bridge)
pickup for best tuning results.
•
In order to tune strings accurately, mute all strings
by hand after you have fi nished tuning each string.
Tuning in NEEDLE mode:
1. Electrical instruments: Connect the output of
your instrument to the INPUT jack of the tuner.
Acoustic instruments: Do not insert anything
into the INPUT jack. Use the internal mic.
2.
For an electric bass, after you turn on the power,
press the MODE button once to display BASS at
the upper right corner of the display.
3.
To drop-tune the instrument, press the FLAT
button to change the setting to the desired
dropped-tuning. Each time you press the button,
the note will be fl attened by one half step.
4.
If the pitch of the string is more than ± 50 cents
away from the correct pitch, tune the string until
the correct note name appears in the LCD and one
of the tuning guide LEDs lights up. When the pitch
of the string is within ± 50 cents of the correct
pitch, tune the string from a lower pitch until the
needle stops at the arrow mark in the center.
5. When the tuner needle stops at the arrow mark
in the center, the LCD display color changes to
orange and the guideline LED in the center will
light up. At this stage, tuning is complete.
Tuning in STROBE mode:
1. Electrical instruments: Connect the output of
your instrument to the INPUT jack of the tuner.
Acoustic instruments: Do not insert anything
into the INPUT jack. Use the internal mic.
2.
For an electric bass, after you turn on the power,
press the MODE button once to display BASS at
the upper right corner of the display.
3. Press the DISP LAY bu tton once to change
the display mode to STROBE mode. To droptune the instrument, press the FLAT button to
chang e the setting to dropped-tuning. Each
time you press the butto n, the note w ill be
fl attened by one half step.
4. If the pitch of the string is more than ± 50 cents
away from the correct pitch, tune the st ring
unt il the corre ct note name appe ars in the
LCD and one of the tuning guide LEDs lights
up. When the pitch of the string is within ± 50
cents of the correct pitch, tune the string so
that the strobe indicator fl ashes in a counterclockwi se direct ion and the flas hing s peed
be comes zer o. The indicato r fl as hes in a
counter-clockwise direction if your instrument
is flat (lo wer tha n t he corre ct pitch), and
clockwise if your instrument is sharp (higher).
5.
When the tuner fl ashing speed becomes zero,
the LCD display color changes to orange and
the guideline LED in the center will light up. At
this stage, tuning is complete.
Installing/replacing the batteries
1
Hold down the clip
located on the left
side of the unit, and
open the back cover.
2
Insert two AAA
batteries, checking
that the correct
polarity is observed.
Place the negative
side toward the spring.
3
Hook the back cover
hinge onto the catch
located at the battery
side, and press the
face into the unit
until the clip snaps
into place.
Specifi cations
Mode: Guitar auto tuning/bass auto tuning
Display mode: NEEDLE mode/STROBE mode
Tuning range: A0 (27.5 Hz) - C8 (4,186 Hz)
Tuning note names:
7B, 6E, 5A, 4D, 3G, 2B, 1E
(Electric guitar, acoustic guitar)
5B, 4E, 3A, 2D, 1G, HC
(Electric bass, acoustic bass)
Drop-tuning: 1 - 4 semitones
Accuracy: ± 1 cent
Display: LCD, LEDs
Input: Internal mic, INPUT jack
Power supply: Two AAA batteries (3V)
Dimensions: 94 (W) x 53 (D) x 15 (H) mm
Weight: 80 g (including batteries)
* Design and specifi cations are subject to change
without notice for product improvement reasons.
6
8
5
12
34
7
A
BC
2
3
1
A
BC
6
8
5
12
34
7
2
3
1
Page 2
製品保証書
フリガナ
ご氏名
ご住所〒
TEL
製品名GU1 保証期間お買い上げ日 年 月 日より1ヵ年
販売店名・住所・TEL
● 枠欄に記載漏れがある場合は保証書が無効となりますの
で、記入の有無をご確認ください。
●
本保証書は裏面記載の保証規定に基づき、お買い上げの
日より1年間無償修理を行うことをお約束するものです。
● 本書は再発行致しませんので大切に保管してください。
保証規定
1 本保証書は、取扱説明書の内容に従ったお取扱により、万が一故障が発生した場合に、お買い上げ日より1年
間の無償修理をお約束するものです。
保証期間内に修理が必要な際には、製品に本保証書を添付の上、お買い求めの販売店に修理をご依頼ください。
2 保証期間内でも次のような場合には有償修理とさせていただきます。
・本書の提示が無い場合
・本書書面に記入漏れが有る場合
・当社指定以外の人物による修理、改造が原因の故障の場合
・お買い上げ後のお取扱の不注意(取扱説明書の内容以外の誤ったお取扱、落下など)により生じた故障や破損
・故障の原因が本製品以外の機器にある場合
・天災(火災、地震、風水害、落雷、異常電圧など)に起因する故障や破損
・電池の液漏れによる故障や破損
・電池その他消耗部品の交換
3 本保証書は日本国内においてのみ有効です。(ThiswarrantycardisvalidonlyinJapan.)
*その他ご不明な点は、お買い求めの販売店までお問い合わせください。
〒489-0871
愛知県瀬戸市東長根町119
A
GUITAR,BASS:ギターをチューニングする時
はGU IT ARを、ベースをチューニングする時は
BASSを表示させてください。
B
NO TE : 入力されている音程に最も近い音が表
示されます。ギター、ベースではそれぞれ以下
のように表示され、数字は弦の番号を示し、ア
ルファベットは英語での音名を示します。
GUITAR7B,6E,5A,4D,3G,2B,1E
BASS5B,4E,3A,2D,1G,HC
C
:
フラット・チューニングの設定を表示します。
6
INPUTJACK
エレクトリック楽器用の入力端子です。
エレキギター、エレクトリックアコースティック
ギター、エレキベースのチューニング時は楽器の
出力を本機のINPUTJACKへ接続してください。
但しその場合、本機の内蔵マイクを用いてアコー
スティック楽器のチューニングは行うことができ
ません。
7
MICROPHONE
アコースティックギターのようにピックアップ・
マイクのない楽器のチューニングには内蔵マイク
をご使用ください。
但し、IN PU T JA CKにプラグが接続された状態
で、内蔵マイクはご使用になれませんのでご注意
ください。
8
チューニングガイドLED
チューニングが表示された音名に合うと中央のLED
が点灯します。表示された音名よりも低いときは左
側が、高いときは右側のLEDが点灯します。
チ ュ ー ニ ン グ 方 法
正確にチューニングするには
・アコースティック楽器をチューニングする際に
はマイクで音を拾いづらくなるため、テレビや
ラジオなどの音響機器の近くで本製品を使用し
ないようにしてください。
・
エレキギター/エレキベースをチューニングする
ときはVOLUMEを最大にし、リア・ピックアッ
プを使用することで適切にチューニングを行うこ
とができます。
・適切にチューニングを行う為に、チューニン
グが1弦終わるごとに、軽く弦全体を押さえて
ミュートしてください。
NEEDLEモードによるチューニング
1.エレクトリック弦楽器の場合 : 楽器の出力と
チューナーのINPUTJACKを接続します。
アコースティック弦楽器の場合: INPUTJACK
に何も挿さずに内蔵マイクをお使いください。
2.
電源を入れた後、エレキベースの場合はMODE
ボタンを一度押してディスプレイの右上にBAS S
を表示させてください。
ダウンチューニングに設定する場合はFLATボタ
ンを押してダウンチューニングに設定をして下
さい。一度押すたびに設定が半音ずつ低くなり
ます。
3.弦の音程が正確な音程より±50 CE NT以上は
なれている場合は、弦の張りを調整しながら目
的の音名をLC Dに表示させ、どちらかのガイド
ラインLEDを点灯させます。
弦の音程が±50 CE NT以内になった場合、正
確な音程よりも音程の低い方から、針が中央の
矢印に合うように調整します。
4.
チューナーの針が中央で止まると液晶ディスプレ
イの表示がオレンジ色に変化し、中央のガイドラ
インLEDが点灯してチューニング完了です。
AFINADOR AUTOMÁTICO PARA GUITARRA Y BAJO
GU1
MANUAL DEL USUARIO
Precaución
1
Para prevenir cortocircuitos, descargas
eléctricas o fallos:
No desmonte ni intente reparar el aparato.
Evite los lugares de elevada temperatura o
humedad (cerca de aparatos de calefacción, luz
solar directa, cuartos de baño, suelos húmedos).
Evite los lugares donde el aparato pueda recibir
vibraciones fuertes.
Evite los lugares sucios o con presencia de polvo.
No utilice el aparato con las manos mojadas.
2
Para prevenir daños:
No fuerce los interruptores u otros mandos.
No deje caer el aparato.
3
Limpieza:
No utilice diluyente, alcohol u otros disolventes para
limpiar el aparato.
4
Para preservar las baterías:
Quite las bater ías cuando no vaya a util izar el
aparato durante un periodo prolongado.
Características y funciones
1
Botón interruptor (POWER):
se utiliza para encender/apagar el afi nador.
2
Botón Visualización (DISPLAY):
se utiliza para seleccionar el modo de
visualización de la afi nación. Cada vez que se
pulsa el botón Visualización (DISPLAY), el modo
cambia entre AGUJA y ESTROBOSCÓPICO.
* En el modo ESTROBOSCÓPICO, la desviación
de la afi nación se indica mediante la velocidad
del indicador estroboscópico. El indicador
parpadea hacia la izquierda si el tono analizado
es grave (más bajo que la nota que se visualiza)
y hacia la derecha si el tono es agudo (más
alto). El indicador deja de parpadear cuando el
tono es el correcto.
3
Botón MODE (Modo):
cambia el modo de afi nación. Cada vez que se
pulsa el botón, el modo de afinación cambiará
entre afi nador de guitarra automático (GUITAR) y
afi nador de bajo automático (BASS).
4
Botón FLAT (Bemol):
ajusta la afinación en bemol (más baja) con
respecto a la afi nación normal. Puede afi nar en
bemol entre uno y cuatro semitonos por debajo
de la afi nación normal. Cada vez que se pulsa el
botón, la nota baja un semitono desde el tono de
afi nación estándar.
5
Pantalla de cristal líquido (LCD):
al encender el afi nador, la pantalla LCD muestra
los siguientes parámetros:
VISUALIZACIÓN = AGUJA
MODO = afi nador automático para guitarra
(GUITAR) o para bajo (BASS)
A GUITAR, BASS: seleccione GUITAR para afi nar
una guitarra y BASS para afi nar un bajo.
B Los nombres de las notas para la guitarra
y para el bajo se muestran de la siguiente
manera: Los números indican el número de
la cuerda y las letras el nombre de la nota
cromática en inglés.
GUITARRA = 7B, 6E, 5A, 4D, 3G, 2B, 1E
BAJO = 5B, 4E, 3A, 2D, 1G, HC
NOTA: se muestra el nombre de la nota
cromática más cercana al tono
reproducido.
C
: Indica que el tono es más grave (bemol).
6
INPUT (Toma de entrada):
es la toma de entrada para los instrumentos eléctricos.
Si va a afinar una guitarra eléctrica, una guitarra
electroacústica o un bajo eléctrico, conecte la salida
del instrumento a la toma de entrada del afi nador. No
obstante, en este caso no podrá utilizar el micrófono
interno para afi nar un instrumento acústico.
7
MICRÓFONO:
Utilice el micrófono interno cuando desee afinar un
instrumento sin pastilla, por ejemplo, una guitarra
acústica. El micrófono interno no se puede utilizar
cuando se halla enchufada una clavija en la toma de
entrada.
8
Diodos indicadores de afi nación:
el diodo del centro se ilumina cuando el tono del
instrumento coincide con la nota que se visualiza.
El diodo de la izquierda se il umina cuando el
instrumento está desafi nado en grave y el diodo
de la derecha se ilumina cuando el instrumento
está desafi nado en agudo.
Procedimiento de afi nación
Para obtener una afi nación precisa:
•
No utilice este afi nador cerca de equipos emisores de
sonido tales como radios o televisores, ya que el sonido
de otros dispositivos puede impedir que el micrófono
recoja correctamente el sonido del instrumento.
• Al afina r una guit arra o un bajo elé ctr ico s,
ponga el volumen al máximo y utilice la pastilla
trase ra ( puen te) p ara obte ner los m ejor es
resultados de afi nación.
• Par a af in ar corr ect amen te el i nstr ume nto,
silencie todas las cuerdas con la mano
después de afi nar cada cuerda.
Afi nación con AGUJA:
1. Instrumentos eléctricos: conecte la salida del
instrumento a la toma de entrada del afi nador.
Instrumentos acústicos: no conecte nada a la
toma de entrada. Utilice el micrófono interno.
2. Para afinar un ba jo eléctric o, tras e ncender
el afi nador, pulse el botón MODE (Modo) una
vez para visualizar BASS (Bajo) en la esquina
superior derecha de la pantalla.
3.
Para afinar en bemol el instrumento, pulse el
botón FLAT (Bemol) para cambiar la confi guración
hasta el tono en bemol deseado. Cada vez que
pulse el botón, la nota bajará un semitono.
4.
Si el tono de la cuerda difiere en más de 50
centésimas del tono correcto, afine la cuerda
hasta que aparezca en la pantalla LCD el nombre
de la nota correcta y se encienda uno de los
diodos indicadores. Si el tono de la cuerda difi ere
en menos de 50 centésimas del tono correcto,
afi ne la cuerda desde un tono más bajo hasta que
la aguja se detenga en la fl echa central.
5.
Cuando la aguja del afinador se detiene en la
flecha central, el color de la pantalla LCD se
vuelve naranja y el diodo central se enciende.
Llegados a este punto, la afi nación ha concluido.
Afi nación en modo ESTROBOSCÓPICO:
1. Instrumentos eléctricos: conecte la salida del
instrumento a la toma de entrada del afi nador.
Instrumentos acústicos: no conecte nada a la
toma de entrada. Utilice el micrófono interno.
2. Para afinar un ba jo eléctric o, tras e ncender
el afi nador, pulse el botón MODE (Modo) una
vez para visualizar BASS (Bajo) en la esquina
superior derecha de la pantalla.
3.
Para afinar en bemol el instrumento, pulse
el botón FLAT (Bemol) para cambiar la
confi guración a afi nación en bemol. Cada vez
que pulse el botón, la nota bajará un semitono.
4. Si el tono de la cuerda difiere en más de 50
centésimas del tono correcto, afi ne la cuerda
hasta que aparezca en la pantalla LCD el
nombre de la nota correcta y se encienda uno
de los dio dos indi cad ores. Si el t ono de la
cuerda difi ere en menos de 50 centésimas del
tono correcto, afi ne la cuerda de forma que el
indicador estroboscópico parpadee hacia la
izquierda y la velocidad de parpadeo llegue a
cero. El indicador parpadea hacia la izquierda
si el tono del instrumento es grave (más bajo
que el tono correcto) y hacia la derecha si el
tono es agudo (más alto).
5. U na vez que la veloc ida d de parp ade o del
afinador llega a cero, el co lor de la pantalla
LCD se vuelve naranja y el diodo central se
enciende. Llegados a este punto, la afi nación
ha concluido.
Instalación/cambio de las pilas
Especifi caciones
Modos: afi nación de guitarra automática/
afi nación de bajo automática
Modos de visualización: AGUJA/ESTROBOSCÓPICO
Intervalo de afi nación: A0 (27,5 Hz) - C8 (4.186 Hz)
Nombres de las notas de afi nación: 7B, 6E, 5A, 4D, 3G,
2B, 1E (guitarra eléctrica, guitarra acústica)
5B, 4E, 3A, 2D, 1G, HC (bajo eléctrico, bajo acústico)
Afi nación en bemol: 1-4 semitonos
Precisión: ± 1 centésima
Visualización: pantalla LCD, diodos
Entradas: micrófono interno, toma de entrada
Alimentación: dos pilas AAA (3V)
Dimensiones: 94 (A) x 53 (F) x 15 (Alt) mm
Peso: 80 g (pilas incluidas)
* El diseño y las especifi caciones pueden
cambiar sin previo aviso por razones de mejora
del producto.
1
Mantenga la lengüeta
ubicada en el lateral
izquierdo del dispositivo
hacia abajo y abra la
cubierta trasera.
2
Introduzca dos pilas AAA,
comprobando que las
polaridades son correctas.
Sitúe el polo negativo
apuntando al muelle.
1
Encaje los resaltes de la
tapa trasera en los orifi cios
del lateral de las pilas; a
continuación, presione la
tapa hacia el dispositivo
hasta que la lengüeta se
cierre haciendo clic.
ACCORDATORE AUTOMATICO PER CHITARRA E BASSO
GU1
LIBRETTO DI ISTRUZIONI
Attenzione
1
Per evitare cortocircuiti, scosse elettriche e
anomalie di funzionamento:
Non smontare o cercare di riparare l’unità.
Non posi zionare l’u nit à in luoghi m olto umidi
e ad alta tempera tura ( ad es. in pros simità di
apparecchi di riscaldamento, alla luce diretta del
sole, in bagno, o su pavimenti bagnati).
Non posizionare l’unit à laddove sono presen ti
eccessive vibrazioni.
Non posizionare l’unità in luoghi polverosi o sporchi.
Non toccare l’accordatore con le mani bagnate.
2
Per evitare guasti:
Non applicare forza eccessiva agli switch o ad
altri comandi.
Non far cadere l’unità.
3
Pulizia:
Non utilizzare diluent i, alcool o alt ri solventi a
scopo di pulizia.
4
Per prevenire lo scaricamento delle pile:
Rimuovere le pile quando l’unità non è utilizzata
per molto tempo.
Caratteristiche e funzioni
6
8
5
12
34
7
1
Tasto POWER
Accende/spegne l’alimentazione.
2
Tasto DISPLAY
Attiva il modo di visualizzazione dell’accordatore.
A ogni pressione del tasto DISPLAY, sono
visualizzati in sequenza i seguenti modi:
NEEDLE – STROBE
* Nel modo STROBE, la deviazione di accordatura
è indicata dalla velocità dell’indicatore strobo.
L’indicatore lampeggia in direzione antioraria
se la tonalità testata è bemolle (più bassa della
nota visualizzata) e in senso orario se è acuta (più
alta). Una volta impostata la tonalità corretta
l’indicatore smette di lampeggiare.
3
Tasto MODE
Commuta il modo di accordatura. Ogni volta
che si preme il tasto MODE, sono visualizzati
in sequenza i seguenti modi: accordatura
automatica per chitarra - accordatura automatica
per basso
4
Tasto FLAT
Consente di regolare l’accordatura bemolle per
un’accord atura s tandard. Sono impostabili da
uno a quattro semitoni al di sotto dell’accordatura
normale. A ogni pressione di FLAT, la nota viene
abbassata di un semitono rispetto alla tonalità di
accordatura standard.
5
Display a cristalli liquidi (LCD)
Quando si accende l’alimentazione, l’LCD
mostrerà le seguenti impostazioni:
DISPLAY = NEEDLE
MODE = accordatura automatica chitarra/basso
A GUITAR, BASS: selezionare GUITAR per
l’accordatura della chitarra e BASS per quella
del basso.
B I nomi delle note vengono visualizzati
rispettivamente per chitarra e basso come
indicato di seguito. I numeri fanno riferimento
al numero di corda e le lettere al numero della
nota cromatica in inglese.
GUITAR = 7B, 6E, 5A, 4D, 3G, 2B, 1E
BASS = 5B, 4E, 3A, 2D, 1G, HC
NOTA:
viene visualizzato il nome della nota
cromatica più vicina alla tonalità eseguita.
C :
Indica l’impostazione di accordatura bemolle.
6
Jack INPUT
Jack di ing ress o deg li st rumenti elettrici. Per
acc ordare una chitarra elettrica, una c hitarra
elettro-acustica o un basso elettrico, collegare
al jack INP UT dell ’acc ord atore l’usci ta dell o
strumento in uso. In tal caso, non sarà tuttavia
possibile utilizzare il microfono interno per
accordare uno strumento acustico.
7
MICROFONO:
Utilizzare il microfono interno quando si vuole
accordare uno strumento non amplifi cato, quale
una chitarra acustica. Il microfono inter no non
può essere usato se una jack è già inserito nel
jack INPUT del GU1 stesso.
8
LED di guida all’accordatura:
Il LED centrale si illumina se la tonalità testata
corrisponde a quella visualizzata. Il LED a sinistra
si illumina se la tonalità testata è bemolle, mentre
il LED a destra si illumina se la tonalità testata è
acuta.
Procedura di accordatura
Per l’accordatura precisa
• Non utilizz are l’accord atore in prossi mità di
apparecchi sonori quali radio o televisioni onde
evitare che l’audio di tali dispositivi sia colto
dal microfono e interferisca con la riproduzione
del suono dello strumento.
• Quand o s i accord a una chitarra elett rica/ un
basso, impostare il volume al massimo e
utilizzare il riproduttore posteriore per un
migliore risultato di accordatura.
• Pe r acc orda re più prec isam ente le cord e,
silenziare tutte le corde a mano dopo aver
ultimato l’accordatura di ogni corda.
Accordatura nel modo NEEDLE:
1. Strumenti elettrici: collegare l’uscita dello
strumento al jack INPUT dell’accordatore.
Strumenti acustici: non utilizzare il jack INPUT.
Utilizzare il microfono interno.
2. Nel basso elettrico, una volta attivata
l’alimentazione, premere una volta il tasto
MODE per visualizzare BASS nell’angolo in alto
a destra del display.
3. Per eseguire l’accordatura bemolle, premere
il tasto FLAT e impostare l’accordatura
desiderata. A ogni pressione del tasto la nota
si abbassa di mezzo punto.
4. Se la tonalità della corda è più di ±50 centesimi
lontana dalla tonalità corretta, accordare la
corda finché sull’LCD non appare la nota
corretta e uno dei LED di guida all’accordatura
non si illumina. Se la tonalità della corda
rientra nei ±50 centesimi della tonalità corretta,
accordare la corda dalla tonalità più bassa fi no
a quando la lancetta non si arresta sulla freccia
centrale.
5. Quando la lancetta si ferma sulla freccia
centrale, il display LCD diventa arancione e il
LED di guida centrale si illumina. L’accordatura
è effettuata.
Accordatura nel modo STROBE:
1. Strumenti elettrici: collegare l’uscita dello
strumento al jack INPUT dell’accordatore.
Strumenti acustici: non utilizzare il jack INPUT.
Utilizzare il microfono interno.
2. Nel basso elettrico, una volta attivata
l’alimentazione, premere una volta il tasto
MODE per visualizzare BASS nell’angolo in alto
a destra del display.
3. Per regolare l’impostazione bemolle dello
strumento, premere il tasto FLAT per impostare
l’accordatura desiderata. A ogni pressione del
tasto la nota si abbassa di mezzo punto.
4. Se la tonalità della corda è più di ±50 centesimi
lontana dalla tonalità corretta, accordare la
corda finché sull’LCD non appare la nota
corretta e uno dei LED di guida all’accordatura
non si illumina. Se la tonalità della corda
rientra nei ±50 centesimi della tonalità corretta,
accordare la corda fino a che l’indicatore
strobo non lampeggia in direzione antioraria
e la velocità di lampeggiamento diventa zero.
L’indicatore lampeggia in direzione antioraria se
lo strumento è bemolle (più basso della tonalità
corretta) e in senso orario se è acuto (più alto).
5.
Quando la velocità di lampeggiamento diventa
zero, il display LCD passa all’arancione e il LED
di guida centrale si illumina. L’accordatura è
completa.
Installazione e sostituzione delle pile
Specifi che
Modi: accordatura automatica chitarra/basso
Modi di visualizzazione: NEEDLE/STROBE
Gamma di accordatura: A0 (27,5 Hz) - C8 (4,186 Hz)
Note di accordatura: 7B, 6E, 5A, 4D, 3G, 2B, 1E
(chitarra elettrica, chitarra
acustica)
5B, 4E, 3A, 2D, 1G, HC
(basso elettrico, basso
acustico)
Accordatura bemolle: da 1 a 4 semitoni
Precisione: ± 1 centesimo
Display: LCD, LED
Ingresso: microfono interno, jack INPUT
Alimentazione: due pile formato AAA (3 V)
Dimensioni: 94 (Largh.) x 53 (Prof.) x 15 (Alt.) mm
Peso: 80 g (pile comprese)
* Il design e le specifiche sono soggette a
modifi che di miglioramento del prodotto, senza
preavviso.
1
Tirare la linguetta a
sinistra dell’unità e
aprire il coperchio
del vano batterie.
2
Inserire due pile
formato AAA
rispettandone le
corrette polarità.
Posizionare il polo
negativo in direzione
della molla.
3
Fissare il coperchio
sull’apposito incastro
e premere fi no a far
scattare la linguetta.
注意
1
ショート、感電、故障の防止
本製品を分解・修理しないでください。
高温、多湿の場所(暖房器具の近く、直射日光
の当たる場所、浴室、濡れた床など)に置かな
いでください。
振動の多い場所に置かないでください。
ほこりや汚れの多い場所に置かないでください。
濡れた手で本製品を操作しないでください。
2
破損の防止
スイッチ類に無理な力を加えないでください。
本製品を落とさないでください。
3
お手入れ
お手入れにシンナー、アルコール類を使用しない
でください。
4
電池消耗の防止
本製品を長時間使用しない時は、電池を外して
ください。
機能・特徴
1
POWERボタン
電源のON/OFFを切り替えます。
2
DISPLAYボタン
チューニングの表示モードを切り替えます。
表示モードはDISPL AYボタンを押すたびに、以下
の順で切り替わります。
NEEDLE‒STROBE
※STROBEモードとは回転のスピードでチューニ
ングのずれを示すモードで、表示された音程よ
りも音程が低い場合は反時計周りに、音程が高
い場合は時計回りに回転し、正しい音程で回転
が止まるようになっています。
3
MODEボタン
チューニング・モードを切り替えます。チューニ
ング・モードはMO DEボタンを押すたびに、以下
の順で切り替わります。
ギターオートチューナー-ベースオートチューナー
4
FLATボタン
レギュラーチューニングに対してどれだけ低い音
にチューニングするかを設定します。半音〜2音下
げた音にチューニングを合わせることができます。
FL ATボタンを押す度にレギュラーチューニングか
ら半音ずつ低くなります。
5
液晶ディスプレイ(LCD)
電源を入れた時点で以下の設定になっています。
DISPLAY=NEEDLE
MODE=ギターオートチューナー
GUITAR & BASS AUTO TUNER
GU1
取扱説明書
MODEL NUMBER : Guitar & Bass Tuner GU1
This equipment fully conform to the protection
requirements of the following Council Directives.
2004/108/EC : Electromagnetic Compatibility
MANUFACTURE : HOSHINO GAKKI CO., LTD.
22-3 Chome, Shumoku-Cho,
Higashi, Nagoya, 461-8717,
Japan.
CE EU REPRESENTATIVE : HOSHINO BENELUX
B.V.
J.N. Wagenaarweg
9, 1422 AK Uithoorn,
Netherlands
A
BC
2
3
1
STROBEモードによるチューニング
1.エレクトリック弦楽器の場合 : 楽器の出力と
チューナーのINPUTJACKを接続します。
アコースティック弦楽器の場合: INPUTJACK
に何も挿さずに内蔵マイクをお使いください。
2.電源を入れた後、エレキベースの場合はM OD E
ボタンを一度押してディスプレイの右上に
BASSを表示させてください。
また、DISPLAYボタンを一度押し、表示モード
をSTROBEに変更してください。
ダウンチューニングに設定する場合はFL ATボタン
を押してダウンチューニングに設定をして下さい。
一度押すたびに設定が半音ずつ低くなります。
3.弦の音程が正確な音程より±50CENT以上はな
れている場合は、弦の張りを調整しながら目的
の音名をLC Dに表示させ、どちらかのガイドラ
インLEDを点灯させます。
弦の音程が±50 CE NT以内になった場合、反
時計回り方向から回転のスピードが0になるよ
うに調整します。
弦の音程が正確な弦の音程より低い場合は反時
計周りの方向に、高い場合は時計周りの方向に
回転します。
4.チューナーの回転のスピードが0になると液晶
ディスプレイの表示がオレンジ色に変化し、中
央のガイドラインLE Dが点灯してチューニング
完了です。
電池のセットと交換方法
1
液晶ディスプレイ
側の側面にある爪
を押さえ、バック
カバーを開きま
す。
2
単4電池を2本正し
い極性で挿入しま
す。ばねのある方
がマイナス極にな
ります。
3
バックカバーの爪
を電池側の側面に
ある出っ張りに
引っ掛け、パチン
と音がするまで
しっかりと装着し
ます。
製 品 仕 様
モード : ギターオートチューニング / ベースオー
トチューニング
表示モード:針モード/ストロボモード
調律範囲:A0(27.5Hz)〜C8(4,186Hz)
調律音名:7B,6E,5A,4D,3G,2B,1E
(エレキギター、アコースティックギター)
5B,4E,3A,2D,1G,HC
(エレキベース、アコースティックベース)
フラット・チューニング:1〜4半音
精度:±1CENT
表示:LCD,LEDs
入力:内蔵マイク,INPUTJACK
電源:単4電池2個 3V
寸法:94(W)×53(D)×15(H)mm
重量:80g(電池含む)
*設計及び仕様は改良のために予告なく変更する事
があります。
安 全 上 の ご 注 意
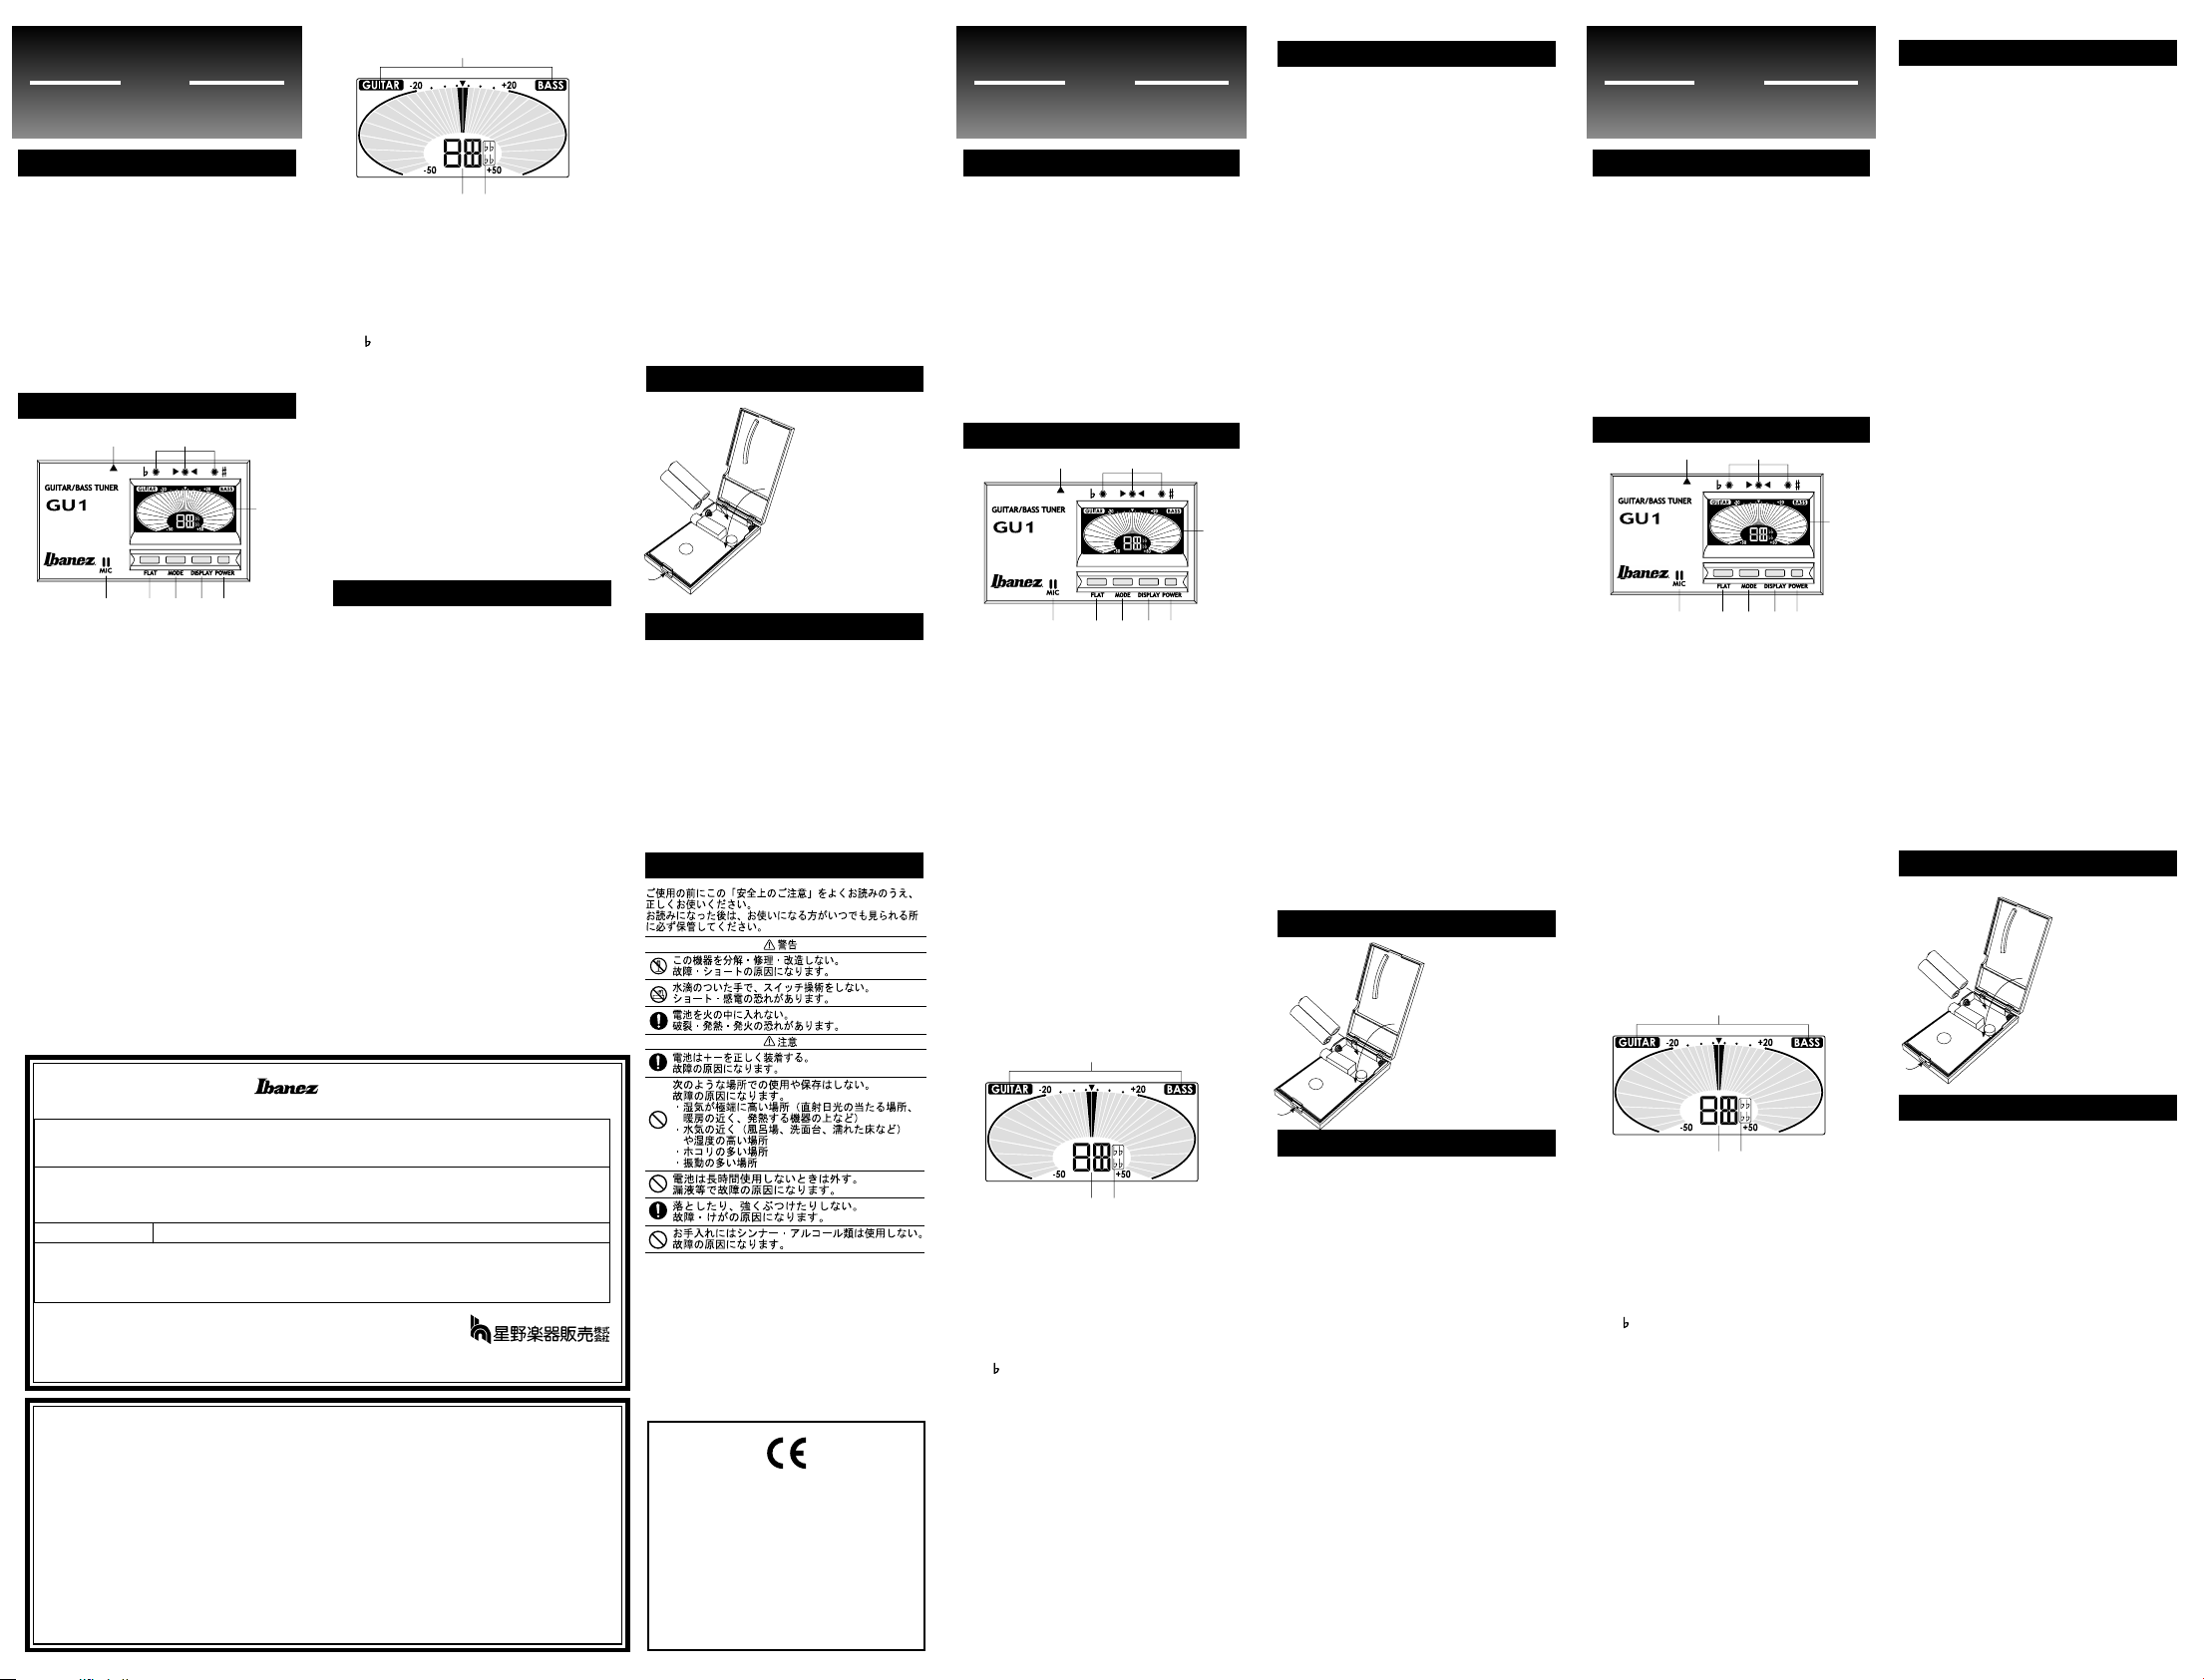
A
BC
6
8
5
12
34
7
A
BC
2
3
1
2
3
1
6
8
5
12
34
7
SEP09736
 Loading...