

Ibanez EDGE III Tremolo, GIBRALTAR PLUS BRIDGE, GIBRALTAR III BRIDGE, GIBRALTAR CUSTOM BRIDGE, GIBRALTAR STANDARD BRIDGE Instruction Manual
...Page 1

Page 2
EDGE III TrEmolo
The Edge III Tremolo is an Ibanez original tremolo that features fine-tuners, much like
the Lo-Pro Edge, and provides extraordinary strength and tuning stability. The Edge III
Tremolo offers features that are required for a double-locking tremolo, and successfully
combines Ibanez’s original ideas with its unique appearance.
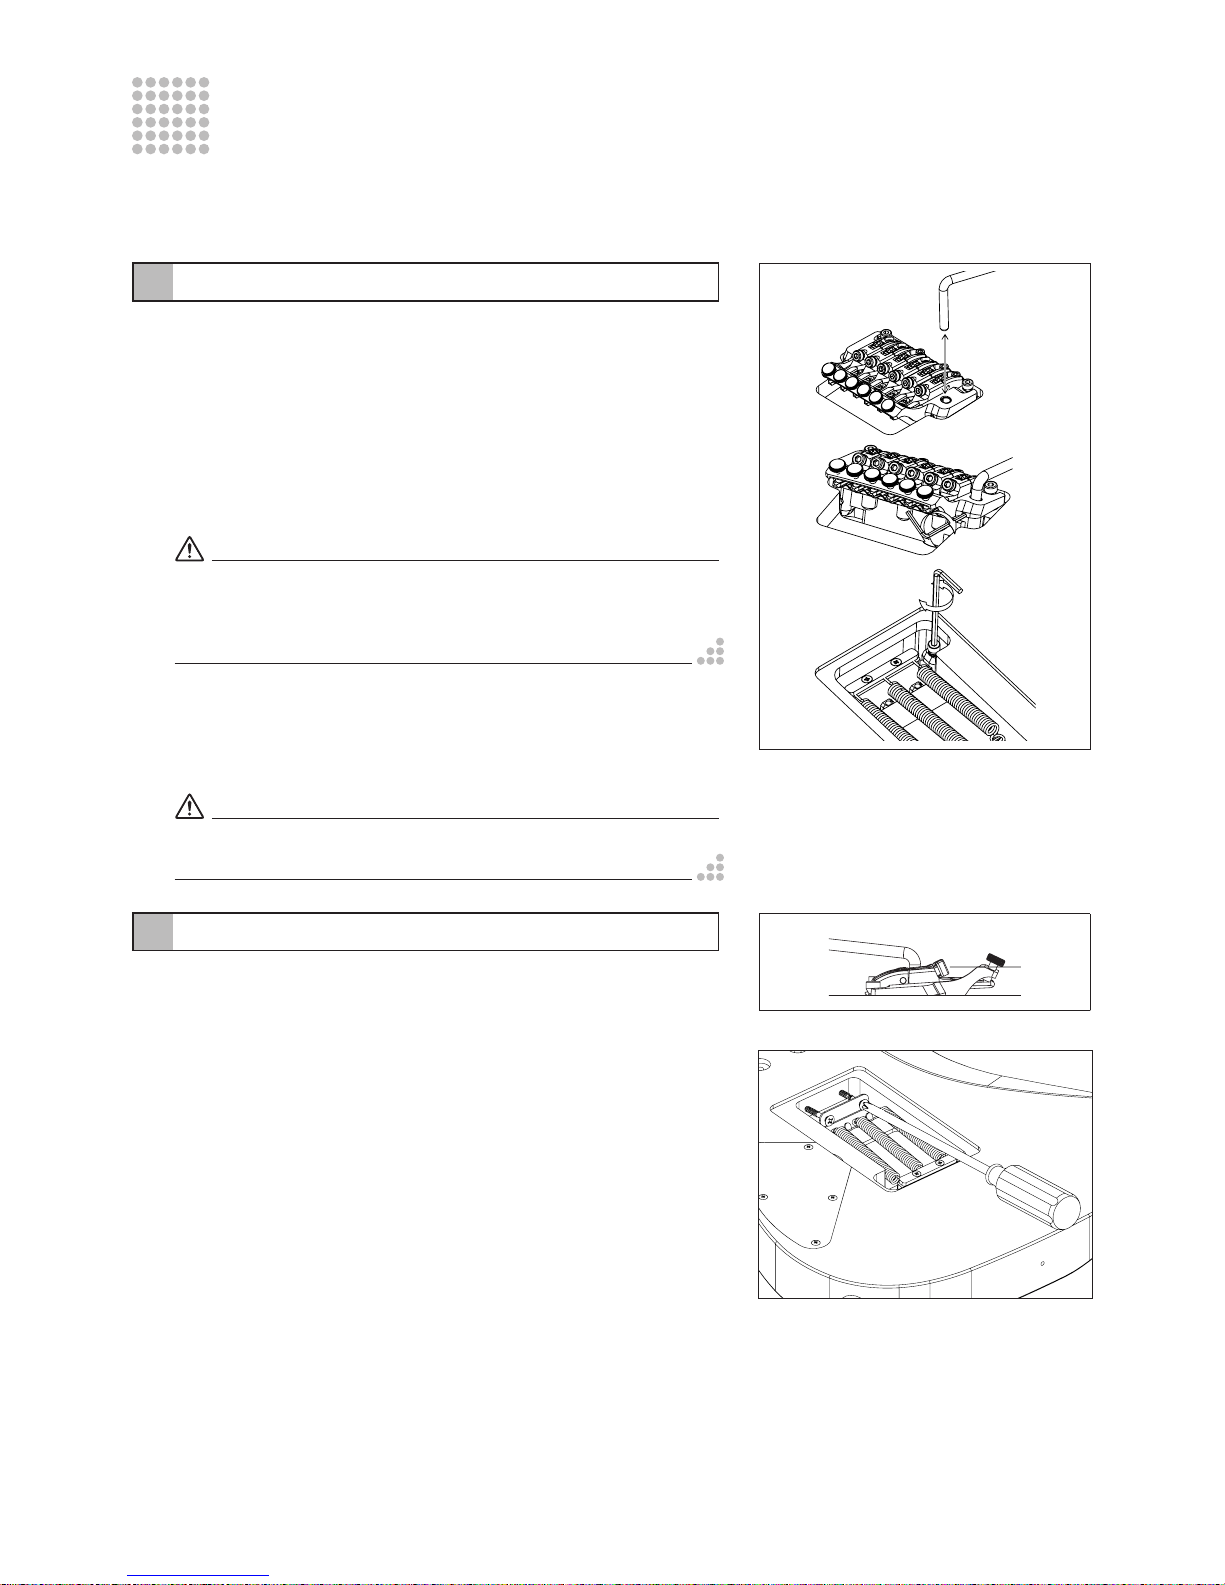
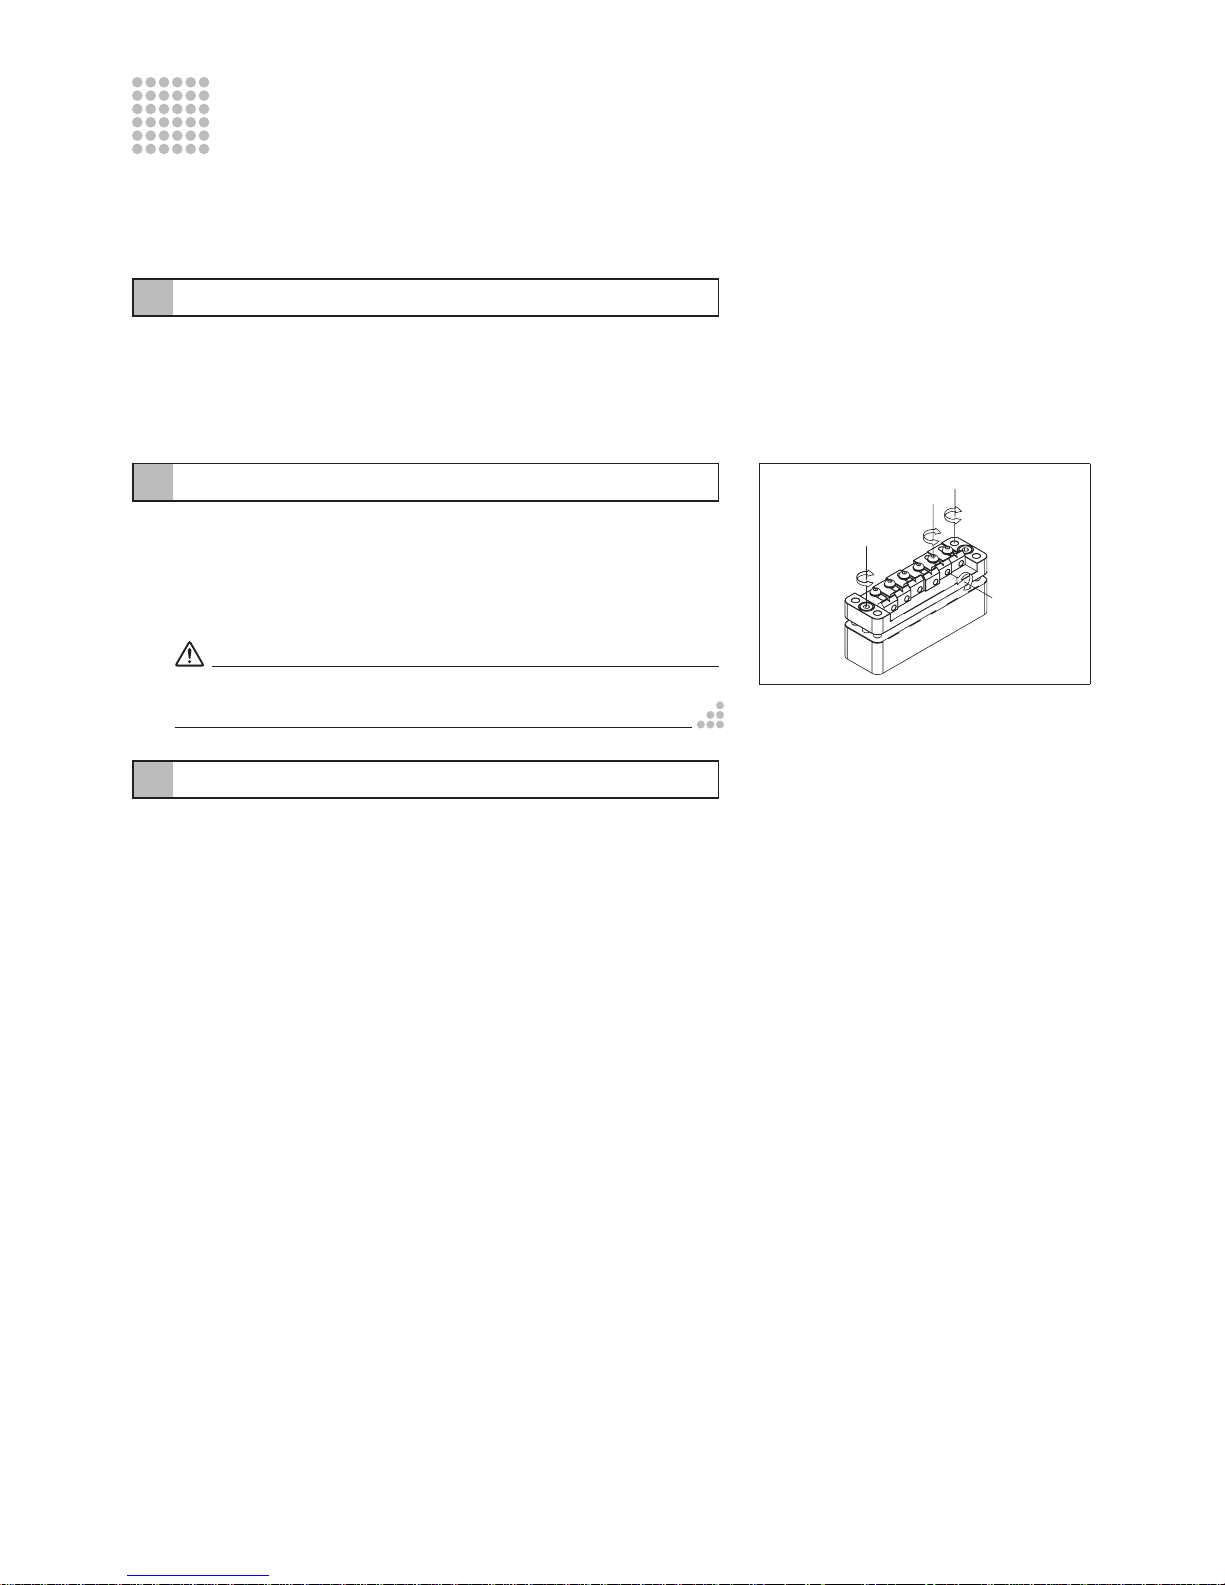
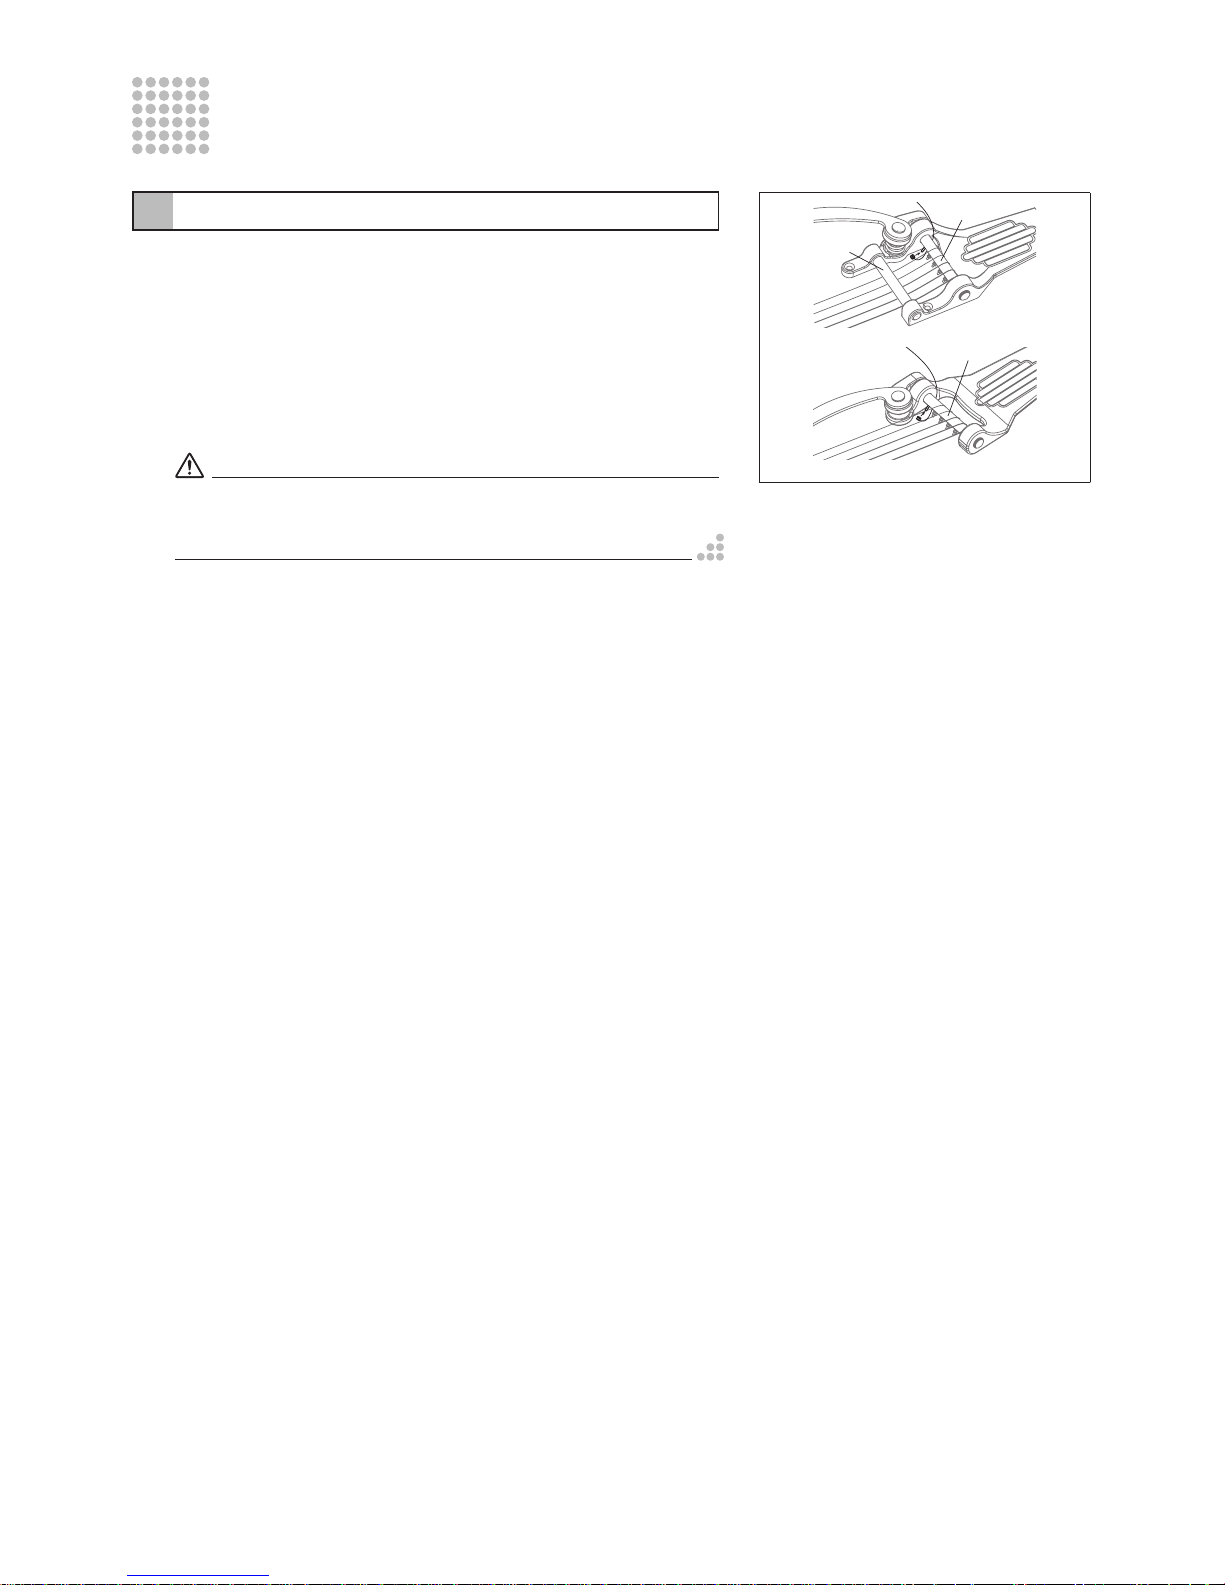
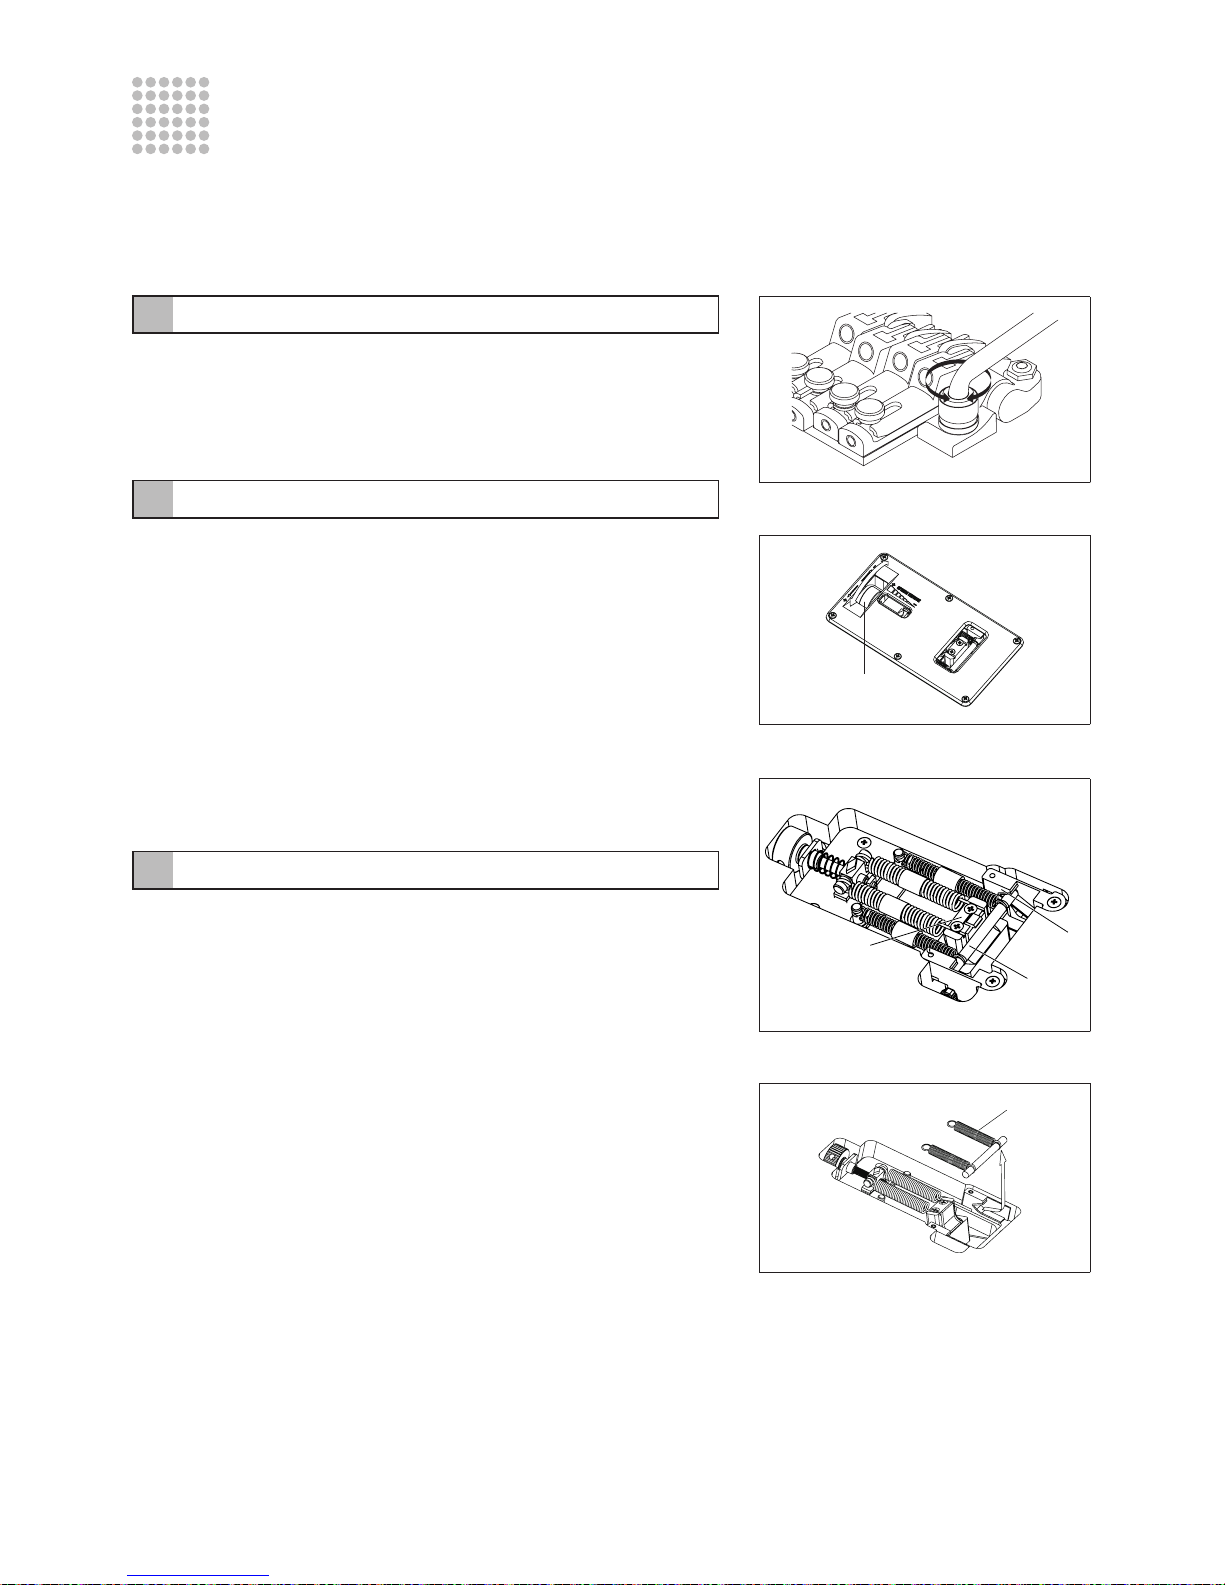
Attaching the tremolo arm
The tremolo arm can be inserted and removed easily. Be sure to insert the tremolo arm
into the arm socket (Fig. 1 A) and push down firmly until the arm snaps into place. To
adjust the torque of the tremolo arm, use a 2 mm Allen key to turn the torque adjustment
screw (Fig. 1 B) through the adjustment hole in the side of the base plate attached to
the back of the arm socket. Turning the screw clockwise will tighten the arm torque, and
turning the screw counterclockwise will loosen the arm torque. To adjust the height of
the arm, remove the tremolo spring cover from the back of the guitar and turn the height
adjustment screw (Fig. 1 C) attached to the bottom of the tremolo block with a 3 mm Allen key. Tightening the screw clockwise will raise the height.
Caution
The Edge III Tremolo has two torque adjustment screws for the tremolo arm:
one is at (Fig. 1 B) and the other is under height adjustment screw (Fig. 1 C).
The adjustment screws are factory adjusted. If adjustment is required, be sure
to remove the tremolo from the guitar before making adjustments.
The Ibanez EGEN8 Herman Li Signature Ibanez EGEN8 has a screw in tremolo arm.
Insert the tremolo arm into the tremolo unit and rotate it to fasten it in place. The method
of adjusting the torque of the tremolo arm is the same as for Edge III.
Caution
Check that the screw (Fig. 1 C) securing the tremolo arm is not loose before
attaching it.
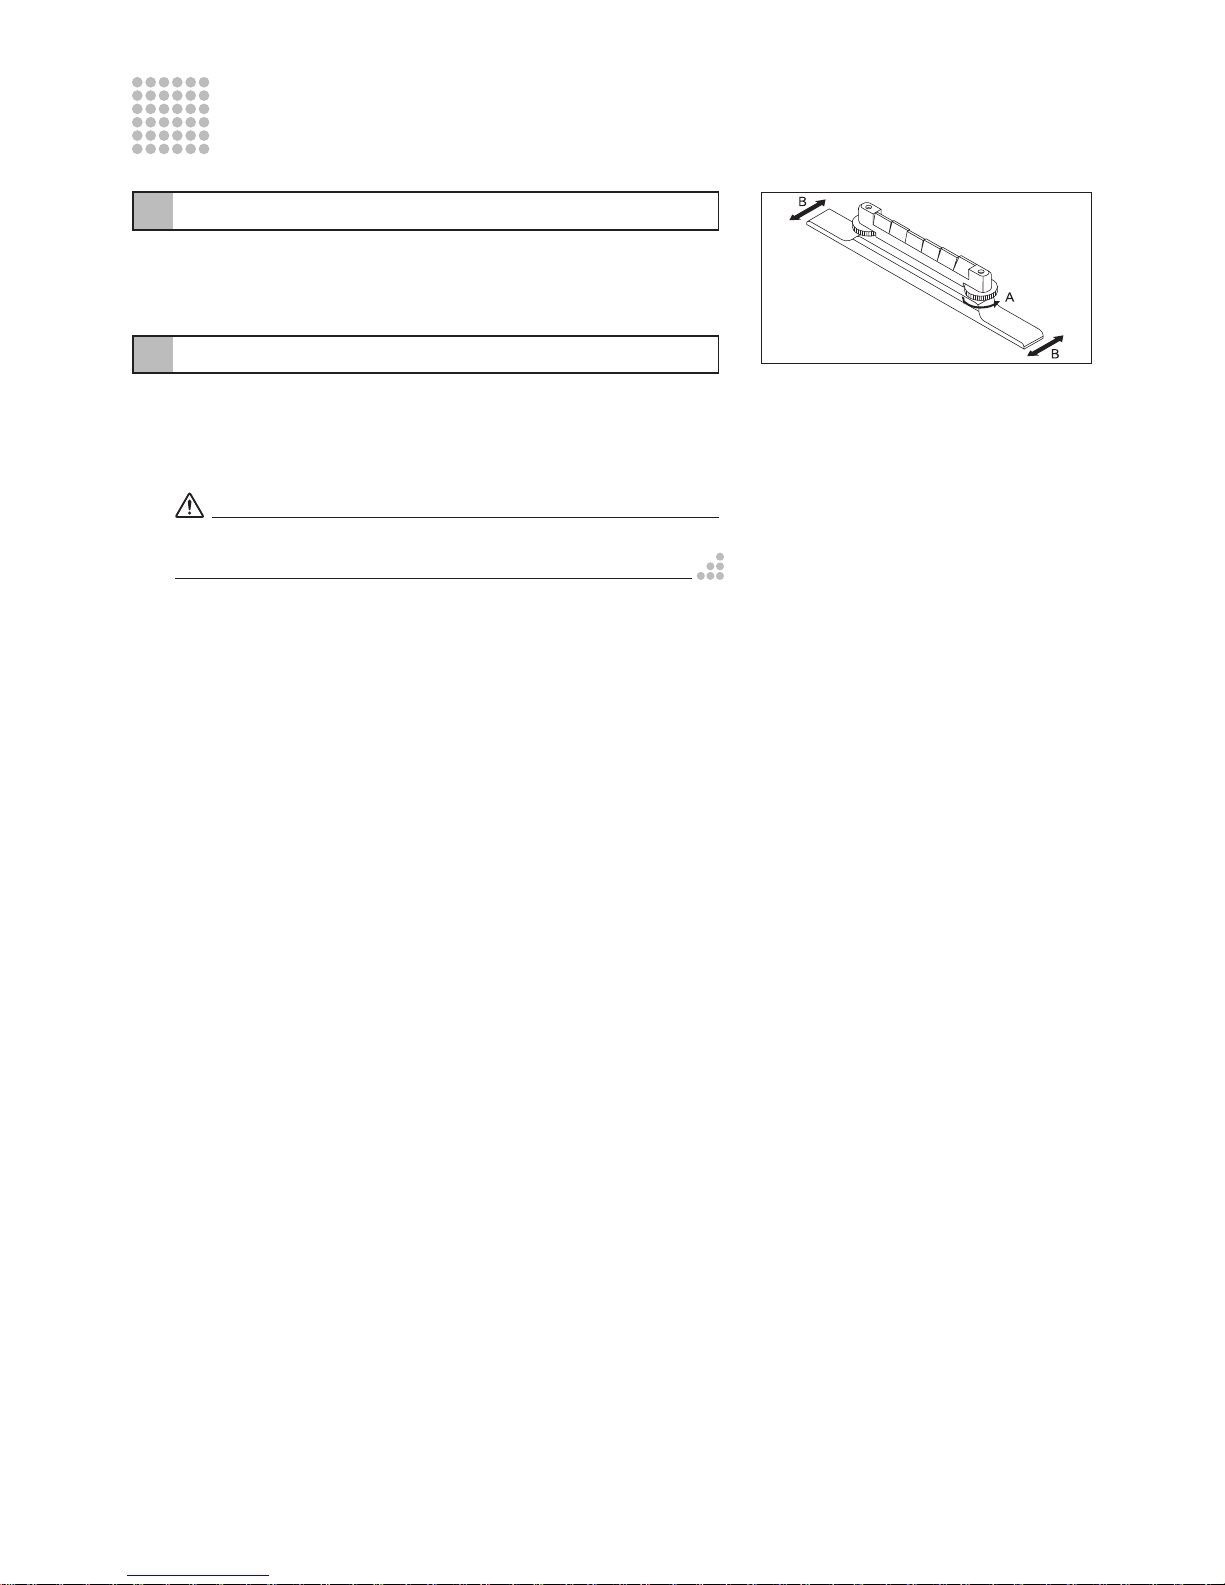
Adjusting the tremolo angle
The angle of the tremolo is adjusted by the balance between the tension of the strings
and the tension of the tremolo springs installed on the back side of the guitar body.
Setting the tremolo so that it is approximately parallel to the surface of the guitar body
will ensure optimal performance (Fig. 2). To adjust the tremolo angle, insert a Philips
screwdriver into a slit in the tremolo spring cover attached to the back of guitar body
and turn the screw of the tremolo spring hook (Fig. 3). With the guitar tuned accurately,
if the tremolo unit is tilted forward, turn the screws clockwise to tighten the springs. If the
tremolo unit is tilted backward, turn the screws counterclockwise to loosen the springs.
When adjusting the tremolo angle, the balance between the tension of the strings and
the tension of the tremolo springs changes each time the tension of the spring is adjusted. Thus, adjustments should affect tuning. Make adjustments by tuning the strings repeatedly. If the string tension significantly changes after the strings have been changed
to a different gauge, it is sometime necessary to change the number of springs or the
way in which the springs are installed.
Fig. 3
Fig. 2
B
A
C
Fig. 1
Page 3
Adjusting the action
Adjust the height of the tremolo unit by turning the stud lock screws (Fig. 4 E) on either
side of the tremolo unit with a 3 mm Allen key. Note that it is not possible to adjust the
height of individual strings.
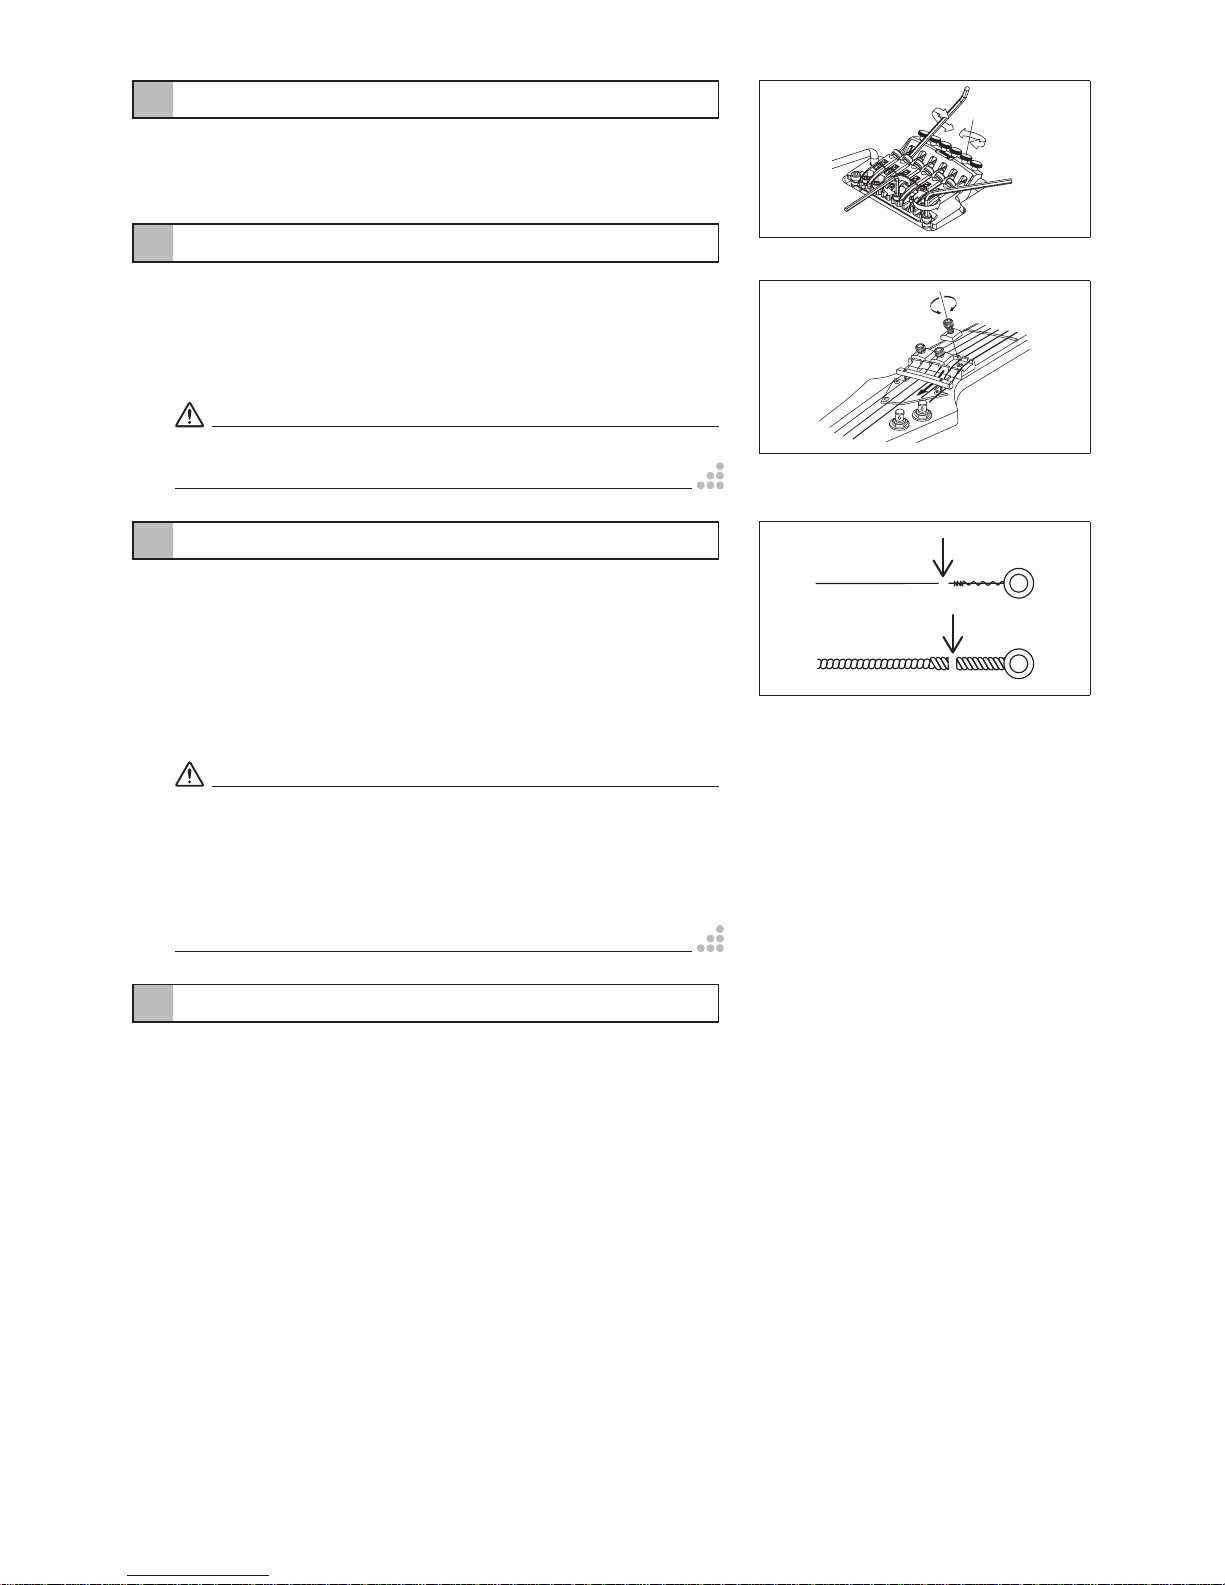
Adjusting the intonation
Loosen the pressure pad screws (Fig. 5 H) on the locking nut with a 3 mm Allen key and
fully loosen the strings. Loosen the saddle lock screw (Fig. 4 F) with a 2 mm Allen key and
adjust the saddle position. Firmly tighten the saddle lock screw (Fig. 4 F), tune the guitar,
and then check the intonation. Repeat these adjustments until the required intonation is
reached, and then tighten the pressure pad screws (Fig. 5 H) in the loc king n uts.
Caution
When loosening the saddle lock screws, you must fully loosen the strings before making adjustments.
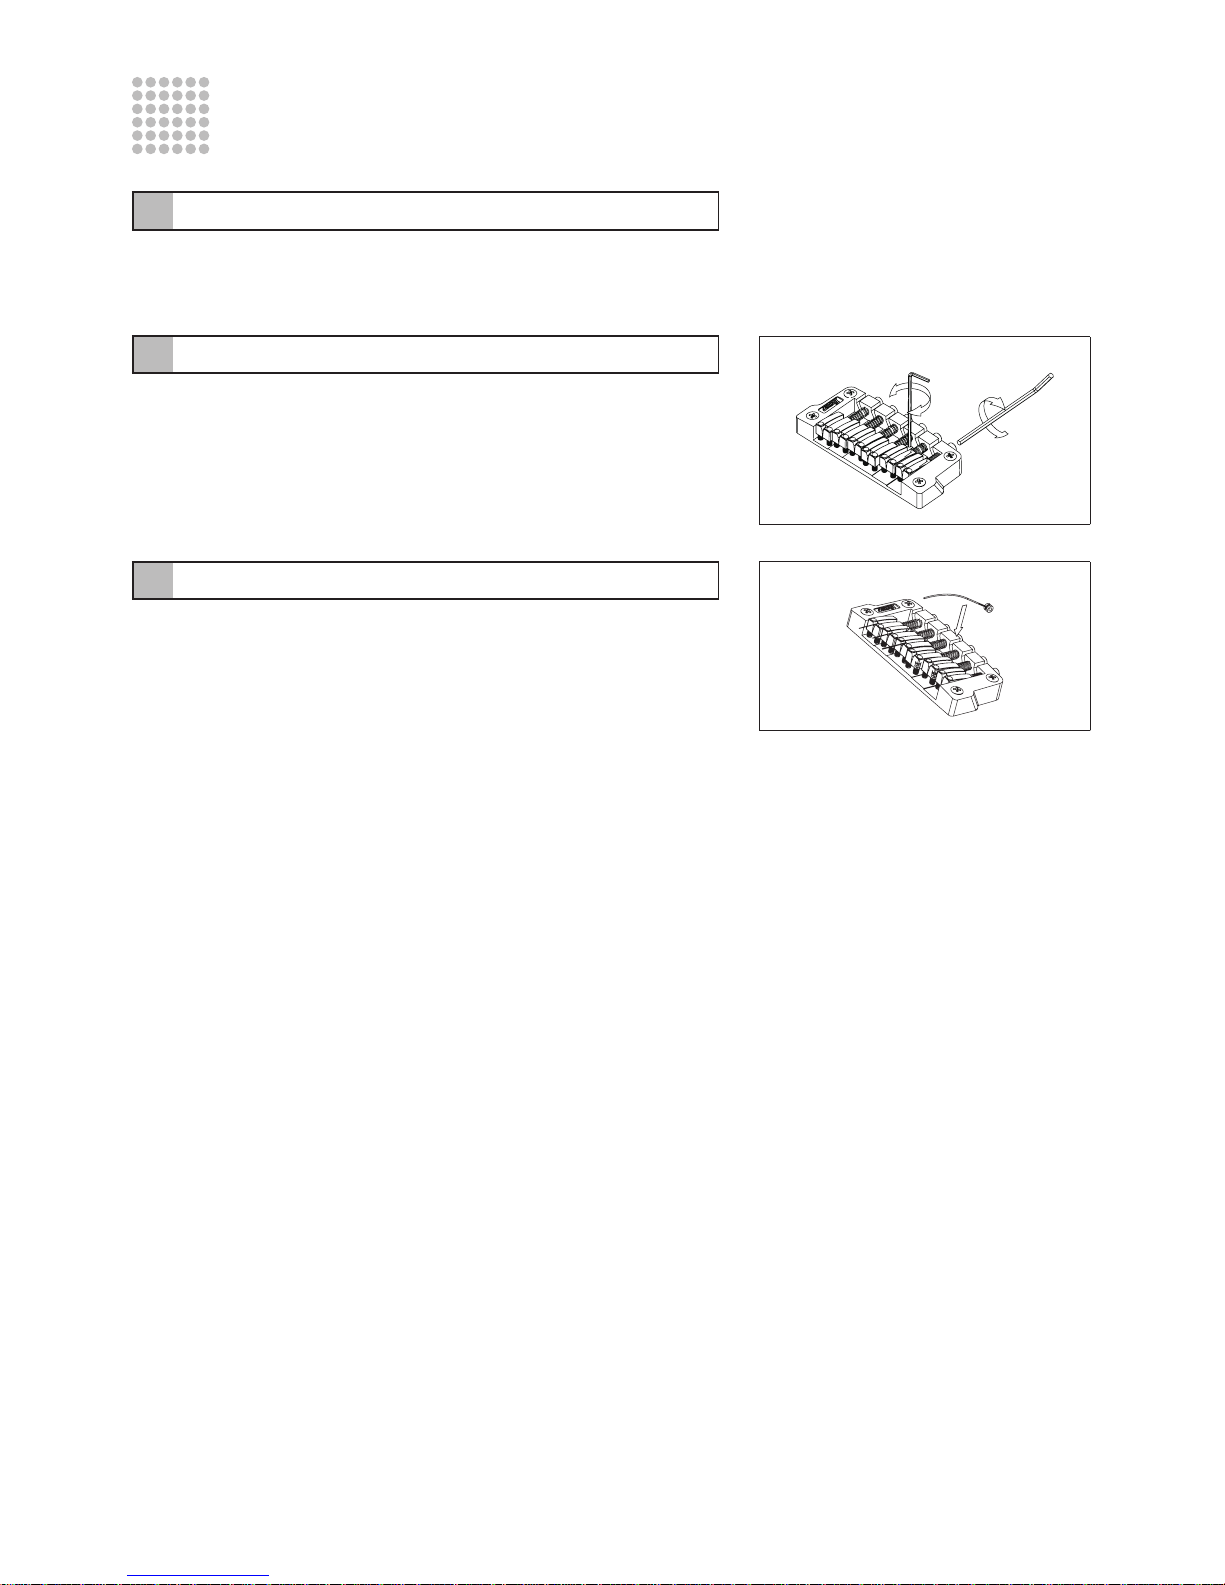
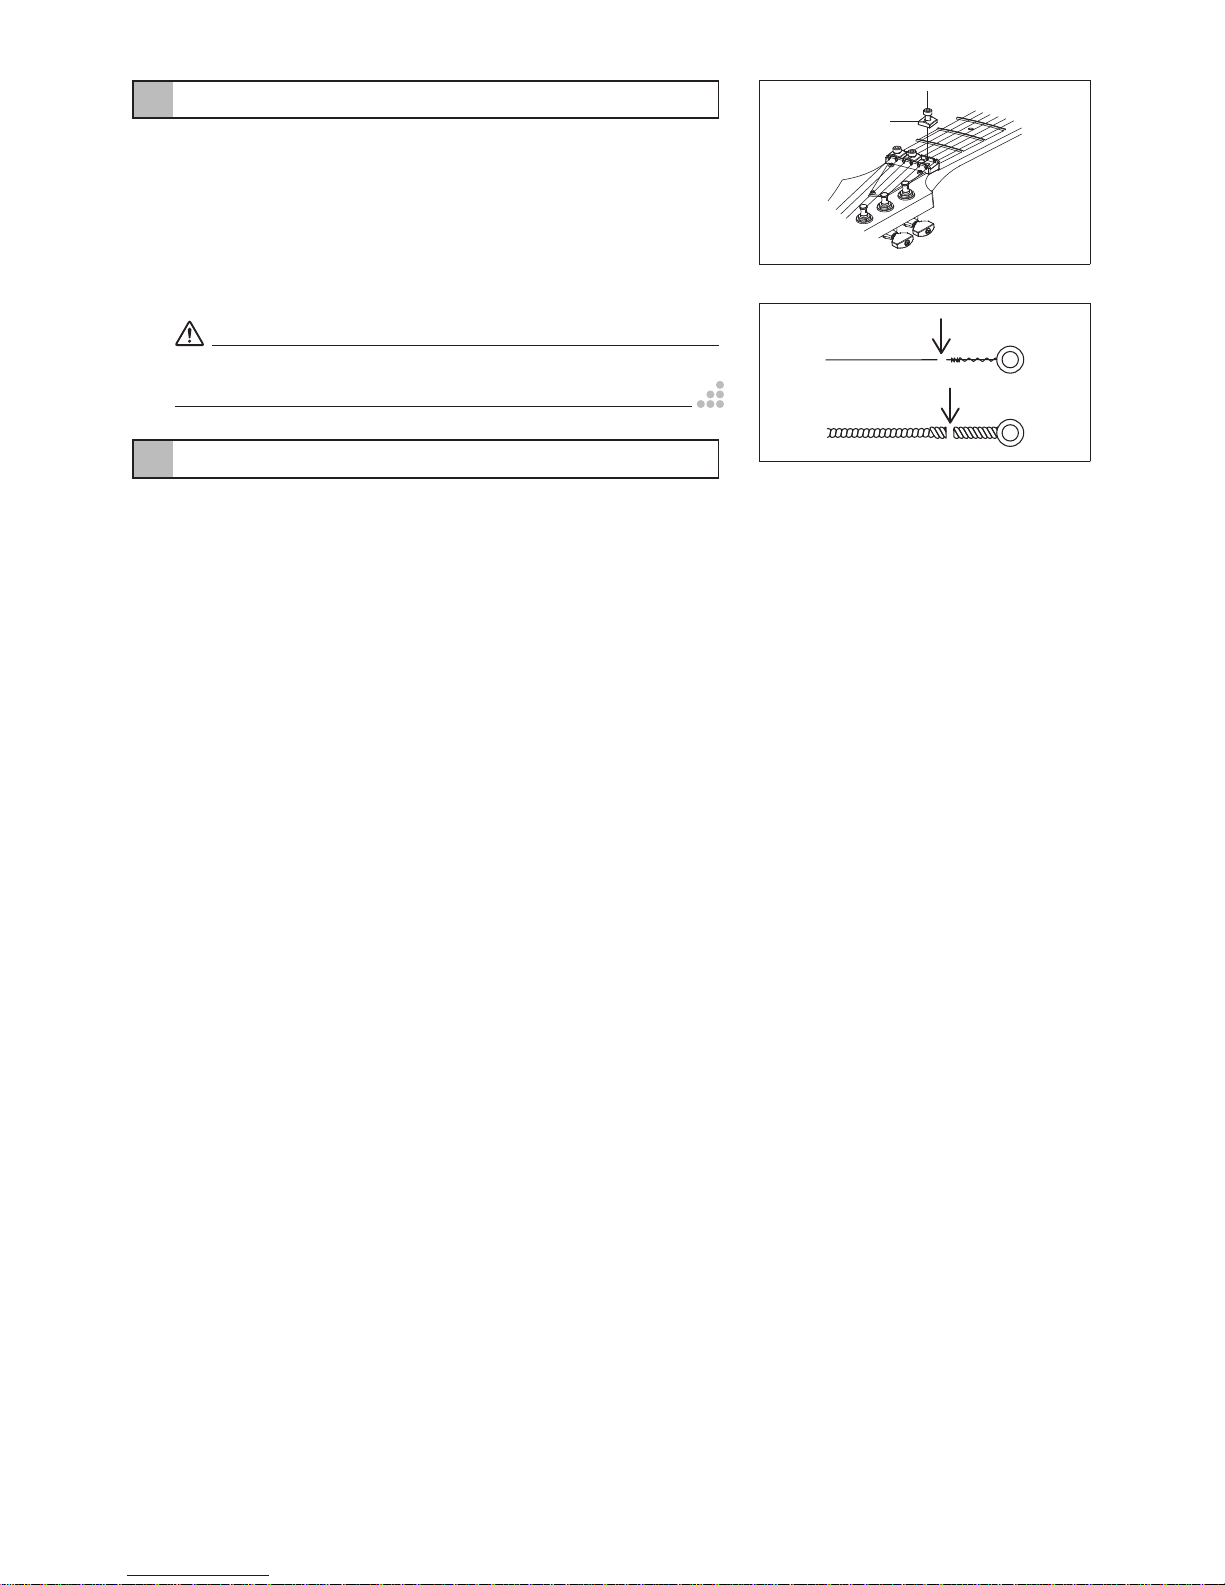
replacing the strings
Loosen the pressure pad screws (Fig. 5 H) on the locking nut with a 3 mm Allen key and
remove the strings from the tuning machines. Loosen the string stopper screw (Fig. 4 G)
on the tremolo unit with a 3 mm Allen key and remove the string from the saddle. Cut off
the ball end of the new string with an end nipper or wire cutter (Fig. 6). Insert the cut side
of the ne w string between the saddle and the string holder block. Tighten the string stopper
screw to secure the string. Wind the string around the tuning machine and tune to pitch.
After tuning, tighten the pressure pad screw on the locking nut.
Caution
Since the angle of the tremolo will change significantly, if all strings are removed at once, you should replace the strings one at a time. To remove all
strings at the same time, tuck a piece of cloth behind the tremolo so that the
tremolo unit sits parallel to the surface of the body. This can make tuning
easy.
Before you tune a string, ensure that the string stopper screw is firmly tightened.
Fine tuning
After locking the locking nut, fine tuning of each string can be carried out by using fine
tuners. To allow maximum fine tuning adjustment, it is recommended that the fine tuners
(Fig. 4 D) be set to the middle position of the range of the movement before tuning.
G
F
E
D
Fig. 4
H
Fig. 5
Fig. 6
Page 4
GIBRALTAR PLUS BRIDGE
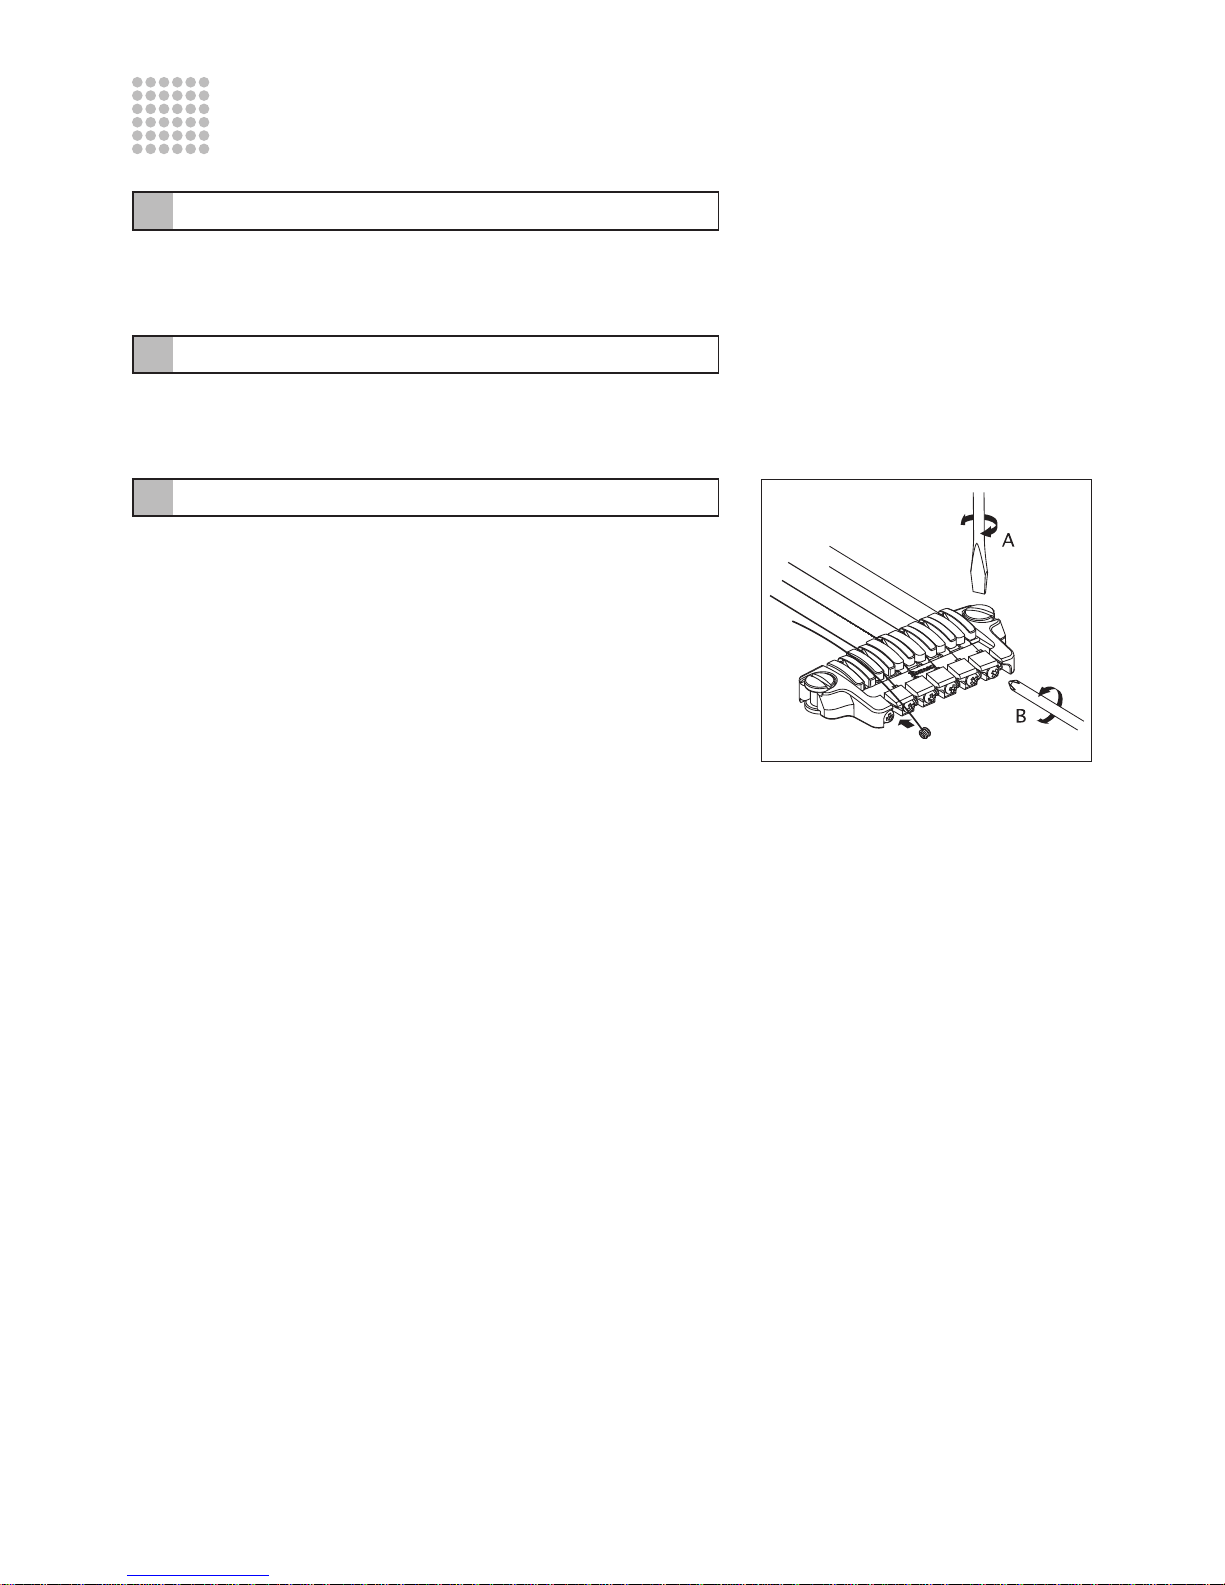
Adjusting the action
Adjust the height of the whole bridge by turning the adjustment bolts (Fig. 1 A) on the
right and left ends of the bridge with a slot head screwdriver or coin. Note that it is not
possible to adjust the height of individual strings.
Adjusting the intonation
To adjust the saddle position, turn the intonation adjustment screws (Fig. 1 B) in the rear
of the bridge with a Phillips screwdriver. Tune the guitar and check the intonation. Repeat
these adjustments until the required intonation is reached.
Replacing the strings
Hook the ball-end (Fig. 1 C) onto the rear section of the tailpiece.
C
Fig. 1
Page 5
GIBRALTAR III BRIDGE (for a guitar/base)
Adjusting the action
Adjust the height of the whole bridge by turning the stud bolts (Fig. 1 A) on the right and
left ends of the bridge with a slot head screwdriver or coin. Note that it is not possible to
adjust the height of individual strings.
Adjusting the intonation
To adjust the saddle position, turn the intonation adjustment screws (Fig. 1 B) on the
saddle subject to adjustment with a Phillips screwdriver. Tune the guitar and check the
intonation. Repeat these adjustments until the required intonation is reached.
A
B
GIBRALTAR III, CB3
Fig. 1
Page 6
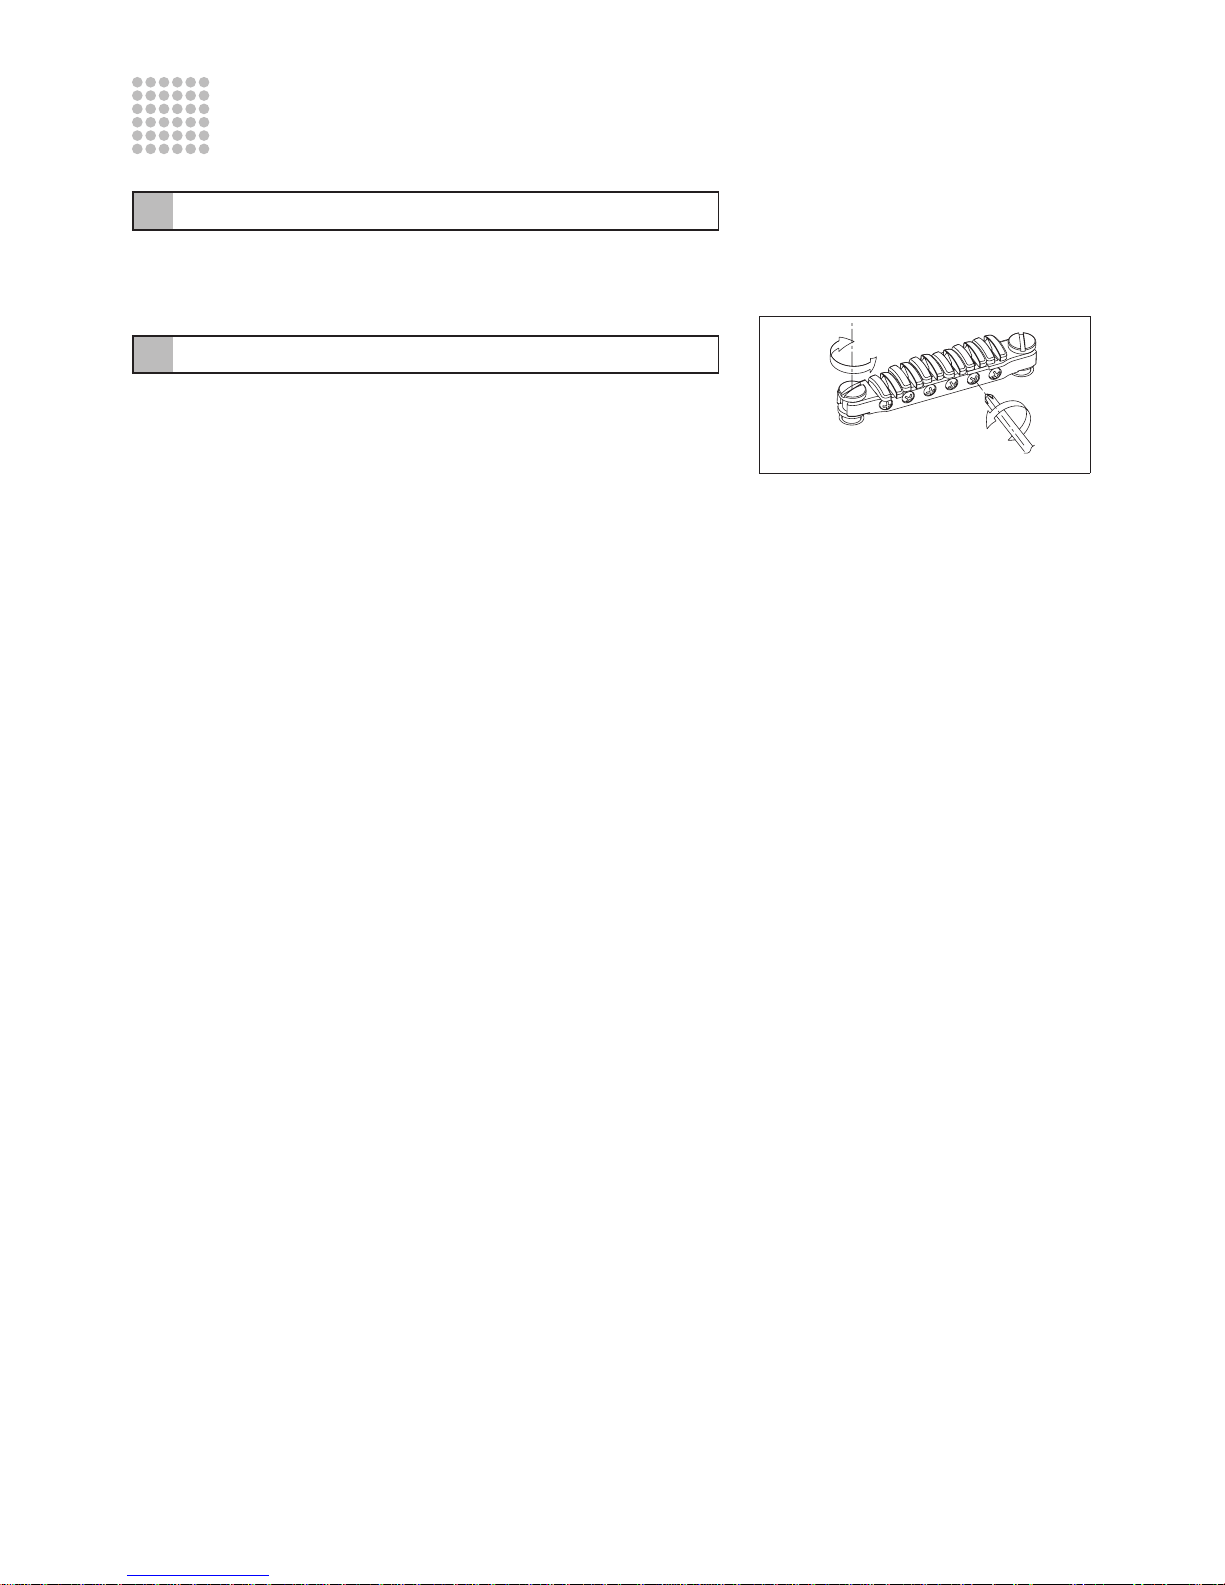
GIBRALTAR CUSTOM BRIDGE
(for a guitar with 6/7 strings)
The Gibraltar custom bridge is designed to enable efficient transfer of string vibration to
the body by securing the bridge body onto the sustain block embedded in the body.
Adjusting the action
Loosen the bolts (Fig. 1 A) on the right and left ends of the bridge unit for fixing the
bridge, and adjust the height of the bridge unit by turning the four height adjustment
screws (Fig. 1 B) on the upper section of the bridge with a 2 mm Allen wrench. Note that
it is not possible to adjust the height of individual strings. After completing adjustment,
tighten the bolts for fixing the bridge.
Adjusting the intonation
Loosen the saddle lock screws (Fig.1 C) with a 2 mm Allen wrench, then turn the intonation adjustment screw (Fig.1 D) with a 2 mm Allen wrench to adjust the saddle position.
Tune the guitar and check the intonation. Repeat these adjustments until the required
intonation is reached, and then tighten the saddle lock screws.
Caution
When adjusting the intonation, be sure to fully loosen the saddle lock bolts
beforehand using a 2 mm Allen wrench. Otherwise, damage may occur.
Replacing the strings
Install strings by threading them from the back of the guitar body through the string anchoring ferrules. After making some string wraps, check that the string rests in the slot
at the center of the saddle.
A
B
C
D
Fig. 1
Page 7
GIBRALTAR STANDARD BRIDGE
Adjusting the action
One of the features of the Gibraltar standard bridge is that the saddle height can be adjusted
individually. To adjust the height of each saddle, turn the adjustment screws (Fig. 1 A) with a
1.5 mm Allen wrench.
Adjusting the intonation
To adjust the saddle position, turn the intonation adjustment screws (Fig. 1 B) on the rear
section of the bridge with a 2.5 mm Allen wrench. Tune the guitar and check the intonation. Repeat these adjustments until the required intonation is reached.
Replacing the strings
There are two methods available for replacing the strings: installing strings through the
string-retainer ferrule, and hooking the ball-end onto the rear of the tailpiece (Fig. 2 C).
A
B
Fig. 1
C
Fig. 2
Page 8
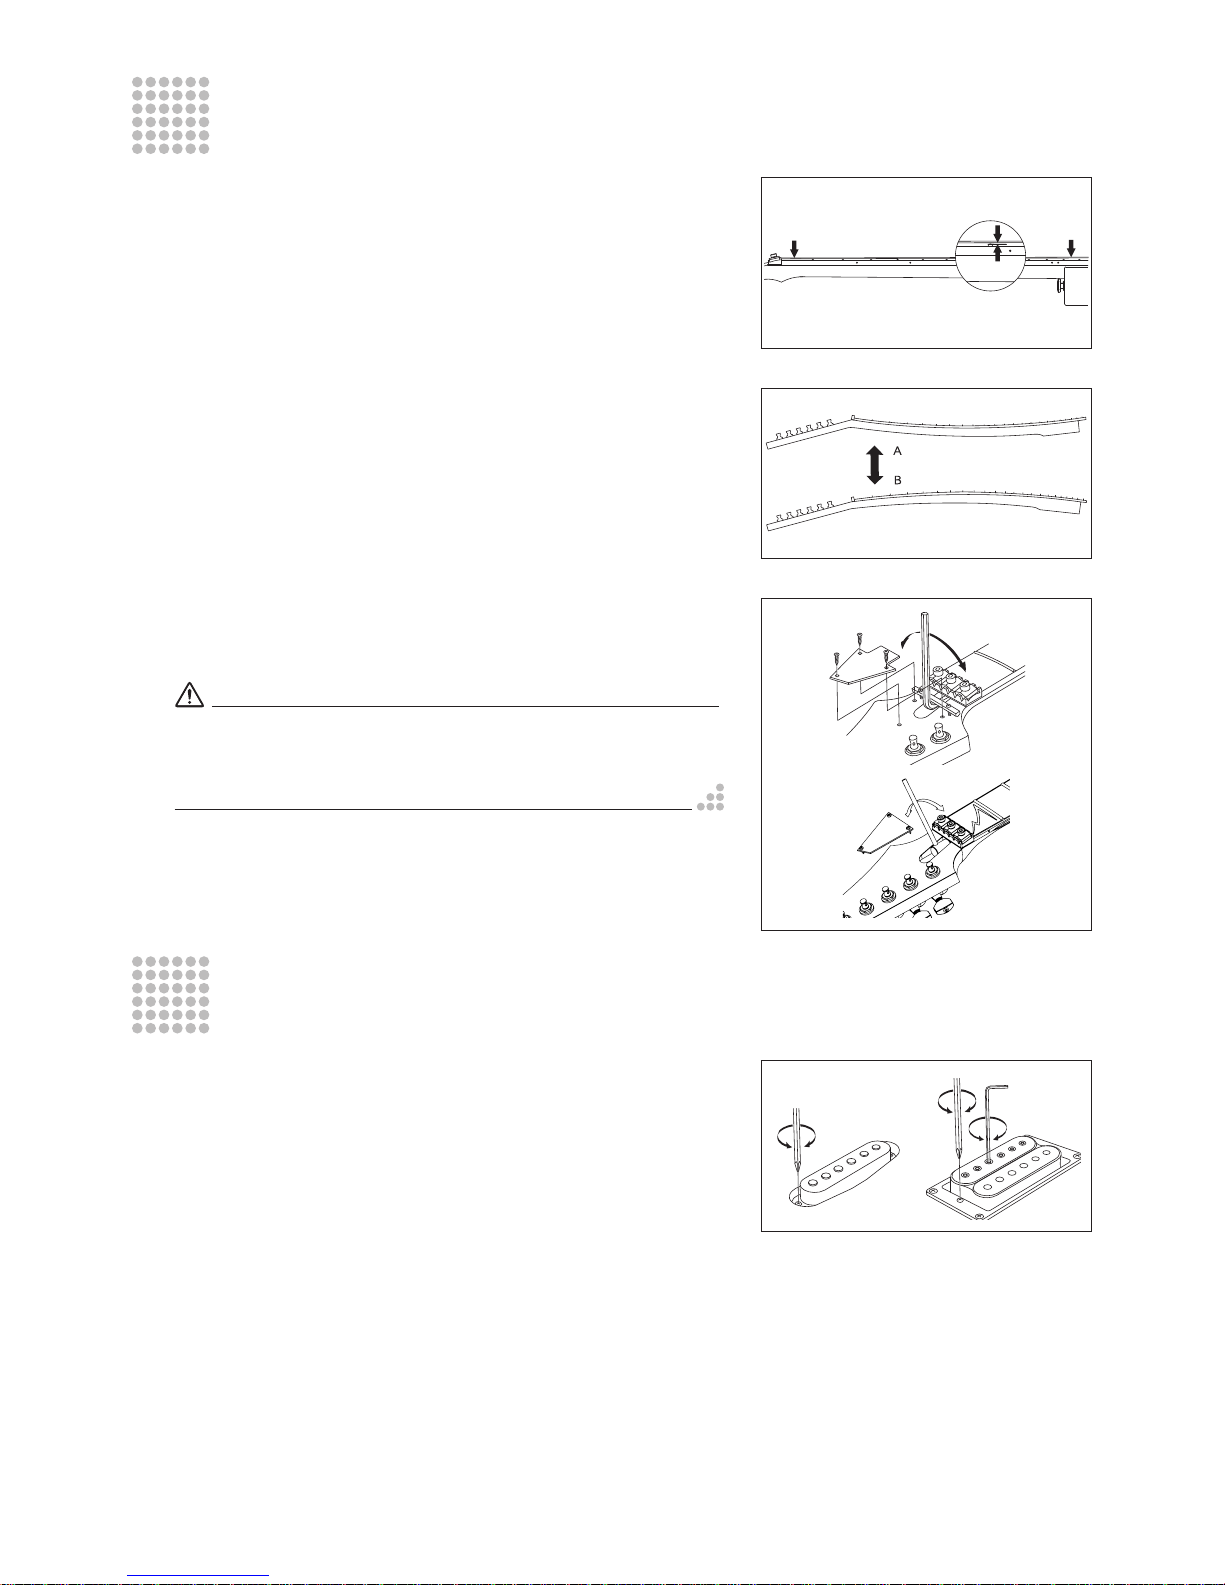
ADJUSTING THE NECK
The neck bears the tension of the strings. The curvature of the neck is subtly affected not
only by the tuning state and string gauge, but also by changes in temperature and humidity. For this reason, the neck contains an internal truss rod that allows the curvature
to be precisely adjusted.
Tune the strings accurately, hold the guitar in playing position, then press the first string
at the first fret and at the fret that is nearest to the point where the neck joins the body,
as shown in Fig. 1. (It will be more convenient to use a capo at the first fret.) Measure
the gap between the string and fret at the eighth fret. Do the same for the sixth (lowest)
string. For each string, the gap should be in the range of 0.3-0.5 mm (a slight bow in
the neck). Although symptoms may vary depending on the type of neck and on how the
neck is joined to the body, problems such as excessive string height, string buzz for high
notes, or intonation difficulties may occur due to an excessively bowed neck (Fig. 2 A),
which will cause this gap to be larger. Conversely, problems such as insufficient string
height, string buzz for low notes, or muted notes may be due to a neck that is bowed
in the reverse direction (Fig. 2 B), which will cause this gap to be smaller. Try to refrain
from simply making a visual judgment. Rather, determine the problem based on the
symptoms that occur, and make the appropriate adjustment. The truss rod nut is located
at the headstock end of the neck. Using the Allen wrench or socket wrench included with
the guitar, tighten the nut toward the right (Fig. 3 C) if you want to bend the neck in the
convex direction, or loosen the nut toward the left (Fig. 3 D) if you want to bend the neck
in the concave direction. Make adjustments in quarter-turns, alternating steps of tuning
and adjustment.
Caution
You must exercise appropriate care when adjusting the neck. If the truss rod
nut does not turn as you expect, or if you are unable to make adjustments
accurately, do not attempt to force the adjustment; contact your dealer or the
Ibanez company.
PICKUPS
By adjusting the pickup height, you can make fine adjustments to the volume and tone. For
a commonly used pickup height, adjust the adjustment screws (Fig. 4 E) on both sides of
the pickup with a Phillip screwdriver to create a space of 2-5 mm between the pickup/pole
piece and the strings pressed at the last fret. Howe v er, this adjustment will depend on your
playing style or on the characteristics of y our amp, so you should make this adjustment while
listening to the actual sound. For pickups of the type that allows the pole piece to be adjusted,
you can correct the volume balance for each string. (Note that y ou can only make adjustment
within a given adjustment range.) Depending on the type of pole piece, use either an Allen
wrench (Fig. 4 F) or a slot head screwdriver, whichever is suited for the pickups .
The volume will increase as the distance between the pickup and string decreases, but if
the spacing is too close, you may get cracked sounds or the string may buzz due to the
magnetic field of the pickup. Conversely, increasing the distance between the string and
pickup will produce a clearer sound with less distortion, but the high-frequency range
may be attenuated and the volume may drop.
For the LZ series of Ibanez active pickups, the pickup characteristics and equalizer balance are adjusted according to the model hosting them. It is designed to enable correct
action to be taken by making correct combinations of the pickups installed on the guitar
and the equalizer to be used. No other combination will work. Do not use this series with
LZ pickups used with some other models or in conjunction with active pickups produced
by other manufacturers. This is also applicable to equalizer selection.
8th fret
Fig. 1
Fig. 2
D
C
C
D
Fig. 3
E
E
F
Fig. 4
Page 9
BATTERY
If your guitar has a built-in preamp or equalizer and requires a battery, you will need to
replace the battery when you notice that the volume has decreased or the sound has
become distorted. The battery is housed in a battery compartment or within the control
cavity. (The location may differ depending on the model of the guitar.) Depending on the
model, either 006P (9 V) battery or two AA (1.5 V x 2) batteries are used. When replacing the battery, check the orientation carefully to place it in the battery compartment or
control cavity in the correct orientation. For a guitar that requires two batteries, do not
mix old and new or alkaline and manganese batteries together. Also, do not use a battery
whose voltage or shape is different from that of the initially installed one.
For a guitar that requires a battery (batteries), the output jack also functions as a power
switch, and the power will turn on when you insert a plug into the output jack. To prevent
battery power leakage and depletion, remove the plug from your guitar if you will not be
using it for an extended period of time. To prevent your amp or other equipment from being damaged when you plug in your guitar, turn off the power of your equipment or turn
down the volume before you make connections.
Caution
The battery shipped with the guitar is for testing.
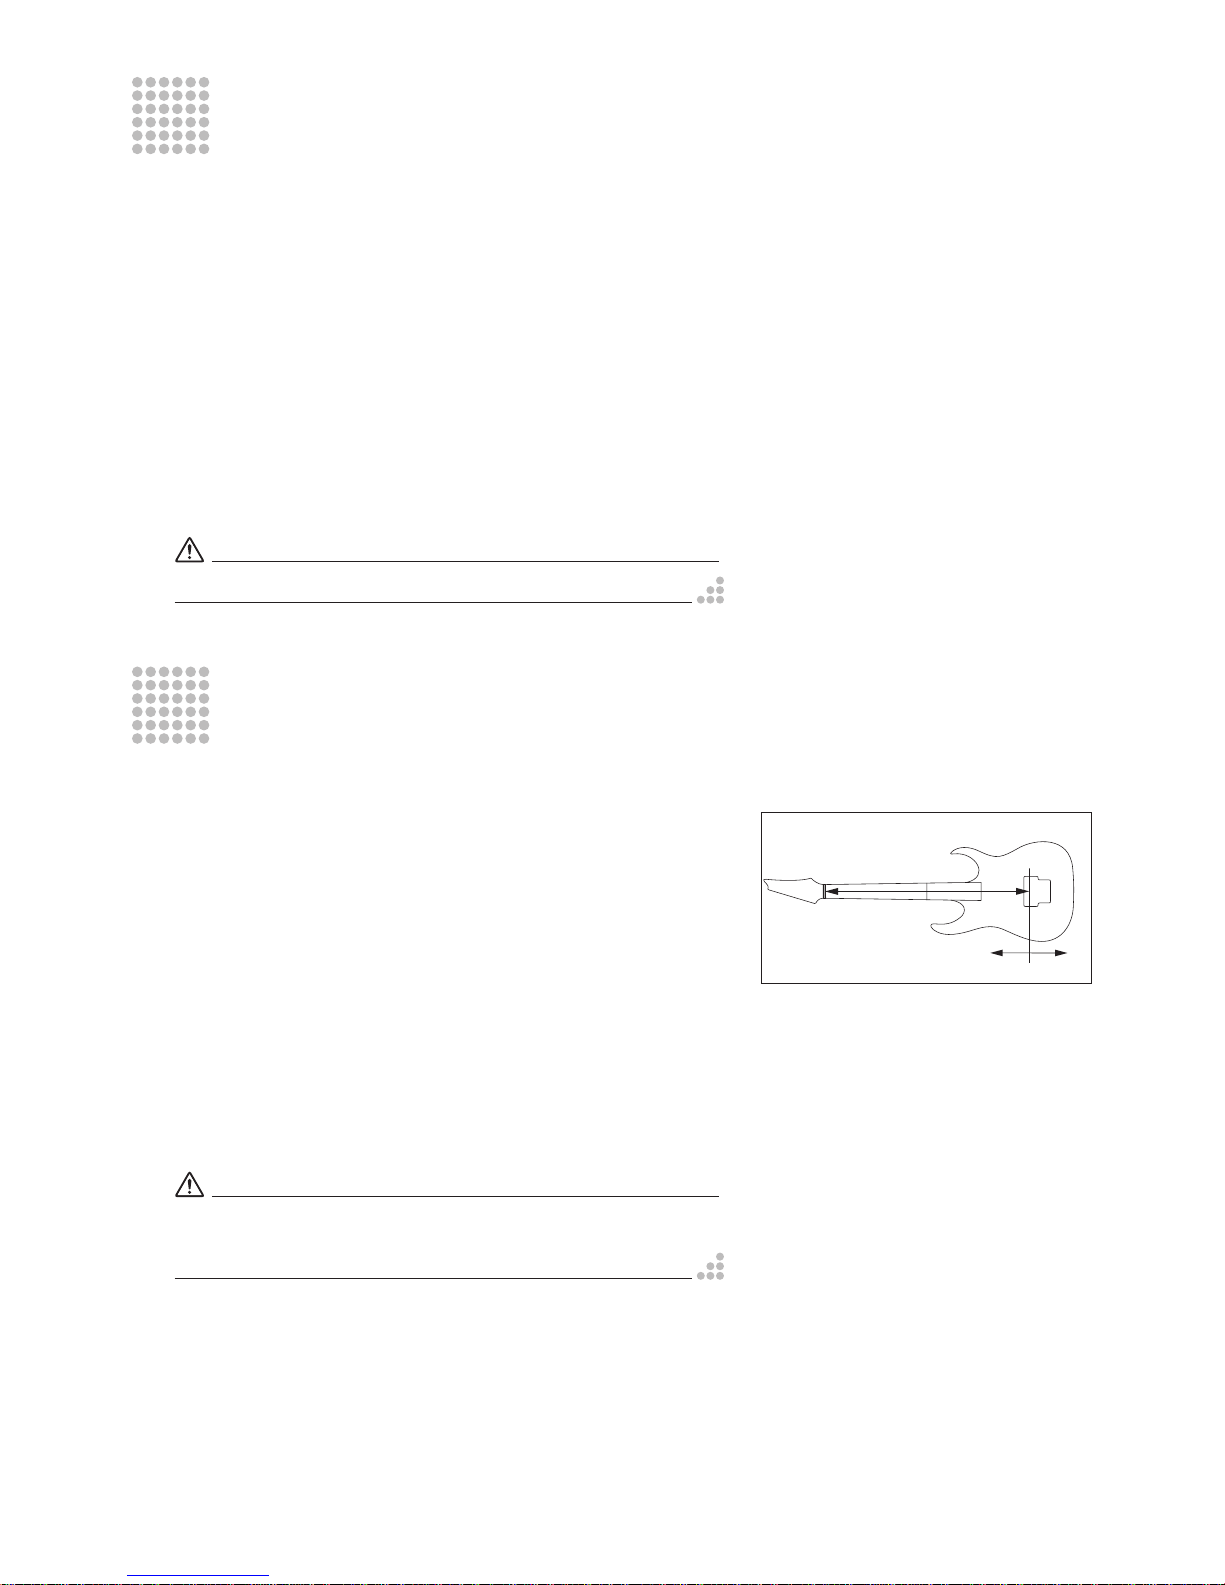
ADJUSTING THE INTONATION
(STRING lENGTH)
The fret position is set according to a calculation of the correct musical scale existing under
certain conditions, referring to the scale from the nut to the bridge. However, conditions under
which the guitar is played greatly vary depending on the thickness of strings, neck condition,
and tuning. In order to correct subtle interval diversions arising from these differences, you will
need to carry out fine adjustment for the string length (intonation adjustment). When replacing
with new strings, or when adjusting the neck, be sure to adjust intonation.
After completing adjustment of the neck or each section of the strings on the higher
side, you should perform accurate tuning (use of a tuning meter is recommended). Hold
it in playing position, and compare the pitch of the string pressed down at the 12th fret
with the harmonic played at the 12th fret. If the pitch played at the 12th fret is lower than
the harmonic, move the bridge saddle forward (Fig. 5 G) to shorten the string length.
Conversely, if the pitch played at the 12th fret is higher than the harmonic, move the
bridge saddle backward (Fig. 5 H) to lengthen the string length. The method of adjusting
depends on the type of bridge your guitar has, so carry out adjustments referring to the
adjustment manual for your bridge.
Caution
The string may break if the saddle is moved a substantial distance, so be sure
to loosen the string before you adjust the saddle if a major adjustment is required.
G
H
12F
Fig. 5
Page 10
VINTAGE VIBRATO
Replacing the strings
Replace the strings one by one. Fix the ball end onto the post of the bar (Fig. 1 B), extend
the string over the bar, and then wrap it around the peg. For a model with a retainer bar
(Fig. 1 A), VBX60/VBX80, pass the string over the bar and then beneath the retainer bar
before wrapping it around the peg. While replacing strings, always pull the string lightly
toward the headstock and exercise care not to allow the ball-end to go off the post. Check
that the string is correctly placed on the saddle while tuning. After completing tuning,
proceed to replacement of the next string. After finishing replacing all strings, carry out
tuning again for the entire unit.
Caution
Removing all strings at the same time may have a serious impact on the state
of each section of the guitar due to sudden changes of tension imposed on the
guitar. Be sure to replace the strings one by one.
B
A
VBX60
VBS80
B
VBF70
Fig. 1
Page 11

FIXED BRIDGE (for a guitar with 6/7 strings)
Adjusting the action
With the fixed bridge, the saddle height can be adjusted individually. To adjust the height
of each saddle, turn the adjustment screws (Fig. 1 A) with a 1.5 mm Allen wrench.
Adjusting the intonation
To adjust the saddle position, turn the intonation adjustment screws (Fig. 1 B) in the rear
of the bridge with a Phillips screwdriver. Tune the guitar and check the intonation. Repeat
these adjustments until the required intonation is reached.
Replacing the strings
Install strings by threading them from the back of the guitar body through the string
anchoring ferrules.
Fig. 1
Page 12

FULL ACOUSTIC TAILPIECE WITH
HEIGHT-ADJUSTMENT MECHANISM
The full acoustic guitar tailpiece has a height adjustment mechanism for strings 1-3
and for strings 4-6. Fasten the adjustment knobs (Fig. 1 A) to lower the height of the
tailpiece.
A
Fig. 1
Page 13
FULL ACOUSTIC BRIDGE
Adjusting the action
Adjust the height of the whole bridge by turning the adjustment spinners (Fig. 1 A) on the
right and left ends of the bridge with your fingers. Note that it is not possible to adjust the
height of individual strings.
Adjusting the intonation
To adjust the position, loosen the strings to move the entire bridge (Fig. 1 B). Tune the
guitar and check the intonation. Repeat these adjustments until the required intonation
is reached. Also, exercise care not to allow the bridge to incline.
Caution
When replacing the strings, it is recommended that they be replaced one by
one so that the bridge does not become displaced.
Fig. 1
Page 14

FULL TUNE (II / III), 510B, ART BRIDGE
Adjusting the action
Adjust the height of the whole bridge by turning the adjustment spinners on the right and
left ends of the bridge (Fig. 1 A). With the 510B bridge, the saddle height can be adjusted
individually. To adjust the height of each saddle, turn the adjustment screws (Fig. 1 C)
with a 1.5 mm Allen wrench.
Adjusting the intonation
To adjust the saddle position, turn the intonation adjustment screws on the saddle subject to adjustment with a slot head screwdriver (Fig. 1 B). Tune the guitar and check the
intonation. Repeat these adjustments until the required intonation is reached.
Fig. 1
Page 15

EDGE-ZERO TREMOLO / ZR2 TREMOLO
The Ibanez Edge Zero or ZR2 Tremolo is a double locking tremolo that features the zero
point system that keeps the tremolo unit flat (at the zero point). This system eliminates
the hassle of tuning, which is a shortcoming of the floating tremolo, providing a more
comfortable playing experience. The Edge-Zero uses knife edge and ZR2 uses ballbearings for pivots.
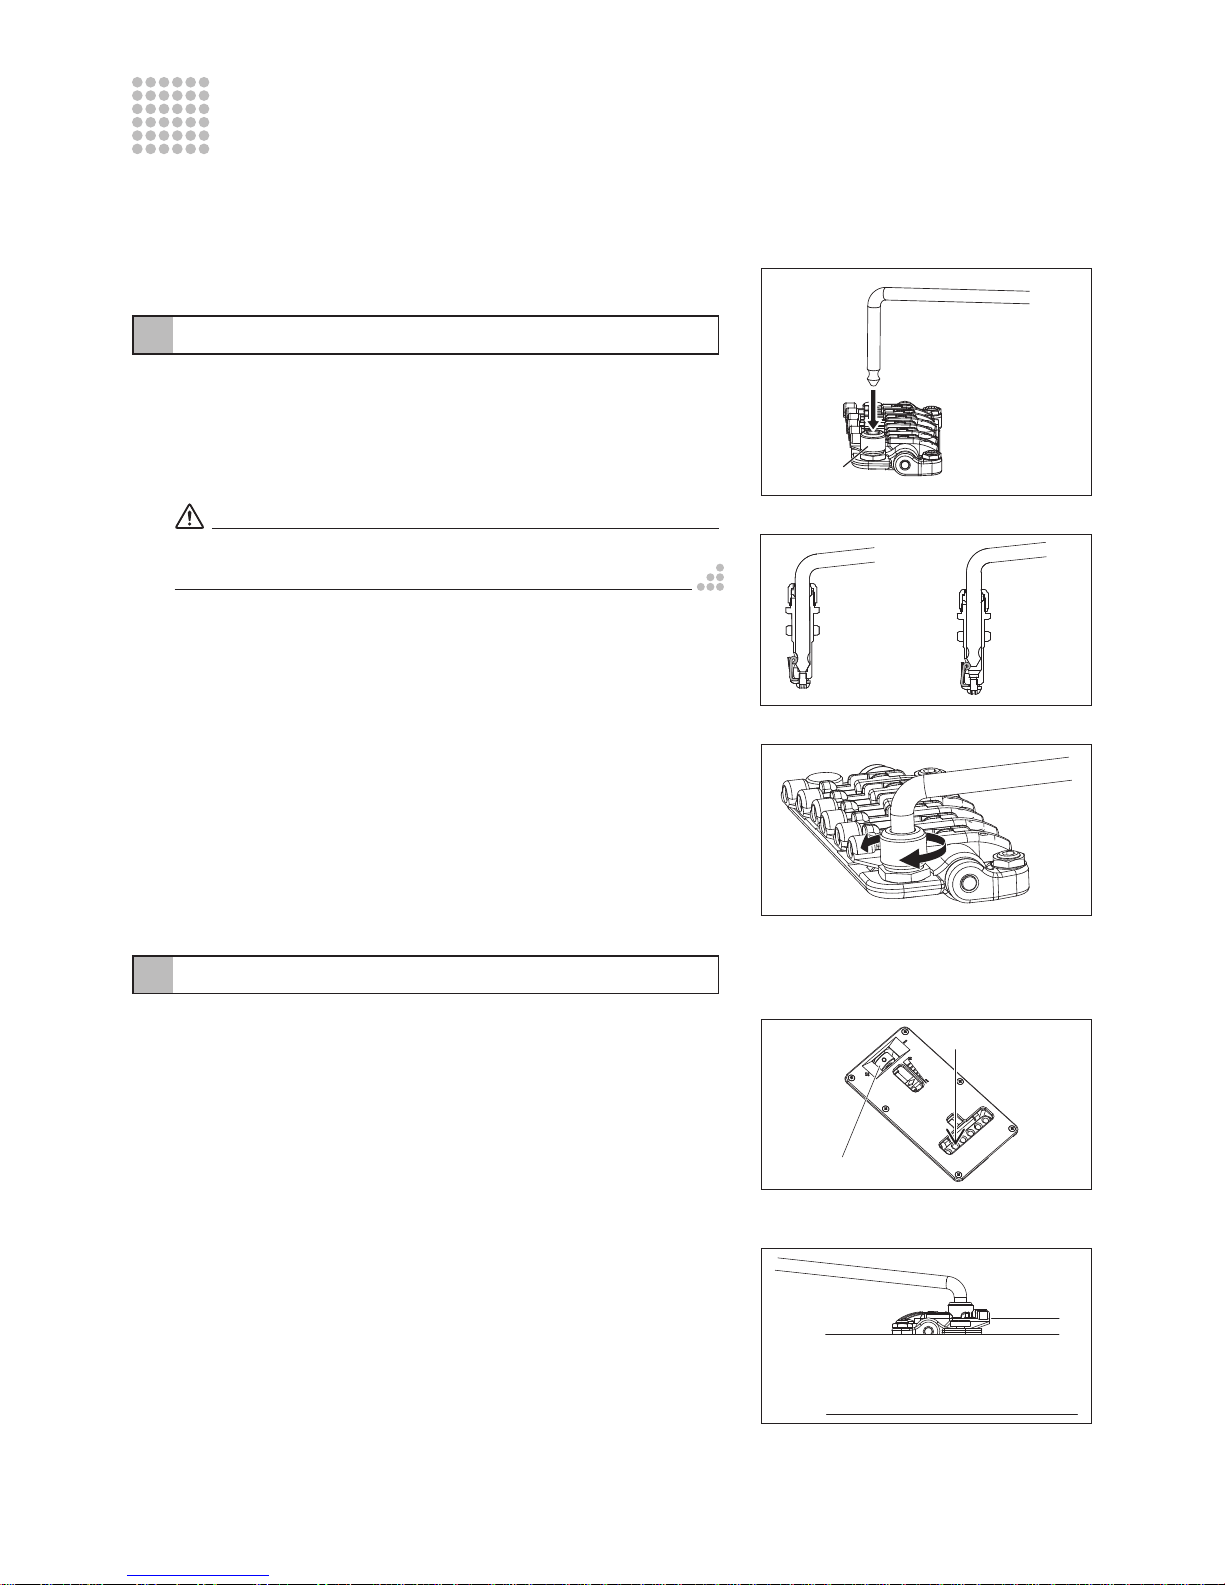
Attaching the tremolo arm
The tremolo arm can be inserted and removed easily. Be sure to insert the tremolo arm
into the arm socket (Fig. 1 A) and push it down firmly until the arm snaps into place (Fig. 2).
The torque of the tremolo arm is adjusted with the torque adjustment cap (Fig. 3). Turning
the cap clockwise will tighten the arm torque, and turning the screw counterclockwise will
loosen the arm torque.
Caution
Be sure to fully loosen the torque adjustment cap before attaching the tremolo
arm.
Adjusting tremolo angle and Zero Point System
The angle of the tremolo is adjusted by the balance between the tension of the strings
and the zero point system installed on the back side of the guitar body. The Edge-Zero
and ZR2 tremolo are designed so that the tremolo unit sits roughly parallel to the surface
of the guitar body by adjusting the zero point system correctly. This ensures optimal
performance. Tuning is completed when the zero point system is adjusted to the correct
position. If the tremolo is roughly parallel to the surface of the body, the stop rod contacts
the tremolo block and the stopper.
To adjust the angle of the tremolo, turn the spring adjustment knob (Fig. 4 B) on the back
side of the guitar. If the stop rod (Fig. 5 C) does not contact the stopper (Fig. 5 D) (or the
tremolo is tilted forward) while the guitar is tuned correctly, turn the spring adjustment
knob clockwise to tighten the spring. If the tremolo block (Fig. 5 E) does not contact the
stop rod (or the tremolo is tilted backward), turn the spring adjustment knob counterclockwise to loosen the spring.
OK
NG
Fig. 2
Fig. 3
B
Fig. 4
A
Fig. 1
E
C
D
Fig. 5
Page 16

Using as a floating tremolo (Zero Point System deactivated)
The Edge-Zero and ZR2 tremolo can also be used as a normal floating tremolo by deactivating the Zero Point System. While holding the arm up (with the tremolo block facing
away from the stop-rod (Fig. 5 C), remove the-stop rod and sub-spring (Fig. 6 F). The
angle of the tremolo that is kept in a floating state is adjusted by the balance between the
tension of the strings and the tension of the tremolo springs installed on the back side
of the guitar body. To maximize performance, set the tremolo so that it is approximately
parallel to the surface of the guitar body. To adjust the angle of the tremolo, turn the
spring adjustment knob (Fig. 4 B) on the back side of the guitar. If the tremolo is tilted
forward while the guitar is tuned correctly, turn the spring adjustment knob clockwise
to tighten the spring. If the tremolo is tilted backward, turn the spring adjustment knob
counterclockwise to loosen the spring.
When adjusting the tremolo angle in the floating state, the balance between the tension
of the strings and the tension of the tremolo springs changes each time the tension of the
spring is adjusted. Thus, adjustments should affect tuning. Make adjustments by tuning
the strings repeatedly.
Adjusting the action
Adjust the height of the tremolo unit by turning the stud lock screws (Fig. 7 H) on either
side of the tremolo unit with a 3 mm Allen key. Note that it is not possible to adjust the
height of individual strings.
Stud lock mechanism (Edge Zero tremolo)
The Edge Zero tremolo has a stud lock mechanism. The stud lock bolts (Fig. 8 L) are
packed in the accessory bag. Remove the tremolo unit and stud bolts (Fig. 7 H) from the
guitar. Install the stud lock bolts into the holes in the bottom of each stud bolt with the
adjustment holes for an Allen key facing up. To lock the stud bolt, insert a 2 mm Allen key
into the hole on the top of the stud bolt and turn the bolt clockwise (Fig. 8 K). The stud
lock bolt is locked when it touches the anchor bolt and cannot be turned any further.
Adjusting the intonation
Remove the intonation adjustment bolts (Fig. 9 N) housed in the bridge unit and tighten
them in the screw holes at the rear of the saddle until the end of each bolt touches the
wall of the bridge unit. Loosen the saddle lock screws with a 2 mm Allen key (Fig. 7 J),
turn the intonation adjustment screws to adjust the saddle position. Tune the guitar and
check the intonation. Repeat these adjustments until the required intonation is reached.
Fully tighten the saddle lock screws and put the intonation adjustment screws into the
bridge unit.
F
Fig. 6
Edge-Zero
H
H
G
G
J
J
ZR-2
Fig. 7
K
L
Fig. 8
N
M
Fig. 9
Page 17
Replacing the strings
Loosen the pressure pad screws (Fig. 10 P) on the locking nut with a 3 mm Allen key and
remove the strings from the tuning machines. Loosen the string stopper screw (Fig. 9 M)
on the tremolo unit with a 3 mm Allen key and remove the string from the saddle. Cut off
the ball end of the new string with an end nipper or wire cutter (Fig. 11). Insert the cut side
of new string between the saddle and the string holder block. Tighten the string stopper
screw to secure the string. Wind the string around the tuning machine and tune to pitch.
After tuning, tighten the pressure pad screw on the locking nut.
Caution
Before you tune a string, make sure that the string stopper screw is firmly
tightened.
Fine tuning
After locking the locking nut, fine tuning of each string can be carried by using fine tuners.
To allow maximum fine tuning adjustment, it is recommended that the fine tuners (Fig. 7 G)
be set to the middle position of the range of the movement before tuning.
Fig. 11
P
Fig. 10
Page 18

FX EDGE BRIDGE/FX EDGE III-8 BRIDGE
The FX EDGE/FX EDGE III-8 bridge is a locking fixed bridge that was developed based
on the Ibanez Lo-Pro Edge and Edge III Tremolo. The Edge supports the bridge with
three stud bolts: one stud mounted at the rear of the base plate in addition to the two
main studs. These studs help to lock the bridge in place and efficiently transmit string
vibration into the body.
Adjusting the action
Adjust the height of the whole bridge by turning all of the three stud bolts. Note that
it is not possible to adjust the height of individual strings. After adjusting the height of
the main studs (Fig. 1 A), the rear stud (Fig. 1 B) must be compensated by using the
provided 3 mm Allen key to keep the angle of the bridge in the correct alignment. (The
bridge should sit parallel to the body (Fig. 2).)
Caution
With a half turn of the main stud, the action changes approximately 0.3 to
0.5 mm. Carry out action adjustments by repeatedly turning the stud bolts in
smaller increments.
The action may change after the final adjustment of the rear stud. It is recommended that you check the final action after the rear stud is adjusted.
A
B
FX-EDGEⅢ-8
FX-EDGE
B
A
Fig. 1
Fig. 2
Page 19

Adjusting the intonation
Loosen the pressure pad screws (Fig. 4 F) on the locking nut with a 3 mm Allen ke y and
fully loosen the strings. Loosen the saddle lock screw (Fig. 3 D) with a 2 mm Allen key and
adjust the saddle position. Firmly tighten the saddle lock screw (Fig. 3 D), tune the guitar,
and then check the intonation. Repeat these adjustments until the required intonation is
reached, and then tighten the pressure pad screws (Fig. 4 F) in the loc king n uts.
Caution
When loosening the saddle lock screws, you must fully loosen the strings
before making adjustments.
Replacing the strings
Loosen the pressure pad screws (Fig. 4 F) on the locking nut with a 3 mm Allen key and remove the strings from the tuning machines. Loosen the string stopper screw (Fig. 3 C) on the
tremolo unit with a 3 mm Allen key and remove the string from the saddle. Cut off the ball end
of the new string with an end nipper or wire cutter (Fig. 5). Insert the cut side of the new string
between the saddle and the string holder block. Tighten the string stopper screw to secure
the string. Wind the string around the tuning machine and tune to pitch. After tuning, tighten
the pressure pad screw on the locking nut.
Caution
Before you tune the strings, make sure that the string stopper screw is firmly
tightened.
Fine tuning
After locking the locking nut, fine tuning of each string can be carried out by using fine
tuners. To allow maximum fine tuning adjustment, it is recommended that the fine tuners
(Fig. 3 E) be set to the middle position of the range of movement before tuning.
Fig. 3
D
C
E
D
C
E
F
Fig. 4
Fig. 5
FX-EDGEⅢ-8
FX-EDGE
Page 20
synchroniZR
The synchroniZR tremolo is a floating-type synchronized tremolo. The synchroniZR features a high level of smoothness of a ball bearing pivot. The ZPX-FX spring system has
an arm-up and stopper function. This limits the action specifically to the arm-down and
eliminates the hassle of tuning, which is a shortcoming of a floating tremolo. The tremolo
arm is made of lightweight duralumin to reduce the shaking of the tremolo caused by the
overall weight of the tremolo arm.
Attaching the themolo arm
The tremolo arm can be easily inserted and removed. Be sure to insert the tremolo arm
into the arm socket (Fig.1 A) and push it down firmly until the arm snaps into place (Fig. 2).
The torque of the tremolo arm is adjusted with the torque adjustment cap (Fig. 3). Turning
the cap clockwise will tighten the arm torque, and turning the screw counterclockwise will
loosen the arm torque.
Caution
Be sure to fully loosen the torque adjustment cap before attaching the tremolo
arm.
Adjusting the tremolo angle
The angle of the tremolo is adjusted by the balance between the tension of the strings
and the tension of the tremolo springs installed on the back side of the guitar body. To
maximize performance, set the tremolo so that it is approximately parallel to the surface
of the guitar body (Fig. 5). To adjust the angle of the tremolo, turn the spring adjustment
knob on the back side of the guitar (Fig. 4 B). If the tremolo is tilted forward while the
guitar is tuned correctly, turn the spring adjustment knob clockwise to tighten the spring.
If the tremolo is tilted backward, turn the spring adjustment knob counterclockwise to
loosen the spring.
When adjusting the tremolo angle in the floating state, the balance between the tension
of the strings and the tension of the tremolo springs changes each time the tension of the
spring is adjusted. Thus, adjustments should affect tuning. Make adjustments by tuning
the strings repeatedly.
A
Fig. 1
OK
NG
Fig. 2
Fig. 3
B
C
Fig. 4
Fig. 5
Page 21

Adjusting the action
Adjust the height of the tremolo unit by turning the stud lock screws (Fig. 6 D) on either
side of the tremolo unit with a 3 mm Allen key. Note that it is not possible to adjust the of
height of individual strings.
Adjusting the intonation
Remove the intonation adjustment bolts (Fig. 7 F) housed in the bridge unit and tighten
them in the screw holes at the rear of the saddle until the end of each bolt touches the
wall of the bridge unit. Loosen the saddle lock screws (Fig. 6 E) with a 2 mm Allen key,
and turn the intonation adjustment screws to adjust the saddle position. In order to tune
the guitar and check the intonation, repeat these adjustments until the required intonation is reached: Fully tighten the saddle lock screws and put the intonation adjustment
screws into the bridge unit.
Replacing the strings
To replace strings, thread the new strings through the tremolo block (Fig. 4 C) from the
back side of the guitar.
Arm up and stopper function
Remove the tremolo spring cover and check the position of the arm up and stopper knob.
Check that the tremolo angle is correctly adjusted (it does not need to be precisely tuned).
Turn the arm up and stopper knob (Fig. 8 G) to adjust the tremolo angle so that the end of
the arm up and stopper (Fig. 8 H) comes into contact the tremolo block (Fig. 8 J). Recheck
that the tremolo angle is correctly adjusted, turn the spring adjustment knob a few more
times clockwise and tune the string. If the tuning is not stable, check that the end of the
arm up and stopper is in contact with the tremolo block (Fig. 8 J). If the spring adjustment
knob is not in contact with the tremolo block, turn it a little more in the clockwise direction
and tune the string again.
E
D
Fig. 6
F
Fig. 7
G
H
J
Fig. 8
Page 22

TIGHT-END BRIDGE
The Tight-End bridge is designed to directly transmit string vibration to the guitar body
by locking the saddles onto the base plate. The top side of the bridge has a smooth finish. This means that if you play hard, the Tight-Edge bridge will support you and your
hands.
Adjusting the action
With the Tight-End bridge, the saddle height can be adjusted individually. To adjust the
saddle height, loosen the saddle lock screw (Fig. 1 B) with a 2 mm Allen key and turn the
adjustment screw for the string (Fig. 1 A) with a 2 mm Allen key.
Adjusting the intonation
To adjust the saddle position, loosen the saddle lock screws (Fig. 1 B) with a 2 mm
Allen key and turn the intonation adjustment screw (Fig. 2 C) with a Philips screwdriver.
In order to tune the guitar and check the intonation. Repeat these adjustments until the
required intonation is reached.
Caution
After adjusting the action and intonation, tighten the saddle lock screw (Fig. 1 B)
to lock the saddle. After locking the saddle, gently tighten the intonation adjustment screws (Fig. 2 C) (to the extent that there is no effect on the saddle position).
This has the effect of preventing loosening due to the effects of string vibration,
etc. Tightening the screws more than necessary can lead to damage.
Replacing the strings
Changing strings by threading them from the back of the guitar body through the string
anchoring ferrules.
A
B
Fig. 1
C
Fig. 2
Page 23

TIGHT-TUNE BRIDGE/TAILPIECES
The Tight-Tune bridge achieves the optimum level of stability and sound transference
while suppressing unnecessary vibrations by allowing each movable part of the bridge
to be locked. The bridge has a stud lock function for fixing the bridge more securely onto
the body. Furthermore, the tailpiece is equipped with a ball-end lock function to retain the
ball end so that it will not come off.
Adjusting the action
Loosen the locking nuts (Fig. 2 D) on the right and left sides of the bridge unit, and adjust
the height of the bridge unit by turning the stud lock screws (Fig. 2 E) with a 3 mm Allen
wrench. Note that it is not possible to adjust the height of individual strings. After completing the adjustment, tighten the locking nuts.
Stud lock function
After adjusting the action, turn the stud lock bolt (Fig. 1 B) clockwise inside the stud bolt
with a 2 mm Allen wrench. Keep tightening until the stud lock bolt contacts the anchor
bolt (Fig. 1 C) and the bolt cannot be turned any further.
Caution
When adjusting the action, be sure to fully loosen the stud lock bolt (Fig. 1 B)
beforehand by turning it counterclockwise with a 2 mm Allen wrench. Otherwise, damage may occur.
Adjusting the intonation
Loosen the saddle lock screws (Fig. 2 G) with a Phillips screwdriver, and turn the intonation adjustment screw (Fig. 2 H) with a Phillips screwdriver to adjust the saddle position.
Tune the guitar and check the intonation. Repeat these adjustments until the required
intonation is reached, and then tighten the saddle lock screws.
Caution
A loose intonation adjustment screw (Fig. 2 H) may cause resonance. If this
occurs, gently tighten the intonation adjustment screw, exercising care not to
allow the saddle to move.
Replacing the strings
Insert the ball-end of the string into the slot of the tailpiece in the direction shown by arrow (Fig. 3 J). The ball-end lock function retains the ball-end. To remove the string, pull it
toward direction (Fig. 3 K).
A
B
C
Fig. 1
D
E
F
G
H
Fig. 2
J
K
Fig. 3
Page 24
ZR TREMOLO
The ZR Tremolo is a double locking tremolo featuring the Zero Point System that keeps
the tremolo unit flat (at the zero point). This system eliminates the hassle of tuning, which
is a shortcoming of a floating tremolo, providing a more comfortable playing experience.
Furthermore, the supporting point is equipped with a high-precision built-in ball bearing,
which realizes smooth arming.
Attaching the tremolo arm
The tremolo arm is a plug-in type with a torque adjustment cap incorporated into the arm
unit. Insert the tremolo arm into the arm socket of the base plate, and then tighten the
torque adjustment cap (Fig. 1) to fix the tremolo arm in place. You can adjust the tremolo
arm torque by tightening/loosening the torque adjustment cap. Turning the cap clockwise
will tighten the arm torque, and turning it counterclockwise will loosen the arm torque.
Adjusting tremolo angle and Zero Point System
The angle of the tremolo is adjusted by the balance between the tension of the strings
and the zero point system installed on the back side of the guitar body. The ZR tremolo
is designed so that by correctly adjusting the Zero Point System, the tremolo unit sits
roughly parallel to the surface of the guitar body. This ensures optimal performance. Tuning is completed when the Zero Point System is adjusted to the correct position. If the
tremolo is roughly parallel to the surface of the body, the stop rod contacts the tremolo
block and the stopper.
To adjust the angle of the tremolo, turn the spring adjustment knob (Fig. 2 A) on the back
side of the guitar. If the stop rod (Fig. 3 B) does not contact the stopper (Fig. 3 C) (or the
tremolo is tilted forward) when the guitar is correctly tuned, turn the spring adjustment
knob clockwise to tighten the spring. If the tremolo block (Fig. 3 D) does not contact the
stop rod (or the tremolo is tilted backward), turn the spring adjustment knob counterclockwise to loosen the spring.
Using as a floating tremolo (Zero Point System deactivated)
The ZR tremolo can also be used as a normal floating tremolo by deactivating the Zero
Point System. While holding the arm up (with the tremolo block facing away from the
stop rod), remove the stop rod (Fig. 3 B) and sub spring (Fig. 4 E). Adjust the angle of
the tremolo that is in a floating state by adjusting the balance between the tension of
the strings and the tension of the tremolo springs installed on the back side of the guitar
body. Setting the tremolo so that it is approximately parallel to the surface of the guitar
body will ensure optimal performance. To adjust the angle of the tremolo, turn the spring
adjustment knob (Fig. 2 A) on the back side of the guitar. If the tremolo is tilted forward
while the guitar correctly tuned, turn the spring adjustment knob clockwise to tighten the
spring. If the tremolo is tilted backward, turn the spring adjustment knob counterclockwise to loosen the spring.
When adjusting the tremolo angle that is in a floating state, the balance between the tension of the strings and the tension of the tremolo springs changes each time the tension
of the spring is adjusted, Thus, adjustments should affect tuning. Make adjustments by
tuning the strings repeatedly.
Fig. 1
A
Fig. 2
D
B
C
Fig. 3
E
Fig. 4
Page 25

Adjusting the action
Adjust the height of the tremolo unit by turning the stud lock screws (Fig. 5 G) on either
side of the tremolo unit with a 3 mm Allen wrench. Note that it is not possible to adjust
the height of individual strings.
Adjusting the intonation
Remove the intonation adjustment bolts (Fig. 6 K) housed in the bridge unit and tighten
them in the screw holes at the rear of the saddle until the end of each bolt touches
the wall of the bridge unit. Loosen the saddle lock screws (Fig. 5 H) with a 2 mm Allen
wrench, then turn the intonation adjustment screws to adjust the saddle position. Tune
the guitar and check the intonation. Repeat these adjustments until the required intonation is reached. Fully tighten the saddle lock screws and put the intonation adjustment
screws into the bridge unit.
Replacing the strings
Loosen the pressure pad screws (Fig. 7 L) on the locking nut with a 3 mm Allen
wrench and remove the strings from the tuning machines. Loosen the string stopper
screw (Fig. 6 J) on the tremolo unit with a 3 mm Allen wrench and remove the string
from the saddle. Cut off the ball end of the new string with an end nipper or wire cutter
(Fig. 8). Insert the cut side of the new string between the saddle and the string holder
block. Tighten the string stopper screw to secure the string. Wind the string around
the tuning machine and tune to pitch. After tuning, tighten the pressure pad screw on
the locking nut.
Caution
Before you tune a string, ensure that the string stopper screw is firmly tightened.
Fine tuning
After locking the strings with locking nuts, fine tuning of individual strings can be carried
out using fine tuners. To provide maximum allowance for fine tuning adjustment after
locking the strings, set the fine tuners (Fig. 5 F) to sit around the middle position of the
range of movement before tuning.
G
F
H
Fig. 5
K
J
Fig. 6
L
Fig. 7
Fig. 8
Page 26

QUICK CHANGE II/III TAILPIECES
Replacing the strings
Insert the string into the slot of the tailpiece, and hook the ball-end onto the rear section
of the tailpiece.
Adjusting the height of the tailpiece
To adjust the height of the tailpiece, turn the stud bolt (Fig. 1 A) on the right and left ends
of the tailpiece with a slot head screwdriver or a coin.
QUIK CHANGE III
A
Fig. 1
Page 27

GIBRALTAR 08 BRIDGE / QUICK CHANGE
08 TAILPIECE
Adjusting the action
Adjust the height of the whole bridge by loosening the locking nuts (Fig. 1) on the right
and left ends of the bridge and turning the stud bolts (Fig. 2) with a slot head screwdriver.
Note that it is not possible to adjust the height of individual strings. After completing the
adjustment, tighten the locking nuts.
Adjusting the intonation
To adjust the saddle position, turn the intonation adjustment screws (Fig. 3) on the saddle subject to adjustment with a slot head screwdriver. Tune the guitar and check the
intonation. Repeat these adjustments until the required intonation is reached.
Replacing the strings
Insert the string into the slot (Fig. 4 A) of the tailpiece, and hook the ball-end onto the
rear section of the tailpiece.
Adjusting the height of the tailpiece
To adjust the height of the tailpiece, after loosening the locking nuts (Fig. 4 B) on the
right and left ends of the tailpiece, turn the adjustment bolts (Fig. 5) with a slot head
screwdriver.
Fig. 1
Fig. 2
Fig. 3
A
B
Fig. 4
Fig. 5
 Loading...