

Page 1

Page 2
Table of Contents
Instruction Manual
NGLISH 2 ..................................................... 2
NGLISH 2 .............................................................. 4
NGLISH 2 ............................................................................... 6
ENGLISH Maintenance Manual ....................................................................... 14
Adjustment Manual .......................................................................... 16
DEUTSCH Wartungs- und Pflegehinweise ....................................................... 26
Einstellungsanleitung ......................................................................28
FRANÇAIS Manuel d'entretien ...........................................................................38
Réglage manuel ............................................................................... 40
ESPAÑOL Manual de mantenimiento ...............................................................50
Manual de ajustes ............................................................................52
ITALIANO Manuale di manutenzione ............................................................... 62
Manuale di regolazione....................................................................64
Guitar Electronics
Guitar Controls
..................................................................................74
........................................................................................76
Thank you for purchasing an Ibanez guitar. In order to keep your guitar in
the best possible condition, please read this manual for information on
care and adjustment.
Page 3
はじめにお読みください
安全にお使いいただくために
本製品をお買い上げいただきまして、まことにありがとうござい
ます。この冊子では、安全にお使いいただく上でお気をつけてい
ただきたい点と、お手入れの際の注意点がまとめてあります。
お使いになる前に、取扱説明書とあわせてよくお読みください。
表示記号について
本書では、本機を安全に正しくご使用いただき、あなたや他の
人々への危害や財産への損害を未然に防ぐために事項を下記の記
号で表示しています。
内容をよく理解してから取扱説明書をお読みください。
この表示を無視して、誤った取り扱いをす
警告
注意
お願い
●外部要因によって生じた本機の故障、不具合などの損害に
つきましては、当社は一切の責任を負いかねますので、あ
らかじめご了承ください。
ると、人が死亡または重傷を負う可能性が
想定される内容を示しています。
この表示を無視して、誤った取り扱いをす
ると、人が傷害を負う可能性が想定される
内容および物的損害のみの発生が想定され
る内容を示しています。
この表示を無視して、誤った取り扱いをす
ると、本商品の本来の性能を発揮できな
かったり、機能停止をまねく内容を示して
います。
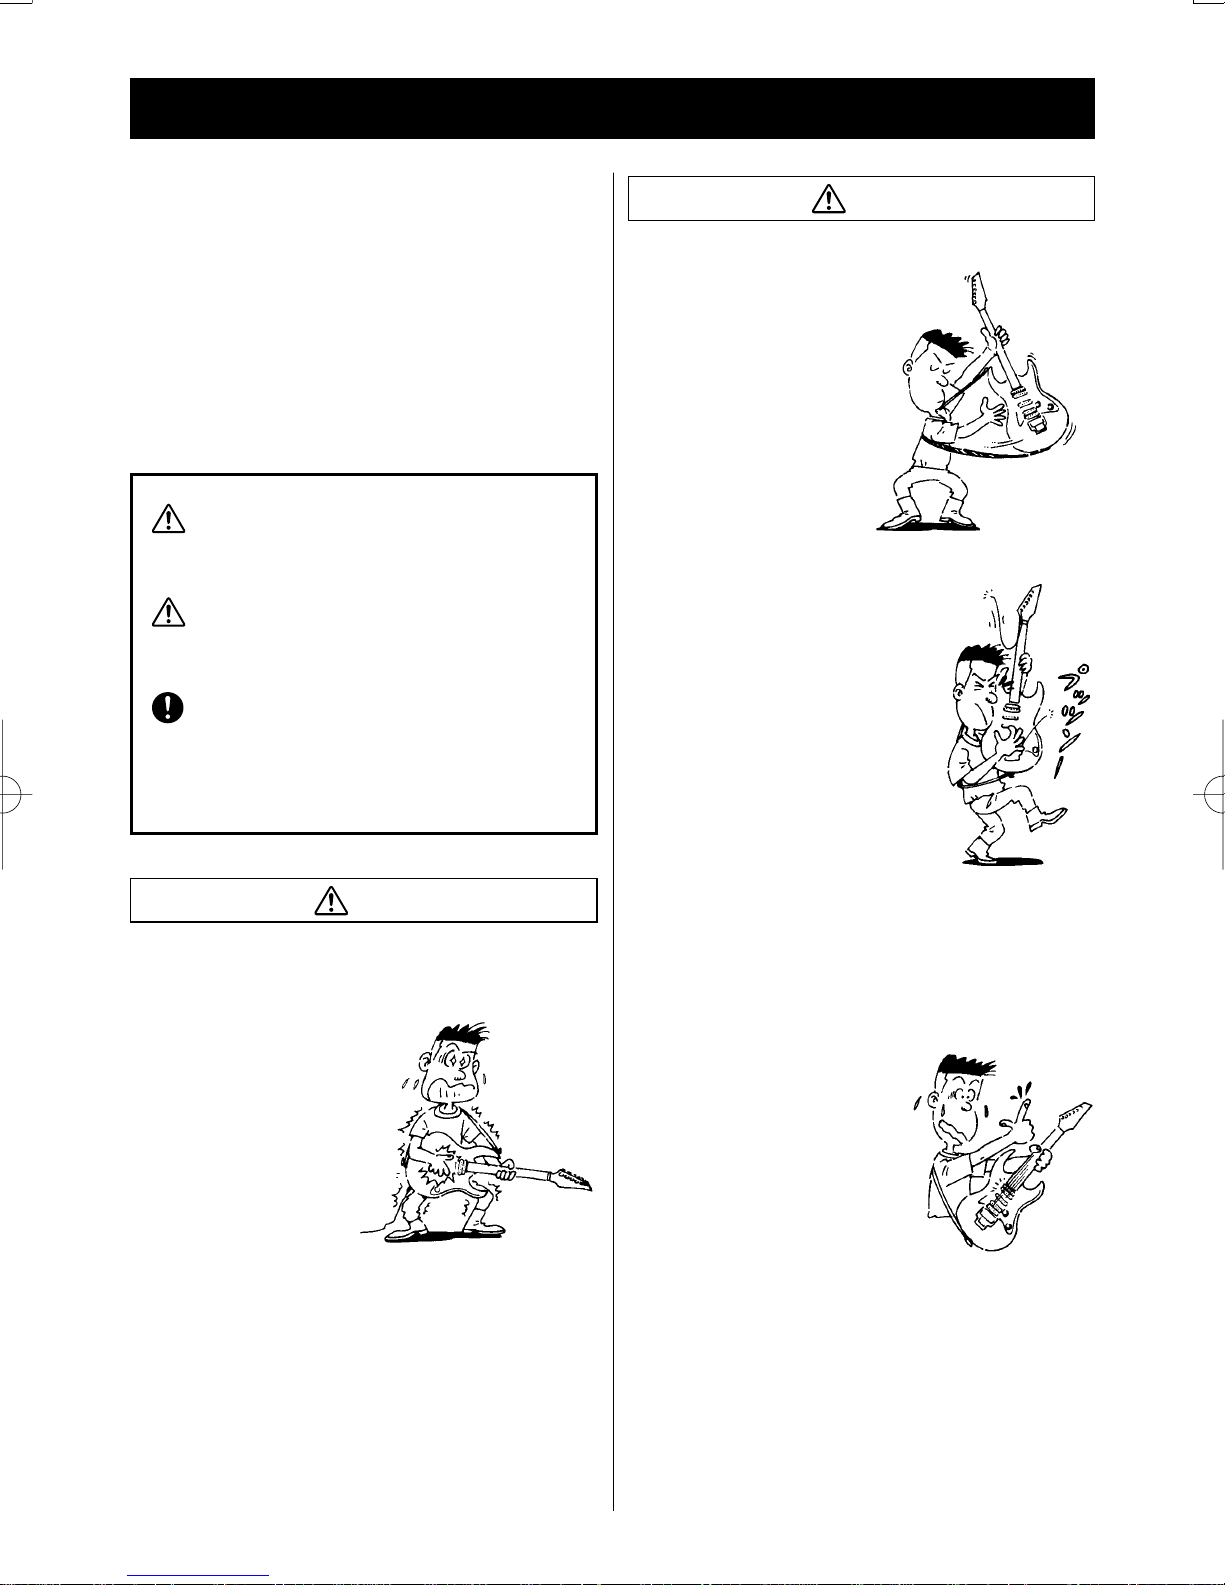
注意
楽器を振り回さないでください。
プロのステージアクションをま
ねて、演奏中にギターを振り回
したり体のまわりでギターを回
したりすると、ギターがスト
ラップから外れたりし、まわり
の人に当たってけがをさせるな
どの事故の原因になりますので
おやめください。
演奏中に顔を楽器に近づけないでください。
ギターの低音弦やベース等の太い弦が切
れた場合、手や顔に当たってけがをする
恐れがあります。弦が切れる前にこまめ
に新しいものと交換してください。特に
目に弦が当たった場合などは失明の危険
がありますので演奏中に弦に顔を近づけ
ることはおやめください。
ギター、ベース用弦は消耗品です。弦が
古くなっていると、通常の弾きかたをし
ているにもかかわらず(特別に強く弾い
たりしなくても)、演奏中に弦が切れて
しまう場合があります。
警告
湿気の多い場所では演奏しないでください。
感電の恐れがありますので、直接雨がかかる野外や風呂場などの
湿気の多い場所では演奏しないでください。
極端な大音量で鳴らさないでください。
ギターアンプ、ヘッドフォンを使用する場合に、長時間大音量で
使用していると回復できない難聴になる恐れがあります。またア
ンプの故障の原因にもなりますので、極端な大音量での使用は避
けてください。
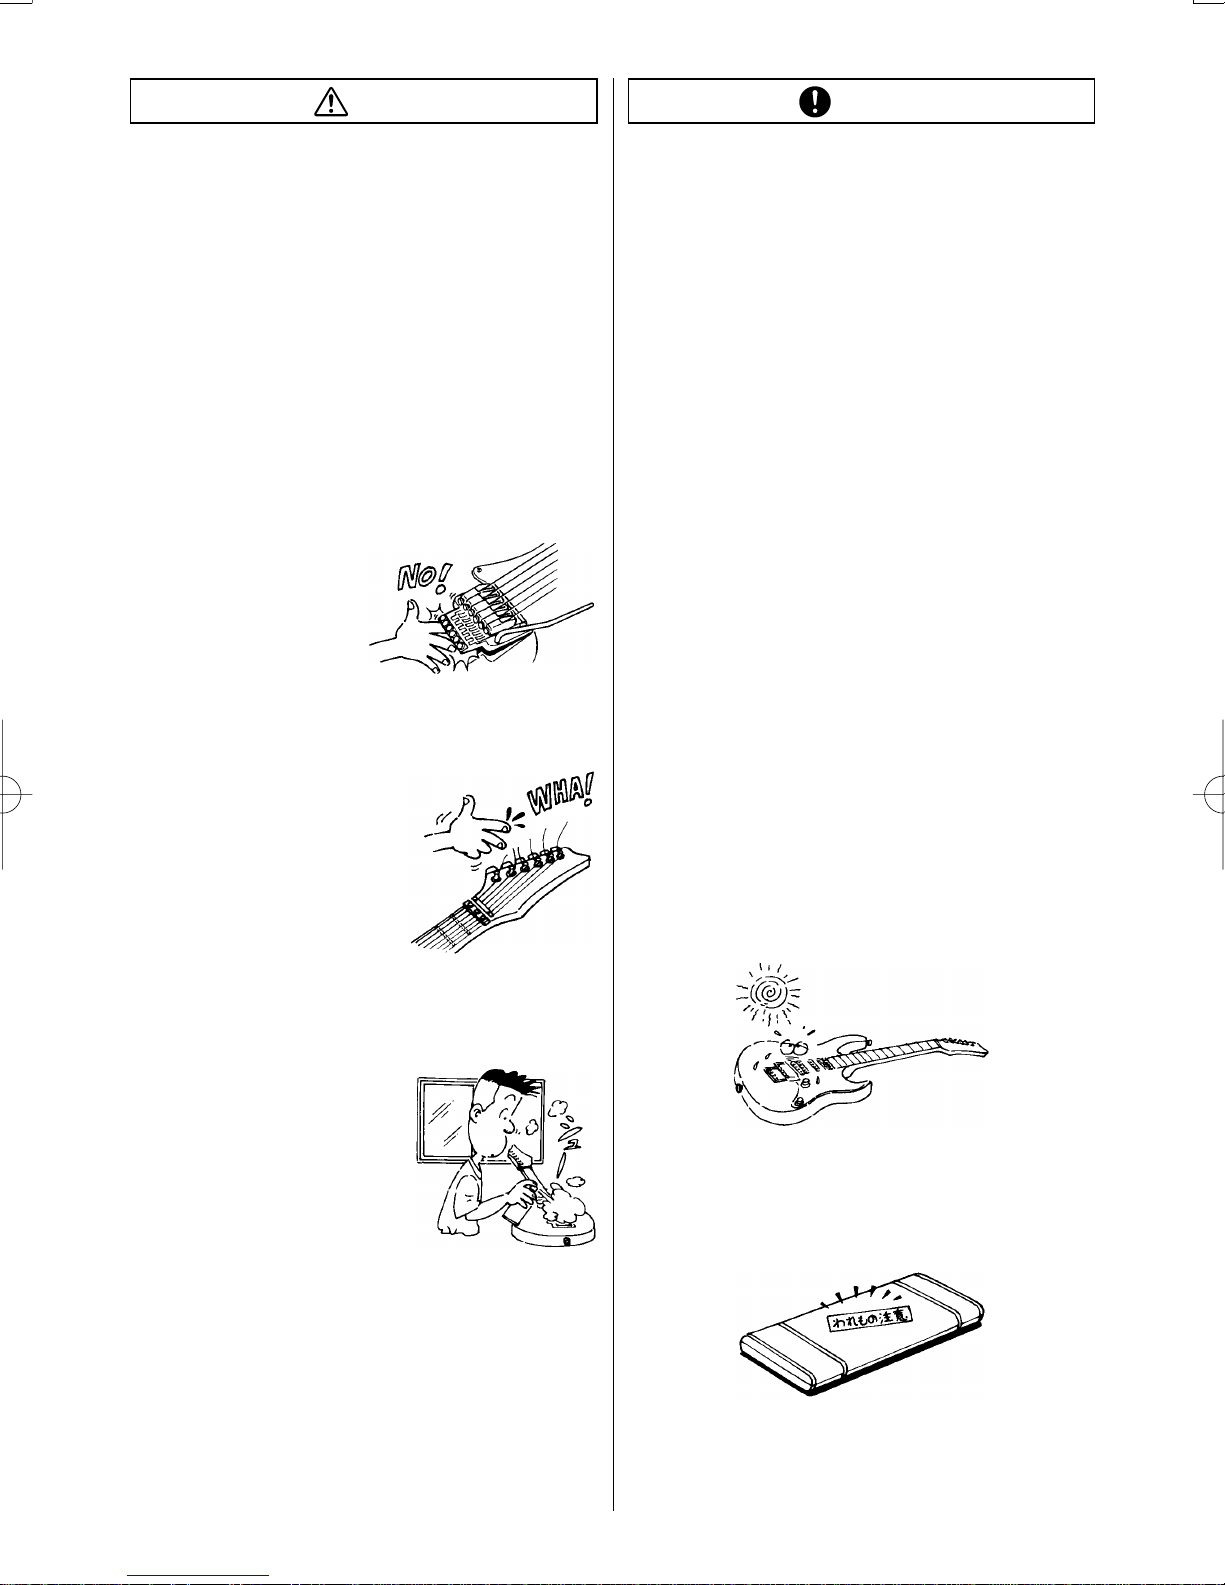
さびた弦を使わないでください。
弦(特にギターの1、2、3弦)が
さびてくると、弦で指を切ってけが
をする恐れがあります。こまめに弦
を新しいものと交換してください。
ストラップがゆるんだまま演奏しないでください。
ストラップを使って立って演奏する場合は、ストラップが確実に
ストラップビンにかかっていることを確認してください。ギター
が足の上などに落下してけがをする恐れがあります。
ピックガードの尖ったところに注意してください
エレクトリックギターの一部のモデルでは、デザイン上ピックカー
ドの先端部分が非常に鋭くなっています。ピッキングの際やクロス
で清掃するときなどにけがをしないようにご注意ください。
。
2
Page 4
注意
お願い
フレットのエッジ部分でのけがに注意してください。
ギターのネックは木製品ですので、モデルによってはまれにネック
の乾燥によってフレットがネックからはみ出してくることがありま
す。このような状態で演奏すると、フレットの端で手を傷つける恐
れがあります。万一このようになった場合は、直ちに演奏を中止し
てお買い求めになった販売店に修理を依頼してください。
無理に弦を張らないでください。
弦を張る場合は、本来の音程以上に強く巻かないよう、チューニン
グをしながら丁寧に巻いてください。必要以上に強く弦を巻いてし
まうと、新品の弦であっても切れてけがをする恐れがあります。ま
た、切れた弦が目に当たった場合などは失明の危険がありますの
で、弦を交換する際は、弦に顔を近づけることはおやめください。
トレモロに指をはさまないよう注意してください。
トレモロシステムには弦の張力
を支えるために非常に強いばね
を使用しています。弦を交換す
る場合など、トレモロ部分で指
をはさんでけがをしないように
ご注意ください。
古くなった電池を楽器に入れたままにしないで
ください。
ベースギターやエレクトリックアコースティックギターなど乾電
池を使用した製品では、乾電池の液漏れ等にご注意ください。ま
た、乾電池は使用しない場合でも自然に放電してしまう特性があ
りますので、定期的に交換することをおすすめします。乾電池を
捨てる場合は、自治体、電気店等の専用の回収箱をご利用くださ
い。また、使用済みの乾電池を火の中に入れると爆発する恐れが
あり非常に危険です。
ギターの表面を樹脂製品などに接触させたまま
保管しないでください。
樹脂製品や家具などの塗装されたものに、ギターの表面を直接長
時間接触させた場合、色移りしたり溶着したりしてお互い損なう
恐れがあります。ギターケース、バッグに入れておくか、布製の
袋に入れるなどして直接それらに接触しないように保管してくだ
さい。
ベンジン、シンナーでは拭かないでください。
ギターの表面をクリーニングする場合にベンジン、シンナー等の
薬品を使用すると、変質したり変色したりする恐れがあります。
ギター用として販売されているクリーナーをご使用ください。
弦で手を傷つかないよう注意してください。
弦の切断部分(特にギターの1、2、
3弦)は非常に鋭くなっており、直接
触れると手を傷つける恐れがありま
す。特にギターのヘッドをクロスな
どで清掃する場合に、糸巻きの部分
に手が当たってけがをしないように
ご注意ください。弦を交換したら、
弦の余った部分が指に当たらない程
度まで短く切っておきましょう。
換気の悪い場所ではスプレー式クリーナーを使
わないでください。
スプレー式のギタークリーナーなど
を使用する場合は、換気に注意して
ください。風通しの悪い場所で使用
すると中毒症状を起こす恐れがあり
ます。また可燃性のものは火気に十
分注意して作業してください。
ケースのふたやバッグのファスナーを開けたまま
持ち運ばないでください。
ギターケース、バッグに入れて持ち運ぶ場合は、ケースの留め金
やファスナーがしっかりとかかっていることを確認してくださ
い。ふたが開いてギターが落下する場合があります。
保管、運送などでは以下のような点にお気をつけて
ください。
●ギターは木製品です。投げたり落としたりすると容易に破損
してしまいます。丁寧にお取り扱いください。
●高温・多湿の場所、砂やほこりの多い場所を避け、換気の良
い場所に保管してください。
●
直射日光が当たると、塗装等の色があせてくる恐れがあります。
●雨の中で演奏するなどしてギターに直接水分がかかったり、
炎天下での演奏など高温の場所に長時間さらされると、ボ
ディー、ネック等の木部に狂いを生じる恐れがあります。
●宅急便などを利用して輸送する場合は専用のハードギター
ケースを使用するか、丈夫なカートンを使用して緩衝材を
十分つめて梱包し、ワレモノ扱いにしてください。楽器店
で購入したときのカートンは運送用には適していない場合
があり、そのまま出荷すると破損する恐れがあります。
3
Page 5
メンテナンス
お手入れ
演奏後は弦の裏側やフレット、ブリッジサドルやナットに付着
した汗や脂を拭き取ることで、錆を防ぎます。ボディーやネッ
クの塗装面のよごれは揮発性の薬品や研磨剤を避け、また、こ
びり付いた汚れは楽器専用ポリッシュを染み込ませた楽器用ク
ロスでていねいに拭き取ってください。オイル仕上げ面の汚れ
や黒ずみは消しゴムや#1000以上の細目のサンドペーパー、
#0000スチールウール等で落とし、年に1〜2回は無色の家具
用仕上げオイルやガンオイルを適度に染み込ませた#0000ス
チールウールや布で拭くことで乾燥を防止できます。また、塗
装仕上げが施されていない指板面も、指板用オイルや良質のレ
モンオイルなどを少量含ませた布で、フレットの際までていねいに拭いてください。フレットの錆やくもりは指板
面をマスキングテープで保護した上で、#0000のスチールウールで磨き、さらにギターケーブルのプラグの先端
など、丸く滑らかな金属で磨くことでより滑らかになります。その他、時々、金属部品類のほこりを取り、軽く油
を染み込ませた柔らかい布で拭いてください。
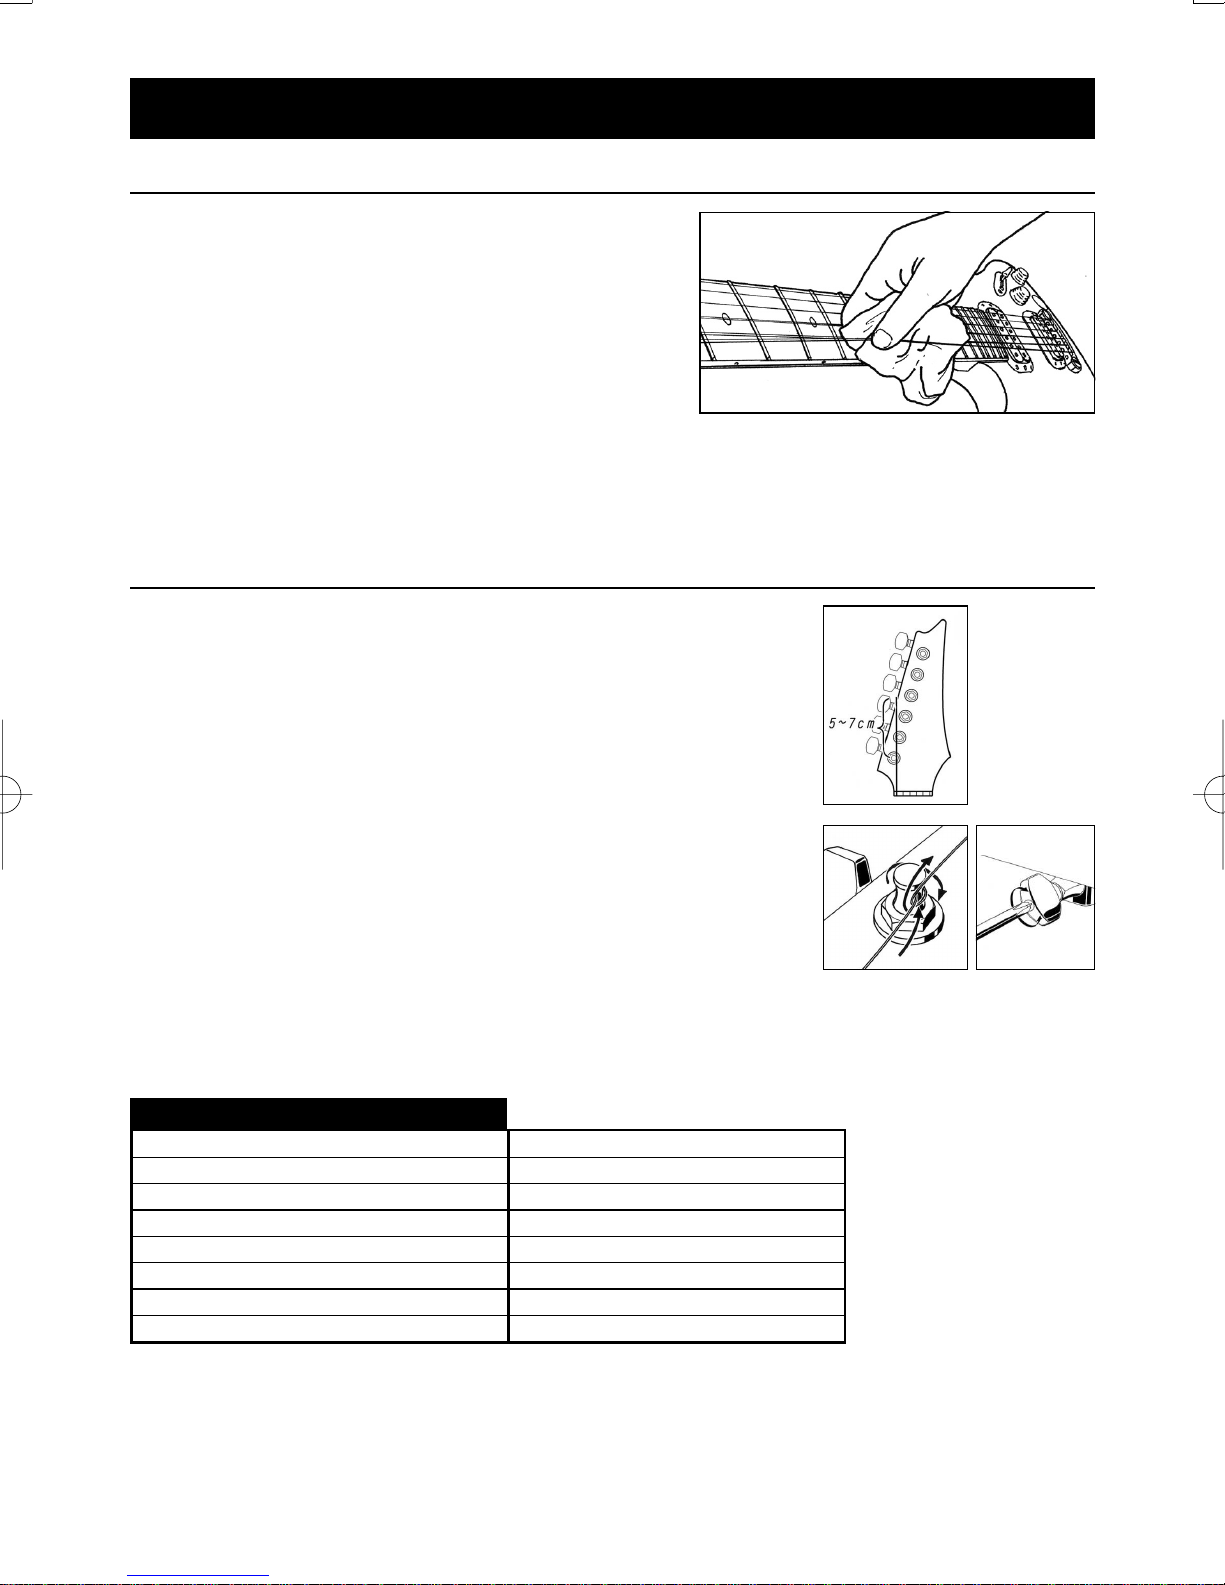
弦・糸巻
弦は錆や変色が発生したり、音がこもって聴こえる時、あるいはビリつきがひ
どくなった時にできるだけすべての弦を同時期に交換してください。交換作業
は1本ごとに行うことで、ネックにかかる力が急激に変化することを防ぎま
す。また、異なるゲージに交換した場合はネックの反り具合が変化してしまう
ため、ネックだけでなく、弦高やイントネーション、トレモロの取り付け角度
など、各部の再調整が必要になります。別紙の各ブリッジの調整方法にした
がって再調整してください。(同じゲージの場合でもイントネーションは弦交
換ごとに再調整をおすすめします。出荷時のゲージは裏面の取扱説明書をご覧
ください。)
弦は糸巻ポストの上から下へ2〜3回、順にきちんと巻きます。ギターの1〜3
弦は先端を図のように巻くことで、不用意にポスト部から弦が抜けることを防
ぎます。また、ポスト内部に弦の先端を挿入するタイプの糸巻は、あらかじめ
ニッパー等で弦の先を切って長さを調整してから巻いてください。
ギア部分が密閉されている糸巻はあらかじめ潤滑油が注入されていますので注
油の必要はありません。また、つまみの先端部分につまみの回転の堅さが調整
できるスクリューが付いている糸巻は、プラスドライバーで調整スクリューを
締め付けるほどつまみの回転が固くなります。お好みの堅さに調整してお使い
ください。
粗悪な弦をご使用になると、弦が原因によるビレ音や音程のくるいが生じることがあります。また、弦がねじれた
り折れたままでのご使用は、ビレやサスティーンの劣化を招きます。あらかじめねじれや折れがないことをご確認
ください。
3
締める
2
ゆるめる
1
STRINGGAUGES
Solidguitarsw/Tremolo,NDM2,JTK&ALLGio
RG321MH,SZ,AXS,AR,ARC,ARX,AD,VBI&IC
7-Stringmodel
MMM1
NTM1
MTM2
ARTCOREguitars
ARTCOREbasses
4
.009/.011/.016/.024/.032/.042inch
.010/.013/.017/.026/.036/.046inch
.010/.013/.017/.026/.036/.046/.054inch
.014/.017/.030/.040/.056/.074inch
.011/.014/.018/.028/.038/.049inch
.011/.015/.018/.028/.038/.054inch
.010/.013/.017/.030/.042/.052inch
.050/.070/.085/.105inch
Page 6
ネック
ネックには弦の張力がかかっています。チューニング状態や弦のゲー
ジが変わったときだけでなく、温度や湿度の変化によっても反り具合
ゆるめる
締める
ゆるめる
締める
が微妙に変化してしまいます。そのため、ネックは内蔵されたアジャ
ストナットを回すことで、反り具合を微調整できる仕組みになってい
ます。正しくチューニングし、演奏時の状態にギターを持って、1弦
の1フレットとボディーとの接合部分にもっとも近いフレットを同時
に押さえた状態(1フレット部にカポタストを装着すると便利です。)
で、8フレット部での弦とフレットのすき間を計ります。同様に低音
弦側でも同じ測定を行い、それぞれのすき間がおおよそ0.3mm〜
0.4mmになることを目安とした、わずかな順反り状態に調整します。
ネックの形状やボディーとのジョイント方法によって症状はさまざまですが、弦高が高く、
高音部の弦ビレがひどくなり、イントネーションが合いにくい場合は、ネックが順反りしす
ゆるめる
ぎている可能性があり、このすき間が大きくなります。弦高が低くなって低音部の弦ビレや
音づまりが発生する場合は、ネックが逆反り状態になっている可能性があり、このすき間が
小さくなります。見た目だけの判断ではなく、症状と合わせた調整が必要です。
締める
アジャストナットはヘッド側(モデルによってはトラスロッドカバーの内部)か、ネックの
付け根側に取り付けられています。ギターに付属の六角レンチ、またはソケットレンチ
を使用して、アジャストナットを右方向に締め込むほどネックは逆ゾリ方向に曲がり、左
方向にゆるめるほど順ゾリ方向に曲がります。四分の一回転ずつを目安に、少しずつ
チューニングと調整をくり返してください。
*ネックの調整には十分な注意が必要です。アジャストナットが上手く回らない時や正しく調整できない場合は、無理な調整は避け、お
買い求めの楽器店か弊社にご相談ください。
ゆるめる
0.3〜0.5mm
日本語
締める
8フレット
弦高
弦高とはフレットと弦との距離を示し、特に弦を押さえたときの演奏性に大きく影響しま
す。正しいネックの反り状態で正しくチューニングを行ってからフレットと弦のすき間を
計って判断します。14フレット部で表の値が一般的な演奏性のための目安となります。弦
高が高すぎると運指が難しくなり、逆に低すぎると弦ビレや音づまり、サスティーンの劣
化を発生します。弦高調整はブリッジ本体またはブリッジサドルの高さを変化させて調整
します。別紙調整マニュアルにしたがって調整してください。また、ネック調整やゲージ
の異なる弦への交換後も弦高の再調整が必要です。
1弦 最低音弦
ソリッド、セミアコースティックギター
フルアコースティックギター
*表示以外の弦は1弦と最低音弦の間で徐々にすき間が大きくなるように調整します。また、弦高を高くする場合は弦切れの可能性があ
りますので、あらかじめ弦をゆるめてから調整を行ってください。
1.5〜1.7mm
1.7〜2.0mm
2.0〜2.3mm
2.3〜2.5mm
弦長(イントネーション)
新しい弦に交換した時やネックの調整を行った後には、すべて
のフレットで正しい音程が得られるように、弦の長さを微調整
(イントネーション調整)することが必要です。正しくチューニ
ングし、演奏時の状態にギターを持って、それぞれの弦の12
フレットを押さえた時の音と、12フレット上でのハーモニク
ス音がおおよそ等しいかどうかを判断する方法が一般的です。
ハーモニクス音を基準として、フレット音が低い場合はブリッ
ジサドルを前方(ヘッド側)へ移動させて弦長を短くします。
逆にフレット音が高い場合は、ブリッジサドルを後方(ヘッド側
と逆方向)へ移動させて弦長を長くします。別紙調整マニュアルにしたがって調整してください。
*正確なイントネーション調整にはチューニングメーターが必要です。特にサドルを後退させる場合は弦切れの原因になりますので、必
ず弦をゆるめてから調整を行ってください。
5
Page 7
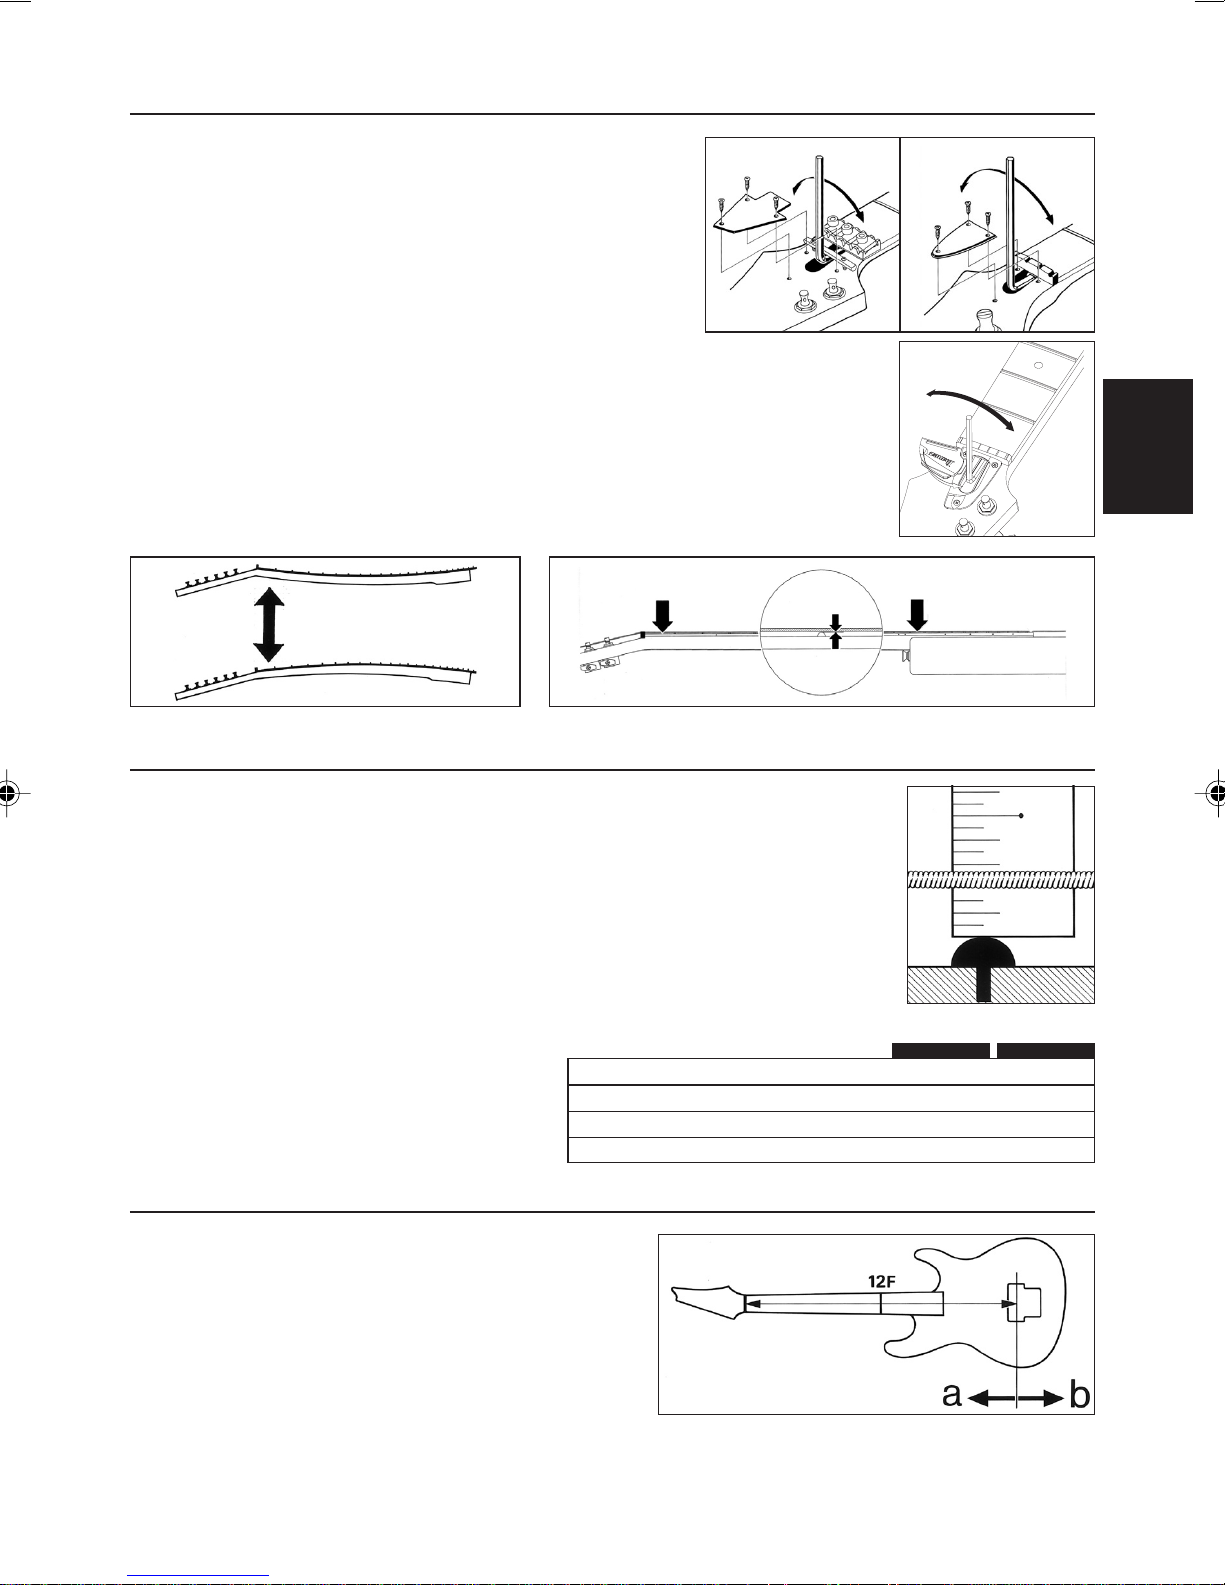
アーチトップブリッジは、ブリッジ本体を前後に移動してイントネーションを調整することができます。(アーチ
トップブリッジのページ参照)下図は工場出し標準位置です。
AF,AFS,AK AG
ピックアップ
ピックアップの高さを調整することでも音
量や音質が微調整できます。プラスドライ
バーでピックアップ両側のアジャストスク
リューを調整し、最終フレットを押さえた
状態でピックアップまたはポールピースと
弦のすき間が、3〜5mm程度になる状態が
一般的ですが、ピックアップの種類だけで
なく、演奏形態やアンプ側の特性によって
も異なりますので、実際に音を確認しなが
ら調整してください。ピックアップと弦の
距離が近いほど音量が増しますが、近すぎると音ワレやピックアップの磁力による弦ビレの原因になります。逆に
距離が遠いほどひずみの少ないクリアな音質になりますが、高域が減少したり音量が低下してしまいます。
ポールピースの高さ調整が可能なタイプは、あくまで各弦ごとのバランス補正として調整してください。ポール
ピースのタイプによって、マイナスドライバーか付属の六角レンチを使用します。特にマイナススクリュータイプ
には調整範囲に限りがありますのでご注意ください。
ギターブリッジ
ジブラルタルカスタムブリッジ
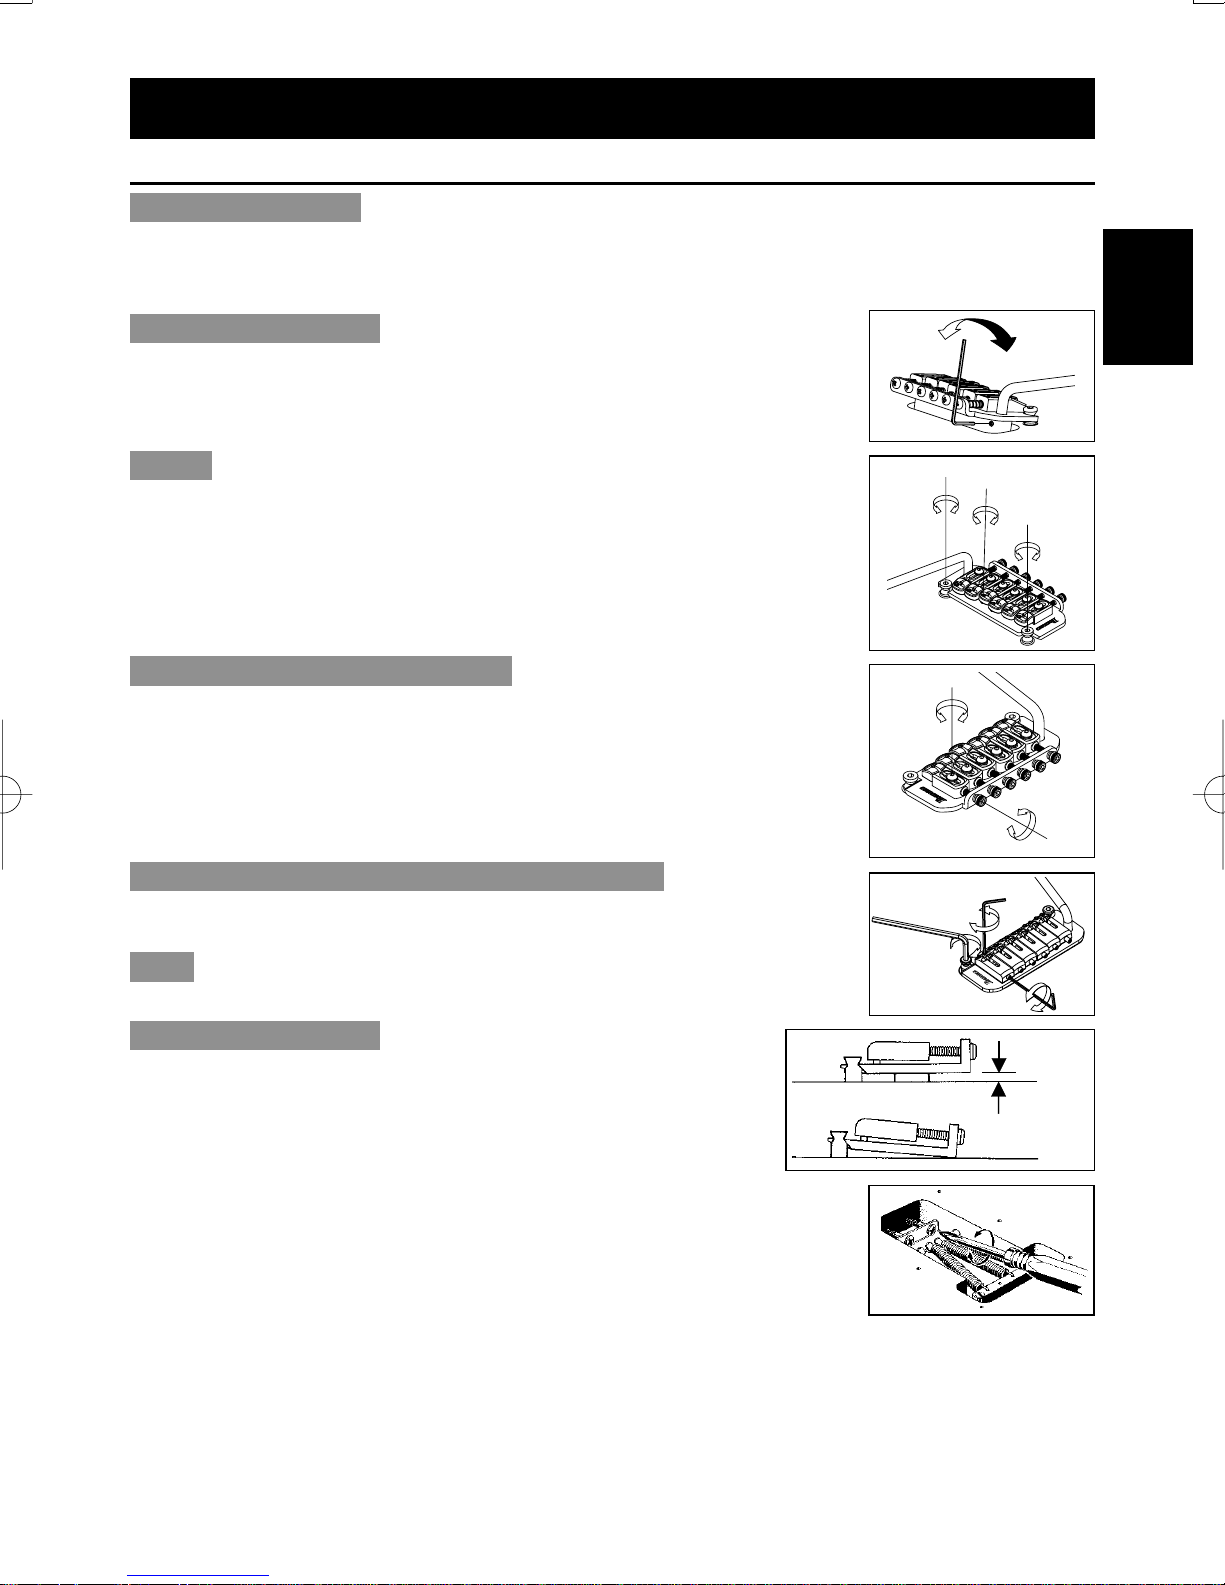
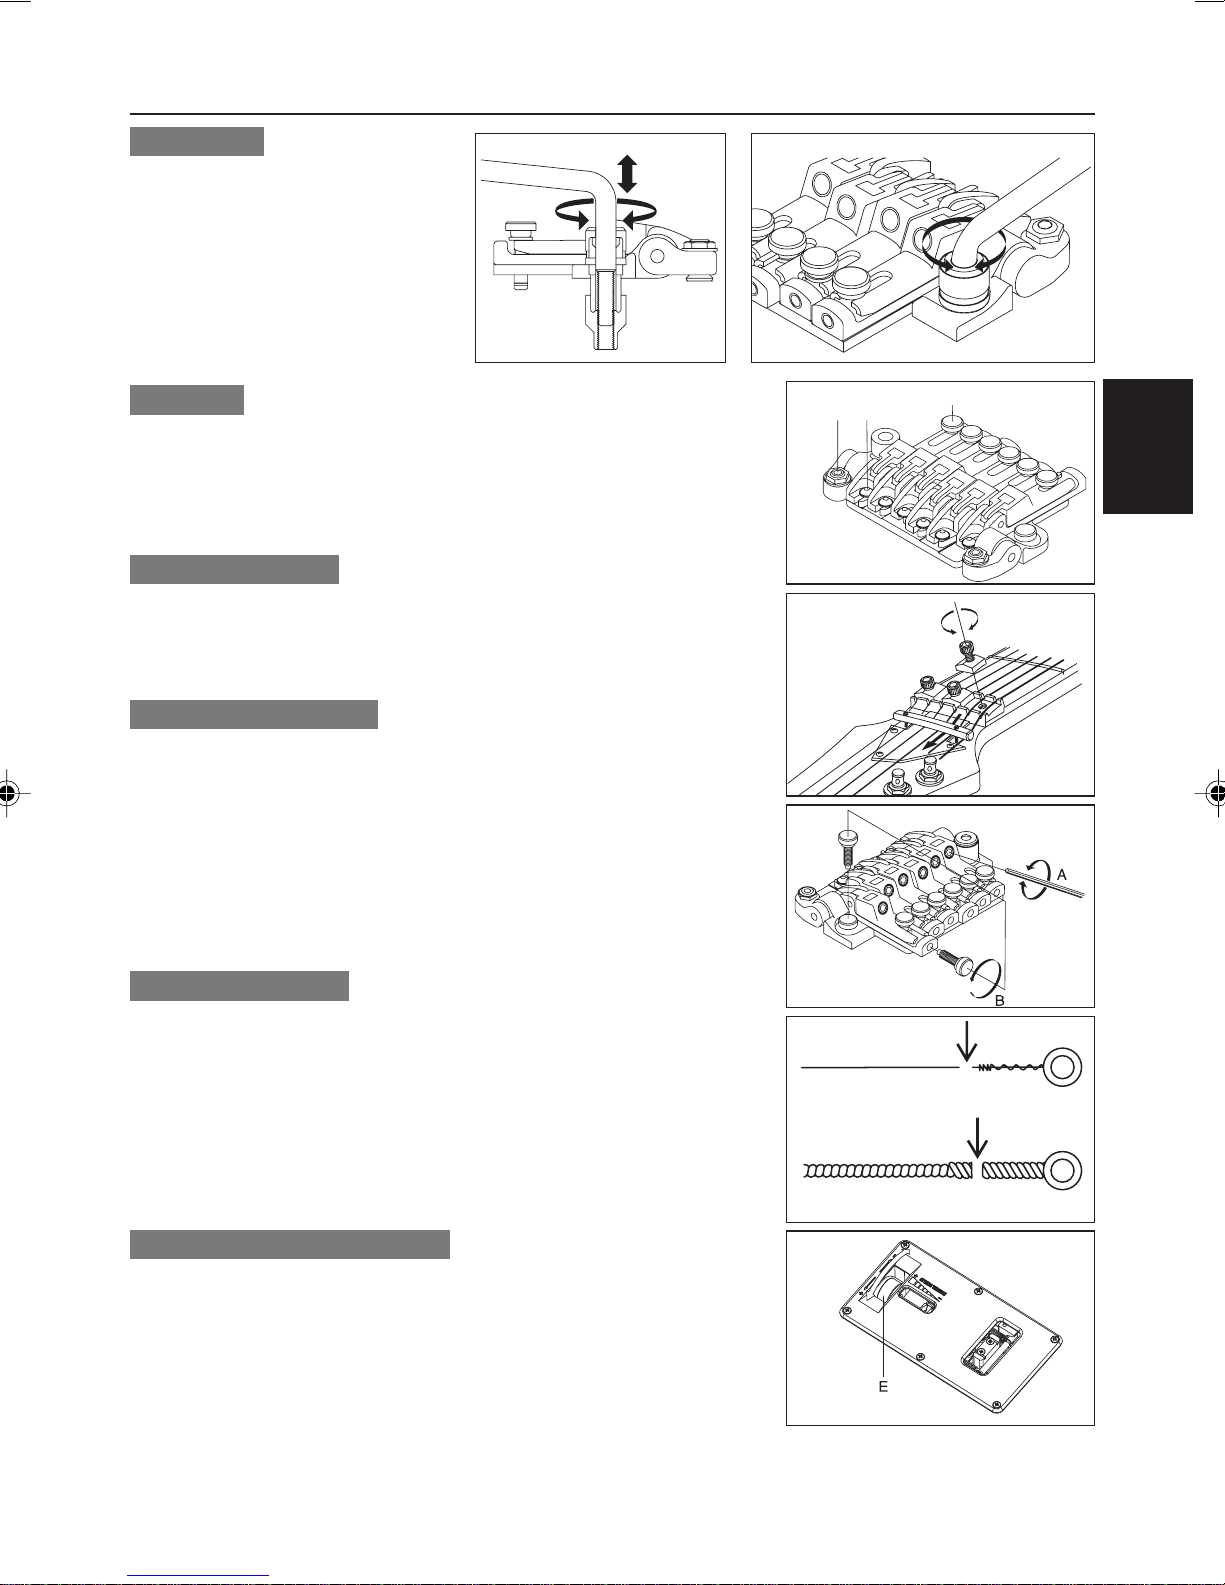
弦高はブリッジ上部の固定スクリュー(A)を付属の3mm六角レンチで緩めてから、
ブリッジ上部の4箇所の高さ調整スクリュー(B)を付属の2mm六角レンチで調整しま
す。調整後は、必ず固定スクリュー(A)を締めてください。
イントネーションの調整はサドル上部の固定スクリュー(C)を付属の2mmレンチで
緩めてから、サドル後方のイントネーション調整スクリュー(D)を付属の2mm六角
レンチでサドルを移動させて調整します。調整後は固定スクリュー(C)を締めてサド
ルをロックしてください。
*固定スクリューを緩めずに調整するとブリッジの破損あるいは不具合がでることがございますので、
ご注意ください。
A
ジブラルタルIII(ギター、ベース)、CB3&フルチューンIII、ARTブリッジ
弦高はブリッジ両側にある弦高調整スク
リュー(A)をマイナスドライバーで回し
て調整します。イントネーション調整は、
ブリッジ後部の調整スクリュー(B)をプ
ラスあるいはマイナスドライバーで回し、
サドルを移動させて調整します。
GIBRALTARIII,CB3
(A)
(B)
(B)
FULLTUNEII,
ART1,ART2
B
C
D
(A)
6
CB3ブリッジの弦交換は、ブリッジ前部から弦穴を通過させて行います。
Page 8
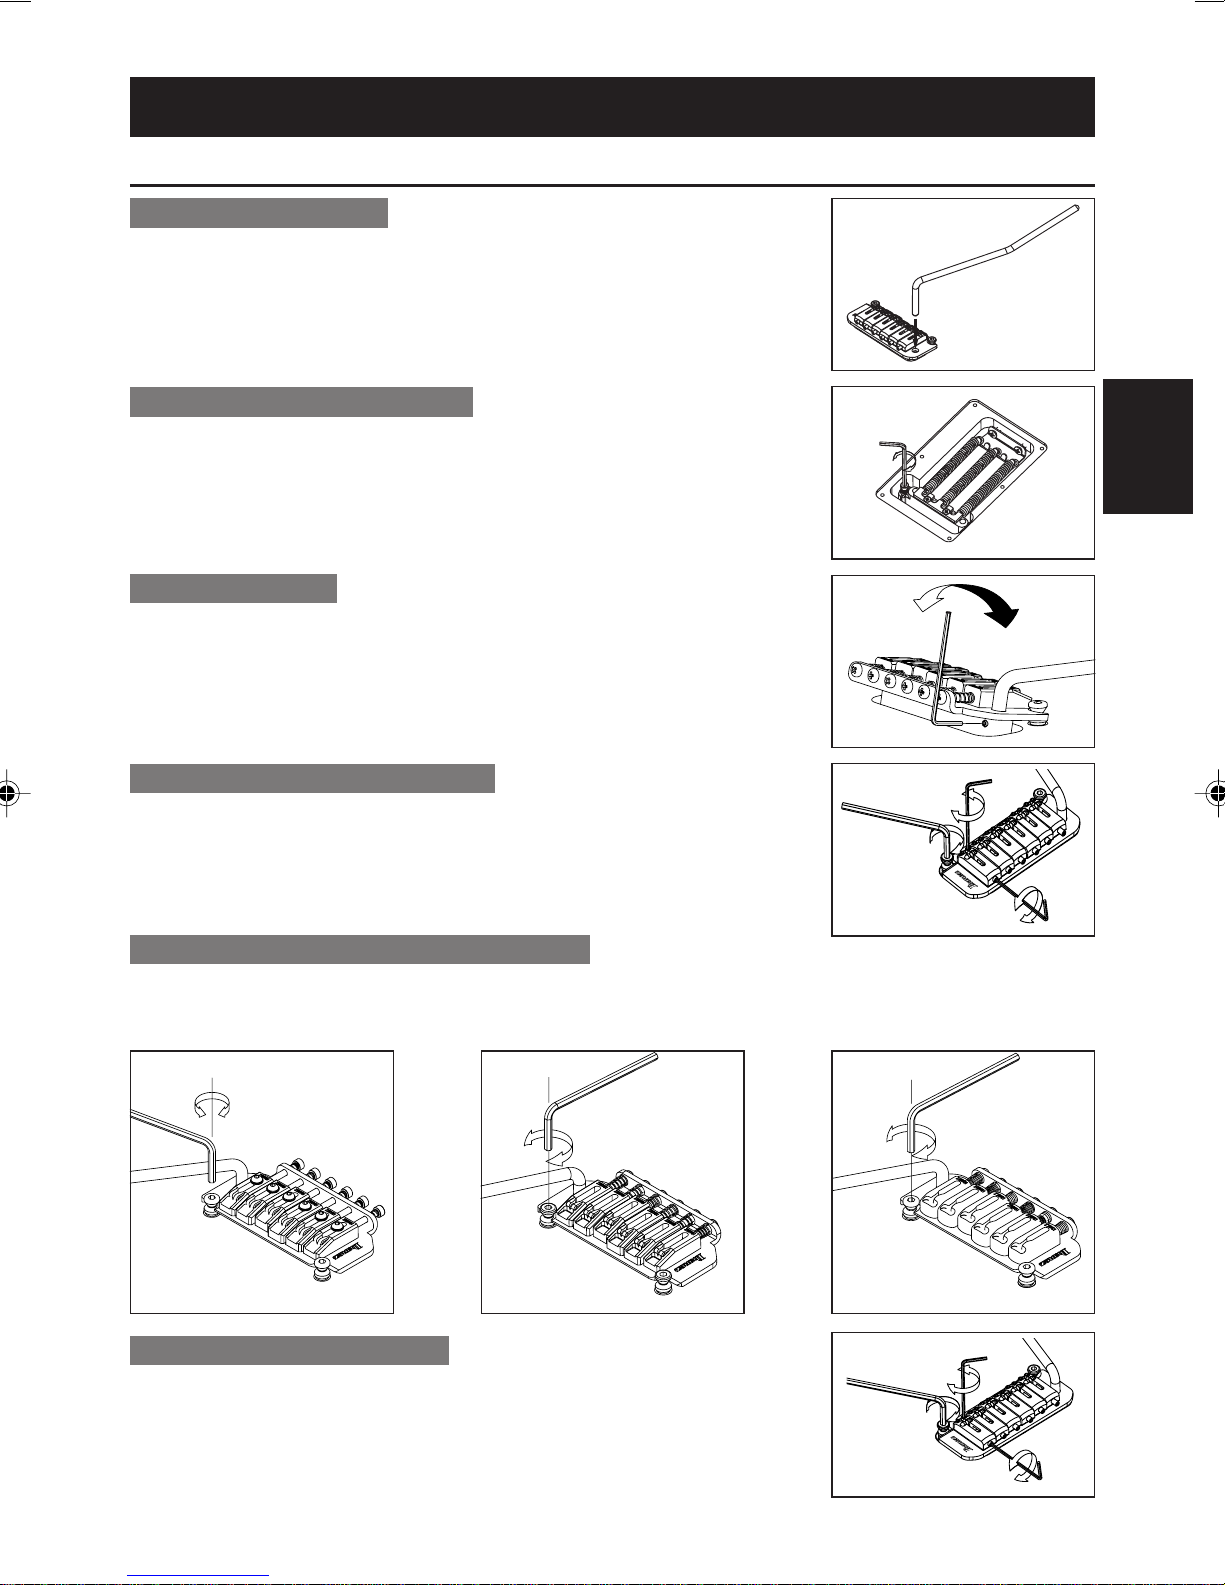
フィックスドブリッジ
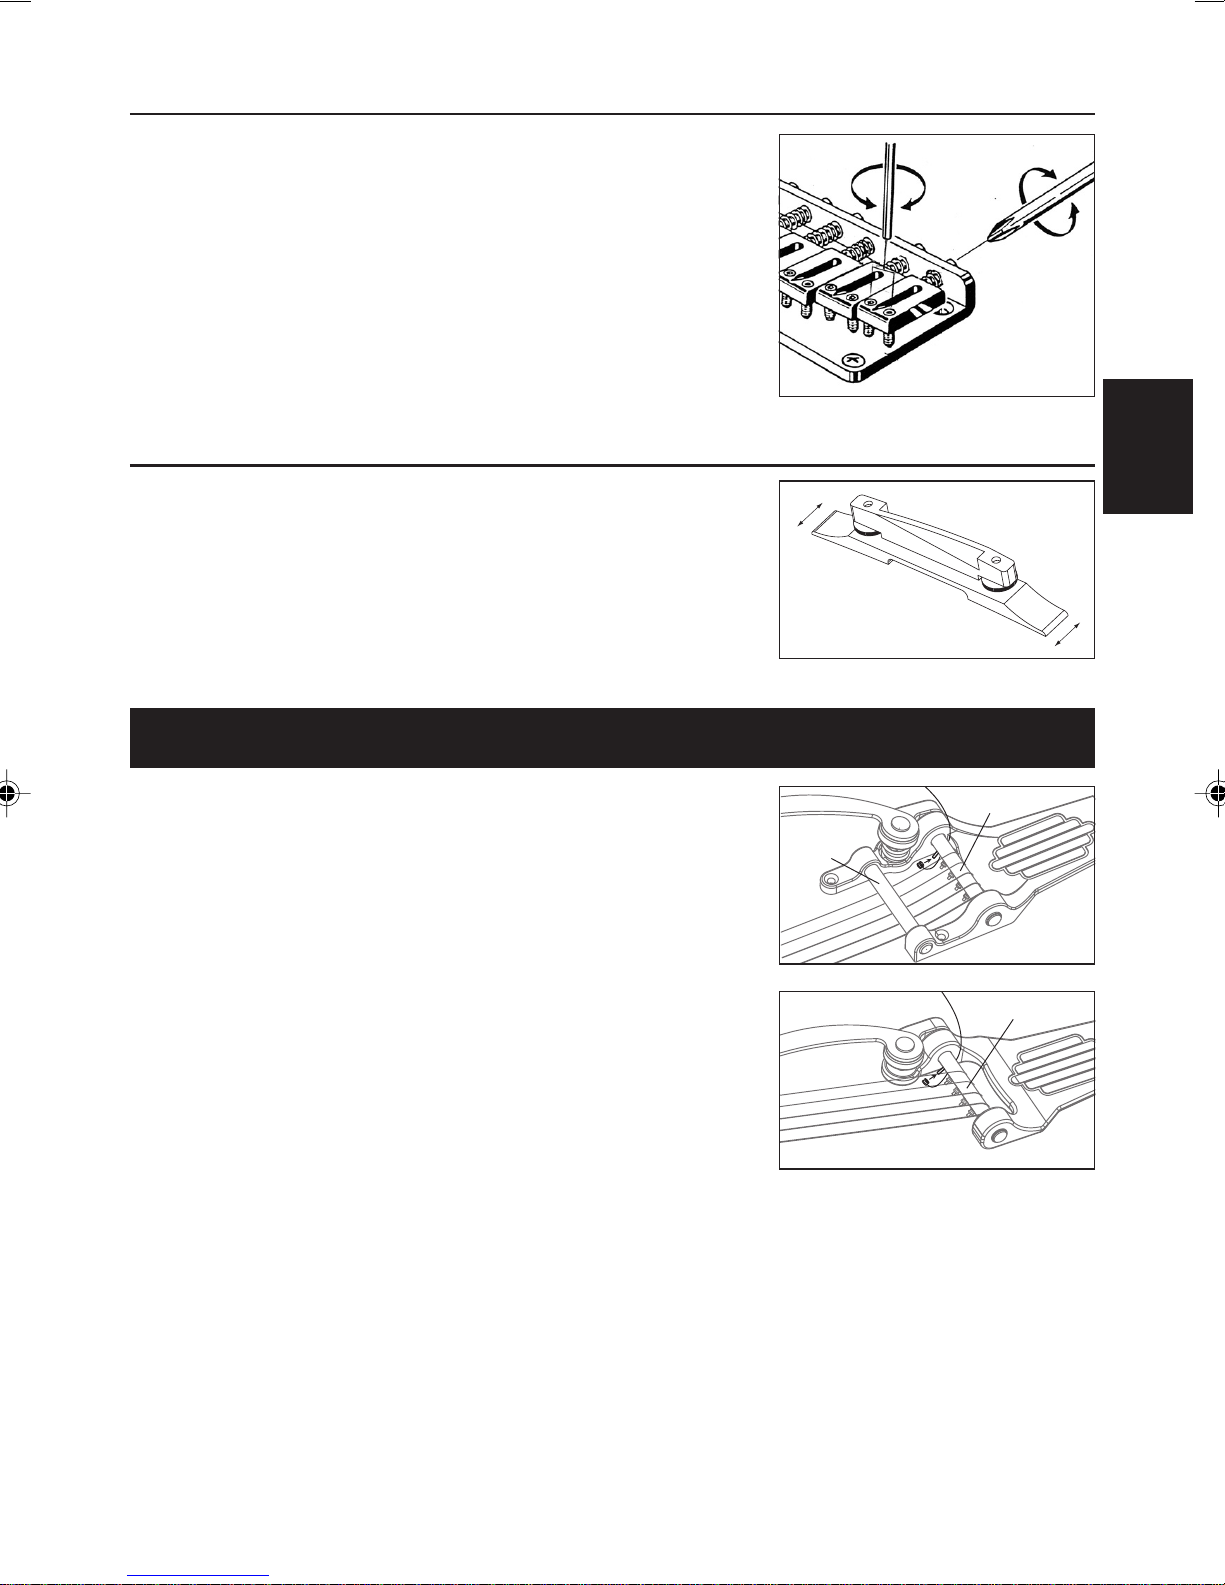
弦はギターボディー裏側から、弦止めフェラルを通して取り付けます。
弦高は各サドルの高さを付属の六角レンチ(1.5mm)で回して調整しま
す。イントネーションはブリッジ後方から各サドルのイントネーション
調整ボルトをプラスドライバーで回して調整します。
*7弦用も調整方法は同じです。
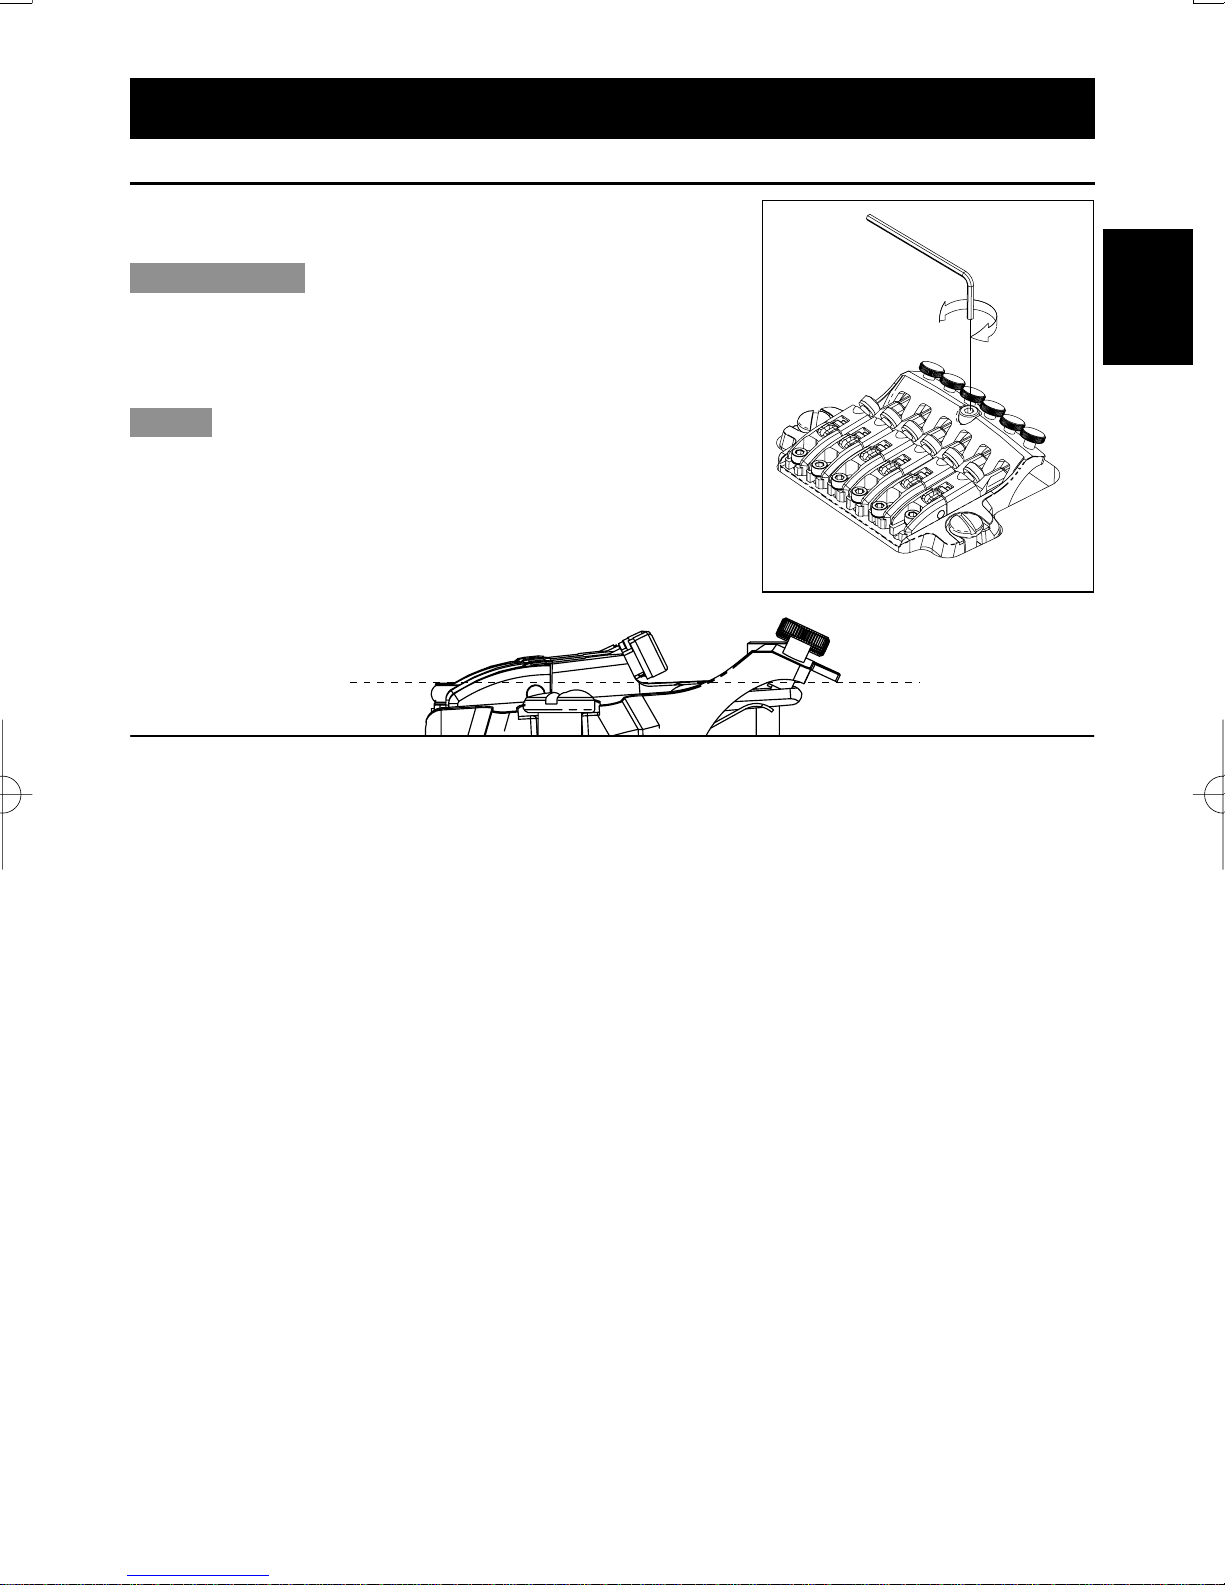
アジャスタブルアーチトップ
弦高調整は、アーチトップブリッジの2本の回転リングを回して行います。
回転リングを右回しすることで弦高を低くすることができ、左回しする
ことで弦高を高く調整できます。
イントネーション調整は、弦を緩めてブリジッジ本体を前後させて調整
してください。
弦交換の時には、ブリッジの位置がずれない為に、弦を1本ずつ交換す
ることをお勧めします。
日本語
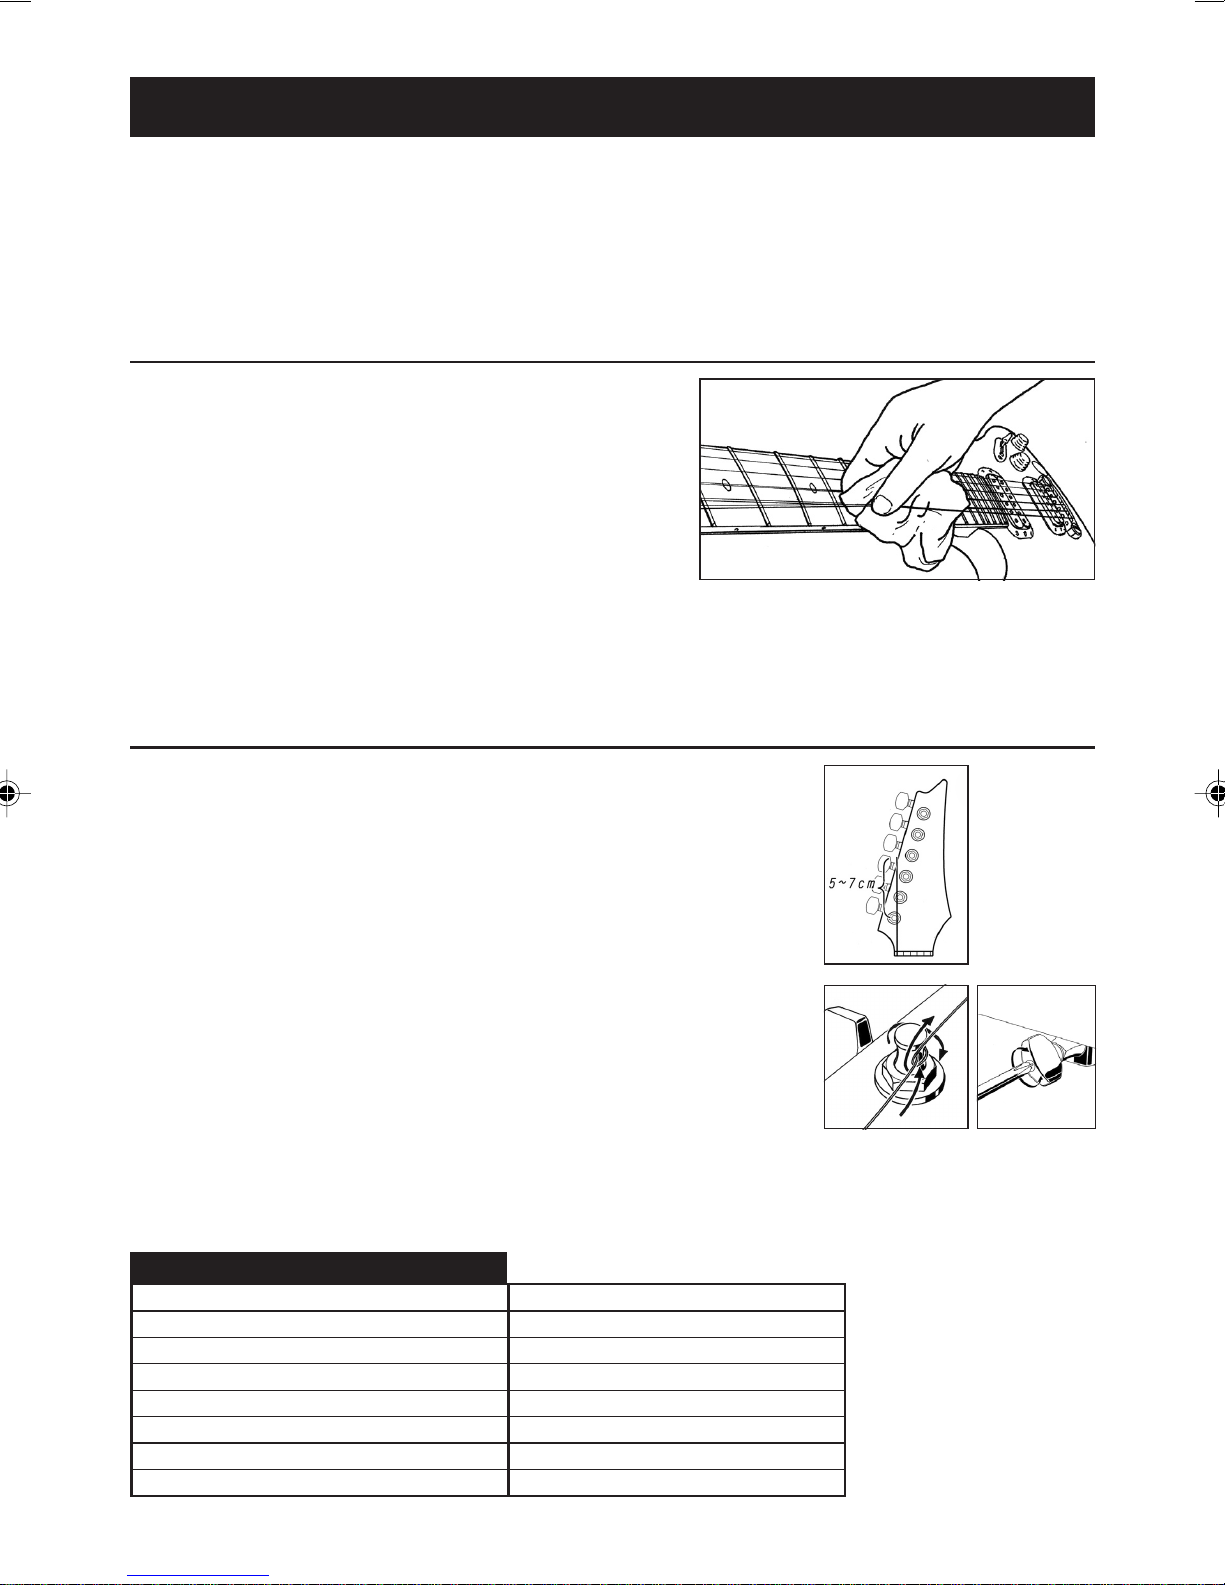
ビンテージビブラート
ビンテージビブラートの弦交換は1本ずつ交換を願います。
1本ずつ交換することで、ホロー構造ギターに対して急なテンション変
化を与えないことで、交換前の状態を保ちながらとなるため、ビンテー
ジビブラートの再調整が容易になります。
弦交換は、図のように弦玉を(B)バー上にあるポストに引っ掛けてから
(B)バーの上を渡していきます。
VBS80は、リテイナーバー(A)がありますので、そのバーの下を通過さ
せてください。
VBF70は リテイナーバーはありません。
交換作業の間は、絶えず弦を糸巻き側に軽く引寄せて、弦玉がポストか
ら外れないように留意してください。
同時に弦がブリッジサドルに正しく位置していることを確認してください。
1本の弦の交換と音程調整が終了しましたら、他の弦も同様な手順で交
換をします。
全ての弦交換が終わりましたらもう1度チューニングを再調整してくだ
さい。
(B)
(A)
VBS80
(B)
VBS70
7
Page 9
テールピース
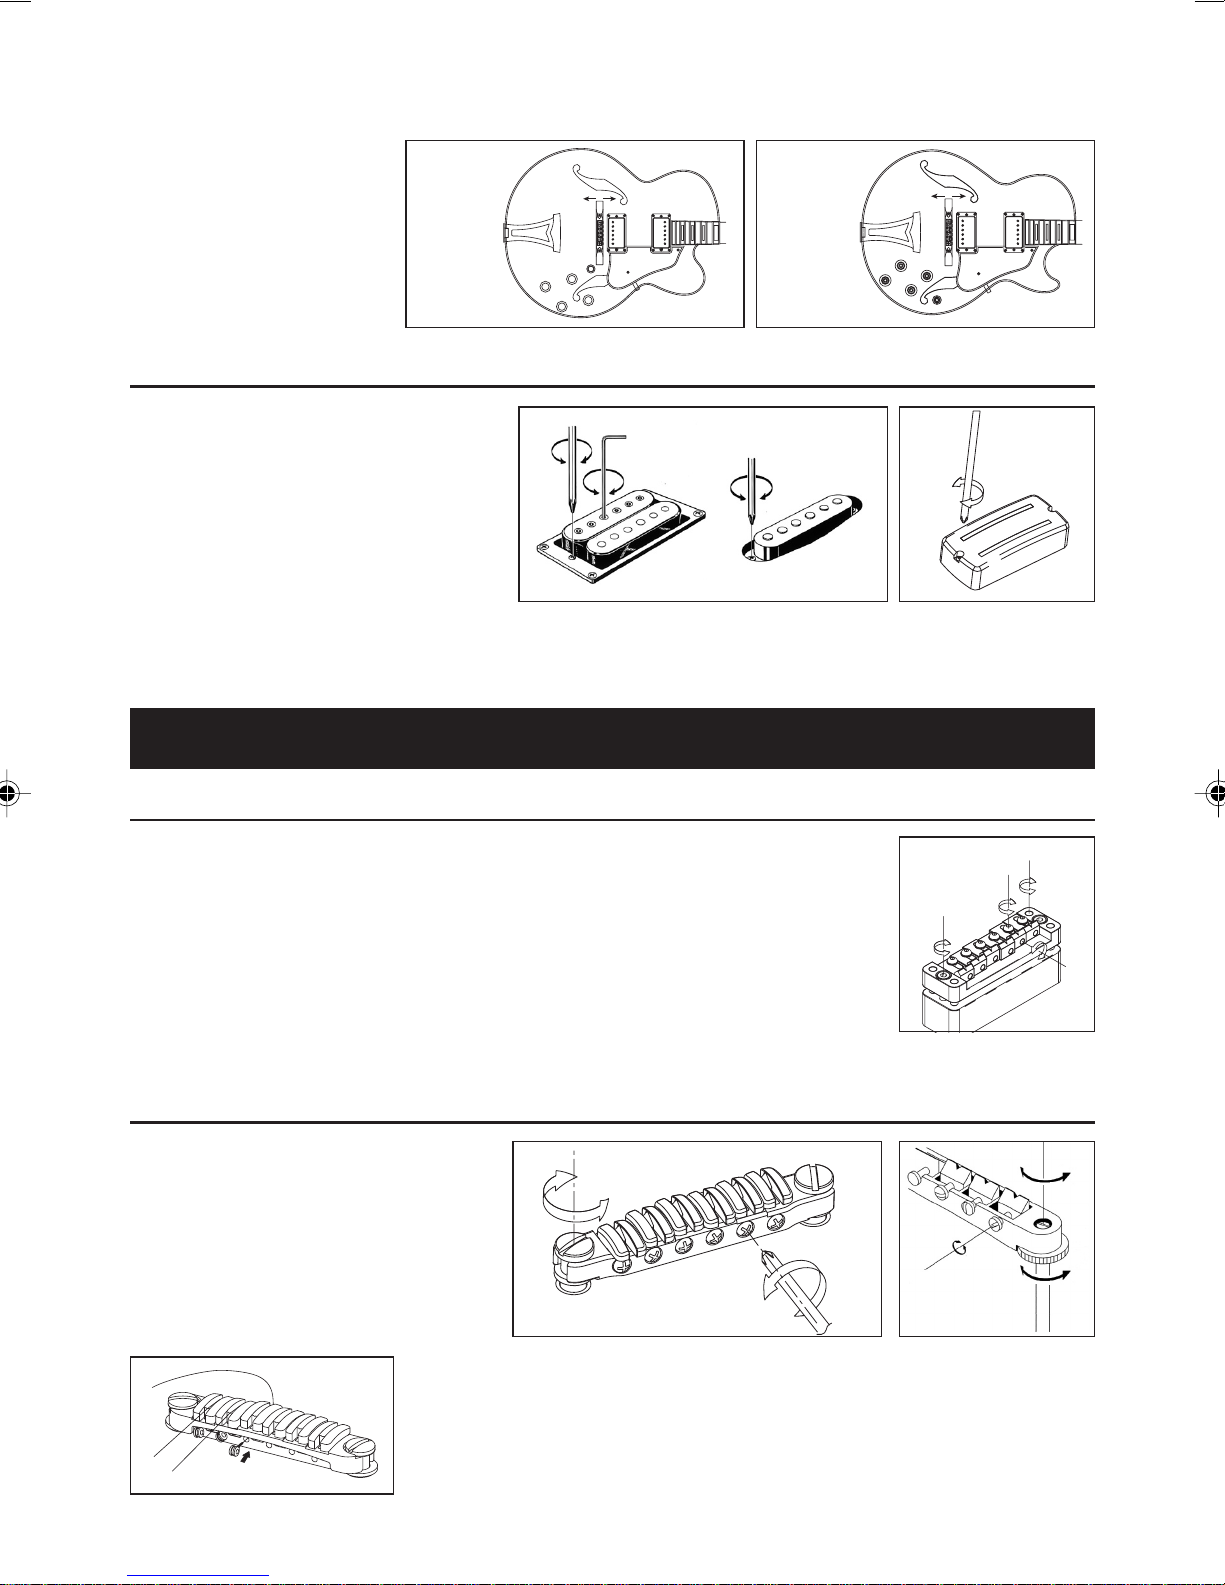
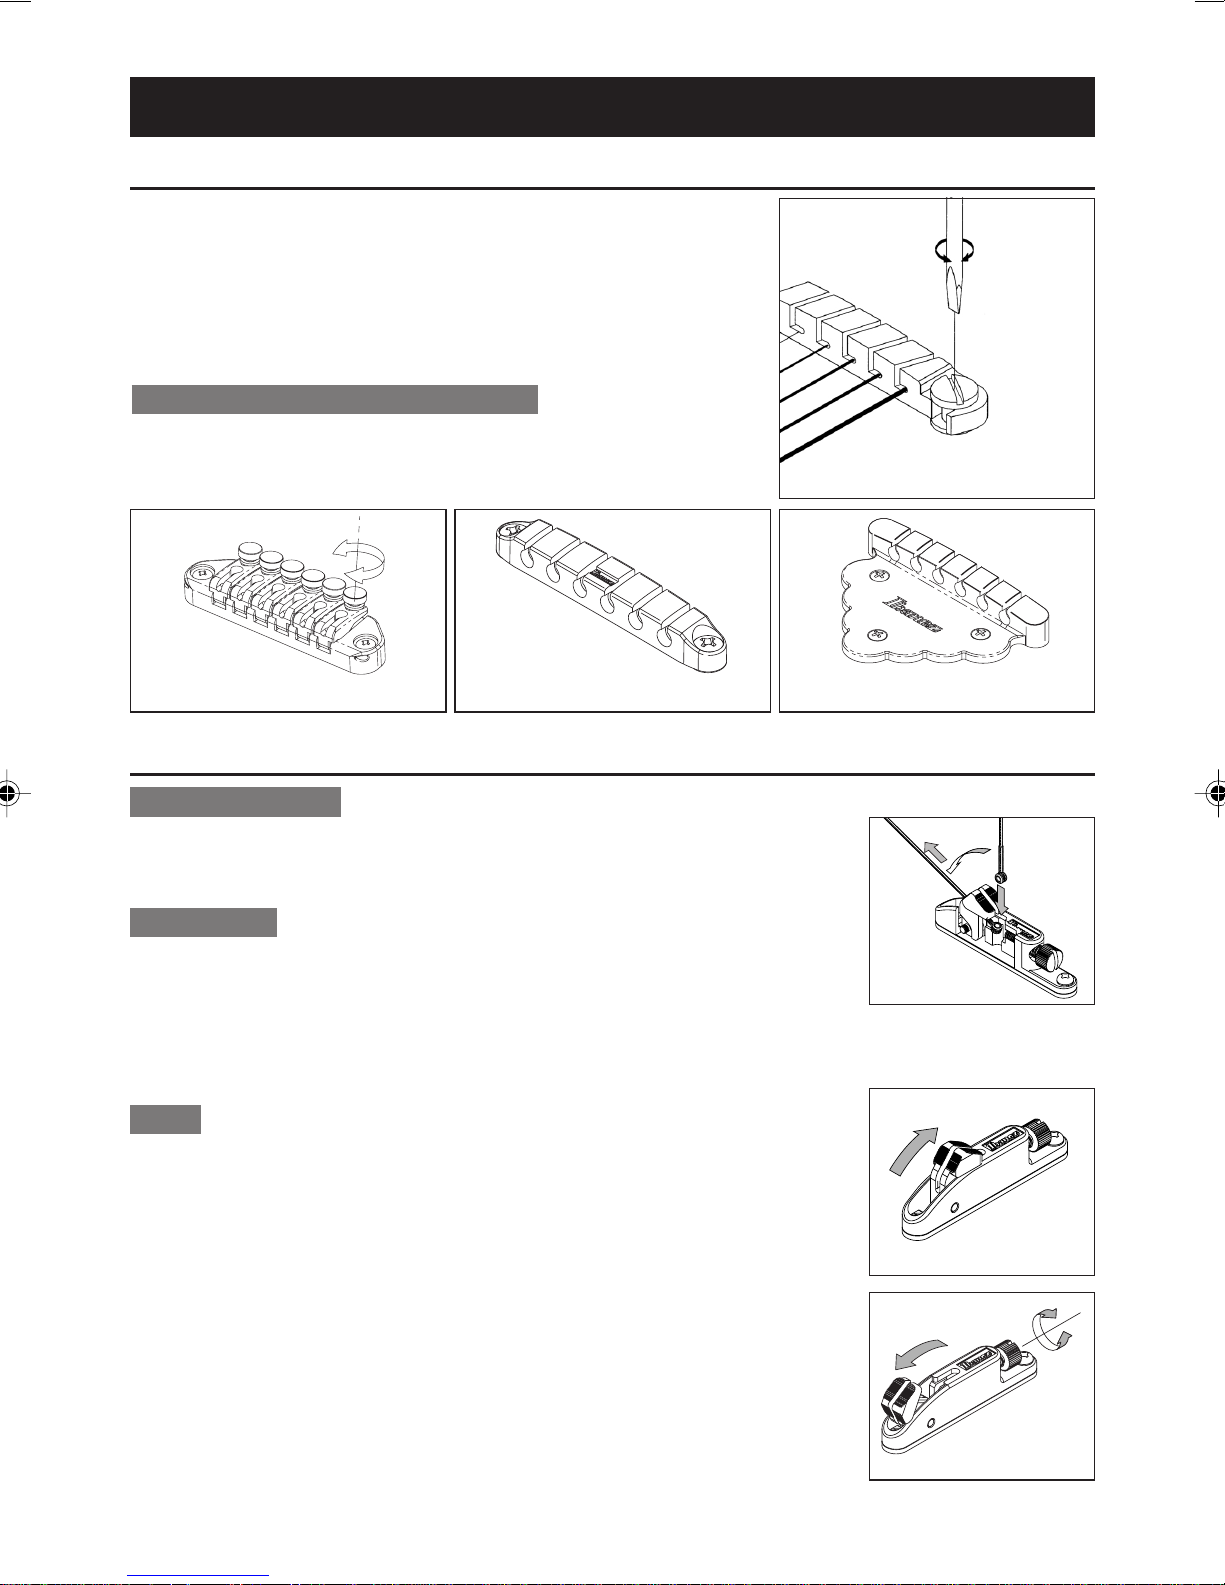
クイックチェンジIIIテールピース
クイックチェンジIIIテールピースは、両側のアジャストボルト(C)を
マイナスドライバーやコインで回すことで高さ調整が行えます。高く
するほど弦のテンションが弱まり、弦のタッチがやわらかくなります。
QUIKCHANGEULTRA/FINETUNNINGクイック
チェンジウルトラ/ファインチューニング機能
クイックチェンジウルトラは、ファインチューンスクリュー
(E)にて音程の微調整ができます。
(E)
QUIKCHANGEMINIQUIKCHANGEULTRA
(C)
QUIKCHANGEIII
QUIKCHANGECLASSIC
8
Page 10
ロッキングブリッジ
FXEDGE、FXEDGEIII-フィックスドブリッジ
IbanezFX-Edge、FX-EdgeIIIブリッジは、IbanezLo-ProEdge
トレモロをベースとしたロッキングタイプのフィックスドブリッジです。
スリースタッド構造
FX-Edgeブリッジは2本のメインスタッドとリアスタッドの合計3本
のスタッドボルトで支持されています。リアスタッドはブリッジ全体
の不要なガタつきや振動を防止するだけでなく、弦振動をより効率的
にボディーへ伝える役割があります
弦高調整
弦高調整は3本のスタッドボルトすべてを回して行います。最初に
メインスタッドをドライバーやコインで調整した後、ギターに付属の
3mm六角レンチでリアスタッドを回し、ブリッジ全体がギターボ
ディーとおおよそ平行になるように調整してください。
メインスタッド
日本語
リアスタッド
メインスタッド
平行
ご注意
*メインスタッド1/2回転で、おおよそ弦高は0.3mm〜0.5mm変化します。弦高調整は3本のスタッドボルトを少しずつ回すこと
を繰り返して行ってください。
*リアスタッドの調整によっても弦高が変化します。最終的な弦高は、リアスタッドの調整後に今1度確認をしてください。
9
Page 11
ロッキングトレモロ
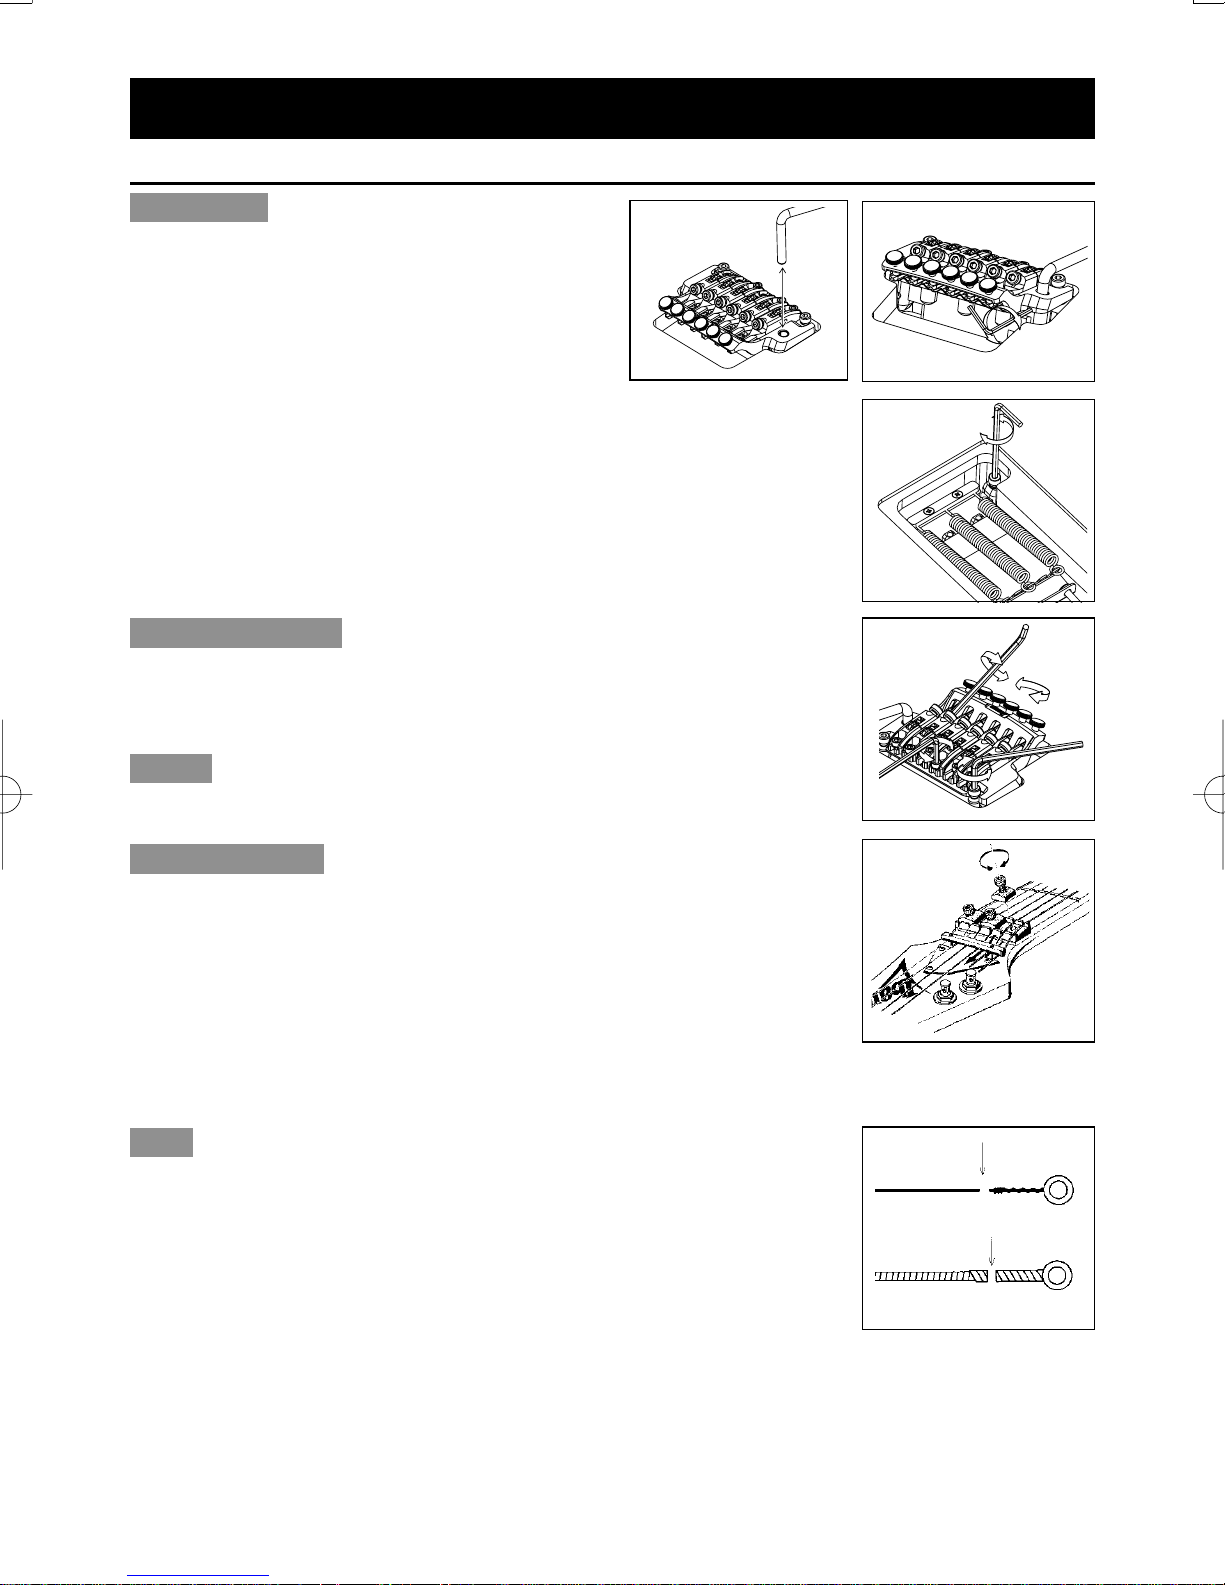
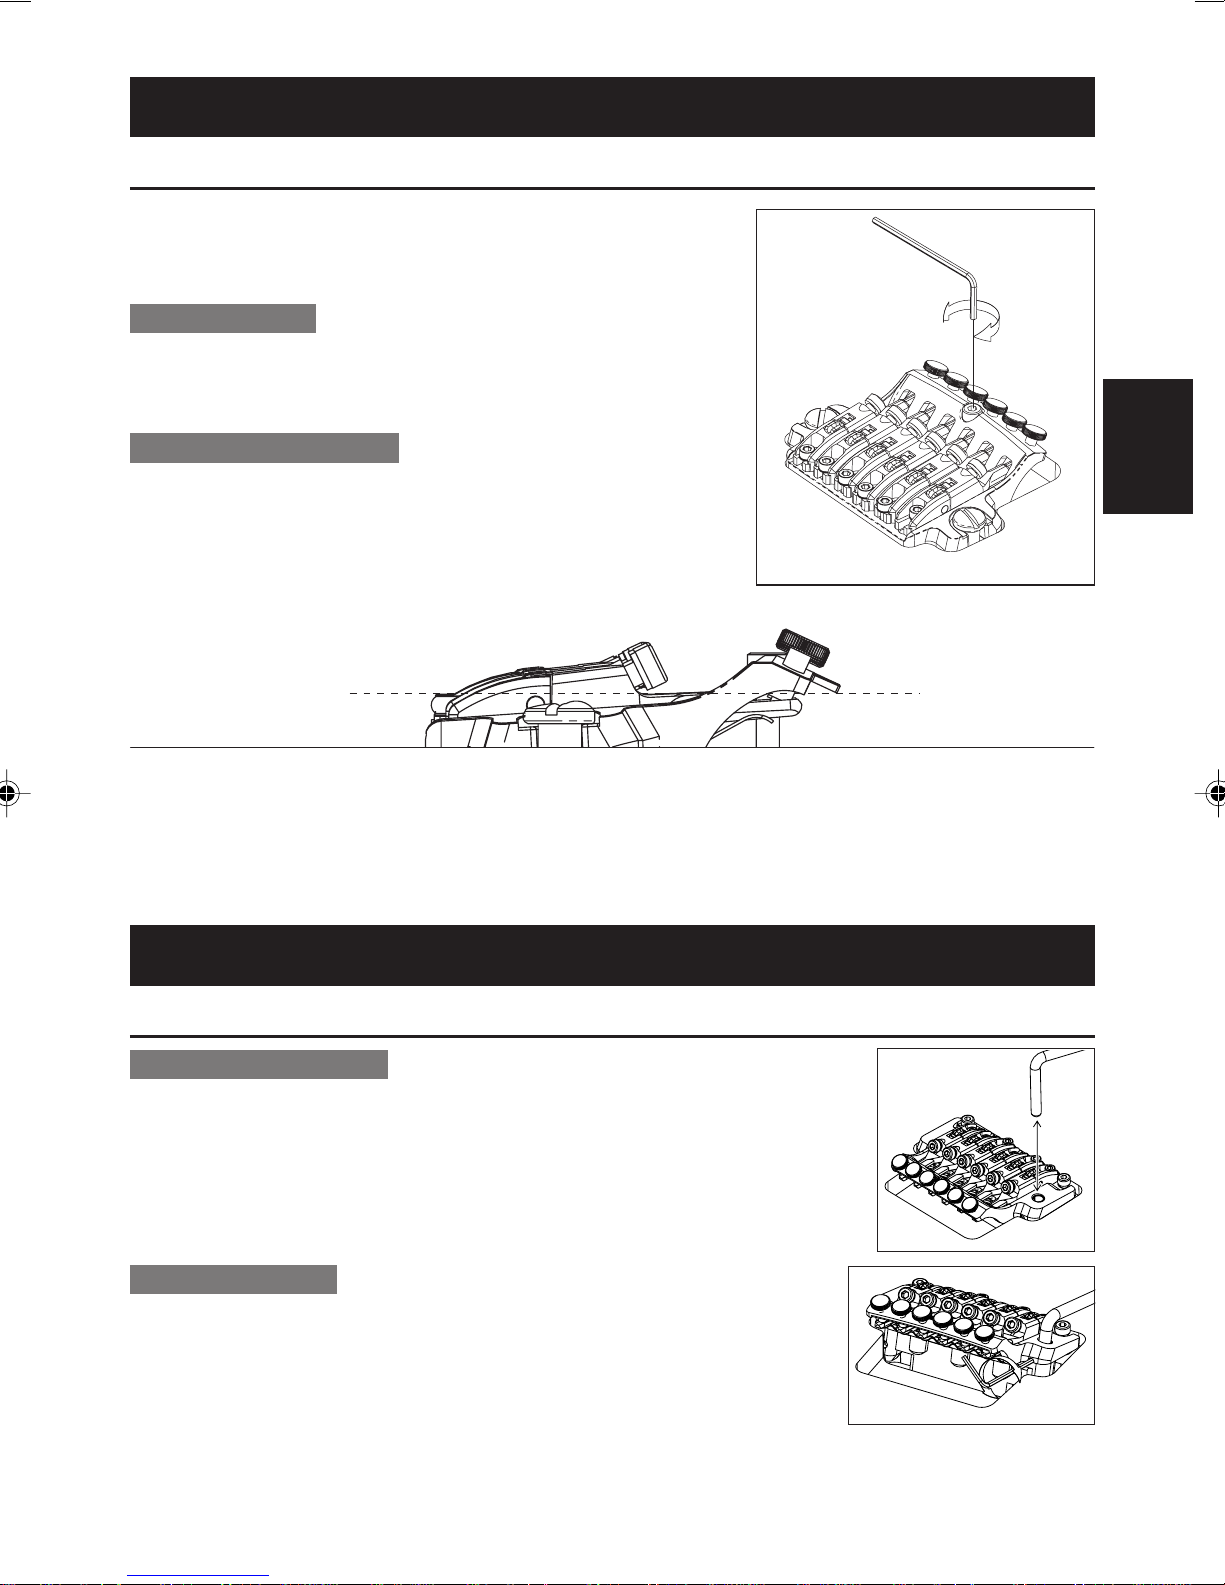
EDGEIIIトレモロ
トレモロアーム
トレモロアームはトレモロベースプレートのアーム挿入
穴に確実に挿し込んで取り付けます。
アームの取り付け固さは挿入穴の後方、ベースプレート
側面の調整穴から1.5mm六角レンチを挿入して、固さ
調整スクリューを回して調整します。
スクリューを時計方向に締め込む事で取り付けが固くな
り、逆に緩めることで取り付けが緩くなります。(A)
アームの取り付け高さはギター裏側のトレモロスプリン
グカバーを取り外し、トレモロブロック底面に取り付けられた高さ調整スクリューを
3mm六角レンチで回して調整します。時計方向に締め込むほど取り付け高さが高く
なります。(B)
ご注意
*アームの取り付け固さ用調整スクリューは、(A)の位置と、更にもう1箇所(B)調整スクリュー
の下方に設けてあります。同調整スクリューはあらかじめ出荷時に調整されていますが、調整が
必要な場合はトレモロをギターから取り外した状態で行ってください。
(A)
(B)
ファイン・チューニング
ロッキング・ナットをロックした後でもファイン・チューナーによって各弦ごとに
チューニングの微調整が行えます。
ロッキング・ナットをロックする前に、あらかじめすべてのファイン・チューナー
(C)を可動範囲の中央付近に調整しておくことがポイントです。
弦高調整
トレモロ本体左右のスタッドボルト(E)を3mm六角レンチで回して、トレモロ全体
の高さを上下に調整します。(各弦ごとの調整は行えません。)
イントネーション調整
イントネーション調整の前に、ロッキング・ナットのプレッシャー・パッド・スク
リュー(D)を3mm六角レンチで緩めて、糸巻きで十分に弦を緩めておきます。各サ
ドルのサドルロックスクリューを2mmの六角レンチで緩め(F)、サドルを移動させ
ます。サドルロックスクリュー(F)をしっかりと締め、チューニングを行ってからイ
ントネーションを確認します。正しいイントネーションが得られるまで同じ調整を繰
り返した後、ロッキング・ナットのプレッシャー・パッド・スクリューを締めます
(D)。
ご注意
*サドルロックスクリューを緩めるときにはかならず十分に弦を緩めてから調整を行ってください。
弦交換
ロッキングナットのプレッシャー・パッド・スクリューを3mmの六角レンチで緩
めて糸巻きから弦を取り外します。(D)
トレモロ本体のストリング・ストッパー・ボルトを3mm六角レンチで緩め、弦を
引き抜いて取り外します。(G)
新しい弦は先端のボールエンド部分をニッパー等で切り落とします。
ボールエンド部を切り落とした側の先端の弦を外した時と逆の要領でサドルとストリ
ング・ホルダー・ブロックの間に挿入しストリング・ストッパー・ボルトを締めて弦
を固定して下さい。
同様に、逆の要領で糸巻きで弦を巻き上げ、正しいチューニングを行ってください。
ロッキングナットのプレッシャー・パッド・スクリューを締めて完了です。
(F)
(G)
(C)
(E)
(D)
ご注意
*全ての弦を一度に取り外すとトレモロの取り付け角度が大きく変化するため、弦は1本ずつ交換して下さい。
*弦をチューニングする前に、ストリング・ストッパー・スクリューがしっかりと締め付けられていることを確認して下さい。
10
Page 12
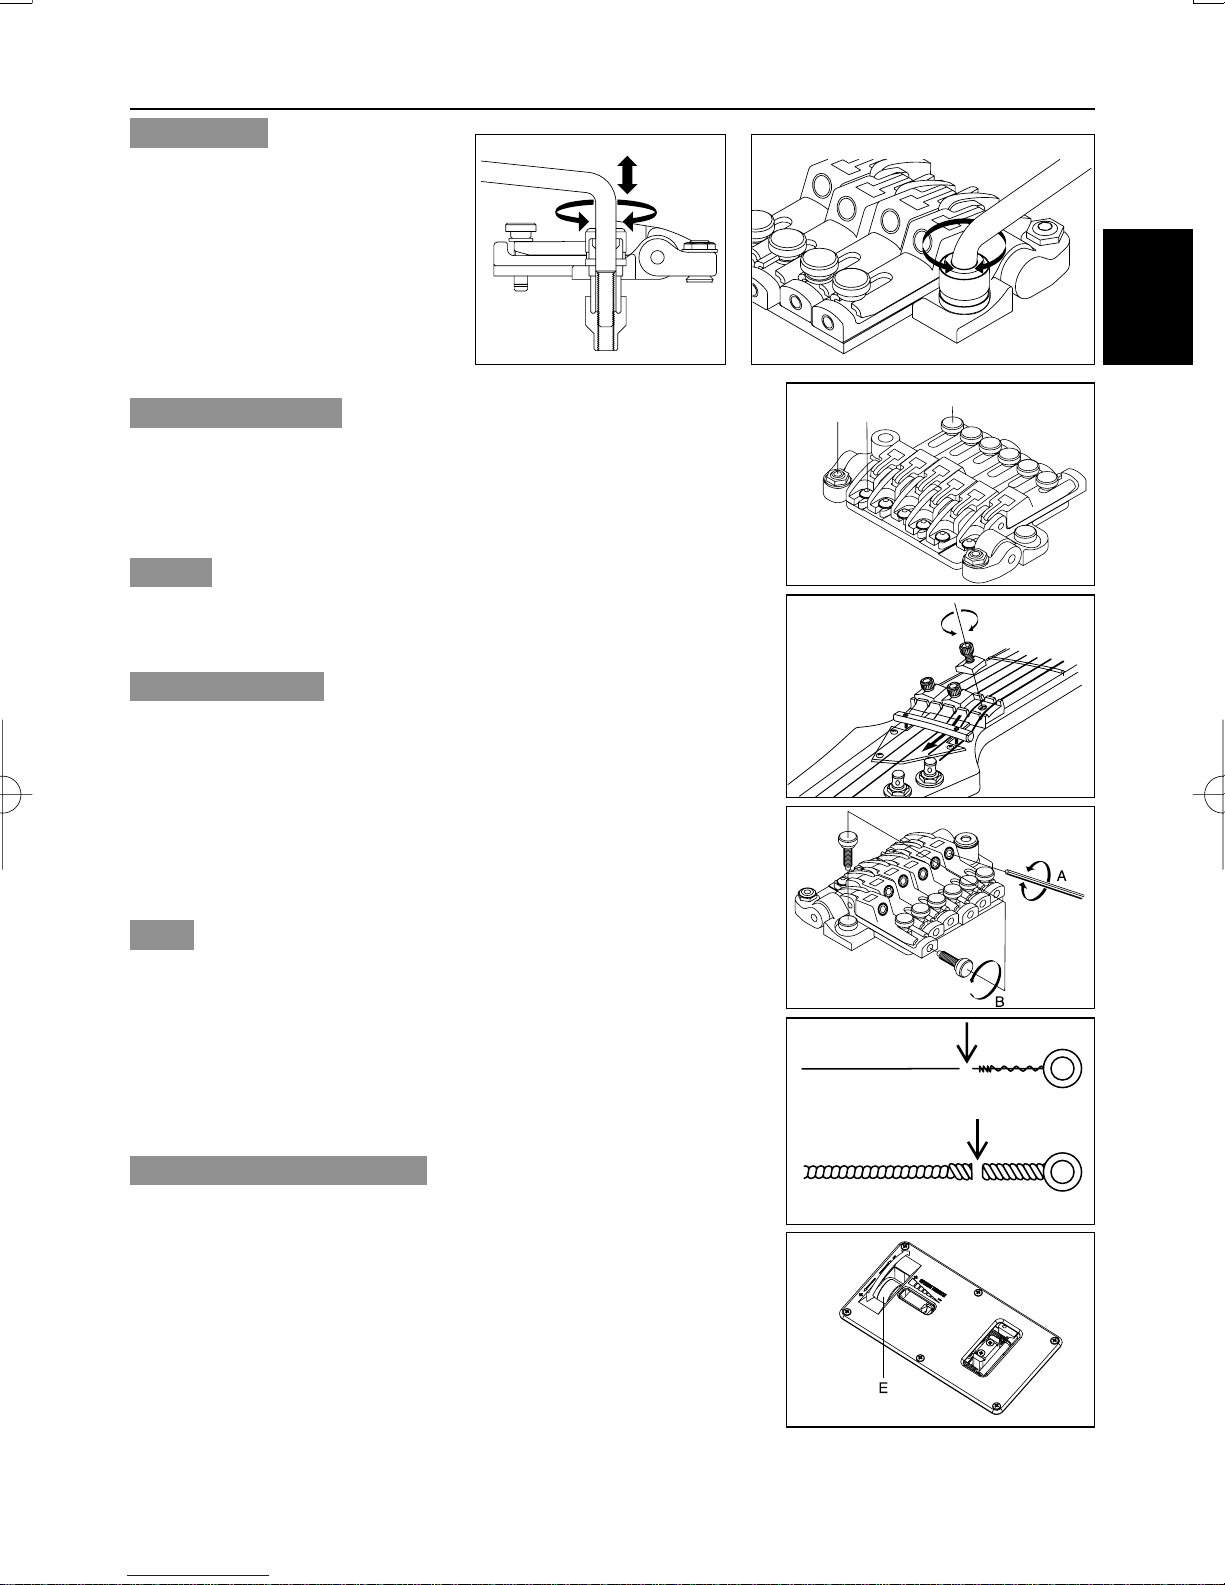
ZRトレモロ
トレモロアーム
スクリューキャップを緩め、アームを
トレモロ本体に挿入後、回転させて締
め込みます(Fig.8)。アームの高さ
は、アームを回転させながら好みの高
さに設定します。アームのトルクは、
スクリューキャップの締め込み具合で
調整します。
アームの取り外しは、スクリュー
キャップを緩め、アームを反時計回り
に回します(Fig.9)。
ファイン・チューニング
ロッキング・ナットをロックした後でもファイン・チューナー(Fig.10
A)によって各弦ごとにチューニングの微調整が行えます。
ロッキング・ナットをロックする前に、あらかじめすべてのファイン・
チューナーを可動範囲の中央付近に調整しておくことがポイントです。
FIG.8
日本語
FIG.9
C
B
A
弦高調整
トレモロ本体左右のスタッドボルト(Fig.10B)を六角レンチで回して上下
させ、トレモロ全体の高さを調整します。(各弦ごとの調整は行えません。)
イントネーション調整
ロッキング・ナットのストリングストッパーボルト(Fig.11)を緩めま
す。ブリッジ本体に収納されているイントネーション調整ボルト(Fig.12
B)を取り外し、サドル後部のネジ穴に締め込み、ボルトの先端がブリッジ
本体のボストに接触するまで締め込みます。サドルロックボルト(Fig.10
C)を緩めて、イントネーション調整ボルトを回してサドル位置を調整しま
す。調整後は、チューニング時に
サドルが前方へ移動しないよう、サドルロックボルトを十分に締め、イント
ネーション調整ボルトをブリッジ本体に収めて下さい。
弦交換
ロッキング・ナットのストリングストッパーボルト(Fig.11)を緩め、糸
巻で完全に弦を緩めてからブリッジサドルのストリングストッパーボルト
(Fig.12A)を六角レンチで緩めて古い弦を取り外します。新しい弦はあ
らかじめニッパーなどでボールエンド部を(Fig.13)の様に切り落とし、
切り落とした側をブリッジサドルに挿入してストリングストッパーボルトを
しっかり固定してから、糸巻きで弦を巻き上げます。チューニング後、トレ
モロ本体の取り付け角度を確認してからロッキング・ナットのストリングス
トッパーボルトを固定して完了です。
FIG.10
FIG.11
FIG.12
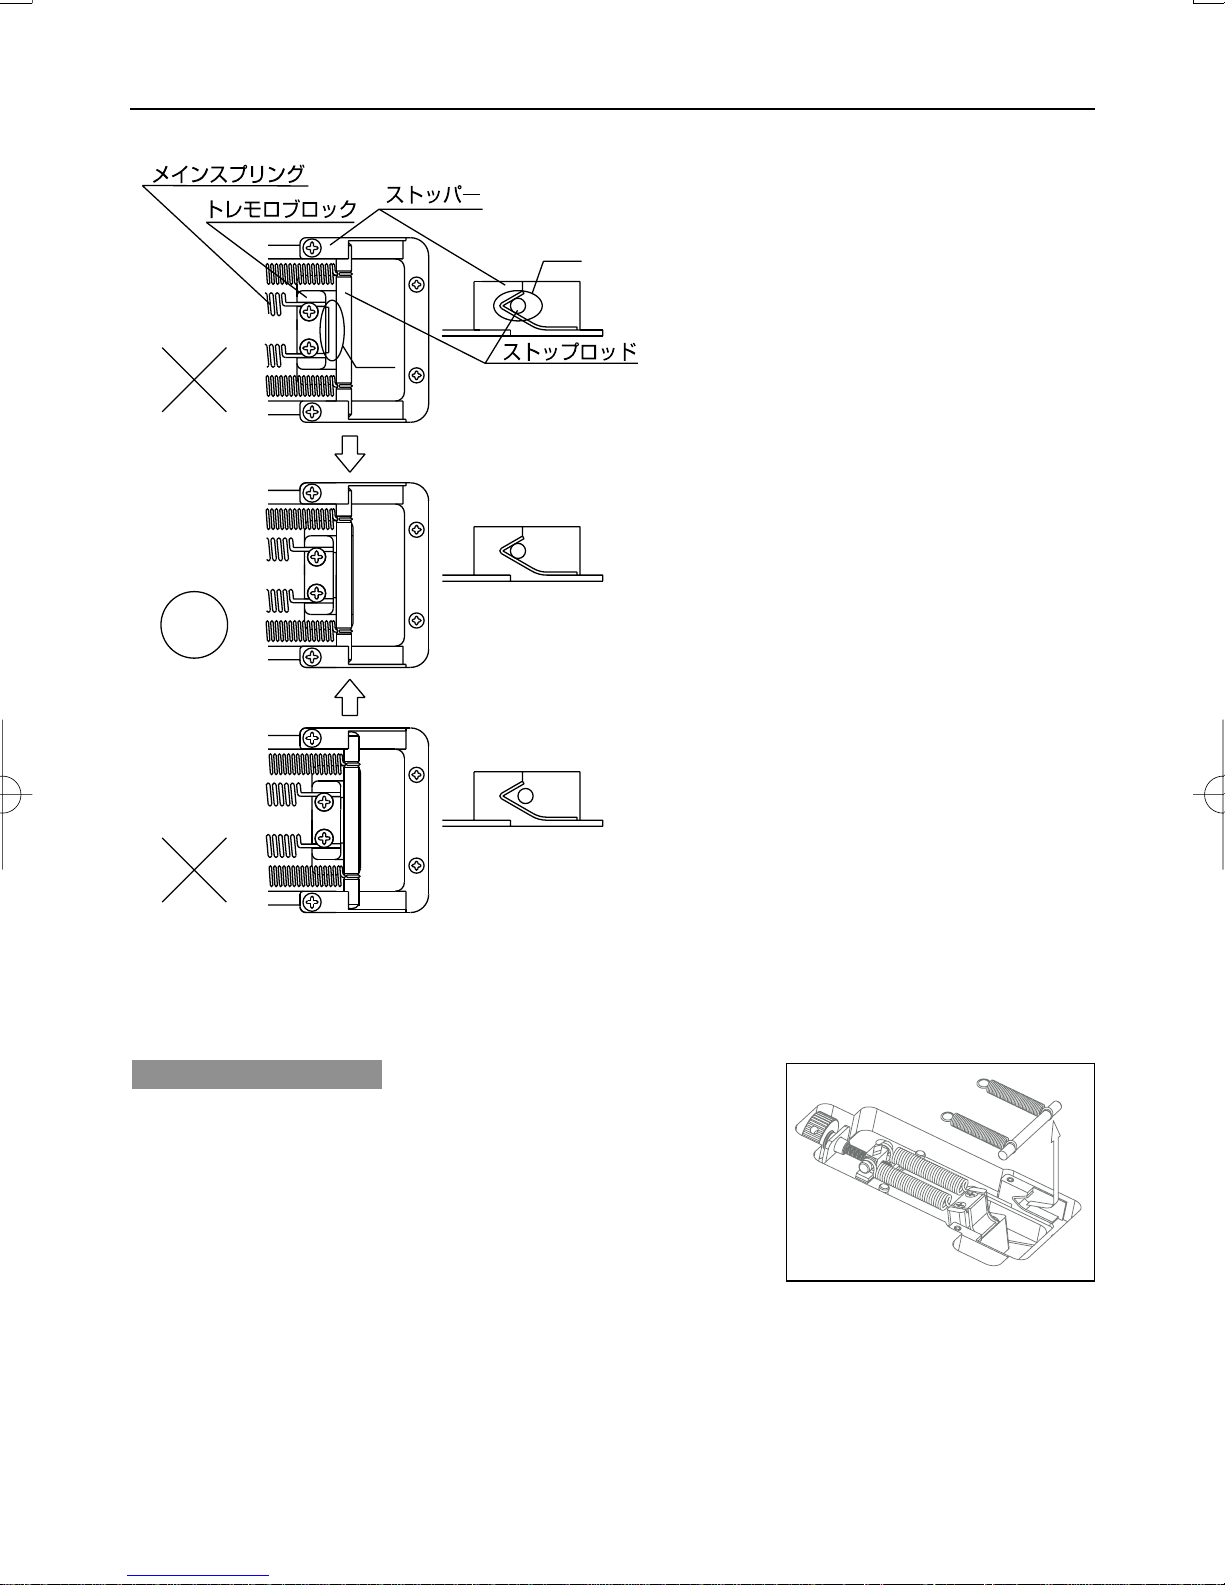
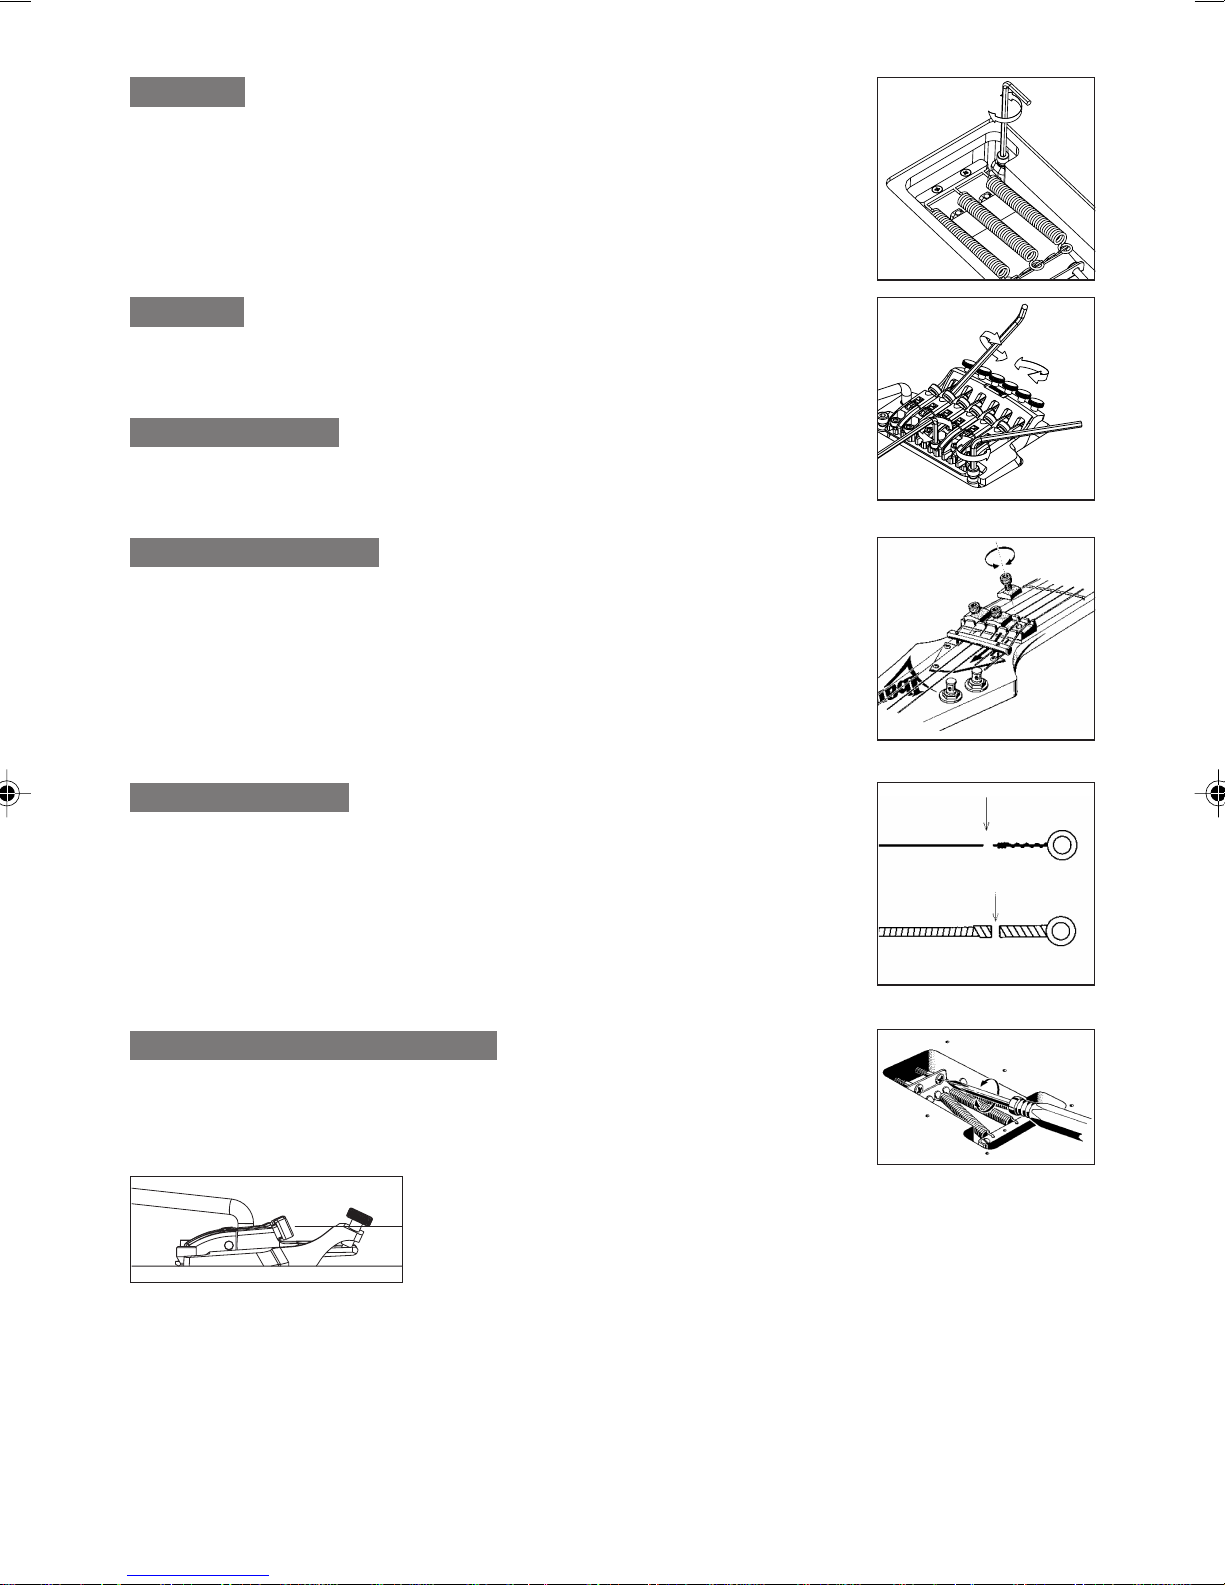
ZEROPOINTSYSTEMの調整
ZEROPOINTSYSTEMは、フローティングトレモロのチューニングが簡
単に行え、アーミング後のチューニングをより安定させ、弦が切れたとき
にもチューニングのくるいを抑えることができるシステムです。
正しくチューニングした状態で、ストップロッドがトレモロブロックとス
トッパーに接した状態であることを確認します。
ストップロッドがトレモロブロックに接していないときは、メインスプリ
ング調整ネジを反時計回りに回して、メインスプリングを緩めて下さい。
ストップロッドがストッパーに接していないときは、メインスプリング調
整ネジを時計回りに回して、メインスプリングを締めて下さい。
*ZEROPOINTSYSTEMが正常な位置に調整されていない場合は、完全にフローティ
ングしているか、ZEROPOINTSYSTEMと弦の張力で釣り合っている状態になり機
能が十分発揮できませんので、調整は正確に行ってください。
FIG.13
FIG.14
11
Page 13
ZPS(ゼロポイントシステム/ZRトレモロ標準装備)
まず最初にギターのチューニング確認をして
ください。
2
1
ギターが正しくチューニングされていること
を確認した上で、"ストップロッド"に"トレモ
ロブロック"と"ストッパー"双方共が接するよ
う"メインスプリング"を調整することで、ゼ
ロポンイントシステムは正しく機能します。
もし"ストップロッド"に"トレモロブロック"
と"ストッパー"が接していない場合には(参
照 図X)、"メインスプリング調整ローラ"
を回して"ストップロッド"に,"トレモロブ
ロック"と"ストッパー"双方共が接するよう
(参照 図
○○
○)に調整してください。
○○
ご注意
*演奏中に弦が切れた場合にはネックのテンションバランスが変化することにより他弦に影響が出ます。通常のギターでは、演奏支障が
出る場合があります。が、本システム搭載機種では調整後は、演奏支障が出ない範囲に他弦のチューニング変動は押さえられます。
フローティングへの切り替え
ZEROPOINTSYSTEMの機能を停止させることで、トレモロを完全にフ
ローティングさせることが可能です。
アームアップをしながら、ストップロッドとメインスプリングを外しま
す。正しくチューニングした状態で、トレモロの取り付け角度をメインス
プリング調整ネジで調整します。
トレモロが、ネック側に対して前方へ傾きすぎている場合は、スプリング調
整ネジを時計回りに回します。反対にトレモロが、ネック側に対して後方へ
傾きすぎている場合は、スプリング調整ネジを反時計回りに回します。
*フローティング状態でのトレモロ取り付け角度の調整は、メインスプリング調整ネジ
を調整するたびに、チューニングがくるってしまいますので、チューニングを繰り返し
ながら根気良く調整して下さい。
12
Page 14
ノンロッキングトレモロ
SAT/FATトレモロ
トレモロアームの取り付け
トレモロアームはトレモロプレートのアーム取り付け穴に挿し込むだけで取り付けられます。
FAT6トレモロのみトレモロアームはスクリュータイプのアームを採用しています。FAT6のトレモロアームは時計
方向に回しながら装着を行います。また、反時計方向に回すことにより取り外しができます。
日本語
トレモロアームのトルク調整
1:トレモロアーム取り付け部後方のトレモロブロック上にアームのトルク調整スク
リューがあります。トレモロをダウンさせた状態で付属の1.5mm六角レンチで
調整し、アームの取り付け固さが変えられます。
弦高調整
2:トレモロ全体の高さは付属の3mm六角レンチで左右のトレモロスタッドを回し、
トレモロプレートの高さを変えて調整します。スムースなトレモロアクションの
ために左右の高さはできるだけ均等にあるように調整してください。
3:SAT30トレモロは、付属の1.5mm六角レンチでサドルごとに調整スクリューを
回して弦高の微調整を行います。
イントネーション調整(SAT30,FAT20)
4:各サドルはトレモロプレートに固定されています。イントネーション調整の前に
付属の2mm六角レンチでサドル固定スクリューを軽くゆるめてください。
5:イントネーション調整は付属の2.5mm六角レンチでイントネーション調整ボルト
を回してサドルを前後させます。調整後はふたたびサドル固定スクリューを固定
してください。
イントネーション調整(SATPRO,SAT10,FAT6,FAT10)
5:イントネーション調整はプラスドライバー(SATPROのみ6角レンチ)を使用
して調整スクリューを回しサドルを前後させます。
1
2
3
4
4
5
3
2
弦交換
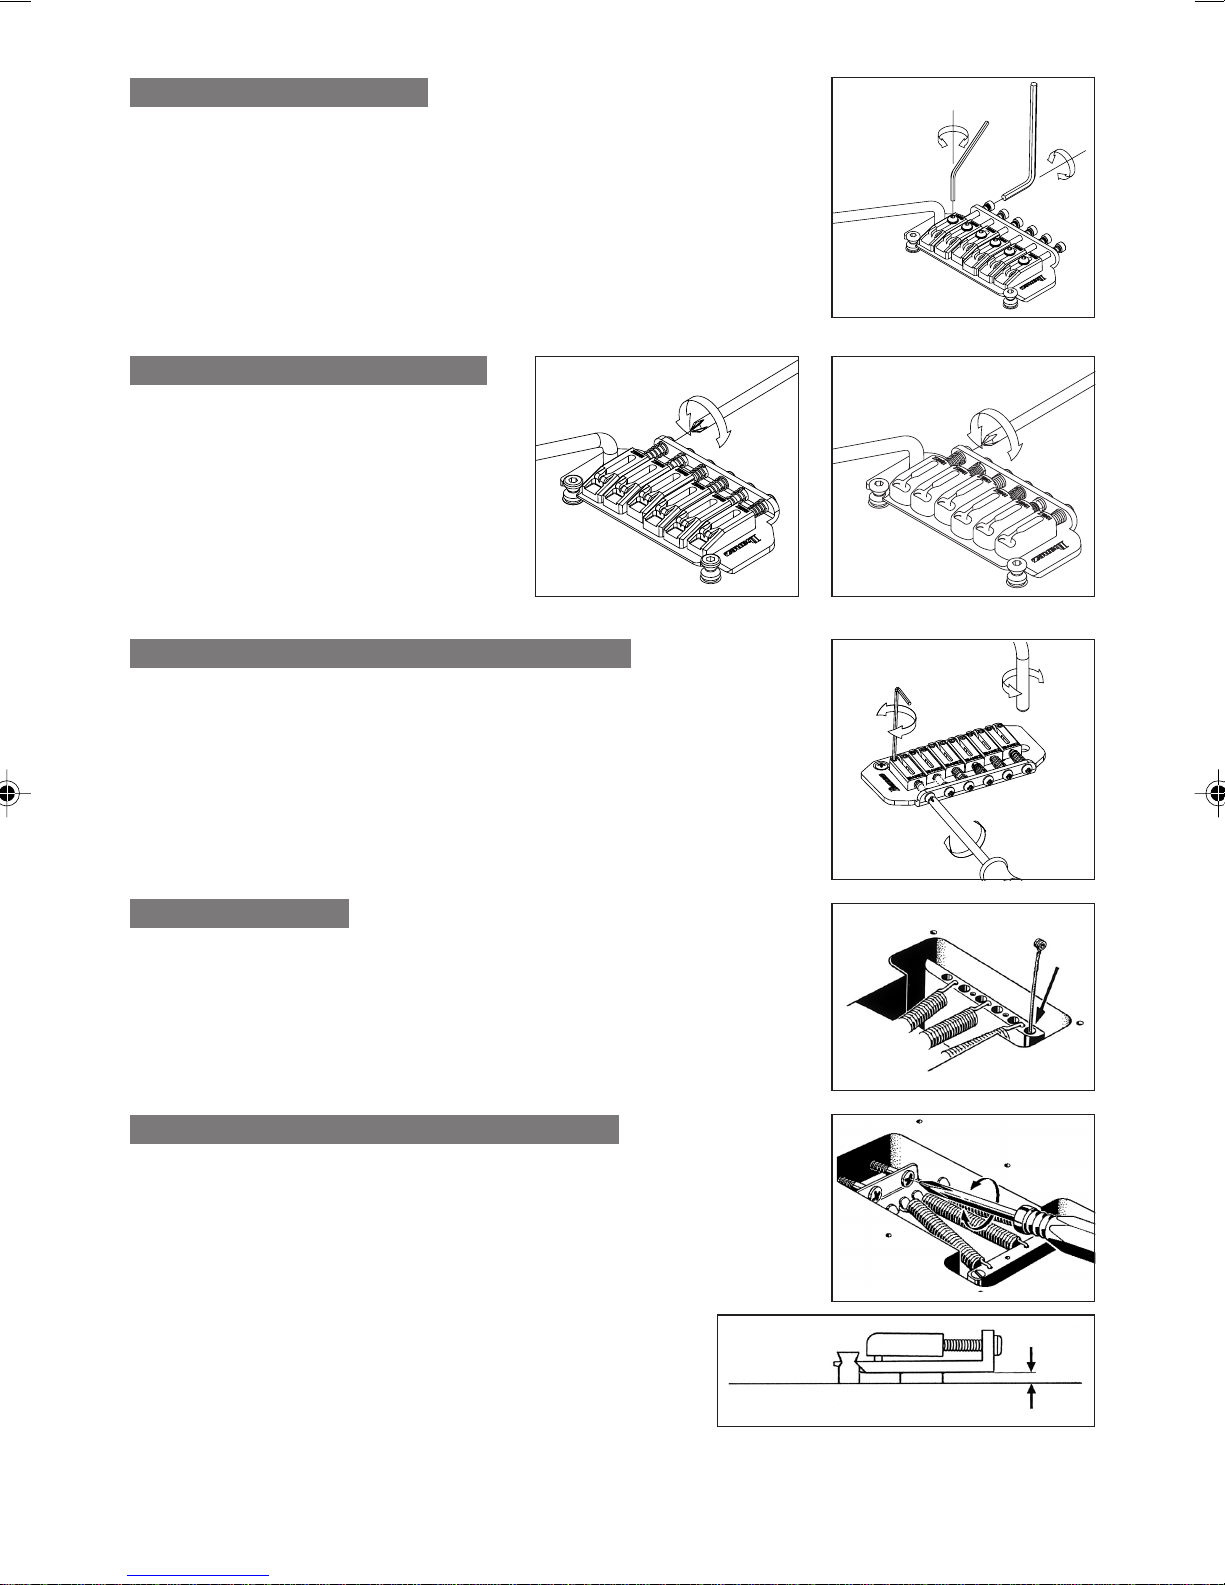
新しい弦はギターの裏側からトレモロブロックを通して取り付けてください。
トレモロの取り付け角度調整
SAT/FATトレモロは通常、アームダウン、アップの両方向が行えるフ
ローティングと呼ばれる状態で使用します。
トレモロの取り付け角度は弦の張力と、ギターボディーの裏側に装着され
たトレモロスプリングの張力バランスで調整します。正しくチューニング
した状態で、ギターボディー裏のトレモロスプリングカバー内のトレモロ
スプリングフックのスクリューをプラスドライバーで回します。トレモロ
が前方へ傾きすぎている場合は、トレモロスプリングの力が弱いため、スクリューを
締め込んでスプリングを長くします。逆にトレモロが後方へ傾きすぎている場合は、
スプリングの力が強すぎますので、スクリューをゆるめ、スプリングを短くします。
トレモロをギターボディーに密着させる場合、トレモロスプリングの張力を余分に強
めておくことで、チョーキング時にも他の弦の音程変化のない、より安定した状態が
得られます。(アームダウンは堅くなります。)
*トレモロ取り付け角度の調整は、トレモロスプリングの長さを変えるたびにチューングがくるってしまいますので、何度もチューニング
を繰り返しながら、根気よく調整してください。
・トレモロスプリング
フローティング状態は、通常3本のスプリングを用いることが一般的です。3本のスプリングでも力が足りない
場合は、両側の2本を斜めにフックにかけることで、更に力を強めることができます。逆に3本では力が強すぎ
る場合は、中央の1本を外し、両側の2本だけを使用します。また、トレモロをボディーに密着させる場合は、
スプリングを4本以上に増やして、完全にトレモロを固定する場合もあります。
トレモロスプリングの取り付け、取り外しは、かならず完全に弦をゆるめた状態で注意深く行ってください。
5
約3mm
13
Page 15
Maintenance
Our congratulations and deepest thanks on making Ibanez your choice of instrument.
Ibanez standards are second to none. All Ibanez instruments are set up to our strict quality
control standards before shipping. The purpose of this manual is to explain how to
maintain your instrument’s finish and to keep your guitar playing as well as it did when it
left our factory.
CLEANING
Regular cleaning of your guitar is one the most important ways
you can maintain the finish and lengthen string life. After
playing, wipe down your instrument to remove any perspiration
from the instrument. Perspiration can actually contain acids
that can be corrosive to the strings and metal parts of the
guitar. Gloss finish guitars should be polished with polish
formulated specifically for musical instruments, and a soft,
treated guitar cloth or a cotton rag. Abrasive rags such as
polyester can scratch the finish. Oil finished guitars should be
wiped clean immediately after playing with a dry cotton rag only. If your guitar has become discolored due to
extended use or heavy perspiration, factory appearance, see a qualified guitar repair person about methods to
restore the oil finish to its original factory appearance.
STRINGS AND TUNING MACHINES
If strings become dirty, discolored, or produce a dull sound or buzz, replace the
strings with new ones. For best results we recommend replacing one string at a
time, this will help to avoid removing the string tension from the neck. When
replacing strings with different gauge strings, it may be necessary to adjust the
truss rod tension. (We recommend only qualified technicians perform this.)
Instruments that have tremolo systems installed may need to be adjusted after
string replacement as changes in string tension can cause the tremolo to raise
or lower. Ibanez guitars and basses are factory equipped with the following
string gauges. Please follow the instructions below for your particular model.
The strings should be tightly wound on to the tuning machines from top to
bottom with 2 to 3 string wraps around the post. In the case of unwound guitar
strings, the ends of the strings should be prepared as shown in the diagram to
prevent unintentional slippage from the posts. In the case of tuning machines,
where the string ends are inserted into the posts, the string can be cut to length
in advance using a pair of string cutters.
If the tuning machines are sealed gear units, they are self-lubricating types. The set screws for the tuning knob
are adjustment screws that can be tightened with a small Phillips head screwdriver to increase the tension.
*The use of coarse strings may lead to buzzing and sound distortion. Using strings that have twists or kinks may cause buzzing or
decreased sustain. Make sure that the new strings are smooth and free from any defects before installing.
STRING GAUGES
Solid guitars w/Tremolo, NDM2, JTK & ALL Gio
RG321MH, SZ, AXS, AR, ARC, ARX, AD, VBI & IC
7-String model
MMM1
NTM1
MTM2
ARTCORE guitars
ARTCORE basses
.009/.011/.016/.024/.032/.042 inch
.010/.013/.017/.026/.036/.046 inch
.010/.013/.017/.026/.036/.046/.054 inch
.014/.017/.030/.040/.056/.074 inch
.011/.014/.018/.028/.038/.049 inch
.011/.015/.018/.028/.038/.054 inch
.010/.013/.017/.030/.042/.052 inch
.050/.070/.085/.105 inch
3
TIGHTEN
2
LOOSEN
1
14
Page 16
NECK
Ibanez steel string models are equipped with adjustable truss
rods. The purpose of a truss rod is to adjust the neck to
LOOSEN
TIGHTEN
counteract string tension. There are many reasons for truss rod
adjustments. One of the most frequent reasons is changing string
gauges or tuning pitch which can affect string tension. String
tension changes may affect the string height and cause fret buzz
or notes that don’t ring true. To adjust the truss rod, locate the
truss rod nut and adjust it by inserting the correct wrench into the
nut and tightening (clockwise) or loosening (counter clockwise)
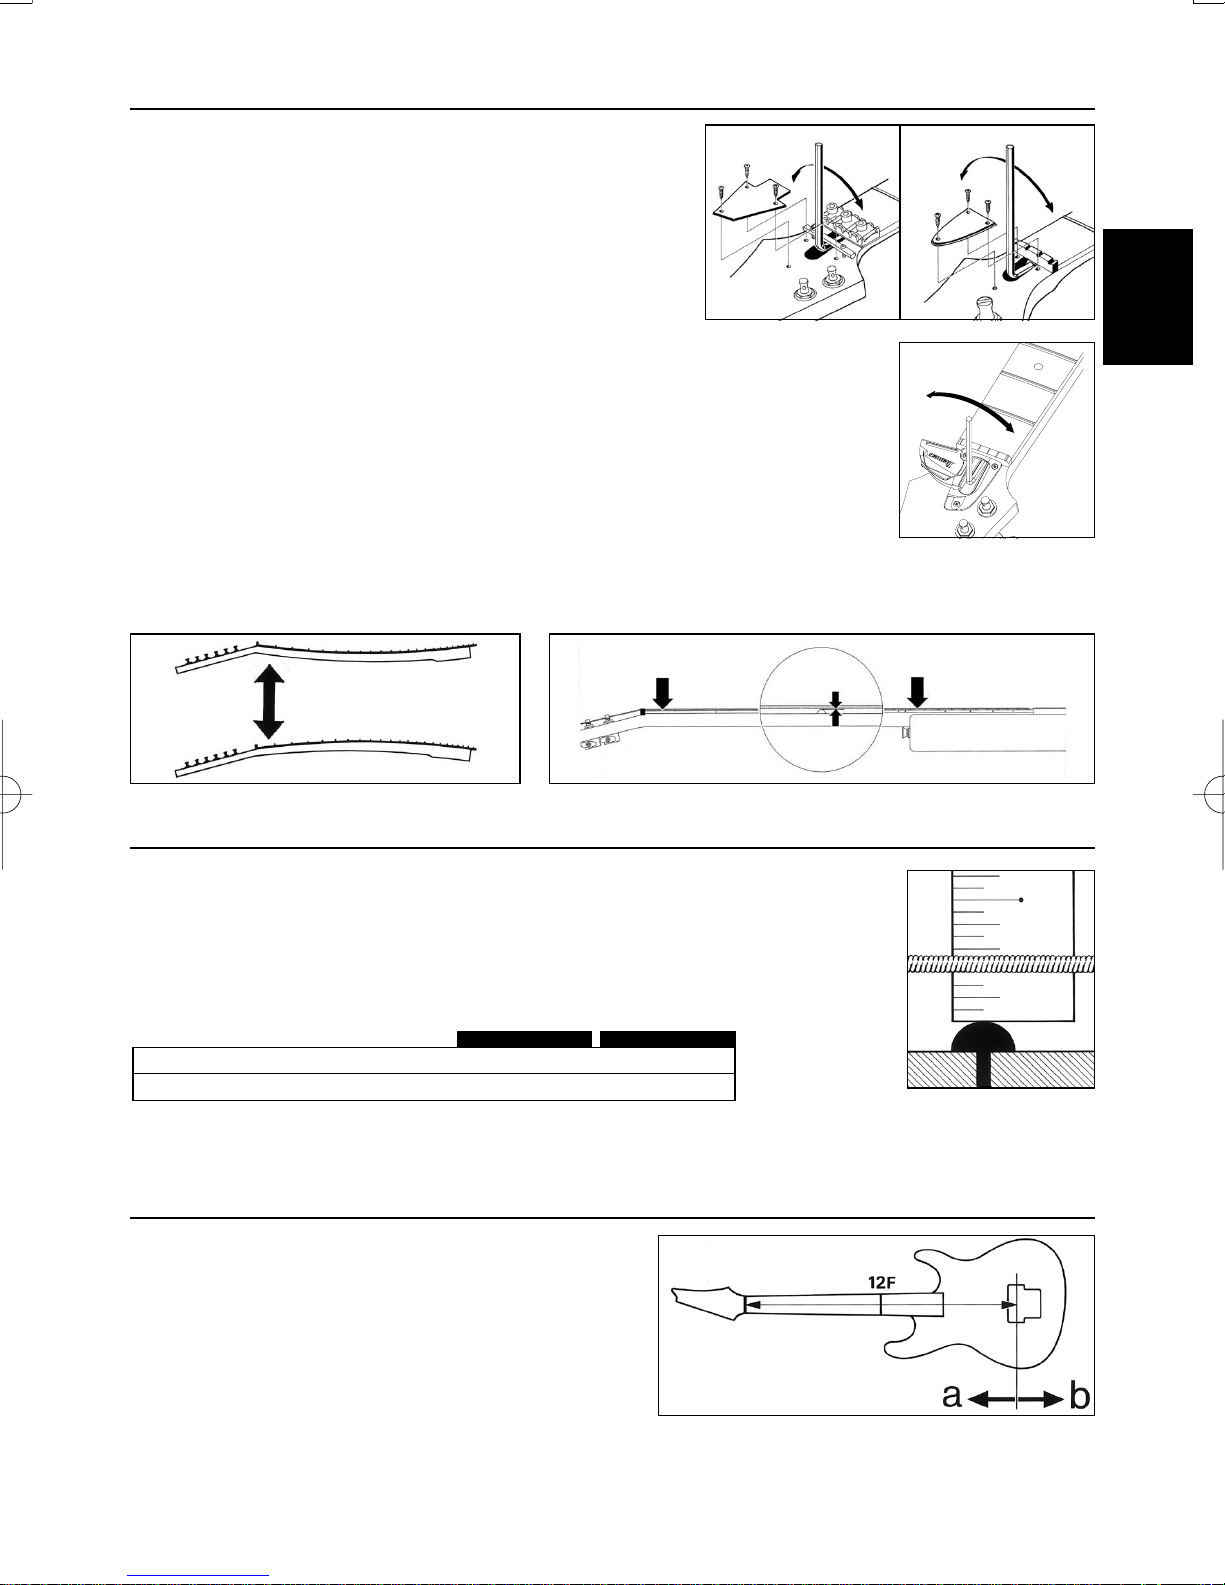
the rod. Truss rod tension can be measured by installing a capo at the first fret the
holding the strings down at the fret position where the neck joins the body. Insert a
thickness gauge between the string and the fret at the 8th fret. There should between
0.3 mm to 0.5mm clearance. That clearance is referred to as “neck relief.” Too much
neck relief can cause the neck to have higher action in the middle of the neck causing
poor intonation and uncomfortable playability. No neck relief can cause fret buzz.
*Appropriate care must be taken when adjusting the neck and we recommend only qualified technicians
perform this procedure.
LOOSEN
TIGHTEN
0.3~0.5mm
8th fret
LOOSEN
LOOSEN
TIGHTEN
ENGLISH
TIGHTEN
ACTION
Ibanez guitar and bass string action is set at the factory. However there are many
reasons that an instrument’s string height can change. Instruments can be affected by
changes in temperature and moisture. High string action can make the guitar difficult to
play. If the string action is too low, fret buzz or unclear notes can occur. To remedy this,
follow the instructions for the particular type of bridge installed. In the case of string
action, make sure the guitar is in tune and the truss rod is adjusted properly. Ibanez
action is set at the 14th fret. The action may also need to be readjusted after the neck
has been adjusted or strings have been changed to a different gauge. Follow the
instructions in the relevant bridge manual to make adjustments.
*If strings other than those described above are used, gradually increase the action clearance from the treble
side through to the bass side.
.009-string's guitars except Gio Ibanez
all Gio Ibanez & .010-, .014- string's guitars
Artcore Guitars
Artcore Basses
TREBLE SIDE BASS SIDE
1.5mm
1.7mm
1.7mm
2.0mm
2.0mm
2.3mm
2.3mm
2.5mm
INTONATION
Intonation adjustment is the operation of adjusting the
location of the string at the saddle to compensate for different
string gauges or different tunings. Follow the instructions of
the particular bridge intonation below. Intonation is properly
set when the 12th fret note and the 12th fret harmonic are
exactly the same note . This is the center point of the scale
and the most accurate way of setting a standard scale length.
With the harmonic note as the standard, if the fretted note is
flat move the bridge saddle forward toward the headstock (a) to decrease the string length. If the fretted note is
sharp, move it back away from the headstock (b) to increase the string length intonation adjustments.
*Please note that strings can be broken when the saddle is moved, so always loosen the strings before making adjustments.
15
Page 17
Below is the standard location of the bridge for AF, AFS and AG guitars.
Adjust the location to obtain proper intonation.
AGAF, AFS, AK
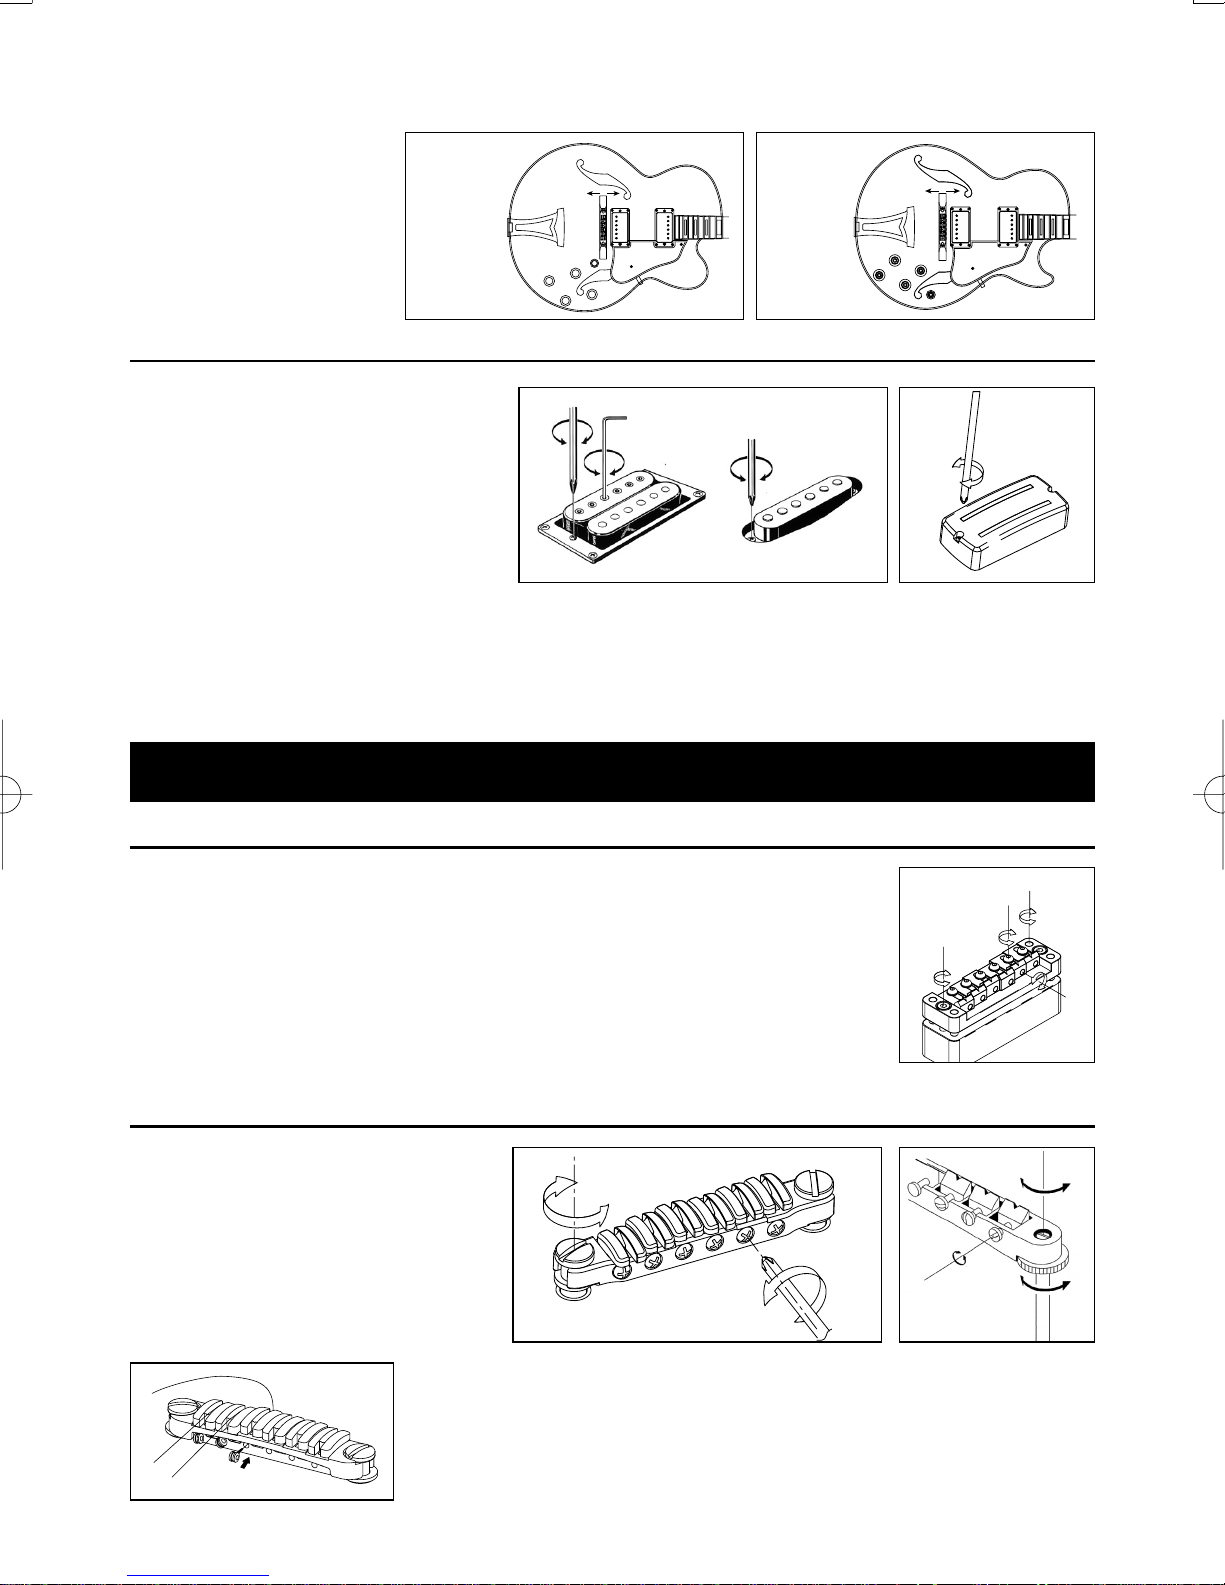
PICKUPS
The output level of the instrument as well
as the quality of the signal can be affected
by the pickup height. Pickup height should
be adjusted until the volume of neck and
bridge pickups are almost equal with both
volumes wide open. The volume may drop
drastically if the pickup height is too low.
As the pickups are magnetic, fret buzzing
and distortion may occur if the pickup is
too close to the strings. Use a small screwdriver to make adjustments to raise or lower the pickup.
*Instruments that have adjustable pole pieces can be adjusted to balance the output of each string.
Guitar Bridges
GIBRALTAR CUSTOM BRIDGE
The height adjustment can be adjusted by 4 pcs of 2.0mm of allen screws (B) on the
bridge. Since the adjustment screws are locked by the bridge lock screw (A), you must
loosen the bridge lock screw by 3.0mm Allen wrench before adjustment.
Each saddle is also locked by a saddle lock screw (C). To adjust the intonation, use a
2.0mm Allen wrench to loosen the saddle locke screws, and then adjust the Intonation
screw (D) by a 2.0mm Allen wrench. When you are finished with the adjustment, lock the
saddle and tune the guitar.
GIBRALTAR III (GUITAR & BASS),
CB3, & FULL TUNE III, ART1, ART2
The action can be adjusted by using a slot
head (-) screwdriver to turn the adjustment
bolt at either end (A).
The intonation can be adjusted by moving
the saddle forward or backward using a
screwdriver to turn the adjustment screw
of each saddle (B).
(A)
(B)
GIBRALTAR III, CB3
A
(B)
FULL TUNE II,
ART1, ART2
B
C
D
(A)
16
REPLACING THE STRINGS : CB3
Install strings by inserting them from the front of the bridge.
Page 18
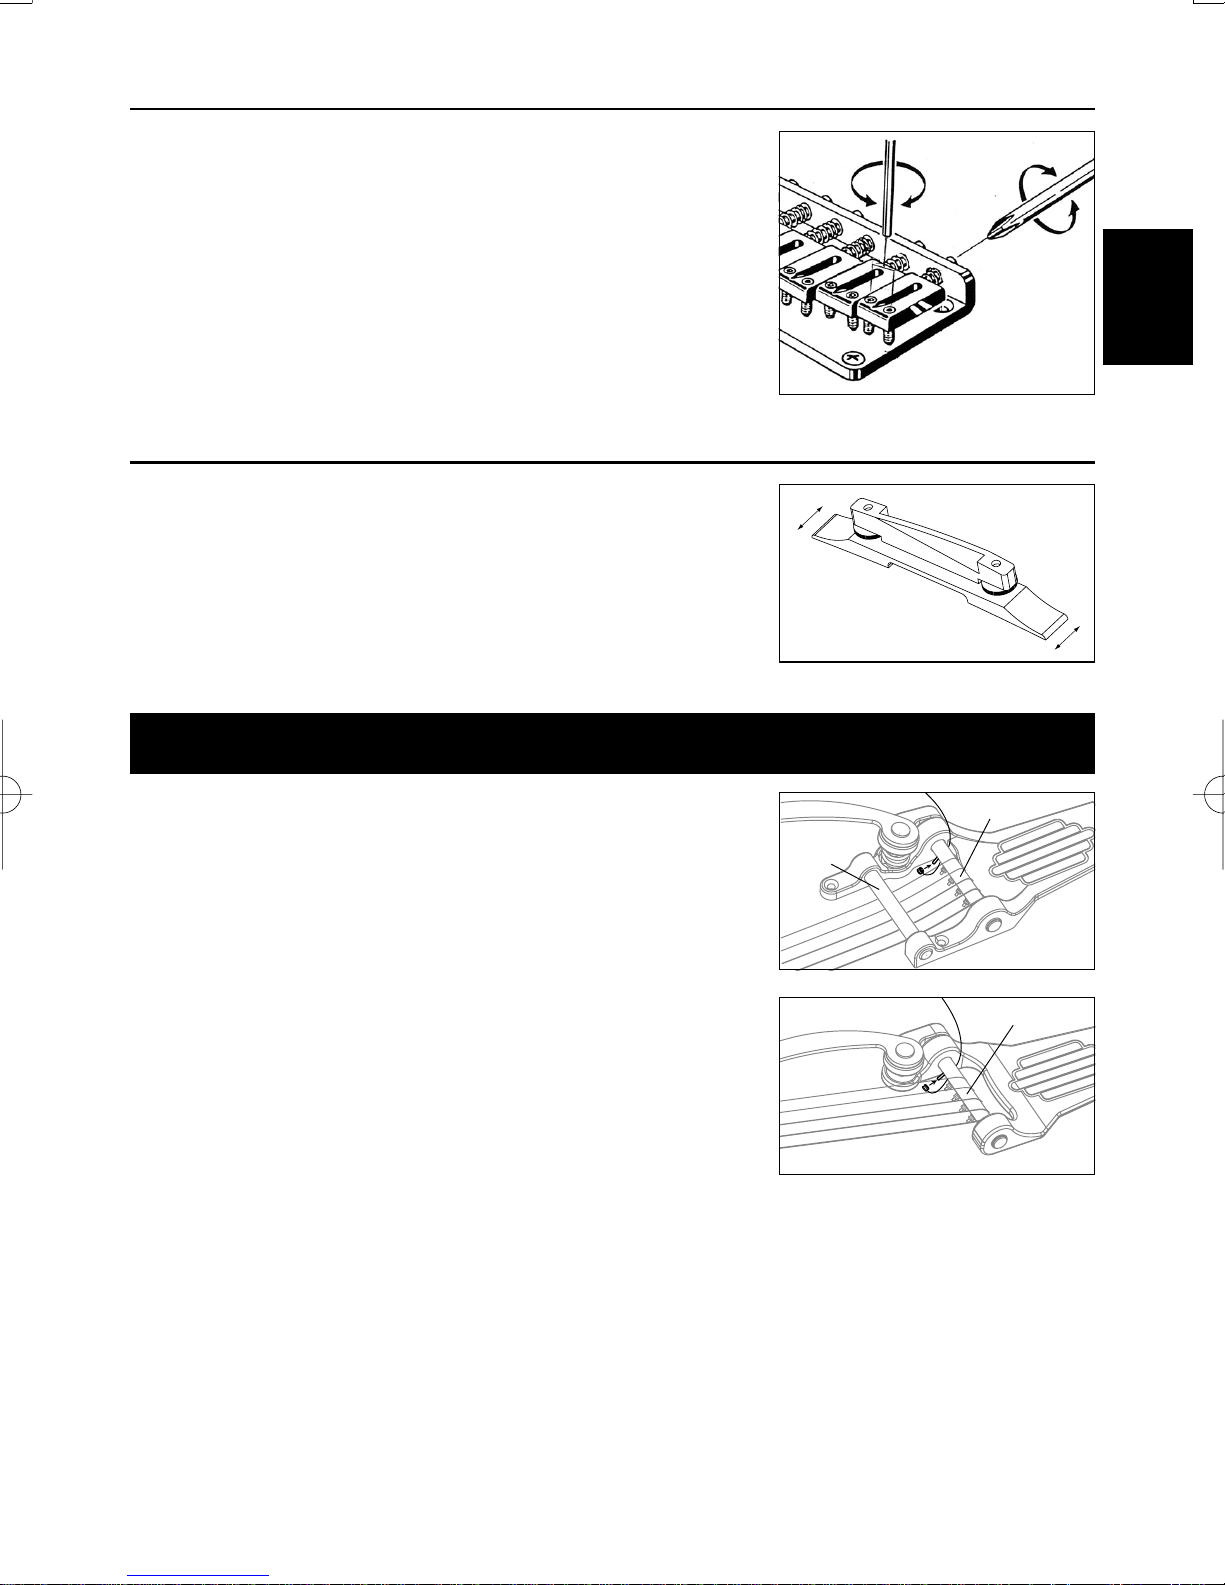
HARDTAIL BRIDGE
To change strings, thread the new strings through the string grommets
located on the back of the guitar and bring them up and over the saddle.
The intonation can be adjusted by adjusting the saddle forward or
backward using a Phillips (+) head screwdriver on the intonation
adjustment screw at the rear of the bridge. String height is controlled by
raising or lowering the small Allen screws using a wrench on either side
of the saddle.
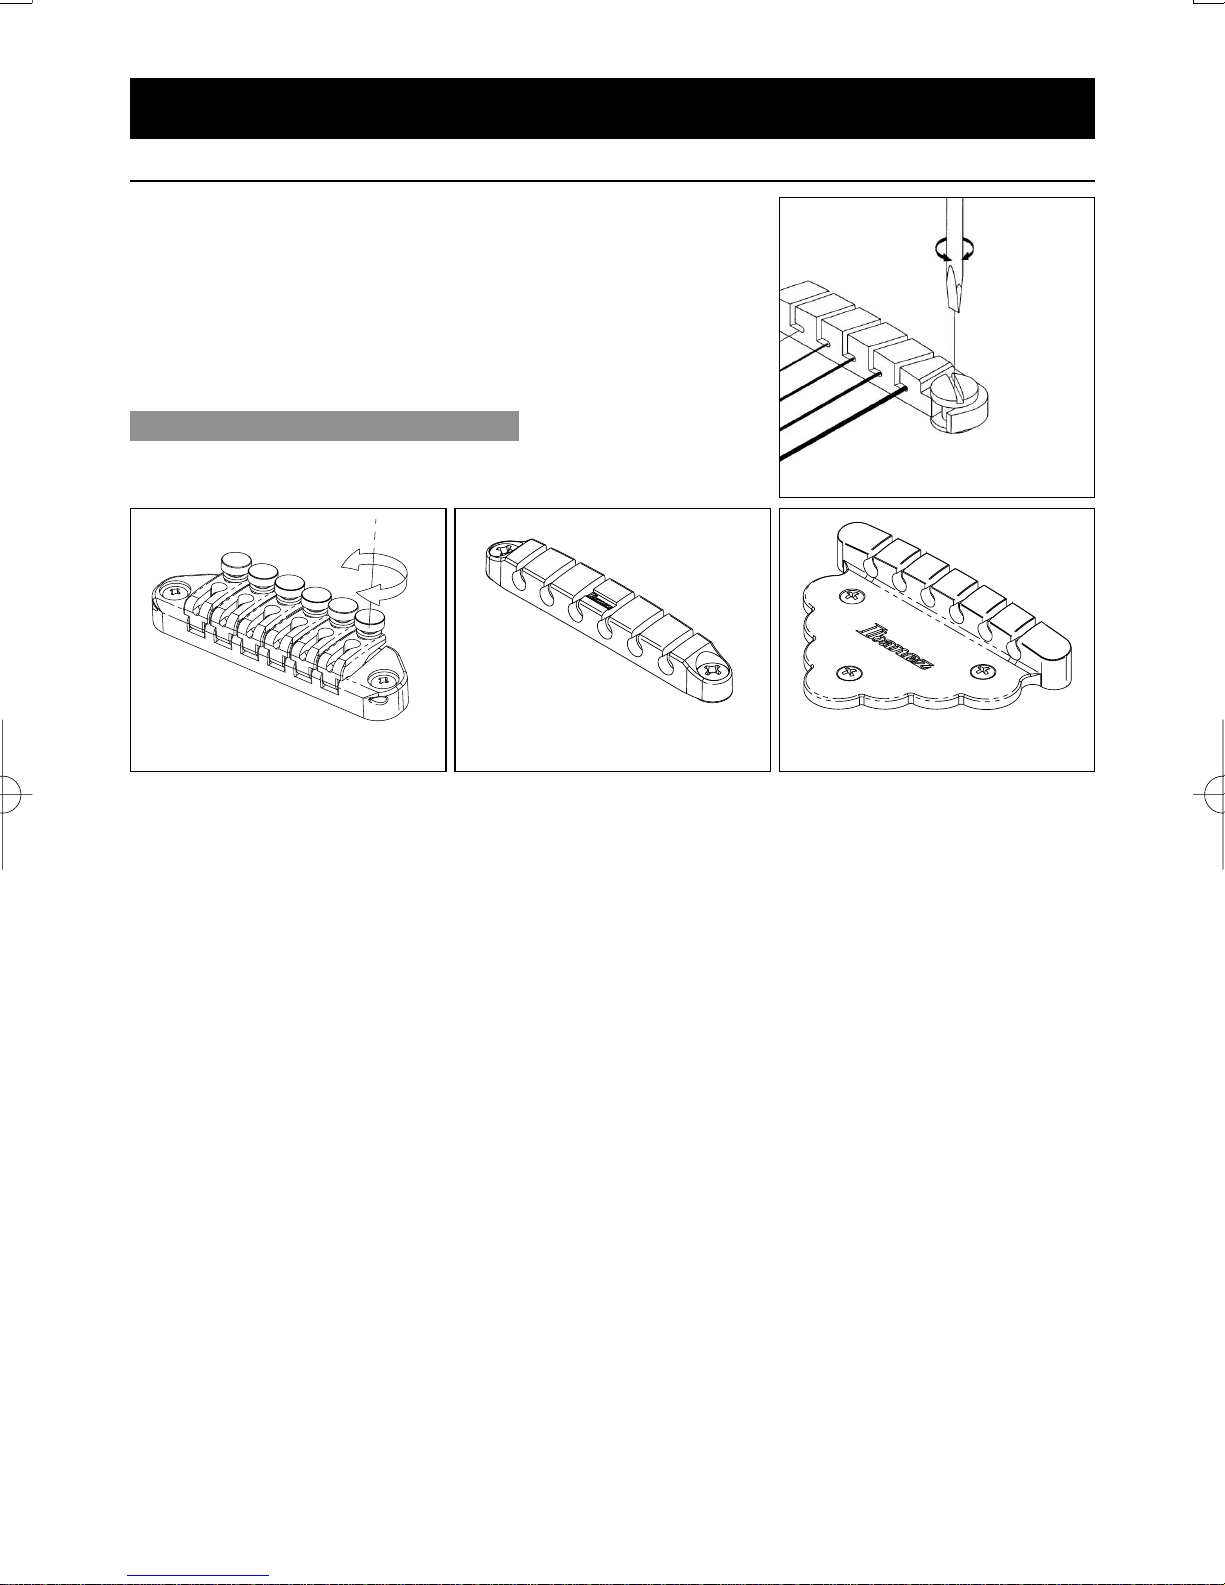
ADJUSTABLE ARCH-TOP
The string height of an arch top bridge can be adjusted by turning the
thumb wheel screws located on either side of the bridge. Clockwise
lowers the string action; counter clockwise raises the string action.
As the bridge is not fixed to the body, intonation can be adjusted by
loosening the strings and moving the location of the bridge forward or
backward.
ENGLISH
Vintage Vibrato
For best results we recommend replacing one string at a time. This will
help to avoid removing the string tension from the neck and keep the
vibrato spring under tension.
To replace the strings on the VBS80, thread the new string under the front
tailpiece retainer bar (A). On VBF70 there is no front retainer bar.
The ball end of the string should be threaded over and around the rear
tailpiece retainer bar (B).
The ball end of the string’s hole is inserted into the rear tailpiece retainer
bar pin and the string should be pulled tight towards the headstock.
Releasing the string tension from the tailpiece may cause the ball end to
slip off the pin. Keeping string tension on the string by pulling it towards
the headstock will alleviate this problem.
Thread the string through the machine head and while keeping tension
on the string, wind the string around the post. Make sure that the string
lands on the proper string saddle on the bridge. Once tight, tune the
string to pitch. Repeat this process for the other strings.
(B)
(A)
VBS80
(B)
VBS70
17
Page 19
Tailpieces
QUIK CHANGE TAILPIECES
The height adjustment of the QUIK CHANGE III can be adjusted by using a
slot head (-) screwdriver or a coin turn the adjustment studs at either
side of the tailpiece (C).
QUIK CHANGE ULTRA / FINE TUNNING FUNCTION
QUIK CHANGE ULTRA has FINE TUNER function.
Even after by the tuning machine, you can make a quick-fine
adjustment by FINE TUNERS (E).
(E)
QUIK CHANGE ULTRA
QUIK CHANGE MINI
DOWNSHIFTER
(C)
QUIK CHANGE III
QUIK CHANGE CLASSIC
INSTALLING THE STRING
To install a new string insert the ball end of the new string into the slot and place the
ball end into the internal hook area of the saddle as shown. Pull the string tight to the
saddle and restring the rest of the string as you normally would on the machine head.
3
2
1
SPECIAL TUNING
The Downshifter also allows the pitch to be raised by setting the standard tuning
while the lever is in the lower position. When the lever is raised the pitch will also be
raised and can be adjusted to the desired pitch.
The Ibanez DOWNSHIFTER allows the pitch of a string to be dropped to a preset desired position with a simple
lever operation. To achieve precise tuning for both the up and down positions, you will need to preset both lever
settings before operating the Downshifter.
TUNING
First check that the Downshifter lever arm is raised to the up position then tune the
string normally using the standard tuning machines on the headstock.
(Note: the Downshifter tuning screw has no effect on the pitch in the up position.)
Next, lower the lever on the Downshifter to the down position and the pitch of the
string will drop down. Adjust the rear tuning screw clockwise to reduce the pitch, or
counter clockwise to raise the pitch. This adjustment can be done by hand or with a
standard screwdriver or a coin until the desired down pitch is acquired. (The preset
factory pitch is set one whole step down to D.) When the lever is raised to the up
position, the thumbscrew can be turned freely but will have no effect on the raised
lever pitch. However, it will affect the settings of down lever pitch.
PLEASE NOTE: The Downshifter device was designed to provide the highest level of
pitch accuracy. However, it should be understood that the Downshifter is a
mechanical device. Pitch variations and tuning readjustments, especially after
frequent use, are to be expected.
18
Page 20
Locking Bridge
FX EDGE, FX EDGE
The Ibanez FX-Edge Bridge is a fixed, double locking bridge, based on
the popular Ibanez Lo-Pro Edge Tremolo. Please read the instructions
below regarding the use and proper adjustment of the bridge.
THREE STUD SYSTEM
Three studs support the FX-Edge Bridge; two main studs and one
smaller, rear stud. The rear stud helps to lock the bridge in place and
also passes additional string vibration through the body.
STRING HEIGHT ADJUNSTMENT
String height can be adjusted by raising or lowering all three studs.
After adjusting the height of the two main studs, the rear stud must be
compensated by using the provided 3mm Allen key to keep the angle
of the bridge in proper alignment. (The bridge should sit parallel to the
body.)
III -FIXED BRIDGE
MAIN STUD
PARALLEL
MAIN STUD
REAR STUD
ENGLISH
NOTE
*Although the string height of the guitar can be raised or lowered up to 0.3mm to 0.5mm with a rotation of the studs, it is recommended
that the adjustments be made in smaller increments.
*The string height may change after the final adjustment of the rear stud. It is recommended to check the final string height after the rear
stud is adjusted.
Locking Tremolos
EDGE III TREMOLO
TREMOLO ARM INSTALLATION
The tremolo arm can be inserted and removed very easily. Insert the arm into the
armhole on the tremolo base plate. Pull up on the arm to remove it.
ARM ROTATION TORQUE
The rotation torque of the arm can be adjusted by raising the tremolo and
inserting a 1.5mm Allen wrench in the screw (A) on the tremolo block, turning this
screw clockwise will tighten the arm torque and turning the screw counter
clockwise will loosen the arm torque.
(A)
19
Page 21
ARM ACTION
The tremolo arm action can be adjusted by using a 3.0mm Allen wrench on the screw
(B) of the tremolo screw.
(B)
FINE TUNING
Even after locking the locking nut, you can use the fine tuners to make fine
adjustments to the tuning of each string. You should adjust all of the fine tuners (C) to
the center of adjustable range before you lock the locking nut.
ADJUSTING THE ACTION
To adjust the entire tremolo unit up or down, use an Allen wrench to turn the stud
bolt (E) located at the left and right of the tremolo unit. (This cannot be adjusted for
each individual string.)
ADJUSTING THE INTONATION
Loosen the Pressure pad screw (D) on the locking nut and loosen the string to be
adjusted. Loosen the Saddle lock screws (F) on the saddle to be adjusted and adjust
the saddle forward or backward. Tighten the Saddle lock screw (F) and tune the
string. After rechecking the intonation, tighten the Pressure pad screw (D).
*On the base plate there are two holes for each Saddle lock screw. These allow the user to change string
gauges while allowing thee maximum saddle movement. If the intonation cannot be adjusted because
the saddle needs to be set back further, remove the intonation screw and insert it into the hole located
further back on the bridge plate.
REPLACING THE STRINGS
In the case of EDGE III tremolo, replace the strings one by one. Removing all the old
strings at once will release the tension on the tremolo and change the tremolo angle
“up-pull.” Loosen the Pressure pad screw (D) on the locking nut and loosen the string
to be replaced. Loosen the String stopper screw (G) and remove the string from the
saddle. Cut off the ball end of new string as shown on the illustration and insert the
cut side of new string between the saddle and the String holder block.Tighten the
String stopper screw (G) and tune the string. After checking the intonation, tighten
the Pressure pad screw (D) on the locking nut.
(F)
(G)
(C)
(E)
(D)
EDGE III ADJUSTING THE TREMOLO SPRING
The tremolo springs adjust the tremolo angle by tightening or loosening the tremolo
tension. To adjust tremolo angle, locate the adjustment screws in the rear tremolo
cavity. The tremolo system when in tune should sit parallel to the surface of the
guitar as follows. If the tremolo system is not sitting parallel to the surface of the
20
guitar, remove the tremolo cavity cover plate and
tighten the Tremolo tension adjustment screws if the tremolo is forward
dumped. Loosen the screws if the tremolo is up-pulled.Retune the strings to
the proper pitch and check the angle. Choose the number and placement of the
tremolo springs according to the string gauge and the tremolo angle.
Page 22
ZR (ZERO RESISTANCE) TREMOLO
TREMOLO ARM
Loosen the screw cap, insert the arm
into the tremolo unit, and rotate it to
fasten it in place (Fig.8). Rotate the arm
to adjust it to the desired height. The
arm torque is adjusted by the tightness
of the screw cap. To remove the arm,
loosen the screw cap and rotate the
arm counter-clockwise (Fig.9).
FIG.8
FIG.9
FINE TUNING
Even after locking the locking nut, you can use the fine tuners (Fig.10 A) to
make fine adjustments to the tuning of each string.
You should adjust all of the fine tuners to the center of their adjustable
range before you lock the locking nut.
ADJUSTING THE ACTION
To adjust the entire tremolo unit up or down, use an Allen wrench to turn
the stud bolt (Fig.10 B) located at the left and right of the tremolo unit.
(This cannot be adjusted for each individual string.)
ADJUSTING THE INTONATION
Loosen the string stopper bolt of the locking nut (Fig.11). Remove the
intonation adjustment bolt (Fig.12 B) from within the bridge unit, fasten it
into the screw hole in the rear of the saddle, and tighten it so that the tip
of the bolt contacts the boss of the bridge unit. Loosen the saddle lock bolt
(Fig.10 C), and turn the intonation adjustment bolt to adjust the position of
the saddle. After completing the adjustment, tighten the saddle lock bolt
sufficiently to prevent the saddle from moving forward during tuning, and
store the intonation adjustment bolt inside the bridge unit.
FIG.10
C
B
A
FIG.11
ENGLISH
REPLACING THE STRINGS
Loosen the string stopper bolt of the locking nut (Fig.11), completely
loosen the string at the tuning machine, use an Allen wrench to loosen the
string stopper bolt of the bridge saddle (Fig.12 A), and remove the old
string. Use wire cutters to remove the ball end from the new string as
shown in Figure 13, insert this end of the string into the bridge saddle,
fasten it firmly, and then tighten the string at the tuning machine. After
tuning, check the angle of the tremolo unit, and fasten the string stopper
bolt of the locking nut to finish the procedure.
ADJUSTING THE ZERO POINT SYSTEM
The Zero Point system makes it easier to tune a floating tremolo unit,
provides greater tuning stability after arming, and limits the tuning drift
that would otherwise occur when a string breaks.
*If the Zero Point system is not adjusted to the correct position it will not
function optimally, since it will either be completely floating, or the Zero
Point system and the string tension will be in balance. You must perform
this adjustment accurately.
FIG.12
FIG.13
FIG.14
21
Page 23
ZPS (ZERO POINT SYSTEM) OF ZR TREMOLO
Main Spring
Tremolo Block
Stopper
2
1
Stop Rod
With the guitar tuned correctly, adjust the Main Spring make
sure that the Stop Rod makes contact with the Tremolo
Block and Stopper.
If the Stop Rod does not make contact with the Tremolo
Block and Stopper, adjust the Main Spring adjustment
screw until contact is made.
With the guitar tuned correctly, Stop Rod must make contact
with the Tremolo Block and Stopper. If it is adjusted
correctly, the tension while pushing down on the arm will be
slightly less than tension while pulling up.The balance of
force is about 3:7 (With this setup, stop rod must the
tremolo block and stopper even the 1st string is completely
loosened.)
<Note>
When a string breaks,because of the tension of neck,the tuning of other strings will be a little higher butstill limits within acceptable range.
SWITCHING TO FLOATING OPERATION
By stopping the Zero Point system from functioning, you can make the
tremolo float completely. While holding the arm up, remove the stop rod
and sub spring. With the guitar tuned correctly, use the main spring
adjustment knob (Fig. 14E) to adjust the angle of the tremolo unit. If the
tremolo unit is tilted forward toward the neck, turn the spring adjustment
knob in the plus (+) direction. Conversely, if the tremolo unit is tilted
backward away from the neck, turn the spring adjustment knob in the
minus (-) direction.
*You will need to tune repeatedly during the process of adjusting the
tremolo angle in the floating state, since the tuning will drift each time you
adjust the main spring adjustment knob.
22
Again, if the Stop Rod does not make contact with theTremolo
Block and Stopper, adjust the Main Spring adjustment
screwuntil contact is made.
Page 24
Non Locking Tremolo
FAT/SAT TREMOLO
TREMOLO ARM INSTALLATION
The tremolo arm can be inserted and removed very easily. Insert the arm into
the armhole on the tremolo base plate. Pull up on the arm to remove it.
TREMOLO ARM ADJUSTMENT (SAT PRO)
To adjust the height of the arm, remove the tremolo spring cover from the back
of the guitar, and use a 3 mm Allen wrench to turn the height adjustment screw
attached to the bottom of the tremolo block. Tightening this in the clockwise
direction will raise the height.
ARM ROTATION TORQUE
The rotation torque of the arm can be adjusted by raising the tremolo and
inserting a 1.5mm Allen wrench in the screw (A) on the tremolo block, Turning
this screw clockwise will tighten the arm torque and turning the screw counter
clockwise will loosen the arm torque.
(A)
ADJUSTING THE STRING HEIGHT (SAT PRO)
To adjust the action of each string, use a 1.5 mm Allen wrench to turn the screw on the
saddle (C). The overall height can be adjusted on either side of the SAT PRO tremolo
unit. To adjust the height, use a 3 mm Allen wrench to turn the stud (D) located on
either side of the unit. Use caution when adjusting the height of the entire tremolo unit;
adjust both sides to the same height to ensure optimum tremolo operation.
ADJUSTING THE STRING HEIGHT (FAT20/FAT10/SAT10)
The height adjustment of the tremolo can be raised or lowered by adjusting the pivot studs (C) that the tremolo
mounts on. These are located at either side of the front of the bridge. Clockwise lowers the tremolo and counter
clockwise raises the tremolo.
(C)
(D)
(E)
ENGLISH
(C) (C) (C)
FAT20 FAT10 SAT10
INTONATION ADJUSTMENT (SAT PRO)
To adjust the intonation, use a 1.5 mm Allen wrench to turn the screw located
at the rear of the saddle (E). Turn the screw clockwise to move the saddle
toward the rear, or counter-clockwise to move the saddle forward.
(C)
(D)
(E)
SAT PRO
23
Page 25
INTONATION ADJUSTMENT (FAT20)
To assure that no movement can occur each saddle has a set screw that locks
the saddle. When adjusting the intonation, loosen the saddle lock screw using
a 2mm Allen wrench. (D)
To adjust the intonation, insert a 2.5mm Allen wrench into the saddle screw at
the rear of the tremolo. Turning the wrench clockwise will adjust the saddle
backward. Counter clockwise will adjust the saddle forward. After the correct
intonation location of the saddle is set tighten the saddle lock down screw to
assure no movement will occur. (E)
INTONATION ADJUSTMENT (FAT10/SAT10)
The intonation can be adjusted by adjusting
the saddle forward or backward using a
Phillips (+) head screwdriver on the
intonation adjustment screw at the rear of
the bridge.
(D)
(E)
FAT20
FAT10
ADJUSTING THE INTONATION & THE STRING HEIGHT (FAT 6)
The intonation can be adjusted by adjusting the saddle forward or backward
using a philips(+) head adjustment screw at the rear of the bridge. String height
is controlled by raising or lowering the small allen screws using a wrench on
either side of the saddle.
REPLACING THE STRINGS
To replace strings, thread the new strings through the string holes located on
the back of the guitar. The strings are then threaded through the tremolo block
and up and over the saddle.
FAT/SAT (expect FAT6) ADJUSTING THE TREMOLO SPRING
A standard tremolo can be adjusted so that the pitch can be raised when the
tremolo arm is pulled up to loosen the tremolo springs located under the
tremolo cavity on the back of the guitar. One disadvantage of this procedure is
that it can cause the pitch to go sharp if string breaks. To remedy this, adjust
the tremolo plate so it sits flush on the body by tightening the tremolo springs.
Choose the number and placement of the tremolo springs according to the
string gauge and the tremolo adjustment .
SAT10
24
Floating PARALLEL
Page 26

ACT TRMOLO
REPLACING THE STRINGS
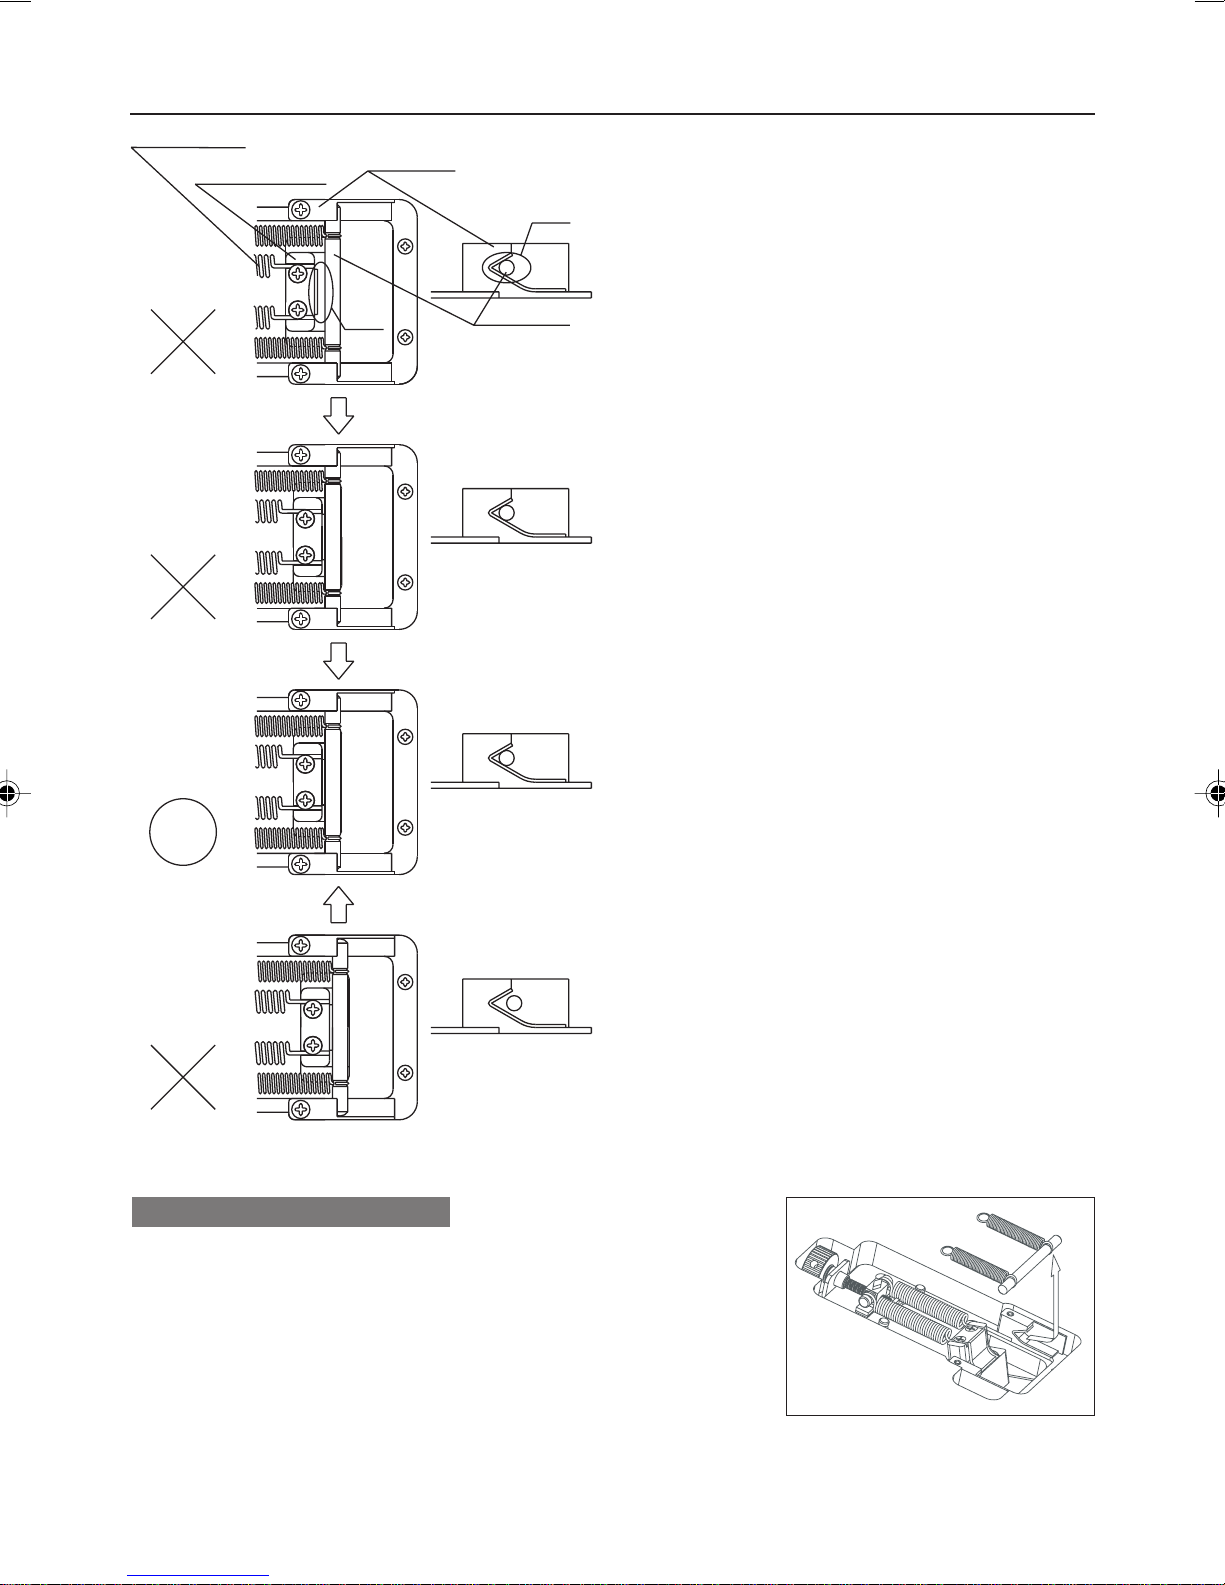
ACT tremolo allow two styles of string installation.
1) The strings are installed by putting the ball end into the string slot and
hooking the ball end below the string catch at the rear of the tremolo unit.
2) The strings are installed by putting the ball end into the string slot and
hooking the ball end in the string catch at the bottom of the tremolo unit.
This increases string tension and adds sustain.
TREMOLO ARM INSTALLATION
The tremolo arm can be inserted and removed very easily. Insert the arm into the armhole on the tremolo base
plate. Pull up on the arm to remove it.
ARM ROTATION TORQUE
The rotation torque of the arm can be adjusted by raising the tremolo and inserting a 2.0mm Allen wrench in the
screw (A) on the tremolo block. Turning this screw clockwise will tighten the arm torque and turning the screw
counter clockwise will loosen the arm torque.
ENGLISH
ADJUSTING THE TREMOLO SPRINGS
ACT Tremolo is designed to function optimally when
it is installed approximately parallel with the
surface of the guitar body. The angle at which the
tremolo is attached can be adjusted by changing the
length of the tremolo springs under the tremolo unit.
Use a Philips (+) screwdriver to turn the tremolo
tension adjustment screws to adjust the length of
the tremolo springs. (B) If the tremolo is tilted
forward toward the neck of the guitar, turn the screws clockwise to tighten the springs. Conversely, if the tremolo
is tilted backward away from the neck, turn the screws counter-clockwise to loosen the springs. Tune the guitar
acctually, re-check the angle of the tremolo, and repeat the adjustment until the tremolo angle is correct.
ADJUSTING THE ACTION
To adjust the entire tremolo unit up or down, use a 3.0mm Allen wrench to turn the stud bolt (C) located at the
left and right of the tremolo unit. (This cannot be adjusted for each individual string.)
ADJUSTING THE INTONATION
Use a 2.0mm Allen wrench to loosen the saddle lock
screws (D) of each saddle, and move the saddle.
Firmly tighten the saddle lock screws, tune the
guitar, and then check the intonation. Repeat these
adjustments until the intonation is correct.
(B)
(A)
(D)
(C)
25
Page 27

WARTUNG
Herzlichen Glückwunsch und vielen Dank dafür, dass Sie sich für ein Produkt von Ibanez
entschieden haben. Ibanez legt bei seinen Produkten die höchsten Standards an. Alle IbanezInstrumente werden vor der Auslieferung unserer strengen Qualitätskontrolle unterzogen. In
dieser Anleitung wollen wir beschreiben, wie Sie das Äußere Ihres Instruments pflegen und
Ihre Gitarre in dem Zustand halten, wie sie bei Auslieferung ab Werk war.
REINIGUNG
Regelmäßige Reinigung Ihrer Gitarre ist einer der wichtigsten
Wege, um das gute Aussehen zu erhalten und die Lebensdauer der
Saiten zu verlängern. Nach dem Spielen wischen Sie das
Instrument ab, um jegliche Schweißreste vom Instrument zu
entfernen. Schweiß kann Säuren enthalten, die die Saiten und
Metallteile der Gitarre angreifen. Gitarren mit Glanzoberfläche
sollten mit spezieller Politur für Musikinstrumente und einem
weichen Pflegetuch für Gitarren oder Baumwolllappen behandelt
werden. Lappen mit grober Textur wie solche aus Polyester können
die Oberfläche zerkratzen. Gitarren mit Oil Finish sollten sofort nach dem Spielen mit einem trockenen
Baumwolllappen abgewischt werden. Wenn Ihre Gitarre durch längere Verwendung oder starken Schweiß verfärbt
wurde und nicht mehr so aussieht wie nach der Lieferung, wenden Sie sich an einen Gitarrenspezialisten zur
Beratung für Möglichkeiten, das Oil Finish wieder wie neu aussehen zu lassen.
SAITEN UND STIMMECHANIKEN
Wenn Saiten verschmutzt oder verfärbt sind oder einen stumpfen Sound oder Brummen
verursachen, ersetzen Sie diese durch neue. Für beste Ergebnisse empfehlen wird den
einzelnen Austausch von Saiten; dadurch wird vermieden, die Saitenspannung vom Hals zu
nehmen. Beim Ersetzen von Saiten mit solchen anderer Dicke kann es erforderlich sein, die
Halsstab-Spannung einzustellen. (Diese Arbeit sollte nur von einem qualifizierten Techniker
ausgeführt werden.) Instrumente, in denen Tremolo-Systeme installiert sind, müssen u.U. nach
dem Saitenaustausch neu eingestellt werden, da Änderungen in der Saitenspannung eine
Erhöhung oder Senkung im Tremolo bewirken können. Gitarren und Bassgitarren von Ibanez
sind werkseitig mit den folgenden Saitendicken ausgestattet. Bitte folgen
Sie den Anweisungen für Ihr Modell. Die Saiten müssen fest von oben nach
unten um die Stimmmechaniken gewickelt werden, wobei 2 bis 3 Saiten um
den Wirbel gewickelt sind. Bei ungewickelten Gitarrensaiten müssen die
Saitenenden vorbereitet werden, wie in der Zeichnung dargestellt, um
ungewünschtes Abrutschen von den Wirbeln zu vermeiden. Bei
Stimmmechaniken, wo die Saitenenden in die Wirbel eingeführt werden,
kann die Saite im Voraus mit Saitenschneidern auf die richtige Länge zugeschnitten werden.
Wenn Stimmmechaniken als versiegelte Rad-Einheiten ausgelegt sind, sind sie selbstschmierend. Die
Stellschrauben für die Mechaniken sind einstellbare Schrauben, die mit einem kleinen
Kreuzschlitzschraubenzieher angezogen werden können, um die Spannung zu steigern.
*Bei Verwendung grober Saiten kann Brummen und Klangverzerrung auftreten. Bei Verwendung von Saiten mit Verdrehungen oder Knicken
kann Brummen oder verringertes Sustain auftreten. Stellen Sie vor dem Anbringen sicher, dass neue Saiten glatt und defektfrei sind.
SAITENDICKEN
Massive Gitarren m. Tremolo, NDM2, JTK & ALL Gio
RG321MH, SZ, AXS, AR, ARC, ARX, AD, VBI & IC
7-String model
MMM1
NTM1
MTM2
ARTCORE Gitarren
ARTCORE Bässe
.009/.011/.016/.024/.032/.042 Zoll
.010/.013/.017/.026/.036/.046 Zoll
.010/.013/.017/.026/.036/.046/.054 Zoll
.014/.017/.030/.040/.056/.074 Zoll
.011/.014/.018/.028/.038/.049 Zoll
.011/.015/.018/.028/.038/.054 Zoll
.010/.013/.017/.030/.042/.052 Zoll
.050/.070/.085/.105 Zoll
3
FESTZIEHEN
2
1
LÖSEN
26
Page 28

HALS
Stahlsaitenmodelle von Ibanez sind mit einstellbaren Halsstäben
ausgestattet. Der Zweck eines Halsstabs ist, den Hals zur
Gegenwirkung gegen Saitenspannung einzustellen. Es kann viele
LÖSEN
FESTZIEHEN
Gründe zur Einstellung von Halsstäben geben. Einer der häufigsten
Gründe ist das Wechseln von Saitendicken oder Änderung der
Tonlage, wodurch die Saitenspannung beeinflusst werden kann.
Änderungen in der Saitenspannung kann die Saitenhöhe
beeinflussen und zu Saitenschnarren oder falsch klingenden Noten
führen. Zum Einstellen des Halsstabs stellen Sie die Halsstabmutter
ein, indem Sie den richtigen Inbusschlüssel in die Mutter einführen
und den Stab festziehen (im Uhrzeigersinn) oder lösen (gegen den Uhrzeigersinn). Die
Halsstabspannung kann gemessen werden, indem ein Capo am ersten Bund angebracht
wird, um die Saiten an der Bundposition festzuhalten, wo der Hals in den Korpus übergeht.
Stecken Sie ein Lineal zwischen Saite und dem 8. Bund ein. Der Abstand soll zwischen 0,3
mm und 0,5 mm betragen. Dieser Abstand wird als Halskrümmung bezeichnet. Zu starke
Halskrümmung kann bewirken, dass der Hals eine höhere Saitenlage in der Mitte des
Halses hat und zu schlechter Intonation und unkomfortablen Spieleigenschaften führen. Zu
wenig Halskrummüng kann Saitenschnarren hervorrufen.
*Ausreichende Vorsicht ist bei der Halseinstellung erforderlich, diese Arbeit sollte nur von qualifizierten
Technikern ausgeführt werden
LÖSEN
FESTZIEHEN
0.3~0.5mm
8. BUND
LÖSEN
LÖSEN
FESTZIEHEN
FESTZIEHEN
DEUTSCH
SAITENLAGE
Die Gitarre und Bass-Saitenlage von Ibanez wird werksseitig optimal eingestellt. Es gibt aber
viele Gründe, warum sich die Saitenhöhe eines Instruments ändern kann. Instrumente können
durch Änderungen in Temperatur und Luftfeuchtigkeit beeinflusst werden. Eine hohe Saitenlage
kann die Gitarre schwer spielbar machen. Eine zu niedrige Saitenlage kann zu Saitenschnarren
oder undifferenzierten Einzeltönen führen. Als Abhilfe folgen Sie den Anweisungen für den
Einbau des betreffenden Stegtyps. Bei Problemen mit der Saitenlage stellen Sie sicher, dass die
Gitarre gestimmt und der Halsstab richtig eingestellt ist. Die Saitenlage wird am 14. (Bässe: 12.)
Bund eingestellt. Nachstellung der Saitenlage kann auch erforderlich sein, nachdem der Hals
neu eingestellt wurde oder Saiten mit unterschiedlicher Stärke ersetzt wurden. Folgen Sie den
Anweisungen in der Bedienungsanleitung des Stegs bei der Vornahme der Einstellungen.
*Wenn andere Stege als die oben beschriebenen verwendet werden, steigern Sie langsam die Saitenlage von
der dünnsten Diskantsaite zur dicksten Basssaite.
.009-String Gitarre ausgenommen Gio Ibanez
alle Gio Ibanez u. .010-, .014-String Gitarren
Artcore-Gitarren
Artcore-Bässe
DISKANTSSAITE BASSSAITE
1.5mm
1.7mm
1,7mm
2,0mm
2.0mm
2.3mm
2,3mm
2,5mm
INTONATION
Die Intonationseinstellung ist das Verfahren der Einstellung
der Lage der Saite am Sattel zum Ausgleich unterschiedlicher
Saitendicken oder Stimmungen. Folgen Sie den Anweisungen
der jeweiligen Steg-Intonation unten. Die Intonation ist richtig
eingestellt, wenn der gegriffene Ton im 12. Bund mit dem
Oberton des 12. Bundes übereinstimmt. Dies ist der
Mittelpunkt der Mensur und die genaueste Art und Weise zur
Einstellung einer Standard-Skalenlänge. Wenn die gegriffene
Note im Vergleich zum Oberton zu tief ist, bewegen Sie den
Brückensattel zum Kopfende des Halses (a) um die Saitenlänge zu verringern. Wenn die gegriffene Note zu hoch ist,
bewegen Sie den Sattel vom Kopfende des Halses (b) weg, um die Saitenlänge zu steigern.
*Beachten Sie, dass Saiten reißen können, wenn der Sattel bewegt wird, lockern Sie also immer die Saiten vor der Einstellung.
27
Page 29

Unten ist die Standard-Lage des Stegs für AF-, AFS- und AG-Gitarren. Stellen Sie die Lage ein, um richtige
Intonation zu erhalten.
AGAF, AFS, AK
TONABNEHMER (PICKUPS)
Der Ausgangspegel des Instruments ebenso
wie die Signalqualität kann durch die
Tonabnehmer-Höhe beeinflusst werden. Die
Höhe sollte so eingestellt werden, bis die
Lautstärke von Hals- und Steg-Pickup bei
voll aufgedrehtem Lautstärkeregler gleich
ist. Die Lautstärke kann drastisch sinken,
wenn die Höhe zu gering ist. Da die Pickups
magnetisch sind, kann Saitenschnarren und
Verzerrung auftreten, wenn der Tonabnehmer zu nahe an den Saiten ist. Verwenden Sie einen kleinen
Schraubenzieher, um Einstellungen zum Anheben oder Absenken des Pickups auszuführen.
*Instrumente mit einstellbaren Polstifte können eingestellt werden, um den Ausgang jeder Saite abzugleichen.
Gitarrenstege
GIBRALTAR CUSTOM BRIDGE
Die Höheneinstellung kann mit 4 Stk. von 2,0 mm Inbusschrauben (B) am Steg justiert
werden. Da die Einstellschrauben von der Stegverriegelungsschraube (A) gesperrt sind,
müssen Sie die Stegsperre vor der Einstellung mit dem 3,0 mm großen Inbusschlüssel
vor der Einstellung lösen.
Jeder Sattel ist außerdem durch eine Sattelverriegelungsschraube (C) gesperrt. Zum
Einstellen der Intonation verwenden Sie einen 2,0 mm großen Inbusschlüssel zum Lösen
der Sattelverriegelungsschrauben und stellen dann die Intonationsschraube (D) mit
einem 2,0 mm großen Inbusschlüssel ein. Wenn Sie mit der Einstellung fertig sind,
verriegeln Sie den Sattel und stimmen Sie die Gitarre.
GIBRALTAR III (GITARREN UND BÄSSE),
CB3, & FULL TUNE III, ART1, ART2
Die Saitenlage kann mit einem
Schlitzschraubenzieher (-) eingestellt
werden, mit dem die Einstellschraube an
jedem Ende (A) gedreht wird.
Die Intonation kann Bewegen des Sattels
nach vorne oder hinten mit einem
Schraubenzieher zum Drehen der
Einstellschraube an jedem Sattel (B)
eingestellt werden.
ERSETZEN
DER SAITEN: CB3
Ziehen Sie die Saiten durch Einführen von der Vorderseite des Stegs auf.
(A)
GIBRALTAR III, CB3
(B)
FULL TUNE II,
ART1, ART2
B
C
A
D
(A)
(B)
28
Page 30

HARDTAIL BRIDGE
Zum Wechseln von Saiten fädeln Sie die neuen Saiten durch die
Saitenhülsen an der Rückseite der Gitarre und führen sie zurück über den
Sattel. Die Intonation kann Einstellen des Sattels nach vorne oder hinten
mit einem Kreuzschlitzschraubenzieher (+) an der
Intonationseinstellschraube hinten am Steg eingestellt werden. Die
Saitenhöhe wird Heben oder Senken der kleinen Inbusschrauben mit
einem Schraubenschlüssel an einer Seite des Sattels geregelt.
EINSTELLBARER ARCH-TOP-STEG
Die Saitenhöhe eines Arch-Top Stegs kann durch Drehen der
Rändelschrauben an beiden Seiten des Stegs eingestellt werden. Durch
Drehen im Uhrzeigersinn wird die Saitenlage gesenkt; durch Drehen
gegen den Uhrzeigersinn wird die Saitenlage angehoben. Da der Steg
nicht fest am Körper ist, kann die Intonation durch Lockern der Saiten
und Bewegen des Stegs nach vorne oder hinten eingestellt werden.
DEUTSCH
Vintage Vibrato
Für beste Ergebnisse empfehlen wir, die Saiten regelmäßig einzeln
auszuwechseln. Dadurch wird vermieden, Saitenspannung vom Hals zu
nehmen, und die Vibratofeder bleibt unter Spannung.
Zum Ersetzen der Saiten am VBS80 fädeln sie die neue Saite unter dem
vorderen Saitenhalter-Rückhaltestab (A) durch. Am VBF70 befindet sich
kein vorderer Rückhaltestab.
Das Kugelende der Saite soll über und um den hinteren SaitenhalterRückhaltestab (B) gefädelt werden. Das Kugelende am Saitenloch wird in
den hinteren Saitenhalter-Rückhaltestangenstift gesetzt, und die Saite
soll leicht zum Kopfende des Halses gezogen werden. Durch Freigeben
der Saitenspannung vom Saitenhalter kann das Kugelende vom Stift
rutschen. Indem die Spannung in der Saite durch Ziehen zum Kopfende
hin bewahrt wird, wird dieses Problem vermieden.
Fädeln Sie die Seite durch den Mechanikkopf, bewahren Sie die
Spannung in der Saite und wickeln Sie die Seite um den Wirbel. Stellen
Sie sicher, dass die Saite auf dem richtigen Saitensattel auf dem Steg
liegt. Wenn straffgezogen, stimmen Sie die Saite auf die richtige Tonlage.
Wiederholen Sie diesen Vorgang für die anderen Saiten.
(B)
(A)
VBS80
(B)
VBS70
29
Page 31

Tailpieces
QUIK CHANGE TAILPIECES
Die Höheneinstellung von QUIK CHANGE III kann mit einem
Schlitzschraubenzieher (-) oder einer Münze justiert werden, indem die
Einstellstutzen an beiden Seiten des Saitenhalters (C) gedreht werden.
QUIK CHANGE ULTRA / FINE TUNING FUNKTION
QUIK CHANGE ULTRA hat eine FINE TUNER-Funktion.
Auch nach dem Stimmen mit dem Tuning-Gerät können Sie
eine Feinstimmung mit FINE TUNERS (E) vornehmen.
(E)
QUIK CHANGE ULTRA
QUIK CHANGE MINI QUIK CHANGE CLASSIC
DOWNSHIFTER
ANBRINGEN DER SAITE
Zum Anbringen einer neuen Saite setzen Sie das Kugelende der neuen Saite in den
Schlitz und setzen das Kugelende in den Innenhakenbereich des Sattels, wie in der
Abbildung gezeigt. Ziehen Sie die Saite fest am Sattel fest und ziehen Sie den Rest der
Saite wie gewöhnlich am Mechanikkopf fest.
(C)
QUIK CHANGE III
3
2
1
SPEZIELLES TUNING
Der Downshifter erlaubt es auch, die Tonhöhe durch Einstellung der Standardstimmung
festzulegen, während der Hebel in abgesenkter Position ist. Wenn der Hebel angehoben wird,
wird die Tonhöhe ebenfalls gehoben und kann auf die gewünschte Tonlage eingestellt werden.
Der Ibanez DOWNSHIFTER erlaubt es, die Tonlage einer Saite durch einfache Hebelbetätigung auf eine
vorgegebene gewünschte Position zu senken. Um präzises Tuning für sowohl Auf- und Ab-Positionen zu erzielen,
müssen Sie beide Hebeleinstellungen vor Betätigung des Downshifters voreinstellen.
TUNING
Prüfen Sie zunächst, ob der Downshifter-Hebelarm auf die Auf-Position angehoben ist, und
stimmen Sie dann die Saite normal mit den Standard-Stimmgeräten am Kopfende des Halses.
(Hinweis: Die Tuning-Schraube am Downshifter hat keine Wirkung auf die Tonlage in AufPosition.) Dann senken Sie den Hebel am Downshifter in Ab-Position und die Tonlage der
Saite sinkt. Stellen Sie die hintere Tuning-Schraube im Uhrzeigersinn, um die Tonlage zu
senken oder gegen den Uhrzeigersinn, um die Tonlage zu heben. Diese Einstellung kann
mit der Hand oder mit einem normalen Schraubenzieher oder einer Münze ausgeführt
werden, bis die gewünschte Tonlage erreicht ist. (Die werkseitige Vorgabe-Tonlage ist ein
ganzer Schritt herunter zu D.) Wenn der Hebel in die Auf-Position angehoben wird, kann
die Rändelschraube frei gedreht werden, hat aber keine Wirkung auf die Tonlage bei
angehobenem Hebel. Sie beeinflusst aber die Einstellungen des abgesenkten Hebels.
BITTE BEACHTEN: Der Downshifter wurde konstruiert, um den höchsten Grad an
Tonlagengenauigkeit zu erzielen. Man darf aber nicht vergessen, dass der Downshifter
eine mechanische Vorrichtung ist. Tonlagenvariationen und Verstimmungen,
besonders nach häufiger Verwendung, sind normal und müssen erwartet werden.
30
Page 32

Locking Bridge
FX EDGE, FX EDGE
Der Ibanez FX-Edge-Sattel ist ein feststehender, doppelt verriegelnder
Sattel, basierend auf dem allgemein bekannten Ibanez Lo-Pro Edge
Tremolo. Bitte lesen Sie die folgenden Anweisungen zum richtigen
Gebrauch und zur richtigen Einstellung des Sattels.
DREI-ZAPFEN-SYSTEM
Drei Drehzapfen halten den FX-Edge-Sattel; zwei Hauptzapfen und ein
kleinerer (hinten). Der hintere Zapfen dient auch zur Befestigung des Sattels,
überträgt aber auch zusätzliche Vibrationsanteile der Saiten zum Korpus.
EINSTELLEN DER SAITENLAGE
Die Saitenlage kann durch Anheben/Absenken aller drei Zapfen
eingestellt werden. Nach Einstellung der beiden Hauptzapfen muss der
hintere Beschlag mit einem 3-mm-Allen-Schlüssel ausgleichend
eingestellt werden, so dass der Sattel richtig ausgerichtet ist. (Der
Sattel sollte parallel zum Korpus ausgerichtet sein.)
III
-FIXED BRIDGE
HAUPTZAPFEN
PARALLEL
HINTERER
ZAPFEN
DEUTSCH
HAUPTZAPFEN
HINWEIS
*Obwohl die Saitenlage der Gitarre durch Drehen der Zapfen um bis zu 0,3 mm bis 0,5 mm angehoben oder abgesenkt werden kann, wird
empfohlen, die Einstellung in kleineren Schritten vorzunehmen.
*Die Saitenlage kann sich nach erfolgter Einstellung des hinteren Zapfens ändern. Es wird empfohlen, die Saitenlage nach Einstellung des
hinteren Zapfens erneut zu prüfen.
Locking Tremolos
EDGE III TREMOLO
TREMOLOARM-INSTALLATION
Der Tremoloarm kann leicht eingesetzt und entfernt werden. Setzen Sie den Arm in
die Armöffnung an der Tremolo-Basisplatte. Ziehen Sie den Arm zum Entfernen hoch.
ARMDREHUNG-DREHKRAFT
Die Drehkraft des Arms kann eingestellt werden, indem das Tremolo angehoben wird
und ein 1,5 mm großer Inbusschlüssel in die Schraube (A) am Tremoloblock eingesetzt
wird. Durch Drehen dieser Schraube im Uhrzeigersinn wird die Arm-Drehkraft
gesteigert, und durch Drehen der Schraube gegen den Uhrzeigersinn wird die ArmDrehkraft verringert.
(A)
31
Page 33

ARM-SAITENLAGE
Die Tremoloarm-Saitenlage kann eingestellt werden, indem 3,0 mm großer
Inbusschlüssel an der Schraube (B) an der Tremoloschraube verwendet wird.
(B)
FEIN-TUNING
Auch nach dem Verriegeln der Verriegelungsmutter können Sie die Fein-Tuner
verwenden, um Feinabstimmungen zur Stimmung jeder Saite vorzunehmen. Sie
(G)
(C)
müssen alle Fein-Tuner (C) auf Mittenposition des Einstellbereichs stellen, bevor Sie
die Verriegelungsmutter festziehen.
EINSTELLEN DER SAITENLAGE
(F)
(E)
Zum Einstellen der gesamten Tremoloeinheit nach oben oder unten verwenden Sie
einen Inbusschlüssel zum Drehen der Stutzenschraube (E) links und rechts von der
Tremoloeinheit. (Dies kann nicht für einzelne Saiten eingestellt werden.)
EINSTELLEN DER INTONATION
(D)
Lösen Sie die Druckplattenschraube (D) an der Verriegelungsmutter und lösen Sie die
einzustellende Saite. Lösen Sie die Sattelverriegelungsschrauben (F) am
einzustellenden Sattel und stellen den Sattel nach vorne oder hinten. Ziehen Sie die
Sattelverriegelungsschraube (F) fest und stimmen die Saite. Nach dem erneuten
Prüfen der Intonation ziehen Sie die Druckplattenschraube (D) fest.
*An der Basisplatte befinden sich zwei Löcher für jede Sattelverriegelungsschraube. Diese erlauben es
dem Anwender, Saitenstärken zu wechseln, während die maximale Sattelbewegung erlaubt wird. Wenn
die Intonation nicht eingestellt werden kann, weil der Sattel weiter zurück gestellt werden muss, entfernen Sie die Intonationsschraube und
setzen sie in das Loch weiter hinten an der Stegplatte ein.
ERSETZEN DER SAITEN
Bei EDGE III Tremolo ersetzen Sie die Saiten einzeln. Wenn die alten Saiten einzeln entfernt
werden, wird die Spannung am Tremolo gelöst, und der "Up-Pull"-Winkel des Tremolo
geändert. Lösen Sie die Druckplattenschraube (D) an der Verriegelungsmutter und lösen Sie
die zu ersetzende Saite. Lösen Sie die Saitenanschlagschraube (G) und entfernen Sie die Saite
vom Sattel. Schneiden Sie das Kugelende der neuen Saite ab, wie in der Abbildung gezeigt, und
setzen Sie die abgeschnittene Seite der neuen Saite zwischen Sattel und Saitenhalterblock ein.
Ziehen Sie die Saitenanschlagschraube (G) fest und stimmen die Saite. Nach dem Prüfen der
Intonation ziehen Sie die Druckplattenschraube (D) auf der Verriegelungsmutter fest.
EDGE III EINSTELLEN DER TREMOLO-FEDER
Die Tremolo-Federn stellen den Tremolowinkel durch Festziehen oder Lösen der
Tremolospannung ein. Zum Einstellen des Tremolowinkels benutzen Sie die Einstellschrauben
im Tremolofach auf der Rückseite des Korpus’. Das Tremolo-System beim Stimmen soll parallel
zur Oberfläche der Gitarre sein. Wenn das Tremolo nicht parallel zur Oberfläche der Gitarre ist,
entfernen Sie die Abdeckplatte des Tremolofachs und erhöhen Sie die Federspannung durch
32
Festziehen der Einstellschrauben, wenn das Tremolo nach vorne geneigt ist. Lösen Sie
die Schrauben, wenn das Tremolo hochgezogen wird. Stimmen Sie die Saiten neu auf
die richtige Tonlage ab und prüfen Sie den Winkel. Wählen Sie die Anzahl und
Platzierung der Tremolo-Federn entsprechend der Federstärke und dem TremoloWinkel.
Page 34

ZR (NULLWIDERSTAND) TREMOLO
TREMOLO ARM
Lösen Sie die Schraubenkappe, setzen
Sie den Arm in die Tremoloeinheit, und
drehen Sie sie zum Befestigen (Abb.
8). Drehen Sie den Arm zur Einstellung
auf die gewünschte Höhe. Die ArmDrehkraft wird durch die Festigkeit
der Schraubenkappe eingestellt. Zum
Entfernen des Arms lösen Sie die
Schraubenkappe und drehen Sie den
Arm gegen den Uhrzeigersinn (Abb. 9).
FEIN-TUNING
Auch nach dem Verriegeln der Verriegelungsmutter können Sie die Fein-Tuner
(Abb. 10 A) verwenden, um Feinabstimmungen jeder Saite vorzunehmen.
Sie müssen alle Fein-Tuner auf Mittenposition ihres Einstellbereichs stellen,
bevor Sie die Verriegelungsmutter festziehen.
EINSTELLEN DER SAITENLAGE
Zum Einstellen der gesamten Tremoloeinheit nach oben oder unten
verwenden Sie einen Inbusschlüssel zum Drehen der Stutzenschraube
(Abb. 10 B) links und rechts von der Tremoloeinheit. (Dies kann nicht für
einzelne Saiten eingestellt werden.)
Abb.8 Abb.9
Abb.10
C
B
A
DEUTSCH
EINSTELLEN DER INTONATION
Lösen Sie die Saitenanschlagschrauben an der Verriegelungsmutter
(Abb.11). Entfernen Sie die Intonationseinstellschraube (Abb.12 B) aus der
Stegeinheit, befestigen Sie sie im Schraubenloch an der Rückseite des
Sattels, und ziehen Sie sie so fest, dass die Spitze der Schraube die
Büchse der Stegeinheit berührt. Lösen Sie die Sattelverriegelungsschraube
(Abb. 10 C) und drehen Sie die Intonationseinstellschraube zum Einstellen
der Position des Sattels. Nach der Einstellung ziehen Sie die
Sattelverriegelungsschraube ausreichend fest, um den Sattel daran zu
hindern, beim Stimmen nach vorne zu rutschen, und legen die
Intonationseinstellschraube im Inneren der Stegeinheit ab.
ERSETZEN DER SAITEN
Lösen Sie die Saitenanschlagschraube der Verriegelungsmutter (Abb. 11),
lösen Sie die Saite an der Stimmmechanik vollständig und verwenden Sie
einen Inbusschlüssel zum Lösen der Saiten-Anschlagschraube am Stegsattel
(Abb. 12 A), und entfernen Sie die alte Saite. Verwenden Sie Drahtschneider
zum Entfernen des Kugelendes von der neuen Saite, wie in Abb. 13 gezeigt,
setzen Sie dieses Ende der Saite in den Stegsattel ein, ziehen Sie es sicher
fest, und ziehen Sie dann die Saite an der Stimmmechanik. Nach dem Tuning
prüfen Sie den Winkel der Tremoloeinheit und befestigen die
Saitenanschlagschraube der Verriegelungsmutter zum Fertigstellen der Arbeit.
EINSTELLEN DES NULLPUNKT-SYSTEMS
Das Nullpunkt-System macht es leichter, eine schwebende Tremoloeinheit zu
stimmen, bietet mehr Tuning-Stabilität nach dem Tremoloeinsatz und begrenzt die
Tuning-Verschiebung, die andernfalls auftreten würde, wenn eine Saite bricht.
*Wenn das Nullpunkt-System nicht auf die korrekte Position gestellt ist,
arbeitet es nicht optimal, da es entweder nicht vollständig schwebt oder
das Nullpunkt-System und die Saitenspannung in Balance sind. Sie
müssen diese Einstellung präzise ausführen.
Abb.11
Abb.12
Abb.13
Abb.14
33
Page 35

ZPS (ZERO POINT SYSTEM) OF ZR TREMOLO
Hauptfeder
Tremoloblock
Anschlag
2
1
Anschlagstab
Bei richtig gestimmter Gitarre stellen Sie die Hauptfeder ein,
um sicherzustellen, dass Anschlagstab den Tremoloblock
und Anschlag berührt.
Wenn der Anschlagstab nicht den Tremoloblock und
Anschlag berührt, stellen Sie die HauptfederEinstellschraube ein, bis Kontakt hergestellt ist.
Bei richtig gestimmter Gitarre muss der Anschlagstab den
Tremoloblock und Anschlag berühren. Bei richtiger
Einstellung ist die Spannung beim Herunterdrücken auf den
Arm etwas geringer als die Spannung beim Hochziehen. Die
Kraftbalance beträgt etwa 3:7. (Bei diesem Setup muss der
Anschlagstab der Tremoloblock und Anschlag sein, auch
wenn die 1. Saite vollständig gelöst wird.)
<Hinweis>
Wenn eine Saite aufgrund von Halsspannung bricht, ist die Stimmung der anderen Saiten etwas höher, aber immer noch innerhalb des
zulässigen Bereichs.
UMSCHALTEN AUF FLOATING-BETRIEB
Durch Stoppen des Nullpunkt-Systems können Sie den Tremolo
vollständig schweben lassen. Während Sie den Arm hochhalten, entfernen
Sie den Anschlagstab und die Nebenfeder. Bei richtig gestimmter Gitarre
verwenden Sie den Hauptfeder-Einstellknopf (Abb. 14E) zur Einstellung
des Winkels der Tremoloeinheit. Wenn die Tremoloeinheit zum Hals nach
vorne geneigt ist, drehen Sie den Federeinstellknopf in Plus-Richtung (+).
Entsprechend gilt: Wenn die Tremoloeinheit weg vom Hals nach hinten
geneigt ist, drehen Sie den Federeinstellknopf in Minus-Richtung (-).
*Sie müssen das Tuning wiederholt während der Einstellung des TremoloWinkels im Floating-Zustand ausführen, da das Tuning jedesmal abweicht,
wenn Sie den Hauptfeder-Einstellknopf einstellen.
34
Zur Wiederholung, wenn der Anschlagstab nicht den
Tremoloblock und Anschlag berührt, stellen Sie die
Hauptfeder-Einstellschraube ein, bis Kontakt hergestellt ist.
Page 36

Non Locking Tremolo
FAT/SAT TREMOLO
TREMOLOARM-INSTALLATION
Der Tremoloarm kann leicht eingesetzt und entfernt werden. Setzen Sie den Arm
in die Armöffnung an der Tremolo-Basisplatte. Ziehen Sie den Arm zum
Entfernen hoch.
TREMOLOARM-EINSTELLUNG (SAT PRO)
Zum Einstellen der Höhe des Arms entfernen Sie die Tremolo-Federabdeckung
von der Rückseite der Gitarre und verwenden einen 3 mm großen
Inbusschlüssel zum drehen der Höheneinstellschraube an der Unterseite des
Tremoloblocks. Durch dieses Festziehen im Uhrzeigersinn wird die Höhe
angehoben.
ARMDREHUNG-DREHKRAFT
Die Drehkraft des Arms kann eingestellt werden, indem der Tremolo angehoben
wird und ein 1,5 mm großer Inbusschlüssel in die Schraube (A) am
Tremoloblock eingesetzt wird.
Durch Drehen dieser Schraube im Uhrzeigersinn wird die Arm-Drehkraft
gesteigert, und durch Drehen der Schraube gegen den Uhrzeigersinn wird die
Arm-Drehkraft verringert.
DEUTSCH
(A)
EINSTELLUNG DER SAITENHÖHE (SAT PRO)
Zum Einstellen der Saitenlage jeder Saite verwenden Sie einen 1,5 mm großen
Inbusschlüssel zum Drehen der Schraube auf dem Sattel (C). Die Gesamthöhe
kann auf jeder Seite der SAT PRO Tremoloeinheit eingestellt werden. Zum
Einstellen der Höhe verwenden Sie einen 3 mm großen Inbusschlüssel zum
Drehen des Stutzens (D) an einer Seite des Geräts. Seien Sie beim Einstellen der
Höhe der gesamten Tremoloeinheit vorsichtig; stellen Sie beide Seiten auf die
gleiche Höhe ein, um optimale Tremolofunktion zu erzielen.
EINSTELLUNG DER SAITENHÖHE (FAT20/FAT10/SAT10)
Die Höheneinstellung des Tremolo kann erhöht oder gesenkt werden, indem die Drehzapfen (C) eingestellt
werden, auf denen das Tremolo befestigt ist. Diese liegen an beiden Seiten vorne am Steg. Durch Drehen im
Uhrzeigersinn wird das Tremolo gesenkt; durch Drehen gegen den Uhrzeigersinn wird das Tremolo angehoben.
(C) (C) (C)
FAT20 FAT10 SAT10
(C)
(D)
(E)
INTONATIONSEINSTELLUNG (SAT PRO)
Zum Einstellen der Intonation verwenden Sie einen 1,5 mm großen
Inbusschlüssel zum Drehen der Schraube an der Rückseite des Sattels (E).
Drehen Sie die Schraube im Uhrzeigersinn, um den Sattel nach hinten zu
bewegen, oder gegen den Uhrzeigersinn, um den Sattel nach vorne zu bewegen.
(C)
(D)
(E)
SAT PRO
35
Page 37

INTONATIONSEINSTELLUNG (FAT20)
Um sicherzustellen, dass keine Bewegung auftreten kann, hat jeder Sattel eine
Stellschraube, die den Sattel verriegelt. Beim Einstellen der Intonation lösen Sie die
Sattelverriegelungsschraube mit einem 2 mm großen Inbusschlüssel. (D)
Zum Einstellen der Intonation setzen Sie einen 2,5 mm großen Inbusschlüssel in die
Sattelschraube an der Rückseite des Tremolo ein. Durch Drehen des Schlüssels im
Uhrzeigersinn wird der Sattel nach hinten justiert. Durch Drehen gegen den
Uhrzeigersinn wird der Sattel nach vorne justiert. Nachdem die korrekte
Intonationslage des Sattels eingestellt ist, ziehen Sie die Sattelverriegelungsschraube
fest, um sicherzustellen, dass keine Bewegung auftritt. (E)
INTONATIONSEINSTELLUNG (FAT10/SAT10)
Die Intonation kann durch Einstellen des
Sattels nach vorne oder hinten mit einem
Kreuzschlitzschraubenzieher (+) an der
Intonationseinstellschraube hinten am Steg
reguliert werden.
FAT10 SAT10
EINSTELLUNG DER INTONATION u. DER SAITENHÖHE (FAT 6)
Die Intonation kann durch Einstellen des Sattels nach vorne oder hinten mit
einer Kreuzschlitzschraube (+) hinten am Steg eingestellt werden. Die
Saitenhöhe wird durch Heben oder Senken der kleinen Inbusschrauben mit
einem Schraubenschlüssel an einer Seite des Sattels geregelt.
(D)
(E)
FAT20
ERSETZEN DER SAITEN
Zum Austauschen von Saiten fädeln Sie die neuen Saiten durch die
Saitenhülsen an der Rückseite der Gitarre. Die Saiten werden dann durch den
Tremoloblock gefädelt und über den Sattel geführt.
FAT/SAT (ausgenommen FAT6) EINSTELLEN DER TREMOLOFEDER
Ein Standard-Tremolo kann so eingestellt werden, dass die Tonlage angehoben
werden kann, wenn der Tremoloarm zurückgezogen wird, um die TremoloFedern unter der Tremolo-Vertiefung an der Rückseite der Gitarre zu lösen. Ein
Nachteil dieses Verfahrens ist, dass sich die Tonlage des Instruments erhöht,
falls eine Saite reißt. Zur Abhilfe justieren Sie die Tremoloplatte so, dass sie
bündig auf dem Körper sitzt, indem Sie die Tremolo-Federn festziehen. Wählen
Sie die Anzahl und Platzierung der Tremolo-Federn entsprechend
der Saitenstärke und der Tremolo-Einstellung.
SCHWEBEND PARALLEL
36
Page 38

ACT TRMOLO
ERSETZEN DER SAITEN
Das ACT Tremolo erlaubt zwei Arten der Saiteninstallation.
1) Die Saiten werden durch Einsetzen des Kugelendes in den Saitenschlitz
und Einhaken des Kugelendes unter dem Saitenfänger an der Rückseite der
Tremolo-Einheit angebracht.
2) Die Saiten werden durch Einsetzen des Kugelendes in den Saitenschlitz
und Einhaken des Kugelendes unter dem Saitenfänger an der Unterseite der
Tremolo-Einheit angebracht. Dadurch wird die Saitenspannung gesteigert
und mehr Sustain erreicht.
TREMOLO-ARM INSTALLATION
Der Tremolo-Arm kann leicht eingesetzt und entfernt werden. Setzen Sie den Arm in die Armöffnung an der
Tremolo-Basisplatte. Ziehen Sie den Arm zum Entfernen hoch.
ARMDREHUNG-DREHKRAFT
Die Drehkraft des Arms kann eingestellt werden, indem das Tremolo angehoben wird und ein 2,0 mm großer
Inbusschlüssel in die Schraube (A) am Tremoloblock eingesetzt wird. Durch Drehen dieser Schraube im
Uhrzeigersinn wird der Tremoloarm fixiert und durch Drehen der Schraube gegen den Uhrzeigersinn gelockert.
EINSTELLEN DER TREMOLO-FEDERN
Das ACT Tremolo ist für optimale Funktion bei
paralleler Ausrichtung zur Oberfläche des
Gitarrenkorpus’ konstruiert. Der Winkel des
Tremolos kann durch Ändern der Länge der
Tremolofedern unter der Tremolo-Einheit eingestellt
werden. Verwenden Sie einen
Kreuzschlitzschraubenzieher (+) zum Drehen der
Tremolospannung-Einstellschrauben zur Einstellung
der Tremolofedern. (B) Wenn das Tremolo zum Gitarrenhals geneigt wird, drehen Sie die Schrauben im
Uhrzeigersinn, um die Federn festzuziehen. Wenn dagegen das Tremolo vom Gitarrenhals weg geneigt wird,
drehen Sie die Schrauben gegen den Uhrzeigersinn, um die Federn zu lösen. Stimmen Sie die Gitarre, prüfen Sie
den Tremolowinkel erneut und wiederholen Sie die Einstellung, bis der Tremolowinkel korrekt ist.
(B)
(A)
DEUTSCH
EINSTELLEN DER SAITENLAGE
Zum Einstellen der gesamten Tremolo-Einheit nach oben oder unten verwenden Sie einen 3,0 mm großen
Inbusschlüssel zum Drehen der Stutzenschraube (C) links und rechts von der Tremolo-Einheit. (Dies kann nicht
für einzelne Saiten eingestellt werden.)
EINSTELLEN DER INTONATION
Verwenden Sie einen 2,0 mm großen Inbusschlüssel
zum Lösen der Sattelverriegelungsschrauben (D) an
jedem Sattel, und bewegen Sie den Sattel. Ziehen
Sie die Sattelverriegelungsschrauben fest, stimmen
Sie die Gitarre, und prüfen Sie dann die Intonation.
Wiederholen Sie diese Einstellungen, bis die
Intonation korrekt ist.
(D)
(C)
37
Page 39

Entretien
Vous avez choisi un instrument Ibanez, nous vous remercions de ce choix et vous
adressons tous nos compliments. Le niveau de qualité atteint par Ibanez est sans pareil.
Avant leur expédition, tous les instruments Ibanez sont contrôlés et garantis conformes à
nos normes rigoureuses de qualité. L'objectif de ce guide est de présenter les différentes
opérations d'entretien nécessaires afin que votre instrument conserve l'aspect extérieur et
les caractéristiques musicales qu'il possédait à sa sortie de nos ateliers.
NETTOYAGE
Un nettoyage régulier de votre guitare est capital pour lui
permettre de conserver son aspect extérieur et pour prolonger la
durée de vie des cordes. Après avoir joué, essuyez votre
instrument afin de supprimer toute trace de transpiration. En effet,
la transpiration peut contenir des substances acides provoquant la
corrosion des cordes et des parties métalliques de votre guitare.
Les guitares dont le fini est d'aspect brillant peuvent être lustrées
en utilisant un produit spécial pour instruments de musique et un
tissu d'entretien pour guitares, ou un chiffon doux en coton. Les
tissus en polyester, du fait de leur nature abrasive, peuvent
produire des rayures sur la couche de finition. Les guitares patinées à l'huile doivent être essuyées immédiatement
après avoir joué, et uniquement à l'aide d'un chiffon sec de coton. Si, après une longue utilisation ou en raison d'une
transpiration importante, les couleurs de votre guitare changent, prenez contact avec un réparateur qualifié afin de
redonner à la patine son aspect d'origine.
CORDES ET MECANIQUES D'ACCORDAGE
Si les cordes deviennent sales, changent de couleur, produisent un son terne ou des
bourdonnements, remplacez-les. Pour éviter de fortes variations de tension du manche et pour
obtenir de meilleurs résultats, nous vous recommandons de remplacer les cordes une à une.
Lors du remplacement de cordes dont le calibre est différent, il peut être nécessaire d'ajuster
la tension de la tige de réglage.
(Cette opération ne doit être effectuée que par un technicien qualifié.) Les instruments équipés
d'un vibrato devront peut-être être réglés à nouveau après un remplacement des cordes, les
changements de tension des cordes étant susceptibles d'élever ou d'abaisser le vibrato. Les
guitares et les basses Ibanez sont montées en usine avec les calibres de cordes ci-après.
Suivez les instructions ci-dessous selon votre modèle.
Les cordes doivent être enroulées soigneusement sur les mécaniques
d'accordage, de haut en bas, en effectuant 2 ou 3 tours autour de l'axe. Pour
les cordes non filées, il convient de préparer les extrémités des cordes
comme indiqué sur le schéma afin d'empêcher les cordes de glisser de la
cheville. Dans le cas de mécaniques d'accordage pour lesquelles les
extrémités des cordes sont insérées dans les axes, les cordes peuvent être
coupées à longueur à l'avance, en utilisant une pince coupante.
Si les mécaniques d'accordage sont à engrenages étanches, alors ceux-ci sont de type autolubrifiant. La résistance
des boutons d'accordage peut être ajustée grâce aux vis de serrage, en utilisant un petit tournevis cruciforme.
*L'utilisation de cordes de mauvaise qualité peut provoquer un phénomène de bourdonnement, ainsi que la distorsion du son. L'utilisation
de cordes entortillées ou tordues peut également provoquer des bourdonnements et réduire la tenue du son (sustain). Veillez à ce que les
cordes neuves soient exemptes de tout défaut ou aspérité avant de les monter.
CALIBRE DES CORDES
Guitares solid body avec vibrato, NDM2, JTK et tous les modèles Gio
RG321MH, SZ, AXS, AR, ARC, ARX, AD, VBI et IC
Modèle à 7 cordes
MMM1
NTM1
MTM2
Guitares ARTCORE
Guitares basses ARTCORE
.009/.011/.016/.024/.032/.042 pouce
.010/.013/.017/.026/.036/.046 pouce
.010/.013/.017/.026/.036/.046/.054 pouce
.014/.017/.030/.040/.056/.074 pouce
.011/.014/.018/.028/.038/.049 pouce
.011/.015/.018/.028/.038/.054 pouce
.010/.013/.017/.030/.042/.052 pouce
.050/.070/.085/.105 pouce
38
3
2
SERRER
1
DESSERRER
Page 40

MANCHE
Les guitares Ibanez à cordes acier sont équipées d'une tige de réglage
ajustable. Le but de la tige de réglage est d'équilibrer la tension que
DESSERRER
SERRER
DESSERRER
les cordes exercent sur le manche, en appliquant une traction inverse.
Plusieurs raisons conduisent au besoin d'ajuster la tige de réglage.
L'une des raisons les plus courantes est le changement des calibres
de cordes ou encore l'accordage de l'instrument. Les opérations
d'accordage des cordes sont susceptibles d'influer sur la hauteur des
cordes : celles-ci peuvent alors friser ou sonner faux. Pour ajuster la
tige de réglage, repérez l'écrou correspondant, insérez la clé
appropriée et faites-la tourner pour serrer (dans le sens des aiguilles
d'une montre) ou desserrer (dans le sens contraire) la tige. La tension de la tige de réglage
peut être évaluée en plaçant un capodastre sur la première frette et en maintenant les cordes
DESSERRER
appuyées sur la frette qui se trouve à l'endroit où le manche rejoint la caisse. Insérez une
jauge d'épaisseur entre la corde et la 8e frette. L'espace entre la corde et la frette doit être
compris entre 0,3 mm et 0,5 mm. Cet espace est appelé le " action ".
Un action trop grande accentue la hauteur des cordes au milieu du manche, ce qui fausse
l'intonation et affecte le confort de jeu. L'absence d'action peut provoquer un phénomène de
bourdonnement au niveau des frettes.
*Une attention particulière est nécessaire lors du réglage du manche et nous vous recommandons de faire effectuer cette opération
uniquement par un technicien spécialisé.
DESSERRER
SERRER
0,3 à 0,5 mm
8e FRETTE
SERRER
SERRER
FRANÇAIS
HAUTEUR
La hauteur des cordes est réglée lors de la fabrication des guitares et des basses Ibanez.
Néanmoins, plusieurs facteurs peuvent provoquer la variation de hauteur des cordes d'un
instrument. Les guitares sont sensibles aux variations de température et d'humidité. Une
hauteur de cordes trop importante peut rendre l'instrument difficile à jouer. Si la hauteur des
cordes est trop basse, un phénomène de bourdonnement indésirable peut se produire au niveau
des frettes. Pour y remédier, suivez les instructions spécifiques selon le type de chevalet
installé. Si la hauteur des cordes n'est pas correcte, vérifiez tout d'abord que la corde basse est
accordée et que la tige de traction est réglée correctement. La hauteur des cordes des
instruments Ibanez est réglée à la quatorzième frette. La hauteur des cordes devra être vérifiée
et éventuellement ajustée à la suite d'un réglage du manche ou d'un changement de calibre
des cordes. Pour effectuer les réglages, suivez les instructions fournies dans la section du
guide concernant le chevalet.
*Si des cordes autres que celles décrites ci-dessus sont utilisées, augmentez progressivement la hauteur des
cordes en commençant par les cordes aigües.
Guitares à corde aigüe de .009, sauf modèles Gio Ibanez
Tous les modèles Gio Ibanez et les guitares à corde aigüe de calibre .010 à .014
Guitares ARTCORE
Guitares basses ARTCORE
CORDES AIGÜES CORDES GRAVES
1,5mm
1,7mm
1,7mm
2,0mm
2,0mm
2,3mm
2,3mm
2,5mm
INTONATION
Le réglage de l'intonation consiste à ajuster la position de la corde au niveau du
pontet afin de compenser les différences de calibre des cordes ou d'accordage.
Suivez les instructions de réglage de chevalet ci-après. L'intonation est
correctement réglée lorsque la note produite au niveau de la 12e frette et la note
harmonique produite au niveau de cette frette sont parfaitement identiques.
Cette note correspond au milieu de la corde et ce réglage constitue la manière
la plus précise pour obtenir une note de référence. En se servant de la note
harmonique comme référence, si la note jouée sur la frette est plus grave, déplacez le pontet vers le haut de l'instrument
(a) afin de réduire la longueur de la corde. Si la note jouée sur la frette est plus aiguë que la note harmonique, déplacez le
pontet vers le bas (b) afin d'augmenter la longueur de la corde.
*Remarque : le déplacement des pontets peut provoquer la rupture des cordes. Pour éviter cela, détendez toujours les cordes avant
d'effectuer de tels réglages.
39
Page 41

L'illustration ci-dessous montre la position standard du chevalet sur les guitares AF, AFS et AG.
Ajustez la position du chevalet pour obtenir une intonation adéquate.
AGAF, AFS, AK
MICROS
Le niveau de sortie de l'instrument ainsi que
la qualité du signal peuvent être affectés
par la position en hauteur des micros.
La hauteur des micros doit être réglée de
manière à ce que le volume obtenu soit
pratiquement identique pour les micros du
manche et du chevalet, lorsque les boutons
de volume sont réglés au plus haut. Le
volume peut chuter considérablement si la
hauteur du micro est trop faible. Étant donné que les micros sont de type magnétique, un phénomène de
bourdonnement et de distorsion peut apparaître lorsqu'un micro est situé trop près des cordes. Utilisez un petit
tournevis pour régler la distance du micro par rapport aux cordes.
*Les instruments possédant des micros à plots réglables permettent d'ajuster la puissance de sortie pour chaque corde.
Chevalets de guitare
CHEVALET GIBRALTAR CUSTOM
Le réglage de la hauteur s'effectue à l'aide des quatre vis Allen de 2,0 mm (B) qui se
trouvent sur le chevalet. Les vis de réglage étant bloquées par la vis de blocage du
chevalet (A), vous devez desserrer cette dernière à l'aide d'une clé Allen de 3,0 mm avant
de procéder au réglage.
Chaque pontet est également bloqué par une vis de serrage de pontet (C). Pour régler
l'intonation, utilisez une clé Allen de 2,0 mm pour desserrer les vis de serrage du pontet,
puis réglez la vis d'intonation (D) à l'aide d'une clé Allen de 2,0 mm. Une fois
l'ajustement terminé, bloquez le pontet et accordez la guitare.
GIBRALTAR III (GUITARE ET BASSE),
CB3 ET FULL TUNE III, ART1, ART2
La hauteur se règle en tournant les vis
d'ajustement (A) situées de chaque côté du
chevalet à l'aide d'un tournevis plat (-).
L'intonation peut être réglée en déplaçant
le pontet vers l'avant ou l'arrière, en
utilisant un tournevis pour tourner la vis de
réglage de chaque pontet (B).
(A)
(B)
GIBRALTAR III, CB3
A
(B)
FULL TUNE II,
ART1, ART2
B
C
D
(A)
40
REMPLACEMENT DES CORDES : CB3
Installez les cordes en les insérant par l'avant du chevalet.
Page 42

CHEVALET HARDTAIL
Pour remplacer les cordes, faites passer les nouvelles cordes à travers les
passe-cordes qui se trouvent au dos de la guitare et faites-les ressortir
par-dessus les pontets.
L'intonation peut être réglée en déplaçant le pontet vers l'avant ou vers
l'arrière, en utilisant un tournevis cruciforme (+) pour ajuster la vis de
réglage de l'intonation, située à l'arrière du chevalet. La hauteur des
cordes peut être ajustée en levant ou en abaissant à l'aide d'une clé les
petites vis Allen situées de part et d'autre de chaque pontet.
CHEVALET ARCH-TOP AJUSTABLE
La hauteur des cordes peut être ajustée sur un chevalet arch-top en
tournant les molettes à main situées de part et d'autre du chevalet.
Tournez les molettes dans le sens des aiguilles d'une montre pour
abaisser la hauteur des cordes et tournez-les dans le sens inverse pour
augmenter la hauteur des cordes.
Le chevalet n'étant pas fixé au corps de la guitare, l'intonation peut être
réglée en détendant les cordes puis en déplaçant le chevalet vers l'avant
ou vers l'arrière.
FRANÇAIS
Vibrato Vintage
Pour des résultats optimaux, nous vous conseillons de remplacer les
cordes une par une. Vous éviterez ainsi de perdre la tension appliquée
par les cordes sur le manche, ce qui permet de maintenir le ressort du
vibrato tendu.
Pour remplacer les cordes sur la VBS80, insérez la nouvelle corde par le
dessous de la barre de retenue avant du cordier (A). Le modèle VBF70 ne
comporte pas de barre de retenue avant.
Enroulez l'extrémité de la corde comportant une boule autour de la barre
de retenue arrière du cordier (B) en passant par-dessus celle-ci.
Fixez la boule située à l'extrémité de la corde sur l'attache de la barre de
retenue arrière du cordier ; la corde doit alors être tendue vers la tête du
manche. Si vous détendez les cordes au niveau du cordier, l'extrémité de
la corde comportant une boule risque de glisser de son attache. Pour
éviter ce problème, maintenez la corde sous tension en la tirant vers la
tête du manche.
Fixez la corde sur la mécanique et enroulez-la autour de l'axe tout en la
maintenant tendue. Assurez-vous que la corde passe bien sur le pontet adéquat au niveau du chevalet. Une fois la
corde tendue, accordez-la. Répétez l'opération pour les autres cordes.
(A)
(B)
VBS80
(B)
VBS70
41
Page 43

Tailpieces
CORDIERS QUICK CHANGE
La hauteur du QUICK CHANGE III peut être ajustée en tournant les vis de
réglage situées de part et d'autre du cordier (C) à l'aide d'un tournevis
plat (-).
QUICK CHANGE ULTRA / FONCTION ACCORDAGE FIN
Le QUICK CHANGE ULTRA offre une fonction d'accordage fin.
Même après avoir accordé votre guitare à l'aide des mécaniques
d'accordage, vous pouvez régler l'accordage de manière plus précise
en utilisant les COMMANDES D'ACCORDAGE FIN (E).
(E)
QUIK CHANGE ULTRA
QUIK CHANGE MINI QUIK CHANGE CLASSIC
DOWNSHIFTER
(C)
QUICK CHANGE III
MONTAGE DES CORDES
Pour monter une corde neuve, insérez la boule de blocage de la corde à travers
l'encoche et placez-la dans la zone de blocage interne du pontet, comme indiqué sur
l'illustration. Tirez fermement sur la corde et montez l'autre extrémité sur la tête du
manche, comme vous le feriez avec n'importe quelle guitare.
3
2
1
ACCORDAGE SPÉCIAL
Le Downshifter vous permet également d'augmenter la hauteur, en réglant
l'accordage standard lorsque le levier est en position basse. Si le levier est monté, la
hauteur le sera également et la corde pourra alors être ajustée à la hauteur souhaitée.
L'Ibanez DOWNSHIFTER vous permet de réduire la hauteur d'une corde à une hauteur prédéfinie en actionnant
simplement un petit levier. Pour que l'accordage soit précis, aussi bien en position haute qu'en position basse,
vous devez régler les deux positions du levier avant d'utiliser le Downshifter.
ACCORDAGE
Vérifiez tout d'abord que le levier du Downshifter est en position haute, puis
accordez la corde normalement en utilisant les mécaniques d'accordage qui se
trouvent sur la tête du manche.
(Remarque : la vis d'accordage du Downshifter n'a aucun effet sur la hauteur de la
corde en position haute.) Placez ensuite le Downshifter en position basse : la
hauteur de la corde est alors réduite. Réglez la vis d'accordage située à l'arrière
dans le sens des aiguilles d'une montre pour réduire la hauteur, dans le sens inverse
pour l'augmenter. Ce réglage peut être effectué à la main ou à l'aide d'un tournevis
standard ou d'une pièce de monnaie, jusqu'à obtenir la hauteur souhaitée pour la
position basse. (La hauteur prédéfinie en usine correspond à un abaissement d'un
ton, c'est-à-dire à un accordage en Ré.) Lorsque le levier est placé en position
haute, la vis à main peut-être réglée, mais cela n'a aucun effet sur la hauteur en
position haute. Cela affectera toutefois la hauteur en position basse.
REMARQUE : Le système Downshifter a été conçu pour que la hauteur soit la plus
précise possible. Vous devez toutefois être conscient que le Downshifter est un
dispositif mécanique. En cas d'utilisation fréquente, il se peut que des variations de
hauteur se produisent, auquel cas vous devrez procéder à un réajustement.
42
Page 44

Locking Bridge
FX EDGE, FX EDGE III -FIXED BRIDGE
Le chevalet Ibanez FX-Edge est un chevalet fixe à double blocage conçu
sur les bases du fameux vibrato Ibanez Lo-Pro Edge. Lisez bien les
instructions ci-dessous portant sur l'utilisation et le réglage du chevalet.
SYSTÈME À TROIS VIS
Le chevalet FX-Edge est fixé à la guitare au moyen de trois vis : deux
vis principales et une vis plus petite située à l'arrière de l'instrument.
La vis arrière permet de bloquer le chevalet et de mieux transmettre
les vibrations des cordes au corps de la guitare.
RÉGLAGE DE LA HAUTEUR DES CORDES
La hauteur des cordes se règle en montant ou en abaissant les trois
vis. Une fois que la hauteur des deux vis principales a été réglée, il est
nécessaire de compenser la hauteur de la vis située à l'arrière à l'aide
de la clé Allen de 3 mm fournie, de manière à conserver l'angle
d'alignement du chevalet. (Le chevalet doit toujours être parallèle au
corps de l'instrument.)
VIS PRINCIPALE
VIS PRINCIPALE
CHEVALET PARALLÈLE À
L'INSTRUMENT
VIS ARRIÈRE
FRANÇAIS
REMARQUE :
*Bien qu'il soit possible d'augmenter ou de réduire la hauteur des cordes de 0,3 mm à 0,5 mm en donnant un tour de vis, nous vous
conseillons de la régler progressivement par incréments plus petits.
*Il se peut que la hauteur des cordes soit modifiée suite au réglage de la vis arrière. Il est donc recommandé de vérifier la hauteur finale des
cordes après le réglage de cette dernière.
Locking Tremolos
VIBRATO EDGE III
INSTALLATION DE LA TIGE DU VIBRATO
Il est très facile d'installer et de retirer la tige du vibrato. Introduisez la tige dans le trou
prévu à cet effet sur la plaque de support du vibrato. Tirez sur la tige pour la retirer.
FRICTION DE LA TIGE
La friction de la tige peut être réglée en levant le vibrato et en introduisant une clé
Allen de 1,5 mm dans la vis (A) qui se trouve sur le bloc de vibrato. Si cette vis est
tournée dans le sens des aiguilles d'une montre, la friction de la tige est
augmentée ; elle est réduite si la vis est tournée dans le sens contraire.
(A)
43
Page 45

HAUTEUR DE LA TIGE
La hauteur de la tige du vibrato peut être réglée en tournant la vis du vibrato (B) à
l'aide d'une clé Allen de 3,0 mm.
(B)
ACCORDAGE FIN
Même après avoir fixé les écrous de blocage, vous pouvez procéder à un accordage fin
(G)
pour chaque corde. Il est recommandé de régler toutes les commandes d'accordage fin
(C) en position médiane avant de serrer l'écrou de blocage.
RÉGLAGE DE LA HAUTEUR
Pour régler l'unité du vibrato vers le haut ou vers le bas, tournez les vis situées de
part et d'autre de l'unité de vibrato (E) à l'aide d'une clé Allen. (Ce réglage ne peut
(F)
(E)
pas être fait individuellement pour chaque corde.)
RÉGLAGE DE L'INTONATION
(D)
Desserrez la vis de serrage (D) de l'écrou de blocage, puis détendez la corde à régler.
Desserrez les vis de serrage de pontet (F) se trouvant sur le pontet à régler, puis
déplacez le pontet vers l'avant ou l'arrière. Serrez la vis de serrage du pontet (F) et
accordez la corde. Après avoir vérifié une nouvelle fois l'intonation, serrez la vis de
serrage (D).
*La plaque de support est équipée de deux trous destinés à accueillir les vis de serrage de pontet. Elles
permettent à l'utilisateur de changer de calibre de cordes tout en autorisant un déplacement maximal
du pontet. Si l'intonation ne peut être réglée parce que le pontet doit être reculé, retirez la vis d'intonation et insérez-la dans le trou situé
plus en arrière sur la plaque du chevalet.
REMPLACEMENT DES CORDES
Avec un vibrato EDGE III, remplacez les cordes une à une. Le fait d'enlever toutes les
cordes usagées simultanément diminuera la tension exercée sur le vibrato et
modifiera l'angle de tirage du vibrato. Desserrez la vis de serrage (D) de l'écrou de
blocage, puis détendez la corde à remplacer. Desserrez la vis d'arrêt de la corde (G)
et retirez la corde du pontet. Coupez l'extrémité à boule de la corde neuve, comme
indiqué sur l'illustration, puis insérez l'extrémité ainsi coupée entre le pontet et le
bloque-corde. Serrez la vis d'arrêt de la corde (G) et accordez la corde. Après avoir
vérifié l'intonation, serrez la vis de serrage (D) de l'écrou de blocage.
(C)
EDGE III RÉGLAGE DU RESSORT DE VIBRATO
Les ressorts de vibrato règlent l'angle du vibrato en augmentant ou réduisant la
tension exercée sur le vibrato. Pour régler l'angle du vibrato, repérez les vis de
réglage qui se trouvent à l'arrière de la cavité du vibrato. Lorsque l'instrument est
accordé, le système de vibrato doit être parallèle à la surface de la guitare, comme
sur l'illustration.
Si le système de vibrato n'est pas parallèle à la surface de la guitare, enlevez la plaque de protection de la cavité du
44
vibrato et serrez les vis de réglage de la tension du vibrato si celui-ci est lâche.
Desserrez les vis si le vibrato est trop tiré. Réaccordez les cordes à la hauteur
souhaitée et vérifiez l'angle. Déterminez le nombre de ressorts de vibrato et leur
position en fonction du calibre des cordes et de l'angle du vibrato.
Page 46

VIBRATO ZR (ZERO RESISTANCE)
TIGE DE VIBRATO
Desserrez le bouchon fileté,
introduisez la tige dans l'unité de
vibrato et installez-la par un
mouvement de rotation (Fig. 8).
Faites-la pivoter pour obtenir la
hauteur désirée. La torsion de la tige
est ajustée par le serrage du bouchon
fileté. Pour retirer la tige, desserrez le
bouchon fileté et tournez la tige dans
le sens contraire des aiguilles d'une montre (Fig. 9).
ACCORDAGE FIN
Même après avoir fixé les écrous de blocage, vous pouvez procéder à un
accordage fin (Fig. 10 A) pour chaque corde.
Il est recommandé de régler toutes les commandes d'accordage fin en
position médiane avant de serrer l'écrou de blocage.
Fig.8 Fig.9
C
B
A
RÉGLAGE DE LA HAUTEUR
Pour régler l'ensemble de l'unité du vibrato vers le haut ou vers le bas,
tournez les vis situées de part et d'autre de l'unité de vibrato à l'aide d'une
clé Allen (Fig. 10 B). (Ce réglage ne peut pas être fait individuellement pour
chaque corde.)
RÉGLAGE DE L'INTONATION
Desserrez le bloque-corde de l'écrou de blocage (Fig. 11). Retirez la vis
d'ajustement de l'intonation (Fig. 12 B) du chevalet, vissez-la dans le trou
fileté à l'arrière du pontet et serrez-le de sorte que le bout de la vis soit en
contact avec la nervure du chevalet. Desserrez la vis de verrouillage du
pontet (Fig. 10 C) et tournez la vis d'ajustement d'intonation pour ajuster
la position du pontet. Une fois le réglage terminé, serrez la vis de serrage
du pontet suffisamment afin d'empêcher le déplacement du pontet lors de
l'accordage, et placez la vis de réglage de l'intonation dans le chevalet.
REMPLACEMENT DES CORDES
Desserrez le bloque-corde de l'écrou de verrouillage (Fig. 11), dégagez la
corde de la mécanique d'accordage, puis à l'aide d'une clé Allen,
desserrez le bloque-corde du pontet de chevalet (Fig. 12 A) et retirez la
corde usagée.
Ensuite, à l'aide d'un cutter, sectionnez la nouvelle corde au niveau de la
boule située à son extrémité, comme indiqué sur la figure 13, insérez cette
extrémité de la corde dans le pontet de chevalet, fixez-la solidement, puis
attachez la corde à la mécanique d'accordage. Après l'accordage, vérifiez
l'angle du chevalet de vibrato, et serrez l'écrou de blocage de la corde
pour terminer la procédure.
Fig.10
FRANÇAIS
Fig.11
Fig.12
Fig.13
RÉGLAGE DU SYSTÈME ZERO POINT
Le système Zero Point facilite l'accordage du chevalet de vibrato flottant,
permet une plus grande stabilité de l'accordage après l'enclenchement et
limite le désaccordage survenant généralement lorsqu'une corde casse.
*Si le système Zero Point n'est pas réglé correctement, il ne fonctionnera pas
de façon optimale car il sera soit complètement flottant, soit en équilibre
avec la tension des cordes. Ce réglage doit être effectué avec précision.
Fig.14
45
Page 47

ZPS (ZERO POINT SYSTEM) OF ZR TREMOLO
Ressort principal
Bloc de vibrato
Butée
2
1
Tige d'arrêt
Une fois la guitare correctement accordée, réglez le ressort
principal pour faire en sorte que la tige d'arrêt soit en
contact avec le bloc de vibrato et la butée.
Si la tige d'arrêt n'est pas en contact avec le bloc de vibrato
et la butée, réglez la vis de réglage du ressort principal
jusqu'à ce que ces éléments soient en contact.
Une fois la guitare correctement accordée, la tige d'arrêt
doit être en contact avec le bloc de vibrato et la butée. Si le
réglage est bon, lorsque vous appuyez sur la tige, la tension
exercée doit être légèrement inférieure à celle exercée
lorsque vous tirez dessus. L'équilibre des forces est
d'environ 3:7 (avec ce réglage, la tige d'arrêt doit entrer en
contact avec le bloc de vibrato et la butée, même si le 1er
ressort est complètement desserré).
<Remarque>
En raison de la tension exercée sur le manche, lorsqu'une corde casse, il se peut que l'accordage des autres cordes soit légèrement plus
haut que la normale, tout en restant dans des limites acceptables.
MISE EN MODE DE FONCTIONNEMENT FLOTTANT
Si vous désactivez le système Zero Point, le vibrato devient complètement
flottant. Tout en maintenant la tige levée, retirez la tige d'arrêt et le ressort
inférieur.
Une fois la guitare correctement accordée, ajustez l'angle du chevalet de
vibrato à l'aide de la vis d'ajustement du ressort principal (Fig. 14 E). Si le
chevalet de vibrato est incliné en direction du manche, tournez la vis
d'ajustement du ressort dans le sens repéré par le symbole (+).
Inversement, si le chevalet de vibrato est incliné en direction de la caisse,
tournez la vis d'ajustement du ressort dans le sens repéré par le symbole (-).
*Au cours du processus de réglage de l'angle de l'unité de vibrato en position flottante, vous devrez souvent réaccorder
la guitare, car l'accordage est modifié chaque fois que vous ajustez la vis d'ajustement du ressort principal.
46
Encore une fois, si la tige d'arrêt n'est pas en contact avec le
bloc de vibrato et la butée, réglez la vis de réglage du ressort
principal jusqu'à ce que ces éléments soient en contact.
Page 48

Non Locking Tremolo
VIBRATO FAT/SAT
INSTALLATION DE LA TIGE DU VIBRATO
Il est très facile d'installer et de retirer la tige du vibrato. Introduisez la tige
dans le trou prévu à cet effet sur la plaque de support du vibrato. Tirez sur la
tige pour la retirer.
RÉGLAGE DE LA TIGE DU VIBRATO (SAT PRO)
Pour ajuster la hauteur de la tige, retirez la plaque de protection des ressorts du
vibrato, qui se trouve au dos de la guitare, et à l'aide d'une clé Allen de 3 mm,
tournez la vis d'ajustement de hauteur fixée à la base du bloc de vibrato.
Tournez la vis dans le sens des aiguilles d'une montre pour élever la tige de
vibrato.
FRICTION DE LA TIGE
La friction de la tige peut être réglée en levant le vibrato et en introduisant une
clé Allen de 1,5 mm dans la vis (A) qui se trouve sur le bloc de vibrato. Si cette
vis est tournée dans le sens des aiguilles d'une montre, la friction de la tige est
augmentée ; elle est réduite si la vis est tournée dans le sens contraire.
FRANÇAIS
(A)
RÉGLAGE DE LA HAUTEUR DES CORDES (SAT PRO)
Pour régler la hauteur de chaque corde, tournez la vis située sur le pontet (C) à
l'aide d'une clé Allen de 1,5 mm. La hauteur de l'ensemble des cordes peut être
réglée de chaque côté du chevalet de vibrato SAT PRO. Pour régler la hauteur,
utilisez une clé Allen de 3 mm et tournez les vis (D) situées de part et d'autre de
l'unité de vibrato. Le réglage de la hauteur du chevalet de vibrato doit être
effectué avec précaution. La hauteur de chaque côté doit être réglée de manière
identique afin d'assurer un fonctionnement optimal du vibrato.
RÉGLAGE DE LA HAUTEUR DES CORDES (FAT20/FAT10/SAT10)
La hauteur du vibrato peut être augmentée ou réduite en ajustant les vis (C) sur lesquelles le vibrato est monté.
Elles sont placées de chaque côté du chevalet, vers l'avant de la guitare. Le vibrato est abaissé lorsqu'elles sont
tournées dans le sens des aiguilles d'une montre et monté lorsqu'elles sont tournées dans le sens contraire.
(C) (C) (C)
FAT20 FAT10 SAT10
(C)
(D)
(E)
RÉGLAGE DE L'INTONATION (SAT PRO)
Pour régler l'intonation, utilisez une clé Allen de 1,5 mm et tournez la vis située
à l'arrière du pontet (E). Tournez la vis dans le sens des aiguilles d'une montre
pour déplacer le pontet vers l'arrière, ou dans le sens contraire pour le déplacer
vers l'avant.
(C)
(D)
(E)
SAT PRO
47
Page 49

RÉGLAGE DE L'INTONATION (FAT20)
Pour empêcher tout déplacement, chaque pontet dispose de sa propre vis de
blocage. Lors du réglage de l'intonation, desserrez la vis de serrage du pontet à
l'aide d'une clé Allen de 2 mm. (D) Pour régler l'intonation, introduisez une clé
Allen de 2,5 mm dans la vis du pontet qui se trouve à la base du vibrato. Le
pontet est déplacé vers l'arrière si vous tournez la clé dans le sens des
aiguilles d'une montre. Dans le sens inverse, le pontet est déplacé vers l'avant.
Une fois la position d'intonation du pontet correctement réglée, serrez la vis de
serrage du pontet afin d'empêcher tout déplacement. (E)
RÉGLAGE DE L'INTONATION (FAT10/SAT10)
L'intonation peut être réglée en déplaçant le
pontet vers l'avant ou vers l'arrière, en
utilisant un tournevis cruciforme (+) pour
ajuster la vis de réglage de l'intonation située
à l'arrière du chevalet.
RÉGLAGE DE L'INTONATION ET DE LA HAUTEUR DES CORDES (FAT 6)
L'intonation peut être réglée en déplaçant le pontet vers l'avant ou vers l'arrière,
en utilisant un tournevis cruciforme (+) pour ajuster la vis de réglage de
l'intonation située à l'arrière du chevalet. La hauteur des cordes peut être
ajustée en levant ou en abaissant à l'aide d'une clé les petites vis Allen situées
de part et d'autre de chaque pontet.
(D)
(E)
FAT20
SAT10FAT10
REMPLACEMENT DES CORDES
Pour remplacer les cordes, faites passer les cordes neuves à travers les trous
qui se trouvent au dos de la guitare. Les cordes sont alors guidées à travers le
bloc de vibrato pour ressortir par-dessus le pontet.
FAT/SAT (SAUF FAT6) RÉGLAGE DU RESSORT DE VIBRATO
Un vibrato standard peut être réglé de manière à ce que la hauteur augmente
lorsque la tige du vibrato est levée : les ressorts de vibrato qui se trouvent dans
la cavité au dos de la guitare sont ainsi détendus. Malheureusement, en cas de
rupture d'une corde, cette procédure risque d'augmenter la hauteur des cordes.
Pour remédier à cela, serrez les ressorts du vibrato afin d'ajuster la plaque de
manière à ce qu'elle soit parallèle au corps de l'instrument.
Déterminez le nombre de ressorts de vibrato et leur position en
fonction du calibre des cordes et du réglage du vibrato.
FLOTTEMENT EN PARALLÈLE
48
Page 50

VIBRATO ACT
REMPLACEMENT DES CORDES
Avec un vibrato ACT, vous pouvez installer les cordes de deux manières
différentes :
1) Installez les cordes en insérant l'extrémité comportant une boule dans
l'encoche prévue à cet effet et coincez la boule en dessous du crochet de
blocage de corde à l'arrière du chevalet.
2) Installez les cordes en insérant l'extrémité comportant une boule dans
l'encoche prévue à cet effet et coincez la boule dans le crochet de blocage
de corde situé sous le chevalet. Cette solution augmente la tension des
cordes et améliore la tenue de son.
INSTALLATION DE LA TIGE DU VIBRATO
Il est très facile d'installer et de retirer la tige du vibrato. Introduisez la tige dans le trou prévu à cet effet sur la
plaque de support du vibrato. Tirez sur la tige pour la retirer.
FORCE DE TORSION DE LA TIGE
La force de torsion de la tige peut être réglée en levant le vibrato et en introduisant une clé Allen de 2 mm dans la
vis (A) qui se trouve sur le bloc de vibrato. Si cette vis est tournée dans le sens des aiguilles d'une montre, la
force de torsion de la tige augmente ; elle diminue si la vis est tournée dans le sens contraire.
FRANÇAIS
RÉGLAGE DES RESSORTS DE VIBRATO
Le vibrato ACT est conçu de telle sorte que ses
performances sont optimales lorsqu'il est installé
plus ou moins parallèlement à la table de la guitare.
L'angle d'attache du vibrato peut être ajusté en
modifiant la longueur des ressorts de vibrato qui se
trouvent sous le chevalet de vibrato. Utilisez un
tournevis cruciforme pour tourner les vis
d'ajustement de la tension du vibrato afin d'ajuster
la longueur des ressorts de vibrato (B). Si le vibrato est incliné vers l'avant, vers le manche de la guitare, tournez
les vis dans le sens des aiguilles d'une montre pour resserrer les ressorts. À l'inverse, si le vibrato est incliné vers
l'arrière, tournez les vis dans le sens inverse des aiguilles d'une montre pour détendre les ressorts. Accordez la
guitare correctement, vérifiez à nouveau l'angle du vibrato puis renouvelez les opérations d'ajustement jusqu'à ce
que l'angle du vibrato soit correct.
RÉGLAGE DE LA HAUTEUR
Pour régler le chevalet de vibrato vers le haut ou vers le bas, tournez les vis (C) situées de part et d'autre du
chevalet de vibrato à l'aide d'une clé Allen de 3 mm. (Ce réglage ne peut pas être fait individuellement pour
chaque corde.)
RÉGLAGE DE L'INTONATION
Desserrez les vis de blocage de chaque pontet (D) à
l'aide d'une clé Allen de 2 mm, puis déplacez le
pontet. Serrez fermement les vis de blocage,
accordez la guitare et vérifiez l'intonation.
Renouvelez ces opérations jusqu'à obtenir une
intonation correcte.
(B)
(A)
(D)
(C)
49
Page 51

Mantenimiento
Gracias y enhorabuena por adquirir un instrumento Ibanez. La norma de Ibanez es la
máxima calidad. Todos los instrumentos Ibanez pasan por nuestros más estrictos
controles de calidad antes de ser entregados. La finalidad de este manual es explicar los
procedimientos destinados a conservar el acabado de su instrumento y mantener este en
el mismo estado de funcionamiento óptimo que presentaba al salir de fábrica.
LIMPIEZA
Una limpieza habitual de su guitarra es una de las maneras
más importantes de conservar el acabado y prolongar la
duración de las cuerdas. Después de usar el instrumento,
límpielo con un paño para eliminar todo resto de transpiración.
De hecho, la transpiración puede contener ácidos que pueden
resultar corrosivos para las cuerdas y piezas metálicas de la
guitarra. Las guitarras con acabado de barniz deben lustrarse
con un pulimento especial para instrumentos musicales y con
un paño suave especial para guitarras o un paño de algodón.
Los paños abrasivos como los de poliéster pueden dañar el
acabado. Las guitarras con acabado en aceite deben limpiarse de inmediato después de utilizarlas y únicamente
con un paño de algodón seco. Si su guitarra ha perdido el color debido al uso prolongado o a una fuerte
transpiración, consulte con un profesional cualificado en reparación de guitarras sobre los métodos para
restablecer el acabado de aceite según el aspecto original de fábrica.
CUERDAS Y CLAVIJEROS
Si las cuerdas se ensucian, se decoloran o producen un sonido apagado o un zumbido,
sustitúyalas por unas nuevas. Para lograr un resultado óptimo, recomendamos cambiar las
cuerdas de una en una a fin de mantener la tensión necesaria en el mástil. Cuando sustituya
cuerdas de espesores diferentes, puede ser necesario ajustar la tensión del alma del mástil.
(Se recomienda confiar esta operación únicamente a técnicos cualificados). En los
instrumentos provistos de un sistema de trémolo es posible que sea necesario efectuar un
ajuste después de cambiar las cuerdas, ya que las variaciones de tensión de las cuerdas
pueden provocar la subida o bajada del trémolo. Las guitarras y bajos Ibanez vienen equipados
de fábrica con cuerdas de los espesores siguientes. Observe las instrucciones siguientes para
su modelo concreto.
Las cuerdas se deben enrollar bien apretadas, con 2 ó 3 vueltas de arriba
abajo alrededor de la clavija. En el caso de cuerdas de guitarra no
enrolladas, los extremos de las mismas deben prepararse como se indica en
el diagrama para evitar que se salgan accidentalmente de las clavijas. En el
caso de clavijeros en que los extremos de las cuerdas se insertan en las
clavijas, puede cortarse previamente la cuerda a la longitud adecuada
utilizando unos alicates.
Si el clavijero tiene los engranajes sellados, dichos engranajes se autolubrican. Los tornillos de fijación de las
palomillas de las clavijas se pueden apretar con un destornillador Phillips pequeño para aumentar la tensión.
*
El uso de cuerdas ásperas puede originar zumbidos y distorsión del sonido. El uso de cuerdas que tengan torceduras o pliegues puede provocar
zumbido o el acortamiento de los sostenidos. Compruebe que las nuevas cuerdas sean lisas y carezcan de defectos antes de instalarlas.
ESPESORES DE CUERDAS
Guitarras de cuerpo sólido con trémolo, NDM2, JTK y ALL Gio
RG321MH, SZ, AXS, AR, ARC, ARX, AD ,VBI y IC
Modelo de 7 cuerdas
MMM1
NTM1
MTM2
Guitarras ARTCORE
Bajos ARTCORE
.009/.011/.016/.024/.032/.042 pulgadas
.010/.013/.017/.026/.036/.046 pulgadas
.010/.013/.017/.026/.036/.046/.054 pulgadas
.014/.017/.030/.040/.056/.074 pulgadas
.011/.014/.018/.028/.038/.049 pulgadas
.011/.015/.018/.028/.038/.054 pulgadas
.010/.013/.017/.030/.042/.052 pulgadas
.050/.070/.085/.105 pulgadas
50
3
2
APRETAR
1
AFLOJAR
Page 52

MÁSTIL
Los mástiles de los modelos Ibanez con cuerdas de acero están
provistos de un alma ajustable. La finalidad del alma es ajustar el
mástil para contrarrestar la tensión de las cuerdas.
AFLOJAR
APRETAR
Existen numerosas razones para ajustar el alma. Una de las
razones más comunes es el cambio del espesor de las cuerdas o
la modificación del tono de afinación; en ambos casos se altera la
tensión de las cuerdas. Los cambios de tensión pueden alterar la
altura de las cuerdas y provocar trasteos o inexactitud de las
notas. Para ajustar el alma localice la tuerca, introduzca en ella la
llave correcta y apriétela (hacia la derecha) o aflójela (hacia la
izquierda). La tensión del alma puede medirse colocando una cejilla en el primer traste y
manteniendo pulsadas las cuerdas en el traste donde se unen el mástil y el cuerpo de la
guitarra. Inserte una galga de espesores entre la cuerda y el 8º traste. Debe haber una
holgura de 0,3 mm a 0,5 mm. A dicha holgura se la denomina "incidencia del mástil".
Si la incidencia es excesiva, la altura de las cuerdas será mayor en el centro del mástil;
la octavación resultará deficiente y la comodidad de ejecución se reducirá. La ausencia
de incidencia del mástil puede provocar trasteo.
*El ajuste del mástil requiere un cuidado especial y recomendamos que este procedimiento lo realicen
únicamente técnicos cualificados.
AFLOJAR
APRETAR
0,3~0,5mm
8º TRASTE
AFLOJAR
AFLOJAR
APRETAR
APRETAR
ALTURA DE LAS CUERDAS
La altura de las cuerdas de las guitarras y los bajos Ibanez se ajusta en fábrica. No
obstante, la altura de las cuerdas de un instrumento puede alterarse por diferentes
motivos. Los instrumentos pueden verse afectados por las variaciones de temperatura y
humedad. Con una altura de cuerdas excesiva, el instrumento puede resultar difícil de
tocar. Si la altura de las cuerdas es demasiado escasa, puede producirse trasteo o notas
poco claras. Para remediarlo, observe las instrucciones específicas del tipo de puente que
tenga instalado. Si ajusta la altura de las cuerdas, verifique que la guitarra esté afinada y
el alma correctamente ajustada. La altura de cuerdas de los instrumentos Ibanez se
establece en el traste 14. Es posible que deba reajustar la altura después de ajustar el
mástil o de cambiar las cuerdas por otras de espesor diferente. Siga las instrucciones
contenidas en el manual del puente correspondiente para efectuar los ajustes.
*Si utiliza cuerdas distintas a las mencionadas anteriormente, aumente gradualmente la altura de las cuerdas
desde los agudos hasta los graves.
Guitarras con cuerdas de .009 excepto Gio Ibanez
Todas las Gio Ibanez y las guitarras con cuerdas .010-.014
Guitarras ARTCORE
Bajos ARTCORE
AGUDOS GRAVES
1,5mm
1,7mm
1,7mm
2,0mm
2,0mm
2,3mm
2,3mm
2,5mm
OCTAVACIÓN
La octavación es la operación de ajustar de la posición de la cuerda en la
silleta para compensar diferentes espesores de cuerdas o diferentes
afinaciones.
Observe las instrucciones siguientes para la octavación de cada tipo de
puente. La octavación es correcta cuando la nota pulsada en el 12º traste
y el armónico del mismo 12º traste son exactamente la misma nota.
Es el punto central de la escala y este método es la forma más precisa
de ajustar la longitud estándar de la escala. Usando la nota armónica
como referencia, si la nota pulsada en el traste es más baja, desplace la silleta del puente hacia delante, es decir
hacia la cejilla (a), para reducir la longitud de la cuerda. Si la nota pulsada en el traste es más alta, desplace la
silleta hacia atrás, es decir alejándola de la cejilla (b) para incrementar la longitud de la cuerda.
*Tenga en cuenta que las cuerdas pueden romperse al mover la silleta; afloje siempre las cuerdas antes de realizar los ajustes.
ESPAÑOL
51
Page 53

A continuación se indica la posición estándar del puente en las guitarras AF, AFS y AG.
Ajuste la posición para obtener la octavación adecuada.
AGAF, AFS, AK
PASTILLAS
La altura de las pastillas puede afectar al
volumen de salida del instrumento, así
como a la calidad de la señal.
Se debe ajustar la altura hasta que el
volumen de la pastilla del mástil y el
volumen de la pastilla del puente sean casi
iguales, con ambos volúmenes al máximo.
El volumen puede reducirse drásticamente
si la altura de las pastillas es demasiado
escasa. Dado que las pastillas son
magnéticas, si están demasiado cerca de las cuerdas puede producirse trasteo y distorsión. Utilice un
destornillador pequeño para ajustar la altura de las pastillas.
*Los instrumentos provistos de polos regulables se pueden ajustar para balancear el volumen de cada cuerda.
Puentes de guitarra
PUENTE A MEDIDA GIBRALTAR
La altura puede ajustarse mediante 4 tornillos Allen de 2,0 mm (B) en el puente. Los
tornillos de ajuste se bloquean con el tornillo de bloqueo del puente (A); por tanto, antes
de proceder al ajuste se debe aflojar el tornillo de bloqueo del puente con la llave Allen
de 3,0 mm.
Asimismo, cada silleta se bloquea mediante un tornillo de bloqueo (C). Para octavar la
guitarra, afloje los tornillos de bloqueo de la silleta con una llave Allen de 2,0 mm y a
continuación ajuste el tornillo de octavación (D) con una llave Allen de 2,0 mm. Cuando
haya terminado el ajuste, bloquee la silleta y afine la guitarra.
GIBRALTAR III (GUITARRA Y BAJO),
CB3 Y FULL TUNE III, ART1, ART2
La altura se puede ajustar girando el tornillo
de ajuste en cualquiera de los extremos (A)
con un destornillador plano (A).
La octavación puede efectuarse girando el
tornillo de ajuste de cada silleta (B) con un
destornillador para desplazar la silleta
adelante o atrás.
(A)
(B)
GIBRALTAR III, CB3
A
(B)
FULL TUNE II,
ART, ART2
B
C
D
(A)
52
SUSTITUCIÓN DE LAS CUERDAS: CB3
Instale las cuerdas introduciéndolas desde la parte delantera del puente.
Page 54

PUENTE HARDTAIL
Para cambiar las cuerdas, pase las nuevas cuerdas por los ojales
correspondientes situados en la parte posterior de la guitarra y llévelas
por encima de la silleta.
Puede ajustar la octavación girando el tornillo de octavación situado en la
parte posterior del puente con un destornillador Phillips para desplazar la
silleta adelante o atrás. La altura de la cuerda se regula subiendo o
bajando los pequeños tornillos Allen mediante una llave en cualquiera de
los lados de la silleta.
PUENTE ARQUEADO AJUSTABLE
La altura de cuerdas en un puente arqueado se puede ajustar girando los
tornillos moleteados situados a cada lado del puente. En el sentido de las
agujas del reloj se reduce la altura; en el sentido contrario al de las
agujas del reloj se aumenta la altura.
Dado que el puente no está fijado al cuerpo, la octavación se puede
ajustar aflojando las cuerdas y desplazando el puente hacia adelante o
atrás.
Vibrato Vintage
Para obtener resultados óptimos recomendamos cambiar las cuerdas una
a una. De este modo no se suprimirá la tensión de las cuerdas en el
mástil y se mantendrá la tensión en el vibrato.
Para cambiar las cuerdas de la VBS80, pase la cuerda nueva por debajo
de la barra de retenida delantera del cordal (A). La VBF70 no tiene barra
de retenida delantera.
El extremo con bola de la cuerda se debe pasar por encima y alrededor
de la barra de retenida trasera del cordal (B).
El orificio de la bola del extremo de la cuerda se introduce en el pasador
de la barra de retenida trasera del cordal y se debe tirar de la cuerda
hacia el clavijero. Si se afloja la tensión de la cuerda en el cordal la bola
puede salirse del pasador. Para solventar este problema se puede
mantener la tensión de la cuerda tirando de ella hacia el clavijero.
Lleve la cuerda al clavijero y, mientras mantiene la tensión, enróllela en la
clavija. Compruebe que la cuerda repose sobre la silleta correcta en el
puente. Cuando esté tensada, afine la cuerda. Repita la operación con el
resto de las cuerdas.
(A)
(B)
ESPAÑOL
VBS80
(B)
VBS70
53
Page 55

Tailpieces
CORDALES QUICK CHANGE
La altura del cordal QUICK CHANGE III se puede ajustar girando los
tornillos de ajuste en cualquiera de los lados del cordal (C) con un
destornillador plano o una moneda.
QUICK CHANGE ULTRA / AFINACIÓN DE PRECISIÓN
El cordal QUICK CHANGE ULTRA dispone de afinadores de precisión
(FINE TUNER).
Incluso después de utilizar el afinador normal, puede efectuar un
ajuste fino y rápido con los afinadores de precisión (E).
(E)
QUIK CHANGE ULTRA
QUIK CHANGE MINI QUIK CHANGE CLASSIC
DOWNSHIFTER (REDUCTOR DE TONO)
(C)
QUICK CHANGE III
INSTALACIÓN DE LA CUERDA
Para instalar una cuerda nueva, introduzca el extremo con bola de la cuerda nueva en
la ranura y coloque la bola en la parte del gancho interno de la silleta, como se
muestra. Tire de la cuerda para tensarla bien en la silleta e instale el otro extremo de la
cuerda del modo habitual en el clavijero.
3
2
1
AFINACIÓN ESPECIAL
El Downshifter permite asimismo elevar el tono ajustando la afinación normal
mientras la palanca se encuentra en la posición baja. Al levantar la palanca, el tono
se eleva y se puede ajustar según se desee.
El DOWNSHIFTER Ibanez permite bajar el tono de una cuerda a una posición predeterminada con solo accionar
una palanca. Para obtener una afinación precisa tanto en posición alta como en posición baja, deberá preajustar
las dos posiciones de la palanca antes de utilizar el reductor de tono.
AFINACIÓN
En primer lugar compruebe que el brazo de la palanca del Downshifter se encuentre
en posición alta; seguidamente afine la cuerda del modo habitual con las clavijas
del clavijero.
(Nota: el tornillo de afinación del Downshifter no afecta al tono cuando la palanca se
encuentra en posición alta.) A continuación baje la palanca del Downshifter: el tono
de la cuerda desciende. Gire el tornillo de afinación posterior hacia la derecha para
bajar el tono o hacia la izquierda para subirlo. Este ajuste se puede efectuar a mano,
con un destornillador normal o con una moneda, hasta obtener el tono reducido que
se desee. (El tono se preajusta en fábrica una nota completa más abajo hasta D.)
Cuando la palanca se sitúa en posición alta, el tornillo manual se puede girar
libremente pero ello no afecta al tono con la palanca subida. No obstante, sí afecta
al tono con la palanca bajada.
NOTA: El dispositivo Downshifter se ha diseñado para proporcionar un nivel máximo
de precisión. No obstante, hay que tener en cuenta que se trata de un dispositivo
mecánico. Cabe prever, por tanto, variaciones de tono y reajustes de afinación,
especialmente después de un uso frecuente.
54
Page 56

Locking Bridge
FX EDGE, FX EDGE III -FIXED BRIDGE
El puente Ibanez FX-Edge Bridge es un puente fijo, de doble bloqueo,
basado en el popular trémolo Ibanez Lo-Pro Edge. Lea las
instrucciones siguientes relativas al uso y ajuste correcto del puente.
SISTEMA DE TRES TORNILLOS
El puente FX-Edge se sujeta mediante tres tornillos: dos principales y
uno posterior, de menor tamaño. El tornillo posterior ayuda a
inmovilizar el puente y transmite vibraciones adicionales de las
cuerdas a través cuerpo del instrumento.
AJUSTE DE LA ALTURA DE LAS CUERDAS
La altura de las cuerdas se puede ajustar subiendo o bajando los tres
tornillos. Después de ajustar la altura de los dos tornillos principales
se debe compensar el posterior con la llave Allen de 3 mm a fin de
mantener el ángulo del puente correctamente alineado. (El puente debe
quedar paralelo al cuerpo del instrumento).
TORNILLO
PRINCIPAL
TORNILLO PRINCIPAL
TORNILLO
POSTERIOR
PARALELO
NOTA
*Aunque la altura de las cuerdas de la guitarra se puede aumentar o reducir hasta 0,3-0,5 mm girando los tornillo, se recomienda efectuar
los ajustes en incrementos menores.
*La altura de las cuerdas puede variar después del ajuste final del tornillo posterior. Se recomienda comprobar la altura final de las cuerdas
después de ajustar el tornillo posterior.
Locking Tremolos
TRÉMOLO EDGE III
INSTALACIÓN DE LA PALANCA DEL TRÉMOLO
La palanca del trémolo se puede poner y quitar muy fácilmente . Introduzca la
palanca en el orificio de la placa base del trémolo. Tire hacia arriba de la palanca
para extraerla.
FRICCIÓN DE GIRO DE LA PALANCA
La fricción de giro de la palanca puede ajustarse levantando el trémolo e
introduciendo una llave Allen de 1,5 mm en el tornillo (A) del bloque. Si gira este
tornillo hacia la derecha aumenta la fricción de la palanca y si lo gira hacia la
izquierda, disminuye.
(A)
ESPAÑOL
55
Page 57

ALTURA DE LA PALANCA
La altura de la palanca de trémolo se puede ajustar girando con una llave Allen de
3,0 mm el tornillo (B) del trémolo.
(B)
AFINACIÓN DE PRECISIÓN
Incluso después de cerrar la tuerca de bloqueo, puede utilizar los tornillos de ajuste fino
para realizar los ajustes finos en cada cuerda. Debe ajustar todos los afinadores de
precisión (C) en el centro del margen de ajuste antes de apretar la tuerca de bloqueo.
AJUSTE DE LA ALTURA
Para ajustar la altura del conjunto de trémolo, gire con una llave Allen los tornillos (E)
situados a la izquierda y a la derecha del trémolo. (El ajuste no se puede realizar para
cada cuerda de forma individual.)
OCTAVACIÓN
Afloje el tornillo de la almohadilla de presión (D) en la tuerca de bloqueo y afloje la
cuerda que va a ajustar. Afloje los tornillos de bloqueo de la silleta (F) que va a
ajustar y desplace la silleta adelante o atrás. Apriete el tornillo de bloqueo de la
silleta (F) y afine la cuerda. Después de comprobar nuevamente la octavación, apriete
el tornillo de la almohadilla de presión (D).
*En la placa base hay dos orificios para cada tornillo de bloqueo de la silleta. Estos tornillos permiten al
usuario cambiar el espesor de las cuerdas sin dejar de disponer del movimiento máximo de la silleta. Si
no puede ajustar la octavación porque la silleta debe desplazarse más atrás, extraiga el tornillo de
octavación e introdúzcalo en el orificio situado más atrás en la placa del puente.
SUSTITUCIÓN DE LAS CUERDAS
En el caso del trémolo EDGE III, las cuerdas se deben cambiar una por una. Si extrae
todas las cuerdas a la vez, se liberará la tensión del trémolo y el ángulo de este
cambiará "tirando hacia arriba". Afloje el tornillo de la almohadilla de presión (D) en
la tuerca de bloqueo y suelte la cuerda que va a cambiar. Afloje el tornillo de tope de
cuerda (G) y extraiga la cuerda de la silleta. Corte el extremo de bola de la cuerda
nueva como se muestra en la ilustración e introduzca la parte cortada de la cuerda
entre la silleta y el bloque de sujeción de la cuerda. Apriete el tornillo de tope (G) y
afine la cuerda. Después de comprobar la octavación, apriete el tornillo de la
almohadilla de presión (D) en la tuerca de bloqueo.
(F)
(G)
(C)
(E)
(D)
EDGE III AJUSTE DE LOS MUELLES DEL TRÉMOLO
Los muelles regulan el ángulo del trémolo al incrementar o reducir la tensión. Para
ajustar el ángulo, localice los tornillos de ajuste situados en la cavidad de la parte
posterior del tremolo. El trémolo, cuando la afinación es correcta, debe quedar
paralelo a la superficie de la guitarra, como se muestra.
Si el trémolo no se encuentra paralelo a la superficie de la guitarra, retire la tapa de
56
la cavidad y apriete los tornillos de ajuste de la tensión si la inclinación es
hacia delante. Afloje los tornillos si el trémolo tira hacia arriba. Vuelva a afinar
las cuerdas en el tono correcto y compruebe el ángulo. Seleccione el número y
ubicación de los muelles del trémolo según el espesor de la cuerda y el ángulo
del trémolo.
Page 58

TRÉMOLO ZR (RESISTENCIA CERO)
PALANCA DEL TRÉMOLO
Afloje la tapa roscada, introduzca la
palanca en el dispositivo de trémolo y
gírela para fijarla (Fig. 8). Gire la
palanca para ajustarla a la altura
deseada. La fricción de la palanca se
ajusta mediante el apriete de la tapa
roscada. Para extraer la palanca,
afloje la tapa roscada y gire la
palanca en el sentido contrario al de
las agujas del reloj (Fig. 9).
AFINACIÓN DE PRECISIÓN
Incluso después de apretar la tuerca de bloqueo, puede utilizar los
afinadores de precisión (Fig. 10A) para realizar ajustes finos en la
afinación de cada cuerda.
Debe ajustar todos los afinadores de precisión en el centro de su margen
de ajuste antes de apretar la tuerca de bloqueo.
AJUSTE DE LA ALTURA DE LAS CUERDAS
Para ajustar la altura del conjunto de trémolo, gire con una llave Allen los
tornillos (Fig. 10B) situados a la izquierda y a la derecha del trémolo.
(El ajuste no se puede realizar para cada cuerda de forma individual.)
Fig.8 Fig.9
Fig.10
C
B
A
OCTAVACIÓN
Afloje el tornillo de tope de cuerda de la tuerca de bloqueo (Fig. 11).
Extraiga el tornillo de octavación (Fig. 12B) del puente, sitúelo en el orificio
del tornillo de la parte trasera de la silleta y apriételo de forma que la
punta toque el saliente del puente. Afloje el tornillo de bloqueo de la silleta
(Fig. 10C) y gire el tornillo de octavación para ajustar la posición de la
silleta. Una vez efectuado el ajuste, apriete el tornillo de bloqueo de la
silleta lo suficiente como para impedir que la silleta se desplace adelante
durante la afinación y guarde el tornillo de octavación en el interior del
puente.
SUSTITUCIÓN DE LAS CUERDAS
Afloje el tornillo de tope de cuerda de la tuerca de bloqueo (Fig. 11), afloje
completamente la cuerda en la clavija, afloje el tornillo de tope de cuerda
de la silleta del puente (Fig. 12A) con una llave Allen y extraiga la cuerda.
Utilice unas tenazas para extraer el extremo de bola de la cuerda nueva
como se muestra en la Figura 13, introduzca ese extremo de la cuerda en
la silleta del puente, ajústelo firmemente y después sujete la cuerda en el
clavijero. Después de efectuar la afinación, compruebe el ángulo del
trémolo y apriete el tornillo de tope de cuerda de la tuerca de bloqueo para
finalizar el proceso.
AJUSTE DEL SISTEMA ZERO POINT
El sistema Zero Point hace que resulte más sencillo afinar un trémolo
flotante, proporciona una mayor estabilidad tonal posterior al
accionamiento de la palanca y limita las variaciones de afinación que se
producen al romperse una cuerda.
*Si el sistema Zero Point no se ajusta en la posición correcta, no
funcionará de forma óptima ya que quedará totalmente flotante o bien el
sistema Zero Point y la tensión de las cuerdas estarán equilibrados. Debe
realizar este ajuste de forma precisa.
Fig.11
ESPAÑOL
Fig.12
Fig.13
Fig.14
57
Page 59

ZPS (ZERO POINT SYSTEM) OF ZR TREMOLO
Muelle principal
Bloque del trémolo
Tope
2
1
Varilla de tope
Con la guitarra afinada correctamente, ajuste el muelle
principal y verifique que la varilla de tope toque el bloque
del trémolo y el tope.
Si la varilla de tope no toca el bloque del tremolo y el tope,
gire el tornillo de ajuste del muelle principal hasta que lo
haga.
Con la guitarra afinada correctamente, la varilla de tope
debe tocar el bloque del tremolo y el tope. Si el ajuste es
correcto, la tensión al bajar la palanca será ligeramente
menor que al subirla. La proporción de las fuerzas es de
aproximadamente 3:7 (con esta configuración, la varilla de
tope debe tocar el bloque del trémolo y el tope incluso con
la primera cuerda completamente floja).
<Nota>
Cuando se rompa una cuerda, la afinación del resto de las cuerdas subirá ligeramente de tono debido a la tensión del mástil, pero dicha
variación permanecerá dentro de unos límites aceptables.
CAMBIO A FUNCIÓN FLOTANTE
Puede hacer que el trémolo quede totalmente flotante desactivando el
sistema Zero Point. Mientras sostiene la palanca arriba, extraiga la varilla
de tope y el muelle secundario. Con la guitarra afinada correctamente,
utilice el mando de ajuste del muelle principal (Fig. 14E) para ajustar el
ángulo del trémolo. Si el trémolo está inclinado hacia delante en dirección
al mástil, gire el mando de ajuste del muelle en el sentido más (+).
Inversamente, si el trémolo está inclinado hacia atrás en dirección contraria
al mástil, gire el mando de ajuste del muelle en el sentido menos (-).
*Durante el proceso de ajuste del ángulo del trémolo en estado flotante
deberá afinar repetidamente la guitarra, ya que esta se desafinará cada
vez que mueva el mando de ajuste del muelle principal.
58
De nuevo, si la varilla de tope no toca el bloque del tremolo y
el tope, gire el tornillo de ajuste del muelle principal hasta
que lo haga.
Page 60

Non Locking Tremolo
TRÉMOLO FAT/SAT
INSTALACIÓN DE LA PALANCA DEL TRÉMOLO
La palanca del trémolo se puede poner y quitar muy fácilmente. Introduzca la
palanca en el orificio de la placa base del trémolo. Tire hacia arriba de la
palanca para extraerla.
AJUSTE DE LA PALANCA DEL TRÉMOLO (SAT PRO)
Para ajustar la altura de la palanca, retire la tapa de los muelles del trémolo en
la parte posterior de la guitarra y, con una llave Allen de 3 mm, gire el tornillo de
ajuste de altura que se encuentra en la parte inferior del bloque del trémolo.
Al apretar dicho tornillo en el sentido de las agujas del reloj, la altura aumenta.
FRICCIÓN DE GIRO DE LA PALANCA
La fricción de giro de la palanca puede ajustarse levantando el trémolo e
introduciendo una llave Allen de 1,5 mm en el tornillo (A) del bloque. Si gira este
tornillo hacia la derecha aumenta la fricción de la palanca y si lo gira hacia la
izquierda, disminuye.
(A)
AJUSTE DE LA ALTURA DE LAS CUERDAS (SAT PRO)
Para ajustar la altura de cada cuerda, gire con una llave Allen de 1,5 mm el
(C)
(D)
tornillo correspondiente en la silleta (C). La altura general se puede ajustar en
los dos lados del trémolo SAT PRO. Para ajustar la altura, gire con una llave
Allen de 3 mm el tornillo (D) situado a cada lado. Tenga cuidado cuando ajuste
la altura del conjunto del trémolo; ajuste ambos lados a la misma altura a fin de
(E)
asegurar un funcionamiento óptimo del trémolo.
AJUSTE DE LA ALTURA DE LAS CUERDAS (FAT20/FAT10/SAT10)
La altura del trémolo se puede aumentar o reducir ajustando los pivotes (C) en los que va montado el trémolo.
Estos pivotes están situados a cada lado de la parte delantera del puente. Si los gira hacia la derecha la altura del
trémolo disminuye y si los gira hacia la izquierda aumenta.
(C)
FAT20
FAT10
(C)
(C)
SAT10
ESPAÑOL
OCTAVACIÓN (SAT PRO)
Para ajustar la octavación, gire el tornillo en la parte posterior de la silleta (E)
con una llave Allen de 1,5 mm. Gire el tornillo en el sentido de las agujas del
reloj para desplazar la silleta hacia atrás o en el sentido contrario al de las
agujas del reloj para desplazarla hacia adelante.
(C)
(D)
(E)
SAT PRO
59
Page 61

OCTAVACIÓN (FAT20)
Cada una de las silletas está provista de un tornillo de bloqueo para impedir
todo movimiento. Para ajustar la octavación, afloje el tornillo de bloqueo de la
silleta con una llave Allen de 2 mm. (D) Para ajustar la octavación, introduzca
una llave Allen de 2,5 mm en el tornillo de la silleta situado en la parte
posterior del trémolo. Si gira la llave a la derecha la silleta se desplaza hacia
atrás. Si la gira a la izquierda la silleta se desplaza hacia delante. Una vez haya
obtenido la octavación correcta con la posición de la silleta, apriete el tornillo
de bloqueo de esta para impedir todo movimiento. (E)
OCTAVACIÓN (FAT10/SAT10)
Puede ajustar la octavación girando el
tornillo situado en la parte posterior del
puente con un destornillador Phillips para
desplazar la silleta adelante o atrás.
FAT10 SAT10
OCTAVACIÓN Y ALTURA DE LAS CUERDAS (FAT 6)
Puede ajustar la octavación girando el tornillo situado en la parte posterior del
puente con un destornillador Phillips para desplazar la silleta adelante o atrás.
La altura de la cuerda se regula subiendo o bajando los pequeños tornillos Allen
mediante una llave en cualquiera de los lados de la silleta.
(D)
(E)
FAT20
SUSTITUCIÓN DE LAS CUERDAS
Pase las cuerdas nuevas por los orificios situados en la parte posterior de la
guitarra. A continuación las cuerdas deben pasarse por el bloque del trémolo y
llevarse hacia arriba por encima de la silleta.
FAT/SAT (excepto FAT6) AJUSTE DE LOS MUELLES DEL TRÉMOLO
Un trémolo estándar puede ajustarse de forma que el tono se eleve al subir la
palanca y aflojarse los muelles situados bajo la cavidad del trémolo en la parte
posterior de la guitarra. Una de las desventajas de este procedimiento es que
puede provocar que el tono se eleve en caso de que se rompa una cuerda.
Para remediarlo, apriete los muelles del trémolo de forma que la placa de este
quede nivelada con el cuerpo de la guitarra.
Seleccione el número y ubicación de los muelles del trémolo
según el espesor de las cuerdas y el ajuste del trémolo.
FLOTANTE PARALELO
60
Page 62

TRÉMOLO ACT
SUSTITUCIÓN DE LAS CUERDAS
Con el trémolo ACT las cuerdas se pueden instalar de dos maneras.
1) Se coloca el extremo con bola en la ranura y se engancha debajo de la
fijación situada en la parte posterior del trémolo.
2) Se coloca el extremo con bola en la ranura y se engancha en la fijación
situada en la parte inferior del trémolo. De este modo se incrementa la
tensión y se alargan los sostenidos.
INSTALACIÓN DE LA PALANCA DEL TRÉMOLO
La palanca del trémolo se puede poner y quitar muy fácilmente. Introduzca la palanca en el orificio de la placa
base del trémolo. Tire hacia arriba de la palanca para extraerla.
FRICCIÓN DE GIRO DE LA PALANCA
La fricción de la palanca se puede ajustar levantando el trémolo e introduciendo una llave Allen de 2 mm en el
tornillo (A) del bloque del trémolo. Al girar este tornillo en el sentido de las agujas del reloj aumenta la fricción en
la palanca y al girarlo en el sentido contrario al de las agujas del reloj disminuye la fricción.
AJUSTE DE LOS MUELLES DEL TRÉMOLO
El trémolo ACT está pensado para funcionar de
forma óptima cuando se instala aproximadamente
paralelo a la superficie del cuerpo de la guitarra.
Puede ajustar el ángulo de fijación del trémolo
modificando la longitud de los muelles situados
debajo del mismo. Con un destornillador Philips (+),
gire los tornillos de ajuste de la tensión del trémolo
para ajustar la longitud de los muelles (B). Si el
trémolo está inclinado hacia delante en dirección al mástil, gire los tornillos en el sentido de las agujas del reloj
para tensar los muelles. Inversamente, si el trémolo está inclinado hacia atrás en dirección contraria al mástil,
gire los tornillos en el sentido contrario al de las agujas del reloj aflojar los muelles. Afine la guitarra, vuelva a
comprobar el ángulo del trémolo y repita el ajuste hasta que el ángulo del trémolo sea el correcto.
AJUSTE DE LA ALTURA
Para ajustar la altura del trémolo, gire con una llave Allen de 3 mm el tornillo (C) situados a la izquierda y a la
derecha del trémolo. (El ajuste no se puede realizar para cada cuerda de forma individual.)
OCTAVACIÓN
Con una llave Allen de 2 mm, afloje los tornillos de
bloqueo (D) de cada silleta y desplace la silleta.
Apriete firmemente los tornillos de bloqueo de la
silleta, afine la guitarra y compruebe la octavación.
Repita estos ajustes hasta obtener la octavación
correcta.
(B)
(A)
(D)
(C)
ESPAÑOL
61
Page 63

Manutenzione
Congratulazioni e grazie di cuore per avere scelto uno strumento Ibanez. Gli standard
qualitativi Ibanez sono senza pari. Tutti gli strumenti Ibanez sono sottoposti a severi controlli
di qualità prima della spedizione. Questo manuale spiega come mantenere intatte la finitura e
la qualità sonora dello strumento, proprio come se fosse appena uscito dalla fabbrica.
PULIZIA
Una pulizia regolare della chitarra è molto importante per
preservare la finitura e allungare la durata delle corde. Dopo aver
suonato, passare un panno sullo strumento per rimuovere le
eventuali tracce di sudore. Il sudore può infatti contenere acidi
che possono essere corrosivi per le corde e per le parti in metallo
della chitarra. Le chitarre con finitura lucida vanno pulite con un
lucidante formulato in modo specifico per gli strumenti musicali
e con un apposito panno soffice per chitarra oppure con uno
straccio di cotone. Stracci abrasivi (come quelli in poliestere)
possono graffiare la finitura. Le chitarre con finitura ad olio vanno pulite subito dopo l'uso solo con uno straccio
di cotone. Se la chitarra si scolorisce dopo un lungo periodo di utilizzo o a causa della traspirazione intensa,
rivolgersi a personale qualificato addetto alle riparazioni di chitarre per informazioni sul metodo migliore per
ripristinare l'aspetto di fabbrica originale della finitura ad olio.
CORDE E MECCANICHE
Se le corde appaiono sporche, scolorite o emettono un suono sordo o un ronzio, sostituirle con
delle corde nuove. Per ottenere risultati migliori, consigliamo di sostituire una corda alla volta,
per evitare di scaricare tutta la tensione dal manico. Se le nuove corde hanno una scalatura
diversa, può essere necessario regolare la tensione del truss rod.
(Consigliamo di fare svolgere questa operazione solo a tecnici qualificati.) In seguito alla
sostituzione delle corde, potrebbe essere necessario regolare gli strumenti dotati di sistemi di
tremolo poiché la modifica della tensione delle corde potrebbe comportare il sollevamento o
l'abbassamento del tremolo. I bassi e le chitarre Ibanez sono equipaggiati in fabbrica con Le
corde delle seguenti scalature. Seguire le istruzioni seguenti per il proprio particolare modello.
Le corde vanno strette saldamente sulle meccaniche partendo da quella
superiore fino a quella inferiore, con 2 a 3 giri di corda attorno al perno della
meccanica. In caso si utilizzino corde della chitarra non rivestite, occorre
sistemarne le estremità seguendo il metodo illustrato nello schema
seguente in modo da prevenire lo spostamento indesiderato dai perni. Nel
caso di meccaniche in cui le estremità delle corde siano inserite nei perni, la
corda può essere preventivamente tagliata in base alla lunghezza
appropriata utilizzando un tronchesino.
Le meccaniche con ingranaggi ermetici sono già lubrificate. Le viti di regolazione per la manopola di regolazione
possono essere serrate con un cacciavite a testa Phillips per aumentare la tensione.
*L'uso di corde usurate può produrre ronzio e distorsione nel suono. L'uso di corde attorcigliate o torte può causare ronzii o un sustain
ridotto. Assicurarsi che le corde nuove siano di forma regolare e prive di difetti prima di montarle.
SCALATURE
Chitarre solidbody con tremolo, NDM2, JTK e TUTTE le Gio
RG321MH, SZ, AXS, AR, ARC, ARX, AD, VBI e IC
Modello a 7 corde
MMM1
NTM1
MTM2
Chitarre ARTCORE
Bassi ARTCORE
.009/.011/.016/.024/.032/.042 pollici
.010/.013/.017/.026/.036/.046 pollici
.010/.013/.017/.026/.036/.046/.054 pollici
.014/.017/.030/.040/.056/.074 pollici
.011/.014/.018/.028/.038/.049 pollici
.011/.015/.018/.028/.038/.054 pollici
.010/.013/.017/.030/.042/.052 pollici
.050/.070/.085/.105 pollici
3
SERRATO
2
1
ALLENTATO
62
Page 64

MANICO
Gli strumenti Ibanez che montano corde in acciaio sono dotati di
truss rod regolabili. Lo scopo di un truss rod è di regolare il manico
per compensare la tensione della corda.
ALLENTATO
SERRATO
Vi sono molte ragioni per regolare il truss rod. Una delle ragioni più
frequenti è il cambio delle scalature delle corde o l'altezza
dell'accordatura, che può influenzare la tensione della corda. Le
modifiche alla tensione possono influenzare l'altezza delle corde e
produrre di conseguenza ronzii nel tasto o distorsioni acustiche. Per
regolare il truss rod, individuare il relativo dado e regolarlo inserendo
la brugola adeguata sul dado e stringendo (in senso orario) o
allentando (in senso antiorario) il perno. La tensione del truss rod
può essere misurata installando un capotasto mobile all'altezza del primo tasto, premendo le
corde all'altezza del tasto dove il manico si congiunge al corpo. Inserire un misuratore di
spessore tra la corda e il tasto all'altezza dell'ottavo tasto. La distanza deve essere compresa
tra 0,3 mm e 0,5 mm. Questa distanza è detta "neck relief" (tolleranza del manico).
Una distanza eccessiva può comportare un aumento dell'action al centro del manico
incidendo negativamente sulla qualità dell'intonazione e sulla comodità di utilizzo dello
strumento. L'assenza completa di neck relief può provocare un ronzio del tasto.
*Va prestata una cura adeguata nella regolazione del manico; consigliamo di fare eseguire questa procedura
solo a tecnici qualificati.
ALLENTATO
SERRATO
0,3~0,5 mm
8° TASTO
ALLENTATO
SERRATO
LOOSEN
TIGHTEN
ACTION
L'action delle corde della chitarra e del basso Ibanez è impostata in fabbrica. Tuttavia, vi
sono molte ragioni per le quali l'altezza della corda dello strumento può cambiare. Gli
strumenti possono risentire di cambi di temperatura e di umidità. Un'action della corda
troppo alta può rendere difficile suonare la chitarra. Se l'action della corda è troppo bassa,
possono verificarsi ronzii del tasto o prodursi note poco chiare. Per porvi rimedio, seguire
le istruzioni per il tipo particolare di ponte installato. Nel controllo dell'action delle corde,
assicurarsi che il basso sia accordato e che il truss rod sia regolato in modo corretto.
L'action Ibanez è impostata sul 14° tasto. Potrebbe essere necessario sistemare di nuovo
l'action dopo la regolazione del manico o il montaggio di corde con una scalatura diversa.
Seguire le istruzioni nel relativo manuale del ponte per effettuare le regolazioni.
*Se si utilizzano corde diverse da quelle descritte in precedenza, aumentare gradualmente la distanza
dell'action partendo dal lato degli acuti fino ad arrivare a quello dei bassi.
Chitarre con corde da .009 (tranne le Gio Ibanez)
Tutte le Gio Ibanez e le chitarre con corde da .010-.014
Chitarre ARTCORE
Bassi ARTCORE
LATO ACUTI LATO BASSI
1,5mm
1,7mm
1,7mm
2,0mm
2,0mm
2,3mm
2,3mm
2,5mm
INTONAZIONE
La regolazione dell'intonazione consiste nel regolare la posizione della corda
sulla selletta in modo da compensare scalature o accordature diverse.
Seguire le istruzioni della particolare intonazione del ponte seguente.
L'intonazione è impostata adeguatamente quando la nota del 12°
tasto e l'armonico al 12° tasto sono identici.
Questo è il punto centrale della scala e il modo più accurato di
impostare una lunghezza standard della scala. Con la nota armonica
come standard, se la nota suonata è calante, spostare la selletta del
ponte in avanti verso la testa (a) per diminuire la lunghezza della corda. Se la nota è crescente, spostarla indietro
rispetto alla testa (b) per aumentare le regolazioni di intonazione della lunghezza della corda.
*Tenere presente che le corde rischiano di spezzarsi quando si sposta la selletta. Per questo motivo, allentare sempre le corde prima di
effettuare le regolazioni.
ITALIANO
63
Page 65

Di seguito viene indicata la posizione standard del ponte per le chitarre AF, AFS e AG.
Regolare la posizione per ottenere l'intonazione adatta.
AGAF, AFS, AK
PICKUP
Il livello generale del segnale in uscita
dello strumento, nonché la qualità del
segnale possono essere influenzati
dall'altezza del pickup.
L'altezza del pickup va regolata finché il
volume dei pickup del manico e del ponte
risultino quasi uguali con entrambi i
volumi completamente aperti. Il volume
potrebbe ridursi notevolmente se il pickup
è tropo distante dalle corde. Siccome i
pickup sono magnetici, possono verificarsi ronzii e distorsione del suono se il pickup è troppo vicino alle corde.
Usare un piccolo cacciavite per effettuare regolazioni e sollevare o abbassare il pickup.
*Gli strumenti che hanno poli regolabili possono essere regolati per bilanciare il segnale di uscita di ogni corda.
Ponti per chitarre
PONTE CUSTOM GIBRALTAR
È possibile regolare l’altezza utilizzando 4 brugole da 2,0 mm (B). Occorre allentare la
vite di fissaggio del ponte (A) che blocca le viti di regolazione con una chiave a brugola
da 3,0 mm prima di proseguire con l'operazione di regolazione.
Ciascuna selletta è altresì bloccata da una vite di fissaggio (C). Utilizzare una chiave a
brugola da 2,0 mm per regolare l'intonazione allentando le viti di fissaggio della selletta
e per regolare in seguito la vite di intonazione (D). Al termine della regolazione, bloccare
la selletta e accordare la chitarra.
GIBRALTAR III (CHITARRA E BASSO),
CB3, & FULL TUNE III, ART1, ART2
È possibile regolare l'action utilizzando un
cacciavite per viti a taglio (-) in modo da
ruotare la vite di regolazione di una delle
estremità (A).
L'intonazione può essere regolata
spostando la selletta in avanti o indietro
con un cacciavite in modo da ruotare la
vite di regolazione di ciascuna selletta (B).
(A)
(B)
GIBRALTAR III, CB3
A
(B)
FULL TUNE II,
ART1, ART2
B
C
D
(A)
64
SOSTITUZIONE DELLE CORDE: CB3
Per montare le corde, inserirle dalla parte anteriore del ponte.
Page 66

PONTE NON TREMOLO
Per cambiare le corde, infilare le corde nuove negli occhielli di guida sul
retro della chitarra e posizionarle in seguito sopra la selletta.
È possibile regolare l'intonazione spostando la selletta in avanti o indietro
utilizzando un cacciavite a testa Phillips (+) sulla vite di regolazione
dell'intonazione nella parte posteriore del ponte. È possibile controllare
l'altezza delle corde alzando o abbassando le piccole brugole posizionate
sui lati della selletta con una chiave apposita.
ARCH-TOP REGOLABILE
L'altezza della corda di un ponte arch top può essere regolata girando le
rondelle circolari poste su uno dei due lati del ponte. Girare in senso
orario per ridurre l'action della corda; girare in senso antiorario per
aumentarla.
Dato che il ponte non è fissato al corpo, l'intonazione può essere regolata
allentando le corde e spostando la posizione del ponte avanti o indietro.
Vibrato Vintage
Per ottenere un risultato migliore, consigliamo di sostituire una corda alla
volta. Ciò per evitare di rimuovere la tensione della corda dal manico e
per tenere la molla del vibrato in tensione.
Per sostituire le molle sul VBS80, infilare la nuova corda sotto alla barra
blocca corde anteriore (A). Sulla VBF70 non c'è barra blocca corde
anteriore.
L'estremità a sfera della corda va infilata al di sopra e attorno alla barra
blocca corde posteriore (B).
Il foro dell'estremità a sfera della corda va inserito nel perno ad ago della
barra blocca corde posteriore e la corda va tirata saldamente verso la
testa. Il rilascio della tensione della corda dalla cordiera può fare uscire
l'estremità a sfera dal perno ad ago. Se si tiene la corda in tensione
tirandola verso la testa si allevia il problema.
Infilare la corda nella meccanica e, mentre si tiene la corda in tensione,
attorcigliare la corda attorno al perno. Assicurarsi che la corda vada sulla
corrispondente selletta del ponte. Una volta tesa, accordare la corda all'altezza dovuta. Ripetere questa procedura
per le altre corde.
(A)
(B)
VBS80
(B)
VBS70
ITALIANO
65
Page 67

Tailpieces
CORDIERA QUIK CHANGE
È possibile regolare l'altezza della QUICK CHANGE III con un cacciavite
per viti a taglio (-) o una moneta in modo da ruotare i prigionieri di
regolazione sui lati della cordiera (C).
QUIK CHANGE ULTRA / FUNZIONE ACCORDATURA DI PRECISIONE
QUIK CHANGE ULTRA dispone di una funzione di ACCORDATURA DI
PRECISIONE.
Anche dopo avere accordato lo strumento utilizzando le meccaniche, è
possibile eseguire rapidamente un'ulteriore regolazione di precisione
grazie agli ACCORDATORI DI PRECISIONE (E).
(E)
QUIK CHANGE ULTRA
QUIK CHANGE MINI QUIK CHANGE CLASSIC
DOWNSHIFTER
(C)
QUIK CHANGE III
MONTAGGIO DELLE CORDE
Per montare una corda nuova, inserirne l'estremità a sfera nell'intaglio e posizionarla
nell'area del gancio interno della selletta come illustrato nella figura. Tirare la corda
sulla selletta e tendere la parte restante della corda avvolgendola sulla meccanica e
ruotando la meccanica come di consueto.
3
2
1
ACCORDATURA SPECIALE
Il downshifter consente inoltre di aumentare l'altezza impostando l'accordatura standard
mentre la leva si trova nella posizione più bassa. Il sollevamento della leva farà
aumentare l'altezza che può essere regolata sulla posizione desiderata.
Il DOWNSHIFTER Ibanez consente di abbassare l'altezza di una corda su una posizione preimpostata mediante il
semplice azionamento di una leva. Per raggiungere un'accordatura precisa sia per le posizioni alte che per quelle basse,
occorre preimpostare le due impostazioni della leva prima di azionare il downshifter.
ACCORDATURA
Innanzitutto, verificare che il braccio della leva del downshifter si trovi nella
posizione alta, quindi procedere alla normale accordatura della corda utilizzando le
meccaniche standard sulla testa.
(Nota: la vite di accordatura del downshifter non ha effetto sull'altezza in posizione
alta.) In seguito, abbassare la leva del downshifter sulla posizione bassa per ridurre
l'altezza della corda. Ruotare la vite di accordatura posteriore in senso orario per
ridurre l'altezza oppure in senso antiorario per aumentarla. È possibile eseguire la
regolazione manualmente oppure utilizzando un cacciavite standard o una moneta
finché la nota non viene abbassata all'altezza desiderata. (L'altezza di fabbrica è
preimpostata per l'abbassamento di un tono completo, cioè sul Re) Quando la leva
viene sollevata in posizione alta, la vite a testa zigrinata potrà essere ruotata
liberamente, ma non avrà alcun effetto sull'altezza della leva sollevata. Tuttavia,
inciderà sulle impostazioni dell'altezza della leva bassa.
NOTA: il dispositivo downshifter è stato ideato per fornire un livello di precisione
dell'altezza ottimale. Tuttavia, occorre ricordare che si tratta di un dispositivo
meccanico e che, di conseguenza, è soggetto a variazioni che comportano
regolazioni successive dell'accordatura, soprattutto dopo un uso frequente.
66
Page 68

Locking Bridge
FX EDGE, FX EDGE III -FIXED BRIDGE
Il ponte FX-Edge Ibanez è un ponte fisso a doppio bloccaggio, che si
basa sul diffusissimo Tremolo Lo-Pro Edge Ibanez. Leggere le istruzioni
seguenti sull'utilizzo e sulla giusta regolazione del ponte.
SISTEMA A TRE PERNI
Tre perni sostengono il ponte FX-Edge; due perni principali e uno più
piccolo, il perno posteriore. Quello posteriore aiuta a bloccare il ponte
in posizione e trasmette anche vibrazioni addizionali della corda
attraverso il corpo.
REGOLAZIONE DELL'ALTEZZA DELLA CORDA
L'altezza della corda può essere regolata alzando o abbassando tutti e
tre i perni. Dopo aver regolato l'altezza dei due perni principali, quello
posteriore va compensato usando la brugola da 3 mm in dotazione per
tenere allineato l'angolo del ponte in modo adeguato. (Il ponte
dev'essere parallelo al corpo.)
PERNO
PRINCIPALE
PERNO PRINCIPALE
PARALLELO
PERNO
POSTERIORE
NOTA
*Sebbene l'altezza della corda della chitarra possa essere sollevata o abbassata fino a 0,3-0,5 mm con una rotazione dei perni, si consiglia
di effettuare le regolazioni in piccoli incrementi.
*L'altezza della corda può cambiare dopo la regolazione finale del perno posteriore. Si consiglia di verificare l'altezza finale della corda dopo
la regolazione del perno posteriore.
Locking Tremolos
TREMOLO EDGE III
MONTAGGIO DEL BRACCIO DEL TREMOLO
L'inserimento e la rimozione del braccio del tremolo sono operazioni estremamente
semplici. Inserire il braccio nell'apposito foro sulla piastra di base del tremolo. Tirare
il braccio per rimuoverlo.
TENSIONE DI SERRAGGIO DEL BRACCIO
È possibile regolare la tensione di serraggio del braccio sollevando il tremolo e
inserendo una chiave a brugola da 1,5 mm nella vite (A) sul blocco tremolo. Se la
vite viene ruotata in senso orario, verrà aumentata la tensione del braccio, mentre
se la si ruota in senso antiorario, la tensione diminuirà.
(A)
ITALIANO
67
Page 69

ACTION DEL BRACCIO
È possibile regolare l'action del braccio del tremolo utilizzando una chiave a brugola
da 3,0 mm sulla vite (B) del tremolo.
(B)
ACCORDATURA DI PRECISIONE
Dopo aver fissato il bloccacorde, utilizzare gli accordatori di precisione per eseguire
le regolazioni di precisione dell'accordatura di ogni corda. Regolare tutti gli
accordatori (C) al centro della rispettiva corsa prima di fissare il bloccacorde.
REGOLAZIONE DELL'ACTION
Per regolare l'intera unità tremolo (discendente e ascendente), utilizzare una chiave a
brugola per girare il prigioniero (E) situato sul lato destro e sul lato sinistro dell'unità
(F)
tremolo. (Questo non può essere regolato per ogni singola corda.)
REGOLAZIONE DELL'INTONAZIONE
Allentare la vite con tassello di fissaggio (D) sul bloccacorde, quindi allentare la corda da
regolare. Allentare le viti di bloccaggio (F) sulla selletta da regolare e spostarla in avanti
o indietro. Serrare la vite di bloccaggio della selletta (F), quindi proseguire
all'accordatura. Una volta verificata l'intonazione, serrare la vite con tassello di fissaggio (D).
*Sulla piastra di base si trovano due fori per ciascuna vite di bloccaggio della selletta che permettono di
modificare le scalature consentendo un massimo di tre movimenti della selletta. Se non è possibile
regolare l'intonazione perché è necessario spostare la selletta ulteriormente indietro, rimuovere la vite
di intonazione e inserirla nel foro più estremo della piastra del ponte.
SOSTITUZIONE DELLE CORDE
Per il tremolo EDGE III, occorre sostituire le corde una alla volta. La rimozione
contemporanea di tutte le corde comporterà un rilascio della tensione sul tremolo
che modificherà l'angolo di sollevamento del tremolo. Allentare la vite con tassello di
fissaggio (D) sul bloccacorde, quindi allentare la corda da sostituire. Allentare la vite
di arresto della corda (G) e rimuovere la corda dalla selletta. Tagliare l'estremità a
sfera della nuova corda nel modo illustrato nella figura, quindi inserire il lato tagliato
della nuova corda tra la selletta e l'arresto bloccacorde. Serrare la vite di arresto
della corda (G), quindi proseguire all'accordatura. Una volta verificata l'intonazione,
serrare la vite con tassello di fissaggio (D) sul bloccacorde.
(G)
(C)
(E)
(D)
EDGE III REGOLAZIONE DELLA MOLLA DEL TREMOLO
Le molle del tremolo consentono di regolarne l'angolo mediante il serraggio o
l'allentamento della tensione del tremolo. Per regolare l'angolo del tremolo,
individuare le viti di regolazione nella cavità del tremolo posteriore. Una volta
accordato, il sistema del tremolo deve trovarsi parallelo alla superficie della chitarra
come illustrato di seguito.
In caso contrario, rimuovere la piastra di copertura della cavità del tremolo e serrare le viti di regolazione della
68
tensione, se il tremolo risulta ulteriormente abbassato. Allentare la viti se il
tremolo è sollevato. Accordare di nuovo le corde all'altezza corretta, quindi
verificare l'angolo. Scegliere il numero e la posizione delle molle del tremolo in
base alla scalatura e all'angolo del tremolo.
Page 70

TREMOLO ZR (ZERO RESISTENZA)
BRACCIO DEL TREMOLO
Allentare il cappuccio della vite,
inserire il braccio nell'unità tremolo,
quindi ruotarlo fino a fissarlo in sede
(fig. 8). Ruotare il braccio per
regolarlo all'altezza voluta. La
tensione di serraggio del braccio è
regolata dalla tenuta del cappuccio
della vite. Per rimuovere il braccio,
allentare il cappuccio della vite e
ruotare il braccio in senso antiorario (fig. 9).
ACCORDATURA DI PRECISIONE
Dopo aver fissato il bloccacorde, utilizzare gli accordatori di precisione
(fig. 10 A) per eseguire le regolazioni di precisione dell'accordatura di ogni
corda. Regolare tutti gli accordatori al centro della rispettiva corsa prima
di bloccare il bloccacorde alla paletta.
Fig.8 Fig.9
C
B
A
REGOLAZIONE DELL'ACTION
Per regolare l'intera unità tremolo (discendente e ascendente), utilizzare
una chiave a brugola per girare il prigioniero (fig. 10 B) situato sul lato
destro e sul lato sinistro dell'unità tremolo. (Questo non può essere
regolato per ogni singola corda.)
REGOLAZIONE DELL'INTONAZIONE
Allentare la vite arresto della corda del bloccacorde (fig. 11). Rimuovere la
vite di regolazione dell'intonazione (fig. 12 B) dall'interno dell'unità ponte,
fissarla nel foro a vite sul retro della selletta, quindi serrarla di modo che
la punta della vite tocchi la borchia dell'unità ponte. Allentare la vite di
bloccaggio della selletta (fig. 10 C) e ruotare la vite di regolazione
dell'intonazione per regolare la posizione della selletta. Una volta
completata la regolazione, serrare la vite di bloccaggio della selletta in
modo sufficiente a prevenirne lo spostamento in avanti durante
l'accordatura, quindi riporre la vite di regolazione dell'intonazione
nell'unità ponte.
SOSTITUZIONE DELLE CORDE
Allentare la vite di arresto della corda sul bloccacorde (fig. 11), allentare
completamente la corda sulla meccanica. Utilizzare una chiave a brugola
per allentare la vite di arresto della corda sulla selletta del ponte (fig. 12
A), quindi rimuovere la corda vecchia.
Utilizzare un tronchesino per tagliare l'estremità a sfera dalla nuova corda,
come da Fig. 13, quindi inserire l'estremità della corda nella selletta del
ponte, fissarla saldamente e serrare la corda sulla meccanica. Dopo
l'accordatura, controllare l'inclinazione del ponte tremolo e fissare la vite
di arresto corda del bloccacorde alla paletta.
Fig.10
Fig.13
Fig.11
Fig.12
ITALIANO
REGOLAZIONE DEL SISTEMA PUNTO ZERO
Il sistema punto zero agevola l'accordatura di un'unità tremolo flottante,
garantisce una maggiore stabilità di accordatura dopo l'utilizzo della leva
tremolo e limita la scordatura causata da una corda spezzata.
*Se il sistema punto zero non è regolato sulla posizione esatta, cioè se il
sistema punto zero e la tensione delle corde non sono in equilibrio, esso
non funziona in modo ottimale dato che sarà completamente flottante. Tale
regolazione va eseguita con precisione.
Fig.14
69
Page 71

ZPS (ZERO POINT SYSTEM) OF ZR TREMOLO
Molla principale
Blocco tremolo
Vite di arresto
2
1
Barra di arresto
Con la chitarra accordata con precisione, regolare la molla
principale assicurandosi che la barra di arresto tocchi il
blocco tremolo e la vite di arresto.
Se la barra di arresto non tocca il blocco tremolo e la vite di
arresto, ruotare la vite di regolazione della molla principale
finché non si ottiene un contatto.
Con la chitarra accordata con precisione, la barra di arresto deve
toccare il blocco tremolo e la vite di arresto. Se regolata
correttamente, la tensione esercitata durante la pressione verso il
basso del braccio sarà leggermente inferiore rispetto a quella della
pressione verso l'alto. L'equilibratura delle forze è di circa 3:7. Con
questa impostazione, la barra di arresto deve toccare il blocco tremolo
e la vite di arresto anche se la 1° corda è completamente allentata.
<Nota>
Quando una corda si spezza a causa della tensione del manico, l'accordatura delle corde risulterà leggermente più alta anche se rimarrà
entro un intervallo accettabile.
PASSAGGIO AL FUNZIONAMENTO FLOTTANTE
Arrestando il funzionamento del sistema punto zero, il tremolo risulterà
completamente flottante. Mantenendo il braccio sollevato, rimuovere la
barra di arresto e la sottomolla.
Con la chitarra accordata con precisione, utilizzare la manopola di
regolazione della molla principale (fig. 14 E) per regolare l'inclinazione del
ponte tremolo. Se l'unità ponte tremolo è inclinata in avanti verso il
manico, girare la manopola di regolazione nella direzione del più (+).
Invece, se l'unità ponte tremolo è inclinata all'indietro lontano dal manico,
girare la manopola nella direzione del meno (-).
*Nel regolare l'inclinazione del ponte tremolo nello stato flottante, l'accordatura si modifica ad ogni regolazione della
manopola di regolazione della molla principale. Durante tale processo sarà necessario eseguire più volte l'accordatura
70
Se la barra di arresto non tocca il blocco tremolo e la vite di
arresto, ruotare di nuovo la vite di regolazione della molla
principale finché non si ottiene un contatto.
.
Page 72

Non Locking Tremolo
TREMOLO FAT/SAT
MONTAGGIO DEL BRACCIO DEL TREMOLO
L'inserimento e la rimozione del braccio del tremolo sono operazioni
estremamente semplici. Inserire il braccio nell'apposito foro sulla piastra di
base del tremolo. Tirare il braccio per rimuoverlo.
REGOLAZIONE DEL BRACCIO DEL TREMOLO (SAT PRO)
Per regolare l'altezza del braccio, rimuovere il coperchio della molla del tremolo
dal retro della chitarra e utilizzare una chiave a brugola da 3 mm per girare la
vite di regolazione dell'altezza sulla parte inferiore del blocco tremolo.
Girandola verso destra si aumenterà l'altezza.
TENSIONE DI SERRAGGIO DEL BRACCIO
È possibile regolare la tensione di serraggio del braccio sollevando il tremolo e
inserendo una chiave a brugola da 1,5 mm nella vite (A) sul blocco tremolo. Se
la vite viene ruotata in senso orario, verrà aumentata la tensione del braccio,
mentre se la si ruota in senso antiorario, la tensione diminuirà.
(A)
REGOLAZIONE DELL'ALTEZZA DELLA CORDA (SAT PRO)
Per regolare l'action di ogni corda, utilizzare una chiave a brugola da 1,5 mm
per girare la vite sulla selletta (C). L'altezza complessiva può essere regolata su
ogni lato dell'unità ponte tremolo SAT PRO. Per regolare l'altezza, utilizzare una
chiave a brugola da 3 mm per girare il prigioniero posto su uno dei lati
dell'unità. Prestare attenzione quando si regola l'altezza di tutta l'unità del
ponte tremolo; regolare entrambi i lati alla stessa altezza per garantire il
funzionamento ottimale del ponte tremolo.
REGOLAZIONE DELL'ALTEZZA DELLA CORDA (FAT20/FAT10/SAT10)
È possibile aumentare o ridurre la regolazione dell'altezza ruotando i perni (C) di montaggio del tremolo
posizionati su entrambi lati della parte anteriore del ponte. La rotazione in senso orario farà diminuire il tremolo,
mentre quella in senso antiorario lo farà aumentare.
(C) (C) (C)
FAT20 FAT10 SAT10
(C)
(D)
(E)
ITALIANO
REGOLAZIONE DELL'INTONAZIONE (SAT PRO)
Per regolare l'intonazione, utilizzare una chiave a brugola da 1,5 mm per girare
la chiave posta sul retro della selletta (E). Girare la vite verso destra per
spostare la selletta all'indietro, o verso sinistra per spostare la selletta in avanti.
(C)
(D)
(E)
SAT PRO
71
Page 73

REGOLAZIONE DELL'INTONAZIONE (FAT20)
Per garantire l'assenza di movimento, ogni selletta è provvista di una vite di
fissaggio. Per regolare l'intonazione, allentare la vite di fissaggio della selletta
con una chiave a brugola da 2 mm (D). Per regolare l'intonazione, inserire una
chiave a brugola da 2,5 mm nella vite della selletta sul retro del tremolo.
Ruotando la chiave in senso orario, la selletta verrà spostata indietro, mentre
ruotandola in senso antiorario, la selletta si sposterà in avanti. Una volta
impostata la posizione di intonazione corretta per la selletta, serrare la vite di
bloccaggio della selletta posteriore per bloccare qualsiasi movimento. (E)
REGOLAZIONE DELL'INTONAZIONE (FAT10/SAT10)
È possibile regolare l'intonazione spostando la
selletta in avanti o indietro utilizzando un
cacciavite a testa Phillips (+) sulla vite di
regolazione dell'intonazione nella parte
posteriore del ponte.
FAT10 SAT10
REGOLAZIONE DELL'INTONAZIONE E DELL'ALTEZZA DELLA CORDA (FAT 6)
È possibile regolare l'intonazione spostando la selletta in avanti o indietro
utilizzando una vite di regolazione a testa Phillips (+) nella parte posteriore del
ponte. È possibile controllare l'altezza delle corde alzando o abbassando le
piccole brugole posizionate su entrambi i lati della selletta con una chiave
apposita.
(D)
(E)
FAT20
SOSTITUZIONE DELLE CORDE
Per sostituire le corde, infilare le nuove corde negli appositi fori sul retro della
chitarra. A questo punto, infilarle nel blocco tremolo e posizionarle sopra la
selletta.
FAT/SAT (tranne FAT6) REGOLAZIONE DELLA MOLLA DEL TREMOLO
È possibile regolare un tremolo standard in modo da potere aumentare l'altezza
d'intonazione quando il braccio viene sollevato per allentare le molle del
tremolo nella la cavità sul retro della chitarra. Questa procedura comporta lo
svantaggio di causare un'intonazione crescente se una corda si spezza. Per
risolvere questo inconveniente, regolare la piastra del tremolo in modo che sia a
livello del corpo serrando le molle del tremolo.
Scegliere il numero e la posizione delle molle del tremolo in base
alla scalatura e alla regolazione del tremolo.
PARALLELO FLOTTANTE
72
Page 74

TREMOLO ACT
SOSTITUZIONE DELLE CORDE
Il tremolo ACT permette di installare la corda in due modi.
1) Le corde vanno installate inserendo l'estremità a sfera nel blocca corde e
agganciando l'estremità stessa al di sotto dell'arresto della corda sulla
parte posteriore dell'unità del tremolo.
2) Le corde vanno installate inserendo l'estremità a sfera nel blocca corde e
agganciando l'estremità stessa al di sotto dell'arresto sulla parte inferiore
dell'unità del tremolo. Ciò aumenta la tensione della corda e aggiunge
sustain.
MONTAGGIO DEL BRACCIO DEL TREMOLO
L'inserimento e la rimozione del braccio del tremolo sono operazioni estremamente semplici. Inserire il braccio
nell'apposito foro sulla piastra di base del tremolo. Tirare il braccio per rimuoverlo.
TENSIONE DI SERRAGGIO DEL BRACCIO
La tensione di serraggio del braccio può essere regolata sollevando il tremolo e inserendo una chiave a brugola
da 2,0 mm nella vite (A) sul blocco del tremolo. Girare la vite in senso orario per stringere la tensione del braccio e
girare in senso antiorario per allentarla.
REGOLAZIONE DELLE MOLLE DEL TREMOLO
Il Tremolo ACT è progettato per funzionare in modo
ottimale quando è installato all'incirca parallelamente
alla superficie del corpo della chitarra. L'angolo con
cui il tremolo è attaccato può essere regolato
cambiando la lunghezza delle molle del tremolo sotto
l'unità del tremolo. Usare un cacciavite con testa a
croce per girare le viti di regolazione della tensione
del tremolo e regolare la lunghezza delle molle del tremolo (B). Se il tremolo è inclinato in avanti verso il manico
della chitarra, girare le viti in senso orario per serrare le molle. Invece, se il tremolo è inclinato all'indietro lontano
dal manico, girare le viti in senso antiorario allentando così le molle. Accordare la chitarra con precisione,
ricontrollare l'inclinazione del tremolo, quindi ripetere la regolazione fino a quando si ottiene il giusto angolo.
REGOLAZIONE DELL'ACTION
Per regolare in altezza l'intera unità tremolo, utilizzare una chiave a brugola da 3,0 mm per girare le viti (stud) (C)
situate sul lato destro e sul lato sinistro dell'unità tremolo. (Questa regolazione non può essere effettuata per ogni
singola corda.)
REGOLAZIONE DELL'INTONAZIONE
Utilizzare una chiave a brugola da 2.0 mm per
allentare le viti di bloccaggio (D) di ogni selletta,
quindi spostare la selletta. Serrare con fermezza le
viti di bloccaggio selletta, accordare la chitarra e
quindi verificare l'intonazione. Ripetere queste
regolazioni fino alla corretta intonazione.
(B)
(A)
(D)
(C)
ITALIANO
73
Page 75

Guitar Electronics
SWITCHING FUNCTION
Ibanez Instruments are unique in the simplicity and
versatility of our switching systems. Each model was
designed to allow the maximum amount of useful
pickup positions with the simplest operations.
SPLITS FUNCTION
WITH "TRUE-DUO"SYSTEM
*BRIDGE PICKUP : "TRUEDUO BUCKER"
SAS32, SA220 : 2 PICKUPS(H-H)
HUMBUCKER PICKUP MODE
NECK CENTER BRIDGE
SINGLE PICKUP MODE
VOLUME POT
SWITCH PUSH DOWN
VOLUME POT
SWITCH PULL UP
SPLITS FUNCTION
JEM. PGM, RG, GRG, S(*), EXR, NDM, GRX :
3 PICKUPS (H-S-H)
(*) except S520EX
NECK CENTER BRIDGE
GSA, GRX : 3 PICKUPS (S-S-H)
NECK CENTER BRIDGE
NECK CENTER BRIDGE
HUMBUCKERS
PARALEL COONNECTED
SAS36/SA260 : 3 PICKUPS(S-S-H)
HUMBUCKER PICKUP MODE
NECK CENTER BRIDGE
SINGLE PICKUP MODE
VOLUME POT
SWITCH PUSH DOWN
VOLUME POT
SWITCH PULL UP
RG(*), SA120, MTM2 : 2 PICKUPS (H-H)
(*)except RG120
NECK CENTER BRIDGE
Humbucking is parallel connected.
NECK CENTER BRIDGE
74
Page 76

OTHERS
JS, JTK : 2 PICKUPS (H-H)
NECK CENTER BRIDGE
JS, JTK (WHEN COIL TAP SWITCH WORKED)
NECK CENTER BRIDGE
JS : Coilt Tap Switch by TONE POT
Pull up=TAP ON NECK&BRIDGE Both
pickups
JTK : Coil Tap Swith by SEESAW Switch
SEESAW DOWNED UPFOWARD=TAP ON
MTM1, K7APEX, MMM, RG120, RG (w/Designed by EMG
or EMG PICKUPS), S520EX, GSA, GRX, GAX30:
2 PICKUPS (H-H)
NECK CENTER BRIDGE
SZ : 2 PICKUPS (H-H)
NECK CENTER BRIDGE
AR, ARC, ARX, AXS, GAX(*), IC, ART, ADC, ADD, ADX, AF,
AFS, AK, AG, AWD, AX, VBT, VPT, GSZ :
2 PICKUPS (H-H)
(*) except GAX30
NECK CENTER BRIDGE
75
Page 77

Guitar Controls
TONE
NECK VOLUME
BRIDGE
VOLUME
3WAY PICKUP
SELECTOR
TOGGLE
NECK
VOLUME
TONE
BRIDGE VOLUME
3 WAY
PICKUP SELECTOR
VOLUME
CONTROLS
1 VOL(*), 1 TONE & 5 WAY LEVER SELECTER 0
*SAS/SA220, 260 : TRUE-DUO SWITCH ON VOLUME
JEM, PGM, NDM, RG, SAS, SA, GSA60,
GRX70,40, GRG
*VOLUME
PICKUP SELECTOR
1 VOL, 1 TONE & 3 WAY LEVER SELECTER
MMM, RG120, S520EX, GSA20, GRX20, 22,
GAX30, RG (w/Designed by EMG or EMG
PICKUPS)
PICKUP SELECTOR
5 WAY
TONE
VOLUME
3 WAY
TONE
1 VOL & 1 LEVER SELECTER
MTM1, K7APEX2 (w/3 way LEVER
SELECTOR)
MTM2 (w/5 way LEVER SELECTOR)
1 VOL, 1 TONE & 3 WAY TOGGLE SWITCH
XPT, VBT, JTKS, ADC, ADD, ADX
VOLUME
TONE
TOGGLE SWITCH
2 VOL, 1 TONE & 3 WAY TOGGLE SWITCH
1 VOL, 1 TONE(*) & 3 WAY TOGGLE SWITCH
JS
(*)Coil Tap Switch on Tone
VOLUME
PICKUP SELECTOR
3 WAY
TONE
w/COIL TAP ON/OFF SW.
1 VOL, 1 TONE & 3 WAY TOGGLE SWITCH
& 2 SEESAW SWICHES 0
JTK
SEESAW SW. FOR BRIDGE PU
SEESAW SW. FOR NECK PU
VOLUME
TONE
TOGGLE SWITCH
SZ, ARC, ARX, ART
2 VOL, 1 TONE & 3 WAY TOGGLE SWITCH
GSZ
76
Page 78

2 VOL, 2 TONE & 3 WAY TOGGLE SWITCH
AXS, AX, AF, AFS, AK, AG, GAX70,75
PICKUP SELECTOR
NECK TONE
BRIDGE TONE
3 WAY
BRIDGE VOLUME
NECK
VOLUME
2 VOL, 2 TONE & 3 WAY TOGGLE SWITCH
AR, IC
3 WAY
NECK
VOLUME
BRIDGE
VOLUME
BRIDGE
TONE
PICKUP SELECTOR
NECK TONE
1 VOL, 1 TONE & 3 WAY TOGGLE SWITCH
AWD
MASTER
VOLUME
MASTER TONE
3WAY PICKUP
SELECTOR
1 VOL, 1 TONE
ASB, AGB
MASTER
VOLUME
MASTER TONE
77
Page 79

Memo
78
Page 80

Memo
79
Page 81

80
This is to certify that the aforementioned
equipments fully conform to protection
requirements of the following EC council directives.
DIRECTIVES:89/336/EEC Electromagnetic compatibility
 Loading...