

Page 1
■ SPECIFICATIONS
Flanger
●
Input Impedance 500K ohms
●
Output Impedance 10K ohms
●
Maximum Input Level 4 dBm
●
Gain 0 dB
●
Delay Time 1ms — 12.8ms
●
Speed Range 0.06Hz — 13Hz
●
Equivalent Input Noise –75 dBm (IHF-A)
●
Power Supply One 9 Volt Battery or
●
Size 124(D) × 74(W) × 53(H) mm
●
Weight 570g, 1.3 lbs
external AC adaptor (9V)
4.9(D) × 3(W) × 2(H) inch.
■ TECHNISCHE DATEN
●
Eingangs-Impedanz 500K ohm
●
Ausgangs-Impedanz 10K ohm
●
Max. Eingangs-Pegel 4 dBm
●
Gain (Signal-Verstärkung) 0 dB
●
Verzögerung 1ms — 12.8ms
●
Geschwindigkeits-Bereich 0.06Hz — 13Hz
●
Störspannungs-Abstand –75 dBm (IHF-A)
●
Spannungsbedarf 9 Volt, 1 9V-Compact-Batterien
●
Größe 124(T) × 74(B) × 53(H) mm
●
Gewicht 570g
oder Netzteil (9V)
■ SPÉCIFICATIONS
●
Impédance d’entrée 500K ohms
●
Impédance de sortie 10K ohms
●
Temps de retard 1ms — 12.8ms
●
Vitesse de balayage 0.06Hz — 13Hz
●
Niveau d’entrée maxi. 4 dBm
●
Rapport niveau entrée sortie 1/1
●
Bruit de fond entrée court-circuitée
●
Alimentation 1 × 9 volts ou par sortie
●
Dimensions 124(P) × 74(L) × 53(H) mm
●
Poida 570g
–75 dBm (IHF-A)
extérieure sur adaptateur
secteur (9V)
Owner’s Manual
Bedienungsanleitung
FL9 OWNER’S MANUAL FL9040101 PRINTED IN JAPAN
Fiabilité grâce à une construction en zinc moulé et caoutchouc.
sortie Jack extérieure.
Possibilité de branchement sur alimentation secteur grâce à la
Diode électroluminéscente de contrôle service/usure des piles.
Changement de pile aisé (sans tournevis).
habituels.
porte pas de parties mécaniques, ce qui élimine les “Plops”
Le nouvel interrupteur Q-1 est totalement éléctronique et ne comPas de problèmes de variation d’effet.
Le circuit delay est équipé d’un réducteur de bruit.
●
●
●
●
●
●
●
■ CARACTÉRISTIQUES
Mode d’emploi
Matte.
Schweres, stabiles Zinkguß-Gehäuse mit rutschfester Gummi-
●
Netzteils (AC 9V).
Bei ständiger Verwendung empfiehlt sich die Anschaffung des
●
LED-Anzeige für eingeschalteten Effekt und Batterie-Stärke.
●
welche Schraubenzieher auswechselbar.
Die Batterie ist in einer separaten Kammer und ohne irgen-d
●
T) und deshalb ist kein Einschaltgeräusch hörbar.
Der Q-1 “Quiet One” -Ein/Aus-Schalter arbeitet elektronisch (FE
●
nungsversorgung, ob mit Batterie oder Netzeil.
Ununterbrochenes Flangen durch elektronisch gesteuerte Span-
●
wert-dadurch ein klares und extrem rauscharmes Signal.
Speziell angepasste Eimerkettenspeicher mit excellentem Rausch-
●
unlich für ein so kleines Gerät.
Gute Qualität und Zweckmäßigkeit vom höchsten Niveau, ersta-
●
■ BESONDERHEITEN
durability.
Zinc die cast construction and rugged rubber stopper assures
●
POWER jack.
external AC power by connecting the adaptor to the EXT.
When using the unit for long periods of time, you can use
●
LED indicator shows status of effect and battery condition.
●
Battery can be changed without tools.
●
ing. (Q-1 “Quiet One” switch)
FET electronic switching provides clickless, popfree switch-
●
complete electric source circuit with with batter itself only.
Continuous status flanging effects can be gained through
●
clear sound.
Adapted low noise BBD in delay circuit. It gains noiseless
●
Can’t believe it is a compact effect!
High quality effect with good function is at the top level.
●
■ FEATURES
Page 2
■ OPERATION
Flanger
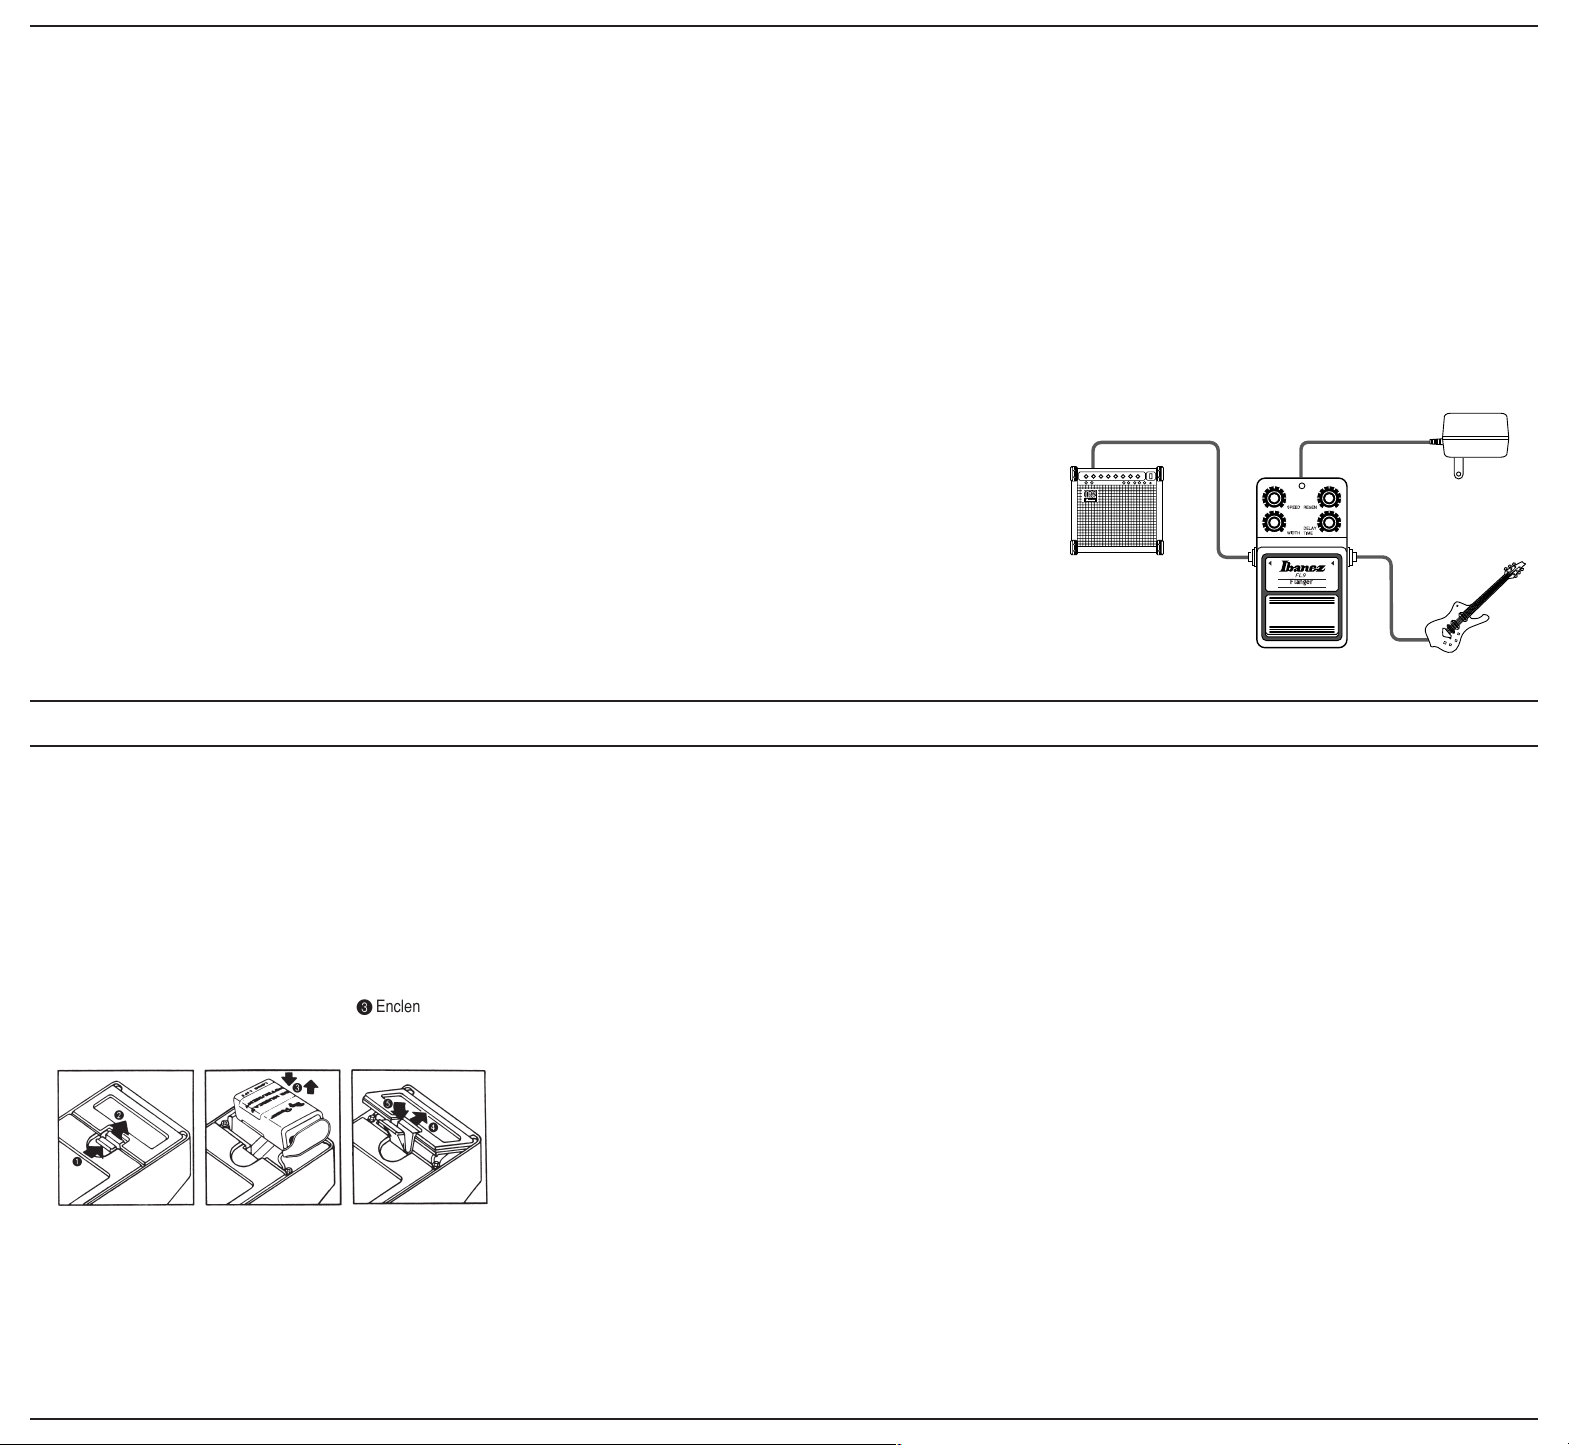
1 Connect the input jack to your instrument. The circuit is
automatically turned on when a plug is inserted.
2 SPEED – Varies sweep rate.
3 WIDTH – Controls amount of sweep deviation.
4 REGEN – Adds overall coloration and depth.
5 DELAY TIME –
Controls center frequency of auto sweep. By turning to the
right you move the center frequency higher which causes the
flanging action to concentrate on the higher audio frequencies.
Turning the control to the left, moves the center frequency
lower, thereby making the FL9 concentrate on the lower
audio frequencies. The delay time control does not work
when the width conrol is fully CW.
6 Soft touch FET electronic switch changes EFFECT/NOR-
MAL.
7 LED indicator comes on when effect is on. If it is dim or
does not light, replace the battery.
8 EXT D.C. – When using external D.C. supply, internal bat-
teries are switched off.
■ BEDIENUNG
1
Verbinden Sie die Eingangsbuchse mit Ihrem Instrument. Dabei
schaltet sich das Gerät gleichzeitig an.
2
“Speed” Steuert die Geschwindigkeit, womit die Frequenzbänder
durcstreift werden
3 “Width” Regelt die Bandbreite, welche durchstreift wird.
4 “Regen” fügt insgesamt Farbe und Tiefe dazu.
5
“Delay time” regelt die mittlere Frequenz des automatischen
Durchlaufs. Durch Rechtsdrehung (im Uhrzeigersinn) bewegen
auf höhere Frequenzen wirkt. Eine Linksdrehung bewegt diese
Mittenfrequenz nach unten, und tiefere Töne werden geflangt.
Der Verzögerungszeitregler ist unwirksam, wenn der Breitenregler (width), ganz nach rechts gedreht ist.
6
Durch eine leichte Berührung schaltet der FET-Schalter elektronisch zwischen “Normal” und Effekt.
7
Die LED-Anzeige leuchtet auf, wenn der Effekt eingeschaltet ist.
Leuchtet sie nur noch schwach, ist die Batterie umgehend auszuwcchseln.
8
EXT D.C. – Sobald ein Netzgerät angeschlossen wird, ist die
Batterie automatisch abgeschaltet.
.
■ DESCRIPTION
1 Connecter l’instrument au jack d’entrée.
2 SPEED – Fait varier la vitesse.
3 WIDTH – Contrôle du balayage.
4 REGEN – Ajoute coloration et profondeur.
5 DELAY TIME –
Contrôle la fréquence de balayage automatique.
En tournant vers la droite, on déplace vers le haut la fréquence
centrale, ce qui a pour effet de concentrer l’action de “Flanging”
sur les fréquences aigües. A l’inverse, en tournant vers la gauche
on déplace la fréquence centrale vers le bas, qui concenre sur
les fréquences graves. Le contrôle du temps de retard ne
marche pas lorsque le contrôle de profondeur est positionné
complètement à gauche.
6 Interrupter à contatct éléctronique.
7
LED – Use LED indique si l’effect est en marche. Si l’on constate
une diminution ou absence de lumière, remplacer la (les) pile(s).
8
EXT D.C. – Lorsque vous utilisez une alimentation extérieure,
la (les) pile(s) est (sont) couplée(s).
AC ADAPTOR
AMPLIFIER
■ CHANGING THE BATTERY
1 Push the tab mar-
rked “OPEN” and
lift up.
2 Replace the batt-
ery as shown in
figure 2.
■ BATTERIE WECHSEL
1
Öffnen des Deckels
in Richtung “Open”.
2
Austausch der Batterie wie in Abbildung.
■ CHANGEMENT DES PILES
1
Pousser la languette marquée “OPEN” et soulever.
Fig. 1 Fig. 2 Fig. 3
2
Replacer la pile
comme indiquée
figure 2.
3 Put the battery
cover into the groove and push to
the end.
3
Gehäusedeckel wieder einsetzen.
3
Enclencher le couvercle dans la rainure et pousser.
■ NOTES
●
Unplug the instrument when not in use.
●
When storing the unit for long periods of time, disconnect
the battery.
●
You will hear some loss level and distortion when the battery begins to run down.
●
Do not remove the screws on bottom.
■HINWEISE
●
Wenn das Gerät länger nich benutzt wird, Stecker herausziehen.
●
Bei längerer Langerung die Batterie entfernen.
●
Geht die Lautstärke zurück oder treten ungewünschte Verzerrungen auf, muß die Batterie aucgewechselt werden.
●
Bitte keinesfalls die Bodenschrauben lösen.
■RECOMMANDATIONS
●
Débrancher l’instrument lorsque vous ne vous servez pas de
l’effet.
●
Déconnecter la pile au cas où vous n’utiliseriez pas l’effet pendant une longue période.
●
Si la pile est usée, vous constaterez une baisse de niveau et de
distorsion.
GUITAR
Page 3

注意事項
注意
警告
警告
注意
・ インプットジャックにプラグを差し込むと電源がオンになります。
電池を長持ちさせるため、使用しない時はインプット・ジャックからプラグを
抜いておいてください。
・ LED が暗くなってきたら、サウンド・クオリティーが著しく低下します。
早めに電池を交換してください。
・ 電池の液漏れ防止のため、長時間使用しない時は、電池を取り外して保管
してください。
・ AC アダプターを使用する時は、故障を防止するために専用の IBANEZ
AC119 をご使用ください。
● La alimentación eléctrica se conectará al insertar el enchufe en la
toma de entrada (IN). Desenchufe la clavija de la toma de entrada
/ PRECAUCIONES / PRECAUZIONI
The FL9 fully conforms to the protection requirements of the following
EC Council Directives.
89/336/EEC : ELECTROMAGNETIC COMPATIBILITY
cuando no se esté utilizando el aparato, para que la pila dure más
tiempo.
● Cuando el indicador LED empieza a verse tenue, la calidad del
sonido también se deteriorará rápidamente. Cambie inmediatamente la pila.
● Cuando no se va a utilizar la unidad durante mucho tiempo, quite la
pila para evitar daños por fugas del electrólito.
● Cuando se utiliza un adaptador de corriente alterna, utilice exclusivamente los adaptadores IBANEZ AC109, AC309 o AC509 para
evitar daños.
● No quite los tornillos de la parte inferior.
◆ L’alimentazione si attiva quando la spina viene inserita nella presa
di ingresso (IN). Quando non si usa l’apparecchio, togliere la spina
dalla presa di ingresso per prolungare la durata della pila.
◆ Quando l’indicatore a LED si affievolisce, la qualità sonora decade
notevolmente. Sostituire immediatamente la pila.
◆ Quando non si usa l’apparecchio per un lungo periodo, estrarre la
pila per evitare danni dovuti a perdite di fluido della pila.
◆ Quando si usa un trasformatore CA, usare solo un trasformatore
IBANEZ AC109, AC309 o AC509 per evitare danni.
◆ Non togliere le viti sul fondo.
機器を安全にご使用いただくため、ご使用前にこの取扱説明書を必ずお読み
ください。
そのあとは大切に保管し、必要になったときにお読みください。
安全上のご注意 必ずお守りください
機器を正しくご使用いただくために、必ずお守りいただくことを次のように
区分して説明しています。
■
表示内容を無視して誤った使い方をしたときに生じる危害や損害の程度を次の
表示で区分して説明しています。
この表示の欄は、「人が死亡または重傷などを負う可能性が
される」内容を示しています。
この表示の欄は、「傷害を負う可能性または物的損害が発生する
可能性が想定される」内容を示しています。
■ お守りいただく内容の種類を、次の絵表示で区分して説明しています。
.......... この絵表示は、必ず実行していただく「強制」の内容を示して
.........
います。
この絵表示は、してはいけない「禁止」の内容を示しています。
................ この絵表示は、気をつけていただきたい「注意喚起」の内容を
示しています。
ケースを絶対に開けないでください
・
機器の裏ぶたやカバーを開けたり、改造しないでください。
異常のときは機器の使用を中止してください
・煙が出たり、変な臭いや音がする場合、機器の使用を中止して
ください。
・直ちにコンセントから AC アダプターを抜いてください。
放熱にご注意
・ACアダプターを布や布団等で覆ったり、つつんだりしないで
ください。
《熱がこもり、ケースの変形や火災の危険があります。》
FL9 OWNER’S MANUAL FL9040101 PRINTED IN JAPAN
想定
指定以外の AC アダプターを使わない
・
必ず指定のAC100ボルト用の ACアダプターをご使用ください。
《指定以外の AC アダプターを使用すると火災、感電の原因に
なることがあります。》
電源プラグの抜き差しは正しく
・濡れた手で AC アダプターを抜き差ししないでください。
《感電の危険があります。》
・コンセントから抜くときは、必ず AC アダプター本体を
持って抜いてください。
《コードの部分を引っ張ると、コードが傷つき、火災や感電の
原因になることがあります。》
水、湿気、ほこり、高温は禁物
・風呂場や屋外など水のかかる所、湿度が高いところ、ほこりの
多い所、温度の高い所では保管や使用をしないでください。
《火災や感電の原因になることがあります。》
長期間使用しないときは
・長期間機器を使用しないときは、安全のため、必ず AC アダプ
ターをコンセントから抜いてください。
《火災の原因になることがあります。》
音量調節は適度に
・大音量で長時間の使用はしないでください。
《難聴などの原因になることがあります。》
■ 主な特徴
● トップレベルの高機能とすばらしいクオリティのエフェクト。コンパクト
エフェクターを超えるサウンドです。
● 遅延回路に低ノイズ BB D を適用。ノイズのないクリアーなサウンドが
得られます。
●
電池のみの電源回路からでも、継続的なステータスフランジャーエフェクト
得られます。
が
●
FET電子スイッチにより、クリックノイズのないエフェクトオンオフ切換えが
できます。
LEDインジケーターがエフェクトのオンオフと電池の残量をお知らせします。
●
● 亜鉛ダイキャストボデーと頑強な滑り止めゴムによる高耐久性。
■CARACTERÍSTICAS
● El efecto de alta calidad ofrece un funcionamiento al máximo nivel.
¡Resulta increíble que sea un efecto compacto!
● BBD de bajo ruido adaptado en el circuito de retardo. Proporciona
un sonido claro libre de ruidos.
● Efectos
● El interruptor electrónico FET permite la conmutación silenciosa.
● Sustitución de la pila sin necesidad de utilizar herramientas.
● El indicador LED muestra el estado de efecto y de la pila.
● Si utiliza la unidad durante periodos prolongados de tiempo, podrá
● Construcción modelada a base de zinc y tope de goma resistente
flanger
trico alimentado exclusivamente con una pila.
continuos obtenidos por medio de un circuito eléc-
(interruptor Q-1 “Quiet One”)
utilizar la corriente alterna (CA) externa conectando el adaptador a
la toma EXT.POWER.
que garantizan la durabilidad.
■FUNZIONI
● Un effetto ai massimi livelli qualitativi. Difficile credere che si tratti di
un effetto preimpostato!
● Il BBD a basso disturbo contribuisce a rendere il funzionamento
estremamente silienzioso.
● L’alimentazione interna regolata garantisce un funzionamento sta-
bile e affidabile anche con l’uso della batteria.
● L’interruttore elettronico FET fornisce una commutazione senza ru-
mori né scatti. (Q-1 interruttore “Quiet One”)
● La pila può essere cambiata senza utensili.
● La spia LED indica lo stato dell’effetto e le condizioni della pila.
● Quando si usa l’apparecchio per lunghi periodi di tempo, è possibile
usare l’alimentazione CA collegando l’ adattatore al jack
EXT.POWER (alimentazione esterna).
● La costruzione in zinco pressofuso e gomma robusta garantisce
durabilità.
Page 4

操作方法
1
2
3
4
5
6
7
8
Flanger
SPEED REGEN
WIDTH
DELAY
TIME
1
5
4
7
2
3
6
8
AMPLIFIER
AC ADAPTOR
GUITAR
楽器をインプットジャックに接続しま
す。電池使用時はプラグが差し込まれ
ると FL9 の電源がオンになります。
Conecte la toma de entrada al
instrumento. Cuando utilice una
pila, se encenderá el FL9 si se inserta un enchufe.
Collegare il jack di ingresso allo
strumento. Quando si utilizza
una pila, FL9 si accende all’inserimento della spina.
スウィープの速さをコントロールします。
Ajusta la velocidad de barrido.
Controlla la velocità di oscillazione.
/ FUNCIONAMIENTO / FUNZIONAMENTO
SPEED
SPEED
SPEED
WIDTH
スウィープの深さをコントロールします。
WIDTH
Controla el nivel de desviación
del barrido.
WIDTH
Controlla la deviazione di oscillazione.
REGEN
サウンド全体に色づけし、深みを与え
ます。
REGEN
Añade coloración y profundidad
global.
REGEN
Aggiunge tono e profondità complessive.
DELAY TIME
自動スウィープの周波数のセンターを
コントロールします。右に回すと、
周波数のセンターが高くなりフラン
ジング効果が高音域に集中します。
左に回すと、周波数のセンターが低く
なり、フランジング効果は低音域に
集中します。WIDTH コントロールが
完全にCWの場合、コーラスの調整の
効果はありません。
DELAY TIME
Controla la frecuencia central del
barrido automático. Al girar este
control hacia la derecha, se aumenta la frecuencia central y,
como resultado, la acción del
efecto
flanger
las frecuencias de audio más altas. Al girarlo hacia la izquierda,
la frecuencia central disminuye,
con lo que el FL9 se concentra
en las frecuencias de audio más
bajas. El control del tiempo de retardo no funciona cuando el control WIDTH está totalmente girado a la derecha.
se concentra en
DELAY TIME
Controlla la frequenza centrale
dell’oscillazione automatica. Girando verso destra, si alza la frequenza centrale con concentrazione dell’azione flanger sulle frequenze audio più elevate. Girando verso sinistra, si abbassa la
frequenza centrale con concentrazione dell’effetto sulle frequenze audio più basse. Il controllo
del ritardo non è operativo quando il controllo Width è spostato
tutto a destra.
ペダルスイッチで、エフェクト/ノー
マルの切換えを行います。
Al pulsar suavemente el interruptor electrónico FET alterna entre
EFFECT/NORMAL.
Interruttore elettronico FET per
attivare/disattivare EFFETTO/
NORMALE.
LED インジケーターはエフェクトオ
ンのとき点灯します。暗くなってきた
ら電池の残量が少なくなっていますの
で電池を交換してください。
Se enciende el indicador LED al
activar el efecto. Si este indicador está desactivado o no se ilumina, sustituya la pila.
La spia LED si accende quando
l’effetto è attivo. Se è fioca o non
si accende, sostituire la pila.
DC ジャック
外部 DC電源を使用する場合は、内部
の電池はオフになります。
EXT D.C.
Si utiliza el suministro eléctrico
de corriente continua externo,
las pilas internas quedarán
desactivadas.
EXT C.C.
Se si usa un’alimentazione C.C.
esterna, le batterie interne sono
disattivate.
■ 電池交換
1
"OPEN" と書いてあ
るツメを矢印の方へ
押しながら引き上げ
ます。
■ CAMBIO DE LA PILA
1
Presione la lengüeta con la marca
“OPEN” y levántela.
■ CAMBIO DELLA PILA
1
Spingere la linguetta contrassegnata
con “APERTO” e
sollevarla.
Fig. 1 Fig. 2 Fig. 3
2
電池をスナップから
外し、付け替えます。
2
Reemplace la pila
tal y como se indica en la figura 2.
2
Sostituire la pila
come mostrato in
figura 2.
3
電池ぶたを溝に引っ
掛け、押し込みます。
3
Coloque la tapa de
la pila en la ranura
y presiónela hasta
el final.
3
Mettere il coperchietto
della pila nella scanalatura e spingere
fino in fondo.
■ 注意
●
使用しない場合には、入力ジャックからプラグを抜いてください。
● 長期間使用しない場合には、電池を取り外して保存してください。
● 電池が消耗すると、レベルと歪みがある程度低下します。
● 底部のねじを外さないでください。
■ NOTAS
● Desenchufe el instrumento si no va a utilizarlo.
●
Cuando almacene la unidad durante un periodo prolongado de
tiempo, desconecte la pila.
●
Escuchará pérdidas de nivel y distorsión cuando la pila empiece a
gastarse.
●
No extraiga el tornillo de la parte inferior.
■ NOTE
●
Scollegare lo strumento quando non in uso.
●
Se si lascia l’apparecchio immagazzinato per lunghi periodi di tempo, scollegare la pila.
●
Sono avvertibili perdite di livello e distorsioni quando la pila comincia ad essere scarica.
●
Non rimuovere le viti sul fondo.
 Loading...