

Quick Installation Guide
VDSL2 Gateway Router
Model no.: iB-WVG300N
VDSL2 Gateway Router
Ver.: 1.0.0
i

VDSL2 Gateway Router
FCC STATEMENT
This equipment has been tested and found to comply with the limits for
a Class B digital device, pursuant to part 15 of the FCC Rules. These
limits are designed to provide reasonable protection against harmful
interference in a residential installation. This equipment generates, uses
and can radiate radio frequency energy and, if not installed and used in
accordance with the instructions, may cause harmful interference to
radio communications. However, there is no guarantee that interference
will not occur in a particular installation. If this equipment does cause
harmful interference to radio or television reception, which can be
determined by turning the equipment off and on, the user is encouraged
to try to correct the interference by one or more of the following
measures:
Reorient or relocate the receiving antenna.
Increase the separation between the equipment and receiver.
Connect the equipment into an outlet on a circuit different from that to
which the receiver is connected.
Consult the dealer or an experienced radio / TV technician for help.
This device complies with part 15 of the FCC Rules. Operation is
subject to the following two conditions:
This device may not cause harmful interference.
This device must accept any interference received, including
interference that may cause undesired operation.
Any changes or modifications not expressly approved by the party
responsible for compliance could void the user’s authority to operate
the equipment.
ii

VDSL2 Gateway Router
FCC RF Radiation Exposure Statement
This equipment complies with FCC RF radiation exposure limits set
forth for an uncontrolled environment. This device and its antenna
must not be co-located or operating in conjunction with any other
antenna or transmitter.
“To comply with FCC RF exposure compliance requirements, this
grant is applicable to only Mobile Configurations. The antennas used
for this transmitter must be installed to provide a separation distance of
at least 20 cm from all persons and must not be co-located or operating
in conjunction with any other antenna or transmitter.”
CE Mark Warning
This is a class B product. In a domestic environment, this product may
cause radio interference, in which case the user may be required to take
adequate measures.
iii

VDSL2 Gateway Router
Contents
1 Package List ....................................................................................................... 5
2 Product Overview ............................................................................................... 6
Introduction ......................................................................................................... 6
3 Features .............................................................................................................. 7
4 Hardware Information and Installation ................................................................ 8
4.1 Hardware Information .................................................................................... 8
4.1.1 Front Panel ..................................................................................................... 8
4.1.2 Rear Panel and Side Panel............................................................................ 8
4.1.3 LED Indicator ................................................................................................. 9
4.2 Hardware Installation ................................................................................... 10
4.2.1 Connecting the Device ................................................................................. 10
5 Web Configuration .............................................................................................11
Network Configuration on PC .....................................................................................11
5.1 Login to the Router........................................................................................11
5.2 Login Menu .................................................................................................. 12
5.3 WAN Interface .............................................................................................. 13
5.3.1 ADSL Connection ......................................................................................... 13
5.3.2 VDSL Connection ......................................................................................... 15
5.3.3 Broadband Connection ................................................................................ 16
5.4 WAN Interface .............................................................................................. 17
5.4.1 Configuring Bridge WAN Interface ............................................................... 21
5.5 3G WAN Setup ............................................................................................. 23
6 Wireless settings............................................................................................... 26
Contact Information ................................................................................................. 26
iv

Package List
VDSL2 Gateway Router
2 x 5dBi Antenna (Fixed)
Power Adapter
2 x RJ11 Patch Cord
RJ45 Patch Cord
ADSL Splitter
Cd & Quick Installation Guide
VDSL2 Gateway Router
Note:
Make sure that the package contains the above items. If any of the listed
items are damaged or missing, please contact the vendor from whom you
have purchased the product.
5

VDSL2 Gateway Router
Product Overview
Quick Installation Guide will help you to configure iBall Baton iB-WVG300N
(VDSL2 Gateway Router) quickly & easily.
Introduction
VDSL2 Gateway Router – Very high speed digital subscriber line
(VDSL Technology) supporting ITU G.993.2 standard that uses existing
twisted copper cable to provide high speed downstream up to 100Mbps
VDSL2 Profile support : 8a, 8b,8c,12a,12b & 17a
VDSL2 Bandplan support: Plan 997, Plan 998
MIMO technology – 5dBi x 2 Internal Omni-directional Antenna provides
better throughput, stability & wireless performance.
Quad WAN Router
ADSL Internet (xDSL)
VDSL Internet (xDSL)
Broadband Internet (Cable / DSL)
3G Internet
With Auto-Failover & Failback between
3G< > ADSL / 3G< > VDSL / 3G< > DSL
USB Port with Multi-function features
Storage Sharing & DLNA Media Server
Wireless On/Off: Allows turning off wireless function not in use.
WPS (Wi-Fi Protected Setup): Automatically establishing WPA2 secure
wireless connection
For detailed instructions, please refer to the User Guide in the Resource
CD.
6

VDSL2 Gateway Router
Product Features
Complies with IEE802.3 & IEEE802.3u standards
Complies with IEEE 802.11b/g/n standards
Enhanced 300Mbps Wireless data transmission speed
VDSL2 Internet - Configure Internet with (RJ11) WAN port
ADSL2 Internet - Backward compatible as configure with (RJ11) WAN port
Broadband Internet (Cable / DSL) - Configure Internet with (RJ45) WAN port
3G Internet - Access 2G/3G Internet with GSM/CDMA compatible data card
3 - 10/100Mbps LAN Port
1 WAN/ LAN (Interchangeable) & 1 (RJ11) WAN Port
IPv6 Ready | Multi-SSID Security
Guest SSID: Access secure Wireless access to guest users
Wireless security such as WEP, WPA & WPA2
AP Isolation and wireless schedule
Built-in firewall, supporting IP/MAC filter, Application filter and URL filter.
Virtual Server, DMZ host, Dynamic DNS, UPnP and Static Routing
With SNMP & DHCP server
5-dBi x 2 Omni-Directional Antenna type
7

VDSL2 Gateway Router
Hardware Information and Installation
Hardware Information
4.1.1 Front Panel
4.1.2 Rear Panel and Side Panel
8
VDSL2 Gateway Router
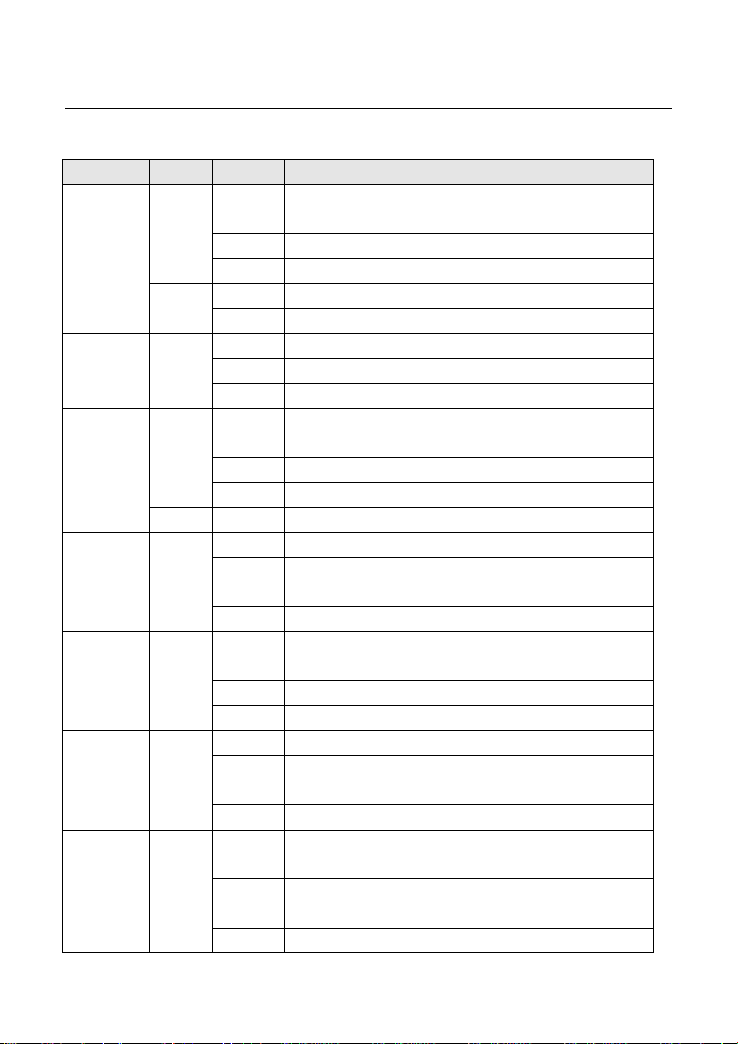
Indicator
Color
Status
Description
Power
Green
On
The device is powered on and the device operates
normally.
Blink
The software is upgrading.
Off
The device is powered off.
Red
On
The device is initiating.
Blink
The software is upgrading.
DSL
Green
On
DSL link has established.
Blink
The DSL line is training.
Off
Device is powered off.
Internet
Green
On
Internet is synchronized successfully in the route
mode.
Blink
Internet data is being transmitted.
Off
Ethernet interface is disconnected.
Red
On
Authentication has failed.
LAN
1/2/3/4
Green
On
The Ethernet interface is connected.
Blink
Data is being transmitted through the Ethernet
interface.
Off
The Ethernet interface is disconnected.
USB1/2
Green
On
The connection of 3G or USB flash disk has
established.
Blink
Data is being transmitted.
Off
No signal is detected.
WLAN
Green
On
WLAN is enabled.
Blink
Data is being transmitted through the wireless
interface.
Off
WLAN is disabled.
WPS
Green
On
Connection succeeds under Wi-Fi Protected
Setup.
Blink
Negotiation is in progress under Wi-Fi Protected
Setup.
Off
Wi-Fi Protected Setup is disabled.
4.1.3 LED Indicator
The following table describes the indicators on the front panel.
9

VDSL2 Gateway Router
4.2 Hardware Installation
4.2.1 Connecting the Device
Step 1 Connect the DSL port of the router and the Modem port of the splitter with a
telephone cable; connect the phone to the phone port of the splitter through a cable;
and connect the incoming line to the Line port of the splitter.
The splitter has three ports:
Line: Connect to a wall phone jack (RJ-11 jack)
Modem: Connect to the Line interface of the router
Phone: Connect to a telephone set
Step1 Connect the LAN port of the router to the network card of the PC through
an Ethernet cable.
Step2 Plug the power adapter to the wall outlet and then connect the other end
of it to the Power port of the router.
Note: If you use 3G WAN service, connect the 3G USB data card to the USB
port of the router.
10

VDSL2 Gateway Router
5 Web Configuration
Network Configuration on PC
Take Windows as an example.
Step1 Click Start > Control Panel > Network and Internet > Network and
Step2 Change Adapter Settings > Local Area Connection.
Step3 Double-click Internet Protocol Version 4 (TCP/IPv4).
Step4 Select Obtain an IP address automatically and Obtain DNS
5.1 Login to the Router
To connect to the Router, you should set up the LAN Connection TCP/IP
setting of the PC to "Obtain an IP address automatically". Launch a suitable
web browser and type 192.168.1.1 in the address bar of the browser.
Sharing Center.
Right-click Local Area Connection and choose Properties.
server address automatically and then click OK. If you select
Use the following IP address, set IP address of the PC as
192.168.1.X (2~254), subnet mask as 255. 255.255.0, and enter
DNS server provided by your ISP.
After that, the login screen shows. Enter the default User Name
admin and Password admin
11

VDSL2 Gateway Router
5.2 Login Menu
After logging in to the VDSL router as a admin user, the following page is
displayed.
12

VDSL2 Gateway Router
5.3 WAN Interface
5.3.1 ADSL Connection
Choose Network Setting > WAN Interface > ADSL
In this page, you can add or remove to configure ADSL Interfaces.
Click Add to add ATM Interface and the following page appears.
13
VDSL2 Gateway Router
In this page, need to enter this PVC (VPI and VCI) value, and select ADSL link type
(EoA is for PPPoE, IPoE, and Bridge.), encapsulation mode, service category.
VPI (Virtual Path Identifier): The virtual path between two points in an ATM network,
and its valid value is from 0 to 255.
VCI (Virtual Channel Identifier): The virtual channel between two points in an ATM
network, ranging from 32 to 65535 (1 to 31 are reserved for known protocols).
DSL Link Type: EoA (it is for PPPoE, IPoE, and Bridge), PPPoA, or IPoA
Encapsulation Mode: LLC/SNAP-BRIDGING, or VC/MUX
Service Category: UBR Without PCR, UBR With PCR, CBR, Non Realtime VBR,
Realtime VBR.
Select Scheduler for Queues of Equal Precedence as the Default Queue:
Weighted Round Robin or Weighted Fair Queuing.
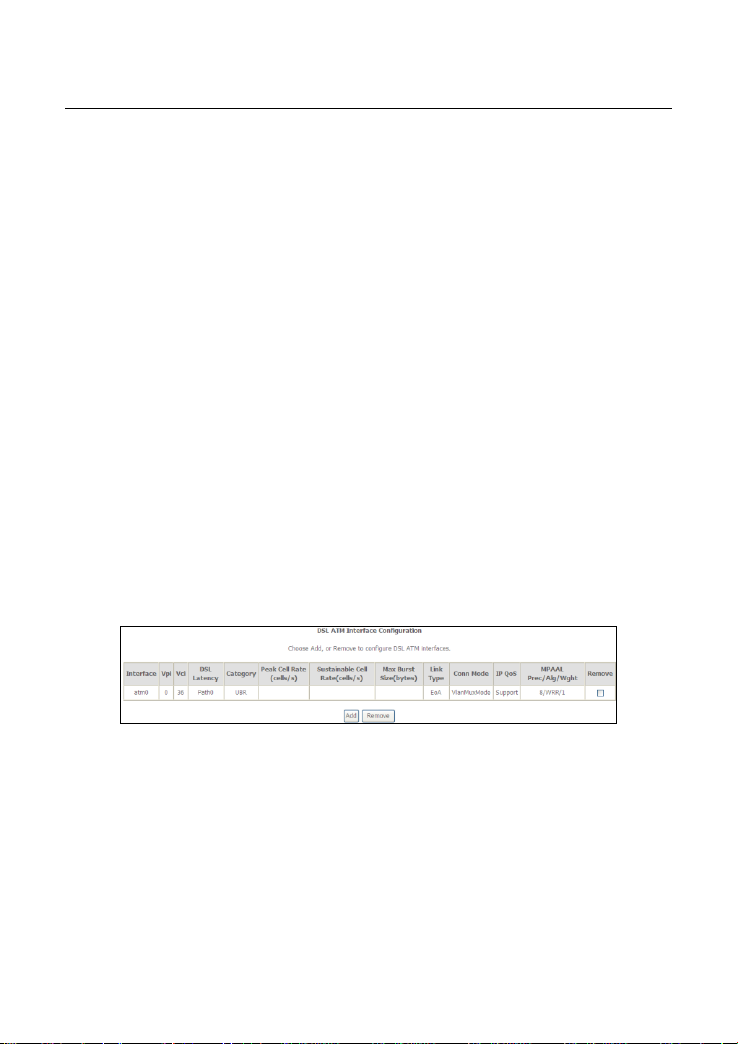
Click Apply/Save to save the configuration, and return the following page:
If you want to remove this Interface, please select the Remove check box and click
Remove.
14

VDSL2 Gateway Router
5.3.2 VDSL Connection
Choose Network Setting > WAN Interface > VDSL, and the following page
appears. In this page, you can add or remove to configure VDSL Interfaces.
Click Add and the following page appears.
In this page, you can select scheduler for queues of equal precedence and enter
the queue value. Click Apply/Save to save configuration.
15

VDSL2 Gateway Router
5.3.3 Broadband Connection
Choose Network Setting > WAN Interface > Broadband, and the following page
appears. In this page, you can add or remove to configure Broadband WAN.
Click Add and the following page appears.
In this page, you can select a ETH port. Click Apply/Save to save configuration.
Note: If Broadband is selected, there are two WAN service types (PPPoE and IPoE).
16

VDSL2 Gateway Router
5.4 WAN Interface
Choose Network Setting > WAN Setup, and the following page appears.
In this page, you can add, remove, or edit a WAN setup.
Note: ADSL / VDSL / Broadband Connection has different WAN Connection
service types: PPP over Ethernet (PPPoE), IP Over Ethernet (Dynamic IP / Static
IP) and Bridging.
You need to configure the WAN Interface according your ISP settings.
5.34.1 Configuring PPPoE WAN Service
This section describes the steps for adding the PPPoE WAN service.
Click the Add button to display the following page. (At first, you must add a proper
ADSL or VDSL interface for this WAN service.)
17

VDSL2 Gateway Router
In this page, you can select a ATM Interface for the WAN service. After selecting the
ATM interface, click Next to display the following page.
In this page, select the WAN service type to be PPP over Ethernet (PPPoE). Click
Next to display the following page.
18

VDSL2 Gateway Router
In this page, you can modify the PPP username, PPP password, PPPoE service
name and authentication method.
PPP Username: The correct user name provided by your ISP.
PPP Password: The correct password provided by your ISP.
PPPoE Service Name: If your ISP provides it to you, please enter it. If not, do not
enter any information.
Authentication Method: The value can be AUTO, PAP, CHAP, or MSCHAP. Usually,
you can select AUTO.
Enable Fullcone NAT:. NAT is one where all requests from the same internal IP
address and port are mapped to the same external IP address and port. Furthermore,
any external host can send a packet to the internal host, by sending a packet to the
mapped external address.
Dial on demand (with idle timeout timer): If this function is enabled, you need to
enter the idle timeout time. Within the preset minutes, if the modem does not detect
the flow of the user continuously, the modem automatically stops the PPPoE
connection. Once it detects the flow (like access to a webpage), the modem restarts
the PPPoE dialup. If this function is disabled, the modem performs PPPoE dial-up all
the time. The PPPoE connection does not stop, unless the modem is powered off and
DSLAM or uplink equipment is abnormal.
PPP IP extension: If you want to configure DMZ Host, you should enable it first.
Use Static IPv4 Address: If this function is disabled, the modem obtains an IP
address assigned by an uplink equipment such as BAS, through PPPoE dial-up. If
this function is enabled, the modem uses this IP address as the WAN IP address.
Enable PPP Debug Mode:Enable or disable this function.
Bridge PPPoE Frames Between WAN and Local Ports:Enable or disable this
function.
Enable IGMP Multicast Proxy:If you want PPPoE mode to support IPTV, enable it.
19

VDSL2 Gateway Router
After setting the parameters, click Next to display the following page.
In this page, select a preferred WAN interface as the system default gateway and
then click Next to display the following page.
20

VDSL2 Gateway Router
In this page, you can obtain the DNS server addresses from the selected WAN
interface. Click Next, and the following page appears.
Step5 In this page, it displays the information about the PPPoE settings.
Click Apply/Save to save and apply the settings.
5.4.1 Configuring Bridge WAN Interface
This section describes the steps for adding the Bridge WAN service.
In the Wide Area Network (WAN) Service Setup page, click the Add button to
display the following page. (At first, you must add a proper ATM or PTM interface for
this WAN service.) Click the Add button to display the following page.
21

VDSL2 Gateway Router
Select the proper ATM Interface and then click Next to display the following page.
In this page, you can select the WAN service type, and modify the service description
for this service. After finishing setting, click Next to display the following page.
In this page, it displays the information about the bridge settings. Click Apply/Save
to save and apply the settings. You can modify the settings by clicking the Back
button if necessary.
22

VDSL2 Gateway Router
5.5 3G WAN Setup
Choose Network Setting > 3G WAN Setup , and the following page appears.
This page is used to configure 3G connection. If you want to access the Internet
through 3G connection, a 3G network card is required. Connect the 3G network card
to the USB interface of the Router.
Information: Click it to display the information of the 3G network card.
Pin Manage: Click it to configure the 3G PIN.
Upload Driver: For a un-support USB dongle, click it to upload the new driver for
supporting the USB. The driver is a text file.
Click Add in the WAN Service For 3G Mobile Setup to display the following page.
In this page, you are allowed to configure the settings of the 3G USB modem.
23

VDSL2 Gateway Router
User Name: Username provided by your 3G ISP.
Password: Password provided by your 3G ISP.
Authentication Method: Select a proper authentication method in the drop- down
list. You can select Auto, PAP, CHAP, or MSCHAP.
APN: APN (Access Point Name) is used to identify the service type. Enter the APN
provided by your 3G ISP.
Dial Number: Enter the dial number provided by your 3G ISP.
Idle time (in sec.): If no traffic for the preset time, the 3G will disconnect
automatically.
Net Select: Select the 3G network that is available.You may select EVDO,
WCDMA, CDMA2000, TD-SCDMA, GSM, or Auto.
Dial on demand: Within the preset minutes, if the modem does not detect the flow
of the user continuously, the modem automatically stops the 3G connection.
Once it detects the flow (like access to a webpage), the modem restarts the
3G dial-up.
Dial Delay (in sec.): The 3G delays dial after the DSL is disconnected.
Default WAN Connection Select: You can select DSL or 3G from the drop-down
list.
WAN Failover: 3G connection is backup for the DSL connection.
You may also click the auto setting button to automatically configure the 3G
connection.
DSL: If the DSL is disconnected, the 3G starts to dial.
IP connectivity: If the system fails to ping the specified IP address, the 3G starts to
dial.
24

VDSL2 Gateway Router
After finishing setting, click the Apply/Save button to save the settings.
Note: When there is no DSL WAN connection, insert the 3G network card, and then
system will perform dial-up automatically.
If the DSL WAN connection and the 3G connection coexist, the DSL WAN connection
takes priority over the 3G connection. When the DSL WAN connection starts to
perform dial-up, the 3G connection will be disconnected. If the DSL WAN connection
has established, you may manually to perform 3G dial-up, and then the DSL WAN
connection will be disconnected.
Note: Compatible GSM/CDMA data card will only detect in USB slot to support
2G/3G Internet
25
VDSL2 Gateway Router
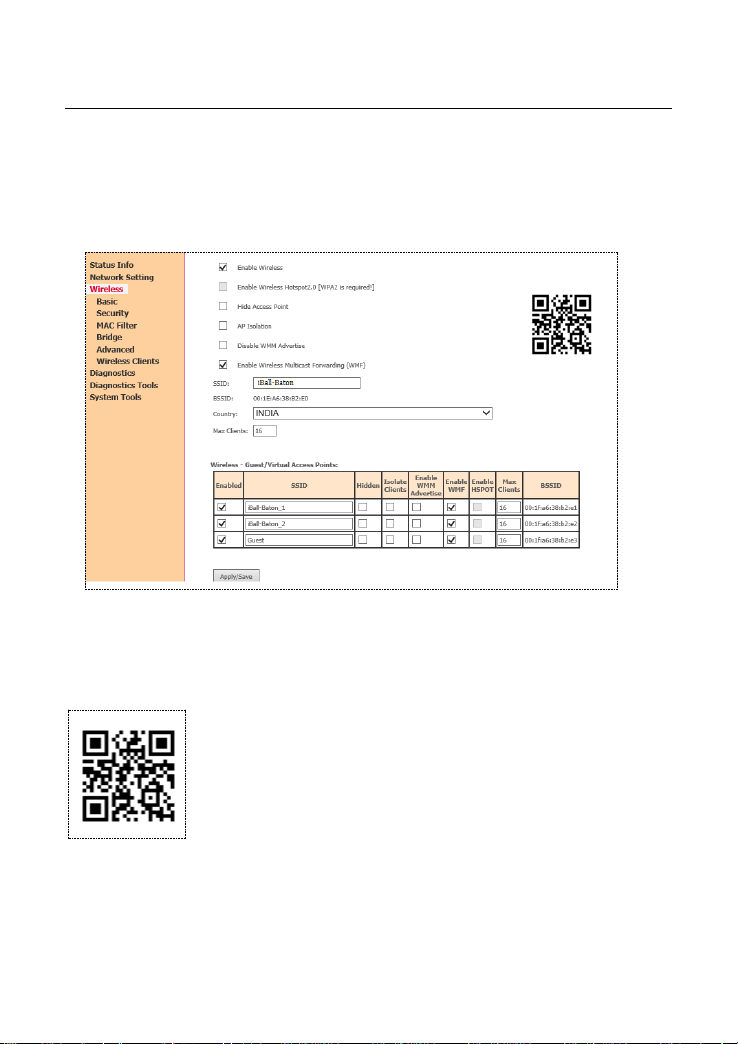
6 Wireless settings
In following page, you can set SSID and encryption for different SSID TO
configure wireless settings
For wireless security, it is recommended to set the encryption mode to
WPA2 and then enter a password.
QR Code
You can also access router GUI menu though any of mobile devices.
Just scan the QR code, Default SSID iBall-Baton will appear on to access router GUI
menu and configure router settings
26

VDSL2 Gateway Router
COPYRIGHT & TRADEMARKS
Specifications are subject to change without notice. iBall Baton is a
registered trademark of Best IT World (India) Pvt. Ltd. Other brands
and product names are trademarks or registered trademarks of their
respective holders.
No part of the specifications may be reproduced in any form or by
any means or used to make any derivative such as translation,
transformation, or adaptation without permission from Best IT World
(India) Pvt. Ltd. All rights reserved.
Contact Information
Note: For any technical help on iBall Baton products please contact
support.baton@iball.co.in
www.iBallBaton.com | www.iBall.co.in
27
 Loading...