

iBall Slide Elan 3x32 User Manual

User
Guide
Model:
iBall
Slide
Elan
3 x 32
1
Legal Information
All rights are reserved. Reproduction, transfer, distribution of the contents herein in any manner without
the prior written permission of Best IT World (India) Pvt. Ltd. is prohibited. Best IT World (India) Pvt. Ltd.
reserves the right to add, modify or delete, any of the contents herein or withdraw this document at any
time without prior notice and without assigning any reasons thereof. For detailed terms and conditions
refer www.iBall.co.in
Safety Precautions
Operate Safely
• Please do not use Slide while charging. Disconnect Slide from charger before use.
• Make sure to charge the battery full for the first time usage.
• Keep the Slide at least an inch away from your body while dialing / answering calls.
• Do not use the Slide if the screen is cracked or broken. Cracked and / or broken screens could cause
injury to hands and / or face.
• To reduce the risk of motion injuries:
- While using your Slide, hold it with a relaxed grip and press the keys lightly.
- Do not handle the Slide with wet hands.
- Use of special keys / features reduce the number of keys pressed
- Take regular breaks in between calls.
- Use hands-free accessories.
- Switch off the Slide before cleaning it.
- Switch off the Slide and external power sources before any attempt to change SIM Cards or any other
accessories.
- Keep your Slide and all accessories out of reach of small children and animals.
When using the device, mind the following
• Hold the device upright, as you would with a traditional Slide.
• Speak directly into the microphone.
Careful handling
• Avoid potential damage to your Slide under:
- Keep away from liquids.
- Avoid using and / or storing in dusty and / or dirty places / environments.
- Do not drop, knock, throw or otherwise handle the Slide roughly.

2
- Avoid exposing your Slide to extreme temperatures. Extreme temperatures reduce the charging
capacity and life of batteries and Slide.
- Never use damaged chargers.
- Do not use chemicals or other cleaning solutions to clean the Slide.
- Use moist or anti-static cloth.
- Avoid using Slide with camera flash or light close to the eyes.
- Do not dismantle the Slide and accessories without permission.
- Avoid handling by unauthorized personnel.
-Do not use damaged power cords or plugs, or loose electrical sockets.
-Do not use your device outdoor during a thunderstorm.
-Do not use your device near devices or apparatuses that emit radio frequencies, such as sound
systems or radio towers.
Turn Off your Slide in Restricted Areas
Use of Slide in certain areas / places / conditions can be hazardous.
• Switch off your Slide:
- Inside air crafts;
- In Medical hospitals / clinics;
- Areas where chemicals are used or stored;
- Fuel and gas stations;
- In and around areas having electrical / electronic equipment; - Areas where any kind of blasting activity
is being carried out.
-Turn off the device in potentially explosive environments.
• Charging batteries in such areas is hazardous as potential sparks may result in explosion and / or fire
and may cause damage to property and / or life and can also prove fatal.
Keep your device dry
Humidity and liquids may damage the parts or electronic circuits in your device.
Do not turn on your device if it is wet. If your device is already on, turn it off (if the device will not turn off
and since you cannot remove the battery, leave it as it is). Then, dry the device with a towel and take it to
a -service center.
Liquids will change the color of the label that indicates water damage inside the device. Water damage
to your device can void your manufacturer’s warranty.
3
Drive Safety
Avoid using your Slide while driving and respect and obey all regulations that restrict the use of Slide or
similar devices while driving. Primary consideration while driving should be safety.
Vehicles
RF signals may affect improperly installed or inadequately shielded electronic systems in motor vehicles
such as electronic fuel injection, electronic speed control, and air bag systems. Only qualified personnel
should service the device or install the device in a vehicle. Faulty installation or service may be
dangerous and may invalidate your warranty. The use of wireless tele devices in an aircraft may be
dangerous to the operation of the aircraft and may be illegal.
Interference with Electronic Devices
Mobile phones/Slide emit Radio Frequency (RF) signals that may interfere with unshielded or improperly
Shielded electronic equipment, such as pace makers, hearing aids, other medical devices and other
electronic devices in homes and / or vehicles and may prove to be hazardous.
Protect Your Hearing
Excessive exposure to high volumes may cause hearing problems. Maintain proper volume levels for
conversations and / or music.
Precautions
In order to use Slide correctly, please read the following statement of the user manual carefully before
using the device.
Do not store your device with metal objects, such as coins, keys, and necklaces
-Your device may be scratched or may malfunction.
-If the battery terminals come into contact with metal objects, this may cause fire.
Do not store your device near magnetic fields
-Your device may malfunction or the battery may discharge from exposure to magnetic fields.
-Magnetic stripe cards, including credit cards, phone cards, passbooks, and boarding passes, may be
damaged by magnetic fields.
Do not use your device or applications for a while if the device is overheated
-Prolonged exposure of your skin to an overheated device may cause low temperature burn symptoms,
such as red spots and pigmentation.
If your device has a camera flash or light, do not use it close to the eyes of people or pets
-Using a flash close to the eyes may cause temporary loss of vision or damage to the eyes.

4
Use caution when exposed to flashing lights
-While using your device, leave some lights on in the room and do not hold the screen too close to your
eyes.
-Seizures or blackouts can occur when you are exposed to flashing lights while watching videos or
playing Flash-based -games for extended periods. If you feel any discomfort, stop using the device
immediately.
-If anyone related to you has experienced seizures or blackouts while using a similar device, consult a
physician before using the device.
-If you feel discomfort, such as a muscle spasm, or disorientation, stop using the device immediately and
consult a physician.
-To prevent eye strain, take frequent breaks while using the device.
Protect your personal data and prevent leakage or misuse of sensitive information
While using your device, be sure to back up important data. iBall is not responsible for the loss of any
data.
When disposing of your device, back up all data and then reset your device to prevent misuse of your
personal information.
Carefully read the permissions screen when downloading applications. Be particularly cautious with
applications that have access to many functions or to a significant amount of your personal information.
Check your accounts regularly for unapproved or suspicious use. If you find any sign of misuse of your
personal information, contact your service provider to delete or change your account information.
In the event your device is lost or stolen, change the passwords on your accounts to protect your
personal information.
Avoid using applications from unknown sources and lock your device with a pattern, password, or PIN.
Using this Guide
This guide has been specially designed to guide you through the basics of your device, such as getting
started with the device. Please read this guide carefully before using your device to ensure safe and
correct use.
The descriptions in this guide are based on the default settings of your device.
Please keep this guide for future reference.
Protect environment save energy
You do not need to charge your Slide battery so often if you do the following:
Close applications and data connections, for example, your Bluetooth connection, when not in use.
Deactivate unnecessary sounds, such as touch screen and key tones.

5
SAR
This device is SAR accredited adheres to international quality benchmarks and safety measures
concerning the harmful impact of radiations. It complies with applicable safety requirements for exposure
to radio waves. The radio waves exposure guidelines employ a unit of measurement called Specific
Absorption Rate (SAR). SAR is a measure of the rate at which energy is absorbed by the body when
exposed to a radio frequency (RF). SAR is usually averaged either over the whole body, or over a small
sample volume (typically 1g or 10g of tissue). The recommended SAR limit for a mobile handset/similar
device is 1.6 W/Kg averaged over a volume containing a mass 1g of human tissue.
SAR Value
• Your Mobile is designed not to exceed the limits of emission of radio waves recommended by
international guidelines.
• SAR (Specific Absorption Rate) is the measurement of body-absorbed RF quantity when the Slide
is in use. SAR value is ascertained according to the highest RF level generated during laboratory tests.
• The SAR value of the Phone or Slide may depend on factors such as proximity to the network
tower, use of accessories.
SAR Recommendations
• Use a wireless hands free system (headphone, headset) with lower Bluetooth emitter.
• Make sure the device has a low SAR.
• Please keep your calls short and use SMS whenever more convenient. This advice applies especially
to children and pregnant women.
• Prefer to use your Slide when the signal quality is good.
SAR Value
Tested SAR Value of Slide iBall Slide Elan 3x32 is as follows:
(2G) GSM 900MHz: 0.941 W/kg(1g)
(2G) GSM 1800MHz: 0.731 W/kg(1g)
(3G) WCDMA 900MHz: 0.590 W/kg(1g)
(3G) WCDMA 2100MHz: 0.898 W/kg(1g)
(4G) FDD-LTE Band B1: 1.240 W/kg(1g)
(4G) FDD-LTE Band B3:0.933 W/kg(1g)
(4G) FDD-LTE Band B5: 1.063 W/kg(1g)
(4G) FDD-LTE Band B8: 0.887 W/kg(1g)
(4G) TDD-LTE Band B40: 0.834 W/kg(1g)
(4G) TDD-LTE Band B41: 1.180 W/kg(1g)
Maximum Permitted SAR value is: 1.6 W/Kg (1g)
Index
Legal Information....................................................................................................................1
Using this Guide..................................................................................................................... 4
SAR…………………………………………………………………………………………....5

6
Index.........................................................................................................................................6
1. Introduction...................................................................................................................... 7
2. Quick Panel Setting........................................................................................................9
3. Starting up the Device................................................................................................. 11
4. Home screen................................................................................................................. 12
5. Settings.......................................................................................................................... 14
6. PC connectivity............................................................................................................. 36
7. Communication.............................................................................................................37
8. Messaging..................................................................................................................... 42
9. Internet........................................................................................................................... 44
10. Media..............................................................................................................................46
11. Connectivity Features.................................................................................................. 50
12. Other...............................................................................................................................50
13. Google Applications..................................................................................................... 53
14. Troubleshooting............................................................................................................ 54
7
1. Introduction
1.1 Specification iBall Slide Elan 3x32
Details
Description
CPU
Powerful Quad Core 1.3GHz ARM Cortex A53 64bit Processor
Memory
3 GB RAM
Storage
32 GB Built-in Storage
Micro SD Support up to 64 GB
Operating System
Android 8.1 Oreo
Connectivity
Wi-Fi 802.11 a/b/g/n, Micro USB Port, Bluetooth 4.0, USB OTG Function,
USB Tethering & Micro HDMI Port
Network
FDD-LTE B1/B3/B5/B8, TDD-LTE B40/B41, (3G) WCDMA-900/2100MHz,
(2G) GSM-900/1800MHz, Single SIM, 4G Support VoLTE Support, 4G
Downlink up to 150 Mbps, Uplink up to 50 Mbps
Sensor
G-Sensor
Camera
5 MP AF rear camera with LED Flash & 2 MP Front Camera
Display
25.5cm (10.1”) IPS Full Capacitive Multi-Touch (1280*800) (149.45 PPI)
Display
Support Video
Support 3g2, 3gp, avi, mp4, mkv, m2ts, webm, mov,
Support Image
Support bmp, jpg,gif, png, wbmp
Support Audio
Support aac, amr, flac,midi, mp2, mp3, oog, wav
Battery
7000mAh Li-Polymer Battery*
Dimension & weight
260.20 x 168.10 x 10.62mm and 593 gram
8
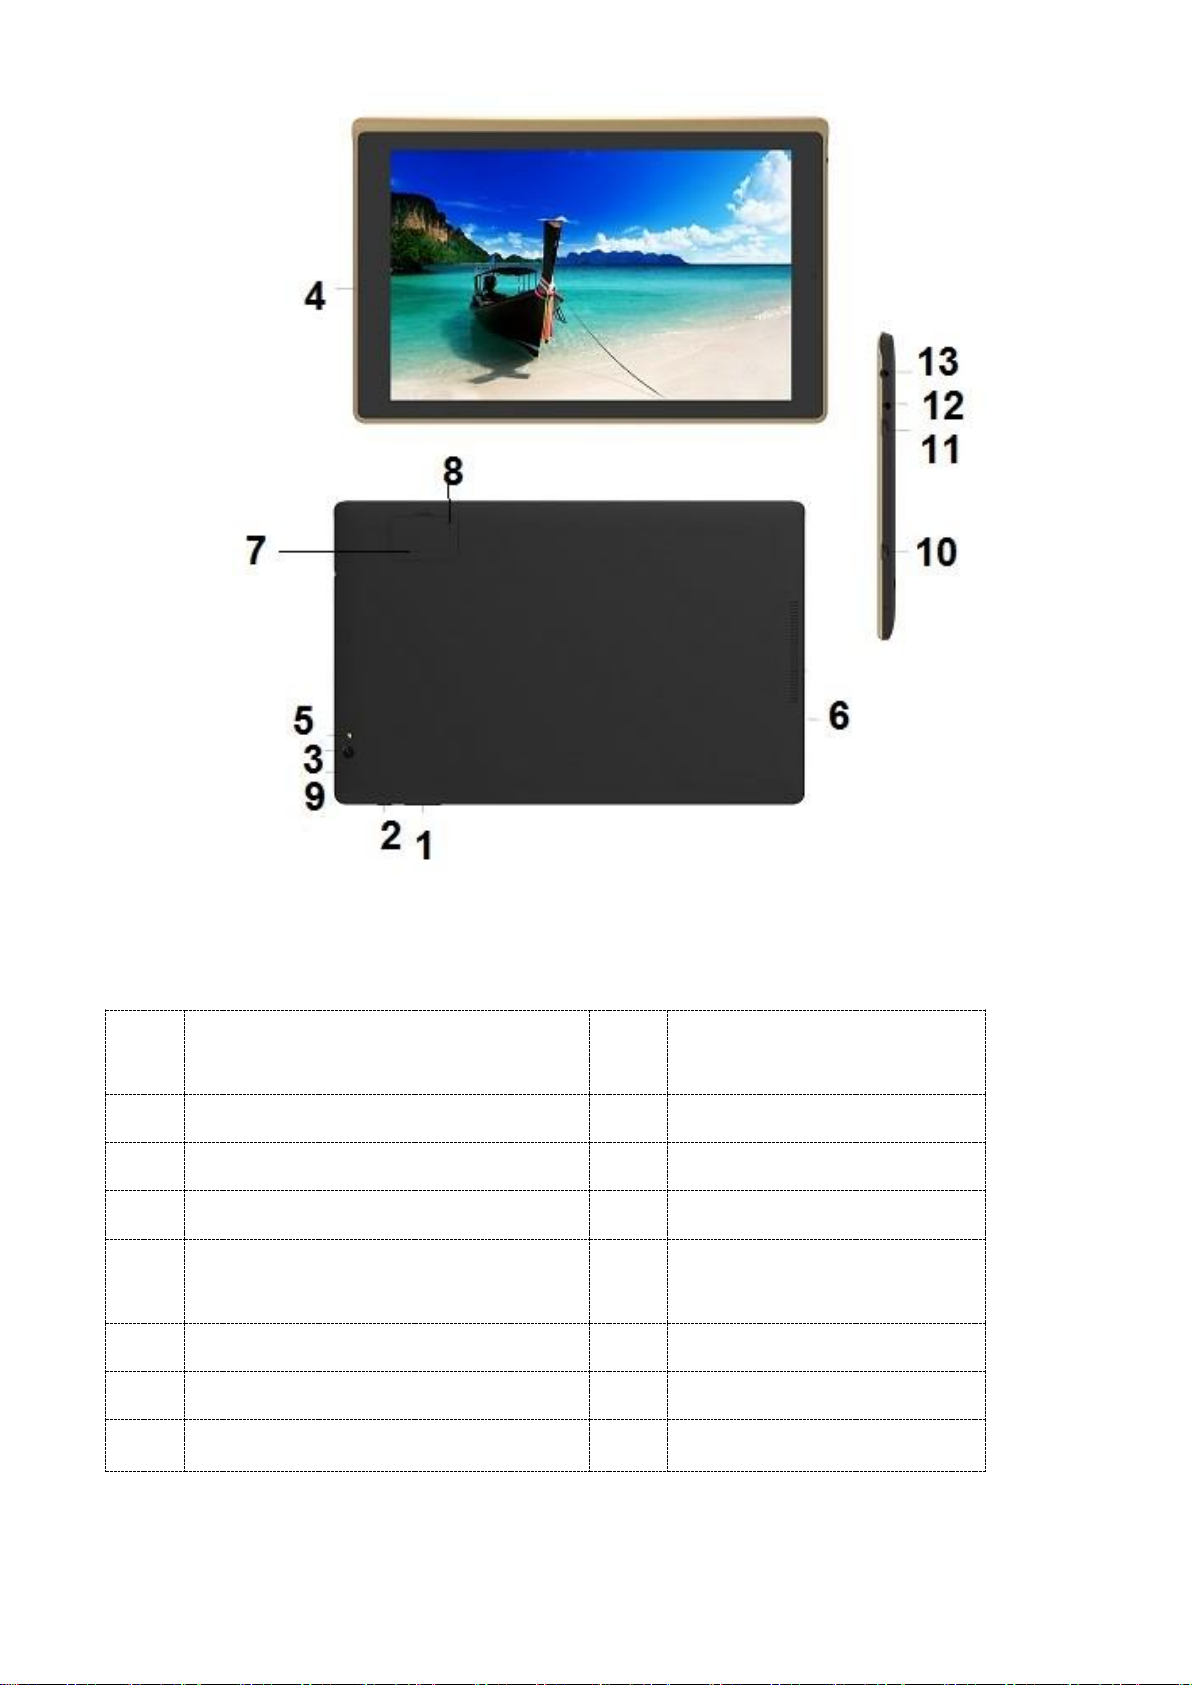
1.2 Know Your Device
Index
Sr.N
o.
DESCRIPTION
Sr.N
o.
DESCRIPTION
1
Volume Up/Down Key
2
On/Off Power Key
3
Rear Camera
4
Front Camera
5
LED Flash
6
Speakers
7
Reset hole
8
SIM slot & SD card slot cover
9
Mic
10
Micro HDMI Port
11
Micro USB Port
12
3.5mm Audio Jack
13
Round DC Pin Charging Port
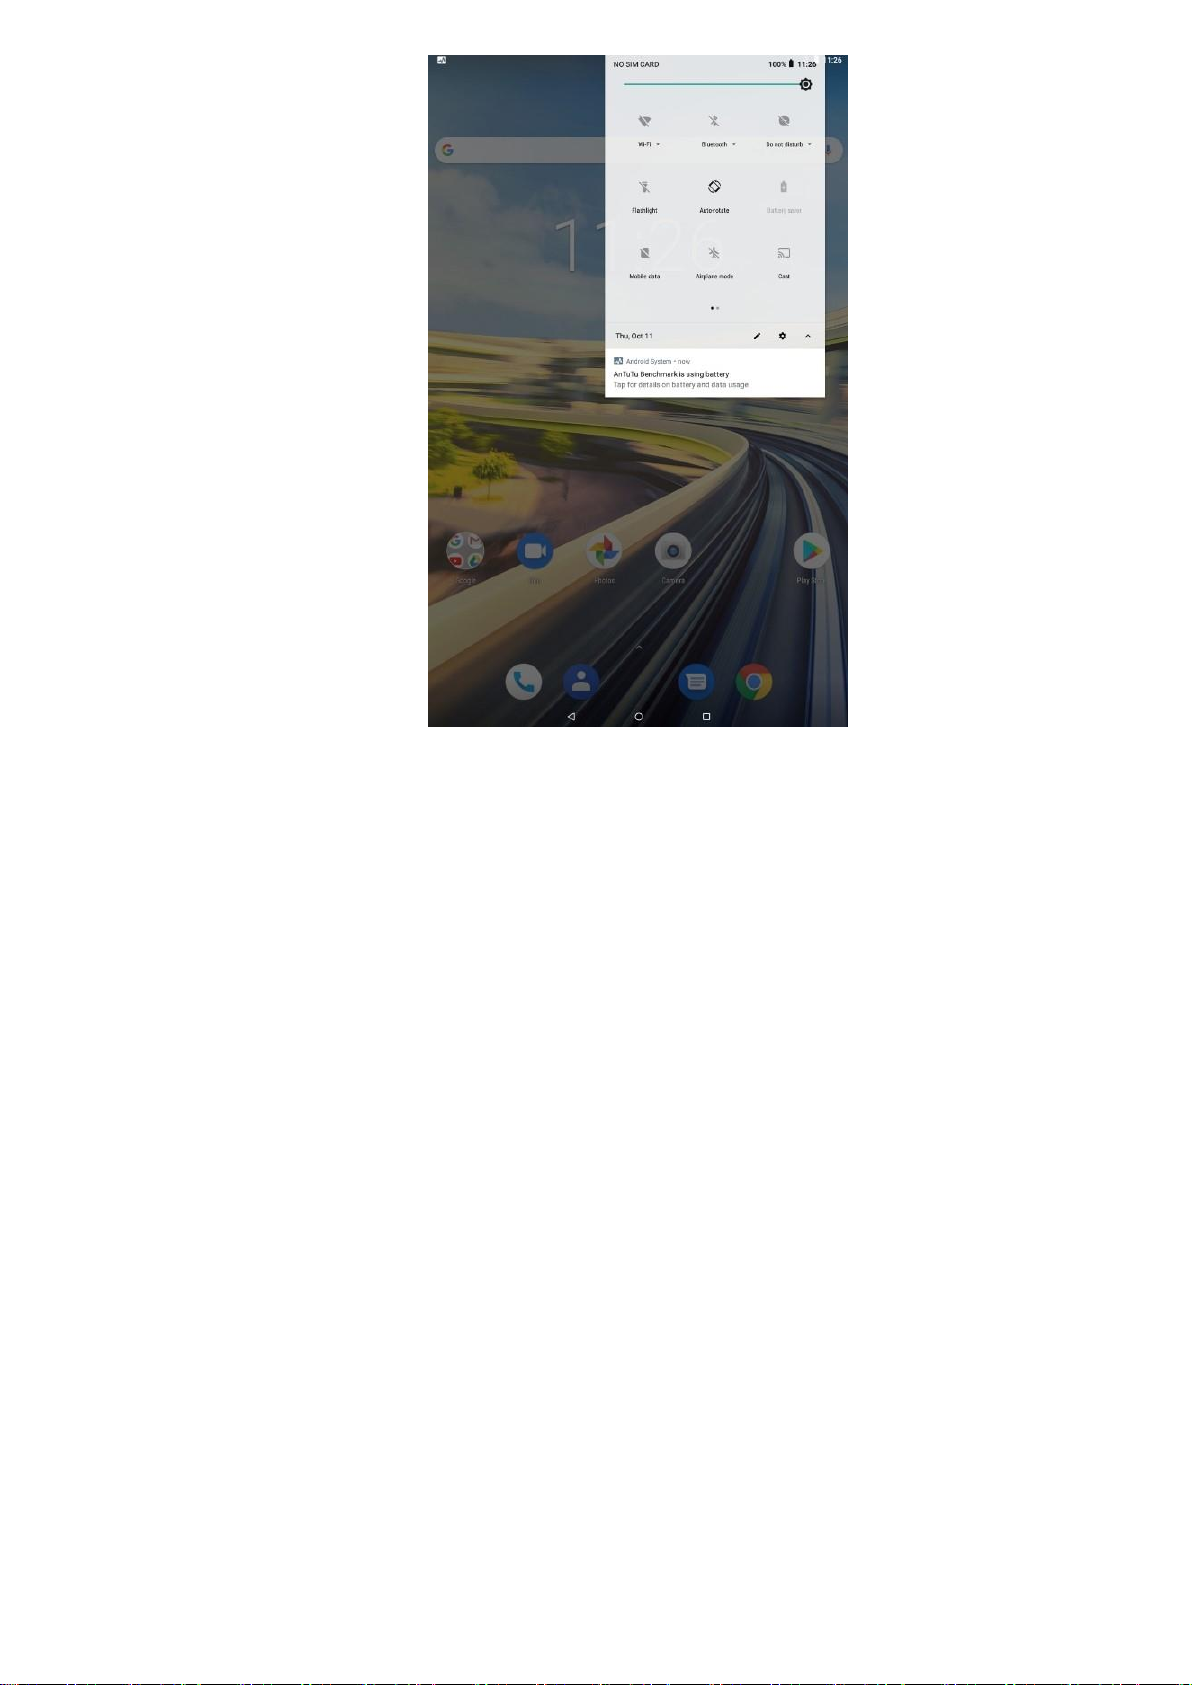
2. Quick Panel Setting
Use Quick Settings to easily get to frequently used settings, like turning on airplane mode. To open Quick
Settings, swipe down from the top of the screen with one finger. To change a setting, just click the icon:
9
Brightness:Using this option you can change the brightness level of the display screen according to
your needs and usage.
Wi-Fi:Using this you can turn Wi-Fi ON/OFF.
Bluetooth:Using this you can turn Bluetooth ON/OFF.
Do not disturb: You’ll have options for “Total Silence,” “Alarms Only,” and “Priority Only,” and you can
set time limits for how long you want Do Not Disturb to last
Flashlight: Using this you can turn Flashlight ON/OFF
Auto Rotation: Using this option you can select whether or not you want to use the auto rotation option.
Battery: It will indicate you the current battery status & you can go to battery setting directly from here
Mobile data:Using this you can turn the data connection ON/OFF. Data connection helps you access
internet using your SIM network.
Airplane Mode:Selecting this option activates the airplane mode, which means it cuts you OFF from all
kind of network connectivity including your SIM network, Bluetooth, WI-FI network or any other network
your handset supports.
.Location:Using this you can turn ON/OFF location access.
Cast:Cast screen allow users to wirelessly share tablet content on television screen.
User:You can Switch User of device
Setting:Click on setting icon to reach system settings.

10
All the functions have been explained in details in their respective sections.
Note: On pressing on some text of these options you will be directed into settings option from there you
can operate further if you want to use more related functions.
To install the SIM card
The SIM card contains your phone number, service details, and phonebook/ message memory. Your
device supports both 4G,3G & 2G SIM cards.
1. Pull cover from the lower back side.
2. Locate the SIM card slot, and then insert the SIM card with its gold contacts facing down and its cutoff
corner facing out the card slot.
3. Push the SIM card completely into the slot.
Note:
• Some legacy SIM cards may not function with your device. You should consult with your service
provider for a replacement of SIM card. There may be some fees for this service.
To install the Memory card
To have additional storage for your images, videos, music, and files, you can purchase a memory card
and install it into your device.
1.Make sure that your device is turned OFF, and then pull the cover from the lower back side.
2. Locate the memory card slot on the upper part of the exposed right panel.
3. Insert the memory card into the slot with its gold contacts facing down until it clicks into place.
Note: To remove the memory card, push outside & eject it from the slot.
Charging the Battery
New batteries are shipped partially charged. Before you start using your device, it is recommended that
you charge the battery. Some batteries perform best after several full charge/discharge cycles.
The battery can be charged and discharged many times, but it will eventually wear out. When the talk
and standby times are noticeably shorter than normal, get the battery replaced. Use only iBall approved
batteries, and recharge your battery only with iBall approved chargers designated for this device. If a
battery is being used for the first time or if the battery has not been used for a prolonged period, it may
be necessary to connect the charger, then disconnect and reconnect it to begin charging the battery. If
the battery is completely discharged, it may take several minutes before the charging indicator appears
on the display or before any calls can be made.
Note: Only the DC pin AC adapter provided with your device must be used to charge the device.
Connect the USB connector of the AC adapter to the sync connector on your device, and then plug in
the AC adapter to an electrical outlet to start charging the battery.
As the battery is being charged while the device is ON, a charging icon appears in the title bar of the
Home screen. After the battery has been fully charged, a full battery icon appears on the title bar of the
Home screen.
Warning!

11
• As a safety precaution, the battery stops charging before it overheats.
3. Starting up the Device
Power ON / OFF
To power OFF your Slide, press & hold the POWER key. On release, the options menu opens. Select
‘Power OFF’ from the given options and confirm. This will turn OFF the device.
To power ON again, press & hold the POWER key. The iBall power start up animation will appear on the
screen indicating that the device is starting. It takes around 40 seconds to completely reboot the device.
Silent mode
To put your device on silent mode quickly, press & hold the – volume down button to zero volume. The
volume level 0 is the Silent mode. On Home screen, click and select SettingsSound & notification,
select ‘Silent’ radio button.
Screen time out
After a period of inactivity, your screen will go to sleep (display will turn black). In sleep, your Slide uses
less battery power. You can control this behavior by following the below mentioned steps:
Set screen timeout period
1. On the Home screen, click and select Settings.
2. Select Display option.
3. Select “Screen Time out”, to set the time period of sleep mode.
Press POWER key once to OFF display immediately. While on a call, to lock your control buttons and
screen from accidental touch activation, press POWER key.
You can increase the security of your Slide by setting Screen Lock pattern. Once set, in order to unlock
your screen, you’ll have to draw the correct unlock pattern. You can set your screen unlock pattern as
follows:
1. On the Home screen, click and select Settings.
2. Select Security and then select Screen lock pattern option.
3. Set or change your unlock pattern by selecting Screen lock pattern, as applicable.
4. Follow the prompts to define your pattern.
Note: You must swipe your finger along the screen to create the pattern, do not select individual dots.
Connect at least four dots in order to create a lock pattern.
If you want your pattern to be hidden as you draw it, clear ‘Make pattern visible’ check box.
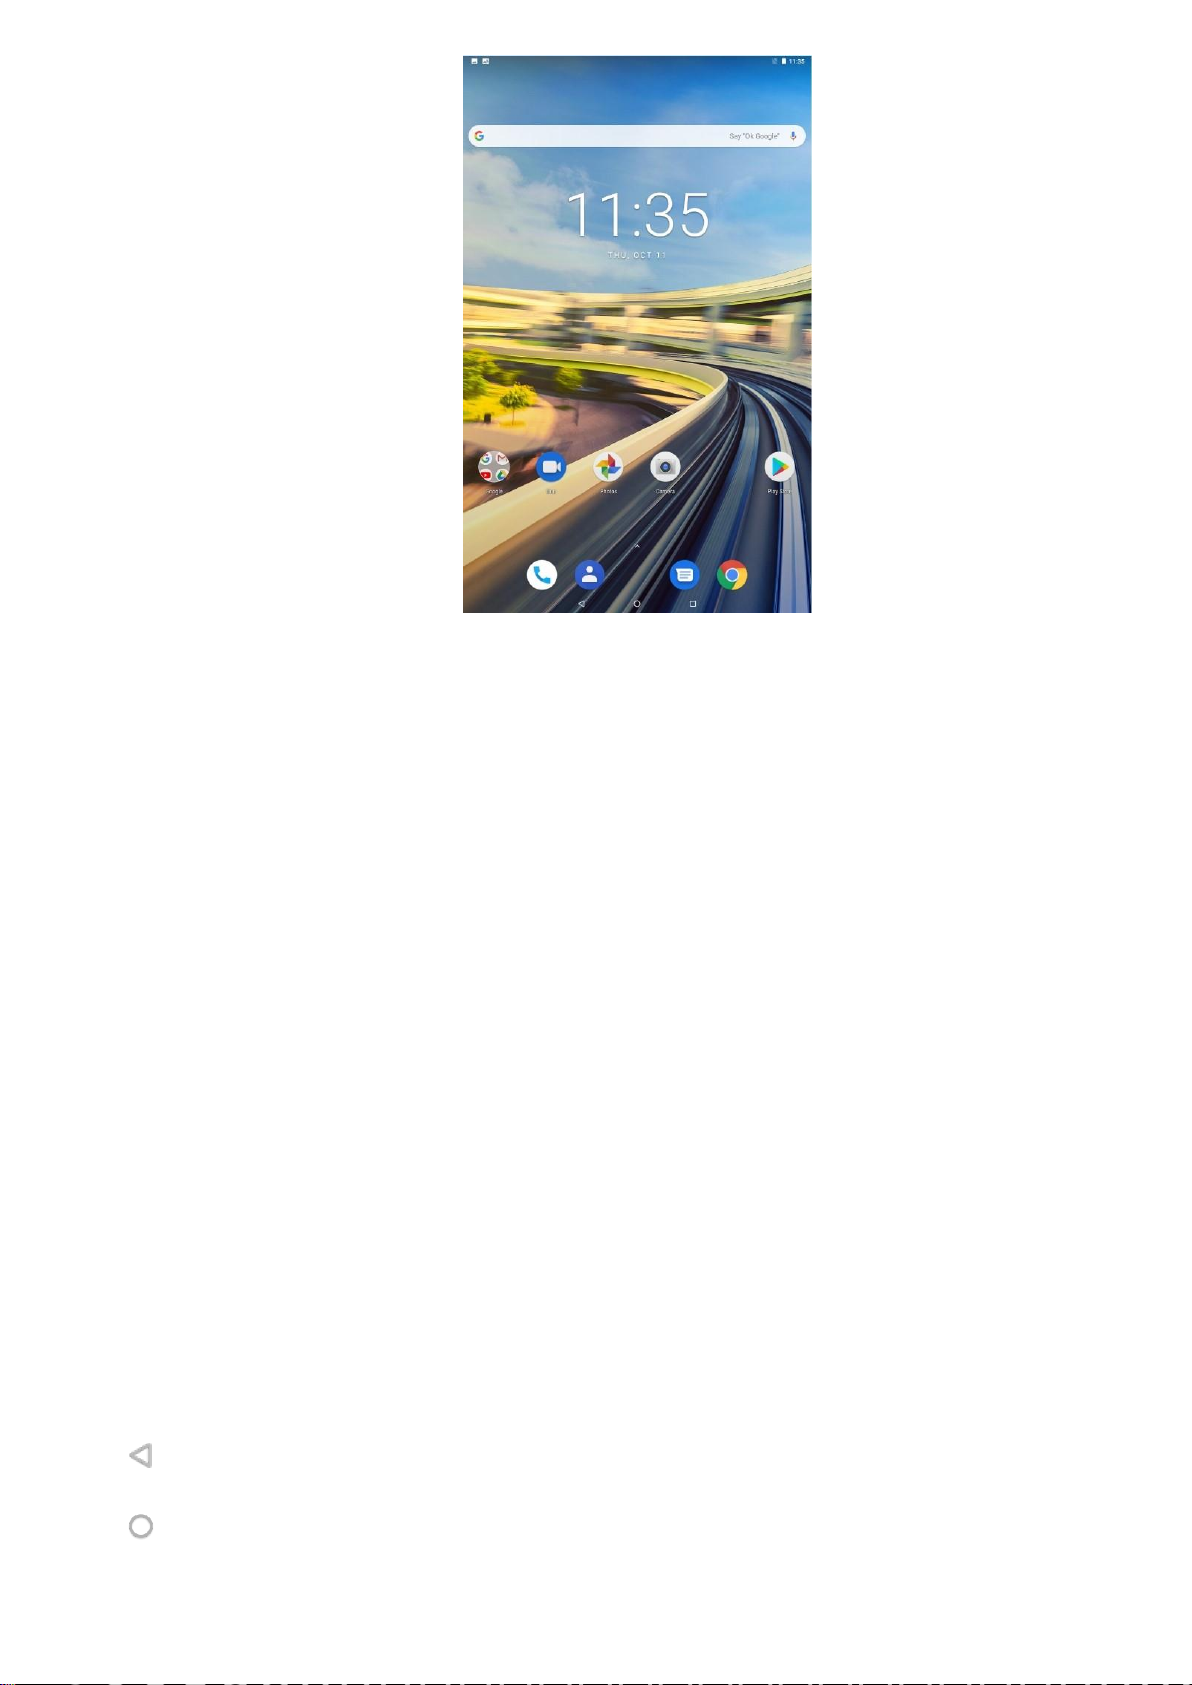
4. Home screen
The Home screen is your starting point for using all the applications on your Slide. You can customize
your Home screen to display applications, shortcuts, and widgets as you like.
12
1. Click the application tab with your fingertip to reveal the application icons.
2. The Home screen actually extends beyond the screen width. On Home screen, swipe your fingertip
left and right along the screen to reveal the full width of the Home screen. This additional space gives
you more room to customize Home with applications, shortcuts, and widgets.
3. Create Home screen shortcuts and widgets:
• Click the Apps tab with your fingertip to reveal the application icons, swipe your fingertip right to show
the shortcuts and widgets.
• Select an Application shortcut, a Shortcut to some of your saved information (such as a play list), a
Widget (a clock or picture frame) for your Home screen.
• The application, shortcut, folder, or widget appears on Home screen.
Tip: To create an application shortcut quickly, click the application tab to reveal all the application icons,
then touch & hold an application icon. Its shortcut is added to the Home screen.
4. To remove a shortcut or widget from your Home screen, touch & hold the item to enter “move mode”.
The application tab turns into a Trash button. Drag the item to the ‘Remove’ button and release
5. Move objects on the Home screen
• To move an icon or other item on the Home screen, you must first touch & hold it to enter move mode.
The object will magnify when it’s ready to be moved.
• Without lifting your finger (or you’ll drop out of move mode), drag the object to the new position. To
move an item to a section of the Home screen not in view, move it to the edge of the screen and hold it
there for a moment. The screen view will shift; position the object and release.
Back: Opens the previous screen you were working in, even if it was in a different app. Once you
back up to the Home screen, you can't go back any further in your history.
Home: Open Home. If you’re viewing a left or right Home screen, opens the central Home screen.
13
Overview: Opens a list of thumbnail images of apps and Chrome tabs you’ve worked with recently. To
open an app, click it. To remove a thumbnail from the list, swipe it left or right.
If you don't use these buttons often, they may shrink to dots or fade away, depending on the current app.
To bring them back, click their location on your device.
4.1 Read your notifications
On the upper side of your Slide screen is the status bar. On the left side, icons will appear, notifying you
of a new message, upcoming calendar event, or something else you should notice. On the right side of
the status bar, you’ll see connection status icons.
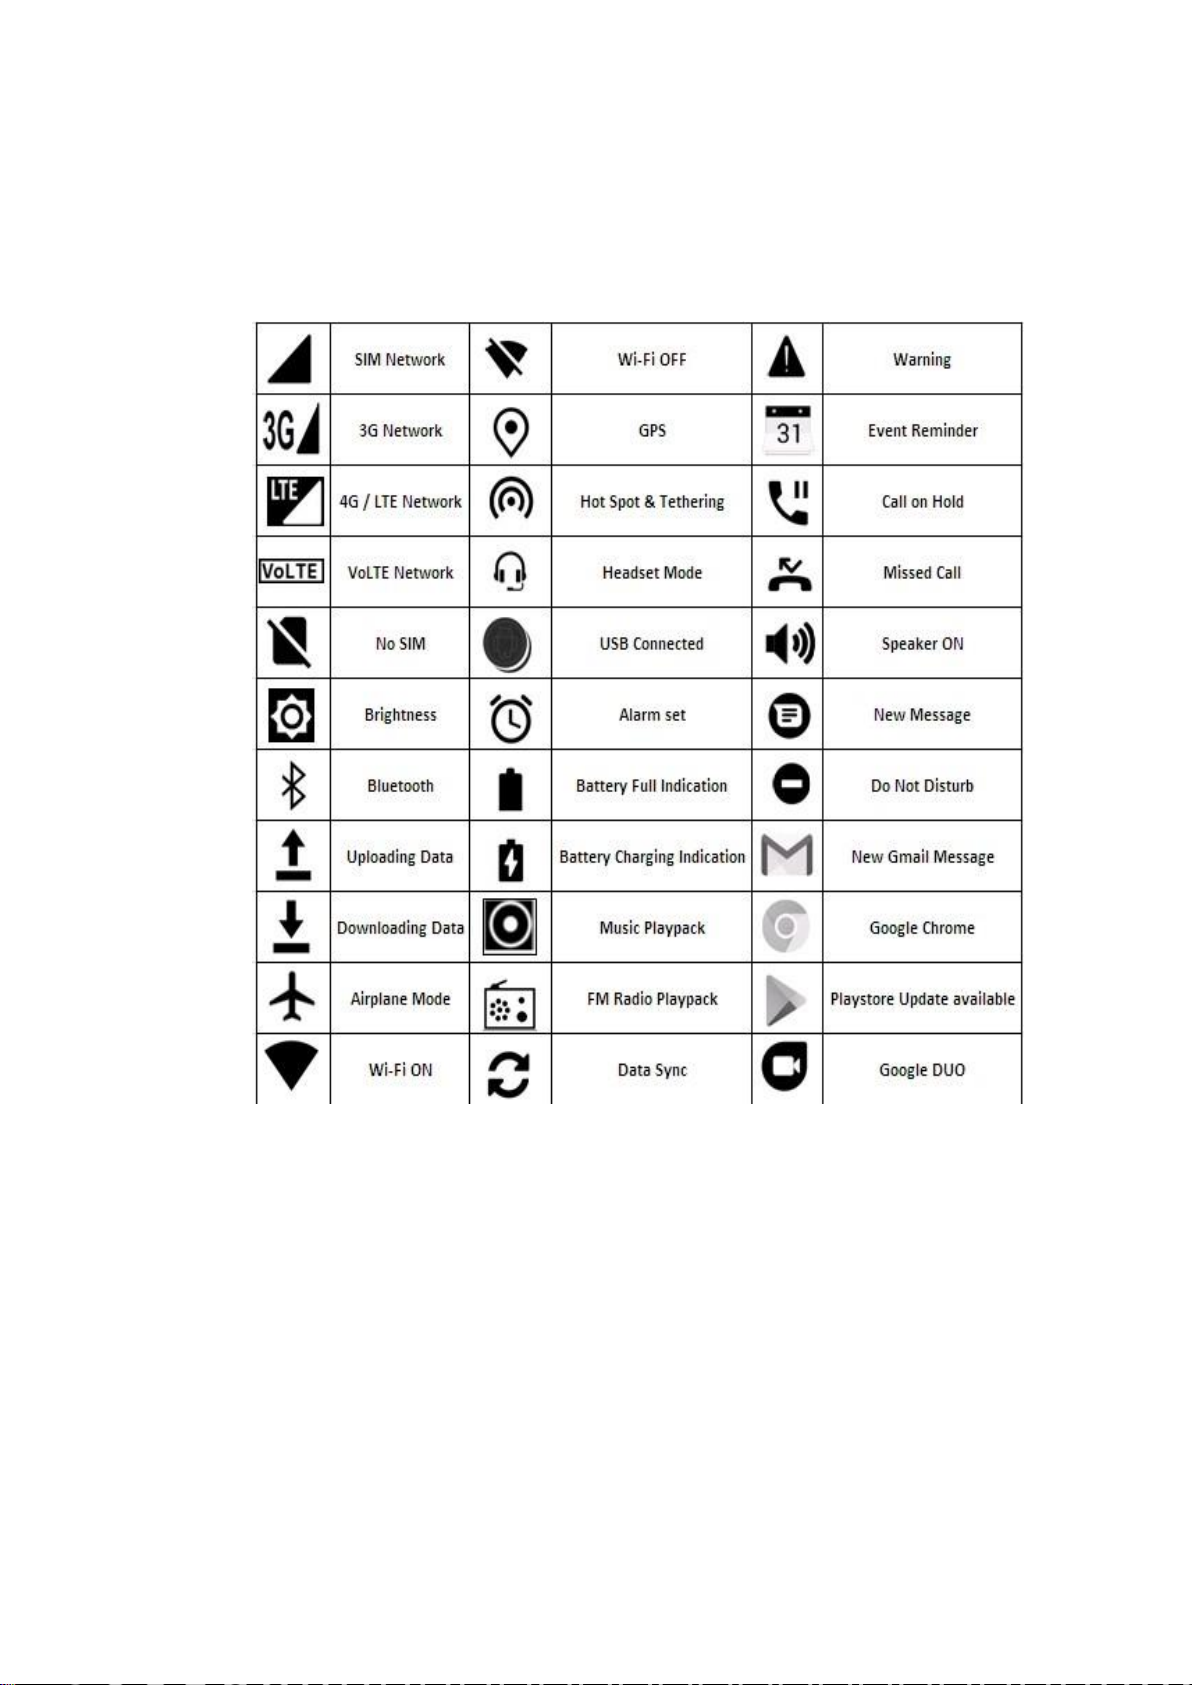
4.2 Connection status icons
Icons in status bar: At the top of the screen, you'll see the status bar. The icons on the left let you know
that you have new notifications. The icons on the right are system icons for things like Wi-Fi and battery
level.
Notifications shade: To read your notifications, swipe down from the status bar at the top of the screen.
Lock screen: When you wake up your device, you'll see your notifications on the lock screen.
14
4.3 Open & dismiss notifications
From the notifications shade or the lock screen, you can manage your notifications:
Open the app: click a notification to open the app.
Dismiss: Swipe a notification right or left to dismiss it. Some notifications can't be dismissed right away.
Clear all: You can dismiss all your notifications at once by touching the Dismiss icon at the bottom .
If you aren't ready to dismiss a notification, you can swipe up to close the notifications shade.
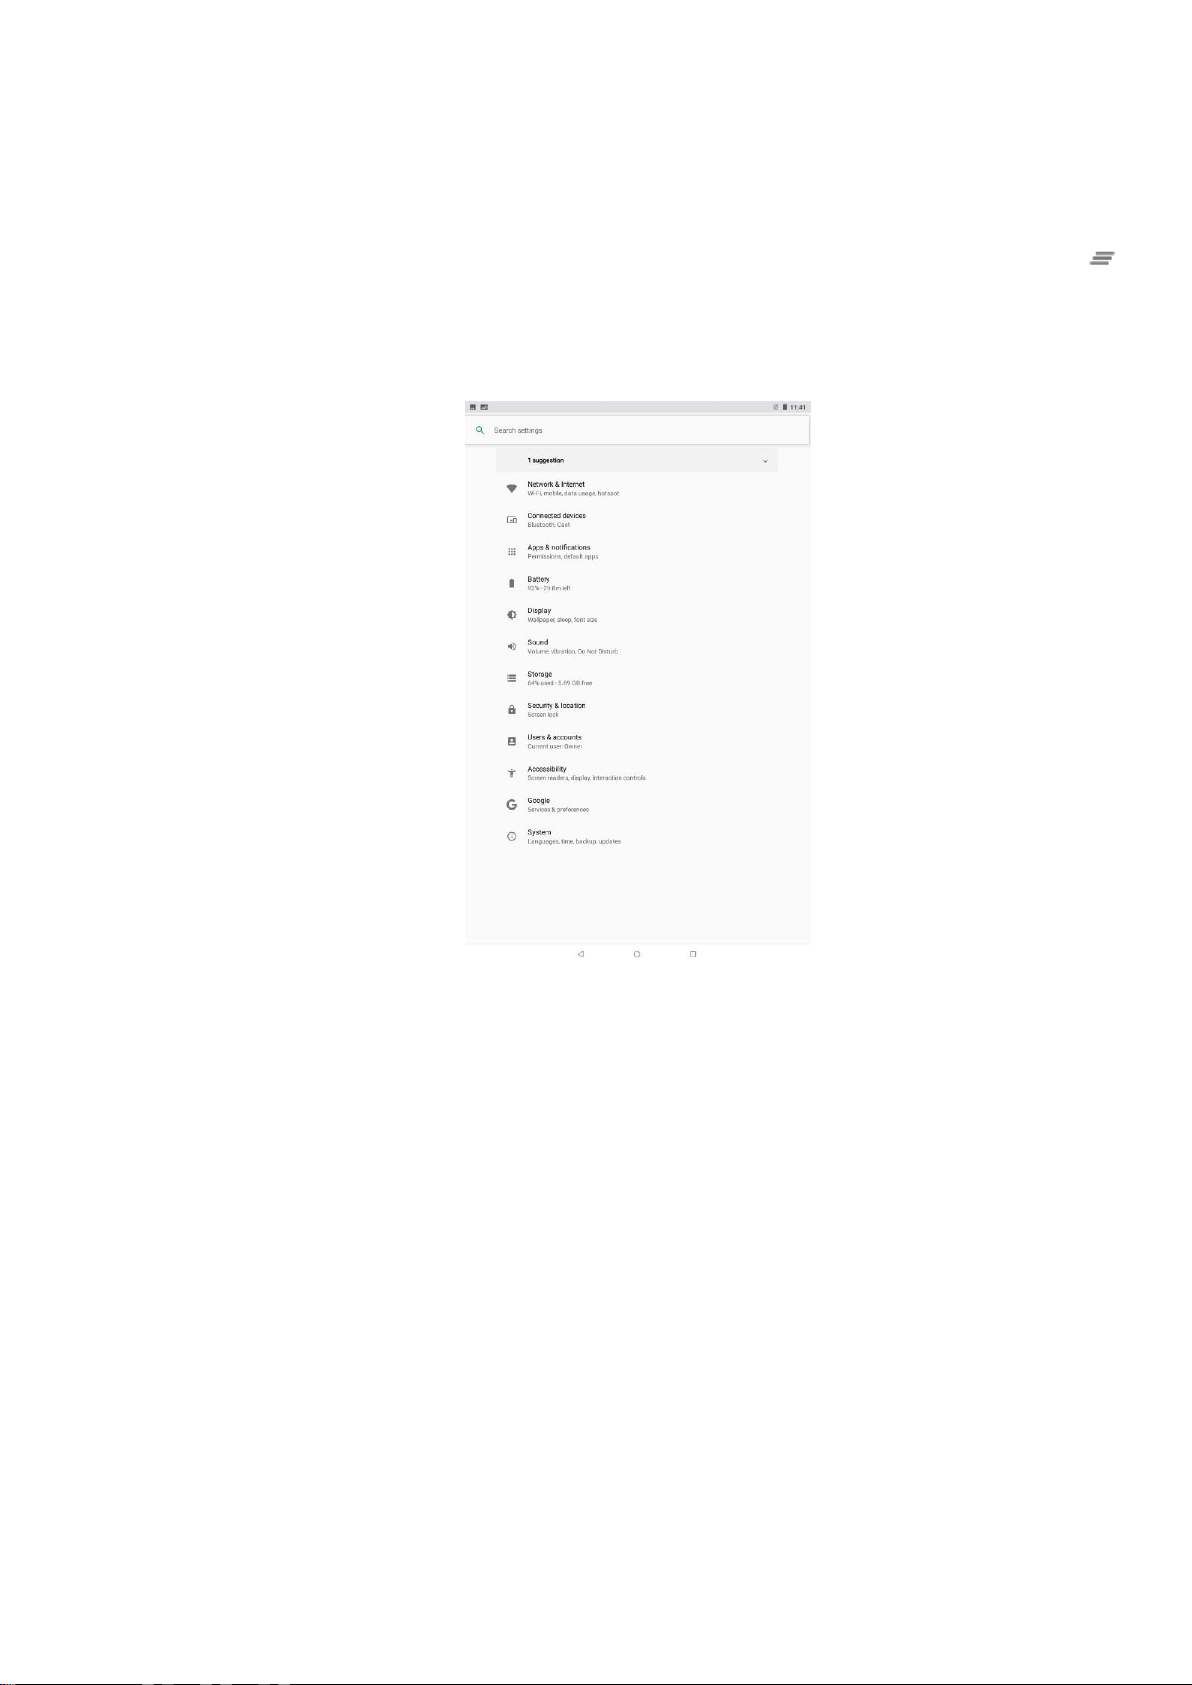
5. Settings
15
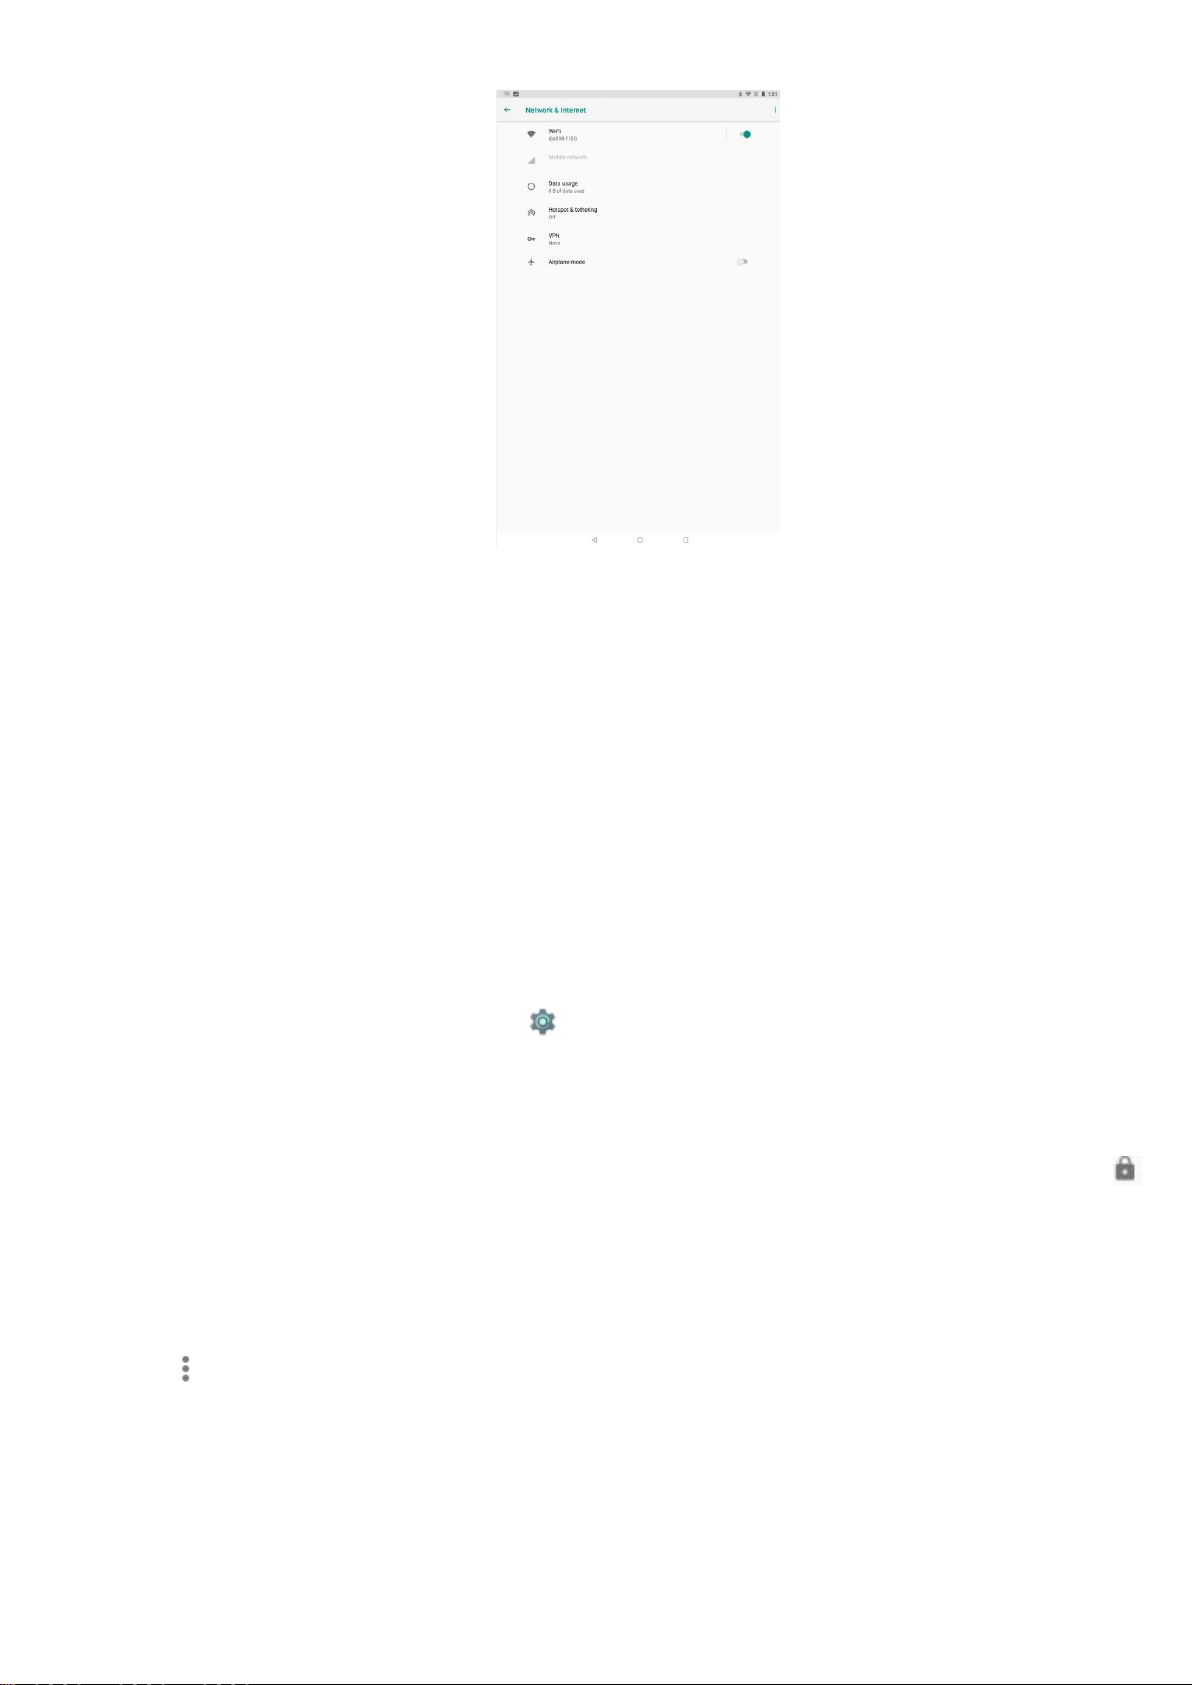
5.1 Network & Internet
A. Wi-Fi
You can connect to Wi-Fi networks with your device, as well as add networks you use often or remove
networks you don't use any longer. You can also change the settings for saved Wi-Fi networks on your
device.
Turn on Wi-Fi and connect to a network
Keep in mind that your device will remember networks you connect to, along with security details, and
connect automatically when in range.
Steps to connect to Wi-Fi on your Slide device:
1. Open your device’s Settings app .
2. Under "Wireless & networks," click Wi-Fi.
3. Click the Wi-Fi switch icon to turn it On.
4. You'll see a list of saved and available networks.
5. Click a network name from the list of available networks to connect to it. You'll see a lock icon
in right side ,if the network is secured and you need to enter a password to connect.
6. Once connected, your device will say "Connected" under the network name and it will show up in
your saved networks list. Your device will automatically connect to it when in range.
Tip: If your saved network you want to connect to isn't showing up in the list of networks, click the Menu
icon in the top right corner of the screen. Then click Refresh to reload the list of networks. Click Add
network and enter the network's name (SSID) and other security details, if needed, then click Save.
Add, change, or remove saved Wi-Fi networks

16
Add a Wi-Fi network
You can add a Wi-Fi network that isn't showing up in the list of networks on your screen, doesn't
broadcast its name (SSID), or is out of range. To add a Wi-Fi network, follow these steps:
1. Open your device’s Settings app .
2. Under "Wireless & networks," click Wi-Fi.
3. Make sure the Wi-Fi is switched On. Click the Menu icon in the top right corner of the screen.
Then, click Add network.
4. Enter the network name (SSID) and other security details, if needed.
5. Click Save.
6. Once connected, your device will say "Connected" under the network name.
Your device will connect to this network automatically the next time you are in range.
Remove a Wi-Fi network
You can forget a saved Wi-Fi network if you don't want your device to connect to it automatically. To
remove a Wi-Fi network from your device, follow these steps:
1. Open your device’s Settings app .
2. Under "network & internet," click Wi-Fi.
3. Make sure the Wi-Fi is switched On.Then click ADD network
4. Enter the network name (SSID) and other security detail , if needed
5. Click Save
6. Once connected your device will say “Connected” under the network name.
Your device will connect to this network automatically the next time you are in range
Remove Wi-Fi network
You can forget a saved Wi-Fi network if you don't want your device to connect to it automatically. To
remove a Wi- Fi network from your device, follow these steps:
1.Open your device‘s Settings app .
2. Under "Networks & internet" click Wi-Fi.
3. Open Saved networks and click the network.
4. Click FORGETS.
View Wi-Fi network details and change network settings
You can view your saved Wi-Fi networks' details and change network settings by following these steps
1. Open your device‘s Settings app .
2. Under "Networks & internet” click Wi-Fi.
17

3. Connect to the network you want to view details for.
4. Click the network name. You can see information about:
• Signal strength
• Frequency
• Security
5. To change network settings, touch and hold the network name. You can choose to:
• Forget network
• Modify network
Advanced Wi-Fi settings
Configure proxy settings
For each Wi-Fi network you add, you can connect via a proxy by following these steps:
1. Open your device’s Settings app .
2. Under "Wireless & networks," click Wi-Fi.
3. Touch and hold a Wi-Fi network in the list of networks.
4. Click Modify network.
5. Select Show advanced options. (You may have to lower the keyboard first. To do so, click the
modified back button .)
6. Click None under Proxy Settings, then click Manual in the menu that opens.
7. Enter the proxy settings.
8. Click Save.
Proxy settings for each Wi-Fi network must be set up separately.
You can choose to change the advanced Wi-Fi settings on your device. Follow these steps to edit
advance Wi-Fi options:
1. Open your device’s Settings app .
2. Click Wi-Fi.
3. In the Wi-Fi settings screen, touch Menu > Advanced. Click one of the setting options below
• Network notification: Turn ON to receive a notification in the Status bar when your device
finds a Wi-Fi network it can connect to.
 Loading...