

iBall Andi 5Q Cobalt Solus, Andi 4 IPS Tiger, Andi 4p ips gem, andi 4.5v baby panther, andi 4.5P User Manual
1

2
Legal Information
All rights are reserved. Reproduction, transfer, distribution of the contents
herein in any manner without the prior written permission of Best IT World
(India) Pvt. Ltd. is prohibited. Best IT World (India) Pvt. Ltd. reserves the
right to add, modify or delete, any of the contents herein or withdraw this
document at any time without prior notice and without assigning any
reasons thereof. For detailed terms and conditions refer
www.iBallMobiles.co.in
Safety Precautions
Operate Safely
• Please do not use Mobile while charging. Disconnect Mobile from charger
before use.
• Make sure to charge the battery full for the first time usage.

3
• Keep the mobile phone at least an inch away from your body while dialing /
answering calls.
• Do not use the mobile phone if the screen is cracked or broken. Cracked
and / or broken screens could cause injury to hands and /or face.
• To reduce the risk of motion injuries:
- While using your mobile phone, hold it with a relaxed grip and press the
keys lightly.
- Do not handle the mobile phone with wet hands.
- Use of special keys / features reduce the number of keys presses
- Take regular breaks in between calls.
- Use hands-free accessories.
- Switch off the mobile phone before cleaning it.
- Switch off the Mobile Phone and external power sources before any
attempt to change batteries, SIM Cards or any other accessories.

4
- Keep your mobile phone and all accessories out of reach of small children
and animals.
Careful handling
• Avoid potential damage to your mobile phones as under:
- Keep away from liquids.
- Avoid using and / or storing in dusty and / or dirty places / environments.
- Do not drop, knock, throw or otherwise handle the mobile phone roughly.
- Avoid exposing your mobile phone and / or batteries to extreme
temperatures. Extreme temperatures reduce the charging capacity and life
of batteries and mobile phone.
- Never use damaged chargers or batteries.
- Do not use chemicals or other cleaning solutions to clean the mobile
phone.

5
- Use moist or anti-static cloth.
- Avoid using mobile phone with camera flash or light close to the eyes.
-Mobile phone and / or accessories should be dismantle and / or repair by
service person only.
Turn Off In Restricted Areas
Use of mobile phones in certain areas / places / conditions can be
hazardous.
• Switch off your mobile phone:
- Inside aircrafts;
- In Medical hospitals / clinics;
- Areas where chemicals are used and / or stored;
- Fuel and gas stations;

6
- In and around areas having electrical / electronic equipment;
- Areas where any kind of blasting activity is being carried out.
• Removing, installing or charging mobile phone batteries in such areas is
hazardous as potential sparks may result in explosion and / or fire and may
cause damage to property and / or life and can also prove fatal.
Drive Safety
Avoid using your mobile phone while driving and respect and obey all
regulations that restrict the use of mobile phones while driving. Primary
consideration while driving should be safety.
Interference with Electronic Devices
Mobile phones emit Radio Frequency (RF) signals that may interfere with
unshielded or improperly shielded electronic equipment, such as pace
makers, hearing aids, other medical devices and other electronic devices in
homes and / or vehicles and may prove to be hazardous.

7
Protect Your Hearing
Excessive exposure to high volumes may cause hearing problems. Maintain
proper volume levels for conversations and / or music.
Use and Dispose of Batteries and Chargers
• Use only iBall accessories and batteries. Using incompatible batteries and
/ or accessories may damage your mobile phone or cause injury.
• Never dispose the battery or mobile phone in fire.
• Never crush or puncture the battery.
• Avoid exposing the battery to high external pressure, which can lead to an
internal short circuit.
• Never place batteries or mobile phone in or on heating devices, such as
microwave ovens, stoves or radiators. Battery may explode when
overheated.
• In order to use mobile phone correctly, please read the following statement
of the user manual carefully before using the mobile phone

8
SAR Value
• Your phone is designed not to exceed the limits of emission of radio waves
recommended by international guidelines.
• SAR (Specific Absorption Rate) is the measurement of body-absorbed RF
quantity when the phone is in use. SAR value is ascertained according to
the highest RF level generated during laboratory tests.
• The SAR value of the phone may depend on factors such as proximity to
the network tower, use of accessories.
SAR recommendations:
• Use a wireless hands free system (headphone, headset) with lower
Bluetooth emitter.
• Make sure the cell phone has a low SAR.
• Please keep your calls short and use SMS whenever more convenient.
This advice applies especially to children and pregnant women.
• Prefer to use your phone when the signal quality is good.

9
• People having active medical implants should preferably keep the phone
at least 15cm away from the implant.
SAR Value
Tested SAR Value of Andi 5Q Cobalt Solus is as follows:
(2G) GSM 900MHz: 0.966 W/Kg (1g)
(2G) GSM 1800MHz: 0.7 W/Kg (1g)
(3G) WCDMA 2100MHz: 0.723 W/Kg (1g)
Maximum Permitted SAR value is: 1.6 W/Kg (1g)
In order to use mobile phone correctly, please read the following statement
of the user manual carefully before using the mobile phone.

10
Index
Legal Information ..................................................................... 1
Safety Precautions .................................................................... 2
SAR Value ................................................................................ 8
Index ....................................................................................... 10
1. Introduction ........................................................................ 12
2. Contacts .............................................................................. 38
3. Messaging ........................................................................... 43
4. E-Mail ................................................................................. 51
5. Settings ............................................................................... 57

11
6. Internet................................................................................ 95
7. Multimedia ....................................................................... 102
8. Others ................................................................................ 111
9. Applications ...................................................................... 125
10. Troubleshooting .............................................................. 128
12
1. Introduction
1.1 iBall Andi 5Q Cobalt Solus
Specifications
Details
Description
CPU
Powerful Octa Core 1.4Ghz advanced Cortex A7
Processor
Display
12.7 cm (5”) HD (1280x720) (289 ppi) Display,
OGS Touch Panel, Durable rear panel with an
elegant glass finish
Memory
2GB RAM
Storage
16GB Built in Storage(approx. 7GB for user & 6GB for
applications)
Micro SD Support up to 32 GB
Android
Android™ 4.4, Kitkat®
13
Yes
Connectivity
Support Dual SIM dual standby(Both SIM slot
support 3G Micro SIM) GSM900/1800MHz;
WCDMA 2100MHz; 3G HSPA + 21Mbps downlink,
5.6Mbps uplink, EDGE Class 12 / GPRS, Wi-Fi
802.11 a/b/g /n, Bluetooth V4.0+EDR, OTG
Function.
Camera
Enhanced 13MP AF Camera with LED flash
Enhanced 5MP front camera for video Calling.
Sensor
G sensor, Proximity sensor and Light sensor
Audio Formats
mp3, ogg, wav, aac, amr, flac, midi
Video Formats
3gp, mp4, avi, 3g2, m2ts, webm
Image Formats
Jpg, bmp, png, wbmp
Audio Port
3.5 mm stereo jack
Soft Keys
Menu, Home key & Back
Hardware Keys
Power, Volume controller
Charging Port
Micro USB
Battery / Power
2250 mAh(Nom-removable) / 5.0V
Dimension & weight
143.9 x 72.0 x 8.3 mm with 135 Gram
14
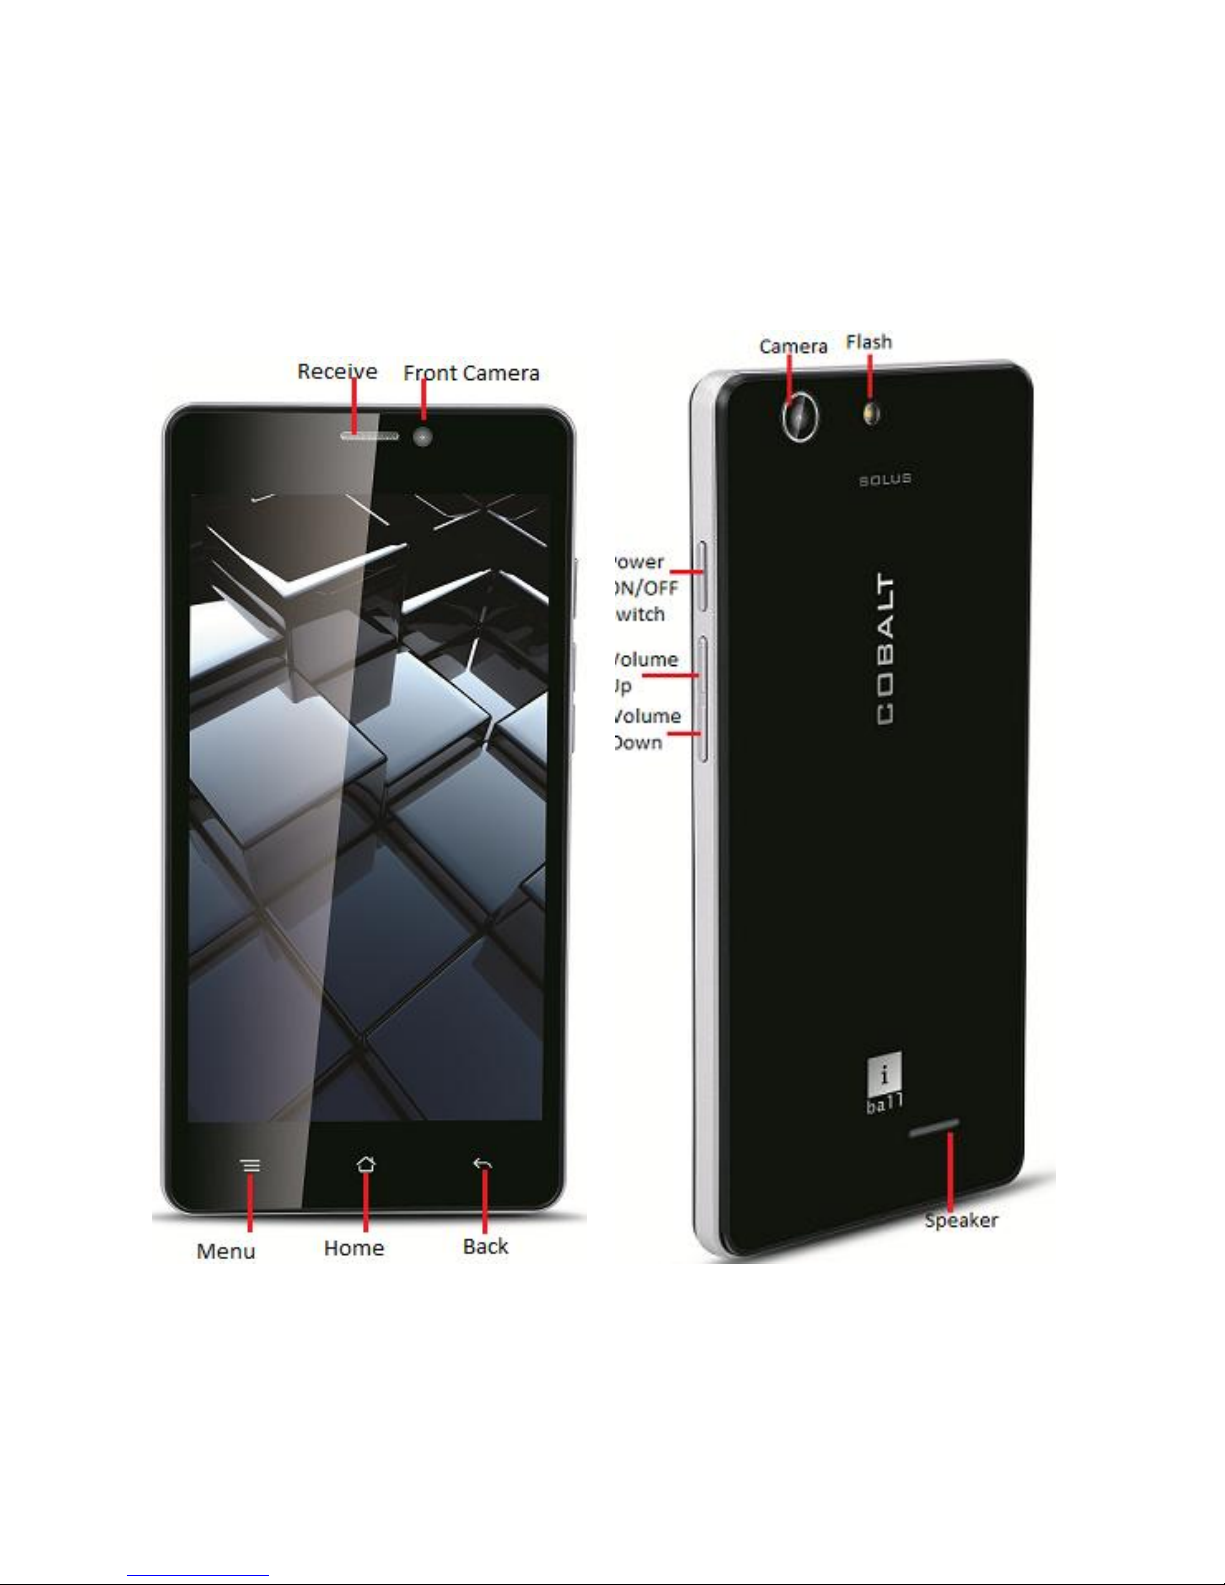
1.2 Know Your Device

15
1.3 Installing the SIM card and
storage card
You need to remove the SIM card adaptor before you can install the SIM
card and you need to remove back cover to install SD card. Also, make sure
to always turn off the power before installing or replacing the SIM card and
SD card.
To Install Micro SIM card
If you don‟t have a micro SIM card, contact your mobile service provider.
They should also activate your micro SIM card so you can start using it right
away.
1. Make sure your device is turned off.
2. Look for the SIM card tray, which is located on the left side of the phone.
Insert the SIM ejection tool (that comes with the phone) into the eject
button, which is the small hole just upper side to the tray door.
3. Push firmly but gently until the tray pops out.

16
4. Remove the tray and place the micro SIM cards inside it, matching the
angled side of the card with the tray.
5. Carefully push the tray back into the phone.
To install a memory card
To have additional storage for your images, videos, music, and files, you
can purchase a memory card and install it into your device.
1. Make sure that your device is turned off, and then remove the back cover.
2. Locate the memory card slot on the upper part of the exposed right panel.
3. Before inseting memory card into slot please make sure to apply given
memory card removal (Black) tape on to memory card. It make ease to
remove memory card without removing battery.
4. Insert the memory card into the slot with its gold contacts facing down
until it clicks into place.
Note:

17
• The phone supports dual SIM cards and both SIM slots supports 3G
network but at a time only one SIM card can be enable as 3G.
• Some legacy SIM cards may not function with your device. You should
consult with your service provider for a replacement of SIM card. There may
be some fees for this service.
• Battery is non-removable.
Charging the Battery
New batteries are shipped partially charged. Before you start using your
device, it is recommended that charge the battery. Some batteries perform
best after several full charge/discharge cycles.
Note: Only the AC adapter and USB sync cable provided with your device
must be used to charge the device.
Connect the USB connector of the AC adapter to the sync connector on
your device, and then plug in the AC adapter to an electrical outlet to start
charging the battery.
As the battery is being charged while the device is on, a charging icon
appears in the title bar of the Home screen. After the battery has been fully
charged, a full battery icon appears in the title bar of the Home screen.

18
Warning:
• As a safety precaution, the battery stops charging before it overheats.
1.4 Quick setting panel
1. Owner: The information of the owner can be stored and then can be
displayed on the lock screen.
2. Battery: Select this to view the level of battery in Percentage on your
Notification Bar.
3. Settings: This is the shortcut to go to the settings panel.
4. Wi-Fi: Using this you can turn Wi-Fi On/Off.
5. Bluetooth: Using this you can turn Bluetooth On/Off.
6. Location: Using this you can turn On/Off location access and by long
pressing you can go for location setting directly.

19
7. Airplane Mode: Selecting this option activates the airplane mode, which
means it cuts you off from all kind of network connectivity including your SIM
network, Bluetooth, Wi-Fi network or any other network your handset
supports.
8. Data connection: Using this you can turn the data connection On/Off.
Data connection helps you access internet using your SIM network.
9. Data Usage: It provides a graphical representation of the data usage for
a specified Data Usage cycle through SIM Internet or Wi-Fi.
10. Audio Profiles: This option allows you to select the audio profiles out of
the 4 predefined profiles, general, silent, meeting and outdoor.
11. Brightness: Using this option you can change the brightness level of
the display screen according to your needs and usage.
12. Auto Rotation: Using this option you can select whether or not you
want to use the auto rotation option.
13. Cast Screen: For connecting to wireless display supported devices.
All the functions have been explained in details in their respective sections.

20
Note: On long pressing on these options you will be directed into settings
option from there you can operate further if you want to use more related
functions.
1.5 Starting up the device
Power on/off
To power off your phone, press & hold POWER. On release, the Phone
options menu opens. Select „Power off‟ and confirm.
To power on again, press & hold POWER.
Silent mode
To silence your phone quickly, press & hold the – volume down button to
zero volume. Or on the Home screen, touch and select Settings > Audio
profiles. Select „Silent‟ check box.
Screen sleep

21
After a period of inactivity, your screen will go to sleep (display will turn
black). In sleep, your phone uses less battery power. You can control this
behavior:
Set screen timeout period
1. On the Home screen, touch and select Settings.
2. Select Display option.
3. Select Screen Time out and Select a time from the menu.
Prevent sleep while charging
1. On the Home screen, then touch and select Settings.
2. Select Developer options.
3. Select „Stay awake’ check box.
Lock screen & put phone to sleep

22
Except when on a phone call, from any screen, press POWER key
(immediately). While not on a call, to lock your control buttons and screen
from accidental touch activation, press POWER key.
You can increase the security of your phone by setting Screen unlock
pattern. Once set, in order to unlock your screen, you‟ll have to draw the
correct unlock pattern. You can set your screen unlock pattern as follows:
1. On the Home screen, touch and select Settings.
2. Select Security and then select Screen lock pattern section.
3. Set or change your unlock pattern by selecting Screen lock pattern, as
applicable.
4. Follow the prompts to define your pattern.
Note: You must slide your finger along the screen to create the pattern, and
not select individual dots. Connect at least four dots to create a lock pattern.
If you want to hide pattern as you draw it, clear „Make pattern visible‟ check
box.
23
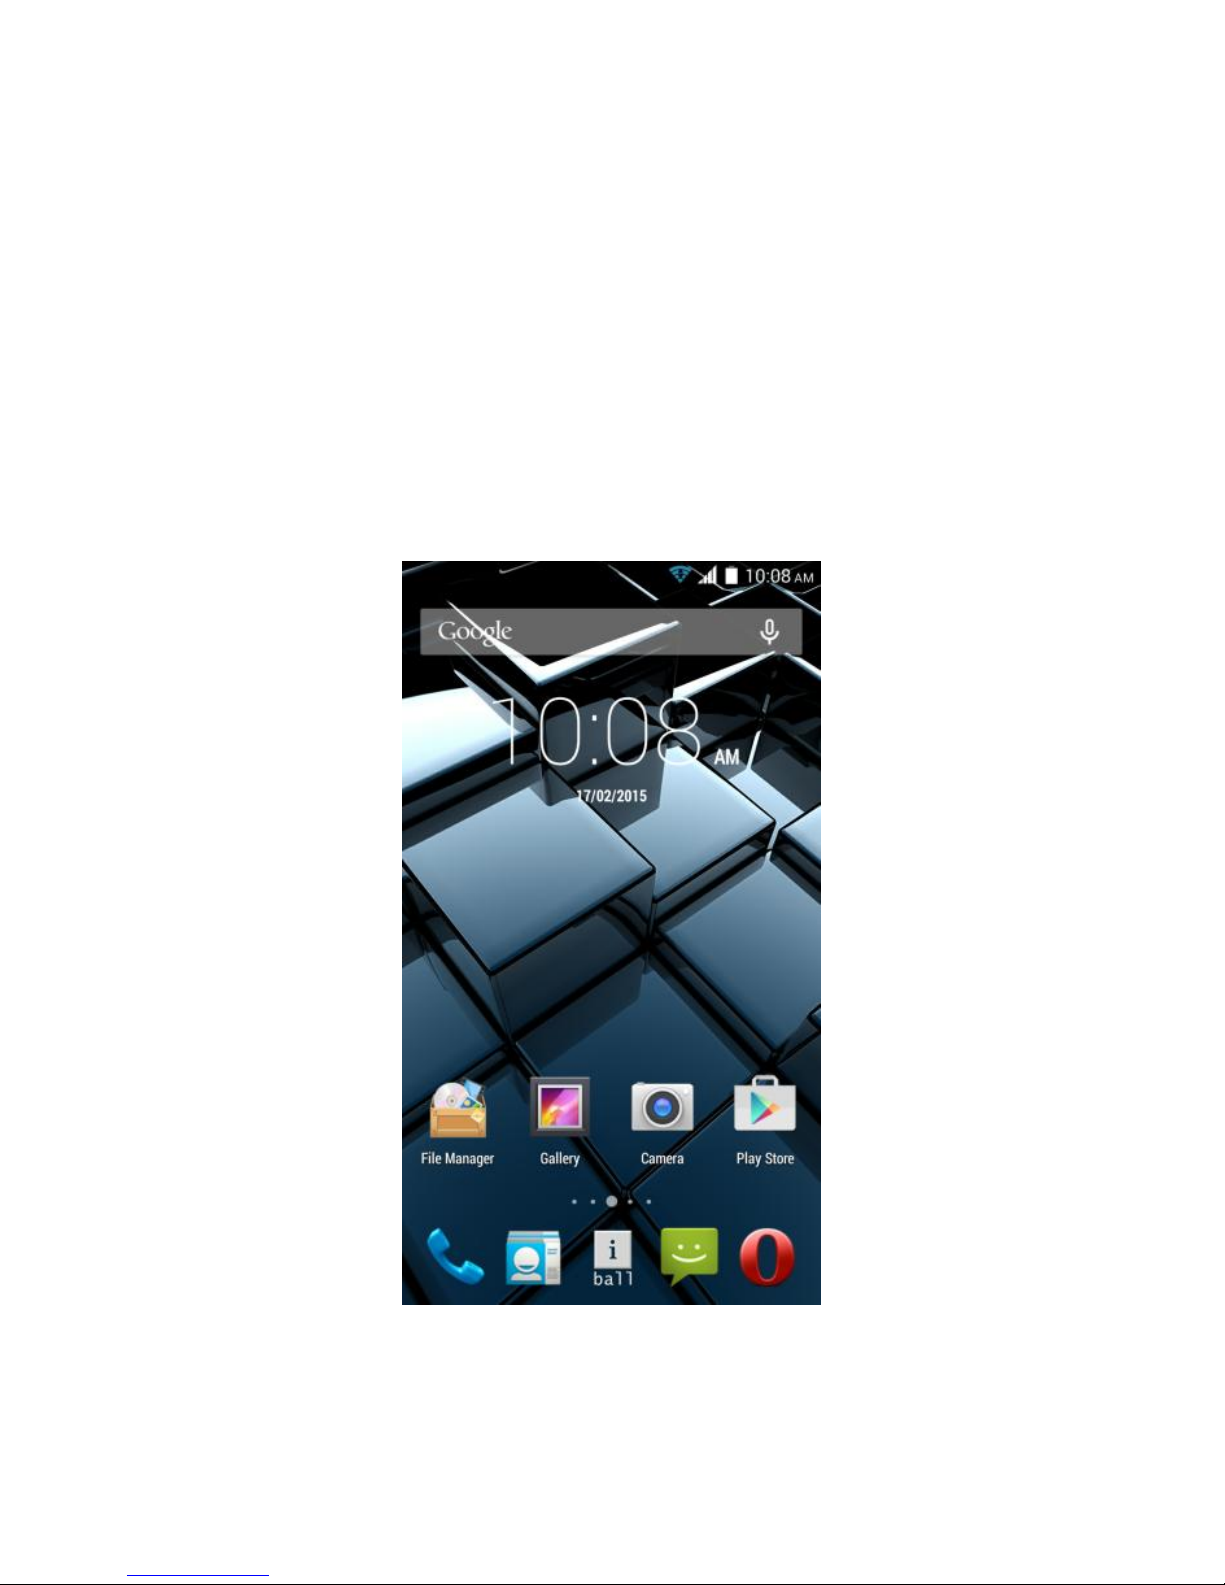
1.6 Home screen
The Home screen is your starting point for using all the applications on your
phone. You can customize your Home screen to display applications,
shortcuts, and widgets as you like.

24
1. Touch the application tab with your fingertip to reveal the application
icons.
2. The Home screen actually extends beyond the screen width. On Home
screen, swipe your fingertip left and right along the screen to reveal the full
width of the Home screen. This additional space gives you more room to
customize Home with applications, shortcuts, and widgets.
3. Create Home screen shortcuts and widgets:
• Touch the application tab with your fingertip to reveal the application icons,
slide your fingertip right to show the shortcuts and widgets.
• Select an Application shortcut, a Shortcut to some of your saved
information (such as a play list), a Widget (a clock or picture frame) for your
Home screen.
• The application, shortcut, folder, or widget appears on Home screen.
Tip: To create an application shortcut quickly, touch the application tab to
reveal all the application icons, then touch & hold an application icon. Its
shortcut is added to the Home screen; close the application tab to see it.

25
4. To remove a shortcut or widget from your Home screen, touch & hold the
item to enter “move mode”. The application tab turns into a Trash button.
Drag the item to the Trash button and release. You‟ll know when your item is
in the Trash because the item and the tab will turn red.
5. Move objects on the Home screen
• To move an icon or other item on the Home screen, you must first touch &
hold it to enter move mode. The object will magnify when it is ready to be
moved.
• Without lifting your finger (or you‟ll drop out of move mode), drag the object
to the new position. To move an item to a section of the Home screen not in
view, move it to the edge of the screen and hold it there for a moment. The
screen view will shift; position the object and release.
1.7 Status Icons
Connection status icons
Along the top of your phone screen is the status bar. On the left side, icons
will appear, notifying you of a new message, upcoming calendar event, or
something else you should notice. On the right side of the status bar, you‟ll
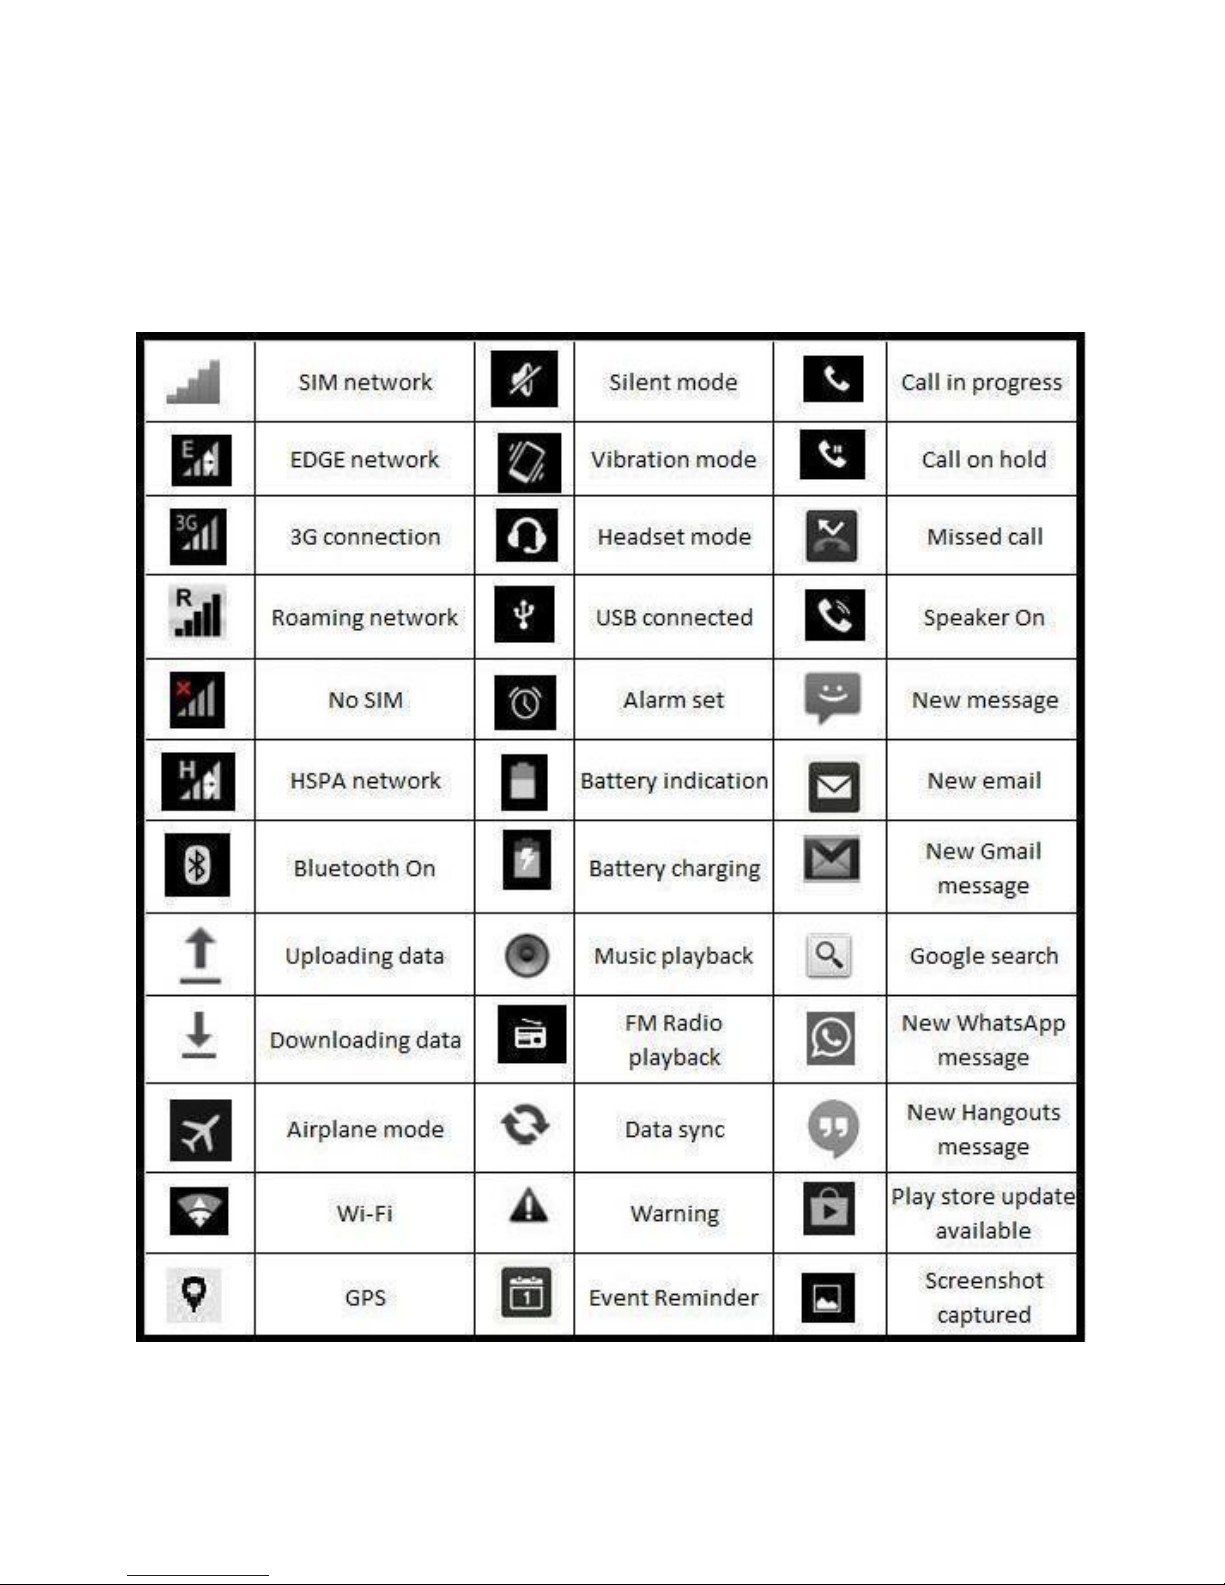
26
see connection status icon

27
Read your notifications
When you see a notification in the status bar, touch the bar and drag it down
the screen using your finger to open the list of notifications displayed in the
sliding window.
Ongoing notifications report activities such as call forwarding ON, current
call status, song playing.
Notifications report the arrival of new messages, calendar events, and
alarms. You can clear notifications list by selecting „Clear‟ notifications at the
top of the notifications window.
To open the message, reminder, or other notification, you can touch the
items. To close the notifications window, you can drag it upside.
Notes: On the home screen, touch the bar and slide your finger down the
screen to open the list of notifications displayed in the sliding window, you
can touch the icon on the top of the screen (such as Wi-Fi, Bluetooth, Data
connection, Airplane mode, Brightness) to open or close the selected
function, sliding your finger left or right to select more functions.

28
1.8 Using phone features
1. Turning the phone function on and off
To enable or disable Airplane Mode
In many countries, you are required by law to turn off the phone while on
board an aircraft. Another way to turn off the phone function is to switch your
device to Airplane Mode.
When you enable Airplane Mode, all wireless radios on your device are
turned off, including the phone function, Bluetooth, and Wi-Fi.
1. Touch -> Settings -> More settings… -> Airplane mode.
2. Touch „Airplane mode‟ to enable or disable.
When you disable Airplane mode, the phone function is turned back on and
the previous state of Bluetooth and Wi-Fi are restored.
Adjusting the volume
29
Press Volume button on the side of the phone to show the volume screen.
If the phone is in vibrating mode, the voice will be muted automatically and
the device will vibrate when there is an incoming call.
2. Making a call

30
On Home screen, touch -> Phone to enter the dial screen.
Touch the on-screen dial pad to enter a number, To dial a number, touch
„Voice Call‟ button (Green icon ) to select SIM1 card or SIM2 card to
make a call. To end a call, touch „END‟ button (Red icon).
1. Call log tab: Select an entry listed in the log to call the number.
2. Contacts tab: Contacts with phone numbers are listed. Select a contact,
and then select the phone number to dial the call.
Note: If you insert 2 SIM cards, the dial screen by default asks for the dialing
SIM. (Defined in the menu Settings/SIM management/Voice call)
Making a video call
Touch the on-screen dial pad to enter a number, touch „Video Call‟
button to make a video call.
Notice: • SIM1 slot can be supported video call default (SIM1 card must be
supported 3G network).
 Loading...