


User Manual
Andi 5G Blink 4G

1
Legal Information
All rights are reserved. Reproduction, transfer, distribution of the contents herein in any
manner without the prior written permission of Best IT World (India) Pvt. Ltd. is prohibited.
Best IT World (India) Pvt. Ltd. reserves the right to add, modify or delete, any of the
contents herein or withdraw this document at any time without prior notice and without
assigning any reasons thereof. For detailed terms and conditions refer www.iBall.co.in
Safety Precautions
Operate Safely
• Please do not use Mobile while charging. Disconnect Mobile from charger before use.
• Make sure to charge the battery full for the first time usage.
• Keep the Mobile at least an inch away from your body while dialing / answering calls.
• Do not use the Mobile if the screen is cracked or broken. Cracked and / or broken
screens could cause injury to hands and / or face.
• To reduce the risk of motion injuries:
- While using your Mobile, hold it with a relaxed grip and press the keys lightly.
- Do not handle the Mobile with wet hands.
- Use of special keys / features reduce the number of keys pressed
- Take regular breaks in between calls.
- Use hands-free accessories.
- Switch off the Mobile before cleaning it.
- Switch off the Mobile and external power sources before any attempt to changeSIM
Cards or any other accessories.
- Keep your Mobile and all accessories out of reach of small children and animals.
When using the device, mind the following
• Hold the device upright, as you would with a traditional phone.

2
• Speak directly into the microphone.
• Do not cover the antenna area with your hands or other objects. This may cause
connectivity problems or drain the battery.
Careful handling
• Avoid potential damage to your Mobiles under:
- Keep away from liquids.
- Avoid using and / or storing in dusty and / or dirty places / environments.
- Do not drop, knock, throw or otherwise handle the Mobile roughly.
- Avoid exposing your Mobile to extreme temperatures. Extreme temperatures reduce the
charging capacity and life of batteries and Mobile.
- Never use damaged chargers.
- Do not use chemicals or other cleaning solutions to clean the Mobile.
- Use moist or anti-static cloth.
- Avoid using Mobile with camera flash or light close to the eyes.
- Do not dismantle the Mobile and accessories without permission.
- Avoid handling by unauthorized personnel.
-Do not use damaged power cords or plugs, or loose electrical sockets.
-Do not use your device outdoor during a thunderstorm.
-Do not use your device near devices or apparatuses that emit radio frequencies, such as
sound systems or radio towers.
Turn Off your Mobilein Restricted Areas
Use of Mobile in certain areas / places / conditions can be hazardous.
• Switch off your Mobile:
- Inside aircrafts;
3
- In Medical hospitals / clinics;
- Areas where chemicals are used or stored;
- Fuel and gas stations;
- In and around areas having electrical / electronic equipment;
- Areas where any kind of blasting activity is being carried out.
-Turn off the device in potentially explosive environments.
• Charging batteries in such areas is hazardous as potential sparks may result in explosion
and / or fire and may cause damage to property and / or life and can also prove fatal.
Keep your device dry
Humidity and liquids may damage the parts or electronic circuits in your device.
Do not turn on your device if it is wet. If your device is already on, turn it off (if the device
will not turn off and since you cannot remove the battery, leave it as-is). Then, dry the
device with a towel and take it to a -service centre.
Liquids will change the colour of the label that indicates water damage inside the device.
Water damage to your device can void your manufacturer‘s warranty.
Drive Safety
Avoid using your Mobile while driving and respect and obey all regulations that restrict the
use of mobile phones or similar devices while driving. Primary consideration while driving
should be safety.
Vehicles
RF signals may affect improperly installed or inadequately shielded electronic systems in
motor vehicles such as electronic fuel injection, electronic speed control, and air bag
systems. Only qualified personnel should service the device or install the device in a
vehicle. Faulty installation or service may be dangerous and may invalidate your warranty.
The use of wireless tele devices in an aircraft may be dangerous to the operation of the
aircraft and may be illegal.
Interference with Electronic Devices

4
Mobile phones/Mobile emit Radio Frequency (RF) signals that may interfere with
unshielded or improperly
Shielded electronic equipment, such as pace makers, hearing aids, other medical devices
and other electronic devices in homes and / or vehicles and may prove to be hazardous.
Protect Your Hearing
Excessive exposure to high volumes may cause hearing problems. Maintain proper
volume levels for conversations and / or music.
Precautions
In order to use Mobile correctly, please read the following statement of the user manual
carefully before using the device.
Do not store your device with metal objects, such as coins, keys, and necklaces
-Your device may be scratched or may malfunction.
-If the battery terminals come into contact with metal objects, this may cause fire.
Do not store your device near magnetic fields
-Your device may malfunction or the battery may discharge from exposure to magnetic
fields.
-Magnetic stripe cards, including credit cards, phone cards, passbooks, and boarding
passes, may be damaged by magnetic fields.
Do not use your device or applications for a while if the device is overheated
-Prolonged exposure of your skin to an overheated device may cause low temperature
burn symptoms, such as red spots and pigmentation.
If your device has a camera flash or light, do not use it close to the eyes of people or
pets
-Using a flash close to the eyes may cause temporary loss of vision or damage to the
eyes.
Use caution when exposed to flashing lights

5
-While using your device, leave some lights on in the room and do not hold the screen too
close to your eyes.
-Seizures or blackouts can occur when you are exposed to flashing lights while watching
videos or playing Flash-based -games for extended periods. If you feel any discomfort,
stop using the device immediately.
-If anyone related to you has experienced seizures or blackouts while using a similar
device, consult a physician before using the device.
-If you feel discomfort, such as a muscle spasm, or disoriented, stop using the device
immediately and consult a physician.
-To prevent eye strain, take frequent breaks while using the device.
Protect your personal data and prevent leakage or
misuse of sensitive information
While using your device, be sure to back up important data. iBall is not responsible for the
loss of any data.
When disposing of your device, back up all data and then reset your device to prevent
misuse of your personal information.
Carefully read the permissions screen when downloading applications. Be particularly
cautious with applications that have access to many functions or to a significant amount of
your personal information.
Check your accounts regularly for unapproved or suspicious use. If you find any sign of
misuse of your personal information, contact your service provider to delete or change your
account information.
In the event your device is lost or stolen, change the passwords on your accounts to
protect your personal information.
Avoid using applications from unknown sources and lock your device with a pattern,
password, or PIN.
Using this Guide

6
This guide has been specially designed to guide you through the basics of your device,
such as getting started with the device. Please read this guide carefully before using your
device to ensure safe and correct use.
The descriptions in this guide are based on the default settings of your device.
Please keep this guide for future reference.
Protect environment save energy
You do not need to charge your Mobile battery so often if you do the following:
Close applications and data connections, for example, your Bluetooth connection, when
not in use.
Deactivate unnecessary sounds, such as touch screen and key tones.
SAR
This device is SAR accredited adheres to international quality benchmarks and safety
measures concerning the harmful impact of radiations. It complies with applicable safety
requirements for exposure to radio waves. The radio waves exposure guidelines employ a
unit of measurement called Specific Absorption Rate (SAR). SAR is a measure of the rate
at which energy is absorbed by the body when exposed to a radio frequency (RF). SAR is
usually averaged either over the whole body, or over a small sample volume (typically 1g
or 10g of tissue). The recommended SAR limit for a mobile handset/similar device is 1.6
W/Kg averaged over a volume containing a mass 1g of human tissue.
SAR Value
• Your Mobile is designed not to exceed the limits of emission of radio waves
recommended by international guidelines.
• SAR (Specific Absorption Rate) is the measurement of body-absorbed RF quantity when
the phone is in use. SAR value is ascertained according to the highest RF level generated
during laboratory tests.
• The SAR value of the phone may depend on factors such as proximity to the network
tower, use of accessories.
SAR Recommendations
• Use a wireless hands free system (headphone, headset) with lower Bluetooth emitter.

7
• Make sure the device has a low SAR.
• Please keep your calls short and use SMS whenever more convenient. This advice
applies especially to children and pregnant women.
• Prefer to use your Mobile when the signal quality is good.
SAR Value
Tested SAR Value of iBall Andi 5G Blink 4G as follows
(2G) GSM 900MHz: 1.011 W/kg (1g)
(2G) GSM 1800MHz: 0.932 W/kg (1g)
(3G) WCDMA 2100MHz: 0.831 W/kg (1g)
(4G) FDD-LTE Band B3/B5/B8: 0.775 W/kg (1g)
(4G) TDD-LTE Band B40: 0.697 W/kg (1g)
Maximum Permitted SAR Value 1.6 W/Kg (1g)

8
Index
Legal Information ...................................................................................................................... 1
Using this Guide ........................................................................................................................ 5
SAR............. .............................................................................................................................. 6
Index ......................................................................................................................................... 8
1. Introduction ....................................................................................................................... 9
2. Quick Panel Setting ......................................................................................................... 11
3. Starting up the Device ..................................................................................................... 14
4. Home screen ................................................................................................................... 15
5. Settings ........................................................................................................................... 18
6. Communication ............................................................................................................... 40
7. Messaging ....................................................................................................................... 47
8. Email ............................................................................................................................... 52
9. Internet ............................................................................................................................ 55
10. Media............................................................................................................................... 57
11. Connectivity Features ..................................................................................................... 65
12. Others.............................................................................................................................. 65
13. Google Applications ........................................................................................................ 71
14. Troubleshooting .............................................................................................................. 73
9
1. Introduction
1.1 Specification iBall Andi 5G Blink 4G
Details
Description
CPU
Powerful Quard Core 1GHz Cortex A53 Advanced 64 bit
Processor
Memory
1GB RAM
Storage
8GB Built-in Storage
Micro SD card Support up to 32 GB
Operating System
Android 6.0, Marshmallow (64-bit)
Connectivity
Dual SIM (Dual Stand by),Wi-Fi 802.11 b\g\n, Bluetooth 4.0, USB
OTG function, USB Tethering
Sensor
G-Sensor,Promixity Sensor & light Sensor
Camera
5MP Rear Camera with LED Flash
2MP Front Camera with LED Flash
Display
12.7cm (5.0‖) IPS FWVGA (854*480),
Full Capacitive Multi Touch.
USB
Mini USB OTG Port
Support Video
Support 3GP,3G2, AVI, M2TS, MKV, MOV, MP4,WEBM
Support Image
Support BMP,GIF,JPG,PNG,WBMP
Support Audio
Support AAC, AMR, FLAS, MIDI, MP2, MP3, OGG, WAV
Audio Port
Speaker / 3.5mm Earphone Jack / Internal MIC / Receiver
speaker
Hardware Keys
Power Switch &Volume Control
Battery
2300mAh Li-ion battery
Power
Input 100~240V to DC 5.V - 1.0A
Dimension & weight
145.73x72.80x8.43mm & 135gm
10
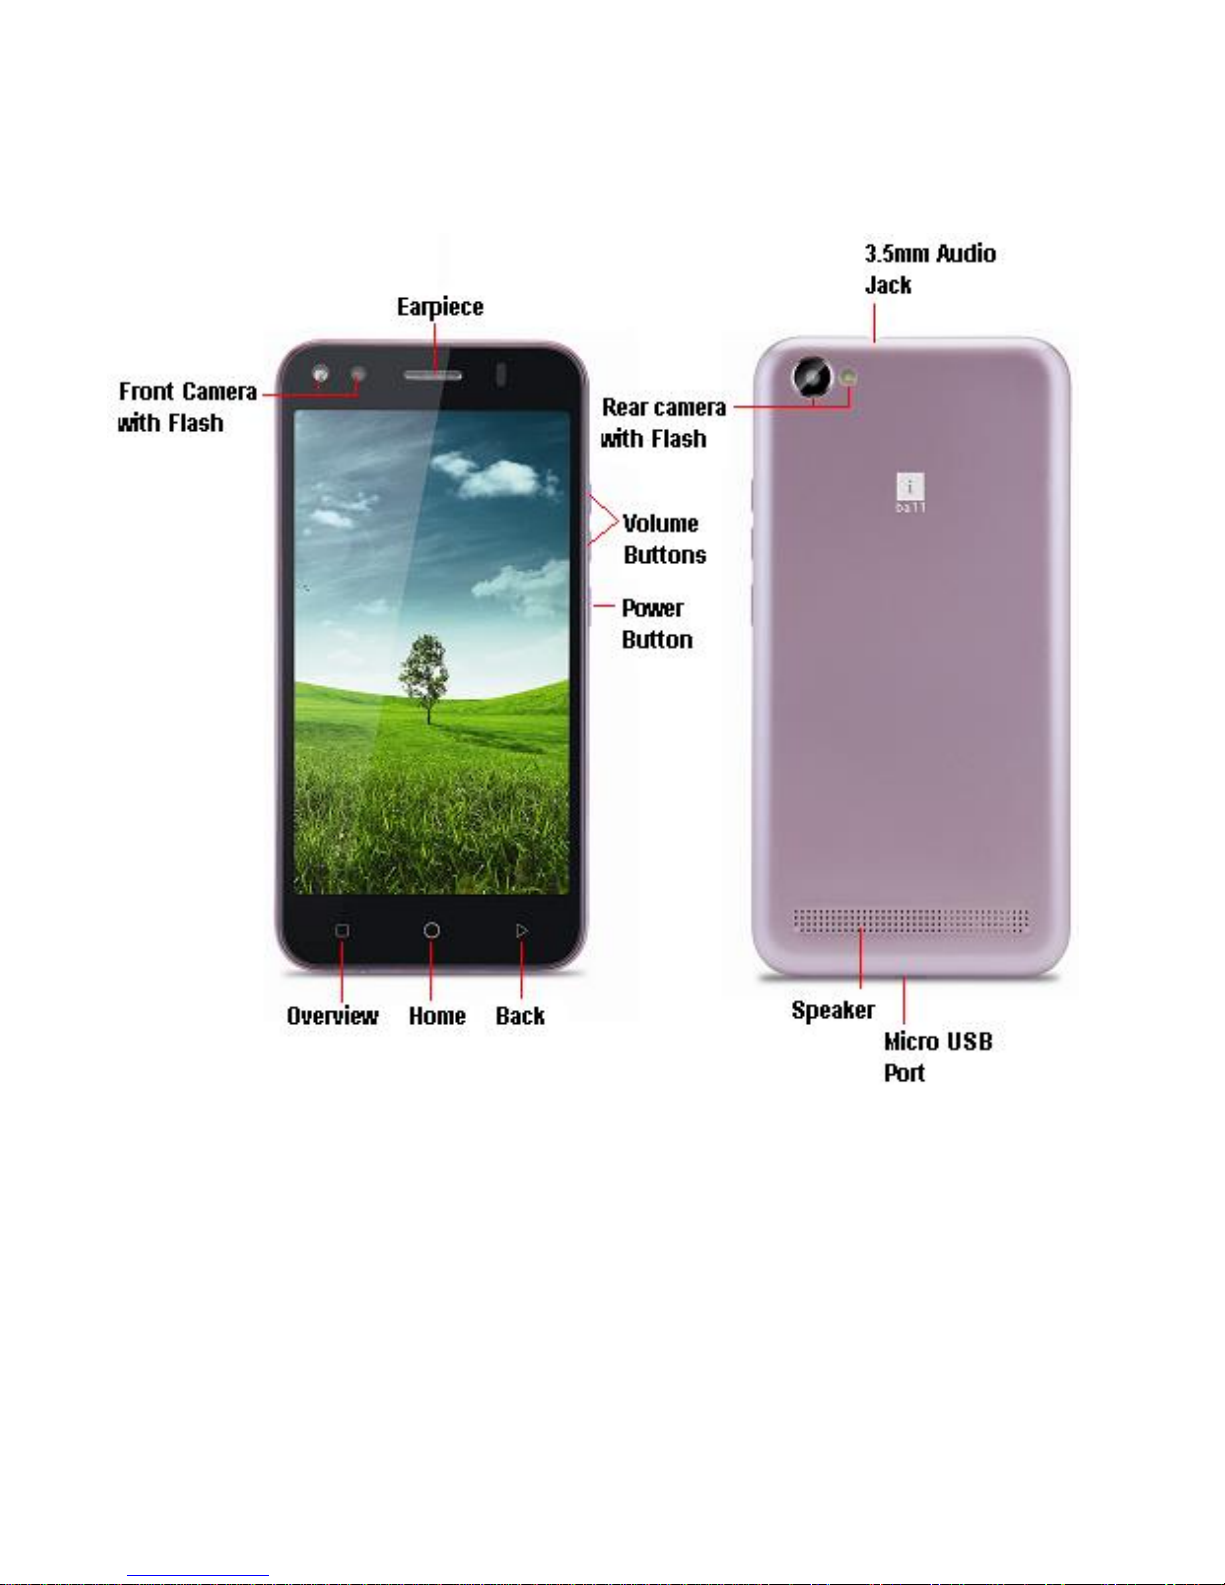
1.2 Know Your Device
11
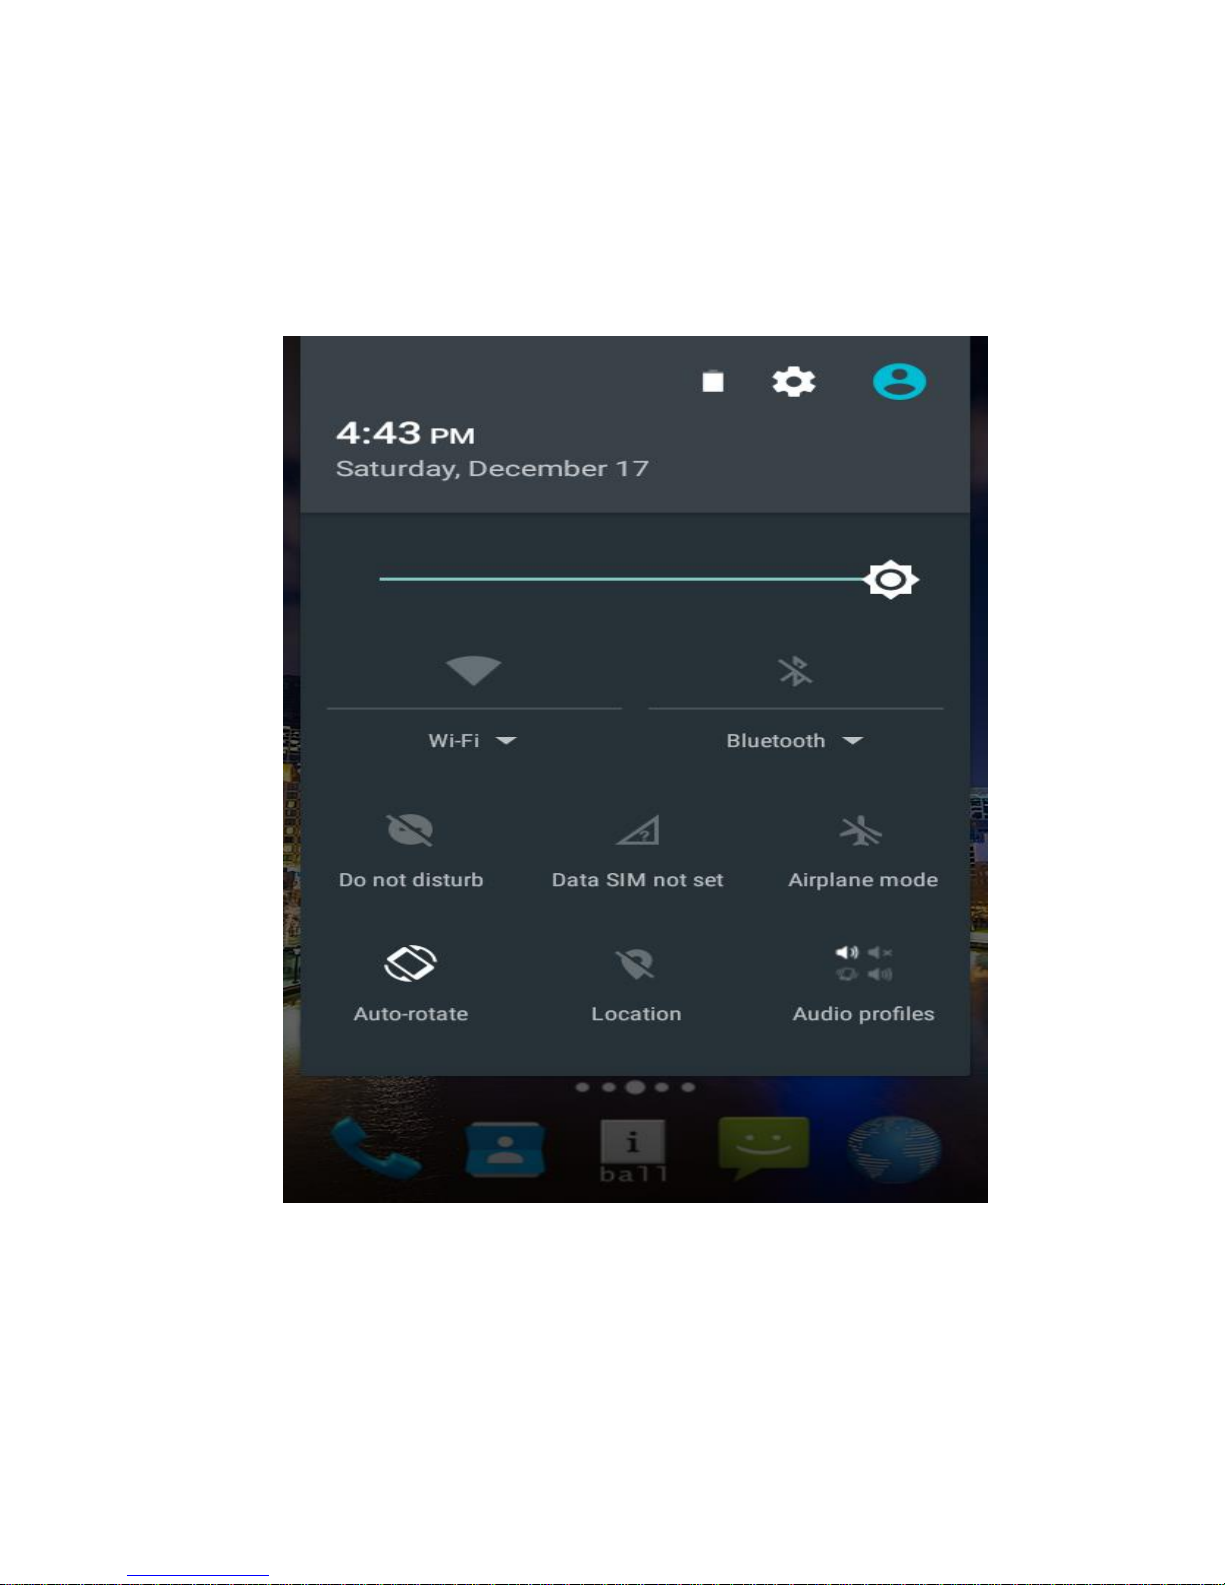
2. Quick Panel Setting
Quick setting panel is the option you will find by Swipe down from the top of anyscreen.
This option provides the shortcut to the following functions:
Setting:Tab to setting icon to reach system settings.
Battery:It will indicate you the current battery status & you can go to battery setting directly
from here.
Brightness:Using this option you can change the brightness level of the display screen
according to your needs and usage.

12
Wi-Fi:Using this you can turn Wi-Fi On/Off.
Bluetooth:Using this you can turn Bluetooth On/Off.
Do not disturb : You‘ll have options for ―Total Silence‖, ―Alarms Only‖ and ―Priority Only‖
and you can set time limits for how long you want Do Not Disturb to last
SIM card setting: Using this you can turn the data connection On/Off. Data connection
helps you access internet using your SIM network and you can change SIM card settings.
Airplane Mode : Selecting this option activates the airplane mode, which means it cuts
you off from all kind of network connectivity including your SIM network, Bluetooth, WI-FI
network or any other network your handset supports.
Auto Rotation : Using this option you can select whether or not you want to use the auto
rotation option.
Location:Using this you can turn location access ON/ OFF.
Audio Profiles : This option allows you to select the audio profiles out of the 4 predefined
profiles General, Silent, Meeting and Outdoor.
All the functions have been explained in details in their respective sections.
Note: On pressing on text of some options you will be directed into settings option from
there you can operate further if you want to use more related functions.
Installing the SIM card and Storage card
You need to open the back cover, which is provided back side of the device before you can
install the SIM card and storage card. Also, make sure to always turn off the power before
installing or replacing the SIM card and storage card.
To remove the back cover
1. Make sure your device is turned off.
2. Firmly hold the device with both hands and the front panel facing down.
3. Pull cover from the lower side until it disengages from the device and then pulls it up to
remove.
To install the SIM card
The SIM card contains your phone number, service details, and phonebook/ message
memory. Your device supports both 2G,3G & 4G SIM cards.

13
1. Remove the battery if it is installed.
2. Locate the SIM card slot, and then insert the SIM card with its gold contacts facing down
and its cut-off corner facing inside the card slot.
3. Push the SIM card completely into the slot.
Note:
• The Mobile supports dual SIM cards, SIM slot 1 & SIM slot 2 both supports 4G networks
but at a time one SIM slot work as a 4G SIM slot.
• Some legacy SIM cards may not function with your device. You should consult with your
service provider for a replacement of SIM card. There may be some fees for this service.
To install the Memory card
To have additional storage for your images, videos, music, and files, you can purchase a
memory card and install it into your device.
1. Make sure that your device is turned off, and then pull the back cover.
2. Locate the memory card slot on the upper part of the exposed right panel.
3. Insert the memory card into the slot with its gold contacts facing down until it clicks into
place.
Note: To remove the memory card, pull it to eject it from the slot.
Charging the Battery
New batteries are shipped partially charged. Before you start using your device, it is
recommended that you charge the battery. Some batteries perform best after several full
charge/discharge cycles.
The battery can be charged and discharged many times, but it will eventually wear out.
When the talk time and standby times are noticeably shorter than normal, get the battery
replaced. Use only iBall approved batteries, and recharge your battery only with iBall
approved chargers designated for this device. If a battery is being used for the first time or
if the battery has not been used for a prolonged period, it may be necessary to connect the
charger, then disconnect and reconnect it to begin charging the battery. If the battery is
completely discharged, it may take several minutes before the charging indicator appears
on the display or before any calls can be made.
Note: Only the AC adapter provided with your device must be used to charge the device.
Connect the USB connector of the AC adapter to the sync connector on your device, and
then plug in the AC adapter to an electrical outlet to start charging the battery.

14
As the battery is being charged while the device is ON, a charging icon appears in the title
bar of the Home screen. After the battery has been fully charged, a full battery icon
appears on the title bar of the Home screen.
Warning!
• As a safety precaution, the battery stops charging before it overheats.
3. Starting up the Device
Power ON / OFF
To power OFF your Mobile, press & hold the POWER key. On release, the options menu
opens. Select ‗Power OFF‘ from the given options and confirm. This will turn OFF the
device.
To power ON again, press & hold the POWER key. The iBall power start up animation will
appear on the screen indicating that the device is starting. It takes around 40 seconds to
completely reboot the device.
Silent mode
To put your device on silent mode quickly, press & hold the – volume down button to zero
volume. Just before the silent mode, on volume level 0 is the vibration mode, or on the
Home screen, click and select Settings Sound & Notification. Select ‗Silent‘ radio button.
You can only activate silent profile but cannot customize it. You can also long press the
power key and you will get the option to change user profile.
Screen time-out
After a period of inactivity, your screen will go to sleep (display will turn black). In sleep,
your Mobile uses less battery power. You can control this behaviour by following the below
mentioned steps:
Set screen timeout period
1. On the Home screen, click and select Settings.
2. Select Display option.
3. Select ―Screen Time out‖, to set the time period of sleep mode.
Press POWER key once to OFF display immediately. While on a call, to lock your control
buttons and screen from accidental touch activation, press POWER key.
15
You can increase the security of your phone by setting Screen unlock pattern. Once set, in
order to unlock your screen, you‘ll have to draw the correct unlock pattern. You can set
your screen unlock pattern as follows:
1. On the Home screen, click and select Settings.
2. Select Security and then scroll down to Screen lock pattern section.
3. Set or change your unlock pattern by selecting Screen lock pattern, as applicable.
4. Follow the prompts to define your pattern.
Note: You must swipe your finger along the screen to create the pattern, do not select
individual dots. Connect at least four dots in order to create a lock pattern.
If you want your pattern to be hidden as you draw it, clear ‗Make pattern visible‘ check box.
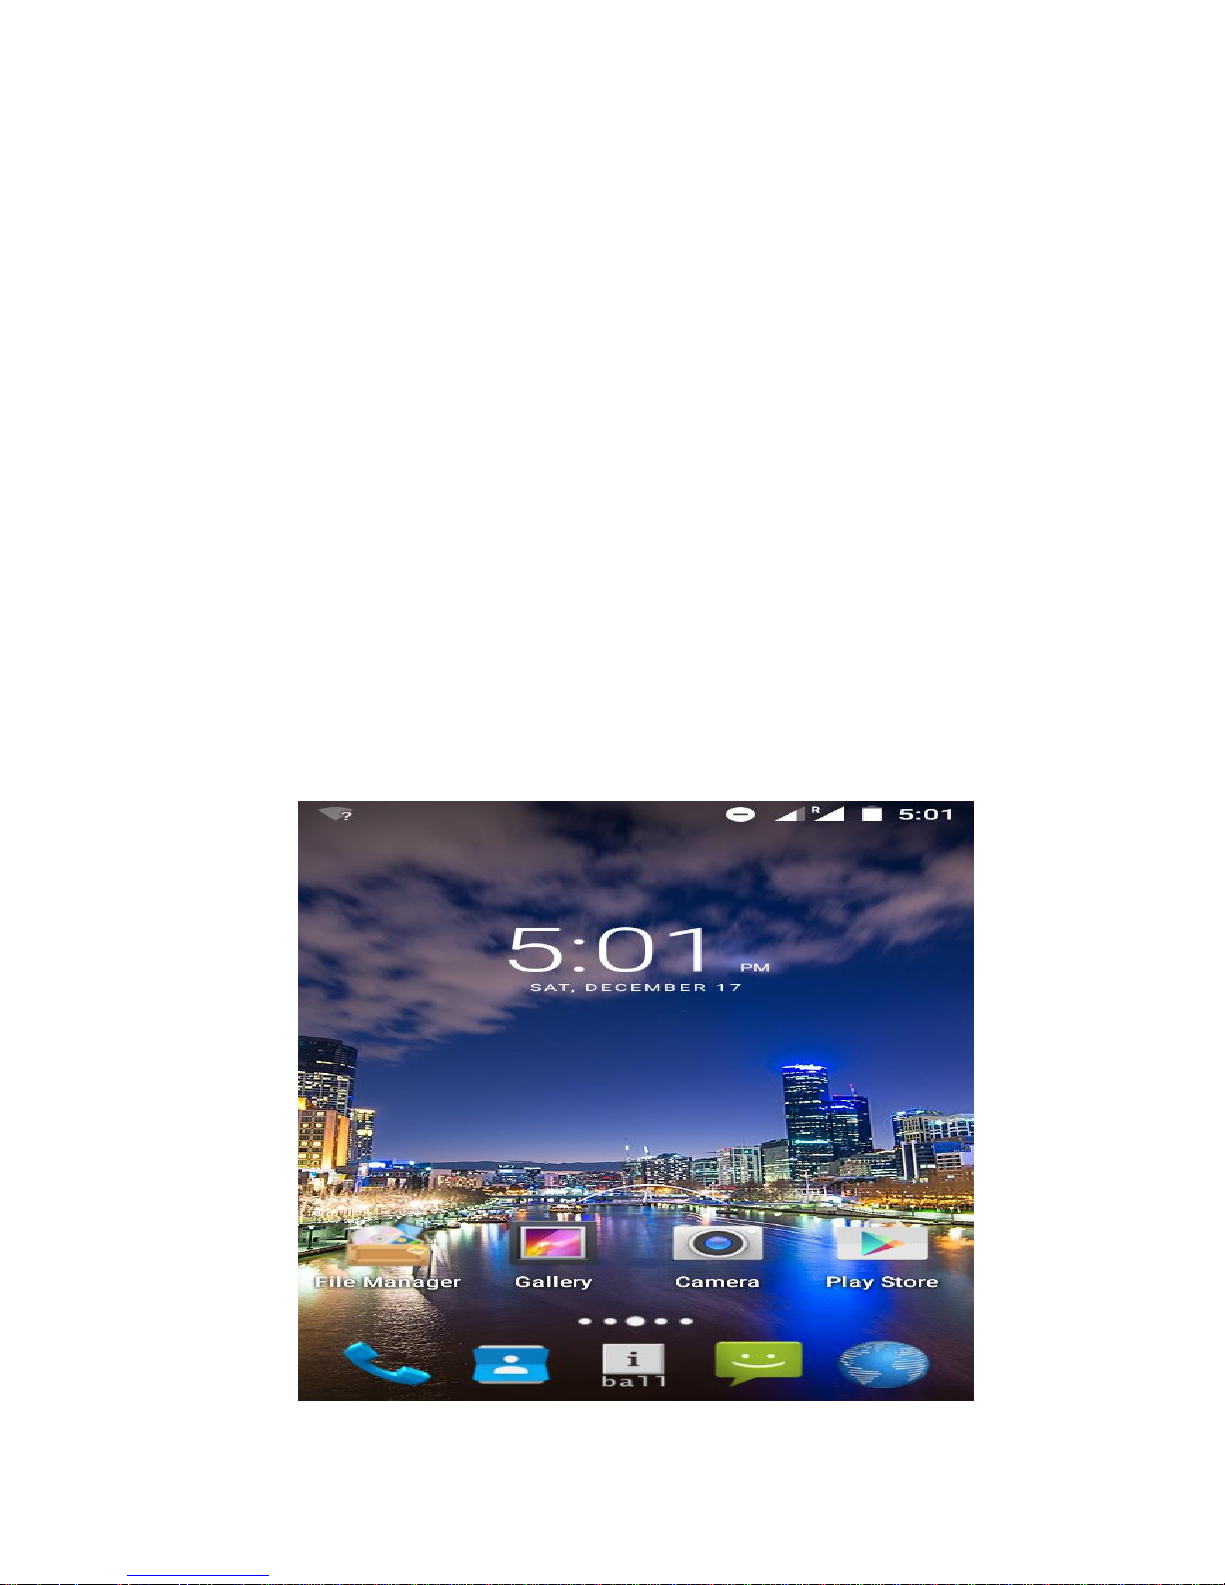
4. Home screen
The Home screen is your starting point for using all the applications on your Mobile. You
can customize your Home screen to display applications, shortcuts, and widgets as you
like.

16
1. Click the application tab with your fingertip to reveal the application icons.
2. The Home screen actually extends beyond the screen width. On Home screen, swipe
your fingertip left and right along the screen to reveal the full width of the Home screen.
This additional space gives you more room to customize Home with applications,
shortcuts, and widgets.
3. Create Home screen shortcuts and widgets:
• Click the Apps tab with your fingertip to reveal the application icons, swipe your fingertip
right to show the shortcuts and widgets.
• Select an Application shortcut, a Shortcut to some of your saved information (such as a
play list), a Widget (a clock or picture frame) for your Home screen.
• The application, shortcut, folder, or widget appears on Home screen.
Tip: To create an application shortcut quickly, click the application tab to reveal all the
application icons, then touch & hold an application icon. Its shortcut is added to the Home
screen; close the application tab to see it.
4. To remove a shortcut or widget from your Home screen, touch & hold the item to enter
―move mode‖. The application tab turns into a Trash button. Drag the item to the Trash
button and release on ― Remove‖ icon.
5. Move objects on the Home screen
• To move an icon or other item on the Home screen, you must first touch & hold it to enter
move mode. The object will magnify when it‘s ready to be moved.
• Without lifting your finger (or you‘ll drop out of move mode), drag the object to the new
position. To move an item to a section of the Home screen not in view, move it to the edge
of the screen and hold it there for a moment. The screen view will shift; position the object
and release.

17
4.1 Read your notifications
On the Top of your phone screen is the status bar. On the left side, icons will appear,
notifying you of a new message, upcoming calendar event, or something else you should
notice. On the right side of the status bar, you‘ll see connection status icons.
18
4.2 Connection status icons
When you see a notification in the status bar, click the bar and swipe your finger down the
screen to open the list of notifications displayed in the sliding window.
Ongoing notifications report activities such as call forwarding ON, current call status, song
playing.
Notifications report the arrival of new messages, calendar events, and alarms. You can
clear notifications list by selecting ‗Clear‘ notifications at the bottom of the notifications
window.
To open the message, reminder, or other notification, you can click the items. To close the
notifications window, drag your finger up the screen.
Note: On the home screen, click the bar and swipe your finger down the screen to open
the list of notifications displayed in the sliding window, you can click the icon on the top of
the screen (such as Wi-Fi, Bluetooth, Data connection, Airplane mode, Brightness) to open
or close the selected function.
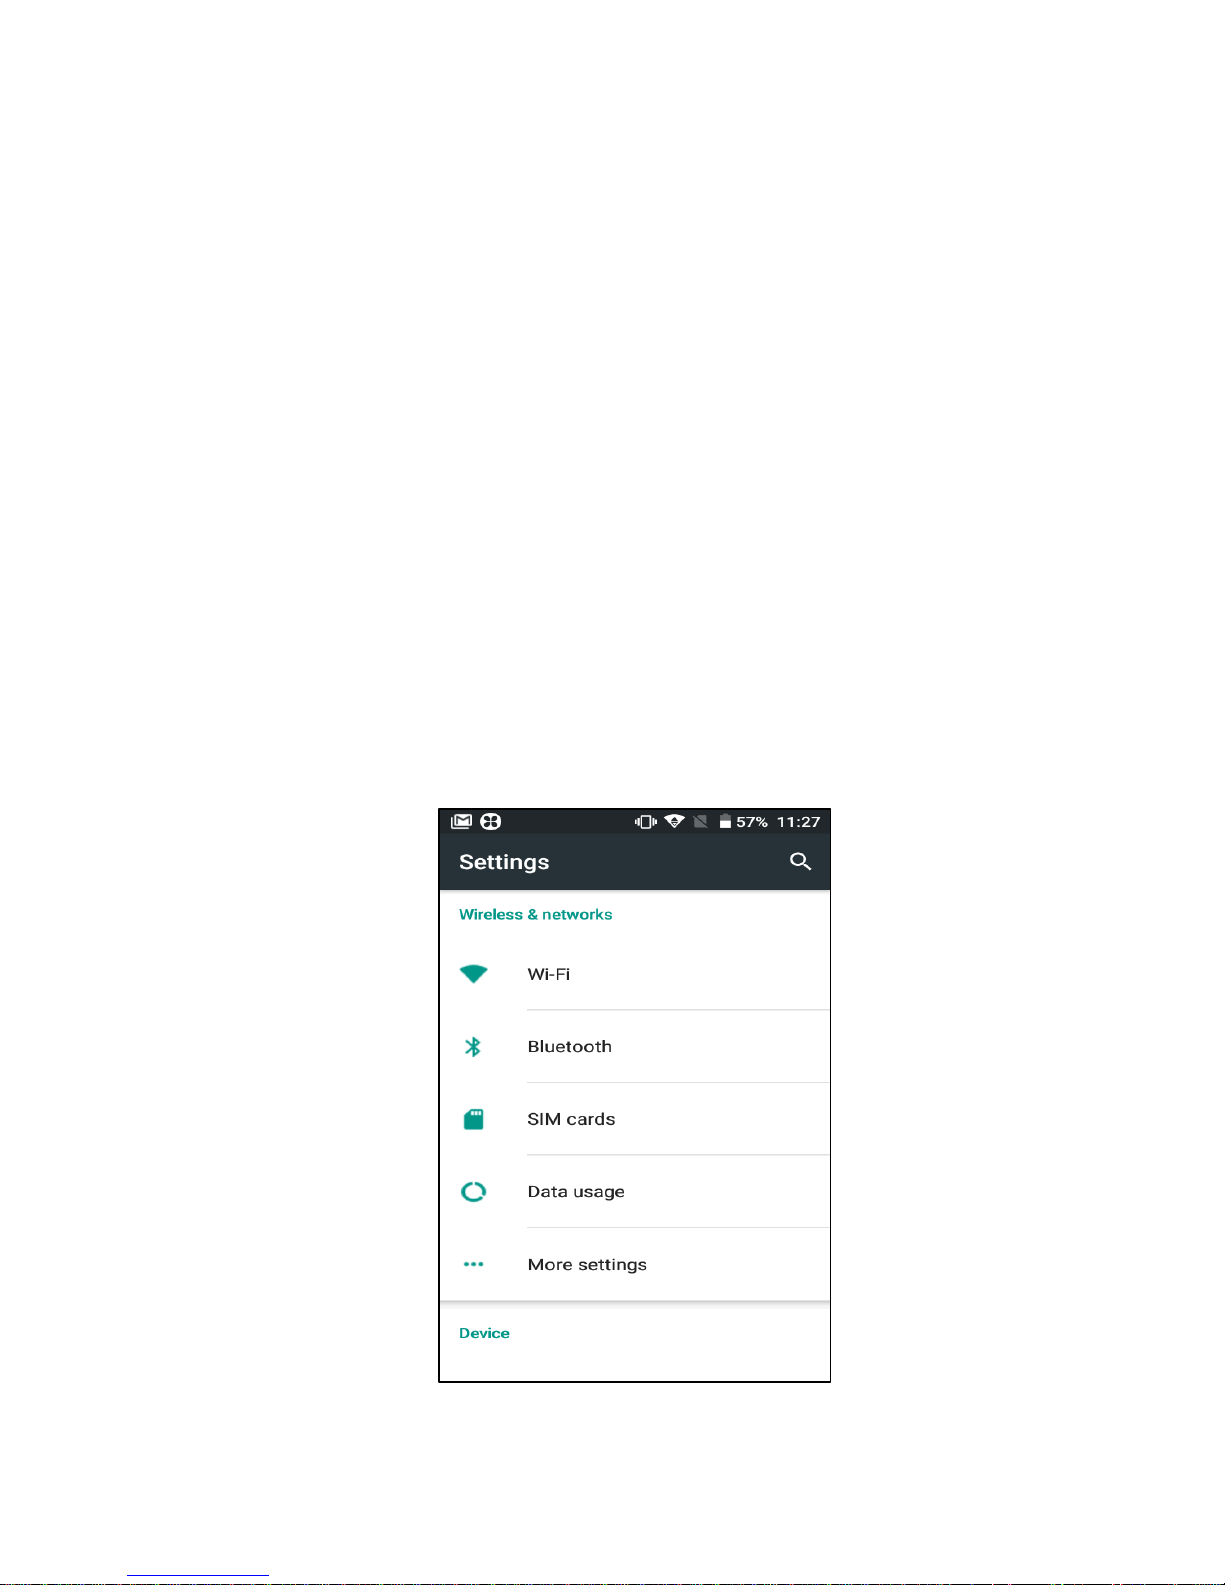
5. Settings
19
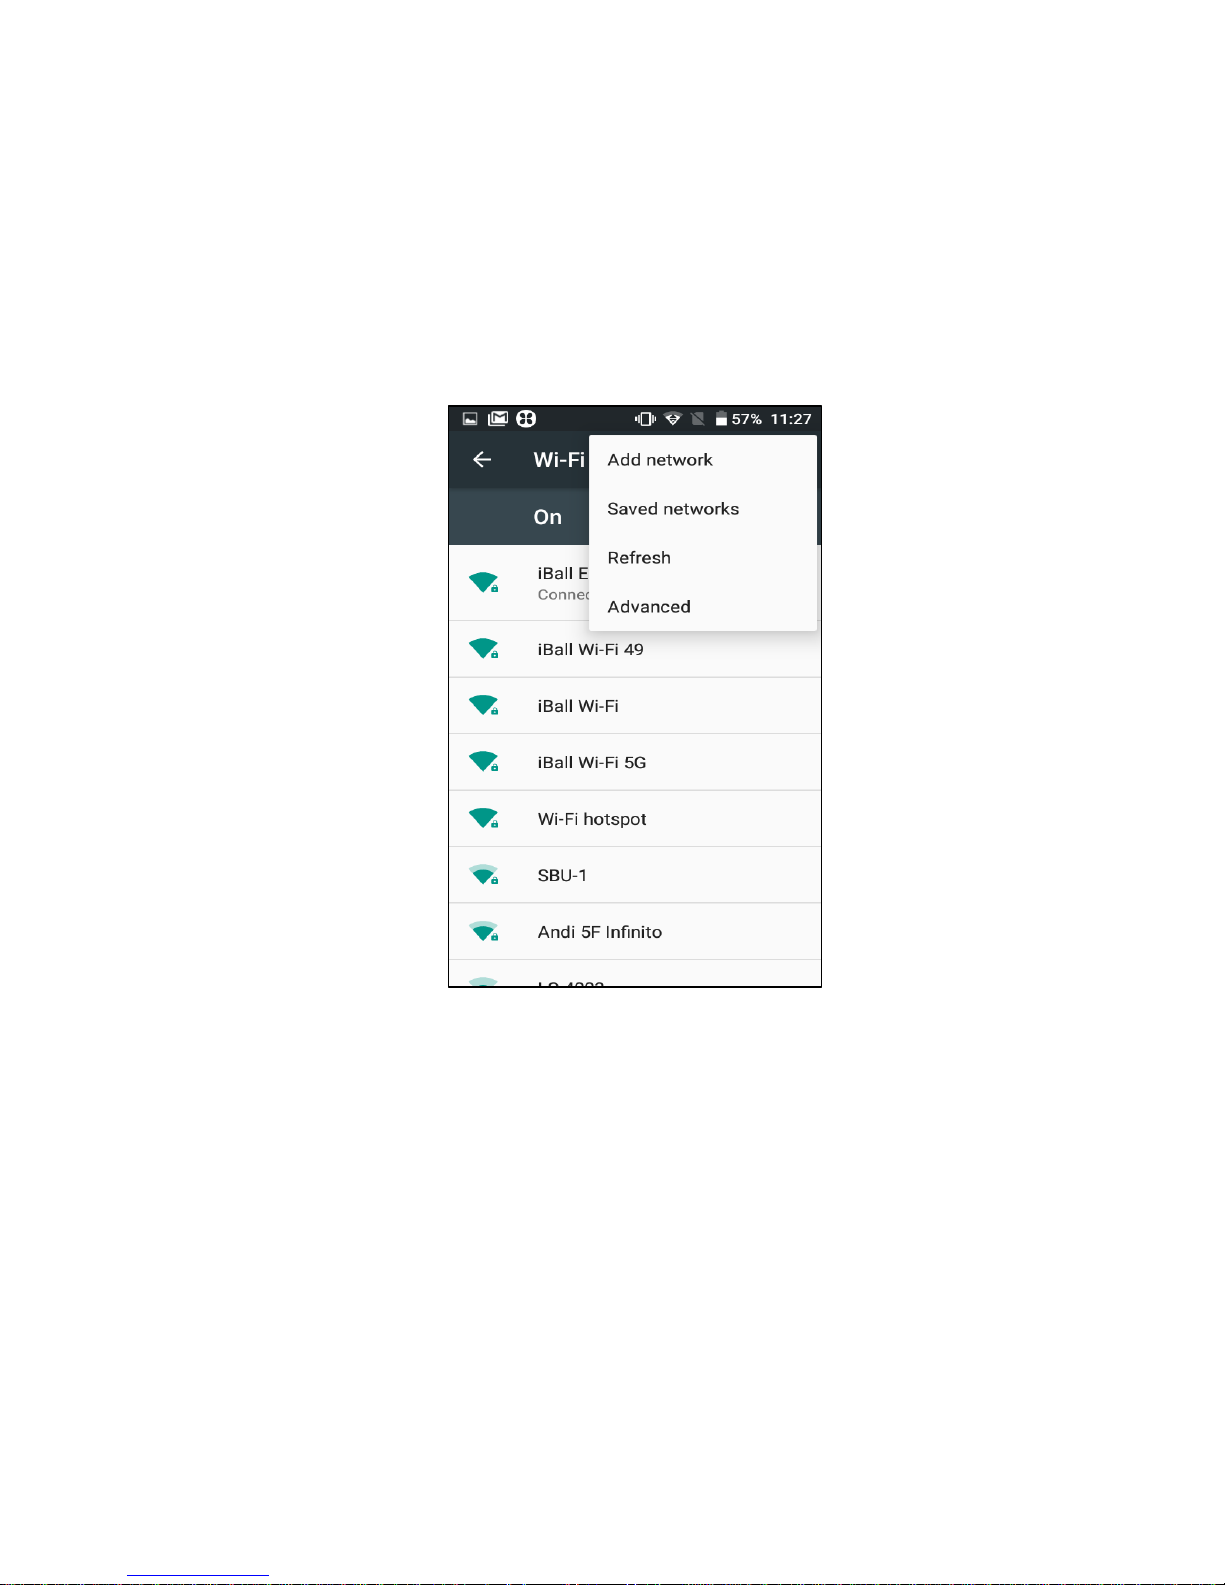
5.1 Wi-Fi
Wi-Fi ON/OFF: Select this option if you prefer to use Wi-Fi for your data connection. You
can activate Wi-Fi by toggling the switch left/right to On/Off Wi-Fi connectivity.
Wi-Fi settings: Open the Wi-Fi settings screen. Select it from the network list. Provide
your username or password if required
Advanced: This option contains the following features:
1.Network notification: By default, when Wi-Fi is on, you receive a notifications in the
Status bar when your device detects an open Wi-Fi network. Uncheck this option to turn
OFF notifications.
2. Keep Wi-Fi on during sleep: To conserve mobile data usage, your device stays
connected to Wi-Fi when the screen goes to sleep.
20
3. Install certificates: Here you can see and add your certificate.
4. Wi-Fi Direct: Using Wi-Fi direct feature, you can transfer little heavy data from one
device to another through Wi-Fi without the need of an access point.
5. WPS Push Button:Select to turn ON Wi-Fi protected setup for a Wi-Fi protected setup
capable network.
6. WPS Pin Entry: Any wireless computer or wireless adapter that will connect to the
modem router wirelessly is a client. The client must support a WPS PIN, and must have a
WPS configuration utility.
7. MAC address: The Media Access Control (MAC) address of your device when
connected to a Wi-Fi network.
8.IPv4 address: The Internet Protocol (IP) address assigned to the device by the Wi-Fi
network you are connected to (unless you used the IP settings to assign it a static IP
address).
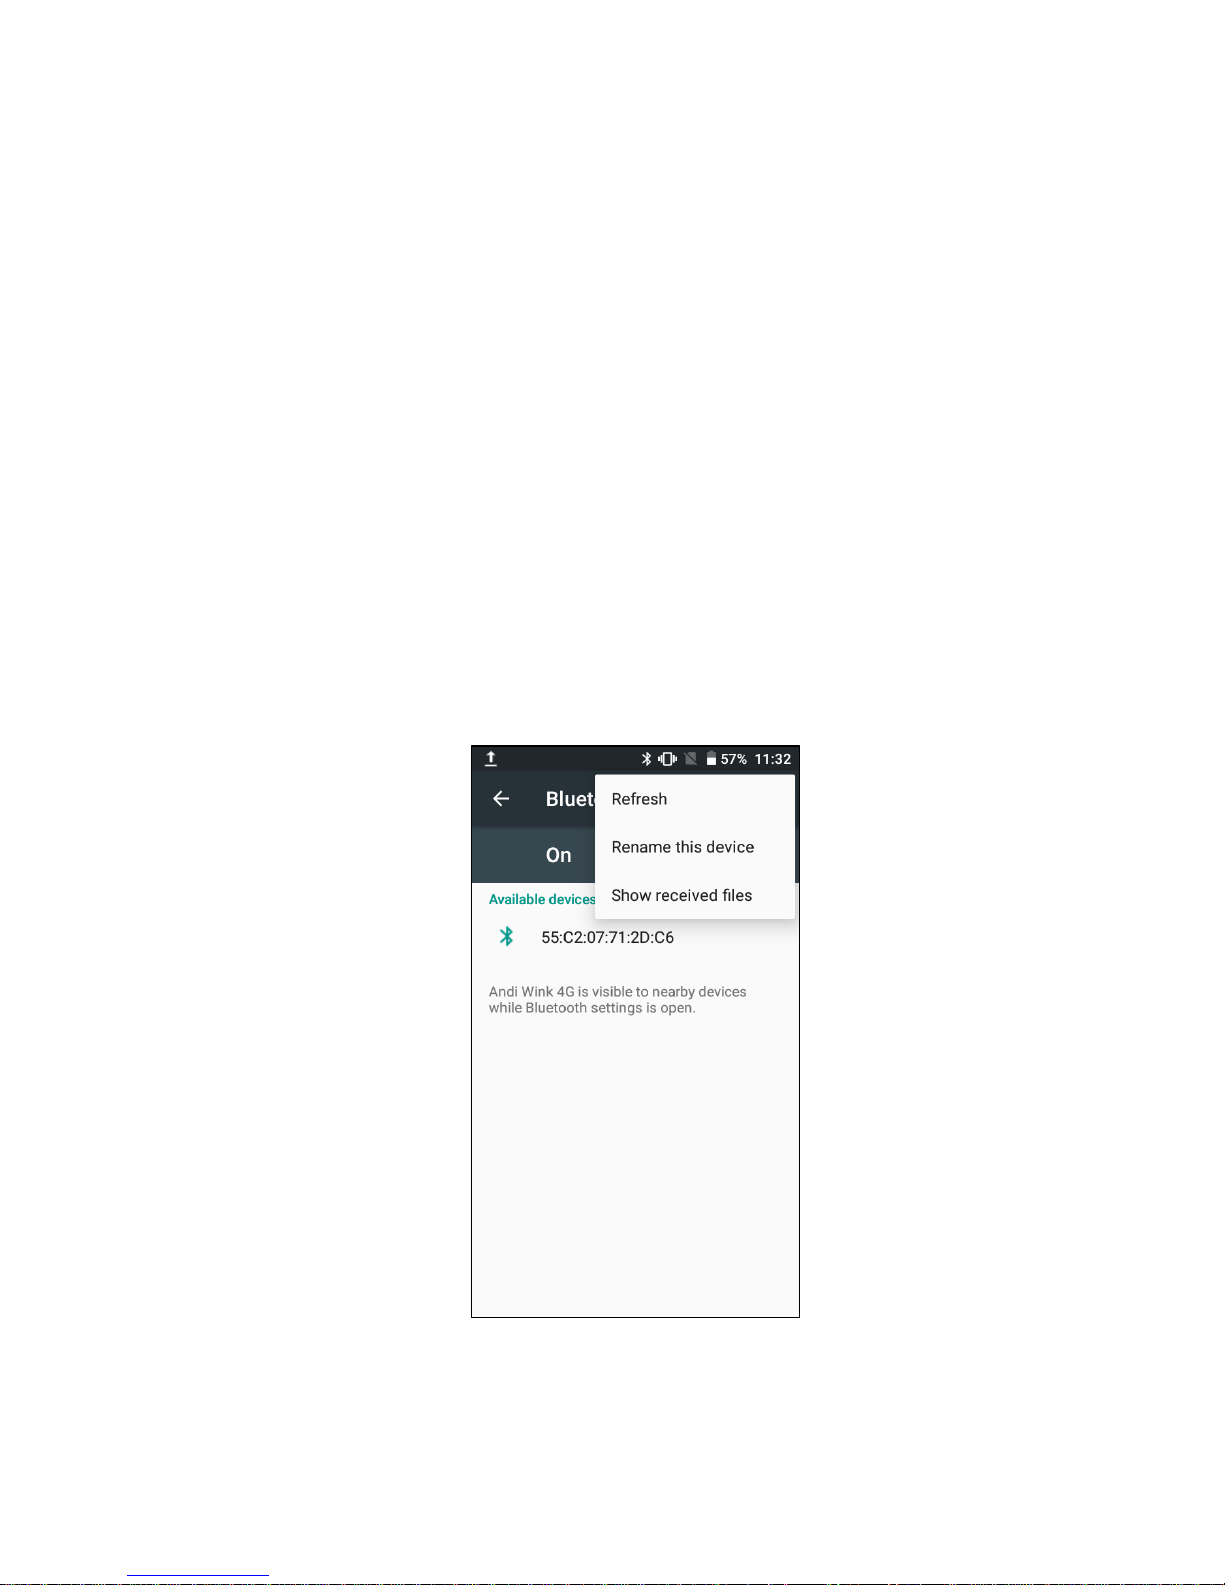
5.2 Bluetooth
Bluetooth ON/OFF: Select this option if you prefer to use Bluetooth for transferring files.
You can activate Bluetooth by toggling the switch left/right to On/Off Bluetooth connectivity.

21
Bluetooth settings: With Bluetooth services ON, you can open the Bluetooth settings
screen to:
Rename this device
1. Make sure you have turned Bluetooth ON.
2. Select Settings Bluetooth . Thne click on this icon .Then select Rename this
device.
3. Type the name for your device in the dialog box, and then click ‗RENAME‘
• Show received file: You can get a path where you have received the file through
Bluetooth.
Pair & connect with Bluetooth devices
Before your Mobile can communicate with a Bluetooth headset or hands-free car kit, the
devices must ―pair‖, then ―connect‖:
1. Make sure you have turned Bluetooth ON.
2. Select, SettingsBluetooth
3. Your Mobile starts scanning for Bluetooth devices within range. As they are found, the
devices appear in the list of Available Bluetooth devices.
4. To pair with a device in the list, select it.
5. Type the device‘s PIN and then click on‗OK‘.
6.Once paired, select the device name to connect.
7. Pairing and connection status appear under the device name.
8. Once the other Bluetooth device shows ―Connected‖ status, you can start using it to dial
and receive phone calls.
9. To disconnect or to unpair with a device, touch this icon next to device name & then
touch on ‗FORGET‘ to open the context menu, click Disconnect or Unpaired, as
appropriate. If you select ‗Unpaired‘ when connected, you will be disconnected as well.
Note: The Mobile supports only the headset and hands-free Bluetooth profiles, so if you try
to connect to a device that is not a headset or hands-free car kit, then you will receive an
―unable to connect‖ message.

22
If you pair with a second headset while connected to the first, the first headset will remain
connected. To switch connection to the second headset you must manually select that
headset again after pairing.
Rescan for Bluetooth devices:
If you want to update the list of Bluetooth devices, select ‗Refresh‘.
5.3 SIM Cards
You can select to activate or deactivate the SIM card you want to keep in use. From here
you can set the default SIM to use voice call, messaging and data connection. You can
also select always ask, which means that the device will ask you which SIM do you want to
use, every time you perform a function.
5.4 Data Usage
It provides a graphical representation of the data usage for a specified Data Usage cycle
through SIM Internet or Wi-Fi.
Data usage refers to the amount of data uploaded or downloaded by your device during a
given period. Depending on the device and your wireless plan, you may be charged
additional fees when your data usage exceeds your plan's limit. To monitor your data
usage, adjust your data usage settings. First check your plan and determine what data
limits may apply.
Warning! The usage displayed on the data usage settings screen is measured by your
handset. Your carrier's data usage accounting may differ. Usage in excess of your carrier
plan's data limits can result in steep overage charges. The feature described here can help
you track your usage, but is not guaranteed to prevent additional charges.
Data usage settings allow you to:
Set the data usage level at which you'll receive a warning.
Set a data usage limit.
View or restrict data usage by app.
To adjust the settings described here:
Click the Settings icon on a Home or All Apps screen.
Click Data usage.

23
By default, you see the settings for mobile data, that is, the data provided by your network
carriers.
5.5 More Settings…
Airplane mode ON/OFF : When airplane mode is selected, all wireless connectivity is
disabled. This icon will display in the status bar when Airplane mode is selected.
Default SMS app: The system settings allow users to select a "default SMS app." Once
selected, only the default SMS app is able to write to the SMS Provider and only the
default SMS app receives the SMS. The default SMS app is responsible for writing details
to the SMS Provider when it receives or sends a new message.
Tethering & portable hotspot: The device is used as a wireless modem for a PC, when
it‘s connected to the PC using a USB cable.
Tethering refers to connecting one device to another. In the context of mobile
phones or Internet tablets, tethering allows sharing the Internet connection of the phone or
phone with other devices such as laptops. Connection of the phone or Mobile with other

24
devices can be done over wireless LAN (Wi-Fi), over Bluetooth or by physical connection
using a cable for example, through USB.
Using hotspot, you can share your Mobile network with other Wi-Fi enabled devices. Also
You can connect and block the User.
Wi-Fi hotspot: Select the Wi-Fi networks which are Mobile hotspots. Apps can be
restricted from using these networks when in the background. Apps may also warn before
using these networks for large downloads.
USB tethering: Tethering refers to connecting one device to another. Tethering allows
sharing the Internet connection of the phone or Mobile with other devices such as laptops.
Sharing internet connection using USB cable is called USB tethering.
Steps to perform USB tethering
USB tethering allows sharing the Internet connection of the Mobile with other devices such
as laptops via USB.
First connect your mobile to PC Via USB cable.
Then in Mobilego to SettingsMore settingsTethering & portable hotspotselect USB
tethering.
You will get an indication on the laptop/PC that USB is connected.
For Windows XP (SP 3)users you need to Right click on ―My Computer‖—Manage---
Device Manager---Other devices---Andi Right click on Update
DriversInstall from a list or specific location (Advanced) nextSearch for the best
drivers in these locationsbrowseiBall tethering driversoknextfinished.
Now you can use the Mobile‘s internet on your system using USB connection.
Bluetooth Tethering: Tethering refers to connecting one device to another. Tethering
allows sharing the Internet connection of the phone or Mobilewith other devices such as
laptops. Sharing internet connection using Bluetooth is called Bluetooth tethering.
Steps to perform Bluetooth tethering
Bluetooth tethering allows sharing the Internet connection of the phone with other devices
such as laptops via Bluetooth.
In Mobilego to settingsturn on Bluetooth.
In settingsgo to More Settingstethering & portable hotspotcheck Bluetooth tethering.

25
In PCturn on the system's Bluetooth.
Dial upsearch for all available Bluetooth devicesadd your Bluetooth deviceselect
your device (Mobile).
Now go to network access point serviceperform pairing of the devices.
Now you can use the Mobile‘s internet on your system using Bluetooth connection.
VPN: VPN stands for Virtual Private Mode. Using this feature, you can connect to your
private network through a public network in a secured way. You can add a VPN
connection, customize it as per your requirement and then save the settings. Once the
network is created, select the network again to connect to it.
Mobile networks:
Data roaming:Select data roaming capability.
Preferred network:You can select prefefined PLMN setting or you can create new as per
your requirement.
Network mode:Select network type from available options as 4G/3G/2G(Auto),4G
Only,4G/3G(Auto),3G Only,3G/2G(Auto)& 2G Only.
Access Point Names:You can create new APN for using internet facility on your handset.
How do I perform my GPRS settings to activate internet?
The path to be followed to perform the GPRS settings in your handset is mentioned below:
Main menuSettingsMore settingsMobile networksAccess Point NamesSelect
the SIM on which you want to perform the settingsselect the option for new APN.
(Please contact your SIM service provider for APN)
Network operators:Out of the two available method of choosing network, you may either
select ―Select manually‖ or ―Choose automatically‖.
5.6 Display
MiraVision: This feature makes the picture quality optimize for better experience.
Brightness level: Select to open the brightness control, and then swipe your finger along
the brightness bar to set the level. In sunlight, increase the level.
Adaptive brightness:Optimize brightness level for available light.

26
Wallpaper: Select to choose the type of wallpaper you want on your home screen. You
can either select a picture from the gallery or download them on your Mobile. You can
select from one out of the available options: Gallery, Live Wallpapers,Photos and
Wallpaper.
Gallery: You can set the Wallpapers from Gallery, which will include wallpapers as well
your camera images present in the gallery.
Wallpapers: You can set the default embedded Wallpapers present in the handset.
Screen Time out: Select to decide how long your phone must be inactive before the
screen turns off.
Daydream: You can select from the provided widgets to be displayed when the screen is
left idle for a long time.
Font Size: Select to choose the font size of characters on your screen.
When device is rotated:Whether you want to rotate contents of the screen when
orientation of screen changed.
5.7 Sound & notification
There are 4 types of audio profiles available by default and you can add new profile , they
are General, Silent, Meeting and outdoor.
Note: Out of the available 4 audio profiles only General and added by user profile can be
customized. The other threeaudio profiles i.e. Silent, Meeting & Outdoor cannot be
customized.
After you select the General profile you will get the following options to be customized
according to your needs and usage.
General:
Alarm & Ringtone volume: Drag your finger along the volume bar to set an incoming call
ringtone & alarm volume.
Phone ringtone: Select to decide on a ringtone to use for incoming calls. Note that you can
override this setting for individual contacts in the Edit contact details screens.
Default Notification sound: Select a ring tone to use for a notification (e.g., new message).
Note that you can override this setting for new Calendar event notifications, text and
multimedia message notifications. Go to the applications settings screens to select specific
ring tones.

27
System:
Vibrate: Select to have your Mobile vibrate for incoming calls.
System sound: You can select the following 4 options also.
Dial pad touch tones: You can select from here if you want the dial pad touch tones to be
activated.
Touch sounds: You can activate this option if you want the touch tones to be activated on
your device.
Screen lock sound: On activating this option the screen lock sound is activated.
Vibrate on touch: Selecting this will make your device vibrate with every touch on the
display.
Notification & Others:
Control notifications on your lock screen
When your screen is locked, you can see your notifications on the lock screen. But if you
don't want your notification details to show while your device is locked, you have a few
options:
Sound enhancement:
BesAudEnh & BesLoudness: This tool enhances audio for earphone and loudness of
loudspeaker.
BesSurround: You can choose as per your requirement as Movie mode or Music mode for
better experience.
5.8 Apps
Manage applications: View all the applications stored on your Mobile and how much
space they occupy.
1. Clear your user data (if you have any associated with a particular application).
2. Disassociate the application with any actions.
3.Uninstall - If you have downloaded an application from Google Playstore, you will be
able to uninstall it from this screen by selecting Uninstall.

28
5.9 Storage& USB
This option helps you to view and manage the data stored on your device. You can view
the total internal storage capacity and the capacity of the external memory card here.
Default Write disk: You can change default write disk location as Phone storage/ External
Storage for captured image/videos, received files, dowanloaded files etc.
External Storage : Monitor and manage the use of your Memory card from this screen:
1. View how much space you are using on your memory card.
2. Select to use your memory card as USB mass storage when your Mobile is connected
to your computer (selected by default)
3. You can Eject, Format as portable and Migrate data of your memory card from your
Mobile. Note that when your Mobile is connected to your computer via USB, you cannot
view pictures or play any media stored on the card from your Mobile.
Phone storage: Reports about internal storage.
1. The Mobile may be used as a USB disk, when we connect the Mobile to PC via USB
cable; two removable devices are detected in your My Computer. One of them is Phone
memory & another is your SD card storage.
5.10 Battery
It gives you the current battery level, along with the distribution of battery consumption by
different apps.
Battery Power Saving: Battery saver limits vibration, location services, and most
background data. Email, messaging, and other apps that rely on syncing may not update
until you open them. You also won't be able to use Google Maps Navigation while using
battery Power Saving.
Battery Percentage: You Enable this to view the battery level in Percentage on your
Notification Bar.
Open SettingsBattery.
The list at the bottom of the screen shows the breakdown of battery usage for individual
apps and services. Click a graph for more details. The details screen for some apps
includes buttons that allow you to adjust settings affecting power usage, or stop the app
completely.

29
Warning! If you stop some apps or services, your device may not work correctly. Battery
status (charging, discharging) and level (as a percentage of fully charged) are displayed at
the top of the screen. The discharge graph shows battery level over time since you last
charged the device, and how long you've been running on battery power.
5.11 Memory
You can see here total RAM and distribution of RAM across applications. It can show the
memory by apps in specified time span. It can also show the Performance, Total memory,
Average used(%) and free memory.
5.12 Users:
You can easily share your device with family and friends by creating a user for each
person. Each person will have their own space on the device for custom home screens,
accounts, apps, settings and more.
5.13 Location
My Location: Select a source for determining your location: Wireless networks, or GPS
satellites. Typically GPS will be more accurate (to street level) but it consumes more
battery power.
High accuracy: Use GPS, WI-FI, Bluetooth and Mobile networks to determine the location
Battery saving: Use Wi-Fi, Bluetooth and mobile networks to determine location.
Device only: Use GPS to determine your location.
5.14 Security
Screen Lock:
None: Select this option if you don‘t want a lock screen. It provides no protection, but lets
you get to the Home screen.
Swipe: Move your finger across the screen to unlock your device. It provides no protection,
but lets you get to the Home screen.
Pattern: Pattern lets you draw a simple pattern with your finger to Lock and unlock the
device.

30
Voice unlock: Voice unlock lets you unlock your phone using your voice. This is somewhat
more securing than face unlock but not as much as pattern or password lock.
PIN: PIN requires four or more numbers. Longer PINs tend to be more secure.
Password: Password requires four or more letters or numbers. This is the most secure
option, as long as you create a strong password.
Make pattern visible: Enable it to show pattern lock while unlocking.
Automatically lock: Automatically lock the screen after 5 seconds after sleep, except
when kept unlocked by Smart Lock
Power button instantly locks: Tap Power button enable the device to instantly lock the
screen by pressing the Power/Lock Key or remove the checkmark to disable it.
Lock screen message: The information of the owner can be stored and then can be
displayed on the lock screen.
Smart Lock:Set up your device to automatically unlock when you have a trusted Bluetooth
device.
Encrypt phone:You can encrypt your accounts,setting,downloaded apps and their
data,media,and other files.After you encrypt your phone,assuming you‘ve set up a screen
lock (that is a pattern or numeric PIN or password),you‘ll need to unlock to decrypt is to
perform a facrory data reset,erasing all your data.

31
Encryption takes an hours or more. You must start with a charged battery and keep your
phone plugged in thoughout the process. If you interrupt it,you ‗ll lose someor all of your
data.
Set up SIM card lock: Lock your SIM card for extra security. You can also change your
SIM card PIN from this screen. If you don‘t know your SIM PIN, you can obtain it from your
SIM service operator.
Make passwords visible: Select to have your password display as you type it. If you
uncheck this option then the password will not be displayed on the screen. Also, the
pattern lock that you will draw will not be visible on the screen making it more secure.
Device Administrator: On selecting this option, you can either view or deactivate device
administrators.
Unknown Sources: On selecting this option, allow installation of apps from unknown
sources.
Mobile anti-theft: Lock the phone or wipe data remotely.
Clear credentials:Remove all certicates.
Screen pinning: You can use screen pinning to keep an app's screen in view until you
unpin it. For example, you could pin a game so that you don't accidentally exit the game
while you're playing. Then, when you're done with the app, you can unpin the screen to get
back to the rest of your apps.
Turn screen pinning ON or OFF
Before you start pinning screens, you'll need to turn ON the screen pinning setting for your
device:
1. Open your device's Settings app .
2. Scroll down and click Security.
3. Click Screen pinning.
4. At the top, switch the setting ON or OFF.
5. If you turned screen pinning ON, you'll also see an option to "Ask for unlock pattern
before unpinning."
Pin a screen
1. Make sure that screen pinning is turned ON for your device (see directions above).
2. Open an app and go to the screen you want to pin.
3. At the bottom, long press on Home key .

32
4. Swipe up to reveal the pin icon . It will be in the bottom right corner of your selected
screen.
5. Click the pin icon .
Unpin a screen
1. When you're on the pinned screen, touch and hold Back key .
2. Release back button and the screen will be unpinned.
3. If you required that the lock screen show after an app is unpinned, you will need to
enter your pattern, PIN, or password.
Apps with usage access:Manage what apps have access to app-usage data on your
device.
5.15 Accounts
This option allows you to add new account on your device. You can add new Gmail or
personal web mail account. You can also add your account of Email, Facebook, Google,
WhatsApp, WeChat and many more. You will find this option in settings. All your accounts
that are present on the device will be displayed here. You can also remove the account
from the device from this location.
Note: Removing the account will not delete the account permanently. It will just remove the
account from the device. You can log in to that account from any other device or the same
device also.
For removing the account, go to settingsselect the account that you want to removetap
on that particular accountselect the option key. Here, you will get two options sync now &
remove account. Click―remove account‖, it will ask for confirmation, click―remove account‖
again and your account will be removed from the device.
5.16 Google
Google Search for Android is an application by Google which integrates Google search
and Google Now into an application for Android devices. Search for Android implements
Google Now, Google's voice recognition and intelligent personal assistant software for
Android, into a Google Search application. Users can speak to their phone in the app to
search. Users can, alongside normal Google Search results, receive interactive weather
results and flight information, among calculations and more features.
In this Ads, Location, Nearby, Search & Now, Security and Set up nearby device options
are present.

33
5.17 Language & input
Language: On selecting this option you can choose the required system language of
theMobile from the given list of languages.
Spell Checker: On selecting this option you can turn on the spell check feature on your
Mobile.
Personal Dictionary: With Google Keyboard, you can see word suggestions from
dictionaries in different languages. You can even add words to your own personal
dictionary.
Keyboard & input methods
Current Keyboard:It is showing default selected keyboard, you can change default
keyboard by tabing Current Keyborad and select from available keyboard.
Android Keyboard: It is the default input method on your Mobile.
Google Hindi Input: Google Hindi Input allows you to type messages, update on social
networks or compose emails in your own native language on your Android phone
iBall MOX Keyboard : It has 21 Indian Regional languages.
Speech
Text-to-Speech output:Here you can change the text to speech out engine settings like
Speech rate, Default language status.
Voice Control:You can Turn ON/OFF voice controlled application setting.
Mouse/trackpad
Pointer speed: On selecting this option, you can control the pointer speed.

34
5.18 Backup & Reset
Back up my data: You can use Android Backup Service to back up data connected to one
or more of your Google accounts. If you have to replace your device or erase its data, you
can restore your data using any account that you backed up.
Automatic restore: When reinstalling an app, restore backed up settings and application
data.
Network settings Reset: This will reset all network settings, including Wi-Fi, Mobile data
and Bluetooth.
Factory Data Reset: You can select this option to reset your Mobile to factory settings.
This will erase all your data from the internal memory of your device and the settings also
will be restored to default. You will also need to sign in with your Google account to use
any application that requires your email account. All the accounts that you were using will
also get removed and you will have to set up all the accounts again including play store.
5.19 Gesture Control
It allows you to control your device with simple gestures. Just swipe your finger across the
screen, and the action you want will be performed.
Double click: Double click on screen to turn on screen.

35
Sliding up: Move your finger in upward direction to open Gallery directly.
Sliding down: Move your finger down to open system setting directly.
Sliding to the left: Move your finger to the left from right to open Whatsapp directly.
Sliding to the right: Move your finger right from left to open Facebook directly.
It has alphabetical gestures also Gesture c, e, m, o and v. On drawing this gestures in
display OFF mode the application assigned to it opens.
Note: For Gesture to work your device should not be locked as Pattern, PIN, password and
you can change application for particular getsure as per your convenience.
5.20 Date & Time
According to the pre-set, system will voluntarily apply the date, time zone, and time
provided by internet.
Manually set date, time and zone.
• Automatic date & time: You can set you Mobile date & time settings, which can detect
automatically by following option
•Automatic time zone: The time zone will detect automatically with this option If you
haave not select this, than you have to set the date & time with time zone manually.
•Set date : select date, month and year to adjust date and click ―OK‖ when you finish
selection.
•Set time : move figure in clock or anticlock wise to select time in hours and then minute,
click AM or PM to change morning or afternoon (there is no such selection when you set
24-hour format). Click ―OK‖ to finish.
Select time zone: Set it to GMT+05:30, India Standard Time.
• Use24-hour format:switch between 12-hour or 24-hour format, the time format you
choose will be used on the alarm clock.
5.21 Scheduled power ON & OFF
This option lets you select the time duration during which you want your device to shut
down and then start up. This is useful in enhancing the battery life of the device. You can
set the fixed time at which you want it to switch OFF and when you want to switch it ON
again. You will find this option in settings.

36
5.22 Accessibility
These are certain special features which help people with certain disabilities. These
options help the users who are visually impaired and cannot access through the functions
properly. These features are great help for such users. You can activate the talkback
function which guides the user by speaking feedback or you can set the font size as extralarge for low vision users.
Mentioned below are all the options that are present in the handset for the users to guide
them.
Services
Talkback: This option provides spoken feedback to blind and visually impaired users.
Switch Access: Switch access enables you to control your device with one or more
switches. For users with limited mobility, switch access provides an alternative to using the
touch screen.
System
Caption: You can turn on captions for your device and specify options (language, text, and
style) for closed captioning.
Magnification gestures: Using this feature you can zoom in & out by triple tapping the
screen.
Large text:The large text setting increases the text size on your device to the largest
available.
High contrast text:High contrast text function makes text easier to read on your device.
This feature fixes the text color as either black or white, depending on the original text
color.
Power button ends call: Calls can be ended with the power button on selecting this
option.
Auto-rotate screen: Check to have the screen rotate automatically when you change the
Mobile‘s orientation.
Speak Password: Check to get spoken feedback while typing passwords.
Accessibility Shortcut: When this feature is turned on, you can quickly enable
accessibility features.

37
Text-to-speech output: The text is spoken for the user convenience.
Touch & hold delay: Lets you adjust the delay required for the Mobile to notice that you're
touching and holding an item (for example, to move an app to a Home screen).
Display
Color inversion: Color inversion exchanges color values. For example, black text on a
white screen becomes white text on a black screen.
Color correction: The color correction setting enables your device to compensate for
color blindness.
5.23 Printing
Some printers let you print from your Android phone over a Wi-Fi or Bluetooth connection.
However, if your printer doesn‘t have such capabilities, you can register your printer to
Google Cloud Print, a technology and service that lets you connect your printer to the Web,
making your printers accessible wherever you are.
*Note: All the printers may not be compatible. Please contact your printer manufacturer for
details
5.24 Developer Options
This option comes after you go to settingsabout iBall Mobilebuild numbertap on this
option 6 to 7 times
Take bug report: This will collect information about your current device state, to send as
an e-mail message.
Desktop backup password: Set a password to secure your backup data.
Stay Awake: Screen will never sleep while charging.
Enable Bluetooth HCI snoop : Capture all Bluetooth HCI packets in a file.
OEM unlocking : Allow the bootloader to be unlocked.
Running services : View and control currently running services.
USB debugging: When you connect your phone to laptop/PC, the following image will pop
up on your screen, it will sync your phone with Laptop/PC through USB connectivity.
Revoke USB debugging authorizations : Revoke access to USB debugging from all
computers you‘ve previously authorized.

38
Bug report shortcut : Show a button in the power menu for taking a bug report
Select mock location app : Select mock location and service information to be sent to a
location manager service for testing.
Enable view attribute inspection :Inspect views‘ attributes in Android System Manager.
Select debug app : set application for debugging.
Wait for debugger : Debugged application waits for debugger to attach before executing.
Verify apps over USB : Check apps installed via ADB/ADT for harmful behaviour.
Logger buffer sizes : select Logger sizes per log buffer.
Wireless display certification : Show options for wireless display certification
Enable Wi-fi Verbose Logging : Increase Wi-Fi logging level, show per SSID RSSI in Wi-
Fi Picker
Aggressive Wi-Fi to Cellular handover: When enabled, Wi-Fi will be more aggressive in
handling over the data connection to cellular, when Wi-Fi signal is low
Always allow Wi-Fi Roam Scans : Allow/ Disallow Wi-Fi Roam Scans based on the
amount of data traffic present at the interface
Use legacy DHCP client : Use the DHCP client from Lollipop instead of the new Android
DHCP client.
Cellular data always active : Always keep mobile data active, even when Wi-Fi is active
(for fast network switching).
Select USB Configuration : MTP (Media Transfer Protocol).
Show touches : Set to show visual feedback for touches.
Pointer Location : Set the Co-ordinates & traces of the pointer when you touch the
screen.
Show surface updates : Flash entire window surfaces when they update.
Show layout bounds : Show clip, bounds, margins etc.
Force RTL layout direction : Force screen layout direction to RTL for all locales.
Window animation scale : The ratio by which the animation scale is applied.

39
Transition Animation Scale : To speed up transitions (and your phone‘s reaction time),
either turn off animations, or reduce the scale.
Animator duration scale : The ratio in which the animation scale is measured.
Simulate secondary displays : Select one option out of the provided four.
Force GPU rendering : Use 2D hardware acceleration in application.
Show GPU view updates : Flash views inside window when drawn with the GPU.
Show hardware layers update : Flash hardware layers green when they update.
Debug GPU overdraw : with options OFF, Show overdraw areas and Show arears for
Deuteranomaly.
Debug non-rectangular clip operations : with options OFF, Draw non-rectangular clip
region in blue and Highlight commands in green.
Force 4x MSAA : Enable 4x MSAA in OpenGL ES 2.0 apps.
Disable HW overlays : Always use GPU for screen compositing.
Disable USB audio routing : Disable aautomatic routing to USB audio peripherals.
Strict mode enabled : Flash screen when apps do long operations on main thread.
Show CPU usage : Screen overlay shows the current CPU usage
Profile GPU rendering : Measure rendering time in adb shell dump system graphics info.
Enable Open GL traces : Asks you to enable or keep GL traces disabled.
Do not keep activities : Set to end a running application when you launch a new
application.
Background process limit : Set the standard limit of processes which run in the
background.
Show all ANRs : Show apps not responding dialog for background apps.
5.25 Power Saving Mode
For more battery backup there is function Power saving mode, there are two modes as
below:

40
Smart power: It will automatically disable some functions (Brightness decreases to 20%,
screen time out will be 15 second, disable GPS, Disable Wi-Fi, Disable Bluetooth, Auto
Synch will be disable, screen rotation will be disable & all background appliacation will be
closed) when device battery level decreases to 15%.
Custom power:In this section you can disable or customize when be power saving should
be turn ON or you can cutomise which functions should be disable after certain battery
level.
5.26 About iBall Mobile
View the model number and version information for your Mobile.
iBall OTA: Here you can check if any system update are available or not, if available you
can download update and install.
Status: You will get the current status like Battery status, Battery level, SIM status, IMEI
information, Wi-Fi MAC address, Bluetooth address, IP address, Serial number & Up time.
Legal information: You will get open source licenses & Google legal information.
Model Number: It is showing device model number
Android version: It will show you current Android version of the phone.
It will also show you other options like Baseband version, kernel version and the build
number of the Mobile. These options help you to know whether your handset is updated to
the latest firmware version or not.
6. Communication
6.1 Phone

41
Making a call
Click Phone icon to enter the dial screen. You can type a number which you want to dial,
you can search your particular contact through number and name..
To dial a number, click ‗Voice Call‘ button to select SIM1 card or SIM2 card to make a call.
To end a call, click ‗END‘ button (Red icon).
1. Call log tab: Select an entry listed in the log to call the number.
2. Contacts tab: Contacts with phone numbers are listed. Select a contact, and then select
the phone number to dial the call.
Answering and Ending a call
When you receive a phone call, the incoming voice call screen will appear, allowing you to
either answer or ignore the call.
1. To answer an incoming call, swipe ‗ANSWER‘ (Blue icon) button rightward.
2. To reject a call, swipe ‗REJECT‘ button (Red icon) button leftward.
3. To reject the call with message, swipe the button upwards.

42
In-call options
While on a call, reveal the in-call options: Loudspeaker, Mute, Dial pad, Hold, Add new
call and Call record
Note: If Bluetooth services are ON and you are connected to a hands-free device, the
more menu indicator will show Bluetooth on.
Touch to switch to the dial keypad.
Touch to turn the speakerphone on or off. If a Bluetooth headset is connected, this
functions as a three-way switch among the built-in earpiece, the speakerphone, and the
headset. The icon changes to indicate the current output. Touch and hold to see a threeway menu.
Touch to mute your microphone.
Touch to put the other party on hold.
Touch to add new call & to start Call record.
Incoming call: During call in progress, if you are on a call (―call in progress‖) when
a another call comes in (―incoming call‖), you have a few choices:
• Answer the incoming call and place the call in progress on hold. To switch calls at any ti
i time, click on the other call notification at the bottom..
• If you don‘t want to interrupt your call in progress, then click ‗END‘.
• If you have one call in progress and one caller on hold, to end both calls, click ‗End Call‘.
Note: Whether the group call function can be used depends on whether the network
operator supports and provides such function as well as whether you have applied for such
function. Please contact network operator for details.
Using Call history
1. The missed call icon appears in the title bar when you missed a call.
2. Use ‗Call log‘ tab to check who the caller was, or view all your dialled numbers, and
received calls. To open ‗Call log‘ tab, click ‗Call log‘ option in the phone screen to enter the
call history list.

43
3. Scroll to select the contact or number you want to dial, click ‗Call‘ button.
4. Tap and hold the selected contact you want to call, and then you can do from the
following options - call, edit number before call, send text message, add to contacts or
remove from call log phone on the shortcut menu.
Speed dial
You can set your favourite contacts as speed dial, specially which contact you are using
frequently.key 1 is default set for Voice mail.
Recents
In this section you can see all call logs and also you can make calls frm here directly.
Contact
View your store contacts in your Mobile. You can select is as per name or number. You
can Delete, import/export, edit and share it
Call History
Here you can see call logs categorized as all calls, Incoming calls, Outgoing calls & missed
calls.
New Contact
You can add new contact from here .
6.2 Settings
Click on Phone icon to enter Dial screen. Then press back key. In Right bottom corner
touch on 3 dots icon & then touch on Settings to enter Call settings, you can make the
operation of voice call and the other settings.
Please note that when you open ‗Call settings‘ for SIM1 or SIM2, your current settings are
fetched, which can take a few moments.
Display options
Contact display options
Sort by: You can change sorting setting of contact either by First name or last name.
name format: You can change contact name format of contact either by First name or last
name.

44
Sounds and vibration
Voice caller ringtone : Select voice calling ringtone.
Also vibrate for calls: It enables vibration for all incoming calls.
Dialpad tones: Enable it to turn ON dialpad touch tones.
SMS on call reject
Here some ready templates for call reject message and you can edit as per your need.You
can reject a call by sending a SMS.
Call settings
Make calls with: Give preference to SIM card for making call or you can select ‗Ask First‘
Out call answer notification :Vibrate when outgoing call is answered.
Flip to mute:Turn over the phone to mute incoming call ringtone while call in incoming.
Smart Answer:Let phone closed to your ear to answer automatically.
Shake To Answer :Answer phone just by shaking instead of gestures
Dial from SMS Directly:While reading SMS,let phoneclosed to your ear can dial the
number in SMS automatically.
Dial in Contact Directly:While in Contact information page ,let phone closed to your ear
can dial the number in SMS automatically.
Auto call recorder:Turn ON to to automatically record all calls(incoming & outgoing) or
you can turn on it during call also.
Call record format: You can set call recording file format from available formats as mp3,
amr & 3gpp.
Emergency Call:Long press the volume up key in lock screen.
All calling accounts : Select which accounts can make calls
Select SIM cards
Voicemail:Select to set a voicemail number that is not being read from the SIM card.

45
Fixed Dialing Numbers:Your mobile device can set up Fixed Dial Numbers (FDN). When
the FDN feature is active, only numbers that are part of the FDN contacts list can be called
from your device.
Call forwarding: Select how you want busy, unanswered, and unreachable calls to be
handled. There is also an option to Always forward.
Call barring: Restrict to answer or dial the call in any situation. You need to apply to the
network operator for opening the international long-distance function and get network
restricting code for barring setups.
Additional settings: From this setting you can set your Caller ID preference and turn
on/off call waiting.
Caller ID: Use default operator settings to display your number in outgoing calls.
Call waiting: During an active call it will notify you of another incoming call & caller will get
the call waiting message. This is operator supported function.
Accessibility
TTY mode : A device that allows deaf or hearing-impaired individuals to communicate via
the telephone by typing text messages. Cell phones with a TTY mode are compatible with
this technology and perform the same service after they're connected to a TTY device.TTY
mode with options TTY OFF, TTY Full, TTY HCO and TTY VCO.
6.3 Contacts
The contacts on your Mobile are synced with your account contacts stored on the Web. To
view the contacts on your device, click and select Contacts. Contacts belonging to a
specific group(You can choose which group) are listed in the Contacts tab. Only those
contacts you star as ―favourites‖ are listed in the Favourites tab. Browse through your
contacts by sliding your fingertip up and down on the screen. Another way to find a contact
quickly is to use ―SEARCH‖ button, click search icon and input the first letter of the name
you‘re looking for , the matching contacts are appeared on the screen.
A. From the Contacts tab, you can:
1. Take action on a contact: Click the contact‘s name to open the context menu. From the
menu you can select to view the Contact details screen, call the contact‘s number, send a
text message, add or remove a star, edit the contact details, or delete the contact.
2. Go to Contact details: Select the contact‘s name to open the Contact details screen,
where all the information you have saved for this contact is displayed.

46
B. Add a contact
1. On the Home screen, click and select Contacts. Your contact list appears.
2. Click the + icon on the bottom of the screen to add new contact.
3. Add all the information you want to store for this contact in the appropriate fields. You
must add some information to save a contact. To change a default label, select the label
name to open the label menu. To add more fields, select ‗More Fields‘ option.
4. You can assign a Caller ID icon to your contact by clicking Caller ID icon. The Pictures
application opens. Navigate to a picture and select it, crop the picture with your fingertips.
When finished, select ‗Save‘. The picture is associated with your contact. If you do not
assign an icon, a default android icon will be assigned.
5. To save your contact click ‗Done‘ i.e tick mark icon at the top right corner.
C. Assign favourites
Use Favourites as a way to display only those contacts you contact most frequently. To
add a contact to favourites:
1. From Contacts, click the contact you want to add to favouritesand to open the Contact
details screen. (Contact number should be saved in Phone memory only)
2. click the star icon on the right-top screen, and the colour of star is changed to white.
3. Now your contact will be listed in favourites.
D.Edit contact details
You can always make changes to the information you have stored for a contact:
1.From Contacts, click the contact and to open the Contact details screen.
2. Select ‗Edit‘. The Edit contact screen appears.
3. Make your changes, then press ‗Done‘ i.e the tick mark icon on the top right corner.
E. Communicate with a contact
From Contacts you can quickly call or text a contact‘s default number, as displayed below
their name on the screen. However, to view all the information you have stored for a

47
contact, and to initiate other types of communication with that contact, open the Contact
details screen. To open a contact‘s details screen, simply select their name from Contacts.
1. Call a contact: From the contact list, click the contact you want to open the Contact
details screen. Click the phone icon in call number directly to dial that contact‘s primary
number (first in the list on their details screen).
2. To dial a different number for the contact, select the contact‘s name, and then select the
number on their details screen and then click the number that you want to call.
3. Send a text or multimedia: To send a text or multimedia message to a contact open the
Contact details screen, select a phone number and click ‗Message‘ icon, A Compose
screen opens for your new message. Complete your message and select ‗Send‘.
4. Send email to a contact: To send an email message to a contact, you must have an
email address stored for them in their contact details.
• Select the contact you want to email. Their Contact details screen opens.
•In the Send email section, select the email address. If you are fetching POP3 or IMAP
email accounts to your phone, then select the account you wish to use to send. A
Compose screen opens for your new message.
•Complete your message, select ‗Send‘.
F. SIM contacts import
If you have stored names and phone numbers on your SIM card, you can add these to the
Contacts stored on your phone by selecting this settings option. From the contact list,
press MENU to select ‗Import/export‘, you can select to import from SIM card or memory
card and then select ‗NEXT‘ and then select ‗Phone contact‘ and again select ‗NEXT‘.
Once the list of names and numbers appears you can:
Import all names/numbers in the list - Press MENU and click―OK‖.
Import only certain names/numbers in the list - Select the name/number you want to
import, then repeat for others as you wish. (As soon as you select the name/number, it is
imported).
7. Messaging
7.1 SMS and MMS messaging
To open the SMS & MMS Messaging application, on the Home screen, click and select the
Messaging icon.

48
About text and multimedia messages
SMS messages are also known as ―text‖ messages and can each be around 160
characters. If you continue to type after the limit is reached, your message will be delivered
as one, but count as more than one message.
MMS messages are also known as ―multimedia‖ or ―picture‖ messages and can contain
text, picture, audio, and video files.
When you compose a message, the phone will automatically convert a text message into a
multimedia message as soon as you add a subject or an attachment, or if you address the
message using an email address rather than a phone number.
View the message from the message list
Select a message thread in the list to open it for reading. When open, the individual
messages appear stacked on the screen, much like with instant messaging conversations
(or chats).
Note that messages you send are also listed in the Read view.
1. Reading multimedia messages
If you have selected to auto-retrieve your multimedia messages, then both the message
header and body will download.

49
If you are downloading only the headers, then you must first select the Download button to
retrieve the message body. If you are concerned about the size of your data downloads,
you can check the message size before you download.
Once the message has downloaded, select ―Play‖ button to view the message.
From a message read view, you can do the following:
1. To view details about a particular message, in the Read view, touch & hold the message
to open the context menu. Select View details.
2. Reply to a message: Simply start typing your message in the text box at the bottom of
the screen to reply to a message. You can always press MENU and select to add a subject
or an attachment to convert it to a multimedia message. Click ‗Send‘ when ready.
3. Links in messages: If a message contains a link to a Web page, it will be selectable. To
view the Web page in the Browser, simply select it.
4. Delete messages: Your messages will be saved until you explicitly delete them.
Delete one message in a thread - With the message thread open in Read view, touch &
hold the individual message you want to delete to open the context menu. Delete all
messages in a thread - With the message thread open in Read view, press
MENUDelete. You can also delete an entire thread from the message list by pressing &
holding the thread to open the context menu, then select ‗Delete‘.
Delete all message threads - From the message list, press MENU and select delete all
threads.
Compose text and multimedia messages
1. Click ‗Compose‘ icon. The Compose screen opens.
2.Add recipients by typing a name, phone number, or email address in the ‗To‘ field.
Matching contacts will appear. Select the recipient or continue typing. Add as many
recipients as you wish. If you send the message to an email address, the message will
automatically convert from a text to a multimedia message.
3. To add a subject, press MENU and click ‗Add subject‘. If you add a subject, the
message will convert to a multimedia message.
4. To add an attachment, click ‗Attach‘ icon on the right-top of the screen. Adding an
attachment will always convert the message to a multimedia message. Select from audio
or picture files. You can select to take a new picture if you want, or record an audio file.

50
Any recordings you make will be stored automatically in the Music application in a play list
named ―My recordings‖. To remove an attachment, select the attachment‘s ‗Remove‘
button.
5. Type your message: As you type, you will be able to track how many
characters/messages you‘re creating. Remember that text messages have a limit around
160 characters. Once you go over that limit, a new message is actually created but
automatically joined into one when received.
Select ‗Send‘ when ready. You can also save a draft.
As your message sends, progress displays in the title bar. If you see this icon to the right of
the message, it means your message is still being delivered.
Save message as draft
While composing, press BACK, your message automatically saves as a draft.
Text and multimedia message settings
To set text and multimedia message preferences, from the message list, press MENU and
select ‗Settings‘. You can set the following from this screen:
SMS Enabled:Here you can select default SMS app for Messaging.
Text Message settings
Request Delivery report: To receive a report on the delivery status of your message,
select this check box.
Manage SIM card messages: Text messages can also be stored on your SIM card. The
exact SIM card number depends on your card, but it is usually around 25-50. To view
messages on your SIM card, delete them, and copy them to your phone memory, select
this setting.
Edit Templates: You can edit the templates using this option.
SMS Service Centre: It contains the SMS service centre number. Please make sure that
this number is not deleted or tempered.
SMS Storage location: You can select whether you want to save the messages in phone
memory or SIM memory.
Multimedia message settings
Group messaging: Use MMS to send a single message when there are multiple
recipients.

51
Request Delivery reports: To receive a report on the delivery status of your message,
select this check box.
Request Read reports: To receive a report on whether each recipient has read or deleted
the message without reading it, select this check box.
Send read report : Send a read report if requested by the MMS sender.
Auto-retrieve: To retrieve all your MMS messages automatically (the header plus the
message will download to your phone), select this check box. If you clear this check box,
then only the message headers will be retrieved and display in your message list. You can
retrieve the full message by selecting the Download button that displays in the header.
Once the message has downloaded, select the ―play‖ button to expand the message.
Roaming auto-retrieve: If you are concerned about data traffic and just want the message
headers to download while roaming, clear the Roaming auto-retrieve check box.
Otherwise, you can select this check box to have your messages download even while
roaming.
Notification settings
You can receive a notification each time you receive a new message.
Select ‗Notifications‘ check box to receive a notification in the status bar when a new
message arrives. If you want your phone to ring when a new message arrives, select that
check box as well. Select Ring tone to open the ring tone menu and select a ring tone
specific to new text and multimedia message notifications. Note that when you check a ring
tone, it plays briefly.
If you want your phone to vibrate when you receive a new message, select ‗Vibrate‘ check
box.
General
Delete old messages : On selecting this option you can delete old messages as it
reaches the limits.
Text message limit : Here you can set limit for text messages.
Multimedia message limit : Here you can set limit for Multimedia messages.
Cell broadcast : Cell Broadcast enables to send out a short message to all handsets in a
particular cell, group of cells or the entire network. Every handset that has Cell Broadcast
channels enabled and is within the coverage area of the cells that are broadcasting a Cell
Broadcast message will receive this message.
Enable WAP PUSH : Enable this option for receiving WAP PUSH.

52
8. Email
8.1 POP3 and IMAP email accounts
Add an email account
You can fetch messages from up to five POP3 or IMAP accounts. Follow these steps:
1. On the Home screen, then click and select Email application.
2. The Set up new account screen appears.
3. Type your account email address and password.
4. If you want, select the Send email from this account by default check box. This setting
only applies if you have more than one POP3 or IMAP account set up. (For this details
please contact your IT support team)
5. Select ‗Next‘.

53
If you have a popular email account, the application will set everything up for you! Before
you go to your Inbox, you can name the account (if you don‘t, your email address will be
used). You are also asked to type your name as you want it to display on outgoing
messages. You must complete this field before you can select ‗Next‘ and go to your Inbox.
For less popular accounts, follow the prompts to type the email server, protocol, and other
account information yourself. After your account settings have been verified, select ‗Next‘
to go to your Inbox.
To add more accounts (up to five), from an Inbox or your Accounts screen, press MENU
and select ‗Add account‘.
8.2 Use your POP3 & IMAP email account
Once you have set up an account, you can do the following:
1. Refresh Inbox: From the Inbox, press MENU and then select ‗Refresh‘ to update your
Inbox with any previously-un-fetched email.
2. Read email: You can display or collapse the messages in your Inbox by selecting Inbox.
Unread messages display with a colour band. (Each account you add will use a different
color.)
3. Forward, Reply and Reply all: You can forward, reply, or reply all to an email message
from the Inbox. From the Inbox, touch & hold the message to open its context menu.
Select the action you want to take.
4. Compose new
From the Inbox:
1. Press MENU and select ‗Compose‘.
2. Add recipients by typing a name or address in the ‗To‘ field. Matching contacts will
appear. Select the recipient or continue typing the address. Add as many as you wish.
3. Type a subject and message.
4. Select ‗Send‘, ‗Save as draft‘, or ‗Discard‘. Pressing BACK will also save as draft unless
you have not typed anything.
5. Delete message
From the Inbox:
1. Expand the Inbox to display the messages.

54
2. Touch & hold the message you want to delete.
3. Select ‗Delete‘.
4. Your message is moved to the Trash.
6. Empty Trash: Once you have moved a message to the Trash, to empty messages in
the Trash you must delete each message individually. Press MENU and select ‗Folders‘ to
enter the Trash.
Note that the message is only deleted from your phone, not from the account server.
7. Remove an email account: You can always remove a POP3 or IMAP email account
from your phone. Go to your Inbox, press MENU and select ‗Accounts‘. Your Accounts
screen opens. Touch & hold the account you want to remove to open the context menu.
Select ‗Remove account‘. You will be asked to confirm before the account is removed.
Edit account settings
To open your Account settings screen, do the following:
1. From your account Inbox, press MENU and select ‗Account settings‘.
2. The Account settings screen appears. You can do the following from this screen:
Account name: Select to change the name of your account as it appears on your Accounts
screen.
Your name: Select to change your name as it appears in outgoing email.
Email check frequency: Select this pop-up menu to set how frequently your email account
is checked for new messages. Note that whenever you open a folder, email is refreshed,
regardless of this setting.
Default account: If you have more than one POP3 or IMAP email account set up on your
phone and want to use this account by default when selecting Compose from the Accounts
screen, select this check box.
Email notifications: If you want an icon to appear in the status bar when a new message
arrives, select this check box.
Incoming server settings: Select Incoming settings if you need to edit the username/
password, server, port, or option to delete email from server.
Outgoing server settings: Select Outgoing settings if you need to edit the SMTP server,
port, and security type, option to require sign-in or username/password.

55
8.3 Add another POP3 or IMAP
To add another account (you can add up to five), go to your Inbox, press MENU and select
‗Accounts‘. Your Account‘s screen opens.
Press MENU and select ‗Add account‘ another account.
9. Internet
9.1 Ways to connect to the internet
Your device‘s networking capabilities allow you to access the Internet or your corporate
network through Wi-Fi, GPRS, EDGE, 3G& 4G networks.
You can also add and set up a VPN or proxy connection. (If required)
9.2 Wi-Fi
Wi-Fi provides wireless Internet access over distances of up to 100 meters (300feet). To
use Wi-Fi on your device, you need access to a wireless access point or ―hotspot‖.

56
Note: The availability and range of your device‘s Wi-Fi signal depends on the number,
infrastructure, and other objects through which the signal passes.
9.3 Browser
To open the Browser, click and select Browser icon. The Browser always opens to the last
Web page you were viewing. The first time you enter the Browser after powering on, your
home page will display. You can change your home page by pressing MENU
SettingsGeneralSet homepage.
Zoom and navigation in Web pages
While viewing a Web page, you can press MENU and select
SettingsAdvancedAccessibility, to set the zoom controls.
Swipe your fingertips in any direction to shift your page view.
The Browse screen
From the Browse screen you can do the following:
1. Go to a Web page: Make sure the focus is not on a text box and then start typing the
URL.
2. Save to bookmark: Bookmark the Web page you are currently viewing:
• Press Menu and then press ‗Add bookmark‘. Confirm the URL and name, and then
select ‗OK‘.
To view all your bookmarks, press Menu and press on Bookmarks.
Open pages in separate tabs
You can keep more than one Web page open by using multiple windows to display the
pages. To open multiple windows please tap on multiple window icon
A. Manage bookmarks
You can store as many bookmarks as you want on your Mobile.
Press MENU and select ‗Add Bookmarks‘.
1. Press MENU and select ‗Add Bookmarks‘. Type a name and location (URL) in the
dialog box. Select ‗OK‘.

57
B . Download Web files and applications
Before you download any files or applications using the Browser, note the following:
The Browser will only allow you to download items that are supported by an application
installed on the Mobile.
Warning! Applications downloaded from the Web can be from unknown sources. To
protect your Mobile and personal data, only download applications from sources you trust,
such as Android Market.
10. Media
10.1 Music
To open your music Library, on the Home screen, click and select the Music icon. Your
music is organized into five categories: Artists, Albums, Songs, Playlists and Folders.
Select a category to view the lists within each. Once in a category, keep selecting until you
reach the music you want to play.
For example, if you select the Artists category, you will see a list of artists in A-Z order. If
you select an artist, the list opens to display that artist‘s albums. Select an album, and the
album‘s song list displays.

58
Load music into your Memory card
All the music you can listen to on your Mobile is stored in memory card. Read the
instructions below to add music to your memory card.
1. Mount your memory card to your computer by doing one of the following:
Remove the memory card and insert it into a card reader attached to your computer; or,
attach your Mobile into your computer using a USB cable that came in the box. If you use
this method, make sure the HomeSettingsStorageSD card is selected.
2. On your computer, find the mounted USB drive and open it.
3. Although your Mobile will find all music files on your memory card, it‘s advisable to keep
the number of files or folders at the root level to a minimum. So, if you wish, create a folder
at the top-level called ―music‖ (or whatever you want) to store your files.
4. Open this folder and copy music files into it. If you want, create folders within ―music‖ to
organize your music further. If you want to use certain music files as phone, notification, or
alarm ring tones.
Note: If you do not want a ringtone to appear in your music Library but if you want it to set
as a ringtone, then create the ―ringtones‖, ―notifications‖, or ―alarms‖ folder outside your
―music‖ folder.
5.When finished copying, close the USB drive window and unmounts or eject the drive as
required by your computer's operating system. Remove the USB cable from your Mobile
and computer.
Play back music
At any level in your Library, touch & hold a listing (a song, artist, album, or playlist) to open
the context menu. Select Play to begin play and go to the Playback screen. You can do the
following using the Playback screen:
1. Shuffle songs: Shuffle plays songs in random order. Touch to toggle shuffle on and off.
When the icon is grey, shuffle is off.
2. Repeat mode: Touch to step through repeat modes: repeat all songs, repeat current
song, don‘t repeat (grey icon).
3. Go to any point in song: Swipe fingertip in progress bar to desired point in a song.

59
4. Playback control: from left to right icons: Go to beginning song, Pause/ resume play and
Go to next of song.
If a song is playing while you are on the Library screen, you can switch to the Playback
screen quickly by selecting the lower song bar.
Playlists
You can create as many playlists as you wish. Note that the ―Recently added‖ playlist is a
system playlist and cannot be deleted or renamed. Also, if you make any voice recordings
as part of a MMS message, they will be stored automatically in a playlist called ―My
recordings‖.
• Create a playlist on your Mobile
1. From the Library, select a category. From the list that appears, navigate to the artist,
album, or song that you want on a playlist.
2. Touch & hold the artist, album, or song to open the context menu.
3. Select Add to playlist.
4. In the Add to playlist menu that opens, select New to create a new playlist, or one of the
existing playlists.
5. The song(s) are added.
• Manage your playlists
Go to the Library screen and select ‗Playlists‘. All your playlists appear.
Touch & hold the playlist to open the context menu. You can do the following from this
screen: Play, Edit (rearrange songs), Delete and Rename.
Create ringtones from songs
You can set any of your songs as a Mobile ringtone:
1. From the Library, navigate to a song you want to use as a Mobile ringtone.
2. Touch & hold the song in the list to open the context menu.
3. Select Use as Phone ringtone. The ringtone is set as your default incoming call ringtone.
4. Now, when you go to Home > Settings > Sound & notification, and select a Phone
ringtone, your song will be listed as an option.

60
Delete music from memory card
All the music you play on your Mobile is stored on the inserted memory card. From your
Mobile, you can delete music stored on the card:
1. From the Library screen, select the Artists, Albums, or Songs category.
2. Go to the screen that shows the artist, album, or song that you want to delete.
3. Touch & hold the item to open the context menu.
4. Select ‗Delete‘. You will be asked to confirm that you want to delete the item from your
memory card.
10.2 Videos
Choose application in main menu. From the list choose the video you want to play. Tap on
the video to select and then play it. You can play/pause the video by single tapping on the
screen. By tapping on the option key you will get two options stop and loop using which
you can either stop the video or can make it play in loop over and over again. You can also
share the video by different means such as messaging, Bluetooth, Email etc. The display
screen frame can also be changed.
It also has option of Floating window, the pin icon, on clicking it the video is reduced to
small size and can be dragged anywhere, you can do other work simultaneously.
10.3 MX Player
The MX Player can play almost every video format one encounters. Some of them are
decoded with hardware support so even 1080p mp4 is no problem. It searches the
complete SD card for videos, not only a particular directory.
The biggest advantage is the ease of use with gestures:
Swipe up/down to change the volume
Swipe up/down to change brightness
Swipe left/right to change the position played

61
10.4 Camera
All the pictures you can capture or view on yourMobile are stored on memory card, which
must be installed in your Mobile. Before you can use the Camera or view pictures in
Pictures, make sure you have a card installed.
Load pictures onto your memory card
Read the instructions below to add pictures to your Memory card or the Mobile storage.
Camera Image
Take a picture
The following shooting modes are available on your camera:
Panorama: Take panoramic photos made up of a maximum of eight consecutive photos.
Face beauty: The camera corrects facial imperfections when taking portraits.
Normal mode: The camera determines the ideal mode for the photo.
You can capture by either voice command or by tab or by V-gesture methods.
Captured pictures are saved to the ―DCIM‖ folder on your memory card or the Mobile.
Tip: Before you take a picture, wipe the sensor window (on the back cover) to remove any
small amounts of oil.
1. To open the Camera, on the Home screen, click and select Camera icon.
2. The Camera opens in capture mode. Frame your picture within the screen and hold the
Mobile steady. Click Camera button to capture. Continue to hold the camera steady for a
second after you hear the shutter sound.
3. Immediately after capture, you can select to Share, the applications through which you
want to share is given on right top corner of the screen. You get many options to use the
image. To find the options, tap on option soft key beside home key. The options are
―Delete‖, ―Slideshow, Edit‖, ‖Rotate left‖, ―Rotate right‖, ―Crop‖, ‖Set picture as‖, ―Details.‖
And Print
4. If you select to save, set as, or share, your picture is saved to Gallery application.
Please check.

62
View your pictures
To view the pictures you have captured, as well as any you have stored on your memory
card or the phone storage, go to Gallery application:
1. To open Pictures, on the Home screen, touch and select Gallery icon.
2. Depending on how many pictures you have stored, they may take a few minutes to load.
3. If you have stored your pictures in folders on your Memory card, then the folders will
display as separate ―albums‖. The top left album always contains all the pictures in all the
albums.
4. The individual pictures display in a grid in thumbnail format. You can select to display
smaller or large thumbnails in Settings.
5. When image open full screen, click on icon to edit image like, colour change, add frame
on image, crop image, mirror effect, adjust brightness & more.
Picture options
You can do the following while in Pictures.
Note: In all the instructions below, you can touch & hold a picture to open the context menu
to access all actions, rather than open the picture in full-screen view.
1. View full-screen: Select a picture to open it in full-screen view.
2. Share a picture: In full-screen view, selecttoshare your picture via Messaging (MMS), or
another application (if you have another application installed on your Mobile that supports
sharing).
3. Set as wallpaper: In full-screen view, press MENU and select set as. From the menu
that opens select Wallpaper. Touch & hold an edge of the cropper to reveal the sizing
arrows, then drag the edge in or out to size. Touch & drag the centre of the cropper to
move it within the picture. When you‘re happy with the cropped area, select ‗Save‘.
4. Set as contact picture: In full-screen view, press MENU and select set as. From the
menu that opens, select Contact icon. Your contact list opens. Select the contact you want
to associate with the picture. Touch & hold an edge of the cropper to reveal the sizing
arrows, then drag the edge in or out to size. Touch & drag the centre of the cropper to
move it within the picture.
When you‘re happy with the cropped area, select ‗Save‘. The picture will now appear in the
Contact details screen, as well as on any incoming call notifications.

63
5. Crop picture: In full-screen view, press MENU and select Crop. Touch & hold an edge of
the cropper to reveal the sizing arrows, then drag the edge in or out to size. Touch & drag
the centre of the cropper to move it within the picture. When you are happy with the
cropped area, select apply crop and then ‗Save‘. If you want to cancel the cropping press
back key. The cropped picture is saved to Pictures as a copy.
Your original is not touched.
6. Rotate picture: In full-screen view, press MENU and Select from Rotate left (counterclockwise) or Rotate right (clockwise). Your picture rotates and is saved automatically.
7. Delete picture: In full-screen view, press MENU and select Delete.
The picture will be removed from the Memory card after you confirm.
8. View picture details: In full-screen view, press MENU and select Details. The picture
details window opens. You can see the title, resolution, file size.
10.5 FM Radio
This device supports FM Radio. You can search and auto save channels. Also, FM
recording function is present. You can record your favourite songs to listen later. The
saved songs will be present in the folder FM records.

64
Note: Within doors or shielded environment, the receiving effect of radio may be affected.
You can improve the effect in the following ways: Near window, adjust the position of
earphone cable or adopt manual adjustment.
10.6 Gallery
Gallery option shows all pictures & videos stored in phone & external storage. We can
preview & access pictures & videos directly from here. On selecting any particular image
you will find many options like delete, Slideshow, edit, rotate left, rotate right, crop, set
picture as, Print and details. You can also share the picture using various means such as
Bluetooth, messaging and third party messaging applications such as WhatsApp, WeChat
etc. For videos you have options like delete, Slideshow and details, which will provide you
the details of the video like the resolution of the video frame, its size etc. You can also
share the video using the same means as of images.
10.7 Sound recorder
The Mobile can be used as a sound recorder. You can record audio files to be listened
later.

65
11. Connectivity Features
11.1 SIM Toolkit
SIM Application Toolkit (commonly referred to as STK) is a standard of the GSM system
which enables the SIM to initiate actions which can be used for various value added
services. The SIM Application Toolkit consists of a set of commands programmed into the
SIM which define how the SIM should interact directly with the outside world and initiates
commands independently of the device and the network. This enables the SIM to build up
an interactive exchange between a network application and the end user and access, or
control access to, the network.
11.2 iBall OTA
In iBall OTA you can check if any system update are available or not, if available you can
download update and install.
12. Others
12.1 Calendar
Calendar views
You can view multiple calendar events on your device, so each calendar event is coded
with a colour.
You can view your calendar in a variety of ways. Touch the date on the left-top of the
screen to select from Day, Week, Month or Agenda.
1. Month view
Days are shown in a month grid. Busy time slots are shown as vertical bars in the
corresponding part of the day. An all-day event is shown as a small vertical bar at the top
of the slot (it does not fill the entire slot).
View event details - Select a day to view all the events in that day. This will take you to
either the Agenda or Day view, depending on which you last visited. Select the event to
view its details.
Edit an event - First select a day to go to either the Day or Agenda view. From there, select
the event to view its details. Assuming you have write privileges on an event, touch and
hold the event and select ‗Edit event‘ to open the event for editing. Navigate months

66
- Swipe your fingertip up/down, through the days and past the beginning/end of the month
to move to the previous/next month.
Create new event- Touch & hold a day to open the context menu. Select ‗New event‘. You
can also press MENU and select ‗New event‘.
2. Event
Events in the current month are shown vertically in a list, one event after the other. Days
with no events are not displayed.
Repeating events - Marked with icon following the time or date.
View event details - Select the event to view its details.
Edit an event - First, select the event to view its details. Assuming you have write privileges
on an event, touch and hold the event and select ‗Edit event‘ to open the event for editing.
Navigate within the current month - Swipe your fingertip up/down.
3. Week view
Days are shown vertically within the Week view. Time slots are defined horizontally in
rows. Events are shown as blocks.
View event details - Highlight an event to open a small popup window in the lower part of
the screen that provides more event information. This window will stay open for three
seconds. (Note that highlighted events are outlined in orange.) To view the full event
details, touch the pop-up window while it‘s open, or select the event itself. You can also
touch & hold the event to open the context menu, then select ‗View event‘.
Edit an event - Assuming you have write privileges on an event, touch and hold the event
to open the context menu, then select ‗Edit event‘.
Navigate within the current week -Swipe your fingertip up/down.
Navigate to a past or future week - Swipe your fingertip left/right.
4. Day view
Days are divided into hour time slots. Events are shown tiled and span the time they last.
All-day events are displayed at the top of the day list.
View event details - Highlight an event to open a small pop-up window in the lower part of
the screen that provides more event information. This window will stay open for three
seconds. (Note that highlighted events are outlined in orange.) To view the full event
details, touch the pop-up window while the pop-up window is open, or select the event

67
itself. You can also touch & hold the event to open the context menu, then select View
event.
• Edit an event - Assuming you have write privileges on an event, touch and hold the event
to open the context menu, then select Edit event.
• Navigate within the current day - Swipe your fingertip up/down.
• Navigate to a past or future day - Swipe your fingertip left/right.
Create new event - Touch an empty time slot to open the new Event details screen.
Create an event
From any of the views, press MENU and select ‗New event‘ to open the new Event details
screen.
• Type the information in the fields.
• Select date & time.
• Name that appears in Day view.
• Description can be as long as you like.
• Select a calendar if you display more than one.
• Set a default reminder time.
• Set online presence: available or busy.
• Select calendar privacy from Default (as defined when calendar was created), Private, or
Public.
When finished, select ‗Done‘. Pressing BACK also saves the event.
Tip: Create an event quickly in the Day or Week view by selecting an empty time slot. A
new Event details screen appears. The ‗From‘ field contains the selected time slot.
Edit an event
To edit an event, you must have the View event screen open and you must have created,
or have write privileges, for the event.
1. Navigate to the View event screen.
2. Touch and hold the event and select ‗Edit event‘. If Edit event is not an option, then you
cannot make any changes to that particular event.

68
Note: If your event repeats, you will be asked to choose which events you want changed
(only the current one you‘re editing, all events in the series, or the current event plus future
events).
3. Once you have finished your edits, select ‗Done‘.
4. To delete the event, from the View event screen, press MENU and select ‗Delete event‘.
• Calendar settings
From any of the calendar views, press MENU and select Settings.
1. Calendar view setting
Hide declined events: Select this check box if you want all the events you decline to be
hidden from all calendar views.
2. Reminder settings
Set alerts & notifications: Select to set the type of event reminder you want:
• Alert - A dialog box will appear to remind you of the event.
• Status bar notification - An icon appears on the left side of the status bar.
• Off - You will receive no reminder.
Choose ringtone: Select Ring tone to open the ring tone menu and select a ring tone
specific to new event notifications. Note that when you check a ring tone, it plays briefly.
Vibrate: Select this check box to have your Mobilevibrate when you are reminded of an
event.
Default reminder time: Select to open the default reminder menu. The time you select will
appear by default in the Reminder section when you create a new event.
12.2 Alarm Clock
To open Alarm Clock, on the Home screen touch and select Clock icon. The Alarm clock
offers as many alarms as you want.

69
Set an alarm
Two alarms are set up for you, ready to customize. All two alarms are turned off by default.
Select the check box to turn on the alarm. To begin, select one of the default alarms to
open Alarm settings.
Set the following options:
Alarm: Select the check box to turn alarm ON (checked) or OFF (cleared). This is the
same check box that appears on the main Alarm Clock screen.
Time: The time the alarm will go off is shown. To change this time, select Time to open the
time selector. Swipe the finger to set the time you want, and then select OK.
Repeat: The current repeat selection is shown. To change the setting, select Repeat and
make a selection from the menu. To have your alarm will only go off once at the set time,
don‘t select any of the options. A one-time alarm is shown on the Alarm Clock screen
without any days under the set time.
Ring tone: The current ring tone selection is shown. Select Ring tone to pick another ring
tone that will play when the alarm rings.
(When you select a ring tone, it plays briefly.) Note that when your alarm goes off, the ring
tone will play a maximum of five minutes.
Vibrate: Select this check box to have your phone vibrate when it goes off.

70
Once your alarm goes off, you will receive an alert with the options to Snooze (for 10
minutes) or Dismiss.
Add more alarms
To add more than three alarms, from the main Alarm Clock screen, press + symbol.
Change clock display
You can change the appearance of the clock displayed on the main Alarm Clock screen:
1. Go to the main Alarm Clock screen.
2. Click the clock with your fingertip to open the Clock selection screen.
3. Drag your fingertip horizontally along the bottom clock face row and touch the face you
want to display.
4. Select ‗Select date format‘ option to open the menu of various date formats.
12.3 Calculator
To open Calculator on the Home screen click and select the Calculator icon.
Use the calculator to perform basic calculations by entering numbers and perform basic
addition, subtraction, multiplication, and division. Also, the advanced operators or
delimiters, such as sine, cosine, tangent, square root, parentheses, etc. can also be used.

71
To delete numbers, one at a time, clickDEL on the screen.
12.4 File Manager
File Manager is an application which provides you easy access to all your media files,
images, documents present in your Mobile and in your SD card. It shows you the total
storage capacity and the available memory of the device. You can create, view, share, and
delete, copy, paste files on your Mobile using this application.
13. Google Applications
13.1 Gmail
Gmail is a free advertising supported email service provided by Google. Users
may access Gmail as secure webmail as well as via POP3 or IMAP4 protocols.
Gmail has a search oriented interface. Gmail runs on Google GFE/2.0 on
Linux.

72
13.2 Play store
Use this application to purchase and download applications and games that are
able to run your handset.
Tap on Play Store application
Installing Applications:
Browse the play store & search the require contents with keywords. Select an application
tap the price & follow on screen instructions to complete the purchase process.
When a new version is available for any installed application, an update icon appears at
the top of the screen to alert you to the update. Open the notification panel and tap the
icon update the application.
13.3 Play Movies & TV
According to Google, there are thousands of Movies & Television shows
available on Google Play Movies & TV, some in HD, including comedy, drama,
animation, action and documentary. Movies can be rented or purchased and
watched on the Google Play website or via an application on an Android device.
Some titles are only available for rental, some only for purchase, and others for both rental
and purchase. TV shows can be purchased by episode or season but cannot be rented.
Alternatively, users can download movies and TV shows for offline viewing and view them
later using the Google Play Movie app.
13.4 Play Music
Google introduced Play Music with a music store. The three major label
partnerships announced were with Universal Music Group, EMI and Sony
Music Entertainment along with other small labels. According to Google, there
are hundreds of free songs in Google Play and millions available for purchase.
Users can also upload up to 20,000 of their songs to the service for free. The service
allows the user to automatically create a playlist of "songs that go well together" using a
feature known as Instant Mix. Music and playlists imported to Google Play music can not
alter playlists in other music program libraries, while changes in other applications are
reflected in the Google Play music library.
13.5 Maps
Google Maps is a built-in app which helps you find a location, the distance to
that location from your current location, and the directions to that location.

73
Enter a keyword for the location and select to search for a location.
14. Troubleshooting
1. When you turn on your device or while you are using the device, it prompts you
to enter one of the following codes:
• Password: When the device lock feature is enabled, you must enter the password you set
for the device.
• PIN: When using the device for the first time or when the PIN requirement is enabled, you
must enter the PIN supplied with the SIM or USIM card. You can disable this feature by
using the Lock SIM card menu.
• PUK: Your SIM or USIM card is blocked, usually as a result of entering your PIN
incorrectly several times. You must enter the PUK supplied by your service provider.
• PIN2: When you access a menu requiring the PIN2, you must enter the PIN2 supplied
with the SIM or USIM card. For details, contact your service provider.
2. Your device displays network or service error messages
• When you are in areas with weak signals or poor reception, you may lose reception.
Move to another area and try again.
• You cannot access some options without a subscription. Contact your service provider for
more details. The touch screen responds slowly or improperly
3. If your device has a touch screen and the touch screen is not responding properly,
try the following:
• Remove any protective covers from the touch screen. Protective covers may prevent the
device from recognizing your inputs and are not recommended for touch screen devices.
• Ensure that your hands are clean and dry when tapping the touch screen.
• Restart your device to clear any temporary software bugs.
• Ensure that your device software is upgraded to the latest version.
• If the touch screen is scratched or damaged, take it to your local iBall Service Centre.

74
4. Your device freezes or has fatal errors
If your device freezes or hangs, you may need to close programs or reset the device to
regain functionality
You can also perform a factory data reset. On the Applications screen, tap Settings →
Accounts → Backup and reset → Factory data reset → Reset iBall Mobile →Erase
everything.
5. Calls are being dropped
When you are in areas with weak signals or poor reception, you may lose your connection
to the network. Move to another area and try again.
6. Outgoing calls are not connected
• Ensure that you have pressed the Dial key.
• Ensure that you have accessed the right cellular network.
• Ensure that you have not set call barring for the phone number you are dialing.
7. Incoming calls are not connected
• Ensure that your device is turned on.
• Ensure that you have accessed the right cellular network.
• Ensure that you have not set call barring for the incoming phone number.
8. Others cannot hear you speaking on a call
• Ensure that you are not covering the microphone of your headphone.
• Ensure that the microphone is close to your mouth.
• If using a headset, ensure that it is properly connected.
• If the Mic is not working, take it to your local iBall Service Centre.
9. Audio quality is poor
• Ensure that you are not blocking the device‘s internal antenna.

75
• When you are in areas with weak signals or poor reception, you may lose reception.
Move to another area and try again.
10. When dialing from contacts, the call is not connected
• Ensure that the correct number is stored in the contact list.
• Re-enter and save the number, if necessary.
• Ensure that you have not set call barring for the contact‘s phone number.
11. Your device is hot to the touch
When you use applications that require more power or use applications on your device for
an extended period of time, your device may feel hot to touch. This is normal and should
not affect your device‘s lifespan or performance.
12. Error messages appear when launching the camera
Your device must have sufficient available memory and battery power to operate the
camera application. If you receive error messages when launching the camera, try the
following:
• Charge the battery or replace it with a battery that is fully charged.
• Free some memory by transferring files to a computer or deleting files from your device.
• Restart the device. If you are still having trouble with the camera application even after
restarting the phone or trying these tips, contact your nearest iBall Service Centre.
13. Error messages appear when opening music files
Some music files may not play on your device for a variety of reasons. If you receive error
messages when opening music files on your device, try the following:
• Free some memory by transferring files to a computer or deleting files from your device.
• Ensure that the music file is not Digital Rights Management (DRM)-protected. If the file is
DDRM-protected, ensure that you have the appropriate license or key to play the file.
• Ensure that your device supports the file type.
14. Another Bluetooth device is not located
• Ensure that the Bluetooth wireless feature is activated on your device.

76
• Ensure that the Bluetooth wireless feature is activated on the device you wish to connect
to, if necessary.
• Ensure that your device and the other Bluetooth device are within the maximum
Bluetooth range (10 m).
If the tips above do not solve the problem, contact your nearestiBall Service Centre.
15. A connection is not established when you connect the device to computer
•Ensure that the USB cable you are using is compatible with your device.
If you want to connect your device for the purpose of mass storage you do not require any
drivers.
• You need drivers for debugging and it will work with Windows Vista and Windows 7
Professional version.
16. My internet connection on SIM is not working properly.
There can be various reasons for why the internet connection over your SIM is not working
properly. The speed depends a lot on the network conditions. If the network is not proper
then the internet browsing speed will vary accordingly. Also, make sure that 4G network for
your network operator is available in your area. Check your internet settings and make
sure they are correctly configured.

77
 Loading...