

Page 1

X-axis Linear Servo Type Cartesian Robot
Assembly Procedures
Thank you for purchasing an IAI product.
Assemble your product correctly by referring to these Assembly Procedures.
First Edition
LSA (Large Size Linear Servo Actuator) + ISA confi guration unit
Number of
No.
confi gured axes
1 2 axes ICSPA2-B1L
2 3 axes Z-axis base mount ICSPA3-B1L
3 3 axes Z-axis slider mount ICSPA3-B1L
4 4 axes ICSPA4-B2L1H GMM07-070
5 6 axes Z-axis base mount ICSPA6-B2L1HB3H (M) GMM07-071
6 6 axes Z-axis slider mount ICSPA6-B2L1HS3M GMM07-072
Z-axis installation method
Model Drawing No.
□
H GMM07-067
□
HB3H (M) GMM07-068
□
HS3M GMM07-069
X-axis Linear Servo Type Cartesian Robot – High-precision 2-axis Specification
[Model]
ICSPA2-B1L H
[1] XY configuration direction
[1] XY configuration directions
Configuration
direction: 1
(Range of operation)
Configuration
direction: 3
(Y-axis installed
on opposite side)
(Range of operation)
Configuration
direction: 2
(Reverse of 1)
(Range of operation)
Configuration
direction: 4
(Reverse of 3)
(Range of operation)
[Assembled parts]
[1] XY bracket [2] Guide rail [3] Cable track
[4] Connector box [5] Connector cover
[7] Joint cover
[8] Grommet with film
[Constituent axes]
Constituent axis
X-axis
LSA-W21SS-I-400- (stroke) -T2-L-
Y-axis
ISPA-MYM-I-200-20- (stroke) -T2-AQ
*
Either of NT1 (for configurations 1 and 3) or
NT2 (for configurations 2 and 4)
comes to in the model code above.
Model
[10] Metal cover
[Assembly Procedure] Drawing No.: GMM07-067
[6] Box cover
[9]
Controller-actuator
cable with cable fix cap
X-axis Linear Servo Type Cartesian Robot – High-precision 3-axis Specification,
X-axis Linear Servo Type Cartesian Robot – High-precision 3-axis Specification,
Z-axis Base Mount
[Model] [Model]
ICSPA3-B1L HB3H (M)
H: Z-axis high-speed type
M: Z-axis medium-speed type
[1] XY configuration direction
[1] XY configuration directions
Configuration
direction: 1
(Range of operation)
Configuration
direction: 3
(Y-axis installed
on opposite side)
(Range of operation)
Configuration
direction: 2
(Reverse of 1)
(Range of operation)
Configuration
direction: 4
(Reverse of 3)
(Range of operation)
[Constituent axes]
Constituent axis
X-axis
LSA-W21SS-I-400- (stroke) -T2-L-
Y-axis
ISPA-MYM-I-200-20- (stroke) -T2-AQ
Z-axis
*
ISPA-MXM-I-200-20<10>- (stroke) -T2-AQ-B
Either of NT1 (for configurations 1 and 3) or
NT2 (for configurations 2 and 4)
comes to in the model code above.
Model
[Assembled parts]
[11] YZ
[1] XY
bracket
[4]
Connector
box 1
[7] Joint
cover 1
[10] Metal
cover
[2] Guide
rail
[5]
Connector
cover
[8] Grommet
with film
[3] Cable
track 1
[6] Box
cover 1
[9] Controller-actuator
cable
with cable
fix cap
mounting bracket 2
plate
[14] Track
[17] Box
cover 2
[12] Track
mounting plate
[15] Cable
track 2
[18] Joint
cover 2
support bracket
[16] Connector
[Assembly Procedure] Drawing No.: GMM07-068
[13] Track
box 2
ICSPA3-B1L HS3M
[1] XY configuration directions
[Constituent axes]
Constituent axis
X-axis
Y-axis
Z-axis
*
Either of NT1 (for configurations 1 and 3) or
NT2 (for configurations 2 and 4)
comes to in the model code above.
Z-axis Slider Mount
M: Z-axis medium-speed type
[1] XY configuration direction
Configuration
direction: 1
(Range of operation)
Configuration
direction: 3
(Y-axis installed
on opposite side)
(Range of operation)
Model
LSA-W21SS-I-400- (stroke) -T2-L-
ISPA-MYM-I-200-20- (stroke) -T2-AQ
ISPA-MZM-I-200-10- (stroke) -T2-AQ-B-NM
Configuration
direction: 2
(Reverse of 1)
(Range of operation)
Configuration
direction: 4
(Reverse of 3)
(Range of operation)
[Assembled parts]
[11] YZ
[1] XY
bracket
[4]
Connector
box 1
[7] Joint
cover 1
[10] Metal
cover
[2] Guide
rail
[5]
Connector
cover
[8] Grommet
with film
[3] Cable
track 1
[6] Box
cover 1
[9] Controller-actuator
cable
with cable
fix cap
mounting bracket 2
[17] Connector
bracket
[14] Track
box 2
[12] Track
mounting plate
[15] Track
mounting bracket 3
[18] Box
cover 2
support bracket
[Assembly Procedure] Drawing No.: GMM07-069
[13] Track
[16] Cable
track 2
[19] Joint
cover 2
X-axis Linear Servo Type Cartesian Robot – High-precision 4-axis Specification
[Model]
ICSPA4-B2L 1 H
[1] XY configuration direction
[Assembled parts]
[1] XY bracket [3] Guide rail[2] XY bracket
[1] XY configuration directions
[4] Cable track [5] Connector cover
Configuration direction: 1
(Range of operation)
[7] Wiring box cover
[8] Grommet with film
[Constituent axes]
Constituent axis
X-axis
Y1-axis
Y2-axis
LSA-W21SM-I-400- (stroke) -T2-L-NT1
ISPA-MYM-I-200-20- (stroke) -T2-AQ
ISPA-MYM-I-200-20- (stroke) -T2-AQ
Model
[10] Metal cover
[Assembly Procedure] Drawing No.: GMM07-070
[6] Wiring box bracket
Controller-actuator
[9]
cable with cable fix cap
X-axis Linear Servo Type Cartesian Robot – High-precision 6-axis Specification,
Z-axis Base Mount
[Model]
ICSPA6-B2L 1 HB3H (M)
H: Z-axis high-speed type
M: Z-axis medium-speed type
[1] XY configuration direction
[Assembled parts]
[1] XY
bracket
[2] XY
bracket
[3] Guide
rail
[11] YZ
plate
[12] Track
mounting plate
[1] XY configuration directions
[14] Track
[Constituent axes]
Constituent axis
LSA-W21SM-I-400- (stroke) -T2-L-NT1
X-axis
ISPA-MYM-I-200-20- (stroke) -T2-AQ
Y1-axis
ISPA-MYM-I-200-20- (stroke) -T2-AQ
Y2-axis
ISPA-MXM-I-200-20<10>- (stroke) -T2-AQ-B
Z1-axis
ISPA-MXM-I-200-20<10>- (stroke) -T2-AQ-B
Z2-axis
Model
Configuration direction: 1
(Range of operation)
[4] Cable
track 1
[7] Wiring
box cover
[10] Metal
cover
[5] Connector
[8] Grommet
cover
with film
[6] Wiring
box bracket
[9] Controller-actuator
cable
with cable
fix cap
mounting bracket 2
[Assembly Procedure] Drawing No.: GMM07-071
[17] Box
cover
[15] Cable
track 2
[18] Joint
cover
[13] Track
support bracket
[16] Connector
box
X-axis Linear Servo Type Cartesian Robot – High-precision 6-axis Specification,
Z-axis Slider Mount
[Model]
ICSPA6-B2L 1 HS3M
M: Z-axis medium-speed type
[1] XY configuration direction
[Assembled parts]
[1] XY
bracket
[2] XY
bracket
[3] Guide
rail
[11] YZ
bracket
[12] Track
mounting plate
[1] XY configuration directions
[4] Cable
[Constituent axes]
Constituent axis
LSA-W21SM-I-400- (stroke) -T2-L-NT1
X-axis
Y1-axis
ISPA-MYM-I-200-20- (stroke) -T2-AQ
Y2-axis
ISPA-MYM-I-200-20- (stroke) -T2-AQ
Z1-axis
ISPA-MZM-I-200-10- (stroke) -T2-AQ-B-NM
Z2-axis
ISPA-MZM-I-200-10- (stroke) -T2-AQ-B-NM
Model
Configuration direction: 1
(Range of operation)
track 1
[7] Wiring
box cover
[10] Metal
cover
[5] Connector
[8] Grommet
with film
cover
[6] Wiring
box bracket
[9] Controller-actuator
cable
with cable
fix cap
[Assembly Procedure] Drawing No.: GMM07-072
[14] Track
mounting bracket 2
[17] Connector
box
[15] Track
mounting bracket 3
[18] Box
cover
[13] Track
support bracket
[16] Cable
track 2
[19] Joint
cover
Manual No.: ME0197-1A
Page 2
Caution: l Although each part has been chamfered to remove sharp edges, exercise due caution during
Hexagonal bolt M8s40
+ high-tension washer
(4 sets)
Parallel pin (1 pc or 2 pcs)
Hexagonal socket head bolt
M8s30
+ high-tension washer
(4 sets)
Parallel pin (2 pcs)
Y-axis: ISPA
[1] XY bracket
X-axis: LSA
X-axis base, reamed-hole side
Track mounting bracket
(Already attached to LSA)
In the case of configuration direction types 2 to 4,
the actuator and bracket directions are different.
(Reverse of 1)
Configuration
direction: 2
(Range of
operation)
Hexagonal socket head bolt M4s10
Hexagonal socket head bolt M4
s
10
+ hexagonal nut (2 sets)
Flange socket
(hexagonal socket head type) M4
s
10
+ hexagonal nut (4 sets)
Hexagonal socket head bolt M4
s
6
+ hexagonal nut (2 sets)
Hexagonal socket head bolt
M3
s
3 (4 pcs)
Cable Tie Mount MB1
(Manufacturer: HellermannTyton)
+ M3 hex socket flat head cap screw
s
5 pcs (1 set)
Guide the Y-axis actuator
cables through the hole.
[3] Cable track
[2] Guide rail
[3] Cable track
[4] Connector box
[2] Guide rail
30
100
[4] Connector box
[8] Grommet with film
Track mounting
bracket
X-axis: LSA
[1] XY bracket
Track mounting bracket
[8] Grommet with film
X-axis motor and encoder
cables.
Guide the cables to the
other side through the hole
* Affix cables using Insulok.
[5] Connector cover
Y-axis actuator cable
Track mounting bracket
Affixing positions of guide rail [2],
cable track [3] and connector box [4]
Make a cut in the film on the grommet to put
through the cables, and then attach it to
the track mounting bracket.
X axis: Joint of the motor
and encoder cables on
LSA side and the cable
connectors coming out of
the X-axis cable track
(on the back side)
Make a cross cut.
Align the guide rail [2] surface
with the end face of the base.
Put the X-axis motor and
encoder cables into the
box through the opening.
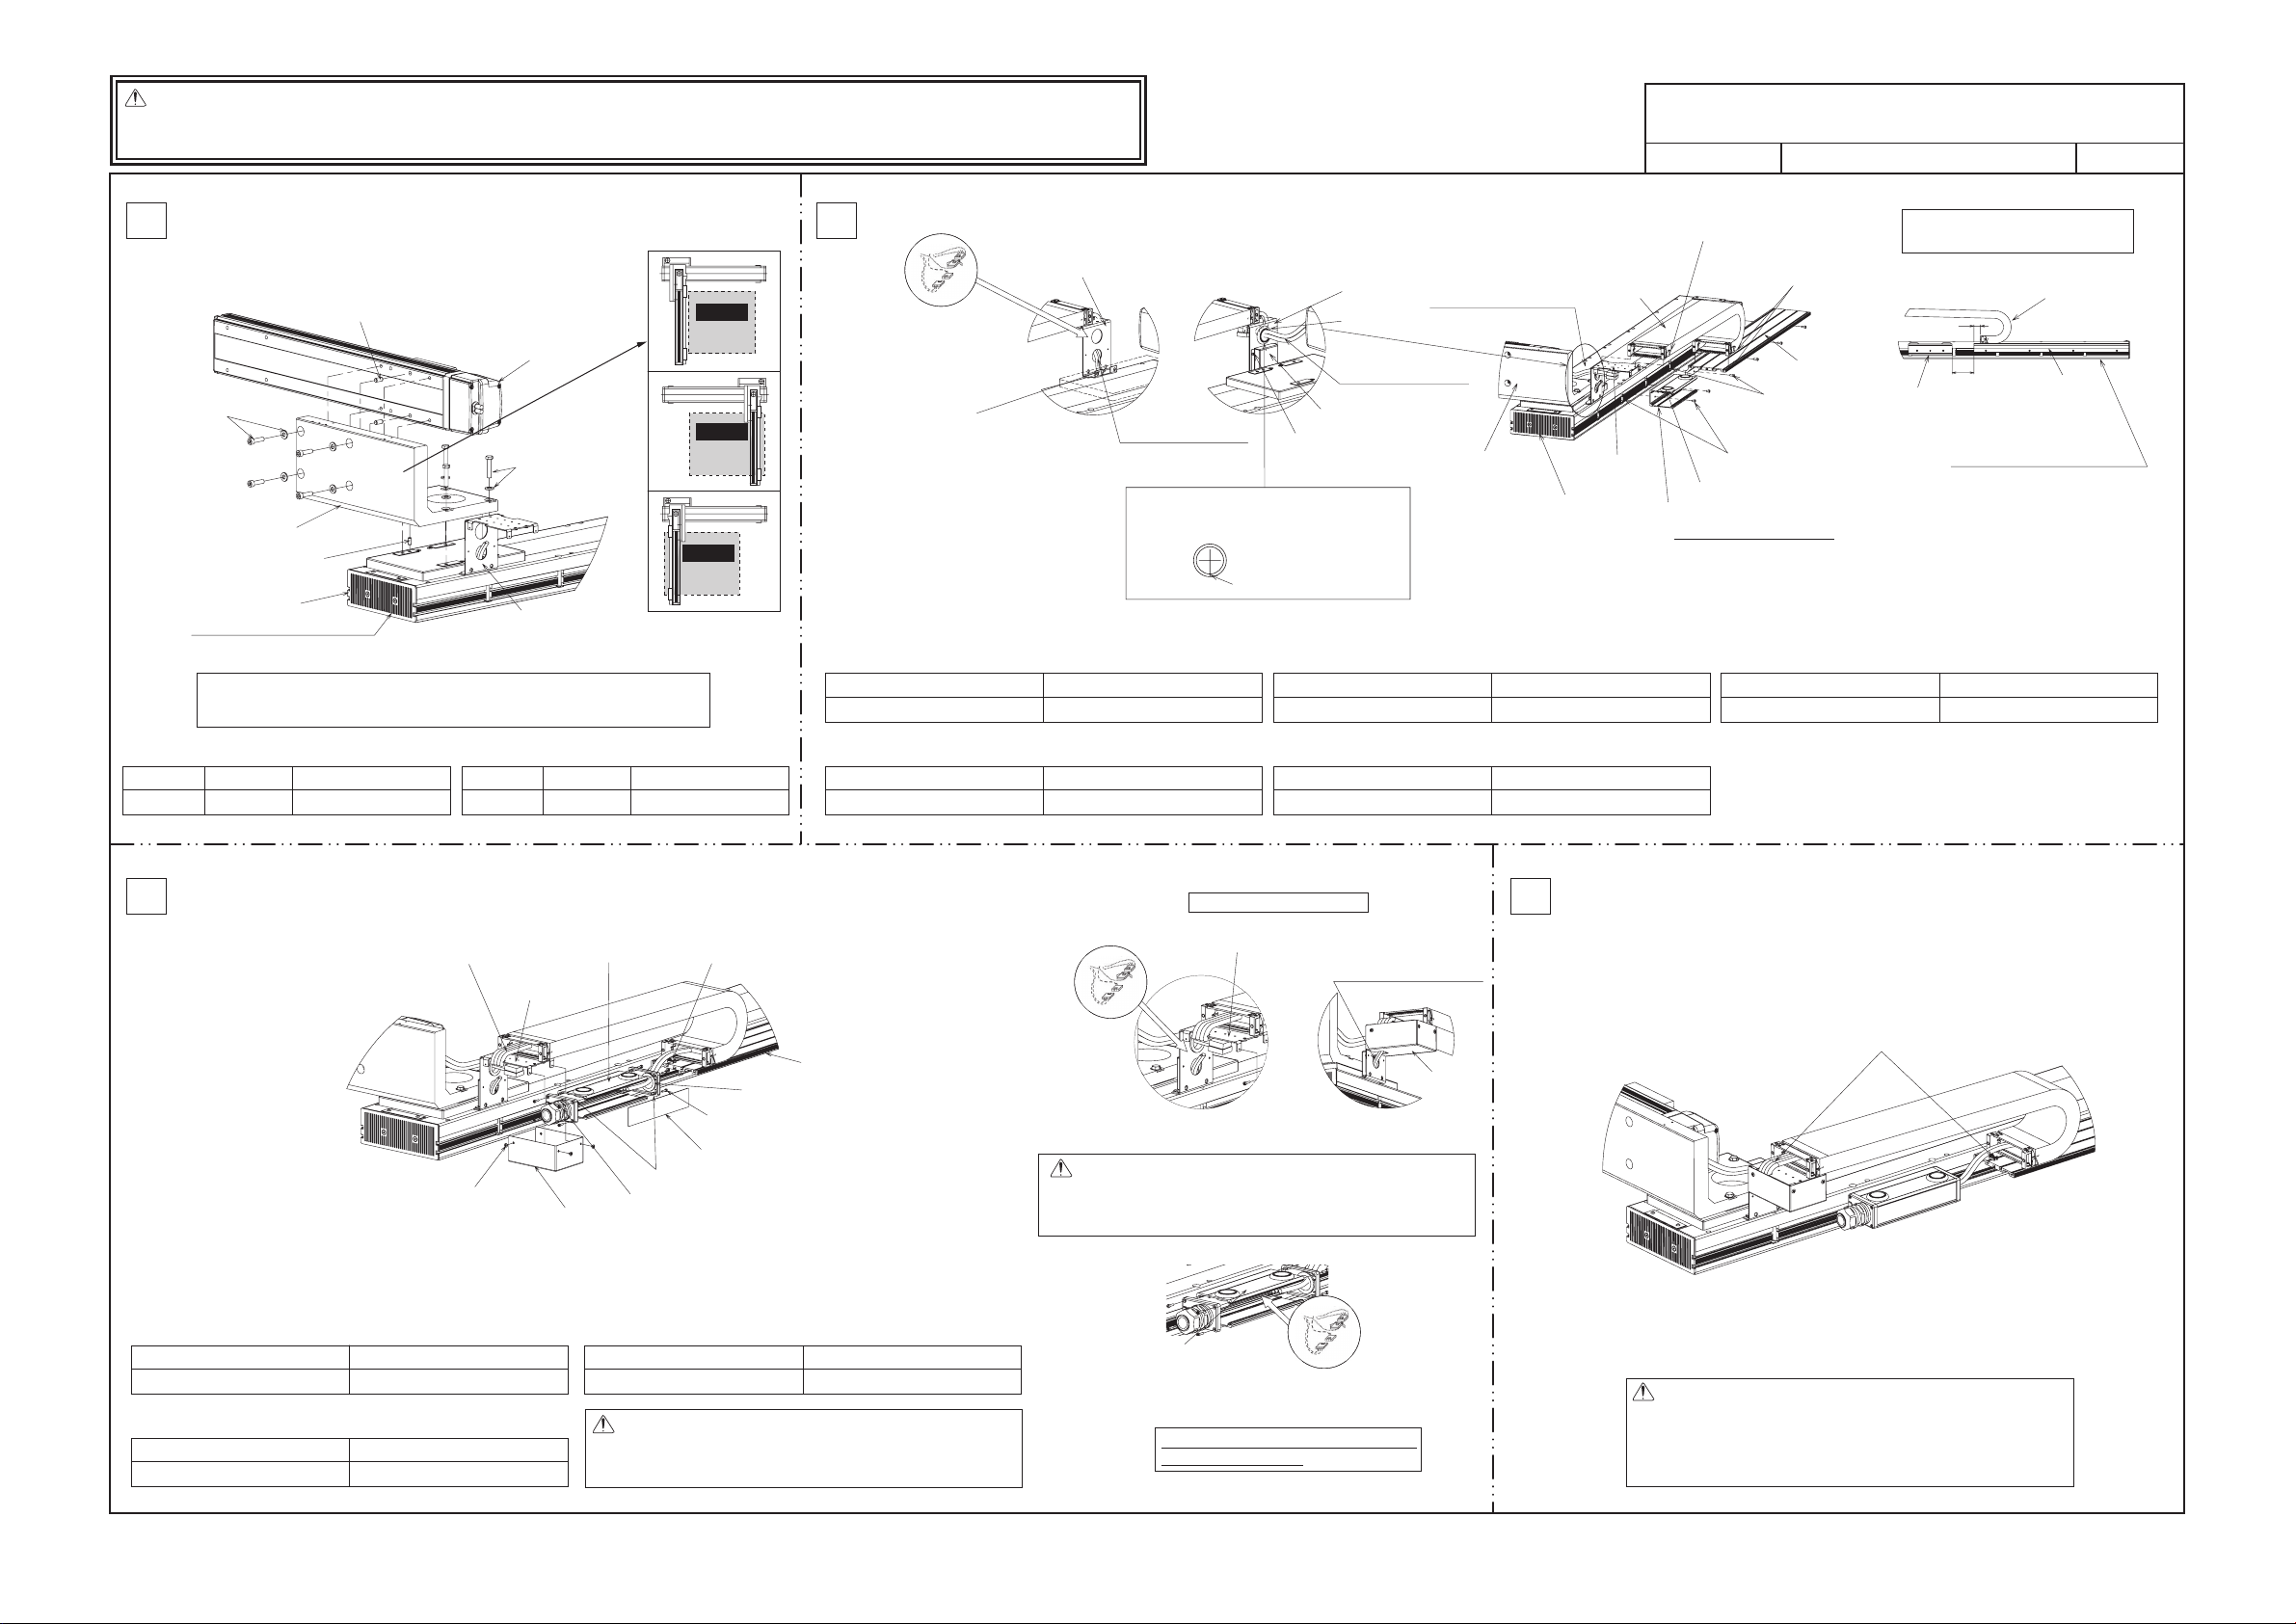
X-axis Linear Servo Type Cartesian Robot – High-precision 2-axis Specification
ICSPA2-BIL□H
[Tools] Allen wrench, spanner wrench
[Installation of X-axis: LSA on XY bracket [1]] [Installation of Y-axis: ISPA on XY bracket [1]] [Installation of X-axis: LSA side of guide rail [2] in the upper T-slot]
[Installation of cable track [3] on track mounting bracket]
[Installation of guide rail [2] for cable track [3] in T-slot]
[Installation of X-axis: LSA side of connector box [4] in the upper T-slot][Cable Tie Mount Attachment to Track Mounting Bracket]
[[5] Connector cover Attachment to Track Mounting Bracket]
Note: To ensure squareness between the X-axis and Y-axis, insert one parallel pin.
Adjust the angle between the X-axis and Y-axis to the right angle, and then
mount the hexagonal bolts.
1
3
2
4
GMM07-067 1/1
Drawing No.
Parallel pin
Hexagonal bolt
Tightening torque
F6h7s15 M8s40mm 306kgfvcm/2997Nvcm
Parallel pin
Hexagonal socket
head bolt
Tightening torque
F8h7s18 M8s30mm 306kgfvcm/2997Nvcm
(Y-axis installed
on opposite side)
Configuration
direction: 3
(Range of
operation)
(Reverse of 3)
Configuration
direction: 4
(Range of
operation)
Tightening torque
M3s5mm 15.8kgfvcm/154Nvcm
Hexagonal socket head bolt
Tightening torque
M3s3mm 15.8kgfvcm/154Nvcm
Hexagonal socket head bolt
Tightening torque
M4s6mm 18.0kgfvcm/176Nvcm
Hexagonal socket head bolt Tightening torque
M4s10mm 36.7kgfvcm/359Nvcm
Hexagonal socket head bolt
Tightening torque
M4s10mm 18.0kgfvcm/176Nvcm
Flange socket
(hexagonal socket head type)
[6] Box cover
[8] Grommet with film
[7] Joint cover
[9] Controller-actuator cable with cable fix cap
[10] Metal cover
Track mounting
bracket
[4] Connector box
[2] Guide rail
Tie-mount KR5G5 (by HellermannTyton)
+ hexagonal socket head button bolt
+ hexagonal nut (1 set)
Tie-mount KR5G5 (by HellermannTyton)
+ hexagonal socket head button bolt (1 set)
Thin-head bolt M3
s
12 (4 pcs)
Hexagonal socket head bolt M3
s
12 (8 pcs)
[Installation of box cover 1 [6] on connector box [4]]
Tightening torque
M3s12mm 5.51kgfvcm/54Nvcm
Hexagonal socket head bolt
[Installation of tie-mount on track mounting bracket]
[Cable Tie Mount Attachment to T-Slot of [2] Guide Rail]
Tightening torque
M4s6mm 11.7kgfvcm/114Nvcm
Hexagonal socket head button bolt
[Installation of metal cover [10] on track mounting bracket]
Tightening torque
M3s4mm 7.12kgfvcm/69.8Nvcm
Thin-head bolt
Track mounting bracket
[10] Metal
cover
Connector joint
for Y-axis: ISPA
M cable and
PG cable
(LS cable)
Cable connector connection
[4] Connector box
Connector jo in t fo r ca ble inside tr ac k
and contro ll er -a ct ua to r cable
Make sure the numbers on the connectors
to be connected match.
Caution: The cables for X-axis (axis 1) and Y-axis (axis 2) are
placed in tracks. Install each cable correctly.
[Cable markings]
v X-axis (axis 1): 1 v Y-axis (axis 2): 2
Secure the cables using wraps.
Caution: Secure the wires to prevent the cables and connectors
from contacting each axis when the axis is moved over its
entire stroke.
When manually moving the actuator with brake, connect
the controller, supply the power, and then release the brake
release switch (by turning the switch to the RLS side).
Attach to the upper T-slot.
Caution: Since the hexagonal holes in thin-head bolts are small,
the hexagonal holes may be damaged depending on the
tightening method. Exercise due caution when tightening
thin-head bolts.
the assembly to prevent injury. If necessary, wear gloves or other protective gears.
Exercise due caution during the assembly to prevent pinching of hands and ngers.
l
* This assembly procedure applies to conguration direction 1. If other conguration direction such as 2, 3 or 4 is used, the actuator and bracket directions vary. However, you can still use this assembly drawing as a reference.
Page 3
Caution: z Although each part has been chamfered to remove sharp edges, exercise due caution during
the assembly to prevent injury. If necessary, wear gloves or other protective gears.
Exercise due caution during the assembly to prevent pinching of hands and fi ngers.
z
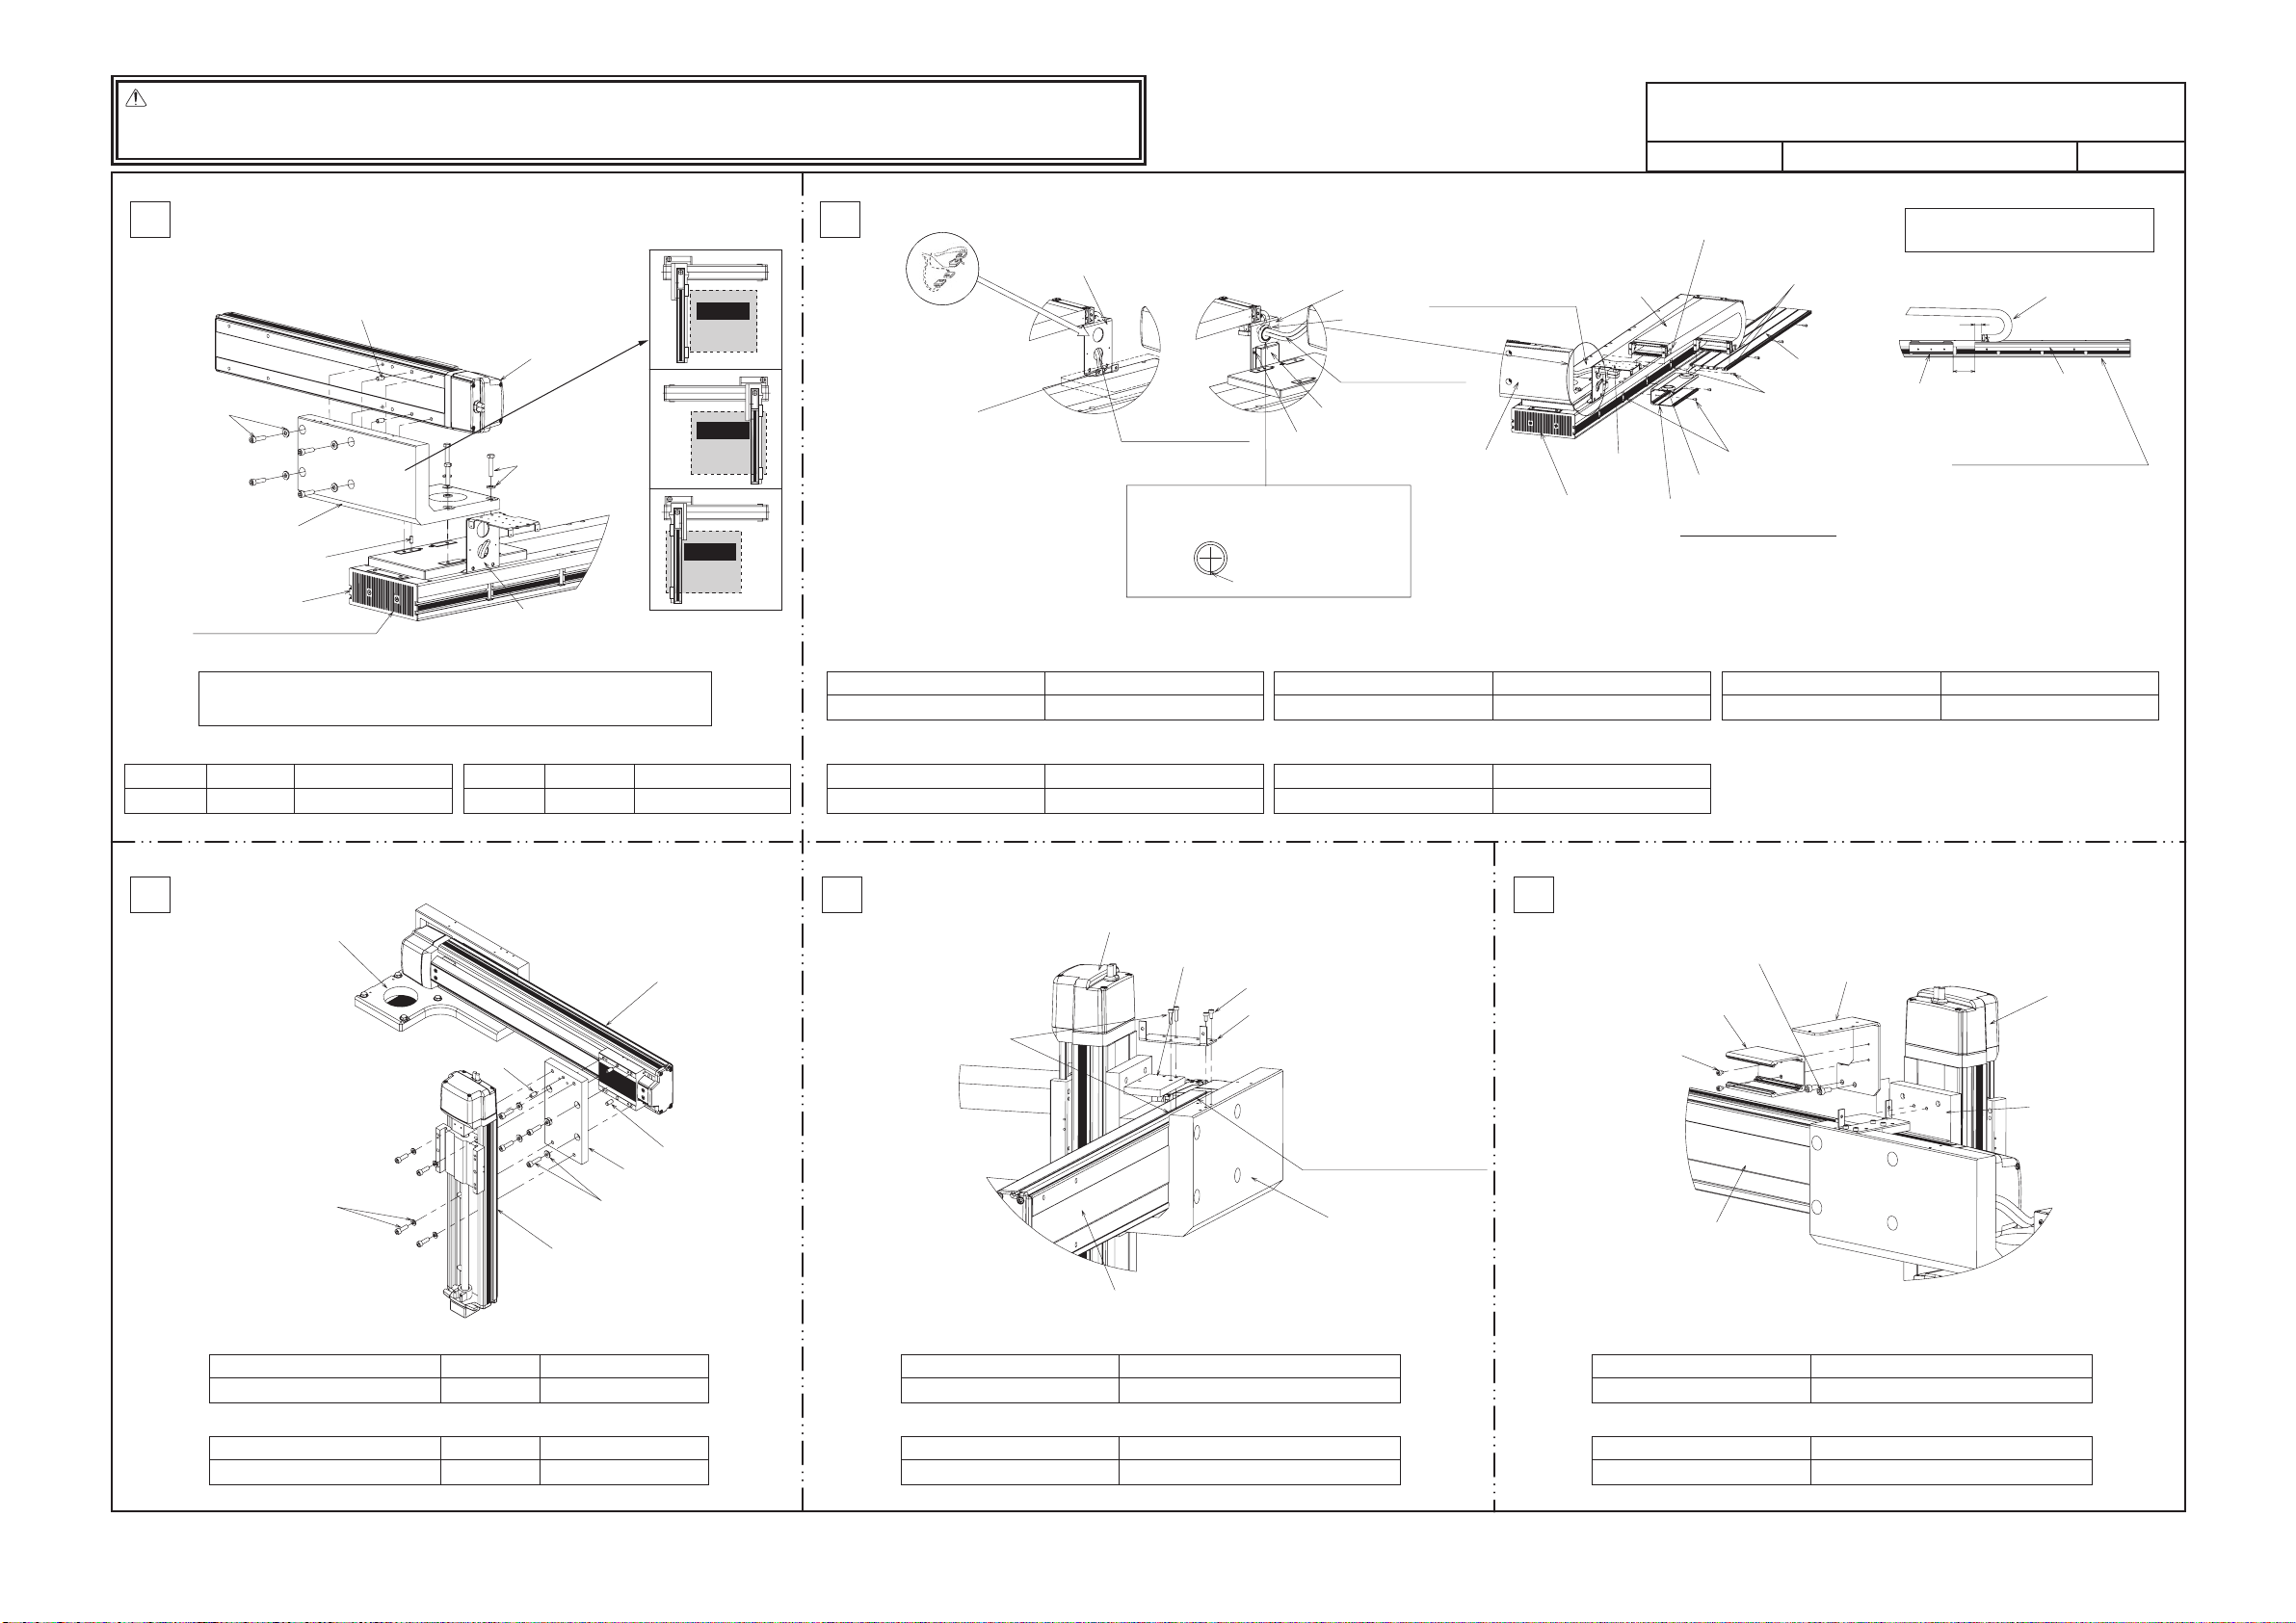
X-axis Linear Servo Type Cartesian Robot – High-precision 3-axis Specification,
Z Base Mount
ICSPA3-B1L□HB3H (M)
Drawing No.
GMM07-068 1/2
[Tools] Allen wrench, spanner wrench
1
In the case of configuration direction types 2 to 4,
the actuator and bracket directions are different.
Parallel pin (2 pcs)
Y-axis: ISPA
Hexagonal socket head bolt
M8s30
+ high-tension washer
(4 sets)
[1] XY bracket
Parallel pin (1 pc or 2 pcs)
X-axis: LSA
X-axis base, reamed-hole side
Note: To ensure squareness between the X-axis and Y-axis, insert one parallel pin.
Adjust the angle between the X-axis and Y-axis to the right angle, and then
mount the hexagonal bolts.
[Installation of X-axis: LSA on XY bracket [1]] [Installation of Y-axis: ISPA on XY bracket [1]]
Parallel pin
F6h7s15 M8s40mm 306kgfvcm/2997Nvcm
Hexagonal bolt
Tightening torque
Hexagonal bolt M8s40
+ high-tension washer
(4 sets)
Track mounting bracket
(Already attached to LSA)
Parallel pin
F8h7s18 M8s30mm 306kgfvcm/2997Nvcm
Hexagonal socket
head bolt
Tightening torque
Configuration
direction: 2
(Reverse of 1)
(Range of
operation)
Configuration
direction: 3
(Y-axis installed
on opposite side)
(Range of
operation)
Configuration
direction: 4
(Reverse of 3)
(Range of
operation)
2
Track mounting bracket
X axis: Joint of the motor
and encoder cables on
LSA side and the cable
connectors coming out of
the X-axis cable track
(on the back side)
Cable Tie Mount MB1
(Manufacturer: HellermannTyton)
+ M3 hex socket flat head cap screw
s
5 pcs (1 set)
* Affix cables using Insulok.
Hexagonal socket head bolt
M3s5mm 15.8kgfvcm/154Nvcm
[[5] Connector cover Attachment to Track Mounting Bracket]
Hexagonal socket head bolt
M3s3mm 15.8kgfvcm/154Nvcm
X-axis motor and encoder
cables.
Guide the cables to the
other side through the hole
Make a cut in the film on the grommet to put
through the cables, and then attach it to
the track mounting bracket.
Tightening torque
Tightening torque
Track mounting bracket
[5] Connector cover
Hexagonal socket head bolt
s
3 (4 pcs)
M3
Make a cross cut.
[Installation of X-axis: LSA side of connector box 1 [4] in the upper T-slot][Cable Tie Mount Attachment to Track Mounting Bracket]
Hexagonal socket head bolt Tightening torque
[Installation of X-axis: LSA side of guide rail [2] in the upper T-slot]
(hexagonal socket head type)
Hexagonal socket head bolt M4s10
Guide the Y-axis actuator
cables through the hole.
[8] Grommet with film
Y-axis actuator cable
[1] XY bracket
M4s6mm 18.0kgfvcm/176Nvcm
Flange socket
M4s10mm 18.0kgfvcm/176Nvcm
[3] Cable track 1
Track mounting
bracket
X-axis: LSA
Tightening torque
Tightening torque
Hexagonal socket head bolt M4
+ hexagonal nut (2 sets)
[2] Guide rail
Flange socket
(hexagonal socket head type) M4
+ hexagonal nut (4 sets)
Hexagonal socket head bolt M4
+ hexagonal nut (2 sets)
[8] Grommet with film
[4] Connector box 1
Attach to the upper T-slot.
[Installation of cable track 1 [3] on track mounting bracket]
[Installation of guide rail [2] for cable track 1 [3] in T-slot]
Hexagonal socket head bolt
Affixing positions of guide rail [2],
cable track 1 [3] and connector box 1 [4]
s
10
[3] Cable track 1
30
100
[4] Connector box 1
s
10
Align the guide rail [2] surface
s
6
with the end face of the base.
M4s10mm 36.7kgfvcm/359Nvcm
[2] Guide rail
3
[1] XY bracket
Hexagonal socket head bolt M8s25
+ M8 dedicated washer (4 sets)
Parallel pin
F8h7s18 M8s30mm 306kgfvcm/2997Nvcm
Parallel pin
F8h7s25 M8s25mm 306kgfvcm/2997Nvcm
Parallel pin (1 pc)
Z-axis: ISPA
[Installation of YZ plate [11] on Y-axis: ISPA]
[Installation of Z-axis: ISPA on YZ plate [11]]
Hexagonal socket
head bolt
Hexagonal socket
head bolt
Tightening torque
Tightening torque
Y-axis: ISPA
Parallel pin (2 pcs)
[11] YZ plate
Hexagonal socket head bolt M8s30
+ flat washer (4 sets)
4
Hexagonal socket head bolt M4
+ hexagonal nut (2 sets)
Hexagonal socket head bolt Tightening torque
M4s8mm 36.7kgfvcm/359Nvcm
[Installation of track support metal [13] on track mounting plate [12]]
Hexagonal socket head bolt Tightening torque
M4s16mm 36.7kgfvcm/359Nvcm
Z-axis: ISPA
[12] Track mounting plate
Hexagonal socket head bolt M4s8 (2 pcs)
s
16
Y-axis: ISPA
[Installation of track support bracket [13] on XY bracket [1]]
[13] Track support bracket
Place the M4 hexagonal nut in
the T slot beforehand to secure
the tie-mount in position.
[1] XY bracket
5
Hexagonal socket head bolt M6s15 (2 pcs)
[16] Connector box 2
Hexagonal socket head bolt
M4
s
5 (2 pcs)
Hexagonal socket head bolt Tightening torque
[Installation of connector box 2 [16] on track mounting bracket 2 [14]]
Hexagonal socket head bolt Tightening torque
[14] Track mounting bracket 2
Z-axis: ISPA
[11] YZ plate
Y-axis: ISPA
[Installation of track mounting bracket 2 [14] on YZ plate [11]]
M6s15mm 126kgfvcm/1234Nvcm
M4s5mm 18.0kgfvcm/176Nvcm
* This assembly procedure applies to confi guration direction 1. If other confi guration direction such as 2, 3 or 4 is used, the actuator and bracket directions vary. However, you can still use this assembly drawing as a reference.
Page 4

X-axis Linear Servo Type Cartesian Robot – High-precision 3-axis Specification,
Z Base Mount
ICSPA3-B1L□HB3H (M)
Drawing No.
GMM07-068 2/2
6
[15] Cable track 2
Hexagonal
socket head
bolt M4
s
12
Hexagonal socket head bolt
M4
s
12
+ hexagonal nut (2 sets)
[13] Track support bracket
Hexagonal socket head bolt M4s8 (2 pcs)
[14] Track mounting bracket 2
Z-axis: ISA, etc.
[16] Connector box 2
[17] Box cover 2
[8] Grommet with film
Hexagonal socket head bolt
s
12 (8 pcs)
M3
[1] XY bracket
[Installation of cable track 2 [15] on track support bracket [13]]
Hexagonal socket head bolt
M4s12mm 36.7kgfvcm/359Nvcm
[Installation of cable track 2 [15] on XY bracket [1]]
Hexagonal socket head bolt
M4s12mm 36.7kgfvcm/359Nvcm
[Installation of cable track 2 [15] on track mounting bracket 2 [14]]
Hexagonal socket head bolt
M4s8mm 36.7kgfvcm/359Nvcm
[Installation of box cover 2 [17] on connector box 2 [16]]
Hexagonal socket head bolt
M3s12mm 5.51kgfvcm/54Nvcm
[18] Joint cover 2
Tightening torque
Tightening torque
Tightening torque
Tightening torque
Cable connector connection
[16]
Connector
box 2
Connector joint for
ISPA M cable and
PG cable (LS cable)
7
Tie-mount KR5G5 (by HellermannTyton)
+ hexagonal socket head button bolt (1 set)
Thin-head bolt M3
[Installation of box cover 1 [6] on connector box 1 [4]]
Hexagonal socket head bolt
M3s12mm 5.51kgfvcm/54Nvcm
[Installation of tie-mount on track mounting bracket]
[Cable Tie Mount Attachment to T-Slot of [2] Guide Rail]
Hexagonal socket head button bolt
M4s6mm 11.7kgfvcm/114Nvcm
s
12 (4 pcs)
Tightening torque
Tightening torque
[4] Connector box 1
Track mounting
bracket
[10] Metal cover
Tie-mount KR5G5 (by HellermannTyton)
+ hexagonal socket head button bolt
+ hexagonal nut (1 set)
[2] Guide rail
[8] Grommet with film
s
Hexagonal socket head bolt M3
[7] Joint cover 1
[6] Box cover 1
[9] Controller-actuator cable with cable fix cap
[Installation of metal cover [10] on track mounting bracket]
Thin-head bolt
M3s4mm 7.12kgfvcm/69.8Nvcm
Caution: Since the hexagonal holes in thin-head bolts are small,
the hexagonal holes may be damaged depending on the
tightening method. Exercise due caution when tightening
thin-head bolts.
12 (8 pcs)
Tightening torque
Cable connector connection
Track mounting bracket
Connector joint
for Y-axis: ISPA
M cable and
PG cable
(LS cable)
Caution: The cables for X-axis (axis 1), Y-axis (axis 2) and Z-axis
(axis 3) are placed in tracks. Install each cable correctly.
[Cable markings]
v X-axis (axis 1): 1 v Y-axis (axis 2): 2 v Z-axis (axis 3): 3
[4] Connector box 1
Connector joint for cable inside track
and controller-actuator cable
Make sure the numbers on the connectors
to be connected match.
Put the X-axis motor and
encoder cables into the
box through the opening.
[10] Metal
cover
8
Tie-mount KR5G5 (by HellermannTyton)
+ hexagonal socket head button bolt
M4
Y-axis: ISPA
[13] Track support bracket
s
6 (2 sets)
[1] XY bracket
[Installation of tie-mount in track mounting bracket 2 [14]]
[Installation of tie-mount on track support bracket [13]]
[Installation of tie-mount in T slot of Y-axis: ISPA
[Installation of tie-mount on track mounting bracket]
Hexagonal socket head button bolt
M4s6mm 11.7kgfvcm/114Nvcm
[14] Track mounting bracket 2
Tie-mount KR5G5
(by HellermannTyton)
+ hexagonal socket head button bolt M4
+ hexagonal nut (1 set)
Install in the T slot of the Y-axis.
Track mounting bracket
Tie-mount KR5G5 (by HellermannTyton)
+ hexagonal socket head button bolt M4
Tightening torque
s
6 (1 set)
9
Z-axis cables X-axis, Y-axis cables
s
6
Secure the cables using wraps.
Secure the cables using wraps.
Secure the cables using wraps.
Caution: Secure the wires to prevent the cables and connectors
Secure the cables using wraps.
from contacting each axis when the axis is moved over its
entire stroke.
When manually moving the actuator with brake, connect
the controller, supply the power, and then release the brake
release switch (by turning the switch to the RLS side).
Page 5
Caution: z Although each part has been chamfered to remove sharp edges, exercise due caution during
the assembly to prevent injury. If necessary, wear gloves or other protective gears.
Exercise due caution during the assembly to prevent pinching of hands and fi ngers.
z
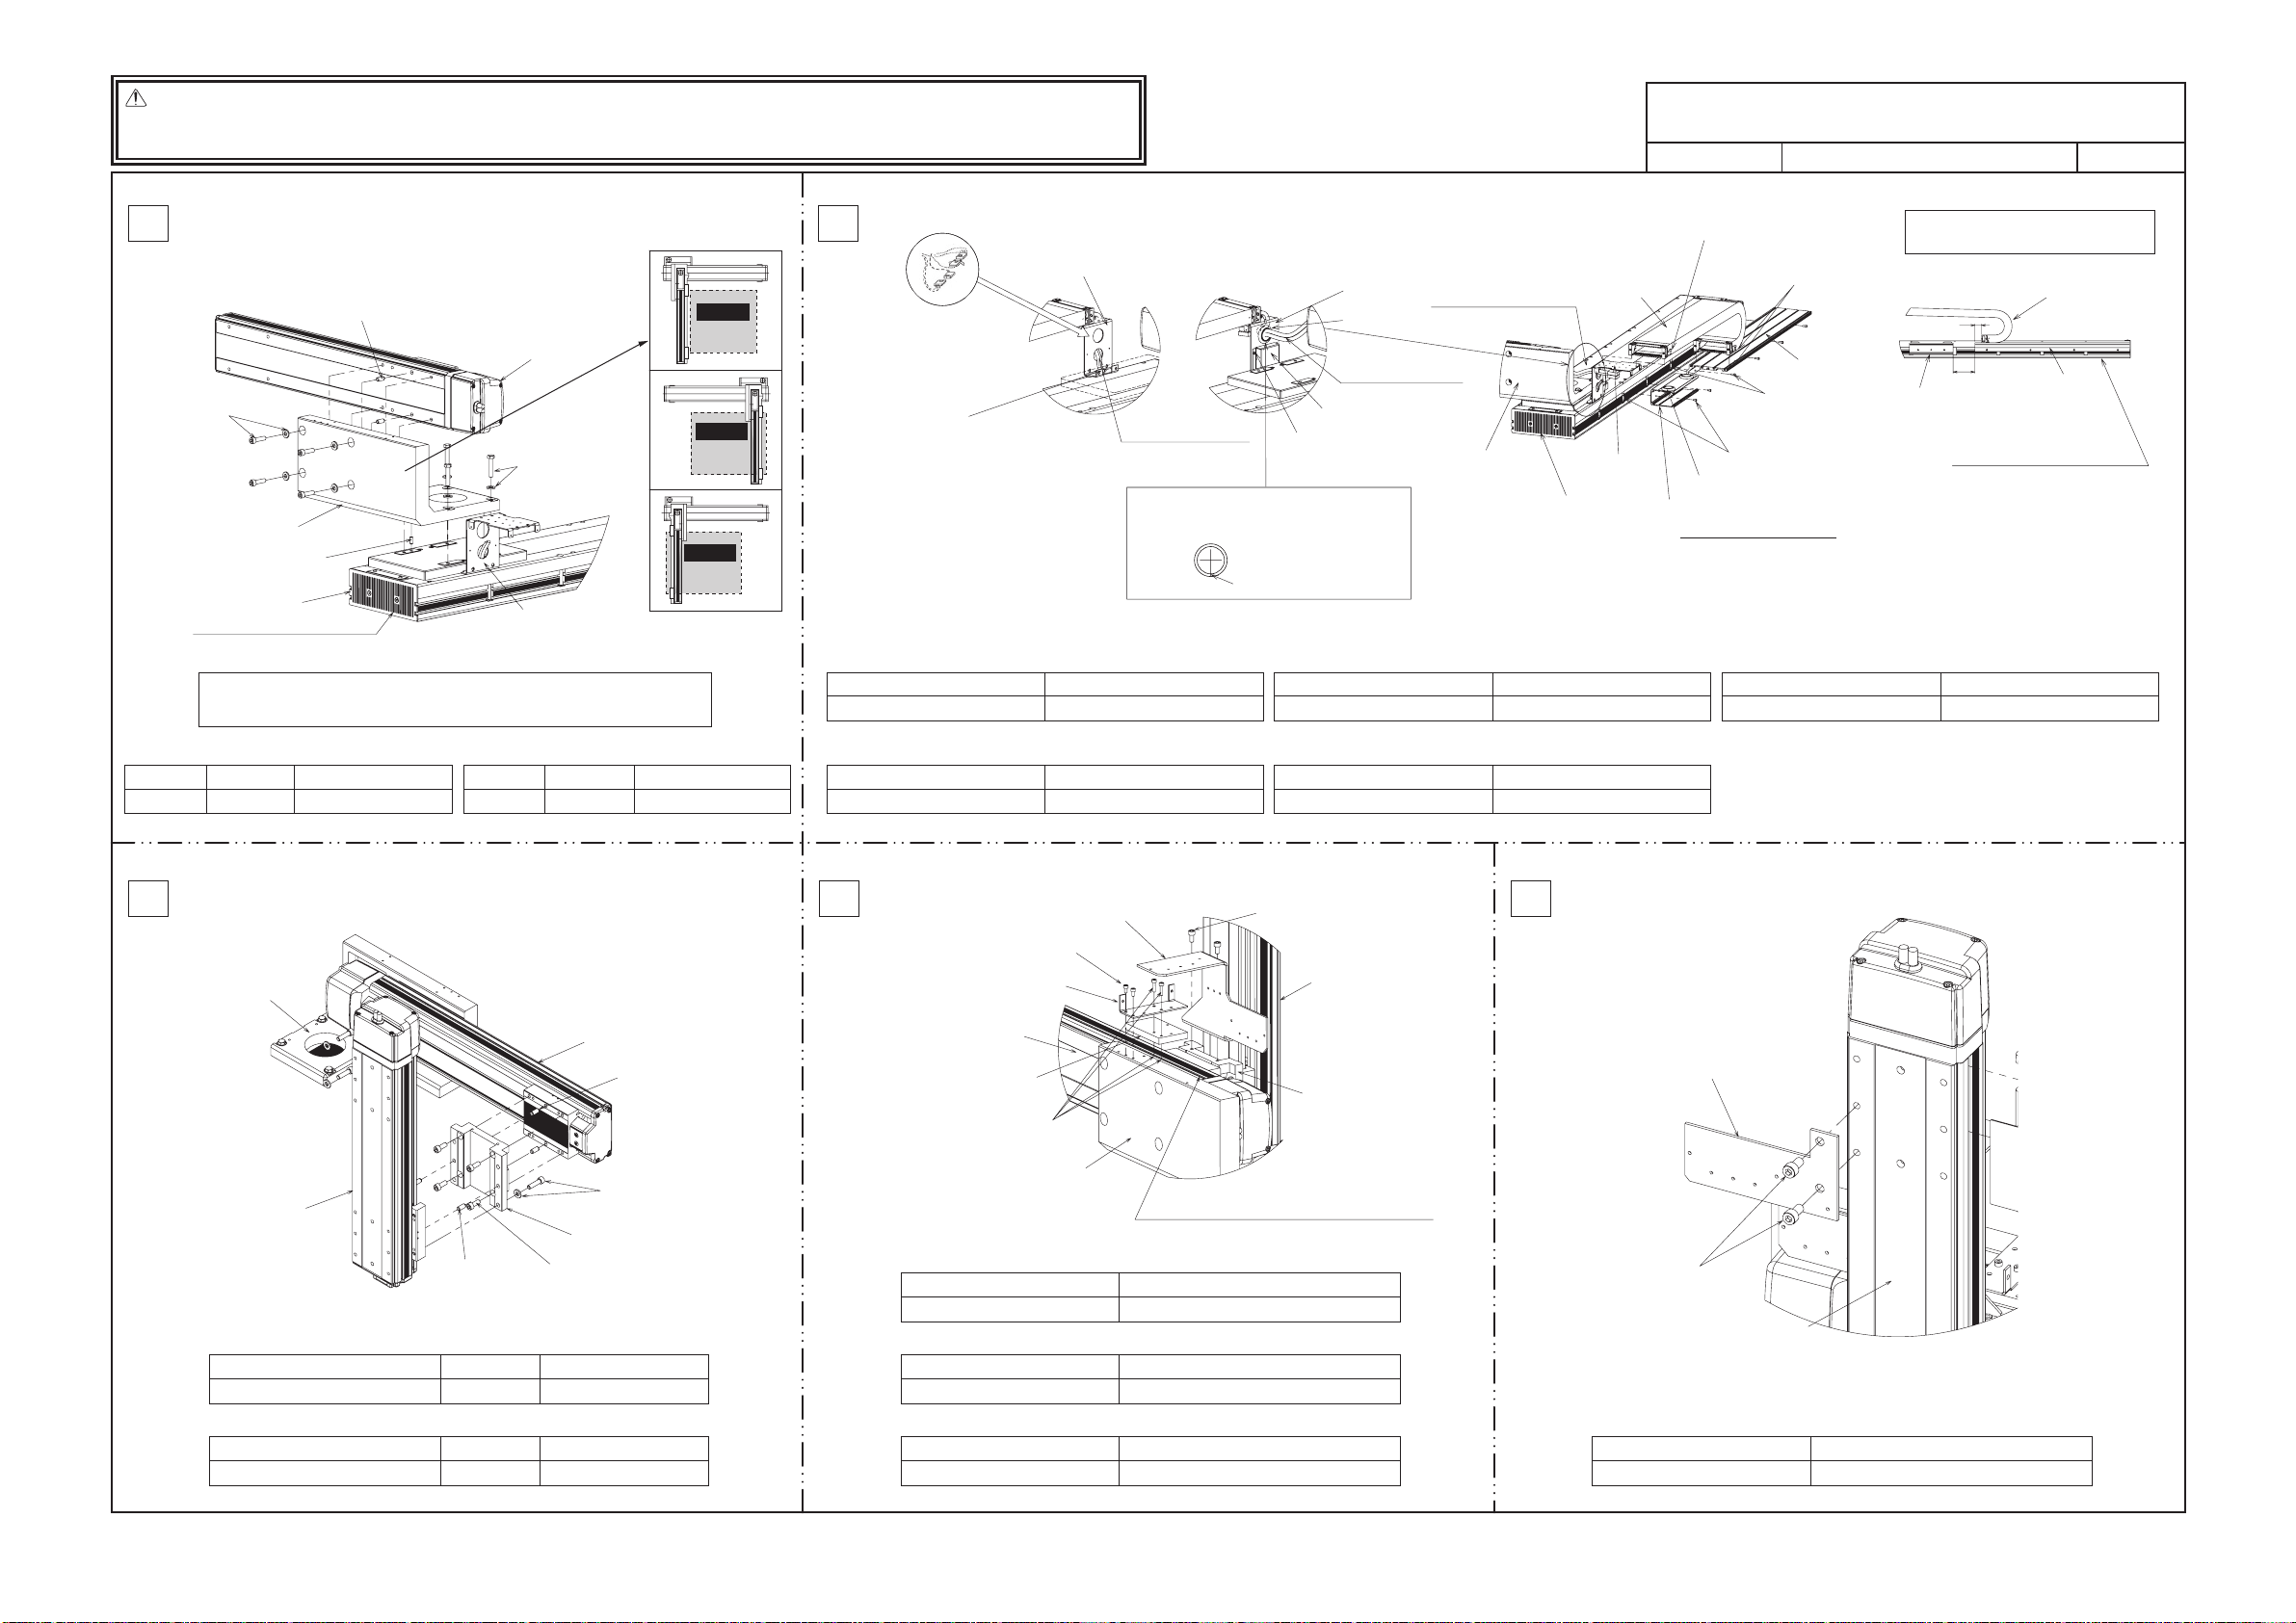
X-axis Linear Servo Type Cartesian Robot – High-precision 3-axis Specification,
Z Slider Mount
ICSPA3-B1L□HS3M
Drawing No.
GMM07-069 1/2
[Tools] Allen wrench, spanner wrench
1
In the case of configuration direction types 2 to 4,
the actuator and bracket directions are different.
Parallel pin (2 pcs)
Y-axis: ISPA
Hexagonal socket head bolt
M8s30
+ high-tension washer
(4 sets)
[1] XY bracket
Parallel pin (1 pc or 2 pcs)
X-axis: LSA
X-axis base, reamed-hole side
Note: To ensure squareness between the X-axis and Y-axis, insert one parallel pin.
Adjust the angle between the X-axis and Y-axis to the right angle, and then
mount the hexagonal bolts.
[Installation of X-axis: LSA on XY bracket [1]] [Installation of Y-axis: ISPA on XY bracket [1]]
Parallel pin
F6h7s15 M8s40mm 306kgfvcm/2997Nvcm
Hexagonal bolt
Tightening torque
Hexagonal bolt M8s40
+ high-tension washer
(4 sets)
Track mounting bracket
(Already attached to LSA)
Parallel pin
F8h7s18 M8s30mm 306kgfvcm/2997Nvcm
Hexagonal socket
head bolt
Tightening torque
Configuration
direction: 2
(Reverse of 1)
(Range of
operation)
Configuration
direction: 3
(Y-axis installed
on opposite side)
(Range of
operation)
Configuration
direction: 4
(Reverse of 3)
(Range of
operation)
2
Track mounting bracket
X axis: Joint of the motor
and encoder cables on
LSA side and the cable
connectors coming out of
the X-axis cable track
(on the back side)
Cable Tie Mount MB1
(Manufacturer: HellermannTyton)
+ M3 hex socket flat head cap screw
s
5 pcs (1 set)
* Affix cables using Insulok.
Hexagonal socket head bolt
M3s5mm 15.8kgfvcm/154Nvcm
[[5] Connector cover Attachment to Track Mounting Bracket]
Hexagonal socket head bolt
M3s3mm 15.8kgfvcm/154Nvcm
X-axis motor and encoder
cables.
Guide the cables to the
other side through the hole
Tightening torque
Tightening torque
Track mounting bracket
[8] Grommet with film
Y-axis actuator cable
[5] Connector cover
Hexagonal socket head bolt
s
3 (4 pcs)
M3
Make a cut in the film on the grommet to put
through the cables, and then attach it to
the track mounting bracket.
Make a cross cut.
[Installation of X-axis: LSA side of connector box 1 [4] in the upper T-slot][Cable Tie Mount Attachment to Track Mounting Bracket]
Hexagonal socket head bolt Tightening torque
M4s6mm 18.0kgfvcm/176Nvcm
[Installation of X-axis: LSA side of guide rail [2] in the upper T-slot]
Flange socket
(hexagonal socket head type)
M4s10mm 18.0kgfvcm/176Nvcm
Guide the Y-axis actuator
cables through the hole.
[1] XY bracket
X-axis: LSA
Tightening torque
Tightening torque
Hexagonal socket head bolt M4s10
[3] Cable track 1
Track mounting
bracket
+ hexagonal nut (2 sets)
[8] Grommet with film
[4] Connector box 1
Attach to the upper T-slot.
Affixing positions of guide rail [2],
cable track 1 [3] and connector box 1 [4]
Hexagonal socket head bolt M4
[2] Guide rail
Flange socket
(hexagonal socket head type) M4
+ hexagonal nut (4 sets)
Hexagonal socket head bolt M4
+ hexagonal nut (2 sets)
[Installation of cable track 1 [3] on track mounting bracket]
[Installation of guide rail [2] for cable track 1 [3] in T-slot]
Hexagonal socket head bolt
M4s10mm 36.7kgfvcm/359Nvcm
s
10
30
100
[4] Connector box 1
s
10
Align the guide rail [2] surface
s
6
with the end face of the base.
[3] Cable track 1
[2] Guide rail
3
[1] XY bracket
Z-axis: ISPA
Parallel pin Tightening torque
Parallel pin
Y-axis: ISPA
Parallel pin (2 pcs)
Hexagonal bolt M8
+ flat washer (4 sets)
[11] YZ bracket
Parallel pin (2 pcs)
[Installation of YZ bracket [11] on Y-axis: ISPA]
Hexagonal bolt
F8h7s18 M8s35mm 117kgfvcm/1148Nvcm
[Installation of Z-axis: ISPA on YZ bracket [11]]
F8h7s18 M8s40mm 306kgfvcm/2997Nvcm
Hexagonal socket
head bolt
Hexagonal socket head bolt M8
(4 pcs)
Tightening torque
4
Hexagonal socket head bolt
M4
[13] Track support bracket
[12] Track mounting plate
Hexagonal socket head bolt M4
+ hexagonal nut (2 sets)
s
35
s
40
[Installation of track support bracket [13] and track mounting plate [12] on Y-axis: ISPA]
[14] Track mounting bracket 2
s
8 (2 pcs)
Y-axis: ISPA
s
16
[1] XY bracket
Hexagonal socket head bolt Tightening torque
M4s16mm 36.7kgfvcm/359Nvcm
[Installation of track support bracket [13] on XY bracket [1]]
Hexagonal socket head bolt Tightening torque
M4s8mm 36.7kgfvcm/359Nvcm
[Installation of track mounting bracket 2 [14] on YZ bracket [11]]
Hexagonal socket head bolt Tightening torque
M6s12mm 126kgfvcm/1234Nvcm
Place the M4 hexagonal nut (1 pc) in the T slot
beforehand to secure the tie-mount in position.
Hexagonal socket head bolt
M6
s
12 (2 pcs)
Z-axis: ISPA
[11] YZ bracket
5
[15] Track mounting bracket 3
Hexagonal socket head bolt
M8
s
15 (2 pcs)
Z-axis: ISPA
[Installation of track mounting bracket 3 [15] on Z-axis: ISPA]
Hexagonal socket head bolt Tightening torque
M8s15mm 306kgfvcm/2997Nvcm
* This assembly procedure applies to confi guration direction 1. If other confi guration direction such as 2, 3 or 4 is used, the actuator and bracket directions vary. However, you can still use this assembly drawing as a reference.
Page 6

[3] Cable track 1
Hexagonal socket head bolt M4s8
(2 pcs)
Hexagonal socket head bolt M4
s
12
+ hexagonal nut (2 sets)
Hexagonal socket head bolt M4
s
12
(2 pcs)
Hexagonal socket head bolt M4s8 (2 pcs)
Hexagonal socket head bolt M4
s
8 (2 pcs)
Z-axis: ISPA
Y-axis: ISPA
[1] XY bracket
[13] Track support bracket
[14] Track mounting bracket 2
[15] Track mounting bracket 3
[16] Cable track 2
ICSPA3-B1L□HS3M
[Installation of cable track 2 [16] on track mounting bracket 2 [14]]
[Installation of cable track 2 [16] on track mounting bracket 3 [15]]
[Installation of cable track 1 [3] on track mounting bracket 2 [14]]
[Installation of cable track 1 [3] on XY bracket [1]]
[Installation of cable track 1 [3] on track support bracket [13]]
Z-axis cables X-axis, Y-axis cables
Put the X-axis motor and
encoder cables into the
box through the opening.
6
8
7
GMM07-069 2/2
Drawing No.
9
[6] Box cover 1
[8] Grommet with film
[7] Joint cover 1
[9] Controller-actuator cable with cable fix cap
[10] Metal cover
Track mounting
bracket
[4] Connector box 1
[2] Guide rail
Tie-mount KR5G5 (by HellermannTyton)
+ hexagonal socket head button bolt
+ hexagonal nut (1 set)
Tie-mount KR5G5 (by HellermannTyton)
+ hexagonal socket head button bolt (1 set)
Thin-head bolt M3
s
12 (4 pcs)
Hexagonal socket head bolt M3
s
12 (8 pcs)
[Installation of metal cover [10] on track mounting bracket]
[Installation of tie-mount on track mounting bracket]
[Cable Tie Mount Attachment to T-Slot of [2] Guide Rail]
[Installation of box cover 1 [6] on connector box 1 [4]]
Tightening torque
M3s4mm 7.12kgfvcm/69.8Nvcm
Thin-head bolt
Tightening torque
M3s12mm 5.51kgfvcm/54Nvcm
Hexagonal socket head bolt
Tightening torque
M4s6mm 11.7kgfvcm/114Nvcm
Hexagonal socket head button bolt
Caution: Since the hexagonal holes in thin-head bolts are small,
the hexagonal holes may be damaged depending on the
tightening method. Exercise due caution when tightening
thin-head bolts.
Track mounting bracket
[10] Metal
cover
Connector joint
for Y-axis: ISPA
M cable and
PG cable
(LS cable)
[4] Connector box 1
Connector jo in t fo r ca ble inside tr ac k
and contro ll er -a ct ua to r cable
Make sure the numbers on the connectors
to be connected match.
Cable connector connection
Caution: The cables for X-axis (axis 1), Y-axis (axis 2) and Z-axis
(axis 3) are placed in tracks. Install each cable correctly.
[Cable markings]
v X-axis (axis 1): 1 v Y-axis (axis 2): 2 v Z-axis (axis 3): 3
[15] Track mounting bracket 3
KR5G5 tie-mount (by HellermannTyton)
+ hexagonal socket head button bolt M4
s
4 (2 sets)
Z-axis: ISPA
[Installation of tie-mount on track mounting bracket 3 [15]]
Tightening torqueHexagonal socket head button bolt
M4s4mm 11.7kgfvcm/114Nvcm
[14] Track mounting bracket 2
[13] Track support bracket
[1] XY bracket
Tie-mount KR5G5 (by HellermannTyton)
+ hexagonal socket head button bolt M4s4 (1 set)
Tie-mount KR5G5 (by HellermannTyton)
+ hexagonal socket head button bolt
M4s6 (1 set)
KR5G5 tie-mount
(by HellermannTyton)
+ hexagonal socket head
button bolt M4s4 (2 sets)
Tie-mount KR5G5 (by HellermannTyton)
+ hexagonal socket head button bolt M4s6 (1 set)
Y-axis: ISPA
Install in the T slot of the Y-axis.
Install on the back side.
[Installation of tie-mount on track mounting bracket 2 [14]]
Tightening torqueHexagonal socket head button bolt
M4s4mm 11.7kgfvcm/114Nvcm
[18] Box cover 2
[17] Connector box 2
[8] Grommet with film
[19] Joint cover 2
Hexagonal socket head bolt M4s6
+ hexagonal nut (2 sets)
Hexagonal socket head bolt
M3
s
12 (8 pcs)
Connector joint for
ISPA M cable and
PG cable (LS cable)
[Installation of connector box 2 [17] on Z-axis: ISPA]
[Installation of box cover 2 [18] on connector box 2 [17]]
Tightening torqueHexagonal socket head bolt
M3s12mm 5.51kgfvcm/54Nvcm
Tightening torqueHexagonal socket head bolt
M4s6mm 18.0kgfvcm/176Nvcm
[Installation of tie-mount on track support bracket [13]]
[Installation of tie-mount in T slot of Y-axis: ISPA]
Tightening torqueHexagonal socket head button bolt
M4s6mm 11.7kgfvcm/114Nvcm
Z-axis: ISPA
[15] Track mounting bracket 3
Secure the cables using wraps.
Secure the cables using wraps.
Wire the cable in a manner
preventing contact with the Z-axis.
Secure the cables using wraps.
Y-axis: ISPA
[1] XY bracket
Secure the cables using wraps.
Secure the cables using wraps.
[14] Track mounting bracket 2
[13] Track support bracket
Secure the cables using wraps.
Caution: Secure the wires to prevent the cables and connectors
from contacting each axis when the axis is moved over its
entire stroke.
When manually moving the actuator with brake, connect
the controller, supply the power, and then release the brake
release switch (by turning the switch to the RLS side).
Hexagonal socket head bolt Tightening torque
M4s12mm 36.7kgfvcm/359Nvcm
Hexagonal socket head bolt Tightening torque
M4s8mm 36.7kgfvcm/359Nvcm
Hexagonal socket head bolt Tightening torque
M4s8mm 36.7kgfvcm/359Nvcm
Hexagonal socket head bolt Tightening torque
M4s8mm 36.7kgfvcm/359Nvcm
Hexagonal socket head bolt Tightening torque
M4s12mm 36.7kgfvcm/359Nvcm
X-axis Linear Servo Type Cartesian Robot – High-precision 3-axis Specification,
Z Slider Mount
Page 7

Caution: z Although each part has been chamfered to remove sharp edges, exercise due caution during
the assembly to prevent injury. If necessary, wear gloves or other protective gears.
[Tools] Allen wrench, spanner wrench
Exercise due caution during the assembly to prevent pinching of hands and fi ngers.
z
1
Parallel pin (2 pcs)
Hexagonal socket head bolt
M8x30
+ high-tension washer
(4 sets)
[1] XY bracket
Parallel pin (1 pc or 2 pcs)
X-axis: LSA
X-axis base, reamed-hole side
Note: To ensure squareness between the X-axis and Y-axis, insert one parallel pin.
Adjust the angle between the X-axis and Y-axis to the right angle, and then
mount the hexagonal bolts.
[Installation of X-axis: LSA on XY bracket [1]] [Installation of Y1-axis: ISPA on XY bracket [1]]
Parallel pin Hexagonal bolt Tightening torque
F6h7s15 M8s40mm 306kgfvcm/2997Nvcm
Parallel pin
Assembly of Y1-axis side
Y1-axis: ISPA
Hexagonal bolt M8x40
+ high-tension washer
(4 sets)
Track mounting bracket
(Already attached to LSA)
Hexagonal socket
head bolt
F8h7s18 M8s30mm 306kgfvcm/2997Nvcm
Tightening torque
[1] XY bracket
X1-axis slider side
(base, reamed-hole side)
Track mounting bracket
(Already attached before delivery)
Y1-axis: ISPA
X-axis: LSA
Y2-axis: ISPA
[2] XY bracket
X2-axis slider side
(base, slotted-hole side)
(different direction)
* The direction is different on the Y2-axis side.
Assemble the parts by referring to
the Y1-axis side.
X-axis Linear Servo Type Cartesian Robot – High-precision 4-axis Specification
ICSPA4-B2L1H
Drawing No.
2
Flange socket
(hexagonal socket head type)
M4
s
10
+ hexagonal nut (3 sets)
[3] Guide rail
[9] Controller-actuator cable with
cable fix cap (for axis 1 or 2)
Hexagonal socket head bolt M4s6
+ hexagonal nut (2 sets)
[6] Wiring box bracket
[9] Controller-actuator cable with
cable fix cap (for axis 3 or 4)
Caution: The cables for Y1-axis side (axes 1 and 2) and Y2-axis side
GMM07-070 1/2
Y1-axis: ISPA
X-axis: LSA
[8] Grommet with film
Y2-axis: ISPA
[3] Guide rail
Attach to the upper T-slot.
Flange socket (hexagonal socket head type) M4s10
+ hexagonal nut (3 sets)
(axes 3 and 4) are placed in tracks. Install each cable correctly.
[Cable markings]
v Y1-axis side (axes 1 and 2): 1-M, PG, (LS), 2-M, PG, (LS)
v Y2-axis side (axes 3 and 4): 3-M, PG, (LS), 4-M, PG, (LS)
3
Hexagonal socket head bolt M4s10 (2 pcs)
Track mounting bracket
[3] Guide rail
[4] Cable track
Hexagonal socket head bolt M4
+ hexagonal nut (2 sets)
Hexagonal socket head bolt M4
+ hexagonal nut (2 sets)
Y1-axis: ISPA
s
Hexagonal socket head bolt M4
X-axis: LSA
s
10
[4] Cable track
s
10
[Installation of cable track [4] on track mounting bracket]
[Installation of guide rail [3] for cable track [4] in T-slot]
Hexagonal socket head bolt
[3] Guide rail
M4s10mm 36.7kgfvcm/359Nvcm
10 (2 pcs)
Y2-axis: ISPA
Track mounting bracket
Tightening torque
Wiring box
In this assembly procedure, the controller-actuator cable is
taken out from the wiring box in the direction shown above.
The cable can also be taken out in the directions shown below.
Affix the wiring box bracket [6] using the holes
on the inner side, and use the upper T-slot.
Affixing positions of guide rail [3], cable track 1 [4] and wiring box bracket [6]
[6] Wiring box bracket
[4] Cable track
30 30
[3] Guide rail
[Installation of wiring box bracket [6] in the upper T slot on X-axis: LSA side]
Hexagonal socket head bolt
M4s6mm 18.0kgfvcm/176Nvcm
[Installation of guide rail [3] in the upper T slot on X-axis: LSA side]
Flange socket (hexagonal socket head type)
M4s10mm 18.0kgfvcm/176Nvcm
[4] Cable track
4343
[3] Guide rail
Align the guide rail [3] surface with the end
face of the base. (Same on the other side)
Hexagonal socket head bolt
Hexagonal socket head bolt
Page 8

X-axis Linear Servo Type Cartesian Robot – High-precision 4-axis Specification
ICSPA4-B2L1H
Drawing No.
GMM07-070 2/2
4
[4] Cable track
Controller-actuator cable
Cable wiring diagram
Y1-axis: ISPA
Cable inside track
X-axis: LSA
Installation of metal cover [10]
Detail view of A
Track mounting bracket
[10] Metal cover
[Installation of metal cover [10] on track mounting bracket]
Thin-head bolt
M3s4mm 7.12kgfvcm/69.8Nvcm
Caution: Since the hexagonal holes in thin-head bolts are small,
the hexagonal holes may be damaged depending on the
tightening method. Exercise due caution when tightening
thin-head bolts.
Tightening torque
Caution:
The cables for X-axis slider on
Y1-axis side (axis 1), Y1-axis (axis 2),
X-axis slider on Y2-axis side (axis 3)
and Y2-axis (axis 4) are placed in
tracks.
Install each cable correctly.
[Cable markings]
v X-axis on Y1-axis side (axis 1): 1
v Y1-axis (axis 2)
v X-axis on Y2-axis side (axis 3): 3
v Y2-axis (axis 4)
X axis: Joint of the motor
and encoder cables on
LSA side and the cable
connectors coming out of
the X-axis cable track
(on the back side)
: 2
: 4
Cable Tie Mount MB1
(Manufacturer: HellermannTyton)
+ M3 hex socket flat head cap screw
s
5 pcs (1 set)
* Affix cables using Insulok.
[Installation of tie-mount on track mounting bracket] [Installation of connector cover [5] on track mounting bracket]
Hexagonal socket head bolt
M3s5mm 15.8kgfvcm/154Nvcm
Y1-axis:
Connector joint for
ISPA M cable and
PG cable (LS cable)
Detail view of A
Connector connection of ISPA, NS cable and cable inside track
Hexagonal socket head bolt
M3
s
Track mounting bracket
X-axis motor and encoder
cables.
Guide the cables to the
other side through the hole
Tightening torque
Cable Connector Joints
Track mounting bracket
3 (4 pcs)
Put the X-axis motor and encoder cables
into the box through the opening.
Track mounting bracket
[8] Grommet with film
[5] Connector
cover
Hexagonal socket head bolt
M3s3mm 15.8kgfvcm/154Nvcm
[10] Metal cover
Y-axis actuator cable
Make a cut in the film on the grommet to put
through the cables, and then attach it to
the track mounting bracket.
Make a cross cut.
Tightening torque
Assemble the Y2-axis side by referring
*
to the Y1-axis side.
Connector connection of cable inside cable track and controller-actuator cable
Installation of wiring box cover [7]
[7] Wiring box cover
[6] Wiring box bracket
[Installation of wiring box cover [7] on wiring box bracket [6]]
Thin-head bolt
M3s4mm 7.12kgfvcm/69.8Nvcm
Caution: Since the hexagonal holes in thin-head bolts are small,
the hexagonal holes may be damaged depending on the
tightening method. Exercise due caution when tightening
thin-head bolts.
*
[8] Grommet with film
Cable inside track
Thin-head bolt M3s4 (6 pcs)
Connector joint for cable inside track
and controller-actuator cable
Make sure the numbers on the
connectors to be connected match.
Tightening torque
Assemble the Y2-axis side by referring
to the Y1-axis side.
5
Tie-mount KR5G5
(by HellermannTyton)
+ hexagonal socket head bolt
M4
s
6 (1 set)
Track mounting bracket
Hexagonal socket head button bolt
Tie-mount KR5G5 (by HellermannTyton)
+ hexagonal socket head bolt M4
+ hexagonal nut (1 set)
[3] Guide rail
[Installation of tie-mount on track mounting bracket]
[Installation of tie-mount in T slot of guide rail [3]]
Tightening torque
M4s6mm 11.7kgfvcm/114Nvcm
Assemble the Y2-axis side by referring
*
to the Y1-axis side.
X-axis: LSA
6
Secure the cables using wraps.
s
6
Secure the cables using wraps.
X-axis: LSA
Assemble the Y2-axis side by referring
*
to the Y1-axis side.
Caution: Secure the wires to prevent the cables and connectors
from contacting each axis when the axis is moved over its
entire stroke.
When manually moving the actuator with brake, connect
the controller, supply the power, and then release the brake
release switch (by turning the switch to the RLS side).
Page 9

Caution: z Although each part has been chamfered to remove sharp edges, exercise due caution during
the assembly to prevent injury. If necessary, wear gloves or other protective gears.
[Tools] Allen wrench, spanner wrench
Exercise due caution during the assembly to prevent pinching of hands and fi ngers.
z
1
Parallel pin (2 pcs)
Hexagonal socket head bolt M8s30
+ high-tension washer (4 sets)
[1] XY bracket
Parallel pin (1 pc or 2 pcs)
X-axis: LSA
X-axis base, reamed-hole side
Note: To ensure squareness between the X-axis and Y-axis, insert one parallel pin.
Adjust the angle between the X-axis and Y-axis to the right angle, and then
mount the hexagonal bolts.
[Installation of X-axis: LSA on XY bracket [1]] [Installation of Y1-axis: ISPA on XY bracket [1]]
Parallel pin Hexagonal bolt Tightening torque
F6h7s15 M8s40mm 306kgfvcm/2997Nvcm
Assembly of Y1-axis side
Y1-axis: ISPA
Hexagonal bolt M8s40
+ high-tension washer
(4 sets)
Track mounting bracket
(Already attached to LSA)
Parallel pin
F8h7s18 M8s30mm 306kgfvcm/2997Nvcm
Hexagonal socket
head bolt
Tightening torque
[1] XY bracket
X1-axis slider side
(base, reamed-hole side)
Track mounting bracket
(Already attached before delivery)
3
Y1-axis: ISPA
X-axis: LSA
Y2-axis: ISPA
[2] XY bracket
X2-axis slider side
(base, slotted-hole side)
(different direction)
* The direction is different on the Y2-axis side.
Assemble the parts by referring to
the Y1-axis side.
X-axis Linear Servo Type Cartesian Robot – High-precision 6-axis Specification,
Z Base Mount
ICSPA6-B2L1HB3H (M)
Drawing No.
2
Flange socket
(hexagonal socket head type)
M4
s
10
+ hexagonal nut (3 sets)
[3] Guide rail
[9] Controller-actuator cable with
cable fix cap (for axis 1, 2 or 3)
Hexagonal socket head bolt M4s6
+ hexagonal nut (2 sets)
[6] Wiring box bracket
[9] Controller-actuator cable with
cable fix cap (for axis 4, 5 or 6)
Caution: The cables for Y1-axis side (axes 1, 2 and 3) and Y2-axis side
GMM07-071 1/4
Y1-axis: ISPA
X-axis: LSA
[8] Grommet with film
[3] Guide rail
Attach to the upper T-slot.
Flange socket (hexagonal socket head type) M4
+ hexagonal nut (3 sets)
(axes 4, 5 and 6) are placed in tracks. Install each cable correctly.
[Cable markings]
v Y1-axis side (axes 1, 2 and 3):
v Y2-axis side (axes 4, 5 and 6):
1-M, PG, (LS), 2-M, PG, (LS),
3-M, PG, (LS)
4-M, PG, (LS), 5-M, PG, (LS),
6-M, PG, (LS)
Y2-axis: ISPA
s
10
Hexagonal socket head bolt M4s10 (2 pcs)
Track mounting bracket
[3] Guide rail
[4] Cable track 1
Hexagonal socket head bolt M4
+ hexagonal nut (2 sets)
Y1-axis: ISPA
Hexagonal socket head bolt M4
s
10
Hexagonal socket head bolt M4
+ hexagonal nut (2 sets)
s
10 (2 pcs)
X-axis: LSA
[4] Cable track 1
s
10
[Installation of cable track 1 [4] on track mounting bracket]
[3] Guide rail
[Installation of guide rail for cable track 1 [4] in T-slot]
M4s10mm 36.7kgfvcm/359Nvcm
Track mounting bracket
Tightening torqueHexagonal socket head bolt
Y2-axis: ISPA
Wiring box
In this assembly procedure, the controller-actuator cable is
taken out from the wiring box in the direction shown above.
The cable can also be taken out in the directions shown below.
Affixing positions of guide rail [3], cable track 1 [4] and wiring box bracket [6]
[6] Wiring box bracket
[4] Cable track 1
30 30
[3] Guide rail
Affix the wiring box bracket [6] using the holes
on the inner side, and use the upper T-slot.
[Installation of wiring box bracket [6] in the upper T slot on X-axis: LSA side]
Hexagonal socket head bolt
M4s6mm 18.0kgfvcm/176Nvcm
[Installation of guide rail [3] in the upper T slot on X-axis: LSA side]
Flange socket (hexagonal socket head type)
M4s10mm 18.0kgfvcm/176Nvcm
[4] Cable track 1
4343
[3] Guide rail
Align the guide rail [3] surface with the end
face of the base. (Same on the other side)
Hexagonal socket head bolt
Hexagonal socket head bolt
Page 10

X-axis Linear Servo Type Cartesian Robot – High-precision 6-axis Specification,
Z Base Mount
ICSPA6-B2L1HB3H (M)
Drawing No.
GMM07-071 2/4
4
Hexagonal socket head bolt M8s25
+ M8 dedicated washer (4 sets)
[1] XY bracket
Parallel pin
F8h7s18 M8s30mm 306kgfvcm/2997Nvcm
Parallel pin
F8h7s25 M8s25mm 306kgfvcm/2997Nvcm
Parallel pin (1 pc)
+ flat washer (4 sets)
Z1-axis: ISPA
[Installation of YZ plate [11] on Y1-axis: ISPA]
[Installation of Z1-axis: ISPA on YZ plate [11]]
Hexagonal socket
head bolt
Hexagonal socket
head bolt
Tightening torque
Tightening torque
Y1-axis: ISPA
Parallel pin (2 pcs)
[11] YZ plate
Hexagonal socket head bolt M8s30
Z1-axis: ISPA
5 6
Hexagonal socket head bolt M4
+ hexagonal nut (2 sets)
Hexagonal socket head bolt Tightening torque
Hexagonal socket head bolt Tightening torque
s
16
[Installation of track support bracket [13] on XY bracket [1]]
M4s8mm 36.7kgfvcm/359Nvcm
[Installation of track support metal [13] on track mounting plate [12]]
M4s16mm 36.7kgfvcm/359Nvcm
[12] Track mounting plate
Hexagonal socket head bolt M4s8 (2 pcs)
[13] Track support bracket
Place the M4 hexagonal nut in
the T slot beforehand to secure
the tie-mount in position.
[1] XY bracket
Y1-axis: ISPA
Hexagonal socket head bolt M6s15 (2 pcs)
[16] Connector box
Hexagonal socket head bolt
M4
s
5 (2 pcs)
Y1-axis: ISPA
[Installation of track mounting bracket 2 [14] on YZ plate [11]]
Hexagonal socket head bolt Tightening torque
M6s15mm 126kgfvcm/1234Nvcm
[Installation of connector box [16] on track mounting bracket 2 [14]]
Hexagonal socket head bolt Tightening torque
M4s5mm 18.0kgfvcm/176Nvcm
[14] Track mounting bracket 2
Z1-axis: ISPA
[11] YZ plate
[15] Cable track 2
7
Hexagonal
socket head
s
12
bolt M4
Hexagonal socket head bolt
M4
s
12
+ hexagonal nut (2 sets)
[13] Track support bracket
* The direction is different on the Z2-axis side.
Assemble the parts by referring to the Z1-axis side.
Hexagonal socket head bolt M4s8 (2 pcs)
[Installation of cable track 2 [15] on track support bracket [13]]
Hexagonal socket head bolt Tightening torque
Hexagonal socket head bolt Tightening torque
[Installation of cable track 2 [15] on track mounting bracket 2 [14]]
Hexagonal socket head bolt Tightening torque
Hexagonal socket head bolt Tightening torque
[14] Track mounting bracket 2
Z1-axis: ISA, etc.
[16] Connector box
[17] Box cover
[8] Grommet with film
Hexagonal socket head bolt
s
12 (8 pcs)
M3
[1] XY bracket
M4s12mm 36.7kgfvcm/359Nvcm
[Installation of cable track 2 [15] on XY bracket [1]]
M4s12mm 36.7kgfvcm/359Nvcm
M4s8mm 36.7kgfvcm/359Nvcm
[Installation of box cover [17] on connector box [16]]
M3s12mm 5.51kgfvcm/54Nvcm
[18] Joint cover
Cable connector connection
[16]
Connector box
Connector joint for
ISPA M cable and
PG cable (LS cable)
* The direction is different on the Z2-axis side.
Assemble the parts by referring to the Z1-axis side.
* The direction is different on the Z2-axis side.
Assemble the parts by referring to the Z1-axis side.
* The direction is different on the Z2-axis side.
Assemble the parts by referring to the Z1-axis side.
Page 11

X-axis Linear Servo Type Cartesian Robot – High-precision 6-axis Specification,
Z Base Mount
ICSPA6-B2L1HB3H (M)
Drawing No.
GMM07-071 3/4
8
[4] Cable track
Controller-actuator cable
Cable wiring diagram
Y1-axis: ISPA
Cable inside track
X-axis: LSA
Installation of metal cover [10]
Detail view of A
Track mounting bracket
[10] Metal cover
[Installation of metal cover [10] on track mounting bracket]
Thin-head bolt
M3s4mm 7.12kgfvcm/69.8Nvcm
Caution: Since the hexagonal holes in thin-head bolts are small,
the hexagonal holes may be damaged depending on the
tightening method. Exercise due caution when tightening
thin-head bolts.
Tightening torque
Caution:
The cables for X-axis slider on Y1-axis side
(axis 1), Y1-axis (axis 2), Z1-axis (axis 3),
X-axis slider on Y2-axis side (axis 4),
Y2-axis (axis 5) and Z2-axis (axis 6)
are placed in tracks.
Install each cable correctly.
[Cable markings]
v X-axis slider on Y1-axis side (axis 1): 1
v Y1-axis (axis 2)
v Z1-axis (axis 3)
v X-axis slider on Y2-axis side (axis 4): 4
v Y2-axis (axis 5)
v Z2-axis (axis 6)
X axis: Joint of the motor
and encoder cables on
LSA side and the cable
connectors coming out of
the X-axis cable track
(on the back side)
Cable Tie Mount MB1
(Manufacturer: HellermannTyton)
: 2
+ M3 hex socket flat head cap screw
: 3
s
5 pcs (1 set)
* Affix cables using Insulok.
: 5
: 6
[Installation of tie-mount on track mounting bracket] [Installation of connector cover [5] on track mounting bracket]
Hexagonal socket head bolt
M3s5mm 15.8kgfvcm/154Nvcm
Y1-axis:
Connector joint for
ISPA M cable and
PG cable (LS cable)
Detail view of A
Connector connection of ISPA, NS cable and cable inside track
Hexagonal socket head bolt
M3
s
Track mounting bracket
X-axis motor and encoder
cables.
Guide the cables to the
other side through the hole
Tightening torque
Cable Connector Joints
Track mounting bracket
3 (4 pcs)
Put the X-axis motor and encoder cables
into the box through the opening.
Track mounting bracket
[8] Grommet with film
[5] Connector
cover
Hexagonal socket head bolt
M3s3mm 15.8kgfvcm/154Nvcm
[10] Metal cover
Y-axis actuator cable
Make a cut in the film on the grommet to put
through the cables, and then attach it to
the track mounting bracket.
Make a cross cut.
Tightening torque
*
Assemble the Y2-axis side by referring
to the Y1-axis side.
Connector connection of cable inside cable track and controller-actuator cable
Installation of wiring box cover [7]
[7] Wiring box cover
[6] Wiring box bracket
[Installation of wiring box cover [7] on wiring box bracket [6]]
Thin-head bolt
M3s4mm 7.12kgfvcm/69.8Nvcm
Caution: Since the hexagonal holes in thin-head bolts are small,
the hexagonal holes may be damaged depending on the
tightening method. Exercise due caution when tightening
thin-head bolts.
[8] Grommet with film
Cable inside track
Thin-head bolt M3s4 (6 pcs)
Connector joint for cable inside track
and controller-actuator cable
Make sure the numbers on the
connectors to be connected match.
Tightening torque
Assemble the Y2-axis side by referring
*
to the Y1-axis side.
Page 12

X-axis Linear Servo Type Cartesian Robot – High-precision 6-axis Specification,
Z Base Mount
ICSPA6-B2L1HB3H (M)
Drawing No.
GMM07-071 4/4
9
Tie-mount KR5G5 (by HellermannTyton)
+ hexagonal socket head button bolt M4
[13] Track support bracket
[1] XY bracket
[Installation of tie-mount in track mounting bracket 2 [14]]
[Installation of tie-mount on track support bracket [13]]
[Installation of tie-mount in T slot of Y1-axis: ISPA]
Hexagonal socket head button bolt
M4s6mm 11.7kgfvcm/114Nvcm
Z1-axis cables
[14] Track mounting bracket 2
s
6 (2 sets)
Tie-mount KR5G5
(by HellermannTyton)
+ hexagonal socket head button bolt
M4
s
6 (1 set)
Install in the T slot of the Y-axis.
Tightening torque
Tie-mount KR5G5
(by HellermannTyton)
+ hexagonal socket head bolt
M4
s
6 (1 set)
Track mounting bracket
[3] Guide rail
[Installation of tie-mount on track mounting bracket]
[Installation of tie-mount in T slot of guide rail [3]]
Hexagonal socket head button bolt
X-axis, Y1-axis cables
Tie-mount KR5G5 (by HellermannTyton)
+ hexagonal socket head bolt M4
+ hexagonal nut (1 set)
Tightening torque
M4s6mm 11.7kgfvcm/114Nvcm
X-axis: LSA
s
6
10
* The direction is different on the Z2-axis side.
Assemble the parts by referring to the Z1-axis side.
Z1-axis cables X-axis, Y1-axis, Z1-axis cables
Secure the cables using wraps.
Secure the cables using wraps.
Secure the cables using wraps.
*
Assemble the Y2-axis side by referring
to the Y1-axis side.
Assemble the Y2-axis side by referring
*
to the Y1-axis side.
Secure the cables using wraps.
X-axis: LSA
* The direction is different on the Z2-axis side.
Assemble the parts by referring to the Z1-axis side.
Caution: Secure the wires to prevent the cables and connectors
from contacting each axis when the axis is moved over its
entire stroke.
When manually moving the actuator with brake, connect
the controller, supply the power, and then release the brake
release switch (by turning the switch to the RLS side).
Page 13

Caution: z Although each part has been chamfered to remove sharp edges, exercise due caution during
the assembly to prevent injury. If necessary, wear gloves or other protective gears.
[Tools] Allen wrench, spanner wrench
Exercise due caution during the assembly to prevent pinching of hands and fi ngers.
z
1
Parallel pin (2 pcs)
Hexagonal socket head bolt M8s30
+ high-tension washer (4 sets)
[1] XY bracket
Parallel pin (1 pc or 2 pcs)
X-axis: LSA
X-axis base, reamed-hole side
Note: To ensure squareness between the X-axis and Y-axis, insert one parallel pin.
Adjust the angle between the X-axis and Y-axis to the right angle, and then
mount the hexagonal bolts.
[Installation of X-axis: LSA on XY bracket [1]] [Installation of Y1-axis: ISPA on XY bracket [1]]
Parallel pin Hexagonal bolt Tightening torque
F6h7s15 M8s40mm 306kgfvcm/2997Nvcm
Parallel pin
Assembly of Y1-axis side
Y1-axis: ISPA
Hexagonal bolt M8s40
+ high-tension washer
(4 sets)
Track mounting bracket
(Already attached to LSA)
Hexagonal socket
head bolt
F8h7s18 M8s30mm 306kgfvcm/2997Nvcm
Tightening torque
[1] XY bracket
X1-axis slider side
(base, reamed-hole side)
Track mounting bracket
(Already attached before delivery)
Y1-axis: ISPA
X-axis: LSA
Y2-axis: ISPA
[2] XY bracket
X2-axis slider side
(base, slotted-hole side)
(different direction)
* The direction is different on the Y2-axis side.
Assemble the parts by referring to
the Y1-axis side.
X-axis Linear Servo Type Cartesian Robot – High-precision 6-axis Specification,
Z Slider Mount
ICSPA6-B2L1HS3M
Drawing No.
2
Flange socket
(hexagonal socket head type)
M4
s
10
+ hexagonal nut (3 sets)
[3] Guide rail
[9] Controller-actuator cable with
cable fix cap (for axis 1, 2 or 3)
Hexagonal socket head bolt M4s6
+ hexagonal nut (2 sets)
[6] Wiring box bracket
[9] Controller-actuator cable with
cable fix cap (for axis 4, 5 or 6)
Caution: The cables for Y1-axis side (axes 1, 2 and 3) and Y2-axis side
GMM07-072 1/4
Y1-axis: ISPA
X-axis: LSA
[8] Grommet with film
[3] Guide rail
Attach to the upper T-slot.
Flange socket (hexagonal socket head type) M4
+ hexagonal nut (3 sets)
(axes 4, 5 and 6) are placed in tracks. Install each cable correctly.
[Cable markings]
v Y1-axis side (axes 1, 2 and 3):
v Y2-axis side (axes 4, 5 and 6):
1-M, PG, (LS), 2-M, PG, (LS),
3-M, PG, (LS)
4-M, PG, (LS), 5-M, PG, (LS),
6-M, PG, (LS)
Y2-axis: ISPA
s
10
3
Hexagonal socket head bolt M4s10 (2 pcs)
Track mounting bracket
[3] Guide rail
[4] Cable track 1
Hexagonal socket head bolt M4
+ hexagonal nut (2 sets)
Y1-axis: ISPA
s
10
Hexagonal socket head bolt M4
+ hexagonal nut (2 sets)
Hexagonal socket head bolt M4
X-axis: LSA
[4] Cable track 1
s
10
[Installation of cable track 1 [4] on track mounting bracket]
[3] Guide rail
[Installation of guide rail for cable track 1 [4] in T-slot]
M4s10mm 36.7kgfvcm/359Nvcm
s
10 (2 pcs)
Track mounting bracket
Tightening torqueHexagonal socket head bolt
Y2-axis: ISPA
Wiring box
In this assembly procedure, the controller-actuator cable is
taken out from the wiring box in the direction shown above.
The cable can also be taken out in the directions shown below.
Affixing positions of guide rail [3], cable track 1 [4] and wiring box bracket [6]
[6] Wiring box bracket
[4] Cable track 1
30 30
[3] Guide rail
Affix the wiring box bracket [6] using the holes
on the inner side, and use the upper T-slot.
[Installation of wiring box bracket [6] in the upper T slot on X-axis: LSA side]
Hexagonal socket head bolt
M4s6mm 18.0kgfvcm/176Nvcm
[Installation of guide rail [3] in the upper T slot on X-axis: LSA side]
Flange socket (hexagonal socket head type)
M4s10mm 18.0kgfvcm/176Nvcm
[4] Cable track 1
4343
[3] Guide rail
Align the guide rail [3] surface with the end
face of the base. (Same on the other side)
Hexagonal socket head bolt
Hexagonal socket head bolt
Page 14

X-axis Linear Servo Type Cartesian Robot – High-precision 6-axis Specification,
Z Slider Mount
ICSPA6-B2L1HS3M
Drawing No.
GMM07-072 2/4
4
[1] XY bracket
Z1-axis: ISPA
Parallel pin Tightening torque
Parallel pin
Y1-axis: ISPA
Parallel pin (2 pcs)
Hexagonal bolt M8
+ flat washer (4 sets)
[11] YZ bracket
Parallel pin (2 pcs)
[Installation of YZ bracket [11] on Y1-axis: ISPA]
Hexagonal bolt
F8h7s18 M8s35mm 117kgfvcm/1148Nvcm
[Installation of Z1-axis: ISPA on YZ bracket [11]]
F8h7s18 M8s40mm 306kgfvcm/2997Nvcm
Hexagonal socket
head bolt
Hexagonal socket head bolt M8
(4 pcs)
Tightening torque
[14] Track mounting bracket 2
5 6
s
35
s
40
Hexagonal socket head bolt
M4
s
8 (2 pcs)
[13] Track support bracket
Y1-axis: ISPA
[12] Track mounting plate
s
Hexagonal socket head bolt M4
+ hexagonal nut (2 sets)
[Installation of track support bracket [13] and track mounting plate [12] on Y1-axis: ISPA]
Hexagonal socket head bolt Tightening torque
M4s16mm 36.7kgfvcm/359Nvcm
[Installation of track support bracket [13] on XY bracket [1]]
Hexagonal socket head bolt Tightening torque
M4s8mm 36.7kgfvcm/359Nvcm
[Installation of track mounting bracket 2 [14] on YZ bracket [11]] [Installation of track mounting bracket 3 [15] on Z1-axis: ISPA]
Hexagonal socket head bolt Tightening torque
M6s12mm 126kgfvcm/1234Nvcm
16
[1] XY bracket
Place the M4 hexagonal nut (1 pc) in the T slot
beforehand to secure the tie-mount in position.
Hexagonal socket head bolt
s
12 (2 pcs)
M6
Z1-axis: ISPA
[11] YZ bracket
[15] Track mounting bracket 3
Hexagonal socket head bolt
M8
s
15 (2 pcs)
Z1-axis: ISPA
Hexagonal socket head bolt Tightening torque
M8s15mm 306kgfvcm/2997Nvcm
7
* The direction is different on the Z2-axis side.
Assemble the parts by referring to the Z1-axis side.
Hexagonal socket head bolt M4s8 (2 pcs)
Hexagonal socket head bolt M4
+ hexagonal nut (2 sets)
Hexagonal socket head bolt M4
[Installation of cable track 1 [4] on track support bracket [13]]
Hexagonal socket head bolt Tightening torque
M4s12mm 36.7kgfvcm/359Nvcm
s
12
s
12 (2 pcs)
Y1-axis: ISPA
[1] XY bracket
[4] Cable track 1
* The direction is different on the Z2-axis side.
Assemble the parts by referring to the Z1-axis side.
Z1-axis: ISPA
[16] Cable track 2
s
Hexagonal socket head bolt M4
[15] Track mounting bracket 3
Hexagonal socket head bolt M4
[14] Track mounting bracket 2
[13] Track support bracket
[Installation of cable track 2 [16] on track mounting bracket 3 [15]]
Hexagonal socket head bolt Tightening torque
M4s8mm 36.7kgfvcm/359Nvcm
8 (2 pcs)
s
8 (2 pcs)
* The direction is different on the Z2-axis side.
Assemble the parts by referring to the Z1-axis side.
[Installation of cable track 1 [4] on XY bracket [1]]
Hexagonal socket head bolt Tightening torque
M4s12mm 36.7kgfvcm/359Nvcm
[Installation of cable track 1 [4] on track mounting bracket 2 [14]]
Hexagonal socket head bolt Tightening torque
M4s8mm 36.7kgfvcm/359Nvcm
[Installation of cable track 2 [16] on track mounting bracket 2 [14]]
Hexagonal socket head bolt Tightening torque
M4s8mm 36.7kgfvcm/359Nvcm
* The direction is different on the Z2-axis side.
Assemble the parts by referring to the Z1-axis side.
Page 15

X-axis Linear Servo Type Cartesian Robot – High-precision 6-axis Specification,
Z Slider Mount
ICSPA6-B2L1HS3M
Drawing No.
GMM07-072 3/4
8
[4] Cable track
Controller-actuator cable
Cable wiring diagram
Y1-axis: ISPA
Cable inside track
X-axis: LSA
Installation of metal cover [10]
Detail view of A
Track mounting bracket
[10] Metal cover
[Installation of metal cover [10] on track mounting bracket]
Thin-head bolt
M3s4mm 7.12kgfvcm/69.8Nvcm
Caution: Since the hexagonal holes in thin-head bolts are small,
the hexagonal holes may be damaged depending on the
tightening method. Exercise due caution when tightening
thin-head bolts.
Tightening torque
Caution:
The cables for X-axis slider on Y1-axis side
(axis 1), Y1-axis (axis 2), Z1-axis (axis 3),
X-axis slider on Y2-axis side (axis 4),
Y2-axis (axis 5) and Z2-axis (axis 6)
are placed in tracks.
Install each cable correctly.
[Cable markings]
v X-axis slider on Y1-axis side (axis 1): 1
v Y1-axis (axis 2)
v Z1-axis (axis 3)
v X-axis slider on Y2-axis side (axis 4): 4
v Y2-axis (axis 5)
v Z2-axis (axis 6)
X axis: Joint of the motor
and encoder cables on
LSA side and the cable
connectors coming out of
the X-axis cable track
(on the back side)
Cable Tie Mount MB1
(Manufacturer: HellermannTyton)
+ M3 hex socket flat head cap screw
: 2
s
5 pcs (1 set)
: 3
* Affix cables using Insulok.
: 5
: 6
[Installation of tie-mount on track mounting bracket] [Installation of connector cover [5] on track mounting bracket]
Hexagonal socket head bolt
M3s5mm 15.8kgfvcm/154Nvcm
Y1-axis:
Connector joint for
ISPA M cable and
PG cable (LS cable)
Detail view of A
Connector connection of ISPA, NS cable and cable inside track
Hexagonal socket head bolt
M3
s
Track mounting bracket
X-axis motor and encoder
cables.
Guide the cables to the
other side through the hole
Tightening torque
Cable Connector Joints
Track mounting bracket
3 (4 pcs)
Put the X-axis motor and encoder cables
into the box through the opening.
Track mounting bracket
[8] Grommet with film
[5] Connector
cover
Hexagonal socket head bolt
M3s3mm 15.8kgfvcm/154Nvcm
[10] Metal cover
Y-axis actuator cable
Make a cut in the film on the grommet to put
through the cables, and then attach it to
the track mounting bracket.
Make a cross cut.
Tightening torque
Assemble the Y2-axis side by referring
*
to the Y1-axis side.
Connector connection of cable inside cable track and controller-actuator cable
[7] Wiring box cover
[6] Wiring box bracket
Installation of wiring box cover [7]
[8] Grommet with film
Cable inside track
Thin-head bolt M3s4 (6 pcs)
Connector joint for cable inside track
and controller-actuator cable
Make sure the numbers on the
connectors to be connected match.
[Installation of wiring box cover [7] on wiring box bracket [6]]
Thin-head bolt
M3s4mm 7.12kgfvcm/69.8Nvcm
Caution: Since the hexagonal holes in thin-head bolts are small,
the hexagonal holes may be damaged depending on the
tightening method. Exercise due caution when tightening
thin-head bolts.
Tightening torque
Assemble the Y2-axis side by referring
*
to the Y1-axis side.
Page 16

X-axis Linear Servo Type Cartesian Robot – High-precision 6-axis Specification,
Z Slider Mount
ICSPA6-B2L1HS3M
Drawing No.
GMM07-072 4/4
9
Z1-axis cables
KR5G5 tie-mount (by HellermannTyton)
+ hexagonal socket head button bolt M4
Tie-mount KR5G5 (by HellermannTyton)
+ hexagonal socket head button bolt M4s4 (1 set)
[14] Track mounting bracket 2
[13] Track support bracket
Tie-mount KR5G5 (by HellermannTyton)
+ hexagonal socket head button bolt M4s6 (1 set)
Tie-mount KR5G5 (by HellermannTyton)
+ hexagonal socket head button bolt M4s6 (1 set)
Install in the T slot of the Y-axis.
[Installation of tie-mount on track mounting bracket 2 [14]]
M4s4mm 11.7kgfvcm/114Nvcm
[15] Track mounting bracket 3
s
4 (2 sets)
[Installation of tie-mount on track mounting bracket 3 [15]]
Tightening torqueHexagonal socket head button bolt
M4s4mm 11.7kgfvcm/114Nvcm
KR5G5 tie-mount
(by HellermannTyton)
+ hexagonal socket head
button bolt M4s4 (2 sets)
Install on the back side.
Y1-axis: ISPA
[1] XY bracket
[Installation of tie-mount on track support bracket [13]]
[Installation of tie-mount in T slot of Y1-axis: ISPA]
Tightening torqueHexagonal socket head button bolt
M4s6mm 11.7kgfvcm/114Nvcm
Z1-axis: ISPA
(by HellermannTyton)
Tightening torqueHexagonal socket head button bolt
Hexagonal socket head bolt M4
+ hexagonal nut (2 sets)
[18] Box cover
Hexagonal socket head bolt
s
12 (8 pcs)
M3
[17] Connector box
[8] Grommet with film
[19] Joint cover
[Installation of connector box [17] on Z1-axis: ISPA]
M4s6mm 18.0kgfvcm/176Nvcm
[Installation of box cover [18] on connector box [17]]
M3s12mm 5.51kgfvcm/54Nvcm
* The direction is different on the Z2-axis side.
Assemble the parts by referring to the Z1-axis side.
Connector joint for
ISPA M cable and
PG cable (LS cable)
Tightening torqueHexagonal socket head bolt
Tightening torqueHexagonal socket head bolt
s
6
Tie-mount KR5G5
(by HellermannTyton)
+ hexagonal socket head bolt
M4
s
6 (1 set)
Track mounting bracket
[3] Guide rail
Hexagonal socket head button bolt
X-axis, Y1-axis cables
Tie-mount KR5G5 (by HellermannTyton)
+ hexagonal socket head bolt M4
+ hexagonal nut (1 set)
[Installation of tie-mount on track mounting bracket]
[Installation of tie-mount in T slot of guide rail [3]]
Tightening torque
M4s6mm 11.7kgfvcm/114Nvcm
Assemble the Y2-axis side by referring
*
to the Y1-axis side.
X-axis: LSA
s
6
10
[15] Track mounting bracket 3
Secure the cables using wraps.
Secure the cables using wraps.
[14] Track mounting bracket 2
[13] Track support bracket
Secure the cables using wraps.
Secure the cables using wraps.
* The direction is different on the Z2-axis side.
Assemble the parts by referring to the Z1-axis side.
Z1-axis cables X-axis, Y1-axis, Z1-axis cables
Secure the cables using wraps.
Z1-axis: ISPA
Secure the cables using wraps.
Wire the cable in a manner
preventing contact with the Z-axis.
Secure the cables using wraps.
Assemble the Y2-axis side by referring
*
Y1-axis: ISPA
[1] XY bracket
Caution: Secure the wires to prevent the cables and connectors
to the Y1-axis side.
from contacting each axis when the axis is moved over its
entire stroke.
When manually moving the actuator with brake, connect
the controller, supply the power, and then release the brake
release switch (by turning the switch to the RLS side).
X-axis: LSA
 Loading...