

i3-TECHNOLOGIES L3503W, L3403UW, L3403FHD User Manual
i3Projector
User’s Manual
(L3503W / L3403FHD / L3403UW)

2
Table of Contents
1. Usage Notice .......................................................................................................................................................................... 4
1.1. Safety Information ..................................................................................................................................................... 4
1.2. Precautions ................................................................................................................................................................... 5
2. Introduction ............................................................................................................................................................................ 6
2.1. Package overview ...................................................................................................................................................... 6
2.2. Product overview ....................................................................................................................................................... 7
A) Main Unit ...................................................................................................................................................................... 7
B) Control Panel ............................................................................................................................................................... 8
C) Input/ Output Connections ................................................................................................................................... 9
D) Remote Control ....................................................................................................................................................... 10
E) IR PEN (*Optional accessory) ............................................................................................................................. 11
3. Installation ............................................................................................................................................................................ 12
3.1. Connecting the Projector .................................................................................................................................... 12
A) Connect to Computer/Notebook ..................................................................................................................... 12
B) Connect to Video Sources................................................................................................................................... 13
3.2. Powering the Projector On/Off ......................................................................................................................... 13
A) Powering On the Projector ................................................................................................................................. 14
B) Powering Off the Projector ................................................................................................................................. 15
C) Warning Indicator ................................................................................................................................................... 15
D) LED Lighting Message .......................................................................................................................................... 16
3.3. Adjusting the projected image ......................................................................................................................... 17
A) Adjusting the Projector’s height ....................................................................................................................... 17
B) Adjusting the Projector’s focus ......................................................................................................................... 18
C) Adjusting Projection Image Size (Diagonal) ................................................................................................ 19
4. User Controls ....................................................................................................................................................................... 25
4.1. Control panel and Remote Control ................................................................................................................. 25
A) Control Panel ............................................................................................................................................................ 25
B) Remote Control ....................................................................................................................................................... 26
4.2. On-screen Display Menus ................................................................................................................................... 28
A) How to operate? ..................................................................................................................................................... 28
B) Picture ......................................................................................................................................................................... 29
C) Screen .......................................................................................................................................................................... 31
D) Settings ....................................................................................................................................................................... 32
E) Volume ........................................................................................................................................................................ 33
F) Options ....................................................................................................................................................................... 34

G) Options/Laser Settings ......................................................................................................................................... 36
H) 3D .................................................................................................................................................................................. 36
I) Blending Mode ........................................................................................................................................................ 37
J) Interactive .................................................................................................................................................................. 38
K) LAN ............................................................................................................................................................................... 46
4.3. EZView ......................................................................................................................................................................... 53
4.4. Crestron ...................................................................................................................................................................... 57
5. Multimedia ........................................................................................................................................................................... 60
5.1. Accessing Multimedia Files ................................................................................................................................. 60
A) How to access Multimedia Mode .................................................................................................................... 60
6. Appendices ........................................................................................................................................................................... 65
6.1. Installing and cleaning the dust filters ........................................................................................................... 65
6.2. Compatibility Modes ............................................................................................................................................. 66
A) VGA Analog............................................................................................................................................................... 66
B) HDMI Digital ............................................................................................................................................................. 67
6.3. RS232 Commands and Protocol Function List ............................................................................................ 70
A) RS232 Port Settings ............................................................................................................................................... 70
B) RS232 Signals Connection .................................................................................................................................. 70
C) Commands set list .................................................................................................................................................. 71
6.4. Ceiling Mount Installation ................................................................................................................................... 73
6.5. Regulation & Safety Notices .............................................................................................................................. 74
Usage Notice
4
1. Usage Notice
1.1. Safety Information
WARNING: TO REDUCE THE RISK OF FIRE OR ELECTRIC SHOCK, DO NOT EXPOSE THIS APPLIANCE TO
RAIN OR MOISTURE. DANGEROUS HIGH VOLTAGES ARE PRESENT INSIDE THE ENCLOSURE. DO NOT
OPEN THE CABINET. REFER SERVICING TO QUALIFIED PERSONNEL ONLY.
Class B emissions limits
This Class B digital apparatus meets all requirements of the Canadian Interference-Causing Equipment
Regulations.
Important Safety Instruction
1. Do not block any ventilation openings. To ensure reliable operation of the projector and to
protect from overheating, it is recommended to install the projector in a location that does not
block ventilation. As an example, do not place the projector on a crowded coffee table, sofa,
bed, etc. Do not put the projector in an enclosure such as a book case or a cabinet that restricts
air flow.
2. Do not use the projector near water or moisture. To reduce the risk of fire and/or electric shock,
do not expose the projector to rain or moisture.
3. Do not install near heat sources such as radiators, heaters, stoves or any other apparatus such
as amplifiers that emits heat.
4. Clean only with dry cloth.
5. Only use attachments/accessories specified by the manufacturer.
6. Do not use the unit if it has been physically damaged or abused. Physical damage/abuse would
be (but not limited to):
• Unit has been dropped.
• Power supply cord or plug has been damaged.
• Liquid has been spilled on to the projector.
• Projector has been exposed to rain or moisture.
• Something has fallen in the projector or something is loose inside.
Do not attempt to service the unit yourself. Opening or removing covers may expose you to
dangerous voltages or other hazards.
7. Do not let objects or liquids enter the projector. They may touch dangerous voltage points and
short out parts that could result in fire or electric shock.
8. See projector enclosure for safety related markings.
9. The unit should only be repaired by appropriate service personnel.
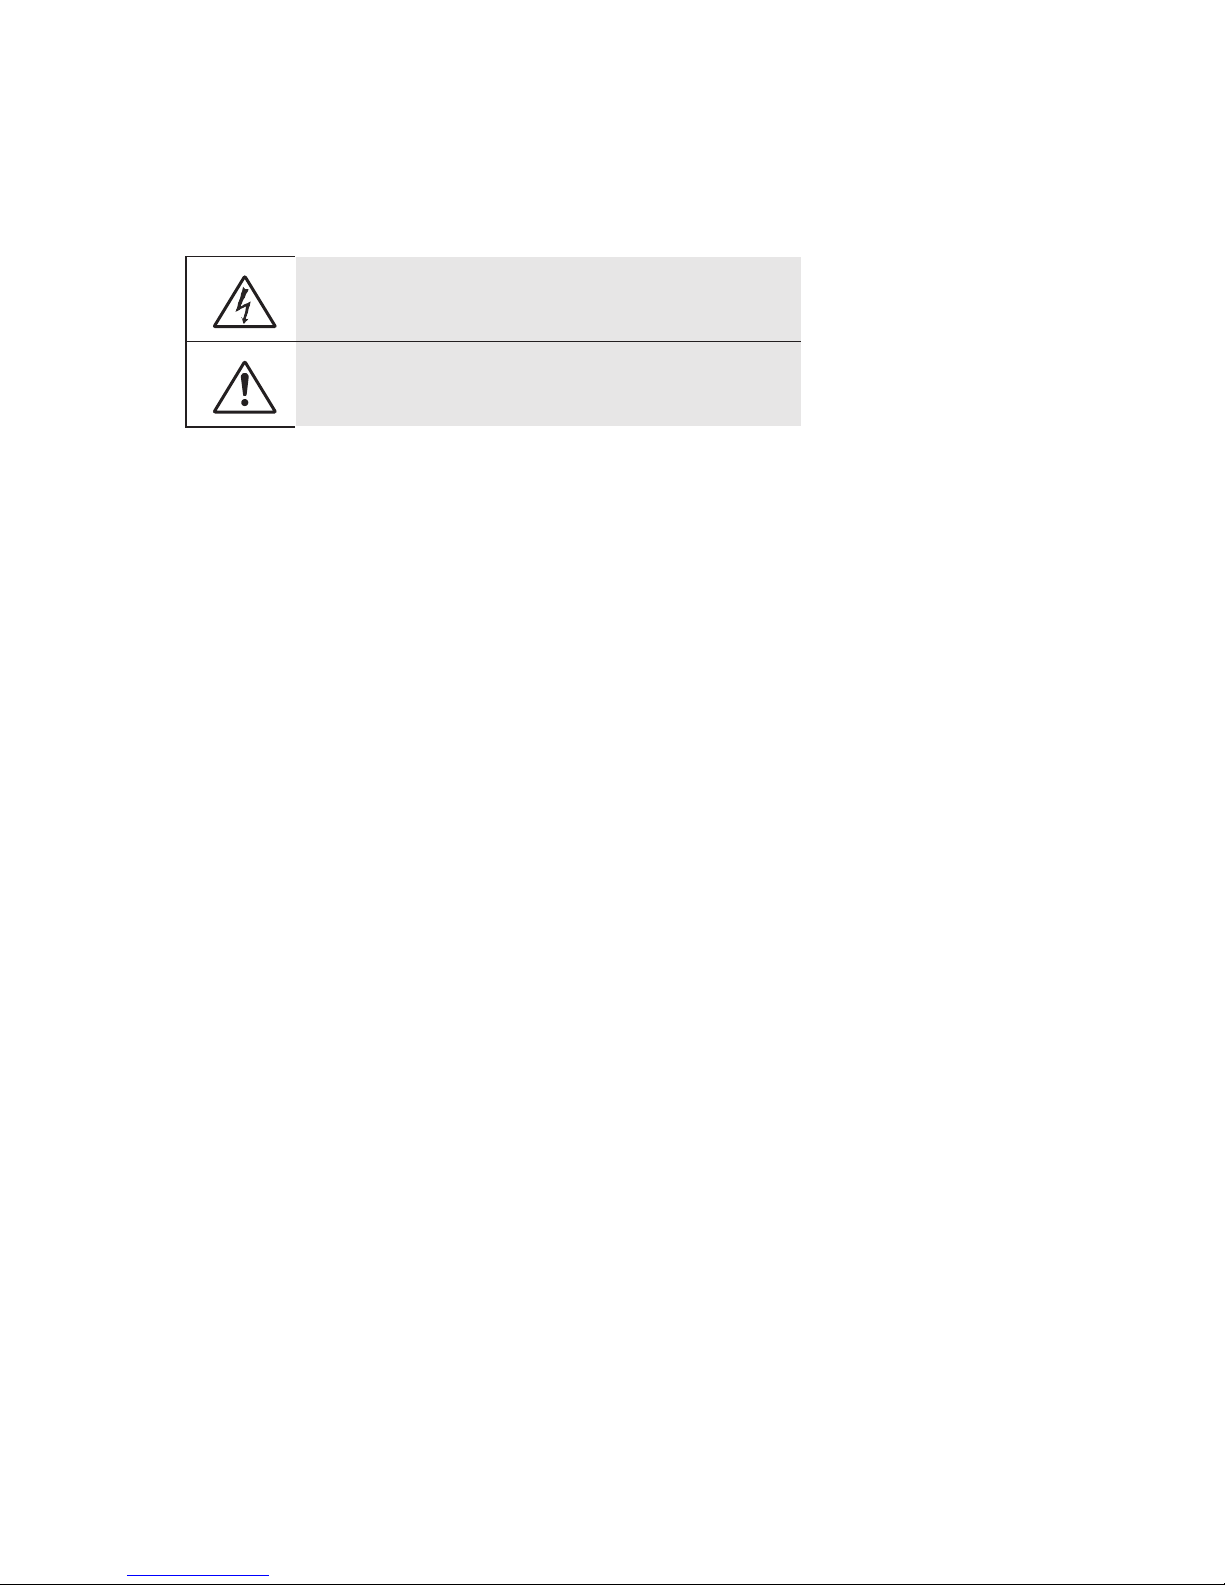
The lightning flash with arrow head within an equilateral triangle is intended to
alert the user to the presence of uninsulated “dangerous voltage” within the
product’s enclosure that may be of sufficient magnitude to constitute a risk of
electric shock to persons.
The exclamation point within an equilateral triangle is intended to alert the user to
the presence of important operating and maintenance (servicing) instructions in the
literature accompanying the appliance.

Usage Notice
1.2. Precautions
Please follow all warnings, precautions and maintenance as recommended in this users
guide.
• Warning: Do not look into the projector’s lens when the lamp is on. The bright light may hurt and
damage your eyes.
• Warning: To reduce the risk of fire or electric shock, do not expose this projector to rain or
moisture.
• Warning: Please do not open or disassemble the projector as this may cause electric shock.
Do:
• Turn off and unplug the power plug from the AC outlet before cleaning the product.
• Use a soft dry cloth with mild detergent to clean the display housing.
• Disconnect the power plug from AC outlet if the product is not being used for a long period of
time.
Don’t:
• Block the slots and openings on the unit provided for ventilation.
• Use abrasive cleaners, waxes or solvents to clean the unit.
• Use under the following conditions:
o In extremely hot, cold or humid environments.
Sea level to 6000 feet Extremely hot: > 35°C Extremely cool: < 5°C
6000 feet above Extremely hot: > 30°C Extremely cool: < 5°C
Extremely humid: > 70% R.H. (Relative Humidity)
o In areas susceptible to excessive dust and dirt.
o Near any appliance generating a strong magnetic field.
o In direct sunlight.
Introduction
6
2. Introduction
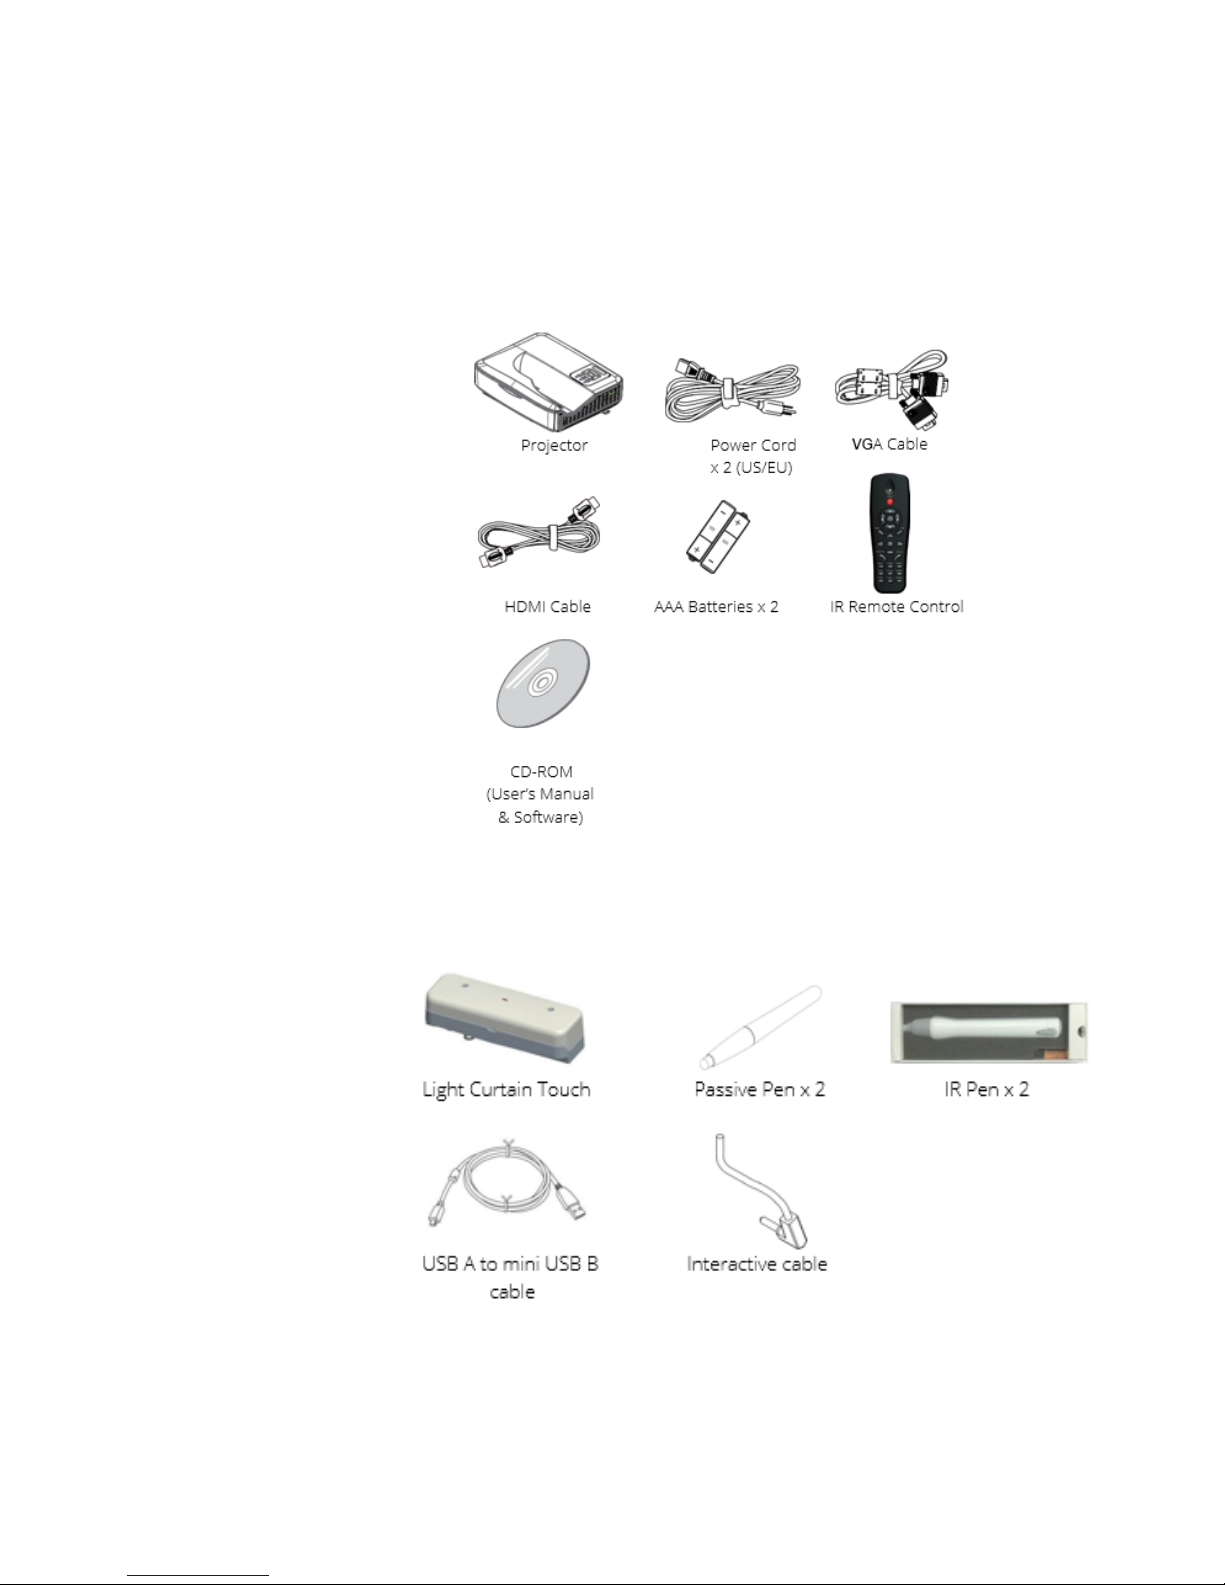
2.1. Package overview
Unpack and inspect the box contents to ensure all parts listed below are in the box. If something is
missing, please contact your nearest customer service centre.
Due to different
applications in each
country, some regions
may have different
accessories
Optional accessories for interactive solution.
Interactive function
works with projector
(Camera embedded)
Introduction
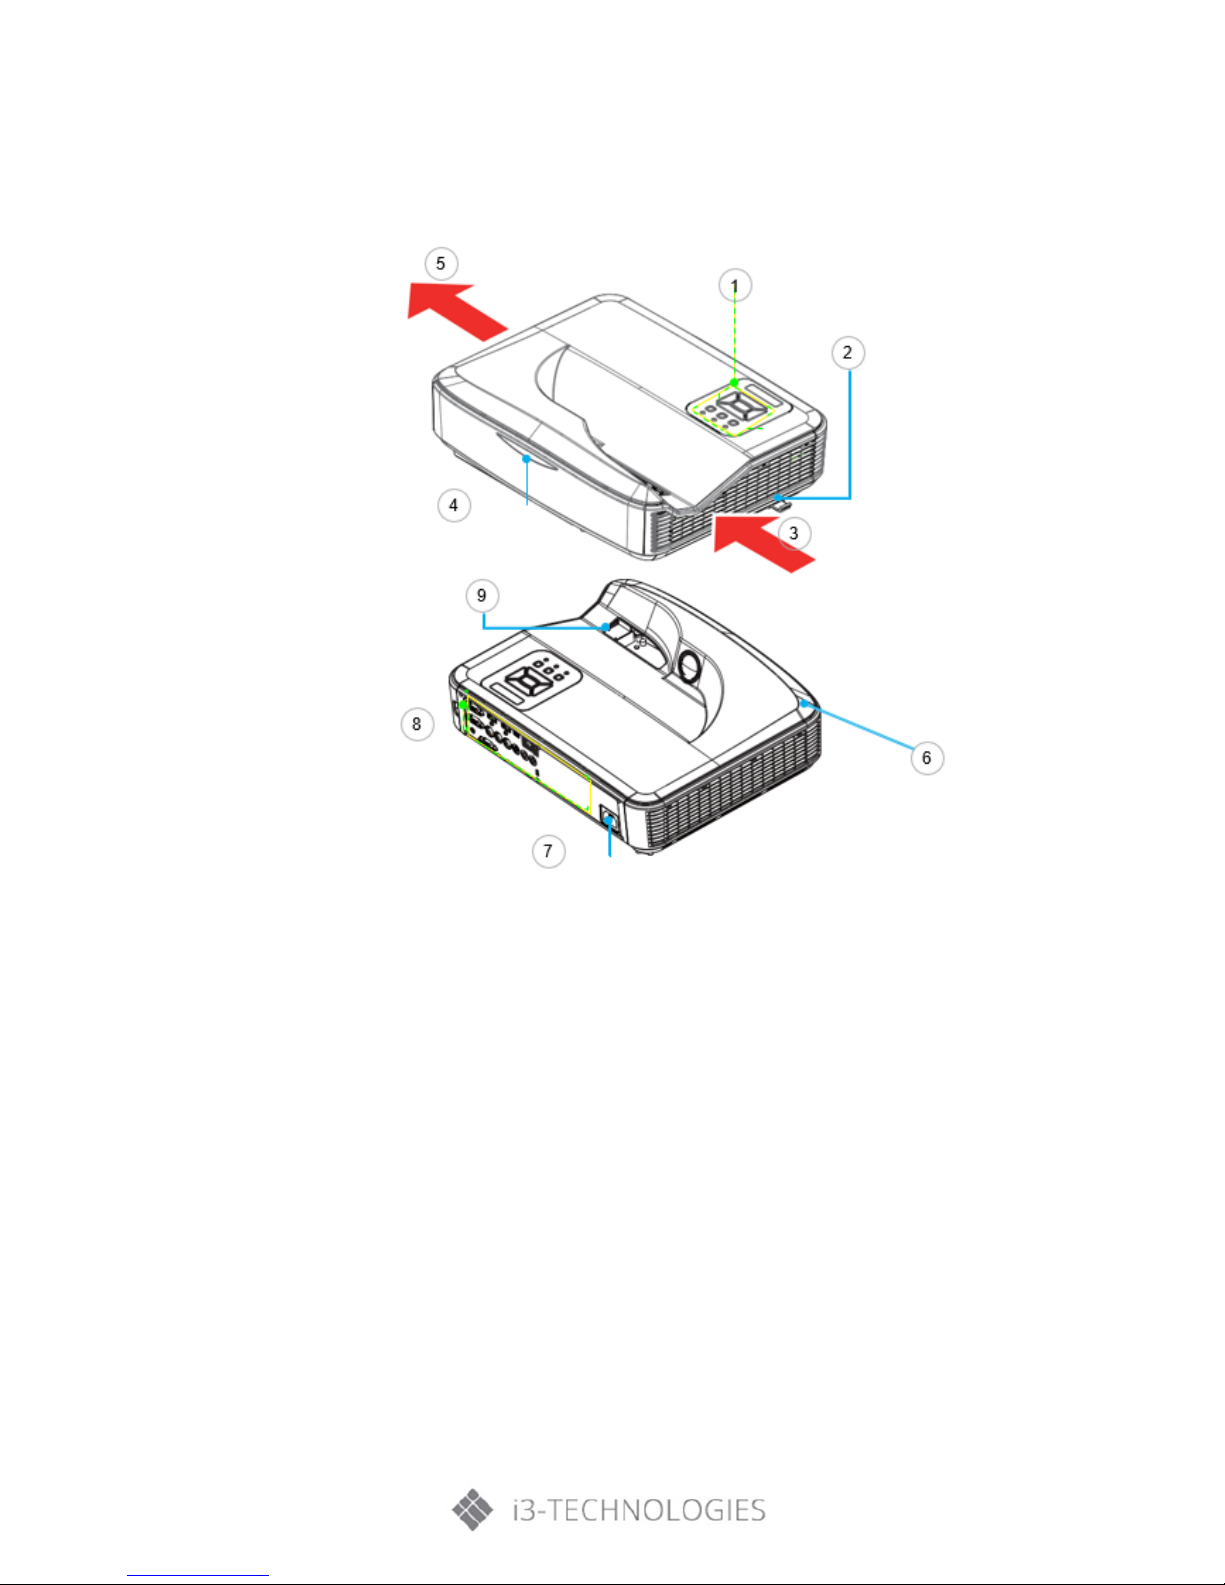
2.2. Product overview
A) Main Unit
1. Control panel
2. Focus switch
3. Ventilation (inlet)
4. IR Receiver
5. Ventilation (Outlet)
6. Speaker
7. Power Socket
8. Input/output Connections
9. Lens
Note: The interface is subject to model’s specifications.
Introduction
8
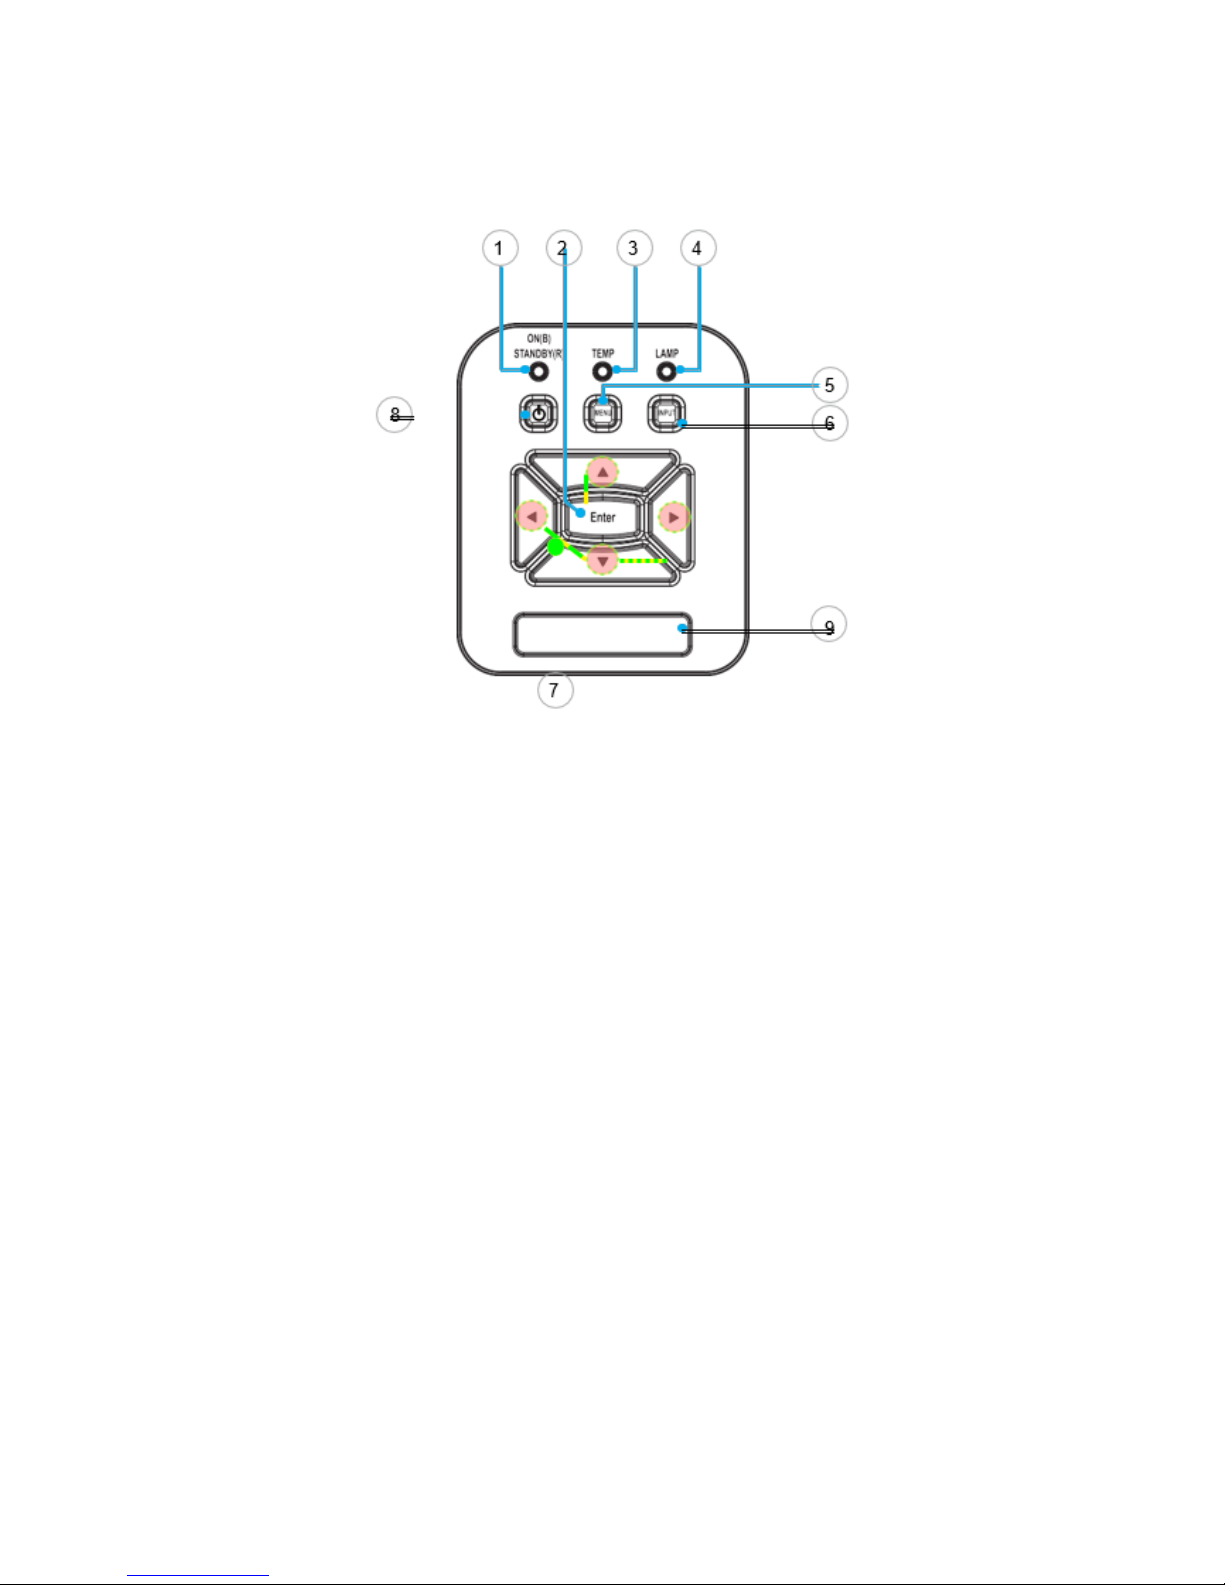
B) Control Panel
1. Power LED
2. Enter
3. Temp LED
4. Lamp LED
5. Menu
6. Input
7. Four Directional Select Keys
8. Power/Standby button
9. IR Receiver

Introduction
C) Input/ Output Connections
1. VGA1-In/yPbPR Connector
(PC Analog Signal/Component Video Input/HDTV/YPbPr)
2. HDMI2 Input Connector
3. HDMI1 Input Connector
4. USB Connector (Connect to PC for Remote Mouse function)
5. RJ45 Connector (Optional)
6. USB Type A Connector (Optional)
7. Power Socket
8. Interactive connector (3.5mm mini jack, Optional)
9. VGA-Out/VGA2-in connector
10. RS-232 Connector (9-pin DIN Type)
11. Composite Video Input Connector
12. Composite Audio input (right) connector
13. Composite Audio input (left) connector
14. Audio Output Connector (3.5mm mini jack)
15. Audio Input Connector (3.5mm mini jack)
16. Audio Input connector (microphone)
17. Kensington
TM
Lock Port
Note:
• The interface is subject to model’s specifications.
• Monitor loop through only support in VGA1-In/YPbPr
Introduction
10
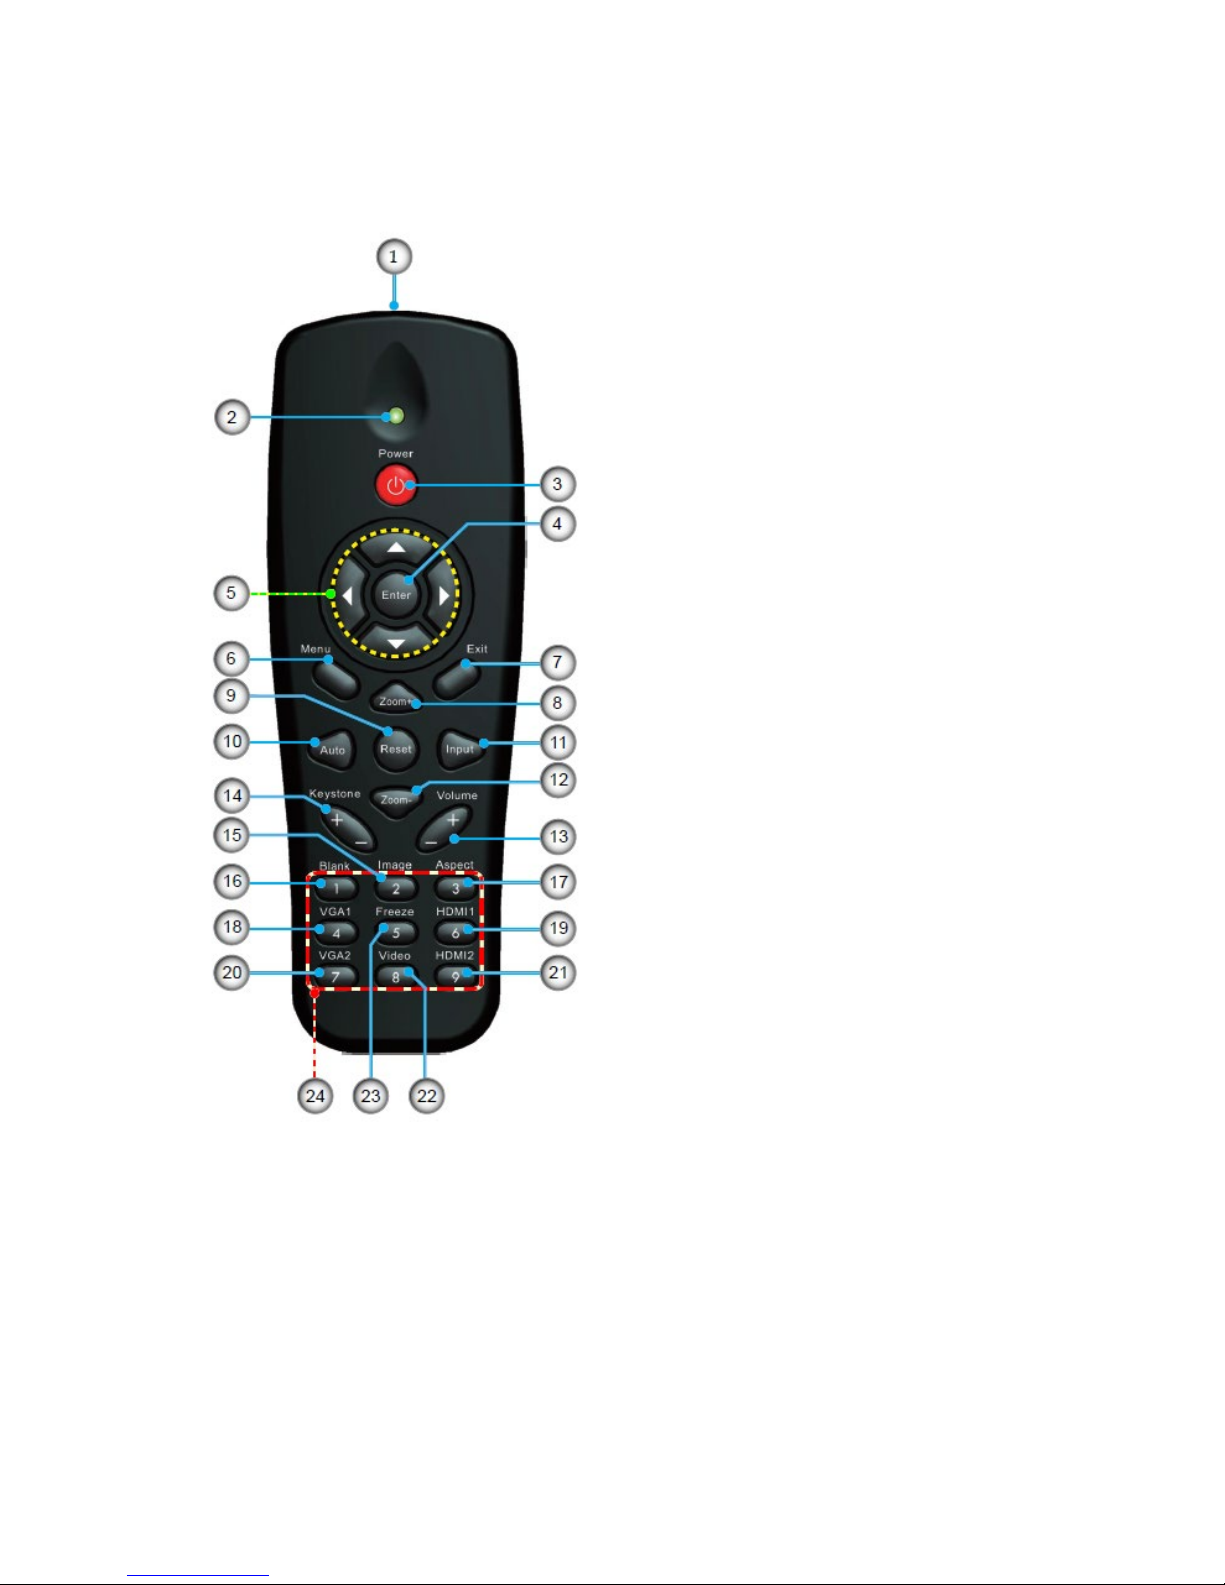
D) Remote Control
1. Infrared transmitter
2. LED Indicator
3. Power ON/OFF
4. OK
5. Four Directional Select Keys
6. Menu
7. Exit
8. Zoom in
9. Reset
10. Auto
11. Source
12. Zoom out
13. Volume +/-
14. Keystone +/-
15. Image
16. Black screen
17. Aspect ratio
18. VGA1
19. HDMI1
20. VGA2
21. HDMI2
22. Video
23. Screen freeze
24. Numbered keypad (for password input)
Introduction
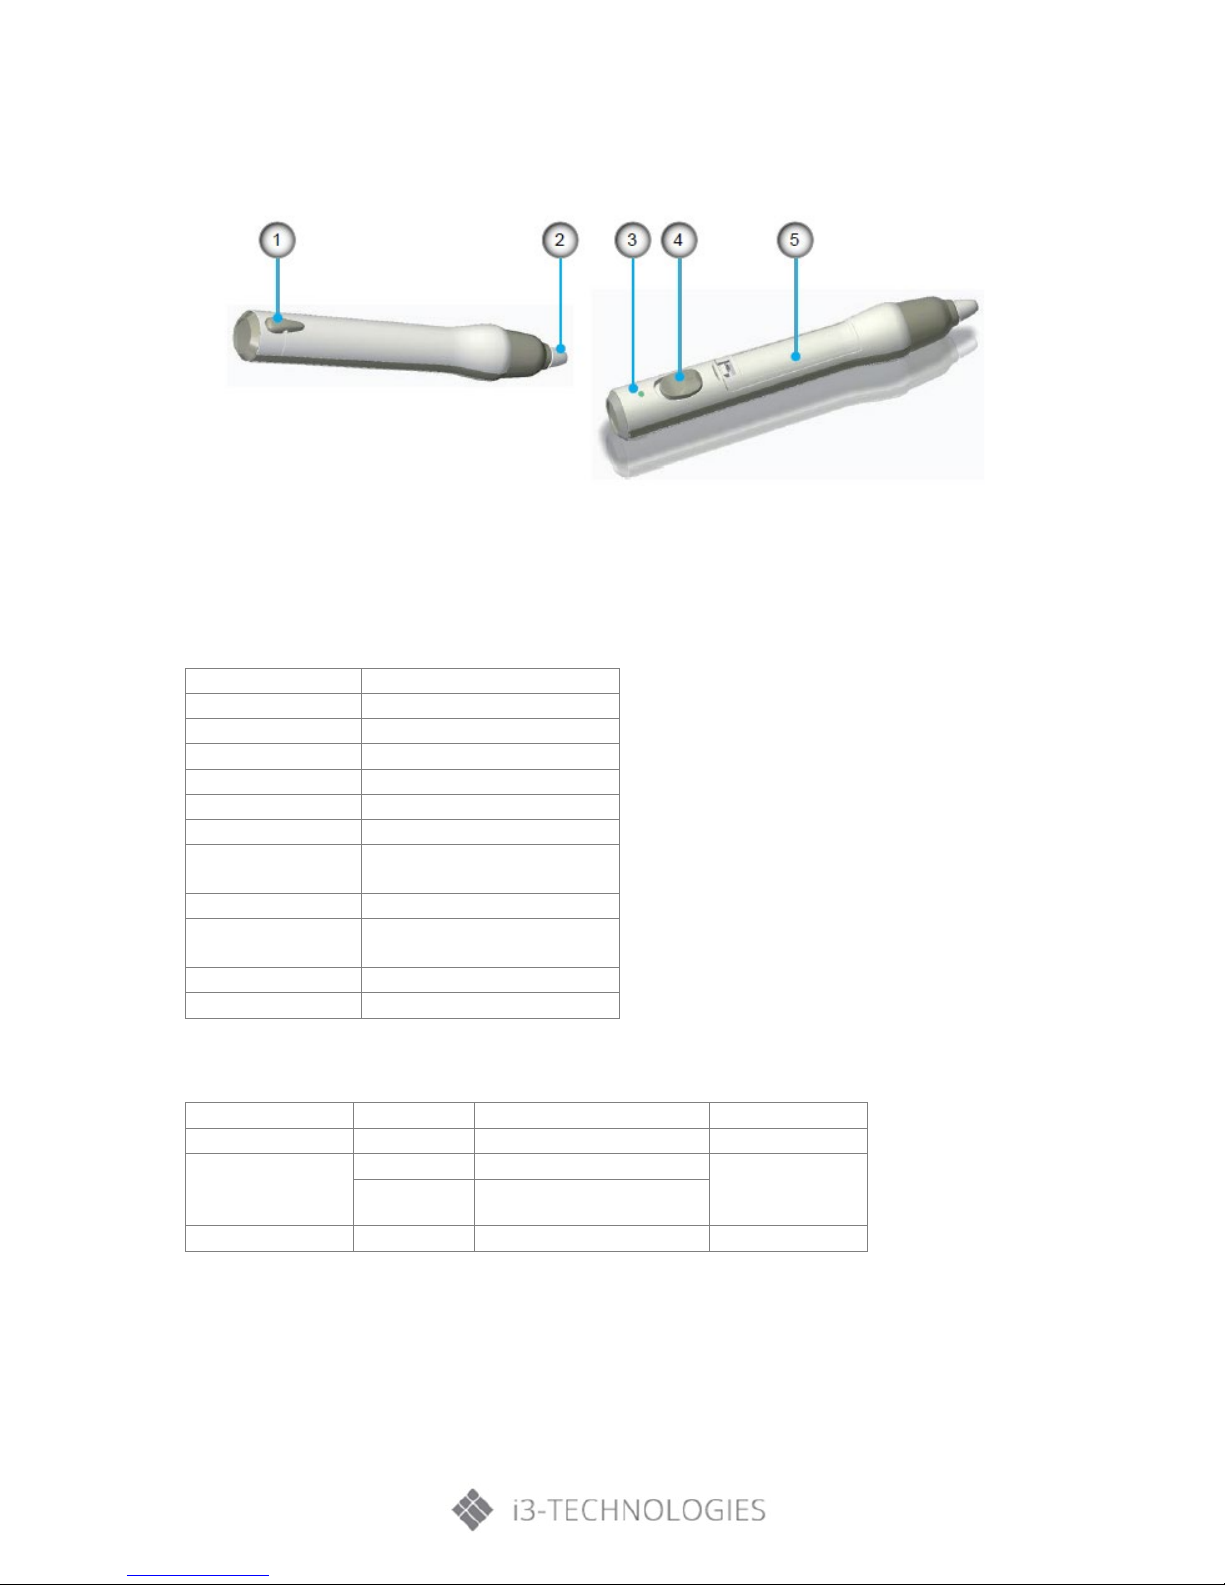
E) IR PEN (*Optional accessory)
1. Strap hole
2. Pen tip
3. LED indicator
4. Power Switch button
5. Battery cover
Function
Description
Power management
On/Off switch
Power indicator
Dual color LED x1
Battery
AAA Battery (alkaline) x 1
Usage time
18 hours (continuous use)
Light source
850nm IR LED
Driving current
50mA/1.5V (Max)
Color
Pen body in white
Decoration strip in grey
Dimension (L x Φ)
150.5mm (L) x 23mm (Diameter)
Pen tip
User Replaceable (two spare
tips as default)
Body material
Plastic
Weight
39g (with battery)
LED Indicator
State
Power Switch
LED State
Remark
Normal On
Off On
Green led on for 2 seconds
Low Battery Power
Off On
Red led on for 2 seconds
When battery is
low
On
Red led blinking
(when pen tip is pressed)
Normal Off
Off
Off
For detailed instructions about IR Pen installation and usage: please refer to “IR Pen & LCT User
Manual/Software” via the “Help” option of the utility user interface.
Installation
12
3. Installation
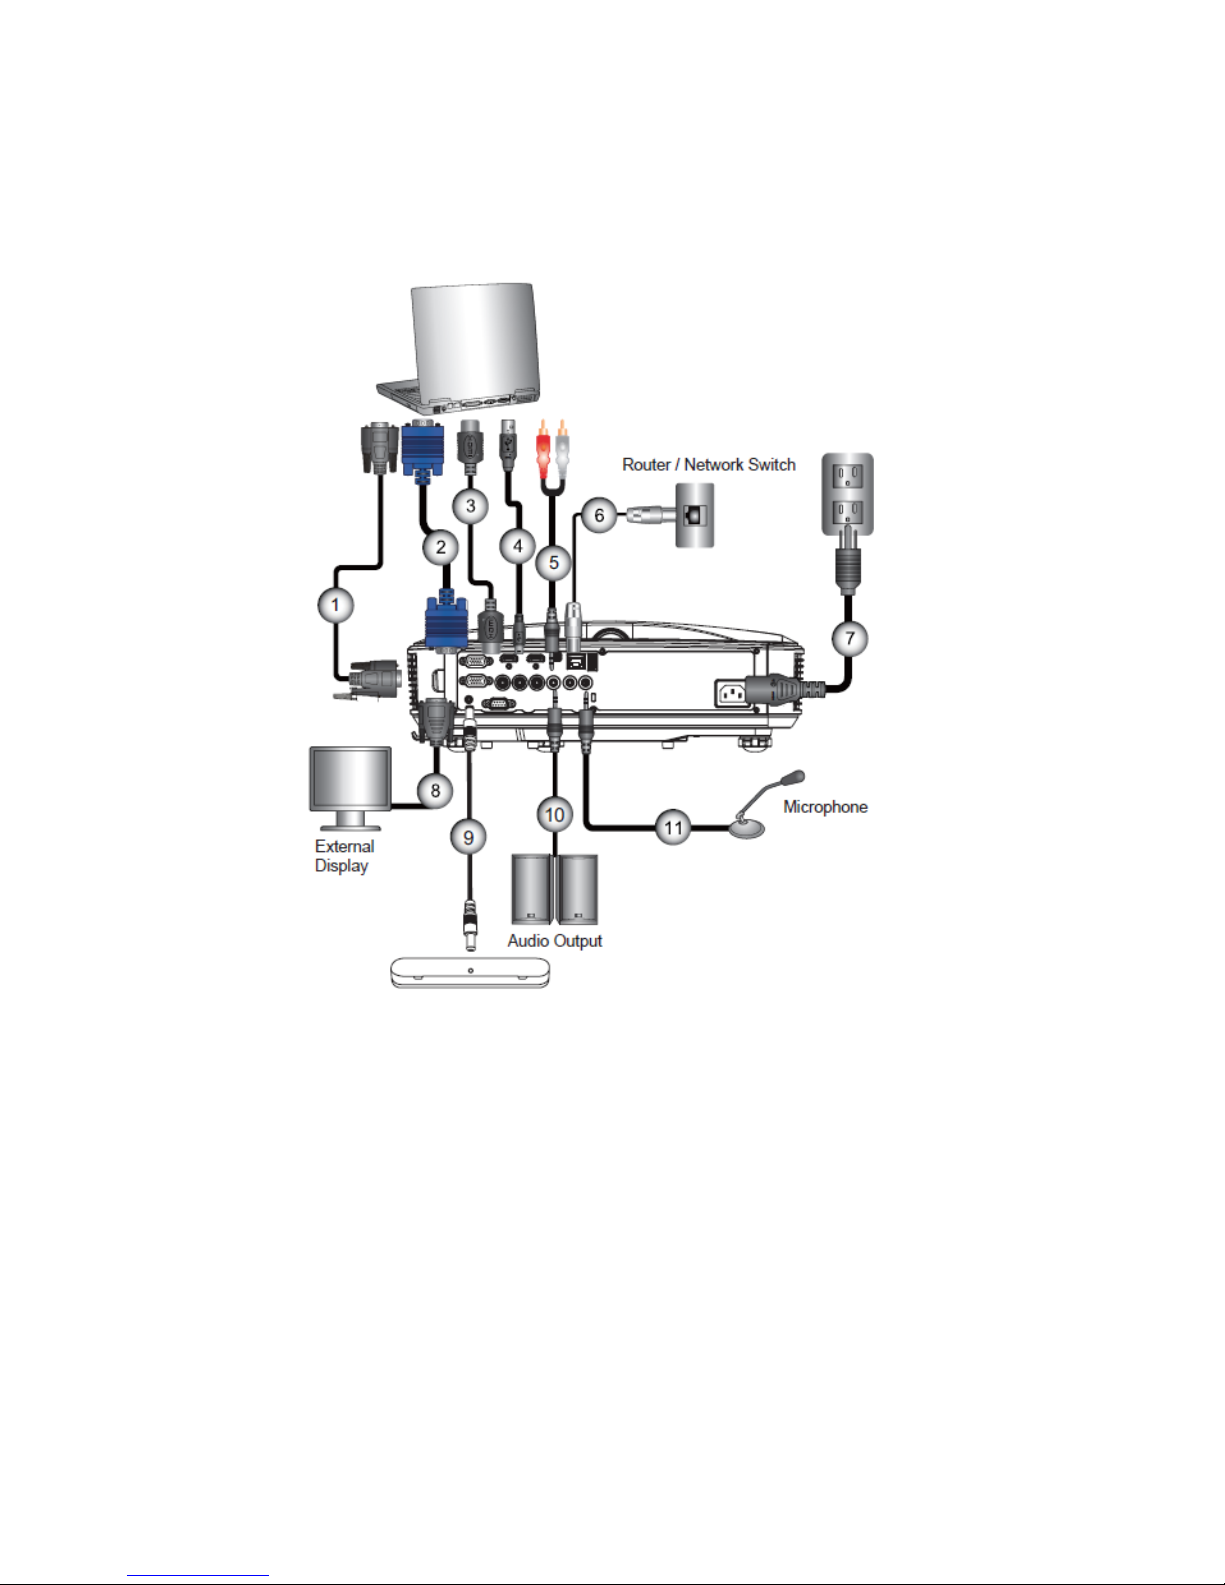
3.1. Connecting the Projector
A) Connect to Computer/Notebook
1. *RS232 Cable
2. VGA Cable
3. *HDMI Cable
4. *USB Cable
5. *Audio Cable/RCA
6. *RJ45 Cable
7. Power Cord
8. *VGA Output Cable
9. DC to DC Cable
10. *Audio Output Cable
11. *Audio Input Cable
Note:
• Due to the difference in applications for each country, some regions may have different
accessories.
• (*) Optional accessory
Installation
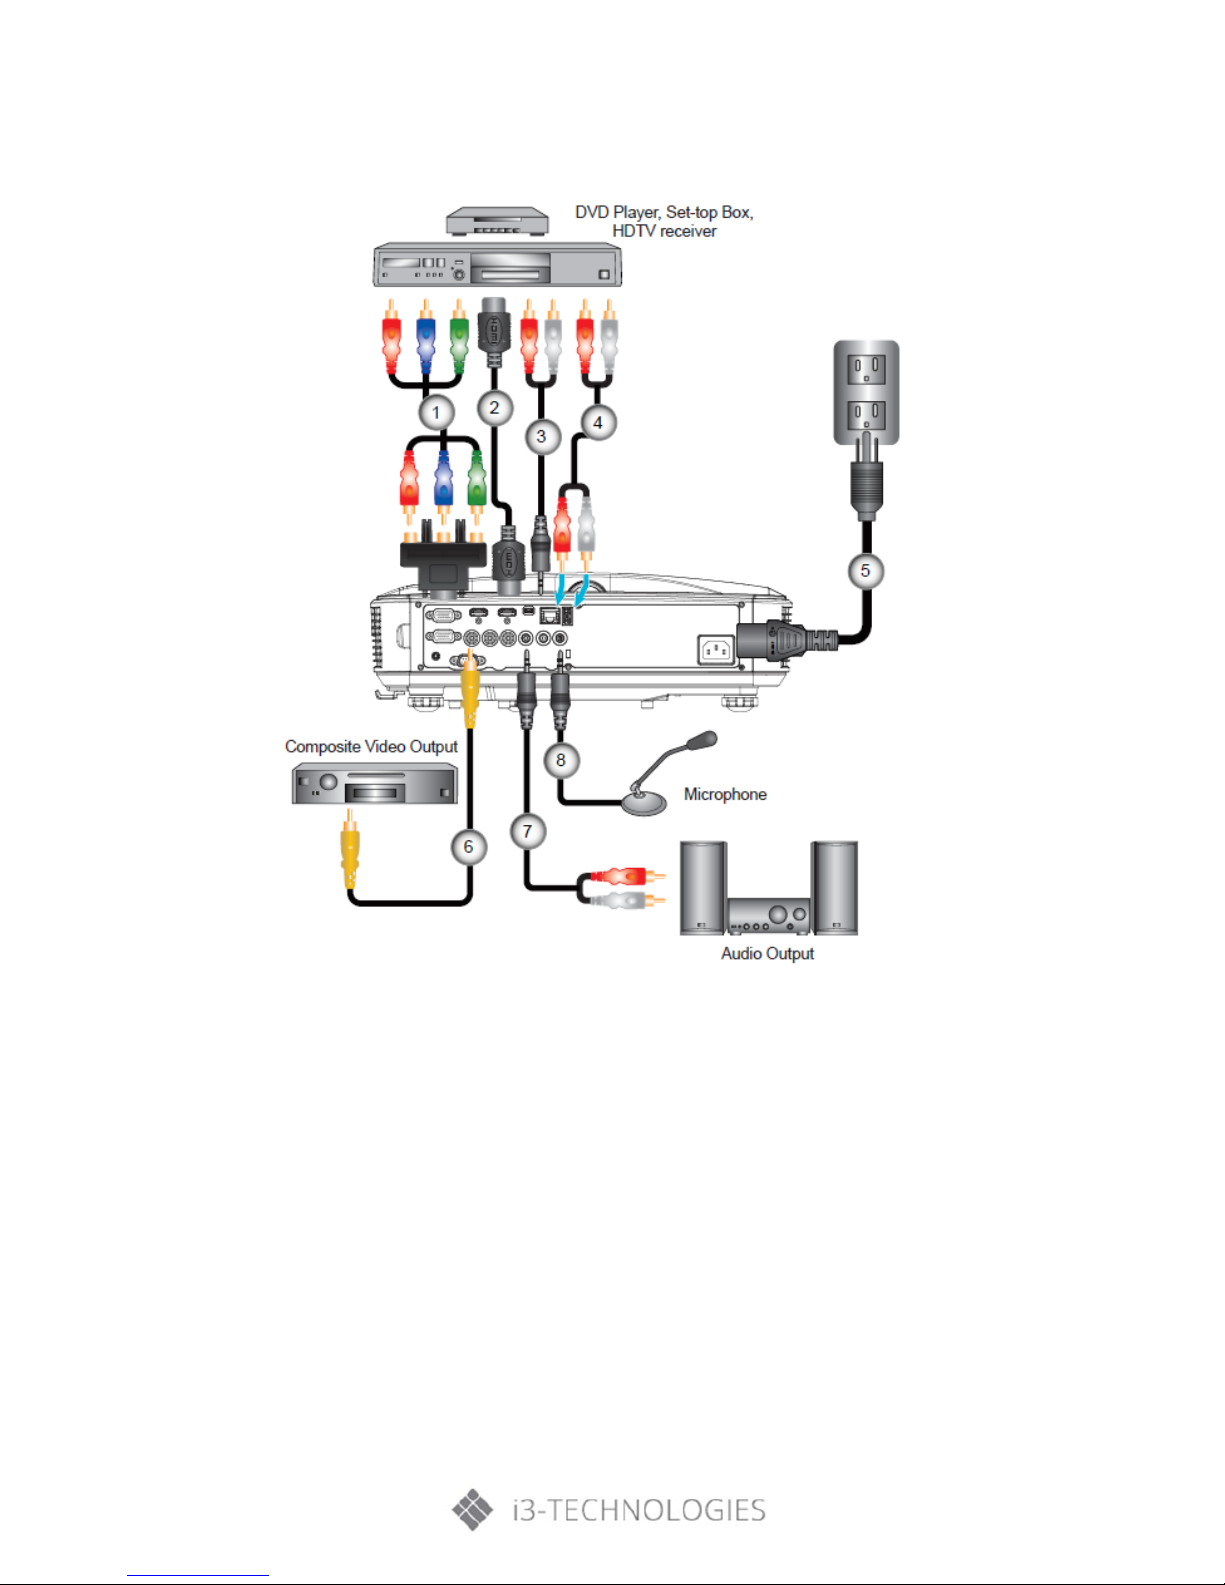
B) Connect to Video Sources
1. *15-Pin to 3 RCA Component/HDTV Adaptor
2. HDMI Cable
3. *Audio Cable/RCA
4. *Audio Cable
5. Power Cord
6. *Composite Video Cable
7. *Audio Cable/RCA
8. *Audio Input Cable
Note:
• Due to the difference in applications for each country, some regions may have different
accessories.
• (*) Optional accessory
3.2. Powering the Projector On/Off
Installation
14
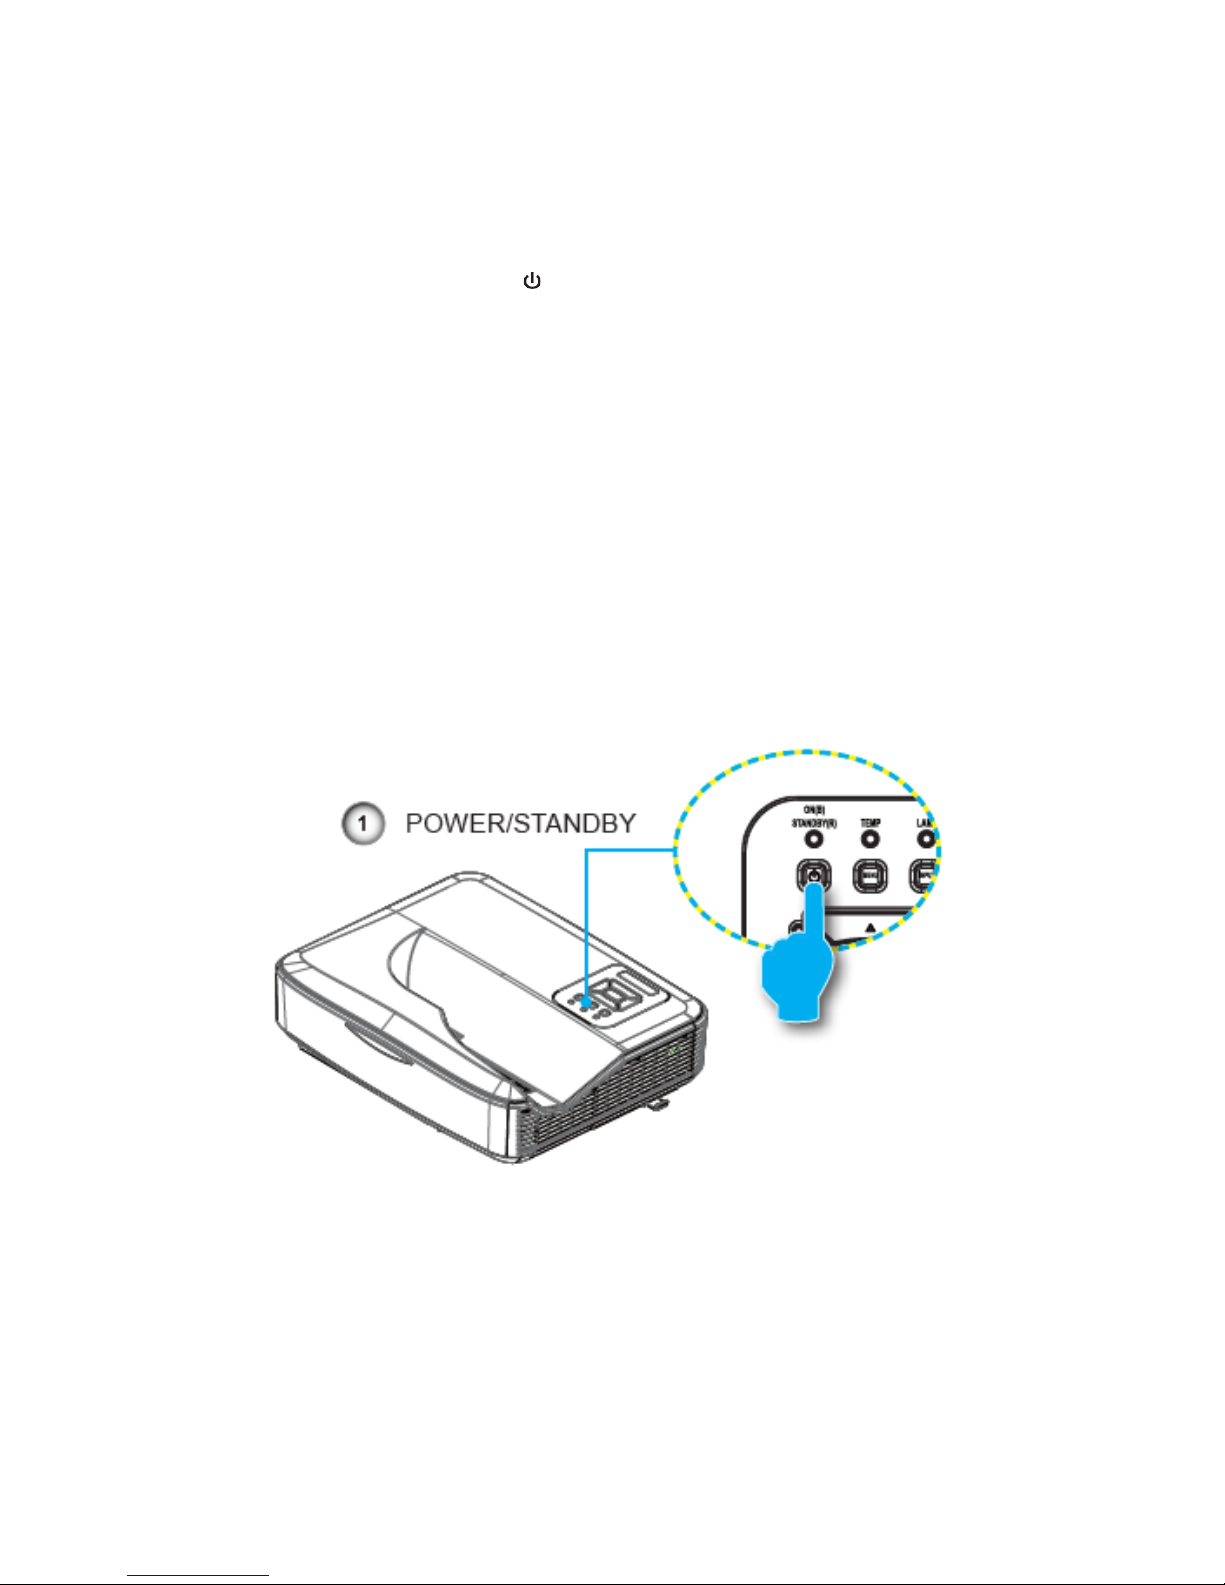
A) Powering On the Projector
1. Securely connect the power cord and signal cable. When connected, the POWER/STANDBY LED
will turn Orange.
2. Turn on the lamp by pressing “ ” button either on the projector or on the remote. At this
moment, the POWER/STANDBY LED will now turn Blue.
The start-up screen will display in approximately 10 seconds. The first time you use the projector,
you will be asked to select the preferred language and power saving mode.
3. Turn on and connect the source that you want to display on the screen (computer, notebook,
video player, etc). The projector will detect the source automatically. If not, push menu button
and go to “OPTIONS”. Make sure that the “Source Lock” has been set to “Off”.
Note:
• When the power mode is in standby mode (power consumption <0.5W), the VGA output/input
and radio will be deactivated when the projector is in standby.
• If you connect multiple sources at the same time, press the “INPUT” button on the control panel
or direct source keys on the remote control to switch between inputs.
Note:
• Turn on the projector first and then select the signal sources.
Installation
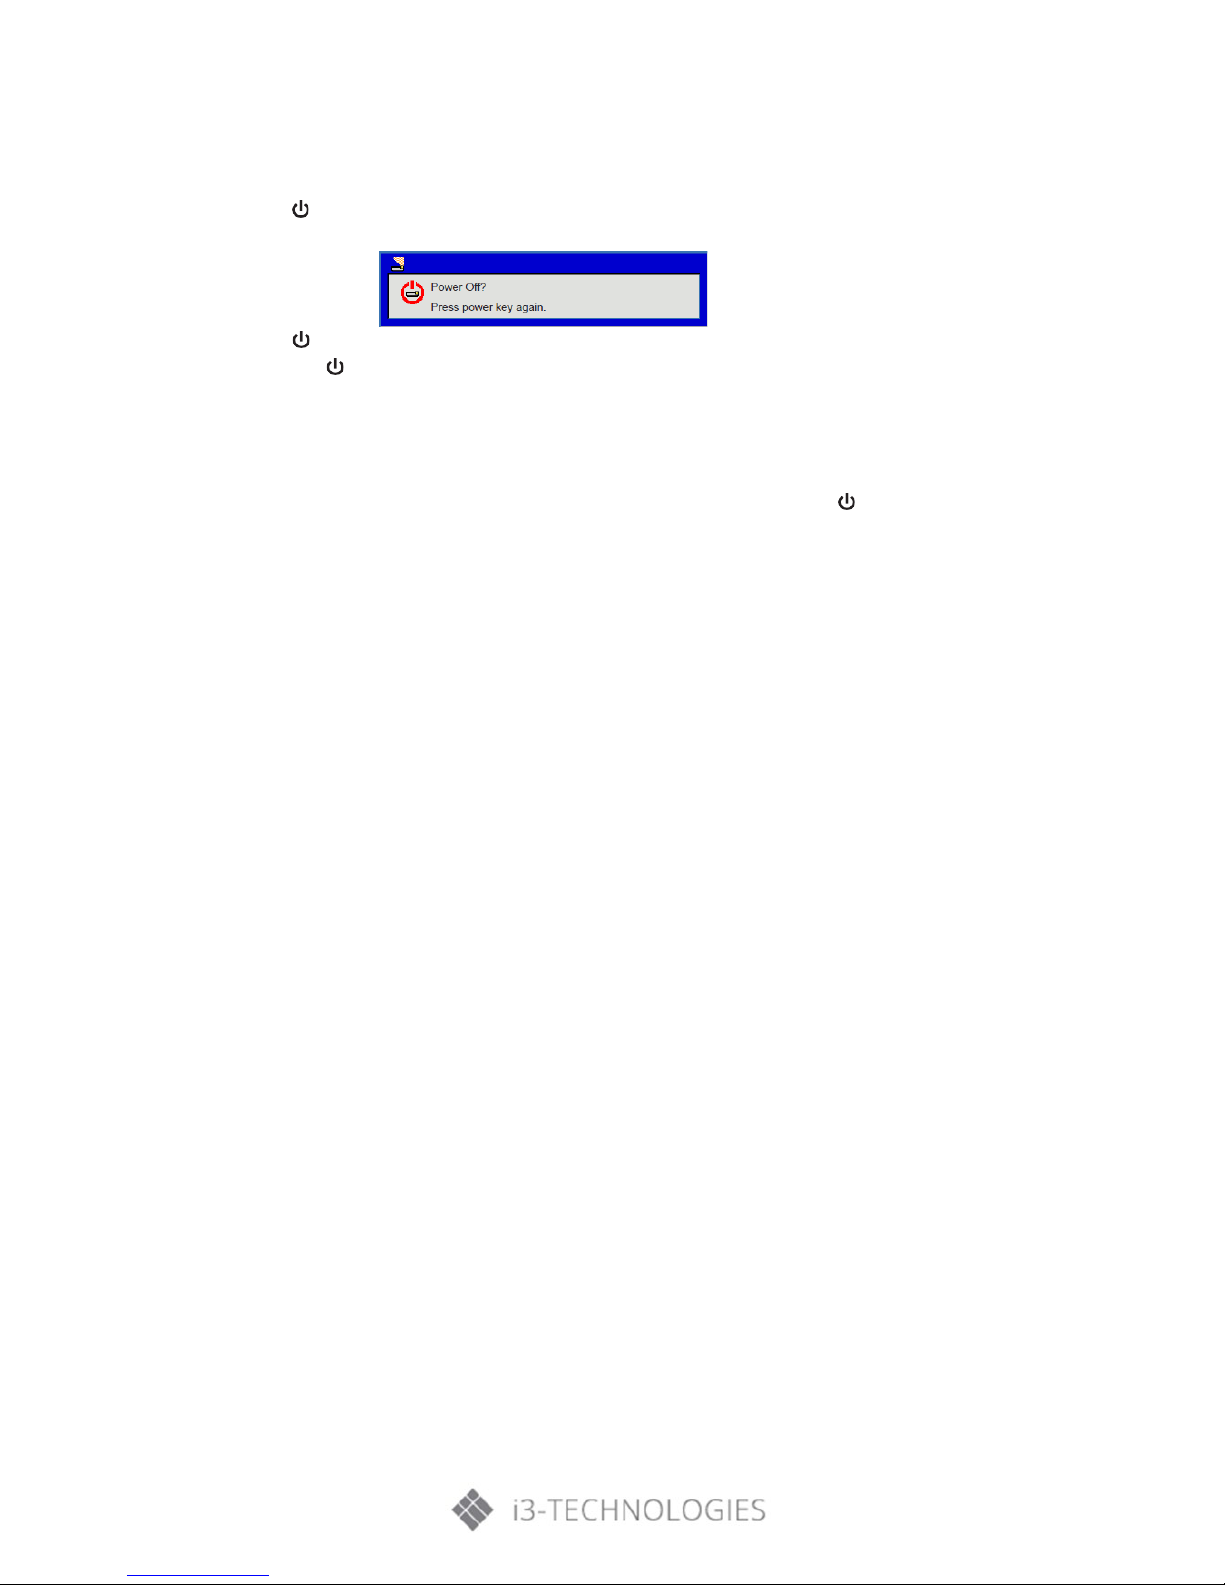
B) Powering Off the Projector
1. Press the ” button on the remote control or on the control panel to turn off the projector.
The following message will be displayed on the screen.
Press the ” button again to confirm otherwise the message will disappear after 10 seconds. When
you press the ” button for the second time, the fan will start cooling the system and will shut down.
2. The cooling fans continue to operate for about 4 seconds for cooling cycle and the POWER/STANDBY
LED will flash Orange. When the POWER/STANDBY LED lights solid Orange, the projector has entered
standby mode.
If you wish to turn the projector back on, you must wait until the projector has completed the cooling
cycle and has entered standby mode. Once in standby mode, simply press ” button to restart the
projector.
3. Disconnect the power cord from the electrical outlet and the projector.
C) Warning Indicator
When the warning indicators (see below) come on, the projector will automatically shut down:
• “LAMP” LED indicator is lit red and if “POWER/STANDBY” indicator flashes amber.
• “TEMP” LED indicator is lit red, this indicates the projector has overheated. Under normal
conditions, the projector can be switched back on.
• “TEMP” LED indicator flashes red and if “POWER/ STANDBY” indicator flashes amber.
Unplug the power cord from the projector, wait for 30 seconds and try again. If the warning indicator
lights up again, please contact your nearest service center for assistance.
Note:
• Contact the nearest service center if the projector displays these symptoms.
Installation
16
D) LED Lighting Message
Note:
• No Light “--“,
* Steady Light
Message
Power LED
Temp_LED
Lamp_LED
Red
Blue
Red
Red
Standby State
(Input Power cord)
*
--
--
--
Power on
--
*
--
--
Warning Up Flashing
--
--
--
State Flashing Flashing
--
--
Burn-in ON Flashing Flashing
--
--
Burn-in OFF
--
--
--
--
Power NG
--
--
*
*
Fan Lock
Flashing
slow:3s
--
CW breakdown
Flashing
fast:500ms
Overheat
--
--
*
--
LD Overheat
--
--
*
--
LD Voltage Error
--
--
--
*
Installation
3.3. Adjusting the projected image
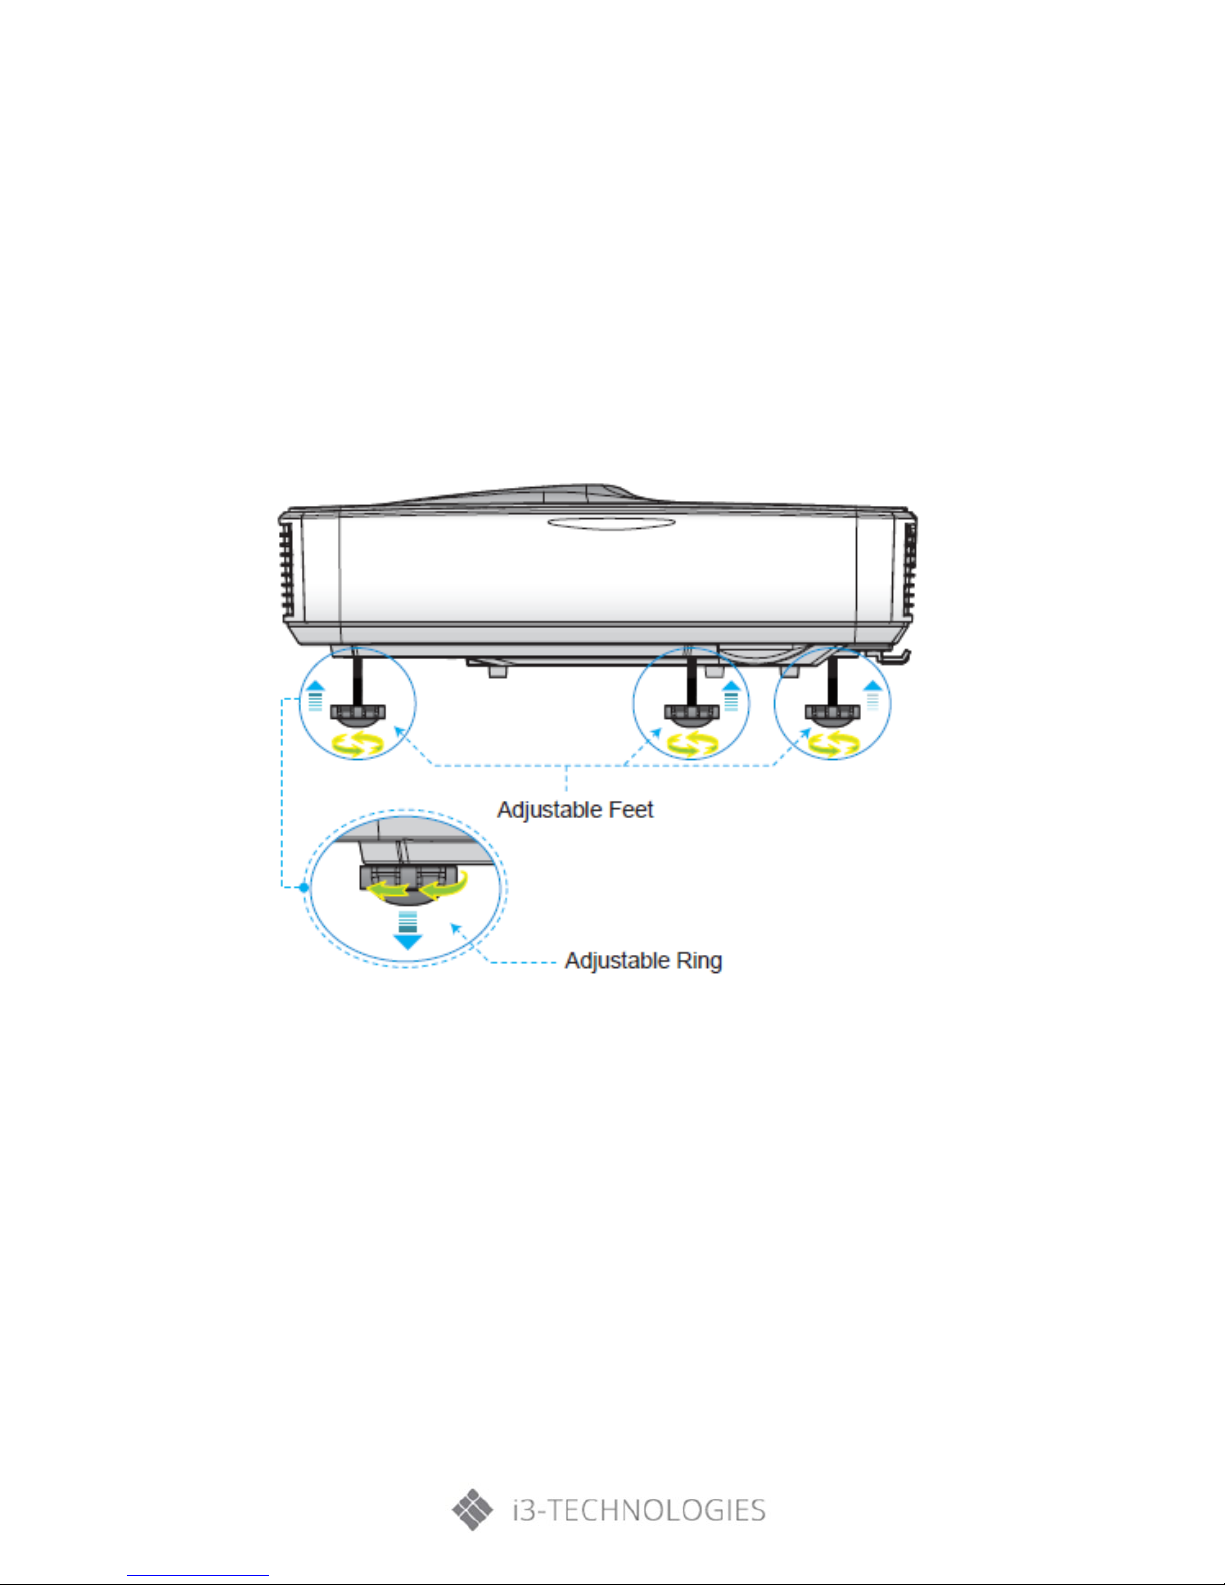
A) Adjusting the Projector’s height
The projector is equipped with adjustable feet for adjusting the image height position.
1. Locate the foot you want to adjust on the underside of the projector.
2. Turn the adjustable foot counter-clockwise to move it outwards or clockwise to move it inwards.
Repeat with the remaining feet as needed.
Installation
18
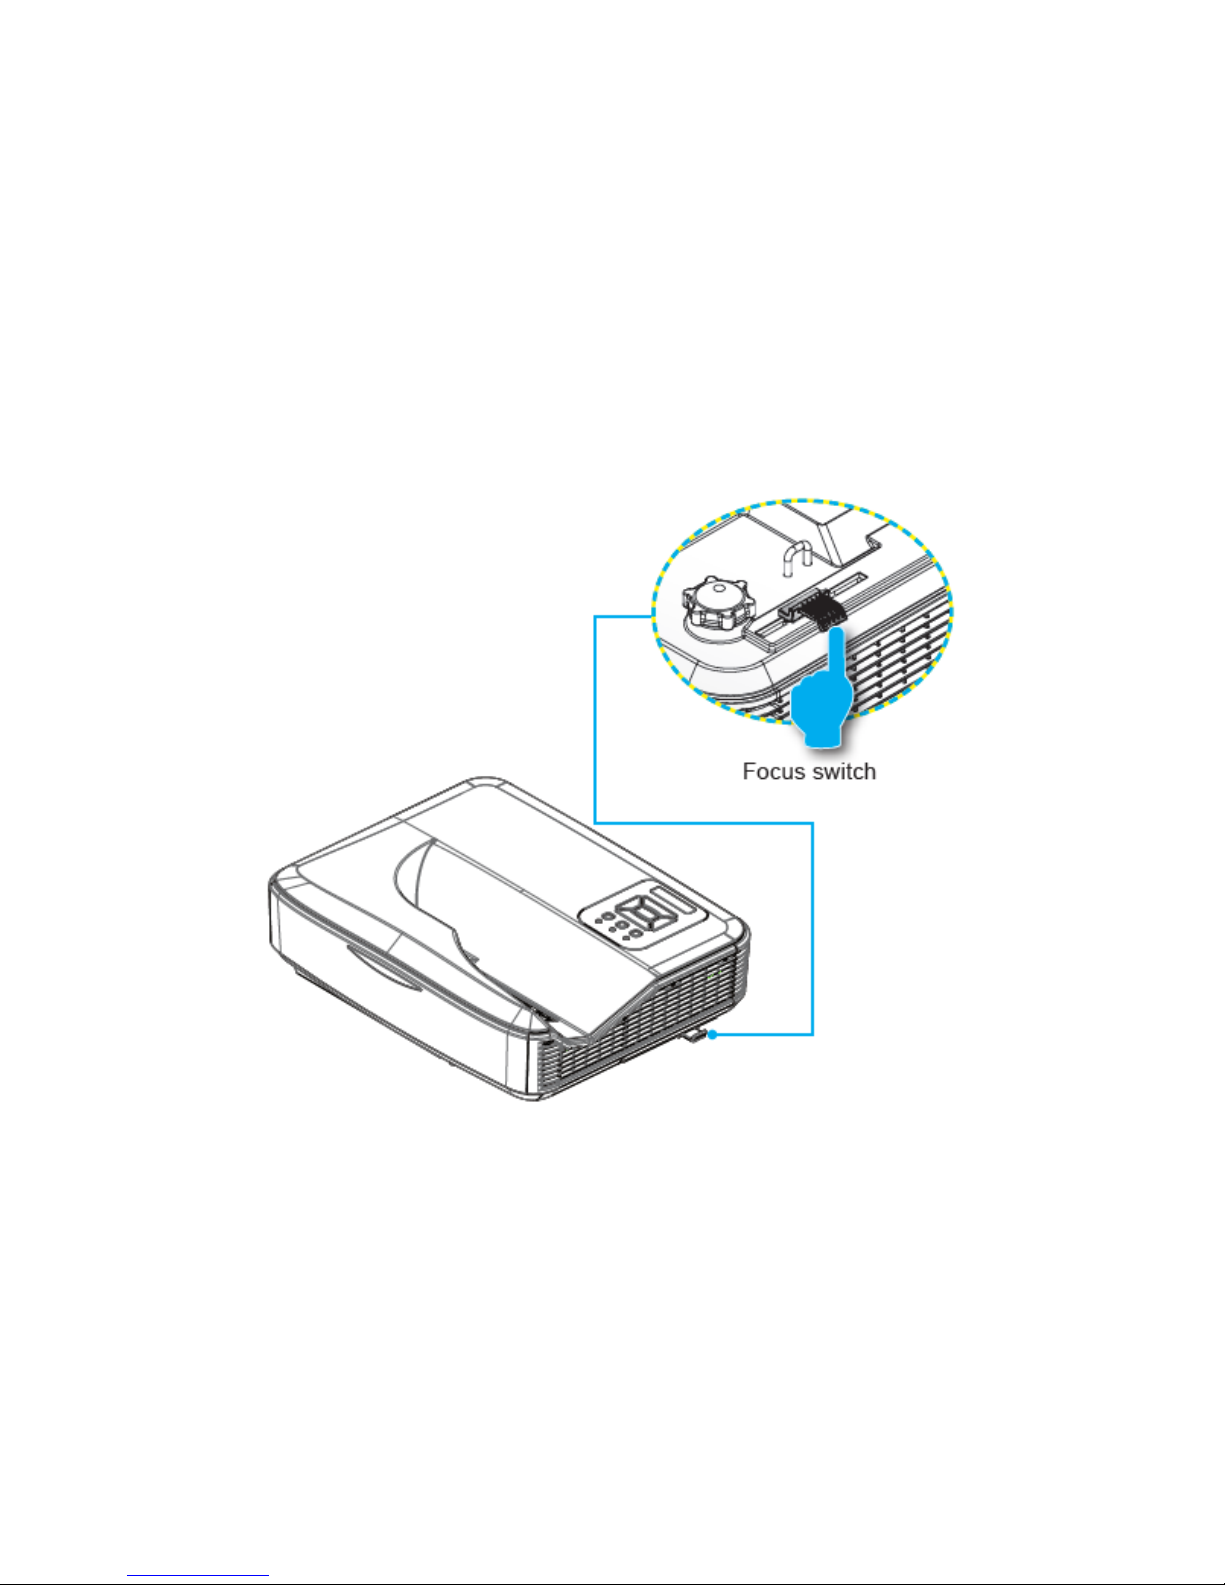
B) Adjusting the Projector’s focus
To focus the image, slide the focus switch to left/right until the image is clear.
• 1080p series: The projector will focus at distances (lens to wall) from 1.59~1.87 feet (0.49~0.57
meters)
• Ultra Wide series: The projector will focus at distances (lens to wall) from 2.36~2.75 feet
(0.72~0.84 meters)
• WXGA series: The projector will focus at distances (lens to wall) from 1.59~2.16 feet (0.49~0.66
meters)
Installation
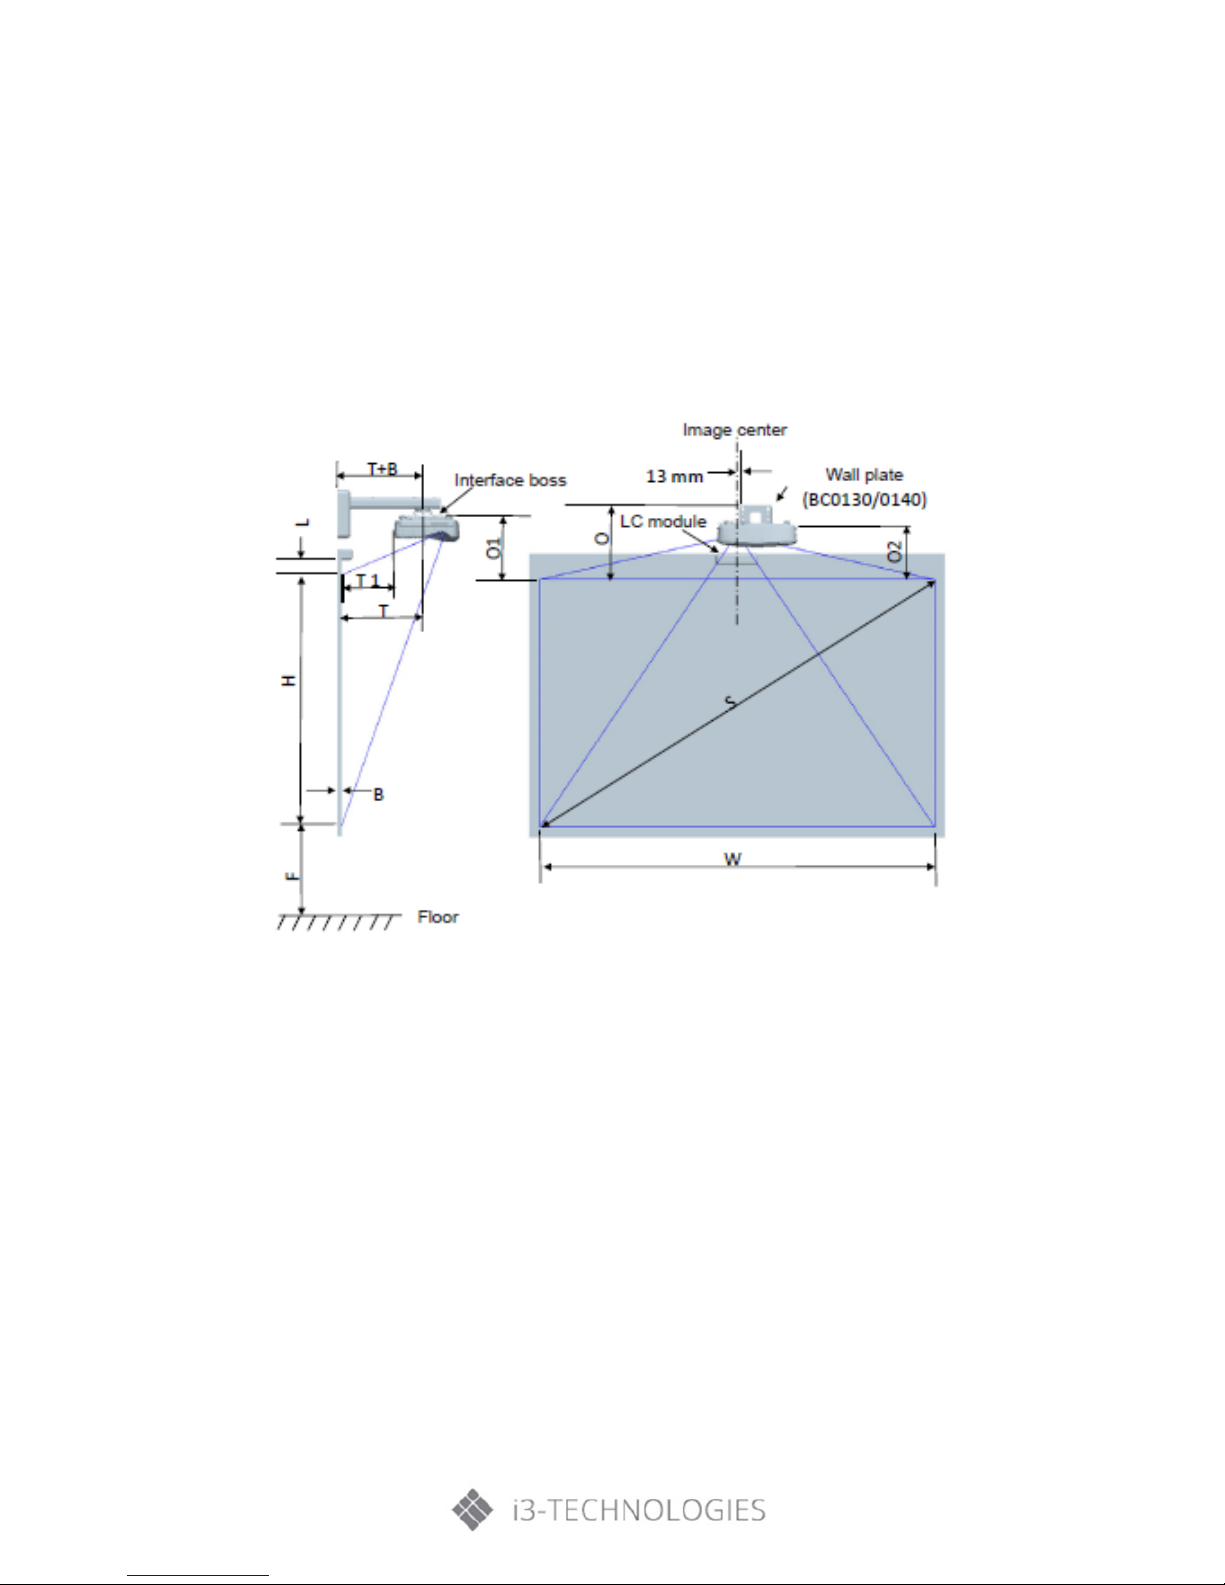
C) Adjusting Projection Image Size (Diagonal)
• 1080p series: Projection Image Size from 87” to 102” (2.21 to 2.59 meters).
• Ultra Wide series: Projection Image Size from 120” to 140” (3.05 to 3.56 meters).
• WXGA series: Projection Image Size from 85” to 115” (2.16 to 2.92 meters).
Projector installation measurement chart Wall Mount:
• This table is for user’s reference only

Installation
20
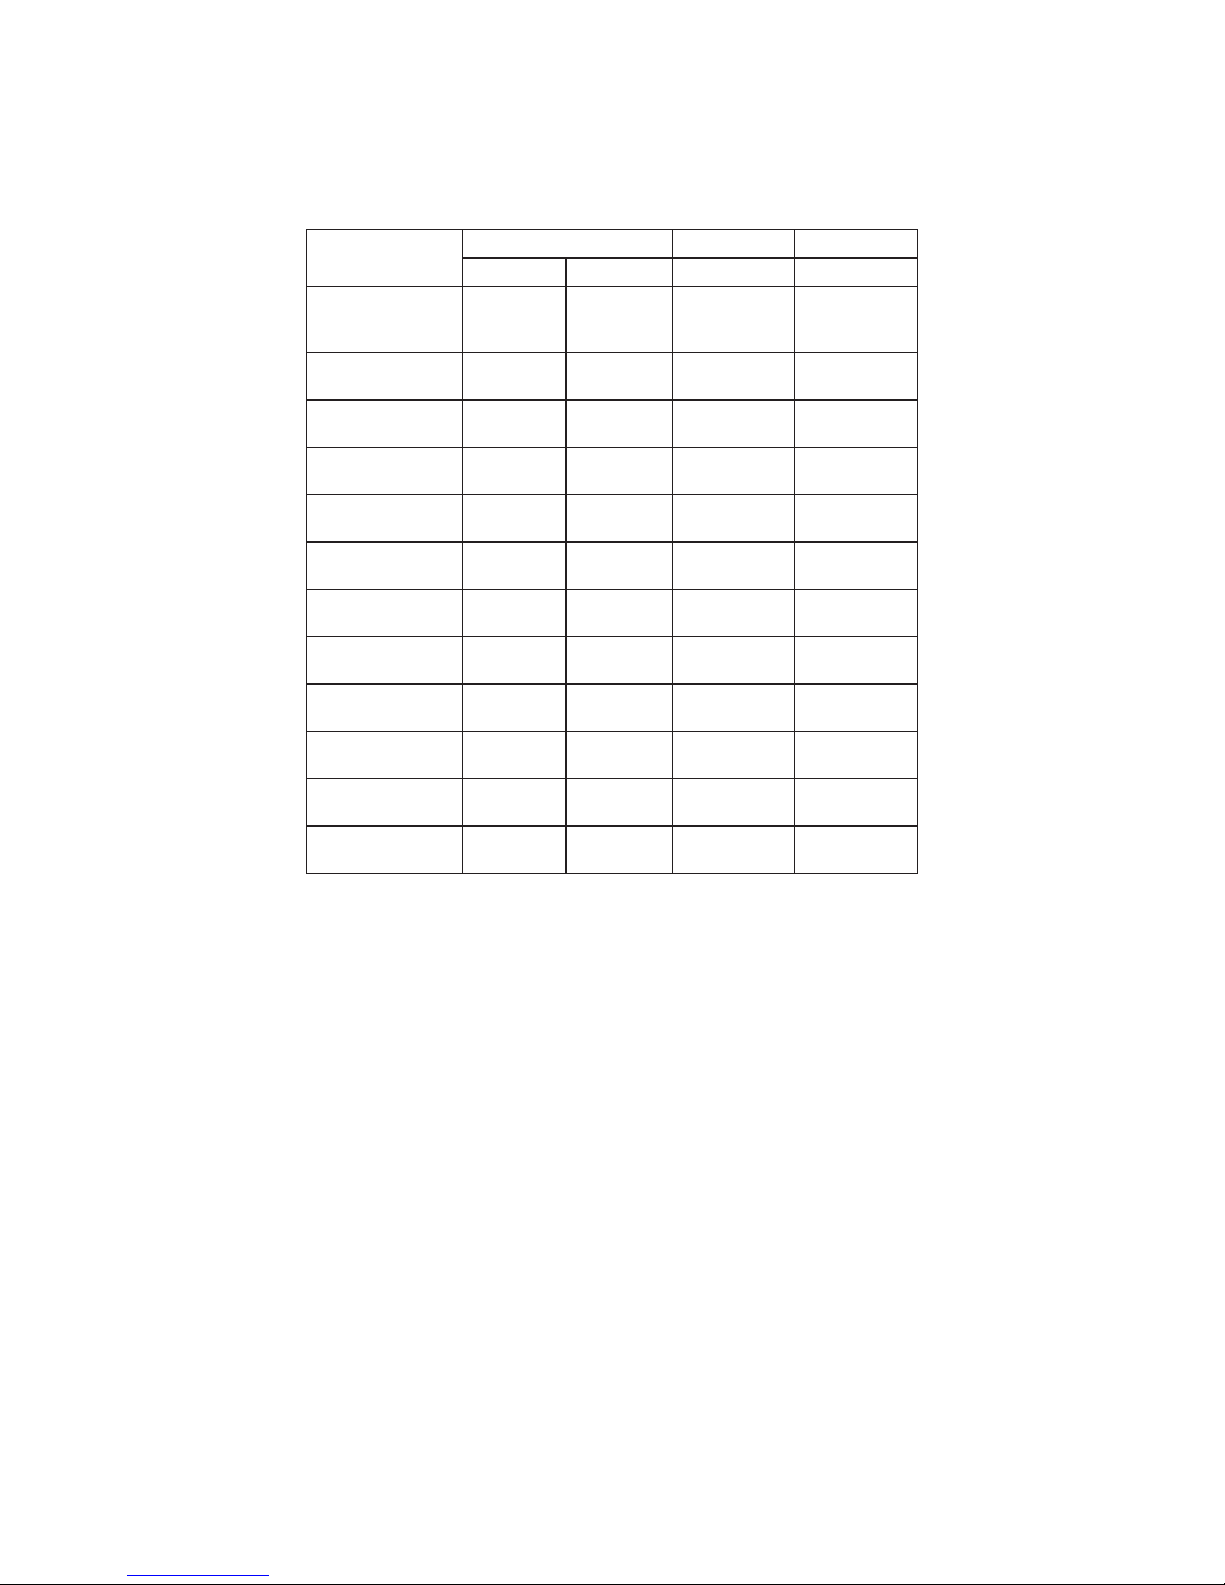
Ultra Wide (16:6) Wall mount installation measurement chart
Diagonal
image size
(S) in inch
Diagonal
image size
(S) in mm
Image
width
(W) in mm
Image
height
(H) in mm
Distance from
surface of
whiteboard to
center of
projector
mount
(T) in mm
Distance from
surface of
whiteboard to
back of
projector (T1)
in mm
Distance from
top of image
to top of wall
plate
(O) in mm
Distance from
top of image
to top of
interface boss
(O1) in mm
Distance from
top of image to
top of projector
(O2) in mm
120
3048
2854
1070
604
467
462
386
366
121
3073
2878
1079
610
473
465
389
369
122
3099
2901
1088
616
479
467
391
371
123
3124
2925
1097
622
485
470
394
374
124
3150
2949
1106
628
491
473
397
377
125
3175
2973
1115
634
497
476
400
380
126
3200
2997
1124
640
503
478
402
382
127
3226
3020
1133
646
509
481
405
385
128
3251
3044
1141
652
515
484
408
388
129
3277
3068
1150
658
521
486
410
390
130
3302
3092
1159
664
527
489
413
393
131
3327
3115
1168
670
533
492
416
396
132
3353
3139
1177
676
539
494
418
398
133
3378
3163
1186
682
545
497
421
401
134
3404
3187
1195
688
551
500
424
404
135
3429
3211
1204
694
557
502
426
406
136
3454
3234
1213
700
563
505
429
409
137
3480
3258
1222
706
569
508
432
412
138
3505
3282
1231
712
575
511
435
415
139
3531
3306
1240
718
581
513
437
417
140
3556
3329
1249
724
587
516
440
420
1080P (16:9) Wall mount installation measurement chart
Diagonal
image size
(S) in inch
Diagonal
image size
(S) in mm
Image
width
(W) in mm
Image
height
(H) in mm
Distance from
surface of
whiteboard to
center of
projector
mount
(T) in mm
Distance from
surface of
whiteboard to
back of
projector (T1)
in mm
Distance from
top of
image to
top of wall
plate
(O) in mm
Distance from
top of image to
top of interface
boss (O1) in mm
Distance from
top of image
to top of
projector (O2)
in mm
87
2210
1926
1083
370
233
364
288
268
88
2235
1948
1096
376
239
367
291
271
89
2261
1970
1108
382
245
370
294
274
90
2286
1992
1121
387
250
372
296
276
91
2311
2015
1133
393
256
375
299
279
92
2337
2037
1146
398
261
377
301
281
93
2362
2059
1158
404
267
380
304
284
94
2388
2081
1171
409
272
383
307
287
95
2413
2103
1183
415
278
385
309
289
96
2438
2125
1196
421
284
388
312
292
97
2464
2147
1208
426
289
390
314
294
98
2489
2170
1220
432
295
393
317
297
99
2515
2192
1233
437
300
396
320
300
100
2540
2214
1245
443
306
398
322
302
101
2565
2236
1258
448
311
401
325
305
102
2591
2258
1270
454
317
403
327
307

Installation
WXGA (16:10) Wall mount installation measurement chart
Diagonal
image size
(S) in inch
Diagonal
image size
(S) in mm
Image
width
(W) in mm
Image
height
(H) in mm
Distance from
surface of
whiteboard to
center of
projector
mount
(T) in mm
Distance from
surface of
whiteboard to
back of
projector (T1)
in mm
Distance from
top of image to
top of wall
plate
(O) in mm
Distance from
top of image to
top of interface
boss (O1) in mm
Distance from
top of image
to top of
projecto
r (O2)
in mm
85
2159
1831
1144
370
233
342
266
246
86
2184
1852
1158
376
239
344
268
248
87
2210
1874
1171
382
245
346
270
250
88
2235
1895
1185
387
250
349
273
253
89
2261
1917
1198
393
256
351
275
255
90
2286
1939
1212
399
262
353
277
257
91
2311
1960
1225
404
267
356
280
260
92
2337
1982
1239
410
273
358
282
262
93
2362
2003
1252
416
279
361
285
265
94
2388
2025
1265
422
285
363
287
267
95
2413
2046
1279
427
290
365
289
269
96
2438
2068
1292
433
296
368
292
272
97
2464
2089
1306
439
302
370
294
274
98
2489
2111
1319
444
307
373
297
277
99
2515
2132
1333
450
313
375
299
279
100
2540
2154
1346
456
319
377
301
281
101
2565
2175
1360
461
324
380
304
284
102
2591
2197
1373
467
330
382
306
286
103
2616
2219
1387
473
336
384
308
288
104
2642
2240
1400
479
342
387
311
291
105
2667
2262
1414
484
347
389
313
293
106
2692
2283
1427
490
353
392
316
296
107
2718
2305
1440
496
359
394
318
298
108
2743
2326
1454
501
364
396
320
300
109
2769
2348
1467
507
370
399
323
303
110
2794
2369
1481
513
376
401
325
305
111
2819
2391
1494
519
382
403
327
307
112
2845
2412
1508
524
387
406
330
310
113
2870
2434
1521
530
393
408
332
312
114
2896
2455
1535
536
399
411
335
315
115
2921
2477
1548
541
404
413
337
317
Installation
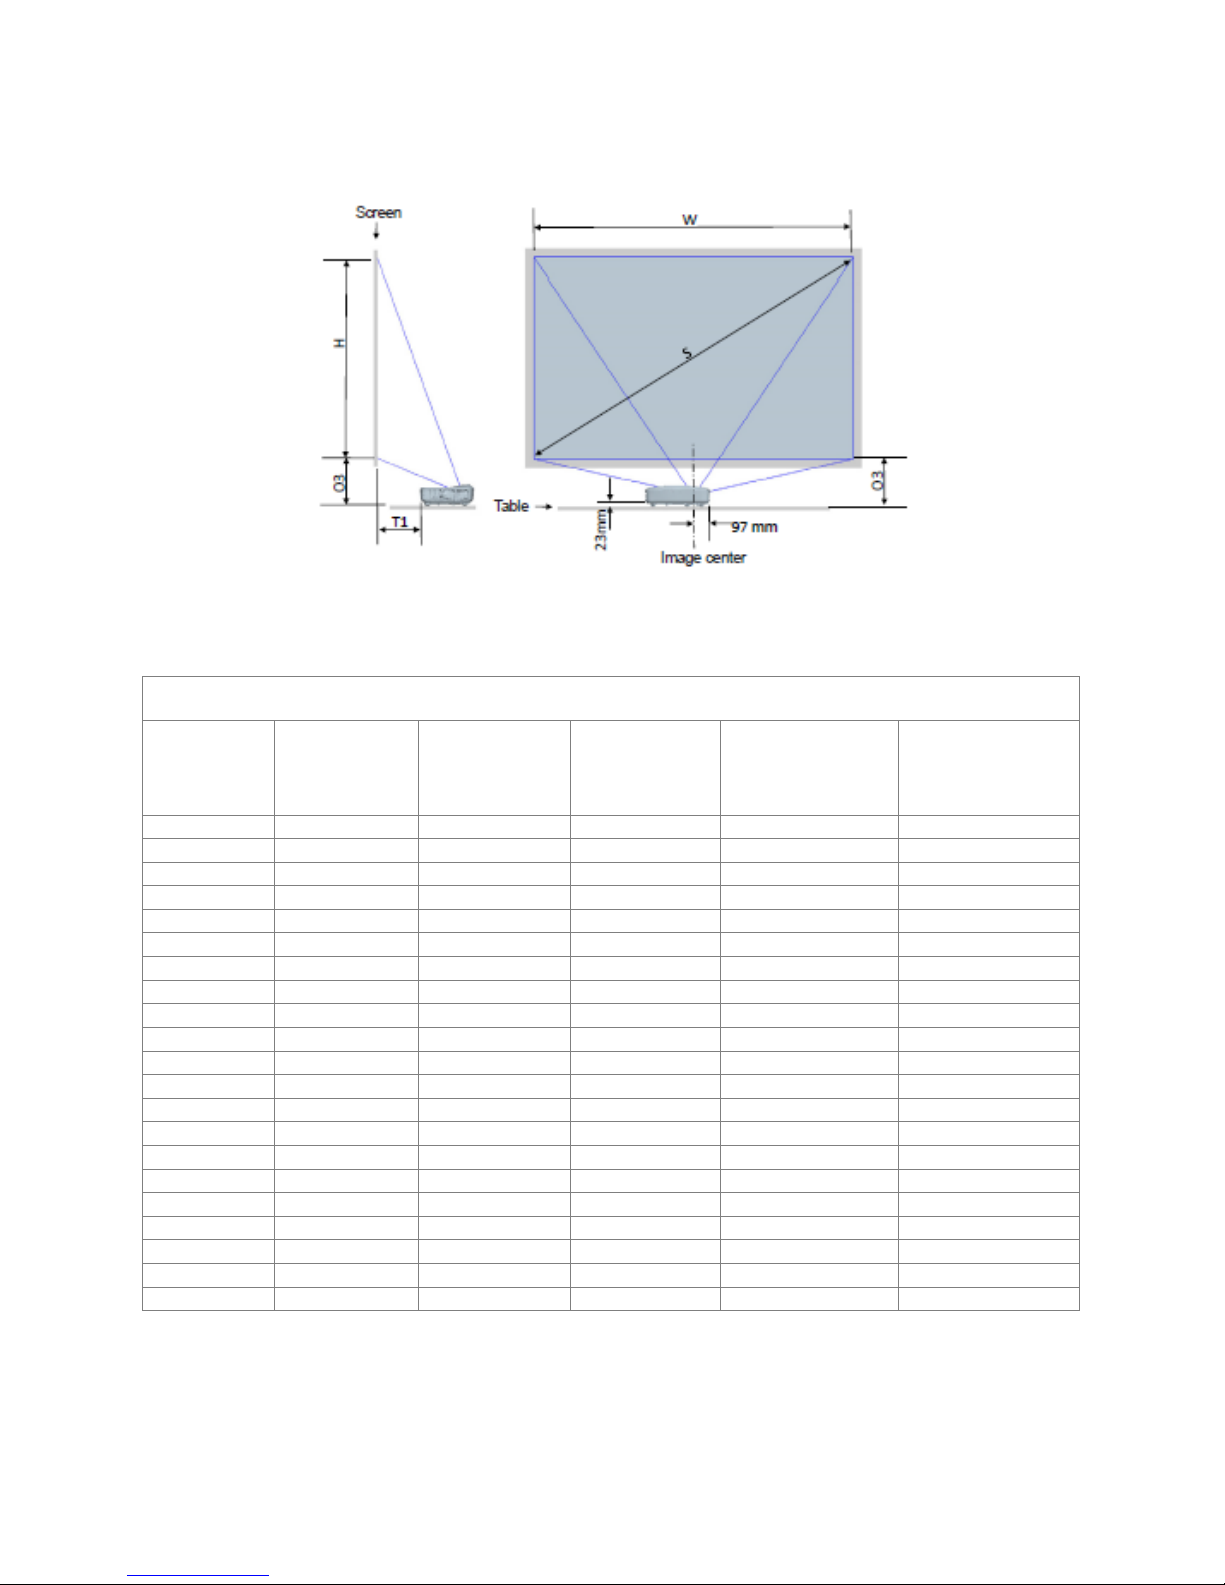
22
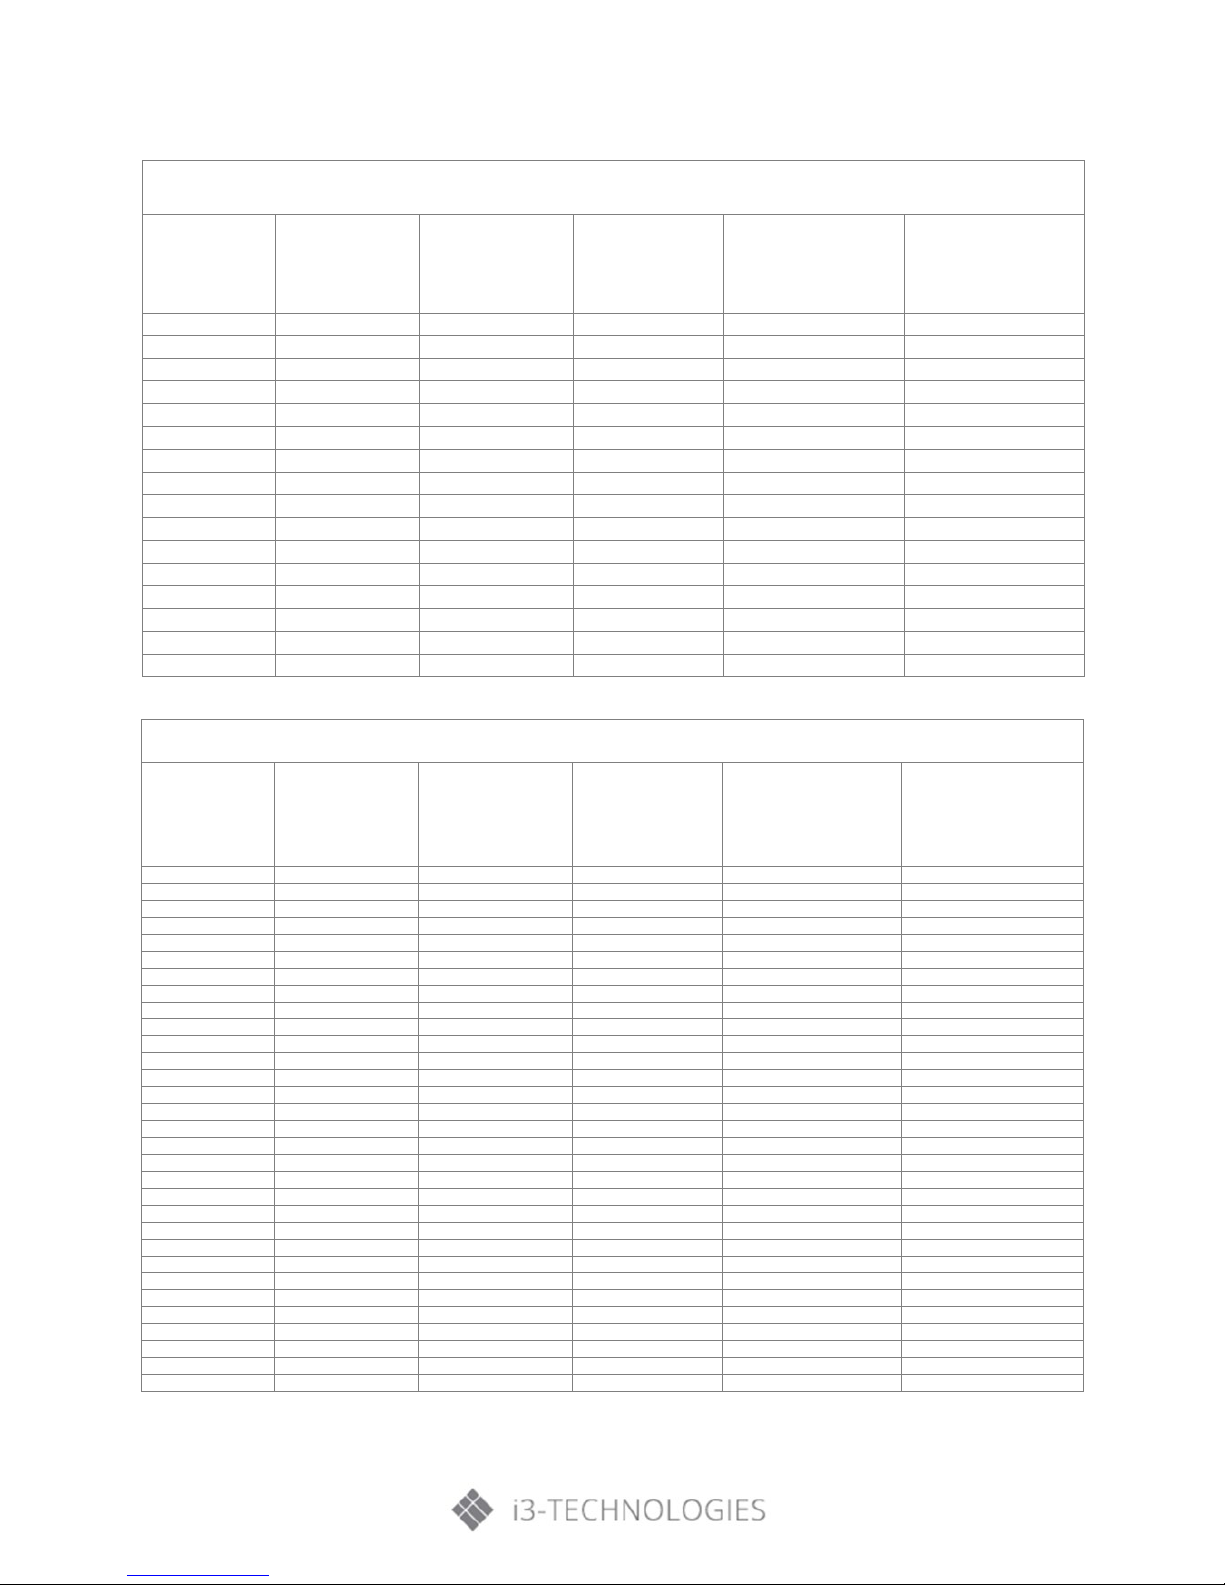
Projector installation measurement chart Table Mount
Ultra Wide (16:6) Table mount installation measurement chart
Diagonal image
size
(S) in inch
Diagonal image
size
(S) in mm
Image width (W) in
mm
Image height (H)
in mm
Distance from
surface
of whiteboard to back
of projector (T1) in mm
Distance from bottom
of image to top of table
(O3) in mm
120
3048
2854
1070
467
389
121
3073
2878
1079
473
392
122
3099
2901
1088
479
394
123
3124
2925
1097
485
397
124
3150
2949
1106
491
400
125
3175
2973
1115
497
403
126
3200
2997
1124
503
405
127
3226
3020
1133
509
408
128
3251
3044
1141
515
411
129
3277
3068
1150
521
413
130
3302
3092
1159
527
416
131
3327
3115
1168
533
419
132
3353
3139
1177
539
421
133
3378
3163
1186
545
424
134
3404
3187
1195
551
427
135
3429
3211
1204
557
429
136
3454
3234
1213
563
432
137
3480
3258
1222
569
435
138
3505
3282
1231
575
438
139
3531
3306
1240
581
440
140
3556
3329
1249
587
443
Installation
1080P (16:9) Table mount installation measurement chart
Diagonal image
size
(S) in inch
Diagonal image
size
(S) in mm
Image width (W) in
mm
Image height (H)
in mm
Distance from surface
of whiteboard to back
of projector (T1) in mm
Distance from bottom
of image to top of table
(O3) in mm
87
2210
1926
1083
233
291
88
2235
1948
1096
239
294
89
2261
1970
1108
245
297
90
2286
1992
1121
250
299
91
2311
2015
1133
256
302
92
2337
2037
1146
261
304
93
2362
2059
1158
267
307
94
2388
2081
1171
272
310
95
2413
2103
1183
278
312
96
2438
2125
1196
284
315
97
2464
2147
1208
289
317
98
2489
2170
1220
295
320
99
2515
2192
1233
300
323
100
2540
2214
1245
306
325
101
2565
2236
1258
311
328
102
2591
2258
1270
317
330
WXGA (16:10) Table mount installation measurement chart
Diagonal image
size
(S) in inch
Diagonal image
size
(S) in mm
Image width (W) in
mm
Image height (H)
in mm
Distance from surface
of whiteboard to back
of projector (T1) in mm
Distance from bottom
of image to top of
table
(O3) in mm
85
2159
1831
1144
233
269
86
2184
1852
1158
239
271
87
2210
1874
1171
245
273
88
2235
1895
1185
250
276
89
2261
1917
1198
256
278
90
2286
1939
1212
262
280
91
2311
1960
1225
267
283
92
2337
1982
1239
273
285
93
2362
2003
1252
279
288
94
2388
2025
1265
285
290
95
2413
2046
1279
290
292
96
2438
2068
1292
296
295
97
2464
2089
1306
302
297
98
2489
2111
1319
307
300
99
2515
2132
1333
313
302
100
2540
2154
1346
319
304
101
2565
2175
1360
324
307
102
2591
2197
1373
330
309
103
2616
2219
1387
336
311
104
2642
2240
1400
342
314
105
2667
2262
1414
347
316
106
2692
2283
1427
353
319
107
2718
2305
1440
359
321
108
2743
2326
1454
364
323
109
2769
2348
1467
370
326
110
2794
2369
1481
376
328
111
2819
2391
1494
382
330
112
2845
2412
1508
387
333
113
2870
2434
1521
393
335
114
2896
2455
1535
399
338
115
2921
2477
1548
404
340
 Loading...